

Page 1

Getting Started InterwriteTM Pad
GETTING STARTED
InterwriteTM Pad
1
for Windows and the Mac
Page 2

2
InterwriteTM Pad Getting Started
We at Interwrite LearningTM are proud of our family of Interwrite products. We strive to continue to bring you the best
the technology has to offer. We urge you to visit our Web
site, where we will post the latest information regarding any
updates and changes we have made that would impact the
instructions in this Getting Started document.
www.InterwriteLearning.com
Click on any of the Interwrite Learning products to access
product information, software downloads, documentation,
and training information.
Please recycle
Page 3

Getting Started InterwriteTM Pad
Table of Contents
Interwrite Pads
About This Guide 5
Product Overview 5
Interwrite Pen 5
Bluetooth Technology 5
Workspace Software 5
Installation Overview
1. Unpack Your Interwrite Pad 6
2. Set Up Your Interwrite Pad and Interactive Pen 6
3. Install the Interwrite Workspace Software 6
4. Connect Your Interwrite Pad 6
Setting Up Your Interwrite Pad
3
Charging the Interwrite Pad and Interactive Pen 8
Attaching the Tether to the Pad and the Pen 8
The Electronic Interwrite Interactive Pen 9
Install the Interwrite Workspace Software
Installing the Interwrite Workspace Software on Windows 10
Installing the Interwrite Workspace Software on the Mac 11
Connect Your Interwrite Pad
BluetoothTM Wireless Installation 12
About Bluetooth and Workspace 12
Bluetooth Requirements 13
Bluetooth Communications 13
Installing the USB Adapter 14
Keeping Track of the Bluetooth Adapter 14
Moving the Bluetooth Adapter 14
Page 4

4
InterwriteTM Pad Getting Started
Connect the Interwrite Devices
Connecting a Wireless Device on Windows 15
Connecting a Wireless Device on the Mac 17
Operating the Interwrite Pad
Operating the Interwrite Pad 19
Operating the Buttons 20
The Sleep/Wake Button 20
The Connect Button 20
The Disconnect Button 21
Light and Tone Indicators 21
The Status Lights 21
The Power Status Light 21
The Connection Status Light 21
The Pad Battery Status Light 21
The Pen Battery Charging Status Light 22
Tone Indicators 22
Replacing the Battery Pack
Replacing the Interwrite Pad Battery Pack 23
Getting Started with Interwrite Workspace
Begin an Interwrite Workspace Session 26
The Interwrite Workspace Toolbar 27
Using the Pen Tool 28
Presentation Files 29
Distributing Presentation Files 30
Additional Interwrite Learning Resources 30
What is PRS? 30
Regulatory Statements and Warranty
Regulatory Statements 31
Warranty 39
Page 5

Getting Started InterwriteTM Pad
5
Interwrite
Pad
About This Guide
TM
This Getting Started guide describes how to set up your Interwrite Pad and
Interactive Pen, install the Interwrite Workspace software, and establish a
communication connection with the PC or the Mac. It ends with an overview
of the Interwrite Workspace software.
Product Overview
The Interwrite Pad is a tablet system featuring the patented digitizer and peninput technology. Used with the Interwrite Workspace software on a PC or a
Mac, Interwrite Pads allow you control the computer by running applications,
opening and editing files, and annotating screen images and presentation files
from anywhere in the room. When used with an InterwriteTM Board, Interwrite
Pads provide the ultimate collaborative system for the interactive class room
or the interactive meeting room.
Interwrite Pen
The electronic Interwrite Pen, when positioned just above (in prox of) or
touching the surface of a powered-on, connected Pad, controls the movements of the mouse on the computer. The Pen becomes a writing and
drawing instrument when one of the many Workspace Annotation Tools is
selected from the projected Toolbar. When in Annotation Mode, a user can
make notes on a PowerPoint Slide Show, highlight areas of interest on a
spreadsheet, or edit a document using a wide range of pen attributes.
Bluetooth Technology
The Interwrite Workspace system uses the BluetoothTM wireless technology
to establish communication between the Pad and the computer. The Interwrite Pads come with the Bluetooth module built into the Pad, so the only
installation required is the Bluetooth USB Adapter on the computer.
Workspace Software
The operation of your Interwrite Pad is facilitated by the Interwrite Workspace software. The software is installed as part of the process of establishing communication between the Pad and the computer and is covered in
this guide. The Workspace software has three operational modes: White-
board Mode, Interactive Mode and Office Mode (Windows only).
Page 6

6
InterwriteTM Pad Getting Started
Interactive Mode, the operational mode used by both Interwrite Pads and
Interwrite Boards, allows you to take advantage of the power and features
of the Workspace software. An Interwrite Pad, acting as an input device to
the computer, remotely controls the computer from anywhere in the room.
When the Interwrite Board and a video projector are added, the computer’s
desktop image projects onto the Interwrite Board’s surface, and the board,
communicates as an input device to the computer.
In this environment, both the person at the Interwrite Board and users with
Pads seated around the room can interact with the presentation. Office
Mode makes it possible to interact directly with Microsoft’s Office suite of
products, PowerPoint, Word and Excel on the PC. Annotations, notes and
calculations can be added directly to the native application files when in this
operational Mode.
Installation Overview
This section describes what you will be doing and the order in which you will
be doing it, to facilitate the setup of your Interwrite Pad and its preparation for
use.
1. Unpack Your Interwrite Pad
The package includes the Interwrite Pad and the rechargeable Interwrite
Interactive Pen, a Pen tether, a Pad Charger, and an Interwrite LearningTM CD
and a Bluetooth USB Adapter.
2. Charge Your Interwrite Pad and Interactive Pen
Your Pad and Pen must be charged before you can use them. Place the
Interactive Pen in the Pad’s Pen Tray and plug the Pad Charger into the
Charger Jack located at the top of the Pad and the other end into a standard
wall socket. The Pad is charged when the Pad Battery Status Light goes off.
3. Install the Interwrite Workspace Software
4. Connect Your Interwrite Pad
Your Interwrite Pad must be able to communicate with the Interwrite Workspace software on your computer. This communication link is established
wirelessly between two Bluetooth communication modules—one built into
the Pad and the other connected to the computer. The wireless Bluetooth
Pad must then be “connected” to Workspace by the Device Manager, one
of the Interwrite Workspace software applications.
Page 7
Getting Started InterwriteTM Pad
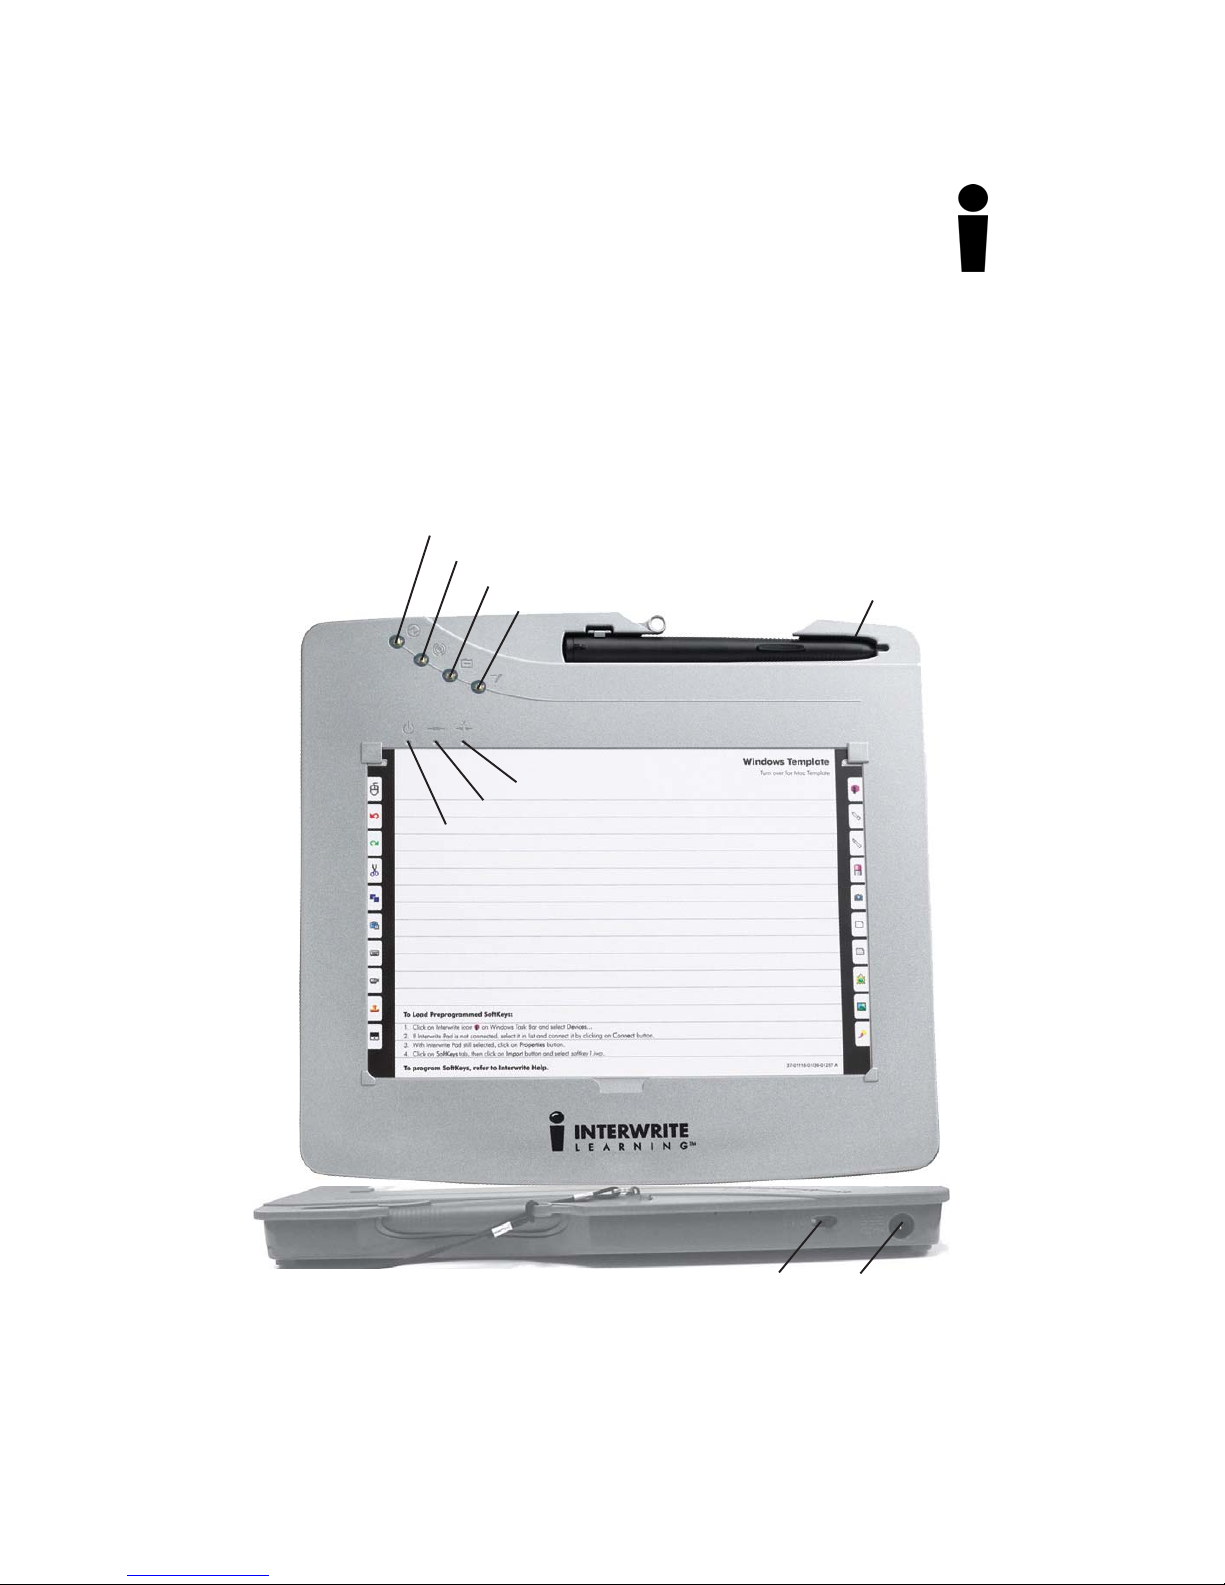
Setting Up Your Interwrite Pad
The Interwrite Pad communicates with the computer using Bluetooth
wireless technology. The Bluetooth communications module is built into the
Interwrite Pad. The Pad communicates through its built-in Bluetooth module
with another Bluetooth module installed on the computer. The Interwrite Pad
runs on Nickel Metal Hydride batteries, which provide about 40 hours of
wireless operation before they have to be recharged.
Power Status Light
Connection Status Light
Pad Battery Status Light
Pen Battery Charging Status Light
TM
Pen Tray
7
Disconnect Button
Connect Button
Sleep/Wake Button
InterwriteTM Pad
Workspace
On/Off
Power
Switch
Charger
Power
Jack
Page 8

8
InterwriteTM Pad Getting Started
The first thing you should do when you unpack your
new Interwrite Pad and Interactive Pen is charge them.
Charging the Interwrite Pad and
Interactive Pen
Before you use your Interwrite Pad and Interactive Pen for the first time, they
should be charged for about three hours, or until the Pad Battery Status Light
goes off. Whenever the Pad battery is low and needs to be recharged, the Pad
Battery Status Light will flash slowly.
1 Place the Interactive Pen in the Pen Tray with the Rocker Button and
Tether Loop facing up.
2 Connect the Pad Charger’s cable to the Charger Power Jack at the top of
the Pad.
3 Plug the Charger into an AC power outlet.
The Interwrite Pad can be used while it is charging.
4 When the Pad and Pen are charged and the Pad Battery Status Light goes
out, unplug the Charger from the Interwrite Pad.
5 Turn on the Power Switch when the Interwrite Pad is charged.
The buttons and status lights are described in more detail in the Operating the
Interwrite Pad section beginning on page 20.
The Pen can be charged only when it is placed in the Pen Tray on the
Pad, and only when the Pad is being charged. A Pen charge lasts over 40
hours. You should always charge the Pen when the Pad is being charged.
Attaching the Tether to the Pad and the Pen
The tether has a loop at each end. One end has a metal ring attached to the
loop – that’s the Pen loop. The other end is the Pad loop.
1 Thread the Pad loop up through the hole above the Pen Tray. Thread the
Pen loop through the Pad loop. Pull to tighten.
2 Thread the metal ring through the Tether Loop eyelet on the Pen.
Page 9
Getting Started InterwriteTM Pad
The Electronic Interwrite Interactive Pen
The Interactive Pen is an input device to the computer. You will use it to write
and draw in Annotation Mode and to control mouse movements in Mouse
Mode by moving the tip of the Pen just above (in prox of) or touching the
Pad’s workspace surface. When the Pen Tip is in prox or touching the Pad’s
workspace, it simulates the same effects you would get using the left mouse
button both in Windows and on the Mac.
Using the Pen
When the Pen is in prox, press the left end of the Rocker Button to simulate a
left mouse button double-click in Windows and on the Mac. Press the right
end of the Rocker Button to simulate a right mouse button click in Windows
and a Ctrl-click on the Mac. In Windows, hold down the left Rocker Button
and touch the Pen Tip to the Pad’s workspace to erase. On the Mac, with the
Pen Tip touching the Pad’s surface, hold down the left Rocker Button to erase.
Sleep Mode
The Pen goes into Sleep Mode after about two minutes of inactivity to conserve power. Touching the Pen to a surface, or clicking one of its Rocker
Buttons, wakes up the Pen. When the Pen is in prox, the Power Status Light
on the Pad will go from flashing to solid green. It goes back to flashing green
when the Pen is out of prox.
9
Rocker
Button
Pen Tip – Up or Down
Same as Left Mouse Button on Windows and Mac
Left – Double-Click Mouse Button with Pen Up
Windows and Mac
Right – Right Mouse Button (Windows)
Ctrl-Click (Mac)
Tether
Loop
Page 10
10
InterwriteTM Pad Getting Started
Installing the Interwrite Workspace
Software on Windows
The Interwrite Workspace software must be installed on Windows
by a user with Administrator privileges. Interwrite Workspace is
compatible with Windows 2000, XP, and Vista.
If you are using Windows 98/Me/NT, you must use Interwrite
Workspace version 5.0. For more information, contact Technical
Support to order an installation CD.
1 Log in as Administrator. Insert the Interwrite Learning CD into the
CD drive on your PC. The installer will autoload. If it doesn’t, click
on the Start button on the Windows Task Bar and select Run from
the menu. Type X:\setup.exe (X represents the CD drive letter).
2 Select the Install Interwrite Workspace Software menu option.
3 Follow the onscreen instructions for the software installation. You
will know Interwrite Workspace has installed successfully by the
appearance of the Interwrite Workspace icon in the System Tray on
the Windows Task Bar. If the icon does not appear, restart your
computer.
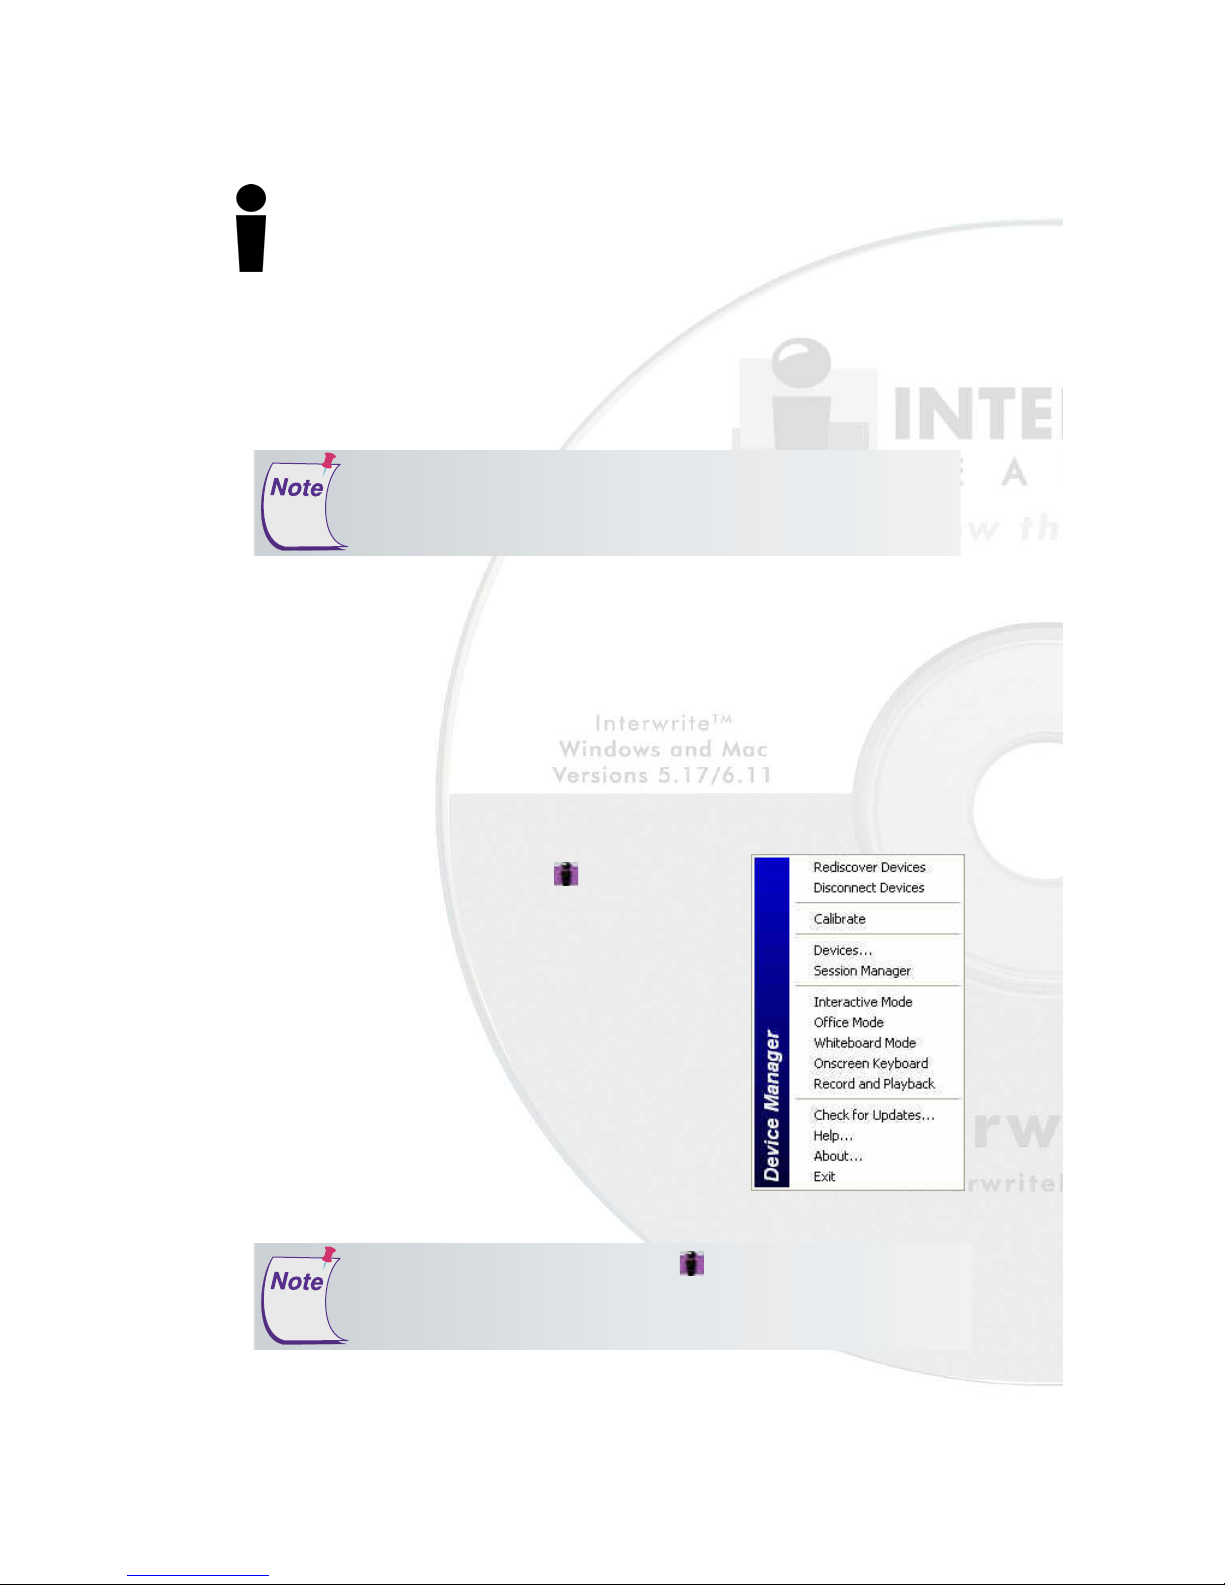
The Interwrite Workspace icon on the Task
Bar indicates that the Interwrite
ager is now running on your PC.
Device Man-
Click on the
Workspace icon to display the options on the
Device Manager Menu shown here. Device
Manager, in addition to managing the Interwrite
hardware devices, provides direct access to the
three operational modes of the Interwrite
Workspace software.
Click the Interwrite Workspace icon in the System Tray of the
Windows Task Bar to display the Device Manager Menu. Select the
Check for Updates
download it now. You should periodically check for updates.
option. If a new version of Workspace is available,
Page 11
Getting Started InterwriteTM Pad
Installing the Interwrite Workspace
Software on the Mac
Interwrite Workspace must be installed on the Mac by a user with
Admin privileges. Interwrite is compatible with Mac OS X version 10.4
or higher.
1 Insert the Interwrite Learning CD into the CD-ROM drive on your
Mac. An Interwrite Workspace CD icon will appear on your
desktop.
2 Double-click on the Interwrite icon on the desktop to display the
CD’s contents. Double-click on the Install Interwrite icon.
3 Follow the onscreen instructions for the software installation.
11
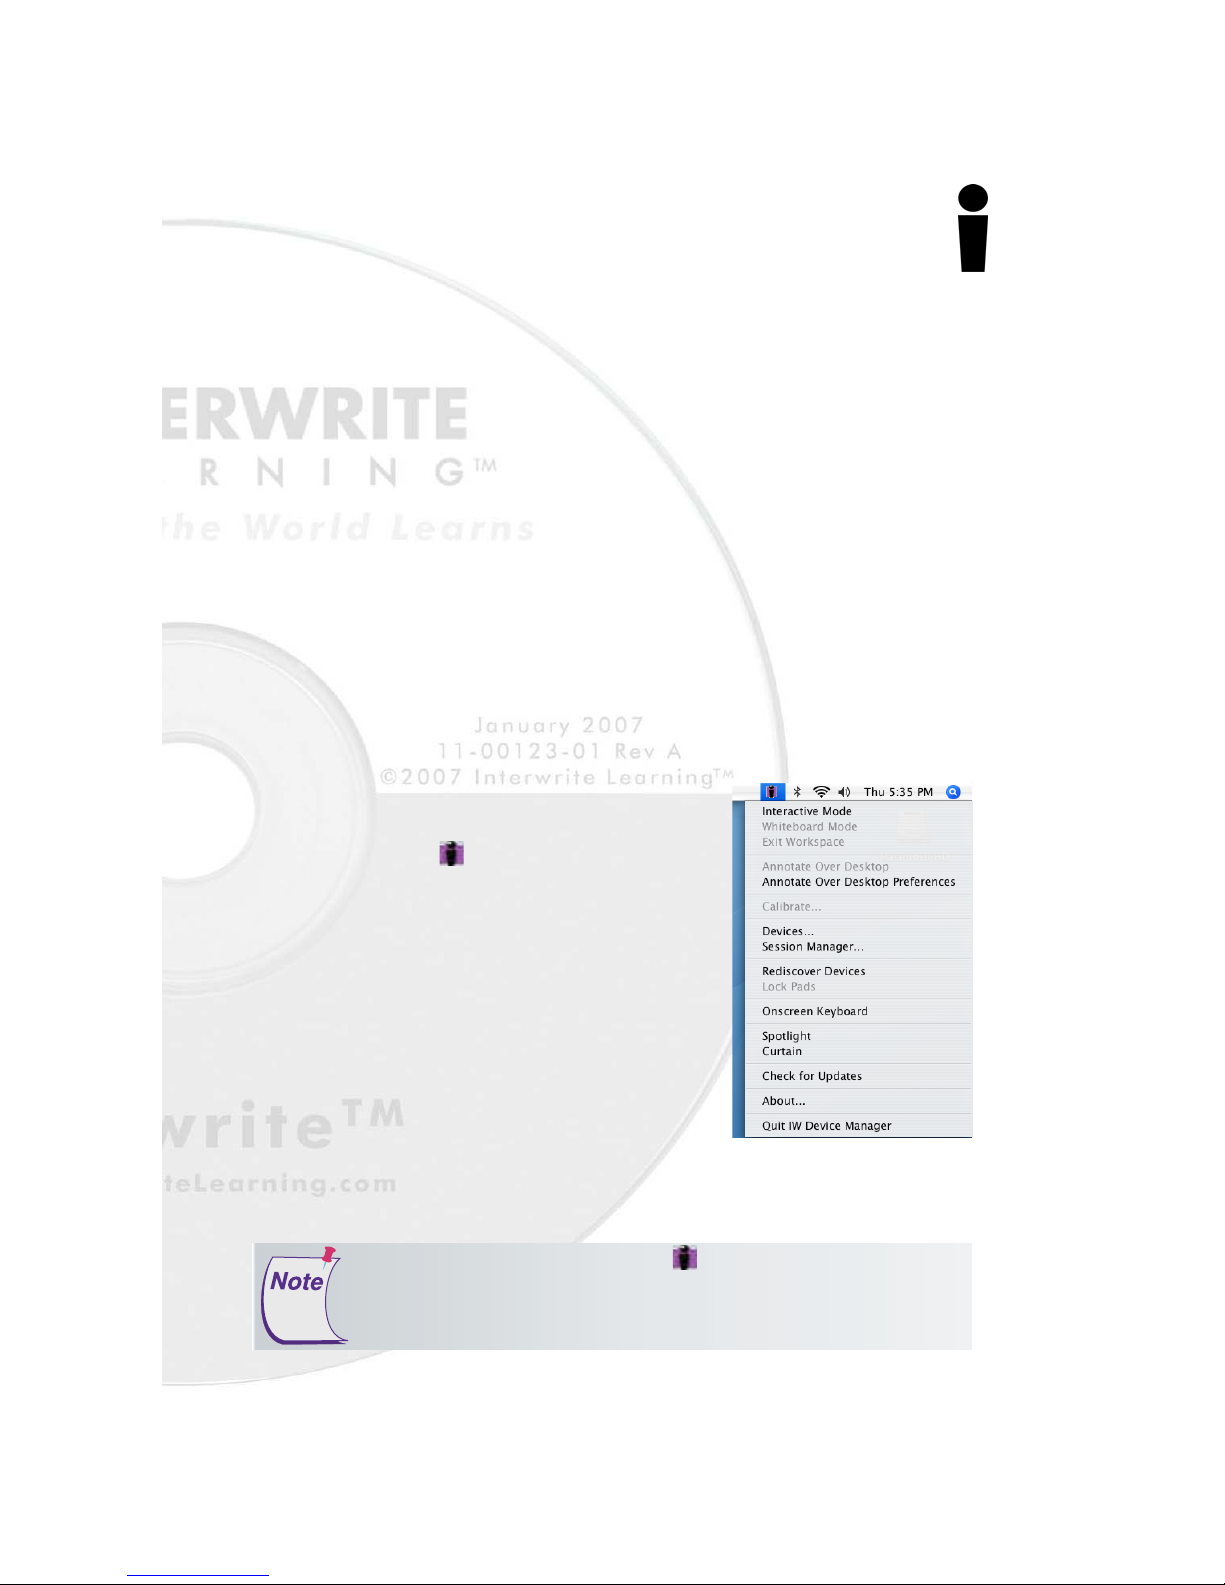
The appearance of the Interwrite
Workspace icon on the Menubar
indicates that the Device Manager is
now running on your Mac. It will load
and run in the background every time
you start up your Mac. Click on the
Interwrite Workspace icon to display the
options on the Device Manager Menu,
shown here. Device Manager, in addition to managing the Interwrite hardware devices, provides direct access to
the two operational modes of Interwrite
Workspace on the Mac.
Click the Interwrite Workspace icon on the Menubar to display
the Device Manager Menu. Select the
new version of Interwrite Workspace is available, download it now.
You should periodically check for updates.
Check for Updates
option. If a
Page 12

12
InterwriteTM Pad Getting Started
Connect Your Interwrite Pad
BluetoothTM Wireless Installation
This section of the Interwrite Pad Getting Started guide describes how to
connect the Bluetooth USB Adapter to the computer
establish communication between the Bluetooth modules
using the Interwrite Workspace software.
Bluetooth BTCOM2
Module
Bluetooth USB Adapter
About Bluetooth and Workspace
The Interwrite Workspace system employs BluetoothTM wireless technology
to establish wireless communication between the Interwrite Boards and
Interwrite Pads and the computer. A Bluetooth Module must be installed on
each component involved in wireless communication. The Bluetooth
BTCOM2 Module is installed on the Interwrite Board. The Bluetooth USB
Adapter shown here is installed on the computer, if necessary. The Interwrite
Pads have the Bluetooth Module built in, so no installation is necessary.
Page 13

Getting Started InterwriteTM Pad
Bluetooth Requirements
If the computer has the Bluetooth Module built in, an external module is not
needed. Most computers with a built-in Bluetooth Module will also have the
Bluetooth driver software installed. Version 6.xx of the InterWrite software
and version 7.0 of the new Interwrite Workspace software support the three
most common Bluetooth stacks (driver software)—Toshiba, WIDCOM and
Microsoft.
Windows XP with Service Pack 2, Windows Vista and Mac OS X
version 10.4 or above have built-in Bluetooth support. If you are
using Windows 98/2000/Me/NT, contact Technical Support to
order an installation Kit.
.
Bluetooth Communications
13
The Interwrite Board and Interwrite Pads in an Interwrite wireless system
communicate with the computer through a single Bluetooth Module connected to the computer. Up to seven Bluetooth-enabled Interwrite Devices—
Boards and Pads—can communicate with the Bluetooth Module connected
to the computer. Only one Bluetooth Module, either built-in or external, can
be connected to the computer at a time.
Interwrite Model 100 Pads are the only Pads that have a cable that
connects the Pad to the computer. Interwrite Model 300, 310 and
400 Pads are wireless. You can have a mix of wired and wireless
Interwrite Pads and Interwrite Boards communicating with the
computer.
Page 14

14
InterwriteTM Pad Getting Started
Installing the USB Adapter
Plug the USB Adapter into one end of the USB cable and insert the other
end into one of the USB ports
It cannot be plugged into a keyboard USB port on the Mac. The operating
system will auto-detect and configure the new hardware device.
Keeping Track of the Bluetooth Adapter
The Velcro button in your Bluetooth Comm Kit is used to attach the USB
Adapter to the side of your monitor, or to the lid of your laptop. Pull the
button apart, remove the paper backing from both pieces, and stick one piece
to the back of the USB Adapter and the other to the monitor or laptop lid. Use
a USB extension cable to connect to the USB port.
on your computer.
Do not install the USB Adapter behind metal enclosures, as this
will limit performance. Metal serves as a shield and reduces the
signal strength. Mount the Adapter so the top of the unit is
positioned above the computer or monitor case. Use a USB cable
extender when additional length is needed to mount the USB
Adapter away from metal or other enclosures.
Moving the Bluetooth Adapter to Another Machine or
USB Port
The Adapter-to-USB-port and Bluetooth software installation (Windows only)
must be performed by a user with Administrator privileges. If the configuration is changed, that is, if the Adapter is moved to another USB port on the
computer, or if a different USB Adapter is installed in the USB port on that
computer, the process must be managed by the Admin.
Page 15

Getting Started InterwriteTM Pad
Connect the Interwrite Devices
The Interwrite Workspace software component Device Manager is the
driver for the Interwrite Devices—Interwrite Boards, Interwrite Pads and
the Interwrite Panel. Device Manager is loaded when Interwrite
Workspace is successfully installed on the computer. It automatically
detects a cabled Interwrite Board or Interwrite Panel. However, the
wireless Interwrite Devices need to be discovered – and, in the case of
the Mac, to select a Service – before the communication connection is
complete.
The following sections describe how to connect wireless Interwrite
Devices, first on Windows, then on the Mac.
Connecting a Wireless Device on Windows
The last step in setting up wireless communications between the Bluetooth
modules on the Interwrite Pad and your PC is performed by Device Man-
ager. Make sure the Interwrite Pad is powered on.
15
1 Click on the Interwrite Workspace icon in the
System Tray on the Windows Task Bar to display the
Device Manager menu.
2 Select the Devices... menu option.
The Devices
dialog box with
the Bluetooth
icon is displayed.
The icon is red when the Bluetooth module is not connected to the PC.
3 Click on the Find Bluetooth Devices button.
A search inquiry for all Bluetooth Devices will begin automatically. When the
inquiry is completed, all Devices discovered during the search will be listed in
the Find Bluetooth Devices dialog.
Page 16

16
InterwriteTM Pad Getting Started
4 Click on the Remember checkbox
next to each discovered Device
you want to see listed in the
Devices List Window.
5 Click OK to return to the Devices
dialog.
The Interwrite Device Addresses shown here are the Radio IDs and can be
found on the back of the Interwrite Device.
Each discovered device is identified in the Devices dialog by its Name, Type,
Connection, Status, Availability, and whether AutoConnect is enabled. The
Properties feature allows you to
give a connected Interwrite
Device the Name shown in the
Devices List Window (the Interwrite Pad is given an additional
Bluetooth Name) and to program
its SoftKeys.
AutoConnect is a property unique
to Bluetooth-enabled Interwrite
Devices. When AutoConnect is enabled, the computer will scan continuously for this and other active, AutoConnect-enabled Bluetooth Devices and
attempt to connect them. Scanning stops once a Device is detected and
connected. Therefore, if you are connecting multiple Devices, make sure
they are all powered on, so all of the Devices will be
detected by the scan. The Status property will tell you
whether the connection succeeded or failed. The Avail-
ability option indicates that a discovered Device is available for connection. The Connect button can be used to
manually connect discovered devices.
6 If you want your Interwrite Pad to AutoConnect when it is powered on,
click on the AutoConnect checkbox.
7 Select your Interwrite Pad in the Devices List Window and click on the
Properties button. Give the Pad a Name. This Name is stored in the
Interwrite Workspace software on this computer and will identify the Pad
when it is connected to this computer.
Once connected, your Interwrite Pad is available as a system pointing device.
Your computer mouse can still be used as a pointing device.
Page 17

Getting Started InterwriteTM Pad
Connecting a Wireless Device on the Mac
The last step in setting up wireless communications between your Bluetooth Interwrite Devices is performed by Device Manager. Make sure
your Interwrite Pad is powered on.
1 Click on the Interwrite Workspace icon on the
Mac Menubar to display the Device Manager
Menu.
2 Select the Devices... menu option.
The Devices dialog box is displayed.
17
3 Click on the Scan Bluetooth
button.
The Select Bluetooth Device dialog
box is displayed.
4 Make sure the Device Type is set
to Input Devices and the Device
Category is set to Discovered
Devices.
5 Click on the Search button.
Every active Interwrite Board and Interwrite Pad running Bluetooth should be
discovered and listed in the left column of the Select Bluetooth Service dialog
box.
Page 18

18
InterwriteTM Pad Getting Started
6 Select the Device in the left
column. A Service displays
in the right column. Interwrite
Bluetooth Devices—Interwrite
Boards and Interwrite Pads—will
use either the ZV-AT Service or
InterWrite Service.
7 Click on the Service displayed in
the right column. When you do,
the Select button is activated.
8 Click on the Select button.
The Bluetooth dialog box goes away. The Interwrite Pad beeps once when it is
connected.
If the Device doesn’t connect, repeat the process—click on the
Device, click on the Service, click the Select button.
Your Interwrite Pad is now listed in the
Bluetooth Devices section of the Devices
dialog with Status Connected. By default,
the Pad will automatically reconnect in the
future. If you want to change that, select
your Interwrite Pad, click on the Device
Properties button and clear the Automatically connect when device is available
checkbox.
If you turn off your Pad and power it on
during the current session, Device Manager will detect that the device has gone
away and will change its status to Discon-
nected. Click on the Connect Device
button to reconnect.
Tip: Give each Interwrite Device a
distinguishable in the Bluetooth Devices list box.
Local Name
so it will be
Page 19

Getting Started InterwriteTM Pad
Operating the Interwrite Pad
The Interwrite Pad provides the freedom to interact with a projected presentation from anywhere in the room. You can write annotations and run
applications remotely, giving you the opportunity to engage others and
encourage participation.
You use the electronic Interactive Pen on the Interwrite Pad’s workspace,
the area defined by the Pad Insert, to move the mouse cursor on the projected image, to select and use Workspace tools, and to click on the programmable SoftKeys indicated along the sides of the Pad Insert. The Pen is
also used to press the indented buttons just above the workspace area.
Power Status Light
Connection Status Light
Pad Battery Status Light
Pen Battery Charging Status Light
Pen Tray
19
Disconnect Button
Connect Button
Sleep/Wake Button
InterwriteTM Pad
Workspace
On/Off
Power Switch
Charger
Power Jack
Page 20

20
InterwriteTM Pad Getting Started
Operating the Buttons
To operate any of the three buttons, position the Pen vertically above the button and
touch the Pen Tip to the button and hold for several seconds.
The Sleep/Wake Button
The Sleep/Wake Button allows you to put your Interwrite Pad into Sleep Mode at
any time. Sleep Mode conserves the battery charge. The Pad drops the connection and goes into an energy-saving standby mode. The Pad will automatically go
into Sleep Mode after a half hour to an hour of inactivity. This button is also used
to wake up the Interwrite Pad from Sleep Mode, returning it to full operating
power.
The Connect Button
The Connect Button wakes up an Interwrite Pad that is in Sleep Mode and
attempts to connect, or reconnect, the powered-on, discovered Pad.
How it Works in Windows
The Interwrite Pad is discovered when the signal sent from the Bluetooth device
installed on the computer is answered by the Pad. An exchange of device addresses
takes place. Device Manager displays the Pad’s address in the Pad’s Properties profile.
The Pad stores the computer’s Bluetooth address. The computer – or more accurately,
the Bluetooth device on the computer – and the Pad are now linked. If the Pad
becomes disconnected, or is powered off, pressing the Connect button on the Pad
will turn it on and reconnect it to the computer with the Bluetooth device that
discovered it.
If you were to take the Interwrite Pad to another location, say another classroom,
where a different computer and Bluetooth device are set up, your Pad would not
be able to communicate with the second computer until the second computer
discovers the Pad. The AutoConnect setting for your Pad determines whether
your Pad stays linked to the first computer, or whether it becomes linked to the
second computer. A link between the Bluetooth devices on the computer and
your Pad occurs only when the AutoConnect option for the Pad is checked. That’s
when the computer’s Bluetooth device address is stored as the Host Address on
the Pad and the link is created.
If you wanted to establish a new link between your Pad and the second computer,
check the AutoConnect setting. The second computer’s Bluetooth device address
will overwrite the value currently stored in the Host Address field on the Pad.
However, if you want to retain the link between your Pad and the first computer,
keep the AutoConnect setting unchecked. In this way, the connection to the
second computer is a temporary one, for this session only. If the Pad becomes
disconnected, it must be connected by clicking on the Connect button to continue communicating in the current session.
Page 21

Getting Started InterwriteTM Pad
How it Works on the Mac
The Interwrite Pad is discovered when the signal sent from the Bluetooth device
installed on the Mac is answered by the Pad’s Bluetooth device. An exchange of
device addresses takes place. Device Manager displays the Pad’s address in the Pad’s
Properties profile. The Pad’s Bluetooth device stores the Mac’s Bluetooth address. The
Mac – or more correctly, the Bluetooth device on the Mac – and the Pad are now
linked. If the Pad becomes disconnected, is powered off, or is asleep (in Sleep Mode),
pressing the Connect button on the Pad will turn it on and reconnect it to the Mac
that discovered it.
If you were to take your Pad to another location with a different Mac and Bluetooth
device, it would not be able to link to this new Mac. It has to be discovered by the
new Mac. Be aware, though, that when your Pad is discovered by the second Mac, it
will lose its link to the first one.
The Disconnect Button
The Disconnect Button breaks the connection between the Pad and the computer. It does not put the Pad into Sleep Mode, nor does it power off the Pad.
Light and Tone Indicators
21
The Status Lights
The four Status Lights across the top of the Pad to the left of the Pen Tray indicate the
status of various aspects of Pad and Pen operation. They may take several seconds to
light up and display their status.
The Power Status Light
The green Power Status Light, the status light on the far left, flashes when the
Pad is on and the electronic Pen is not in prox (just above the Pad’s workspace
surface). It is solid green when the Pen (or another Interwrite Learning pointing
device) is in prox or touching the Pad’s workspace surface. When the Pad is powered
off or in Sleep Mode, the Power Status Light is off.
The Connection Status Light
The Connection Status Light flashes when the Pad connects, disconnects, or
beeps. Otherwise, it is not on.
The Pad Battery Status Light
The Pad Battery Status Light is on only while the Pad is plugged in for charging.
It turns off when the Pad is fully charged and remains off during normal Pad
operation. When the Pad battery is low and needs to be recharged, the Pad
Battery Status Light will slowly flash.
Page 22

22
InterwriteTM Pad Getting Started
Power Status Light
Connection Status Light
Pad Battery Status Light
Pen Battery Charging Status Light
Pen Tray
Disconnect Button
Connect Button
Sleep/Wake Button
Workspace
Charger Power JackOn/Off Power Switch
The Pen Battery Charging Status Light
The Interactive Pen should always be charged when the Pad is being charged. The
Pen Battery Charging Status Light turn on for 10 seconds when the Pen is
properly seated – Rocker Button facing up – in the Pen Tray (and the Pad Charger
is plugged in to the Pad). The Pen Battery Charging Status Light remains on only
when the Pad Charger is plugged into the Pad and the Pen is charging. The Pen
Battery Charging Status Light turns off when the Pen is fully charged, or when the
Pad Charger has been disconnected from the Pad.
Tone Indicators
The Pad emits four high frequency beeps when it powers on. When it connects
with the computer, you will hear a rising tone. When it goes into Sleep Mode or
disconnects, you will hear a descending tone.
When you press the Connect Button to reconnect your Pad, you will hear a
clicking tone until the connection link either succeeds, which is indicated by the
rising Connect tone, or fails, which is indicated by the low frequency Error tone. If
the Pad is already linked to a computer and you press the Connect Button, you
will hear one high frequency beep. During charging, if the Pen is positioned
incorrectly in the Pen Tray, a long, continuous tone will sound until the Pen is
properly positioned.
You will hear a click when you touch a SoftKey with the Pen and the Connection
Status Light will flash. If you program a SoftKey to beep, you will hear the beep
when the function assigned to the SoftKey is executed.
Page 23

Getting Started InterwriteTM Pad
Replacing the Interwrite Pad Battery Pack
23
The Interwrite Pad’s battery pack is accessed from the
back of the Pad.
Back View of Pad
Top of Pad
Tools Required:
Small
Phillips
screwdriver
Battery Cover
Thumb Grip
Interwrite Learning
Rechargeable NiMH Battery Pack
Connector Receptacle
Battery Connector
Page 24

24
InterwriteTM Pad Getting Started
Replacing the Interwrite Pad Battery Pack
(cont.)
1 Turn your Interwrite Pad over and use a small Phillips screwdriver to
remove the screw holding the Battery Cover in place.
2 Push down on the Thumb Grip and slide the Battery Cover away from the
screw hole.
3 Lift the Battery Pack out of the compartment, being careful not to pull
too hard on the battery lead wires to the Connector.
4 Locate the white Battery Connector plugged into the Connector
Receptacle. The Connector has a small bump that snaps into the hole on
the side of the Connector Receptacle to hold the Connector in place. On
some Connectors this is a tight fit, while on others it is not.
5 First, try using the Connector wires to gently pull the Connector straight
up and out of the Receptacle. If you feel any resistance, stop this action.
6 If there is resistance, it’s probable the bump needs to be released from
the hole in the Receptacle. Use a fingernail, a thin-bladed screwdriver, a
letter opener—any instrument that can be used to slightly bow out the
wall of the Connector Receptacle, so the Connector bump is clear of the
hole. If you can, grasp the edges of the Battery Connector with your
fingers. Otherwise, use the wires to gently pull the Battery Connector
straight up and out of the Receptacle.
7 Discard the old Battery Pack, following the proper disposal procedures.
8 With the small bump on the new Battery Pack Connector facing the top
of the Pad, plug the Connector into the Receptacle, gently pushing down
until you feel it snap into place.
9 Feed the lead wires into the open space under the screw hole and set the
Battery Pack into the compartment with the foam side facing up.
10 Fit the Battery Cover into the grooves and slide it back into place.
11 Replace the screw.
Page 25

Getting Started InterwriteTM Pad
Getting Started with Interwrite Workspace
The purpose of this document is to give you a feel for the Interwrite system by
showing you how to select and use a tool in Interactive Mode. The Annotation
Tools of Interactive Mode consist of freehand tools, text tools and drawing
tools. Of the freehand tools, the Pen tool is the most frequently used Interwrite
Workspace Tool. The following pages describe how to select and configure
the Pen tool.
The Interwrite system is at the heart of a successful interactive collaboration,
whether it is in a classroom of fourth graders studying world geography, or in
a boardroom of corporate executives brainstorming a new product launch. All
the tools you will need to stimulate inspiration, connection and participation
can be found in the Interwrite Workspace software. Here’s a quick look at the
Workspace basics to get you started.
Workspace Modes
Interwrite Workspace is run in one of three operational modes, Interactive
Mode, Office Mode (Windows only), or Whiteboard Mode.
25
Workspace Tools have been categorized as Annotation Tools, Editing Tools,
Page Tools, Presentation Tools, Multimedia Tools, Navigation Tools, File
Management Tools, and Setup Tools. The Interwrite Workspace Help file
describes all these tools in detail and can be accessed from the Device Manager Menu.
Whiteboard
Whiteboard Mode, available only when using an Interwrite Board with
Workspace , allows you to capture and preserve notes, drawings, calculations—whatever you write on the Interwrite Board with an Interwrite Marker
Pen.
Office
Office Mode makes it possible to interact directly with the native files of the
Microsoft Office suite of products, PowerPoint, Word and Excel.
Interactive
Interactive Mode allows you to open and run applications while in Mouse
Mode, using the tip of your electronic Interwrite Pen on the Interwrite Panel
screen to move the cursor. In Annotation Mode, you use the Interwrite Pen to
select Interwrite Workspace Tools from the Toolbar.
Page 26

26
InterwriteTM Pad Getting Started
Begin an Interwrite Workspace Session
1 When you are ready to begin an Interwrite Workspace session, turn on
your Interwrite Panel. The Panel must be active and connected. You can
verify this in Session Manager, or Devices, both Device Manager Menu
options.
2 You can start Workspace in Interactive Mode by using your electronic
Interwrite Pen to click on the Interwrite Workspace icon
Windows Task Bar or the Mac’s Menubar to display the Device Manager
Menu. Select Interactive Mode from the menu.
The Workspace Toolbar displays on the screen.
By default, the basic Toolbar is shown
here. A more advanced toobar can be
selected in the
Preferences option.
Customize Toolbar
on the
Page 27

Getting Started InterwriteTM Pad
The Interwrite Workspace Toolbar
Minimize Toolbar
27
Workspace Menu
Mouse Mode tool
Selection tool
Pen tool
Highlighter tool
Eraser tool
Shape tool
Line tool
Text tool
Undo Previous Action
Clear
Create Blank Page
Create Grid Page
Gallery tool
Screen Capture tool
Previous Page
Next Page
When you start up Interwrite
Workspace in Interactive Mode, the
Toolbar displays, along the right side of
the projected desktop image, At that
time, Workspace is in Mouse Mode.
Use your Interwrite Pen to select the
Pen tool from the Toolbar. Select a
capture option from the Capture
dialog, click on the window, or click
and drag to capture a portion of the
screen.
Your capture is displayed in the
Annotation Window. Or, you can start
up Annotation Mode by selecting one
of the Page Creation Tools.
The page type you select is displayed
in the Annotation Window and the
Pen tool is automatically selected.
Page Sorter tool
Toolbox
PRS tool
Save
Exit
Once the Annotation Window is
open, you can begin writing or
drawing on the page.
Page 28

28
InterwriteTM Pad Getting Started
Using the Pen Tool
The attributes of the Pen tool can be changed by selecting different
options from the Properties Bar at the bottom of the Annotation Window.
Select the Pen tool’s Down Arrow to display its Tool Settings Menu.
Properties Bar
The Pen tool Properties Bar provides options to change line color, width,
transparency, and line ends and line styles. Each attribute change is
displayed in the Preview Box.
Properties Bar
Line color
Change line color
Line width
Line transparency
Line ends
Dash styles
Preview box
Change the Pen tool’s line color and width to determine how it will affect
the look of your annotations. The best way to familiarize yourself with all
the different Interwrite Workspace tools and how they can be used to
enhance your presentations is to experiment with them.
Page Functions
Workspace also provides the ability to move within pages within the
window. Select the functions at the bottom of the screen to pan a page,
move between pages, use the PRS tool (optional), or discard annotations.
Trash
Next
Previous
Pan page
(PRS)
Current location
Insert question
Page 29

Getting Started InterwriteTM Pad
Presentation Files
The presentation file is made up of your annotated pages. The Page
Creation and Capture tools are used to create the pages in the presentation file and the Annotation Tools are used to create the annotations. The
presentation file is automatically saved as a .GWB file.
As soon as Interwrite Workspace goes into Annotation Mode, an untitled
presentation file is created. Unless you give the file a name, it is automatically saved using today’s date as the filename. (Multiple files created today
have 01, 02, 03, etc., appended to the date name.)
An existing presentation file can be opened, its pages can be sorted,
annotations can be added to the existing pages, and new pages can be
added to the file. Your presentation will determine how each presentation
file evolves.
For example, you can prepare a presentation file of blank maps ahead of
time for a geography lesson. Or, you can capture and annotate each of
the monthly earnings spreadsheets as you review the past fiscal year
during a budget meeting. Or, you can run a PowerPoint Slide Show in
Office Mode (Windows only) and annotations can be added to each slide
and saved in the native file.
29
Building the Presentation File
You can build your presentation file during your presentation, or you can
pre-build it, including the screen captures, images, graphs and text pages
you want to present. However you choose to do it, the process is the
same.
To capture a screen or window, click on the Mouse Mode tool with your
Interactive Pen and arrange the desktop for capture. Select an Annotation
Tool, the Pen, for example, indicate your capture preference (by clicking
on either the Partial, Window, or Screen option in the dialog), and anno-
tate the captured image.
Use the Page Creation Tools to add a blank, gridded, or background
image page. By default, Interwrite Workspace is in Autosave mode, so
your annotated pages are automatically saved as you build your presentation file.
Click the Save tool to save the file using the default filename (current
date), or a name you type on the pop-up Onscreen Keyboard.
Page 30

30
InterwriteTM Pad Getting Started
Distributing Presentation Files
The Interwrite Workspace presentation files you create can be printed for
local distribution, or emailed to anyone, anywhere.
Use the Page Sorter tool to review the presentation file. The pages in the
presentation file can be sorted, moved, duplicated, merged, and deleted
using the Page Sorter tool. When the file pages have been arranged to your
satisfaction, you can use Page Sorter’s export option to export it to one of a
number of file formats, or you can close Page Sorter and select an option
from the Workspace File Menu.
The native file format of saved presentation files has the .GWB extension.
GWB files can be read on any computer on which Interwrite Workspace is
installed. For general distribution, we recommend exporting the presentation
file to the PDF format using the Export PDF File tool located in the Toolbox,
or by selecting the the Export PDF File option from the Workspace File
Menu.
Now everyone can stay in the information loop, whether they were able to
attend the presentation or not.
Additional Interwrite Learning Resources
We invite you to visit the Interwrite Learning Web site at
www.InterwriteLearning.com
where we have provided a variety of resources to help make your Interwrite
Workspace experience more rewarding. We especially encourage you to
visit
www.InterwriteLearning.com/support_interwrite.htm
and
www.InterwriteLearning.com/erc/index.htm.
What is PRS?
Interwrite PRS is an Audience Response System—a comprehensive response
system for electronically testing, polling, and surveying a group of people. It
can be used in conjunction with Interwrite Workspace to take a survey of
the audience response to the presentation, or to test the level of comprehension after a lesson presentation, for example. Learn more about PRS by
visiting our Web site.
Page 31

Getting Started InterwriteTM Pad
Regulatory Statements
These devices comply with part 15 of the FCC Rules and with RSS-210
of Industry Canada. Operation is subject to the following two conditions:
1 These devices may not cause harmful interference, and
2 These devices must accept any interference received, including
interference that may cause undesired operation.
Note: This equipment has been tested and found to comply with the limits of
a Class B digital device, pursuant to Part 15 of the FCC rules.
These limits are designed to provide reasonable protection against harmful
interference in a residential installation. This equipment generates, uses and
can radiate radio frequency energy and, if not installed and used in accordance with the instructions, may cause harmful interference to radio communications. However, there is no guarantee the interference will not occur in a
particular installation.
If this equipment does cause harmful interference to radio or television reception, which can be determined by turning the equipment off and on, the user
is encouraged to try to correct the interference by one or more of the following measures.
31
• Reorient or relocate the receiving antenna.
• Increase the separation between the equipment and the receiver.
• Connect the equipment into an outlet on a circuit different from that to
which the receiver is connected.
• Consult the dealer or an experienced Radio/TV technician for help.
The radiated output power is far below the FCC Radio Frequency exposure
limits. Nevertheless, each of the devices should be used in such a manner that
the potential for human contact during normal operation is minimized.
Canada
Industry Canada Class B emission compliance statement. This Class B
digital apparatus complies with Canadian ICES-003.
Avis de conformité á la réglementation d’Industrie Canada. Cet appareil
numérique de classe B est conforme á la norme NMB-003 du Canada.
Page 32

32
InterwriteTM Pad Getting Started
Declaration of Conformity
The “CE“ mark on this device indicates compliance under the EMC 89//
336/EEC Directive.
Declaration of conformity according to ISO/IEC Guide 22 and EN 45014
Manufacturer’s Name: GTCO Corp. (dba Interwrite Learning)
Manufacturer’s Address: 8224 East Evans Road
Scottsdale, AZ 85260 U.S.A.
declares, that the product
Product Name: Interwrite Pad
Model Number: 400
Product Options: All
conforms to the following product specifications:
EMC: ETSI EN 301 489-1/2000
EN 55022/1998 CLASS B
CISPR 22(1997) CLASS B
EN 61000-4-2/1995
EN 61000-4-3/1995
EN 61000-4-4/1995
EN 61000-4-5/1995
EN 61000-4-6/1996
EN 61000-4-11/1994
EN 61000-3-2/1995
EN 61000-3-3/1995
Safety: EN60950-1:2002
RoHS: “-R” labelled products conform to DIRECTIVE
2002/95/EC. These products are RoHS-compliant.
Supplementary Information
The product herewith complies with the requirements of the Low Voltage Directive 73/23/EEC
and the EMC Directive 89/336/EEC.
Scottsdale, Arizona, U.S.A. 6-1-2006 Dana Doubrava
Dispositif à faible puissance (1 mW), pas de limitation pour son usage à
l’intérieur ou à l’extérieur.
Low power device (1 mW), no limitation for indoor or outdoor use. This
product is suitable for indoor use only.
Location Date Engineering Mgr
Page 33

Getting Started InterwriteTM Pad
The Interwrite Pad, assembled by Interwrite Learning, contains the Bluetooth® Serial Module BISM II, #B02456, FCC ID: PI401B, from Ezurio Ltd.
Their Declarations of Conformity are included here. The BTCOM2 Module, USB Adaptor II, and PCMCIA Card II are RoHS-compliant.
Declaration of Conformity
In accordance with Annex IV of the EU directive 1999/5/EC
Notified Body consulted: Phoenix Test-Lab
ID-Number of Notified Body: 0700
declare under our responsibility that the BISM II Module
complies with the appropriate essential requirements of the Article 3 of the
R&TTE and the other relevant provisions, when used for its intended purpose.
Health and Safety requirements contained in Article 3 (1) a)
EN 60 950: 1992 Safety of information technology equipment + Amendment
A1:1993, Amendment A2:1993, Amendment A3:1995, Amendment A4:1997,
Amendment A11:1997
EN 50371: Generic standard to demonstrate the compliance of low-power
electronic and electrical apparatus with the basic restrictions related to human
exposure to electromagnetic fields (10 MHz - 300 GHz) - General public
Protection requirements with respect to electromagnetic compatibility Art.3 (1)
b)
EN 301489-17 V1.1.1 (09-2000), Electromagnetic Compatibility and radio
spectrum Matters (ERM); Electro Magnetic Compatibility (EMC) standard for
radio equipment and services; Part 17: Specific conditions for wideband
Hiperlan equipment
Means of the efficient use of the radio frequency spectrum
EN 300328-2 V1.2.1 (11-2001), Radio Equipment and Systems (RES); Wideband
transmission systems; Technical characteristics and test conditions for data
transmission equipment operating in the 2,4 GHz ISM band and using spread
spectrum modulation techniques. Part 2: Harmonized EN covering essential
requirements under article 3(2) of the R&TTE directive.
Ezurio Ltd
Unit 2, 126 Colindale Avenue, Colindale
London NW9 5HD, United Kingdom
tel: +44 (0)20 8938 1000
fax: +44 (0)20 8905 8608
www.ezurio.com
Registered in England
No. 5178293
33
Safety Information
Switch off the Bluetooth device before boarding an aircraft. Make sure it
cannot be switched on inadvertently. The operation of wireless appliances in
an aircraft is forbidden by many airlines to prevent interference with communications systems. Applications that could result in use on aircraft should carry
appropriate warnings.
Page 34

34
InterwriteTM Pad Getting Started
Declaration of Conformity
Manufacturer’s Name: Lih Rong_Electronics co., LTD
Manufacturer’s Address: Hsin Chuang City, Taipei
Taiwan, R.O.C.
Importer’s Name: GTCO CalComp GmbH
Importer’s Address: Kreillerstrasse 24
Munich 81673 Germany
declares, that the product
Product Name: Bluetooth USB Adapter
Model Number: BTA-6030R
conforms to the following product specifications:
EMC: EN301489-1 v1.5.1(2004-11)
EN301489-17 v1.2.1(2002-08)
ETSI EN 300 328 V1.6.1 (2004-11)
Safety: EN60950-1:2001
IEC60950-1:2001
RoHS: “-R” labelled products conform to DIRECTIVE
2002/95/EC. These products are RoHS-compliant.
following the provisions of Council Directive 89/336/EEC (EMC
Directive) and Council Directive 73/23/EEC (Low Voltage Directive)
where applicable
Place and Date: Taipei, Taiwan 07/17/2007
Authorized Person: Raymond Wang
Title: QC Manager
Page 35

Getting Started InterwriteTM Pad
Declaration of Conformity
In accordance with Annex IV of the EU directive 1999/5/EC
Notified Body consulted: Phoenix Test-Lab
ID-Number of Notified Body: 0700
declare under our responsibility that the Ezurio Bluetooth PC Card II
complies with the appropriate essential requirements of the Article 3 of the
R&TTE and the other relevant provisions, when used for its intended purpose.
Health and Safety requirements contained in Article 3 (1) a)
EN 60 950: 1992 Safety of information technology equipment + Amendment
A1:1993, Amendment A2:1993, Amendment A3:1995, Amendment A4:1997,
Amendment A11:1997
EN 50371: Generic standard to demonstrate the compliance of low-power
electronic and electrical apparatus with the basic restrictions related to human
exposure to electromagnetic fields (10 MHz - 300 GHz) - General public
Protection requirements with respect to electromagnetic compatibility Art.3 (1)
b)
EN 301489-17 V1.1.1 (09-2000), Electromagnetic Compatibility and radio
spectrum Matters (ERM); Electro Magnetic Compatibility (EMC) standard for
radio equipment and services; Part 17: Specific conditions for wideband
Hiperlan equipment
Means of the efficient use of the radio frequency spectrum
EN 300328-2 V1.2.1 (11-2001), Radio Equipment and Systems (RES); Wideband
transmission systems; Technical characteristics and test conditions for data
transmission equipment operating in the 2,4 GHz ISM band and using spread
spectrum modulation techniques. Part 2: Harmonized EN covering essential
requirements under article 3(2) of the R&TTE directive.
Ezurio Ltd
Unit 2, 126 Colindale Avenue, Colindale
London NW9 5HD, United Kingdom
tel: +44 (0)20 8938 1000
fax: +44 (0)20 8905 8608
www.ezurio.com
Registered in England
No. 5178293
35
Japan
Page 36

36
InterwriteTM Pad Getting Started
The Electronic Interwrite Pen
This device complies with Part 15 of FCC rules and with RSS-210 of Industry
Canada. Operation is subject to the following two conditions: (1) This device
may not cause harmful interference, and (2) This device must accept any
interference received, including interference that may cause undesired operation.
The radiated output power is far below the FCC Radio Frequency exposure
limits. Nevertheless, this device should be used in such a manner that the
potential for human contact during normal operation is minimized.
WARNING: Changes or modifications made to this equipment not expressly
approved by Interwrite Learning may void the FCC authorization to operate
this equipment.
Battery Handling and Precautions
• Always charge batteries prior to first use.
• Never short-circuit batteries or reverse polarity.
• Do not incinerate or dismantle batteries. Cell components are corrosive and may be harmful
to skin and eyes.
• Do not pull on battery lead wires or connectors. Excessive force on the leads or connectors
can damage the welding joints and other connections.
• Do not mix with other battery types. It could cause leaks, or an explosion, resulting in
personal injury.
• Dispose of properly.
• Replace only with the same or an equivalent battery type recommended by Interwrite
Learning, P/N 11-00667-01.
Manipulation de la batterie et précautions
• Chargez toujours la batterie avant la première utilisation.
• Ne court-circuitez jamais une batterie et n’en inversez jamais les polarités.
• N’incinérez pas et ne démontez pas la batterie. Leurs cellules sont corrosives et présentent
un risque pour la peau et les yeux.
• Ne tirez pas sur les fils métalliques de la batterie ni sur ses connecteurs. Une pression
excessive sur les fils ou les connecteurs risque d’endommager les joints et les autres
connexions.
• N’utilisez pas en conjonction avec d’autres types de batterie. Vous risquez de provoquer des
fuites ou une explosion pouvant occasionner des blessures corporelles.
• Mettez la batterie au rebut de manière adéquate.
• Remplacez-la uniquement par une batterie identique ou de type équivalent recommendée
par Interwrite Learning, Réf. 11-00667-01.
Page 37

Getting Started InterwriteTM Pad
Handhabung des Akku und Vorsichtsmaßnahmen
• Laden Sie den Akku vor dem ersten Gebrauch stets auf.
• Schließen Sie den Akku niemals kurz und verändern Sie niemals seine Polarität.
• Verbrennen und demontieren Sie keine Akkus. Bestandteile des Akku sind ätzend und
können schädlich für
Haut und Augen sein.
• Ziehen Sie nicht an Akkuanschlussdrähten oder Anschlussklemen. Übermäßige
Kraftanwendung an Anschlussdrähten oder -klemmen kann die Schweißpunkte und andere
Verbindungen beschädigen.
• Benutzen Sie den Akku nicht zusammen mit anderen Batterien. Dies könnte ein Auslaufen
oder eine
Explosion verursachen, was Personenschäden zur Folge haben könnte.
• Entsorgen Sie den Akku ordnungsgemäß.
• Ersetzen Sie den Akku nur mit dem gleichen oder einem gleichwertigen Batterietypen, der
von Interwrite Learning, P/N 11-00667-01empfohlen wird.
Gestione e precauzioni relativi alla batteria
• Caricare le batterie sempre prima del primo utilizzo.
• Non cortocircuitare mai le batterie o invertire la polarità.
• Non incenerire o smontare le batterie. I componenti degli elementi sono corrosivi e
possono essere nocivi alla pelle ed agli occhi.
• Non tirare i fili conduttori o i connettori della batteria. Una forza eccessiva sui conduttori
o connettori può danneggiare i giunti saldati ed altri collegamenti.
• Non mescolare con altri tipi di batteria. Potrebbe causare perdite o un’esplosione, avendo
come conseguenza lesioni a persone.
• Smaltire la batteria secondo le normative.
• Sostituire solo con lo stesso tipo, o un tipo equivalente, di batteria consigliato da
Interwrite Learning, N/P 11-00667-01.
37
Precauciones y manipulación de baterías
• Cargue siempre las baterías antes de utilizarlas por primera vez.
• Nunca ponga en cortocircuito baterías o invierta la polaridad.
• No incinere o desmonte las baterías.Los componentes de la celda son corrosivos y pueden
producir lesiones en la piel y los ojos.
• No tire de los cables conductores de la batería ni de los conectores. Ejercer exceso de fuerza
en los cables conductores o en los conectores puede dañar las uniones soldadas u otras
conexiones.
• No intercambie con otros tipos de baterías.Podría producir fugas, explosión o causar
heridas graves.
• Desheche las baterías adecuadamente.
• Sustituya sólo con baterías del mismo tipo o equivalentes recomendadas por Interwrite
Learning, P/N 11-00667-01
Page 38

38
InterwriteTM Pad Getting Started
European Union Emission Directive
This product is in conformity with the protection requirements of EU Council
Directive 89/366/ECC on the approximation of the laws of the Member
States relating to electromagnetic compatibility.
This product has been tested and found to comply with the limits for Class A
Information Technology Equipment according to CISPR 22/European Standard
EN55022. The limits for Class A equipment were derived for typical industrial
environments to provide reasonable protection against interference with
licensed communication devices.
European Union WEEE Directive
The manufacture of this equipment required the extraction and use of natural
resources. It may contain hazardous substances that could impact health and
the environment.
• In order to avoid the dissemination of the hazardous substances into the
environment and to diminish the pressure on our natural resources, we
encourage you to return this product to the appropriate take-back system
facility. These facilities reuse or recycle most of the materials in this
equipment in a responsible way.
• The crossed-out wheeled bin symbol below invites you to use these take-
back systems.
• If you need more information about the collection, reuse and recycling
systems in your area, please contact your local or regional waste
authority.
• Further information about the responsible end-of-life management of this
and other Interwrite Learning products is available on our Web site at
www.InterwriteLearning.com.
European Contact:
Interwrite Learning
A Division of GTCO CalComp GmbH
European Headquarters
Kreiller Strasse 24
81673 Munich
Germany
Tel: +49 (0) 89 370012-0
Fax: +49 (0) 89 370012-12
Page 39

Getting Started InterwriteTM Pad
39
Limited Warranty for the Interwrite Pad
Interwrite Learning warrants these products to be free from defects in material and workmanship under the following terms. Complete
and return the enclosed warranty registration card to ensure that your products are covered by this warranty.
Coverage
Parts and labor are warranted for one (1) year from the date of the first consumer purchase for the Interwrite Pad, electronic Pen, Pad Charger,
and accessories. This warranty applies to the original consumer purchaser only.
Within the European Union, the warranty period is two (2) years, as mandated by the EU. Contact your local dealer or distributor for additional
warranty information.
Warranty is valid only if original consumer’s purchase or lease date is less than or equal to six months from the original Interwrite Learning sale date.
This information will be captured by the system serial number and confirmed by the reseller’s purchase order.
A nominal Warranty Handling Fee will be charged after the first 90 days of use and calculated from the date of original consumer purchase. This
payment may be made by Visa, MasterCard, or American Express. A copy of the sales receipt or invoice will be required for warranty verification.
Conditions
Except as specified below, this warranty covers all defects in material or workmanship in the products. The following are not covered by the
warranty:
1. Any product on which the serial number has been defaced, modified, or removed (if applicable).
2. Damage, deterioration, or malfunction resulting from:
a. Accident, misuse, abuse, neglect, fire, water, lightening, or other acts of nature, unauthorized product modification for any purpose,
or failure to follow instructions supplied with the product.
b. Repair, or attempted repair, by anyone not authorized by Interwrite Learning.
c. Any damage in shipment of the product (claims must be presented to the carrier).
d. Any other cause which does not relate to a manufacturing defect.
3. Any product not sold or leased to a consumer within six months of Interwrite Learning’s original sale date.
4. Consumable parts, e.g., batteries, dry-erase markers, eraser felt.
Interwrite Learning will pay all labor and material expenses for covered items, but will not pay for the following:
1. Removal or installation charges.
2. Costs for initial technical adjustments (set up), including adjustments of user controls.
3. Certain shipping charges. (Payment of shipping charges is discussed in the next section of this warranty.)
4. Packaging costs. (Customers should keep their boxes.)
Warranty Service Procedures
1. To obtain service on your Interwrite Learning product, contact the Technical Support Department to receive a Return Material
Authorization Number (RMA#) and shipping instructions by calling:
In United States: (480) 443-2214 (MST)
2. Ship the product to Interwrite Learning with the RMA# marked clearly on the outside of the box. Interwrite Learning reserves the right to
3. Although the consumer must pay any shipping charges to ship the product to Interwrite Learning for warranty service, Interwrite
4. Whenever warranty service is required, the original dated sales invoice (or a copy) must be presented as proof of warranty coverage,
5. If Interwrite Learning determines that the unit is not defective within the terms of the warranty, the consumer shall pay the cost of all
Technical Support
Web-based Technical Support is available free of charge at: www.InterwriteLearning.com, where current driver releases, as well as comprehensive
technical support, troubleshooting, Technical Bulletins and FAQs can be found.
Telephone Technical Support is available free of charge to the original consumer for a period of 90 days from the date of purchase of the product.
Please contact our Technical Support Department:
You can also fax your request to:
Our toll-free number in the U.S. is: 800-856-0732 (MST)
Disclaimer of Unstated Warranties
The warranty printed above is the only warranty applicable to this purchase. ALL OTHER WARRANTIES, EXPRESSED OR IMPLIED,
INCLUDING, BUT NOT LIMITED TO, THE IMPLIED WARRANTIES OF MERCHANTABILITY AND FITNESS FOR A PARTICULAR PURPOSE
ARE DISCLAIMED. Assuming the warranty above stated is otherwise applicable, it is expressly understood and agreed that Interwrite Learning’s
sole liability, whether in contract, tort, under any warranty, in negligence, or otherwise, shall be for the repair or replacement of the defective parts,
and under no circumstances shall Interwrite Learning be liable for special, indirect, or consequential damages. The price stated and paid for the
equipment is a consideration in limiting Interwrite Learning’s liability.
Notice
Some states and provinces do not allow the exclusion or limitation of incidental or consequential damages, so the above exclusion may not apply
to you. This warranty gives you specific legal rights, and you may have other rights, which vary from state to state, or province to province.
To obtain service on your Interwrite Learning product, call our Technical Support Department at (480) 443-2214 (MST), or fax us at
(480) 948-5508 (MST); in Europe call +49 (0) 89 370012-0 (CET), or fax us at +49 (0) 89 370012-12 (CET).
We can also be contacted through our Web site at www.InterwriteLearning.com (in US), at EUOffice@gtcocalcomp.com (in Germany), or at
infos@calcomp.fr (in France).
Important! All products returned to Interwrite Learning for service must have prior approval in the form of a Return Merchandise Authorization
Number (RMA#), which can be obtained by calling the Technical Support Department.
In Europe: +49 (0) 89 370012-0 (CET)
refuse the shipment, if not properly marked.
Learning will pay the return shipping charges for ground shipment. Other shipping options are available at an additional fee.
and should be included in shipment of the product. In addition, please include your name, address, telephone number, fax number,
email address, and a description of the problem.
freight charges, as well as any repair charges.
In United States: (480) 443-2214 (MST)
In Europe: +49 (0) 89 370012-0 (CET)
In United States: (480) 948-5508 (MST)
In Europe: +49 (0) 89 370012-12 (CET)
Page 40

40
InterwriteTM Pad Getting Started
Corporate Headquarters
7125 Riverwood Drive
Columbia, Maryland 21046
Tel: 410.381.6688
Fax: 410.910.0051
Sales: 866.496.4949
European Headquarters
Interwrite Learning
A Division of GTCO CalComp GmbH
Kreiller Strasse 24
81673 Munich
Germany
Tel: + 49 (0) 89 370012-0
Fax: + 49 (0) 89 370012-12
www.InterwriteLearning.com
Support: 480.443.2214
Western Office
8224 East Evans Road
Scottsdale, Arizona 85260
Tel: 480.948.6540
Support: 480.443.2214
Fax: 480.948.5508
Interwrite Learning and Interwrite are trademarks of GTCO Corp.
Bluetooth is a trademark of, and is owned by, Bluetooth SIG, Inc., U.S.A.,
All other products and company names are the trademarks or registered
The information contained in this document is subject to change without notice. Interwrite Learning assumes no
responsibility for technical, or editorial errors, or omissions that may appear in this document, or for the use of this
material. Nor does Interwrite Learning make any commitment to update the information contained in this document.
This document contains proprietary information which is protected by copyright. All rights reserved. No part of this
document can be photocopied or reproduced in any form without the prior, written consent of Interwrite Learning.
Copyright© 2007 Interwrite Learning
and is licensed to Interwrite Learning.
trademarks of their respective owners.
TM
37-01125-01 Rev. C
 Loading...