

Page 1

Getting Started InterwriteTM Board
GETTING STARTED
1
Interwrite
TM
Board
for Windows and the Mac
Page 2

2
InterwriteTM Board Getting Started
We at Interwrite LearningTM are proud of our family of Interwrite products. We strive to continue to bring you the best
the technology has to offer. We urge you to visit our Web
site, where we will post the latest information regarding any
updates and changes we have made that would impact the
instructions in this Getting Started document.
www.InterwriteLearning.com
Click on any of the Interwrite Learning products to access
product information, software downloads, documentation,
and training information.
Please recycle
Page 3

Getting Started InterwriteTM Board
Table of Contents
Interwrite Board – Overview
Installation Overview 7
1. Unpack Your Interwrite Board 7
2. Mount Your Interwrite Board 8
3. Install the Interwrite Workspace Software 9
4. Connect Your Interwrite Board 9
5. Connect the Video Projector 9
6. Prepare the Electronic Interwrite Pens and
Install the Pen Charging Station 9
7. Calibrate Your Interwrite Board 9
Mount Your Interwrite Board
Mounting the Interwrite Board on the Wall 10
Attaching Floor Stand Mounting Brackets to
the Interwrite Board 12
3
Mounting the Interwrite Board on the Floor Stand 13
Install the Interwrite Workspace Software
Installing the Interwrite Workspace Software on Windows 14
Installing the Interwrite Workspace Software on the Mac 15
Connect Your Interwrite Board
Cable Installation 16
BluetoothTM Wireless Installation 18
Install the BTCOM2 Module on the Interwrite Board 19
Install the Bluetooth Module on the Computer 20
Install the USB Adapter 21
Connect the Interwrite Devices 22
Connecting a Wireless Device on Windows 22
Connecting a Wireless Device on the Mac 24
Connect the Video Projector
Connect the Video Projector 26
Page 4

4
InterwriteTM Board Getting Started
Calibrate Your Interwrite Board
Calibrating the Interwrite Board 29
Getting Started with Interwrite Workspace
Beginning an Interwrite Workspace Session 31
The Interwrite Workspace Toolbar 32
Using the Pen Tool 33
Presentation Files 34
Distributing Presentation Files 35
Additional Interwrite Learning Resources 35
What is PRS? 35
Whiteboard Mode 36
Interwrite Accessories
BTCOM2 Communications Kit 37
The InterwriteTM Pad 37
The Rechargeable Interactive Pen and
Pen Charging Station 38
Using the Rechargeable Interactive Pen 39
Assembling the Interwrite Marker Pen 40
The Interwrite Interactive Pen 41
Installing the Mounting Clips on the
Interwrite Board and Wall 42
Attaching the Pen Tray to the Interwrite Board 43
The Interwrite Board Floor Stand 44
The Floor Stand Accessory Shelf 44
Assembling the Floor Stand 44
Assembling the Legs 45
Attaching the Crossbars to the Leg Assemblies 45
Regulatory Statements and Warranty
Regulatory Statements 46
International Interwrite Board Warnings 52
Warranty 54
Page 5

Getting Started InterwriteTM Board
5
Interwrite
Board
Overview
The InterwriteTM Board is central to the Interactive Classroom. These durable
TM
electronic whiteboards feature Interwrite Learning’s patented electromagnetic technology. Used alone, or in combination with Interwrite
Interwrite Board will provide the most effective means of facilitating and
stimulating a successful interactive, collaborative environment, whether in
the classroom, in the meeting room, or reaching out to participants around
the world.
You will see in this Getting Started guide how versatile your Interwrite Board
installation can be, accommodating every type of presentation environment.
Every step of the setup and installation process for each possible configuration
is described in these pages. In addition, a variety of accessories are described.
Some of the Interwrite Board accessories, such as an electronic pen, are
required, others are optional. In any case, we will show how they can be used
to uniquely tailor your interactive environment to your requirements.
Once set up, your Interwrite Board must be able to communicate with your
computer, either by means of a cable connection (serial or USB), or wirelessly,
using the Bluetooth
manages the communication link with your Interwrite Board, controls its
operation, and provides a robust set of tools to achieve the interactive
experience.
TM
Comm Kit. The Interwrite Workspace software
TM
Pads, your
You will use Interwrite Workspace software tools to establish communication with your Interwrite Board and to calibrate it. Calibration ensures that
the cursor on the projected image is properly aligned with the tip of the
electronic Interwrite Pen on the whiteboard’s surface.
The Interwrite software lets you operate your Interwrite Board in one of two
primary operational modes: Whiteboard Mode and Interactive Mode.
Whiteboard Mode makes it possible for you to easily capture the notes,
drawings and calculations on your Interwrite Board for print and/or electronic distribution. The only equipment you need to run the Whiteboard
Mode is your Interwrite Board, one or more electronic Interwrite Marker
Pens, and your computer.
Page 6

6
InterwriteTM Board Getting Started
Interactive Mode allows you to take advantage of the full power and
features of the Interwrite system. Running Interactive Mode requires your
Interwrite Board, an Interactive Pen or one or more Marker Pens, a
computer, and a video presentation projector. The video projector is
connected to the computer so it can project the image of the computer
desktop onto the Interwrite Board’s surface. Once connected, your
Interwrite Board communicates as an input device to the computer.
Page 7

Getting Started InterwriteTM Board
Installation Overview
This section describes what you will be doing and the order in which you will
be doing it, to facilitate the installation of your Interwrite Board and its preparation for use.
1. Unpack Your Interwrite Board
Open the shipping box and remove the Accessory Box. Leave the Interwrite
Board in the box until you are ready to mount it.
In the Accessories section of this guide, you will see that a variety of Interwrite
Board accessories are available to help you create the interactive environment
that best suits your requirements. Following is a basic list of the Interwrite
accessories likely to be included with your Interwrite Board:
7
USB Cable
Cable Guides
Power Supply
Power Supply
Adapters
Mounting Clips
Interwrite Pens
Wall Mounting BracketSerial Cable
Pen Tray
Interwrite Learning
TM
This Interwrite
Board
TM
CD
Getting Started Guide
If you are going to connect your Interwrite Board using a cable, only one
cable, either Serial or USB, can be used. If you are going wireless, neither
cable should be used.
If your Power Supply shipped with a set of adapters, the instructions for
fitting the correct adapter on the plug are described on page 17. If you are
connecting your Interwrite Board using a USB cable, the Power Supply is
not needed. However, the Power Supply is required if you are using a serial
connection, attaching the BTCOM2 Module to the board for wireless
communication, or connecting the Interactive Pen Charging Station to the
board’s controller.
The Cable Guides are used to manage and guide dangling cables.
The optional Mounting Clips will be used only when you are mounting
your Interwrite Board on the wall. Their installation is described in the
Accessories section on page 42.
The Pen Tray is an optional accessory. If you are planning to mount your
Interwrite Board on the wall and you purchased a Pen Tray, it should be
installed on your Interwrite Board before it is mounted on the wall. Instructions for attaching the Pen Tray can be found on page 43.
Your Interwrite Board ships with one Wall Mounting Bracket. The board’s
frame is designed to hang from the Mounting Bracket installed on the wall.
Page 8

8
InterwriteTM Board Getting Started
You will need an electronic Interwrite Pen to use with your Interwrite
Board. You can choose from among the Interactive Pen, the Marker Pen
and the rechargeable Interactive Pen, described beginning on page 39.
The optional Interwrite Interactive Pen Charging Station (page 38) is
designed to attach easily to the Interwrite Board frame. Nevertheless, it can
be mounted instead on the wall, although it should be close enough to the
Interwrite Board’s controller so it can be plugged into the Power Connector
on the top of the controller housing. (The Pen Charging Station can be
plugged directly into a wall socket or power strip. The power cable with a
standard power plug for such an installation is sold separately.) If you are
mounting your Interwrite Board on the wall, you should attach the Pen
Charging Station to the Interwrite Board before you mount it.
The Interwrite Learning CD contains the Interwrite Workspace software for
both a Windows installation and a Mac installation. Interwrite Workspace
must be installed on your computer before you can complete the installation
of your Interwrite Board.
2. Mount Your Interwrite Board
Will this be a wall mount, or a floor stand mount? If you are mounting your
Interwrite Board on a floor stand, you need to assemble the floor stand first.
The instructions for assembling your floor stand are included in the floor stand
shipping box. In addition, instructions for assembling your floor stand can be
found on page 44 in this guide.
The type of mount will also determine which Mounting Brackets, if any, you
will attach to the back of the Interwrite Board. For a floor stand mount, two
Mounting Brackets are attached to the back of the Interwrite Board with
supplied Phillips screws. These Mounting Brackets ship with the floor stand.
For a wall mount, the Interwrite Board requires only one Mounting Bracket,
which is attached to the wall. The frame of the Interwrite Board is designed to
overlap the Mounting Bracket on the wall. The hardware for attaching the
Mounting Bracket to the wall is not included. You will supply the hardware
that is appropriate to the type of wall on which the Interwrite Board is being
mounted.
WALL MOUNT
If you purchased a Pen Tray and/or an Interactive Pen Charging Station,
install them before you hang the Interwrite Board on the Wall Mounting
Bracket. If you plan to use the optional Mounting Clips (page 42) to stabilize
your wall-mounted board, install them after you have mounted your Interwrite Board on the wall.
Page 9

Getting Started InterwriteTM Board
FLOOR STAND MOUNT
After you assemble the floor stand, attach the two Mounting Brackets to the
back of the Interwrite Board using the Phillips screws provided. It requires
two people, one at each end of the Interwrite Board, to mount it on the
floor stand. It is attached using the Knob Screws provided. You can attach
the Pen Tray and/or Pen Charging Station after the Interwrite Board is
mounted on the floor stand.
3. Install the Interwrite Workspace Software
4. Connect Your Interwrite Board
Your Interwrite Board must be able to communicate with the Interwrite
Workspace software on your computer. This communication link is established either by means of a physical cable (USB or serial) connection, or
wirelessly between two Bluetooth communication modules—one connected
to the Interwrite Board and one connected to the computer. The computer
will automatically find an Interwrite Board that is connected to it by a cable,
but the wireless Bluetooth Modules must be “connected” by the Interwrite
Device Manager, one of the Interwrite Workspace software applications.
9
5. Connect the Video Projector
In order to run Interwrite Workspace in Interactive Mode, a video projector
must be connected to the computer.
6. Prepare the Electronic Interwrite Pens and
Install the Pen Charging Station
The Interwrite Marker Pen must be assembled and a battery installed before
use. A battery is installed in the Interactive Pen. The optional Pen Charging
Station is installed on the Interwrite Board and the rechargeable Interactive
Pens must be charged before they can be used. Instructions for attaching the
Pen Charging Station to the Interwrite Board are on page 38. Instructions for
assembling the Marker Pen and the Interactive Pen are on pages 40 and 41.
7. Calibrate Your Interwrite Board
Your Interwrite Board needs to be calibrated to ensure that the tip of the
electronic Interwrite Pen is aligned with the cursor on the projected image.
Any time the Interwrite Board or video projector is moved, the Interwrite
Board must be re-calibrated.
Page 10
10
InterwriteTM Board Getting Started
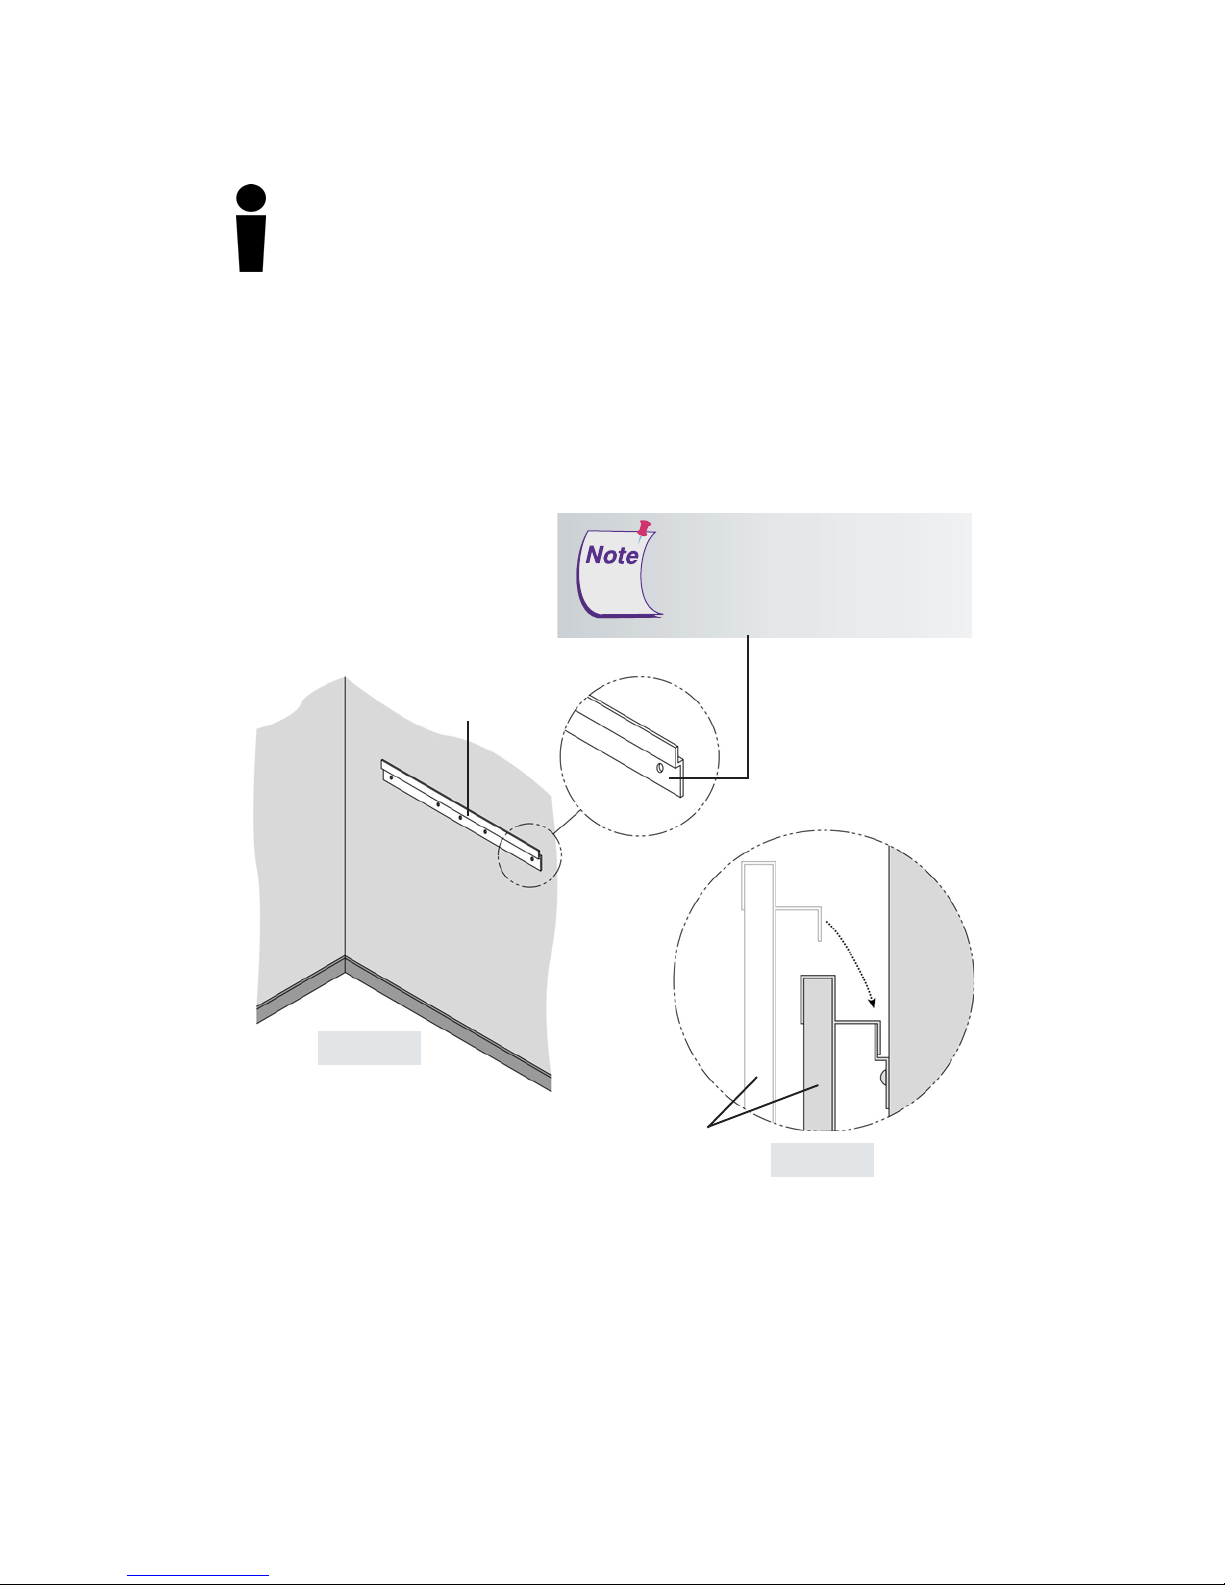
Mounting the Interwrite Board on the
Wall
The Interwrite Board Wall Mounting Bracket, found in the Accessory Box,
is mounted on the wall. The Interwrite Board frame overlaps the Mounting
Bracket’s lip.
The hardware for attaching the
Mounting Bracket to the wall is
not included. The hole spacing
on the bracket matches 16” and
24” wall stud spacing.
Wall Mounting
Bracket
Figure 1
Wall
Interwrite Board
Figure 2
Hang the Interwrite Board frame
on the Wall Mounting Bracket, as
shown above.
Page 11

Getting Started InterwriteTM Board
Two people should mount the Interwrite Board on the
wall to avoid injury, or damage to the Interwrite Board.
If you are planning to use the Mounting Clips, described on page
42, in conjunction with the wall mount, install them on the back
of the board and attach them to the wall
Interwrite Board.
1 Attach the Wall Mounting Bracket to the wall (Figure 1), using
hardware appropriate for the wall structure. (This hardware is not
included.)
2 Hang the Interwrite Board by interlocking the Wall Mounting
Bracket with the rear edge of the top part of the Interwrite Board
frame, shown in Figure 2.
after
you hang the
11
Page 12
12
InterwriteTM Board Getting Started
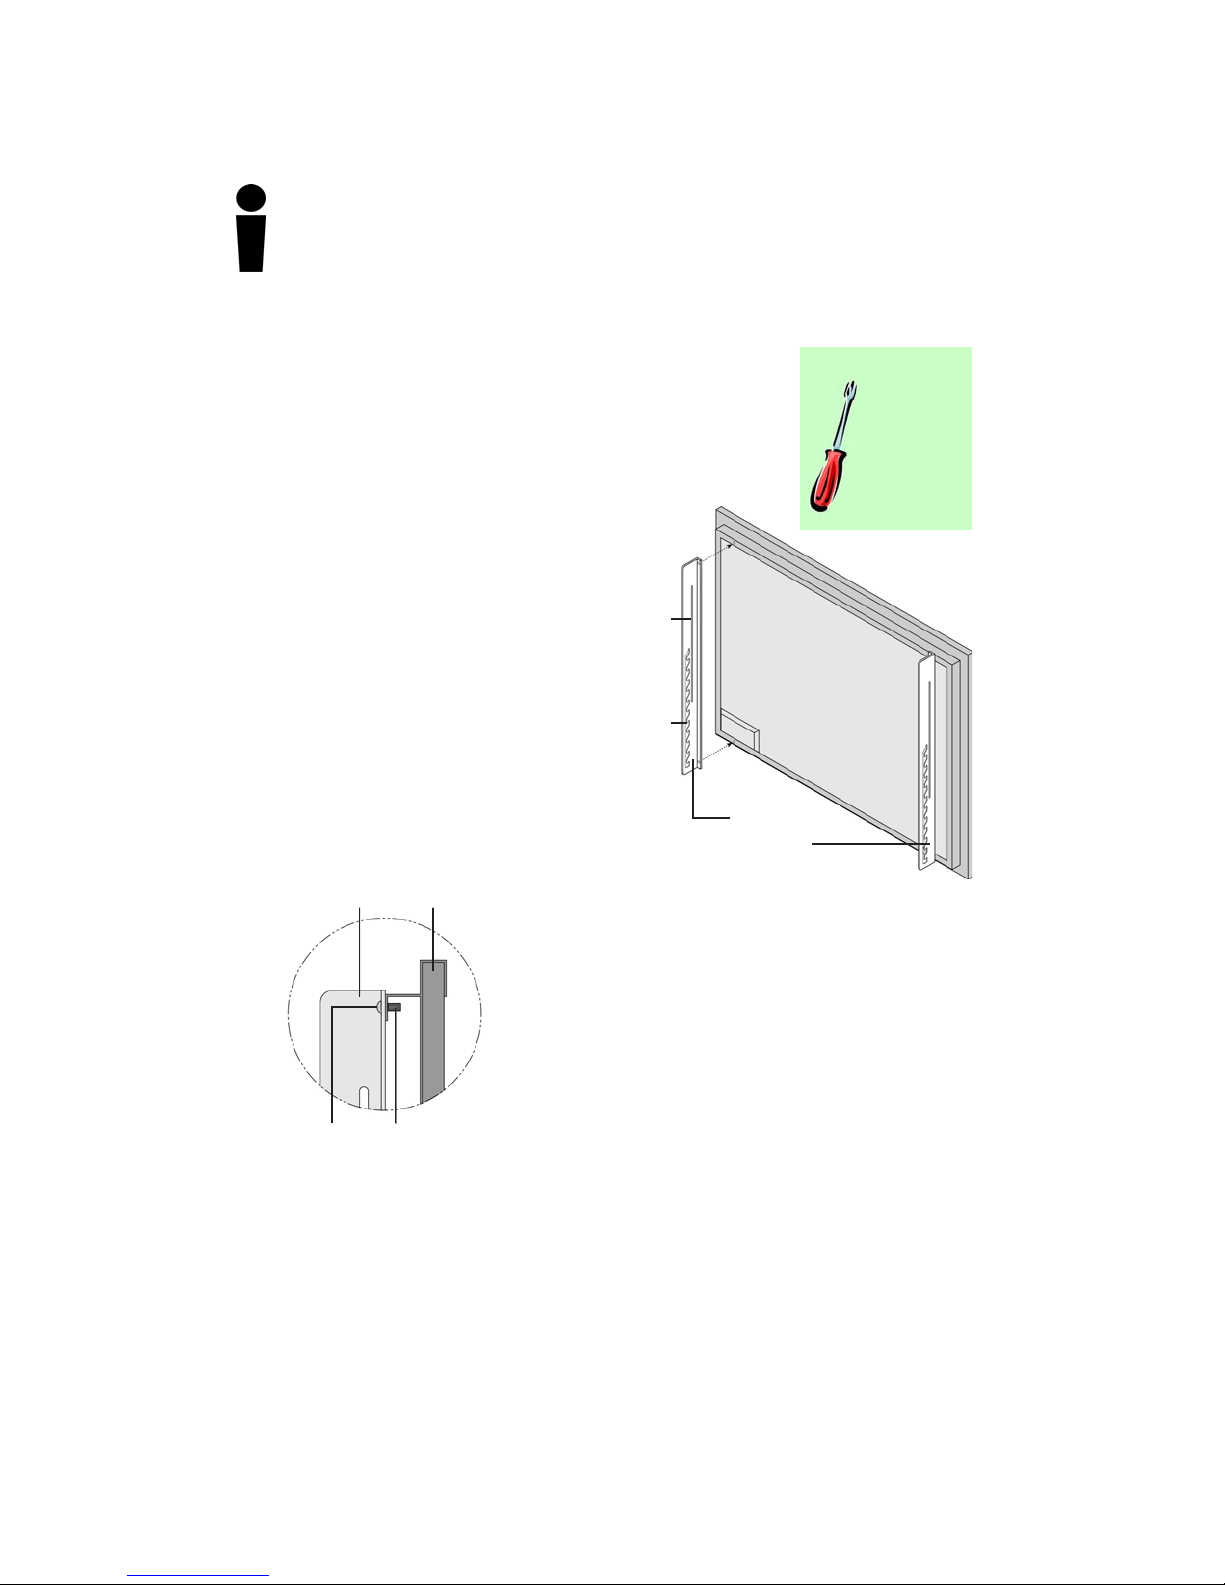
Attaching the Floor Stand Mounting
Brackets to the Interwrite Board
After you have assembled the floor stand (instructions on page 44), you will attach the Mounting
Brackets that came with the floor stand to the back
of the Interwrite Board.
1 Attach the Mounting
Brackets to the back of the
Interwrite Board frame. The
Slide Slot is oriented toward
the top of the Interwrite
Board, the Ratchet Slots are
toward the bottom, and the
short side of the bracket
points inward toward the
center of the board.
Mounting
Bracket
Interwrite Board
Slide
Slot
Ratchet
Slot
Tools Required:
Phillips
screwdriver
Mounting
Brackets
Small
Screw
2 Line up the holes in the bracket
with the Brass Inserts on the
frame. Use the two small screws
provided to attach the bracket.
Brass Insert
Page 13
Getting Started InterwriteTM Board
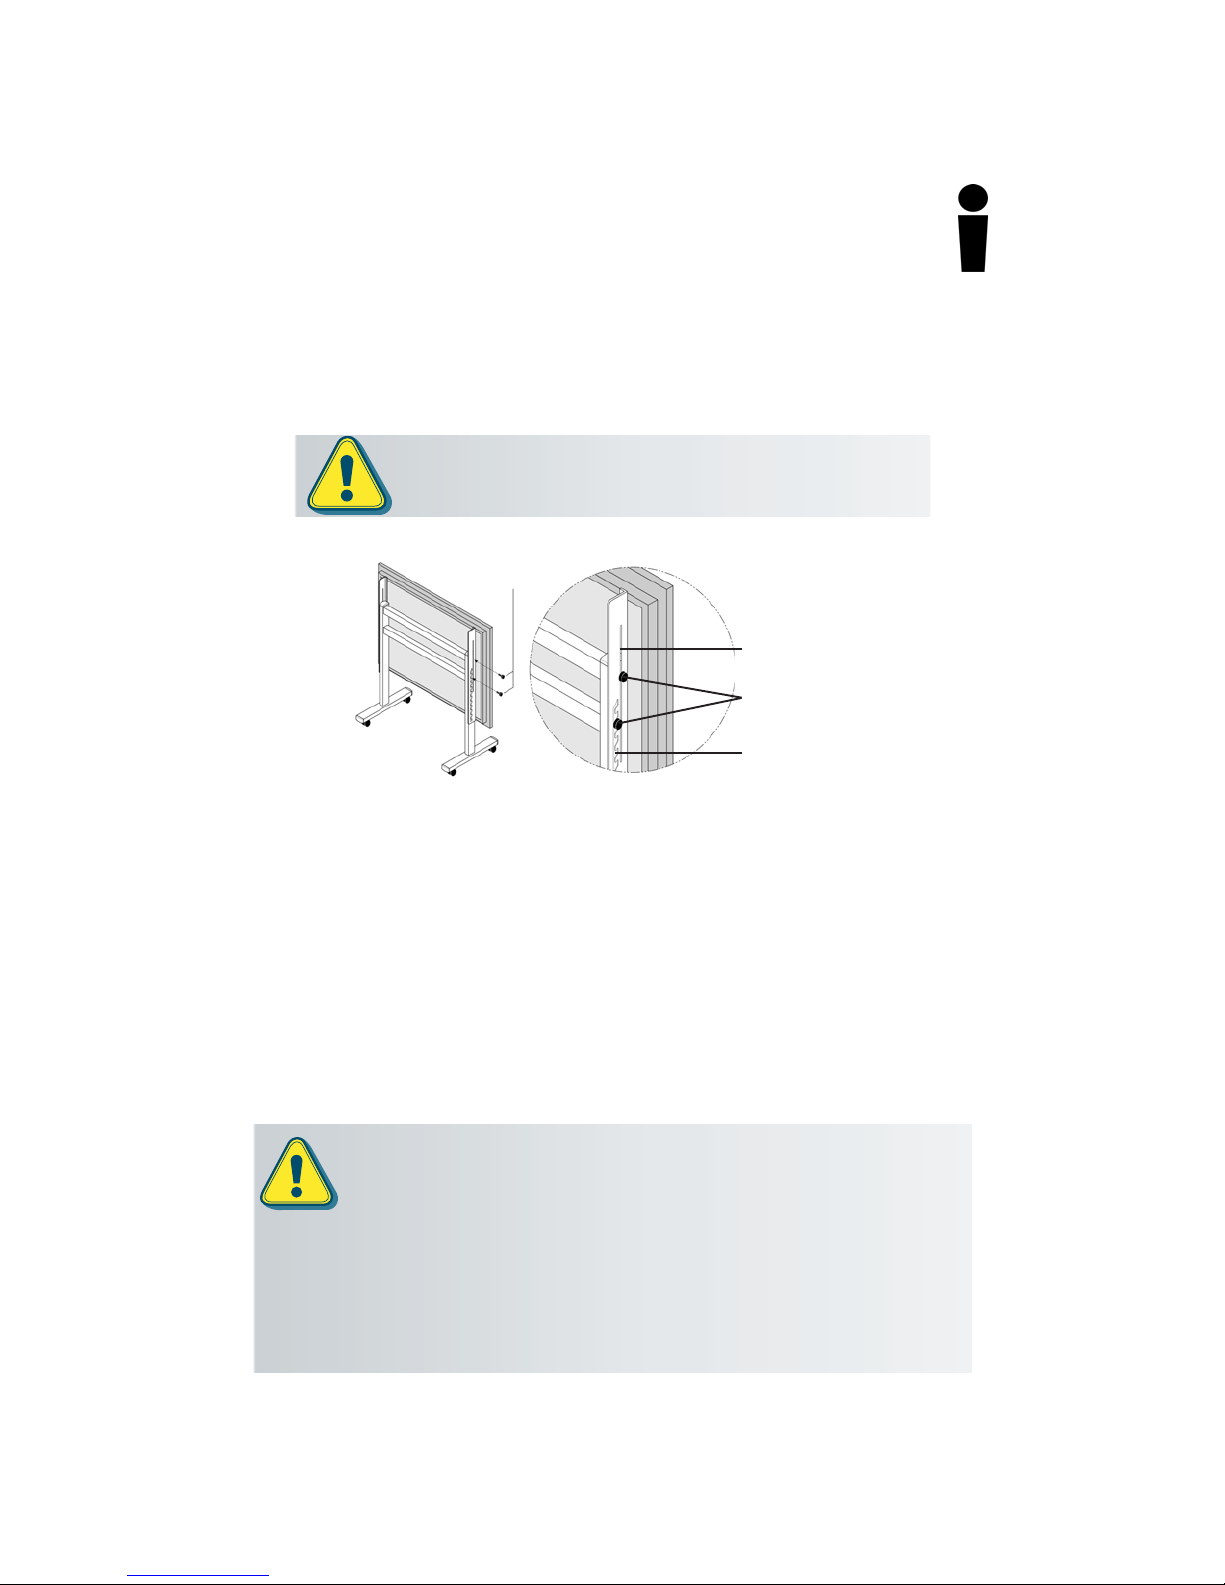
Mounting the Interwrite Board
on the Floor Stand
The Interwrite Board is attached to the floor stand with the provided Knob
screws—two on each side of the board.
Two people should mount the Interwrite Board on the floor
stand to avoid injury, or damage to the Interwrite Board.
Knob
screws
Slide Slot
Knob screws
13
Floor Stand
3 With one person at each end of the Interwrite Board, position the
Mounting Brackets on either side of the Floor Stand Legs. Thread the top
Knob screw through the Slide Slot in the Mounting Bracket and into the
hole closest to the front edge of the Floor Stand. Screw the second Knob
screw through one of the Ratchet Slots in the Mounting Bracket and into
the screw hole positioned in the middle of the second, lower set of four
Crossbar screws.
Ratchet Slot
The position of the Interwrite Board on the floor stand can be adjusted by
standing in front of the Interwrite Board, grasping the bottom of the board
with both hands, and sliding it up or down, coming to rest on one of the
Ratchet Slots in the Mounting Brackets.
One person can adjust the position of the Interwrite Board up or down,
but be sure to stabilize the floor stand before you attempt to reposition
the board. Lock down the thumb tabs on the Casters, or push the floor
stand against a wall to prevent it from rolling, or put one of your feet on
the Floor Stand Foot to hold it in place as you adjust the Interwrite
Board’s position.
Position the floor stand on a level surface to avoid tipping.
Lower the Interwrite Board to the lowest position on the floor stand
before moving the stand.
Do not hang objects on the Interwrite Board.
Page 14
14
InterwriteTM Board Getting Started
Installing the Interwrite Workspace
Software on Windows
The Interwrite Workspace software must be installed on Windows
by a user with Administrator privileges. Interwrite Workspace is
compatible with Windows 2000, XP, and Vista.
If you are using Windows 98/Me/NT, you must use Interwrite
Workspace version 5.0. For more information, contact Technical Support to order an installation CD.
1 Log in as Administrator. Insert the Interwrite Learning CD into the
CD drive on your PC. The installer will autoload. If it doesn’t, click
on the Start button on the Windows Task Bar and select Run from
the menu. Type X:\setup.exe (X represents the CD drive letter).
2 Select the Install Interwrite Workspace Software menu option.
3 Follow the onscreen instructions for the software installation. You
will know Interwrite Workspace has installed successfully by the
appearance of the Interwrite Workspace icon in the System Tray on
the Windows Task Bar. If the icon does not appear, restart your
computer.
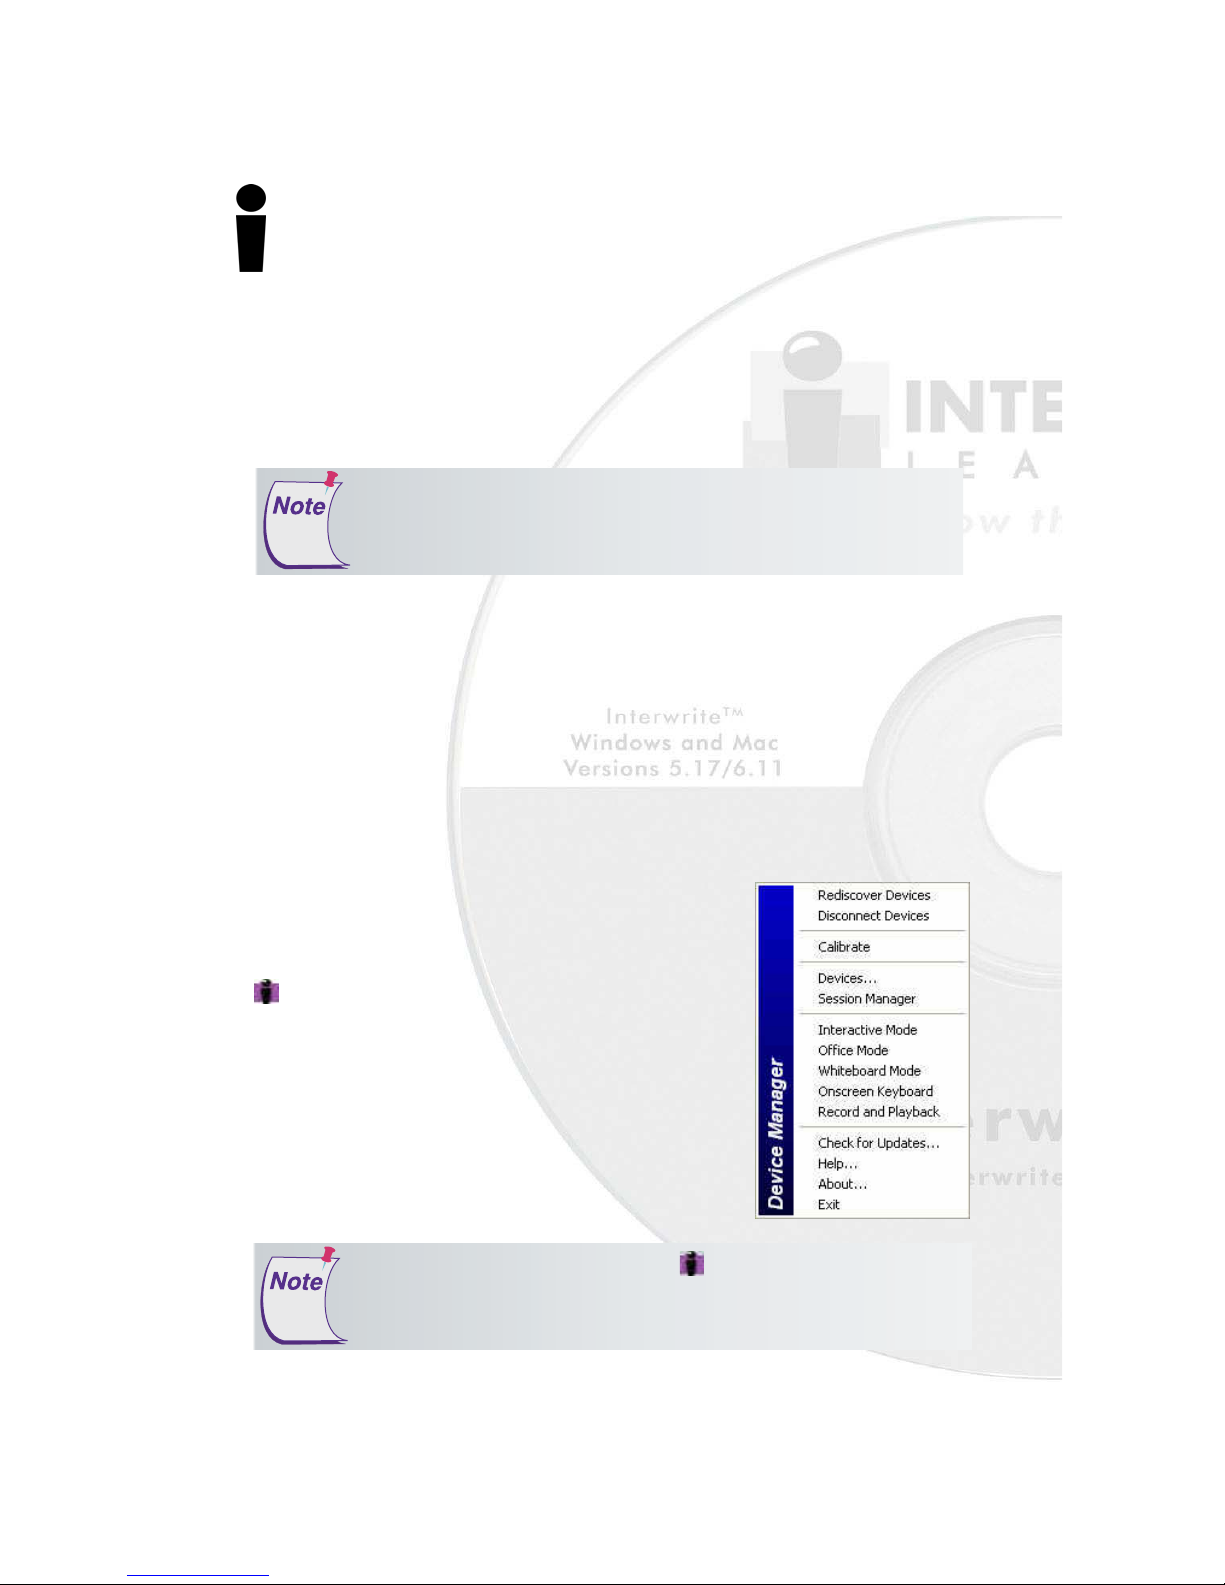
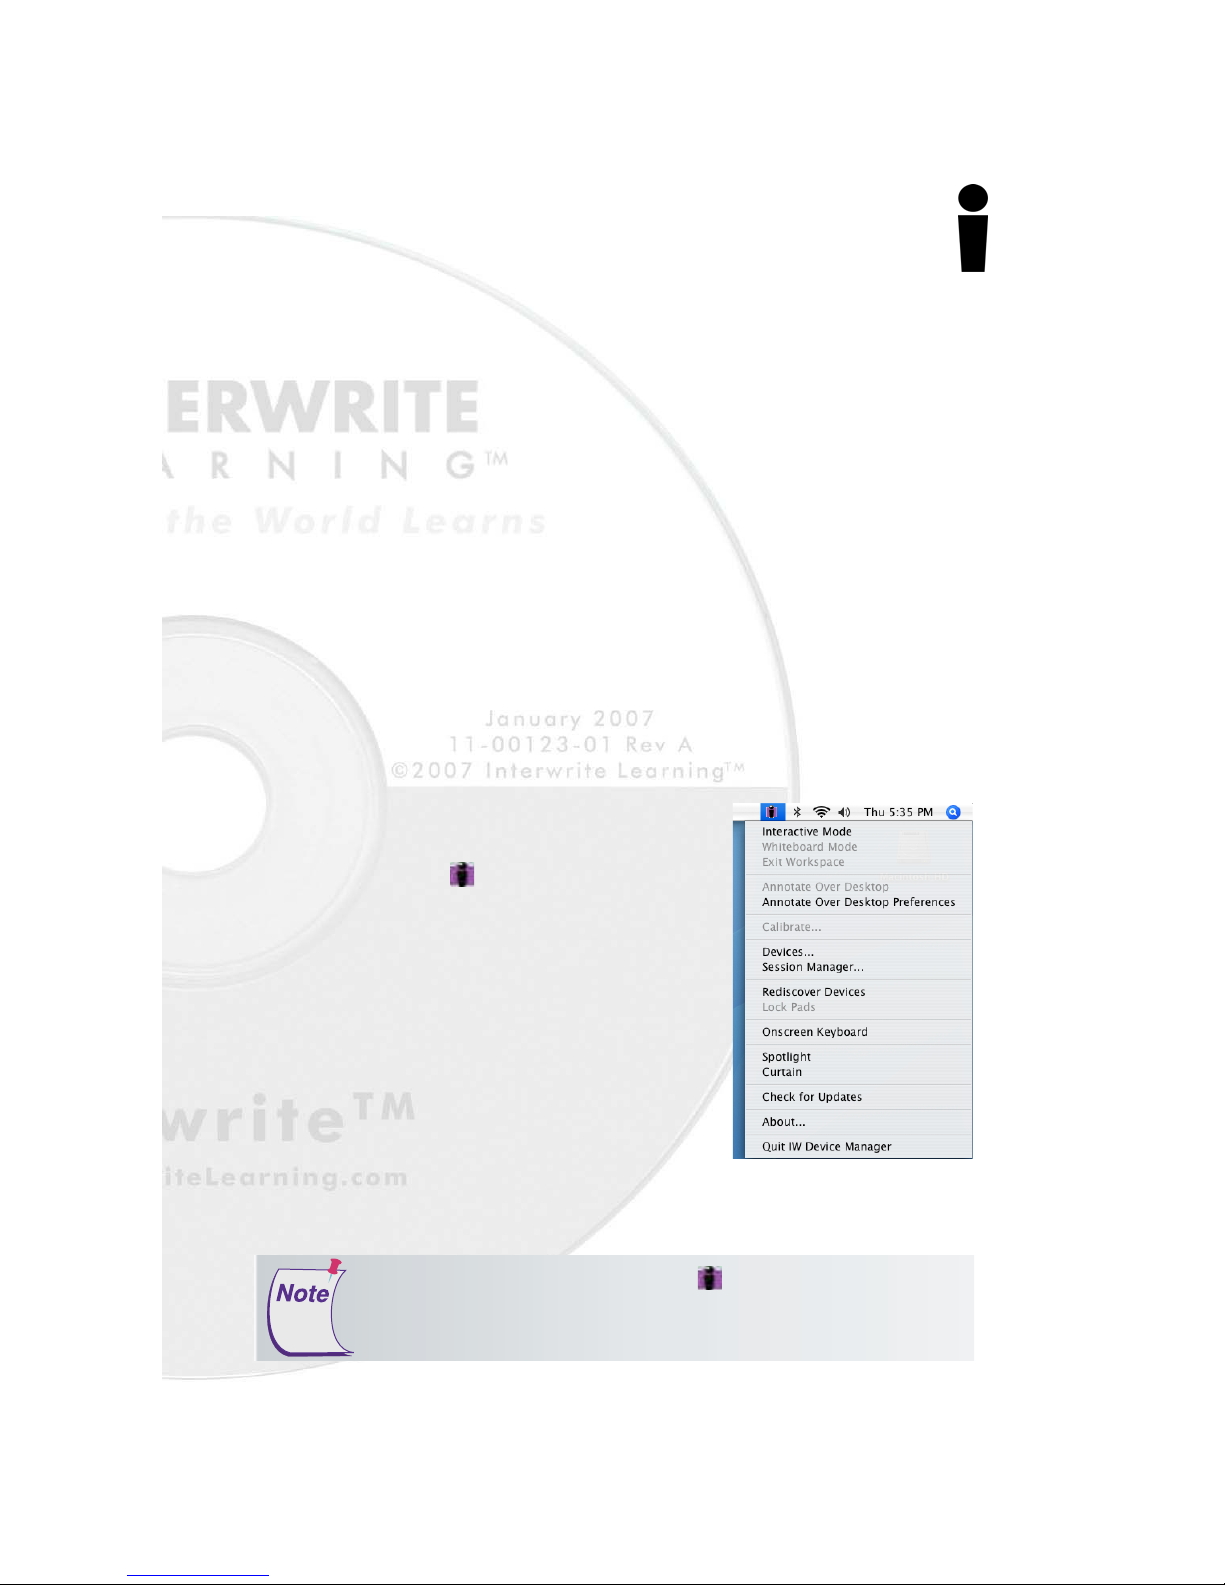
The appearance of the Interwrite Workspace icon
on the Task Bar indicates that the Interwrite
Device Manager is now running on your PC.
Click on the Workspace icon to display the op-
tions on the Device Manager Menu shown here.
Device Manager, in addition to managing the
Interwrite hardware devices, provides direct
access to the three operational modes of the
Interwrite Workspace software.
Click the Interwrite Workspace icon in the System Tray of the
Windows Task Bar to display the Device Manager Menu. Select the
Check for Updates
download it now. You should periodically check for updates.
option. If a new version of Workspace is available,
Page 15
Getting Started InterwriteTM Board
Installing the Interwrite Workspace
Software on the Mac
The Interwrite Workspace software must be installed on the Mac by
a user with Admin privileges. Interwrite Workspace is compatible
with Mac OS X version 10.4 or higher.
1 Insert the Interwrite Learning CD into the CD-ROM drive on your
Mac. An Interwrite Workspace CD icon will appear on your
desktop.
2 Double-click on the Interwrite icon on the desktop to display the
CD’s contents. Double-click on the Install Interwrite icon.
3 Follow the onscreen instructions for the software installation.
15
The appearance of the Interwrite
Workspace icon on the Menubar
indicates that the Device Manager is
now running on your Mac. It will load
and run in the background every time
you start up your Mac. Click on the
Interwrite Workspace icon to display
the options on the Device Manager
Menu, shown here. Device Manager,
in addition to managing the Interwrite
hardware devices, provides direct
access to the two operational modes of
Interwrite Workspace on the Mac.
Click the Interwrite Workspace icon on the Menubar to display
the Device Manager Menu. Select the
new version of Interwrite Workspace is available, download it now.
You should periodically check for updates.
Check for Updates
option. If a
Page 16
16
InterwriteTM Board Getting Started
Connect Your Interwrite Board:
Cable Installation
The Interwrite Board is connected to the computer either via a cable, or
wirelessly. If you are not using the Bluetooth wireless communication system
described next, you can connect your Interwrite Board to the computer using
either the supplied USB cable, or the serial cable. Do not use both cables.
Choose one or the other to connect the PC and the Interwrite Board. The
Mac can be connected to the Interwrite Board only with the USB cable.
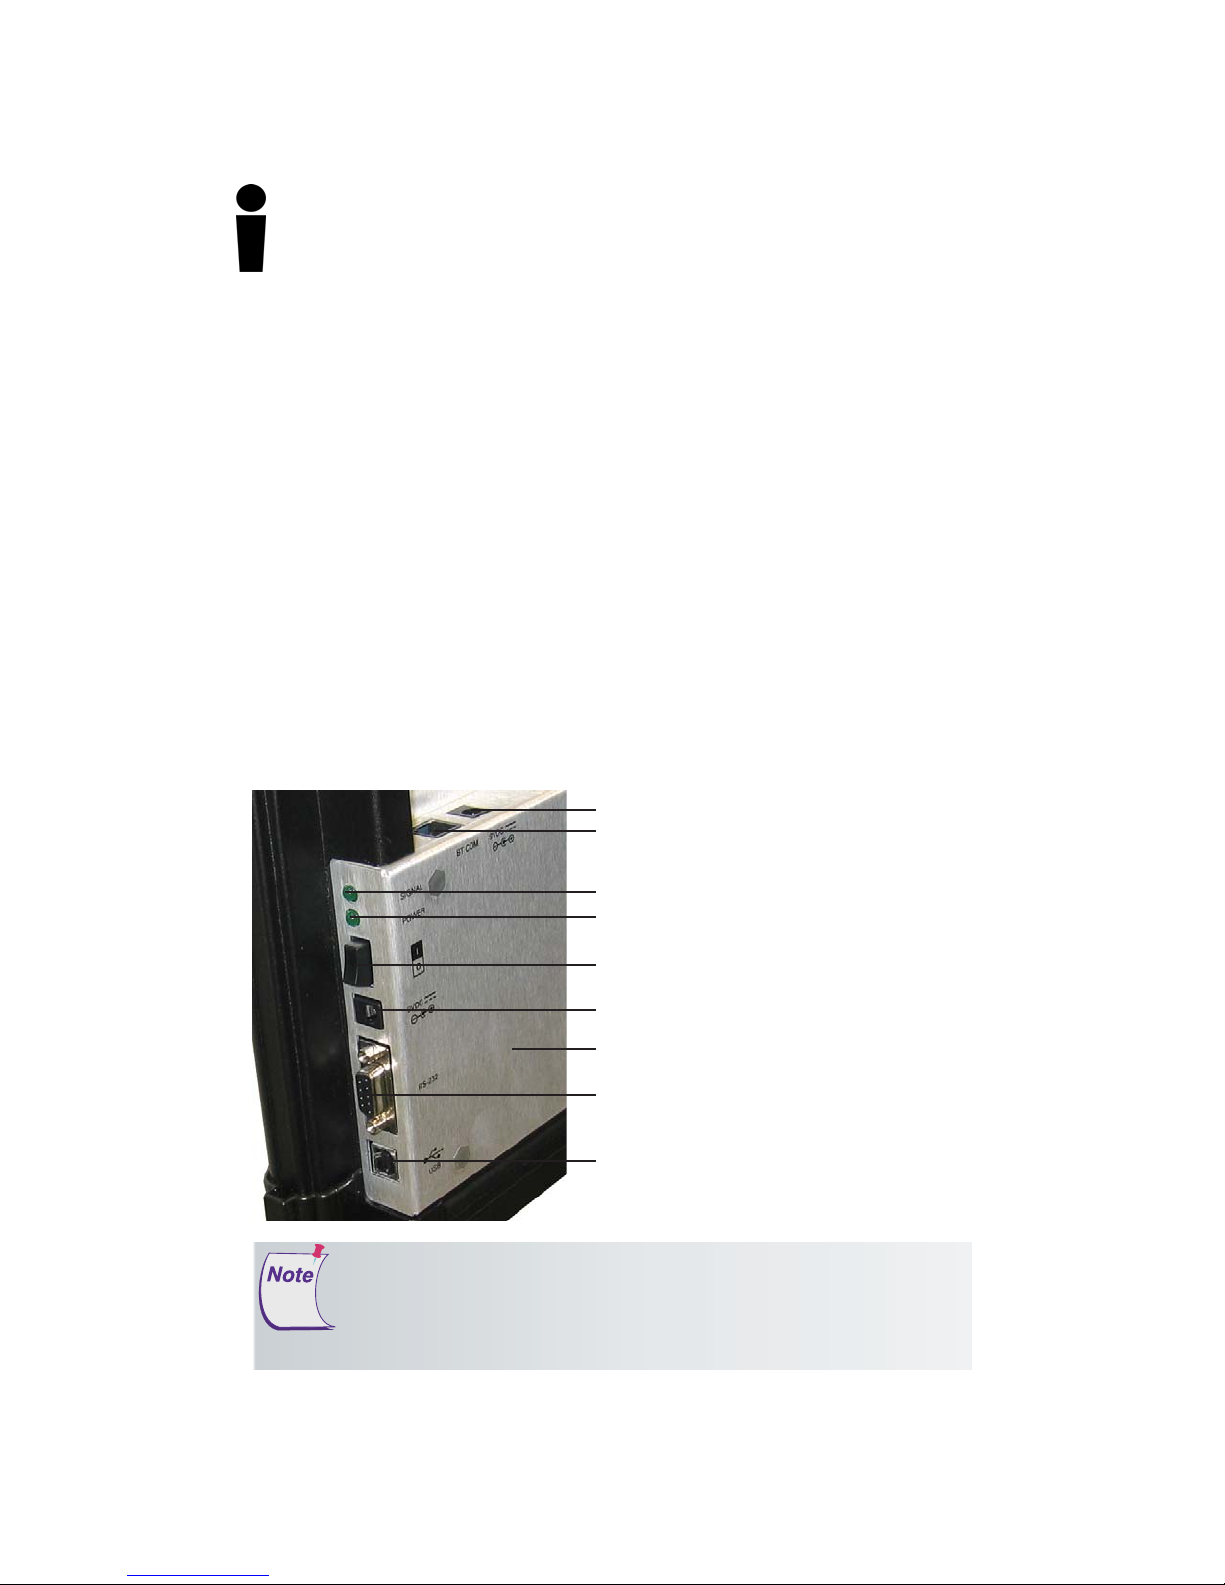
The connectors and switches on the Interwrite Board Controller are shown
in the graphic below. Please note that the Controller on your Interwrite
Board has two power connectors, one on the top of the Controller and one
on the side. Plug the Power Supply into the Power Connector on the side of
the Controller. The Power Supply is not necessary if you are using a USB
connection. However, if you are using a serial connection, attaching a
BTCOM2 Module for wireless communication, or attaching the optional Pen
Charging Station, you must connect the Power Supply. The Pen Charging
Station, if you have one, is plugged into the Power Connector on the top of
the Controller.
2nd Power Connector
RJ12 BTCOM2 Port
Pen Prox LED
Power LED
Power Switch
Power Connector
Controller
Serial Connector
USB Connector
Use either a Serial or a USB connection, never both.
There is only one Connector for USB. It is on the side of the Controller, as
shown in the photo. The Connector located on the top of the Controller
with the Power Connector is the RJ12 Connector for the BTCOM2
Module.
Page 17
Getting Started InterwriteTM Board
1 Shut down and turn off the computer.
2 Plug the square USB B connector end into the USB Connector on the
Interwrite Board. Or, if you are using a PC and installing the serial cable,
attach one end of the serial cable to the Serial Connector on the board’s
Controller.
17
3 Plug the flat USB A connector into an available USB port
computer or USB hub, or the serial cable into the serial port on the PC.
4 If necessary, attach the appropriate power plug adapter to the Power
Supply plug, following these simple instructions:
a Remove and discard the Shipping
Collar Insert.
b Note that each plug adapter has a lip
that fits into the recess at the top of
the plug housing. Locate the lip on
the plug adapter you selected and tilt
it into the recess.
c Snap the lower edge of the plug
adapter into the adapter well. If
necessary, slide the thumb grip away
from the well as you push the plug
down into the well.
5 Plug the cylindrical metal end of the
power cord into the Power Connector on
the side of the Controller and plug the
plug into a power socket.*
1
6 Use the supplied cable guides to manage
dangling cables. Remove the protective
covering to expose the adhesive surface
and stick them where you want to guide
the cable and power cord.
7 Toggle the Power Switch to turn on the
Interwrite Board. It will beep four times
and the Power LED will light up to
indicate the board has power.
8 Turn on the computer. It will automatically find the cable-connected
Interwrite Board.
9 The Pen Prox LED will light up and stay lit as long as the electronic
Interwrite Pen is in prox of or touching the Interwrite Board surface.
Plug Housing
2
Shipping Collar Insert
3
Recess
4
Adapter Well
5
Thumb Grip
6
Lip
7
Plug Adapter
on your
* The Power Supply is not necessary if you are using a USB connection.
However, if you are using a serial connection, attaching a BTCOM2 Module
for wireless communication, or attaching the Pen Charging Station, you must
connect the Power Supply.
Page 18

18
InterwriteTM Board Getting Started
Connect Your Interwrite Board:
BluetoothTM Wireless Installation
The Interwrite Workspace system employs
Bluetooth
lish wireless communication between the
Interwrite Boards and Interwrite Pads and
the computer. A Bluetooth Module must
be installed on each component involved
in wireless communication. The Bluetooth
BTCOM2 Module is installed on the
Interwrite Board. Interwrite Pads have the
Bluetooth Module built in, so no installation is necessary.) The Bluetooth USB
Adapter shown here is installed on the
computer, if necessary.
If the computer has the Bluetooth Module built in, an external module is not
needed. Most computers with a built-in Bluetooth Module will also have the
Bluetooth driver software installed. Version 6.xx of the Interwrite software
and version 7.0 of the new Interwrite Workspace software support the three
most common Bluetooth stacks (driver software)—Toshiba, WIDCOM and
Microsoft.
This section of the Interwrite Board Getting Started guide describes how to
install the BTCOM2 Module on the Interwrite Board, install the Bluetooth
software on the PC (it’s already installed on the Mac), and connect the
Bluetooth USB Adapter to the computer.
TM
wireless technology to estab-
The Interwrite Board and Interwrite Pads in an Interwrite wireless system
communicate with the computer through a single Bluetooth Module connected to the computer. Up to seven Bluetooth-enabled Interwrite Devices—
Boards and Pads—can communicate with the Bluetooth Module connected
to the computer. Only one Bluetooth Module, either built-in or external, can
be connected to the computer at a time.
Page 19

Getting Started InterwriteTM Board
Install the BTCOM2 Module on the Interwrite Board
The BTCOM2 Module allows Interwrite Boards to operate wirelessly,
eliminating the need for a serial or USB cable connection between your
Interwrite Board and your computer. If either cable connection is in place,
disconnect it before installing your BTCOM2 Module.
The BTCOM2 Module is installed on the Interwrite Board. It communicates
with the external or built-in Bluetooth module on the computer.
19
2nd Power Connector
RJ12 BTCOM2 Port
Pen Prox LED
Power LED
Power Switch
Power Connector
Controller
Serial Connector
USB Connector
3 You will attach the BTCOM2 Module
to the back of the Interwrite Board.
Remove the paper covering the
adhesive strip on the BTCOM2 Base.
Position the Base on the back of the
Interwrite Board at the top corner, on
the controller housing side. Press
firmly to affix the adhesive strip to
the back of the Interwrite Board.
4 The BTCOM2 Module should be
positioned with the Bluetooth logo
facing forward. Route the RJ12 cable
through the cable guide on the Base.
1 Toggle the Power Switch to
power off the Interwrite Board.
2 Remove the serial or USB
connector from the Interwrite
Board, if it is still connected.
BTCOM2
Module
Base
Paper Strip
The RJ12 Port and Power
Connectors are on the top
of the Controller. Do NOT
attempt to plug a USB
Connector into the RJ12 Port.
5 Plug the RJ12 Connector into the RJ12
Port (it looks like a phone jack) on
the top side of the controller housing.
6 Attach the Power Supply, if you have
not already done so. Power on your
Interwrite Board. The Power LED will
light up and you will hear four beeps
that indicate the power is on,
followed by one beep when the
Interwrite Board has recognized the
BTCOM2 Module.
RJ12 Port
RJ12 BTCOM2
Connector
BTCOM2
Base
Interwrite Board
Frame
Page 20

20
InterwriteTM Board Getting Started
Connect Your Interwrite Board:
Install the Bluetooth Module
on the Computer
This section of the Interwrite Pad Getting Started guide describes how to
connect the Bluetooth USB Adapter to the computer
establish communication between the Bluetooth modules
using the Interwrite Workspace software.
About Bluetooth and Workspace
The Interwrite Workspace system employs BluetoothTM wireless technology
to establish wireless communication between the Interwrite Boards and
Interwrite Pads and the computer. A Bluetooth Module must be installed
on each component involved in wireless communication. The Bluetooth
BTCOM2 Module is installed on the Interwrite Board. The Bluetooth USB
Adapter shown here is installed on the computer, if necessary. The Inter-
write Pads have the Bluetooth Module built in, so no installation is necessary.
Bluetooth Requirements
If the computer has the Bluetooth Module built in, an external module is not
needed. Most computers with a built-in Bluetooth Module will also have the
Bluetooth driver software installed. Version 6.xx of the Interwrite software
and version 7.0 of the new Interwrite Workspace software support the three
most common Bluetooth stacks (driver software)—Toshiba, WIDCOM and
Microsoft.
Windows XP with Service Pack 2, Windows Vista and Mac OS X
version 10.4 or above have built-in Bluetooth support. If you are
using Windows 98/2000Me/NT, contact Technical Support to
order an installation Kit
.
Bluetooth Communications
The Interwrite Board and Interwrite Pads in an Interwrite wireless system
communicate with the computer through a single Bluetooth Module connected to the computer. Up to seven Bluetooth-enabled Interwrite Devices—
Boards and Pads—can communicate with the Bluetooth Module connected
to the computer. Only one Bluetooth Module, either built-in or external, can
be connected to the computer at a time.
Page 21

Getting Started InterwriteTM Board
Installing the USB Adapter
Plug the USB Adapter into one end of the USB cable and insert the other
end into one of the USB ports
It cannot be plugged into a keyboard USB port on the Mac. The operating
system will auto-detect and configure the new hardware device.
Keeping Track of the Bluetooth Adapter
The Velcro button in your Bluetooth Comm Kit is used to attach the USB
Adapter to the side of your monitor, or to the lid of your laptop. Pull the
button apart, remove the paper backing from both pieces, and stick one
piece to the back of the USB Adapter and the other to the monitor or laptop
lid. Use a USB extension cable to connect to the USB port.
on your computer.
21
Do not install the USB Adapter behind metal enclosures, as this
will limit performance. Metal serves as a shield and reduces
the signal strength. Mount the Adapter so the top of the unit is
positioned above the computer or monitor case. Use a USB
cable extender when additional length is needed to mount the
USB Adapter away from metal or other enclosures.
Moving the Bluetooth Adapter to Another Machine or
USB Port
The Adapter-to-USB-port and Bluetooth software installation (Windows only)
must be performed by a user with Administrator privileges. If the configuration is changed, that is, if the Adapter is moved to another USB port on the
computer, or if a different USB Adapter is installed in the USB port on that
computer, the process must be managed by the Admin.
Page 22

22
InterwriteTM Board Getting Started
Connect the Interwrite Devices
The Interwrite Workspace software component Device Manager is the
driver for the Interwrite Devices—Interwrite Boards, Interwrite Pads and the
Interwrite Panel. Device Manager is loaded when Interwrite Workspace is
successfully installed on the computer. It automatically detects a cabled
Interwrite Board or Interwrite Panel. However, the wireless Interwrite
Devices need to be discovered – and, in the case of the Mac, to select a
Service – before the communication connection is complete.
The following sections describe how to connect wireless Interwrite Devices,
first on Windows, then on the Mac.
Once the Interwrite Devices are connected, a user with Administrator privileges will calibrate the Interwrite Board.
Connecting a Wireless Device on Windows
The last step in setting up wireless communications between your Bluetooth
modules on the Interwrite Board and your PC is performed by Device
Manager. Make sure the Interwrite Board is powered on.
1 Click on the Interwrite Workspace icon in the
System Tray on the Windows Task Bar to display the
Device Manager menu.
2 Select the Devices... menu option.
The Devices
dialog box with
the Bluetooth
icon is displayed.
The icon is red
3 Click on the Find Bluetooth Devices button.
A search inquiry for all Bluetooth Devices will begin automatically. When the
inquiry is completed, all Devices discovered during the search will be listed in
the Find Bluetooth Devices dialog.
when the Bluetooth module is not connected to the PC.
Page 23

Getting Started InterwriteTM Board
4 Click on the Remember checkbox
next to each discovered Device
you want to see listed in the
Devices List Window.
5 Click OK to return to the Devices
dialog.
The Interwrite Device Address shown here is the Radio ID and can be found
on the back of the Interwrite Device.
Each discovered device is identified in the Devices dialog by its Name, Type,
Connection, Status, Availability, and whether AutoConnect is enabled. The
Properties feature allows you to
give a connected Interwrite
Device the Name shown in the
Devices List Window (the Interwrite Pad is given an additional
Bluetooth Name) and to program
its SoftKeys.
23
AutoConnect is a property unique
to Bluetooth-enabled Interwrite
Devices. When AutoConnect is enabled, the computer will scan continuously for this and other active, AutoConnect-enabled Bluetooth Interwrite
Devices and attempt to connect them. Scanning stops once a Device is
detected and connected. Therefore, if you are connecting multiple Devices,
make sure they are all powered on, so all of the Devices will be detected by
the scan. The Status property will tell you whether the
connection succeeded or failed. The Availability option
indicates that a discovered Device is available for connection. The Connect button can be used to manually connect discovered devices.
6 If you want the Interwrite Board to AutoConnect when it is powered on,
click on the AutoConnect checkbox.
7 Select your Interwrite Board in the Devices List Window and click on the
Properties button. Give the Interwrite Board a Name. This Name is stored
in the Interwrite Workspace software on this computer and will identify
the Interwrite Board when it is connected to this computer.
Once connected, your Interwrite Board is available as a system pointing
device. Your computer mouse can still be used as a pointing device.
Page 24

24
InterwriteTM Board Getting Started
Connecting a Wireless Device on the Mac
The last step in setting up wireless communications between your Bluetooth Interwrite Devices is performed by Device Manager. Make sure
your Interwrite Board is powered on.
1 Click on the Interwrite Workspace
icon on the Mac Menubar to
display the Device Manager Menu.
2 Select the Devices... menu option.
The Devices dialog box is displayed.
3 Click on the Scan Bluetooth
button.
The Select Bluetooth Service dialog
box is displayed.
4 Make sure the Device Type is set
to Input Devices and the Device
Category is set to Discovered
Devices.
5 Click on the Search button.
Every active Interwrite Board and Interwrite Pad running Bluetooth should be
discovered and listed in the left column of the Select Bluetooth Service dialog
box.
Page 25

Getting Started InterwriteTM Board
6 Click on the Device in the left
column. A Service is displayed
in the right column. Interwrite
Bluetooth Devices—Interwrite
Boards and Interwrite Pads—will
use either the ZV-AT Service or
InterWrite Service.
7 Click on the Service displayed in
the right column. When you do,
the Select button is activated.
8 Click on the Select button.
The Bluetooth dialog box goes away. The Interwrite Board beeps once when it
is connected.
If the Device doesn’t connect, repeat the process—click on the
Device, click on the Service, click on the Select button.
25
The Interwrite Board is now listed in the
Bluetooth Devices section of the Devices
dialog with Status Connected. By default,
the Interwrite Board will automatically
reconnect in the future. If you want to
change that, select the Interwrite Board,
click on the Device Properties button and
clear the Automatically connect when
device is available checkbox.
If you turn off your Interwrite Board and
power it on during the current session,
Device Manager will detect that the device
has gone away and will change its status
to Disconnected. Click on the Connect
Device button to reconnect.
Tip: Give each Interwrite Device a
distinguishable in the Bluetooth Devices list box.
Local Name
so it will be
Page 26

26
InterwriteTM Board Getting Started
Connect the Video Projector
The Interwrite Board is connected to the computer, either wirelessly or
wired, so it can communicate with the computer as an input device. The
communication between the two is governed by the Interwrite Workspace software. Interwrite Workspace makes it possible to run this
system in one of the Interwrite operational modes.
Whiteboard Mode is used when you want to capture notes, drawings
and calculations made on the Interwrite Board using the electronic
Interwrite Marker Pens. The only equipment you need to run Whiteboard
Mode is an Interwrite Board, one or more Marker Pens, and the computer. The video projector is not used in Whiteboard Mode.
Interactive Mode and Office Mode (Windows only) require an Interwrite
Board, one of the electronic Interwrite Pens (Interactive Pen, Recharge-
able Interactive Pen, or Marker Pen), the computer, and a video presentation projector. The projector is connected to the computer so it can
project the image of the computer desktop onto the Interwrite Board
surface. The electronic Interwrite Pen can then be used to run applications (Mouse Mode) and to make annotations (Annotation Mode) on the
projected desktop image on the Interwrite Board.
Page 27

Getting Started InterwriteTM Board
Interwrite Board
Video Cable
27
Video Projector
(required for Interactive Mode)
Computer
1 Turn off the computer and Interwrite Board.
2 Connect a video cable between the computer and the
video projector.
3 Power on the Interwrite Board—it will beep four times to
indicate it has power and then beep once to indicate it
has recognized the BTCOM2 Module, if one is connected
for wireless communication.
4 Turn on the computer. The Interwrite Board will beep
once when the connection between the Interwrite Board
and the computer has been established, assuming that
the AutoConnect setting is checked.
5 Turn on the video projector.
Page 28

28
InterwriteTM Board Getting Started
Calibrate Your Interwrite Board
Your Interwrite Board must be
calibrated if you are going to be
using the Interwrite system in
Interactive Mode. After the
hardware—computer, Interwrite
Board, electronic Interwrite Pen,
and video projector—has been
set up and communication
between the Interwrite Board
and the computer has been
established, calibration is the
final step in the Getting Started
process before you can actually
use the Interwrite system.
Calibration ensures that the
electronic ink is properly aligned
on the projected image with the
Pen tip on the Interwrite
Board’s surface.
An Interwrite Board Features
Menu, like the one shown here,
appears on each side of the
Interwrite Board. It offers a
variety of Interwrite options,
including the Calibration tool
discussed here, that can be easily
accessed no matter which side
of the Interwrite Board you are
positioned at.
Start Interwrite in
Interactive Mode
Start Interwrite in
Whiteboard Mode
Display Keyboard
Clear all annotations
from current page
(Click twice to clear)
Save all pages
(with annotations)
Calibrate Interwrite
Board
Silence (Lock) all
Connected Pads
Activate (Unlock) all
Connected Pads
Program SoftKeys to:
a) perform an Interwrite
function,
b) launch an application,
c) run a macro, or
d) open an Internet Web site
Select Mouse Mode
Select Pen Tool
Select Highlighter Tool
Select Eraser Tool
Create Blank Page
Move to Previous Page
Move to Next Page
Page 29

Getting Started InterwriteTM Board
Calibrating the Interwrite Board
1 Aim the projector at the Interwrite Board’s writing area, and size the
projected desktop image to fit within the writing area. Make sure the
image is properly projected on the Interwrite Board before continuing.
2 Using your electronic Interwrite Pen, click on the Calibrate icon
located on either of the Interwrite Board Menus.
29
Calibration Point
A blue calibration screen with a white
Calibration Point in the upper left corner
will display on the projected image on the
Interwrite Board.
3 Using an electronic Interwrite Pen,
click on each of the Calibration Points
as they appear on the Interwrite
Board. A bell tone will accompany
each successful click. Click the left
Calibration Screen
If an error occurs during calibration, simply abort the operation and
start over.
Recalibrate the Interwrite Board whenever the projector or the
Interwrite Board has been moved.
The video projector should be utilized to project an image of the computer
desktop on the Interwrite Board only when Interwrite Workspace is operating
in
Interactive Mode
Workspace is operating in
. The video projector should not be used when Interwrite
Whiteboard Mode
mouse button on the Pen (Windows
only) to repeat a point. Click the right
mouse button (Windows only), or type
the Esc key on the computer (both
Windows and Mac), to abort the
calibration.
.
When calibration is complete, you are ready to begin using Interwrite
Workspace to annotate captured screens and presentation pages on your
Interwrite Board. The next section of this Getting Started guide gives you an
overview of the Interwrite Workspace software.
Page 30

30
InterwriteTM Board Getting Started
Getting Started with Interwrite Workspace
The purpose of this document is to give you a feel for the Interwrite system
by showing you how to select and use a tool in Interactive Mode. The
Annotation Tools of Interactive Mode consist of freehand tools, text tools
and drawing tools. Of the freehand tools, the Pen tool is the most frequently
used Interwrite Workspace Tool. The following pages describe how to
select and configure the Pen tool.
The Interwrite system is at the heart of a successful interactive collaboration,
whether it is in a classroom of fourth graders studying world geography, or
in a boardroom of corporate executives brainstorming a new product
launch. All the tools you will need to stimulate inspiration, connection and
participation can be found in the Interwrite Workspace software. Here’s a
quick look at the Workspace basics to get you started.
Workspace Modes
Interwrite Workspace is run in one of three operational modes, Interactive
Mode, Office Mode (Windows only), or Whiteboard Mode.
Workspace Tools have been categorized as Annotation Tools, Editing Tools,
Page Tools, Presentation Tools, Multimedia Tools, Navigation Tools, File
Management Tools, and Setup Tools. The Interwrite Workspace Help file
describes all these tools in detail and can be accessed from the Device
Manager Menu.
Whiteboard
Whiteboard Mode, available only when using an Interwrite Board with
Workspace , allows you to capture and preserve notes, drawings, calculations—whatever you write on the Interwrite Board with an Interwrite Marker
Pen.
Office
Office Mode makes it possible to interact directly with the native files of the
Microsoft Office suite of products, PowerPoint, Word and Excel.
Interactive
Interactive Mode allows you to open and run applications while in Mouse
Mode, using the tip of your electronic Interwrite Pen on the Interwrite Panel
screen to move the cursor. In Annotation Mode, you use the Interwrite Pen
to select Interwrite Workspace Tools from the Toolbar.
Page 31

Getting Started InterwriteTM Board
Begin an Interwrite Workspace Session
1 When you are ready to begin an Interwrite Workspace session, turn on
your Interwrite Board. The Interwrite Board must be active and connected.
You can verify this in Session Manager, or Devices, both Device Manager
Menu options.
2 You can start Workspace in Interactive Mode in one of the following ways:
• Use your Interactive Pen to click on the Interactive Mode icon on
either of the Interwrite Board’s Features Menus.
• Use your Interwrite Pen on the Interwrite Board’s surface to guide the
mouse cursor on the projected image to the Interwrite Workspace
icon on the Windows Task Bar or the Mac’s Menubar. Click the icon
to display the Device Manager Menu.
• Select Interactive Mode from the menu.
• Use your Interwrite Pen to double-click on the Interwrite Workspace
icon on the desktop.
3 The Workspace Toolbar displays.
31
Page 32

32
InterwriteTM Board Getting Started
The Interwrite Workspace Toolbar
Minimize Toolbar
Workspace Menu
Mouse Mode tool
Selection tool
Pen tool
Highlighter tool
Eraser tool
Shape tool
Line tool
Text tool
Undo Previous Action
Clear
Create Blank Page
Create Grid Page
Gallery tool
Screen Capture tool
Previous Page
Next Page
When you start up Interwrite
Workspace in Interactive Mode, the
Toolbar displays, along the right side
of the projected desktop image, At
that time, Workspace is in Mouse
Mode.
Use your Interwrite Pen to select the
Pen tool from the Toolbar. Select a
capture option from the Capture
dialog, click on the window, or click
and drag to capture a portion of the
screen.
Your capture is displayed in the
Annotation Window. Or, you can
start up Annotation Mode by selecting one of the Page Creation Tools.
The page type you select is displayed
in the Annotation Window and the
Pen tool is automatically selected.
Page Sorter tool
Toolbox
PRS tool
Save
Exit
Once the Annotation Window is
open, you can begin writing or
drawing on the page.
Page 33

Getting Started InterwriteTM Board
Using the Pen Tool
The attributes of the Pen tool can be changed by selecting different
options from the Properties Bar at the bottom of the Annotation
Window.
Select the Pen tool’s Down Arrow to display its Tool Settings Menu.
Properties Bar
The Pen tool Properties Bar provides options to change line color,
width, transparency, and line ends and line styles. Each attribute change
is displayed in the Preview Box.
Properties Bar
33
Line color
Change line color
Line width
Line transparency
Line ends
Dash styles
Preview box
Change the Pen tool’s line color and width to determine how it will
affect the look of your annotations. The best way to familiarize yourself
with all the different Interwrite Workspace tools and how they can be
used to enhance your presentations is to experiment with them.
Page Functions
Workspace also provides the ability to move within pages within the
window. Select the functions at the bottom of the screen to pan a page,
move between pages, use the PRS tool (optional), or discard annotations.
Trash
Next
Previous
Pan page
Current location
Insert question
(PRS)
Page 34

34
InterwriteTM Board Getting Started
Presentation Files
The presentation file is made up of your annotated pages. The Page
Creation and Capture tools are used to create the pages in the presentation file and the Annotation Tools are used to create the annotations.
The presentation file is automatically saved as a .GWB file.
As soon as Interwrite Workspace goes into Annotation Mode, an
untitled presentation file is created. Unless you give the file a name, it is
automatically saved using today’s date as the filename. (Multiple files
created today have 01, 02, 03, etc., appended to the date name.)
An existing presentation file can be opened, its pages can be sorted,
annotations can be added to the existing pages, and new pages can be
added to the file. Your presentation will determine how each presentation file evolves. For example, you can prepare a presentation file of
blank maps ahead of time for a geography lesson. Or, you can capture
and annotate each of the monthly earnings spreadsheets as you review
the past fiscal year during a budget meeting. Or, you can run a PowerPoint Slide Show in Office Mode (Windows only) and annotations can
be added to each slide and saved in the native file.
Building the Presentation File
You can build your presentation file during your presentation, or you
can pre-build it, including the screen captures, images, graphs and text
pages you want to present. However you choose to do it, the process is
the same. To capture a screen or window, click on the Mouse Mode
tool with your Interactive Pen and arrange the desktop for capture.
Select an Annotation Tool, the Pen, for example, indicate your capture
preference (by clicking on either the Partial, Window, or Screen option
in the dialog), and annotate the captured image. Use the Page Creation
Tools to add a blank, gridded, or background image page. By default,
Interwrite Workspace is in Autosave mode, so your annotated pages are
automatically saved as you build your presentation file. Click on the Save
tool to save the file using the default filename (today’s date), or a name
you type on the pop-up Onscreen Keyboard.
Page 35

Getting Started InterwriteTM Board
Distributing Presentation Files
The Interwrite Workspace presentation files you create can be printed for
local distribution, or emailed to anyone, anywhere.
Use the Page Sorter tool to review the presentation file. The pages in the
presentation file can be sorted, moved, duplicated, merged, and deleted
using the Page Sorter tool. When the file pages have been arranged to your
satisfaction, you can use Page Sorter’s export option to export it to one of a
number of file formats, or you can close Page Sorter and select an option
from the Workspace File Menu.
The native file format of saved presentation files has the .GWB extension.
GWB files can be read on any computer on which Interwrite Workspace is
installed. For general distribution, we recommend exporting the presentation
file to the PDF format using the Export PDF File tool located in the Toolbox,
or by selecting the the Export PDF File option from the Workspace File
Menu.
Now everyone can stay in the information loop, whether they were able to
attend the presentation or not.
35
Additional Interwrite Learning Resources
We invite you to visit the Interwrite Learning Web site at
www.InterwriteLearning.com
where we have provided a variety of resources to help make your Interwrite
Workspace experience more rewarding. We especially encourage you to
visit
www.InterwriteLearning.com/support_interwrite.htm
and
www.InterwriteLearning.com/erc/index.htm.
What is PRS?
Interwrite PRS is an Audience Response System—a comprehensive response
system for electronically testing, polling, and surveying a group of people. It
can be used in conjunction with Interwrite Workspace to take a survey of
the audience response to the presentation, or to test the level of comprehension after a lesson presentation, for example. Learn more about PRS by
visiting our Web site.
Page 36

36
InterwriteTM Board Getting Started
Whiteboard Mode
Whiteboard Mode allows you to capture notes, drawings, calculations—
whatever you write on your Interwrite Board with an Interwrite Marker
Pen—for distribution. Whiteboard Mode requires only a computer, your
Interwrite Board, and one or more Interwrite Marker Pens. When you
select Whiteboard
Mode, a blank white
screen, representing
the Interwrite Board,
appears on your
computer monitor.
As you write on the
Interwrite Board with
one of the uncapped
Interwrite Marker
Pens, whatever you
write appears on the
computer screen in
the color of the
Marker Pen. Whenever you change Pens, the new pen color is displayed on the computer screen.
The process for capturing what you have written on the Interwrite Board
is quite simple. Using a capped Marker Pen, click on the Whiteboard
Mode icon on one of the Interwrite Board Features Menus to initiate
Whiteboard Mode. Uncap each Marker Pen as you use it on the Interwrite Board surface, being sure to recap it snugly to keep it from drying
out when you switch to another Marker Pen. When you have finished
one screen’s-worth, click the capped pen on the Save icon. Then, click
twice on the Clear icon. The electronic image of the Interwrite Board on
your computer will be blank. Erase the dry-erase ink from the Interwrite
Board surface, and you are ready to continue on a new page in the
presentation file. Unless you give the file a name, it is saved using today’s
date as the name.
You can use the Page Sorter tool, described on the previous page, to
prepare the presentation files created in Whiteboard Mode for distribution.
Page 37

Getting Started InterwriteTM Board
Interwrite Accessories
BTCOM2 Communications Kit
The BTCOM2 Communications Kit outfits your
Interwrite system for Bluetooth® wireless
communication. The BTCOM2 Module is connected to your Interwrite Board and the Bluetooth
USB Adapter is installed on your computer. The
Bluetooth module is built into the Interwrite Pads.
Wireless communication between your Interwrite
Devices and your computer gives you more
flexibility in setting up your classroom when the
Interwrite Board and computer do not have to
be cabled together.
37
The InterwriteTM Pad
Interwrite Pads add another dimension to your Interwrite
interactive experience. They can be used from anywhere
in the room, allowing students to participate in the
presentation and instructors to control the presentation.
All the interactive functions you can perform at the
Interwrite Board can be done using an Interwrite Pad.
Page 38

38
InterwriteTM Board Getting Started
The Rechargeable Interactive Pen
and Pen Charging Station
The optional Pen Charging Station is designed to attach to the frame of the
Interwrite Board just above the controller housing, so it can plug into the
Power Connector on the top of the controller. It can also be hung on the wall,
using the Wall Mount Hangers shown below.
Your Pen Charging Station can be ordered with a Power Cord if you
don’t want to connect it to the Interwrite Board and have it powered
by the board’s power supply.
When the Pen Charging Station is plugged into either the wall socket or the
Interwrite Board (which must be powered on), snap each of your rechargeable Interactive Pens into a slot to charge them. It’s a good idea to keep the
Pens in the Charger when they are not being used. It’s the ideal place to store
them, and you don’t have to worry about overcharging them. They will not
charge beyond their capacity.
Installing the Pen Charging Station
1 Unscrew the Thumb Screws and
position the Pen Charging Station on
the Interwrite Board frame.
2 Tighten the Thumb Screws to lock the
Pen Charging Station into place.
3 Plug the Power Plug into the Power
Connector on the top of the board’s
Controller.
Wall
Mount
Hangers
Thumb
Screws
Power
Plug
When the Pen Charging Station is plugged into the Interwrite Board, it will
have power as long as the Interwrite Board is powered by the power supply.
Positioning the Pens in the Pen Charging
Station
1 Each Pen snaps into one of the charging slots.
2 Position the Pen so that the Pen Tether Loop is
pointing out, away from the charging slot.
3 The LED Light below each slot turns on when
the Pen is positioned in the slot. The light stays
on while the Pen is charging and turns off when
the Pen is fully charged. Periodically, the Pen
will slowly draw current to maintain a full charge. This is known as trickle
charging and, when the Pen is trickle charging, the light remains off. The
rechargeable Interactive Pen will not over-charge.
Charger LED Lights
Page 39

Getting Started InterwriteTM Board
Using the Rechargeable Interactive Pen
The rechargeable Interactive Pen is used to write and draw in Interactive
Mode and functions as a mouse. It requires no assembly. You can attach a
tether to the Pen, if desired. We recommend placing the rechargeable Interactive Pen in one of the Pen Slots on the Pen Charging Station when it is not
being used. The photo below identifies the parts of the rechargeable Interactive Pen and describes their function.
The Pen Tip is used to apply virtual ink to the page in the Annotation Window.
To use the Pen Tip as an eraser on-the-fly, without selecting the Eraser tool,
hold down the left mouse button and touch the pen to the Interwrite Board’s
surface. On the Mac, with the Pen Tip on the board’s surface, press the left
button and hold it while erasing.
Pen Tip – Up or Down
Same as Left Mouse Button on Windows and Mac
39
Rocker
Button
Left – Double-Click Mouse Button with Pen Up
Windows and Mac
Right – Right Mouse Button (Windows)
Ctrl-Click (Mac)
Tether
Loop
The rechargeable Interactive Pen goes into
two minutes of inactivity to conserve power. Stash the Pen in a slot
in the Pen Charging Station when it is not being used.
Sleep Mode
after about
Page 40

40
InterwriteTM Board Getting Started
Assembling the Interwrite Marker Pen
The electronic Interwrite Marker Pen can be used in both Interactive
Mode and Whiteboard Mode. It is used uncapped in Whiteboard Mode to
apply dry-erase ink on the Interwrite Board. Whatever you write or draw
with the uncapped Marker Pen is mirrored on the computer screen. The
capped Marker Pen is used in Interactive Mode to apply virtual ink, in the
same way the Interactive Pen does. The small felt eraser on the end of the
Marker Pen will erase both the real dry-erase ink and virtual ink. Replacement erasers and Pen Caps are included in the Accessory Kit.
Electronics Module
Step 5
Marker
Pen Cap
Clip
Eraser
Battery
Cover
Marker
Holder
Left – Double-Click Mouse
Button with Pen Up
Windows and Mac
1 Locate the pen components shown here. Separate the Marker Holder
from the Electronics Module by depressing the Clip on the underside of
the Electronics Module and pulling the two apart.
2 Remove the Battery Cover on the Electronics Module by pushing forward
on the thumb grip. Insert the supplied AAA battery into the battery
compartment, positioning it properly to ensure the correct polarity.
Replace the Battery Cover.
3 Remove the Marker’s colored cap and discard it. Replace it with one of
the supplied Pen Caps.
4 Insert the Marker with the Pen Cap in place into the Marker Holder.
Step 4
Assembled Interwrite Marker Pen
LED
Right – Right Mouse Button
(Windows)
Ctrl-Click (Mac)
Pen Tip – Up or Down
Same as Left Mouse Button
on Windows and the Mac
Page 41

Getting Started InterwriteTM Board
5 Snap the Electronics Module into the Marker Holder. The LED will flash
four times, indicating the pen is active.
The two buttons on the Interwrite Marker Pen function in Windows as left
double-click and right-click mouse buttons, and on the Mac as left double-click
and Ctrl-click mouse buttons. The capped Pen Tip acts as a left-click mouse
button when Interwrite Workspace is in Mouse Mode.
In both Windows and on the Mac, the left mouse button on the Marker Pen
has the same chorded function, described on the previous page, as the
Interactive Pens have when Interwrite Workspace is in Annotation Mode. It
will erase the virtual ink on the projected image on-the-fly without having to
select the Eraser tool.
The Interwrite Marker Pen goes into Sleep Mode after 10 seconds of
inactivity. The LED will flash continuously when the battery needs to
be replaced.
Keep the Marker capped as much as possible to prevent it from drying
out. The Pen Cap enables the Marker Pen to be used in Interactive
Mode to annotate a projected image on the Interwrite Board without
actually applying real ink to the board.
41
The Interwrite Interactive Pen
The Interwrite Interactive Pen is used exclusively in Interactive Mode. Its
buttons and Pen Tip work the same as those on the rechargeable Interactive
Pen and the Marker Pen. Following are the instructions for installing or replacing the battery.
1 Push in the clip on the battery cover to remove it.
2 Insert the supplied AAA battery into the battery compartment,
positioning it properly for the correct polarity. As soon as the battery
makes a connection, the LED will flash four times, indicating the pen is
active.
3 Replace the Battery Cover.
The Interactive Pen goes into
inactivity to conserve power. The LED will flash continuously when the
battery needs to be replaced.
Sleep Mode
LED
Battery Cover
after about 10 seconds of
Page 42

42
InterwriteTM Board Getting Started
Installing the Mounting Clips
on the Whiteboard and Wall
The two Mounting Clips, found in the Accessory Kit that
shipped with your Interwrite Board, can be used in conjunction with a wall mount installation of the board. They fasten
the bottom of the Interwrite Board to the wall to prevent it
from being jostled loose from the Wall Mounting Bracket.
Install the Mounting Clips after the Interwrite Board is hung
from the Wall Mounting Bracket. The hardware for attaching the Mounting
Clips to the wall is not included, as the type of wall on which they will be
mounted varies from installation to installation.
If you are using a ceiling mount projector, be sure the Interwrite
Board is aligned to the projector image
Mounting Clips to avoid having to reposition the board.
Back of the
Interwrite Board
before
you install the
Mounting
Clip
Front of the
Interwrite Board
Interwrite Board
Frame
Mounting Clip
1 Hook the Mounting Clip over the lip of
the Interwrite Board frame on the back of
the board. Position a Mounting Clip in
each corner at the bottom of the board.
2 Mark the location of the holes in each
Mounting Clip on the wall.
3 Install suitable anchors into the wall.
4 Install screws to secure the Mounting Clips
to the wall. Use two screws per Clip. The
recommended screw size is number 8 or
M4.
Page 43

Getting Started InterwriteTM Board
Attaching the Pen Tray to the Interwrite Board
If your Interwrite Board is going to be mounted on the wall, attach the optional Pen Tray before you mount the board. If the Interwrite Board is going to
be mounted on a floor stand, the Pen Tray can be easily attached at any time.
The Interwrite Board Pen Tray attaches to the frame. Use one of the provided
Phillips screws for each attachment hole in the Pen Tray.
Tools Required:
Phillips
screwdriver
Interwrite
Board
Pen Tray
43
Phillips screws
1 Locate the predrilled screw holes for the Pen Tray in the frame of the
Interwrite Board.
2 Attach the Pen Tray to the Interwrite Board using the small Phillips screws
provided, one for each hole in the Pen Tray.
3 Slide the rubber bumpers, if they came with your Pen Tray, onto each
end, fitting the contours of the bumper to those on the tray.
To avoid damage to the Interwrite Board controller located on the
back of the board near the corner, do not rest the Interwrite Board
on the controller housing. When handling and maneuvering your
Interwrite Board, be careful not to scratch or damage the Interwrite
Board’s writing surface.
Never nail or drill the Interwrite Board. Doing so will damage the
unit and void your warranty.
Page 44

44
InterwriteTM Board Getting Started
The Interwrite Board Floor Stand
If your Interwrite Board is shared, the Floor Stand gives
your Interwrite Board the mobility necessary to move it
easily from room to room. The Floor Stands are
model-specific, so be sure to specify your Interwrite
Board model number when ordering your Floor Stand.
The Floor Stand Accessory Shelf
The Floor Stand Accessory Shelf provides convenient storage space for the equipment that moves
with the Interwrite Board. The Accessory Shelf
comes in black or gray.
Assembling the Floor Stand
Leg Assembly
End Cap
Leg
Foot
1/4-20x2”
flat head screw
(use 4 per Foot)
Caster
End Cap
Tools Required:
Phillips
screwdriver
Wrench
Foot
Crossbar
Holes
Leg
Lockwasher
Caster
End Cap
Caster
Foot
Page 45

Getting Started InterwriteTM Board
Assembling the Legs
1 Using four of the supplied flat head screws, attach a Foot to the bottom
end—the end without the Crossbar Holes—of one of the Legs.
2 Place a Lockwasher over the Caster screw and screw the Caster into the
hole on the underside of the Foot – one at each end. Tighten with the
wrench.
3 If they are not already in place, insert three End Caps (two on each end
of the Foot and one at the top of the Leg).
4 Repeat Steps 1 through 3 for the other Foot and Leg.
Examine the assembled Floor Stand Legs. One side of each Leg
assembly has 8 holes (2 groups of 4), and the other side has more
than 8 holes. In this step, the sides with just the 8 holes must face
inward
toward
the Crossbars.
Attaching the Crossbars to the Leg Assemblies
45
Crossbar
Crossbars
Leg Assembly
1/4-20x2”
flat head screw
(use 4 per Crossbar end)
Leg Assembly
(The side with more than 8 holes
faces
away
from the crossbar.)
5 Attach both Crossbars to one Leg assembly using 8 of the
supplied flat head screws – 4 screws for each Crossbar. The
screws will slide through the 4 outermost holes in each group of
holes on the Leg assembly. Attach the other Leg assembly to the
Crossbars in the same way.
Page 46

46
InterwriteTM Board Getting Started
Regulatory Statements
These devices comply with part 15 of the FCC Rules. Operation is
subject to the following two conditions:
1 These devices may not cause harmful interference, and
2 These devices must accept any interference received, including
interference that may cause undesired operation.
Note: This equipment has been tested and found to comply with the limits of a
Class A digital device, pursuant to Part 15 of the FCC rules.
These limits are designed to provide reasonable protection against harmful
interference in a residential installation. This equipment generates, uses and can
radiate radio frequency energy and, if not installed and used in accordance with
the instructions, may cause harmful interference to radio communications. However, there is no guarantee the interference will not occur in a particular installation.
If this equipment does cause harmful interference to radio or television reception,
which can be determined by turning the equipment off and on, the user is encouraged to try to correct the interference by one or more of the following measures.
• Reorient or relocate the receiving antenna.
• Increase the separation between the equipment and the receiver.
• Connect the equipment into an outlet on a circuit different from that to which
the receiver is connected.
• Consult the dealer or an experienced Radio/TV technician for help.
Each device complies with Part 15 of FCC rules and with RSS-210 of Industry
Canada. Operation is subject to the following two conditions: (1) The device may
not cause harmful interference, and (2) The device must accept any interference
received, including interference that may cause undesired operation.
The radiated output power is far below the FCC Radio Frequency exposure limits.
Nevertheless, each of the devices should be used in such a manner that the
potential for human contact during normal operation is minimized.
Canada
Industry Canada Class A emission compliance statement. This Class A
digital apparatus complies with Canadian ICES-003.
Avis de conformité á la réglementation d’Industrie Canada. Cet appareil
numérique de classe A est conforme á la norme NMB-003 du Canada.
Page 47

Getting Started InterwriteTM Board
Declaration of Conformity
The “CE“ mark on this device indicates compliance under the EMC 89//
336/EEC Directive.
Declaration of conformity according to ISO/IEC Guide 22 and EN 45014
Manufacturer’s Name: GTCO Corp. (dba Interwrite Learning)
Manufacturer’s Address: 7125 Riverwood Drive
Columbia, MD 21046 U.S.A.
declares, that the product
Product Name: Interwrite Board
Model Numbers: 1060, 1077, 1040, 1071, 1085
Product Options: All
conforms to the following product specifications:
EMC: EN55022:1988+A1:2001+A2:2003-Class A
EN55024:1998+A1;2001+A2:2003
EN 61000-3-2:2000
EN 61000-3-2:1995+A1:2001
EN 61000-4-2:1995+A1:1998+A2002
EN 61000-4-3:2002+A1:2002
EN 61000-4-4:1995+A1:2001+A2:2001
EN 61000-4-5:1994+A1:2001
EN 61000-4-11:1994+A1:2001
ETS 300 683 (1997)
ETS 300 220 (2000-09)
Safety: EN60950-1:2002
RoHS: “-R” labelled products conform to DIRECTIVE
2002/95/EC. These products are RoHS-compliant.
47
Supplementary Information
The product herewith complies with the requirements of the Low Voltage Directive 73/23/EEC
and the EMC Directive 89/336/EEC.
Scottsdale, Arizona, U.S.A. 6-1-2006 Dana Doubrava
Location Date Engineering Mgr
Page 48

48
InterwriteTM Board Getting Started
European Union Emission Directive
This product is in conformity with the protection requirements of EU
Council Directive 89/366/ECC on the approximation of the laws of the
Member States relating to electromagnetic compatibility.
This product has been tested and found to comply with the limits for Class
A Information Technology Equipment according to CISPR 22/European
Standard EN55022. The limits for Class A equipment were derived for
typical industrial environments to provide reasonable protection against
interference with licensed communication devices.
European Union WEEE Directive
The manufacture of this equipment required the extraction and use of
natural resources. It may contain hazardous substances that could impact
health and the environment.
• In order to avoid the dissemination of the hazardous substances into
the environment and to diminish the pressure on our natural
resources, we encourage you to return this product to the appropriate
take-back system facility. These facilities reuse or recycle most of the
materials in this equipment in a responsible way.
• The crossed-out wheeled bin symbol below invites you to use these
take-back systems.
• If you need more information about the collection, reuse and recycling
systems in your area, please contact your local or regional waste
authority.
• Further information about the responsible end-of-life management of
this and other Interwrite Learning products is available on our Web
site at www.InterwriteLearning.com.
European Contact:
Interwrite Learning
A Division of GTCO CalComp GmbH
European Headquarters
Kreiller Strasse 24
81673 Munich
Germany
Tel: +49 (0) 89 370012-0
Fax: +49 (0) 89 370012-12
Page 49

Getting Started InterwriteTM Board
Declaration of Conformity
Manufacturer’s Name: Lih Rong_Electronics co., LTD
Manufacturer’s Address: Hsin Chuang City, Taipei
Taiwan, R.O.C.
Importer’s Name: GTCO CalComp GmbH
Importer’s Address: Kreillerstrasse 24
Munich 81673 Germany
declares, that the product
Product Name: Bluetooth USB Adapter
Model Number: BTA-6030R
conforms to the following product specifications:
EMC: EN301489-1 v1.5.1(2004-11)
EN301489-17 v1.2.1(2002-08)
ETSI EN 300 328 V1.6.1 (2004-11)
49
Safety: EN60950-1:2001
IEC60950-1:2001
RoHS: “-R” labelled products conform to DIRECTIVE
2002/95/EC. These products are RoHS-compliant.
following the provisions of Council Directive 89/336/EEC (EMC
Directive) and Council Directive 73/23/EEC (Low Voltage Directive) where applicable
Place and Date: Taipei, Taiwan 07/17/2007
Authorized Person: Raymond Wang
Title: QC Manager
Page 50

50
InterwriteTM Board Getting Started
The BTCOM2 Module, assembled by Interwrite Learning, contains the
Bluetooth® Serial Module BISM II, #B02456, FCC ID: PI401B, from Ezurio
Ltd. Their Declaration of Conformity is included here. The BTCOM2
Module, USB Adaptor II, and PCMCIA Card II are RoHS-compliant.
Declaration of Conformity
In accordance with Annex IV of the EU directive 1999/5/EC
Notified Body consulted: Phoenix Test-Lab
ID-Number of Notified Body: 0700
declare under our responsibility that the BISM II Module
Ezurio Bluetooth USB Adaptor II
Ezurio Bluetooth PC Card II
complies with the appropriate essential requirements of the Article 3 of the
R&TTE and the other relevant provisions, when used for its intended purpose.
Health and Safety requirements contained in Article 3 (1) a)
EN 60 950: 1992 Safety of information technology equipment + Amendment
A1:1993, Amendment A2:1993, Amendment A3:1995, Amendment A4:1997,
Amendment A11:1997
EN 50371: Generic standard to demonstrate the compliance of low-power
electronic and electrical apparatus with the basic restrictions related to human
exposure to electromagnetic fields (10 MHz - 300 GHz) - General public
Protection requirements with respect to electromagnetic compatibility Art.3 (1)
b)
EN 301489-17 V1.1.1 (09-2000), Electromagnetic Compatibility and radio
spectrum Matters (ERM); Electro Magnetic Compatibility (EMC) standard for
radio equipment and services; Part 17: Specific conditions for wideband
Hiperlan equipment
Means of the efficient use of the radio frequency spectrum
EN 300328-2 V1.2.1 (11-2001), Radio Equipment and Systems (RES); Wideband
transmission systems; Technical characteristics and test conditions for data
transmission equipment operating in the 2,4 GHz ISM band and using spread
spectrum modulation techniques. Part 2: Harmonized EN covering essential
requirements under article 3(2) of the R&TTE directive.
Ezurio Ltd
Unit 2, 126 Colindale Avenue, Colindale
London NW9 5HD, United Kingdom
tel: +44 (0)20 8938 1000
fax: +44 (0)20 8905 8608
www.ezurio.com
Registered in England
No. 5178293
Page 51

Getting Started InterwriteTM Board
Safety Information
Switch off the Bluetooth device before boarding an aircraft. Make sure it
cannot be switched on inadvertently. The operation of wireless appliances in
an aircraft is forbidden by many airlines to prevent interference with communications systems. Applications that could result in use on aircraft should carry
appropriate warnings.
The Electronic Interwrite Pen
This device complies with Part 15 of FCC rules and with RSS-210 of Industry
Canada. Operation is subject to the following two conditions: (1) This device
may not cause harmful interference, and (2) This device must accept any
interference received, including interference that may cause undesired operation.
The radiated output power is far below the FCC Radio Frequency exposure
limits. Nevertheless, this device should be used in such a manner that the
potential for human contact during normal operation is minimized.
WARNING: Changes or modifications made to this equipment not expressly
approved by Interwrite Learning may void the FCC authorization to operate
this equipment.
51
%04;?FIOT`elmqtlvz{|
¡¢ªTI{¯FI¢ª°²
;·º¼FÀÁ
?FIOT`e;ВЗСХЩЮ¼аб0им
стухцабхчыlьяĀālĂĄĈĉċаб
ыČĎđБĔĕ0имсlĖĘ`сиęĚĞğ;
ċĢ`мсБ?FIOT`eĤĦĨ0имсĩğ{ī
Ĭ¼ıĴ`ĸĺOº`e²ļ;абБ
Page 52

52
InterwriteTM Board Getting Started
International Interwrite Board Warnings
WARNING
• Two people should mount the Interwrite Board on the wall or Floor Stand
to avoid injury, or damage to the Interwrite Board.
• One person can adjust the position of the Interwrite Board up or down,
but be sure to stabilize the Floor Stand before you attempt to reposition
the board. Lock down the thumb tabs on the Casters, or push the Floor
Stand against a wall to prevent it from rolling, or put one of your feet on
the Floor Stand Foot to hold it in place as you adjust the Interwrite
Board’s position.
• Position the Interwrite Board Floor Stand on a level surface to avoid
tipping.
• Lower the Interwrite Board to the lowest position on the Floor Stand
before moving the stand.
• Do not hang objects on the Interwrite Board.
WARNUNG
• Zum Befestigen des Interwrite Board an der Wand oder am Ständer sind
zwei Personen erforderlich, um Personenverletzung oder Beschädigungen
des Interwrite Board zu vermeiden.
• Die Höhe des Interwrite Board kann auch von einer Person allein
verstellt werden, dazu muss jedoch sichergestellt sein, dass der Ständer
des Boards sicher steht und nicht umfallen kann. Dazu entweder die
Laufrollen arretieren, den Ständer gegen eine Wand rollen oder einen
Fuß auf den Ständer stellen, damit das Interwrite Board beim Verstellen
der Höhe nicht wegrollen kann.
• Stellen Sie den Interwrite Board-Ständer auf einen ebenen Untergrund,
damit er nicht umfallen kann.
• Stellen Sie das Interwrite Board vor dem Transport in die niedrigste
Position.
• Hängen Sie keine Gegenstände an das Interwrite Board.
ATTENTION
• Il faut deux personnes pour fixer le tableau blanc sur le mur ou sur le
pied de sol afin d’éviter tout endommagement ou blessure.
• Une seule personne peut ajuster la position du tableau blanc (vers le
haut ou le bas) mais assurez-vous que le pied de sol est bien stable
avant de repositionner le tableau. Abaissez les languettes de verrouillage
des roulettes avec le pouce, poussez le pied de sol contre un mur pour
Page 53

Getting Started InterwriteTM Board
éviter qu’il ne roule ou placez l’un de vos pieds sur le pied de sol pour
maintenir celui-ci en place pendant que vous ajustez sa position.
• Positionnez le pied de sol du tableau sur une surface plane afin d’éviter
tout basculement.
• Descendez le tableau blanc jusqu’à la position la plus basse du pied de
sol avant de le déplacer.
ADVERTENCIA
• Dos son las personas recomendadas para instalar la pizarra en la pared o
en la base de pie con el fin de evitar que se produzcan heridas
personales o se dañe la pizarra.
• Una persona puede ajustar la posición de la pizarra hacia arriba o hacia
abajo pero asegurándose de que la base de pie haya quedado estable
antes de intentar colocar el tablero. Fije el bloqueo manual de las
ruedecillas o coloque la base de pie contra la pared para evitar que se
mueva, también puede poner uno de sus pies en la base para sujetarla
cuando ajuste la posición de la pizarra.
• Coloque la base de pie de la pizarra en una superficie nivelada para
evitar que vuelque.
• Baje la pizarra hasta la posición más baja de la base de pie antes de
transladar esta última.
• No cuelgue objetos en la pizarra.
53
AVVERTENZA
• Due persone devono montare la Lavagna sulla parete o su un cavalletto
per evitare lesioni o danni alla Lavagna.
• Una persona può regolare la posizione della Lavagna verso l’alto o il
basso, ma assicurarsi di stabilizzare il cavalletto prima di tentare di
riposizionare la lavagna. Bloccare verso il basso le linguette di
bloccaggio sulle rotelle o spingere il cavalletto contro una parete per
impedirne il rotolamento, oppure appoggiare il proprio piede sul piede
del cavalletto per tenerlo fermo mentre si regola la posizione della
Lavagna.
• Posizionare il cavalletto della Lavagna su una superficie piana per
evitarne il rovesciamento.
• Abbassare la Lavagna alla posizione più bassa sul cavalletto prima di
spostare il supporto.
• Non appendere oggetti sulla Lavagna.
Page 54

54
InterwriteTM Board Getting Started
Limited Warranty for the Interwrite Board
Interwrite Learning warrants these products to be free from defects in material and workmanship under the following terms. Complete and
return the enclosed warranty registration card to ensure that your products are covered by this warranty.
Coverage
Parts and labor are warranted for three (3) years from the date of the first consumer purchase for the Interwrite Board, controller, electronic
Pens, electronic erasers, power supply, cables and accessories. This warranty applies to the original consumer purchaser only.
Within the European Union, the warranty period is three (3) years, as mandated by the EU. Contact your local dealer or distributor for
additional warranty information.
Warranty is valid only if original consumer’s purchase or lease date is less than or equal to six months from the original Interwrite Learning sale
date. This information will be captured by the system serial number and confirmed by the reseller’s purchase order.
A nominal Warranty Handling Fee will be charged after the first 90 days of use and calculated from the date of original consumer purchase.
This payment may be made by Visa, MasterCard, or American Express. A copy of the sales receipt or invoice will be required for warranty
verification.
Conditions
Except as specified below, this warranty covers all defects in material or workmanship in the products. The following are not covered by the
warranty:
1. Any product on which the serial number has been defaced, modified, or removed (if applicable).
2. Damage, deterioration, or malfunction resulting from:
a. Accident, misuse, abuse, neglect, fire, water, lightening, or other acts of nature, unauthorized product modification for any
purpose, or failure to follow instructions supplied with the product.
b. Repair, or attempted repair, by anyone not authorized by Interwrite Learning.
c. Any damage in shipment of the product (claims must be presented to the carrier).
d. Any other cause which does not relate to a manufacturing defect.
3. Any product not sold or leased to a consumer within six months of Interwrite Learning’s original sale date.
4. Consumable parts, e.g., batteries, dry-erase markers, eraser felt.
Interwrite Learning will pay all labor and material expenses for covered items, but will not pay for the following:
1. Removal or installation charges.
2. Costs for initial technical adjustments (set up), including adjustments of user controls.
3. Certain shipping charges. (Payment of shipping charges is discussed in the next section of this warranty.)
4. Packaging costs. (Customers should keep their boxes.)
Warranty Service Procedures
1. To obtain service on your Interwrite Learning product, contact the Technical Support Department to receive a Return Material
Authorization Number (RMA#) and shipping instructions by calling:
In United States: (480) 443-2214 (MST)
2. Ship the product to Interwrite Learning with the RMA# marked clearly on the outside of the box. Interwrite Learning reserves the
3. Although the consumer must pay any shipping charges to ship the product to Interwrite Learning for warranty service, Interwrite
4. Whenever warranty service is required, the original dated sales invoice (or a copy) must be presented as proof of warranty
5. If Interwrite Learning determines that the unit is not defective within the terms of the warranty, the consumer shall pay the cost of
Technical Support
Web-based Technical Support is available free of charge at: www.InterwriteLearning.com, where current driver releases, as well as
comprehensive technical support, troubleshooting, Technical Bulletins and FAQs can be found.
Telephone Technical Support is available free of charge to the original consumer for a period of 90 days from the date of purchase of the
product. Please contact our Technical Support Department:
You can also fax your request to:
Our toll-free number in the U.S. is: 800-856-0732 (MST)
In Europe: +49 (0) 89 370012-0 (CET)
right to refuse the shipment, if not properly marked.
Learning will pay the return shipping charges for ground shipment. Other shipping options are available at an additional fee.
coverage, and should be included in shipment of the product. In addition, please include your name, address, telephone number,
fax number, email address, and a description of the problem.
all freight charges, as well as any repair charges.
In United States: (480) 443-2214 (MST)
In Europe: +49 (0) 89 370012-0 (CET)
In United States: (480) 948-5508 (MST)
In Europe: +49 (0) 89 370012-12 (CET)
Disclaimer of Unstated Warranties
The warranty printed above is the only warranty applicable to this purchase. ALL OTHER WARRANTIES, EXPRESSED OR IMPLIED,
INCLUDING, BUT NOT LIMITED TO, THE IMPLIED WARRANTIES OF MERCHANTABILITY AND FITNESS FOR A PARTICULAR
PURPOSE ARE DISCLAIMED. Assuming the warranty above stated is otherwise applicable, it is expressly understood and agreed that
Interwrite Learning’s sole liability, whether in contract, tort, under any warranty, in negligence, or otherwise, shall be for the repair or
replacement of the defective parts, and under no circumstances shall Interwrite Learning be liable for special, indirect, or consequential
damages. The price stated and paid for the equipment is a consideration in limiting Interwrite Learning’s liability.
Page 55

Getting Started InterwriteTM Board
Notice
Some states and provinces do not allow the exclusion or limitation of incidental or consequential damages, so the above exclusion may not
apply to you. This warranty gives you specific legal rights, and you may have other rights, which vary from state to state, or province to
province.
To obtain service on your Interwrite Learning product, call our Technical Support Department at (480) 443-2214 (MST), or fax us at
(480) 948-5508 (MST); in Europe call +49 (0) 89 370012-0 (CET), or fax us at +49 (0) 89 370012-12 (CET).
We can also be contacted through our Web site at www.InterwriteLearning.com (in US), at EUOffice@gtcocalcomp.com (in Germany), or at
infos@calcomp.fr (in France).
Important! All products returned to Interwrite Learning for service must have prior approval in the form of a Return Merchandise
Authorization Number (RMA#), which can be obtained by calling the Technical Support Department.
55
Page 56

56
InterwriteTM Board Getting Started
Corporate Headquarters
7125 Riverwood Drive
Columbia, Maryland 21046
Tel: 410.381.6688
Fax: 410.910.0051
Sales: 866.496.4949
European Headquarters
Interwrite Learning
A Division of GTCO CalComp GmbH
Kreiller Strasse 24
81673 Munich
Germany
Tel: + 49 (0) 89 370012-0
Fax: + 49 (0) 89 370012-12
www.InterwriteLearning.com
Support: 480.443.2214
Western Office
8224 East Evans Road
Scottsdale, Arizona 85260
Tel: 480.948.6540
Support: 480.443.2214
Fax: 480.948.5508
Interwrite Learning and Interwrite are trademarks of GTCO Corp.
Bluetooth is a trademark of, and is owned by, Bluetooth SIG, Inc., U.S.A.,
All other products and company names are the trademarks or registered
The information contained in this document is subject to change without notice. Interwrite Learning assumes no
responsibility for technical, or editorial errors, or omissions that may appear in this document, or for the use of this
material. Nor does Interwrite Learning make any commitment to update the information contained in this document.
This document contains proprietary information which is protected by copyright. All rights reserved. No part of this
document can be photocopied or reproduced in any form without the prior, written consent of Interwrite Learning.
Copyright© 2007 Interwrite Learning
and is licensed to Interwrite Learning.
trademarks of their respective owners.
TM
37-01122-01 Rev. C
 Loading...