

Page 1

InterWrite PRS
User’s Guide
Beta Documentation
Page 2

Page 3

1Chapter 1
InterWrite PRS Overview
InterWrite PRS is the most important, comprehensive assessment tool you will ever
use. Its use as an electronic audience response testing and polling system is unrivalled,
but the real appeal of PRS lies in its ability to provide an instructor with instant
feedback about each student’s understanding of the lesson or lecture. The InterWrite
Personal Response System (PRS) easily tracks and records each individual response
coming in from the audience. The instant feedback for the instructor and the students
is in the form of a chart of the response distribution that can be displayed after each
question is answered. The questions used to assess the students’ understanding of the
material being presented can be prepared in advance, or composed on-the-fly. This
flexibility is the hallmark of the PRS system, and what makes it such a powerful
assessment tool. Whether used to survey, review, or test, the PRS system meets the
challenge with an impressive collection of features that engages students and encourages their participation. Teachers can spend more time teaching and less time marking
tests and maintaining grade books. Response data are electronically gathered, scored
and recorded in grade books. A variety of report formats extend the considerable array
of class and individual student assessment tools available to the instructor. In addition,
PRS supports industry-standard XML formats, providing seamless integration with
electronic textbook courseware, grading applications and Course Management
Systems.
The versatility of PRS is evident in its widespread application. Teachers at all education
levels can use it to assess and test their students. Marketing researchers, political
analysts, and pollsters in all fields can use PRS to survey and electronically record
preferences, opinions, and votes. The PRS system can be used in any situation where
there is a need to gather, record and evaluate response data.
The PRS hardware communicates the response data to the PRS software. Two
different PRS hardware systems are available to satisfy the operating and budgetary
requirements of any organization. The IR (infrared) system features IR Clickers and IR
Receivers that use a patented, proprietary transmission protocol in a one-way transmission network to send data from Clicker to Receiver. The IR Clicker transmitter is a
small handheld, battery-powered device with numbered and lettered response
buttons, a power switch, an LED power/transmission indicator light, and an infrared
transmitter. The IR Receiver is connected to the computer and has a red LED power
indicator light and an infrared receiver. The IR Receiver decodes the transmitted data,
which are then relayed to the PRS software on the computer. The PRS software
provides the functionality necessary to establish an environment in which that transmitted data can be electronically converted quickly and easily into useful response
information.
Page 4

2 Chapter 1
The InterWrite PRS electronic data collection process is divided into four sections. Each section
addresses a different aspect of the PRS audience response system from setup to assessment
and evaluation of recorded response data.
PRS Overview
The RF, radio frequency, hardware system features RF Clickers and RF Receivers that use a
two-way transmission protocol to send data back and forth between the RF Clickers, an RF
Receiver and the PRS software. The RF Clicker remote is a battery-operated device that
features an LCD display and a keypad that includes numeric, lettered and math symbol Input
Keys and a set of Navigation Keys. The RF Clicker’s LCD display makes it possible for the
student to see and edit Responses before they are sent and to receive, in return, status
messages about each data transmission. The USB RF Receiver hub is connected to the computer. It sends transmitted data to the PRS software on the computer and status messages from
the PRS software back to the RF Clickers.
The interactive, two-way transmission of the RF environment affects how PRS is used in the
classroom. Some additional features are available—features that cannot be supported in an IR
environment, while other PRS features necessary for IR are not required in an RF environment.
Where differences exist, the basic functionality will be described and those features that
pertain to RF only will be identified by this icon, which is included in the PRS logo on
RF product labels.
Classes is the section that gives a name to the group of participants, who will be referred
to as students throughout the rest of this manual, that is meeting for a specific purpose.
This is the setup phase of the PRS system. In the vernacular of this section of PRS, Classes
are defined and, typically, associated with a Roster of students.
The Lessons section is where Questions are defined and organized into Lessons.
Sessions is the section where the Questions in a Lesson are presented to the students in
a Class for their Responses.
The Gradebooks section is where the results of a Session, which have been scored, or
Marked, for each student in the Class, are recorded and totaled in a Class Gradebook.
Page 5

3Chapter 1 InterWrite PRS – Classes
Classes
The general makeup of the Class is defined in the Classes section. A Class is a
group of people, an audience, who, during a Session, respond electronically
to Questions that assess their knowledge of a subject, or poll their opinions.
Each Class definition consists of:
• Information about the Class – a Name that uniquely identifies it and a
Type that describes the hardware environment in which it will take place,
•a Roster of participants, students, that will be associated with the Class,
•a Response Map, which is used to assign each student a specific location
in a virtual seating chart, the Response Grid, and
• Default Settings for the two windows that can be displayed during a
Session. The Response Grid window is where response transmissions
from IR Clickers are acknowledged. The Chart window is where
response distribution is graphed.
The primary function of the Classes section is to uniquely name a Class and
type it. When PRS is used in an RF environment, the RF-Type Class is the focal
point of operation. The options on the RF Menu (described in the Menu
section of this chapter) illustrate this point. An RF Class Type is started and
stopped. RF Clickers scan for a specific Class and join it. A Class Roster does
not have to be in place when a Class is started. A Roster based on transmitted Student IDs is derived from Session results. The IR-Type Class must be
associated with a Roster, which can be associated with a Response Map.
Students are identified in PRS and most Course Management Systems by
their Student IDs. In an RF environment, the Student ID is saved in the RF
Clicker’s memory and is sent with each Response transmitted from the
Clicker, ensuring that the Response is associated in PRS records with the
Student ID, and thereby, with the student. In an IR environment, there is no
way to enter a Student ID into the IR Clicker’s memory, so the IR Clicker ID,
which is transmitted with each Response, is used to establish the link to the
Student ID. This can only be accomplished through the use of a Class Roster.
Class Roster
The Class Roster identifies the students in the Class and connects their
names and Student IDs to their IR Clicker ID numbers. A Roster can be
created locally in PRS as part of the Class definition. The student’s name,
Student ID, Clicker ID number, and other information are entered into a
student profile form, and each profile form is added to the Roster. Or, an
existing Roster can be imported into the Class definition. Rosters derived
from Blackboard (Chapter Seven), Rosters derived from the PRS Web
Registration Application (Chapter Seven), and Rosters used with other Class
definitions can be imported into a new or existing Class definition. In the RF
environment, the Class Roster is used primarily to link the transmitted
Student ID with the student’s name.
Page 6

4 Chapter 1InterWrite PRS – Classes
Loaner Clickers
Capturing and recording student Responses during a Session is what PRS
is all about and is the key to its successful use. If a student has forgotten
his Clicker, or it is malfunctioning, he won’t be able to participate in the
Session. Therefore, we recommend keeping a few Loaner units on hand
to be pressed into service when needed. The process of registering
Loaner IR Clickers for a Class is described in Chapter Three Classes, Class
Roster. Loaner RF Clickers can be configured by selecting the Configure
Clickers option from the RF Menu, described later in this chapter.
Response Map
Tab
During a typical PRS Session in an IR environment, a Lesson is presented
to the students in the Class. A Question and its Response options are
displayed at the top of the Session dialog and a Response Grid or At-
tendee List is displayed at the bottom in the Response Area. Students
point their IR Clickers toward an IR Receiver and press the number/letter
button that represents their Response Choice for the Question. The LED
on the Clicker flashes while it is sending the signal to the Receiver. To
acknowledge receipt of the Response transmission, the student’s name or
Clicker ID number displays on the top line in a Response Box in the
Response Grid. When the Attendee List is displayed in the Response
Area, the student’s name is deleted from the Attendee List to indicate a
successful transmission.
When a Class is quite large, the Response Grid will be quite large, too,
making it more difficult for each student to track his Response verification in
the Response Grid. A Response Map, created as part of the Class definition,
provides the means of assigning, or mapping, each student to a permanent
position in the Response Grid. The students, as well as the instructor, can
easily verify that their Responses were received and recorded.
In an RF environment, there is no need to display a Response Grid. Status
messages regarding transmissions are displayed on the LCD screen on
the RF Clicker, so students can confirm their Responses have been
received and recorded without having to monitor a Response Grid at the
front of the room.
Response
Window and
Chart Window
Default Settings
Tab
A Results Chart is displayed after the Question’s Timer has expired or the
Question is stopped. It charts the Response distribution among the
possible Response Choices. It’s a useful tool in an academic environment
because it makes it possible for an instructor to immediately assess the
students’ level of comprehension of the material being covered. The
Default Settings for both the Response window with its display of the
Question, the Response Choices, and the Response Grid or the Attendee
List and the Chart window with its display of response distribution are
part of a Class definition. Some of the default settings established here
can be changed on-the-fly at the beginning of a Session.
Page 7

5Chapter 1 InterWrite PRS – Lessons
Lessons
The Lessons section is the staging area for your questionnaires. Lessons
are made up of sets of Questions. The Lessons containing the Question
Sets are organized in the Lesson Tree. The Lesson Tree is structured much
like a file directory, making it very easy and intuitive to plan, prepare and
organize large numbers of Lessons in advance.
A Lesson is presented during a Session. At the beginning of each new
Session, the Lesson is associated with a Class. The Questions in the
Lesson, or a selected subset of the Questions, are presented to the Class
during the Session. The electronic Responses of each student in the Class
are recorded and saved in a Session file. The Responses in the Session file
can be graded, Marked, and added to a Gradebook.
A Lesson can be copied, renamed, imported, and exported. A new Session
for a selected Lesson can be started directly from the Lesson section,
eliminating the need to go to the Sessions section to initiate the Session.
In addition, a variety of Reports can be created from PRS Lessons. This
Lesson Reporting function gives an instructor an easy way to access and
list the Questions and Response Choices in a Lesson. The importance of
this feature becomes apparent when a Lesson is presented in a Self Paced
Mode Session or as a homework assignment for RF. The Questions and
Response Choices are not displayed during this type of Session, so the
Report function provides the instructor with a convenient way of making
them available to the students.
Questions
A Lesson’s Questions can be composed in PRS. These Questions are
stored in a native PRS XML format to support industry standards, making
them available for export and import. Question Defaults are set as part of
the Lesson definition. These default settings influence the presentation of
the Questions during a Session.
Many textbook publishers provide electronic Question Sets with their
textbooks. Most use the QTI XML storage format for their Question Sets,
which is supported by PRS, so they can be easily imported directly into a
PRS Lesson. PRS’s powerful Question Editor can then be used to modify
any Question in the imported Question Set, to add additional Questions to
the Question Set, to copy Questions into other Lessons, and to select a
subset of the Questions for presentation during a Session.
Page 8

6 Chapter 1InterWrite PRS – Lessons
Another powerful Lesson presentation tool is the PRS PowerPoint Add-in.
When InterWrite PRS is installed on your Windows computer, a PRS
Toolbar is automatically added to your Microsoft PowerPoint software.
On the Mac, the PRS PowerPoint Add-in has to be manually installed, but
once installed, the Add-in works the same on both systems.
The PRS Toolbar becomes part of the PowerPoint application. It is used to
make any slide in a PowerPoint presentation into a PRS Question Slide.
When a PowerPoint Slide Show with one or more PRS Question Slides is
run, PRS is launched, if it isn’t already running. When the PRS PowerPoint
Slide Show is begun, a New Session dialog is displayed. During the
course of the Slide Show presentation in an IR environment, every time a
PRS Question Slide appears, a Response Grid or Attendee List displays to
verify that the students’ Responses to the Question on the Slide have
been received and recorded.
In an RF environment, the Start RF Class dialog is displayed, the RF
Class is selected and started, and the students join the Class before the
PRS PowerPoint Slide Show is started. When the PRS PowerPoint Slide
Show is begun, a New Session dialog is displayed. It is not necessary to
display a Response Grid in RF.
The recorded Responses from a PRS PowerPoint Session are saved in a
standard PRS Session file. The file is listed in the Sessions Section List Win-
dow, making PowerPoint Session results accessible to the Session functions
described next.
A similar process is available to InterWrite users who have both
InterWrite and PRS installed on their systems. Multiple Question Slide-like
pages can be created in InterWrite and tagged as PRS Question Slides, and
run in a PRS Session. In addition, single PRS Question Slides can be
inserted “on-the-fly” into any InterWrite presentation.
PRS PowerPoint
Add-in
Page 9

7Chapter 1 InterWrite PRS – Sessions
Sessions
A Lesson is presented during a Session to the students in a Class for their
Responses. A Session can be started from the Sessions section, or from
the Lessons section. Below is a summary of the process leading up to,
and including, the Session.
• The Class definition establishes a Class Name and Class Type.
IR Class Type
· A Roster of students must be linked to the Class definition.
· A Response Map should be set up to indicate where each
student’s Responses will appear in the Response Grid.
· Default Settings can be established for the Response window
and
the Results Chart window.
Class Type
· A Roster can be linked to the Class definition, but it’s not
required.
· Default Settings can be defined for the Results Chart window.
• The Lesson contains the Questions that will be presented to the Class
during the Session.
• At the beginning of the Session, the New Session dialog is displayed.
· The Audience type is selected.
· Self Paced Mode can be enabled.
· The Class participating in the Session is selected.
· A Lesson is chosen for presentation to the selected Class.
· Presentation options are set and default settings are reviewed.
In an RF environment, the same New Session dialog displays, but
several options are grayed out, because their settings have already
been established. It is not necessary to designate a Class, as the RF
Class has already been started and the students have joined it. The
default Audience Type is designated as part of the Class definition.
The Audience Type and the Self Paced Mode settings are addressed
when the RF Class is started. An additional option is added to the
New Session dialog for an RF Class Session—the Collect Homework
checkbox. This option is described in Chapter Five Sessions.
• The results of each Session are saved in a Session file, which is listed
in the Sessions Section List Window.
Sessions can be renamed, resumed, reviewed, marked, and exported.
Reports on a number of different aspects of a Session can be created.
Page 10

8 Chapter 1InterWrite PRS – Sessions
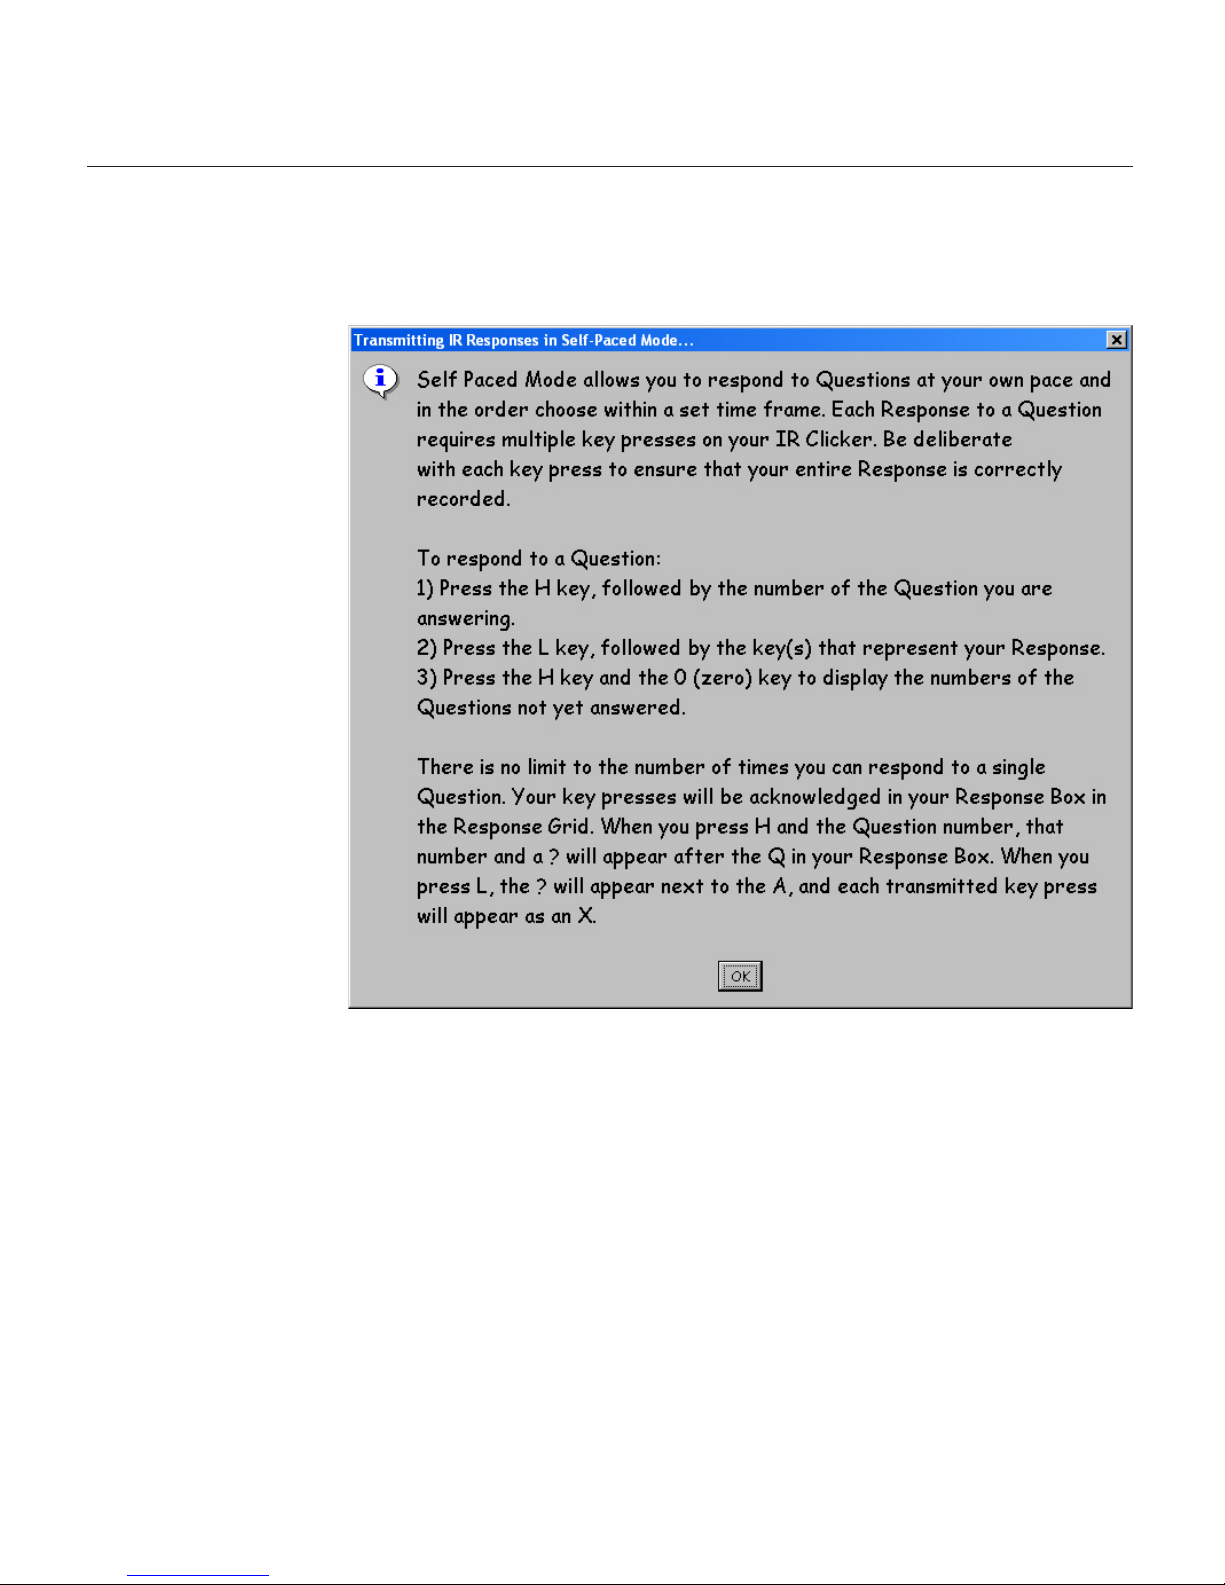
Self Paced Mode
An option available when profiling a Session is Self Paced Mode. A Self
Paced Session allows the instructor to configure a timed Session wherein
students can answer Questions in any order and at their own pace during
the designated time frame. Any Lesson can be chosen for presentation
during a Self Paced Session. Other Session settings that are not relevant
to a Self Paced Session are grayed out. A specialized Response Grid is
displayed for an IR Session that allows students to verify Responses and
track unanswered Questions. In an RF Self Paced Session, messages
regarding the status of each transmitted Response are displayed on the
LCD screen.
Insert Question
One more important feature of the basic – that is, non-Self Paced – PRS
Session is the ability to insert impromptu Questions during the Session.
For example, based on class discussions between Questions, or on a high
percentage of incorrect Responses to a Question, an instructor may
decide to approach the material from a different perspective, or try to
isolate or clarify the source of the students’ confusion by adding one or
more ad hoc Questions to the Session. The value of this feature in terms
of instant assessment is immeasurable. An instructor can be immediately
and effectively responsive when he perceives a weakness in the students’
understanding of the material.
No Lesson
While the purpose of this manual is to describe the features of PRS, it is
important to note that one can easily use the assessment and testing
functionality of PRS’s audience response system without using its Lesson
capabilities. No Lesson is an option on the New Session dialog. When
you select this option, only the Response Area is displayed for IR, and
only the Session Toolbar is displayed for RF.
Page 11

9Chapter 1
InterWrite PRS is a powerful, interactive tool, particularly in the classroom. Not only
does it free teachers from the more tedious aspects of teaching (grading tests, maintaining grade books), but it provides instantaneous assessment and feedback. Every
teacher knows each class has its own dynamic—no two classes are the same. The PRS
system can be used to present and review content in a way that keeps the students in
each class engaged and to immediately evaluate their level of comprehension, giving
the teacher the flexibility and functionality to react accordingly.
InterWrite PRS – Gradebooks Section
Gradebooks
The Gradebooks section is the section where electronic Gradebooks are
defined. The results of marked Sessions are recorded and added to the
Gradebooks. A variety of Reports can be created based on the data in the
Gradebooks. Gradebooks are stored in a format that makes them readily
accessible for export to third party Course Management Systems (CMS), such
as Blackboard, WebAssign and WebCT. A PRS Blackboard Registration
Application (Chapter Seven) has been developed that links the Clicker ID
of the registering student’s IR Clicker to his Blackboard Student ID. Class
Rosters set up in Blackboard can be imported into PRS Class definitions,
and exported PRS Gradebooks can be imported into Blackboard. In an RF
environment, where student Responses are linked directly to the Student
ID, the transfer of data is even easier.
Page 12

10 Chapter 1InterWrite PRS – Screen Elements
Screen
Elements
The main screen of each of the four PRS Sections has the following elements
in common: the Menubar, the Section Tabs, the Function Buttons, the Table
Header Buttons, and the List Window.
The menus on the PRS Menubar provide options for:
• setting Preferences on the File Menu,
• starting and stopping Classes and configuring RF Clickers on the RF
Menu,
• establishing the communication link between the IR Receiver and the
PRS software on the Connection Menu,
• offering another way of moving from section to section using the View
Menu, and
• providing additional information about using the PRS system on the Help
Menu.
The Menus on the PRS Menubar are described in detail in the next section.
The Section Tabs provide a way of moving from one section to another. Each
of the four PRS sections has a set of Function Buttons that allow you to
create, edit, and delete the components of that section with additional,
specialized functions specific to the section.
Each section has a List Window where the work product of that section is
displayed in a table—Class Rosters, Questions, Sessions, Gradebooks, etc. A
feature of each List Window is the ability to click on a column Table Header
Button to sort the data in the List Window by the contents of that column.
For example, in the Classes Roster List Window shown above, a click on the
Last Name Table Header Button will order the entries in the Roster List
Window alphabetically in ascending order based on the students’ last names.
A green Sort Indicator Arrow will display on the Table Header Button used
to index the contents of the table. Click on the Table Header Button with the
Sort Indicator Arrow to toggle between ascending and descending sort order.
This feature is available in every dialog that has a List Window.
New Screen Shot needed
Menubar
Section
Table
Function
List
Sort Indicator Arrow
Buttons
Header
Tabs
Buttons
Window
Page 13

11Chapter 1 InterWrite PRS – PRS Menus
PRS Menus
File Menu
The File Menu provides the options to set system Preferences and to Exit
the PRS application.
Exit Use this File Menu option to exit and close the PRS application.
Default Data Directory This Preference shows the current location of the
Data Directory. Click on the Browse button if you want to navigate to a
different directory location for the Exports, Gradebook, Lessons, Reports,
ResponseMap, Roster, Session, and Settings folders.
Default System Font By default, the display font used throughout the
PRS system in Windows is Comic Sans MS. The default font on the Mac is
Arial. Click on the Down Arrow to display a list of the fonts installed on
the computer.
Font Preview When you select a font from the drop-down list, an
example of the font selection is displayed here. Click on the second Set
to Default button to return to the default system font when PRS is
restarted.
Preferences Customer ID By default, in an IR environment, each IR Clicker is assigned a
unique string of six numbers. This numeric string is the transmitter’s ID. Any
IR Clicker can be used with any InterWrite PRS installation. Programmable IR
Clickers are different in that they can be programmed with unique IDs that
will be accepted and recognized by only one InterWrite PRS system—the
InterWrite PRS system whose Customer ID matches the one used to program
the IR Clickers. So, for example, if an elementary school teacher wants to
have an IR Clicker for each child in her class that is numbered in a way that’s
easy for the children to identify and remember, she can purchase Programmable IR Clickers that can be assigned unique IDs, which are associated with
the Customer ID of her InterWrite PRS system, and which cannot be used
with any other InterWrite PRS system. That unique Customer ID is entered
here in this field.
If the Customer ID gets changed, click on the Set to Default button to return
the Customer ID to its original assignment.
Page 14

12 Chapter 1InterWrite PRS – PRS Menus
Menu
The RF Menu provides a one-stop shop for the settings that are specific
to the RF environment. Many of the options described here will make
much more sense when you have read Chapter Three Classes and understand them in the context of the Class Type and the Class System Types,
Open and Closed.
Start Class This menu option displays the Start RF Class dialog, the same dialog
displayed when PRS is started up (and an RF Receiver is installed).
Stop Class This menu option is selected when you want to end the RF Class.
Joined List This menu option displays the complete list of RF Clickers that joined the
RF Class. When you stop the Class, this list is deleted.
Configure Clickers By default, an RF Clicker is set to Normal and does not require any
additional configuration. A Normal Clicker is the property of the student
and can be used in any Class whose Class System Type is designated as
Open.
A Loaner Clicker is an RF Clicker that can be loaned to a student during a
Class when his Clicker has malfunctioned, or he has forgotten it. An RF
Clicker configured as a Loaner Clicker will require the student borrowing
it to input his Student ID before he joins the Class, ensuring that his
Responses will be credited to him during that Class. Loaner Clickers can
be configured for both Open and Closed Classes.
A Closed Clicker is an RF Clicker that is linked to the Class ID assigned to
a Closed Class System Type. Closed Clickers are automatically assigned a
unique Join ID to identify each one in the Closed Class. Whereas Normal
Clickers are typically student-owned and can be used in any Open Class,
Closed Clickers are the property of the school and remain in the class-
room. Each Closed Clicker can then be assigned to a specific student in
the Closed Class, so that Johnny always uses Clicker 1 and Suzie always
uses Clicker 2, and so on.
A Master Clicker is a special RF Clicker that can be used by an instructor
to send commands to a Session from anywhere in the room. Master
Clicker Commands are described in Chapter Two PRS System Installation.
The Closed Loaner Clicker setting is used to set up a Loaner Clicker for
use in a Closed Class. Any student can use a Closed Loaner Clicker
because, as is characteristic of any RF Clicker designated as a Loaner, it
prompts the person using it to enter his Student ID before he joins the
Class, in this case, the Closed Class.
A Closed Master Clicker is a Master Clicker used to send commands to a
Session that is run in a Closed Class.
Page 15

13Chapter 1 InterWrite PRS – PRS Menus
Scan for Receivers This RF Menu option will look for and attach to any RF Receivers on the
system. Use this menu item only when an RF Receiver is attached to a
USB port on the computer. Or, when the RF Receiver has been moved
from one USB port to another after the PRS software has been started.
Configuring
Clickers
The basic process for configuring RF Clickers is the same, no matter which
Clicker Type configuration you choose.
1 Select the Clicker Type from the
drop-down menu.
2 When you choose one of the
Closed configurations, select a Class
in the RF Closed Classes window.
The Class ID you assigned to the
Closed Class will display.
3 Click on the Setup button to display
the Setup Instructions in the
Instructions window for the Clicker
Type you chose.
4 Turn on all the Clickers, as
instructed, and press the Quick
Jump number displayed in the
angle brackets (< >) on each
Clicker.
5 The “Configuration Class” name is displayed on each LCD. Press the
Enter/Send key to join each Clicker to the Configuration Class.
6 If the Clickers have been configured for Closed, each Clicker will display
the ID: field. Enter a unique ID for each Clicker. Press to save the ID.
The LCD display confirms the Clicker Type assignment. The Instructions
window on the Configure Clickers dialog will list the Join IDs assigned to
each of the Clickers you configured. You can Close the dialog, or select a
new Clicker Type and configure additional Clickers.
Normal is the default Clicker Type. Normal Clickers require
no configuration and can be used in any Open Class. The
option appears on the Clicker Type menu so that you can set
a Clicker that has been configured previously as a Loaner,
Master, Closed, Closed Loaner, or Closed Master Clicker
back to Normal.
Page 16

14 Chapter 1InterWrite PRS – PRS Menus
Connection Menu
The Connection Menu is used to:
• specify the COM Port to which the Receiver is connected,
• simulate Clicker input from the computer keyboard,
• test for both the COM Port connection and for the receipt of a signal
from a Clicker.
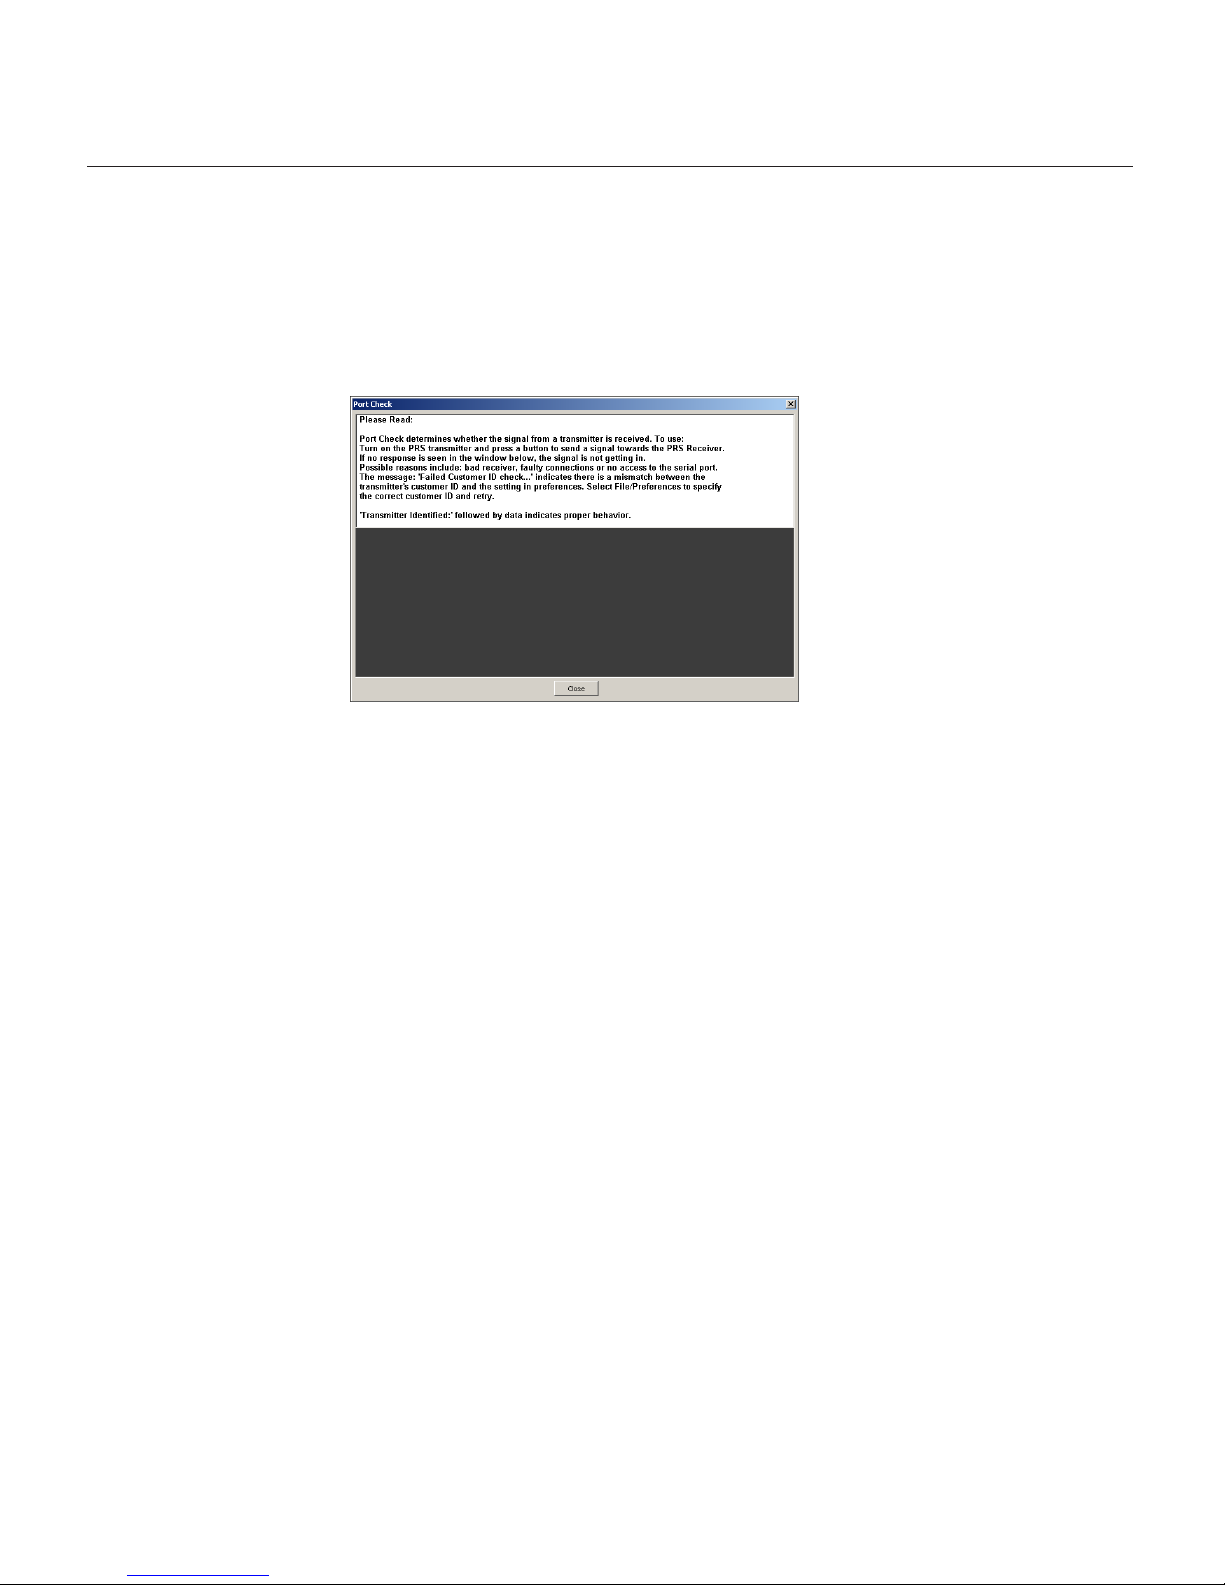
Port Check
The Port Check menu option is used primarily to detect IR
Receivers. The USB-connected RF Receiver is automatically
assigned to a COM Port and the assignment is noted on the
Connection Menu.
Configuring an
Clicker as a
Master
Master Clickers are specially configured RF Clickers that can send commands to the PRS software during a Session to remotely control the
Session presentation. This is true of Master Clickers configured for both
the Open Class and the Closed Class. The command key assignments are
described in Chapter Two PRS System Installation.
Configuring
Clickers for a
Closed Class
The Student ID is attached to each transmission sent to the PRS software. In
the Open Class paradigm, the student enters his Student ID, which is saved
in the memory of his personal Clicker. In the Closed Class model, where
Clickers are owned by the school and stay in the classroom, there are two
ways to set up the Closed Clickers so each will have a unique ID to bundle
with transmissions.
If the Closed Clickers will always be used by the same 30 students, you
can assigns IDs of 1 through 30, for example, label the Clickers accordingly, and assign a specific Clicker to each of the 30 students.
However, if the Closed Clickers are going to be used in the classroom by
different groups of students throughout the day, you might consider
configuring those Clickers as Closed Loaners. Clickers configured as
Loaners, regardless of whether they are used in an Open Class or a
Closed Class, will prompt for an ID before they join the Class. So, each
student in each Closed Class Session will have his Responses attributed
directly to his Student ID.
As part of the installation of the IR Receiver (Chapter Two), the COM port
to which the IR Receiver is connected must be communicated to the
InterWrite PRS software. The number of COM ports displayed on the
Connection Menu will vary with the number of COM Ports on the
computer. Select from the list the COM port to which the IR Receiver is
connected. If you don’t know which COM port it is, or if you want to test
the connection, select a COM port in the Connection Menu, click on the
Page 17
15Chapter 1 InterWrite PRS – PRS Menus
Transmitter Test
As indicated in the white message box on the Port Check window, the
Port Check feature verifies that a signal from an IR Clicker is received by
the IR Receiver. Not only can you use Port Check to verify the IR Receiver COM port connection, you can also use it to test an IR Clicker.
Verify the IR Clicker does not need new batteries. (Under normal operating conditions, the LED indicator light on a powered-on IR Clicker is
bright green. Change the batteries when the LED indicator light is dim.)
Select the Port Check option and send a transmission by pointing the
tapered end of the powered-on IR Clicker toward one of the IR Receivers
in the room and pressing a numbered button. If nothing shows up in the
Port Check window, there is a problem with the IR Clicker. Try resetting
it. Straighten a paper clip and stick the end of the paper clip into the hole
on the back of the IR Clicker. The hole is located to the right side, near
the battery pack. Push until you feel a slight click. Power on the IR Clicker
and rerun the Transmitter Test.
Port Check menu option, verify the IR Receiver is powered-on, and send a
signal from a powered-on IR Clicker to the IR Receiver. If the IR Receiver
is connected to the COM port you selected in the Connection Menu, a
Clicker Identified message will appear in the black Port Check window. If
the Port Check window remains blank, select another COM port in the
Connection Menu and repeat the transmission check process.
Page 18

16 Chapter 1
View Menu
The View Menu lists all four of the PRS Sections and indicates with a
diamond which section is currently being displayed in the PRS Window.
You can move to another section by selecting it from the View Menu, or
by clicking on its Section Tab in the PRS Window.
InterWrite PRS – PRS Menus
Key Input If you are learning how to use the InterWrite PRS system and/or you want
to simulate a Session, you can set up PRS to accept input from the
computer keyboard that simulates Clicker input signals. When you want
to test a Lesson, you can run a test Session without having a PRS Receiver
connected to your computer.
1 Select the Key Input feature on the Connection Menu.
2 When you are using a Response Map, make sure the Response Grid
(Class definition) has enough Response Boxes, in addition to those
assigned to the students in the Roster, to accommodate the number
of simulations you intend to use. When there is no Response Map in
place, the grid will roll over.
3 Click on the New Session Function Button in the Sessions Section.
4 Start the Question.
5 To send a simulated Response to the Question, type a letter, which
identifies a unique ID (there are twenty-six unique IDs, one for each
letter of the alphabet). Then, type the number of your test Response
Choice.
5 Use the SHIFT and CTRL keys in combination with the letter key to
indicate a High Confidence Level or Low Confidence Level (see the
following Clicker Operation Instructions section), respectively. For
example, the Key Input SHIFT + b + 1 would be interpreted by the
Key Input Response Simulation option as: “Respondent ‘b’ has high
confidence that the first Response Choice is the correct one.”
As you enter these alphanumeric combinations from the computer
keyboard, each will register as a Response in a Response Box in the
Response Grid displayed below the Question and Response Choices.
Page 19
17Chapter 1 InterWrite PRS – PRS Menus
Help Menu
Check for
Updates
This option links to the GTCO CalComp Web site where it checks for the
current version of the InterWrite PRS software. If there is a newer version
of the software, you will be given the option to download it. You should
check for updates periodically to make sure you have the latest and
greatest version of the PRS software.
InterWrite PRS
Help
This menu option displays a Help file for the PRS software.
Clicker Operation
Instructions
RF Clickers and IR Clickers are used to electronically transmit a student’s
Response to a Question presented during a Session. The basic operation of
the RF Clicker and IR Clicker may not be intuitive to the first-time user.
We’ve included Basic Operating Instructions for both the RF Clicker and IR
Clicker on this menu. In addition, although the IR Clickers have a limited
selection of keys when compared to the RF Clickers, they can respond to
most Question Types. The Response process is not as straightforward as it is
with the RF Clicker, so an instruction set has been included on this menu for
responding to various Question Types using the IR Clicker.
Basic Instructions
The first instruction set describes the basic operation of an RF Clicker.
Page 20
18 Chapter 1InterWrite PRS – PRS Menus
Basic Operating Instructions for IR Clickers
Page 21
19Chapter 1 InterWrite PRS – PRS Menus
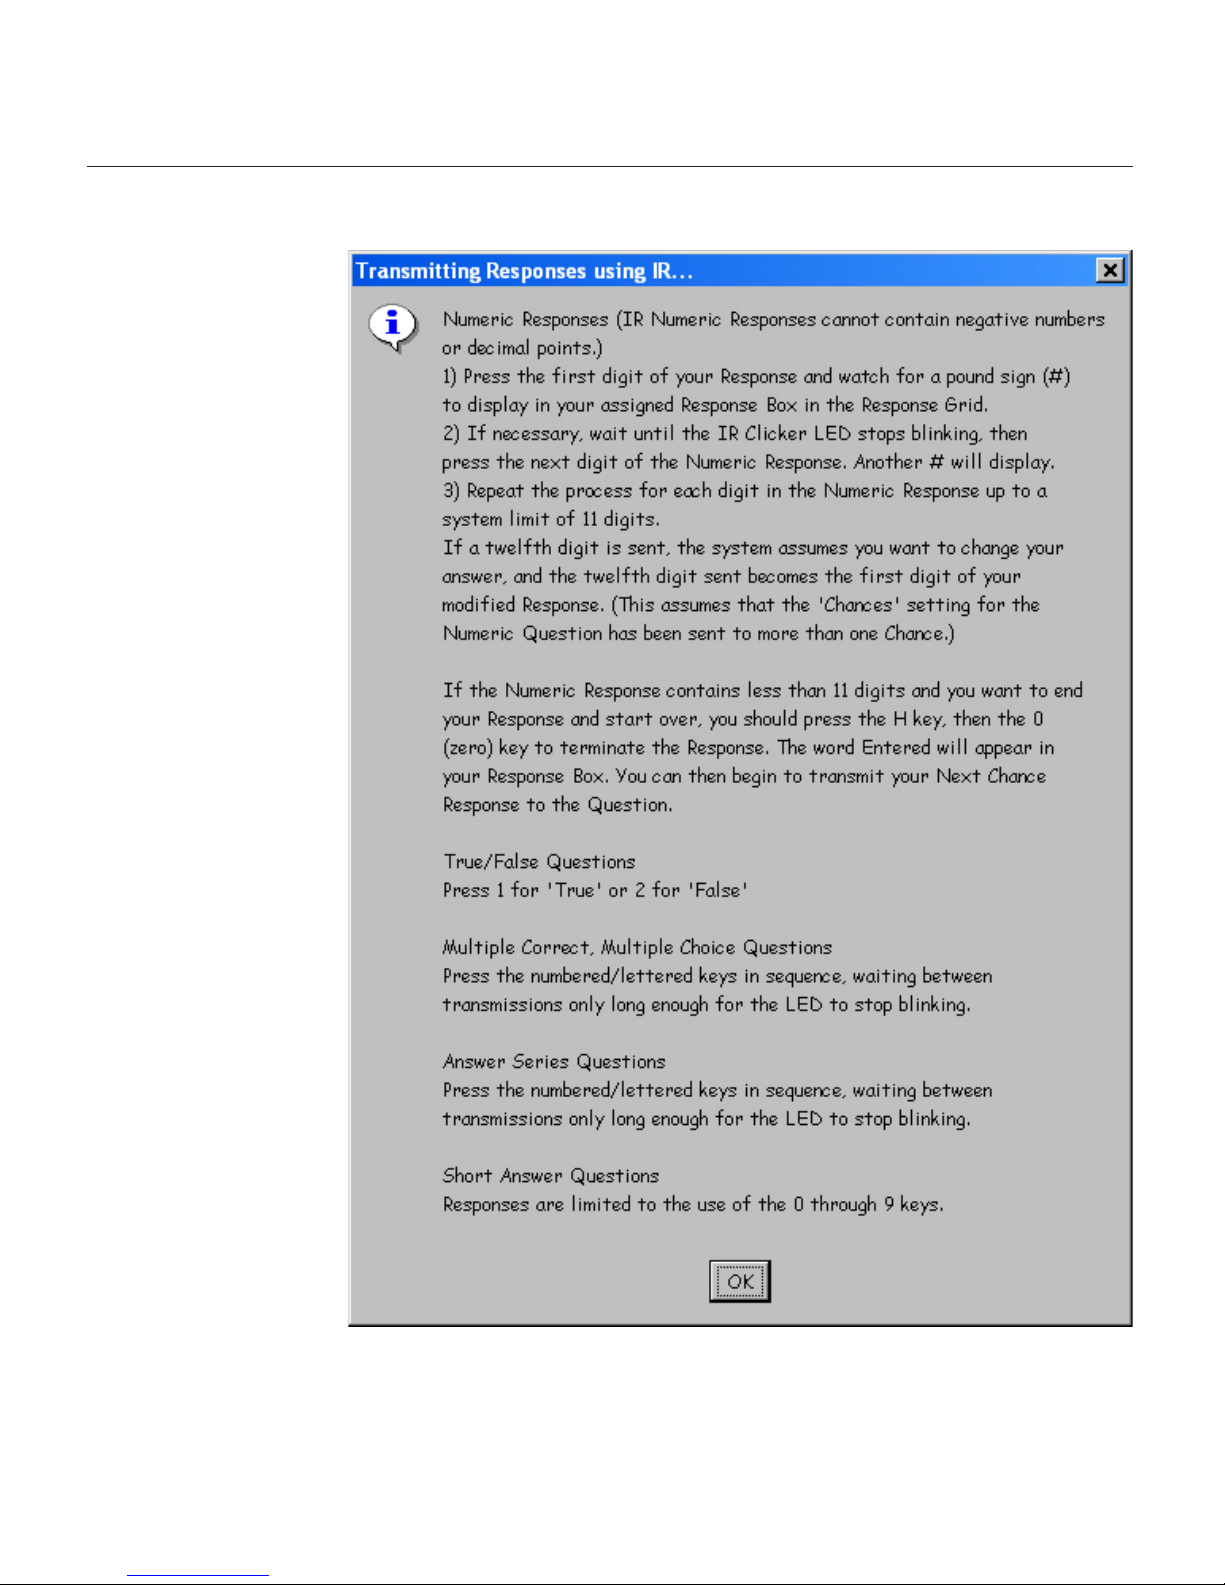
Responding to Different Question Types Using the IR Clicker
Page 22
20 Chapter 1InterWrite PRS – PRS Menus
Confidence Level
A Confidence Level designation allows a student to qualify his Response
to a Question. By attaching a High Confidence Level indicator to a Response,
a student is saying that he is very sure about the correctness of his Response.
When a student attaches a Low Confidence Level indicator to his Response,
he is basically saying his answer is a guess and he has little confidence in its
correctness.
IR Clickers have an H key and an L key in the bottom row of keys. Pressing
the H key followed by a Response value key attaches a High Confidence
indicator to the Response. Pressing the L key plus a Response value key
attaches a Low Confidence indicator to the Response.
Self Paced Session Instructions
This set of instructions describes how to respond to Questions during a Self
Paced Session when using an IR Clicker.
Page 23

21Chapter 1 InterWrite PRS – Manual Organization
About The About Help Menu option displays an information window with the
PRS version number, system information, and contact information for
GTCO CalComp.
Example Files Click on this menu option to view examples of a Class Roster and a Response
Map, among others, in the native .csv format. This links to the GTCO CalComp Web site, where the examples are found.
Clickers do not have H and L keys. The key is used to indicate Low
Confidence and the key is used to indicate High Confidence. When a
Confidence Level is attached to a Response from an RF Clicker, the Confidence Level Indicator should follow the Response. Confidence Level Indica-
tors can only be used with True/False Question Types and single-choice
Multiple Choice Question Types.
By default, when a Confidence Level is not indicated, all Responses are
assigned a Medium Level of Confidence. The instructor should indicate at the
beginning of a Session, or before a Question is presented, that he wants a
Confidence Level attached to the Response(s).
Manual
Organization
This InterWrite PRS User’s Guide covers all aspects of the PRS system,
including the installation, set up, and troubleshooting of the hardware. A
chapter is devoted to the installation and set up of the InterWrite PRS
Web Registration Application, a Web-based application that makes it
possible for students to register online for those classes using the PRS
system, and the PRS Blackboard Registration Application, which makes the
export and import of information between PRS and Blackboard possible.
The primary focus of this User’s Guide, though, is the PRS software. A
chapter is devoted to each of the four tabbed Sections of the PRS software with detailed descriptions of each section’s functions and procedures.
Chapter One InterWrite PRS Overview This chapter introduces the
InterWrite PRS system, identifies the primary screen elements, describes
the Menu options on the PRS Menubar, and outlines the organization of
this manual.
Chapter Two PRS System Installation Both of the PRS hardware
systems feature Receivers and Transmitters, or Clickers. Both are easy to
install and operate. The Clickers are handheld, battery-powered devices.
AAA batteries are easily installed in the back of each type. IR Receivers
are connected to each other, if more than one is being used, to a power
supply, and to the serial port on the computer. The IR Receiver setup is
completed when the COM port is selected on the Connection Menu.
Page 24

22 Chapter 1InterWrite PRS – Manual Organization
Each RF Receiver is connected to a USB Port, which is automatically
detected by the PRS software.
Chapter Three Classes Describes how to set up a Class definition.
Chapter Four Lessons Describes how to add branches to the Lesson
Tree, define and organize Questions, import Questions into Lessons, and
set up PowerPoint Lessons.
Chapter Five Sessions Describes how to set up and run a Session, how
to insert impromptu, unplanned Questions during a Session, how to
rename, resume, review, mark, and export a Session, and how to create a
Session Report.
Chapter Six Gradebooks Describes how to set up a Gradebook, add
Marked Sessions, export Gradebooks, and create Reports based on Gradebook data.
Chapter Seven PRS Registration Applications This chapter first describes
how to install and set up the Web-based PRS Registration Application, and
then how to install the PRS Blackboard Registration Application and set up
the PRS Tab in Blackboard. Both applications are included on the InterWrite
PRS CD.
The optional PRS Web Registration Application is used to register PRS
Clickers over the Internet. The application includes an Administrative
section that supports the organization and maintenance of the Internet
registration process.
The PRS Blackboard Registration Application is used to establish a
connection between the student’s IR Clicker and his Blackboard Student
ID, so Roster information can be exported from Blackboard for use in a
Class definition, and Marked PRS Sessions can be exported from PRS
Gradebooks for use in Blackboard.
Appendix Regulatory and Warranty Statements.
Page 25

23Chapter 2
PRS System Installation
The InterWrite PRS system consists of the PRS software, the optional PRS
Web Registration Application and PRS Blackboard Registration Application, and the PRS hardware. Setup, installation, and operation of the two
PRS registration applications is detailed in Chapter Seven. The setup and
installation of the InterWrite PRS software and hardware is covered here.
PRS is compatible with Windows 2000 and XP. The PRS application software
must be installed on Windows by an Administrator.
1 Log in as Administrator. Insert the PRS CD into the CD drive on your
PC. The installer will autorun.
If it doesn’t, click on the Start button on the Windows Task Bar and
select Run from the menu. Type X:\setup.exe (X represents the CD
drive letter).
2 Select the Install InterWrite PRS Software menu option.
3 Follow the onscreen instructions for the software installation.
Windows
Installation
PRS is compatible with Mac OS X 10.2.6 and above. The InterWrite PRS
application software must be installed on the Mac by an Admin.
1 Insert the PRS CD into the CD-ROM drive on your Mac. An InterWrite
PRS icon will appear on your desktop.
2 Double-click on the InterWrite PRS icon on the desktop to display the
CD’s contents. Double-click on the Install InterWrite PRS icon.
3 Follow the onscreen instructions for the software installation.
Mac
Installation
For the Mac installation, Tiger (10.4) and Panther (10.3) are
automatically supported. To run InterWrite PRS on Jaguar
(10.2), you must first download the free version of Java
1.4.2 available for 10.2.6 and above.
InterWrite
PRS Software
The PRS software for the Mac and Windows is included on the InterWrite
PRS CD.
Install the PRS software first so the appropriate drivers are
in place when you install the hardware.
Page 26

24 Chapter 2PRS System Installation – PRS Hardware
If you are installing a Mixed PRS System that uses both
IR and RF PRS hardware, don’t mix up the Power Supply
cables. The Power Supply for IR is slightly different than the
one for RF, and they cannot be used interchangeably.
The PRS hardware, Receivers and Transmitters (Clickers), is available in
two transmission types—IR (Infrared) and RF (Radio Frequency). The IR
Receivers and IR Clickers support a one-way, line-of-sight transmission
from Clickers to Receivers and on to the PRS software. The RF Receiver
Hubs and RF Clicker Remotes support two-way radio frequency transmission. Responses are transmitted from RF Clickers to RF Receivers to the
PRS software and status messages are returned via the Receiver to the
individual Clickers. Both PRS hardware systems are used to send, capture
and decode signals that are ultimately relayed to the PRS software on the
computer, where they are interpreted as Question Responses. Each
Response has a code attached to it that identifies the Clicker it came
from. The software establishes the connection between that unique
transmitted code and the student’s identity, providing the basis for
recording Responses and attributing them to the student. In the IR system,
the unique code is the Clicker ID. It is matched in the Class Roster to the
Student ID and student name. In the RF system, the Student ID is the
unique code transmitted with each Response. As the Student ID is the
unique identifier of students in the Class, a Roster does not have to be in
place in order to have the Responses attributed correctly and recorded.
The Clickers are small, battery-operated, handheld devices. IR Clickers
have a keypad that consists of four rows of lettered and numbered keys
and a Power button. The RF Clickers have an expanded keypad that
includes Input Keys and Navigation Keys. A two-line LCD screen displays
Responses as they are entered and the returned status messages.
The Receivers receive and decode data transmitted to them from the
Clickers. The IR Receiver sends the decoded data via a serial connection to
the computer. The RF Receiver uses a USB connection. In both cases, the
decoded data are analyzed and recorded by the PRS software.
PRS
Hardware
Page 27

25Chapter 2 PRS System Installation – RF Receiver
Receiver
Installation
The RF Receiver does not rely on line-of-sight transmission, so it does not
have to be positioned at the front of the room. Just be aware that the RF
Receiver works best when it is not sitting on a metal surface (such as your
computer box). The PRS RF Receiver ships with a 9V Power Supply,
Power Supply Plug Adaptors, a USB cable.
1 Plug the Power Supply into a wall or power strip outlet.
2 Plug the other end of the Power Supply into the RF Receiver.
3 Plug the square USB B connector into the RF Receiver.
4 Plug the flat USB A connector into an available USB port on your
computer.
The RF Receiver is automatically assigned to a COM Port and that information is communicated to the PRS software, so there is no need to set
the COM Port on the Connection Menu.
In a Windows installation: The unsigned RF Receiver
driver is already installed on your computer. Nevertheless,
Windows may need some coaxing before it will recognize
the new hardware. Be persistent and do not let Windows
worry you about the driver being unsigned. This will not
in any way affect the operation of the RF Receiver or PRS.
LED Light Phases The RF Receiver green LED light has three phases:
• Fast Flash No USB connection
• Slow Flash Scanning for a free channel, or one with less noise
• Solid On Working
Page 28
26 Chapter 2
Clicker
Setup and
Operation
The RF Clicker ships with the batteries installed, so there is no real setup
involved.
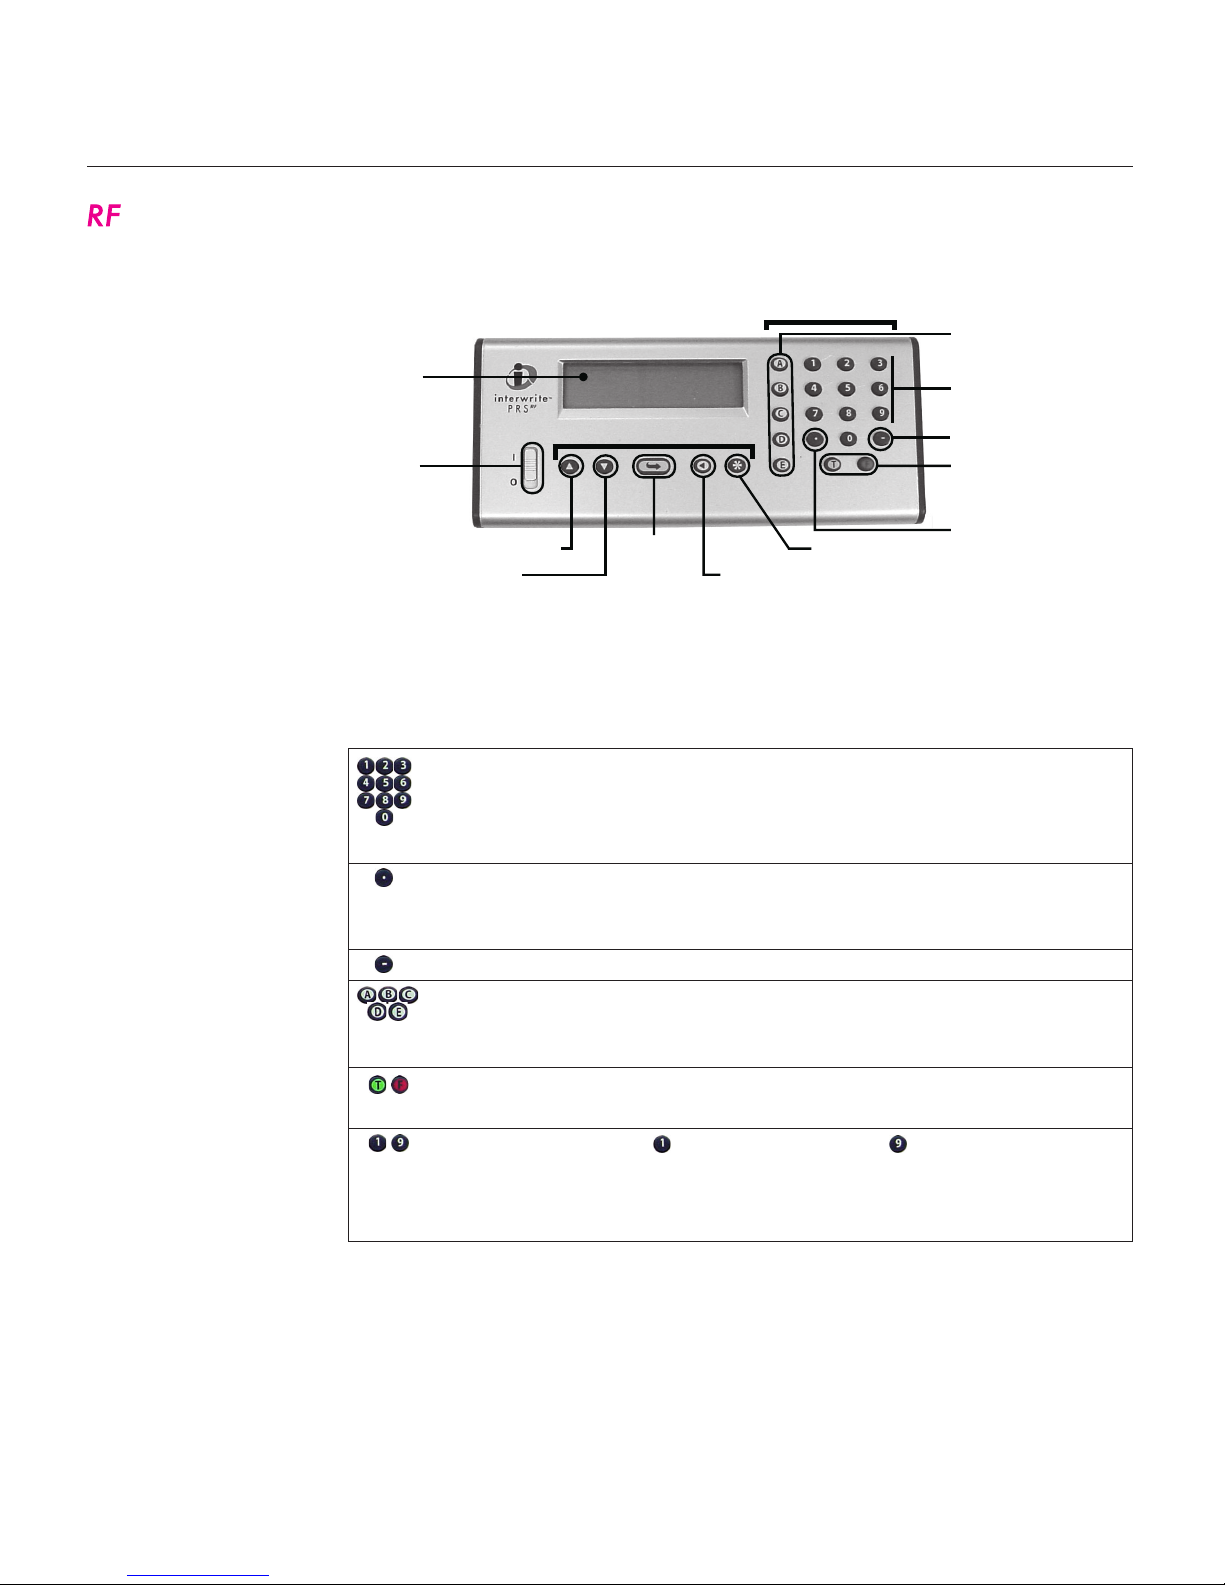
Clicker Key Quick Reference
FUNCTION
Numeric Keypad Enter numeric Responses and Response Choices
for numbered Multiple Choice Questions
Enter numeric values, e.g., Student ID and
numeric Responses
Decimal Point Enter a decimal point in a numeric Response
Press twice to enter a forward slash (/) for
fractions
Minus Sign Enter to indicate a negative number
Multiple Choice/
Alpha Character
Keys
Enter your Response Choice(s) to a Multiple
Choice Question
Switch to Alpha Mode
True/False
Response Keys
Enter Response to True/False Questions
Switch to Alpha Mode
Confidence Level
Indicators
= Low Confidence and = High Confidence
Enter a Confidence Level after a single-choice
Multiple Choice Response, or after a True/False
Response
INPUT KEYS
Power
Switch
Enter/
Send
Scroll Up
Scroll
Down
Cycle/
Backspace
Menu Key
Decimal
Point
True/False
Response Keys
Minus Sign
2-Line
LCD
Display
Numeric Keypad
Multiple Choice
Option Keys
Navigation Keys
Input Keys
PRS System Installation – RF Clicker
Page 29

27Chapter 2
NAVIGATION KEYS
Scroll Up
Scroll Down
Scroll Up and Scroll Down when in Setup Menu
(watch for the
symbol on the LCD display), or
when in Homework Mode
Scroll through the alphabet when in Alpha Mode
Enter/Send
Cycle/Backspace
Cycle through setting options when
is displayed
in the lower right corner of the LCD display, or go
up a menu level when is in the upper left corner
Menu Key Display Setup Menu
Stop Autoscan
Save input values, e.g., Student ID
Send Responses
Backspace to clear a character in an input field
FUNCTION
LCD DISPLAY
SYMBOLS
FUNCTION
When this symbol appears in the upper left corner of the LCD screen,
press the
key to go up a level in the Setup Menu. When the symbol
appears on the second line of the LCD display in the right corner, it
means you can click on the
key to cycle through the possible settings
for the Setup Menu option.
This symbol indicates you can press the or key to scroll up or down
through the Setup Menu options.
When you see this symbol on the LCD display, press the key to
display an input field, or a submenu.
First-time users and students using Loaner Clickers will
be prompted to enter an ID. This is the Student ID. It
will be saved in the memory of Student-owned Clickers,
but stored only temporarily in Loaners.
PRS System Installation – RF Clicker
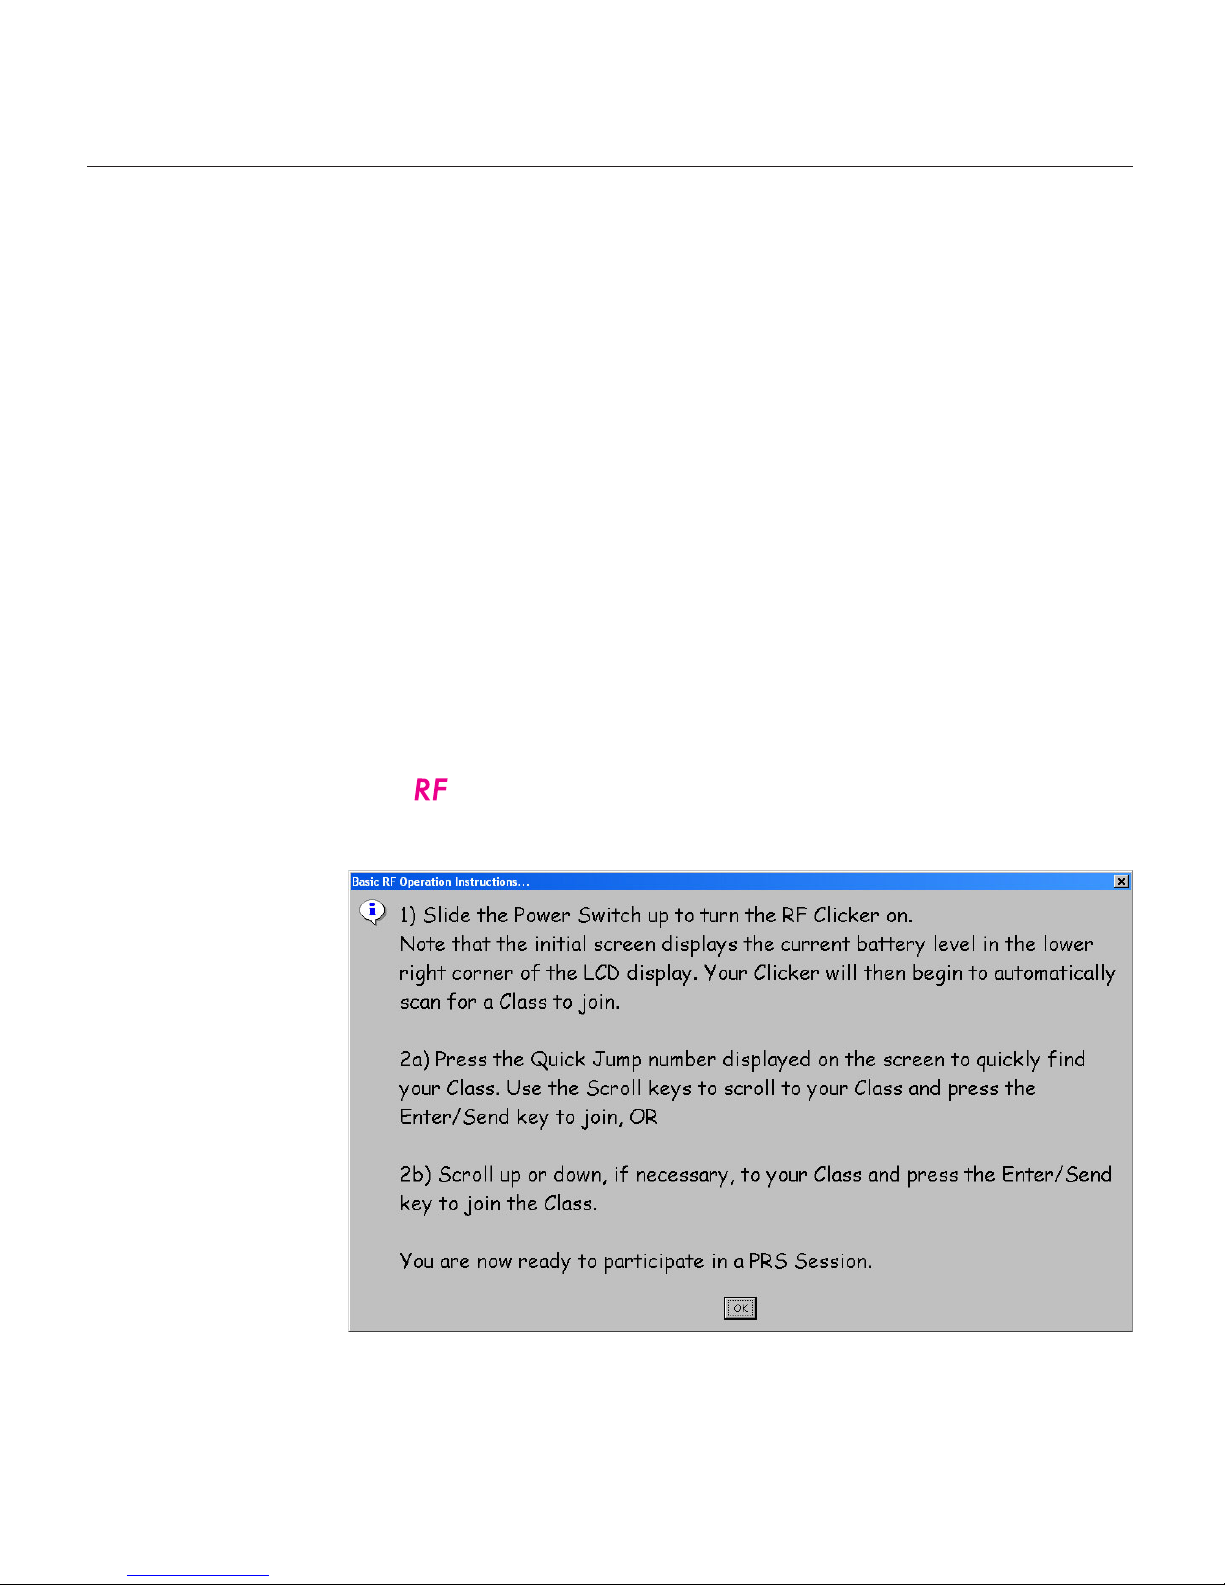
Basic Operation 1 Slide the Power Switch up to turn the RF Clicker on.
After the initial screen displays, where a battery icon indicates the relative
level of battery life remaining, the RF Clicker begins Autoscanning for a
Class to join.
2a Press the Quick Jump number, displayed in angle Brackets (< >) on the
PRS Status Bar, to quickly find your Class. Scroll , if necessary, to
your Class and press to join, OR
2b When Autoscanning has completed, scroll or , if necessary, to
your Class and press to join.
Page 30

28 Chapter 2PRS System Installation – Master RF Clicker
1 On the back of the RF Clicker, remove the Screw holding the Battery
Cover in place.
2 Remove the Battery Cover by pushing down on the Thumb Grip and
sliding it toward the bottom of the Clicker.
3 Remove the old batteries and discard them following the proper disposal
procedures.
4 Insert three AAA batteries, positioning them properly to ensure the
correct polarity.
5 Slide the Battery Cover back into place and replace the Screw.
Replacing
Clicker Batteries
Back of RF Clicker
Screw Battery
Cover
Thumb
Grip
When you see the Low Battery
message when you turn on your
RF Clicker, you have about 15%
Battery Life remaining. Replace
the batteries as soon as possible.
Master RF Clicker
Command Key
Assignments
COMMAND
Start Question
Resume Question
Pause Question
Stop Question
Increase Timer
Decrease Timer
Next Question
Previous Question
Close Chart
KEY
Master
Clicker
The Master RF Clicker is a special configuration of the RF Clicker that is
set using the Configuring Clickers option on the RF Menu. An RF Clicker
configured as a Master or Closed Master Clicker enables the instructor to
send commands to the PRS software during a Session and control the
presentation from anywhere in the room. The following table summarizes
the key assignments for an RF Clicker configured as a Master Clicker.
Page 31

29Chapter 2 PRS System Installation – IR Receiver
1 Plug one end of the Stereo Cable into the OUT jack of the IR
Receiver.
2 Plug the other end of the Stereo Cable into the connector on the 3-
Way Cable.
3 Plug the Power Supply connector into the receptor on the 3-Way
Cable.
4 Plug the serial end of the 3-Way Cable into an RS232 serial COM
port on the computer, or into a serial-to-USB adapter, if your
IR Receiver
Setup and
Operation
The IR Receiver must be positioned at the front of the room where it can
capture the line-of-sight signals from the IR Clickers. A glass window on the
front of the IR Receiver unit above the red LED Light contains an IR Sensor
reception cone, which has a Reception Angle of approximately 90 degrees.
The size and seating arrangement of the room will predict where at the front
of the room the IR Receiver should be located. Be sure to test transmission
reception from everywhere in the room. One IR Receiver can receive and
process data from up to 50 Clickers. Larger rooms with more seating may
require more than one IR Receiver. Multiple Receivers are daisy-chained
together. Receivers in the corners of the room should point diagonally to the
opposite corner at the rear of the room to take advantage of the entire
Reception Angle of the IR Sensor. The primary IR Receiver ships with one
stereo cable (6 meters), a 3-way RS232 Serial cable and a Power Supply. Each
additional IR Receiver ships with a 12 meter stereo cable used to attach it to
the next Receiver in sequence. One Power Supply can serve up to four IR
Receivers.
Hardware
Connections for
One IR Receiver
(RS232 COM Port)
Computer
3-Way Cable
Stereo Cable
Power Supply
IR Receiver
IR Sensor
LED Light
Page 32

30 Chapter 2
When more than one IR Receiver is required for coverage, plug one end of
the 12 meter Stereo Cable into the OUTput jack on the second unit and the
other into the INput jack on the first unit, the third into the second, and so on
down the chain. The last IR Receiver in series does not have to be terminated. One Power Supply will serve up to four units in the chain. Please
contact GTCO CalComp if you require a special configuration. Contact
information is in the Appendix.
PRS System Installation – IR Receiver
computer does not have any available serial COM ports. We
recommend the KEYSPAN USB Serial Adapter.
5 Plug the Power Supply into an AC wall outlet or power strip.
Ensure all connections are secure.
Complete all connections before plugging in the Power
Supply.
Hardware
Connections for
Multiple IR
Receivers
(RS232 COM Port)
Computer
3-Way Cable
Stereo Cables
Power Supply
IR Receivers
IR Sensor
LED Light
The PRS software needs to be informed where to pick up data collected
by the IR Receiver. It needs to be told which COM port the Receiver is
connected to.
1 Open the PRS application.
2 From the Connection Menu, select the COM port the IR Receiver is
connected to. The Mac lists either the device, or an identifying serial
number, that each port is connected to, making it fairly easy to find the
correct connection for the IR Receiver. Windows, on the other hand, just
lists the available ports on the system. It’s up to you to determine which
Making the
Connection
Page 33

31Chapter 2
port the IR Receiver is connected to. If you’re not sure, refer to the
Port Check section in Chapter One for information on testing the
COM ports for the connection.
PRS System Installation – IR Clicker
Troubleshooting
the IR Receiver
Connection
If the IR Receiver is not being recognized on any of the COM Ports, first,
check all connections to make sure they are secure. From the Connection
Menu, select a COM Port and run a Port Check, as documented in Chapter
One, PRS Menus. Repeat for each COM Port. If the IR Receiver still fails to
show up, leave it connected and restart the computer. In most cases, the IR
Receiver will now show up as connected to the COM Port.
The software for some serial devices will take over a COM Port and fail to
release it when the device is disconnected. If the IR Receiver is attached to
one of these COM Ports, Windows won’t recognize it because the Port has
been commandeered by another application. We’ve seen this behavior when
a Palm Pilot, for example, had been connected to the COM Port to which the
IR Receiver is currently connected.
IR Clickers require little in the way of setup. It’s simply a matter of
installing two batteries, as follows:
1 A tiny screw holds the battery cover in place on the back of the unit.
IR Clickers are shipped either with the screw in place, or taped inside
the lid of the Clicker box. If the screw is in place, remove it now.
2 Remove the battery cover by pushing down on the thumb grip and
sliding it in the direction of the arrow.
3 Insert two AAA batteries, positioning them properly to ensure the
correct polarity.
4 Slide the battery cover back on and reinsert the screw to hold it in
place.
IR Clicker Setup
and Operation
Low Confidence Key
On/Off Power
Signal Direction
LED Light
Response Keys
High Confidence Key
Page 34

32 Chapter 2
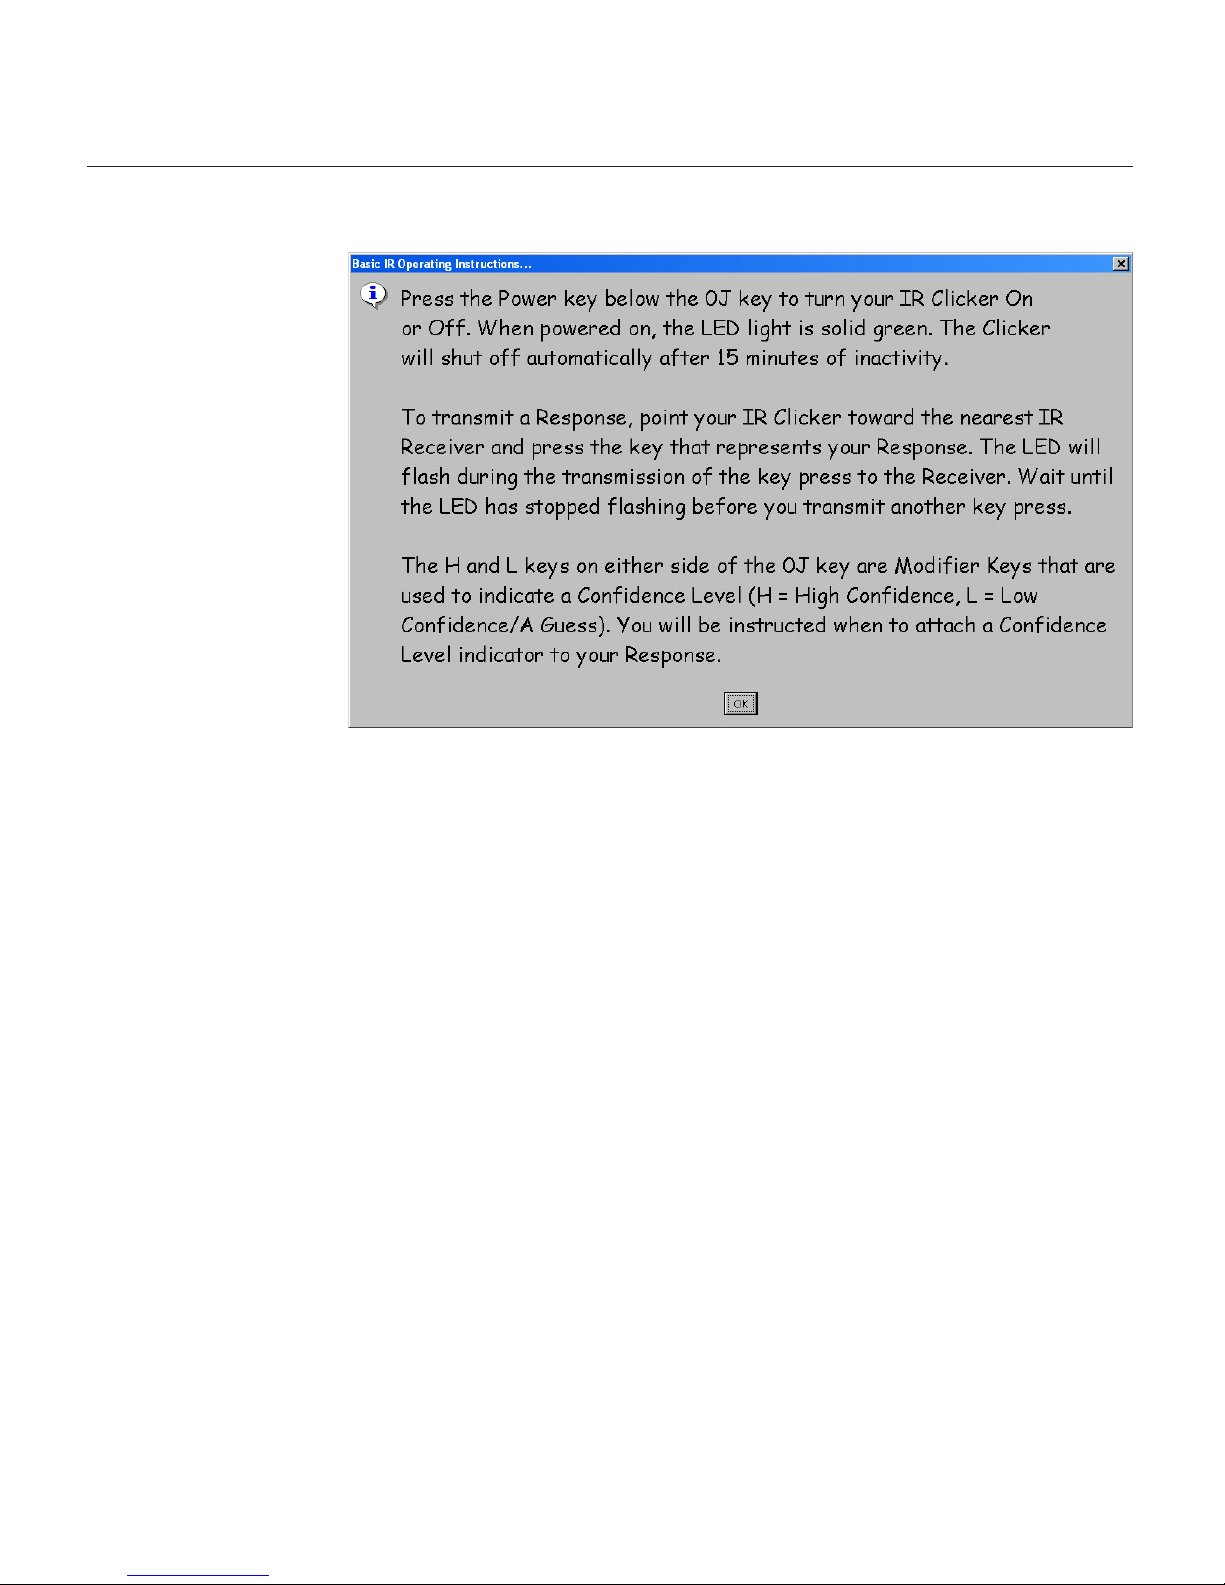
Basic Operation 1 Press the ON/OFF button to power the IR Clicker on.
2 Locate the IR Receiver and point the Clicker toward it.
3 Make your Response Choice and press the corresponding
alphanumeric Response Key.
4 Watch the Response Grid or Attendee List for verification of the
receipt of your transmission.
The LED Light will flash while the Response transmission to the IR
Receiver is in progress. The IR Clicker’s power will automatically shut off
after 15 minutes of inactivity.
PRS System Installation – IR Clicker
Confidence Level You might want students to qualify their Responses to a Question by
indicating the level of confidence they have in the correctness of their
answers. The IR Clickers have an H key and an L key in the bottom
row of keys. These keys can be used in combination with the Response
keys to attach a Confidence Level to a Response. The H key indicates the
student has a high level of confidence in the accuracy of his Response.
The L key signifies the student is basically guessing at the correct answer
and has a low level of confidence in the accuracy of his Response. By
default, when a Confidence Level is not indicated, all Responses are
assigned a Medium Level of Confidence. You should indicate at the
beginning of a Session, or before a Question is presented, that you want
a Confidence Level attached to the Responses. When a Confidence Level
is requested, students should be told to press the H or L key first, then
press a Response Key.
The Confidence Level setting will revert to the default value of Medium after
15 seconds have passed without a transmission, or after the IR Clicker is
powered Off and On.
LED Light The LED Light* illuminates to indicate the following:
Red = High Confidence Level Transmission
Green = Medium Confidence Level Transmission
Orange = Low Confidence Level Transmission
Flashing = Response Transmission in Progress
*Replace the batteries when the LED Light becomes dim.
Clicker Operation
Instructions
Even with the limited key selection of the IR Clickers, they are capable of
sending a variety of different Responses, depending on the type of
Question being asked. Clicker Operation Instruction sets can be accessed
from the Help Menu (Chapter One, PRS Menus). Display the relevant
instruction set prior to the beginning of the Session.
Page 35

33Chapter 2
On/Off Power
Signal Direction
LED Light
Decrease Key
Increase Key
Command Keys
Neck Cord Ring
PRS System Installation – Master IR Clicker
Master IR Clicker
The Master IR Clicker is a special version of the IR Clicker for use by instructors. It affords an instructor remote control capabilities, leaving him free to
move around the room, while managing the Session presentation. The H and
L Modifier Keys, which on a regular IR Clicker are used to attach a Confidence Level to a Response, are used on the Master IR Clicker in combination
with the Command Response Keys to send commands to the PRS software
instead of Responses.
The keys numbered 0 through 3 have special Command assignments on
the Master IR Clicker. Each special Command Key has a letter above it.
The letters stand for: Start/Stop (0), Time (1), Question (2), and Graph
(3). The H Modifier Key is used to indicate increases (+), while the L
Modifier Key is used to indicate decreases (—). So, when the H and 1 Keys
are pressed, the Command to increase the Timer by 30 seconds is sent to
the PRS software.
Key 0 is associated with Start, Pause, Resume, and Stop.
H+0: Start or Resume the Timer, depending on which option is
available.
L+0: Pause, if available; Stop, if the Resume option is available. The
effect is to require two successive entries of L+0 for a complete stop.
Key 1 is associated with Time.
H+1: Increase the allotted time on the Timer by 30 seconds.
L+1: Decrease the allotted time on the Timer by 30 seconds.
Key 2 is associated with the Question Number Indicator on the Results
Chart Toolbar, if the Results Chart is open, or on the Session Dialog Toolbar.
H+2: Move to the next Question (when autoadvance is not enabled)
and increase the Question Number by one.
Command Key
Assignments
Page 36

34 Chapter 2PRS System Installation – Flash Drive
Instructors will often set up Classes, Lessons and Gradebooks on a USB
Flash Drive connected to their office computers. They can then easily
access everything they’ve worked on when they connect the Flash Drive
to the classroom computer. This works fine as long as the Preferences,
Set Default Data Directory option on the File Menu (Chapter One) points
to the correct drive letter on each computer. My Flash Drive shows up as
the E: Drive on my laptop, where I have one CD-ROM drive, and as the F:
Drive on my desktop, where I have two CD-ROM drives. Make sure that
on each system where you are using PRS, the PRS Default Data Directory
is pointing to the correct drive letter for the Flash Drive. If it’s not, PRS
will build new a default data directory on the local drive, and it won’t see
the PRS directory on the Flash Drive.
Another option is to use the Flash Drive only to move PRS files from one
system to another. Save everything locally and use the Flash Drive as a
transfer medium.
Using a Flash
Drive with
PRS
L+2: Move to the previous Question and decrease the Question
Number by one.
Key 3 is associated with the Results Chart.
H+3: Open the Results Chart.
L+3: Close the Results Chart.
Each of these Commands is associated with a specific Function Button. If
the associated Function Button on the Session screen is disabled, the
remote Command will have no effect.
Be aware that if your signal is received by multiple IR Receivers, the result
would be the same as if you had transmitted the same Command multiple
times. For example, if you send L+0 and it hits two Receivers, it will issue
both the Pause and Stop Commands.
Page 37

35Chapter 3
Classes
Classes is the section of PRS where each meeting, or Class, is defined and
profiled. The primary function of the Classes section is to establish an
association between the Class profile and the Roster of students in that
Class. The Class profiles are listed in the left pane of the Classes Window.
Class Rosters are displayed in the right pane.
The following screen shot shows the Classes Window after some Classes
have been profiled and associated with Class Rosters, an example of
which is shown in the right pane, the Roster List Window. A feature of the
List Window is that you can click on one of the labelled column Table
Header Buttons, where the green Sort Indicator Arrow will appear, to sort, or
index, the entries in the List Window based on that key. Click repeatedly on
the Table Header Button to toggle between ascending and descending order.
Page 38

36 Chapter 3
In the PRS Overview in Chapter One, two types of PRS hardware systems
were described:
• Radio Frequency Receivers and Clickers that feature two-way
transmissions
• Infrared Receivers and Clickers that feature one-way transmissions
Although the Class has the same function in both transmission environments—identifying and naming a group of students—its implementation in
each environment is different enough that it will be discussed in two
separate sections of this chapter.
The first section describes the operation of the Class in the RF environment. The second section covers the implementation of the Class in the
IR environment.
When PRS is started up after at least one RF-Type Class has been profiled, it goes into what can be thought of as Classroom Mode. A Start RF
Class dialog, which lists all defined RF-Type Classes, displays first. When
you select the RF Class you want to start and click OK, the RF Receiver
begins broadcasting the selected Class. Powered-on RF Clickers will find
the Class, either through Autoscan or Quick Jump, and join it. Each time a
Clicker joins the Class, the Joined counter on the Status Bar of the PRS
window is incremented. When everyone has joined the Class, you are
ready to begin a Session.
You do not have to have an RF Receiver connected to
your computer in order to define an RF-Type Class. You
can define the Class on one computer and transfer it to
the computer connected to the RF Receiver when you
are ready to start the Class and run a Session. For
purposes of this discussion, it will be assumed that the
Class is profiled on the computer to which the RF
Receiver is connected.
Classes – RF Class
When PRS detects an RF Receiver connected to the computer, it goes
into RF Mode. Upon startup of a new installation of PRS, you will be
reminded that you have not defined any RF-Type Classes and, as a result,
have no Classes to start. The remedy is to either set an existing Class to
the RF Type, or define a New Class. What this suggests from the begin-
ning is that in the RF environment, the Class is central to the process of
presenting a PRS Session. You will start the Class, students will join it and,
after the Session is finished, you will stop the Class.
The Class
in the
Environment
Page 39

37Chapter 3
A Class Roster does not have to be in place in order to run a Session. Each RF
Clicker has been registered to the student’s Student ID. (The RF Clicker will
Autoscan for Classes, but will not allow the student to join a Class until a
Student ID has been entered and saved.) The Student ID is transmitted with
every Response, providing a way of identifying the student and attributing his
Response. When the Class is stopped, a Roster listing the Clicker IDs and
Student IDs of all the students who participated in the Session will appear in
the Roster List Window of the Classes section. The Roster will be associated
with the Class and the name of the Class will be used to name the Roster.
You can double-click on the Last Name and First Name fields to enter
student names in those fields. If a Class Roster is already in place, students
whose Student ID had not been associated previously with the Class will be
added to the Class Roster.
Classes – New RF Class
Click on the New Class Function Button to display the following dialog
where you can set up your RF Class.
Class Info Section
In the RF environment the Class Name is the name that the RF Receiver
broadcasts and the name that displays on the RF Clicker’s LCD screen
when it is scanning for Classes to join. The Class Name is derived from
the first six characters entered in the Course/Instructor field and the first
four characters entered in the Section/Location field. It cannot be edited.
Page 40

38 Chapter 3
Receivers Class ID This is the ID that the RF Clickers in the Closed Class will be linked
to, and which will uniquely identify the RF Receiver with the Closed Class
being profiled here. The Class ID must be four characters long—choose from
0 through 9 and A through F to represent the Hex number that will identify
the Closed Class. When you click on the Set Class ID button, a dialog will
display with a note reminding you that the Class ID must be unique and
should not be used by any other PRS users within 500 feet of your location.
If you were to share a Class ID with another classroom within that radius, the
Clickers in that other classroom could join your Closed Class.
In order to link the RF Clickers with this Closed Class, you must Configure
the Clickers. This option is selected from the RF Menu (Chapter One, PRS
Menus) and completes the process of associating RF Clickers with the RF
Receiver in a Closed environment.
Default
Audience
Type
The Audience Type setting determines whether a student’s identification will be
recorded and saved with his Responses. This is a default setting that can be
changed when the RF Class is started.
Known The Student ID that identifies each student is recorded with the
student’s transmitted Responses. This Audience Type setting is necessary
when you expect to grade, or Mark, Sessions for this Class.
Anonymous The Anonymous Audience Type is used when identification of
the students is not required and their Responses are not recorded and
graded. This setting is typically used when the Class is being polled or
surveyed, or during review Sessions.
System Type System Type describes your preference for the kind of environment in which
your Class will be run. You have the choice of an Open Class System, or
a Closed Class System.
• An Open Class System is one in which the RF Clickers are Student-
owned. These Clickers belong to the students and are used by them to
join any Open RF Class in any classroom where PRS is running.
• A Closed Class System is one in which the RF Clickers are Class-owned.
These Clickers stay in the classroom and are assigned to the students for
use only when they are in that classroom. When this System Type is
selected, the Set Class ID button is activated in the Receivers section on
this dialog. A Class ID is assigned to the RF Receiver. The classroom RF
Clickers are configured as Closed and linked to the assigned Class ID.
(Configure Clickers is an RF Menu option and is described in Chapter
One, PRS Menus.)
Classes – RF Class Type
Class Type
Section
When the Clicker Type is set to RF, three subsections are displayed; System
Type, Default Audience Type, and Receivers.
Page 41

39Chapter 3
As indicated above, the Response Grid is not used for an RF Class, so you
can ignore these settings. However, after each Question is presented
during a Session, you will most likely want to display the Results Chart to
show the Response distribution.
Classes – New RF Class Settings
Response Map
Tab
A limitation of the IR environment that does not exist in the RF environment
is that there is no way to return receipt confirmation messages to the IR
Clickers. In that environment, user identification is displayed in a Response
Box to confirm that a Response from that user was received during a Session.
The Response Boxes are arranged in rows and columns on the screen,
making up the Response Grid. The Response Map acts as a virtual seating
chart, providing a fixed location in the Response Grid for each student’s
Response Box, enabling him to easily locate his receipt confirmation. The
Response Grid and Response Map are not necessary in the RF environment
as messages confirming Response receipt are returned directly to the individual RF Clickers. You can ignore the Response Map Tab when you are
defining a Class for RF.
Default Settings
Tab
Default settings for the Response Grid Window and the Results Chart
Window are established on this tab. These windows are displayed during
a Session.
Page 42

40 Chapter 3
You can establish, as part of the Class definition, the default settings for how
you want the Results Chart window to display for this Class. The following
table describes the options for each of the Chart window settings.
That’s all there is to profiling a Class for the RF environment. You can skip
the next section about the Class in the IR environment and go to the Class
Roster section at the end of this chapter.
Chart Type
Show Correct
Response
Chart Values
by
Bar Vertical
Bar Horizontal
Pie
Yes/No
Percent
Number
Automatically
Show Chart
Yes/No
Do you want the bar chart to display along the
horizontal or vertical axis, or would you prefer a
pie chart of the results?
Percent: The results are charted based on the
percentage of Responses for each Response
Choice.
Number: The results are charted based on the
number of Responses for each Response Choice.
Do you want a chart of the Response distribution
results to display automatically after each Question
during a Session? If you choose No, you can click
on the Show Chart Function Button on the
Session dialog Toolbar when you are ready to
display the Results Chart.
Option DescriptionSettings
When this option is set to Yes, the number of the
correct Response, percentage of Correct and
Incorrect Responses and number of Out of Range
Responses is displayed above the chart, the
correct answer is displayed as bright blue in the
chart legend, and the color of the correct
Response’s chart bar or pie section is combined
with bright blue.
Show
Confidence
Levels
Yes/No The Confidence Level of Responses is shown in
the color of the bars and pie sections—Red=High
Confidence, Green=Medium (default) Confidence,
Yellow=Low Confidence. If you choose No, the
High Confidence and Low Confidence colors will
not display in the Results Chart.
Classes – New RF Class Settings
Page 43

41Chapter 3 Classes – IR Class
The Class identifies and names a group of students. The Class definition
addresses three different aspects of the PRS Class: 1) Class Name and Type,
2) the Response Map, which assigns each student a fixed position in the
Response Grid, and 3) default settings for the Response Grid and Results
Chart that will display when this Class participates in a Session. In the IR
environment, the Class Roster is an important part of the Class definition.
When a Response is sent from an IR Clicker to the IR Receiver, the Clicker ID
is attached to the Response. The Class Roster, described at the end of this
chapter, links the Clicker ID to the student’s name and Student ID, ensuring
that the transmitted Response will be credited to that student.
The Class
in the IR
Environment
Click on the New Class Function Button to display the following dialog
where you can set up your IR Class.
Class Info Section
The Class Name is derived from the first six characters entered in the
Course/Instructor field and the first four characters entered in the
Section/Location field. It cannot be edited.
Class Type Section
1 Select the IR Clicker Type from the drop-down list.
The rest of the options in this section will disappear when the IR Clicker Type
is selected, as they are relevant only in an RF environment.
2 Click on the OK button to save the new Class definition.
Page 44

42 Chapter 3Classes – IR Class Response Map
Before you can set up a Response Map, you must have a Class
Roster linked to this new Class definition. Go to the Class Roster
section at the end of this chapter. Return here when you are
ready to continue with the Class definition.
Response Map
Tab
The Class Response Map provides a way of mapping each student listed in the
Class Roster to a permanent location in a Response Grid. It is a virtual seating
chart. The Response Grid is displayed in the Response Area below the Ques-
tion and Response Choices. In a PRS PowerPoint Lesson Session, the Response
Grid can be sized and moved to any location over the Question Slide.
When a Response Map is not defined, Responses are posted to the Response
Grid in the order received. An individual’s Response will rarely show up in the
same place in the Response Grid from one Question to the next. Large groups
of students will find it difficult to track and verify their Response transmissions if
a Response Map is not in place. When a student has been assigned a permanent position in the Response Grid by means of a Response Map, he has only
one place to look to verify that his Response has been transmitted, received
and recorded.
A Response Map can be imported or created. Created Response Maps can be
derived either by using the Class Roster to populate the Map, or by having
students register for the Response Map by pressing a key on their IR Clickers
when requested to do so. A Response Map can be updated when respondents
not currently included in the Response Map attend a Session. Their responses
will show up at the end of the Response Grid, assuming there are additional,
empty Response Boxes in the grid. You will be prompted to save the Response
Map with the new registrations.
Page 45

43Chapter 3
If the size of your Class is likely to fluctuate from one
Session to the next, add more Rows and/or Columns to
the Response Map than indicated by the size of the
Class Roster. Additional students can then be easily
accommodated when they show up for a Session. If you
haven’t set up enough Response Boxes in the Response
Grid, and the Response Map hasn’t been set to cycle in
the Grid Settings section, when the Response Grid is full,
additional Responses will be ignored.
Classes – IR Class Response Map
You have three options:
Use Roster, Random via Responses, or
Sequential via Responses. The Use Roster
option allows you to create a Response
Map directly from the Roster associated
with this Class definition. The order of
assignment in the Response Map is based on the order in which the
students are listed in the Roster. When you select this option and click
on the Next button, the Response Map List Window is populated with
information extracted from the Roster, the Rows and Columns fields are
automatically calculated based on the size of the Roster, and the Re-
sponseMap directory displays. Name the new Response Map and save
it. The name and path to the newly created Response Map is displayed
in the Response Map field above the Response Map List Window. Add
more Rows and Columns if you either expect more students, or plan to
run test Sessions and use Key Input (Chapter One, PRS Menus, Connec-
tion Menu) to simulate Response transmissions.
Sequential and Random Response Maps
Both the Sequential via Responses option and the Random via Responses
option require the registration of the IR Clickers. Sequential registration
allows you to register students in the Response Map in a specific order,
while Random registration assigns the next position in the Response
Map to the next signal received. The end result of the three types of
Response Map creation is the same; each student occupies a specific,
assigned position on the Response Map.
Create Response
Map Function
Click on the Create Response Map button below the Response Map List
Window to display the Create Response Map Choose Type dialog.
Page 46

44 Chapter 3Classes – IR Class Response Map
Select either the Sequential or Random
response option and click on the Next
button. The Response Map Row/Column
prompt displays. Use this option to describe how you want the individual Response Boxes arranged in the grid. Set the
number of Rows and Columns you want in the Response Map. If necessary, add additional Rows or Columns to the Class definition to provide
room for late registrants, or for Key Input Response simulations (Chapter
One). Click on the Next button.
The following screen shots show a portion of each screen that displays
for a Sequential Response Map.
The yellow Assignment Block moves from one Response Box to the next
in order across the Response Map. When a signal is sent from an IR
Clicker, its Clicker ID is registered to the Response Box with the Assignment Block in it. If a Clicker ID is not assigned to the Response Box you
want it to be in, click on the Pause button.
Page 47

45Chapter 3
Use the green arrow buttons to reposition the yellow Assignment Block.
Click on the Clear button to remove the Clicker ID currently in the Response
Box with the Assignment Block. Click on the Resume button to activate the
Assignment Block and register the correct Clicker ID to that Response
Box.
Random Response Maps provide assigned locations, but they are in no
particular order of assignment. The Response Map grid displays, but there is
no yellow Assignment Block. Simply have each student press a button on
his or her IR Clicker, one after the other. The student’s Clicker ID will
display in the Response Box to which the student is now assigned. When
the Response Map Random Registration process is finished, you will be
prompted to name and save the Response Map in the ResponseMap
directory.
Classes – IR Class Response Map
Import Response
Map Function
Click on the Import Response Map button to import an existing Response Map. The ResponseMap directory, where the Response Maps
are stored by default, displays. Select the Response Map you want to
import, or browse to another location where you have stored Response
Maps and import one from there.
Remove Response
Map Function
A prompt displays when you click on the Remove Response Map button
to remind you that the Response Map you are removing is just disassociated from this Class definition. The Response Map file is not deleted and
remains available to be used with this or any other Class definition.
Click on the End button when all Response Box assignments have been
made. You will be prompted to name and save the Response Map in the
ResponseMap directory.
Page 48

46 Chapter 3
Cycle
Response
Map Delay
(in seconds)
1 – 9
Option DescriptionSettings
This sets the amount of time, in seconds, the
current block of Response Boxes (set above) will
display before cycling to the next block.
Cycle
Response
Map Number
of Boxes
20 – 300 Set the number of Response Boxes that will
display during each Response Map Cycle.
Bottom Line
of Response
Box Shows
None
Clicker ID
Last 4 digits
Clicker ID
Last 2 digits
Clicker ID
If this Class definition has an associated Response
Map, you can choose what, if anything, will
display on the bottom line of each Response Box
in the Response Grid.
Cycle
Response
Map (if map
size is greater
than 50)
Yes/No If you have a large number of students in the
audience, you can set the Response Map to Cycle
Mode. When set to Yes, each block of Response
Boxes (defined next) will display for the amount of
time (Delay) set below before cycling through to
the next block in sequence. Cycling, when set,
continues throughout the Session.
You should always cycle the Response Map when
the defined number of Response Boxes is very
large. The Response Boxes in the Response Area
could be so small, they would be difficult to see
and read. Students would not be able to verify
receipt of their Response under such extreme
circumstances.
Classes – IR Class Settings
Grid Settings
Section
The options set in the Grid Settings section below the Response Map
Function Buttons pertain to the Response Map defined here. Each setting
is described in the table below.
Page 49

47Chapter 3
Number of
Response
Boxes
Option DescriptionSettings
20 – 2000 The setting you choose here is based on the
number of students in the Class. It will be grayed
out when a Response Map has been set up for
the Class.
The number of Response Boxes is determined by
the size of the Class and is divided into a display of
the Rows and Columns that will fit in the Response
Area. If you want all Responses to be displayed at
the same time, set the number of Response Boxes
equal to or higher than the number of students
participating in the Session. Each Response will be
recorded and displayed in a Response Box. If the
number of Response Boxes is smaller than the
number of students, the last Responses received
will display at the beginning of the Response Grid
Classes – IR Class Settings
Default Settings
Tab
Default settings for the Response Grid Window and the Results Chart
Window are established on this tab. These windows are displayed during
a Session. Some of the settings established here can be changed on the
New Session dialog before the Session is begun.
The following table identifies each of the options in the Response Grid
section and its possible settings for the Response Area window.
Response Grid
Section
Page 50

48 Chapter 3
Option DescriptionSettings
and overwrite the initial Response in that Response Box. All overwritten Responses will have
already been recorded, so no Response data are
lost when a smaller Response Grid is defined. This
is the opposite of what happens when a Response
Map is defined. In that case, if the Response Grid
defined by the Response Map is smaller than the
audience, only the Responses that are displayed in
a Response Box are recorded. All others are lost.
This option is grayed out when a Response Map is
set up as part of the Class definition. The Response
Box colors are already set to indicate the number
of tries by each respondent: Blue – has not yet
responded, Yellow – out-of-range response, try
again, Rose – one in-range Response transmission,
Teal – second in-range Response transmission, Red
– Last Chance Response, further attempts to
respond will be ignored.
Unique to last digit of ID: Each digit, 0 through 9,
is assigned a color, e.g., 0=orange, 1=pink, 2=blue,
etc. When responding to a Question, each IR
Clicker’s Response will display in the color
assigned to the last digit of its ID. This makes it
easier for a respondent to find his Response in the
Response Grid, especially if there is no Response
Map in the Class definition.
Clear: All students display the same Response
colors: Green = an in-range Response transmission, Yellow = an out-of-range Response transmission, Red = the Last Chance in-range Response,
further attempts to respond will be ignored.
Response Box
Color
Unique to last
digit of ID
Clear
Display
Response in
Box
Do you want to display each student’s Response
to each Question during a Response Session?
Your setting here will depend in part on whether
or not you plan to identify students during the
Response Session – Known or Anonymous
(Audience option, New Session) – and whether or
not you want each student’s Response to be
published, especially if his name is displayed. If
this is a survey, you may want to show Responses and names. If it’s a test, you probably
won’t want to show Responses.
Yes/No
Classes – IR Class Settings
Page 51

49Chapter 3
Top Line of
Response Box
Displays
Clicker ID Last
4 digits
Clicker ID
Last 2 digits
Clicker ID
Last Name
First Name
Nickname
First Name
Last Initial
Last Name
First Initial
Student ID
When the Response Grid is chosen as the Display
Mode for the Session, the selection from this list
determines what type of student identification
will display on the top line of the Response Box.
Be mindful of privacy issues if you choose to
display the Student ID.
Option DescriptionSettings
Display
Question
Yes/No If the Questions for a Session are going to be
presented orally, written on the board, or displayed
on an overhead projector, for example, set this
option to No.
Attendee List
Shows
Choose from this list which field from each
student profile you want to display to identify the
student when Attendee List is chosen as the
Display Mode for the Session.
Automatically
Advance
Question
Yes/No When this option is set to Yes, after the Timer has
expired and the Results Chart has been closed,
the next Question will automatically display. When
set to No, you must manually advance to the next
Question in the Session.
Clicker ID Last
4 digits
Clicker ID
Last 2 digits
Clicker ID
Last Name
First Name
Nickname
First Name
Last Initial
Last Name
First Initial
Student ID
Classes – IR Class Settings
Page 52

50 Chapter 3
Chart Type
Show Correct
Response
Chart Values
by
Bar Vertical
Bar Horizontal
Pie
Yes/No
Percent
Number
Automatically
Show Chart
Yes/No
Do you want the bar chart to display along the
horizontal or vertical axis, or would you prefer a
pie chart of the results?
Percent: The results are charted based on the
percentage of Responses for each Response
Choice.
Number: The results are charted based on the
number of Responses for each Response Choice.
Do you want a chart of the Response distribution
results to display automatically after each Question
during a Session? If you choose No, you can click
on the Show Chart Function Button on the
Session dialog Toolbar when you are ready to
display the Results Chart.
Option DescriptionSettings
When this option is set to Yes, the number of the
correct Response, percentage of Correct and
Incorrect Responses and number of Out of Range
Responses is displayed above the chart, the
correct answer is displayed as bright blue in the
chart legend, and the color of the correct
Response’s chart bar or pie section is combined
with bright blue.
Show
Confidence
Levels
Yes/No The Confidence Level of Responses is shown in
the color of the bars and pie sections—Red=High
Confidence, Green=Medium (default) Confidence,
Yellow=Low Confidence. If you choose No, the
High Confidence and Low Confidence colors will
not display in the Results Chart.
Classes – IR Class Settings
The following table describes the Results Chart settings options.
Chart Section Responses are graphed to provide immediate, visual feedback about the
Response distribution for each Question during a Session, making the
Results Chart an excellent tool for on-the-spot assessment. After a
Question is run during a Session, the Results Chart is displayed either
automatically, or manually by clicking on the Show Chart button on the
Session dialog Toolbar. These default settings can be changed from one
Session to the next.
Page 53

51Chapter 3 Classes – Class Function Buttons
Select a Class definition in the Classes List Window. Click on the Create
Report Function Button. The Report, listing the complete Class Roster,
will display in a Print Preview window. The Print Preview window features
a number of Export options on the File Menu, navigation tools on the
Navigation Menu and Toolbar, and zoom tools on the Zoom Menu and
Toolbar.
Select a Class definition in the Classes List Window. Click on the Delete
Class Function Button. You will be prompted to verify you want to delete
the Class. A Class cannot be deleted if it’s the only Class in the List
Window.
Select a Class definition in the Classes List Window. Click on the Edit Class
Function Button. The Class definition window displays. Make your changes to
any of the settings in the tabbed sections. Note that everything about the
Class definition can be edited, except the Class Name.
Page 54

52 Chapter 3
We recommend keeping a few Loaner Clickers on hand in
case a Clicker malfunctions or a student has forgotten to bring
his. Each IR Loaner Clicker should be profiled in the Class
Roster. When a student uses a Loaner Transmitter during a
Session, edit the Class Roster before starting the Session.
Insert the student’s Student ID into the Loaner’s profile. This
will ensure that the student’s Responses are correctly recorded
and credited to him. After the Session, remove the student’s
Student ID from the Loaner profile.
An RF Clicker is configured as a Loaner. Select the Configure
Clickers option from the RF Menu (see Chapter One, PRS
Menus for details). The student using the RF Loaner Clicker
will not be able to join a Class until he has entered his
Student ID.
A Class Roster can be created by adding names here in the PRS application,
or a Roster can be imported. Existing Class Rosters can be imported into, as
well as disassociated, or removed, from the Class. When a Roster is established as part of a Class definition, it becomes associated with that Class.
When a Roster is removed, it is disassociated from the Class definition.
However, the Roster file itself is not deleted and remains available to be
associated with other Class definitions.
The Add Name to Roster Function Button is used to build the Roster locally
in the PRS application, and/or to add names to an existing, associated Roster.
A Name can be deleted from the Roster by selecting the name in the Roster
List Window and clicking on the Delete Name From Roster Function Button.
Classes – Class Roster
The Roster identifies the people in the class, meeting, or polling group.
The purpose of the Roster in the IR environment is to link a student’s
name and Student ID to his or her Clicker ID, ensuring the student’s
Responses are attributed to him or her. The IR Clicker ID is sent with
each Response transmission during a Session. Without a Class Roster,
there is no way to match Responses to students and subsequently to mark
the results of a Session.
In the RF environment, a Class Roster does not have to be in place in
order to run a Session for the Class. The Student ID, saved in the studentowned RF Clicker’s memory, or temporarily stored in the Loaner RF
Clicker’s memory before the student joins the Class, is transmitted with
each Response, ensuring attribution and identification. So a Class Roster
based on Student IDs can actually be generated during a Class Session.
Student names can be added to the Roster after the fact.
The Class
Roster
Page 55

53Chapter 3 Classes – Class Roster
Creating and Maintaining a Class Roster
As described earlier, Class Rosters can be developed locally as part of the
Class definition, or they can be developed outside PRS and imported into the
Class definition. A Roster associated with a Class definition can be maintained
using the Add Name and Delete Name Function Buttons. Rosters developed
using third part CMS applications are usually maintained in the application
and reimported into the Class definition.
A somewhat unique situation exists when a Class Roster is developed using
the Web-based PRS Registration Application described in Chapter Seven. The
Web-based PRS Registration Application can be set up so that students
required to buy a PRS Transmitter for one or more classes can register online
for those classes. The resulting Roster, in addition to being managed online in
the Admin portion of the PRS Registration application, can be downloaded to
the PRS/Roster directory for import into a Class definition. Conversely, a
Roster developed locally in PRS for a Class definition using the Add Names
function can be imported into the PRS Web Registration Application. The
registration files created by PRS and the PRS Web Registration Application
are stored separately. Online registrations are maintained in a database on the
PRS Registration Application Web site. Rosters created in PRS using the Add
Names function and downloaded Rosters are stored and maintained in the
PRS/Roster directory on the computer. If you want to keep individual Rosters
synchronized, you should make all changes at one location and download or
import to the other location.
Roster Display Mode
During a Session, the Class Roster can be displayed in one of two ways in the
Response Area below each Question and its Response Choices. The Roster
can be displayed in a Response Grid, or as an Attendee List.
A Response Grid is made up of individual Response Boxes that are arranged
in a grid of rows and columns. When a student transmits a Response to a
Question, confirmation of a received signal in the form of the student’s
Transmitter ID number or his name (this identification selection is made in
the Response Window Defaults dialog of the New Class definition) is
displayed in a Response Box in the Response Grid. When a Response Map
(the next tab) has been set up as part of the New Class definition, each
student will have an assigned Response Box—a permanent location—in the
Response Grid, where that confirmation of transmission and receipt of his or
her Responses will always appear.
The Attendee List (the list of everyone from the Class Roster who is in
attendance during the Session) is also displayed in the Response Area below
each Question and its Response Choices. As each student transmits his
Page 56

54 Chapter 3Classes – Class Roster Function Buttons
Response to a Question, his name is removed from the list to verify transmission receipt. When the Question’s Countdown Timer has expired, the
remaining names in the Attendee List are of those students who did not
respond to the Question.
Both Display Modes are useful in helping the instructor monitor Class
participation during a Session. An option to toggle between the two Roster
Display Modes is available from the Preferences menu on the Session dialog
Toolbar, and can be used at any time during the Session to view either the
Response Grid or the Attendee List.
The Function Buttons above the Roster List Window in the Classes Section
represent the options available for creating and maintaining Class Rosters.
Roster Function
Buttons
Imported Rosters can come from a variety of sources, including
third party Course Management Systems and other Class definitions. Click on the Import Roster Function Button when you want to import
an existing Roster to associate with the selected Class.
By default, the Import Roster Function Button displays the PRS/Roster
directory. You can browse to another location to find the Roster you want to
import for this Class definition. Rosters associated with PRS Classes must be
in a .csv file format. Imported Rosters can come from a variety of sources.
They can be created in PRS for another Class, created as a .csv file in Excel,
downloaded from the PRS Web Registration Application (Chapter Seven), or
created in a Course Management System, such as Blackboard (Chapter
Seven), WebAssist or Web CT.
If you want to create a Roster from an existing MS Excel spreadsheet, here
are a few tricks to make the process go smoothly. PRS can read only those
Rosters stored in a .csv format. In addition, PRS expects a specific structure in
the .csv file. It is recommended that you use one of the example files
accessed on the GTCO CalComp Web site from the Help Menu, or create a
dummy Roster file. Use the Add Names Function Button to add one name,
real or phony, and include any other information you want in your Roster file
from the choices available in the Add Names dialog. Name and save the file.
When you open it in Excel, you will have the proper file structure into which
you can copy and paste roster information from your existing spreadsheet.
The .csv file format does not accept embedded commas in names, which is
why student names are broken down into separate First Name, Middle Initial,
and Last Name fields. When you save the file, you will be asked whether you
want to save the formatting. Click on the Yes button. When you exit Excel,
you will be prompted again to save the file. You do not have to save it again,
unless you want to save it in the Excel .xls format.
Page 57

55Chapter 3 Classes – Class Roster Function Buttons
Enter the student’s profile information into the appropriate fields, being sure
to include his or her Student ID and, for IR, the IR Clicker ID number. Click
on the Add button to save the profile to the PRS database in the PRS/Roster
directory. The Add Names To Roster dialog is persistent, allowing you to edit
and add as many profiles as needed to the Class Roster. Each profile will be
displayed in the List Window as it is added to the Roster in the Class definition. Click on the OK button when you have finished editing and adding
student profiles. They will display in the Roster List Window in the Classes
section.
When you click on the Remove Roster button, a prompt displays to
remind you that the Class Roster you are removing will no longer
be associated with this particular Class, but the actual Roster .csv file is not
deleted. It will continue to be available to import into this Class or any other
Class you define.
Use the Add Name To Roster Function Button to create a Class
Roster, or to add a name or names to the existing Roster. You can
also use this function to edit any of the student profiles in the Roster. Click on
the Add Name To Roster Function Button to display the dialog shown here.
Page 58

56 Chapter 3Classes – Class Roster Function Buttons
Select the name you want to delete from the Class Roster and click
on the Delete Name From Roster Function Button. A prompt will
display to verify that you want to delete the selected name from the Class
Roster. This option deletes the name from the Roster file identified in the
field above the Roster List Window. If this Roster is used with any other Class
definitions, the name just deleted will no longer appear in those Class
Rosters.
Editing On The Fly You can directly edit an item in a List Window by double-clicking on it and
making the change in the Edit dialog that displays.
Page 59

57Chapter 4
Lessons
The screen shot above shows a typical display of Lessons section, which
are branches of the Lesson Tree, and of the Questions in the selected
Lesson.
New Lessons and Imported Lessons can be added to the Lesson Tree.
Existing Lessons can be edited, copied, deleted and exported. A variety of
Reports can be created from the Lessons in the Lesson Tree. A New
Session can be started up for the selected Lesson from this section.
Lesson Tree
List Window
Question List Window
Lessons is the section where you define and organize your questionnaires,
which are called Lessons. Each Lesson is made up of a series of Questions.
The Lessons main screen, shown below, is divided into two panes. The
Lessons are organized in the Lesson Tree in the left pane. Questions for
the selected Lesson are displayed in the right pane in the Questions List
Window. Note that each pane has its own set of Function Buttons.
PRS Lessons
Page 60

58 Chapter 4Lessons – Lesson Tree List Window, Questions
Questions
Questions can be composed and stored in the selected Lesson in PRS by
clicking on the New Question Function Button. Questions in a variety of
different formats can also be imported as a Lesson. As described in
Chapter One, many textbook publishers provide electronic Question Sets
with their textbooks. The PRS software has the capability of importing the
Question Sets from Wiley (WileyML format), Pearson (proprietary XML
format), Learning Pathways (proprietary format), Bedford, Freeman,
Worth (QTI XML format), and native PRS XML (Open Specification
format); as well as Questions in .png, .gif and .jpg image formats. Once
these Question Sets, whatever their source, are imported into a PRS
Lesson, they become PRS Questions. You can set Question Defaults for
the Questions in the new, imported Lesson and use the PRS Question
Editor to edit, manage, and delete them as you would the Questions in
any of the homegrown PRS Lessons. You can also add new Questions to
an imported Question Set.
And finally, for those teachers and presenters who prepare their presentations using Microsoft’s PowerPoint software, the good news is that you
can incorporate the Audience Response System capabilities of PRS
directly into your PowerPoint Slide Shows. You’ll see how easily that’s
The Lesson Tree is structured like a file directory, providing a way of
arranging and organizing your Lessons. Branches are created in the
Lesson Tree, and individual Lessons are categorized and stored in the
Branches. A Branch is defined by clicking on a position in the Lesson Tree
(initially, the Lessons Branch is the only Branch), clicking on the New
Lesson Function Button, and naming the Branch. No other New Lesson
settings are necessary in a Branch definition. Typically the Branch is
named for the Class, e.g., Biology. Subbranches can specify types of
Lessons, i.e., Review, Quizzes, Midterms, Finals; or Lesson categories, e.g.,
the Digestive System, the Nervous System, the Circulatory System, etc.
Lessons are then defined by clicking on a Branch in the Lesson Tree and
clicking on the New Lesson Function Button. The Lesson Function Buttons
are activated when you click on a Branch in the Lesson Tree.
In the context of the PRS system, a Lesson is a questionnaire and consists
of a series of Questions. The Lesson is merely a storage container for the
Questions and their default presentation settings. The presentation
settings describe how the Questions are to be presented to the audience
during a Session.
The Lesson Tree
List Window
Page 61

59Chapter 4 Lessons – Question List Window
The Question Function Buttons become active when a Lesson is selected in
the Lesson Tree. New Questions can be created for the Lesson, and
existing Questions can be edited, copied and deleted. Questions can also
be rearranged in the Question List Window by moving them up or down.
By default, all the Questions in the Lesson are Selected, indicated by the
green Check Mark. This means that when the Lesson is presented in a
Session, all the Questions in the Lesson will be displayed during the
Session. If you wanted to present a subset of a Lesson’s Questions during a
Session, simply clear each Question’s Selected checkbox by clicking on it.
All Unselected Questions will be excluded from the Session. The
unselected Questions will remain stored in the Lesson, but they will not
appear again in any Session that uses that Lesson until the checkboxes have
been re-selected here.
You can order, or index, the Questions in the Question List Window by
clicking on the Table Header Button of the column of data you have
chosen as the Index Key. Click on the Table Header Button again to toggle
between ascending and descending order.
The Question
List Window
Page 62

60 Chapter 4Lessons – New Lesson
Give the Lesson a Name. The Name identifies the Lesson in the Lesson
Tree. The default settings for the presentation of the Questions in this
Lesson during a Session are set up in the Defaults section of the New
Lesson dialog. Although the defaults set here apply to all the Questions in
the Lesson, you can change the default settings in the New Question
dialog for an individual Question. The following table describes each
Default option and lists its possible settings.
Timer The Timer is set for the amount of time you want
to give students to answer each Question. Be
aware of the anticipated size of the Class when
you set the Timer. When signals are transmitted
from Clickers to the Receiver, the Receiver
processes the first signal it receives and ignores
the others coming in at exactly the same time.
Signals from Clickers are not queued by the
Receiver. Even so, each transmitted signal is
processed very quickly, so signals that are sent
within nanoseconds of each other are usually
processed without having to be resent, especially
Option DescriptionSettings
00:30 – 90:00
min.s
The New Lesson Function Button is used to create Branches in the Lesson
Tree and Lessons within those Lesson Tree Branches. To create a Branch,
click on the location in the Lesson Tree where you want the new Branch
to appear and click on the New Lesson Function Button. Give the Branch
a Name and click on the OK button.
To create a new Lesson, click on the Branch in the Lesson Tree where
you want to store the new Lesson and click on the New Lesson Function
Button. In either case, the following screen will display.
Page 63

61Chapter 4 Lessons – New Lesson, Defaults
Select the number of Response Choices you want
to have as the default value for the Multiple
Choice Questions in the Lesson.
Choices 2 – 10
Option DescriptionSettings
Orient
Choices
Rows
Columns
Response Choices can be displayed either in rows
or in columns. The settings for this option should
be considered in conjunction with the Question
Location setting below. Typically, when you set
the Question Location to Left, the Response
Choices are aligned in Rows to the right of the
Question. When Question Location is set to Top,
the Choices orientation probably depends more
on the type of Response Choices—columns often
being more suitable for graphic Responses.
Font Size
Chances
10 – 36 points
1 – 10,000
Font Face All System
Fonts
Choose a font size that will project well.
Choose a font from among the fonts installed on
the computer. Generally speaking, you should
avoid using decorative fonts, which might be
difficult to read, or using a number of different
fonts on the same Question screen, which might
be distracting.
You can set a limit on the number of tries, or
Chances, a student can have to answer a Question. During a Session, when a student is transmitting Responses, the Last Chance Response, the
upper limit of whatever value the Chance option is
set to, will display as red in the Response Box, and
is the Response that will be recorded. Additional
Responses will be ignored. An out-of-range
with smaller, classroom-size groups. But, with
groups of several hundred, serial processing can
be an issue. Just be sure to set enough time on the
Timer so that every student has a reasonable
chance of getting their Responses to each
Question processed. If, as you are presenting the
Session, you see that the default Timer value is not
giving all the students enough time to respond,
you can change the setting for the Timer at the
beginning of each Question. Or, you can set the
default Timer to a higher value. Then, during the
Session, click on the Stop Question button
at
the top of the Question dialog to stop the Timer
when you have verified that everyone has
responded to the Question.
Page 64

62 Chapter 4Lessons – New Lesson, Defaults
Font Color Black
Red
Green
Blue
Yellow
Orange
Brown
Purple
Dark Gray
Lt Brown
Lt Green
Slate
Cyan
Dk Blue
Magenta
Set a default color for the Questions and Responses in the Lesson. You can use color changes
in addition to, or instead of, Font Style changes to
add emphasis and to make your Lesson more
visually appealing and engaging.
Option DescriptionSettings
Show Choices Show
Hide
You can choose to Show or Hide the Question
choices for each Question.
Font Style Regular
Bold Italic
Underline
Bold Italic
Bold Under line
Italic Under
line
Bold Italic
Underline
Regular is usually the best choice for the default
Font Style. As you are composing individual
Questions and Choices, you can use the different
Font Styles to emphasize specific characters,
words, or phrases. When choosing different Font
Styles, as well as mixing Font Faces, apply the
principle of less is more.
Points 0 through
1000
You can assign a point value, also called a weight,
to each Question in the Lesson. Set the default
Question Point Value here.
Question
Location
Top
Left
Questions can be located at the Top of the display
screen, or on the Left. As indicated above,
Question Location is usually set with consideration
to the orientation of the Response Choices.
Response will not count against the number of
Chances a student has to answer the Question.
The instructor should inform the students how
many chances they have to select the right
Response during the allotted time for each
Question, and remind them to watch the Response Grid (IR environment) to make sure all
their Responses have been properly transmitted
and received.
Page 65

63Chapter 4 Lessons – Lesson Function Buttons
The Font Settings you choose here, including color, will be applied to all
the Questions in the Lesson. Nevertheless, you can change any of the
font settings on a character-by-character basis in the Question dialog as
you compose the individual Questions for the Lesson.
Select the Lesson you want to edit in the Lesson Tree and click on the
Edit Lesson Function Button to display the Lesson profile dialog. You can
change the Lesson Name and any of the Default settings. Click on the
OK button to save your changes.
In the Lesson Tree, select the Lesson you want to copy. A prompt with
the Lesson Tree will display. Select the Branch to which you want to copy
the selected Lesson, and click on the OK button. The Lesson will display
in the Lesson Tree Branch as Copy of and the name of the Lesson you
copied.
Select the Lesson you want to delete from the Lesson Tree. Click on the
Delete Lesson Function Button. You will be prompted to verify you want
to delete the Lesson.
As described earlier, Lessons are made up of Question Sets. These
Question Sets can be imported into a PRS Lesson from a variety of
sources, shown in the screen shot below.
Note that you can opt to use the question default settings from the
imported file, or you can unselect this option at the top of the Informa-
tion tab and set PRS Question Defaults on the Question Defaults tab.
Page 66

64 Chapter 4Lessons – Export Lesson
When you choose to import a Question Set into a PRS Lesson, the PRS
directory will display in the left pane. Browse to the directory where the
files of the File Type you chose are stored. When you have reached the
destination directory, the files in the folders in that directory will display in
the pane on the right side of the window in Windows and on the left side
of the window on the Mac, with a heading that indicates the type of files
expected from that source. When you are assured you have chosen the
directory that contains the Question Set you want to import into this
Lesson, click on the Select (Windows) or Choose (Mac) button. Click on
the OK button to save the imported Question Set as a PRS Lesson. When
the imported Lesson is selected in the Lesson Tree, the Questions will
display in the Question List Window. You can use the Question Editor to
edit, copy, delete, and add new Questions to the imported set. Imported
Questions can also be moved, selected and unselected.
Lessons are exported to a PRS Open Specification XML format and
stored in the PRS\Exports directory. You can select a specific Lesson in
the Lesson Tree to export, or you can select a Branch in the Lesson Tree
to export. When you select a Branch, all the Sub-Lessons in the Branch
will be exported.
Exporting a single Lesson
1 Select the Lesson you want to
export from the Lesson Tree.
2 Click on the Export Lesson
Function Button.
The name of the Lesson displays at
the top of the Export Lesson dialog.
3 Click on the OK button.
A Choose Destination Directory and File Name dialog displays. PRS has
created a folder in the Exports directory named for the Lesson.
4 Name the file that will contain the exported Lesson and click on the
Select button.
A prompt verifying the path to the exported Lesson will display. The XML
file containing the exported Lesson and using the filename you provided
here will be created in the named Exports subdirectory.
Page 67

65Chapter 4 Lessons – Export Lesson
Exporting the Lessons in a Branch
of the Lesson Tree
1 Select the Branch of the Lesson
Tree that contains the Lessons
you want to export.
2 Click on the Export Lesson
Function Button.
The name of the Branch displays at
the top of the Export Lesson dialog and the Export Sub-Lessons checkbox
is selected.
3 Click on the OK button.
The Choose Destination Directory and File Name dialog displays. PRS
has created a folder in the Exports directory named for the Branch.
4 Name the XML file that will contain all the Lesson files in the selected
Branch and click on the Select button.
A prompt will display verifying the location of the file containing the
exported Sub-Lessons. If this file is moved to another PRS system and is
imported, it will recreate the Branch in the Lesson Tree and all the SubLessons in that Branch.
Select the Lesson for which you want to create a Report and click on the
Create Report Function Button. Choose the type of Report you want to
create for this Lesson. The Text Only option means that graphics in the
Question or in any of the Response Choices will not be included in the
Report. This function is often used when an instructor is running a Self
Paced Session (Chapter Five). The Questions and Response Choices do
not display during this type of Session, so this is an easy way to make
them available to the students.
You can start a Session directly from the Lesson Module. Select the
Lesson you want to use during the Session and click on the New Session
Function Button. Fill in the remaining Session options in the New Session
dialog (Chapter Five) that displays.
Page 68

66 Chapter 4Lessons – New Question
The settings options can be found below the Toolbar. Some of these options were set as Defaults in the New Lesson dialog. You can change the default settings for the Question you are
currently profiling. The changes you make to the default Question settings are persistent for
subsequent Questions of the same Question Type until you change them again. There are two
additional settings in the Question Editor: Choices Type, where you can choose between lettered
or numbered Question Choices; and Answer, where you can choose between Any, or None. The
Any selection is used most frequently for survey Questions where there is not right or wrong
answer. None is selected for a throwaway Question with no correct answer that is often used to
take attendance. The difference between the two is that the Responses to a None Question are
not included in Session Reports that calculate Response totals. You will note that as you change
the Question Type (described in the next section), some of the settings options will be grayed out
because they are not relevant to the selected Question Type being profiled.
A Lesson is made up of a series of Questions. When you have profiled
the Lesson, click on the New Question Function Button to display the
Question Editor, shown below. The editing tools you can use when
creating a Question are arranged in the Toolbar. The table to the right
describes each tool.
Page 69

67Chapter 4 Lessons – New Question Toolbar
* The PRS Question Editor is an HTML (Hypertext Markup Language) editor. It has
somewhat different formatting requirements than a standard text editor. The specialized HTML Editing Tools described above provide the formatting commands you
need when composing your Questions and Responses.
Switch to Freehand
Mode
Use this tool to toggle between writing or drawing
freehand and typing Questions and Responses.
Tool FunctionTool Name
Undo Undo, or remove, the most recently typed character.
Repeat Undo until all characters are removed.
Redo Redo to replace most recently removed character.
Repeat Redo to replace all removed characters.
Cut Cut the selected item.
Copy Make a copy of the selected item.
Paste Paste the copied or cut item.
Insert Image Use this tool to add a graphic to the Question and/or
to any of the Responses.
Insert Horizontal
Rule
Insert a horizontal line at the cursor location.
Insert Subscript Display the text box in which you will type the
subscript text. It will be half the font size.
Insert Superscript Display the text box in which you will type the super-
script text. It will be half the font size.
Subscript/Superscript Off
Turn off the subscript or superscript font option and
return to the default font size.
*
*
*
*
*
Indent 4 Spaces
with Linebreak
Issue an HTML formatting command to insert a
linebreak and indent four spaces.
Indent 4 Spaces Issue an HTML formatting command to indent four
spaces.
Insert Linebreak Issue an HTML formatting command to insert a
linebreak.
*
*
Run Character
Map
Launch the Windows Character Map, select a font,
and either drag/drop or copy/paste the character into
the text.
Show/Hide Notes This tool button toggles the Instructor Notes on and
off. The default is Hide Notes. Instructor Notes will not
display when the Question is presented during a
Session, regardless of whether they are on or off here.
Page 70

68 Chapter 4Lessons – Question Types
Multiple Choice
Question Type
First, review your default settings to make sure they apply to the way you
want to profile and present this Question. Then, decide whether you want
the Choices to be lettered or numbered. When you begin entering your
question in the window pane labelled Q, you will see that what you are
entering is reflected in the Name field. This name will appear in the
Question List Window, identifying the Question. You can edit this field, if
you prefer a different way of naming the Quesstion.
Typically, Multiple Choice Questions provide a set number of Response
Choices (two to five) from which one Choice is selected as the correct
one. When you are profiling a traditional Multiple Choice Question, you
Question Types
You can choose from among five Question Types:
• Multiple Choice
• Numeric
• Answer Series
• True/False
• Short Answer
The Question Editor interfaces changes to accommodate the different
Question Types. Following are some notes about what those differences
mean when you are profiling the different Question Types.
Page 71

69Chapter 4
Numeric
Question Type
will click on the checkbox of the correct Response. When you do, the bar
along the left side of the correct Question Choice will display as blue.
Multiple correct Multiple Choice Questions are also an option. Simply
click on the checkboxes of the correct Choices. Each selected Choice will
display the blue bar.
Numeric Questions are fairly straightforward – enter the numeric question in the Q window pane and enter the correct Response in the Answer
field. Numeric Responses can contain up to 11 numeric characters,
including the decimal point and minus sign. RF Clickers have both a
Decimal Point key and a Minus Sign key. However, IR Clickers do not. In
addition, IR Clickers must go through a fairly complicated series of key
presses when transmitting numeric Responses. Instructions for transmitting Responses to Numeric, Multiple Correct Multiple Choice, True/
False, Answer Series, and Short Answer Question Types when using IR
Clickers can be found on the Help Menu. You can display the instructions for IR Clicker users, or create a handout for each IR Clicker.
Lessons – Question Types
Page 72

70 Chapter 4
Answer Series
Question Type
The Answer Series Question expects Responses in which the Answers
are arranged in a predetermined order. For example, each Response
might be a specific historical event and the Question would instruct the
student to put the events in order from earliest to most recent. Students
with RF Clickers would enter the letters or numbers in order and send the
string in one transmission, while students with IR Clickers will send the
ordered Responses as individual key presses, one after the other, waiting
between key presses for the Clicker LED to stop flashing.
Lessons – Question Types
Page 73

71Chapter 4
True/False
Question Type
Enter the statement in the Q window pane and indicate whether it is true
or false by clicking on the radio button in the appropriate Response
pane. RF Clickers have a key and an key, IR Clickers do not. That’s
why there is a (1) and a (2) next to the T and F, respectively. IR Clickers
can respond to True/False Questions by pressing the 1 key for a True
Response and the 2 key for a False Response.
Lessons – Question Types
Page 74

72 Chapter 4
Short Answer
Question Type
Short Answers can contain up to 11 alphanumeric characters. You will
enter the correct Response in the Answer field. Students with RF Clickers
will enter all the characters in the Short Answer Response and then press
to send the answer. Alpha characters A through F and T are entered
by pressing the respective keys. For other alpha characters, students
should be instructed to press one of the alpha keys to go into Alpha
Mode and use the and keys to scroll to the letter they want to
enter.
Students with IR Clickers must press each character in the Short Answer
Response and wait between key presses until the LED on the Clicker
stops flashing, indicating it is ready to transmit another key press. In
addition, Short Answer Responses coming from IR Clickers are limited to
the numbers 0 through 9 and the letters A through J.
Lessons – Question Types
Page 75

73Chapter 4 Lessons – Question Function Buttons
In the Lesson Tree, select the Lesson that contains the Question you
want to edit. The Lesson’s Questions will display in the Question List
Window in the right pane. Select the Question you want to edit. Click on
the Edit Question Function Button to display the Question Editor. You
can change any Question setting, add or change Instructor’s Notes, and
use the Question Editor’s tools to edit or change the Question and the
Responses. Click on the Previous and Next buttons to move to other
Questions in the Question Set you want to edit. Click on the Update
button at the bottom of the dialog when you have made your edits and
are ready to return to the Lessons main screen.
In the Lesson Tree, select the Lesson that contains the Question(s) you
want to delete. The Questions for the selected Lesson will display in
the Question List Window. Select the Question you want to delete, or
using the Shift key, select a block of Questions you want to delete. Click
on the Delete Question Function Button. You will be prompted to verify
you want to delete the Question(s).
Use the Copy Question Function Button to copy a Question from
one Lesson to another. Select the Question in the List Window. Click
on the Copy Question Function Button. In the pop-up Lesson Tree
dialog, select the Lesson you want to copy the Question to. The copied
Question will be appended to the list of Questions in the List Window.
Use the two directional Move Function Buttons, described below, to
position the copied Question where you want it in the Lesson.
Select a Question in the Question List Window and click on the Move
Up Function Button to move the Question up one position in the list
of Questions. If the selected Question is at the top of the Question List,
this function will not be available.
Select a Question in the Question List Window and click on the Move
Down Function Button to move the Question down one position in
the list of Questions. If the selected Question is at the bottom of the
Question List, this function will not be available.
Page 76

74 Chapter 4Lessons – Question Function Buttons
Click on the Unselect All Function Button to clear the checkboxes
next to all the Questions. You can then click on individual checkboxes
to select a subset of the Questions for presentation during a Session.
Click on the Select All Function Button to select all the Questions in
the List Window. Each Question will have a green checkmark in the
checkbox to the left of the Question to indicate it is selected. All selected
Questions are included when this Lesson is presented during a Session.
Page 77

75Chapter 4
PowerPoint
Lessons
Lessons – PowerPoint Lessons
A Microsoft PowerPoint Slide Show can be easily turned into a PRS
Lesson. When InterWrite PRS is installed on your Windows computer, the
PRS PowerPoint Add-in automatically creates a PRS Toolbar in PowerPoint
that provides the functionality to turn any PowerPoint slide into a PRS
Lesson Question.
In an IR environment, when a PowerPoint Slide Show with PRS Question
Slides is run, PRS views this as a PRS Session and a New Session dialog
displays, allowing you to configure the Session and indicate whether you
want to display a Response Grid or Attendee List in the Response Area
when a PRS Question Slide is encountered.
On the Mac, the PRS PowerPoint Add-in must be
installed manually. The instructions for installing the PRS
PowerPoint Add-in on the Mac can be found at the end
of this chapter. Once installed, the PRS PowerPoint Addin works the same on both Windows and the Mac.
In an environment, an RF Class is started and the students join the
Class before the PRS PowerPoint Slide Show is started. When the PRS
PowerPoint Slide Show is begun, a New Session dialog is displayed. It is
not necessary to display either the Response Grid or Attendee List in RF.
At the end of the PRS PowerPoint Session, Responses are recorded in a
standard PRS Session file. PowerPoint-based Sessions are displayed in the
Sessions List Window as a PowerPoint Lesson. You can then mark it as
you would any other Session.
Page 78

76 Chapter 4
Click on the New Question Function Button on the PRS Add-in Toolbar in
PowerPoint when you want to turn the currently selected PowerPoint
slide into a PRS Question slide. The following InterWrite PRS Power-
Point COM Add-in dialog displays. You will recognize some of the New
Question Settings options. The settings you choose here will be saved
with this PowerPoint slide, and the InterWrite PRS logo will display on the
slide to identify it as a PRS PowerPoint Question Slide. The logo can be
moved to any location on the Question slide.
Crafting a
PowerPoint
Slide as a PRS
Question
Lessons – PowerPoint Lessons
The presence of the
PRS logo on the
PowerPoint slide
indicates this is a
PRS Question.
Animation effects cannot be used on PowerPoint PRS
Question Slides.
Page 79

77Chapter 4
Define the Session Profile here
just as you would for any PRS
Session (Chapter Five). In
addition to the absence of the
PRS Lesson selection option,
there are differences in the last
two settings on the dialog. You
can Automatically Advance the
Slide, rather than the Question,
and you can Ask Questions Only
Once. During the Slide Show,
you may have reason to go back
a slide or two. If a PRS Slide is
among the slides you go back
through, and you don’t want to
re-ask the Question, leave this setting at the default Yes. On the other
hand, you may have set up your presentation in such a way that PRS
Slides further on in the Slide Show might reveal something that will hint at
the correct answer in an earlier slide. You may want to go back and re-ask
that Question to see how many students picked up on the correct
answer. In that case you would set this option to No.
As you go through the Slide
Show, when a PRS Question
Slide is encountered—identified
by the PRS logo—a Response
Grid or Attendee List, depending on the Display Mode
chosen, will display in a Re-
sponse Area across the lower
portion of the Slide. You can
size and move the Response
Area to an optimal placement
over the PRS Question Slide.
PRS remembers the size and
position of the Response Area
for each Question Slide in the
Slide Show.
Lessons – PowerPoint Lessons
When you run a PowerPoint Slide Show with PRS Question slides,
InterWrite PRS is launched, if it isn’t already running, and the following
PRS New Session dialog displays.
Running a
PowerPoint Slide
Show with PRS
Question Slides
Page 80

78 Chapter 4
Depending on your Session settings, either the Countdown Timer will
autostart, or you will have to click on the Start Question button to
start the Countdown Timer. If you set up the Show Results Graph option
to automatically display the Results Graph, it will pop up over the Response Area when the Countdown Timer runs down to zero.
Lessons – PowerPoint Lessons
While the PRS PowerPoint Session is running, the
PowerPoint slide is switched into Annotation Mode, so
you can write notes on the slide. This also prevents you
from accidentally advancing to the next slide while the
Session is running.
Click on the PRS button on
the Add-in Toolbar to display
the About PRS Add-in dialog.
In addition to providing
version information about the
PRS PowerPoint Add-in, this
dialog is where you can
disable the PRS Session while
you are viewing the PowerPoint Slide Show.
About PRS Add-in
By default, the Enable PRS Session option is checked so that when you run
this PRS PowerPoint Slide Show, PRS will automatically launch and the New
Session dialog will display. If you want to run the PRS PowerPoint Slide Show
so you can review the PRS Question Slides without launching PRS, clear the
Enable PRS Session checkbox.
Page 81

79Chapter 4 Lessons – Mac PowerPoint Add-in
Installing the PRS
PowerPoint Add-in
on the Mac
The following steps describe how to install the PRS PowerPoint Addin on the Mac.
1 Open PowerPoint and select the PowerPoint Menu.
2 Select the Preferences... menu option.
3 Click on the View tab and uncheck the Project Gallery at startup
option. Click on the OK button.
4 Select the Tools Menu.
5 Select the Add-ins... menu option.
6 Click on the Add... button. Navigate to the folder in which PRS is
installed. By default, PRS is installed in the InterWrite PRS folder.
7 Select the PRS AddIn.ppa file and click on the Open button.
8 The PRS Add-in file will be listed in the Add-in List. Click on the
OK button.
9 Restart PowerPoint.
By default, the PRS Add-in Toolbar displays along the left side of the
PowerPoint window. You can move it by grabbing the spot next to
the Close button and dragging it to the top of the window where the
other Toolbars are located. Click and drag the Resize button to
change the PRS Toolbar’s orientation.
On the Mac, there may be some lag time between when
a Question Slide is accessed and when PRS is displayed.
Remember, patience is a virtue.
Page 82

80 Chapter 4
(This page left blank intentionally.)
Page 83

117Appendix
Appendix
PRS Hardware
Specifications
IR RECEIVER SPECIFICATIONS
Dimensions: 2.4 x 4.7 x 1.6 inches (60 x 120 x 41 mm)
Weight: 3.8 ounces (108 grams)
Power: 8-15V DC (via signal cable)
Reception Cone Angle: Approximately 90 degrees
IR CLICKER TRANSMITTER SPECIFICATIONS
Dimensions: 2.25 x 4.25 x 1 inch (56 x 107 x 25 mm)
Weight (without batteries):
Power: Two AAA (1.5V) Alkaline Batteries*
Signal: Infrared
Effective Distance: 21 yards (20 meters) minimum
*Replace the batteries when the LED Light becomes dim.
2 ounces (55 grams)
RF RECEIVER HUB SPECIFICATIONS
Dimensions:
4.25 x 3.25 x .875 inches (108 x 83 x 23 mm)
Weight:
3 ounces ( 85 grams)
Power:
200 mAmps
Signal:
2.46 GHz ISM Band
Effective Distance:
>50 Meters
RF CLICKER REMOTE SPECIFICATIONS
Dimensions: 6.0 x 2.56 x 0.7 inch (152 x 65 x 18 mm)
Weight (with batteries): 4 ounces (138 grams)
Power: Three AAA (1.5V) Batteries*
Signal: 2.46 GHz ISM Band
Effective Distance:
>50 Meters
*Replace the batteries when the Low Battery message displays on the
LCD screen, indicating about 15% Battery Life remaining.
Page 84

118 Appendix
Note: This equipment has been tested and found to comply with the limits of a Class
B digital device, pursuant to Part 15 of the FCC rules.
These limits are designed to provide reasonable protection against harmful interference in a residential installation. This equipment generates, uses and can radiate radio
frequency energy and, if not installed and used in accordance with the instructions,
may cause harmful interference to radio communications. However, there is no
guarantee the interference will not occur in a particular installation.
If this equipment does cause harmful interference to radio or television reception,
which can be determined by turning the equipment off and on, the user is encouraged to try to correct the interference by one or more of the following measures.
· Reorient or relocate the receiving antenna.
· Increase the separation between the equipment and the receiver.
· Connect the equipment into an outlet on a circuit different from that to which the
receiver is connected.
· Consult the dealer or an experienced Radio/TV technician for help.
These devices comply with part 15 of the FCC Rules. Operation is subject to
the following two conditions:
1 These devices may not cause harmful interference, and
2 These devices must accept any interference received, including
interference that may cause undesired operation.
Canada
Industry Canada Class B emission compliance statement. This Class B digital
apparatus complies with Canadian ICES-003.
Avis de conformité á la réglementation d’Industrie Canada. Cet appareil
numérique de classe B est conforme á la norme NMB-003 du Canada.
Regulatory Statements
This device complies with Part 15 of FCC rules and with RSS-210 of Industry Canada.
Operation is subject to the following two conditions: (1) This device may not cause
harmful interference, and (2) This device must accept any interference received,
including interference that may cause undesired operation.
The radiated output power is far below the FCC Radio Frequency exposure limits.
Nevertheless, this device should be used in such a manner that the potential for
human contact during normal operation is minimized.
Page 85

119Appendix Declaration of Conformity
PRS IR Receiver Declaration of Conformity
The “CE“ mark on this device indicates compliance under the EMC 89//336/
EEC Directive.
Declaration of conformity according to ISO/IEC Guide 22 and EN 45014
Manufacturer’s Name: GTCO CalComp,Inc.
Manufacturer’s Address: 7125 Riverwood Drive
Columbia, MD 21046 U.S.A.
declares, that the product
Product Name: InterWrite PRS IR Receiver
Model Numbers: RX-02
Product Options: All
conforms to the following product specifications:
EMC: EMC Directive 89/336/EEC and amendment 92/31/EEC
Emissions Testing: EN 55022:1998 Class B
EN 61000-3-2 Harmonics Class A
EN 61000-3-3 Flicker
Immunity Testing: EN 55024:1998 including:
EN 61000-4-2;ESD
EN 61000-4-3;Radiated Immunity
EN 61000-4-4;EFT/B
EN 61000-4-5;Surges
EN 61000-4-6;Conducted Immunity
EN 61000-4-11;Voltage Dips
Declaration
of Conformity
Supplementary
Information
Supplementary Information
The product herewith complies with the requirements of the Low Voltage Directive
73/23/EEC and the EMC Directive 89/336/EEC.
Scottsdale, Arizona, U.S.A. 4-30-2004 Dana Doubrava
Location Date Engineering Mgr
Page 86

120 AppendixDeclaration of Conformity
PRS IR Clicker Transmitter Declaration of Conformity
The “CE“ mark on this device indicates compliance under the EMC 89//336/
EEC Directive.
Declaration of conformity according to ISO/IEC Guide 22 and EN 45014
Manufacturer’s Name: GTCO CalComp,Inc.
Manufacturer’s Address: 7125 Riverwood Drive
Columbia, MD 21046 U.S.A.
declares, that the product
Product Name: InterWrite PRS IR Clicker Transmitter
Model Numbers: TX-01A, TX-02A
Product Options: All
conforms to the following product specifications:
EMC: EMC Directive 89/336/EEC and amendment 92/31/EEC
Emissions Testing: EN 55022:1998 Class B
Immunity Testing: EN 55024:1998 including:
EN 61000-4-2;ESD
EN 61000-4-3;Radiated Immunity
Supplementary
Information
Supplementary Information
The product herewith complies with the requirements of the Low Voltage Directive
73/23/EEC and the EMC Directive 89/336/EEC.
Scottsdale, Arizona, U.S.A. 4-30-2004 Dana Doubrava
Location Date Engineering Mgr
Page 87

121Appendix
PRS RF Receiver Hub Declaration of Conformity
The “CE“ mark on this device indicates compliance under the EMC 89//336/
EEC Directive.
Declaration of conformity according to ISO/IEC Guide 22 and EN 45014
Manufacturer’s Name: GTCO CalComp,Inc.
Manufacturer’s Address: 7125 Riverwood Drive
Columbia,MD 21046 U.S.A.
declares, that the product
Product Name: InterWrite PRS RF Receiver Hub
Model Numbers: H1
Product Options: All
conforms to the following product specifications:
EMC: EMC Directive 89/336/EEC and amendment 92/31/EEC
Emissions Testing: EN 55022:1998 Class B
EN 61000-3-2 Harmonics
EN 61000-3-3 Flicker
Immunity Testing: EN 55024:1998 including:
EN 61000-4-2;ESD
EN 61000-4-3;Radiated Immunity
EN 61000-4-4;EFT/B
EN 61000-4-5;Surges
EN 61000-4-6;Conducted Immunity
EN 61000-4-11;Voltage Dips
Supplementary
Information
Supplementary Information
The product herewith complies with the requirements of the Low Voltage Directive
73/23/EEC and the EMC Directive 89/336/EEC.
Scottsdale, Arizona, U.S.A. 1-1-2006 Dana Doubrava
Location Date Engineering Mgr
Declaration of Conformity
Page 88

122 Appendix
PRS RF Clicker Remote Declaration of Conformity
The “CE“ mark on this device indicates compliance under the EMC 89//336/
EEC Directive.
Declaration of conformity according to ISO/IEC Guide 22 and EN 45014
Manufacturer’s Name: GTCO CalComp,Inc.
Manufacturer’s Address: 7125 Riverwood Drive
Columbia, MD 21046 U.S.A.
declares, that the product
Product Name: InterWrite PRS RF Clicker Remote
Model Numbers: R1
Product Options: All
conforms to the following product specifications:
EMC: EMC Directive 89/336/EEC and amendment 92/31/EEC
Emissions Testing: EN 55022:1998 Class B
Immunity Testing: EN 55024:1998 including:
EN 61000-4-2;ESD
EN 61000-4-3;Radiated Immunity
Supplementary
Information
Supplementary Information
The product herewith complies with the requirements of the Low Voltage Directive
73/23/EEC and the EMC Directive 89/336/EEC.
Scottsdale, Arizona, U.S.A. 1-1-2006 Dana Doubrava
Location Date Engineering Mgr
European Contact European Contact:
GTCO CalComp GmbH
European Headquarters
Kreiller Strasse 24
81673 Muenchen
Germany
Tel: +49 (0) 89 370012-0
Fax: +49 (0) 89 370012-12
Declaration of Conformity
Page 89

123Appendix
European Union Emission Directive
This product is in conformity with the protection requirements of EU Council
Directive 89/366/ECC on the approximation of the laws of the Member States
relating to electromagnetic compatibility.
This product has been tested and found to comply with the limits for Class B
Information Technology Equipment according to CISPR 22/European Standard
EN55022. The limits for Class B equipment were derived for typical industrial
environments to provide reasonable protection against interference with
licensed communication devices.
European Union WEEE Directive
The manufacture of this equipment required the extraction and use of natural
resources. It may contain hazardous substances that could impact health and
the environment.
• In order to avoid the dissemination of the hazardous substances into the
environment and to diminish the pressure on our natural resources, we
encourage you to return this product to the appropriate take-back system
facility. These facilities reuse or recycle most of the materials in this
equipment in a responsible way.
• The crossed-out wheeled bin symbol below invites you to use these take-
back systems.
• If you need more information about the collection, reuse and recycling
systems in your area, please contact your local or regional waste authority.
• Further information about the responsible end-of-life management of this
and other GTCO CalComp products is available on our Web site at
www.gtcocalcomp.com.
European Union Directives
Page 90

124 AppendixLimited Warranty
Limited Warranty for InterWrite PRS Receivers and Clickers
GTCO CalComp Corporation warrants these products to be free from defects in material and workmanship under
the following terms. Complete and return the enclosed warranty registration card to ensure that your products
are covered by this warranty.
Coverage
Parts and labor are warranted for one (1) year from the date of the first consumer purchase for the InterWrite PRS
Receivers and Clickers. This warranty applies to the original consumer purchaser only. This warranty does not
apply to any product purchased outside the United States or Canada. For warranty information outside the United
States or Canada, contact your local dealer or distributor.
Warranty is valid only if original consumer’s purchase or lease date is less than or equal to six months from the
original GTCO CalComp sale date. This information will be captured by the system serial number and confirmed
by the reseller’s purchase order.
Conditions
Except as specified below, this warranty covers all defects in material or workmanship in the products. The
following are not covered by the warranty:
1 Any product on which the serial number has been defaced, modified, or removed (if applicable).
2 Damage, deterioration, or malfunction resulting from:
a Accident, misuse, abuse, neglect, fire, water, lightening, or other acts of nature, unauthorized
product modification for any purpose, or failure to follow instructions supplied with the product.
b Repair, or attempted repair, by anyone not authorized by GTCO CalComp.
c Any damage in shipment of the product (claims must be presented to the carrier).
d Any other cause which does not relate to a manufacturing defect.
3 Any product not sold or leased to a consumer within six months of GTCO CalComp’s original sale date.
4 Consumable parts, e.g., batteries.
GTCO CalComp will pay all labor and material expenses for covered items, but will not pay for the following:
1 Removal or installation charges.
2 Costs for initial technical adjustments (set up), including adjustments of user controls.
3 Certain shipping charges. (Payment of shipping charges is discussed in the next section of this warranty.)
4 Packaging costs. (Customers should keep their boxes.)
Warranty Service Procedures
1 To obtain service on your GTCO CalComp product, call the Service & Support Department at (410) 312-
9221 (EST), or (480) 443-2214 (MST) to obtain a Return Material Authorization Number (RMA#) and
shipping instructions.
2 Ship the product to GTCO CalComp with the RMA# marked clearly on the outside of the box. GTCO
CalComp reserves the right to refuse the shipment, if not properly marked.
3 Although the consumer must pay any shipping charges to ship the product to GTCO CalComp for warranty
service, GTCO CalComp will pay the return shipping charges for ground shipment. Other shipping options
are available at an additional fee.
4 Whenever warranty service is required, the original dated sales invoice (or a copy) must be presented as
proof of warranty coverage, and should be included in shipment of the product. In addition, please include
your name, address, telephone number, fax number, email address, and a description of the problem.
5 If GTCO CalComp determines that the unit is not defective within the terms of the warranty, the consumer
shall pay the cost of all freight charges, as well as any repair charges.
Technical Support
Web-based Technical Support is available free of charge at:
www.gtcocalcomp.com
where current driver releases, as well as comprehensive technical support, troubleshooting, Technical Bulletins
and FAQs can be found.
Telephone Technical Support is available by contacting our Service & Support Department at (410) 312-9221
(EST), or (480) 443-2214 (MST). You can also fax your request to (410) 290-9065 (EST), or (480) 948-5508 (MST).
Our toll-free numbers in the U.S. are: 800-344-4723 for our East Coast customers and 800-856-0732 for our West
Coast customers.
Limited
Warranty
Page 91

125Appendix
Disclaimer of Unstated Warranties
The warranty printed above is the only warranty applicable to this purchase. ALL OTHER WARRANTIES,
EXPRESSED OR IMPLIED, INCLUDING, BUT NOT LIMITED TO, THE IMPLIED WARRANTIES OF MERCHANTABILITY AND FITNESS FOR A PARTICULAR PURPOSE ARE DISCLAIMED. Assuming the warranty above stated is
otherwise applicable, it is expressly understood and agreed that GTCO CalComp’s sole liability, whether in
contract, tort, under any warranty, in negligence, or otherwise, shall be for the repair or replacement of the
defective parts, and under no circumstances shall GTCO CalComp be liable for special, indirect, or consequential
damages. The price stated and paid for the equipment is a consideration in limiting GTCO CalComp’s liability.
Notice
Some states and provinces do not allow the exclusion or limitation of incidental or consequential damages, so the
above exclusion may not apply to you. This warranty gives you specific legal rights, and you may have other rights,
which vary from state to state, or province to province.
To obtain service on your GTCO CalComp product, call our Service & Support Department at (410) 312-9221
(EST), or (480) 443-2214 (MST), fax us at (410) 290-9065 (EST), or (480) 948-5508 (MST). We can also be
contacted through our Web site at
www.gtcocalcomp.com.
Important! All products returned to GTCO CalComp for service must have prior approval in the form of a Return
Merchandise Number (RMA#), which can be obtained by calling the Service & Support Department.
Limited Warranty
Page 92

126 AppendixPRS Web Registration – The Admin Module
Copyright© 2006 GTCO CalComp Inc.
InterWrite is a trademark of GTCO CalComp Inc.
All other products and company names are the
trademarks or registered trademarks of their
respective owners.
The information contained in this document is subject to change without notice.
GTCO CalComp assumes no responsibility for technical, or editorial errors, or omissions that may appear in this document, or for the use of this material. Nor does
GTCO CalComp make any commitment to update the information contained in
this document. This document contains proprietary information which is protected
by copyright. All rights reserved. No part of this document can be photocopied or
reproduced in any form without the prior, written consent of GTCO CalComp Inc.
GTCO CalComp, Inc.
8224 East Evans Road
Scottsdale, AZ 85260
USA
TEL: 800.856.0732
480.948.6540
FAX: 480.948.5508
GTCO CalComp, Inc.
7125 Riverwood Drive
Columbia, MD 21046
USA
TEL: 800.344.4723
410.381.6688
FAX: 410.290.9065
GTCO CalComp GmbH
Kreiller Strasse 24
81673 Muenchen
Germany
TEL: +49 (0) 89 370012-0
FAX: +49 (0) 89 370012-12
www.gtcocalcomp.com
37-00874-01 Rev. D
 Loading...