

Page 1
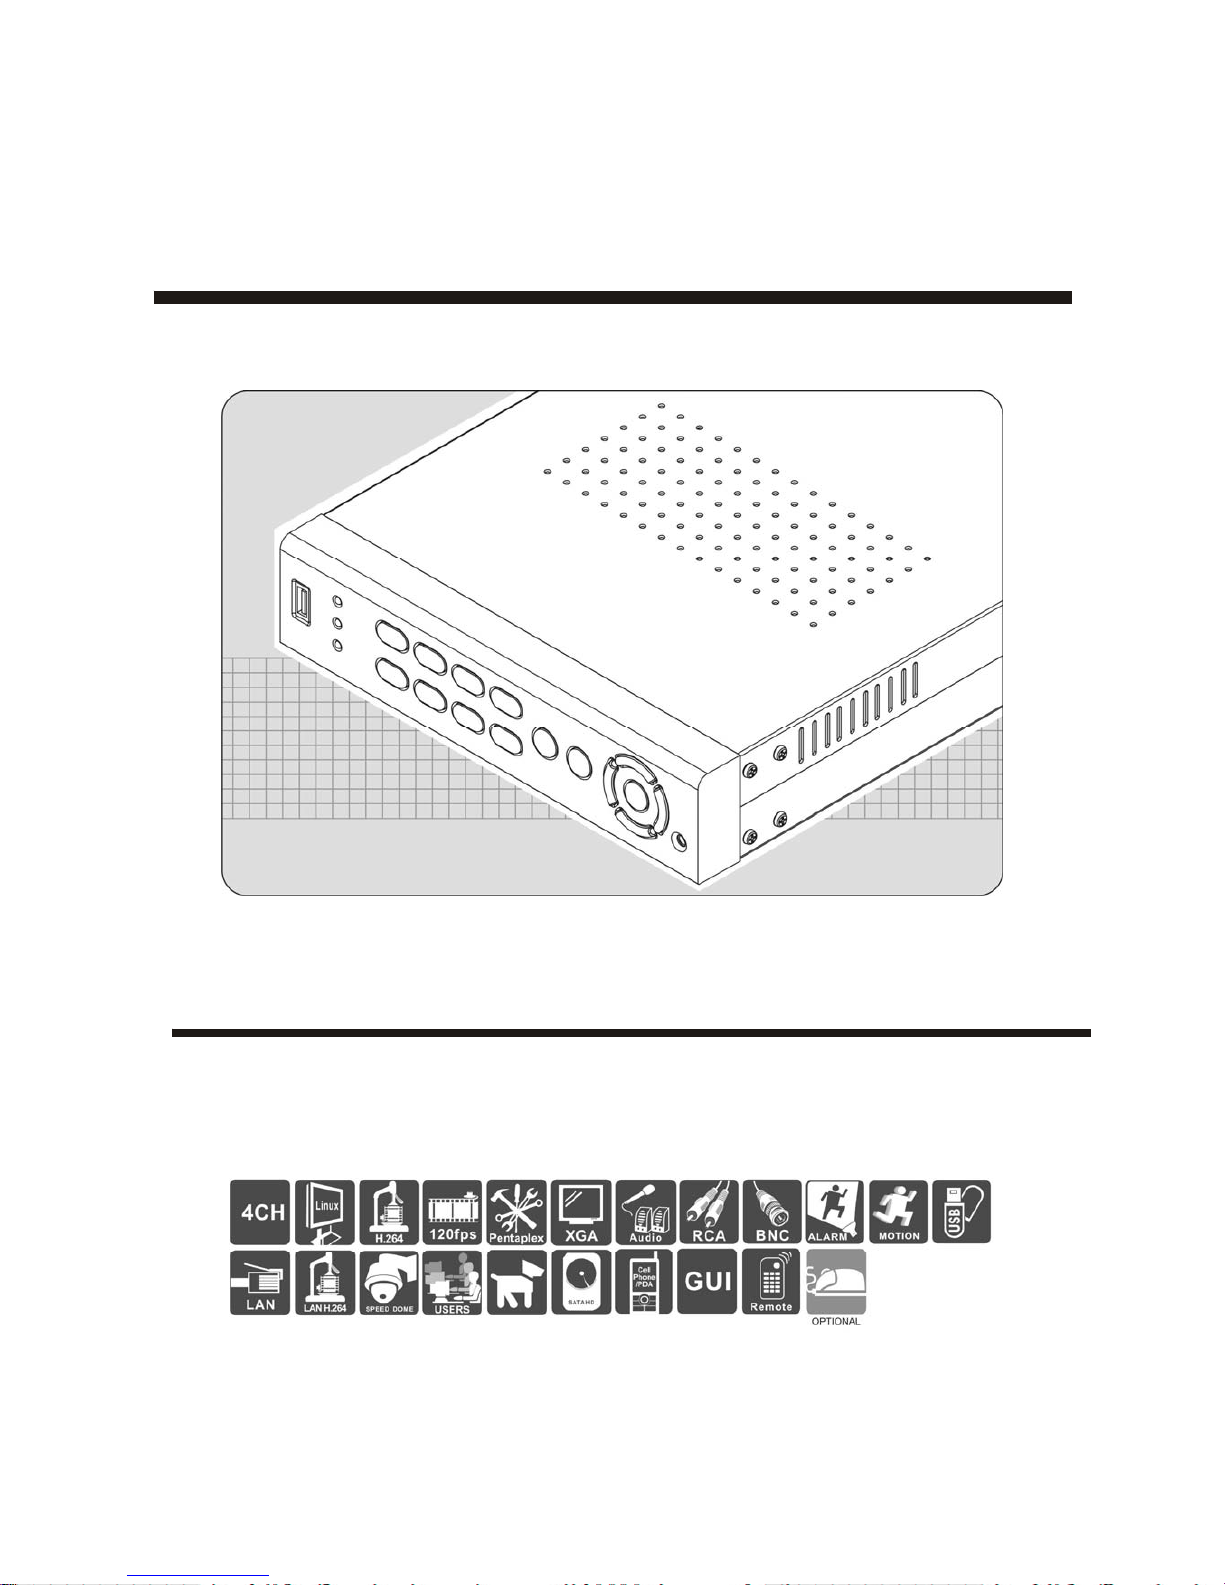
4CH H.264
STANDALONE DVR SYSTEM
USER MANUAL
2010 Apr. V1.0
Page 2
ii
WARNING
¾ Do not expose the DVR under the sunlight, heat or
wet environment while installation. As it could
decrease the performance of DVR and damage the
machine.
¾ Do not touch the power plug or case with wet hands
as this could result electric shock.
¾ Do not forcedly bend or put heavy object on power
cable as this could result in injury to personal or
equipment.
¾ Do not operate with damaged power cord or loose
electrical outlet as this could result in electric shock or
accident.
¾ Please use individual power instead of share electrical
outlets with other electrical equipment as this could
result in damage or accident.
¾ Do not attempt to service this DVR by yourself as it
may expose you to dangerous voltage or other
hazards. Please refer all service to the qualified
servicing distributor.
¾ Do not open the covers or insert any object into DVR.
CAUTION
¾ Do not place the machine on an uneven surface or it would
decrease the DVR efficiency or malfunction.
¾ Avoid any shock or bumping of the DVR while recording.
Improper handling could damage the system.
CAUTION
Make sure the voltage selector switch
(115V/230V) is set to appropriate setting
before plug in!
Page 3

iii
CONTENTS
1. Specification...................................................................................1
2. Front Panel......................................................................................2
3. Installation.......................................................................................3
4. DVR Installation..............................................................................3
5. System Operation...........................................................................4
6. Display Setup..................................................................................6
7. Main Menu Setup............................................................................8
7.1 Search........................................................................................9
7.2 Record Setup ..........................................................................10
7.3 HDD Setup...............................................................................1 1
7.4 Basic Setup.............................................................................12
7.4.1 Language.......................................................................13
7.4.2 Time Setup.....................................................................13
7.4.3 Password Setup............................................................13
7.4.4 Camera Setup................................................................14
7.4.5 XGA/Audio Setup..........................................................15
7.5 Advance Setup........................................................................15
7.5.1 Alarm Setup...................................................................15
7.5.2 System Information ......................................................16
7.5.3 Motion Detection...........................................................18
7.5.4 PTZ Setup ......................................................................19
7.5.5 Network Setup...............................................................20
8. Other Function..............................................................................21
9. Cell Phone Monitoring Operation ...............................................21
10. H264Player Operation..................................................................24
11. Web Operation..............................................................................26
12. Default Setting..............................................................................33
13. HDD Support List..........................................................................34
14. USB Flash Memory Stick Support List.......................................35
Page 4
1
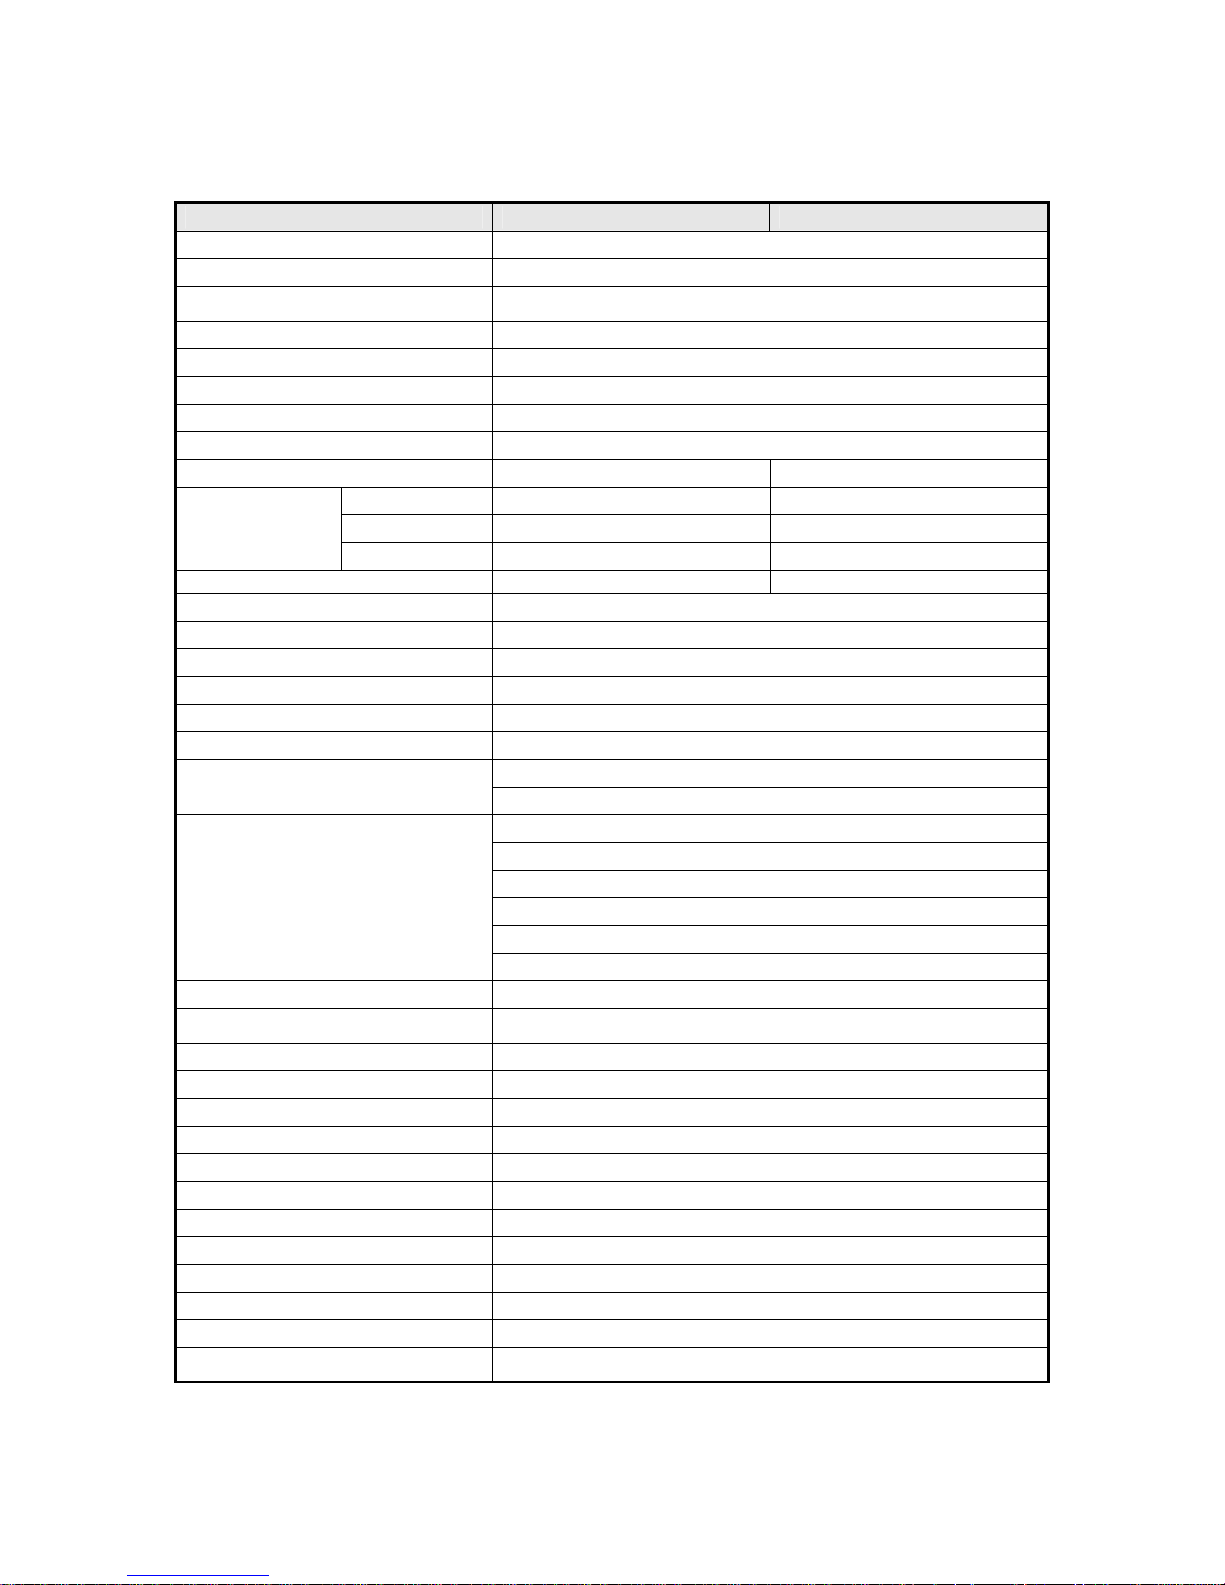
1. Specification
Video Format NTSC PAL
Video Input 4 CH Input / BNC
Audio Input 4 CH Input / RCA
Video Output
1CH Output / BNC
Audio Output 1CH Output / RCA
XGA Output
640x480、800x600、1024x768、1280x1024、1440x900
Alarm Input 4CH Alarm In
Alarm Output
Buzzer,2 x Relay Out (N.O、N.C)
Display Mode Full Screen, 4CH Split Screen,Auto Switch
Display Resolution 720 x 480 720 x 576
Highest 720 x 480 720 x 576
High 720 x 240 720 x 288
Recording
Resolution
Normal 360 x 240 360 x 288
Recording Frame Max. 120 FPS Max. 100 FPS
Compression Algorithm H.264
Operating System Embedded Linux
Pentaplex Live / Record / Playback / Network / Mobile Phone
Recording Mode Manual, Schedule, Event
Schedule Recording Full Recording, Motion, Alarm, Manual Recording
Status Indicator Power, Recorder, Play
Alarm Trigger, Motion Trigger, Video Loss
Event Mode
Recording Duration: 10~60 sec.
Normal Speed: x1
Fast Forward: x2 / x4 / x8 / x16multiple speed
Slow Forward: 1/2、1/4、1/8 multiple speed
Fast Rewind: x2 / x4 / x8 / x16
Frame by Frame Playback: Forward
Playback Mode
Search Function: Time / Event
Network Protocol TCP/IP / PPPoE / DHCP / SMTP / DDNS
HDD Type
SATA 3.5”HDD x 1 (No HDD Included)
HDD Management Automatic Format System
PTZ Control Communication Protocol (PELCO P, PELCO D, MIKAMI)
Backup Device USB 2.0 Flash Memory Stick
Firmware Update Host USB
Multi-Language English / Chinese / Others
Control Mode Front Panel / Remote Control / USB Mouse / Internet
Network Control IE Browser
Network Function Live Display / Playback / PTZ Control / System Setup
Power Supply DC 12V / 3A(AC100V~240V 50/60HZ)
Unit Dimension 220mm (D)x 228mm (W) x 48 (H) mm
Weight Unit Weight 1.6kg ( HDD and Power Adapter Not Included )
Operating Temperature
0℃ ~ 46℃
Page 5
2
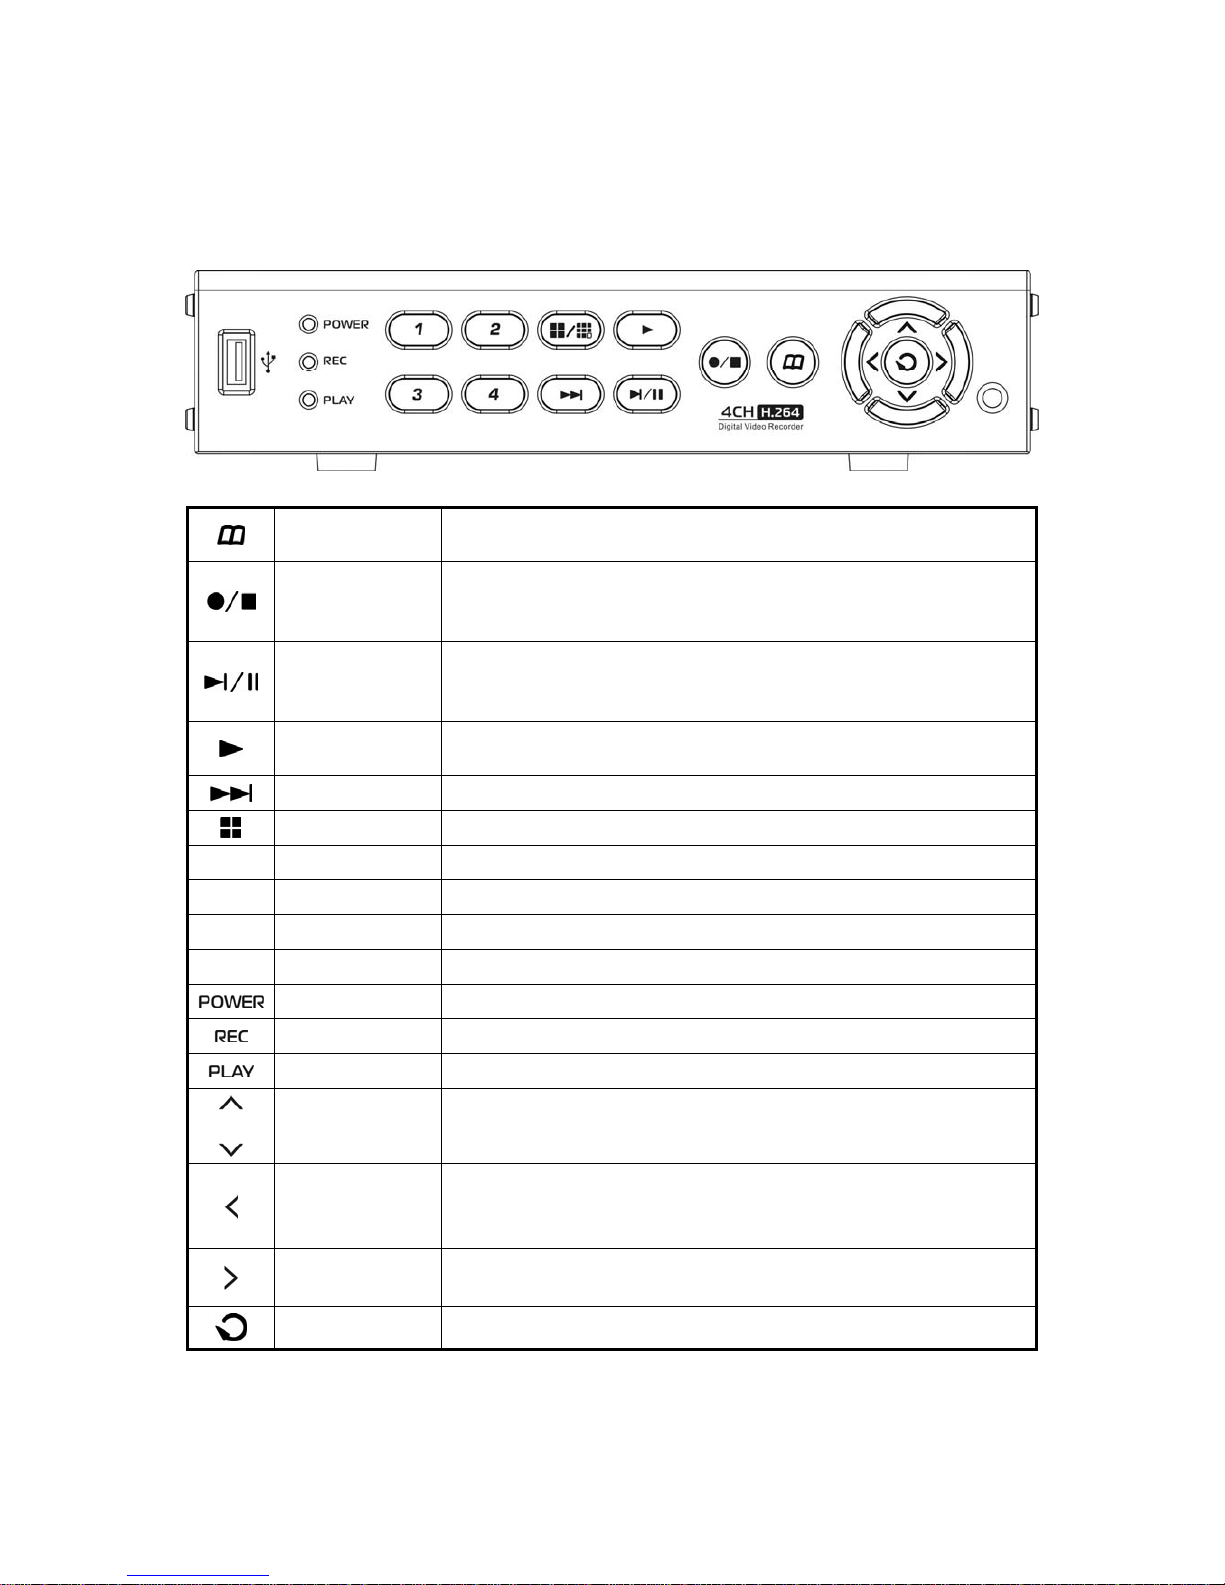
2. Front Panel
MENU
Under the live viewing mode, press MENU to enter the main menu.
Under the menu mode, press MENU to go to the upper menu.
Manual Record/
STOP
Press this button to start recording in live mode.
Under the playback mode, press the button to stop the operation or
go to upper menu.
Step / Pause
Under the playback mode, press Step button to enter Play Frame by
Frame mode. Under the playback mode, press the button to pause
the playback.
Play
Under the live viewing mode, press the Play button to enter the
playback mode.
Slow Forward
Slow Forward speed: 1/2、1/4、1/8
Quad Quad screen display.
1
Channel 1 Under the live viewing mode or playback mode,channel 1 display.
2
Channel 2 Under the live viewing mode or playback mode,channel 2 display.
3
Channel 3 Under the live viewing mode or playback mode,channel 3 display.
4
Channel 4 Under the live viewing mode or playback mode,channel 4 display.
Power Indicator The LED lights on when power on.
Record Indicator The LED lights on when the DVR is recording.
Play Indicator The LED lights on when the DVR is playing.
Up
Down
To move up or down of the selection setting in the menu
Left
Fast Rewind
To move left of the selection setting in menu.
Playback: x2 / x4 / x8 / x16 Multiple Speed.
Right
Fast Forward
To move right of the selection setting in menu.
Playback: x2 / x4 / x8 / x16 Multiple Speed.
Enter Press the Enter button to confirm the setup or go into sub-menu.
Page 6
3
3. Installation
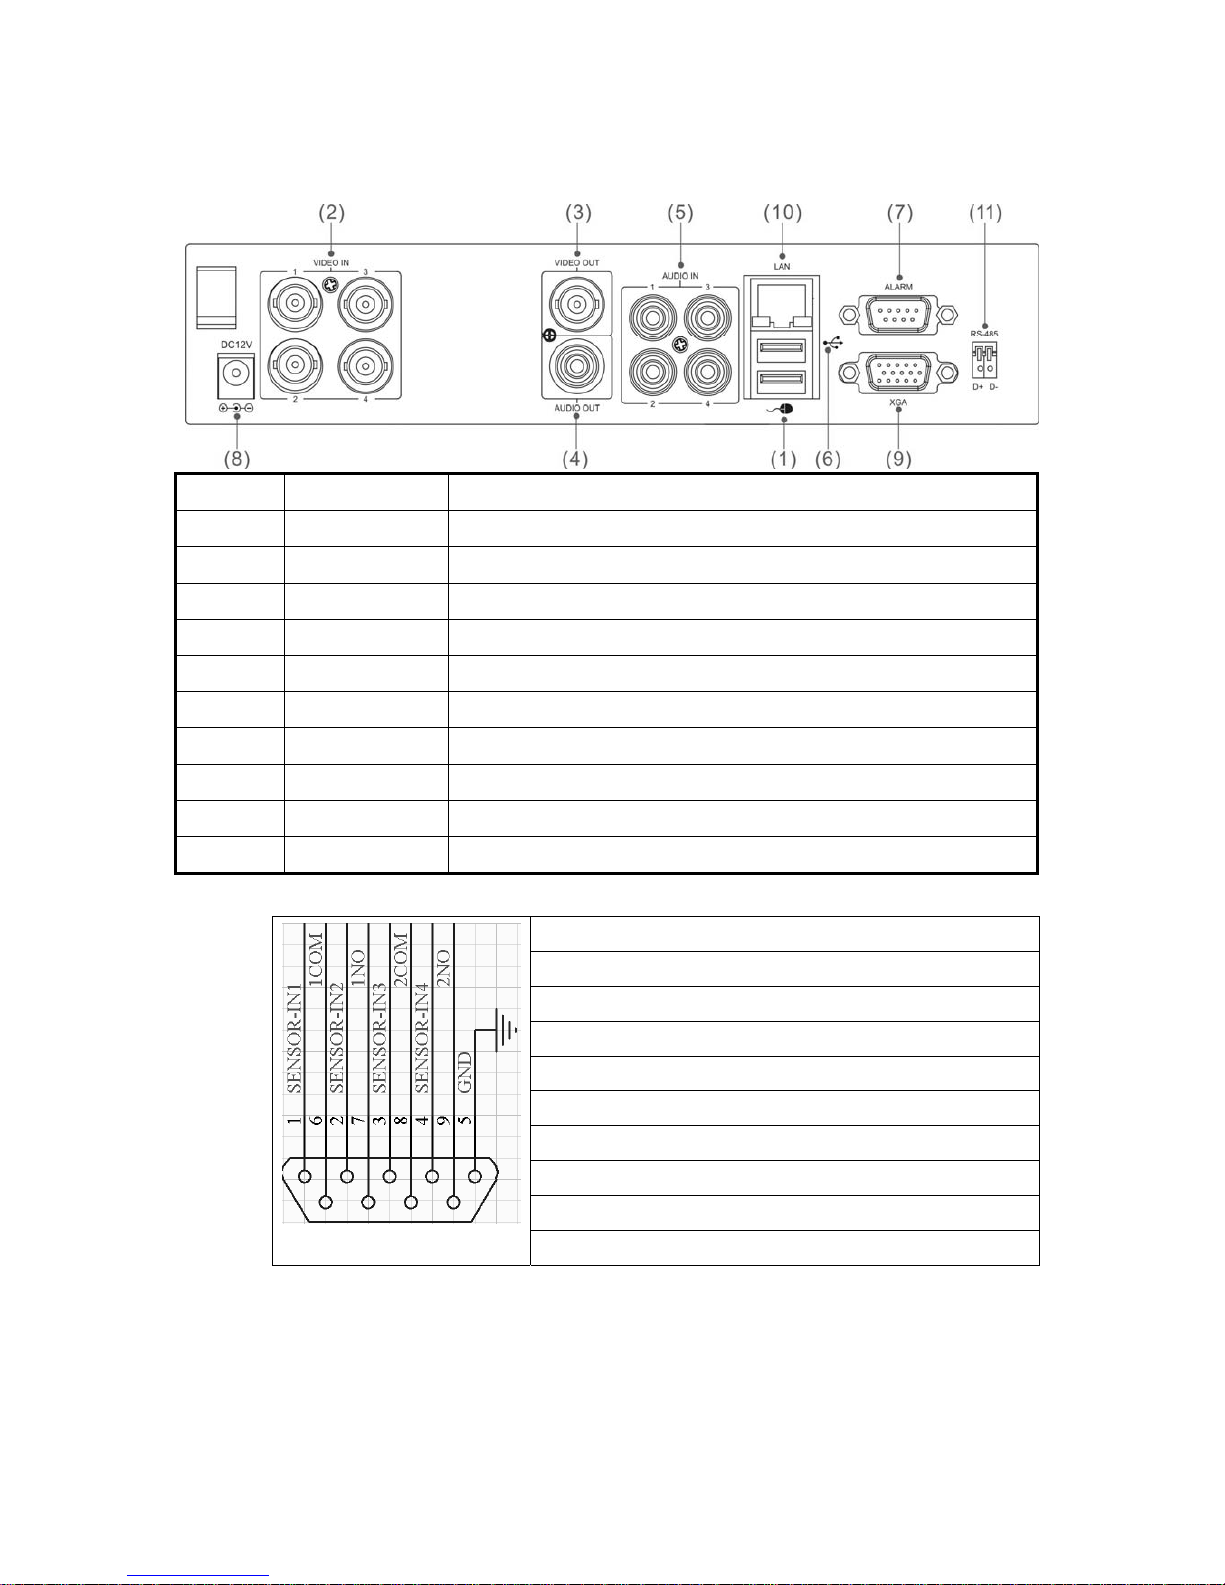
1 USB Mouse Port 1.1 USB Mouse
2 VIDEO IN 4CH Video Input (BNC)
3 VIDEO OUT 1CH Video Output (BNC)
4 AUDIO OUT 1CH Audio Output (RCA)
5 AUDIO IN 4CH Audio Input
6 USB 2.0 Port USB Backup or Firmware Update
7 ALARM, Alarm I/O
8 DC12V Power Input
9 XGA PC Monitor Output
10 LAN RJ-45 Network Connection
11 RS-485 For Speed Dome Use
z Alarm I/O
Item
Point 1: CH1 sensor input.
Point 2: CH2 sensor input.
Point 3: CH3 sensor input.
Point 4: CH4 sensor input.
Point 5: ground.
Point 6: the first relay joint port.
Point 7: the first relay normal open.
Point 8: the second relay joint port.
Point 9: the second relay normal open.
4. DVR Installation
z Connect the camera video output to the DVR video input port
with BNC connectors.
The camera install coaxial cable is suggested cat 6 or above.
Page 7
4
z DVR Network installation
Please connect DVR to HUB or router by using RJ-45 network cable and
make sure the DVR network indicator LED is on.
(Please refer to 7.5.5 Network Setup for further network setting information
of using static IP, PPPoE or DHCP.
z Alarm Installation
Please refer to 3. Installation for external alarm I/O installation.
Plase refer to 7.5.1 Alarm Setup.
z Speed Dome Installation
This device can support 3 kinds of communication protocol ( Pelco D、Pelco
P & MIKAMI)
z Power Installation
Please use the provided power cable and adaptor to connect the DVR
(AC100V~AC230V). Please refer to 3. Installation
for connecting position.
The DVR system will enter into live viewing mode when power is connected.
Please refer to 6. Display Setup - Live Viewing Mode
for more information.
5. System Operation
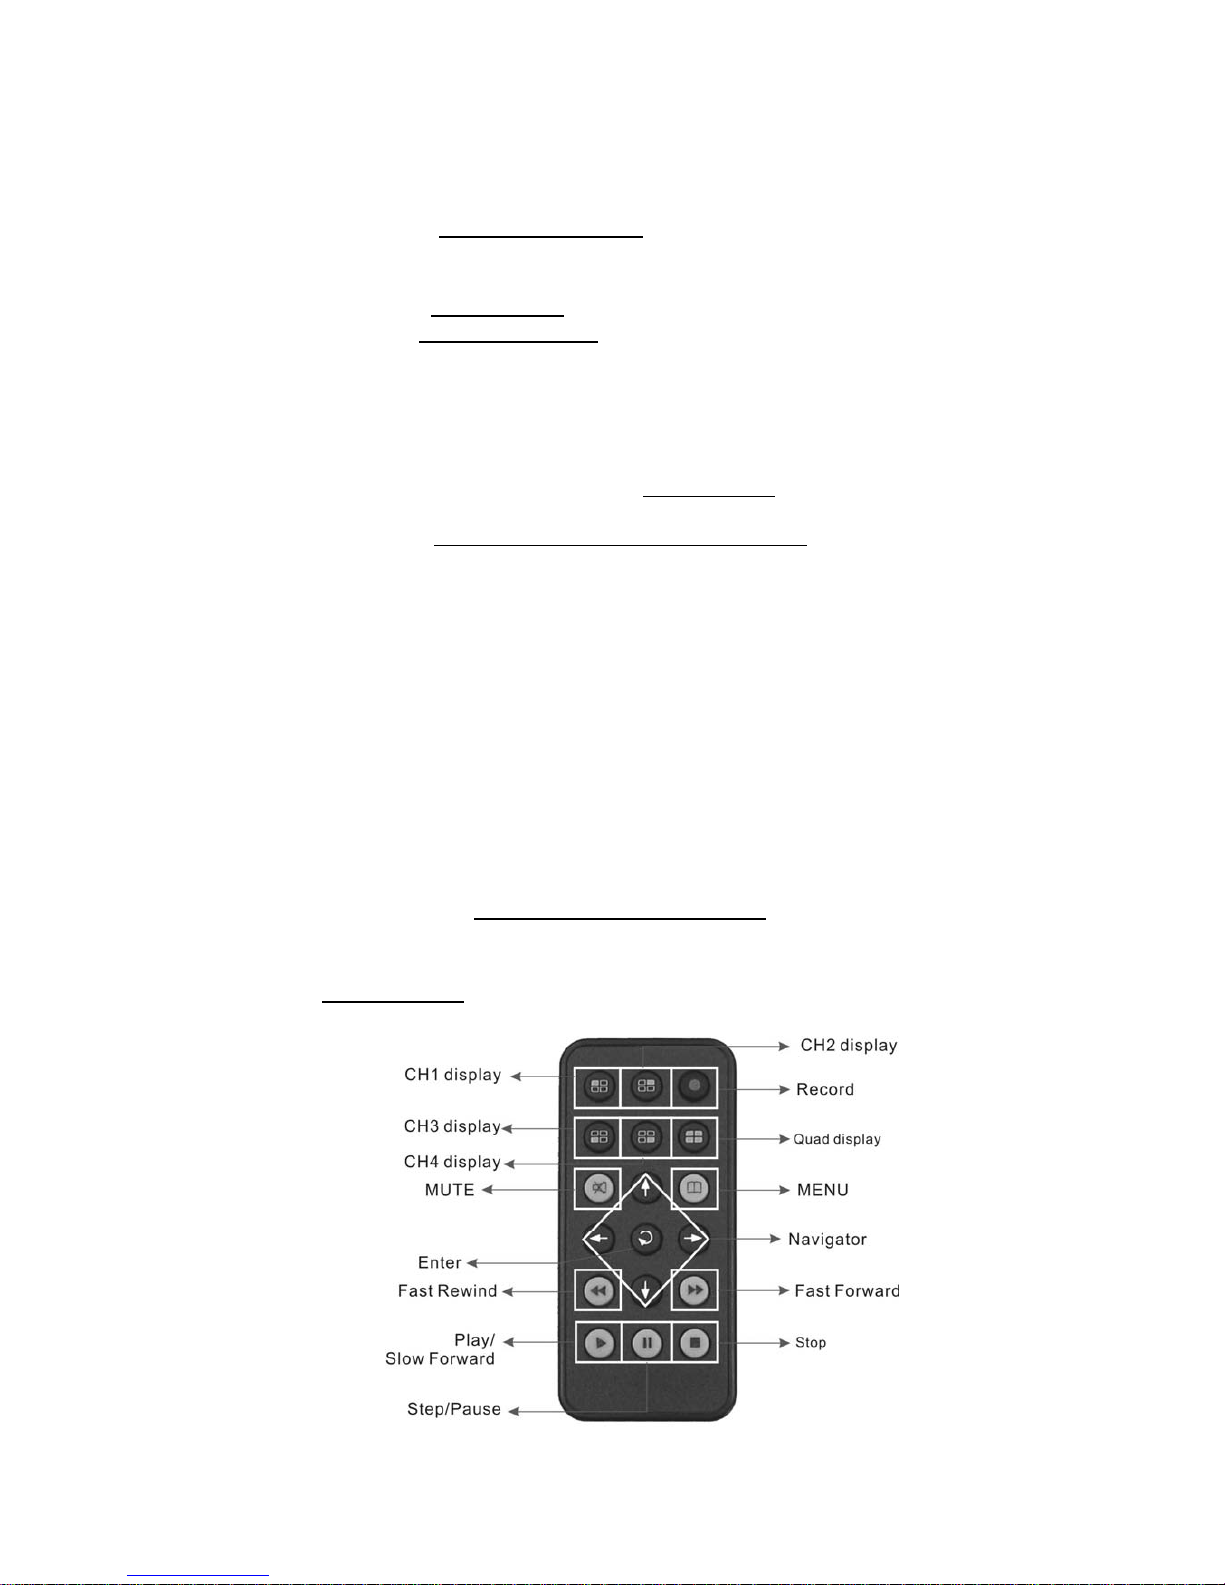
There are 3 kinds of DVR control method: front panel, remote control and USB
mouse.
z USB Mouse Operation
¾ Quick Menu: Right click the mouse button under the live viewing mode
to go for enter into Quick Menu.
¾ Left click the mouse button under the main menu to go to the sub-select
menu.
¾ Left click the mouse button under the select menu to go to the
sub-menu.
¾ Use the mouse to change the setting.
¾ Please refer to 6. Display Setup - PTZ Setup.
z Remote Control Operation
¾ Remote Control and front panel operation are the same; please refer to
2. Front Panel and the reference table of the button as below.
¾
Page 8
5
z Virtual Keyboard Operation
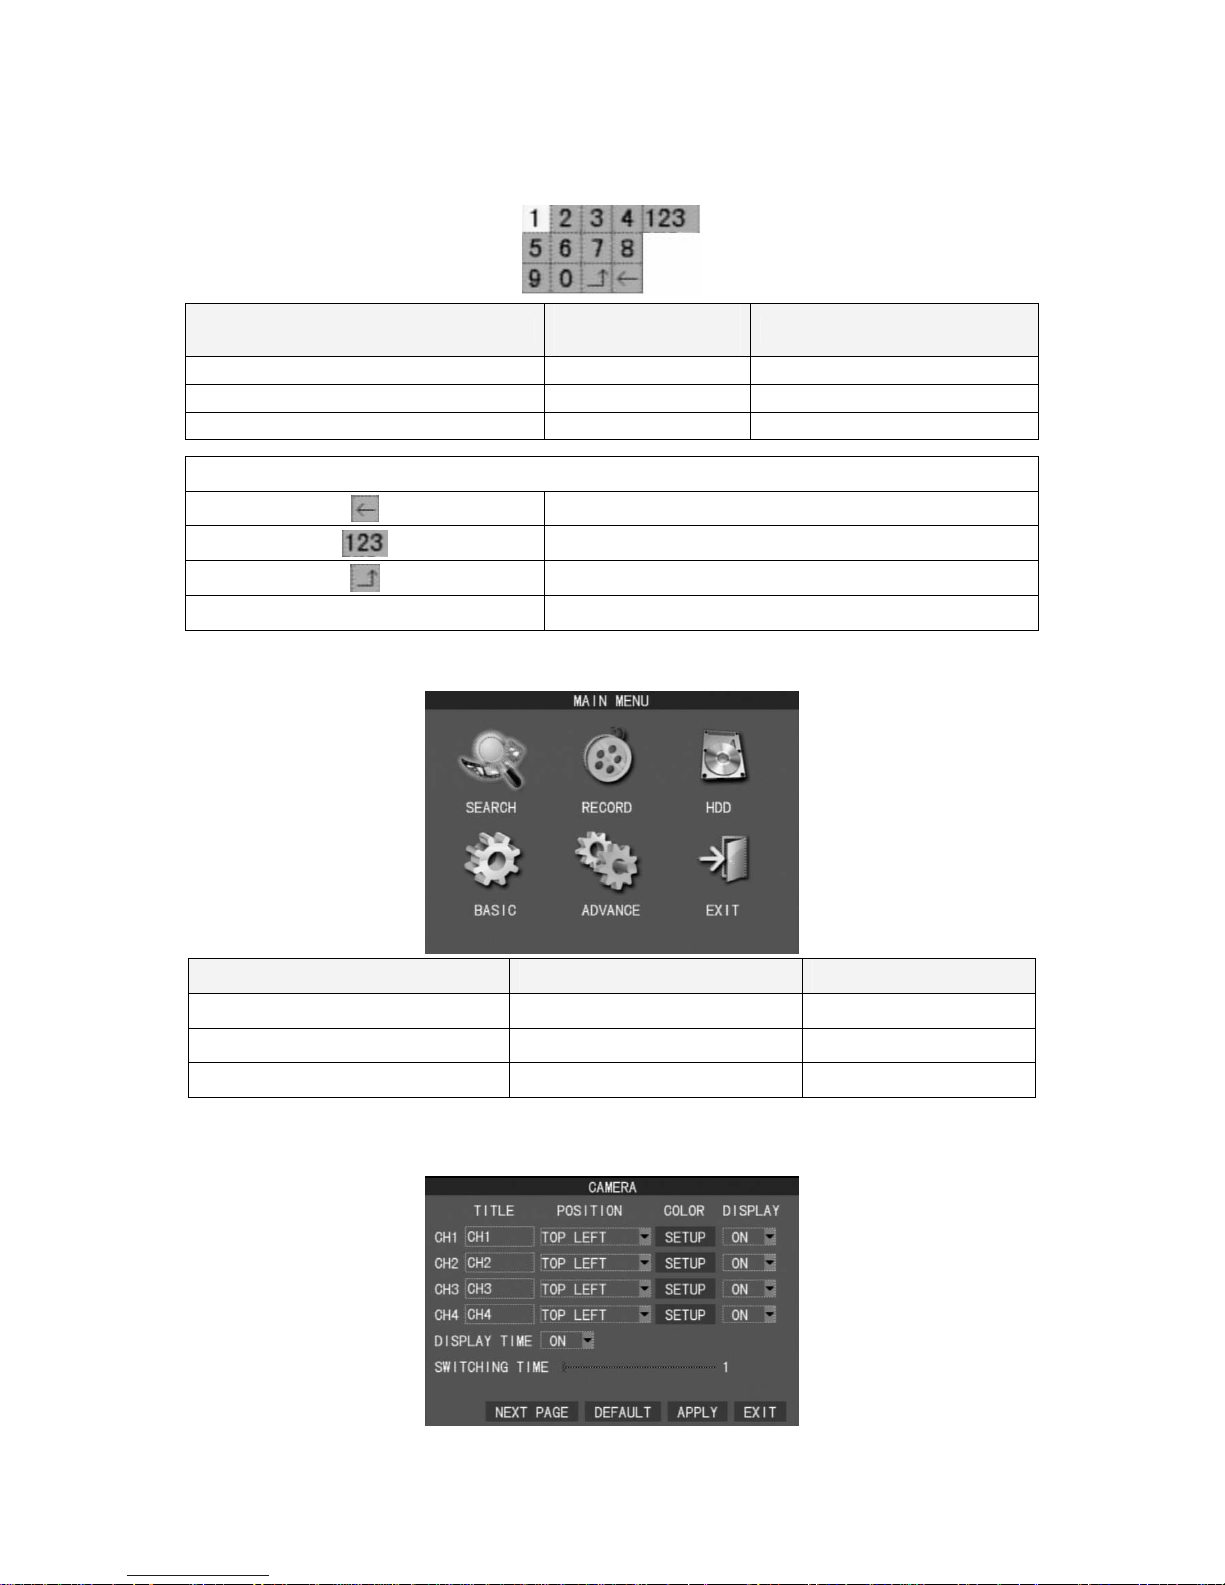
The text input of the virtual keyboard is as below:
Menu Operation
Front Panel & Remote
Control Operation
Mouse Operation
Select character from virtual keyboard [Up/Down/Left/Right] [Move Cursor]
Keyin the select character [Enter] [Left Click]
Exit the virtual keyboard [MENU] [Left Click]out of selection area
Key Description of Virtual Keyboard
Delete the previous character
Switch to text input
Enter key. Save and exit the virtual keyboard
Other Keys Character Keyin
z Main Menu Operation
Setup Operation Front Panel & Remote Control USB Mouse
Select [Up/Down/Left/Right] [Moving Cursor]
Enter Select Menu [Enter] [Left Click]
Return to Upper Menu [MENU] [Exit]
z Setup Operation
Page 9
6
Setup Operation Front Panel & Remote Control USB Mouse
Select [Up/Down/Left/Right] [Moving Cursor]
Confirm Select Setting [Enter] [Left Click]
Change the Select Setting [Left/Right] [Left Click]
Return to Upper Menu [MENU] [Exit]
Default
Set back to default setting
Exit
Return to upper menu
6. Display Setup
There are 3 kinds of screen display mode: Live, Auto Switching and PTZ. DVR.
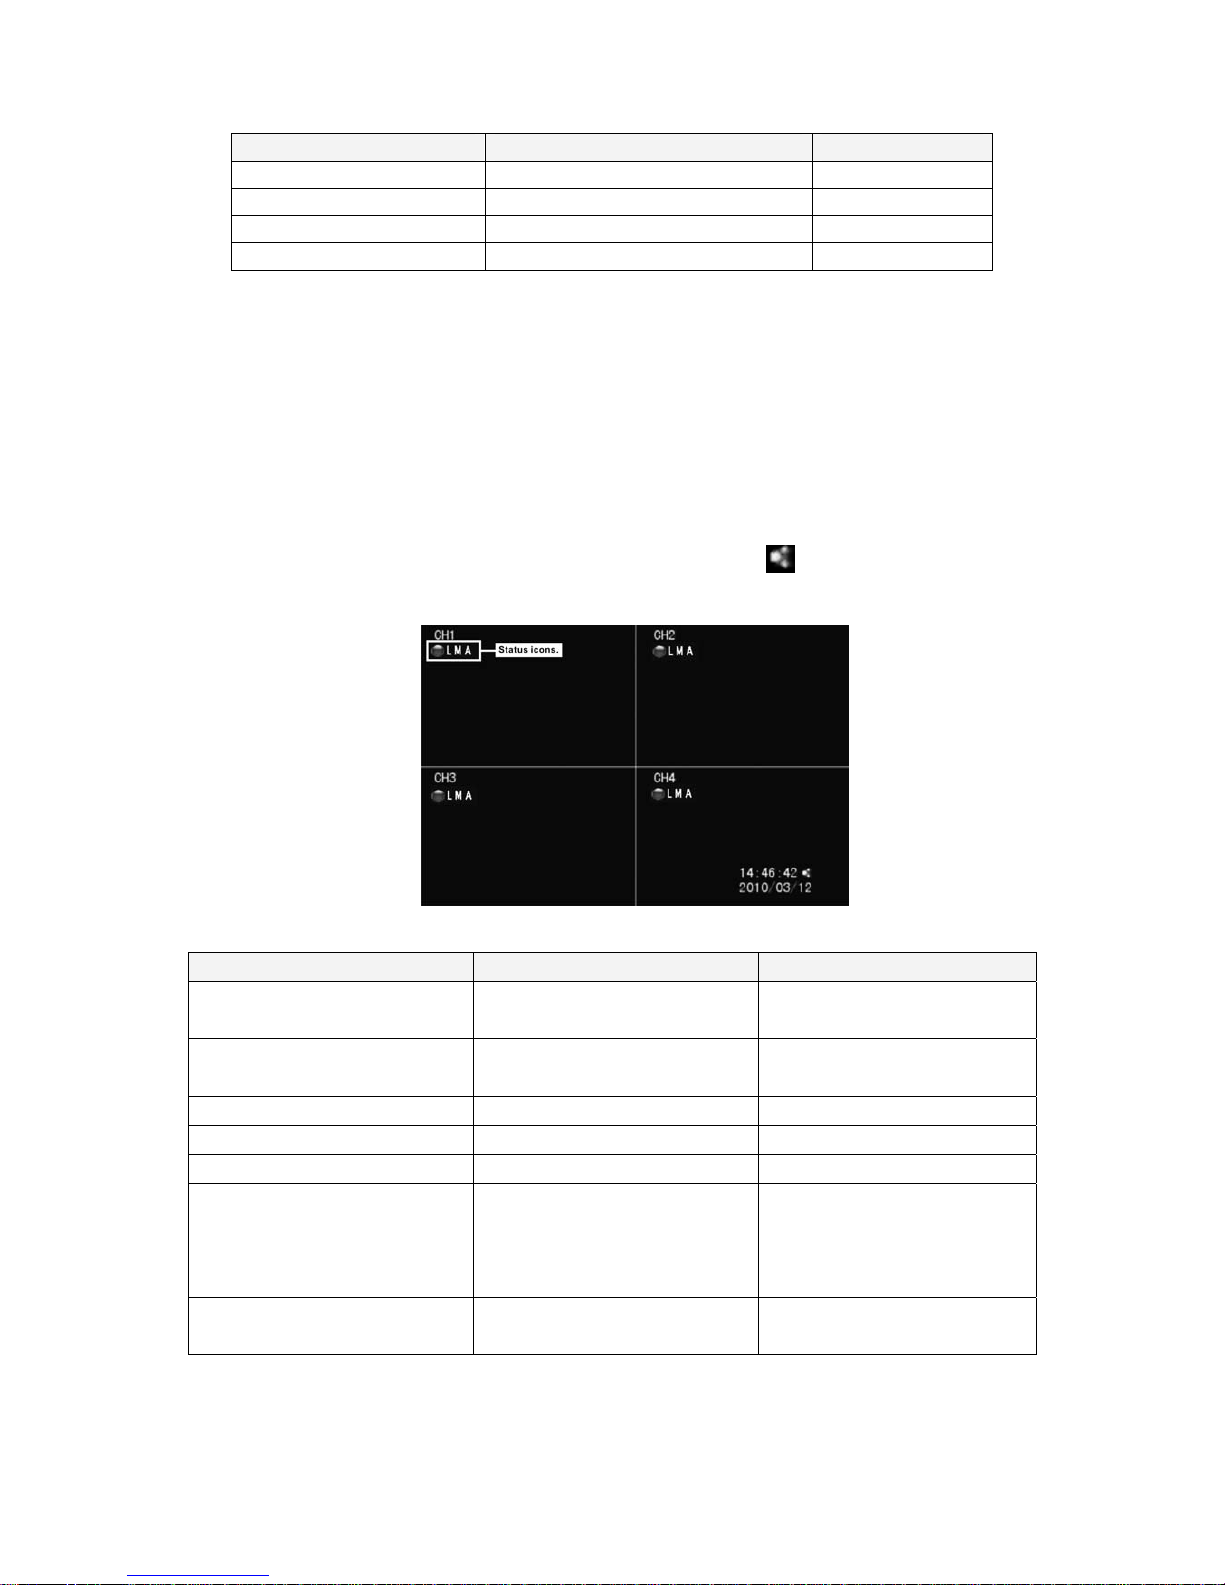
z Live Viewing Mode
The DVR will go to the live viewing mode after bootup.
There are 5 different status icon: ●、M、L、A、 『Record』、『Motion
Triggered』、『Video Loss』、『Alarm Triggered』、『Sound on/off』。
Setup Operation Front Panel&Remote Control USB Mouse
Channel 1~4 Single Channel
Display
[CH1~4]
Select one of channel
[Double click left button]
4 Channel Split Display [4 CH Split]
Under single channel
[Double click left button]
Quick Menu [MENU] [Right]
Playback Mode [Play]
Start/Stop the Manual Record [Record]
Start/Stop the Auto Switching
Front Panel
[Auto Switch]
Remote Control
[Auto Switch]
Start/Stop Mute
Remote Control
[Mute]
Page 10
7
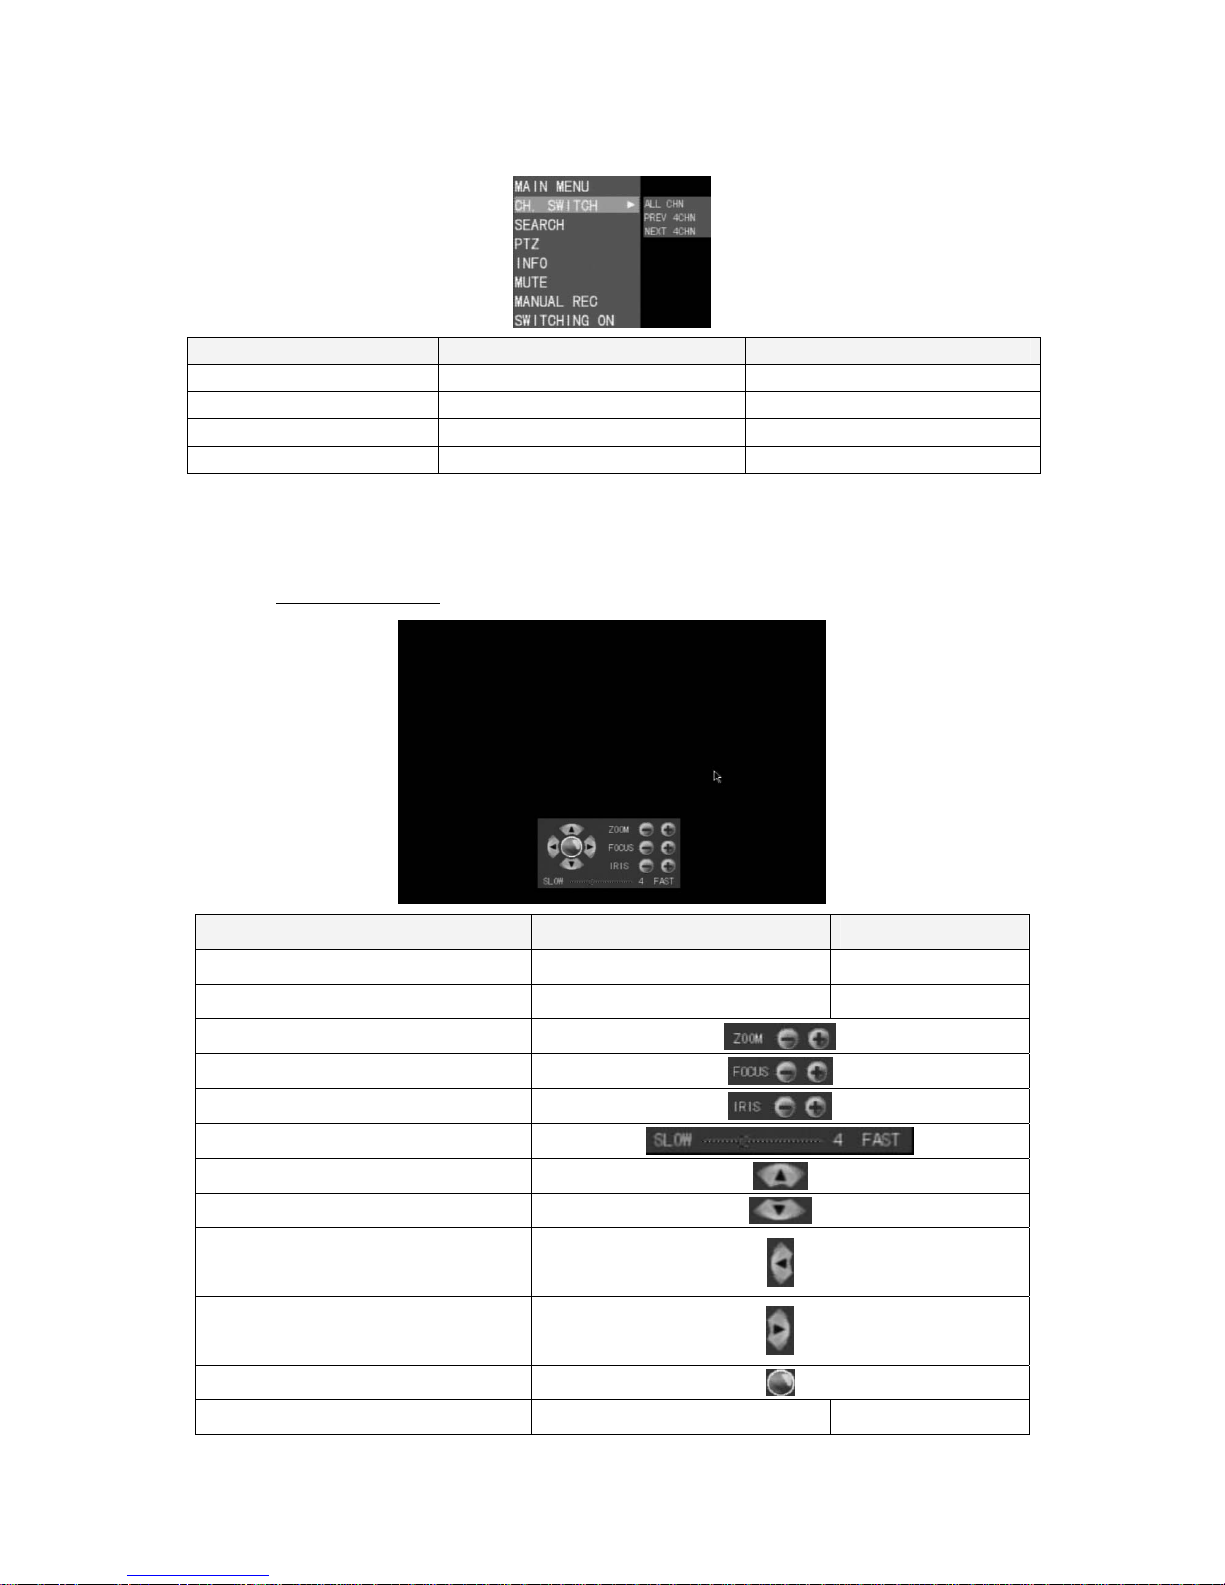
z Quick Menu
Setup Operation Front Panel & Remote Control USB Mouse
Select Item [Up/Down] [Moving Cursor]
Enter the Select Item [Right] [Moving Cursor]
Confirm the Select Item [Enter] [Left Click]
Exit [MENU] [Left Click]out of selection area
z PTZ
Please set the speed dome properly before control PTZ. Please refer to
7.5.4 PTZ Setup.
Setup Operation Front Panel & Remote Control USB Mouse
Select Item [Up/Down/Left/Right] [Moving Cursor]
Enter Select Item [Enter] [Left Click]
Zoom +,-
Focus, +-
Iris, +-
Adjust Movment Speed
PTZ Upward
PTZ downward
PTZ Left
PTZ Right
Start/Stop Auto Tracking
Exit [MENU] Right Click
Page 11
8
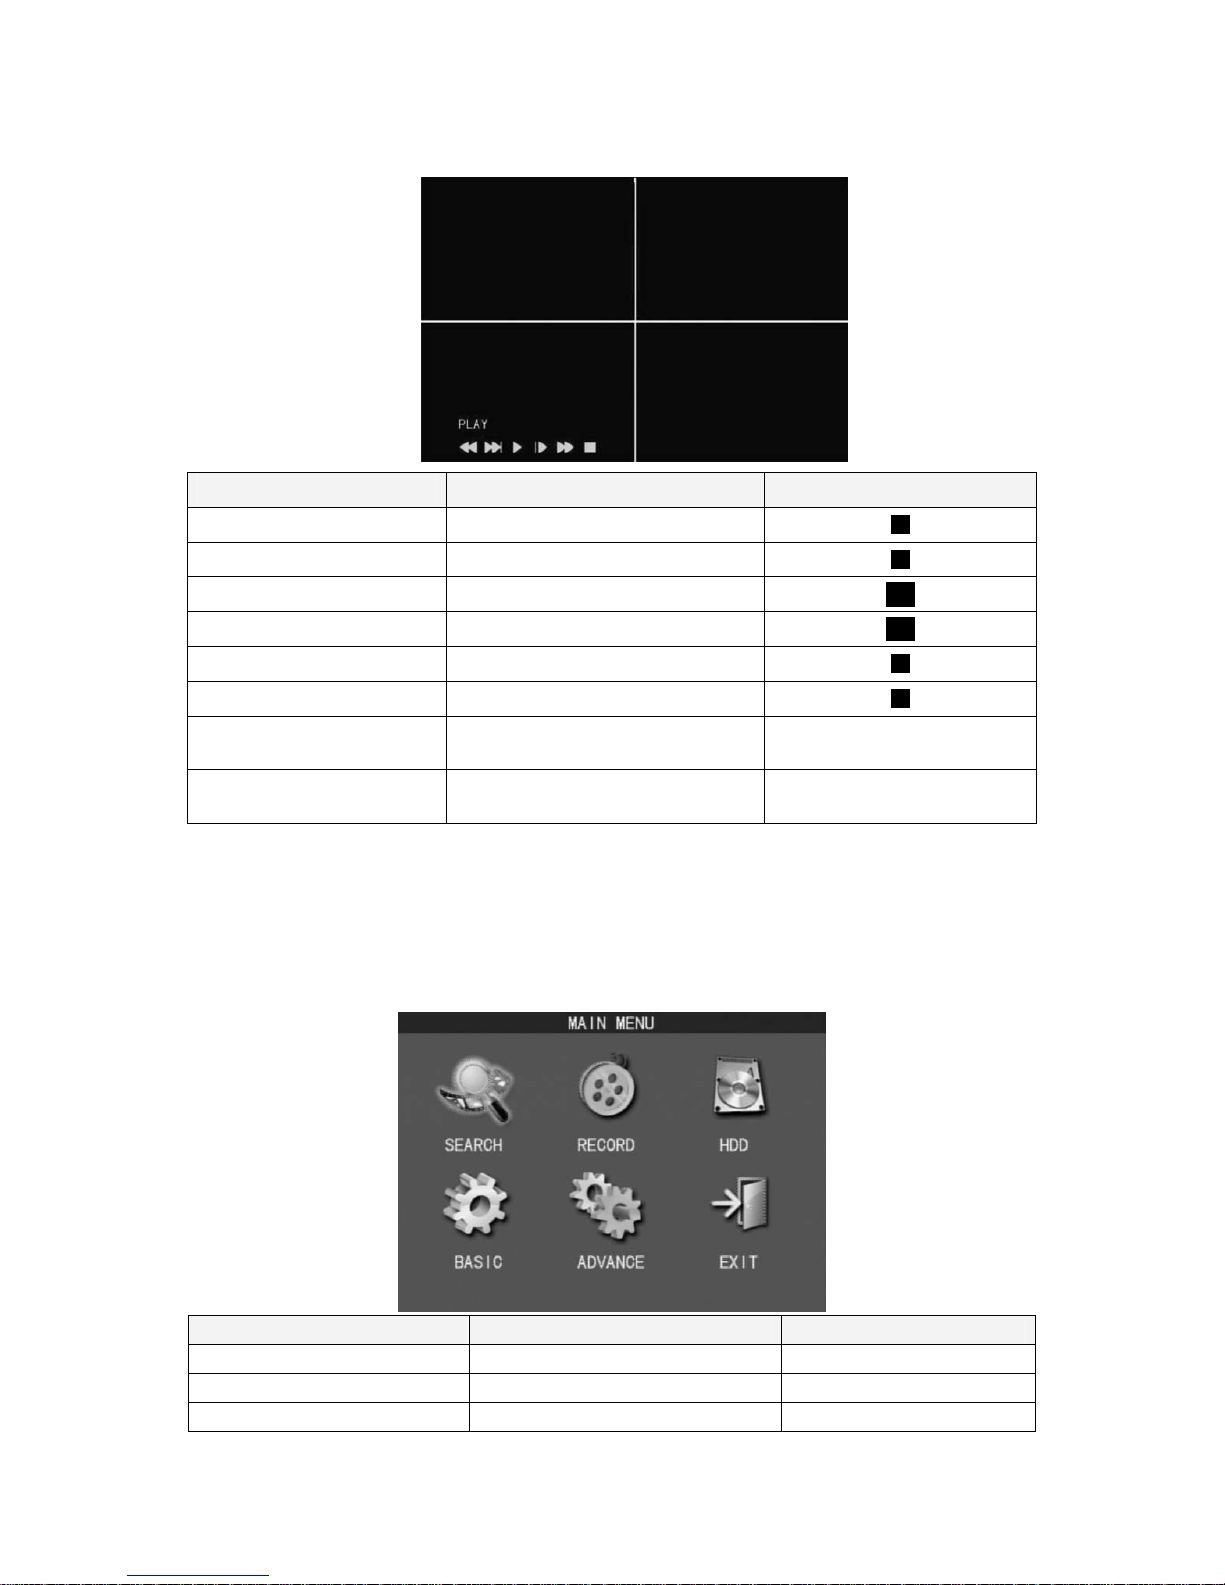
z Palyback Operation
Setup Operation Front Panel & Remote Control USB Mouse
Fast Rewind [Fast Rewind]
Fast Forward [Fast Forward]
Step Forward [StepForward]
|
Step/Pause [Step/Pause]
|
Play 1x [Play]
Stop [Stop]
1~4 Single Channel Display [1~4 Channel]
Select Channel
[Double left click]
Quad Display [Quad 4]
Under single channel
[Double left click]
z Auto Switching
1. Auto switch starts from order CH1~CH4, 4 split channel.
2. Press the button again to stop the function.
7. Main Menu Setup
Setup Operation Front Panel & Remote Control USB Mouse
Select Item [Up/Down/Left/Right] [Moving Cursor]
Enter Select Item [Enter] [Left Click]
Exit Main Menu [MENU] [Exit]
Page 12
9
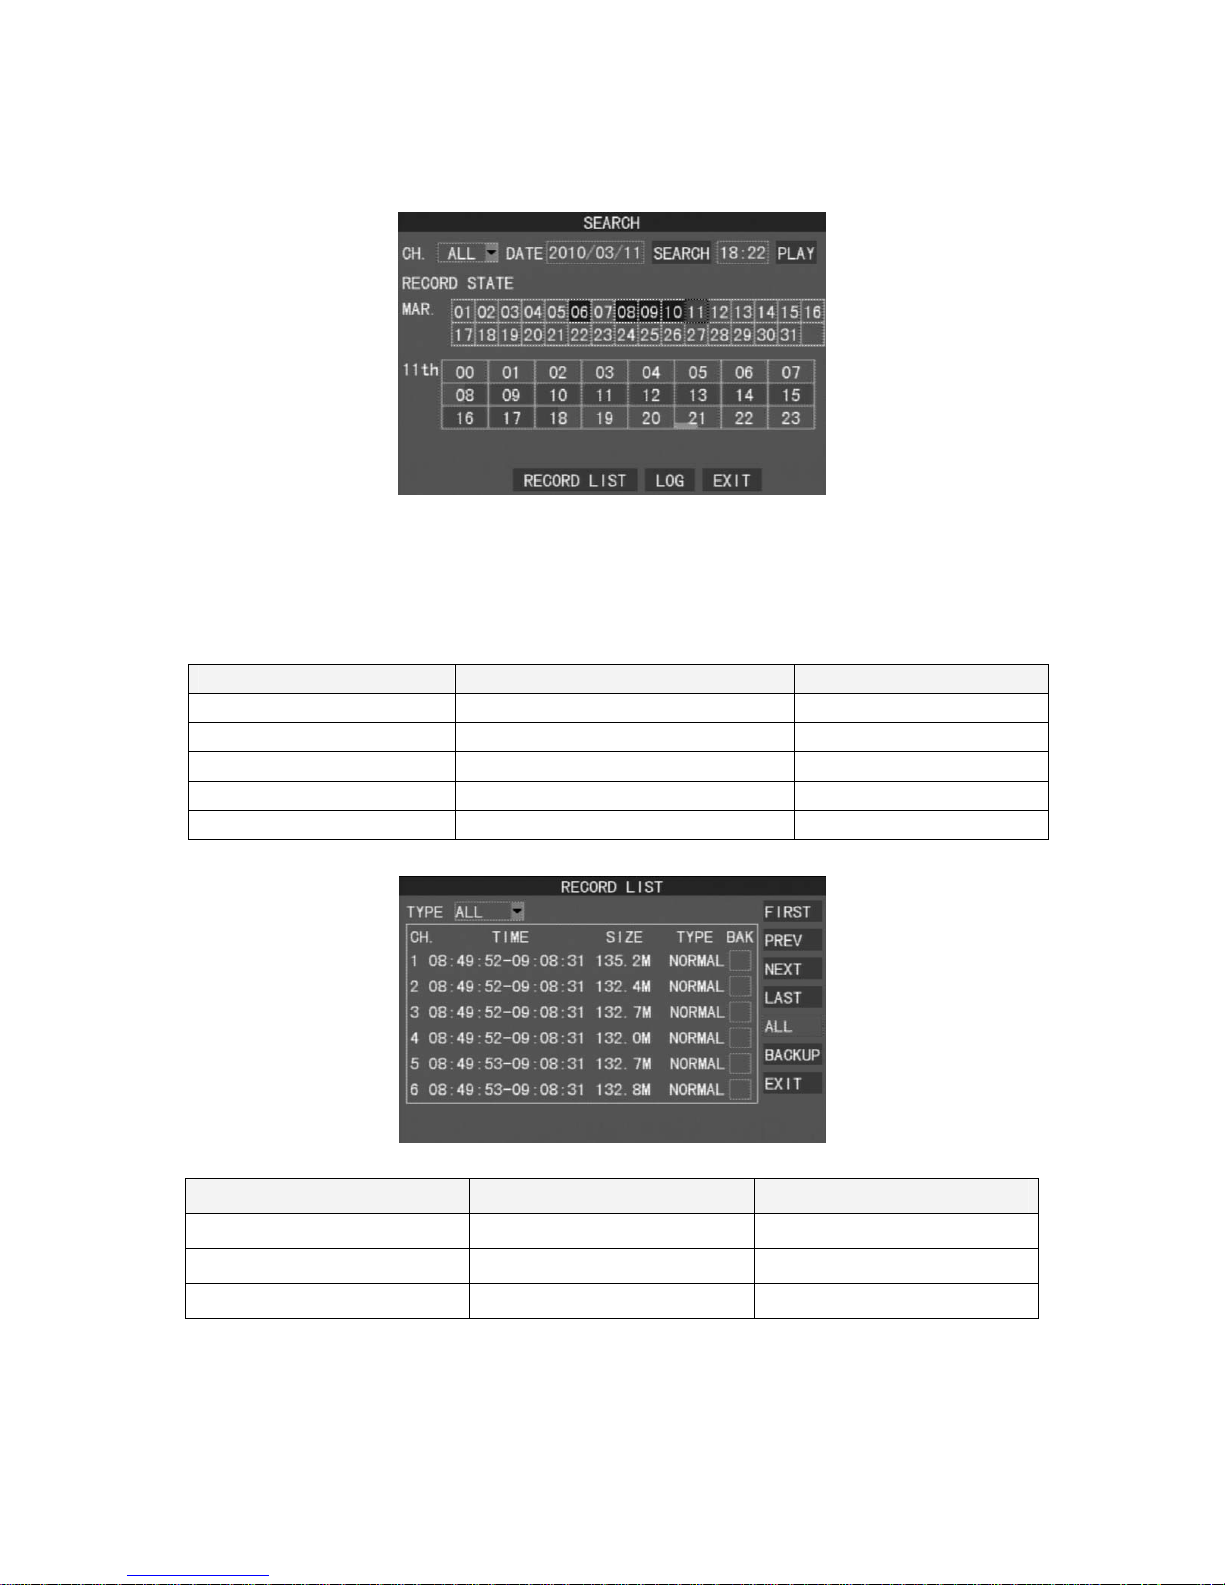
7.1 Search
★ No data: no color; data of alarm trigger: red color, normal record data: green
color.
★ Select the first half of date frame under the date, the playback will start from
00 mins:00 sec. Select the second half of date frame under the date, the
playback will start from 30mins:00sec. If there is no data on the date, please
try to search from record list.
Setup Operation Front Panel & Remote Control USB Mouse
Search [Enter] [Left Click]
Select Channel [Up/Down] [Moving Cursor]
Select Dates [Up/Down/Left/Right] [Moving Cursor]
Playback [Enter] [Left Click]
Return to Upper Menu [MENU] [Exit]
z Record List
Setup Operation Front & Remote Control USB Mouse
Enter Select Item [Enter] [Left Click]
Select Item [Up/Down/Left/Right] [Moving Cursor]
Return to Upper Menu [MENU] [Exit]
★ List all of recording data and click on one of record data to playback.
Select All
Please click “ALL” to select all of list.
Backup
Please click “BACKUP” to backup the selecting file to USB flash memory stick.
Page 13
10
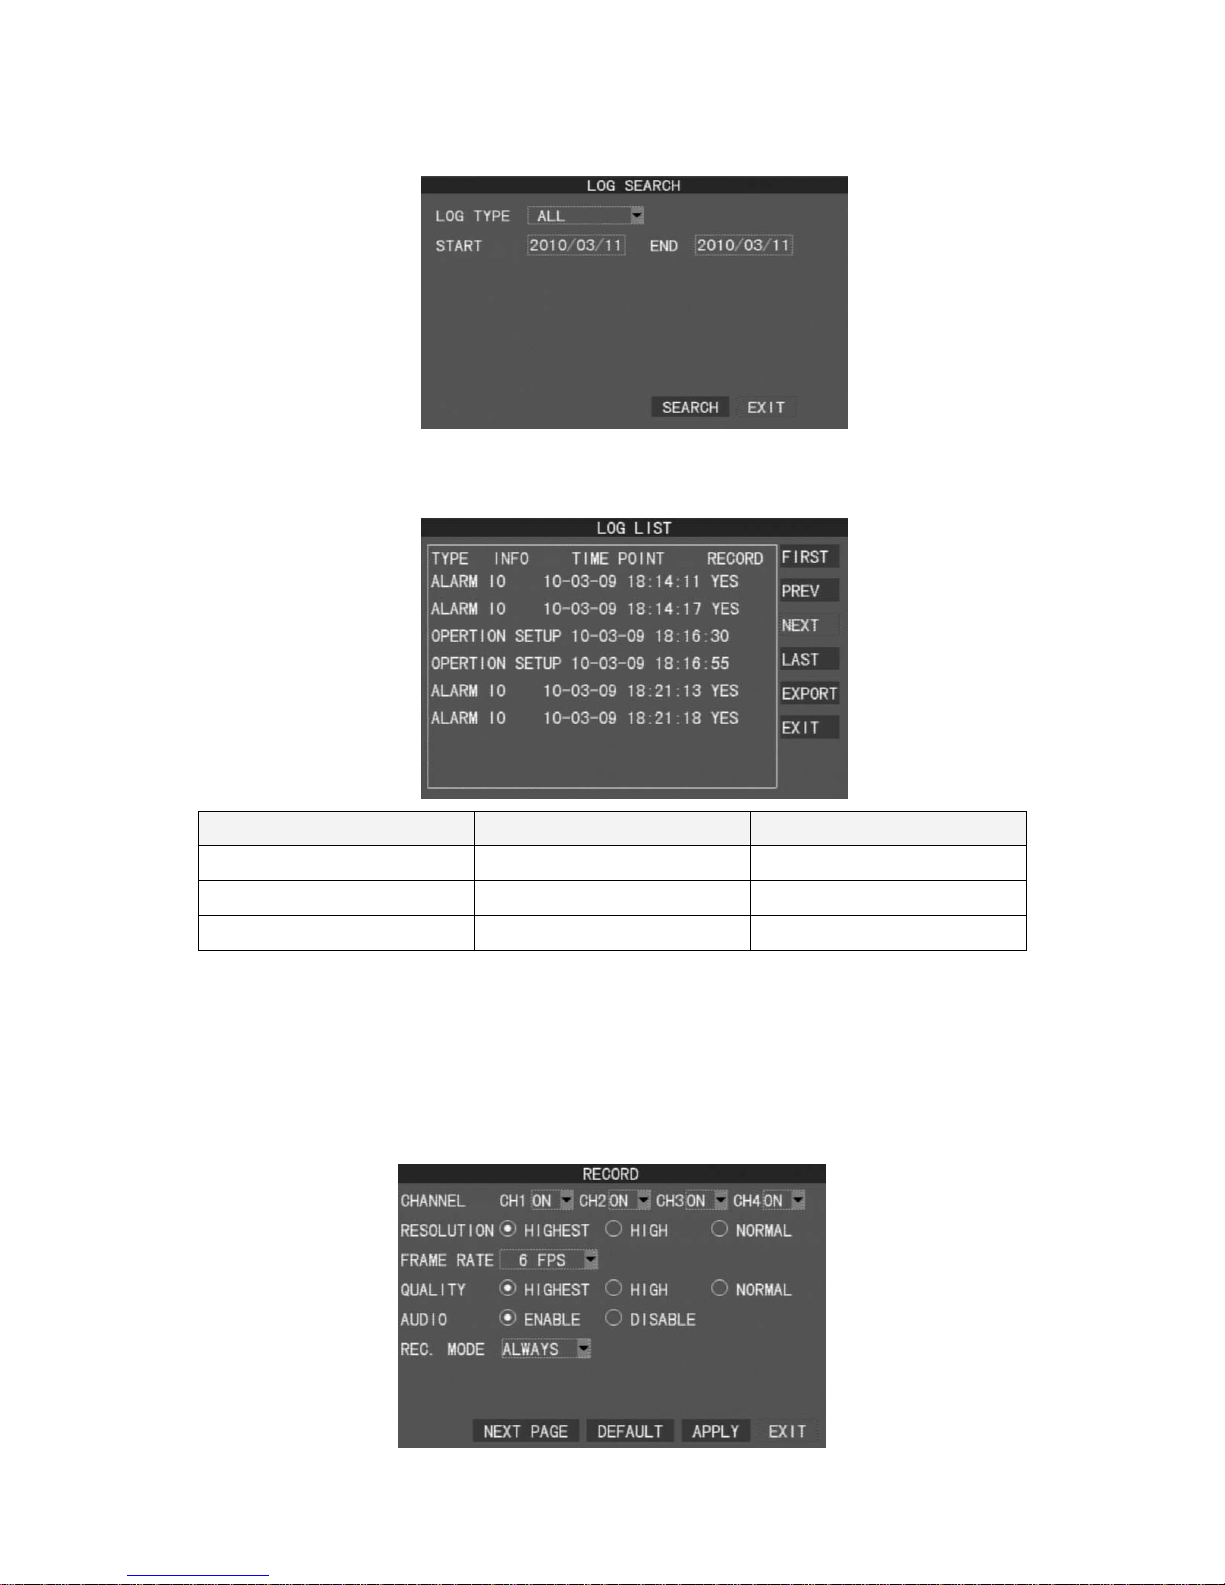
z Log Search
★ Select log type and time before search.
Log List
Setup Operation Front & Remote Control USB Mouse
Enter Select Item [Enter] [Left Click]
Select Item [Up/Down/Left/Right] [Moving Cursor]
Return to Upper Menu [MENU] [Exit]
★ You can click the list to playback when the alarm trigger shows YES.
EXPORT
Please click export button to export the data to USB flash memory
stick.
7.2 Record Setup
Page 14
11
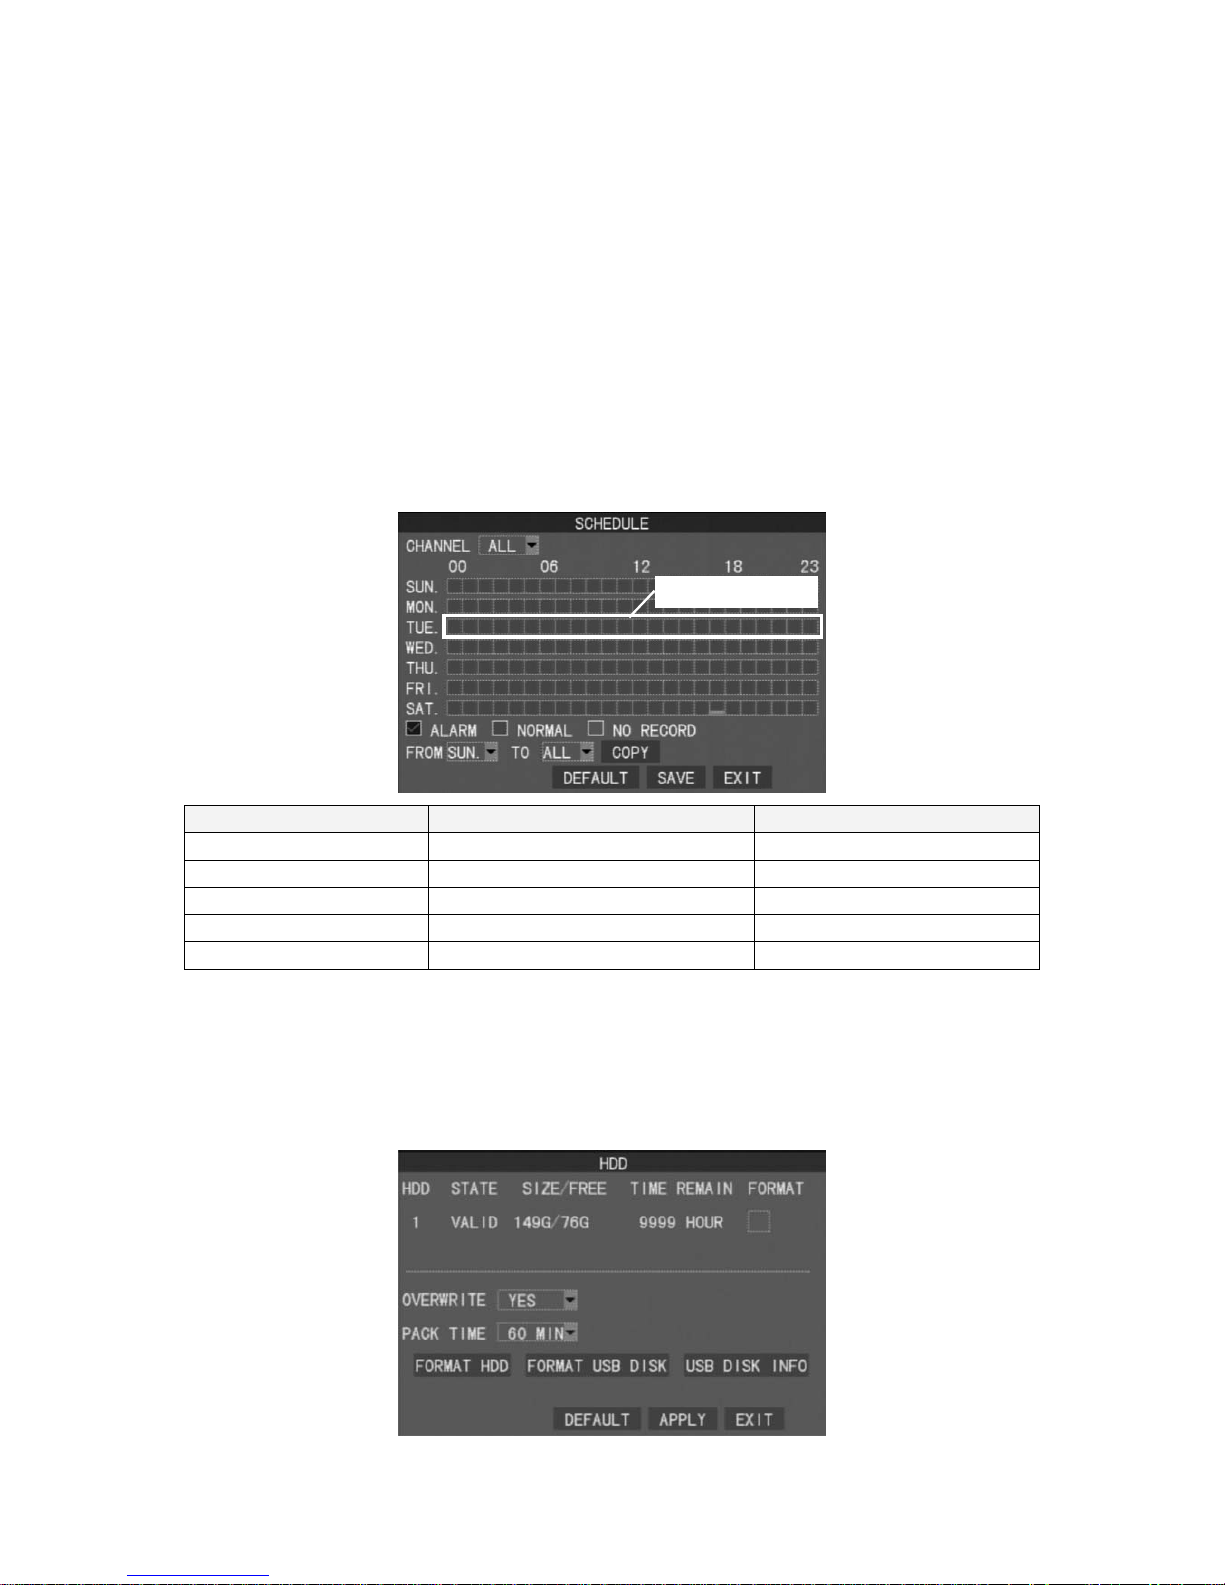
z Channel
On/Off the channel.
z Resolution
Set the recording resolution: Normal, High and Highest.
z Frame Rate
Record frame setup
z Quality
Set the record quality: Normal, High and Highest
z Audio
Enable/Disable
z Schedule
Record schedule setup: Continue Record and Schedule Record.
Record Schedule
Setup Operation Front Panel & Remote Control USB Mouse
Enter Select Item [Enter] [Left Click]
Select Channel [Up/Down] [Moving Cursor]
Select Time&Date [Up/Down/Left/Right] [Moving Cursor]
Return to Upper Menu [MENU] [Exit]
Setup Operation Front Panel & Remote Control USB Mouse
Copy
(1)Select the source date
(2)Select the date wish to copy to
(3)Copy
7.3 HDD Setup
Time&Date Schedule
Page 15
12
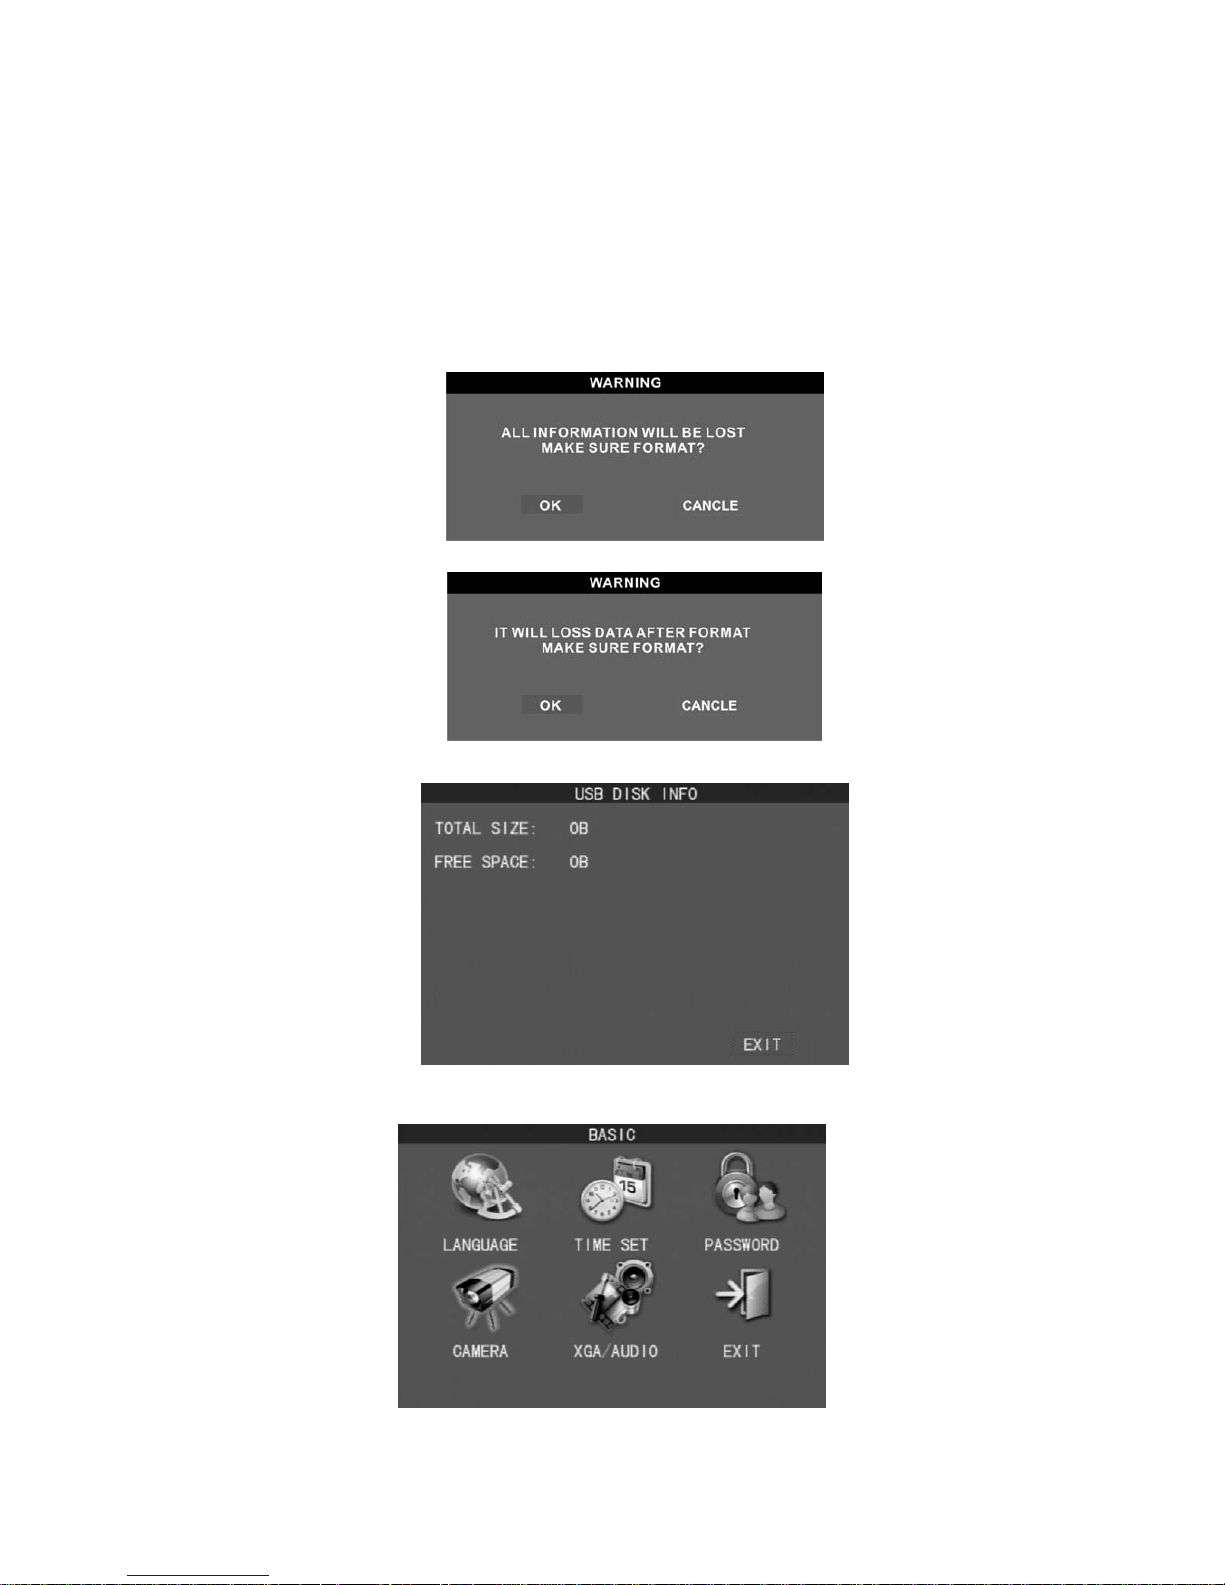
z Format
Format the selecting HDD.
z Overwrite
On/Off.
z Pack Time
Set the required packing time frame to allow the system to pack each saving
file under continue recording mode. Pack time setting:15 mins、30min、
60min.
z Format HDD
z Format USB Memory Flash Stick
z USB Disk Info
7.4 Basic Setup
Page 16
13
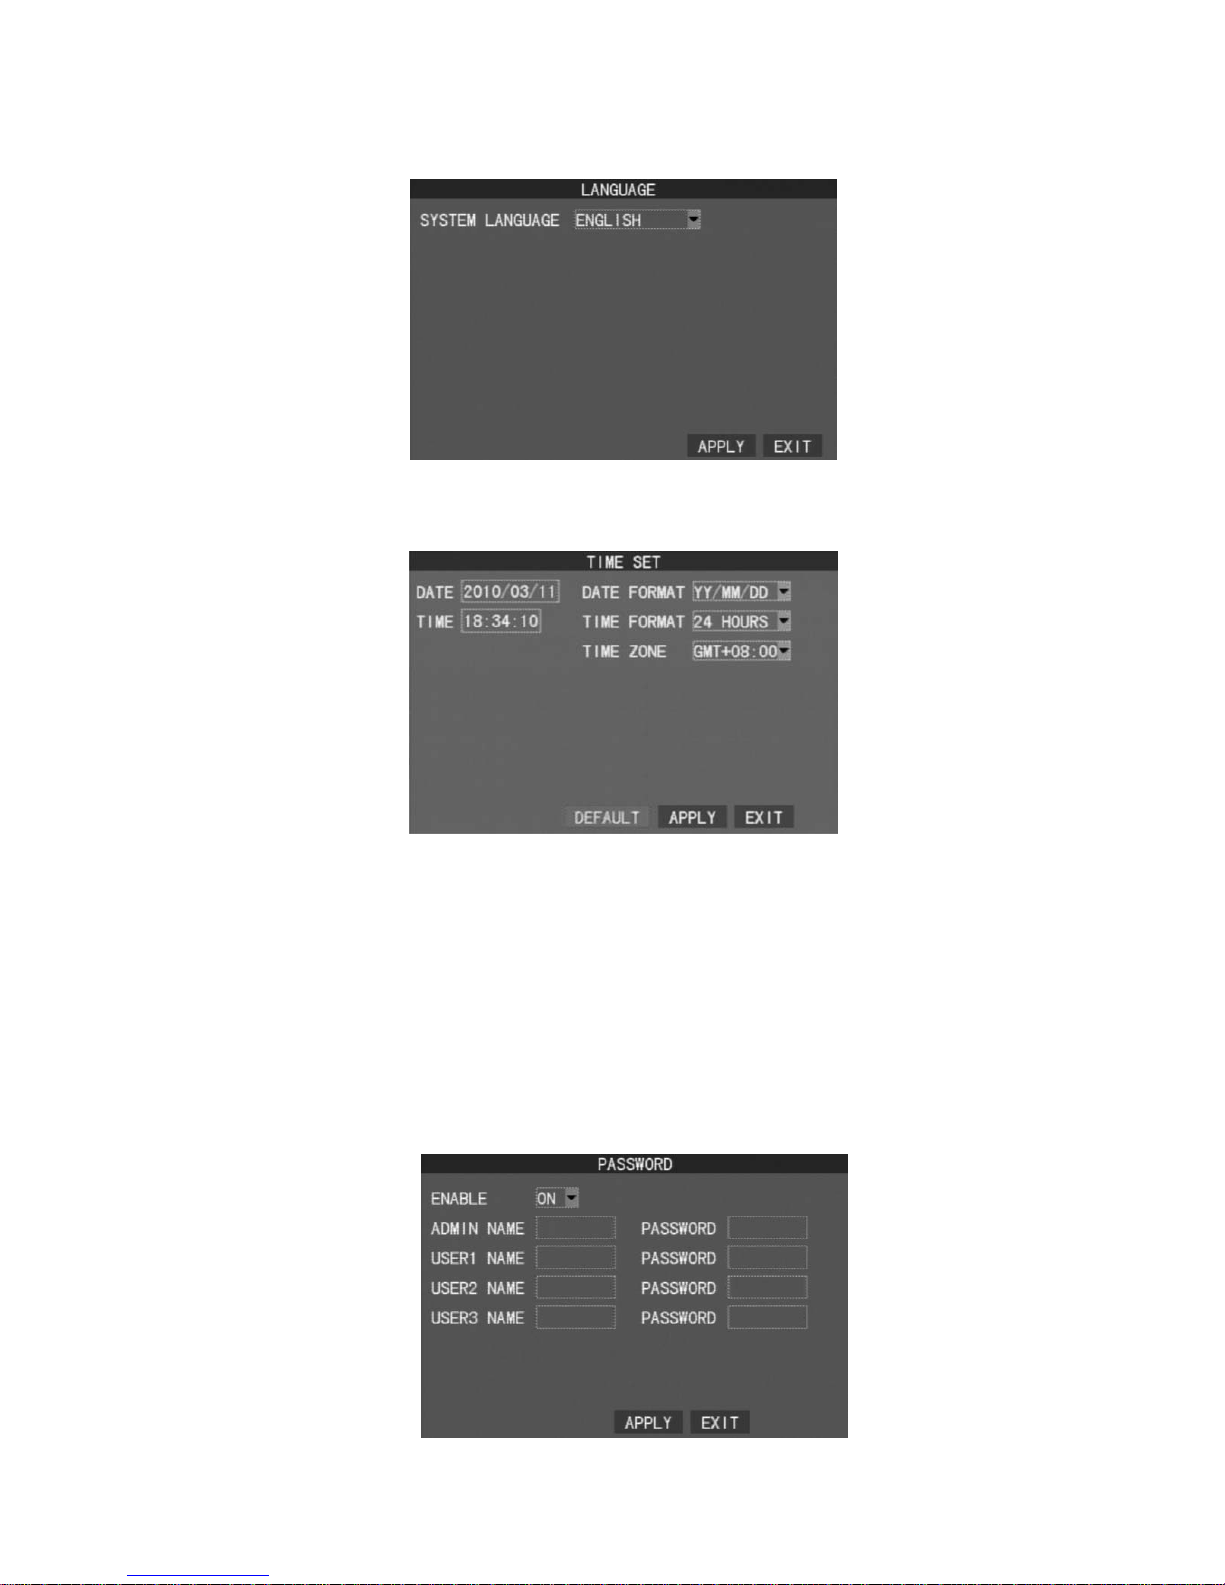
7.4.1 Language
★ Please reboot after setup.
7.4.2 Time Setup
z System Time Setup
Select by using virtual keyboard
z Data Format Setup
Set: YY/MM/DD、MM/DD/YY
z Time Format Setup
Set: 24Hours、12Hours
z Time Zone Setup
Set: GMT-12~GMT+13
7.4.3 Password Setup
Page 17
14
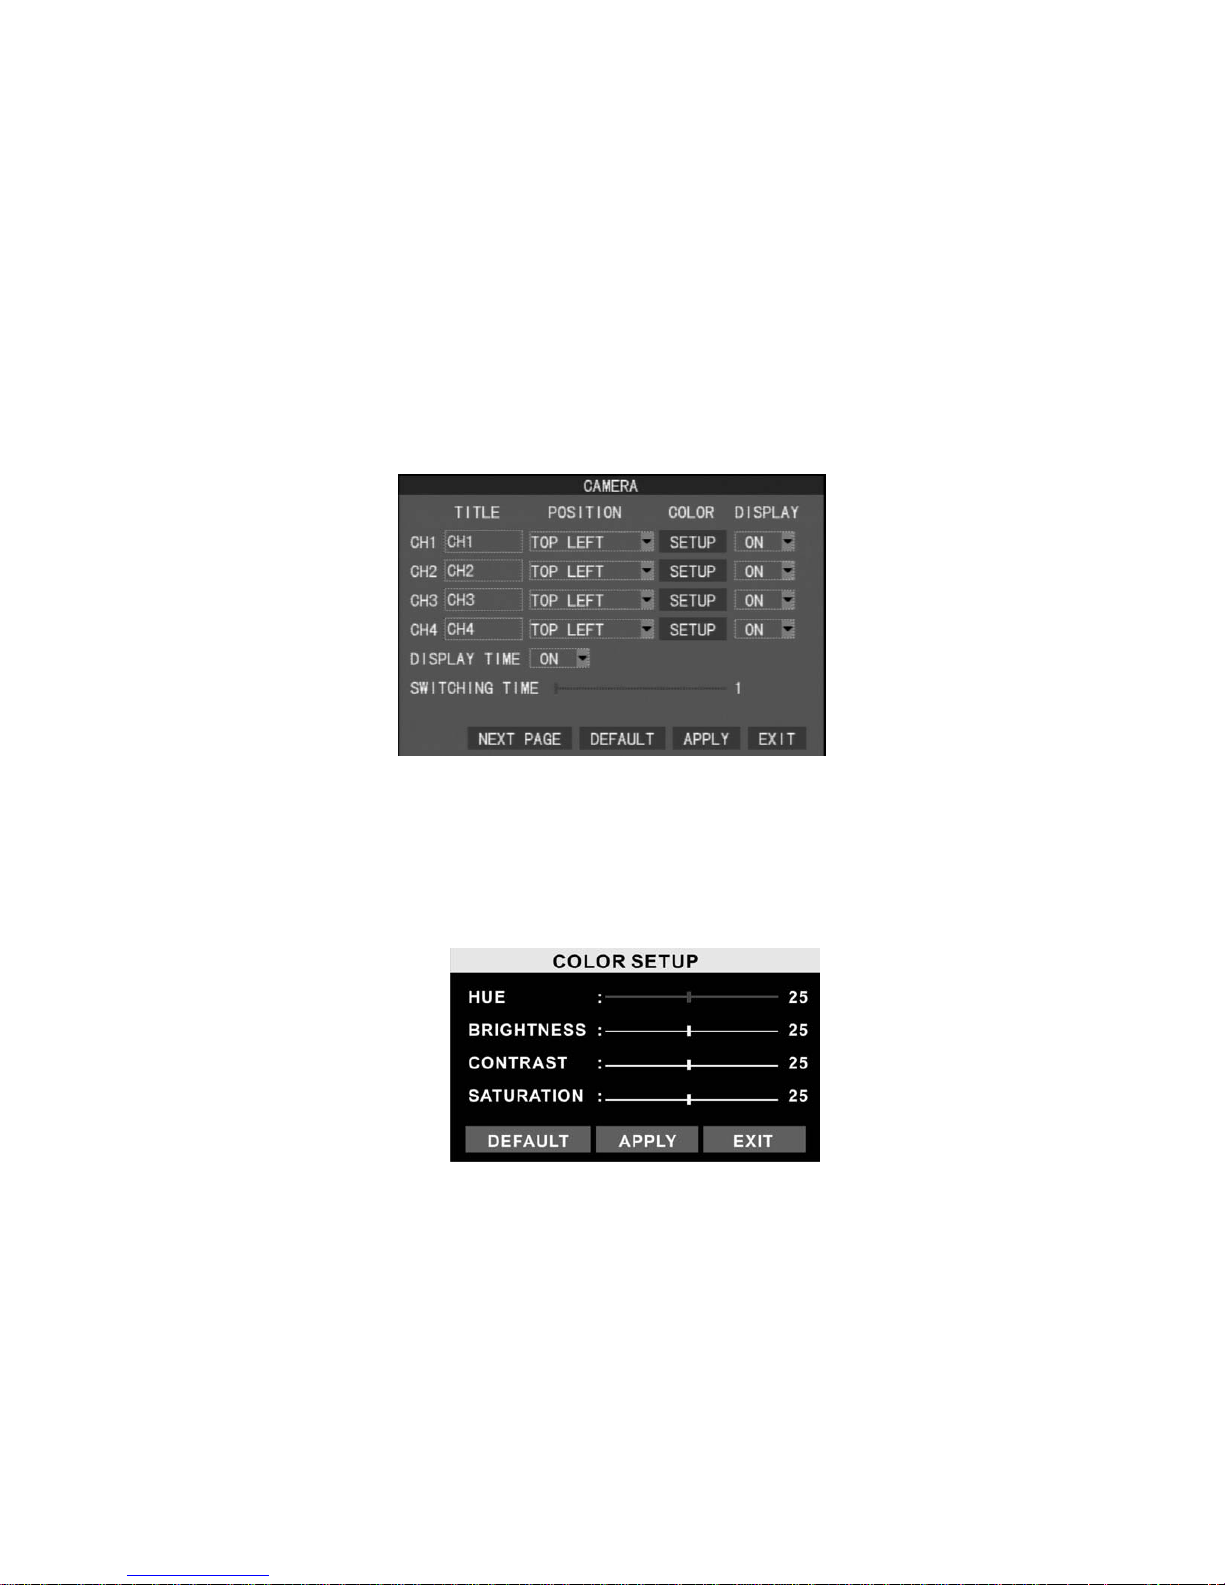
z Password Setup
Enable: On/Off
Administrator account: User name and password can not be left blank, and
the password must set more than 4 digits. User account: User name and
password can leave as blank.
Set: On
Administrator Account
Administrator account allows user to access all of functions.
User Account
User account only allows user to access “Live Viewing Mode”, “Search”,
“Info”, “PTZ”, “Manual Record” and “Auto Switching”.
7.4.4 Camera Setup
z Camera Title
Set the title of camera. Use virtual keyboard to key in.
z Title Position
Set the title position. Set: Top Left、Top Right、Bottom Left、Bottom Right and
Off.
z Camera Color Setup
Hue: 0~50
Brightness: 0~50
Contrast: 0~50
Saturation: 0~50
z Display
Display the channel, set: On/Off
z Display Time
Display the time on the channel, set: On/Off.
z Switching Time
Set the auto switch duration time, set: 1~10 sec.
Page 18
15
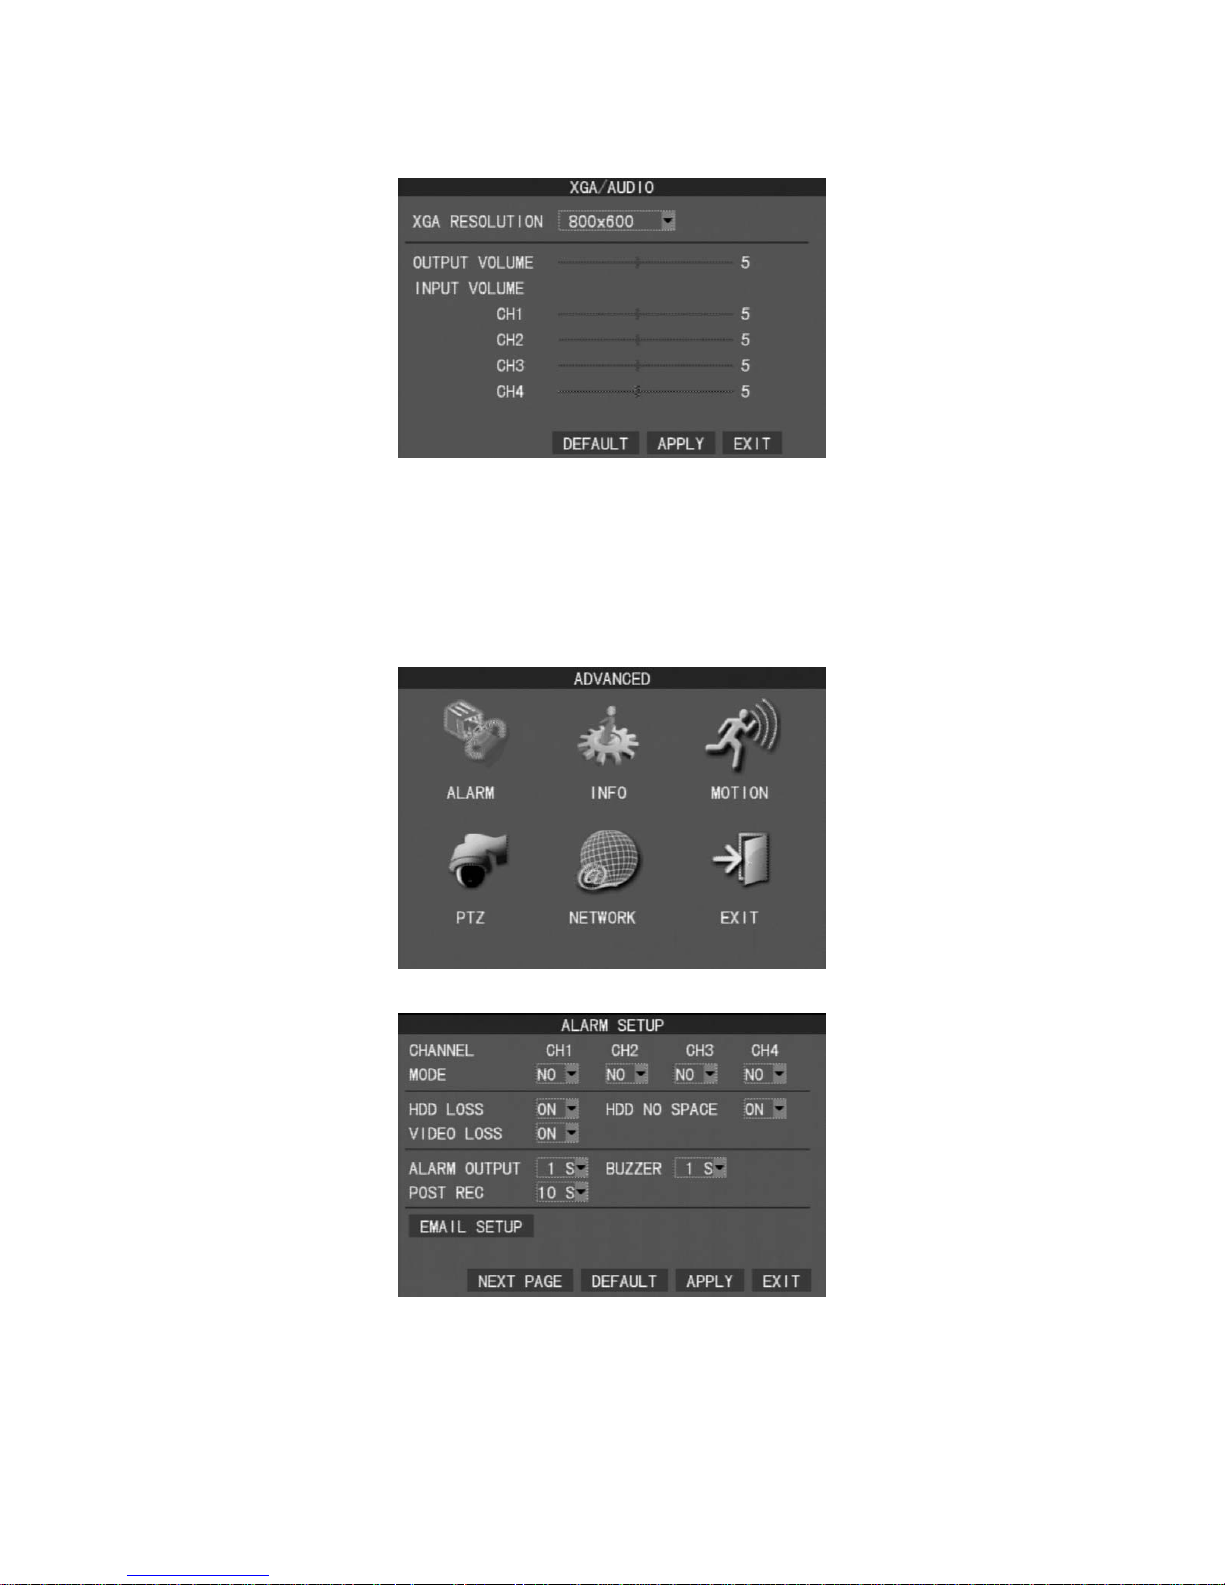
7.4.5 XGA/Audio Setup
z XGA Resolution Setup
Set: 600X480、800X600、1024X768、1280X1024、1440X900
z Output Volume Setup
Set: 1~10
z Input Volume Setup
Set: 1~10
7.5 Advance Setup
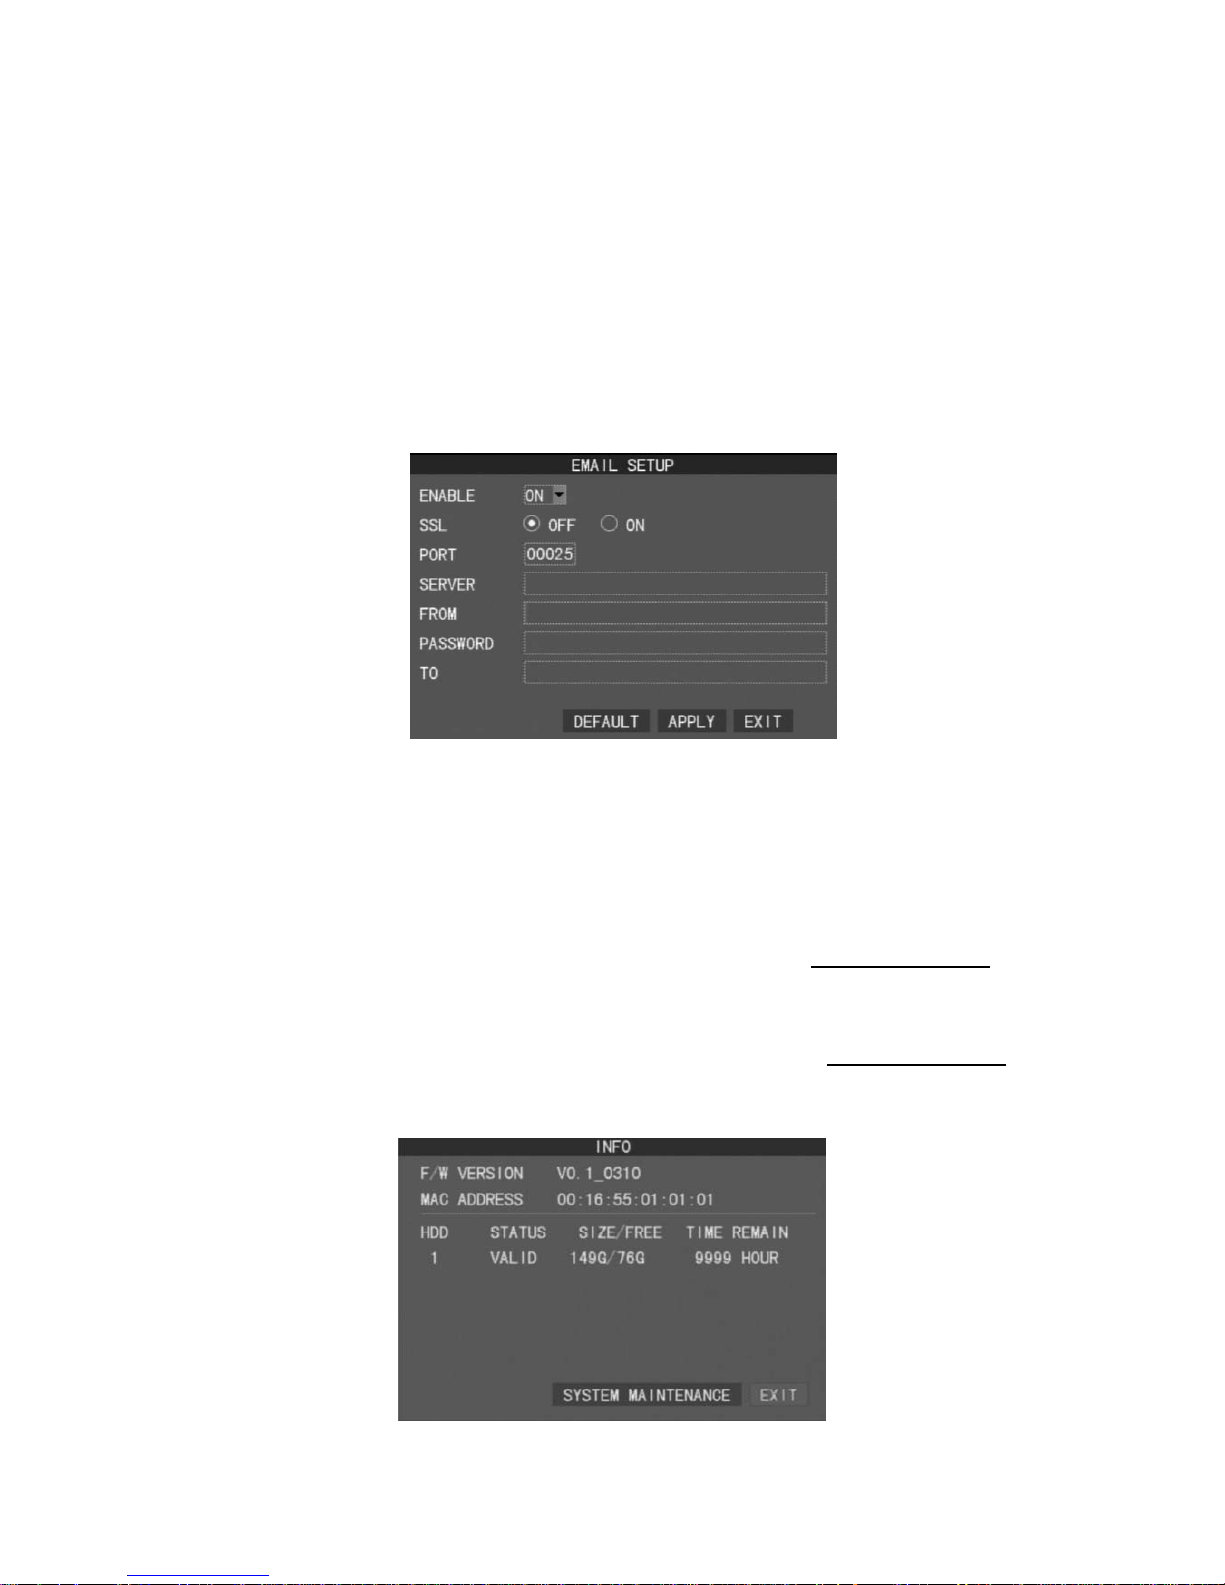
7.5.1 Alarm Setup
z Mode
Enable/disable alarm trigger. Set: On/Off.
z HDD Loss
Alarm when HDD loss connects. Set: On/Off.
z HDD NO SPACE
Page 19
16
Alarm when HDD has not get enough space. Set: On/Off.
z Video Loss
Set: On/Off.
z Post REC Time
The duration of the recording after triggered: 10, 20,…,60 secs or off.
z Buzzer
The duration of the buzzer beeping after triggered: 1~30 sec or off.
z Alarm Output
Alarm out after alarm triggered: 1~30 sec or off.
z E-MAIL Setup
Forward E-mail after alarm triggered. Enable: On/Off.
★ Enable: On
SSL
Enable the SSL encryption. Recommend to set on if it is using gmail.
SMTP
SMTP port number key in. For example, gmail port 465.
SMTP
SMTP server key in. For example, gmail : smtp.gmail.com
From
Sender E-mail address key in. For example, gmail: [email protected]
Password
Sender E-mail account password. For example, gmail: **********
To
Receiver E-mail address key in. For example, gmail: [email protected]
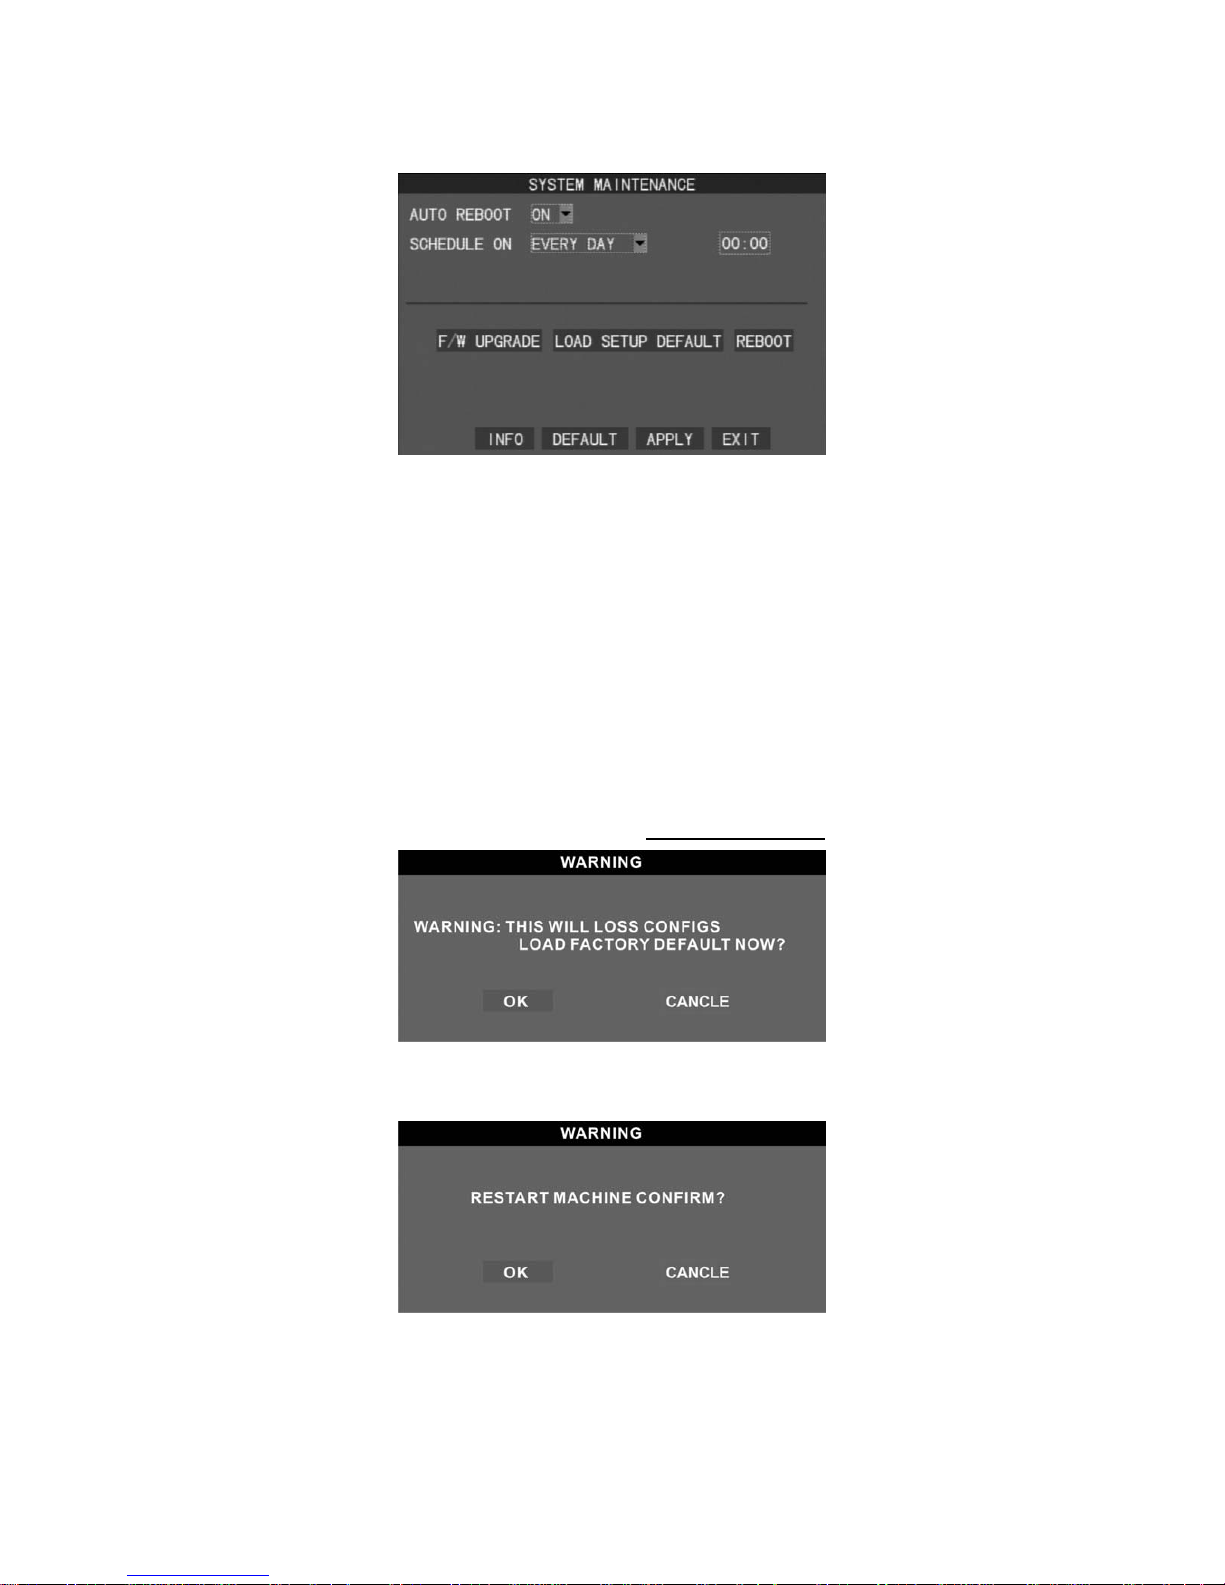
7.5.2 System Information
Provide F/W version、MAC address、HDD etc. information
Page 20
17
z System Maintenance
Auto Reboot:On/Off
Default: On
Maintenance Schedule Setup
F/W Upgrade
Please plug the USB flash memory stick into the USB port on the DVR
rear panel after downalod the new firmware to the USB flash memory
stick.
Note: the firmware only can be upgraded by using the USB port. Please
don’t operate the system or remove the USB flash memory stick while it
is in upgrade progressing in order to prevent any serious system error.
The system will automatic reboot after upgrade.
Load Setup Default
Set factory default. Please refer to 12.Default Setting.
Reboot the DVR
Please click OK to reboot the DVR.
Info
Return to system information main page.
Page 21
18
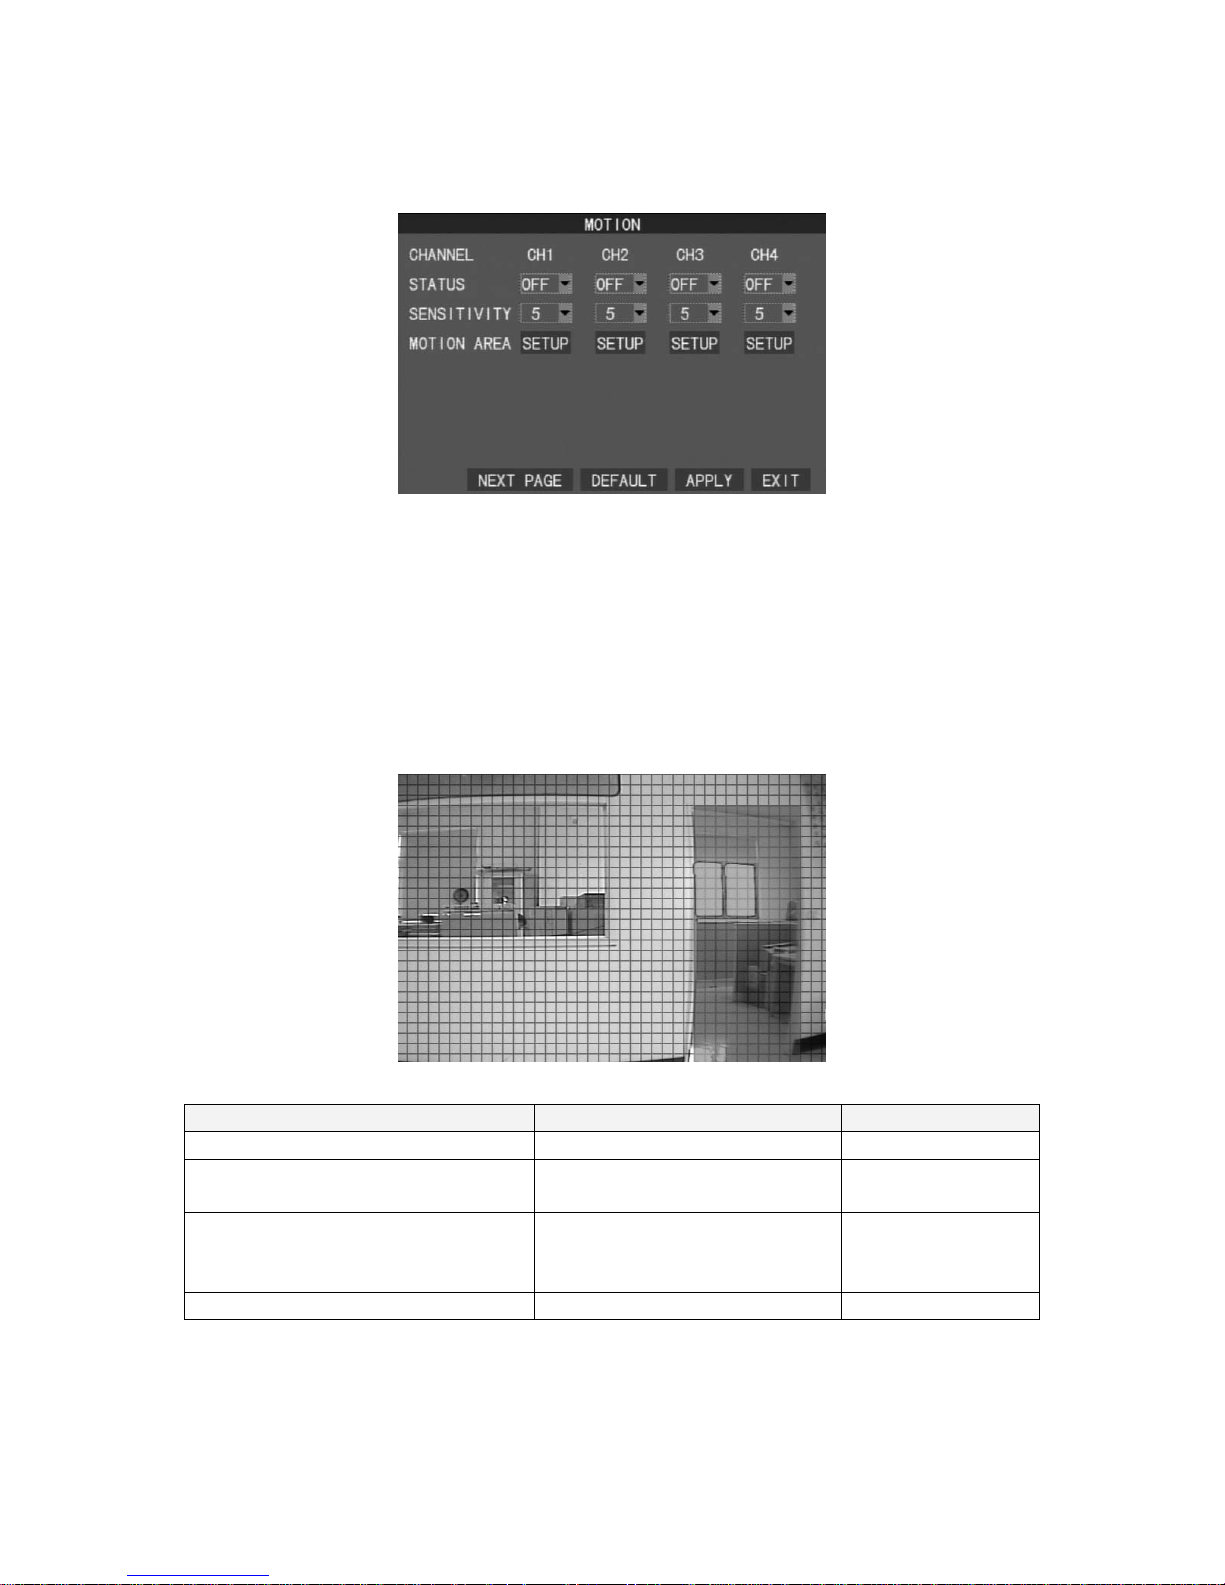
7.5.3 Motion Detection
z Channel Status
Enable/disable motion detection for each camera. Set: On/Off.
z Sensitivity
Sensitivity level of motion detection. Set: 1~10. Higher value equal more
sensitive.
z Motion Area Setup
Setup by each small square.
Setup Operation Front Panel & Remote Control USB Mouse
Area Selection [Up/Down/Left/Right] [Moving Cursor]
Set Detection Area: must set on none
detection area(Transparent Area)
(1)Move to the area
(2)Press Enter to set the area
[Drag by Left Click ]
Clear Detection Area: clear the set
detection area: must set on detection
area(Green Area)
(1)Move to the area
(2)Press Enter to set the area
[Drag by Left Click]
Return to Upper Menu [MENU] [Right Click]
Page 22
19
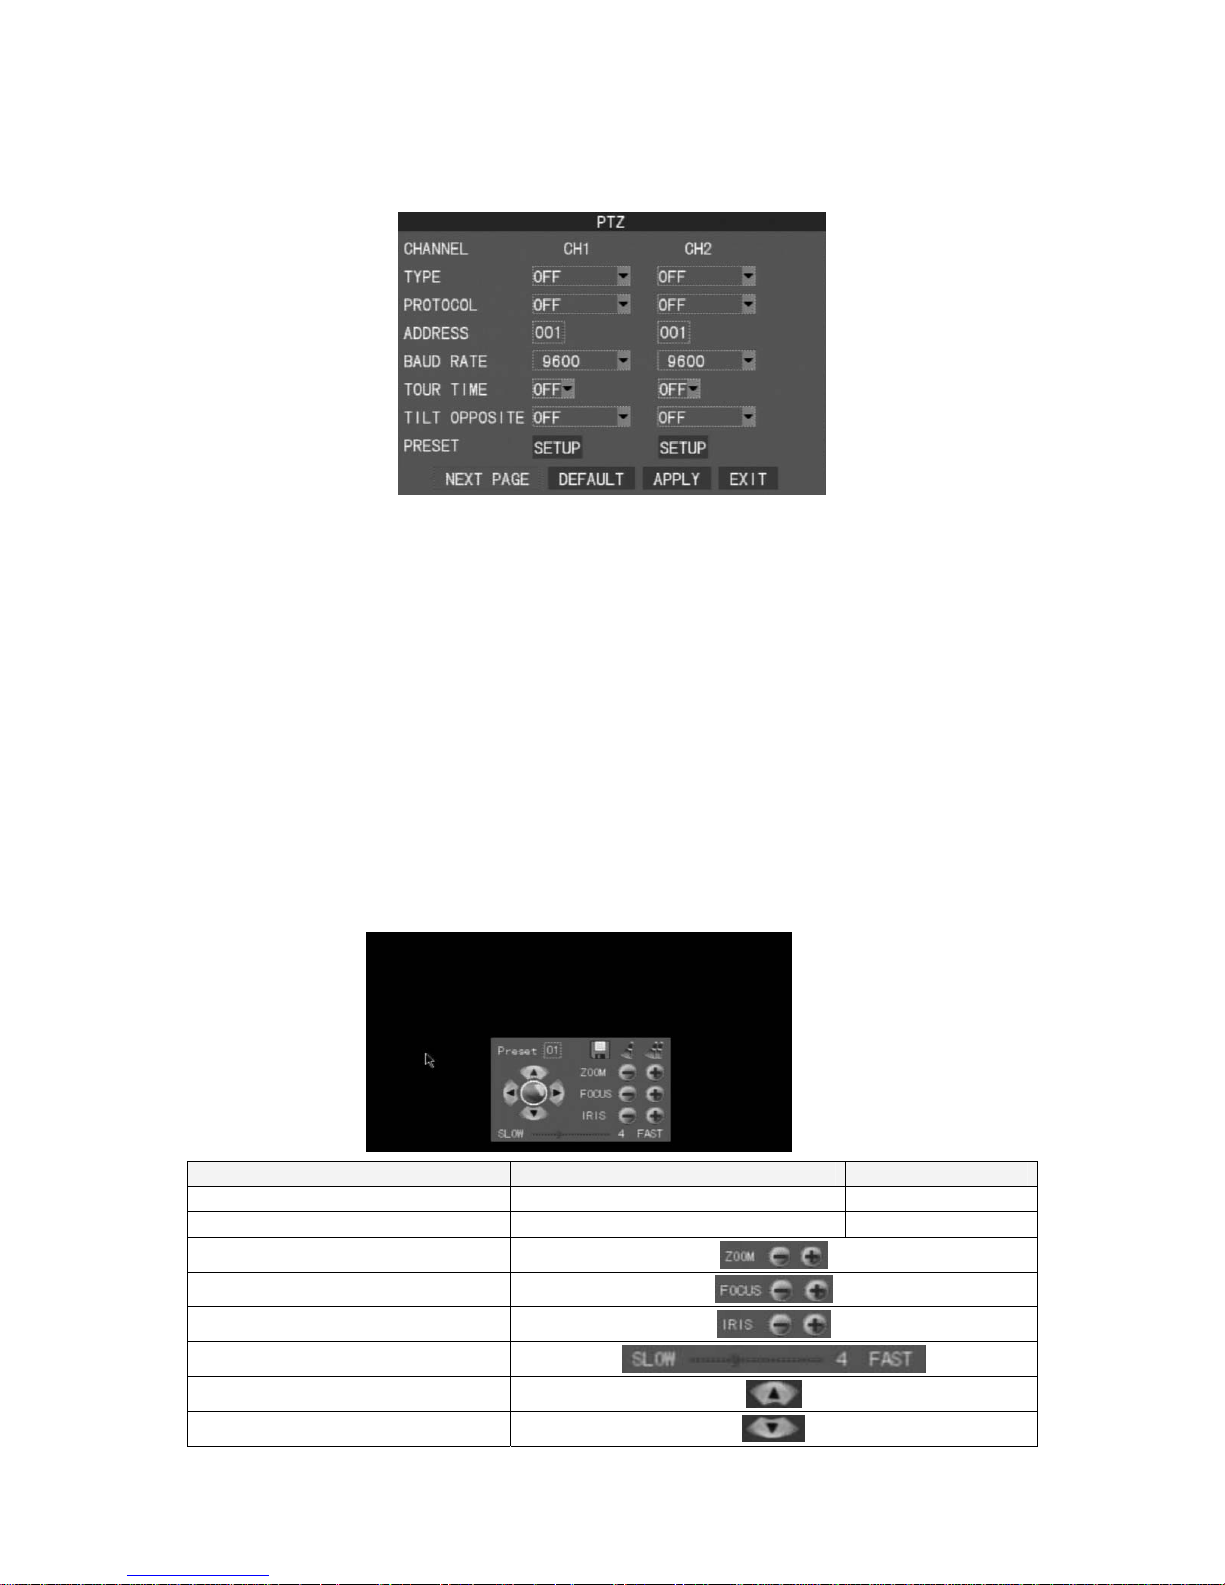
7.5.4 PTZ Setup
z Type
Speed dome model type. Set: PTC-301、PTC-203ST、FUM 626、
JG_QG988、FUM 622SD、FUM 628 or off. Please select the correct
communication protocol if you enable this setting.
z Protocol
Speed dome protocol. Set: PELCO P、PELCO D、MIKAMI or off.
z Address
Speed dome address. Set: 0~255.
z Baud Rate
Speed dome baud rate. Set: 1200、2400、4800、9600、19200.
z Tour Time
Speed dome tour time. Set: 5、10、15、20、25 sec or off.
z Tilt Opposite
Set speed dome image up side down. Set: On/Off.
z Preset
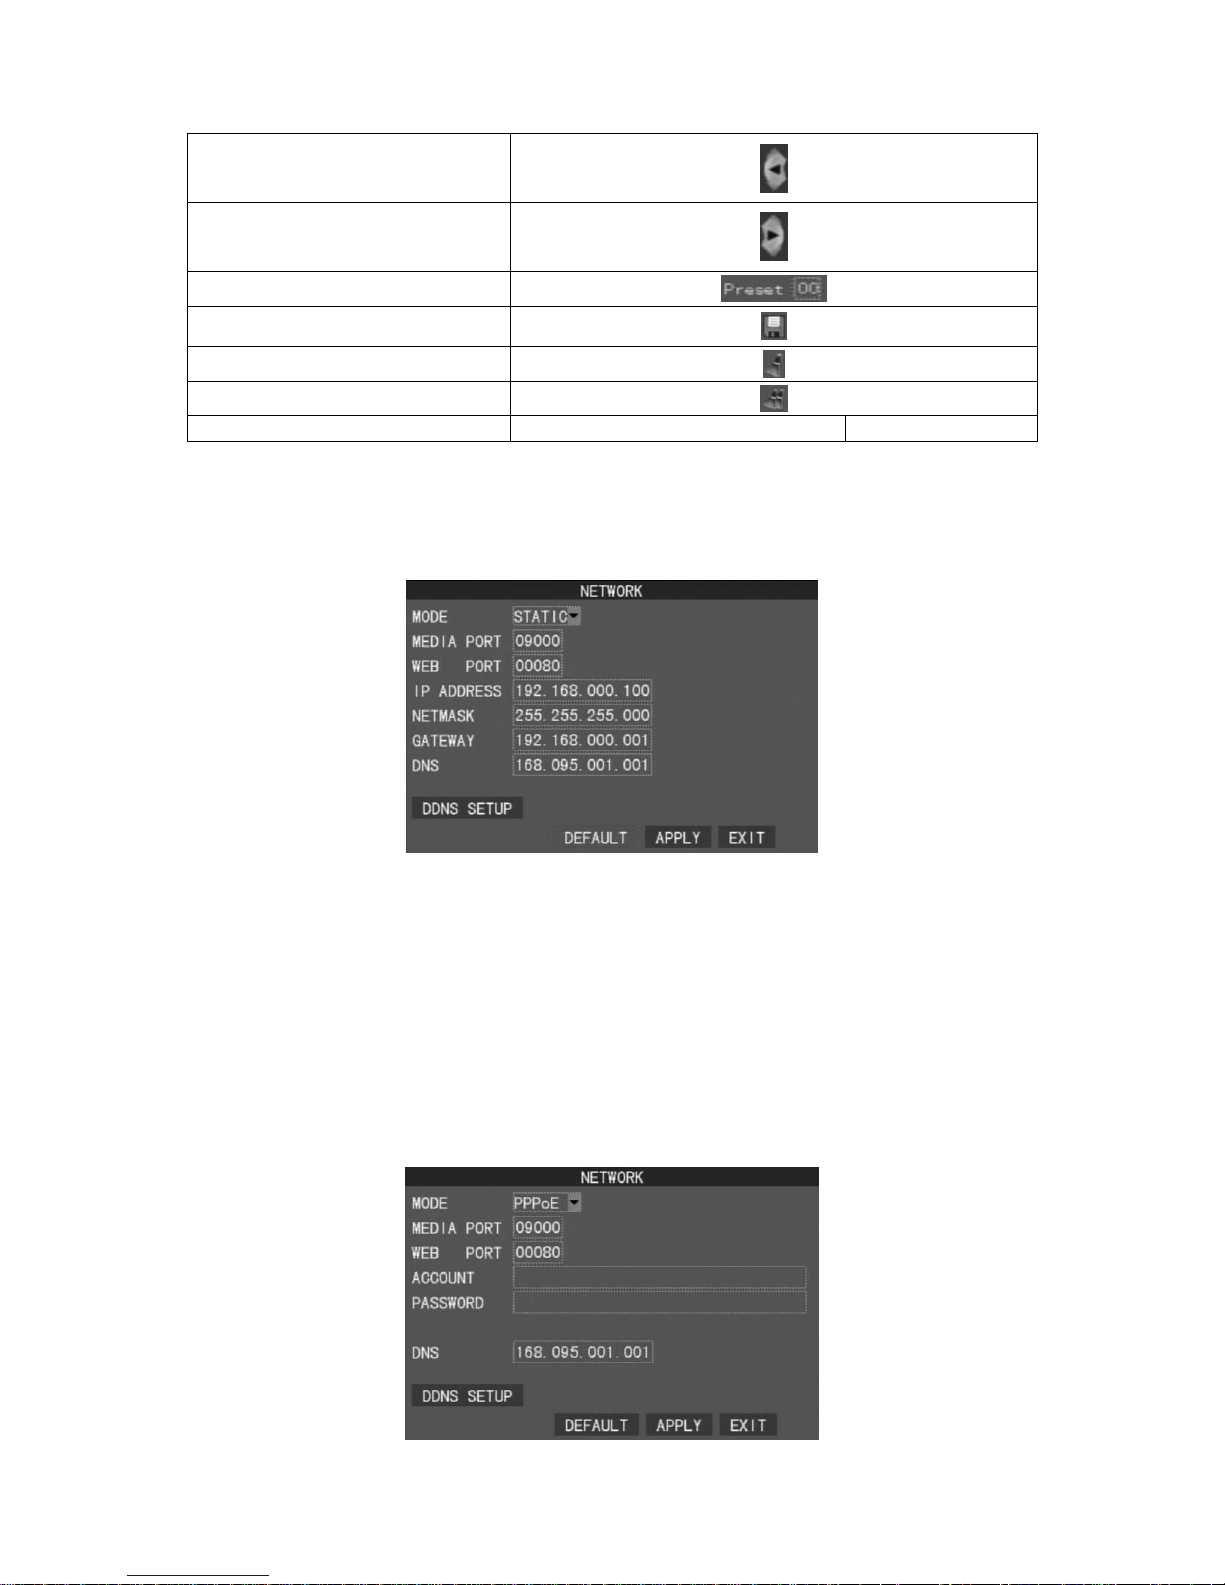
Setup Operation Front Panel & Remote Control USB Mouse
Select Item [Up/Down/Left/Right] [Moving Cursor]
Enter Select Item [Enter] [Left Click]
Zoom +,-
Focus +,-
Iris +,-
Adjust Movement Speed
Set PTZ Upward
Set PTZ Downward
Page 23
20
Set PTZ Leftward
Set PTZ Rightward
Number Preset Setting
Save Preset Setting
Clear Preset Setting
Clear All Preset Setting
Return to Upper Menu [MENU] [Right Click]
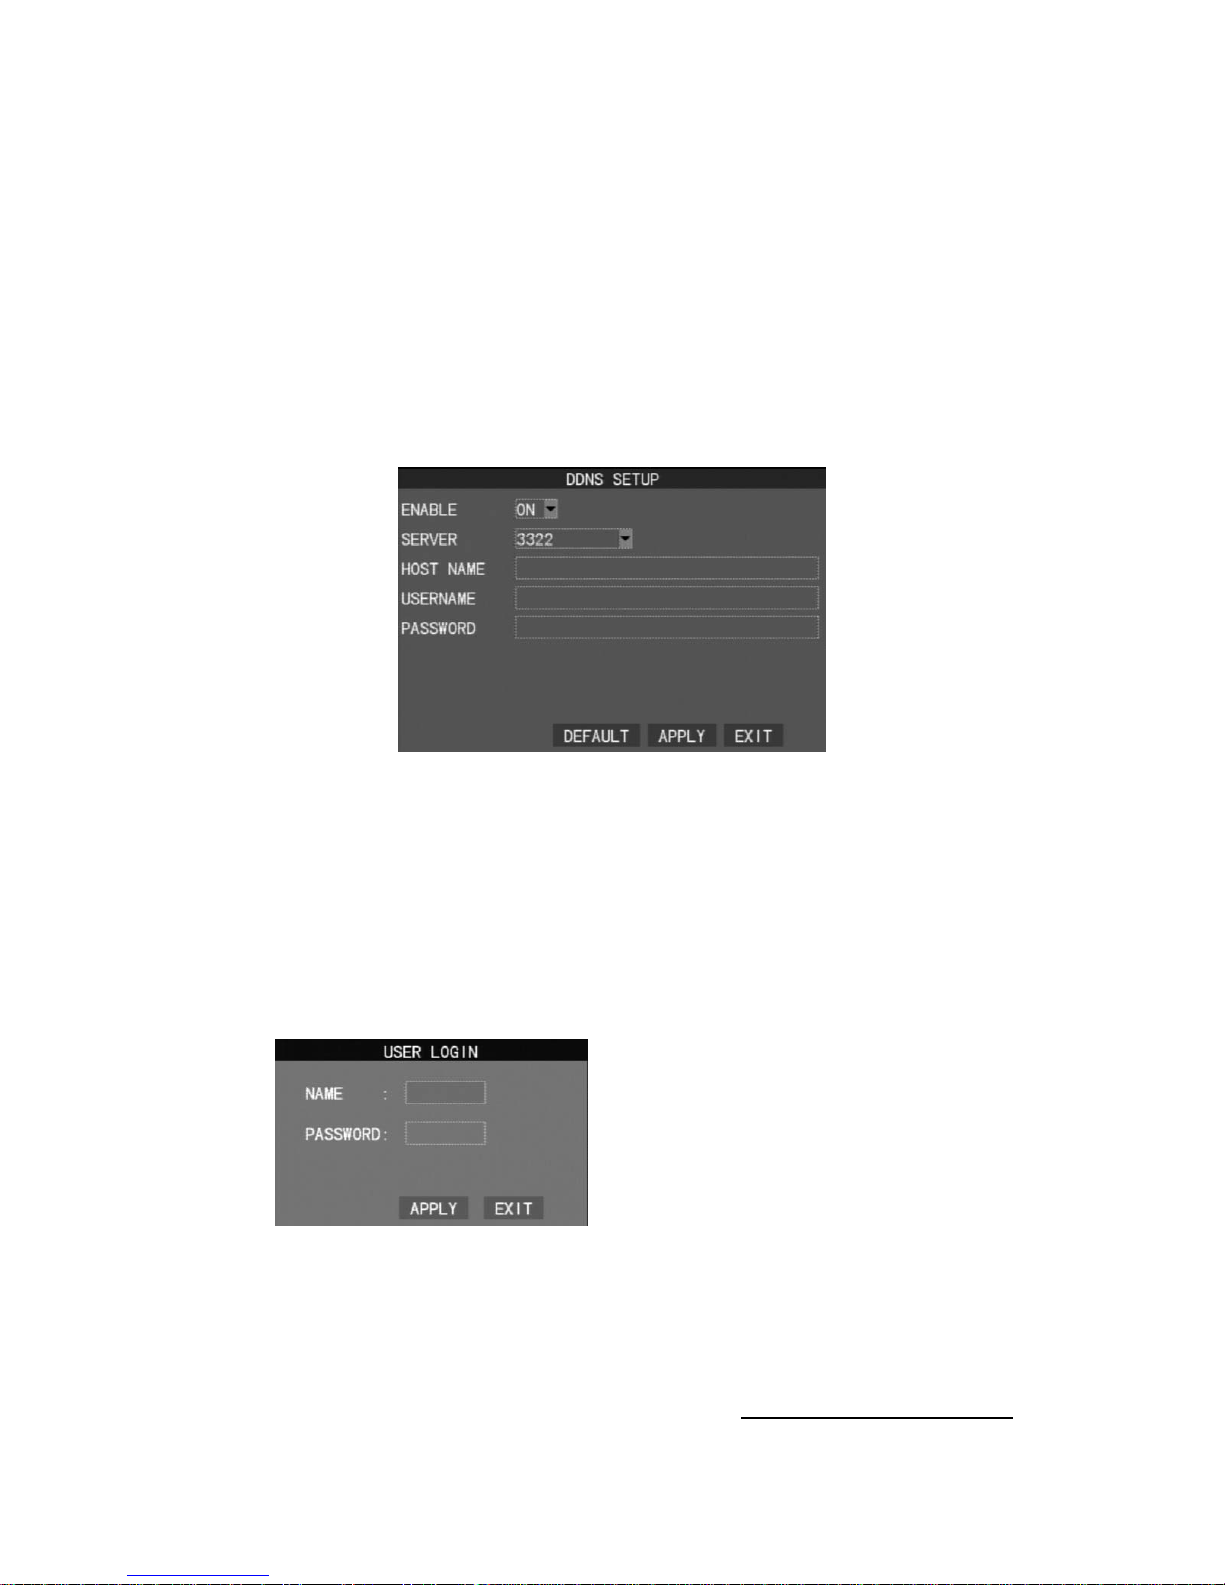
7.5.5 Network Setup
z Mode
Set the connection method. Set: Static IP、DHCP、PPPoE.
Static IP
IP Address
Please use the virtual keyboard to key in the IP address.
NetMask
Please use the virtual keyboard to key in the subnet mask address.
Gateway
Please use the virtual keyboard to key in the gateway address.
DHCP
Automatic retrieve the dynamic IP address, subnet mask address and
gateway address.
PPPOE
Page 24
21
PPPoE User Name
PPPoE Password
z Media Port
Please use the virtual keyboard to key in the media port.
z Web Port
Please use the virtual keyboard to key in the web port.
z DNS
Please use the virtual keyboard to key in.
z DDNS Setup
DDNS
Enable/disable DDNS. Set: On/Off
Enable: On
Server
DDNS Server. Set: 3322、dyndns、perfecteyes、myq-see、cctvdvr
Host Name
User Name
Password
8. Other Function
z User Login
After the user created the user account, the system will ask the user to login
the system before operate the system or setup.
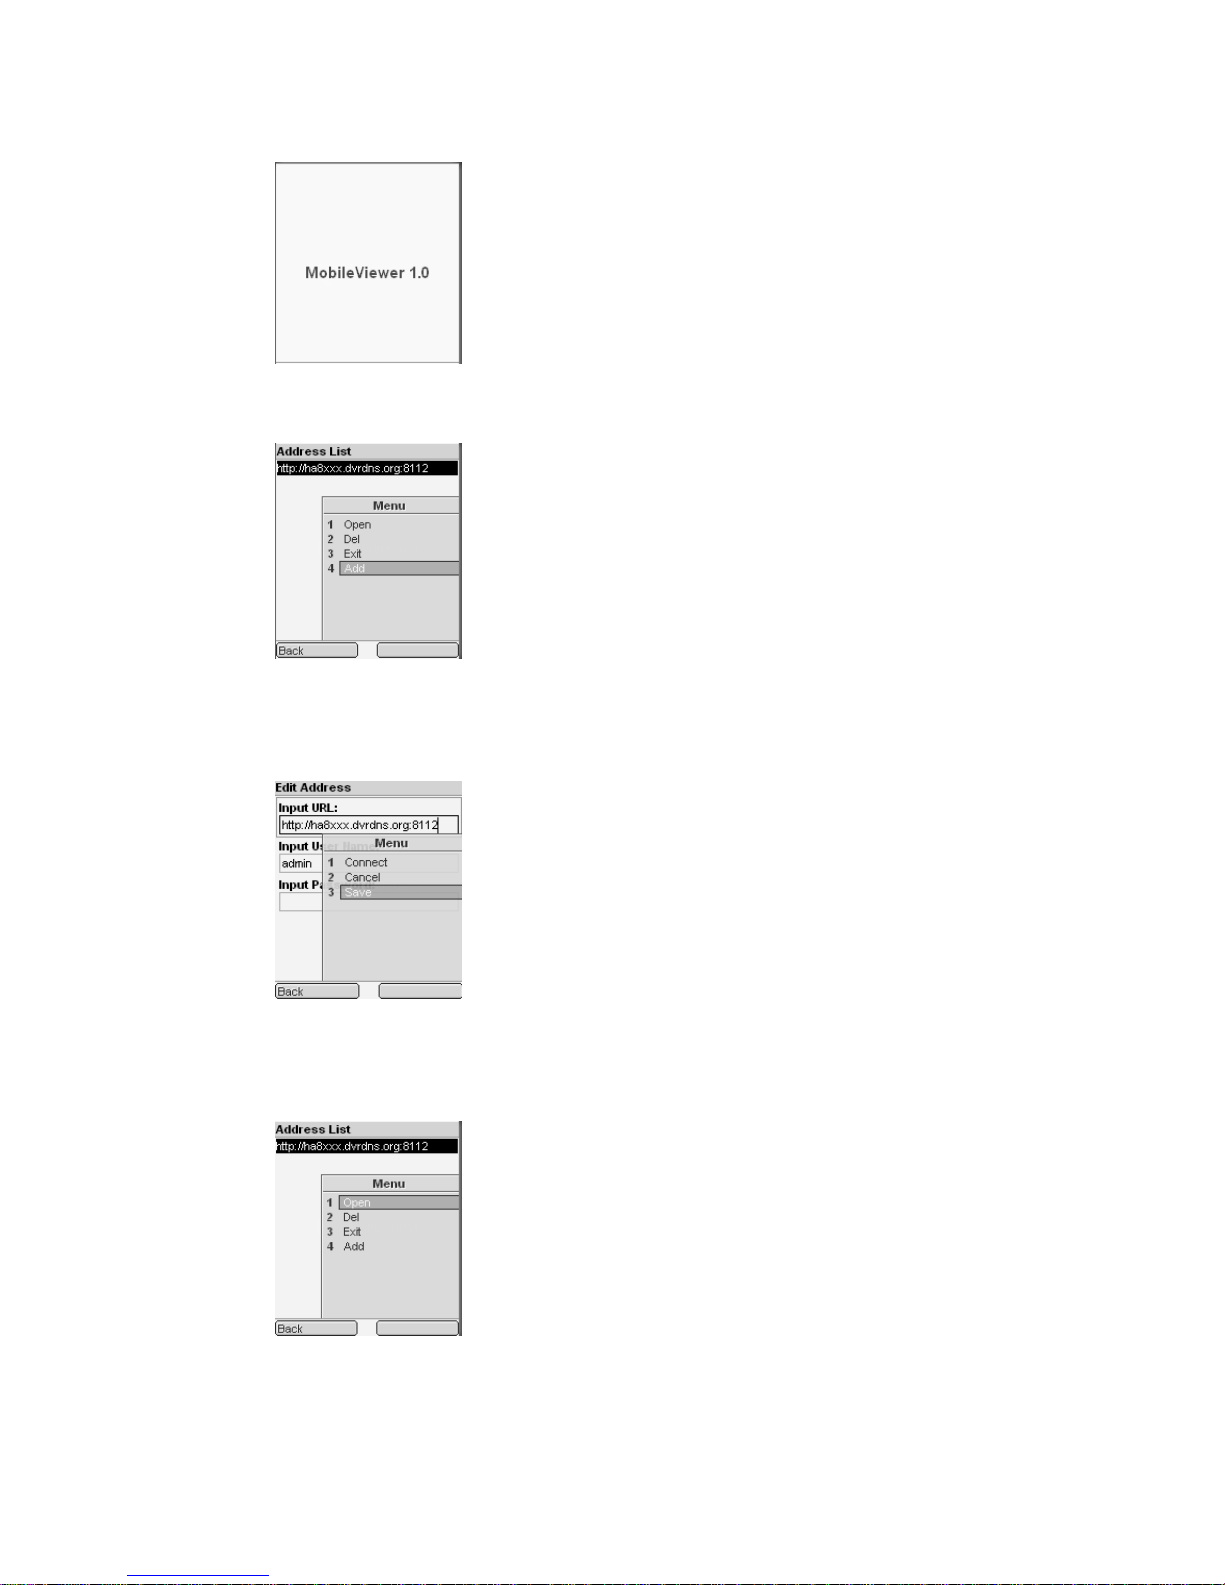
9. Cell Phone Monitoring Operation
1. The mobile phone must support Java Script.
2. Please use the mobile phone to login the URL http://xxx.xxx.xxx/viewer.jar
(DVR end) to download the program.
Page 25
22
3. Execute the viewer.jar
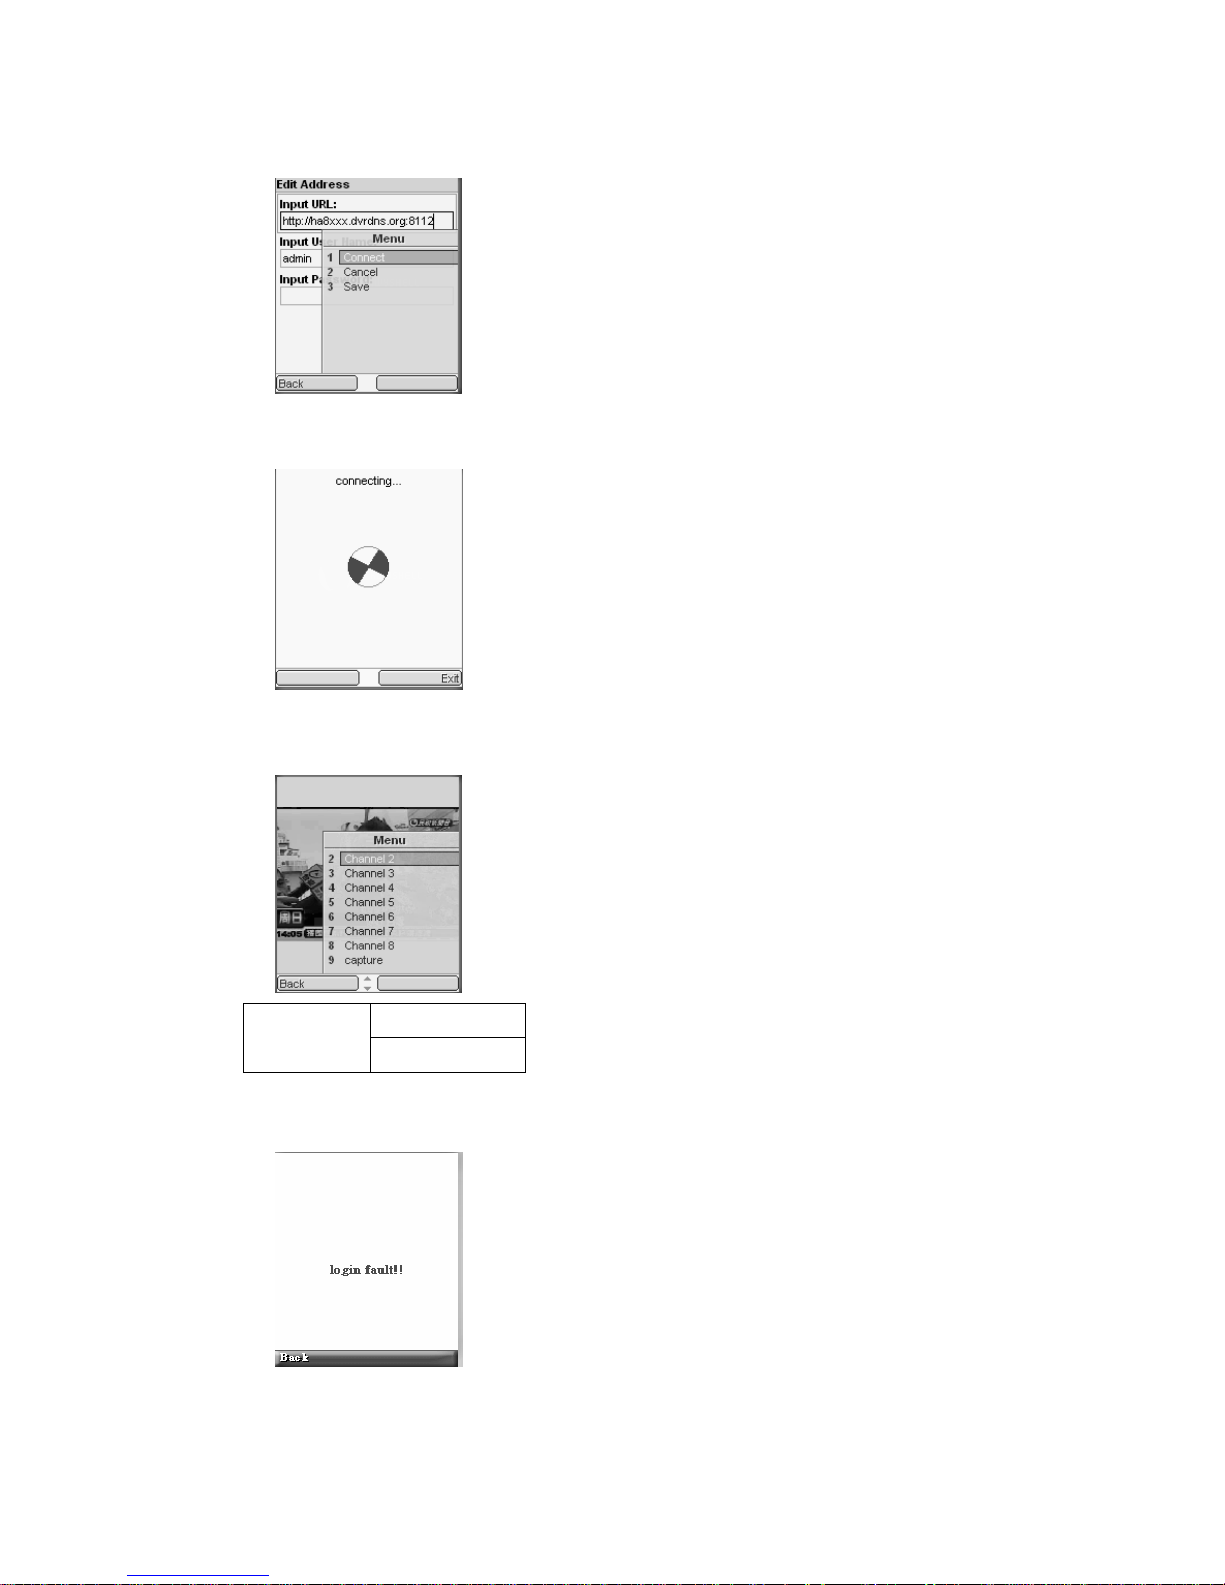
4. Open the menu and select [Add] to add connecting information.
5. Press [Save] to save relating information after key in the URL, user name
and password.
6. Press [Open] to open the login information after select the connecting
address.
Page 26
23
7. Press [Connect] to login the system after the login information is confirmed.
8. Connecting.
9. Connect success.
Capture
Menu
Channel[1~8]
10. Login fail, please return to the login menu.
Page 27
24
10. H264Player Operation
z Preface
H264Player software allows to playback the backup saving file from the
DVR.
z System Requirement
Operating System: Windows 2000、XP、Vista.、Windows 7.
z Program obtainment and installation
While user start to backup the file from DVR, the system will automatically
copy the H264Player.exe file and recorded data to the backup device for
example, an USB flash memory stick.
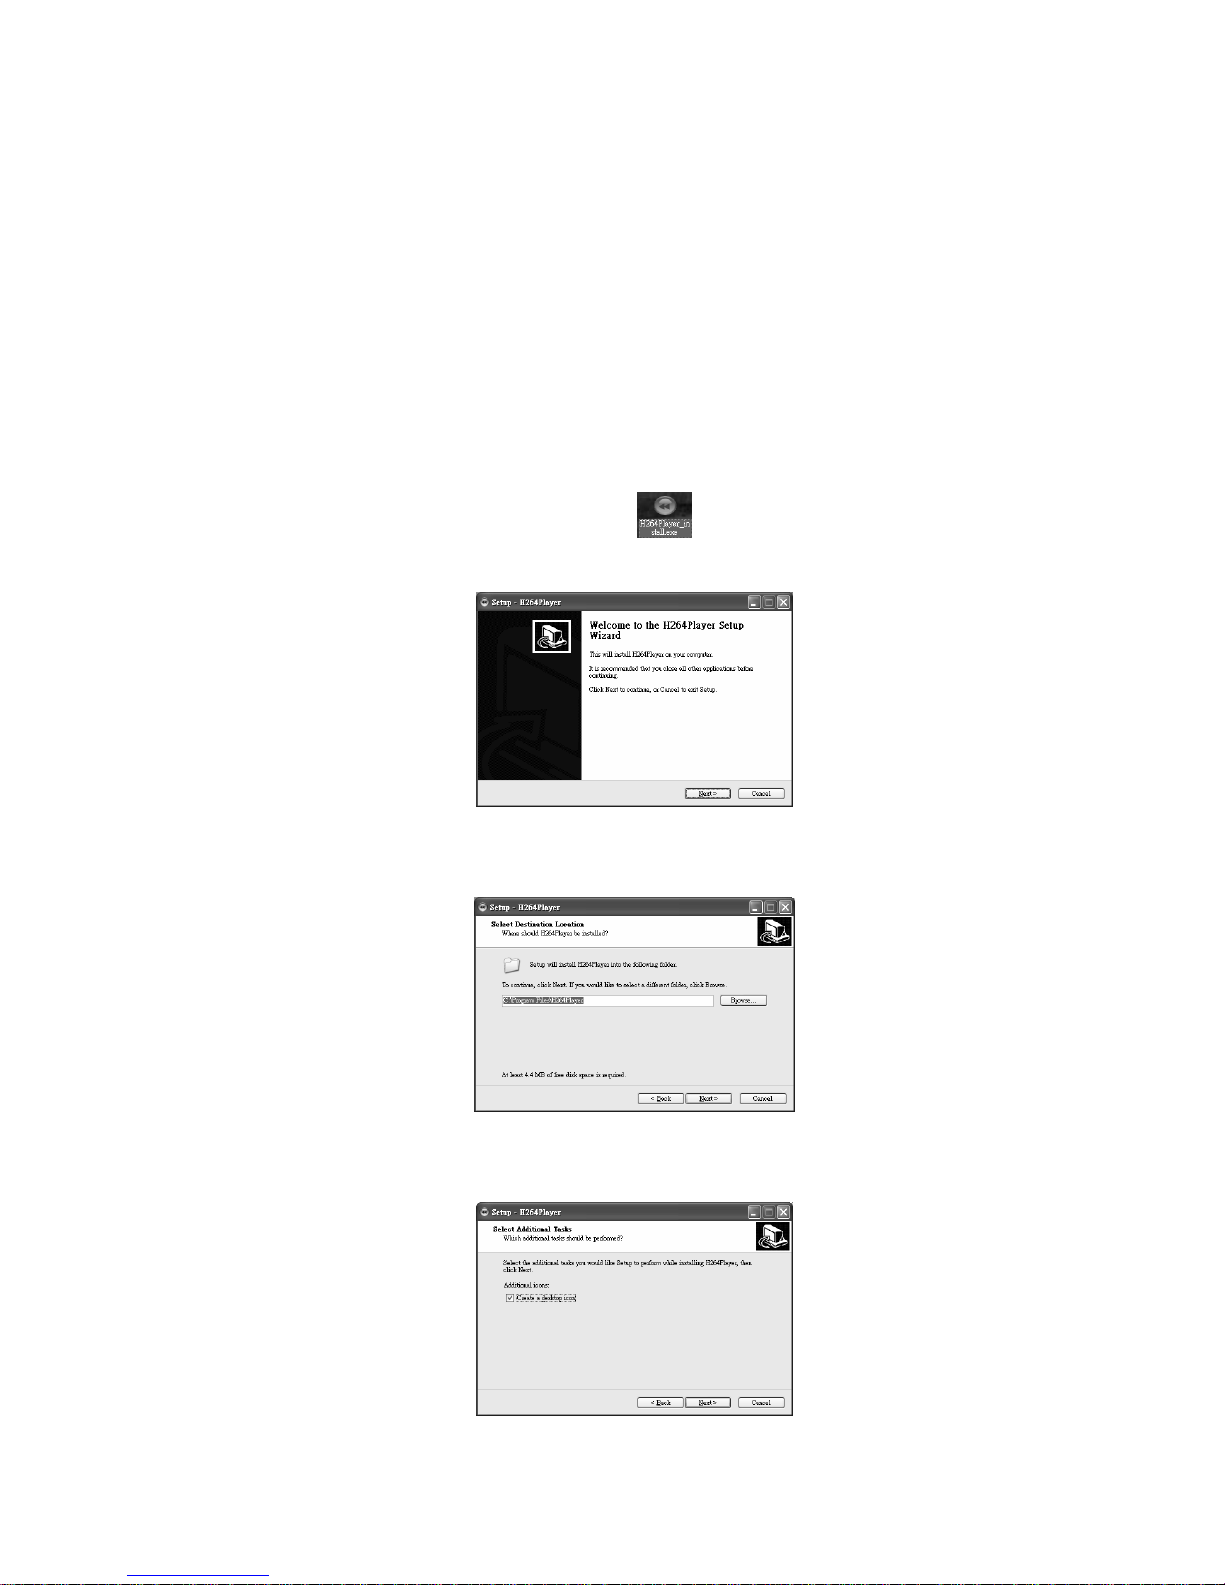
Execute the installation file
Step 1: Ask for the Installation
Step 2: Select the Install Location
Step 3: Select Additionnal Tasks
Page 28
25
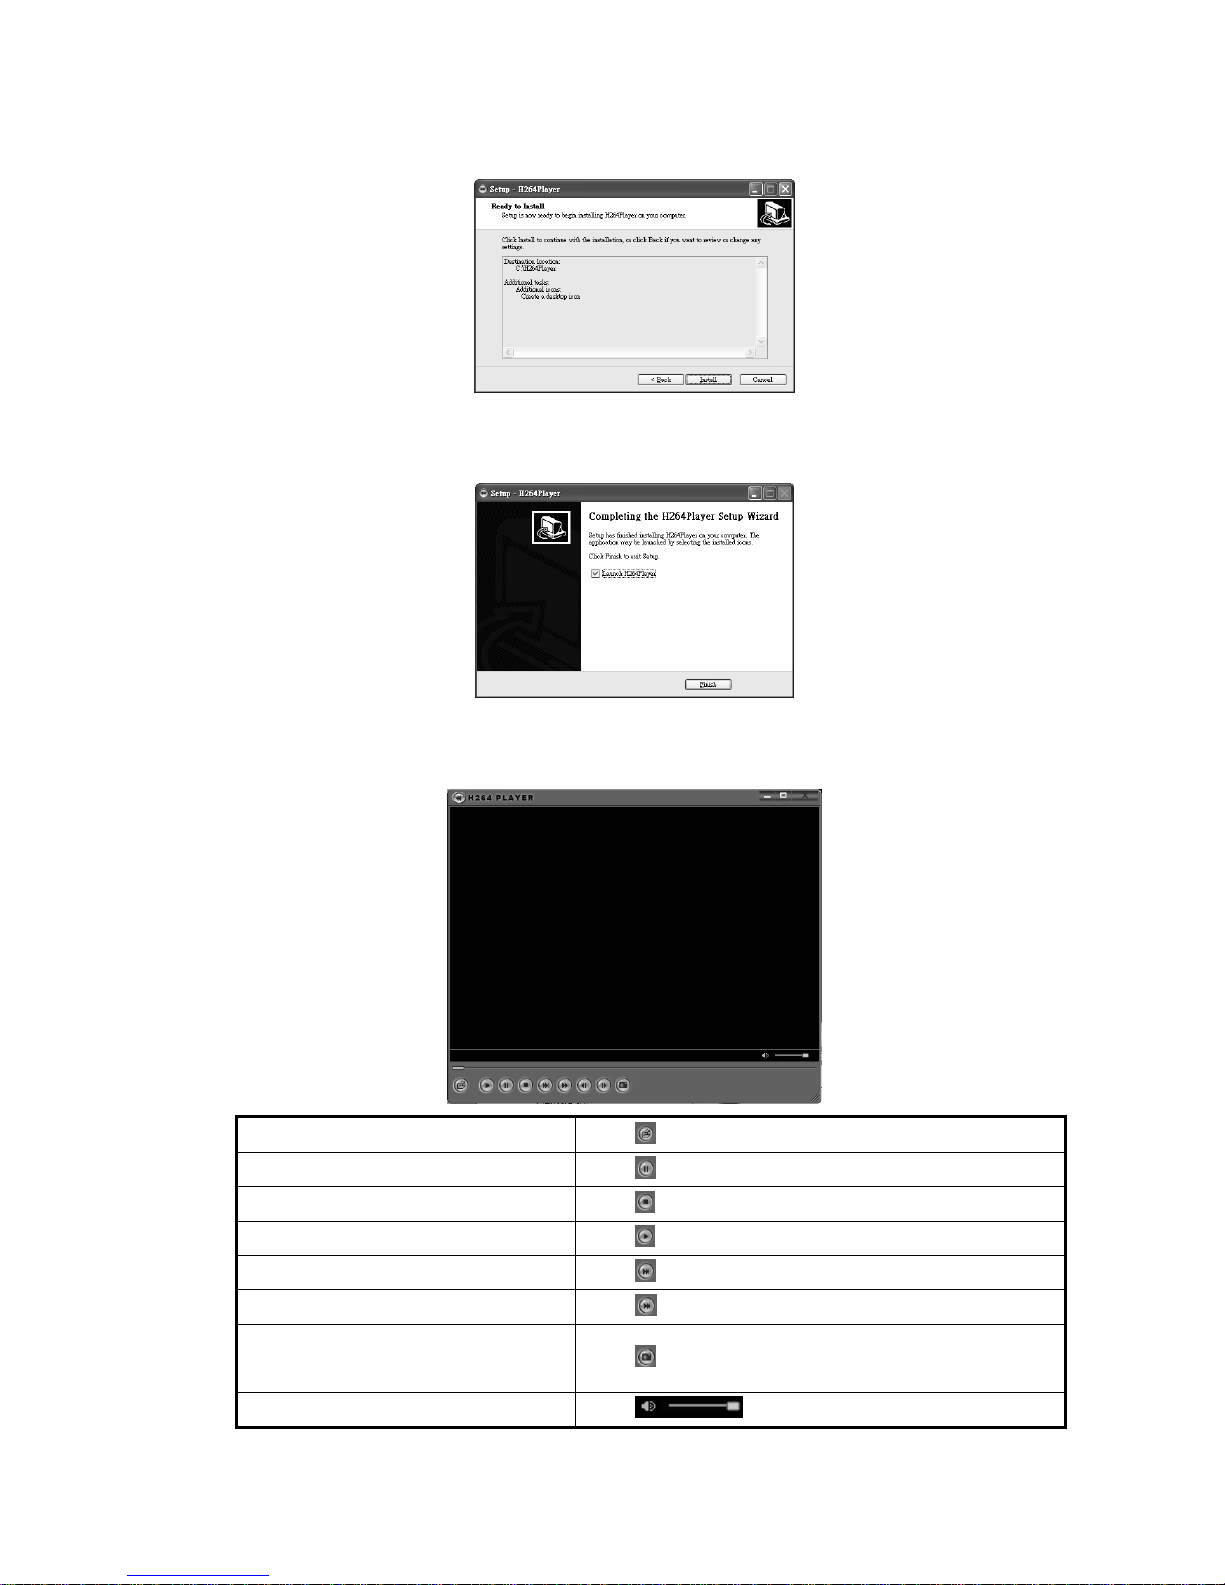
Step4: Install Confirmation
Step 5: Installation Complete
z User Interface
Open File
Click
Pause
Click
Stop
Click
Play 1x
Click
Fast Forward
Click
Slow Forward
Click
Capture the image (snap shot) to the
host computer
Click
Volume Control
Drag
Page 29
26
Rewind
Click
Step Forward
Click
Pop-up Menu
Right click the mouse to open the pop-up menu including
Setting、Language、About H264Player、Exit
11. Web Operation
z Preface
The Web Application Manager allows the user to remotely monitoring、
playback、backup through the DVR.
z System Requirement
Operating System: Windows 2000、XP、Vista.、Windows 7
Web Browser: Internet Explorer
z Add-on Installation
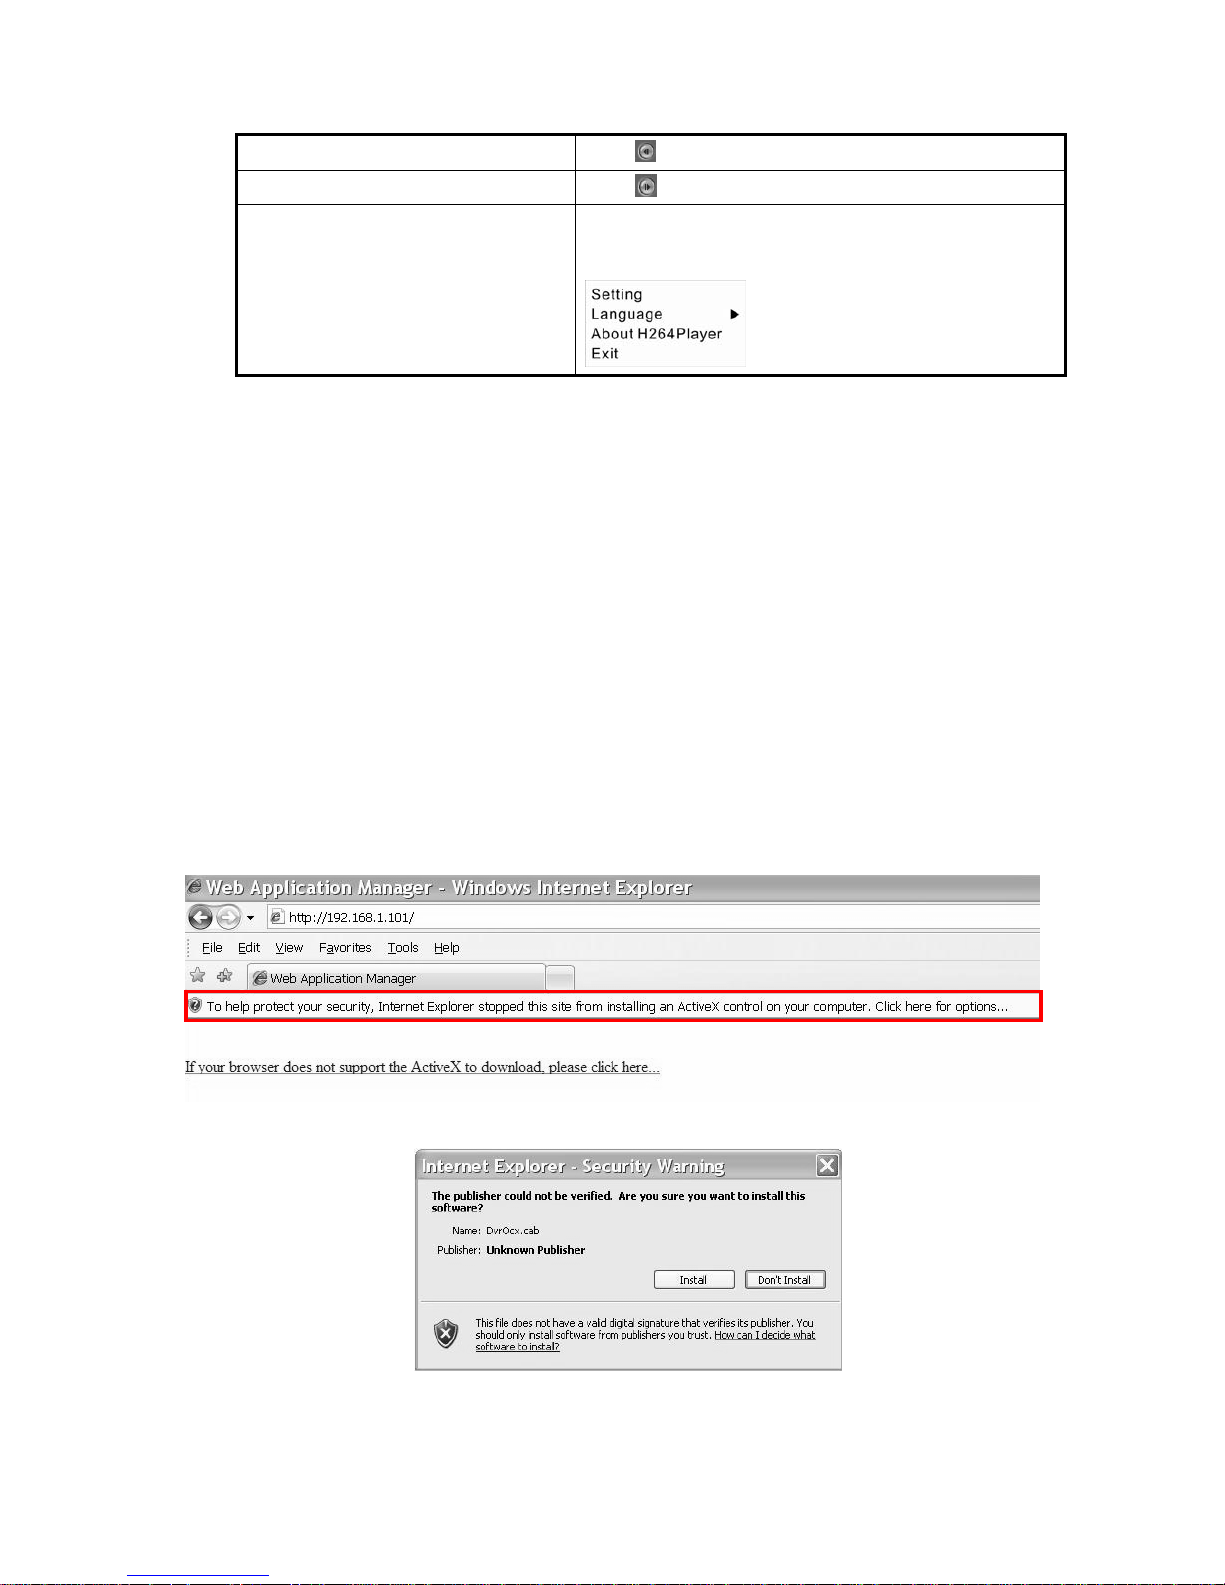
Please use the IE browser to login the IP address of DVR setting. If the user
is the first time to login the page, the system will ask the user to download
and install the add-on as you can see the page below. Please click the
request to install the ActiveX add-on.
Installation Diagram:
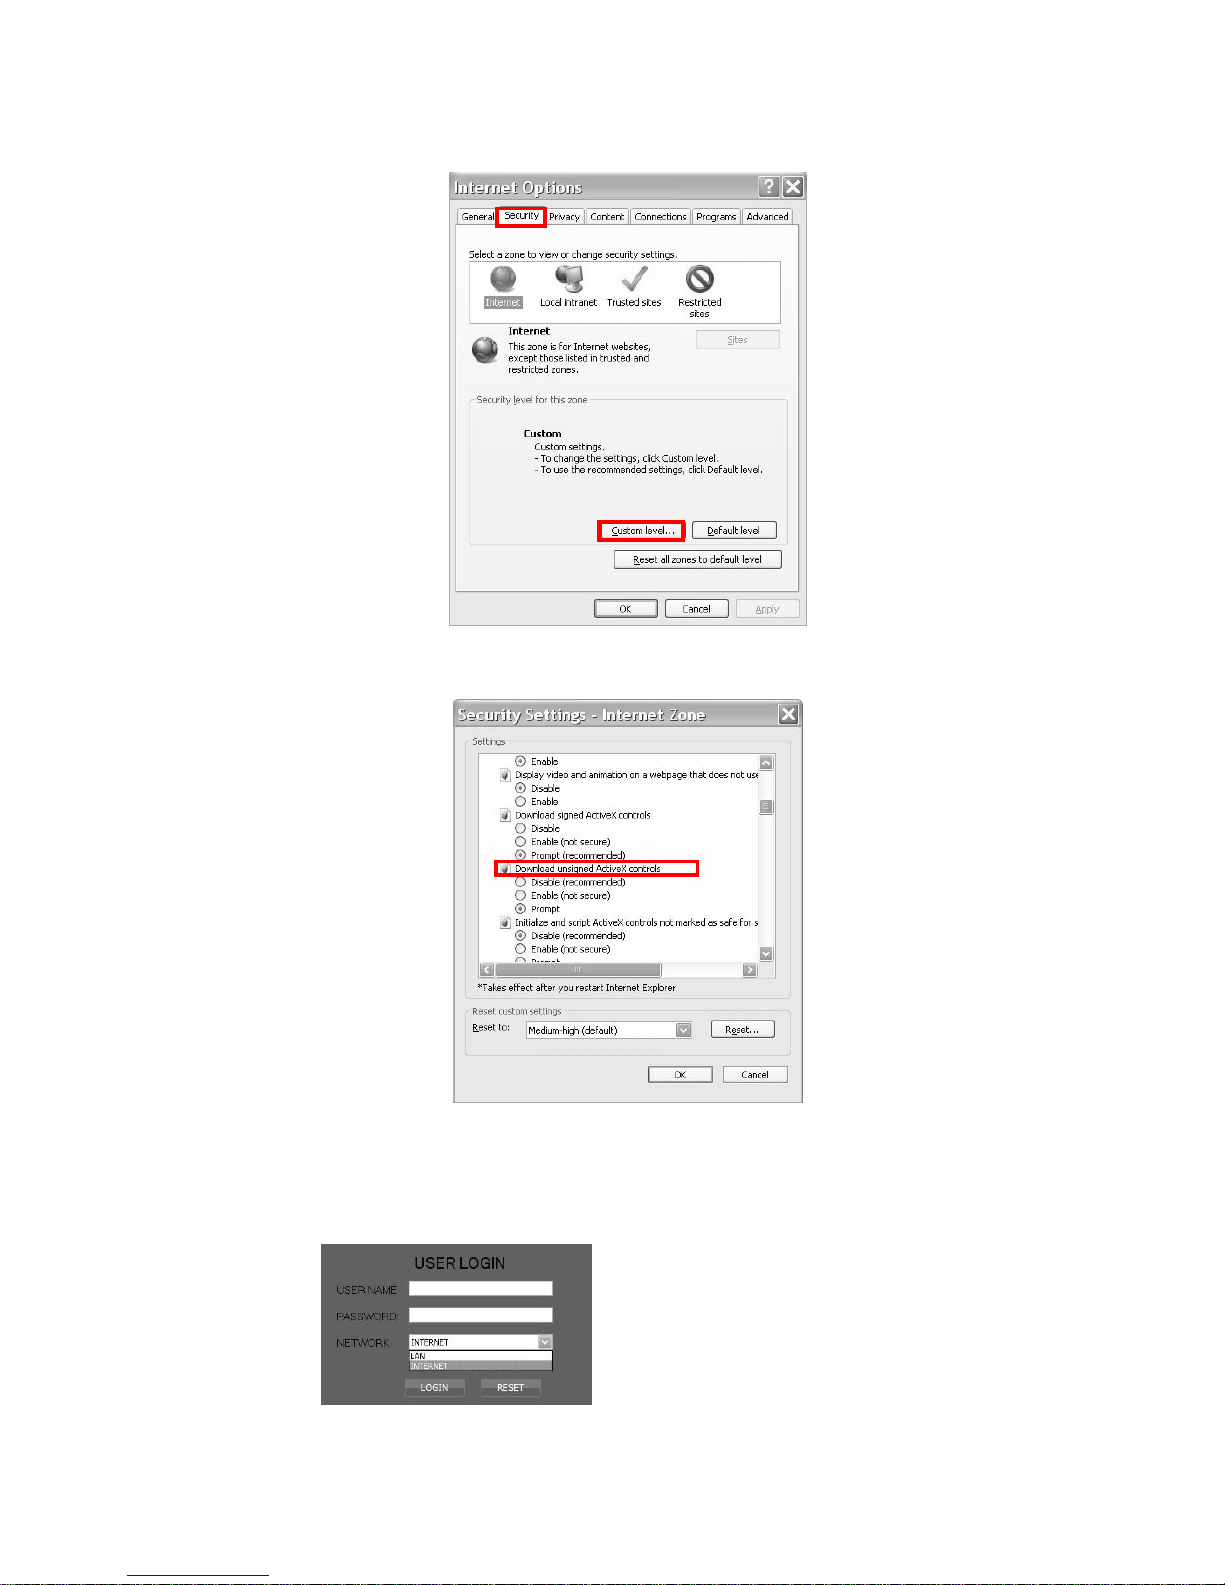
If the system did not pop up the message box as above, please follow the setting
as below:
Page 30
27
Select 『Tools』Æ 『Internet Setting』Æ 『Security』Æ Custom Level
Select 『Download unsigned ActiveX controls』Æ Prompt
z User Interface
Login Page
Please login user name and password from the setting of DVR end.
Page 31
28
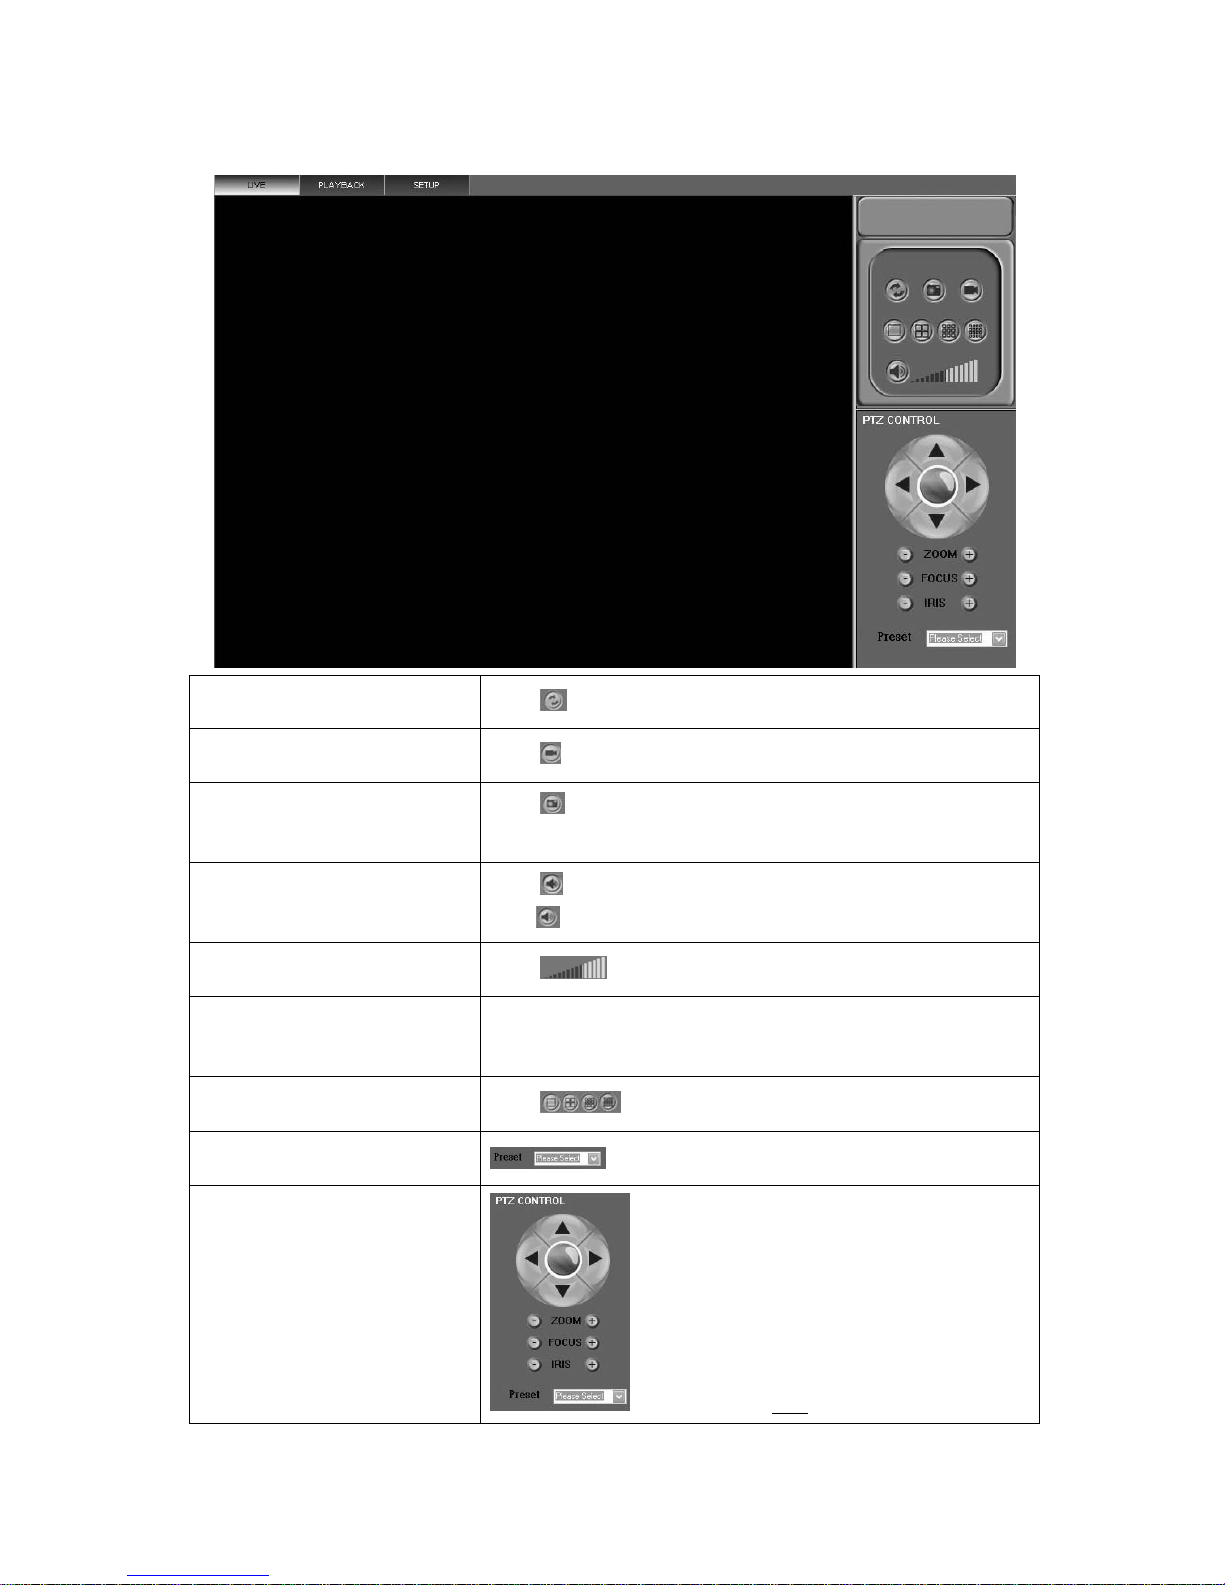
Live Monitoring
Start/Stop the Live Monitoring
Click
Record the Footage to
Computer
Click
Start/Stop record (saving path: Setup/Information)
Snapshot the Image
Click
to snap shot the image (saving path:
Setup/Information)
Enable/Disable Audio
Click
under the live viewing mode to enable the audio, and
click
to disable.
Volume Control
Click
Switch Channel Display
Double click the channel to enter single channel display, double
click again to return.
Single/4/8/16 Display
Click
Speed Dome Preset Point
PTZ Control
Please refer to “PTZ” for more information.
Page 32
29
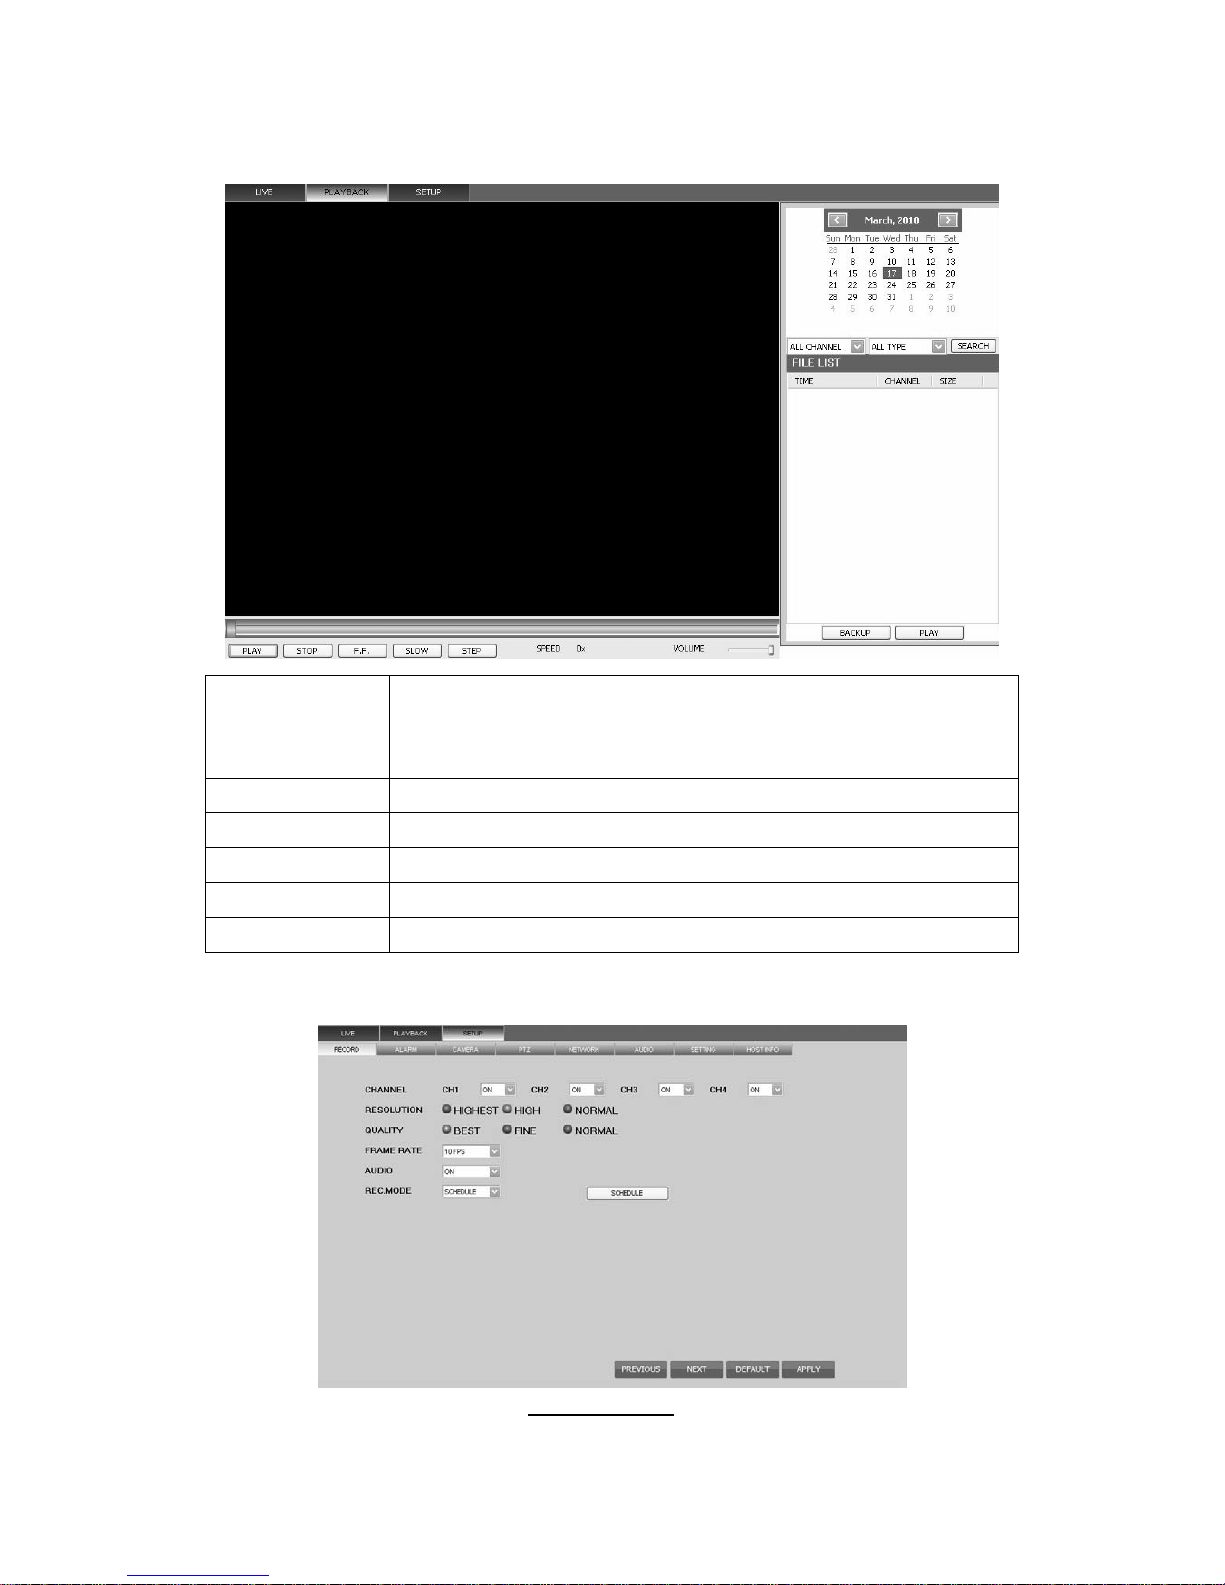
Playback
Event Search
(1)Select Date
(2)Select Channel and Type
(2)Click Search
Playback Click on pop up file list
Fast Forward
Click “Fast Forward” (Speed: 2X、 4X、 8X、 16X)
Slow Rewind
Click “ Rewind” (Speed: 1/2、1/ 4X、1/ 8X)
Step Forward Click “Step”
Backup Click “Backup”, backup path: SetupÆ System SettingÆ Backup Location
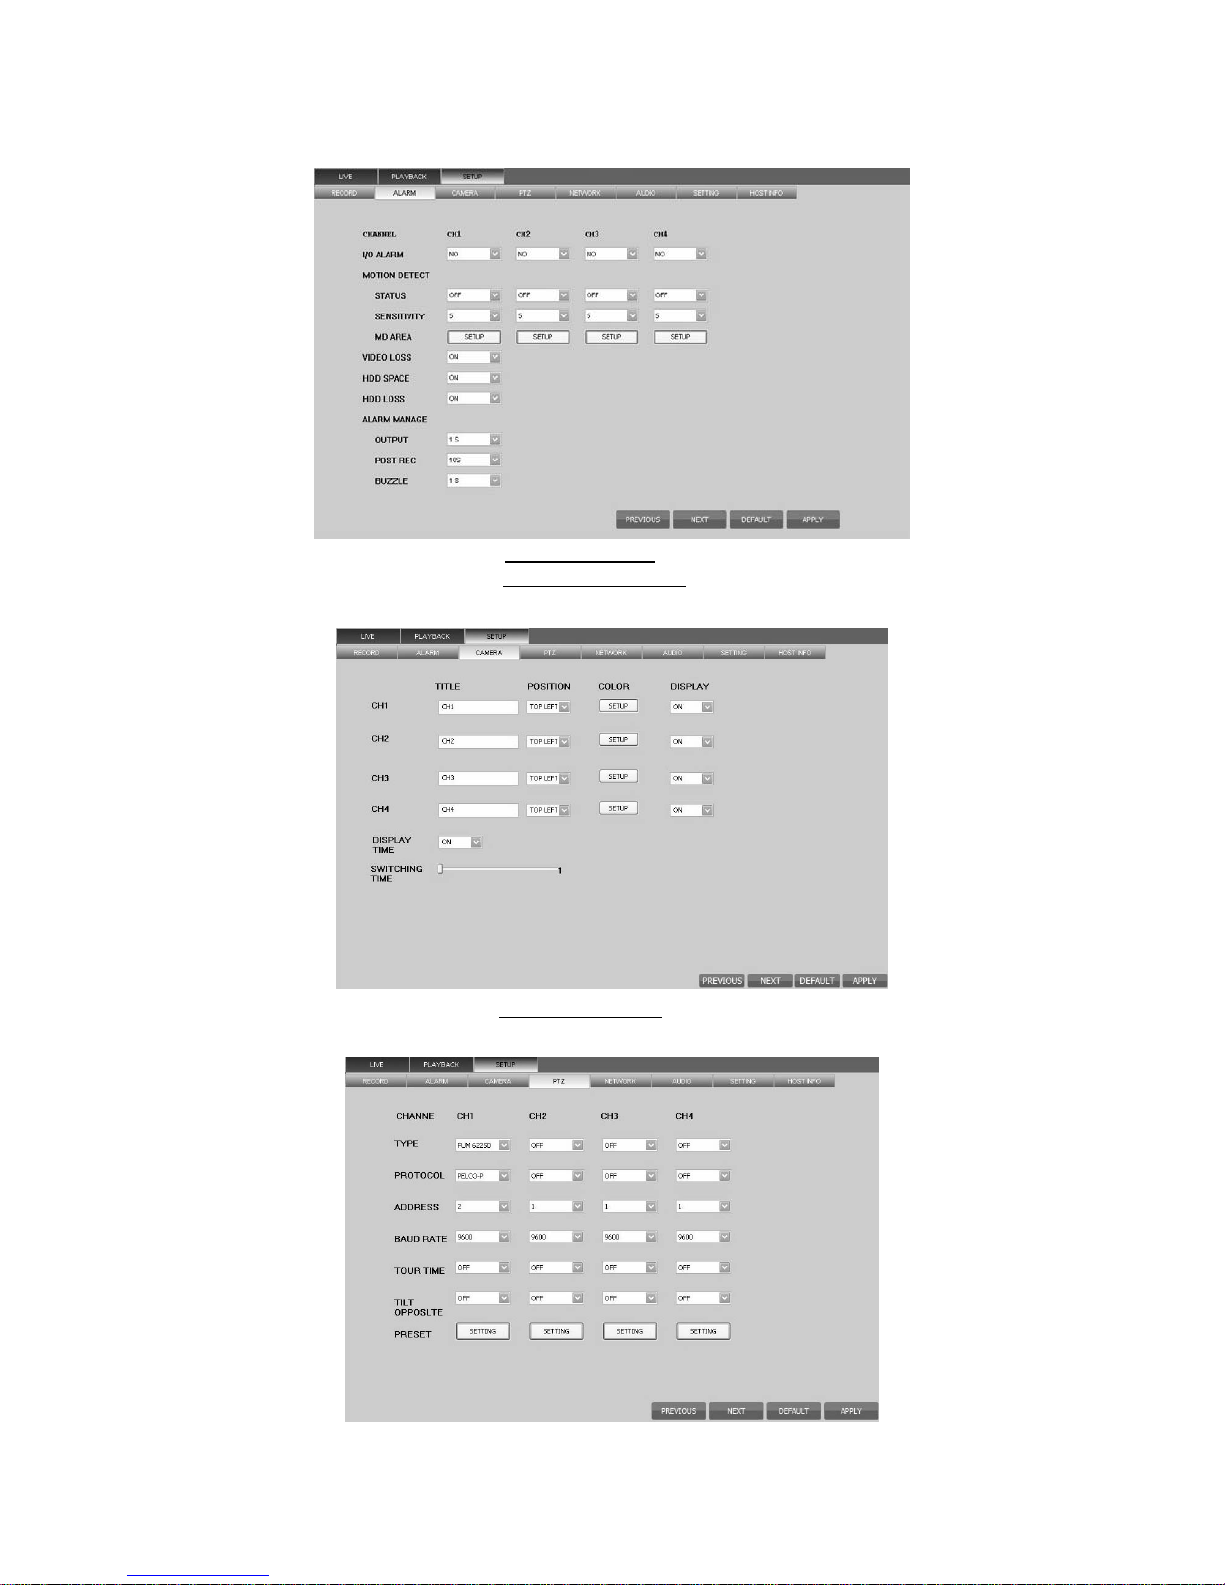
Setting
★ Please refer to 7.2 Record Setup for more information
Page 33
30
Alarm
★ Please refer to 7.5.1 Alarm Setup.
★ Please refer to 7.5.3Motion Detection
.
Camera Setting
★ Please refer to 7.4.4Camera Setup
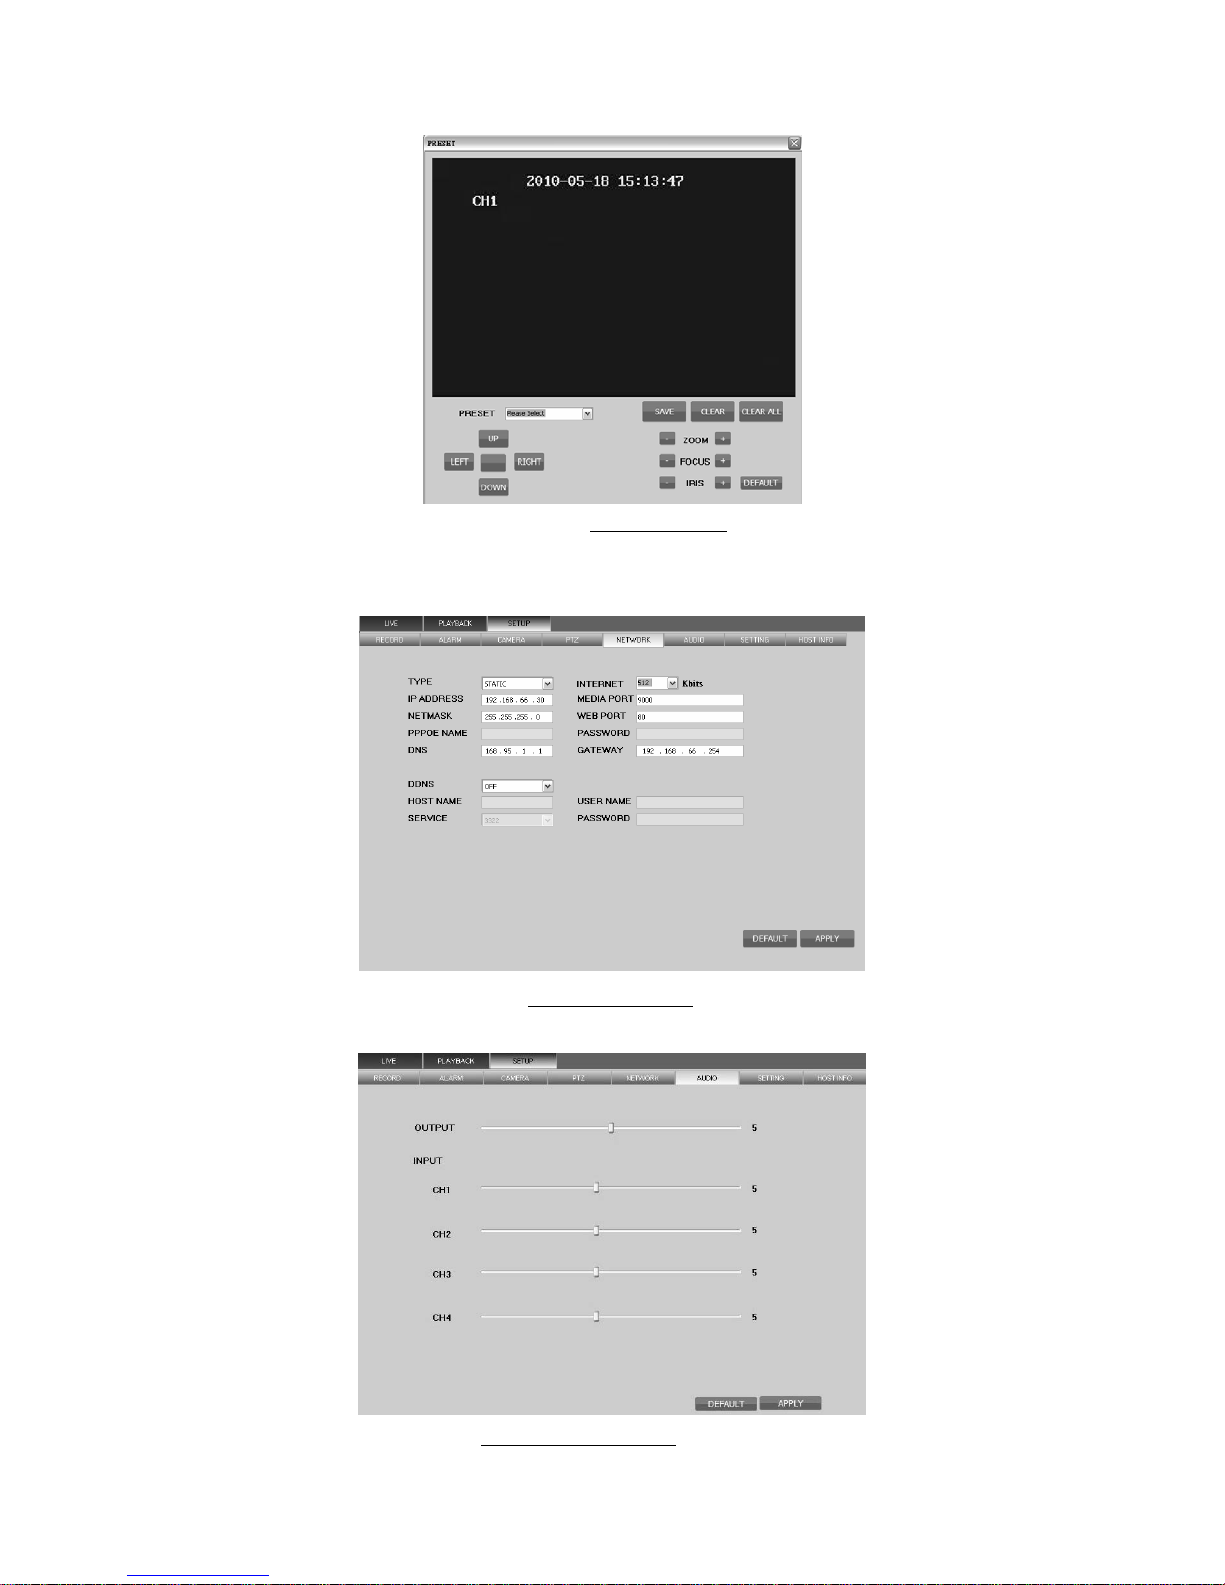
PTZ
Page 34
31
★ Please refer to 7.5.4 PTZ Setup for more information
Network Setting
★ Please refer to 7.5.5Network Setup for more information.
Audio Setting
★ Please refe 7.4.5 XGA/Audio Setup for more information
Page 35
32
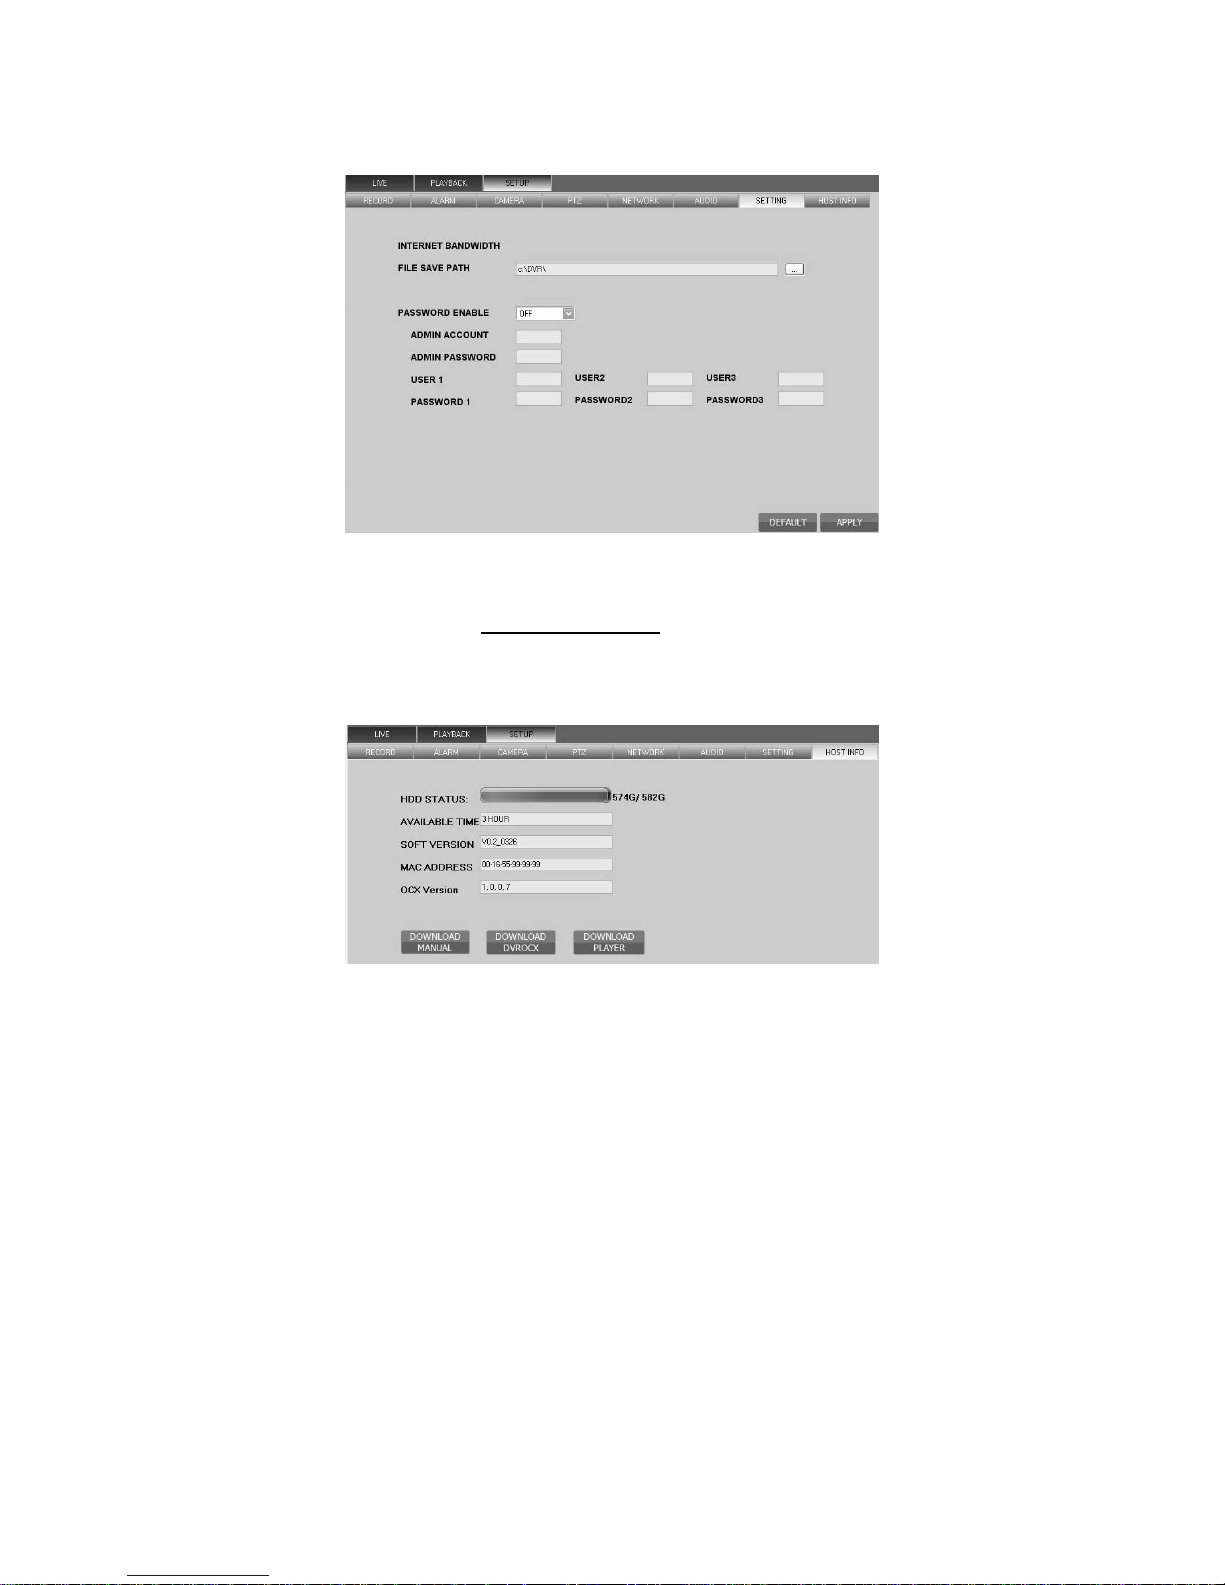
System Setup
Internet: Select the bandwidth.
File Saving Path: Select the location of saving file.
★ Please refer 7.4.3Password Setup for more information.
System Information
Page 36
33
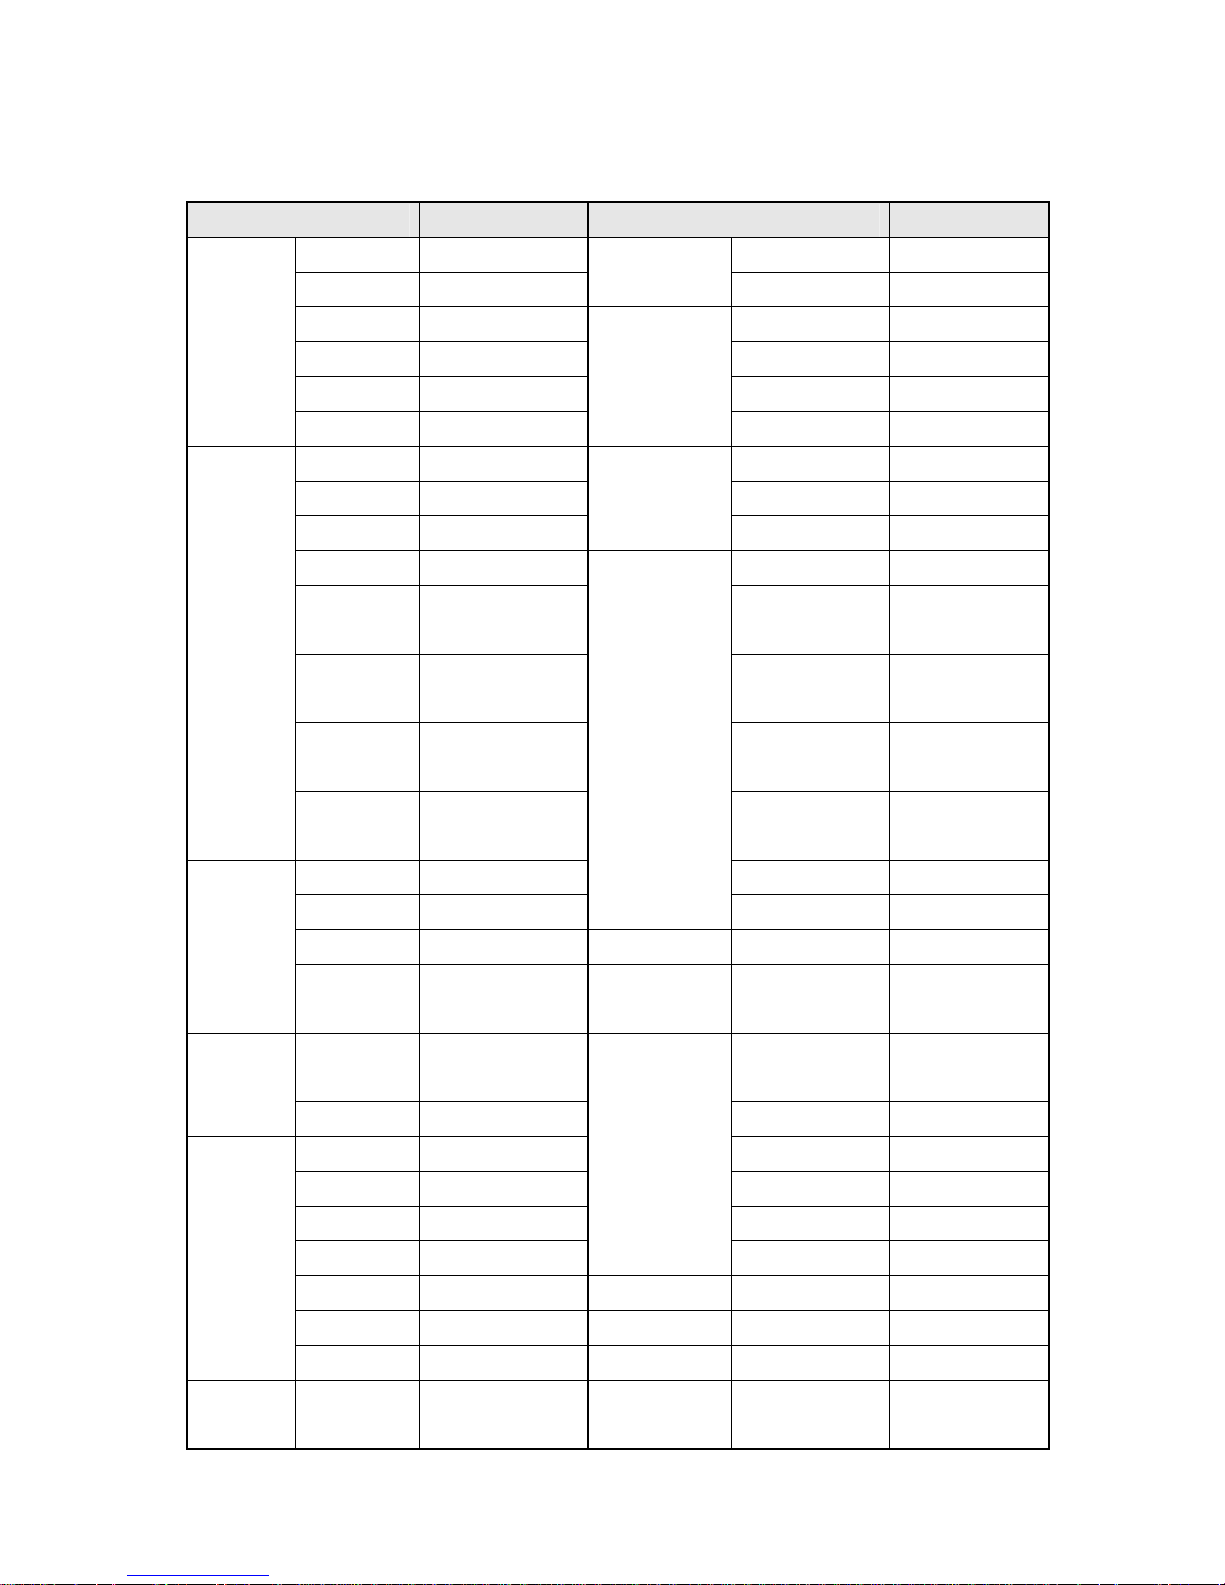
12. Default Setting
Item Default Setting Item Default Setting
Channel On Overwrite Yes
Resolution Normal
HDD Setup
Pack Time 60 Mins
Frame Rate Real-time Date Format YY/MM/DD
Quality Highest Time Format 24 Hours
Audio Disable Time Zone GMT+08:00
Record
Setup
Schedule Always
Time Setup
Daylight Saving Off
Channel 1 CH1 XGA Resolution 800X600
Channel 2 CH2 Output Volume 5
Channel 3 CH3
XGA/Audio
Setup
Input Volume 5
Channel 4 CH4 Mode On
Title
Position
Top Left HDD Loss On
Display On
HDD NO
SPACE
On
Display
Time
On Video Loss On
Camera
Setup
Switching
Time
1 sec. Alarm Output 1 sec.
Hue 25 Post REC 10 sec.
Brightness 25
Alarm Setup
Buzzer 1 sec.
Contrast 25
E-MAIL Setup
E-MAIL Off
Camera
Color
Setup
Saturation 25
System
Maintenance
Maintenance
Schedule Setup
Off
Channel
Status
Off Type Off
Motion
Detection
Sensitivity 5 Protocol Off
Mode Static IP Address 001
Media Port 09000 Baud Rate 9600
Web Port 00080 Tour Time Off
IP Address 192.168.000.100
PTZ
Tilt Opposite Off
NetMask 255.255.255.0
Gateway 192.168.000.001
Network
Setup
DNS 168.095.001.001
DDNS
Setup
DDNS Off
Page 37
34
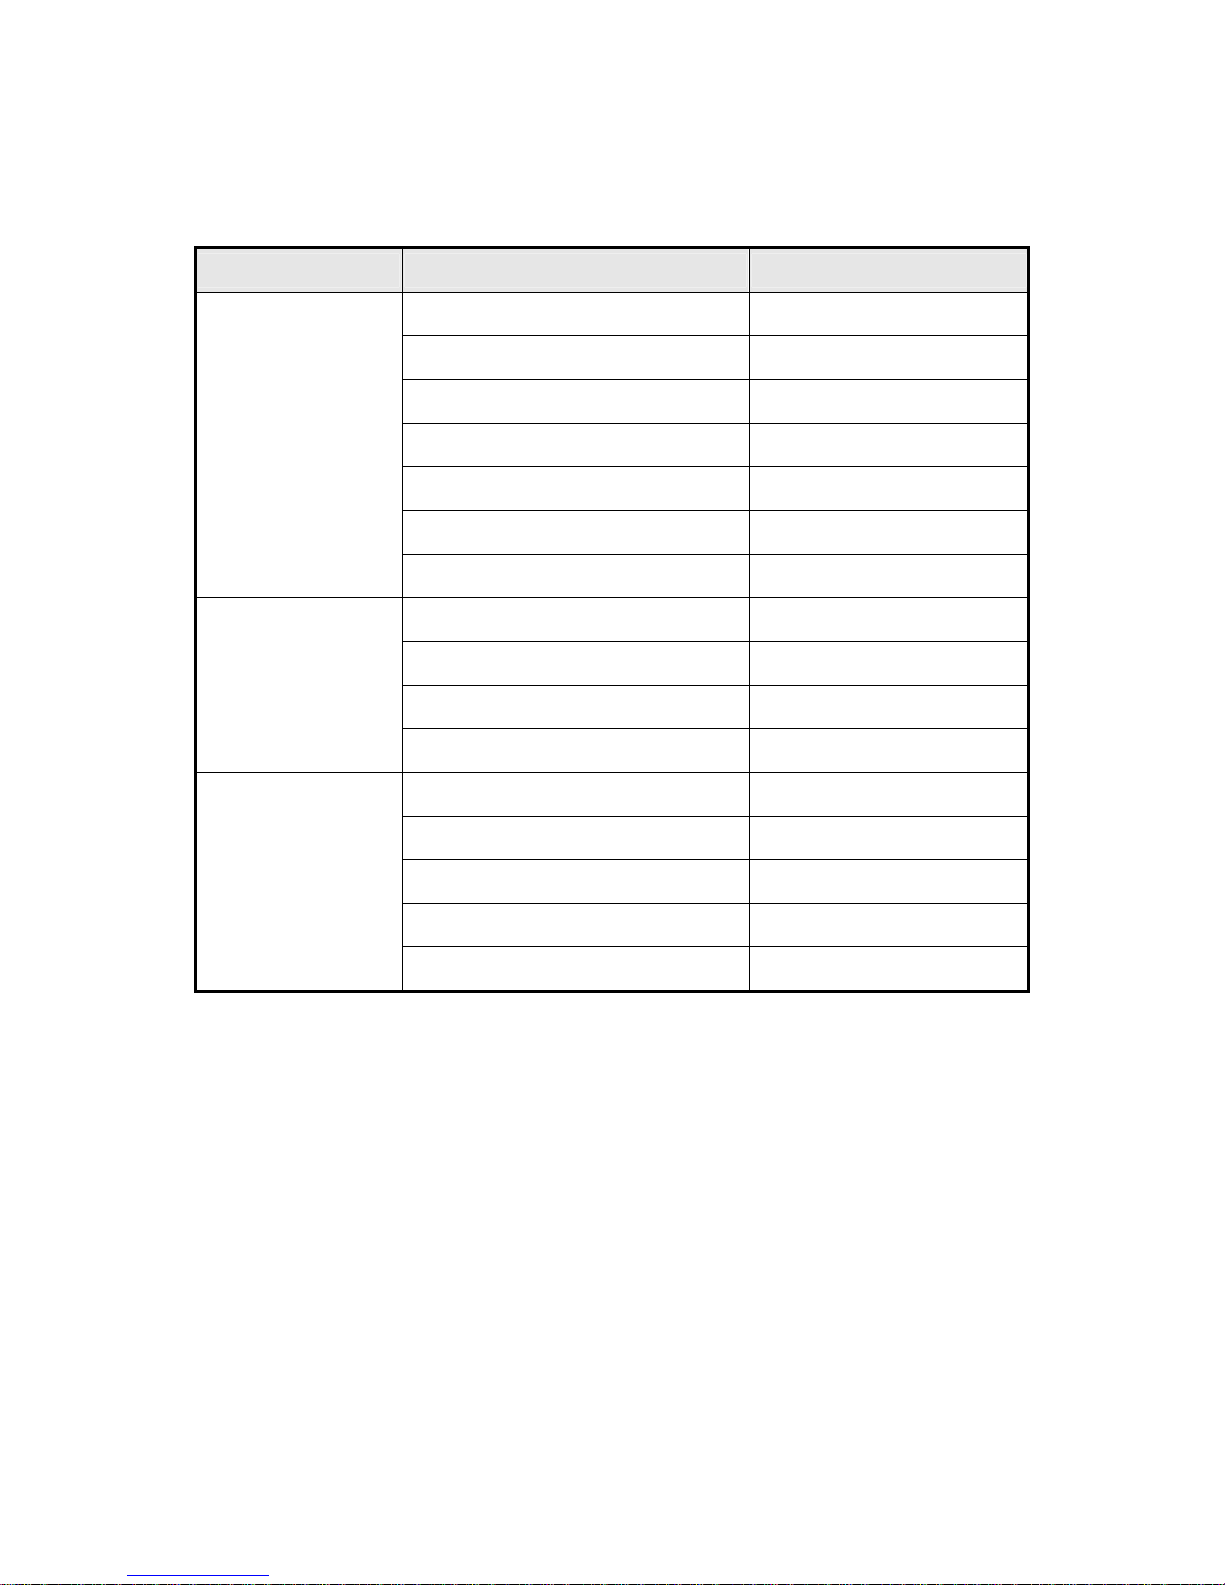
13. HDD Support List
Suggest to install the Hard Driver listed below to make sure the compatibility.
Brand Model Number Capacity
ST3250310CS 250G
ST3320410SV 320G
ST3500312CS 500G
ST3750528AS 750G
ST31000424CS 1T
ST31500541AS 1.5T
SEAGATE
ST32000542AS 2T
HCT721025SLA380 250G
HCT721032SLA380 320G
HCP725050GLA380 500G
HITACHI
HCT721010SLA360 1T
WD3200AVVS 320G
WD3200AAKS 320G
WD5000AVVS 500G
WD10EVVS 1T
WD
WD2001FASS 2T
Page 38
35
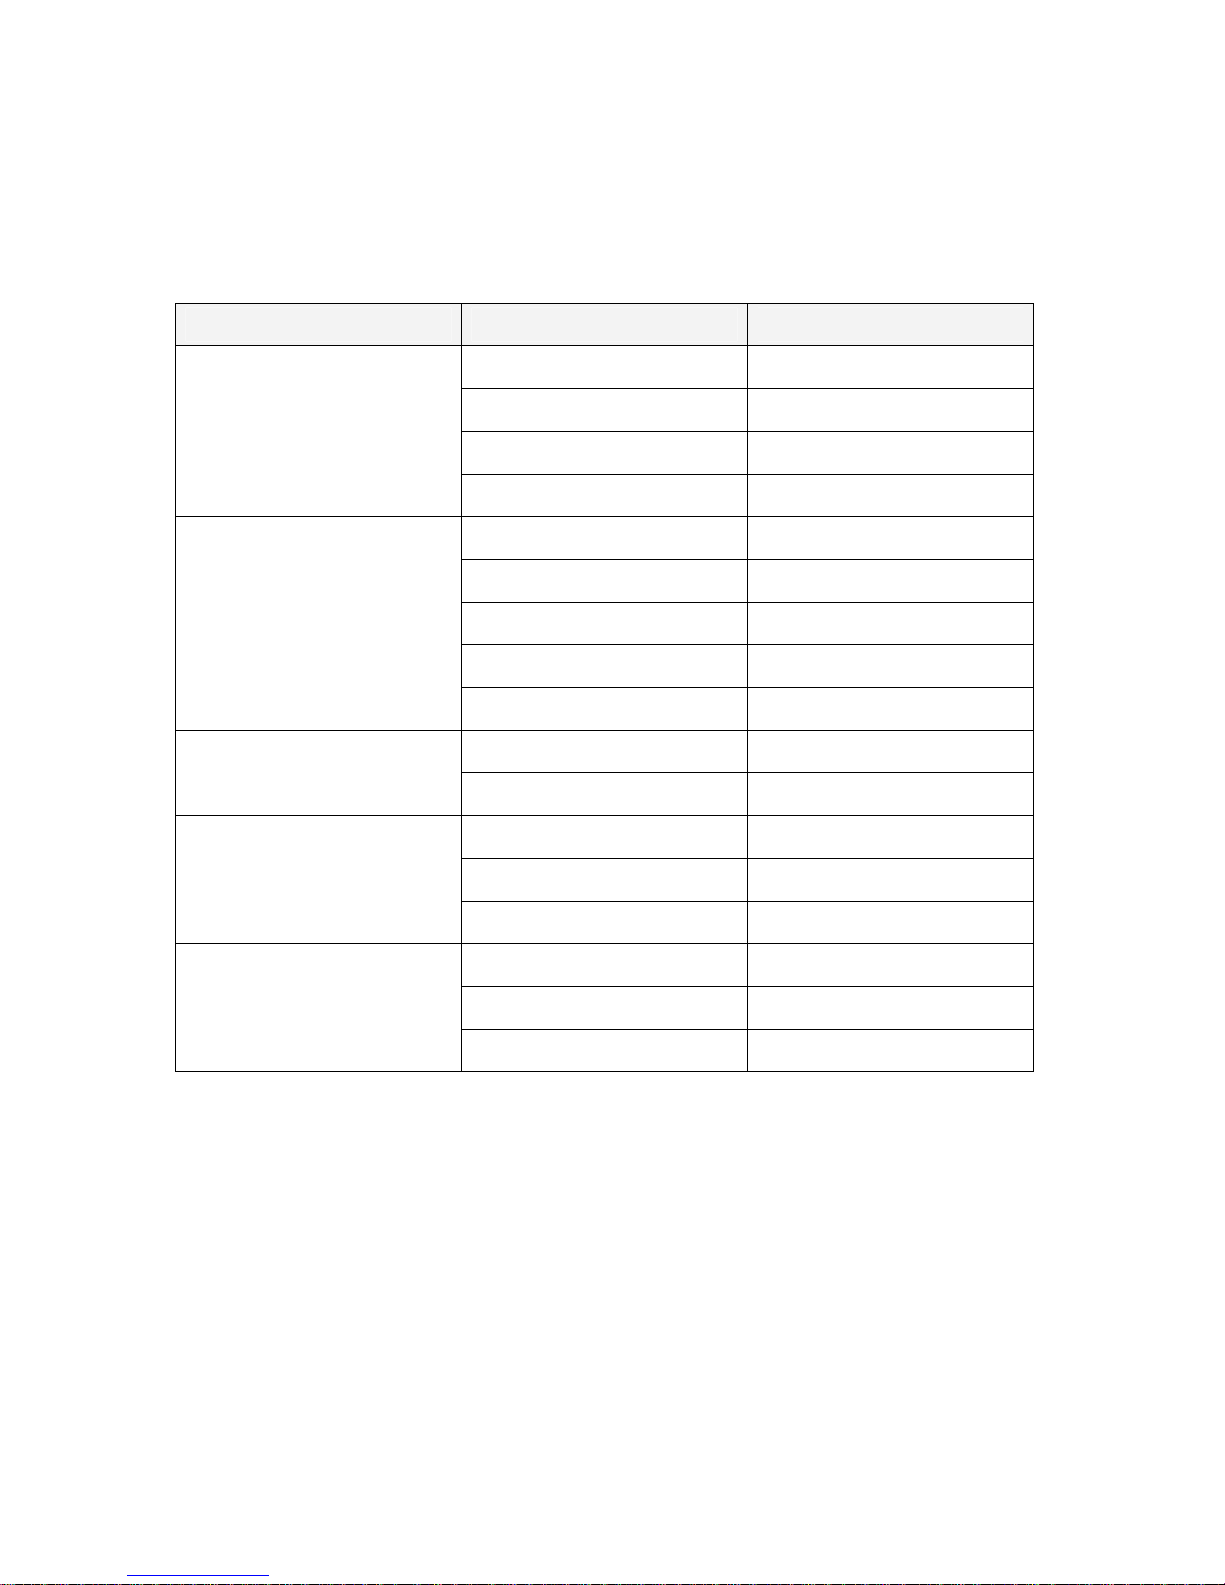
14. USB Flash Memory Stick Support List
The following recommended flash drives have passed all testing procedures and are
safe to a:backup, b:Playback by PC, and c:update firmware.
Brand Model Number Capacity
Jetflash V20 4G
Jetflash V20 8G
Jetflash V30 16G
Transcend
Jetflash V20 32G
PD1 1G
PD1 4G
PD1 8G
C801 16G
Adata
C801 32G
Microvault 8G
SONY
Microvault 16G
Cruzer Micro 4G
Cruzer Micro 8G
SanDisk
Cruzer Micro 16G
DTIG2 4G
DTIG2 8G
Kingston
DTIG2 16G
 Loading...