

Page 1
Page 2

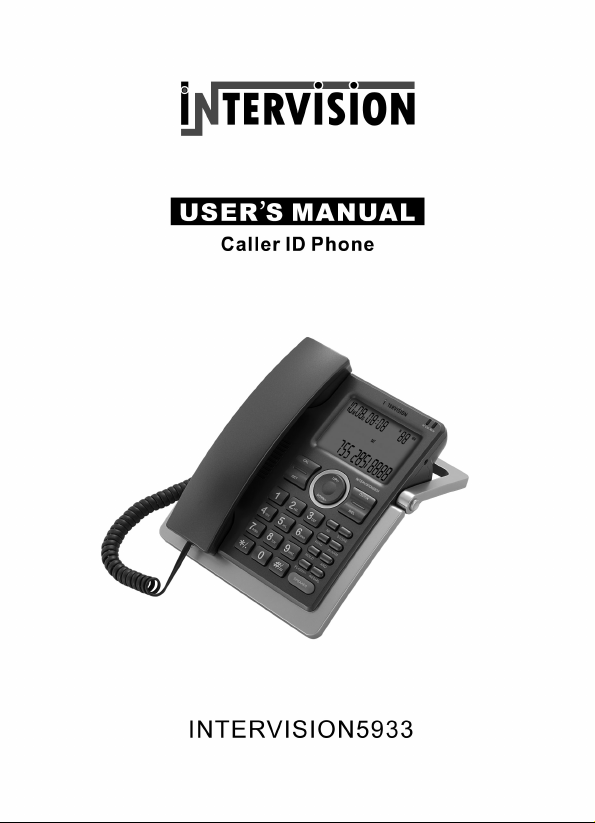
TELEFON INTERVISION 5933ID
Va multumim pentru achizitionarea telefonului INTERVISION 5933ID.Prezentul manual
este conceput pentru a va familiariza cu acest telefon si va sfatuim sa-l cititi cu atentie
inainte de a utiliza aparatul.
Masuri de precautie inainte de folos i rea aparatului
1. Cititi si urmariti instructiunile cu atentie.
2. Scoateti aparatul din priza inainte de a-l curata. Nu folositi lichide pentru a-l curata.
Folositi o carpa uscata pentru curatire.
3. Nu amplasati aparatul pe suprafete instabile. Aparatul ar putea cadea si s-ar putea strica.
4. Nu supraincarcati priza si cordoanele de legatura deoarece ar putea cauza un incendiu
sau socuri electrice.
5. Nu amplasati obiecte straine pe aparat deoarece ar putea scurtcircuita aparatul si
produce un incendiu. Evitati scurgerea oricarui fel de lichid pe aparat.
6. Evitati mutarea sau deconectarea apa ratului pe timp de furtuna deoarece exista r is c u l
unor socuri electrice de la tunete sau fulgere.
7. Numai persoanele autorizate p ot u mbla in interiorul aparatului pentru a-l repa ra . Daca
apare vreo defectiune contactati cel mai apropiat service autorizat pentru a evita pierde rea
garantiei.
Caracteristici
Compatibil FSK/DTMF/ETSI cu autodetectie
Ecran LCD 16 digiti cu calendar
99 de numere primite, 18 formate in m emorie
Doua numere memorie directa prin apasarea unei singure taste si 10 memorii prin
apasarea a doua taste
Posibilitatea de selectare a 16 modele de sonerii
3 tipuri de melodii pentru a pel in asteptare
Functie de nu deranjati
Functie de transfer intre 2 telefoane paralele (intre 2 modele asemana t oa re)
Parola pentru functia de nu deranjati pentru a evita pierderea unor telefoane importante
Functie de preformare si editare
Reformare a numarului si formare automata
3 pasi pentru blocare si 5 setari pentru ceasul alarma
16 nivele ale contrastului ecranului LCD
Setarea codului PABX
Mod de formare compatibil cu Ton/Pulse
3 niveluri de volum pentru maini libere
8 nivele de volum pent ru sonerie
Calculator si functie de taste t on
Indicator LED pentru convorbire in derulare sau pentru un apel nou de primit
Protectie impotriva tunetelor
Functie hands free si microfon
Iluminare a aparatului
1
Page 3
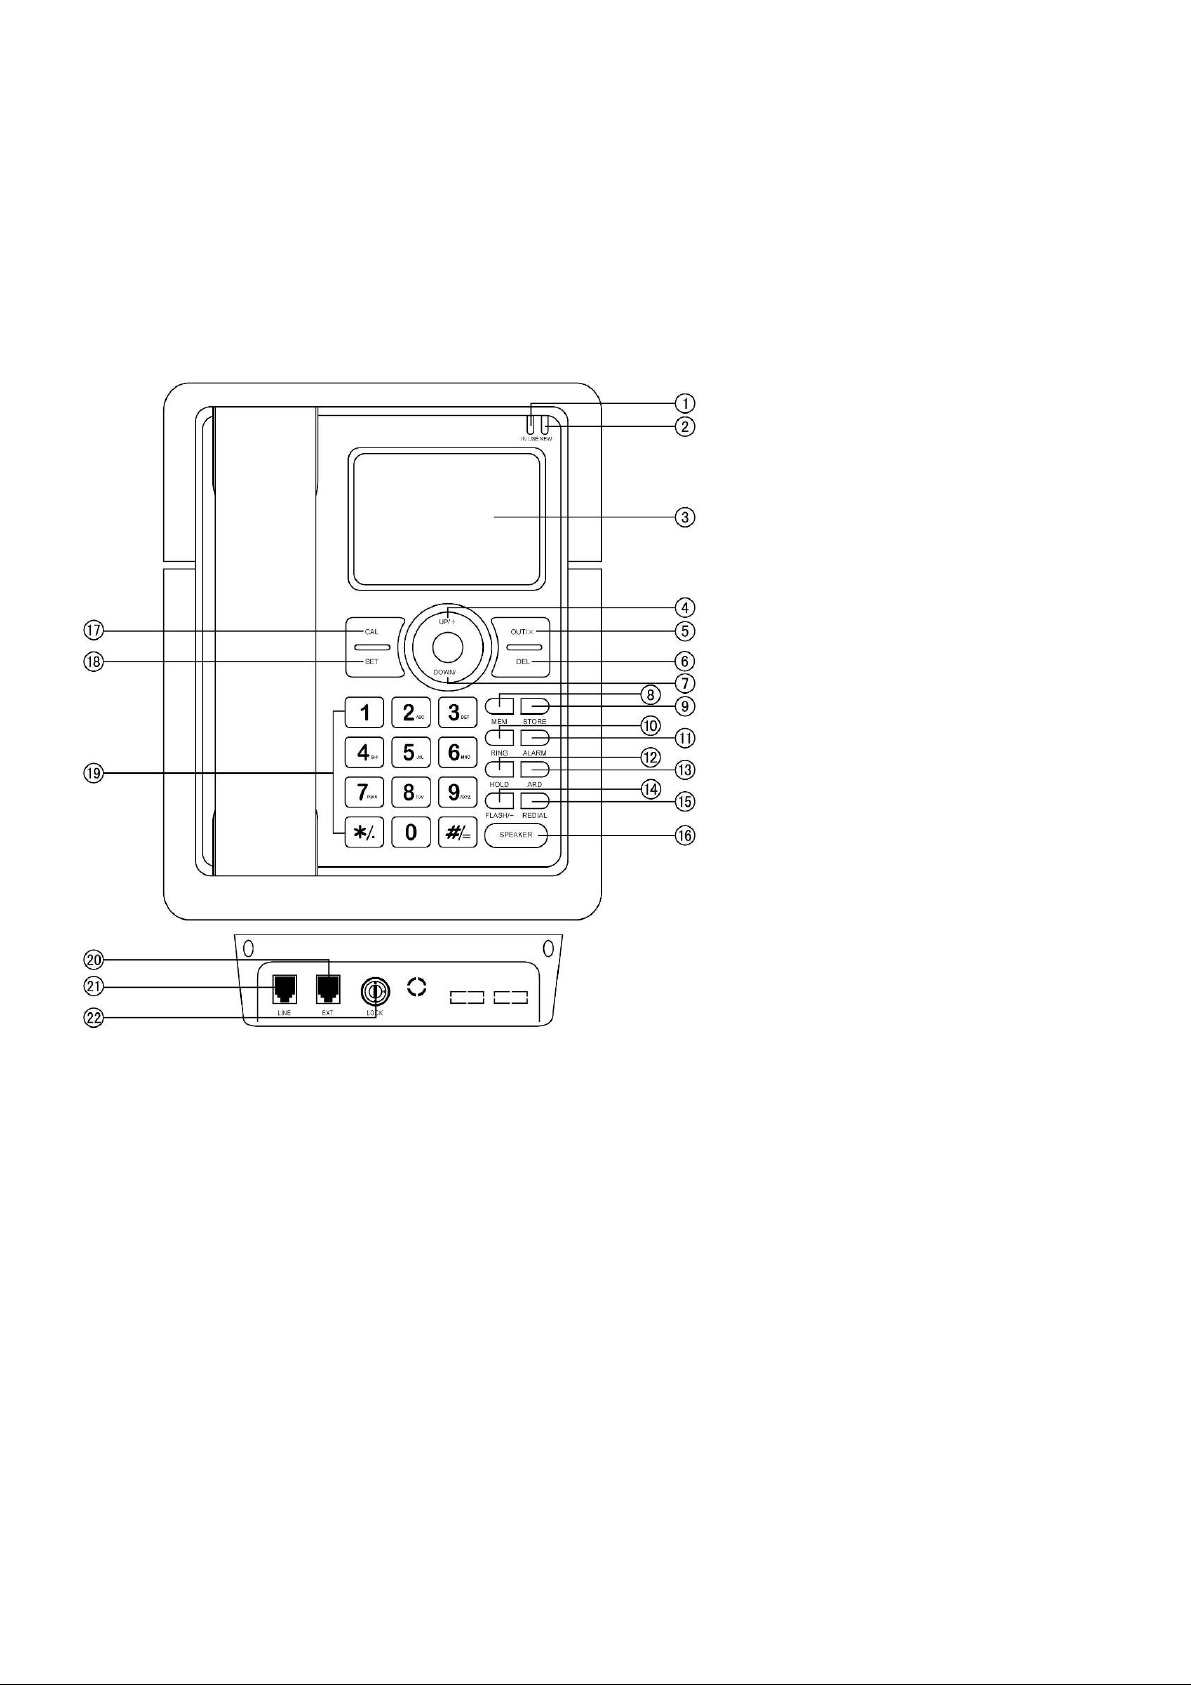
Schema aparatului
1- In Use (in desfasurare, folosinta)
2- NEW (nou)
3- LCD (ecranul LCD)
4- SUS/+
5- OUT/X
6- DEL (stergere)
7- JOS/ 8- MEM (memorie)
9- STORE (stocare)
10- RING (sonerie)
11- ALARM(alarma)
12- HOLD (asteptare)
13- ARD
14- FLASH/ ÷
15- REDIAL (formarea a
ultimului numar format)
16- SPEAKER (difuzor)
17- CAL
18- SET (setare)
19- Tastele numerice
20- EXT (iesire)
21- LINE (linie)
22- LOCK (blocare)
Pornirea aparatului
1.Aparatul necesita trei baterii de 1.5 V format AA. Deschideti compartimentul bateriilor,
introduceti bateriile corespunzator polaritatii, dupa care inchideti trapa. Dupa aceasta
ecranul LCD se va aprinde daca ati introdus bateriile corect.Va recomandam sa folositi
baterii alkaline.
2. Introduceti cablul telefonic in mufa corespunzatoare din aparat si celalalt capat al
firului in priza telefonica.
3. Conectati receptorul la aparat folosind cablu l spiralat.
4. Setati modul de formare ton/ puls in concordanta cu setarea fur nizorului dumneavoastra
de telefonie.
5. Cereti activarea serviciului de identificare a apelantului de de la compania dvs. de
telefonie.
2
Page 4

Primirea unui telefon
1. Cand primiti un telefon, se aude soneria, iar ecranul LCD afiseaza numarul care va
apeleaza, data, ora si imaginea NEW (nou). Indicatorul LED NEW va clipi cand apelul
este pierdut.
2. Daca acelasi apelant va va suna din nou, iar apelul anterior nu a fost vazut, ecranul va
afisa imaginea REP. Cand memoria telefoane lor primite este plina, ultimul numar
inlocuieste cel mai vechi din memorie.
NOTA:Pentru ca telefonul dvs sa va afiseze numarul apelantului trebuie sa
contactati mai intai compania dvs de telefonie pentru a va activa serviciul respectiv!
Folosind receptorul
1. Ridicati receptorul si vorbiti cu cealalta persoana.
2. Cand convorbirea s-a terminat asezati receptorul pe aparat, in pozitia lui normala.
Transferul pe difuzor
1. Cand folositi receptorul, apasati tasta SPEAKER si puneti receptorul pe aparat.
2. Cand s-a terminat convorbirea , apasati tasta SPEAKER din nou.
Folosind difuzorul
1. Cand telefonul suna, apasati tasta SPEAKER si vorbiti. Pe ntru ca interlocutorul sa va
auda clar vocea, vorbiti in difuzor de la o distanta de 32 de cm sau mai putin.
2. Cand ati terminat apasa ti ta sta SPEAKER din nou.
Formarea unui numar de telefon
1. Ridicati receptorul.
2. Cand auziti tonul, formati numarul dorit.
3. Aparatul va incepe sa cronometreze convorbirea dupa 6 secunde.
4. Cand ati terminat, asezati receptorul in pozitia initiala.
Folosind difuzorul
1. Apasati tasta SPEAKER
2. Cand auziti tonul, formati numarul dorit.
3. Aparatul va incepe sa cronometreze convorbirea dupa 6 secunde.
4. Cand ati terminat apasati tasta SPEAKER in nou.
Functiile de pretastare
1. Cand receptorul este in furc a, formati numarul dorit.
2. Daca gresiti, apasati DEL pentru a corecta.
3. Apasati tasta SPEAKER sau ridicati receptorul si numarul va fi format automat.
Reformare
1. Ridicati receptorul si apasati tasta SPEAKER
2. Apasati REDIAL si ultimul numar format de dvs. va fi format din nou.
Autoreformare a ultimului numar format
1. Apasati tasta SPEAKER, formati numarul, daca auziti ton de ocupat.
2. Apasati ARD si ultimul numar format va fi automat format la fiecare 9-10 secunde
pana va prinde legatura.
3. Telefonul va forma acelasi numar timp de 32 de ori.
Cand primiti un telefon in timp ce fol ositi autoreformarea, ridicati receptorul si a pasati
tasta SPEAKER pentru a raspunde. Functia de a ut ore fo rmare va fi dezactivata.
3
Page 5

Vizualizarea primirii telefoanelor, raspunderea la acestea si stergerea apelurilor
primite
Vizualizarea
In modul normal al telefonului, apasati SUS+/JOS- pentru a vizualiza numerele apelurilor
primite sau pierdute
Stergerea
Cand numarul dorit pentru a fi sters este selectat, apasati DEL si acesta va fi sters. Daca
tineti apasat pe DEL timp de 3 sec toate numerele vor fi sterse.
Raspunsul la apelurile primite/pierdute
1. Selectati numarul dorit, apasati tasta SPEAKER sau ridicati receptorul si numarul este
format sau
2. Apasati REDIAL, ecranul LCD va afisa PICK UP (ridicat).
3. Apasati tasta SPEAKER sau ridicati receptorul, numarul este format.
Nota: Daca codul PABX este setat, telefon ul va detecta si va adauga codul inaintea
numarului automat cand mai formati numarul inapoi. Va tasta codul PABX mai intai si
dupa o pauza de 2 sec va tasta num a r ul.
Noi telefoane primite si sonerie pe ecranul LCD
Indicatorul de nou si de sonerie clipeste acelasi beculet, iar cand un nou numar nu a fost
vizualizat, beculetul clipeste la un interval de 4 sec.
Prevenirea mesajului FSK pentru a a utoajusta timpul real
Cand primiti un mesaj FSK, aparatul va ajusta timpul real automat.Puteti anula aceasta
dupa cum urmeaza:
1. In modul normal al aparatului, apasati si tineti ALARM pentru 3 sec, ecranul LCD va
afisa DATE OFF.
2. Apasati ALARM din nou, ecranul LCD va afisa DATE ON.
3. Apasati SET pentru a iesi.
Nota: DATE OFF nu permit e auto ajustarea timpului real
Vizualizarea apelurilor formate, raspunsul si stergerea acestora
Vizualizarea
In modul normal, apasati OUT/X, dupa care repetati OUT/X pentru a vizualiza numerele
formate unul cate unul.
Raspunsul
1. In modul normal (receptorul in furca), apasati OUT/X pentru a revedea numarul dorit,
dupa care apasati tasta SPEAKER sau ridicati receptorul, numarul este format sau
2. Apasati REDIAL, ecranul LCD va afisa PICK UP (ridicat), apasati tasta SPEAKER
pentru a ridica receptorul, numarul este format.
Stergerea
1. In modul normal, apasati OUT/X pentru a select a numarul dorit.
2. Apasati DEL si numarul selectat este sters sau
3. Apasati si tineti DEL pentru 3 sec. Toate numerele vor fi sterse.
Setarea meniului
Setarea datei si a orei
1. In modul normal apasati tasta SET si itemul pentru an va clipi.
4
Page 6

2. Apasati SUS/+ sau JOS/- pentru a edita anul.
3. Apasati SET pentru a confirma si pentru a introduce luna.
4. Repetati pasii setarii anului si pentru luna.
5. Repetati de asemenea si pentru setarea zilei si a orei.
Setarea prefixului
1. Dupa setarea date i si a orei, apasati SET. Ecranul LCD va afisa CODE 0---- si 0 cod ul
de zona va clipi.
2. Apasati SUS/+ sau JOS/- pentru a edita codul de la 0 la 9
3. Apasati SET pentru a confirma si introduceti noua cifra care va clipi
4. Repetati pasii de mai sus pentru setarea intregului cod
Ajustarea contrastului ecranului LCD
1. Dupa setarea prefixului, apasati SET si ecranul va afisa LCD 08
2. Apasati SUS/+ sau JOS/- pentru a ajusta contrastul ecranului LCD, in total sunt 16
nivele de contraste
3. Apasati SET pentru a confirma si pentru a iesi.
In modul normal mai puteti apasa FLASH/ ÷ pentru a introduce setarea contrastului LCD
direct, dupa care apasati FLASH/ ÷ repetat pentru a ajusta contrastul
Setarea ceasului alarma
1. In modul normal, apasati ALARM o da ta, ecranul va afisa 12-00 AL 1.
2. Apasati SUS/+ sau JOS/- pentru a selecta ON sau OFF. Ecranul va afisa ALM cand
alarma este setata la ON (activa).
3. Apasati SET, valoarea 12 va incepe sa clipeasca.
4. Apasati SUS/+ sau JOS/- pentru a seta ora alarmei si apasati SET pentru a confirma si
introduce setarea minutelor
5. Apasati SUS/+ sau JOS/- pentru a edita minutele alarmei si apasati SET pentru a
confirma si a merge la urmatorul grup de setare a alarmei.
6. Repetati pasii de mai sus pentru a seta alarmele aditionale.
Nota: Primele 3 grupuri de a l arme vor fi repetate periodic in fieca re z i in timp ce ultimele
2 o singura data
Setarea codului secret si functiei de indepartare monitorului
Setarea
1. In modul normal, apasati si tineti RING pentru 3 secunde, ecra nul va afisa Pin ----
2. Introduceti un cod de 4 cifre folosin d t astele numerice.
3. Apasati DEL pentru a edita codul secret, dupa care apasati SET pentru a confirma.
4. Cand ultima cifra a codului secret este #/=, telefonul va activa functia de remote
monitor.
5. Setati soneria la OFF.
Utilizarea
1. Codul secret. Cand suna cineva , va auzi sunetul obisnuit al soneriei de 3 sau 4 ori.
Totusi telefonul nu va suna. Cel care apeleaza va auzi un scurt sunet “di”, ceea ce
inseamna ca trebuie sa tasteze codul secret. Din moment ce formeaza codul secret,
telefonul va incepe sa sune. Apasati tasta SPEAKER sau ridicati receptorul pentru a vorbi.
5
Page 7

2. Remote monitor: Daca ultima cifra a codului este #/=, dupa ce cel care apeleaza
formeaza corect codul, telefonul va intra in modul maini libere automat.
3. Daca testeaza gresit codul, va tr e b ui sa sune din nou si sa tasteze codul secret.
Nota: Aceasta functie este potrivita cand soneria este dezactivata. Cel care suna trebuie sa
cunoasca codul secret pentru a intra in legatura.
Transferul intre telefoane par alele
Setarea numarului
1. In modul normal, apasati si tineti SET, ecranul LCD va afisa EL--
2. Tastati “*” si numarul extensiei(de exemplu “1” si “2”, folosind tasta DEL pentru a
edita.
3. Apasati SET pentru a confirma si pentru a iesi.
Transferul liniei de la telefoane paralele
Cand se primeste un telefon, folositi unul dintre telefoanele conectate in paralel pentru a
raspunde. Apasati “*” si numarul extensiei care a fost setata pentru alt telefon, aparatul va
suna, ridicati receptorul si apasati tasta SPEAKER pentru a raspunde la telefon.
Nota:Folositi acela s i m odel de telefon pentru a putea efectua transferal.Aceasta fu nc tie
este oferita de compania de telefonie si poate sa nu functioneaza corespunzator.Pentru a
obtine cel mai bun rezultat verificati ca bateriile sa fie incarcate.
Functia de formare antifurt
1. In modul normal, apasati si tineti #/= pentru 3 secunde,ecran ul LCD va afisa SPI ON.
2. Apasati tasta SPEAKER de doua ori dupa care
3. Apasati si tineti #/= pentru 3 sec din nou, ecranul va afisa SPI OFF
Cand functia antifurt este activa, cine doreste sa formeze va auzi DI-DI, DI-DI continuu
si nu va putea forma numar ul.
Nota: Daca numarul paginei este setat aceasta functie va fi inactiva.
Setarea soneriei si ajustarea volumui
Exista 16 tipuri de sonerie si functia de dezactivare care pot fi setate.
1. In modul normal, apasati RING, ecranul LCD va afisa ring 02 db8
2. Apasati RING pentru a selecta soneria dorita sau pentru a o dezactiva.
3. Apasati SUS/+ sau JOS/- pentru a seta volumul.
4. Apasati SET pentru a confirma si pentru a iesi.
Nota: Volumul este de la 1db la 8db. Daca este inactiva soneria, modul va fi nu deranjati.
Daca telefonul este setat la acest nivel, telefonul nu va suna cand apeleaza cineva.
Ajustarea volumului pentru maini libere
In modul maini libere, apasat i SUS /+ sau JOS/- pentru a ajusta volumul, ec ranul LCD va
afisa nivelul volumului, in total fiind 3 niveluri.
Selectarea modului de formare pulse sau ton
1. In modul normal, apasati si tinet i ta sta * / . pe ntru 3 sec, ecranul LCD va afisa P, dupa
care modul de formare este setat la pulse.
6
Page 8

2. Apasati tasta SPEAKER de doua ori si tineti */. pentru 3 sec din nou, ecranul LCD va
afisa T dupa care modul de formare este setat pe ton.
Setarea codului PABX
1. In modul normal, apasati si tineti DEL pentru 3 secunde pentru a seta codul PABX,
ecranul va afisa SET PCODE- si “-“ va clipi.
2. Apasati SUS/+ sau JOS/- pentru a seta codul PABX de la 0 la 9.
3. Daca alegeti “-“ inseamna ca nici un cod nu a fost setat.
4. Apasati SET pentru a confirma si pentru a iesi.
Muzica apelului in asteptare
Selectarea muzicii; exista 3 tipuri de melodii
1. Cand receptorul este scos din furc a sau in modul maini libere, apasati HOLD.
2. Apasati OUT/X pentru a selecta melodia dorita. Va incepe imediat melodia sa fie
redata.
3. Apasati HOLD pentru a iesi.
Cand este activ modul maini libere, apasati HOLD pentru a introduce apel in asteptare si
melodia incepe sa fie redata.
In modul apel in asteptare
1. Apasati HOLD pentru a dezactiva apel in a s teptare si pentru a relua convorbirea sa u
2. Ridicati receptorul.
Cand vorbiti pe modul maini libere, apasati HOLD pentru a activa modul apel in
asteptare si melodia incepe sa fie redata. In modul asteptare
1. Ridicati receptor ul pe ntru a vorbi sau
2. Apasati tasta SPEAKER pentru iesi di n ac est mod si pentru a vorbi pe modul maini
libere.
Apelarea numerelor dintr-o singura atingere
Memorarea numarului
1. Formati numarul pe care doriti sa-l apelati sau verificati la numerele formate sau
primite pe cele care doriti sa le memorati.
2. Apasati tasta STORE
3. Apasati tasta MEM
Apelarea numarului memorat
Cand receptorul este in furca sau nu, apasati tasta MEM pentru a forma nu marul me morat .
Memorarea numerelor din doua atingeri
1. Formati numarul pe care doriti sa-l apelati sau verificati la numerele formate sau
primite pe cele care doriti sa le memorati.
2. Apasati tasta STORE.
3. Apasati una din taste pentru a memora numarul (0-9)
Apelarea numarului memorat
Cand receptorul este in furca sau nu, apasati tasta STORE si tasta corespunzatoare de la
0 la 9 pentru a forma numarul memorat
7
Page 9

Detectarea bateriilor consumate
Cand voltajul este mai scazut de 3.9v, ecranul va afisa “” pentru a va atrage atentia ca
trebuie sa inlocuiti bateriile.
Functia FLASH
Cand numarul la care ati format este ocupat, apasati FLASH/ ÷ dupa care apasati
REDIAL pentru a forma din nou.
Blocarea
Intoarceti cheia in dreptul punctului galben, toate numerele sunt blocate cu exceptia
numerelor de urgenta 119,120,122,110.
Intoarceti cheia la punctul verde si toate numerele ince pand c u 0 sunt bloca te.
Intoarceti cheia la punctul rosu si toate numerele pot fi formate.
Tastele pentru ton
1. In modul normal, apasati si tineti CAL pentru 3 secunde, tastele de ton su nt active cand
auziti sunetul di.
2. Apasati si tineti CAL pentru 3 secunde din nou, tastele de ton sunt inactive cand auziti
sunetul di.
Calculator
In modul normal, apasati tasta CAL si ecranul LCD va afisa 0-, aparatul fiind acum
calculator.
Acesta are operatiile +,-, x, ÷; in acest mod ,#/= sunt folosite ca = si tastele */. ca . ,
OUT/X si FLASH/ ÷ sunt folosit ca x si ÷. SUS/+ si JOS/- sunt folosite ca + si -.
1. In modul normal apasati CAL .
2. Apasati tastele (1,0,+,2,2,6), ÷,2, #/=.
3. Dupa ce ati calculat, apasati SET pentru a iesi.
Nota: Scoateti din priza telefonul cand instalati/scoateti bateriile.
Disfunctional itati
Fara voce
Verificati daca receptorul este in furca si daca telefonul este conectat la linia telefonica.
Numai primire
Verificati daca modul P/T este setat corect. Verificati daca aparatul este blocat (folositi
tastele de deblocare pentru a dezactiva).
Baterii uzate sau nepotrivite
Indepartati bateriile uzate sau nepotrivite, inlocuindu-le cu unele noi, de preferinta
alkaline.Eliminati de urgenta bateriile din care se scurge lichid si curatati.
Zgomot
Verificati daca este afectat circuitul (schimbati-l)
Verificati daca cablul de legatura este uzat sau ud (schimbati conectorul)
Suna o data dupa care se deconecteaza cand primiti un telefon. Formarea
numerelor este valabila
Verificati daca sunt prea multe extensii sunt folosite impreuna sau calitatea extensiilor
nu este suficient de buna (schimbati extensiile neco respunzatoare)
8
Page 10

Verificati daca conectorul este intr-un mediu prafuit sau umed.
LCD devine inactiv
Verificati daca contrastul ecranului LCD este setat corect sau daca bateriile sunt slabe
(ajustati contrastul ecranului, daca ramane la fel, schimbati bateriile)
Nu suna
Verificati daca soneria este inactiva, resetati-o.
Majoritatea functiilor nu merg
Verificati daca bateriile sunt suficient de puternice (schimbati bateriile). Daca bateriile
sunt bune , scoateti bateriile si cablurile si reinstalati dupa 10 min.
9
Page 11

INTRODUCTION
Thank you for purchasing our newest Caller ID phone. This manual is designed to familiarize you
with this phone. To get the maximum use from your new phone, we suggest that you read this
instruction manual carefully before using.
SAFETY INSTRUCTION
When using your telephone equipment, the following basic safety precautions should always be
followed to reduce the risk of fire, electric shock and injury to persons:
1. Read, understand and follow all warnings and instructions
2. Unplug the product from the wall outlet before cleaning. Do not use liquid cleaners or aerosol
cleaners. Use a soft damp cloth for cleaning.
3. Do not place this product on unstable surfaces. The product may drop, causing serious
damage to the product.
4. Do not overload wall outlets and extension cords as this can result in fire or electric shock.
5. Never push foreign objects of any kind into this product through cabinet slots as they may
affect dangerous voltage points or short circuit parts that could result in fire or electric shock.
Never spill liquid of any kind on the product.
6. Avoid moving or disconnecting this unit during a heavy storm, as there may be a remote risk of
electric shock from lightning and thunder.
7. Unauthorized persons cannot open or service even if there is a defect with the unit. This will
void the warranty, please send to service center for any defects.
FEATURES
¾ FSK/DTMF/ETSI compatible with auto-detection
¾ 12-digit LCD display with calendar
¾ 99 incoming, 18 outgoing number memories
¾ 1 one-touch memory and 10 two-touch memories
¾ 16 kinds of ringing tones for selection
¾ 3 kinds of hold on music selection
¾ Do Not Disturb function
¾ Transfer function between parallel phones (using 2 similar models)
¾ Secret code function in Do Not Disturb state to avoid missing VIP calls
¾ Pre-dial and edit function
¾ Redial and auto-redial function
¾ 3-step lock function and 5 sets of alarm clock
¾ 16 levels of LCD contrast
¾ Set PABX code
¾ Pulse/Tone dialing mode compatible
¾ 3 levels of hands free volume for selection
¾ Ring volume 8 steps for selection
¾ Calculator function and key tone function
10
Page 12
¾ In use and new call LED indicator
¾ Backlight function
¾ Thunder-proof and protection from steal operation
¾ Hands free dialing and speaking function
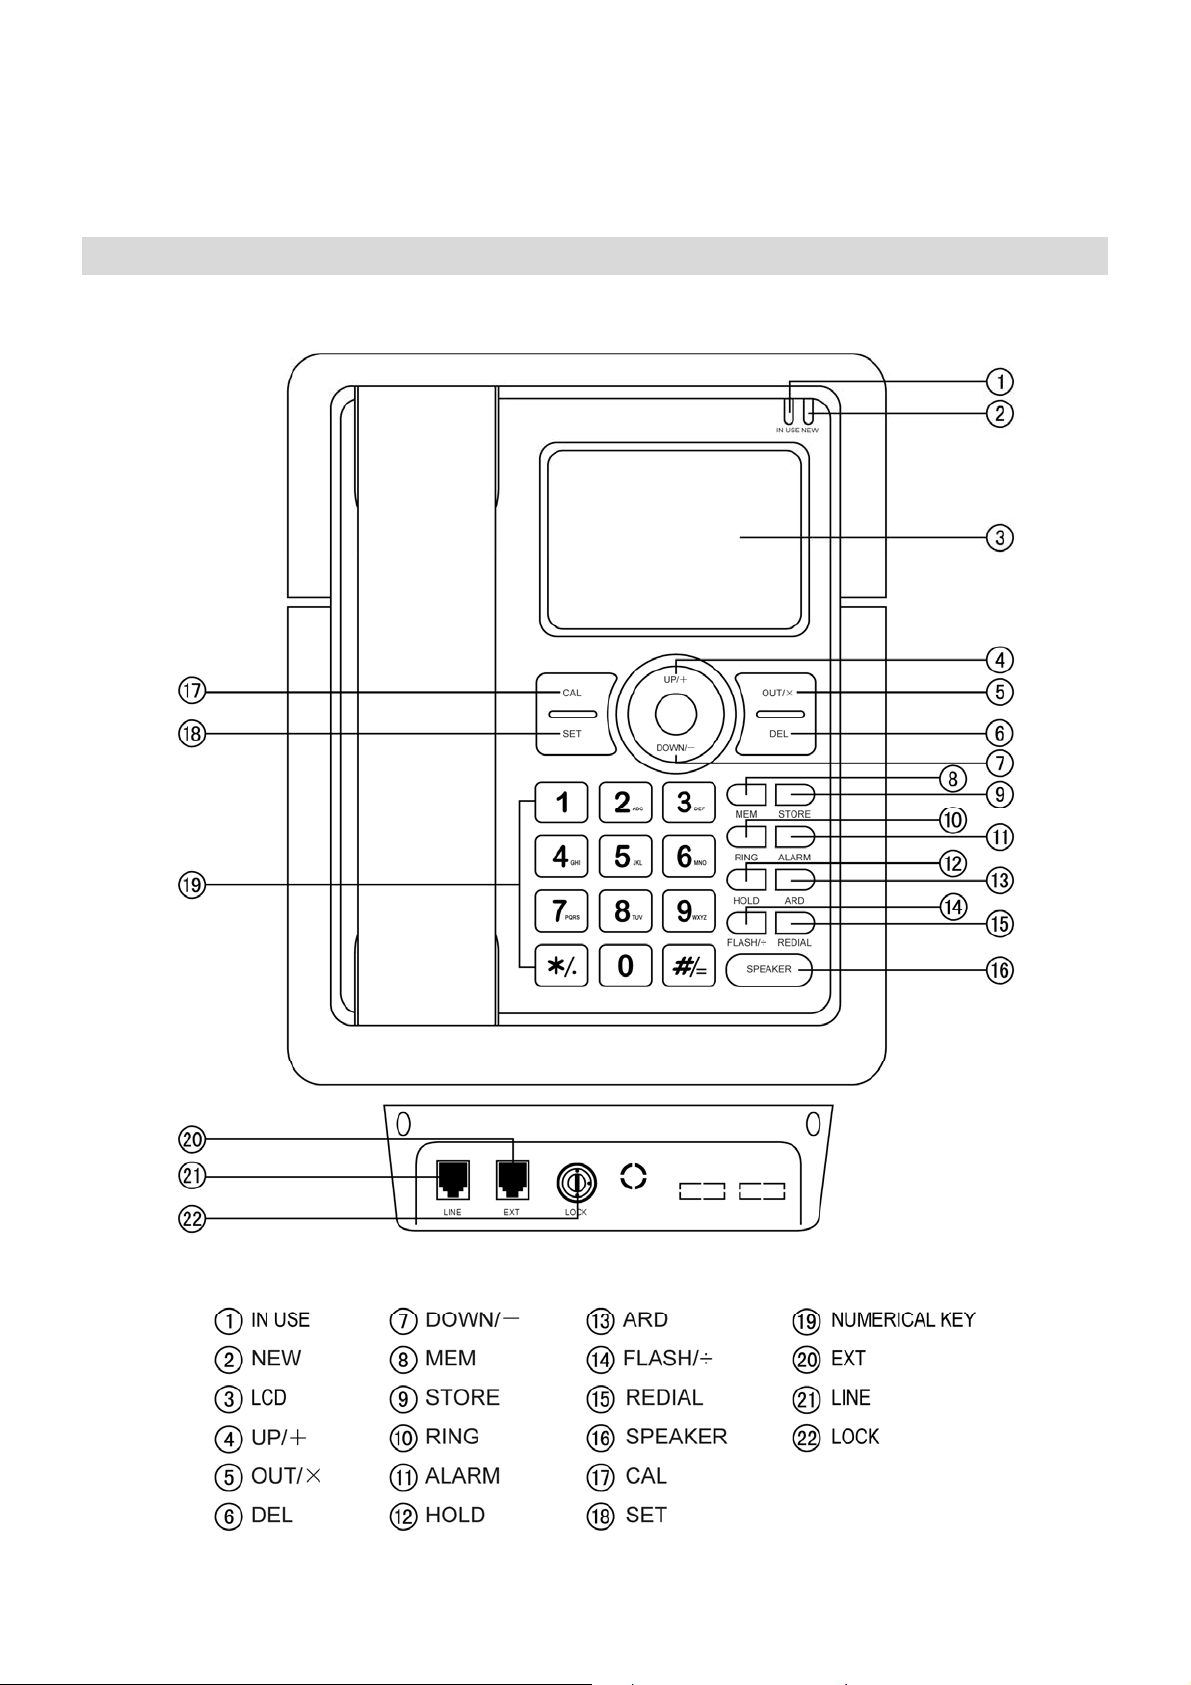
LOCATION DESCRIPTION
11
Page 13

GETTING STARTED
1. The unit requires 3 X 1.5V AA batteries. Open the battery compartment cover and insert the
batteries in the right polarity , then close the cover (Proposal using alkali battery). There should
be time display on the liquid crystal screen after the batteries are inserted.
2. Insert one end of the line cord to the line jack of the base and the other end to the wall outlet of
exchange.
3. Connect the handset and the unit with coiled line.
4. Setting the dialing mode to correct mode according to the directions from your local telecom.
5. Apply for the caller ID from your local telecom office.
RECEIVING A CALL
1. When a call comes, the telephone rings, and LCD displays the seq. number of the call, the
date, time, incoming number and the NEW icon. The NEW LED indicator will flash when
missed called.
2. If the same number is received again, and the previous call has not been reviewed, the LCD
displays REP icon.
When the incoming memory is full, the latest incoming number replaces the oldest number in
the memory
NOTE: For the phone to display incoming number and other information, you must have
an active Caller ID subscription with your local telephone exchange company.
¾ From handset
1. Pick up the handset and talk to the other party.
2. When finished, return the handset to the base.
¾ Switching to speakerphone
1. When using the handset, press SPEAKER key and return the handset to the base.
2. When finished, press SPEAKER key again.
¾ From speakerphone
1. When the telephone rings, press SPEAKER key and talk to the caller. For the other party to
hear your voice clearly, speak into the speaker from a distance of 32cm or less.
2. When finished, press SPEAKER key again.
NOTE:
Generally telecom transmits the incoming message between the first ring and the second ring. So
please answer the phone after the second ring.
MAKING A CALL
¾ From handset
1. Pick up the handset.
2. When you hear the dial tone, dial the desired number.
3. The unit will start to time the conversation after 6 seconds.
4. When finished, return the handset to the base.
12
Page 14

¾ From Speakerphone
1. Press SPEAKER key
2. When you hear the dial tone, dial the desired number.
3. The unit will start to time the conversation after 6 seconds.
4. When finished, press SPEAKER key again.
¾ Pre-dialing function
1. When the handset is on the base, dial the desired number.
2. If there are mistakes, use the DEL key to edit.
3. Press SPEAKER key or pick up the handset and the number will be dialed automatically.
¾ Redial:
1. Pick up the handset or press SPEAKER key,
2. Press REDIAL key, the last dialed number will be dialed again
¾ Auto-redial
1. Press SPEAKER key, dial a number, if you hear an engaged tone.
2. Press ARD key and the last dialed number will be redialed automatically at every 9-10
seconds until the line is through.
3. The phone will redial the same number automatically for 32 times.
When there is an incoming call while using auto-redial, pick up the handset or press SPEAKER
key to answer the call. The auto redial function will be terminated.
REVIEWING, CALLING BACK AND DELETING INCOMING NUMBERS
¾ Review ing
On-hook state. Press UP/+ or DOWN/- key to scroll and review the numbers.
¾ Deleting
When the desired number is shown, press DEL key, the number is deleted.
Press and hold DEL key for 3 seconds; all the incoming numbers are deleted.
¾ Calling back
1. Scroll to the desired number, press SPEAKER key or pick up the handset, and the number is
dialed out, or
2. Press REDIAL key, LCD displays PICK UP,
3. Press SPEAKER key or pick up the handset, the number is dialed out.
NOTE: If the PABX code is set, the telephone will detect and add the code before the number
automatically when dialing back the number. It will dial the PABX code first and then after a 2
second pause and then dial the number.
NEW INCOMING CALL LED AND RINGING LED
New and ring indicator is the same LED, when a new call comes in, the LED is blinking, when a
new number has not been reviewed, the LED is blinking in 4s interval.
PREVENTING FSK MESSAGE TO AUTO-ADJUST REAL TIME
When a FSK message comes, the unit adjusts real time automatically, you can prevent real time
auto adjustment as follows:
13
Page 15

1. In on-hook state, press and hold ALARM key for 3 seconds, LCD displays DATE OFF,
2. Press ALARM key again, LCD displays DATE ON,
3. Press SET key to quit.
NOTE: DATE OFF: Does not allow real time auto adjustment
REVIEWING, CALLING BACK AND DELETING OUTGOING NUMBERS
¾ Review ing
In on-hook state, press OUT/X key, then repeat OUT/X to review outgoing numbers one by one.
¾ Calling back
1. In on-hook state, press OUT/X key to review the desired number, then press SPEAKER key or
pick up the handset, and the number is dialed out, or
2. Press REDIAL key, LCD displays PICK UP, press SPEAKER key or pick up the handset, the
number is dialed out.
¾ Deleting
1. In on-hook state, press OUT/X key to scroll to the desired number.
2. Press DEL key and the number is deleted, or
3. Press and hold DEL key for 3 seconds. All numbers will be deleted.
SETTING MENU
¾ Setting date & time
1. In on-hook state, press SET key, the value for the year flashes.
2. Press UP/+ or DOWN/- key to edit the year.
3. Press SET key to confirm and enter the next value month setting.
4. Repeat the year setting step to set the month.
5. Repeat the above steps for date and time setting.
¾ Setting Local Area Code and Long Distance Code
1. After setting up the date and time, press SET key. LCD displays CODE 0 ----and the long
distance code” 0“ flashes,
2. Press UP/+ or DOWN/- key to edit the flashing code from 0 to 9.
3. Press SET key to confirm and enter the next flashing code setting.
4. Repeat the above steps for the rest code setting.
¾ Adjusting LCD Contrast
1. After setting up the local area code, press SET key, LCD display LCD 08
2. Press UP/+ or DOWN/- key to adjust the LCD contrast, total 16 levels can be selected.
3. Press SET key to confirm and exit.
Alternatively at on-hook state, press FLASH/÷ key to enter LCD contrast setting directly,
then press FLASH/÷ key continuously to adjust the LCD contrast.
¾ Setting Alarm Clock
1. In on-hook state, press ALARM key once, LCD displays 12-00 AL1,
2. Press UP/+ or DOWN/- key to select ON or OFF. LCD displays “ALM” icon when the alarm is
set to ON.
14
Page 16

3. Press SET key, value “12” starts to flash.
4. Press UP/+ or DOWN/- key to set the alarm hour and press SET key to confirm and enter
alarm minute setting.
5. Press UP/+ or DOWN/- key to edit alarm minute and press SET key to confirm and go to next
group alarm clock setting.
6. Repeat the above steps to set additional alarms.
NOTE: The first 3 groups alarm clock will be repeated periodically every day while the last 2
groups alarm clock is effected one time.
SECRET CODE SETTING AND REMOTE MONITOR FUNCTION
¾ Setting
1. In on-hook state, press and hold RING key for 3 seconds, LCD displays Pin ----.
2. Input a 4-digit of PIN using the numeric keys.
3. Press DEL to edit the secret code, press SET to confirm.
4. When the last digit of the secret code is #/=, the telephone will activate remote monitor
function.
5. Set the ringer to OFF. (Please refer to section “SETTING RINGING TONE”).
¾ Usage
1. Secret code: When caller call this telephone, he/she will hear the usual ringing tone (when
the line gets through) three times or four times. However, the telephone unit will not ring. The
caller will hear a short “di” sound, which means that the caller need to key in the secret code.
Once the caller keys in the correct code, the telephone unit will ring. Press SPEAKER key or
pick up the handset to have the conversation with the caller.
2. Remote monitor: If the last digit of the secret code is #/=, after the caller keys in the correct
secret code, the telephone unit will go into hands free mode automatically.
3. If the caller keys in the wrong code, he/she will have to call again and key in the correct secret
code PIN.
NOTE: This function is useful only when the telephone ringer is set to OFF. The caller must know
the secret code in order to dial through the line.
TRANSFER BETWEEN PARALLEL PHONES
¾ Setting paging number
1. In on-hook state, press and hold SET key, LCD displays EL--
2. Key in “*” and the paging number (example “*1”and ”*2” ), using DEL key to edit
3. Press SET key to confirm and exit.
¾ Transferring the line from paralleled phones:
When a call comes, use one of paralleled phone to answer . Press ”*” and the p aging number that
was set in another telephone unit, the unit rings, pick up its handset or press SPEAKER key to
answer the incoming call.
NOTE: Please use same series phones to transfer as above operation. If the paging
number is set, anti-steal dialing function will not work. Any special services starting with
15
Page 17

“ * ” offered by your Telephone company may not function properly.
To get the best effect of this function, you should load the batteries before using.
ANTI-STEAL DIALING FUNCTION
1. In on-hook state, press and hold #/= key for 3 seconds, LCD displays SPI ON
2. Press SPEAKER key twice and then
3. Press and hold #/= key for 3 seconds again, LCD displays SPI OFF,
When the anti-steal is set to ON, users who want to dial using an extension to dial via the same
line will hear a “DI-DI, DI-DI” beep continuously and will not be allowed to make a call.
NOTE: If page number is set this function will not work.
SETTING RINGING TONE AND ADJUST RINGING VOLUME
There are 16 kinds of ringing tones and ringing OFF for selection:
1. In on-hook state, press RING key, LCD displays ring 02 db8
2. Press RING to select the desired ringing or set ring OFF.
3. Press UP/+ or DOWN/- key to set ringing volume-
4. Press SET to confirm and exit.
NOTE: The volume ranges from 1db-8db, with 8db being the loudest. Ring OFF is “Do Not
Disturb” mode. If the phone is set to this mode, the telephone will not ring when there is an
incoming call.
ADJUST HANDSFREE VOLUME
In hands free mode, press UP/+ or DOWN/- to adjust the handsfree volume, LCD displays the
volume level and there are a total of 3 levels.
SELECTING PULSE OR TONE DIALING MODE
1. In on-hook state, press and hold */. key for 3 seconds, LCD displays P, then dialing mode is
set as Pulse.
2. Press SPEAKER key twice and hold */. key for 3 seconds again, LCD displays T then dialing
mode is set as Tone.
SETTING PABX CODE
1. In on-hook state, press and hold DEL key 3 seconds to set PABX code, LCD displays
SET PCODE- and the” -” flashes.
2. Press UP/+ or DOWN/- key to set PABX code from 0 to 9.
3. If choose ” -”, it means no PABX code has been set.
4. Press SET key to confirm and quit.
HOLD ON MUSIC
¾ Hold music selection
There are 3 kinds of hold music for selection
1. At off-hook or hands free state, press HOLD key
2. Press OUT/X key to select the desired hold music. It plays the music at same time.
3. Press HOLD key to quit.
¾ When talking over handset, press HOLD key to enter the hold mode and the hold music
16
Page 18

is sent out. In hold mode
1. Press HOLD key to release hold mode and continue to talk over handset, or
2. Hang up handset, it enters hands-free hold mode.
¾ When talking at hands-free mode, press HOLD key to enter the hold mode and the hold
music is sent out. In hold mode
1. Pick up handset to talk over handset, or
2. Press SPEAKER key to quit hold mode and talk at hands-free mode.
ONE TOUCH MEMORY OPERATION
¾ Store the number in one-touch memory
1. Pre-dial the desired number or checking incoming and outgoing number that you want to
store.
2. Press STORE key
3. Press MEM key
¾ Make a call from one-touch memory
In off-hook or on-hook situations, press MEM key to dial the stored number out.
TWO TOUCH MEMORY OPERATION
¾ Store the number in two-touch memory
1. Pre-dial the desired number or checking incoming and outgoing number that you want to
store.
2. Press STORE key
3. Press one of digit key (0-9)
¾ Make a call from two-touch memory
In off-hook or at hands-free state, press STORE key + digit key (0-9) key, the relevant number will
be dialed out.
LOW BATTERY DETECTION
When the voltage is lower than 3.9v, LCD displays “” icon to remind the user to replace the
batteries.
LCD BACKLIGHT FUNCTION
The backlight is turned on when receiving an incoming call, dialing, pressing any key or in MUSIC
HOLD mode. It will fade off if the telephone is left idle for 10 seconds.
NOTE: If batteries are not loaded, there will be no LCD backlight function.
FLASH FUNCTION
When dialing and the line is engaged, press FLASH/÷ key and then press REDIAL key to dial it
out again.
LOCK
Turn the key to yellow point, all numbers are locked except emergency numbers 119, 120, 122,
110.
Turn the key to green point, all numbers starting with “0” are locked
Turn the key to red point, all numbers are allowed to be dialed out .
17
Page 19

KEY TONE
1. In on-hook state, press and hold CAL key 3 seconds, key tone is active when hearing “di”
voice.
2. Press and hold CAL key 3 seconds again, key tone is inactive when hearing “di” voice.
CALCULATOR FUNCTION
In on-hook state, press CAL key, LCD displays 0- , the unit is in calculator state.
The unit is available for operation of “+.-.×.÷”, in the calculator state ,#/= key is used as “=”and the
*/.key is used as “.”, OUT/x and FLASH/÷are used as x and ÷ respectively. UP/+ or DOWN/-
key is used as sign of positive/negative.
Eg.1(10+26) ÷2
1. In on-hook state, press CAL key
2. Press (1 , 0 , +, 2 , 6 ), ÷, 2 , #/= keys
3. After calculated, press SET key to quit.
Eg.2 0.5× 0.6-1
1. In on-hook state, press CAL key
2. Press0, */. , 5 , x , 0 , */. , 6 , - , 1 , #/= keys
3. After calculated, press SET key to quit.
NOTES
Please unplug telephone line and power (if any) when installing / replacing batteries.
TROUBLESHOOTING
? No voice
+ Check if the handset is on the phone or if the line has terminated.
? Receive only
+ Check if P/T mode is properly set.
Check if the unit is locked (use the key to unlock it)
? Rusty batteries or leakage
+ Remove the rust or wipe away the leakage.
? Noise
+ Check if the circuit is spoilt. (Change the circuit)
Check if the connector is wet or rusty (Change the connector)
? Ring once then disconnect when receiving a call. Dialing function is still available
+ Check if connector is in a moist environment.
Check if too many extensions are used together or the quality of extension is not good enough
(Change the bad extension)
? LCD become dim
+ Check if LCD contrast is properly set or if the batteries are weak. (Adjust LCD contrast, if the
LCD is still dim, replace the batteries.)
? No ring
+ Check if the RING tone is in the OFF state, reset it.
18
Page 20

? Most of the functions failed
+ Check if the batteries are strong enough. (Change the batteries)
If batteries are OK (Remove the battery, unplug the lines and reinstall after 10 minutes)
NOTE: Due to continuous product development all features and specifications are subject to
change without prior notice
19
 Loading...