

InterVac F, RM F, H, RMD Installation And Operating Manual
RECORD THIS INFORMATION FOR
FUTURE REFERENCES
MODEL NUMBER _______________________
DATE OF PURCHASE ___________________
PLACE OF PURCHASE__________________
THE BUILT-IN VACUUM SYSTEM
Manual # W502 rev.: 8-6-14
INSTALLATION and OPERATING MANUAL
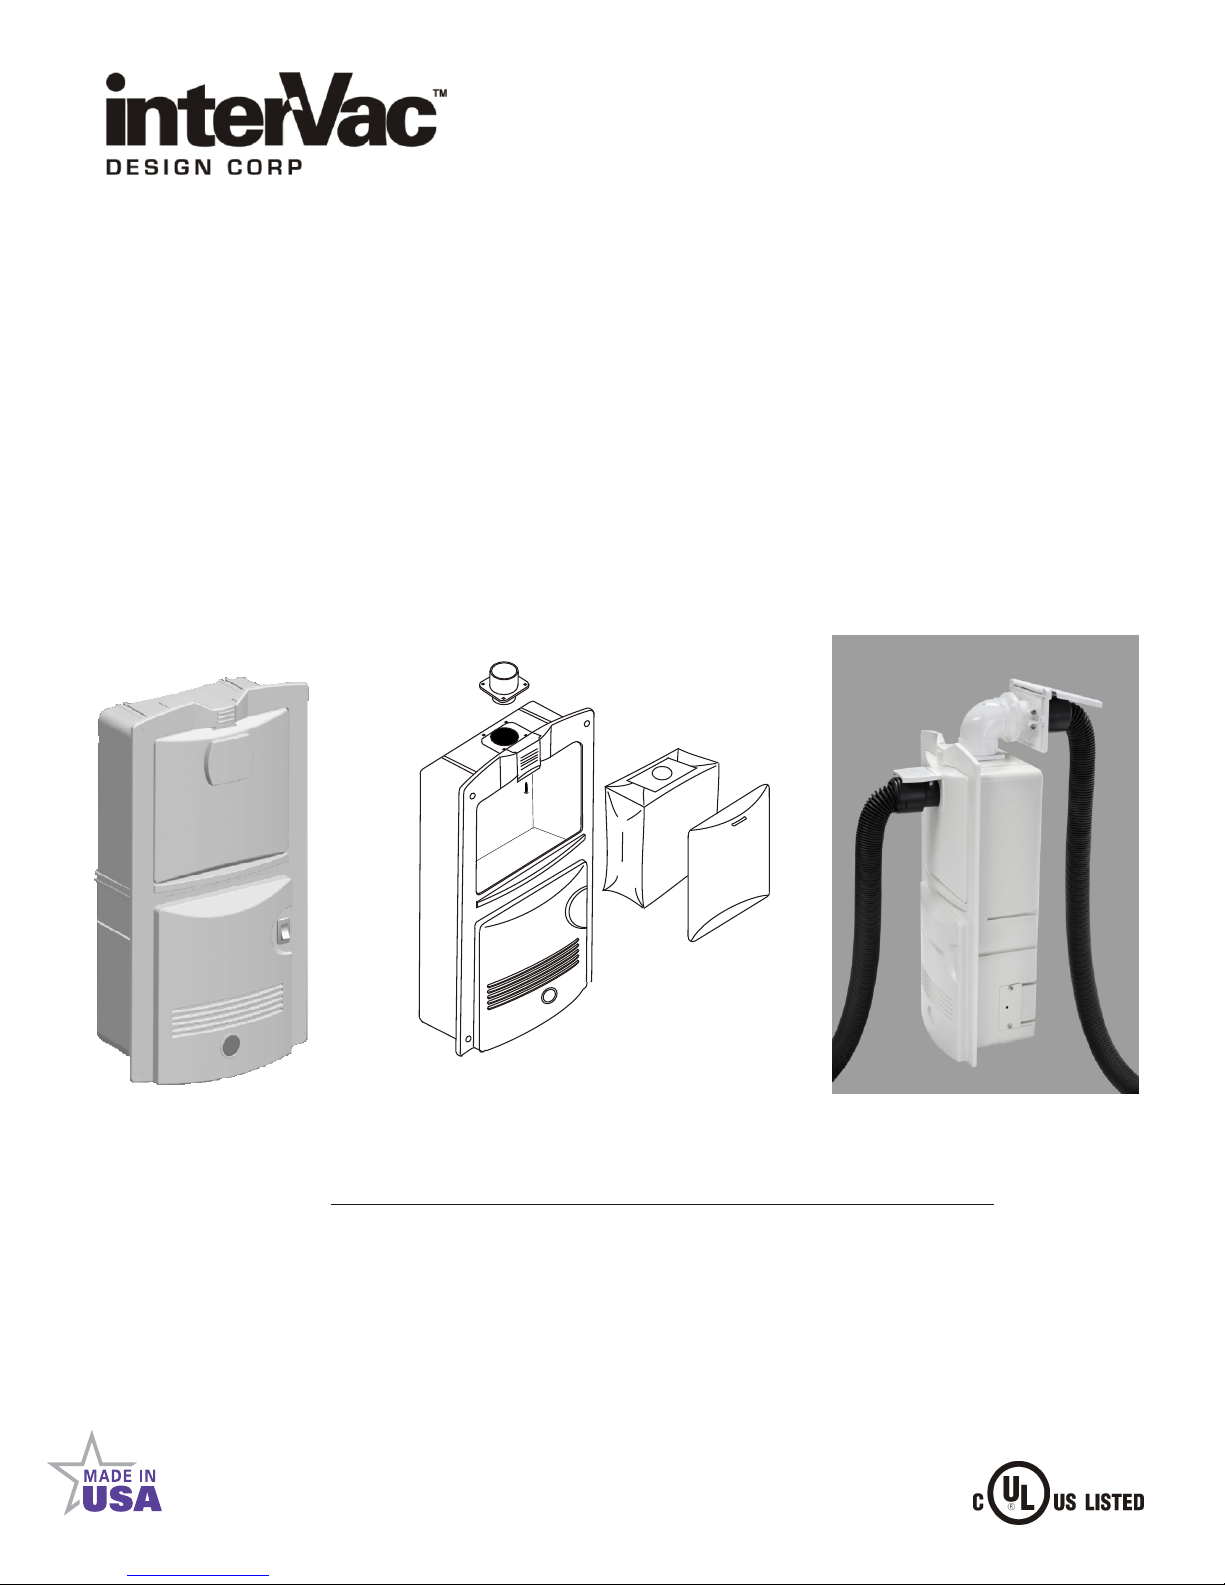
TYPE: 120 VOLT Model: F in-wall mounted
Model: H surface mounted
Model: RM (F) remote vacuum, in-wall mounted
Model: RM (H) remote vacuum, surface mounted
Model: RMD remote vacuum, double sided
Models F & H Models RM Model RMD
IF YOU SHOULD HAVE ANY QUESTIONS OR EXPERIENCES A PROBLEM WITH YOUR INTERVAC
PRODUCT, DO NOT RETURN THIS PRODUCT TO THE STORE OR DEALER
PLEASE CALL US DIRECT 1-888-499-1925
WARNING:
This manual must be read and understood before installation, adjustment, service or maintenance is performed.
This unit should be installed by a qualified technician. Modification of this product can be extremely hazardous
and could result in personal injury or property damage.
InterVac Design Corp., Palm City, FL 34990
2939 SW 42nd Avenue
Phone 772-463-1400 • USA & Canada toll free 888-499-1925
www. .com •
intervacdesign e-mail: sales@intervacdesign.com
Owner read carefully.
Instructions must stay with unit.
66XF

IMPORTANT SAFETY INSTRUCTIONS
Polarization Instructions for models with 120volt cord only.
These appliances have a polarized plug (one blade is wider than the other). This plug will fit in a
polarized outlet only one way. If the plug does not fit fully in the outlet, reverse the plug. If it still does not
fit, contact a qualified electrician to install the proper outlet. Do not change the plug in any way.
When using an electrical vacuum cleaner, basic precautions should always be followed including the following:
Read all instructions carefully before using this vacuum cleaner.
WARNING: TO REDUCE THE RISK
OF FIRE, ELECTRIC SHOCK, OR INJURY:
1. Unplug from electrical outlet when not in use and before
servicing.
2. Do not use on wet surfaces.
3. Never operate this vacuum cleaner without a dust bag and filters
in place.
4. Close attention is necessary when used by or near children.Do
not allow unit to be used as a toy.
5. Use only for intended use as described in this manual. Use only
the manufacturer's recommended attachments and dust bag.
6. Do not use with damaged cord or plug. If appliance is not working
as it should, has been dropped, damaged, left outdoors, or fell into
water, return the vacuum cleaner to InterVac or an authorized
service dealer for examination and repair.
7. Do not put any object into openings. Do not use with any openings
blocked; keep free of dust, lint, hair and any other material that
may reduce air flow. If the secondary filter becomes dirty,
rinse in warm water or replace with a new filter. Filter should be
completely dry before using.
8. Never drop or insert any object into any opening.
9. Turn off all controls before unplugging.
10. Do not pull or carry by cord, do not use cord as a handle, do not
close a door on the cord, or pull cord around sharp edges or
corners. Do not run over cord. Keep cord away from
heated surfaces.
11. Do not unplug by pulling on cord. To unplug, grasp the plug, not
the cord.
12. Keep hair, loose clothing, fingers, and all parts of body away
from any openings and all moving parts.
13. Do not pick up anything that is burning or smoking, such as
cigarettes, matches, or hot ashes.
14. Use extra caution when cleaning on stairs.
15. Do not handle plug or appliance with wet hands.
16. Do not pick up flammable or combustible liquids such as
gasoline, or use in areas where they may be present.
17. Do not place objects against the vacuum cleaner. Keep area
clear.
18. Do not step on the hose or pull the hose forcibly.
19. Do not pick up large objects such as waste paper or cloth,
which may clog the hose.
20. Do not install this vacuum cleaner in an area exposed to high
temperatures.
21. Install this vacuum cleaner in a dry place.
22. Do not attempt to service the vacuum cleaner. Unit is sealed
and cannot be opened without damage to the unit. For service,
call your local authorized service dealer, or InterVac Design's
Customer Care Center.
SAVE THESE INSTRUCTIONS
LI
M
ITED WARRANTY
Inter
the ate f
N
D sp
This warranty
re
You must etur
This
co
w ic
su
d ma e th
There
INTERVAC DE
THE
IMPL ED AR AN IES, I C UDI
PU POSE,
So
im lied a n
tha
d aler o
co pa y a
c e
a D si
ca h re
o s
sable du
i
o st
u
red be
i
warrant
er
da age
v m i ccu
re
h
h s
h as hotel
c
a g a t b b
are
U
R M
e at s
m st
p
vary f m
t ro s
m
gn Corp.
rigin
o
und. E
f
s
s
i e d y h n
ore warranty performance
f
r n
on
y l
wh
ul from accide t, misuse, abu
t n s e sh
of
, ,
t is a
n e
o xp
SE
w
n d
SI E I BL F D T R
OF HI
T
W
R
ARE LI
do ot llow
e
y lasts,
rra t
tat
ur
rvi ce
o
se ce n
dr
ss.
e
w ll
repa r
i
l purchase n
a i
clu
ed are
x
d h l
bags, i
y covers
fice
tri
re
n a
ters,
f l cu
xten ed onl
yo r
w
rranty ard r
u a
f d
ch
o
rs in ship
restaurant
uta le
t
ed a n
ss
w rra t
GN SHALL
PRODU
S
T N L
ITED TO THE APP I ABLE WARRANT
t
h m
the
so
to state. f a p
e I
t
r.
e t
he
po
i t
the
eve t
n
t
e fo
lowi
va
u
cle
m
to
t
e origi
is rend re .
c o
ailures
ac
o t
e exclusion
If h pr
ue
en
m
or
en al use f the product r
r t
s of
od.
G
i s
e ep
e
xc t
NOT B L A
T, OR
C
ab
AR
G
N H
ve xcl
o e
ob em with this prod
r
l
blem
e o
er u it
w
of
n i
ner too
a l
reg
to defects
or f
t
e, n glect, mi
as li
LIMIT
SIN OUT
I
T
L C
or
si ns or
u o
ith n
w o
re
u
n
w
e
a def
ct
in m
e
g t ms
e
s
al
purchaser
e d
s
ern our webs te
i
t
o i n
in mat ri
ilures whi
a c c
o
ted abo
s
E
OR
G
E WA
R N ES
li
itation f inciden al or consequ
li itations m y
is
no
han led to your satisf ctio , t
t d a n h
teri ls or
a a r ra
that
q ire normal
re u l e n
and vacuum
.
A
q
e
h are caused
andling,
e.
v
A
S
ND
INCI EN AL
O Y
F AN
RA
TI
o
m a
ct
u
lt arts,
r
b
i
p
wo
kmanship.
rep ac me t:
hoses.
pu cha e ece pt
r
s r
i
or er to be
ls
r
w
a
,
o
rkmanship wh
o
o
mis
s
rvic
e
by
a ca n e o o m
e n n o r
EXCLUSIONS
O ONSE
BR
ACH OF
E S A
F MERCHANT
O
PER
Y I R
develos during
OD
t
not pply to u. Th s
a
p t w rr
2
ree
of c
arge
f r
ix
(6)
f h
or
other
i
d v d o o
produ
ppli tio , alt rati n, m dification, or
by
ts
a yo e the tha
o
War nty
proo of
f
co ered un
ch
ccu
i
o
n
t supp ied
o l n
years n Nort
s
mi h
va rom country
g
t
ry
ate
of ri inal purchase
d
s durin
r
an uth
n
er
by
a
o g
these
n
g o
I terV
o
i
f
pr visi ns
rmal
use and
ac Design
rized
s ce
co
ervice nte
:
C
SET
UENTIAL
Q
THI W
ABILITY
FO
TH
nti l da ag s or l mi ation
e a m
yo i
or
after
he
en
wrie to
t
DAMAGES
RR NTY
A .
ND ITNES FOR
A
F S PA
ABOVE.
e i
w rra
t
a
a
gi
n y
any pe od, yo
t ri u
t
e Custo
h me
RES L
ALL EXPR SSED
t s n
s
yo
ve
u e
r Se vice e
U F
A RTICULAR I
o
sp ci
m y
r
h e
a
Am
ric
to
co
.
do s
or
,
mercial
TING
E
how long
i
le al
f
c
g
nta
co ct
t
C n
e
rom V
a
f
ntry
u
will be
e
f
ilures
a
use
r
RO
AND
rig
your
r
a
the e r
t
not
, or
M
an
ts
h
. d o

Specification: 120 Volt, 10 Amp 50/60Hz, Weight 8 lb
Parts List:
Depending on model 2 dry-wall anchors, 1 red push pin
Paper templates: #W602 or #W600 4 screws and caps
3 wire connectors with F,RMF, RMD-F units only 2 high filtration bags #Y08 or #Y09
1 wood strip ( for in-wall units only)
CAUTION:
switch or circuit bre
a a e
Code or
ARNING: e c c nn c ns h l
W El
T
o avoid possible electrical shock,
ker
.
All
wiring must be
Canadian Electric Codes.
ctri al o e tio s ou d b
be
sure t
at
electric ty
h
in accord
e
a
m
d
is tur
i
nc
e
y
b
q l ed l ct i
a
ed
off at the
n
with
the US
ua ifi e
main
National
e r c
Ele
c
ia
n.
CAUTION: DO NOT PICK UP LIQUIDS, LIT CIGARETTES, HOT ASHES,
RAZOR BLADES, NEEDLES, PINS OR OTHER SHARP OBJECTS!
GROUNDING INSTRUCTIONS for
Models F + RM(F) + RMD when PERMANENTLY WIRED
This appliance must be connected to a grounded metal, permanent wiring system; or an equipment-grounding
conductor must be run with the circuit conductors and connected to the equipment-grounding terminal or lead
on the appliance.
WARNING: Disconnect all electrical power to the wall area before installing!
Do not drill near studs where electrical cable may be secured to studs adjacent to receptacles.
Note: The four mounting holes in the outer corners of the flange of the Vacuum Cleaner must be drilled from
the back of the unit with a 3/16” drill bit when the unit is to be recessed into a wall.
To reach with the vacuum hose as far as possible, choose a wall or surface that is centrally located and has an
electrical outlet or switch from a 15 amp circuit breaker. Make sure the wall is hollow and there are no pipes or
other obstructions in the section you choose.
tric
MODEL: H surface mounted with power cord attached
External to Wood Surfaces: (see Fig.: A)
Step 1. To cover with the vacuum hose as much area as possible, choose a wall or surface that is centrally located
and has an electrical outlet close by.
Step 2. Cut paper template from instruction manual, page 12. Tape the template to the wall or a surface at a comfortable
operating height or a minimum of 2 to 3 inches above the floor. Mark the 4 centers accurately.
Carefully remove template from the wall and place it into the operating manual for future references .
Step 3. Attach the enclosed #8 screws to the wall as marked on the template. Keep the screw heads 1/8” from the wall.
Step 4. Slide the key holes on the back of the vacuum cleaner over the 4 screw heads and secure by pushing down.
If vacuum cleaner is loose re-tighten screws.
TIP: If vacuum cleaner is mounted on its back or side , it may slide off the screw heads when you pull on the vacuum hose.
To prevent this, fasten a small wood block against the top of the unit.
Step 5. Check to be sure dust bag and motor filter (under dust bag) are in place. The corners of the filter have to be
tucked under the ribs so that the filter lays flat!
INSTALLATION
3
External to Drywall (½ thick) Surfaces: (see Fig.: A)
Step 1. To cover with the vacuum hose as much area as possible, choose a wall or surface that is centrally located
and has an electrical outlet close by.
Step 2. Tape the paper template #W600 on page 12 to a wall at a comfortable operating height or a minimum of 2-3 inch
above the floor. 2 of the 4 mounting screws should be in the center of a wall stud behind the dry wall for strength.
Step 3. With an awl or similar object mark the center of the 4 key holes accurately. Carefully remove template from the
wall and place it into the operating manual for future references .
Step 4. With a 3/32 drill bit, pre-drill all 4 holes.
Step 5. Now use a 5/16 drill bit to enlarge the 2 holes which are not going into the wall-stud.
Step 6. Squeeze the two arms of the anchor together and insert through the hole. Very lightly hammer the anchor
flush with the dry-wall surface.
Step 7. Insert the red key-pin and push hard to open the anchor behind the dry-wall, remove red key. Do not hammer key.
Step 8. Attach the four screws (#8) through the 2 anchors and into the wall-stud. Keep the screw heads 1/8” from the
wall surface.
Step 9. Slide the key holes on the back of the vacuum cleaner over the 4 screw heads and push down.
If the vacuum cleaner is loose on the screws re-tighten screw heads a little more.
TIP: If vacuum cleaner is mounted on its back or side, it may slide off the screws heads when you pull on the vacuum hose.
To prevent this, fasten a small wood block against the top of the unit.
Step10. Check to be sure dust bag and motor filter (under dust bag) are in place. The corners of the filter have to be
tucked under the ribs so that the filter lays flat !
MODEL F recessed installation
Paper Template # W602
WARNING: Disconnect all electrical power to the wall area before installing!
Do not drill near studs where electrical cable may be secured to studs adjacent to receptacles.
Note: The four mounting holes in the outer corners of the flange of the Vacuum Cleaner must be drilled
from the back of the unit with a 3/16” drill bit when the unit is to be recessed into a wall.
To reach with the vacuum hose as far as possible, choose a wall or surface that is centrally located and has an
electrical outlet or switch from a 15 amp circuit breaker. Make sure the wall is hollow and there are no pipes or
other obstructions in the section you choose.
Recessed Installation into ½ inch thick Drywall: (see Fig.: B)
We recommend that vacuum cleaner be mounted against one side of a 2X4 wall stud.
TIP: Drywall installation: with a 3” dia. hole saw, cut a hole first and check for obstructions! It is easier to
re-plaster the 3” dry-wall slug than a large cut-out if you do encounter an obstruction.
Step 1 The vacuum cleaner should be mounted to the side of a 2X4 wall stud . Make sure no electrical switches or outlets
are on the installation side when mounted to a 2X4.
Step 2. Tape the template against the wall at a comfortable operating height (or a minimum of 2 to 3 inches off the floor)
to the edge of the 2X4 (use the vertical cut-out line from the template and align with the edge of the 2X4)
Step 3. Refer to the paper template #W602 for the cut-out.
Step 4. Install 14 or 16 gage AWG, 300V minimum Romex cable (use wires rated for at least 95C) from the electrical power
supply and pull the power cable through the wall cut-out.
Step 5. a) Open the 2 3/4" x 1 3/8" side cover and pull the 3 inside wires through the opening.
b) Insert your 120 volt power supply cable through the Romex clamp and out of the side opening.
d) With 3 wire nuts connect black to black ,white to white and green to bare ground conductor wires.
e) Tighten the Romex clamp and replace the side cover.
Step 6. Slide the unit, bottom first, into the opening and secure with the four screws and screw caps.
use 2 screws for the 2X4 and 2 screws for the 2 anchors. Do not over-tighten.
Step 7. Check to be sure dust bag and motor filter (under dust bag) are in place. The corners of the filter have to be
tucked under the ribs so that the filter lays flat!
Recessed into Wood Surface Installation: (see Fig.: B)
Same procedure as above, but do not use the drywall anchors. Pre-drill the 4 outer holes 3/16 dia. and secure
vacuum cleaner with the 4 screws and caps.....
4
 Loading...