

Page 1
RECORD THIS INFORMATION FOR
FUTURE REFERENCES
MODEL NUMBER _______________________
DATE OF PURCHASE ___________________
PLACE OF PURCHASE__________________
BUILT-IN VACUUM SYSTEMS
Manual # W520 Date: June.-2014
INSTALLATION AND OPERATING MANUAL
120 VOLT POWER UNITS
MODEL CS8 and CS-RM with POWER CORD
MODEL CS8-F and CS-RM-F for HARDWIRED
MODEL CS6 for Power Management
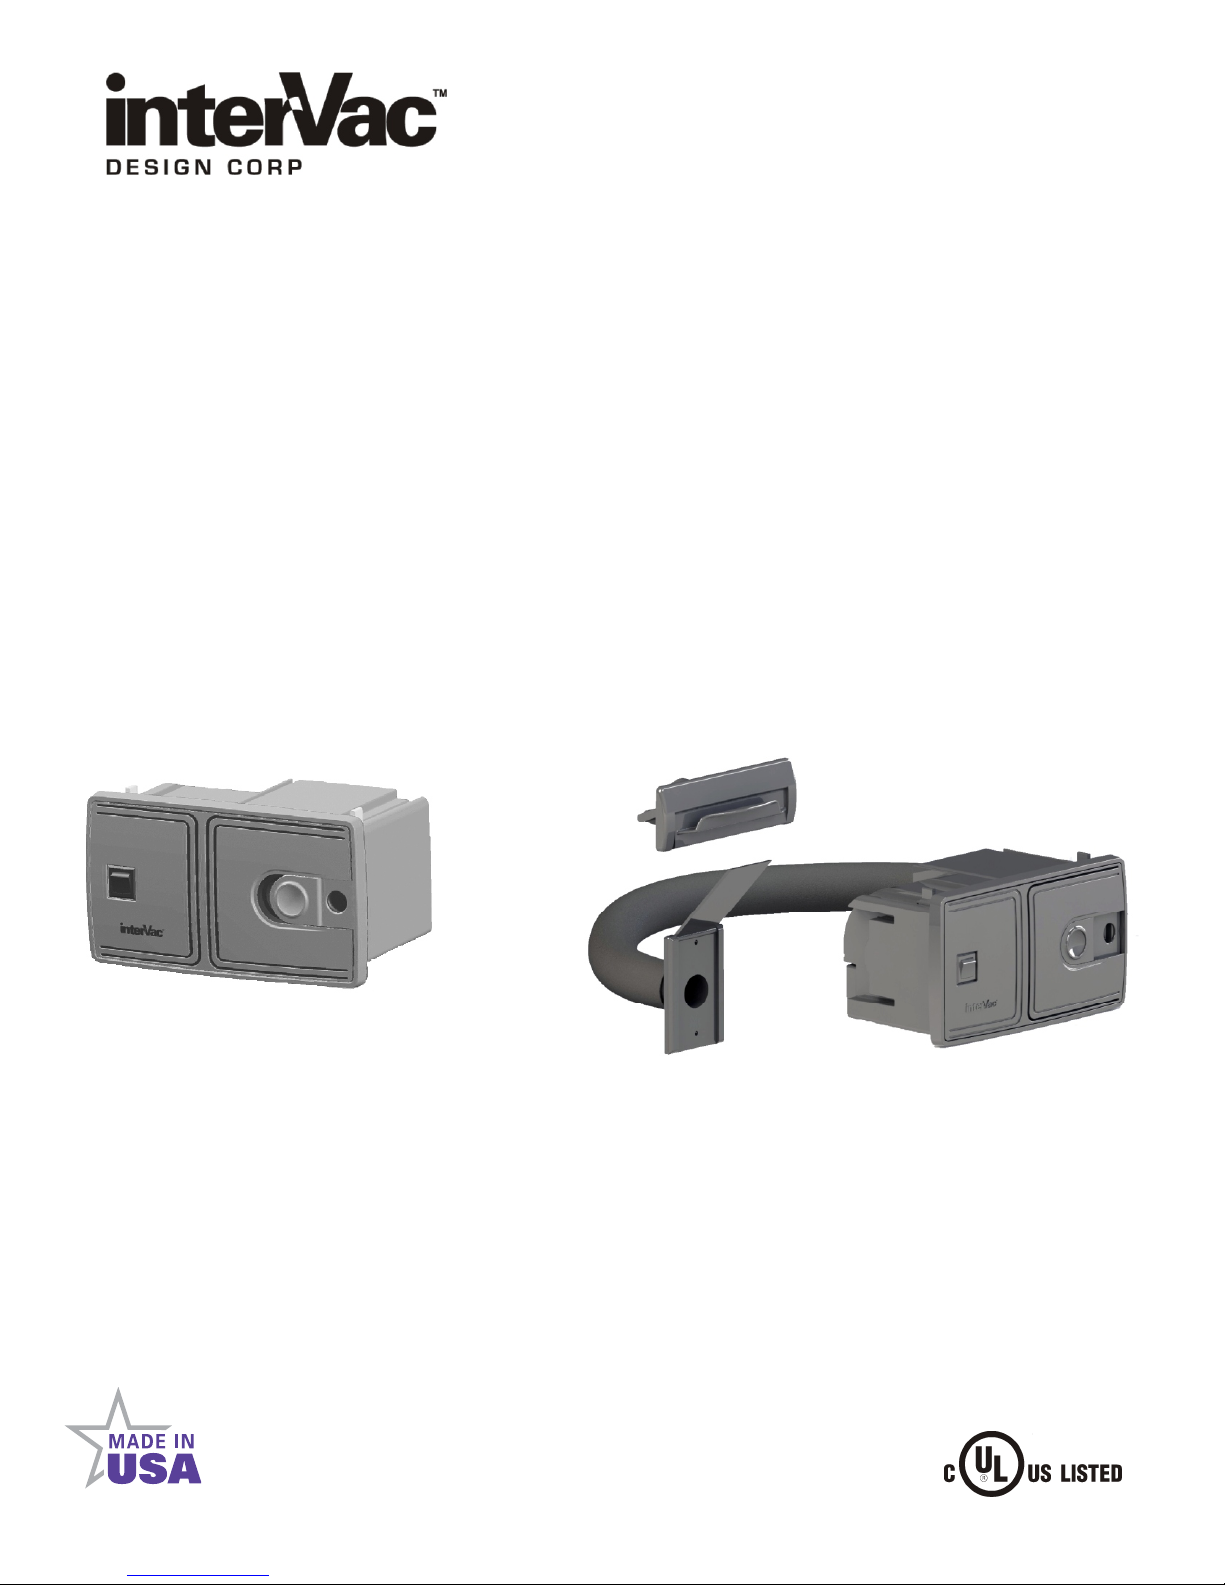
VacPort
Model CS8
Vacuum valve
Model CS8-RM
PLEASE NOTE:
The CS8 and CS6 have 1 opening in the dust bag
The CS-RM has 2 opening in the dust bag
WARNING: Owner read carefully.
This manual must be read and understood before installation, adjustment, service or maintenance is performed.
This unit should be installed by a qualified technician.
Modification of this product can be extremely hazardous and could result in
personal injury or property damage. Instructions must stay with unit.
2939 SW 42nd Ave. Palm City, Fl. 34990
1-888-499-1925 www.intervacdesign.com •
e-mail: [email protected]
InterVac Design Corp. ,
1
Page 2

IMPORTANT SAFETY INSTRUCTIONS
Polarization Instructions for Models CS8-H and CS-RM-H with Power Cord only.
These appliances have a polarized plug (one blade is wider than the other). This plug will fit in a polarized outlet
only one way. If the plug does not fit fully in the outlet, reverse the plug. If it still does not fit, contact a qualified
electrician to install the proper outlet. Do not change the plug in any way. DO NOT USE WITH EXTENSION CORD!
When using an electrical vacuum cleaner, basic precautions should always be followed including the following:
Read all instructions carefully before using this vacuum cleaner.
WARNING: TO REDUCE THE RISK OF FIRE, ELECTRIC SHOCK, OR INJURY:
1. Do not leave appliance when plugged in. Unplug from an
electrical outlet when not in use and before servicing.
2. Do not use outdoors or on wet surfaces.
3. Never operate this vacuum cleaner without a dust bag and filters
in place.
4. Close attention is necessary when used by or near children.Do
not allow unit to be used as a toy.
5. Use only for intended use as described in this manual. Use only
the manufacturer's recommended attachments and dust bag.
6. Do not use with damaged cord or plug. If appliance is not working
as it should, has been dropped, damaged, left outdoors, or fell into
water, return the vacuum cleaner to InterVac or an authorized
service dealer for examination and repair.
7. Do not put any object into openings. Do not use with any openings
blocked; keep free of dust, lint, hair and any other material that
may reduce air flow. When the secondary filter becomes dirty,
rinse in warm water or replace with a new filter. Filter should be
completely dry before using.
8. Never drop or insert any object into any opening.
9. Turn off all controls before unplugging.
10. Do not pull or carry by cord, do not use cord as a handle, do not
close a door on the cord, or pull cord around sharp edges or
corners. Do not run appliance over cord. Keep cord away from
heated surfaces.
SAVE THESE INSTRUCTIONS
for Household and R/V use
11. Do not unplug by pulling on cord. To unplug, grasp the plug, not
the cord.
12. Keep hair, loose clothing, fingers, and all parts of body away
from any openings and all moving parts.
13. Do not pick up anything that is burning or smoking, such as
cigarettes, matches, or hot ashes.
14. Use extra caution when cleaning on stairs.
15. Do not handle plug or appliance with wet hands.
16. Do not pick up flammable or combustible liquids such as
gasoline, or use in areas where they may be present.
17. Do not place objects against the vacuum cleaner. Keep area
clear.
18. Do not step on the hose or pull the hose forcibly.
19. Do not pick up large objects such as waste paper or cloth,
which may clog the hose.
20. Do not install this vacuum cleaner in an area exposed to high
temperatures.
21. Install this vacuum cleaner in a dry place.
22. Do not attempt to service the vacuum cleaner. Unit is sealed
and can not be opened without damage to the unit. For service,
call your local authorized service dealer, or InterVac Design's
Customer Care Center.
LIMI
Int
Vac i n Corp. wi
Des g
r gi l pu
o i
na
Disposabl
This
warr
r qui ed b
e r
Y
u
m
o
u t t
This ranty ly
c
er da
whi
h
r ult
c
es
s h as
uc
dam
There ar xpressed
INTER
THE
IMP IED
PURPOS
So e
i plied warr
that
e that
ag s ta
IMITS
V C DESIGN HAL
US OF
L
states do
m a
m
va y
chas
r
e the
d st bag
e
u s
nty is extended
a
r
efo e
s
m i
hote
e
no e
a ranty
w
r p fo
re urn your
cov
age
wh c oc urs n
fro
a
m c i
,
c ,
l
of
fi e ta
i
attribu
A S
THIS
E
WA
,
E E
from tat to
NT
RRA IE UDING HE
AR LIMITE
not ll
nty ast, s
a
l o
l repa r the powe un t wi new or rebui t pa ts, fr e of charge for three(3)
l
i
in ev t of a d fect n ma
,
fi ters,
e fa es n
h c i s p o
c
dent, misuse,
res ur nt
en e i te s
vacu m
l u
onl
the r gi l
y to
er r nc s rende ed
ma e i
ar ant
w
rs ilur
ble
wa ranti s
c rd
r y
a
to
r
a
a
c
a
due to
hi
ment r
r
or
ts
o od.
f G
exce
e
en e
T
L
RO
P
DUCT
S, INCL T
T
D O HE
w the ex l si
o
the
tate If
.
BE LIABLE OR INCIDE T
NO
,
OR ARSING O
T
A PLICABLE
c u
a ve
bo
e ns
problem ith
a
r
tem tha eq
i
cleaner tool
o i na
bus
tal us
p
regst
o
r i
defects
ailur s
f
, nlect, ishandling
e eg m , pl
of the pr
l
st
pt
as
i ed a e
L
I
W
P
n
o
i tation i
o r
l
mi
xclusio
or l mitati
w th
ED W
T
i
th
rial
s t r ui
and
vacu
s
ur
haser.
c pu
r .
o ou
er n r
i
m ter
a
c
e
whi h
F N
ARRA
is product d
duc
o
bov .
A
D EX LUS NS
N C IO
T
OF
U
NT
RRANTY
WA
of
i
on ma
A N
or workm
re normal r lacemen
um es
A
r
c e r
we
site in
b r
al or
i
s
are caus
or
t,
s
ANY
IES
O
F
PE
cidental or
n ti ag
s y t apply yo
elops durin or
ev
RRA TY
l r
an
hos
hase rec
o
work
ed
misap
ervice
e
ship. No cas
ep t:
.
ipt or other p
d
t
be
er
ans ip whi h
m
by products
by an
y
co ered un
o v d
h c
i ation, lte ation,
c
one other
re
nds Ex l
h fu
oo of de
f
oc urs duri
c ng o
ot s
ppl
n u
a r fi
ed
i by Int V i
an n
th
:
AL OR
CO
REAC
B H
M RCHANTABILITY
E ND F S
RIO R B
no to u.
NSEQUEN
OF
THIS
D SET
FO
consequen
T
af the
g ter war
I L DAMAGE
T
A S
W
ARR NTY.
A
TH
A O
al
dam
h
s rrant
i
wa y
A A
E.
V
es
ranty
yea
s fr the d of er
r
. c
modi
a
ded are th ollowin
u e f g
of or gi al
at i
er
hese provisions
t
n rm
er ac Des gn, or
c
tio
a
a hor
ut i e n o
LL
ITNE S
or l mi
i
ta
gives
y u s
o pe
pe i
d, ou ay c tac y
r o y m
om
ur hase
n
p c
l
us
a ds
a
e
or omm r
n,
c
z d
service ce ter, r
RE
ULTING
S
EXPRE
FO AARTICULAR
R
P
tion
s on
cific
ho lo
on t
ate
will be
.
nd oe
failures ov
ia
e
c l
F M
RO
SE A D
S
D
w
ng
le l
ri
ga
gh
u
not war on
se
N
an
ts
ou
2
r r s e s
Page 3
Specification:
CS8 120 Volt, 7 Amp 60Hz, Weight 5.5 lb
CS-RM 120 Volt, 7 Amp 60Hz, Weight 5.6 lb
Parts List:
Vacuum Cleaner with screws and clamps
Vacuum tool kit: various
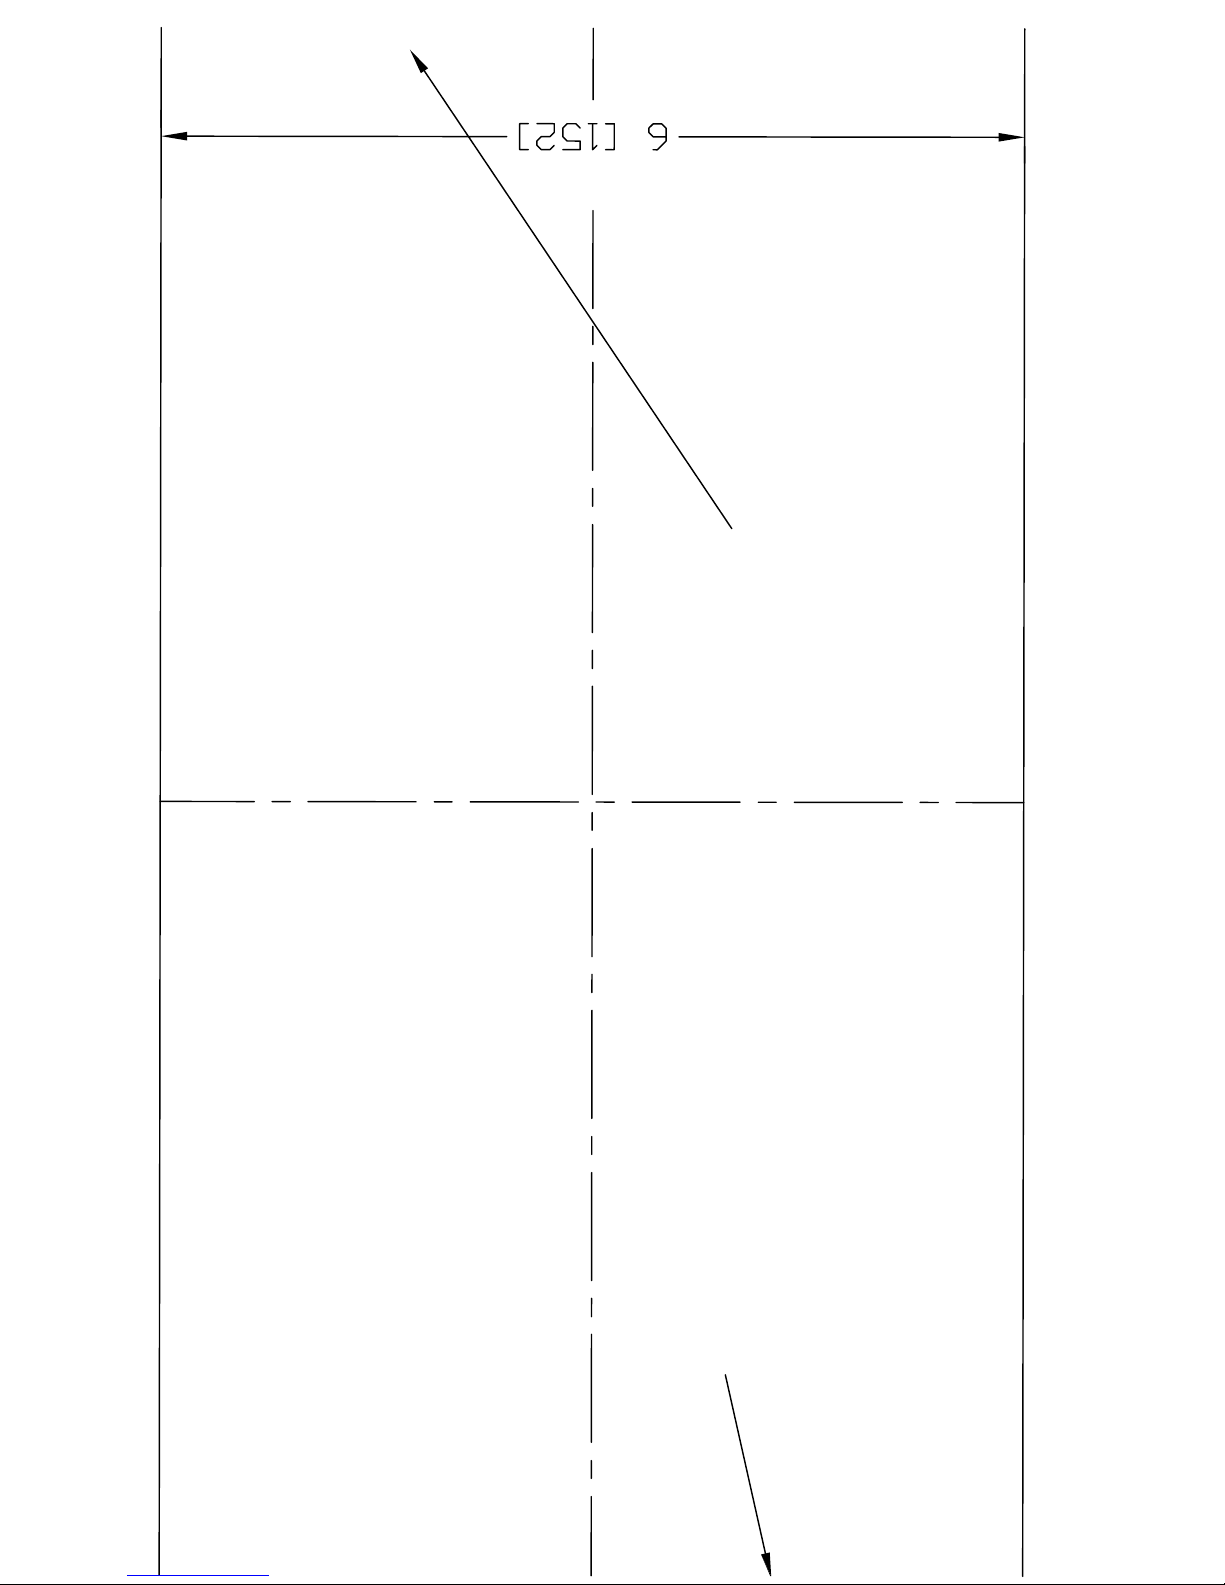
Paper template #W608
Read the Safety Instruction on the switch side behind the front panel !
CAUTION: DISCONNECT POWER BEFORE ATTEMPTING TO INSTALL THIS UNIT.
CHECK FOR ANY OBSTRUCTIONS BEHIND THE MOUNTING SURFACE
CS8 and CS-RM with POWER CORD
DO NOT USE WITH EXTENSION CORD
Recessed Installation into Wood or other Hard Surface Walls:
The central vacuum should be mounted so that power supply cord can be plugged directly into a electrical outlet.
Choose a place that is centrally located to maximize the reach with the vacuum hose.
The minimum wall thickness is 3/8” the maximum is 1”.
The cut-out in the wall is 11“ wide X 6” high and requires a minimum depth of 6”
Very important: If you installed the vacuum in a very small cabinet you must make provisions to
exhaust the air from the vacuum out of the cabinet.
Option 1: Cut a hole in the cabinet a minimum 3”, attach a louver to cover the hole.
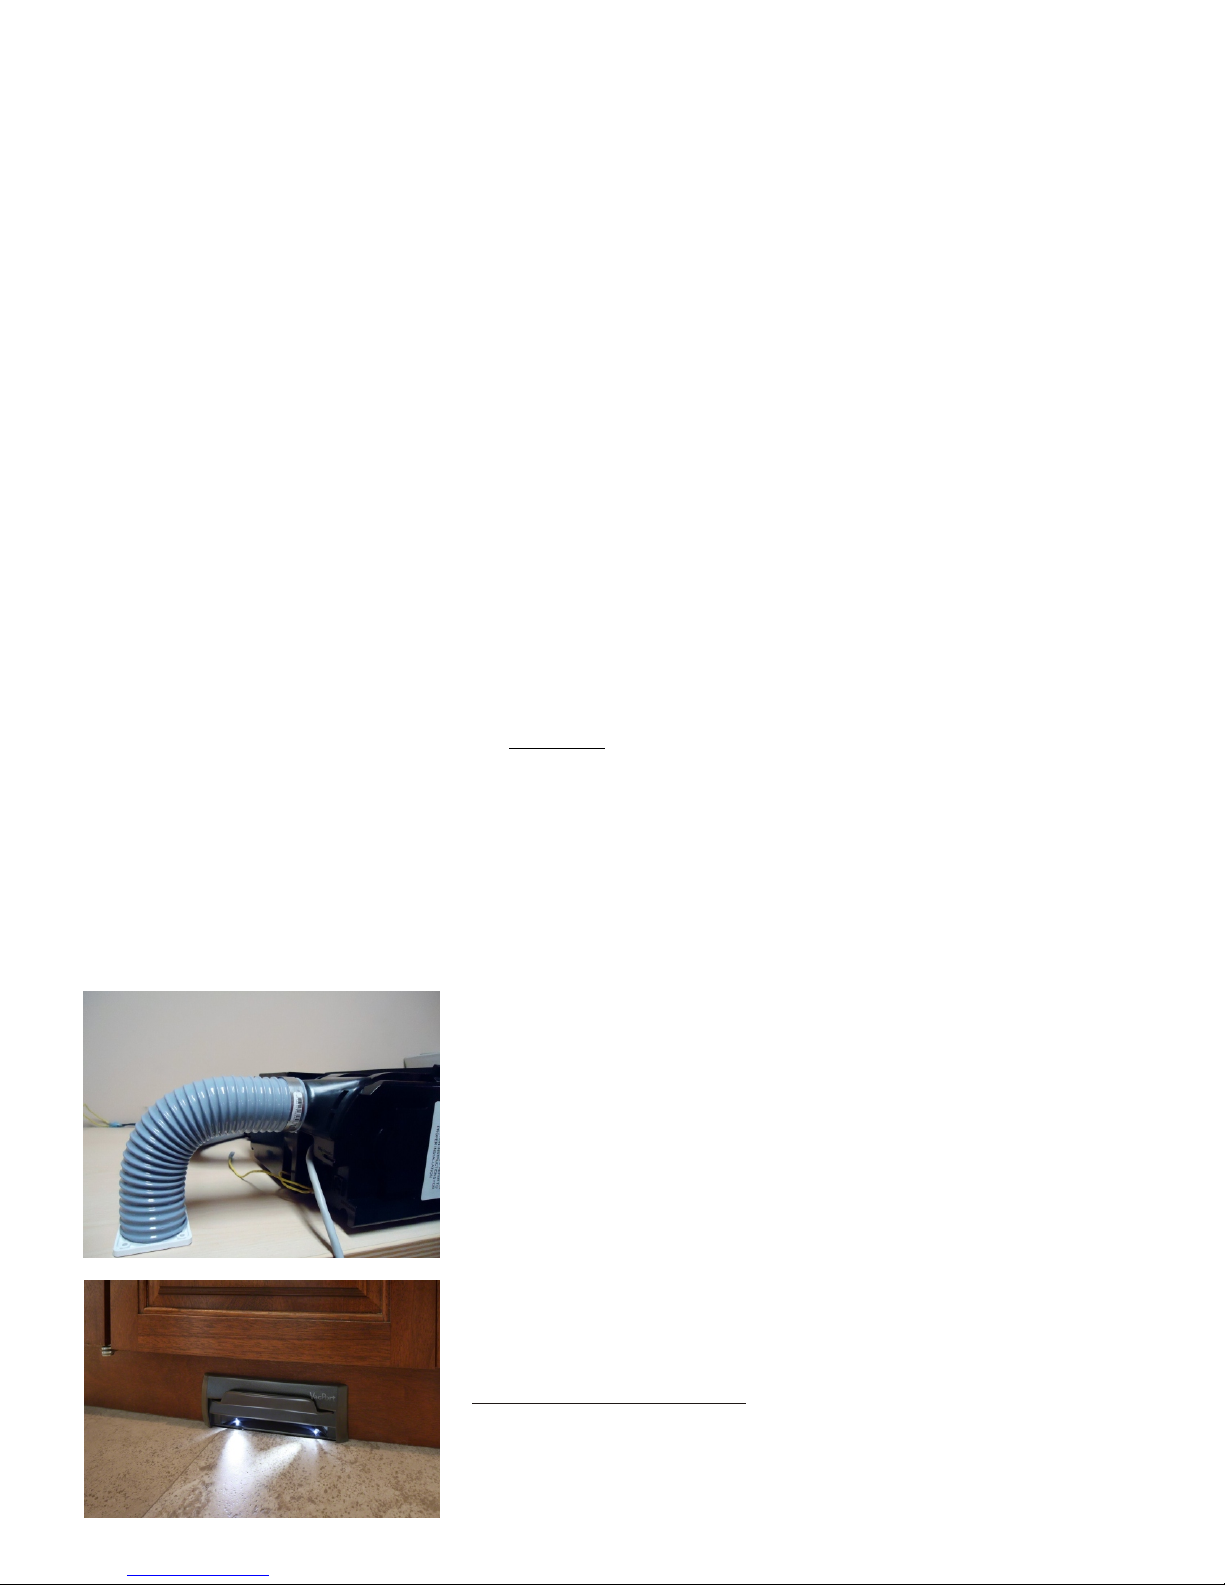
Option 2: Use our part #B560 exhaust fitting with a 2” diameter flex-hose to guide
the warm air to the outside, or to where ever you prefer. See page 8 options
Step A. Tape the paper template against the surface at a comfortable operating height
Step B. With a skill saw cut along the dotted line of the paper template.
Step C. Slide the unit, power cord in first, into the opening and secure by tightening the four attached
screws with the “clamps”. Do not over-tighten.
Step D. Check to be sure dust bag and motor filter are in place.
Step E. Install the remote vacuum valve (CS-RM model only). Then route the flex-hose from the valve to the vacuum.
Step F. From the remote vacuum valve install 2 yellow 20 gage, UL approved (AVLV2) rated minimum 300volt, 95 C,
wires (24 volt line) along the flex-hose to the bottom of the vacuum to the 2 yellow pigtails.
Secure the wires with “ty-wraps” to the flex-hose.
Connect yellow wires with butt connectors outside the Housing.
CS8-F and CS-RM-F Hard Wired
Same wall installation procedure as above , steps A through D.
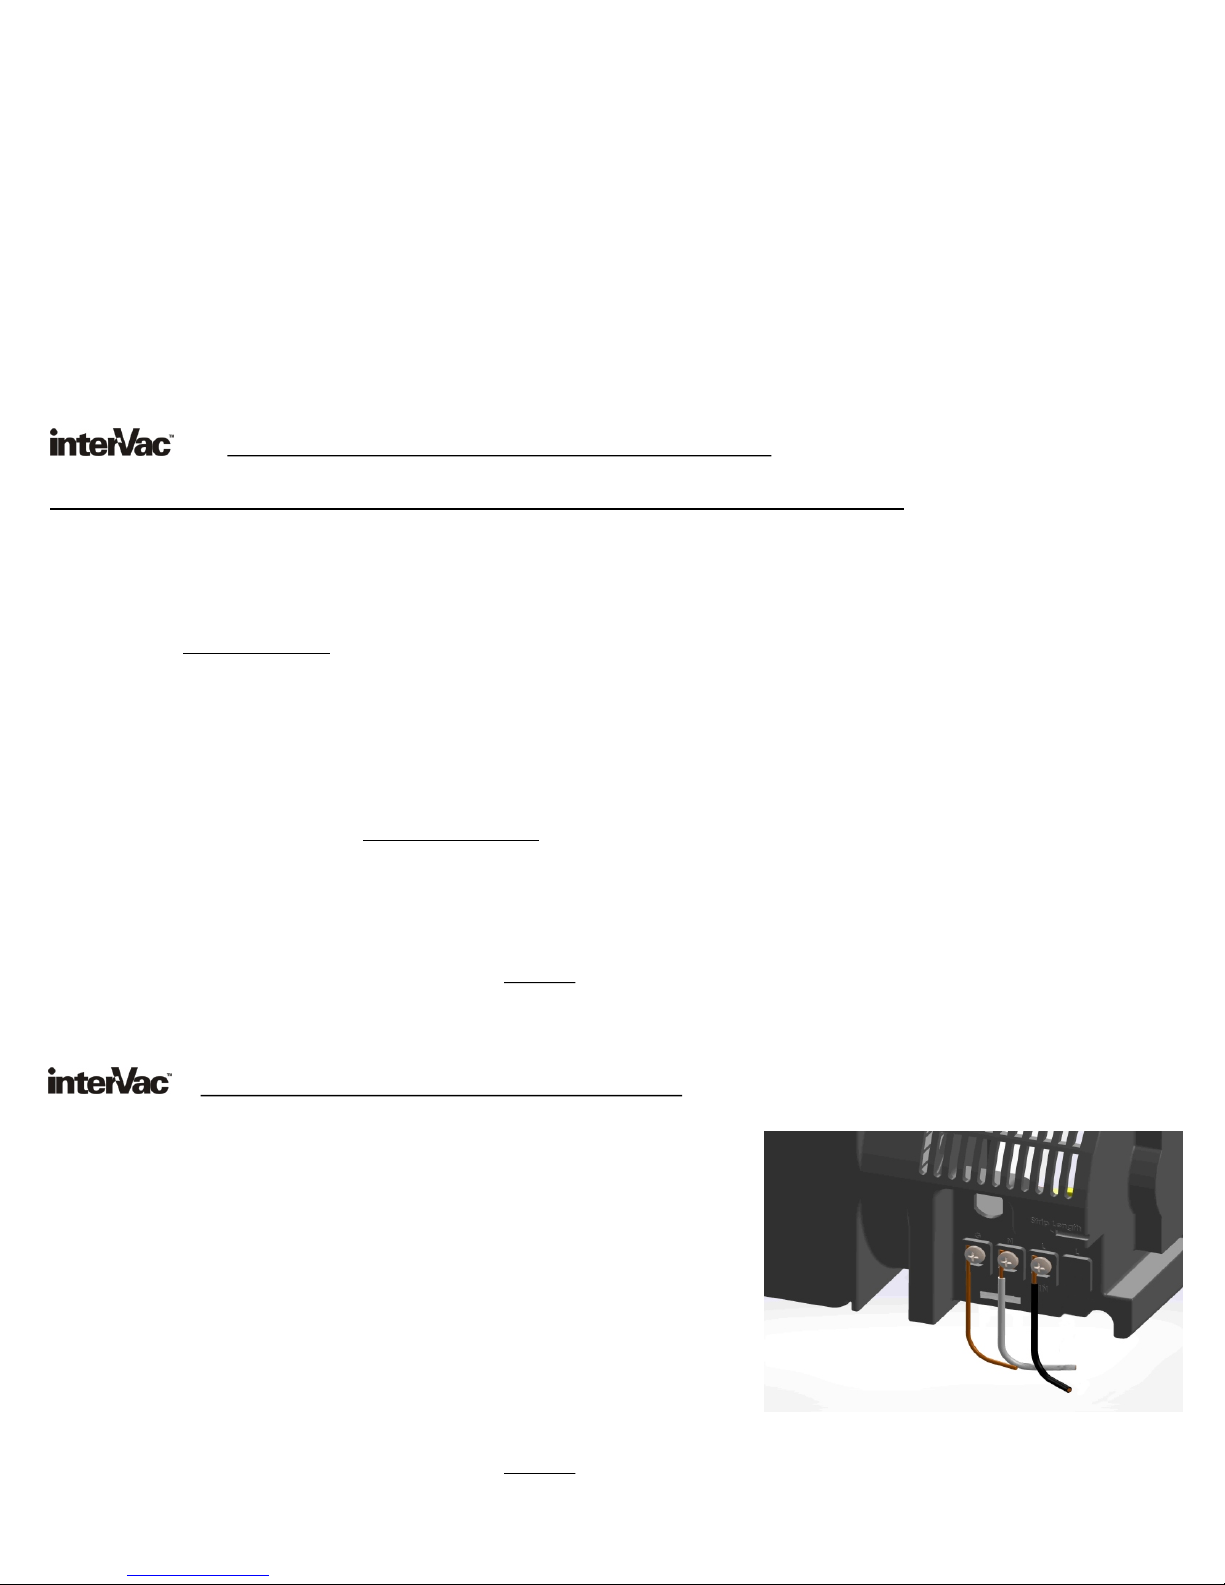
Step 1. From the Circuit Breaker run a 14 gage Romex cable to the
back of the vacuum.
Step 2. Slide the wire cover (supplied) over the cable.
Step 3. Strip the 3 wires about 5/8” and attach the Black to “L”, the white
wire to “N” (neutral) and the GROUND wire to the “G” connection.
Step 4. Press the wire cover into the 2 slots above and below
the cable connections. Then attach the small screw.
Step 5. Install the remote vacuum valve (CS-RM model only). Then route the
flex-hose from the valve to the vacuum.
Step 6. From the remote vacuum valve install 2 yellow 20 gage, UL
approved (AVLV2) rated minimum 300volt, 95 C, wires
(24 volt line) along the flex-hose to the bottom of the vacuum to the 2 yellow pigtails.
Secure the wires with “ty-wraps” to the flex-hose.
Connect yellow wires with butt connectors outside the Housing.
3
Page 4
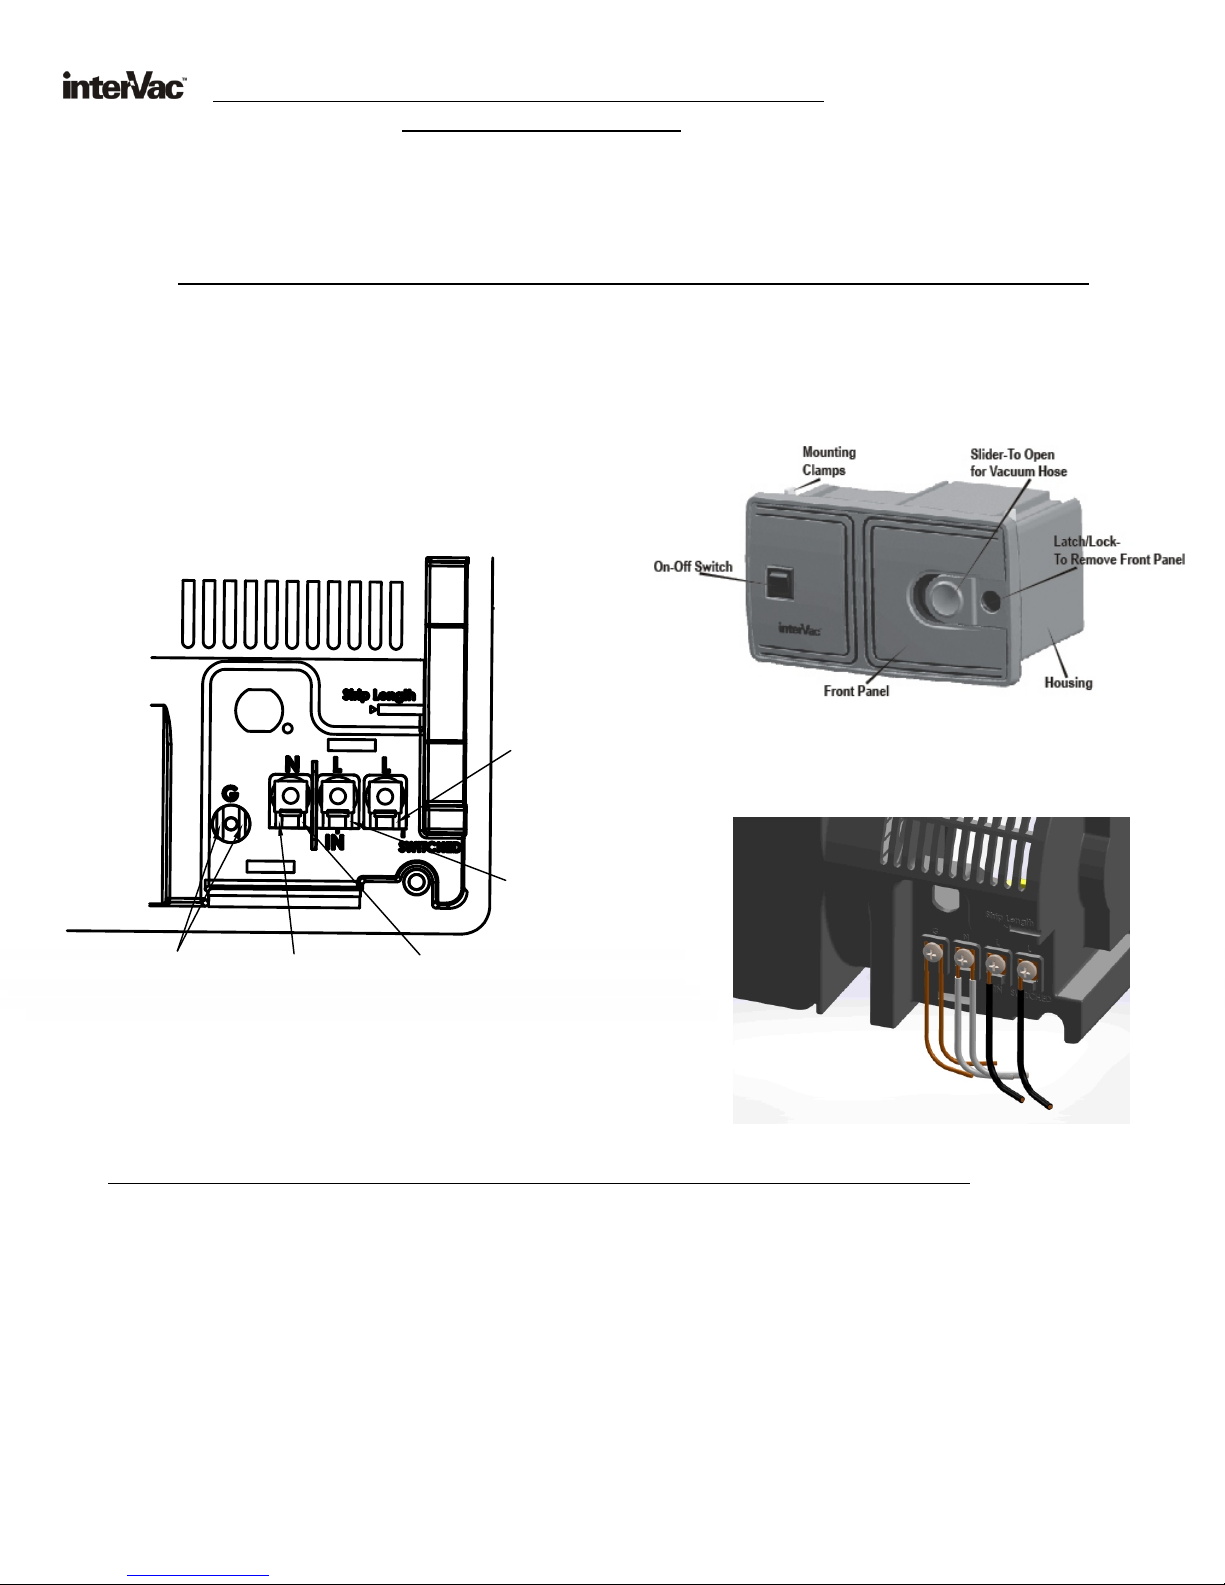
CS6 Hard Wired for Power Management
use 14 gage Romex wire
Same wall installation procedure as on page 4, steps A through D.
The CS6 version was designed for limited amperage availability. If for example you use the microwave oven or your
air conditioner with the vacuum cleaner at the same time your circuit breaker might be overloaded.
AFTER INSTALLING THE FOLLOWING ELECTRICAL CONNECTIONS YOU CAN ONLY RUN ONE APPLIANCE AT A TIME.
The following installation can be made only by a qualified electrician
To prevent overloading the circuit breaker:
Step 1. Turn off the breaker to the area you will install the unit in.
Step 2. Find the power cable connecting the Microwave Oven to the Circuit Breaker.
Step 3. Disconnect the exciting cable at the Microwave Oven.
Reroute the cable to the vacuum cleaner installation.
"L" Black
from
Micro
or A
/C u t
"
" Black
W
fro i u
m C
rc
Break
re
Grou
nd
W res
fr
r a e
Mic
i
i
rc i Br k
u t ea erom C
ow v
or A
/
Cand
" " Wh te W
N
i
t
r
a
l
C Unor A/ it
ire
r
owa
Neu
from Mic
ve
,
"
N
" White W
ut
r l
aNe
from Circ
uit B
ire
,
reaker
Step 4. In the back of the vacuum find the wire connections
ire
W
vwa e
ni
ireL
i
t
CS hardwired version with
Protective Cover removed.
4
Page 5
HOW TO OPERATE YOUR VACUUM CLEANER
IF THE VACUUM STOPS RUNNING:
If the vacuum hose becomes clogged the motor will shut off. Push the switch into “source” (Model CS8-R)
or “off”position (Model CS8-C) and let the motor cool down for one hour. Restart the vacuum without the
vacuum hose attached and push the slider cover to open on the front panel, let the vacuum run for
about 10 minutes. If vacuum keeps running the hose or the tools are clogged.
PLEASE SEE TROUBLE SHOOTING GUIDE.
A. Connecting and disconnecting the friction vacuum hose.
1. Push the slider cover on the front panel to the open position.
2. Insert hose cuff with a twist and push to secure.
3. To remove, turn cuff in either direction while pulling hose towards you.
B. On / Off Switch
1. To start the vacuum cleaner, push the switch to the “I” on or “VAC” position depending on your model.
2. To stop the vacuum cleaner, push the switch to the “O” off or “MICRO / SOURCE” position depending on
Model.
C: How to change the Y10 dust bag. DO NOT REUSE DUST BAGS
CS6 and CS8 MODELS single collar bag
Replacement bag: Part # Y10 high filtration 5 layer fiber bag.
1. Remove the front panel on the vacuum cleaner by sliding the latch/lock to the left and remove the front
panel and dust bag.
2. Carry front panel and dust bag to the trash container. Remove full bag and discard.
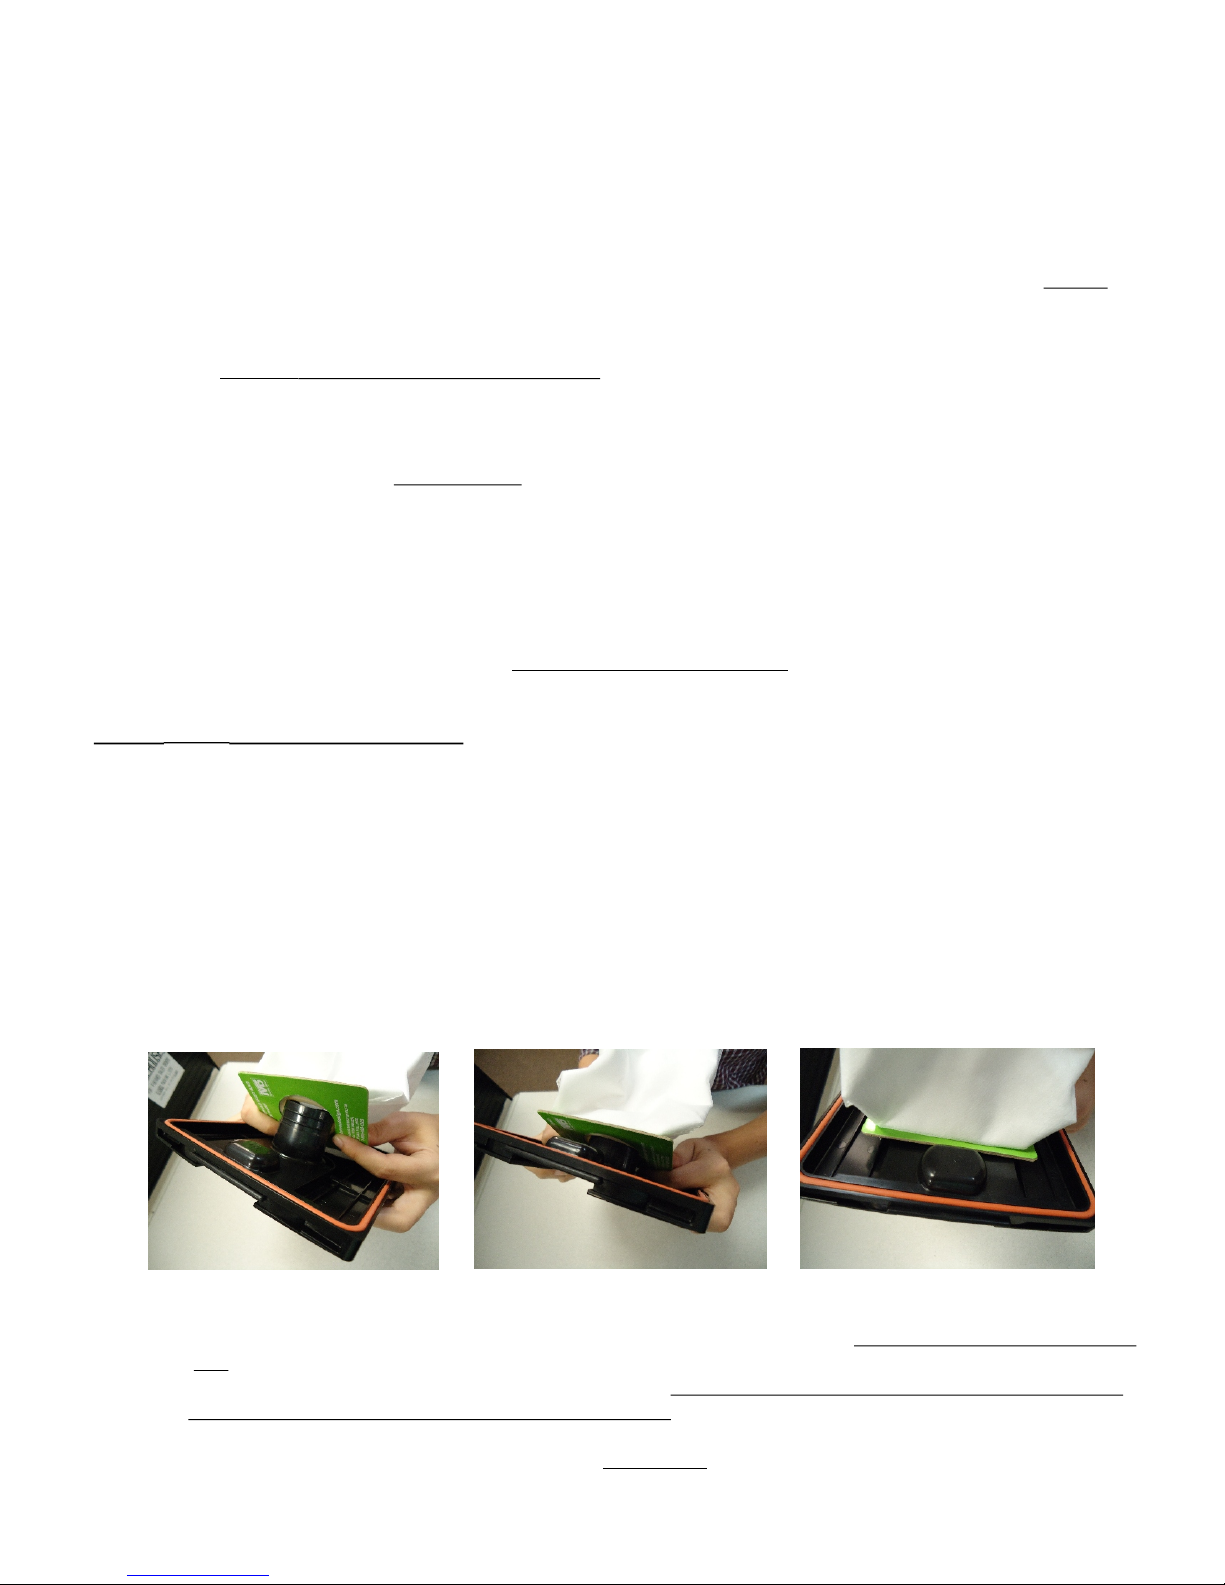
3. Push the card board collar of the new dust bag all the way over the pipe on the front panel. Pictures A to C
4. Slide the front panel, with the left side first into the small slots on the left side of the vacuums frame,
ensure dust bag is completely inside compartment, then push the right side into the frame until the lock/latc
clicks into place. With your thumb you might have to push the lock/latch further to the right.
Picture A Picture B Picture C
C: To change motor filter, Replacement Part # Y22
1. Remove FRONT PANEL with DUST BAG.
2. On the left side, inside the vacuum chamber, you will see the filter with the arrow pointing towards the back
wall.
3. Replace the filter with a new or cleaned filter, with the arrow pointing towards the back wall check that the
filter stays on the left side of the top and bottom frame.
4. If the filter is dirty you can wash in mild soap by hand.
Do not clean in washing machine. Let filter dry completely and reuse as needed.
5
Page 6
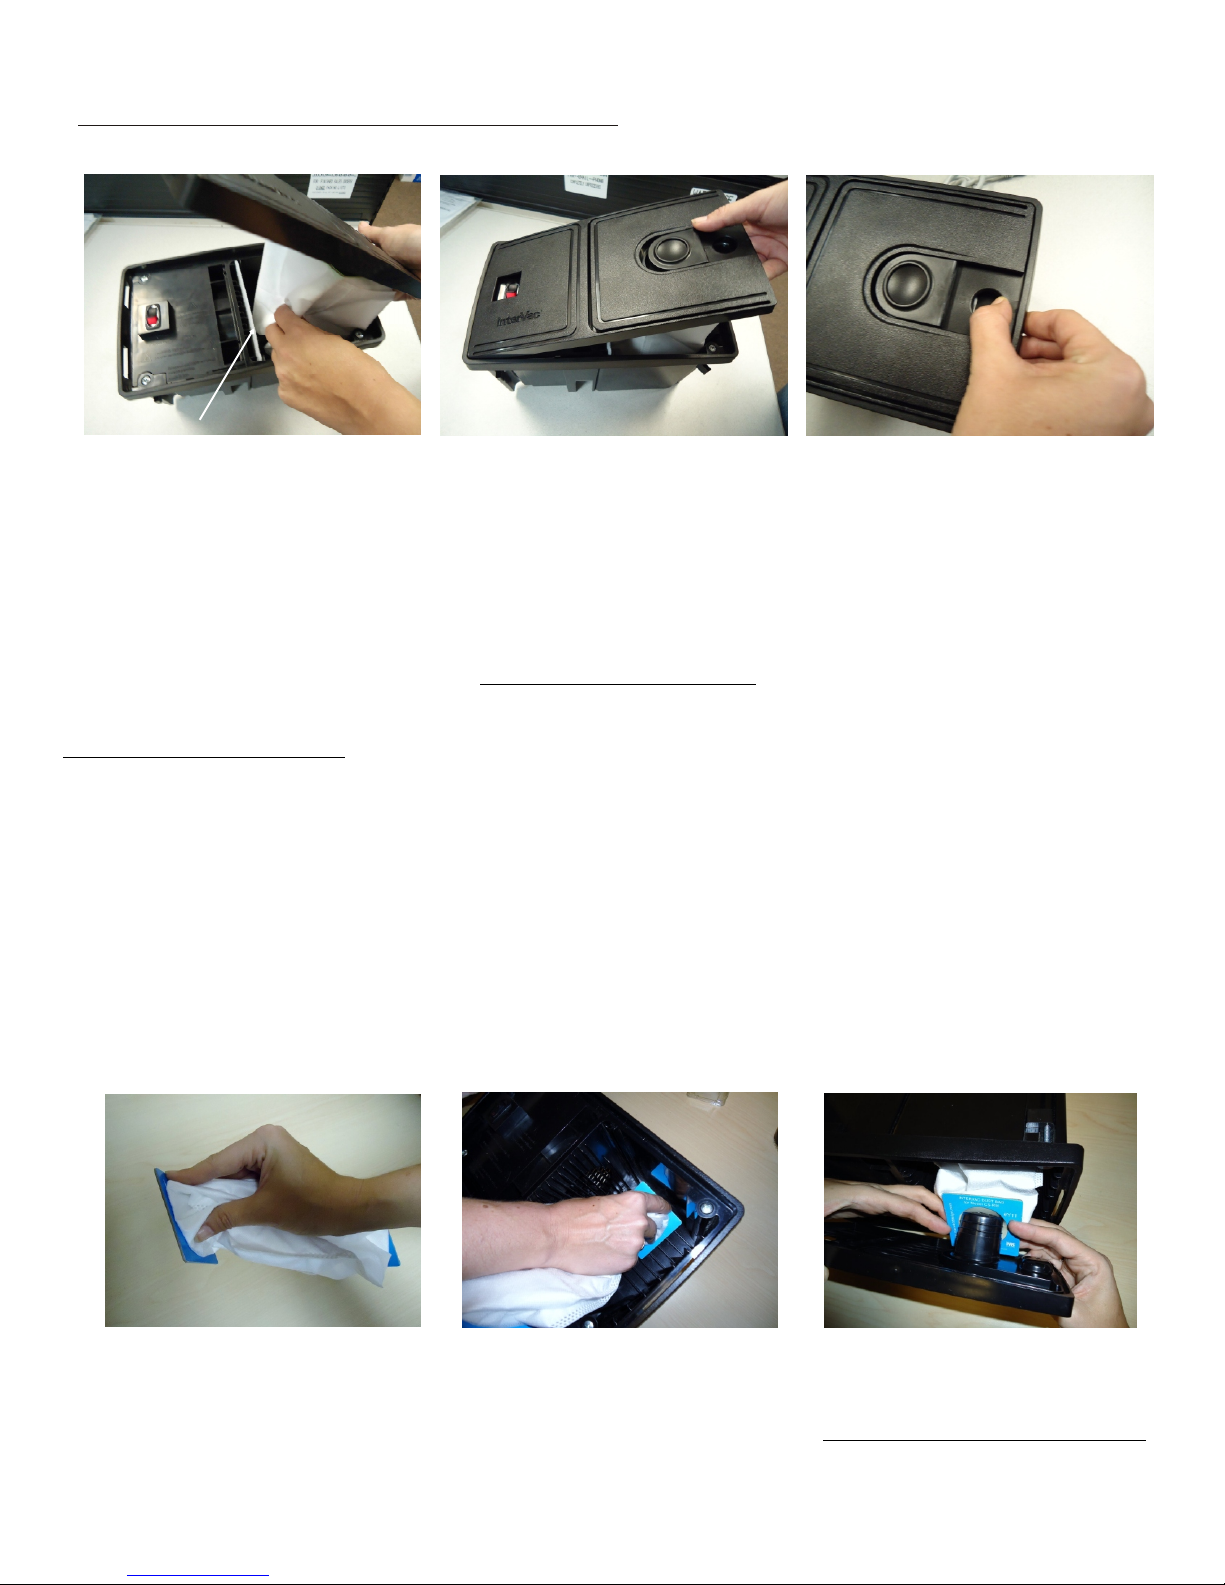
Attaching Front Panel and Dust Bag to Vacuum
Picture D Picture E Picture F
Never use Vacuum without Motor Filter
Insert Motor filter first, then
slide dust bag into vacuum
chamber.
Slide front panel with left
side into the vacuum
frame.
Watch out that bag does
not get clamped between
front panel and frame!
Snap front panel down into
the frame and push the
latch hard to the right to lock.
C: How to change the Y11 dust bag. DO NOT REUSE DUST BAGS
CS-RM MODELS double collar bag
Replacement bag: Part # Y11 high filtration 5 layer fiber bag.
1. Remove the front panel on the vacuum cleaner by sliding the latch/lock to the left and remove the front
panel and dust bag. Remove full bag and discard.
2. Please notice: the #Y11 double sided bag has 2 openings. The collar which attaches in the back of the
vacuum chamber is clearly marked “PUSH THIS COLLAR OVER PIPE IN THE VACUUM CHAMBER FIRST”
Hold the dust in your hand like shown in the picture #1 below. Then push onto “scooped pipe” in the back Pic.#2.
3. Push the front card board collar of the dust bag all the way over the pipe on the front panel, Pic.#3
4. Slide the front panel, with the left side first into the small slots on the left side of the vacuums frame, see Pic’s E
and F above. Ensure dust bag is completely inside compartment, then push the right side into the frame until the
lock/latch clicks into place.
Picture 1 Picture 2 Picture 3
C: To change motor filter, replacement Part # Y22
1. Remove FRONT PANEL with DUST BAG.
2. On the left side, inside the vacuum chamber, you will see the filter with the arrow pointing towards the back wall.
3. Replace the filter with a new or cleaned filter, with the arrow pointing towards the back wall check that the
filter stays on the left side in the top and bottom support. If the filter is dirty you can wash in mild soap by hand.
6
Page 7
TROUBLE SHOOTING:
TIP : If using our very convenient stretch hose, be aware there will be some loss of suction power, should you require
more suction power, we recommend you try our traditional central vacuum hose.
NOTE: IF MOTOR SUDDENLY STOPS:
1. The most common cause is a clogged hose. Disconnect vacuum hose from cleaner, hold one end
high up in the air and drop a quarter or similar object into the hose. If the quarter gets
stuck the hose is clogged. Try to unclog the hose with a long stick or see below “cleaning the hose”.
2. The bag is overfilled or fine dust has clogged the bag.
Replace with new bag.
DO NOT EMPTY AND REUSE
3. The vacuum cleaning tools are clogged.
4. Vacuuming large amounts of dust other than household dirt, such as dry-wall or fine wood dust can
block the bags pores fast, even if the bag is fairly new.
5. The motor filter is dirty and should be cleaned or replaced.
6. If vacuum unit is installed in a air tight compartment the exhausting air cannot escape, the motor can
overheat and shut off until it has cooled down and is restarted. See page 3 “very important”.
CLEANING THE STRETCH HOSE:
The stretch hose, besides all its’ conveniences, has a tendency to get clogged, especially if you have pets.
a) lift the hose up on both ends and dispense some liquid detergent into both ends.
b) with a garden hose, holding both ends still up, fill ¾ with water.
c) shake hose up and down, let detergent loosen the dirt.
d) stretch the hose as far as you can ( 2 people required ) and wash the dirt out with the full pressure of the
garden hose. Repeat if necessary.
e) Hang hose up, let hose drain and dry completely, up to 24 hours.
MAINTENANCE INSTRUCTION:
a) keep vacuum chamber clean. Use a brush to clean out dirt if accumulated.
Options:
au
h s
w en ac m
As for s y r A 12k as
o
C ns s o
2. ee
a fl
ac fl -ho
Att
am slp
c
g
v uu
embl pa
ts f f
i
ang
h
un whi
ex os
t of
fl
s go
ed
ex s o ne nd pi t wi P
.
the
tin
a
warm
i to e i
s b ns al
i m
t #
nel
-h e 0 5 f
c
X64
h
pi tnd
e t fun
r fro
th a
t le
6
s s
in
d
.
nap i b k f v .
l a s go th
VacPort sweeper pan.
Model A900 with LED lighting
Model A910 with out LED lighting
For CS8-RM models only.
Besides a standard vacuum valve you could add the VacPort in
your kitchen cabinet’s kick-board and use a broom to quick
clean the floor.
uum ou id the ab net
e v c ts e c i Ex
ve
ry
a
nto ac o acuum
nfi d s
c
o
ne p
VC g
lu
e o
ac
r h
.
eh
os
e
7
Page 8
08
6
plate W
em
T
per
a
P
s
odel
S
l C Mo
l
r
f a
:
e
in
l
tEd
u ting
c
e
h
t
r is
e
p
a
p
e
t
a
l
p
m
e
t
f
o
e
g
e
d
i
11" 2 w ( 80mm)
8
 Loading...