

interVac CS-6, CS-8, CS-RM User Manual
RECORD THIS INFORMATION
FOR FUTURE REFERENCES
MODEL:________________
THE COMPACT CENTRAL VACUUM SPECIALIST
DATE PURCHASED:_______
PLACE PURCHASED_
Manual # M10
Revision Date:11-21- 2018
INSTALLATION AND OPERATING MANUAL
120 VOLT POWER UNITS
MODEL CS-6 for Power Management
MODEL CS-8 Power Cord or Hardwired
MODEL CS-RM with Power Cord
_
________
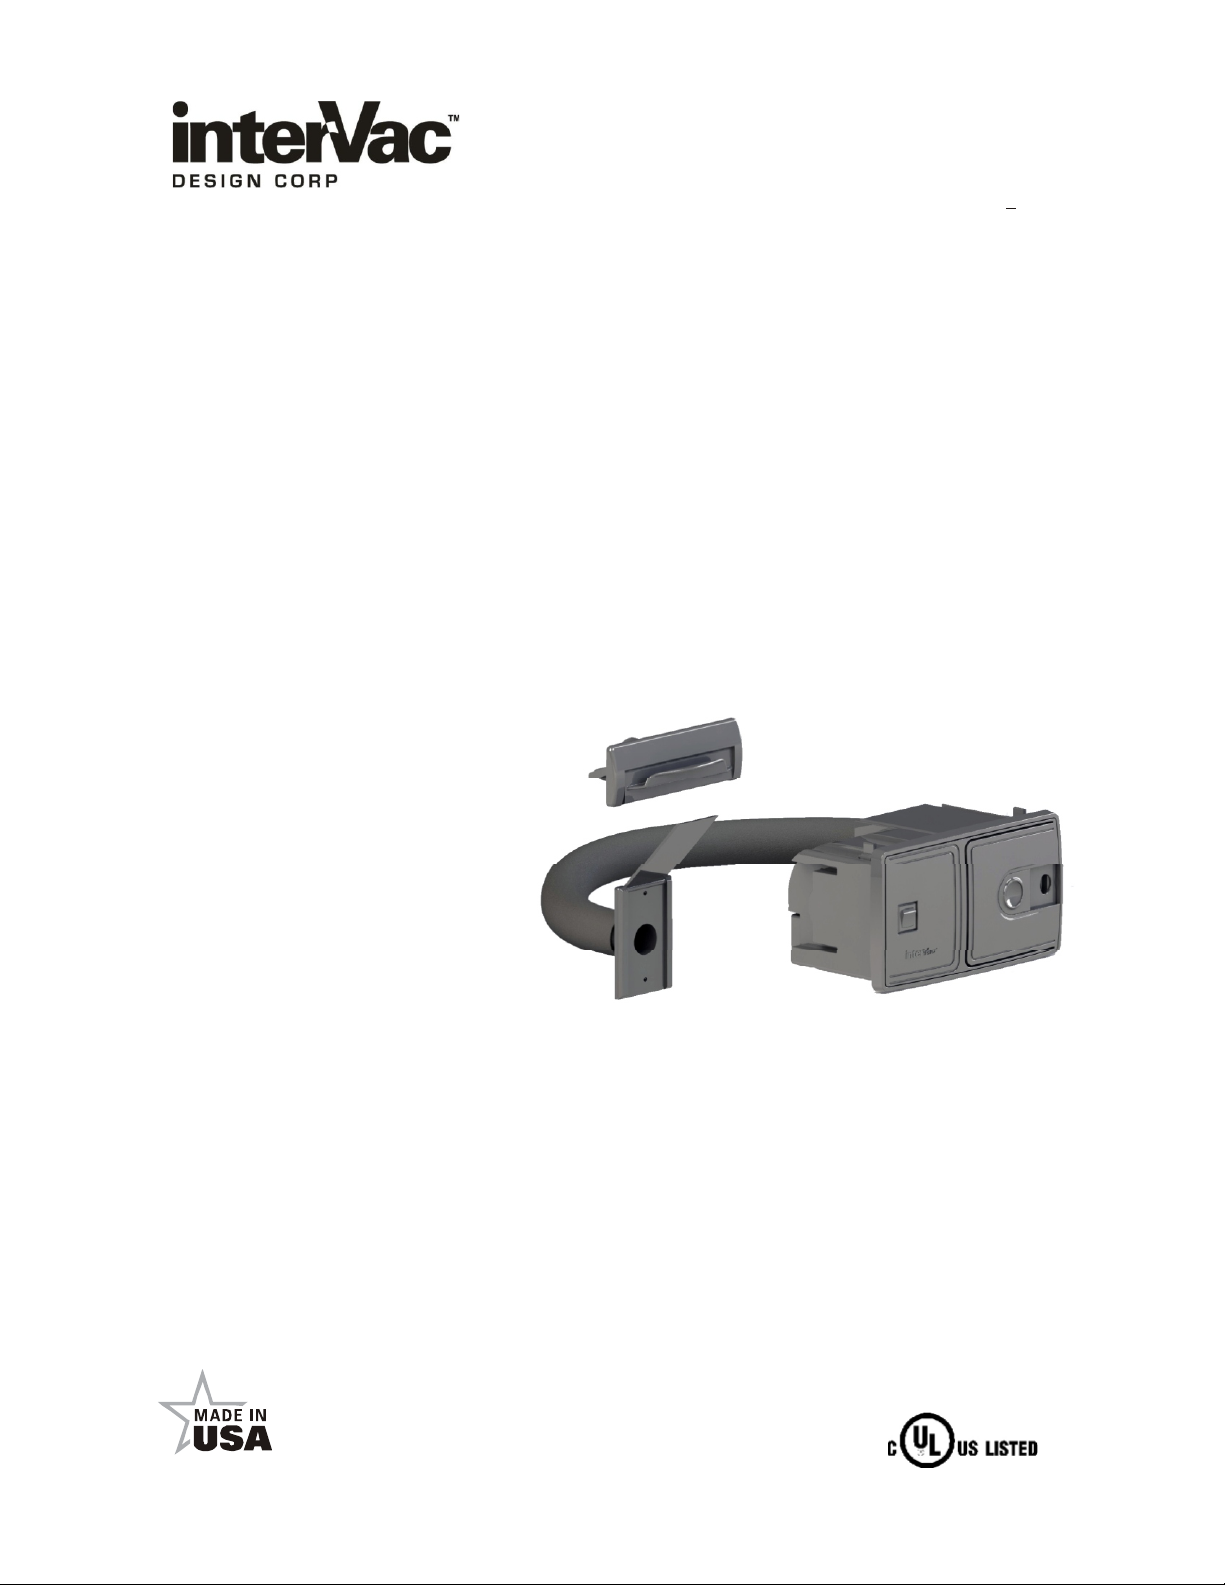
VacPort
VacPort
Model CS-6 + CS-8
Vacuum valve
PLEASE NOTE:
CS8 and CS6
The have single opening in the dust bag
CS-RM
The has double opening in the dust bag
IF YOU SHOULD HAVE ANY QUESTIONS OR EXPERIENCE A PROBLEM WITH YOUR INTERVAC
PRODUCT, DO NOT RETURN THIS PRODUCT TO THE STORE OR DEALER, PLEASE CALL OUR
SERVICE DEPARTMENT AT: 1-888-499-1925, WE ARE HERE TO HELP.
WARNING:
Owner read carefully.
Model CS-RM
Model CS8-RM
This manual must be read and understood before installation, adjustment,
service or maintenance is performed. This unit should be installed by a
qualified technician.
InterVac Design Corp. ,
2939 SW 42nd Ave. Palm City, Fl. 34990
1-888-499-1925 www.intervacdesign.com •
e-mail: intervac@intervacdesign.com
66XF
IMPORTANT SAFETY INSTRUCTIONS
POLARIZATION INSTRUCTIONS FOR MODELS CS-8 AND CS-RM WITH POWER.
These have a polarized plug (one blade wider than the other). This plug will fit in a
Polarized outlet only one way. If the plug does not fit fully in the outlet, reverse the plug.
If it does not fit, contact a qualified electrician to install the proper outlet. Do not change
the plug in any way!
When using an electrical vacuum cleaner, basic precautions should always
be followed including the following: Read all instructions carefully before
WARNING: TO REDUCE THE RISK OF
FIRE, ELECTRIC SHOCK, OR INJURY:
1.
Do not leave appliance when plugged in. Unplug from an
electrical outlet when not in use and before servicing.
2.
Do not use outdoors or on wet surfaces.
3.
Never operate this vacuum cleaner without a dust bag and filters
in place.
4.
Close attention is necessary when used by or near children.Do
not allow unit to be used as a toy.
5.
Use only for intended use as described in this manual. Use only
the manufacturer's recommended attac hments and dust bag.
6.
Do not use with damaged cord or plug. If appliance is not working
as it should, has been dropped, damaged, left outdoor s, or
fell into water, return the vacuum cleaner to InterVac or an
authorized service dealer for examination and repair.
7.
Do not put any object into openings. Do not use with any openings
blocked; keep free of dust, lint, hair and any other material that
may reduce air flow. When the secondary filter becomes dirty,
rinse in warm water or replace with a new filter. Filter should be
completely dry before using.
8.
Never drop or insert any object into any opening.
9.
Turn off all controls before unplugging.
10.
Do not pull or carry by cord, do not use cord as a handle, do not
close a door on the cord, or pull cord around sharp edges or
corners. Do not run appliance over cord. Keep cord away from
heated surfaces.
DO NOT USE WITH EXTENSION CORD!
using this vacuum cleaner.
11. .
Do not unplug by pulling on cord. To unplug, grasp the plug
not the cord.
12.
Keep hair, loose clothing, fingers, and all parts of body away
from any openings and all moving parts.
13.
Do not pick up anything that is burning or smoking, such as
cigarettes, matches, or hot ashes.
14.
Use extra caution when cleaning on stairs.
15.
Do not handle plug or appliance with wet hands.
16.
Do not pick up flammable or combustible liquids such as
gasoline, or use in areas where they may be present.
17.
Do not place objects against the vacuum cleaner. Keep area
clear.
18.
Do not step on the hose or pull the hose forcibly.
19.
Do not pick up large objects such as waste paper or cloth,
which may clog the hose.
20.
Do not install this vacuum cleaner in an area exposed to high
temperatures.
21.
Install this vacuum cleaner in a dry place.
22.
Do not attempt to service the vacuum cleaner. Unit is sealed
and can not be opened without damage to the unit. For
service, call your local authorized service dealer, or
InterVac Design's Customer Care Center.
SAVE THESE INSTRUCTIONS
for Household and R/V use
2
Specification:
CS-6 and CS-8 120 Volt, 9.5 Amp 60Hz, Weight 5.5 lb
CS-RM 120 Volt, 10 Amp 60Hz high efficiency motor, Weight 5.6 lb
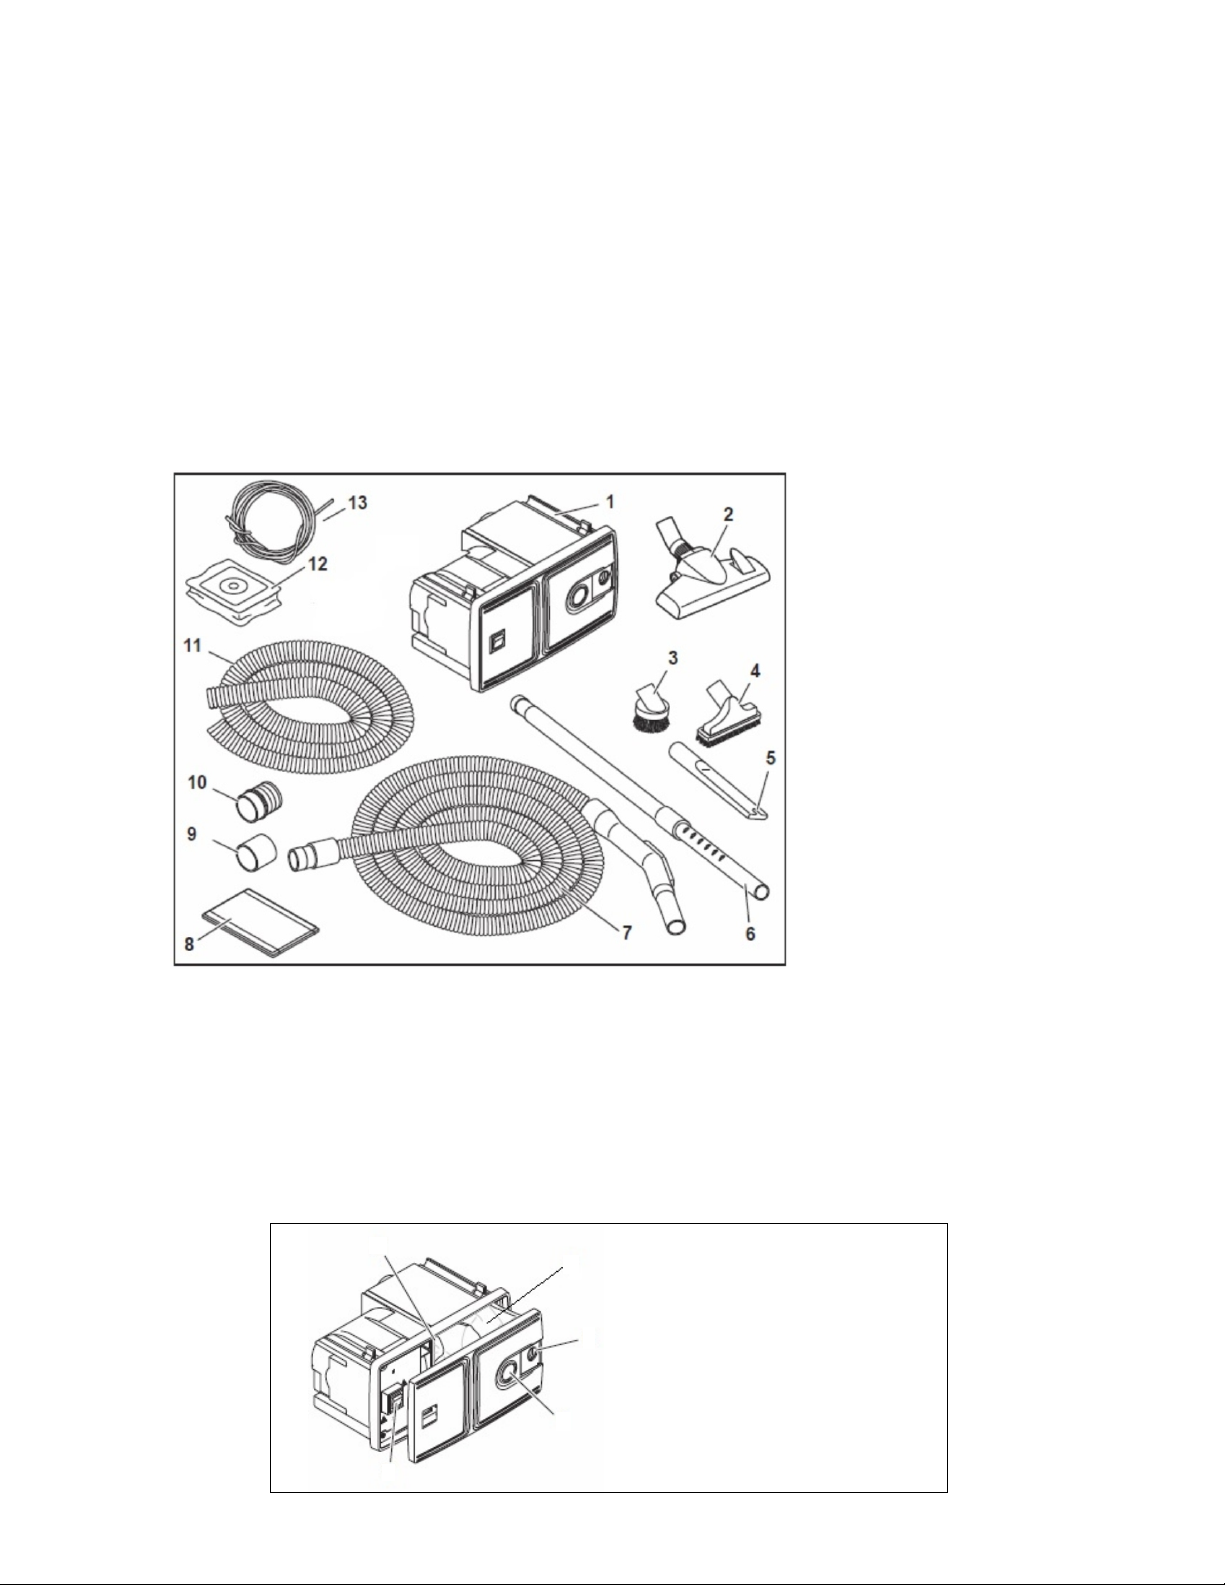
Parts List:
Vacuum Cleaner with screws and clamps
Vacuum tool kit: various
Read the Safety Instruction on the yellow label on the housing!
CAUTION: DISCONNECT POWER BEFORE ATTEMPTING TO INSTALL THIS UNIT.
CHECK FOR ANY OBSTRUCTIONS BEHIND THE MOUNTING SURFACE
Please Note:
Some of our CS
models do not have
the complete vacuum
tool accessory kit as
pictured on the left.
Part:
1) power unit
2) floor tool
3) dust brush
4) upholstery tool
5) crevice tool
6) telescoping wand
4
6
1
7) 20, 30 or 40 foot vacuum hose
depending on model
8) inlet valve for CS-RM only
9) pipe to pipe coupling, CS-RM only
10) pipe to flex-hose coupling, CS-RM
11) 2” dia. Black Flex-hose, CS-RM only
12) dust bags (2)
13) 6’ low voltage wire, for CS-RM only
5
1) on-off switch
2) sliding hole cover
3
3) lock-slider
4) motor filter
5) dust bag
7
2
6) vacuum housing
7) vacuum front panel
3

cedure as on page 5 and 6
For Power Management CS-6 only Hard Wiring model CS-8 or CSRM
Turn off the breaker to the area you will install the unit.
Find the power cable connecting the Microwave Oven to the Circuit Breaker.
Disconnect the exiting cable at the Microwave Oven. Reroute the cable to the Vacuum
cleaner installation.
In the back of the vacuum find the wire connections.
Strip all 3 wires by about 5/8”.
Tip: leave a loop in the wires from the vacuum to the wall where the cables are
securely attached.
From the Microwave (or other appliance) connect the Black wire to (line)(switched),
the White wire into (neutral) and connect the Ground wire under the washer screw
head to .
From the Circuit Breaker run a new 14 or 12 gage Romex cable to the back of the
vacuum.
Strip the 3 wires and attach the Black to , the White wire into the other (neutral)
and the GROUND wire to the other connection.
Attach the wire cover (supplied) over the connections by guiding the wires through the
opening at the bottom of the cover and screw cover into place.
On the front side of the vacuum, toggle the switch to “SOURCE”.
Switch-on the circuit breaker and check if the other appliance is operating.
Now toggle the switch on the Vacuum to “VAC”.
The other appliance will stop operating and the Central Vacuum is ready for use.
“G”
“N”
“G”
4
 Loading...