

Page 1

User Guide
Behind-The-Ear (BTE) Models:
Standard Tube
Thin Tube
Interton Crisp
Interton Share
Interton Step
Interton Gain
Page 2

2
3
Hearing instrument model:
Left serial number:
Right serial number:
Receiver tube length:
Battery s ize:
13 o ra ng e
312 b ro w n
675 bl ue
Open/standard fit ting:
Small Medium Large St. dome Custom mould
Programme Beep Descripti on of when to use
1
2
3
4
Delayed on-activatio n................14
Volume control.....................22
Push button.......................23
Wireless..............24, 25, 26, 42, 43
AutoPhone.....................29-33
Telecoil/Tele-loop system .............34
Direct Audio In put (DAI)...............35
Power device-exce eds 132 dB SPL .......
SPECIFIC F EATURES SUPP ORTED BY YOUR HE ARING SYS TEM:
Note: Your hearin g system might not sup port all 4 enviro nmental program mes. Ask your hear ing care professi onal for details.
Ask your he aring care profes sional to marked opt ions supported b y your hearing syste m.
Standard fitting
Ear hook
Open fit ting
Thin tube options
Page 3

4
5
Becoming Accustomed to Amplification
While purch asing a hearing system is a m ajor step, it is only one step in a pro cess toward more comforta ble
hearing. Su ccessfully adapting to th e amplification your hear ing system provid es takes time and consistent
use.
You will enjoy more ben efits from your Inte rton hear ing system by taki ng the followin g actions:
• Wear the system reg ularly in order to get comfor table with using it.
• It takes time to get us ed to a hearing a id. It may help to beg in by wearing you r hearing aid for short
periods – eve n as little as 15 minute s – and then grad ually building up your wearing time. In a way, it’s
no different than adjus ting to contact le nses. Spea k to you hearing c are professio nal, who can design
a schedule t ailored just for you.
• As you get more co mfortabl e with the system, in crease the wea ring time and wear your hearing system
in multiple t ypes of listening environments.
It may take as long a s several month s for your brain to get u sed to all the “new” s ounds around you. Following these suggestions will give your brain time to lear n how to interpret amplification a nd increase the
benefits you ge t from using an I nterton hearing system.
Th a n k Yo u
Thank you for selecting an Interton hearing system. We are prou d of our hearing products and are confident you have chosen one of the best products available.
Please familiarize yourself with the information in this guide. It contains important instructions for proper
use and care, tec hnical performan ce informatio n, and other gen eral information about you r hearing sys tem.
Your hearing system h as been adjusted to your par ticular hearing los s. Yo ur hearing health ca re professional
will explai n these adjustments and the sp ecial featu res of your par ticular mod el.
Page 4

6
7
Hearing instrument t ype desig nations for mod els included in this user g uide are: Model M70- 80e,
FCC ID: X26M70-80 e, IC: 6941C-M7080e, Model M70-80, FCC ID: X26M70-8 0, IC: 6941C-M7080 and
Model: M60, FCC ID X 26M60, IC: 6941C-M60. Please see page 12 for list of model s referring to all types.
Statement:
This devic e complies w ith Part 15 of the FCC Rule s and IC rules.
Operation i s subject to the fol lowing two co nditions: (1) this device may not c ause harmf ul inter ference,
and (2) this device m ust accept any i nterference receive d, including interferen ce that may cause undesired
operation.
Note: This equipme nt has been tes ted and found to com ply with the lim its for a Class B digital device,
pursuant to pa rt 15 of the FCC Rules an d ICES-003 of th e IC rules. These limits are d esigned to prov ide
reasonable protection against harmf ul interference in a residential inst allation. Thi s equipment generates,
uses and ca n radiate radio frequency en ergy and, if not in stalled and used in accordance with the i nstructions, m ay cause harmful interference to radio c ommunications. However, there is no gua rantee that
interfere nce will not oc cur in a particular installation. If this e quipment does cause ha rmful inter ference to
radio or televi sion reception, which can be determine d by turning the equipment of f and on, the use r is
encourag ed to try to corre ct the interfe rence by one or m ore of the following measures:
• Reorient or relocate the receiving antenna.
• Increase the separation b etween the equipment an d receiver.
• Connect th e equipment i nto an outlet on a circuit different from the one in which the re ceiver is co nnected.
• Consult the dealer or an experienced radio/TV technician for help.
Changes or modifications can void the user´s authority to operate the equipment.
Page 5

8
9
Intended use
Generic air-conduction hearing instruments are wearable sound-amplifying devices intended to compensate for impaire d hearing. The fundam ental operating principle of hearin g instruments is to receive, amplify,
and transfer sound to the ear dr um of a hearin g impaired pe rson.
List of countries:
Products without wireless functionality are intended for worldwide sales.
In the EU, products with wireless functionality with wireless functionality are intended for sale in countries
within European Economi c Area as well as S witzerla nd.
The products are in compliance with the following regulatory requirements:
• In EU: the device co nforms to the Esse ntial Requi rements according to Annex I of Co uncil Directive
93/42/EEC for medical d evices (MDD) and essenti al requirem ents and other re levant provisi ons of Directive 1999/5/EC (R&TTE).
• The declaration of conformity may be consulted at www.interton.com
• In US: FCC CFR 47 Part 15, subpart C.
• Other identified applicable international regulatory requirements in countries outside EU and US. Please
refer to local co untry requ irements for th ese areas.
• In Canada: the se hearing i nstruments a re certifi ed under the r ules of IC.
• Cet apparei l numériqu e de la classe B e st conforme à l a norme NMB-003 du Canada.
• Japanese Radio Law and Japanese Telecommunications Business Law Compliance. This device is
granted purs uant to the Japan ese Radio Law (電波法) and the Japanese telecommunications Business
Law (電気通信事業法) This device should not be m odified (other wise the granted design ation number
will become invalid)
Page 6

10
11
Hearing Instrument(s) model and
basic information ......................2, 3
Thank you ............................. 4
Becoming Accustomed to Amplification .......5
Intended use ...........................8
List of countr ies . . . . . . . . . . . . . . . . . . . . . . . . . 8
Instruments component identification ........ 13
On/Off function ........................ 14
Delayed activation (optional) ............... 14
Inserting/ Replacing the battery ............ 15
Low batter y indicator .................... 17
Inserting/removing hearing instruments....... 18
Volume control (optional) .................22
Push button (optional) ...................23
Flight mode (wireless devices only)....... 25, 26
Telephone use ........................27
Listen to radio or T V .................... 28
Cellular ph ones ........................28
AutoPhone (optional) ..................29-33
Telecoil (optional) .......................34
Tele-loop systems (optional) ...............34
Direct Audio input (optional) ...............35
Contents
Connecting/Disconnecting audio boots ......35
Care and maintenance...................36
Cleaning earmoulds.....................38
Cleaning thin tubes and domes ............39
How to apply dome s ....................40
Wireless warnings and precautions
(wireless devices only) ...................42
General warnings....................... 43
Troubleshooting guide ...................46
Technical Data ......................... 54
Warranty and repairs ....................57
Temperature test, transport and
storage information......................58
Hearing instrument expectations ........... 59
Warning to Hear ing Aid Disp ensers (US onl y) ..59
Important Notice for Prospective
Hearing A id Users (US only ...............60
Children wit h hearing loss (US only) ......... 62
High sound pressure levels ...............62
Page 7

6
1
5
4
3
2
12
7
8/9
13
14
8/9
2
11
10
12
13
Hearing instruments of type
M70-8 0 are avai lable in the
following variants:
CI370/80-DVIW
CI370/80-DVIW Open
CI270/80-DVIW
CI270/80-DVIW Open
ST680 -DW
ST680 -DW HP
ST480-DW
ST280 -DW
ST670-DW
ST670-DW Open
ST4 70 -D W
ST270-DW
Non wireless hearing instruments a re availa ble in th e following variants:
SR138 0-DVI
SR1370 -DVI
SR136 5- DI
SR1280 -DVI
SR127 0- DVI
SR 118 0 -V I
SR 1170 -VI
GAN39 0-DV I
GAN290-DVI
Hearing instruments of type
M60 ar e availab le in the f ollowing variants:
CI365-DIW Open
CI365-DIW
CI265-DIW Open
CI265-DIW
ST665 -DW
ST665-DW Open
ST465-DW
ST265 -DW
1. Push button
2. Battery compar tment & On /Off switch
3. Sound outlet
4. Front microphone inlet
5. Back microphone Inlet (optional)
6. Volume control (optional)
7. Direct audio input
8. Left/Right indicator
(Lef t=B lue/ Rig ht=R ed)
9. Battery lock (optional)
10. Model
11. Manufacturer
12. Serial number
13. Ear hook
14. Open fitting thin tube
Analogue VC Digital VC to ggle
Page 8

14
15
Getting started
On&Off function
1. When the bat tery door is closed, the he aring instr ument turns
on, and the defau lt program wi ll be activ ated.
2. To turn off the hearing instrument, ope n the batter y door. Many
individu als can use the ir fingernail to pull it open.
i
Whenever the hearing instruments are not in use, remember to turn them of f
to avoid unnecessary battery consumption.
Delayed activation
Hearing instruments c an be turned o n once you have plac ed them on your e ars. If you prefer to turn them
on just prior to placing them o n your ear, your hearin g care profess ional can ac tivate a function called
Delayed on-activation. This function will delay the time in which the hea ring instru ments turn on by s everal
On
Off
seconds af ter the battery comp artment is closed. Wi th Delayed on-activation, a be ep will be heard for each
second of the delay period.
Inserting/Replacing the battery
1. Open the battery door completely by using your fingernail.
2. Remove the used bat tery if pres ent. Inser t the new batter y with the positive side
in the correct position.
3. Gently close the batter y door.
i
Always use new Zinc-Air batteries that have a mi nimum remai ning shelf-li fe of 1 year.
Page 9

16
17
Low batter y indicator
Your hearing care p rofessiona l can set your he aring instr ument to give an ac oustical indication whe n the battery is reac hing its end of li fe. The heari ng instrume nt will reduc e amplification and emit a melody if bat tery
power gets too low. This si gnal will recur every fi ve minutes (15 minutes for GAN390-DV I and GAN290-DVI) until the heari ng instrument automatically switches off. It is recomm ended that you ke ep spare batte ries on hand.
Low batter y indicator ( instrument s paired with a ccessori es only)
Active usage of th e Interton wireless acce ssories (Remote Control, Pho ne Clip and T V Streamer) requires
more batter y power from the h earing ins truments tha n when these a re working on their own. When th e
battery i n the hearing instrument h as depleted to a leve l at which use of th e Interton T V Streamer T V and
Phone Clip ca nnot be suppo rted, the hea ring instrument will play t wo sets of desce nding tones. Af ter
this, your hearing instrum ent and Inter ton Remote Contro l will continu e to work as usual, bu t you will not
be able to use your I nterton T V Streamer an d Phone Clip. At some point the batte ry level wil l not suppor t
the remote control either and you w ill once again hear the descending tone s. The hear ing instruments will
continue to work a s usual. Once a n ew battery is inserted, full operati on of the accessories will resume.
i WARNING
1. Remove the batteries to prevent leakage whe n the hearin g instruments are not in use for an ex tended
period of time.
2. Do not attempt to recharge batterie s (Zinc Air) w hich are not specificall y designated a s recharge able
because they may leak or explode.
3. Do not plac e batteries i n your mouth. Con sult a physici an immediately if a batter y has been swa llowed,
as they can be ha rmful to your he alth.
4. Keep bat teries away fro m pets, childre n and indivi duals who are m entally ch allenged.
5. Do not atte mpt to dispose of bat teries by bur ning them. Use d batteries a re harmful to the environment.
Please dispose of them according to local regulations o r return them to your h earing care practitioner.
Page 10

18
19
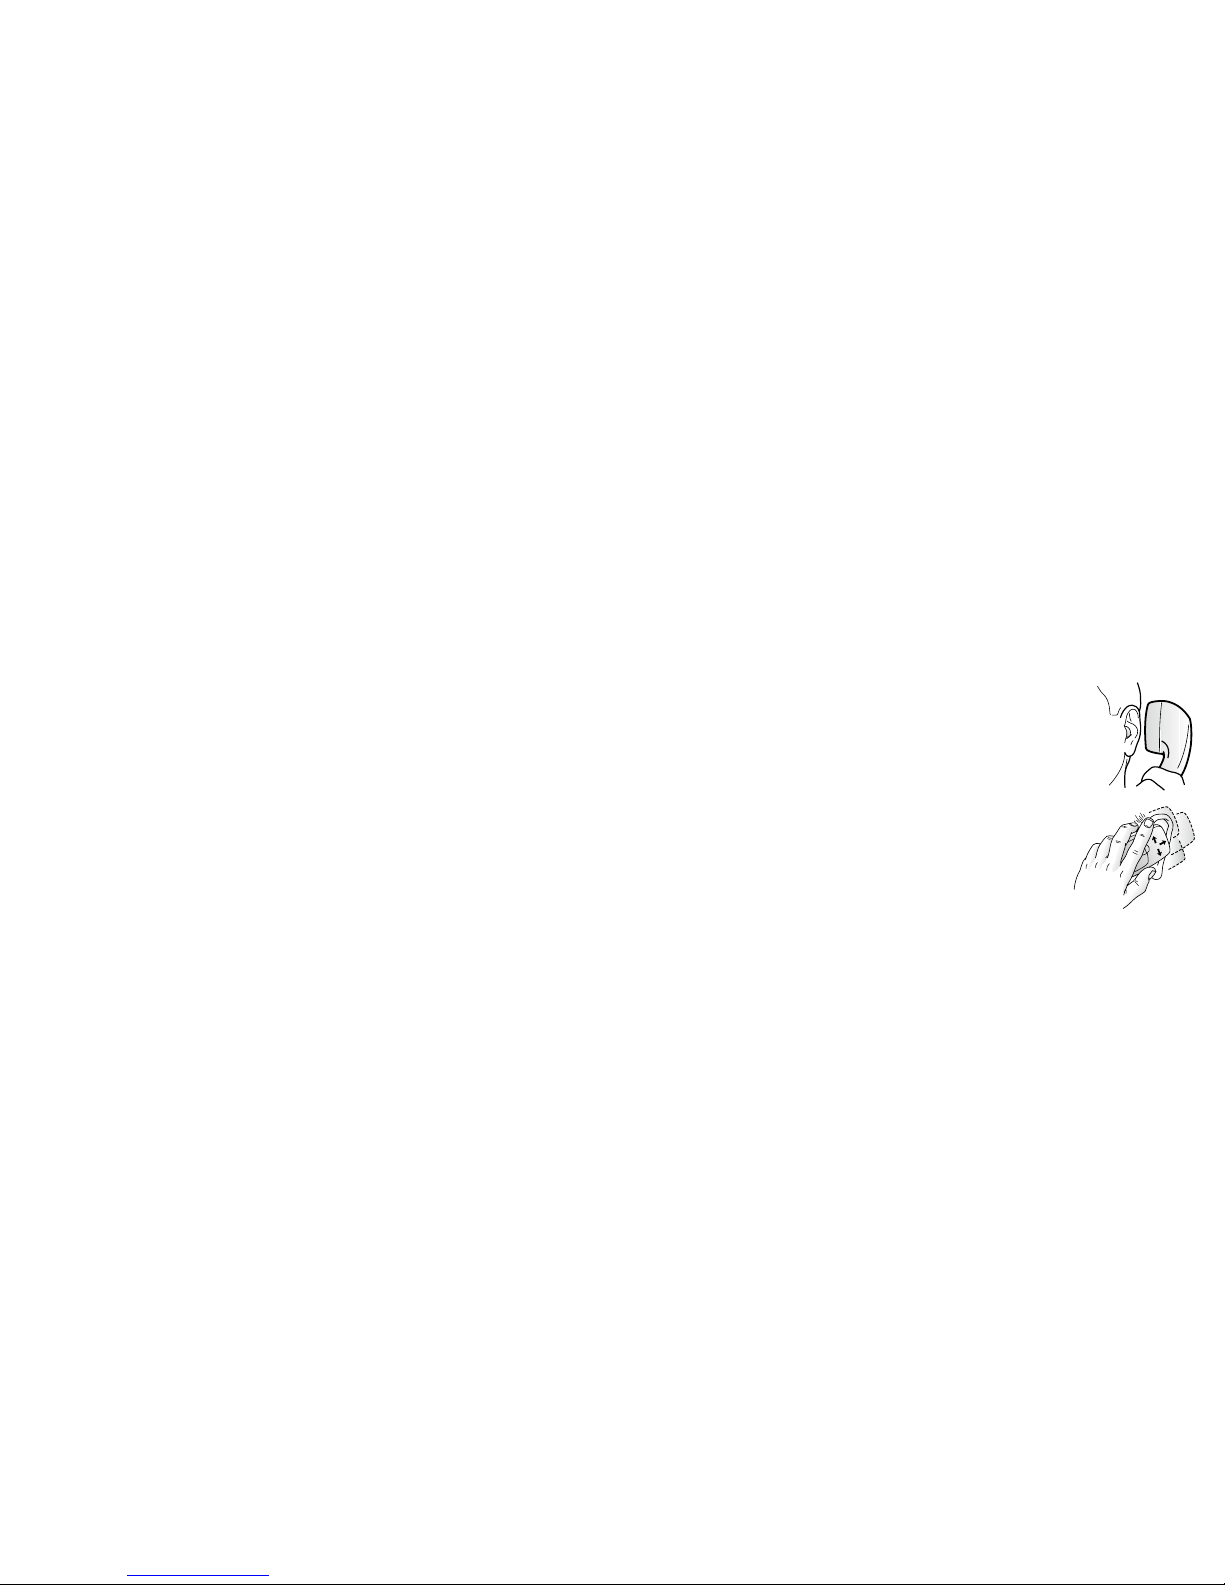
Inserting/Removing hearing instruments
Insertion (custom earmoulds)
1. Hold the ear mould betwe en your thumb a nd index finger and position its sound outlet in your ear canal.
2. Sli de the earmo uld all the way into your e ar with a gentl e, twisting move ment.
3. Turn the top part of the earmould g ently back wards and for wards so that it tu cks behind the fold of skin
above your ear c anal.
4. Move the e armould up and down and g ently press to ensure it is po sitioned correctly i n the ear. Opening
and closing your mouth can ease insertion.
5. Make sure th e hearing instrument is s eated behind the ear.
By experim enting, an eas ier method may b e discovered. Wi th proper insertion, he aring
instrumen ts should fit snugly but comfortably. If the he aring instr uments caus e irritation
of the ears, contact your hearing care profe ssional.
i CAUTION
Never attempt to mo dify the sh ape of the hear ing instrum ent, earmoulds, or tubing you rsel f.
i
It may be helpfu l to pull your ear up a nd outward with your opposite hand during
insertion.
Page 11

20
21
Insertion (domes/custom earmoulds with thin tubes)
1. Hold the thin tube where it be nds, and gentl y push the dome i nto the ear canal. Push the dome fa r
enough into the e ar canal so th at the thin tube li es flush with th e head.
2. It is im portant that the tube and th e dome fit correctly into your ea r.
3. When the d ome is place correctly, you should not be able to see the thin tube stick ing out when facing
a mirror.
i CAUTION
You should never attem pt to bend or modify the sha pe
of the thin tube.
i CAUTION
Use only original Interton/GN Hearing consumables
e.g. tubes and dome s.
Removal (custom earmolds)
1. Hold a portion of your earmould towards the back of the ear.
2. Pull the earmould outward and simultaneously rotate the earmould forward.
3. Consul t your hearin g care profess ional if you have difficulti es removing th e hearing instrument.
Removal (domes/custo m earmoulds wi th thin tubes)
1. Hold the thin tube with your thum b and forefinge r and pull the tub e outward.
2. For th in tube custom earmould s, grasp the removal string a nd pull the earmould
outward.
3. Consul t your hearin g care profess ional if you have difficulti es removing th e
hearing instrument.
Page 12

22
23
Operation of the hearing instrument
Volume control (optional)
The volume co ntrol will allow the volume of hearing instr uments to be increased or decreased.
1. To increase the volume, push the volume c ontrol up or move the w heel
upwards.
2. To decrease the vo lume, push the volume control down or move the
wheel downwards.
When volume is increase d or decreas ed, a beep sign al will be hea rd for each incremental
change. Whe n the upper or l ower limits of the volume range are reached, a beep signal with a longer duration will be he ard. During th e fitting of the instrument, your h earing care profession al will have chosen an
optimal volum e setting for you. W hen switchin g the instrume nt on, the volume w ill have this optimal setting.
Push button
Depending on your exper ience level w ith hearing instruments, in dividual h earing ne eds, and the ty pe of
listening env ironments you ex perienc e, your hearing
care professional may activate additional programmes.
If additional programmes have been activated, the following list explains how they work.
1. You can switch betwee n programme s by pushing
the push button once.
2. You will then h ear one or more beeps. The number of beeps indicates wh ich program me you have
selected (one b eep = progra mme one, two be eps = program me two, etc.).
3. When the h earing ins truments are tu rned off a nd then back on, th e hearing in strument al ways returns
to the default setting (programme one).
Page 13

24
25
Only appli cable to wire less device s.
If your heari ng system suppo rts wireless functionality an d it is paired wi th wireless accessor y like TV
Streamer you can activate streaming mode.
1. Push and hold the push button for 2 seconds.
2. You will then h ear shor t melody that i ndicates stre aming mode.
To switch back to environme ntal program p ush the push bu tton shor tly. Hearing Instr ument will return to
the default setting (programme one).
For easier eve ryday use of you r wireless h earing ins trument controls you can use
wireless remote control. Ask your hearing care professional for more information.
Flight mode. Only applicable to Wireless devices*
i WARNING
When board ing a flight or entering an are a where RF transmitter s are prohibited, wireles s functionality mus t
be deactivate d, as it is not allowed to radiate radio signals during fl ights or in other wise restricted areas.
For Crisp devices:
It is possibl e to disable wireless operation by openi ng and closin g the batter y compar tment of the hea ring
instrumen t while at the same time pressing the push button. When dis abled manu ally, wireless op eration
may be re-ena bled by opening and closi ng the batter y compar tment norm ally, (i.e. without at the sa me
time pressi ng the push but ton).
*Instruments paired with accessories only
Page 14
26
27
Telephone use
Finding the optimal position for holding a telephone may require practice for some
individu als, and one or more of the followin g suggestio ns may be helpfu l.
1. Hold the telephone as you would normally.
2. Hold the telephone towards the top of the ear (closer to where the microphones
are).
3. If whistli ng occurs, it m ay take a few seconds of holding the te lephone in th e
same position before the hearing instrument eliminates the feedback.
4. Any whistling may also be decreased by holding the te lephone sl ightly away from
th e e ar.
5. Depending on your individual needs, your hea ring care professional m ay activate
a programme specifically for telephone use.
For Step d evices:
It is possibl e to disable wireless operation by openi ng and closin g the batter y compar tment three tim es
within a ten sec ond period (open-close, o pen-close, open-clos e). Your instruments will now b e in flight
mode.
If the hearing instrument is in flight mode, the hearing i nstrument must have been op erating in flig ht mode
for at least 10 seconds before attempting to enable wireless again. it is possible to re-enable wireless
opera tion by opening and closing the battery door once. 10 seconds after this operation is completed,
wireless o peration will begin agai n.
i
It is impor tant to wait an additional 15 seconds after wireless function resumes be fore open ing and
closing the battery compartme nt again for any re ason. If the battery compa rtment is o pened and closed
during this 15 seco nd window, flight mode will resume.
Page 15

28
29
Listen to radio or TV
When listen ing to the TV or the radio, start o ut by listening to news commentator s since they usually spea k
clearly, then tr y other programmes. If you find i t difficult to listen to TV or ra dio, your heari ng care professional will be able to give you advice on availa ble access ories to enha nce your listen ing capabilities for T V
and radio.
Cellular phones
Your hearing instrument is designed to comply with the most stringent Standards of International Electromagnetic Compatibility. However, not all cell phones are hearing instrument compatible. The varying degree of distur bance can be d ue to the nature of your particula r cellular p hone or of your wi reless tele phone
service provider.
If you find it dif ficult to obtain a good result w hile using you r cellular p hone, your hea ring care profe ssional
will be able to gi ve you advice on ava ilable acc essorie s to enhance lis tening capabilities.
AutoPhone (optional)
The AutoPhone function, allows your hearing instrument to automatically switch to your tele phone programme when a telephone receiver with an AutoPhone magnet is raised to the ear. When the telephone
receiver is removed from the e ar, the hearing instr ument automatically retur ns to the previous listening
programme.
Page 16

30
31
Placement of AutoPhone magnets
Place AutoPhone magnet on your telephone receiver to allow operation of the
AutoPhone function. In order to place AutoPhone magnet properly:
1. Clean the telephone receiver thoroughly.
2. Hold the telephone vertically, in a position similar to when making a telephone
call.
3. Place the magnets just be low the telepho ne receiver. Make sure n ot to
cover the micro phone open ings. If nece ssary, move the mag net to another pos ition to improve ease of
use and comfo rt while speaking.
4. If you are not satisfied with the strength of AutoPhone, you can reposition the Au toPhone magnet or
add additional AutoPhone magnets.
i
Only use a recommended cleaning agent to clean the telephone prior to placing the magnet on the
phone.
AutoPhone usage
Telephones can b e used in a norm al manner. A short melody will indicate that the AutoPhone feature has
automatically switched the hearing instrument to your telephone programme. Initially, you may need to
move the telephone receiver slightly to find the best position for reliable AutoPhone activation and good
hearing on the telephone. When you remove the telephone re ceiver AutoPh one will stay activated for a
few seconds to avoi d accidenta l switching of f. After that hea ring instru ment will swi tch to previously u sed
environmental programme.
Page 17

32
33
i WARNING
AutoPhone warnings
1. Keep magnets o ut of reach of pets, children an d mentally challeng ed persons. If a magnet is swa llowed,
please seek advice from a medical practitioner.
2. The AutoPhone magnet may affect some medical devices or electronic systems. The manufacturer of
any magnetic ally sensi tive devices (e.g. pace makers) shou ld advise you re garding app ropriate safet y
precautio ns when usin g your hearin g instrumen t and magnet in close proximit y to the medica l device
or electron ic system in question. If the manu facturer cannot issue a statement, we recomm end keeping
the magnet or a telephone equipped with the magnet 30 cm (12”) away from magnetically sensitive
devices (e.g. pacemakers).
i CAUTION
AutoPhone precautions
1. High distortion during dialing or phoning may mean that the magnet is not in the optimal position relative
to the telephon e receiver. To avoid the issue, pl ease move the magnet to another p lace on the telephone
receiver.
2. Only use magnets supplied by Interton/GN Hearing.
Page 18

1
34
35
Telecoil (optional)
If equipped, a telecoil can be activated by your h earing care profession al and acces sed through o ne of
the additional programmes. A telecoil picks up a telephone’s magnetic signal and converts it to sound. An
optional telephone programme may help to improve speech understanding on the telephone. When using
a telecoil pro gramme, the receiver of the telephone may ne ed to be held clos er to the hearin g instrument.
The handset of the telephon e may need to be moved to sl ightly dif ferent posi tions in order to find the best
receptio n.
Tele-loop systems (optional)
Many places, such as theatre s, houses of wor ship, and schoo ls are equipp ed with tele-l oop systems.
When using a te lecoil prog ramme with tel e-loop system s, sound is picke d up directly and may improve
speech un derstand ing. If there is no so und from the he aring instr uments in a tele -loop system and with a
telecoil pro gramme acti vated, the tele-loop system may not be tur ned on or is not op erating correctly. If
a facility i s not equippe d with a tele-loop system, sitti ng as close as po ssible to the fro nt may be helpfu l.
Direct Audio Input (optional)
Use of Direct Au dio Input (DAI), which enables a d irect connection of the he aring instr uments to items such
as televisio n, radio, and remote microphones, m ay increase speech unde rstanding for some indiv iduals.
The sound so urce is conne cted to the heari ng instrume nts by a cable or a wi reless FM syste m to the audio
boot. This accessory c onnects to the bot tom of the heari ng instrume nts, and once pro perly clic ked into
place, the hearing instruments switch to DAI automatically.
Connecting/Disconnecting audio boots
Connecting audio boots
1. Align the tip of th e audio boot with the groove ju st above the battery com partment
and below the model numbe r.
Page 19

3
2
4
5
36
37
2. Once in place, move the b oot in the direction of the batter y compar tment.
3. Gently click the audio b oot onto the hear ing instrume nt.
Disconnecting audio boots
4. Press a nd hold the but ton on the front side of the audio bo ot.
5. Gently remove the audio boot from the hea ring instrument.
Care and maintenance
i
Proper handling
Please follow the following instructions to prolong the durability of your hearing instruments:
1. Keep your hea ring instrument cle an and dry. Wipe the case wi th a soft cloth or tissue af ter use to remove
grease or moisture. Do not use water or solvents, as th ese can dam age the hearing instrume nt(s).
2. Neve r immerse he aring instr uments in water or other liquids, as liquids may c ause perma nent damag e
to the hearing i nstruments.
3. Avoid rough handling of hearing instruments or dropping them on hard surfaces or floors.
4. Do not le ave hearing instruments in or near direc t heat or sunlight, such as in a hot, pa rked car, as
excessive he at can cause damage or defor m the casing.
5. Do not wear your instrume nt while showe ring, swimmi ng, in heavy ra in or in a moist atm osphere such
as a steam bath or sauna.
6. If your instr ument does g et wet, or if it has be en exposed to high humidit y or perspir ation, it shoul d be
left to dry out overnight with the batter y out and the battery compartment open. It is also a good idea to
put the instru ment and bat tery in a sea led container together wi th a drying a gent (desicc ator) overnigh t.
Do not use the instrument until it is completely dry. Consult your hearing c are professional as to which
drying a gent to use.
7. Remove your hearing instrum ent when applying such things as cosm etics, per fume, aftershave, hair
spray, and suntan lotion. These might get into the instrument and cau se damage.
Page 20

38
39
Cleaning earmoulds
1. Remove the ear mould and at tached tubi ng from the hea ring instruments prior to
cleaning.
2. Cle an the earmould using a mild soap, and rinse w ith lukewarm water.
3. After cl eaning, dr y earmoulds thorough ly and remove any residual water a nd debris
from the tubin g utilising an a ir bulb and wi re loop.
i
Earmould tubing may become stiff, bri ttle, or disco loured over tim e. Contact your
hearing care professional regarding tube changes.
Cleaning thin tu bes and domes
1. Remove thin tubes from hear ing instrum ents before cle aning by unscrewing
them counter clockwise.
2. Wip e down thin tube s and domes with a damp cloth.
3. In order to clear the thin tub e of moisture and d ebris, push the black cleaning
rod through the thin tube, beginning at the end opposite the dome.
i
Thin tube and dome systems sh ould be changed every th ree months or
sooner, should the components become stiff or brittle.
Page 21

1
2
40
41
How to apply domes
It is recommended that your hearing care professional change domes, as incorrect dome re place ment
could result in the dome fal ling out in the e ar.
Mini domes
1. Push the new dom e over the flange s on the thin tube.
2. Make sure that the new dome is properl y and secure ly mounted.
Standard domes
Standard do mes are mounted in a similar manner to mini do mes, but a few extra steps are required. Tulip
domes cons ist of two “petal s”. It is important to note that th e largest petal is the outerm ost petal.
To ensure this:
1. Push the largest petal away from the thin tube usi ng a finger. This bend s the petal for ward.
2. Then push the largest petal back, and it will be placed on top of the s maller petal.
Page 22

42
43
Only applicable to wireless devices
i CAUTION
General precaution (wireless he aring instr ument): When the w ireless fu nction is acti vated, the device uses
a low-powered dig itally cod ed transmis sions in orde r to communicate with other wireless devices. Although unlikely, nearby electronic device s may be affec ted. In that case, move th e hearing in strument
away from the affected electronic device. W hen using wi reless fun ctionalit y and the devi ces are affected
by electromagnetic inter ference, move away from the source of interferenc e.
i WARNING
General wa rnings (he aring instr ument): Be caref ul when board ing flights, to reme mber to deacti vate the
wireless functionality.Turn off your wireless functionality by using the flight mode in areas where radio frequency emission is prohibited.
Applicable to all devices
i WARNING
General warnings
1. Consult a he aring care p rofessiona l if you discover a fo reign objec t in your ear canal, if you exper ience
skin irri tation, or if exces sive ear wax accumulates w ith the use of the he aring instr ument.
i
For use of wireless functionality only use Interton/ GN Hearing accessories. For further guidance
regarding e.g. pai ring, pleas e refer to the user gu ide of the relevant Interton/ GN H earing accessor y.
This devic e operates in the f requency range of 2.4 GHz - 2.48 GHz.
This devic e includes a R F transmitter that operates i n the range of 2.4 GHz - 2.48 GHz.
Page 23

44
45
2. Dif ferent types of radiation, e.g. from NMR, MRI or CT sca nners, may da mage the instr ument. There fore, do not wear the i nstrument during these o r other corresponding sc anning proc edures. Oth er
types of radiation (burglar alarms, room surveillance systems, radio equipment, mobile telephones
etc.) will not damage the i nstrument. They could, however, moment arily affect the sound q uality or
create strange sounds from th e instruments.
3. Do not wear hea ring instru ments in mine s, oil fields, or oth er explosive areas unless those areas are
certified for hearing instrument use.
4. Do not allow oth ers to use your he aring instr uments. This m ay cause dama ge to the hearin g instruments or to the hea ring of the other i ndividua l.
5. Instrume nt usage by chil dren or menta lly challe nged persons should be s upervi sed at all time s to
ensure thei r safety.The hearing instr ument conta ins small parts that coul d be swallowed by ch ildren.
Please be mindful not to leave ch ildren unsu pervised with this he aring instr ument.
6. Hearing in struments should be used o nly as prescribed by your he aring care p rofessiona l. Incorrect
use may result in sudden and permanent hearing lo ss.
7. S pecial ca re should be exerc ised in sele cting and fit ting a hearing instrument(s) whose maxi mum
sound pressure level exceeds 132 dB SPL (with an IEC 60711:1981 occluded ea r simulator), beca use
there may be a ris k of impairing the remainin g hearing of th e hearing in strument us er.
8. External devices c onnected to the electrical input must be s afe according to the requireme nts of IEC
60601-1-1, IEC 60065, or IEC 6 0950-1, as appropriate.
i CAUTION
Only connect Interton h earing instruments to Inte rton/GN Hearing acce ssories intended and qualified to be
used with Interton hearing instruments.
If device is bro ken, do not use.
Page 24

46
47
TROUBLESHOOTING GUIDE
SYMPTOM CAUSE
No sound • Not turned on
• Dead battery
• Battery d oor will not close
• Blocked earmould or tube
POSSIBLE REMEDY PAGE IN THIS USER GUIDE
• Turn on by closing the battery door 14
• Replace battery 15
• Insert battery properly 15
• Clean earmould or tube 38, 39
Page 25

48
49
TROUBLESHOOTING GUIDE
SYMPTOM CAUSE
Not loud
enough
• Incorrect earmould placement
• Blocked earmould or dome
• Change in hearing sensitivity
• Excessi ve ear wax
• Volume set too low
POSSIBLE REMEDY PAGE IN THIS USER GUIDE
• Reinsert earmould 18
• Clean earmould, replace dome, replace filter 38
• Consult your hearing care professional -
• Consult your physician -
• Increase the volume control if available or consult your hearing
care professional
22
Page 26

50
51
TROUBLESHOOTING GUIDE
SYMPTOM CAUSE
Excessive
whistling / feedback
• Incorrect earmould placement
• Incorrect dome placement
• Excessi ve ear wax
• Feedback control may need adjustment
• Earmould tubing worn or damaged
• Thin tube connection loose
• Hearing instrument settings not optimal
POSSIBLE REMEDY PAGE IN THIS USER GUIDE
• Re-insert earmould carefully 18
• Re-insert dome 36
• Consult your hearing care professional -
• Consult your hearing care professional -
• Consult your hearing care professional -
• Change thin tube or consult your hearing care professional -
• Consult your hearing care professional -
Page 27

52
53
TROUBLESHOOTING GUIDE
SYMPTOM CAUSE
Sound
distorted /
not clear
• Weak battery
• Improper earmould or dome fit
• Hearing instrument damaged
• Hearing instrument settings not optimal
Wireless d oes not work • Possible Root Cause - Device i s in flight mode
If there are a ny other prob lems not ment ioned in thi s guide, ple ase contact yo ur hearing c are profes sional.
POSSIBLE REMEDY PAGE IN THIS USER GUIDE
• Replace battery 15
• Consult your hearing care professional -
• Consult your hearing care professional -
• Consult your hearing care professional -
• For Crisp dev ices with a push button: Open a nd close the battery com partment. For Crisp
devices wi thout a push bu tton: Open and c lose the batte ry door twice within 10 seco nds.
• For all Step devices: Open an d close the battery compa rtment on ce. Wireles s will reactivate 10
seconds later (If Root Cause is d evice in flight mode)
Page 28

54
55
Technical Data
Open fitti ng (Thin tu be)
Hearing Instrument Model
Maximum output
(2ccCoupler / IEC 60118 -7)
Batter y
size
ST665-DW Open, ST465-DW Ope n, ST265-DW
Open
117 dB S PL (typical ) 312
CI365-DIW Open, CI265-DIW Open 119 dB SPL (typica l) 312
ST670-DW Open, ST470-DW Open, ST270-DW
Open
122 dB SPL (typical) 13
CI370-DVIW Open, CI270-DVIW Open,
SR1365-DI Open
123 dB SPL (typical) 13
SR1370-DVI Open, SR1270-DVI Open 126 dB SPL (typical) 13
Technical Data
Ear hook + earmould
Hearing Instrument Model
Maximum output
(2ccCoupler / IEC 60118 -7)
Batter y
size
ST665-DW, ST465-DW, ST265-DW 122 dB SPL (typical) 312
CI365-DIW, CI265-DIW, SR1365-DI 123 dB SPL (typical) 312
CI370 -DVI W, CI270 -DVI W 127 dB SPL (typical) 13
ST670-DW, ST470-DW, ST270-DW SR 1370 -D VI ,
SR1270-DVI, SR1170-VI
128 dB SPL (typical) 13
CI380 -DVIW, CI280-DVIW 13 0 dB SPL (typic al) 13
ST680-DW, ST680-DW HP, ST480-DW, ST280-DW 131 dB SPL (typical) 13
Page 29

56
57
Technical Data
Ear hook + earmould
Hearing Instrument Model
Maximum output
(2ccCoupler / IEC 60118 -7)
Batter y
size
SR1380-DVI, SR1280-DVI, SR1180-VI 136 dB SPL (typical) 13
GAN39 0-DVI, G AN290 -DVI 139 dB SPL (typical) 675
Warranty and repairs
Interton provides a warranty on heari ng instrume nts in the event of defe cts in workma nship or mater ials,
as described in applicable warranty documentation.
In its service policy, Interton pledges to secure functionality at least equivalent to the original hearing instrument.
As a signatory to the United Nations Global Compact initiative, Interton is committed to doing this in line
with environ ment-friendl y best practices. Heari ng instrume nts therefore, at Interton’s discretion, may be
replaced by new products or products manufactured from new or serviceable used parts, or repaired using new or refurbished replacement parts.
The warranty period of h earing ins truments is de signated on you r warranty c ard, which is provided by your
hearing care professional.
Page 30

58
59
For hearing instruments that require service, please contact your hearing care professional for assistance.
Interton hearing instruments that mal function mu st be repaire d by Interton qualified techni cian. Do not
attempt to open the c ase of heari ng instrume nts, as this will invalidate the warr anty.
Temperature test, transport and storage information
Interton Hearing Instruments are subjected to variou s tests in temperature and damp heating cycling
betw een -25° C (-13F) a nd +70° C (+158F) acc ording to interna l and industr y standards.
During transport or storage, the temper ature should not exceed the limit values of -20° C (-4F) to +60° C
(+140F) and relative hu midity of 90% R H, non conden sing (for limite d time). The air pres sure betwee n 500
and 1100 hPa is appropriate.
i
Hearing instrument expectations
A hearing aid will not restore n ormal hearing and will n ot prevent or improve a hearing impairment re sulting
from organic conditions
Consistent u se of the aid is recommended. In m ost cases, infrequent us e does not per mit you to attain
full benefit from it.
The use of a hea ring aid is only part of he aring rehabilitation and may need to be sup plemented by auditory
training and instructions in lip-reading.
i Warning to Hearing Aid Dispensers (US only)
A hearing aid dispense r should adv ise a prospec tive hearin g aid user to cons ult promptly with a license d
physician ( preferably a n ear speci alist) before di spensing a h earing aid, i f the hearing aid dispens er determines through inquiry, actual observation, or review of any other available information concerning the
prospective user, that the prospective user has any of the following conditions:
Page 31

60
61
(i) Visible congenital or traumatic deformity of the ear.
(ii) Histor y of active drain age from the ea r within the prev ious 90 days.
(iii) Histor y of sudden or r apidly prog ressive hearing loss within the previous 90 days.
(iv) Acute or chronic dizziness.(v) Unilateral hearing l oss of sudden o r recent onse t within the prev ious
90 days.(vi) Audiometric air-bone gap equal to or gre ater than 15 decibels at 500 hert z (Hz), 1,000
Hz, and 2,000 Hz.
(vii) Visible evidence of significant cerumen accumulation or a foreign body in the ear canal.
(viii) Pain or discomfor t in the ear.
Important Notice for Prospective Hearing Aid Users (US only)
Good health practice req uires that a per son with a hea ring loss have a m edical evaluation by a licen sed
physician (preferably a physician who specializes in diseases of the ear) before purchasing a hearing
aid. Licens ed physicia ns who speci alize in disea ses of the ear are often referred to as otolary ngologists,
otologists or otorhinolar yngologi sts. The purpose of the medic al evaluation i s to assure that all m edically
treatable conditions that may affect hearing are id entified and treated before the h earing aid i s purchased.
Following the m edical eval uation, the physi cian will gi ve you a written statement that sta tes that your hearing loss has b een medic ally evaluated a nd that you may be co nsidered a candidate for a he aring aid. Th e
physician w ill refer you to an aud iologist or a h earing aid d ispenser, as appro priate, for a hear ing aid evaluation. The audiologist or hearing aid d ispenser w ill conduct a hearing ai d evaluation to ass ess your ability
to hear with and w ithout a hea ring aid. The h earing aid evaluation wil l enable the au diologist or dispense r
to select and fi t a hearing ai d to your individ ual needs. If yo u have reser vations about your abilit y to adapt
to amplificati on, you should in quire about th e availabili ty of a trial-re ntal or purchase-option p rogram. Many
hearing aid dispense rs now offer p rograms that permit you to wear a h earing aid fo r a period of tim e for a
nominal fee after which you may decide if you want to purchase the hearing a id. Federal law restricts the
sale of hear ing aids to those i ndividua ls who have obtain ed a medica l evaluation fro m a licensed p hysician.
Federal law p ermits a fully informed ad ult to sign a waive r statement declining the me dical evalu ation for
religious or personal beliefs that preclude consultation with a physician. The exercise of such a waiver is
not in your best h ealth interes t and its use is stro ngly discouraged.
Page 32

62
63
Children with hearing loss (US only)
In addition to se eing a physici an for a medic al evaluation, a child with a hea ring loss sh ould be direc ted
to an audiolog ist for evaluation and rehabi litation because hear ing loss may ca use problems in language
developme nt and the educ ational and social growth of a child. An audiologist is qu alified by trai ning and
experien ce to assist in the evaluation and rehabilita tion of a child with hearing lo ss.
i High sound pressure levels
Special care should be exe rcised in sel ecting and fit ting a hearing instrume nt(s) whose max imum sound
pressure level exceeds 132 dB SPL (with an IEC 60711:1981 occluded ear simu lator), because th ere may
be a risk of impa iring the remaining hearing of the hear ing instrum ent user.
Be aware of inform ation marked with the warning symbol
i
i WARNING points out a situation that could le ad to serious in juries,
CAUTION indicates a situation that could lead to minor and mode rate injurie s.
i
Advice and tips on how to ha ndle your hea ring instru ment better.
Equipment includes RF transmitter.
Page 33

64
65
Page 34

66
67
Please ask yo ur local hearing c are profession al
concerning disposal of your hearing instrument
Page 35

Worldwide headquarters
Interton A/S | Lautrupbjerg 7 | DK-2750 Ballerup | Denmark
Tel.: +45 45 75 1111 | Fax: +45 45 75 1119 | www.interton.com | CVR no. 55082715
Any issues relating to the EU Medical Device Directive 93/42/EEC, or
Council Directive 1999/5/EC on Radio Equipment and Telecommunications
terminal equipment should be directed to Interton A/S.
0297
400080000-GB-16.02-Rev.D
 Loading...