

r F1.00
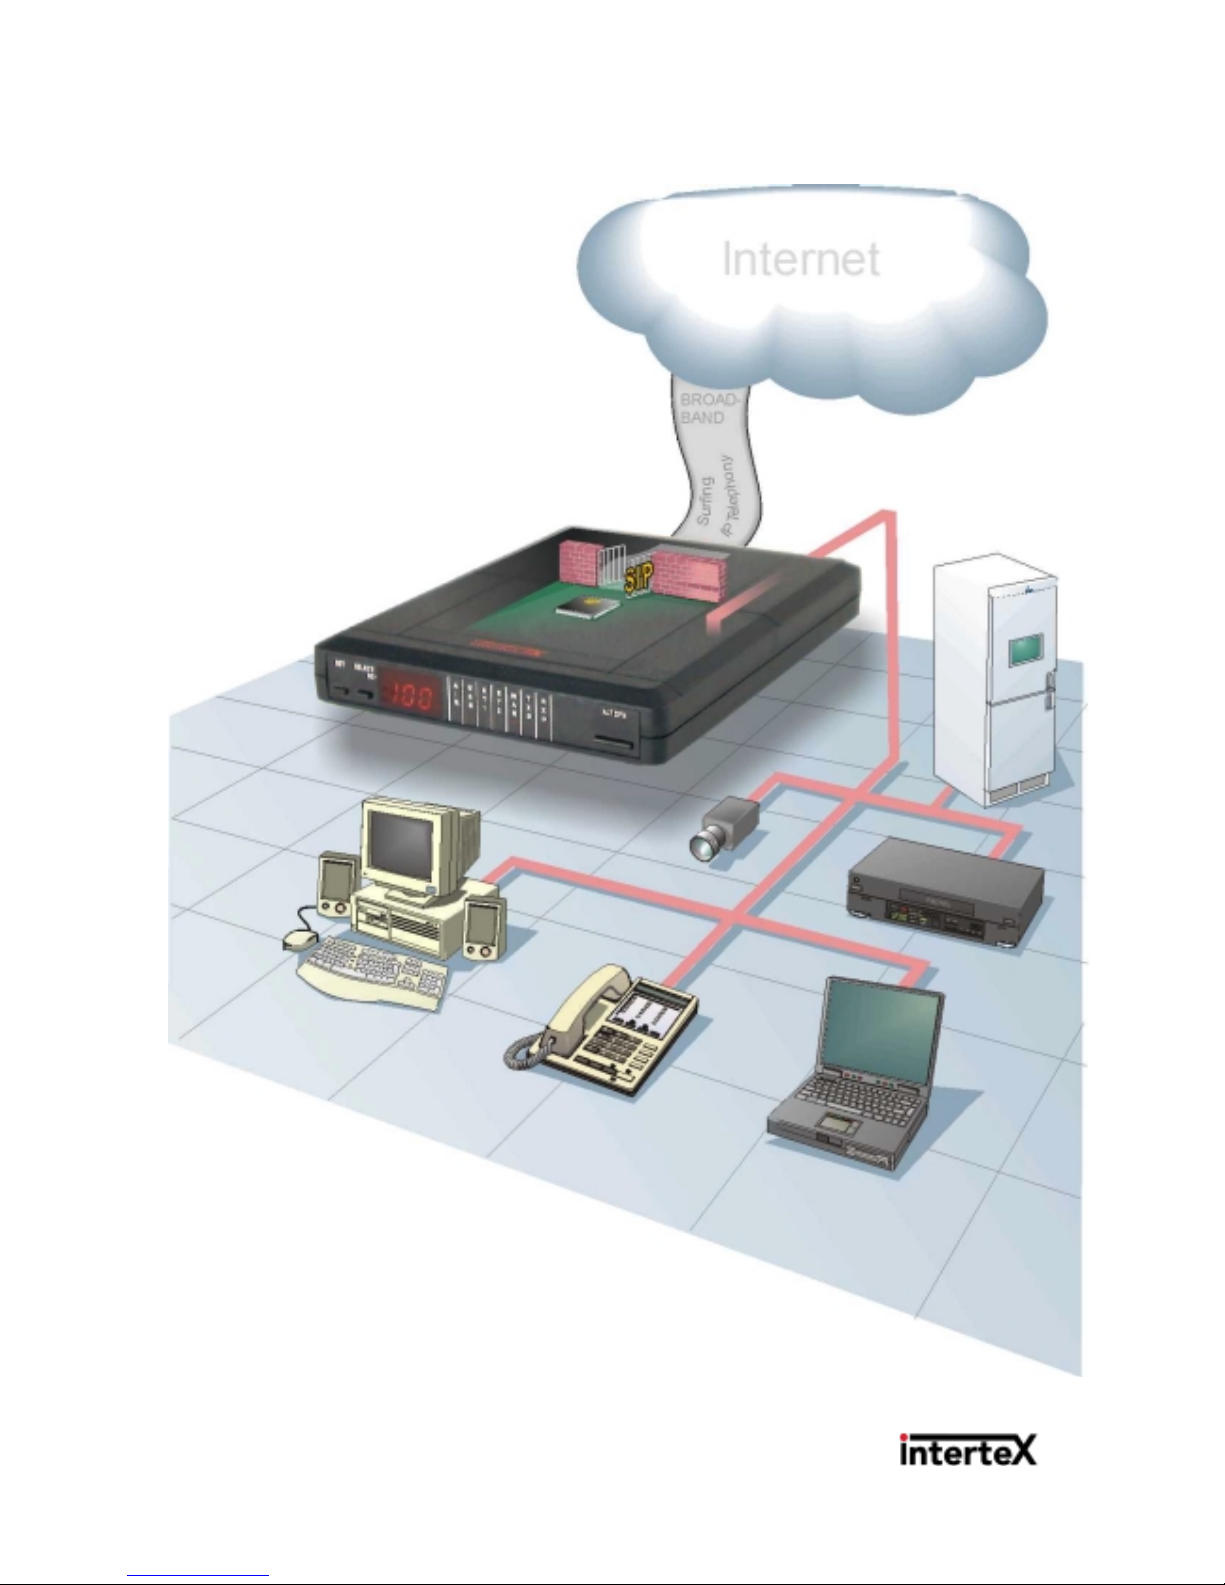
Intertex IX66 Internet Gate
Getting Started
This guide helps you
to install and connect the
Intertex Internet Gate to the Internet.
Through the built in web server, you can
thereafter configure the Internet Gate for your specific
needs. For detailed instructions and explanations, you can
use the complete Online User Guide on the Internet, www.igmanual.com.
2
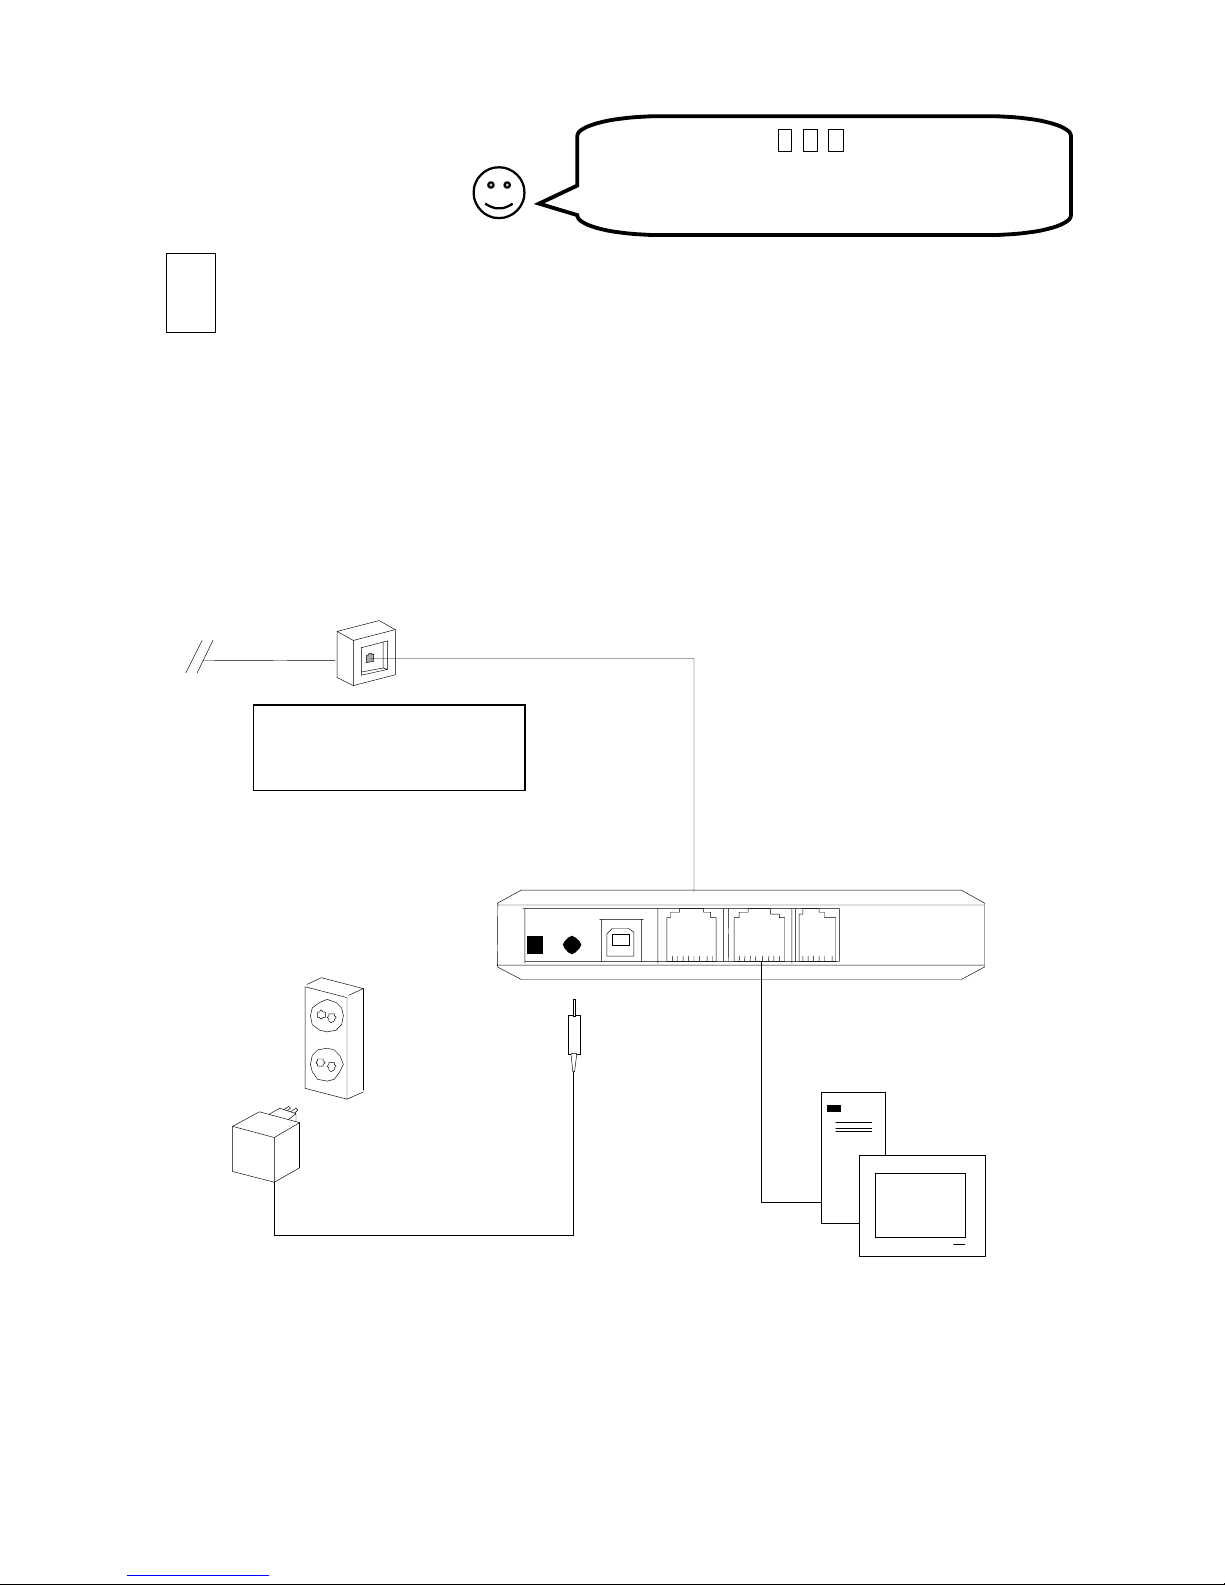
Quick Start
Hook up the Cables!
NOTE! It is important that your PC is switched off now!
• Use one of the included Ethernet cables to connect the port named
ET1
on the Internet
Gate to the Ethernet port on your PC.
• Use the other Ethernet cable to connect port
ET2
of the Internet Gate to your broadband
or WAN connection.
(The WAN connection is an RJ45 connector either directly in your wall, or on the back
side of the equipment (eg an ADSL-modem) delivering your broadband connection.)
• Connect the power adapter and push the ON switch.
ON
DC
USB
ET2
ET1 EXP
PC
Ethernet connector in wall,
or on ADSL modem or cable
modem.
For information about how to connect a LAN, please see page 7!
In most cases, the
A, B, C
steps on this page
will get your Internet Gate up and running.
If you run into problems you find the solution to
the most common problems in this guide.
A
3
I don’t see the Internet Gate’s built in page! Why?
1. Do you have an Ethernet card installed in your PC, and is it
properly configured? See page 8!
2. Did you connect all the cables properly? LEDs ET1 and ET2
should be lit on your IX66 Internet Gate!
3. Reboot your PC and try again!
4. Is your PC and web browser properly configured? See page 8!
5. Do you already have a DHCP server on your LAN? See page 9!
6. Do you have static IP addresses on your LAN? See page 10!
I don’t see the web page! Why?
1. Reboot your PC, allowing it to get fresh configuration data
from your IX66 Internet Gate, and try again!
2. Reboot your IX66 Internet Gate, and try again!
3. Is your firewall correctly configured? Press
ALT CFG
on your IX66 Internet Gate repeatedly, until
”Hi” is shown in the display.
4. Is your web browser properly configured? See page 8!
5. Is your Internet Gate properly configured? See page 12!
6. Do you have to log in to WAN? See page 11!
7. Check your Internet connection with the built-in
diagnostic test tool! See page 7!
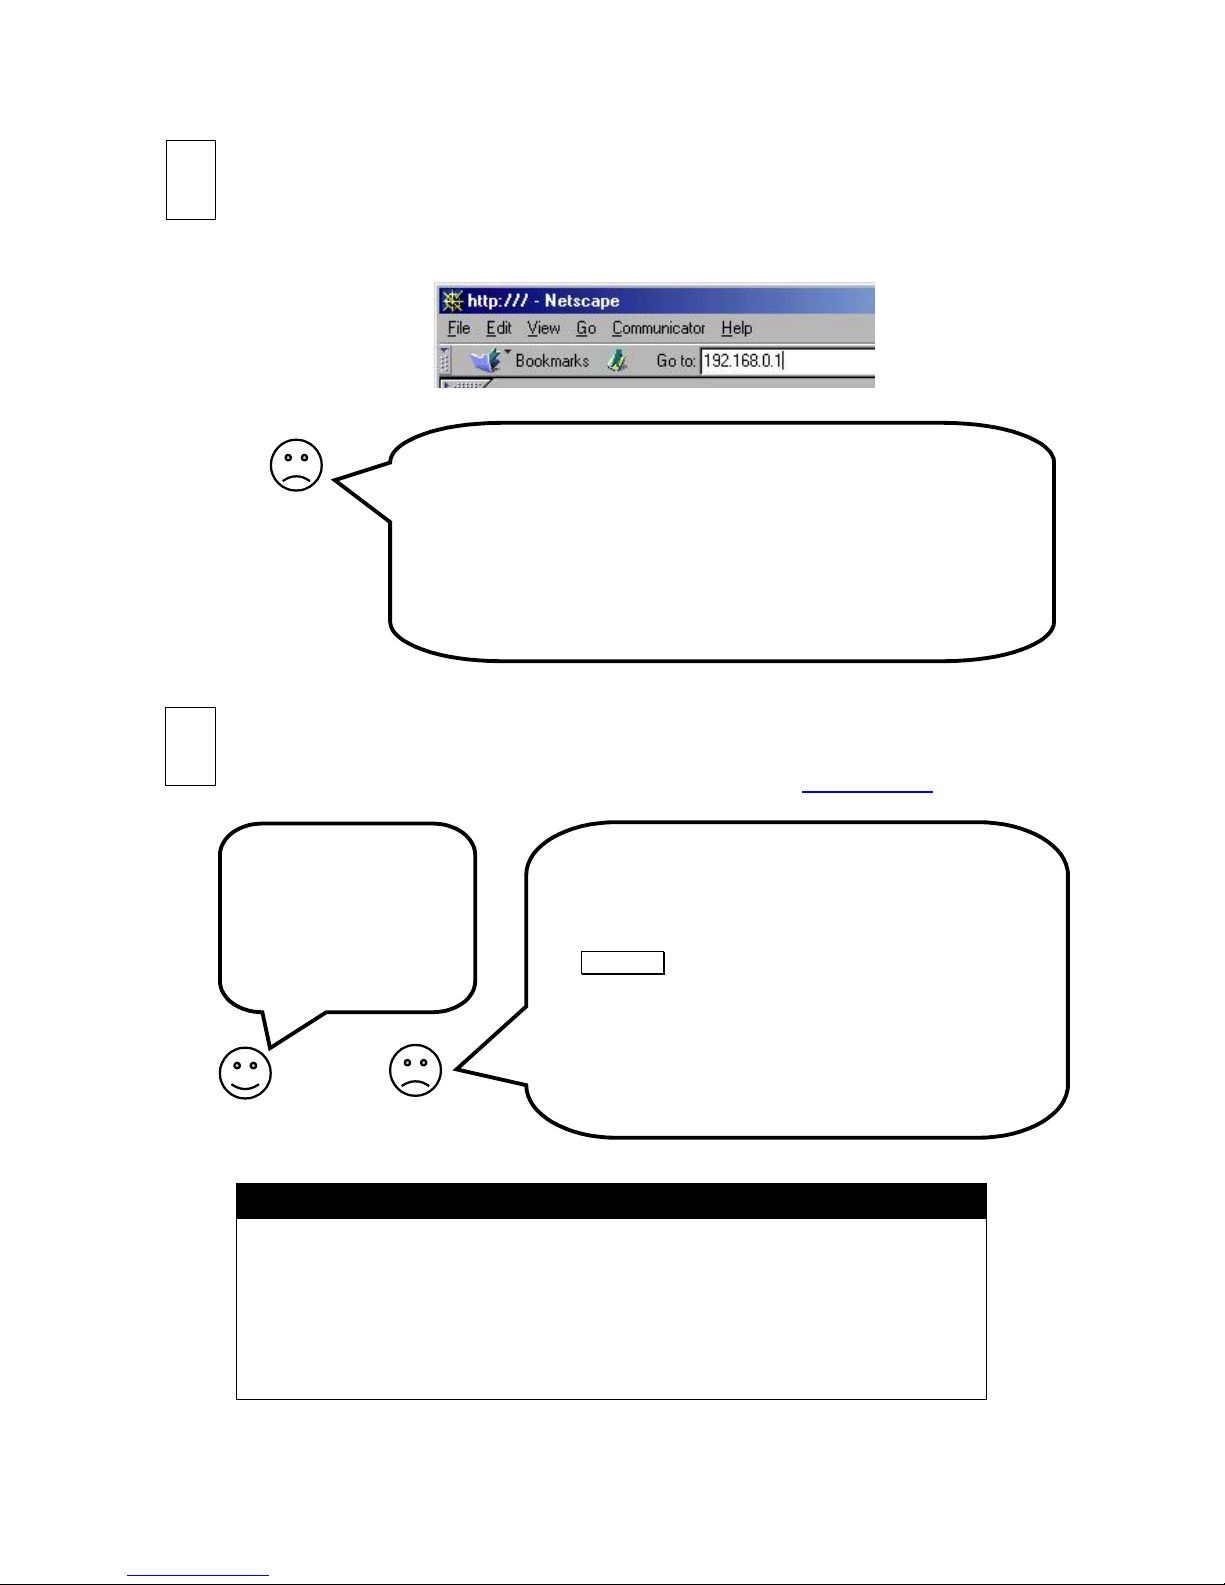
Do you see the requested
web page?
Then you have made it!
You have installed your
IX66 Internet Gate!
Congratulations!
Surf into your Internet Gate!
• Check that you have connection with the Internet (indicated by WAN LED is lit)
• Turn then on your PC and start your web browser (e g Netscape or Internet Explorer)
• Surf into your Internet Gate by typing its IP address into the address field:
192.168.0.1
• You may now log in and use the setting pages if you would like to (see more on page 12).
Check the Internet Connection
Now try to surf to an Internet site. You can for example surf to www.intertex.se
Note! Now you are finished, but take a moment to see the online user manual!
Now when your Internet Gate is connected to the Internet you should refer to the
complete and up to date online user manual, available on the Internet.
To access the online user manual, click
Online User Manual
on the first built-in page in
your Internet gate. See page 14, Using the Online User Manual for more information.
You may also access the online user manual from any PC with Internet access.
Just surf to
www.igmanual.com
and select your model!
B
C

4
Overview - Front Panel
Note: on some simpler models of IX66 Internet Gate, some buttons and lamps may be missing.
SELECT
Press to see Ethernet link
speeds of ET1 and ET2.
Press and hold for 2 seconds
to cancel any set-up.
SET
Press to see
version number.
Press and hold for
3 seconds to enter
set-up mode.
AD
Show LAN IP address of IX66 Internet Gate
CFG
Configure LAN IP address of IX66 Internet Gate
DHP
Turn LAN DHCP server of IX66 Internet Gate on/off
RST
Reset all configuration to factory defaults
LQ
Diagnostic test
TX,RX
Both lit: full duplex; Flashing: half duplex
Interface indicators:
On
: Interface is connected.
Off
: Interface is not used.
Flashing
: Data is sent or received.
AIR –
Wireless (Bluetooth or 802.11)
(option)
USB –
Universal Serial Bus (option)
ET1 –
Ethernet 1 (PC or LAN)
ET2 –
Ethernet 2 (WAN - Internet)
WAN –
Internet connection.
TXD –
Data is sent to the Internet.
RXD –
Data is received from Internet.
A
LT CFG
Press to select
firewall security
profile.
Get acquainted with
the Internet Gate!
5
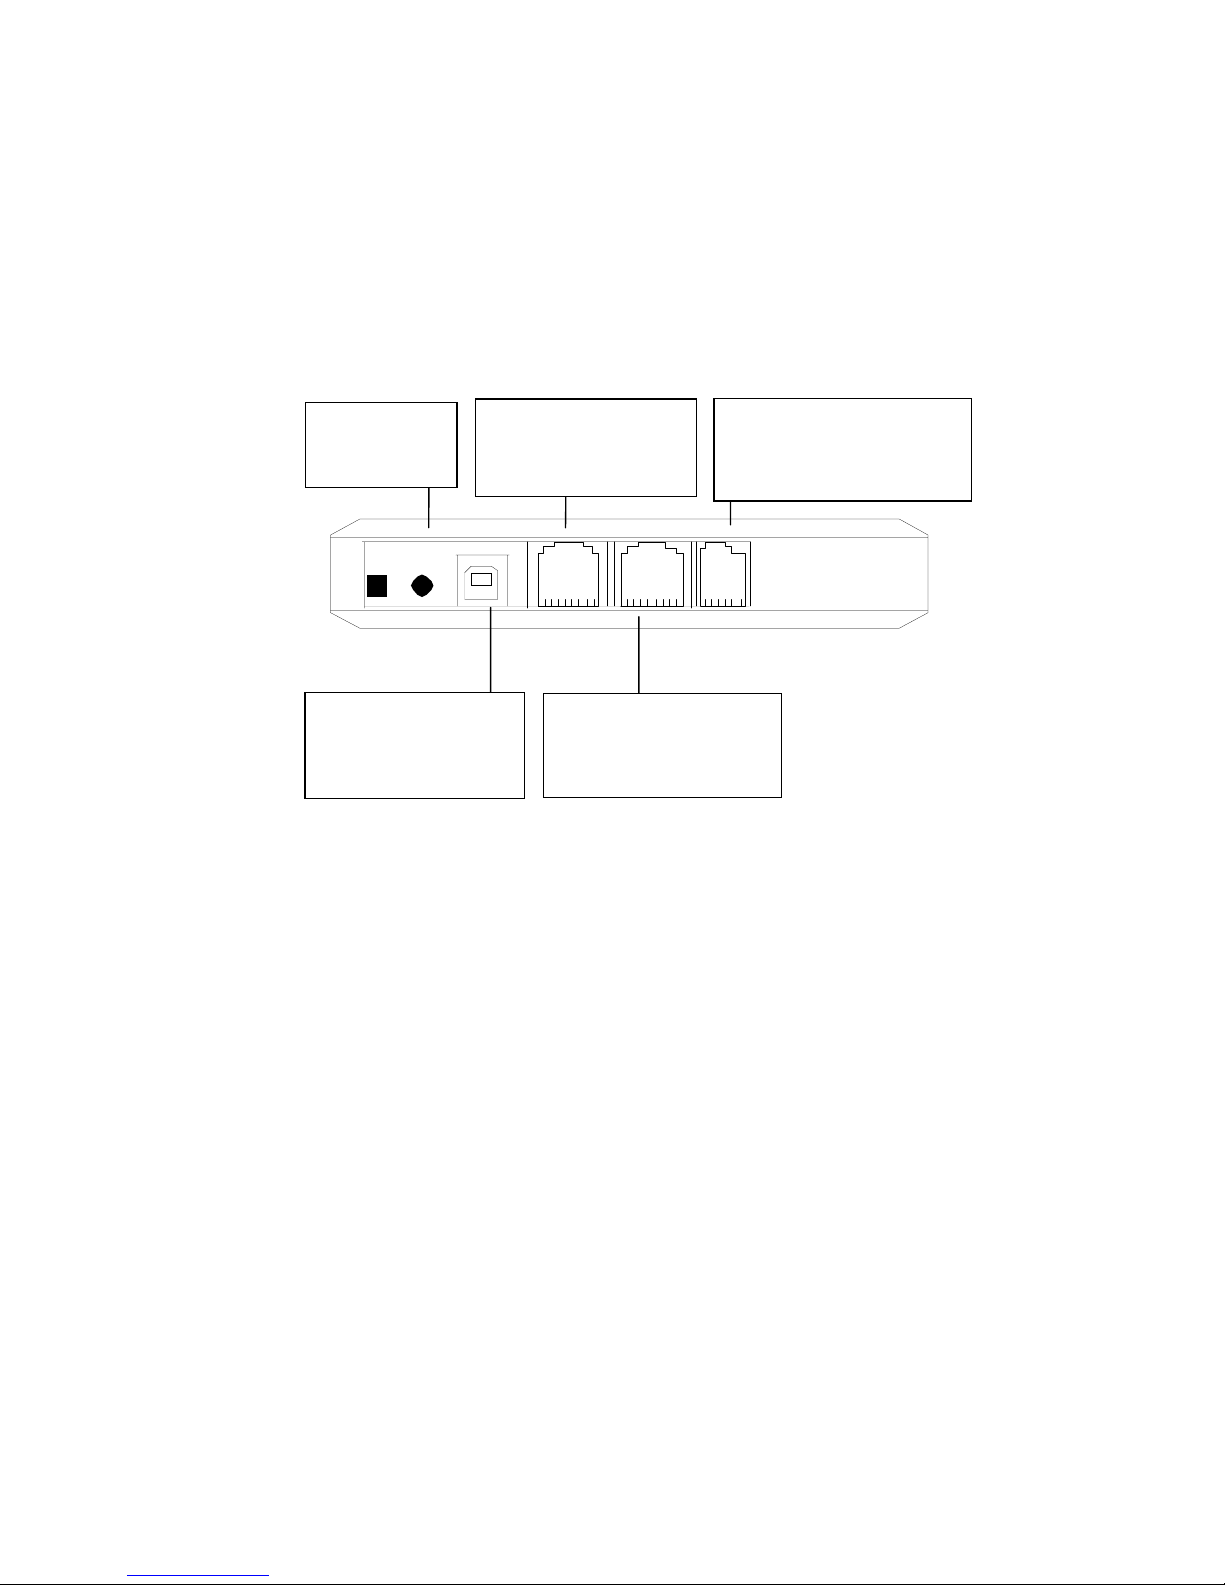
Overview - Back Panel
ON
DC
USB ET2 ET1 EXP
Note: on some simpler models of IX66 Internet Gate, some connectors may be missing.
ET1
10/100 Mbps Ethernet
port to be connected to
PC or LAN.
DC
Power port.
9V, 600 mA.
USB
Port for firmware
upgrade.
EXP
Expansion port for future
usage, e g home appliance
control.
ET2
10/100 Mbps Ethernet
port to be connected to
WAN
(
Internet).

6
Package Details
The following items should be included in your box:
!" Getting Started guide (this document)
!" IX66 Internet Gate
!" Power adapter
!" 2 × Ethernet-cable (RJ45/RJ45, straight through)
If any of the items above are damaged or missing, please contact your dealer.
Note!
If you use your own Ethernet cables, make sure they are wired correctly:
!" A straight-through cable must be used to connect Internet Gate to a PC.
!" Most ethernet hubs require a crossover cable to connect to Internet Gate
Requirements
In order to set up and use your Internet Gate you need:
!" A PC or a local area network (LAN) with PCs using the TCP/IP protocol.
!" A web browser such as Microsoft Internet Explorer or Netscape Navigator, version 4 or later,
installed on the PC.
!" One RJ-45 Broadband Internet Connection, from wall connector or ADSL or cable modem.
Getting Help
There are several ways to get information about the Internet Gate:
!"
Getting Started Guide
– This Getting Started guide helps you install, configure and start
using the Internet Gate.
!"
Built in Help
– All configuration pages on the built in web server have help texts that describe
the different parameters.
!"
Online User Manual
– In the online manual you find information that are always up to date
and tailored for your specific system configuration. You access it via the link on the
configuration pages of the Internet Gate or directly at www.igmanual.com.
!"
Support
– If you experience problems when installing or using the Internet Gate that cannot
be solved by the help indicated above, your retailer will assist you.
HELP!

7
Detailed instructions
Have you problems getting your IX66 Internet Gate to work?
Read the detailed instructions on the following pages for help!
Connecting a LAN
If you have a Local Area Network (LAN) with several computers connected, you can connect the
network hub to your IX66 Internet Gate, and allow all computers to share the Internet connection.
Usually you need a crossover Ethernet cable to connect the hub to port ET1 of your IX66 Internet
Gate. But if your hub have a port marked “UPLINK”, you should use a straight ethernet cable.
If your network uses dynamic IP-addressing (recommended), then your IX66 Internet Gate’s own builtin DHCP server will provide IP addresses to all your network PC-s. Please turn off any other DHCP
servers on your LAN. Read more on page 9.
Is your network using static IP addresses? Read how to configure on page 10!
Diagnostic test
If you cannot access the Internet, your IX66 Internet Gate can attempt to localise the problem. Start
the diagnostic test like this:
1.
Press and keep
SET
pressed 3 seconds to enter setup-mode
2. Press
SELECT
4 times until “LQ” is lit
3.
Press
SET
AD CFG DHP RST
LQ
TX
RX
AD CFG DHP RST
LQ
TX
RX
It takes a couple of seconds to perform the test. Any errors discovered are shown in the display.
”E 1” to ”E 9” indicate error in your extern Internet connection:
AD CFG DHP RST
LQ
TX
RX
No WAN Ethernet link. Check cable in port ET2. Contact your broadband-supplier if error
remains.
AD CFG DHP RST
LQ
TX
RX
No WAN DHCP server found. Check configuration according to page 12. Reboot your IX66
Internet Gate. Contact your Internet Service Provider (ISP) if error remains.
AD CFG DHP RST
LQ
TX
RX
No Gateway found. Check configuration according to page 12. Reboot your IX66 Internet
Gate. Contact your Internet Service Provider (ISP) if error remains.
AD CFG DHP RST
LQ
TX
RX
No DNS server found. Check configuration according to page 12. Reboot your IX66 Internet
Gate. Contact your Internet Service Provider (ISP) if error remains.
AD CFG DHP RST
LQ
TX
RX
No Internet connection. You do have connection to your ISP, but they have no Internet
connection for the moment. Contact your Internet Service Provider (ISP) if error remains.
”E11” to ”E19” indicate error in your local network:
AD CFG DHP RST
LQ
TX
RX
No Ethernet link. Check cable in port ET2.
AD CFG DHP RST
LQ
TX
RX
No DHCP addresses requested. The DHCP server of IX66 Internet Gate is on, but no PC-s on
LAN have requested any addresses. This might be OK, but check your settings, see page 8.
AD CFG DHP RST
LQ
TX
RX
No Ethernet packets at all received.
This might be OK, but check your settings, see pages 8 and 12.
Note: the diagnostic test can find multiple errors. Press
SELECT
to flip through all error messages.
If no error messages are shown, then your Internet connection is OK. Any errors are probably due to
your PC’s settings. Please see page 8 for more information!
Read here if you have
problems, or want to
make special settings!

8
I have no ”Network” icon on my
desktop! Why?
You must have an Ethernet card installed
on your PC. Install an Ethernet card according to the manufacturer’s instructions.
There is no ”TCP/IP” in the list! Why?
It is not installed. Select ”Add...”,
”Protocol”, ”Microsoft”, ”TCP/IP”.
Check your PC’s settings!
The IX66 Internet Gate is delivered with factory defaults that fit most users. If your PC have the default
network and web settings then everything should work at once. If not, please check your PC’s settings:
(The steps described here are for Windows 98. Other operating systems have similar menues,
though accessing them might be done differently.)
• Right
click on the ”
Network
” icon on your desktop, and
select ”
Properties
”.
• Double click on ”
TCP/IP
” for your network card on the
list that appears.
• There are two different ways of addressing computers in a local area network (LAN):
a)
either dynamic addressing, there a DHCP server provides IP-addresses to all computers,
b)
or static addressing, there all computers have been pre-configured with their own addresses
Check which way of addressing your LAN is using by checking the settings of one of the PC-s:
a)
If dynamic IP addressing is used, your
properties look like this:
In that case, you do not need to do
anything. The built-in DHCP server of your
IX66 Internet Gate will provide the correc t
IP addresses.
You should check your other settings
though, according to pages 9, 11 and 12.
b)
If static IP addresses are used, your
properties look similar to this:
In that case, you have two alternatives:
Alternative 1:
change the settings of your
Internet Gate and your PC-s, to fit your
LAN. See page 10 for more information!
Alternative 2:
restore all PC-s on your LAN to
dynamic IP addressing
See page 9 for more information!

9
To use IX66 Internet Gate with dynamic IP-addressing on LAN
The IX66 Internet Gate is delivered configured for dynamic IP-addressing on LAN, there IX66 Internet Gate
acts as a DHCP server, and provides IP addresses. All PC-s on your LAN must be configured like this:
NOTE:
The steps described here must be performed on all PC-s of
the LAN. (The steps described here are for Windows 98. Other
operating systems have similar menues, though accessing them
might be done differently.)
1. Rightclick on the ”
Network
” icon on your desktop, and select
”
Properties
”.
2. Click on ”
TCP/IP
” for your network card on the list that appears.
3. Click on ”
Properties
” to see TCP/IP configuration:
4. Check ”
Obtain an IP address automatically
”.
The built-in DHCP-server in your IX66 Internet Gate will
provide dynamic IP addresses to all PC-s on your LAN.
5. Check your DNS, Gateway and WINS settings: All fields should
be empty, and DNS and WINS should be disabled:
6. Click on ”OK”. Reboot the PC.
7. You may check that the built-in DHCP server of your IX66
Internet Gate is enabled, by checking the settings of ET1 in the
built-in Network Settings page (see picture on page 12).
You can see the most common settings here to the right:
These should suit most users.
Other DHCP servers on your LAN? Turn them off!
If your IX66 Internet Gate shows “DHP LAN Err” on its display, it
indicates that there is already a DHCP server on your LAN, that
the built-in DHCP server in your IX66 Internet Gate collides with:
AD CFG DHP RST
LQ
TX
RX
AD CFG DHP RST
LQ
TX
RX
You should turn all other DHCP servers on your LAN off.
(Alternatively, you can turn off the built-in DHCP server in your IX66 Internet Gate, and set the IX66
Internet Gate as default gateway in
all
your PCs’ settings.)

10
To use IX66 Internet Gate with static IP-addressing on LAN
If you want your IX66 Internet Gate to be part of an existing network that uses static IP addresses
you can change the IP address of your Internet Gate’s LAN port (ET1) with the front panel keys:
1.
Press and hold
SET
pressed for 3 seconds, to enter setup mode
AD CFG DHP RST
LQ
TX
RX
2. Press
SELECT
once, so CFG is lit
AD CFG DHP RST
LQ
TX
RX
3. Press
SET
.
The first 3 digits of the IP address are shown and the first digit flashes
4. Press
ALT CFG
repeatedly, until the correct digit is displayed
AD CFG DHP RST
LQ
TX
RX
5. Press
SELECT
: the next digit flashes, and can be changed using
ALT CFG
AD
CFG DHP RST
LQ
TX
RX
6. Use
SELECT
to step through all digits of the IP address.
Use
SET
to step back to previous digit if you have made any error.
Use
ALT CFG
to change the value of the flashing digit.
You can cancel the IP address set-up, without saving any changes, by
pressing the
SELECT
key and holding it pressed for 2 seconds
7. After stepping through all digits of the IP address, the subnet mask appears
and can be modified. Each subnet mask number can only be set to values
255, 254, 252, 248, 240, 224, 192, 128, or 0
AD CFG DHP RST
LQ
TX
RX
8. Press
ALT CFG
repeatedly, until the correct value is displayed.
Press
SELECT
to step to the next subnet mask number.
9. The IP address and mask is stored after all digits have been set.
AD CFG DHP RST
LQ
TX
RX
If the display displays “no” after setting an IP address, it means that there is already someone using
that IP address on the LAN. Two units can not share the same IP address on the same LAN. You
must select another IP address for your IX66 Internet gate. Redo the settings from step 1 again.
You can also change the LAN IP address of your IX66 Internet Gate by changing the settings for ET1
in the built-in Network Settings page (see picture on page 12). Enter the desired IP address and
Network mask, and de-select DHCP. ET1 shall be used as “inside”.
NOTE:
The steps described here must be performed on all
PC-s of the LAN. (The steps described here are for Windows
98. Other operating systems have similar menues, though
accessing them might be done differently.)
1. Rightclick on the ”
Network
” icon on your desktop, and
select ”
Properties
”.
2. Click on ”
TCP/IP
” for your network card on the list that
appears.
3. Click on ”
Properties
”, select ”
Gateway
”.
4. Enter the IP-address of your IX66 Internet Gate (same value
as set at steps 3-6 above), and click ”
Add
”.
To just read the current LAN IP address,
select AD instead of CFG in step 2 above.
11
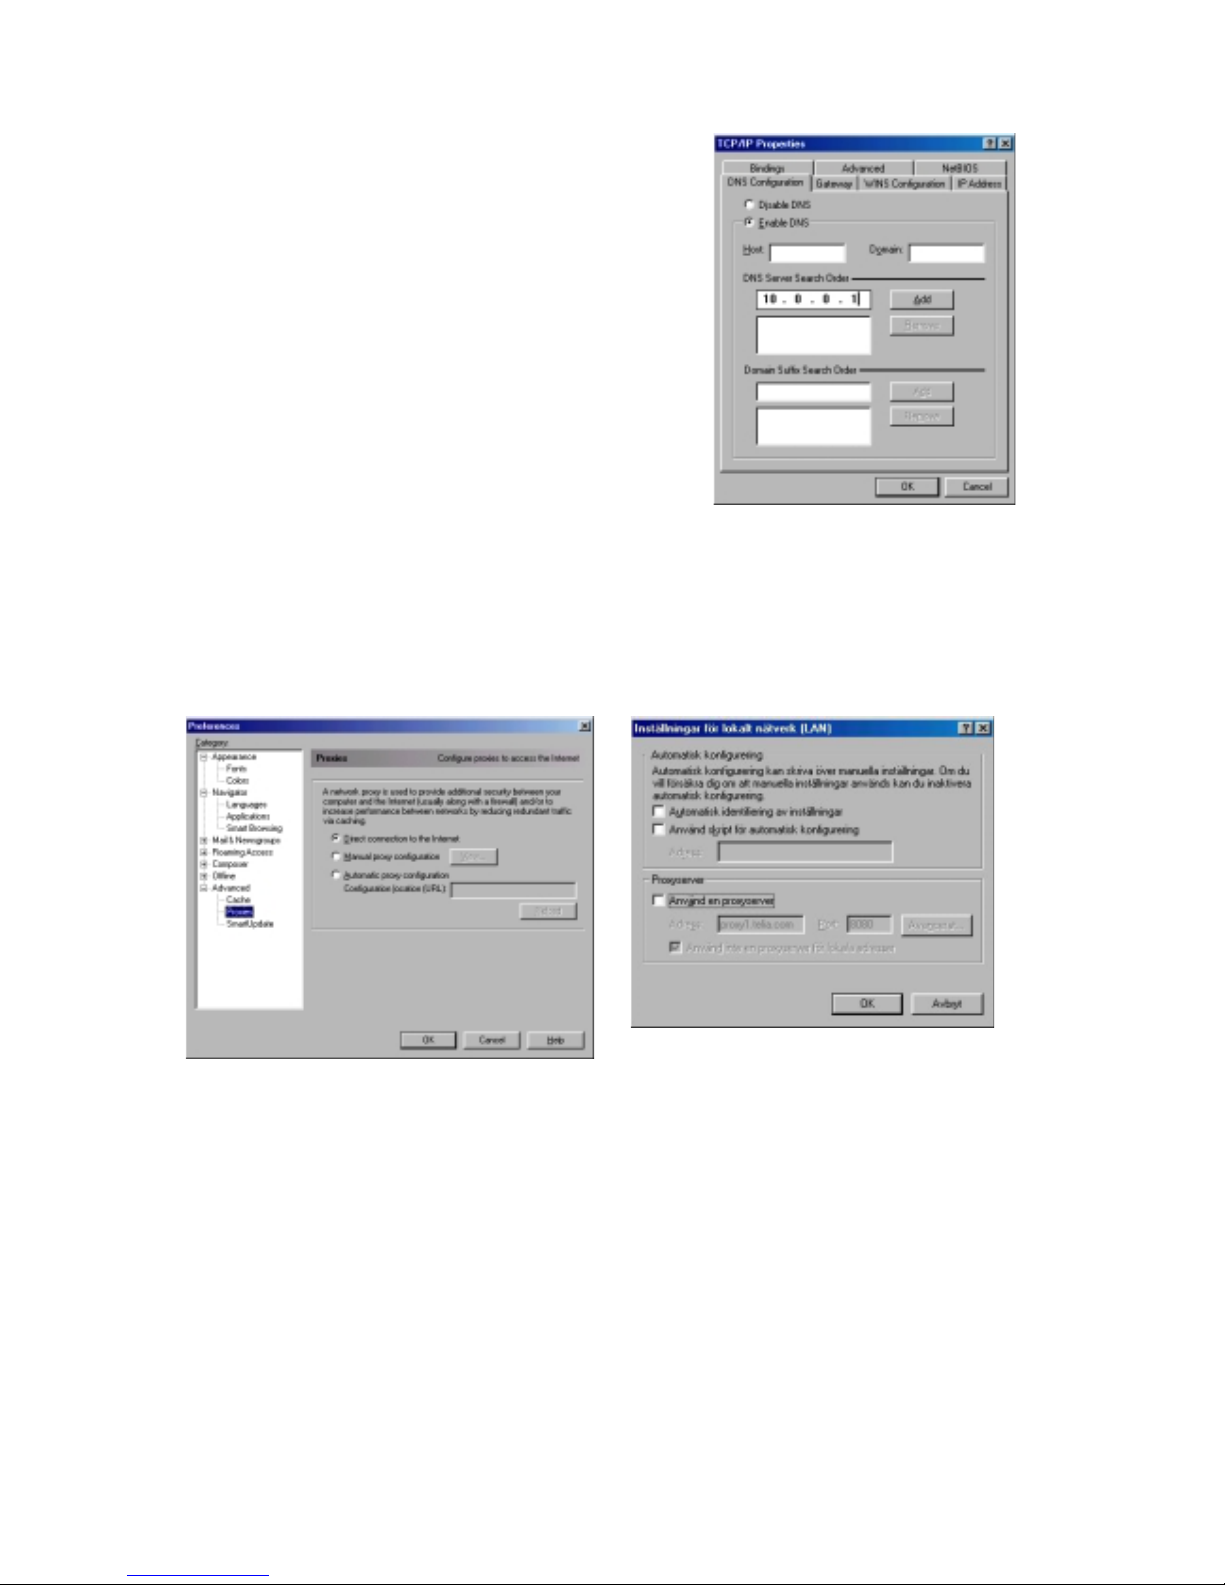
5. If you have got an IP-address to a DNS server from your
Internet Service Provider (ISP):
• select ”
DNS configuration”
,
• select ”
Activate DNS
”,
• enter the IP address of the DNS server,
• click on ”
Add
”.
6. Click on ”OK”.
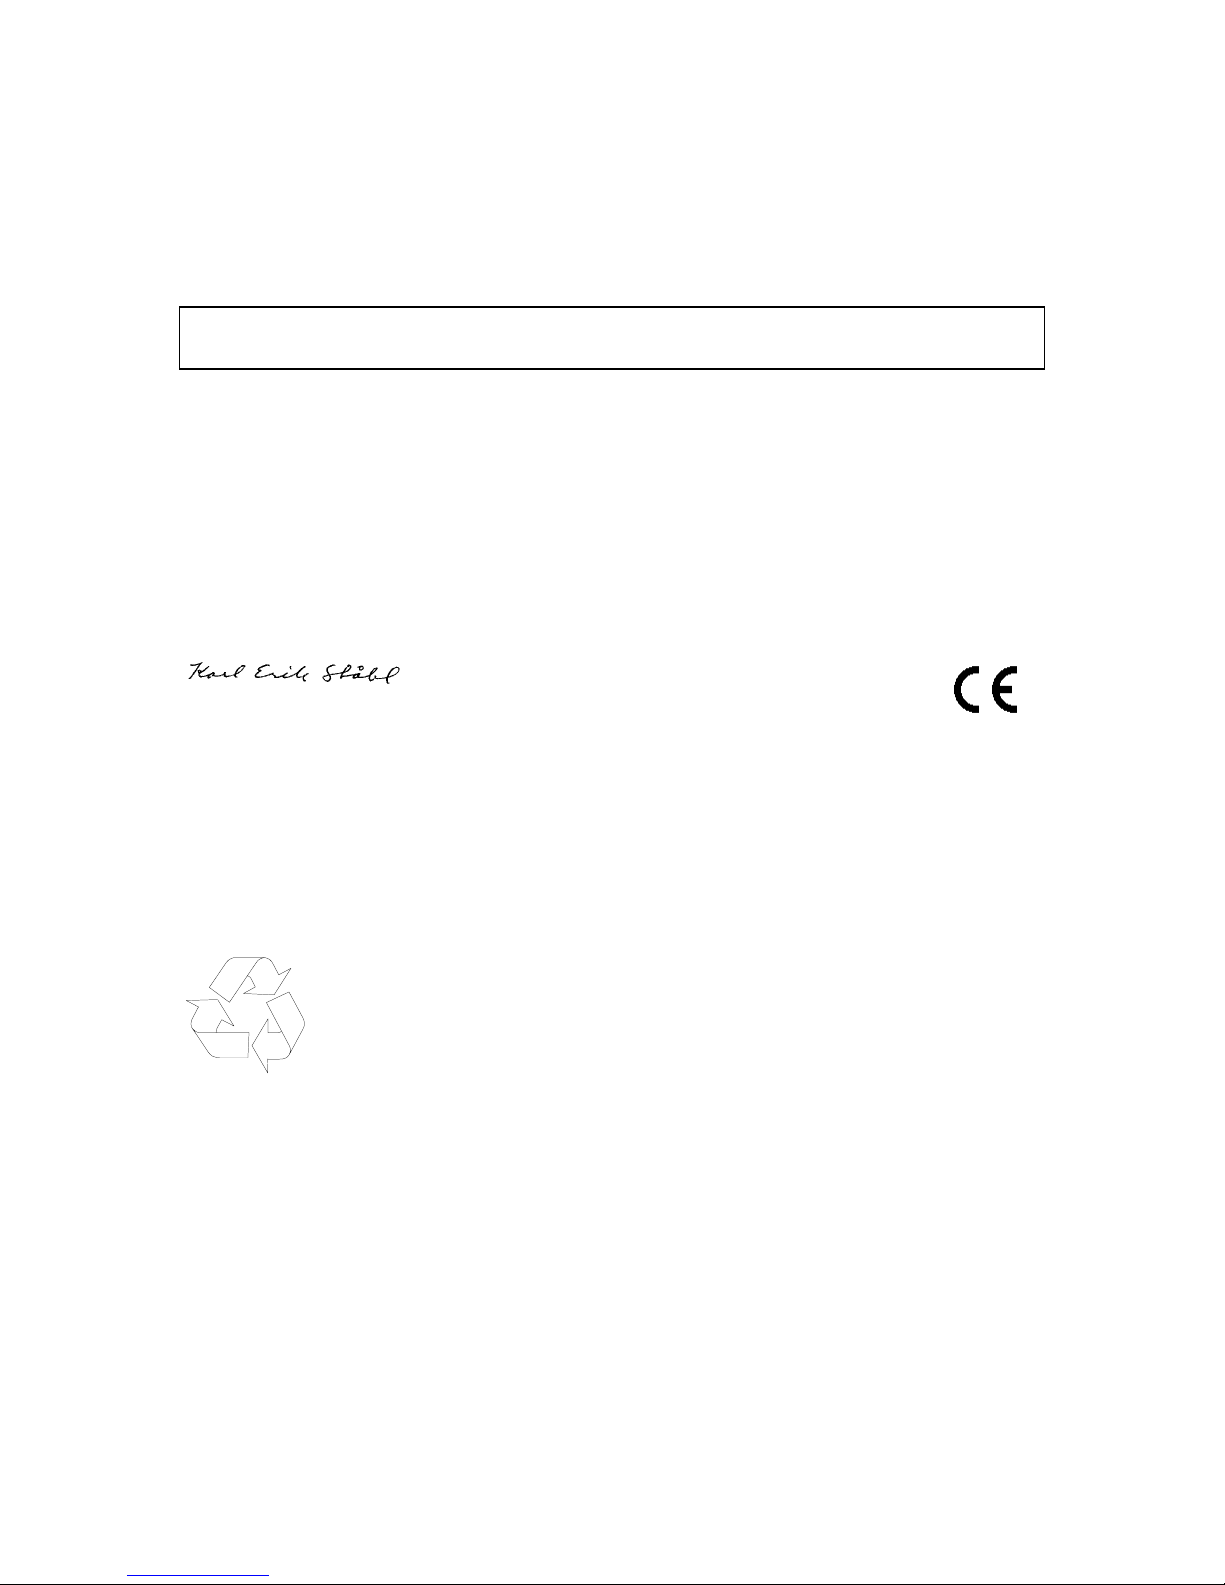
Check the proxy settings of your web browser
If your web browser is configured to use a proxy server, you might have problems reaching the built-in
pages of your IX66 Internet Gate. In that case, turn off usage of the proxy server.
Netscape Navigator:
select Edit, Properties, Advanced, Proxies:
”Direct connection to the Internet” shall be selected.
Internet Explorer:
select Tools, Options..., Connection,
LAN-settings: the checkbox ”Use a proxyserver” must not be selected.
Log in to WAN
Some broadband providers require that you log in into their network before you are allowed to use
their Internet connection. This may be done using a web page, special program, or some other way.
Please read the documentation you received with your broadband access.

12
Configure your IX66 Internet Gate!
IX66 Internet Gate is delivered with factory settings that suit most users. In some situations however,
you need to change your IX66 Internet Gate’s configurations.
To access the built-in pages inside your IX66 Internet Gate, do the following:
1. Open a web browser, such as Internet Explorer or Netscape Navigator, on your PC.
2. Write the IP address of your IX66 Internet Gate,
192.168.0.1
, in the address field of the
browser. The first built-in page should appear.
3. Klick on
Log in
.
4. Enter
User name
and
Password
.
(At delivery is User name=
admin
, Password=
admin
. You should change them at once!)
5. Select
Network
in the main menu that appears.
6. Select
ET2
as WAN interface. Klick on ”Change”.
7. Enter your Internet settings:
a. If your Internet Service Provider (ISP) uses dynamic IP addressing, check “
Get by
DHCP
”. Then the fields marked in the above picture will be filled in automatically, the
next time you turn on your IX66 Internet Gate.
b. If your Internet Service Provider (ISP) have given you your own static IP address,
enter it. Fill also in the fields DNS server, Domain name and Gateway.
8. Klick on ”
Save
”. Reboot first your IX66 Internet Gate, then your PC.
Get in contact with
your Internet Gate!
Just surf into it!
How do I configure ET1
(the LAN-connection)?
Read on pages 8 - 11!
Don’t foget to save the
settings after you have
made any changes!
Always click on the
”
Save
” button after you
have changed anything
on any page!

13
Configuring security levels
The following security levels are set in IX66 Internet Gateway at delivery:
Hi
: Allow only web and e-mail traffic
Lo
: Allow all outgoing, and all proper incoming traffic
AC
: Same as Hi
blo
: Blocked, no traffic allowed
You can switch between the different security levels på pressing the
ALT CFG
button on the front panel of the IX66 Internet Gate, or by
changing the setting on the main menu page of the built-in web interface.
You can edit the firewall configuration by selecting
Security
below
Settings
on the main menu page.
Then choose configuration AC (AltConf = Alternative Configuration) to set your own security level and
adjust it according to the games and applications you use.
If you have a web-, Telnet- or FTP-server on your LAN, that
should be reachable from outside, enter its LAN IP address here.
If you want to allow other computers on the internet to access
your LAN, select here what protocols that should be allowed
through the firewall. (For example, check
Ping
if you want that
incoming ping request should be allowed through. Enter the IP
address of the LAN computer that the ping shall be forwarded to.)
If you are playing multiplayer games with other gamers over the
Internet, enable such communication here. Check the game you
want to play, and enter the IP address of the LAN PC you want to
play from. See also “Generic Settings” below.
Hint: if your game is not in the list, try to allow “Direct X” and
“Loose UDP”. These protocols are used by many games.
Very advanced users can enter here and change port
redirections manually.
If you want to allow the computers on your LAN to reach the
Internet, select here what protocols should be allowed through.
(For example, check
Ping
if you want that your computers should
be able to ping to other computers on the Internet.)
Note: the selection ”
All
” is not the same as marking all checkboxes in the list! “All” allows all outgoing data traffic, but if you
mark all checkboxes will only the listed known protocols will be
allowed out.
Very advanced users can open outgoing ports here manually.
Many games use the protocol “loose UDP” to communicate over
the Internet. Check this box if your want to play such games.
Don’t forget to click “
Save
” after your changes!
Don’t forget to change security level to “AC” to activate your
settings!
Some settings on this page needs an IP
address of a LAN PC to work.
To see the address, select Run… on that
PC’s Start menu, and enter WINIPCFG

14
Using the Online User Manual
Once your Internet connection is up and running, you can easily access the online user manual for
complete and up to date information about your Internet Gate.
1. Surf to the built-in web page of your Internet Gate
2. Click
Online User Manual
.
Note!
You can also read the Online User Manual from any computer
with Internet access, at
www.igmanual.com
Technical specification
System support
Independent of operating systems.
Configuration
Built-in web server
Protocol
IP, TCP, UDP, DHCP, HTTP, SIP
Measurements
180x130x25 mm
Weight
0,3 kg
Ports
EXP: Expansion port for future usage.
ET1: 1 x 10/100 Base-T (RJ 45), IEEE 802.3 and 802.3u compatible
ET2: 1 x 10/100 Base-T (RJ 45), IEEE 802.3 and 802.3u compatible
USB: USB specification 1.0 and 1.1
Power supply
9V DC, 600 mA
Firewall
Generic rule-based packet-filtering, Stateful inspection, Port redirection,
NAT+PAT
Smart card reader
(option)
ISO 7816-1/2/3/4, Asynchronous Cards (T=0, T=1)
SIP-support
IETF protocol for sessions over Internet (e.g. IP Telephony), RFC2543
SIP-proxy
Firewall awareness (controls the firewall), Parallel Forking, Session
Timer
SIP-registrar
SIP-clients are automatically registered, so that the proxy can forward
calls and media streams to the correct recepient
15
DECLARATION OF CONFORMITY
according to EN 45014
The manufacturer Intertex Data AB, Rissneleden 45, 174 44 Sundbyberg, Sweden, herewith
declares the firewalls/modems in the Intertex IX66 Internet Gate series are in compliance with the
essential requirements and other relevant provisions of the following EC directives:
1999/5/EC Radio & Telecommunications Terminal Equipment Directive (R&TTE)
and that the following harmonised standards and/or technical specifications have been applied:
Electromagnetic Emission:
EN 50081-1:1992, EN 50081-2:1993, EN 55022:1998
Electromagnetic Immunity:
EN 50082-1:1997, EN 61000-6-2:1999, EN 55024:1998
Safety:
EN 60950
Stockholm August 27, 2001
Karl Erik Ståhl, President Intertex Data AB
To preserve the environment, you should return the product to where you
purchased it or directly to an accredited electronics recycling station.
Intertex uses accredited companies and organisations for recycling and disposion
of electronics, packing materials and emballage.

16
IX66 Internet Gate is developed and manifactured by Intertex Data AB.
Copyright © 2001 Intertex Data AB
All rights reserved.
This manual and any associated artwork, software, and product designs are copyri ght ed with al l
rights reserved. Under the copyright l aws t hi s manual, artwork, software, and product designs
may not be copied, in whole or part, without t he written consent of Intertex. Under the law,
copying includes translat i on t o another language or format.
Intertex Data AB
Rissneleden 45
SE-174 44 Sundbyberg
Sweden
www.intertex.se
 Loading...