

Page 1

INT2000
USER GUIDE
Part No. 935.0350
Issue 1, September1997
##
Page 2

Page 3

Inter-Tel INT2000 User Guide
TABLE OF CONTENTS
INTRODUCING THE INT2000 1.............................
WARNINGS 2.............................................
Range Limits 2...............................................
Cordless Telephones And Privacy 2.............................
Base Units and Handsets 2....................................
Battery Packs 3..............................................
Not Waterproof 3.............................................
INSTALLING THE INT2000 4...............................
Selecting The Location 4......................................
AC Adapters 4...............................................
Attaching The Belt Clip To The Handset 5.......................
Rechargeable Battery Packs And The Charger 5.................
USING THE INT2000 8.....................................
Handset Controls 8...........................................
Range Limits 8...............................................
Feature Buttons 9............................................
The SPCL Button 10..........................................
CALL Buttons 10.............................................
Interaction With The Telephone System 10......................
User-Programmable Feature Buttons 13.........................
INTERCOM CALLS 14.....................................
Placing Intercom Calls 14......................................
Receiving Intercom Calls 14...................................
OUTSIDE CALLS 15.......................................
Placing Outside Calls 15.......................................
Receiving Outside Calls 15....................................
Call Screening 16.............................................
Inter-Tel Integrated Systems, Inc. 9/97
Page 4

Inter-Tel INT2000 User Guide
PLACING CALLS ON HOLD 17..............................
MUTING THE MICROPHONE 17............................
REQUESTING A CALLBACK 18.............................
CALL WAITING 18.........................................
PICKING UP A CALL FROM ANOTHER PHONE
(REVERSE TRANSFER) 18.................................
ACCOUNT CODES 19.....................................
STATION-TO-STATION MESSAGES 20......................
Leaving Messages 20.........................................
Receiving Messages 21.......................................
CALL TRANSFER 22.......................................
Transferring To Another Extension 22...........................
Transferring To Voice Mail 22..................................
Transferring To An Outside Number 22..........................
CALL FORWARDING 23....................................
Manual Call Forwarding 23.....................................
Automatic System Forwarding 23...............................
STATION SPEED DIALING 24..............................
Storing Station Speed-Dial Numbers 24.........................
Using Speed-Dial Buttons 25...................................
Dialing Station Speed-Dial Numbers 25..........................
SYSTEM SPEED DIALING 25...............................
INTERCOM, OUTSIDE, AND FEATURE DIRECTORIES 26.....
REDIALING 27............................................
CONFERENCE CALLS 28..................................
PAGING 29...............................................
RECORD-A-CALL 29.......................................
DO-NOT-DISTURB 30......................................
REMINDER MESSAGES 32................................
Page 5

Inter-Tel INT2000 User Guide
MISCELLANEOUS FEATURES 33...........................
Standard And Alternate Keymaps 33............................
Date, Time, Name, and Extension Number Display 33.............
Hookflash 33.................................................
SPECIAL PROGRAMMING 34..............................
Ring Tone Selection and Volume 34............................
Programming for Private Intercom Calls 34.......................
Hunt Group Remove/Replace 34...............................
ACD HUNT GROUPS 35...................................
ACD Hunt Group Login 35.....................................
ACD Hunt Group Logout 35....................................
ACD Agent Wrap-Up Terminate 35.............................
AGENT HELP 36..........................................
TROUBLESHOOTING 37...................................
OPTIONAL EQUIPMENT AND REPLACEMENT PARTS 38.....
Optional Headset 38..........................................
Optional Backup AC Adapter 38................................
Other Optional Accessories and Replacement Parts 38............
NOTES 39................................................
DEFAULT FEATURE CODES 42............................
Page 6

Page 7

Inter-Tel INT2000 User Guide
INTRODUCING THE INT2000
Congratulations on your purchase of the Inter-Tel INT2000 cordless telephone. Itis designed to workon an Inter-Teltelephone systemto provide you
with access to multiple lines, Caller ID, and other phone system features.
Tohelpfamiliarize yourself withthefeaturesoftheINT2000andget the most
from your new phone, please read this user guide thoroughly.
Your INT2000 includes the following items:
•
Handset
•
Base Unit
•
Battery Charger
•
Telephone cord
•
AC Adapters for Base Unit and Battery Charger
•
Two rechargeable Battery Packs
•
Belt Clip
•
Wall Mount Adapter
Ifanyofthese itemsare missing or damaged, contact your service representative. If your INT2000 is not performing to your expectations, please try the
simplestepslistedintheTroubleshootingsection of this user guide. If you are
still unable to resolve the problem, contact your service representative.
1
Page 8

Inter-Tel INT2000 User Guide
WARNINGS
Range Limits
The INT2000 is designed for commercial use. Range has been approved for
150 to 300 feet per Base Unit. Actual range may be less or greater than this
distance depending on the environment. Building wiring, walls, elevators
and other electronic interference frequencies maylimit the range of this telephone.Pleaseconsultyourtelecommunicationsconsultant for testing of your
location.
To maximize the range capability, do the following:
•
Locate the Base Unit a t the highest point possible in the center of your
coverage zone. Ifyouare planningto cover an outdoorarea, suchas a car
lot, building grounds, or campus, place the unit near a window and the
highest point within the building.
•
Place the Base Unit away from anyelectronic device. This includes, but
is not limited to, computer screens, radios, electronic signs, coffee pots,
microwaves, and other electronic devices.
Cordless Telephones And Privacy
Cordlesstelephones areradiodevices.CommunicationsbetweentheHandset
andBaseUnitofyourcordlesstelephoneare accomplishedbymeans of radio
waves which are broadcast over the open airways. Because of the inherent
physical properties of radio waves, your communications can be received by
radio receiving devices other than your own telephone unit.
Base Units and Handsets
The Handsets are programmed to work a specific Base Unit. You cannot
switchto a newHandsetor a new Base Unit without having it reprogrammed
by Inter-Tel.
2
Page 9

Inter-Tel INT2000 User Guide
Battery Packs
The Battery Packs contain rechargeable, sealed, lead-acid batteries. To reduce the risk of fire or injury to personsby the battery, read and follow these
instructions:
•
Useonly the appropriatetype and size BatteryPack specifiedin this user
guide.
•
Do not dispose of the Battery Pack in a fire. The cell may explode.
•
Do not open or mutilate the Battery Pack. Released electrolyte is corrosive and may cause damage to the eyes or skin. It may be toxic if swallowed.
•
Exercise care in handling the Battery Pack in order not to short the battery with conducting materials such as rings, bracelets, and keys. The
battery or conductor may overheat and cause burns.
•
Donot chargetheBatteryPackusedinthistelephoneinanychargerother
thantheoneprovidedwithit.Usinganother chargermaydamagethebattery, or cause the battery to explode.
•
Observe proper polarity orientation between the Battery Pack and Battery Charger.
•
Do not short circuit the Battery Pack.
Not Waterproof
Thisunitisnotwaterproof.Toreducetheriskoffire, electricalshock,ordamage to the unit, DO NOT expose this unit to rain or moisture.
3
Page 10

Inter-Tel INT2000 User Guide
INSTALLING THE INT2000
Selecting The Location
Selecta locationfor the INT2000thatavoidsexcessive heat or humidity.The
BaseUnitofyour INT2000 can be placed ona deskortabletopnearastandard
120V AC outlet and telephone line jack. The Base Unit can also be mounted
on a standard wall plate using t he Wall Mount Adapter. Keep the Base Unit
and Handset away from sourcesofelectrical noise (motors, fluorescentlighting, computers).
Before using your INT2000, be sure to raise t he antenna to the vertical position.
AC Adapters
The smaller AC Adapter, with the yellow ring on the connector, connects to
theyellowjackon the backoftheBatteryCharger.The otherACAdapterconnects to the back of the Base Unit.
The AC Adaptersare equipped with a polarized line plug (a plug having one
blade wider than the other). This plug will fit into the power outlet only one
way.If you are unableto insert the plug fully intothe outlet, try reversingthe
plug.If you cannot plugthe AC Adapter intothe outlet, contact anelectrician
about replacing the outlet.
NOTE:Routethepower cord where it will not create a trip hazard, or where it
could become worn and create a fire or other electrical hazard.
4
Page 11

Inter-Tel INT2000 User Guide
Attaching The Belt Clip To The Handset
Youcanuse the Belt Clip to attach the Handset to your belt or pocket forconvenient portability.
1. SnapthetaboutoftheBeltClip
notch on the topof the Handset.
2. Slide the clip into the tab slot.
The Belt Clip is designed to fit
snugly into the Handset.
3. Press firmly until the Belt Clip
snaps into place.
4. Toremove, simply press the retaining clip in toward the Belt
Clip blade and slide the clip up
at the same time. Once theBelt
Clip is removed, remember to
re-install the cover tab.
Rechargeable Battery Packs And The Charger
NOTE:Youcanonly use your INT2000 withthe Handset when itisout of the
Battery Charger.
The rechargeable Battery Pack must be fully charged before using your
INT2000 for the first time (this requires 6-8 hours).
The unique design of your INT2000 allows you to place the Handset in the
Battery Charger with or without the Belt Clip attached. The Battery Charger
alsohas the abilityto charge a secondbattery with or withoutthe Handsetbeing charged. The Battery Packs can automatically be recharged either in or
out of the Handset.
Rechargeablebatteries can develop a reduced charge capacity caused by repeated charge and discharge cycles. The battery life will seem to be shorter
every time you use the unit. To avoid reduced charge capacity, operate the
unit until theBATT LOW indicator appears. Do this at least once a month.
Avoid “topping off” the charge after using the phone for a short time.
5
Page 12

Inter-Tel INT2000 User Guide
Low Battery Indicator
WhentheBatteryPack intheHandsetis lowandneedsto be charged,youwill
seea BATT LOWmessageonthedisplay. If youareona call, only theTALK
button will operate and the Handset beeps every 3 seconds. In standby mode,
no buttons operate and the Handset beeps every 15 seconds for up to 15 minutes.
Complete your call as quickly as possible and return the Handset to the Battery Charger for charging, or replace the Handset Battery Pack with another
charged Battery Pack.
Installing The Battery Pack In The Handset
1. Remove the battery cover by
pressing the latch and sliding
the cover down and off of the
Handset.
2. If replacing a battery, remove
the old battery.
3. Slide the Battery Pack down
into the Handset.
4. Replace the cover and slide it
up until it latches into the
Handset.
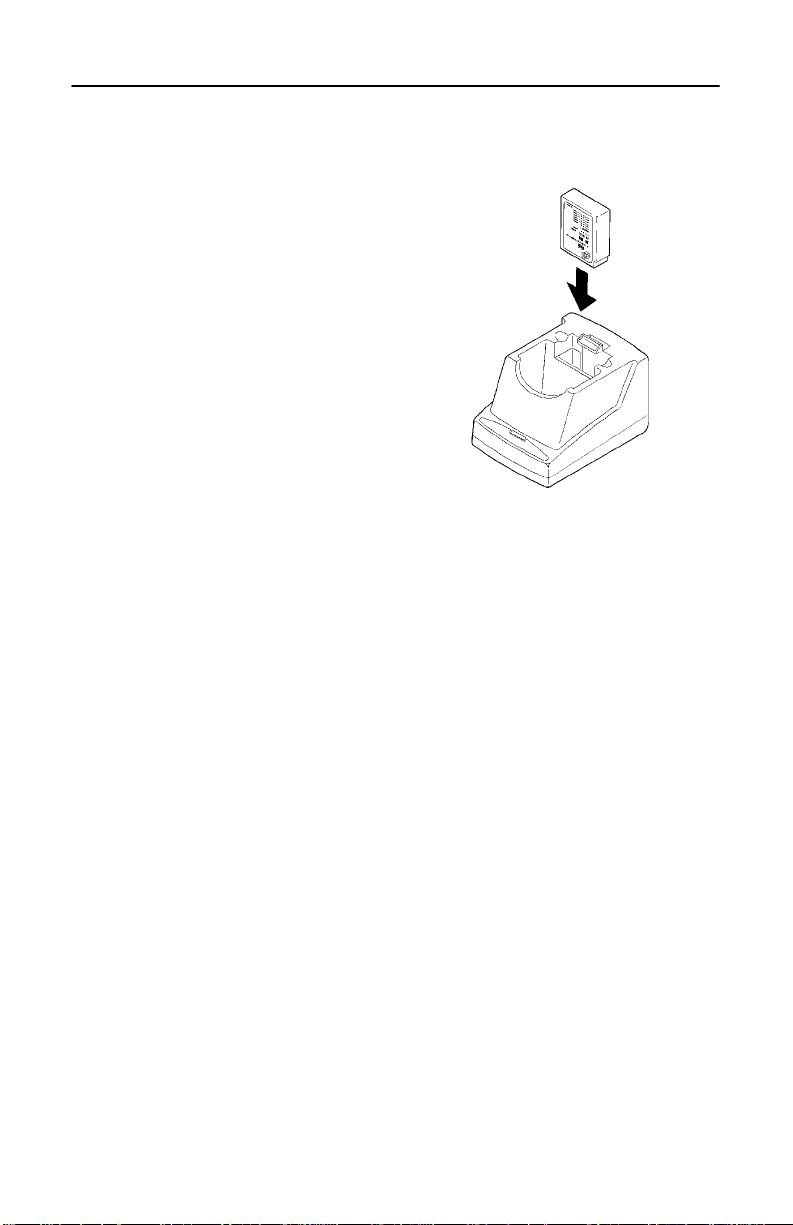
Charging The Battery Pack Inside The Handset
WhentheBatteryPack intheHandsetis lowandneedsto be charged,youwill
see a BATT LOW message on the display.
1. Place the Handset in the front
slot of the Battery Charger.
2. Make sure the CHARGE 1 indicator lights. If the CHARGE
1 light is not lit, check to see
that the AC Adapter is plugged
in, and that the Handset is making good contact with the Battery Charger contacts.
6
Page 13
Inter-Tel INT2000 User Guide
Charging A Spare Battery Pack
1. Slide the spare Battery Pack
into the second slot in the Battery Charger until the retaining
clip snaps over the top of the
pack.
2. Make sure the CHARGE 2 indicator lights. If the CHARGE
2 indicator does not light,
checktoseethatthe AC Adapter is plugged in, and that the
Battery Pack is making good
contact with the Battery Charger contacts.
3. Charge the Battery Pack without interruption for 6-8 hours.
4. When charging is complete,
press out on the latch and remove the Battery Pack for use.
Or, if you do not need the Battery pack immediately, leave it
in the Battery Charger. (It will
not overcharge.)
Cleaning The Battery Charging Contacts
Tomaintaina good charge,itisimportanttocleanallchargingcontacts on the
HandsetandBatteryChargeraboutoncea month. Use a pencileraser or other
contact cleaner. Do not use any liquids or solvents.
7
Page 14

Inter-Tel INT2000 User Guide
USING THE INT2000
Handset Controls
TALK Button
When you pick up the Handset and press TALK, you will see: ACQUIRING
LINK. You then see one of the following:
•
After the connectionhas been made betweenthe Handset and BaseUnit
“TALK”will appear on the display.Then the screen will go into standby
mode and the phone is ready to use.
•
If there isno connectionto the Base Unit, you hear an error tone and NO
SERVICE appears on the display.
•
If the channel is busy, you hear an error tone and the display shows SYSTEM BUSY.
You must have a connection between the Handset and the Base Unit to perform any operation. If the Handset does not respond when you attempt to
place a call or enter a feature code, press the TALKbutton to acquire a link.
CHAN Button
Ifyouhave more than onecordlesstelephoneinyouroffice,they must operate
on different channels. Press the CHANNEL button to select a channel that
provides the clearest communication.
VOL Button
•
During a Call: Press VOL on the front of the Handset to select a high or
low volume level.
•
StandbyMode:PressVOLonthefrontoftheHandsettoselect from Ring
TypeAhigh, Ring TypeA Low,Ring TypeB High, Ring TypeB Low,or
Ring Off (vibrate mode).
Range Limits
If the Handsetis at (orbeyond) the range limit of theINT2000, you may seea
NO SERVICE message.
•
If you are in standby mode, you cannot make or answer calls (the phone
mayringintermittently)until you are back withinrangeoftheBaseUnit.
•
Ifyouareonacall,youhear a warningtone.Movebackintorangewithin
20 seconds.
8
Page 15

Feature Buttons
•
The buttons on your INT2000 are arranged according to a programmed
“keymap.” Your customer service representative, trainer, or system administrator can tell you if your keymap is different from the layout described in this guide. You can use the diagrams on the following two
pages to note any differences. Some optional feature keys that youmay
want to request include:
— ScrollingButtons:If you want to be able to scroll through displays,
you need PREVIOUS and NEXT buttons.
— Message Button: If you want to leave messages while on a call,
scroll through waiting messages, and switch between numeric and
alpha characters when entering a do-not-disturb message or using
the directories, you need a MSG button.
— ForwardButton: If you use custom do-not-disturb messages or di-
rectories,you will wanta FWDbuttonforleavingspacesand forentering two consecutive letters that appearon the same dialpad key.
The FWD button is also used for forwarding calls.
— Switch Keymaps Button: You can have two different keymaps. If
you want to be able to switch between two keymaps quickly, you
maywanta buttonprogrammed withthe “SwitchKeymaps” codeon
both keymaps. (See page 33 for information about switching keymaps.)
Inter-Tel INT2000 User Guide
— User-Programmable Buttons: You may want most of the buttons
to be userprogrammable to allowyou to choose the feature codesor
extension numbers you dial.
•
If your INT2000 has been reprogrammed by the installer so that its featurebuttonsdo not match the feature buttonsdescribedin this user guide,
refer to the owner’s guide for your phone system for procedures on using
feature codes. Default feature codes are listed on the back of this user
guide.
•
Thefeature buttons on your INT2000 are e quipped withlamps.Theflash
rates of the lamps indicate the status of the lines, phones, and features
assignedtothe buttons.The flash rates and theirmeanings are explained
throughoutthisuser guide.Formoredetailedflashrate information,refer
to your telephone system owner’s guide.
9
Page 16

Inter-Tel INT2000 User Guide
The SPCL Button
•
Depending on how the installer programmed your INT2000, you may
haveaSPCLbutton.This buttonallowsyou tousefeaturecodes whileon
a call. Instructions are provided in this guide for using the SPCL button.
If your INT2000 does not have a SPCL button and you would like to use
these features, contact your service representative and request a keymap
for your INT2000 that includes a SPCL button.
•
There is a system-wide option called “SPCL Key Required For Feature
Code Entry.” If your customer service representative, trainer, or system
administrator tells you that it is enabled in your telephone system, you
must always press the SPCL button before dialing a feature code.
CALL Buttons
•
Your INT2000may have CALL buttons like those shown in the diagram
on page 12. These buttons are used for call access. They are not
associated with specific lines. Instead, they are assigned to calls in the
order that the calls are placed or received. If there are morecalls in progress than there are CALL buttons, new calls wait until a CALL button
becomes available. Pressing an unlit CALL button will enter the programmed Outgoing Call feature code for your phone.
Interaction With The Telephone System
•
Your telephone system may have one dial tone for both intercom calls
and outside calls. Or, it may have two dial tones: (1) When you lift the
HandsetorpressTALK, you hearintercomdialtone. (2) Whenyouselect
an outgoing line, you hear standard outside dial tone.
•
Many features are controlled by timers and “time out” if you wait too
longbefore performingthe next step.If this happens,you must start over.
•
Four fast tones or repeating fast tones signal that you made a mistake,
tried to select a restricted line, dialed a restricted or invalid number,
dialed too slowly between digits, or waited too long before performing
the next step. If you hear this signal, hang up and try again.
•
Your telephone system may be equipped with an optional Inter-Telvoice
processingsystem.If so,youwillbe provided with aseparate Voice Mail
user guide that explains the Voice Mail features.
10
Page 17

Inter-Tel INT2000 User Guide
•
The INT2000 has a two-line display with16-characters per line. The default display shows the extension number, user name, time of day, and
date. Other displays include: reminder messages, do-not-disturb messages, numbers dialed, call sources, elapsed time of calls, current call
costs, error messages, etc.
•
In this user guide, phone locations are often referred to as “stations.”
Each station i n your telephone system has an extension number that allows you to place intercom calls to it. Some stations belong to “hunt
groups” that have special extension numbers which route your call
through the stations in the group. Yourcustomer service representative,
trainer, or system administrator can provide you with a list of extension
numbers for your telephone system.
11
Page 18

Inter-Tel INT2000 User Guide
1
2
3 11
4
5
6
7
8
9
1 Ringer On/Off Switch
2 Display
3 TALK Button
4 CALLButton#2
5 CALLButton#1
6 HOLD Button
7 TRANSFER Button
8 Dialing Keypad
10
12
13
14
15
9 Microphone
10 Headset Jack
11 CHANNEL and
VOLUME Buttons
12 CALL Button #3
13 SPCLorCALLButton#4
14 MUTE Button
15 REDIAL Button
12
Page 19

Inter-Tel INT2000 User Guide
User-Programmable Feature Buttons
Dependingon how your systemis programmed, someofyour feature buttons
may be designated as “user-programmable.” If so, you can program them
with any of the feature codes listed on the back of this user guide. (Station
Speed-Dialbuttonsrequirespecialprogramming, as described i n the last section below.)
To program a user-programmable feature button:
1. Dial
3 9 7
.
2. Press the feature button you want to program.
3. Dial the feature code you want to store under that button. (Refer to the
back of this guide for default feature codes.)
To return all feature buttons to theiroriginal default values:
Dial
3 9 5
.
To display the current feature button values:
1. Dial
3 9 6
.
2. Press the feature button(s) you want displayed.
3. Press TALK to hang up.
To change a user-programmable feature button into a Station Speed-Dial
button:
1. Dial
3 9 7
.
2. Press the feature button you want to change into a Station Speed-Dial
button.
3. Dial
3 8 2
.
4. When the display asks for a number, dial a digit 0–9. This is the station
speed-dial number “location.”
5. Label the corresponding button onyour INT2000 withthe station speeddial location number (0–9) and the extension number or outside telephone number that will be stored there. You can now use the procedure
outlined on page 24 to program and use the Station Speed-Dial button.
13
Page 20

Inter-Tel INT2000 User Guide
INTERCOM CALLS
Placing Intercom Calls
To place anintercom call:
1. If necessary, press TALK. You will see ACQUIRING LINK.
2. Dial an extension number.
3. If your call goes throughhandsfree to the called phone’s speaker, speak
after you hear a double tone. If you hear continuous ringing, wait for the
call to be answered.
4. Whenyoufinishthe call, press the TALKbuttonagain.Thiswillhangup
the phone and put it in standby mode.
Options
If you want to place a non-handsfree call that will ring at the other phone
until answered:
•
If there is no answer, you can do any of the following:
•
•
#
Press
essary if you programmed your INT2000 for the Ring Intercom Always feature described on page 34.)
You can leave a message: Press SPCL and dial
your MSG button, if you have one). Then hang up OR wait for the
message center to answer.(See page 20 for more Message options.)
If the party you called is busy, you can stay on the line and wait for
the phone to become available: When you hear busy signals, do not
hang up. After a system timer expires, you hear music until the
phone is available. (You cannot do this if the called phone is in donot-disturb mode.)
before dialing the extension number.(This step is not nec-
3 6 5
Receiving Intercom Calls
To receive anintercom call:
1. Press TALK or lift the Handset out of the Battery Charger.
2. When you finish the call, press TALKor place the Handset back on the
Battery Charger.
14
(or press
Page 21

Inter-Tel INT2000 User Guide
OUTSIDE CALLS
Placing Outside Calls
To place an outside call:
1. If necessary, lift the Handset from its Battery Charger.
2. Press a CALL button.
3. Dial the desired number. (If you see a request for an account code and
hearasingle progress tone,youmustdial anaccount code beforeyou can
place your call.)
4. When finished with the call, press TALK to hang up.
To make anemergency call:
Pressa CALL button and dial
the preset emergency number.
9 1 1
to automatically place a call to
Options
When dialing the number, you can use one of the following features:
•
Outside Directory: To use the speed-dial directory, see page 26.
•
Station Speed Dial: To use the station speed-dial feature, see page
24.
•
System Speed Dial: To use the system speed-dial feature, see page
25.
•
Redial: To redial the last outside number you dialed, see page 27.
Receiving Outside Calls
To receive a call:
1. PresstheTALKbutton,aCALLbutton,oranydialingkeypadbutton.Or,
lift the Handset out of the Battery Charger.
2. When you finishthe call, press TALKor place the Handset back on the
Battery Charger.
15
Page 22

Inter-Tel INT2000 User Guide
Call Screening
This feature is available only if your telephone system is equipped with an
optional Inter-Tel Voice Mail system. The Transfer Method options can be
programmed in the database or by t he mailbox user(see your Voice Mailuser
guideforprogramminginstructions).DependingontheTransferMethod programmed for your phone, transferred calls from Voice Mail may be unannounced (as usual), or one of the following may occur:
•
“Announce Only” Calls: Before the Voice Mail system transfers a call
to you, a prompt asks the caller to record his or her name before the system completes the transfer.
•
“Screened” Calls:BeforetheVoiceMailsystemtransfersa call to you, a
prompt asks the caller to record his or her name. When you answer the
call from Voice Mail, you hear,“You have a call from(caller’sname),”
You then have the following options:
#
— To accept the call, press
— To replay the announcement, press
— To send the call to Voice Mail, press
.
1
.
2
.
— Toforwardthe call to another extension, press
extension number.
— To refuse the call, press
.
*
16
3
andthenenterthe
Page 23

Inter-Tel INT2000 User Guide
PLACING CALLS ON HOLD
The first procedure places a call on individual hold, the second places it on
system hold. Individual hold places the call on hold at one phone. It can then
be directly picked up at that phone or it can be picked up at another phone
using the reverse transfer (call pick-up) feature. An outside call on system
hold can be pickedup directlyat any phone that shows a fluttering button for
the call, including the phone that placed it onhold. (Intercom calls cannot be
placed on system hold.)
To place a call onIndividual Hold:
1. Press the HOLD button.
2. Hang up OR place another call.
3. To return to the call, press the HOLD button again.
To place anoutside call on System Hold:
1. Press the SPCL button and dial
2. Hang up OR place another call.
3. Toreturn to a call on system hold at any phone with a fluttering button,
lift the Handset and press the fluttering button.
3 3 5
.
MUTING THE MICROPHONE
To mutethemicrophonesothatyou canheartheotherpartybut theycannot
hear you (this does not put them on hold):
Press the MUTE button. Your phone will remain muted until you press
the button again, even if you hang up and place anothercall. While the
phone is muted, the TALK icon in the display flashes.
17
Page 24

Inter-Tel INT2000 User Guide
REQUESTING A CALLBACK
When you call a phone that is busy, or try to select an outgoing line that is
busy, you can stayonthelineandwaitforittobecomeavailable(thisiscalled
“campingon”)oryou can requesta callback(“queue” onthe phoneor line).If
you request a callback, your phone will ring when the phone or line you are
waiting for is available.
To camp onto a busy phone or line:
Whenyouhearbusysignals,do nothangup.Youhearmusic,ifavailable,
until the line or phone is available.
To request a callback (queue on to the phone or line):
1. When you hear busy signals, press the SPCL button, dial
hangup. (You can dothis even if yourcall has “camped on”and you hear
music.)
2. When your phone rings, lift the Handset and wait for the other party to
answer.
To cancel a queue before the callback:
6
Dial
.
6
, and then
CALL WAITING
Ifyoureceiveacallwhileyou arealreadyonanother call, youwillheara“call
waiting” tone through your Handset and/or you see a display.
To respond to a waiting call:
1. If you wish to end the current call, press TALK to hang up. The waiting
call rings in. Answer it by pressing TALK again.
2. If you wish to place the currentcall on hold,press the HOLD button and
then press TALK. When the waiting call rings, answer it by pressing
TALK again. You can switch between calls by pressingthe HOLD button.
PICKING UP A CALL FROM ANOTHER PHONE (REVERSE TRANSFER)
To pick up a call that is ringing or holding at another phone or hunt group:
4
1. Lift the Handset and dial
2. Dial the extension or hunt group number where the call is ringing.
.
18
Page 25

Inter-Tel INT2000 User Guide
ACCOUNT CODES
If your telephone system is programmed to use the Station Message Detail
Recording (SMDR)feature, the systemwillperiodicallyprint out a record of
telephonecalls placed from thephones within the system.Accountcodescan
be used to add information to these reports.
There are three types of account codes:
•
Standard account codes that are entered into the SMDR report automatically whenever you place a call.
•
Forcedaccountcodesthat you must dial before beingallowedtoplacean
outside call.
•
Optional account codes that can be entered at any time during a call.
Yourcustomerservicerepresentative, trainer, or systemadministratorcantell
you which types of accountcodes are used onyour telephone system. The account code is recorded in the report as soon as the call is completed. If more
than one account code isentered during a call, onlythe lastaccount code that
was entered is recorded.
To enter an optional account code while on an outside call:
Pressthe SPCLbutton, dial
3 9 0
, and then dial the optionalaccount
code. If theaccount code hasfewer than the programmedmaximumnum-
#
ber of digits and is not immediately accepted, press
.
To enable an account code for all calls placed from your phone:
Dial
3 9 1
and then the account code. If the account code has fewer
than the programmed maximum number of digits and is not immediately
accepted, press
#
. This code will be used for all calls made from your
phone until it is disabled.
To disable the code:
Dial
3 9 1
again and then press#.
19
Page 26

Inter-Tel INT2000 User Guide
STATION-TO-STATION MESSAGES
Leaving Messages
If you call a phone that is busy, does not answer, or is in do-not-disturb, you
can use the station-to-station messaging feature to let the other person know
you called.
To signal that a message is waiting, a called phone’s MSGbutton flashes and
the display shows the number of waiting messages.
IfYouDoNotHaveAMSGButton
To leave a message:
1. If you call a phone that is busy, does not answer, or is in do-not-disturb,
and want to leave a message, hang up.
2. Then enter
To cancel a message that you left at another phone:
1. Dial
2. Dial the extension number of the phone where you left the message.
3 6 7
3 6 6
and dial the desired extension number.
.
If You Have A MSG Button
If you have a MSG button, there are two messaging options:
•
Have the called party return your call. When the party you called responds to the message indication, a call is automatically placed to your
phone.
•
Leave a message with the called party’s message center. When the
party you called responds to the message indication, a call is automatically placed to his or her messa ge center instead of your phone. Sometimes the Voice Mail system is programmed as the message center.
To leave a message while on an intercom call:
1. After calling the extension where you want to leave the message, press
your MSG button.
2. Hang up or wait for the message center to answer.
20
Page 27

Inter-Tel INT2000 User Guide
To cancel a message that you left at another phone:
1. Dial
2. Dial the extension number of the phone where you left the message.
3 6 6
.
Receiving Messages
IfYouDoNotHaveAMSGButton
When you see MSG on your display:
3 6 5
Dial
ly placed to the phone or message center that left the first waitingmessage.
To cancel a waiting message:
3 6 5
Dial
celed.
If You Have A MSG Button
When you see MSG on your display:
Lift the Handset and press your MSG button. A call is automatically
placed to the phone or messagecenter that left the first waiting message.
toviewthemessage,then press#. A call isautomatical-
to view the message, then press*. The message is can-
Ifyouhavemore than one message, you can select themessageyouwantto
answer or cancel:
1. Press the MSG button repeatedly to view your waiting messages. The
display shows MESSAGE RECEIVED FROM (source).
#
2. Whenthe desired message is displayed,press
to cancel the message without responding.
21
to respondor press
*
Page 28

Inter-Tel INT2000 User Guide
CALL TRANSFER
Transferring To Another Extension
To transfer a call to another extension:
1. To transfersothatthe call ringsattheother phone:Press theTRANS-
FER button.
To transfer so that the call is on hold at the other phone: Press the
SPCL button and dial
2. Dial the desired extension number.
3. Waitfor an answer, announce the call, and then hang up to complete the
transfer.
4. If the number isbusy,there is no answer, orthe transfer is refused, return
to the caller being transferred by pressing the fluttering button.
Transferring To Voice Mail
To transfer a call to Voice Mail:
1. Press the TRANSFER button.
2. Dial the Voice Mail extension number.
3 4 6
3. If you want to send the call to a specific Voice Mail mailbox,dial thede-
sired mailbox number and then hang up to complete the transfer.
Ifyouwant tosend thecall to the VoiceMail mainmenu(sothat thecaller
can select the mailbox number), hang up to complete the transfer.
Transferring To An Outside Number
To transfer a call to an outside number:
1. Press the TRANSFER button.
2. Select an outgoing line.
3. Dial the desired telephone number.
4. Waitfor an answer, announce the call, and then hang up to complete the
transfer.
5. If the number isbusy,there is no answer, orthe transfer is refused, return
to the caller being transferred by pressing the fluttering button.
22
Page 29

Inter-Tel INT2000 User Guide
CALL FORWARDING
Manual Call Forwarding
Withmanualcall forwarding, you can chooseto send incoming intercom and
outside calls to another extension number. You may also be able to forward
calls to outside numbers, if your phone is programmed to allow it.
To forward calls:
1. Dial one of the following feature codes:
3 5 5
•
warded without ringing at your phone.
3 5 6
•
wardediftheyare not answeredbefore atimer expires.(Thistimeris
adjusted by the installer; it cannot be changed at your phone.)
3 5 7
•
incoming calls are forwarded without ringing at your phone.
3 5 8
•
are forwarded if your phone is busy or if you do not answer, as described above.
2. Then do one of the following:
•
To forward to an outside telephone number: Dial an outgoing line
code and dial a telephone number.
•
To forward to an extension number: Dial the extension number.
•
To forward to your message center: Pressyour MSG button, if you
have one.
(Call Forward All Calls): All incoming calls are for-
(Call Forward If No Answer): All incoming calls are for-
(Call Forward If Busy): When your phone is busy, all
(Call Forward If No Answer or Busy):Allincomingcalls
To cancel any call forward request:
Dial
3 5 5
and press#.
Automatic System Forwarding
Your phone may be programmed with the automatic call forwarding feature
called “System Forwarding.” If so, you can use the following procedure to
turn the System Forwarding feature on and off.
To enable or disable System Forwarding:
3 5 4
Dial
to enable or disable System Forwarding.
23
Page 30

Inter-Tel INT2000 User Guide
STATION SPEED DIALING
Storing Station Speed-Dial Numbers
You can store up to 10 personal speed-dialnumbers and associated names in
station speed-dial “locations” 0–9. These locations are then dialed using a
featurebutton or code plusone of the numbers0–9 on your dialpad. Or,if you
have programmable feature buttons, you can create Station Speed-Dial buttons (as described on page 13) for one-touch speed dialing.
To program your station speed-dial locations:
1. Dial
2. Dial the location code 0–9 to be programmed OR pressa StationSpeed-
3. Enter the desired name for the speed-dial number to be programmed, as
4. Press
5. Dialthe extension number or telephonenumber tobe stored. If yournum-
3 8 3
Dial button that you want to program (if you have one).
described below:
•
Remain in alphanumeric mode:Pressthe keypad buttonsto enter the
desired characters. (Refer to the chart on page 26.) The number of
times a buttonis pressed determines which characteris entered. For
example, 533266 wouldenter “JEAN.”You needa FORWARDbuttontoenter adjoining characters that are located under the samebutton or to leave spaces. For adjoining characters, press the FORWARD button once to advance to the next character. For example,
66FWD6667776 would enter “NORM.” (Note that letters correspond to the letters printed on keypad buttons 1–9.) Press the FORWARD button twice to leave a space.
•
Change to numeric mode: Press the MSG button (if you have one)
andthen pressthekeypadbuttonstoenterthedesirednumbers.Press
#
WARD button, you can press it to leave a space.
#
ber includes an asterisk, pound, a hookflash (a quick hangup and release), or a pause, press the SPCL button once for an asterisk (*), twice
for a pound (#), three times for a hookflash, or four times for a pause.
(Eachpauseand/or hookflashcountsasoneof the 16 digits.) If you have a
FORWARD button, youcanenter more than one*,#,pause, or hookflash
in a row by pressing FORWARD to move to the next character.
.
for a hyphen (–), or press*for a colon (:). If you have a FOR-
to save the name.
24
Page 31

Inter-Tel INT2000 User Guide
Hint: If you want to be able to dial outside telephone numbers without
firstselectingan outgoingline, enter aline access code (suchas the Outgoing Call code “8”) at the beginning of the outside telephone number.
#
6. Press
to save the number.
Using Speed-Dial Buttons
Ifyouhave programmable feature buttons, youcancreate StationSpeed-Dial
buttons (as described on page 13) for one-touch speed dialing.
To view the current programming of Station Speed-Dial buttons:
1. Dial
2. Press the Station Speed-Dial button to be viewed.
3. Press
3 9 6
#
.
to exit.
Dialing Station Speed-Dial Numbers
1. If placing an outgoing call, select an outgoing line by pressing a CALL
button.
2. To usetheSpeedDialbuttonforthenumberyouwishtocall:Press the
desired Station Speed-Dial button.
Ifyou do nothave a Speed Dial button:Dial
sired station speed-dial location number (0–9).
3 8 2
andthen thede-
SYSTEM SPEED DIALING
Your system administrator can store up to 1000 speed-dial numbers insystem
speed-dial“locations” 000–999. Thesespeed-dialnumberscanthenbedialed
using a feature code or the SYSSPD feature button, plus one of the location
numbers 000–999.
To view and/or dial system speed-dial num bers:
1. Dial
3 8 1
.
2. Dial the location code (000–999) for the desired number. The number
displays.
#
3. T o dial the number: Press
.
25
Page 32

Inter-Tel INT2000 User Guide
INTERCOM, OUTSIDE, AND FEATURE DIRECTORIES
The optional directories allow you to “look up” extension numbers, system
speed-dialnumbers,and featurecodes,andtheir associatednames.Ifsearchingfor a name, youdonotneed to enter thefullname.Thesystemwill findthe
closestmatch andshowthenumber andits associatedname onyourdisplay. If
desired, you can then dial the displayed number.
To perform a directory search:
1. Dial
2. Press
3 0 7
1
number directory, or press
3. Enter letters or numbers (up to 10 characters) as described below:
•
Remain in alphanumeric mode:Pressthe keypad buttonsto enter the
desired characters. (Refer to the following chart.) The number of
times a buttonis pressed determines which characteris entered. For
example, 77776444844 would enter “SMITH.” You need a FORWARD button to enter adjoining characters that are located under
the same button or to leave spaces. For adjoining characters, press
theFORWARD buttononcetoadvancetothenextcharacter.Forexample, 66FWD6667776 would enter “NORM.” (Note that letters
correspond to the letters printed on keypad buttons 1–9.) Press the
FORWARD button twice to leave a space.
.
to select the intercom directory, press2to select the outside
3
to select the feature code directory.
NUMBER OF TIMES BUTTON IS PRESSED
BUTTON 1 2345
1–&( ) 1
2ABC’ 2
3DEF!3
4GHI *4
5JKL/ 5
6MNO#6
7PQRS7
8TUV? 8
9WXYZ9
0@: . , 0
•
Change to numeric mode: Press the MSG button (if you have one)
and then press the keypad buttons to enter an extension number.
26
Page 33

Inter-Tel INT2000 User Guide
#
4. Press
NEXT to scroll forward alphabetically through the directory or press
PREVIOUStoscrollbackward.Thedisplaywilltimeoutifthe numberis
not dialed.
5. T o dial a number or feature code while it is displayed: Press
tobeginthesearch.Ifyou have scrollingbuttons,youcanpress
REDIALING
If you reach a busy number, are disconnected, or if there is no answer, the
number in yourredial memory can be redialed easily.Anoutside line isautomatically selected and the telephone number is redialed.
Your INT2000 can be programmed to store,inredial memory,the last outside
telephone number that you dialed or an outside telephone number that you
saved.(Your customerservicerepresentative,trainer, or systemadministrator
can tell youwhether your phoneisprogrammed for “Last Number Dialed” or
“Last Number Saved” operation.) Choose the appropriate procedure for your
phone:
To use the Last Number Dialed feature (if enabled):
#
.
Pressthe REDIAL button. Aline is selected automatically and the number is dialed.
To use the Last Number Saved feature (if enabled):
To save a number: While your phone isidle orwhile you are listeningto
intercom dial tone, press the REDIAL button. This replaces the current
number in redial memory with the last number that you dialed.
To redial the saved number: While on a call or after selecting a line,
pressthe REDIAL button.A line is selected automaticallyand the number in redial memory is dialed.
27
Page 34

Inter-Tel INT2000 User Guide
CONFERENCE CALLS
You can establish multi-party conference calls without operator a ssistance.
There can be up to four parties in aconference. In addition toyou, theconference can include anycombinationofup to three intercomand/oroutsideparties.
To set up a conference call:
1. While on the first call, press the SPCL button and then press
2. Place an intercom or outside call. To place it on “conference wait hold,”
5
pressthe SPCLbuttonandthen
up to two more calls on conference wait hold.)
5
3. Press
to join all of the calls together in the conference.
Options
During the conference call you can do the following:
1. Place the conference on hold: Press the HOLD button. This places the
conference on hold(the parties are still connected). To return to the conference, press the fluttering CALL button.
.(Ifnecessary,repeatthissteptoplace
5
.
2. Add additional parties to the conference: Do the following:
•
PresstheSPCLbuttonandthen
5
. This leaves the conference par-
ties connected.
•
Place a call to the party to be added to the conference.
•
Pressthe SPCLbuttonandthen
5
twice to put yourselfandthenew
party into the conference.
3. Transfer the conferenceto another extension or to VoiceMail: Press the
TRANSFER button and dial the desired extension number. (If you wish,
you can wait for an answer.) Then hang up when you are ready to complete the transfer.
28
Page 35

Inter-Tel INT2000 User Guide
PAGING
The Paging feature allows announcements to be made through keyset speakers. If your system is equipped with optional external paging equipment, announcements can also be made through the external speaker(s).
There can be up to 10 paging zones for different areas of your building. Your
customerservicerepresentative,trainer,orsystem administratorcan tellyou
how your telephone system is programmed. You can list them here for your
convenience:
0 _______________________ 5 _______________________
1 _______________________ 6 _______________________
2 _______________________ 7 _______________________
3 _______________________ 8 _______________________
4 _______________________ 9 _______________________
To make a page:
7
1. Dial
2. Dial the desired zone number (0–9).
3. After the tone, make your announcement.
4. Press TALK to hang up.
.
RECORD-A-CALL
If your telephone system is equipped with an Voice Mail voice processing
unit, your phone may be programmed to usethe Record-A-Call feature. Ifso,
youcandial a feature codewhenever you want torecord an ongoing call.You
can retrieve the message containing the recorded call later, just as you would
any other mailbox message.
To use the Record-A-Call feature while on a call:
1. Press the SPCL button and dial
2. If required, dial the desired mailbox number. (Your phone may be programmed to select the mailbox, or you may be required to dial it.)
3. You hear a confirmation tone when the Record-A-Call feature is activated.
4. To turn off Record-A-Call: Press the SPCL button and dial
OR press TALK to hang up.
3 8 5
29
.
3 8 5
Page 36

Inter-Tel INT2000 User Guide
DO-NOT-DISTURB
Placing your phone in do-not-disturb halts calls (except for queue callbacks,
recalls, and direct ring-in calls). Other users calling you hear a repeating
signal of four fast tones (if they have a display, it shows the do-not-disturb
message you have selected).
There can be up to 20 different Do-Not-Disturb messages in your telephone
system. They can be changed by the system administrator, installer, or programmer. Your customer service representative, trainer, or system administrator will give you a list of Do-Not-Disturb Messages for your system. You
can list them here for your convenience:
01 _______________________ 11 _______________________
02 _______________________ 12 _______________________
03 _______________________ 13 _______________________
04 _______________________ 14 _______________________
05 _______________________ 15 _______________________
06 _______________________ 16 _______________________
07 _______________________ 17 _______________________
08 _______________________ 18 _______________________
09 _______________________ 19 _______________________
10 _______________________ 20 _______________________
To enable do-not-disturb:
1. Dial
2. Dial the desired 2-digit number for the message you wish to use.
3. Ifdesired,customizetheseconddisplay linebyenteringthe desirednum-
3 7 2
bers or letters as described below:
•
Remain in numeric mode: Press the keypad buttons to dial the desired numbers. Press
If you have a FORWARD button, you can press it to leave a space.
.
#
for a hyphen (–) or press*for a colon (:).
30
Page 37

Inter-Tel INT2000 User Guide
•
Changeto alphanumericmode:PressMESSAGEbutton(if you have
one)and then press thekeypadbuttonstoenterthe desiredcharacters.
(Referto thechartbelow.)Thenumberoftimesa buttonispresseddetermines which character is entered. For example, 33377744432999
would enter “FRIDAY.”
You need a FORWARD button to enter adjoining characters that are located under the same button or to leave
spaces.For adjoining characters, press the FORWARD button once
to advance to the next character.
For example, 6 FWD 666 FWD
6632999 would enter “MONDAY.” (Note that letters correspond to
theletters printed on keypad buttons 1–9.) PressFORWARD twiceto
leave a space.
NUMBER OF TIMES BUTTON IS PRESSED
BUTTON 1 2345
1–&( ) 1
2ABC’ 2
3DEF!3
4GHI *4
5JKL/ 5
6MNO#6
7PQRS7
8TUV? 8
9WXYZ9
0@: . , 0
4. Press TALK to hang up.
To cancel do-not-disturb:
3 7 2
Dial
.
31
Page 38

Inter-Tel INT2000 User Guide
REMINDER MESSAGES
Reminder Messages are set, like an alarm clock, to signal you at a specified
time. You can select the message and time up to 24 hours in advance. At the
programmed time, the Reminder Message signals youwith a single beepand
your display shows the message. If yourphone isbusy, you still hear the beep
and the message displays for 10 seconds during the call, then the display returnsafter you hang up. (Reminder Message displays interrupt, but do not affect, programming.)
There can be up to 20 different Reminder Messages in your phone system.
They can be changed by the system adminstrator or programmer. Your service representative,trainer,orsystemadministratorwill giveyou a list of the
messages for your system. You can list them here for your convenience:
01 _______________________ 11 _______________________
02 _______________________ 12 _______________________
03 _______________________ 13 _______________________
04 _______________________ 14 _______________________
05 _______________________ 15 _______________________
06 _______________________ 16 _______________________
07 _______________________ 17 _______________________
08 _______________________ 18 _______________________
09 _______________________ 19 _______________________
10 _______________________ 20 _______________________
To request a reminder message:
1. Dial
3 0 5
.
2. Dial the desired 2-digit number for the message that you want.
#
3. While the desired message is displayed, press
.
4. Enterthe time youwishto receive the messagein hours and minutes.For
example, 0900 =9:00. (If you dialthree digits, such as 900 for 9:00, press
#
.)
5. If your system is set for 12-hour display format, press
2
press
forPM.(Ifit is setfor 24-hourformat, youdo notneed thisstep.)
1
for AM OR
To cancel all reminder message requests before they signal you:
Dial
3 0 6
.
To clear a received reminder message:
While viewing the reminder message, press
.
*
32
Page 39

Inter-Tel INT2000 User Guide
MISCELLANEOUS FEATURES
Standard And Alternate Keymaps
Each phone (inlcuding your INT2000) is programmed with a standard keymap that determines where each feature button appears on the phone. They
can also havean alternatekeymap. If you have an alternate keymap, youcan
switchbetweenthekeymapsbydialingtheSwitchKeymapsfeature code. (If
you have a Switch Keymaps button, you can press it at any time, instead of
following these procedures, to change keymaps.)
To switch between keymaps when your phone is idle:
3 9 9
Dial
To switch between keymaps during a call:
While on a call, press the SPCL button and dial
.
3 9 9
.
Date, Time, Name, and Extension Number Display
This feature displays the system date and time, user name, and extension
number for approximately five seconds during a call or when other displays
are shown.
To show the date andtime display (while on a call, in do-not-disturb, etc.):
Press the SPCL button and dial
3 0 0
.
Hookflash
A timed hookflash (a quick hangup and release) may be required for certain
telephone company services. This feature code sends a timed hookflashover
the outside line when used.
To generate a hookflash while using a line:
Press the SPCL button and dial
3 3 0
.
33
Page 40

Inter-Tel INT2000 User Guide
SPECIAL PROGRAMMING
Ring Tone Selection and Volume
The tone of your INT2000’s ring signals can be changed to create distinctive
ringing. If phones are placed close together, c hanging the tone makes each
phone’s ring easier to recognize.
To select the type of ring tone for your INT2000:
Press the VOL button. You can choose Ring Type A (high or low volume), Ring Type B (high or low volume), or Ring Off (vibrate mode).
To turn off the ringer:
Move the switch on the side of the Handset to OFF.
Programming for Private Intercom Calls
You can place private (non-handsfree) intercom calls whenever you wish by
pressing the pound (#) button before dialing the extension number. Or, your
phone can be programmed to always send private calls using the Ring Intercom Always feature described below.
To placeonlyprivateintercomcalls(RingIntercomAlways)ortocancelthe
Ring Intercom Always feature:
Dial
3 7 7
.
Hunt Group Remove/Replace
Your system may be programmed with “hunt groups.” These are groups of
stationsthat share a commonextensionnumber in addition to having individualextensionnumbers. (A phone that is part ofahunt group can also be called
directly using its individual extension number.) The phone or phones that receive the call when a hunt group extension number is dialed is determined by
a list programmed in your telephone system’s software. If you are a member
of a hunt group, you can use the following procedure to determine when you
will receive hunt group calls.
To prevent your phone from receiving hunt group calls or to allow it to receive hunt group calls again:
1. Dial
hunt group calls.
2. Dial
3 2 3
group calls.
3 2 2
to remove your station from the hunt group and prevent
to replace your stationin the hunt group and receive hunt
34
Page 41

Inter-Tel INT2000 User Guide
ACD HUNT GROUPS
ACD hunt groups use a special feature called “Automatic Call Distribution”
(ACD)that distributesthe hunt group callsequally amongthe available members. ACD hunt group members a re referred to as “agents.” Agentscanlogin
to and out of the ACDhunt group at any time. While logged in, the agent will
receivecallsthroughthe ACDhunt group. When theagentislogged out,calls
tothat ACD hunt groupwill bypass the agent. If your phone isinan ACDhunt
group, use the following procedures to log in and out.
ACD Hunt Group Login
To log into one or more ACD hunt groups:
To log intoone ACD hunt group:Dial
sion number of the desired ACD hunt group.
To log in to all of your ACD hunt groups at once: Dial
ACD Hunt Group Logout
To log out of one or more ACD hunt group:
To log out of all of your ACD hunt groups at once: Dial
To log out of oneACDhuntgroup: Dial
displays will appear:
•
If you were logged in to only one hunt group, the display shows
AGENT LOGGED OUT OF <hunt group>.
•
Ifyou werelogged in to morethan one hunt group,thedisplayshows
AGENT LOGOUT ACD NUMBER. Dial the extension number of
the desired ACD hunt group.
•
If you were not logged in to any hunt group, thedisplay showsNOT
LOGGED INTO ANY ACD GROUP. Start over.
3 2 6
3 2 7
andthendial the exten-
3 2 8
3 2 8
.Oneofthe following
.
.
ACD Agent Wrap-Up Terminate
Each time anagent ends an ACD hunt groupcall, a timer is started.Untilthat
timer expires, the agent will not receive another call through any ACD hunt
group. If an agent wishestoend the wrap-up session before the timer expires,
he or she can use the following procedure.
To terminate the ACD Agent wrap-up period before the timer expires:
3 2 9
Dial
play shows CANNOT ACCESS RESERVED FEATURE.)
.(If you werenot logged in to an ACD hunt group,the dis-
35
Page 42

Inter-Tel INT2000 User Guide
AGENT HELP
Your telephone system may be programmed to support the Agent Help feature, which allows youto request helpfrom a designated“AgentHelpExten-
sion” (usually your supervisor) during a call. When your requestcall ringsat
the Agent Help Extension, the supervisor can choose to join the call or reject
the request.
If the Agent Help Extension isa keyset, its microphone is muted and the supervisor cannot be heard unless he or she presses the MUTE button. If the
AgentHelpExtensionisa single-lineset,the supervisorcanbeheard assoon
astheconference is established. In either case, the supervisor canhear allother parties on the call.
To use the Agent Help feature while on a call:
1. Press the SPCL button and dial
NOTE:Thisfeaturecannotbeusedifthe AgentHelp feature is not avail-
ableat your phone, you alreadyhave four partiesinyour call, notenough
systemcircuits are currentlyavailable, or the Agent HelpExtensionisin
do-not-disturb.
2. If required, dial the Agent Help Extension number. (Your phone may be
programmedtoautomaticallydial the number, or you maybe required to
dial it.)
3. If the Agent Help Extension accepts the call, you hear the Agent Help
tone (if it is enabled) and the supervisor can monitor or join your call.
IftheAgentHelpExtensionrejectsthe call, you heara confirmationtone
and the display shows AGENT HELP REJECTED.
To respond to an Agent Help request:
When you receive an Agent Help, your display shows <name> RE-
QUESTS HELP. You can do one of the following:
•
To accept the call: Answer as usual.
•
To reject the call: Dial
3 7 5
3 7 6
.
. You hear a confirmation tone.
36
Page 43

Inter-Tel INT2000 User Guide
TROUBLESHOOTING
If your INT2000 is not performingto your expectations, please trythese simple steps. If you are still unable to resolve the problems, c ontact your service
representative. NOTE: Do not attempt to service this unit yourself. All service must be done by qualified service personnel.
Problem:Charge 1 lightwillnot come on when Handset is placed in Battery
Charger.
Possible Solutions:
•
Make sure the AC Adapter is plugged into t he BatteryCharger and wall
outlet.
•
Make sure Handset is properly seated in Battery Charger.
•
Make sure the Battery Pack is properly placed in the Handset.
•
Makesurethat the chargingcontactsontheHandsetand BatteryCharger
are clean.
Problem: Conversation interrupted frequently.
Possible Solutions:
•
Make sure that the Base Unit antenna is fully vertical.
•
Move closer to the Base Unit.
•
Check for LOW BAT warning.
Problem: Warning tone and NO SERVICE message.
Possible Solution:
•
Move closer to the Base Unit.
Problem: Handset does not ring.
Possible Solutions:
•
Ringer switch may be set in the OFF position.
•
Battery may be weak. Charge the Battery Pack for 8-10 hours.
•
Make sure the Base Unit antenna is fully vertical.
•
The Handset may be too far away from the Base Unit.
37
Page 44

Inter-Tel INT2000 User Guide
OPTIONAL EQUIPMENT AND REPLACEMENT PARTS
Optional Headset
The optional Headset provides a “handsfree” option for the INT2000. With
theHeadsetinstalled, you can usethe Belt Clip to carry the Handset,andconduct a conversation using the Headset.
To install the optional Headset,open the cover over the HEADSET Jack and
plug the Headset in. No other settings are needed.
Operation of the INT2000 using the Headset is exactly the same as using the
Handset. However, you will hear through the Headset earphone, and talk
through the Headsetmicrophone. The Handsetearphone and microphoneare
disconnected.
Optional Backup AC Adapter
The optional Backup AC Adapterprovides protectionagainst losinga call in
case of AC Power failure. The Backup Adapter contains a Battery Pack that
provides enough power for you to complete the call and hang up.
Other Optional Accessories and Replacement Parts
For the following Optional Accessoriesand Replacement Parts contact your
service representative.
•
AC Adapters
•
Telephone Cord
•
Belt Clip
•
Battery Pack
•
Battery Charger with AC Adapter
•
Wall Mount Adapter
•
Headset
•
Leather Carrying Case
38
Page 45

NOTES
Inter-Tel INT2000 User Guide
39
Page 46

Inter-Tel INT2000 User Guide
NOTES
40
Page 47

NOTES
Inter-Tel INT2000 User Guide
41
Page 48

Inter-Tel INT2000 User Guide
DEFAULT FEATURE CODES
Usetheblankspacesbelowto enter custom feature codesif your telephone system
has been reprogrammed with new codes.
Account Code — All Following Calls 391_____...................
Account Code — Optional 390_____..............................
ACD Agent Log In 326_____....................................
ACD Agent Log Out 327_____...................................
ACD Agent Wrap-Up Terminate 329_____.........................
Agent Help Request 375_____...................................
Call Forward All Calls 355_____.................................
Call Forward If Busy 357_____................................
Call Forward If No Answer 356_____...........................
Call Forward If No Answer or Busy 358_____....................
Conference 5_____..........................................
Default Station 394_____.......................................
Directory 307_____............................................
Do-Not-Disturb On 370_____....................................
Do-Not-Disturb Off 371_____...................................
Feature Key Default 395_____...................................
Hold — Individual 336_____....................................
Hold — System 335_____......................................
Hookflash 330_____...........................................
Hunt Group Remove 322_____..................................
Hunt Group Replace 323_____..................................
Message 365_____............................................
Cancel Message That You Left 366_____........................
Cancel Current Message On Your Phone 368_____.................
Silent Message 367_____.....................................
Page 7_____................................................
Program Keys 397_____........................................
Queue (Callback) Request 6_____..............................
Record-A-Call 385_____.......................................
Redial 380_____..............................................
Reminder Message 305_____....................................
Reminder Message Cancel 306_____............................
Reverse Transfer (Call Pick-Up) 4_____.........................
Review Keys 396_____.........................................
Ring Intercom Always On/Off 377_____...........................
Station Speed Dial 382_____....................................
Station Speed Dial Programming 383_____.......................
System Forward On/Off 354_____................................
System Speed Dial 381_____....................................
Switch Keymap 399_____.......................................
Transfer To Ring 345_____......................................
42
 Loading...