

Page 1
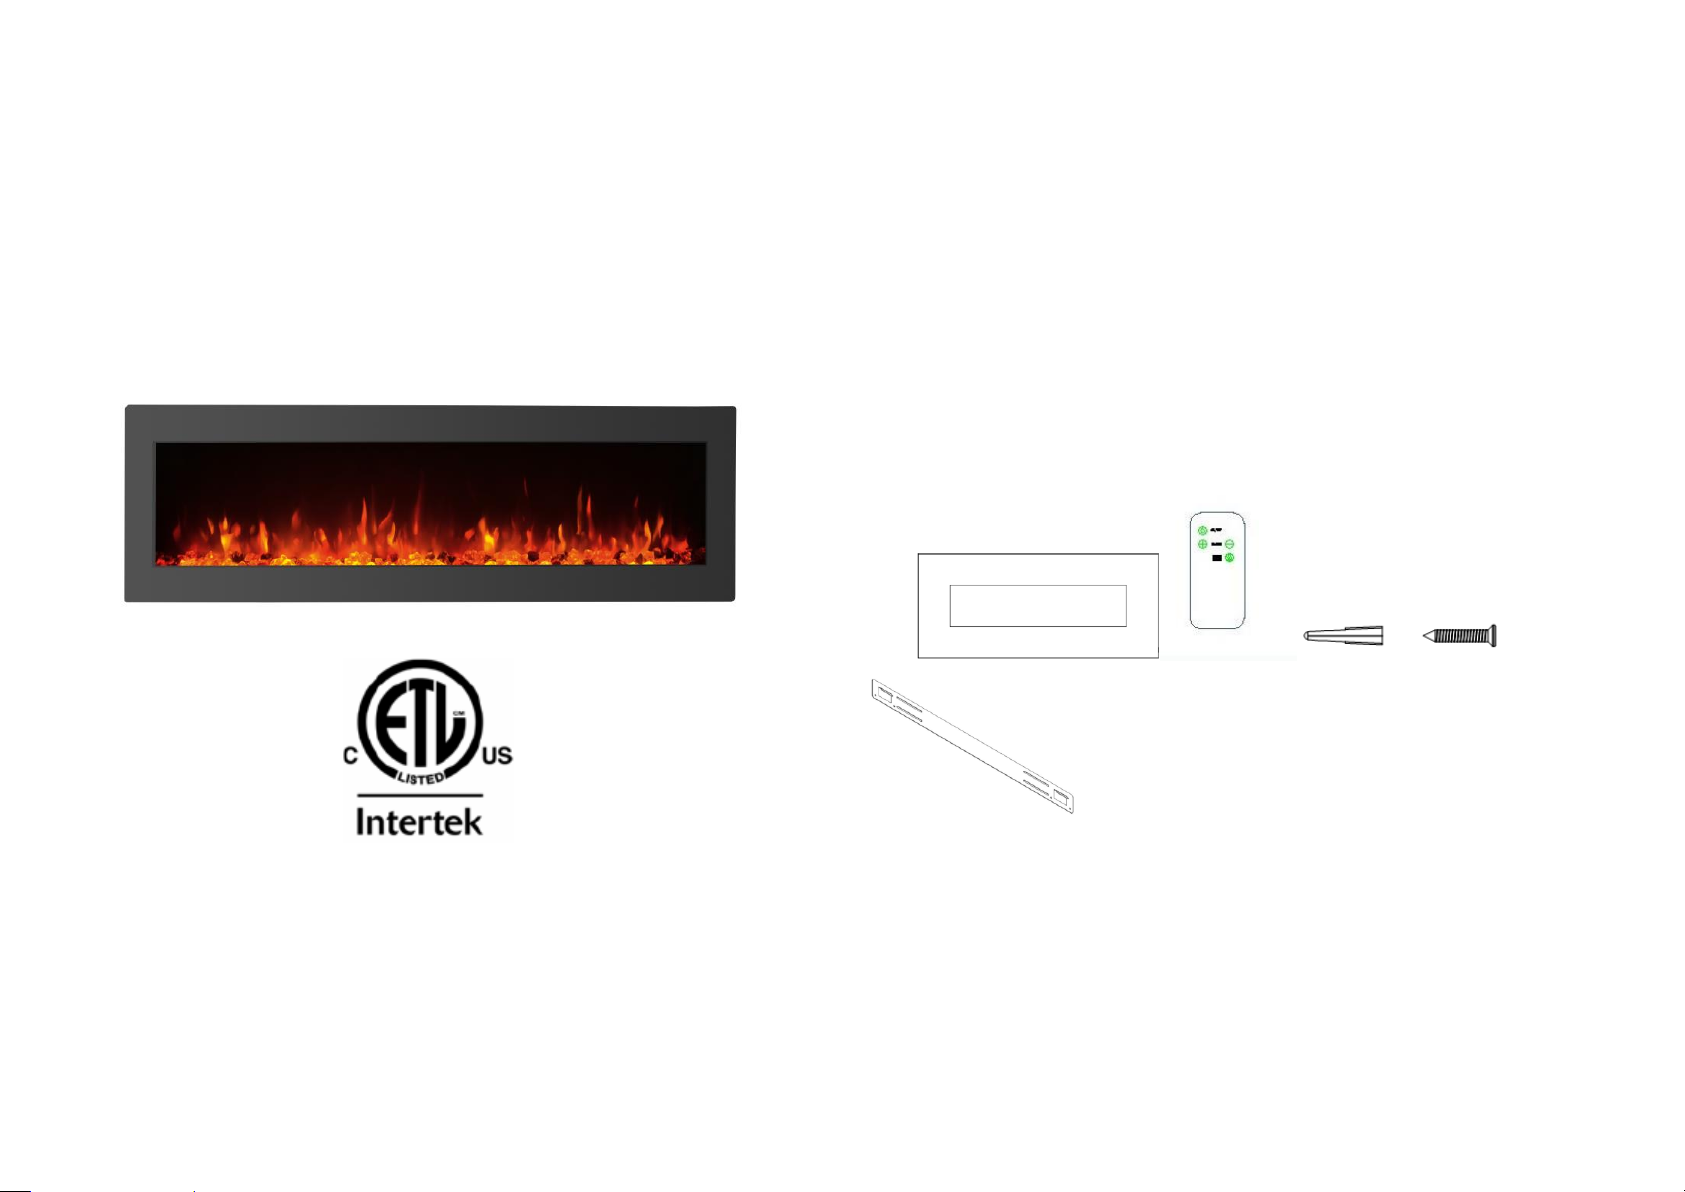
Wall Mounted Electric Fireplace
(With Remote Control)
Model#
ZCR3824&ZCR3830&ZCR3840
Please read all instructions carefully and
Retain for future reference
-1-
Getting Started
⚫ Remove the appliance from the box.
⚫ Remove any packaging from the product.
⚫ Place the packaging inside the box and either store or dispose of safely.
Contents of Carton
⚫ Heater
⚫ Wall fixing bracket and screws
⚫ Remote control
⚫ one pc bracket and one pc bottom bracket
⚫ 8 pcs 6x25mm top bracket
⚫ 2 pcs 4*8mm and 2pcs 6x25mm to fix bottom bracket
⚫ 1 Instruction Manual
Helpful Advice before Fitting
⚫ Please retain all packaging until you have checked and counted all the parts and the
contents of the hardware pack against the parts list.
⚫ The hardware pack contains small items which should be kept away from young
children.
⚫ We suggest that you open the hardware pack and place all the contents into a container,
therefore reducing the risk of losing any small pieces.
-2-
Page 2
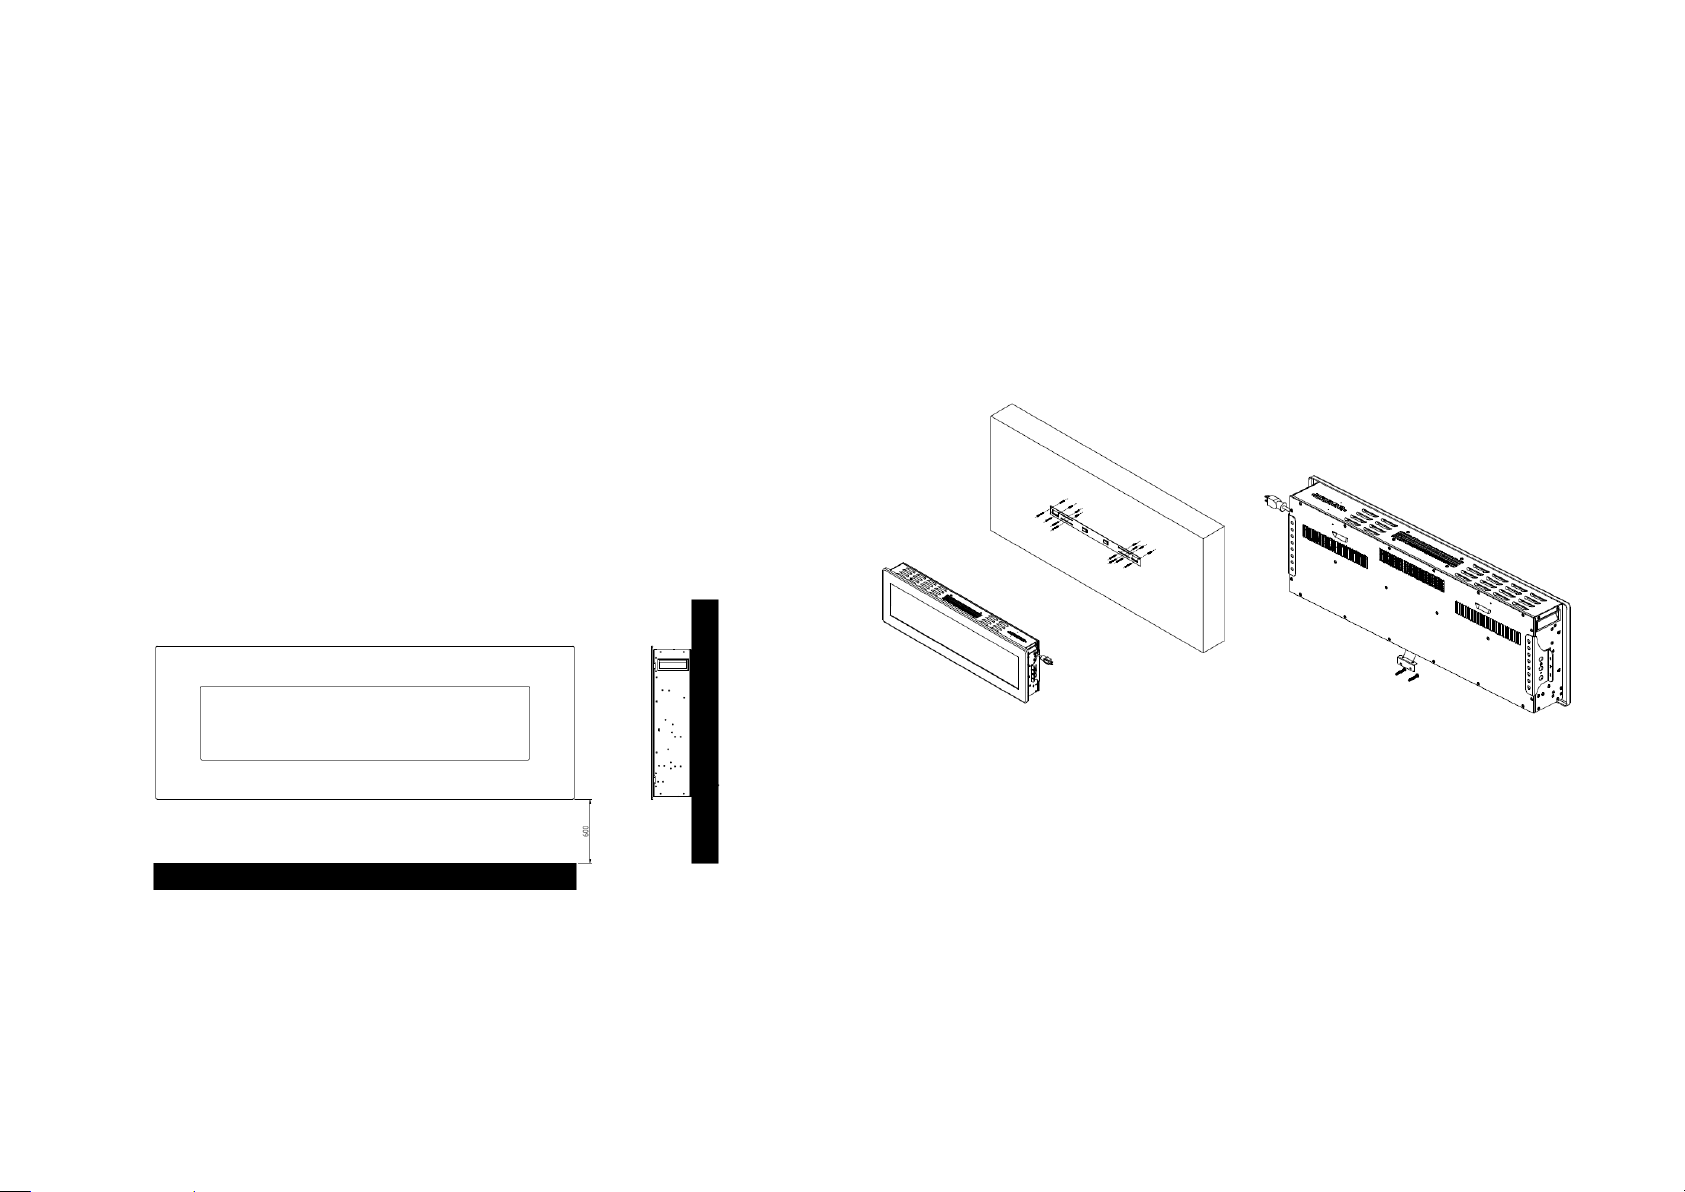
Installation (see Fig1 ~ Fig 6)
⚫ Do not connect the appliance until properly fixed to the wall and the instructions are
fully read.
⚫ The minimum distances must be observed in the diagrams.
⚫ For installation of the appliance, care must be taken not to damage concealed cables.
⚫ Please be careful while drilling the holes.
Wall Mount Instructions
⚫ This appliance is designed to be fixed to a wall at a minimum height of 300mm and the
minimum distance from the top of the heater to the ceiling should be 1000mm. The
wall bracket must be fitted horizontally and the cable routed to the bottom right of the
heater.
⚫ A distance of 600mm from the bottom of the heater to the floor is recommended for
optimum viewing of the fuel bed; see Fig.1 below for recommended fixing
dimensions.
Fig.1
⚫ For optimum viewing, mark the top four screws ( fixing positions on the wall in
accordance with the recommended fixing dimension; See Fig.2
-3-
Note: Ensure the bracket is level by using a spirit level whilst marking out the hole
positions.
⚫ Drill holes with a No.6 drill bit.
⚫ Fix the wall bracket using the plug and 6x25mm screws provided.
⚫ Carefully lift up the heater ensuring the top rear ledge of the heater engages with the
wall bracket(see Fig.2) and is sitting centrally. This process should be carried out by
two people to avoid injury or damage to property or the appliance.
⚫ Put the crystal to the white boarder , then gently bring the heater down against the wall,
see fig.3
Fig.2
-4-
Page 3
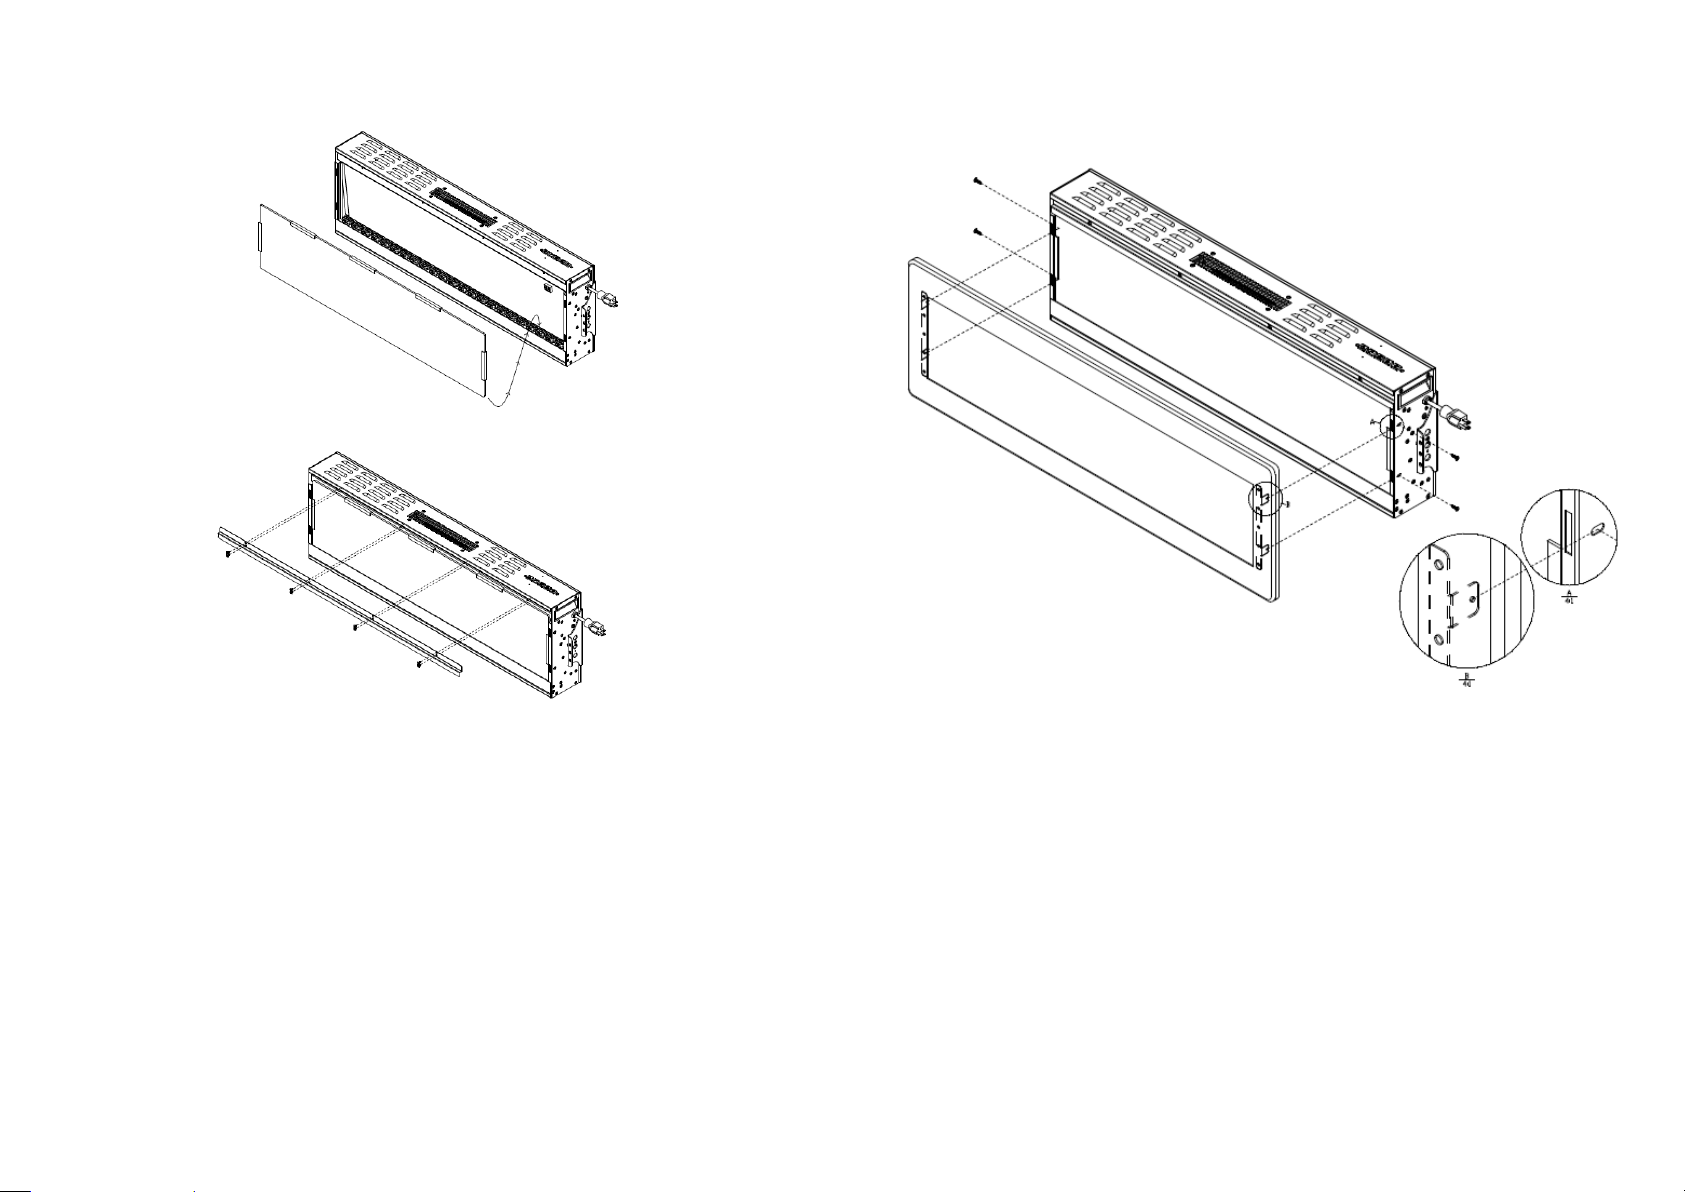
Fig.3
⚫ Place the front glass and steel panel surround over the front of the fire aligning the
slots in the bracket at each side of the glass panel with the lugs on the sides of the fire;
See Fig.3
⚫ Again, two people will be required for this operation.
-5-
⚫ Fix the steel penal with 4 pcs of 4*8mm screws provided.(Fig.4)
Fig.4
Manual Operation
⚫ The switches located at the center right hand side of the fire .The standby switch must
be first switch on.
IMPORTANT: THESE INSTRUCTIONS SHOULD BE READ CAREFULLY AND
RETAINED FOR FUTURE REFERENCE
-6-
Page 4

Base Option
⚫ Take of the base from the left and right side of the fireplace, please see Fig.5
Fig.5
⚫ Install the base with 6*12mm screws (6*12 screws is on the bottom of the fireplace) as
provided, please see Fig.6
Fig.6
-7-
Instructions for Use
⚫ The appliance can be operated either by the switches located on the top right hand side
of the fire or by supplied remote control.
TO ACCESS CONTROL PANEL
⚫ Press once the button on the remote control this turns ON/OFF the appliance
and fire effect.
⚫ Press the button for operates the dimmer mode. Each time the dimmer button is
Pressed, the intensity of the flame decrease. There are 5 brightness levels you can
cycle through and the OFF setting.
⚫ Press once the button for the low heat setting(750W); press twice for the high
heat setting(1500W); press again to turn off the heater.
⚫ Temperature setting button . The highest temperature of the thermostat is 82℉.
There are several thermostat levels you can cycle through between 62℉ and 82℉, and
the OFF settings, keep pressing 5 seconds to toggle between ℃ and ℉.
⚫ Timer setting. Press the button to cycle through the timer settings (1Hour,
2H,3H,4H,5H,6H,7H,and 8H) and the OFF setting.
⚫ Colorful Setting.
On remote Press the remotes button to set the flame color.
9 colors: Orange, green, blue, white, orange&green, orange&blue, orange&white,
green&blue, green&white.
- 8 -
Page 5

On fireplace control panel, keep pressing the button dimmer button 3 seconds to set
The flame color
Infrared Remote control
Remote control requires two AAA batteries
-9-
DO NOT mix old and new batteries.
DO NOT use rechargeable silver oxide cell batteries with remote control unit.
DO NOT mix alkaline. Standard (Carbon-zine). Or rechargeable (Nickle - Cadmium)
batteries.
DO NOT dispose of batteries in fire. Improper disposal may cause batteries to leak or
explode.
Important Safety Instructions
When using this electrical appliance, basic precautions should be followed to reduce the
risk of fire, electric shock, and injury to person, including the following :
⚫ This heater must be used on an AC supply only and the voltage marked on the heater
must correspond to the supply voltage.
⚫ Do not switch the appliance on until it properly installed and described in this manual.
⚫ Do not leave the appliance unattended during use.
⚫ Do not leave the appliance unattended whilst connected to the mains supply.
⚫ Keep out of reach of children and do not allow them to operate this appliance.
⚫ From time to time, check the cord for damage .Never use the appliance if the cord or
any part of the appliance shows signs of damage.
⚫ Do not operate this appliance with a damaged plug or cord, after a malfunction or after
being dropped or damaged in any way.
⚫ Repairs to electrical appliances should only be performed by a qualified electrician.
Improper repairs may place the user at serious risk.
-10-
Page 6
⚫ Do not run the cable under carpets, rugs etc.
⚫ Do not allow the mains cable to hang over sharp edges or come into contact with hot
surfaces.
⚫ WARNING: In order to avoid overheating, do not cover or obstruct the heater in any
way.
⚫ Overheating will result if it is accidentally covered.
⚫ Never immerse the product in water or any other liquids.
LED Bulb Replacement
Note: The flame effect on this electric fireplace insert is created by LED Bulbs.
The life of these LED bulbs will be 100,000 hours. The users are not recommended to
Replace the LED Bulbs. For any reason should the bulbs stop working properly, contact a
Qualified technician.
Cleaning:
⚫ Turn heater OFF and unplug from electrical outlet before any cleaning or maintenance
is performed. Wait at least 10 minutes to allow all components to cool properly.
⚫ Use a vacuum or duster to keep heater and vent area clean from dust and dirt.
⚫ The exterior of the fireplace should be cleaned with a damp cloth or duster.
Do not use abrasive cleaners or liquid sprays.
WARNINGS AND CAUTIONS
WARNING To avoid electrical shock not open the back panel of the insert unless
the
Power has been turned off. And the insert has been unplugged.
WARNING Any electrical repairs.to this electric fireplace. Should only be
Performed by a qualified technician.
WARNING Any electrical wiring repairs should only be performed by a qualified
Technician. And also must comply with local buildings codes.
WARNING Discontinue use of this electric fireplace if any of the follow has
-11-
Occurred: Water damage. If insert has been or dented. If power cord has
Become broken. If power cord becomes hot to touch, if unit smokes or
Smells like smoke.
Note: When the heat functions is used for the first time. A slight odor may be
Present. This is normal and should be occur again unless heater is not used
For extended periods of time and dust is allowed to accumulate on heater
Element.
Technical Specification
⚫ Supply: 120V/60Hz
⚫ Rated power:750W/1500W
Meaning of crossed - out wheeled dustbin:
Do not dispose of electrical appliances as unsorted municipal waste, use separate collection
facilities.
Safety Cut-Off
⚫ This appliance is fitted with a safety cut-off which will operate if the fire overheats
(e.g. due to blocked air vents) .For safety reasons, the fire will NOT automatically
reset.
⚫ To reset the appliance, disconnect the appliance from the mains supply for at least 15
minutes. Reconnect the supply to the mains and switch on the appliance.
Troubleshooting
Symptom
Solution
No operation/no fan,
Check fuse by replacement,
Check for safety cut-off operation,
No fire effect light,
Check the LED light with technician.
-12 -
Page 7

Meaning of crossed –out wheeled dustbin:
Do not dispose of electrical appliances as unsorted municipal waste, use separate
collection facilities.
Contact you local government for information regarding the collection systems
available.
If electrical appliances are disposed of in landfills or dumps, hazardous substances can
leak into the groundwater and get into the food chain, damaging your health and
well-being.
When replacing old appliances with new ones, the retailer is legally obligated to
take back your old appliance for disposals at least free of charge.
-13-
 Loading...