


ENGLISH
SpiroCom XXL BT
User Manual

Copyright © 2017 Interspiro
This publication contains or refers to proprietary information which is protected by copyright. All rights are reserved. Interspiro®
and Divator® are registered trademarks belonging to Interspiro. This publication may not be copied, photocopied, reproduced,
translated, or converted to any electronic or machinereadable form in whole or in part, without prior written approval from Interspiro.

Table of Contents
Introduction and safety ........................................................................................................... 5
Safety notice ................................................................................................................. 5
Safety terminology and symbols ..................................................................................... 5
Product description ................................................................................................................ 6
Overview ....................................................................................................................... 6
Main components .......................................................................................................... 6
Preparation ........................................................................................................................... 7
Install attachment bracket on mask ................................................................................. 7
Install SpiroCom on mask ............................................................................................... 8
Install microphone on Inspire mask ................................................................................. 8
Install microphone on S-mask ......................................................................................... 9
Install microphone on Spiromatic mask ......................................................................... 10
Install microphone on N/PE/ESA mask with new cover ................................................... 12
Install microphone on N/PE/ESA mask with old cover .................................................... 13
Operation ............................................................................................................................ 15
Power on the SpiroCom ............................................................................................... 15
Battery power level ...................................................................................................... 15
Bluetooth® function ..................................................................................................... 15
Team Talk function ...................................................................................................... 16
Long range radio transmission (PTT) ............................................................................ 16
Adjusting the volume .................................................................................................... 16
Mute function for Team Talk .......................................................................................... 16
Power off the SpiroCom ............................................................................................... 16
Maintenance ....................................................................................................................... 17
Battery replacement ..................................................................................................... 17
Cleaning and drying ..................................................................................................... 18
Technical data SpiroCom XXL BT ......................................................................................... 19
3

4

Introduction and safety
Safety notice
The product must only be used with other approved Interspiro products. The apparatus must be maintained, serviced and tested as described in this user manual, Interspiro service manuals and Interspiro
test instructions.
Interspiro is not responsible for:
• combinations of products, unless put to market by Interspiro
• changes or adaptations made to the product by a third party
Changes to this document - necessitated by typographical errors, inaccuracies of current information or
improvements and changes of equipment - may be made at any time without prior notice.
Exposure to extreme conditions, may require different procedures rather than those described in this
manual. The guarantees and warranties specified in the conditions of sale are not extended by this
Safety notice.
Safety terminology and symbols
In this document, the terms DANGER, WARNING and NOTICE are used to indicate potential hazards.
Read the accompanying information carefully and follow the safety instructions.
DANGER
The DANGER type of hazard statement signifies that there is a risk of serious injury or
death.
WARNING
The WARNING type of hazard statement signifies that there may be a risk of serious
injury or death.
NOTICE
The NOTICE type of hazard statement signifies that there may be a risk of damage to
equipment or property.
5

1
2
3
4
5
6
7
8
SpiroCom XXL BT
Product description
Overview
The SpiroCom XXL mask unit is made for wireless transmission of the sound to the long-range radio
and has Team Talk and PTT and if desired – an external loudspeaker (VPU) functionality.
Main components
1. MODE button
2. PTT button
3. Display
4. Ear speaker
5. Microphone
6. LED indicator
7. Adjustment button (+/-)
8. External loudspeaker (VPU) [optional]
6

SpiroCom XXL BT
Preparation
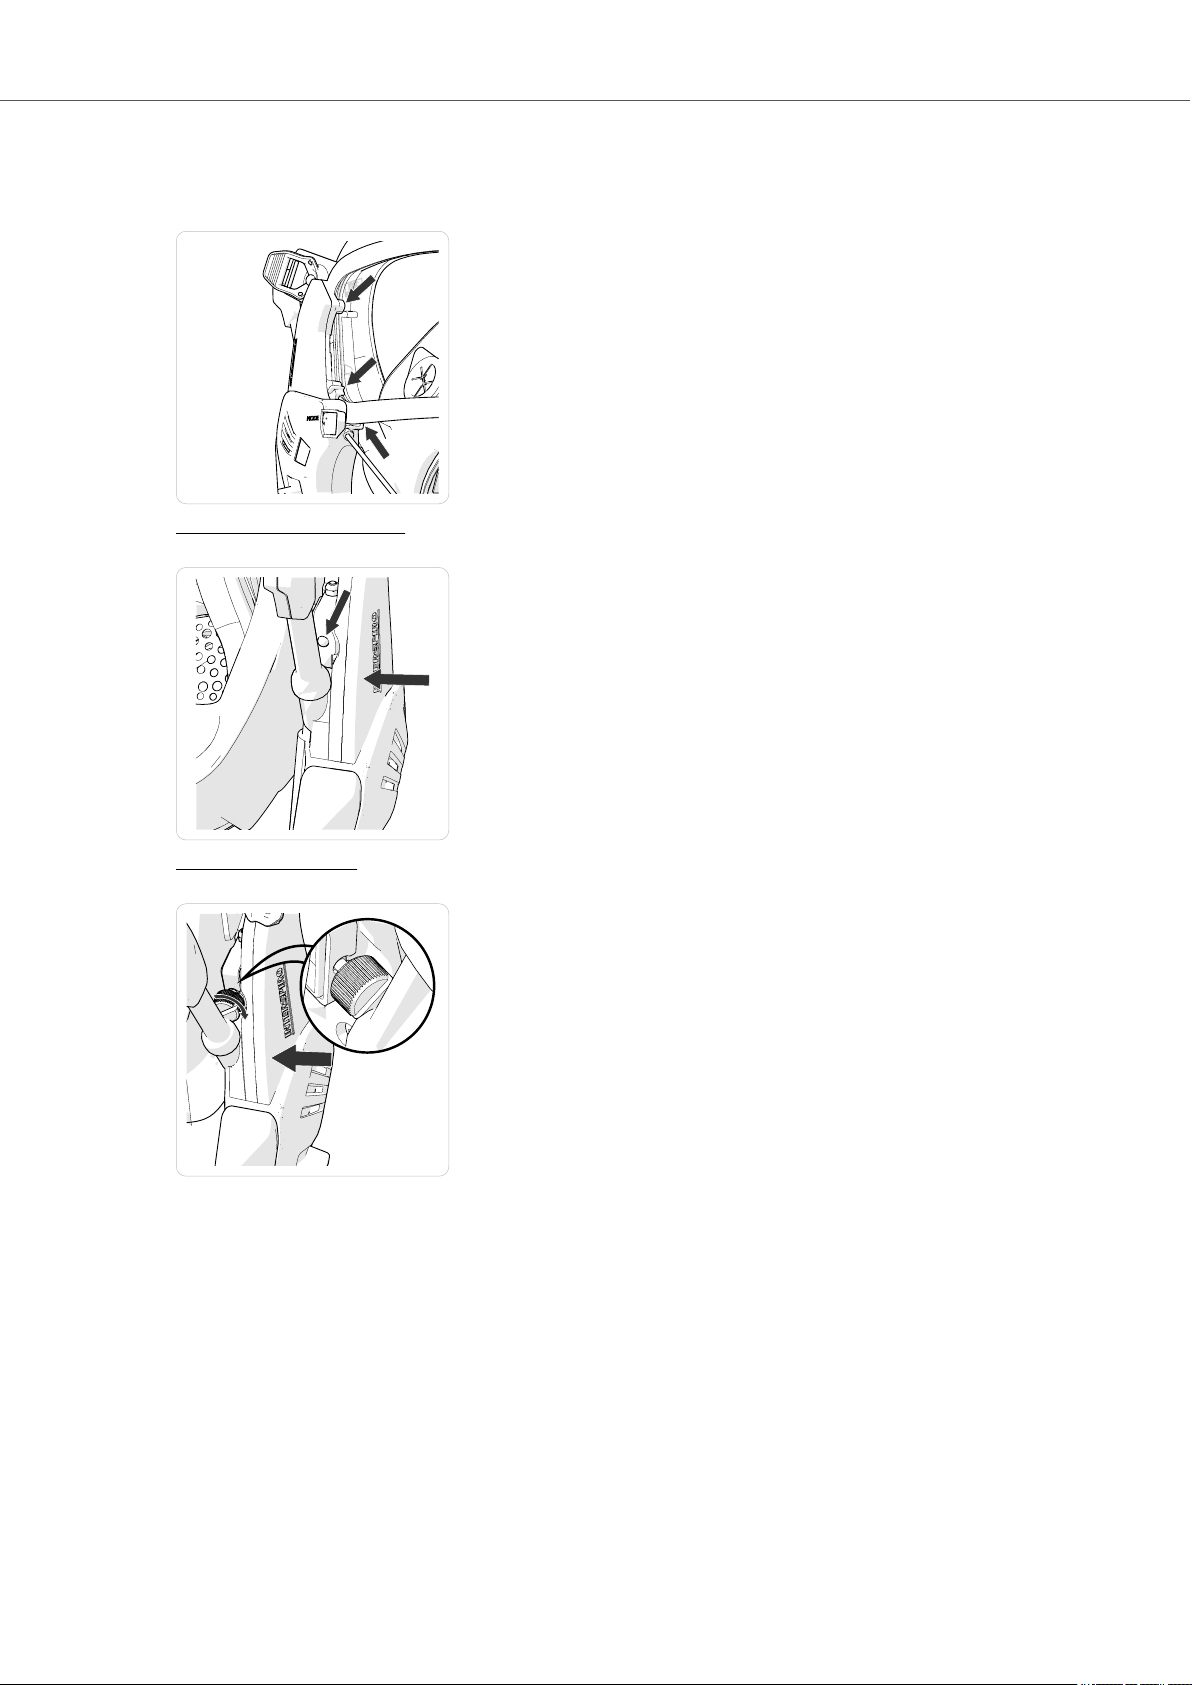
Install attachment bracket on mask
1. Remove the visor frame screw (and lock washer) on the right side of the mask.
2. Put the attachment bracket on the mask.
3. Install the long screw (supplied with the SpiroCom) and the lock washer. Tighten the screw.
7
SpiroCom XXL BT
Install SpiroCom on mask
1. Put the SpiroCom in position on the mask by placing the hooks over the visor frame.
2. Quick connection version:Press the SpiroCom against the mask until the locking peg locks into the
hole in the attachment bracket.
3. Hand screw version: Press the SpiroCom against the mask until it is possible to tighten the hand
screw moderately in the hole in the attachment bracket.
4. Make sure that the SpiroCom is safely attached to the mask.
Install microphone on Inspire mask
1. Put the microphone cable between the lower visor frame and front piece of the mask.
8
SpiroCom XXL BT
2. Push the microphone into the hole in the frontpiece of the mask
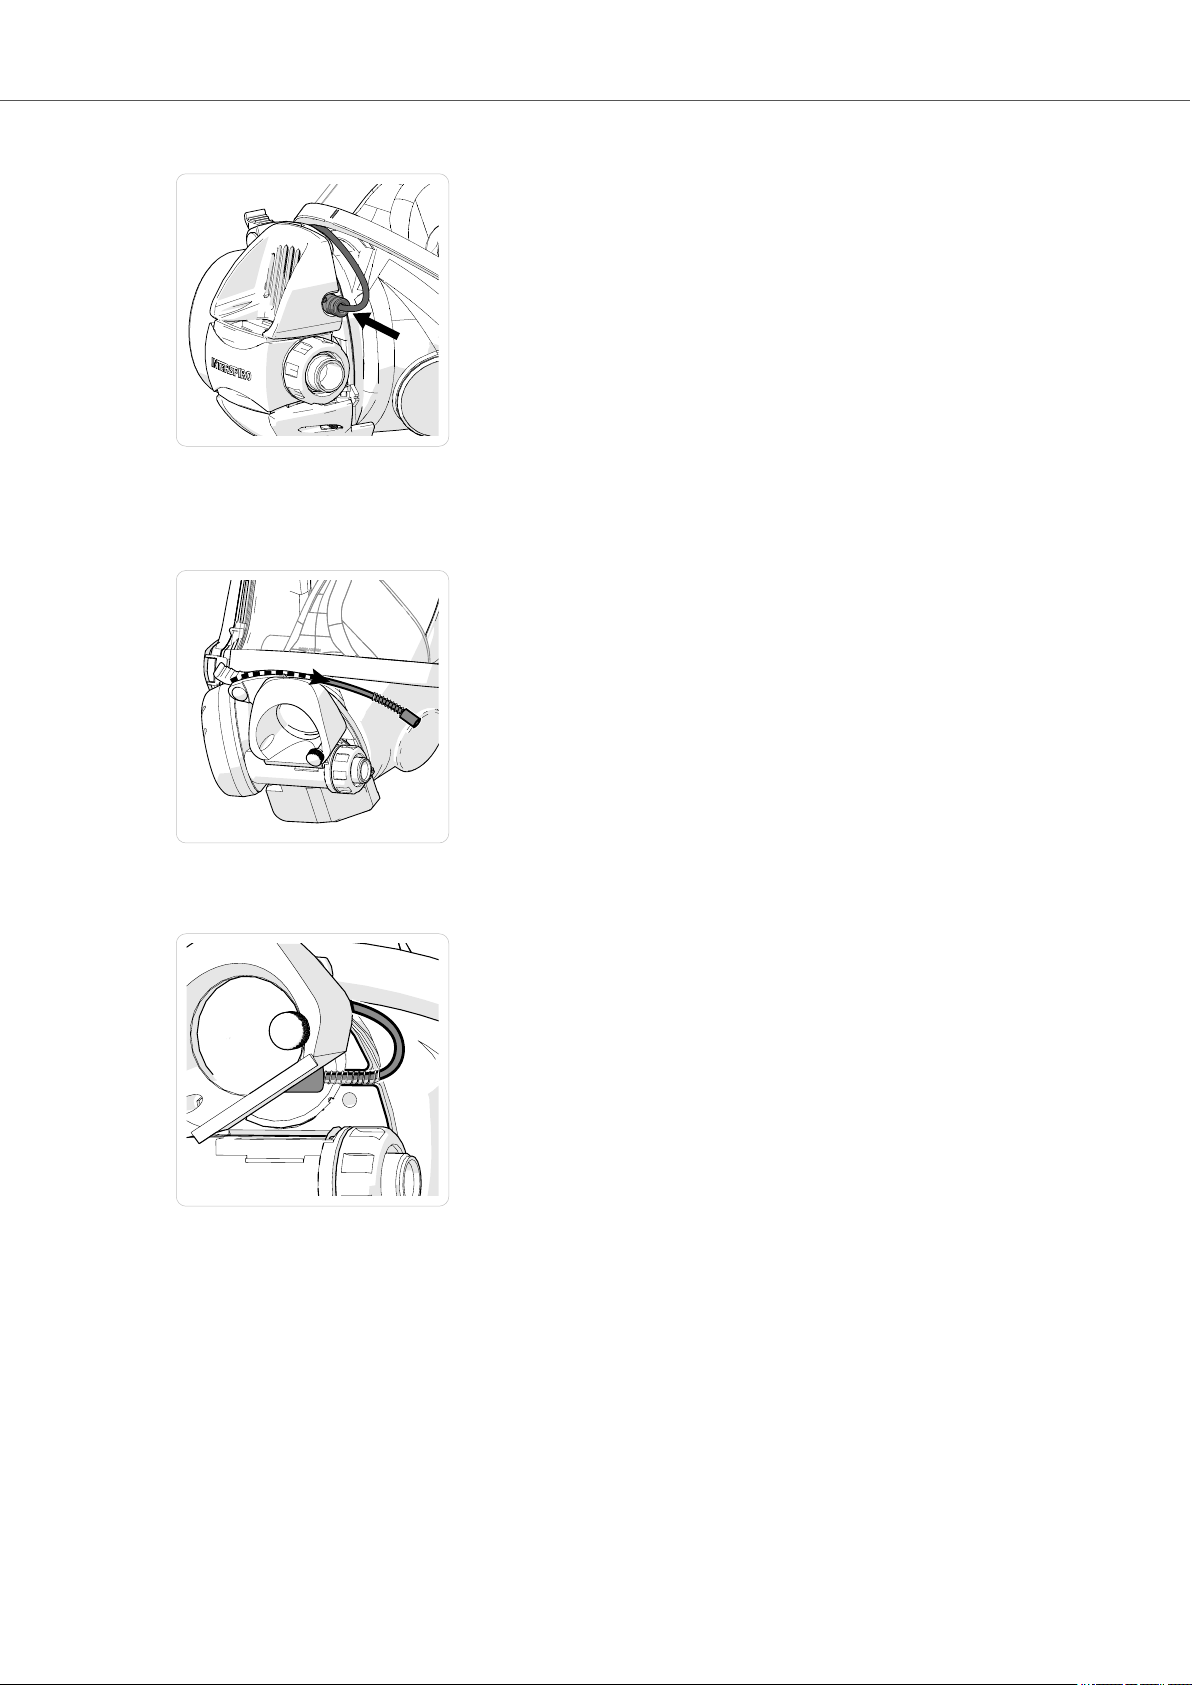
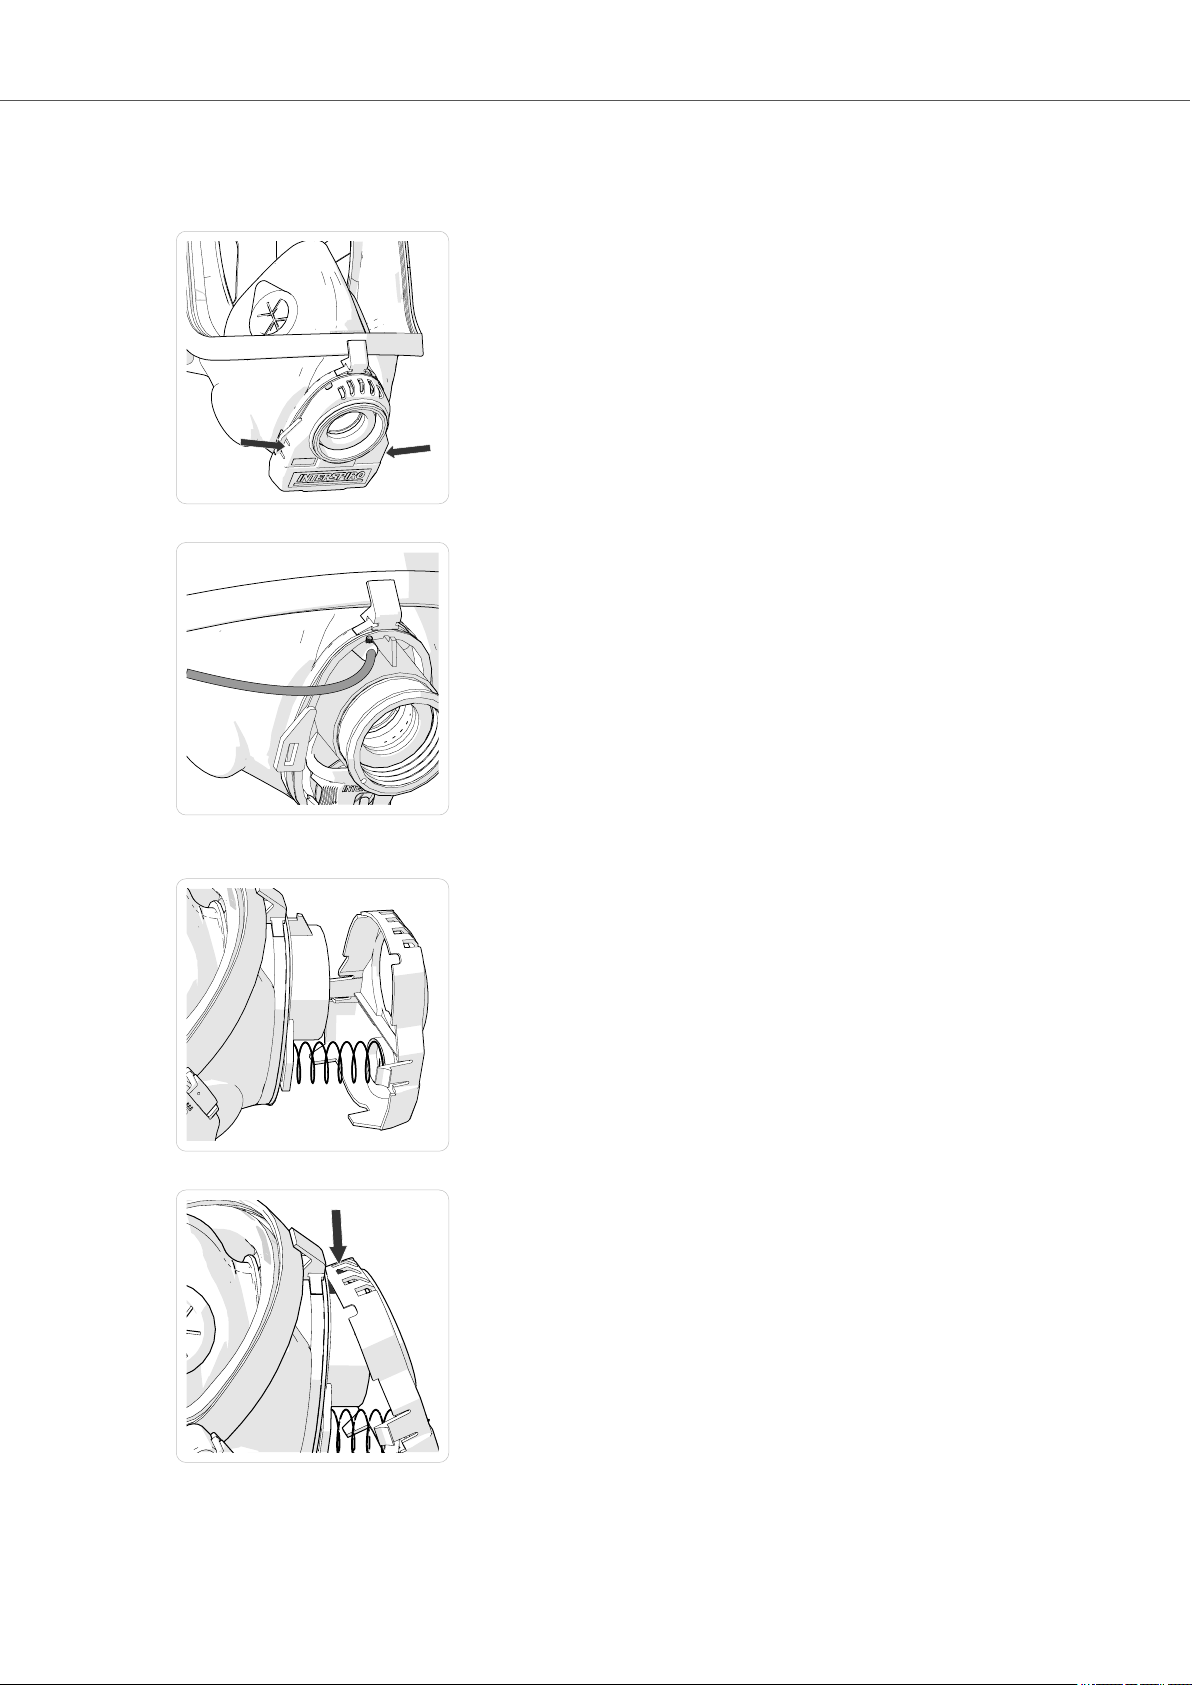
Install microphone on S-mask
1. Put the microphone cable between the lower visor frame and front piece of the mask.
2. Loosen the hand screw on the speech diaphragm and turn the speech diaphragm up.
3. Put the part of the microphone cable with the spring into the slot in the mask. The spring will prevent the cable from damage caused by opening and closing the speech diaphragm.
4. Turn the speech diaphragm down and tighten the hand screw.
9
SpiroCom XXL BT
5. If the speech diaphragm is in the correct position, the lip of the speech diaphragm covers the serial
number on the breathing valve.
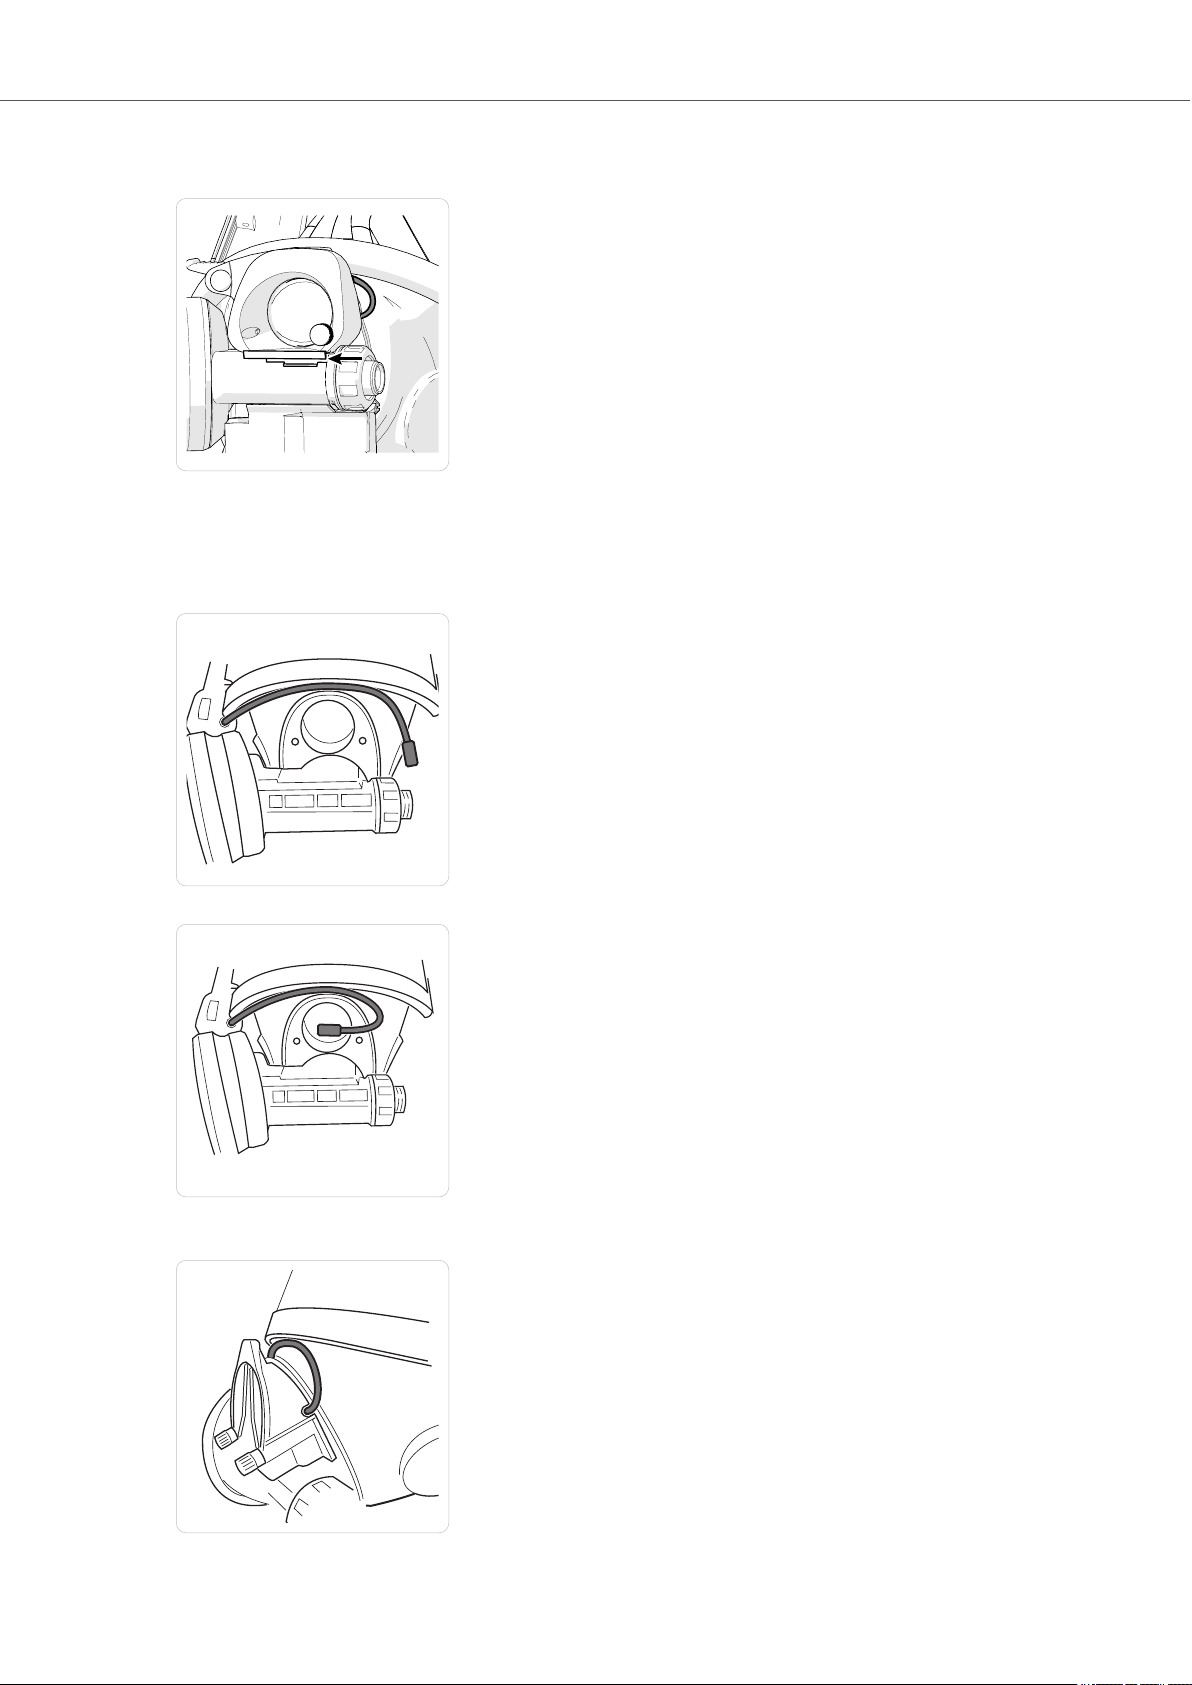
Install microphone on Spiromatic mask
1. Loosen the hand screws and remove the external speech cone/blank cover.
2. Put the microphone cable between the lower visor frame and front piece of the mask.
3. Put the microphone so that it is in the center of the front piece of the mask.
4. Install the external speech cone and tighten the hand screws. Make sure the microphone cable is
correctly installed in the slot in the speech cone.
10

SpiroCom XXL BT
5. Attach the locking lugs in the mask with the two screws.
6. Make sure that the screws on the locking plates are correctly tightened so the locking plates turn
evenly.
7. Make sure that the locking lugs on the speech diaphragm is turned towards the locking plates. Hold
the speech diaphragm by the edges and carefully press the speech diaphragm in place.
NOTE: Do not press in the middle of the speech diaphragm, this can deform the speech diaphragm.
8. Turn the locking plates with a screwdriver or similar tool to lock the speech diaphragm.
11
Click!
Klick!
Clic!
Click!
Klick!
Clic!
Click!
Klick!
Clic!
SpiroCom XXL BT
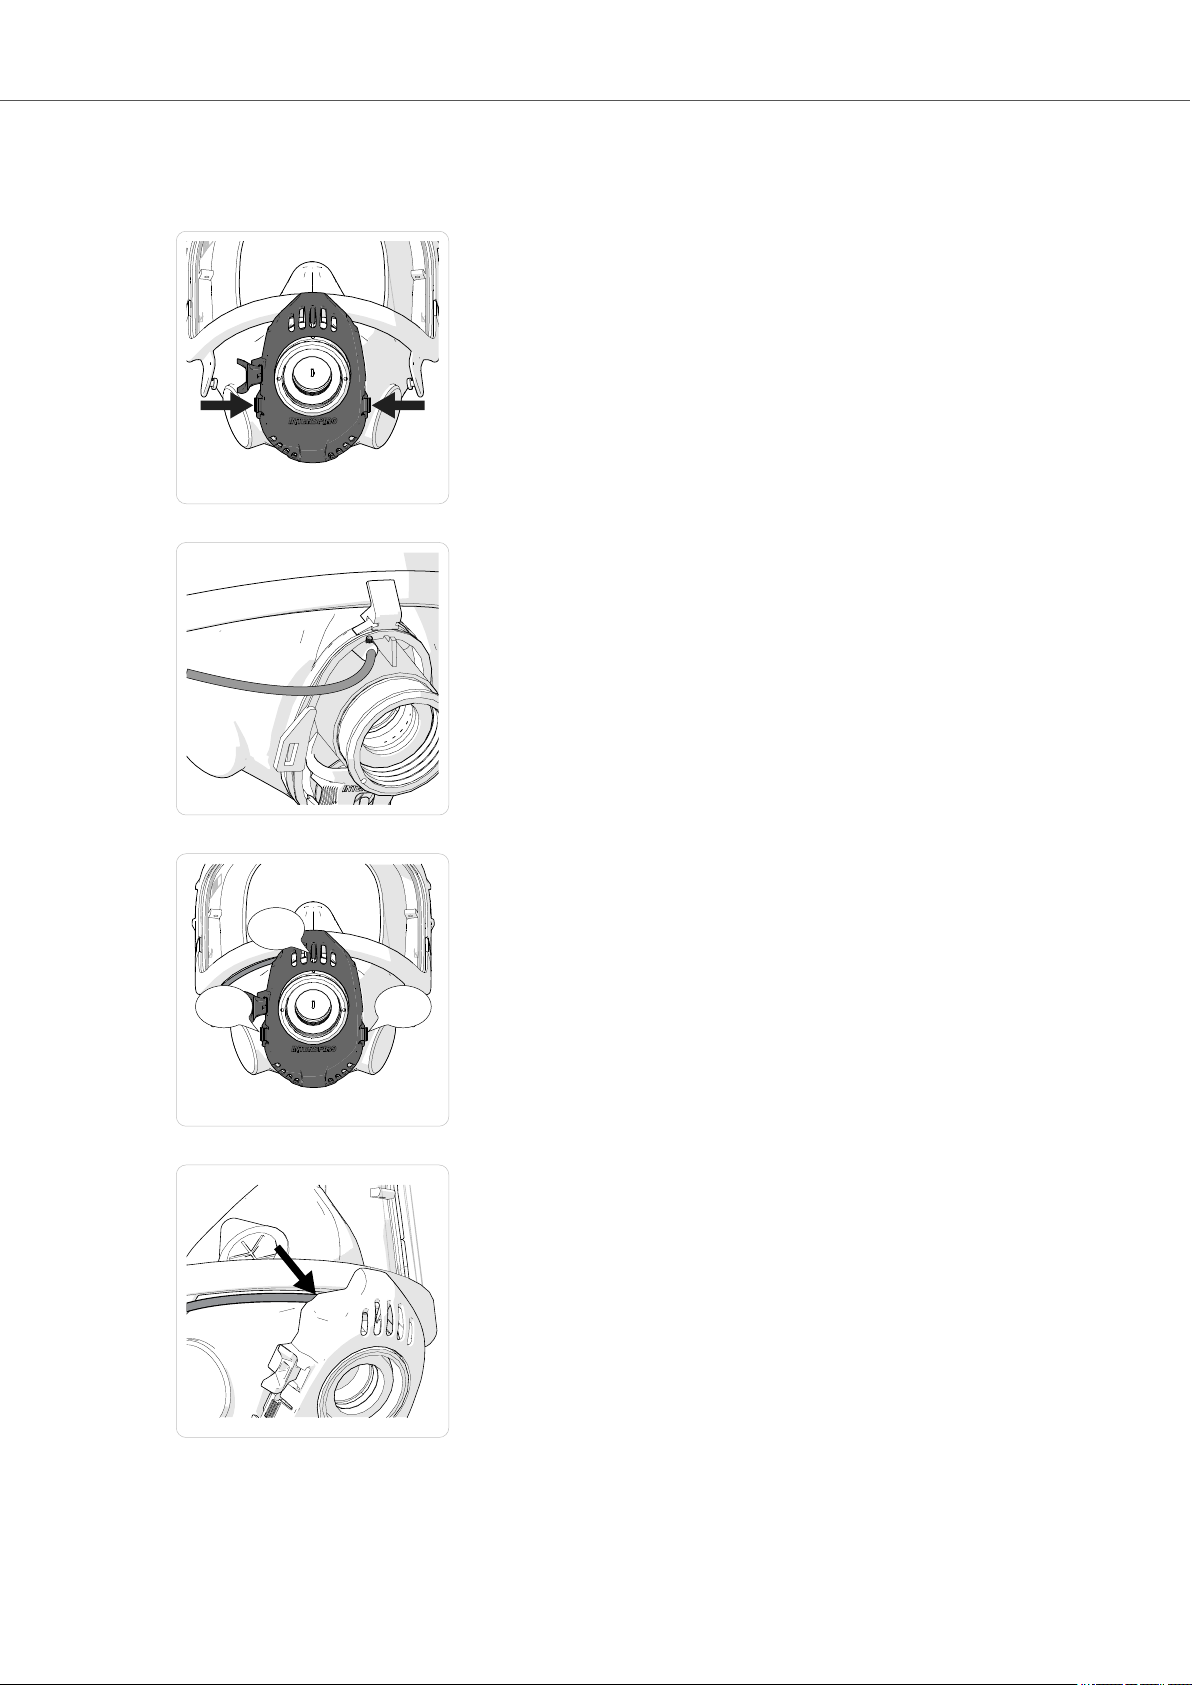
Install microphone on N/PE/ESA mask with new cover
1. Remove the mask cover by pushing the locking tabs.
2. Put the microphone into the front piece of the mask with the stop screw touching the edge.
3. Put on the mask cover.
4. Make sure the microphone cable is correctly installed between the cover and the mask.
12
SpiroCom XXL BT
Install microphone on N/PE/ESA mask with old cover
1. Remove the mask cover by pushing the locking tabs.
2. Put the microphone into the front piece of the mask with the stop screw touching the edge.
3. Put the outer end of the exhalation valve spring in the circular cavity on the inside of the mask cover.
4. Insert the upper “hook” of the connector into the middle hole (in the upper part) of the mask cover.
13

SpiroCom XXL BT
5. Push the lower part of the mask cover towards mask until it locks. Make sure the microphone cable
is correctly installed between the cover and the mask.
14

SpiroCom XXL BT
Operation
Power on the SpiroCom
1. Push the MODE button for 3 seconds and then release it. The display shows the group number.
2. If the unit does not start or the display shows “LO”, replace the batteries.
Battery power level
The remaining battery level is shown in the display when turning on the power on the SpiroCom. It has
five levels described below.
• b4 = > 75% battery power remaining.
• b3 = 50% - 75% battery power remaining.
• b2 = 25% - 50% battery power remaining.
• b1 = < 25% battery power remaining.
• b0 = Less than 2 hours of battery power. Change batteries when this level is reached. When the bat-
teries reaches this level during use, the LED indicator starts flashing red and two dots are shown on
the display.
• Lo = The battery power level is too low. Replace the batteries to start the unit.
Bluetooth® function
Bluetooth® pairing
1. Push down and hold the Adjustment button.
2. Push the MODE button for 3 seconds and then release it.
3. Release the Adjustment button. The SpiroCom starts up and plays 3 tones of the same pitch in the
ear speaker to indicate that the SpiroCom is visible for the long-range radio for Bluetooth® pairing.
NOTE
Note that the device will not start up until the Adjustment button has been released.
4. Search for Bluetooth® devices using the long-range radio.
5. Select the SpiroCom for pairing in the long-range radio.
6. The SpiroCom plays 3 single tones of an increasing pitch in the ear speaker to indicate that the
SpiroCom now is Bluetooth® paired and connected to the long-range radio.
NOTE
Note that a new pairing is needed when batteries have been replaced in the SpiroCom.
Bluetooth® connection of paired device
When a long-range radio (that has been paired with the SpiroCom) and/or the SpiroCom has been powered off and powered on again, it is possible that the Bluetooth® connection must be established man-
15

SpiroCom XXL BT
ually using the long-range radio. This is the case when the long-range radio is not using automatic connect to paired devices.
1. Power on the SpiroCom.
2. Select the SpiroCom for Bluetooth® connection in the long-range radio.
3. The SpiroCom plays 3 single tones of an increasing pitch in the ear speaker to indicate that the
SpiroCom now is Bluetooth® connected with the long-range radio.
Bluetooth® notifications
• If an established Bluetooth® connection gets disconnected the SpiroCom plays 3 single tones of a
decreasing pitch in the ear speaker to indicate that the connection has been lost.
• If the connection is re-established the SpiroCom plays 3 single tones of an increasing pitch.
Team Talk function
• The SpiroCom is started with the last used group number.
• To Change the group number push the Adjustment button up or down. The group number can be
changed until the SpiroCom has connected to a group
• When the SpiroCom connects to a group "connected" is heard in the ear speaker and the group
number remains lit in the display.
• If the group number must be changed after the SpiroCom has been connected to a group it needs to
be restarted.
Long range radio transmission (PTT)
1. Push up and hold the PTT button to start a transmission.
2. Wait until the LED indicator shows a red light and a beep is heard in the ear speaker - now you can
speak.
3. Release the PTT button to end the transmission.
Adjusting the volume
• The volume in the ear speaker can be adjusted after the SpiroCom has connected to a group.
• There are 5 volume levels and the default level is 3 (medium)
• Push the Adjustment button up or down to change the volume, each step is indicated with a beep in
the ear speaker. The lowest and highes level are indicated with a double beep.
Mute function for Team Talk
The microphone of the SpiroCom can be muted (switched off) for Team Talk with the Adjustment button.
Mute: Push down and hold the Adjustment button (approximately 4 seconds) until the LED indicator
starts flashing red.
Unmute: Push up the Adjustment button one time, then the LED indicator stops flashing.
Power off the SpiroCom
1. Push and hold the MODE button (approximately 7 seconds) until the display shows “- -” and the
LED indicator shows a red light.
2. Release the MODE button.
The SpiroCom will automatically power off after 15 minutes, if no sound is detected by the microphone.
16

Maintenance
PH1
Battery replacement
WARNING
Batteries must only be changed in an area known to be non-hazardous.
NOTICE
Always use the specified AAA alkaline batteries "Duracell MN2400" or "Energizer
E92". Interspiro assumes no liability for mechanical, electrical or any other type of battery failure.
SpiroCom XXL BT
Do not mix different brands of batteries and do not mix old and new batteries.
Cold conditions during storage and use will decrease battery life.
1. Loosen the screw with a screwdriver and open the battery cover lid.
2. Remove the old batteries.
3. Put in new batteries. Make sure the batteries are correctly installed, as shown on the back of the
SpiroCom.
4. Close the battery cover lid and tighten the screw moderately.
17

SpiroCom XXL BT
Cleaning and drying
1. Remove the microphone from the mask and cover it with a washing plug.
2. Clean the SpiroCom with a moist sponge, if needed use a mild detergent.
3. Let the SpiroCom dry in an upright position.
18

SpiroCom XXL BT
Technical data SpiroCom XXL BT
Ingress protection
Rating Note
IP67 For sealed unit, excluding microphone.
Frequency
Region Frequency
Europe 868 MHz
USA 915 MHz
Approvals
Approval Note
CE Approved
FCC ID: YDFSCMBT34320
IC 8937A-34320
The mask mounted unit is intrinsically safe
Region Note
Europe GA Exia IIB T4, -30°C - + 60°C
USA UL913, for use in Class I, II, III, Division 1, Group C to G Hazardous Locations
Substitution of components may impair Intrinsic safety.
This device complies with part 15 of the FCC Rules. Operation is subject to the following two conditions:
(1) This device may not cause harmful interference, and (2) this device must accept interference received, including interference that may cause undesired operation. Changes or modifications not expressly approved by the party responsible for compliance could void the user´s authority to operate the
equipment. This equipment has been tested and found to comply with the limits for a Class A digital
device, pursuant to part 15 of the FCC rules. These limits are designed to provide reasonable protection
against harmful interference with the equipment is operated in a commercial environment. This equipment generates, uses, and can radiate radio frequency energy and, if not installed and used in accordance with the instruction manual, may cause harmful interference to radio communication. Operation of
this equipment in a residential area is likely to cause harmful interference in which case the user will be
required to correct the interference at his own expense.
This device complies with Industry Canada’s licence-exempt RSSs. Operation is subject to the following
two conditions: (1) This device may not cause interference; and (2) This device must accept any interference, including interference that may cause undesired operation of the device.
Le présent appareil est conforme aux CNR d’Industrie Canada applicables aux appareils radio exempts
de licence. L’exploitation est autorisée aux deux conditions suivantes : 1) l’appareil ne doit pas produire
de brouillage; 2) l’appareil doit accepter tout brouillage radioélectrique subi, même si le brouillage est
susceptible d’en compromettre le fonctionnement.
19

20
 Loading...