

Page 1

Unit 7, 41 Brownfields
Welwyn Garden City
Hertfordshire
AL7 1AN
UK
Tel: +44 (0) 1462 600101
Email: moreinfo@interspaceind.com
www.interspaceind.com
For Technical Support or Sales Enquiries
Interspace Industries Head Office:
+44 (0) 1462 600101
Emergency Technical Support Hot Line:
+44 (0) 7976 385046
Website:
www.interspaceind.com
Cueing and Presentation Control Specialists
MicroCue3
User Manual
05/06/18
Page 2
2
Table of Contents
Introduction and features and benefits. 3
Operation, 4
Software update 4
First time connection. 5
Adding a handset 5
Erasing Handset 5
Keyboard Command Programming 6
Keyboard Control (additional info) 6
Add a handset to a specified port 6
Remote deselection of port 6
Remote Control 6
Network Power 7
Settings 7
Items included 8
French 10
Deutsch 18
Italiano 26
Norsk 34
Português 42
Español 50
Compliance testing
EU Compliance 58/59
FCC Compliance 60/61
Laser Warnings and compliance 67
67
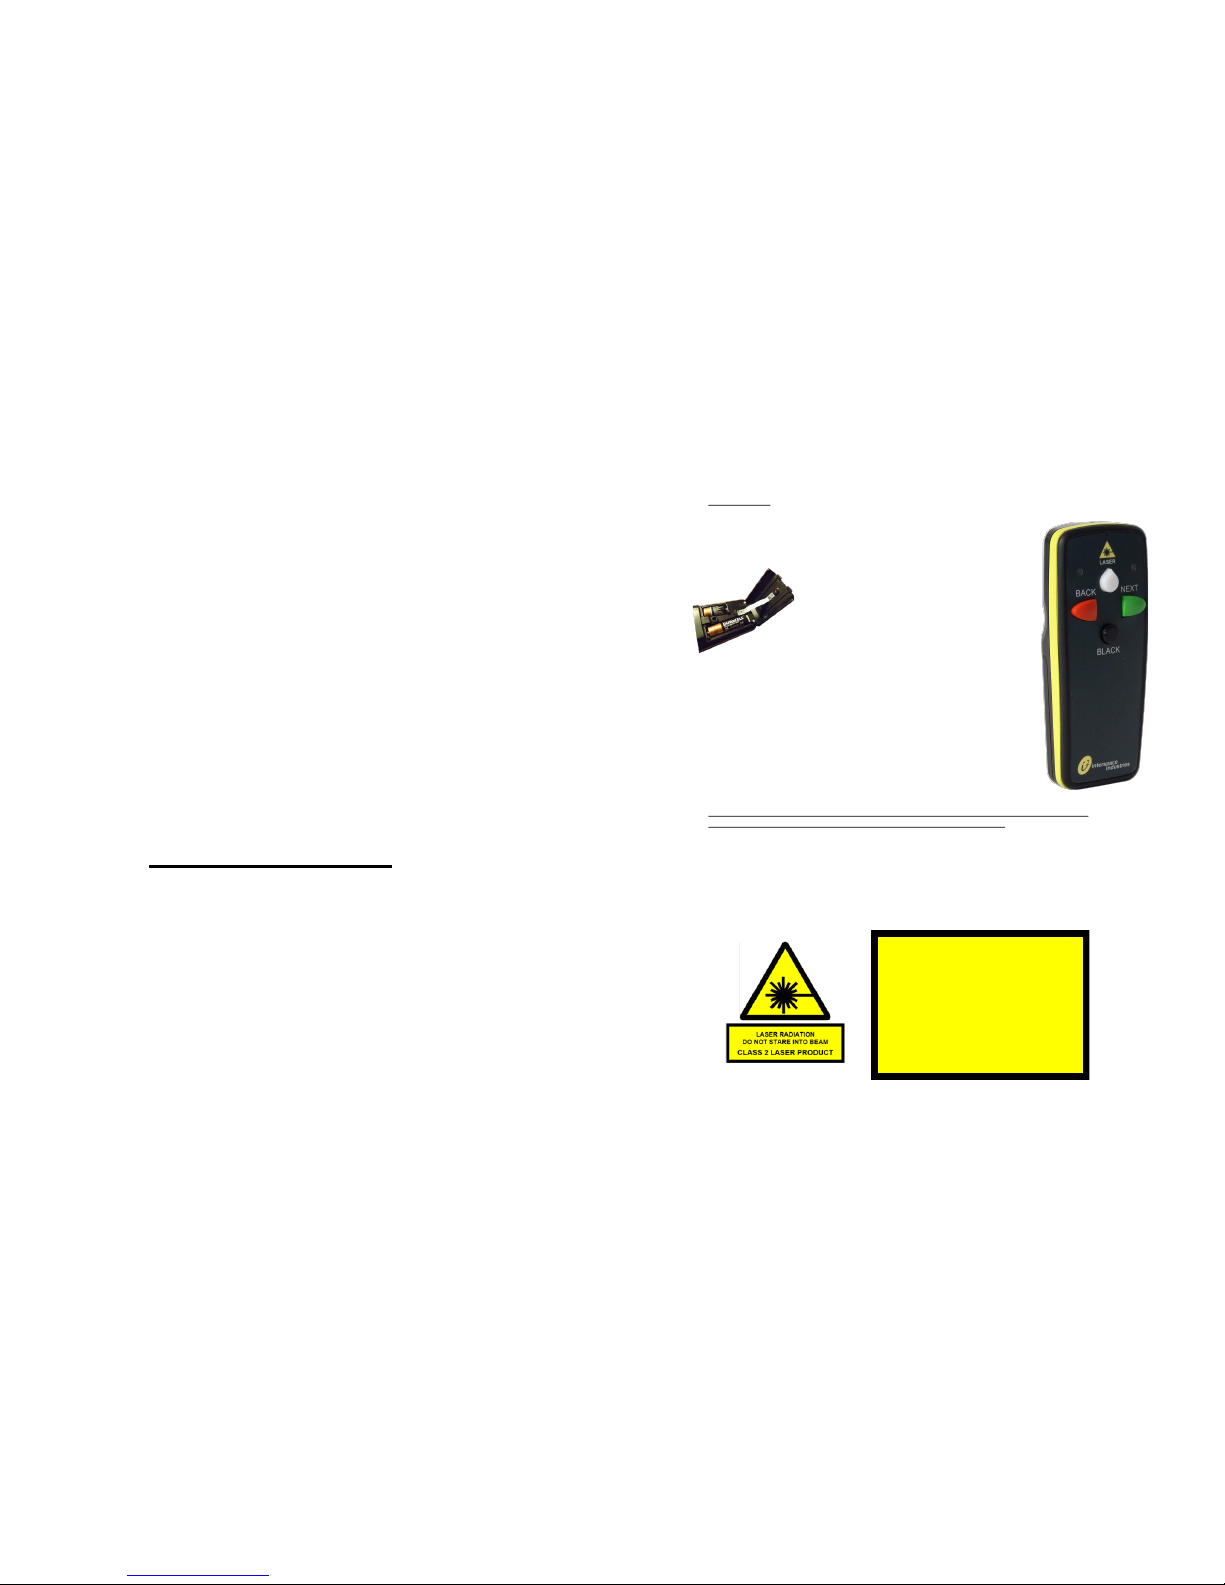
Handsets
Laser Handset
A slimmer, slightly longer handset that sits comfortably in your hand. A finger
notch on the rear of the handset anchors it to your hand. Extensive redesign
of the internal antenna means we have squeezed a little bit more distance out
of this handset. Over 100m open field.
We use 2 batteries:- one for the transmitter, (AA or
MN1500 size, 1.5V) and a separate battery just for the
Laser (CR2, 3V). This is a high power/high capacity
battery that is common in photographic systems and
readily available.
Safe Laser Use
The Laser is Class 2, less than 1mW green 522nm laser. It is 10x brighter
than an equivalent red laser.
It is important to use the laser in a safe manner by highlighting your images
on screens. It is not advisable to use a laser on a monitor that has a glass
front, or something similar, as the reflection of the beam could reflect into
someone's eyes and may cause discomfort or worse. Use the beam in either
a circular or backwards and forwards motion to circle an outline, highlight an
item being discussed or, underline something.
CAUTION – Use of controls or adjustments or performance of procedures other than
those specified herein may result in hazardous radiation exposure
DO NOT SHINE INTO THE SKY AT AIRCRAFT —
You will be arrested, fined and imprisoned in many countries!
LASER RADIATION
DO NOT STARE INTO BEAM
Wavelength 522nm
CW/Pulsed Pulsed
Average Power 800μW
Pulse Duration 44μs
Frequency 10.5kHz
Complies with IEC/EN 608251:(2014) and 21 CFR
1040.10 & 1040.11 except for deviation Pursuant to
Laser No. 50, dated June 24, 2007
FCC ID T3QI2TXL
Page 3

66
Notes
3
Introduction, features and benefits
MicroCue3 (MC3) has been designed for the presenter of small to medium sized shows,
where reliability is paramount for the remote cueing of presentation images or slides on a
computer.
With the continued march of the computer, more than just one are being used on a show for
backup and for a slide ahead, so the presenter knows what is the next slide coming. They can
align their speech to fit the next slide if they do not know it from memory.
MicroCue3 has been designed for increased reliability, building on the MicroCue2 product.
RF range has been the same on all our products of 100m with our new handset. However
position and environment has called MicroCue2 into question.
Using a LCD screen gives full access to both text and graphics.
As this is “3” in the series then we should follow with 3 USB ports to control external
computers.
It is still USB powered, The use of the optional external DC power allows a remote unit to be
powered on the i2Net without plugging it in to a local USB port - great as a remote RF
receiver.
i2Net has been developed for long distance on cable (greater than 1500m) with power and
data on 2 pairs plus screen.
Using a network infrastructure we can connect 2 or more MC3 units together and share
resources such as handsets, lamps and more in the future
Auto share of handsets over a network connection ensures all handsets are valid. Only when
the unit is powered down do the “network” handsets get forgotten and reset back to the state
prior to the network connection.
USB port enable or disable to manage control of attached computers.
Audio - a mini jack 3.5mm stereo connection allows for the audio tones corresponding to
Next, Back and Black out commands can be heard on a headset with adjustable volume from
the front panel.
EN
Page 4

4
Operation,
Software update
- it is important to ensure all the connected MC3 units are all running the
same software revision, failure to do this could result in unforeseen
operation.
Check regularly for software updates on www.interspaceind.com web site. For PC only.
Attach a PC to USB port 1 and run the update—select the button that says “check for
updates” - follow its instructions and the MC3 will be updated.
Place the MicroCue3 in a clear space for viewing and in good clear line of sight to the
presenters and their handsets. Ensure the aerial is pointing up for the best reception.
Using the supplied micro USB cables - connect the MC3 to the (working) computer
using port 1 first for convention. (see “items included”)
If this is the first time of plugging in, the computer must have a minute or two to
configure itself. The computer should come up to say the device has been configured
correctly. ( see “first time connection”) Do not unplug or use during this time or you may
corrupt the installation!
Do a walk test with the handset and check for any dead spots of operation - you may
have to move the receiver if this occurs or set up a 2nd MicroCue3 unit as a receiver
near the presenter. Bear in mind an empty venue (no audience) can change significantly
especially if they are between the presenter and the receiver (MC3).
Check you have the handsets for the receiver - delete rogue handsets if need be. (see
“erasing handsets”)
The presenter uses the simple yet powerful handsets of Interspace Industries. The
technician uses the main unit as a powerful resource for ensuring a cue gets through
with visual and audible monitoring if needed.
Should you wish to use a different command than the “arrow right, arrow left” for the
cues, please see “Keyboard command programming”
Once plugged in on USB the corresponding port enable switch will illuminate to say it is
connected and active.
If a port switch starts to flash it means the Port has been disconnected or gone to sleep,
this is to give the technician information to reset the USB connection if needed such as
re-plugging it.
65
For Technical Support or Sales Enquiries:
Interspace Industries Head Office:
+44 (0) 1462 600 101
Emergency Technical Support Hot Line:
+44 (0) 7976 385 046
Website:
www.interspaceind.com
For tekniske spørsmål eller kjøp kontakt:
Lokalt kontor for Interspace industries
Hamstad Media AS
e-post
daniel@hamstadmedia.no
Telefon
Telefon: 48287106
Nettsted
www.hamstadmedia.no
Für technischen Support oder Vertriebsanfragen:
Ihr lokaler Ansprechpartner von Interspace Industries:
publitec Präsentations systeme & Eventservi ce GmbH
+49 2330-8032-0
Hotline für technischen Notfall-Support außerhalb der
Geschäftszeiten:
+49 163-8032-11
(Morgens von 7:00 – 8:30 Uhr, Abends von 18:00 – 22:00
Uhr, sowie am Wochenende von 7:00 – 22:00 Uhr)
Website:
www.publitec.tv
Page 5

64
Para Ayuda Técnica o Solicitudes de Ventas:
Oficinas locales de Interspace Industries:
+34 932 965 084
Teléfono de Soporte Técnico:
+34 932 965 084
Página Web:
www.grandslam.es/interspace_industries/
Per il Supporto Tecnico o Richieste Commerciali:
AGMULTIVISION SRL
+39 02 87166000
Per aprire un ticket di assistenza:
https://www.agmultivision.it/supporto.html
Sito Web:
www.agmultivision.it
Para Ajuda Técnica ou Pedido de Vendas:
Serviços locais de Interspace Industries:
+34 932 965 084
Telefono de Suporte Técnico:
+34 932 965 084
Página Web:
www.grandslam.es/interspace_industries/
Assistance Technique ou Enquêtes de Ventes:
Interspace Industries Head Office:
+34 932 965 084
Emergency Technical Support Hot Line:
+34 932 965 084
Website:
www.interspaceind.com
5
First time connection.
The MicroCue3 uses the inbuilt driver with the computer's operating system for USB devices.
As you plug each port of the MC3 to a computer's USB connection, the computer will
configure itself, it is important to let it do this without unplugging it or really using it. Wait for it
to say (in the case of PC) it has configured the device and is ready to use. - If the port has
been installed incorrectly it could have problems for subsequent installs and you will have to
uninstall the device. - please consult your IT manager for this function. Usually there are no
issues and as soon as it is installed you can use it fully.
Adding a Handset.
When you need to add a new handset. Push the menu jog button and it shows learn at the
top. Push again to select, Learn Handsets is displayed, push again. Push any button on that
handset and then push the Jog button to confirm it is that one. - the handset is stored.
Erasing
There are a couple of options on MC3 to remove handsets.
1st, select the menu jog button and select Erase and then Erase Handsets and then to erase
all handsets, select yes. This will erase all handsets, this is a good place to be and will ensure
you have a good starting point for handsets.
When on the Network, it will erase all the handsets on that unit (both local and from the
network) and also send a message to erase those handsets from all other units that have
copied from the initial unit. All other units will keep their locally stored handsets.
2nd, Select Erase All this will erase Handsets and Keyboard functions - this is factory reset
and will ensure a proper starting point for everything on that unit.
3rd, Select Erase Handset xxx - this will allow you to select which Handset you need to erase
if you are mid show without upsetting all the other handsets and features.
4th, Network erase. A global erase for everything on the network. WARNING THIS WILL
ERASE EVERYTHING BACK TO FACTORY SETTINGS. This has an additional confirmation
to ensure you really want to.
EN
Page 6

6
Keyboard Command Programming
The cues of the MC3 are factory set at :- right cursor arrow for NEXT, left cursor arrow for
BACK and the letter “b” for Black out. These cues can be reprogrammed using an
external USB keyboard.
Prove the Keyboard works with the system (we are adding more all the time) by showing
that it controls your host computers.
Enter the menu system and select Learn, - now select Learn keyboard, - follow the
menu guide and deselect the ports you do not want programmed.
Enter the key or sequence of keystrokes required and then select on a handset which
button you want the feature for it to be assigned to.
Each time you now select that button on the handsets on those ports it will have that key
or key sequence sent.
Keyboard Control (additional info)
With the features of the Keyboard programming feature you can see that one keyboard
can control all the computers connected to that MC3, this is very useful for editing. All the
computers can be edited, such as typo errors at the same time for a very fast on show
edit :- keyboard save and run show, all from the keyboard.
Add a handset to a specified port
To follow in a future software update
Remote deselection of port
To follow in a future software update
Remote control
The ability to control other MC3 units’ Port enable buttons, on the network. This allows
the lectern unit to be disabled when not controlling that computer.
Volume
Using your own supplied headphones adjust the volume level of the beeps to a
comfortable level to hear. We would recommend standard 32 ohm impedance
headphones.
63
Radio Frequency System
A proven RF system for all wireless applications.
Operating frequency: 434.075MHz (UK, Europe & USA)
Transmission method: FM (Pure FSK)
Maximum transmit power: 10mW (EU) 11mV/m @3m (USA)
This frequency is open and licence exempt for UK, Europe and USA. Other countries should
consult their respective authorities.
The system used is a coded transmission whereby the receivers are programmed to the
transmitters which each have individual and unique codes. Nominal range of the transmitters
is typically 75M in an enclosed venue.
Page 7

62
Safety Instructions
All safety and operating instructions should be read before this product is operated and should be retained
for further reference. Please adhere to all the warnings on this product and in these operating
instructions. Please follow these instructions carefully.
Power. Only use the power source indicated on the device. Devices equipped with a grounded plug
should only be used with a grounded type outlet. In no way should this grounding be disconnected,
modified or suppressed.
Keep Away From Harmful Substances
To prevent the risk of electric shock and fire, do not expose this device to rain, humidity or intense heat
sources (such as radiators or direct sunlight). Avoid using this equipment in environments where there is
excessive heat, dust, moisture, chemicals, vibration or mechanical shocks.
Slots and Openings. These are designed into the device for ventilation and to avoid overheating. Always
ensure these openings remain clear. Do not attempt to insert anything into these openings under
any circumstances. If liquids have been spilled on, or objects have fallen into the product it must be
checked by a qualified technician before re-using.
DO NOT OPEN SYSTEM DUE TO HIGH VOLTAGE.
DO NOT IMMERSE IN WATER.
If you have any queries regarding these safety instructions or how to maintain the unit please do not
hesitate to contact us on:
moreinfo@interspaceind.com — www.interspaceind.com
Servicing. Do not attempt to service this product yourself. Should an unauthorised person attempt to
either open the covers or service our products, it may invalidate your Limited Factory Warranty. In
addition, opening or removing covers and screws may expose you to electric shocks or other hazards.
Refer all servicing to qualified service personnel.
Environmental
WEEE and RoHS Compliance. This product been manufactured and sold in accordance with the
requirements of the EC WEEE and RoHS directives. Please return all end-of-life items to your supplier, or
Interspace Industries directly, for appropriate disposal.
Packaging Materials:
Cardboard box: Grade 150K/T ‘B’ (Single Walled Corrugated- Brown Kraft)
Protective Foam: Grade HLB 22 Grey Foam (High Load Bearing)
7
Network Power.
If using the i2Net you have a couple power options. The USB power used for the unit does
not have enough energy to place power on the Network as well,
Use a computer or USB power at both
Use 12V-30V DC at either end will allow a diversity Aerial system and additional
products such as Confidence lamp and wired button.
A separate i2Net power supply can be used for local power and to help with very long
cables.
Settings
Brightness
Adjust the brightness of the screen for the environment you are using it in.
Unit ID
Shows the unique net addresses of the devices on the network - No auto hide on cue.
Diagnosis
i2Net Pwr - shows the current Voltage at that unit from (or out to) the network
Balance - shows that the data presented to the unit is in balance i.e. not a broken
cable and missing pin 2 or pin 3.
RX & TX- Data Packets sent and received to the network shows data is present.
CRC- Errors of data - corrupted data
NVM- Read/Write Cycles, to show memory storage cycles
EN
Page 8
8
Items included
Single system
Qty Part
1 MicroCue3
3 USB A to USB micro
1 Handset (2 or 3 button with or without Laser)
Pro twin system
Qty Part
2 MicroCue3
6 USB A to USB micro
2 Handsets (2 or 3 button with or without Laser)
1 DC 12V power supply
1 Hard plastic professional carry case.
61
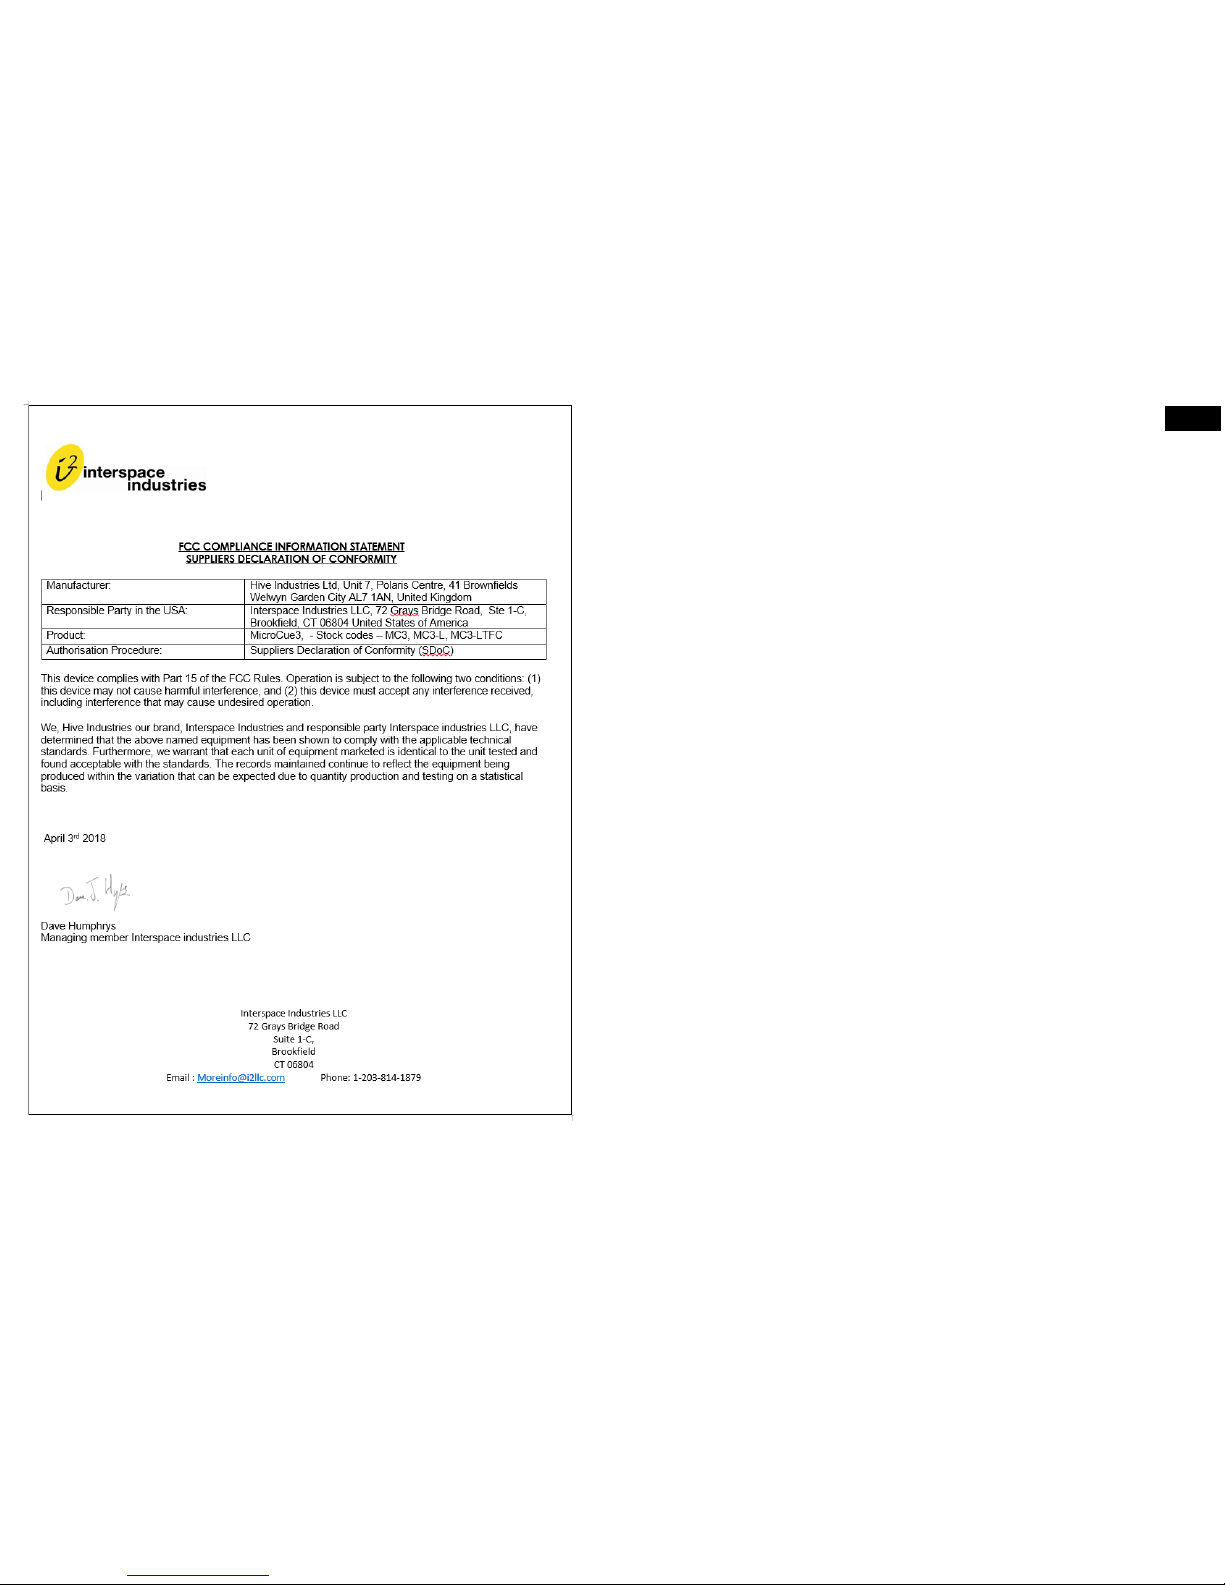
FCC COMPLIANCE INFORMATION STATEMENT
DECLARATION OF CONFORMITY
This device complies with Part 15 of the FCC Rules. Operation is subject to the following two
conditions: (1) this device may not cause harmful interference, and (2) this device must
accept any interference received, including interference that may cause undesired operation.
We, Interspace Industries, have determined that the above named equipment has been
shown to comply with the applicable technical standards. Furthermore, we warrant that each
unit of equipment marketed is identical to the unit tested and found acceptable with the
standards. The records maintained continue to reflect the equipment being produced within
the variation that can be expected due to quantity production and testing on a statistical
basis.
David J Humphrys, Managing Director
Interspace Industries
Unit 7, 41 Brownfields
Welwyn Garden City
Herts
AL7 1AN
April 3rd 2018
Manufacturer: Interspace Industries
Responsible Party in the
USA:
Interspace Industries LLC
72 Grays Bridge Road
Suite 1-C,
Brookfield
CT 06804
Main number 203-814-1879
Product: MicroCue3
Authorisation Procedure: Declaration of Conformity
Page 9
60 9
EN
Page 10
10
Sommaire
Introduction, caractéristiques et avantages 11
Utilisation, 12
Mise à jour du logiciel 12
Première connexion 13
Mémoriser une télécommande 13
Suppression 13
Programmation des ordres au clavier 14
Commande par le clavier (infos complémentaires) 14
Ajouter une télécommande à un port donné 14
Désélection à distance du port 14
Télécommande 14
Alimentation du réseau 15
Réglages 15
Composants fournis 16
59
Page 11

58
Future tests
11
Introduction, caractéristiques et avantages
Le MicroCue3 (MC3) s'adresse à des présentations petites ou intermédiaires, où la fiabilité est un
attribut indispensable pour commander à distance des images ou des diapositives enregistrées
dans un ordinateur.
Puisque les ordinateurs sont toujours plus présents dans nos environnements, plusieurs unités et
plusieurs ordinateurs peuvent être utilisés simultanément, par exemple pour servir d'ordinateur de
secours ou pour afficher par avance la diapositive suivante ; ainsi, le présentateur est à même de
préparer son propos s'il a oublié le contenu de cette diapositive.
Développé à partir du produit MicroCue2, le MicroCue3 a été conçu pour offrir une fiabilité accrue.
La plage des radiofréquences était la même sur tous nos produits, à savoir une porté de 100 m
avec notre nouvelle télécommande. Toutefois, la position et l'environnement a remis le MicroCue2
en question.
L'écran à LCD affiche des textes et des graphiques.
Comme c'est le « numéro 3 » de la série, nous offrons 3 ports USB pour le pilotage d'ordinateurs
externes.
L'appareil est toujours alimenté par un port USB. L'alimentation CC externe en option permet d'ali-
menter une unité à distance par le réseau i2Net sans avoir à la brancher dans un port USB local -
parfait comme récepteur RF sans fil.
Le réseau i2Net a été conçu pour fonctionner sur de grandes distances (supérieures à 1 500 m) ;
l'alimentation et les données sont transmises sur deux paires de câbles, et les images/vidéos sur
une troisième.
En utilisant une architecture réseau, nous pouvons raccorder plusieurs unités MC3 et partager
leurs ressources telles que les télécommandes, les lampes et autres appareils à venir.
Le partage automatique des télécommandes sur une connexion réseau garantit que toutes les
télécommandes sont valides. Les télécommandes « réseau » sont oubliées et remis sur leur état
précédant la mise en réseau uniquement lorsque l'unité est mise hors tension.
Le port USB est activé ou désactivé afin de commander les ordinateurs connectés.
Audio - la connexion stéréo avec mini-connecteur 3,5 mm permet de produire dans un casque des
signaux sonores correspondant aux commandes Suivant, Précédent et Écran noir, avec réglage du
volume sur la face avant.
FR
Page 12

12
Utilisation,
Mise à jour du logiciel
- il est important de veiller à ce que toutes les unités MC3 connectées aient la
même version logicielle. Si les versions ne sont pas identiques, des
dysfonctionnements imprévus peuvent se produire.
Seulement pour PC. Regardez régulièrement pour des mises à jour sur le
site: www.interspace.com Raccordez le PC au port USB 1 du MC3 et commencé la mise à jour sélectionnez la touche que dit "check for updates" (regardez pour des mises à jour), suivez les
instructions et le MC3 sera mise à jour.
Placez le MicroCue3 dans un endroit dégagé et aisément visible par les présentateurs avec
leurs télécommandes. Assurez-vous de pointer l'antenne vers le haut de manière à avoir la meilleure réception possible.
À l'aide des câbles USB micro fournis, raccordez le MC3 par convention au port 1 de l'ordinateur (en fonctionnement). (voir « composants fournis »)
S'il s'agit du premier raccordement, l'ordinateur doit se configurer. Cette opération prendra une
ou deux minutes. Puis l'ordinateur signalera que l'appareil a été correctement configuré. (voir
« Première connexion »). Pendant cette opération, ne débranchez pas et n'utilisez pas l'ordina-
teur car vous pourriez corrompre l'installation !
Faites un test en marchant avec la télécommande et vérifiez s'il y a des zones mortes. Le cas
échéant, vous devrez éventuellement déplacer le récepteur ou installer une 2è unité MicroCue3
qui fera office de récepteur à proximité du présentateur. L'acoustique d'une salle vide et d'une
salle avec du public peut sensiblement changer, notamment si le public se trouve entre le présentateur et le récepteur (MC3).
Vérifiez que vous avez les télécommandes destinées au récepteur - si nécessaire, supprimez les
télécommandes inutiles (voir « suppression des télécommandes »).
Le présentateur utilise les télécommandes simples mais puissantes fournies par Interspace In-
dustries. Le technicien utilise l'unité principale comme ressource puissante pour s'assurer qu'une
commande s'accompagne, si besoin est, d'une validation visuelle et sonore.
Si vous souhaitez utiliser un ordre différent des ordres « flèche droite, flèche gauche », veuillez
consulter « Programmation des ordres au clavier ».
Une fois branché dans un port USB, l'interrupteur du port concerné s'allume pour signaler qu'il
est connecté et actif. Si un interrupteur de port se met à clignoter, cela indique que le port a été
débranché ou mis en veille. Si nécessaire, le technicien doit alors réinitialiser la connexion USB,
par exemple en rebranchant le câble.
57
ES
Page 13

56
Artículos incluidos
Sistema único
Ctd. Componente
1 MicroCue3
3 USB A a USB micro
1 1 Mando a distancia (2 ó 3 botones con o sin láser)
Sistema Pro Twin
Ctd. Componente
2 MicroCue3
6 USB A a USB micro
2 Terminales de mano (2 o 3 botones con o sin láser)
1 Fuente de alimentación de 12V DC
1 Maleta de transporte profesional de plástico rígido.
13
FR
Première connexion
Le MicroCue3 utilise le pilote intégré avec le système d'exploitation de l'ordinateur pour appareils USB. Lorsque vous branchez un port du MC3 dans un port USB de l'ordinateur, ce dernier se configure. Il est alors important de le laisser fonctionner sans le débrancher ou l'utiliser. Attendez le message (dans le cas d'un PC) indiquant qu'il a configuré l'appareil et que ce
dernier est désormais prêt à l'emploi. - Si le port n'a pas été installé correctement, des problèmes pourraient survenir lors des installations suivantes et vous devrez désinstaller l'appareil. - Veuillez consulter votre responsable informatique pour exécuter cette tâche. L'installation ne pose généralement aucun problème et vous pouvez utiliser toutes les fonctionnalités
de l'appareil dès qu'il est installé.
Mémoriser une télécommande
Quand vous avez besoin de mémoriser une télécommande, sélectionnez la roue du menú et
appuyez, dans l’écran vous verrez “Learn” (mémoriser) appuyez encore pour voir “Learn
Handsets” (mémoriser une télécommande), appuyez encore. Ensuite, appuyez n’importe quel
touche de la télécommande et après appuyez sur la roue du menú pour confirmer la liaison. La télécommande est mémorisée..
Suppression
Le MC3 propose quelques options qui permettent de supprimer des télécommandes.
Tout d'abord, sélectionnez la roue de menu puis Supprimer et Supprimer des télécom-
mandes. Pour supprimer toutes les télécommandes, sélectionnez Oui. En supprimant toutes
les télécommandes, vous pouvez gérer convenablement les télécommandes adaptées.
Une fois sur le réseau, l'appareil supprimera toutes les télécommandes rattachées à cette
unité (locales et en réseau) et enverra un message pour supprimer les télécommandes de
toutes les unités liées à l'unité initiale. Toutes les autres unités conserveront leurs télécommandes enregistrées localement.
Dans la seconde options, sélectionnez Supprimer tout. Cette action supprimera les télécommandes et les fonctions du clavier - cette réinitialisation sur les défauts usine vous permettra
de gérer convenablement toutes les fonctionnalités de cette unité.
Comme troisième option, sélectionnez Supprimer la télécommande xxx - grâce à cette option,
vous pouvez sélectionner la télécommande qu'il vous faut supprimer si vous êtes en train de
faire votre présentation, sans perturber les autres télécommandes et paramètres.
Quatrième option : suppression par le réseau. Suppression générale de toutes les fonctionnalités du réseau. ATTENTION : CETTE ACTION REMETTRA TOUTES LES FONCTIONNALITÉS SUR LES PARAMÈTRES USINE. Le système vous demande de confirmer votre action.
Page 14

14
Programmation des ordres au clavier
Les commandes du MC3 sont paramétrées en usine de la manière suivante : - flèche de pointeur
droite pour SUIVANT, flèche de pointeur gauche pour PRÉCÉDENT, et la lettre « b » pour Écran noir.
Ces commandes peuvent être reprogrammées au moyen d'un clavier USB externe.
Contrôlez que le clavier est compatible avec le système (nous en ajoutons toujours de nouveaux) en
vérifiant qu'il pilote vos ordinateurs hôtes.
Entrez dans le système de menu puis sélectionnez Apprendre ; sélectionnez ensuite Apprendre
clavier. Suivez le guide du menu puis désélectionnez les ports que vous ne souhaitez pas programmer.
Saisissez la touche ou la séquence de touches demandée puis sélectionnez le bouton d'une télécom-
mande que vous voulez affecter à la fonction.
Désormais, chaque fois que vous sélectionnerez ce bouton sur les télécommandes connectées à ces
ports, il aura cette touche ou séquence de touche.
Commande par le clavier (infos complémentaires)
Avec la fonction de programmation du clavier, vous pouvez commander avec un seul clavier tous les
ordinateurs connectés au MC3 ; cette fonction est très utile pour éditer une présentation. Les modifications, telles que les erreurs de frappe, sont prises en compte simultanément par tous les ordinateurs. Vous éditez ainsi très rapidement votre présentation : - le clavier sauvegarde et exécute la
présentation.
Ajouter une télécommande à un port donné
À venir dans une mise à jour du logiciel
Désélection à distance du port
À venir dans une mise à jour du logiciel
Télécommande
Possibilité de commander d'autres unités MC3 ; le port active les boutons, sur le réseau. Cette fonction permet de désactiver l'unité de pupitre lorsqu'elle ne commande pas cet ordinateur.
Volume
En utilisant votre casque fourni, réglez le volume des bips sur un niveau confortable à l'oreille. Nous
vous recommandons d'utiliser des casques standard ayant une impédance de 32 ohms.
55
ES
Alimentación de red.
Si usa i2Net, usted tiene un par de opciones de alimentación. La alimentación USB utilizada
para la unidad no es suficiente para alimentar también a la red.
Use un ordenador o alimentación USB en ambos
El uso de 12V-30V DC en ambos lados permitirá un sistema de antena diverso y
productos adicionales como el botón cableado y la lámpara de confidencia .
Puede usarse una fuente de alimentación i2Net separada para la alimentación local y
como ayuda con cables muy largos.
Ajustes
Brillo
Ajuste el brillo de la pantalla para el entorno donde esté usando la unidad.
ID de la unidad
Muestra las direcciones de red exclusivas de los dispositivos en la red. No se oculta
automáticamente al recibir señal.
Diagnóstico
i2Net Pwr - muestra el voltaje actual en esa unidad desde (o hacia) la red
Balance - muestra que los datos presentados a la unidad están equilibrados, p.ej. no
hay ningún cable roto y que no faltan los pines 2 o 3.
RX & TX- Paquetes de Datos enviados y recibidos a la red mostrando que hay datos
presentes.
CRC- Errores de datos – datos corruptos
NVM- Ciclos de escritura/Lectura, para mostrar ciclos de almacenamiento en la
memoria
Page 15

54
Programación de los botones del mando
Las señales del MC3 se configuran en fabrica de la siguiente manera: - flecha de cursor derecha para NEXT (siguiente), flecha de cursor izquierda para BACK (atrás) y la
letra “b” para BLACK OUT (oscurecer). Estas señales pueden reprogramarse usando
un teclado USB externo.
Compruebe que el teclado funciona con el sistema (estamos añadiendo más constan-
temente) y que controla sus ordenadores centrales.
Acceda al sistema del menú y seleccione Learn (aprender). A continuación, seleccio-
ne Learn Keyboard (aprender teclado). Siga la guía del menú y deseleccione aque-
llos puertos que no desee programar.
Introduzca la tecla o secuencia de teclas que desee y a continuación seleccione en un
mando a distancia a qué botón quiere asignar la función.
Ahora, cada vez que seleccione ese botón en los mandos a distancia, en esos puer-
tos se enviar esa tecla o secuencia de teclas.
Control de teclado (información adicional)
Con la función de programación “Features of the keyboard” (funciones del teclado),
usted puede ver que con un teclado puede controlar todos los ordenadores conectados a ese MC3. Se trata de una función muy útil para la edición. Todos los ordenadores conectados pueden editarse al mismo tiempo para una rapidísima edición durante
el acto (por ejemplo, errores tipográficos). el teclado guarda y muestra la información,
todo desde el teclado.
Añada un mando a distancia a un puerto especifico
En una futura actualización del software
Deseleccin a distancia de un puerto
En una futura actualización del software
Control a distancia
La capacidad de controlar los puertos USB de los MC3 en red. Esto permite deshabi-
litar la unidad que haya en el atril cuando no est controlando ese ordenador.
Volumen
Usando sus propios auriculares, ajuste el nivel del volumen de los pitidos hasta un nivel que se
resulte cómodo escuchar. Recomendamos el uso de auriculares estándar con una impedancia
de 32 ohmios.
15
FR
Alimentation du réseau
Si vous utilisez le réseau i2Net, vous avez à votre disposition deux options d'alimentation.
L'alimentation par le port USB utilisée pour l'unité n'est pas assez puissante pour alimenter
également le réseau,
Utilisez un ordinateur ou une alimentation USB
Une alimentation CC 12 V-30 V à l'une ou l'autre des extrémités permet d'utiliser un sys-
tème d'antenne de diversité et d'autres produits, comme une lampe confidentielle et
un bouton filaire.
Une alimentation i2Net indépendante peut servir d'alimentation locale et améliorer la
qualité en présence de câbles très longs.
Réglages
Luminosité
Réglez la luminosité de l'écran en fonction de l'environnement dans lequel vous l'utilisez.
Identification de l'unité
Indique les adresses réseau uniques des appareils sur le réseau - Pas d'auto-masquage sur
signal.
Diagnostique
i2Net Pwr - indique la tension courante présente dans l'unité provenant du ou allant
vers le réseau
Balance - indique que les données présentées à l'unité sont correctes, c'est-à-dire
qu'aucun câble n'est sectionné et que la broche 2 ou la broche 3 est pré-
sente.
RX & TX- Les paquets de données envoyés et reçus sur le réseau indiquent la pré-
sence de données.
CRC- Erreurs de données - données corrompues
NVM- Cycles de lecture/écriture, qui indique les cycles de mise en mé
moire
Page 16

16
Composants fournis
Système mono
Qté Pièce
1 MicroCue3
3 USB A vers USB micro
1 Télécommande (2 ou 3 boutons, avec ou sans pointeur laser)
Système duo pro
Qté Pièce
2 MicroCue3
6 USB A vers USB micro
2 Télécommande (2 ou 3 boutons, avec ou sans pointeur laser)
1 Alimentation CC 12 V
1 Malette de transport professionnelle en plastique dur.
53
ES
Primera Conexión
El MicroCue3 usa el controlador integrado del sistema operativo del ordenador para dispo-
sitivos USB. A medida que usted conecta cada puerto del MC3 a un USB de un ordenador,
éste se configurar automticamente. Es importante dejar tiempo para que se realice esta
operación, sin desconectarlo o usarlo. En el caso de un PC, espere hasta que se le indique
que el dispositivo ha sido configurado y est listo para ser usado. Si el puerto ha sido insta-
lado incorrectamente, podría generar problemas en subsiguientes instalaciones y deberá
desinstalar el dispositivo. Por favor, consulte con su técnico informático. Normalmente no
hay problemas y se puede usar el dispositivo tan pronto esté instalado.
Añadir un Mando a Distancia
Cuando necesite añadir un mando a distancia, pulse el botón de la unidad central y en la
pantalla aparecer “learn” (vincula). Pulse el botón otra vez para que aparezca “Learn
Handsets” (vincula mando a distancia), pulse otra vez el botón. Entonces, pulse cualquier
botón del mando a distancia que quiera vincular y seguidamente pulse el botón de la unidad central para confirmar la vinculación. El mando a distancia está memorizado.
Borrado
El MC3 dispone de dos opciones para eliminar los mandos a distancia.
Primera opción: seleccione el botón de ajuste de menú y seleccione Erase (borrar) y a
continuación, Erase Handsets (eliminar mandos a distancia); después, para eliminar todos
los terminales, seleccione Yes (sí). Esto eliminar todos los mandos a distancia. Esto ase-
gurar que usted tiene un buen punto de inicio para configurar los mandos a distancia.
Cuando esté en red, eliminar todos los mandos en esa unidad (tanto a nivel local como de
la red) y enviar un mensaje para eliminar los mandos de todas aquellas unidades que
hayan copiado los parámetros de la unidad inicial. Todas las demás unidades conservarán
sus mandos almacenados localmente.
Segunda opción: seleccione Erase All (eliminar todo). Esto eliminar los mandos y las
funciones de teclado. Se trata de un reinicio de fabrica que asegurar un punto de inicio
adecuado para todas las funciones de esa unidad.
Tercera opción: seleccione Erase Handset xxx (eliminar mando xxx). Esto le permitirá
seleccionar qu mando necesita eliminar si se encuentra en mitad de un acto sin por ello
alterar los otros mandos y sus funciones.
Cuarta opción: Network Erase (borrado global). Un borrado global de todo lo que haya en
la red. ADVERTENCIA: ESTO DEVOLVER EL DISPOSITIVO A SU CONFIGURACIN
DE FBRICA. Se le pedirá una confirmación adicional para tener la seguridad de que es lo
que usted desea hacer.
Page 17

52
Manejo
Actualización del Software
Es importante asegurarse que todos los MC3 conectados estén utilizando la misma
versión de software, en caso contrario la actualización podría dar errores.
Sólo para PC
Compruebe con regularidad si hay actualizaciones de software disponibles en la web:
www.interspace.com
Conecte el PC al puerto USB 1 del MC3 y empiece la actualización: seleccione el botón que
dice “check for updates” (compruebe actualizaciones), siga las instrucciones de la pantalla y el
software del MC3 será actualizado.
Coloque el MicroCue3 en un espacio despejado que permita una buena visión de los
presentadores y sus mandos a distancia. Asegúrese que la antena esté orientada hacia arriba
para favorecer la mejor recepción.
Con los cables micro USB proporcionados, conecte el MC3 al ordenador principal en el puerto 1
(vea complementos incluidos en pág. 56).
Si es la primera vez que lo conecta a ese ordenador, éste necesitará un minuto o dos para auto
configurarse. El ordenador deberá mostrar un mensaje que indique que el dispositivo ha sido
configurado correctamente (vea primera conexión en pág. 53) NO UTILICE O DESCONECTE
EL MC3 DURANTE LA PRIMERA CONEXIÓN O PODRÍA CORROMPER LA INSTALACIÓN.
Compruebe la cobertura del aparato andando por la sala con el mando a distancia así podrá
comprobar si hay alguna zona donde la señal no sea buena. Si esto ocurriera, deberá recolocar
el MC3 o instalar un segundo en red, cerca del presentador. Tenga presente que una sala vacía
(sin el público) puede cambiar significativamente la cobertura de la señal.
Verifique que los mandos a distancia están vinculados a los MC3 utilizados, en caso necesario
elimine los mandos que no se usaran (ver borrado en pág. 53).
El presentador usa los sencillos pero potentes mandos a distancia de Interspace Industries y el
técnico se sirve de la unidad central para asegurarse que se recibe la señal (visual y
acústicamente).
En caso de no querer usar el estándar Adelante, Atrás, Pausa para las ordenes del mando a
distancia, vea la pág. 54 para la programación de los botones del mando.
Al conectar el ordenador al puerto USB, el interruptor correspondiente se iluminará para indicar
que está conectado y activo. Sí el interruptor empezara a parpadear, significaría que el cable ha
sido desconectado o que el ordenador está en reposo. Esto permite al técnico ver que las
conexiones estén activas y reiniciarlas en caso necesario.
17
FR
Page 18

18
Inhaltsverzeichnis
Einführung, Merkmale und Vorteile 18
Erste Inbetriebnahme 20
Betrieb 20
Allgemein 20
Anlernen 21
Einzelzuordnung von Handset 21
Fernauswahl des Ports 21
Fernsteuerung 21
Löschen 21
Tastaturbefehle 22
(Zusatzinfo) 22
Audio 22
Stromversorgung 23
Einstellungen 23
Helligkeit 23
Geräte-ID 23
Diagnose 23
Softwareupdate 24
Lieferumfang 24
Einführung, Merkmale und Vorteile
Der MicroCue3 (MC3) wurde für Moderationen von kleinen bis mittelgroßen Shows entwickelt,
bei denen das Remote-Cueing von Präsentationsbildern oder Dias auf einem Computer
zuverlässig und problemlos ablaufen muss.
Computer sind bei Präsentationen und Shows heutzutage nicht mehr wegzudenken. Meistens
ist auch mehr als nur ein PC im Einsatz – z.B. ein Backup, sowie ein Vorschaugerät für die
angeordneten Folien, damit der Moderator immer weiß, was als nächstes kommt.
51
ES
Introducción, Características y Beneficios
MicroCue3 (MC3) ha sido diseñado para el presentador de pequeños y medianos eventos, en
los que la fiabilidad en el paso de diapositivas es de vital importancia.
Al ser el Tercero de la serie MicroCue, hemos añadido 3 puertos USB para así poder controlar
hasta 3 ordenadores.
Al usar más de un ordenador en los eventos (maestros y back-up) o para mostrar las siguientes
diapositivas, este equipo es indispensable ya que ofrece al presentador la opción de ver la siguiente diapositiva (si no se conoce el orden de memoria).
El MicroCue3 es la evolución del MicroCue2 con fiabilidad incrementada.
La cobertura inalámbrica es la misma que en todos nuestros productos, de unos 100m con
nuestros nuevos mandos a distancia. Sin embargo, en el MicroCue2, su posición o entorno
puso en entredicho esta distancia.
El Equipo dispone de una pantalla LCD que muestra tanto texto como imágenes.
Sigue siendo alimentado por el puerto USB aunque el uso de un alimentador externo permite
conectar más de un MicroCue3 a través del puerto i2Net, en caso de querer mayor cobertura
inalámbrica.
I2Net ha sido desarrollado para poder conectar cables más largos (superiores a 1.500 m), con
alimentación y datos.
Gracias a este sistema, podemos crear una red de 2 o más MC3 y compartir recursos como los
mandos a distancia, las lámparas inteligentes y más funciones en el futuro.
Al estar en red, se puede utilizar más de un mando a distancia. Una vez desconectado el MC3
de la red, los mandos vuelven a ser exclusivos de cada unidad.
Se pueden habilitar o deshabilitar los puertos USB, para gestionar mejor el uso de los ordenadores conectados.
Un conector mini Jack estéreo de 3.5 mm permite conectar auriculares para que el técnico oiga
(con control de volumen en la parte frontal del equipo) cuando el presentador avanza, retrocede
o pausa la presentación.
Page 19

50
Índice
Introducción, características y beneficios 51
Funcionamiento, 52
Actualización de software 52
Primera conexión. 53
Añadir un Mando a Distancia 53
Borrado 53
Programación de los botones del mando 54
Control de teclado (información adicional) 54
Añada un mando a distancia a un puerto especifico 54
Deseleccione a distancia un puerto 54
Control a distancia 54
Alimentación de red. 55
Ajustes 55
Artículos incluidos 56
19
DE
Der große Vorteil hierbei: sollte der Moderator die Rede nicht auswendig wissen, kann er diese
an die nächste Folie einfach anpassen.
Der MicroCue3 ist eine Weiterentwicklung des MicroCue2, wobei das Augenmerk auf eine noch
höhere Verlässlichkeit gelegt wurde.
Die RF-Reichweite unserer neuen Handsender (Handsets) liegt bei max. 100 m, so wie schon
bei den Vorgängermodellen. Aber je nach Standort und Umfeld waren die Leistungen des
MicroCue2 unterschiedlich.
Mithilfe eines Farbdisplays haben Sie nun vollen Zugriff auf alle Einstellungen und
Informationen.
Da es sich hier um die "dritte" Generation handelt, bieten wir nun auch 3 USB-Ports an, um
externe Computer ansteuern zu können.
Der MC3 wird wie sein Vorgänger weiterhin über den USB Port mit Strom versorgt. Eine externe
Stromversorgung ermöglicht es jedoch, ein weiteres Gerät über das "i2Net" ohne zusätzliche
Stromquelle zu betreiben. Somit ist es möglich, einen MC3 als weitere Empfangsstation zu
nutzen, ohne dass dieser an eine Spannungsquelle angeschlossen sein muss.
Das i2Net wurde entwickelt, um mehrere Geräte über große Entfernungen (über 1500 m) zu
verbinden. Es werden Daten sowie Strom übertragen.
Mithilfe einer Netzwerkinfrastruktur können wir zwei oder mehrere MC3-Geräte miteinander
verbinden und Ressourcen wie Handsets, Lampen und mehr in Zukunft gemeinsam nutzen.
Das automatische Teilen von Handsets über eine Netzwerkverbindung stellt sicher, dass alle
Handsets (unabhängig davon, auf welchem Gerät sie angelernt wurden) innerhalb des
Netzwerkes genutzt werden können. Erst wenn das Gerät ausgeschaltet wird, werden die
"Netzwerk"-Handsets „vergessen“ und in den Zustand vor der Netzwerkverbindung
zurückgesetzt.
Eine Aktivierung oder Deaktivierung des USB-Anschlusses, um die Steuerung der
angeschlossenen Computer zu verwalten, ist ebenfalls möglich.
Ein 3,5-mm-Stereoklinkenanschluss ermöglicht die Wiedergabe der Töne, welche auf die
Befehle Next, Back und Black ansprechen. Ein Headset kann an der Seite des MC3
angeschlossen werden. Über das neue Menü kann die Lautstärke angepasst werden.
Page 20

20
Erste Inbetriebnahme
Der MicroCue3 verwendet den eingebauten USB-Treiber des Computer-Betriebssystems. Wenn
Sie den MC3 an einen USB-Port des Computers anschließen, konfiguriert sich das System von
selbst. Es ist wichtig, dass er dies tun kann, ohne ihn währenddessen zu trennen oder zu
benutzen. Warten Sie, bis er Ihnen mitteilt (im Falle eines PCs), dass er das Gerät konfiguriert
hat und einsatzbereit ist. Wenn der Port falsch installiert wurde, kann es zu Problemen bei
nachfolgenden Installationen kommen und Sie müssen das Gerät deinstallieren. Bitte wenden
Sie sich für diese Funktion an Ihren IT-Manager. Normalerweise sollten keine Probleme auftreten
und sobald das Gerät installiert ist, können Sie es uneingeschränkt nutzen.
Betrieb
Bitte stellen Sie sicher, dass alle angeschlossenen MC3-Systeme dieselbe
Softwareversion nutzen, da es sonst zu unvorhergesehenen Problemen kommen
kann.
Allgemein
Stellen Sie den MicroCue3 an eine freie Stelle, mit uneingeschränktem Blick auf den Moderator
mit dem Handset. Stellen Sie sicher, dass die Antenne nach oben zeigt, um den besten Empfang
zu gewährleisten.
Verbinden Sie den MC3 über die mitgelieferten Micro-USB-Kabel mit dem (Arbeits-)Computer
über Port 1 (siehe "Lieferumfang"). Wenn der Computer zum ersten Mal verbunden wird, muss
dieser sich ein oder zwei Minuten selbst konfigurieren. Der Computer sollte sich melden, wenn
das Gerät korrekt konfiguriert wurde (siehe "Erste Inbetriebnahme"). Während dieser Zeit dürfen
Sie den Stecker nicht ziehen oder das Gerät verwenden, da sonst die Installation nicht richtig
ausgeführt werden kann!
Nachdem der USB-Anschluss des MC3 mit dem Computer verbunden wurde, leuchtet der
entsprechende Port auf und zeigt somit an, dass er aktiv ist. Wenn ein Port zu blinken beginnt,
bedeutet dies, dass der Port getrennt oder in den Ruhezustand versetzt wurde. Dies dient dazu,
dem Techniker Informationen zum Zurücksetzen der USB-Verbindung zu geben, falls
erforderlich, wie z.B. diese wieder anzuschließen.
49
PO
Page 21

48
Artigos incluídos
Sistema único
Qtd Peça
1 MicroCue3
3 USB A para micro USB
1 Auscultador (2 ou 3 botões com ou sem Laser)
Sistema Pro twin
Qtd Peça
2 MicroCue3
6 USB A para micro USB
2 Auscultadores (2 ou 3 botões com ou sem Laser)
1 Fonte de alimentação de CC de 12V
1 Estojo de transporte profissional em plástico rígido
21
DE
Anlernen
Wenn Sie ein neues Handset anlernen wollen, wählen Sie mithilfe des „jog buttons“ im Menü
den Punkt „Learn/Anlernen“ aus. Nun wird auf dem Display „Learn Handset/Handset
anlernen“ angezeigt. Bestätigen Sie dies und drücken dann einen beliebigen Knopf auf dem
Handset. Zum Speichern drücken Sie den „Jog button“ erneut. Fertig.
Einzelzuordnung von Handset
Folgt in einem zukünftigen Software-Update…
Fernauswahl des Ports
Folgt in einem zukünftigen Software-Update…
Fernsteuerung
Folgt in einem zukünftigen Software-Update…
Die Möglichkeit, die Port-Freigabetasten anderer MC3-Geräte im Netzwerk zu steuern.
Dadurch
kann die Rednerpulteinheit deaktiviert werden, wenn der Computer nicht gesteuert wird.
Löschen
Es gibt eine Reihe von Optionen auf dem MC3, um Handsets zu entfernen.
1. Drücken Sie die Menü-Taste und wählen Sie „Erase/Löschen“ und dann „Erase
Handsets/Handsets löschen“, und um alle Handsets zu löschen, drücken Sie dann
„Yes/Ja“.
2. Nun werden alle Handsets gelöscht. Dies ist ein guter Ausgangspunkt für die
Installation neuer Handsets. Wenn Sie sich im Netzwerk befinden, werden alle
Handsets auf diesem Gerät (sowohl lokal als auch im Netzwerk) gelöscht; und es wird
auch ein Befehl gesendet, um diese Handsets von allen anderen Geräten zu löschen,
die von dem ursprünglichen Gerät kopiert wurden. Alle anderen Geräte behalten ihre
lokal gespeicherten Handsets.
3.
4. Wählen Sie „Erase All/Alles löschen“. Damit werden alle Handsets und
Tastaturfunktionen gelöscht und das Gerät somit in den Auslieferungszustand
zurückgesetzt (Werksreset).
5. Wählen Sie "Erase Handset xxx/Handset löschen xxx" - hiermit können Sie auswählen,
welches Handset Sie löschen möchten. Zum Beispiel, wenn Sie mitten in der
Vorführung sind und keine anderen Handsets und Funktionen stören sollen.
6. Netzwerk löschen. Alles in dem Netzwerk wird gelöscht. VORSICHT! Dadurch werden
alle Geräte in dem Netzwerk auf die „Werkseinstellungen“ zurückgesetzt!
Page 22

22
Tastaturbefehle
Die Cues des MC3 sind werkseitig wie folgt eingestellt:
Pfeil rechts für NEXT (Weiter),
Pfeil links für BACK (Zurück),
Buchstabe "b" für Black (Schwarzbild).
Diese Cues können über eine externe USB-Tastatur umprogrammiert werden. Überprüfen Sie, ob
die Tastatur mit dem System kompatibel ist (wird ständig erweitert) indem Sie sicherstellen, dass
damit der Computer gesteuert werden kann.
Öffnen Sie das Menüsystem und wählen Sie „Learn/Lernen“, - wählen Sie nun „Learn Keyboard/
Tastatur anlernen“, - folgen Sie der Menüführung und deaktivieren Sie die Ports, die Sie nicht
programmieren möchten. Geben Sie die gewünschte Taste oder Tastenfolge ein und wählen Sie
dann an einem Handset aus, welcher Taste die Funktion zugeordnet werden soll. Jedes Mal, wenn
Sie nun diese Taste auf den Handsets an diesen Ports auswählen, wird diese Taste oder
Tastenfolge gesendet.
(Zusatzinfo)
Mit der Funktion der Tastaturprogrammierung können Sie sehen, dass eine Tastatur alle, an den
MC3 angeschlossenen, Computer steuern kann. Dies ist sehr nützlich bei der Bearbeitung
(Editing). Alle Computer können bearbeitet werden, wie z.B. Tippfehler, für eine sehr schnelle OnShow-Bearbeitung: Tastatur speichern und Show starten, alles über die Tastatur.
Audio
Ein 3,5-mm-Stereoklinkenanschluss ermöglicht die Wiedergabe der Töne, welche auf die Befehle
Next, Back und Black ansprechen. Ein Headset kann an der Seite des MC3 angeschlossen
werden. Über das neue Menü kann die Lautstärke angepasst werden.
Wir empfehlen Standard-Kopfhörer mit 32 Ohm Impedanz.
47
PO
Potência da Rede.
Se estiver a usar o i2Net, tem algumas opções de alimentação. A alimentação por USB
utilizada para a unidade não tem potência suficiente para alimentar também a Rede.
Use um computador ou alimentação por USB em ambos
Usar uma CC de 12V-30V em cada extremidade permitirá um sistema de antenas
diversificado e produtos adicionais, como lâmpada Confidence e botão com fio.
Pode utilizar-se uma fonte de alimentação i2Net separada para alimentação local e para
ajudar com cabos muito longos.
Definições
Luminosidade
Ajusta a luminosidade do ecrã para o ambiente em que o estiver a usar.
ID da Unidade
Mostra os endereços de rede exclusivos dos dispositivos na rede - Sem ocultar
automaticamente no contributo.
Diagnóstico
Alimentação i2Net - mostra a atual Tensão na unidade a partir de (ou para) a rede
Equilíbrio - mostra que os dados apresentados na unidade estão
equilibrados, ou seja, não é um cabo partido e o pino 2 ou pino
3 estão em falta.
RX & TX- Os pacotes de dados enviados e recebidos para a rede
mostram que os dados estão presentes.
CRC- Erros de dados - dados corrompidos
NVM- Ciclos de Leitura/Escrita, para mostrar ciclos de
armazenamento de memória
Page 23

46
Programação dos Comandos do Teclado
As indicações do MC3 estão configuradas de fábrica em: seta para a direita para NEXT
(SEGUINTE), seta para a esquerda para BACK (VOLTAR) e a letra «b» para Black out
(Desativar). Estes contributos podem ser reprogramados usando um teclado USB externo.
Verifique se o Teclado funciona com o sistema (estamos sempre a adicionar mais), mostrando
que controla o seu computador central.
Entre no sistema de menu e selecione Learn (Memorizar) - agora selecione Learn keyboard
(Memorizar teclado) - siga o guia do menu e desmarque as portas que não pretende
programar.
Insira a tecla ou sequência de teclas necessária e, de seguida, selecione no auscultador qual o
botão a que pretende associar a funcionalidade.
Sempre que selecionar esse botão nos auscultadores nessas portas, enviará essa tecla ou
sequência de teclas.
Controlo do Teclado (informação adicional)
Com a funcionalidade de programação das Funcionalidades do Teclado, consegue ver que um
teclado pode controlar todos os computadores ligados ao MC3 e isto é muito útil para a edição.
Todos os computadores podem ser editados, como erros de digitação ao mesmo tempo, para
uma edição muito rápida no evento: - guardar e executar evento, tudo a partir do teclado.
Adicionar um auscultador a uma porta específica
A seguir numa atualização de software futura
Desmarcação remota da porta
A seguir numa atualização de software futura
Controlo remoto
A capacidade de controlar os botões de acionamento de porta de outras unidades MC3 na
rede. Isto permite que a unidade de leitura seja desativada quando não estiver a controlar esse
computador.
Volume
Usando os seus próprios auscultadores fornecidos, ajuste o nível de volume dos bips para um
nível confortável de audição. Recomendamos auscultadores comuns com uma impedância de
32 ohm.
23
DE
Stromversorgung
Wenn Sie das i2Net verwenden, haben Sie mehrere Stromversorgungsoptionen. Die für das
Gerät verwendete USB-Stromversorgung reicht nicht aus, um auch das Netzwerk mit Strom
zu versorgen.
Verwenden Sie daher einen Computer oder eine USB-Stromversorgung an beiden
Endgeräten.
Die Verwendung von 12V-30V DC-Strom an einem der Endgeräte ermöglicht die
Nutzung eines vielseitigen Antennensystems und den Anschluss von zusätzlichen
Produkten wie beispielsweise einer Confidence lamp und kabelgebundenen
Handsets.
Ein separates i2Net-Netzteil kann für die lokale Stromversorgung und lange Kabelwege
verwendet werden.
Einstellungen
Helligkeit
Passen Sie die Helligkeit des Displays an die Umgebung an.
Geräte-ID
Zeigt die Netzadressen der im Netzwerk befindlichen Geräte an.
Diagnose
i2Net Pwr Zeigt die aktuelle Spannung an diesem Gerät vom (oder zum) Netz an.
Balance Zeigt an, dass die Daten, die dem Gerät geliefert werden, fehlerfrei sind -
kein unterbrochenes Kabel oder fehlender Pin 2 oder 3.
RX & TX Datenpakete, die an das Netzwerk gesendet und empfangen werden
zeigen an, dass Daten vorhanden sind.
CRC Datenfehler - beschädigte Daten
NVM Lese-/Schreibzyklen, zur Anzeige der Speicherzyklen
Page 24
24
Softwareupdate
Überprüfen Sie regelmäßig, ob Ihr MC3 System aktuell ist. Alle aktuellen Updates
finden Sie auf www.interspaceind.com .
Verbinden Sie den „Port 1“ des MC3 mit dem Computer und wählen den Button
„check for updates“ aus. Folgen Sie der Anleitung und Ihr System wird auf den
neusten Stand gebracht.
Lieferumfang
Einzelsystem
Anzahl Bestandteil
1 MicroCue 3
3 USB A auf USB Micro
1 Handset (2 oder 3 Tasten mit oder ohne Laser)
Pro Doppelsystem
Anzahl Bestandteil
2 MicroCue 3
6 USB A auf USB Mirco
2 Handsets (2 oder 3 tasten mit oder ohne Laser)
1 DC 12V-Stromversorgung
1 Profi-Tragekoffer aus Hartplastik
45
PO
Primeira ligação
O MicroCue3 usa o transmissor embutido com o sistema operacional do computador para
dispositivos USB. À medida que liga cada porta do MC3 à ligação USB de um computador,
este configurar-se-á sozinho, é importante deixar que isso aconteça sem o desligar ou sem
o utilizar. Aguarde que indique (no caso do PC) que configurou o dispositivo e que está
pronto a ser utilizado. Se a porta for instalada corretamente, pode haver problemas com as
instalações subsequentes e terá de desinstalar o dispositivo. Consulte o seu gestor de TI
para esta função. Geralmente não há problemas e assim que é instalado, pode usá-lo na
sua totalidade.
A
Eliminar
Existem algumas opções no MC3 para remover auscultadores.
Em primeiro lugar, selecione o botão jog do menu e selecione Erase (Eliminar) e, de
seguida, Erase Handsets (Eliminar Auscultadores) e, depois, para eliminar todos os
auscultadores, selecione yes (sim). Isto eliminará todos os auscultadores e garantirá que
tem um bom ponto de partida para os auscultadores.
Quando estiver na Rede, eliminará todos os auscultadores nessa unidade (locais e da
rede) e também enviará uma mensagem para eliminar os auscultadores de todas as outras
unidades que tenham copiado da unidade inicial. Todas as outras unidades manterão os
seus auscultadores armazenados localmente.
Em segundo lugar, Selecione Erase All (Eliminar Todos), isto eliminará as funções dos
Auscultadores e do Teclado - trata-se de uma configuração de fábrica e garantirá um ponto
de partida adequado para tudo nessa unidade.
Em terceiro lugar, selecione Erase Handset xxx (Eliminar Auscultador xxx) - isto permitirlhe-á selecionar o Auscultador que tem de eliminar se estiver a meio do evento sem
perturbar os outros auscultadores e funcionalidades.
Em quarto lugar, eliminar a rede. Uma eliminação geral de tudo na rede. AVISO: ISTO IRÁ
REPOR AS CONFIGURAÇÕES DE FÁBRICA. Isto tem uma confirmação adicional para
garantir que pretende realmente fazê-lo.
Page 25

44
Funcionamento
Atualização do software
- é importante garantir que todas as unidades MC3 ligadas estão a executar a
mesma revisão de software, caso contrário, isto poderá resultar num
funcionamento imprevisto.
X
Coloque o MicroCue3 num espaço livre para visualização e numa linha de visão nítida para os
apresentadores e os seus auscultadores. Certifique-se de que a antena está a apontar para a
melhor receção.
Usando os cabos micro USB fornecidos - ligue o MC3 ao computador (em funcionamento) usando
primeiro a porta 1 para convenção. (Consultar «artigos incluídos»).
Se estiver a liga-lo pela primeira vez, o computador precisa de um minuto ou dois para configurar.
O computador deve indicar que o dispositivo foi configurado corretamente. (Consultar «primeira
ligação») Não desligue o nem utilize durante este tempo, pois poderá corromper a instalação!
Faça um Teste de Percurso com o auscultador e verifique se existem pontos mortos de
funcionamento - poderá ter de mover o recetor se isto ocorrer ou configurar uma segunda unidade
MicroCue3 como recetor perto do apresentador. Tenha em consideração que um local do evento
vazio (sem público) pode mudar significativamente, especialmente se estiver entre o apresentador
e o recetor (MC3).
Verifique se tem os auscultadores para o recetor - elimine os auscultadores não autorizados, se
necessário. (Consultar «eliminar auscultadores»)
O apresentador usa os auscultadores simples, mas potentes, da Interspace Industries. O técnico
usa a unidade principal como um recurso poderoso para garantir que o contributo do apresentador
é obtido com monitorização visual e audível, se necessário.
Caso pretenda usar um comando diferente de «seta direita, seta esquerda» para os contributos,
consulte «programação do comando do teclado»
Quando estiver ligado à porta USB, o interruptor de acionamento da porta correspondente acendese para indicar que está ligado e ativo. Se o interruptor da porta começar a piscar, significa que a
porta foi desligada ou suspensa e isto serve para informar o técnico de que deve repor a ligação
USB, se necessário, como ligá-la novamente.
25
DE
Page 26

26
Indice
Introduzione, caratteristiche e vantaggi 27
Funzionamento, 28
Aggiornamento del software 28
Primo collegamento. 29
A 29
Eliminazione 29
Programmazione comandi tastiera 30
Controllo mediante tastiera (altre info) 30
Aggiunta di una cuffia a una porta specificata 30
Deselezione di una porta in remoto 30
Controllo in remoto 30
Alimentazione di rete. 31
Impostazioni 31
Accessori in dotazione 32
43
Introdução, características e benefícios
O MicroCue3 (MC3) foi concebido para o apresentador de pequenos a médios eventos, nos
quais a fiabilidade é fundamental para a entrada remota de imagens e diapositivos da
apresentação num computador.
Com o avanço contínuo dos computadores, utiliza-se mais do que apenas um num evento
para backup e para os diapositivos, para que o apresentador saiba qual é o próximo
diapositivo. Podem alinhar o seu discurso para se adaptar ao próximo diapositivo se não o
souberem de cor.
O MicroCue3 foi concebido para aumentar a fiabilidade, com base no produto MicroCue2.
A gama RF tem sido a mesma em todos os produtos de 100 m com o nosso novo auscultador.
Todavia, a posição e o ambiente puseram em causa o MicroCue2 .
Usar um ecrã LCD dá acesso total a texto e gráficos.
Como este é o «3» na série, devemos continuar com 3 portas USB para controlar
computadores externos.
Ainda é alimentado por USB. A utilização da alimentação de CC externa opcional permite que
uma unidade remota seja alimentada no i2Net sem a ligar a uma porta USB local - excelente
como recetor RF remoto.
O i2Net foi desenvolvido para longa distância em cabo (superior a 1500 m) com potência e
dados em 2 pares mais o ecrã.
Usando uma infraestrutura de rede, podemos ligar 2 ou mais unidades MC3 ao mesmo tempo
e partilhar recursos, como auscultadores, lâmpadas e muito mais no futuro.
A partilha automática de auscultadores através de uma ligação de rede garante que todos os
auscultadores são válidos. Os auscultadores «de rede» são ignorados e repostos para o
estado anterior à ligação de rede apenas quando a unidade é desligada.
A porta USB ativa ou desativa para gerir o controlo dos computadores ligados.
Áudio - uma mini ligação estéreo de 3,5 mm permite que os sons de áudio correspondentes
aos comandos Next (Seguinte), Back (Voltar) e Black out (Desativar) possam ser ouvidos num
auscultador com volume ajustável a partir do painel frontal.
PO
Page 27

42
Índice
Introdução, características e benefícios 43
Funcionamento 44
Atualização do software 44
Primeira ligação. 45
A 45
Eliminar 45
Programação dos Comandos do Teclado 46
Controlo do Teclado (informação adicional) 46
Adicionar um auscultador a uma porta específica 46
Desmarcação remota da porta 46
Controlo remoto 46
Potência da Rede. 47
Definições 47
Artigos incluídos 48
27
IT
Introduzione, caratteristiche e vantaggi
MicroCue3 (MC3) è stato concepito per i conduttori di eventi da piccoli a medi, in cui
l'affidabilità è fondamentale per l'allestimento in remoto di presentazioni di immagini o
diapositive su un computer.
Con la continua avanzata del computer, più di un dispositivo può essere utilizzato per un unico
evento per ottenere un backup e vedere l'immagine successiva, così il conduttore sa quale
diapositiva sta per arrivare. Quindi può allineare il proprio discorso in modo che si adatti alla
diapositiva successiva se non la ricorda a memoria.
MicroCue3 è stato concepito per una maggiore affidabilità, fondata sul prodotto MicroCue2.
La portata RF è la stessa per tutti i nostri prodotti, di 100 m con le nostre nuove cuffie. Ma
posizione e ambiente hanno messo in discussione MicroCue2.
L'utilizzo di uno schermo LCD consente un accesso completo sia al testo che alla grafica.
Poiché questo è il numero “3” della serie, avremo 3 porte USB per controllare i computer
esterni.
L'alimentazione è ancora mediante USB; l'utilizzo di un'alimentazione CC esterna opzionale
consente a un'unità remota di essere alimentata mediante i2Net senza necessità di
collegamento a una porta USB locale - perfetta come un ricevitore RF remoto.
i2Net è stato sviluppato per una lunga distanza su cavo (superiore a 1500 m) con
alimentazione e dati su 2 coppie più schermo.
L'utilizzo di un'infrastruttura di rete ci consente di collegare 2 o più unità MC3 assieme e di
condividere risorse come cuffie, lampade e altro ancora in futuro.
La condivisione automatica delle cuffie su una rete assicura che tutte le cuffie siano valide.
Solo quando l'alimentazione all'unità perde potenza, le cuffie della rete vengono "dimenticate"
e riportate allo stato precedente alla connessione di rete.
Abilitazione o disabilitazione della porta USB per gestire il controllo dei computer collegati.
Audio - il collegamento stereo mediante mini jack 3,5 mm consente di avere toni audio
corrispondenti ai comandi Avanti, Indietro e Oscuramento che possano essere sentiti su un
ricevitore con il volume regolabile dal pannello di controllo.
Page 28

28
Funzionamento,
Aggiornamento del software
- È importante assicurare che tutte le unità MC3 collegate siano dotate della
stessa versione del software, in caso contrario potrebbe verificarsi
un funzionamento non previsto.
X
Posizionare il MicroCue3 in uno spazio libero che consenta la visione e in modo che sia
chiaramente visibile in linea da parte dei conduttori e delle loro cuffie. Assicurarsi che l'antenna
sia puntata in modo da avere la migliore ricezione possibile.
L'utilizzo dei cavi micro USB in dotazione consente di collegare l'MC3 al computer (in uso)
utilizzando prima la porta 1 come convenzione. (Vedere “Accessori in dotazione”)
Se questo è il primo collegamento, il computer impiega un minuto o due per configurarsi. Il
computer deve mostrare il messaggio che conferma la corretta configurazione del dispositivo.
(Vedere “Primo collegamento”) Non scollegare il dispositivo né utilizzarlo durante questo
periodo di tempo altrimenti l'installazione non si completa!
Effettuare un test di camminata con le cuffie e controllare gli eventuali punti morti del
funzionamento; potrebbe essere necessario spostare il ricevitore se ciò accade o configurare
una seconda unità MicroCue3 come ricevitore accanto al conduttore. Ricordare che una sala
vuota (assenza di pubblico) può modificare in modo significativo la condizione soprattutto se lo
spazio vuoto è tra il conduttore e il ricevitore (MC3).
Controllare di avere le cuffie per il ricevitore: eliminare le cuffie malfunzionanti, se necessario.
(Vedere “Eliminazione cuffie”)
Il conduttore utilizza cuffie semplici ma potenti prodotte da Interspace Industries. Il tecnico
utilizza l'unità principale come risorsa potente per assicurare che la presentazione proceda
bene, attraverso monitoraggio visivo e sonoro, se necessario.
Se si desidera un comando diverso rispetto a “freccia destra, freccia sinistra” per le immagini,
vedere “Programmazione comandi tastiera”.
Dopo il collegamento all'USB, l'interruttore della porta corrispondente attivata si accende
comunicando che la porta è collegata e attiva. Se l'interruttore di una porta inizia a
lampeggiare, vuol dire che la porta è disconnessa oppure in pausa, questo serve al tecnico per
ricevere le informazioni necessarie alla reimpostazione del collegamento USB, se necessario,
ad esempio, eseguendo un nuovo collegamento.
41
NO
Page 29

40
Deler som følger med
Enkelt system
Antall Del
1 MicroCue3
3 USB A til USB mikro
1 Håndsett (2 eller 3 knapper med eller uten laser)
Pro tvillingsystem
Antall Del
2 MicroCue3
6 USB A til USB mikro
2 Håndsett (2 eller 3 knapper med eller uten laser)
1 DC 12V strømforsyning
1 Bæreveske i hard plast.
29
IT
Primo collegamento.
Il dispositivo MicroCue3 utilizza il driver integrato del sistema operativo del computer per i
dispositivi USB. Quando si collega una porta dell'MC3 al collegamento USB di un computer, il
computer si configura; è importante lasciarglielo fare senza scollegarlo né utilizzarlo.
Attendere fino al messaggio (per i PC) di avvenuta configurazione del dispositivo; poi è
pronto per l'uso. - Se la porta è stata installata in modo non corretto, potrebbero esserci
problemi per le installazioni successive e sarà necessario disinstallare il dispositivo. Consultare il proprio responsabile IT per questa funzione. Di solito non ci sono problemi e
immediatamente dopo l'installazione è possibile un utilizzo completo.
A
Eliminazione
Ci sono alcune opzioni per rimuovere le cuffie dall'MC3.
La prima: selezionare il pulsante Jog e selezionare Elimina e poi Elimina cuffie e poi, per
eliminare tutte le cuffie, selezionare Sì. Così si eliminano tutte le cuffie; questo è il posto
migliore in cui entrare per assicurarsi di avere un buon punto di partenza con le cuffie.
Quando si è nella rete, si eliminano tutte le cuffie di quella unità (sia locali che di rete) e viene
anche inviato un messaggio per eliminare quelle cuffie delle altre unità che sono state copiate
dall'unità iniziale. Tutte le altre unità conservano le cuffie memorizzate a livello locale.
La seconda: selezionare Elimina tutto; questo consente di eliminare le cuffie e le funzioni
della tastiera; si tratta di una reimpostazione di fabbrica e assicura un punto di partenza
corretto per tutte le funzioni su quella unità.
La terza: selezionare Elimina cuffia xxx; questo consente di scegliere quale cuffia è
necessario eliminare a metà della presentazione senza influenzare le altre cuffie e le altre
funzioni.
La quarta: eliminazione di rete. Una eliminazione globale per tutto ciò che è sulla rete.
AVVERTENZA: QUESTO CANCELLA TUTTO RIPRISTINANDO LE IMPOSTAZIONI DI
FABBRICA. C'è una richiesta di conferma aggiuntiva per assicurare che è ciò che davvero si
vuole fare.
Page 30

30
Programmazione comandi tastiera
I comandi dell'MC3 sono impostati in fabbrica: freccia destra per AVANTI, freccia sinistra per
INDIETRO e la lettera "b" per Oscuramento. Questi comandi possono essere riprogrammati
utilizzando una tastiera USB esterna.
Provare che la tastiera funzioni con il sistema (ne aggiungiamo continuamente) mostrando che
controlla i computer host.
Entrare nel sistema del menu e selezionare Apprendi, - ora selezionare Apprendi tastiera, -
seguire la guida del menu e deselezionare le porta che non si desidera programmare.
Immettere il tasto o la sequenza di comandi mediante i tasti necessari, poi selezionare su una
cuffia quale pulsante si desidera assegnare a una determinata funzione. Ogni volta che si
seleziona quel pulsante sulla cuffia per quelle porte, saranno inviati quel tasto o quella
sequenza di tasti.
Controllo mediante tastiera (altre info)
Con le funzioni di Programmazione comandi tastiera è possibile vedere che una tastiera può
controllare tutti i computer collegati a quell'MC3, e questo è molto utile per l'editing. Tutti i
computer possono essere utilizzati per l'editing: per esempio correzioni di refusi
contemporaneamente durante una presentazione molto veloce; salvataggio della tastiera ed
esecuzione presentazione e il tutto dalla tastiera.
Aggiunta di una cuffia a una porta specificata
Da rispettare per un futuro aggiornamento del software
Deselezione di una porta in remoto
Da rispettare per un futuro aggiornamento del software
Controllo in remoto
La possibilità di controllare altre unità MC3, porte, pulsanti, sulla rete. Questo consente all'unità
leggio di essere disattivata quando non controlla quel computer.
Volume
Utilizzando le proprie cuffie in dotazione, regolare il livello del volume dei bip a un livello comodo
da ascoltare. Raccomandiamo cuffie standard con impedenza da 32 ohm.
39
NO
Strømtilførsel til nettverket.
Hvis du bruker i2Net-et har du et par strømforsyningsalternativer.
Strømforsyningen via USB for enheten har ikke nok energi for å gi kraft til
nettverket også.
Bruk en PC eller USB-strømforsyning på begge
Bruk av 12V-30V DC i begge ender vil gjøre det mulig å bruke et allsidig
antennesystem og andre produkter som Sikringslampe (Confidence
Lamp) og kablet knapp.
En separat i2Net strømforsyning kan brukes som lokal strømforsyning for å
hjelpe til med svært lange kabler.
Innstillinger
Lysstyrke
Juster lysstyrken på skjermen for det miljøet du bruker den i.
Enhets-ID
Viser den unike nettadressen til enhetene i nettverket - Ingen automatisk skjuling
på stikkordet.
Diagnose
i2Net Pwr - viser den faktiske spenningen på den aktuelle enheten fra
(eller ut av) nettverket
Balanse - viser dataene som presenteres til enheten i balanse, det vil si
ikke kabelbrudd alle at pinne 2 eller 3 mangler.
RX & TX- Datapakker som sendes og mottas til nettverket viser at det
finnes data.
CRC- Feil i data - defekte data
NVM- Lese-/skrivesykluser for å vise minnesykluser
Page 31

38
Programmering av tastaturkommandoer
Stikkordene til MC3 er fabrikkinnstilt på: -høyre pil for NESTE, venstre pil for TILBAKE og
bokstaven “b” for Black out (Svart skjerm). Disse stikkordene kan reprogrammeres ved
hjelp av et eksternt USB-tastatur.
Sjekk at tastaturet virker sammen med systemet (vi legger til flere hele tiden) ved å vise at
det styrer verts-PC-ene.
Gå inn i menysystemet og velg Lær (Learn) - så velger du Lær tastatur (Learn keyboard)
- følg menyguiden og velg bort de portene du ikke ønsker skal programmeres.
Legg inn tasten eller tastaturkombinasjonen som kreves og velg så på et håndsett hvilken
knapp du ønsker at funksjonen for den skal tilordnes.
Hver gang du nå velger denne knappen på håndsettene på disse portene vil den ha den
tasten eller tastaturkombinasjonen som er sendt.
Tastaturkommando (ytterligere info)
Med tastaturprogrammeringsfunksjonen kan du se at et tastatur kan styre alle PC-ene som
er koblet til MC3, noe som er svært nyttig ved redigering. Alle PC-er kan redigeres, som for
eksempel feilskrift på samme tid for hurtig redigering under presentasjonen: - tastaturet
lagring og kjør videre, alt fra tastaturet.
Legg til et håndsett til en bestemt port
Som skal følges i en framtidig programvareoppdatering
Fjernstyrt bortvelging av en port
Som skal følges i en framtidig programvareoppdatering
Fjernstyring
Mulighet for å styre andre MC3-enheters Portaktiveringsknapper på nettverket. Dette gjør
det mulig for talerstolenheten å være deaktivert nå den ikke styrer denne PC-en.
Volum
Du kan bruke dine egne hodetelefoner for å justere volumnivået på lydsignalene til et
komfortabelt nivå. Vi anbefaler at du bruker standard hodetelefoner med impedans på 32
ohm.
31
IT
Alimentazione di rete.
Se si utilizza i2Net, ci sono alcune opzioni di alimentazione. L'alimentazione USB utilizzata
per l'unità non ha abbastanza energia per alimentare anche la rete.
Utilizzare un computer o l'alimentazione USB per entrambe.
Utilizzare 12V-30V CC per entrambe consente un sistema di antenne diversificato e la
possibilità di utilizzare altri prodotti come la lampada Confidence e un pulsante
cablato.
Un'alimentazione i2Net separata può essere utilizzata per l'alimentazione locale e per
aiutare in caso di cavi molto lunghi.
Impostazioni
Luminosità
Regolare la luminosità dello schermo a seconda dell'ambiente in cui si è.
ID unità
Mostra l'indirizzo di rete unico dei dispositivi sulla rete - Nessun nascondimento automatico
nella presentazione.
Diagnosi
i2Net Pwr - mostra la tensione corrente per quella unità dalla (o fuori dalla) rete.
Balance - mostra che i dati presentati per l'unità sono bilanciati, cioè non ci sono
cavi rotti né pin 2 o pin 3 mancante.
RX & TX- Pacchetti di dati inviati e ricevuti per la presentazione sulla rete
presenti.
CRC- Errore di dati - Dati corrotti.
NVM- Cicli di lettura/scrittura, per mostrare i cicli di salvataggio in memoria.
Page 32

32
Accessori in dotazione
Sistema singolo
Q.tà Parte
1 MicroCue3
3 Da USB A a micro USB
1 Cuffia (2 o 3 pulsanti con o senza laser)
Sistema gemello Pro
Q.tà Parte
2 MicroCue3
6 Da USB A a micro USB
2 Cuffie (2 o 3 pulsanti con o senza laser)
1 Alimentazione CC 12V
1 Custodia professionale per il trasporto in plastica dura.
37
NO
Første gangs tilkobling.
MicroCue3 bruker den innebygde driveren sammen med PC-ens operativsystem for
USB-enheter. Når du plugger inn hver port på MC3 til PC-ens USB-kontakt vil PC-en
konfigurere seg, og det er viktig å la den gjøre dette uten å plugge den ut eller faktisk
bruke den. Vent til at den sier (i dette tilfelle PC-en) at den har konfigurert enheten og
er klar til bruk. - Hvis porten er installer feil kan den ha problemer som gjør senere
tilkoblinger vanskelig slik at du må avinstallere enheten. - ta kontakt med IT-sjefen for
denne funksjonen. Vanligvis er det ingen problemer og så snart du har installert kan du
bruke den uten problemer.
A
Sletting
Det finnes noen muligheter på MC3 for å fjerne håndsett.
1. Velg menyknappen og velg Slett (Erase) og så Slett håndsett (Erase Handsets)
og så for å slette alle håndsett velger du ja (yes). Dette vil slette alle håndsettene;
dette er et bra utgangspunkt og sil sikre at du har et godt startpunkt for håndsettene.
Når du er på Nettverket vil det slette alle håndsettene på denne enheten (både lokalt
og fra nettverket) og også sende en melding om å slette håndsettene fra alle andre
enheter som har kopiert fra den første enheten. Alle andre enheter vil opprettholde
sine lokalt lagrede håndsett.
2. Velg Slett alle (Erase All). Dette vil slette håndsettene og tastaturfunksjonene dette innebærer en tilbakestilling til fabrikkinnstillingene og vil sikre et korrekt startpunkt
for alt på denne enheten.
3. Velg Slett håndsett xxx (Erase Handset xxx). Dette gjør at du kan velge hvilket
håndsett du vil slette hvis du er midt i presentasjonen uten å måtte forstyrre alle andre
håndsett og funksjoner.
4. Nettverkssletting En global sletting av alt på nettverket. ADVARSEL. DETTE VIL
SLETTE ALT TILBAKE TIL FABRIKKINNSTILLINGENE. Denne prosessen krever en
ekstra bekreftelse for å sikre at du faktisk ønsker å gjøre det.
Page 33

36
Betjening,
Programvareoppdatering
- det er viktig å sikre at alle tilkoblede MC3-enheter bruker samme
programvareversjon; hvis det ikke er tilfelle kan det føre til uforutsette
resultater.
X
Plassen MicroCue3 på et sted med klar sikt og klar synslinje for foredragsholderne og
håndsettene deres. Sikre at antennen peker opp for best mulig mottak.
Ved hjelp av USB-kablene som følger med kobler du MC3 til (arbeids) PC-en via port 1 først
for møtet. (se “medfølgende deler”)
Hvis det er første gang du plugger inn trenger PC-en et minutt eller to for å konfigurere seg.
PC-en skal gjennomføre prosessen ved å si at enheten er konfigurert uten problemer. (se
“første gangs tilkobling”) Ikke trekk ut pluggen eller bruk enheten da det kan forstyrre
installasjonen!
Foreta en test med håndsettet og kontroller at det ikke finnes dødpunkter - det kan hende at
du må flytte mottakeren hvis dette skjer eller sette opp en andre MicroCue3-enhet som
mottaker nær foredragsholderen. Husk at en tom sal (uten publikum) kan endre seg
betydelig særlig hvis publikum er plassert mellom foredragsholderen og mottakeren (MC3).
Kontroller at du har håndsettene til mottakeren - slett defekte håndsett ved behov. (se “slik
sletter du håndsett”)
Foredragsholderen bruker de enkle og kraftige håndsettene til Interspace Industries.
Teknikeren bruker hovedenheten som en kraftig ressurs for å sikre at et stikkord kommer
gjennom med visuell og hørbar monitorering hvis det trengs.
Hvis du skulle ønske å bruke en annen kommando enn “pil høyre, pil venstre” for
stikkordene bes du se “Programmering av tastaturkommandoer”
Når den er plugget inn i den USB-kontakten vil den tilhørende portaktiveringsbryteren lyse
opp for å si at den er tilkoblet og aktiv.
Hvis en portbryter begynner å blinke betyr det at porten er koblet fra eller gått i dvale; dette
er for å gi teknikeren melding om å tilbakestille USB-tilkoblingen hvis det trengs til, for
eksempel, ny innplugging.
33
IT
Page 34

34
Innhold
Introduksjon, produktegenskaper og fordeler 35
Betjening, 36
Programvareoppdatering 36
Første gangs tilkobling. 37
A 37
Sletting 37
Programmering av tastaturkommandoer 38
Tastaturkommando (ytterligere info) 38
Legg til et håndsett til en bestemt port 38
Fjernstyrt bortvelging av en port 38
Fjernstyring 38
Strømtilførsel til nettverket. 39
Innstillinger 39
Deler som følger med 39
35
NO
Introduksjon, produktegenskaper og fordeler
MicroCue3 (MC3) er utviklet for foredragsholdere som skal framføre små til mellomstore
presentasjoner, der pålitelighet er avgjørende for fjernstyring av presentasjon av bilder eller
slides på en PC.
Mens PC-en går blir mer enn bare et brukt i en presentasjon for backup og for neste bilde,
slik at du vet hvilket bilde som kommer. De kan innrette talen til neste slide hvis de ikke
husker den.
MicroCue3 er utviklet for økt pålitelighet og bygger på MicroCue2-produktet.
RF-området har vært det samme for alle produktene med 100m med det nye håndsettet. Men
posisjon og miljø har ført til at det stilles spørsmål om MicroCue2.
Bruken av LCD-skjerm gir full tilgang til både tekst og grafikk.
I og med at dette er “3” i serien må vi følge opp med 3 USB-porter for å kunne styre eksterne
PC-er.
Den blir stadig drevet via USB. Bruken av valgfri DC strømforsyning gjør at enheten kan få
strøm på i2Net uten å måtte plugge den til en lokal USB-port - flott som RF-mottaker.
i2Net er utviklet for lange avstander på kabel (lengre enn 1500 meter) med strøm og data på
2 par pluss skjerm.
Ved hjelp av en nettverks infrastruktur kan vi i framtiden koble 2 eller flere MC3-enheter
sammen og dele ressurser som håndsett, lamper og mer.
Automatisk deling av håndsett over en nettverksforbindelse sikrer at alle håndsettene er
gyldige. Bare når enheten kobles fra strømforsyningen blir “nettverk”-håndsettene glemt og
tilbakestilt til tilstanden før nettverksforbindelsen.
Aktivering eller deaktivering av USB-porter gir kontroll av tilknyttede PC-er.
Audio - en mini-jack 3,5mm stereokontakt gjør det mulig å høre lydsignaler som tilsvarer
kommandoene Neste, Tilbake og Svart skjerm (Black out) kan høres i hodetelefonene med
justerbart volum fra frontpanelet.
 Loading...