

Page 1
Application Note 1809
Intersil JESD204B High Speed ADC Evaluation Kit
Installation Guide and Quick Start Manual
The Intersil JESD204B High Speed ADC evaluation system
allows users to evaluate the Intersil portfolio of low-power, 12to 16-bit, high-performance analog-to-digital converters (ADC)
with JESD204B high speed serial outputs. These converters
run at sampling rates of 40MSPS to 500MSPS and their
JESD204B outputs operate at rates from 1 to 4.375Gbps. The
evaluation system uses the Intersil iEvalADC software, which
displays all pertinent data such as SFDR, SINAD, ENOB,
harmonics, current, and power measurements. The software
also plots outputs in frequency spectra and time domain.
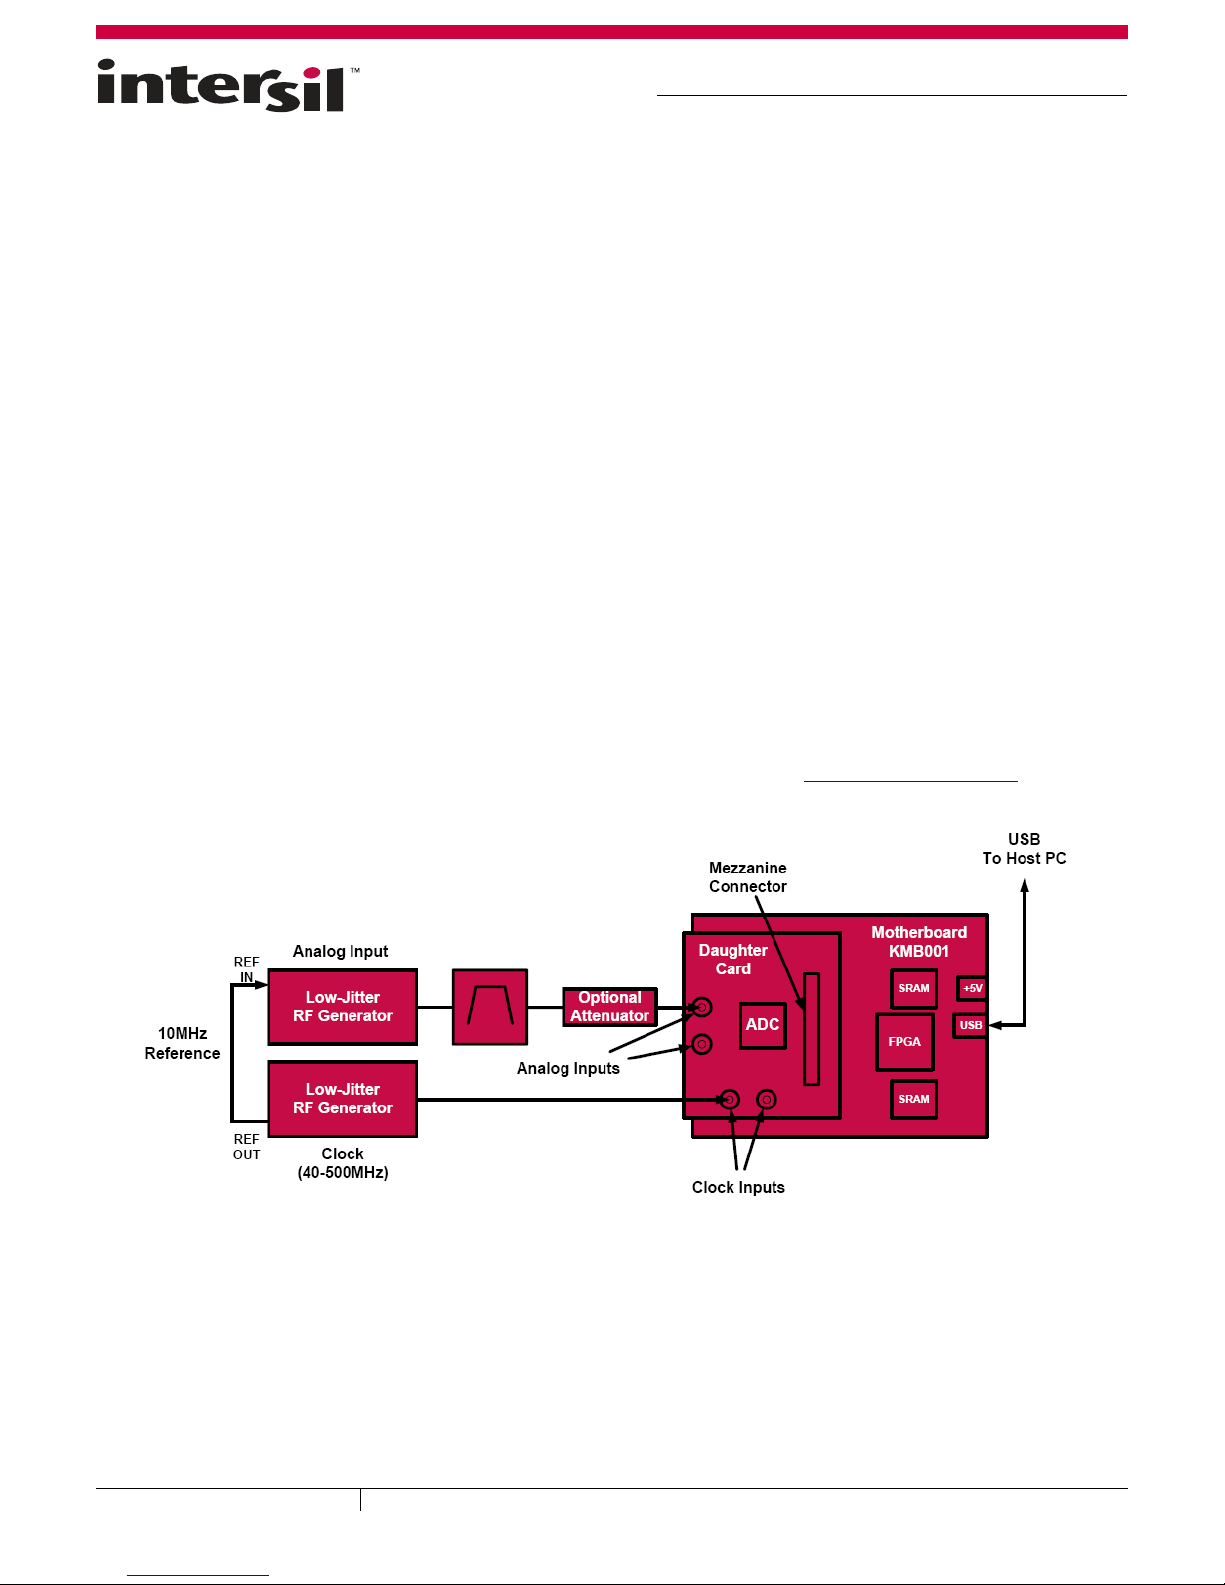
To begin testing, simply connect the input signal, sampling
clock, and target computer to the motherboard, and supply
power (Figure 1). The motherboard (ADCMB-HSFMCEV1Z)
provides appropriate supply voltages and captures digital data
from the daughter card. Daughter cards contain the ADCs and
attach directly to the motherboard to form the ADC evaluation
platform (Figure 2). To ensure proper operation of the system,
it is recommended that the most current software version be
installed. If Intersil iEvalADC is already installed on the
machine, a new installation may proceed without removing
the prior version.
Features
• Complete high-speed ADC measurement solution
• 40MSPS to 500MSPS operation
• Datasheet-style, live-updated display with calculation of
critical ADC parameters (SNR, SFDR, SINAD, ENOB,
Harmonics, Power)
• Multiple display modes: frequency (FFT), time domain
• Integrated SPI control for ADC configuration
• JESD204B receiver reference design (included with
iEvalADC software)
• USB 2.0 interface for rapid data transfer
20
•1M (2
) word capture depth
Evaluation System Contents
The evaluation system is provided with a USB cable to connect
to a PC and a 5V power supply. The user need only provide
signal and clock sources, optional filters, and a PC running the
Microsoft Windows™ XP operating system with Java installed.
Intersil iEvalADC software can be downloaded from the Intersil
web site. Please visit www.intersil.com/jesd204b
details.
for more
FIGURE 1. EVALUATION PLATFORM BLOCK DIAGRAM
December 5, 2012
AN1809.0
1
1-888-INTERSIL or 1-888-468-3774
CAUTION: These devices are sensitive to electrostatic discharge; follow proper IC Handling Procedures.
| Intersil (and design) is a trademark owned by Intersil Corporation or one of its subsidiaries.
All other trademarks mentioned are the property of their respective owners.
Copyright Intersil Americas Inc. 2012. All Rights Reserved.
Page 2
Application Note 1809
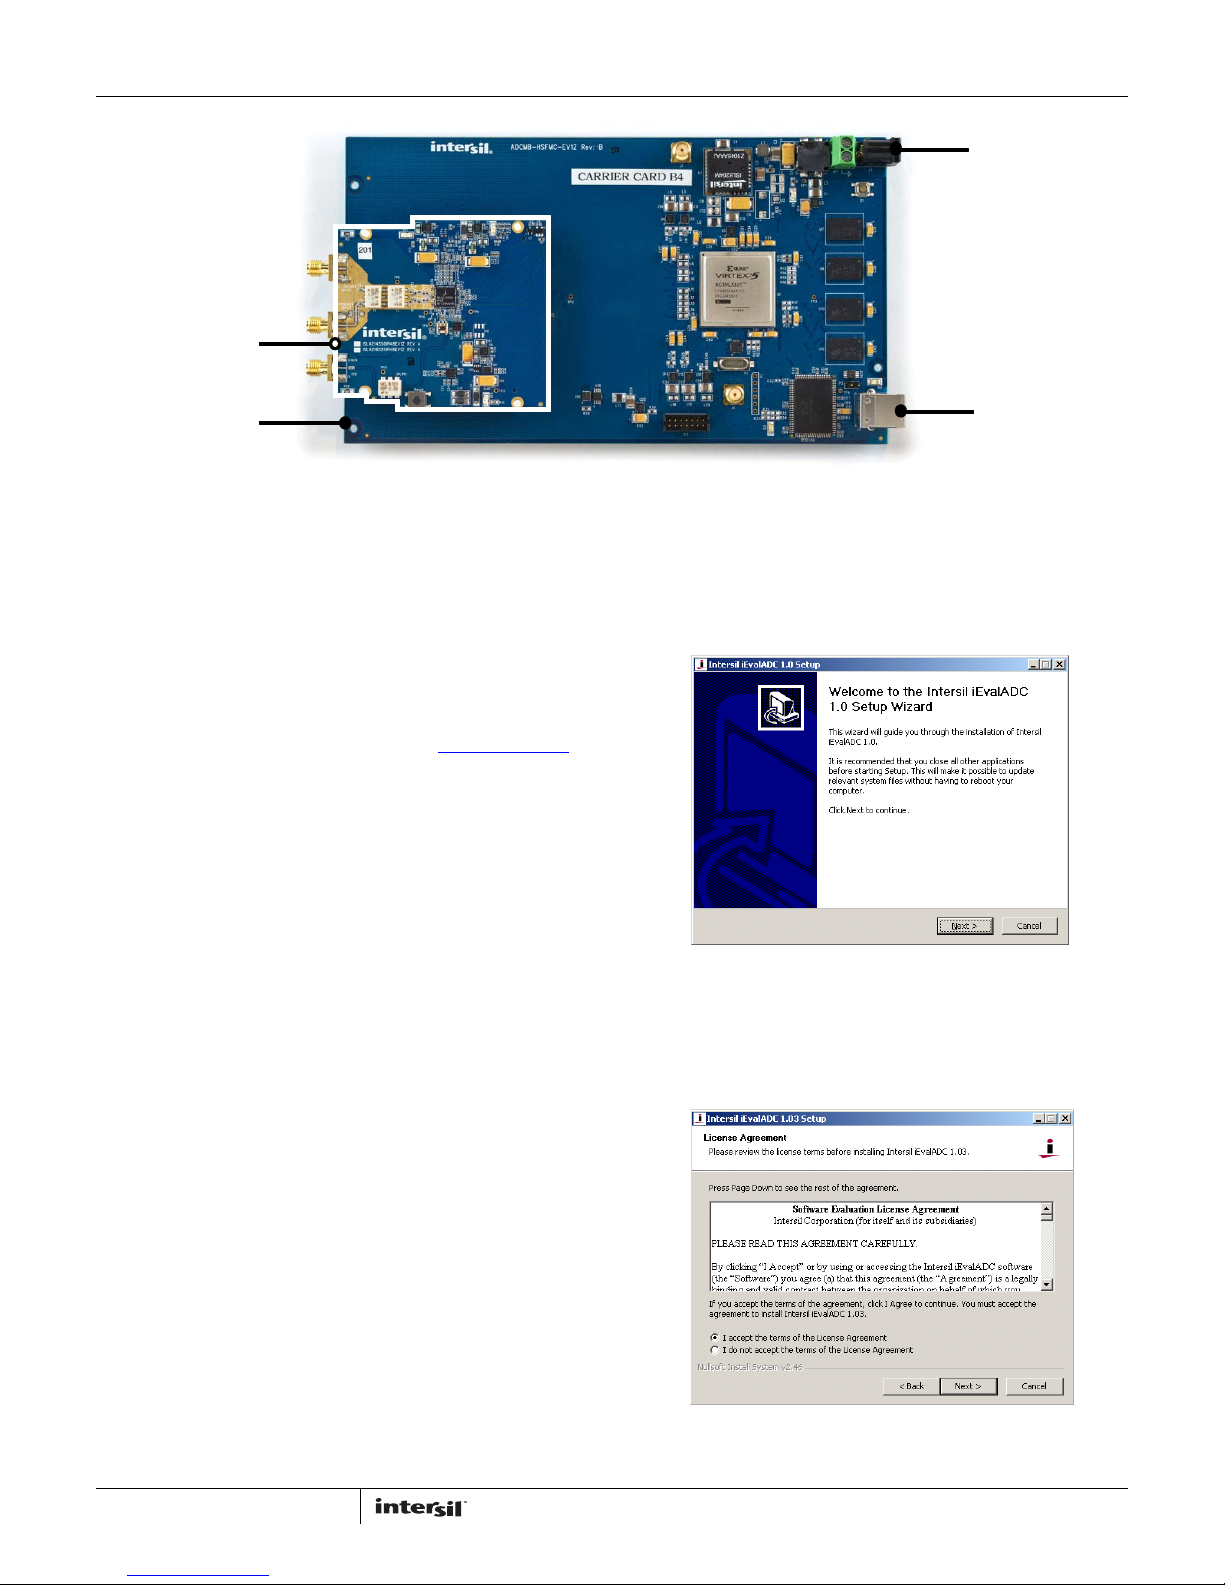
Daughter
Card
Mother
Board
USB
5V Power
FIGURE 2. EXAMPLE EVALUATION BOARD CONNECTIONS SHOWING ISLA214S50 DAUGHTER CARD
Installation Requirements
Before installing iEvalADC, please confirm the following:
• PC operating system is Windows XP
• The account that the software is installed from has
administrator privileges.
• Java is installed.
- The Java Runtime Environment is installed on the PC. If not,
it can be installed by downloading from http://java.com/
- Windows XP has associated files with the *.jar extension
with the java runtime environment. This is done by default
during the java runtime environment install. You can modify
your file extension associations by opening an explore
window, clicking on the Tools drop down menu, selecting
Folder Options, and interacting with the pop up window.
Setup and Operation of the ADC
Evaluation Platform
To set up the ADC evaluation platform, the following items are
required:
1. Intersil ADCMB-HSFMCEV1Z motherboard
2. USB cable (USB-A to USB-B, 1.25 to 2M long) (supplied with
ADCMB-HSFMCEV1Z)
3. 5V power supply, 18 W minimum (supplied with ADCMBHSFMCEV1Z)
4. Intersil daughter card containing ADC to be tested (ordered
separately)
5. Suitable signal and clock sources (see “Appendix A” on
page 4)(supplied by user)
6. PC with free USB2.0 port, logged in with administrator rights
(supplied by user)
Installing the iEvalADC Software
1. Double click the installer executable (i.e.,
“Intersil_iEvalADC_V1.04.exe”). This will launch the installer,
resulting in the following window. Click "Next".
FIGURE 3.
2. The End User License Agreement will be displayed. In the
License Agreement window, if you agree with the Software
Evaluation License Agreement, click “I accept the terms of
the License Agreement” radio button, then click "Next".
2
FIGURE 4.
AN1809.0
December 5, 2012
Page 3

Application Note 1809
3. The “Choose Install Location” window opens. Click "Next".
FIGURE 5.
4. The “Choose Start Menu Folder” opens. Click “Install”.
7. Windows will automatically detect the new hardware and
prompt for the appropriate driver via the “Found New
Hardware Wizard”. Click “No, not this time”, then click "Next".
FIGURE 8.
8. The Software Installation wizard window will open. Click the
“Install the software automatically (Recommended)” radio
button, then click "Next".
FIGURE 6.
5. The “Completing the Intersil iEvalADC Setup Wizard” window
opens. Click “Finish”.
FIGURE 7.
6. Setup the hardware as shown in Figure 1.
FIGURE 9.
9. The” Completing the Found New Hardware Wizard” window
will open. Click “Finish”. (For common issues encountered
during this process and solutions to these issues, please refer
to “Appendix B” on page 4).
FIGURE 10.
10. Double click on the iEvalADC shortcut on the desktop to
launch the application.
3
AN1809.0
December 5, 2012
Page 4

Application Note 1809
Running the Software
Once the installation is complete, the software can be launched
by double clicking on the shortcut located on the desktop, by
default called “iEvalADC”. There is no need to attach the
evaluation kit hardware to launch the software. The first time the
program is launched, you may experience a delay as the Java
runtime environment unpacks the required libraries. Subsequent
runs will be much shorter. A window similar to the following will
be displayed once iEvalADC has launched.
FIGURE 11.
Thank you for installing the iEvalADC software. For a complete
user guide for iEvalADC, please refer to Application Note 1809
.
Appendix A
Source Requirements
Source jitter and noise will degrade performance. For best test
results, a combined jitter (for both clock and signal sources) that
does not exceed 200fs is recommended.
Appendix B
Sometimes there are multiple drivers that match the VID/PID
characteristics of the hardware. In those cases, a window similar
to the following will be displayed when trying to automatically
install the driver. When this occurs, select the driver with the
location of “c:\windows\inf\Icyusb.inf” and click “Next”.
FIGURE 12.
Occasionally, windows will prompt for the ‘ICYUSB.sys’ file after
selecting the icyusb.inf file. If so, the prompt will look something
like the window displayed in Figure 13. If this prompt is
displayed, fill in the install directory of iEvalADC along with the
subdirectory, lib. Alternatively, browse to this directory. If you
accepted the defaults during installation, the correct path will be
C:\Program Files\Intersil\iEvalADC\lib. After entering the
appropriate directory, click “OK”, then, click “Search for the best
driver in these locations”. Also, make sure the check box “Include
this location in the search” is selected and the directory
highlighted is the install directory of iEvalADC with the “lib”
subdirectory, and click “Next” or ”OK”.
Sample Clock and Input Signal Source Setup
Sample clock settings:
• 40MHz to 500MHz sine, +10dBm
Signal settings:
• 4.5MHz to 250MHz, +10dBm to +16dBm (depending on
analog input attenuation)
Intersil Corporation reserves the right to make changes in circuit design, software and/or specifications at any time without notice. Accordingly, the reader is
cautioned to verify that the Application Note or Technical Brief is current before proceeding.
For information regarding Intersil Corporation and its products, see www.intersil.com
4
FIGURE 13.
AN1809.0
December 5, 2012
Page 5

Mouser Electronics
Authorized Distributor
Click to View Pricing, Inventory, Delivery & Lifecycle Information:
Intersil:
ADCMB-HSFMCEV1Z
 Loading...