

Intersan GalvinCare WM-TMVPMSCS Technical Data Manual
Version 1, 6 June 2018, Page 1 of 5
SPECIFICATIONS
This progressive shower mixer provides state of the art features to comply with healthcare requirements.
The GalvinCare® paddle handle provides straight forward temperature control and minimises ligature risk.
Suitable for high and low pressure systems with a thermostatically controlled water temperature of
113°F/45°C maximum.
Enables water to be mixed closer to the point of discharge, minimising stagnant warm water which provides
ideal conditions for legionella bacteria to grow.
Smooth internal components and body reduces scale build-up and bacteria growth.
Maximum temperature limiter fitted for protection from accidental scalding.
Water flow starts from cold ensuring safe usage.
Clean smooth lines facilitate fast and easy cleaning.
All servicing and commissioning can be done without removing the device. Easy access isolators, help
minimise time spent on commissioning and maintenance.
Designed to provide stable mixed temperature with rapid shut down in the event of cold or hot water supply
failure.
IMPORTANT: All GalvinCare
®
mental health fixtures leave our premises in good working order. The
following instructions must be followed in all respects and read in conjunction with Clinimix® Progressive
Thermostatic Mixing Valve Manual.
TECHNICAL DATA
Inlet
½” NPT – Male
Outlet
½” NPT – Male
Headwork
Thermostatic mixing valve
Working Pressure Range (psi/kPa)
Min
3/50
Max
72.5/500
Working Temperature Range (°F/°C)
Min
41/5
Max
185/90
Finish
Chrome
NOTE: Galvin Specialised continually strive to improve their products. Specifications may change without notice.
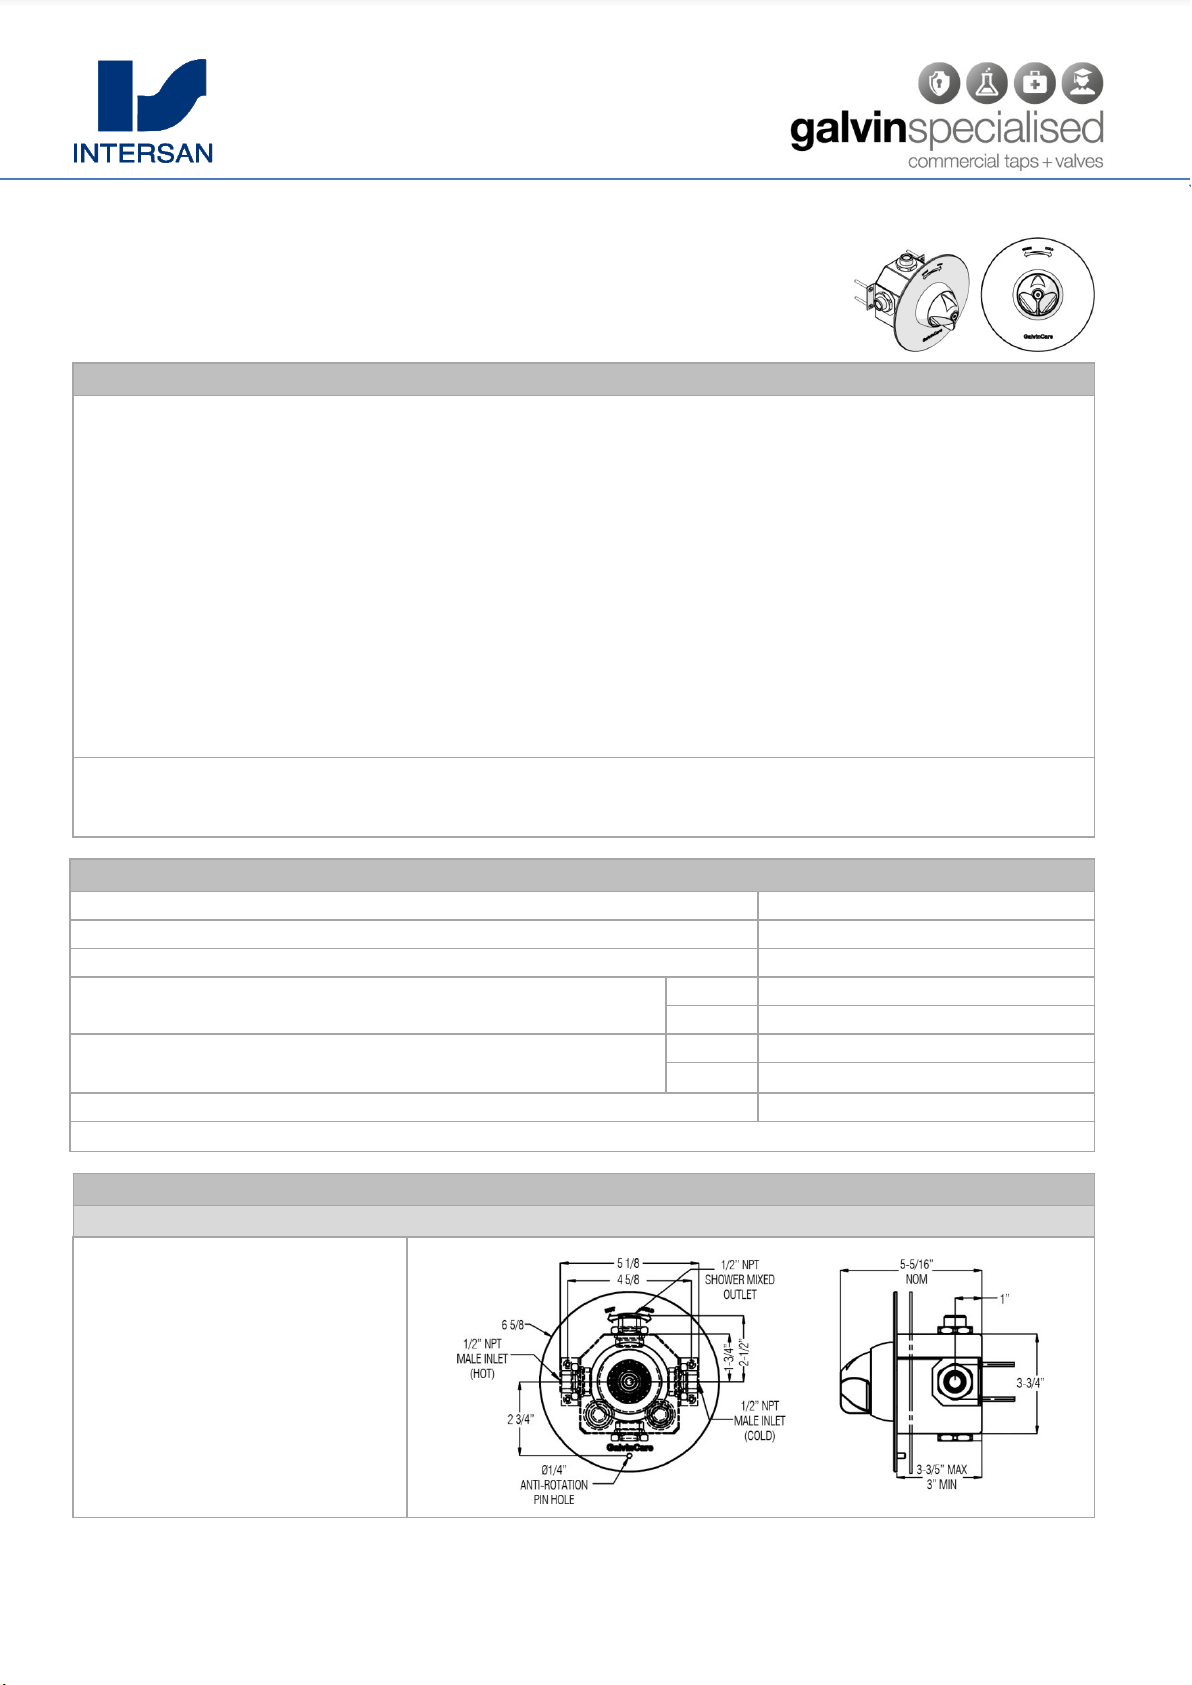
PRE-INSTALLATION
MOUNTING DETAILS – OVERALL DIMENSIONS
The rough in details have
been provided to show correct
fitment of the Progressive
Shower unit (see side image).
The unit must be mounted so
that the inlet is horizontal and
the outer plastic box of the
Progressive shower unit
stocks out of the finished wall
(to a maximum 3/8” or 10mm)
GalvinCare ® Thermostatic Progressive Mixer
PRODUCT CODES:
- WM-TMVPMSCS

Version 1, 6 June 2018, Page 2 of 5
TOOLS REQUIRED
Power drill
Spanner and hex key
INSTALLATION
INSTALLATION COMPLIANCE: Galvin Specialised products must be installed in accordance with these
installation instructions and in accordance with local regulatory requirements. Water and/or electrical supply
conditions must also comply to the applicable national and/or local standards. Failing to comply with these
provisions shall void the product warranty and may affect the performance of the product.
IMPORTANT: Whilst our product designs take into account a broad range of installation types and surfaces, it
is important that surfaces which fixtures are mounted to are flat and free from defect. This is especially
important when installing product ranges that have been designed for correctional and health facilities, where
special attention is required to minimise ligature points and areas for concealment of contraband. In addition to
ensuring the products are fitted securely and in accordance with the following instructions, consideration shall
be given to the use of non-pick mastics such as Sikaflex 11FC or Dow Corning 995 Silicone Structural Sealant
to ensure a high quality and safe installation.
1. Fit body assembly
Fit hot and cold water supplies to the correct
side of the shower unit and the outlet to the
shower head. To make this easier the outlet
can be changed from one end to the other by
swapping it with the opposite plug. Do not use
heat on any of these connections as it will
damage the shower.
Note: Hot and cold inlet cannot be swapped.
2. Fit face plate
Fit the faceplate and shower flange.
Ensure faceplate anti-rotation pin sits correctly
and the o-ring is fitted underneath the flange..
3. Secure flange
Secure the flange with the three supplied
screws.
Use supplied M6x20mm long screws, if not
suitable change to M6x16mm long screws.
4. Fit handle
Secure the handle with supplied tamper proof
screw.
Ensure the handle is oriented correctly.
 Loading...