

Page 1
MEMORY PHONE
Model 9825
OPERATING INSTRUCTIONS
All manuals and user guides at all-guides.com
all-guides.com
Page 2
1
This Interquartz telephone has been manufactured to very high standards and
is very easy to use. Please read this manual carefully to find out how to use the
features.
Contents
1. Important Notes .......................................................................... 2 - 3
Intended use ...................................................................................... 2
Telephone facilities .............................................................................. 2
REN number ........................................................................................ 3
Emergency calls .................................................................................. 3
2. Installation ................................................................................... 4 - 5
Connection ........................................................................................... 4
Wall mounting ................................................................................ 4 - 5
3. Telephone Features ..................................................................... 6 - 7
4. Operating Instructions ................................................................ 8 - 10
Manual dialling ..................................................................................... 8
Memory dialling ............................................................................. 8 - 9
Cascade dialling . ................................................................................ 9
Redial / Pause Function ................................................................ 9 - 10
5. PBX and System Usage .................................................................... 11
6. Maintenance and Problem Solving .................................................. 12
7. Warranty and Service ................................................................ 13 - 14
Figure 1. General Appearance ........................................................... 3
Figure 2. Wall Mounting ..................................................................... 4
Figure 3. Handset Retainer for Wall Mounting .................................... 5
Figure 4. Switch Location of Model 9825 ........................................... 6
Figure 5. Recall Switch ...................................................................... 11
All manuals and user guides at all-guides.com
Page 3
2
1. Important Notes
Intended Use
This apparatus is intended for use on 2 wire analogue PSTN and PABX circuits
within the United Kingdom.
Declaration of Conformity
I
nterquartz (UK) Limited declares under its sole responsibility that this product
Model: Memory Phone
9825
Is in conformity with the following relevant harmonised standards
Health & Safety 73/23/EEC
Electromagnetic Compatibility 89/336/EEC
Following the provisions of Council Directive 1999/5/EC on radio
equipment and telecommunications terminal equipment.
A J Roberts April 2000
Director
Telephone Facilities
This telephone has been designed for the use of the following facilities :
- operation in the absence of proceed indication
- storage of memories for retrieval by a predetermined code
- repeat attempt, single
- recall ( earth or timed-break selectable )
- selectable pulse or tone signalling
- access pause insertion ( maximum of 3 )
- ringer volume control
- ringing indicator
- mute buttons on handset and base unit to cut out transmission
- message waiting light
All manuals and user guides at all-guides.com
Page 4

3
REN number
The REN number of this telephone is 1.
If you wish to connect any other equipment to the line, simply add the
REN numbers of each piece together and ensure that the total does not
exceed 4. If too many phones are connected to the line, the circuit may be
overloaded and your telephone may not ring.
Not all telephones have the same REN.
If a British Telecom phone is supplied unmarked, you may assume that it
has a REN of 1.
Emergency Calls
"999" calls can be made on this telephone for the purpose of making calls
to the emergency service. An access code may also be required if the
phone is connected to a PABX.
Figure 1. General Appearance
Redial / Pause
Button
Recall Button
Store Button
Dial Button
Mute Button
Indicator
All manuals and user guides at all-guides.com
Page 5

4
2. Installation
This telephone is designed to be plugged straight into a modular style
socket. If you do not have one of these sockets, they may be obtained
directly from your Network Supplier.
Connection
Insert the line cord into the socket. Set the TONE / PULSE switch to the
appropriate position. If you are unsure as to whether your exchange is
pulse or tone, contact your Network Supplier and they will advise you. Set
the ringer volume and ringer pitch control as desired.
Wall Mounting
1. Using the template supplied, position it where you want to fix your
telephone. Drill two holes and fix roundheaded screws, leaving them
slightly proud of the surface.
Figure 2. Wall Mounting
Screw Slots
All manuals and user guides at all-guides.com
Page 6
5
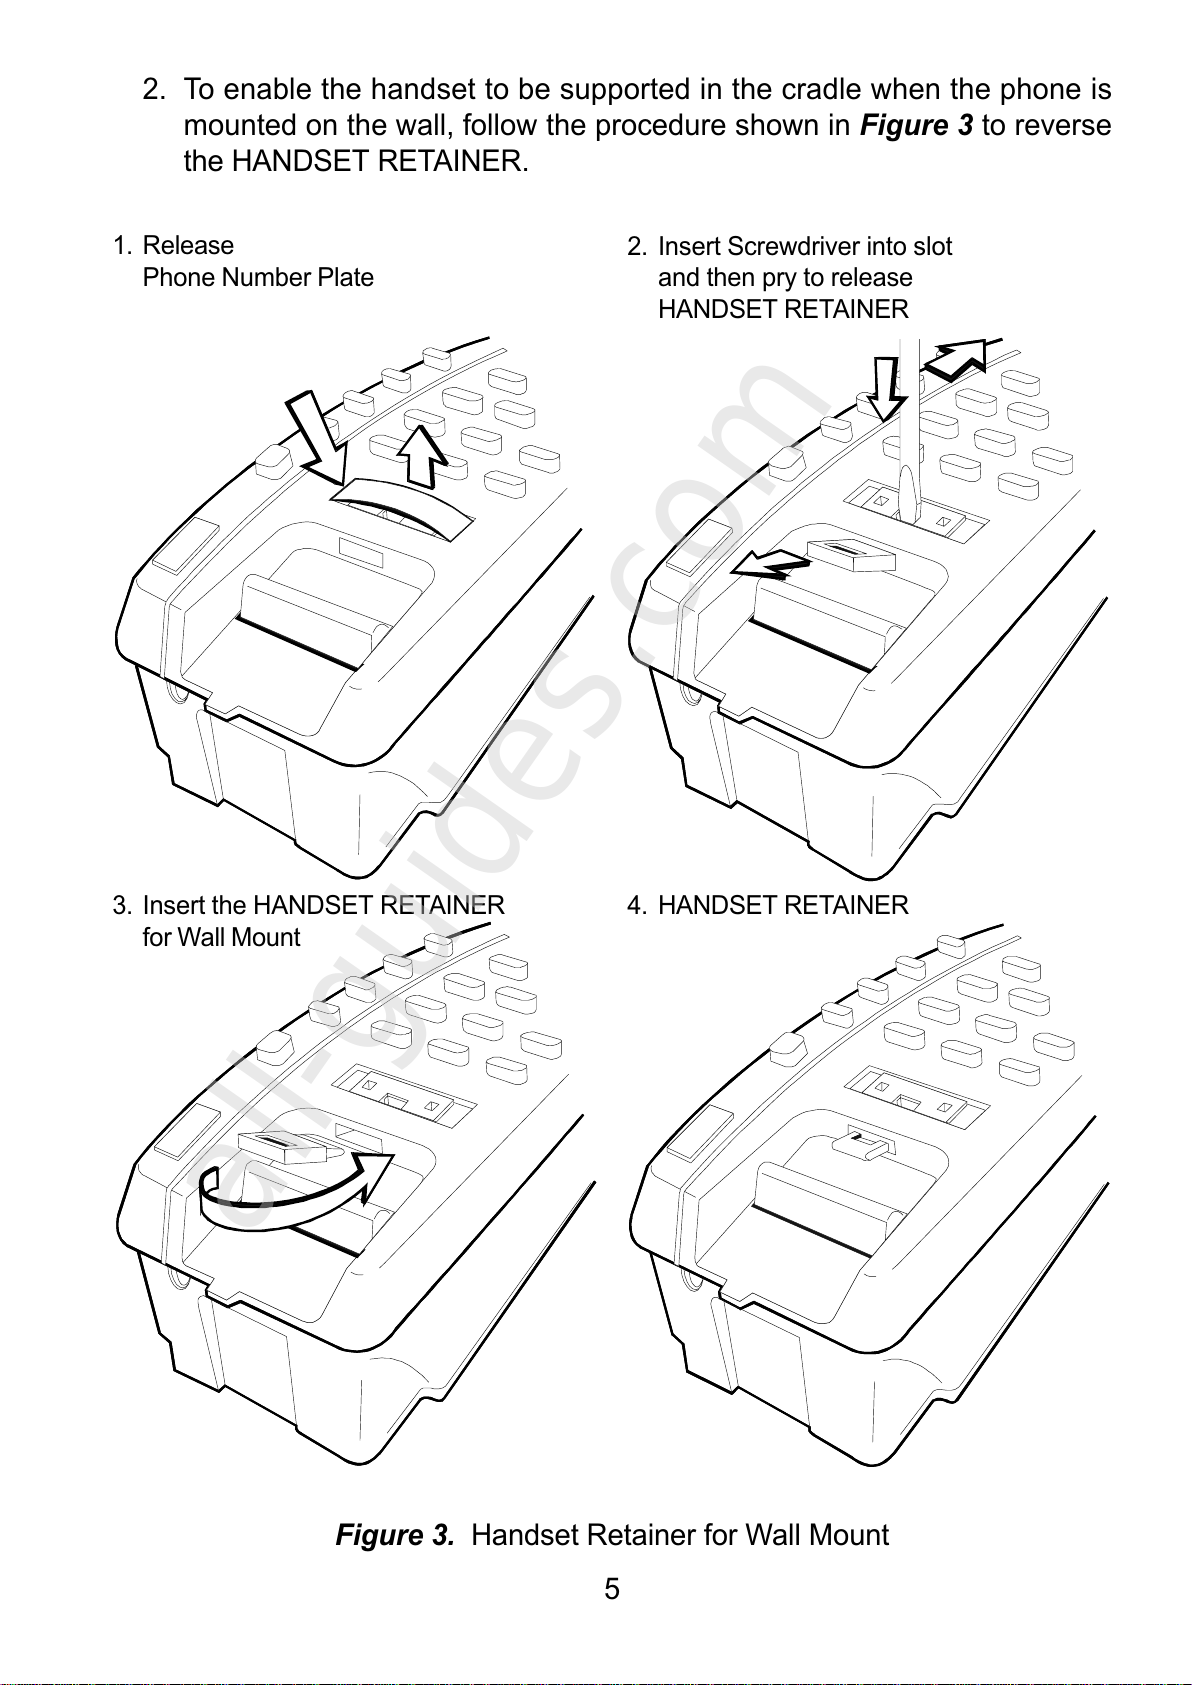
1. Release
Phone Number Plate
2. Insert Screwdriver into slot
and then pry to release
HANDSET RETAINER
3. Insert the HANDSET RETAINER
for Wall Mount
4. HANDSET RETAINER
2. To enable the handset to be supported in the cradle when the phone is
mounted on the wall, follow the procedure shown in Figure 3 to reverse
the HANDSET RETAINER.
Figure 3. Handset Retainer for Wall Mount
All manuals and user guides at all-guides.com
all-guides.com
Page 7
6
3. Telephone Features
Ringer Indicator
Flashes to signal an incoming call.
Ringer Volume Switch
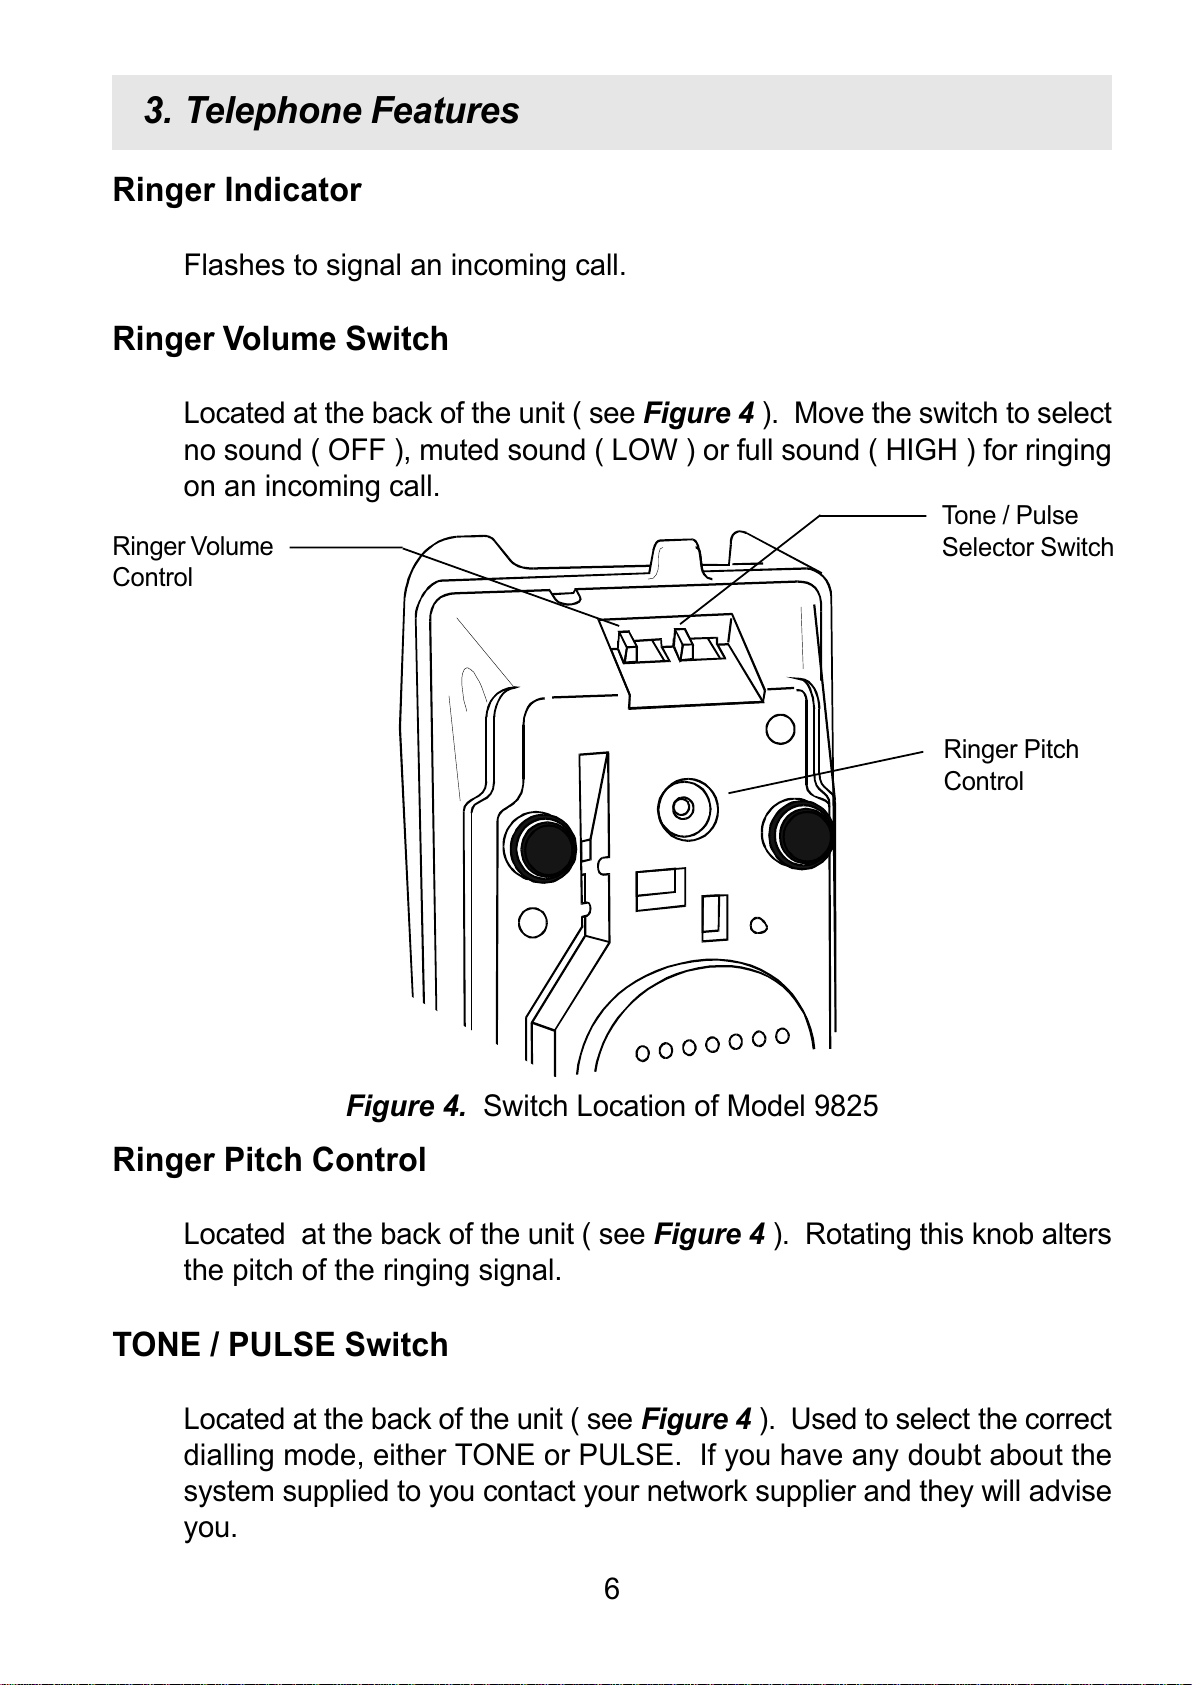
Located at the back of the unit ( see Figure 4 ). Move the switch to select
no sound ( OFF ), muted sound ( LOW ) or full sound ( HIGH ) for ringing
on an incoming call.
Ringer Pitch Control
Located at the back of the unit ( see Figure 4 ). Rotating this knob alters
the pitch of the ringing signal.
TONE / PULSE Switch
Located at the back of the unit ( see Figure 4 ). Used to select the correct
dialling mode, either TONE or PULSE. If you have any doubt about the
system supplied to you contact your network supplier and they will advise
you.
Figure 4. Switch Location of Model 9825
Tone / Pulse
Selector Switch
Ringer Volume
Control
Ringer Pitch
Control
All manuals and user guides at all-guides.com
Page 8
7
Memory Index Card
Rotate this card, which is located underneath the right side of the telephone.
You can record details of numbers stored in your telephone’s memories.
Memory Retention
The telephone does not require any external power for memory retention.
If the phone is disconnected from the line, then the memories will be
retained for 30 minutes, provided that the handset is not removed from the
cradle during the time that the phone is disconnected.
Mute Buttons (Handset and Base Unit)
Press, and release the Mute button to mute the microphone so that your
voice will not be heard by the other party.
Press and release the mute button on the base unit. The red LED will light
indicating that the mute is "on". Press the button a second time; the light
will go out and the mute will be released. If the telephone handset is replaced
on the cradle with the mute "on", the mute will automatically be released
when the handset is next lifted.
Press and hold down the Mute button on the handset to cut off the
microphone path. This is a Press-to-Mute type switch. No visual indication
is provided. Release of the button will automatically reconnect the
transmission path.
All manuals and user guides at all-guides.com
Page 9
8
4. Operating Instructions
Manual Dialling
Lift the handset, listen for the dial tone and then dial the required number
using the keypad.
Memory Dialling
This telephone has 10 memories, one behind each number on the keypad
( 0 - 9 ). Each memory is capable of storing 16 digits.
All the memories are able to store numbers, PAUSE, * AND # ( in tone
mode ). See the Redial / Pause section for further details of the use of
these keys.
If the telephone is removed from the line, the memories will be retained for
30 minutes, provided that the handset is not removed from the cradle.
Batteries are not required for memory retention.
Storing a number
1. Lift the handset
2. Press the STORE key
3. Enter the phone number that you want to store ( up to 16 digits )
4. Press the STORE key
5. Press the memory location button of your choice
( any of the buttons from 0 to 9 )
6. Replace the handset
All manuals and user guides at all-guides.com
Page 10
9
Dialling a number
1. Lift the handset
2. Press the DIAL key
3. Press the required memory button, 0 to 9
Cascade Dialling
The contents of any memory can be cascaded, or added together, with
additional dialling or other memories. In cascade dialling, make sure that
each dialling sequence is complete before activating the next.
Redial / Pause Function
Depending on its use, this button either acts as a redial button or as a
pause inserting button.
Redial
1. Lift the handset
2. Press the REDIAL / PAUSE button
3. The last number called will automatically be redialled
( up to 31 digits )
Pause
The Pause command may be needed if the phone is connected to certain
types of PABX or to any network where a pause is required.
Note: Not more than three pauses should be entered consecutively,
otherwise the telephone may not function properly.
(Any other usage will invalidate the design of the apparatus).
All manuals and user guides at all-guides.com
Page 11
10
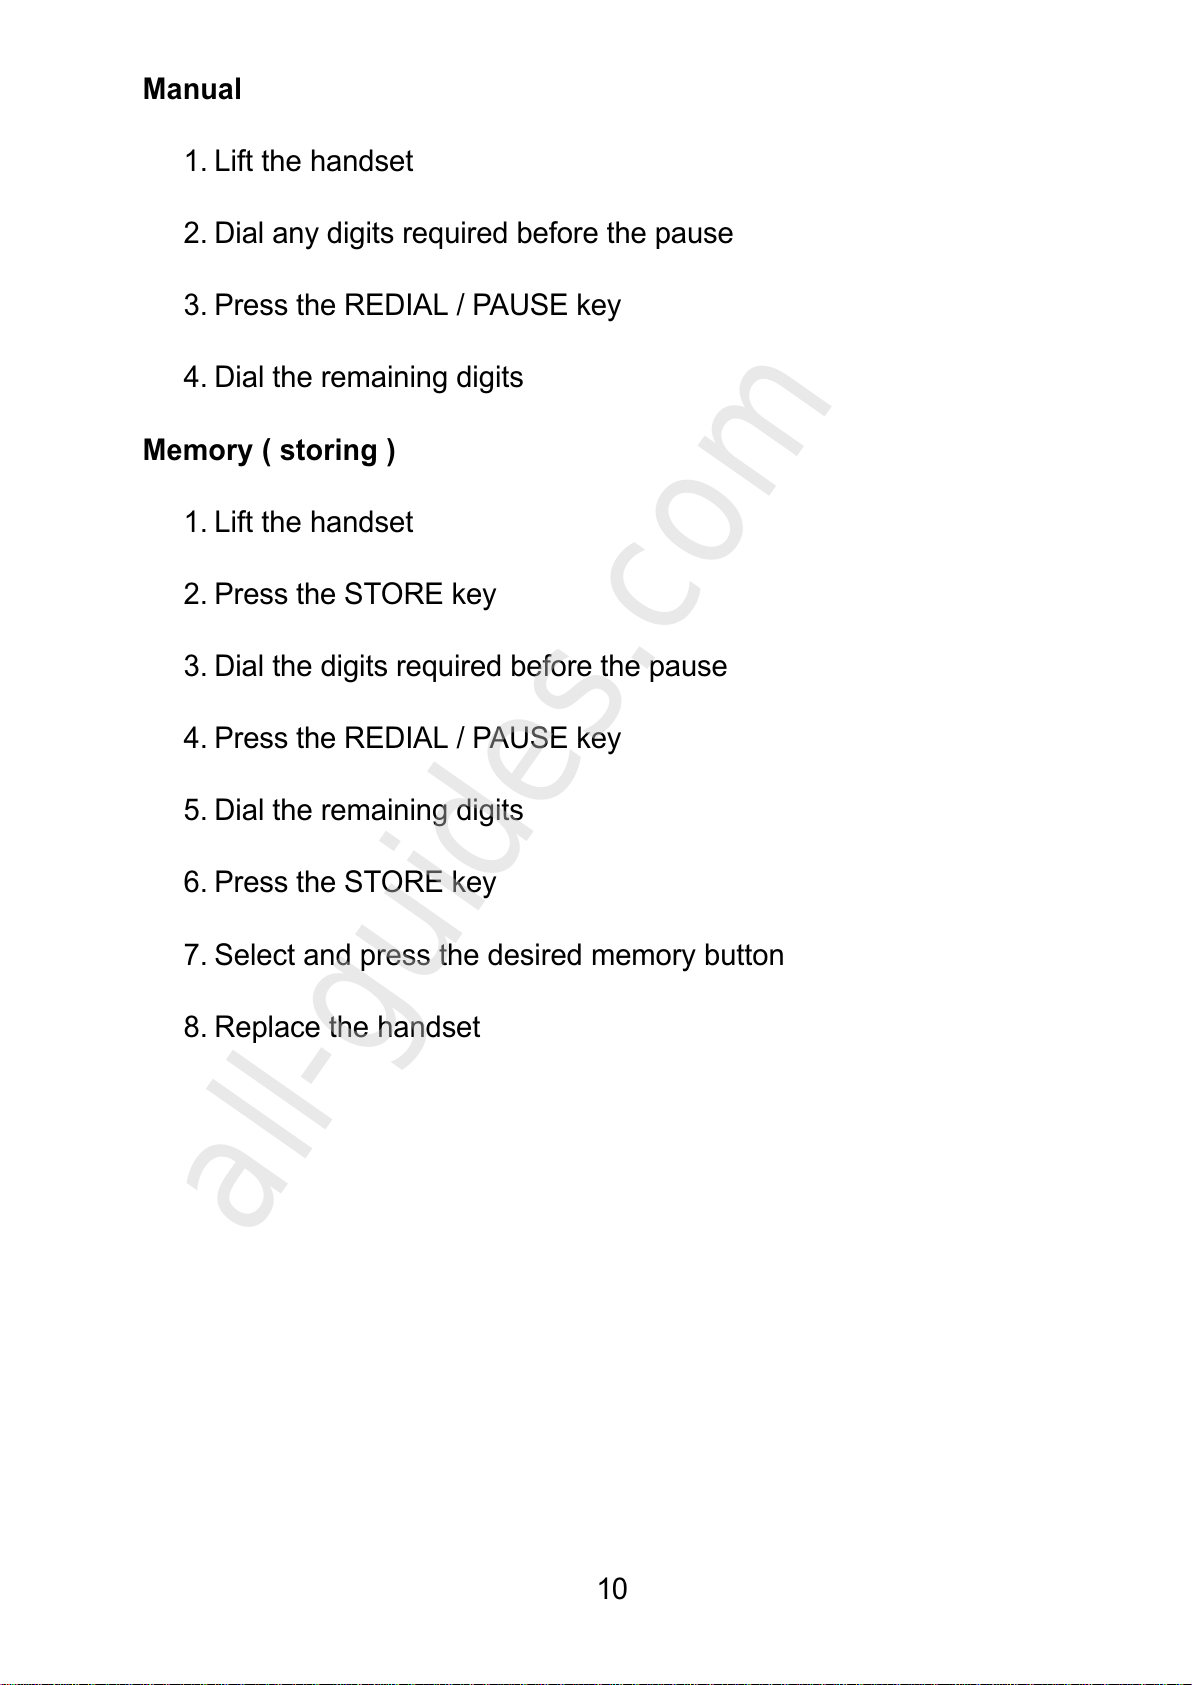
Manual
1. Lift the handset
2. Dial any digits required before the pause
3. Press the REDIAL / PAUSE key
4. Dial the remaining digits
Memory ( storing )
1. Lift the handset
2. Press the STORE key
3. Dial the digits required before the pause
4. Press the REDIAL / PAUSE key
5. Dial the remaining digits
6. Press the STORE key
7. Select and press the desired memory button
8. Replace the handset
All manuals and user guides at all-guides.com
all-guides.com
Page 12
11
5. PBX and System Usage
This telephone can be used behind a PABX or a network system that
utilises the recall function. There are many such systems and whilst it is
likely that no problems will be encountered, it cannot be guaranteed that
the telephone will operate correctly under all circumstances and any cases
of difficulty should be referred to your supplier.
Recall
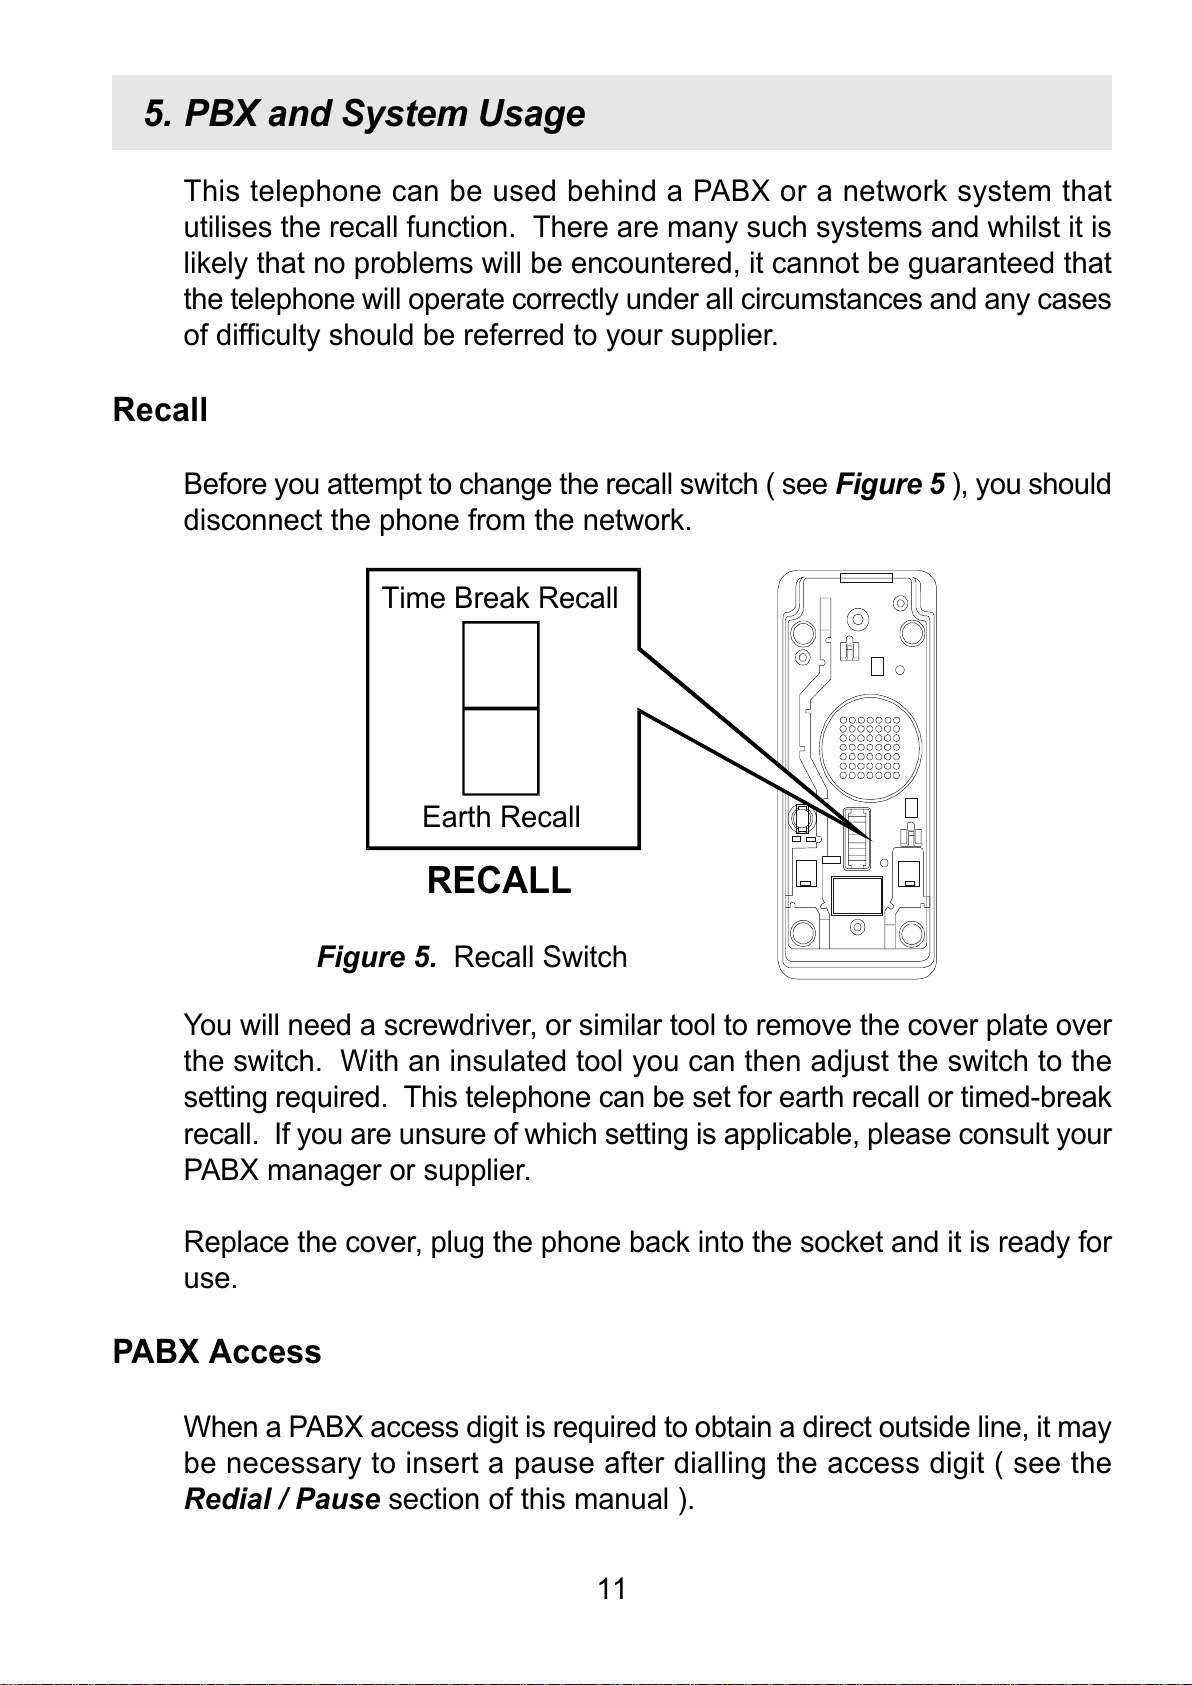
Before you attempt to change the recall switch ( see Figure 5 ), you should
disconnect the phone from the network.
You will need a screwdriver, or similar tool to remove the cover plate over
the switch. With an insulated tool you can then adjust the switch to the
setting required. This telephone can be set for earth recall or timed-break
recall. If you are unsure of which setting is applicable, please consult your
PABX manager or supplier.
Replace the cover, plug the phone back into the socket and it is ready for
use.
PABX Access
When a PABX access digit is required to obtain a direct outside line, it may
be necessary to insert a pause after dialling the access digit ( see the
Redial / Pause section of this manual ).
Time Break Recall
Earth Recall
RECALL
Figure 5. Recall Switch
All manuals and user guides at all-guides.com
Page 13
12
6. Maintenance and Problem Solving
Your telephone is a precision electronic instrument. Avoid rough handling
and extreme temperatures.
Use a mild detergent and a damp cloth when cleaning. Never use a stronger
cleaner.
If your telephone does not appear to be working correctly, please check
the following :
No dial tone - Is the phone cord properly connected to the wall
socket?
Will not dial - PULSE / TONE switch may be set to the wrong
position
Will not ring - Ringer switch may be set to off
- REN number may exceed 4, for all telephones
connected to the line. Disconnect a phone until
the number is below 4.
If there are still problems, and you have more than one telephone :
Remove the "problem" phone. Insert another phone and check that it
works. If "yes" then the "problem" phone is possibly faulty. If not, then
you may have a faulty line. Try using the other socket and see which
phone works. If you do have a faulty line then you should contact your
Network Supplier.
You should however be aware that if you request them to repair a fault that
is found not to be theirs, then they are entitled to charge you for their visit.
In the event that you still have problems then you should consult your
supplier.
All manuals and user guides at all-guides.com
Page 14
13
7. Warranty and Service
This product is guaranteed, by Interquartz (UK) Limited, for six years
from the date of manufacture.
Every Interquartz telephone has a unique serial number and part of that
number refers to the date of manufacture. A label, similar to that shown
below is affixed to each telephone
9515 030852
(model no) QC.P
The figure 9515 means that the telephone was made during week 15 (10
April) 1995. Under the six year warranty, cover will apply until 10 April
2001.
A warranty is designed to cover either manufacturing faults or component
defects. It is not designed to cover fair wear and tear. The Interquartz
warranty is no exception.
We look to you, our customer, to be reasonable and sensible over the
warranty. We will endeavour to repair any telephone sent in to us within
the warranty period but we reserve the right to charge for items that we
consider replaceable under wear and tear. For example, if a handset cord
splits within a few months, it will be replaced. If a phone is returned after,
say, four years of heavy use with a similar problem, we might take a different
view and wish to charge.
If you have a genuine warranty problem and provided that the warranty
seal has not been broken, we will either repair your telephone, or, at our
sole discretion, replace it with a similar telephone. In the event that a
model may have been discontinued, any replacement would have similar
or better features.
All manuals and user guides at all-guides.com
Page 15
14
If you need to return a faulty unit to us, send it to:
Interquartz (UK) Limited
Pennine House
Salford Street
Bury
BL9 6YA
Make sure that you tell us what appears to be wrong with the phone.
DO NOT FORGET TO INCLUDE YOUR OWN NAME AND ADDRESS.
We ask that you bear the cost of returning the telephone to us. We will
return it to you, at our expense.
This warranty is in addition to any statutory rights
All manuals and user guides at all-guides.com
Page 16

Distributed in the United Kingdom
by Interquartz (UK) Limited
Manufactured by
International Quartz Limited
A Subsidiary of Chiaphua Industries Ltd.
©Copyright INTERNATIONAL QUARTZ LTD. 20003C9825001VXA12B
This telephone is approved to
EEC directive 1999/5/EC
All manuals and user guides at all-guides.com
all-guides.com
 Loading...