

Page 1

1
1. FEATURES.........................................................................................................3
2. GENERAL CONTROLS AND INDICATORS .....................................................4
Ringer Indicator / Message-waiting Light ........................................................... 5
Ringer Volume Switch........................................................................................ 5
Ringer Pitch Control ...........................................................................................5
Alpha-numeric Keypad .......................................................................................5
Cradle Switch .....................................................................................................5
Hang-up Function...............................................................................................5
Volume Slider .....................................................................................................5
PBX Recall Key.................................................................................................. 5
Tone / Pulse Switch ...........................................................................................6
Tone Key............................................................................................................6
Mute Key............................................................................................................ 6
Basic Operation..................................................................................................6
Redial Key ..........................................................................................................7
Save Key............................................................................................................7
Pause Function ..................................................................................................7
On Hook Dial / Headset Key and Indicator.........................................................8
3. ON HOOK DIAL AND HEADSET OPERATION ................................................9
On Hook Dialling ................................................................................................9
Headset mode operation ....................................................................................9
Trainee / Supervisor Mode .................................................................................9
4. PABX EXTENSION USAGE, 'EASYCALL' AND CUSTOMNET USAGE ....... 11
Pause Function when Dialling ..........................................................................11
Holding and Transferring Calls ......................................................................... 11
* and # Keys.....................................................................................................11
Using The Memories ........................................................................................11
Easycall and Customnet...................................................................................11
5. MEMORY FEATURE OPERATION ................................................................. 12
One-touch Memories........................................................................................12
Cascade Dialling ..............................................................................................12
6. INSTALLATION ................................................................................................13
Unpacking ........................................................................................................ 13
General Setting-up ...........................................................................................13
CONTENTS
Page 2

2
Location............................................................................................................13
Wall Mounting .................................................................................................. 13
Line Connection ............................................................................................... 15
Technical Adjustments - for Correct Operation ................................................15
PBX Recall Key Settings.................................................................................. 15
600 Ohm / Complex and AGC A / AGC B Selector..........................................15
Message-waiting Light...................................................................................... 16
Headset Microphone Sensitivity Adjustment.....................................................16
Headset Polarity Switch....................................................................................16
7. GENERAL CARE AND MAINTENANCE.......................................................... 18
Cleaning ...........................................................................................................18
Failure to Operate and Service Difficulties ....................................................... 18
8. THUNDERSTORMS .........................................................................................19
9. WARRANTY .....................................................................................................21
10.SERVICE CENTRES .......................................................................................21
ILLUSTRATIONS
Figure 1 - General Appearance, Main Features ................................................4
Figure 2 - Wall Mounting .................................................................................14
Figure 3 - Rear View, Showing Adjustments ...................................................17
Figure 4 - Wall-mount Bracket.........................................................................20
Page 3

3
* ALPHA-NUMERIC keypad
* Convenient pushbutton Tone or Pulse dialling
* Fully modular connection provides maximum ease of installation on desk or wall
* Telephone line powered, unaffected by mains power interruption
* Adjustable Handset / Headset hearing level
* ON-HOOK dialling with speaker volume control
* User selectable ringer volume and pitch
* Dual neon and super bright LED ringer lamp
* PBX Recall facility
* 10 one touch memories
* Headset Microphone Sensitivity Adjustment
* Headset Polarity Switch
* Telstra Easycall compatible
* Full PABX system compatible
* Telstra Customnet compatible
* Built in message waiting option
* Built in headset socket
* Battery compartment for memory back up
* Mute Key
* Save Key
1. FEATURES
Page 4
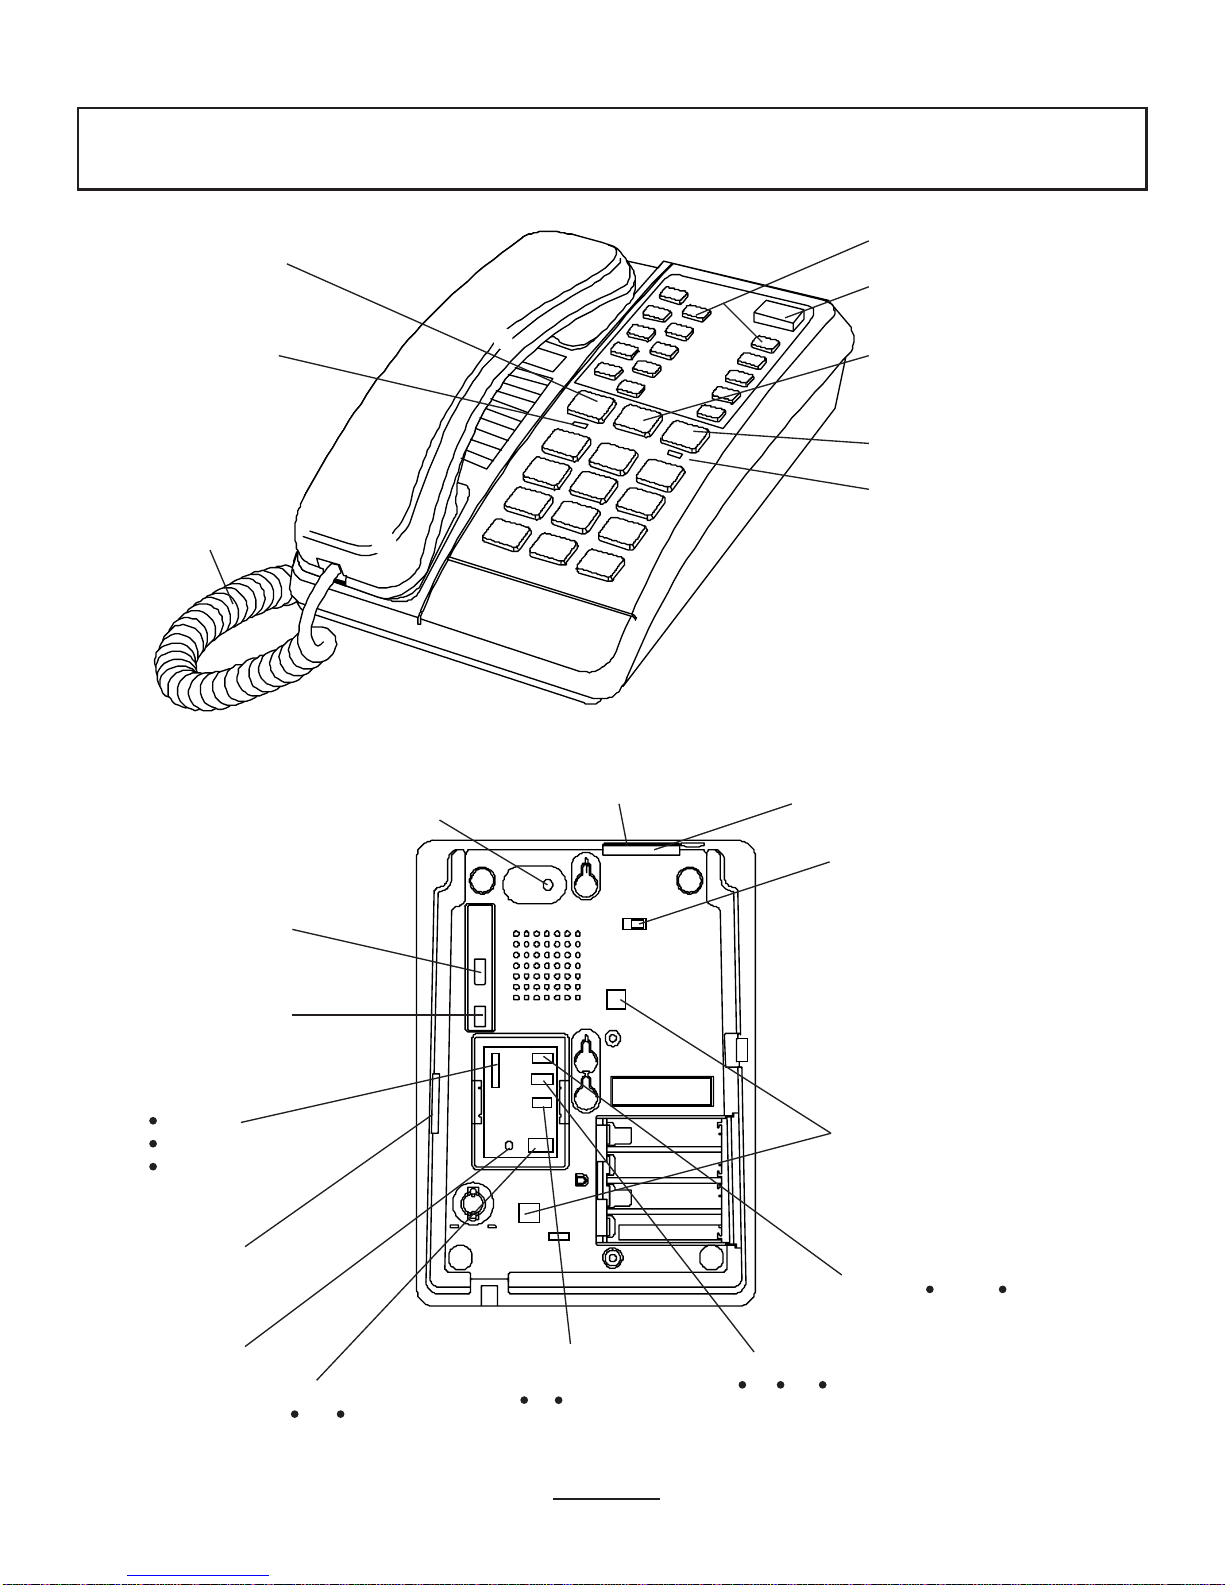
4
HEADSET
ON HOOK DIAL
KEY
HEADSET
ON HOOK DIAL
INDICATOR
HANDSET
CORD
2. GENERAL CONTROLS AND INDICATORS
MOUNTING
HOLES FOR
W ALL BRACKET
RINGER
HIGH/LO W/OFF
SWITCH
TONE/PULSE
SWITCH
PBX RECALL
SWITCH
GAIN SWITCH
TERMINATION SWITCH
Figure 1
Bottom View of IQ350
LINE JACK
RINGER PITCH
CONTR OL
HEADSET J ACK
TBR E
B A ISDN
TBR TIMING
SWITCH
600 ms
200 ms
100 ms
COM 600
MEMORY KEYS
RINGER / MESSAGE
WAITING INDICATOR
PBX RECALL
KEY
MUTE KEY
MUTE INDICATOR
EARPIECE /
HEADSET /
SPEAKER
VOLUME
CONTROL
MW RI
HEADSET
MIC. ADJUST
Top View of IQ350
HEADSET
POLARITY
SWITCH
Page 5

5
RINGER INDICATOR / MESSAGE-WAITING LIGHT (OPTIONAL)
Flashes when the telephone rings with an incoming call. It may also function as a
"message-waiting" indicator lamp. (see Section 6. - Installation)
RINGER VOLUME SWITCH
The three available positions allow selection of OFF (no sound), LOW volume,
and HIGH volume of the telephone's ringing sound during an incoming call.
RINGER PITCH CONTROL
Illustrated in Figure 1, the pitch of ringing sound may be altered by rotating the
control.
ALPHA-NUMERIC KEYPAD
The standard numeric digits are available for normal dialling. The alphabetic
characters are provided for Voice Mail and Telstra Customnet applications.
CRADLE SWITCH
Located in the handset cradle, this plastic lever is depressed by the handset
(when placed in the cradle) to cut-off the line. See the HANG-UP FUNCTION
section below.
HANG-UP FUNCTION
If the CRADLE switch is tapped or depressed momentarily, the line (and the call)
will be released automatically. After a minimum of 1 second, dial tone will again
be heard and dialling may commence. This function prevents the false transmission of a Hook Flash or Timed Break signal from the CRADLE switch.
CAUTION : Tapping the CRADLE switch, as recommended in some PABX user
guides for use with call-hold or call-transfer procedures, will not create a
Hookflash. See the PBX RECALL KEY section for call-hold etc. for use with
PABXs.
VOLUME SLIDER
Used to adjust the volume of the ON HOOK DIAL speaker and also to adjust the
hearing level of the HANDSET/ HEADSET. Set to midway for normal listening
level. Adjustment during a conversation will not be detected by the other party.
PBX RECALL KEY
For use with PABX systems to invoke special PABX facilities such as call-hold or
call-transfer which may be available in your PABX.
Page 6

6
TONE / PULSE SWITCH
Used to select the dialling mode, either TONE (DTMF) or PULSE (Decadic). The
correct mode depends on the telephone network, if in any doubt, contact your
authorised Interquartz dealer.
TONE KEY
Used for PULSE to TONE conversion during dialling. Your telephone line may
require the TONE / PULSE switch to be set to the PULSE position for normal
dialling, but certain long distance services, (for example, telephone answering /
messaging systems, or electronic banking-by-phone) to which you may
subscribe may require dialled command digits using TONE format following the
access telephone number for that service. The TONE command can be used
manually and is storable in memory.
Manual dialling:
1. Lift HANDSET or press ON HOOK DIAL / HEADSET.
2. Dial the portion of the number required in PULSE format (TONE / PULSE
switch set to PULSE).
3. Press TONE (a pause period of 3.6 seconds is automatically inserted).
4. Dial the service's command digits as required.
Memory dialling:
The TONE command may be used in a MEMORY to automatically provide
dialling format conversion so that any following digits will be dialled in TONE
format, irrespective of the actual setting of the TONE / PULSE switch. When
storing the number sequence into a MEMORY, insert the TONE command at the
appropriate point in the sequence (see "MEMORY FEATURE OPERATION"
section).
MUTE KEY
When pressed, it cuts off transmission from the handset microphone to allow
users privacy. The red light indicates when the mute condition is active. Press
MUTE again to release the mute condition.
BASIC OPERATION
IQ 350 can be used in the same way as a normal telephone; simply lift the
HANDSET to answer an incoming call, or lift the HANDSET and dial on the
KEYPAD to commence an outgoing call. Please refer to section 5 for detailed
operating instructions for MEMORY usage, and section 4 for PABX, Customnet,
and Easycall usage.
Page 7

7
REDIAL KEY
Press to redial the last number previously dialed, which may be up to 32 digits
long. When pressed while still on-line, the telephone will clear that call and retry
the number. It can be used in handset, handsfree, and on hook dial modes.
Dialling more than 32 digits during one call cause erasure of the entire number
from the REDIAL memory.
SIMPLIFIED EXAMPLE 1 : TO REDIAL LAST NUMBER
1. lift HANDSET, or press ON HOOK DIAL/
HEADSET
2. press REDIAL
SIMPLIFIED EXAMPLE 2 : DIRECT REDIAL
1. lift HANDSET, or press ON HOOK DIAL/
HEADSET
2. dial a number, but find it engaged.
3. press REDIAL; the telephone will automatically
clear and re-connect the line and re-dial the last
number.
SAVE KEY
The save key can be used either to store into or retrieve from the save memory
by simply pressing the save key after a number is dialled and before hanging up
the phone.
Using the save key as a number notepad during a call, requires the user to :
1. press STORE
2. enter the desired number (up to 32 digits)
3. press the save key before hanging up the phone.
PAUSE FUNCTION
The Pause command may be needed if your phone is connected to certain types
of PABX or to any network where a pause is required (e.g. between internal and
external dial tones).
For manual dialling:
1. Lift HANDSET.
2. Dial any digits required before the pause.
3. Press PAUSE
4. Dial the remaining digits.
For memory usage (storage procedure):
1. Lift HANDSET, or press ON HOOK DIAL / HEADSET
2. Press STORE
Page 8

8
3. Dial digits required before the pause.
4. Press PAUSE
5. Press STORE
6. Select and press desired MEMORY Key.
7. Replace HANDSET or press ON HOOK DIAL / HEADSET
When dialled, this stored number will PAUSE at the appropriate place in the
dialling sequence.
ON HOOK DIAL / HEADSET KEY AND INDICATOR
When the ON HOOK DIAL / HEADSET KEY is pressed an indicator will glow to
show that the ON HOOK DIAL mode or HEADSET mode is activated.
Page 9

9
3. ON HOOK DIAL AND HEADSET OPERATION
ON HOOK DIALLING
• Press the ON HOOK DIAL / HEADSET Key and the dial tone will be heard in
the speaker.
• Dial the required number on the keypad.
• When the called party answers the telephone, pick up the handset to talk.
• It is possible to revert to ON HOOK DIALLING mode by pressing the ON
HOOK DIAL / HEADSET Key.
• To terminate the call, replace the handset on the cradle or press the ON
HOOK DIAL / HEADSET Key.
HEADSET MODE OPERATION
Plug the HEADSET cord plug into the HEADSET jack of the telephone.
• Press the ON HOOK DIAL / HEADSET Key. Dial tone will be heard in the
HEADSET.
• Dial the required number on the keypad.
• Lifting the handset during headset mode will revert to handset mode operation.
• To revert back to headset mode operation during handset mode, press the ON
HOOK DIAL / HEADSET Key.
TRAINEE / SUPERVISOR MODE
Allows for the HANDSET and a HEADSET to be used in tandem. This will enable
a supervisor to monitor a trainee's progress during a call, or 'take over' a call.
The following procedures assume that the trainee is wearing the HEADSET and
a call is in progress.
Training mode
Allows a supervisor to monitor a trainee during a call.
• During a trainee's call the supervisor may lift the HANDSET (The HEADSET/
ON HOOK DIAL indicator will turn off).
• Quickly press the HEADSET / ON HOOK DIAL key and the indicator will
illuminate.
• The trainee may continue the conversation with the supervisor only listening to
its progress.
Page 10

10
Supervisor mode
Allows a supervisor to 'take over" a call between a trainee and another party.
• During a call, the supervisor may lift the HANDSET to continue a normal
conversation with the other party, while the trainee listens to its progress
through the HEADSET.
• To return the call to the trainee, press the HEADSET / ON HOOK DIAL key
and replace the HANDSET in the cradle.
Page 11

11
4. PABX EXTENSION USAGE, 'EASYCALL' AND
CUST OMNET USAGE
Where this telephone is used on a PABX (telephone switchboard) extension, or a
Direct Line with Telstra's Easycall service the following information is important.
PAUSE FUNCTION WHEN DIALLING
Depending on your telephone system, this may or may not be required. If in
doubt, check with your system supplier or Interquartz dealer, as failure to
observe your system's requirements may lead to difficulty in making outgoing
external calls. If you have determined that a pause is required by your PABX or
switch-board, please consult the following sections of this manual:
PAUSE Function section
HOLDING AND TRANSFERRING CALLS
The method used for these functions is dependent on the system type, so you
will need to check the system's Extension User Guide. The PBX RECALL KEY is
typically used for this purpose, and it's related adjustment switches described in
the INSTALLATION section of this manual must be correctly set to suit your
system for correct operation. Please also refer to the PBX RECALL KEY section
of this manual.
* AND # KEYS
These may be used, when the TONE / PULSE switch is set to TONE position or
if the TONE KEY has been pressed during the call, to control special PABX and
exchange facilities. Consult your PABX or EASYCALL User Guide to ascertain
their usage.
USING THE MEMORIES
Many different numbers and codes can be stored. You may find it useful to store
some of your favourite PABX or EASYCALL facility commands in the telephone
for fast, convenient access to those facilities (e.g. DIVERSION, CALL FORWARD, CALL BACK etc.) Consult your system User Guide.
EASYCALL AND CUSTOMNET
All of the facilities available can be accessed by the methods described in the
User Guide available from Telstra. Note that the "Recall" key referred to in the
EASYCALL instructions is equivalent to the PBX RECALL KEY described in this
manual.
Page 12

12
5. MEMORY FEATURE OPERATION
All memories are able to store any combination of numeric entries and PAUSE, *
and # in tone dialling mode, and the Tone command. See "TONE KEY", "REDIAL
KEY" and "PAUSE FUNCTION" section for further details of these functions.
ONE-TOUCH MEMORIES
Located at the Top of the keyboard, these keys provide easy dialling of oftenused numbers. Each memory can store 16 digits.
Storing a number :
1. Lift HANDSET or press ON HOOK DIAL / HEADSET
2. Press STORE
3. Enter the telephone number
4. Press STORE
5. Press desired memory key 1-10.
6. Replace HANDSET or press ON HOOK DIAL / HEADSET
Dialling a number :
1. Lift HANDSET or press ON HOOK DIAL / HEADSET
2. Press desired memory key 1-10.
CASCADE DIALLING
The contents of any memory can be "cascaded" or added together with additional manual dialling or other memories. In cascade dialling, make sure that
each dialling sequence is completed before activating the next.
Page 13

13
6. INSTALLATION
UNPACKING
The carton contains the following :
* Telephone body and handset
* Coiled cord and line cord.
* Operating Manual.
GENERAL SETTING-UP
1. Fit the COILED CORD to the appropriate sockets in the HANDSET and the
telephone base.
2. Fit the LINE CORD to the rear socket and to your telephone network outlet.
3. If long-term support without connection to the line for the memories is
required, install 2 x AA size alkaline batteries in the battery compartment
shown in Figure 1. The batteries are not supplied.
4. Set the Tone / Pulse switch to suit your system.
5. Set the Ringer Volume and Ringer Pitch controls.
6. See following sections to complete the installation.
LOCATION
The telephone should be placed on a desk, table or shelf where it is not likely to
be pushed off. If the unit is to be wall-mounted, it should be seated securely on
the WALL MOUNTING BRACKET. Avoid excessive heat, damp, dust, direct
sunlight, vibration, and other appliances or devices which may transmit or emit
electrical or electromagnetic radio frequency noise or signals (e.g. computers,
welders, pagers).
WALL MOUNTING
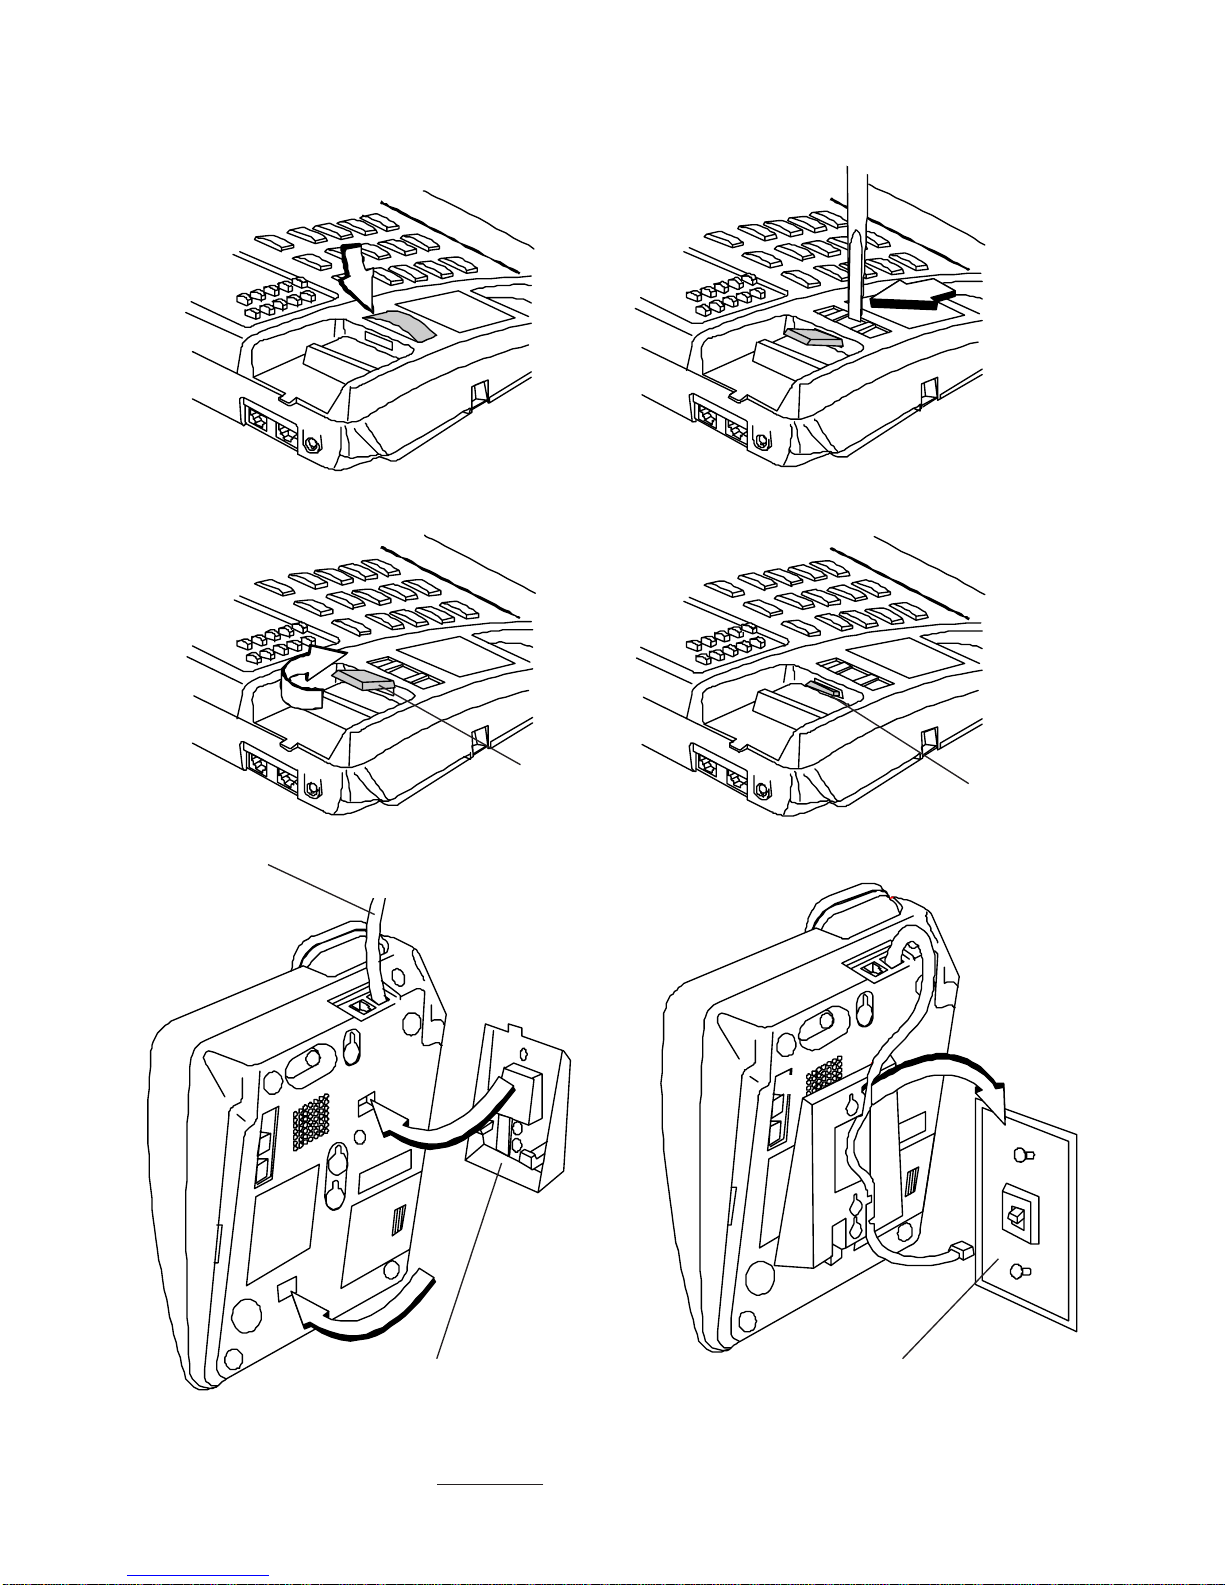
1. Fit the optional WALL MOUNT BRACKET (optional, not supplied) to the wall
and attach the WALL MOUNT BRACKET to the underside of telephone (see
Figure 2).
2. To enable the HANDSET to be supported in the cradle, follow the procedure
shown in Figure 2 to reverse the HANDSET RETAINER.
NOTE : The WALL MOUNT BRACKET and MODULAR WALL JACK illustrated
in Figure 2 are available from your authorised Interquartz dealer.
Page 14
14
1. Release
Phone number Plate
HANDSET
RETAINER
2. Insert Screw Driver into
slot and then pry to
release HANDSET RETAINER
TELEPHONE
LINE CORD
WALL MOUNT BRACKET
(OPTIONAL, NOT SUPPLIED)
MODULAR WALL JACK
(OPTIONAL, NOT SUPPLIED)
Figure 2 : Wall Mounting
4. HANDSET RETAINER
3. Rotate retainer 180 and
re-Insert retainer into slot
FOR WALL MOUNT
Page 15

15
LINE CONNECTION
This telephone is supplied with a "Telstra-style" plug Type 603 for connection to
the network via a complementary Type 610 socket (not supplied). Pins 2 and 6
comprise the speech and dialling pair, with pin 1 being reserved for earth recall
where required. The type 603 plug can be removed to utilise the RJ45 Plug (also
provided). Other types of plugs and cords are available on request.
TECHNICAL ADJUSTMENTS - FOR CORRECT OPERATION
CAUTION : Please exercise care when adjusting all selectors described, as they
and their surrounding electronic components may be damaged by rough treatment. It is also recommended that all adjustments be made with the telephone
disconnected from the line.
PBX RECALL KEY SETTINGS
To achieve compatibility with all systems, the PBX RECALL key may be selected
to execute either Earth Recall or Timed Break (Hook Flash) by switches on the
telephone's underside.
1. Determine the setting required for your system
2. Set HF/E switch as required.
3. If HF is selected, set the HF TIME switch to suit your system.
If in doubt, contact your system supplier or Interquartz dealer.
The telephone, unless pre-set by your dealer will be factory-set on HF and
100mS.
600 OHM / COMPLEX AND AGC A / AGC B SELECTORS
Intended to provide enhanced compatibility with all line conditions, these controls
influence the sidetone (the sound of your own voice that you hear in the receiver) of
the HANDSET. The selectors, unless pre-set by your dealer, are factory-set to
complex and AGC "B". Note that for direct lines and PABX out-door extension (i.e.
any long lines) the factory settings should not be altered. If in doubt, contact your
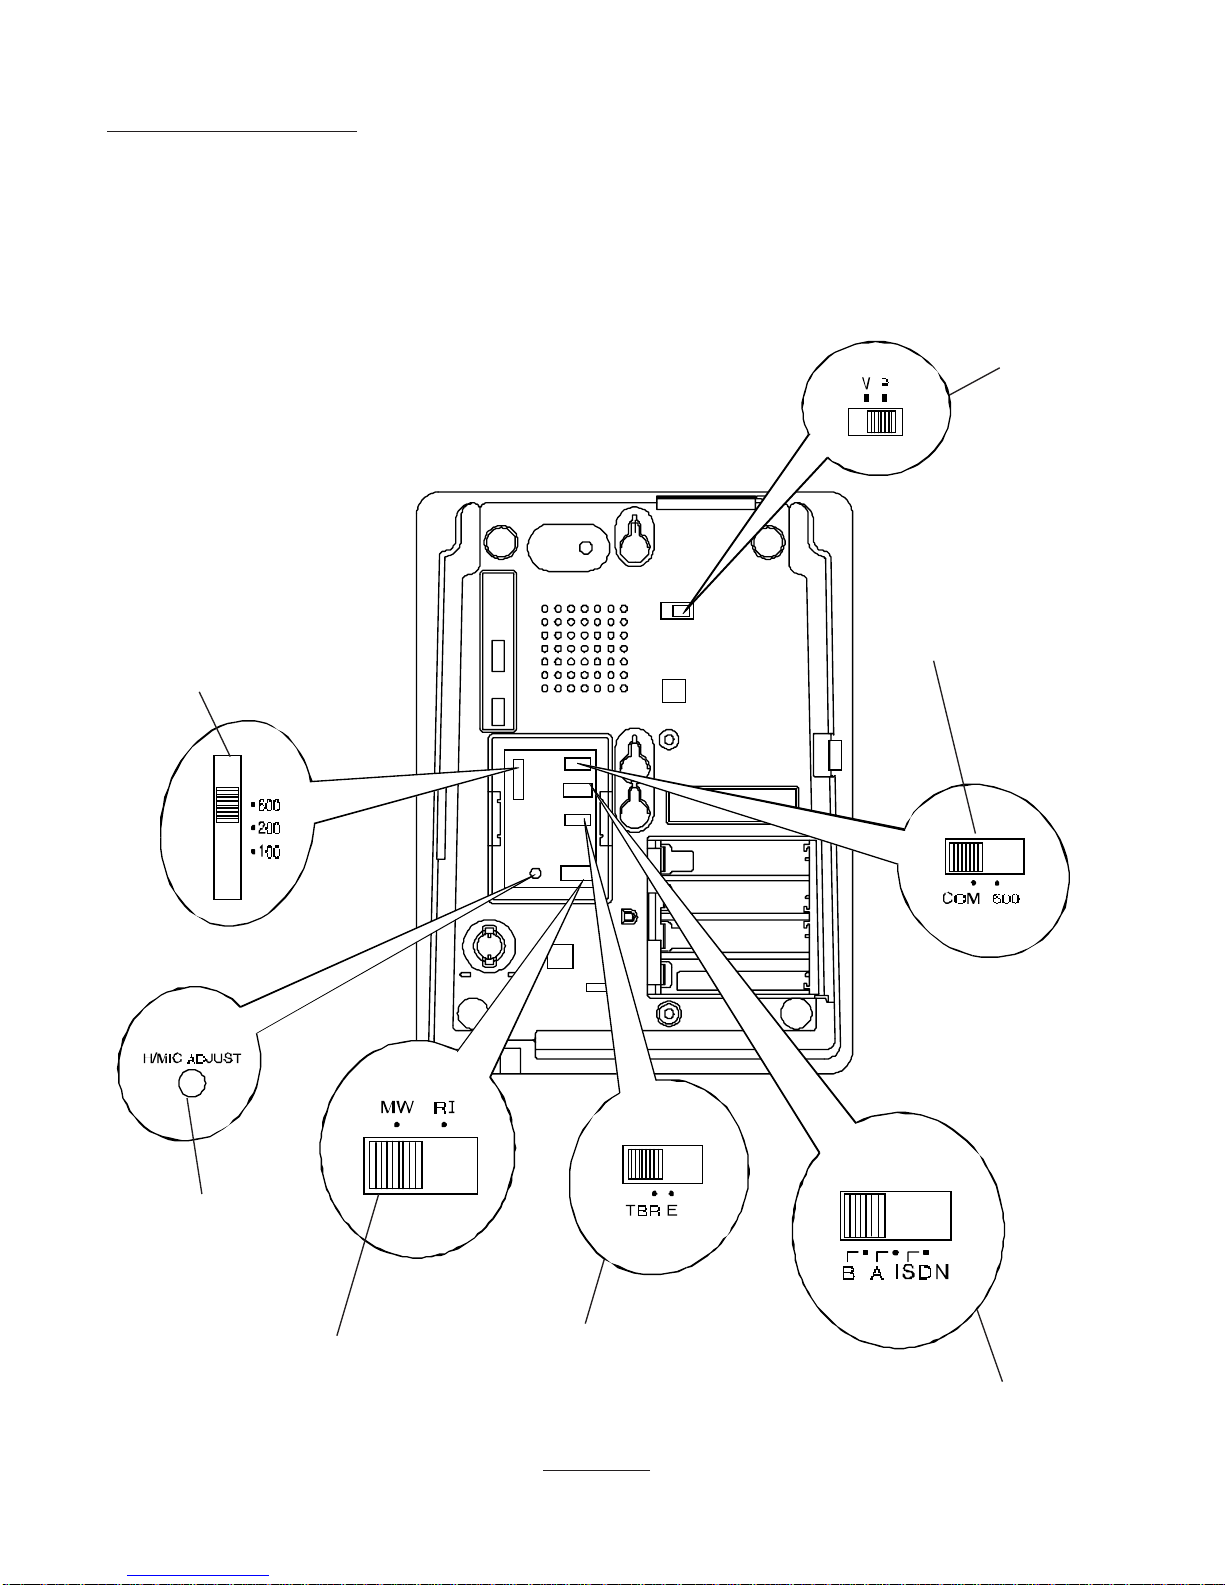
Interquartz dealer. Figure 3 describes their locations and settings.
Page 16

16
MESSAGE WAITING LIGHT - refer to fig. 3
Enables the user to select a message waiting feature compatible with most PABX
systems on the Australian market (including : NEC, FUJITSU, ALCATEL and
NORTEL).
To select this feature -
1. disconnect phone from line cord
2. release plastic cover from the underside of the phone to expose the message
waiting selection switch.
3. select the message waiting (mw) setting.
4. replace the plastic cover and re-connect the line cord.
HEADSET MICROPHONE SENSITIVITY ADJUSTMENT
This control allows a number of different HEADSETS on the Australian market to
function correctly with the IQ 350 telephone by adjusting the HEADSET'S
Microphone sensitivity. The control is located on the underside of the telephone
(see Fig. 3). The adjustment can be made by a small screwdriver or similar
implement that will fit into the control slot.
To make this adjustment :
1. Connect the HEADSET to the headset socket at the rear of the telephone
(see Fig. 1).
2. With the HEADSET plugged in, put it on and lift the HANDSET to your other
ear and make an out-going call.
3. Using the ON HOOK DIAL / HEADSET Key switch between HANDSET
and HEADSET mode (The indicator will illuminate when the HEADSET is in
use) while speaking to the other party.
4. Determine with the other party if your voice level is the same when using the
HANDSET and HEADSET.
5. If a difference is detected, adjust the microphone sensitivity so that your
voice level when using the HEADSET matches that of the HANDSET.
HEADSET POLARITY SWITCH
Located on the underside of the telephone (see Fig.3), this switch provides
compatibility with the two common Headset wiring standards.
* Position 'V' suits Plantronics Vista Headsets and other Headsets wired in the
same configuration.
* Position 'P' suits Plantronics Polaris Headsets and other Headsets wired in the
same configuration.
Page 17
17
NOTICE TO USERS
This telephone may contain a special "message waiting" feature which is suitable
only for PABX systems (contact your vendor if unsure if it has or not). If so, it
may not be connected to any other telephone system or network without the
authority of the Australian Telecommunications Authority.
Figure 3
TBR TIMING SWITCH
GAIN SWITCH
PBX RECALL SWITCH
MESSAGE WAITING
SWITCH
HANDSFREE MIC
ADJUST
TERMINATION SWITCH
HEADSET
POLARITY
SWITCH
Page 18

18
This telephone is a precision electronic instrument. While in use and storage, care
should be taken to avoid rough handling, extreme temperature, and damp or dirty
environments.
CLEANING
NEVER use aerosol sprays or other chemical agents or substances which leave
a residue (furniture polish for example).
Use a mild detergent and a damp, clean cloth when cleaning. Do not allow
moisture to enter the telephone’s interior-damage may result!
FAILURE TO OPERATE AND SERVICE DIFFICULTIES
If you are satisfied with the operation of your telephone service, your installation
is completed. However, if telephone service problems occur at any time, it is
recommended that the installation procedure described in this manual be
re-checked.
If a fault occurs, try to determine if the fault is with the telephone, or with the
network or system to which the telephone is connected:
* Disconnect the "suspect" telephone, and test the line with a substitute
telephone. If the telephone service then operates satisfactorily, the fault is
in the "suspect" telephone.
* Test the "suspect" telephone on a known good line. If the fault still occurs,
the fault is in the "suspect" telephone.
Consult your Interquartz dealer for further advice if necessary.
7. GENERAL CARE AND MAINTENANCE
Page 19

19
8. THUNDERST ORMS
The telephone, in common with household electrical appliances, can be a source
of electric and acoustic shock during thunderstorms. The possibility of a telephone user experiencing a shock is minimal. Nevertheless, customers should be
aware of some simple precautions to follow during thunderstorms :
* Use your telephone only for calls of the utmost urgency. Keep these calls brief.
* Whilst using your telephone keep clear of electrical appliances and metal
fixtures such as : stoves, air conditioners, refrigerators, window frames and
sinks.
Page 20
20
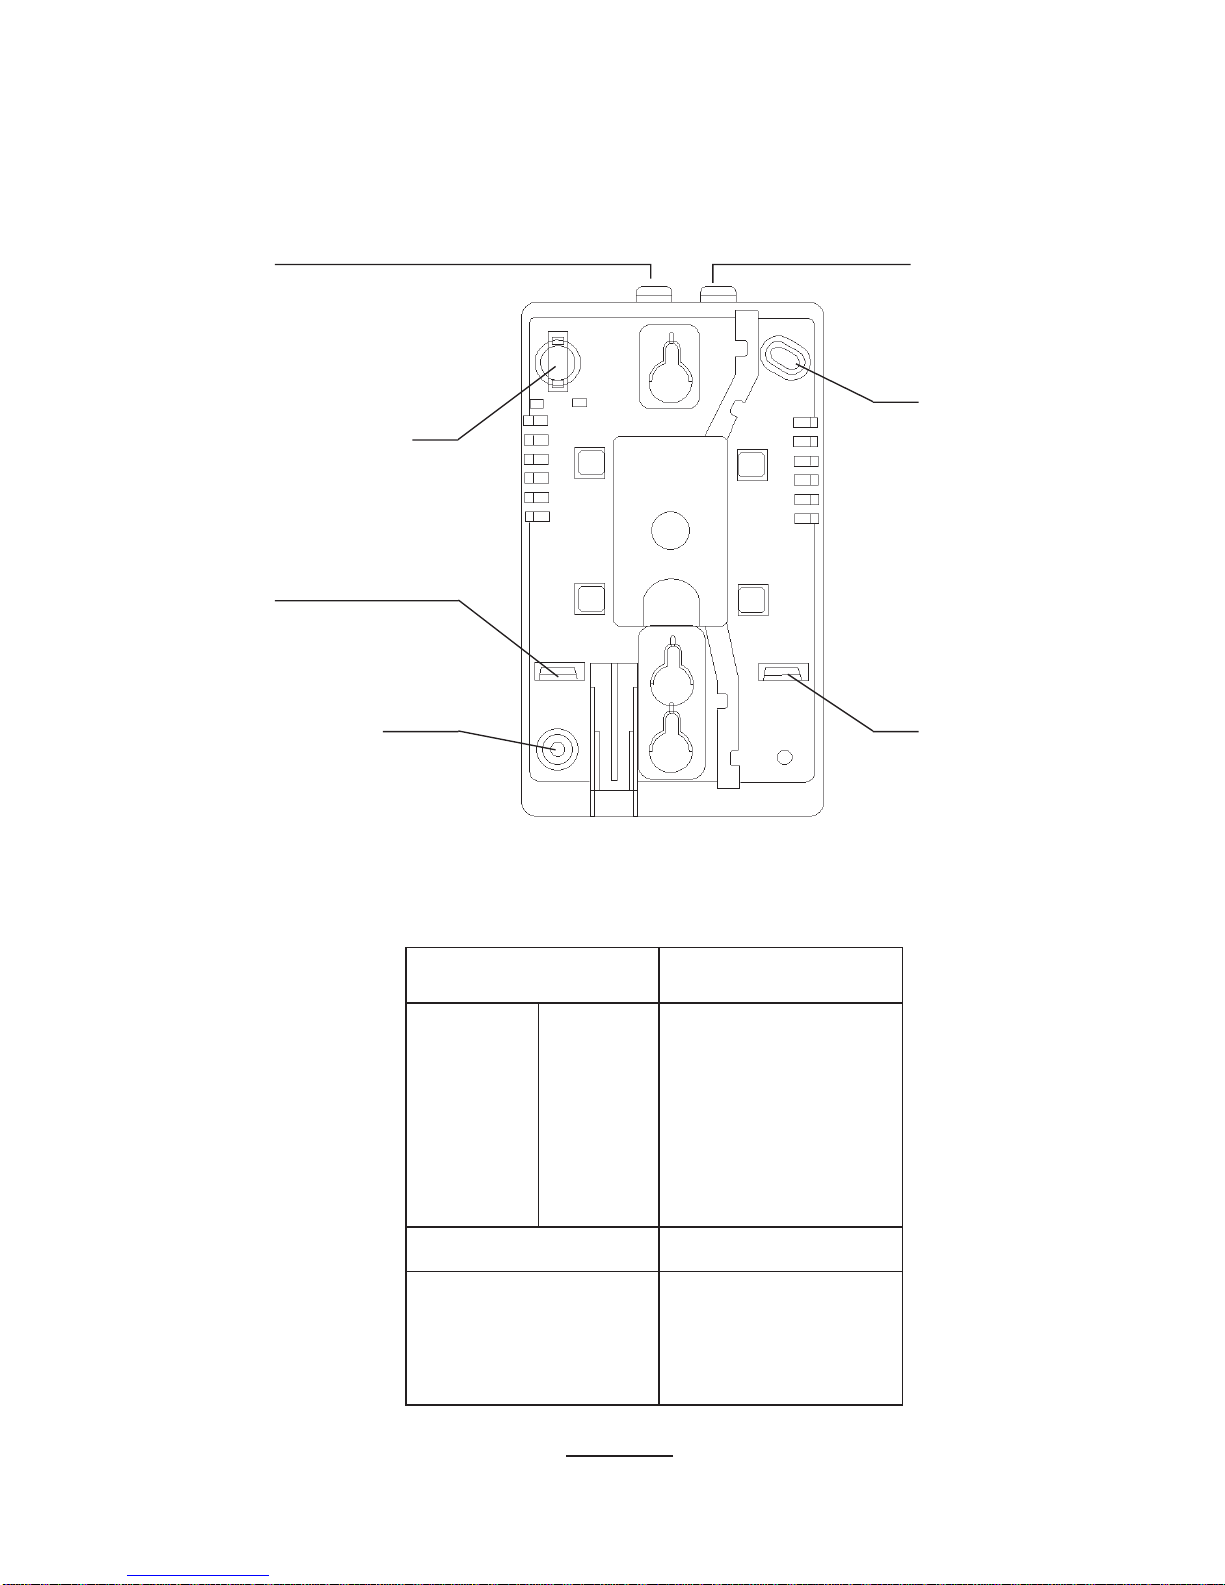
Figure 4
MOUNTING
HOLE "E"
LUG "D"
LUG "A"
LUG "C"
LUG "B"
BREAK OFF LUGS
"B" and "D"
"A" and "C"
"A" ONLY
TELEPHONE MODELS
IQ 90
IQ 250
IQ 350
IQ 450
IQ 550
IQ E2
IQ E3
IQTEL 80
IQTEL 300
IQTEL 500
IQTEL E1
IQTEL E2
IQTEL E3
IQTEL ET
IQTEL 25
IQ 300
9853 XT
9835 MKII
9836
9837
PIVOT FOR SWING-OUT
PLATE
MOUNTING HOLE "F"
WALL-MOUNT BRACKET (OPTIONAL NOT INCLUDED WITH PHONE)
Please note:
1. The wall bracket may be secured onto the wall by using mounting holes "E" and "F"
2. Lugs to break off before wall mounting the phone.
Page 21

21
10. SERVICE CENTRES
Interquartz (A'Asia) Pty. Limited warrants the original purchaser against failure
under normal usage resulting from defective material and workmanship at time of
manufacture for a period of three years from the date of purchase. Proof of purchase
and date of purchase are required for determining validity of this warranty. This
warranty does not cover defects or damage due to normal wear and tear, negligence,
accidents, exposure to radiation, misuse, improper maintenance, lightning strikes or
unauthorised repairs or modifications and excludes freight or postage costs to/from
your local authorised service centre unless otherwise arranged. Consequential loss not
included. Notification of any defect must be made within the warranty period before
a warranty repair can be effected.
This guarantee is in addition to all other Warranties or Guarantees expressed or
implied by the Trade Practices Act or other Commonwealth or State laws and all
other obligations and liabilities on the part of Interquartz (A'Asia) Pty. Limited.
VICTORIA 03-9464-3333
NEW SOUTH WALES 02-9875-4011
QUEENSLAND 07-3808-8008
SOUTH AUST. 08-8269-2555
WESTERN AUST. 08-9249-9569
TASMANIA 03-6231-0888
03-6334-5555
03-6234-7177
9. W ARRANTY
Page 22

HEADSET PHONE
MODEL IQ350
OPERATING INSTRUCTIONS
Page 23

Manufactured by
International Quartz Limited
A Subsidiary of Chiaphua Industries Ltd.
©Copyright INTERNATIONAL QUARTZ LTD. 1998
3CIQ3501-03B
 Loading...