

Page 1

Version 0.4 Page | 1
Handset Operations Manual
Page 2

Version 0.4 Page | 2
Contents
Handset Operations Manual .............................................................................................................................. 1
Contents ............................................................................................................................................................. 2
1 About This Document ................................................................................................................................ 5
Audience ................................................................................................................................................ 5
Abbreviations ......................................................................................................................................... 5
References/Related Documentations.................................................................................................... 5
Document History .................................................................................................................................. 5
2 Making Handset Ready .............................................................................................................................. 6
Package - Contents/Damage Inspection ................................................................................................ 6
Before Package Is Opened: ................................................................................................................ 6
Contents of Package: ......................................................................................................................... 6
Damage Inspection: ........................................................................................................................... 7
Before Using the Phone ......................................................................................................................... 7
Installing the Battery.......................................................................................................................... 7
Using the Charger .............................................................................................................................. 7
Handset in the Charger ...................................................................................................................... 7
Open Back Cover ................................................................................................................................ 8
Handset Serial Number ...................................................................................................................... 8
Replace Battery .................................................................................................................................. 8
3 Phone Overview ......................................................................................................................................... 9
Handset – Front View ............................................................................................................................ 9
Rear View - Handset ............................................................................................................................ 10
Tone Type and Volume ........................................................................................................................ 11
Frequency definition ........................................................................................................................ 11
Handset tone types .......................................................................................................................... 11
Handset volume ............................................................................................................................... 12
Ring cadence .................................................................................................................................... 12
Display .................................................................................................................................................. 13
Handset LCD display ........................................................................................................................ 13
Handset LCD Icons ........................................................................................................................... 13
Handset LED ..................................................................................................................................... 14
Charger LED...................................................................................................................................... 14
4 Handset MMI - Operations ...................................................................................................................... 15
Incoming call .................................................................................................................................... 15
Outgoing Call by Pre-dial ................................................................................................................. 16
Finish Talk Mode .............................................................................................................................. 16
Hold .................................................................................................................................................. 17
Transfer Call ..................................................................................................................................... 17
Semi-attended transfer sequence: .................................................................................................. 17
Conference Call ................................................................................................................................ 18
REDIAL .............................................................................................................................................. 18
Auto Stand-by .................................................................................................................................. 18
Page 3

Version 0.4 Page | 3
Out of Range .................................................................................................................................... 18
Low Battery ...................................................................................................................................... 18
Mute ................................................................................................................................................ 18
Hands free ........................................................................................................................................ 19
Headset ............................................................................................................................................ 19
Volume setting ................................................................................................................................. 19
Menu setting mode ............................................................................................................................. 19
Audio Settings ...................................................................................................................................... 19
Ringer melody .................................................................................................................................. 20
Alert volume .................................................................................................................................... 20
Alert tone ......................................................................................................................................... 20
Key sound ......................................................................................................................................... 20
Confirmation sound ......................................................................................................................... 20
Coverage warning ............................................................................................................................ 20
Charger warning .............................................................................................................................. 20
Connectivity ......................................................................................................................................... 21
Registration ...................................................................................................................................... 21
Deregistration .................................................................................................................................. 21
Settings ................................................................................................................................................ 21
Time & date ..................................................................................................................................... 21
Language .......................................................................................................................................... 21
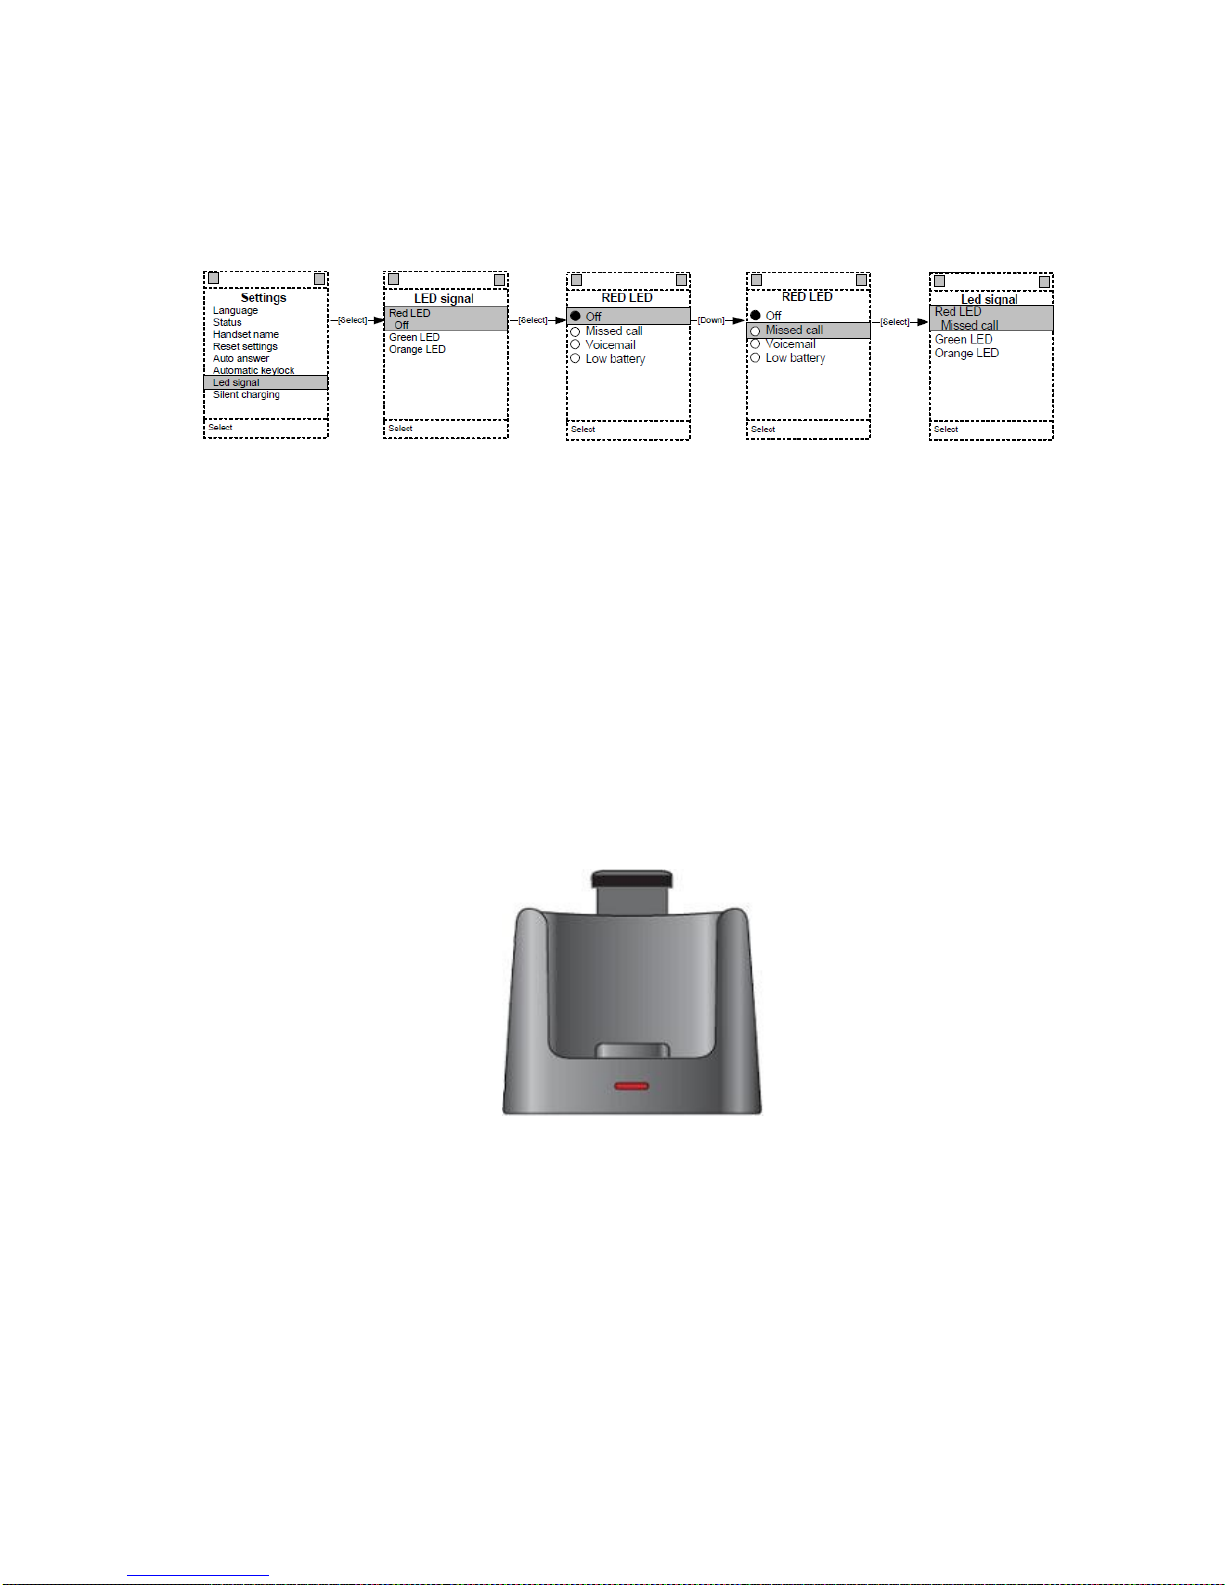
LED Signal ......................................................................................................................................... 21
Power Save ...................................................................................................................................... 21
Security ............................................................................................................................................ 21
Handset name .................................................................................................................................. 22
Reset settings ................................................................................................................................... 22
Status ............................................................................................................................................... 22
Auto answer ..................................................................................................................................... 22
Silent charging ................................................................................................................................. 22
Do not disturb .................................................................................................................................. 22
Speed Dial/One Touch Dial .................................................................................................................. 23
How to setup speed dial .................................................................................................................. 23
How to call a speed dial number ..................................................................................................... 23
5 Handset - Service Menu Management .................................................................................................... 24
Service Menu ....................................................................................................................................... 24
Service Menu Parameter Definitions ................................................................................................... 24
Master Reset .................................................................................................................................... 24
Site Survey Mode ............................................................................................................................. 25
HS Logs ............................................................................................................................................. 26
Status ............................................................................................................................................... 27
IPEI ................................................................................................................................................... 27
Demo mode ..................................................................................................................................... 28
Wideband......................................................................................................................................... 28
Test Tone on OK key ........................................................................................................................ 28
Handover ......................................................................................................................................... 28
6 Calls Operations – Handset MMI ............................................................................................................. 29
Initiating Calls ....................................................................................................................................... 29
Call Holding .......................................................................................................................................... 30
Page 4

Version 0.4 Page | 4
Call Transfer (Blind).............................................................................................................................. 30
Call Bridging (Attended Transfer) ........................................................................................................ 31
Call Conference (Conference) .............................................................................................................. 31
7 Flow Graphs – Call Transfer ..................................................................................................................... 32
Some Definitions – Call Transfer .......................................................................................................... 32
Call Transfer - Requirements ............................................................................................................... 32
Types of Call Transfer........................................................................................................................... 32
8 Flow Graphs – Conference Calls .............................................................................................................. 33
Call Conferencing Operation ................................................................................................................ 33
Types of Conference Calls .................................................................................................................... 33
Page 5

Version 0.4 Page | 5
1 About This Document
This document describes the features and functionalities available in the SME VoIP DECT Handset. We
describe how to operate the handset without going into details of its mechanical features.
Complete description of mechanical features is addressed in a separate document.
Audience
This guide is intended for everyday users as well as system administrators.
Abbreviations
For the purpose of this document, the following abbreviations hold:
DHCP: Dynamic Host Configuration Protocol
DLC: Data Link Control (Layer)
DNS: Domain Name Server
HTTP: Hyper Text Transfer Protocol
IOS: Internetworking Operating System
IPEI: International Portable Equipment Identity
NAT: Network Address Translator
PARI: Primary Access Rights Identity
PCMA: A-law Pulse Code Modulation
PCMU: mu-law Pulse Code Modulation
RPN: Radio fixed Part Number (Physical channel number useful in handover procedures)
SME: Small and Medium scale Enterprise
STUN: Session Traversal Utilities for NAT
References/Related Documentations
[1]: Adding Multiple Base Stations to Network V0.2 Document
[2]: How to Initiate Force Handover Procedure V0.2
[3]: -
Document History
Revision Author Issue Date Comments
0.1 MYA 16-Nov-2010 Initial Version
0.2 KMR 10-Feb-2011 Updated
0.3 JMG 07-July-2011 Service Menu section updated
0.4 JMG 04-Nov-2011 Updates regarding connectivity and settings
Page 6

Version 0.4 Page | 6
2 Making Handset Ready
In this chapter we briefly describe how to prepare the handset for use, install, insert and charge new
batteries.
Package - Contents/Damage Inspection
Before Package Is Opened:
Examine the shipping package for evidence of physical damage or mishandling prior to opening. If
there is a proof mishandling prior to opening, you must report it to the relevant support center of the
regional representative or operator.
Contents of Package:
Make sure all relevant components are available in the package before proceeding to the next step.
In principle, every shipped base unit package/box contains the following items:
2 x mounting screws and 2 x Anchors
1 x Handset hook
1 x A/C Adaptor
1 x Battery
1 x charger
1 x Handset Unit, 1 x Battery cover
Page 7

Version 0.4 Page | 7
Damage Inspection:
The following are the recommended procedure for you to use for inspection:
1. Examine all relevant components for damage.
2. Make a “defective on arrival - DOA” report or RMA to the operator. Do not move the shipping
carton until it has been examined by the operator. The operator/regional representative will
initiate the necessary procedure to process this RMA. They will guide the network
administrator on how to return the damaged package if necessary.
3. If no damage is found then unwrap all the components and dispose of empty
package/carton(s) in accordance with country specific environmental regulations.
Before Using the Phone
Here are the pre-cautions users should read before using the Handset:
Installing the Battery
1. Never dispose of the battery in fires, otherwise it will explode.
2. Never replace the batteries in potentially explosive environments, for e.g. close to
inflammable liquids/ gases.
3. ONLY use approved batteries and chargers from the vendor or operator.
4. Do not disassemble, customize or short circuit the battery
Using the Charger
Each handset is charged through the use of a handset charger. The charger is a compact desktop unit
designed to charge and automatically maintains the correct battery charge levels and voltage. The
charger Handset is powered by AC supply from 110-240VAC that supplies 5.5VDC at 600mA. When
charging the battery for the first time, it is necessary to leave the handset in the charger for at least 10
hours before the battery is fully charged and the handset ready for use.
Handset in the Charger
For correct charging, ensure that the room temperature is between 0°C and 25°C/32°F and 77°F. Do
not place the handset in direct sunlight. The battery has a built-in heat sensor which will stop charging
if the battery temperature is too high.
If the handset is turned off when placed in charger, the handset turns on and shows (shortly) the
charging message “The battery is charging”. After a while the display backlight first dims and then turns
off (if not demo mode is enabled). There will be a response for e.g. incoming calls. If the handset is
turned on when placed in charger, the display shows (shortly) the charging message “The battery is
charging”. After a while the display backlight first dims and then turns off.
Page 8

Version 0.4 Page | 8
Open Back Cover
1. Press down the back cover and slide it towards the bottom of the handset.
2. Remove Back Cover from Handset
Handset Serial Number
The serial number (IPEI/IPUI number) of each handset is found either on a label, which is placed
behind the battery, or on the packaging label. First, lift off handset back cover and lift the battery and
read the serial number.
The serial number is usually needed to enable service to the handset. It must be programmed into the
system database via the SME VoIP Configuration interface.
Replace Battery
Remove Back Cover from Handset. Remove the old battery and replace with a new one.
Page 9

Version 0.4 Page | 9
3 Phone Overview
Handset – Front View
1. Ear Speaker
2. Screen
3. Navigation Keys (Up/Down/Right/left)
4. Selection Key (centre of Navigation key)
5. Call Key/ Accept Call Key (Off-hook key)
6. End, ON/OFF Key, Back Key (On-hook key)
7. Activity Menu Key
8. Speaker Key
9. Tone Key
10. Special Programmable Keys (User Key)
11. Naming for Programmable Keys
12. Operational Key
13. 3 soft Keys
Page 10

Version 0.4 Page | 10
Rear View - Handset
14. 3.5mm Headset connector
15. Volume Up key (side key)
16. Volume Down Key (side key)
17. Mute key (side key)
18. External Speaker
19. Battery
20. Strap Hole
Page 11
Version 0.4 Page | 11
Tone Type and Volume
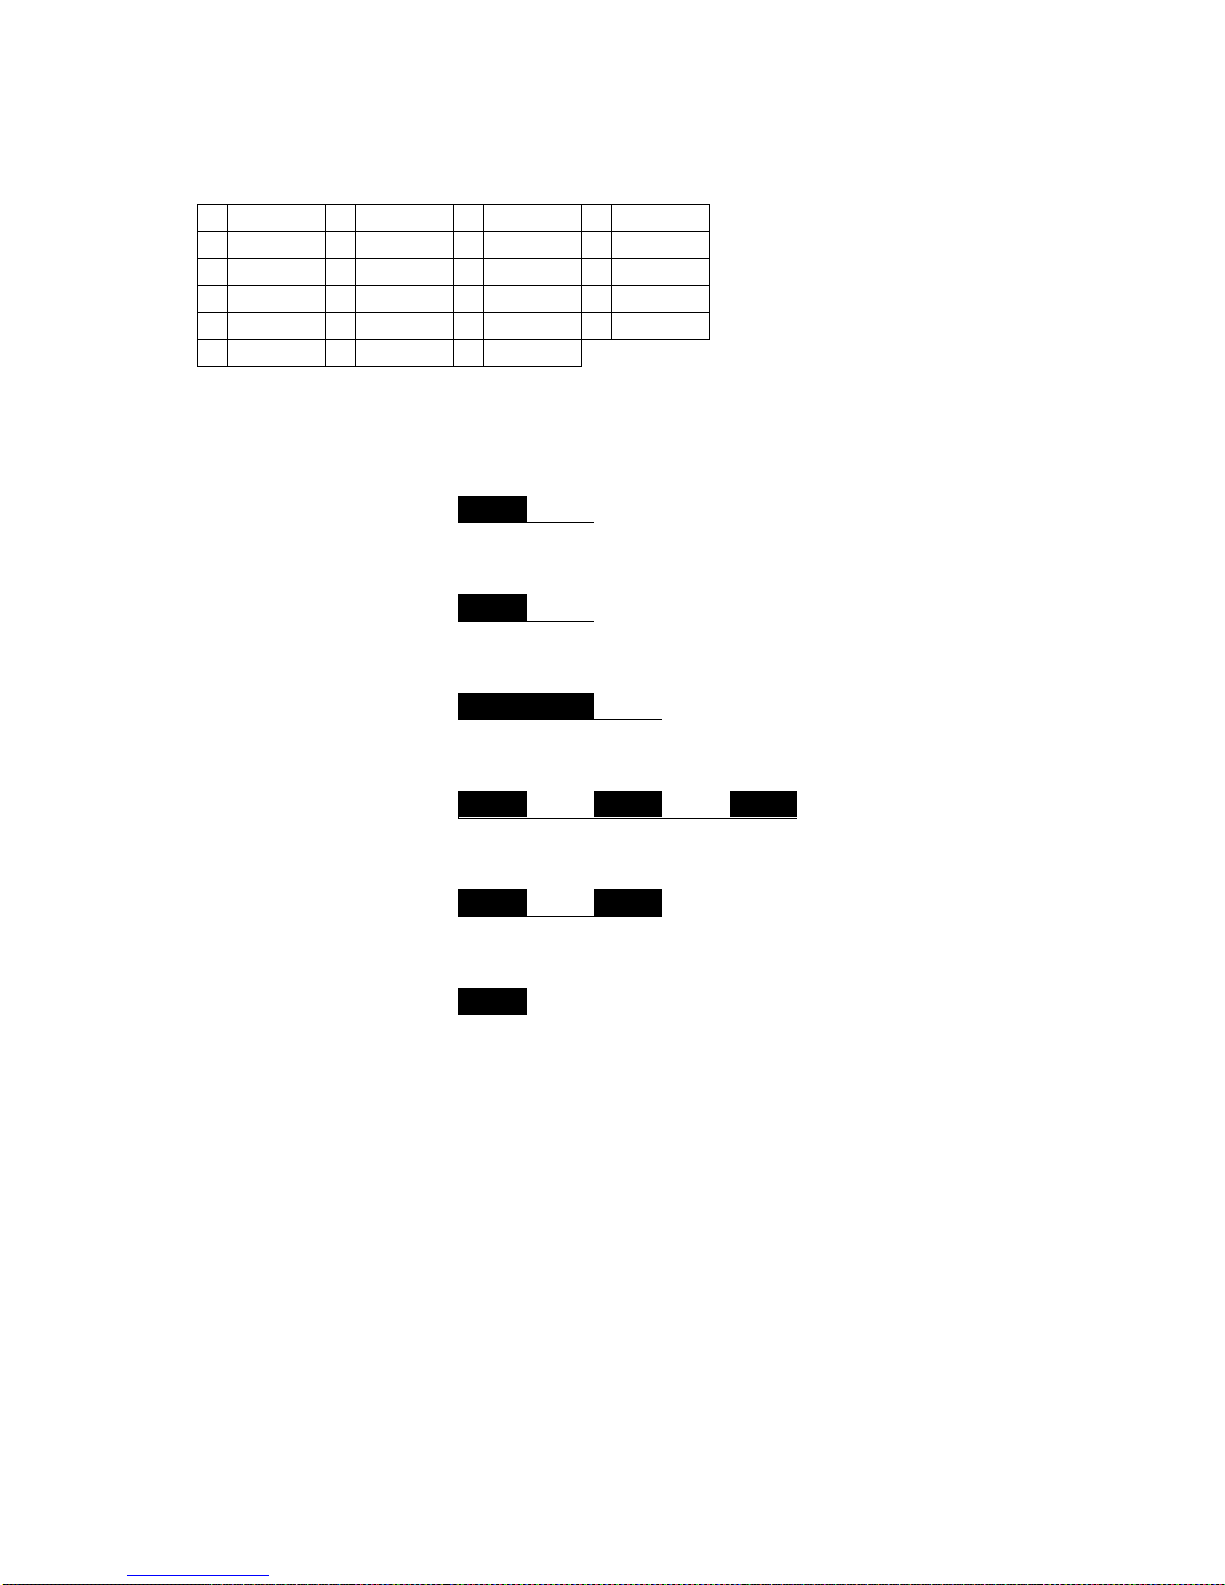
Frequency definition
A 440 Hz G 659 Hz M Hz S Hz
B 622 Hz H Hz N Hz T Hz
C 1109 Hz I Hz O Hz U Hz
D 1245 Hz J Hz P Hz V Hz
E 3000 Hz K Hz Q Hz W Hz
F 831 Hz L Hz R Hz
Handset tone types
Key Tone 1
E
10 ms 20 ms
Key Tone 2
C
50 ms 190 ms
Range Alarm Tone
F G
120 ms 120 ms 380 ms
Low Battery Alert Tone
D D D
100 ms 20 ms 100 ms 20 ms 100 ms
Error Tone
B A
100ms 20ms 100ms
Confirmation Tone
D
100 ms
Page 12

Version 0.4 Page | 12
Handset volume
Volumes for each tone are shown below.
Tone Type Level Comment
Ring Melody It depends on Ringer Volume Setting.
Alert Tone It depends on Alert Volume Setting.
Key Sound Constant Can be enabled or disabled by the user.
(Options are Silent, Click, Tone)
Confirmation Sound Constant Can be enabled or disabled by the user.
Coverage Warning Constant Used to warning for out of RF link range.
Can be enabled or disabled by the user.
Charger Warning Constant Used to warning for battery low. Can be
enabled or disabled by the user.
Ring cadence
Cadence 1:
2s
4s
2s
4s
2s
4s
2s
4
2s
Cadence 2:
2s
4s
2s
4s
2s
4s
2s
4
2s
Note:
When ringer volume is Off (Vibrate), Handset vibrates according to this timing (Xs on / Xs off) in all the
cadences.
On
Off
On
Off
Page 13

Version 0.4 Page | 13
Display
Handset LCD display
262K TFT type Colour LCD with backlight. 176 x 220 pixel display
For dial number: 1 2 3 4 5 6 7 8 9 0 * #
For Message:
- Upper Case: A B C D E F G H I J K L M N O P Q R S T U V W X Y Z
- Lower Case: a b c d e f g h i j k l m n o p q r s t u v w x y z
- Symbol: ! “ – ( ) @ / : _ ; + & % * = < > £ ¡ $ ¥ ˚ [ ] { } \ ~ ^ § ¿ # | ' ΄ (blank)
Handset LCD Icons
Talk icon
- Handset Talk mode
Battery Status Icon
- Battery Full
- Battery Level 7
- Battery Level 6
- Battery Level 5
- Battery Level 4
- Battery Level 3
- Battery Level 2
- Battery Level 1
- Battery Level low
- Battery empty
Charge On:
- Animation: Low → Level 1 → ... → Level 7→ Full → Low (only green colours)
The following icons can be displayed
- Ringer Off
- Mute
- Key lock icon
- Alarm icon
- Radio signal strength
Page 14
Version 0.4 Page | 14
Handset LED
One bi-colour LED (Message light pipe) to provide three colour message indications (RED, GREEN,
YELLOW).
The behaviour of the LED can be configured by the end user as shown below.
Charger LED
Two LEDs (Light pipe)
LED on the front of the charger:
- Handset is connected to the charger: On
- Handset is not in the charger: Off
LED on the top of the charger:
- Reserve battery (standby battery) put in charger: On
- Reserve battery (standby battery) fully charged: Off
Page 15
Version 0.4 Page | 15
4 Handset MMI - Operations
The handset can be in three main states seen from the user:
1. Active call
2. Idle
3. Menu
In active call the Umber handset call MMI will be used to guide the user.
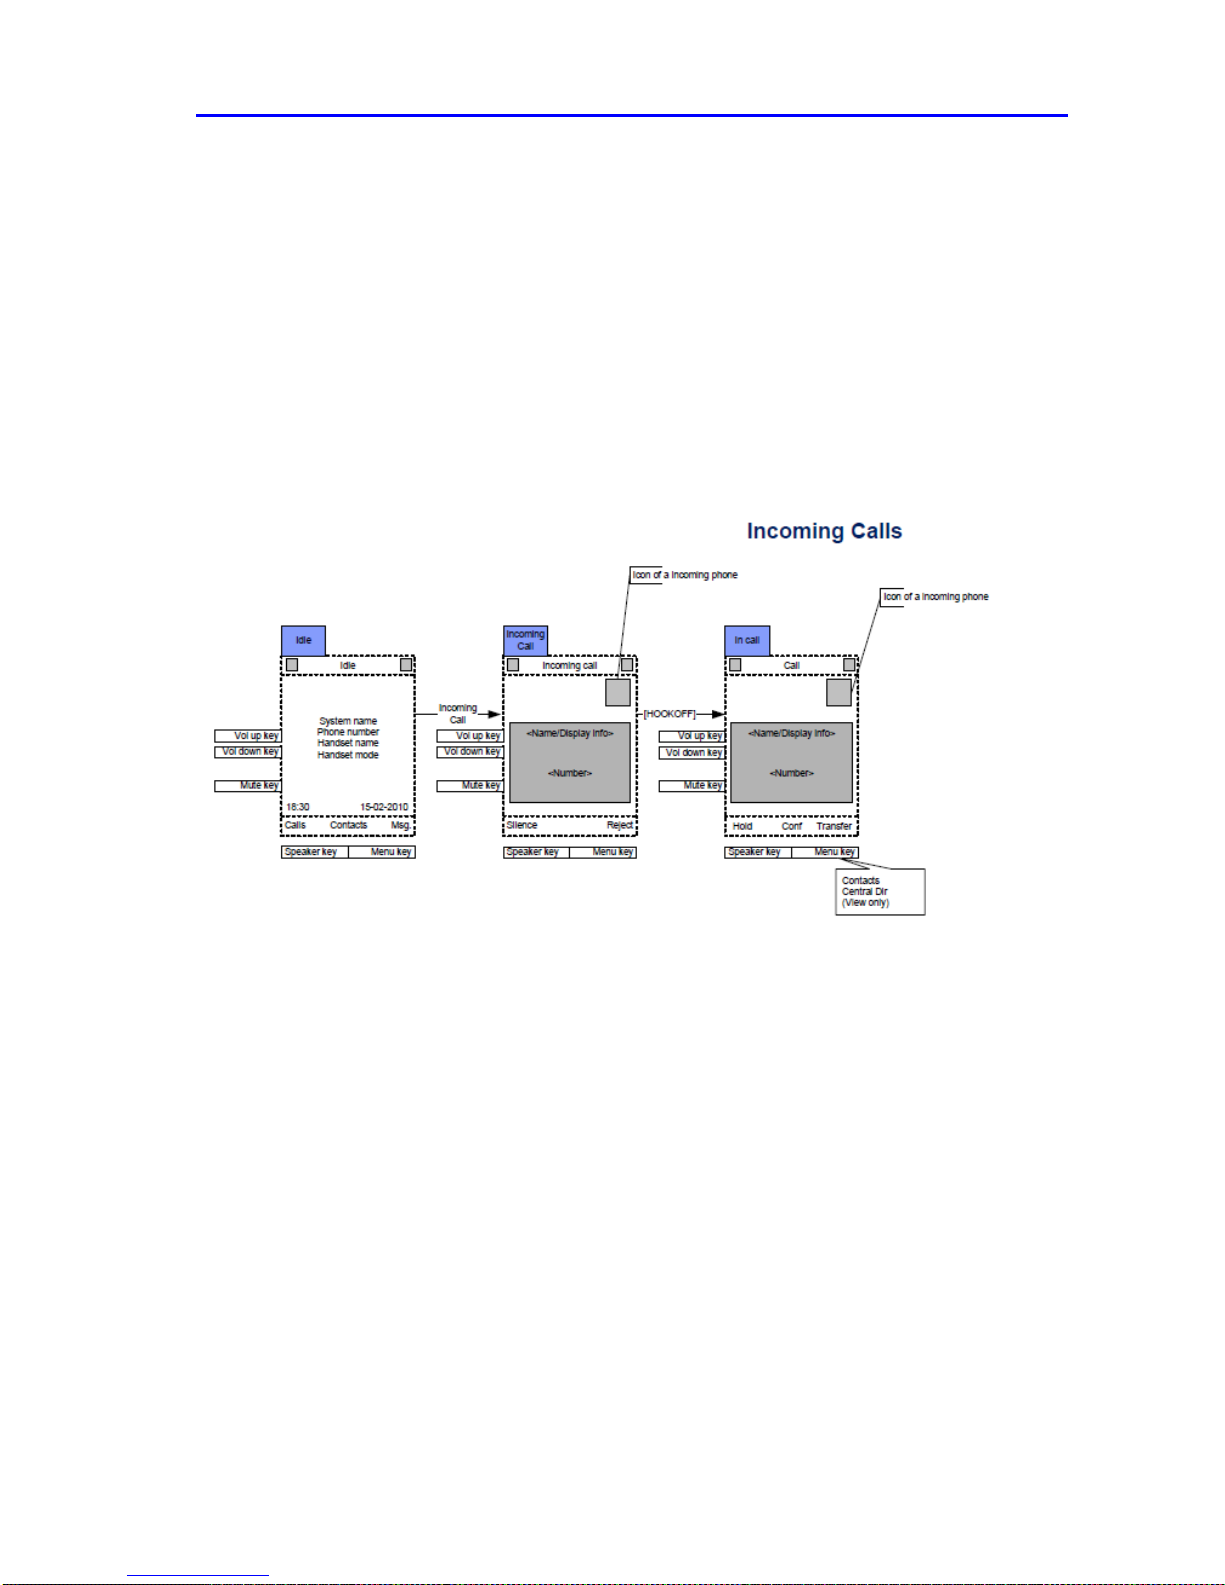
Incoming call
The handset will start alerting and display the “incoming call screen” when receiving an incoming call.
The caller ID of the caller will be displayed. The user answers the call by pressing “Green-key” (Offhook).
If the feature “Auto answer” is enabled on the handset, then the incoming call is answered no matter
if the handset is placed or removed from the cradle/charger. If “Auto answer” is disabled, then the
user has to press “Green-key” no matter if the handset is placed or removed from the cradle/charger.
The received phone number is stored in the call log.
Page 16
Version 0.4 Page | 16
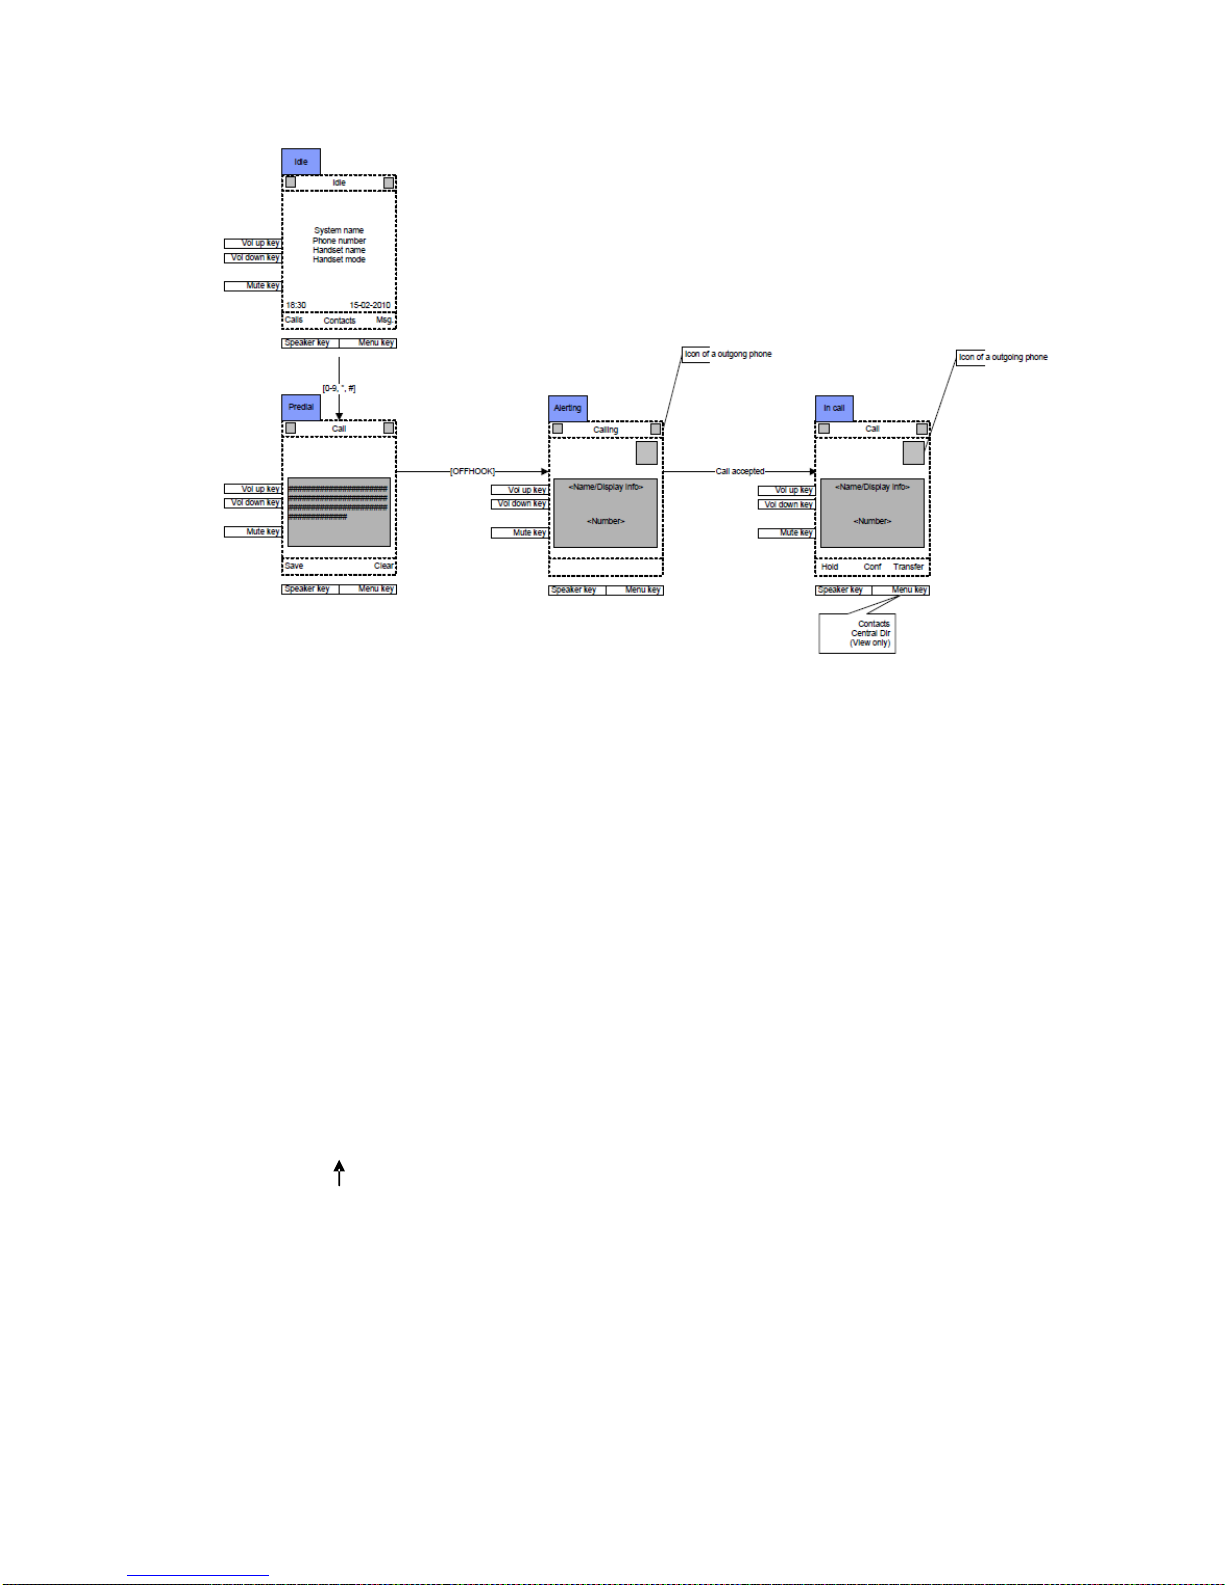
Outgoing Call by Pre-dial
Simply pre-dial the phone number. It is also possible to select call an entry in the private phone book
or the central phone book.
To make a call to the outside line, simple type in the phone number and press “Green-key” (Off-hook),
Depending on the setup of the PBX, it may be necessary to add a prefix in front of the phone number.
Finish Talk Mode
To end a call, simply press “Red-key” (On-hook) to terminate any call. If one call is active and another
call is on hold, then the active call will be terminated when pressing “Red-Key” and the handset
automatically returns to the call on hold, i.e. the call on hold is now active, and the user has to press
the “Red-key” again to terminate this call.
Page 17
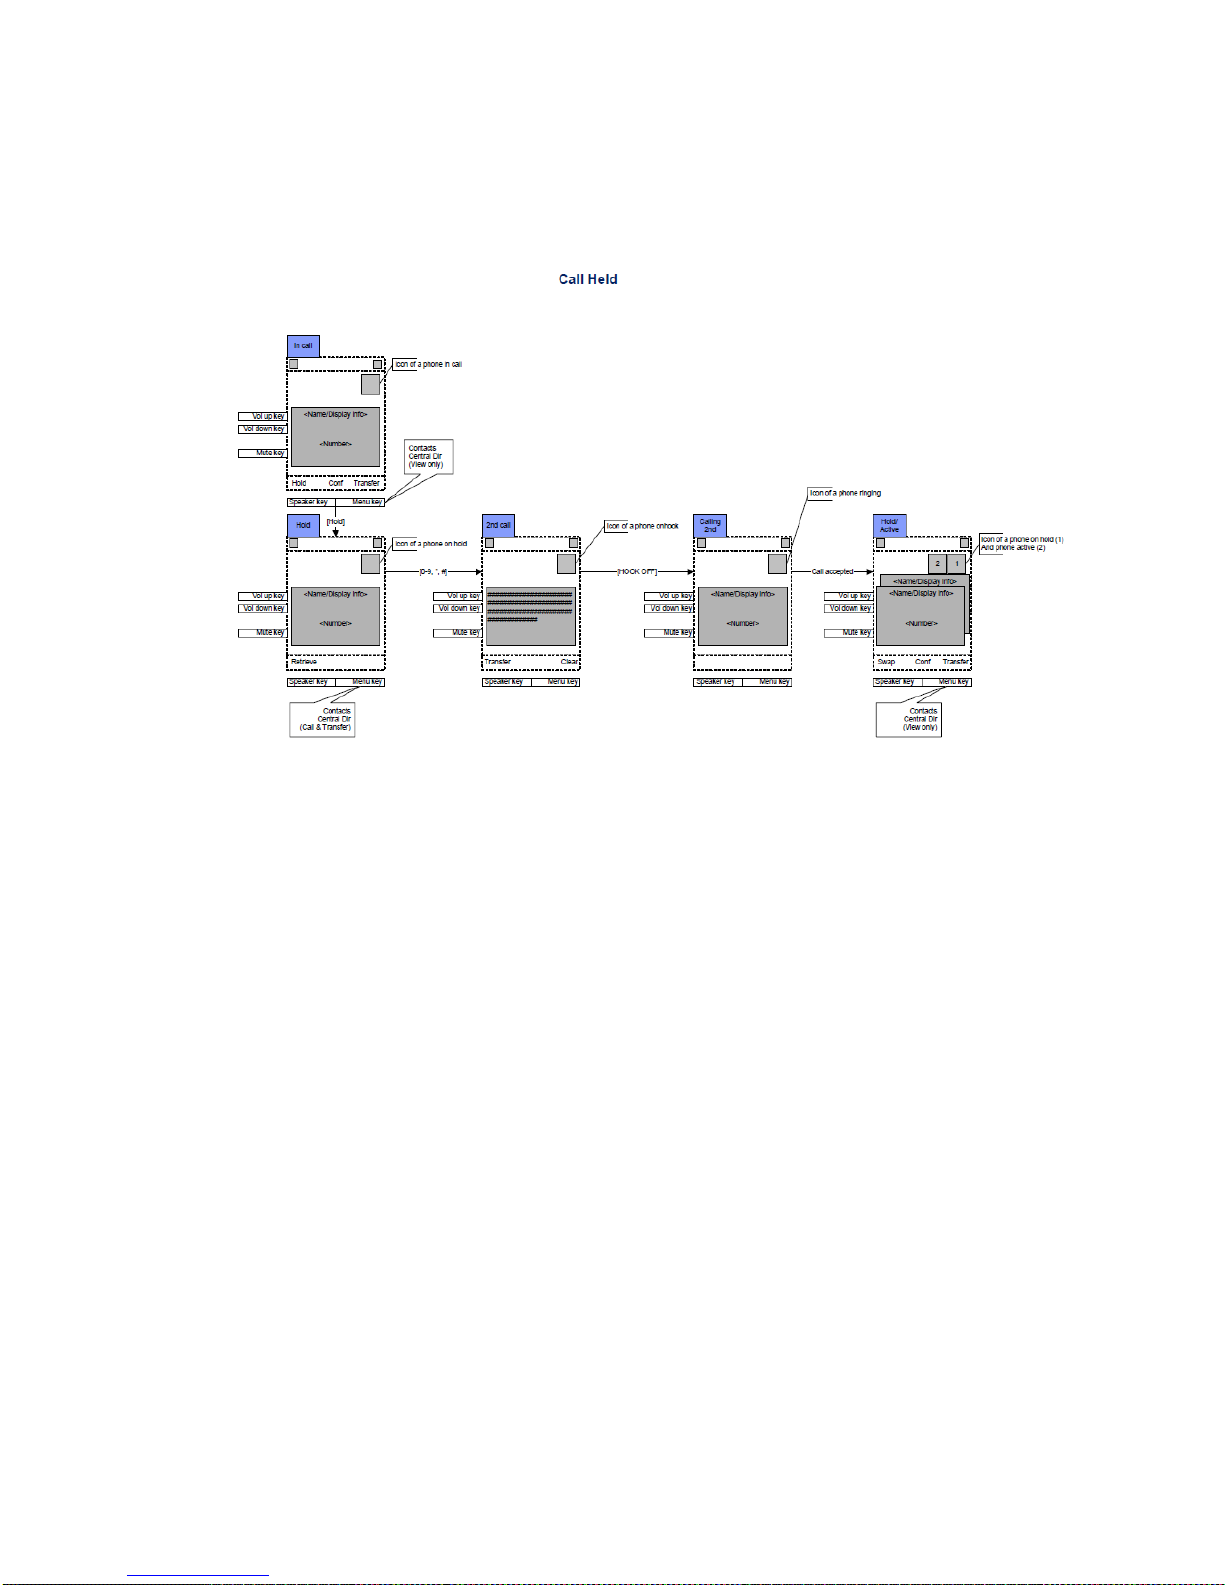
Hold and Retrieve
Hold
By pressing hold the call is on hold and can be retrieved or a second call can be established.
From the second call conference, swap or transfer is possible.
It is possible to swap call, i.e. to toggle between 2 external parties.
Swap calls
then automatically put on hold, and vice versa.
Example: If call “1” is active and call “2” is on hold, then the user can swap to call “2” and “call “1” is
Page 18
Version 0.4 Page | 17
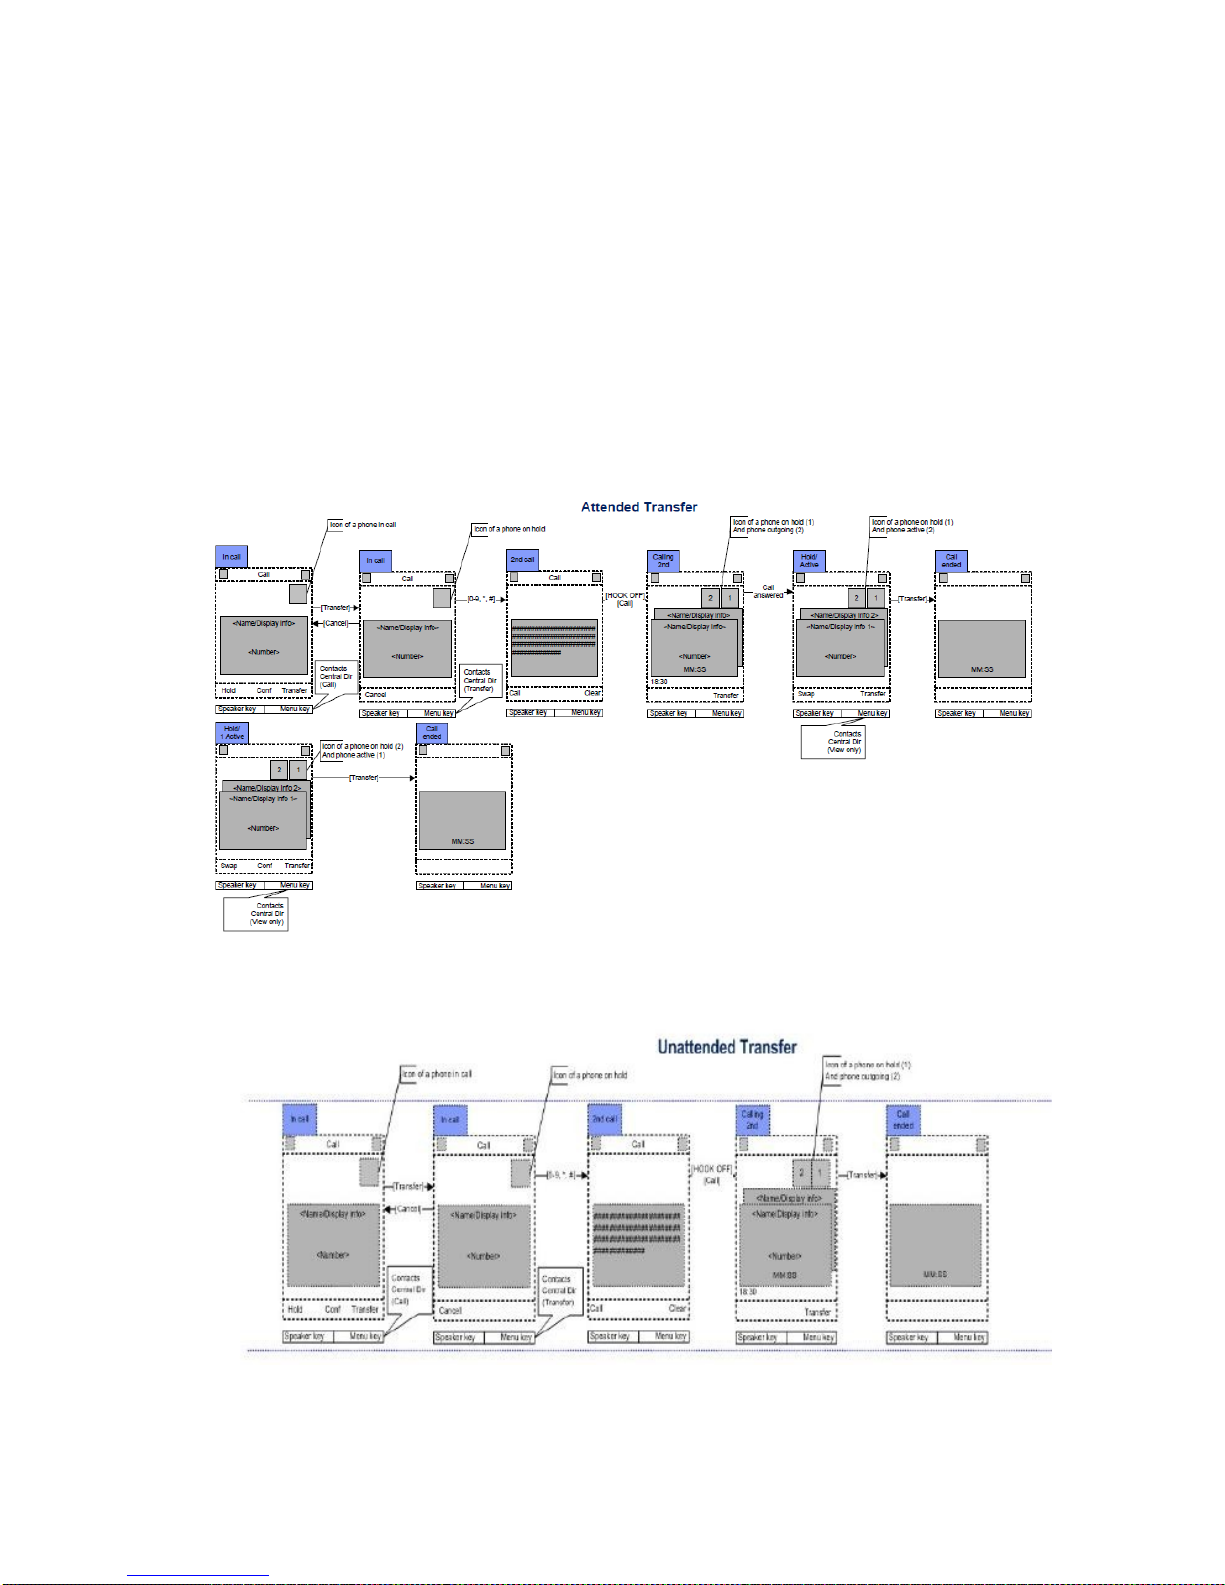
Transfer Call
Both attended and semi-attended transfer is possible.
Attended transfer sequence:
Semi-attended transfer sequence:
Page 19
Version 0.4 Page | 19
Hands free
The audio is routed to the speaker if the user press the “Hands free key” during call. Pressing “Hook off
key” will switch back to earpiece mode.
Headset
The audio is routed to the headset if a headset is connected when initiating the call. The audio is
routed to the headset if a headset is connected during call. The audio is routed to the speaker if the
“Hands free speaker key” is pressed during headset mode.
Volume setting
There are 3 individual volume settings, i.e. one volume setting for earpiece mode, one volume setting
for speaker mode and one volume settings for headset mode. The volume setting can be adjusted
during call by pressing the volume keys (Side key up and down). The level of the audio is displayed
graphically when pressing the keys and saved automatically after a timeout.
If earpiece mode is used during call, then the earpiece level is adjusted when pressing the volume key
Up or Down. If speaker mode is used during call, then the speaker level is adjusted when pressing the
volume key Up or Down. If headset mode is used during call, then the headset level is adjusted when
pressing the volume key Up or Down.
Menu setting mode
Various settings can be changed, such as ring type, registration, and deregistration etc.
1. The handset returns one step back if the user press “Red key” (On-Hook) when in the menu
structure
2. The Handset keeps each menu setting mode for 1 minute without key operation. The Handset
cancels the menu setting and goes to standby mode.
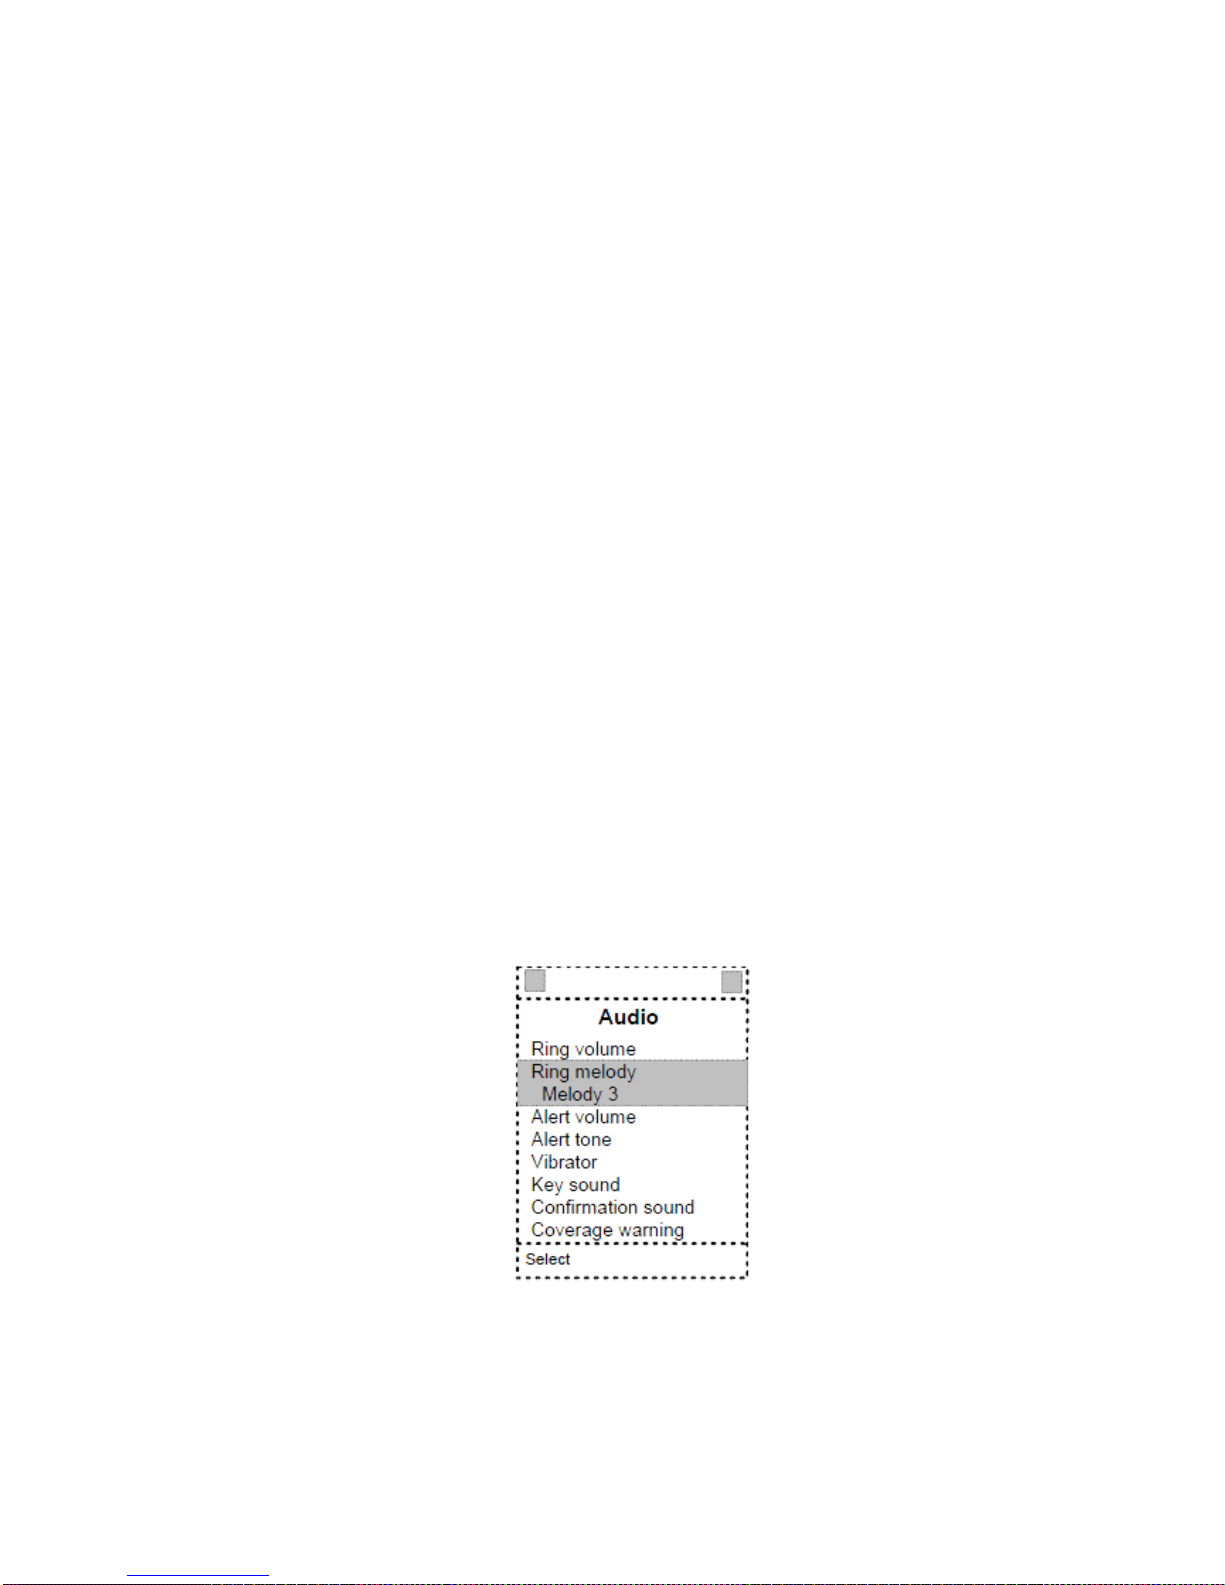
3. The current setting of a menu/feature is always displayed below the menu. The menu must be
highlighted to see the current setting. An example is shown below.
Audio Settings
Ringer volume
The ringer volume settings can be adjusted by selecting menu “Audio settings → Ringer volume”. The
currently used level is displayed when entering the menu “Ringer volume”. The volume can be increased
by pressing navigation key Up or Right. The volume can be decreased by pressing navigation key Down
or Left. An audible indication (play back) is given when adjusting the ringer volume. The currently used
ringer melody is used as play back when adjusting the volume.
Page 20

Version 0.4 Page | 20
Ringer mute:
The ringer is switched off when the lowest level is selected in menu “Audio settings→ Ringer volume”.
The ringer OFF icon is displayed in the top bar when the ringer is off.
Ringer melody
The ringer melody can be changed by selecting menu “Audio settings → Ringer melody”. A list of
melodies is displayed when entering the menu. Each displayed melody on the list can be selected by
pressing soft key “Select”. The graphical user interface (radio button) allows the user to choose only
one of a predefined set of options (melodies). Each melody on the list can be played back by selecting
soft key “Play”. The soft key “Play” changes to “Stop” during play back.
Alert volume
The alert volume can be adjusted by selecting menu “Audio settings → Alert volume”. The currently
used level is displayed when entering the menu “Alert volume”. The volume can be increased by
pressing navigation key Up or Right. The volume can be decreased by pressing navigation key Down or
Left. The currently used alert melody is used as play back when adjusting the volume.
Alert tone
Different kind of alert tones can be selected. The alert tone is used when the alarm clock occur. The
graphical user interface (radio button) allows the user to choose only one of a predefined set of
options (melodies).
Each melody on the list can be played back by selecting soft key “Play”. The soft key “Play” will change
to “Stop” during play back.
Vibrator
In the vibrator menu different vibrator states can be selected. The options are Off, Vibrate then ring,
Vibrate only, Vibrate and ring.
Key sound
The key sound can be Silent, Click or Tone. A sound is generated on each key press when the key sound
Click or Tone are selected. No key sound will be generated when pressing the keys during “key lock
state” even though one of the key sounds is selected.
Confirmation sound
When the feature “Confirmation sound” is enabled (On), an audible indication is given when an event
succeeds or fails. Example: A positive confirmation sound is generated when a new setting is set or an
entry is saved successfully in the phonebook. A negative confirmation sound is generated if the action
fails.
Coverage warning
When the feature “Coverage warning” is enabled (On), then an audible indication is given in the
earpiece when the user is close to maximum range.
Charger warning
When the feature “Charger warning” is enabled (On), then an audible indication will be given when the
handset is correctly connected to the charger.
Page 21

Version 0.4 Page | 22
Handset name
The handset name can be changed by selecting menu “Settings → Handset name”. An editor is
displayed when entering the menu. The handset name is typed in by using the numeric keys and
afterward saving the name. The handset name is displayed on the idle display.
Reset settings
The handset name can be reset to default settings by selecting menu “Settings → Reset settings”. The
base is not reset to default when selecting this feature. The handset is still registered after a reset.
Status
The menu “Status” delivers some useful information to the end user. The displayed information’s are:
Base station:
- Software version
- Hardware version
- IP address
- MAC address
- System name
Handset status:
- Software version
- Hardware version
- DECT band
- Battery level
- IPEI
Auto answer
The feature “Normal”, “Any key” and “Automatic” can be selected via menu “Settings → Auto
answer”.
Normal:
The user must always press “Green-key (Off-hook) to answer a call. The call is not answered by
removing the handset from the cradle/charger.
Any key:
Pressing any key will answer an incoming call. The call is not answered by removing the handset from
the cradle/charger.
Automatic:
If the feature “Automatic” is enabled on the handset, then the incoming call is answered automatically
after 5 seconds.
Silent charging
The feature “Silent charging” can be set by selecting menu “Settings → Silent charging”. Handset must
be placed in charger in order to work as mentioned below. The options of silent charging are:
Off:
The handset is ringing when receiving incoming calls (audio alert and incoming call screen displayed).
Disconnect:
The handset doesn’t react on incoming call (no audio alert and no incoming call screen displayed).
Silent:
The handset reacts on incoming call but the handset doesn’t ring (no audio alert but the incoming call
screen displayed).
Do not disturb
The feature “Do not disturb” can be set by selecting menu “Settings → Do not disturb”. When disabled
the handset reacts on all incoming activity, when enabled the handset does not react.
Page 22

Version 0.4 Page | 23
Speed Dial/One Touch Dial
The speed dial feature allows the user to assign a speed dial number (2 – 9) to a contact. This enables
the user to call a contact by making a single long key press on one of the number keys (2 – 9) when in
idle. A contact can only be assigned to one speed dial number at a time. The first defined number of
the contact will be dialled when the speed dial key is pressed. This means that if all numbers (Work,
Mobile, Home & Other) for the contact is defined then the Work number will be dialled. If the Work
number is not defined then the Mobile number is dialled etc.
NOTE:
The ‘1’ key is reserved for voicemail. Long key press on ‘0’ is used for starting a normal dial string with
‘+’.
How to setup speed dial
Prerequisite: There must be at least one contact in the contact list.
Steps:
1. Go to the contact list > Move to the contact that you want to assign a speed dial number to.
2. Select “More” > Select “Speed dial”
3. Move to the speed dial number (2 – 9) that you want to assign the contact number to.
4. Select “Add”. The contact name should be appended to the speed dial number.
5. Leave speed dial list by pressing “Hook on” key > Press “Hook on” key to exit “More” menu >
Exit contacts list by pressing “Hook on” key.
How to call a speed dial number
Prerequisite: The handset is in idle and the key lock is not active.
Steps:
1. Make a long key press (> 2 seconds) on a speed dial key that is assigned to a contact. The first
number defined is dialled.
Page 23
Version 0.4 Page | 24
5 Handset - Service Menu Management
This section describes how to use the feature “Service Menu” available only to vendors and developers
of the handset.
The document will also describe some options available in the Service Menu.
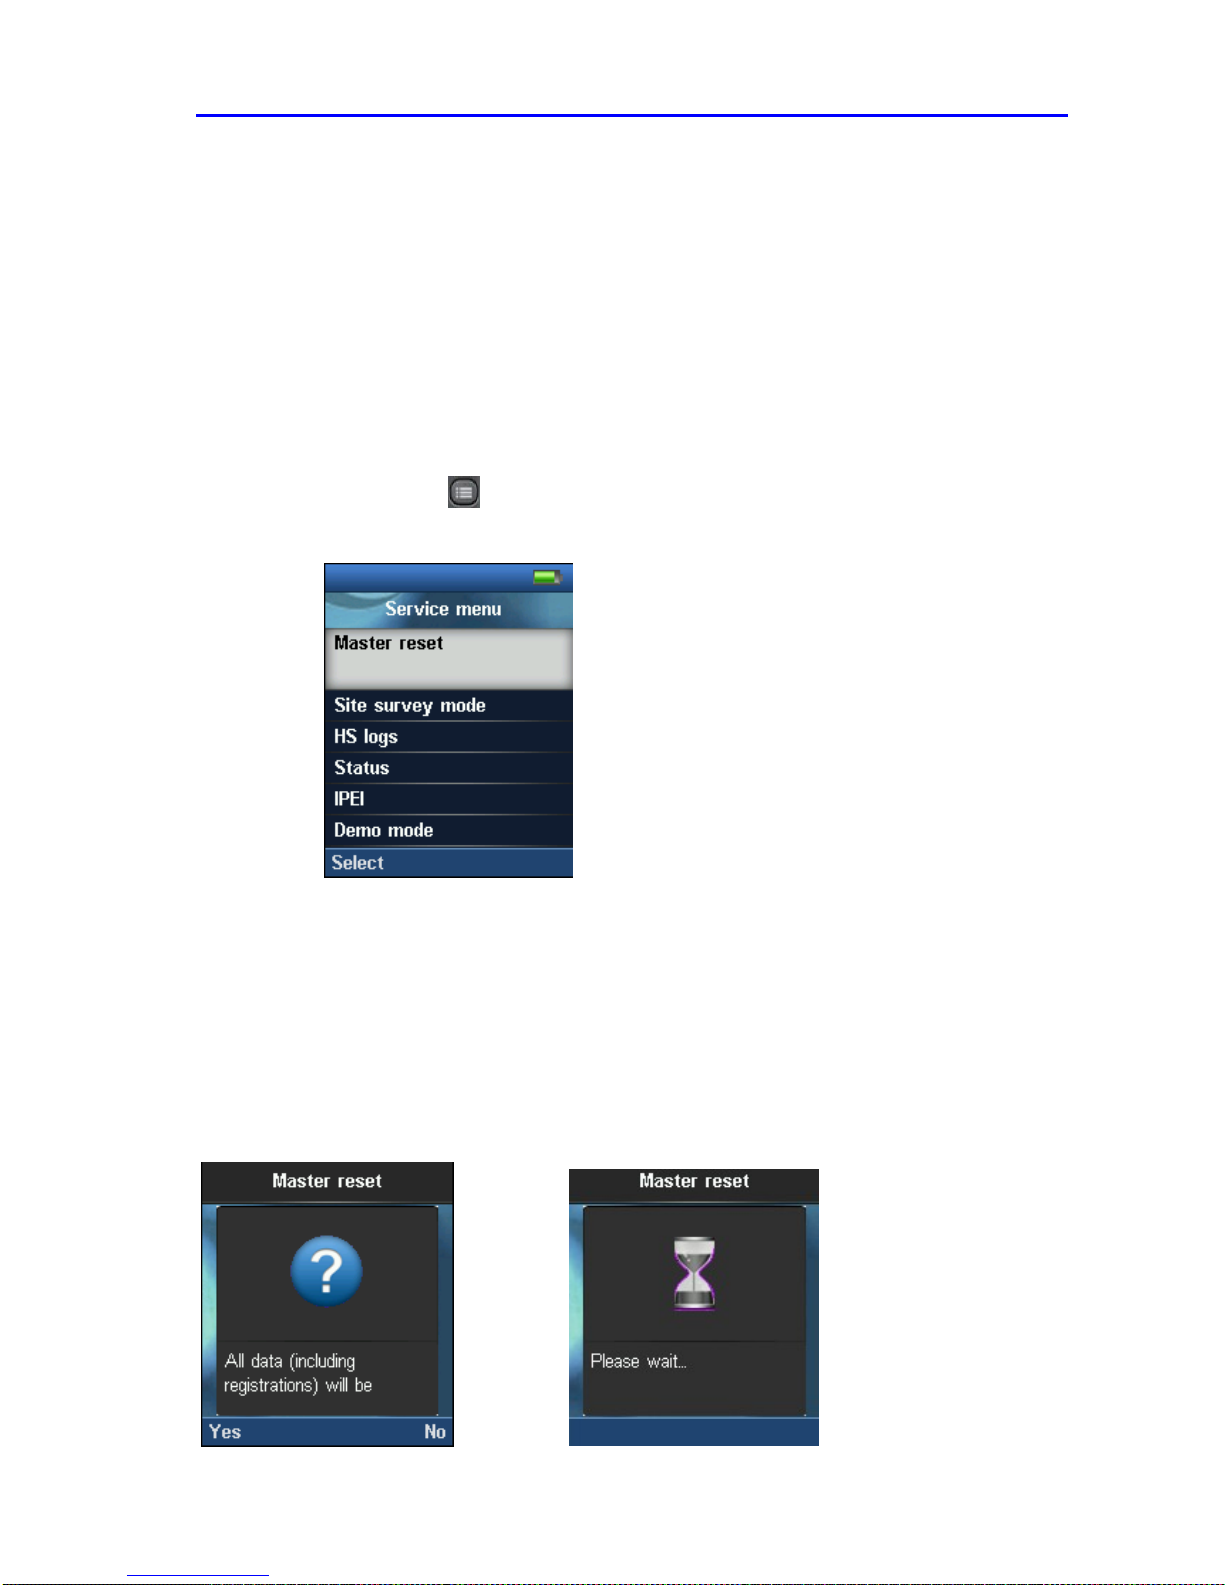
Service Menu
This menu is normally used to reveal features not used/seen by the end-user. By means of a special
key sequence a special service menu can be accessed. This service menu enables some special features
like Master reset, Site survey mode, Handset logs, Status, IPEI, Demo mode, Wideband and Test Tone.
To access the service menu, do as following step:
STEP 1 Click on Menu in idle mode > Type *SERVICE* or *7378423* from the keypad to
display the Service Menu
Service Menu Parameter Definitions
The Service Menu is not for end users – only installers and suppliers.
Master Reset
This feature allows the user to clear all settings to default, including registration and bring Handset the to
normal condition and initial state.
Valid inputs: Yes or No
Screen shots
Page 24
Version 0.4 Page | 25
Site Survey Mode
To enable Site Survey Mode, do the following step:
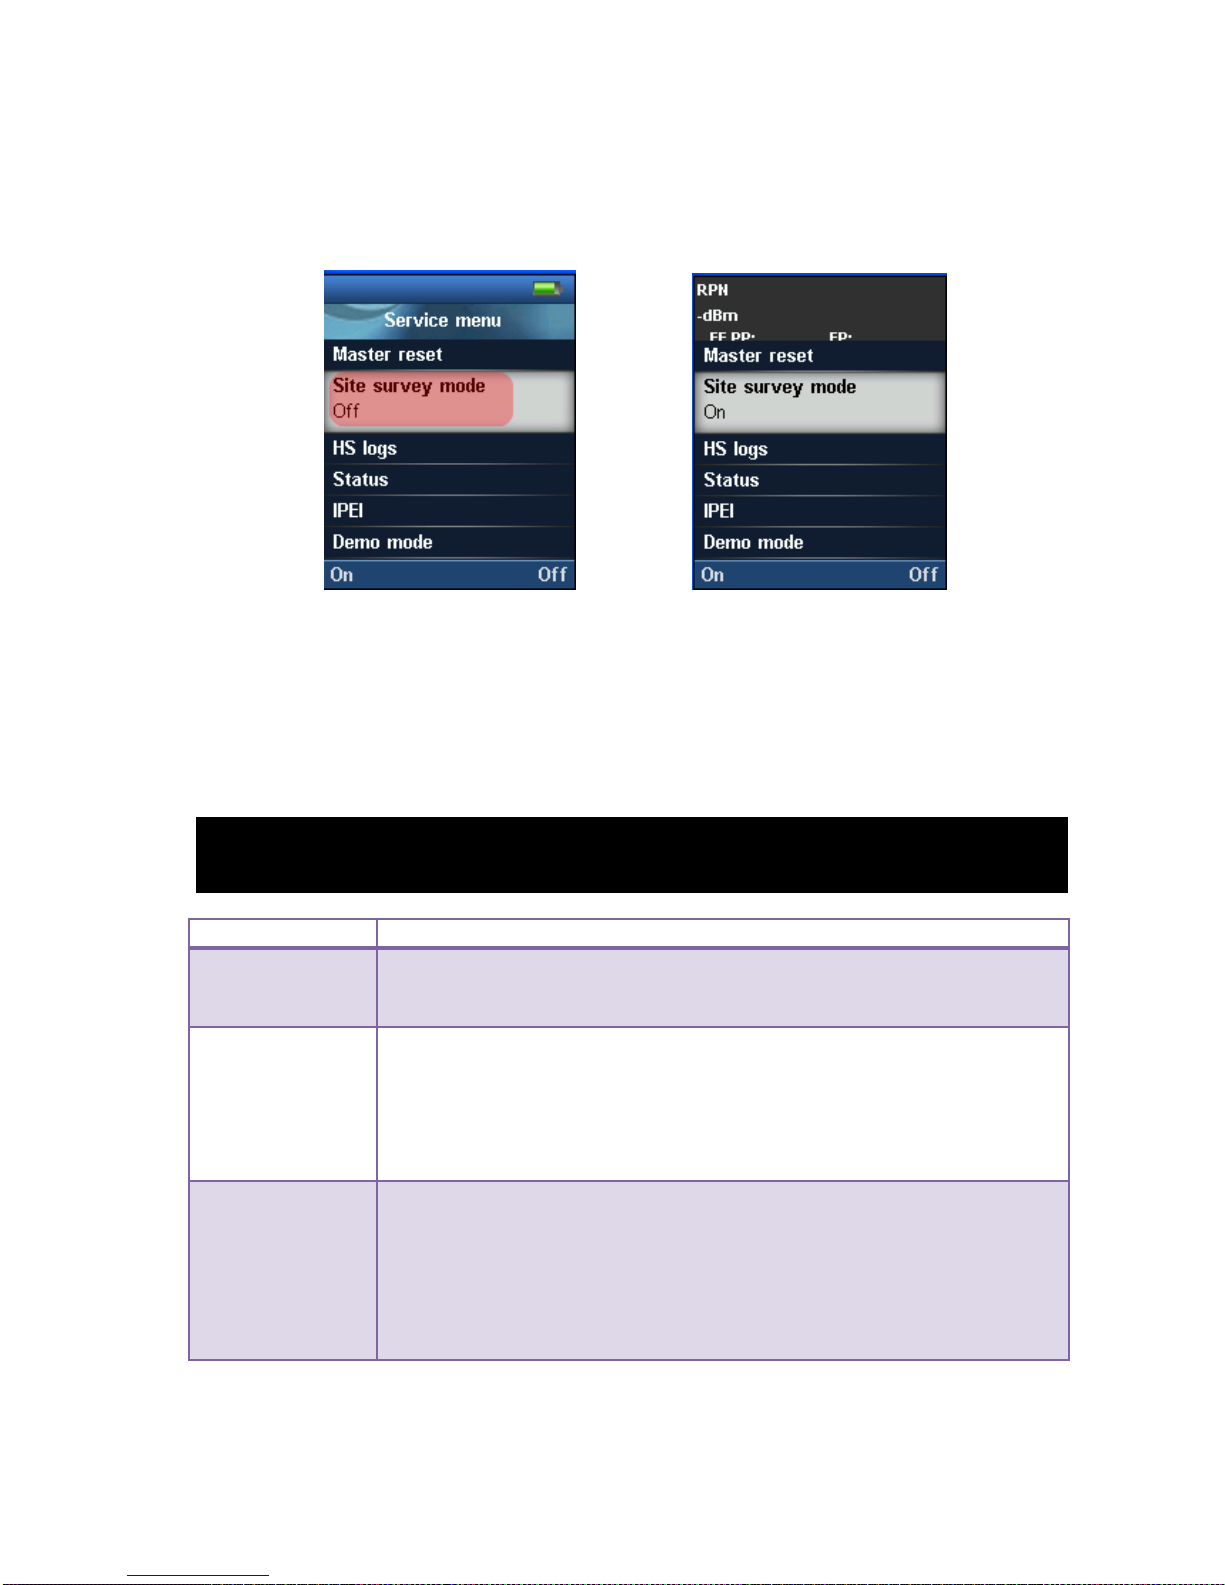
STEP 1 On the Service Menu (or Debug mode) scroll down to the Site survey mode > Enable
the Site survey mode to switch from Off to On.
This sets the handset in a state to list all visible bases around it and/or chained to the same base
station(s). Handsets in site survey mode can display up to 5 other handsets with the strongest signal
strength.
In Site Survey Mode the handset MMI shows the RFP (including slave RFP) to which the handset is
locked to and the corresponding signal strength (RSSI).
Valid Inputs: On or Off
Line1: RPN 28 20 03
Line2: -dBm 56 84 78
Line3: FE PP: 1 FP: 4
Parameter/Line Description
RPN
The line contains the list of base stations identified by the handset as RPNs of
the bases in respect to the signal strength values below. Up to 5 RPNs can be
displayed.
-dBm (Signal
Strength)
This indicates the actual signal strength information (RSSI) to the base station
the current handset is locked to and additional RFPs visible. RSSI unit is -dBm.
The RSSI value increases the closer the base is to the handset.
If the base could not be detected, the RSSI value will decrease and after a while
the entry will be deleted, if e.g. the dummy-bearer position has changed or the
RFP is unreachable.
FE PP:XX FP:XX
Indicates the number of sync/CRC errors (Frame-Errors) within the last update
cycle.
This information is only valid for the actual link to the relevant base station.
The PP value is the number of detected Sync/CRC error(s) within the last 100
receiving frames (per sec.). The FP value is the number of received bit
information within the last 100 receiving frames (per sec.). This information is
interpreted as Sync and CRC errors on the base station receiving side.
Page 25
Version 0.4 Page | 26
HS Logs
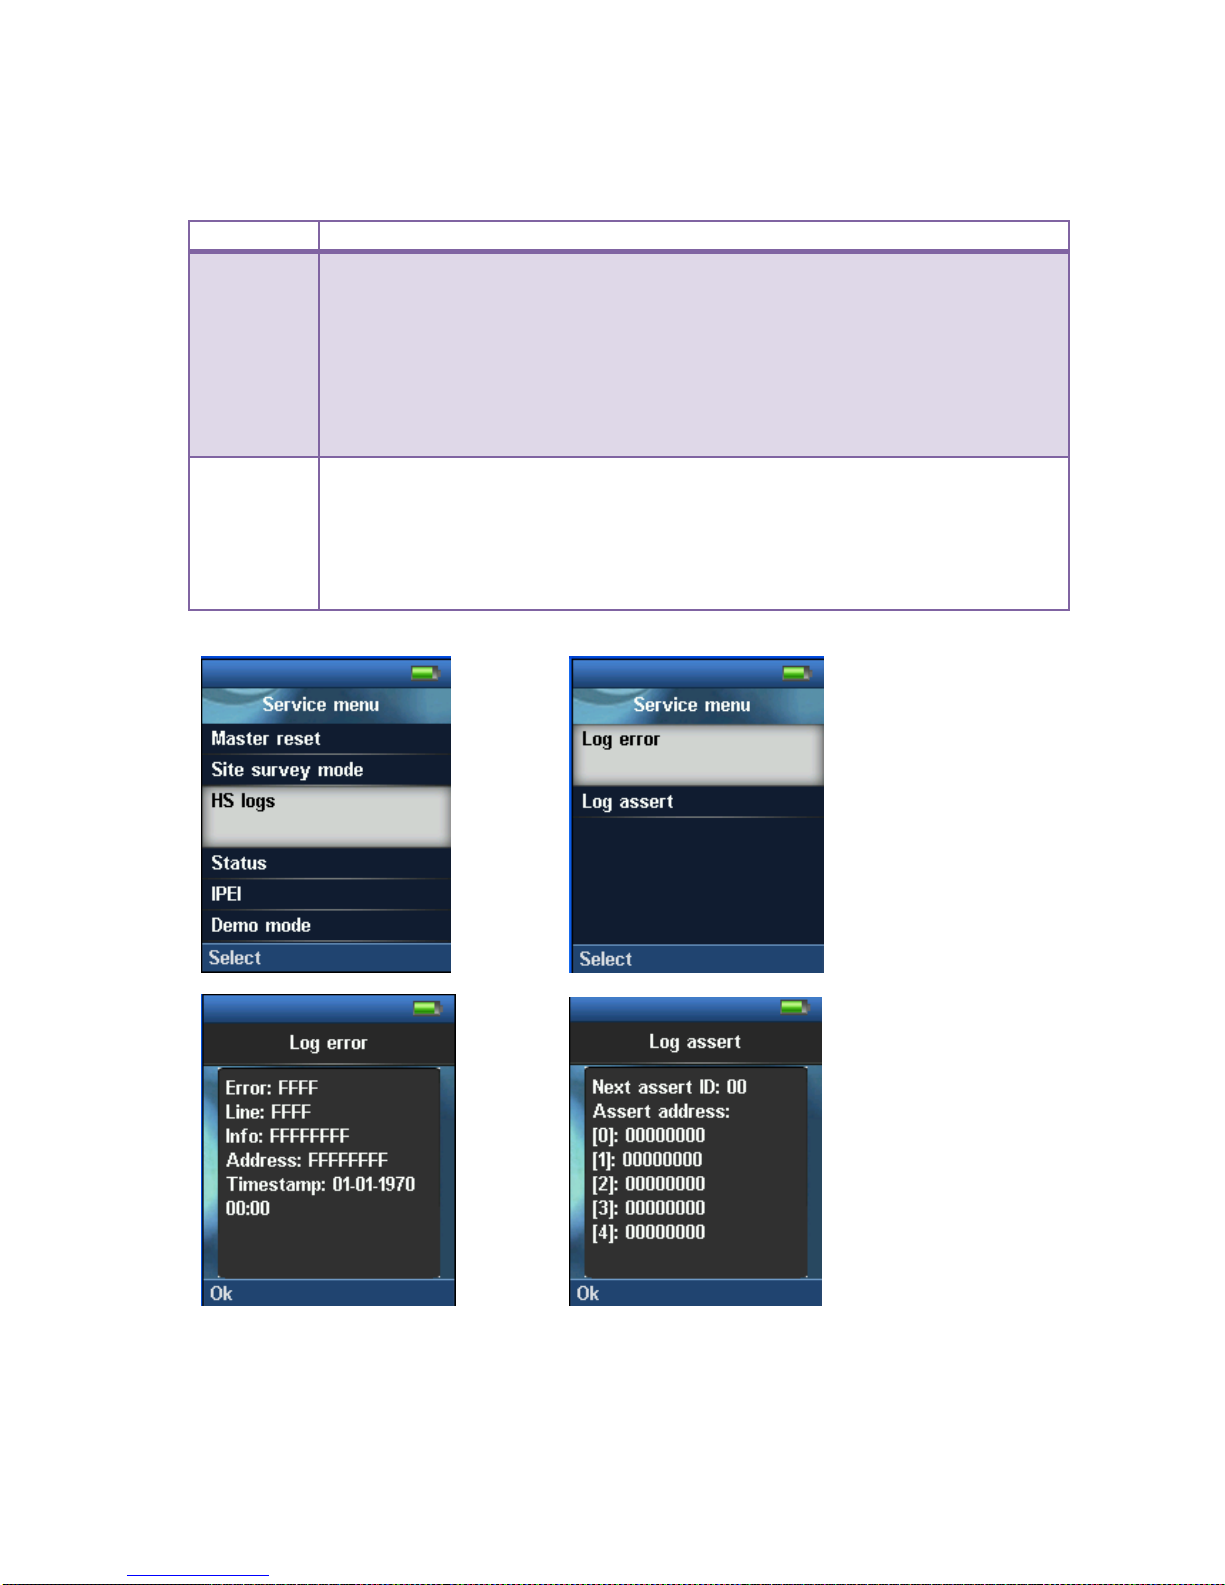
The HS log is a debugging feature that allows the user to retrieve low level interesting messages from
the handset.
HS Logs Description
Log error These are debug error logs retrieved from the PP log file. The last log retrieved is
formatted into:
Error: Log event error code. Valid value is 0000 to FFFF (in Hex).
Line: Location within the software code which triggered this error. Valid value is 0000
to FFFF (in Hex).
Address: Register bank and/address from which error occurred. Valid value is
00000000 to FFFFFFFF (in Hex.)
Timestamp: Date and Time when the log error event occurred.
Log Assert This reports of the function/exception handler that run after an erroneous state in
handset operation.
Next assert ID: Immediate exception handler ID to be run when a specific error occurs.
Valid value is 00 to FF (in Hex).
Assert address: Register bank and/address where an exception handler is executed as
a result of the error which occurred. Valid value is 00000000 to FFFFFFFF (in Hex.)
Screenshots
Page 26
Version 0.4 Page | 27
Status
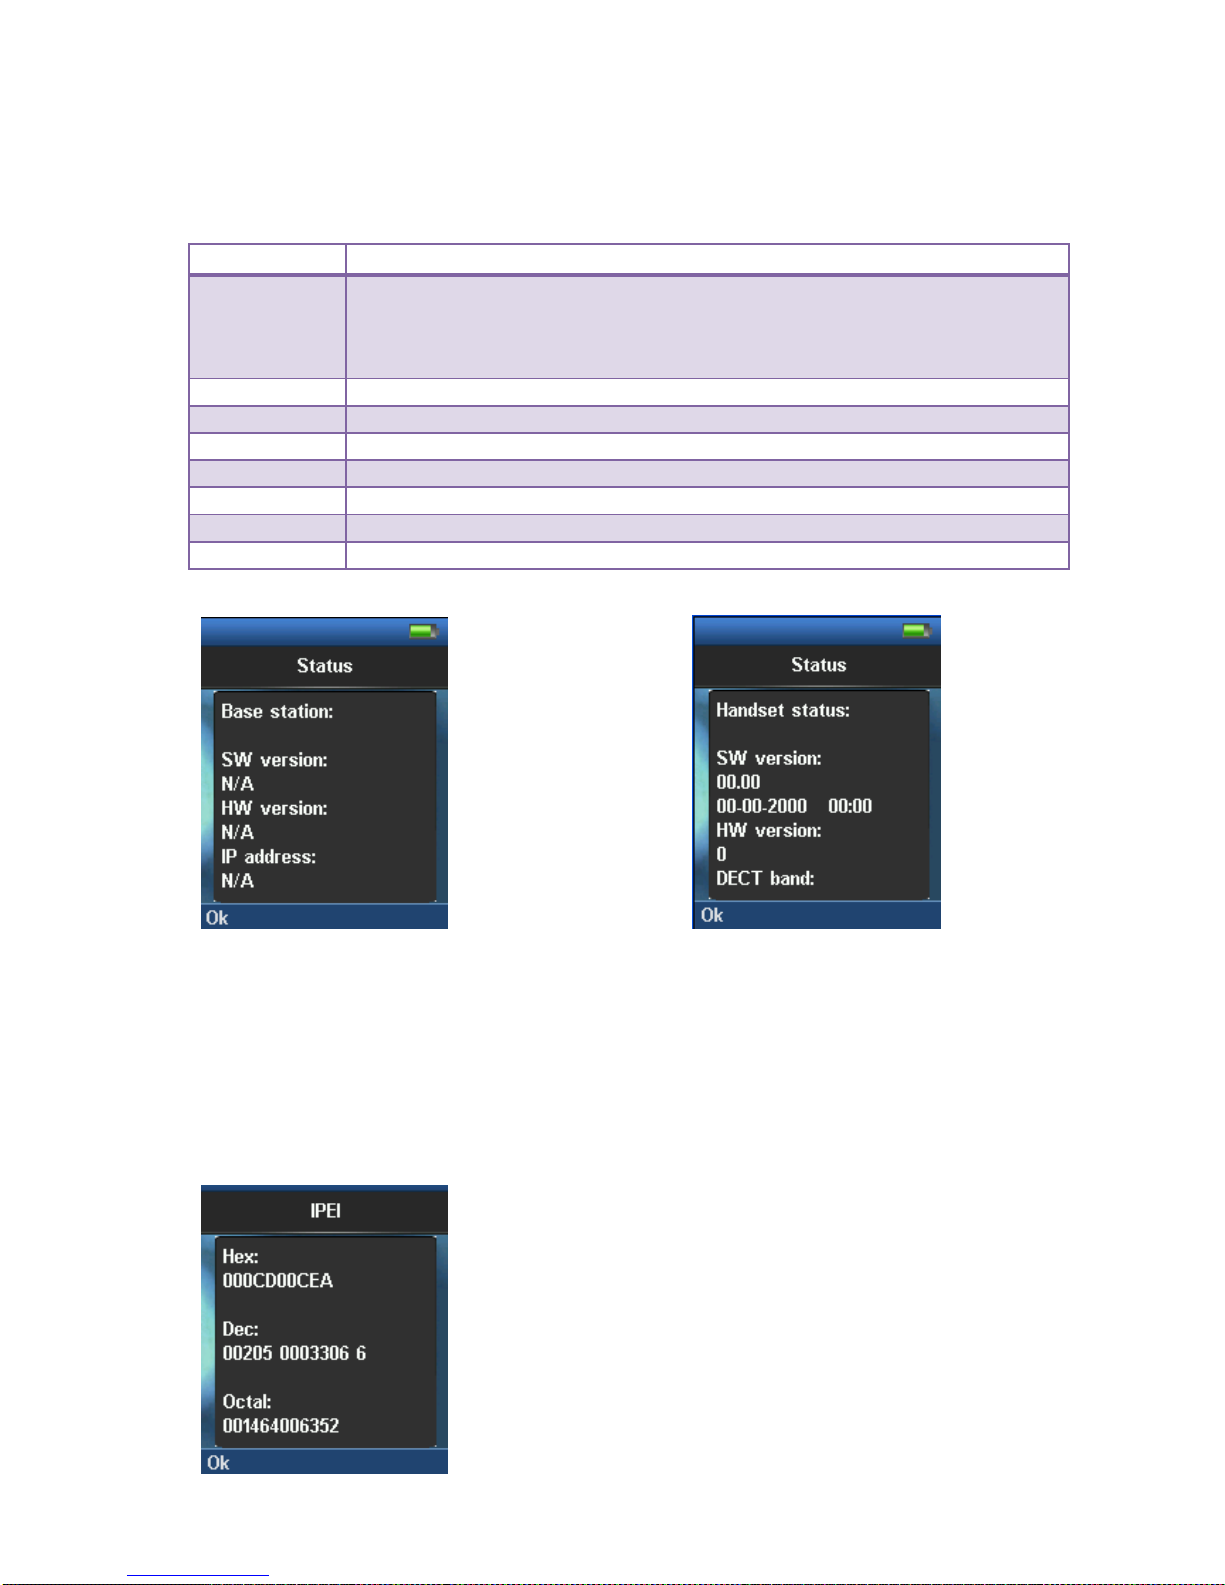
This provides the present condition of the handset and the base station it is location registered to.
Some of the information available in this mode is described in the table below (this information is
updated during location request update from the DECT system).
Parameter Description
SW Version Base station: Current firmware installed on the current Base station the Handset is
location registered to.
Handset: firmware presently installed in the handset.
Nomenclature: Version Date Stamp (for e.g.: 00.21 01-07-2010 00:00).
HW Version Current hardware module used in base station and handset.
DECT Band Operating frequency of system. DECT band includes US, EU, LTAM, SA, N/A options.
IP Address IP address of base station.
MAC Address HW address of base station.
System Name Name describing the SME network. Usually a string of 16 bytes.
Battery Level Current handset battery energy position (in %).
IPEI: HW address of the handset - see description below.
IPEI
The IPEI (International Portable Equipment Identity) is a unique identification of portable part
(handset) and DECT Repeater. The IPEI is formatted and displayed in HEX, OCT, and OCT
nomenclatures.
Page 27

Version 0.4 Page | 28
Demo mode
The demo mode enables constantly backlighting, so be aware of that when this mode is enabled,
backlight saving is disabled and therefore battery consumption will increase.
Wideband
When Wideband mode is enabled (On) the handset supports G722 codec, but to ensure Wideband
audio remember to enable the codec in the base station as well. When Wideband is disabled (Off)
Narrowband codec is used, the option Prefer is not supported at the moment.
Test Tone on OK key
When this feature is enabled (On) a 1 kHz test tone can be put into the audio streaming, e.g. when a
call has been established press the centre key of the handset (where this feature is enabled) and the
test tone is streamed through to the counterpart handset.
Handover
The Handover feature is for Interquartz internal test only (ensure that all settings are set to Off).
Page 28
Version 0.4 Page | 29
6 Calls Operations – Handset MMI
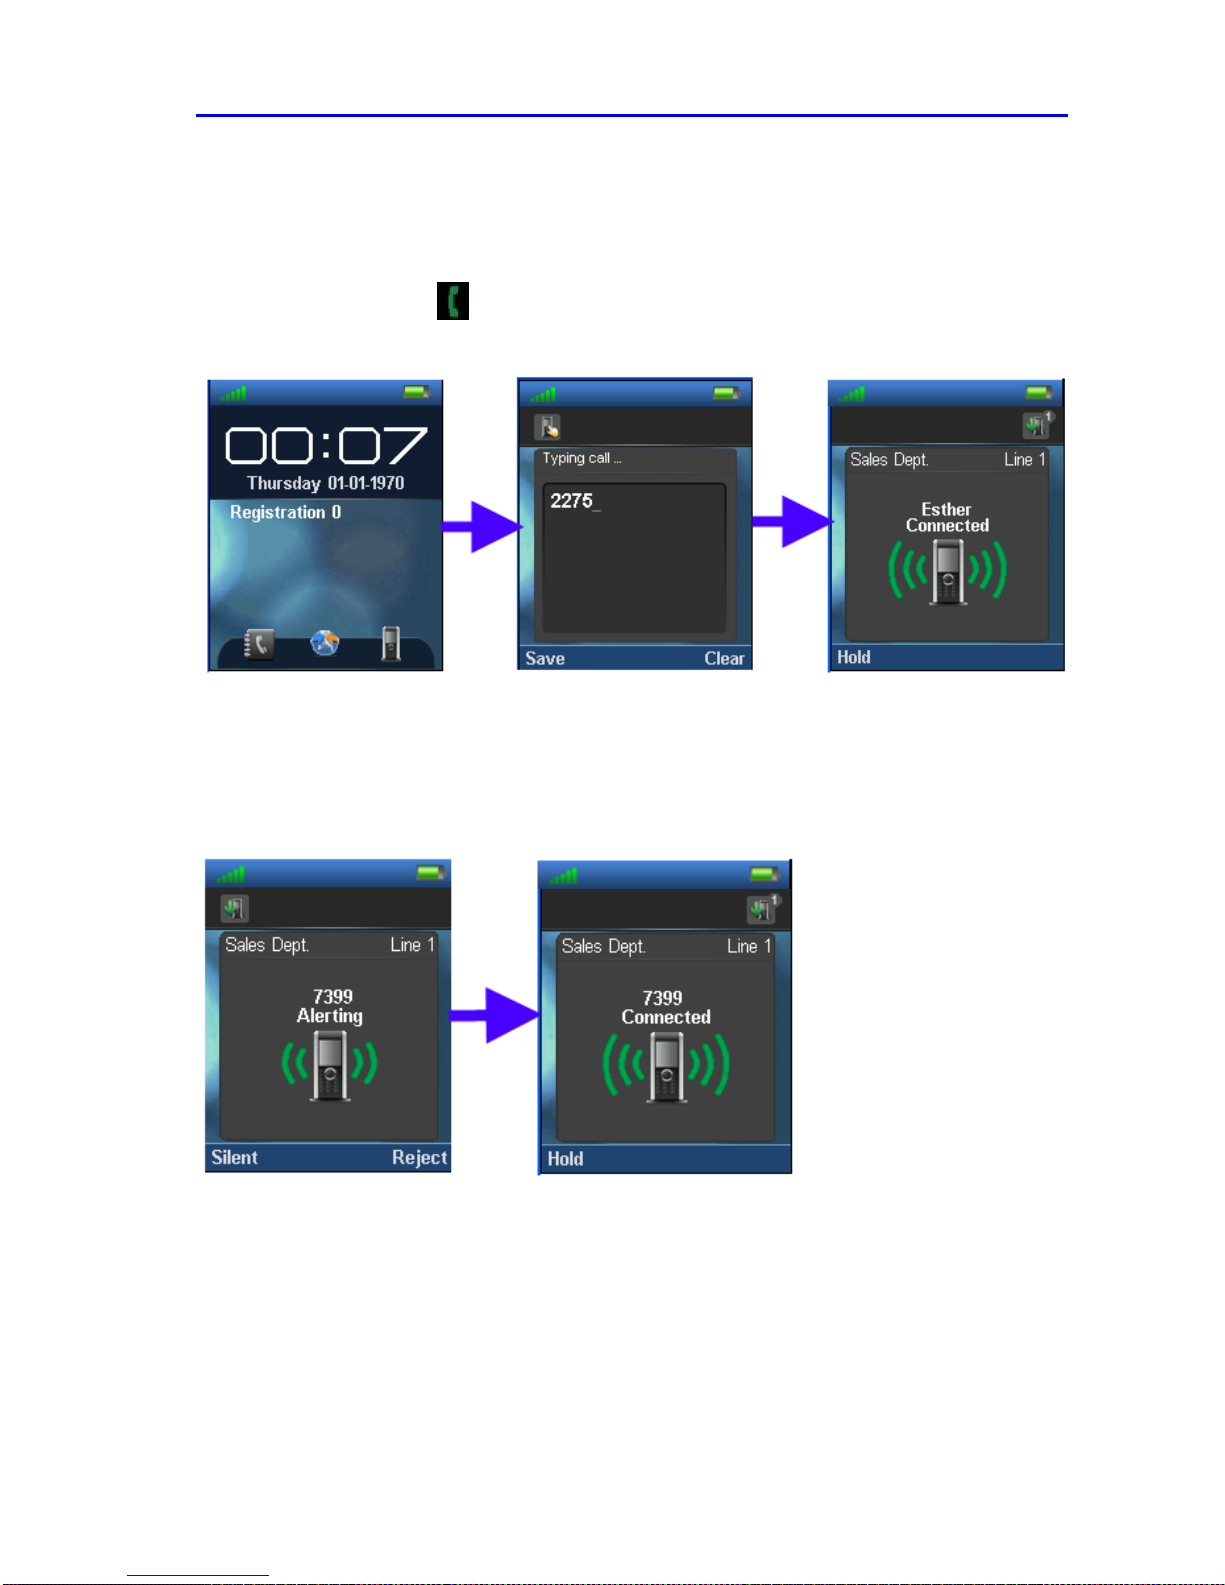
Initiating Calls
Enter Number
Press Green Button to start dialling
Originating Party
Destination Party
The destination party must press the Green button available on its handset to accept the
incoming call or reject to disallow the call.
Page 29
Version 0.4 Page | 30
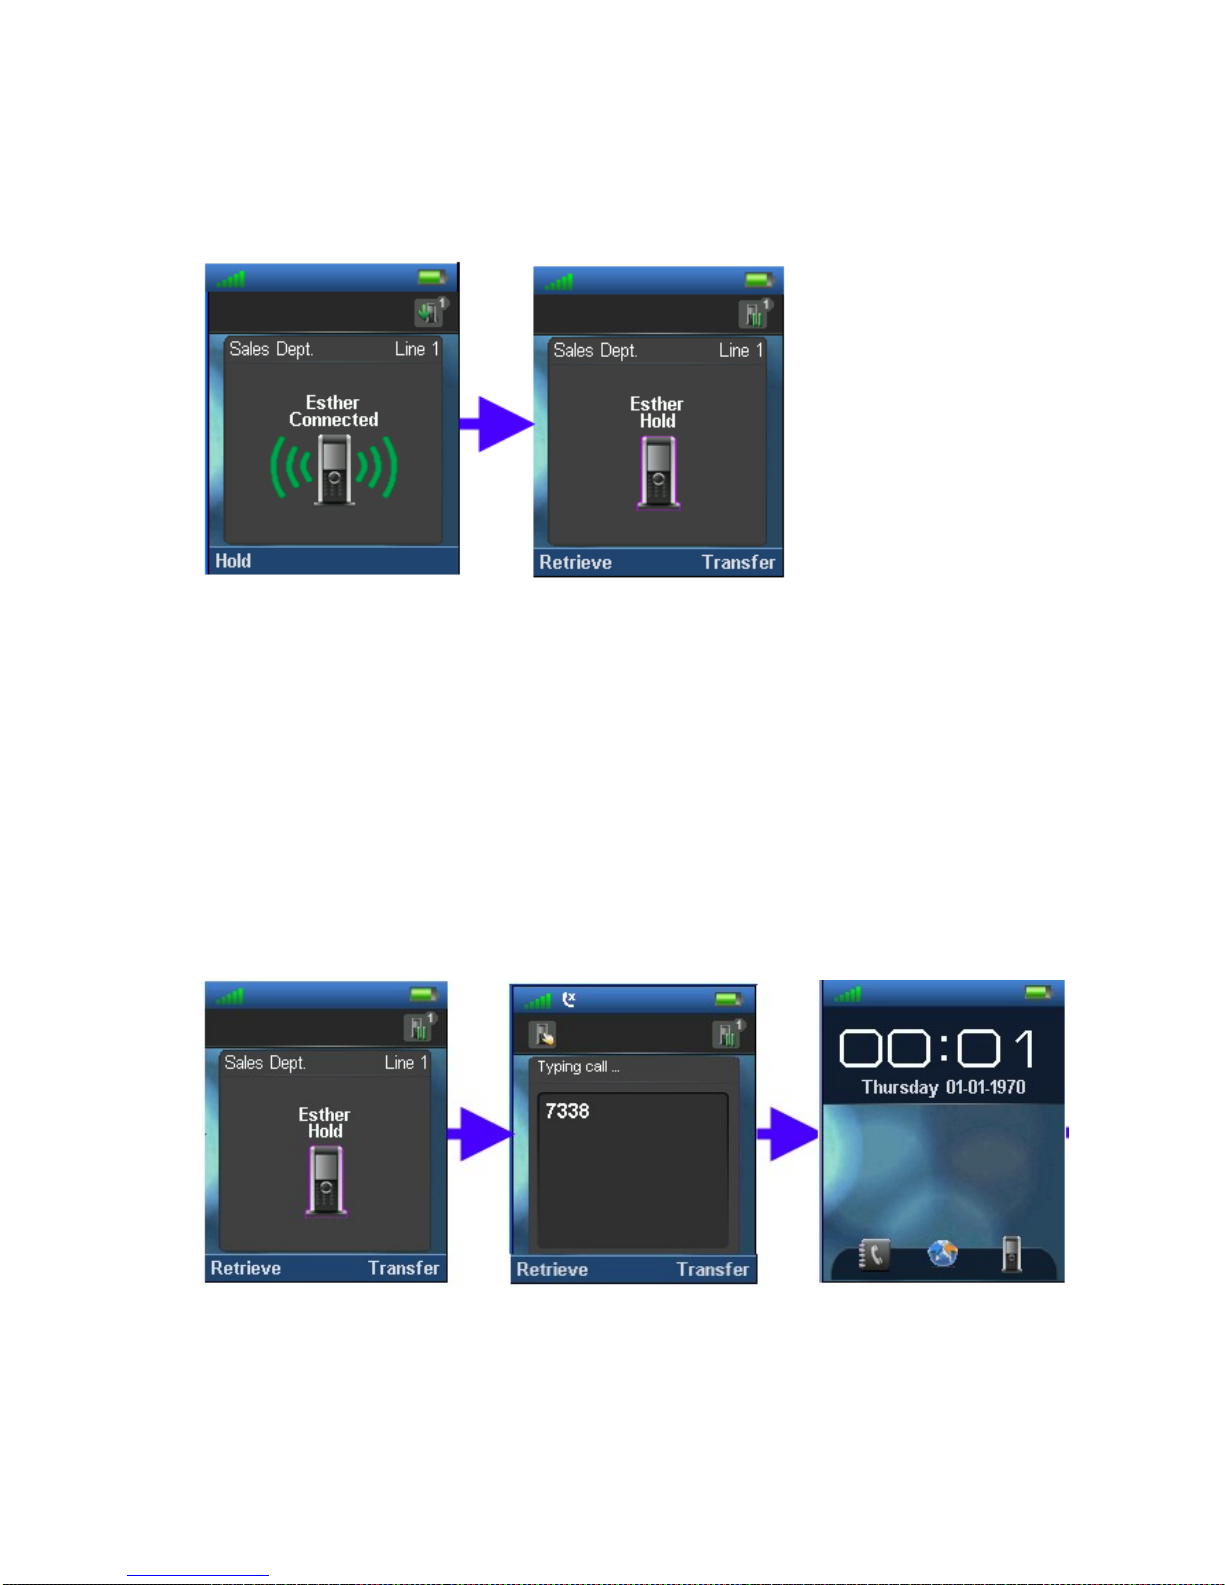
Call Holding
Press the Hold option at the left while call session is in progress or “Connected”,
Press “Retrieve” option to re-connect the call placed on hold.
Call Transfer (Blind)
While “Connected”, press the Hold option, to put the call session on hold.
Enter the transfer destination number.
Next, Press the “Transfer” option to transfer call session from Originator to the Target
Transfer. The Facilitator handset performs transfer procedure and returns to Idle mode (On
hook mode)
Facilitator
Page 30

Version 0.4 Page | 32
7 Flow Graphs – Call Transfer
Some Definitions – Call Transfer
There are three actors in a given transfer event, each playing one of the following roles:
Transferee: the party being transferred to, the Transfer Target.
Transferor: the party initiating the transfer.
Transfer Target: the new party being introduced into a call with the Transferee.
The following roles are used to describe transfer requirements and scenarios:
1. Originator - wishes to place a call to the Recipient. This actor is the source of the first
INVITE in a session, to a Facilitator or a Screener.
2. Facilitator - receives a call or out-of-band request from the Originator, establishes a call to the
Recipient through the Screener, and connects the Originator to the Recipient.
3. Screener - receives a call ultimately intended for the Recipient and transfers the calling party to
the Recipient if appropriate.
4. Recipient - the party the Originator is ultimately connected to.
Call Transfer - Requirements
Any party in a call session is able to transfer any other party in that session at any point in that session.
The Transferor and the Transferee are not removed from a session as part of a transfer transaction.
This requirement is needed so for e.g. ring-back on transfer failure will not be lost.
The Transferor is aware of whether or not the transfer was successful.
Types of Call Transfer
There are three different methods to transferring calls depending on the SIP Server the customer may
be using (most SIP server call transfer method is based on the Refer method). They are as follows and
will be explained in more detail below:
Basic or Unattended Transfer - Basic Transfer consists of the Transferor providing the Transfer
Target's contact to the Transferee. The Transferee attempts to establish a session using that
contact and reports the results of that attempt to the Transferor. The signalling relationship
between the Transferor and Transferee is not terminated, so the call is recoverable if the Transfer
Target cannot be reached. Note that the Transfer Target's contact information has been exposed
to the Transferee. The provided contact can be used to make new calls in the future.
Basic or Unattended Transfer with Consultation - Transfer with Consultation Hold is the same as
the Basic Transfer above but involves a session between the Transferor and the Transfer Target
before the transfer actually takes place. This is implemented with SIP Hold and Transfer feature.
Attended Transfer - The Transferor places the Transferee on hold, establishes a call with the
Transfer Target to alert them to the impending transfer, places the Target on hold, then proceeds
with transfer.
Page 31

Version 0.4 Page | 33
8 Flow Graphs – Conference Calls
The intent of this document is to describe how to establish conference call sessions between one or
multiple parties from a typical handset MMI. Secondly, explain the conference call scenarios in a SME
network – using call flow diagrams.
Call Conferencing Operation
In call conference process architecture, a user agent (UA), known as a participant, establishes a SIP
dialog with another UA, known as a focus. The focus is the central point of control, authentication,
and authorization. This section defines the operation of a focus and participant UAs. Note that only
the signalling (SIP) needs to be centralized; the media can be centrally mixed, distributed, or even
multicast.
Types of Conference Calls
There are three main types of conference calls approach explored from the perspective of different
user agent (UA) types (usually known as participant). We briefly describe two of them.
Conference unaware participant:
The simplest user agent is able to dial in to a conference and to be invited to a conference. Any
conferencing information is optionally conveyed to/from it using non-SIP means. Such a user
agent does not usually host a conference.
Conference aware participant
A conference-aware user agent supports SIP conferencing call control SUCH as a conference
participant. A conference-aware UA should be able to process SIP redirections.
A conference-aware UA usually renders to the user any information about the conference
obtained from the SIP conference package/feature.
 Loading...