

Page 1
Gigaset AS180/AS280
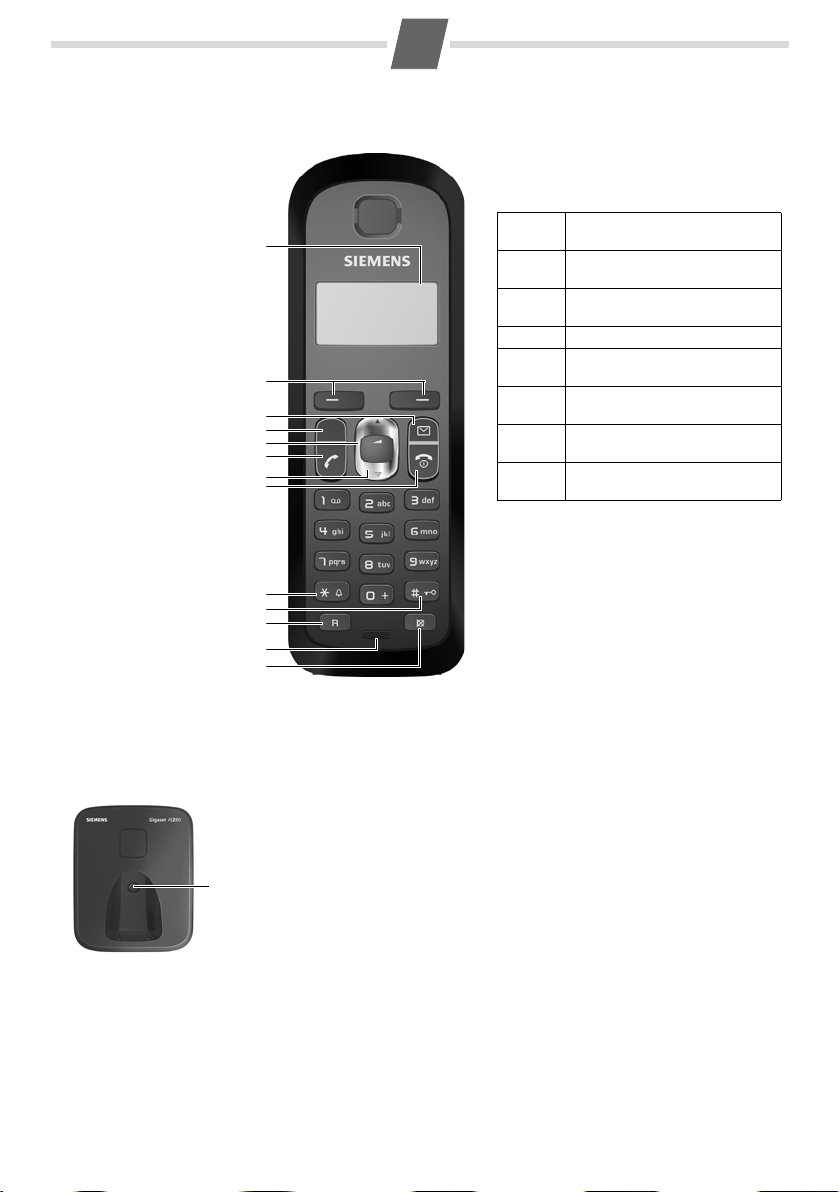
The handset at a glance
1 Charge status of
the batteries
2Display keys
3Message key
Flashes: new messages
received
4 AS180:
h Directory key
AS280:
d Handsfree key
5 Control key (u)
6Talk key
7 AS280:
h Directory key
(press down)
8 End call and
On/Off key
9Ringer on/off
(press and hold
in idle status)
10 Keypad lock on/off
(press and hold)
11 Recall key
- Consultation call
(flash)
- Dialling pause
(press and hold)
12 Microphone
13 "Microphone off" key
9
10
11
12
13
1
2
3
4
5
6
7
8
1
V
11. 12 . 11: 56
INT MENU
Display keys on handset:
Pressing a key launches the function that
appears above that key in the display.
Display
icon
INT
Function when pressed
Call other registered handsets
¢ page 9.
MENU
“
U
T
˜
OK
Open main/submenu (see
Menu tree
Go back one menu level.
Scroll up/down or adjust
volume with u.
Move cursor to left/right
with u.
Backspace deletes one charac-
ter at a time from right to left.
Confirm menu function or
save entry.
¢ page 13).
The base station at a glance
AS180/AS280 base station
Registration/paging key:
Search for handsets (press briefly, "Paging"
Register handsets (press and hold
¢ page 9).
¢ page 9)
Page 2
2
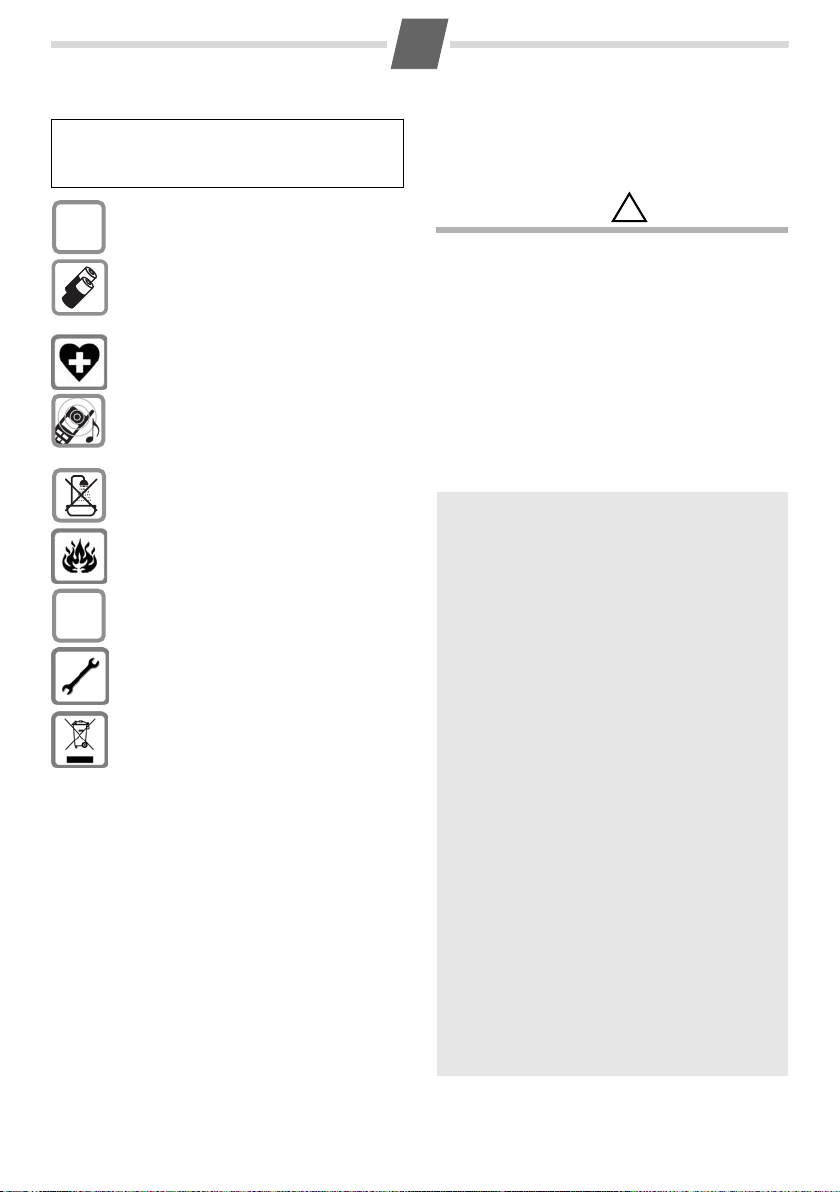
Safety precautions
Read this user guide and the safety precautions carefully
before use. Explain their content and the potential haz
ards associated with using the telephone to your children.
Only use the mains adapter supplied.
$
Fit only the recommended, rechargeable
batteries (¢ page 11), i.e. never use any
other battery type or non-rechargeable batteries as this could result in significant health risks
and personal injury.
The operation of medical appliances may be
affected. Be aware of the technical conditions
in
your particular environment, e.g. doctor's
surgery.
Do not hold the rear of the handset to your ear
when it is ringing. Otherwise you risk serious
and permanent damage to your hearing.
The handset may cause an unpleasant humming noise in hearing aids.
Do not install the phone in a bathroom or
shower room. The handset and base station
are
not splashproof.
Do not use your phone in environments with a
potential explosion hazard, e.g. paint shops.
If you give your Gigaset to someone else, make
sure you also give them the user guide.
ƒ
Please remove faulty base stations from use or
have them repaired by Service, as they could
interfere with other wireless services.
Disposal
Batteries should not be disposed of in general
household waste. Observe the local waste dis
posal regulations, details of which can be
obtained from your local authority or the dealer
you purchased the product from.
All electrical and electronic equipment must be
disposed of separately from general household
waste using the sites designated by local
authorities.
If a product displays this symbol of a crossed-out
rubbish bin, the product is subject to European
Directive 2002/96/EC.
The appropriate disposal and separate collection of used equipment serve to prevent potential harm to the environment and to health.
They are a precondition for the re-use and recy
cling of used electrical and electronic equipment.
For further information on disposing of your
used equipment, please contact your local
authority, your refuse collection service or the
dealer you purchased the product from.
Emergency numbers cannot be dialled if the keypad lock
(¢ page 1) is activated!
Not all of the functions described in this user guide are
available in all countries.
Care
Wipe the base station, charging cradle and handset
-
with a damp cloth (do not use solvent) or an anti
static cloth.
Never use a dry cloth. This can cause static.
Contact with liquid
!
If the handset has come into contact with liquid:
◆ Switch off the handset and remove the bat-
tery pack immediately.
◆ Allow the liquid to drain from the handset.
◆ Pat all parts dry, then place the handset with
the battery compartment open and the keypad
facing down in a dry, warm place for at least
72
hours (not in a microwave, oven etc.).
◆ Do not switch on the handset again until it is
completely dry.
When it has fully dried out, you will normally be
able to use it again.
ECO DECT
You are helping to protect the environment with
your Gigaset AS180/AS280.
Reduced energy consumption
Your telephone has a power-saving adapter plug
and uses less power.
Reduced transmission power
The transmission power of your telephone is
reduced automatically:
The handset's transmission power is reduced
-
depending on the distance to the base station.
The transmission power on the base station is
reduced to virtually zero when only one handset
is registered and the handset is in the base sta
tion.
You can reduce the transmission power of the
handset and base station even more by using
Eco Mode/Eco Mode+ (see Menu tree
¢ page 14):
◆ Eco Mode: 80% transmission power reduc-
-
tion in standby mode and during a call (the
range of the base station is reduced).
◆ Eco Mode+: 100% transmission power deac-
tivation in standby mode (top left display icon
½). Press and hold the talk key c to check
that the base station can be reached. You will
hear the ringing tone if the base station can
be reached.
-
-
Page 3
3
First steps
Check the pack contents
◆ one Gigaset AS180/AS280 base station,
◆ one mains adapter,
◆ one Gigaset AS18H/AS28H handset,
◆ one phone cord,
◆ two batteries,
◆ one battery cover,
◆ one user guide.
If you have purchased a model with multiple handsets, the package should contain two
batteries, a battery cover and a charging cradle with mains adapter for each additional
handset.
Setting up the base station and charging cradle (if included)
The base station and charging cradle are designed for use in enclosed dry rooms with a
temperature range of +5°C to +45°C.
¤ Set up the base station at a central location on a flat, non-slip surface in your house or
apartment.
Please note
Pay attention to the range of the base station.
This is up to 300 m in unobstructed outdoor areas and up to 50 m inside buildings.
The range is reduced when Eco Mode (
The phone's feet do not usually leave any marks on surfaces. However, due to the multitude of different varnishes and polishes used on today's furnishings, the occurrence of
marks on the surfaces cannot be completely ruled out.
You can also mount the base station and charging cradle on the wall.
Please note:
◆ Never expose the telephone to the influence of heat sources, direct sunlight or other
electrical devices.
◆ Protect your Gigaset from moisture, dust, corrosive liquids and vapours.
¢ page 14) is activated.
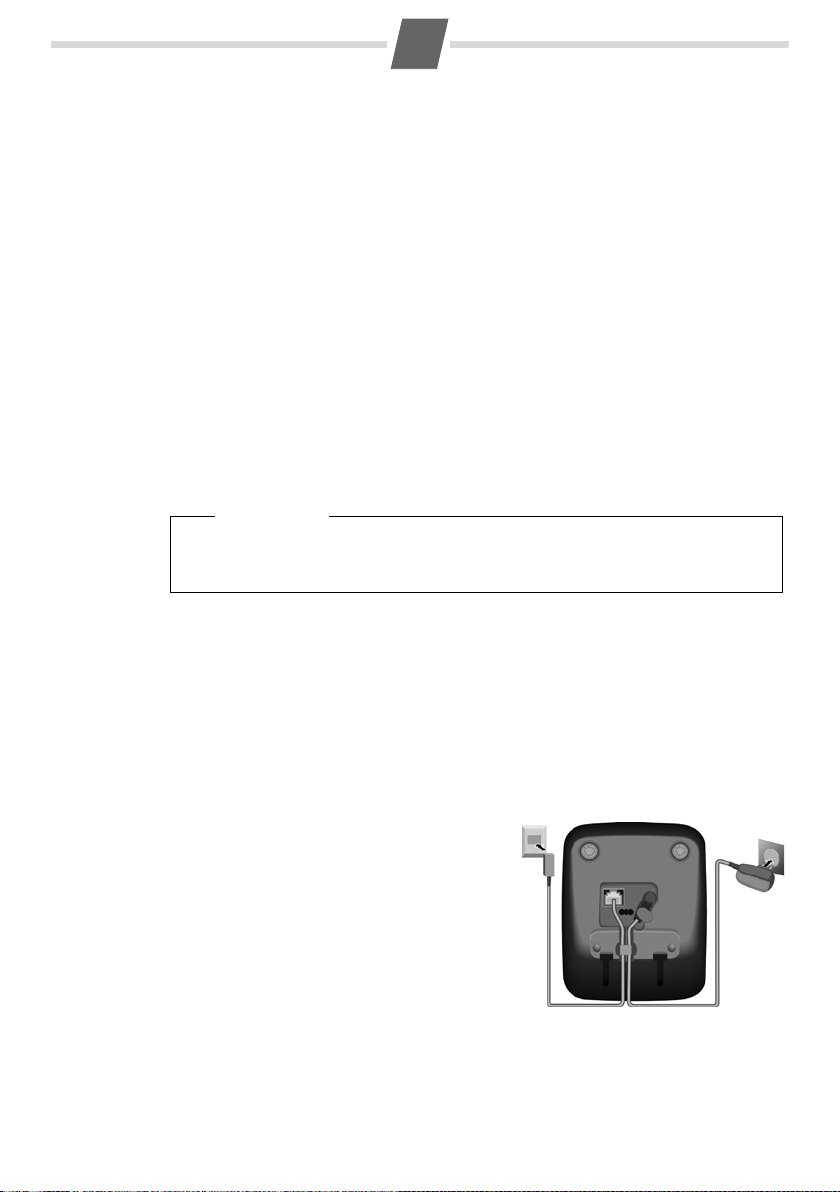
Connecting the base station
¤ First connect the mains adapter 1.
¤ Then connect the telephone jack 2
and insert the cables into the cable
ducts.
Please note:
◆ The mains adapter must always be
connected, as the phone will not
operate without mains connection.
◆ Only use the mains adapter and
phone
cord supplied. Pin connections
on telephone cables can vary.
2
1
1
1
Page 4
4
Connecting the charging cradle (if included)
2
1
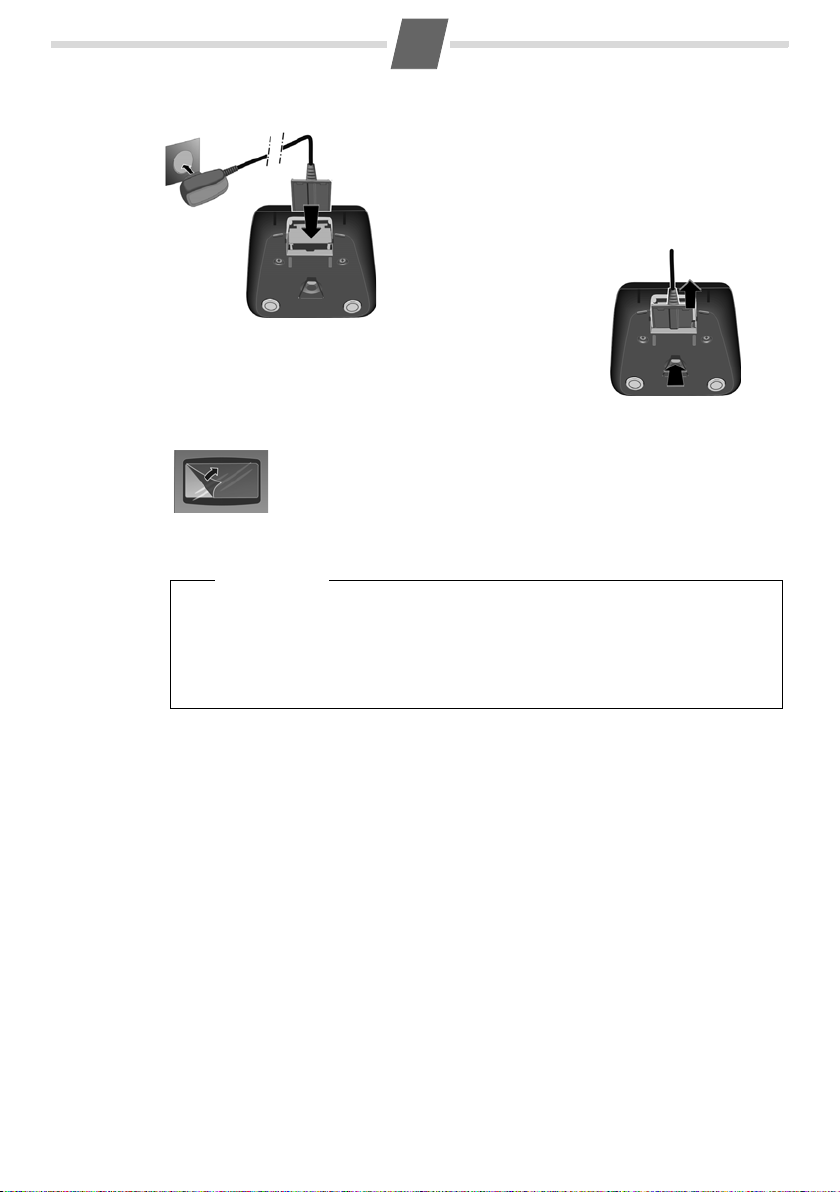
¤ Connect the flat plug from the power supply 1.
¤ Plug the mains adapter into the plug socket 2.
If you need to disconnect the plug from the charging cradle,
press the release button 1 and disconnect the plug 2.
Setting up the handset for use
The display is protected by a plastic film.
Please remove the protective film!
Inserting the batteries and closing the battery cover
Warning
Use only the rechargeable batteries (¢ page 11) recommended by Gigaset Commu-
nications GmbH*. Never use conventional (non-rechargeable) batteries, as this could
result in significant health risks and damage to property. For example, the outer casing of the batteries could be destroyed or the batteries could explode. The phone
could also malfunction or be damaged as a result of using batteries that are not of the
recommended type.
2
1
*Gigaset ommunications GmbH is a trademark licensee of Siemens AGC
Page 5
5
f
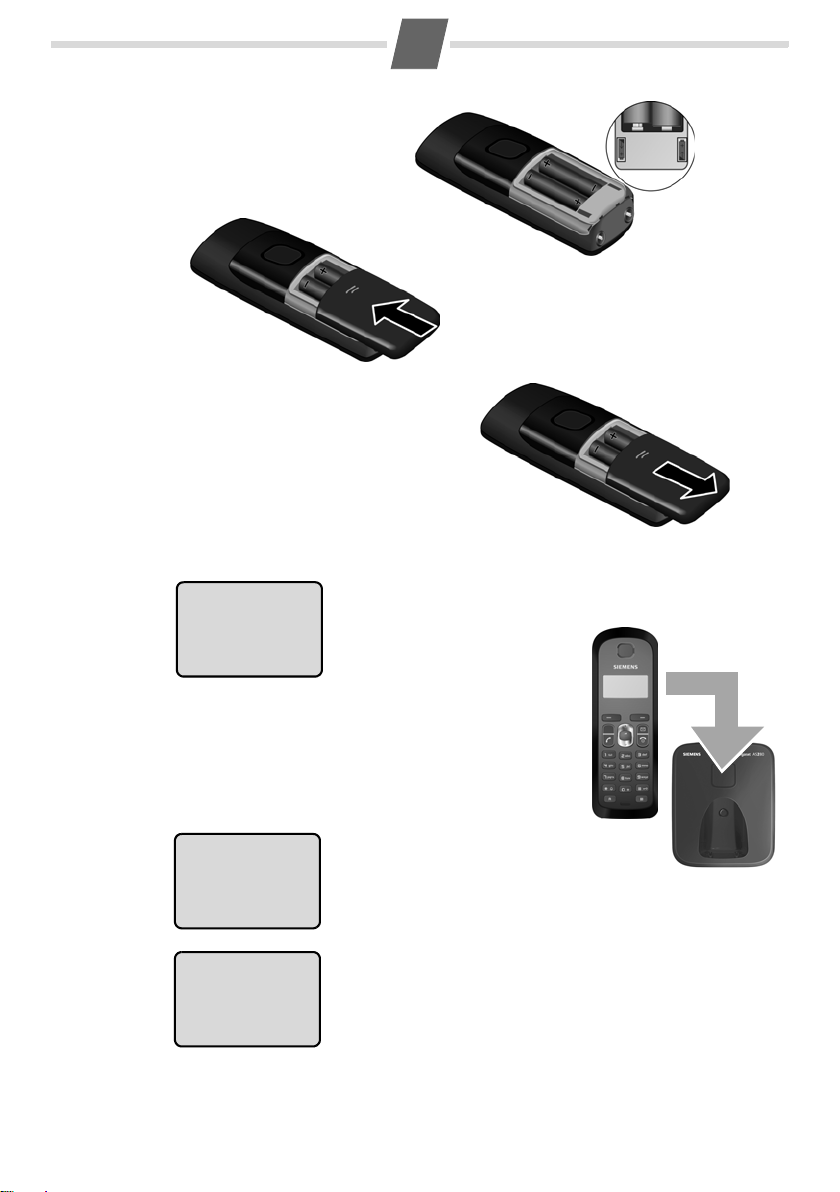
¤ Insert the batteries the right
way round.
The polarity is indicated in/on
the battery compartment.
¤ Slide the battery cover back into the
main casing until it clicks into place.
If you need to open the battery cover,
or instance to replace the batteries,
place your fingertip in the grooved area
on the top of the cover and slide down.
Placing the handset in the base station and registering
V
Put into base
MENU
Before you can use the phone, you must first register the
handset to the base station.
–
+
¤ Place the handset with
the display facing up
in the base station.
V
Registering
V
INT MENU
If you have purchased a model with multiple handsets, repeat the registration process
for each individual handset. Handsets are assigned the lowest available internal number
(1–4). If more than one handset is registered to the base station, the internal handset
The handset registers automatically.
Registration can take up to 5 minutes.
Do not remove the handset from
the base station during this time.
After successful registration, the idle screen is displayed.
Charge status of the batteries:
–
= e V U (flat to full)
–
= flashes: batteries almost flat
–
e V U flashes: charging
Page 6
6
number appears in the top left of the display, e.g. 2. If the internal numbers 1–4 are
already assigned to other devices, number
Please note
◆ Each key press interrupts the automatic registration.
◆ If automatic registration does not work, the handset will have to be registered
manually
◆ Only place the handset in the base station or charging cradle that is intended for
it.
(¢ page 9).
4 will be overwritten.
Initial charging and discharging of the batteries
The correct charge level can only be displayed if the batteries are first fully charged and
discharged.
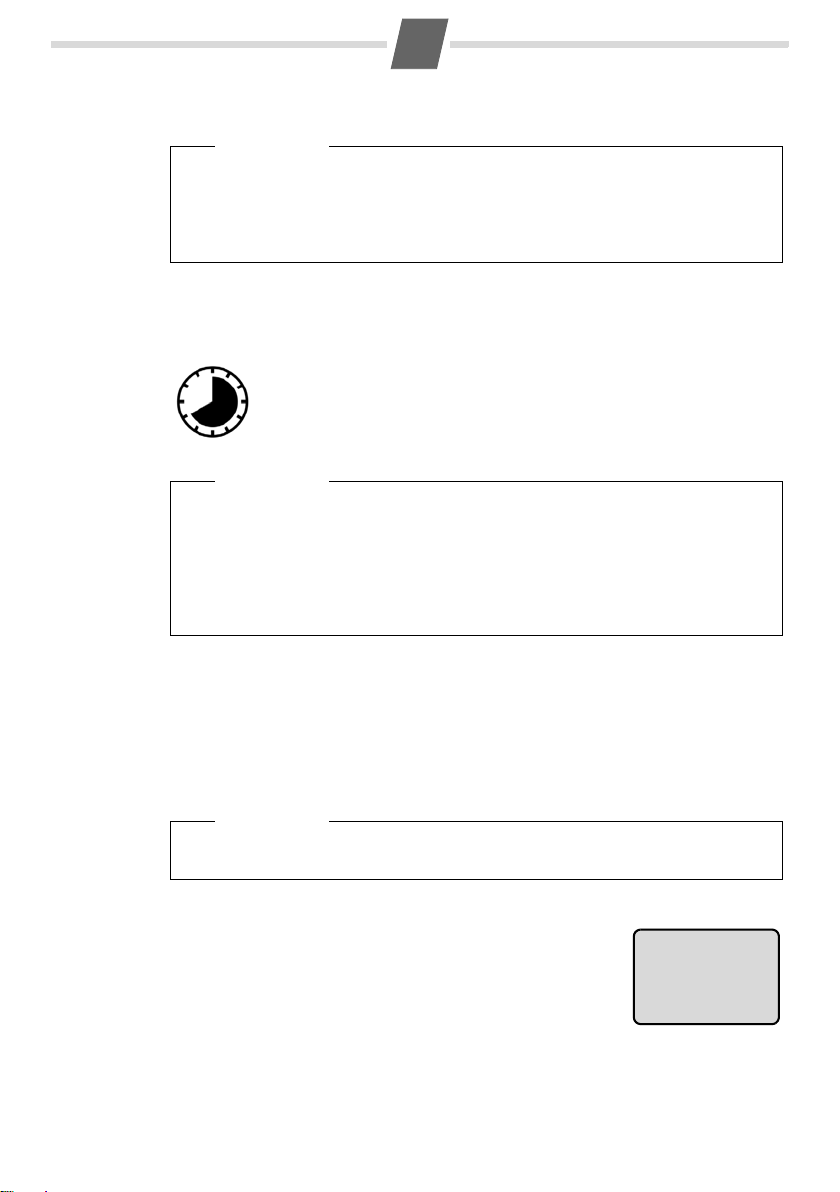
¤ Place the handset in the base station or charging cradle for
eight hours.
8 h
◆ After the first battery charge and discharge you may replace your handset in the
base station or charging cradle after every call.
◆ Always repeat the charging and discharging procedure if you remove the batteries
from the handset and reinsert them.
◆ The batteries may warm up during charging. This is not dangerous.
◆ After a while, the charge capacity of the batteries will decrease for technical rea-
sons.
¤ Then remove the handset from the base station or charging cradle
and do not replace it until the batteries are fully discharged.
Please note
Setting the date and time
Set the date and time so that the correct date and time can be assigned to incoming calls,
and so that the alarm can be used.
MENU ¢ Settings ¢ OK ¢ Date/Time ¢ OK
¢ Date: ¢ ~ (enter the day, month and year in 6-digit format) ¢ OK
¢ Time: ¢ ~ (enter hours and minutes in 4-digit format) ¢ OK (display message: Saved)
¢ a (press and hold to return to idle status)
Please note
When entering the time and date, you can move the position of an entry to the left
or right by pressing the control button up or down.
Display in idle status
Once the phone is registered and the time set,
the idle display is shown as in this example.
Activating/deactivating the handset
Press and hold the end call key a to activate or deactivate the handset.
If you place a deactivated handset in the base station or
charging cradle, it will automatically activate.
Your phone is now ready for use!
If you have any questions about using your phone, please read the tips on troubleshooting
("
Questions and answers" ¢ page 11) or contact our Customer Care team ¢ page 12.
11.12. 11:56
INT MENU
V
Page 7

7
Making calls
Making external calls and ending calls
External calls are calls using the public telephone
network.
~
(Enter the phone number) ¢c.
The phone number is dialled. (Or you can first
press and hold
number.) During the call you can adjust the ear
piece volume using t and set the volume with u.
End the call/cancel dialling:
Press the end call key a.
You can automatically insert a network provider
dialling code before any phone number (see Menu
tree "Preselection"
c [dial tone] and then enter the
-
¢ page 14).
Accepting a call
The handset indicates an incoming call by ringing
and by a display on the screen.
Press the talk key c to accept the call.
When Auto Answer is activated (see Menu tree
¢ page 14), simply remove the handset from the
base station/charging cradle.
In idle status, use t to activate the menu for setting the call volume and use u to set the volume.
Calling Line Identification
When you receive a call, the caller's number will be
displayed on your handset; the caller's name will
be displayed if it is stored in the directory.
Requirements:
1 You have asked your network provider for the
caller's number (
handset screen.
2 The caller has asked the network provider for
his number to be identified (CLI).
®
not
Withheld appears if the caller has withheld CLI, and
Unavailable appears if CLI has not been requested.
appears in the display if you have
requested Calling Line Identification,
Switch to mute
You can mute your handset when making external
calls. Your caller can no longer hear you.
Press the "Microphone off" key m during the call to
activate/deactivate the function.
CLIP) to be displayed on your
Handsfree talking (AS280 only)
To activate while dialling:
Enter the number ~ and press the handsfree
key
d.
Switching between earpiece and handsfree
mode:
During a call and when listening to the answer
machine (AS285 only), press the handsfree key
to activate or deactivate handsfree talking.
During a call, use t to activate the menu for setting the handsfree volume and use u to set the
volume.
d
Using the directory and lists
Directory
To open the directory: press h.
You can store up to 40 (AS180) or 80 (AS280)
numbers (max. 32 digits) and
(max. 14 characters). Enter
associated names
letters/characters
¢ page 11.
Saving the first number in the directory
h ¢ New Entry? ¢ OK
¢ ~ (enter number) ¢ OK
¢ ~ (enter name) ¢ OK
Storing a number in the directory
h ¢ MENU ¢ New Entry ¢ OK
¢ ~ (enter number) ¢ OK
¢ ~ (enter name) ¢ OK
Selecting a directory entry
Open the directory with h. You hav e th e fo ll owi ng
options:
◆ Use u to scroll through the entries until the
required name is selected.
◆ Enter the first character of the name and scroll
to the entry with
Dialling with the directory
h ¢ u (select entry) ¢ c
Using other functions
h ¢ u (select entry) ¢ MENU
u, if required.
Page 8
8
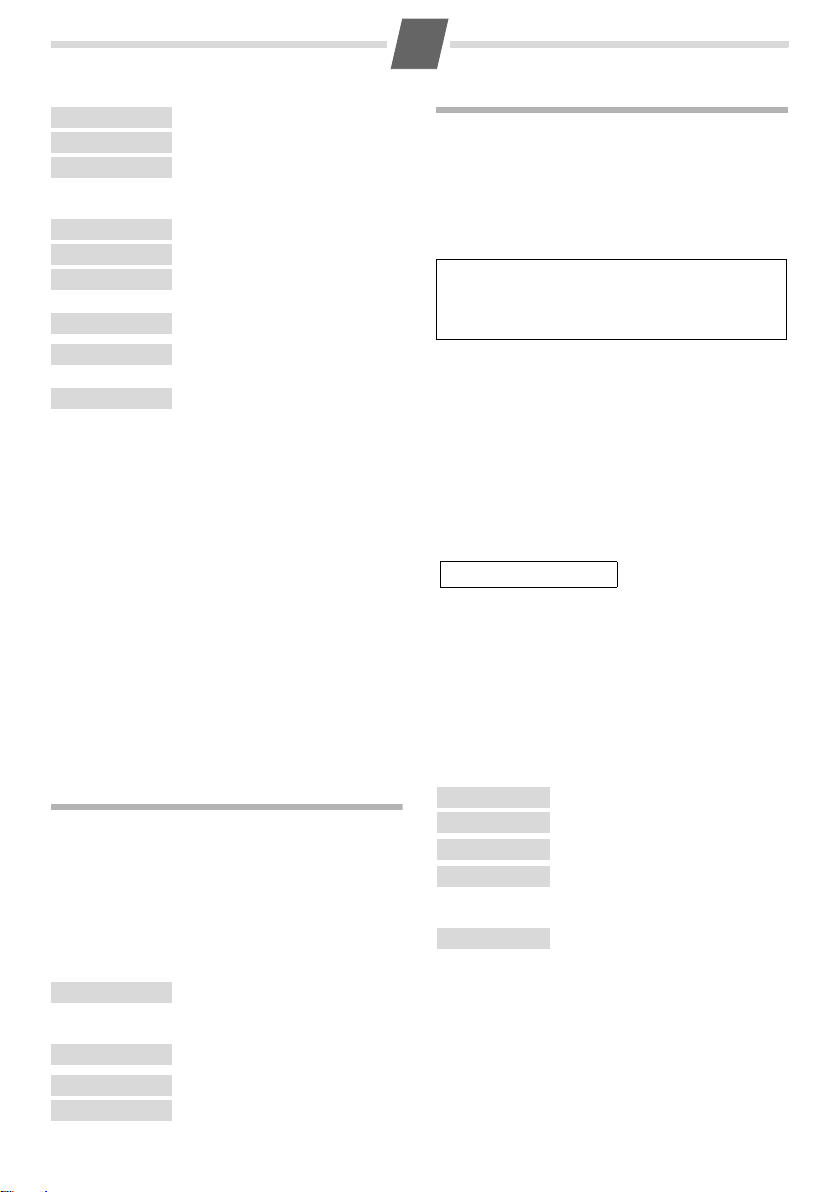
The following functions can be selected with u:
New Entry
Show Number
Use Number
Edit Entry
Delete Entry
Send Entry
Delete List
Send List
Shortcut
Save new phone number.
Display the phone number.
Edit or add to the number.
Then
dial or select other
functions from the
Edit selected entry.
Delete selected entry.
Send a single entry to another
handset
(¢ page 8).
Delete all directory entries.
Send the complete list to
another handset
For shortcuts, assign the current entry to a key.
MENU.
(¢ page 8).
Using shortcut keys
You can assign directory entries to the keys 0 and
2–9:
h ¢ u (select entry) ¢ MENU ¢ Shortcut ¢ OK
¢ ~ (press the key you want to assign the entry to)
To dia l, press and hold the required shortcut key.
Transferring the directory to another handset
Requirements:
◆ The sending and receiving handsets must both
be registered to the same base station.
◆ The other handset and the base station can
send and receive directory entries.
h ¢ u (select entry) ¢ MENU ¢ Send Entry /
Send List ¢ OK ¢ ~ (enter the internal number of
the receiving handset) ¢ OK
Last number redial list
This list contains the ten last dialled numbers.
Dialling from the last number redial list
c (press briefly) ¢ u (select entry) ¢ c
Managing entries in the last number redial list
c (press briefly) ¢ u (select entry) ¢ MENU
You can select the following settings:
Use Number
Copy to Dir.
Delete Entry
Delete List
Edit or add to the number.
Then
dial or select other
functions from the
Copy an entry to the directory.
Delete selected entry.
Delete all entries.
MENU.
Calls list/voicemail (network mailbox) list
An advisory tone sounds and the message key
flashes as soo n as a new entry appears in the calls
list/voicemail list. A message appears in the dis
play.
When you press the f key, all the lists are displayed. If only one list contains new messages,
this
will be opened automatically.
Please note:
If calls are saved in the network mailbox, you will
receive a message if the appropriate settings have
been set (depending on your network provider).
-
Calls list
Precondition: CLIP (¢ page 7)
Depending on the type of list set, the calls list con-
tains (¢ page 14)
◆ answered calls
◆ missed calls
Depending on the type of list set, all numbers of
the last 25 incoming calls are saved or just the
missed calls are saved.
The calls list is displayed as follows:
CallsList 01+02
Number of new entries + number of old, read entries
Open the calls list
f ¢ CallsList 01+02 ¢ OK
The last incoming call is displayed.
If necessary, use u to select another entry.
Using other functions
u (select entry) ¢ MENU
The following functions can be selected with u:
Delete Entry
Copy to Dir.
Date/Time
Status
Delete List
Delete current entry.
Copy an entry to the directory.
Call date and time (if set).
New Call: new missed call.
Old Call: entry already read.
Answ.: call taken.
Warning! All old and new
entries will be deleted.
Calling back a caller from the calls list
f ¢ CallsList 01+02 ¢ OK ¢ u (select entry)
¢ c
Page 9
9
Assigning key 1 for fast access to the network mailbox
Simply press and hold key 1 on the handset and
you will be connected directly to the network mail
box.
See Menu tree ¢ page 13.
Locating a handset ("paging")
You can locate your handset using the base station.
◆ Briefly press the registration/paging key on the
base station
◆ All handsets will ring simultaneously ("pag-
ing"), even if the ringer tones are deactivated.
End paging: briefly press the registration/paging
key on the base station
talk key c on a handset.
(¢ page 1).
(¢ page 1) or the
Registering handsets
You can register up to four handsets on your base
station (Gigaset AS18H/AS28H) recommended).
Please note:
Each additional handset must be registered on
the base station in order for it to work properly!
For automatic registration of handsets to
Gigaset
AS180/AS280 ¢ page 5.
Manual registration of handsets to Gigaset AS180/
AS280
1. On the handset: MENU ¢ Settings ¢ OK
¢ Handset ¢ OK ¢ Register HS ¢ OK ¢ Enter the
system PIN of the base station (default is 0000)
¢ OK.
Registering flashes in the display.
2. On the base station: within 60 seconds of
entering the system PIN, press and hold the regis
tration/paging key (¢ page 1) (min. 3 seconds).
Registration takes approx. 1 minute.
De-registering handsets
Handsets can only be de-registered by resetting
the base station to its default settings. This will
also reset other settings
If you have only registered handsets for other GAPcompatible devices, these can only be de-regis
tered with a hardware reset ¢ page 10.
¢ page 10.
-
Using several handsets
Making internal calls
-
Internal calls are free calls to other handsets that
are registered to the same base station.
To make a call to other handsets, press
◆ INT ¢ ~ (1...4, enter internal number of the
handset), the handset is called or
◆ INT ¢ star key P, all handsets are called.
When a participant answers you can speak to
them. To end the call, press the end call key
Internal consultation call/connecting a call
You are in conversation with an external participant. Press the INT key and call one or all handsets.
The external participant hears the hold music.
◆ Before the internal participant has answered,
press the end call key
the participant who answers the call.
◆ After the internal participant has answered,
you can talk to him. Press the end call key
the call is diverted, or press the display key
you are reconnected to the external participant.
Listening in to an external call
You are conducting an external call. An internal
participant can listen in on this call and take part in
the conversation (conference).
Precondition: The Listening in function must be
activated.
Activating/deactivating listening in
MENU ¢ Settings ¢ OK ¢ Base ¢ OK
¢ Listening in ¢ OK (‰ = on)
Internal listening in (conference)
You want to listen in to an existing external call.
Press and hold the c key. You can listen in to the
call. All participants hear a signal tone.
To e nd : press the end call key a. All participants
hear a signal tone.
If the first internal participant presses the end call
key
a, the handset that has "listened in" remains
connected to the external participant.
a; the call is diverted to
a.
a;
”;
Page 10

10
Setting the alarm clock
Activating/deactivating the alarm clock
MENU ¢ Alarm Clock ¢ OK ¢ Activation
¢ OK (‰ = on)
When activated:
¢ Set the wake-up time ¢ OK
When the alarm clock rings, press any key to switch
it off for 24
wake-up icon
wake-up time will be displayed instead of the date.
hours. If the alarm clock is set, the
l will appear on the screen and the
Setting the wake-up time
MENU ¢ Alarm Clock ¢ OK ¢ Wake-up time ¢ OK
Enter the wake-up time in hours and minutes, then
press
OK.
Phone settings
For details on how to set audio settings, see Menu
tree
¢ page 13.
For details on how to set the system PIN on the
base station, see the Menu tree
¢ page 14.
Changing the display language
MENU ¢ Settings ¢ OK ¢ Handset ¢ OK
¢ Language ¢ OK ¢ select the language ¢ OK
The current language is indicated by ‰ .
If you accidentally choose a language you do not
understand:
MENU ¢ 4 2 1 (press the keys one after the other)
Select the correct language with u and press OK.
Resetting the handset
You can reset individual settings and changes that
you have made. Entries in the directory, the calls
list and the handset's registration to the base sta
tion will be retained.
MENU ¢ Settings ¢ OK ¢ Handset ¢ OK
¢ Reset Handset ¢ OK
Cancel the reset with a.
Restoring the base station to the factory settings
When restoring factory settings:
◆ All handsets are de-registered
◆ Individual settings are reset
◆ All lists are deleted
◆ The system PIN is reset to the original code
0000
Only the date and time are retained.
Software reset
MENU ¢ Settings ¢ OK ¢ Base ¢ OK
¢ Base Reset ¢ OK
Hardware reset
Disconnect the power cord from the base station.
Hold down the registration/paging key
(¢ page 1) on the base station while reconnecting the power cable to the base station. Release
the key after approximately 5 seconds.
Repeater mode
With a repeater you can increase the range of your
base station. You will need to activate repeater
mode
(¢ page 14). Repeater mode and Eco mode
or Eco mode+ (¢ page 1) cancel each other out.
Operating the base station on
PABX
the
The following settings are only necessary if your
PABX requires them, see the user guide for your
PABX.
When entering the digits, enter them slowly one
after the other.
Changing the dialling mode
MENU ¢ 4 I O 1 1 ¢ The number for the set dial-
ling mode flashes: 0 = touch tone dialling (DTMF);
1 = dial pulsing (DP) ¢ enter number ¢OK.
Setting recall
MENU ¢ 4 I O 1 2 ¢ The number for the current
recall flash
3 = 400 ms; 4 = 250 ms; 5 = 300 ms; 6 = 600 ms;
7 = 800 ms ¢ enter number ¢ OK.
es: 0 = 80 ms; 1 = 100 ms; 2 = 120 ms;
Changing pause after line seizure
You can set the length of the pause inserted
between pressing the talk key
phone number.
MENU ¢ 4 I O 1 O ¢ The number for the current
pause length flashes: 1 = 1 sec.; 2 = 3 sec.; 3 = 7 sec.
c and sending the
¢ enter number ¢ OK.
Changing the pause after the recall key
MENU ¢ 4 I O 1 4 ¢ The number for the current
pause length flashes: 1 = 800 ms; 2 = 1600 ms;
3 = 3200 ms ¢ enter number ¢ OK.
Page 11
11
Appendix
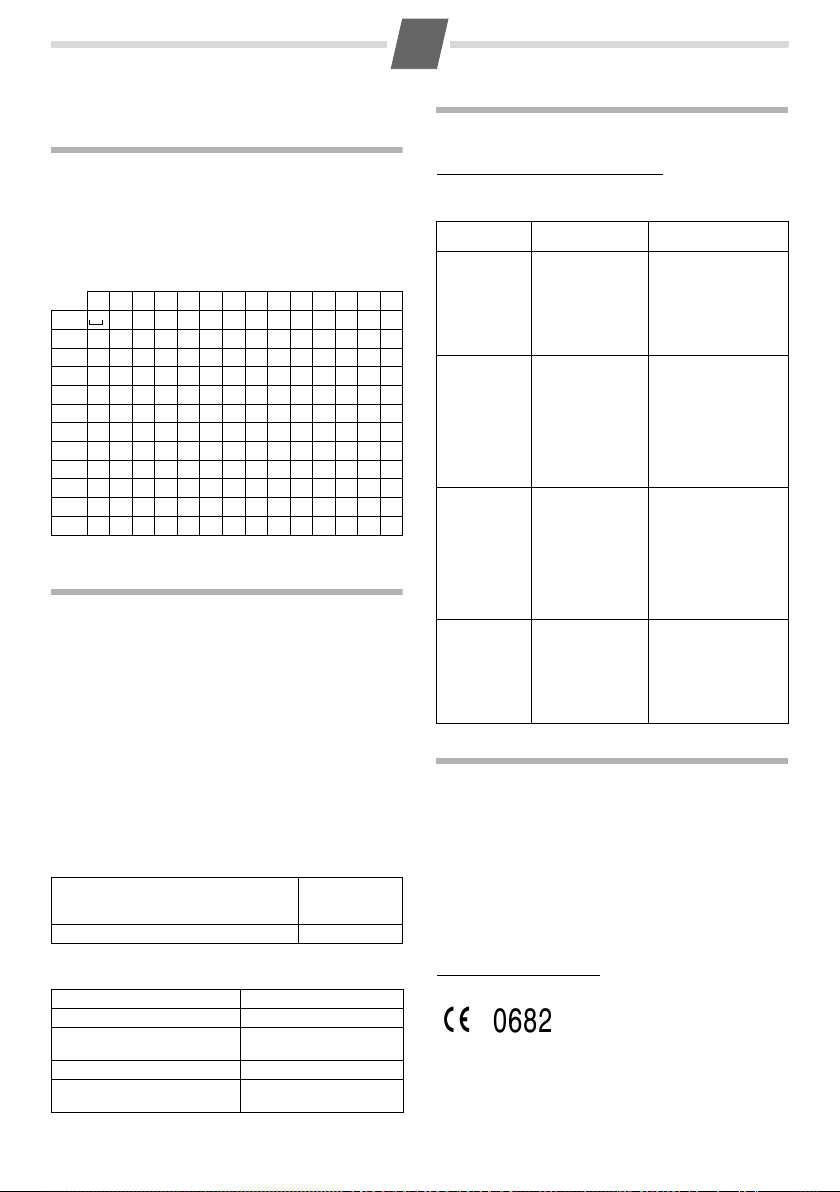
Entering letters/characters
Press the relevant key the number of times indicated.
Briefly press the hash key # to switch from
"Abc" to "123" mode, from "123" to "abc" mode and
from "abc" to "Abc" mode.
Standard characters
1x 2x 3x 4x 5x 6x 7x 8x 9x 10x 11x 12x 13x 14x
1)
1 £ $ ¥ ¤
1
a b c 2 ä á à â ã ç
2
d e f 3 ë é è ê
I
g h i 4 ï í ì î
4
j k l 5
5
m n o 6 ö ñ ó ò ô õ
L
p q r s 7 ß
M
t u v 8 ü ú ù û
N
w x y z 9 ÿ ý æ ø å
O
. , ? ! 0 + - : ¿ ¡ " ’ ; _
Q
* / ( ) < = > %
P
Abc
123
-->
-->
# @ \ & §
#
1) Space
Specifications
Recommended batteries
Technology: Nickel-metal-hydride (NiMH)
Size: AAA (Micro, HR03)
Voltage: 1.2 V
Capacity: 400–800 mAh
We recommend the following types of battery:
◆ GP 550/700 mAh
◆ Yuasa Phone 700/800 mAh
◆ Peacebay 550/650 mAh
(Valid at the time of going to press)
The handset is supplied with recommended batteries.
Base station power consumption
In standby mode
– Handset in base station
– Handset outside base station
During a call approx. 1.5 W
General specifications
DECT standard is supported
GAP standard is supported
Range up to 300 m outdoors
Base station power supply 230 V ~/50 Hz
Environmental conditions
in
123
operation
abc
approx. 1.3 W
approx. 1.3 W
up to 50 m indoors
+5°C to +45°C, 20% to
75%
relative humidity
Questions and answers
If you have any queries about the use of your
telephone, visit our website at
www.gigaset.com/customercare
for 24-hour support. The table below contains a lis t
of common problems and possible solutions.
Problem Cause Solution
Nothing
appears in the
display.
No wireless
connection to
the base sta
tion, Base
flashes in the
display.
You cannot
hear a ringer/
dialling tone
from the fixed
line network.
Error tone
sounds after
system PIN
prompt.
PIN forgotten.
The handset is not
switched on.
The batteries are
flat.
The handset is
outside the range
of the base sta
tion.
The handset is not
registered.
The base station is
not turned on.
The phone cord
supplied has not
been used or has
been replaced by
a new cord with
the wrong jack
connections.
You have entered
the wrong
system
PIN.
Press the end call
key a for approx.
5
seconds or place
the handset in the
base station.
Charge or replace the
batteries.
Move the handset
closer to the base
station.
-
Register the handset
¢ page 9.
Check the mains
connector on the base
station
¢ page 3.
Please always use the
phone cord supplied
or ensure that the
pin
connections are
correct when purchas
ing from a retailer:
3-4 assignment of
telephone leads/EURO
CTR37.
Reset the system PIN
to the default 0000
¢ page 10.
All handsets are deregistered. All set
tings are reset. All
lists are deleted.
-
Authorisation
This device is intended for analogue phone lines in
your network.
Country-specific requirements have been taken
into consideration.
We, Gigaset Communications GmbH, declare that
this device meets the essential requirements and
other relevant regulations laid down in Directive
1999/5/EC.
A copy of the 1999/5/EC Declaration of Conformity
is available at this Internet address:
www.gigaset.com/docs.
-
Page 12

12
Service (Customer Care)
You can get assistance easily when you have technical questions or questions about how to use your device
by using our online support service on the Internet at:
www.gigaset.com/customercare
This site can be accessed at any time wherever you are. It will give you 24/7 support for all our products. It
also a list of FAQs and answers plus user guides for you to download. You will also find frequently asked
questions and answers in the Questions and Answers section of this user guide in the appendix.
If the device needs to be repaired, please contact one of our Customer Care Centers:
Abu Dhabi. . . . . . . . . . . . .97 12 62 23 800
Argentina . . . . . . . . . . . . . 0800-888-9878
Australia . . . . . . . . . . . . . . . .1300 665 366
Austria .05 17 07 50 04 (0,065 Euro/Min.)
Bahrain . . . . . . . . . . . . . . . 97 31 73 11 173
Belgium . . . . . . . . . . . . . . . . 0 78 15 66 79
Bosnia Herzegovina . . . . . . . . 033 276 649
Brazil . . . . . . . . . . . . . . . . . . . . . . . . . . . . . .
Grande Capitais e Regiões Metropolitanas:
. . . . . . . . . . . . . . . . . . . . . (11) 4003 3020
. . . . . . . . . . . . . . . . . .R$ 0,14 (US$ 0,069)
Demais localidades: . . . . . 0800 888 3020
. . . . . . . . . . . . . . . . . .R$ 0,20 (US$ 0,098)
Bulgaria. . . . . . . . . . . . . . . . . 02 873 94 88
Canada . . . . . . . . . . . . . . . . .866 247 8758
China . . . . 0 21 400 670 6007 (RMB 0.11)
Croatia . . . . . . . . 01 / 2456 555 (0,23 Kn)
Czech Republic . . . . . . . . . . . . 233 032 727
Denmark . . . . . . . . . . . . . . . . . 35 25 86 00
Dubai . . . . . . . . . . . . . . . . 97 14 39 69 944
Egypt. . . . . . . . . . . . . . . . . . . 202 7623441
Finland . . . . . . . . . . . . . . . . 09 23 11 34 25
France. . . 01 56 38 42 00 (Appel national)
Germany. . . . . . . . . . . . . . .01805 333 222
(0,14 Euro/Min. aus dem Festnetz der Deutschen Telekom.
Für Anrufe aus den Mobilfunknetzen können
abweichende Preise gelten)
Greece . . . . . . 801 1000 500 (0,026 Euro)
Hong Kong . . . . . . . . . . . . . . . . 2763 0203
. . . . . . . . . . . . . . . . . . . . . . . . . 2389 7285
Hungary . . . . . . . . . 06 14 71 24 44 (27 Ft)
India . . . . . . . . . . . . . . .Please refer to your
. . . . . . . . . . . . . . . . . . .local warranty card
Ireland . . . . . . . . . . . . . . . .18 50 77 72 77
Israel . . . . . . . . . . . . . . . . . . 1 700 700 727
Italy. . . . . . . . . . . . . . . . . . . . 199.15.11.15
Jordan . . . . . . . . . . .00962 6 5625460/1/2
Kuwait . . . . . . . . . . . . . . . 00965-2464993
Latvia . . . . . . . . . . . . . . . . . . . . . 7 50 11 18
Lebanon. . . . . . . . . . . . . . 00961-1236110
Luxembourg . . . . . . . . . . . 40 66 61 56 40
Malaysia. . . . . . . . . . . . . . . .603 77124304
Malta . . . . . . . . . . . . . . +353 21 4940 632
Mexico. .01800 999 4442738 (01800 999
Gigaset)
Netherlands
. . . . . . . . .0900-3333102 (0,25 Euro/min.)
New Zealand . . . . . . . . . . . 08 00 27 43 63
Norway . . . . . . . . . . . . . . . . . . 22 70 84 00
Oman. . . . . . . . . . . . . . . . 96 82 47 09 281
Poland . . . . . . . . . . . . . . . . .0 801 140 160
Portugal. . . . . . . . . . . . (351) 808 781 223
Romania . . . . . . . . . . . . +4.021.529.7114.
Russia. . . . . . . . . . . . . . . 8 (495) 228 1312
Serbia. . . . . . . . . . . . . . . . . . 0800 222 111
Singapore . . . . . . . . . . . . . . . . . 6735 9100
Slovak Republic
. . . . . . . . . . . . . 02 59 68 22 66 (4,428 sk)
Slovenija . . . . . . . . . . . . . . . 0 14 74 63 36
South Africa. . . . . . . . . . . . 08 60 10 11 57
Spain . . . . . . . . . . . . . . . . . . . . 902 103935
Sweden . . . . . . . . . . . . . . . . . 08 750 99 11
Switzerland
. . . . . . . . . . 0848 212 000 (0,08 SFr./Min.)
Taiwan. . . . . . . . . . . . . . . . . 02 266 24343
Thailand. . . . . . . . . . . . . . . . . 02 722 1118
Turkey . . . . . . . . . . . . . . . .0216 459 98 59
Ukraine . . . . . . . . . . . .+380-44-451-71-72
United Arab Emirates . . . . . 0 43 66 03 86
United Kingdom . . . . . . .0 84 53 67 08 12
USA . . . . . . . . . . . . . . . . . 1-866 247-8758
. . . . . . . . . . . . . . . . . . . . . . . . . . . (toll free)
Please have your record of purchase ready when calling.
Replacement or repair services are not offered in countries where our product is not sold by
authorised dealers.
Page 13
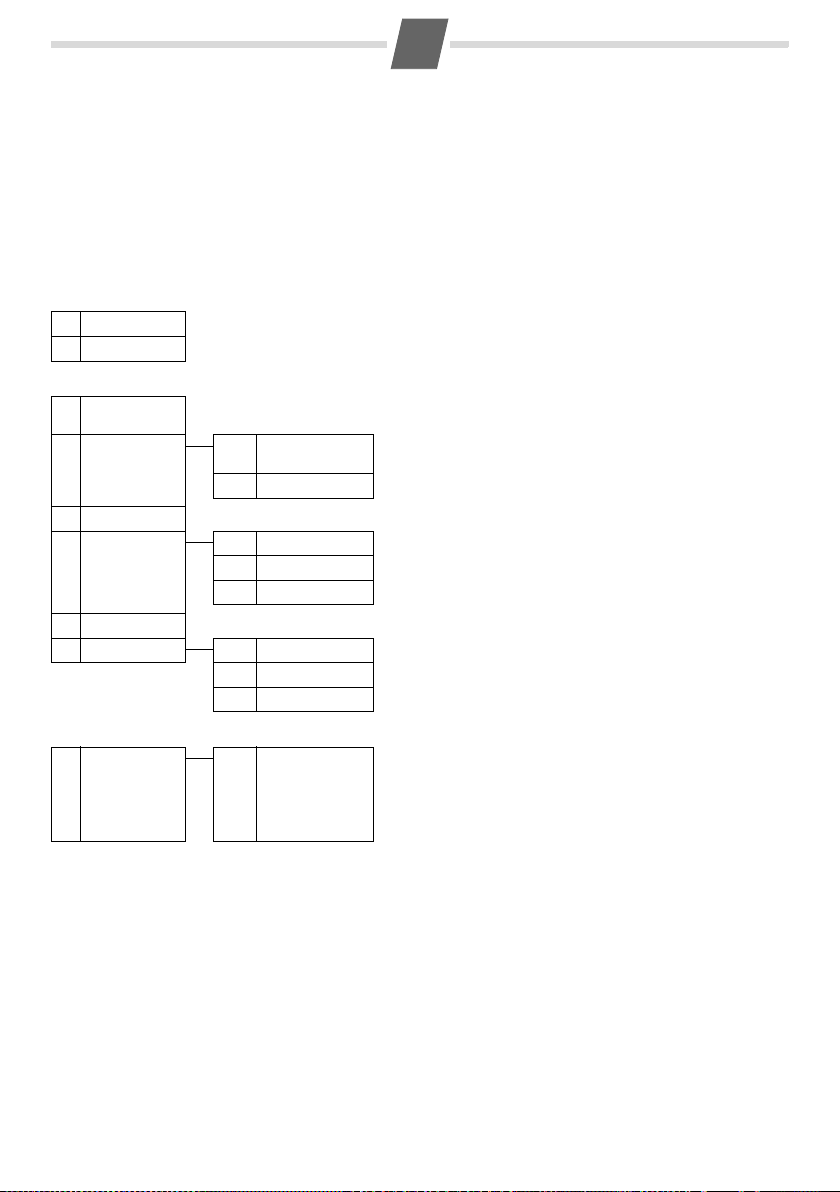
Menu tree
13
Your phone has an extensive range of features.
These are offered in the form of menus.
To select a function while the phone is in idle sta-
tus, press MENU (open menu), use the t and v
keys to scroll to the function you require and press
OK to confirm.
As an alternative to selecting functions using the
t and v buttons, you can also enter the digit
combination that is in front of the function in the
menu tree.
For setting the time and date, for example:
MENU ¢ 4 1 ¢ OK
To return to idle status: press and hold the a
key.
1 Alarm Clock
1-1 Activation Activating/deactivating the alarm clock
1-2 Wake-up time Input format: HHMM
2 Audio Settings
2-1 Handset Vol-
ume
2-1 Handset Vol-
ume
2-2 Ringer Volume 5 levels + "crescendo" available
2-3 Ringer Melody 2-3-1 External Calls 10 ringer melodies available for external calls
2-4 Advis. Tones Activate/deactivate
2-5 Battery Low 2-5-1 Off Warning tone to indicate
3 Voice Mail
3-1 Set Key 1
(all devices)
Can be set to one of 3 levels (AS180)
2-1-1 Earpiece Can be set to one of 3 levels (AS280)
2-1-2 Speaker Can be set to one of 5 levels (AS280)
2-3-2 Internal Calls 10 ringer melodies available for internal calls
2-3-3 Alarm Clock 10 ringer melodies available for alarm clock
2-5-2 On always
2-5-3 During Call only during a call
3-1-1 Netw. Mailbx Assign key 1 with network mailbox and enter the network mailbox
battery is almost flat:
number (in idle status, press and hold key 1 to dial).
Netw. Mailbx: your network provider's answer machine; must be
requested separately. The network mailbox list can be displayed if
your network provider supports this function and if key
assigned with the network mailbox.
never
1 has been
Page 14
14
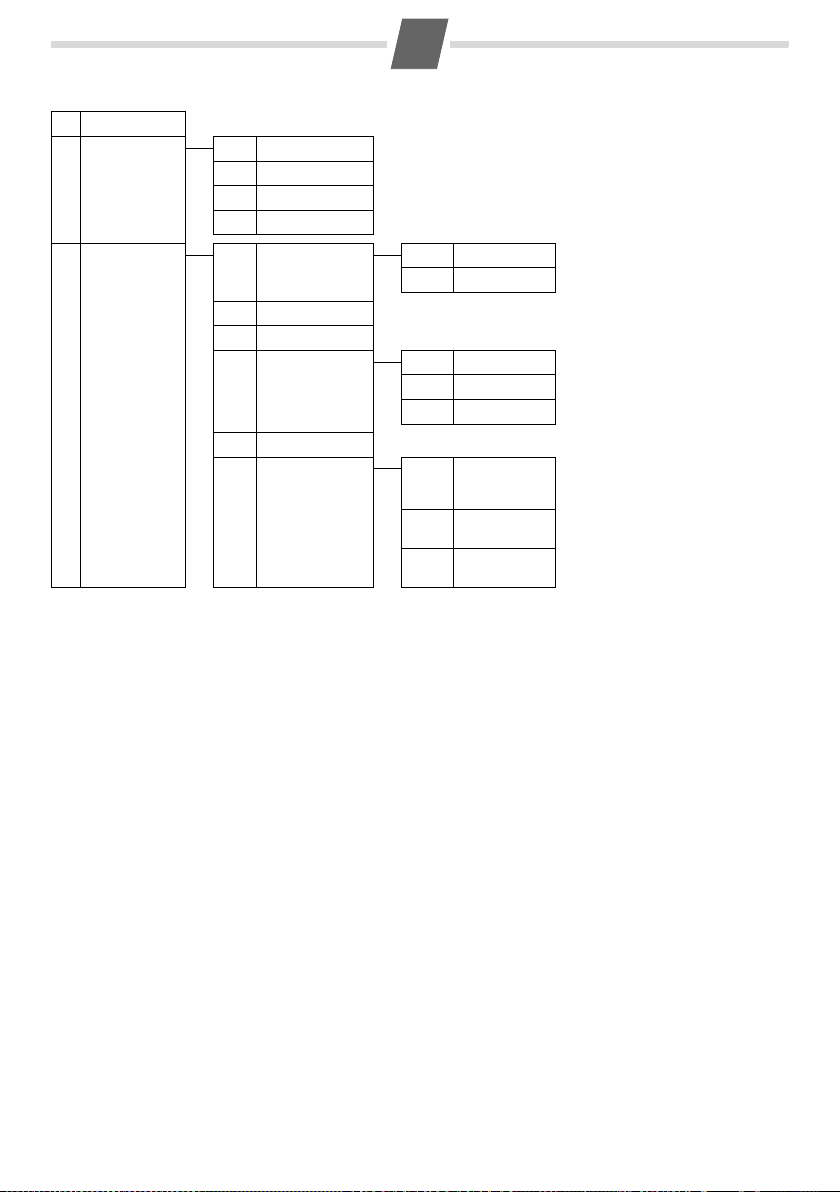
4 Settings
4-1 Date/Time Enter date (DDMMYY format), then time (HHMM format)
4-2 Handset 4-2-1 Language Set the display language ¢ page 10
4-2-2 Auto Answer Automatically activate/deactivate auto answer ¢ page 7
4-2-3 Register HS Manually register the handset ¢ page 9
4-2-4 Reset Handset Reset the handset ¢ page 10
4-3 Base 4-3-2 Call list type 4-3-2-1 Missed Calls ¢ page 8
4-3-2-2 All Calls ¢ page 8
4-3-3 System PIN Change system PIN (default is 0000)
4-3-4 Base Reset Restore factory settings ¢ page 10
4-3-5 Additional 4-3-5-1 Repeater activate/deactivate ¢ page 10
4-3-5-2 Eco Mode+ activate/deactivate ¢ page 2
4-3-5-3 Eco Mode activate/deactivate ¢ page 2
4-3-6 Listening in Activate/deactivate the function ¢ page 9
4-3-7 Preselection 4-3-7-1 Presel. Number Network provider dialling code,
4-3-7-2 With Preselect First digits of the dialling codes,
4-3-7-3 Without Presel First digits of dialling codes, should
should be inserted automatically
before the dialled phone number.
should be dialled with preselection.
be dialled without preselection.
 Loading...