

Page 1
®
Quick Start Guide
M10 Model
Page 2

Internet Security Systems, Inc.
6303 Barfield Road
Atlanta, Georgia 30328-4233
United States
(404) 236-2600
http://www.iss.net
© Internet Security Systems, Inc. 2003-2006. All rights reserved worldwide. Customers may make reasonable numbers of
copies of this publication for internal use only. This publication may not otherwise be copied or reproduced, in whole or in
part, by any other person or entity without the express prior written consent of Internet Security Systems, Inc.
Patent pending.
Internet Security Systems, ADDME, ActiveAlert, AlertCon, the AlertCon logos, FireCell, FlexCheck, SecurityFusion,
SecurePartner, SiteProtector, SecureU, System Scanner, Virtual Patch, Wireless Scanner, and X-Press Update are trademarks
and service marks; Database Scanner, Internet Scanner, the Internet Security Systems logo, Online Scanner, Proventia,
RealSecure, SAFEsuite, Secure Steps, and X-Force are registered trademarks and service marks of Internet Security
Systems, Inc. Network ICE, the Network ICE logo, and ICEpac are trademarks, BlackICE a licensed trademark, and ICEcap
a registered trademark of Network ICE Corporation, a wholly owned subsidiary of Internet Security Systems, Inc.
Powering Content Security is a trademark and Cobion is a registered trademark of Cobion AG, a wholly owned subsidiary
of Internet Security Systems, Inc. SilentRunner is a registered trademark of Raytheon Company. Acrobat and Adobe are
registered trademarks of Adobe Systems Incorporated. Certicom is a trademark and Security Builder is a registered
trademark of Certicom Corp. Check Point, FireWall-1, OPSEC, Provider-1, and VPN-1 are registered trademarks of Check
Point Software Technologies Ltd. or its affiliates. Cisco and Cisco IOS are registered trademarks of Cisco Systems, Inc. HPUX and OpenView are registered trademarks of Hewlett-Packard Company. IBM and AIX are registered trademarks of
IBM Corporation. InstallShield is a registered trademark and service mark of InstallShield Software Corporation in the
United States and/or other countries. Intel and Pentium are registered trademarks of Intel. Lucent is a trademark of Lucent
Technologies, Inc. ActiveX, Microsoft, Windows, and Windows NT are either registered trademarks or trademarks of
Microsoft Corporation. Net8, Oracle, Oracle8, SQL*Loader, and SQL*Plus are trademarks or registered trademarks of
Oracle Corporation. Seagate Crystal Reports, Seagate Info, Seagate, Seagate Software, and the Seagate logo are trademarks
or registered trademarks of Seagate Software Holdings, Inc. and/or Seagate Technology, Inc. Secure Shell and SSH are
trademarks or registered trademarks of SSH Communications Security. iplanet, Sun, Sun Microsystems, the Sun Logo,
Netra, SHIELD, Solaris, SPARC, and UltraSPARC are trademarks or registered trademarks of Sun Microsystems, Inc. in the
United States and other countries. All SPARC trademarks are used under license and are trademarks or registered
trademarks of SPARC International, Inc. in the United States and other countries. Adaptive Server, SQL, SQL Server, and
Sybase are trademarks of Sybase, Inc., its affiliates and licensers. Tivoli is a registered trademark of Tivoli Systems Inc.
UNIX is a registered trademark in the United States and other countries, licensed exclusively through X/Open Company,
Ltd. All other trademarks are the property of their respective owners and are used here in an editorial context without
intent of infringement. Specifications are subject to change without notice.
© Intel Corporation, 2002.
Disclaimer: The information contained in this document may change without notice, and may have been altered or
changed if you have received it from a source other than ISS or the X-Force. Use of this information constitutes acceptance
for use in an “AS IS” condition, without warranties of any kind, and any use of this information is at the user’s own risk.
ISS and the X-Force disclaim all warranties, either expressed or implied, including the warranties of merchantability and
fitness for a particular purpose. In no event shall ISS or the X-Force be liable for any damages whatsoever, including direct,
indirect, incidental, consequential or special damages, arising from the use or dissemination hereof, even if ISS or the
X-Force has been advised of the possibility of such damages. Some states do not allow the exclusion or limitation of
liability for consequential or incidental damages, so the foregoing limitation may not apply.
Reference herein to any specific commercial products, process, or service by trade name, trademark, manufacturer, or
otherwise, does not necessarily constitute or imply its endorsement, recommendation, or favoring by Internet Security
Systems, Inc. The views and opinions of authors expressed herein do not necessarily state or reflect those of Internet
Security Systems, Inc., and shall not be used for advertising or product endorsement purposes.
Links and addresses to Internet resources are inspected thoroughly prior to release, but the ever-changing nature of the
Internet prevents Internet Security Systems from guaranteeing the content or existence of the resource. When possible, the
reference contains alternate sites or keywords that could be used to acquire the information by other methods. If you find a
broken or inappropriate link, please send an email with the topic name, link, and its behavior to
Document part number: DOC-QSG-PROVISAM10-006-A
March 21, 2006
.
Page 3

Contents
Preface
Overview . . . . . . . . . . . . . . . . . . . . . . . . . . . . . . . . . . . . . . . . . . . . . . . . . . . . . . 5
Getting Technical Support . . . . . . . . . . . . . . . . . . . . . . . . . . . . . . . . . . . . . . . . . . . 6
Chapter 1: Getting Started
Overview . . . . . . . . . . . . . . . . . . . . . . . . . . . . . . . . . . . . . . . . . . . . . . . . . . . . . . 9
Package Contents . . . . . . . . . . . . . . . . . . . . . . . . . . . . . . . . . . . . . . . . . . . . . . . 10
Hardware Descriptions. . . . . . . . . . . . . . . . . . . . . . . . . . . . . . . . . . . . . . . . . . . . 11
Chapter 2: Initial Setup
Overview . . . . . . . . . . . . . . . . . . . . . . . . . . . . . . . . . . . . . . . . . . . . . . . . . . . . . 13
Connecting to the Appliance for Initial Setup . . . . . . . . . . . . . . . . . . . . . . . . . . . . . 15
Initial Setup for Routing Mode . . . . . . . . . . . . . . . . . . . . . . . . . . . . . . . . . . . . . . . 22
Initial Setup for Transparent Mode . . . . . . . . . . . . . . . . . . . . . . . . . . . . . . . . . . . . 29
Connecting Appliances to the Network . . . . . . . . . . . . . . . . . . . . . . . . . . . . . . . . . 34
Accessing Proventia Manager . . . . . . . . . . . . . . . . . . . . . . . . . . . . . . . . . . . . . . . 35
Index . . . . . . . . . . . . . . . . . . . . . . . . . . . . . . . . . . . . . . . . . . . . . . . . . . . . . . . . 39
Proventia® Network Multi-Function Security Appliance Quick Start Guide
3
Page 4

Contents
4
Page 5

Preface
Overview
Introduction This guide is designed to assist you with the initial setup process.
Scope This guide covers basic appliance setup only. It does not cover advanced
appliance configuration and management topics such as high availability,
virtual private networking, network address translation, and
SiteProtector management.
Support This guide supports the firmware version installed on your Proventia
appliance at the factory.
Audience This guide is written for users who are setting up the appliance for the
first time. A fundamental knowledge of network security policies and IP
addresses and network configuration is helpful in understanding this
guide.
Related
documentation
For information on topics not covered in this guide, go to the following
ISS Web sites:
●
www.iss.net/support/documentation
■ User guides
■ Frequently asked questions
■ Datasheets
■ Information about virtual private networks and firewalls
●
www.iss.net/download/
■ Readme files
■ Product downloads and updates
Proventia® Network Multi-Function Security Appliance User Guide
5
Page 6

Getting Technical Support
Introduction ISS provides technical support through its Web site and by email or
telephone.
The ISS Web site The Internet Security Systems (ISS) Resource Center Web site (
www.iss.net/support/
) provides direct access to online user
http://
documentation, current versions listings, detailed product literature,
white papers, and the Technical Support Knowledgebase.
Support levels ISS offers three levels of support:
● Standard
● Select
● Premium
Each level provides you with 24x7 telephone and electronic support.
Select and Premium services provide more features and benefits than the
Standard service. Contact Client Services at
if
you do not know the level of support your organization has selected.
Hours of support The following table provides hours for Technical Support at the Americas
and other locations:
Location Hours
Americas 24 hours a day
All other
locations
Table 1: Hours for technical support
6
Monday through Friday, 9:00 A.M. to 6:00 P.M. during their
local time, excluding ISS published holidays
Note: If your local support office is located outside the
Americas, you may call or send an email to the Americas
office for help during off-hours.
Page 7

Getting Technical Support
Contact information The following table provides electronic support information and
telephone numbers for technical support requests:
Regional
Electronic Support Telephone Number
Office
North America Connect to the MYISS
section of our Web site:
www.iss.net
Latin America
Europe, Middle
East, and Africa
Asia-Pacific,
Australia, and
the Philippines
Japan
Standard:
(1) (888) 447-4861 (toll free)
(1) (404) 236-2700
Select and Premium:
Refer to your Welcome Kit or
call your Primary Designated
Contact for this information.
(1) (888) 447-4861 (toll free)
(1) (404) 236-2700
(44) (1753) 845105
(1) (888) 447-4861 (toll free)
(1) (404) 236-2700
Domestic: (81) (3) 5740-4065
Table 2: Contact information for technical support
Proventia® Network Multi-Function Security Appliance User Guide
7
Page 8

8
Page 9

Chapter 1
Getting Started
Overview
Introduction Before you access the Proventia Setup Assistant and complete the initial
setup, you should review the contents of the packet and familiarize
yourself with the appliance hardware.
Related
documentation
In this chapter This chapter contains the following topics:
This chapter does not provide instructions for rack mounting the
appliance. For instructions, see the rack mount instructions included with
your appliance or go to
Topic Pa g e
Package Contents 10
Hardware Descriptions 11
www.iss.net/support/documentation/
.
Proventia® Network Multi-Function Security Appliance User Guide
9
Page 10

Package Contents
Introduction Use the following checklist to verify the contents of the box.
M10 contents The package includes the following items:
Item
9
1 appliance
1 AC power cord
1 Proventia Appliance Recovery CD
1 serial cable
1 Ethernet cable (CAT-5, cross-over)
warranty statement
10
Page 11
Hardware Descriptions
Hardware Descriptions
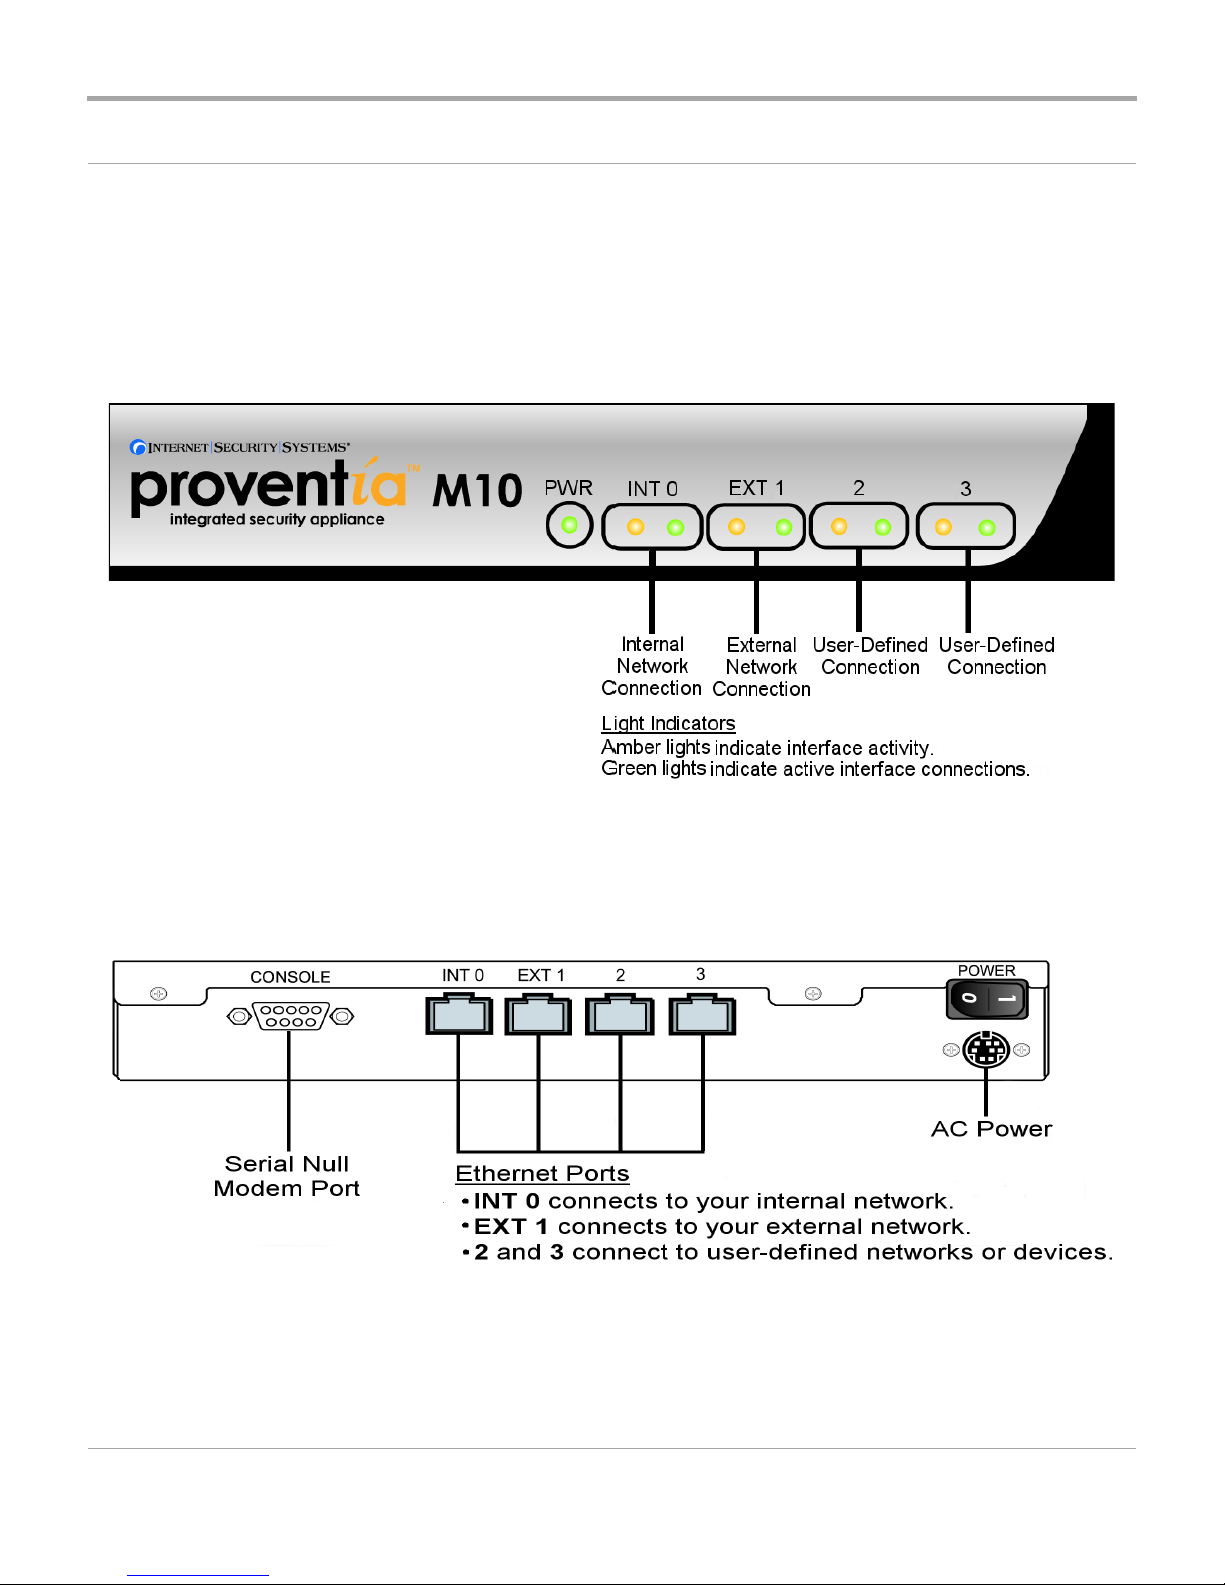
Introduction This topic describes the front and back panels of the appliance hardware.
M10 front panel The M10 front panel is shown below:
Figure 1: M10 front panel
M10 back panel The M10 back panel is shown below:
Figure 2: M10 back panel
Proventia® Network Multi-Function Security Appliance User Guide
11
Page 12

12
Page 13

Chapter 2
Initial Setup
Overview
Introduction The first stage in setting up the appliance is the Initial Setup stage. In this
stage, you connect a computer directly to the appliance and run the
Proventia Setup wizard, which assist you in performing the following
initial setup tasks:
● Set the operation mode for the appliance.
■ Routing
■ Transparent
Note: Each mode has different requirements, features, and
deployment considerations.
● Routing appliances—assign IP addresses, subnetworks, gateways,
and DNS servers to the external and internal interfaces.
● Transparent appliances—assign an invisible IP address for appliance
management purposes only, enable the external interface on the
appliance, and assign DNS servers.
● Set system passwords and time.
Note: The Proventia Setup Assistant guides you through the initial setup
process. ISS recommends that you run the Proventia Setup Assistant for
initial setup only. After you complete this process, use Proventia Manager
to configure and manage the system.
In this chapter This chapter contains the following topics:
Topic Pa g e
Connecting to the Appliance for Initial Setup 15
Proventia® Network Multi-Function Security Appliance User Guide
13
Page 14

Topic Pa g e
Initial Setup for Routing Mode 22
Initial Setup for Transparent Mode 29
Connecting Appliances to the Network 34
Accessing Proventia Manager 35
14
Page 15

Connecting to the Appliance for Initial Setup
Connecting to the Appliance for Initial Setup
Introduction Before you can access the Proventia Setup Assistant and complete the
initial setup, you must connect a computer directly to the appliance and
establish a connection between the devices. This connection is for initial
setup only.
Task overview The following table describes the tasks for connecting a computer to the
appliance:
Task Description
1 Choose a cable for the connection, and then connect the computer to
the appliance.
2 Configure the connection.
Table 3: Tasks for connecting a computer to the appliance
Choosing a cable The box includes two cables that you can use to connect your computer to
the appliance:
Cable Description
Ethernet crossover Provides access to a graphical version of the setup
wizard.
Serial null modem Provides access to a text version of the setup wizard.
Table 4: Cable descriptions
Connecting the
The following table describes how to connect the devices:
devices
If you choose the... Then...
Ethernet crossover cable 1. Plug the cable into the port labeled 0 or INT
0 depending on the model, and then
connect it to your computer.
2. Configure the connection between the
devices.
Table 5: Connecting the devices
Proventia® Network Multi-Function Security Appliance User Guide
15
Page 16

If you choose the... Then...
Serial null modem cable 1. Plug the cable into the port labeled Console,
and then connect it your computer.
2. Configure the connection between the
devices.
Table 5: Connecting the devices (Continued)
Configuring
Ethernet
connections
To configure an Ethernet connection between the devices:
Note: The steps for configuring an Ethernet connection vary depending
on your Microsoft operating system. See your Microsoft documentation
for more information. The procedure shown is for Microsoft XP.
1. Turn on the appliance, and then start your computer.
2. On the computer, select Start
ÆSettingsÆNetwork ConnectionsÆ
Local Area Connection.
16
Page 17
Connecting to the Appliance for Initial Setup
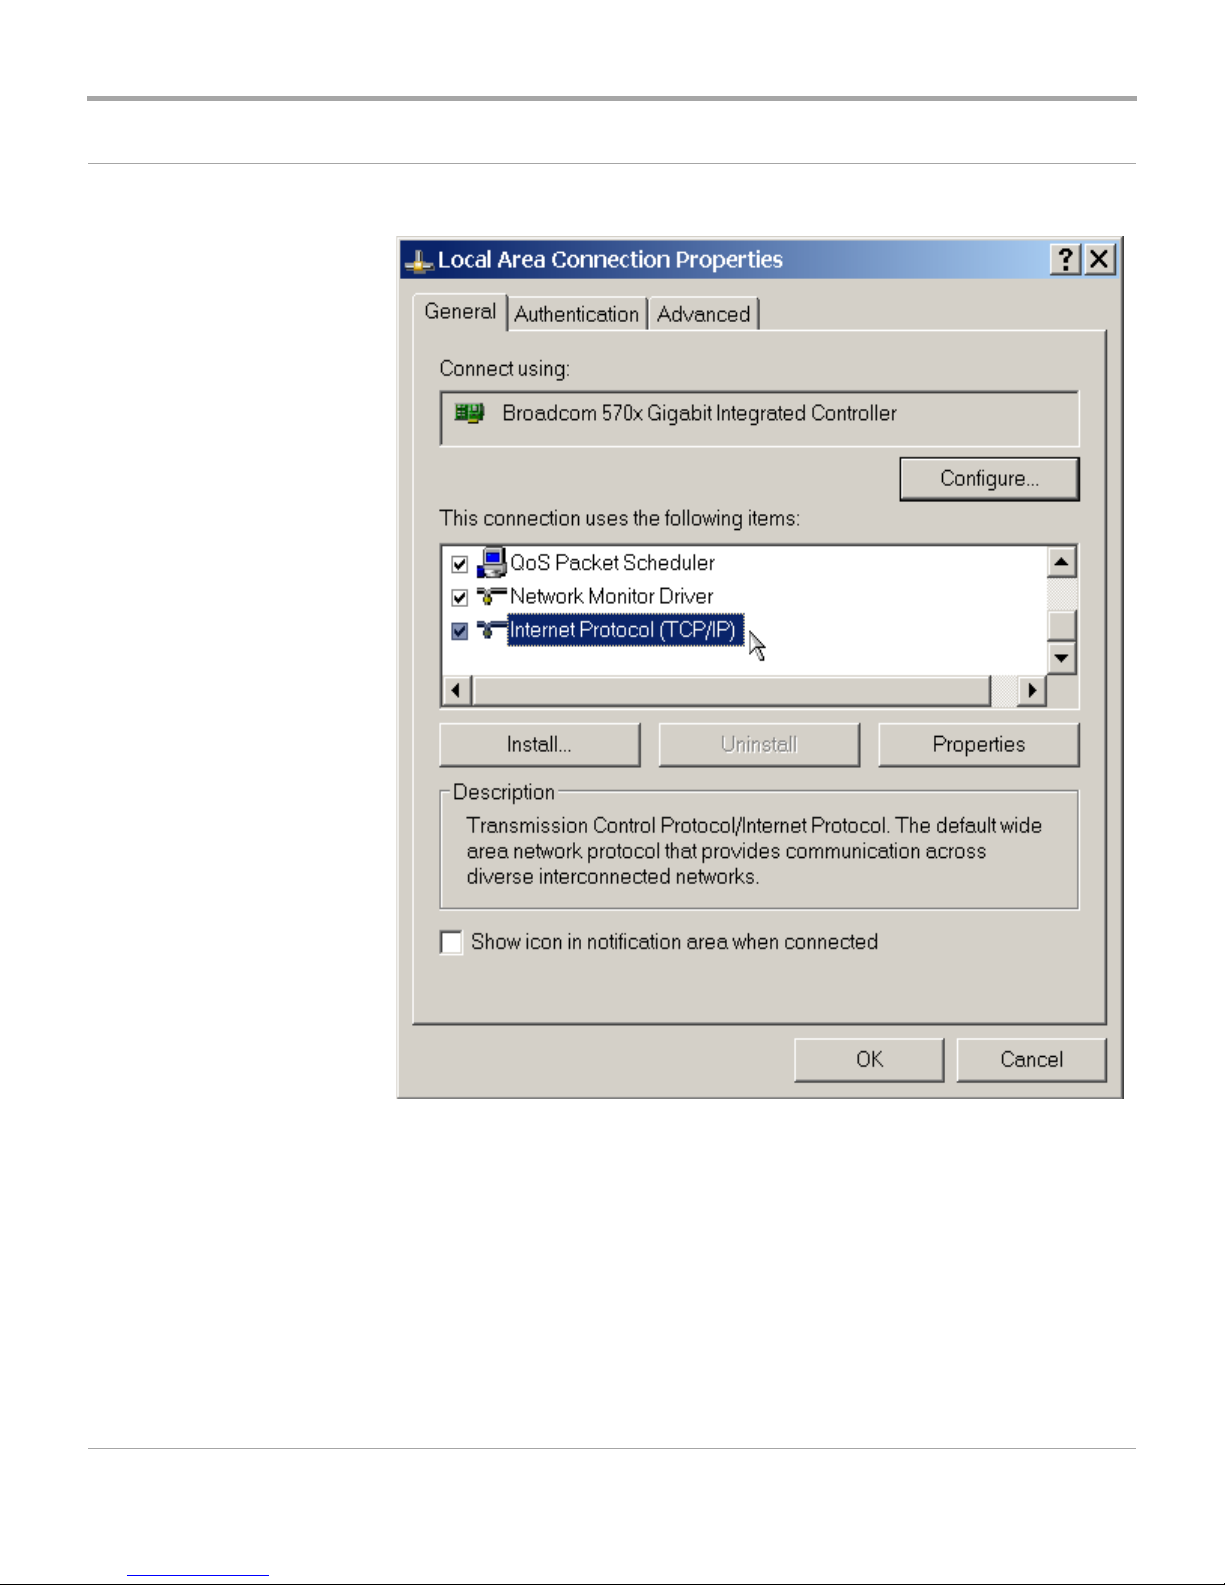
3. Click Properties on the Local Area Connection Properties window.
4. On the General tab, select Internet Protocol (TCP/IP), and then click
Properties.
Proventia® Network Multi-Function Security Appliance User Guide
17
Page 18
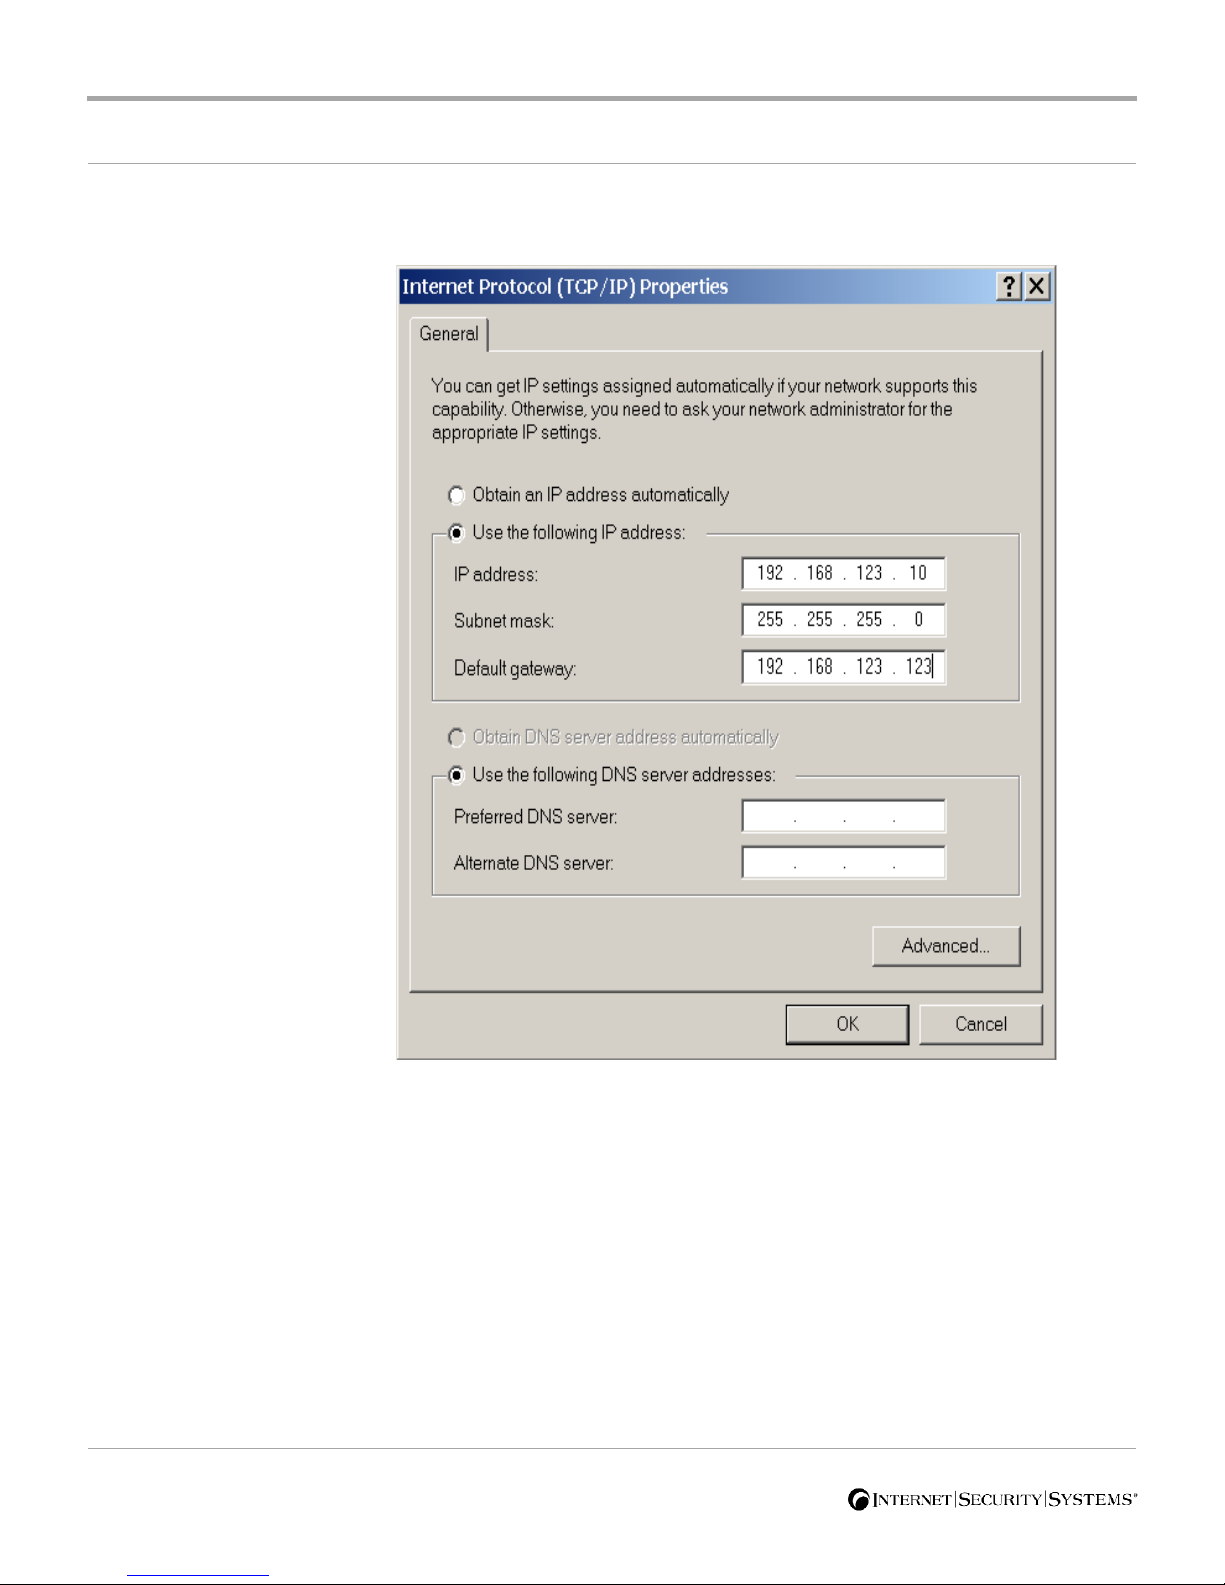
5. Select Use the following IP address, and configure the settings as
shown:
Note: You do not need to configure the DNS server addresses for
initial setup.
6. Click OK, and then click OK again.
7. Click Close, and then close Network Connections.
18
Page 19
Connecting to the Appliance for Initial Setup
Configuring serial
connections
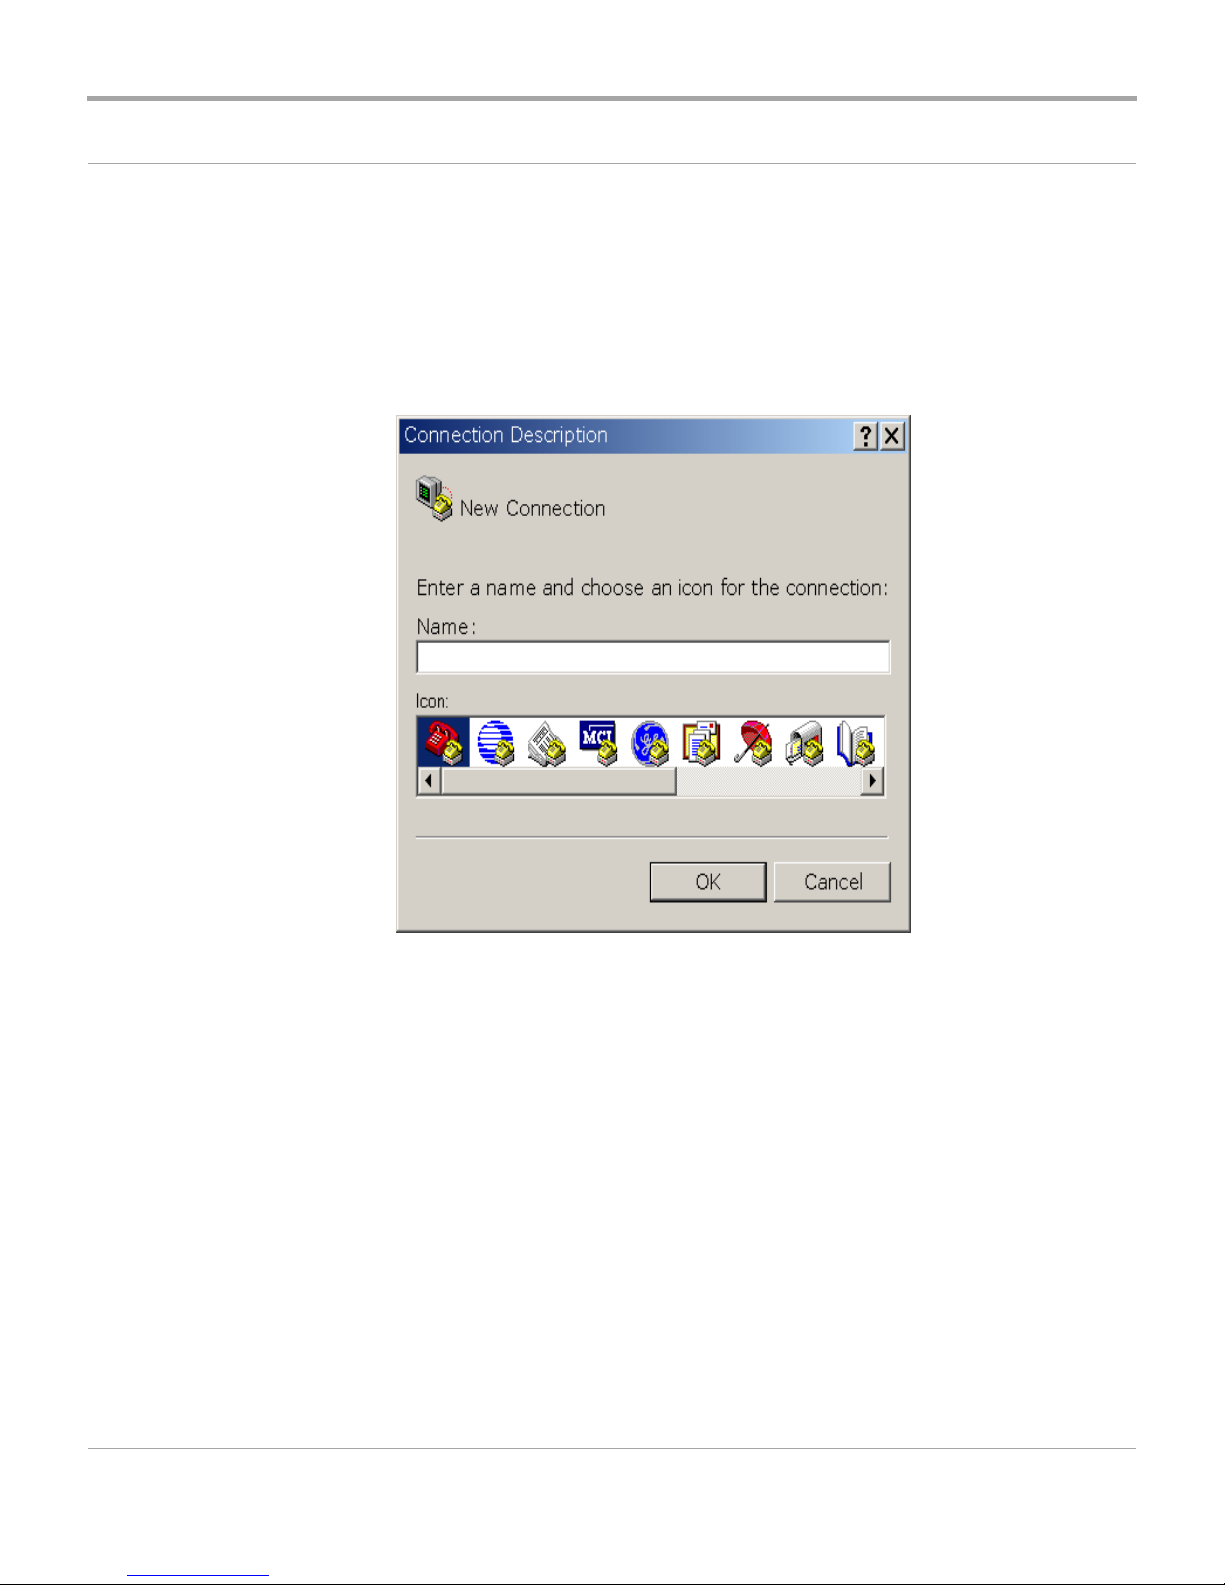
To configure a serial connection:
Note: The procedures for creating a terminal connection vary depending
on the program you use. The procedures shown are for HyperTerminal.
1. On your computer, select Start
ÆProgramsÆAccessoriesÆ
CommunicationsÆHyperTerminal.
2. Type a name for the connection, and then click OK.
Proventia® Network Multi-Function Security Appliance User Guide
19
Page 20
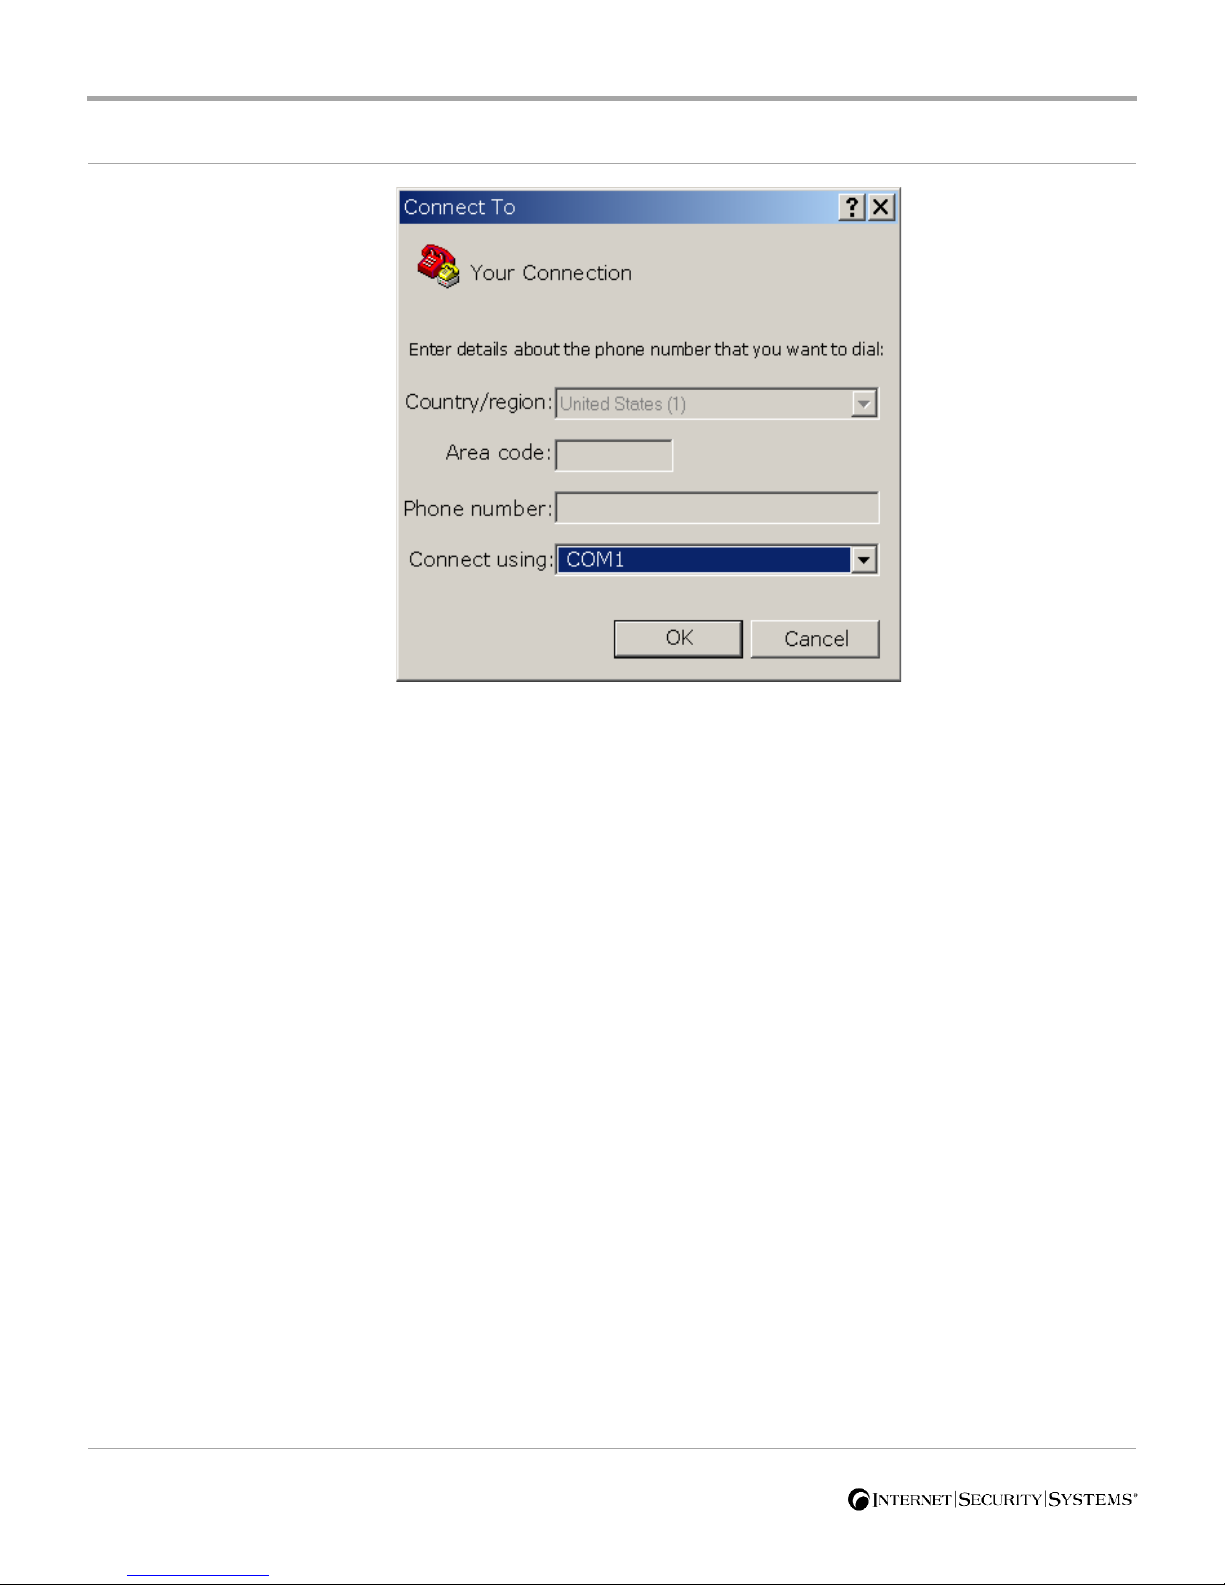
3. In the Connect using list, select COM1, and then click OK.
20
Page 21
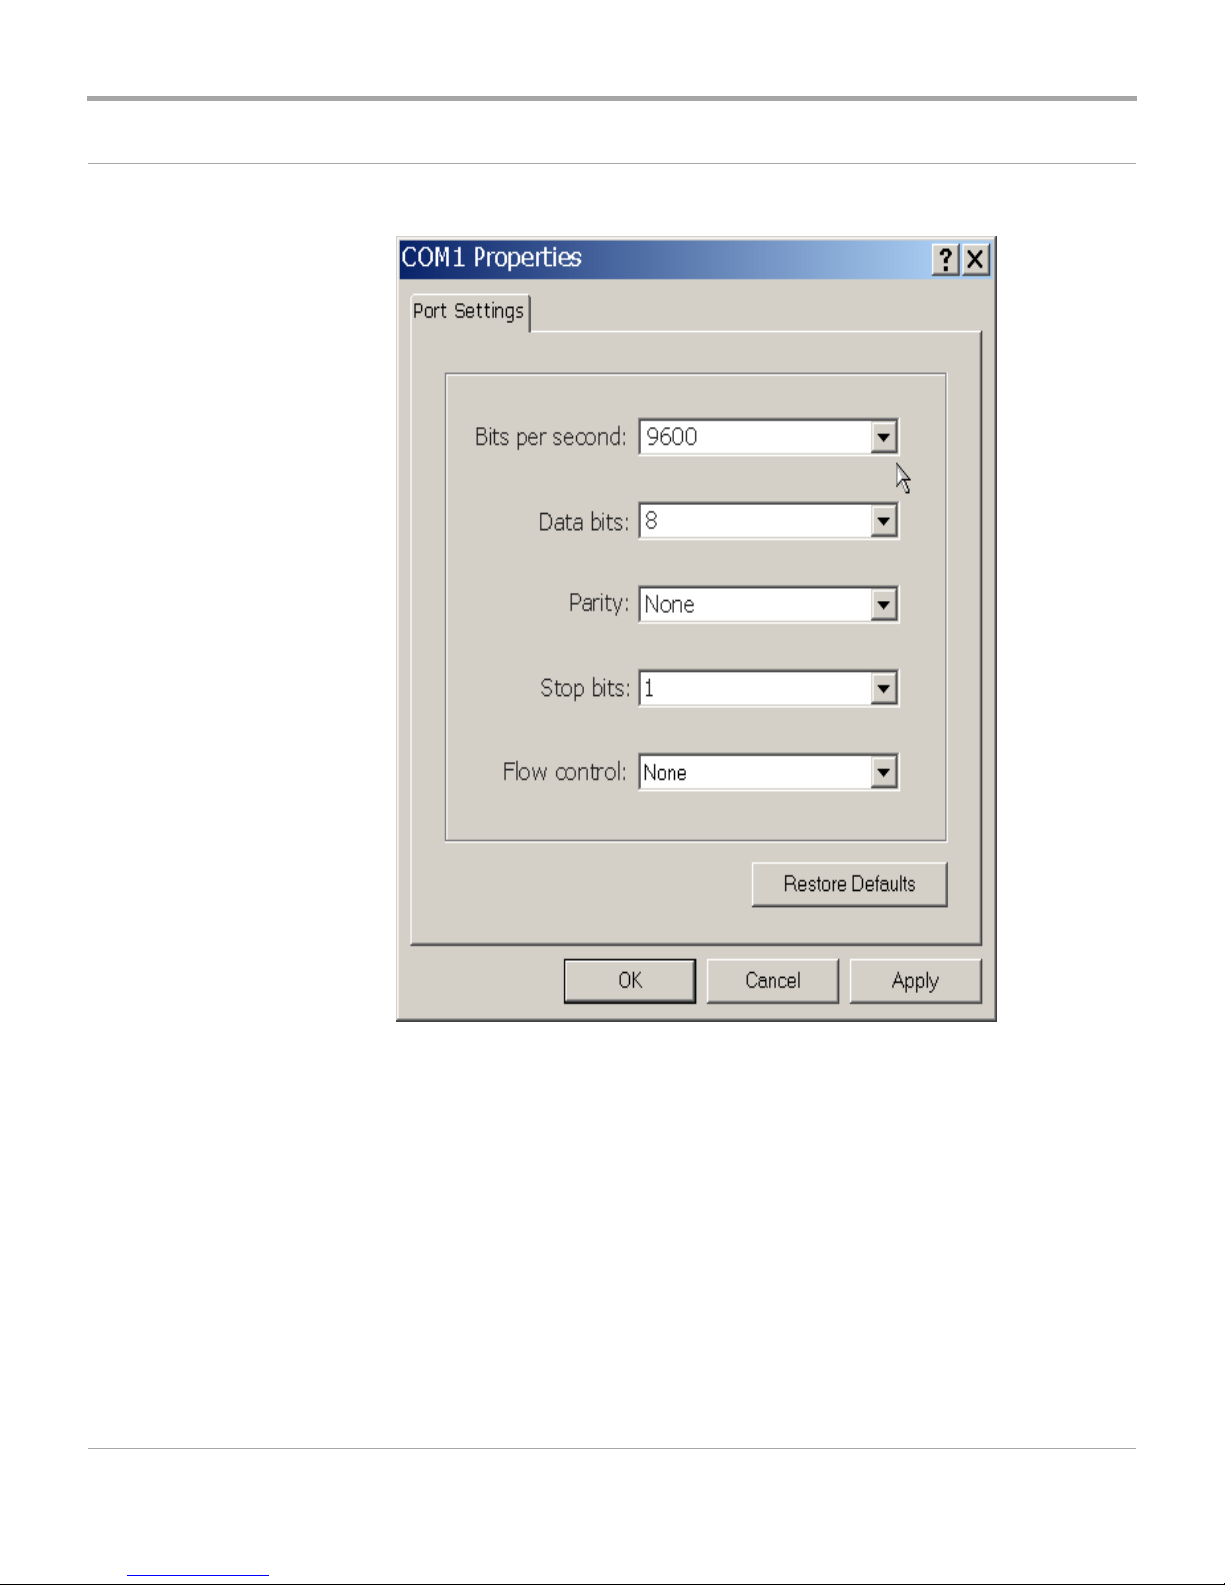
Connecting to the Appliance for Initial Setup
4. Configure the settings as shown:
5. Click Apply, and then click OK.
Proventia® Network Multi-Function Security Appliance User Guide
21
Page 22

Initial Setup for Routing Mode
Introduction In routing mode, the appliance can perform complex routing functions
and provide full security protection for your network. The routing
functions include the following:
● determining the IP addresses on the networks connected to it
● calculating and choosing the best routes to destinations on the
networks
Required
information
Deployment
considerations
To perform routing functions, the appliance must know the following
information:
● which physical interfaces are enabled
● what are the IP addresses of the enabled interfaces
● what IP networks or subnetworks exist on the phsyical networks
connected to the interfaces
Routing mode deployments require careful consideration to ensure the
following:
● The external and internal interfaces must have IP addresses.
● Routes must exist to each network segment.
● No overlaping subnets exist.
● No routing loops exist.
● Other routers know how to route traffic to networks behind the
appliance.
Features
22
The following features are available:
● Protection Features
■ Antispam
■ Antivirus
■ Automatic Security Updates
Page 23

Initial Setup for Routing Mode
● Routing Features
■ Firewall, including network address translation and virtual private
network capability
■ Intrustion Prevention
■ Web Filter
■ Dynamic Host Configuration Protocol (DHCP) Server and Relay
■ Network address translation
■ Open Shortest Path Routing Protocol (OSPF)
■ Virtual private networking
Proventia® Network Multi-Function Security Appliance User Guide
23
Page 24
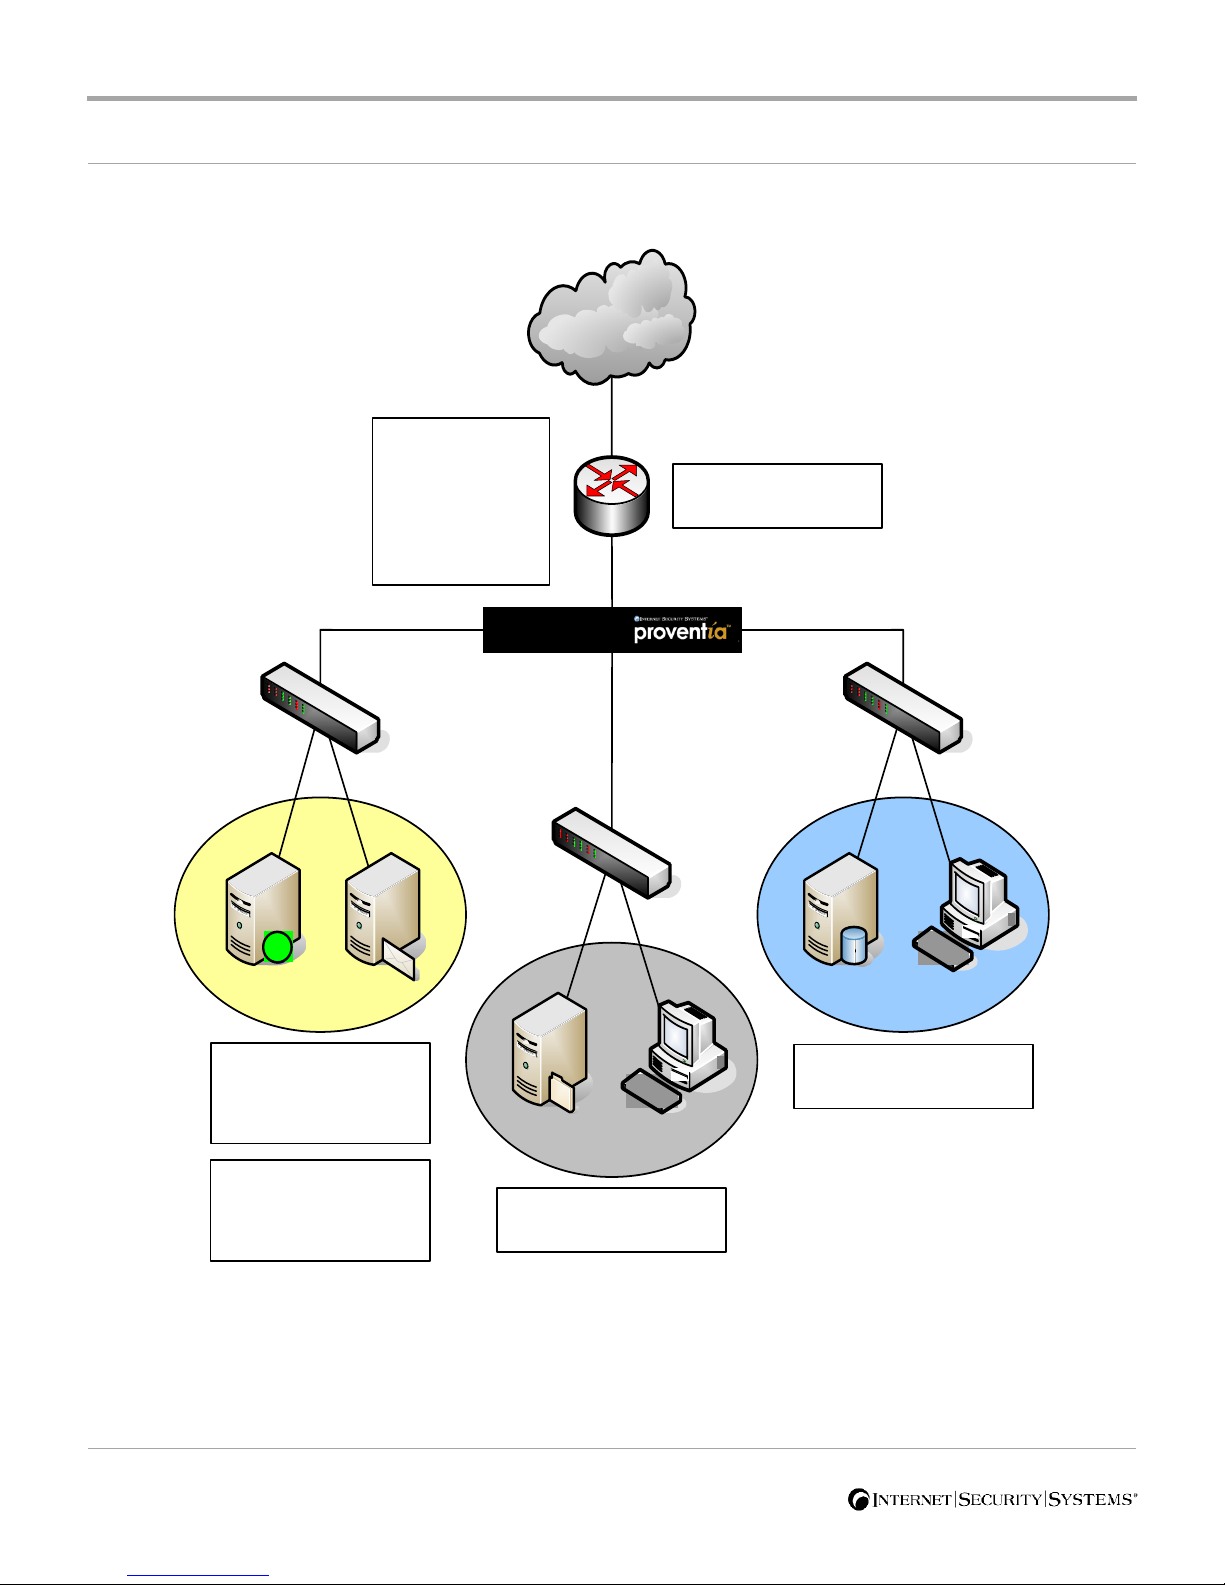
Diagram
The following diagram illustrates a routing mode deployment:
Internet
Proventia M -Series
DMZ
172 .16.200.0/24
eth0: 192.168 .100.1
eth1: 10.10.100.2
eth2: 172.16 .100 .1
eth3: 172.16 .200 .1
eth3 (3)
Router
Internal IP: 10.10.100.1
eth 1 (EXT 1)
eth0 ( INT 0)
eth2 (2)
`
Corporate
192.168 .100 .0/24
Web Server
Internal IP : 172.16.200.3
External IP : 10 .10.200 .3
Email Server
Internal IP: 172.16.200.4
External IP : 10.10.200 .4
Figure 3: Routing mode diagram
24
`
Database Server
IP Address : 192.168.100 .2
Engineering
172 .16.100.0/24
File Server
IP Address : 172.16.100 .2
Page 25

Initial Setup for Routing Mode
Procedure To set up the appliance in routing mode:
1. On the computer connected to the appliance, open a browser, and
then go to the defautl IP address for the appliance:
https://192.168.123.123
Note: For serial connections, start the HyperTerminal connection to
the appliance.
2. At the Proventia Local Management Interface login, type the
following login credentials:
■ Username = admin
■ Password = admin
3. Follow the on-screen instructions. The setup wizard guides you
through the initial setup process. During this process, you must
provide the information described in the following table: Next steps
Information Description
Appliance
You must select routing mode.
Mode
Host Name You must provide a fully qualified domain name for the
appliance such as the following example:
appliance.yourcompany.net
Time and date You must set the time and date for the appliance. To
synchronize the appliance time with the time of a network
server, you enable the Network Time Protocol (NTP) and
provide the IP address of the server.
Table 6: Required information for routing mode setup
Proventia® Network Multi-Function Security Appliance User Guide
25
Page 26

Information Description
External
Interface IP
Address
The appliance must know the IP address, subnet mask,
and default gateway for the external interface before it
can properly route traffic to and from that network. There
are 3 methods for assigning this information to the
interface:
• Static—you manually assign the IP address, subnet
mask, and default gateway
a
to the interface.
• DHCP—you assign a DHCP server to the interface,
and then the interface leases its IP address, subnet
mask, and default gateway from the DHCP server
dynamically.
• PPPoEb—the interface leases its IP address from a
PPPoE server at your Internet Service Provider (ISP).
Before the interface can access the server, you must
provide the following information to the interface:
• username and password required for PPPoE server
access
• the Internet connection type (continuous or on
demand)
c
• settings for Clamp MSS
(optional)
• the service name (optional information that is
typically not required for DSL subscribers in the US)
Note: Keep the default setting to enable the interface
when the appliance boots.
External
Interface
Nameserver
Table 6: Required information for routing mode setup (Continued)
26
The interface routes traffic based on IP addresses. The
interface works with its DNS server to translate host
names into IP addresses. For example, the interface
works with its DNS server to translate
atlanta.fileserver01
into
172.16.100.2
.To
locate its DNS server, the interface must know the IP
address of the DNS server. There are 2 methods for
assigning a DNS server to the interface:
• Manual—you manually provide the IP address of the
DNS server.
• Dynamic—the interface gets the IP address of its
DNS server dynamically without user input.
Page 27

Initial Setup for Routing Mode
Information Description
Internal
d
Interface
IP
Address and
Subnet Mask
The appliance must know the IP address and subnet
mask for the internal interface before it can properly route
traffic to and from that network. You must provide this
information for the interface.
Note: Keep the default setting to enable the interface
when the appliance boots.
Secondary and
Te r t ia r y
Nameservers
DNS Search
Path
To assign backup or additional DNS servers to the
interfaces, you must provide the IP addresses of the DNS
servers. These are optional.
You must provide the search path to the DNS server such
as the following example:
yourcompany.net
Password You must set the following passwords required for
appliance access:
• Root—users must provide this password when they
access the appliance from a command-line.
• Administrator—users must provide this password
when they access the appliance.
• Proventia Manager—users must provide this
password when they login to Proventia Manager.
Note: All passwords can be the same as the root
password.
Bootloader
Password
When you try to access the bootloader program or
change appliance boot options, you must provide the
bootloader password. This password is always the same
as the root password.
Table 6: Required information for routing mode setup (Continued)
a. The default gateway is the router where the interface sends packets when the
destination of the packet is outside the interface’s subnet.
b. For more information about PPPoE-leased IP addresses, contact your Internet
Service Provider (ISP).
c. ClampMSS is a technology that addresses problems with DSL connections, such
as the following: sporadic timeouts, problems with Web browsers that connect but
fail to receive data, problems with downloading files larger than 1K, and problems
with SSH connections. For more information, go to
drtcp
.
d. You set up a single internal interface during the initial setup. You can set up
additional internal interfaces later in Proventia Manager.
Proventia® Network Multi-Function Security Appliance User Guide
www.dslreports.com/
27
Page 28

Next steps After you complete the initial setup, you can do the following:
● Review the settings, exit Proventia Setup Assistant, and then close the
browser.
● Disconnect the computer from the appliance.
● Reset the computer’s TCP/IP settings so that it can access your
internal network.
● Connect the computer to the internal network.
Note: You can then use this computer to access Proventia Manager
from your network.
● Connect the interfaces on the appliance to the internal and external
networks.
● Access Proventia Manager.
● Configure, update, and back up the system.
● Configure the protection features.
● Back up the configuration settings.
Reference: For information about these tasks, see the User Guide.
28
Page 29

Initial Setup for Transparent Mode
Initial Setup for Transparent Mode
Introduction In transparent mode, the appliance is a bridging device. It inspects traffic,
and then forwards the traffic to the appropriate interface. For example,
traffic enters a transparent appliance on one interface, the appliance
inspects the traffic, and then the appliance forwards the traffic out
another interface. The appliance does not perform complex, network
routing functions such as network address translation or best route
calculations in transparent mode.
Deployment
considerations
Features
A transparent appliance can be deployed into an existing network
without changing existing network settings such as IP addresses, subnets,
and routers. Transparent mode deployments require careful planning to
ensure the following:
● A router infrastructure is in place on your network to properly route
traffic because the appliance is not capable of routing in transparent
mode.
● The appliance is deployed behind a router.
● The appliance is not directly connected to the Internet.
The following features are available in transparent mode:
● Antispam
● Antivirus
● Automatic Security Updates
● Firewall, including traffic filtering based on MAC address and data-
link protocol
● Intrustion Prevention
● Web Filter
The following routing features are not available in transparent mode:
● Dynamic Host Configuration Protocol (DHCP) Server and Relay
● Network address translation
● Open Shortest Path Routing Protocol (OSPF)
● Virtual private networking
Proventia® Network Multi-Function Security Appliance User Guide
29
Page 30
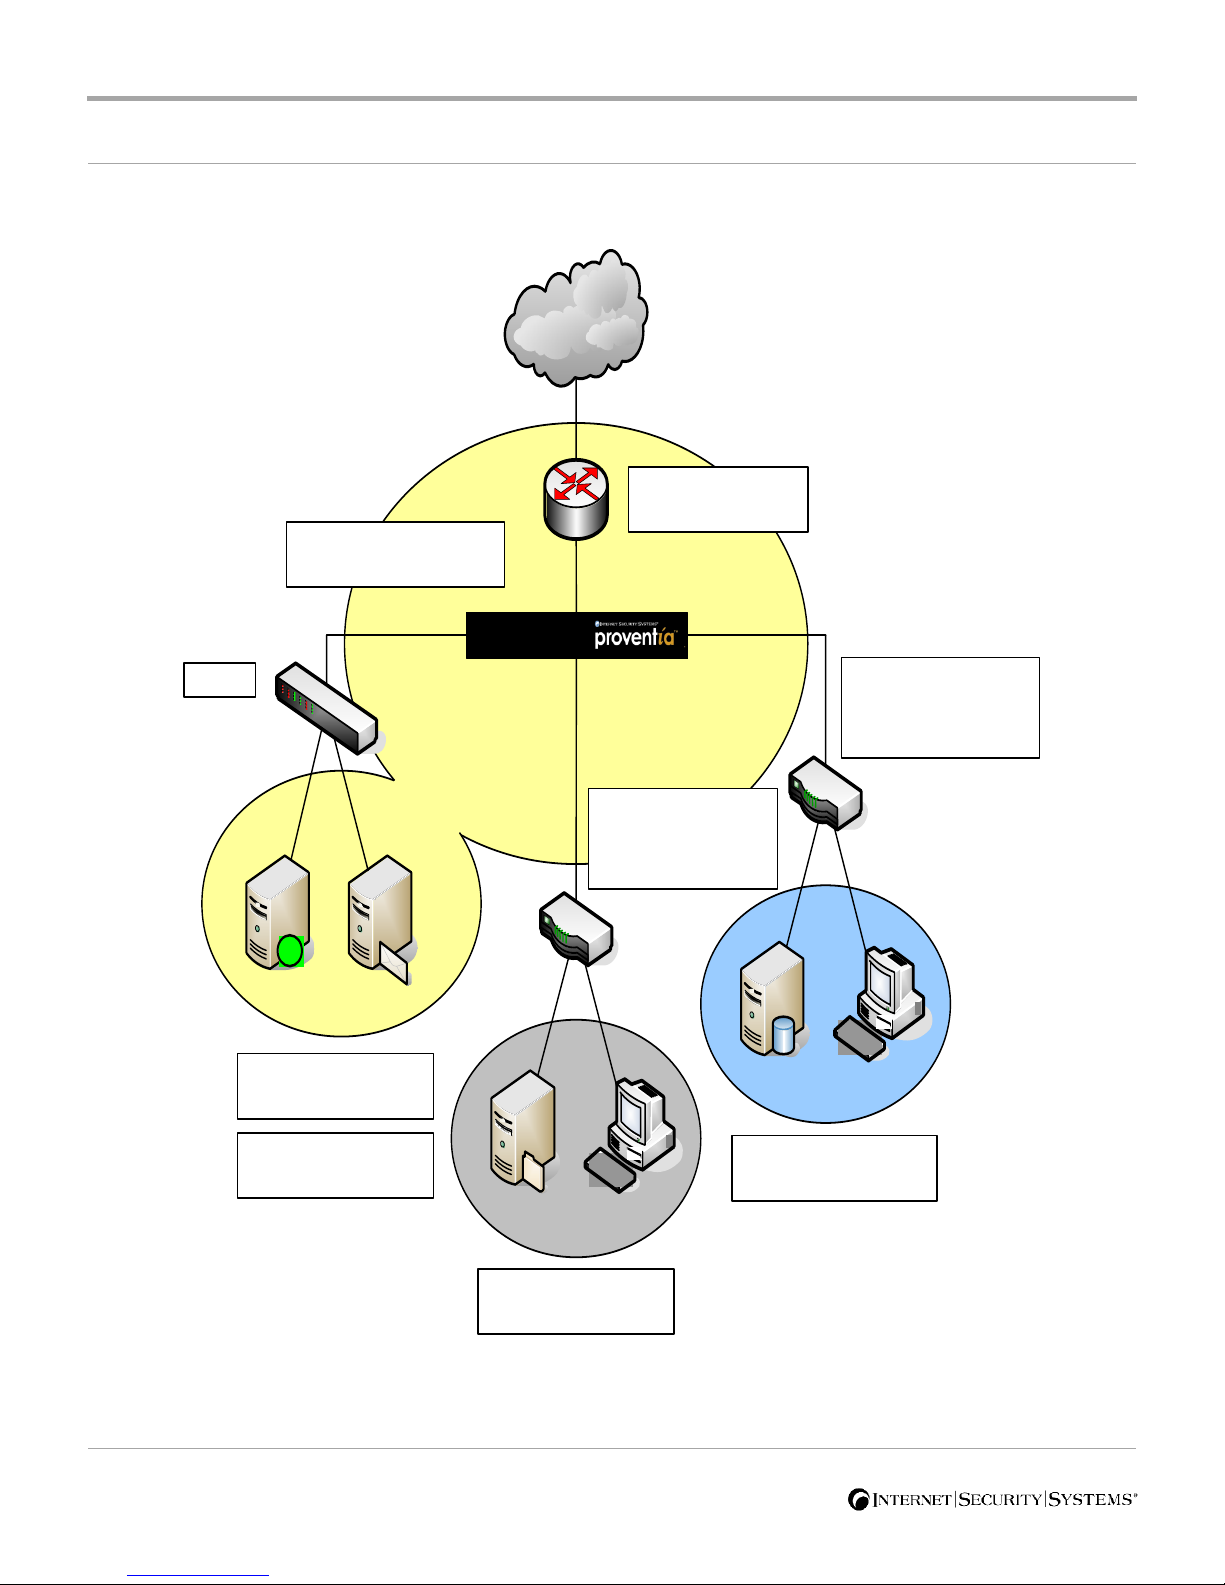
Diagram
The following diagram illustrates a transparent mode deployment:
Internet
Extern al Ro uter
Internal IP: 10.10.100.1
Proventia M -Series
Management IP : 10.10.100 .2
eth1 (EXT 1)
Switch
10.10.100.0/24
Web Server
IP Address: 10.10.100 .11
Em ail S erver
IP Address: 10.10.100 .12
DMZ
eth3 (3)
10.10.100 .0/24
DMZ
172 .16.100.0/24
eth2 (2)
External IP : 10.10 .100 .3
Internal IP : 172.16 .100 .1
Engineering
eth0 (INT 0)
Internal Router A
`
Internal Router B
External IP: 10.10.100.4
Internal IP : 192 .168 .100.1
`
Corporate
192.168 .100 .0/24
Database Server
IP Address: 192.168.100 .2
Figure 4: Transparent mode diagram
30
File Server
IP Address: 172.16.100 .2
Page 31

Initial Setup for Transparent Mode
Procedure To set up the appliance in transparent mode:
1. On the computer connected to the appliance, open a browser, and
then go to the defautl IP address for the appliance:
https://192.168.123.123
Note: For serial connections, start the HyperTerminal connection to
the appliance.
2. At the Proventia Local Management Interface login, type the
following login credentials:
■ Username = admin
■ Password = admin
3. Follow the on-screen instructions. The setup wizard guides you
through the initial setup process. During this process, you must
provide the information described in the following table:
Information Description
Appliance
You must select transparent mode.
Mode
Host Name You must provide a fully qualified domain name for the
appliance such as the following example:
appliance.yourcompany.net
Time and date You must set the time and date for the appliance. To
synchronize the appliance time with the time of a network
server, you enable the Network Time Protocol (NTP) and
provide the IP address of the server.
Management IP
Address and
Netmask
In transparent mode, the appliance interfaces do not
have IP addresses, subnet masks, or default gateways.
The interfaces simply pass traffic between networks after
the appliance runs security checks on it.
To access the appliance with Proventia Manager, you
must assign a management IP address, subnet, and
gateway to the appliance. This information is invisible to
the network and used for management purposes only.
Note: The following must reside on the same subnet:
• IP address of the computer used to access Proventia
Manager
• management IP address for the appliance
Proventia® Network Multi-Function Security Appliance User Guide
31
Page 32

Information Description
Primary,
Secondary, and
Te r t ia r y
Nameservers
The interface works with its DNS server to translate host
names into IP addresses. For example, the interface
works with its DNS server to translate
atlanta.fileserver01
into
172.16.100.2
locate its DNS server, the interface must know the IP
address of the DNS server. There are 2 methods for
assigning a DNS server to the interface:
• Manual—you manually provide the IP address of the
DNS server.
• Dynamic—the interface gets the IP address of its
DNS server dynamically without user input.
To assign backup or additional DNS servers to the
interfaces, you must provide the IP addresses for the
secondary or teritary DNS servers. These are optional.
DNS Search
Path
You must provide the search path to the DNS server such
as the following example:
yourcompany.net
Passwords You must set the following passwords required for
appliance access:
• Root—users must provide this password when they
access the appliance from a command-line.
• Administrator—users must provide this password
when they access the appliance.
• Proventia Manager—users must provide this
password when they login to Proventia Manager.
Note: All passwords can be the same as the root
password.
.To
Bootloader
Password
Next steps After you complete the initial setup, you can do the following:
● Review the settings, exit Proventia Setup Assistant, and then close the
browser.
● Disconnect the computer from the appliance.
32
When you try to access the bootloader program or
change appliance boot options, you must provide the
bootloader password. This password is always the same
as the root password.
Page 33

Initial Setup for Transparent Mode
● Reset the computer’s TCP/IP settings so that it can access your
internal network.
● Connect the computer to the internal network.
Note: You can then use this computer to access Proventia Manager
from your network.
● Connect the interfaces on the appliance to the internal and external
networks.
● Access Proventia Manager.
● Configure, update, and back up the system.
● Configure the protection features.
● Back up the configuration settings.
Reference: For information about these tasks, see the User Guide.
Proventia® Network Multi-Function Security Appliance User Guide
33
Page 34

Connecting Appliances to the Network
Introduction After you complete the initial setup process, you can connect your
appliance to the network.
Important: When you connect the appliance to the network before you
configure the firewall or other protection features, you do not expose
your network to vulnerabilities. Connecting the appliance to the network
allows you to test the configuration settings as you go through the
configuration process.
Before you begin Before you connect your appliance to the network, you must disconnect
the computer used for the initial setup from the internal interface. This
interface is used to connect the appliance to the internal network.
Procedure To connect the appliance to the network:
1. Connect the interfaces to the network as follows:
Interface Connection
INT 0 Connect the private network (internal) to this interface.
EXT 1 Connect the public network (Internet) to this interface.
2. Connect any additional private, internal networks to the internal
interfaces.
Note: The number of additional interfaces on the appliance varies
depending on the model.
3. Review the lights on the front panel for status information:
Color Indication
green Successful connection
amber (flickering) Activity on the connection
34
Page 35

Accessing Proventia Manager
Accessing Proventia Manager
Introduction After the initial setup, you are ready to access Proventia Manager for the
first time, and then configure, update, and back up the system and the
protection features. This topic provides information about how to access
Proventia Manager for the first time.
Prerequisites Before you try to access Proventia Manager, you must choose a computer,
and then complete the following tasks:
Task
9
Verify that the computer has Internet Explorer Version 6 or later installed.
Verify that the computer’s TCP/IP settings are properly configured to
access the private, internal network.
Accessing Proventia
Manager
Connect the computer to the private, internal network. This allows you to
access the appliance and Proventia Manager from the network.
To access Proventia Manager for the first time:
1. On a computer connected to the internal network, open a browser,
and then go to the DNS name or IP address of the appliance as in the
following examples:
■
https://my_appliance.mycomputer.net
■
https://123.45.67.890
Note: If you receive a hostname mismatch error message, then type
your username (
admin
) and Proventia Manager password when
prompted.
2. Login with username
Note: If the navigation pane does not appear when you log in, click
admin
and your Proventia Manager password.
the following link at the top of the page:
Click here to reload this page with navigation.
Proventia® Network Multi-Function Security Appliance User Guide
35
Page 36
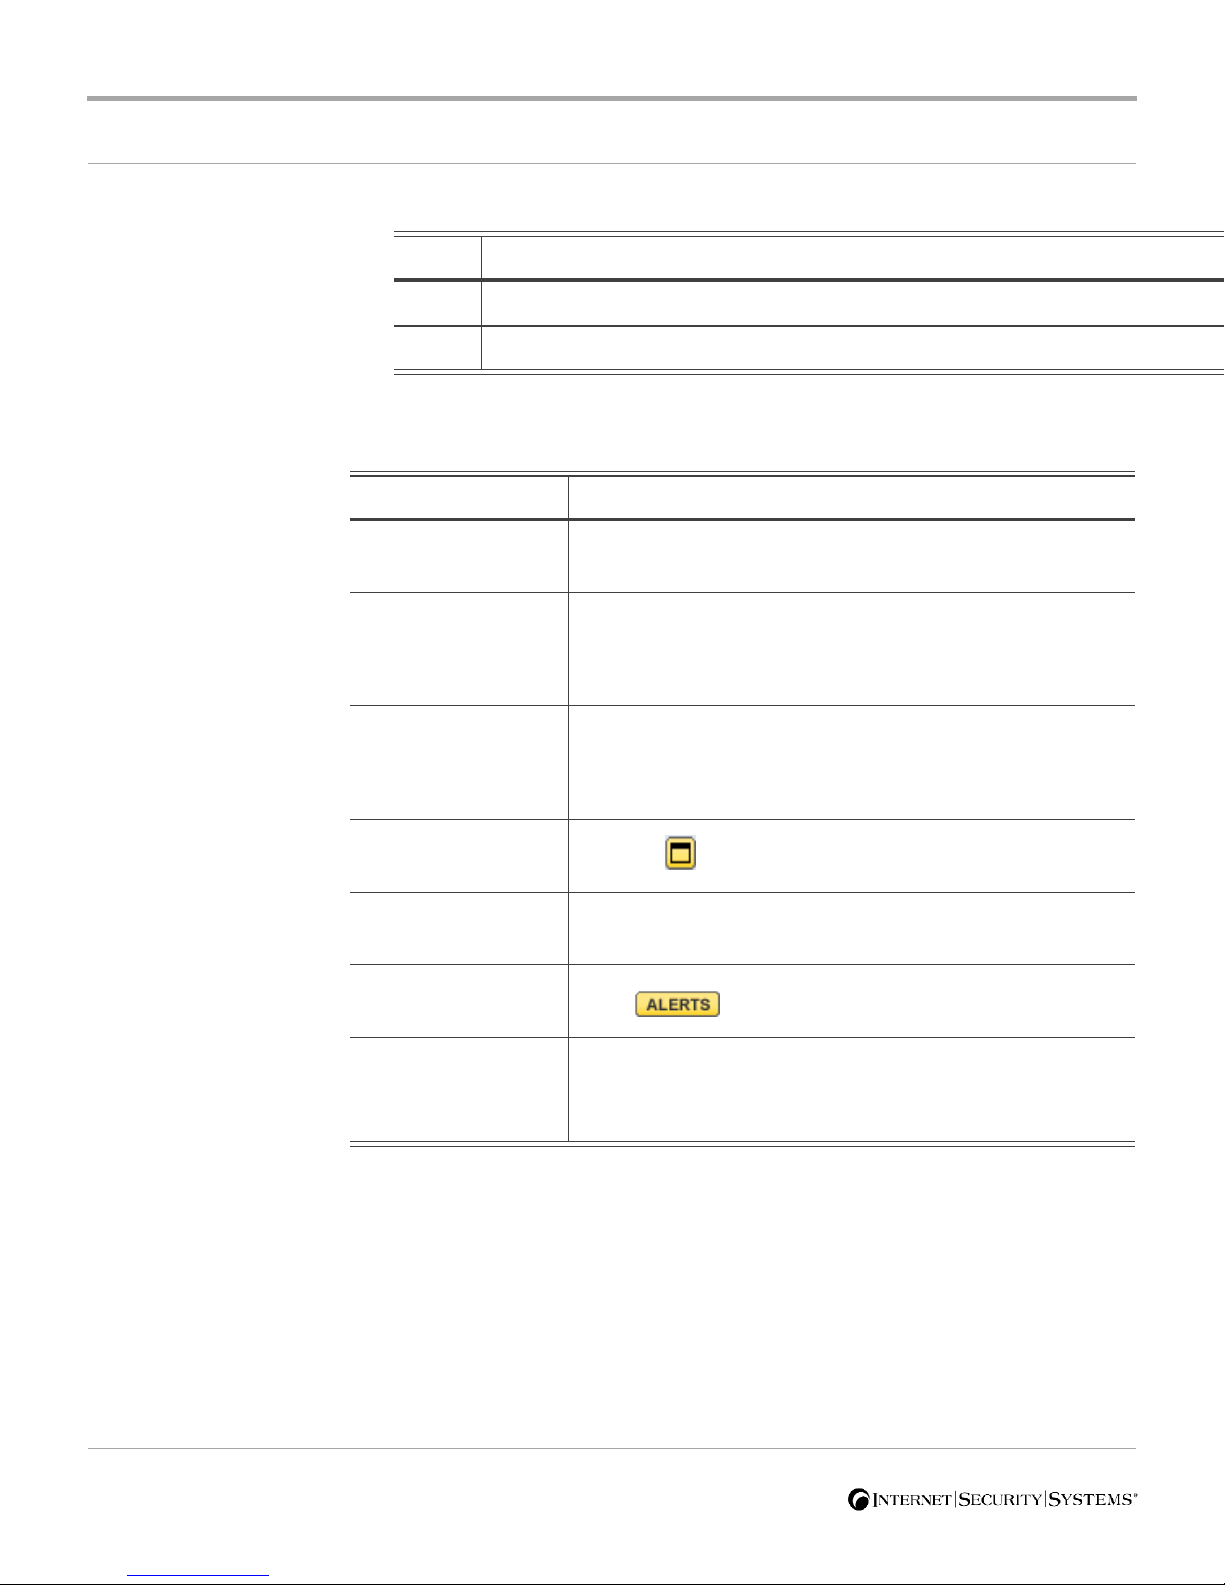
3. Do you want to use the Getting Started procedures?
If... Then...
Ye s S e l e c t Ye s, and then select Launch Proventia Manager.
No Select No, and then select Launch Proventia Manager.
Working with
Proventia Manager
Use the following procedures to navigate in Proventia Manager:
To... Do this...
Access an item in
the pane
Expand an item in
the pane
Collapse an item in
the pane
Minimize or
maximize a page
Open any page in a
new window
View the alerts for a
module
Double-click the item.
Do one of the following:
• Click the corresponding + sign.
• Double-click the item.
Do one of the following:
• Click the corresponding + sign.
• Double-click the item.
Click the icon in the upper right corner of any page.
Right-click the page in the navigation pane, and then
select Open in a new window from the menu.
Click at the top of any page for the feature.
Save changes Click Save Changes.
Table 7: Working with Proventia Manager
Saving and
canceling changes
You can change multiple policies before you save them. For example, you
can change an appliance access policy, a firewall policy, and a network
address translation policy, and then save the changes for all three at once.
Note: You must save the following items individually:
● Certificate management settings
36
A red flag icon appears next to unsaved changes in the
navigation pane.
Page 37
Accessing Proventia Manager
● Filter Database settings
● High availability changes
● Licensing information
● Network settings (IP addresses for the interfaces, operation modes,
● SiteProtector management settings
● Update settings
You can cancel all changes made to all open policies. For example, you
change an appliance access policy, a firewall policy, and a network
address translation policy. You then cancel the changes. Proventia
Manager cancels the changes you made to all three open policies. You
cannot retrieve any changes you have cancelled.
and routing)
Getting help for
Proventia Manager
To access help, click the Help button on any page. The following table
provides information about icons in help:
Icon Description
Click this icon to display additional information or key
considerations.
Click the text beside the icon to display step-by-step instructions.
Click the text beside the icon to display step-by-step instructions
for related tasks.
Table 8: Help icon descriptions
Proventia® Network Multi-Function Security Appliance User Guide
37
Page 38

38
Page 39

Index
a
additional interfaces, connecting 34
c
connecting additional interfaces 34
d
diagrams
M10 appliance back panel 11
M10 appliance front panel 11
i
Internet Security Systems
technical support 6
Web site 6
n
network cable connections 34
t
technical support, Internet Security Systems 6
w
Web site, Internet Security Systems 6
Proventia® Network Multi-Function Security Appliance User Guide
39
Page 40

Index
40
 Loading...