

PWR
IDE
Welcome
You're only minutes away from the best network security available.
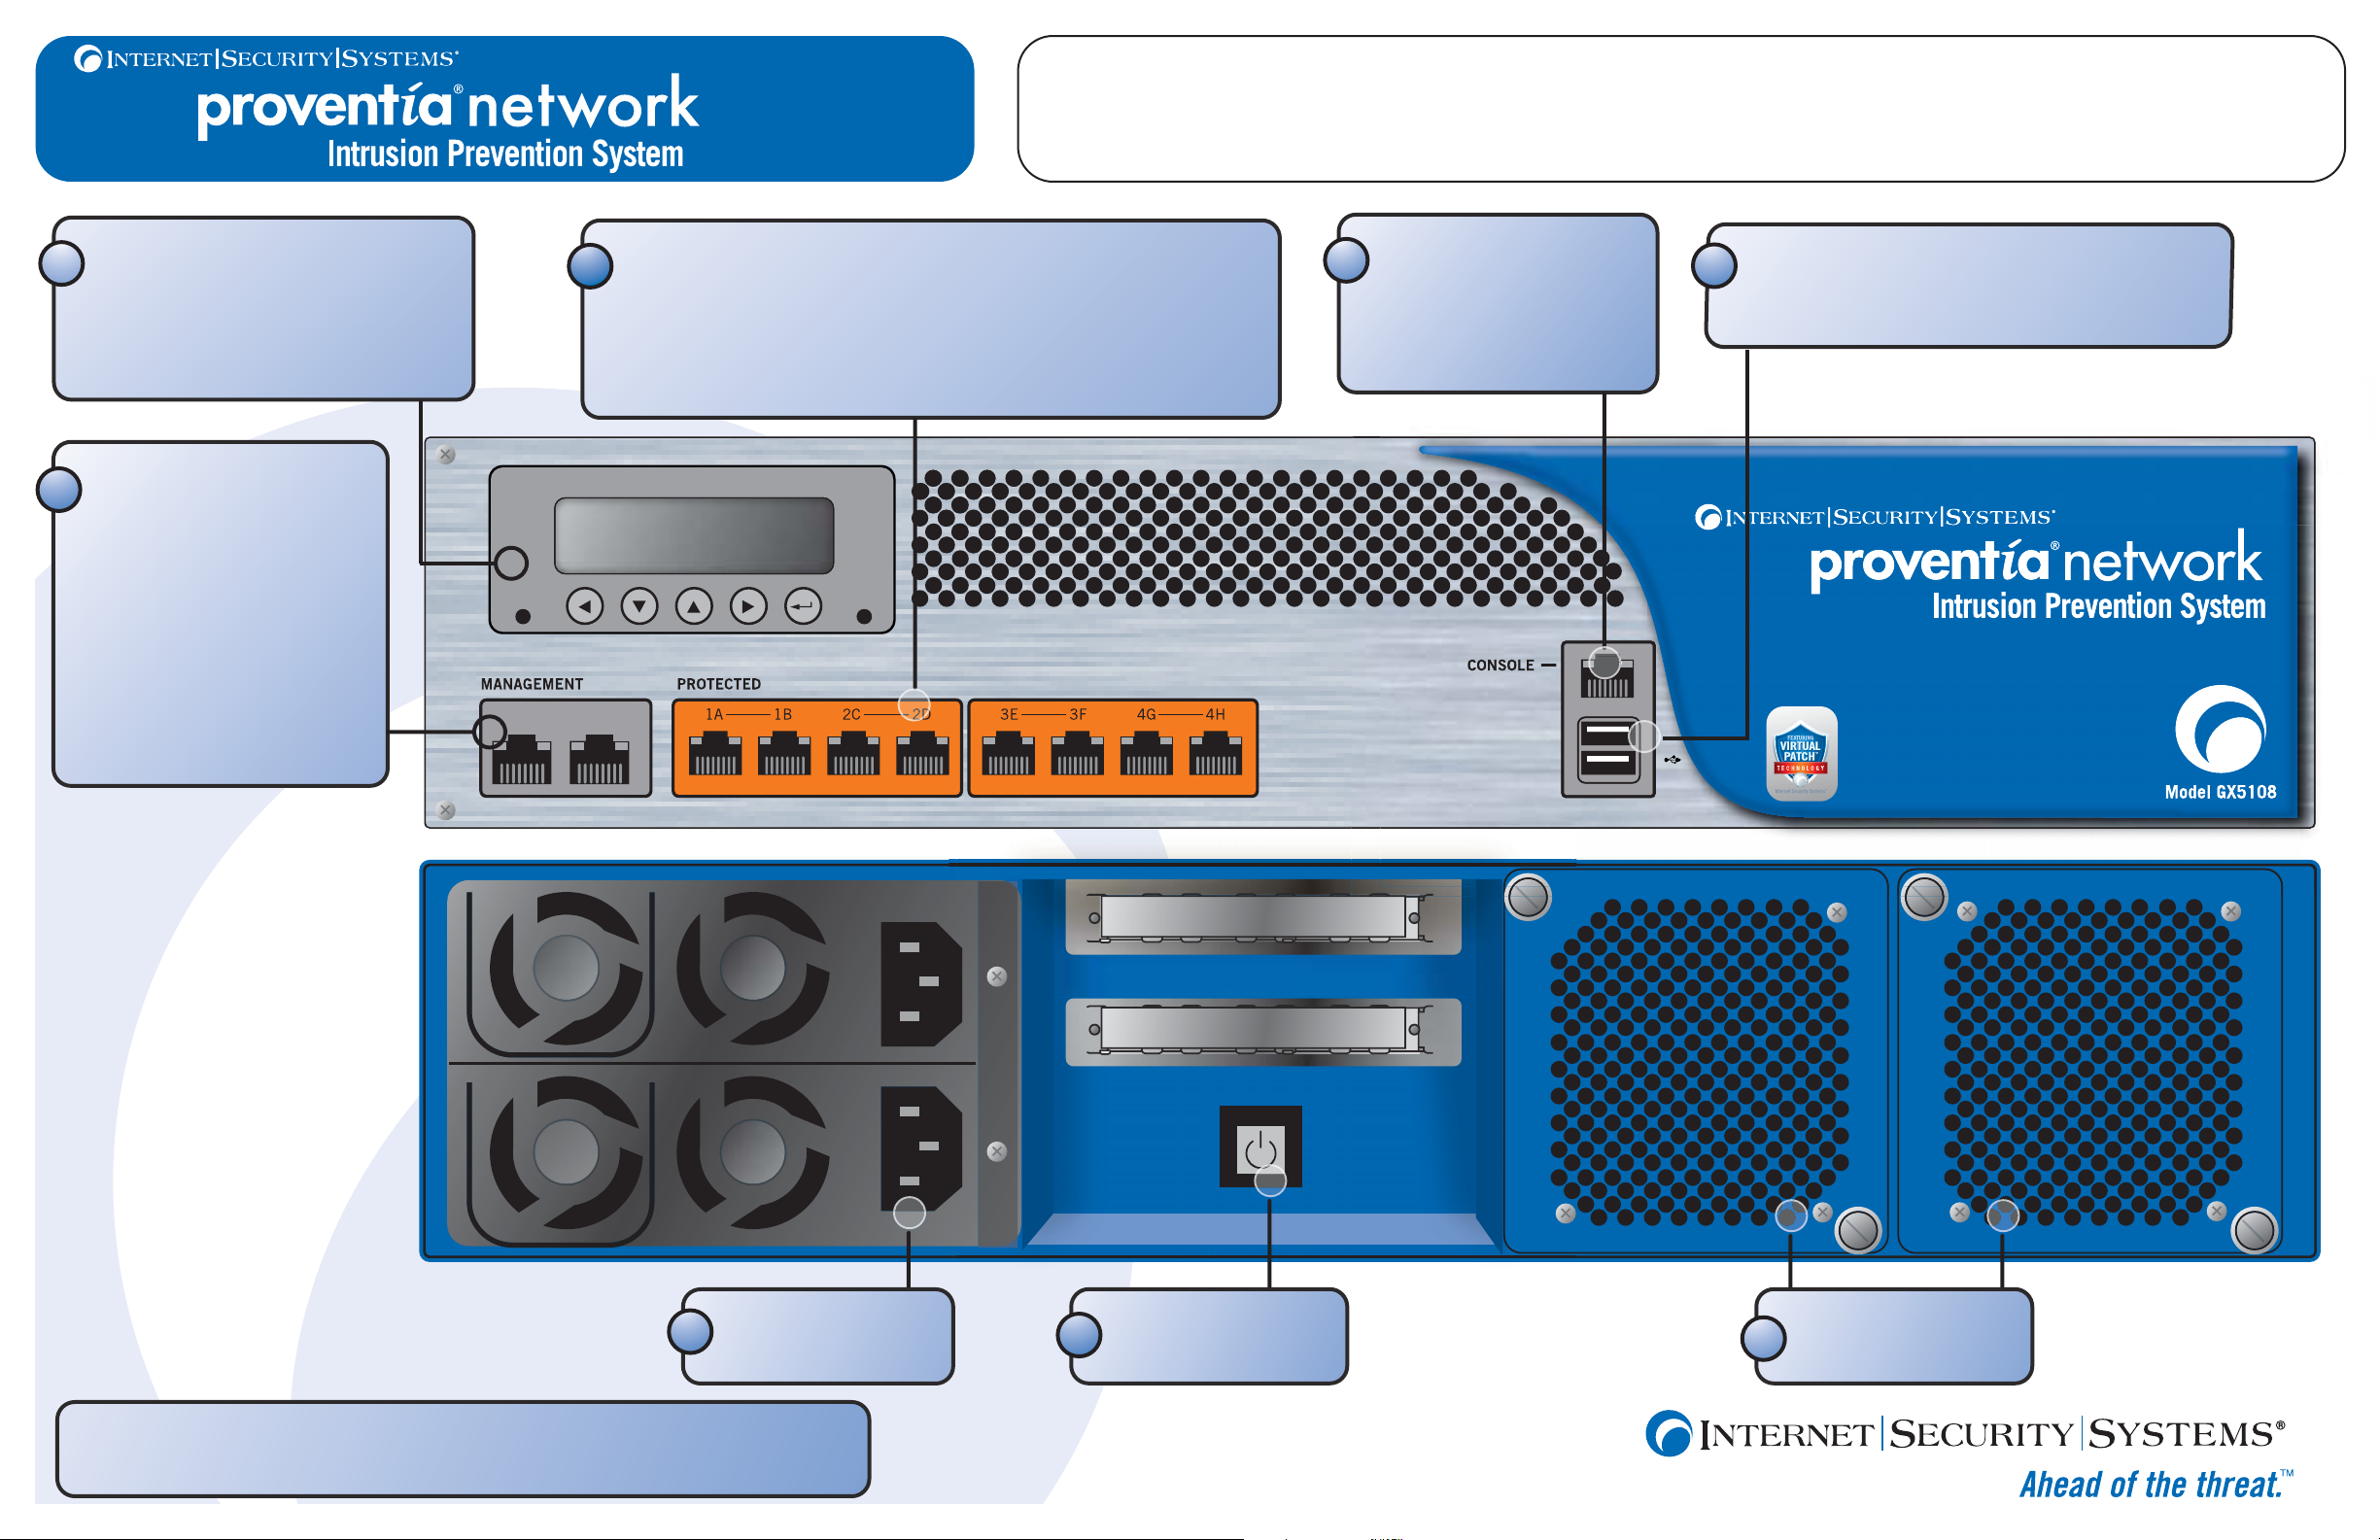
Model GX5108
LCD Controller Module1
USB Ports4
Used to communicate with optional external bypass unit
Serial Console Port3
Management Ports
5
Protected Ports
2
Used for initial network configuration,
restarting or shutting down the appliance
and obtaining IPS version information
Management port 1 is used
to communicate with Proventia
Manager and Proventia
SiteProtector™ central
management system
Management port 2 is used
exclusively for sending RSKill
(TCP Reset) responses
Used for either inline intrusion prevention (IPS mode) or passive intrusion
detection (IDS mode)
Inline prevention uses a pair of ports per segment
Passive detection uses a single port per segment
Used for terminal-based (optional)
setup and recovery
6 Power Supplies
8 Fan Assemblies
Technical Support - http://www.iss.net/support
7 Power Button
12
Consider
Connect
Configure
Getting
Started
Select a monitoring mode
1
The mode you select affects how you connect your appliance to the network. Consider the following:
Mode Responses Benefits
Inline Protection Block, Quarantine, Firewall Monitors network and actively blocks malicious traffic
Inline Simulation Block, Quarantine
Passive Monitoring Block Replicates traditional IDS technology
This card provides connection and initial configuration information for the Proventia Network Intrusion
Prevention System (IPS) GX5000 series model appliances. The steps you perform here will allow you remote
network access to the appliance so that you can perform more advanced configuration tasks. You will find
more advanced configuration information in the Proventia Network Intrusion Prevention System User Guide
available on the Web at www.iss.net/download.
Allows you to realize the full benefit of the IPS
(Simulated)
Monitors network without affecting traffic patterns
Helps you baseline and test your security policy
Monitors traffic without sitting inline
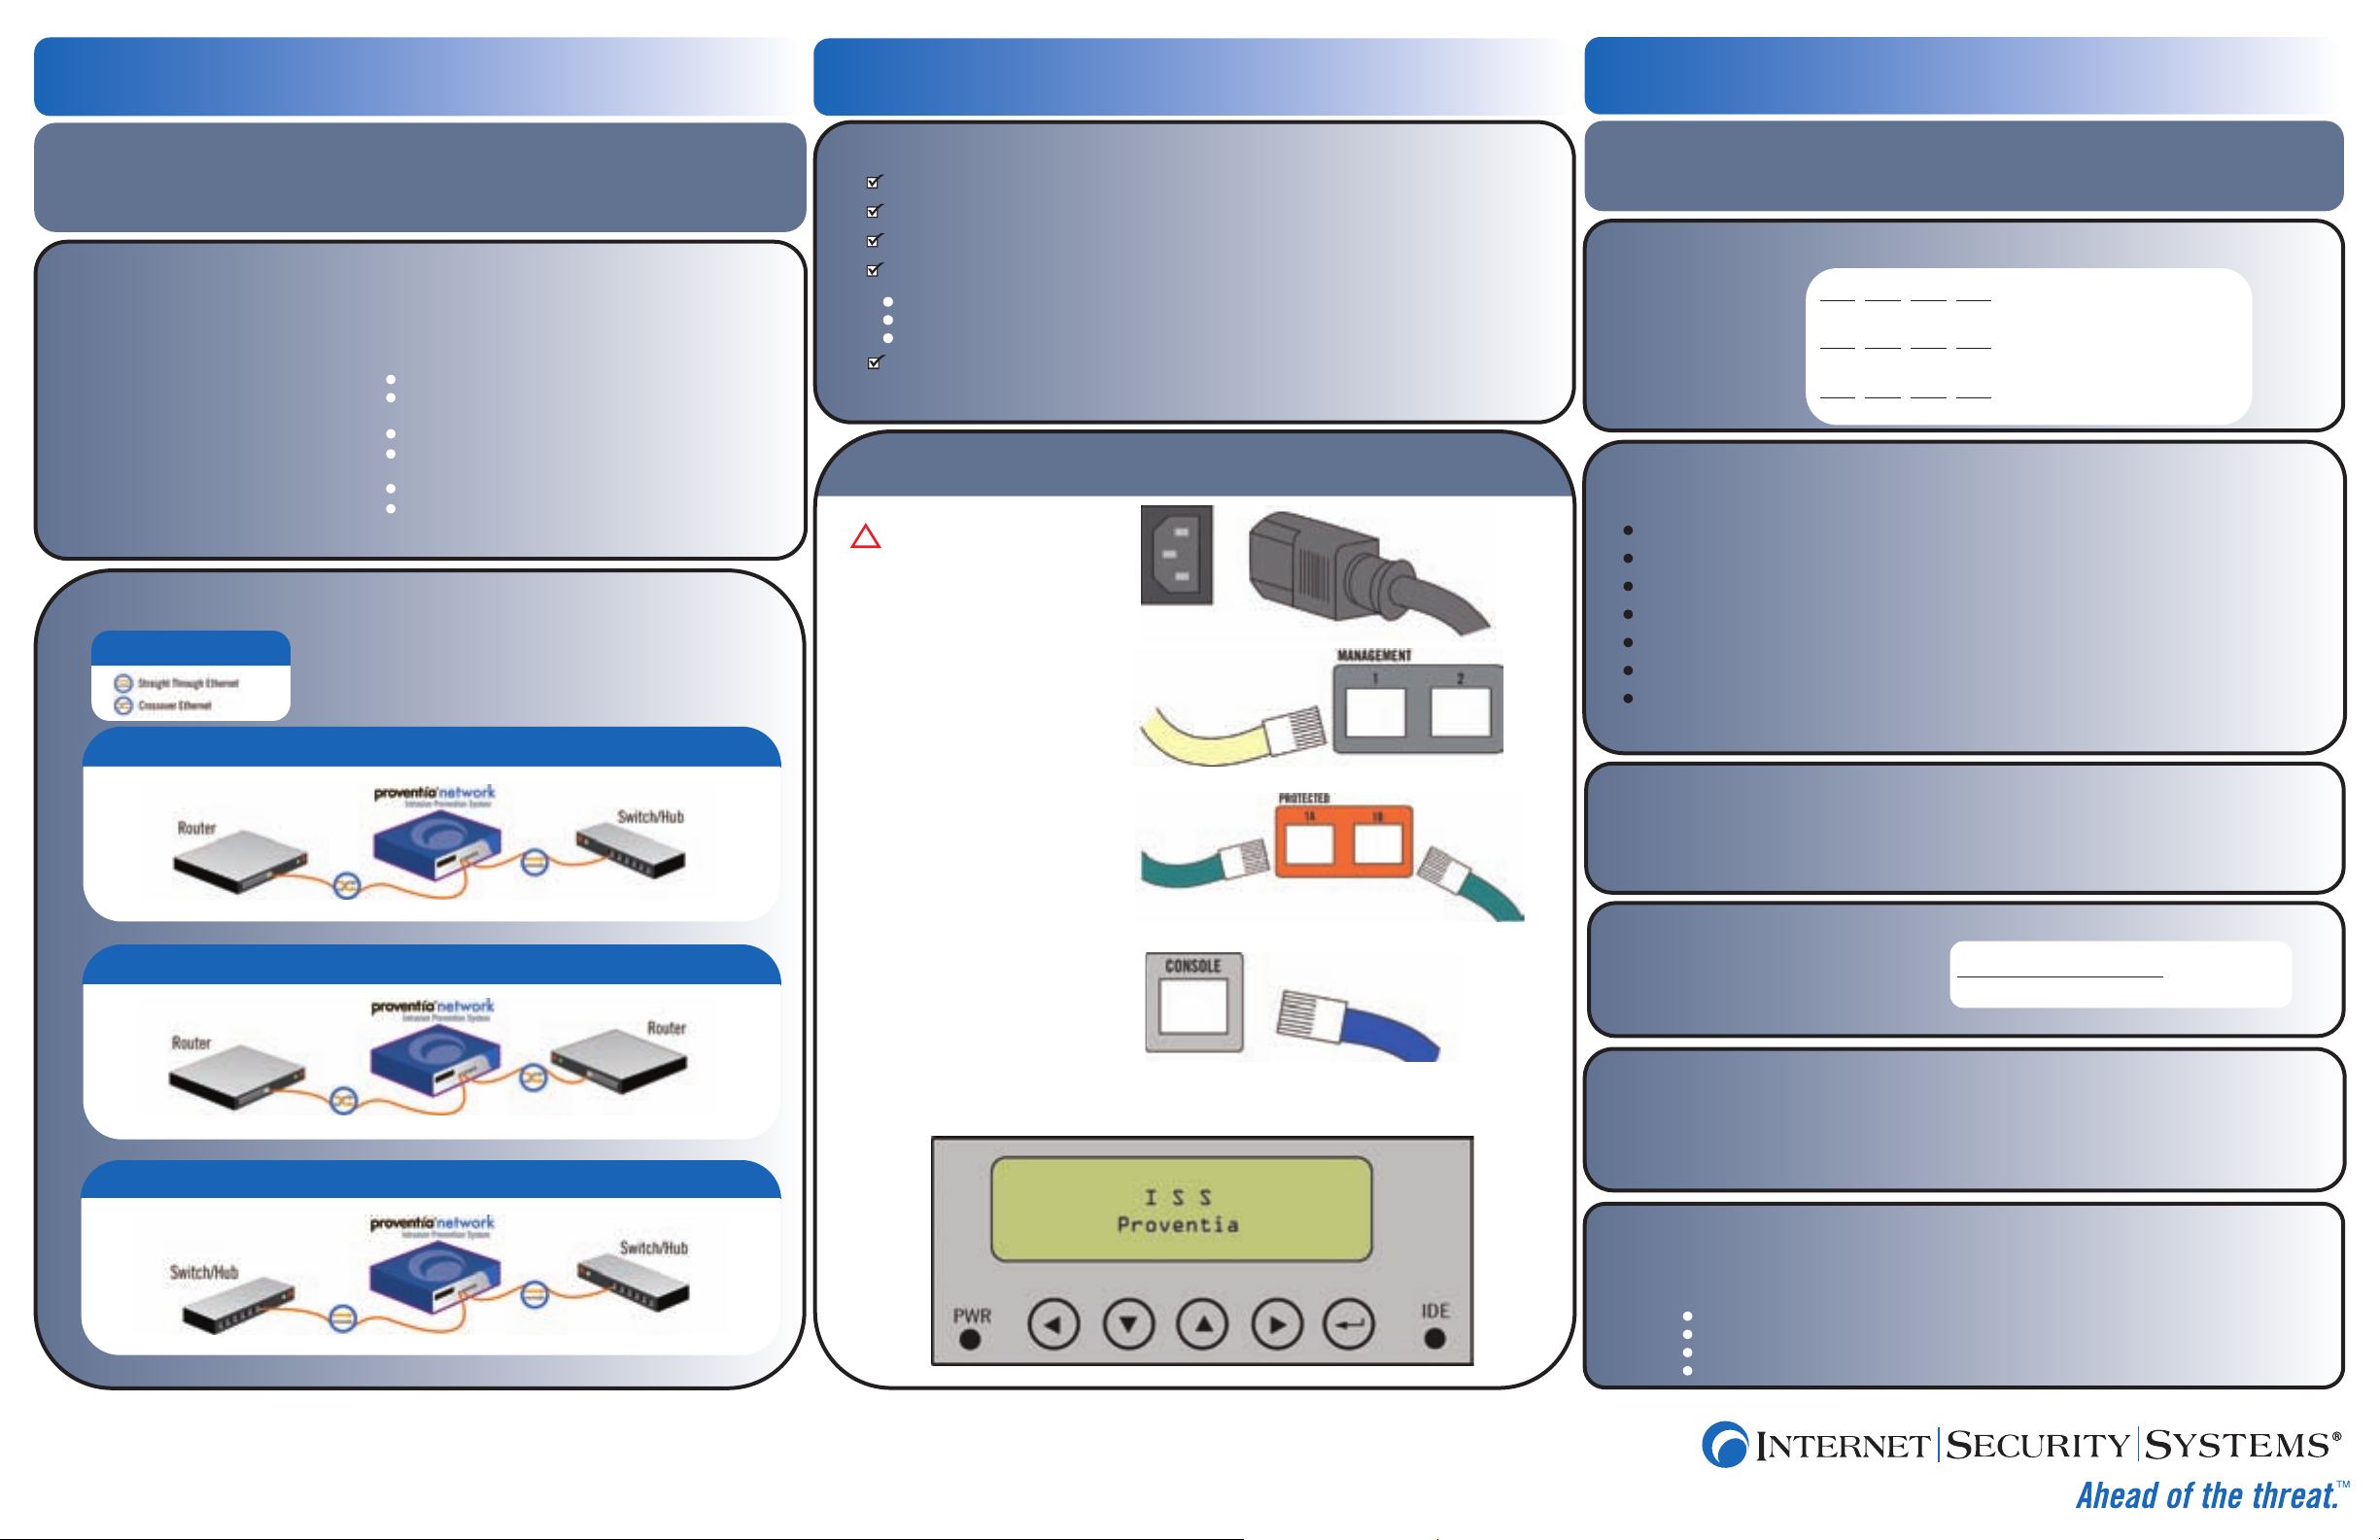
2 Review common deployment scenarios
Legend
Router to Switch/Hub
Gather materials
1
Proventia Network IPS appliance
Proventia serial console cable (blue)
Ethernet crossover cable (red)
For each inline segment:*
a pair of Ethernet cables, straight-through or crossover, depending on your network type
a crossover adapter
additional Ethernet cables as needed
Two power cords
*
ISS provides one crossover adapter and two one-foot Ethernet cables (green) per segment.
Connect the appliance
2
A Connect the power cords.
You must connect both power cords to the
appliance to prevent warning signals
from sounding.
B
Connect the management port.
Always connect your network to
management port 1, on the left, using a
straight-through cable. Management
port 2, on the right, is the kill (TCP reset)
port.
The following tasks describe how to use the LCD panel to connect the appliance to the network. You can also connect the
appliance using the Proventia Setup program. You must complete the initial configuration using only one method or the other. For
more information on using Proventia Setup to connect to the network, refer to Chapter 3, "Configuring Appliance Settings," in the
Network Intrusion Prevention System User Guide.
Gather network information
1
Use this table to record
important network information
you need to configure the
appliance.
Enter network information
2
Enter the network information you gathered in Step 1 as follows:
Press ENTER (carriage return symbol) on the LCD panel. The LCD displays a message: "Do you want to configure the appliance?"
Select OK, and then press ENTER.
Press ENTER on the LCD panel to display the IP address screen.
Press the UP and DOWN buttons to select a number, and then press the RIGHT ARROW button to move to the next field.
When you have completed all fields on the screen, press ENTER.
Select OK to move forward, and then press ENTER to confirm your selection.*
Complete these steps again to enter the subnet mask and the default gateway..
*If you select Cancel and then press ENTER, all fields are cleared, and no information is saved. You can re-enter information as necessary.
• • •
IPAddress
• • •
Subnet Mask
• • •
Default Gateway
Router to Router
Switch/Hub 1 to Switch/Hub 2
C
Connect the protected ports.
To run the appliance in inline protection or
inline simulation mode, plug cables into
both monitoring ports. To run in passive
mode, plug one cable into the first port of
the pair only, leaving the second port
empty.
D
(Optional) Connect the serial console.
Complete this step only if you want to
connect the appliance directly to a
computer to complete advanced
configuration.
E
Turn on the appliance.
The ISS
Proventia screen appears, and
you are ready to begin configuration.
3 Save network information
Once you have entered all your network information, a final confirmation screen appears in the LCD screen.
Select OK to save all network information and enable the Management port, or select Cancel to return to the ISS Proventia
screen without saving any of the information you entered. Press ENTER to confirm your selection.
4 Record your password
When you confirm your settings, the appliance saves your
information, and then generates a unique, alphabetic,
case-sensitive password. Record this password, because
you must use it to log on to the appliance
Proventia Password
5 Log on to the appliance
You are ready to log on to the appliance and configure advanced settings. You can log on to the appliance either from a local
computer by directly connecting the appliance to a computer using a serial console cable, or from a remote computer through
a terminal emulation session. For more information about logging on to the appliance and accessing Proventia Setup, see
Chapter 3, "Configuring Appliance Settings," in the Proventia Network Intrusion Prevention System Users Guide.
What's
next?
Once you have logged on to the appliance and configured advanced settings such as your DNS and host name, your adapter
modes, your port link settings, and your backup and recovery settings, you will be ready to install your license and setup
appliance management.
The Proventia Network Intrusion Prevention System User Guide walks you through these and other important tasks, such as:
Configuring your security policy, including specifying events and responses
Creating firewall rules to protect your network
T
racking alerts
Monitoring important system information
Copyright© 2006 Internet Security Systems, Inc. All rights reserved worldwide
Internet Security Systems and Ahead of the threat are trademarks, and the Internet Security Systems logo and Proventia are registered trademarks, of Internet Security Systems, Inc. All other marks and trade names mentioned are the property of their
owners, as indicated. All marks are the property of their respective owners and used in an editorial context without intent of infringement. Specifications and content are subject to change without notice.
Distribution: General
MSM-ISSQSCGX5108C
 Loading...