

Page 1

1
Camera
Network Camera
Quick Guide
Page 2
Network Camera·Quick Guide
1
1 1
Thank you for purchasing our product. If there are any questions, or requests,
please do not hesitate to contact the dealer.
This manual applies to I7-C41413-IR, I7-C41430-IR cameras.
This manual may contain several technical incorrect places or printing errors, and
the content is subject to change without notice. The updates will be added to the
new version of this manual. We will readily improve or update the products or
procedures described in the manual.
DISCLAIMER STATEMENT
“Underwriters Laboratories Inc. (“UL”) has not tested the performance or
reliability of the security or signaling aspects of this product. UL has only tested
for fire, shock or casualty hazards as outlined in UL’s Standard(s) for Safety,
UL60950-1. UL Certification does not cover the performance or reliability of the
security or signaling aspects of this product. UL MAKES NO REPRESENTATIONS,
WARRANTIES OR CERTIFICATIONS WHATSOEVER REGARDING THE
PERFORMANCE OR RELIABILITY OF ANY SECURITY OR SIGNALING RELATED
FUNCTIONS OF THIS PRODUCT.
Page 3
Network Camera·Quick Guide
2
2 2
Regulatory Information
FCC Information
FCC compliance: This equipment has been tested and found to comply with the
limits for a digital device, pursuant to part 15 of the FCC Rules. These limits are
designed to provide reasonable protection against harmful interference when
the equipment is operated in a commercial environment. This equipment
generates, uses, and can radiate radio frequency energy and, if not installed and
used in accordance with the instruction manual, may cause harmful interference
to radio communications. Operation of this equipment in a residential area is
likely to cause harmful interference in which case the user will be required to
correct the interference at his own expense.
FCC Conditions
This device complies with part 15 of the FCC Rules. Operation is subject to the
following two conditions:
1. This device may not cause harmful interference.
2. This device must accept any interference received, including interference that
may cause undesired operation
EU Conformity Statement
This product and - if applicable - the supplied accessories too
are marked with "CE" and comply therefore with the
applicable harmonized European standards listed under the
Low Voltage Directive 2006/95/EC, the EMC Directive 2004/108/EC, the RoHS
Directive 2011/65/EU.
2012/19/EU (WEEE directive): Products marked with this
symbol cannot be disposed of as unsorted municipal waste in
the European Union. For proper recycling, return this product to
your local supplier upon the purchase of equivalent new
Page 4
Network Camera·Quick Guide
3
3 3
equipment, or dispose of it at designated collection points. For more information
see: www.recyclethis.info.
2006/66/EC (battery directive): This product contains a
battery that cannot be disposed of as unsorted municipal
waste in the European Union. See the product
documentation for specific battery information. The battery
is marked with this symbol, which may include lettering to
indicate cadmium (Cd), lead (Pb), or mercury (Hg). For proper recycling, return
the battery to your supplier or to a designated collection point. For more
information see: www.recyclethis.info.
Page 5
Network Camera·Quick Guide
4
4 4
Safety Instruction
These instructions are intended to ensure that user can use the product correctly
to avoid danger or property loss.
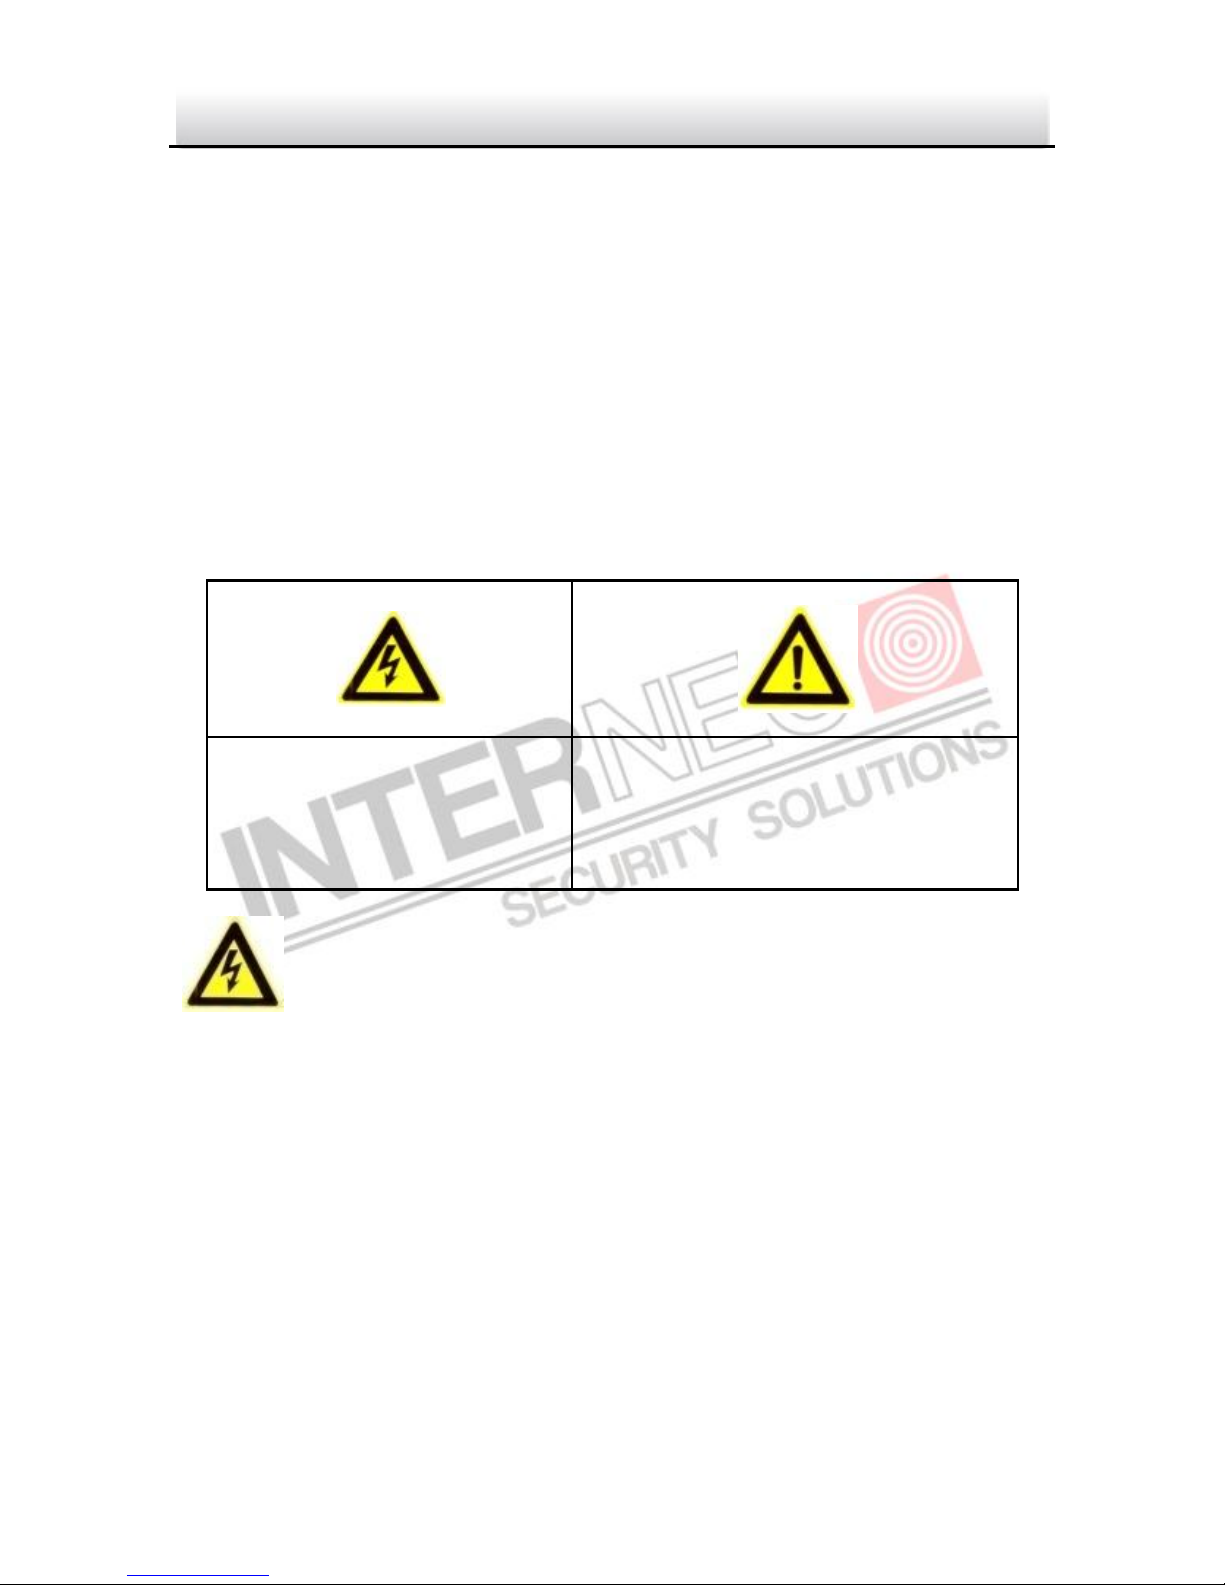
The precaution measure is divided into “Warnings” and “Cautions”
Warnings: Serious injury or death may occur if any of the warnings are
neglected.
Cautions: Injury or equipment damage may occur if any of the cautions are
neglected.
Warnings
Please adopt the power adapter which can meet the safety extra low voltage
(SELV) standard. And source with DC 12V or AC 24V (depending on models)
according to the IEC60950-1 and Limited Power Source standard.
If the product does not work properly, please contact your dealer or the
nearest service center. Never attempt to disassemble the camera yourself.
(We shall not assume any responsibility for problems caused by unauthorized
repair or maintenance.)
Warnings Follow these
safeguards to prevent serious
injury or death.
Cautions Follow these precautions
to prevent potential injury or
material damage.
Page 6
Network Camera·Quick Guide
5
5 5
To reduce the risk of fire or electrical shock, do not expose this product to rain
or moisture.
This installation should be made by a qualified service person and should
conform to all the local codes.
Please install blackouts equipment into the power supply circuit for convenient
supply interruption.
Please make sure that the ceiling can support more than 50(N) Newton
gravities if the camera is fixed to the ceiling.
If the product does not work properly, please contact your dealer or the
nearest service center. Never attempt to disassemble the camera yourself.
(We shall not assume any responsibility for problems caused by unauthorized
repair or maintenance.)
Cautions
Make sure the power supply voltage is correct before using the camera.
Do not drop the camera or subject it to physical shock.
Do not touch sensor modules with fingers. If cleaning is necessary, use a clean
cloth with a bit of ethanol and wipe it gently. If the camera will not be used for
an extended period of time, put on the lens cap to protect the sensor from
dirt.
Do not aim the camera lens at the strong light such as sun or incandescent
lamp. The strong light can cause fatal damage to the camera.
The sensor may be burned out by a laser beam, so when any laser equipment
is being used, make sure that the surface of the sensor not be exposed to the
laser beam.
Page 7
Network Camera·Quick Guide
6
6 6
Do not place the camera in extremely hot, cold temperatures (the operating
temperature should be between -30°C ~ 60°C), dusty or damp environment,
and do not expose it to high electromagnetic radiation.
To avoid heat accumulation, good ventilation is required for a proper operating
environment.
Keep out of water and any liquid.
While shipping, the camera should be packed in its original packing.
Improper use or replacement of the battery may result in hazard of explosion.
Please use the manufacturer recommended battery type.
Page 8
Network Camera·Quick Guide
7
7 7
Table of Contents
1 Overview .......................................................................................................... 8
1.1 Appearance ...................................................................................... 8
1.2 Wiring ............................................................................................ 10
2 Installation ...................................................................................................... 11
2.1 Disassembling ................................................................................ 11
2.2 Mounting ....................................................................................... 12
2.2.1 Ceiling mounting .................................................................. 12
2.2.2 Ceiling mounting with gang box ........................................... 16
2.2.3 Wall Mounting ..................................................................... 18
2.3 Image and Focus Adjusting ............................................................. 21
3 Setting the Network Camera over the LAN ..................................................... 24
4 Accessing via Web Browser ............................................................................ 29
Page 9
Network Camera·Quick Guide
8
8 8
1 Overview
1.1 Appearance
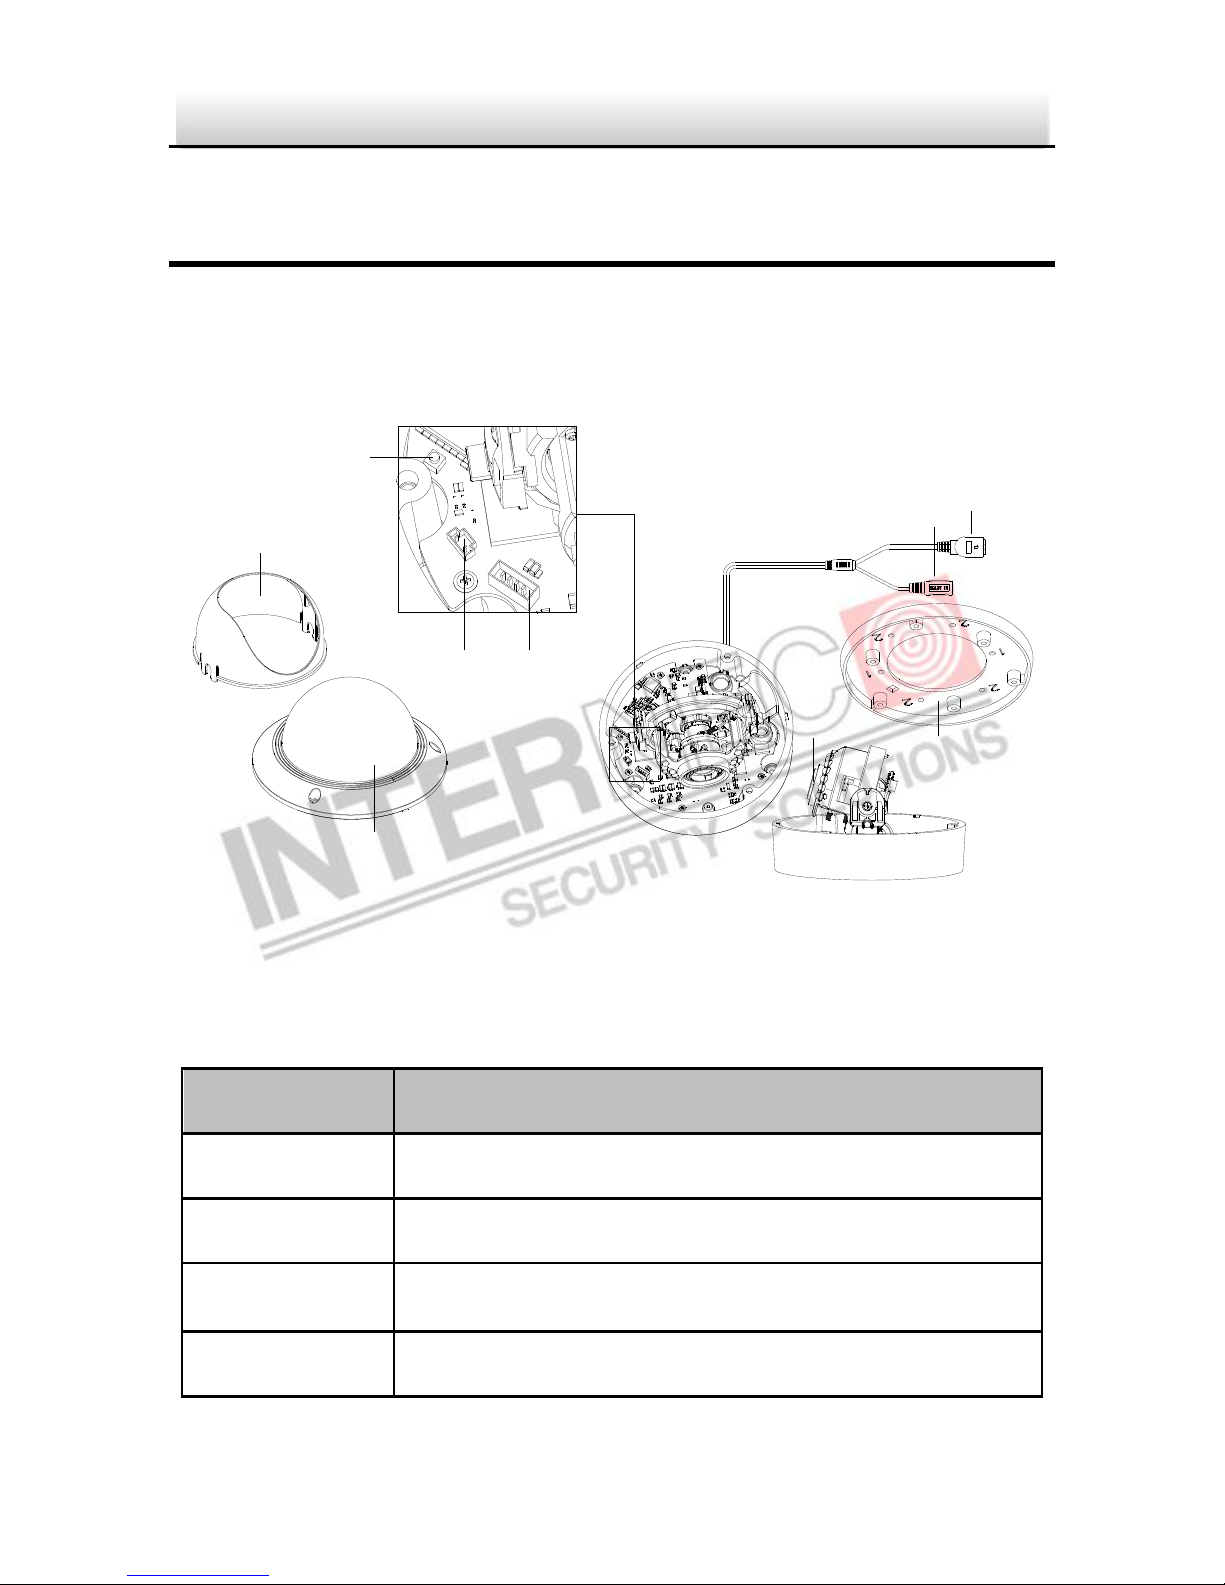
Figure 1-1 Overview
Table 1-1 Overview
No.
Description
1
Lower Dome
2
Black Liner
3
Reset Button
4
AUX Video Output Interface
1
4
5
2
3
6
7
8
9
Page 10
Network Camera·Quick Guide
9
9 9
5
Serial Port
6
Power interface
7
Ethernet interface
8
Mounting Base
9
Lens
Notes:
To reset the default parameters to the camera, you need to press and hold the
reset button and power on the camera. After the power on the camera, you
must still press and hold the reset button for about 10 seconds.
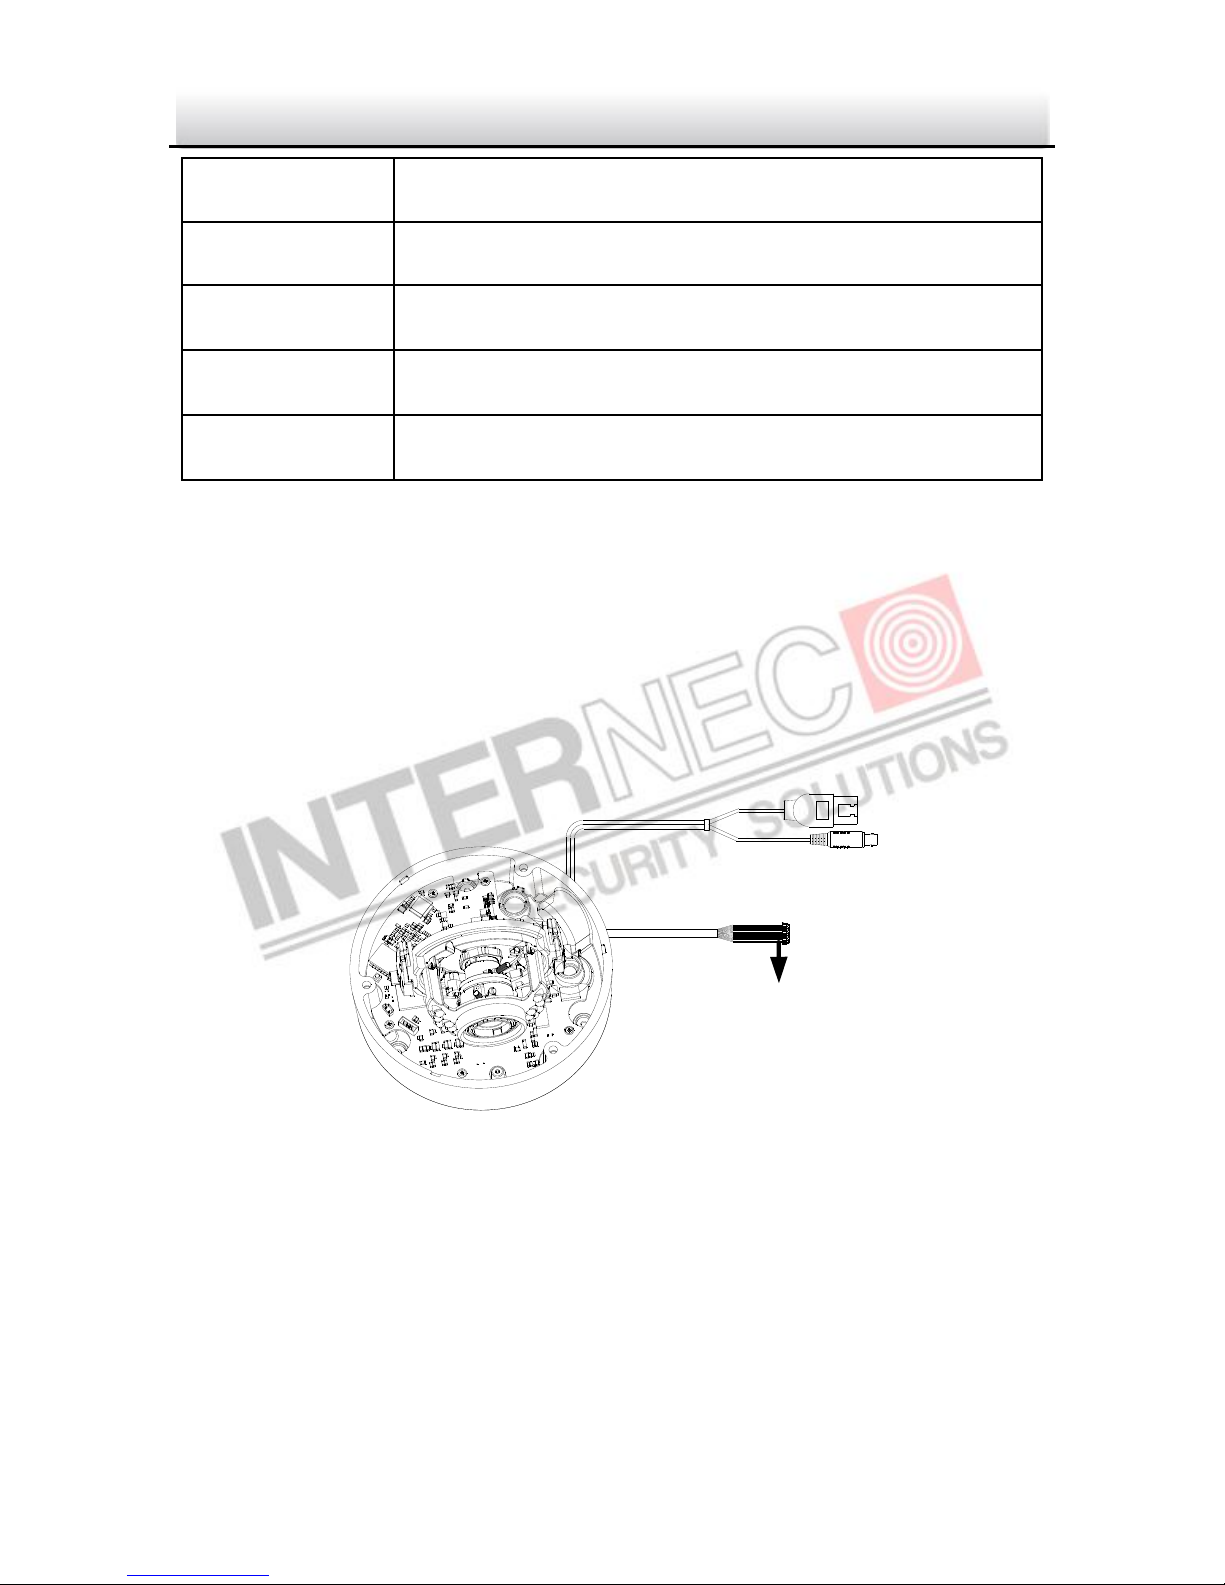
The I7-C41430-IR model support audio and alarm functions. The interfaces are
shown as follows.
Figure 1-2 Audio and Alarm Interfaces
Audio and Alarm Interfaces
Page 11
Network Camera·Quick Guide
10
10 10
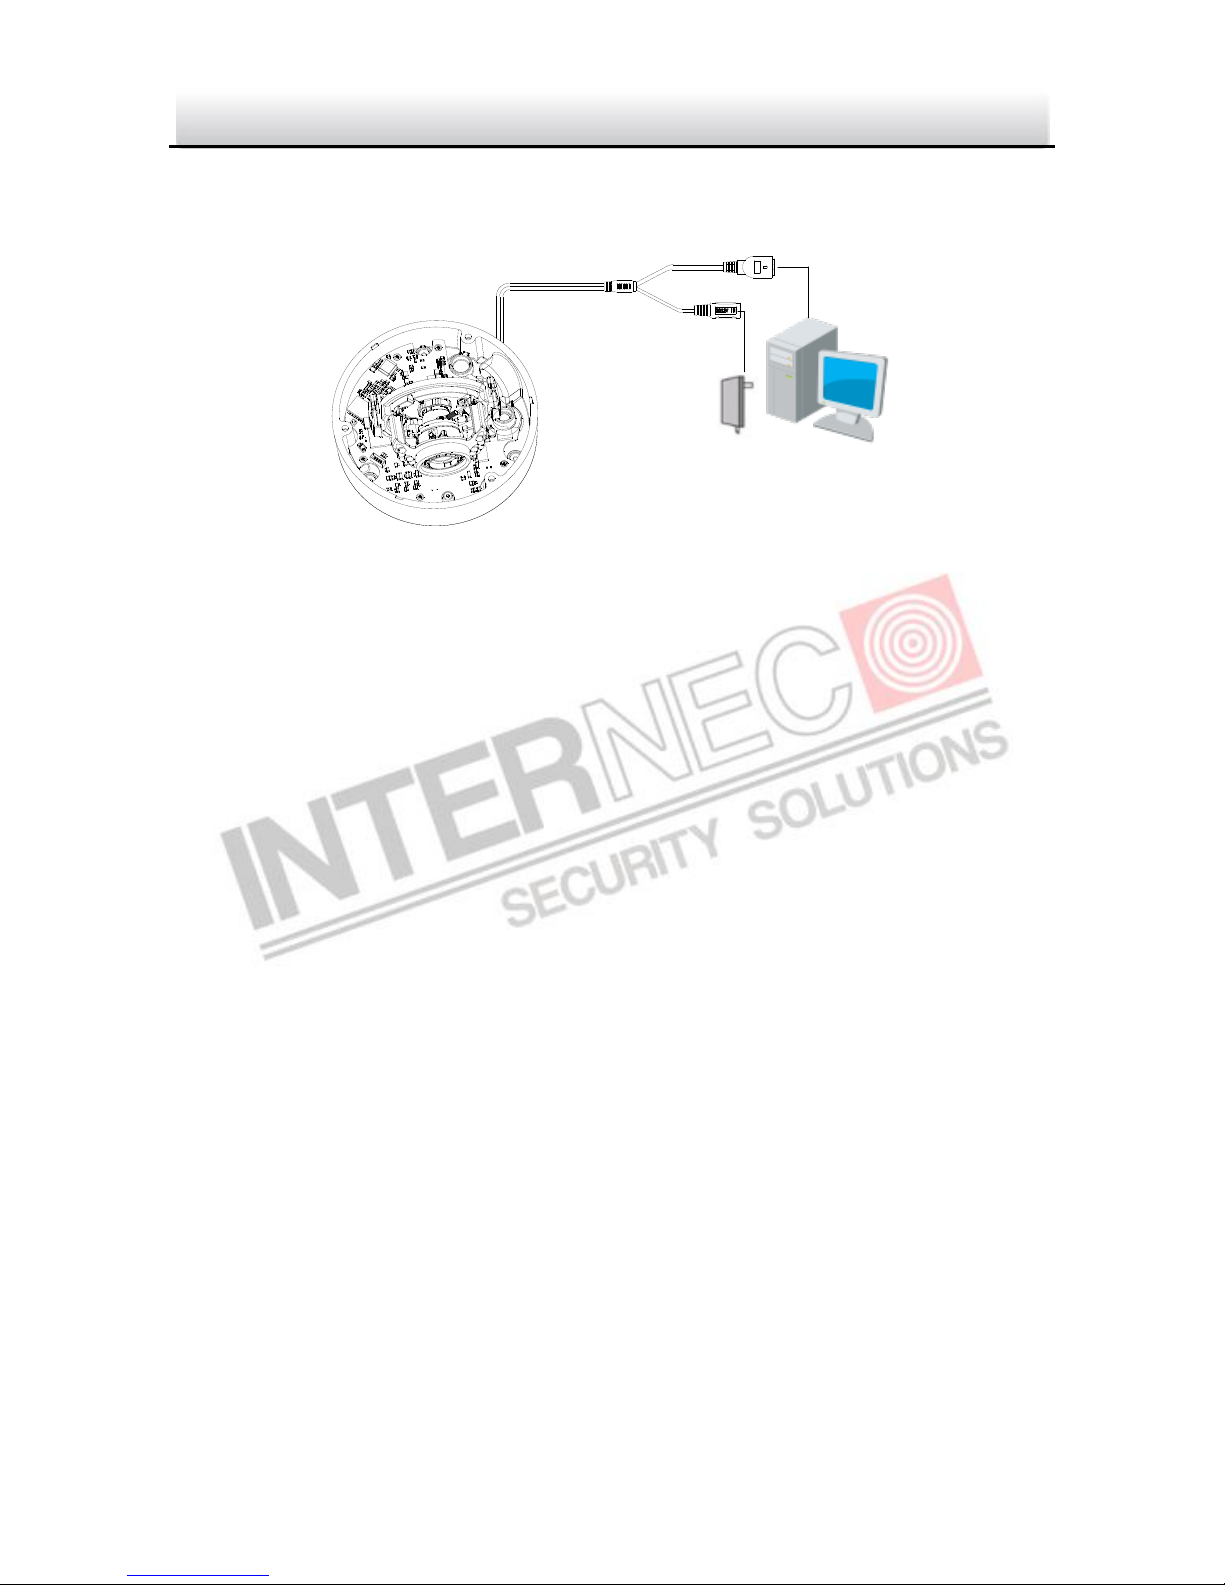
1.2 Wiring
Figure 1-3 Wiring
Page 12
Network Camera·Quick Guide
11
11 11
2 Installation
Before mounting, please make sure that the device in the package is in good
condition and all the assembly parts are included.
Notes:
Please make sure that the device in the package is in good condition and all
the assembly parts are included.
Check the specification of the products for the installation environment.
Make sure that all the related equipment is power-off during the installation.
Check whether the power supply is matched with your AC outlet to avoid any
damage.
If the product does not function properly, please contact your dealer or the
nearest service center. Do not disassemble the camera for repair or
maintenance by yourself.
Please make sure that the wall is strong enough to withstand three times the
weight of the camera
2.1 Disassembling
Steps:
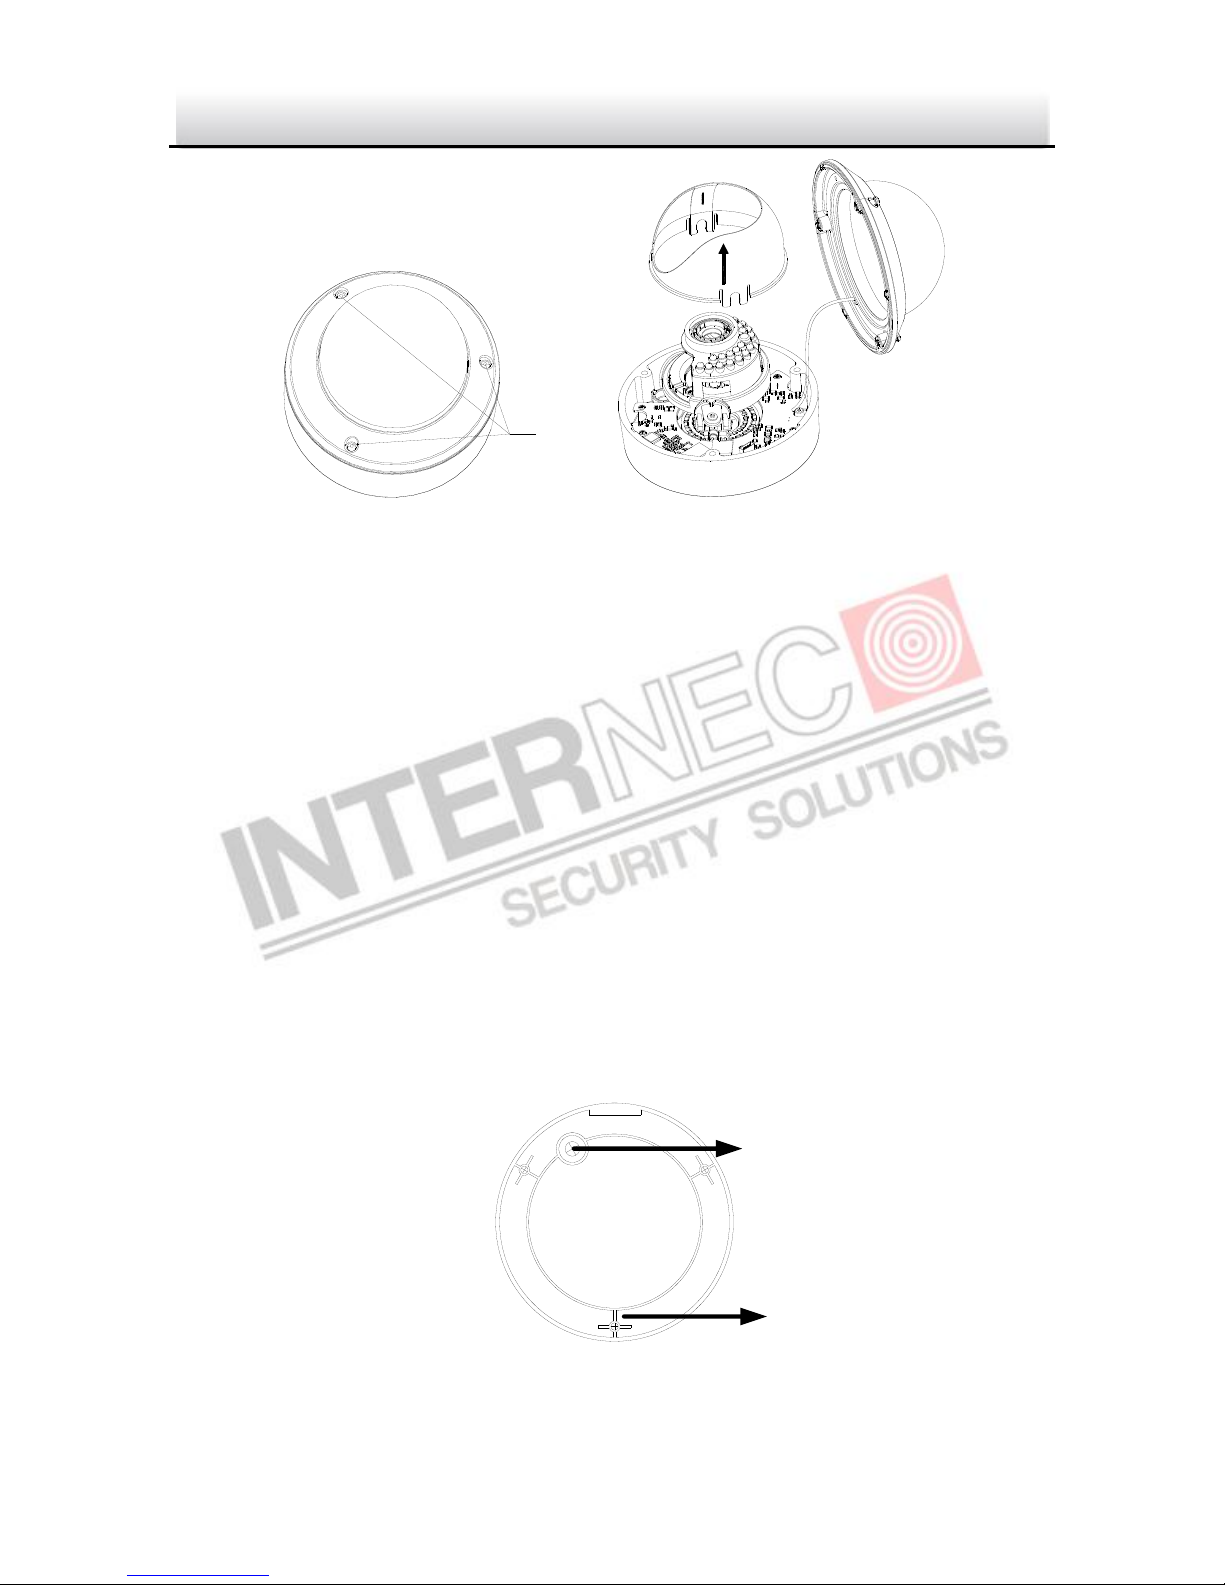
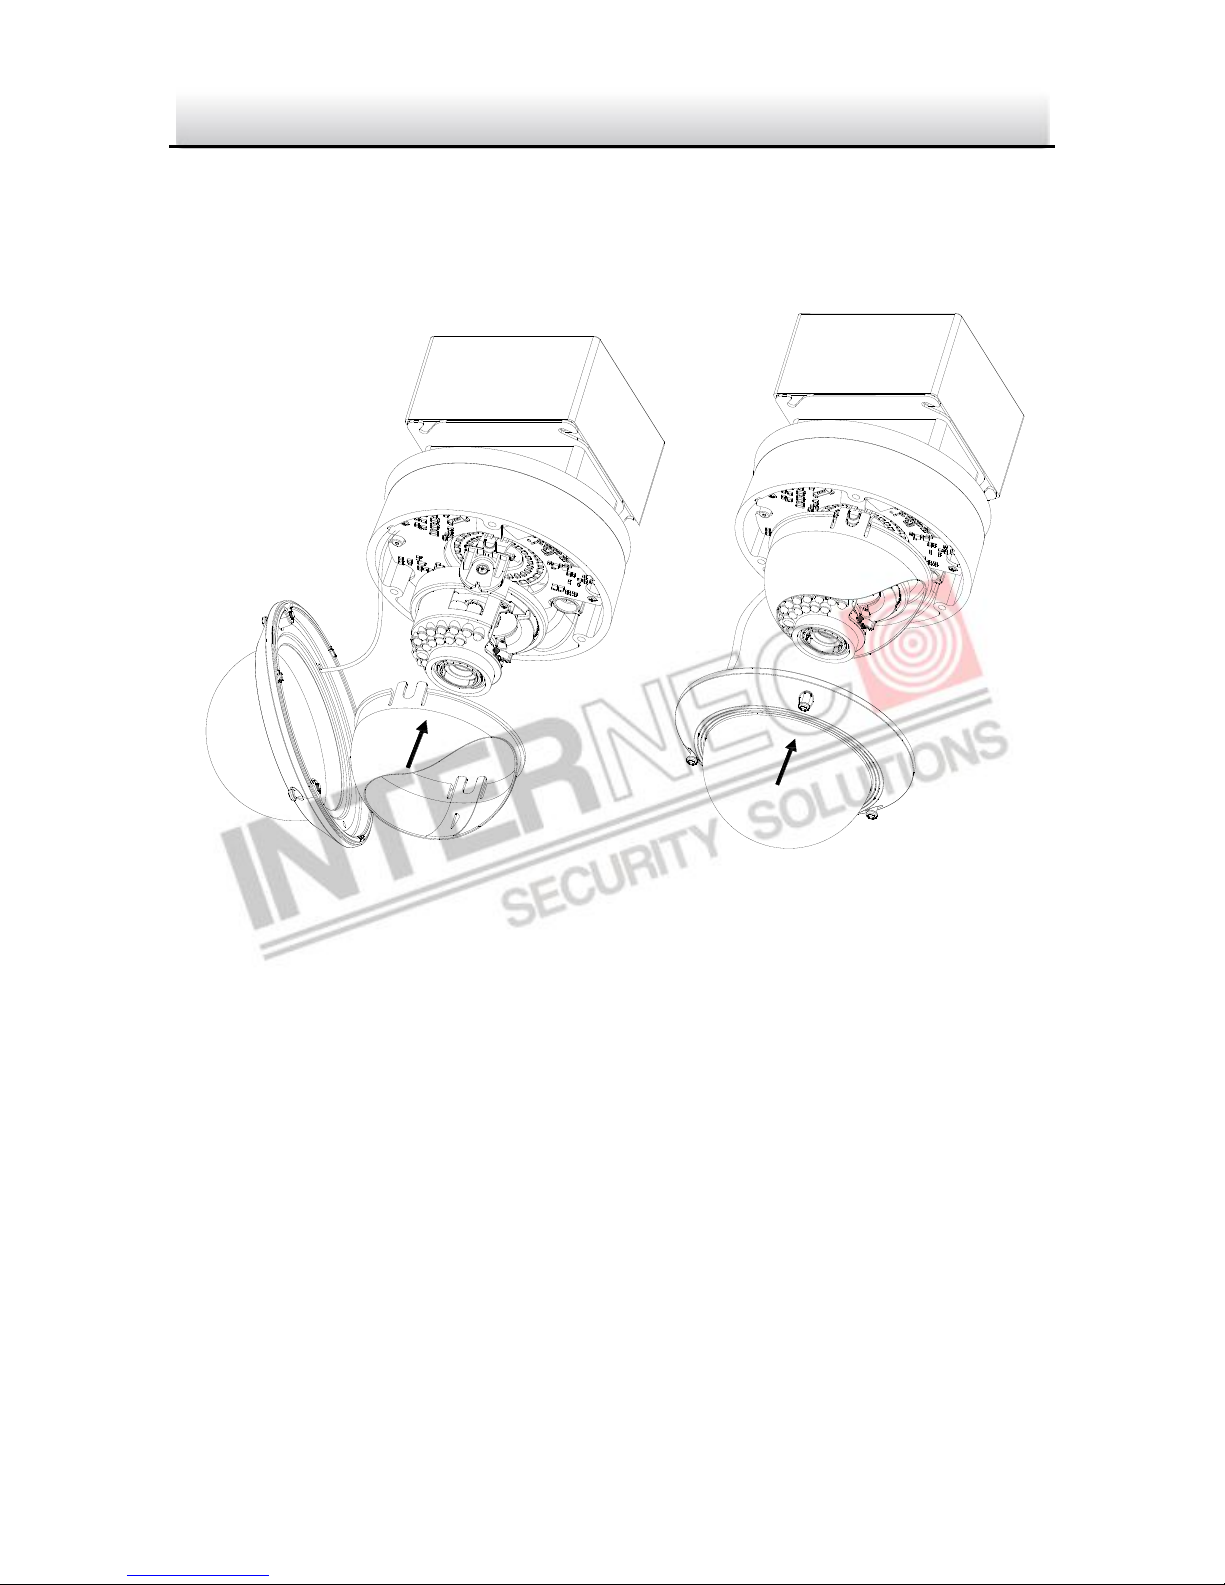
1. Loosen the three screws on the edge of the lower dome with screw driver.
2. Open the lower dome and remove the inner black liner as shown in Figure 2-1.
Page 13
Network Camera·Quick Guide
12
12 12
Figure 2-1 Remove the Lower Dome and Black Liner
2.2 Mounting
2.2.1 Ceiling mounting
Steps:
1. Disassemble the camera. Refer to the section 2.1.
2. Attach the drill template (supplied) to the place where you want to fix the
camera.
3. According to the drill template as shown in Figure 2-2, drill three screw holes
in the ceiling.
Figure 2-2 The Drill Template
Screws
Black Liner
Lower
Dome
Drill Template
Screw Hole
Cable Hole
Page 14
Network Camera·Quick Guide
13
13 13
4. If you want to route the cables inside the ceiling, drill a cable hole in the ceiling
according to the drill template. Skip this step, if you want to route the cables
on the surface of the ceiling. Refer to Conduit Installation on the Side for side
cable routing.
5. Attach the camera to the ceiling by aligning the holes of the back box with the
holes on the ceiling.
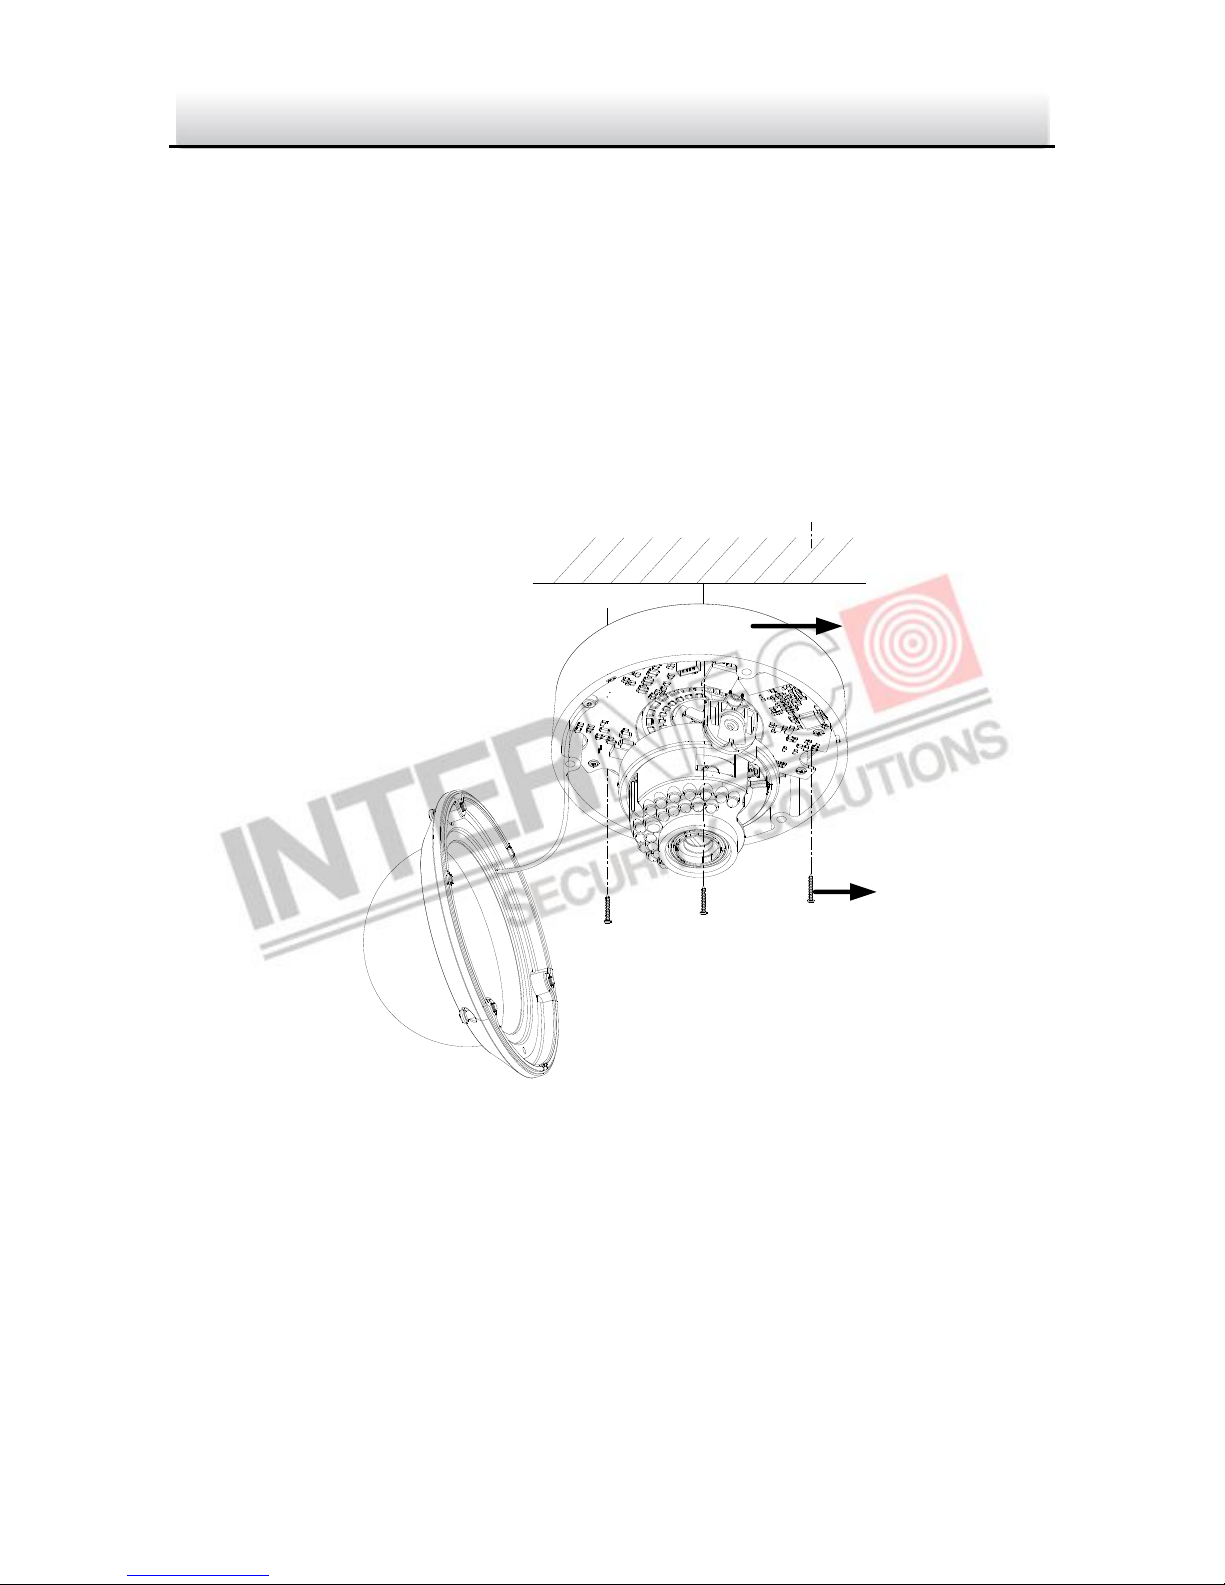
6. Secure the camera with the supplied screws as shown in Figure 2-3.
Figure 2-3 Secure the Camera
7. Route the cables through the cable hole.
8. Connect the video output connector to the monitor. Connect the power
connector to the power supply.
Back Box
Screws
Page 15

Network Camera·Quick Guide
14
14 14
9. Adjust the image and focus. Please refer to the section 2.3 for more detailed
information.
10. Install the inner black liner back to the camera.
11. Install the lower dome back to the camera and secure it with screws as
shown in Figure 2-4.
Figure 2-4 Secure Black Liner and Lower Dome
Conduit Installation on the Side
If you want to route the cables from side of the camera, you need to follow the
steps below to install a conduit for cable routing.
Steps:
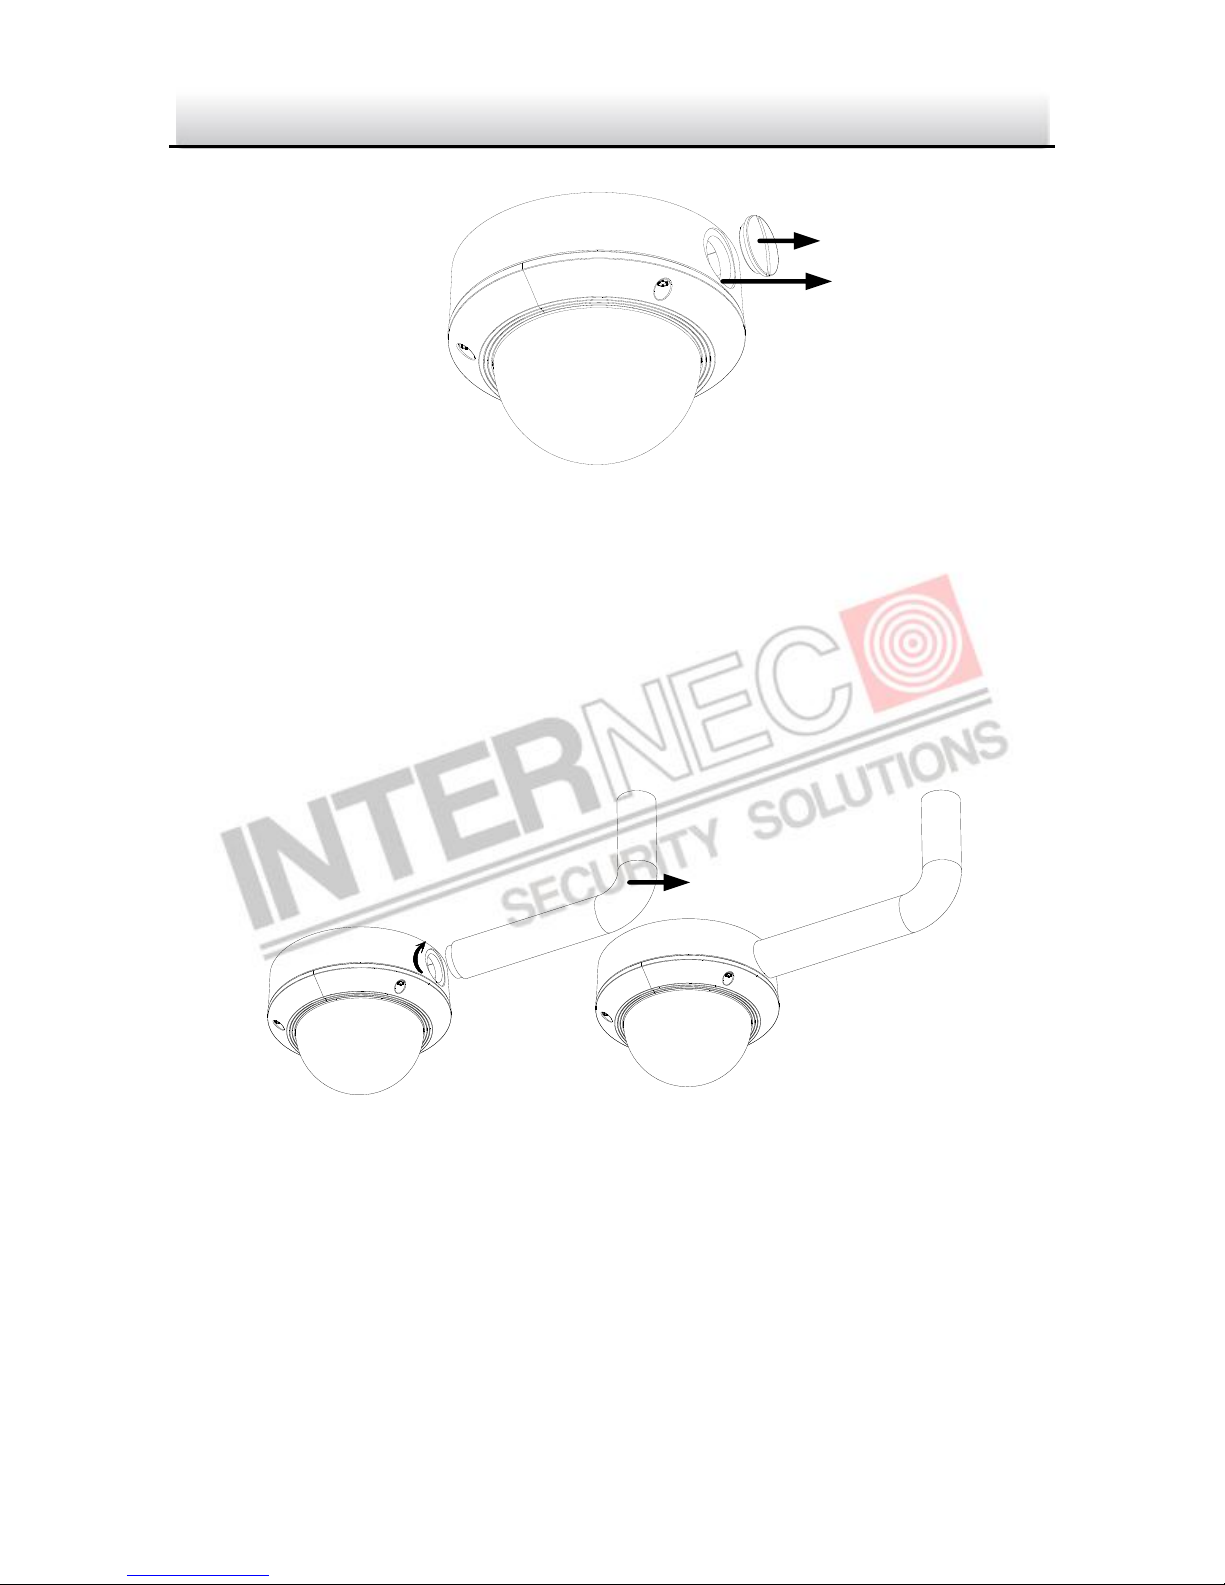
1. Rotate the water-proof plug counterclockwise to remove it from the camera.
Page 16
Network Camera·Quick Guide
15
15 15
Figure 2-5 Remove the water-proof plug
2. Route the power cable and network cable through the side outlet to the
conduit.
3. Align and rotate clockwise the conduit to the side outlet tightly.
Figure 2-6 Install the Conduit to the Camera
Water-proof Plug
Side Outlet
Conduit
Page 17
Network Camera·Quick Guide
16
16 16
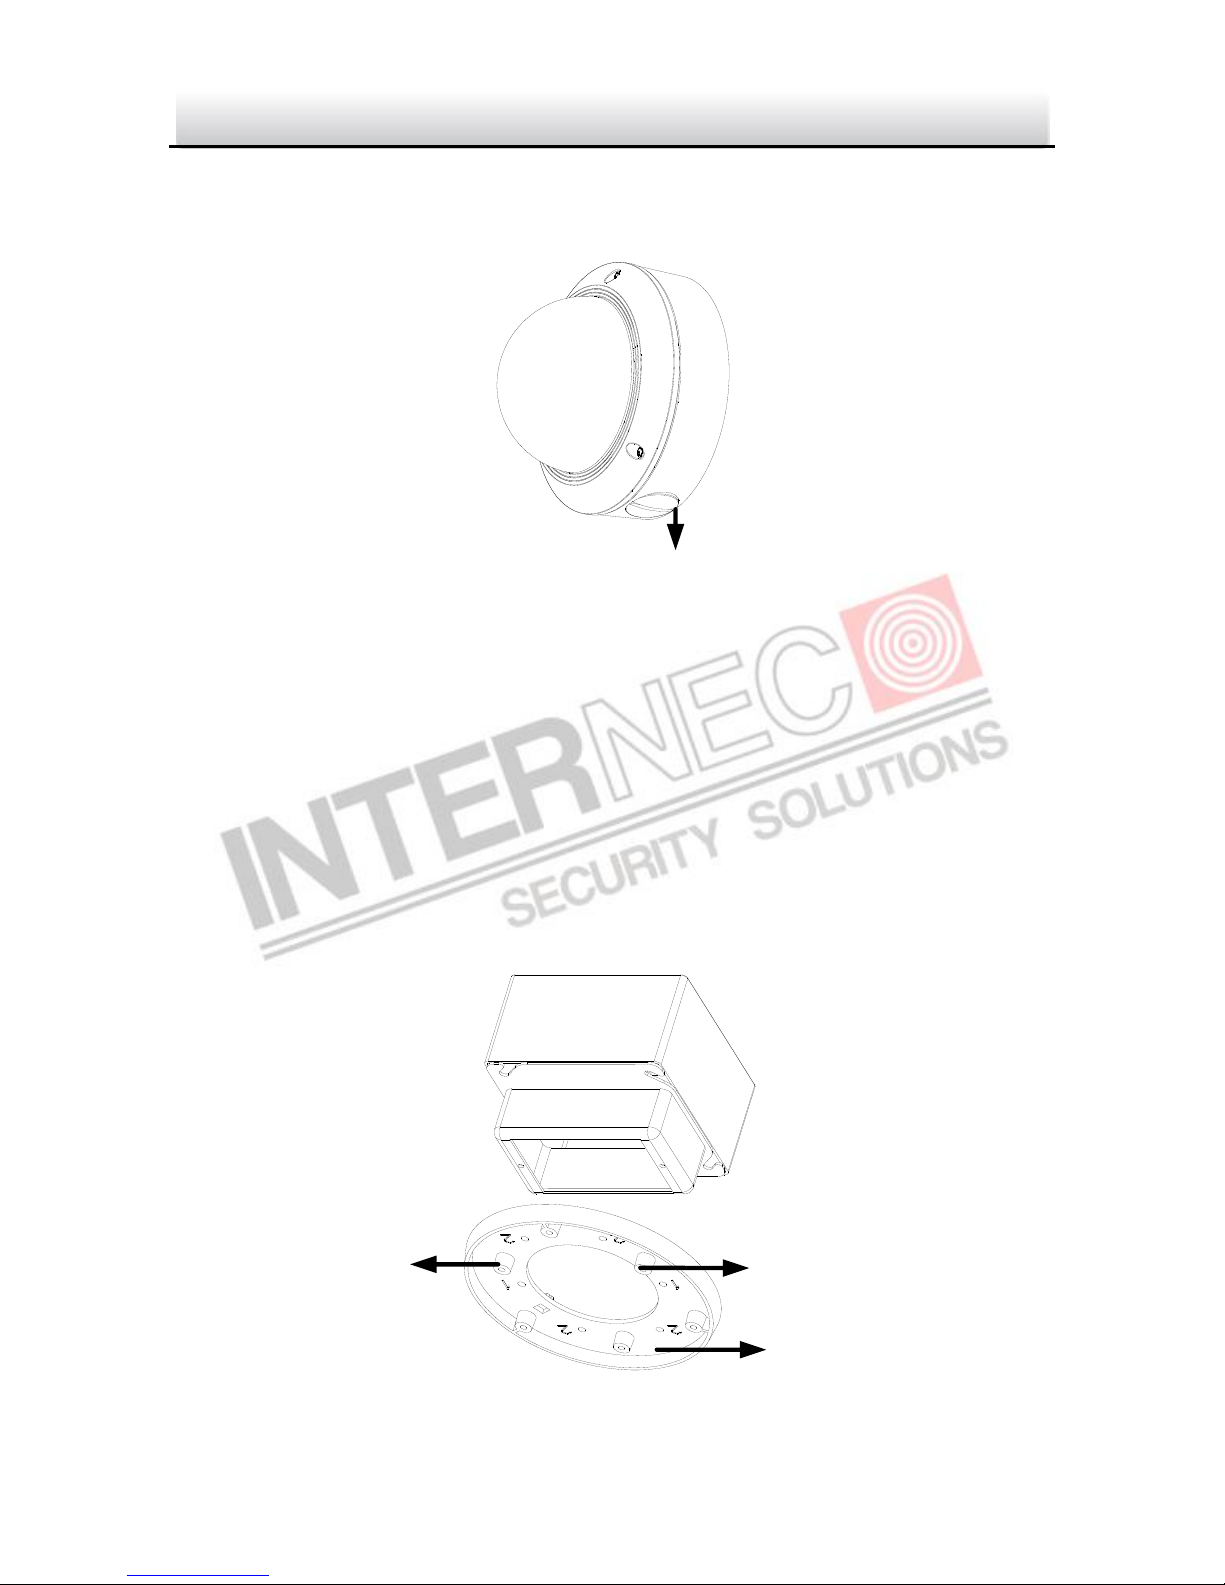
Note: For wall mounting, position the side outlet directly downward for water
proofing.
Figure 2-7 Side Outlet Direction
2.2.2 Ceiling mounting with gang box
Steps:
1. Disassemble the camera. Refer to the section 2.1.
2. Install the gang box in the ceiling.
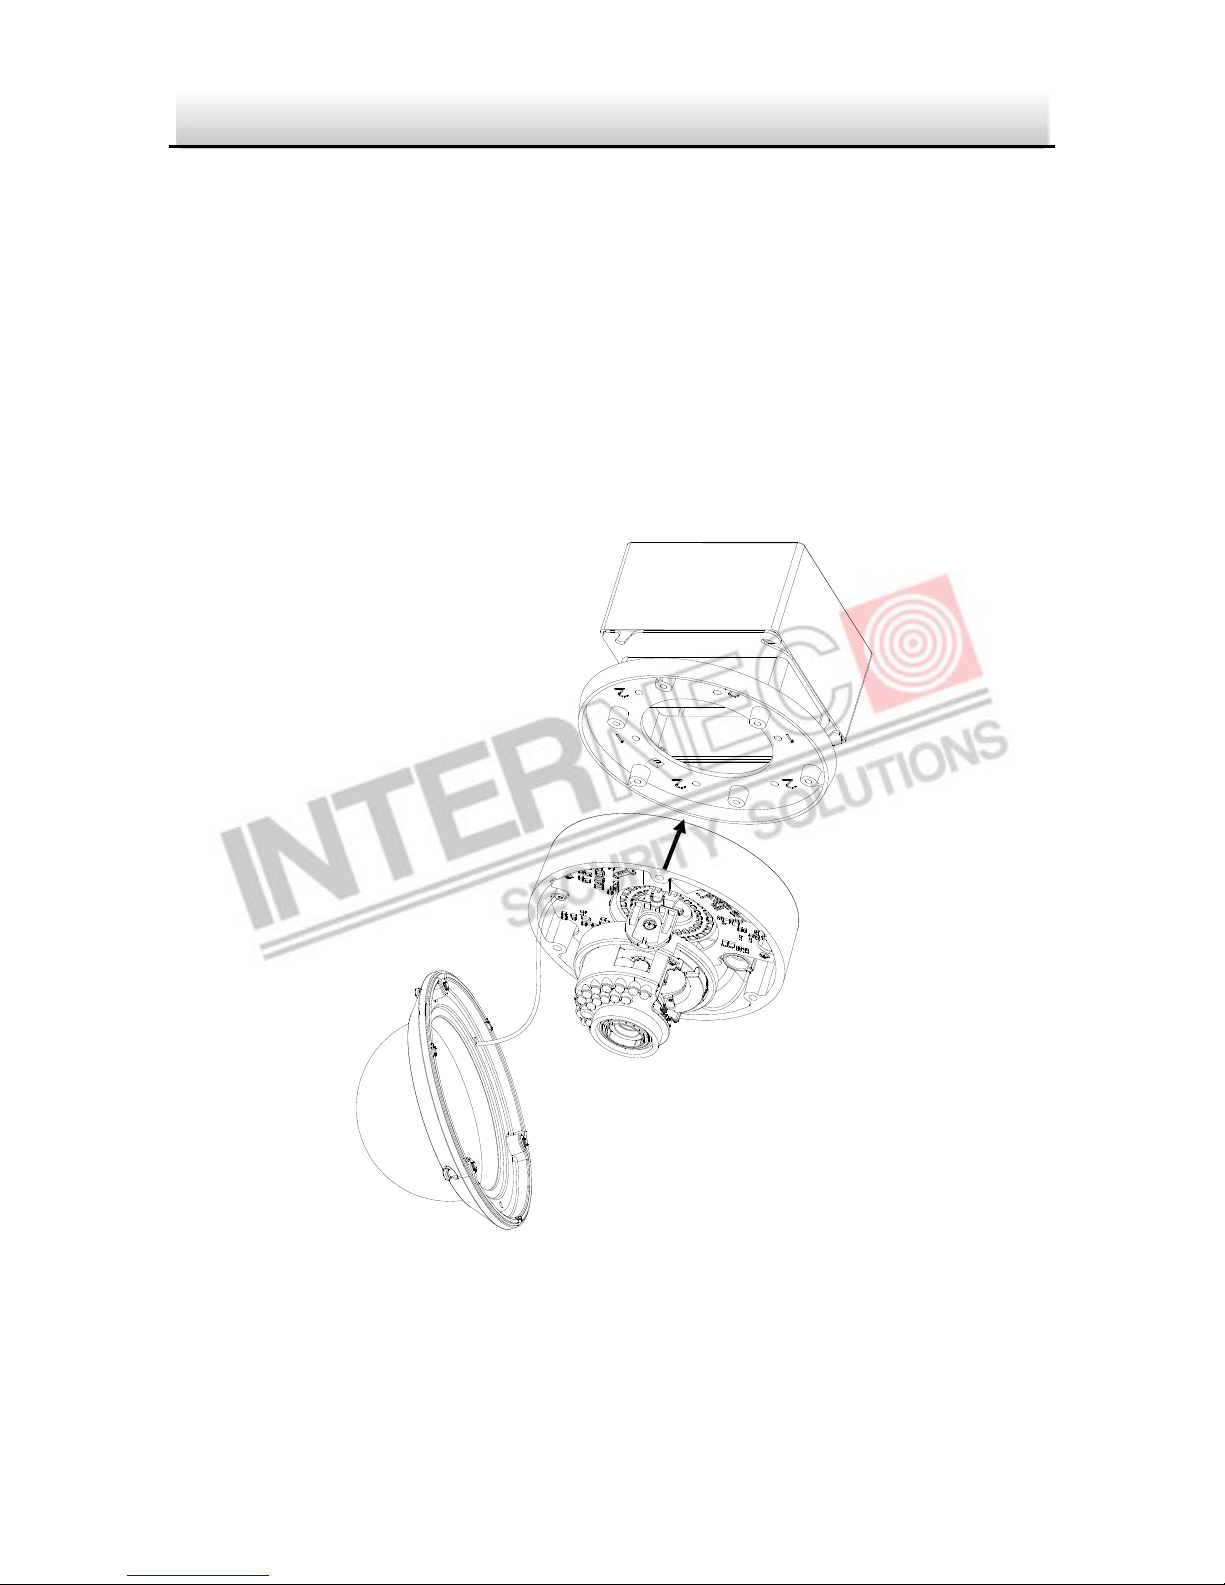
3. Attach the mounting base to the gang box with two screws.
Figure 2-8 In-ceiling Mount
Screw Hole
Screw Hole
Mounting Base
Downward
Page 18
Network Camera·Quick Guide
17
17 17
4. Route the cables through the hole in the center of the mounting base.
5. Align the camera with the mounting base.
6. Tighten the screws to secure the camera with the mounting base.
7. Connect the video output connector to the monitor. Connect the power
connector to the power supply.
8. Adjust the image and focus. Please refer to the section 2.3 for more detailed
information.
Figure 2-9 Secure Camera
9. Install the inner black liner back to the camera.
Ceiling
Page 19
Network Camera·Quick Guide
18
18 18
10. Align the lower dome with the camera.
11. Tighten the screws to secure the lower dome with the camera as shown in
Figure 2-10.
Figure 2-10 Secure Lower Dome
2.2.3 Wall Mounting
For the wall mounting, you have to purchase a wall mount.
Steps:
1. Disassemble the camera. Refer to the section 2.1.
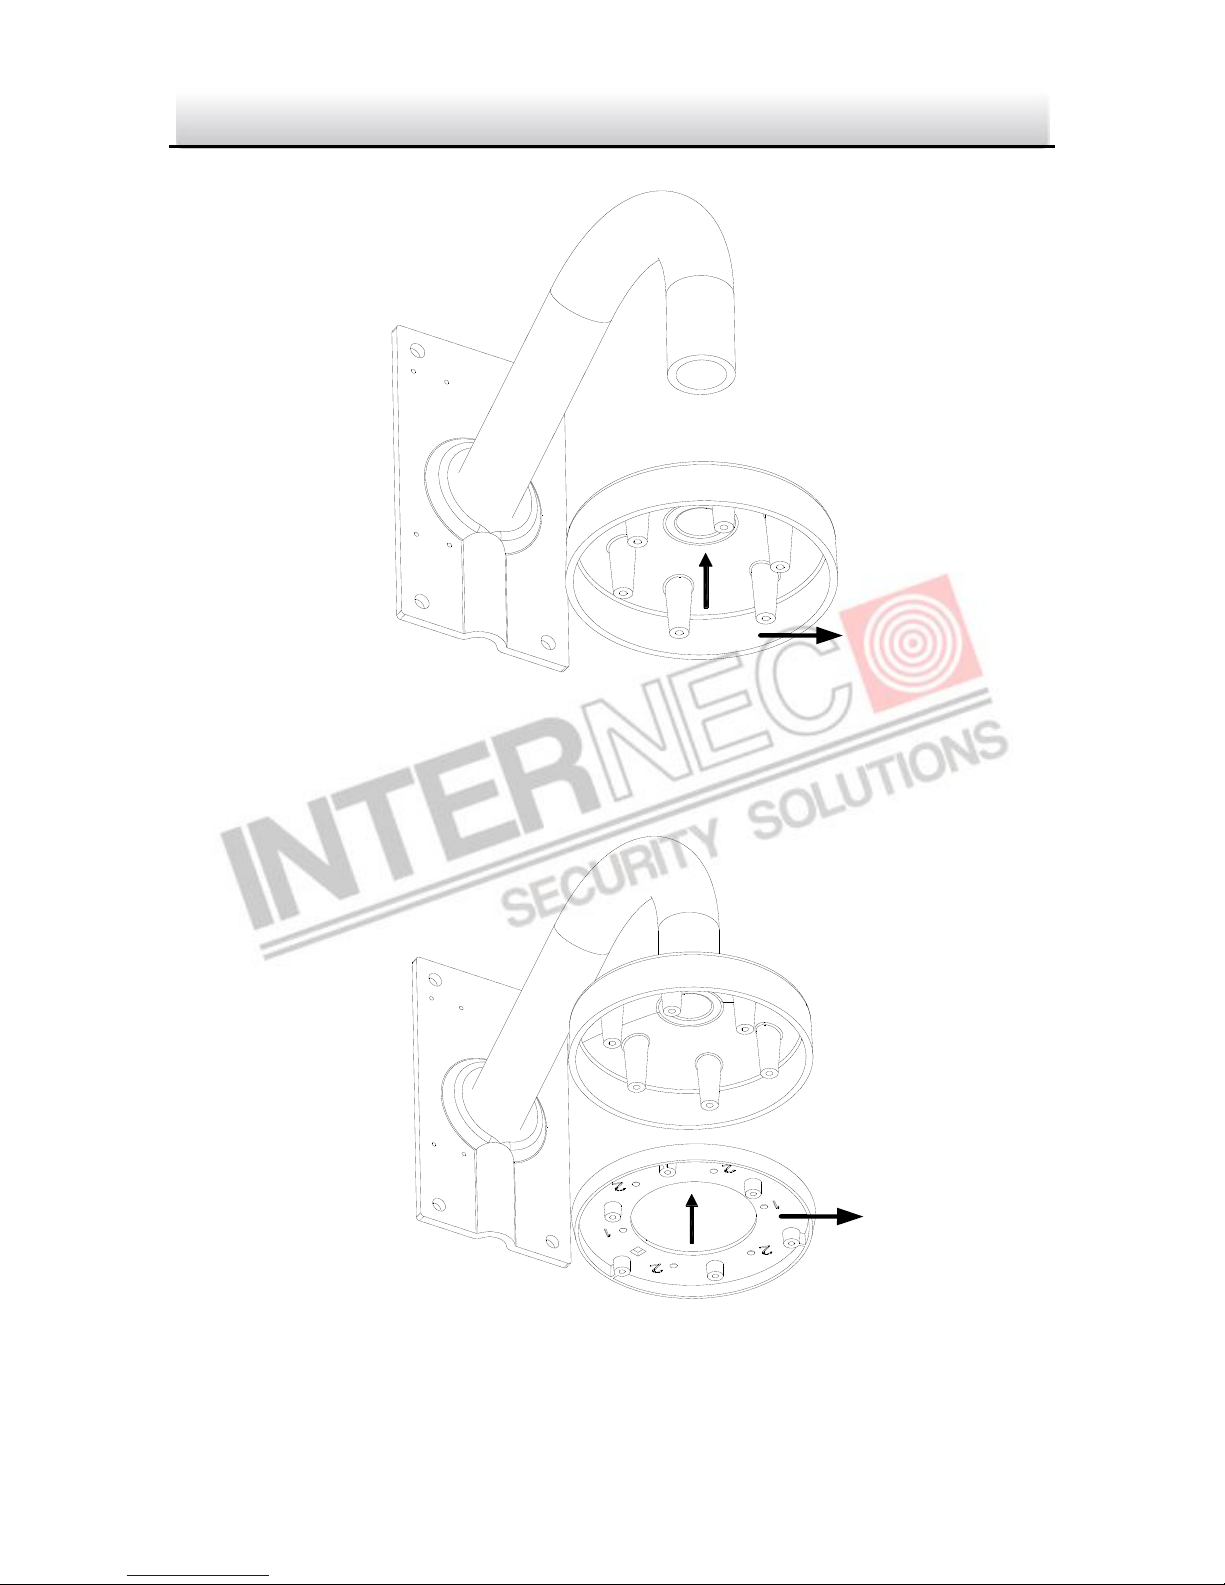
2. Install the wall mount and mounting adapter as shown in Figure 2-11.
3. Align the screw holes of the mounting base with the corresponding screw
holes of the mounting adapter.
4. Secure the mounting base to the mounting adapter with four screws.
Page 20
Network Camera·Quick Guide
19
19 19
Figure 2-11 Install the Mounting Adapter I7-B1256
Figure 2-12 Secure Mounting Base
Mounting
Adapter
Mounting
Base
Page 21
Network Camera·Quick Guide
20
20 20
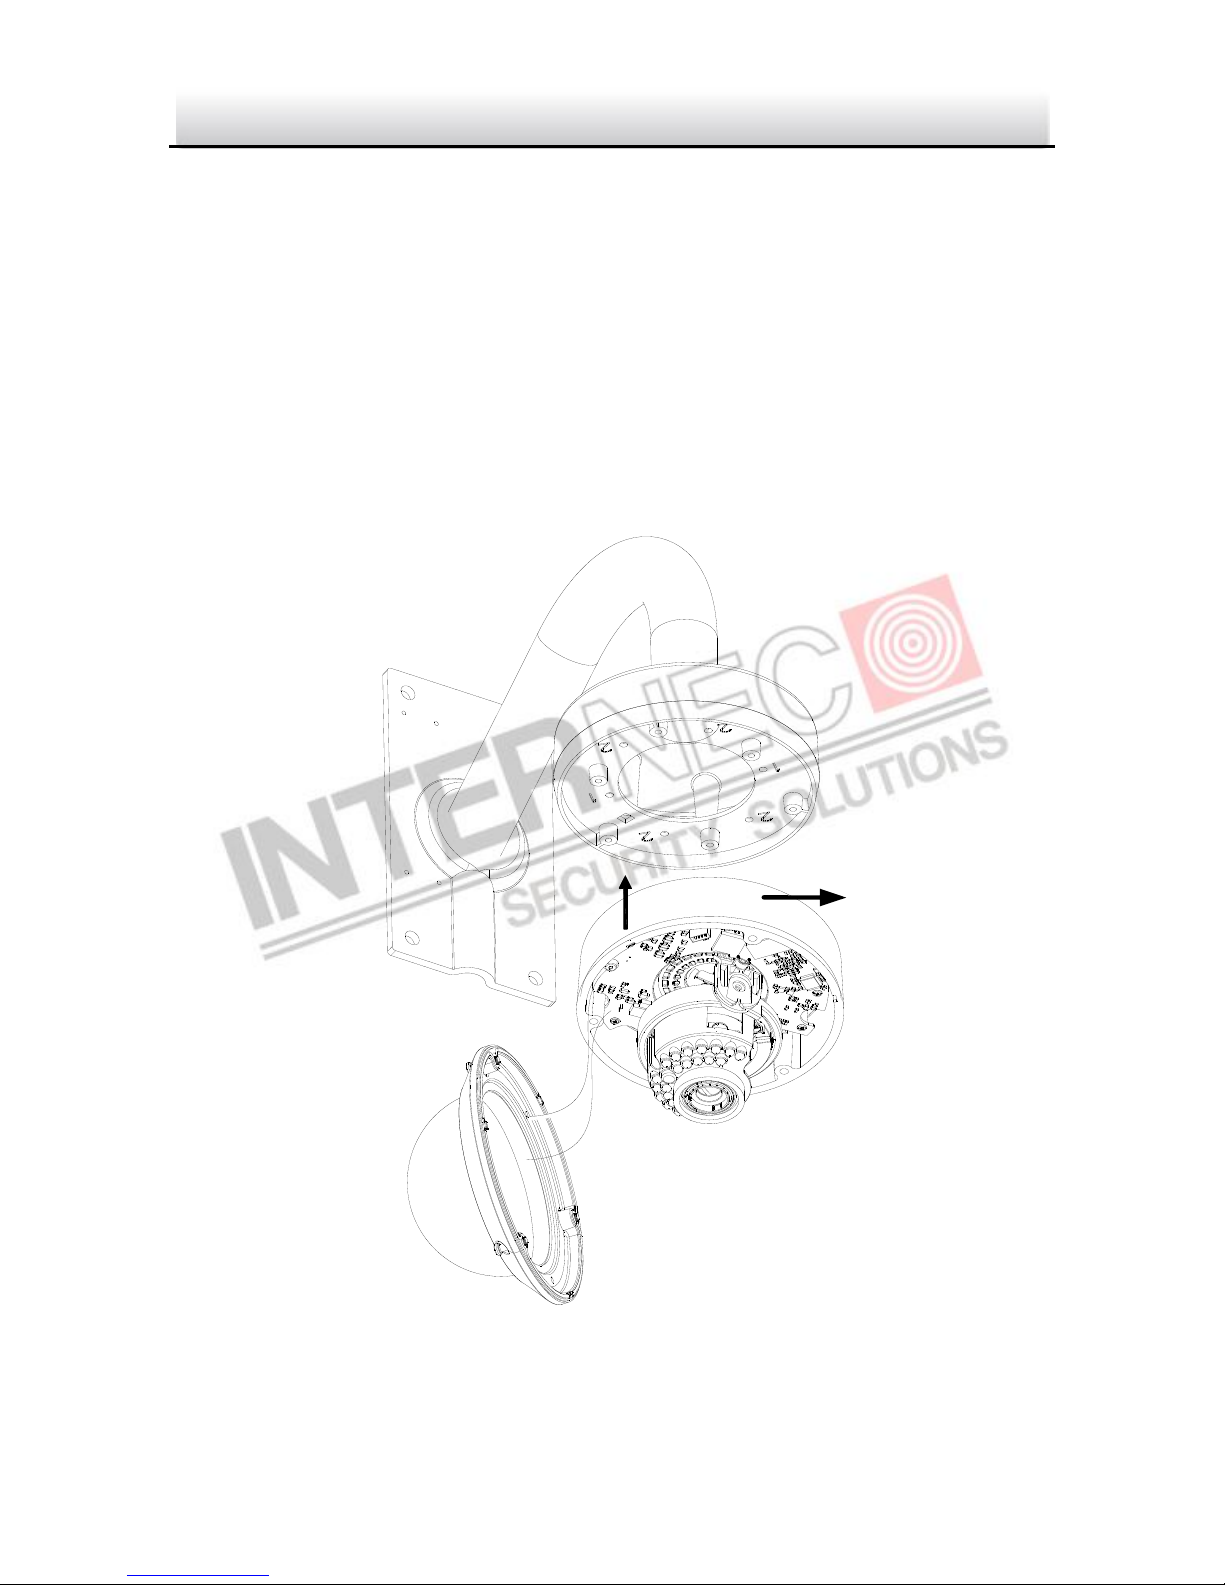
5. Route the cables through the hole in the center of the wall mount.
6. Align the camera with the mounting base.
7. Tighten the set screws to secure the camera with the mounting base.
8. Connect the video output connector to the monitor. Connect the power
connector to the power supply.
9. Adjust the image and focus. Please refer to the section 2.3 for more detailed
information.
Figure 2-13 Secure Camera
Camera
Page 22
Network Camera·Quick Guide
21
21 21
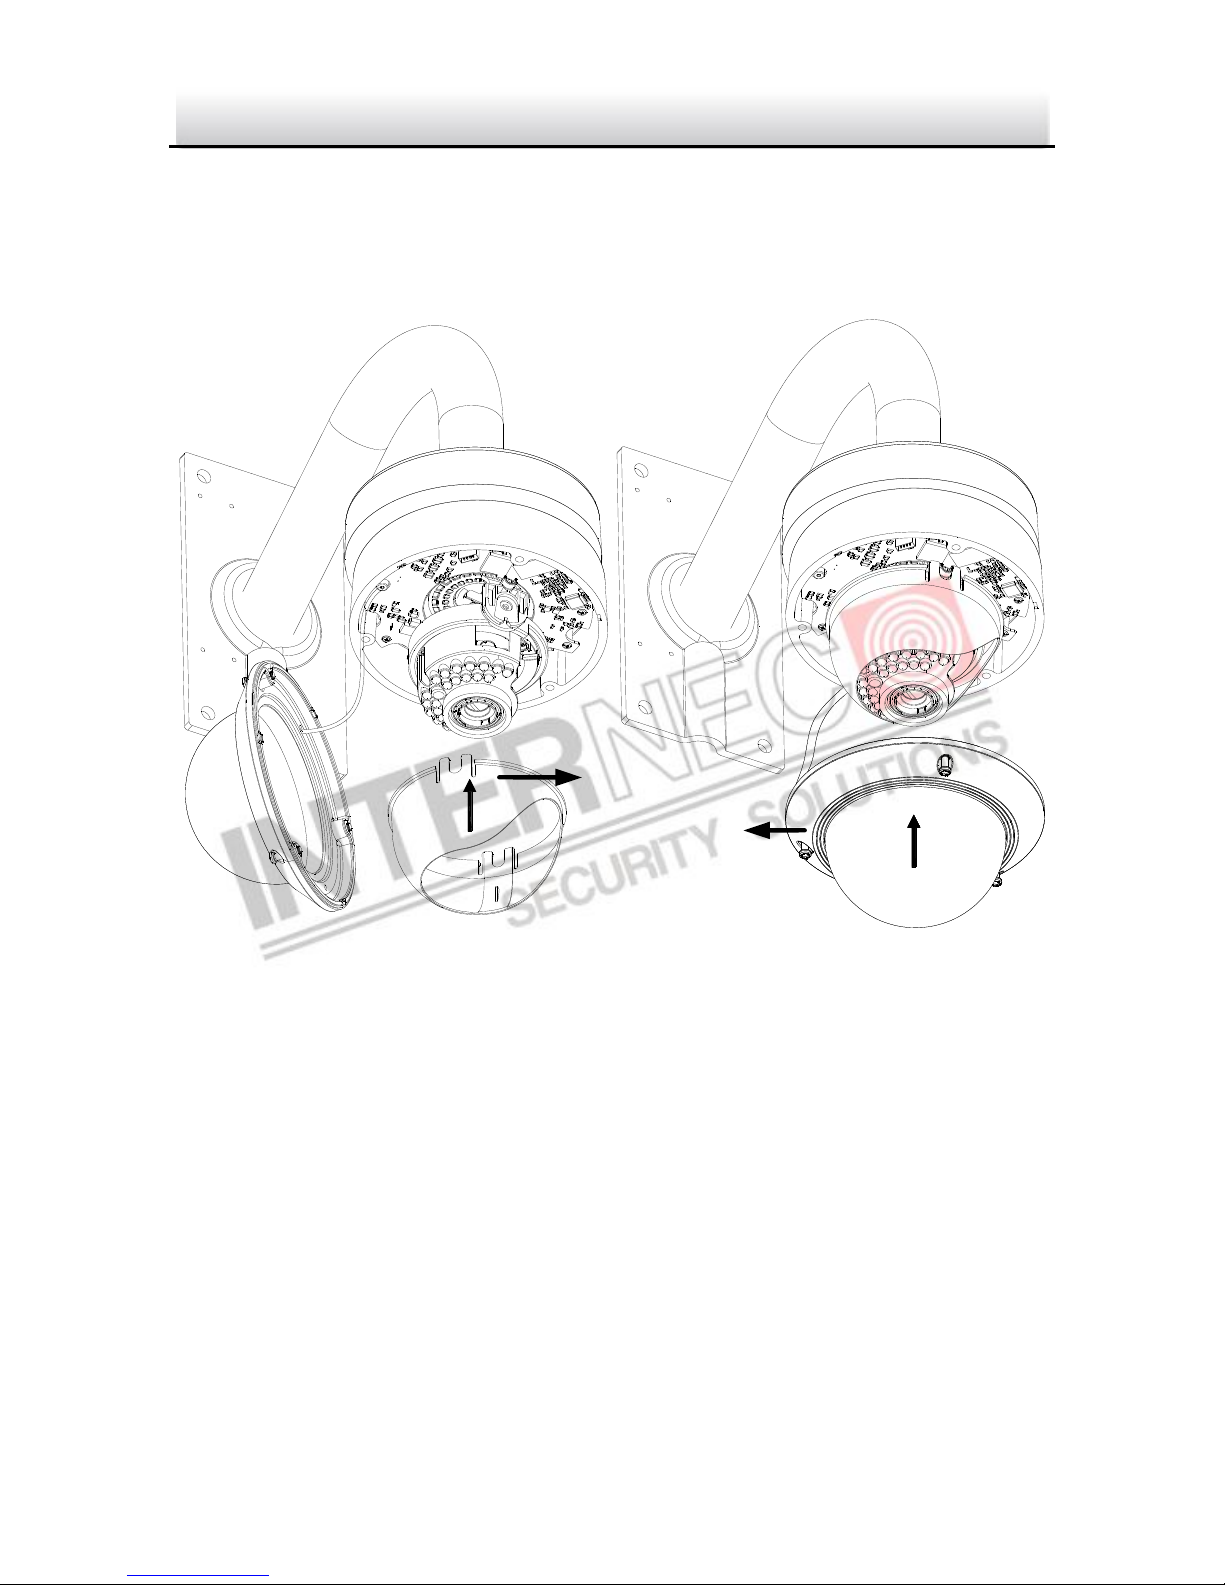
10. Install the inner black liner back to the camera.
11. Align the lower dome with the camera.
12. Tighten the screws to secure the lower dome with the camera.
Figure 2-14 Secure Black Liner and Lower Dome
2.3 Image and Focus Adjusting
Steps:
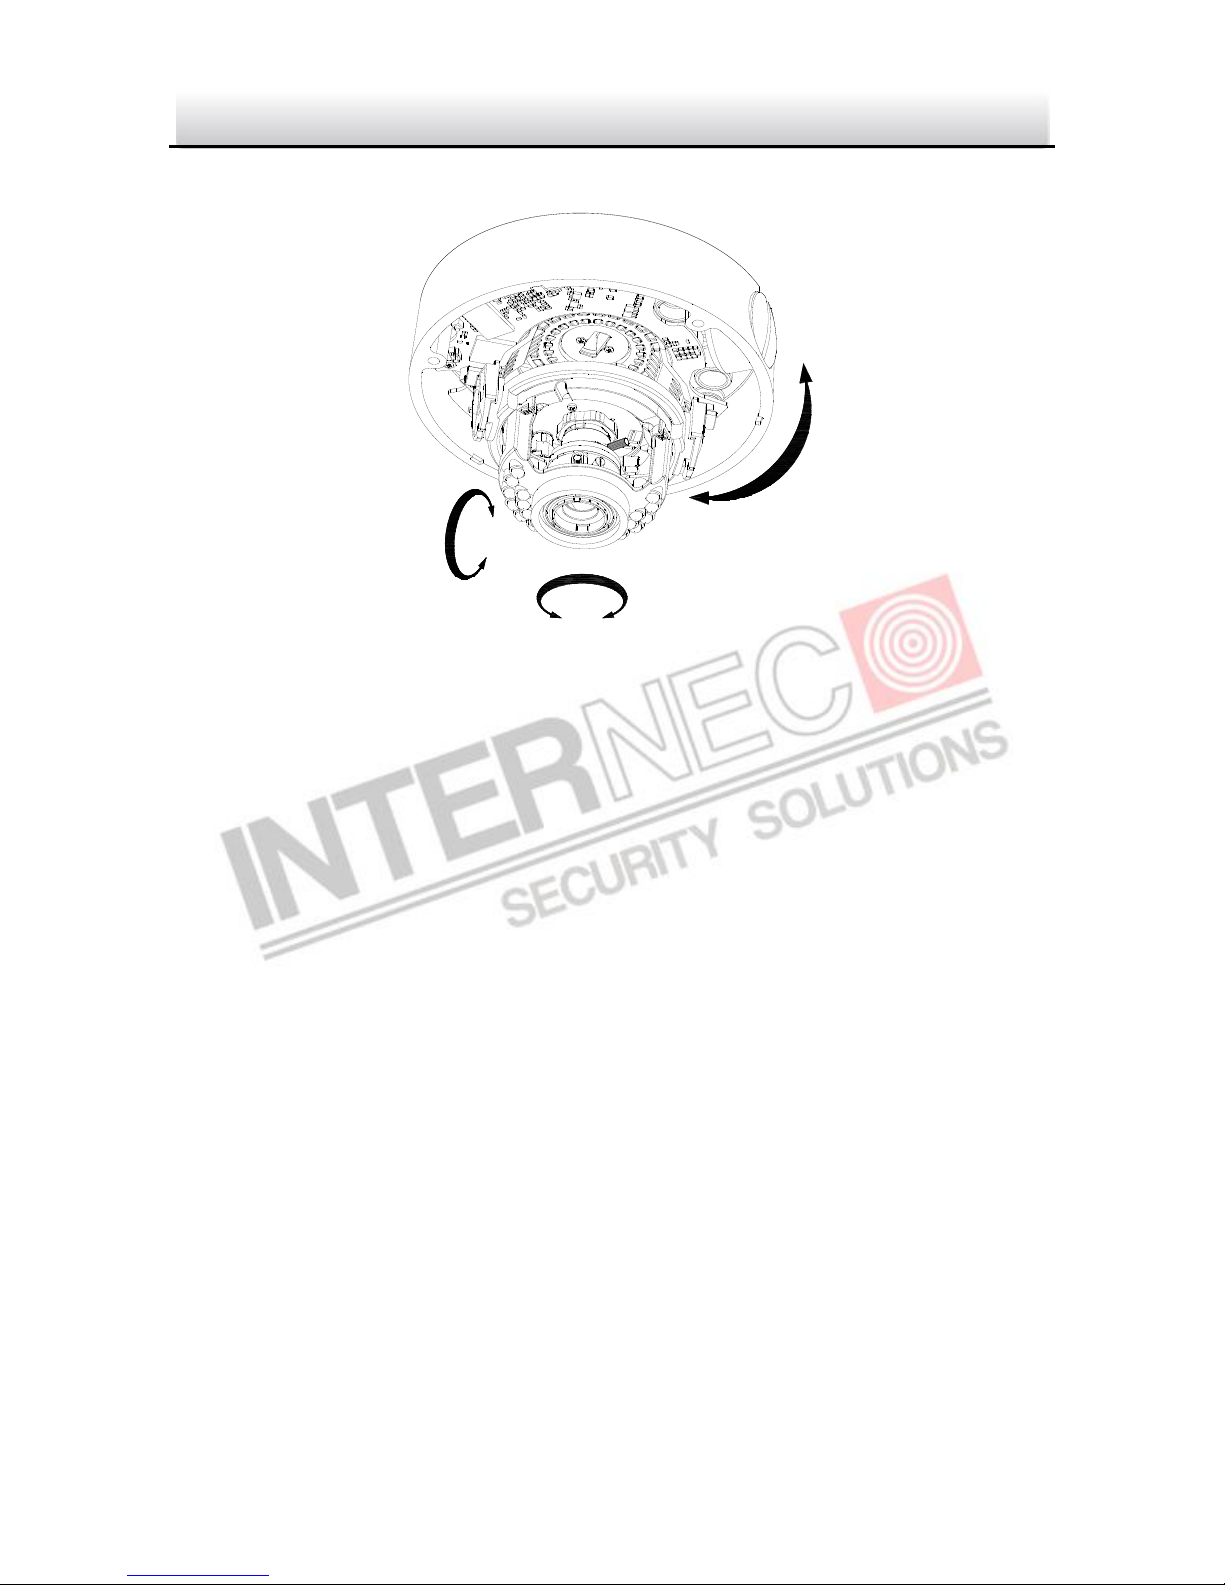
1. Three-axis adjustment.
1). View the camera image using the monitor.
2). Rotate the panning table to adjust the panning position of the camera.
3). Rotate the tilting axes to adjust the tilting position of the camera.
Black Liner
Lower Dome
Page 23
Network Camera·Quick Guide
22
22 22
4). Rotate the lens table to adjust the azimuth angle of the image.
Figure 2-15 Three-axis Adjustment
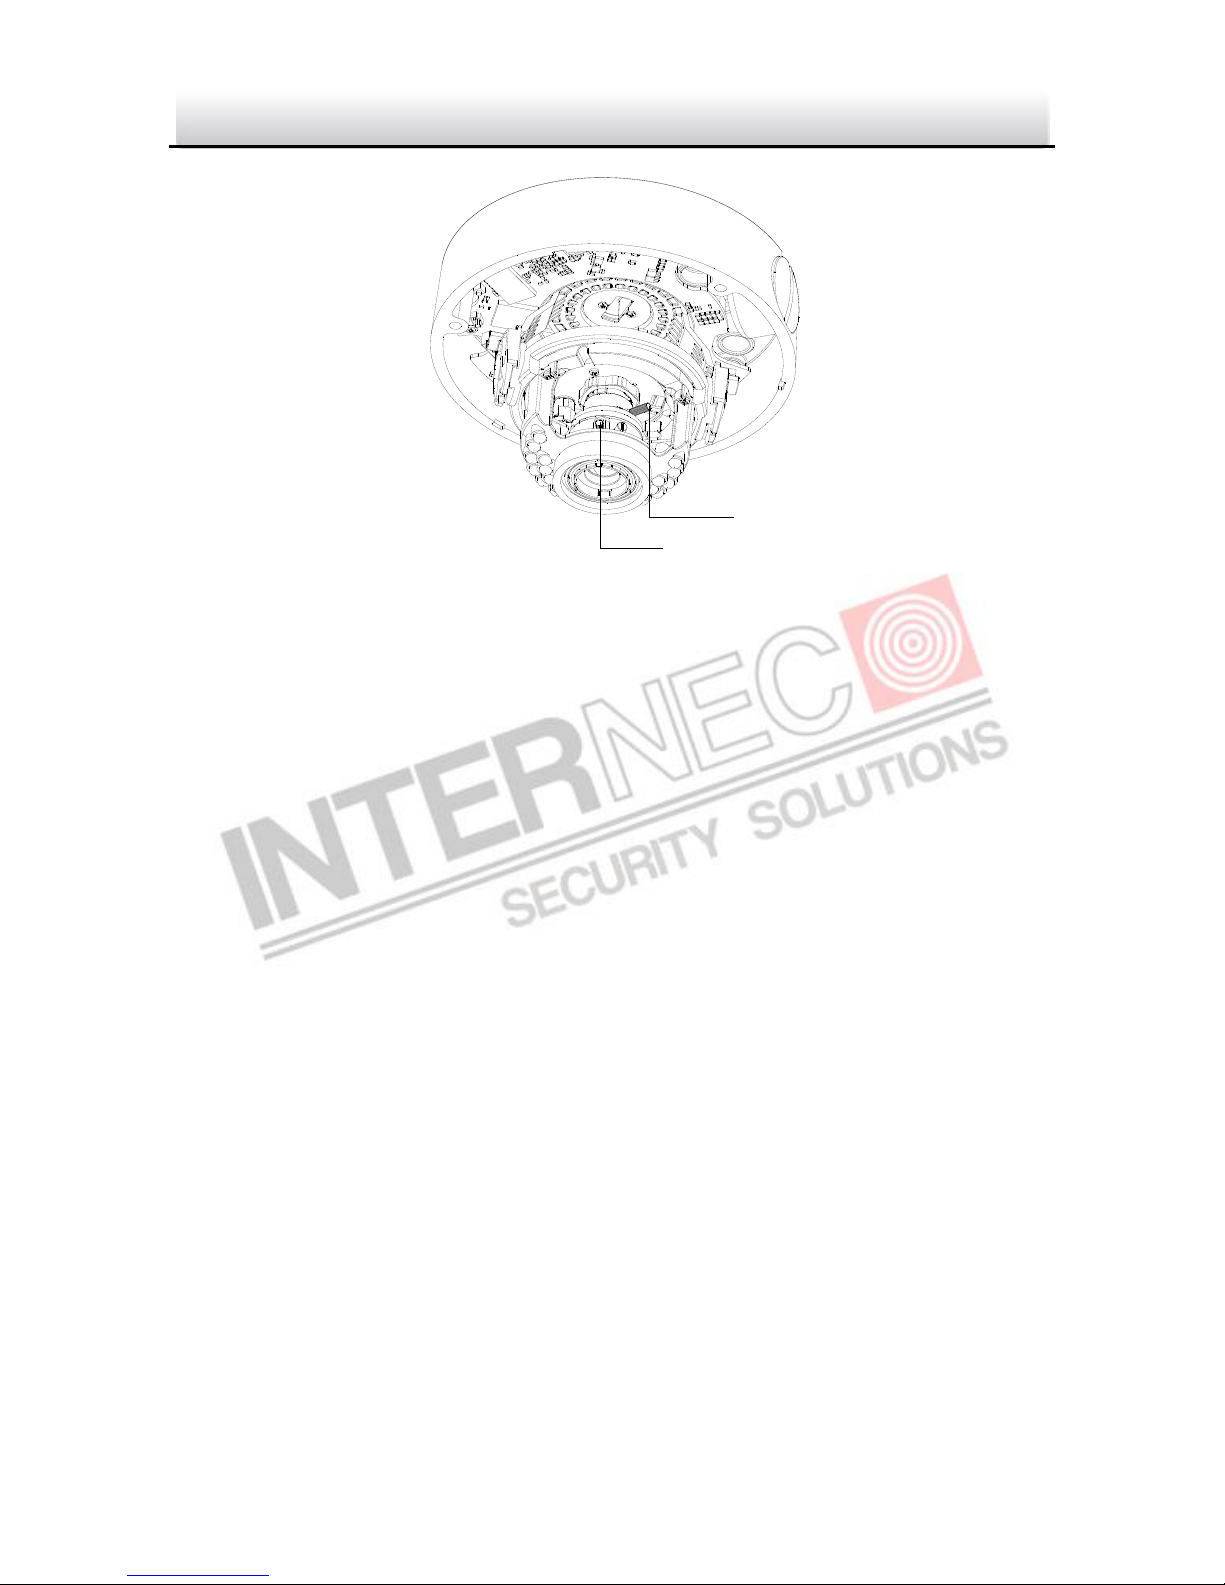
2. Zoom and focus adjustment.
1). View the camera image using the monitor.
2). Loosen the zoom lever and move the lever between T(Tele) and W(Wide)
to obtain the appropriate angle of view.
3). Tighten the zoom lever.
4). Loosen the focus lever and move the lever between F(Far) and N(Near) to
obtain the optimum focus.
5). Tighten the focus lever.
Panning
Tilting
Rotation
Page 24
Network Camera·Quick Guide
23
23 23
Figure 2-16 Lens Adjustment
Menu Button
Lever
Lever
Page 25
Network Camera·Quick Guide
24
24 24
3 Setting the Network Camera over the
LAN
Purpose:
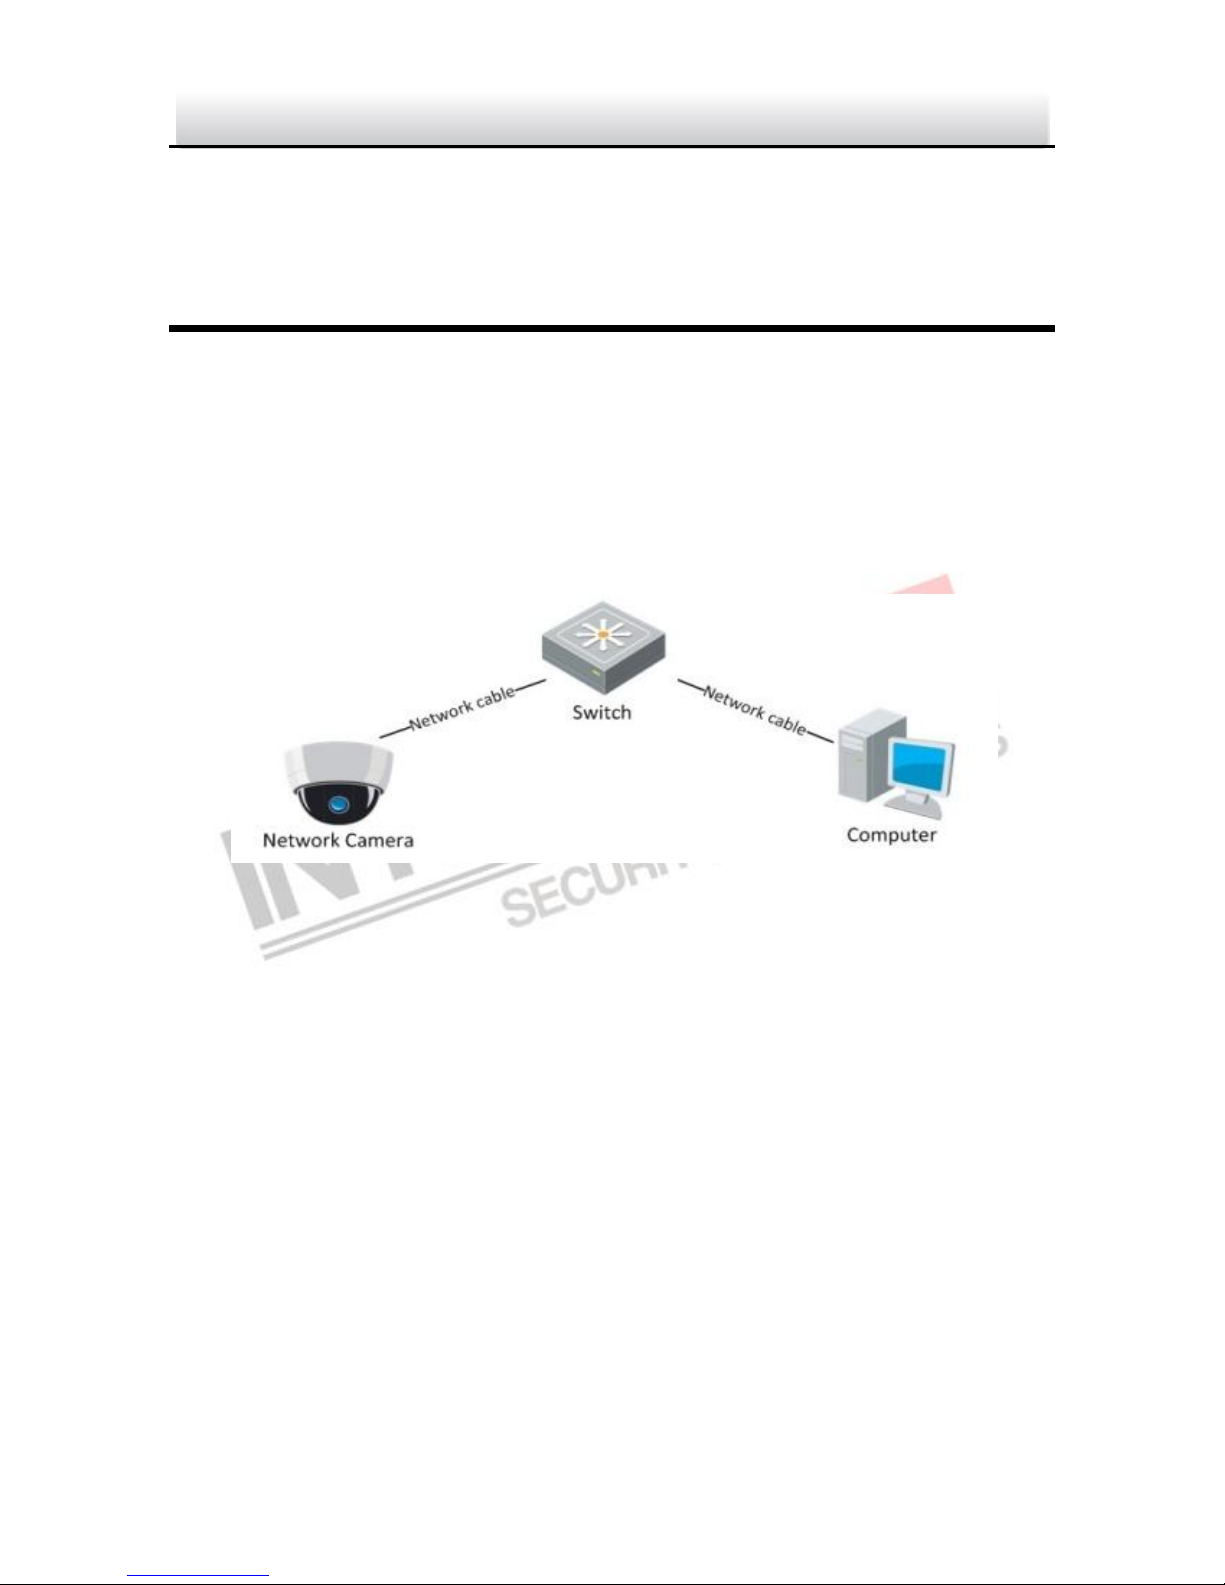
To view and configure the camera via LAN (Local Area Network), you need to
connect the network camera in the same subnet with your PC. Then, install the
SADP or i7-VMS software to search and change the IP of network camera.
The following figure shows the cable connection of network camera and PC:
Figure 3-1 Wiring over LAN
Set the IP address of the camera for accessing via LAN.
Steps:
1. To get the IP address, you can choose either of the following methods:
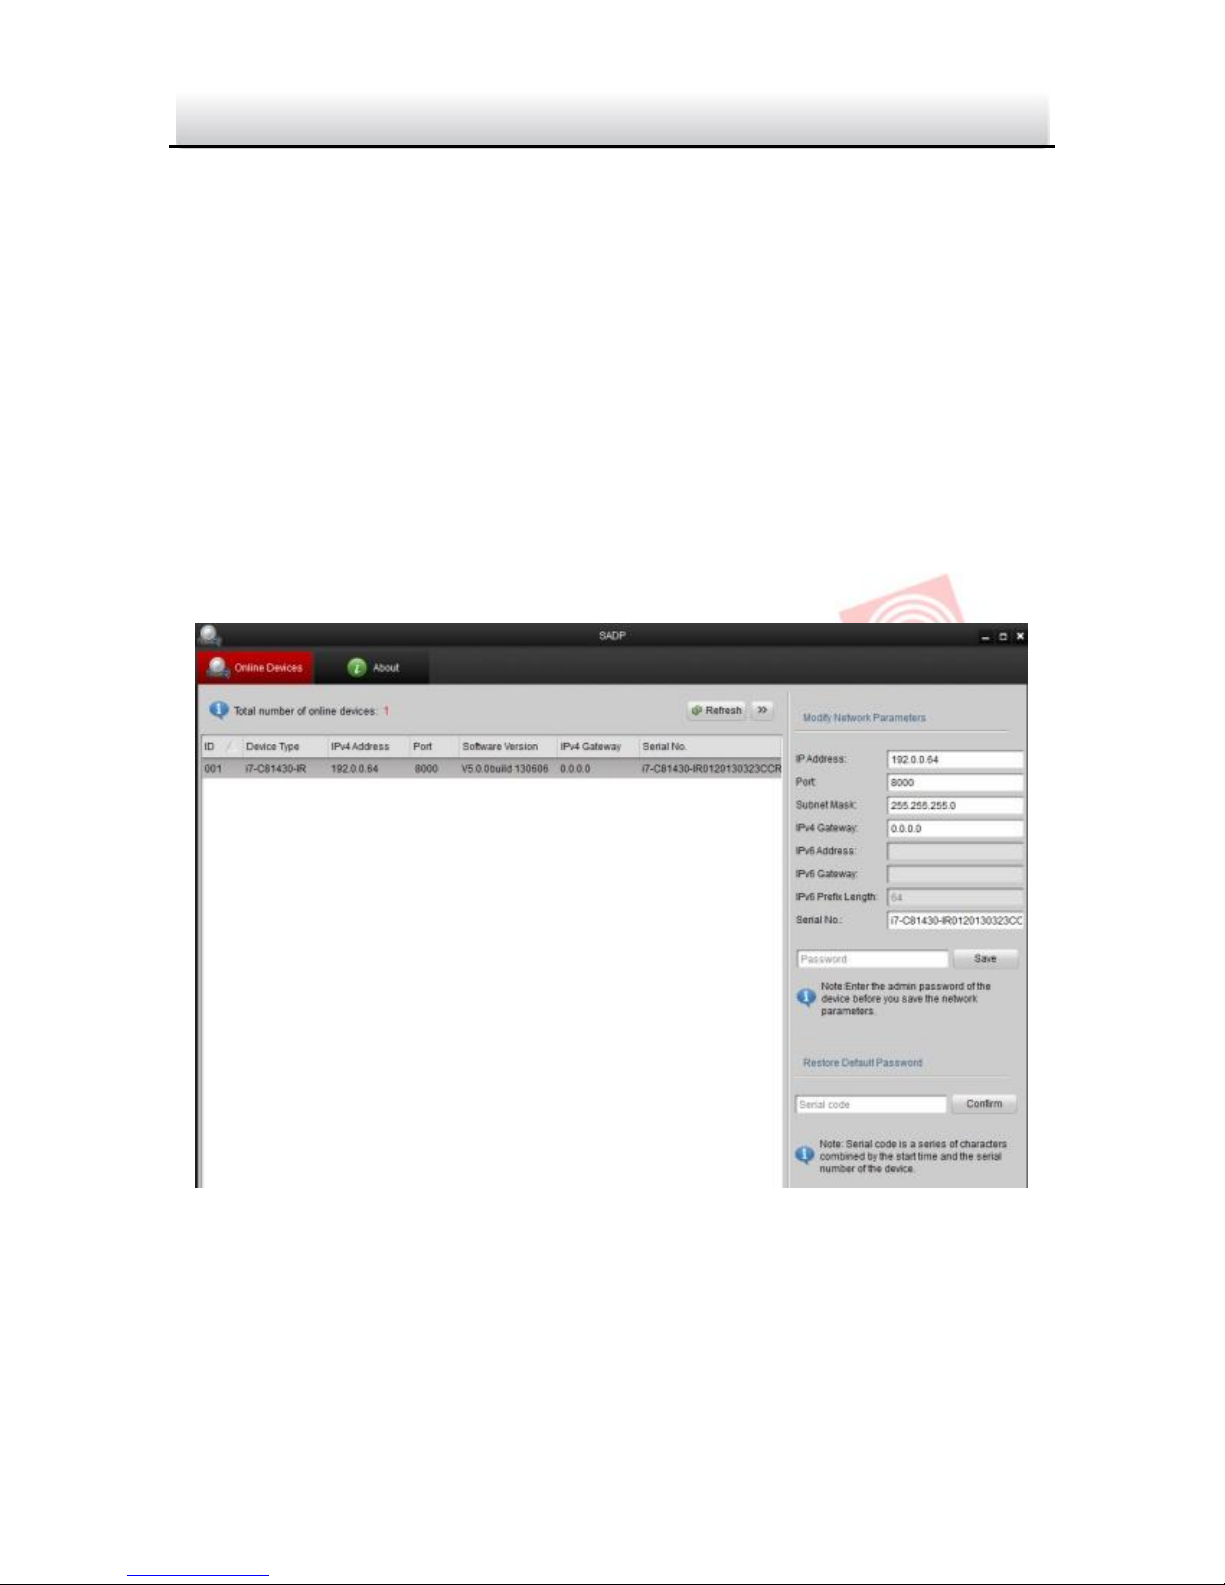
Use SADP, a software tool which can automatically detect network
camera in the LAN and list the device information like IP address, subnet
mask, port number, device serial number, device version, etc., shown in
Figure 3-2.
Use i7-VMS software and to list the online devices. Please refer to the
user manual of client software for detailed information.
Page 26
Network Camera·Quick Guide
25
25 25
2. Change the IP address and subnet mask to the same subnet as of your PC.
Refer to the following introductions to set IP address with SADP software:
Search active devices online
Search online devices automatically:
After launch the SADP software, it automatically searches the online
devices every 15 seconds from the subnet where your computer locates.
It displays the total number and information of the searched devices in
the Online Devices interface. Device information including the device type,
IP address, port number, gateway, etc. will be displayed.
Figure 3-2 Searching Online Devices
Page 27
Network Camera·Quick Guide
26
26 26
Note: Device can be searched and displayed in the list in 15 seconds after
it goes online; it will be removed from the list in 45 seconds after it goes
offline.
Search online devices manually:
You can also click to refresh the online device list
manually. The newly searched devices will be added to the list.
Note: You can click or on each column heading to order
the information; you can click to show the device table and
hide the network parameter panel on the right side, or click to
show the network parameter panel.
Modify device information
Steps:
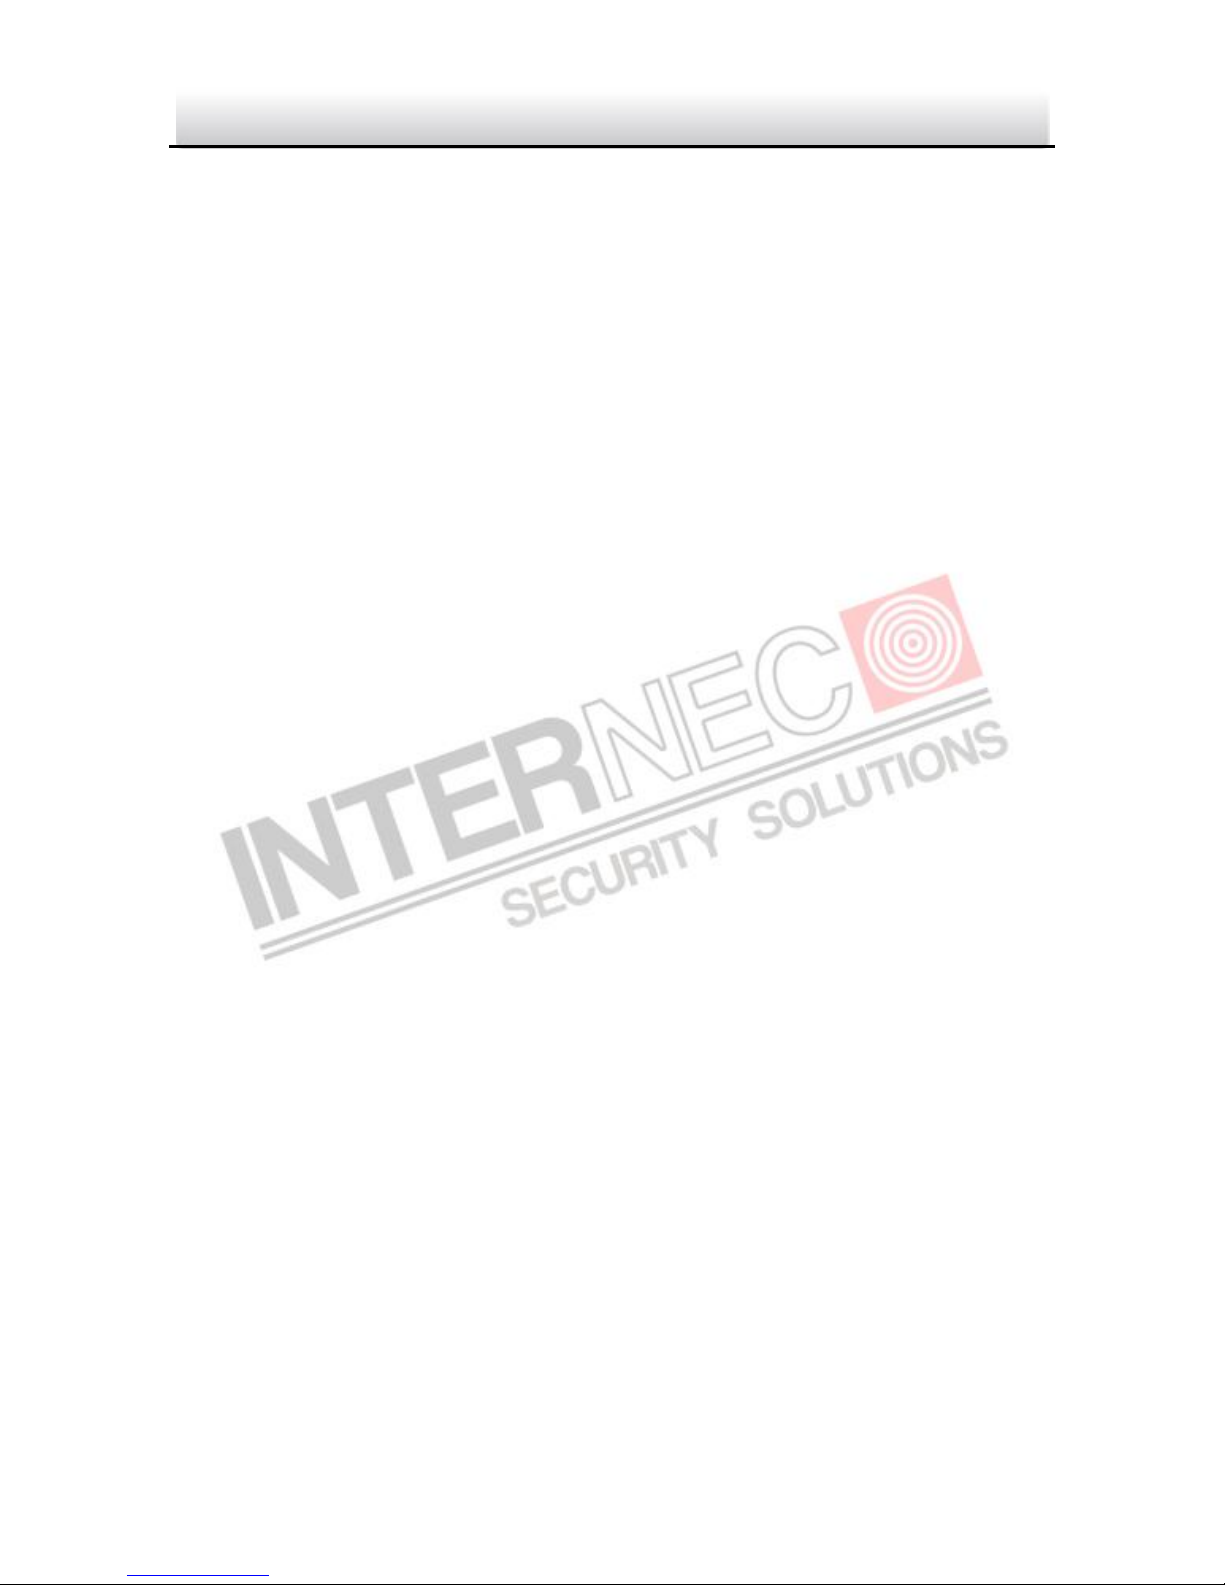
1). Select the device to be modified in the device list as shown in Figure
3-3. The network parameters of the device will be displayed in the
Modify Network Parameters panel on the right side as shown in Figure
3-4.
2). Edit the modifiable network parameters, e.g. IP address and port
number.
Page 28
Network Camera·Quick Guide
27
27 27
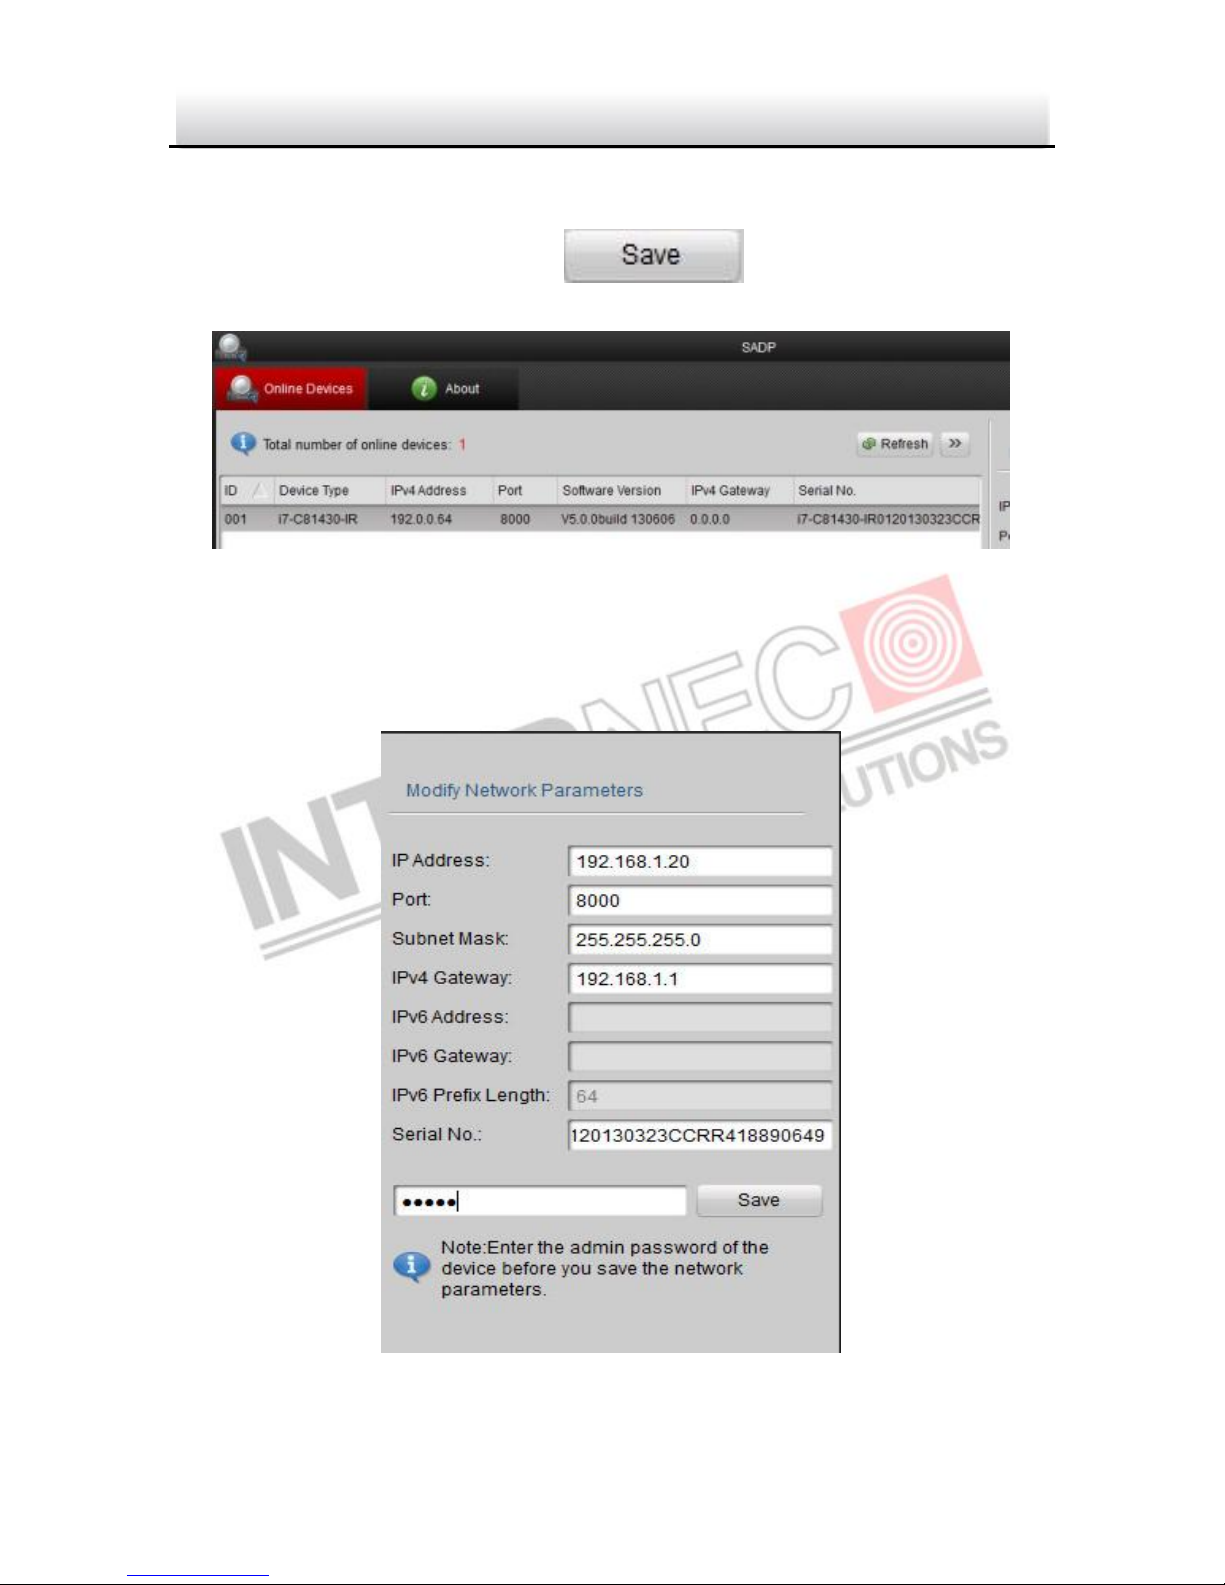
3). Enter the password of the admin account of the device in the
Password field and click to save the changes.
Figure 3-3 Select a device
Page 29
Network Camera·Quick Guide
28
28 28
Figure 3-4 Modify Network Parameters
3. Enter the IP address of network camera in the address field of the web
browser to view the live video.
Notes:
The default value of the IP address is 192.0.0.64. The default user name is
admin, and password is 12345.
For accessing the network camera from different subnets, please set the
gateway for the network camera after you log in.
Page 30
Network Camera·Quick Guide
29
29 29
4 Accessing via Web Browser
System Requirement:
Operating System: Microsoft Windows XP SP1 and above version / Vista / Win7 /
Server 2003 / Server 2008 32bits
CPU: Intel Pentium IV 3.0 GHz or higher
RAM: 1G or higher
Display: 1024×768 resolution or higher
Web Browser: Internet Explorer 7.0 and above version, Apple Safari 5.02 and
above version, Mozilla Firefox 3.5 and above version and Google Chrome8 and
above version
Steps:
1. Open the web browser.
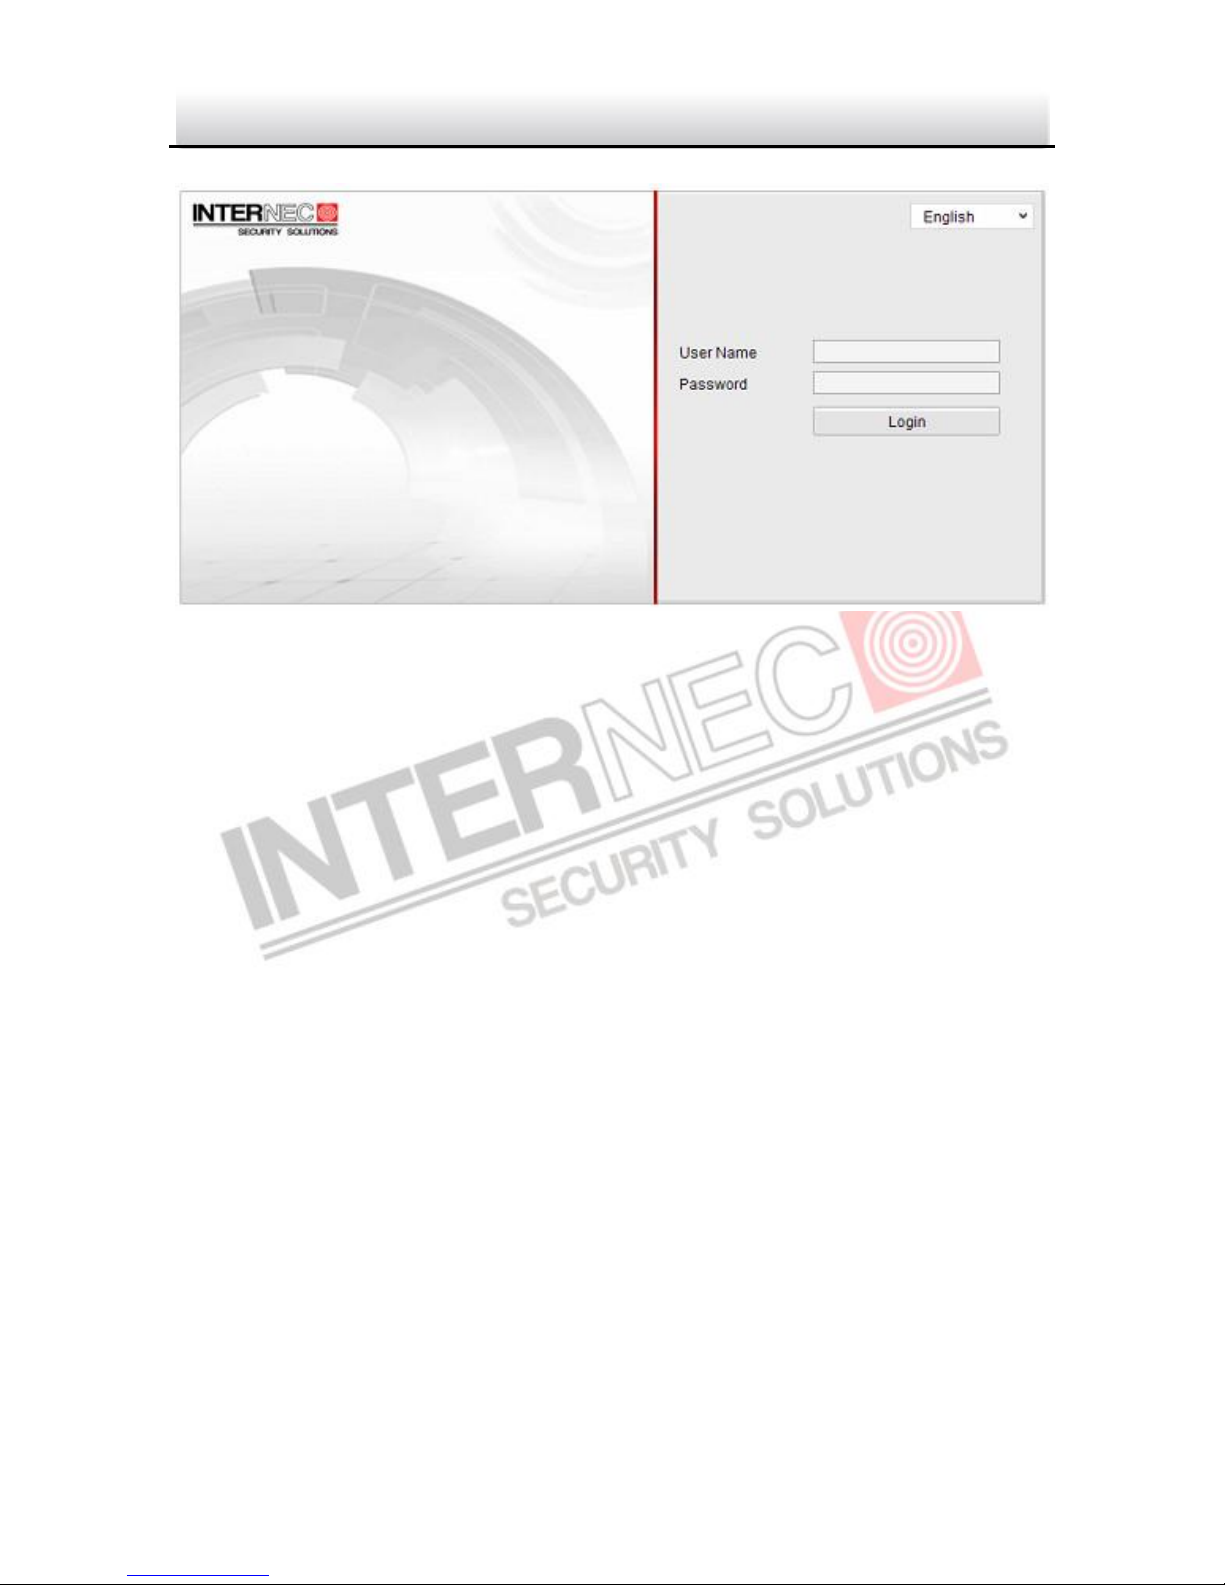
2. In the browser address bar, input the IP address of the network camera, e.g.,
192.0.0.64 and press the Enter key to enter the login interface.
3. Input the user name and password.
4. Click .
Page 31
Network Camera·Quick Guide
30
30 30
Figure 4-1 Login Interface
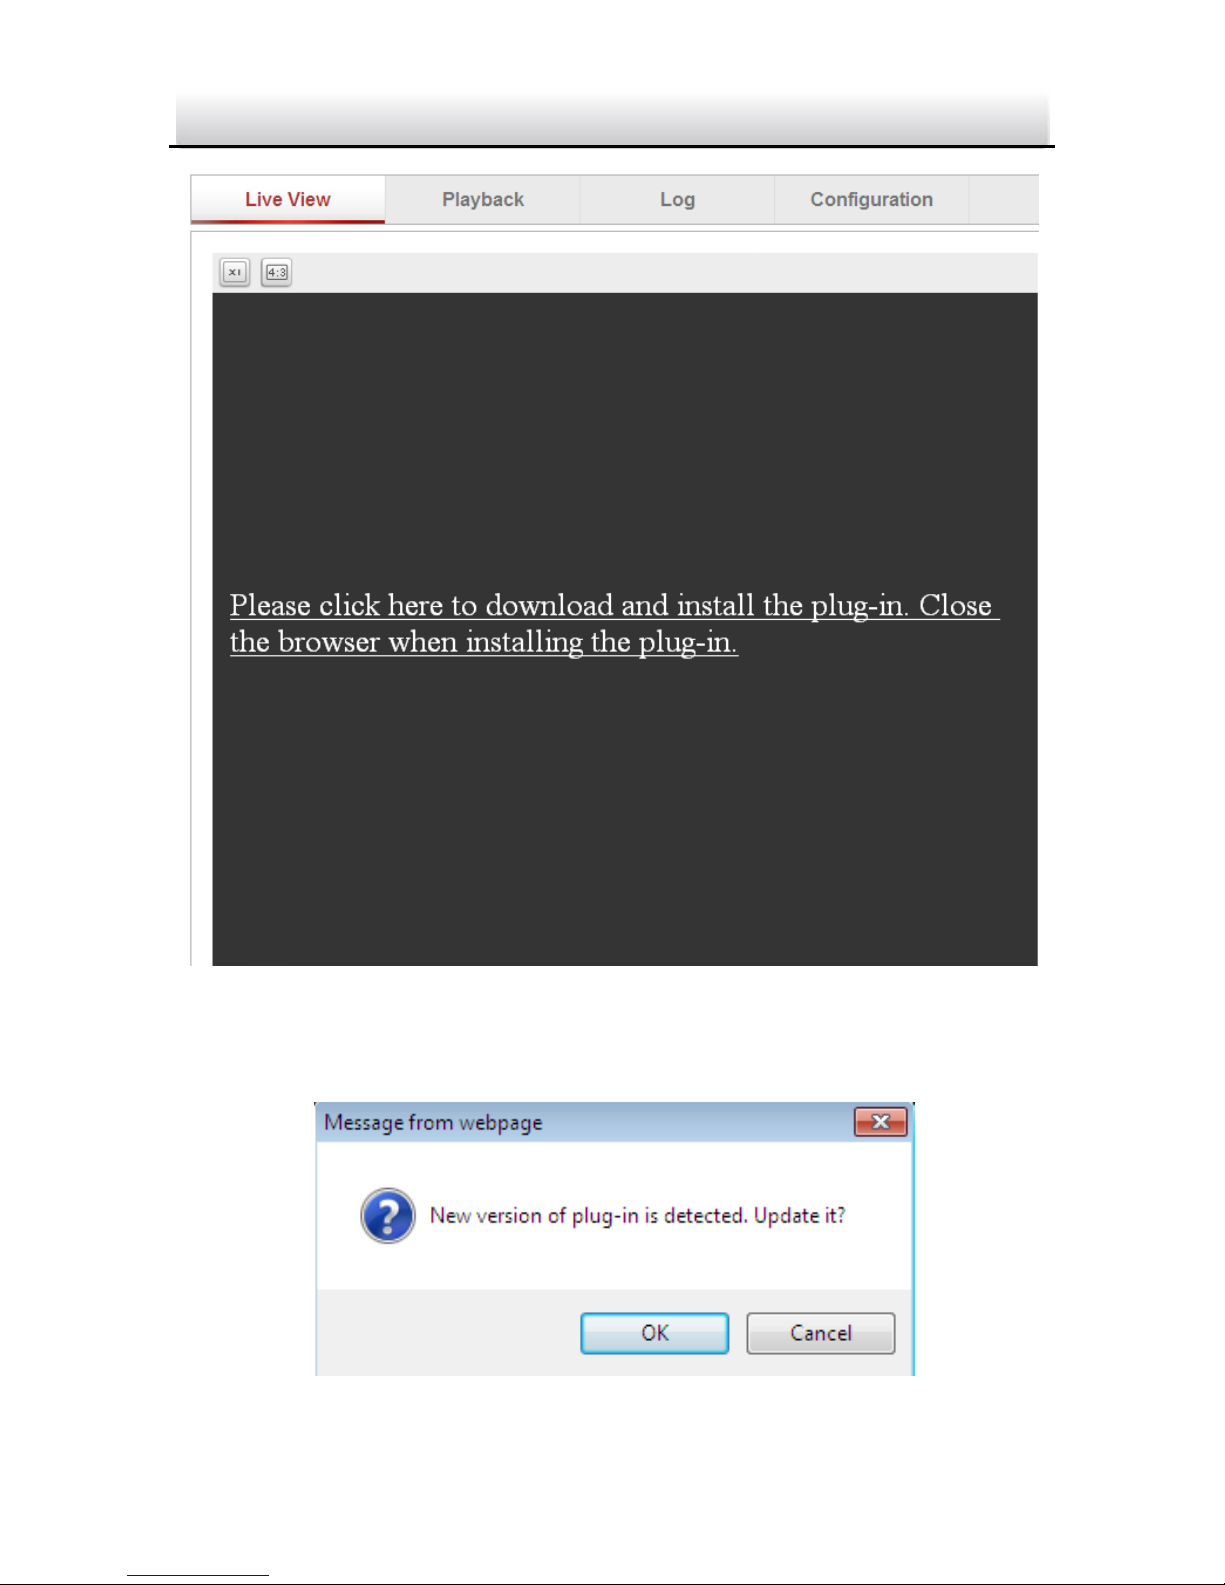
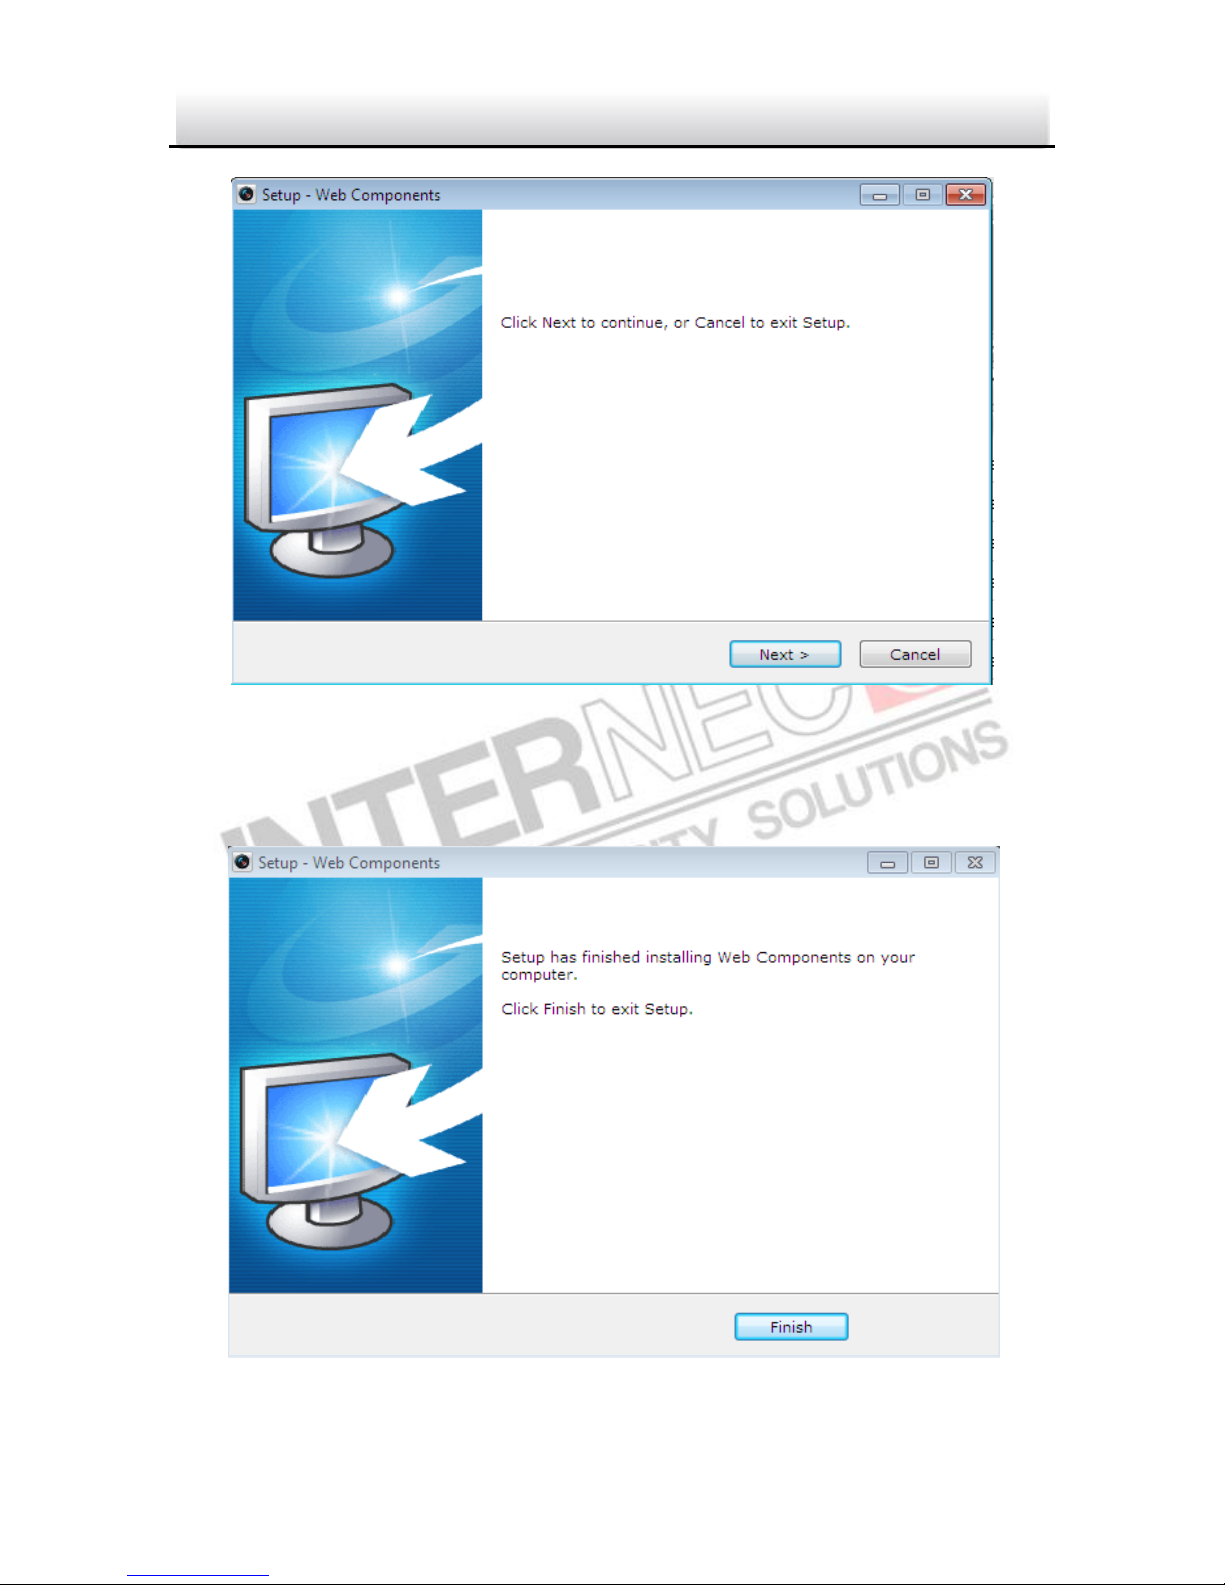
5. Install the plug-in before viewing the live video and managing the camera.
Please follow the installation prompts to install the plug-in.
Note: You may have to close the web browser to finish the installation of the
plug-in.
Page 32
Network Camera·Quick Guide
31
31 31
Figure 4-2 Download Plug-in
Figure 4-3 Download Plug-in
Page 33
Network Camera·Quick Guide
32
32 32
Figure 4-4 Install Plug-in
Figure 4-5 Install Plug-in
Page 34
Network Camera·Quick Guide
33
33 33
6. Reopen the web browser after the installation of the plug-in and repeat the
above steps 2-4 to login.
Note: For detailed instructions of further configuration, please refer to the user
manual of network camera.
Page 35

Network Camera·Quick Guide
0
0 0
 Loading...