

International Medcom Radalert 100 Operating Manual

Radalert 100
Nuclear Radiation Monitor
Operating Manual

Copyright 2006 by International Medcom, Inc. All rights reserved.

Contents
1 Introduction 1
How the Radalert 100 Detects Radiation 1
2 Features 2
The Display 3
The Switches 4
The Detector 5
The Ports 5
3 Operation 6
Units of Measurement 6
Starting the Radalert 100 6
Operating Modes 6
Taking a Timed Total Count 7
Operating Ranges and Response Times 8
Using the Alert 10
The Utility Menu 11
Interfacing to an External Device 12
4 Common Procedures 13
Establishing the Background Count 13
Environmental Area Monitoring 13
Checking an Object 14
5 Maintenance 15
Calibration 15
Precautions 18
Troubleshooting 19
6 Basics of Radiation and Its Measurement 21
Ionizing Radiation 21
Measuring Radiation 23
Radiation Measurement Units 24
Higher Than Normal Readings 25
Appendix A Technical Specifications 26
Warranty 28


1 Introduction
The Radalert™ 100 is a health and safety instrument that measures
alpha, beta, and gamma radiation. With the Radalert 100, you can:
• Monitor possible radiation exposure while working near
radionuclides
• Ensure compliance with regulatory standards
• Check for leakage from X-ray machines and other sources
• Set the alert level and use the Radalert 100 in Alert mode; if
the radiation goes above the level you set, the alert beeper
sounds to let you know
• Screen for environmental contamination or environmental
sources of radioactivity
• Connect the Radalert 100 to a computer or data logger to
record and tabulate your data
This manual gives complete instructions for using the Radalert 100
and procedures for common applications.
How the Radalert 100 Detects Radiation
The Radalert 100 uses a Geiger-Mueller tube to detect radiation.
The Geiger tube generates a pulse of electrical current each time
radiation passes through the tube and causes ionization. Each
pulse is electronically detected and registers as a count. The
Radalert 100 displays the counts in the mode you choose: counts
per minute (CPM), milliroentgens per hour (mR/hr), or total counts
for a timed period. In SI units, counts per second (CPS) and
microsieverts per hour (µSv/hr) are used.
1
1
2
3
7
2 Features
The Radalert 100 measures alpha, beta, gamma, and x-ray
radiation. This chapter briefly describes the Radalert 100's
functions. For more information on how to use the Radalert 100,
see Chapter 3, "Operation."
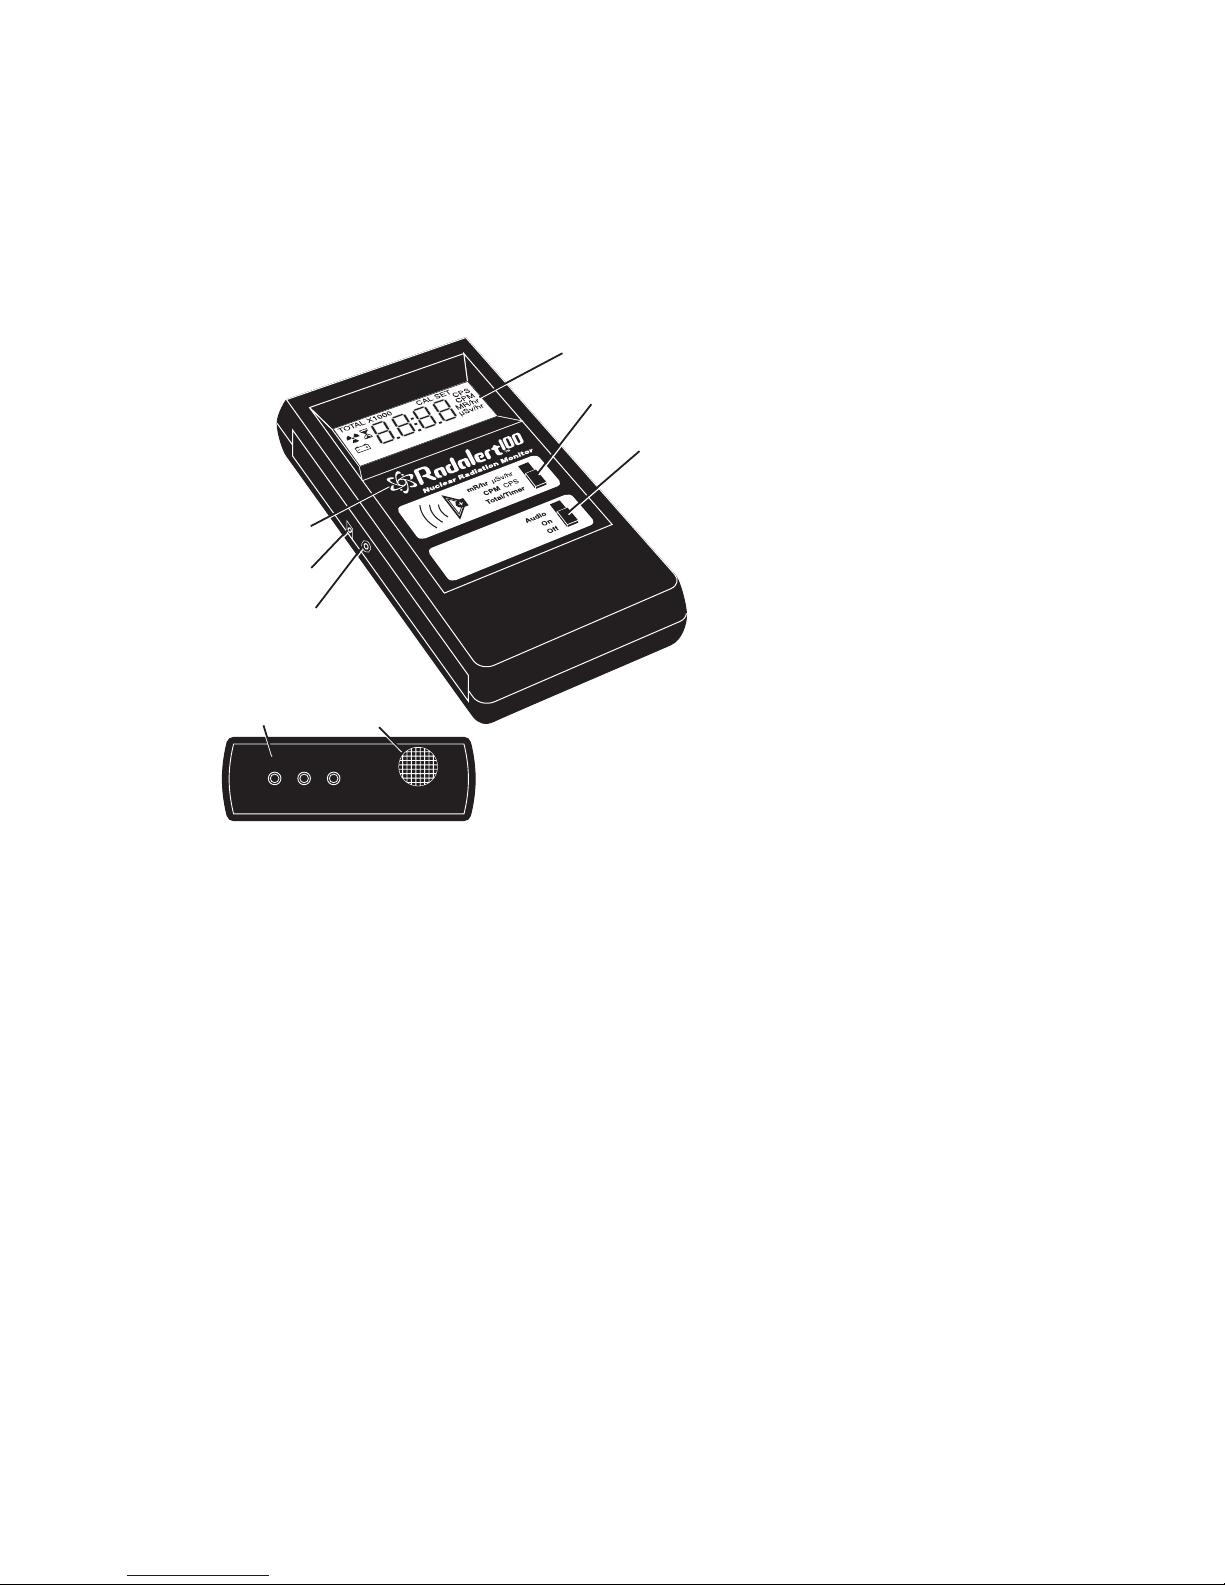
4 LCD
5 Mode Switch
6 On/Off/Audio
Switch
Count Light
Calibration
Input Port
Audio/Data
Output Port
+, –, and
Set Buttons
Set
8 Alpha
Window
–+
The Radalert 100 counts ionizing events and displays the results on
the liquid crystal display (LCD) (4). You control which unit of
measurement is shown by using the mode switch.
Whenever the Radalert 100 is operating, the red count light (1)
flashes each time a count (i.e., an ionizing event) is detected.
2

The Display
Several indicators on the LCD show information about the mode
setting, the current function, and the battery condition.
E Total Mode
D Timer
C Alert Mode
Indicator
B Low Battery
Indicator
A Numeric
Display
F X1000
Mode
G Calibration
Mode
H Timer, Alert or
Calibration Set
Mode
I Units of
Measurement
J Menu
• The numeric display (A) shows the current radiation level in
the unit specified by the mode switch setting.
• A small battery (B) appears to the left of the numeric display
to indicate low battery voltage.
• A radiation symbol (C) appears when the Alert feature is on.
• An hourglass (D) appears to the left of the numeric display
during a timed count.
• TOTAL (E) appears when the Radalert 100 is in Total mode.
• X1000 (F) appears when the radiation level is displayed in
X1000 mode.
• CAL (G) appears while you are calibrating the Radalert 100.
• SET (H) appears when you are setting the timer, the Alert
level, or the calibration factor, or working in the Utility Menu
(the numeric display shows the setting you are adjusting
instead of the current radiation level).
• The current unit of measurement (I) – CPM, CPS, mR/hr or µ
Sv/hr – is displayed to the right of the numeric display.
3

• MENU (J) appears when you are in the Utility Menu.
The Switches
The Radalert 100 has two switches on the front, and three buttons
on the end panel. Each switch has three settings, which are
described below.
On/Off/Audio Switch (6)
Audio. The Radalert 100 is on, and it makes a clicking sound
for each radiation event detected.
On. The Radalert 100 is operating, but audio is off.
Off. The Radalert 100 is not operating.
Mode Switch (5)
mR/hr µSv/hr. The LCD shows the current radiation level in
milliroentgens per hour from .001 to 110 or, when SI units are
used, in microsieverts per hour from .01 to 1100.
CPM CPS. The LCD shows the current radiation level in
counts per minute from 0 to 350,000 or, when SI units are
used, in counts per second from 0 to 3,500. When X1000 is
shown, multiply the numeric reading by 1000 to get the
complete reading.
Total/Timer. The display shows the accumulated total of
counts starting when the switch is turned to this position, from
0 to 9,999,000. When X1000 is shown, multiply the numeric
reading by 1000 to get the complete reading.
+, -, and SET Buttons (7) (on the end panel)
+ and – Buttons: These are used to adjust the numeric
display for timed counts, alert settings, and calibration
settings, and to scroll through the Utility Menu.
Set Button: This is used to set the alert, to set the correct
calibration reading, and to select items in the Utility Menu.
4

For more information, see “Taking a Timed Count,” “Using
the Alert,” and “The Utility Menu” in Chapter 3 and
“Calibration” in Chapter 5.
The Detector
The Radalert 100 uses a Geiger tube to detect radiation. Alpha
radiation does not penetrate most solid materials, so this Geiger
tube has a thin disk of mica, which alpha radiation can penetrate,
on its end. The screened opening at the top of the Radalert 100 is
called the alpha window (8). It allows alpha and low-energy beta
and gamma radiation to penetrate the mica end of the tube.
CAUTION: The mica end surface of the Geiger tube is fragile. Be
careful not to let anything penetrate the screen.
The Ports
There are two ports on the left side of the Radalert 100.
The calibration input port (2) is used for calibrating electronically
using a pulse generator. For more information, see “Calibrating
Electronically” in Chapter 5.
The output port (3) below the calibration input port allows you to
interface the Radalert 100 to a computer, data logger, earphones,
or other device using a 3.5 mm stereo plug. For more information,
see “Interfacing to an External Device” in Chapter 3.
5

3 Operation
The guidelines in this chapter describe how to use the Radalert
100.
Units of Measurement
The Radalert 100 is designed both for users of conventional units
(milliroentgens per hour and counts per minute) and for users of
SI units (microsieverts per hour and counts per second). To switch
between conventional and SI units, use the Utility Menu. See “The
Utility Menu” in this chapter.
Starting the Radalert 100
Be sure that a standard 9-volt alkaline battery is installed in the
battery compartment in the lower rear of the Radalert 100. Note:
When installing the battery, place the battery wires along the side
of the battery and not under it.
To start the Radalert 100, set the top switch to the mode you want,
and set the bottom switch to On or Audio. The Radalert 100 then
does a four-second system check, displaying all the indicators and
numbers.
After the system check, the radiation level is displayed in the
selected mode. One minute after you start the Radalert 100, a
short beep indicates that enough information has been collected to
ensure statistical validity.
Operating Modes
When the mode switch is set to mR/hr or CPM, the numeric
display is updated every three seconds. At low count rates,
significant changes in the radiation level displayed can take up to
one minute to stabilize. See “Operating Ranges and Response
Times” in this chapter for more information.
6
 Loading...