

International Harvester 274 Operator Manual
e
INTERNATIONAL
274
TRACTOR
OPERATOR'S
MANUAL
®

To The Owner
Y
our
new I nternational
ed
to
meet
ments.
ability
and
ity
your
Your
ested
tractor.
ed
modern
parts
ance.
The
to
work
requirement, and
of
the
hydraulic
work
local
in
the
He
in
the
latest
tools, and original-equipm.ent I H service
which
today's
ease
match
and shorten
International
performance
has
factory
method
assure
Harvester
exacting operating require-
and
comfort
ground
system are intended
your
trained servicemen,
proper
tractor
of
speeds
Harvester dealer
of
to
the
effort
hours on
you
receive
servicing tractors, and
fit
and good
is
operation,
engine
less
to
the
job.
from
perform-
design-
the
power
versatil-
lighten
is
inter-
this
inform-
To
obtain
operation
ing on its use,
'by
your
Before
carefully.
and
New
a
nominal
When in need
and engine serial numbers,
suffix
spaces
top
performance
the
tractor
periodically,
International
you
operate
It
has
been prepared
maintain
copies may
letters.
provided below.
your
price.
of
Write
shou
Harvester Dealer.
the
tractor,
tractor
be
ordered
parts, always specify
these serial numbers in
and assure economical
Id
be
inspected, depend-
or
at
least once a year,
study
th
is
manual
to
help
you
operate
with
utmost
from
including
efficiency.
your
the
prefix
dealer
tractor
at
and
the
METRIC
A standard
been adopted
lents
parentheses.) A conversion
on page 73
of
are used
for
measurement
for
world-wide
throughout
your
reference.
(SI)
known
use
. English
this
manual.
list
of
MEASUREMENTS
as
International
Units
(Metric
commonly
System
followed
Equivalents are given in
used measurements are listed
of
by
Units
Metric
(SI)
has
Equiva-
1.
Engine serial
number
2.
Tractor
serial
number

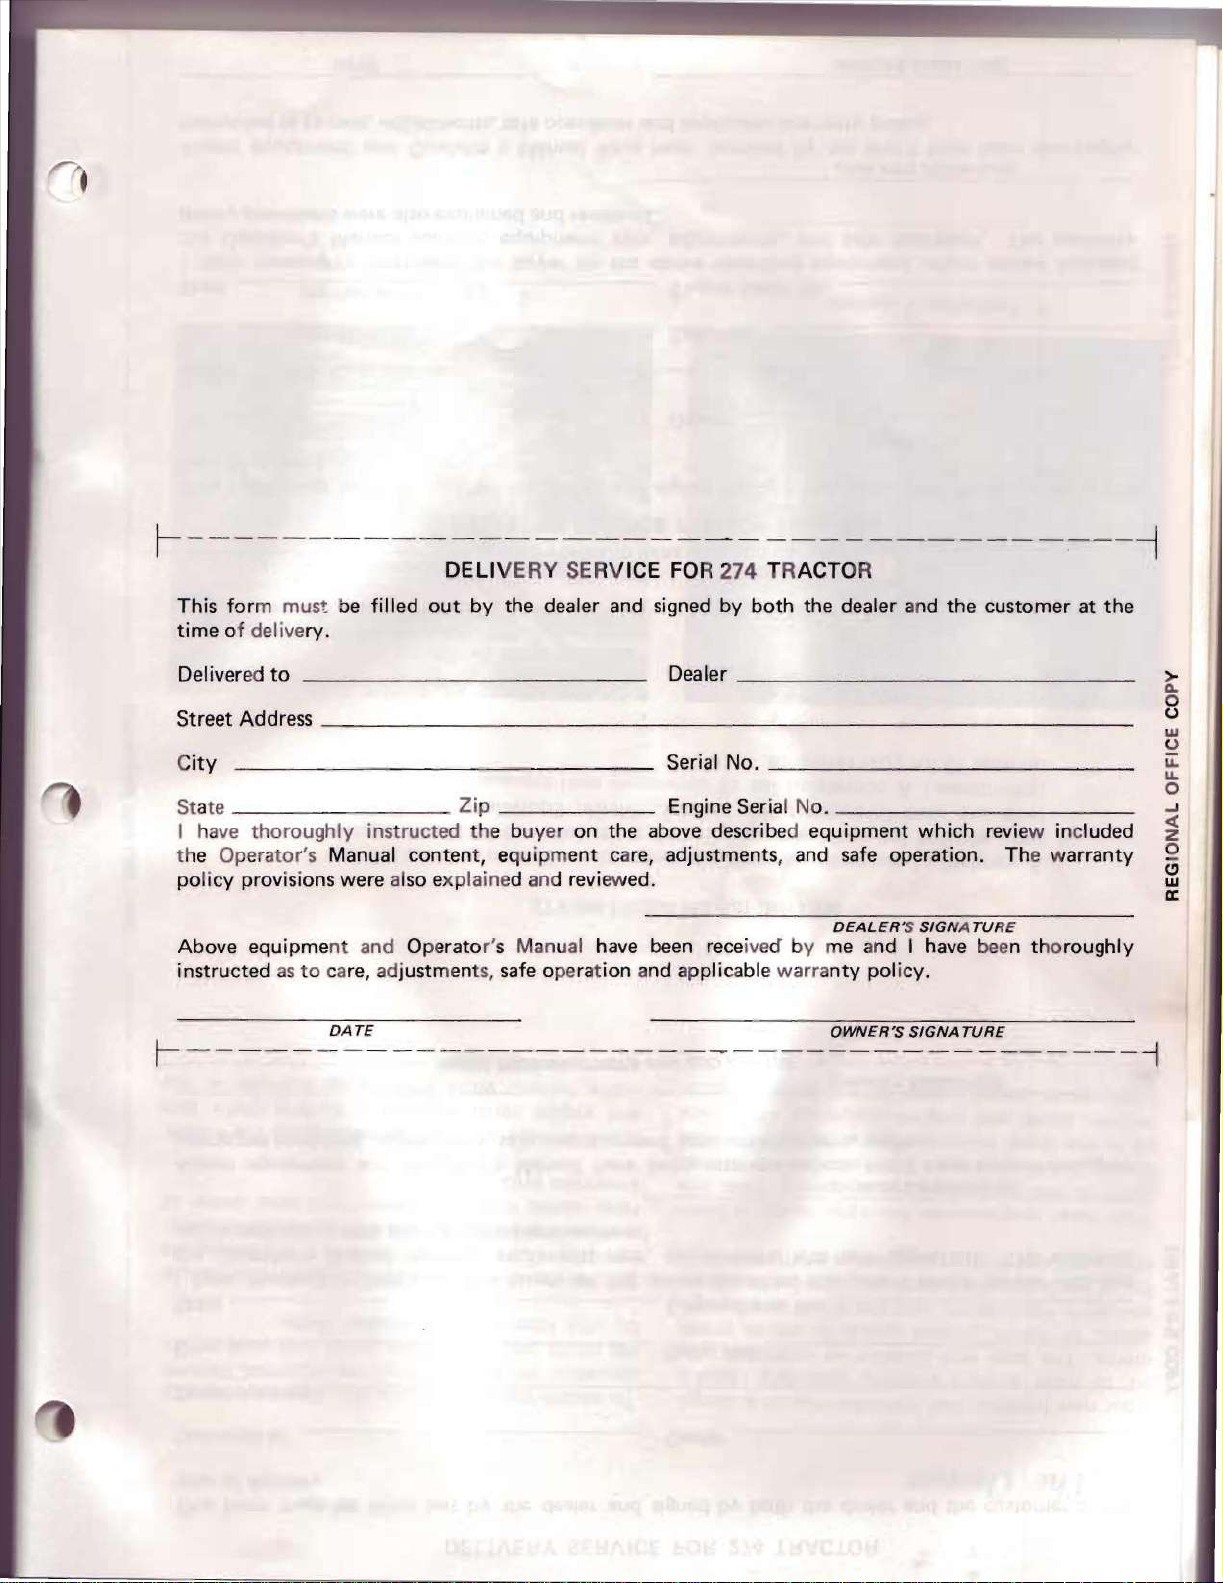
This
time
form
of
delivery.
must
be
filled
DELIVERY
out
by
the dealer and signed by
SERV I
CE
FOR 274 TRACTOR
both
the dealer and the customer at the
Delivered
Street Address
City
State
I have
the Operator's Manual content,
policy
Above equipment and Operator's Manua
instructed
~ ---- --
to
____________
thoroughly
provisions were also explained and reviewed.
as
to
--------
instructed
care, adjustments, safe operation and applicable
DA
TE
___________
Zip
the
buye r on the above described equ,
eq
uipment car
--FOLDBACKHEREANDADDCARBON
l h
Dealer
____
________
Serial No. _
Engine Serial No.
e,
adjustments, and
ave
been
____________________________
_
_________________
_____________________
__________________
received
ipment
safe
DEALER'S
by
me and I have
warranty
OWNER'S
--
-
which
operation. The
SIGNA
policy.
SIGNA
----
review included
TURE
been
TURE
-
--
~
warranty
thoroughly
- -
____
-----
_
---l
_
__
f----
-
---
This
form
must
time
of
delivery.
Delivered
Street Address
City
State Zip
I have
the Operator's Manual content, equi
policy
Above
instructed
to
thoroughly
provisions were also explaine d and reviewed.
equipment
as
-----
be
filled
____________
instructed the buyer on the above described equipment
and Operator's Manual have
to
care, adjustments,
DATE
---
DELIVER
out
by
FOLD
FORWARD HERE
Y SERVICE
the dealer and signed by
---,-
____
pment
safe
operation and applicable
__________
care, adjustments, and
AND
FOR 2
Dealer
Serial No.
Engine
been
received
ADD
CARBON·--
74
TRACTOR
both
the dealer and the cust
______
__
_ _
____ ~ ___
Serial No. _
by
warranty
- -
_____
___ ~ ___________
___
safe
DEALER
me and I have been
policy.
OWNER'S
----
_________
-'-
__' _
__________
which
operation. The
'S
SIGNATURE
SIGNA
- -
___________
review included
TURE
--
-
omer
at the
_ _ _
warranty
thoroughly
_
__
_
-l
>
0..
8
~
a:
w
z
;:
o
r---
This
time
---
for
m must
of delivery.
----
be
filled
---
DELI VERY SERVICE FOR
out
by
------------------------i
the dealer and signed by both the dealer and the customer at the
274
TRACTOR
Delivered
Street Address
C
ity
State
I
have
the Operator's Manual content, equipment ca
policy provisions were also explained and reviewed.
Above equipme
instructed
~------
to
_-,-
_____________________________
thoroughly
as
to care, adjustments,
instructed the buyer on the above described equipment which review in cluded
nt
and Operator's Manual
DATE
-
--
Zip
have
safe operation and applicable warra
------------
Dealer
Serial No.
Engine Serial No.
re,
adjustments, and
been
_______________
rece
ived by me and I have
-
--------
______________
____
safe
operation.
DEALER'S SIGN
nty
policy.
OWNER'S
SIGNATURE
_
______
Th
e warranty
A TURE
been th
--
-------~
_
_
_
_
oroughly
>
Q.
o
<.J
w
<.J
LA.
LA.
o
..J
<
Z
o
e"
w
a:
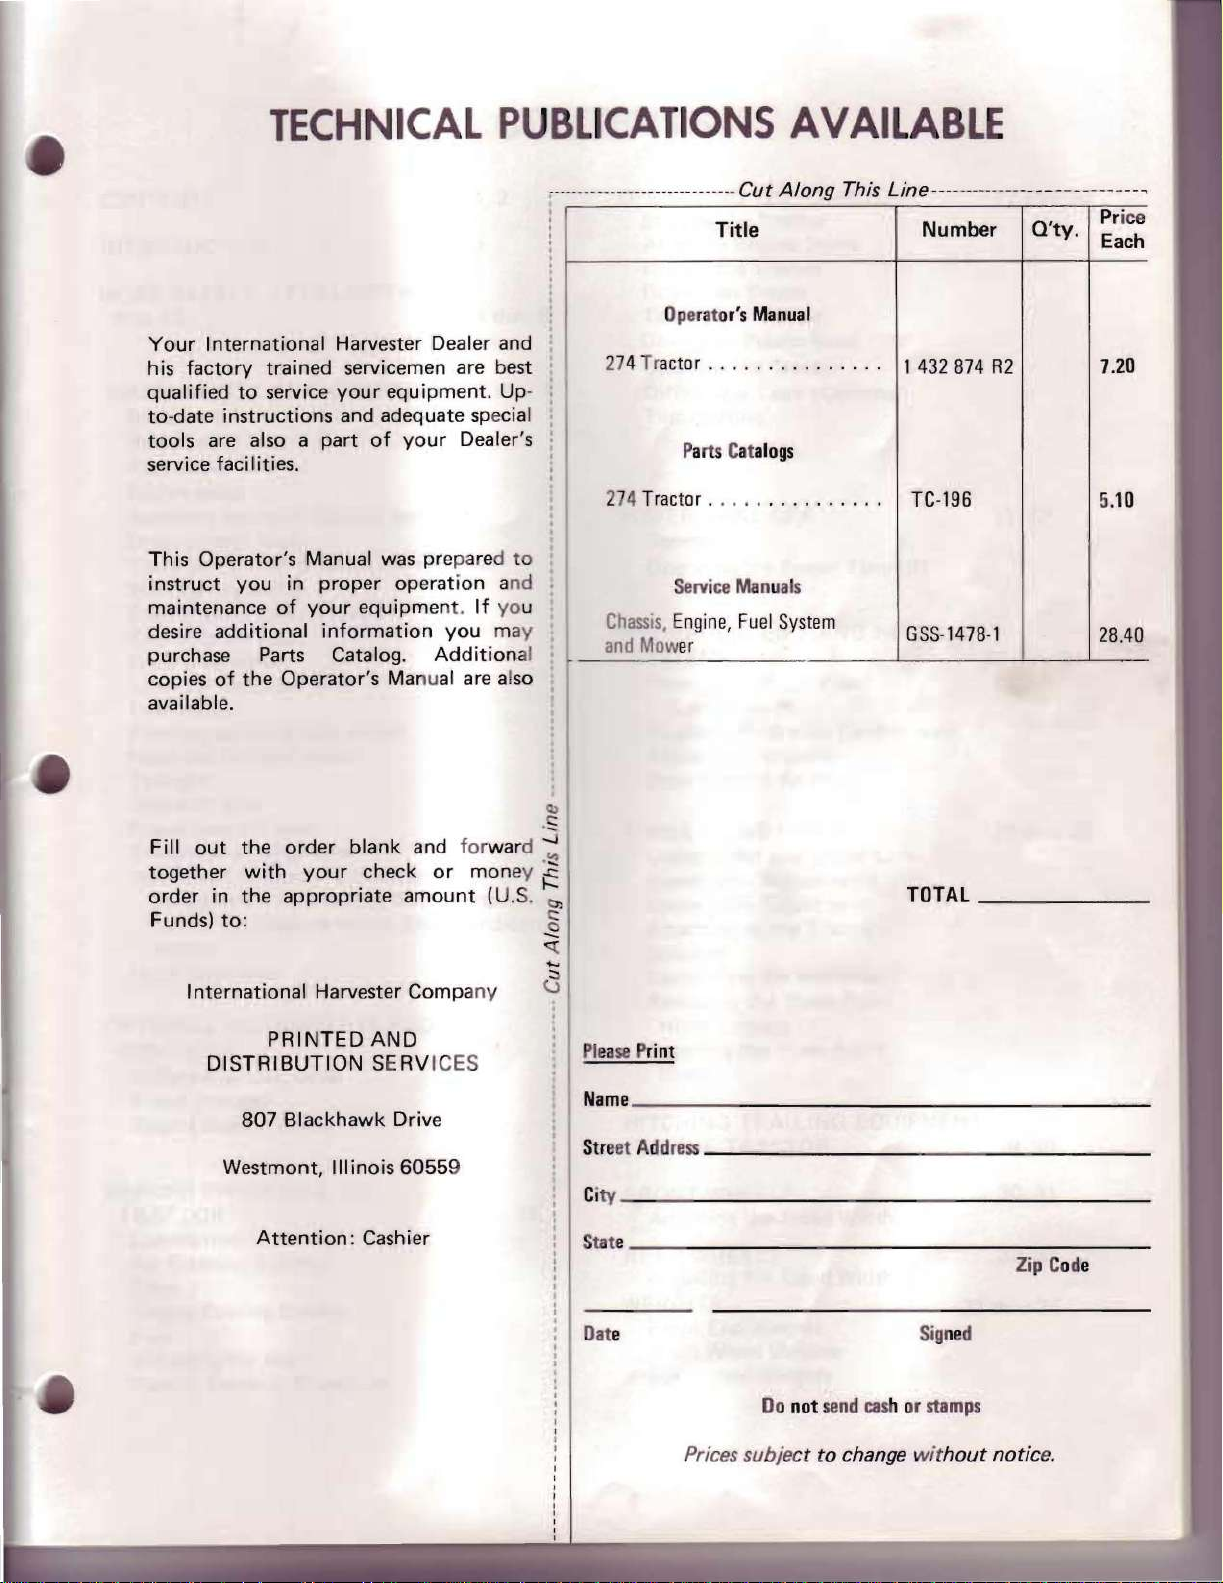
TECHNICAL
PUBLICATIONS
AVAILABLE
Your I nternational Harvester Dealer and ,
his factory trained servicemen are best '
qualified
to-date instructions and adequate special
tools
service faci lities.
This Operator's Manual was prepared
instruct you
maintenance
desire
purchase Parts
copies
available.
to
service
are a'iso a part
of
additional information you may
of
the
your
equipment.
of
your
in
proper
your
Catalog. Additional,
Operator's Manu
operation and •
equipment.
al
Up-
Dealer's
If
you
are also
to
;---------------------------
I
I
I
Operat
274 Tr
actor
........
Pa
rts
27
4 Tractor . . .............
Service
C
hassi
s,
Engine,
r
and Mow
er
--Cut Along
Title
or's
Manual
...
Cat
alogs
Manuals
Fuel
System
This
....
Line
-------
Number
1 432874
TC-196
GSS-1478·1
-----
----------------
Q'ty.
R2
Pr
Each
7.20
5.
10
I
28.40
ice
Fill
out
the
order
together with
order
Funds) to:
in
the
appropriate
International Harvester Company
PRINTED AND
DISTRIBUTION SERVICES
807 Blackhawk Drive
Westmont,
Attention:
blank and forward
your
check
amount
Illinois 60559
Cashier
or
money
(U.S.
OJ
.S
:!
~
tl)
.§
<:(
....
....
Please
Print
Name
__________
Stre
et
Ci
ty
_____
Su
te
___
Dat
e
______________________
Address
__________
________________
___________________
TOTAL
____
____
Signed
__________
____
______
_______
____________
Zip
Code
__
_
_
_
__
Prices
Do
subje
not
send
cas
ct
to change wit
h or
stamps
hout
notic
e.
CONTENTS
CONTENTS
INTRODUCTION
WORK
INSTRUMENTS
OPTIONAL
SAFELY -FOLLOW
RULES
AND
Brake
pedals
Brake pedal latch
Park
brake lever
Clutch pedal
Auxiliary
Drop
Three
Starting
Engine
Fuel
Glow
Low
F
use
Flashing warming
Head and
Taillight
Gearshift lever
Power
Transmission range lever
Instrument Cluster
Speedmeter, Hourmeter, Water temperature
territe,
territe)
Hook
CONTROLS 14
Differential
Fixed drawbar
Engine
hydraulic
control knob
point
hitch
key switch
speed
shut
off
plug signal
fuel
indicator
block
taillight
take-off
Oil pressure tellite, Charge indica tor
open lever
INSTRUMENTS
lock
coolant
control
position control lever
control
knob
lamp
light
switch
lever
(Tachometer,
pedal
heater
THESE
CONTROLS
lever
lever
switch
AND
1,2
3
4thru6
7
thru
13
OPERATING
Starting the
After
Driving the
Driving on Slopes
Tow
ing the
Drivi
ng
Stopping the
Differential Lock (Optional)
Transporti
POWER
General
Op
erating the Power Take-
HYDR
TH
HITCH
AULIC
SYSTEMS
Three
C
ontro
Auxili ary Hydraulic Control lever
Adjustable Stoppers
Dr
op Co
RE
E PO
Low
er Links and Upper Link
Low
er
Upp er
Attaching
Stabilizer
Uncoupling
Rem
oving the Three Point
Hit
ch Linkage
Installing the Three
Hit
ch
ING
TO THE
THE
TRACTOR
Tractor
the Engine Starts
Tractor
Tractor
on Public Road
Tractor
ng
TAKE
-OFF
LIFT
AND
Po
int
Hitch
Position
l I ever
ntrol
Knob
INT
HITCH
Link
Adjustments
Link
Adjustment
to
the Trac
the Implement
TRAILING
TRACTOR
tor
Point
Off
HITCH
EQUIPMENT
17
thru
21,22
22
thru
25thru
29,30
20
24
29
BEFORE O
TRA
Lubricati on
Air
Tires
Engine
Fuel
Adjusting the Seat
Tractor
PERATING
CTOR
Cleaning System
Cooling System
Break-In Procedure
THE
15, 16
FRONT WHEELS
Adjusti ng the Tread Width
REAR
WEIGH
WHEELS
Adjusting the Tread Width
TS
Front End Weights
Fro nt
Wh
eel
Weights
R
ear Wh
eel
Wei
ghts
1
33
0,31
3
32,33
thru
35

CON
TEN
TS
PREVENTIVE
GUIDE
PREVE
NTIVE
Hood 38
Fuel Shut
Filler
Cap
Fuel
Filter
Draining Water
Bowl 40
Venting the Fuel System
Cooling System 41
Adding Coolant
System
Cleaning the Cooling System 42
Filling
Fan Belt
Dry-Type
Electrical System
Charging
Generator 4
Lighting Switch
Headlight Replacement 46
Flashing Warning Light 47
Taillight (Optional) 47
Rear
Work Lamp (Optional)
Fuse
Battery
Tellite Bulb Replacement 49, 50
Rear
Wheels
Adjusting the Toe-in
Tires
Care
of
Infl
at ion
Shipping Tractors Equipped
Pneumatic Tires
Mounting Tires on the Rim
MAINTENANCE
MAINTENANCE
Off
Valve 39
Air
Vent 39
from
Sediment
to
the Cooling
the Cooling System
Tens
ion
Air
Cleaner 4
System and Alternator
Tires
wit
4
48,49
50,
h
36,37
38
40
40
41
42
2,43
3,44
45
5,46
46
47
48
50
51
51
51
51
51
52
STORING TH E TRACTOR
Storage
Removing
COLD WEA TH ER
Fuel System
Electrical
Lubricati on
Cooling System
En
gine C
LUBRICA TION
Checking the
Engine Oil
Checki
Chang
Changing the Engine Oil Filter
Gear Lubricant
Tr
ansmission Breather
Hydraulic Fluid F
Lubrication F
Greasing the
LUBRICATION TABLE
LUBRICA
SPECI
EXTRA EQUIPMENT
F ICATIONS
ACCE
UN
IVE
INSTRUMENTS AND
CONTROLS
from Storage
oolant
ng the Oil Le
ing Engine Oil
TIO
SSO
RIES
RSAL
Heater (Optional)
Oil Le
itting Grease
Front
N GUIDE
SYMBOL
PRE
vel
vel
ilter
Wheels
CAUTI
AND
S FOR
ONS
54,55
55, 56
56 thru
62
63
thru
67
thru
71
72
61
66
70
Traction and Weights
Overloading
Brake
Brake Adjustment
Park Brake Adjustment
Bleeding the Brake
Care
and
Adjustment
Clutch
of
the Engine
52
52
52
52
53
53
54
METR
IC (SI) MEASU REMENTS
73
INTRODUCTION
FRONT
Assembled in
tion
and maintenance
274
Tractors. This
detail in
understand
operation
the
of
this
hope
the
the
International
A
of a protec
manual are oper ati on, lubrica-
instructions
material
that
correct
tractor.
it
care,
has
will
help you
efficient
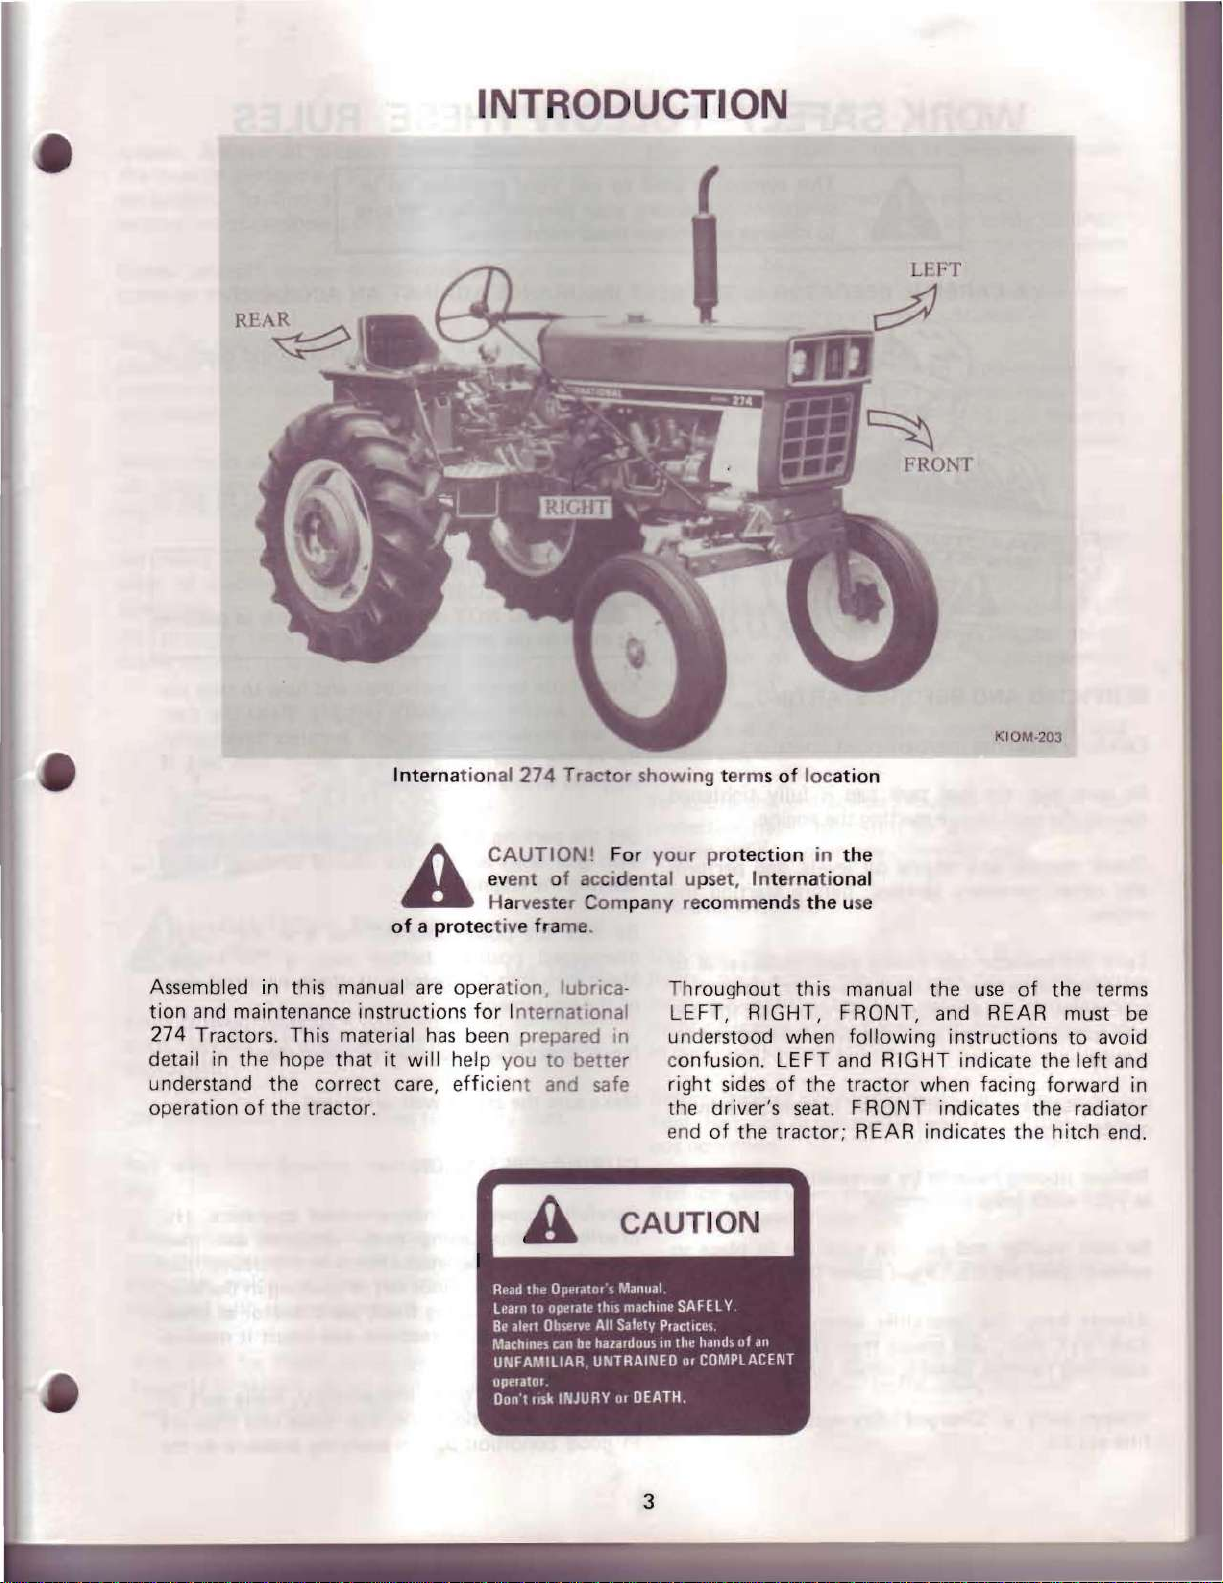
274 Tractor showing terms of loc
CAUTIO
ev
ent
of accide
Harvester Company recomm
tiv e frame.
for
I
nternat
been prepared
to
and safe
NI For
your protection
nta
onal
In
bette
r
CAUTION
in
l upset
. International
ends the
Th
roughout
LEFT,
understood when
c
onfusion.
right
sides
the driver's seat.
end
of
this
RIGHT,
LEFT
of
the
the
tractor; REAR
ation
the
use
manual
FRONT
following
and
RIGHT
tractor
FRONT
KIOM-203
the
use
, and
when facing
indicates
REAR
instructions
indicate
indicates the
of
the
the
must
to
the
left
forward
radiator
hitch
terms
be
avoid
and
in
end.
3

WORK SAFEL V- FOLLOW THESE RULES
A
CAREFUL
_ .
'12"
SERVICING
Carefully supervise
Be
sure
against
Check
any
engine.
Turn
the
any
and
moved.
coolant
other
the
pressure release
steam
continue
AND
that
the
the
stop
before
and
necessary services,
radiator
to
escape;
to
turn
This symbol
structions concerning
to
A
OPERATO R IS THE BEST INSURANCE
BEFORE STARTIN
inexperienced
fuel
tank
cap
starting
engine oil levels,
cap
slowly
point
to
then
press
until
the
observe and
operators.
is
fu
the
engine.
before
counterclockwise
allow
the
down
cap
G_
Ily
and
starting
pressure
on
is free
is
used
follow
tightened
perform
the
to
or
the
cap
to
be
re-
to
call
your
att
ention to in-
your
personal safety. Be sure
these instructions.
AGAINST
Avoid loose-fitting
moving parts.
STARTING
Starting
starting
A
or
ether in the air intake.
Know
tractor
tor
Be
supplied with a
Set
sion gear
starting
Be
disengaged position
Make sure
of
the
Never
how
and
in
the
the
sure
equ
operate
and /
the
Flu
id
(Ether)
the engine.
WARNING!
EXPLOSION
DO NOT
to
use
the
or
implements
implement
operators seat
ROPS frame.
parking
shift
the
brake
lev
er
engi ne.
power take-off
that
the
ipment.
vehic
AN
ACCID E
clothing,
use
controls
operator'
lever
in the neutral
before starting the engine.
helpers
le
in
which
must
not
HAZA
starting aid such
an
RD
and
quickly.
s manuals
and fasten
and
place
rod
or
observers stand
enclosed area.
could
be
used
how
Read
thoroughly.
seat
the
position
is
in the
NT
catch
to
as
gas
to
stop
the
belt if
transmis-
"OF
on
aid
in
oline
the
trac-
before
F"
clear
Check
ments.
Reduce
as
Be sure
exha
Always
Keep d i
mo
Always
fi
brakes and
tipping
your
work
muffler
ust
gases are discharged
keep
rt,
unting handles,
carry
rst aid kit.
program
the
trash,
a "Ch
clutch
hazards
and
exhau
operators
and
grease
steerin
arged"
pedal
for
corre
by
spreading wheels as far
permits.
st
pipe
are in place so
above
the
operator.
compartment
from
the
pedals, steps,
g wheel,
fire e
and
xti
nguisher
controls
ct
adjust-
clean.
.
and
Make
sure the area
DURIN
C
drauli
enough
may also infect a minor
If
Serious
treatment
conne
a
in
G OPERATION
aref
ully supervis
c fluid
force
injured
good
by
infec
is not
ct ions are tight
condition
to
escaping
tion
4
is well
e inexperienced o
escaping
penetrate
or
given
ventilat
under pressure
the
cut
fluid,
reaction
immediately. Make sure all
and
that
before
app
ed.
perat
ors. Hy-
can
sk i
n.
Hydraulic fluid
or
opening
see
a doctor at once.
can
hoses and lines are
lyi
ng
in
the
result it medical
pressure
skin.
to
have
the
WORK SAFEl Y -
system. Relieve all pressure before disconnecting
the
I ines or
lic system.
small piece
Power
place on the
Stop
place
the
position before
any reason.
Always
off
the
ing
or
No riders
clear
operation.
I H strongly recommends a
frame (ROPS).
perform
To
of
cardboard
take-off
tractor.
the
engine, set the parking brake lever and
transmission gear
keep shields in place. Disengage PTO. shut
engine, and remove
unclogging
allowed. Make certain
of
machinery before starting the engine
ing
other
work
on t
he
find
a leak under pressure u
or
wood.
master shield must alw ays
shift
dismounting
power
It
is
driven machinery.
available
Never
lever in t
from
the trac
the
key before adjust·
that
everone
rollover
for
this trac tor.
hydra
se
hands.
he
neutral
tor
prorect
be
u-
se
in
for
IS
or
i e
FO
LLOW
Use
ment:
a
Wi
th trail-behind PTO driven implements
hi
tching
line
m
ay
turning
Check overhead clearance
under
tree branches, enteri
On
ht
rig
distr
chance
THESE
care when
Use
A.
B.
C.
D.
e standard wheel
only
Limit
loads
Don't
backing.
Use
counterweight
suggested in
point
with
the PTO shaft.
pu
II
apart
the
tractor.
power
rear wheel
ibution
of
an
of
overtu rn.
RULES
pulling
approved
turn
on
I ines, guy wires, bridges,
the
loads
or
using heavy equip-
hitch
points.
to
those
you
can safely
too
sharp, and
or
Operator's Manual
the
fixed
If
it
or
create excessive angles when
carefully
ng
or
leavi
weight
to
help maintain
tractor
and
use
wheel weights when
drawbar must
is
not,
ng
bu i
Id i ngs,
must remain on the
proper
to
control.
care when
the
be
the
driveline
before
driving
low
hanging
etc.
weight
decrease the
in
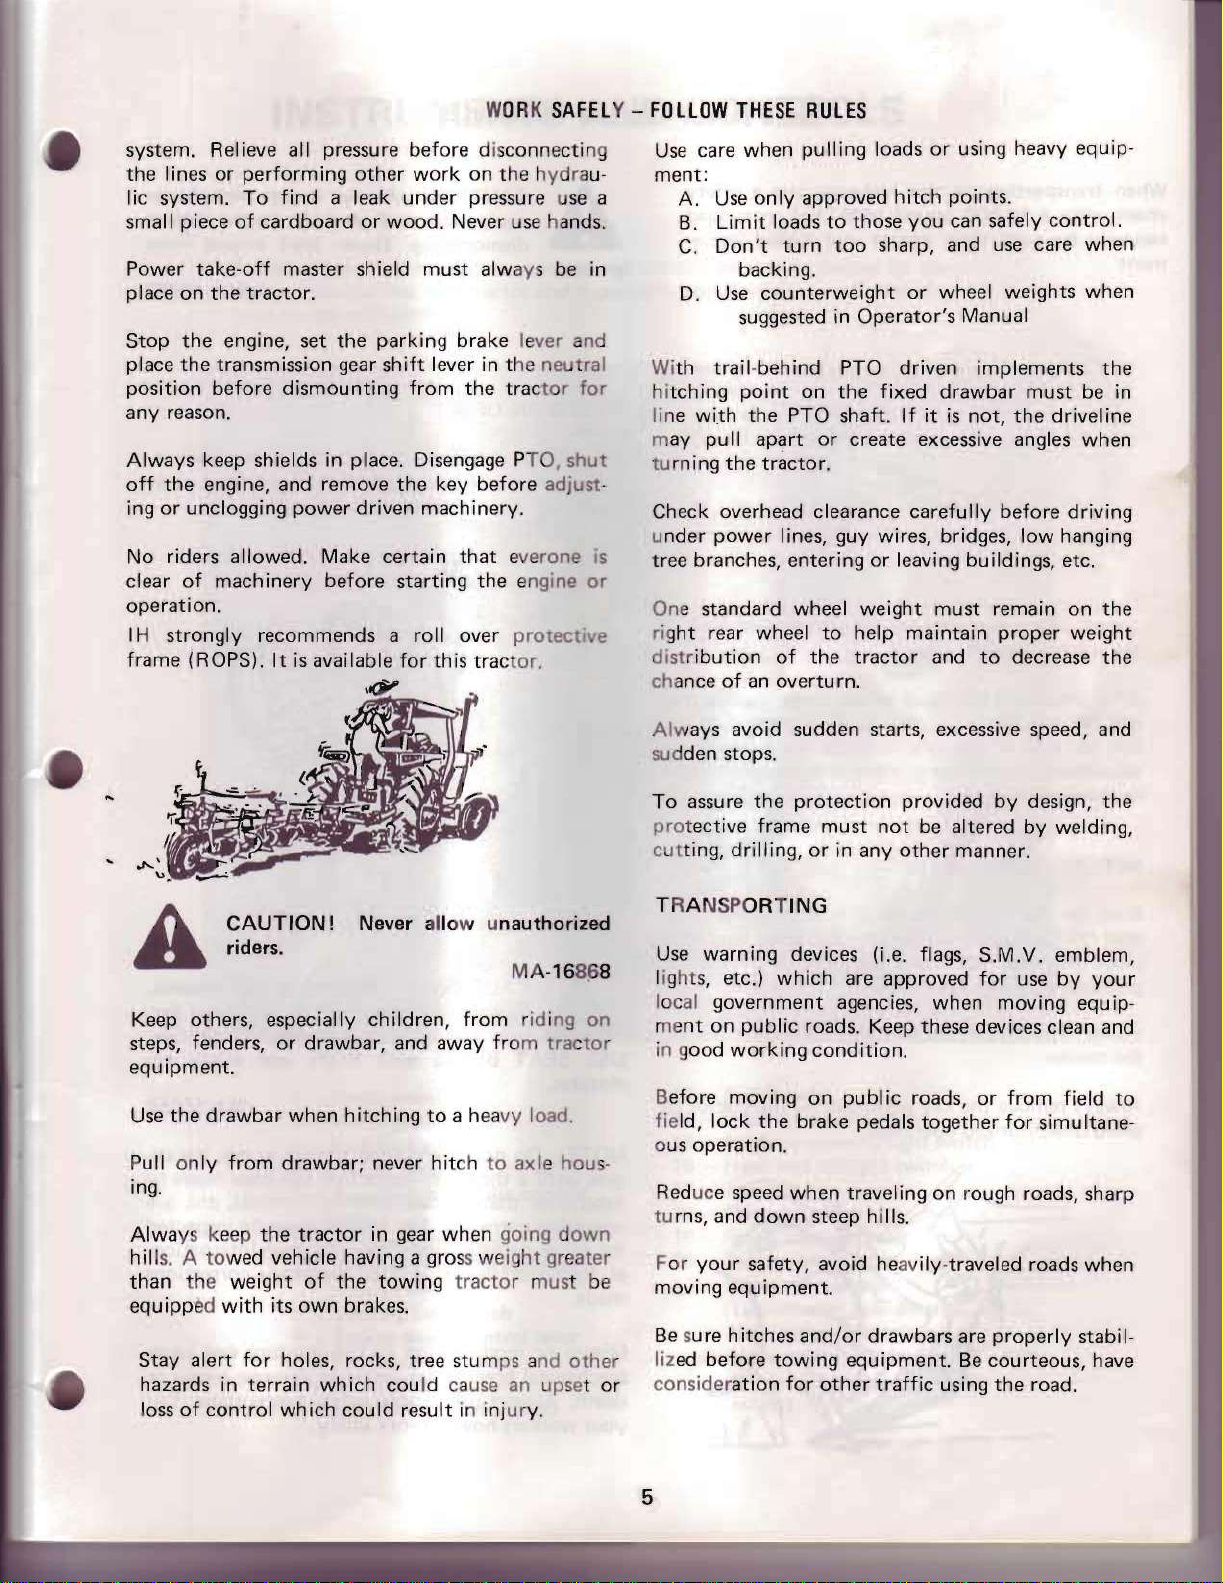
CAUTION!
A
Keep others, especially children,
steps, fenders,
equipment.
Use
P
ull
ing.
Alwa
hill
s. A towed
than
equipp
Stay alert
hazards in terra i n wh ich cou lid cause
loss
riders.
or
the drawbar when
only
from
drawbar; never
ys keep
the weight
ed
of
the
with
for
control
tractor
vehicle having a gro ss weig
its
own
holes, rocks, tree stum
which
Never
drawbar, and away from
hitching
of
the
brakes.
could result
allow
from
to a hea
hit
ch
in gear when going
towing
tracto
in
unauthorized
MA
-168p8
riding
vy load.
to
axl e
ht
r must
ps
an
injury.
tractor
down
greater
and
upset
on
hou
be
other
Always
su
dden stops.
To
pro
cutting,
TRANSP
Use
light
loc
me
in good
Before moving on publ ic roads,
field,
o
s-
or
us
Red
tu
For
moving equipment.
Be
liz
consider
avoid sudden starts, excessive speed, and
assure
tective frame must
al
nt
operation.
uce
rns, and
sure hitches
ed
the
protection
drilling,
ORTING
warning devices (i.e. flags, S.M.V. emblem,
s,
etc.)
government agencies, when moving equip-
on
public
working
lock
speed
your
safety, avoid heavily-traveled roads when
before
ation
or
which
roads. Keep these devices clean and
condition.
the
brake pedals together
when travel ing on rough roads, sharp
down
steep hills.
and/or
towing
for
other
provided
not
be
in any
other
are approved
drawbars are
equipment.
traffic
by
altered
manner.
Be
using
by
for
use
or
from
for
properly
courteous, have
the
design, the
welding,
by
your
field
to
simultane-
stabil-
road.
5
WORK
SAFELY
- FOllOW THESE
RUL
ES
When transporting
chain with a
capacity
ment
the
After
run by driving
left for a
adjustment.
or
be used
.
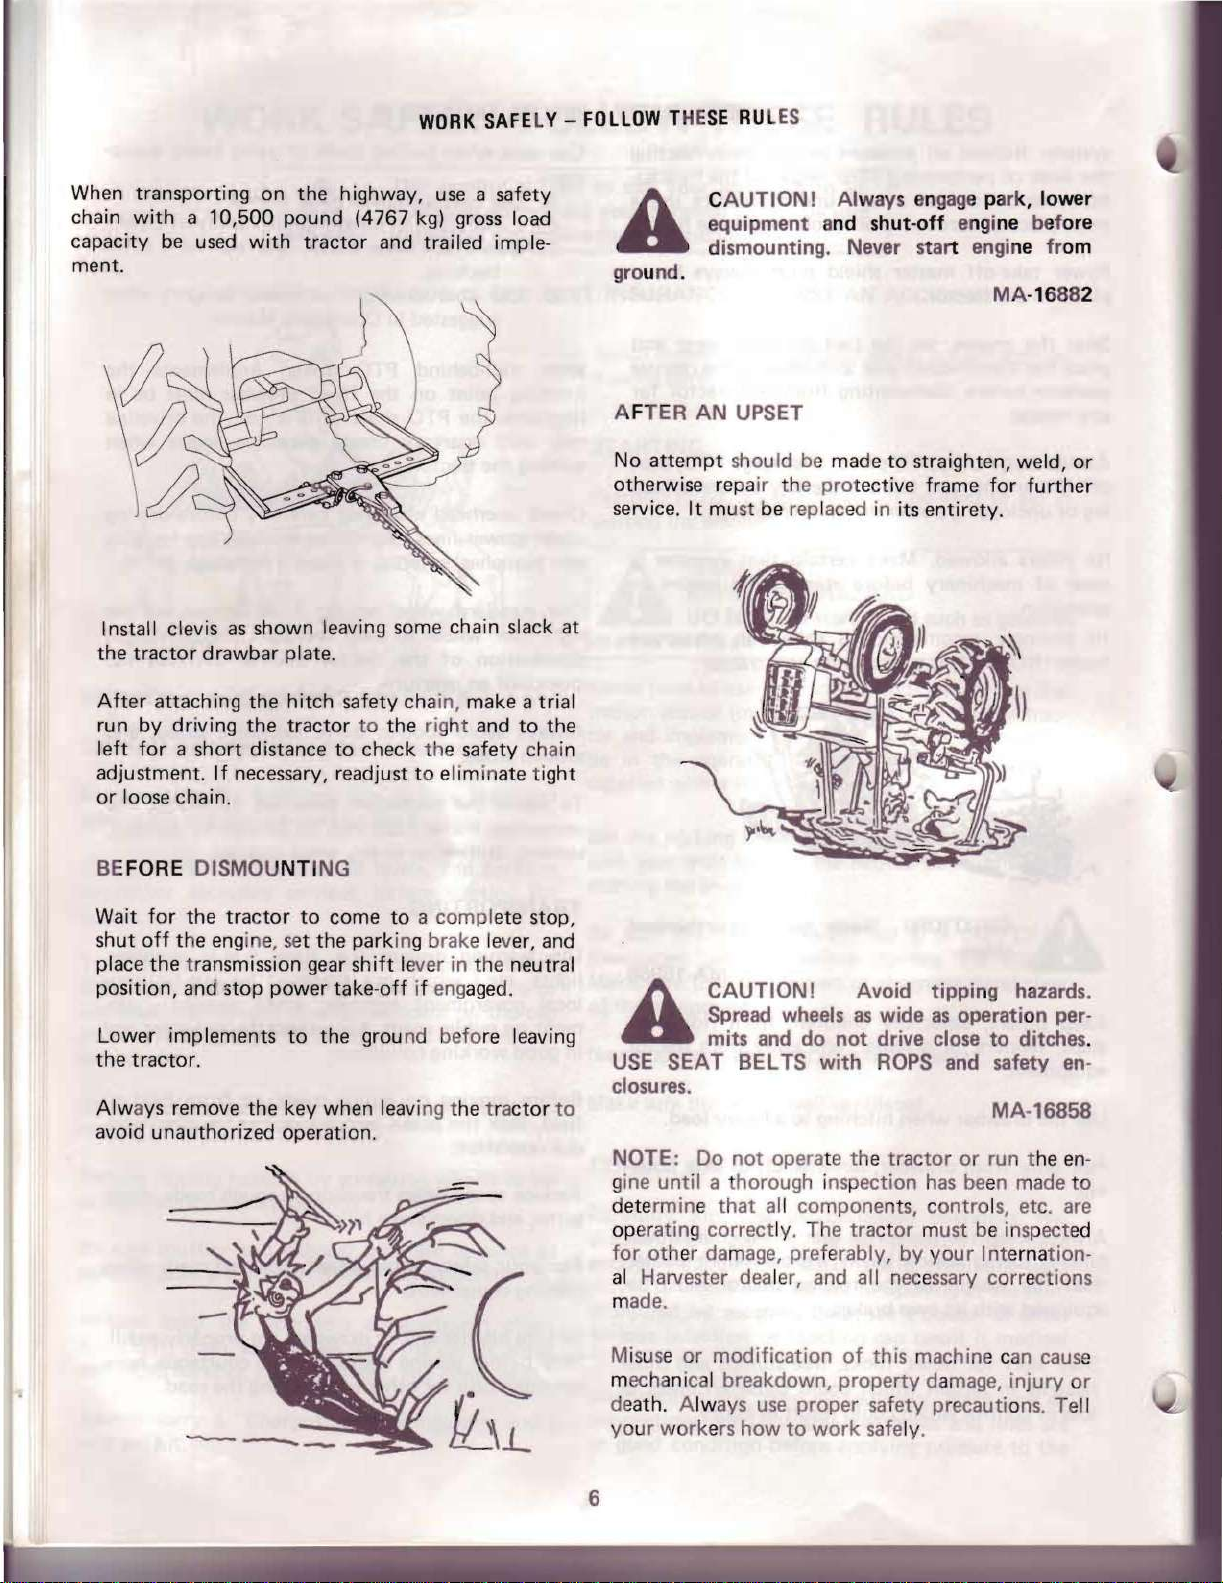
Install clevis as shown leaving some chain slack
tractor
attaching
short
loose chain.
on
the
highway, use a safety
10,500
drawbar
If
pound
with
plate.
the
hitch safety cha in, make a trial
the
tractor
distance
necessary, readjust to eliminate
(4767
tractor
to
kg)
and trailed imple-
to
the right
check
the safety ch ain
gross load
and
to
tight
at
the
CAUTION I Always engage park, lower
ment and
equip
A
ground.
AFTER AN UPSET
No
otherwise repa
service. It must be replaced in its
dismounting. Nev
attempt
should be made
ir
the
shut-off engine bef
er sta
to
pro
tective frame for
rt
engi ne fr
MA-16882
straighten, weld,
further
entirety
.
ore
om
or
BEFORE
Wait
shut
place
position, and
Lower implements
the
tractor.
Always remove
avoid
DISMOUNTI
for
the
tractor
off
the
engine, set
the
transmission gear
stop
unauthorized
the
NG
to
come
the
parking brake lever, and
shift
power
take-off if engaged.
to
the
grou nd
key when leav i
operation.
to
a compl
lever
ng
in
the
befo
the t ra
ete
stop,
neutral
re leaving
ctor
to
CAUT I
Spread wheels
A
USE SEAT BELTS with ROPS
closures.
NOTE: Do not
gine until a horough inspection has be en made
dete
operatin g
for
al
Harvester dealer, and all necessary correcti ons
ade
m
su
Mi
mechanical
death. A
your work ers
mits and
rmine
correct
oth
er da mage, preferably,
.
se
or
modification
lw
ON
I Avoid tippi ng hazards.
as
wide as operation per-
do
not
drive close
ope
rate th e tra
that ali
breakdown, property
ays use
compone
ly. The tractor
proper
how
to
work
nts
of
this machine can cause
saf
ety
safe ly.
to
ditches
and
safety en -
MA
-16858
ctor
or
run t he en-
, c
ontrols, etc. are
must be inspected
by you r I nterna
damage, injury or
precauti ons. Tell
tion
.
to
-
6
INSTRUMENTS AND CONTROLS
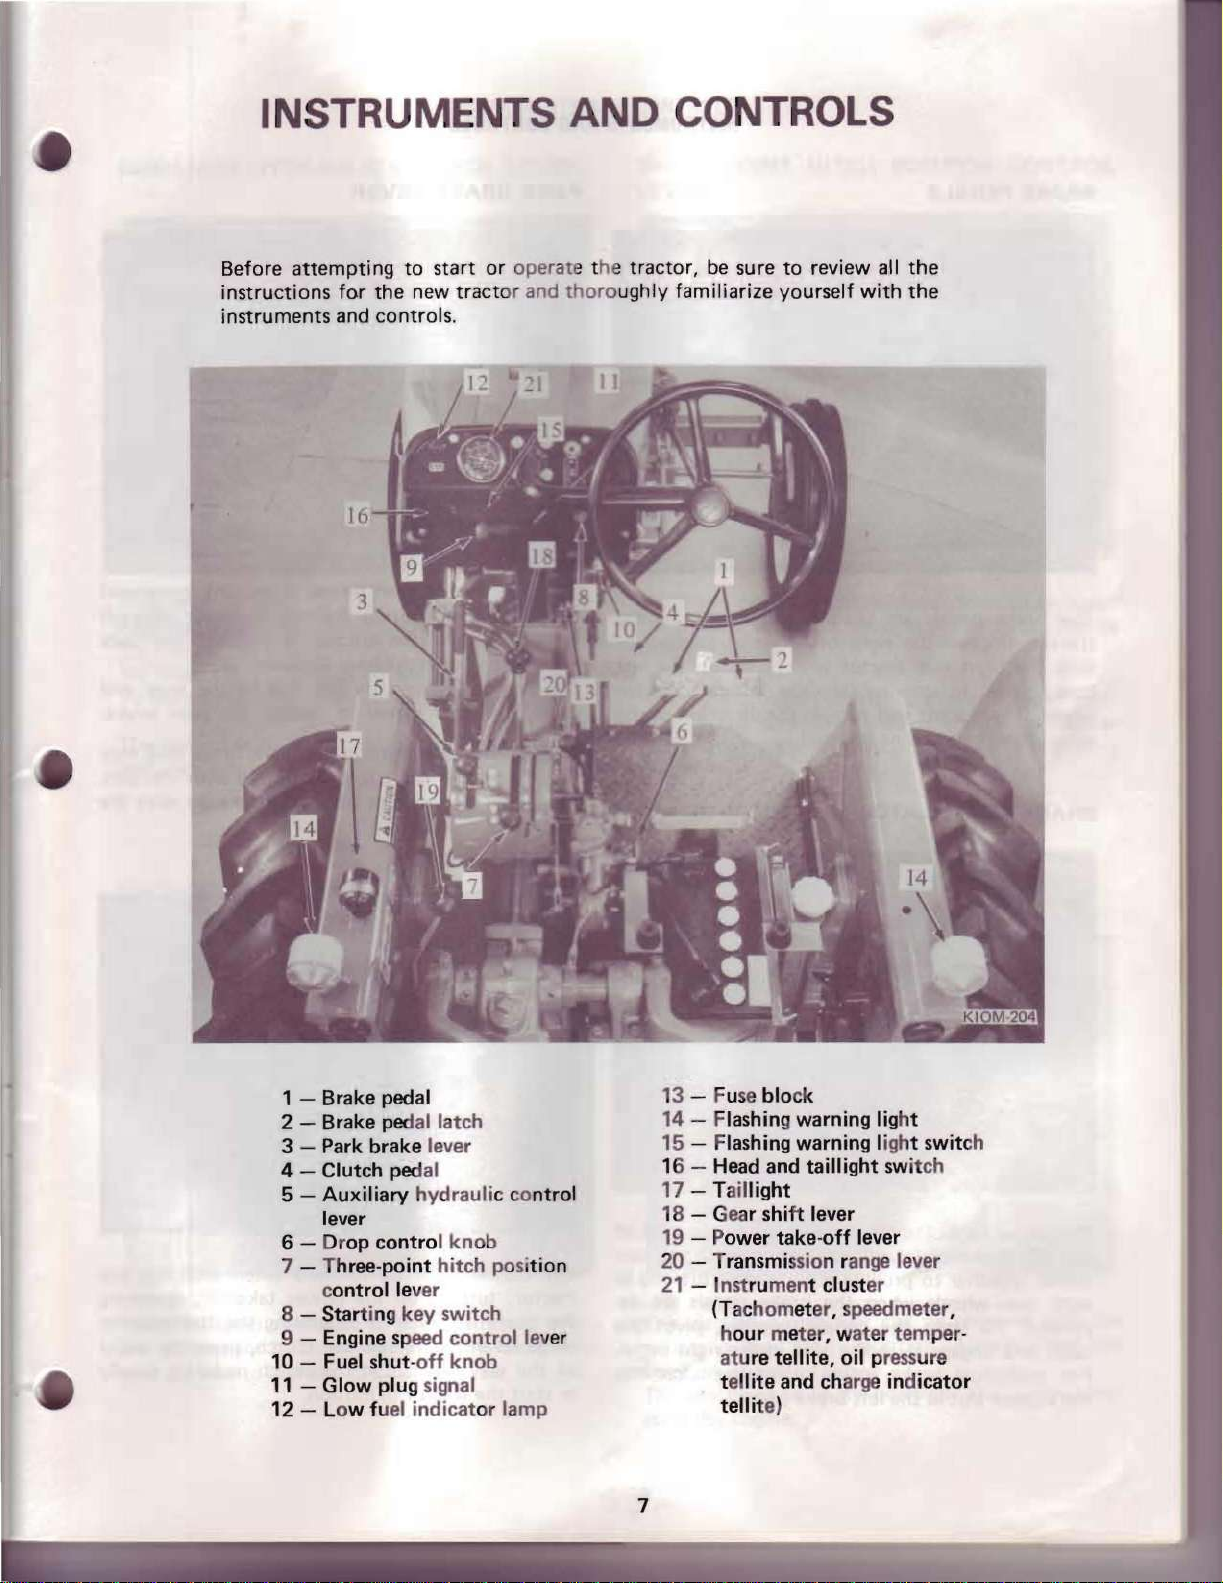
Before
instructions for
instruments and controls.
attempting
the
to
new
start
tract
or
or
operat
and
e the
tractor
thoro
ughly familiarize yourself with
, be sure
to
review
all
the
the
1 - Brake pedal
2 - Brake ped
3 - Park
4 - Clutch pedal
5 - Auxiliary hydraulic control
lever
6 - Dr
7 - Three-point hitch posi
8 9 - Engine speed
10 - Fuel shut11
12 - Low fuel indicator
op
c
ontrol
Starting
- Glow plug signal
al
latch
brake
lever
control knob
lever
key
switch
control lever
off
knob
tion
lamp
13 - Fuse blo ck
14
- Flashing warning
15 - Flashing warning l
16 - Head and taillight
17
- T a ill ight
18 - Gear shi
19 - Power
20
- Transmission range lever
21
- Instrument cluster
(Tachom
h
at
tellite
tellite)
ft
lever
take-off
eter, speed
our
meter, w
ure tellite, oil pressure
and charge indicator
7
lig
lever
ater
ht
igh
t switch
switch
meter
temper
,
-
INSTRUMENTS
AND
CONTROL
S
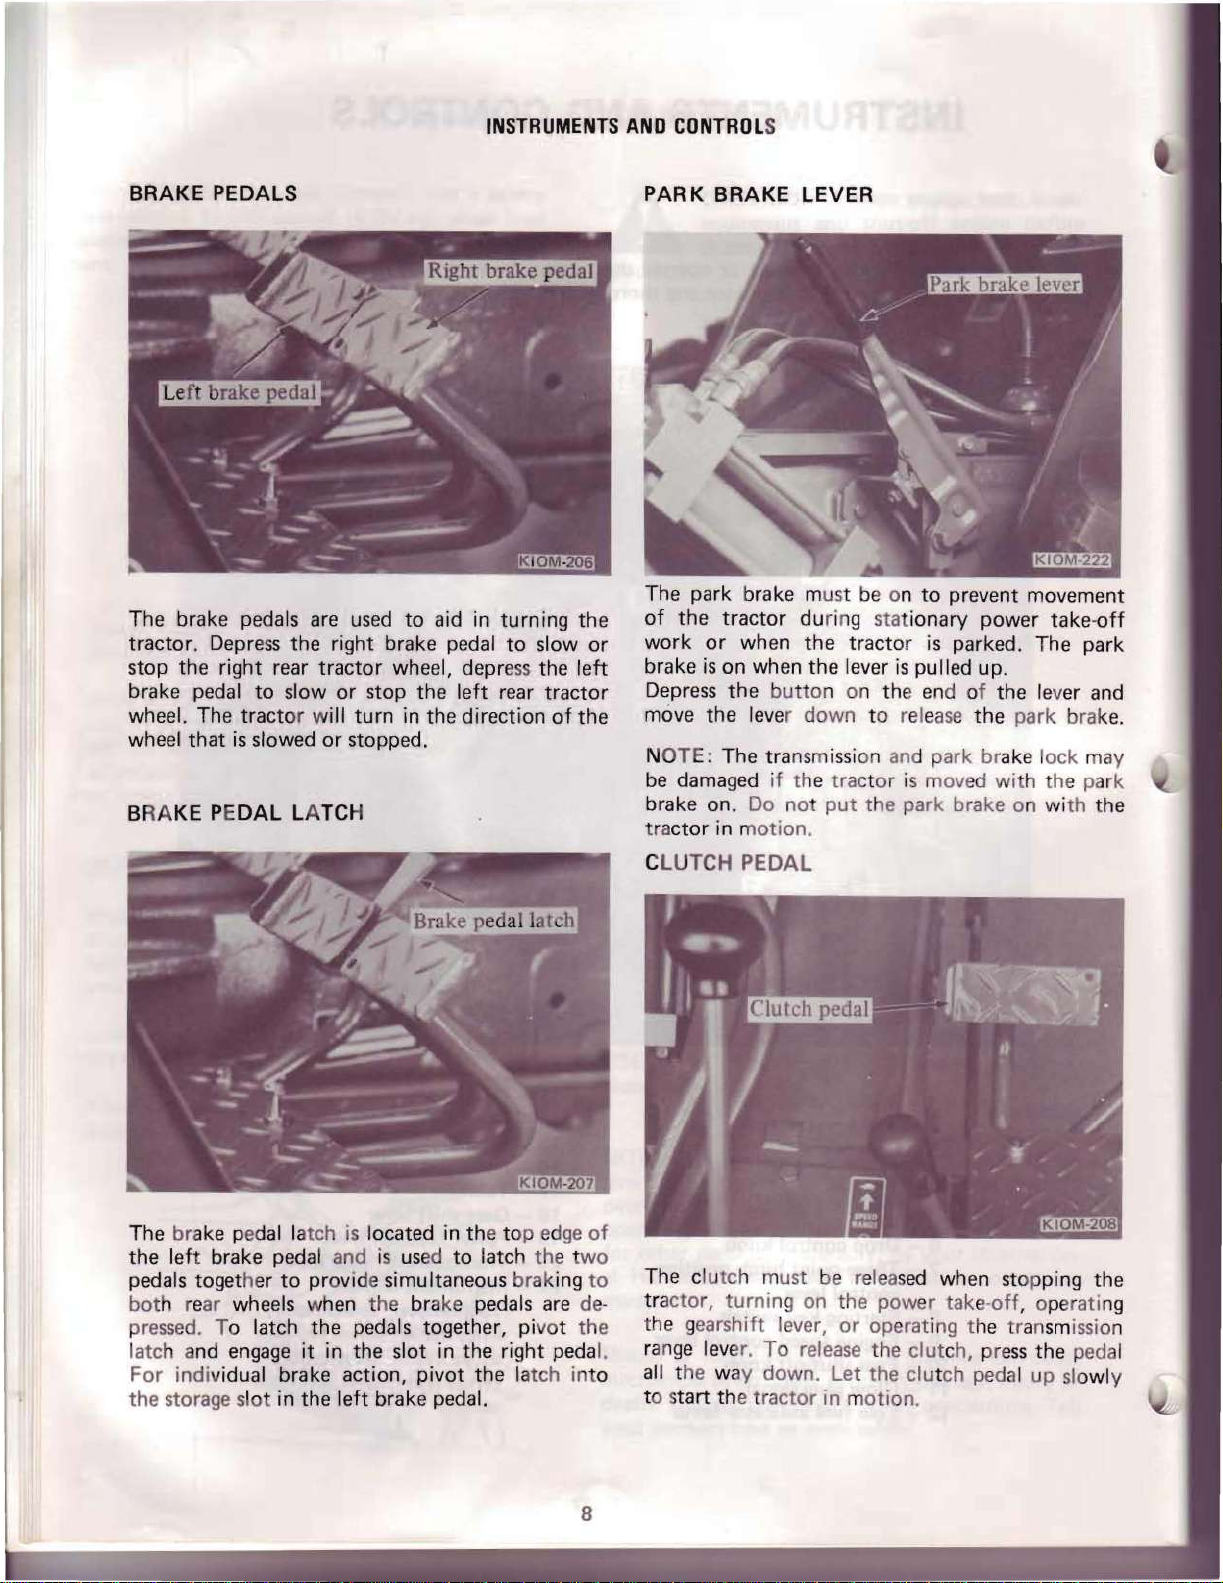
BRAKE PEDALS
The
brake pedals are used
tractor.
stop
brake
wheel.
wheel
BRA
Depress
the
right rear
pedal
that
KE PEDAL
The
to
tract
is
slowed
the
right brake pedal
tractor
slow
or
stop
or w
ill
turn
or
stopped.
LATCH
to
aid
wheel,
the
in
the
in
turning
to
depr
ess
left rear
direction
slow
the
tractor
of
the
or
left
the
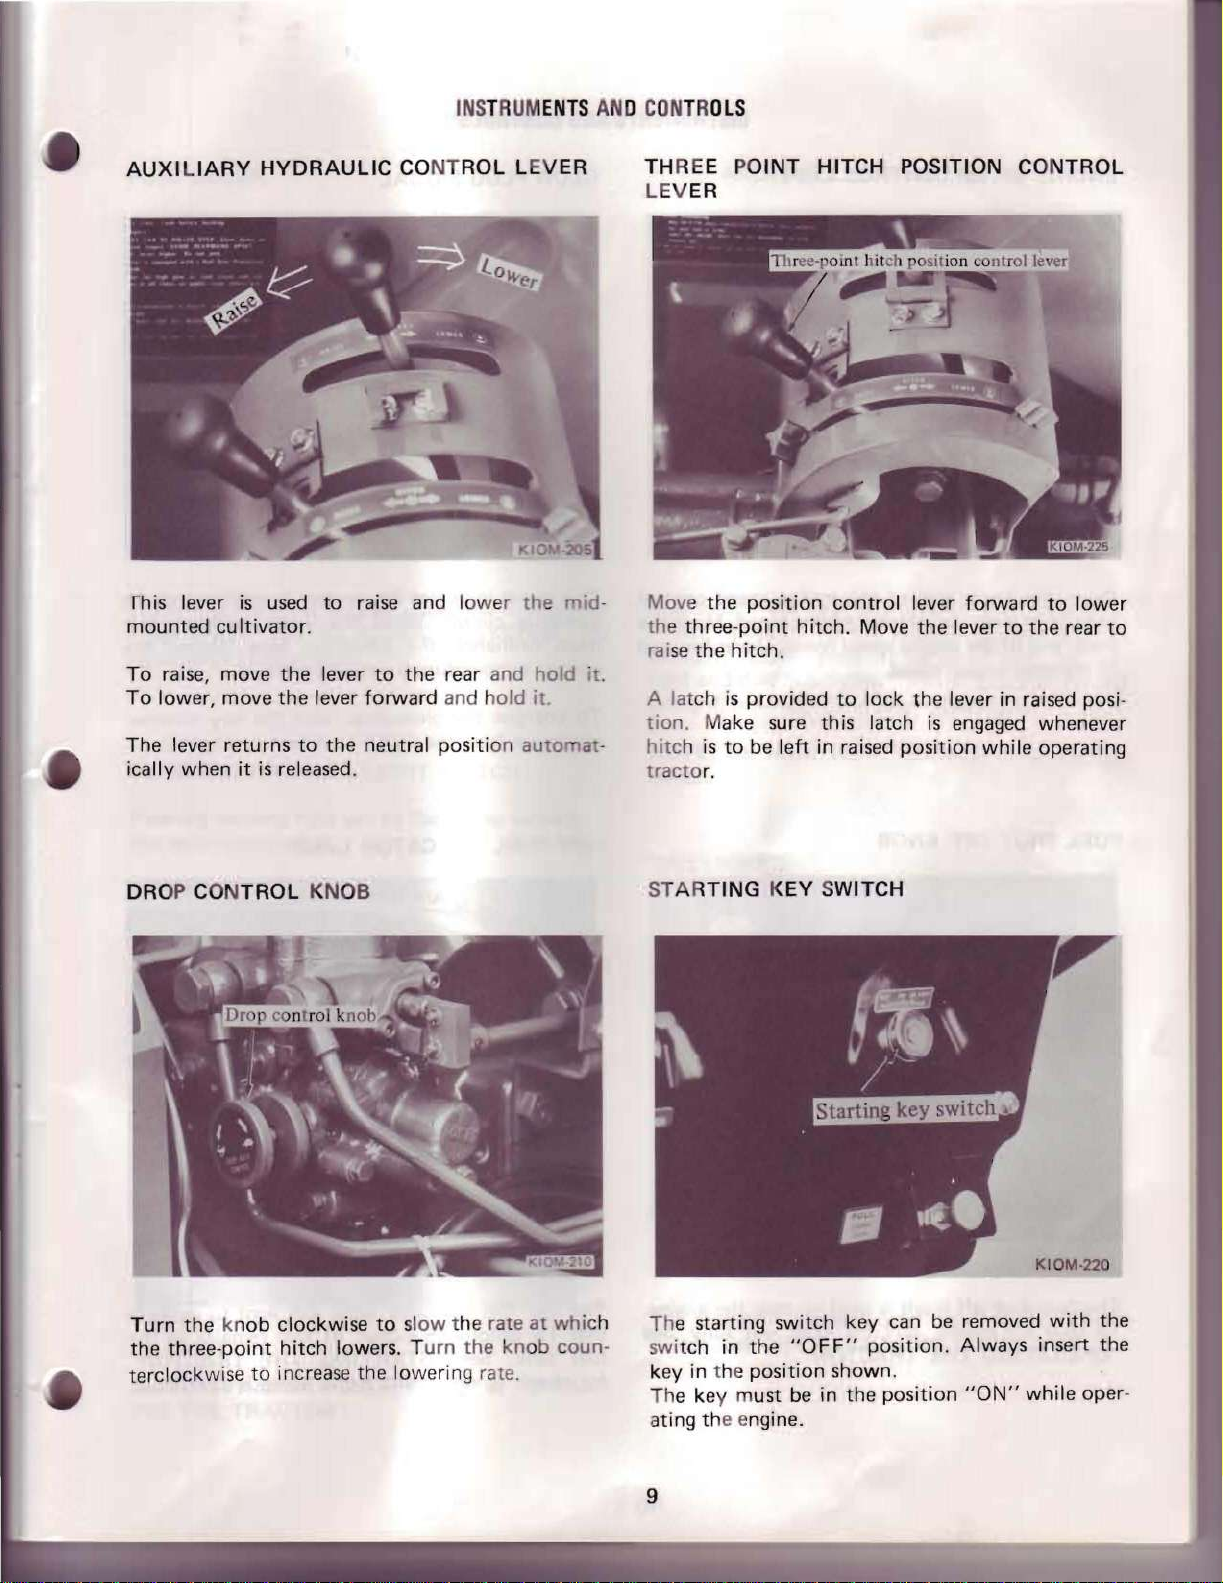
PAR K BRAKE
LEVER
The park brake must be on
of
the
tractor during sta t ionary
work
brake
move
NOT
be damaged if the
brake on.
tra
is
Depress
E:
ctor
or
when
on
when
the butt
the
lever
The
tra nsm
Do not
in motion
the
tracto
the
lever
is
on on the en d of
down
to release
iss
ion an d
tra
ctor is moved with t he park
put
the park brake o n wi
.
to
prevent
power
r is parked.
pulled up.
the lev
the
park brake l
movement
take-off
The
park
er
and
park brake.
ock
may
th
the
The brake pedal la
the
left brake pedal
pedals
bot
pressed. To
latch a
For
the
toget
h re
ar
nd
indi vidual
storage s
her
to provide
wheels when the brake pedals are de-
latch
engage it
brake
lot
in
tch
is located
and
is used
in the top edge
to
latch the t
simu Itaneous braking
the
pedals together, pivot the
in
the
slot
in
the
action,
the
left brake pedal.
pivot
the latch int
right peda
of
wo
to
l.
o
CLU
TCH
PEDAL
The clutch must be released when sto pping
tractor,
turn
ing
on
the
pow
er
take-off
, operati
the gearshift lever, or operating the transm
ran
ge
lever. To release the
a
ll
the way down. Let
to s
tart the t
ractor
in m
the
clut
otion.
clut
ch,
pre
ss
the ped
ch
pedal up slowly
issi
the
ng
on
al
8
INS
TRUM
ENTS AND CONTR
OLS
AUXILIARY
rhis lever
mounted cultivator.
To
raise, move the lever
To
lower, move
The lever returns
ically
when
HYDRAULIC CONTROL LEVER
is
used
the
to
it
is
released.
to
raise
and
low
er the
to
the rear and
lever
forward and h
the neutral positi on auto
old it.
mid
hold
it .
err
THREE POINT HITCH POSITION CONTROL
LEV
ER
-
Move the position
th
e three-point h
rai
se
the
A latch is provided
tion.
Make sure this latch
-
hitch is
tracto
to
r.
hitch
be
.
left
control
itch
. Move
to
in raised
lever
forward
the
lever
lock the lever in raised posi-
is
engaged
position
while operating
to
to
lower
the
rear
whenever
to
DROP CONTROL NOB
Turn
the knob
the three-point
terclockwise
clockwise
hitch
lowers. Turn the knob coun-
to
increase the lowering rate.
to slow
the rate at
whi
ch
ST
ARTING KEY SWITCH
The starting switch key can
switch in the
key in the position shown.
The key
ating
th
e engine.
must
"OFF"
be
position. Always insert the
in the position
be
removed
"ON"
with
the
while oper-
9

EN
GINE
SPEED
CONT
ROL LEVE
INSTRUMENTS AND
R
CONT
GLO
ROL
S
W PLUG S
IGNAL
Move the
lever
knob end of the engine speed c
to
decrease engine spee
UEL SHUT OFF
F
to
the
knob
rear
end
of
the engin e speed c
to
increase engine speed. Move
d.
KNOB
ontrol
lever
ontrol
the
forward
This signal indicates
glowplug circu
mum brilliance, the glow
correct tempe
To
energise the glowplu
clockwise
LOW
FUEL
rature for
from
INDICATOR
the correct
it
. When the signal reaches maxi-
engine starting.
the
"OFF"
plu
gs
gs,
turn the key
position and
LAMP
functioning
have reached
count
hold
of
it.
the
the
er-
The fuel shut
To s
top the
"OPERATING
engine, pull the
off
knob
is
THE TRACTO
used
to
stop the engine.
knob
out
R".
fully.
See
10
The
low
fuel
that
1 ~ gallons (5.5
tank.
fuel
for
che
ck to determine
indicator
See
"STARTING
lamp
liter)
if
will
light
to indicate
of
fuel remains in the
THE
TRACTOR"
the tellite
is
functional.
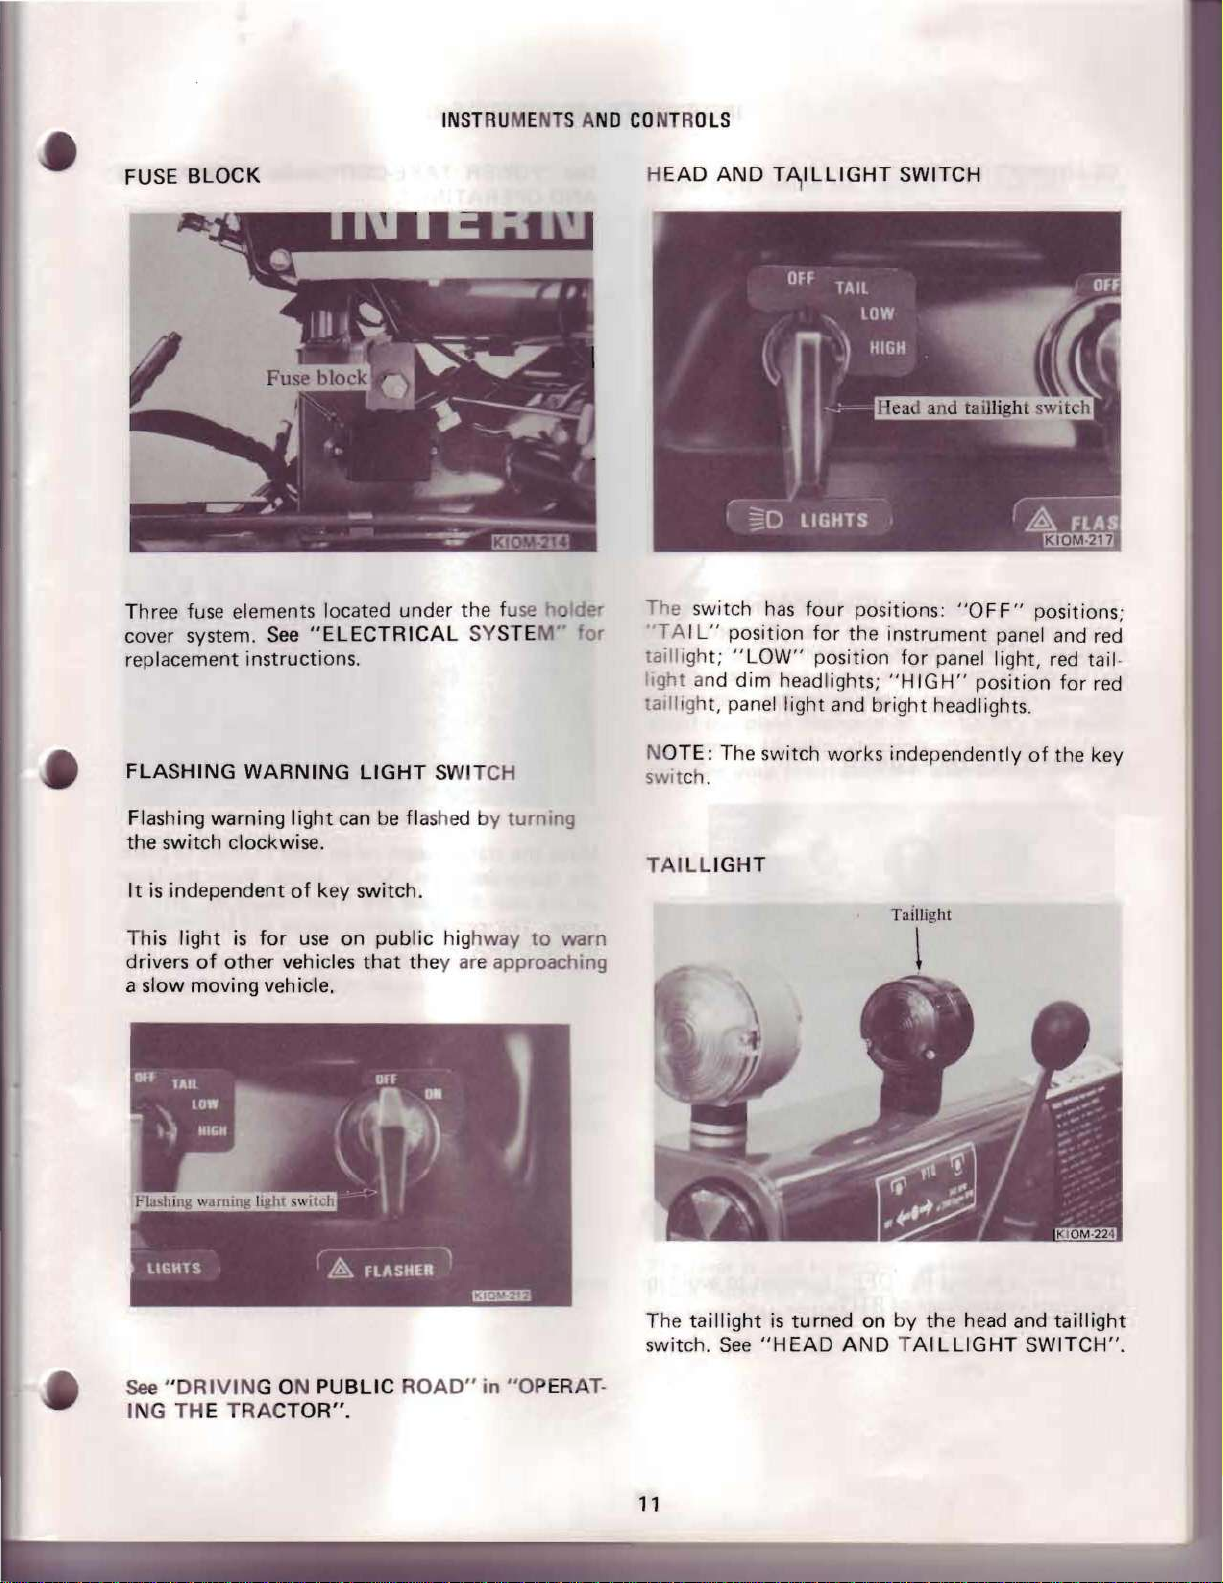
FUSE
BLOCK
INSTRU
MENTS A
ND CONTR
H
EAD
OLS
AND
T~ILLIGHT
SWITCH
Three fuse elements located under the f
cover system.
See
"ELECTRICAL
SYSTE
replacement instructions.
FLASHING
Flashing warning
WARNING
light
LIGHT
can
SWITCH
be flas
hed by turning
the switch clockwise.
It
is
independent
This light
drivers
of
other
is
of
for
vehicles
key switch.
use
on
public
that
hig
hway
they are approachmg
a slow moving vehicle .
use
to
' d
..
warn
or
The switch
"T A I L" position
tailli ght ; "
light
and
has
LOW"
dim
headlights; "
four
positions:
for
the instrument panel and
position
"OF
for
panel light,
HIGH"
position
F"
a,II,ght, panel light and bright headlights.
NOTE : The switch works independently
swit
ch.
TAI
LLI
GHT
Ta
illight
positions;
red
red
tail-
for
red
of
the key
See "
DRIVIN
G ON
PUBLIC
I G THE TRACTOR".
ROAD"
in
"OPERA
T-
The
switch.
11
taillight
See
is
turned on by the head and
"HEAD
AND TAILLIGHT
taillight
SWITCH".
INSTRUMENTS
AND
CONTROLS
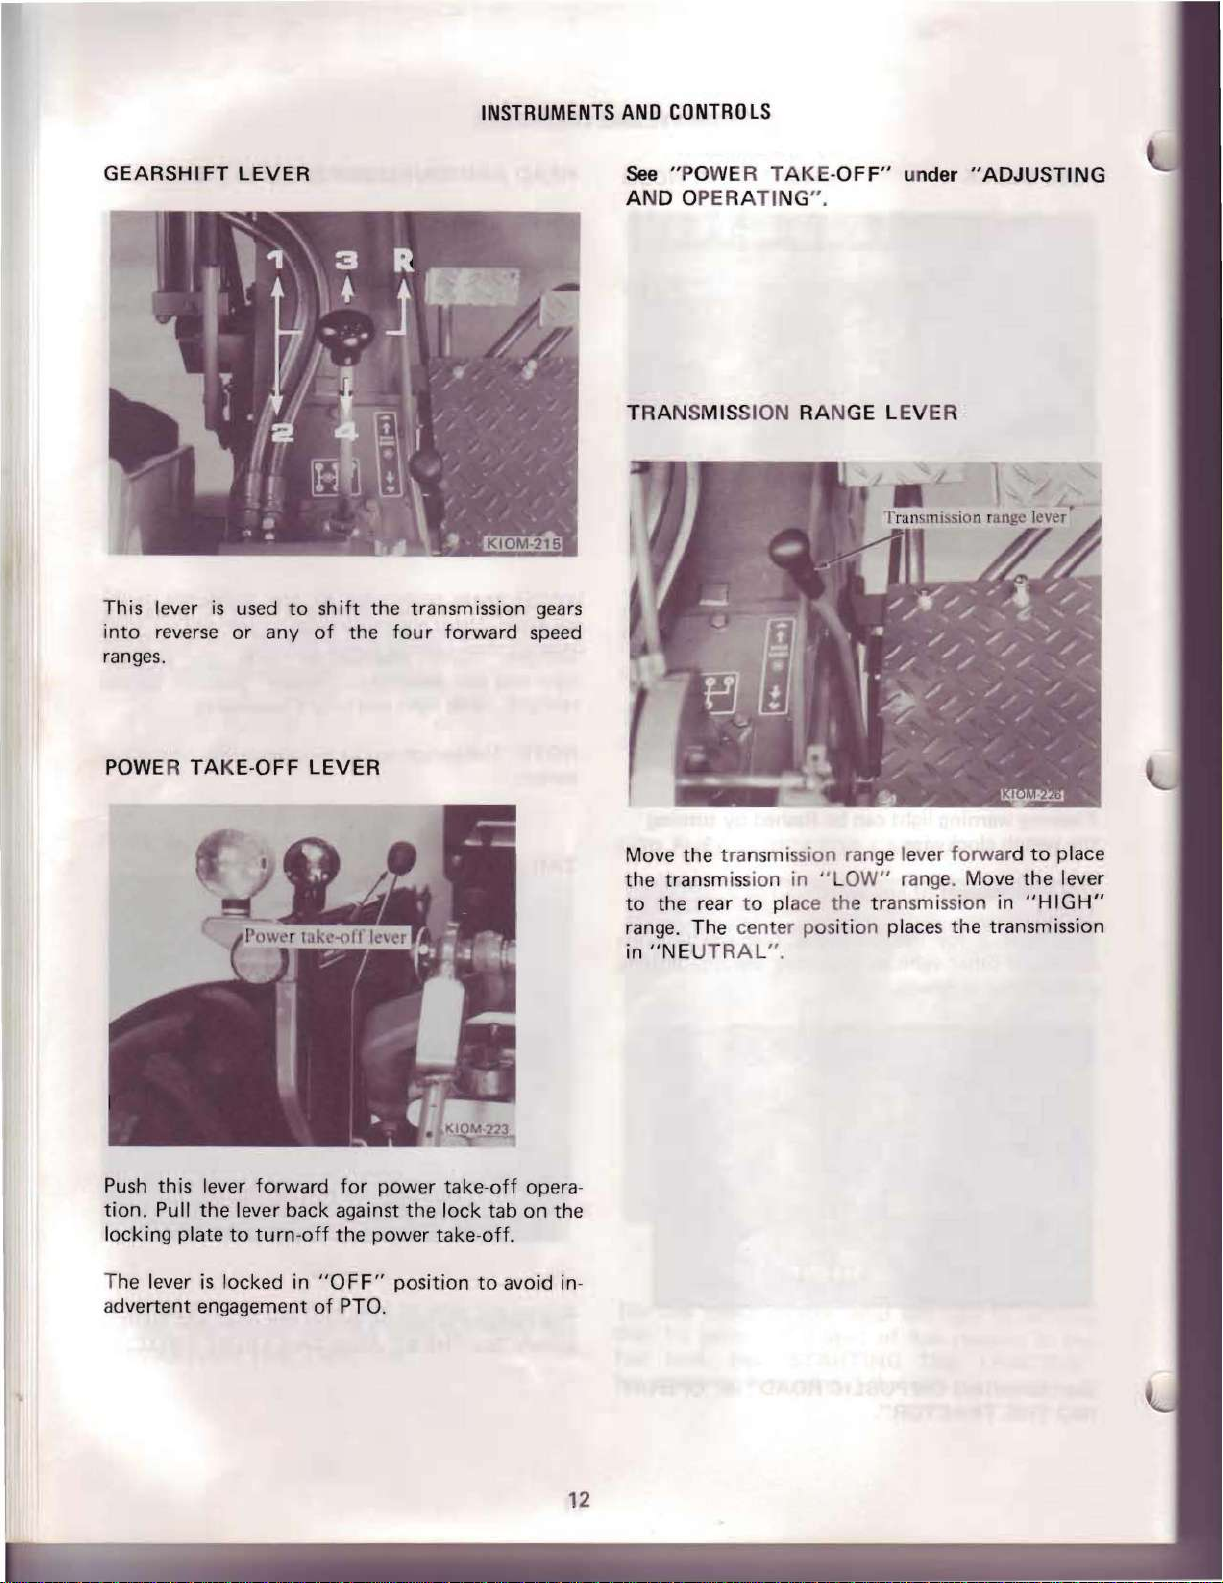
GEARSHIFT
This lever
into
is
reverse
ranges.
LEVER
used
to
or
any
shift
of
the
the
transmission gears
four
forward
speed
See
"POWER TAKE
AND OPERATING",
TRANSMISSION
RA N
-OFF" under
GE
LEVER
"ADJUSTING
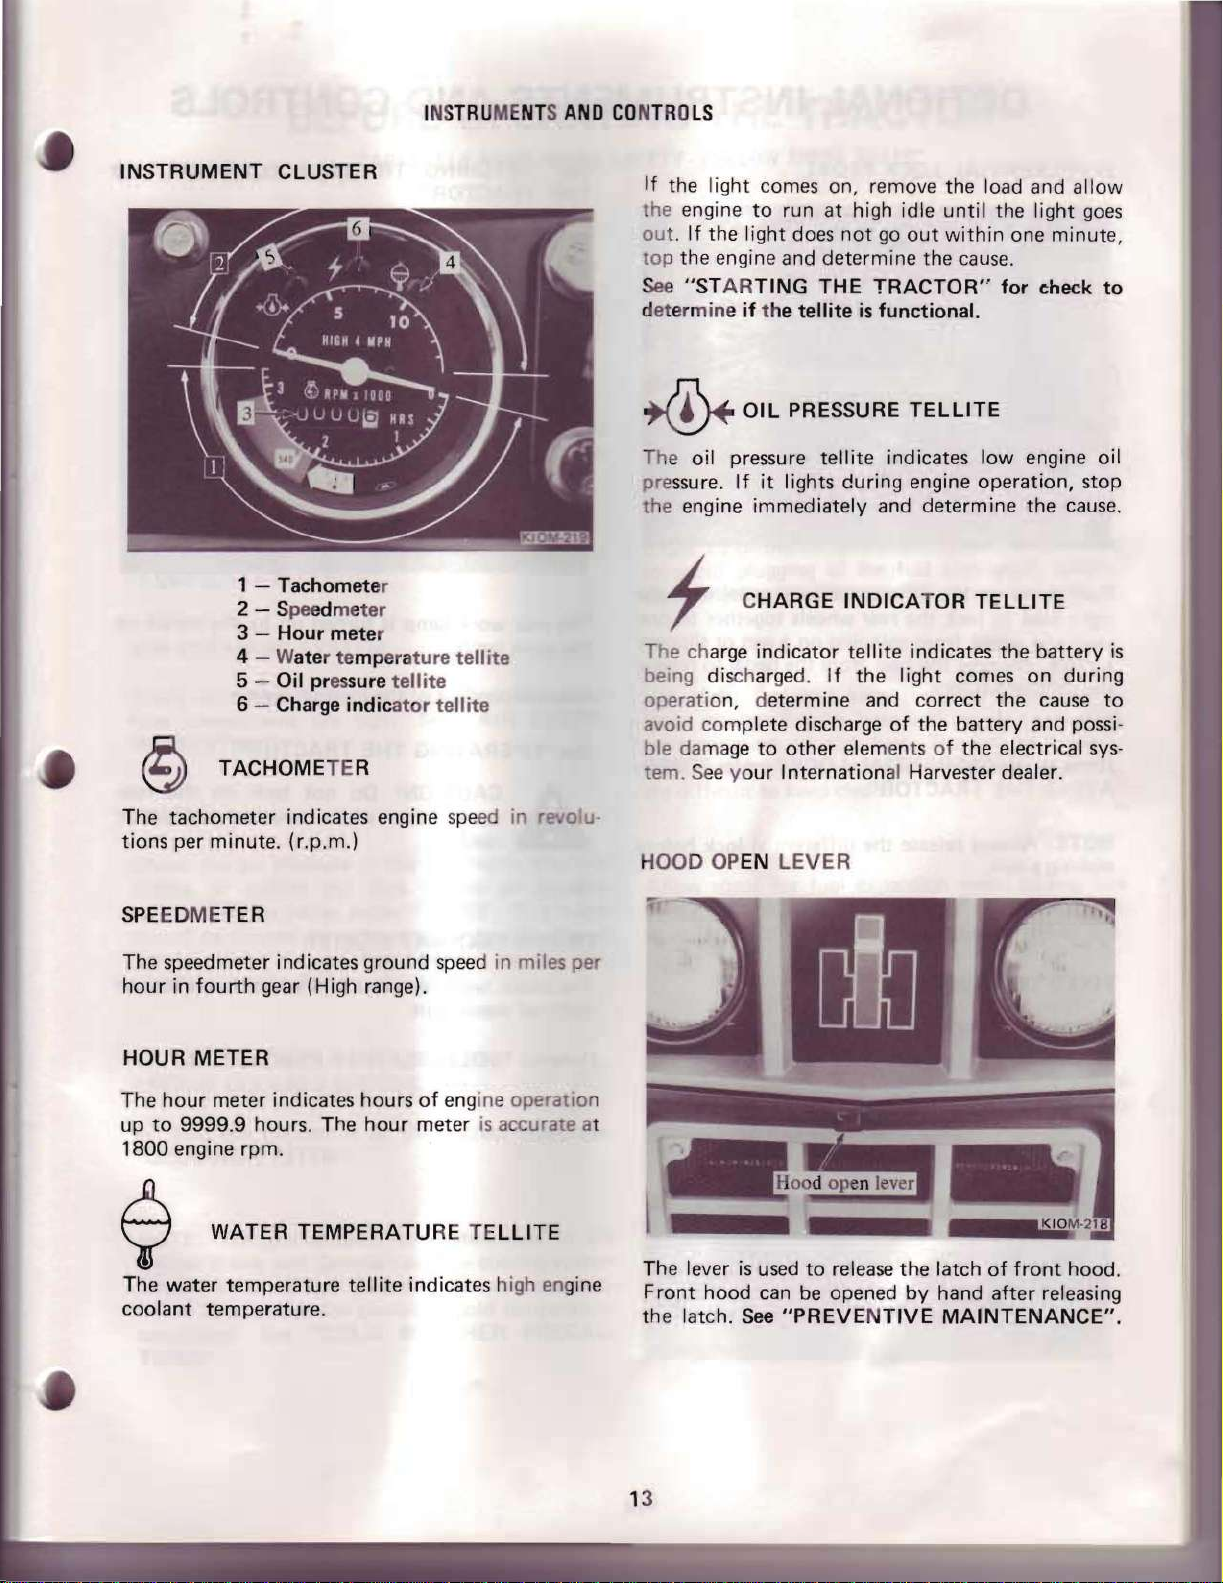
POWER TA
Push
this
tion.
Pull
locking
The
a
dvertent
plate
lever
engagement
KE-OFF LEVER
lever
forward
the
lever
back
to
turn-off
is
locked in
"OFF"
of
for
power
against
the
power
PTa
.
take-off
the
lock
take
position
tab
-off.
to
avoid in-
opera
on
the
Move
the
the
trans
to
the
range .
in
"NE
transmission
mission in "LOW"
rear t o place the transmission
The
center position places the transmission
UTR
AL".
ran
ge
lever
forward to
range. Move
in
place
the
lever
"HIGH"
-
IN
STRUMENT
S
AND
CONTROLS
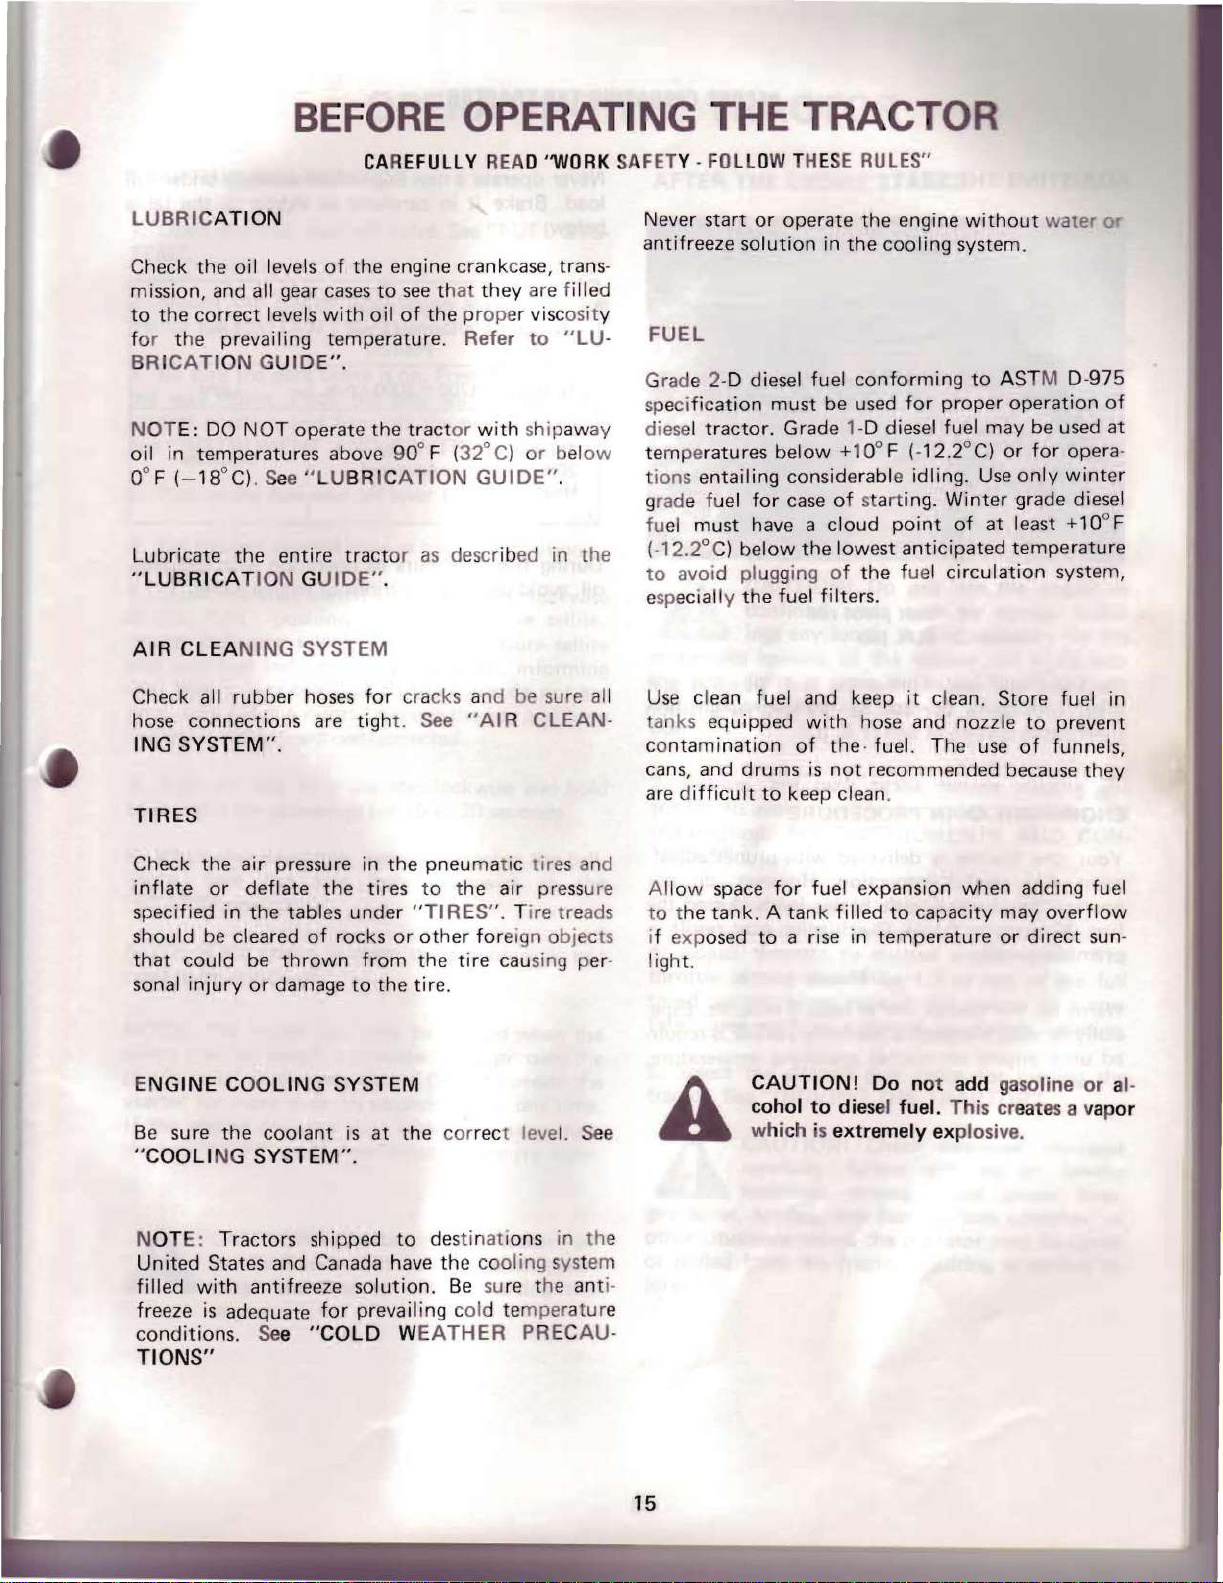
INSTRUMENT
1 - Tachomete r
2 - Speed meter
3 4 - Water te
5 6 - Charge
~
TACHOMETER
CLUSTER
Hour
meter
mp
Oil pres
sure
indic
era
ture
tellite
ator
tellite
tellite
If
the
light
comes on, remove the load and
he
engine
out. If
top
the engine and determine the
See
"STARTING
determine
~
The oil pressure
pressure.
the engine
f CHARGE INDICAT
The ch
being discharged. If the
operation, determine and correct
avoid complete discharge
ble dam
tem.
See your
to
run
at
high idle
the light does
if
the
OIL
If
it
immediately and determine the
not
go
THE
TRACTOR"
tellite
PRESSURE
lights during engine operation, stop
is
tellite
functional.
until
out
within
TELLITE
indicates
OR
arge
age
indicator
to
other
Internation
tellite
elements of the electrical
indicates the
light
of
the
al Harvester dealer.
cause.
comes on during
battery
the
light
one minute,
for
check
low
engine oil
TELLITE
battery
the
cause
and possi-
allow
goes
to
cause.
is
to
sys-
The tachometer indicates engine s
tions per minute. (r.p.m.)
SPEEDME
The speedmeter indicates ground
hour
HOUR
The
up
to
1800
The water temperature
coolant
TER
in
fourth
METER
hour
9999.9
engine
gear (High range).
meter indicates hours
hours. The
rpm
.
WATER
temperature.
TEMPERATURE TELLITE
hour
tellite
spee
of
meter
indicates high engi
pe
ed
in r °
d in miles per
eng
ine operatIon
is
accurate at
u-
ne
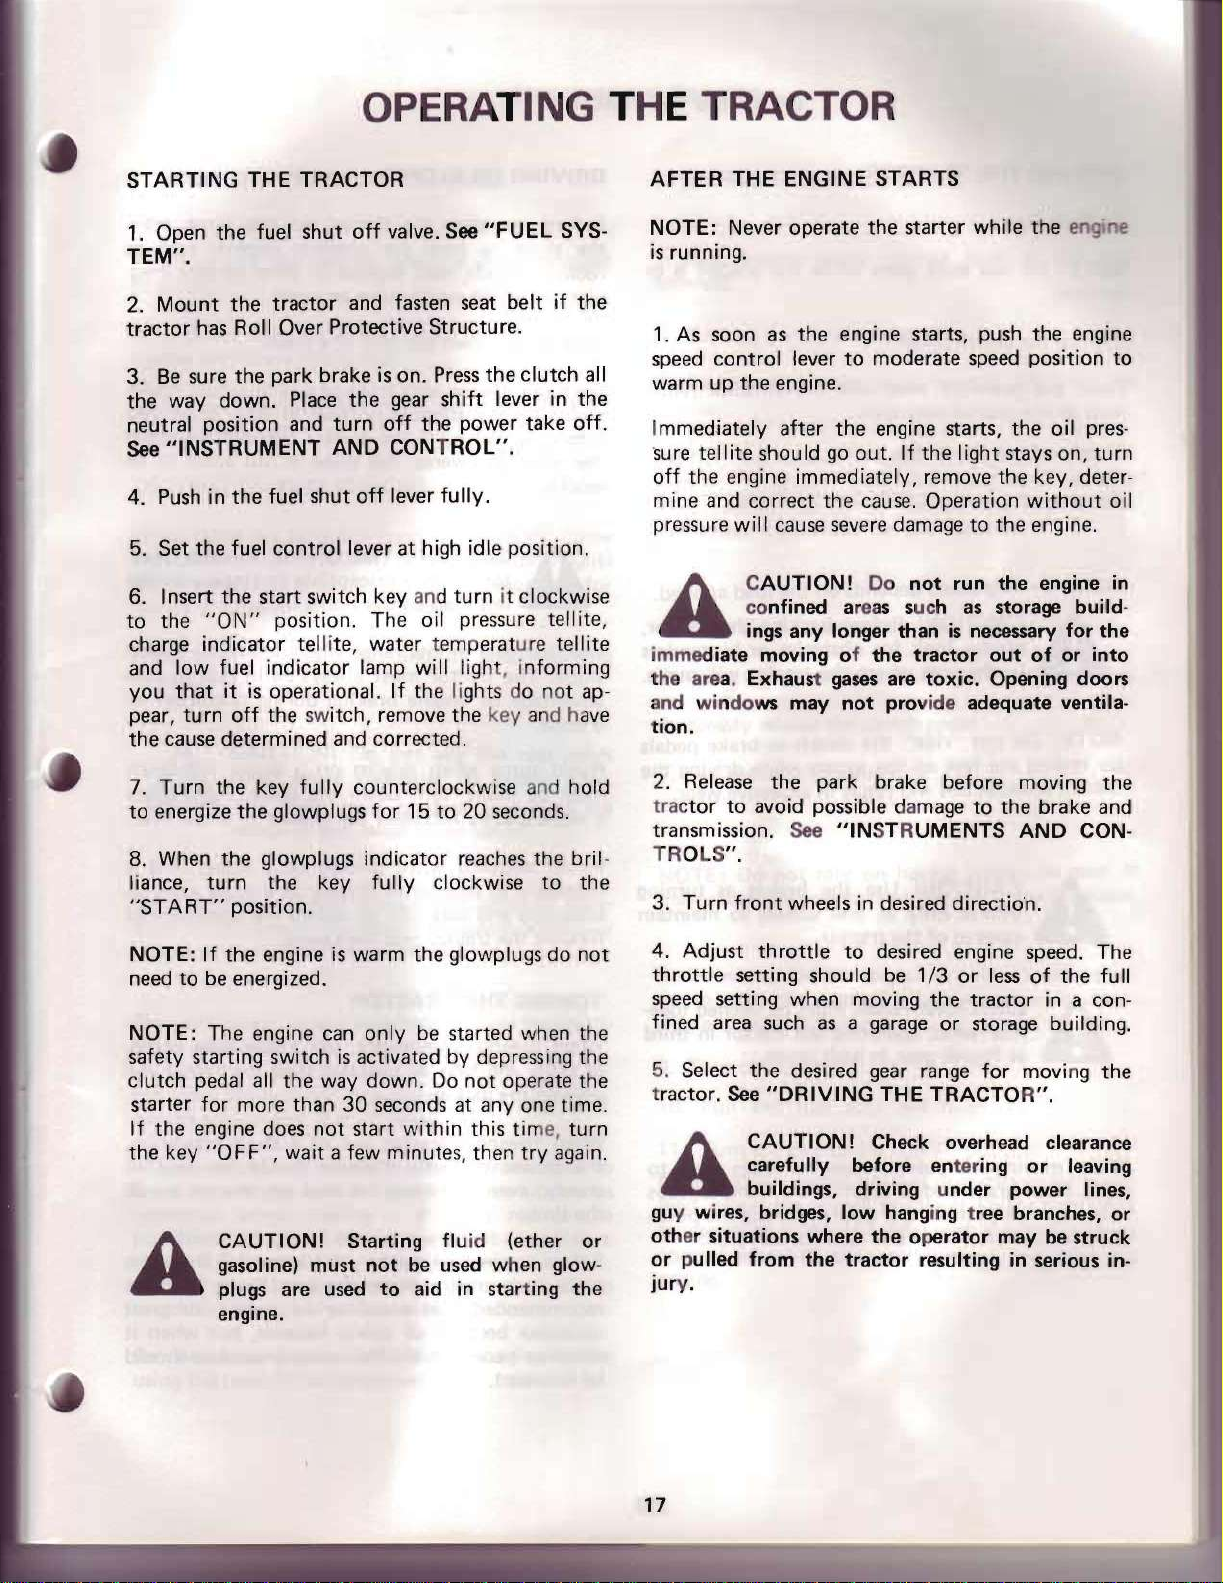
HOOD OPEN
The lever
Front
the latch.
is
hood
See
LEVER
used
to
release
can
be
opened
"PREVENTIVE
the latch
by
of
front
hand
after
MAINTENANCE".
hood.
releasing
13

OPTIONAL INSTRUMENTS AND CONTROLS
DIFFERENTI
Push
down on the different
rig
ht
heel to lock t
ve
nt o
ne
surface.
the
diff
erenti al lock.
AL
whe
el
Remove the he
LOCK P
he rear wheel
from spinning on a wet
EDA
ial
el
fro m the p
L
lock
pedal
s together to pre-
edal
wi th t
or
slippery
to
rele
he
ase
S
ee
"HITCHING
THE TR
RE
The rear work lamp
the work
It
is
ACTOR".
AR WORK LAMP
lamp.
independe
nt
of
TRAILING
is
turned on by the switch on
the ignition switch.
EQUIPME
NT
TO
Refer
to
" DIFFERE
ATING
NOTE : Alw
maki
F
IXED
THE
ng
a turn.
DRAWBAR
NTIAL
TRACTOR".
ays
release
LOCK"
the differential lo ck be
under "OPER-
for
See
"OPERATING THE
CAUTION!
work lamp while traveling on public
A
e
ENGINE COOLANT HEATER
he
T
optional equipment.
Refer
road.
block type engin
to
"COLD
WEATHER PRECAUTION".
TRACTOR"
Do
not
e coolant heater is availab
turn
.
on the rear
le
as
14
BEFORE
CA
REFUllY
OPERATING THE TRACTOR
READ "WORK SAFET
Y -FOll
OW THESE
RULES
"
lUBRICATION
Check the oil levels
mission, and all
to
the
correct levels
for t he prevailing temperature . Refer
BRI
CATI
ON GUIDE
NOTE: DO
oil in temperatures above 90° F (
O°F
(-lSoC). See "LUBRIC
Lubricate the entire
"LUBRICAT
AIR
CLEA
Check all
hose connections are tigh
ING
SYSTEM
TIRES
NOT
ION GU
NING
rubber
of
gear
cases
with
",
operate the
SYSTEM
hoses
",
the
tract
IDE"
to
oil
or
_
for cra
engine crankc
see
that
they
of
the p
rop
tract
or
with
320 C) or below
ATION
t.
GUIDE"
as
describ
cks and be sure all
See
"AI
R C LEAN-
ase
, trans -
are filled
er viscosity
to
"lU
shipaway
,
ed
in
the
Never start
antifreeze solution in
FUEL
Grade 2-D diesel fuel
specific
diesel
temperatures
tions entailing considerable
grade fu
fu
el must have a cloud
(-12 .2°
to
avoid plugging of the fuel
e
sp
ecially
clean fuel and keep
Use
anks equipped
ntamination
co
ns,
ca
are d
ifficult
or
operate the engine
ation
must be used
tractor.
C)
and drums
Grade 1-0 diesel fuel may be used at
below
el
for
case
below
the
fuel
to
keep clean.
the lowest anticipated temperature
with
of
is
without
the
cooling system.
conforming
for
proper
+10° F (-12.2°
idling. Use
of starting.
fi
Iters.
hose and nozzle
the· fuel. The
not
recommended because
Winter
point
of
circulation
it
clean. Store fuel in
water
to
ASTM 0-975
operation
C)
or
for
opera-
only
winter
grade diesel
at least +10 ° F
system,
to
prevent
use
of
funnels,
or
of
they
Check the air pressure in
inflate
specified in the tables under
should
that
sonal
E
NGINE
Be
"COOLI
N
United
filled
freeze
conditions. See "COLD
TIONS"
or
deflate the tires to the air pressure
be
cleared
could
injury
COOLING
sure
the
NG
OT
E: Tractors shipped
States and Canada have the cooling syst
with
is
adequate
of
be
thrown
or
damage
coolant
SYSTEM"
antifreeze solution.
for
the
rocks
from
to
the
SYSTEM
is
at the correct leve
,
prevailing cold temperature
pneumatic tires nd
UTI RES" . Tire treads
or
other
foreig
n obj cts
the
tire
causing per-
tir
e.
l. See
to dest inations in the
em
WE
Be sure
ATHER
the ant
PRECAU-
i-
he
space
tank
All ow
to t
if exposed
light.
A
for
fue l expansion when adding fuel
. A tank
to
CAUTION!
cohol
which is
filled
to capacity may
a rise in temperature
Do not add gasoline
to
diesel
extremely
fuel. This creates a vap
or
ex plosive.
overflow
direct
sun-
or
alor
15

BEFORE
OPERATING THE
TRACTOR
ADJUSTING THE SEAT
1
.-Seat
2.
-Q.A.
To
adjust
pivot
then install seat
the
seat remove the
rod. Move
the
pivot
seat
and
piv
pin
O.A
ot
to
rod
O.A.
the
. pin.
pin
desired
and seat
position
Never operate a
load. Brake
below
.
Period
1
st
Hour
2nd
Th rough
20th
Hour
During first
oil,
avoid
it
1700 ~ 2000 r.p.m.
50
prolon
new
engine immediately
in carefully
Engine
Control
Speed
Lever
Position
Fully
Advanced
hours of
operation
ged periods
as
of
shown
engine
under
in
the
Load
Light
Moderate
with
shipaway
idling.
full
table
ENGINE BREAK-
Your
new
tractor
ment
operate
first
premature
Warm
cially
ed
and careful inspection. However,
the
tractor
20
working
wear.
up
the
tractor
in
cold
climates, a
until
engine
IN PROC
is
with
EDURE
delivered
heavy loads
with
hours. Overloading
for
at
least 5 minutes. Espe·
warm
-up period
oil
reach
es
operating
proper
adjust·
do
during
may
result in
is
requir·
temperature
not
the
.
16
OPERATING THE TRACTOR
STARTING
1.
Open
TEM".
2.
Mount
tractor
3.
Be
sure
the
way
neutral
See
"INSTRUMENT
4.
Push
5.
Set the fuel
Insert
6.
to
the
charge
and
low
you
that
pear,
turn
the
cause determined and corrected.
THE
TRACTOR
the
fuel shut
the
tractor
has
RollOver
the
park brake
down.
position
in
the
"ON"
indicator telli
fuel
it
Place
and
the
fuel shut
control
start switch key and
position. The oil pressure tellite,
indicator
is
operational.
off
the switch,
off
and fasten
Protective Structure.
is
the
turn
AND
off
lever at high
te,
water tem
lamp
remove the key and h
valve.
See
seat
on.
Press
gear
shift
off
the
power
CONT
ROL".
lever fu lIy.
turn
will
light, in
If
the li
"FUEL
belt
the
clutch
lever in
take
idle
position.
it clockwise
perature
ght
s do not ap-
SYS-
if
the
all
the
off.
tellite
forming
ave
AFTER
NOTE:
is
running.
1. As soon
speed
warm up
Immediately
sure tel lite should
off
mine and correct
pressure
A
immediate moving of
the area
and
tion.
THE
ENGINE
Never operate
as
the
control
the
windo
engine
. Exhaust
lever
the
engine.
after
immediately,
will
cause
C
AUTION!
co
nfined
ings any longer than
ws
may
engine starts, push the engine
the
go
the
severe
gases
not
STARTS
the
starter while the en one
to
moderate
engine starts, the
out.
If
the
light
remove the key, deter-
cause.
areas such
Operation
damage
Do
not
run
as
is
the
tractor
are
toxic.
pro
vide adequate ventila-
speed
to
necessary
position
oil
stays on,
without
the
engine.
the
engine in
storage
out
Opening doors
of
build-
for
or
to
pres-
turn
oil
the
into
7.
Turn
the key
to
energize
8.
When the glowplugs
liance,
"START"
NOTE:
need
NOTE:
safety starting switch
clutch
starter
If
the
the key
A
the
turn
position.
If
the
to
be
energized.
The engine can
pedal all
for
more than
engine does
"OFF",
CAUTION!
gasoline) must
plugs
engine.
fully
glowplugs
the key
engine
the
not
wait
are used
counterclockwise and
for
15
to
20 seconds.
indicator
fully
is
warm
only
is
activated by depressing the
way
down.
30
seconds at
start
a few minutes, then
Starting
not
to
reaches the
clockwise
the
glowplugs do
be
started when the
Do
not
operate the
anyone
within
be
this tim
try
flu
id
(ether
used when
aid in starting
to
time.
e,
again.
glow
hold
bril-
the
not
turn
or
-
the
2.
Release
trac
tor
transmission.
TR
OLS
3.
Turn
4.
Adjust
throttle
speed
fined area such
5. Select
tractor.
A
gu
y wires, bridges,
ot
her situations where
or
pulled
jur
y.
the
to
avoid possible damage
See
".
front
wheels in desired
throttle
setting should
setting when moving
the
desired gear range
See
"DRIVING
CAUTION!
lIy
carefu
buildings,
from
the
park brake before moving
to
the
brake and
"IN
STR
UMENTS
direction.
to
desired engine speed. The
be
1/3
the
as
a garage
Check overhead clearance
before en
driving
low
the ope
tractor
or
THE
TRACTOR".
ter
under
hanging tree branches,
rator
resulting in serious in-
AND
or
less
of
the
tractor
storage building.
for
ing
moving
or
power
may
in a con-
leaving
be
struck
the
CON-
full
the
lines,
or
17
OP
ERA
TING THE
TRACTOR
DRIVING THE TRACTO R
To Sh ift Gears
NOTE:
motion.
Depress
Place
lever in
Slowly release
For gr
NOTE: Driving speed depends
A
NOTE:
by
tractor
Do
not
shift gears while the
the
clutch pe dal.
the gear
the
ound
rest ing the feet on t he peda ls while dr
because this wi
shift lever and
desired positions.
the
clutch pedal.
speed, see "SPECIFICATIONS
CAUTION! Bef
always lo
in
the
Do
not
ok
for
area where
"ride
" the clutch
ll
result
transmi
on the load ap plied.
ore
backing
obstacles
the
in
tractor
ssion ran
the
or
tractor
or
brake peda
excessive wear.
is
".
tracto
bystande
will move.
ivin
g the
in
ge
DRIVING
Before
the
slope
rocks , mounds, ruts, stum ps
ularities which cou
Drive up
Back
ments up
intend
the
slope in reverse,
worked .
r,
rs
Us
e first gear in low range when driving
slope. The
advantage
a slop
ls
id
Avo
must be made,
sl
ope greatly increases
a
ON
SLOPES
ope
rati
ng
to
look for possible hazards such
or
down t he face
the
tractor
the steepe
to
work.
CAUTION! This Off-Set, Hi·Clear Trac-
tor
is
more susceptible
left
than
tractor
of
engine braking during operatio n
e.
turns
when driving
turn
the
tractor
ld
cause an upset.
with
front
st
po rtion
If the
the
conventional
must always be
down the slope. Turning up
on any slope, walk
or
other
surface irre g-
of
a slope.
or
mid -m
ounted
of
each slope you
trac
tor
can
not
slope
is
too
steep
to
tipping
tractor.
in
gear
on
a slope.
the
chance of a roll over.
impl
negotia
to
to
on a ste
to
take
If
a
turn
as
e-
te
be
the
ep
on
CAUTION!
br
akes
A
A
When moving on
field, latch brake pedals toge
operation when making a stop
bility
c
ontrol
CA
UTIO
ther when operating t
or
fourth
of
loss
of
control and upset
Use
the
only
at
low speeds
of
the tracto
N!
Pedals must be latched toge-
gear,
in
high range.
public road
ther
brakes as t urning
to
mainta
r.
he
tractor in third
s,
or
from field to
for simultaneous
to
reduce
or
the
collision.
possi-
to
Avoid s
necessary
in
smoo
fl
ipping
TOWING THE TRACTOR
When towing
or
cab
operate the brakes.
When t
the
stea
the
Before
place
recommended
distances because
bec
om
be followed.
pping when driving up a slope. If it
to
stop whi
thly
and carefully
the
tractor
is
le
and have an operato r ste
ow
ing a
power
dy,
time.
of
even pull must be ke
tow
ing
to another
es necessary
le
driving up a slope, start
to
reduce
over backward.
necessary, use a
tractor
both
the
, check
that a tractor
out
tractors should be used. A
tractor,
of
the
to tra
the
safety hazards,
fottowing procedure should
the
possibility of
tow
rope, chain,
er
the
tractor
of
a stuJ:k condition,
pt
on
the
tract
or
nsp
ort
it from one
local laws. It
be towed for great
but
is
when it
is
up
and
all
not
18
OPE
RAT
ING THE TRACTO
R
TOWING
1.
Make sure
position.
2.
A driver must be in t
tractor
3. Do
meters per hour).
DRIVING ON PUBLIC
When travelling on pub lic road,
Moving Vehicle) emblem, flashing arn n9
and
use
Keep these devices cl
condition.
A
THE
TRACTO
the
parking brake is in
and
apply
the brakes.
not
tow
over 9.3
other
warning devices
by your local gove
CAUTIO
lamp
The
motorist
N!
whi
light
and cau
R -Continued
he
tractor seat to steer the
mil
es per
ROAD
which
rnment
ea
Do not use
le
may confuse
agencies.
n and
travelling
se
an accident.
se
are
In
on
the
hour
t e S
app
good
the
public
and
relea
(15 . ira-
rear
bhnd the
sed
ing
work
road.
STOPPING THE TRACTOR
1. Pu
sh
engine speed
rw
ard.
fo
2. Depress the
3.
De
pre
ss
the brake pedal
trac
tor.
NOTE:
parkin
flu
park brake
4.
5. Place
6.
7.
The brak
g,
or
id se
epage
is
Pl
ace
the
the
Slowly
Pu
release the
t the park brake on.
clutch
other
tends
provided
PTa
gearshift lever in the neutral position.
control
pedal.
es
are
not
stationary jobs since normal
to
release
for
this purpose.
control
in
clutch
lever all the way
to
stop and hold
intended
the
"off"
pedal.
the
brake. The
position.
for
use
the
in
Be
sure hitches
before
lized
of
loss
of
Shut
off
power
ing
or
not
For
your
safety avoid heavi ly-traveled roads
moving equipment,
When moving on
field,
lock
operation when making a stop
possibility
Reduce
avoid
Be
using
speed
loss
courteous, have considera
the road. Drive defensively.
and/or
towing
control
to
in
use.
brake pedals together
of
loss
when traveling on rou
of
control
drawb
equipme
and upset
any attachment wh
if
at
public roads
of
control and upset
and upset
nt
or
all possib
ars
to
co llision.
, or
or
tion
are
pro
e I stabi-
reduce poss'bility
en
tra
sort
le.
from
for
to
collision.
for
'eld
simultaneous
reduce the
or
collIsion.
gh
roads to
other traffi
en
to
NOTE:
may
Do
cause
not rely on having
the
possibili
ty
of
tractor
coasting
down
8. Lower equipment 0 ground before leavin g trac-
tor
to avoid the possibility of the equipment drop-
·
ping and causing inj ury.
9.
Turn off
10.
Pu
11. Turn the key
NOTE:
load ,
temperature
contro
engine.
c
lights.
II the fuel shut
to
If
the engine h
allow the engine to idle
is
reduced, then push the engine
l lever all the way forward and stop the
off
lever
the " OFF" position.
as
just operated under heavy
at
1500 r.p.m.
in
gear.
a slope.
unt
speed
It
il
19
OPERATING
THE
TRACTOR
STOPPING THE TRACTOR - Continued
12. Remove the key.
13. Dismount
ing implements have stopped.
NOTE:
valve
of
"PREVENTIVE
DIFFE
The
when one wheel
conditions than the other . Continual engagement
of
wearing parts and may improve performance
tractor
apparent . However, the
disengaged before
It
if
the engine
time. See
RENTIAL LOCK (OPTIONA
differential
the
differential
even
from
the
is
advisable
is
"FUEL
MAINTENANCE"
to
to
be
tractor
SHUT
only
after all
close the fuel
stopped
for
VALVE"
.
L)
lock
equalizes drive wheel slip
is
operating under poorer
lock
is
not
harmful
when excessively unequal slip
differential
attempting
turns.
lock
rotat
shut-off
any length
under
traction
to
the
of
the
is
not
must
be
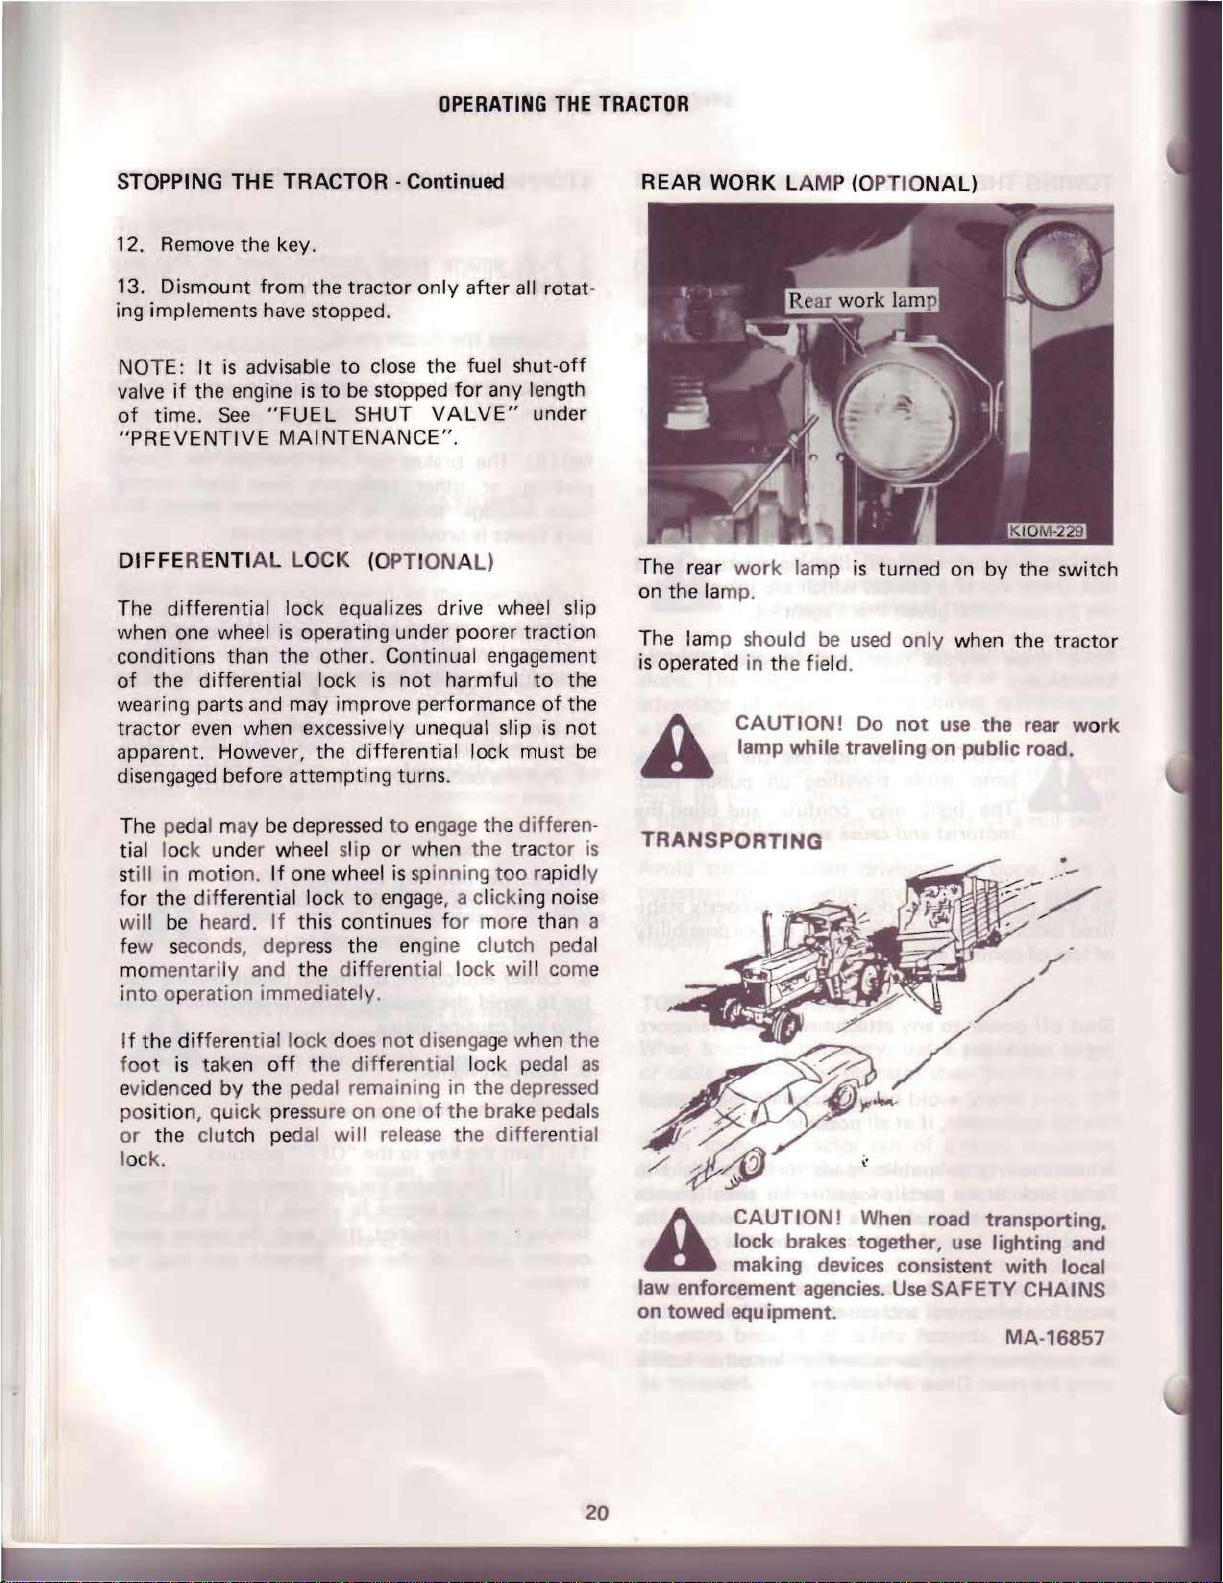
REAR WORK LAMP (OPTIO
-
The rear
on the
The lamp should
is
operated in the field.
la
work
mp.
lamp
CAUTION!
lamp while traveling on public road.
A
be
is
turned on
used
only
Do
not
NAL)
by
when the
use
the rear work
the switch
tractor
ed
The p
tial lock under wheel slip
st ill in motion.
for
will
few seconds,
momentarily and the differential
into
If the differential
f
oot
evidenc
position, quick pre
or
lock.
al may
the differential
be
heard.
operation
is
tak
ed
the
clut
be
depressed
If
one wheel
lock
If
this continues f
depr
ess
immediately.
lock
en
off the
by the pedal remaining in
ssure
ch pedal
to engage the
or
when
is spinning too rapid
to
engage,
the engine
does not disengage when the
differ
ential lock pedal
on
one
of
will
release the
differen
the
tra
ctor
a cl
icking
or
mor
clutch
lock will come
the
the
brake pedals
noise
e than a
pedal
depressed
differ
ential
-
TRANSPORTING
is
ly
as
A
law enforcement
on towed
CAUTIONI
lock brakes together,
When
road transporting.
use
making devices consistent
equ
agencies.
ipment.
Use
SAFETY CHAINS
lighting and
with
local
MA-16857
20
 Loading...