

International Datacasting SFX Pro Series, SuperFlex SFX3102, SuperFlex SFX3103, SuperFlex SFX3101, SuperFlex SFX4104 User Manual Addendum

SFX Series Pro Audio
Satellite Receiver (with PMR)
To IDC Part No. 92080190-50, User’s Guide
Addendum

Preface
All rights are reserved by International Datacasting Corporation. This Addendum contains the valuable properties and trade secrets of
International Datacasting Corporation, embodying substantial creative efforts and confidential information, ideas or expressions. No
part of this Addendum may be reproduced, translated or transmitted in any form or by any means without the prior written permission
of this company.
The information in this document is subject to change in order to improve reliability, design or function without prior notice; all changes
are incorporated into new editions and/or revisions.
In no event will we be liable for technical or editorial errors or omissions contained herein; nor for incidental, special or consequential
damages from the furnishing, performance or use of this manual.
Note: The screen captures shown in this Guide are for reference only and may not exactly match the pages that are displayed on your
browser. Not all receiver models and/or versions of the application firmware will support all features described in this guide. If you
have any questions regarding availability of certain features, please contact International Datacasting’s Customer Service Department.
SFX Series Pro Audio Satellite Receiver (with PMR) Addendum
International Datacasting Corporation Part No. 92080960-50
This Addendum is intended to be used in conjunction with the SFX Series Satellite Receiver User’s Guide. International Datacasting
Corporation Part No. 92080190-50 or the SFX Duo Series User’s Guide. International Datacasting Part No: 92081890-50. Full service
and contact information is provided in Chapter 3 of those manuals.
Record of Revisions
International Datacasting Corporation is constantly improving its products and therefore the information in this document is subject to
change without prior notice. International Datacasting makes no warranty of any kind with regard to this material, including but not
limited to the implied warranties of merchantability and fitness for a particular purpose.
No responsibility for any errors or omissions that may pertain to the material herein is assumed. International Datacasting makes no
commitment to update or to keep current the information contained in this document. International Datacasting assumes no
responsibility for use of any circuitry other than the circuitry employed in International Datacasting’s systems and equipment.
The source code for binaries in all IDC products that are covered under the GNU Public License (GPL) is available for free download
from IDC Customer Service. If you would like a copy of the GPL source code for your IDC product on CD, please contact IDC
Customer Service – a fee may be involved for preparing and mailing the CD to you.
This unit may contain software subject to one or more of the copyright notices contained in the SFX Series Satellite Receiver User’s
Guide (International Datacasting Corporation Part No. 92080190-50) or the SFX Duo Series User’s Guide (International Datacasting
Part No. 92081890-50).
Copyright © 2009, 2010, 2011 Rev. 2.8, International Datacasting Corporation
All rights reserved. Printed in Canada.
LINUX is a registered trademark of Linus Torvalds, in the United States and other countries.
Microsoft, Windows and Windows NT are registered trademarks of Microsoft Corporation in the United States and/or other
countries.
Livewire is a registered trademark of TLS Corporation in the United States and other countries.

SFX SERIES PRO AUDIO SATELLITE RECEIVER (WITH PMR) ADDENDUM
Table of Contents
Getting Started 4
Front Panel 4
Rear Panel 5
Controlling the Pro Audio with the Front Panel LCD Display/Keypad Interface 8
Web GUI Operation 12
Main Menu Page 12
Audio 12
Configuring an Audio Stream 12
Configuring Silence Monitoring 14
Setting Audio Backup Preferences 15
IP MetaData and Setting a Cue 18
Recording and Playback of Audio Content - Option 19
Live Assist 22
Triggered Action Types 22
Trigger List 22
Viewing the Scheduled Triggers 25
Pro Audio Debug 26
The LiveWire™ Option 27
About Livewire 27
How Livewire Works 27
Using Terminal Commands 30
Additional Audio Commands 30
Rev 2.8 3

SFX SERIES PRO AUDIO SATELLITE RECEIVER (WITH PMR) ADDENDUM
Chapter 1
Getting Started
International Datacasting Corporation (IDC) would like to thank you for purchasing the SFX Series SuperFlex Satellite
Receiver (herein referred to as the “satellite receiver”). This Addendum provides the information required to configure
and operate only the Pro Audio features of your satellite receiver. The installation, set up, control and configuration of
the balance of your receiver is described in the appropriate Receiver User’s Guide. Your SFX Pro Audio receiver can
be one of four models:
• SFX3102 / SFX3103 Pro Audio Receiver (1R) Unit – single tuner, two audio channels
• SFX3101 Pro Audio EXP Receiver (2R) unit – single tuner, four audio channels; or
• SFX4104 Pro Audio EXP Receiver (2R) unit – dual tuner; four audio channels
• SFX4104 Pro Audio EXP Receiver (2R) unit – dual tuner; four audio channels, media recorder.
The illustrations provided in this chapter identify indicators and connectors on the satellite receiver in both the Pro
Audio EXP double height and the Pro Audio single height rack mount configuration. Acquaint yourself with these
illustrations, and refer to the physical unit itself.
Front Panel
Once you have removed the satellite receiver from the box, please familiarize yourself with the front panel. Refer to
Figure 1- 1 or Figure 1- 2 for the location of the indicators. The differences between the standard SFX receiver’s front
panel and the Pro Audio’s front panel are described in the table under the figures.
Figure 1- 1 Front Panel Indicators (SFX3102 / SFX3103 Pro Audio)
LED Indicators
Lock
Status
Control
1 - Audio - 2
LCD Display
Keypad
Rev 2.8 4

SFX SERIES PRO AUDIO SATELLITE RECEIVER (WITH PMR) ADDENDUM
Figure 1- 2 Front Panel Indicators (SFX3101 Pro Audio EXP)
Figure 1- 3 Front Panel Indicators (SFX4104 Pro Audio EXP)
Indicator Description
1- AUDIO - 2
3- AUDIO - 4
Purpose: provides indication of the authorization and audio decoding activity on the audio outputs.
Colour: off/green, where:
Solid Green – audio channel is authorized (enabled), but there is no audio decoding activity.
Flashing Off/Green – audio channel is authorized and decoder is decoding “streaming audio” (e.g. live
programming) activity.
Flashing Off/Orange - audio channel is authorized and decoder is decoding “store and forward” audio (e.g.
previously uploaded content).
Flashing Orange/Green – audio channel is decoding store and forward audio data from a previous
recording.
Red: silence has been detected on audio channel outputs. Note: Relay 4 on the channel with the dead air
is also set “ON”.
Off – audio channel is not authorized.
Rear P anel
Please refer to Figure 1- 4 through Figure 1- 8 for your receiver’s rear panel. The table following the figures describes
only the Pro Audio differences from the standard rear panel. It uses the letter “X” in place of the audio and associated
relay channel numbers.
Rev 2.8 5

SFX SERIES PRO AUDIO SATELLITE RECEIVER (WITH PMR) ADDENDUM
Figure 1- 4 SFX 2102 / SFX2103 Pro Audio Rear Panel Connectors
Figure 1- 5 SFX 3102 Pro Audio Rear Panel Connectors
Figure 1- 6 SFX 3109 Pro Audio Rear Panel Connectors
Layout of Output Connectors
Relay Audio Relay Audio
Pro Audio Relay Ch 1 Audio Ch 1 Relay Ch 2 Audio Ch 2
EXP Relay Ch3 Audio Ch 3 Relay Ch 4 Audio Ch 4
Relay Ch 1 Audio Ch 1 Relay Ch 2 Audio Ch 2
To TV
Figure 1- 7 SFX 3101 Pro Audio EXP Rear Panel Connectors
Rev 2.8 6

SFX SERIES PRO AUDIO SATELLITE RECEIVER (WITH PMR) ADDENDUM
Figure 1- 8 SFX 4104 Pro Audio Rear Panel Connectors
Connector Description
Audio Channel X This is a DE-9P (male) connector used as a unidirectional (output) analog audio data
port. The pin outs for this port are as follows:
PIN Acronym Reference
1 LEFT + Audio X Left +
2 GND Ground
3 AES + Digital Audio Output X +
4 GND Ground
5 RIGHT + Audio X Right +
6 LEFT - Audio X Left -
7 GND Ground
8 AES - Digital Audio Output X -
9 RIGHT - Audio X Right -
An alternative pin out is available as below. This alternative is in use if a label
“Option B” is on the rear panel.
PIN Acronym Reference
1 LEFT - Analog Left Out -
2 LEFT + Analog Left Out +
3 AES + AES +
4 RIGHT - Analog Right Out -
5 RIGHT + Analog Right Out +
6 GND Analog Ground
7 GND Analog Ground
8 AES - AES -
9 GND Analog Ground
Rev 2.8 7

SFX SERIES PRO AUDIO SATELLITE RECEIVER (WITH PMR) ADDENDUM
Connector Description
Relay CH X This is a DA-15P (male) connector used as for 4 Form C relays for Legacy Networks.
The pin outs for this port are as follows:
PIN Acronym Reference
1 RX RS–232 Receive
2 Relay 1 NO NO Form C Lock 1
3 Relay 2 NO NO Form C Lock 2
4 Relay 3 NO NO Form C Lock 3
5 Relay 4 NO NO Form C Lock 4
6 GND Ground
7 Relay 1 NC NC Form C Lock 1
8 Relay 2 NC NC Form C Lock 2
9 TX RS-232 Transmit
10 Relay 1 Com Form C Common 1
11 Relay 2 Com Form C Common 2
12 Relay 3 Com Form C Common 3
13 Relay 4 Com Form C Common 4
14 Relay 3 NC NC Form C Lock 3
15 Relay 4 NC NC Form C Lock 4
Controlling the Pro Audio with the Front Panel LCD Display/Keypad Interf ace
The SFX Series Satellite Receiver Users Manual describes how to set up the receiver using only the keypad and front
panel display. This addendum describes how to set up the receiver Pro Audio items only.
Table 1- 1 lists the items in the display item group of a SFX Series Satellite receiver with the Pro Audio option installed.
Table 1- 2 lists the items
displayed during normal operation. From there, you can press the arrow keys to navigate around the various other
display items, or enter the menu item group, as shown in the table by the item number references and notes for each
of the arrow keys.
Pressing the check mark button is generally the same as pressing Enter on a keyboard and commits an action or
selection. Pressing the X button is generally the same as pressing Esc on a keyboard and aborts an action or
selection. The X button is also used to exit from the menu item group back to the to the display item group. When you
are in the display item group, you can press X twice to return to display item 1.
When power is applied to the unit, you will always start the cycle at Menu main item 1 (Carrier A). You are able to
cycle through the main items by using the vertical arrow keys ( ˆ ) or ( ˇ ). To examine or change one of the main item
parameters press the check mark button ( √ ) to enter the sub menu. You can move through the sub menu
parameters by using the horizontal arrow keys (< for back or > forward). If you wish to change a parameter, press the
check mark button ( √ ) to enter the edit mode or use the vertical arrow keys ( ˆ ) or ( ˇ ) which will select it. In the case
of a numeric value, a flashing cursor will appear over one digit. To change that digit, use the vertical arrow keys ( ˆ ) or (
ˇ ). To change another digit in this parameter, use the horizontal arrow keys (< for back or > forward) to select it and
repeat. When you have finished, commit your changes by pressing the check mark button (√). If the sub menu item is
not numeric, using the vertical arrow keys ( ˆ ) or ( ˇ ) will allow you to cycle through the available settings. Commit your
choice as above. A * beside a displayed selection indicates that this is the current configured value being used by the
receiver.
appearing in the menu item group of the same receiver. Display item 1 or 2 will generally be
NOTE: The LCD Display/Keypad interface will remember the last menu item you accessed and will always start there the next time
you enter the menu item group from the display item group. The same is true in reverse – it will remember the last display item when
you return from the menu item group.
Rev 2.8 8

SFX SERIES PRO AUDIO SATELLITE RECEIVER (WITH PMR) ADDENDUM
Table 1- 1 Display Item Group - Pro Audio
Display Items Carrier Selection
Tuner Parameter S Any S2 Remarks
LBAND 1 Eb/No ■ *Out of Lock* or real value
C/N ■ ■ *Out of Lock* or real value
Uncorr Errors ■ ■ *Out of Lock* or real value
Viterbi BER ■ *Out of Lock* or real value
BER ■ *Out of Lock* or real value
Signal Level ■ ■ %
Signal Quality ■ %
Audio Backup ■ ■ Pref/Alt/Netstream/Playlist
Sat0 MAC Address ■ ■ MAC address
Stream 1 Channel ■ ■ Channel ID or “none”
Stream 2 Channel ■ ■ Channel ID or “none”
Stream 3 Channel ■ ■ EXP Models Only
Stream 4 Channel ■ ■ EXP Models Only
CH1 Relays 1-4 ■ ■ 1 = “energized”
CH2 Relays 1-4 ■ ■ 1 = “energized”
CH3 Relays 1-4 ■ ■ EXP Models Only
CH4 Relays 1-4 ■ ■ EXP Models Only
MetaData String 1 ■ ■ String or “none”
MetaData String 2 ■ ■ String or “none”
MetaData String 3 ■ ■ EXP Models Only
MetaData String 4 ■ ■ EXP Models Only
Ch1 Ch2 ■ ■ LR and Level Meter
Ch3 Ch4 ■ ■ EXP Models Only
LBAND 2 Repeat items shown above 2 4104 EXP Models only
Audio Backup ■ ■
Note: the Recoding and Playback functions of the SFX4104 Pro Audio EXP PMR are not settable through the keypad.
Rev 2.8 9

SFX SERIES PRO AUDIO SATELLITE RECEIVER (WITH PMR) ADDENDUM
Table 1- 2 Menu Item Group – Pro Audio
Main Item Parameter Remarks
Eth 0 Interface See User’s Guide
Eth 1 Interface See User’s Guide
Note: If there are more Ethernet interfaces, they will appear here
Sat0 Interface See User’s Guide
Sat1 Interface See User’s Guide 4104 Models Only
Routing See User’s Guide
Configuration See User’s Guide
Volume Ch 1 Level
Ch 1 Mute
Ch 2 Level
Ch 2 Mute
Ch 3 Level EXP Models Only
Ch 3 Mute EXP Models Only
Ch 4 Level EXP Models Only
Ch 4 Mute EXP Models Only
NTP See User’s Guide
Info Firmware Version
Live Assist Version
LiveWire™ Version
XD version
Pro Audio Version
SoftCell or
CypherCast
Option Only
Tuner See User’s Guide
LBAND 1 1) Carrier A or B See User’s Guide
2) LNB See User’s Guide
3) Ch Guide Config See User’s Guide
4) Ch Guide List Channel Number
Channel Name
Channel Description
Authorized
Audio Player 1
Audio Player 2
Audio Player 3 EXP Models Only
Audio Player 4 EXP Models Only
Channel Forward eth0
Option
Includes Channel Guide Reset option
Rev 2.8 10

SFX SERIES PRO AUDIO SATELLITE RECEIVER (WITH PMR) ADDENDUM
Channel Forward eth1
5) PID List See User’s Guide
6) Ports See User’s Guide
LBAND 2 Items 1,2 5 & 6 repeated for LBAND 2
Reboot
Audio Player 1 Channel ID
Channel Name
Audio type
Multicast Address (not shown for type = PES)
UDP Port (not shown for type = PES)
Interface
Output Device (only available if Livewire™ is installed)
Async Data
Audio Player 2 As Audio Player 1
Audio Player 3 EXP Models Only
Audio Player 4 EXP Models Only
Audio Alarms Alarm Timeout
Pro Audio 1
Pro Audio 2
Pro Audio 3 EXP Models Only
Pro Audio 4 EXP Models Only
Relay4 on Channel 1
Relay4 on Channel 2
Relay4 on Channel 3 EXP Models Only
Relay4 on Channel 4 EXP Models Only
Audio Backup General Configuration
Preferred Carrier
Alternate Carrier
Netstream
Playlist
XD License Info See User’s Guide
4104 Models Only
Rev 2.8 11

SFX SERIES PRO AUDIO SATELLITE RECEIVER (WITH PMR) ADDENDUM
Chapter 2
Web GUI Operation
This chapter will provide detailed information on the meaning and operation of the Pro Audio pages and menu options
available on the Web GUI for the SFX Series Pro Audio family of receivers. Note: you cannot
functions described here through the front panel key pad.
Main Menu Page
Once you have successfully logged in to the Web GUI you will be presented with the Main Menu page as shown in the
SFX Series Satellite Receiver Users Guide. This addendum is concerned with the Audio Menu items shown there. On
most of the pages in your Pro Audio receiver, there are two common buttons:
set up the audio
Menu Item Description
Show Selecting this button will always return you to the status display for the current selected page.
Edit Selecting this button will enter the Edit mode for the current selected page.
Audio
When the Audio Menu Tool Bar item is selected, a sub menu page appears which provides menu items relating to the
setup and maintenance of both store and forward and live streaming audio distribution streams, audio triggers, silence
monitoring, recording and playback and audio backup functions. These are described in the following sections.
Configuring an Audio Stream
To show the current audio stream configuration, click the Audio Tab in the Main Menu and then Audio Configuration.
An example of the Audio Configuration page, for a Pro Audio EXP model, is shown in Figure 2- 1. To configure an
audio stream, click on Edit to show the Edit Audio Configuration page (Figure 2- 2). You can also select the audio
stream from the Electronic Channel Guide (ECG) if it is available. In this case, select a channel from the drop-down list
(if your Service provider is broadcasting an Electronic Channel Guide). Complete information on the use of the
Channel guide is contained in your SFX Series Satellite Receiver User’s Guide. The display fields in the Audio
Configuration Page are explained in Figure 2- 2 (Edit Audio Configuration) except for the following:
Column/Field Description
Relays 1- 4 Form C relays, with NO, Common and NC contacts controlled from head end by Service Provider
and locally by “Fire Trigger”.
Note: Relay 4 can be used to show an Audio Alarm output.
Metadata Descriptive text related to audio stream content, provided by Service Provider.
Rev 2.8 12

SFX SERIES PRO AUDIO SATELLITE RECEIVER (WITH PMR) ADDENDUM
Figure 2- 1 Audio Configuration Page (Scrolled to top)
The following fields can be edited on the Edit Audio Configuration page:
Edit Field Description
Output Sample Rate Select from the pull down list the output sample rate for all output streams. Note all Livewire only
Audio Player Select from the pull down list the audio decoder used to decode the selected stream.
Interface Select the source interface for the incoming audio stream, options are: sat0, sat1 (only on 4104
Enable Liverwire™
Output
Async Data Rate Select the data rate for the RS232 compatible Metadata output (IP audio only).
supports 48KHz, so Livewire outputs are set to 48Khz regardless of this setting.
models), eth0 and eth1.
Selection is not available without Livewire™ installed. Select the device for audio output from
CH1 (Pro Audio) through CH4 (Pro Audio), or Livewire™ 1 – 4, only one Livewire™ output per
decoder. (Note: only 2 Pro Audio and 2 Livewire devices are available in the 1RU model).Please
contact your Service Provider for more details.
Rev 2.8 13

SFX SERIES PRO AUDIO SATELLITE RECEIVER (WITH PMR) ADDENDUM
Figure 2- 2 Edit Audio Configuration Page
Configuring Silence Monitoring
Silence monitoring allows you to individually monitor the output of each of the audio players for unwanted periods of
silence in their live audio stream. The threshold – the period of time for which the silence must remain to cause a
warning – is configurable. When detected, the event will cause an error message to be logged and set the
corresponding player’s front panel led RED. If the audio re-commences playing for a period longer than the threshold
time, silence monitoring will log a return to live audio and return the led for that player to green/flashing.
To show the current audio stream silence monitoring preferences, click the Audio Main Menu Tab and click Audio
Alarms Configuration. To configure an audio alarm, click on Edit to show the Edit Audio Alarms page (Figure 2- 3).
The following fields can be edited on the Edit Audio Alarms Configuration page:
Edit Field Description
Alarm Timeout (ms) Set the period for monitoring for silence on any player (50 – 500 milliseconds).
Alarm on Pro Audio Output 1 When checked, Audio Alarm feature is enabled on this player.
Alarm on Pro Audio Output 2 When checked, Audio Alarm feature is enabled on this player.
Alarm on Pro Audio Output 3 When checked, Audio Alarm feature is enabled on this player. EXP Models Only.
Alarm on Pro Audio Output 4 When checked, Audio Alarm feature is enabled on this player. EXP Models Only.
Relay 4 on Pro Audio Output 1 When checked, Relay 4 will change on Audio Alarm for this player.
Relay 4 on Pro Audio Output 2 When checked, Relay 4 will change on Audio Alarm for this player.
Relay 4 on Pro Audio Output 3 When checked, Relay 4 will change on Audio Alarm for this player. EXP Models Only.
Relay 4 on Pro Audio Output 4 When checked, Relay 4 will change on Audio Alarm for this player. EXP Models Only.
Rev 2.8 14

SFX SERIES PRO AUDIO SATELLITE RECEIVER (WITH PMR) ADDENDUM
Figure 2- 3 Edit Audio Alarms Configura tion
Setting Audio Backup Preferences
Audio backup allows you to predetermine a sequence of state changes that will reprogram your receiver’s audio output
if signal levels drop below previously set threshold levels on your receiver’s current input. The sequence begins with
the preferred carrier state (note: this can be Carrier A or B, as set under the DVB Carrier menu item).
If the C/N ratio of the preferred carrier drops below a threshold level, the receiver will switch to the alternate carrier. A
channel change can also be programmed during the switch, to change the audio processed from the alternate carrier.
If the C/N ratio of the alternate carrier drops below a threshold level, the receiver will test the level of the preferred
carrier and switch back to it if the C/N is higher than the threshold level. If the level is insufficient, the receiver will
switch to a network interface for input. The receiver will continue to test both the preferred and alternate carriers’ C/N
levels and will switch back to the first carrier for which the C/N exceeds the threshold. If during this state the network
interface LAN times out, the receiver will use a local playlist as the audio source. In the playlist state, the receiver will
poll the Net input and will switch to it as soon as the Net input becomes valid. It also continues to check the levels of
the preferred and alternate carriers.
You can set individual C/N levels (in dB) for each carrier; the time period used to determine C/N failure and for timeout
protection for the network LAN. Each individual state in the sequence can be disabled, allowing the sequence to skip
that step on failure. Each state switch can be accomplished with or without a channel change.
To show the current audio stream backup preferences, click the Audio Tab in the Main Menu and click Audio Backup
Configuration. To configure an audio backup, click on Edit to show the Edit Audio Backup page (Figure 2- 4 and
Figure 2- 5).
The following fields can be edited on the Audio Backup Configuration page:
Edit Field Description
Audio Backup Enabled Check this box to enable/disable the Audio backup feature.
Preferred C/N Fault Threshold (dB) Set the threshold at which this carrier will be tagged as faulty and
a state change will be made to the first available good alternate
stream source.
Rev 2.8 15

SFX SERIES PRO AUDIO SATELLITE RECEIVER (WITH PMR) ADDENDUM
Edit Field Description
C/N Recovery Threshold
(dB)
Fault Timeout (sec) Set the period (in secs) during which the carrier must remain
Recovery Timeout (sec) Set the period (in secs) for which the carrier must exceed the
Lock Audio Configuration When checked, and in this state, this forces the players to the
Player 1 Channel Use the pull down list to select the channel to use on this player
Player 2 Channel Use the pull down list to select the channel to use on this player
Player 3 Channel Same as above, EXP Models only
Player 4 Channel Same as above, EXP Models only
Alternate Check Preferred State
Enabled
Check Preferred State
Interval
C/N Fault Threshold (dB) Set the threshold at which this carrier will be tagged as faulty and
C/N Recovery Threshold
(dB)
Fault Timeout (sec) Set the period (in secs) during which the carrier must remain
Recovery Timeout (sec) Set the period (in secs) for which the carrier must exceed the
Lock Audio Configuration When checked, and in this state, this forces the players to the
Player 1 Channel Use the pull down list to select the channel to use on this player
Player 2 Channel Use the pull down list to select the channel to use on this player
Player 3 Channel Same as above, EXP models only
Player 4 Channel Same as above, EXP models only
Netstream Enabled Check this box to allow this interface to be a part of the Audio
Interface Use the pull down list to select the network interface to be used in
Fault Timeout (sec) Set the period (in secs) at which the network interface will be
Recovery Timeout (sec) Set the period (in secs) for which the interface must have received
Set the level which the carrier signal must (re)establish before the
carrier is tagged as good. This level must be equal to or greater
than the Fault Threshold; can be up to 4.dB greater than the Fault
Threshold level and can be set to 2 decimal places.
below the Fault Threshold to be tagged as failed.
Recovery Threshold before being tagged as restored.
channel shown in their respective pull down boxes. No changes
are allowed from a local interface. When unchecked, changes can
be made through a local interface.
when switched to this state or continue with “Use Original
Channel” option.
when switched to this state, or continue with “Use Original
Channel” option.
Check this box to allow disconnection from this carrier to check for
the availability of the Preferred carrier.
Note: This will result in a change in the output of the audio players
at least two lock times in duration. During this change, the players
will output the Net stream if available, or revert to the playlist if not.
If no playlist is specified, there will be no output until lock is reacquired.
Enter the interval to be used by the Alternate state between
checks for the availability of the Preferred state.
a state change will be made to the first available good alternate
stream source.
Set the level which the carrier signal must (re)establish before the
carrier is tagged as good. This level must be equal to or greater
than the Fault Threshold; can be up to 4.dB greater than the Fault
Threshold level and can be set to 2 decimal places.
below the Fault Threshold to be tagged as failed.
Recovery Threshold before being tagged as restored.
channel shown in their respective pull down boxes. No changes
are allowed from a local interface. When unchecked, changes can
be made through a local interface.
when switched to this state. Default is “Use Original Channel”.
when switched to this state. Default is “Use Original Channel”.
Backup sequence. If not enabled, this state will be skipped in the
backup sequence.
this state.
determined to have lost data connection if no packets have been
received in the period.
Rev 2.8 16

SFX SERIES PRO AUDIO SATELLITE RECEIVER (WITH PMR) ADDENDUM
Edit Field Description
packet data to be tagged as connected.
Lock Audio Configuration When checked, and in this state, this forces the players to the
Player 1 Channel Use the pull down list to select the channel to use on this player
Player 2 Channel Use the pull down list to select the channel to use on this player
Player 3 Channel Same as above, EXP models only.
Player 4 Channel Same as above, EXP models only.
Playlist Enabled Check this box to allow the playlist to be a part of the Audio
Check Net State Interval Enter the interval to be used by the Playlist state between checks
Player 1 Trigger Use the pull down list to select the trigger for this player
Player 2 Trigger Use the pull down list to select the trigger for this player
Player 3 Trigger Same as above, EXP models only.
Player 4 Trigger Same as above, EXP models only.
channel shown in their respective pull down boxes. No changes
are allowed from a local interface. When unchecked, changes can
be made through a local interface.
when switched to this state or continue with “Use Original
Channel” option.
when switched to this state or continue with “Use Original
Channel” option.
Backup sequence. If not enabled, this state will be skipped in the
backup sequence.
for the availability of the Netstream state.
Figure 2- 4 Edit Audio Backup Configuration (top)
Rev 2.8 17

SFX SERIES PRO AUDIO SATELLITE RECEIVER (WITH PMR) ADDENDUM
Figure 2- 5 Edit Audio Backup Configuration (scr olled)
IP MetaData and Setting a Cue
Selecting the IP MetaData and Cue from the Audio main menu item allows you to configure the MetaData and Cue
data outputs of your receiver Figure 2- 6.
MetaData Delivery Enable allows the receiver to multicast the contents of any MetaData.
Cue Delivery Enable allows the receiver to output xml encapsulated packages identifying the TS and Relay number for
any relay event.
Edit Field Description
MetaData Delivery Enable Check to enable the output of MetaData
MetaData Multicast IP Set Multicast address for MetaData delivery
MetaData Port Set Corresponding UDP Port.
Cue Delivery Enable When checked, Audio Alarm feature is enabled on this player. EXP Models Only.
Cue Multicast IP Set Multicast address for Cue message delivery.
Cue Port Set Corresponding UDP Port.
Rev 2.8 18

SFX SERIES PRO AUDIO SATELLITE RECEIVER (WITH PMR) ADDENDUM
Figure 2- 6 IP MetaData and Cue Configuratio n Page
Recording and Playback of Audio Content - Option
Contact your Service provider to see if this option is supported on your Network. Selecting the PMR menu item from
the Audio main page shows a list of all the playback events in your receiver (see Figure 2- 7). Using the buttons, you
can view and add recording or playback events. Recording and Playback events can not be set by Terminal
commands.
Button Description
View Recording Event Selecting this button will returns you to the View Recording Events page Figure 2- 7.
Add Recording Event Goto Add Recording Event page (Figure 2- 8).
View Playback Event Goto the list of events scheduled for playback shown on the View Playback Events page (not
shown) – similar to the View Recording Events page.
Add Playback Event Goto Add Playback page Figure 2- 9 .
The fields on the View Recording and View Playback pages have the following meaning.
Edit Field Description
Name Enter a descriptive name for this recording or series of recordings. (The date code is appended
to the file name as a differentiator in recurring recordings).
Channel Select the channel to be recorded from the list.
Date Enter the date, or use the calendar to select the date of the first recording.
Recurring Recordings Check if this event is to be recorded multiple times and select the day or days of the week.
Start Time Enter the start time in (HH:MM;SS) format.
Rev 2.8 19

SFX SERIES PRO AUDIO SATELLITE RECEIVER (WITH PMR) ADDENDUM
Edit Field Description
Duration Enter the duration of the event in (HH:MM;SS) format.
Keep Days Enter the number of days that this recording will be kept. After this period has elapsed, the
Options - Recording Events: Use this pull down to delete all instances of this recording event including
recording is deleted.
any content already recorded.
Playback Events: Use this pull down to delete the trigger for the playback of this event. It does
not delete the content. (The content will expire when the Keep Days reaches zero).
Figure 2- 7 View Recording Events
The fields have the following meaning on the Add Playback Event page.
Edit Field Description
List of Recordings Select the recording to playback from the pull down list. Items shown in black are available,
those in grey, not yet.
Start Immediately Check this radio button to begin the playback immediately.
Output Stream Select the player for this playback event.
The remaining hard disc drive space and the receiver Time Zone are shown for your convenience.
Rev 2.8 20

SFX SERIES PRO AUDIO SATELLITE RECEIVER (WITH PMR) ADDENDUM
Figure 2- 8 Add Recording Event page
Figure 2- 9 Add Playback Event page
Rev 2.8 21

SFX SERIES PRO AUDIO SATELLITE RECEIVER (WITH PMR) ADDENDUM
Live Assist
Selecting the Trigger List menu item from the Audio main page shows a list of all events (see Figure 2- 10) that are
scheduled to be triggered in the receiver, together with their trigger type and description. This list of events and the
actual triggered actions are made up from triggers provided in band by your Service Provider.
Triggered Action Types
The triggered actions shown can be to play file, change to a different audio stream or channel on the satellite or to
return to the live stream. The local content played can be organized into Single, Timed Playlist or Percent events and
may be either with or without throwing relay contacts.
1. Single
2. Timed Playlist
3. Percent – The receiver executes a single action from a Playlist with no “repeat” possibility. The action is
Relay contacts are shown (Figure 2- 1) as ON, OFF, N/A or as a numeric value. This numeric value is the time in
milliseconds that the contacts are activated. Note that NO and NC contacts are available for all actions and states.
The percentage attribute does not apply to Timed Playlists triggers. Relay operation in a local trigger is limited to a
250ms pulse option.
Trigger List
Selecting the Trigger List menu item from the Audio main page shows a list of all events that are scheduled to be
triggered in the receiver, together with their trigger type and description. The detail of each trigger may be viewed
using pull down box in each trigger and selecting Show.
– The receiver executes a single action unless “repeat” is checked. Actions may be one of:
• Play File – the receiver plays a file stored on the hard drive and then
returns to the live stream.
• Relay Only – adjust the relay settings for the selected channel.
• Play File and Relay – the receiver executes a combination of the Play Local
Content and Relay Only.
• Return to Live – the receiver returns to the live satellite stream, aborting the
local content playback (if necessary). Note: if the receiver is currently
outputting a satellite channel, RTL will have no effect.
• Set Channel – the receiver tunes the selected player to a new audio
channel.
– The receiver executes a sequential list of actions using their specified start time for control.
The individual actions available are described above.
selected according to a percentage chance allocated to each Playlist action. Over the number of times that
the receiver is to execute the action it will only do so the specified percentage of times.
Rev 2.8 22
SFX SERIES PRO AUDIO SATELLITE RECEIVER (WITH PMR) ADDENDUM
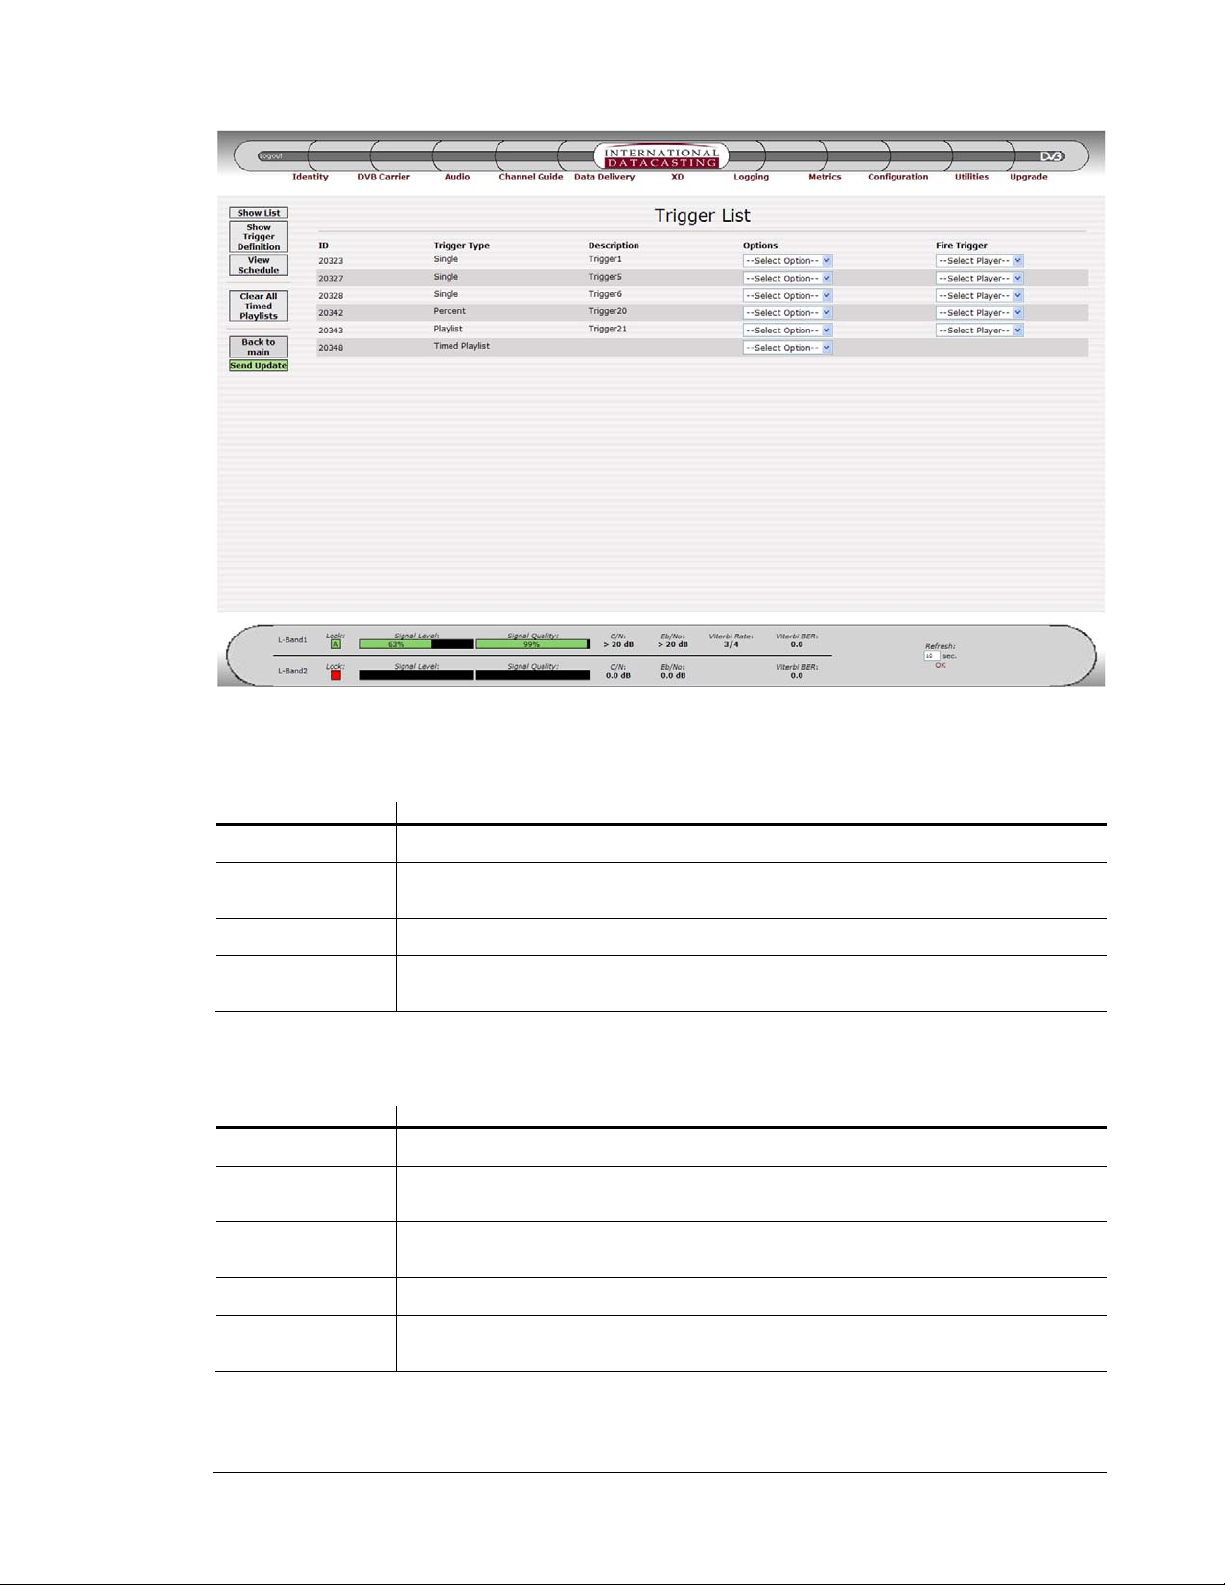
Figure 2- 10 Trigger List Page
The following buttons are available on the Trigger List and the View Schedule Pages:
Menu Item Description
Show List Select this button to return you back to the Trigger List page, Figure 2- 10.
Show Trigger
Definition
View Schedule Select this button to show the View Schedule page Figure 2- 12.
Clear All timed
Triggers
The display fields and columns in the Trigger List Page have the following meaning:
Column/Field Description
ID Cross reference to the unique identifier for this trigger, as shown in Figure 2- 10.
Trigger Type Description of the trigger types are: Single, Timed Playlist, or Percent (see explanation under
Trigger Description Descriptive text, usually, but not always, showing the trigger action. Provided by the creator of the
Select this button to show a pop up window. Enter the trigger number and click OK to show the
Trigger Info page Figure 2- 11.
Select this button to clear all timed triggers in the schedule.
Triggers above).
trigger.
Options Use this pull down box to Show this Trigger, shown in Figure 2- 11.
Fire Trigger Use this pull down box to fire the selected trigger on any of the available players. When selected
the trigger is activated immediately.
Rev 2.8 23

SFX SERIES PRO AUDIO SATELLITE RECEIVER (WITH PMR) ADDENDUM
Figure 2- 11 Trigger Info Page – from Option - Show Trigger
The information shown on the Trigger Info page is different whether a playlist (P) or timed playlist is shown. The timed
playlist shows all parameters, the Playlist, only those indicated. The fields and columns have the same meaning as
described on the Trigger List page. The additional display fields and columns have the following meaning:
Column/Field P Description
Earliest Valid ● The start time of the window in which the triggered actions may occur (dd:mm:yy format).
Expiry ● The end time of the window in which the triggered actions may occur (dd:mm:yy format).
The receiver may purge the trigger at any time after this date/time.
Repeat Weekdays Shows the Days of the week in which this trigger may occur.
Repeat Count The number of times this event will be repeated (max. = 65,535).
Repeat Intervals The interval in HH:MM:SS format for the time between repetitions of this event (Note: if
Repeat Interval is shown, the choice of First Date and Time in the element will be disabled).
Output Stream ● The selected audio player in which this event will be inserted or no action; (N/A).
Elem # ● Designator for the possible action resulting from a trigger. Up to 10 elements may be listed
in a single Timed Playlist. Multiple timed playlists may be used on a single receiver.
First Date The first date (within the time window) on which this element will occur (Note: that if this is
the first element in the trigger, then this date is also the first date of the trigger activation).
Time The start time of the first element in this trigger, in hh:mm:ss format.
Action 1
● Shows the action required by this element. Available commands are:
Play Local File
Relay only
Play Local file and Relay
Return to Live
Rev 2.8 24

SFX SERIES PRO AUDIO SATELLITE RECEIVER (WITH PMR) ADDENDUM
Column/Field P Description
Set Channel
N/A shows no action
Relays 250 ms Pulse
1 2 3 4
● A check in the appropriate box shows pulsed operation of a relay. Blank shows no operation.
Note (1): The action includes the full path of the file to be played by the chosen audio player or the Channel number to
tune to for a Set Channel command.
Note (2): Files can be placed on the receiver via Samba directory shares as described in the SFX Series User’s
Guide).
Viewing the Scheduled Triggers
To view the triggers currently scheduled in the receiver, click the View Schedule button on any trigger page. In a large
schedule, use the scroll bar to view the portion of interest. In the View Schedule page (Figure 2- 12) the display fields
and columns have the following meaning:
Column/Field Description
Audio Player Use the pull down box to see only triggers that are scheduled for this audio player.
Date Select the adjacent button to select the schedule start date for display from the pull down list.
Update View Use this button to refresh the schedule when you change date or time on this page.
Time The start time of this element of the trigger, in hh:mm:ss format.
Trig ID The ID of this trigger.
Element # The ID of the separate elements in this trigger.
Action The action performed by this element.
File Name / Channel
Number
The data needed by the action to enable completion.
Rev 2.8 25

SFX SERIES PRO AUDIO SATELLITE RECEIVER (WITH PMR) ADDENDUM
Figure 2- 12 View Schedule Page
Pro Audio Debug
Selecting the Pro Audio Debug menu item from the Audio main page shows a list of parameters for each audio
channel (see Figure 2- 13).
The display fields and columns have the following meaning:
Column/Field Description
Audio Channel Identifies the audio player.
Live The number of audio samples in the Live buffer, normally 9000>X<14000
File The number of audio samples in the File buffer. Only shows a count when a file is being played.
FPGA The number of audio samples in the FPGA buffer, normally 9000>X<14000
Aside from the Common Menu items, the following buttons are available on the Pro Audio Debug page:
Menu Item Description
Show Pro Audio
Debug Info
Select this button to return you back to the Show Audio Debug page, Figure 2- 13.
Edit Refresh Interval Select this button to access the Refresh Debug Info page where the refresh interval can be
changed.
Rev 2.8 26

SFX SERIES PRO AUDIO SATELLITE RECEIVER (WITH PMR) ADDENDUM
Figure 2- 13 Pro Audio Debug Information
The LiveWire™ Option
About Livewire
Livewire is an Audio-over-IP communications protocol developed and marketed by the Axia Audio division of Telos
Systems. Livewire allows transport of real-time, “live” uncompressed digital audio, plus program associated data (PAD)
and machine remote control over a switched Ethernet network. The same network can also carry file transfers,
messaging and other routine traffic.
Because Livewire makes use of existing Ethernet cabling, an entire facility can be wired in hours, instead of weeks.
Expanding or modifying your system is simple, thanks to Livewire’s inherent scalability and modularity.
How Livewire Works
In a Livewire IP-Audio network, every audio source has a text name and a unique numeric ID. When a source is ready
for use, its presence is “advertised” over the network, and added to the global list of audio sources from which users
can select.
Livewire networks employ two types of audio streams: Livestreams, with small, fast packets for high-priority live audio,
and Standard Streams, with bigger packets for audio file transfers and other non-critical audio. There is no inefficiency
from having both available because all streams stop at the Ethernet switch and take no system network bandwidth
unless they are subscribed to by a receiver. Each receiver takes only the stream it needs, taking the low-delay version
if available, or the standard version if not. The selection happens transparently with no user action needed. Users just
select the channel they want and audio is delivered to the equipment they are using.
To configure and use the Livewire™ outputs, click the Configuration>Livewire Configuration to show the current
configuration (Figure 2- 14).
Aside from the Common Menu Items, the following menu items are available on the Livewire Configuration page:
Rev 2.8 27

SFX SERIES PRO AUDIO SATELLITE RECEIVER (WITH PMR) ADDENDUM
Menu Item Description
Show Selecting this button returns you to the Livewire Configuration page, shown in Figure 2- 14.
Edit Options Selecting this button will enter the Edit Options page Figure 2- 15.
Edit Channels Selecting this button will enter the Edit Channels page shown in Figure 2- 16.
Figure 2- 14 Livewire Configuration
NOTE: Only 2 Livewire output devices will be shown for a 1R unit. This page is from a 2R unit.
The following fields can be edited through the Edit Options Page.
Column/Field Description
Interface Select the Ethernet interface for the Livewire output.
Forward Channel Description from
Channel Guide
Select to enable/disable the output of the Channel Description (from the Channel
Guide) in Livewire information format.
Rev 2.8 28

SFX SERIES PRO AUDIO SATELLITE RECEIVER (WITH PMR) ADDENDUM
Figure 2- 15 Edit Options page
The following fields can be edited through the Edit Channels Page.
Column/Field Description
Output Device Identifies the Livewire device (output stream).
Audio Player Identifies the player for this Livewire stream.
Channel # Select to set a Livewire channel number to this device (Note: this channel number differs from the
one provided by the Channel Guide (if present) and is used by Livewire to identify and
demultiplex the audio streams).
Description Select to set a description to this Livewire output stream (Note: this description can differ from
the Channel Description provided by the Channel Guide).
Rev 2.8 29

SFX SERIES PRO AUDIO SATELLITE RECEIVER (WITH PMR) ADDENDUM
Figure 2- 16 Edit Channels page
Using T erminal Commands
Additional Audio Commands
The full Terminal command set and how to connect to your receiver and use them can be found in your receiver User’s
Manual. These additional commands are applicable to the Pro Audio models only and are listed in alphabetical order
(ignoring the command modifier eg: “Set”).
Command Description
GetAudioSampleRate Displays the sample rate in Hz.
GetEventSchedule Displays the events scheduled for a player between dates entered.
GetFECConfig Displays the current FEC configuration.
GetFECDebug Displays the packet statistics, by audio decoder.
GetFECTunnelEnable
SetFECTunnelEnable
GetFireTrigger Fires a specified trigger on a player.
GetLiveAssistFeatures Contact your service Provider for the use of this command.
GetTriggerDefinition Shows the information related to a Trigger.
Enable/disable FEC on all audio decoders.
GetTriggerList Displays all triggers by ID with Type and Description.
Rev 2.8 30

international headquarters
50 Frank Nighbor Place
Kanata, Ontario Canada K2V 1B9
tel: 613-596-4120 | fax: 613-596-4863
www.Datacast.com
email: sales@Datacast.com
Printed In Canada
Rev 2.8 31
 Loading...