


2
User Guide for SIP-T42G IP Phone
This device is marked with the CE mark in compliance with EC Directives 2014/35/EU and 2014/30/EU.
Any Changes or modifications not expressly approved by the party responsible for compliance could void the
user’s authority to operate the equipment. This device complies with Part 15 of the FCC Rules. Operation is
subject to the following two conditions:
1.
This device may not cause harmful interference, and
2.
This device must accept any interference received, including
interference that may cause undesired operation.
Note: This equipment has been tested and found to comply with the limits for a Class B digital device, pursuant
to part 15 of the FCC Rules. These limits are designed to provide reasonable protection against harmful
interference in a residential installation. This equipment generates, uses and can radiate radio frequency energy
and, if not installed and used in accordance with the instructions, may cause harmful interference to radio
communications. However, there is no guarantee that interference will not occur in a particular installation. If
this equipment does cause harmful interference to radio or television reception, which can be determined by
turning the equipment off and on, the user is encouraged to try to correct the interference by one or more of the
following measures:
1.
Reorient or relocate the receiving antenna.
2.
Increase the separation between the equipment and receiver.
3.
Connect the equipment into an outlet on a circuit different from that to which the receiver is connected.
4.
Consult the dealer or an experienced radio/TV technician for help.
To avoid the potential effects on the environment and human health as a result of the presence of
hazardous substances in electrical and electronic equipment, end users of electrical and electronic
equipment should understand the meaning of the crossed-out wheeled bin symbol. Do not dispose
of WEEE as unsorted municipal waste and have to collect such WEEE separately.

3
User Guide for SIP-T42G IP Phone
Yealink SIP-T42G IP phone firmware contains third-party software under the GNU General Public License (GPL).
Yealink uses software under the specific terms of the GPL. Please refer to the GPL for the exact terms and
conditions of the license.
The original GPL license, source code of components licensed under GPL and used in Yealink products can be
downloaded online:
http://www.yealink.com/GPLOpenSource.aspx?BaseInfoCateId=293&NewsCateId=293&CateId=293.
About This Guide
Thank you for choosing the SIP-T42G IP phone, an ultra-elegant Gigabit IP phone which is exquisitely designed
to provide business telephony features, such as Call Hold, Call Transfer, Busy Lamp Field, Multicast Paging and
Conference over an IP network.
This guide provides everything you need to quickly use your new phone. First, verify with your system
administrator that the IP network is ready for phone configuration. Also be sure to read the Packaging Contents
and Regulatory Notices sections in this guide before you set up and use the SIP-T42G IP phone.

4
User Guide for SIP-T42G IP Phone
Thank you for choosing the SIP-T42G IP phone, an ultra-elegant Gigabit IP phone which is exquisitely designed
to provide business telephony features, such as Call Hold, Call Transfer, Busy Lamp Field, Multicast Paging and
Conference over an IP network.
This guide provides everything you need to quickly use your new phone. First, verify with your system
administrator that the IP network is ready for phone configuration. Also be sure to read the Packaging Contents
and Regulatory Notices sections in this guide before you set up and use the SIP-T42G IP phone.
5
User Guide for SIP-T42G IP Phone
Hardware Compenent Instructions ................................................................................................................. 7
Icon Instructions ............................................................................................................................................. 9
LED Instructions ........................................................................................................................................... 11
Packaging Contents ..................................................................................................................................... 13
Phone Installation ......................................................................................................................................... 14
Phone Initialization ....................................................................................................................................... 16
Phone Status ................................................................................................................................................ 17
Entering Data and Editing Fields .................................................................................................................. 17
General Settings .......................................................................................................................................... 20
Audio Settings .............................................................................................................................................. 22
Contact Management ................................................................................................................................... 24
Directory ....................................................................................................................................................... 24
Local Directory ............................................................................................................................................. 24
Blacklist ................................................................................................................................................... 30
Call History Management ............................................................................................................................. 31
System Customizations ................................................................................................................................ 33
Hotline .......................................................................................................................................................... 34
Placing Calls ................................................................................................................................................ 35
Answering Calls ........................................................................................................................................... 36
Ending Calls ................................................................................................................................................. 37
Redialing Numbers ....................................................................................................................................... 38
Auto Answer ................................................................................................................................................. 39

6
User Guide for SIP-T42G IP Phone
Auto Redial ................................................................................................................................................... 39
Call Mute ...................................................................................................................................................... 40
Call Hold/Resume ........................................................................................................................................ 40
Do Not Disturb (DND) ................................................................................................................................... 41
Call Forward ................................................................................................................................................. 42
Call Transfer ................................................................................................................................................. 47
Call Waiting .................................................................................................................................................. 48
Conference ................................................................................................................................................... 48
Call Park ....................................................................................................................................................... 49
Call Pickup ................................................................................................................................................... 50
Anonymous Call ........................................................................................................................................... 50
Anonymous Call Rejection ........................................................................................................................... 51
Messages ..................................................................................................................................................... 52
Voice Mail ..................................................................................................................................................... 52
Message Waiting Indicator (MWI) ................................................................................................................. 53
General Issues ............................................................................................................................................. 54
Display Issues .............................................................................................................................................. 54
Call Issues .................................................................................................................................................... 54
Headset & Handset Issues ........................................................................................................................... 55
Service Agreements ..................................................................................................................................... 56
Limitations of Liability .............................................................................................................................. 56
Safety Instructions ........................................................................................................................................ 56

7
User Guide for SIP-T42G IP Phone
This chapter provides the overview of the SIP-T42G IP phone.
The main hardware components of the SIP-T42G IP phone are the LCD screen and the keypad.

8
User Guide for SIP-T42G IP Phone
1
LCD Screen
Shows information about calls, messages, soft keys, time, date and other
relevant data:
•
Call information—caller ID, call duration
•
Icons (for example, )
•
Missed call text or second incoming caller information
•
Prompt text (for example, “Saving config file!”)
•
Time and date
2
Power Indicator LED
Indicates phone power and some feature statuses.
•
Receives an incoming call—fast flashing
•
Receives a voice mail or text message, slow flashing
3 Line Keys
Use these keys to activate up to twelve lines and assign various features.
4
(Mute Key)
Toggles and indicates mute feature.
(Headset Key)
Toggles and indicates the headset mode.
(Message Key)
Accesses voice mails.
(Redial Key)
Redials a previously dialed number.
5 Speakerphone Key
Toggles and indicates the hands-free speakerphone mode.
6 Volume Key
Adjusts the volume of the handset, headset, speaker, and ringer.
7 Keypad
Provides the digits, letters, and special characters in context-sensitive
applications.
8
Scroll through the displayed information.
Confirms actions or answers incoming calls.
Cancels actions or rejects incoming calls.
Hardware component instructions of the SIP-T42G IP phone are:

9
User Guide for SIP-T42G IP Phone
9 Soft Keys
Label automatically to identity their context-sensitive features.
10
Speaker
Provides hands-free (speakerphone) audio output.
11 Hookswitch Tab
Secures the handset in the handset cradle when the IP phone is mounted
vertically. For more information on how to adjust the hookswitch tab, refer
to Yealink Wall Mount Quick Installation Guide for Yealink IP Phones.
12 Hookswitch
Picking up the handset from the handset cradle, the hookswitch bounces
and the phone connects to the line, laying the handset down on the
handset cradle, the phone disconnects from the line.
Network is unavailable
The line registers successfully
Registration failed
Registering
The shared/bridged line registers successfully
Hands-free speakerphone mode
Handset mode
Headset mode
Voice Mail
Icons appearing on the LCD screen are described in the following table:

10
User Guide for SIP-T42G IP Phone
Auto Answer
Do Not Disturb
Call Hold
Call Mute
Ringer volume is 0
Phone Lock
Call Forward/Forwarded Calls
Missed Calls
Received Calls
Placed Calls
Recording box is full
A call cannot be recorded
Recording starts successfully
Recording cannot be started
Recording cannot be stopped
The contact icon

11
User Guide for SIP-T42G IP Phone
Solid red
The phone is initializing.
Fast flashing red (300ms)
The phone is ringing.
Slow flashing red (1s)
The phone receives a voice mail.
Off
The phone is powered off.
The phone is idle.
The phone is busy.
The call is placed on hold or is held.
The call is muted.
Solid green
The line is seized.
The line is in conversation.
Fast flashing green
The line receives an incoming call.
Slow flashing green
The call is placed on hold.
Off
The line is inactive.
Solid green
The monitored user is idle.
Fast flashing red (200ms)
The monitored user receives an incoming call.

12
User Guide for SIP-T42G IP Phone
Solid red
The monitored user is busy.
The monitored user’s conversation is placed on hold
(This LED status requires server support).
Slow flashing red (1s)
The call is parked against the monitored user’s phone number.
Off
The monitored user does not exist.

13
User Guide for SIP-T42G IP Phone
This chapter provides the following basic installation instructions and information for obtaining the best
performance with the SIP-T42G IP phone.
The following components are included in your SIP-T42G IP phone package:
•
•

14
User Guide for SIP-T42G IP Phone
•
•
•
•
Check the list before installation. If you find anything missing, contact your system administrator.
This section introduces how to install the phone:
1.
Attach the stand
2.
Connect the handset and optional headset
3.
Connect the network and power

15
User Guide for SIP-T42G IP Phone
EHS36 is used for connecting the phone and a compatible wireless headset. For more
information on how to use EHS36, refer to Yealink EHS36 User Guide.
You have two options for power and network connections. Your system administrator will advise you which one to
use.
•
AC power (Optional)
•
Power over Ethernet (PoE)
To connect the AC power:
1.
Connect the DC plug on the power adapter to the DC5V port on the phone and
connect the other end of the power adapter into an electrical power outlet.
2.
Connect the included or a standard Ethernet cable between the Internet
port on the phone and the one on the wall or switch device port.

16
User Guide for SIP-T42G IP Phone
The IP phone should be used with Yealink original power adapter (5V/1.2A) only. The use of
the third-party power adapter may cause the damage to the phone.
If in-line power is provided, you don’t need to connect the phone to the power adapter. Make
sure the switch/hub is PoE-compliant.
The phone can also share the network with another network device such as a PC (personal
computer). This is an optional connection.
Important! Do not remove power from the phone while it is updating firmware and
configurations.
With the included or a regular Ethernet cable, the SIP-T42G IP phone can be powered from a PoE-compliant
switch or hub.
To connect the PoE:
1. Connect the Ethernet cable between the Internet port on the phone
and an available port on the in-line power switch.
After your phone is powered on, the system boots up and performs the following steps:
The phone finishes the initialization by loading the saved configuration. The LCD screen displays “Welcome
Initializing…please wait” during this process.

17
User Guide for SIP-T42G IP Phone
,
If your network does not use DHCP, contact your system administrator.
The phone attempts to contact a DHCP server in your network to obtain valid IPv4 network settings (e.g., IP
address, subnet mask, default gateway address and DNS address) by default.
You can view phone status via phone user interface. Available information of phone status includes:
•
Network status (e.g., IPv4 status, IP mode, MAC address).
•
Phone status (e.g., product name, hardware version, firmware version, product ID, MAC address and
device certificate status).
•
Account status (e.g., register status of SIP account).
To view the phone status via phone user interface:
1. Press or press
2.
Press or to scroll through the list and view the specific information.
If the phone has successfully started up, the idle LCD screen will be displayed as below.
The idle screen displays the label of the current account, time and date, and four soft keys.
You can enter data and edit fields using the phone keypad.
Keypad on the phone provides different characters (or numbers) when using the input
mode. You can change the following input modes to enter data and edit fields on your phone. When your phone

18
User Guide for SIP-T42G IP Phone
1
1
2abcABC
abc2дже
абвгз
abc2дже
абвгз
ABC2ДЖЕ
АБВГЗ
2
3defDEF
def3èéêë
ð
def3èéêë
ð
DEF3ÈÉÊË
Ð
3
4ghiGHI
ghi4ìíîï
ghi4ìíîï
GHI4ÌÍÎÏ
4
5jklJKL
jkl5£ jkl5£ JKL5£
5
6mnoMN O
mno6öøò
óôõñ
mno6öøò
óôõñ
MNO6ЦШ
ТУФХС
6
7pqrsPQR S
pqrs7ßS
pqrs7ßS
PQRS7S
7
8tuvTUV
tuv8ùúûü
tuv8ùúûü
TUV8ÙÚÛ
Ü
8
9wxyzWX YZ
wxyz9ýÞ
wxyz9ýÞ
WXYZ9ÝÞ
9
0 space
space
space
0
*.,’?!\-()@/:
_;+&%=<
>
£$¥¤[]{}
~^¡¿§#”|
*.,’?!\-()@/:
_;+&%=<
>
£$¥¤[]{}
~^¡¿§#”|
*.,’?!\-()@/:
_;+&%=<
>
£$¥¤[]{}
~^¡¿§#”|
*.,’?!\-()@/:
_;+&%=<
>
£$¥¤[]{}
~^¡¿§#”|
.*:/@[]
# # # # #
keypad matches the input mode, you can press the keypad repeatedly to view the character (or numbers) options
and stop to select. When the character (or numbers) you want to enter displays in the field, wait one second, and
enter the next character (or numbers).
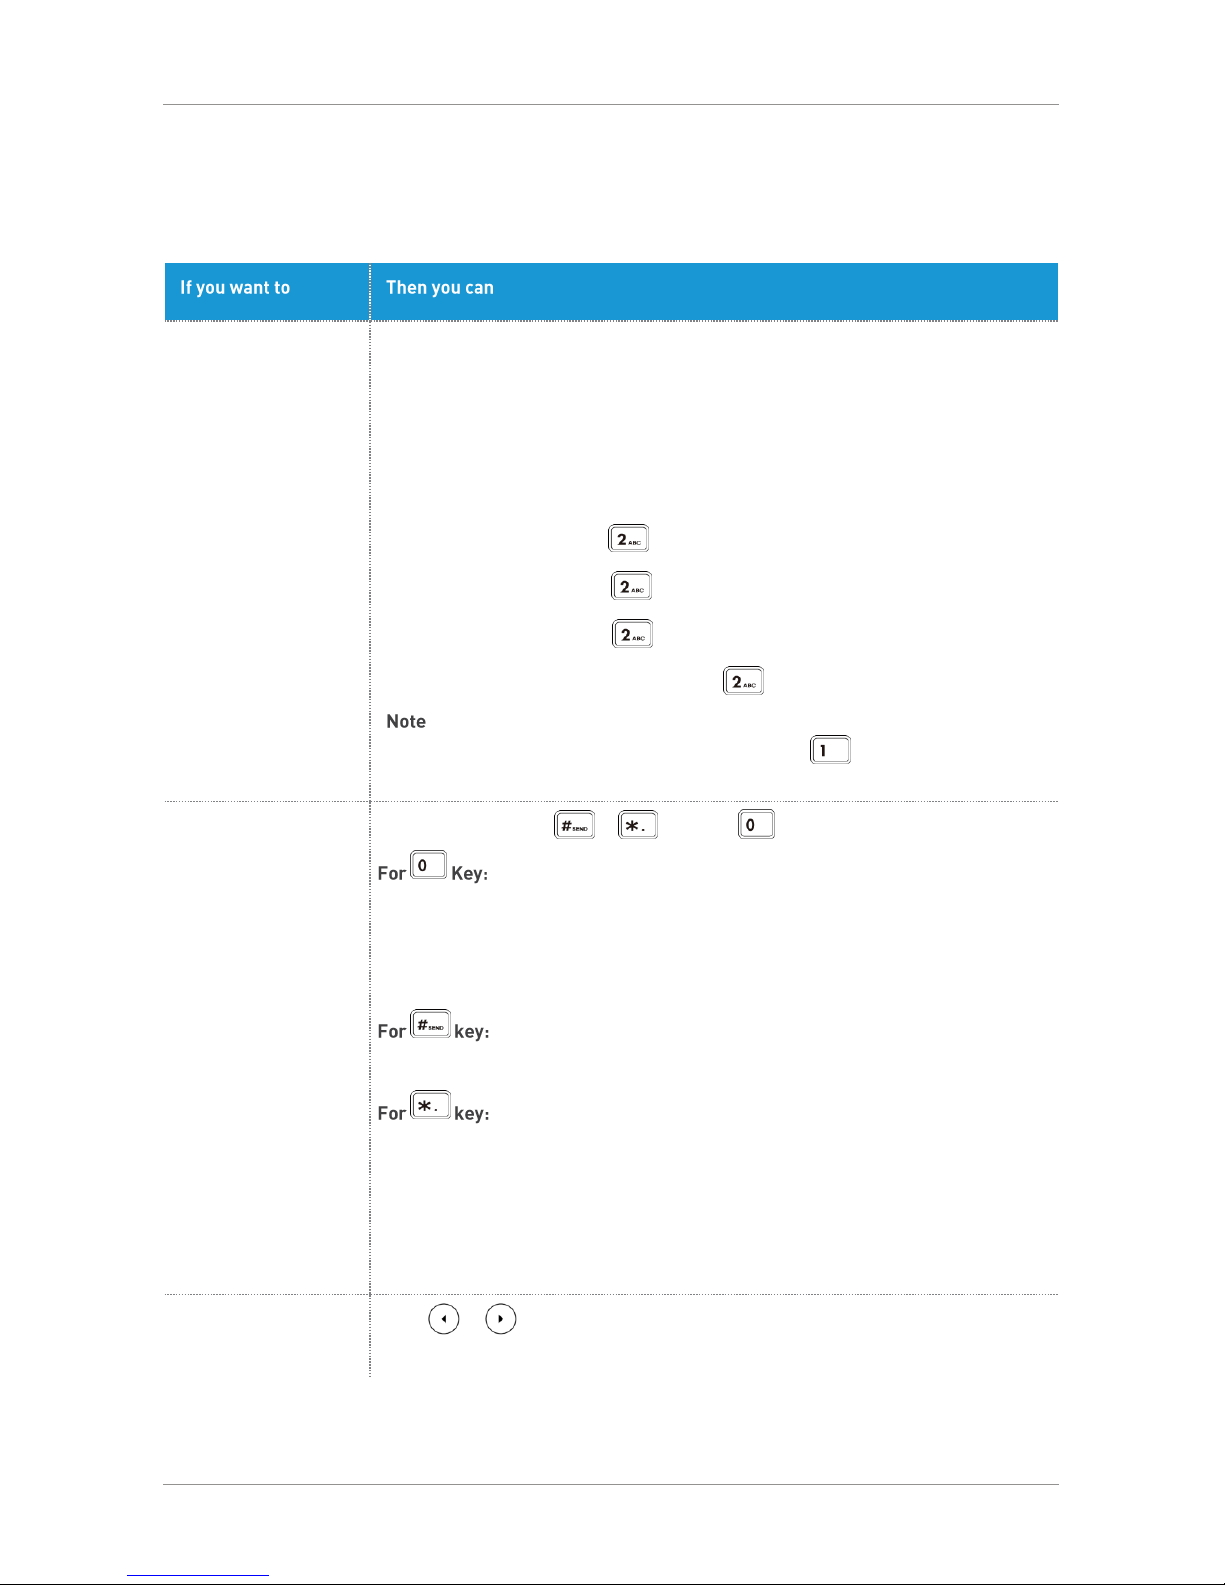
The following table lists the input modes and character (or numbers) options for the keypad:
19
User Guide for SIP-T42G IP Phone
Enter only digits
(1), uppercase
(A) characters,
lowercase (a)
characters, or
alphanumeric (2aB)
characters.
Press a keypad key one or more times (depending what input mode you’re in) to
enter the characters that is displayed on the keypad key.
You can press the abc soft key one or more times to switch among uppercase
(ABC soft key), numeric (123 soft key), alphanumeric (2aB soft key), uppercase and
lowercase (Abc soft key) and lowercase (abc soft key) input modes.
For example, if the input mode is ABC:
•
To enter “A”, press once.
•
To enter “B”, press twice quickly.
•
To enter “C”, press three times quickly.
•
To enter “2ДЖЕАБВГЖ”, press more than three times quickly.
: When you are in the uppercase (ABC soft key), uppercase and lowercase
(Abc soft key) or lowercase (abc soft key) input mode, is not available.
Enter special
characters.
Press the keypad key or , or press .
If it is in the uppercase (ABC soft key), uppercase and lowercase (Abc soft key) or
lowercase (abc soft key) input mode, it will provide the space character.
If it is in the numeric (123 soft key) or alphanumeric (2aB soft key) input mode, it will
only provide the digit 0.
It only provides the pound character #.
If it is in the uppercase (ABC soft key),lowercase (abc soft key), uppercase and
lowercase (Abc soft key) or alphanumeric (2aB soft key) input mode, it will provide
the following special characters: *.,?!\-()@/:_;+&%=<>£$¥¤[]{}~^¡¿§#”|.
If it is in the numeric (123 soft key) input mode, it will provide the following special
characters: .*:/@[].
Delete text you entered.
Press
or to position the cursor to the right of the text you want to delete,
and then press the Delete soft key to delete one character at a time.
To enter or edit data:
Do one of the following:

20
User Guide for SIP-T42G IP Phone
You can customize your SIP-T42G IP phone by personally configuring certain settings, for example, time & date
and ring tones. You can add contacts to the phone’s local directory manually or from call history. You can also
personalize different ring tones for different callers.
You can configure the backlight to adjust the brightness of the LCD screen. Backlight status on the LCD screen
can be configured from the following options:
•
•
•
designated time (in seconds).
Backlight is on permanently.
Backlight is off permanently.
Backlight is turned off when the phone is inactive after the
To configure the backlight via phone user interface:
1. Press
2.
The default language of the phone user interface is English.
Press or , or the Switch soft key to select the desired time from the field.
3.
Press the Save soft key to accept the change or the soft key to cancel.
To change the language for the phone user interface:
1. Press
2.
Press or to select the desired language.

21
User Guide for SIP-T42G IP Phone
3.
Press the soft key to accept the change.
Text displayed on the phone user interface will change to the selected language.
The time and date are displayed on the LCD screen when the phone is idle. You can configure the phone to obtain
the time and date from the Simple Network Time Protocol (SNTP) server automatically, or configure the date
and time manually. If the phone cannot obtain the time and date from the SNTP server, contact your system
administrator for more information.
To configure the time and date format via phone user interface:
1. Press
2.
Press or , or the soft key to select the desired time
format ( or ) from the Time Format field.
3.
Press or , or the soft key to select the desired date format from the t field.
4.
Press the soft key to accept the change or the soft key to cancel.
There are 7 available date formats. For example, for the date format “WWW DD MMM”,
“WWW” represents the abbreviation of the weekday, “DD” represents the two-digit day, and “MMM” represents
the first three letters of the month.

22
User Guide for SIP-T42G IP Phone
WWW MMM DD
Sat May 16
DD-MMM-YY
16-May-15
YYYY-MM-DD
2015-05-16
DD/MM/YYYY
16/05/2015
MM/DD/YY
05/16/15
DD MMM YYYY
16 May 2015
WWW DD MMM
Sat 16 May
The date formats available:
You can press the Volume key to adjust the ringer volume when the phone is idle or ringing. You can also press
the Volume key to adjust the receiver volume of currently engaged audio devices (handset, speakerphone or
headset) when the phone is in use.
To adjust the ringer volume:
1. Press to adjust the ringer volume.
1. Press to adjust the ringer volume.
You can also press to adjust the ringer volume when selecting a ring tone.

23
User Guide for SIP-T42G IP Phone
If the ringer volume is adjusted to minimum, the icon will appear on the LCD screen.
1. Press to adjust the volume of currently engaged audio device
Ring tones are used to indicate incoming calls. You can select different ring tones to distinguish different
accounts registered on your phone, or to distinguish your phone from your neighbor’s.
(handset, speakerphone or headset).
To select a ring tone for the phone via phone user interface:
1. Press
2.
Press
3.
(Optional.) Press to adjust the ringer volume.
4.
Press the soft key to accept the change or the Back soft key to cancel.
or
to select the desired ring tone.
To select a ring tone for the account via phone user interface:
1. Press
2.
Press or to select the desired account and then press the Enter soft key.
3.
Press
or to select the desired ring tone.
If Common is selected, this account will use the ring tone selected for the phone.

24
User Guide for SIP-T42G IP Phone
The priority of ring tone for an incoming call on the phone is as follows: Contact ring tone
(refer to Adding Contacts) >Group ring tone (refer to Adding Groups) >Account ring tone
>Phone ring tone.
4.
(Optional.) Press to adjust the ringer volume.
5.
Press the soft key to accept the change or the soft key to cancel.
This section provides the operating instructions for managing contacts.
Directory provides easy access to frequently used lists.
To view the directory via phone user interface:
1. Press the soft key when the phone is idle.
The LCD screen displays the enabled list(s) in the directory.
If there is only one list in the directory, press the soft key to enter this list directly.
The built-in phone directory can store the names and phone numbers of your contacts. You can store up to 1000
contacts and 48 groups in your phone’s local directory. You can add new groups and contacts, edit, delete or
search for a contact, or simply dial a contact number from the local directory.
To add a group to the local directory:

25
User Guide for SIP-T42G IP Phone
1.
Press the Directory soft key.
The IP phone enters the local directory directly as there is only
If the Local Directory is removed from the directory, press to enter
the local directory.
2.
Press the soft key.
3.
Enter the desired group name in the Name field.
4.
Press or , or the Switch soft key to select the desired ring tone from the Ring field.
Local Directory enabled in the directory by default.
5.
Press the soft key to accept the change or the soft key to cancel.
You can also edit or delete any newly added contact groups.
To edit a group in the local directory:
1.
Press the soft key.
The IP phone enters the local directory directly as there is only
Local Directory enabled in the directory by default.
If Local Directory is removed from the directory, press to enter the
local directory.
2.
Select the desired contact group.
3.
Press the soft key and then select .

26
User Guide for SIP-T42G IP Phone
4.
Press or to highlight the group information and then edit.
5.
Press the soft key to accept the change or the soft key to cancel.
To delete a group from the local directory:
1.
Press the soft key.
The IP phone enters the local directory directly as there is only Local Directory enabled in the directory
by default.
If Local Directory is removed from the directory, press
2.
Select the desired contact group.
3.
Press the soft key and then select .
to enter the local directory.
The LCD screen prompts the following warning:
4.
Press the soft key to confirm the deletion or the soft key to cancel.
You can also delete all groups by pressing the soft key, and then select
You can add contacts to the local directory in one of the following ways:
•
Manually
•
From call history
•
From a remote phone book

27
User Guide for SIP-T42G IP Phone
If the contact already exists in the directory, the LCD screen will prompt —Contact name
existed!
To add a contact to the local directory manually:
1.
Press the soft key.
The IP phone enters the local directory directly as there is only Local Directory enabled in the directory
by default.
If Local Directory is removed from the directory, press
2.
Select the desired contact group and then press the Enter soft key.
If the contact is not in any group, select and then press the soft key.
3.
Press the soft key.
4.
Enter the name and the office, mobile or other numbers in the corresponding fields.
to enter the local directory.
5.
Press or , or the soft key to select the desired account from the field.
If Auto is selected, the phone will use the default account when
placing calls to the contact from the local directory.
6.
Press or , or the soft key to select the desired ring tone from the field.
If Auto is selected, this contact will use the ring tone according to the
priority: Group ring tone >Account ring tone > Phone ring tone.
7.
Press or , or the soft key to select the desired group from the Group field.
8.
Press the soft key to accept the change or the soft key to cancel.
To add a contact to the local directory from call history:
1.
Press the soft key.
2.
Press
3.
Press the soft key, and then select .
or to highlight the desired entry.

28
User Guide for SIP-T42G IP Phone
4.
Press the soft key. And then enter the contact name.
5.
Press the soft key to accept the change.
The entry is successfully saved to the local directory.
To edit a contact in the local directory:
1.
Press the soft key.
The IP phone enters the local directory directly as there is only Local Directory enabled in the directory
by default.
If Local Directory is removed from the directory, press
2.
Select the desired contact group and then press the Enter soft key.
If the contact is not in any group, select and then press the soft key.
3.
Press
4.
Press the soft key, and then select .
5.
Press
to enter the local directory.
or to highlight the desired contact.
or to highlight the contact information and then edit.
6.
Press the soft key to accept the change or the soft key to cancel.
To delete a contact from the local directory:
1.
Press the soft key.
The IP phone enters the local directory directly as there is only Local Directory enabled in the directory
by default.
If Local Directory is removed from the directory, press
2.
Select the desired contact group and then press the soft key.
If the contact is not in any group, select and then press the soft key.
to enter the local directory.

29
User Guide for SIP-T42G IP Phone
3.
Press or to highlight the desired contact.
4.
Press the soft key, and then select .
The LCD screen prompts the following warning:
5.
Press the soft key to confirm the deletion or the soft key to cancel.
You can also delete all contacts by pressing the soft key, and then select
To place a call to a contact from the local directory:
1.
Press the soft key.
The IP phone enters the local directory directly as there is only Local Directory enabled in the directory
by default.
If Local Directory is removed from the directory, press
2.
Select the desired contact group and then press the soft key.
If the contact is not in any group, select and then press the soft key.
3.
Press
4.
Do one of the following:
ª
If only one number for the contact is stored in the local directory, press the soft key to dial out
ª
If multiple numbers for the contact are stored in the local directory, press the soft key to
To search for a contact in the local directory:
1.
Press the soft key.
The IP phone enters the local directory directly as there is only Local Directory enabled in the directory
by default.
If Local Directory is removed from the directory, press
2.
Press the soft key.
or
to highlight the desired contact.
the number.
display a list of numbers.
Press
or to highlight the desired number. Press the soft key to dial out the number.
to enter the local directory.
to enter the local directory.

30
User Guide for SIP-T42G IP Phone
3.
Enter a few continuous characters of the contact name or continuous numbers of
the contact number (office, mobile or other number) using the keypad.
The contacts whose name or phone number matches the characters entered will appear on the LCD screen.
You can dial from the result list.
You can search for a contact from the desired lists when the phone is on the dialing screen. The lists can be
Local Directory, History, Remote Phone Book and LDAP.
To search for an entry in the enabled search source lists:
1.
Pick up the handset, press the Speakerphone key or press the line key.
2.
Enter a few continuous characters of the entry’s name or continuous numbers of the entry’s phone
number (office, mobile or other number) using the keypad.
The entries in the enabled search source lists whose name or phone number
matches the characters entered will appear on the LCD screen. You can press
or to scroll to the desired entry, and then place a call to the entry.
The built-in phone directory can store names and phone numbers for a blacklist. You can store up to 30 contacts,
add, edit, delete or search for a contact in the blacklist directory, and even call a contact from the blacklist
directory. Incoming calls from blacklist directory contacts will be rejected automatically.
To add a contact to the blacklist directory manually:
1. Press
2.
Press the soft key.
3.
Enter the name and the office, mobile or other numbers in the corresponding fields.

31
User Guide for SIP-T42G IP Phone
4.
Press or , or the soft key to select the desired account from the field.
If is selected, the phone will use the default account when placing calls to the contact from the
blacklist directory.
5.
Press the soft key to accept the change or the soft key to cancel.
To add a contact to the blacklist directory from the local directory:
1.
Press soft key.
The IP phone enters the local directory directly as there is only Local Directory enabled in the directory
by default.
If Local Directory is removed from the directory, press
to enter the local directory.
2.
Select the desired contact group and then press the soft key.
If the contact is not in any group, select and then press the soft key.
3.
Press
4.
Press the soft key and then select . The
or to highlight the desired contact.
LCD screen prompts “Move selected to blacklist?”.
5.
Press the soft key to accept the change.
The SIP-T42G IP phone maintains call history lists of Placed Calls, Received Calls, Missed Calls and Forwarded
Calls. Each call history list supports up to 100 entries. You can view call history, place a call, add a contact or
delete an entry from the call history list.
History record feature is enabled by default. If you don’t want to save the call history, you can disable the feature.
To disable history record via phone user interface:
1. Press
2.
Press or , or the Switch soft key to select from the History Record field.

32
User Guide for SIP-T42G IP Phone
3.
Press the soft key to accept the change or the soft key to cancel.
To view call history:
1.
Press the soft key.
The LCD screen displays all call records.
2.
Press
3.
Press
4.
Press the soft key, and then select .
The detailed information of the entry appears on the LCD screen.
To place a call from the call history list:
1.
Press the soft key.
2.
Press
3.
Press
4.
Press the soft key.
or to switch among all, placed, received, missed and forwarded call lists.
or to select the desired entry.
or to switch among all, placed, received, missed and forwarded call lists.
or to select the desired entry.
To add a contact to the local directory (or blacklist directory) from the call history
list:
1.
Press the soft key.
2.
Press
3.
Press
4.
Press the soft key, and then select (or ).
5.
Enter the desired values in the corresponding fields.
6.
Press the soft key to accept the change.
or to switch among all, placed, received, missed and forwarded call lists.
or to select the desired entry.

33
User Guide for SIP-T42G IP Phone
To delete an entry from the call history list:
1.
Press the soft key.
2.
Press
3.
Press
4.
Press the soft key.
or to switch among all, placed, received, missed and forwarded call lists.
or to select the desired entry.
To delete all entries from the call history list:
1.
Press the soft key.
2.
Press
3. Press the soft key, and then select
4.
Press the soft key.
The LCD screen prompts “Delete all the call records?”.
5.
Press the soft key to confirm the deletion or the soft key to cancel.
or to switch among all, placed, received, missed and forwarded call lists.
If you want to use a headset, physically connect your headset and activate the headset mode for use.
To activate the headset mode:
1. Press on the phone.
The headset key LED illuminates solid green when the headset mode is activated.
Press the line key or the Answer soft key to answer an incoming call. The call will be connected to your
headset automatically.
Enter the desired number and then press the Send soft key, the phone will then place a call using the
headset automatically.

34
User Guide for SIP-T42G IP Phone
To deactivate the headset mode:
1. Press again on the phone.
The headset key LED goes out when the headset mode is deactivated.
You can dial a hotline number immediately upon lifting the handset, pressing the Speakerphone key or the line
key. You can also configure a delay, and then the phone will dial out the hotline number automatically after the
designated period of time.
To configure the hotline number via phone user interface:
1. Press
2.
Enter the desired number in the field.
3.
Enter the delay time (in seconds) in the field.
The valid values range from 0 to 10 (seconds) and the default value is —4.
4.
Press the soft key to accept the change or the soft key to cancel.

35
User Guide for SIP-T42G IP Phone
The SIP-T42G IP phone is designed to be easily used like a regular phone on a public switched telephone
network (PSTN). You can place calls, answer calls, transfer a call to someone else, or conduct a conference call.
You can place a call in one of three ways using your SIP-T42G IP phone:
•
Using the handset
•
Using the speakerphone
•
Using the headset
You can also dial the number first, and then choose the way you want to speak to the other party.
You can also search and dial a contact from call history or local directory.
During a call, you can alternate between Speakerphone, Headset, or Handset mode by pressing the
Speakerphone key, the Headset key, or by picking up the handset.
The call duration of the active call and far-site’s information (name or phone number) are visible on the LCD
screen. In the figure below, the call to ―Tom (the phone number: 1021) has lasted 17 seconds.
To place a call using the handset:
1.
Pick up the handset.
2.
Enter the desired number using the keypad.
3.
Press
,
, or the soft key.
The # key is configured as a send key by default.
To place a call using the hands-free speakerphone mode:
Do one of the following:
•
With the handset on-hook, press or the line key to obtain a dial tone.
Enter the desired number using the keypad.
Press
,
or the soft key.

36
User Guide for SIP-T42G IP Phone
•
With the handset on-hook, enter the desired number using the keypad.
Press
,
,
or the soft key.
To place a call using the headset:
Do one of the following:
•
With the optional headset connected, press to activate the headset mode.
Press the line key to obtain a dial tone.
Enter the desired number using the keypad.
Press
•
With the optional headset connected, press to activate the headset mode.
Enter the desired number using the keypad.
Press
The SIP-T42G IP phone can handle multiple calls at a time. However, only one active call (the call that has audio
associated with it) can be in progress at any time, other calls are placed on hold. The SIP-T42G IP phone can
handle a maximum of 12 calls at one time.
To place multiple calls:
You can have more than one call on your SIP-T42G IP phone. To place a new call during an active call, do one of
the following:
•
Press the line key. The active call is placed on hold.
Enter the desired number using the keypad.
,
, or the soft key.
,
, or the soft key.
Press
•
Press the soft key to place the original call on hold.
Press the soft key.
Enter the desired number using the keypad.
Press
You can press or to switch between calls, and then press the soft key to retrieve the desired
call.
,
, or the soft key.
,
, or the soft key.
When you are not in another call, you can answer a call in one of three ways:
•
Using the handset
•
Using the speakerphone
•
Using the headset

37
User Guide for SIP-T42G IP Phone
You can reject incoming calls by pressing the X key or the Reject soft key. You can also
activate Do Not Disturb mode to ignore the incoming calls without ringing on your phone.
You can forward incoming calls to someone else by pressing the soft key.
Call duration and destination will always appear on the LCD screen for the active call.
To answer a call using the handset:
1. Pick up the handset.
To answer a call using the hands-free speakerphone mode:
Do one of the following:
•
Press .
•
With the handset on-hook and the headset mode deactivated, press the soft key.
•
With the handset on-hook and the headset mode deactivated, press the line key with the fast flashing
green LED indicator.
To answer a call using the headset: Do one of the following:
•
Press .
•
With the headset mode activated, press the soft key.
•
With the headset mode activated, press the line key with the fast flashing green LED indicator.
If you have an active call, and an incoming call arrives on the phone, do one of the following:
•
Press the soft key.
The incoming call is answered and the original call is placed on hold.
•
Press to access the new call.
Press or the soft key.
The incoming call is answered and the original call is placed on hold.

38
User Guide for SIP-T42G IP Phone
When a call is placed on hold, you cannot press to end it. You should press the Resume
soft key to resume the call, and then press to end it.
To end a call:
Do one of the following:
•
If you are using the handset, press , the soft key or hang up the handset.
•
If you are using the headset, press , or the soft key.
•
If you are using the speakerphone, press
,
or the soft key.
To redial the last dialed number from your phone:
1. Press twice.
A call to your last dialed number is attempted.
To redial a previously dialed number from your phone:
1.
Press when the phone is idle.
2.
Press or to select the desired entry from the placed calls
list, and then press or the soft key.
To view placed calls list when the phone is on the dialing screen:
1. Pick up the handset, press the Speakerphone key or press the line
key. The LCD screen displays the placed calls list.
You can also enter a few continuous characters of the contact name or continuous numbers of the
contact number (office, mobile or other number) to search from placed calls list.

39
User Guide for SIP-T42G IP Phone
Auto answer is only applicable when there is no other call in progress on the phone.
You can use auto answer feature to automatically answer an incoming call on a line. Auto answer is configurable
on a per-line basis.
To configure auto answer via phone user interface:
1. Press
2.
Press or , or the soft key to select the desired account from the field.
3.
Press or , or the soft key to select Enabled from the field.
Press the soft key to accept the change or the soft key to cancel. The icon appears on the LCD
screen.
You can enable auto redial to automatically redial a phone number when the called party is busy. You can also
configure the number of auto redial attempts and the time to wait between redial attempts.
To configure auto redial via phone user interface:
1. Press
2.
Press or , or the soft key to select Enabled from the field.

40
User Guide for SIP-T42G IP Phone
3.
Enter the desired time (in seconds) in the field.
The default value is ―10.
4.
Enter the desired number of redial attempts in the field.
The default value is ―10.
5.
Press the soft key to accept the change or the soft key to cancel.
To use auto redial:
When the called party is busy, the following prompt will appear on the LCD screen of the phone:
1.
Press the soft key to activate auto redial.
The LCD screen prompts the following:
2.
Wait for the designated period of time or press the soft key to redial the phone number.
The phone will retry as many times as configured until the called party is idle.
You can mute the microphone of the active audio device during an active call so that the other party cannot hear
you. Call mute applies to all modes (Handset, Headset and Speakerphone).
To mute a call:
1. Press during an active call.
The LCD screen indicates that the call is now muted. The mute key
LED illuminates solid red when the call is muted.

41
User Guide for SIP-T42G IP Phone
The phone will beep softly every 30 seconds to remind you that you still have a call on hold.
To un-mute a call:
1.
Press
The mute key LED goes out.
You can place an active call on hold. Only one active call can be in progress at any time. Other calls can be made
and received while placing the original call on hold. When you place a call on hold, your IP PBX may play music
to the other party while waiting.
again to un-mute the call.
To place a call on hold:
1. Press the soft key during a call.
The line key LED flashes green. The LCD screen indicates that the call is on hold.
To resume a held call:
1. Press the soft key.
Multiple Calls on Hold:
If multiple calls are placed on hold, do one of the following:
•
Press or to switch between the calls, and then press the soft key to retrieve the
desired call.
•
Press the corresponding line key to retrieve the call.
If more than one call is placed on hold, a numbered prompt appears on the LCD screen, for example “2/3”,
indicating that this is the second call out of three calls.

42
User Guide for SIP-T42G IP Phone
The prompt message will display only if Missed Call Log for the line is enabled.
Do not disturb is local to the phone, and may be overridden by the server settings. For more
information, contact your system administrator.
When DND and busy forward are enabled in phone mode, calls will be sent to the configured
destination number.
You can use DND to reject incoming calls automatically on the phone. The prompt message
(“n” indicates the number of missed calls) will appear on the LCD screen, and callers will receive a busy
message. All calls you receive while DND is enabled are logged to your missed calls list.
You can enable/disable DND for the phone system, or you can customize DND for each or all accounts. Two DND
modes:
•
•
(default): DND is effective for the phone system.
: DND can be configured for each or all accounts
You can receive incoming calls from authorized numbers when DND is enabled.
To activate DND in phone mode:
1. Press the soft key when the phone is idle.
The icon on the status bar indicates that DND is enabled.
Incoming calls will be rejected automatically and (“n” indicates the
number of missed calls. e.g., 1 New Missed Call(s)) will prompt on the LCD screen.
You can configure your phone to forward incoming calls to another party through static forwarding. You can also
forward incoming calls while your phone is ringing; refer to Dynamic Forwarding.
Three types of static forwarding:
•
•
•
Incoming calls are immediately forwarded.
Incoming calls are immediately forwarded if the phone is busy.
Incoming calls are forwarded if not answered after a period of time.

43
User Guide for SIP-T42G IP Phone
You can enable/disable call forward for the phone, or you can customize call forward for each or all accounts.
Two call forward modes:
•
•
(default): Call forward is effective for the phone system.
: Call forward can be configured for each or all accounts.
To enable call forward in phone mode:
1. Press
2.
Press
3.
Depending on your selection:
a)
If you select d:
1)
2)
3) (Optional.) Enter the always forward on code or off code respectively in the or
b)
If you select d:
or to select the desired forwarding type, and then press the soft key.
Press or , or the soft key to select from the field.
Enter the destination number you want to forward all incoming calls to in the to field.
field.
1)
Press or , or the soft key to select from the field.
2)
Enter the destination number you want to forward all incoming calls to when the phone is busy in
the to field.
3)
(Optional.) Enter the busy forward on code or off code respectively in the or field.
c)
If you select :
1)
Press or , or the soft key to select from the field.

44
User Guide for SIP-T42G IP Phone
2) Enter the destination number you want to forward all unanswered incoming calls to in the
to field.
3)
Press
or , or the soft key to select the ring time to wait before forwarding from the
field.
The default ring time is 12 seconds.
4) (Optional.) Enter the no answer forward on code or off code respectively in the or
field.
4.
Press the soft key to accept the change or the soft key to cancel.
The
icon on the status bar indicates that the call forward is enabled.
To enable call forward in custom mode:
1. Press
2.
Press
or
to select the desired account, and then press the soft key.
3.
Press
4.
Depending on your selection:
a)
If you select , you can enable it for a specific account.
1)
2)
3)
or to select the desired forwarding type, and then press the soft key.
Press or , or the soft key to select from the d field.
Enter the destination number you want to forward all incoming calls to in the to field.
(Optional.) Enter the always forward on code or off code respectively in the or e
field.
You can also enable always forward for all accounts. After always forward was enabled for a specific
account, do the following:

45
User Guide for SIP-T42G IP Phone
1)
Press or to highlight the d field.
2)
Press the soft key.
The LCD screen prompts ―Copy to all lines?.
3)
Press the soft key to accept the change or the soft key to cancel.
b)
If you select , you can enable it for a specific account.
1)
Press
or , or the soft key to select from the rd field.
2)
Enter the destination number you want to forward incoming calls to when the phone is busy in the
to field.
3)
(Optional.) Enter the busy forward on code or off code respectively in the or e field.
You can also enable busy forward for all accounts. After busy forward was enabled for a specific
account, do the following:
1)
Press
2)
Press the s soft key.
or
to highlight the field.
The LCD screen prompts ―Copy to all lines?.
3)
Press the soft key to accept the change or the soft key to cancel.
c)
If you select , you can enable it for a specific account.
1)
Press or , or the soft key to select from the field.

46
User Guide for SIP-T42G IP Phone
Call forward is local to the phone, and may be overridden by the server settings. Call forward
on code or off code may be different between servers. For more information, contact your
system administrator.
2) Enter the destination number you want to forward all unanswered incoming calls to in the
to field.
3)
Press
or , or the soft key to select the ring time to wait before forwarding from the
field.
The default ring time is 12 seconds.
4) (Optional.) Enter the no answer forward on code or off code respectively in the or
field.
You can also enable no answer forward for all accounts. After no answer forward was enabled for a
specific account, do the following:
1)
Press
2)
Press the soft key.
or to highlight the d field.
The LCD screen prompts ―Copy to all lines?.
3)
Press the OK soft key to accept the change or the Cancel soft key to cancel.
5.
Press the soft key to accept the change or the soft key to cancel.
If you activate call forward for the default account, the associated line icon will change to , and the icon
will appear on the status bar.
If you activate call forward for the non-default account, only the associated line icon will change to .
To disable call forward in phone mode:
1. Press
2.
Press
3.
Press
4.
Press the soft key to accept the change.
or to select the desired forwarding type and then press the soft key.
or , or the soft key to select to disable the call forward.

47
User Guide for SIP-T42G IP Phone
When the phone forwards a call, a prompt window will pop up by default, if you want to
disable the feature, contact your system administrator for more information.
To forward an incoming call to another party:
1.
When the phone is ringing, press the soft key.
2.
Enter the number you want to forward the incoming call to.
3.
Press
,
, or the soft key.
The LCD screen prompts a call forward message.
You can transfer a call to another party in one of three ways:
•
•
•
To perform a blind transfer:
1.
Press the soft key during a call.
2.
Enter the number you want to transfer the call to.
3.
Press the soft key to complete the transfer.
Then the call is connected to the number to which you are transferring.
Transfer a call directly to another party without consulting.
Transfer a call when the target phone is ringing.
Transfer a call with prior consulting.
To perform a semi-attended transfer:
1.
Press the soft key during a call.
2.
Do one of the following:
•
Enter the number you want to transfer the call to.

48
User Guide for SIP-T42G IP Phone
•
Press the soft key, and then select . Select the desired group and search
for the contact (Directory should be configured in advance).
•
Press the soft key, and then select . Select the desired list and then press or
to select the entry (Directory should be configured in advance).
•
Press the soft key, and then select . Select the desired group and
search for the contact (Directory should be configured in advance).
3.
Press
4.
Press the soft key to complete the transfer when receiving ring back.
or
to dial out.
To perform an attended transfer:
1.
Press the soft key during a call.
2.
Do one of the following:
•
Enter the number you want to transfer the call to.
•
Press the soft key, and then select ry. Select the desired group and search
for the contact (Directory should be configured in advance).
•
Press the soft key, and then select . Select the desired list and then press or
to select the entry (Directory should be configured in advance).
3.
Press
4.
After the party answers the call, press the soft key to complete the transfer.
If you are using a handset, the transfer can be completed by hanging up the handset. You can cancel the transfer
before the call is connected by pressing the soft key.
You can enable or disable call waiting on the phone. If call waiting is enabled, you can receive another call while
there is already an active call on the phone. Otherwise, another incoming call is automatically rejected by the
phone with a busy message when there is an active call on the phone. You can also enable or disable the phone
to play a warning tone when receiving another call.
To configure call waiting via phone user interface:
1. Press
2.
Press or , or the soft key to select from the field.
or
to dial out.

49
User Guide for SIP-T42G IP Phone
3.
Press or , or the soft key to select from the field.
4.
(Optional.) Enter the call waiting on code or off code respectively in the or field.
5.
Press the soft key to accept the change or the soft key to cancel.
You can create a conference with other two parties using the phone’s local conference. You can create a
conference between an active call and a call on hold by pressing the Conference soft key. The SIP-T42G IP phone
also supports network conference.
The SIP-T42G IP phone supports up to 3 parties (including yourself) in a conference call. This is the default
method of conference called Local Conference.
To set up a local conference call:
1.
Place a call to the first party.
2.
When the first party answers the call, press the soft key to place a new call.
The active call is placed on hold.
3.
Enter the number of the second party and then press
,
4. When the second party answers the call, press the
soft key again to join all parties in the conference.
You can press or to see all parties in the conference.
To join two calls in a conference:
1.
Place two calls using two different accounts on the phone (for example, place the
first call using account 1, and then place the second call using account 2).
2.
Press or to select the call for conference and ensure that the
call is active (for example, select the call on account 1).
3.
Press the soft key to join the two calls in the conference on account 1.
During the conference call, you can do the following actions:
•
Press the soft key to place the conference on hold.
•
Press the soft key to split the conference call into two individual calls on hold.
, or the soft key.
•
Press the soft key, and then press or to select the desired party:

50
User Guide for SIP-T42G IP Phone
ª
Press the soft key to mute the party. The muted party can hear everyone, but no one can
hear the muted party.
ª
Press the soft key to remove the party from the conference call.
ª
Press the soft key to place a new call.
ª
Press the soft key to return to the previous screen.
•
Press
you.
•
Press the soft key to drop the conference call.
You can use call park feature to place a call on hold, and then retrieve the call from another phone in the system
(for example, a phone in another office or conference room). You can park an active call by pressing the
soft key or call park key (if configured) on the phone. If the call is parked successfully, there is a voice prompt
confirming that the call was parked. You can retrieve the parked call by pressing the soft key or the
retrieve park key (if configured).
to mute the conference call, all other participants can hear each other, but they cannot hear
You can use call pickup to answer someone else’s incoming call on your phone. The SIP-T42G IP phone supports
directed call pickup and group call pickup. Directed call pickup is used for picking up a call that is ringing at a
target phone number. Group call pickup is used for picking up a call that is ringing at any phone number in a
certain group. The pickup group should be predefined, contact your system administrator for more information.
To pick up a call directly:
1.
When a call is ringing on another phone, pick up the handset,
press the Speakerphone key or press the line key.
2.
To pick up the call from a specific extension, dial *95 + ext.
3.
To pick up any call ringing currently on any other phone, dial *96 + ext.
4.
The call is answered on your phone.
To pick up a call in the group:
1.
When a call is ringing on another phone within the group, pick up the
handset, press the Speakerphone key or press the line key.
2.
Dial *97
3.
The call is answered on your phone.

51
User Guide for SIP-T42G IP Phone
2. Press
or , or the soft key to select the desired line from the D field.
3. Press
or to scroll to the field.
4. Press
or , or the soft key to select from the field.
You can use anonymous call to block your identify and phone number from appearing to the called party when
you call someone. For example, you want to call to consult some services, but don’t want to be harassed.
Anonymous call is configurable on a per-line basis. You can also configure the phone to send anonymous call on/
off code to the server to activate/deactivate anonymous call on the server side.
To configure anonymous call via phone user interface:
1. Press
2.
Press or , or the soft key to select the desired line from the field.
3.
Press or , or the soft key to select Enabled from the field.
4.
(Optional.) Press or , or the soft key to select the desired value from the
field.
The phone will send the configured on code or off code depending on your selection
when you enable or disable anonymous call feature on the phone.
5.
(Optional.) Enter the anonymous call on code and off code respectively in the and field.
6.
Press the soft key to accept the change or the soft key to cancel.
You can use anonymous call rejection to reject incoming calls from anonymous callers. Anonymous call rejection
automatically rejects incoming calls from callers who deliberately block their identities and numbers from being
displayed. Anonymous call rejection is configurable on a per-line basis. You can also configure the phone to send
anonymous call rejection on/off code to the server to activate/deactivate anonymous call rejection on the server
side.
To configure anonymous call rejection via phone user interface:
1. Press

52
User Guide for SIP-T42G IP Phone
5.
(Optional.) Press or , or the soft key to select the desired value from the
field.
The phone will send the configured on code or off code depending on your selection
when you enable or disable anonymous call rejection feature on the phone.
6.
(Optional.) Enter the anonymous call rejection on code and off code
respectively in the and field.
7.
Press the soft key to accept the change or the soft key to cancel.

53
User Guide for SIP-T42G IP Phone
Before listening to voice mails, make sure the voice mail access code has been configured.
When all new voice mails are retrieved, the power indicator LED will go out.
This chapter provides operating instructions for the advanced features of the SIP-T42G IP phone.
You can leave voice mails for someone else using the SIP-T42G IP phone. You can also listen to voice mails
that are stored in a voice mailbox. When receiving a new voice mail, the phone will play a warning tone. The
power indicator LED will slow flash red, and the LCD screen will prompt “n New Voice Mail(s)” (“n” indicates the
number of unread voice messages, e.g., 4 New Voice Mail(s)) and a flashing icon .
If the voice mail pop-up message box disappears, it won’t pop up again unless the user receives a new voice mail
or the user re-registers the account that has unread voice mail(s).
To leave a voice mail:
You can leave a voice mail for someone else when he/she is busy or inconvenient to answer the call. Follow the
voice prompt from the system server to leave a voice mail, and then hang up.
To listen to voice mails:
1.
When the LCD screen prompts that the phone receives a new voice mail and the power indicator LED
slow flashes red, you can press or the Connect soft key to dial out the voice mail access code.
2.
Follow the voice prompt to listen to your voice mails.
To view the voice mail via phone user interface:
1. Press
The LCD screen displays the amount of new and old voice mails.

54
User Guide for SIP-T42G IP Phone
2.
Select an account and then press the Connect soft key to listen to voice mails.
The SIP-T42G IP phone supports MWI feature when receiving a new voice message. If someone leaves you a
voice mail, you will receive a message waiting indicator. MWI will be indicated in three ways: a warning tone, an
indicator message (including a voice mail icon) on the LCD screen, and the power indicator LED slow flashes red.
This will be cleared when you retrieve all voice mails or delete them.

55
User Guide for SIP-T42G IP Phone
This chapter provides general troubleshooting information to help you solve the problems you might encounter
when using your SIP-T42G IP phone.
Press the OK key when the IP phone is idle to check the basic information of the IP phone, such as IP address
and firmware version.
Three ways to obtain the MAC address of a phone:
You can ask your supplier for the shipping information sheet which includes MAC addresses according to the
corresponding PO (Purchase Order).
•
You can find the MAC address on the label of carton box.
•
You can also find the MAC address from the phone’s bar code on the back of the phone.
•
Ensure that the phone is properly plugged into a functional AC outlet.
•
Ensure that the phone is plugged into a socket controlled by a switch that is on.
•
If the phone is plugged into a power strip, try to plug it directly into a wall outlet instead.
•
If the phone is powered from PoE, ensure that you use a PoE-compliant switch or hub.
•
Ensure that the Ethernet cable is plugged into the Internet port on the phone and the Ethernet cable is
not loose.
•
Ensure that the switch or hub in your network is operational.
•
Contact your system administrator for more information.

56
User Guide for SIP-T42G IP Phone
•
Check the SIP registration with your system administrator.
•
Check that the DND (Do Not Disturb) mode is deactivated on your phone.
•
Check that call forward is disabled on the phone.
•
Check whether the caller number is stored in the blacklist directory.
Check that the handset cord is fully connected to both the handset jack on the phone and handset.
•
Check that the headset cord is properly connected to the headset jack on the phone.
•
Check that the headset mode is activated.
•
Check that the headset volume is adjusted to an appropriate level.
•
Check for any loose connections and that the phone has been installed properly.
•
Switch between the Handset, Headset (if present) or Hands-Free Speakerphone to check whether the
dial tone is present for one of the audio modes.
•
If the dial tone exists on another audio mode, connect a different handset or headset to isolate the
problem.
Check the ringer volume on the phone. To adjust the ringer volume setting, press the Volume key when the
phone is on-hook and idle.
When there is a call on hold, the phone will play a hold tone every 30 seconds. Call hold tone is enabled by
default.

57
User Guide for SIP-T42G IP Phone
Contact your Yealink Authorized Reseller for information on service agreements applicable to your product.
TO THE FULL EXTENT ALLOWED BY LAW, YEALINK EXCLUDES FOR ITSELF AND ITS SUPPLIERS ANY LIABILITY,
WHETHER BASED IN CONTRACT OR TORT (INCLUDING NEGLIGENCE), FOR INCIDENTAL, CONSEQUENTIAL,
INDIRECT, SPECIAL, OR PUNITIVE DAMAGES OF ANY KIND, OR FOR LOSS OF REVENUE OR PROFITS,
LOSS OF BUSINESS, LOSS OF INFORMATION OR DATA, OR OTHER FINANCIAL LOSS ARISING OUT OF OR
IN CONNECTION WITH THE SALE, INSTALLATION, MAINTENANCE, USE, PERFORMANCE, FAILURE, OR
INTERRUPTION OF ITS PRODUCTS, EVEN IF YEALINK OR ITS AUTHORIZED RESELLER HAS BEEN ADVISED OF
THE POSSIBILITY OF SUCH DAMAGES, AND LIMITS ITS LIABILITY TO REPAIR, REPLACEMENT, OR REFUND OF
THE PURCHASE RICE PAID, AT YEALINK’S OPTION. THIS DISCLAIMER OF LIABILITY FOR DAMAGES WILL NOT
BE AFFECTED IF ANY REMEDY PROVIDED HEREIN SHALL FAIL OF ITS ESSENTIAL PURPOSE.
The following basic safety precautions should always be followed to reduce the risk of fire, electrical shock, and
other personal injury.
•
Before you install and use the device, read the safety instructions carefully and observe the situation
during operation.
•
During the process of storage, transportation, and operation, please always keep the device dry and
clean.
•
During the process of storage, transportation, and operation, please avoid collision and crash of the
device.
•
Please do not attempt to dismantle the device by yourself. In case of any discrepancy, please contact the
appointed maintenance center for repair.
•
Without prior written consent, no organization or individual is permitted to make any change to the
structure or the safety design of the device. Yealink is under no circumstances liable to consequences
or legal issues caused by such changes.
•
Please refer to the relevant laws and statutes while using the device. Legal rights of others should also
be respected as well.

58
User Guide for SIP-T42G IP Phone
•
Place the device at a well-ventilated place. Do not expose the device under direct sunlight.
•
Keep the device dry and free of dust.
•
Place the device on a stable and level platform.
•
Please do not place heavy objects on the device in case of damage and deformation caused by the heavy
load.
•
Keep at least 10 cm between the device and the closest object for heat dissipation.
•
Do not place the device on or near any inflammable or fire-vulnerable object, such as rubber-made
materials.
•
Keep the device away from any heat source or bare fire, such as a candle or an electric heater.
•
Keep the device away from any household appliance with a strong magnetic field or electromagnetic
field, such as a microwave oven or a refrigerator.
•
Do not let a child operate the device without guidance.
•
Do not let a child play with the device or any accessory in case of accidental swallowing.
•
Please only use the accessories provided or authorized by the manufacturer.
•
The power supply of the device must meet the requirements of the input voltage of the device. Please
use the provided surge protection power socket only.
•
Before plugging or unplugging any cable, make sure that your hands are completely dry.
•
Do not spill liquid of any kind on the product or use the equipment near water, for example, near a
bathtub, washbowl, kitchen sink, wet basement or near a swimming pool.
•
Do not tread on, pull, or over-bend any cable in case of malfunction of the device.
•
During a thunderstorm, stop using the device and disconnect it from the power supply. Unplug the
power plug and the Asymmetric Digital Subscriber Line (ADSL) twisted pair (the radio frequency cable)
to avoid lightning strike.
•
If the device is left unused for a rather long time, disconnect it from the power supply and unplug the
power plug.
•
When there is smoke emitted from the device, or some abnormal noise or smell, disconnect the device
from the power supply, and unplug the power plug immediately. Contact the specified maintenance
center for repair.
•
Do not insert any object into equipment slots that is not part of the product or auxiliary product.
•
Before connecting a cable, connect the grounding cable of the device first. Do not disconnect the
grounding cable until you have disconnected all other cables.
•
Before cleaning the device, stop using it and disconnect it from the power supply.
•
Use a piece of soft, dry and anti-static cloth to clean the device.
•
Keep the power plug clean and dry. Using a dirty or wet power plug may lead to electric shock or other
perils.

59
User Guide for SIP-T42G IP Phone
-11
Samoa
-10
United States-Hawaii-Aleutian, United States-Alaska-Aleutian
-9:30
French Polynesia
-9 United States-Alaska Time
-8 Canada(Vancouver, Whitehorse), Mexico(Tijuana, Mexicali), United States-Pacific Time
-7
Canada(Edmonton,Calgary), Mexico(Mazatlan, Chihuahua), United States-MST no DST,
United States-Mountain Time
-6
Canada-Manitoba(Winnipeg), Chile(Easter Islands), Mexico(Mexico City,Acapulco), United
States-Central Time
-5
Bahamas(Nassau), Canada(Montreal, Ottawa, Quebec), Cuba(Havana), United States-
Eastern Time
-4:30
Venezuela(Caracas)
-4
Canada(Halifax, Saint John), Chile(Santiago), Paraguay(Asuncion), United Kingdom-
Bermuda(Bermuda), United Kingdom(Falkland Islands), Trinidad & Tobago
-3:30
Canada-New Foundland(St. Johns)
-3 Argentina(Buenos Aires), Brazil(DST), Brazil(no DST), Denmark-Greenland(Nuuk)
-2:30
Newfoundland and Labrador
-2 Brazil(no DST)
-1 Portugal(Azores)
0
Denmark-Faroe Islands(Torshavn), GMT, Greenland, Ireland(Dublin), Morocco,
Portugal(Lisboa, Porto, Funchal), Spain-Canary Islands(Las Palmas), United
Kingdom(London)
+1
Albania(Tirane), Austria(Vienna), Belgium(Brussels), Caicos, Chad, Croatia(Zagreb),
Czech Republic(Prague), Denmark(Kopenhagen), France(Paris), Germany(Berlin),
Hungary(Budapest), Italy(Rome), Luxembourg(Luxembourg), Macedonia(Skopje),
Namibia(Windhoek), Netherlands(Amsterdam), Spain(Madrid)
+2
Estonia(Tallinn), Finland(Helsinki), Gaza Strip(Gaza), Greece(Athens), Israel(Tel Aviv),
Jordan(Amman), Latvia(Riga), Lebanon(Beirut), Moldova(Kishinev), Romania(Bucharest),
Russia(Kaliningrad), Syria(Damascus), Turkey(Ankara), Ukraine(Kyiv, Odessa)
+3
East Africa Time, Iraq(Baghdad), Russia(Moscow)
+3:30
Iran(Teheran)
+4
Armenia(Yerevan), Azerbaijan(Baku), Georgia(Tbilisi), Kazakhstan(Aktau),
Russia(Samara)
+4:30
Afghanistan(Kabul)
+5
Kazakhstan(Aqtobe), Kyrgyzstan(Bishkek), Pakistan(Islamabad), Russia(Chelyabinsk)
+5:30
India(Calcutta)

60
User Guide for SIP-T42G IP Phone
+5:45
Nepal(Katmandu)
+6
Kazakhstan(Astana, Almaty), Russia(Novosibirsk, Omsk)
+6:30
Myanmar(Naypyitaw)
+7
Russia(Krasnoyarsk), Thailand(Bangkok)
+8
Australia(Perth), China(Beijing), Russia(Irkutsk, Ulan-Ude), Singapore(Singapore)
+8:45
Eucla
+9
Japan(Tokyo), Korea(Seoul), Russia(Yakutsk, Chita)
+9:30
Australia(Adelaide), Australia(Darwin)
+10
Australia(Brisbane), Australia(Hobart), Australia(Sydney, Melboume, Canberra),
Russia(Vladivostok)
+10:30
Australia(Lord Howe Islands)
+11
New Caledonia(Noumea), Russia(Srednekolymsk Time)
+11:30
Norfolk Island
+12
New Zealand(Wellington, Auckland), Russia(Kamchatka Time)
+12:45
New Zealand(Chatham Islands)
+13
Tonga(Nukualofa)
+13:30
Chatham Islands
+14
Kiribati

User Guide for SIP-T42G IP Phone
61
 Loading...