

Page 1

Polycom IP 7000
Conference Phone
Owner’s Manual V.3
Page 2

1 INTRODUCTION ....................................................................................................................................... 5
Using this Document Notational conventions ........................................................................................................... 5
Typographicalconventions .......................................................................................................................................... 5
Special messages ........................................................................................................................................................ 5
Definition .................................................................................................................................................................... 5
Basic Requirements ................................................................................................................................................... 6
2 GETTING TO KNOW YOUR HOSTED PBX SYSTEM....................................................................................... 7
Before you Begin Your Installation ............................................................................................................................. 7
Assigning Extension Numbers and Phone Numbers to Phones ................................................................................ 8
3 INSTALLING YOUR POLYCOM CONFERENCE PHONE .................................................................................. 9
Installing your Conference Phone .............................................................................................................................. 9
Option 1: Connect the Conference Phone to your data network ............................................................................. 9
Option 2: Connect the Conference Phone wirelessly within 40’ using the Wireless Adapter................................. 10
Activating the Service ............................................................................................................................................... 12
4 USING YOUR HOSTED PBX PHONE SYSTEM ............................................................................................. 13
System Description ................................................................................................................................................... 13
Getting Started ......................................................................................................................................................... 13
Conference Phone Introduction to your Polycom Conference Phone ............................................................. 13
Conference Phone– Basic Call Features .................................................................................................................. 16
Handling Multiple Calls ............................................................................................................................................ 16
Answering When in another Call .............................................................................................................................. 17
Managing Incoming Calls.......................................................................................................................................... 17
Rejecting Calls ........................................................................................................................................................... 17
To send incoming calls from a particular contact directly to voice mail: ................................................................. 17
Diverting Calls ........................................................................................................................................................... 18
To divert incoming calls from a contact to a third party: ........................................................................................ 18
Ending Active Calls .................................................................................................................................................... 19
Placing Calls .............................................................................................................................................................. 19
To place a call off-hook............................................................................................................................................. 19
Placing a Second Call ................................................................................................................................................ 20
Placing Calls Using Speed Dials................................................................................................................................. 20
To place a call using a speed dial index number: ..................................................................................................... 20
Muting the Microphone ........................................................................................................................................... 21
To mute the microphone if you use external microphones: ................................................................................... 21
Redialing Numbers ................................................................................................................................................... 21
To redial the last number dialed: ............................................................................................................................. 21
To redial a previously dialed number: ...................................................................................................................... 21
Placed Calls. .............................................................................................................................................................. 21
Call Hold .................................................................................................................................................................... 22
Holding and Resuming Calls ..................................................................................................................................... 22
To place a call on hold: ............................................................................................................................................. 22
To resume a call on hold:.......................................................................................................................................... 22
Call Transfer .............................................................................................................................................................. 22
Performing a Consultative Transfer .......................................................................................................................... 23
To transfer a call: ...................................................................................................................................................... 23
Performing a Blind Transfer ...................................................................................................................................... 23
To perform a blind transfer: ..................................................................................................................................... 23
Call Park .................................................................................................................................................................... 25
Paging (Intercom) ..................................................................................................................................................... 25
Forwarding Incoming Calls ....................................................................................................................................... 26
To access forwarding options: .................................................................................................................................. 26
Forwarding Calls Statically........................................................................................................................................ 26
2
Page 3

To disable call forwarding: ....................................................................................................................................... 28
Forwarding Calls Dynamically ................................................................................................................................... 29
To forward an incoming call to another extension: ................................................................................................. 29
Directed Call Pickup .................................................................................................................................................. 29
Call Recording ........................................................................................................................................................... 30
Conference Calls ....................................................................................................................................................... 30
Setting Up Conferences ............................................................................................................................................ 31
Setting Up a Conference Using the Conference Soft Key ........................................................................................ 31
Setting Up a Conference with an Active Call and a Call on Hold .............................................................................. 31
To set up a conference call with an active call and a call on hold: ........................................................................... 31
Holding and Resuming Conferences ........................................................................................................................ 32
To place a conference call on hold: .......................................................................................................................... 32
Splitting Conferences ............................................................................................................................................... 32
To split a conference: ................................................................................................................................................ 32
Ending Conferences .................................................................................................................................................. 32
To end a conference: ................................................................................................................................................ 32
Using Voicemail ........................................................................................................................................................ 33
Setting up the voicemail box for the first time ........................................................................................................ 33
Retrieving messages from your Conference Phone................................................................................................. 33
Retrieving messages when you are away from the office ...................................................................................... 34
Returning a Call......................................................................................................................................................... 34
Change your Voicemail PIN ...................................................................................................................................... 34
Record a Personal Greeting via the Phone .............................................................................................................. 35
Forward Voicemail Messages via the Phone ........................................................................................................... 35
Logging into your Voicemail Box via the Web .......................................................................................................... 35
Retrieving messages via the Web ............................................................................................................................. 36
Forward Voicemail Messages via the Web .............................................................................................................. 36
Voicemail Notification via Email............................................................................................................................... 38
To Create a Voicemail Group .................................................................................................................................... 39
Change the Amount of Time Before Voicemail Picks Up ......................................................................................... 40
Additional Call Features Using Call Lists.................................................................................................................... 41
Viewing Call Lists ...................................................................................................................................................... 41
To view a call list: ...................................................................................................................................................... 42
Managing Call Lists ................................................................................................................................................... 42
To manage a call list: ................................................................................................................................................ 42
Speed Dial list ........................................................................................................................................................... 43
To update a speed dial entry in your contact directory:.......................................................................................... 43
Managing Contacts ................................................................................................................................................... 44
Viewing Your Local Contact Directory ...................................................................................................................... 44
Adding Contacts to Your Local Contact Directory .................................................................................................... 44
Adding Contacts Manually ....................................................................................................................................... 45
To add a contact manually: ...................................................................................................................................... 45
Adding Contacts from Call Lists ................................................................................................................................ 47
To add a contact to the Contact Directory from a call list: ...................................................................................... 47
Searching for Contacts ............................................................................................................................................. 48
Searching for Contacts in Your Contact Directory.................................................................................................... 48
To search for a contact in the Contact Directory: .................................................................................................... 48
Updating Contacts in Your Contact Directory .......................................................................................................... 48
To update a contact in your Contact Directory: ....................................................................................................... 49
Deleting Contacts from Your Contact Directory ....................................................................................................... 49
To delete a contact from the Contact Directory: ..................................................................................................... 49
Placing Calls to Contacts ........................................................................................................................................... 50
To place a call to a contact in the Contact Directory: .............................................................................................. 50
Inbound Caller ID ...................................................................................................................................................... 50
Extension Set-Up options ......................................................................................................................................... 51
Do Not Disturb .......................................................................................................................................................... 51
Using Do Not Disturb ................................................................................................................................................ 51
To enable and disable Do Not Disturb: ..................................................................................................................... 51
Configuring Basic Setting .......................................................................................................................................... 52
3
Page 4

Updating Preferences .............................................................................................................................................. 52
Updating the Language ............................................................................................................................................ 52
To change the language: .......................................................................................................................................... 52
Language. .................................................................................................................................................................. 52
Updating the Time and Date Display ........................................................................................................................ 53
To update the time and date display: ...................................................................................................................... 53
Time and Date........................................................................................................................................................... 53
To change the order of the time and date display: ................................................................................................. 54
To enable or disable the time and date display: ...................................................................................................... 54
Time and Date........................................................................................................................................................... 54
Updating the Display Contrast ................................................................................................................................. 55
To adjust the contrast on the phone screen: ........................................................................................................... 55
Updating the Backlight Intensity .............................................................................................................................. 55
To change the backlight intensity: ........................................................................................................................... 56
Updating the Ring Tone ............................................................................................................................................ 57
Selecting a Ring Tone ............................................................................................................................................... 57
To select a different ring tone: ................................................................................................................................. 57
To adjust the speaker volume: ................................................................................................................................. 58
To adjust the ringer volume: .................................................................................................................................... 58
5 SAFETY INFORMATION .......................................................................................................................... 59
IMPORTANT SAFETY AND CONFORMANCE INFORMATION FOR IP PBX BASE UNIT AND PHONES ..................... 59
Conformance ............................................................................................................................................................. 59
Important Safety instructions .................................................................................................................................. 59
FCC Information ....................................................................................................................................................... 61
Data Equipment ........................................................................................................................................................ 61
Systems ..................................................................................................................................................................... 61
Automatic Dialers ..................................................................................................................................................... 61
Toll Restriction and Least Cost Routing Equipment ................................................................................................. 61
Equal Access Requirements...................................................................................................................................... 61
Electrical Safety Advisory ......................................................................................................................................... 62
Radio Interference .................................................................................................................................................... 62
RF Radiation Exposure .............................................................................................................................................. 62
Modifications ............................................................................................................................................................ 62
IMPORTANT SAFETY AND CONFORMANCE INFORMATION FOR VERTICAL CORDLESS TRANSMITTER AND
CORDLESS PHONES ........................................................................................................................................... 62
Part 15 FCC Rules ...................................................................................................................................................... 63
Class B Digital Device or Peripheral .......................................................................................................................... 63
Modifications ............................................................................................................................................................ 63
Installation Instructions ............................................................................................................................................. 63
Plugs Acts as Disconnect Device ............................................................................................................................... 63
Industry Canada (IC) ................................................................................................................................................. 64
CE and VCCI Mark ..................................................................................................................................................... 64
4
Page 5

1 Introduction
Congratulations on purchasing the Intermedia Hosted PBX phone
system and service. Hosted PBX was designed specifically for the
small to mid-size business and combines a business-class phone
system with Voice over IP phone service.
This User Guide will show you how to setup and use your new
Hosted PBX phone system and service.
Using this Document
Notational conventions
Acronyms are defined the first time they appear in the text. The
term LAN refers to a group of Ethernet-connected computers at
one site.
Typographicalconventions
Italic text is used for items you select from menus and drop-down
lists and the names of displayed web pages.
Bold text is used for text strings that you type when prompted by
the program, and to emphasize important points.
Special messages
This document uses the following icons to draw your attention to
specific instructions or explanations.
Provides clarifying or non-essential information on the current
topic.
Definition
WARNING
Explains terms or acronyms that may be unfamiliar to many
readers. These terms are also included in the Glossary.
Provides messages of high importance, including messages
relating to personal safety or system integrity.
5
Page 6

Basic Requirements
The Hosted PBX phone system is designed to use your
existing broadband data connection as well as the existing
data wiring in your office. Where you don’t have data wiring,
you may use the optional Wireless Adapters to connect
Conference Phones to the optional Base Unit wirelessly.
In order to use all the features of the Hosted PBX phone system
and service, you must have the following:
•
Broadband Internet access
•
At least one free port on your router or modem/router
•
Your router must be set to DHCP
6
Page 7

2 Getting to know your Hosted PBX system
Before you Begin Your Installation
The Hosted PBX phone system is designed to use your existing
broadband data connection as well as the existing data wiring in
your office. Where you don’t have data wiring, you may use the
optional Base Unit and Wireless Adapters to connect Conference
Phones to the Base Unit wirelessly. In order to begin using your
new phone system and service, you need to perform the following
steps:
1.
Make sure you have received all of your phones and
optionalequipment
2.
Go to https://exchange.intermedia.net/aspx/Login.aspx Enter your
login name and password to the Admin Portal
3.
Activate your phone lines
4.
Install your phones and optional equipment
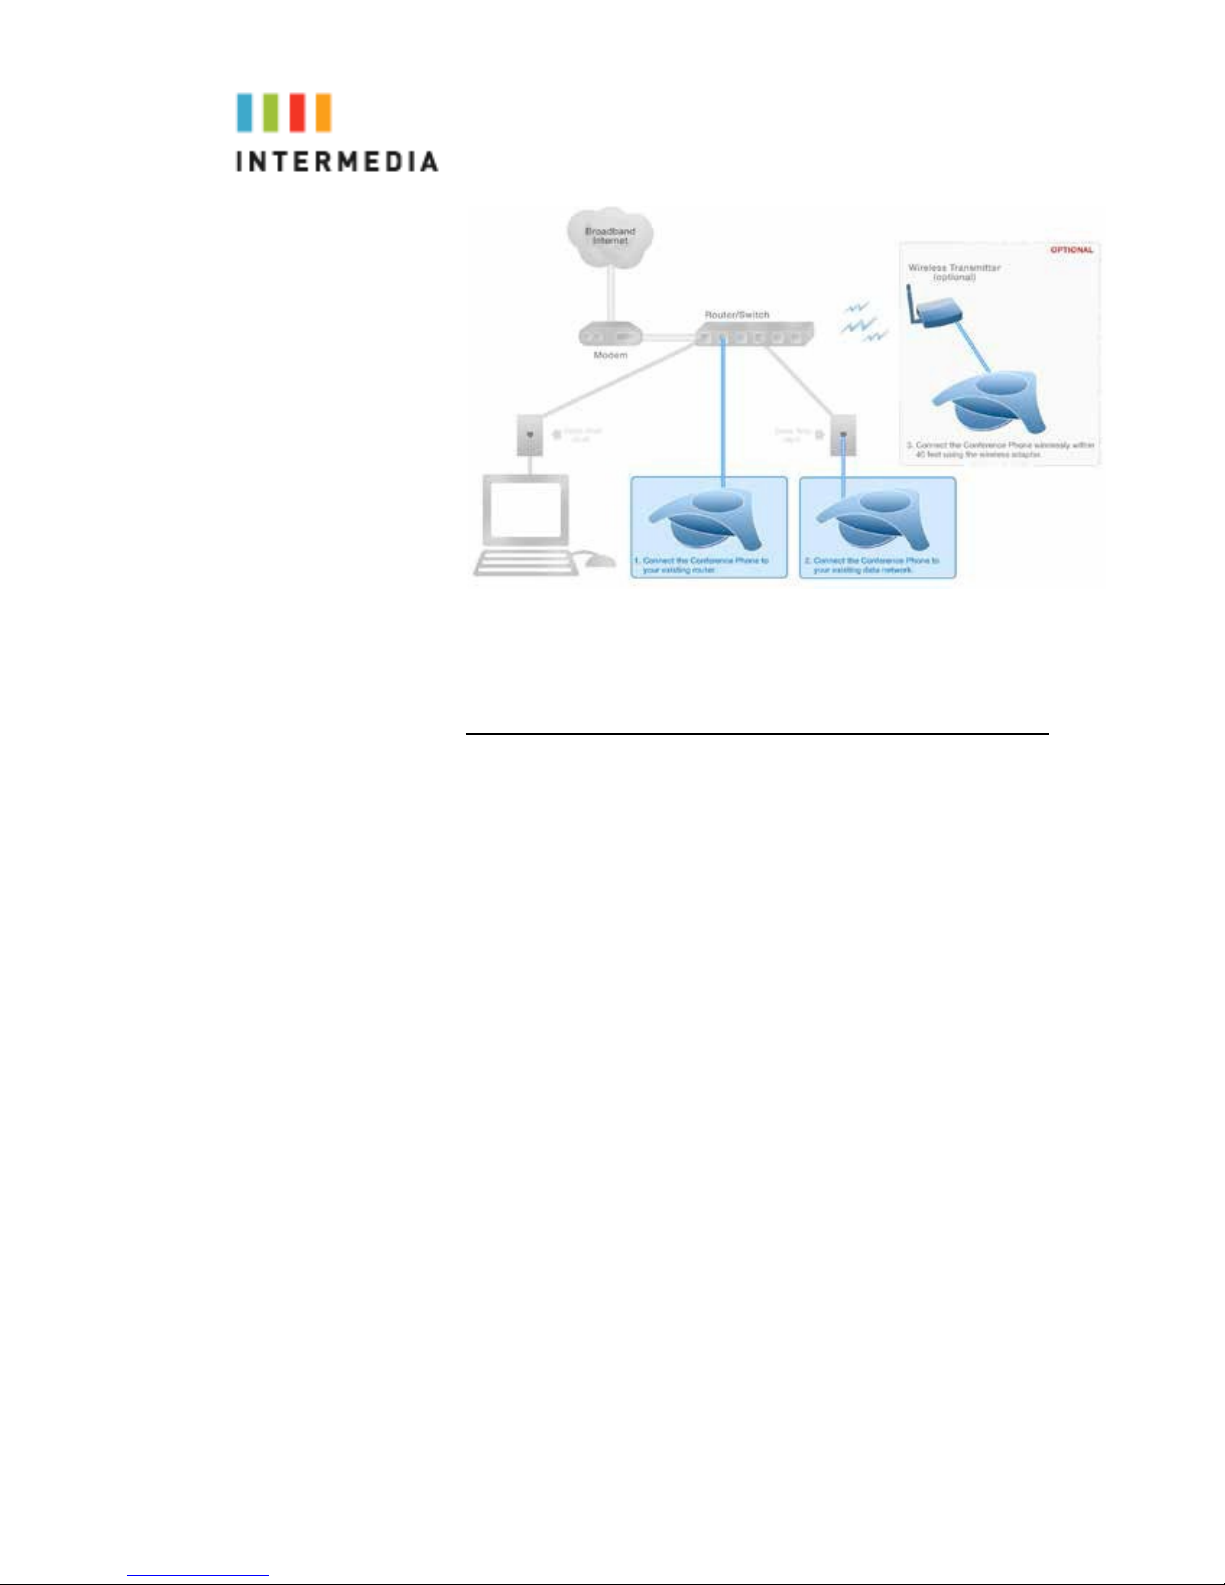
You have several options regarding how to setup your new phone
system. How you choose to install your phone system will depend
on your existing data network and the phones and optional
equipment you have purchased. The diagram below describes
options for setting up the phone system. By purchasing the
optional Wireless Transmitter and Wireless Adapters you may
also connect Conference Phones wirelessly.
7
Page 8
Assigning Extension Numbers and Phone Numbers to Phones
Each phone is assigned an extension and a phone number. The
Packing list includes a list of your phones and their associated
phone numbers and extension. You should have also received and
email from Intermedia with the phone numbers and extensions
associated with each enhanced services such as an Auto Attendant
or WebFax. You may also log into your Admin Portal at
https://exchange.intermedia.net/aspx/Login.aspx to view a list of your
phone numbers and extensions.
8
Page 9

3 Installing your Polycom Conference Phone
Installing your Conference Phone
The Conference Phone can be installed in one of 2 ways:
•
You may connect Conference Phones to your existing router
or data wall jack
•
You may connect Conference Phones Wirelessly to the
optional Wireless Transmitter.
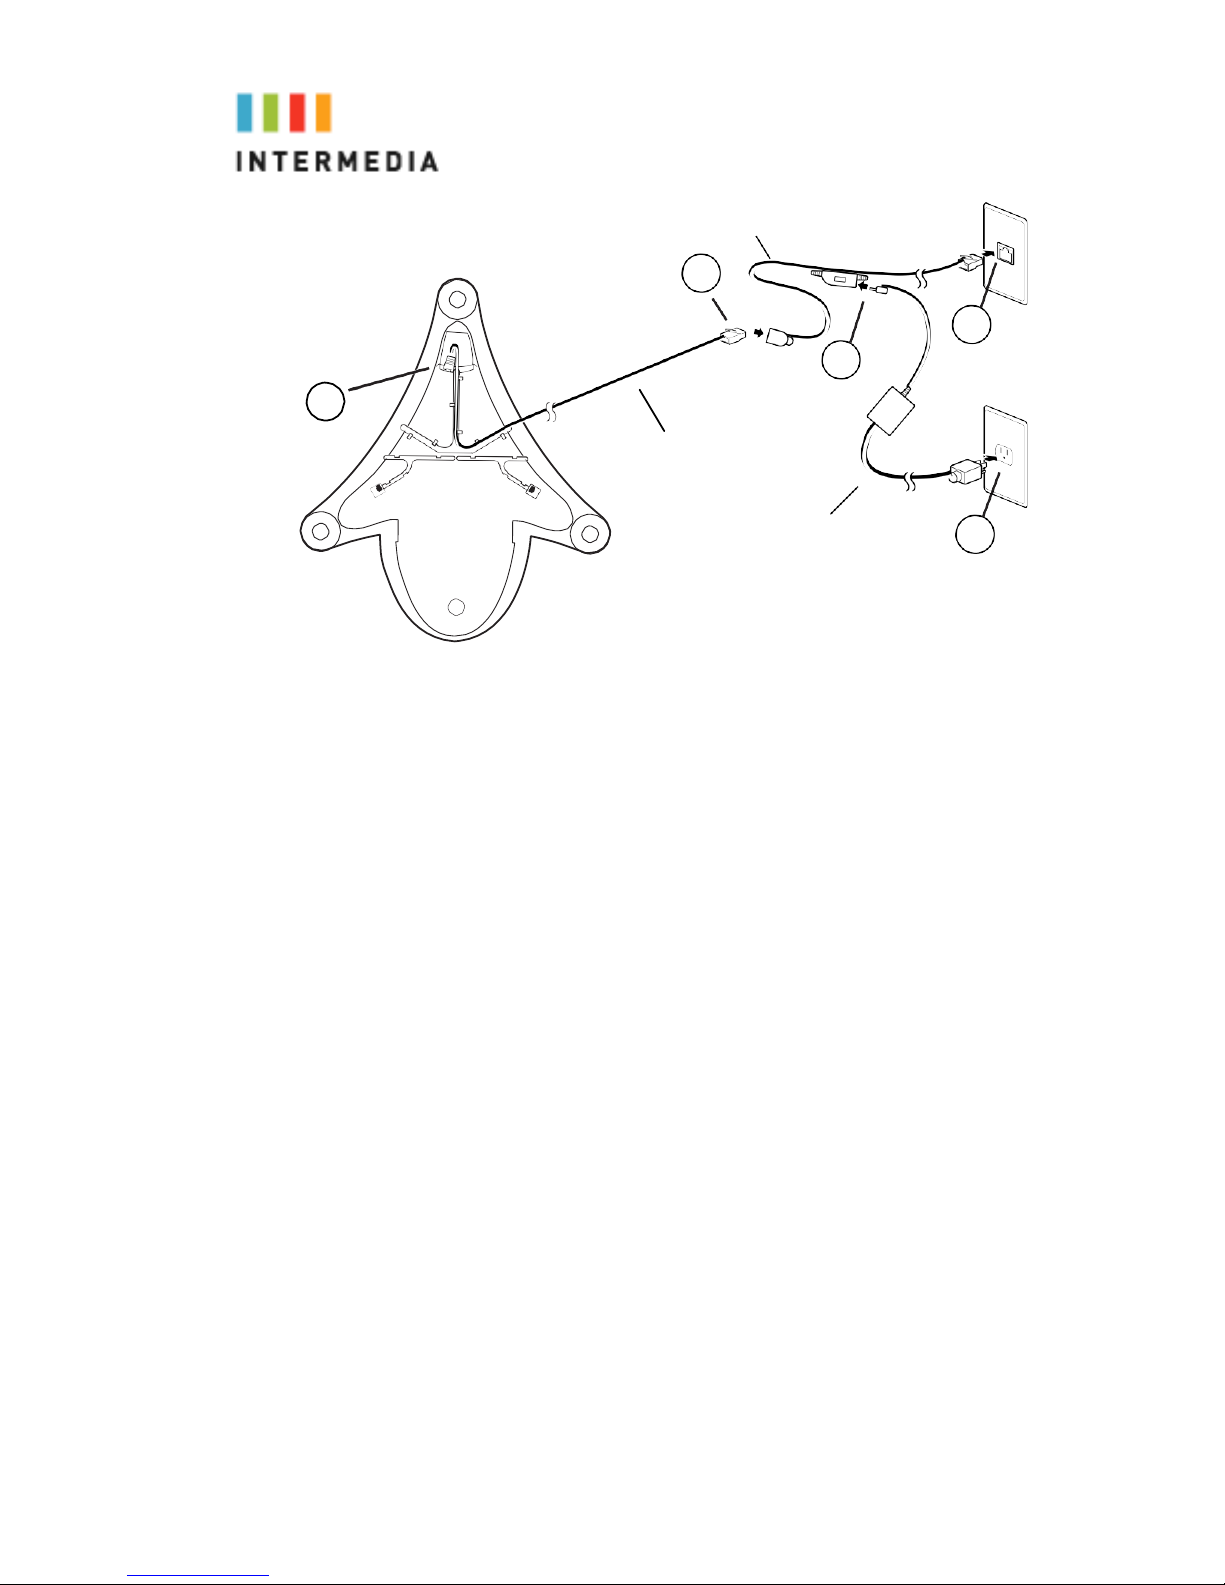
Option 1: Connect the Conference Phone to your data network
1.
Connect one end of the 25-foot Network Cable to the
LAN jack on the phone.
2.
Connect the other end of the 25-foot Network Cable to
the Power Insertion Cable.
3.
Connect the Power Insertion Cable to an available LAN
port on the wall or router/switch device port.
4.
Connect the Power Adapter to the Power Insertion Cable
5.
Connect the Power Adapter (with the attached Regional
Power Cord) to the wall outlet.
9
Page 10
Power Insertion Cable
2
3
4
1
25-foot Network Cable
Power Adapter
5
Option 2: Connect the Conference Phone wirelessly within 40’
using the Wireless Adapter
The wireless adapter allows a Conference Phone to be used
without a cord connecting it to the local network but requires the
use of the optional Wireless Transmitter. The range of the
Wireless Adapter is 40 feet from the optional Wireless Transmitter.
10
Page 11
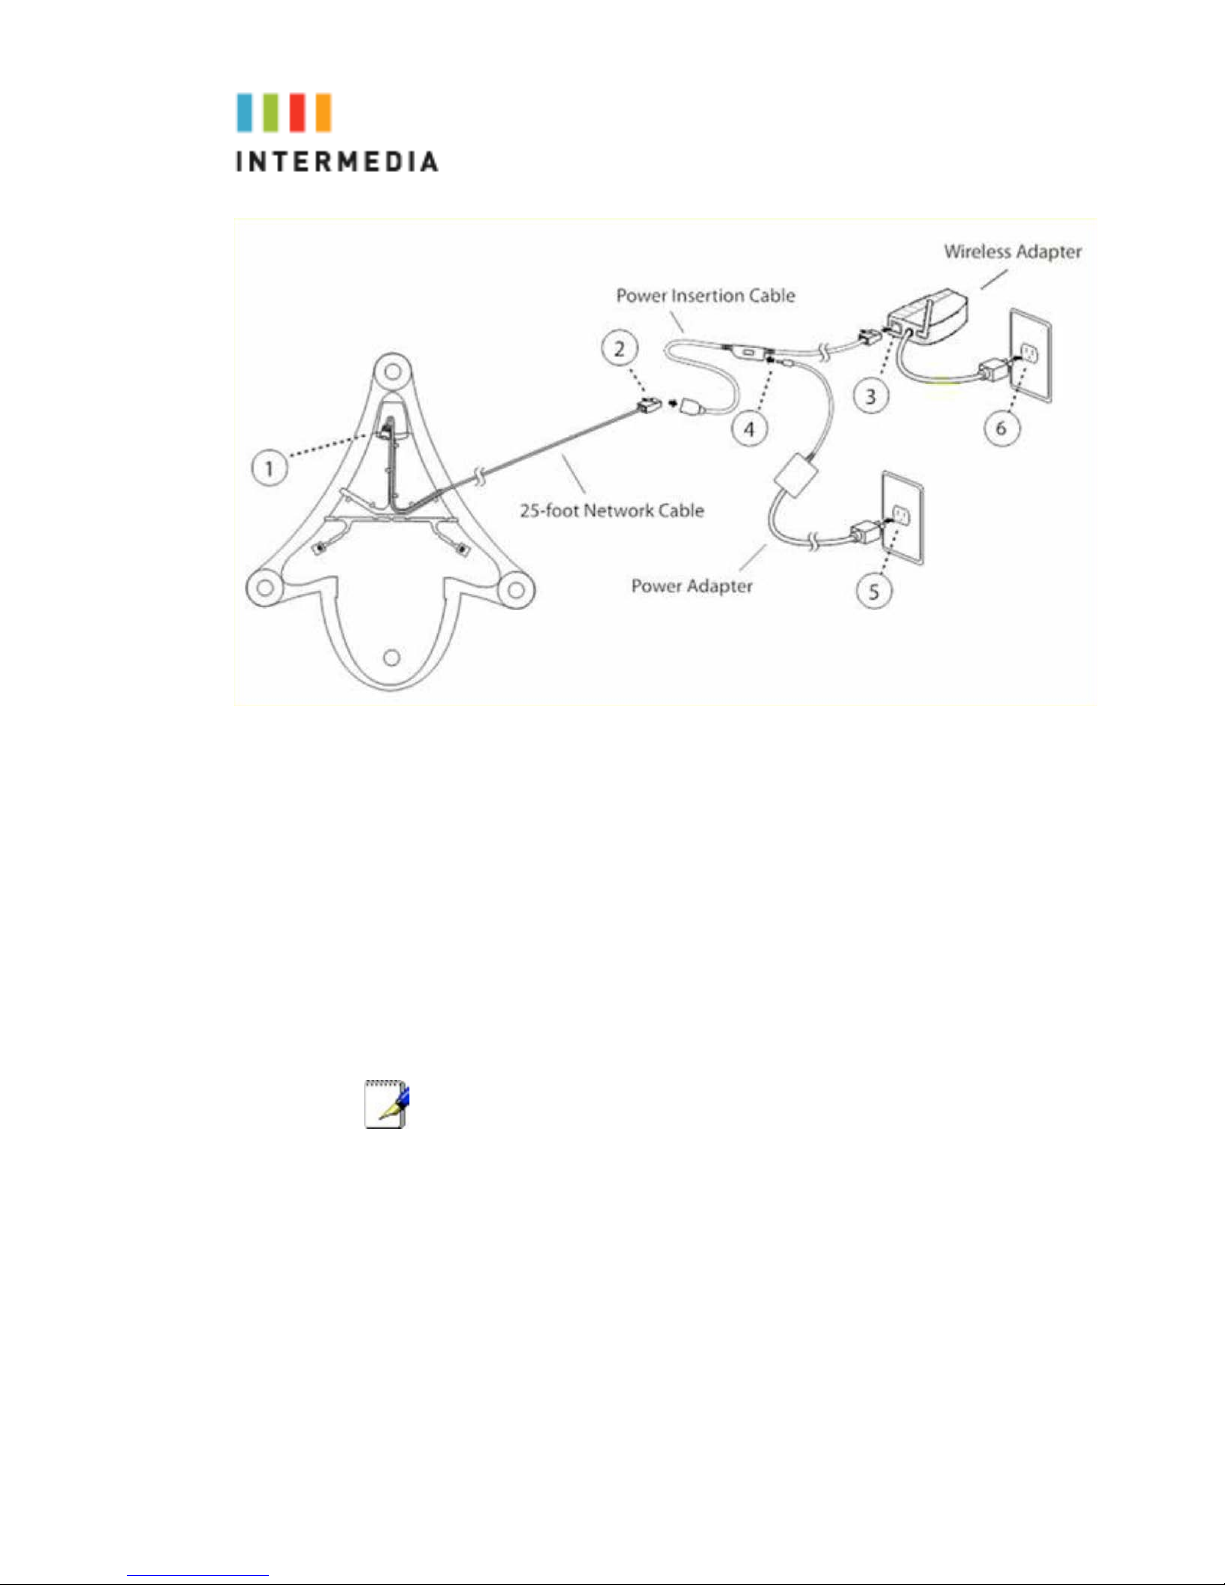
To connect the phone using the Wireless Adapter
1.
Connect one end of the 25-foot Network Cable to the LAN
jack on the phone.
2.
Connect the other end of the 25-foot Network Cable to the
Power Insertion Cable.
3.
Connect the Power Insertion Cable to the LAN port on the
Wireless Adapter
4.
Connect the Power Adapter to the Power Insertion Cable
5.
Connect the Power Adapter (with the attached Regional
Power Cord) to the wall outlet.
6.
Plug the Wireless Adapter’s power adapter into the wall
outlet.
To avoid interference or static on the phone, place the Wireless Adapter
away from the phone as shown.
N
o
t
e
11
Page 12
Activating the Service
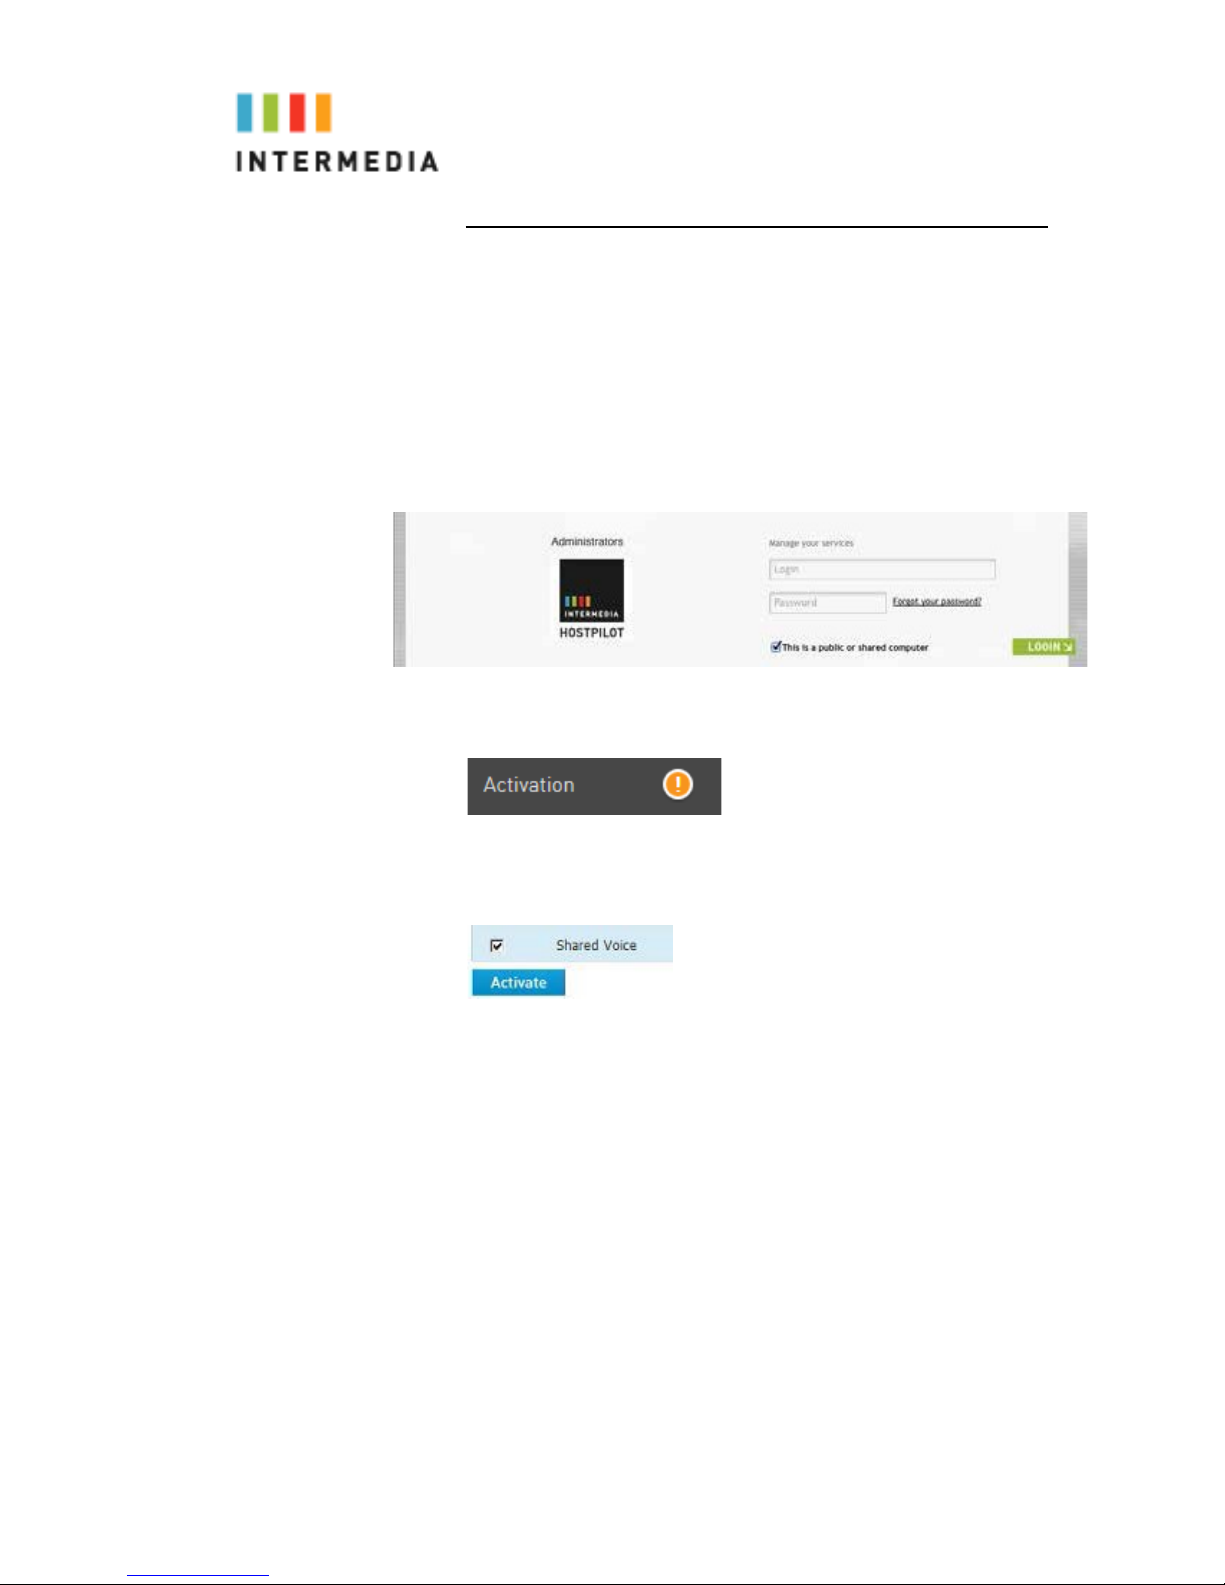
Before you can make or receive calls, you need to activate your
phone line(s). This also activates the billing for your phone
line(s).
To activate your phone line(s):
1.
Go to https://exchange.intermedia.net and enter your
Administrator Portal login name and password
2.
On the 1st screen, click the “Activation” tab.
3.
Select either the “Line activation” or “Phone activation” section, place a
check in the box next to the items you wish to activate, and press the
Save changes button.
NOTE- You will activate all of your lines at once, so if there is no
“Activate Lines” button, then you have already activated the
lines.
12
Page 13

4 Using Your Hosted PBX phone system
System Description
•
The Hosted PBX phone system supports up to 100
phones
•
By using the optional Base Unit, you may purchase more
phones than phone lines to increase your savings
•
You can have as few as on phone at an address
•
Through your Admin Portal, you can view information and
make changes to phone system
Getting Started
This section of your Owner’s Manual is your guide to using the
Polycom Conference Phone. It also explains how to program
system settings for your Conference Phone
Conference Phone
Introduction to your Polycom Conference Phone
This phone provides multi-person audio conferencing capabilities
for medium to large conference rooms.
It features a 3-line display that contains prompts and menus with
selectable options. This unique menu-driven interface makes the
system simple to use, and no codes are needed to program and
activate features.
Some system settings are programmed through your Admin Portal
website while others are programmed through the phone.
13
Page 14
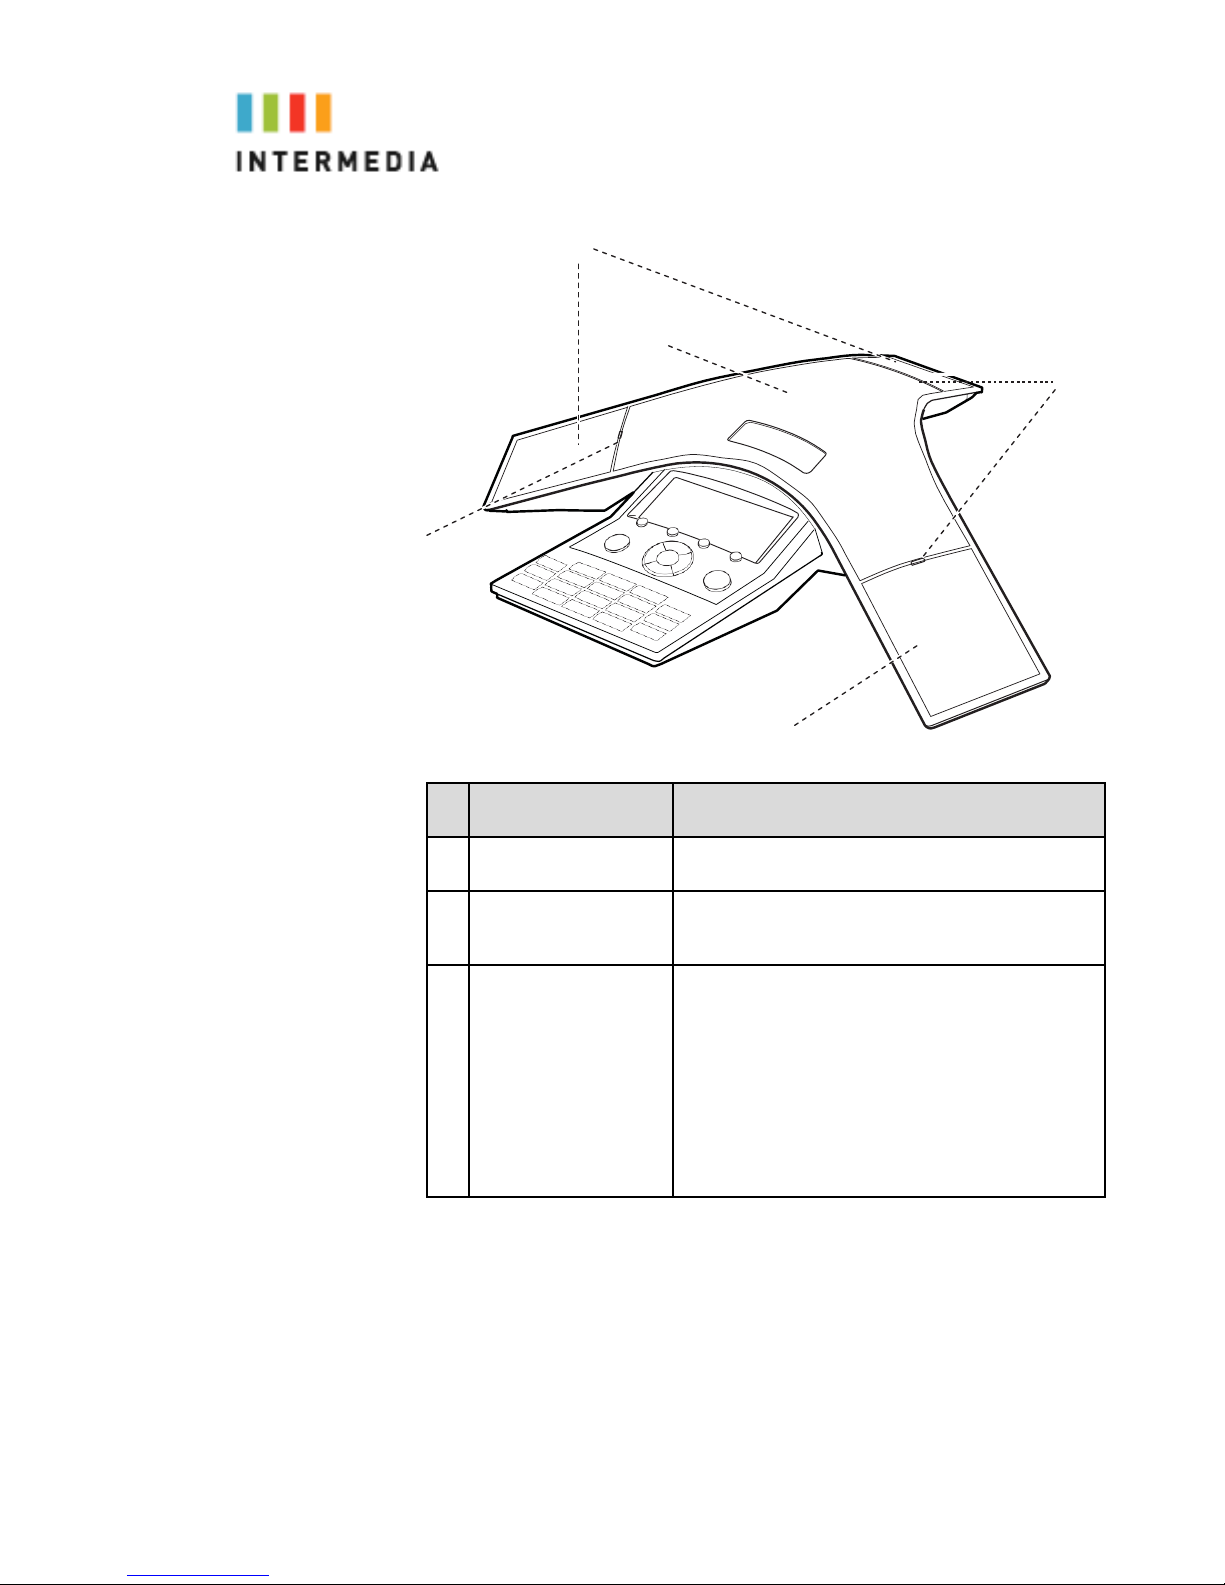
2
1
3
3
2
Feature
1
Speaker
2
Microphones
3
LED Indicators
Description
Allows for ringer and hands-free audio output.
Provide 360ocoverage by three internal microphones.
Indicate phone and call status through three bi-color
LEDs. The LEDs illuminate to indicate the following
normal operational states:
Solid red—A muted call
•
Flashing red—A call is on hold
•
Solid green—A dial-tone is available, dialing is
•
in-progress, or a call is in-progress
Flashing green—An inco ming call
•
14
Page 15
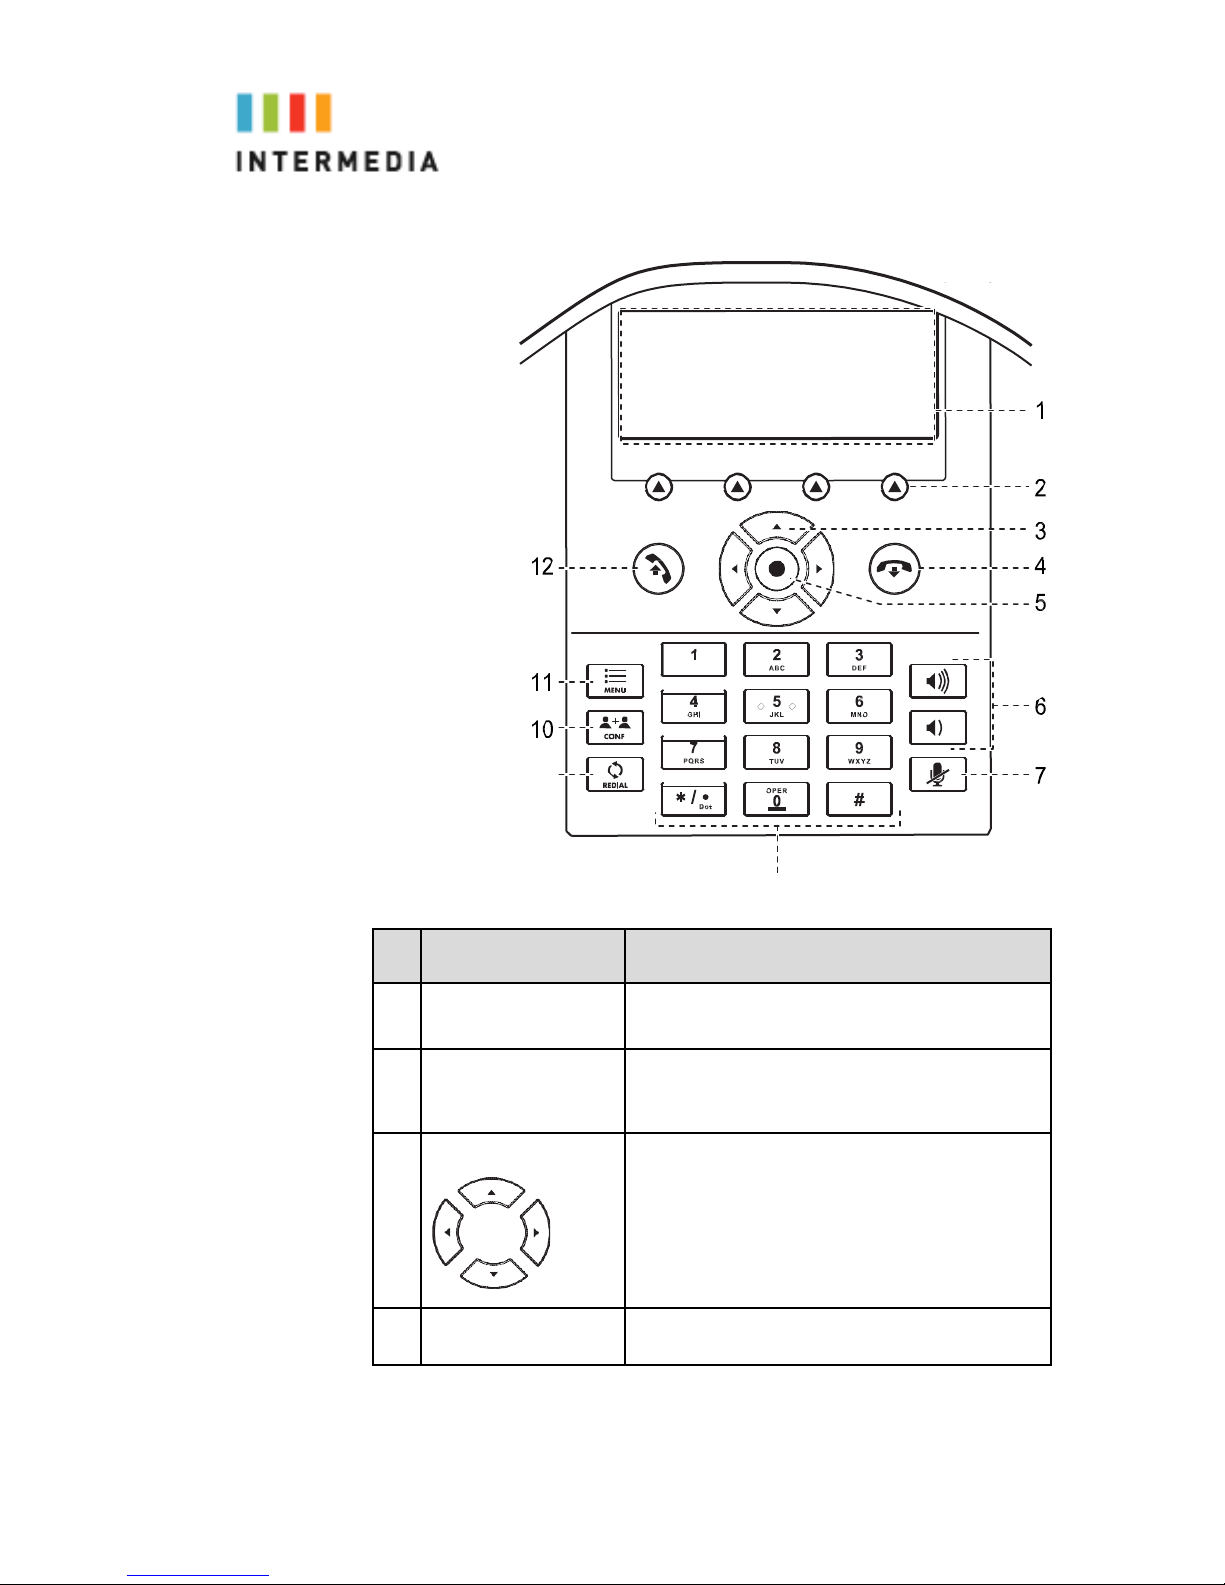
9
8
Item
1 LCD graphic display Shows call and status information, messages,
2 Soft keys Select specific context-sensitive functions that
3 Scroll keys
Description
soft keys, menus, time, and date.
display on the screen above each soft key.
Allow you to:
• Scroll through displayed information
• Enable or disable fields
• View additional soft keys
4 End Call key Ends a call.
15
Page 16
5 Select key Allows you to:
• Select a field of displayed data
• Enable or disable fields
6 Volume keys Adjust the volume of the speaker and the ringer.
7 Mute key Stops local audio from being heard at the far end of
the call.
8 Dial pad keys Contain 10 digits, 26 alphabetic characters, and
other special characters available in
Context-sensitive applications.
9 Redial key Dials the most recently dialed party.
10 Conference key Allows you to set up local audio conferences.
Conference Phone– Basic Call Features
Answering Calls
Your Conference Phone does not have a handset or headset. All
calls are placed through the speaker phone.
To answer a call:
Press
The three LEDs flash green when the phone rings.
or the Answer soft key.
Handling Multiple Calls
You can make or receive up to 6simultaneous phone calls on your
Conference Phone. If you are on a call and have another call on
hold, or you are on a conference with two callers, the third call will
be sent to your voicemail box.
16
Page 17

Answering When in another Call
1.
2.
3.
4.
Press the Hold soft key to place the original call on hold.
Press the down arrow to access the new call.
Soft key labels are updated on the display showing
Ignore, Answer, and Reject.
Press the Answer soft key to answer the incoming call.
OR
Do one of the following steps:
1.
Press the down arrow
2.
Press the Answer Soft Key
The first call is put on hold and the second call is answered.
Managing Incoming Calls
You can manage incoming calls from the c ontacts in your
Contact Directory by doing the following:
•
Rejecting calls from a particular contact by sending the call to
your voice mail system.
•
Diverting calls from a particular contact to another party.
Rejecting Calls
You can customize your phone so that incomi ng c alls from a
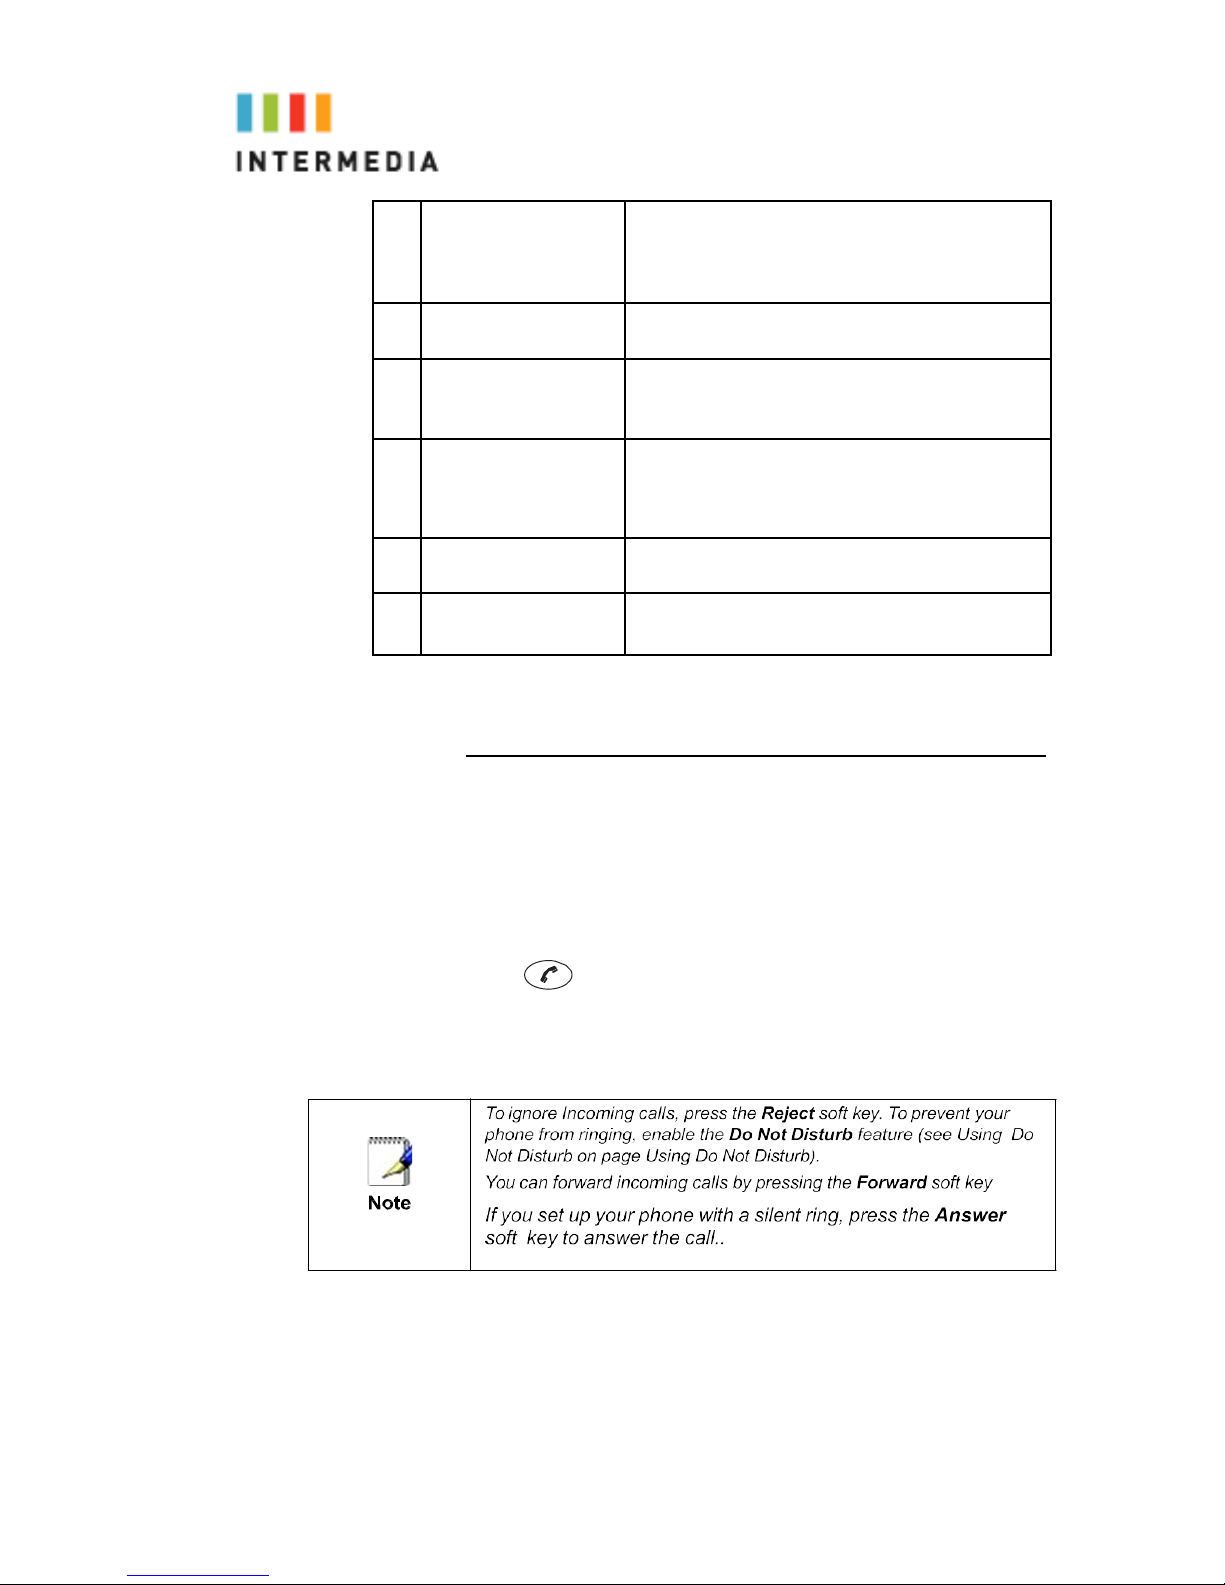
particular party are immediately sent to your voice mail system. (If
you do not have a voice mail system set up, the call will still ring on
your phone.)
To send incoming calls from a particular contact directly to
voice mail:
1.
Press
, and then select Features > Contact Directory.
The Directory screen displays.
17
Page 18
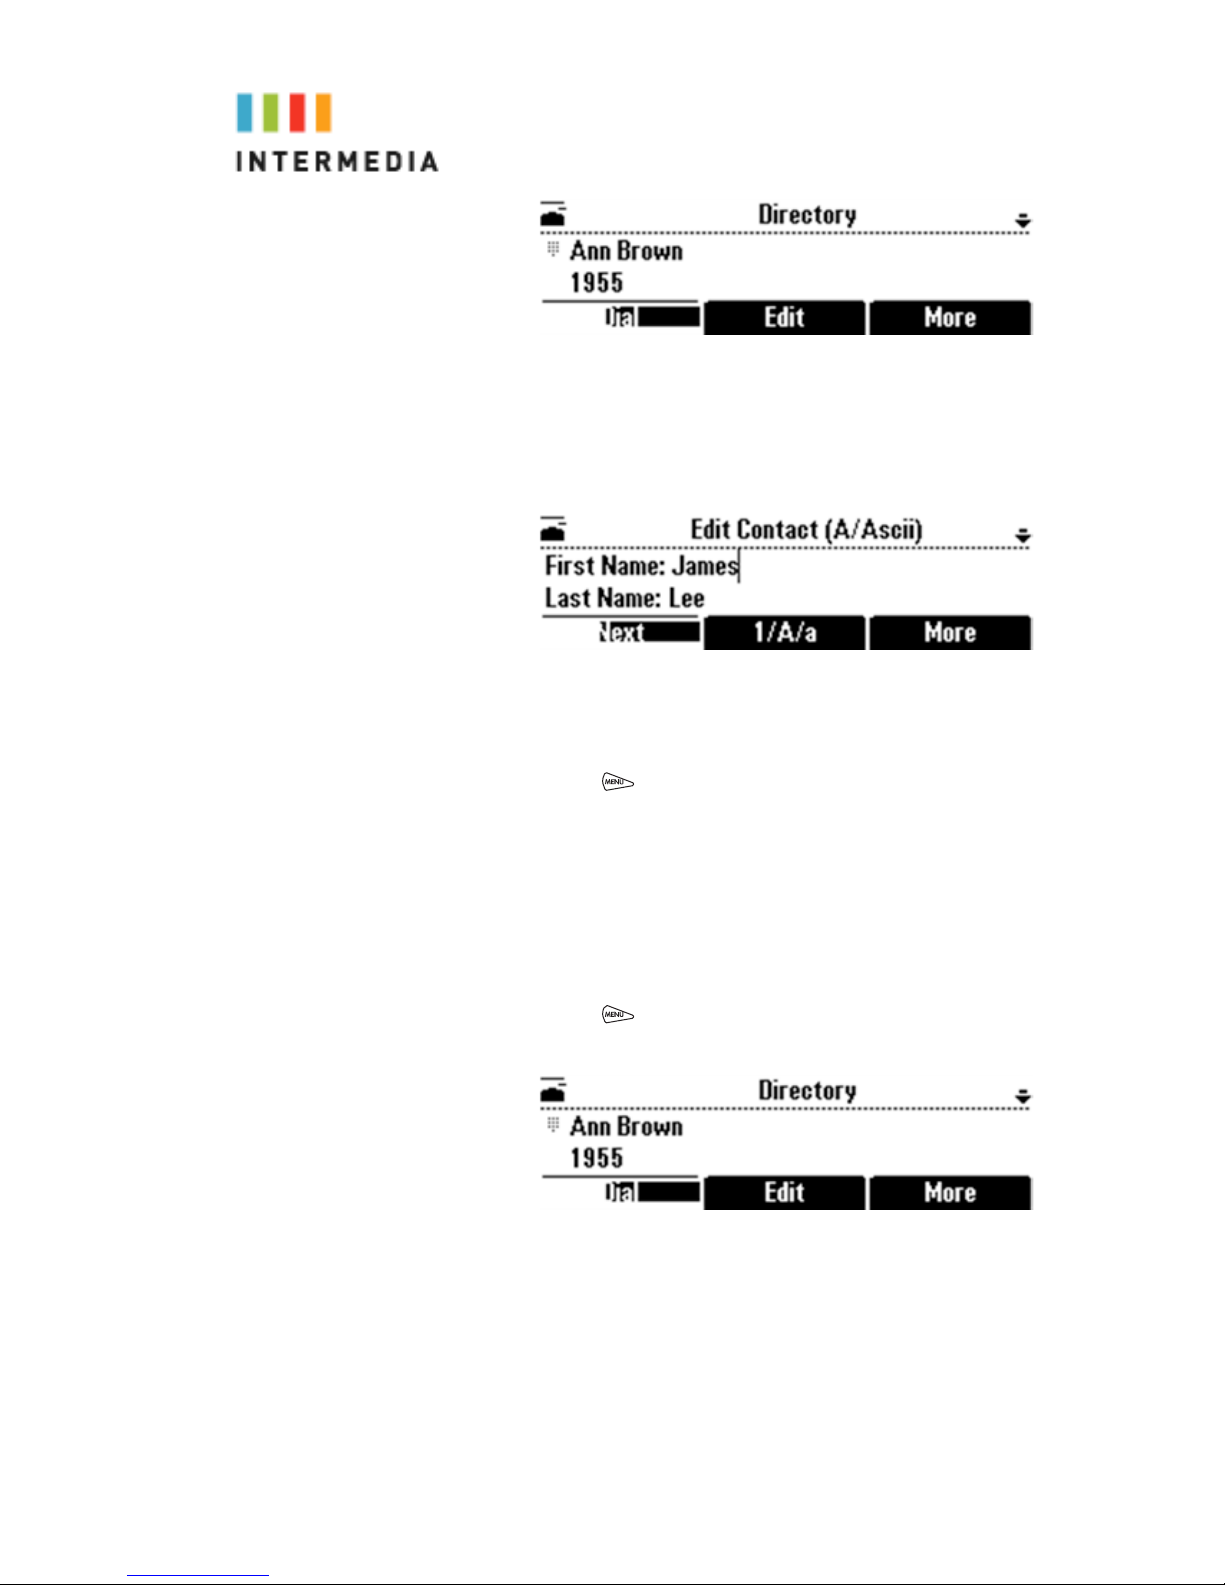
2.
3.
4.
Scroll to the contact. Or, search for the contact (see
Searching f
Contacts in Your
use t
Press the Edit soft key.
The Edit Contact screen displays.
or Contacts in Your on page Searching for
). To scroll through a list of contacts,
he * key to Page Up and the # key to Page Down.
5.
6.
7.
Diverting Calls
You can customize your phone so that incom i ng c alls from a
particular party are transferred directly to a third party.
To divert incoming calls from a contact to a third party:
1.
2.
3.
4.
5.
Use the Next soft key to scroll to the Auto Reject field, and
hange the Auto Reject setting to Enabled. Use the
then c
scroll ke
Press the Save soft key.
Press
Press
The Directory screen displays.
Scroll to the contact for whom you want to transfer calls.
Or, s
page Sear
To scroll through a list of contacts, use the * key to Page
Up and
Press the Edit soft key.
The Edit Contact screen displays.
ys or the Change soft key to select Enabled.
to return to the idle screen.
, and then select Features > Contact Directory.
earch for the contact (see Searching for Contacts on
ching for Contacts).
the # key to Page Down.
18
Page 19
6.
7.
8.
9.
10.
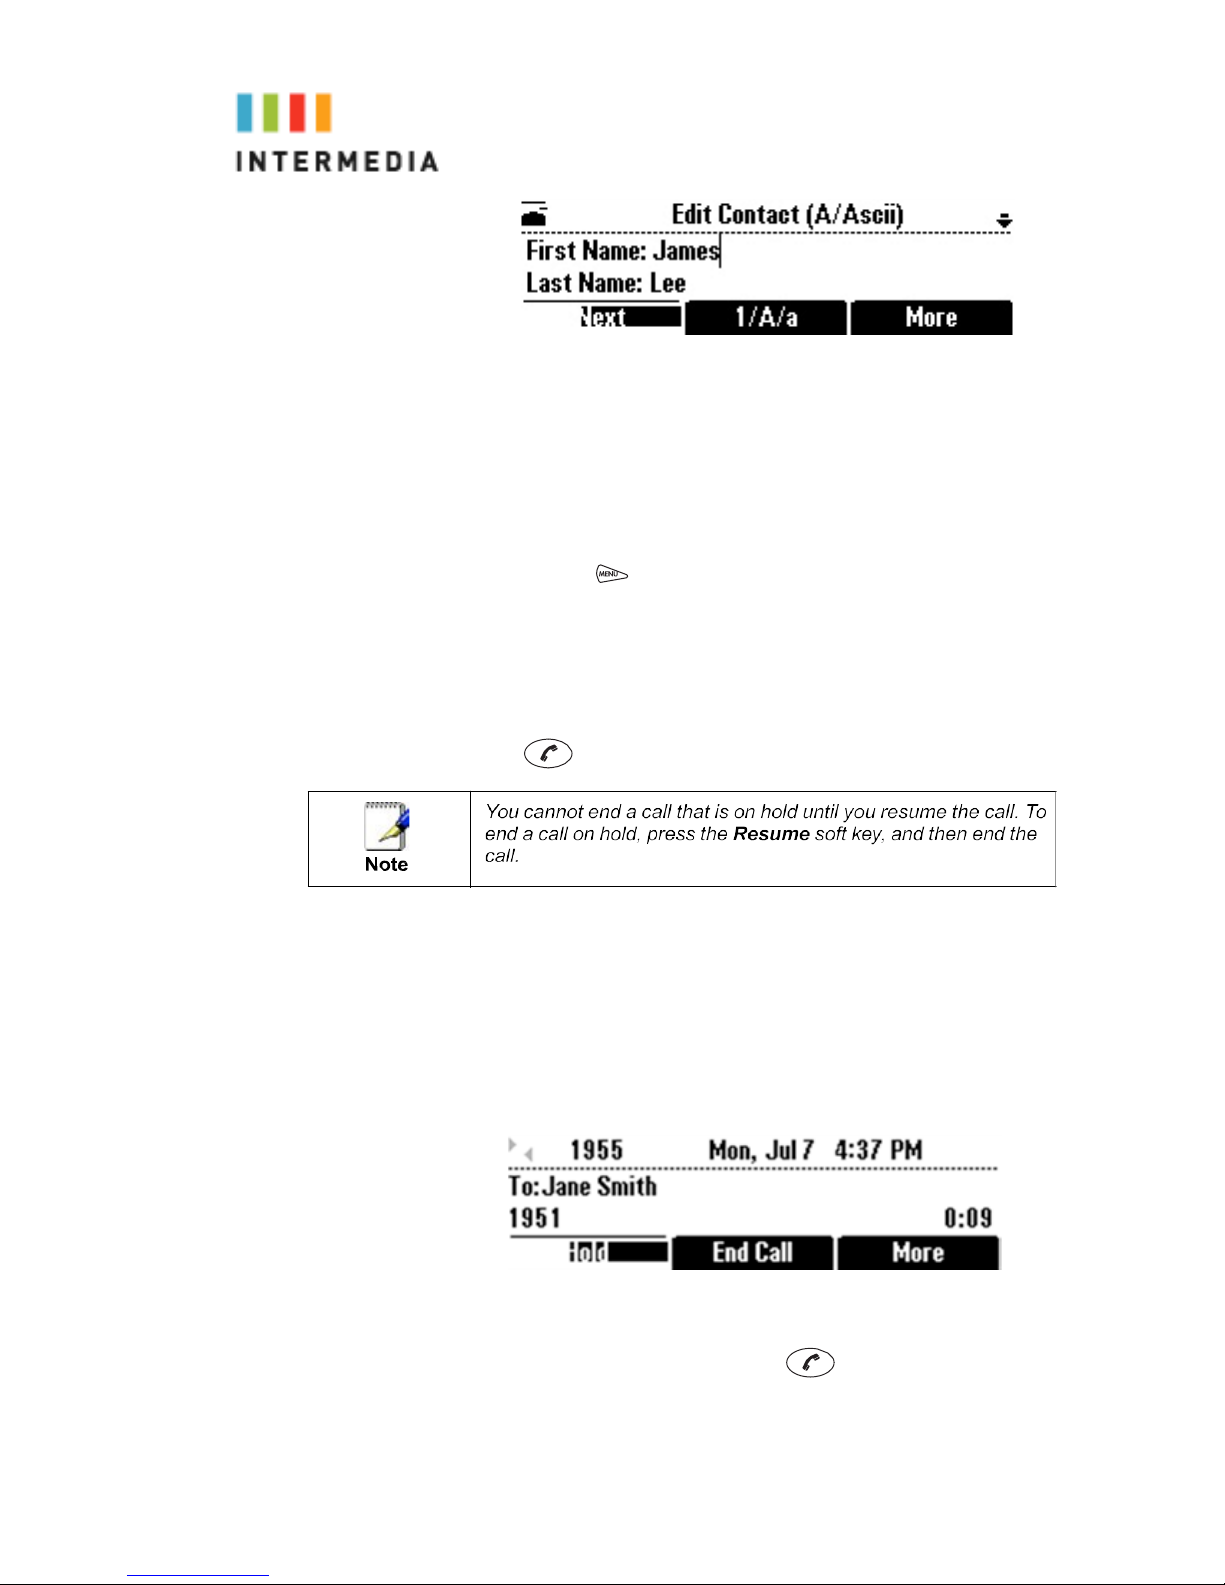
Use the Next soft key to scroll to the Divert Contact field,
and then enter the number of the party to whom you want
to divert the call.
You can enter a maximum of 32 characters.
Use the Next soft key to scroll to the Auto Divert field,
and then change the Auto Divert setting to Enabled. Use
the scroll keys or the Change soft key to select Enabled.
Press the Save soft key.
Press
to return to the idle screen.
Ending Active Calls
To end a call:
Press
or the End Call soft key.
Placing Calls
You can place a call off-hook with a dial tone), or on hook (without
a dial tone).
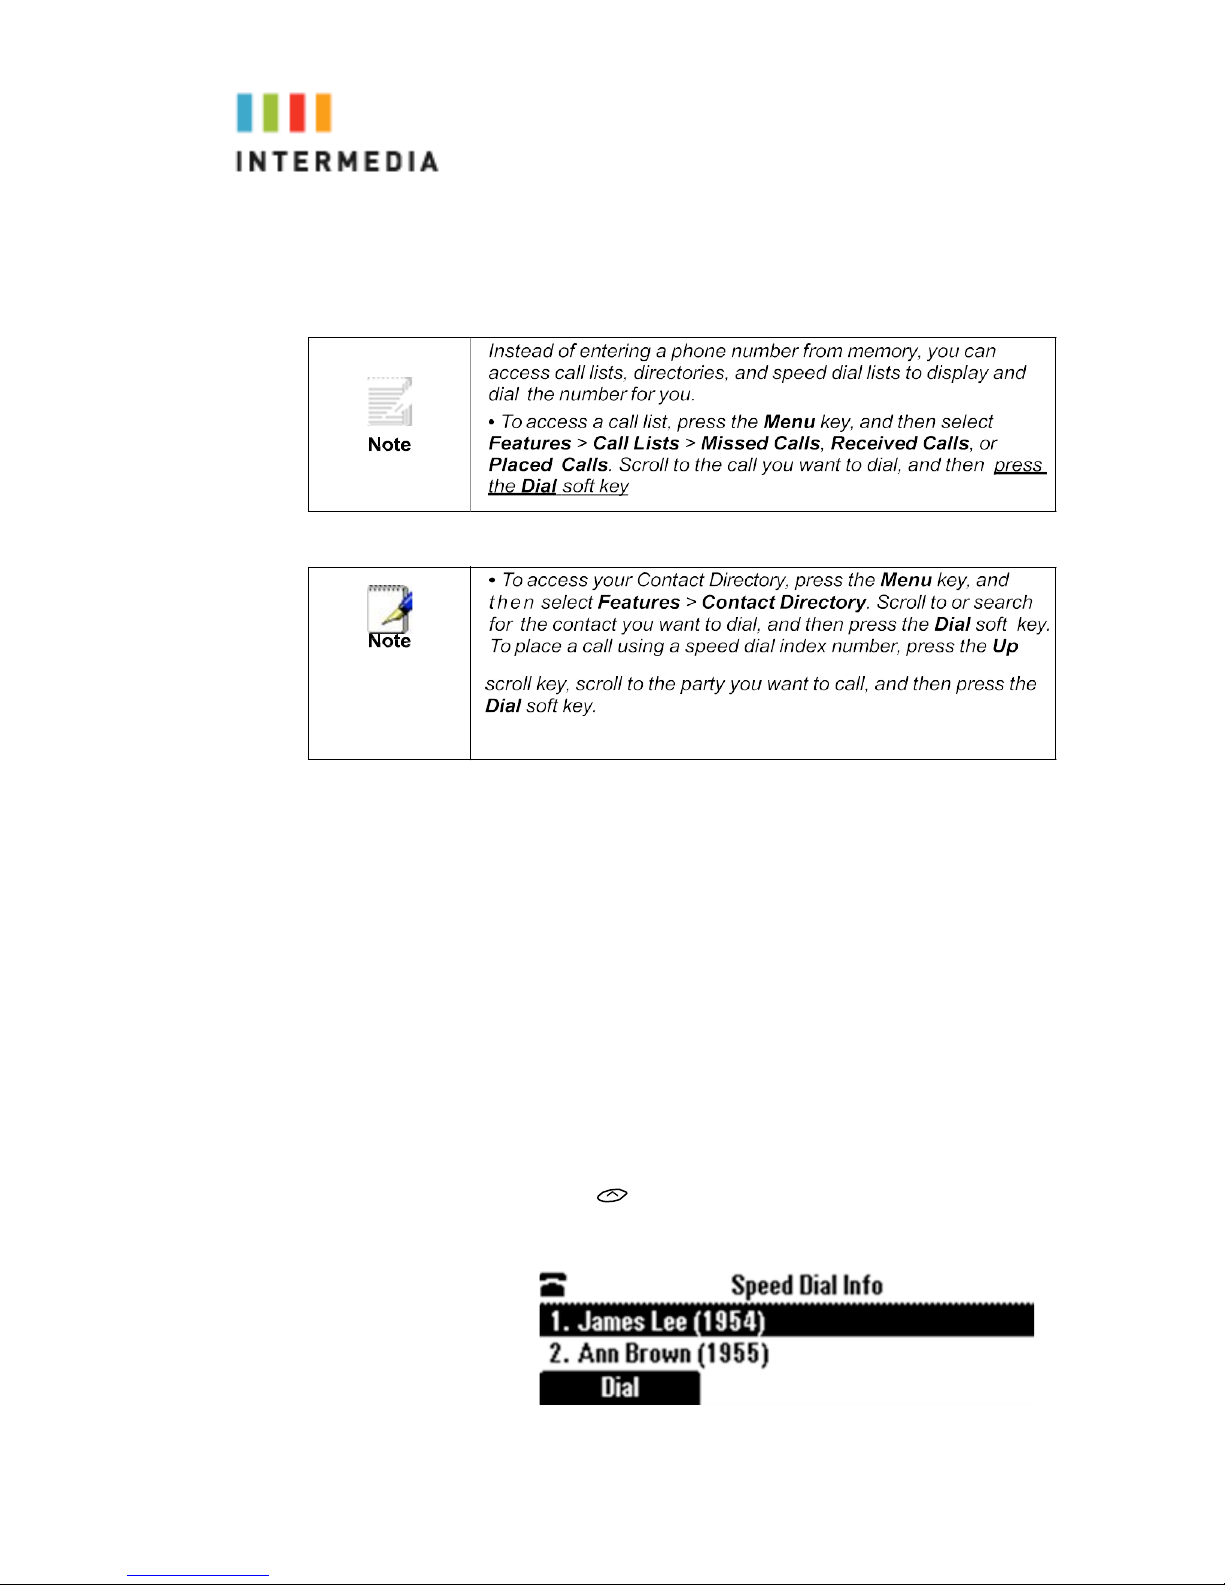
The phone displays the duration of active calls on the phone
screen. The following figure shows an active call to Jane Smith at
directory number 1951 that has lasted for nine seconds.
To place a call off-hook
1.
2.
3.
To obtain a dial tone, press or the New Call soft
key.
Enter the phone number of the party you want to call.
Press the Send soft key.
19
Page 20
4.
5.
6.
To place a call on-hook (to dial a phone number):
Enter the phone number of the party you want to call,
Press th e D i al s oft key.
Placing a Second Call
While on a call, you may place that call on hold and make a
second call. There are two ways to place another call:
1.
2.
3.
Placing Calls Using Speed Dials
Use a speed dial index number for quick dialing. Speed dial index
numbers are associated with entries in your Contact Directory.
To place a call using a speed dial index number:
1.
Press the Hold soft key to place the original call on hold.
Press the New Call soft key
Dial the phone number or extension
Press .
2.
3.
The Speed Dial Info screen displays
Do one of the following:
20
Page 21
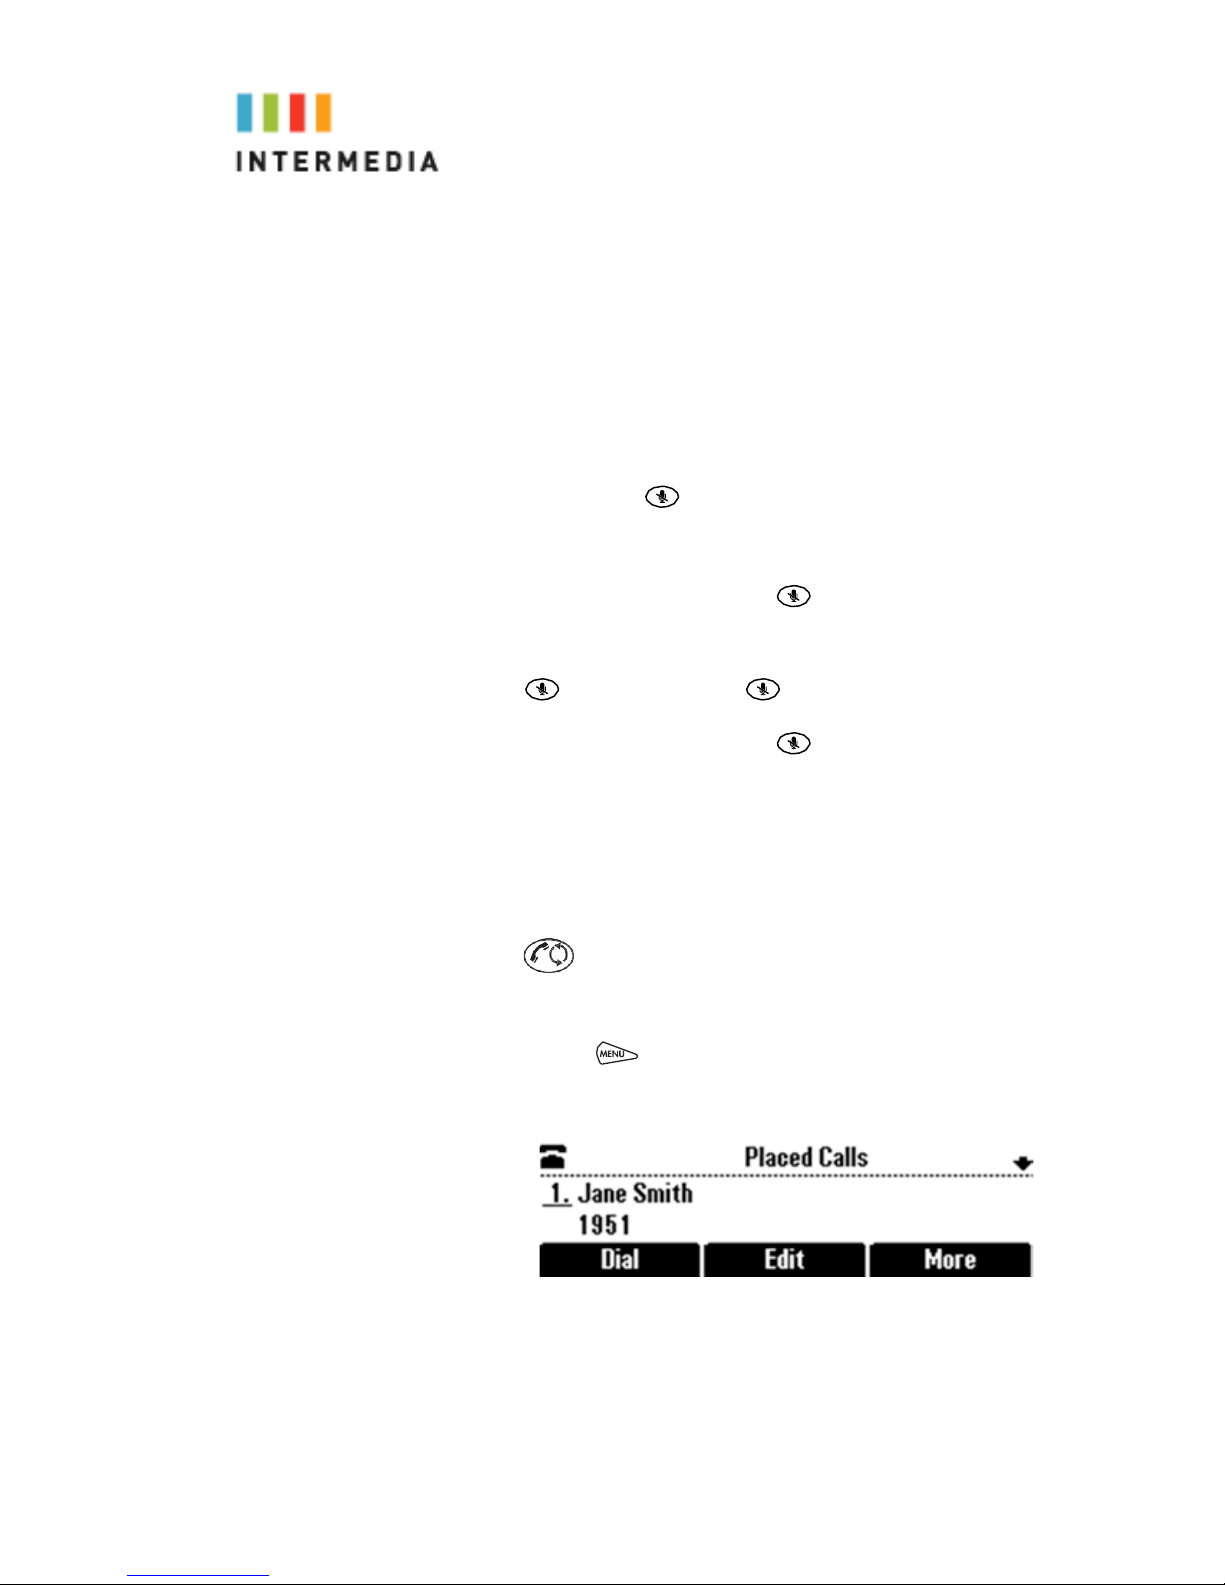
If you know the contact’s speed dial index number, enter the
number.
or
If you do not know the contact’s speed dial index number, scroll
to the contact, and then press the
placed.
Muting the Microphone
To mute the microphone:
Dial
soft key. The call is
During a call, press .
The three console LEDs glow red to indicate that the other party (or
parties) cannot hear you. You can still hear all other parties while
Mute is enabled.
To turn off the Mute feature, press again.
To mute the microphone if you use external microphones:
Press
external microphones.
To turn off the Mute feature, press again.
Redialing Numbers
You can redial the last number you dialed, or search a list of
placed calls to find a previously-dialed number.
To redial the last number dialed:
on the phone or the button on the top of the
Press
To redial a previously dialed number:
.
1.
2.
3.
Press
Placed Calls.
The Placed Calls screen displays:
Scroll to the number you want to redial, and then press
the
Dial
, and then select Features > Call Lists >
soft key.
21
Page 22

Call Hold
To place a call on hold
Holding and Resuming Calls
You can place up to eight calls on hold on your phone.
(For information on placing conference calls on hold, see
Holding and Resuming Conferences on page Holding and
Resuming Conferences.)
To place a call on hold:
During a call, press the
to indicate that a call is on hold.
The following screen shows Jane Smith on hold. The Resume
soft key now displays on the screen.
Hold
soft key. The console LEDs flash red
To resume a call on hold:
Multiple Calls on Hold
If multiple calls are on hold, use to switch between the
calls, then press the
call.
Call Transfer
You can transfer calls from your Conference Phone to another
phone in your office or to any other phone number outside your
office. For example, if you receive a call from a coworker in the
office, you can transfer that call to another coworker in the office or
on his cellular phone outside the office.
A call can be transferred in one of three ways:
Resume
soft key to retrieve the desired
•
Consultative transfer—You have the option of either talking to
the party to whom you are transferring the call, or you can
choose not to talk to the party, and complete the transfer when
you hear the party’s ring-back sound.
•
Blind transfer—the call is automatically transferred after you dial
the number of the party to whom you want to transfer the call.
You do not have the option of talking to the party.
•
Attended transfer—the parties are automatically connected to
each other after you exit a conference.
22
Page 23

Performing a Consultative Transfer
Perform a consultative transfer if you want to talk to the party to
whom you are transferring the call. Or, you can choose not to
talk to the party. In this case, you wait for the party’s ring-back
sound, and then transfer the call.
To transfer a call:
1.
During a call, press the
placed on hol
2.
Place a call to the party to whom you want to transfer the call.
3.
When you hear the ring-back sound, press the
he transfer is complete.
key. T
ou want to talk privately to the person to whom you are
If y
transferring the call before the transfer is complete, wait until the
person answers the call, talk to the person, and then press the
Trnsfer
soft key.
d.
Trnsfer
soft key. The active call is
Trnsfer
soft
To cancel the transfer before the call connects, press the
Cancel
Performing a Blind Transfer
When you use a blind transfer, you transfer a call without
speaking to the party to whom you are transferring the call. The call
is automatically transferred as soon as you dial the party’s
number.
To perform a blind transfer:
1.
2.
3.
soft key.
During a call, press the
The following screen, with the Blind soft key, displays.
Press the
party t
Trnsfer
Blind
soft key, and then place a call to the
o whom you want to transfer the call.
soft key.
(If you want to cancel the transfer before the call is
placed, and
soft key.)
The c
specified.
return to the original call, press the
all automatically transfers to the party you
23
Cancel
Page 24
Call Transfer to Voicemail
You may transfer any caller to a specific voicemail box belonging
to any other user on the system.
1.
2.
3.
4.
During a call, press the
Press the
When you hear the dial tone, dial *99 plus the desired
extension number
Your line will hang up and the extension you transferred to
the desired voicemail box.
Blind
soft key.
Trans
soft key.
Using Network-based Call Transfer
This call transfer method is used when you want to transfer a call
without tying up two lines on your phone system. It uses the Intermedia network to transfer the call instead of the phone system.
1.
2.
3.
4.
5.
6.
Receive a call on your Conference Phone
Touch #5 to start the transfer (this will place your caller on
hold)
At the dial tone, enter the extension or phone number you
want to transfer the caller to
When the transfer party picks up the phone, touch #5
again.
All three of you will be connected.
Hang up and the two parties are connected (without tying
up any of your lines)
24
Page 25

Call Park
To Park a call
Parking a call is very similar to putting a call on hold. The key
difference is, when you put a call on hold you can only retrieve
the held call from the phone that put the call on hold. With Call
Park, you can put a call on hold and pick it up from ANY phone
within the same Call Park Group. Through the Admin Portal,
Call Park Groups can be creates so specific groups of phones
can park calls for each other. If you do not create specific Call
Park Groups, all phones are automatically assigned to the
Standard Call Park Group.
To create a Call Park Group which allows specific phone to park
calls for each other, login to the Admin Portal and click the
Groups Tab then select Call Park Groups.
To Park a Call:
1.
2.
3.
4.
While on a call, press the More soft key
Press the Park soft key
The phone will respond with a voice prompt such as
“Call Parked on 9001”. The caller will hear hold music.
To pick up the parked call, anyone on any phone may
dial the park number (9001 in this example) to be
connected with the caller.
Paging (Intercom)
To page to all phones
Paging allows you to speak to all phones at the same time
through t hei r speaker phone. Paging is used to make
announcements such as “Jim, you have a visitor in the lobby” or
to let people know about a parked call such as “Susan, you have
a call waiting on Park 2”. Paging will only notify phones not in
use or not set to DND.
To group specific phones so only they receive specific Paging
calls, login to the Admin Portal and click the Groups Tab then
select Paging Groups.
Initiating a Page
1.
2.
3.
4.
5.
Use the speaker phone
Dial the Paging Group (9100 is the Standard Paging
Group for all phones).
WAIT FOR THE TONE before speaking
Make your announcement which will be heard on all
phones (except phones set to DND or phones in
use).
Hang up the phone when finished
25
Page 26

Answering a Page
1.
2.
3.
Use the speaker phone
Press the “Answer” soft key on the phone display
Talk directly back to the person who initiated the page
Rejecting a Page
1.
To ignore a page, press the “Reject” button
Forwarding Incoming Calls
You can set up your phone to forward incoming calls to another
party (static forwarding), or you can forward a call as your phone
rings (dynamic forwarding). Your phone will forward calls even if
you enable the Do Not Disturb Feature.
You can also reject calls from a particular contact (by
sending the call to your voice mail system), or divert calls
from a particular contact to another party.
To access forwarding options:
Do one of the following:
Press
, and then select Features >
Forward
From the idle screen, press the
. or
Forward
soft key.
Forwarding Calls Statically
You can set up your phone to forward calls to another number.
To forward calls to another extension:
1.
From the idle screen, press the
The Forwarding Type Select screen displays.
Forward
soft key.
26
Page 27
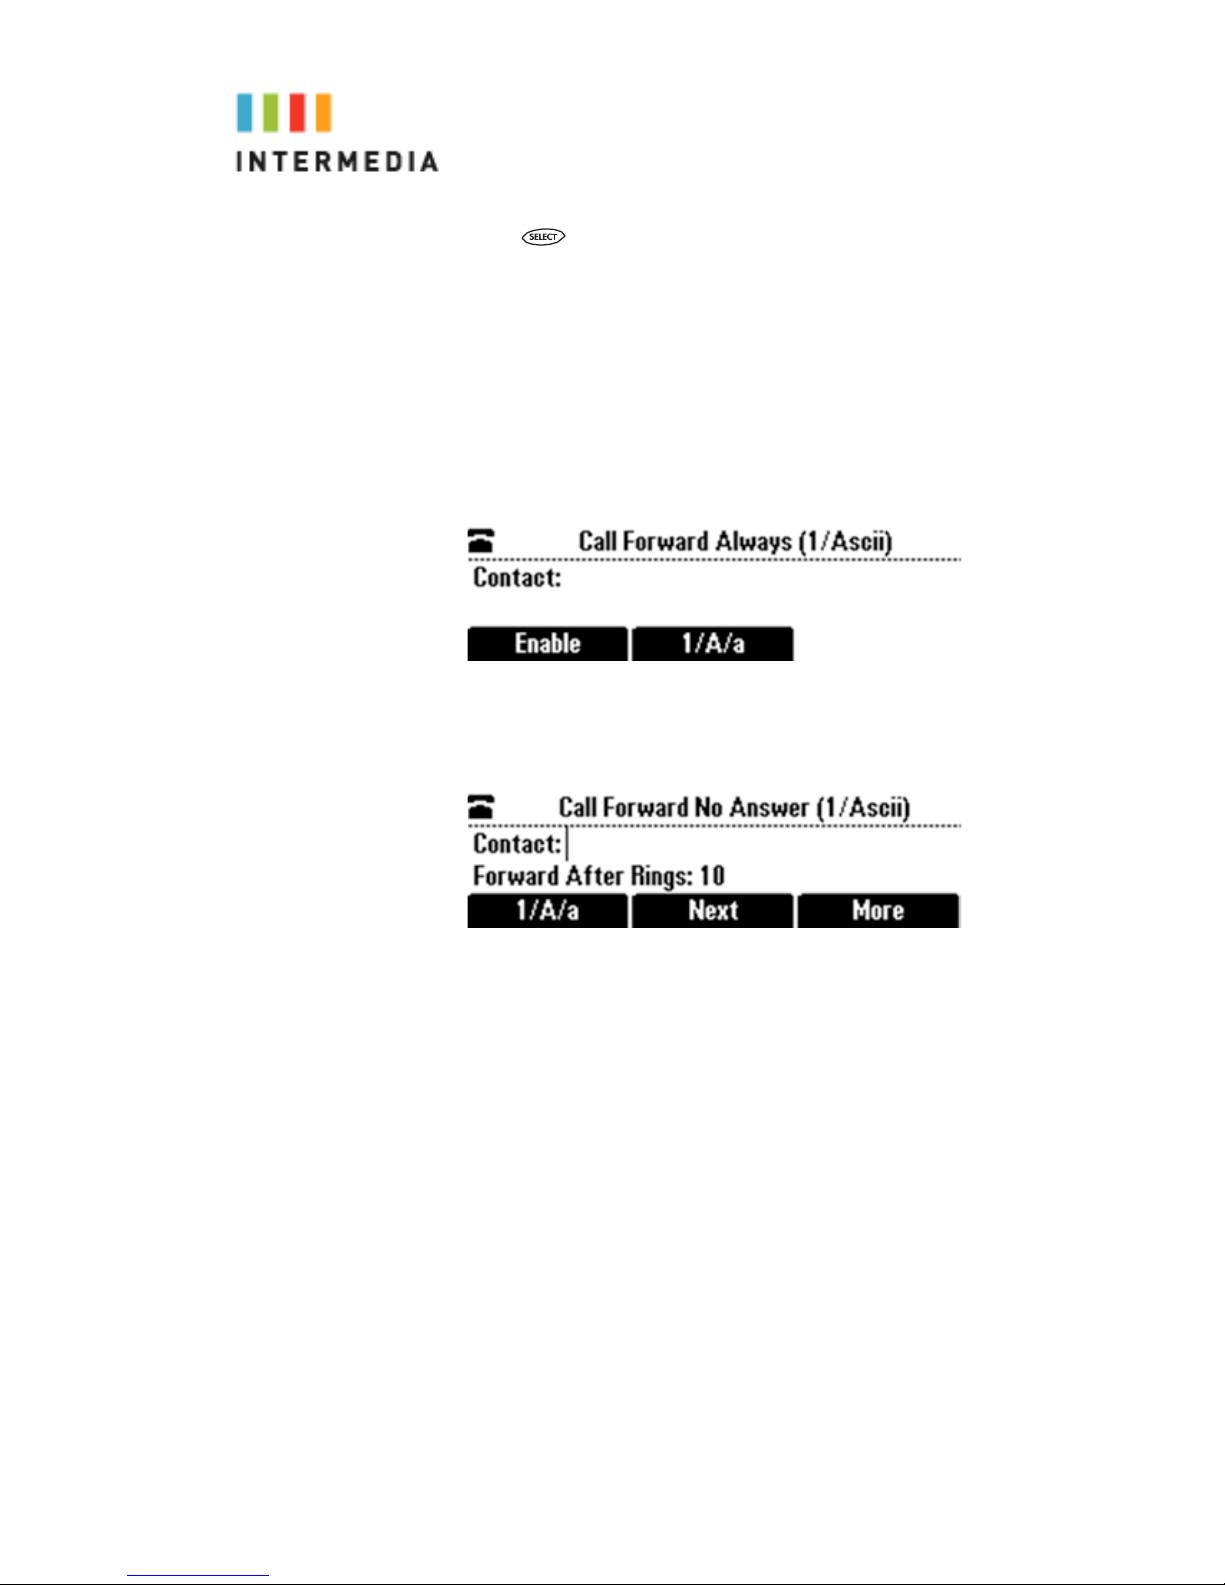
2.
Scroll to the forwarding type you want, and then press
he options are:
. T
Always
No Answer
Busy
a call.
3.
Do one of the following:
If y
ou selected
displays.
— to forward all incoming calls.
—to forward all unanswered incoming calls.
—to forward calls that arrive when you are already in
Always
, the Call Forward Always screen
Enter a number to forward all incoming calls to.
If you selected
displays.
No Answer
, the Call Forward No Answer screen
Do the following (use the
between fields):
a
In the
Contact
field, enter a number to forward all
unanswered incoming calls to.
b
In the
Forward After Rings
to wait before forwarding the call (one ring is
approximately six seconds). Two rings is the
recommended value.
If you selected
Busy
, the Call Forward Busy screen displays.
27
Next
and
Prev
soft keys to move
field, enter how many rings
Page 28
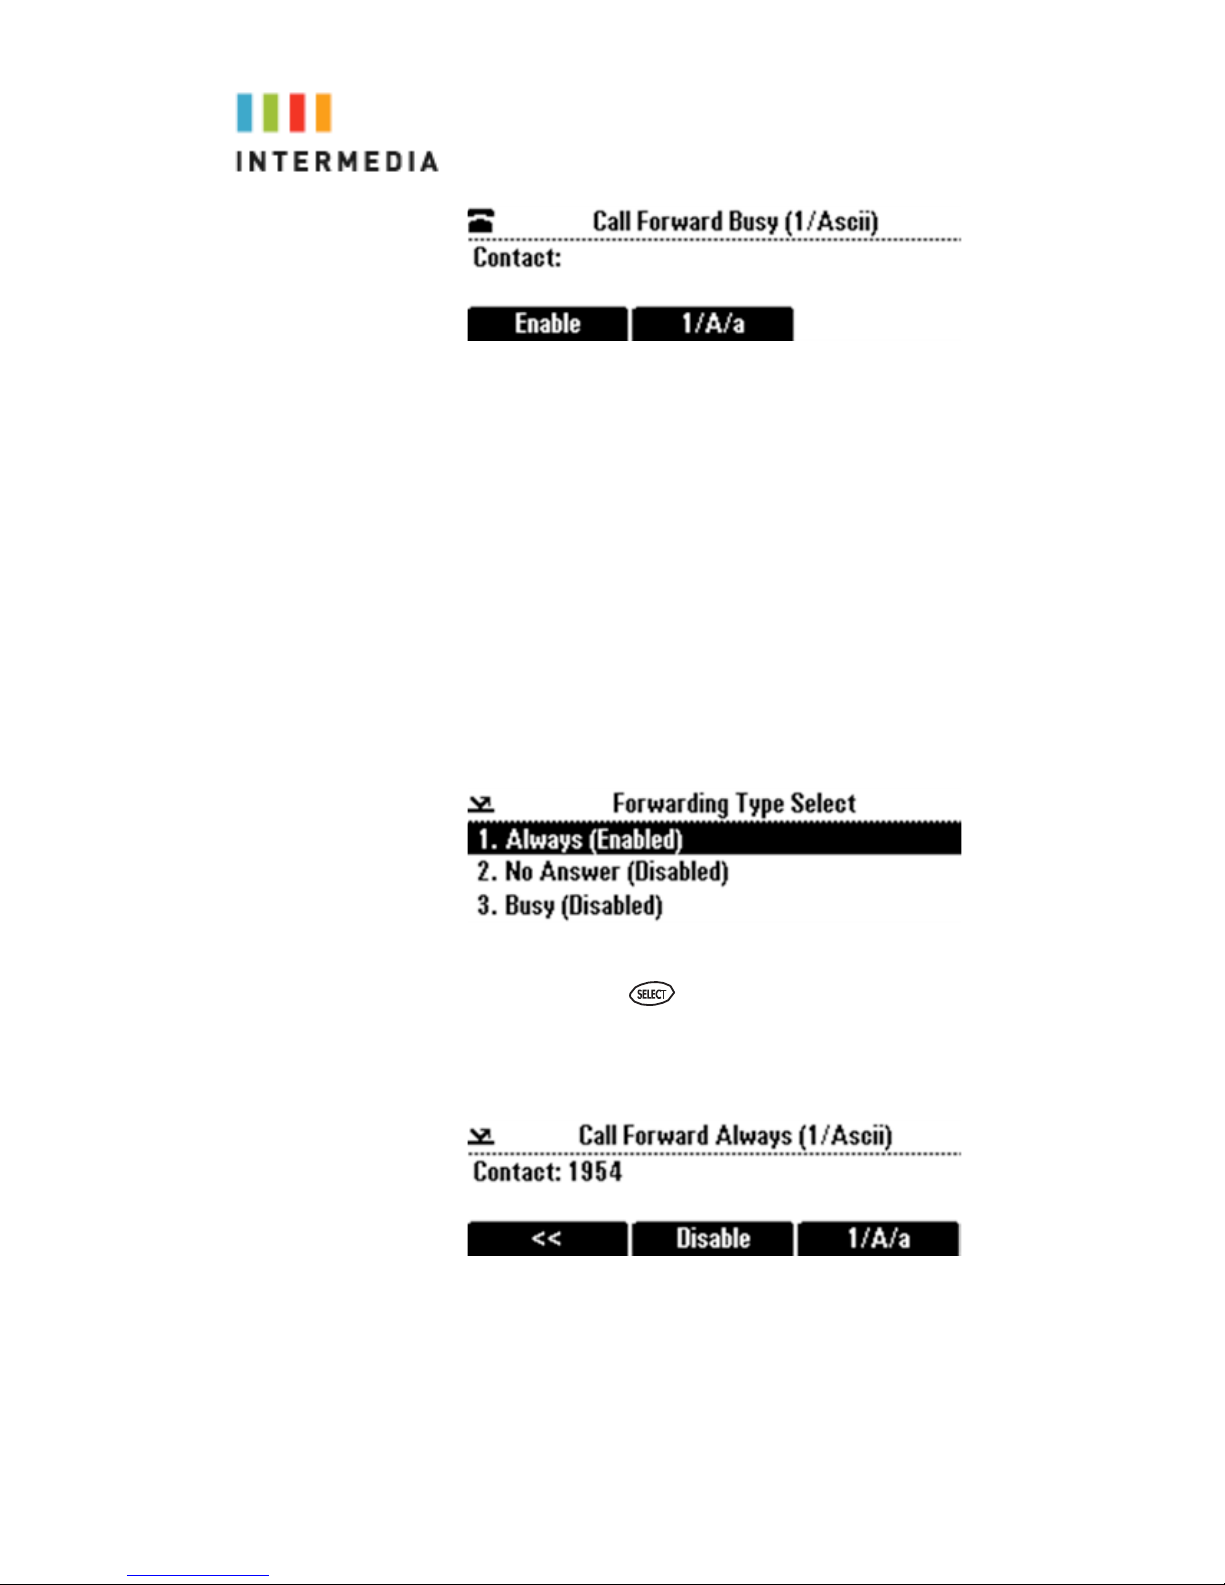
Enter a number to forward all future incoming calls to when you are
already in another call.
4.
Press the
Enable
If you selected the forwarding type
soft key.
Always
, a moving
arrow displays on the idle screen next to the directory number.
To disable call forwarding:
1.
From the idle screen, press the
The F
orwarding Type Select screen displays, showing the
forwarding type that is enabled.
Forward
soft key.
The following screen shows the forwarding type “Always”
enabled.
2.
Scroll to the forwarding type you want to change, and
then pr
ess .
A screen displays showing the details of the forwarding type
you want to disable.
3.
To turn off call forwarding, press the
28
Disable
soft key.
Page 29

Forwarding Calls Dynamically
You can manually forward a call to another number while
your phone rings.
To forward an incoming call to another extension:
1.
While your phone rings, press the
Forward
soft key. The
Call Forwarding screen d
2.
Enter the number to forward the incoming call to.
Your phone
to (
displays the last number you forwarded calls
either statically or dynamically). If you previously set a
forwarding number and want to enter a new one, use the
soft key to delete the number.
Press the
3.
The in
Forward
coming call is forwarded to the other party. If call forwarding is
disabled, future calls will not be forwarded and forwarding remains
isplays.
soft key.
disabled.
Directed Call Pickup
D
irected Call Pickup allows you to answer a phone call which is ringing
at another phone in your organization. There are three types of
Directed Call Pickup:
• Directed Pickup – allows you to answer a call ringing at a
pecific extension
s
• Any Call Pickup – allows you to answer any call ringi
ng
anywhere in your organization
• Group Pickup – allows you to answer a call ringing a specific
group of extensions
D
irected Pickup
irected Pickup allows you to answer a call that is ringing at a specific
D
extension. To use Directed Pickup, when a specific extension begins to
ring:
1. Pick up your HPBX phone
2. Dial *95 + the 3-digit extension of the phone you wish t
ans
wer. (i.e. *95 + 100) Press the Dial soft key to speed up t
pr
ocess
o
he
3. Your phone will immediately answer the call
A
ny Call Pickup
A
ny Call Pickup allows you to answer a call that is ringing anywhere
29
Page 30

within your organization, even at other physical addresses. To use Any
Call Pickup:
1. Pick up your HPBX phone
2. Dial *96. Press the Dial soft key to speed up the process
3. Your phone will answer the phone call that has been ringing
the longest within your organization
Group P
ickup
Group Pickup allows you to answer a call ringing a phone within a
specific group of phones. Your company’s Call Park Groups are used
to define which pickup group a specific phone belongs to. Use the
Admin Portal to modify Call Park Groups. To answer a call within a
specific pickup group:
1. Pick up your HPBX phone
2. Dial *97. Press the Dial soft key to speed up the process
3. The phone will answer the call in its pickup group that has been
ringing the longest
Call Recording
The Call Recording feature allows you to record calls whenever you
ia the *80 command. Intermedia Call Recording comes in two
wish v
flavors; Automatic and On Demand. Only On Demand recording may
be initiated from the desk phone.
On Demand Call Recording
On Demand call recording allows you to turn the recording of a
conversation on and off at any time during a phone call. To use On
Demand call recording:
1. Once making or answering a phone call, once the call has been
answered by both parties, press *80. All parties in the call will hear a
prompt that call recording has started.
2. If enabled, all parties of the call will also hear a beep tone every 15
seconds to indicate recording is still in progress.
3. To manually end the call, press *80 again. All parties in the call will
hear a prompt that recording has stopped.
4. The call recording will also end if any of the following situations
occur:
a. The call is ended (all parties hang up)
b. The maximum call recording limit is reached
c. The maximum call recording storage limit is reached
30
Page 31

Once created, the recorded phone conversation will be stored within
your desk phone’s voicemail web interface. To access your
recordings:
1. Navigate to https://www.intermedia.net/login/voice/
2. Log in with your phone number and voicemail PIN
3. Click on the Call Recordings tab to listen to and manage your
recorded calls
Conference Calls
You can create a conference with up to two other parties using
the phone’s local conference feature. To quickly set up a
conference, you can use the
between an active call and a call on hold.
Join
soft key to create a conference
After you set up a conference, you can hold the conference call,
split the conference call into individual calls on hold, or end the
conference call (and your connection to the conference call
participants).
This section includes the following topics:
Holding and Resuming Conferences on page Holding and
•
Resuming Conferences
•
Splitting Conferences on page Splitting Conferences
31
Page 32

Setting Up Conferences
You can set up a conference in one of two ways:
•
Using the
•
Using the
on hol
Setting Up a Conference Using the Conference Soft Key
d.
Confrnc
Join
soft key.
soft key, if you have an active call and a call
To set up a conference using the Conference soft key:
1.
2.
3.
4.
The Active: Conference screen displays.
Setting Up a Conference with an Active Call and a Call on
Hold
If you are currently in an active call, and you have another call on
hold, you can create a conference call between the active call,
the call on hold, and yourself, by pressing the
Call the first party.
Press the Confrnc soft key. The active call is placed on
hold.
Enter the number of the second party, and then press the
Send soft k
When the second party answers, press the Confrnc
soft k
ey.
ey to join all parties in the conference.
Join
soft key.
To set up a conference call with an active call and a call on
hold:
If you have an active call and a call on hold, scroll to either call,
and then press the
The Active: Conference screen displays.
A conference is created with the active call, the call on hold, and
yourself.
32
Join
soft key.
Page 33
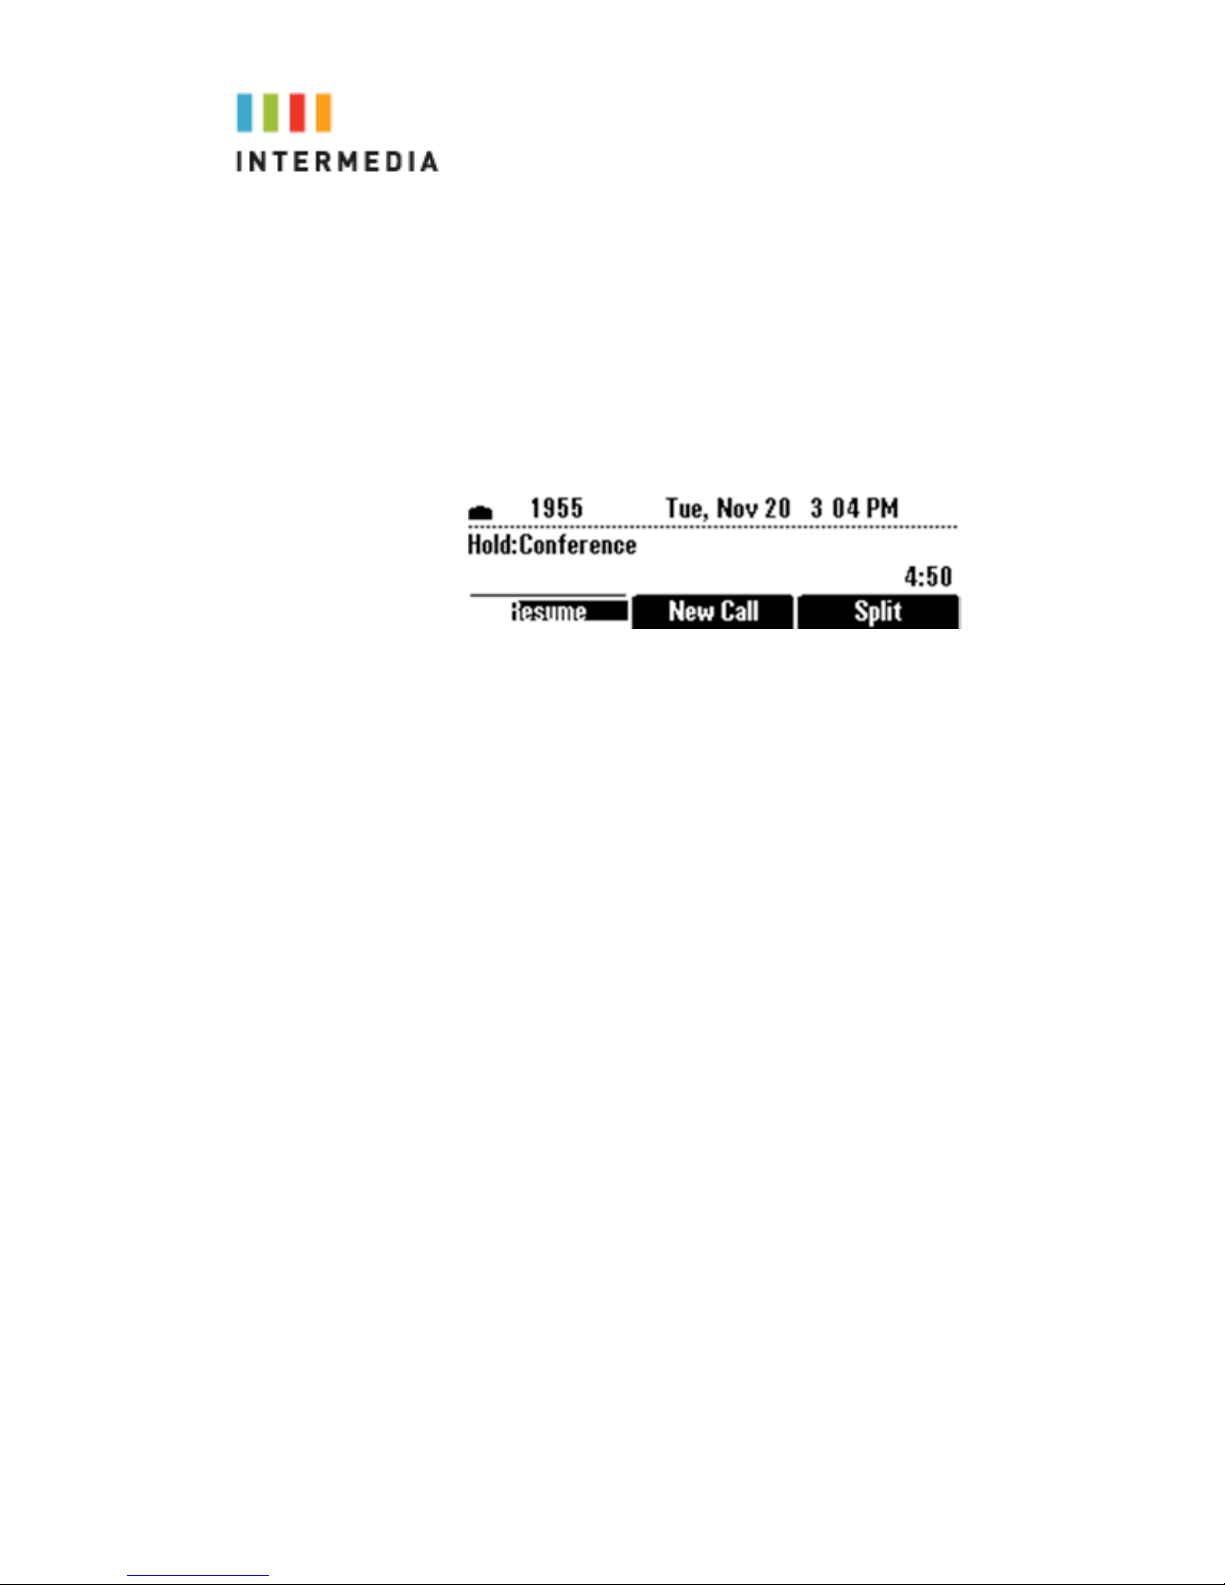
Holding and Resuming Conferences
When you place a conference call on hold, you place all other
conference participants on hold.
To place a conference call on hold:
From the Active: Conference screen, press the
Hold
soft key. The
Hold: Conference screen displays. The other parties in the
conference call are put on hold.
From the Hold: Conference screen, you can do the following:
•
•
To resume the conference call, press the
ctive: Conference screen will display again.
The A
To place a call to a new party, press the
The c
onference remains on hold, and the new call be-
comes the active c
•
To end the conference call and split the conference into two
separate c
alls on hold, press the
all.
Split
Resume
New Call
soft key.
soft key.
soft key.
Splitting Conferences
When a conference has been established, a
Split
soft key
is available. When you split a conference, you end the conference
and put all parties on hold.
To split a conference:
From the Active: Conference screen, press the
Split
soft key. The
conference ends, and all calls are split into individual calls and put
on hold.
Ending Conferences
You can end a conference, and your connection to the other
parties, by pressing the
End Call soft key, the other parties remain connected.
End Call
soft key. When you use the
To end a conference:
From the Active: Conference screen, press the
T he two other parties remain connected.
33
End Call
soft key.
Page 34

Using Voicemail
Each phone receives a Voicemail box which can record up to 90
minutes of messaging with a maximum of 5 minutes per message.
Each user can record his or her personal greeting for the voicemail
box. Voicemail is automatically saved for 90 days.
Messages can be retrieved from the Conference Phone, any other
phone or through a personal website at
http://www.intermedia.net/accesslinelogin/index.asp. When a
message left in your voicemail box, your Conference Phone
message waiting indicator will flash. Additionally, your voicemail
box can send an email to alert you of the new message.
Setting up the voicemail box for the first time
1.
2.
Press the Menu button.
Features will be highlighted. Press the Select key
3. Use the down arrow and scroll to Messages. Press the
Select key
4.
5.
6.
Press the Connect soft key
Enter your temporary PIN when prompted (0000).
Follow voice prompts to record your name and unavailable
greeting and
change your PIN.
Retrieving messages from your Conference Phone
1.
2.
Press the Menu button.
Features will be highlighted. Press the Select key
3. Use the down arrow and scroll to Messages. Press the
Select key
4.
5.
6.
Press the Connect soft key
The system will prompt you to enter your PIN
The system will then say, “You have x new and y old
voicemailmessages”
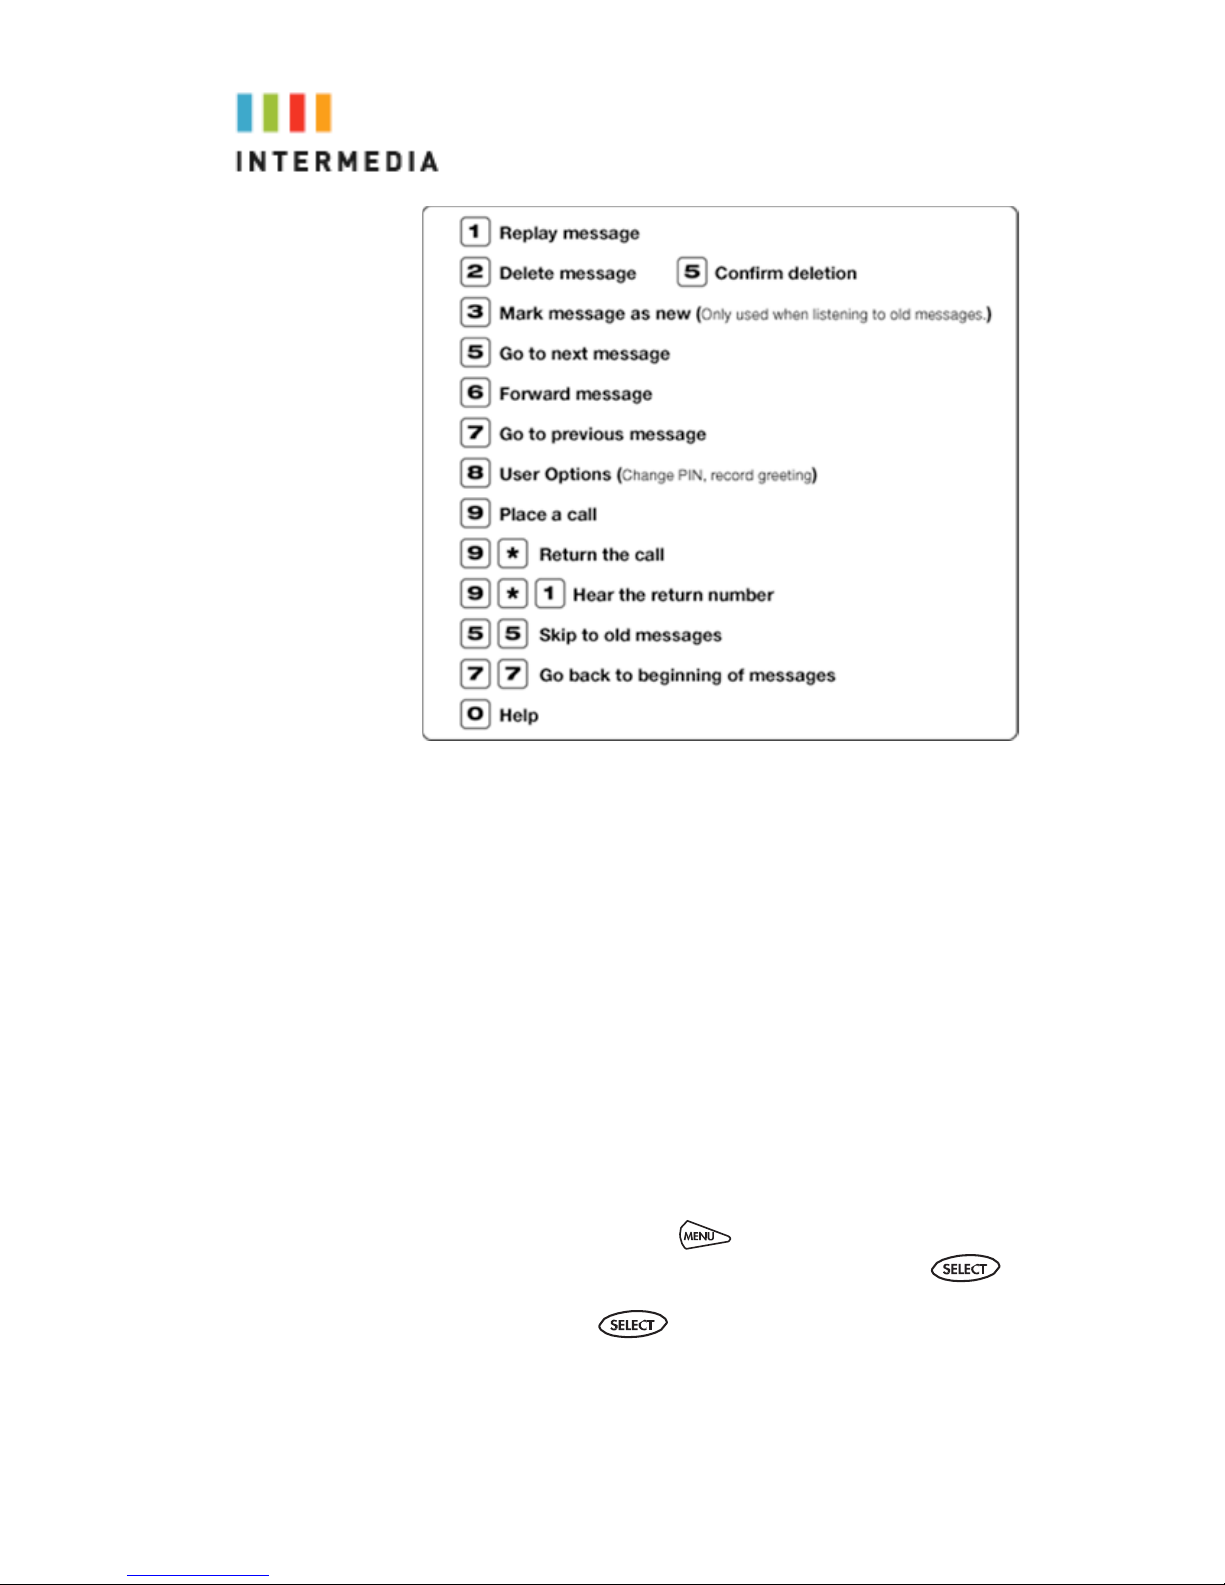
7.
The following options are available through the keypad
34
Page 35
Retrieving messages when you are away from the office
1.
2.
R
1.
2.
Dial your Conference Phone and allow it to ring
When your voicemail greeting begins to play, enter your
PIN over your gr
eeting.
eturning a Call
While listening to a message or after listening to a
message, p
ress 9* to call that person back
You may return to your voicemail box WITHOUT calling
back in by pr
called bac
essing ## after talking to the person you
k
Change your Voicemai l PIN
1.
2.
3.
4.
5.
Press the Menu button.
Features will be highlighted. Press the Select key
Use the down arrow and scroll to Messages. Press the
elect key
S
Press the Connect soft key
The system will prompt you to enter your PIN
35
Page 36

6.
7.
8.
Press 8 for User Options
Press 7 to change your PIN
Enter the new 6 to 10-digit PIN when prompted.
Record a Personal Greeting via the Phone
1.
2.
Press the Menu button.
Features will be highlighted. Press the Select key
3. Use the down arrow and scroll to Messages. Press the
Select key
4.
5.
Press the Connect soft key
Enter your PIN when prompted or enter your PIN over the
greeting.
6.
7.
Select 8 for User Options
Select 1 to record your Unavailable Greeting. Follow the
instructions.
Forward Voicemail Messages via the Phone
A user can forward a voicemail from his or her voicemail box to
another voicemail box or group of voicemail boxes.
1.
2.
3.
4.
5.
6.
Once logged in to your voicemail box, press 1 to listen to
essage(s)
your m
Press 6 at any time while listening to the message to
for after the m
essage
Press 1 to forward the message
Enter the phone number, extension number or group
number t
o receive the message
Record an introduction to the message.
Touch * to send the message
Logging into your Voice mail Box via the Web
1. Go to https://www.intermedia.net/accesslinelogin/index.asp
2.
3.
Enter your Conference Phone Number and PIN
Click Login
36
Page 37
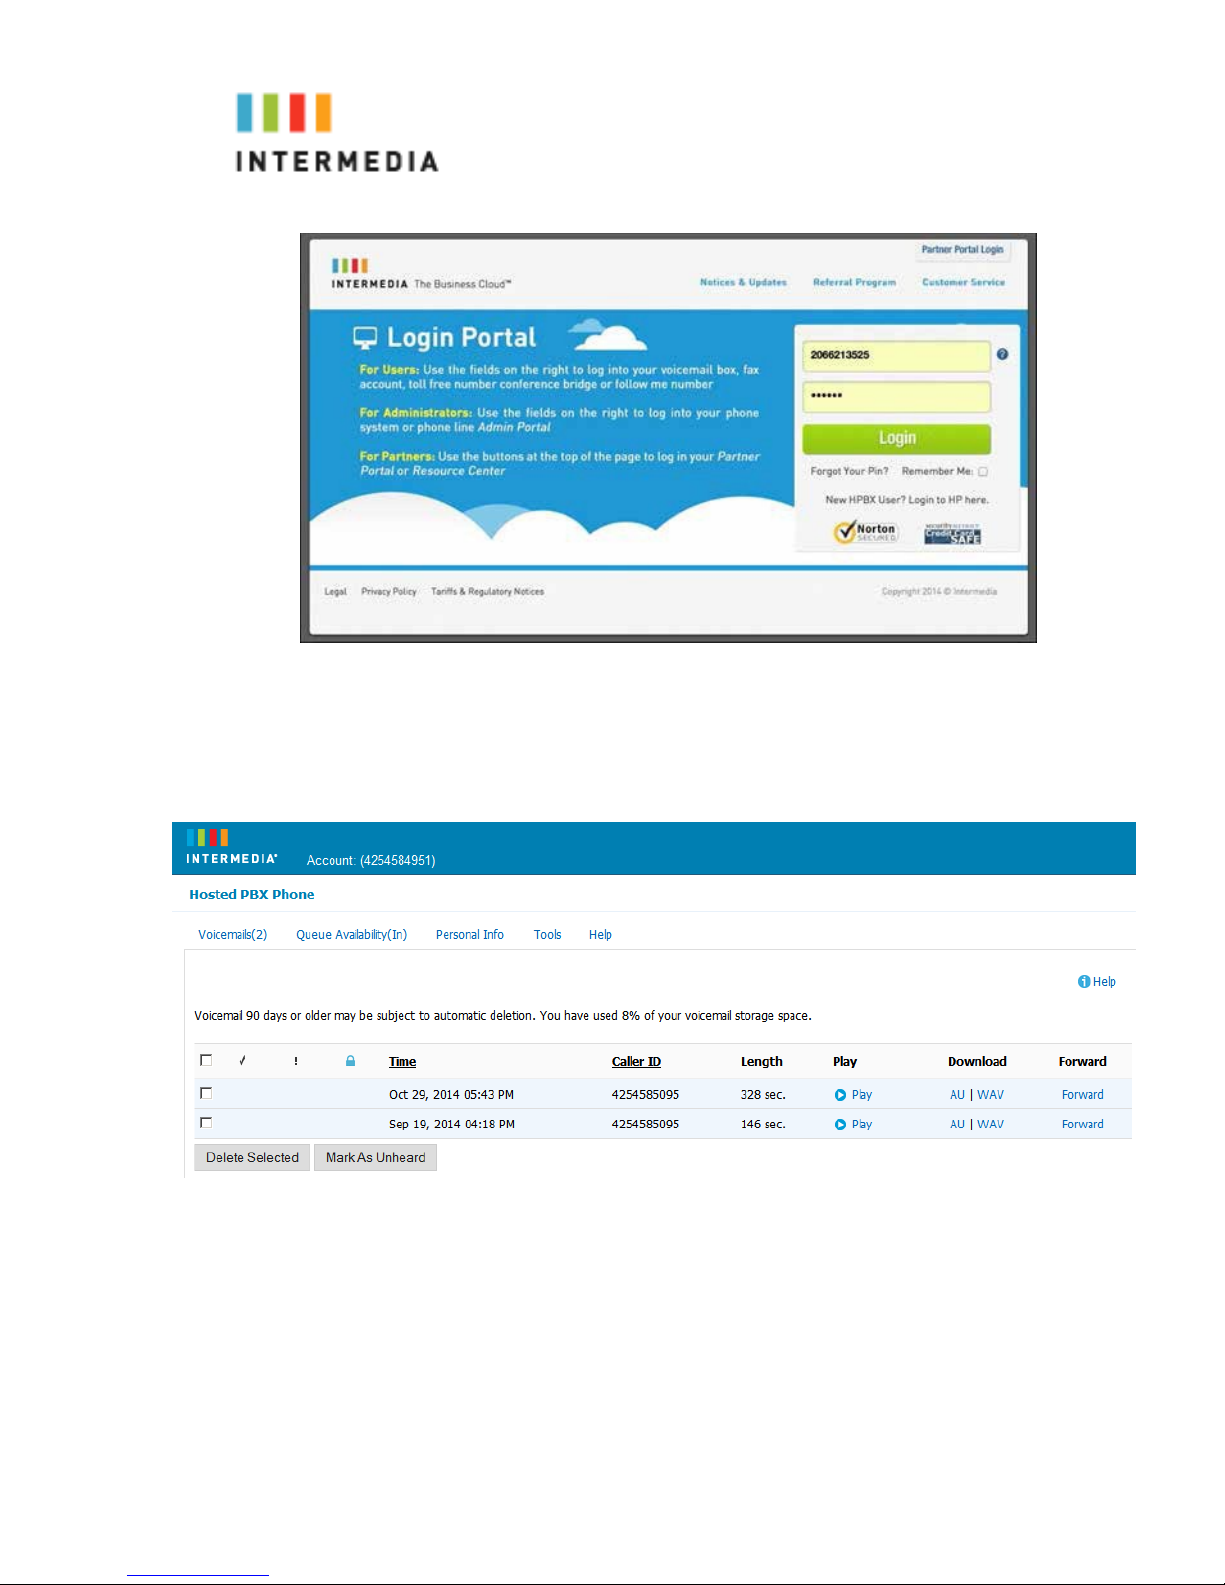
Retrieving messages via the Web
1.
2.
Once logged in, click the Play button associated with the
voicemail m
essage you wish to listen to
The voicemail message will play through your speakers
Forward Voicemail Messages via the Web
A user can forward a voicemail message from his or her
v oic em ai l box to another voicemail once logged into the
personal website. Voicemail messages may be forwarded via
email to anyone or forwarded directly into another person’s
voicemail box (providing they are in your company and have an
Intermedia phone)
1.
Once logged in click the Forward button associated with the
voicemail m
essage you wish to forward
37
Page 38
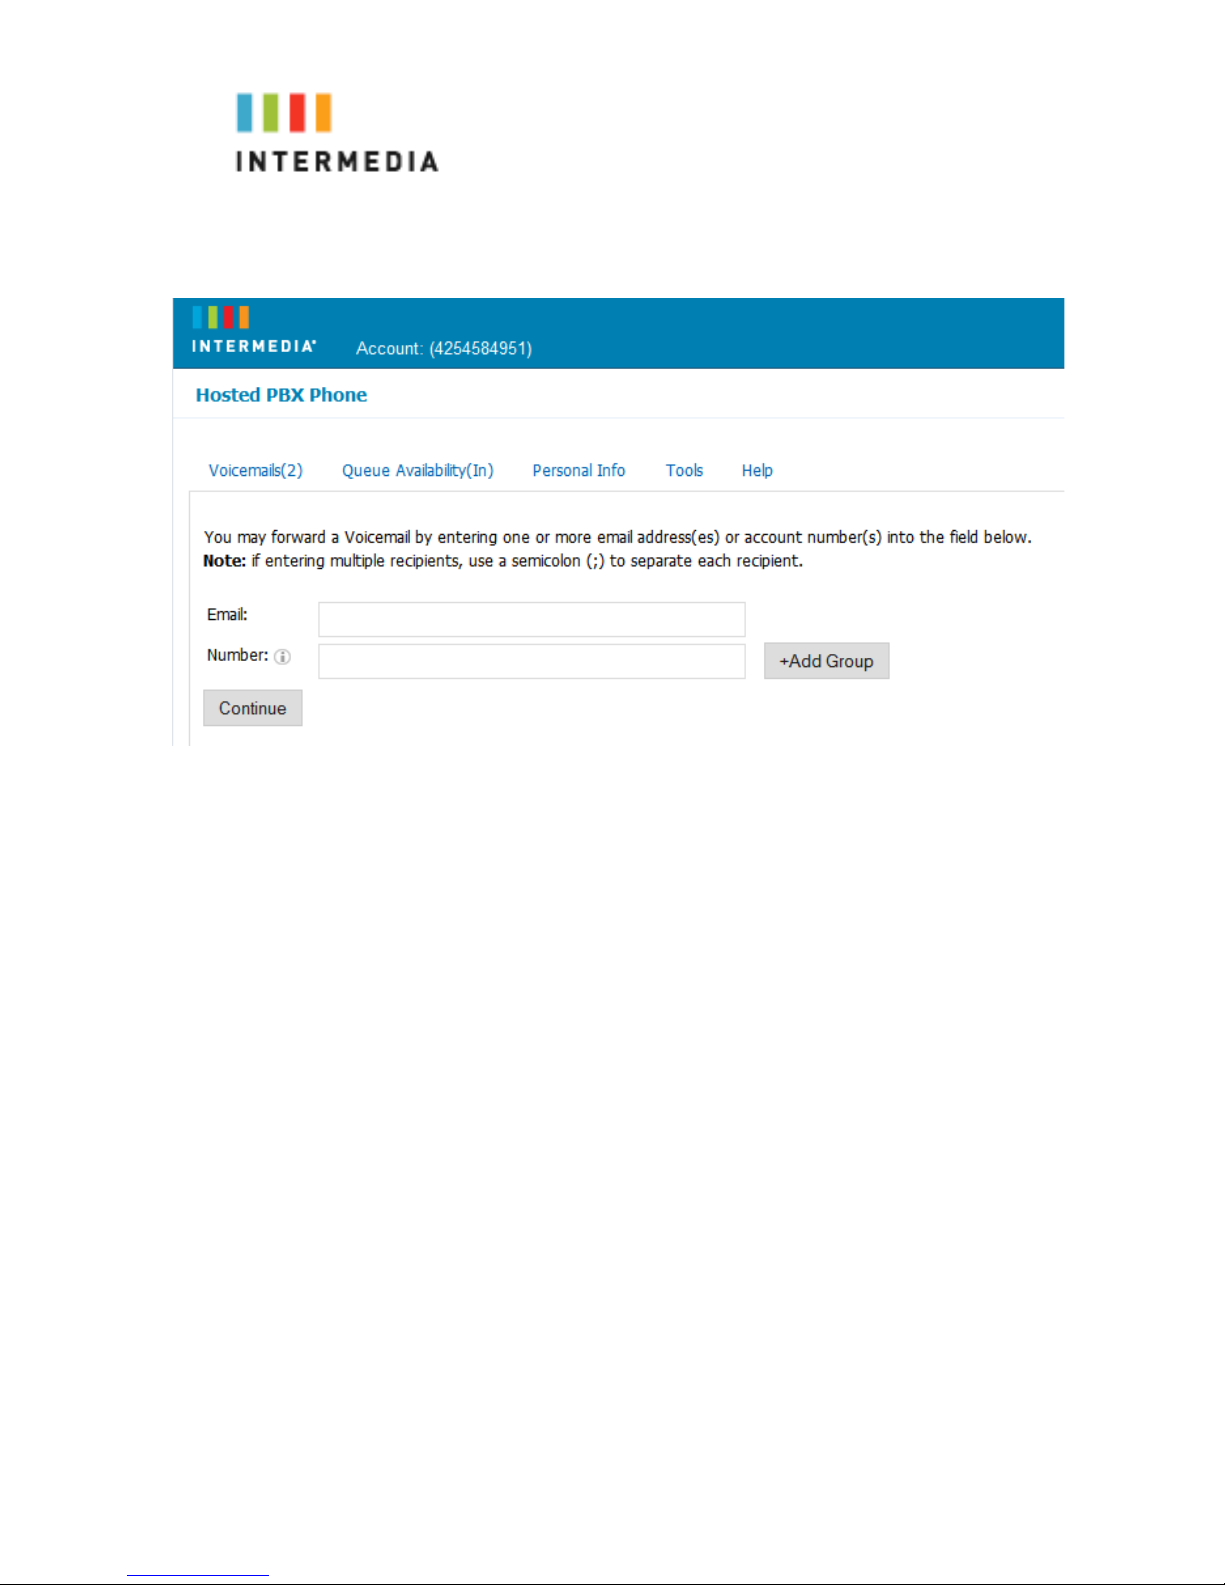
2.
3.
Enter one or more email address or one or more
Intermedia phone num
bers
Click the Continue button
4.
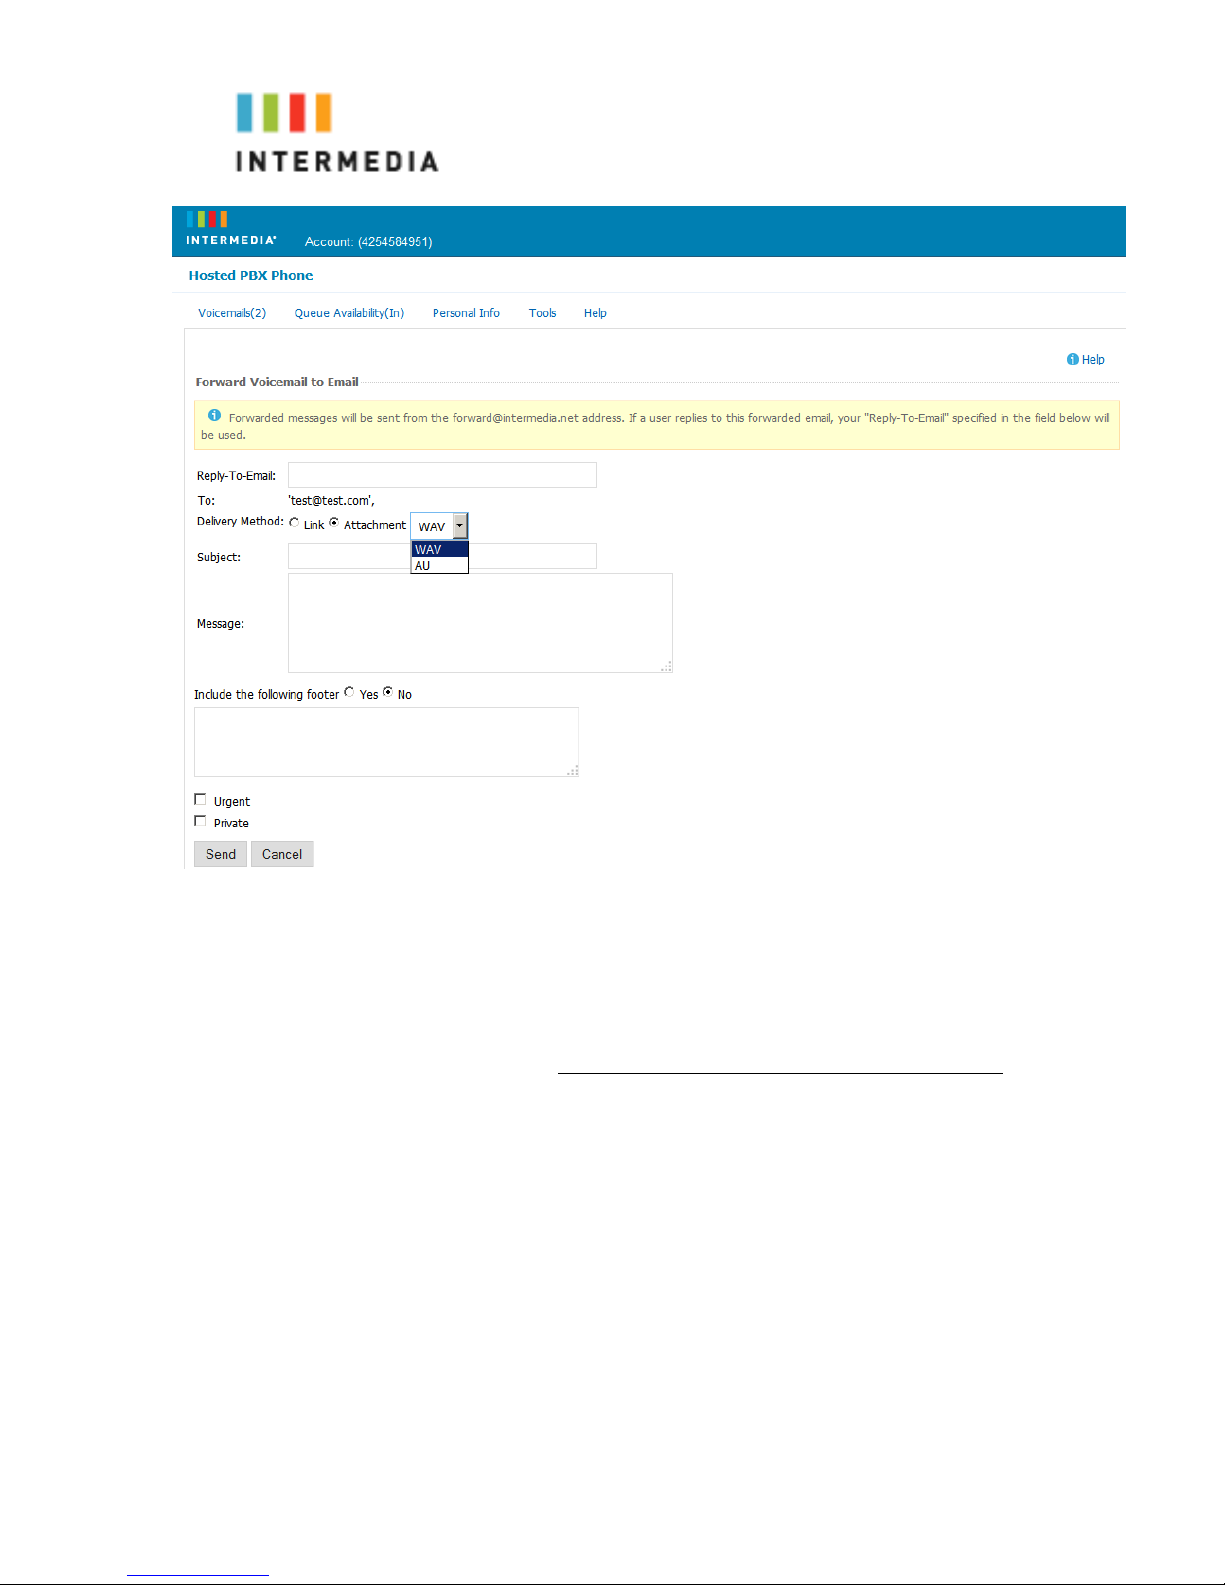
If you have entered email address, fill in your email
address, t
he subject line and any message you wish to
include
5.
6.
Select the delivery method: Send a link to the voicemail
message or s
ent the voicemail message as an attachment
Click the Send button when finished
38
Page 39
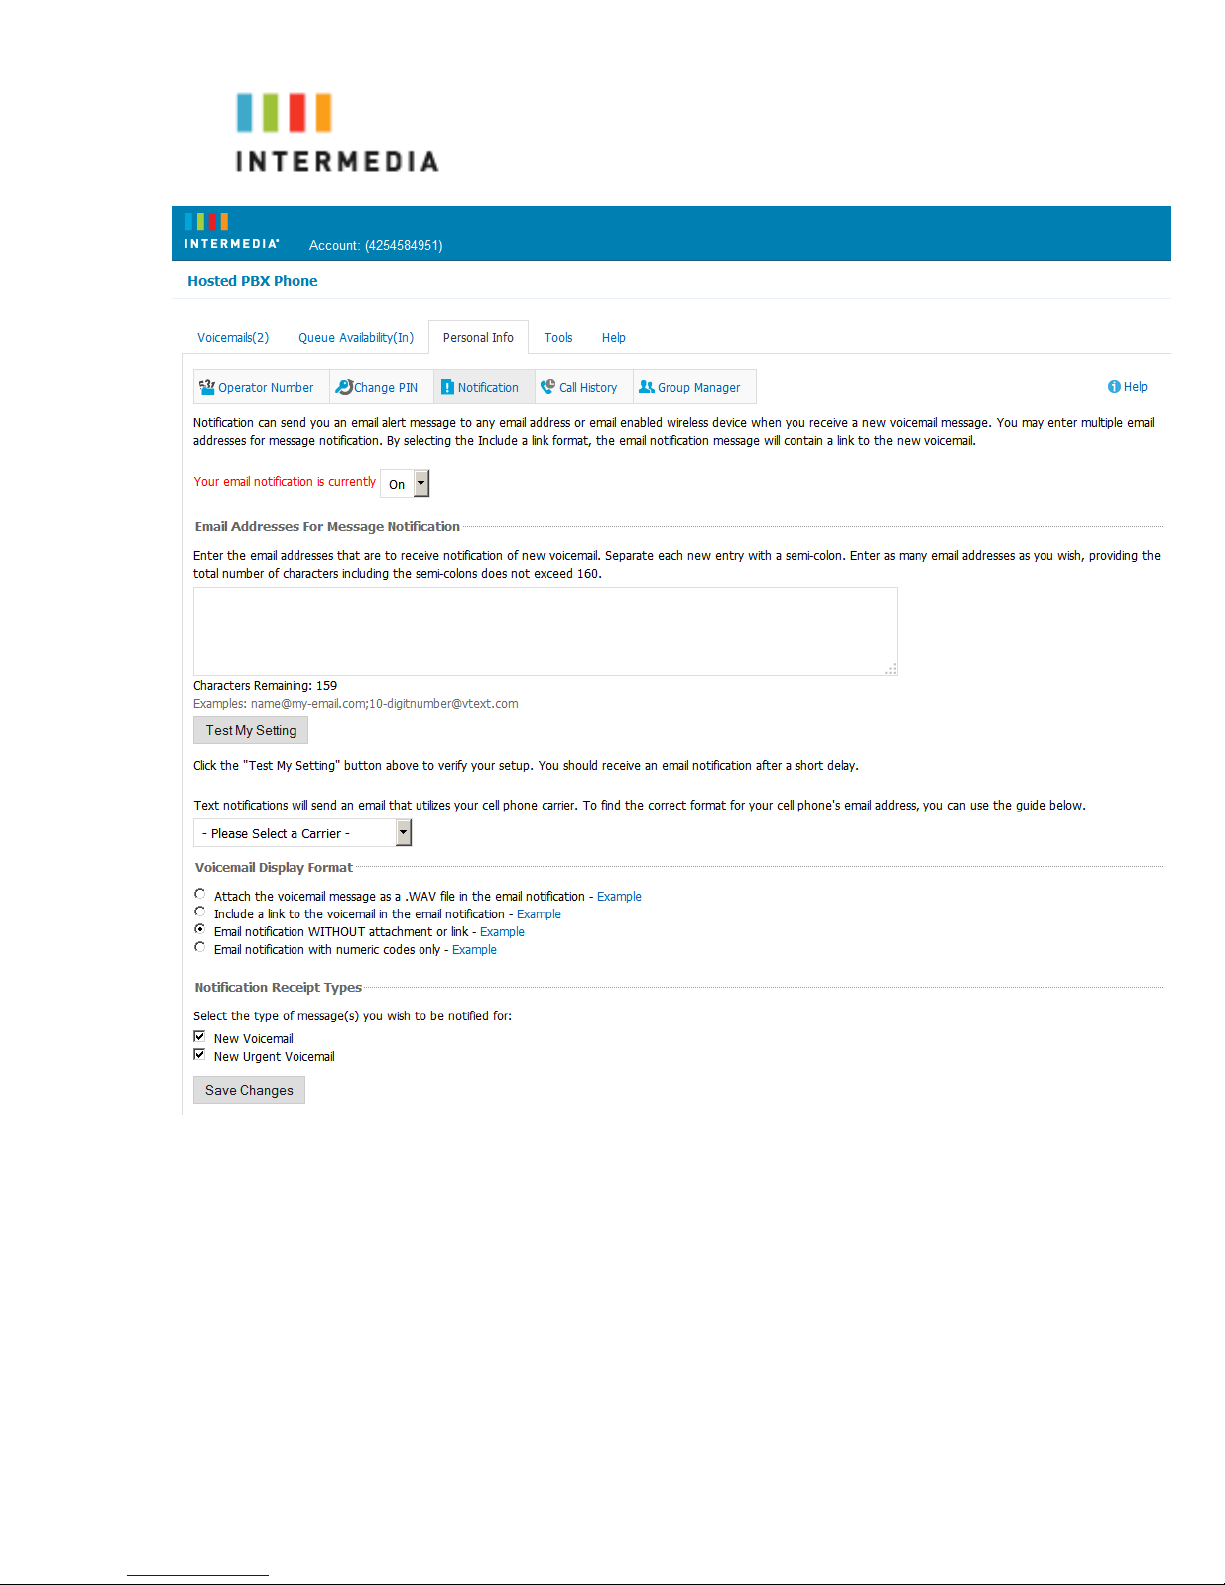
oicemail Notification via Email
V
You may setup your voicemail box to send you an email alert
whenever someone leaves you a voicemail message.
1.
Go to https://www.intermedia.net/accesslinelogin/index.asp
2.
Enter your Conference Phone Number and PIN
3.
Click Login
4.
Select the Personal Info Tab at the top of the web page
5.
Select the Notification button
6.
Enter your email address in the space provided (you may
enter m
7.
Select the Display Format (what the email message looks
like)
8.
Click Ok to save your changes
ultiple email addresses)
39
Page 40
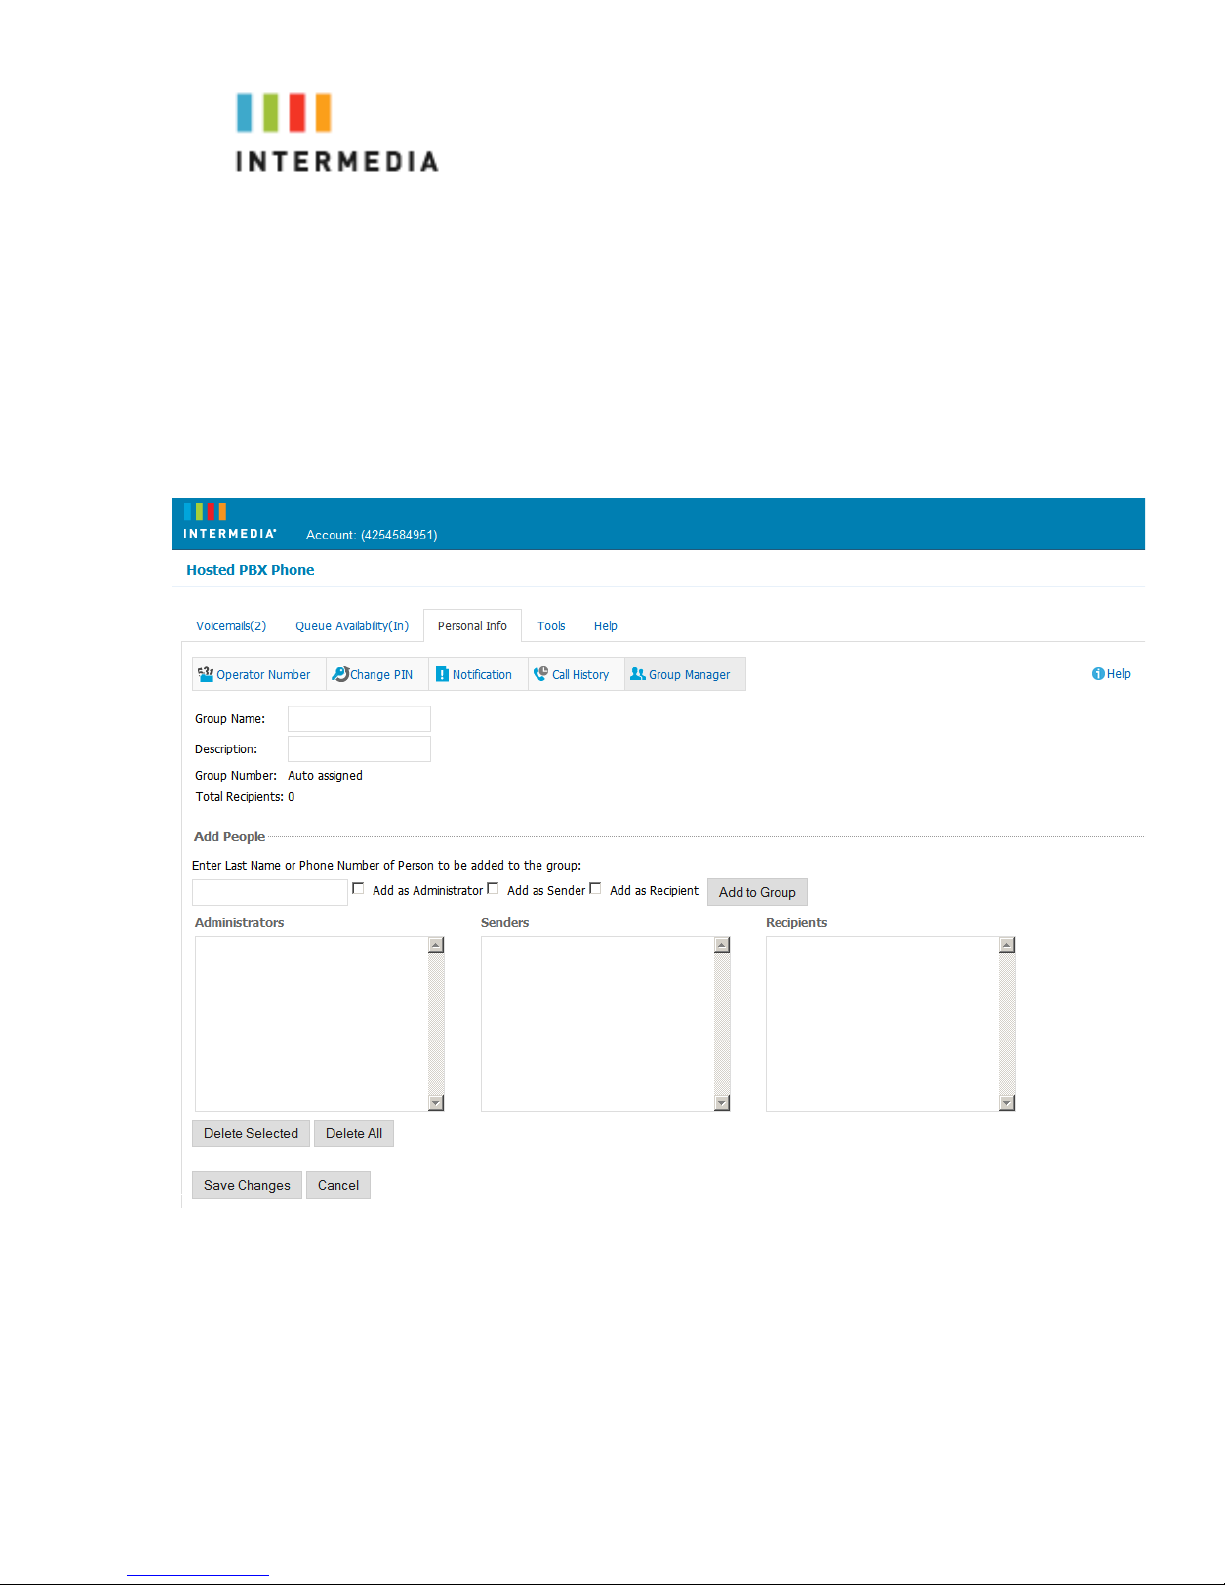
To Create a Voicemail Group
A Voicemail Group allows you to quickly forward a voicemail
message to multiple other people without entering each person
individually. Voicemail groups are created through your
personal website.
1.
2.
3.
4.
Once logged in, select the Personal Info Tab
Select the Group Manager button
Click the Create Group button
Assign a Group Number- used when forwarding
to a group through the phone
5.
6.
Assign a Group Name
Add an optional description
40
Page 41
7.
8.
9.
10.
11.
Add members to the group one at a time by entering
their name or phone numbe
r
For each member you add, determine if that
person should be:
•
Administrator- Able to make changes to the
group Sender-
•
Recipient- Able to receive messages sent to this
Able to send to this group, or
group
Click the Add button
Repeat step 7 through 9 as necessary to add all of
the members
Click the Save button
Change the Amount of Time Before Voicemail Picks Up
Your Voicemail box is programmed to take messages when
you can’t answer your phone. If you want the phone to ring
more or less times, you may change this setting:
1.
2.
From the idle screen, press the Forward soft key.
The Forwarding Type Select screen displays.
41
Page 42

3.
4.
5.
Scroll to the No Answer Forwarding.
Press
.
Press the Next soft key to go to the Forward After Rings
field.
6.
7.
8.
9.
10.
Use the << soft key to remove the existing number of rings
Enter how many rings to wait before forwarding the call
ng is approximately 4 seconds).
(one ri
Press the Disable soft key
Repeat steps 1 through 3
Press the Enable soft key
Additional Call Features
Using Call Lists
Your phone maintains lists of missed, received and placed calls.
Each list can hold up to 100 entries.
If you miss a call, the idle screen will display a message
indicating the number of missed calls you have. To view
information about the missed call, view your Missed Calls list
(see Viewing Call Lists on page Viewing Call Lists). After you
view the Missed Calls list, the message on the idle screen
is removed.
The following figure shows what the idle screen looks like when
you miss a call.
Viewing Call Lists
You can access any call list from the Call Lists menu, or you can
quickly access missed calls from the idle screen.
42
Page 43
To view a call list:
Do one of the following:
Press
, and then select Features > Call Lists > Missed
Calls, Received Calls, or Placed Calls.
or
To quickly view the speed dial list, press from the
idle screen.
Managing Call Lists
You can clear all the records in a call list, or just one record. You
can also choose a record in a list and return the call, store the call
details in your local Contact Directory, or view detailed
information about the particular call.
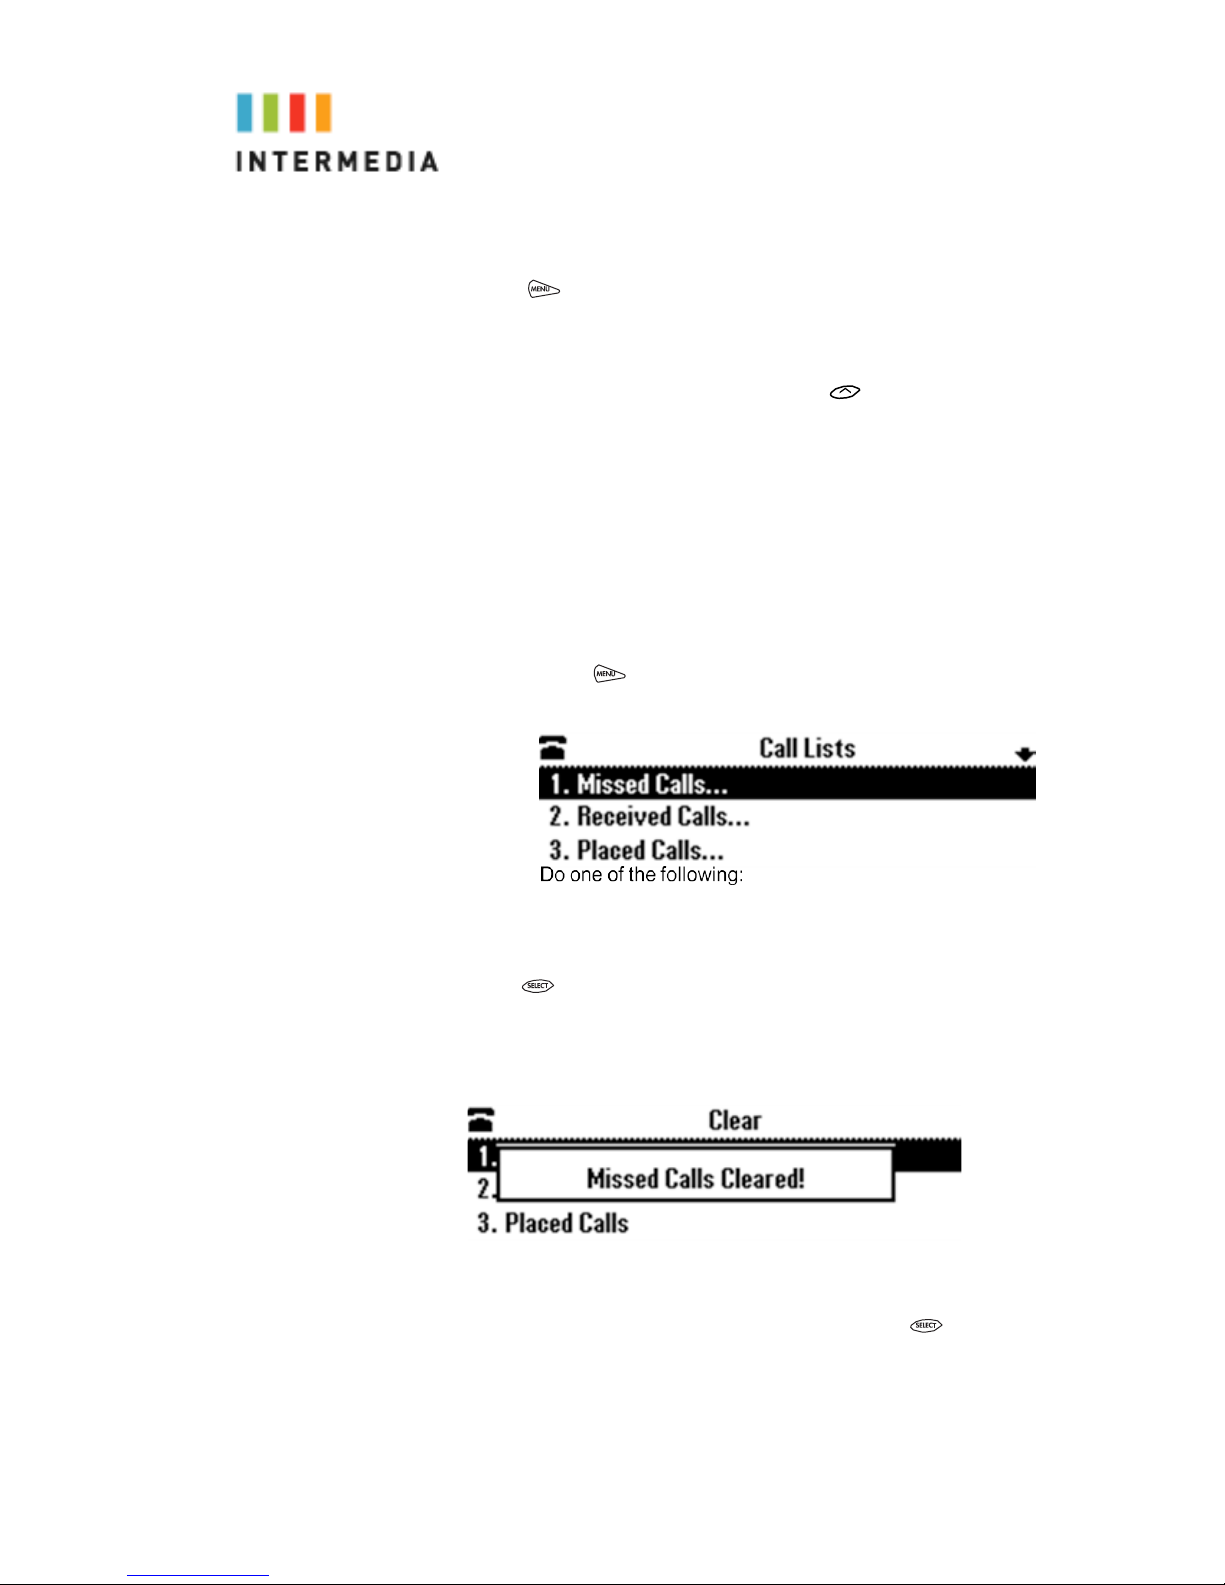
To manage a call list:
1. Press
, and then select Features > Call Lists. The Call
Lists screen displays.
2.
To clear the records in a call list, select
Clear
, and then scroll
to either Missed Calls, Received Calls or Placed Calls. Then,
press .
The following figure shows the message that displays when you
clear a Missed Calls list.
or
To view and manage a call list, scroll to Missed
Calls
, or
Placed Calls
list information displays.
The following figure shows a Placed Calls list.
Calls, Received
, and then press . The call
43
Page 44

To manage your call list (press the
these options):
More
soft key to view all
To return the call, press the
To edit the phone number (if necessary) before you dial the
number or store the call details in your Contact Directory, press
the
Edit
soft key.
To remove the call from the list, press the
To store the contact in your Contact Directory, press the
Save
soft key.
To view information about the call, such as the phone number,
the time and duration of the call, and the name of the caller,
press the
3.
Info
Press
soft key.
to return to the idle screen.
Dial
soft key.
Clear
soft key.
Speed Dial list
Managing Speed Dial Entries
Use the speed dial feature for fast, automated dialing. To
use speed dial, you enter a speed dial index number
instead of entering a complete phone number.
When you create a Contact Directory entry, the phone
automatically assigns a Speed Dial Index number to the contact.
The following steps describe how to update a speed dial entry for
a user.
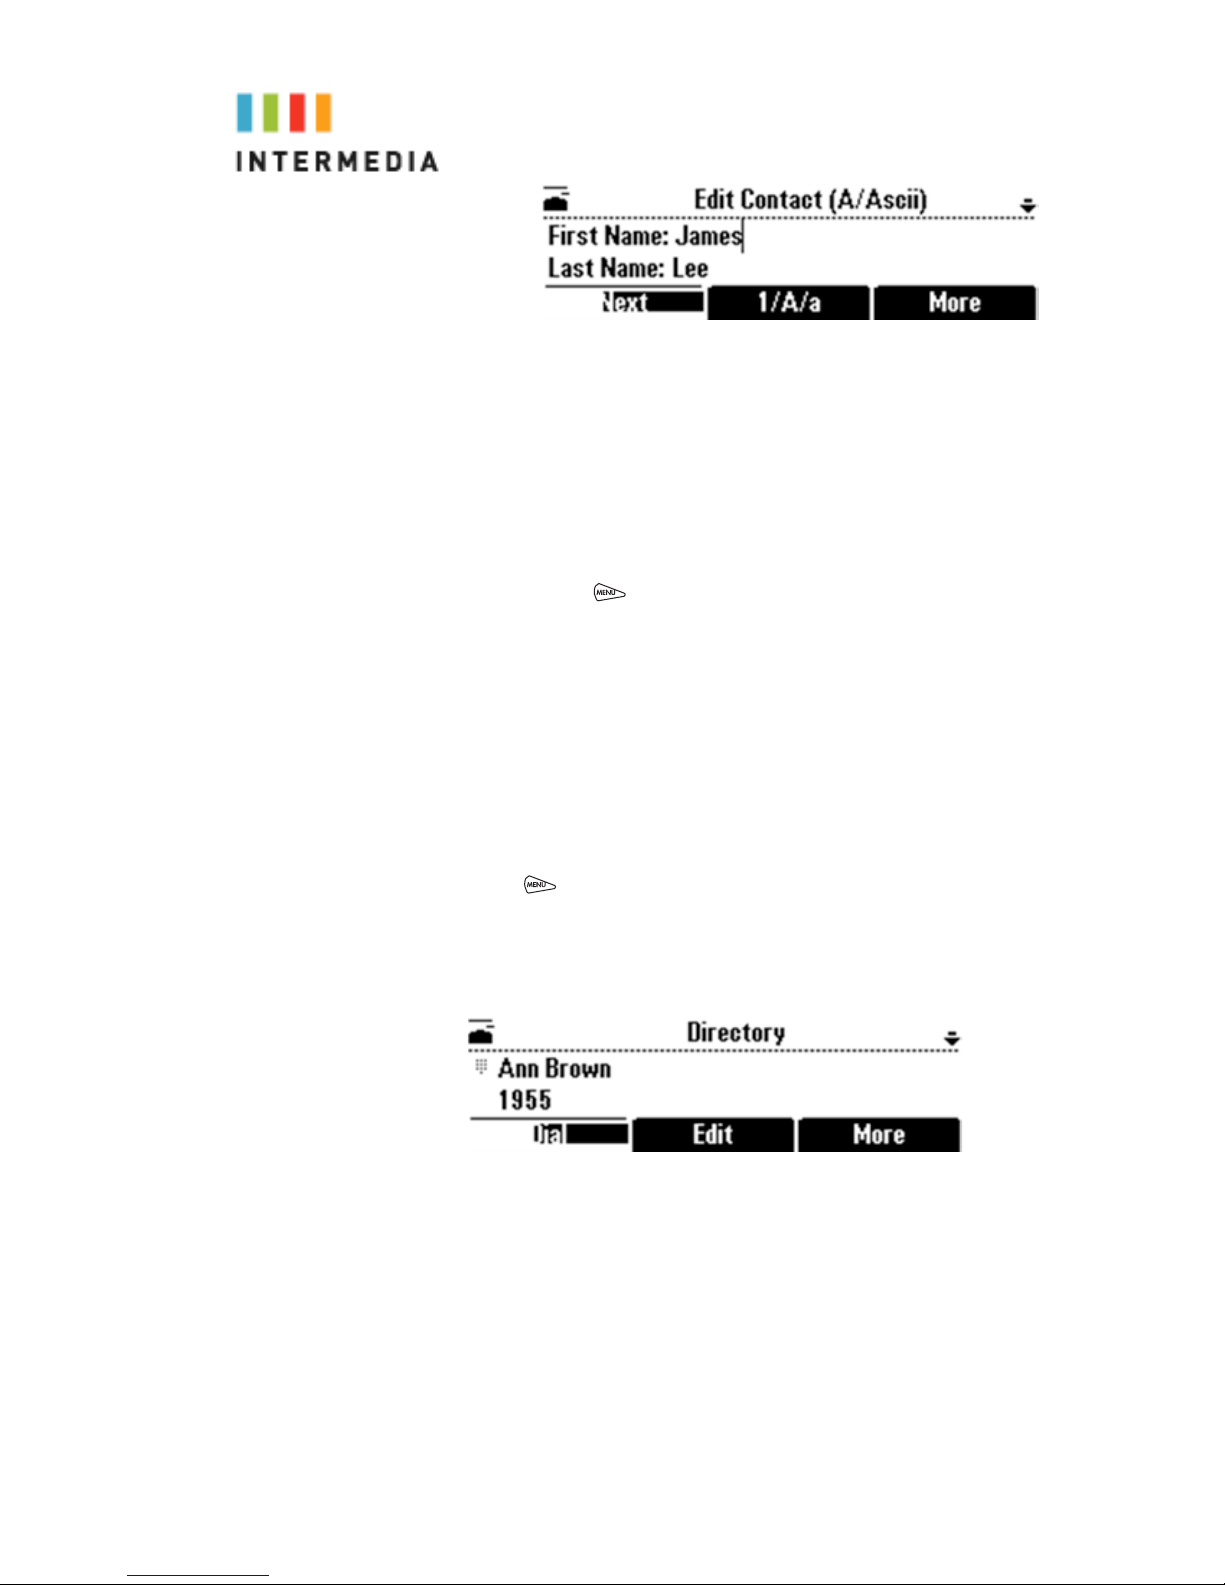
To update a speed dial entry in your contact directory:
1.
Press
, and then select Features > Contact Directory.
The Directory screen displays.
2.
Scroll to the user’s entry, and then press the Edit soft key.
The Edi
t Contact screen displays.
44
Page 45
3.
4.
5.
6.
Use the Next and Prev soft keys to scroll to the Speed Dial
Index f
ield, and then update the speed dial index number.
he << soft key to delete an existing entry.
Use t
You can assign any unused speed dial index number from 1
9. If you assign a speed dial index number that is
to 9
already t
exists” di
number (f
index is invalid” di
aken, the message “Speed dial index already
splays. If you enter an invalid speed dial index
or example, 0 or 00), the message “Speed dial
splays.
Press the Save soft key.
Press
to return to the idle screen.
Managing Contacts
You can store a large number of contacts in your phone’s local Con-
tact Directory.
You can dial and search for contacts in this directory. You may be
able to add, edit, and delete contacts.
Viewing Your Local Contact Directory
To view your local Contact Directory:
Press
, and then select
Features > Contact Directory
Directory screen displays, listing all the contacts in your
. The
directory. Scroll to view all your contacts. You can use the # key to
Page Down, and the * key to Page Up.
Adding Contacts to Your Local Contact Directory
You can add contacts to your local Contact Directory in the
following ways:
•
Manually (if you have permission to update your local Contact D
•
From a call list
irectory)
45
Page 46
Adding Contacts Manually
You can update your local Contact Directory manually, instead of
importing contact information from a call list or a Corporate
Directory.
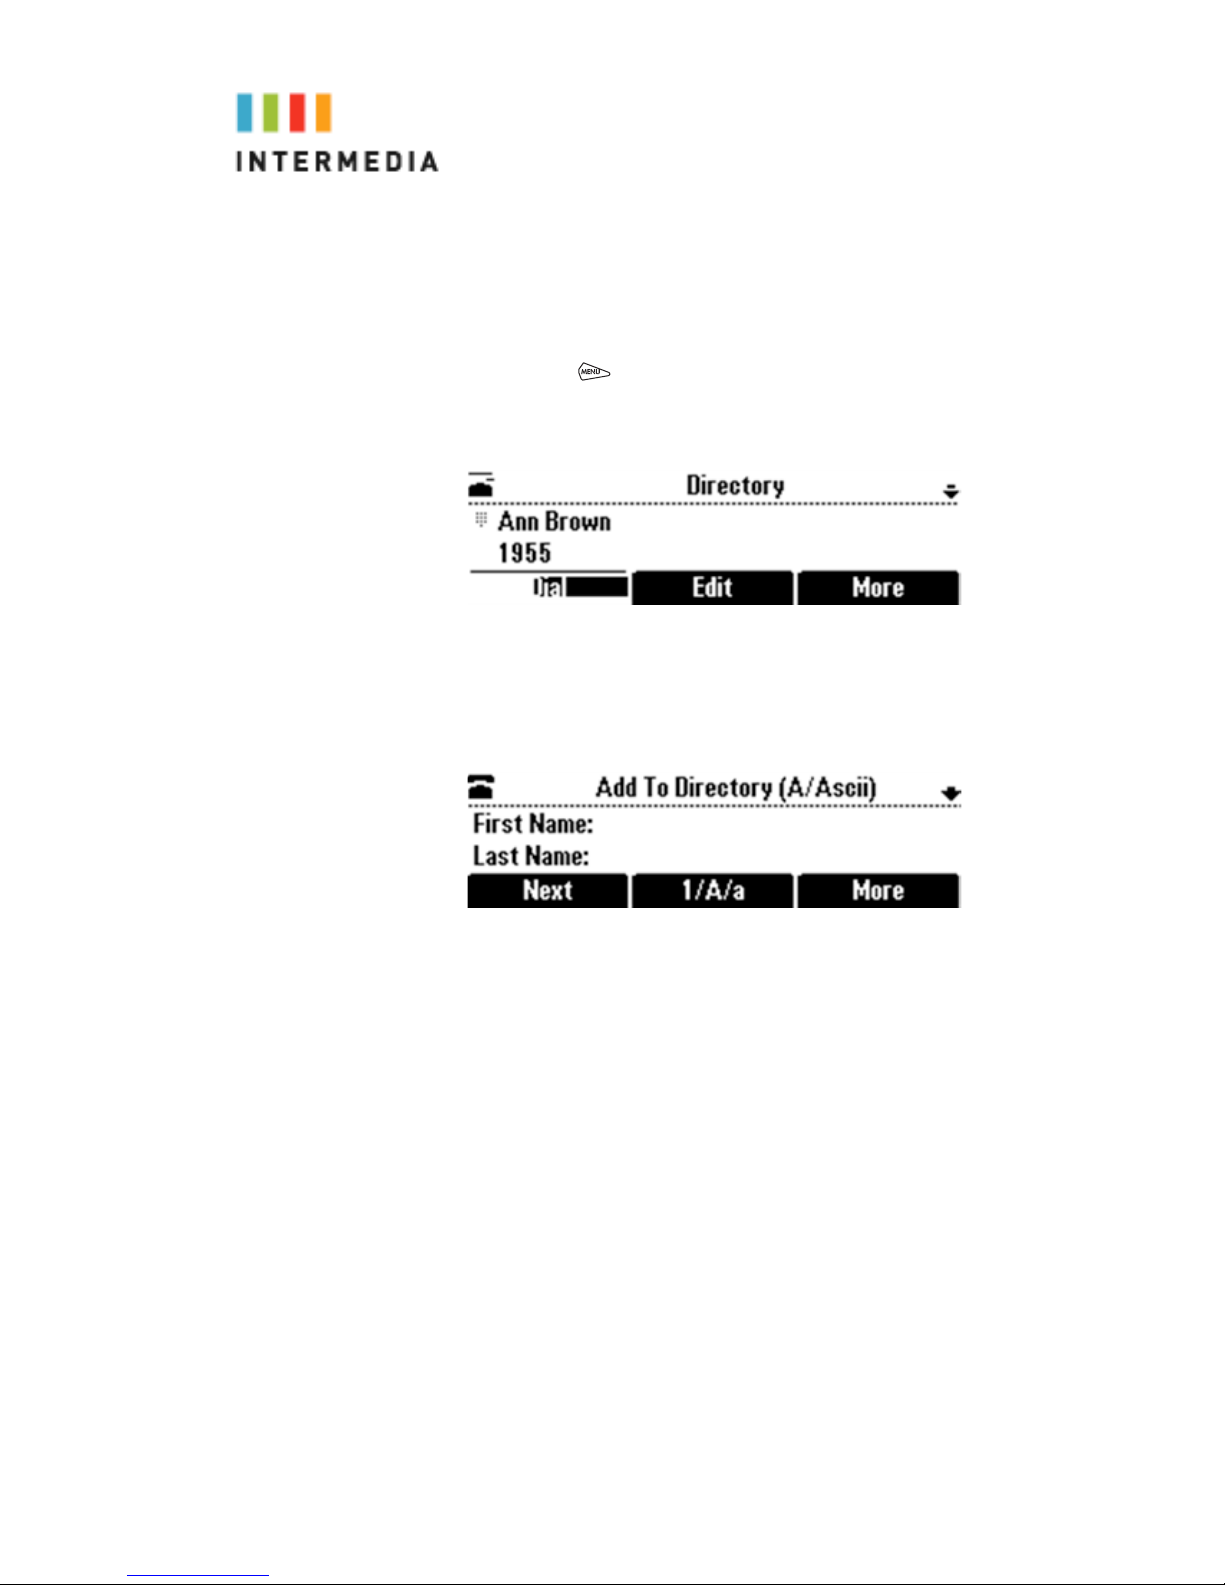
o add a contact manually:
T
1.
Press
, and then select Features > Contact Directory.
The Directory screen displays.
2.
To add a contact to your phone’s database, press the
soft key.
Add
The Add To Directory screen displays.
3.
Enter the contact information. To move between fields, use
Next
and
Prev
the
information
soft keys. Enter the following
(Optional.) Enter the First Name and Last Name of the contact.
(To enter the contact’s name, see Navigating Menus and
Entering Data on page 1-12.)
You can enter a maximum of 32 characters.
(Required) Enter the Contact phone number.
You can enter a maximum of 32 characters. The phone number
must be unique, and must not already exist in the directory. If you
save an entry with a non-unique phone number, the entry will not
be saved.
(Optional) Update the Speed Dial Index number.
The speed dial index number is automatically assigned to the next
available index value, up to a maximum value of 99. You can assign any unused speed dial index number from 1 to 99.
46
Page 47
If you assign a speed dial index number that is already taken, the
message “Speed dial index already exists” displays. If you enter an
invalid speed dial index number (for example, 0 or 00), the
message “Speed dial index is invalid” will be displayed.
(Optional) Enter a Label for the contact. You can enter a
maximum of 32 symbols, letters, or numbers.
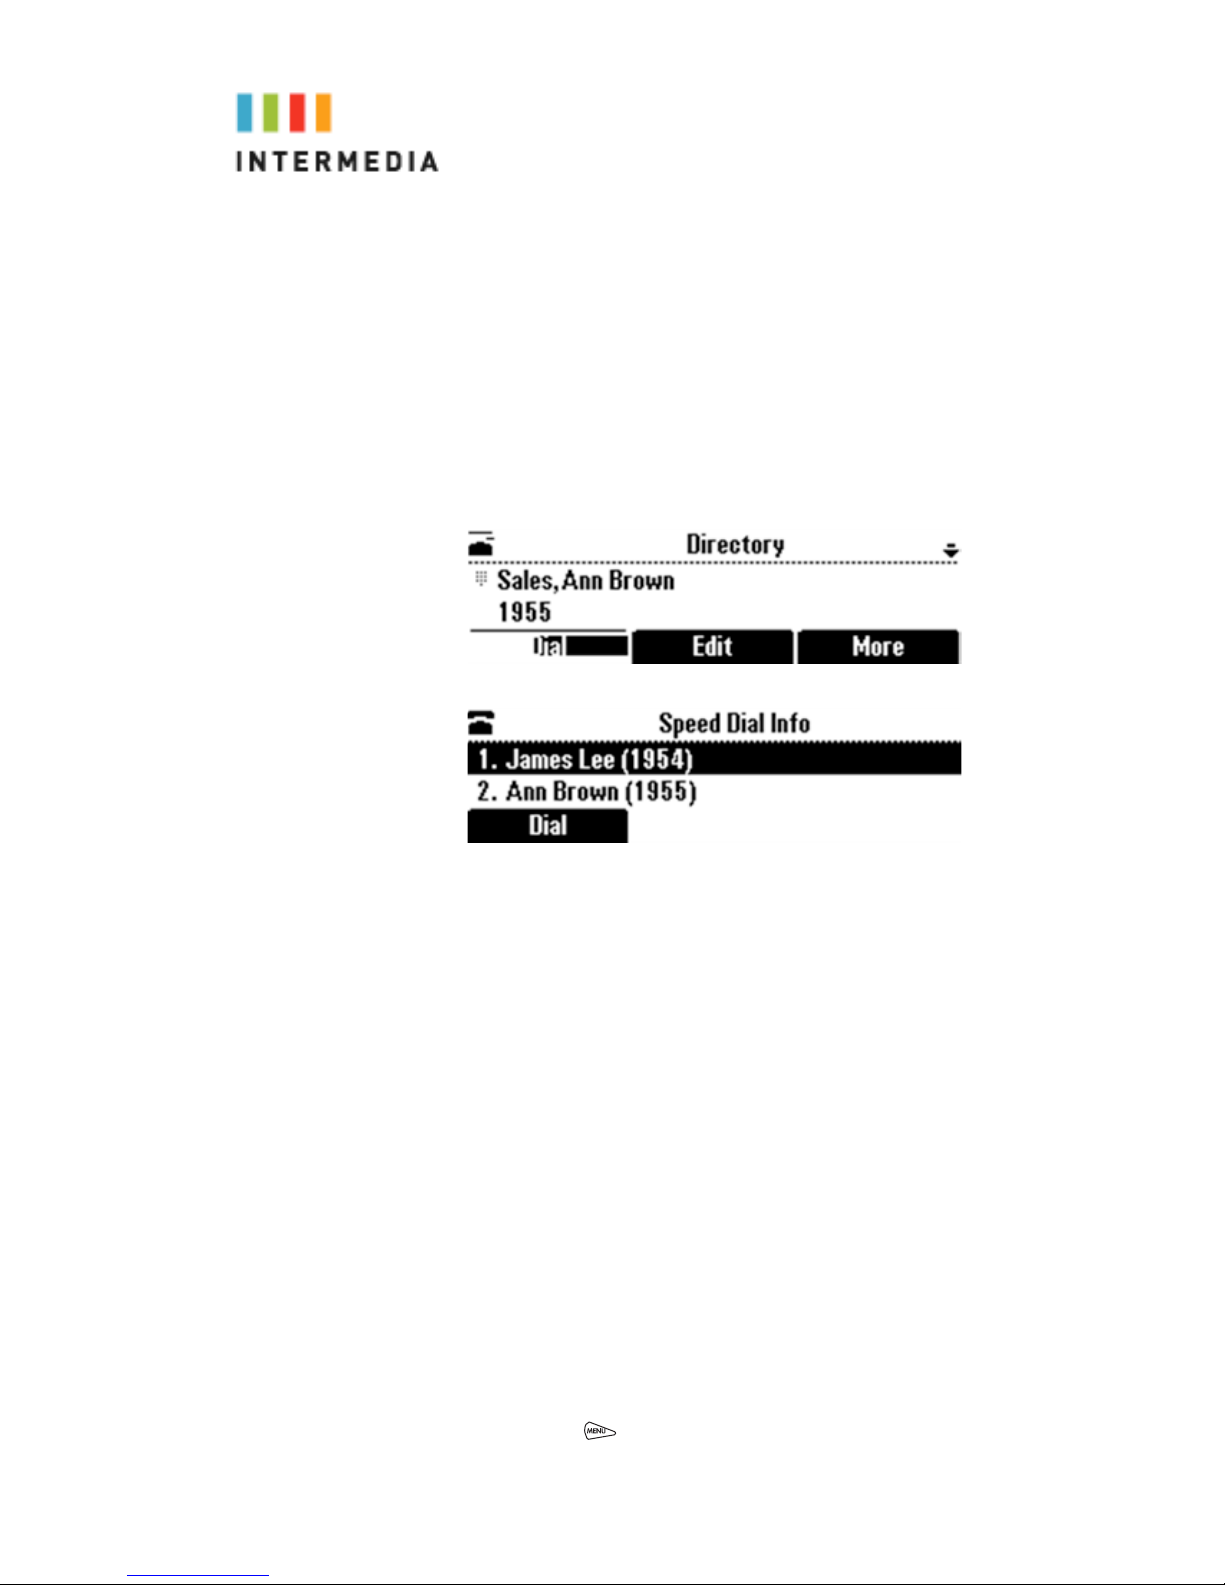
If you specify a label, the label will be the first item that displays for
the contact in the Contact Directory and on the Speed Dial Info
screen (before the contact’s first and last names, if specified). For
example, in the following figures, Ann Brown has been assigned the
label “Sales.”
(Optional) Set the Ring Type.
(Optional) Assign a Divert Contact.
The Divert Contact identifies the third party to which you want this
contact’s calls sent. You can enter a maximum of 32 characters.
(Optional) Change the Auto Reject and Auto Divert settings. If
you set the Auto Reject field to enabled, each time the contact
calls, the call will be directed to your voice mail system (if a voice
mail system is set up). If you set the Auto Divert field to enabled,
each time the contact calls, the call will be directed to a third party
you specify in the Divert Contact field.
Use the scroll keys or the
Change
soft key to switch between the
Enabled and Disabled settings for the Auto Reject and Auto Divert
fields.
4.
Press the Save soft key.
5.
Press
to return to the idle screen.
47
Page 48
Adding Contacts from Call Lists
You can save call information from a call list to your Contact
Directory.
To add a contact to the Contact Directory from a call list:
1.
Do one of the following:
To s
elect a call list, press and then select Features
> Call Lists > Missed Calls, Received Calls, or Placed
Calls. Or to quickly see a list of missed calls, press f
the idle s
2.
Scroll to the contact’s call.
creen.
rom
To scroll through a list of contacts, use the * key to Page
Up and
the # key to Page Down.
To save the contact to your Contact Directory, press the
Save soft ke
y.
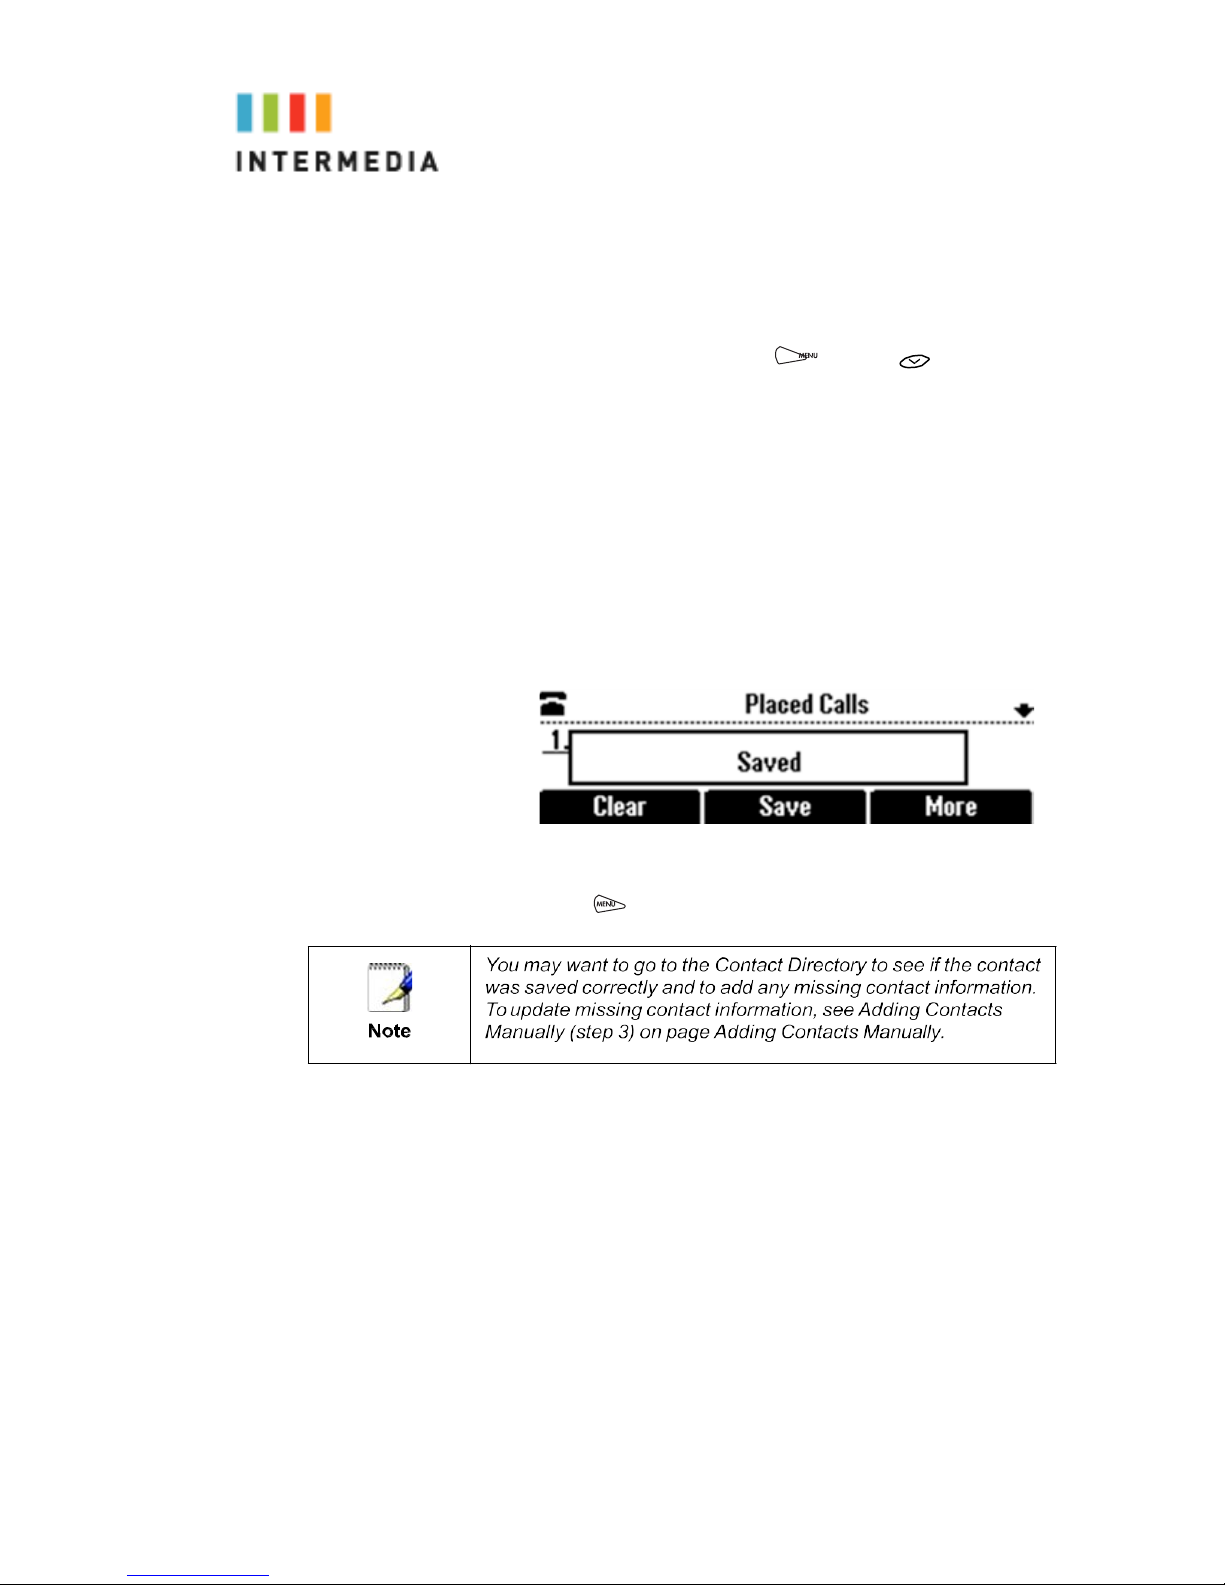
The following figure shows the message that displays
when y
ou save a contact to your Contact Directory.
3.
4.
If the contact already exists in your Contact Directory,
“Contact a
Press
lready exists” displays.
to return to the idle screen.
48
Page 49
Searching for Contacts
You can search for contacts in your local Contact Directory,
Searching for Contacts in Your Contact Directory
Search for a contact by scrolling through the directory, or
entering specific search criteria.
o search for a contact in the Contact Directory:
T
1.
Press
, and then select Features > Contact Directory.
The Directory screen displays.
2.
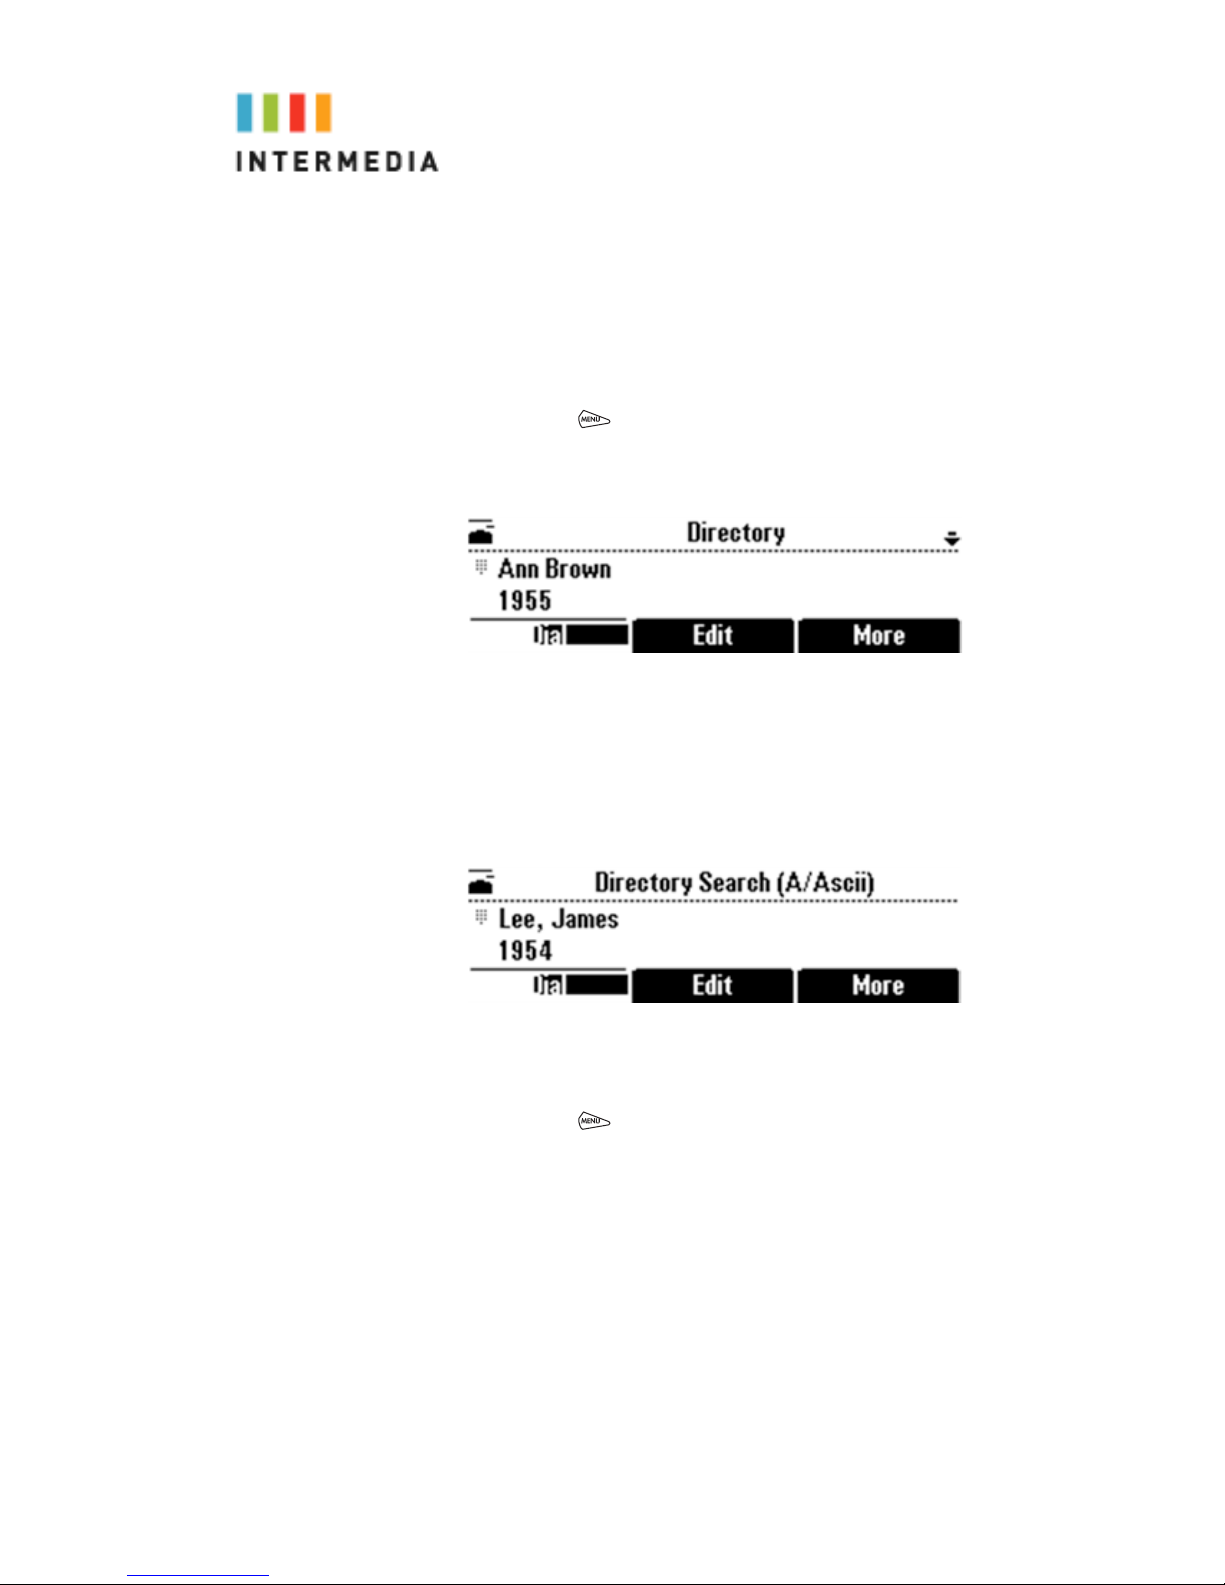
Press the
characters of t
press the
Search
soft key. Then, enter the first few
he contact’s first or last name, and then
Search
soft key again.
The Directory Search screen displays a list of successful
matches.
3.
Scroll to the contact you are searching for. You
can di
4.
Press
al, edit, or delete the contact.
to return to the idle screen.
Updating Contacts in Your Contact Directory
You can update contact information for contacts in your local
Contact Directory. You cannot update information for contacts in
your Corporate Directory.
49
Page 50
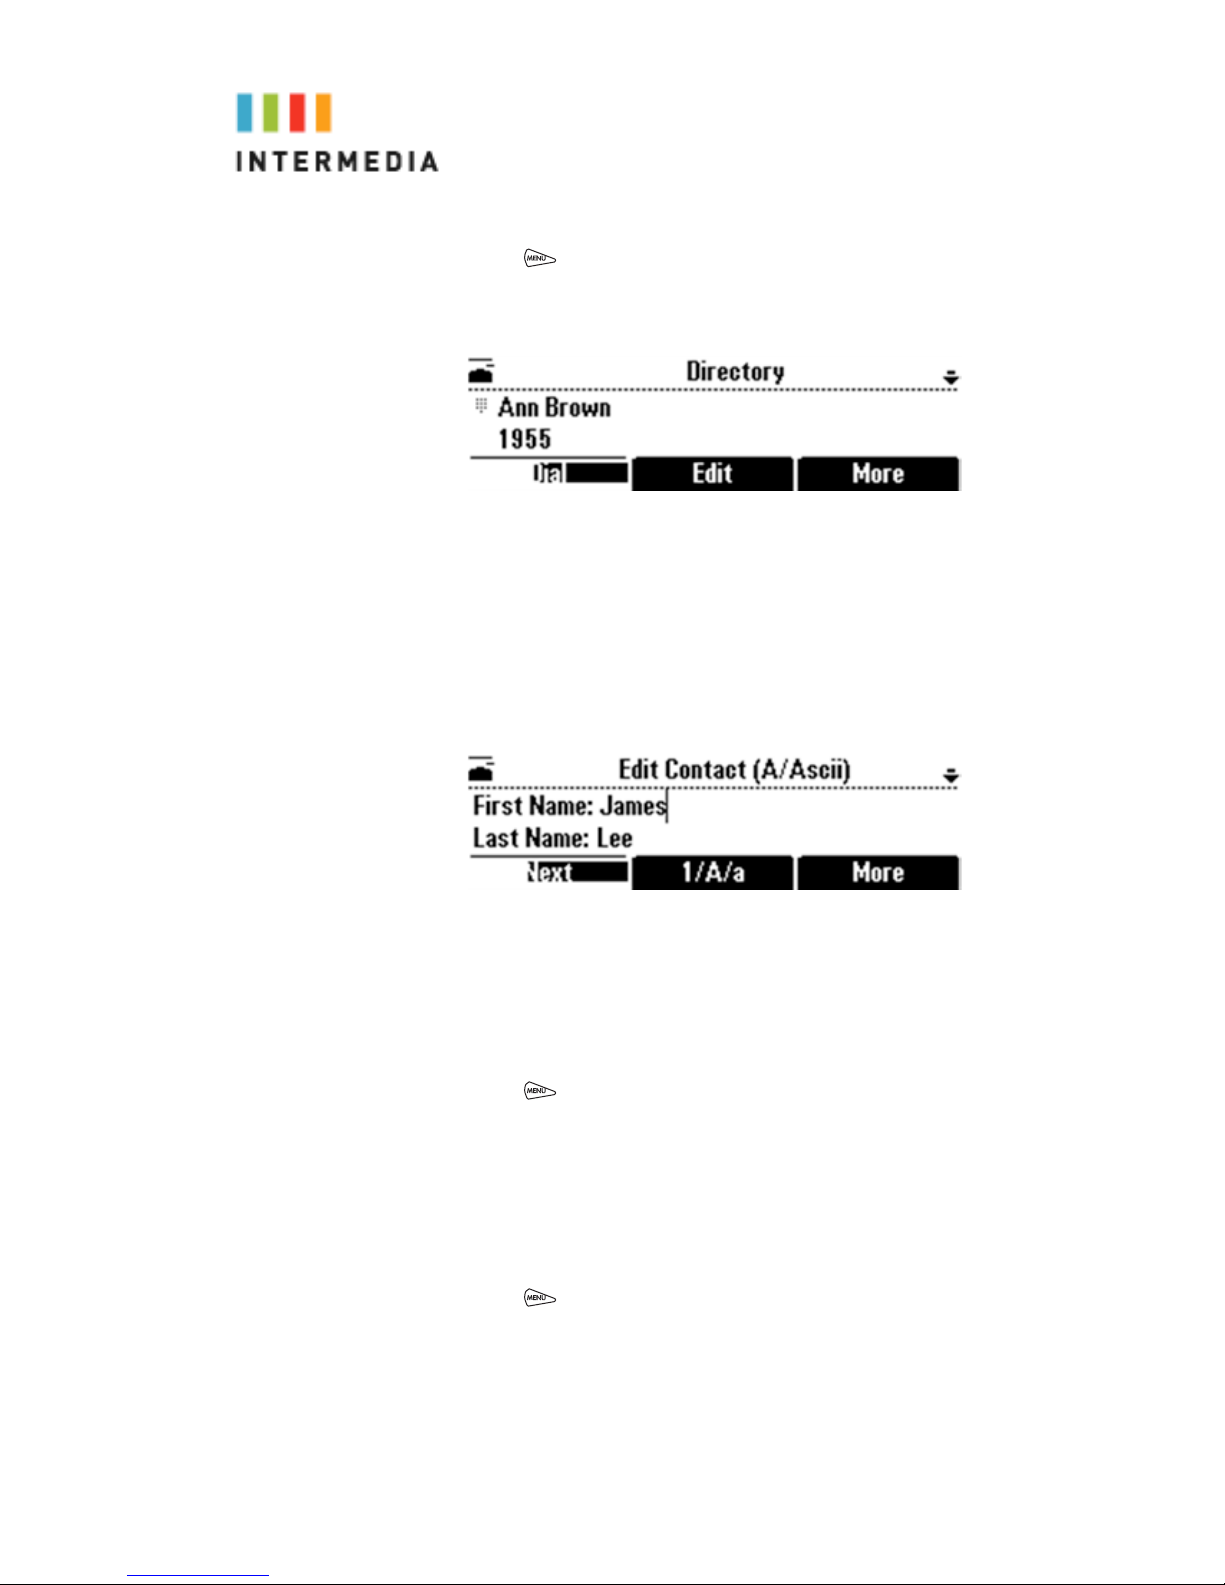
To update a contact in your Contact Directory:
1.
Press
, and then select Features > Contact Directory.
The Directory screen displays.
2.
Scroll to the contact whose information you want to update, or
search for the c
To s
croll through a list of contacts, use the * key to Page Up and
the # key to Page Down.
ontact
Press the
3.
The Edi
4.
Update the contact information. Use the
to scroll between fi
For i
Edit
soft key.
t Contact screen displays.
Next
and
Prev
elds.
nformation on the fields you can update, see Adding
Contacts Manually (step 3) on page Adding Contacts Manually.
Press the
5.
Press
6.
Save
soft key.
to return to the idle screen.
Deleting Contacts from Your Contact Directory
You can delete contacts from your Contact Directory.
soft keys
To delete a contact from the Contact Directory:
1.
Press
, and then select Features > Contact Directory.
The Directory screen displays.
50
Page 51
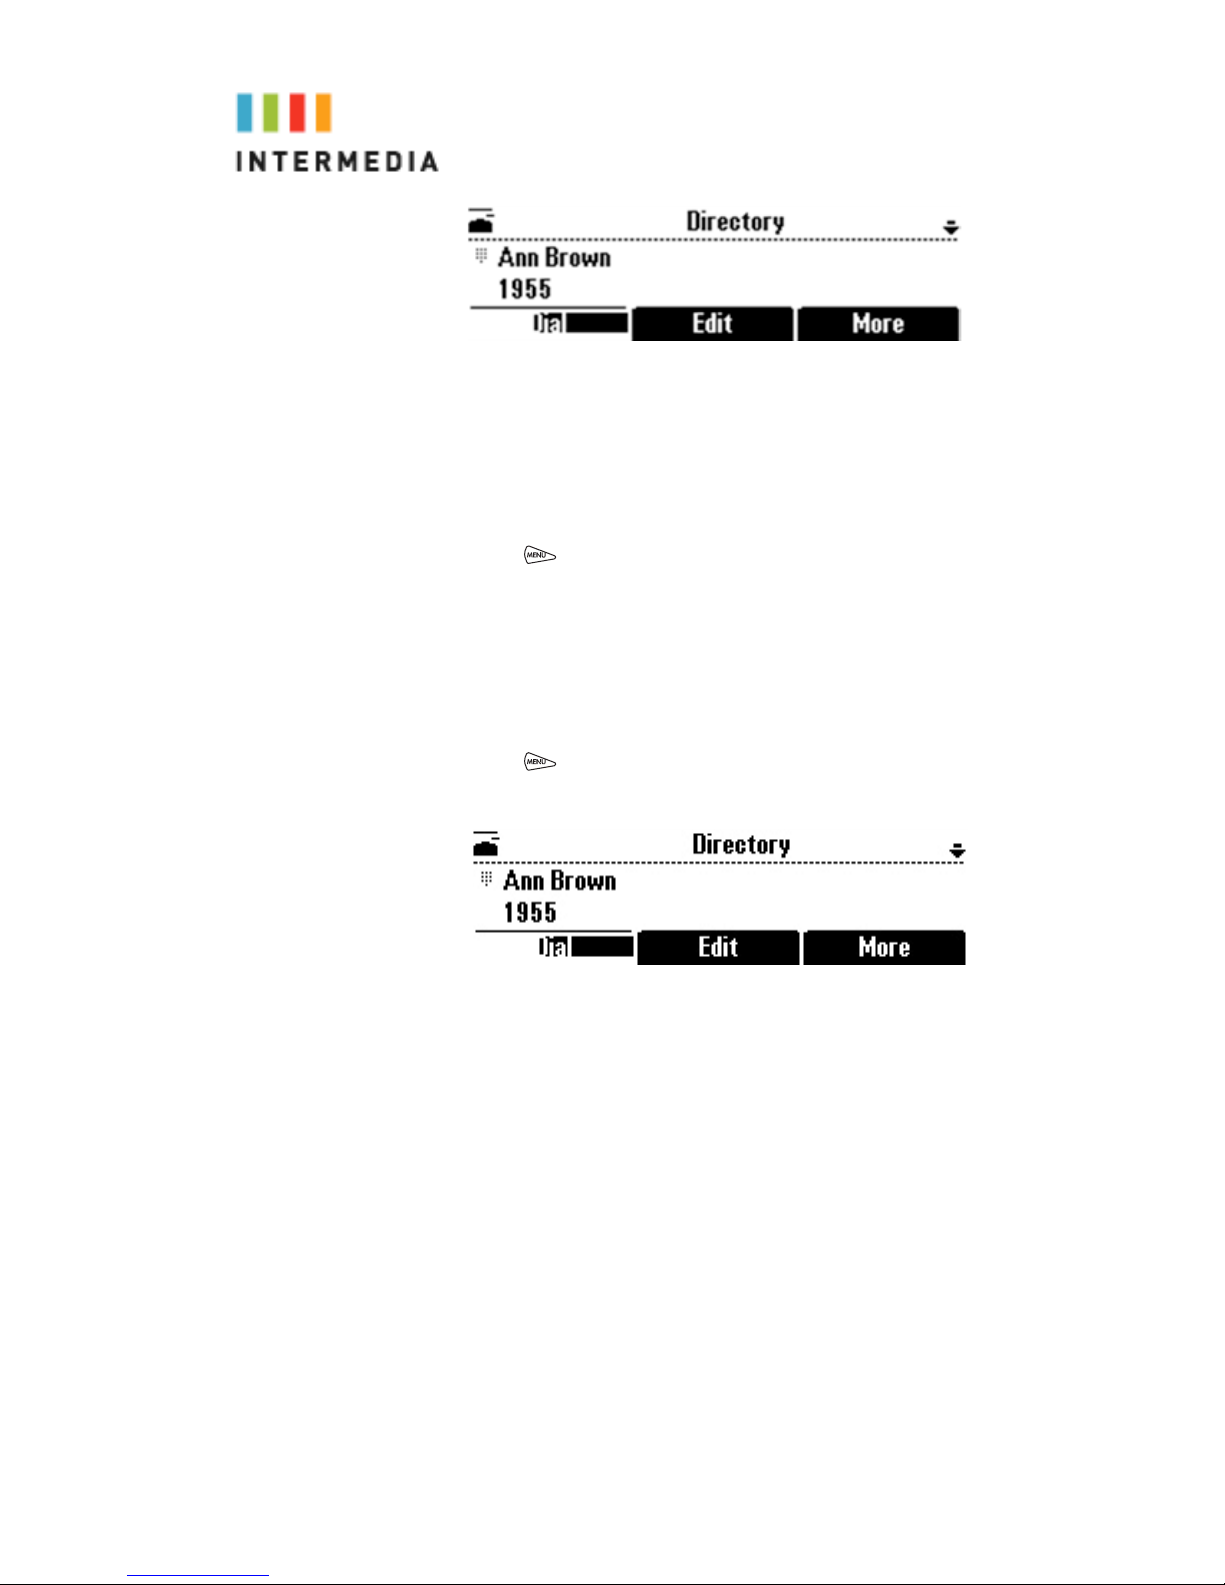
2.
Scroll to the contact you want to delete. Or, search for the
contact
To s
croll through a list of contacts, use the * key to Page Up and
the # key to Page Down.
3.
Press the
The c
4.
Press
Delete
ontact is deleted from the directory.
to return to the idle screen.
soft key.
Placing Calls to Contacts
You can place calls to contacts from your Contact Directory.
To place a call to a contact in the Contact Directory:
1.
Press
, and then select Features > Contact Directory.
The Directory screen displays.
2.
Scroll to the contact you want to call. Or, search for the contact.
croll through a list of contacts, use the * key to Page Up and
To s
the
#
Press the
3.
key to Page Down.
Dial
soft key.
Inbound Caller ID
The name of the caller and phone number will scroll across the
second line of the Conference Phone’s LCD screen. The
information will continue to scroll until the phone has been
answered.
51
Page 52
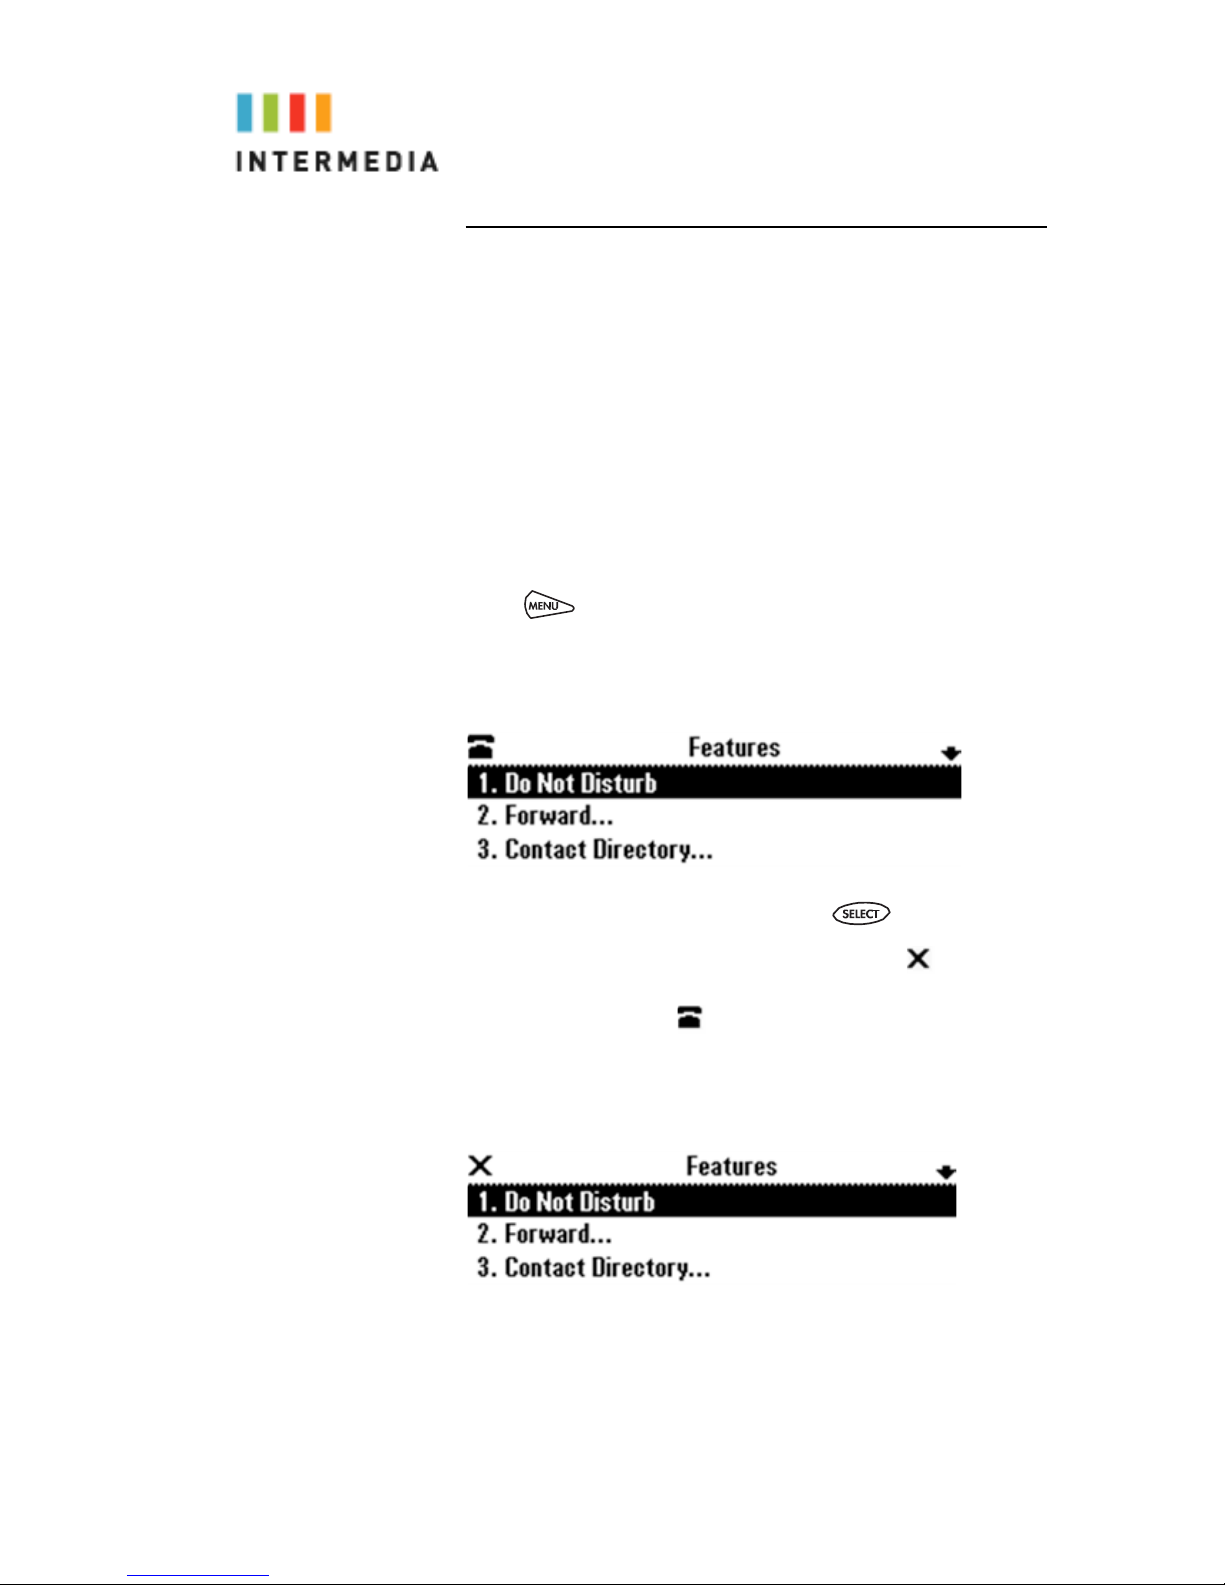
Extension Set-Up options
Do Not Disturb
A Conference Phone can be set to Do Not Disturb (DND). When
a phone is set to DND, any internal or external call will
immediately route to that phone’s voicemail box without ringing
the phone.
sing Do Not Disturb
U
To prevent your phone from ringing, activate the Do Not Disturb
feature Calls you receive while Do Not Disturb is enabled will
display in your Missed Calls Call List. If you have chosen to
forward your calls to another number, calls will be sent to that
number if Do Not Disturb is enabled.
To enable and disable Do Not Disturb:
1.
Press
, and then select Features.
The Features screen displays. If Do Not Disturb is not
highlighted, scroll to it.
2.
To toggle Do Not Disturb on or off, press .
When you enable Do Not Disturb, a flashing icon,
at the top left of the screen. When you disable Do Not Disturb,
the registered line icon, , displays instead.
The following figure shows what the Features menu looks like
with Do Not Disturb enabled.
, displays
52
Page 53

3.
Press
to return to the idle screen.
If you enabled Do Not Disturb, the idle screen displays a flashing
icon, , next to the directory number.
Configuring Basic Setting
To configure basic phone settings, press , and t hen select
Settings > Basic
customize.
This section includes the following topics:
•
Preferences
•
Updating the Display Contrast
•
Updating the Backlight
•
Updating the Ring Tone
to view the basic phone settings you can
Updating Preferences
The Preferences menu allows you to customize the language
that displays on your phone and to specify how the time and date
display on the idle screen.
Updating the Language
The phone supports many languages. English (Internal) is the
default language that displays.
To change the language:
1.
Press
, and then select Settings > Basic > Preferences >
Language.
The Language screen displays.
2.
Scroll to the language you want, and then press .
The t
ext on the screen changes to the language that you
to return to the idle screen.
53
3.
Press
selected.
Page 54
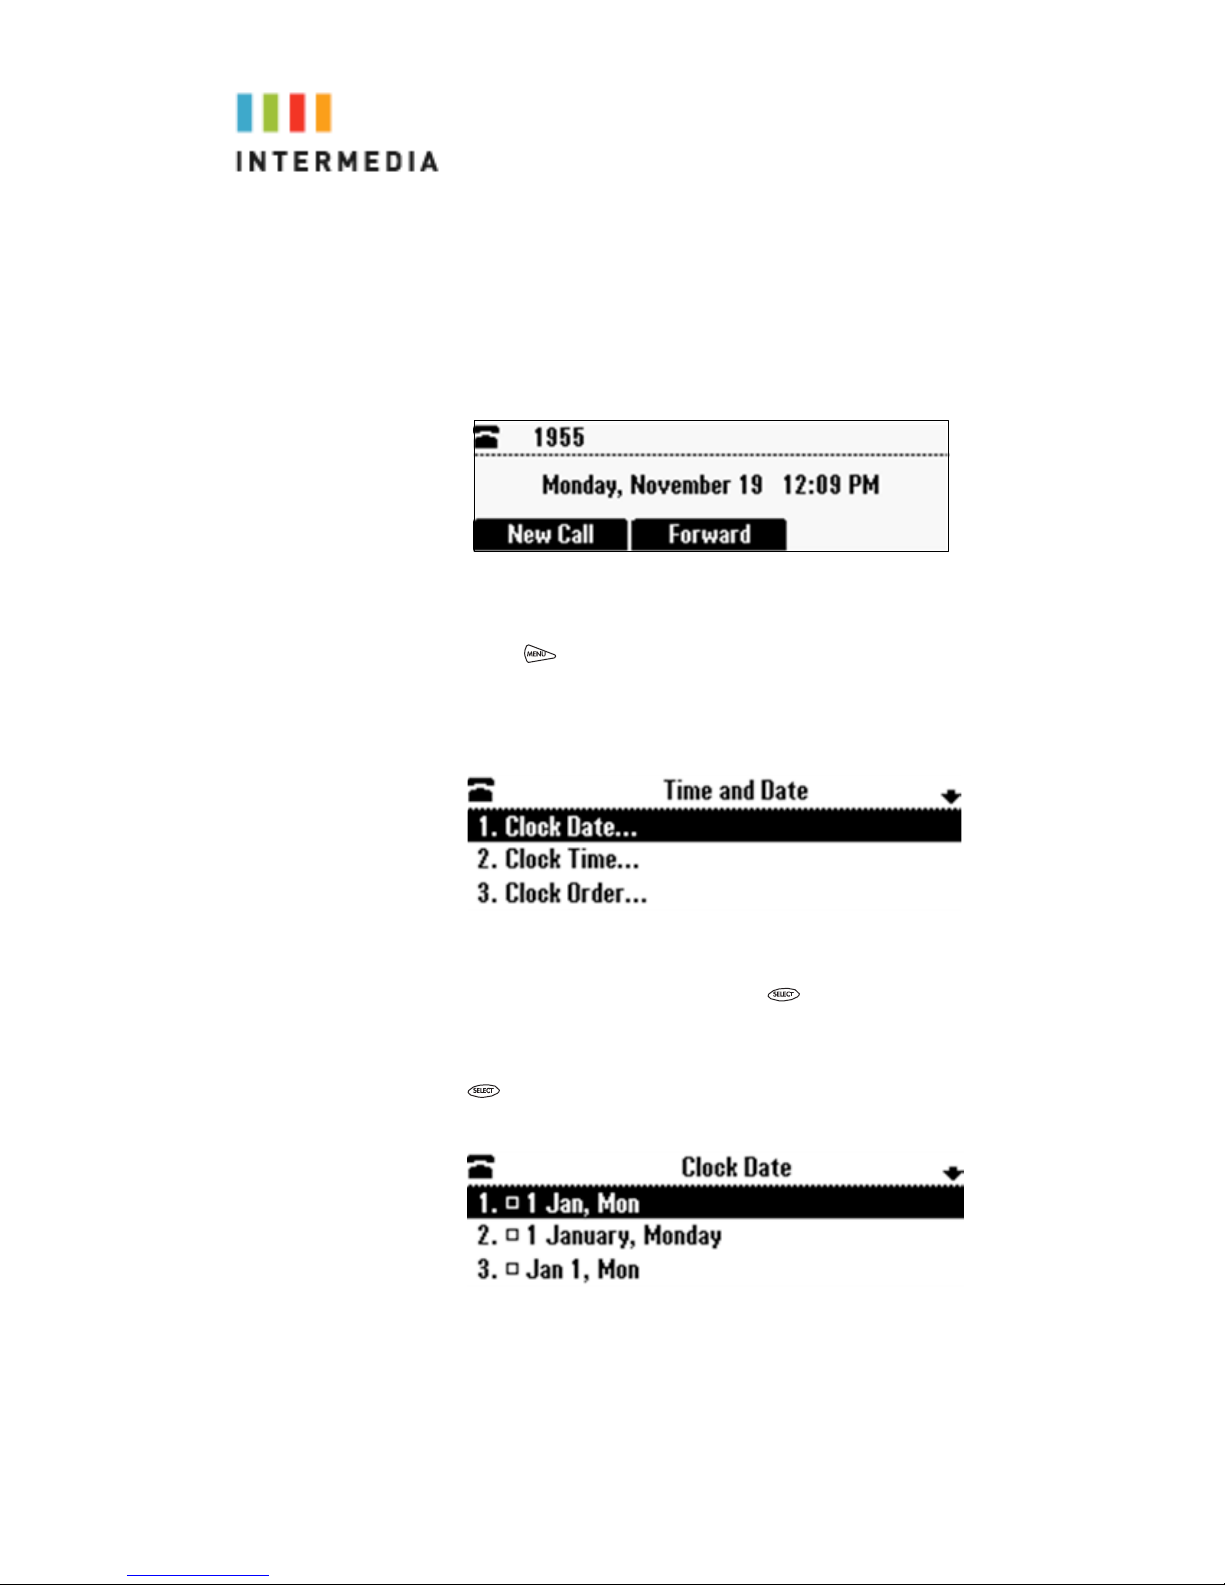
Updating the Time and Date Display
The time and date appear on the idle screen of your phone. You
can select from various formats for the time and date display,
including whether the time or date displays first (clock order). You
can also turn the time and date display off, so the time and date
does not display on the idle screen. Select and set options that are
right for you.
The following figure shows the default format for the date and time
display on the phone screen.
o update the time and date display:
T
1.
Press
, and then select Settings > Basic > Preferences >
Time and Date.
The Time and Date screen displays.
2.
Do one of the following:
change the date format, press .
To
or
To change the time format, scroll to
Clock Time
The Clock Date screen or the Clock Time screen displays.
, and then press
Or
54
Page 55
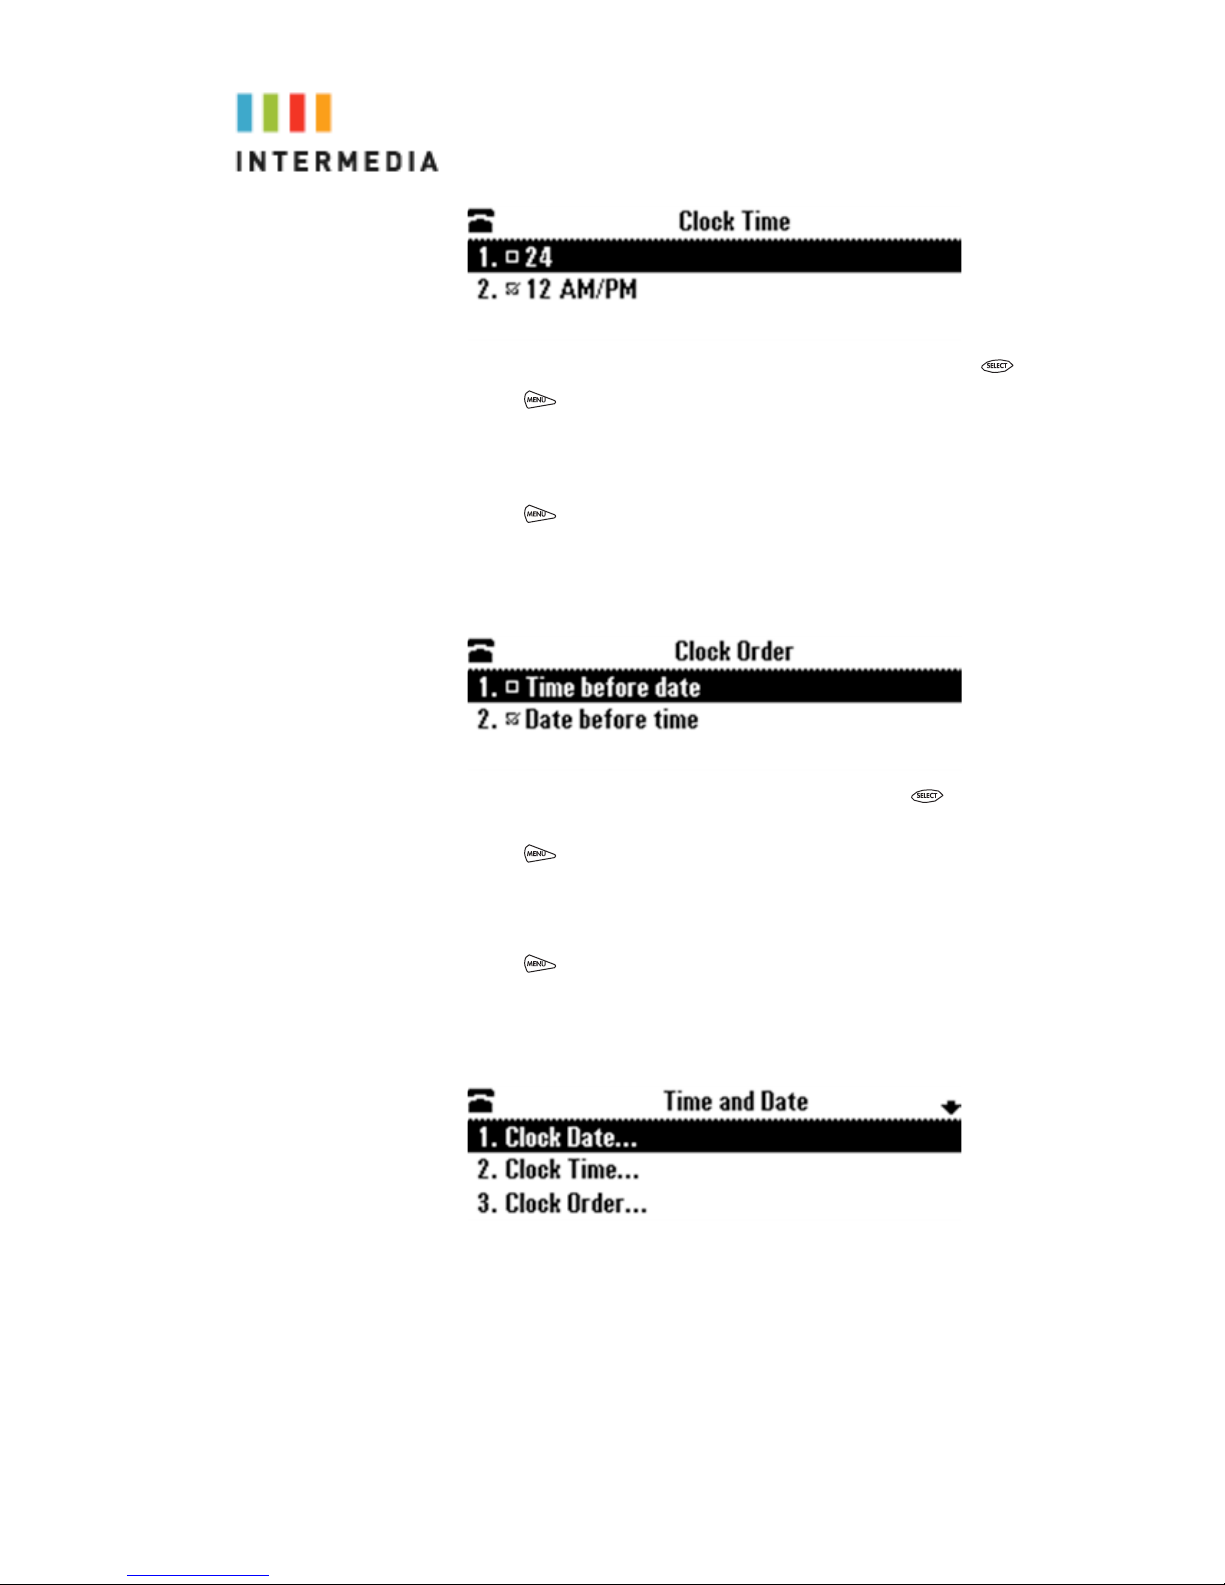
3.
Scroll to the date or time format you want, and then press .
4.
Press
to return to the idle screen.
To change the order of the time and date display:
1.
Press
, and then select Settings > Basic > Preferences >
Time and Date > Clock Order.
The Clock Order screen displays.
2. Scroll to the clock order you want, and then press .
The default setting is date before time.
3.
Press
to return to the idle screen.
To enable or disable the time and date display:
1.
Press
, and then select Settings > Basic > Preferences >
Time and Date.
The Time and Date screen displays.
2.
Do one of the following:
isable the time and date display, scroll to
To d
To enabl
e the time and date display, you do not have to highlight
an item. Enable is already highlighted. Go to step 3.
55
Disable
. or
Page 56

3.
Press
4.
Press
Updating the Display Contrast
You can set how light or dark the screen appears.
To adjust the contrast on the phone screen:
.
to return to the idle screen.
Press
1.
The Contrast screen displays.
2.
Press the
display c
Press the
3.
4.
Press
Updating the Backlight Intensity
Backlight intensity on the phone has three components:
•
Backlight On
•
Backlight Idle
, and then select Settings > Basic > Contrast.
Up
or
Down
soft keys to increase or decrease the
ontrast.
Ok
soft key.
to return to the idle screen.
•
Maximum Intensity You can modify the Backlight On intensity and
the Bac
medium, l
Maximum Intensity, you modify the entire backlight i
scale. F
low, m
Idle i
following ev
•
Any key press
•
Incoming calls
•
Ending a call, holding a call, resuming a call by the other party
•
A voice message received
If y
backlight t
in the following cases:
klight Idle intensity separately. You can select high,
ow, and off levels for both. When you modify the
ntensity
or example, if you decrease the Maximum Intensity, the
edium, and high levels for both Backlight On and Backlight
ntensities decrease. The Backlight On intensity applies to the
ents:
ou do not press any keys on the phone, after 20 seconds of the
urning on, the backlight dims (or changes) to medium
56
Page 57
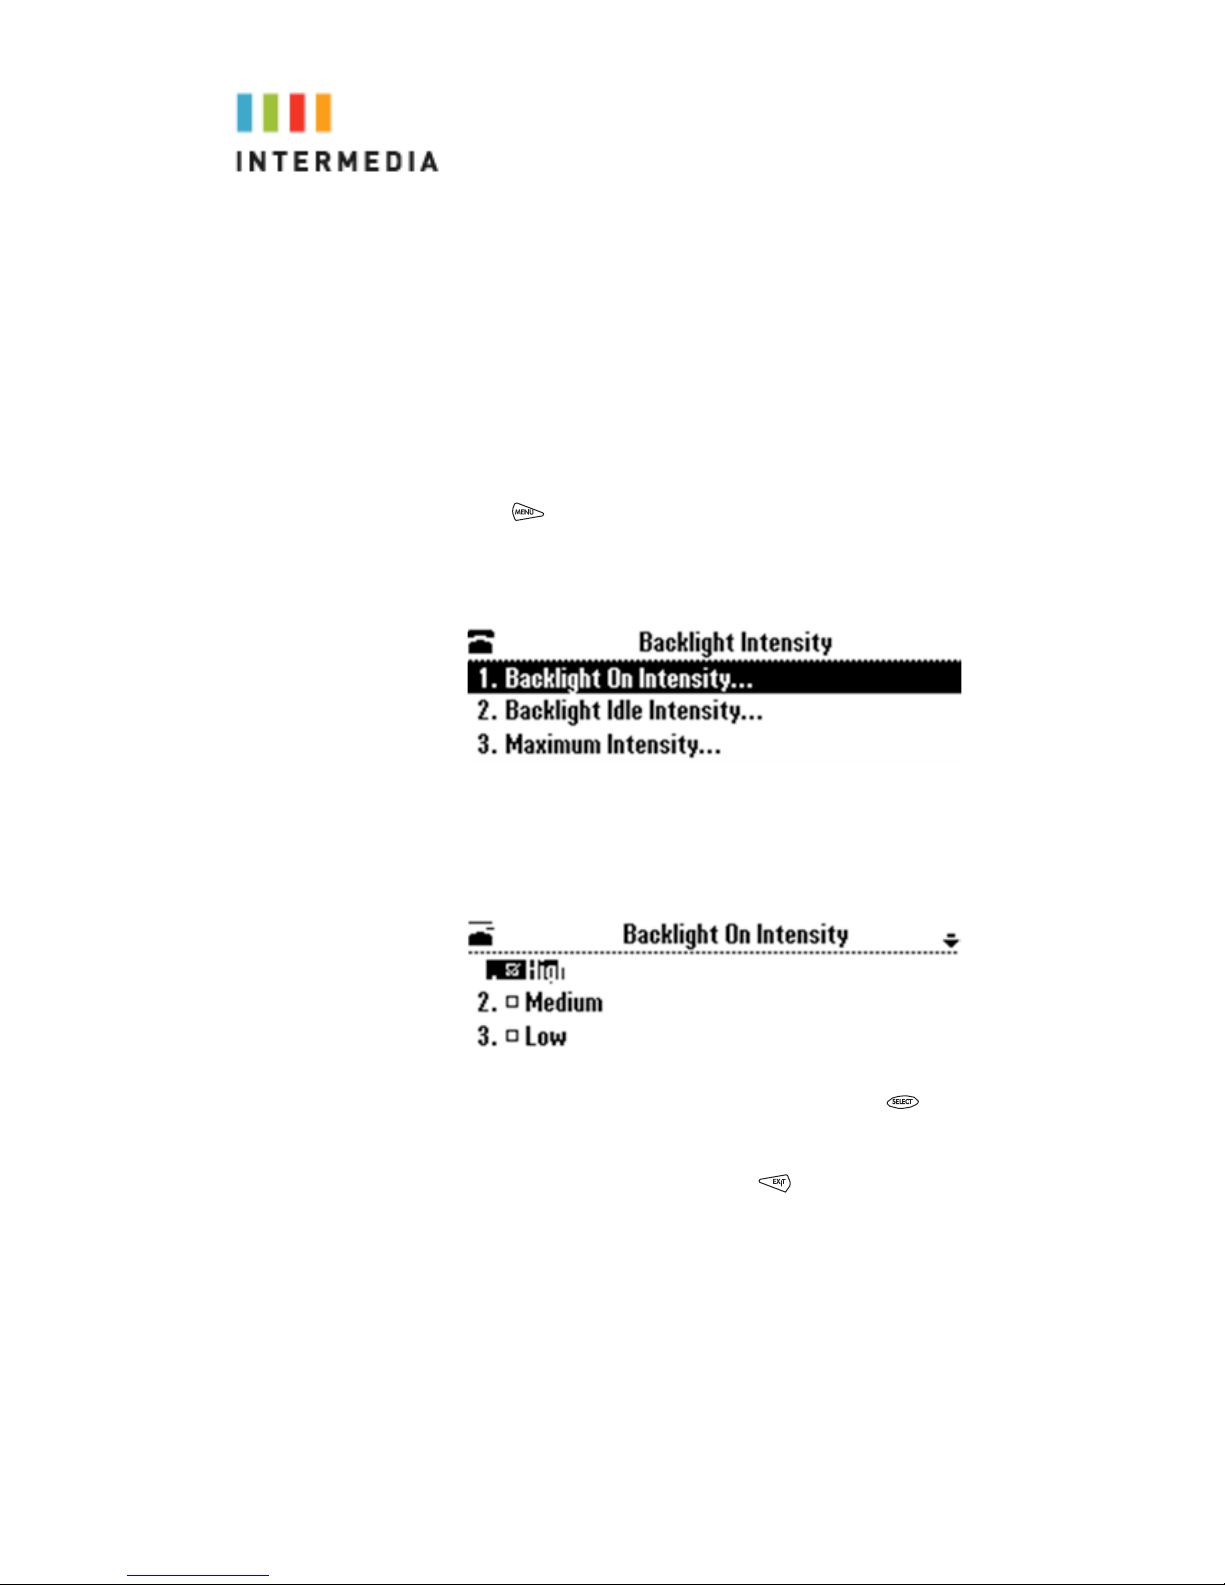
•
A call is in progress
•
A call is on hold
•
There is an incoming call (ringing)
•
There is an outgoing call (ringing back)
•
Any menu shows on the display
l other cases, the Backlight Idle intensity applies.
In al
To change the backlight intensity:
1.
Press
, and then select Settings > Basic > Backlight
Intensity.
The Backlight Intensity screen displays.
2. Select Backlight On Intensity.
The Backlight On Intensity screen displays.
3.
Scroll to the intensity you want, and then press . T h e default
Backlight On Intensity is High.
4.
If you selected a new intensity, press the
not select a new i
5. S
elect Backlight Idle Intensity.
ntensity, press
57
Save
soft key. If you did
Page 58
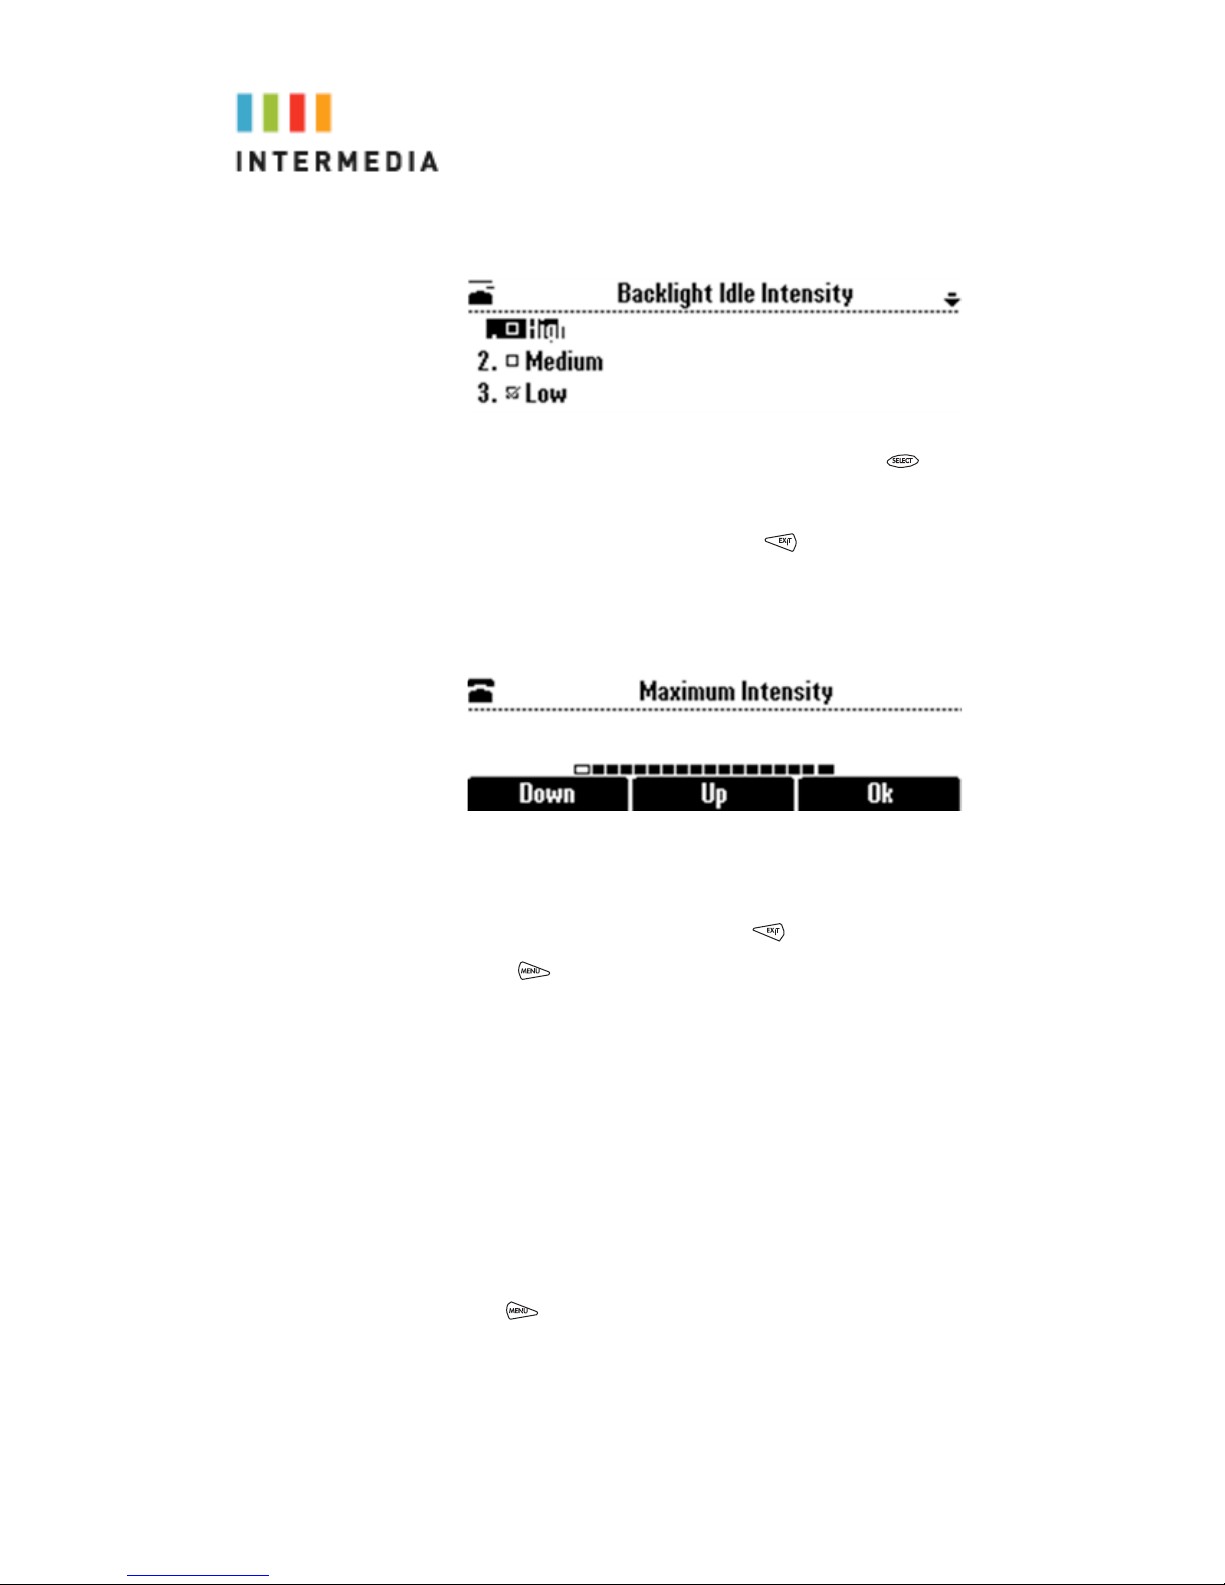
The Backlight Idle Intensity screen displays.
6.
Scroll to the intensity you want, and then press . The default
Backlight Idle Intensity is Low.
7.
If you selected a new intensity, press the
not select a new i
elect Maximum Intensity.
8. S
ntensity, press
Save
soft key. If you did
The Maximum Intensity screen displays.
9.
Press the
mum i
10.
If you selected a new intensity, press the
select a new i
Press
11.
Up
or
Down
soft keys to increase or decrease the maxi-
ntensity the screen can display.
ntensity, press
to return to the idle screen.
Ok
soft key. If you did not
Updating the Ring Tone
You can select from many different ring tones to distinguish your
phone f
for c
your phone
rom your neighbor’s. You can also set distinctive ring tones
ontacts in your local directory so you can identify callers when
rings.
Selecting a Ring Tone
You can choose a unique ring tone for your phone to identify it
when it rings.
To select a different ring tone:
1.
Press
, and then select Settings > Basic > Ring Type. The
Ring Type screen displays.
58
Page 59

2.
Scroll to the ring type you want. To hear the ring type before you
select it
, press the
Play
soft key. The default ring type is Low Trill.
To select the ring type, press .
3.
4.
Press
to return to the idle screen.
Adjusting the Speaker and Ringer Volume
To adjust the speaker volume:
During a call, press either
or
.
To adjust the ringer volume:
When the phone is in the idle state, press either
or
.
59
Page 60

5 Safety Information
Congratulations on purchasing the Intermedia Hosted PBX phone
system and service. Hosted PBX was designed specifically for the
small to mid-size business and combines a business-class phone
system with Voice over IP phone service.
This User Guide will show you how to setup and use your new
Hosted PBX phone system and service.
IMPORTANT SAFETY AND CONFORMANCE
INFORMATION FOR IP PBX BASE UNIT AND
PHONES
Conformance
This equipment is designed for use in the United States.
This equipment complies with the following standards:
FCC Part 15, Subparts B, C, D
FCC Part 68
UL60950
Analog extension ports: TNV3
CO port: TNV3
ADSL port: TNV3
Power fail port TNV3
LAN/WAN ports SELV
Important Safety instructions
The following safety information is reprinted from IEC60950.
a.
When using your telephone equipment, basic safety
precautions s
lectric shock, and injury to persons, including the
fire, e
following:
b.
Read and understand all instructions.
c.
Follow all warnings and instructions marked on the product.
d.
Unplug this product from the wall outlet before cleaning. Do not
uid cleaners or aerosol cleaners. Use a damp cloth for
use liq
cleaning.
e.
Do not use this product near water (for example, in a wet
basement).
f.
Do not place this product on an unstable cart, stand, or table.
The product can fall, causing serious damage to the product.
g.
Slots and openings in the cabinet and the back or bottom are
provided f
hould always be followed to reduce the risk of
or ventilation, to protect it from overheating; these
60
Page 61

openings must not be blocked or covered. This product should
CAUTION
Central Office line connections.
never be placed near or over a radiator or heat register. This
product should not be placed in a built-in installation unless
proper ventilation is provided.
h.
This product should be operated only from the type of power
source i
of pow
Power C
i.
The power socket outlet must be located near the product and
must be eas
j.
Do not allow anything to rest on the power cord. Do not locate
this pr
k.
Do not use an extension cord with this product’s AC power
cord. T
other electrical equi
l.
Never push objects of any kind into this product through
cabinet slots as they can touch dangerous voltage points or
short out p
shock.
Never s
m.
To reduce the risk of electric shock, do not disassemble this
product, but t
service or r
can e
re-a
subsequently us
n.
Unplug this product from the wall outlet and refer servicing to
qualified se
i.
If liquid has been spilled into the product.
iii.
operatinginstructions.
iv.
instructions bec
damage and
restore t
When t
ii.
will often require extensive work by a qualified technician to
he product to normal operation.
- If
damaged.
v.
o.
Avoid using a telephone during an electrical storm. There can
be a r
p.
Do not use the telephone to report a gas leak in the vicinity of
the l
ndicated in the manual. If you are not sure of the type
er source to your building, consult your dealer or local
ompany.
ily accessible to allow plugging/unplugging.
oduct where persons walking on it will abuse the cord.
he AC outlet for this product should not be used for any
pment.
arts that could result in a risk of fire or electric
pill liquid of any kind on the product.
ake it to a qualified serviceman when some
epair work is required. Opening or removing covers
xpose you to dangerous voltages or other risks. Incorrect
ssembly can cause electric shock when the product is
ed.
rvice personnel under the following conditions: -
he power supply cord or plug is damaged or frayed.
If the product has been exposed to rain or water.
If the product does not operate normally by following the
Adjust only those controls that are covered by the operating
ause improper adjustment of other controls can result in
the product has been dropped or the cabinet has been
If the product exhibits a distinct change in performance.
emote risk of electric shock from lightning.
eak.
Use only 26 AWG line cord or larger for
61
Page 62
FCC Information
Mode of Operation
USOC Jack
Permissive
RJ11C
Port
FIC
SOC
USOC
REN
Line 1
02LS2
9.0Y
RJ11C
0.1B
Line 2
02LS2
9.0Y
RJ11C
0.1B
Line 3
02LS2
9.0Y
RJ11C
0.1B
Phone
02LS2
9.0Y
RJ11C
0.1B
Customer Owned Coin/Credit Card Phones
To comply with state tariffs, the Telephone Company must be given
notification prior to connection. In some states, the state public
utility commission, public service commission or corporation
commission must give prior approval of connection.
Data Equipment
The table below shows which jacks are associated with which
modes of operation:
Systems
Facility Interface Codes (FIC), Service Order Codes (SOC),
USOC Jack Codes and Ringer Equivalence Numbers (REN) are
shown in the table below for each port where applicable:
Automatic Dialers
WHEN PROGRAMMING EMERGENCY NUMBERS AND (OR)
MAKING TEST CALLS TO EMERGENCY NUMBERS:
Remain on the line and briefly explain to the dispatcher the
1.
reason for the c
Perform such activities in the off-peak hours, such as early
2.
morning or late ev
Toll Restriction and Least Cost Routing Equipment
The software contained in Hosted PBX phone system to allow
user access to the network must be upgraded to recognize newly
established network area codes and exchange codes as they are
placed into service.
Failure to upgrade the premises systems or peripheral equipment
to recognize the new codes as they are established will restrict
the customer and the customer’s employees from gaining access
to the network and to these codes.
Equal Access Requirements
This equipment is capable of providing user’s access to interstate
providers of operator services through the use of access codes.
Modification of this equipment by call aggregators to block access
all.
enings.
62
Page 63

dialing codes is a violation of the Telephone Operator Consumers
Act of 1990.
Electrical Safety Advisory
It is strongly suggested that an AC surge arrestor be installed in
the AC outlet to which this equipment is connected.
Radio Interference
This device complies with Part 15 of the FCC Rules. Operation
is subject to the following two conditions: (1) this device may
not cause harmful interference, and (2) this device must accept
any interference received, including interference that may cause
undesired operation.
This equipment has been tested and found to comply with the
limits for a Class B digital device, pursuant to Part 15 of the FCC
Rules. These limits are designed to provide reasonable
protection against harmful interference in a residential
installation. This equipment generates uses and can radiate
radio frequency energy and, if not installed and used in
accordance with the instructions, may cause harmful interference
to radio communications.
However, there is no guarantee that interference will not occur in
a particular installation. If this equipment does cause harmful
interference to radio or television reception, which can be
determined by turning the equipment off and on, the user is
encouraged to try to correct the interference by one or more of
the following measures:
q.
Reorient or relocate the receiving antenna.
r.
Increase the separation between the equipment and receiver.
s.
Connect the equipment into an outlet on a circuit different from
o which the receiver is connected.
that t
t.
Consult the dealer or an experienced radio/TV technician for
help.
RF Radiation Exposure
This equipment complies with FCC radiation exposure limits set
forth for an uncontrolled environment. This equipment should be
installed and operated with a minimum distance of 8 inches (20
centimeters) between the radiator and your body.
This transmitter must not be co-located or operated in conjunction
with any other antenna or transmitter.
Modifications
Changes or modifications not expressly approved by the party
responsible for compliance could void the user’s authority to
operate the equipment. There are no user-serviceable parts or
adjustments inside this equipment - please do not open the
equipment case.
IMPORTANT SAFETY AND CONFORMANCE
INFORMATION FOR VERTICAL CORDLESS
TRANSMITTER AND CORDLESS PHONES
63
Page 64

FCC Information
Part 15 FCC Rules
This device is compliant with Part 15 of the FCC Rules.
Operation is subject to the following two conditions:
1.
This device may not cause harmful interference, and
2.
This device must accept any interferences received, including
interference t
Class B Digital Device or Peripheral
Note: This equipment is tested and complies with the limits for
a Class B digital device, pursuant to Part 15 of the FCC Rules.
These limits are designed to provide reasonable protection
against harmful interference in a residential installation. This
equipment generates, uses, and can radiate radio frequency
energy and, if not installed and used in accordance with the
instructions, may cause harmful interference to radio
communications. However, there is no guarantee that interference
will not occur in a particular installation. If this equipment does
cause harmful interference to radio or television reception, which
can be determined by turning the equipment off and on, the user is
encouraged to try to correct the interference by one or more of th e
following measures:
2.
Reorient or relocate the receiving antenna.
Increase the separation between the equipment and receiver.
3.
4.
Connect the equipment into an outlet on a circuit different from
o which the receiver is connected.
that t
Consult the dealer or an experienced radio/TV technician for
5.
help.
hat may cause undesired operation.
Modifications
In accordance with Part 15 of the FCC Rules, the user is
cautioned that any changes or modifications not expressly
approved by Polycom, Inc. could void the user’s authority to
operate the equipment. This equipment may not be used on a
coin service or party line.
Installation Instructions
Installation must be performed in accordance with all relevant
national wiring rules.
When using Power over Ethernet (PoE), the equipment is to be
connected only to PoE networks without connections to the
outside plant.
Plugs Acts as Disconnect Device
The socket outlet to which this apparatus is connected must be
installed near the equipment and must always be readily
accessible.
64
Page 65

Industry Canada (IC)
This Class [B] digital apparatus complies with Canadian
ICES-003. Cet appareil numérique de la classe [B] est
conforme à la norme NMB-003 du Canada.
CE and VCCI Mark
This SoundStation IP 6000 phone is marked with the CE mark.
This mark indicates compliance with EC Directives 2006/95/ED
and 2004/108/EC. A full copy of the Declaration of Conformity
can
be obtained from Polycom Ltd., 270 Bath Road, Slough, Berkshire,
SL1 4DX, UK.
65
 Loading...