

Page 1
User’s Guide
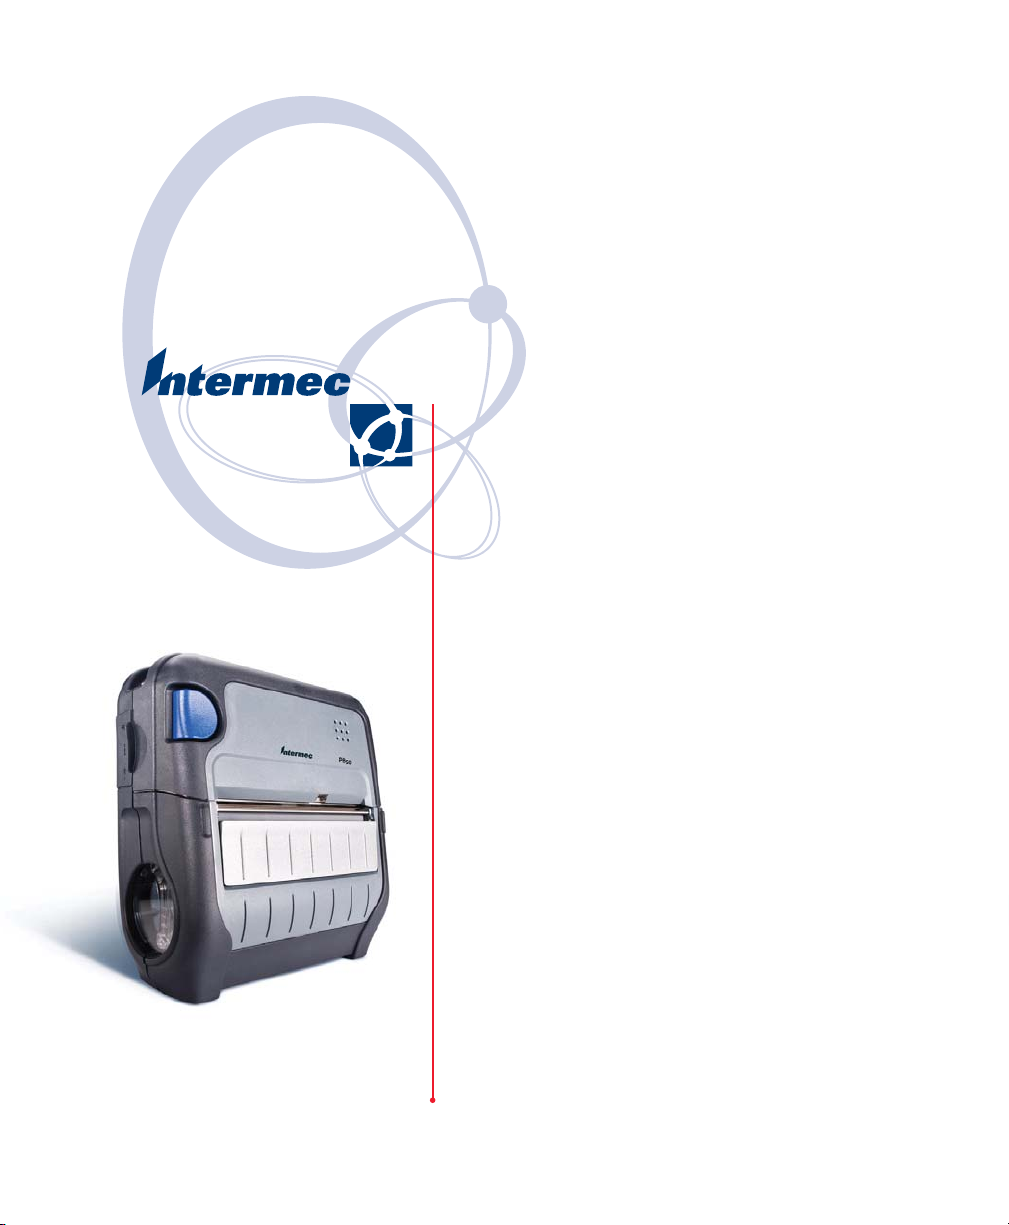
PB50 Portable Label
Printer
Page 2

Intermec Technologies Corporation
Worldwide Headquarters
6001 36th Ave.W.
Everett, WA 98203
U.S.A.
www.intermec.com
The information contained herein is provided solely for the purpose of allowing customers to
operate and service Intermec-manufactured equipment and is not to be released, reproduced, or
used for any other purpose without written permission of Intermec Technologies Corporation.
Information and specifications contained in this document are subject to change without prior
noticed and do not represent a commitment on the part of Intermec Technologies Corporation.
© 2007 by Intermec Technologies Corporation. All rights reserved.
The word Intermec, the Intermec logo, Norand, ArciTech, Beverage Routebook, CrossBar,
dcBrowser, Duratherm, EasyADC, EasyCoder, EasySet, Fingerprint, i-gistics, INCA (under
license), Intellitag, Intellitag Gen2, JANUS, LabelShop, MobileLAN, Picolink, Ready-to-Work,
RoutePower, Sabre, ScanPlus, ShopScan, Smart Mobile Computing, SmartSystems, TE 2000,
Trakker Antares, and Vista Powered are either trademarks or registered trademarks of Intermec
Technologies Corporation.
There are U.S. and foreign patents as well as U.S. and foreign patents pending.
Wi-Fi is a registered certification mark of the Wi-Fi Alliance.
Bluetooth is a trademark of Bluetooth SIG, Inc., U.S.A.
ii PB50 Portable Label Printer User’s Guide
Page 3

Contents
Before You Begin. . . . . . . . . . . . . . . . . . . . . . . . . . . . . . . . . . . . . . . . . . . . . . . . . . . . iv
Safety Information . . . . . . . . . . . . . . . . . . . . . . . . . . . . . . . . . . . . . . . . . . . iv
Global Services and Support. . . . . . . . . . . . . . . . . . . . . . . . . . . . . . . . . . . . iv
Warranty Information . . . . . . . . . . . . . . . . . . . . . . . . . . . . . . . . . iv
Web Support . . . . . . . . . . . . . . . . . . . . . . . . . . . . . . . . . . . . . . . . . v
Telephone Support . . . . . . . . . . . . . . . . . . . . . . . . . . . . . . . . . . . . v
Service Location Support . . . . . . . . . . . . . . . . . . . . . . . . . . . . . . . vi
Who Should Read This Manual . . . . . . . . . . . . . . . . . . . . . . . . . . . . . . . . . vi
Related Documents . . . . . . . . . . . . . . . . . . . . . . . . . . . . . . . . . . . . . . . . . . vi
Using the PB50 Portable Label Printer . . . . . . . . . . . . . . . . . . . . . .1
1
Learning About the PB50 Portable Label Printer. . . . . . . . . . . . . . . . . . . . . . . . . . . . . 2
Identifying the Parts of the Printer . . . . . . . . . . . . . . . . . . . . . . . . . . . . . . . . 2
Understanding the Printer Firmware. . . . . . . . . . . . . . . . . . . . . . . . . . . . . . . 2
Understanding the Control Panel . . . . . . . . . . . . . . . . . . . . . . . . . . . . . . . . . 3
Understanding the Printer Sounds . . . . . . . . . . . . . . . . . . . . . . . . . . . . . . . . 5
Understanding the Backlight . . . . . . . . . . . . . . . . . . . . . . . . . . . . . . . . . . . .6
Using the Batteries . . . . . . . . . . . . . . . . . . . . . . . . . . . . . . . . . . . . . . . . . . . . . . . . . . . 6
Installing the Battery . . . . . . . . . . . . . . . . . . . . . . . . . . . . . . . . . . . . . . . . . . 6
Charging the Batteries . . . . . . . . . . . . . . . . . . . . . . . . . . . . . . . . . . . . . . . . . 7
Understanding the Battery Icons. . . . . . . . . . . . . . . . . . . . . . . . . . . . . . . . . . 8
Extending Battery Life . . . . . . . . . . . . . . . . . . . . . . . . . . . . . . . . . . . . . . . . . 8
Contents
Loading Media . . . . . . . . . . . . . . . . . . . . . . . . . . . . . . . . . . . . . . . . . . . . . . . . . . . . . . 9
Printing a Test Page. . . . . . . . . . . . . . . . . . . . . . . . . . . . . . . . . . . . . . . . . . . . . . . . . . 13
Configuring the PB50 . . . . . . . . . . . . . . . . . . . . . . . . . . . . . . . . . . . . . . . . .15
2
Configuring the PB50. . . . . . . . . . . . . . . . . . . . . . . . . . . . . . . . . . . . . . . . . . . . . . . .16
Understanding the Display Modes . . . . . . . . . . . . . . . . . . . . . . . . . . . . . . . 16
Understanding Ready Mode . . . . . . . . . . . . . . . . . . . . . . . . . . . .16
Understanding Information Mode. . . . . . . . . . . . . . . . . . . . . . . . 16
Understanding Pause Mode . . . . . . . . . . . . . . . . . . . . . . . . . . . . . 17
Understanding Setup Mode . . . . . . . . . . . . . . . . . . . . . . . . . . . . .17
Understanding Error Mode . . . . . . . . . . . . . . . . . . . . . . . . . . . . . 19
Understanding Test Mode . . . . . . . . . . . . . . . . . . . . . . . . . . . . . . 19
Changing Configuration Settings . . . . . . . . . . . . . . . . . . . . . . . . . . . . . . . . 21
Changing the Configuration Settings From the Display. . . . . . . . 21
Changing the Configuration Settings from PrintSet. . . . . . . . . . . 23
PB50 Portable Label Printer User’s Guide iii
Page 4

Contents
Changing the Configuration Settings Using the Command
Line . . . . . . . . . . . . . . . . . . . . . . . . . . . . . . . . . . . . . . . . . . . . 23
Changing Configuration Settings from the Printer Home
Page . . . . . . . . . . . . . . . . . . . . . . . . . . . . . . . . . . . . . . . . . . . . 24
Changing Configuration Settings from SmartSystems Console. . 24
Establishing Communications With a Host. . . . . . . . . . . . . . . . . . . . . . . . . . . . . . . 24
Setting Up Bluetooth Communications . . . . . . . . . . . . . . . . . . . . . . . . . . 25
Setting Up 802.11 Radio Communications. . . . . . . . . . . . . . . . . . . . . . . . 26
Configuring Wireless Printing Using IPL . . . . . . . . . . . . . . . . . . 29
Configuring Wireless Printing Using Fingerprint . . . . . . . . . . . . 31
Setting Up Serial Communications . . . . . . . . . . . . . . . . . . . . . . . . . . . . . . 33
Upgrading the Firmware . . . . . . . . . . . . . . . . . . . . . . . . . . . . . . . . . . . . . . . . . . . . . 34
Downloading Fonts and Graphics . . . . . . . . . . . . . . . . . . . . . . . . . . . . . . . . . . . . . . 35
Troubleshooting and Maintaining the PB50 . . . . . . . . . . . . . 37
3
Troubleshooting the PB50 . . . . . . . . . . . . . . . . . . . . . . . . . . . . . . . . . . . . . . . . . . . . 38
Contacting Product Support . . . . . . . . . . . . . . . . . . . . . . . . . . . . . . . . . . . 38
Understanding Error Messages . . . . . . . . . . . . . . . . . . . . . . . . . . . . . . . . . 38
Troubleshooting Printer Problems and Finding Solutions . . . . . . . . . . . . . 40
Troubleshooting Communication Problems . . . . . . . . . . . . . . . . . . . . . . . 42
Using the Line Analyzer in Fingerprint . . . . . . . . . . . . . . . . . . . . 42
Using Dump Mode in IPL . . . . . . . . . . . . . . . . . . . . . . . . . . . . . 42
Cold Booting the PB50 . . . . . . . . . . . . . . . . . . . . . . . . . . . . . . . . . . . . . . . . . . . . . . 43
Cleaning the Printer. . . . . . . . . . . . . . . . . . . . . . . . . . . . . . . . . . . . . . . . . . . . . . . . . 44
Specifications . . . . . . . . . . . . . . . . . . . . . . . . . . . . . . . . . . . . . . . . . . . . . . . . . 47
A
Specifications. . . . . . . . . . . . . . . . . . . . . . . . . . . . . . . . . . . . . . . . . . . . . . . . . . . . . . 48
Accessories for the PB50 . . . . . . . . . . . . . . . . . . . . . . . . . . . . . . . . . . . . . . . . . . . . . 50
IPL and Fingerprint Setup Menus . . . . . . . . . . . . . . . . . . . . . . . . . . 53
B
IPL Setup Menu . . . . . . . . . . . . . . . . . . . . . . . . . . . . . . . . . . . . . . . . . . . . . . . . . . . 54
Fingerprint Setup Menu . . . . . . . . . . . . . . . . . . . . . . . . . . . . . . . . . . . . . . . . . . . . . 55
iv PB50 Portable Label Printer User’s Guide
Page 5
Before You Begin
This section provides you with safety information, technical
support information, and sources for additional product
information.
Safety Information
Your safety is extremely important. Read and follow all warnings
and cautions in this document before handling and operating
Intermec equipment. You can be seriously injured, and
equipment and data can be damaged if you do not follow the
safety warnings and cautions.
This section explains how to identify and understand dangers,
warnings, cautions, and notes that are in this document. You may
also see icons that tell you when to follow ESD procedures and
when to take special precautions for handling optical parts.
A warning alerts you of an operating procedure, practice,
condition, or statement that must be strictly observed to avoid
death or serious injury to the persons working on the
equipment.
Contents
A caution alerts you to an operating procedure, practice,
condition, or statement that must be strictly observed to
prevent equipment damage or destruction, or corruption or
loss of data.
Note: Notes either provide extra information about a topic or
contain special instructions for handling a particular condition or
set of circumstances.
Global Services and Support
Warranty Information
To understand the warranty for your Intermec product, visit the
Intermec web site at www.intermec.com and click Support >
Returns and Repairs > Warranty.
PB50 Portable Label Printer User’s Guide v
Page 6

Before You Begin
Web Support
Visit the Intermec web site at www.intermec.com to download
our current manuals (in PDF). To order printed versions of the
Intermec manuals, contact your local Intermec representative or
distributor.
Visit the Intermec technical knowledge base (Knowledge
Central) at intermec.custhelp.com to review technical
information or to request technical support for your Intermec
product.
Telephone Support
These services are available from Intermec.
In the USA and
Canada call 1-800755-5505 and
Services Description
choose this option
Order Intermec
products
Order Intermec
media
Order spare
parts
Te c h n i ca l
Support
Service • Get a return authorization
Service contracts • Ask about an existing
• Place an order.
• Ask about an existing
order.
Order printer labels and
ribbons.
Order spare parts. 1 or 2 and then
Talk to technical support
about your Intermec
product.
number for authorized
service center repair.
• Request an on-site repair
technician.
contract.
•Renew a contract.
• Inquire about repair
billing or other service
invoicing questions.
1 and then choose 2
1 and then choose 1
choose 4
2 and then choose 2
2 and then choose 1
1 or 2 and then
choose 3
vi PB50 Portable Label Printer User’s Guide
Page 7

Before You Begin
Outside the U.S.A. and Canada, contact your local Intermec
representative. To search for your local representative, from the
Intermec web site, click Contact.
Service Location Support
For technical support in South Korea, use the after service
locations listed below:
AWOO Systems
102-1304 SK Ventium
522 Dangjung-dong
Gunpo-si, Gyeonggi-do Korea, South 435-776
Contact: Mr. Sinbum Kang
Telephone: +82-31-436-1191
Email: sbkang@awoo.co.kr
Sammi Information Systems Co Ltd
7-9FL, Seo Jo Building
103-15, Galwor-Dong
Seoul, Yong San-ku Korea, South 140-807
Contact: Kyung-Hee Koo
Telephone: +82-2-790-5508
Email: jlovekoo@sammicomputer.co.kr
Who Should Read This Manual
This user’s guide is for the person who is responsible for
installing, configuring, and maintaining the PB50 printer.
This guide provides you with information about the features of
the PB50, and how to install, configure, operate, maintain, and
troubleshoot it.
Before you work with the PB50, you should be familiar with your
network and general networking terms, such as IP address.
Related Documents
This table contains a list of related Intermec documents and their
part numbers.
Document Title Part Number
Intermec Fingerprint Programmer’s Reference
Manual
Intermec Printer Language (IPL) Command
Reference Manual
PB50 Portable Label Printer User’s Guide vii
937-005-xxx
066396
Page 8

Before You Begin
The Intermec web site at www.intermec.com contains our
documents (as PDF files) that you can download for free.
To d ownloa d docume nts
1 Visit the Intermec web site at www.intermec.com.
2 Click Support > Manuals.
3 In the Select a Product field, choose the product whose
documentation you want to download.
To order printed versions of the Intermec manuals, contact your
local Intermec representative or distributor.
viii PB50 Portable Label Printer User’s Guide
Page 9

1
Using the PB50 Portable
Label Printer
PB50 Portable Label Printer User’s Guide 1
Page 10
Chapter 1 — Using the PB50 Portable Label Printer
Learning About the PB50 Portable Label Printer
The PB50 is a rugged direct thermal label and receipt printer that
is designed for use with the CK31, 700 series, CK61, CN2B, and
CN3 handheld computers as well as the SF51 and SR61.
scanners. The PB50 provides:
• print resolution of 203 dpi.
• print speeds of up to 75 mm per second (3 ips)
• 802.11 or Bluetooth radio options.
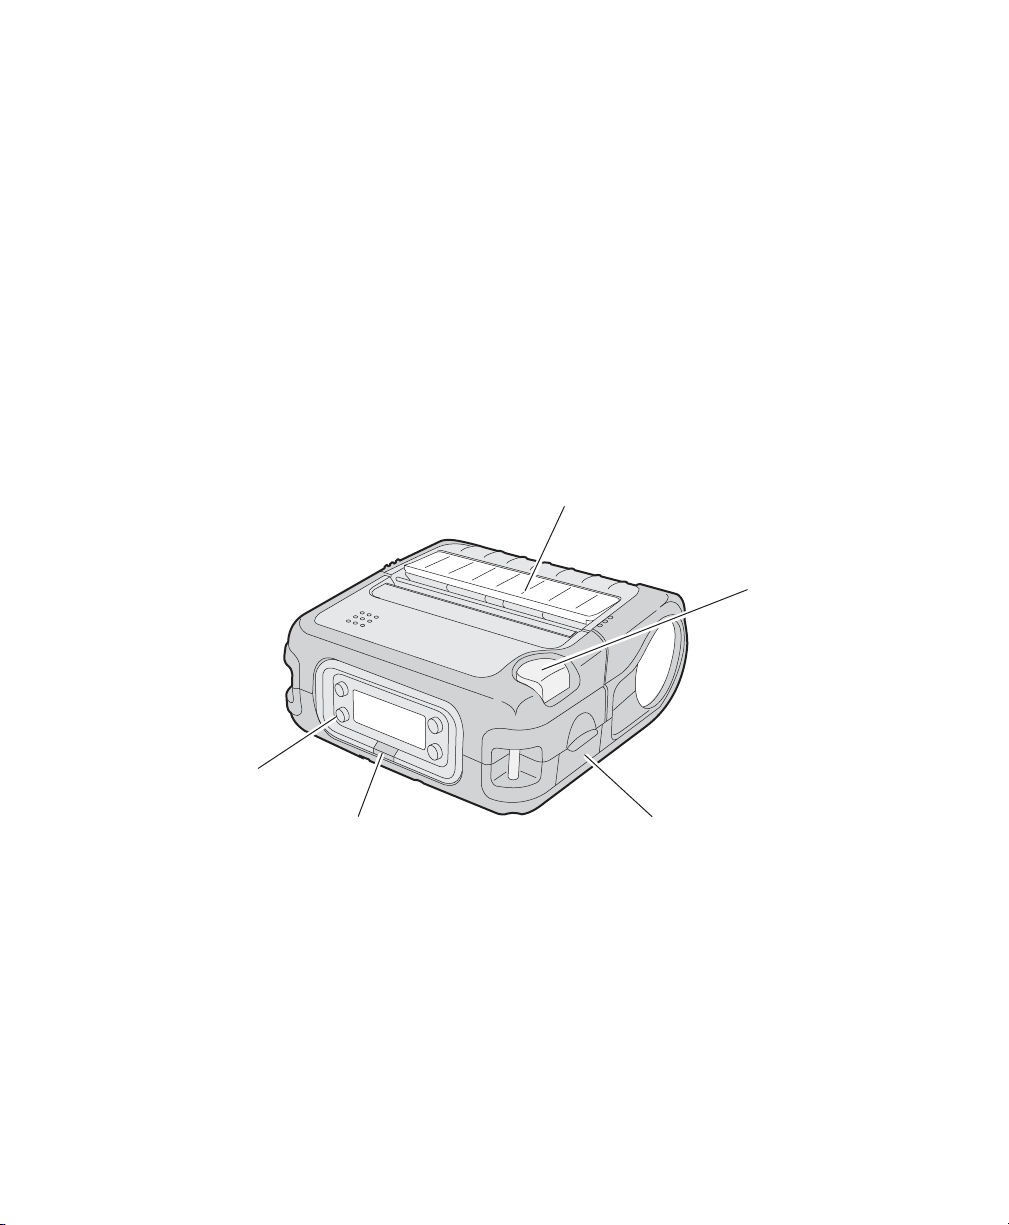
Identifying the Parts of the Printer
Use this illustrations to familiarize yourself with some of the
features of the PB50.
Self-strip
door
Media cover
release button
Control panel
Ready-to-Work
indicator
PB50 Printer: This illustration shows the important features of the PB50
printer. A weather-resistant flap protects the communications port.
Communications port
Understanding the Printer Firmware
Your PB50 printer comes with either Intermec Printer Language
(IPL) or Fingerprint firmware. The choice of firmware affects the
functionality of the printer and how you interact with it. This
manual contains information for using both types of printer
firmware.
2 PB50 Portable Label Printer User’s Guide
Page 11
Chapter 1 — Using the PB50 Portable Label Printer
The current firmware type and version display on the PB50
screen when the printer is in Ready mode.
SETUP:
IPL 8.70
SER-COM
The screen of a PB50 running IPL firmware
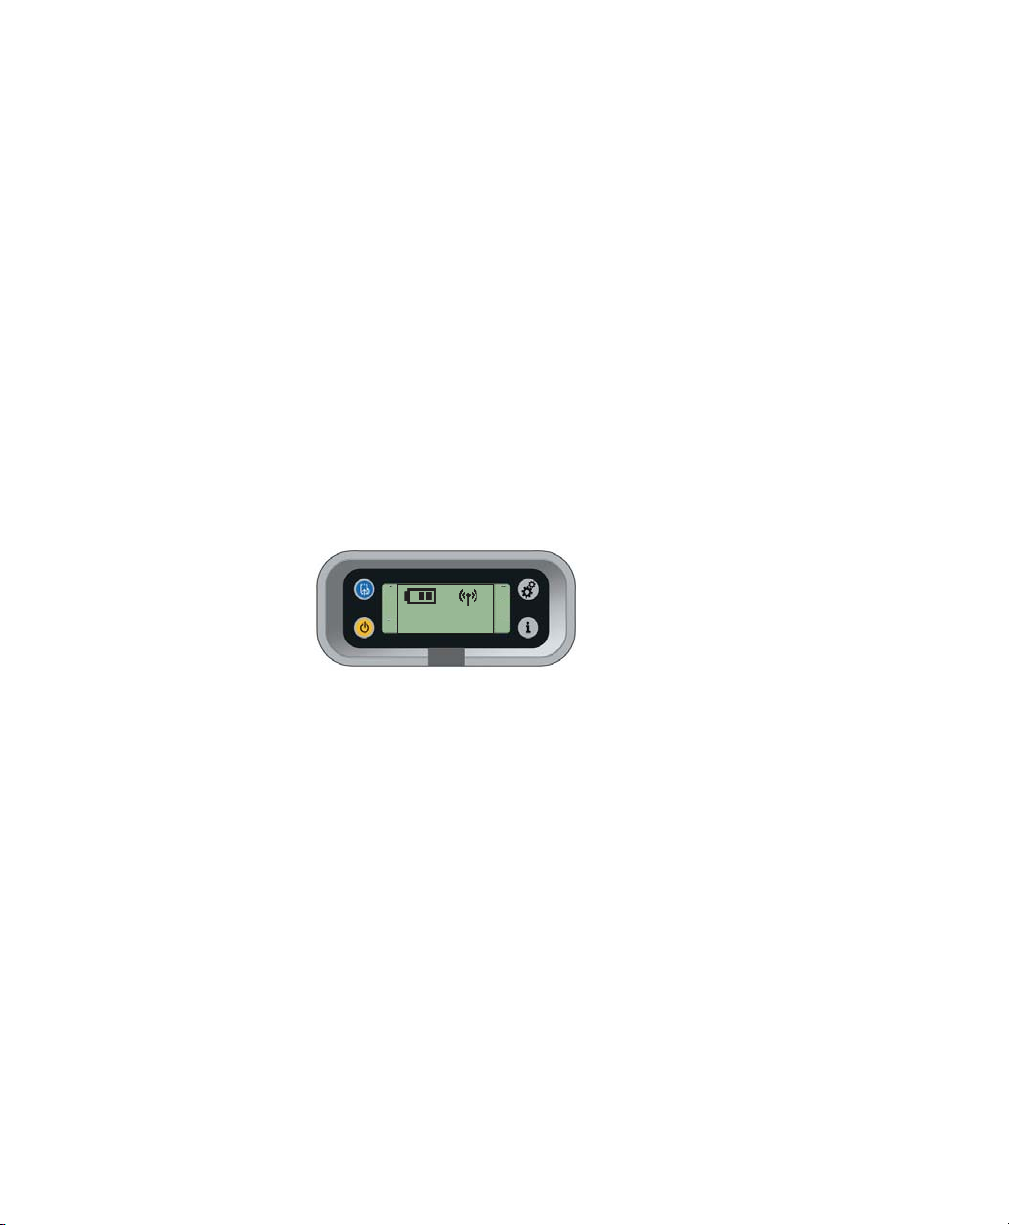
Understanding the Control Panel
The PB50 control panel contains four buttons, a liquid crystal
display (LCD), and one LED indicator. Use the four buttons to
navigate the menu system and perform functions on the PB50
printer. See the following tables to understand the buttons, the
menu system, and what the LED means.
Feed button
SETUP:
SER-COM
Standby button
Ready-to-work
indicator
PB50 Control Panel: Use this illustration to familiarize yourself with the
buttons and lights on the PB50.
Setup button
Info button
Understanding How to Use the PB50 Buttons
Button
Name
Feed Press to advance label or receipt paper by 5 mm
Setup Press to display the Setup menu.
Button Function
(0.19 inch).
If the printer is printing, pressing this button
causes the printer to pause. Press the button
again to resume printing.
PB50 Portable Label Printer User’s Guide 3
Page 12

Chapter 1 — Using the PB50 Portable Label Printer
Understanding How to Use the PB50 Buttons (continued)
Button
Name
Standby
(Power)
Info Press to display a summary of network
Button Function
Press to put the printer in Standby mode. In
Standby mode, power to the radio, the display,
and the backlight are turned off.
Press to turn the printer back on and put in
Ready mode.
connection information. Each setting in the
summary information displays on the screen for
five seconds.
All of the buttons can act as “soft keys,” which means that the
function of each button depends on the state of the printer. A
small icon appears in the screen next to the button to indicate the
function it performs.
Understanding the Soft Keys
Button Soft Key(s) Description
• Moves up one level in the menu
system. This soft key appears in
Setup mode.
• Increases the value of a number
when editing settings such as an IP
address. This soft key appears in
Setup mode.
• Pauses the printing job.
Exit Setup mode and return to Ready
mode.
Moves through the settings at the
same level in the menu system.
• Moves down one level in the menu
system and saves changes to a
setting.
• Exits a printing job or exits
Information mode.
4 PB50 Portable Label Printer User’s Guide
Page 13

Chapter 1 — Using the PB50 Portable Label Printer
There is only one LED on the PB50 printer: the Ready-toWork™ indicator.
Understanding the Ready-to-Work Indicator
Indicator State Description
Off The PB50 is not connected to a host through the
On The PB50 is connected to a radio or the serial port
Blinking A blinking light can mean one of several
Understanding the Printer Sounds
The PB50 plays sounds in response to several actions that you
can take with the printer. Use the following table to understand
when the sounds occur and what they mean.
radio or serial cable.
is enabled.
conditions:
• The printer is out of paper.
• The media cover is open.
• There is a printer hardware error. For a list of
possible problems, see “Troubleshooting the
PB50” on page 38.
Understanding the Printer Sounds
Sound Occurs when:
Power • You insert a battery in the printer.
• The PB50 starts charging the battery.
• You plug in the AC adaptor.
Hardware You open or close the media door.
Button You press any of the PB50 buttons.
Error • The paper is not feeding out of the printer
because the media door is open or the printer is
out of paper.
• A print job failed because the media door is
open or the printer is out of paper.
PB50 Portable Label Printer User’s Guide 5
Page 14

Chapter 1 — Using the PB50 Portable Label Printer
Understanding the Backlight
The screen backlight on the PB50 behaves the same way as a
screensaver on your PC. After a set amount of time elapses
without any user interaction, the backlight goes off. The screen
backlight turns on when:
• the printer begins printing.
• you press a button.
• you connect the printer to external power.
You can change the amount of time to have elapse before the
backlight turns off using the Setup menu. Options for backlight
are always off, always on, 5 seconds, 10 seconds, 20 seconds, 30
seconds, or 60 seconds.
Using the Batteries
The PB50 uses a rechargeable 2200 mAh lithium-ion battery
(Model AB13) for power. You must fully charge the battery
before you can use the PB50. A fully charged battery can last up
to one week without needing to be recharged.
Use Intermec Model AB13 battery only. Use of another
battery may present a risk of fire or explosion.
The Model AB13 battery may present a fire or chemical burn
hazard if mistreated. Do not disassemble, heat above 100°C
(212°F), or incinerate.
Dispose of used batteries promptly. Keep away from children.
Installing the Battery
Make sure you fully charge the battery before you use your PB50.
You can charge the battery before or after you install them into
the PB50.
To install the battery
1 Lay the PB50 upside down on a flat surface.
6 PB50 Portable Label Printer User’s Guide
Page 15
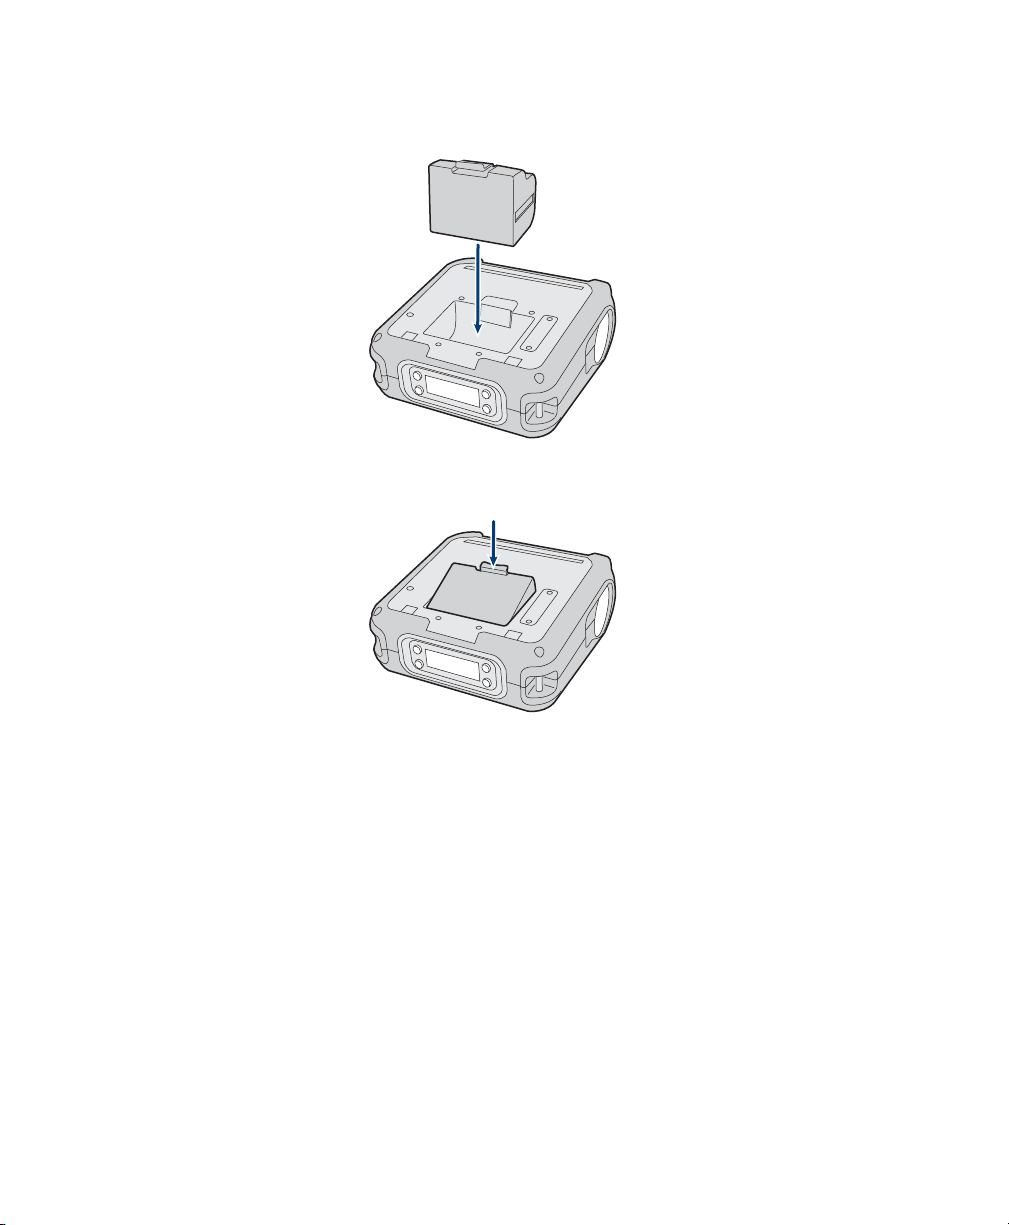
Chapter 1 — Using the PB50 Portable Label Printer
2 Insert the battery with the tab facing away from the front
control panel.
3 Insert the edge of the battery under the lip of the PB50 and
then push down until you hear the battery latch click.
Charging the Batteries
There are two ways to charge the PB50 battery:
• connect AC power to the printer and charge the battery while
it is in the PB50.
• Charge the battery in the AC18 4-bay battery charger.
For information on charging your battery in the 4-bay battery
charger, see the AC18 4-Bay Battery Charger Instructions
(P/N 943-128-001).
It takes approximately 4 hours to charge the battery while it is
installed in the PB50 printer. To charge the battery inside the
PB50, you need:
• an Intermec 12 VDC power supply (Model AE19).
PB50 Portable Label Printer User’s Guide 7
Page 16
Chapter 1 — Using the PB50 Portable Label Printer
•an AC power cord.
To charge the battery inside the PB50
1 Install the battery in the PB50. For help, see the previous
section, “Installing the Battery.”
2 Connect the power supply to the DC power connector on the
printer.
3 Connect one end of the power cord to the power supply and
then plug the other end into an AC outlet.
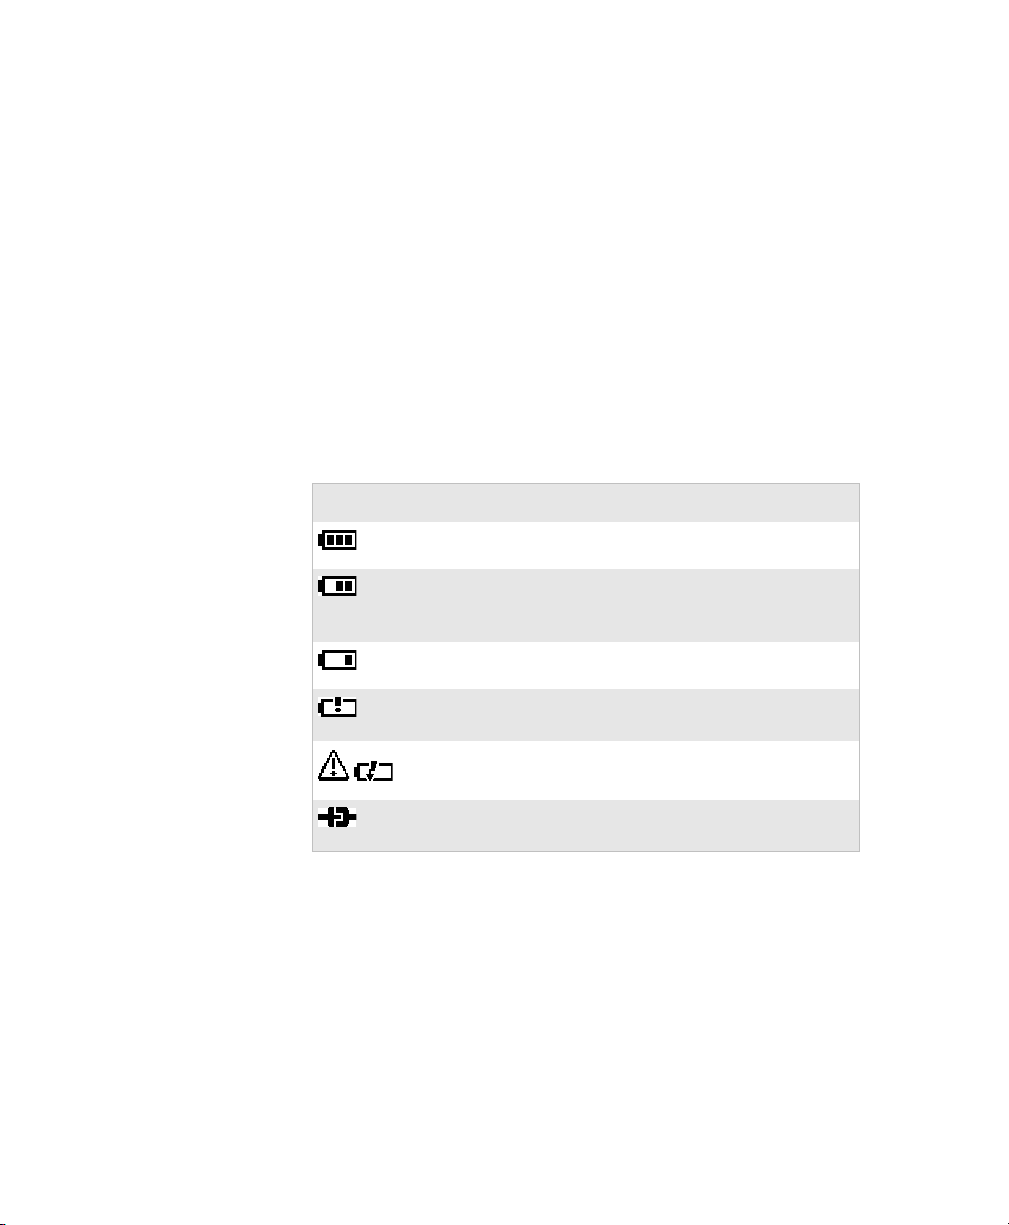
Understanding the Battery Icons
The easiest way to tell the status of your battery is to look at the
battery icons on the control panel of the PB50.
Battery Icon Status
Icon Status
Battery is fully charged.
Battery has a medium charge. You should be able to work
for several more hours before charging or replacing the
battery.
Battery is low. You need to replace the battery soon.
Battery is critically low. You need to replace the battery
now.
Battery charging error. You may need to replace the
battery.
External power connected and there is no battery in the
printer.
Extending Battery Life
Here are some tips for extending the overall life of your battery:
• Never expose the battery to direct sunlight or temperatures
over 40°C (104°F).
• Only charge the battery inside the PB50 using a power supply
or in the 4-bay battery charger (Model AC18).
8 PB50 Portable Label Printer User’s Guide
Page 17
Loading Media
Chapter 1 — Using the PB50 Portable Label Printer
Here are some tips for extending the life of your battery between
charges:
• Press the Standby button to put the printer in Standby mode.
• Remove the battery from the printer if you will not be using it
for three days or more.
• Do not operate the PB50 in extremely cold temperatures.
Using the PB50 in temperatures below freezing reduces the
overall battery life.
Remember that any rechargeable battery loses its ability to
maintain a charge over time. You can only recharge it a finite
number of times before you must replace it.
You can use roll or fanfold receipt media with the PB50 printer.
The PB50 ships with a small amount of media loaded and a test
page printed to verify that the printer works. The PB50 supports
self-strip printing applications. See the second procedure for
information on how to correctly load media for self-strip
printing.
For information on media specifications, see Appendix A.
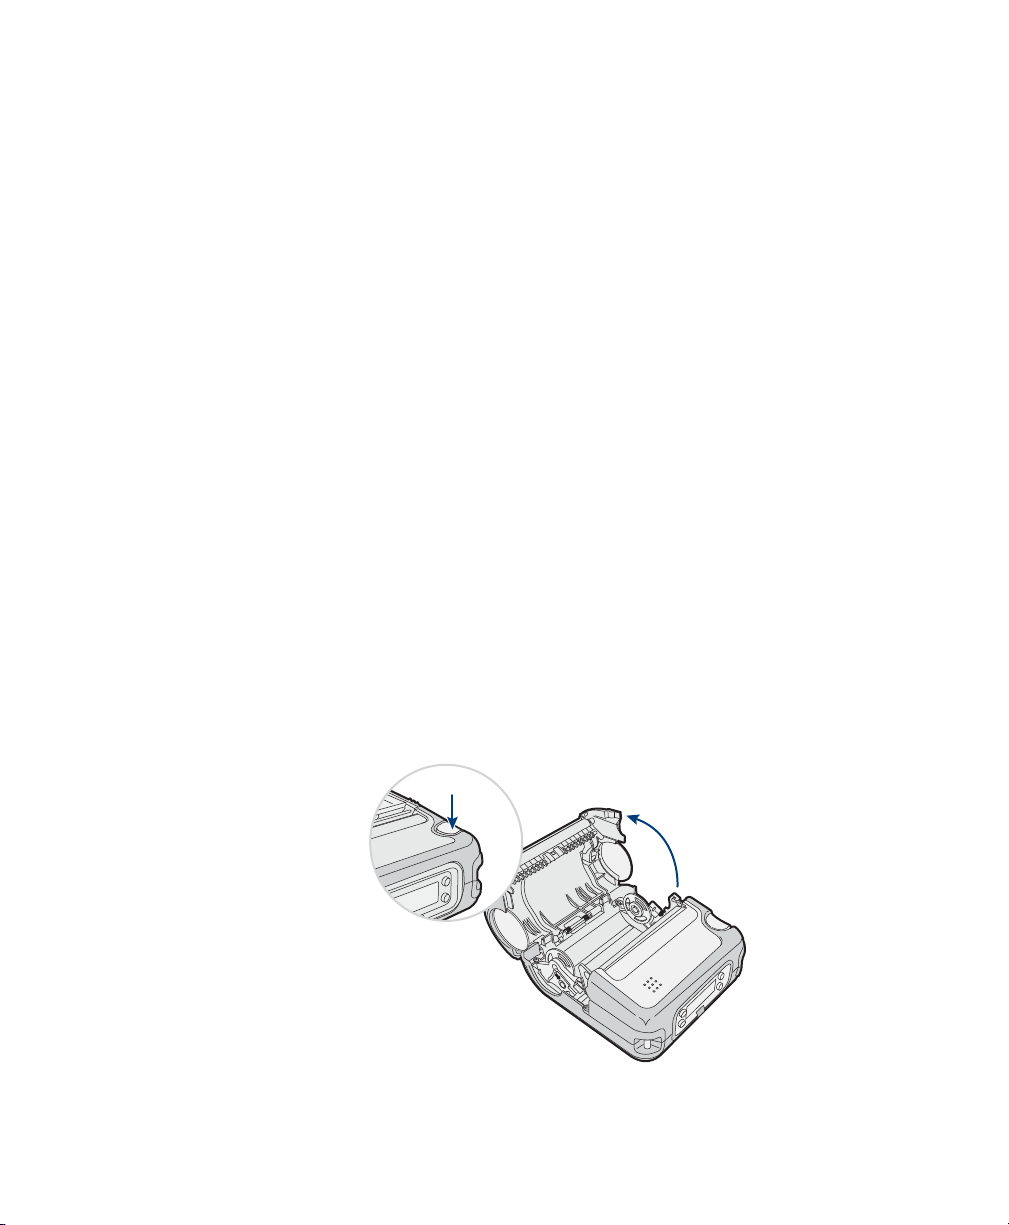
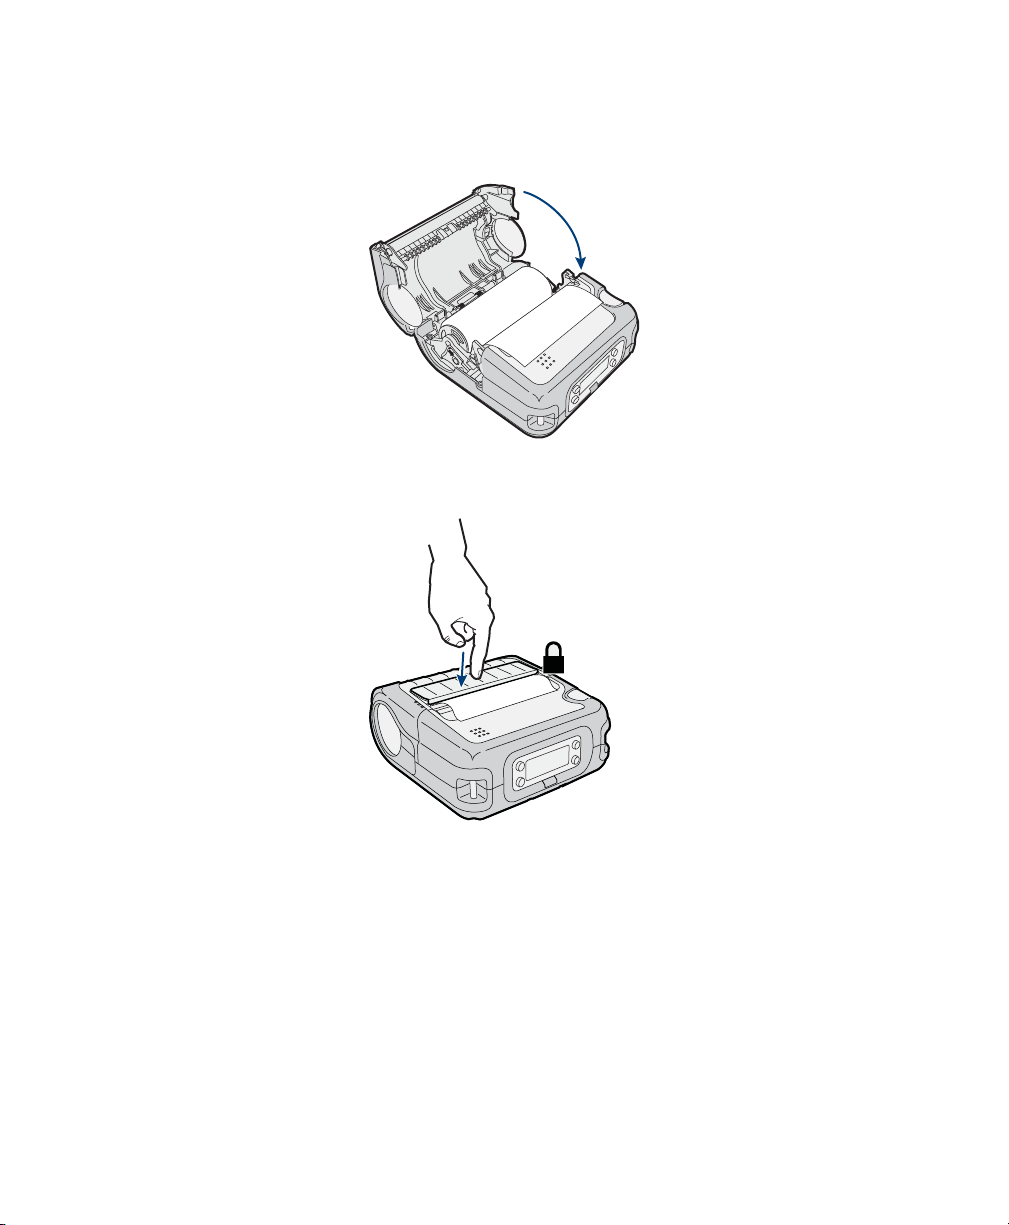
To l oad med ia
1 Press down on the blue media cover release button until the
cover releases.
PB50 Portable Label Printer User’s Guide 9
Page 18
Chapter 1 — Using the PB50 Portable Label Printer
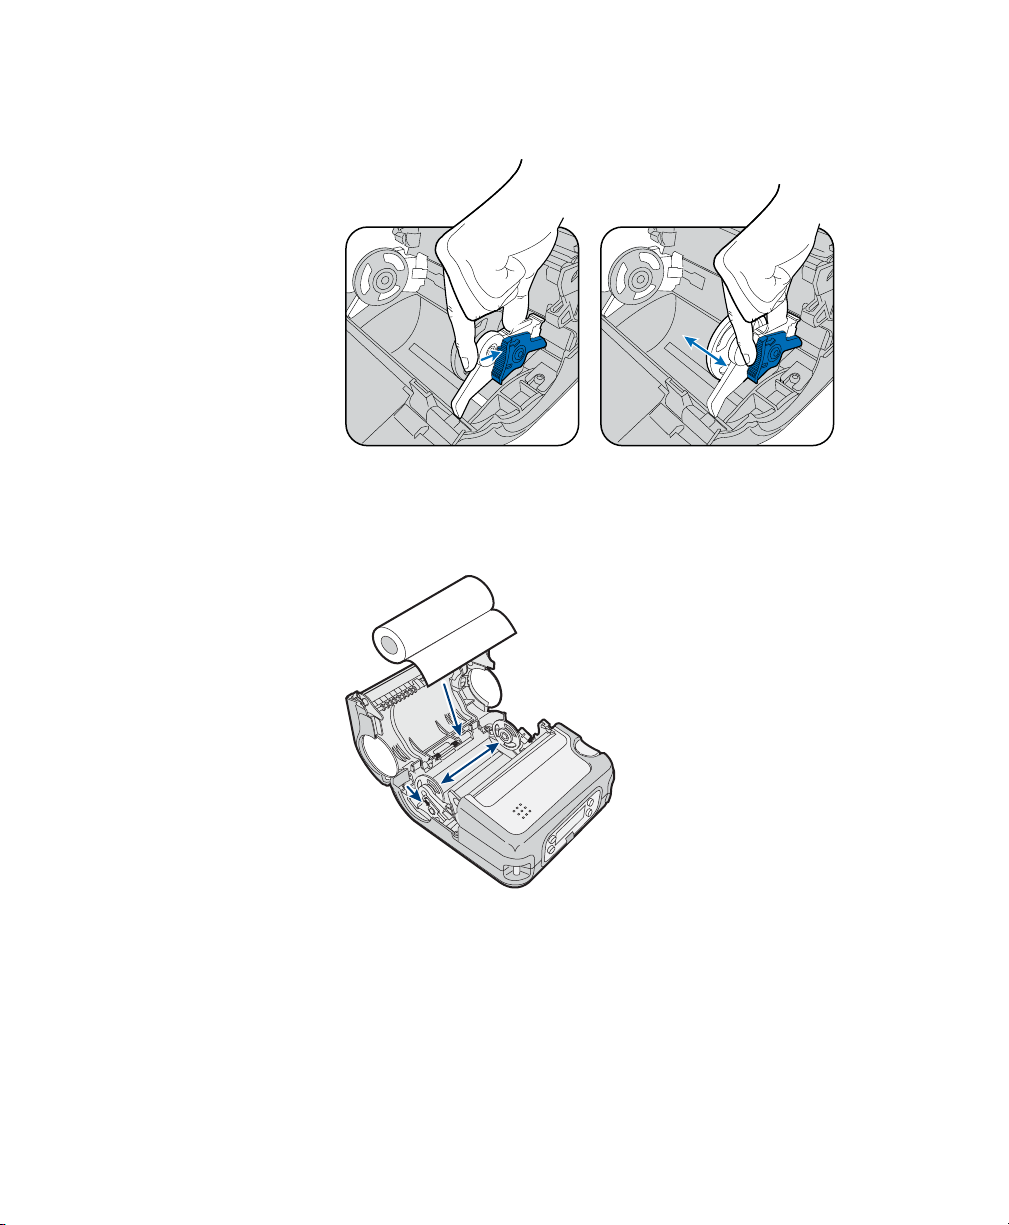
2 Press down on the media adjust guide and slide the two media
supports apart.
3 Insert a roll of media and press the media adjust guide until
the roll is held firmly in place. Make sure you load the media
clockwise so that it pulls off the core from the bottom of the
printer.
4 Pull out a few inches of the media.
10 PB50 Portable Label Printer User’s Guide
Page 19
Chapter 1 — Using the PB50 Portable Label Printer
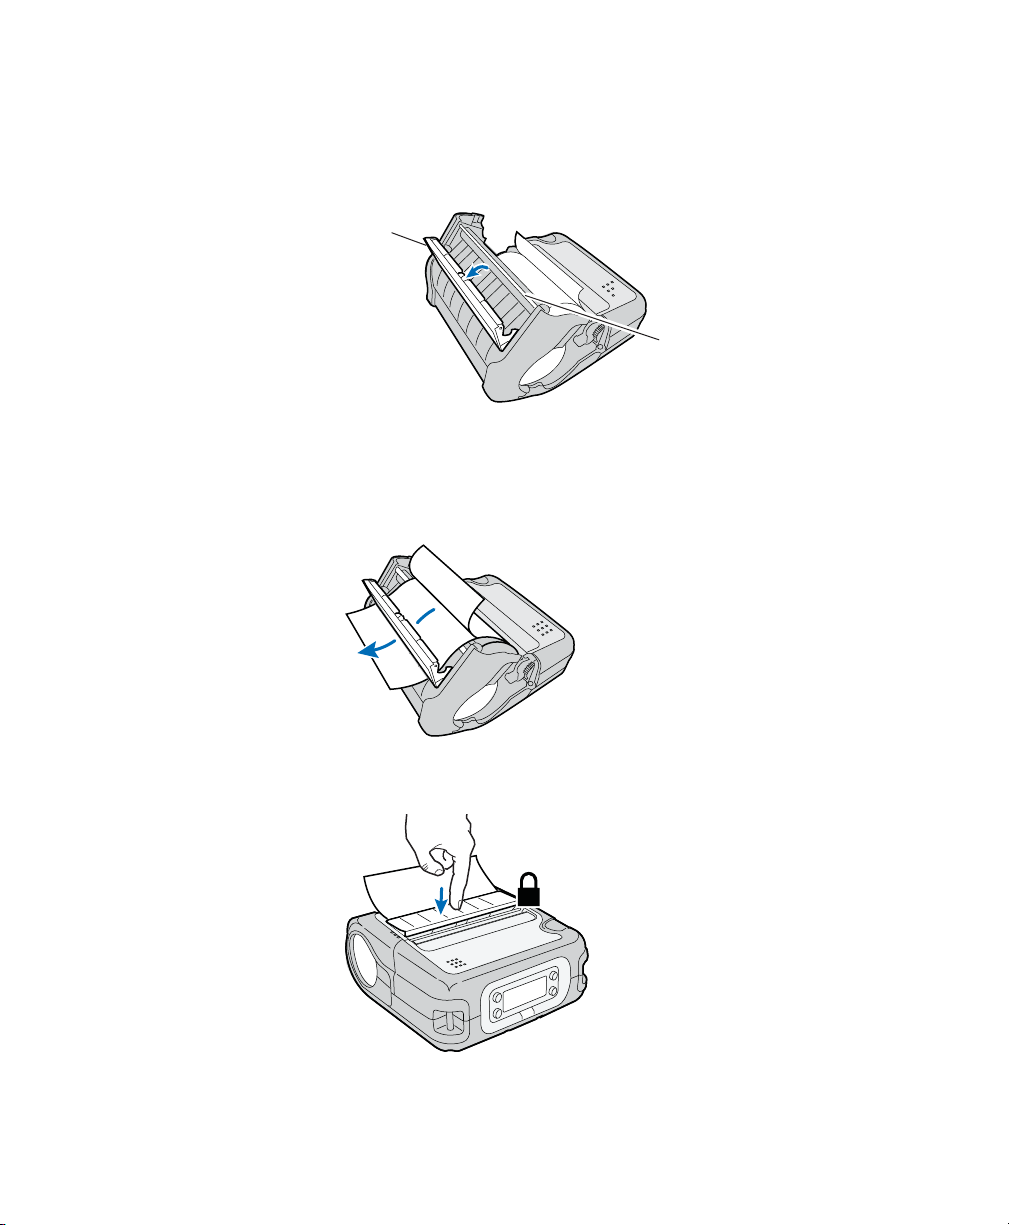
5 Close the media cover until it latches. The printer emits the
hardware sound to tell you that the media door closed
correctly.
6 Press down on the self-strip door to make sure the media
cover is completely latched.
7 Press the Feed button several times to advance the media.
PB50 Portable Label Printer User’s Guide 11
Page 20
Chapter 1 — Using the PB50 Portable Label Printer
To load media for self-strip printing
1 Complete Steps 1 through 4 in the previous procedure.
2 Open the self-strip door in the media cover.
Self-strip
door
3 Remove a label from the roll of media so that you are left with
several inches of label liner.
4 Feed the label liner over the self-strip bar and out the back of
the self-strip door.
Self-strip
bar
5 Close the media cover until it latches and press down on the
self-strip door to make sure it locks.
12 PB50 Portable Label Printer User’s Guide
Page 21

Printing a Test Page
After you have loaded media in the printer, you are ready to print
a testprint. You can choose from several different testprints
including: setup info, hardware info, Bluetooth info, network
info, diamonds, chess, bar codes #1, and bar codes #2. If you
cannot get the testprint information to print, see
“Troubleshooting the PB50” in Chapter 3.
To print a test print with a PB50 loaded with IPL firmware
1 Press the Setup button.
2 Press until you reach Te s t / S e r v i c e .
3 Press to enter the Test/Service menu system.
4 Press to enter the Testprint Config menu.
5 Press to enter the Config menu.
6 Press to choose a testprint.
7 Press to print the Config testprint of your choice.
To print a testprint with a PB50 loaded with Fingerprint firmware
Chapter 1 — Using the PB50 Portable Label Printer
1 Press the Setup button.
2 Press until you reach Print Defs.
3 Press to enter the Print Defs menu system.
4 Press until you reach Te s t p r i n t .
5 Press to enter the Testprint menu.
6 Press to choose a testprint.
7 Press to print the testprint of your choice.
PB50 Portable Label Printer User’s Guide 13
Page 22

Chapter 1 — Using the PB50 Portable Label Printer
Hardware
USB Device
USB Host
USB Host
CRC failed
Bluetooth
Model PB50
TPH Resolution 8.00 dots/mm (203 dpi)
TPH Temperature 53
Battery Voltage 1.7V
Hardware version 20.0
Ram 16384 (k)
Flash 65636 (k)
c: 16547328 bytes free
d: 33312256 bytes free
tmp: 8188416 bytes free
Odometer: 2 (m)
Sample Network Test Print Page
14 PB50 Portable Label Printer User’s Guide
Page 23

2
In this chapter you will find these sections:
•Configuring the PB50
• Establishing Communications With a Host
• Upgrading the Firmware
• Downloading Fonts and Graphics
Configuring the PB50
PB50 Portable Label Printer User’s Guide 15
Page 24
Chapter 2 — Configuring the PB50
Configuring the PB50
There are several different ways you can change the configuration
settings of the printer. You can change them directly from the
display, or remotely from the SmartSystems console.
For more information on the IPL menu system, see Appendix B,
“IPL and Fingerprint Setup Menus.”
Understanding the Display Modes
The PB50 has six display modes to help you effectively interact
with the printer: Ready, Information, Paused, Setup, Error, and
Test. Use the following sections to understand the different
printer modes
Understanding Ready Mode
The printer is in Ready mode when the printer is on and ready to
print. The main screen displays the power status, the radio status,
and the printer language and version.
SETUP:
IPL 8.70
SER-COM
The PB50 in Ready Mode
Understanding Information Mode
When the printer is in Information mode, it displays a subset of
pertinent information about the printer. If the printer
experienced an error, the error message displays first followed by
the printer information. Each message displays on the screen for
five seconds. After five seconds on the last information screen, the
printer exits Information mode.
To enter Information mode
•Press the Information button on the control panel.
16 PB50 Portable Label Printer User’s Guide
Page 25

Chapter 2 — Configuring the PB50
LOW BATTERY:
12.7 V
The PB50 in Information Mode
Understanding Pause Mode
Use Pause mode to momentarily stop printing or to cancel a
current print job. Once you pause the printer, the Pause mode
screen appears. Use the Feed button to both pause and resume
printing.
To enter Pause mode
•Press the Feed button while the printer is printing.
To resume printing
•Press the Feed button (or soft key).
To cancel a print job
1 Press the Feed button to pause printing.
2 Press the Information button (or soft key) to cancel the
print job.
PAUS E
The PB50 in Pause Mode
X
Understanding Setup Mode
Use Setup mode to change the settings on the printer.
To enter or exit Setup mode
•Press the Setup button.
PB50 Portable Label Printer User’s Guide 17
Page 26

Chapter 2 — Configuring the PB50
Sample Setup Mode Screen
Once you enter Setup mode, there are two editing modes: normal
and enhanced.
Editing Settings in Setup Mode
Editing Mode To Navigate To Accept Value
Normal • Press to move among
Press .
choices.
• Press to go up a level in
menu system.
Enhanced • Press to move within the
Press .
editable fields. When the
field blinks, you can edit it.
• Press to increase the
value of the field.
BAUDRATE:
9600
Normal Editing Mode: In normal editing mode, you see an up arrow and a
right arrow for making selections.
IP ADDRESS:
+
130.42.240.102
[
Enhanced Editing Mode: In enhanced editing mode you have a plus sign and
a right arrow to change the value of numeric fields.
18 PB50 Portable Label Printer User’s Guide
Page 27

Chapter 2 — Configuring the PB50
Understanding Error Mode
The printer enters Error mode when it detects an error condition
such as a low battery or a paper fault. Some error messages appear
on the screen immediately when they occur, such as DOOR
OPEN. Other error messages do not appear until you press the
Information button. If there is more than one error at a given
time, the highest priority error message displays first.
ERROR:
PAPER FAULT
Sample Error Mode Screen
If you encounter an error message, see “Understanding Error
Messages” on page 38 for information on how to fix the
problem.
Understanding Test Mode
Use Test mode when you want to verify printer settings, print test
labels, restore factory default settings, or enter Dump mode for
troubleshooting purposes. Two test modes are available: Test
mode and Extended Test mode.
Using Test Mode
Test mode is a simple sequence of events which requires little user
interaction. Extended Test mode requires more user interaction
and lets you choose which actions you want the printer to
perform.
To e nter Tes t mode
1 Make sure the printer is in Ready mode and is loaded with
media.
2 Press the Feed and Standby buttons at the same time and
hold until Select Media appears on the screen and it displays
the time of media you are using (gap, mark, or continuous).
3 Release both buttons. The printer performs a test feed (sensor
calibration), prints a series of test labels, and then enters
Dump mode.
The printer is now in Dump mode and it scans the
communication ports. Any characters received on the
PB50 Portable Label Printer User’s Guide 19
Page 28

Chapter 2 — Configuring the PB50
communication ports are printed on a label when you exit
Dump mode.
4 Press Feed to exit Dump mode.
After you exit Dump mode, the printer returns to Ready mode.
For more information on Dump mode, see “Troubleshooting
Communication Problems” on page 42.
Using Extended Test Mode
You can use Extended Test mode to run additional diagnostic
tests. Additional options include printing specific test labels,
entering Dump mode, and resetting to factory defaults.
To enter Extended Test mode
1 Make sure that the printer is loaded with media.
2 Press the media cover release button to open the media cover.
3 Press the Standby button to turn the printer off.
4 Press Feed and Standby buttons at the same time until
CLOSE PRINTER DOOR appears on the screen.
5 Close the media cover. You are now in Extended Test mode.
• Press to cycle through the options.
• Press to select a test option.
•Press to exit Extended Test mode.
TEST LABELS
CHESS
Sample Extended Test Mode Screen
20 PB50 Portable Label Printer User’s Guide
Page 29

Chapter 2 — Configuring the PB50
Options in Extended Test Mode
Function Description
Select Media This option is almost the same as the process
in Test mode, except that the printer performs
a slow test feed in Extended Test mode. The
slow test feed enables the printer to perform a
slow sensor calibration which can help resolve
gap or mark detection problems.
Tes t L ab els This option allows you to print test labels one
at a time. Press to print the next label.
Dump Mode This options enters Dump mode. For more
information
on Dump mode, see
“Troubleshooting Communication
Problems” on page 42.
Factory Default This option restores the factory default
settings. Press to select this option and
then follow the instructions on the screen.
Setup and Exit This option exits Extended Test mode and
puts the printer in Setup mode.
Exit This option exits Extended Test mode.
Changing Configuration Settings
There are several ways you can change the configuration settings
of the printer. You can change the configuration settings:
•from the display.
• from the host PC using PrintSet.
• from the host PC using the command line.
• from the printer home page.
• from the SmartSystems Console.
Changing the Configuration Settings From the Display
You need to enter Setup mode before you can change
configuration settings. For more information on entering Setup
mode and navigating through the settings, see “Understanding
Setup Mode” on page 17.
PB50 Portable Label Printer User’s Guide 21
Page 30

Chapter 2 — Configuring the PB50
The top levels of the Setup menu are organized in a one-way
loop. Each level has several sub-levels. When the printer starts up,
the firmware determines the options available on the printer and
adds this information to the Setup menu.
Starting point
SETUP:
DISPLAY
SETUP:
BATTERY
SETUP:
PRINT DEFS
SETUP:
SER-COM,UART1
SETUP:
MEDIA
The Main Levels of the Setup Menu in Fingerprint
Starting point
SETUP:
DISPLAY
SETUP:
BATTERY
SETUP:
SER-COM
SETUP:
NET-COM. NET1
SETUP:
NETWORK
SETUP:
FEEDADJ
SETUP:
NETWORK
SETUP:
TEST/SERVICE
SETUP:
CONFIGURATION
SETUP:
MEDIA
The Main Levels of the Setup Menu in IPL
22 PB50 Portable Label Printer User’s Guide
Page 31

Chapter 2 — Configuring the PB50
Changing the Configuration Settings from PrintSet
PrintSet Version 4.2 is a printer configuration tool that you can
download from the Intermec web site. PrintSet can communicate
with your printer through a serial cable or a network connection.
It works on all PCs running Windows 98 (or later). PrintSet
allows you to easily change all of the setup parameters. It also
includes setup wizards to guide you through some common
configuration tasks.
Changing the Configuration Settings Using the Command Line
You can change configuration parameters by sending commands
directly to the printer using your terminal program
(Hyperterminal) and a serial or network connection.
If your printer uses the Fingerprint language, you use the SETUP
command, followed by the node, subnode, and parameters
setting. Here is a Fingerprint example that sets your media setting
to labels with gaps:
SETUP “MEDIA,MEDIA TYPE,LABEL (w GAPS)”
If your printer uses the IPL language, you would send this
command:
<STX><SI>T1<ETX>
Fingerprint automatically sends feedback to Hyperterminal as
you type. If you want to see what you are typing with IPL, you
need to complete the following procedure.
To see IPL commands as you type
1 From the Hyperterminal menu, select File > Properties> the
Settings tab.
2 Click the ASCII Setup button.
3 Select Echo typed characters locally.
4 Click OK twice.
For more information on how to change configuration settings,
see either the Fingerprint Programmer’s Reference Manual (P/N
937-005-xxx) or the IPL Programmer’s Reference Manual (P/N
066396). You can download both documents from the Intermec
web site at www.intermec.com.
PB50 Portable Label Printer User’s Guide 23
Page 32

Chapter 2 — Configuring the PB50
Changing Configuration Settings from the Printer Home Page
If you have an 802.11 radio in your PB50 printer and it is
connected to the network, you can use your web browser to open
the printer home page and make any desired configuration
changes. To connect to a wireless network, follow the procedure
in “Setting Up 802.11 Radio Communications” on page 26.
The PB50 Printer Home Page
From the home page, click Configuration to make your changes.
Changing Configuration Settings from SmartSystems Console
You can use the SmartSystems Console to change configuration
settings on your printer. The PB50 ships with the SmartSystems
client loaded on it. The console is part of SmartSystems
Foundation and is available from the Intermec web site. To
download SmartSystems Foundation, go to www.intermec.com/
products/smrtsysfoundation/index.aspx.
Establishing Communications With a Host
The PB50 must establish communications with a host that will
send the data for the printer to print. The PB50 provides three
ways to communicate with a host:
• Bluetooth radio communications
• 802.11 b/g radio communications
• Serial communications
24 PB50 Portable Label Printer User’s Guide
Page 33

Setting Up Bluetooth Communications
The PB50 can contain a Bluetooth radio that allows wireless
communications with a remote device from distances up to 100
meters (approximately 328 feet) depending on the Bluetooth
range capabilities of the remote device, environmental
conditions, and obstructions. For the Bluetooth-enabled devices
to exchange data, both devices must establish a connection.
Bluetooth software is always running in the background.
The PB50 cannot initiate a Bluetooth connection. One of the
devices, such as a CK31, CK61, 700 series, CN2B, or CN3
mobile computer, must request a connection with the printer.
The PB50 then accepts or rejects the connection. Use Intermec
Settings on the mobile computer to enable the Bluetooth settings
on the PB50.
The PB50 can also connect to Bluetooth scanners such as the
SF51 and the SR61. You can create the bar code labels you need
to connect the printer to a Bluetooth scanner using EasySet
software. If you are going to create the bar code labels using
EasySet, you will need to know the Bluetooth Device Address
and the PIN of the PB50. You can download a free version of
EasySet from the Intermec web site at www.intermec.com.
Chapter 2 — Configuring the PB50
Each PB50 equipped with a Bluetooth radio has a unique
Bluetooth Device Address (BDA) loaded into its module when
manufactured. You can find the BDA on the certification label
located on the bottom of the printer.
To set up Bluetooth communications with a mobile computer
• Follow the procedure to discover and connect to Bluetooth
devices in your mobile computer user’s manual.
Note: For maximum security, you need to configure a
Bluetooth passcode for the PB50. The default passcode for the
PB50 is “1234.”
To set up Bluetooth communications with a scanner
1 Download and install EasySet.
2 Create the following bar code labels using EasySet:
• Administrator reset factory defaults
• Bluetooth parameters - security - not active
PB50 Portable Label Printer User’s Guide 25
Page 34

Chapter 2 — Configuring the PB50
• Bluetooth parameters - connect/disconnect - compose BT
address
• Bluetooth parameters - security - compose PIN:
3 Scan the bar code labels with the Bluetooth scanner.
4 Will the printer blink in response??
Understanding Bluetooth Radio Icons
Icon Description
The Bluetooth radio is on and the printer is not connected to
a serial cable.
The Bluetooth radio is turned off. The Bluetooth radio turns
off when you connect a serial cable.
Setting Up 802.11 Radio Communications
The PB50 can have an internal 802.11 b/g radio to transfer and
receive data using wireless communications. This manual
assumes that you have already set up your wireless
communications network including your access points. The
following procedures include information on setting up wireless
security for both IPL and Fingerprint versions of the PB50.
The PB50 supports these authentication modes: none, WEP,
WPA Personal and Enterprise mode, WPA2 Personal and
Enterprise mode (802.1x authentication).
WPA and WPA2 Enterprise mode currently support PEAP,
TTLS, and LEAP. For LEAP authentication, EAP is not
supported.
Understanding 802.11 Radio Icons
Icon Description
Excellent signal
Strong signal
Good signal
Poor signal
26 PB50 Portable Label Printer User’s Guide
Page 35

Chapter 2 — Configuring the PB50
Understanding 802.11 Radio Icons (continued)
Icon Description
Very poor signal
No Signal
Radio is off
To set up the PB50 to work in your wireless network, you will
need:
• Serial cable (P/N 075497-001)
• Host PC running Windows or Linux
• Serial port software such as Hyperterminal
Note: If you are using IPL commands with Hyperterminal, you
may want to be able to see the commands as you type them on
your screen. For help, see “Changing the Configuration Settings
Using the Command Line” on page 23.
To set up the PB50 for wireless communications
1 Connect the 8-pin circular DIN connector to the serial port
on the PB50.
2 Connect the other end of the serial cable to a serial port on
the back of your PC or to a serial adapter on your mobile
computer.
3 Open Hyperterminal on your PC and configure the following
parameters for the serial port:
Parameter Default Setting
Baud rate 115200
Data bits 8
Parity None
Stop bits 1
4 From the host PC, check the wireless settings.
PB50 Portable Label Printer User’s Guide 27
Page 36

Chapter 2 — Configuring the PB50
If you have an IPL version of the printer, send these
commands to the PB50:
<STX><SI>wt,SSID<ETX>
<STX><SI>wt,WEP1<ETX>
<STX><SI>wt,WEP2<ETX>
<STX><SI>wt,WEP3<ETX>
<STX><SI>wt,WEP4<ETX>
<STX><SI>wt,AUTH<ETX>
<STX><SI>wt,WPA<ETX>
<STX><SI>wt,WPA2<ETX>
<STX><SI>wt,WPA_PSK<ETX>
<STX><SI>wt,ROAM<ETX>
<STX><SI>wt,PWR_MODE<ETX>
<STX><SI>wt,CHANNEL<ETX>
<STX><SI>wt,AP_MAC<ETX>
<STX><SI>wt,SIGNAL<ETX>
<STX><SI>wt,SPEED<ETX>
<STX><SI>wt,ACTIVE<ETX>
If you have a Fingerprint version of the printer, send this
command to the PB50:
setup write “wlan”,”uart1:”
5 Set up the PB50 to use the correct SSID and authentication
modes. See one of the following procedures to configure
wireless printing on your IPL or Fingerprint printer.
6 If you are going to use certificates for validation, transfer the
certificate to the printer. The printer can accept .pfx, .pem,
and .der certificates.
7 Verify that the PB50 is connected to the access point and
make sure it has an IP address allocated to it.
Use the following sections to set most of your wireless
communication settings. For help with additional commands
and information, see either the Fingerprint Programmer’s Reference
Manual (P/N 937-005-xxx) or the IPL Programmer’s Reference
Manual (P/N 066396). You can download both documents from
the Intermec web site at www.intermec.com.
28 PB50 Portable Label Printer User’s Guide
Page 37

Chapter 2 — Configuring the PB50
Configuring Wireless Printing Using IPL
Use the following procedures to configure your PB50 with IPL
for wireless printing.
To configure the printer to use WEP authentication
1 Send the following commands to login as an admin and set
the SSID:
<STX><ESC>.s,su -p pass admin<ETX>
<STX><SI>ws,SSID, xxxxx<ETX>
Where xxxxx can be from 0 to 32 alphanumeric characters.
2 Send the following commands to configure the WEP keys.
The following example sets WEP key 1 to 1234 and enables
WEP key 1.
<STX><SI>ws,WEP1, 0x0001020304<ETX>
<STX><SI>ws,.WEP_KEY,1<ETX>
3 Send the following command to activate the settings.
<STX><SI>ws,ACTIVE,1<ETX>
To configure the printer to use WPA-PSK or WPA2-PSK mode
1 Send the following commands to login as an admin and set
the SSID:
<STX><ESC>.s,su -p pass admin<ETX>
<STX><SI>ws,SSID, xxxxx<ETX>
Where xxxxx can be from 0 to 32 alphanumeric characters.
2 Send the following commands to set up WPA-PSK or WPA2-
PSK authentication:
<STX><SI>ws,WPA,ON<ETX>
<STX><SI>ws,WPA2,ON<ETX>
<STX><SI>ws,WPA_PSK, xxxxxxxxxx<ETX>
Where xxxxxxxxxx is a value between 8 and 64 characters.
3 Send the following command to activate the settings:
<STX><SI>ws,ACTIVE,1<ETX>
To configure the PB50 to use WPA or WPA2 Enterprise mode
1 Send the following commands to login as an admin and set
the SSID:
<STX><ESC>.s,su -p pass admin<ETX>
<STX><SI>ws,SSID, xxxxx<ETX>
PB50 Portable Label Printer User’s Guide 29
Page 38

Chapter 2 — Configuring the PB50
Where xxxxx can be from 0 to 32 alphanumeric characters.
2 Send the following commands to enable WPA-802.1x or
WPA2-802.1x authentication:
<STX><SI>ws,WPA,ON<ETX>
<STX><SI>ws,WPA2,ON<ETX>
<STX><SI>ws,WPA_PSK, <ETX>
3 Send these commands to configure the EAP_TYPE:
<STX><SI>ws,EAP_TYPE,xxxx<ETX>
Where xxxx can be OFF, LEAP, PEAP, or TTLS.
<STX><SI>ws,.EAP_USER,xxxx<ETX>
<STX><SI>ws,.EAP_PASS,xxxx<ETX>
Where xxxx can be an alphanumeric value up to ??? characters.
4 If you are using TTLS, you may need to send this command
to set the TTLS outer name:
<STX><SI>ws,TTLS_USER, xxxx <ETX>
Where xxxx can be an alphanumeric value up to ??? characters.
5 If you are using certificates for validation, here are some
commands you may need to use.
• Send the following commands to set a certificate and
enable validation:
<STX><SI>ws,CA_CERT,c:/testCA.pfx@export<ETX>
<STX><SI>ws,VALIDATE,ON<ETX>
Where c:/testCA.pfx is the location and name of the
certificate and export is the passphrase.
• Send the following commands to set a common name for
server 1 and server 2:
<STX><SI>ws, .SERVER_CN1,xxxxxxxxxx <ETX>
<STX><SI>ws, .SERVER_CN2,xxxxxxxxxx <ETX>
Where xxxxxxxxxx can be a value from 0 to 64 characters.
• Send the following command to make sure your values
match those used by the access point:
<STX><SI>wt,[variable name]<ETX>
30 PB50 Portable Label Printer User’s Guide
Page 39

Chapter 2 — Configuring the PB50
All variables are returned with the exception of EAP_PASS
which always returns “****” if configured and CA_CERT
which transmits the name of the last certificate authority
successfully installed. An additional read-only variable for
the supplicant state, called STATE, is also returned.
• You may need to send the following command several
times for the wireless station to connect:
<STX><SI>ws,ACTIVE,1<ETX>
Configuring Wireless Printing Using Fingerprint
Use the following procedures to configure your PB50 with
Fingerprint for wireless printing.
To configure the printer to use WEP authentication
1 Send the following commands to login as an admin and set
the SSID:
run”su-p pass admin”
setup write “wlan”,”uart1:”
setup “wlan”,”SSID”,”xxxxx”
Where xxxxx can be from 0 to 32 alphanumeric characters.
2 Send the following commands to configure the WEP keys.
The following example sets WEP key 1 to 1234 and enables
WEP key 1.
setup “wlan”,”WEP1”,”0x0001020304”
setup “wlan”,”.WEP_KEY”,”1”
setup “wlan”,”ACTIVE”,”1”
setup write “wlan”,”uart1:”
To configure the printer to use WPA-PSK or WPA2-PSK mode
1 Send the following commands to login as an admin and set
the SSID:
run”su-p pass admin”
setup write “wlan”,”uart1:”
setup “wlan”,”SSID”,”xxxxx”
Where xxxxx can be from 0 to 32 alphanumeric characters.
2 Send the following commands to set up WPA-PSK or WPA2-
PSK authentication:
setup “wlan”,”WPA”,”ON”
setup “wlan”,”WPA2”,”ON”
setup “wlan”,”WPA_PSK”,”xxxxxxxxxx”
PB50 Portable Label Printer User’s Guide 31
Page 40

Chapter 2 — Configuring the PB50
setup “wlan”,”ACTIVE”,”1”
setup write “wlan”,”uart1:”
Where xxxxxxxxxx is a value between 8 and 64 characters.
To configure the PB50 to use WPA or WPA2 Enterprise mode
1 Send the following commands to login as an admin and set
the SSID:
run”su-p pass admin”
setup write “wlan”,”uart1:”
setup “wlan”,”SSID”,”xxxxx”
Where xxxxx can be from 0 to 32 alphanumeric characters.
2 Send the following commands to set up WPA-802.1x or
WPA2-802.1x authentication:
setup “wlan”,”WPA”,”ON”
setup “wlan”,”WPA2”,”ON”
setup “wlan”,”WPA_PSK”,””
setup write “wlan”,”uart1:”
• To view the 802.1x values, send this command:
setup write “8021x”,”uart1:”
3 Send these commands to configure the EAP_TYPE:
setup “8021x”,”EAP_TYPE”,”xxxx”
Where xxxx can be OFF, LEAP, PEAP, or TTLS.
setup “8021x”,”.EAP_USER”,”xxxx”
setup “8021x”,”EAP_PASS”,”xxxx”
Where xxxx can be an alphanumeric value up to ?? characters.
4 If you are using TTLS, you may need to send this command
to set the TTLS outer name:
setup “8021x”,”TTLS_USER”,”xxxx”
Where xxxx can be an alphanumeric value up to ??? characters.
5 If you are using certificates for validation, here are some
commands you may need to use.
• Send the following commands to set a certificate and
enable validation:
setup “8021x”,”CA_CERT”,”c:/test.pfx@export”
setup “8021x”,”VALIDATE”,”ON”
32 PB50 Portable Label Printer User’s Guide
Page 41

Where c:/test.pfx is the location and name of the certificate
and export is the passphrase.
• Send the following commands to set a common name for
server 1 and server 2:
setup “8021x”,”.SERVER_CN1”,xxxxxxxxxx <ETX>
setup “8021x”,”.SERVER_CN2,xxxxxxxxxx <ETX>
Where xxxxxxxxxx can be a value from 0 to 64 characters.
• Send the following command to make sure your values
match those used by the access point:
setup write “8021x”,”uart1:”
• You may need to send the following command several
times for the wireless station to connect:
setup “wlan”,”ACTIVE”,”1”<ETX>
Setting Up Serial Communications
You can use a serial cable (P/N 075497-001) to connect the
PB50 to a PC or a mobile computer. For the mobile computer,
you may need to purchase a serial adapter. For more information,
contact your local Intermec sales representative.
Chapter 2 — Configuring the PB50
Before you can establish a serial connection, you need to make
sure that the settings on the PC or mobile computer match those
of the PB50.
Serial Port Settings on the PB50
Parameter Default Setting
Baud rate 115200
Data bits 8
Parity None
Stop bits 1
Flow control XON_XOFF
To connect the PB50 to a PC or mobile computer
1 Connect the 8-pin circular DIN connector to the serial port
on the PB50.
PB50 Portable Label Printer User’s Guide 33
Page 42

Chapter 2 — Configuring the PB50
2 Connect the other end of the serial cable to a serial port on
the back of your PC or to a serial adapter on your mobile
computer.
Connecting the PB50 to the Serial Port of a PC
Upgrading the Firmware
The latest firmware and software is always available for download
from the Intermec web site at www.intermec.com.
Serial
cable
Serial
port
To download firmware updates
1 Go to the Intermec web site at www.intermec.com.
2 Click Support > Downloads.
3 In the Select a Product field, choose PB50 portable printer.
The latest available software displays on the page.
4 Download the latest firmware version to your computer.
Make sure you choose the correct firmware upgrade for your
IPL or Fingerprint printer.
5 Extract the .zip file to a folder on your computer.
You have options for upgrading the firmware based on whether
your PB50 has a Bluetooth radio or an 802.11 b/g radio. Use one
of the following procedures to upgrade your printer firmware.
Your printer should reboot after you finish upgrading the
firmware. If it does not reboot, you will need to cold boot the
printer. For help, see “Cold Booting the PB50” on page 43.
34 PB50 Portable Label Printer User’s Guide
Page 43

Chapter 2 — Configuring the PB50
To upgrade your printer using PrintSet
1 Download the latest version of PrintSet from the Intermec
web site at www.intermec.com.
2 Select File > Add Printer to start the Add Printer Wizard
which guides you through the process of adding your printer.
3 Select your printer under My Printers and then go to Printer
> Firmware Wizard.
The Firmware Wizard guides you through the necessary steps to
update your firmware.
To upgrade your printer using an 802.11 network connection
1 Browse to the home page of the printer. For help, see
“Changing Configuration Settings from the Printer Home
Page” on page 24.
2 From the home page, click Maintenance.
3 From the Firmware upgrade page, browse to the upgrade
firmware file.
4 Click Upgrade.
To upgrade your printer using a serial connection
1 Add Rod’s procedure here...????
Downloading Fonts and Graphics
The easiest way to download fonts and graphics is to use the free
Intermec printer application called PrintSet. You can download
PrintSet from the downloads page for the PB50 printer on the
Intermec web site at www.intermec.com.
Follow the procedures in the PrintSet online help to download
fonts and graphics.
PB50 Portable Label Printer User’s Guide 35
Page 44

Chapter 2 — Configuring the PB50
36 PB50 Portable Label Printer User’s Guide
Page 45

3
Troubleshooting and
Maintaining the PB50
PB50 Portable Label Printer User’s Guide 37
Page 46

Chapter 3 — Troubleshooting and Maintaining the PB50
Troubleshooting the PB50
You may have printer operation, print quality, or printer
communication problems at some time during the life of the
PB50 printer. It is easy to fix most of the problems and you will
find solutions in the “Printer Problems and Solutions” section of
this chapter. If you cannot find the answer to your problem, you
may need to contact Product Support.
Contacting Product Support
Before you call Intermec Product Support, you may want to visit
the Intermec technical knowledge base (Knowledge Central) at
intermec.custhelp.com to review technical information or to
request technical support. If you still need help after visiting
Knowledge Central, you may need to call Product Support.
To talk to an Intermec Product Support representative in the
U.S.A. or Canada, call:
1-800-755-5505
Outside the U.S.A. and Canada, go to www.intermec.com and
click Contact to find your local Intermec representative.
Before you call Intermec Product Support, make sure you have
the following information ready:
• Printer serial number
• Firmware type and version
• Bluetooth, wireless, or serial port settings
You can find all of the information listed above in the printer
menu system or on a test print page.
Understanding Error Messages
Use the following tables to troubleshoot some common error
message you may see display on PB50 screen. Some of the error
messages are specific to the type of firmware you have loaded on
your PB50.
38 PB50 Portable Label Printer User’s Guide
Page 47

Chapter 3 — Troubleshooting and Maintaining the PB50
Possible PB50 Error Icons and Messages
Error Icon Error Message Description
Pause The printer is paused.
Paper out The printer is out of paper. Load a
new roll of media. For help, see
“Loading Media” on page 9.
Test feed not
done
Printhead hot The printhead is overheated and
‘
Upgrading The printer is loading new firmware.
The printer did not perform a test
feed before it printed out test labels.
It is important to perform a test feed
because it calibrates the sensor. Press
the Feed button to perform a test
feed.
needs to cool down. Wait for printing
to resume automatically.
LSS too high,
LSS too low
These errors can occur when you run
a test feed without any media
installed, or if you have incorrect
media settings.
Load the printer with media (see
“Loading Media” on page 9), run
Test mode (see “Using Test Mode”
on page 19), and select the
appropriate media type.
IP configuration
error
The printer is trying to acquire an IP
address from the network. Wait for
the printer to complete the task
before taking any action.
IP link error ????
Field out of label You are attempting to print in an area
that extends beyond the print
window. See the programmer’s
reference manual for your type of
firmware (IPL or Fingerprint) for
information on how to set the media
parameters.
PB50 Portable Label Printer User’s Guide 39
Page 48

Chapter 3 — Troubleshooting and Maintaining the PB50
Troubleshooting Printer Problems and Finding Solutions
Use the following tables to troubleshoot some common problems
you may encounter with the PB50 printer.
Printer Problems and Solutions
Problem Possible Solution
The printer does not turn
on when you press
Standby.
The blue light is blinking. • Make sure media is loaded and the
The printer is not
printing with a Bluetooth
connection.
The printer is not
printing with an 802.11
wireless connection.
• Replace the battery with a charged
battery.
• Connect external power to make sure
the printer works correctly and to charge
the battery.
media cover is closed. For help, see
“Loading Media” on page 9.
• There is a printing error. The screen
displays an error message containing
information on the error.
• The printer is paused. The printer is
cancelling a print job.
• The printer is in Setup mode. Press
Setup to exit Setup mode.
• Re-establish a Bluetooth connection
with the mobile computer or scanner.
For help, see your mobile computer
user’s manual or “Setting Up Bluetooth
Communications” on page 25.
• Make sure the mobile computer can
print to a known good printer.
• Print a Bluetooth test print page to
make sure that the mobile printer
discovered your printer. For help, see
“Printing a Test Page” on page 13.
• Make sure the printer is in Ready mode.
• Check your wireless settings??
•
40 PB50 Portable Label Printer User’s Guide
Page 49

Chapter 3 — Troubleshooting and Maintaining the PB50
Printer Problems and Solutions (continued)
Problem Possible Solution
When printing, the
printer is skipping labels.
Printer keeps printing or
feeding when it should
stop.
Printout is faded or weak. • Fingerprint users: adjust the media
The battery charge is not
lasting as long as it
should.
The test pages do not
print.
Print quality it poor. • Clean the printhead. For help, see
The printout is not in the
desired position.
• Go into Test mode and run a test feed.
For help, see “Using Test Mode” on
page 19.
• Make sure the label gap sensor is clean.
For help, see “Cleaning the Printer” on
page 44.
• Check media settings.
• Make sure the label gap sensor is clean.
For help, see “Cleaning the Printer” on
page 44.
constant, factor, and contrast.
• IPL users: adjust the media sensitivity
setting.
• Check to see if the printhead needs
cleaning. For help, see “Cleaning the
Printer” on page 44.
• Check the battery date. If the battery is a
few years old, the shortened life may be
due to normal aging.
• Replace the battery.
• Make sure that the blue light is not
blinking. If it is, make sure your printer
has media and that the media cover is
closed.
• Make sure that you can advance media
by pressing the Feed button.
“Cleaning the Printer” on page 44.
• Check the battery and recharge or
replace as necessary. For help, see
“Charging the Batteries” on page 7.
• Check the quality of the media. Use
only Intermec media to ensure superior
print quality and product performance.
• Check for errors in the software
application.
• Make sure the label gap sensor and
platen roller are clean.
PB50 Portable Label Printer User’s Guide 41
Page 50

Chapter 3 — Troubleshooting and Maintaining the PB50
Troubleshooting Communication Problems
Use Dump mode to verify that the printer is receiving data from
the host correctly.
Using the Line Analyzer in Fingerprint
In Dump mode, the printer runs a Fingerprint program called
Line Analyzer. The Line Analyzer captures incoming characters
on the communication ports and prints them on one or more
labels.
The easiest way to enter Dump mode is through Test mode or
Extended Test mode. For help, see “Understanding Test Mode”
on page 19.
After the printer enters Dump mode, it tells you it has entered
Dump mode by printing it on a label. The display shows the
Dump mode icon and printer is ready to receive data.
While the printer is receiving data, the Ready-to-Work indicator
blinks (true??) After a half of a second, if no more characters have
been received, the printer times out. The program considers the
transmission terminated and prints out a label.
Printable characters are printed in black-on-white. Control
characters and space characters (ASCII 000 to 032 dec) are
printed in white-on-black.
As long as a continuous string of characters is being received, the
program wraps the lines until the label is full and then starts to
print another label. After each character transmission, the
following information prints:
• Page number
• Number of characters printed on the label
• Total number of characters received so far
When you exit Dump mode, a final label prints to inform you
that it is exiting from Dump mode.
Using Dump Mode in IPL
When you enter Dump mode, the printer captures incoming
characters on the communication ports and prints them on one
or more labels.
If you have IPL firmware on your printer, you can access Dump
mode in two different ways with slightly different results:
42 PB50 Portable Label Printer User’s Guide
Page 51

Chapter 3 — Troubleshooting and Maintaining the PB50
• You can access Dump mode through Test mode or Extended
Test mode and you will receive printouts that look exactly like
those produced with the Line Analyzer program in
Fingerprint. For more information, see the previous
procedure, “Using the Line Analyzer in Fingerprint” on
page 42.
• You can access Dump mode from the Setup menu. If you
access Dump mode this way, characters are printed on a
continuous line along with corresponding hexadecimal
numbers.
To enter Dump mode from the Setup menu
1 Press the Setup button.
2 Press until you reach Te s t / S e r v i c e .
3 Press to enter the Test/Service menu.
4 Press until you reach Data Dump and then press .
5 Press to select Yes and then press .
6 Cold boot the printer to exit Dump mode. For help, see the
next procedure, “Cold Booting the PB50.”
Cold Booting the PB50
You rarely need to cold boot the PB50 printer, unless you are
upgrading the firmware. If your printer occasionally locks up,
you will want to cold boot it.
Note: The Setup menu is not affected by a cold boot. Your
printer retains all of your configuration settings after the printer
powers back up.
To reset the PB50
1 Disconnect the PB50 from power if externally powered.
2 Remove the battery from the PB50 for at least one second.
3 Insert the battery back into the PB50.
4 Reconnect external power if your PB50 is externally powered.
A cold boot reinitializes the 802.11 radio and clears the working
memory.
PB50 Portable Label Printer User’s Guide 43
Page 52

Chapter 3 — Troubleshooting and Maintaining the PB50
Cleaning the Printer
To properly maintain your PB50, you should clean it at the
recommended intervals.
To avoid possible personal injury or damage to the printer,
never insert any pointed or sharp objects into the printer.
Use only the cleaning agents specified in this section. Intermec
is not responsible for damage caused by any other cleaning
materials used on this printer. Clean the printer with a cotton
swab saturated with alcohol.
Tear bar
Paper
sensor
Printhead
Label gap
sensor
PB50 Portable Label Printer: Identifying the parts of the PB50 to clean
regularly.
Label taken
sensor
Platen
roller
44 PB50 Portable Label Printer User’s Guide
Page 53

Chapter 3 — Troubleshooting and Maintaining the PB50
Cleaning the PB50 Printer
Printer Part Cleaning Method Cleaning Interval
Printhead Use 70% isopropyl alcohol on a
cotton swab to clean the print
elements from end to end.
Platen roller Rotate the platen roller and
clean it thoroughly with 70%
isopropyl alcohol on a cotton
swab.
Paper sensors Clean thoroughly with 70%
isopropyl alcohol and a cotton
swab.
Tea r b ar Clean thoroughly with 70%
isopropyl alcohol and a cotton
swab.
Exterior Clean with a water-dampened
cloth.
Interior Brush or air blow. Make sure
the paper sensor is free of dust.
After every five rolls
of media or more
often if necessary.
After every five rolls
of media or more
often if necessary.
After every five rolls
of media or more
often if necessary.
As needed.
As needed.
After every five rolls
of media or more
often if necessary.
PB50 Portable Label Printer User’s Guide 45
Page 54

Chapter 3 — Troubleshooting and Maintaining the PB50
46 PB50 Portable Label Printer User’s Guide
Page 55

A
Specifications
PB50 Portable Label Printer User’s Guide 47
Page 56

Chapter A — Specifications
Specifications
Physical Dimensions
Depth 78.7 mm (3.1 in)
Height 174.5 mm (6.9 in)
Width 159.5 mm (6.3 in)
Weight 1190 g (2 lb)
Power Specifications
AC power adapter voltage 100 to 240V
Printer voltage 100V to 240V and 50 Hz to 60 Hz
Operating power Rechargeable 16.8 V 2200 mAh lithium-
Temperature and Humidity Specifications
Operating temperature -15°C to 50°C (5°F to 122°F)
Non-operating temperature 0°C to 45°C (32°F to 113°F)???
Relative humidity 0 to 95% non-condensing
ion battery
Media Specifications
Core inside diameter, standard 19 mm (0.75in)
Core inside diameter, with adapter 10.2 mm (0.4 in)
Maximum roll outside diameter 67.3 mm (2.65 in)
Media width, label with liner/receipt 49mm (1.9 in) to 111.5 mm (4.4 in)
Media length, label 25.4 mm (1.0 in) to 609.6 mm (24 in)
Media length, receipt Continuous
Media caliper, label with liner/receipt 0.05 mm (0.002 in) to 0.165 mm (0.0065 in)
Media caliper, tag 0.15 mm (0.006 in)
Gap length (centered on perforation) 3.17 mm (0.125 in) to 12.7 mm (0.50 in)
Notch length (centered on perforation) 6.35 mm (0.25 in)
Notch width (centered on perforation) 12.7 mm (0.50 in)
Black mark length (centered on perforation) 3.17 mm (0.125 in) to 12.7 mm (0.50 in)
Black mark width (centered on media width) 12.7 mm (0.50 in) to full width of media
48 PB50 Portable Label Printer User’s Guide
Page 57

Chapter A — Specifications
Receipt roll stock media is supplied as a continuous roll. Label,
tag, and fanfold media use repeat indicators for non-continuous
media. Gap, notch, and black marks are used as repeat indicators:
• Gap: Label and fanfold media
• Notch: Tag me di a
• Black mark: Label, tag, and fanfold media
Here are a few things to keep in mind when ordering media for
the PB50 printer:
• Black marks can be sensed on either side of the media.
• You can use higher caliper media in the printer, but print
quality will be reduced.
• Receipt roll stock media has an end of roll indicator. The end
of roll indicator is a red marking (on last 3 feet of roll) on the
thermally sensitive side of the paper.
External Fanfold Media Specifications
Stack height 70 mm (2.75 in)
Page length 152 mm (6 in) to 305 mm (12 in)
Note: The stack height is for a 6-inch page length supplied in 12inch stacks (two 6-inch stacks of equal height with the bottom
page linked).
Specialty media is required for unique customer environments,
including printer operating temperature extremes. Intermec
recommends that you test the media in your application.
Supported Media
The PB50 printer supports direct thermal label, tag, and receipt
media. Both North American and European label media are
supported in multiple label lengths. Receipt media is supported
in both a top coated and an uncoated paper in continuous roll
stock only.
The default media sensitivity number is: 180.
PB50 Portable Label Printer User’s Guide 49
Page 58

Chapter A — Specifications
Use the following table as a guide when setting sensitivity
numbers.
Sensitivity Media Description
180 Duratherm II Label
180 Duratherm III Label
101 Duratherm 2.3 mil Uncoated Receipt
401 Duratherm 3.3 mil Coated Receipt
720 Duratherm Lightning Plus
150 Duratherm II 5 mil Tag
180 Duratherm Near IR
430 Duratherm Synthetic
450 Duratherm Lightning IR
470 Duratherm Lightning
103 Linerless
102 Duratherm 2.3 mil Uncoated Receipt
440 Thermal Eco
140 Thermal Topcoated
Accessories for the PB50
You can use these accessories (sold and ordered separately) with
the PB50 printer. To order accessories, contact your local
Intermec sales representative.
AB13 Battery
Use the lithium-ion 2200 mAh battery to provide power to the
printer.
AC18 4-Bay Battery Charger
Use the AC18 to charge up to four batteries at a time. The
battery charger is designed to sense when a battery is fully
charged and not overcharge it, ensuring long and consistent
battery life.
AV8 Vehicle Dock
Use the vehicle dock to attach the PB50 to a truck.
Belt Clip (
Use the PB50 belt clip to attach the printer to your belt.
50 PB50 Portable Label Printer User’s Guide
Page 59

Chapter A — Specifications
Handstrap
Use the PB42 and PB50 handstrap to conveniently carry your
PB50 printer. With the handstrap attached, you can also attach
the shoulder strap.
Power Supply (Model AE19)
Provides power to the PB50 and the 4-bay battery charger
(Model AC18).
Serial Cable
The serial adapter is an 8-pin DIN to DB9 connector that
connects from the PB50 printer to your desktop PC.
Shoulder Strap
Use the shoulder strap in combination with the handstrap to
easily carry the PB50 printer. The wide padded strap makes it
comfortable to wear the printer for long periods of time.
PB50 Portable Label Printer User’s Guide 51
Page 60

Chapter A — Specifications
52 PB50 Portable Label Printer User’s Guide
Page 61

B
IPL and Fingerprint Setup
Menus
PB50 Portable Label Printer User’s Guide 53
Page 62

CONTRAST
ORIENTATION
BACKLIGHT
SER-COM
SETUP
BAUDRATE
DATA BITS PARITY STOPBITS PROTOCOL
MEDIA
TEST LABELS
CONFIG
FORMAT
UDC
PAG E
FONT
NETWORK
IP SELECTION
IP ADDRESS NETMASK
DEFAULT
ROUTER
NAME SERVER
MAC ADDRESS
TEST/SERVICE
TEST PRINT
DATA DUMP MEMORY RESET
LSS TEST
BATTERY
LOW BATTERY
DISPLAY
MEDIA TYPE PAPER TYPE
TESTFEED
MODE
LBL LENGTH
DOTS
SENSITIVITY
DARKNESS
LBL REST POINT
FORM ADJ DOTSXFORM ADJ DOTS
Y
CONFIGURATION
PWRUP
EMULATION
PRINT SPEED
LTS
CALIBRATION
Chapter B — IPL and Fingerprint Setup Menus
IPL Setup Menu
54 PB50 Portable Label Printer User’s Guide
Page 63

Fingerprint Setup Menu
SETUP
SER-COM
Chapter B — IPL and Fingerprint Setup Menus
BAUDRATE
NET-COM NET 1
NEW LINE
NETWORK
IP SELECTION
FEEDADJ
START ADJ STOP ADJ
MEDIA
MEDIA SIZE MEDIA TYPE
PRINT DEFS
CHAR LENGTH PARITY STOPBITS FLOWCONTROL
IP ADDRESS NETMASK
XSTART
WIDTH
LENGTH
LABELS
(w GAPS)
PAP ER TY PE
DIRECT
THERMAL
CONTRAST
LABEL
LABEL
FAC TO R
DEFAULT
ROUTER
RTS/CTS
ENQ/ACK
XON/XOFF
DATA TO HOST
DATA FROM
NAME SERVER
CONTRAST TESTFEED
NEW LINE REC BUF
HOST
MAC ADDRESS SSID
TESTFEED
MODE
LEN (SLOW
MODE)
TRANS BUF
HEAD RESIST TEST PRINT PRINT SPEED
BATTERY
LOW BATTERY
DISPLAY
ORIENTATION
CONTRAST
BACKLIGHT
LSS TEST CLIP DEFAULT
LESS AUTO
LSS MANUAL
LTS
LTS VAL UE
LTS ADJUST
LTS TEST
PB50 Portable Label Printer User’s Guide 55
Page 64

Chapter B — IPL and Fingerprint Setup Menus
56 PB50 Portable Label Printer User’s Guide
Page 65

Worldwide Headquarters
6001 36th Avenue West
Everett, Washington 98203
U.S.A.
tel 425.348.2600
fax 425.355.9551
www.intermec.com
PB50 Portable Label Printer User’s Guide
*934-012-001*
P/N 934-012-001
Page 66

Important WUBB-151GB Radio Information!
Note: You need to read this information only if your Intermec product contains the WUBB-151GB 802.11b/g radio.
For Users in the United States and Canada
This device complies with Part 15 of the FCC rules and with RSS-210 of Industry Canada. Operation is subject to the following two
conditions: (1) This device may not cause harmful interference, and (2) This device must accept any interference received, including
interference that can cause undesired operation.
Changes or modifications not expressly approved by Intermec could void the user’s authority to operate this equipment.
For Users Outside of the United States and Canada
Intermec Technologies Corporation declares that this module is in compliance with the essential requirements and other relevant provisions
of R&TTE Directive (1999/5/EC).
The transmitter module’s output power is ??? mW or less. The products using this module are intended for business and industrial
environments. They should not be used in residential environments and by children.
This product is marked with this logo and uses radio frequency bands that are not harmonized throughout the
European Community.
The following table indicates the areas of intended use of the equipment and any known restrictions.
Country of
Intended Use
Austria X
Belgium X
Cyprus X
Czech Republic X
Denmark X
Estonia X
Finland X
France X X Outdoor frequency operation restricted to 10 mW in 2454 to 2483.5 MHz
Germany X
Greece X
Hungary X
Ireland X
Italy X
Latvia X
Lithuania X
Luxembourg X
Malta X
The Netherlands X
Poland X
Portugal X
Slovakia X
Slovenia X
Spain X
Sweden X
Ye s No
License
Required
Restrictions Details
band.
Page 67

Country of
Intended Use
United Kingdom X
Other non-EU:
Iceland X
Liechtenstein X
Norway X
Switzerland X
Ye s No
License
Required
Restrictions Details
美国和加拿大以外的用户请注意:
Intermec Technologies Corporation 声明,此模块符合 R&TTE 指令 (1999/5/EC) 的基本要求和其它相关规定。
发射模块的输出功率为 100mW 或以下。使用此模块的产品计划用于商业和工业环境。不能在住宅环境
中或由儿童使用。
本产品上标有此徽标,并在整个欧盟范围内使用不同的无线电波频段。
下表列出了计划使用该设备的地区以及任何已知限制。
计划使用该设备的国家 是 否 需要的许可证 限制 详细信息
法国 XX
户外频率操作限制在 2446.5 MHz 到
2483.5 MHz 之间
Pour les utilisateurs en dehors du Canada et des Etats-unis
Intermec Technologies Corporation déclare que ce module est conforme aux exigences de base et autres exigences pertinentes de la Directive
R&TTE (1999/5/EC).
La puissance de sortie du module émetteur-récepteur est de 100 mW ou moins. Les produits utilisant ce module sont destinés à des
environnements commerciaux et industriels. Ils ne doivent pas être utilisés dans des environnements résidentiels et par des enfants.
Ce produit porte ce logo et utilise des bandes RF qui ne sont pas harmonisées à travers l’Union Européenne.
Le tableau suivant répertorie les zones d’utilisation prévues pour l’équipement et les restrictions connues.
License
Pays d’utilisation prévu Oui Non
France X X L’opération extérieure de fréquence est limitée à une valeur variant
requise
Restrictions Détails
entre 2 446,5 MHz et 2 483,5 MHz.
Für Benutzer außerhalb der USA und Kanada
Intermec Technologies Corporation erklärt hiermit, dass dieses Modul die wesentlichen Anforderungen und anderen relevanten
Bestimmungen der R&TTE-Direktive (1999/5/EC) erfüllt.
Die Ausgangsleistung des Sendermoduls beträgt maximal 100 mW. Die Produkte, in denen dieses Modul verwendet wird, sind für
gewerbliche und industrielle Umgebungen vorgesehen. Sie dürfen nicht in Wohngebieten und nicht von Kindern benutzt werden.
Dieses Produkt wird mit diesem Logo vertrieben und verwendet Funkfrequenzbänder, die in der Europäischen
Gemeinschaft nicht harmonisiert sind.
Page 68

Die folgende Tabelle führt die vorgesehenen Einsatzbereiche der Ausrüstung sowie bekannte Einschränkungen an.
Vorgesehen zur
Verwendung in diesem Land
Frankreich X X Frequenzbereich für Verwendung im
Ja Nein
Lizenz
obligatorisch
Einschränkungen Einzelheiten
Freien eingeschränkt auf 2446,5 MHz bis
2483,5 MHz.
미국 및 캐나다 이외의 거주자의 경우
Intermec Technologies Corporation 은 이 모듈이 R&TTE Directive (1999/5/EC) 필수 조건 및 기타 관련 규정을 준수함
을 보증합니다 .
송신기 모듈의 출력 전력은 100mW 이하입니다 . 이 모듈을 사용하는 제품은 업무 및 산업용으로 설계되
었습니다 . 이 제품을 가정용으로 사용하거나 어린이가 사용해서는 절대 안됩니다 .
이 제품에는 이 로고가 부착되어 있으며 고주파 대역을 사용하므로 EU ( 유럽 공동체 )
의 경우 사용이 적합하지 않습니다 .
아래 표에 이 장비의 용도 및 알려진 규정 사항이 표시되어 있습니다 .
장비 사용 국가 예 아니오 필요 라이센스 규정 사항 상세 정보
프랑스 XX
외부에서 사용 시 주파수 범위는
2446.5MHz 에서 2483.5MHz 사이로 사용이
제한되어 있습니다 .
Para usuários que residem fora dos Estados Unidos e do Canadá
A Intermec Technologies Corporation declara que este módulo está em conformidade com os requisitos essenciais e outras disposições
relevantes da Diretiva R&TTE (1999/5/EC).
A potência produzida pelo módulo transmissor é de 100 mW ou menos. Os produtos que usam este módulo foram projetados para
ambientes comerciais e industriais e não devem ser usados em ambientes residenciais, nem por crianças.
Este produto é identificado por este logotipo e usa faixas de radiofreqüência não harmonizadas em toda a
Comunidade Européia.
A tabela a seguir identifica as áreas às quais o equipamento destina-se para uso e todas as restrições conhecidas.
Licença
País destinado para uso Sim Não
França X X Freqüência de operação ao ar livre restrita à faixa de 2446,5
requerida
Restrições Detalhes
MHz a 2483,5 MHz.
Для пользователей вне Соединенных Штатов или Канады
Intermec Technologies Corporation заявляет, что данный модуль отвечает основным требованиям и другим существенным
положениям директивы R&TTE (1999/5/EC).
Выходная мощность передатчика не превышает 100 мВт. Продукты, в которых используется этот модуль, предназначены для
условий бизнеса и промышленных условий. Они не должны использоваться в жилых районах и не предназначаются для детей.
Этот продукт маркирован данным логотипом и использует диапазоны радиочастот, не гармонизированные
на территории Европейского Сообщества.
В следующей таблице приведены области предполагаемого применения
Страна предполагаемого
использования
Франция
Да Нет
XX
Требуется
лицензия
Ограничения Подробности
оборудования и все известные ограничения.
Работа вне помещений ограничена диапазоном
частот 2446,5 МГц – 2483,5 МГц.
Page 69

Para usuarios fuera de los Estados Unidos y Canadá
Intermec Technologies Corporation declara que este módulo está conforme a los requisitos esenciales y otras disposiciones pertinentes de la
Directriz R&TTE (1999/5/EC).
La potencia de salida del módulo transmisor es de 100mW o menor. Los productos que usan este módulo están destinados a entornos
comerciales e industriales. No deben utilizarse en entornos residenciales ni quedar en manos de niños.
Este producto está marcado con este logotipo y utiliza bandas de radiofrecuencia no armonizadas en toda la
Comunidad Europea.
La tabla siguiente indica las áreas de uso a las cuales se destina el equipo y toda restricción conocida.
Se requiere
País donde se intenta usar Si No
Francia X X La operación de frecuencias en exteriores está restringida
licencia
Restricciones Detalles
entre 2446.5 MHz y 2483.5 MHz.
Worldwide Headquarters
6001 36th Avenue West
Everett, Washington 98203
U.S.A.
tel 425.348.2600
fax 425.355.9551
www.intermec.com
2006 Intermec Technologies
©
Corporation. All rights reserved.
Important WUBB-151 GB Radio Information!
*933-110-001*
P/N 933-110-001
Page 70

PB50 Compliance Insert
For Users in the United States and Canada
Caution: This marking indicates that the user should read all included documentation before use.
Attention: Ce marquage indique que l’usager doit, avant l’utilisation, lire toute la documentation incluse.
Caution: For use with Intermec battery pack Model AB13 only. For power supply, use Intermec Model 073573 or AE19.
No user-serviceable parts.
Attention: Pour utilisation seulement avec bloc-batterie Intermec modèle AB13. Pour l’alimentation, utilisez le modèle
Intermec 073573 ou AE19. Il ne contient aucune pièce réparable par l’utilisateur.
The users of this product are cautioned to use accessories and peripherals approved by Intermec Technologies Corporation. The use of
accessories other than those recommended, or changes to this product that are not approved by Intermec Technologies Corporation, may
void the compliance of this product and may result in the loss of the user’s authority to operate the equipment.
FCC Digital Emissions Compliance
This equipment has been tested and found to comply with the limits for a Class B digital device, pursuant to Part 15 of the FCC Rules.
These limits are designed to provide reasonable protection against harmful interference in a residential installation. This equipment
generates uses and can radiate radio frequency energy and, if not installed and used in accordance with the instructions, may cause harmful
interference to radio communications. However, there is no guarantee that interference will not occur in a particular installation. If this
equipment does cause harmful interference to radio or television reception, which can be determined by turning the equipment off and on,
the user is encouraged to try to correct the interference by one or more of the following measures:
• Reorient or relocate the radio or television receiving antenna.
• Increase the separation between the computer equipment and receiver.
• Connect the equipment into an outlet on a circuit different from that to which the radio or television receiver is connected.
• Consult the dealer or an experienced radio television technician for help.
Canadian Digital Apparatus Compliance
This Class B digital apparatus meets all requirements of the Canadian Interference-Causing Equipment Regulations.
Conformité aux normes canadiennes sur les appareils numériques
Cet appareil numérique de la classe B respecte toutes les exigences du Réglement sur le matériel brouilleur du Canada.
Battery Information
Caution: The battery pack used in this device may ignite, create a chemical burn hazard, explode, or release toxic
materials if mistreated. Do not incinerate, disassemble, or heat above 100
AC18. Do not short circuit; may cause burns. Keep away from children.
Use only Intermec battery pack Model AB13. Use of incorrect battery pack may present risk of fire or explosion. Promptly
dispose of used battery pack according to the instructions.
Attention: Le bloc-piles utilisé dans cet appareil peut prendre feu, constituer un risque de brûlure chimique, exploser ou
dégager des substances toxiques s’il est manipulé de façon inappropriée. Ne pas jeter au feu, démonter ou chauffer à plus
de 100 °C (212 °F). Rechargez uniquement avec le chargeur Intermec modèle AC18. Ne pas court-circuiter; cela pourrait
causer des brûlures. Garder hors de la portée des enfants.
N’utiliser que le modèle de bloc-piles Intermec AB13. L’utilisation d’un mauvais bloc-piles pourrait constituer un risque
d’incendie ou d’explosion. Mettre rapidement au rebut tout bloc-piles usé, conformément aux instructions.
°C (212°F). Charge only with Intermec Model
Page 71

Battery Recycling Information
This product contains or uses a lithium-ion (Li-ion) main battery. When the battery reaches the end of its useful life, the
spent battery should be disposed of by a qualified recycler or hazardous materials handler. Do not mix this battery with the
Li-ionLi-ion
Note: In the U.S.A., the EPA does not consider spent Li-ion batteries as hazardous waste.
solid waste stream. Contact your Intermec Technologies Service Center for recycling or disposal information.
Ce produit contient ou utilise une pile principale au lithium-ion (Li-ion). Lorsque la batterie atteint la fin de sa durée de
vie utile, la batterie usées doivent être mises aux rebuts par un agent de recyclage ou un manipulateur de matériaux
dangereux agréé. Il ne faut pas mélanger la batterie aux autres déchets solides. Pour plus d’informations sur le recyclage ou
la mise aux rebuts, contacter votre centre de services Intermec Technologies.
Battery Chargers
Caution: For use with Intermec battery pack Model AB13 only. For power supply, use Intermec Model 073573 or AE19.
No user-serviceable parts.
Attention: Pour utilisation seulement avec bloc-batterie Intermec modèle AB13. Pour l’alimentation, utilisez le modèle
Intermec 073573 ou AE19. Il ne contient aucune pièce réparable par l’utilisateur.
Vehicle Docks
Caution: For use with Intermec Model PB50 and battery pack Model AB13 only. For power supply, use Intermec Model
073573 or AE19. No user-serviceable parts.
Attention: Add translation here.
Caution: For continued protection against risk of fire, replace only with same type and ratings of fuse.
Attention: Pour une protection continue contre les risques d’incendies, remplacez seulement avec des fusibles du même
type et du même calibre.
Specific Absorption Rate (SAR)
Radio Wave Exposure and Specific Absorption Rate (SAR) Information for Model BSM-RN41 Configurations with Bluetooth Radio
The FCC permits a maximum SAR value of 1.6 W/kg. For body worn operation, the highest SAR value for the Model PB50, as tested by
(enter test lab here), is (enter value here).
This product has been tested and meets the FCC RF exposure guidelines when used with the Intermec accessories supplied or designated for
this product. Use of other accessories may not ensure compliance with FCC RF exposure guidelines.
For Users Outside of the United States or Canada
Caution: This marking indicates that the user should read all included documentation before use.
Caution: For use with Intermec battery pack Model AB13 only. For power supply, use Intermec Model 073573 or AE19.
No user-serviceable parts.
Users of this product are cautioned to use accessories and peripherals approved by Intermec Technologies Corporation. The use of accessories
other than those recommended, or changes to this product that are not approved by Intermec Technologies Corporation, may void the
compliance of this product and may result in the loss of the user’s authority to operate the equipment.
CE Marking: Refer to the Declaration of Conformity for a list of the EU Directives and Standards that this product complies with.
Battery Information
Caution: The battery pack used in this device may ignite, create a chemical burn hazard, explode, or release toxic
materials if mistreated. Do not incinerate, disassemble, or heat above 100
AC18. Do not short circuit; may cause burns. Keep away from children.
Use only Intermec battery pack Model AB13. Use of incorrect battery pack may present risk of fire or explosion. Promptly
dispose of used battery pack according to the instructions.
°C (212°F). Charge only with Intermec Model
Battery Recycling Information
This product contains or uses a lithium-ion (Li-ion) main battery. When the battery reaches the end of its useful life, the
spent battery should be disposed of by a qualified recycler or hazardous materials handler. Do not mix this battery with the
Li-ionLi-ion
solid waste stream. Contact your Intermec Technologies Service Center for recycling or disposal information.
Page 72

Battery Chargers
Caution: For use with Intermec battery pack Model AB13 only. For power supply, use Intermec Model 073573 or AE19.
No user-serviceable parts.
Vehicle Docks
Caution: For use with Intermec Model PB50 and battery pack Model AB13 only. For power supply, use Intermec Model
073573 or AE19. No user-serviceable parts.
Caution: For continued protection against risk of fire, replace only with same type and ratings of fuse.
对于美国或加拿大以外的用户
警告 : 该标志表明,用户应在使用前通读所有随附的文档。
警告:仅供与 Intermec AB13 型电池组配合使用。请使用 Intermec 073573 或 AE19 型电源。没有可供用户维修的零部件。
敬告本产品的用户,请务必使用 Intermec Technologies Corporation 许可的附件和外围设备。如果使用推荐附件之外的其它附件,或
未经 Intermec Technologies Corporation 许可而擅自改装本产品,都可能会使本产品的符合性无效,并可能会导致用户失去操作本设
备的权利。
CE 标记:请参考 “符合性声明”来了解该产品遵守的一揽子 EU 指令和标准。
电池信息
警告:该装置中所使用的电池包可能着火、造成化学燃烧危险、爆炸,而且如果处理不当会释放有毒物质。 请勿烧毁、分解
电池,或者加热到 100 鸆 C (212 鸉 F) 以上。 只能使用 Intermec AC18 型充电器充电。请勿使电池短路,以免引起火灾。
请不要让儿童接触到电池。
仅供使用的 Intermec 电池包型号是 AB13。使用电池包错误可能引起火灾或爆炸。请根据说明及时处理用过的电池包。
电池循环利用
Li-ionLi-ion
电池充电器
警告:仅供与 Intermec AB13 型电池组配合使用。请使用 Intermec 073573 或 AE19 型电源。没有可供用户维修的零部件。
车载底座
注意:仅限与 Intermec PB50 型和 AB13 型电池配套使用。 请使用 Intermec 073573 或 AE19 型电源。 无用户可维修的部
件。
注意:为长期防止火灾的发生,请仅使用相同类型和额定值的保险丝进行更换。
本产品包含或使用锂离子 (Li-ion) 主电池。电池达到使用寿命后,请交由合格的回收者或危险材料处理者进行处理。
请勿将使用后的电池混同其他固体废弃物处理。请联系 Intermec 技术服务中心了解有关回收或处理的信息。
Für Benutzer außerhalb von Kanada oder den Vereinigten Staaten
Vorsicht: Diese Kennzeichnung weist darauf hin, dass der Benutzer vor dem Gebrauch alle mitgelieferten Unterlagen
lesen soll.
Page 73

Vorsicht: Nur zur Verwendung mit dem Intermec-Akkusatz, Modell AB13. Als Netzteil Intermec Modell 073573 oder
AE19 verwenden. Enthält keine Teile, die vom Benutzer gewartet werden können.
Die Benutzer dieses Produkts werden darauf hingewiesen, nur Zubehörteile und Peripheriegeräte zu verwenden, die von Intermec
Technologies Corporation genehmigt sind. Falls nicht empfohlene Zubehörteile verwendet oder an diesem Produkt Änderungen
vorgenommen werden, die nicht von Intermec Technologies Corporation genehmigt sind, kann dadurch die behördliche Konformität des
Produkts verletzt werden und der Benutzer die Berechtigung zur Verwendung des Geräts verlieren.
CE-Kennzeichnung: Die Konformitätserklärung enthält eine Liste der EU-Richtlinien und Normen, denen das Produkt entspricht.
Akku-Informationen
Vorsicht: Der in diesem Gerät verwendete Akkusatz kann sich bei Missbrauch entzünden, chemische Verätzungen
verursachen, expoldieren oder toxische Substanzen freisetzen. Nicht verbrennen, zerlegen oder über 100°C (212 °F)
erwärmen. Nur mit Intermec Modell AC18 aufladen. Keinen Kurzschluss verursachen; Verbrennungsgefahr. Von Kindern
fern halten.
Nur Intermec Akkusatz-Modell AB13 verwenden. Wenn ein falscher Akkusatz verwendet wird, besteht Brand- oder
Explosionsgefahr. Den verbrauchten Akkusatz sofort gemäß Anweisungen entsorgen.
Informationen zum Recycling von Batterien
Dieses Produkt enthält oder verwendet einen Lithiumionen-Hauptakku. Wenn die Batterie ausgedient hat, sollte sie durch
einen qualifizierten Recycler oder durch den Sondermüll entsorgt werden. Werfen Sie die Batterie nicht in den Abfall.
Li-ionLi-ion
Setzen Sie sich mit Ihrem Intermec Technologies Service-Zentrum in Verbindung, um weitere Informationen zum
Recycling oder Entsorgen zu erhalten.
Akkuladegeräte
Vorsicht: Nur zur Verwendung mit dem Intermec-Akkusatz, Modell AB13. Als Netzteil Intermec Modell 073573 oder
AE19 verwenden. Enthält keine Teile, die vom Benutzer gewartet werden können.
Fahrzeug-Andockstationen
Vorsicht: Nur zur Verwendung mit dem Intermec Modell PB50 und Akkusatz, Modell AB13. Als Netzteil Intermec Modell
073573 oder AE19 verwenden. Enthält keine Teile, die vom Benutzer gewartet werden können.
Vorsicht: Für fortwährenden Schutz gegen Brand nur durch eine Sicherung gleichen Typs und Nennwertes ersetzen.
미국 및 캐나다 이외의 거주자의 경우
주의 : 이 표시는 제품 사용 전에 모든 설명서 내용을 읽어야 한다는 것을 나타냅니다 .
주의 : 인터멕 건전지 AB13 모델과 함께만 사용 . 전원 공급은 Intermec 073573 또는 AE19 모델을 사용하십시오 . 사용자
조작 사용 부품 아님 .
Intermec Technologies Corporation 에서 승인한 부속품 및 주변 기기를 사용하는 본 제품의 사용자는 주의를 기울여야 합니다 . 권장
되지 않은 부속품을 사용하거나 Intermec Technologies Corporation 의 승인 없이 본 제품을 변경할 경우 , 본 제품의 보증이 무효화되
거나 장비 조작에 대한 사용자의 권한이 박탈될 수 있습니다 .
유럽인증마크 (CE Marking): 이 제품이 준수하는 EU 지침 및 표준 목록에 대한 적합성 선언을 참조하십시오 .
배터리 정보
T 주의 : 이 장치에 사용된 배터리 팩은 잘못 다룰 경우 불이 붙거나 화학 반응을 일으키거나 폭발하거나 또는 유독 물질이
흘러나올 수 있습니다 . 배터리를 불에 태우거나 분해하거나 100°C (212°F) 이상의 열을 가하지 마십시오 . Intermec AC18
모델로만 충전하십시오 . 배터리를 단락시키지 마십시오 . 화재가 발생할 수 있습니다 . 어린이 손이 닿지 않는 곳에 보관하
십시오 .
Intermec 배터리 팩 AB13 모델만 사용하십시오 . 그 외 배터리 팩을 사용할 경우 화재나 폭발 위험이 있습니다 . 다 쓴 배터
리 팩은 지침에 따라 올바르게 폐기하십시오 .
Page 74

배터리 재활용 정보
이 제품은 리튬 이온 배터리를 내장 또는 사용하고 있습니다 . 배터리의 수명이 다한 경우 , 다 쓴 배터리는 반드시 공
인된 폐기 업체나 위험 물질 처리 작업장을 통해 안전하게 폐기하십시오 . 이 배터리는 다른 쓰레기와 함께 처리할 수
Li-ionLi-ion
없습니다 . 재활용이나 폐기에 대한 기타 자세한 사항은 Intermec 기술 서비스 센터에 문의하십시오 .
배터리 충전기
주의 : 인터멕 건전지 AB13 모델과 함께만 사용 . 전원 공급은 Intermec 073573 또는 AE19 모델을 사용하십시오 . 사용자
조작 사용 부품 아님 .
차량 독
주의 : Intermec 모델 PB50 및 배터리 팩 모델 AB13 만 사용하십시오 . 전원 공급은 Intermec 모델 073573 또는 AE19 를 사
용하십시오 . 사용자 서비스 가능한 부품이 없습니다 .
주의 : 화재의 위험으로부터 향후 지속적으로 예방하려면 동일한 유형 및 정격의 퓨즈로만 교체하십시오 .
Para usuários fora do Canadá ou dos Estados Unidos
Cuidado: Esta identificação indica que o usuário deve ler toda a documentação fornecida antes do uso.
Cuidado: Para uso apenas com a bateria modelo AB13 da Intermec. Use o modelo 073573 ou AE19 da Intermec como
fonte de alimentação. Este equipamento não contém peças que possam ser reparadas pelo usuário.
Se advierte a los usuarios de este producto que usen accesorios y periféricos aprobados por Intermec Technologies Corporation. El uso de
accesorios aparte de los recomendados, o los cambios a este producto que no estén aprobados por Intermec Technologies Corporation,
pueden anular el cumplimiento de este producto y ocasionar la pérdida de la autorización del usuario para operar el equipo.
Marcas CE: Consulte na Declaração de Conformidade a lista de Diretivas e Normas da União Européia com as quais este produto está em
conformidade.
Informações sobre a bateria
Cuidado: A bateria utilizada neste dispositivo pode pegar fogo, criar risco de queimadura química, explodir ou exalar
materiais tóxicos se abusada. Não incinerar, desmontar nem aquecer a bateria a mais de 100°C (212°F). Carregar apenas
com o modelo de carregador AC18 da Intermec. Não provocar curto-circuito, pois pode causar queimaduras. Manter
afastada de crianças.
Apenas a bateria da Intermec modelo AB13. O uso de uma bateria incorreta pode gerar risco de incêndio ou explosão.
Descartar imediatamente as baterias usadas segundo as instruções fornecidas.
Infomações de Reciclagem de Bateria
Este produto contém ou usa uma bateria principal de íon de lítio (Li-ion). Quando a bateria chega ao fim da sua vida útil,
deve ser descartada por um profissional de reciclagem qualificado ou por um especialista no manuseio de materiais
Li-ionLi-ion
perigosos. Não misture a bateria com fluxo de lixo sólido. Entre em contato com seu Centro de Serviços de Tecnologia
Intermec para informações de reciclagem ou descarte.
Corregadores de baterias
Cuidado: Para uso apenas com a bateria modelo AB13 da Intermec. Use o modelo 073573 ou AE19 da Intermec como
fonte de alimentação. Este equipamento não contém peças que possam ser reparadas pelo usuário.
Acopladores para veículos
Cuidado: Para uso apenas com o modelo PB50 e a bateria modelo AB13 da Intermec. Use o modelo 073573 ou AE19 da
Intermec como fonte de alimentação. Este equipamento não contém peças que possam ser reparadas pelo usuário.
Page 75

Cuidado: Para desfrutar de proteção contínua contra risco de incêndio, trocar apenas por fusível do mesmo tipo e mesmas
especificações elétricas.
Для пользователей вне Соединенных Штатов или Канады
Осторожно: Эта пометка означает, что пользователь должен прочитать всю прилагаемую документацию,
прежде чем начинать работу.
Осторожно: Для использования только с батарейным источником питания модели Intermec AB13. В качестве
блока питания используйте Intermec модели 073573 или AE19. Детали, обслуживаемые пользователем,
отсутствуют.
Пользователи этого продукта предупреждаются, что они должны использовать принадлежности и периферийные устройства,
утвержденные Intermec Technologies Corporation. Использование принадлежностей, не являющихся рекомендованными, или
внесение в этот продукт изменений, не утвержденных Intermec Technologies Corporation, может сделать продукт не
соответствующим требованиям и привести к утрате пользователем права работать с данным оборудованием.
Маркировка CE: Список директив и стандартов ЕС, которым соответствует
Информация по батареек
Осторожно: При неправильном обращении батарейный источник питания, используемый в этом устройстве,
может воспламениться, создать опасность химического ожога, взорваться или выделять ядовитые
материалы. Не сжигайте, не разбирайте, не допускайте нагрева выше 100°C (212 °F). Для зарядки используйте
только устройство Intermec модели AC18. Не замыкайте контакты накоротко – это может причинить ожог.
Прячьте от детей.
Используйте только батарейный источник
батарейного источника питания сопряжено с опасностью возгорания или взрыва. Незамедлительно
ликвидируйте использованный батарейный источник питания в соответствии с инструкциями.
питания Intermec модели AB13. Использование неподходящего
данный продукт, см. в Декларации соответствия.
Информация по утилизации батареек
В данном изделии содержится или используется литиево-ионная (Li-ion) батарейка. Ликвидацию
использованной батарейки, исчерпавшей свой ресурс, должно осуществлять специализированное
предприятие по утилизации или обращению с опасными материалами. Эта батарейка ни в коем случае не
Li-ionLi-ion
должна попасть в обычные твердые отходы. По вопросам утилизации или ликвидации обращайтесь в
соответствующий сервис-центр компании Intermec Technologies.
Зарядные устройства
Для использования только с батарейным источником питания модели Intermec AB13. В качестве блока
питания используйте Intermec модели 073573 или AE19. Детали, обслуживаемые пользователем,
отсутствуют.
Автомобильные стойки
Осторожно: для использования только с Intermec Model PB50 и батарейным источником питания Intermec
AB13. В качестве блока питания используйте Intermec 073573 или AE19. Детали, обслуживаемые
пользователем, отсутствуют.
Осторожно: Для постоянной защиты от риска пожара заменяйте только плавкой вставкой того же типа и
номинала.
Para usuarios fuera de Canada o de los Estados Unidos
Precaución: Esta marca indica que el usuario debe leer toda la documentación incluida antes del uso.
Precaución: Para usarse solamente con la batería Intermec Modelo AB13. Para la fuente de alimentación, use el Modelo
073573 o AE19 de Intermec. No hay piezas a las cuales pueda dar servicio el usuario.
Os usuários deste produto devem usar acessórios e periféricos aprovados pela Intermec Technologies Corporation. Usar acessórios não
recomendados, ou fazer alterações neste produto não aprovadas pela Intermec Technologies Corporation, poderá anular a conformidade
deste produto e resultar na perda da permissão do usuário de utilizar o equipamento.
Page 76

Marcas de la CE: Remítase a la Declaración de Conformidad para ver una lista de las Directrices y Estándares de la UE con los cuales cumple
este producto.
Información de la batería
Precaución: La batería que se usa en este dispositivo puede encenderse, crear un peligro de quemadura química, explotar o
expedir materiales tóxicos si se trata indebidamente. No la incinere, desarme ni caliente sobre 100°C (212°F). Cargue
solamente con el Modelo AC18 de Intermec. No haga cortocircuitos porque pueden causar quemaduras. Manténgala
alejada de los niños.
Use sólo la batería Intermec modelo AB13. El uso de la batería incorrecta puede presentar peligro de incendio o de
explosión. Descarte rápidamente la batería usada según las instrucciones.
Información acerca del reciclaje de la batería
Este producto contiene o usa una batería principal de iones de litio (Li-ion). Cuando la batería llega al final de su vida útil,
debe ser desechada por personal especializado en reciclaje de materiales o manejo de materiales peligrosos. No mezcle la
Li-ionLi-ion
batería con otros residuos sólidos. Pónganse en contacto con su Centro de servicio de Intermec Technologies para obtener
información sobre reciclaje o desecho de materiales.
Cargadores de batería
Caution: Para usarse solamente con la batería Intermec Modelo AB13. Para la fuente de alimentación, use el Modelo
073573 o AE19 de Intermec. No hay piezas a las cuales pueda dar servicio el usuario.
Acopladores para vehículos
Precaución: Para usarse solamente con el Modelo PB50 y la batería Modelo AB13. Para la fuente de alimentación, use el
Modelo 073573 o AE19 de Intermec. No hay piezas a las cuales pueda dar servicio el usuario.
Precaución: Para continuar la protección contra el peligro de incendio, cambie sólo por el mismo tipo y capacidad
nominal de fusible.
Page 77

Worldwide Headquarters
6001 36th Avenue West
Everett, Washington 98203
U.S.A.
tel 425.348.2600
fax 425.355.9551
www.intermec.com
2007 Intermec Technologies
©
Corporation. All rights reserved.
PB50 Compliance Insert
*933-108-001*
P/N 933-108-001
 Loading...