

Page 1

Page 2

Wireless-G CompactFlash Card
Table of Contents
Chapter 1: Introduction 1
Welcome 1
What’s in this Guide? 1
Chapter 2: Getting to Know the Wireless-G CompactFlash Card 3
The Front Panel 3
Chapter 3: Setting Up the PDA 5
Overview 5
Setup Wizard 5
Chapter 4: Installing the CompactFlash Card 8
Overview 8
Installing the Card 8
Chapter 5: Connecting to a Wireless Network 10
Overview 10
Connect to a Wireless Network 10
Chapter 6: Configuring the Wireless-G CompactFlash Card with the Wireless Network Monitor16
Overview 16
Wireless Network Monitor 16
Page 3

Wireless-G CompactFlash Card
List of Figures
Figure 2-1: Front Panel 3
Figure 3-1: PDA to PC Installation 5
Figure 3-2: Welcome 5
Figure 3-3: License Agreement 5
Figure 3-4: Click Yes 6
Figure 3-5: Application Being Installed 6
Figure 3-6: Mobile Device 7
Figure 3-7: Congratulations 7
Figure 4-1: Successful Installation 8
Figure 4-2: CompactFlash Installation into PDA 8
Figure 4-3: Start Screen 9
Figure 4-4: Wireless Network Monitor Icon 9
Figure 5-1: Wireless Network Monitor Icon 10
Figure 5-2: Status Screen 10
Figure 5-3: Configure Wireless Networks 11
Figure 5-4: Settings 11
Figure 5-5: Configure Network Authentication 12
Figure 5-6: PDA Connected 12
Figure 5-7: Configure Wireless Networks 13
Figure 5-8: Add/Edit Configuration 13
Figure 5-9: SSID 14
Figure 5-10: Wireless Security (WEP) 14
Figure 5-11: Power Management 15
Figure 5-12: Select Profile 15
Figure 6-1: Wireless Network Monitor Icon 16
Figure 6-2: Status Screen 16
Figure 6-3: Version Information Screen 17
Figure 6-4: Wireless Advanced Screen 17
Page 4

Wireless-G CompactFlash Card
•This equipment has been tested and found to comply with the limits for a Class B digital device, pursuant to Part 15 of the FCC Rules. These limits are designed to
provide reasonable protection against harmful interference in a residential installation. This equipment generates, uses and can radiate radio frequency energy and,
if not installed and used in accordance with the instructions, may cause harmful interference to radio communications. However, there is no guarantee that
interference will not occur in a particular installation. If this equipment does cause harmful interference to radio or television reception, which can be determined by
turning the equipment off and on, the user is encouraged to try to correct the interference by one of the following measures:
•
•-•Reorient or relocate the receiving antenna.
•-•Increase the separation between the equipment and receiver.
•-•Connect the equipment into an outlet on a circuit different from that
•to which the receiver is connected.
•-•Consult the dealer or an experienced radio/TV technician for help.
•
•This device complies with Part 15 of the FCC Rules. Operation is subject to the following two conditions: (1) This device may not cause harmful interference, and (2)
this device must accept any interference received, including interference that may cause undesired operation.
•
•FCC Caution: Any changes or modifications not expressly approved by the party responsible for compliance could void the user's authority to operate this
equipment.
•
•IMPORTANT NOTE:
•FCC Radiation Exposure Statement:
•This equipment complies with FCC radiation exposure limits set forth for an uncontrolled environment. This equipment should be installed and operated with
minimum distance 20cm between the radiator & your body.
•This transmitter must not be co-located or operating in conjunction with any other antenna or transmitter.
Intermec declared that WM600-AF is limited in CH1~11 by specified firmware controlled in USA.
FCC Statement
IC Statement
"Operation is subject to the following two conditions: (1) this device may not cause interference, and (2) this device must accept any interference, including
interference that may cause undesired operation of the device."
"To prevent radio interference to the licensed service, this device is intended to be operated indoors and away from windows to provide maximum shielding.
Equipment (or its transmit antenna) that is installed outdoors is subject to licensing."
Figure 6-5: Network Troubleshooting Screen 18
Figure 6-6: More Information Screen 18
Figure 6-7: Repair Screen 18
Figure 6-8: Contact Screen 19
Figure 6-9: Site Survey Screen 19
Figure 6-10: Link Test Screen 20
Page 5

Wireless-G CompactFlash Card
Chapter 1: Introduction
Welcome
Thank you for choosing the Wireless-G CompactFlash Card.
The Wireless-G CompactFlash Card installs directly into your Pocket PC using a CompactFlash Type II slot. The
user-friendly software makes it a snap to set up, and you’re ready to share data, printers, or high-speed Internet
access over your existing wireless network at speeds up to 54Mbps. It's also compatible with Wireless-B
(802.11b) wireless networks.
Use the Wireless CompactFlash Card to connect your PDA to wireless networks at the office , at home, or in any of
the growing number of public wireless hotspot venues springing up in coffee shops, airport lounges, hotels and
convention centers.
Use the instructions in this Guide to help you connect the CompactFlash Card, set it up, and configure it to
communicate with your PDA and PC. These instructions should be all you need to get the most out of the
CompactFlash Card.
What’s in this Guide?
This user guide covers the steps for setting up and using the Dual-Band Wireless A+G Notebook Adapter.
• Chapter 1: Introduction
This chapter describes the Adapter’s applications and this User Guide.
• Chapter 2: Getting to Know the Wireless-G CompactFlash Card
This chapter describes the physical features of the Adapter.
• Chapter 3: Setting Up the PDA
This chapter instructs you on how to use the Card’s Setup Wizard.
• Chapter 4: Installing the CompactFlash Card
This chapter shows you how to install CompactFlash Card into your PDA.
• Chapter 5: Connecting to a Wireless Network
This chapter shows you how to connect the CompactFlash Card to a wireless network.
Chapter 1: Introduction
Welcome
1
Page 6
Wireless-G CompactFlash Card
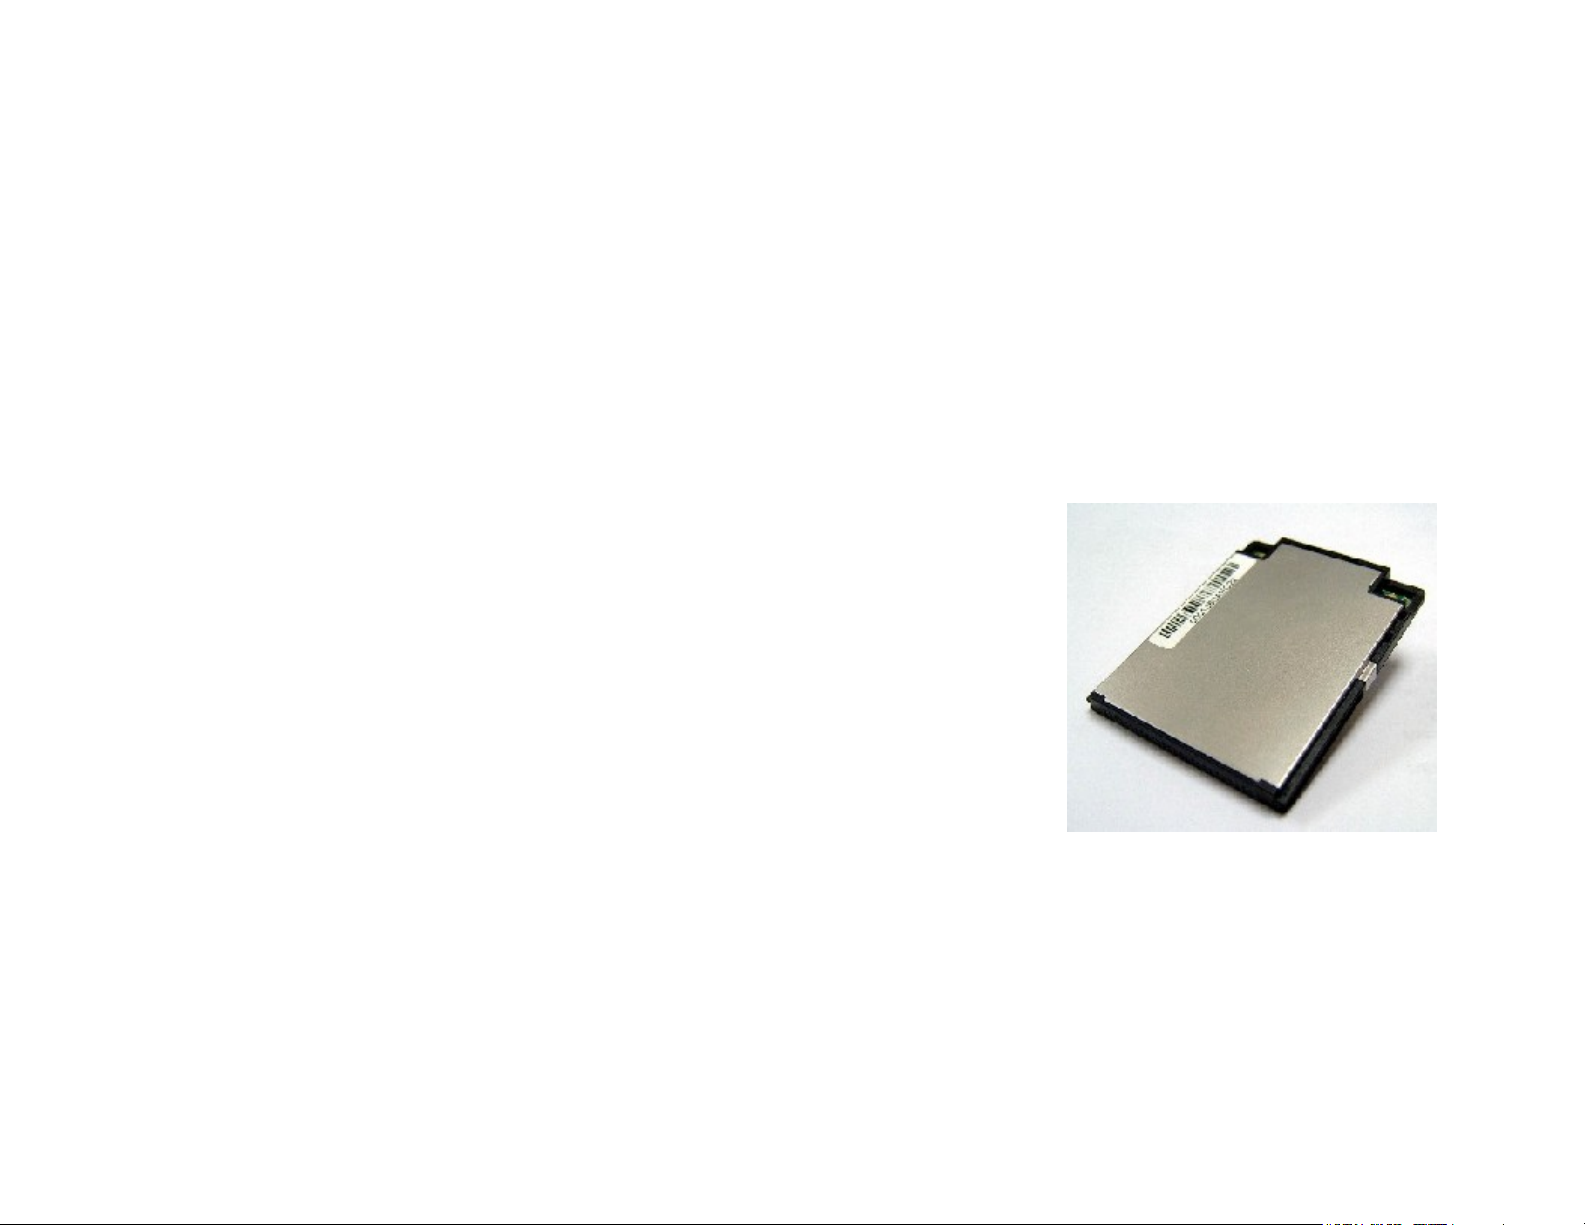
Chapter 2: Getting to Know the Wireless-G CompactFlash Card
The Front Panel
The CompactFlash Card's LEDs, where information about network activity is displayed, are located on the front
panel.
Power Green. The Power LED lights up when the CompactFlash Card is powered on.
Link Green. If the Link LED is flickering, the CompactFlash Card is actively sending or receiving
data to or from one of the devices on the network.
With these, and many other, Intermec products, your networking options are limitless. Go to the Intermec w ebsite at
wwwW.. Intermec.co
Chapter 2: Getting to Know the Wireless-G CompactFlash Card
The Front Panel
m for more information about products that work with the CompactFlash Card.
Figure 2-1: Front Panel
3
Page 7
Wireless-G CompactFlash Card
Chapter 3: Setting Up the PDA
Overview
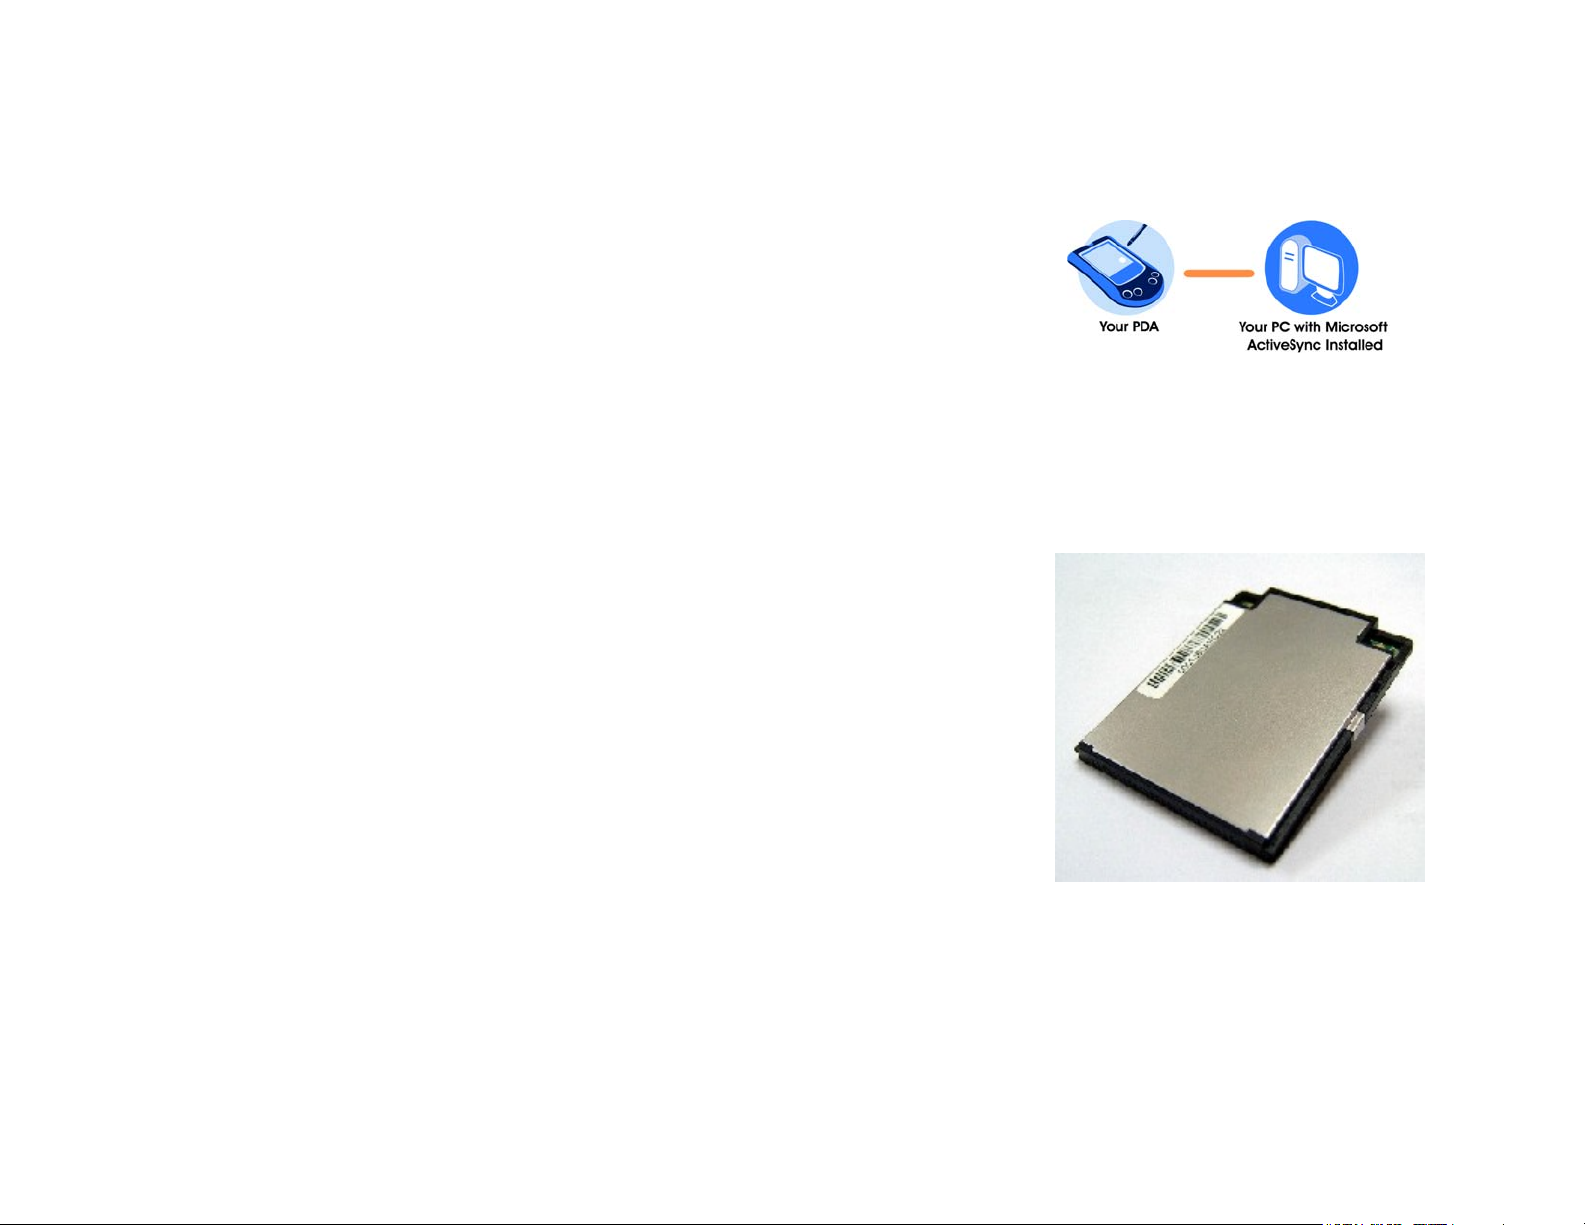
This Setup Wizard will take you through all the steps necessary to install the Card’s software on your PC so it can
communicate with the PDA. The role of this module is a mobile device. It should not operate within 20 cm human body.
Connect your PDA to your PC. Make sure you have the Microsoft ActiveSync software installed on your PC. Refer
to your PDA’s documentation for information on Microsoft ActiveSync software. The module is mainly for industrial devices.
Setup Wizard
1. Insert the Setup Wizard CD into your PC's CD-ROM drive.
Figure 3-1: PDA to PC Installation
2. The Setup Wizard's Welcome screen should appear on your monitor. (If it does not, the autorun is not
functioning. Start the Setup Wizard manually by clicking the Start button, selecting Run, and typing
d:\setup.exe (where "D" is your PC's CD-ROM drive)).
Click the Install button to continue this Setup Wizard. Clicking the User Guide button opened this Guide. To
exit this Setup Wizard, click the Exit button.
3. The following screen displays the License Agreement. Read the agreement, then if you agree, click Next to
continue.
Click Cancel to return to the previous screen.
Chapter 3: Setting Up the PDA
Overview
Figure 3-2: Welcome
Figure 3-3: License Agreement
5
Page 8

Wireless-G CompactFlash Card
4. When asked if you want to install the Intermec Wireless-G CompactFlash Card using the default application
install directory, click Yes to continue.
Click Cancel or No to return to the previous screen.
Figure 3-4: Click Yes
5. A screen will appear to show that the application is being installed. Do not
Chapter 3: Setting Up the PDA
Setup Wizard
cancel.
Figure 3-5: Application Being Installed
6
Page 9

Wireless-G CompactFlash Card
6. When asked to check your mobile device screen to see if additional steps are necessary to complete this
installation, click OK.
7. The Congratulations screen will appear when the installation is complete. Click Exit to exit the Setup Wizard.
Figure 3-6: Mobile Device
Chapter 3: Setting Up the PDA
Setup Wizard
Figure 3-7: Congratulations
7
Page 10
Wireless-G CompactFlash Card
Chapter 4: Installing the CompactFlash Card
Overview
This chapter explains the steps to install the CompactFlash Card. Make sure that you have installed the Setup
Wizard software before installing the Card.
IMPORTANT: Make sure that the Setup Wizard software is
installed before installing the Card.
Installing the Card
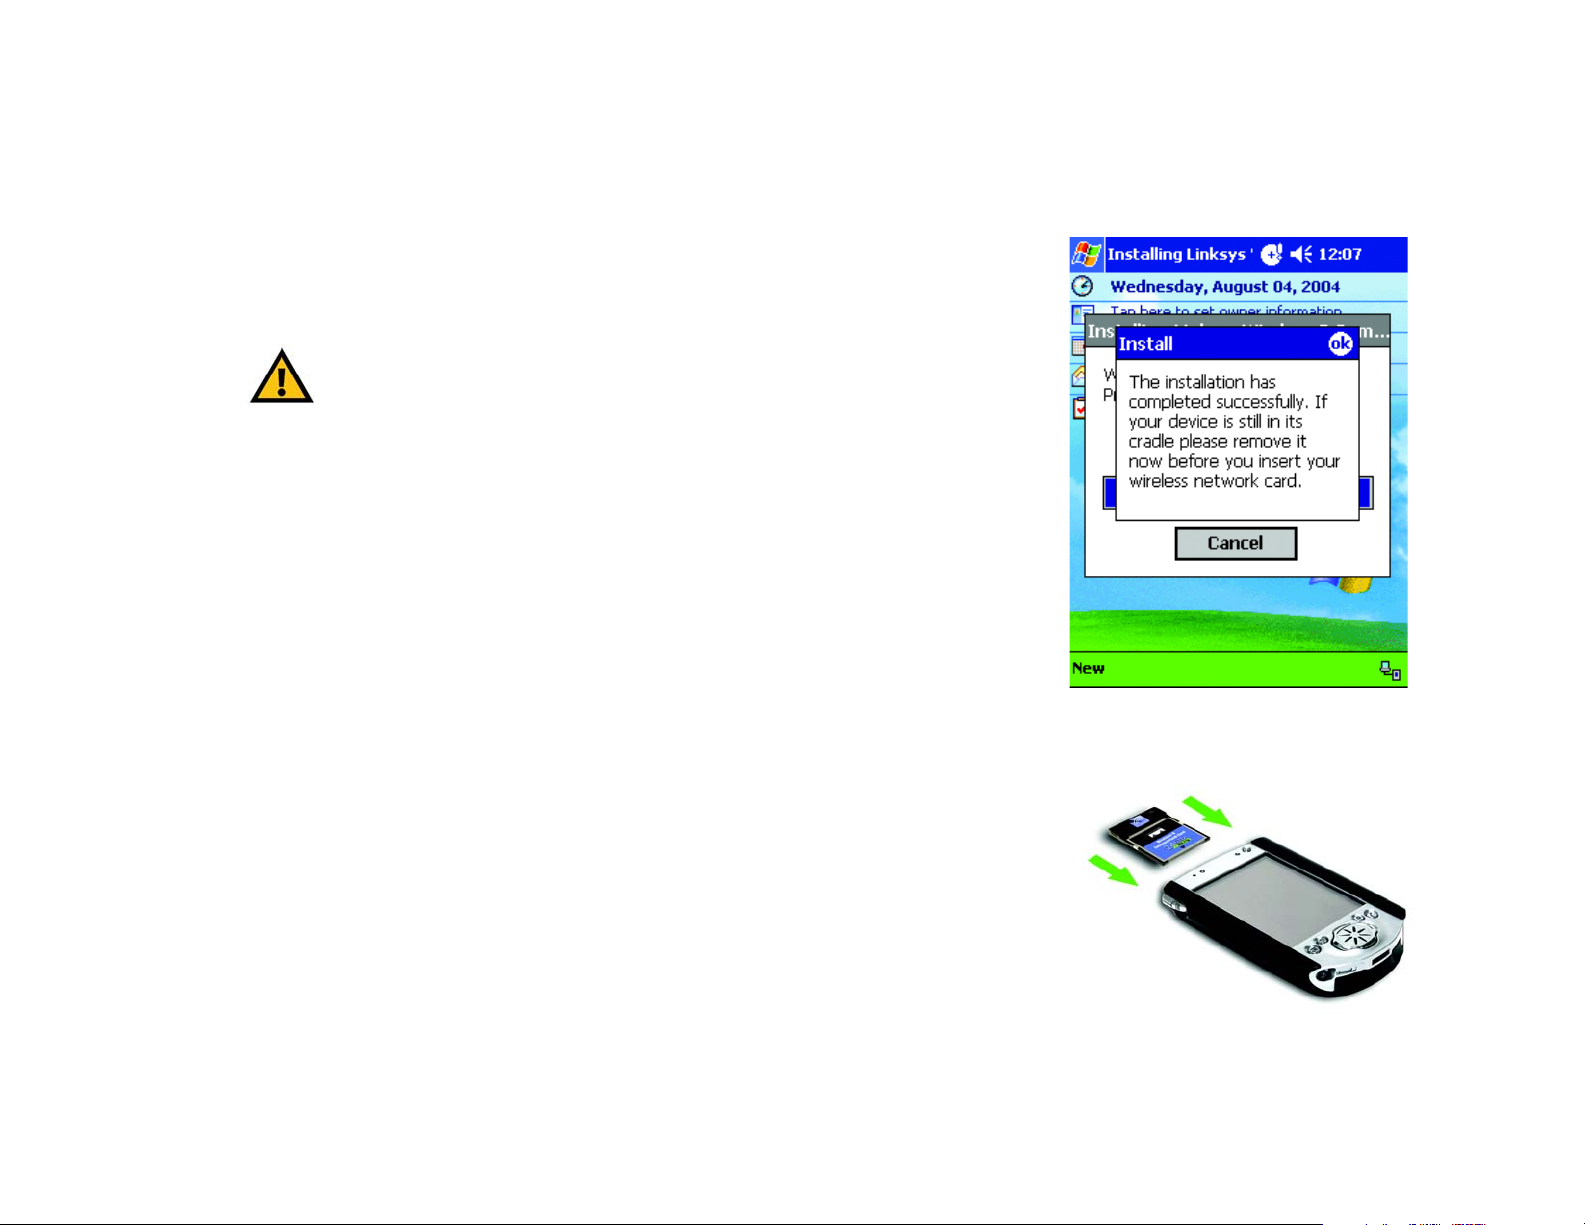
1. After installing the Setup Wizard software, the Installation has completed successfully screen will appear on
your PDA. Click OK.
2. Disconnect the PDA from your PC.
3. Insert the Wireless CompactFlash Card into your PDA.
Chapter 4: Installing the CompactFlash Card
Overview
Figure 4-1: Successful Installation
Figure 4-2: CompactFlash Installation into PDA
8
Page 11

Wireless-G CompactFlash Card
4. The Start screen in will appear for Pocket PC 2002 users. The default setting is Use server-assigned IP
address. In most cases, you should keep the default setting. However, if you are using fixed IP addresses on
your wireless network, then click the radio button next to Use specific IP address, and complete the IP
address, Subnet mask, and Default gateway fields. Click the OK button to close the screen.
Figure 4-3: Start Screen
5. The Wireless Network Monitor icon will appear on the desktop of your PDA.
Chapter 4: Installing the CompactFlash Card
Installing the Card
Figure 4-4: Wireless Network Monitor Icon
9
Page 12
Wireless-G CompactFlash Card
Chapter 5: Connecting to a Wireless Network
Overview
This chapter explains how to connect your PDA to a wireless network.
Connect to a Wireless Network
1. On your PDA’s desktop, click the Wireless Network Monitor icon at the bottom of the desktop.
2. The Status screen will appear. Click Configure Wireless Networks near the bottom of the screen.
3. Continue to the section for the Pocket PC operating system that your PDA uses.
Chapter 5: Connecting to a Wireless Network
Overview
Figure 5-2: Status Screen
10
Page 13
Wireless-G CompactFlash Card
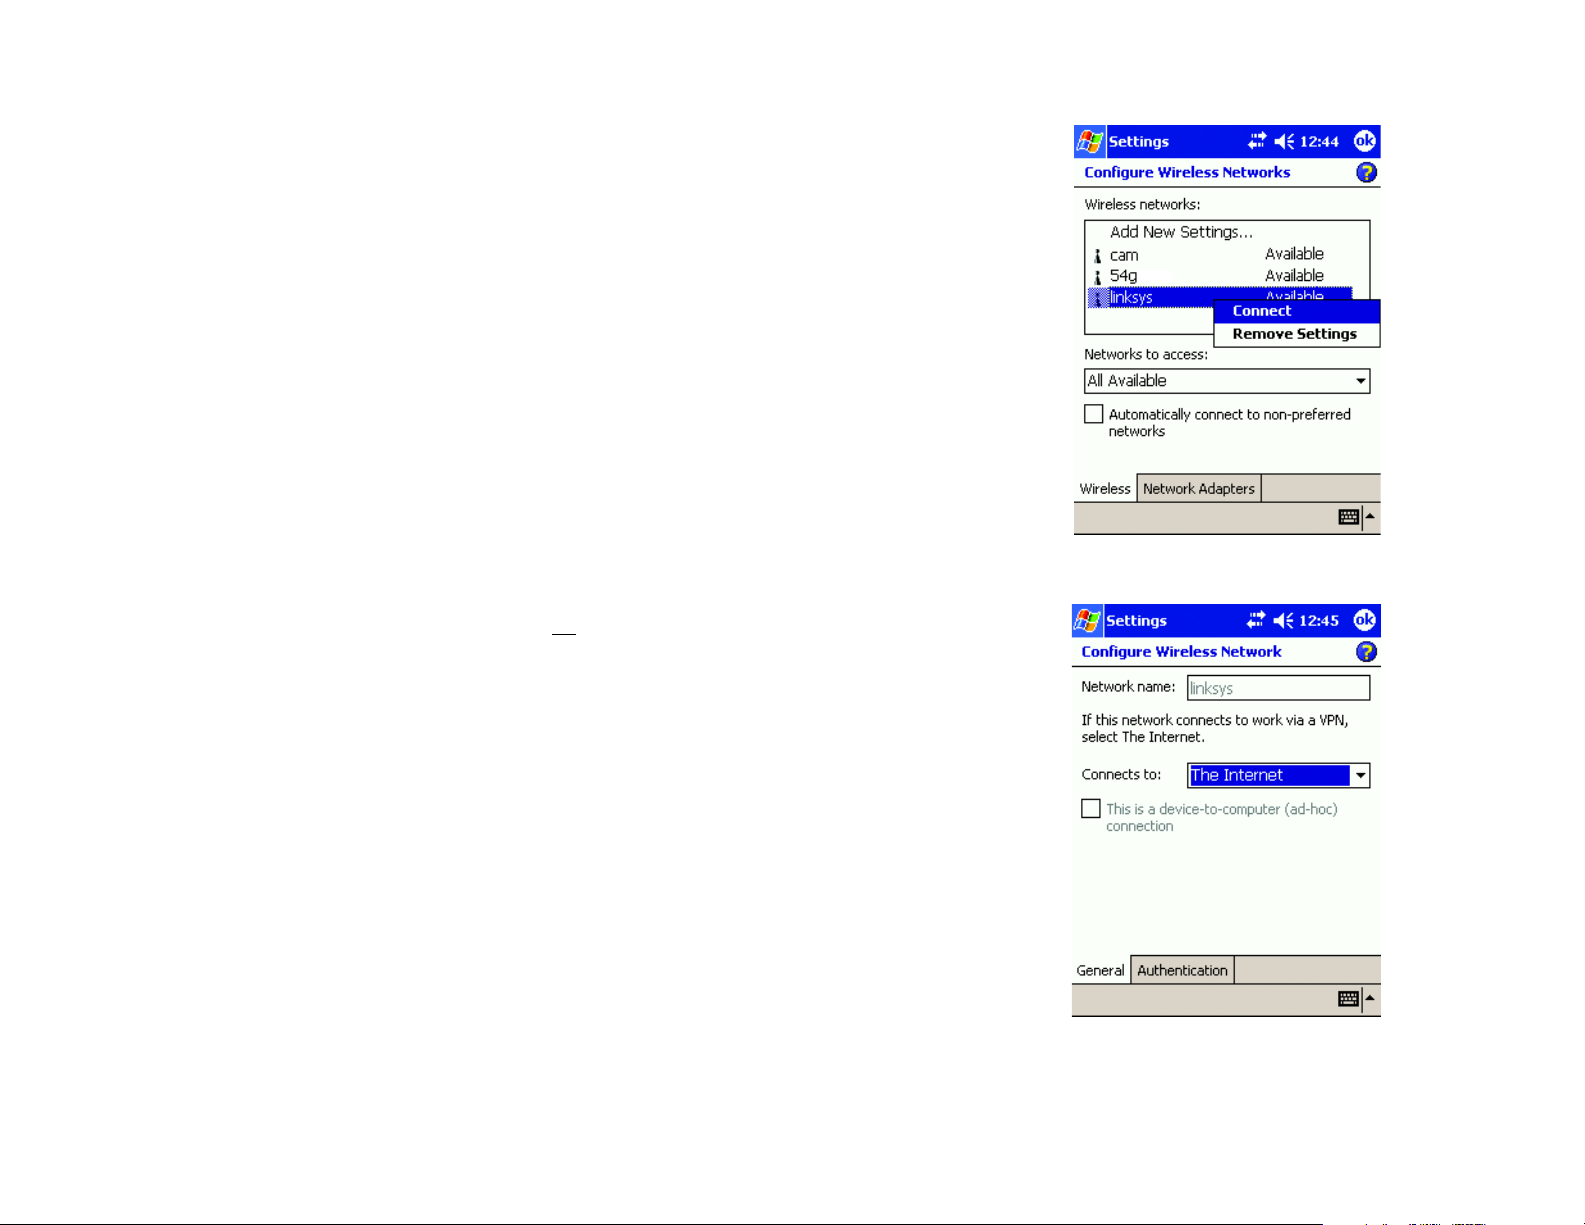
Pocket PC 2003
1. Select your wireless network from the list and click Connect.
Figure 5-3: Configure Wireless Networks
2. On the Settings screen, if your wireless network does not
have Wireless Security-WEP, click OK, then go to
step D.
If your wireless network has Wireless Security-WEP, click Authentication.
Chapter 5: Connecting to a Wireless Network
Connect to a Wireless Network
Figure 5-4: Settings
11
Page 14

Wireless-G CompactFlash Card
3. When the Configure Network Authentication screen appears, Check the box for Data encryption (WEP
Enabled) and uncheck the box for The Key is provided for me automatically. Enter the Network key in the
field and click OK.
4. The next screen will show that the PDA is connected to the wireless network. Click OK.
Figure 5-5: Configure Network Authentication
The installation of the Wireless-G CompactFlash Card is complete.
Chapter 5: Connecting to a Wireless Network
Connect to a Wireless Network
Figure 5-6: PDA Connected
12
Page 15

Wireless-G CompactFlash Card
Pocket PC 2002
1. When the Configure Wireless Networks screen appears, select the Default profile and click Edit.
2. On the Add/Edit Configuration screen, select Access Point from the drop-down menu for Wireless Mode.
Click Next.
Figure 5-7: Configure Wireless Networks
Chapter 5: Connecting to a Wireless Network
Connect to a Wireless Network
Figure 5-8: Add/Edit Configuration
13
Page 16

Wireless-G CompactFlash Card
3. On the next screen, enter the name of your wireless network in the SSID field. You can click Scan to search
for an existing wireless network name. Click Next.
Figure 5-9: SSID
4. If your wireless network has Wireless Security-WEP, check Wireless Security (WEP). Then select Use
Hexadecimal (0-9, A-F) and enter the WEP key in a Key field. Click Next.
Chapter 5: Connecting to a Wireless Network
Connect to a Wireless Network
Figure 5-10: Wireless Security (WEP)
14
Page 17

Wireless-G CompactFlash Card
5. Power Management is a power saving mode. To enable Power Managem ent, select On. To disable Power
Management, select Off. Then, click Finish.
Figure 5-11: Power Management
6. You will return to the Select Profile screen. Click OK.
The installation of the Wireless-G CompactFlash Card is complete.
Chapter 5: Connecting to a Wireless Network
Connect to a Wireless Network
Figure 5-12: Select Profile
15
Page 18

Wireless-G CompactFlash Card
Chapter 6: Configuring the Wireless-G CompactFlash Card with the Wireless Network Monitor
Overview
the CompactFlash Card can be configured with the Wireless Network Monitor. This chapter explains how to
configure the CompactFlash Card in this manner.
On your PDA’s desktop, click the Wireless Network Monitor icon at the bottom of the screen.
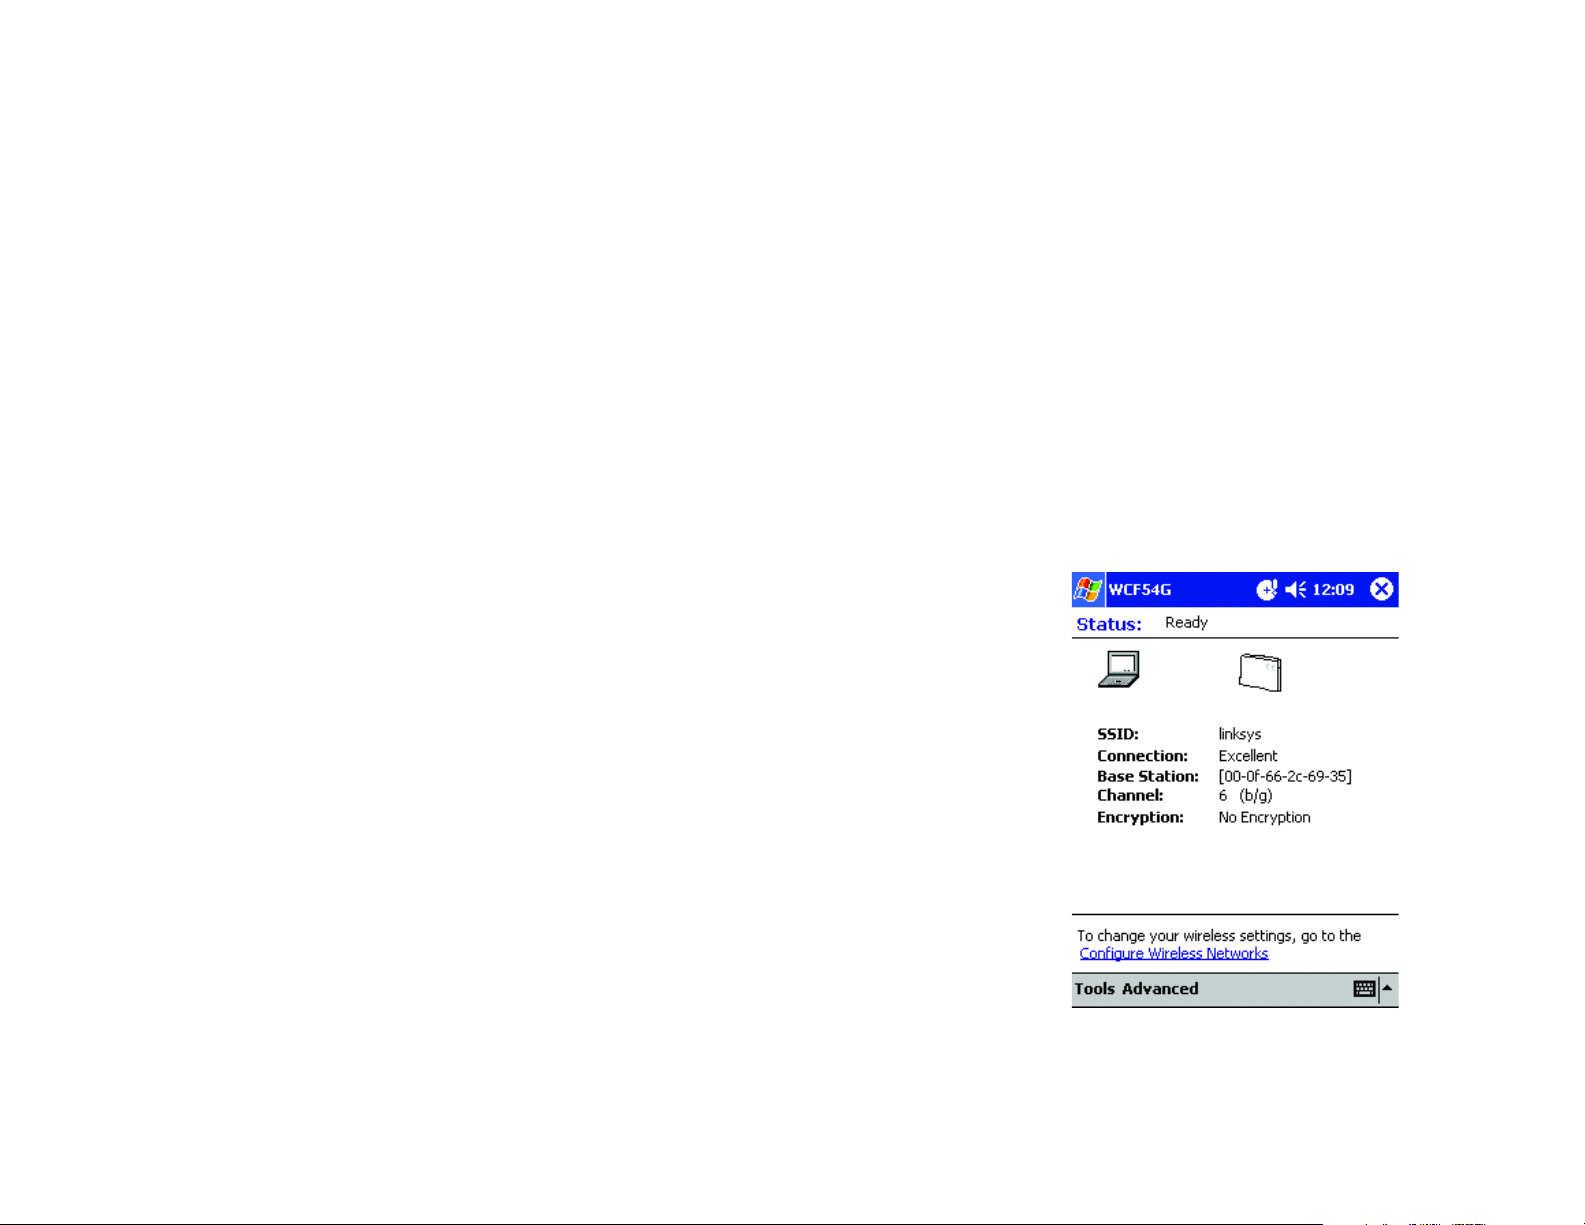
Wireless Network Monitor
The Status screen appears first. It displays the status of your wireless connection, the SSID, the strength of the
connection, the base station, the channel, and the encryption.
Two menu options are available: Tools and Advanced. The options are described below.
Tools
There are many tools available for your use. They are described below.
Exit. Select Exit to exit the Wireless Network Monitor.
Turn Radio. Select Turn Radio Off to disable the wireless connection. Select Turn Radio On to enable the
wireless connection.
Power Management. Power Management is a power saving mode. Select On to enable Power Management.
Select Off to disable Power Management.
Chapter 6: Configuring the Wireless-G CompactFlash Card with the Wireless Network Monitor
Overview
Figure 6-2: Status Screen
16
Page 19
Wireless-G CompactFlash Card
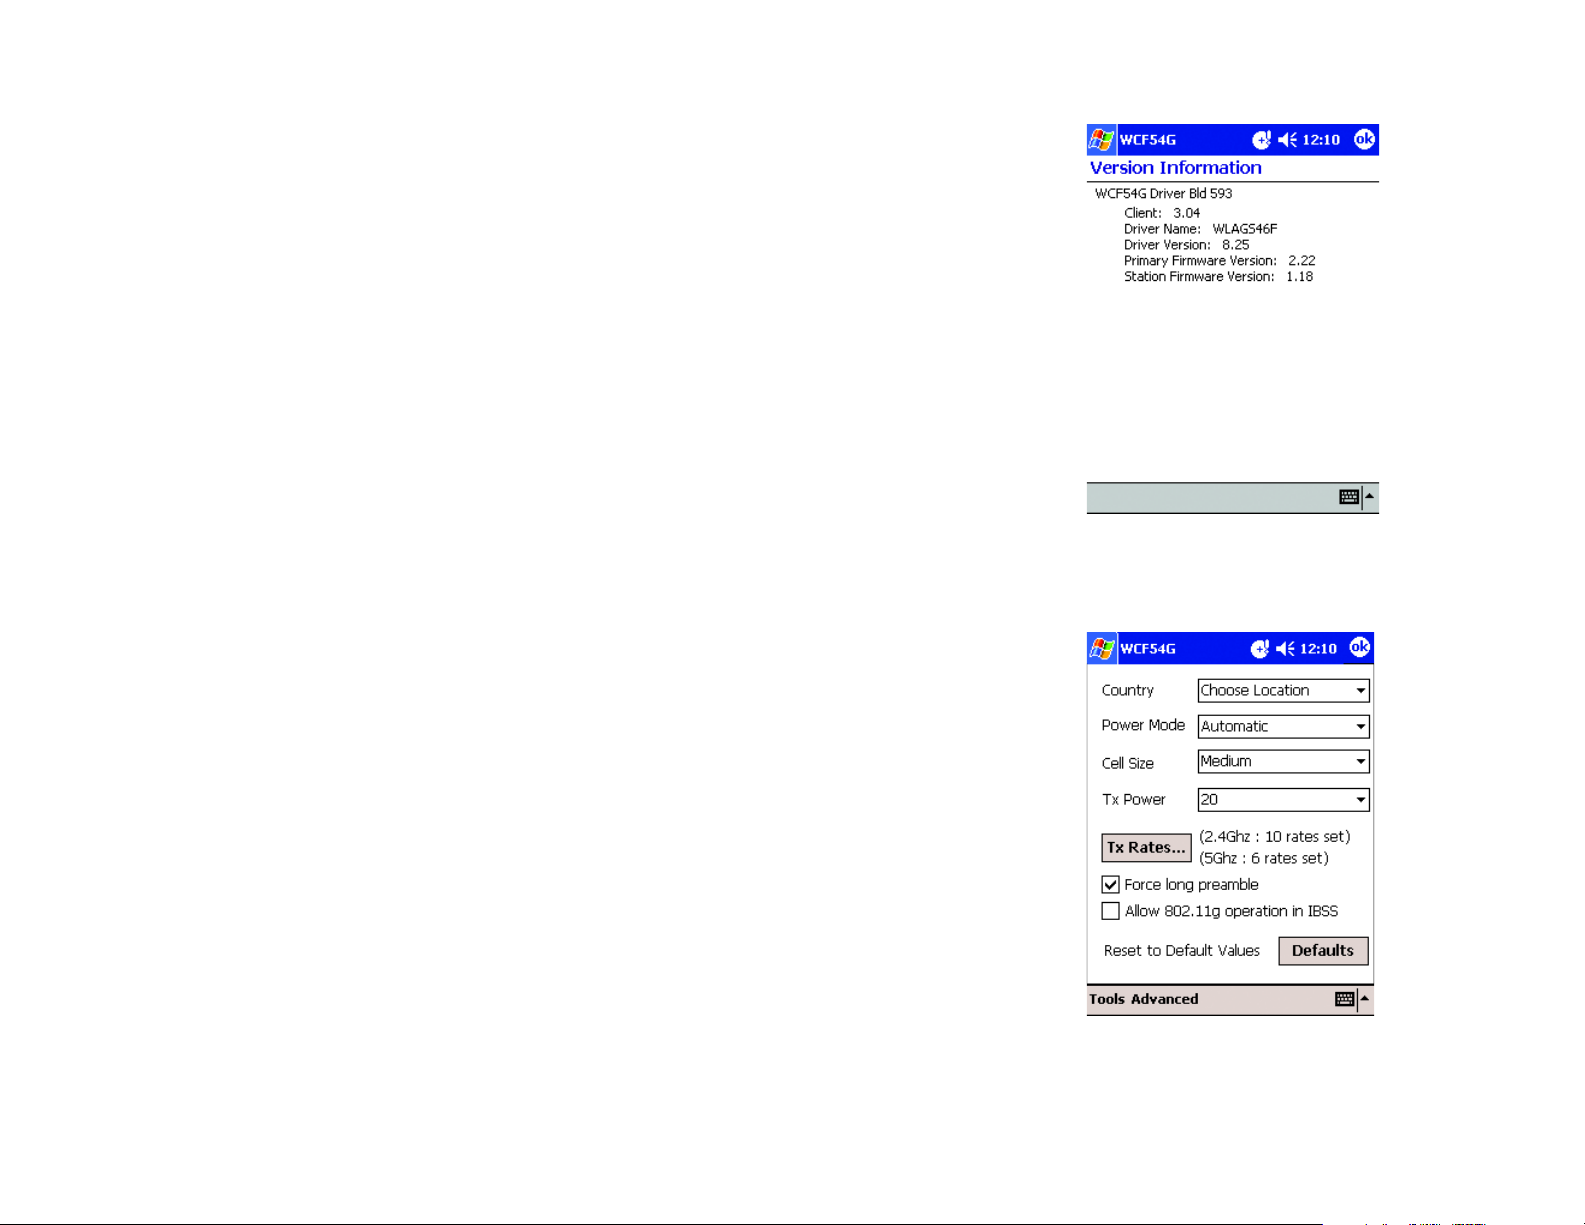
Version Information. Select Version Information to view information about the driver. Included is the Client,
Driver Name, Driver Version, Primary Firmware Version, and Station Firmware Version.
Wireless Advanced. The advanced wireless settings are displayed on this screen.
Country
Power Mode
Cell Size
Tx Power
Tx Rates
Force long preamble
Allow 802.11g operation in IBSS
Reset to Default Values
Defaults
Chapter 6: Configuring the Wireless-G CompactFlash Card with the Wireless Network Monitor
Wireless Network Monitor
Figure 6-3: Version Information Screen
Figure 6-4: Wireless Advanced Screen
17
Page 20

Wireless-G CompactFlash Card
Advanced
Three advanced options are offered: Network Troubleshooting, Site Survey, and Link Test. See below for
descriptions.
Network Troubleshooting. The IP Address of the CompactFlash Card is displayed.
For information on the connection, click More Info. The More Information screen will appear. The MAC
Address, IP Address, Subnet Mask, DHCP Server, Gateways, and DNS are displayed. The IP Forward Table
displays the Destination, Mask, Interface, Next Hop, Policy, Type Protocol, Age, Next Hop AS, Metric 1, Metric
2, Metric 3, and Metric 4.
For repair information, click Repair. The Repair screen will appear.
You can check the connectivity by entering the IP Address into the field, then clicking Contact. The Contact
screen will appear.
Figure 6-5: Network Troubleshooting Screen
Chapter 6: Configuring the Wireless-G CompactFlash Card with the Wireless Network Monitor
Wireless Network Monitor
Figure 6-6: More
Information Screen
Figure 6-7: Repair Screen
18
Page 21

Wireless-G CompactFlash Card
Site Survey. To find the MAC Address of the access point, click Open. The SNR, Signal Noise, Channel, and Privacy
of the access point will be displayed.
Figure 6-8: Contact Screen
Chapter 6: Configuring the Wireless-G CompactFlash Card with the Wireless Network Monitor
Wireless Network Monitor
Figure 6-9: Site Survey Screen
19
Page 22

Wireless-G CompactFlash Card
Link Test. To run a test, enter the IP Address in the field. The MAC Address and Transfer Rate will be displayed.
The SNR, Signal , and Noise will be displayed for the Station and Device.
Figure 6-10: Link Test Screen
Chapter 6: Configuring the Wireless-G CompactFlash Card with the Wireless Network Monitor
Wireless Network Monitor
20
 Loading...