

User’s Manual
CK32 I-Safe
Handheld Computer
User’s Manual
CK32 I-Safe
Handheld Computer

Intermec Technologies Corporation
Worldwide Headquarters
6001 36th Ave.W.
Everett, WA 98203
U.S.A.
www.intermec.com
The information contained herein is provided solely for the purpose of allowing customers to
operate and service Intermec-manufactured equipment and is not to be released, reproduced, or
used for any other purpose without written permission of Intermec Technologies Corporation.
Information and specifications contained in this document are subject to change without prior
noticed and do not represent a commitment on the part of Intermec Technologies Corporation.
© 2007 by Intermec Technologies Corporation. All rights reserved.
The word Intermec, the Intermec logo, Norand, ArciTech, Beverage Routebook, CrossBar,
dcBrowser, Duratherm, EasyADC, EasyCoder, EasySet, Fingerprint, i-gistics, INCA (under
license), Intellitag, Intellitag Gen2, JANUS, LabelShop, MobileLAN, Picolink, Ready-to-Work,
RoutePower, Sabre, ScanPlus, ShopScan, Smart Mobile Computing, SmartSystems, TE 2000,
Trakker Antares, and Vista Powered are either trademarks or registered trademarks of Intermec
Technologies Corporation.
There are U.S. and foreign patents as well as U.S. and foreign patents pending.
Wi-Fi is a registered certification mark of the Wi-Fi Alliance.
Microsoft, Windows, and the Windows logo are registered trademarks of Microsoft Corporation
in the United States and/or other countries.
Bluetooth is a trademark of Bluetooth SIG, Inc., U.S.A.
ii CK32 I-Safe Handheld Computer User’s Manual

Contents
Before You Begin. . . . . . . . . . . . . . . . . . . . . . . . . . . . . . . . . . . . . . . . . . . . . . . . . . . . vii
Safety Information . . . . . . . . . . . . . . . . . . . . . . . . . . . . . . . . . . . . . . . . . . . vii
Global Services and Support. . . . . . . . . . . . . . . . . . . . . . . . . . . . . . . . . . . viii
Warranty Information . . . . . . . . . . . . . . . . . . . . . . . . . . . . . . . . viii
Web Support . . . . . . . . . . . . . . . . . . . . . . . . . . . . . . . . . . . . . . . viii
Telephone Support . . . . . . . . . . . . . . . . . . . . . . . . . . . . . . . . . . . ix
Who Should Read This Manual . . . . . . . . . . . . . . . . . . . . . . . . . . . . . . . . . ix
Related Documents . . . . . . . . . . . . . . . . . . . . . . . . . . . . . . . . . . . . . . . . . . . x
Other Copyright Information. . . . . . . . . . . . . . . . . . . . . . . . . . . . . . . . . . . . x
Patent Information. . . . . . . . . . . . . . . . . . . . . . . . . . . . . . . . . . . . . . . . . . . xi
Using the CK32 I-Safe Handheld Computer . . . . . . . . . . . . . . . .1
1
Introducing the CK32 I-Safe Handheld Computer. . . . . . . . . . . . . . . . . . . . . . . . . . .2
Using the Battery . . . . . . . . . . . . . . . . . . . . . . . . . . . . . . . . . . . . . . . . . . . . . . . . . . . . 4
Charging and Installing the Battery . . . . . . . . . . . . . . . . . . . . . . . . . . . . . . .5
Maximizing Battery Life . . . . . . . . . . . . . . . . . . . . . . . . . . . . . . . . . . . . . . . . 6
Checking the Battery Status . . . . . . . . . . . . . . . . . . . . . . . . . . . . . . . . . . . . . 6
Understanding the Low Battery Warnings . . . . . . . . . . . . . . . . . . . . . . . . . . 7
Contents
Using the Keypad . . . . . . . . . . . . . . . . . . . . . . . . . . . . . . . . . . . . . . . . . . . . . . . . . . . . 8
Using the Color-Coded Keys . . . . . . . . . . . . . . . . . . . . . . . . . . . . . . . . . . . 10
Capitalizing All Characters . . . . . . . . . . . . . . . . . . . . . . . . . . . . . . . . . . . . .11
Using the Power Button . . . . . . . . . . . . . . . . . . . . . . . . . . . . . . . . . . . . . . . 11
Understanding the Status Lights . . . . . . . . . . . . . . . . . . . . . . . . . . . . . . . . . . . . . . . . 12
Using the Touch Screen . . . . . . . . . . . . . . . . . . . . . . . . . . . . . . . . . . . . . . . . . . . . . . 14
Using the Stylus . . . . . . . . . . . . . . . . . . . . . . . . . . . . . . . . . . . . . . . . . . . . . 15
Aligning the Screen. . . . . . . . . . . . . . . . . . . . . . . . . . . . . . . . . . . . . . . . . . .15
About the Audio System . . . . . . . . . . . . . . . . . . . . . . . . . . . . . . . . . . . . . . . . . . . . . . 16
Understanding the Audio Feedback. . . . . . . . . . . . . . . . . . . . . . . . . . . . . . . . . . . . . .16
Scanning Bar Codes . . . . . . . . . . . . . . . . . . . . . . . . . . . . . . . . . . . . . . . . . . . . . . . . .18
Enabling or Disabling Symbologies . . . . . . . . . . . . . . . . . . . . . . . . . . . . . . 19
Scanning a Bar Code Label to Verify Scanner Operation . . . . . . . . . . . . . .19
CK32 I-Safe Handheld Computer User’s Manual iii

Contents
Understanding Windows Mobile . . . . . . . . . . . . . . . . . . . . . . . . . . . 23
2
Understanding Windows Mobile . . . . . . . . . . . . . . . . . . . . . . . . . . . . . . . . . . . . . . . 24
Finding Information in Windows Mobile . . . . . . . . . . . . . . . . . . . . . . . . . 24
Learning the Basic Skills . . . . . . . . . . . . . . . . . . . . . . . . . . . . . . . . . . . . . . 25
Using the Today Screen . . . . . . . . . . . . . . . . . . . . . . . . . . . . . . . 25
Accessing Programs. . . . . . . . . . . . . . . . . . . . . . . . . . . . . . . . . . . 26
Closing an Application . . . . . . . . . . . . . . . . . . . . . . . . . . . . . . . . 26
Using the Navigation Bar and the Command Bar. . . . . . . . . . . . 26
Using Pop-Up Menus. . . . . . . . . . . . . . . . . . . . . . . . . . . . . . . . . 27
Entering Information . . . . . . . . . . . . . . . . . . . . . . . . . . . . . . . . . 27
Using Transcriber . . . . . . . . . . . . . . . . . . . . . . . . . . . . . . . . . . . . 29
Finding and Organizing Information . . . . . . . . . . . . . . . . . . . . . 30
Customizing the CK32 I-Safe . . . . . . . . . . . . . . . . . . . . . . . . . . . 30
Using Microsoft ActiveSync. . . . . . . . . . . . . . . . . . . . . . . . . . . . . . . . . . . . . . . . . . . 32
Using Internet Explorer Mobile . . . . . . . . . . . . . . . . . . . . . . . . . . . . . . . . . . . . . . . . 34
Configuring the CK32 I-Safe. . . . . . . . . . . . . . . . . . . . . . . . . . . . . . . . . 35
3
Configuring the Operating Parameters. . . . . . . . . . . . . . . . . . . . . . . . . . . . . . . . . . . 36
Configuring the CK32 I-Safe Using Intermec Settings . . . . . . . . . . . . . . . 36
Remotely Configuring the CK32 I-Safe Using SmartSystems Foundation . 37
Setting Up Ethernet Communications. . . . . . . . . . . . . . . . . . . . . . . . . . . . . . . . . . . 37
Setting Up Bluetooth Communications . . . . . . . . . . . . . . . . . . . . . . . . . . . . . . . . . . 39
Configuring Bluetooth Communications for Wireless Printing . . . . . . . . . 41
Creating an Application That Lets You Print Wirelessly . . . . . . . 41
Selecting the Current Wireless Printer on the CK32 I-Safe. . . . . 42
Connecting to a Bluetooth Audio Device . . . . . . . . . . . . . . . . . . . . . . . . . 45
Setting Up 802.11 Radio Communications . . . . . . . . . . . . . . . . . . . . . . . . . . . . . . . 45
Configuring the Network Parameters for a TCP/IP Network . . . . . . . . . . 46
Configuring the Network Parameters for a UDP Plus Network. . . . . . . . . 47
Checking the Status of Your Wireless Connection. . . . . . . . . . . . . . . . . . . 47
Using ISpyWiFi. . . . . . . . . . . . . . . . . . . . . . . . . . . . . . . . . . . . . . . . . . . . . 48
Starting the Utility . . . . . . . . . . . . . . . . . . . . . . . . . . . . . . . . . . . 48
ISpyWiFi . . . . . . . . . . . . . . . . . . . . . . . . . . . . . . . . . . . . . . . . . . 49
WiFi Scan. . . . . . . . . . . . . . . . . . . . . . . . . . . . . . . . . . . . . . . . . . 51
Supplicant. . . . . . . . . . . . . . . . . . . . . . . . . . . . . . . . . . . . . . . . . . 52
Ping . . . . . . . . . . . . . . . . . . . . . . . . . . . . . . . . . . . . . . . . . . . . . . 54
iv CK32 I-Safe Handheld Computer User’s Manual

Supplicant Logging . . . . . . . . . . . . . . . . . . . . . . . . . . . . . . . . . . . 55
Configuring Security on the CK32 I-Safe . . . . . . . . . . . . . . . . . . . . . . . . . . . . . . . . . 56
Understanding the Wireless Network . . . . . . . . . . . . . . . . . . . . . . . . . . . . . 57
Using WPA Security . . . . . . . . . . . . . . . . . . . . . . . . . . . . . . . . . . . . . . . . . . 57
Using Static WEP Security . . . . . . . . . . . . . . . . . . . . . . . . . . . . . . . . . . . . . 58
Using 802.1x Security. . . . . . . . . . . . . . . . . . . . . . . . . . . . . . . . . . . . . . . . . 59
Using LEAP Security . . . . . . . . . . . . . . . . . . . . . . . . . . . . . . . . . . . . . . . . . 59
Choosing Between Funk and Microsoft Security . . . . . . . . . . . . . . . . . . . . 60
Configuring Funk Security Using Intermec Settings . . . . . . . . . . 60
Configuring Funk Security Using the Profile Wizard. . . . . . . . . . 65
Configuring EAP-FAST with Profile Wizard . . . . . . . . . . . . . . . . 72
Configuring Microsoft Security . . . . . . . . . . . . . . . . . . . . . . . . . . 73
Loading a Certificate . . . . . . . . . . . . . . . . . . . . . . . . . . . . . . . . . . . . . . . . . 76
Disabling Security . . . . . . . . . . . . . . . . . . . . . . . . . . . . . . . . . . . . . . . . . . . 79
Developing and Installing Applications . . . . . . . . . . . . . . . . . . . 81
4
Developing Applications for the CK32 I-Safe . . . . . . . . . . . . . . . . . . . . . . . . . . . . . . 82
Developing a New Application Using the Intermec Developer Library. . . . 82
Developing a Web-Based Application. . . . . . . . . . . . . . . . . . . . . . . . . . . . . 83
Converting a Trakker Antares Application for the CK32 I-Safe . . . . . . . . . 83
Installing Applications on the CK32 I-Safe. . . . . . . . . . . . . . . . . . . . . . . . . . . . . . . . 84
Installing Applications Using SmartSystems Foundation. . . . . . . . . . . . . . . 85
Installing Applications Using Microsoft ActiveSync . . . . . . . . . . . . . . . . . . 85
Installing Applications Using Wavelink Avalanche . . . . . . . . . . . . . . . . . . . 87
Contents
Launching An Application Automatically . . . . . . . . . . . . . . . . . . . . . . . . . . . . . . . . .90
RunAutoRun . . . . . . . . . . . . . . . . . . . . . . . . . . . . . . . . . . . . . . . . . . . . . . . 90
AutoExec . . . . . . . . . . . . . . . . . . . . . . . . . . . . . . . . . . . . . . . . . . . . . . . . . . 91
AutoRun. . . . . . . . . . . . . . . . . . . . . . . . . . . . . . . . . . . . . . . . . . . . . . . . . . . 93
AutoCopy. . . . . . . . . . . . . . . . . . . . . . . . . . . . . . . . . . . . . . . . . . . . . . . . . .95
AutoReg . . . . . . . . . . . . . . . . . . . . . . . . . . . . . . . . . . . . . . . . . . . . . . . . . . . 96
AutoCab. . . . . . . . . . . . . . . . . . . . . . . . . . . . . . . . . . . . . . . . . . . . . . . . . . . 97
Troubleshooting and Maintenance. . . . . . . . . . . . . . . . . . . . . . . . . 99
5
Upgrading the CK32 I-Safe Using SmartSystems . . . . . . . . . . . . . . . . . . . . . . . . . . 100
Contacting Product Support . . . . . . . . . . . . . . . . . . . . . . . . . . . . . . . . . . . . . . . . . . 103
Troubleshooting the CK32 I-Safe . . . . . . . . . . . . . . . . . . . . . . . . . . . . . . . . . . . . . . 104
Problems While Operating the CK32 I-Safe. . . . . . . . . . . . . . . . . . . . . . . 104
CK32 I-Safe Handheld Computer User’s Manual v

Problems While Configuring Security . . . . . . . . . . . . . . . . . . . . . . . . . . . 106
Problems with Wireless Connectivity . . . . . . . . . . . . . . . . . . . . . . . . . . . 107
Resetting Your Computer . . . . . . . . . . . . . . . . . . . . . . . . . . . . . . . . . . . . . . . . . . . 110
Preferred Reset Method . . . . . . . . . . . . . . . . . . . . . . . . . . . . . . . . . . . . . . 110
Secondary Reset Method. . . . . . . . . . . . . . . . . . . . . . . . . . . . . . . . . . . . . 110
Performing a Clean Boot. . . . . . . . . . . . . . . . . . . . . . . . . . . . . . . . . . . . . 111
Cleaning the Scanner Window, Screen, and Computer . . . . . . . . . . . . . . . . . . . . . 111
Cleaning the Scanner Window and Screen . . . . . . . . . . . . . . . . . . . . . . . 112
Cleaning the Handle and Computer . . . . . . . . . . . . . . . . . . . . . . . . . . . . 112
Specifications . . . . . . . . . . . . . . . . . . . . . . . . . . . . . . . . . . . . . . . . . . . . . . . . 115
A
Physical and Environmental Specifications. . . . . . . . . . . . . . . . . . . . . . . . . . . . . . . 116
Physical Dimensions. . . . . . . . . . . . . . . . . . . . . . . . . . . . . . . . . 116
Weight . . . . . . . . . . . . . . . . . . . . . . . . . . . . . . . . . . . . . . . . . . . 116
Power Specifications . . . . . . . . . . . . . . . . . . . . . . . . . . . . . . . . . 116
Electrical Specifications. . . . . . . . . . . . . . . . . . . . . . . . . . . . . . . 116
Temperature and Humidity Specifications . . . . . . . . . . . . . . . . 116
LCD Touch Screen Specifications. . . . . . . . . . . . . . . . . . . . . . . 116
Keypad Options . . . . . . . . . . . . . . . . . . . . . . . . . . . . . . . . . . . . 117
Bar Code Symbologies . . . . . . . . . . . . . . . . . . . . . . . . . . . . . . . 117
Linear Imager Reading Distances . . . . . . . . . . . . . . . . . . . . . . . 118
Accessories. . . . . . . . . . . . . . . . . . . . . . . . . . . . . . . . . . . . . . . . . . . . . . . . . . . . . . . 122
AN1 Communications Adapter (P/N 871-223-xxx) . . . . . . . . . 122
AC11 Quad Battery Charger (P/N 852-914-xxx) . . . . . . . . . . . 122
Handle (P/N 714-625-xxx). . . . . . . . . . . . . . . . . . . . . . . . . . . . 122
Hand Strap (P/N 825-183-xxx) . . . . . . . . . . . . . . . . . . . . . . . . 122
Carrying Strap Kit (P/N 825-186-xxx) . . . . . . . . . . . . . . . . . . . 123
AB6 Battery Pack (P/N 318-021-xxx). . . . . . . . . . . . . . . . . . . . 123
Tethered Stylus (P/N 203-828-xxx) . . . . . . . . . . . . . . . . . . . . . 123
Battery Eliminator (P/N 714-619-xxx) . . . . . . . . . . . . . . . . . . . 123
Power Supply (P/N 851-061-xxx). . . . . . . . . . . . . . . . . . . . . . . 123
Screen Protector (P/N 346-065-004) . . . . . . . . . . . . . . . . . . . . 123
Index . . . . . . . . . . . . . . . . . . . . . . . . . . . . . . . . . . . . . . . . . . . . . . . . . . . . . . . . . . . . . . 125
vi CK32 I-Safe Handheld Computer User’s Manual

Before You Begin
This section provides you with safety information, technical
support information, and sources for additional product
information.
Safety Information
Your safety is extremely important. Read and follow all warnings
and cautions in this document before handling and operating
Intermec equipment. You can be seriously injured, and
equipment and data can be damaged if you do not follow the
safety warnings and cautions.
This section explains how to identify and understand dangers,
warnings, cautions, and notes that are in this document. You may
also see icons that tell you when to follow ESD procedures and
when to take special precautions for handling optical parts.
A warning alerts you of an operating procedure, practice,
condition, or statement that must be strictly observed to avoid
death or serious injury to the persons working on the
equipment.
Before You Begin
A caution alerts you to an operating procedure, practice,
condition, or statement that must be strictly observed to
prevent equipment damage or destruction, or corruption or
loss of data.
Note: Notes either provide extra information about a topic or
contain special instructions for handling a particular condition or
set of circumstances.
CK32 I-Safe Handheld Computer User’s Manual vii

Before You Begin
• The Intermec Models CK32 I-Safe, AB6 Battery Pack, AN1
Communications Adapter, and AC11 Battery Charger
contain no user serviceable components. Return these
models ONLY to Intermec Authorized Service Centers for
Repair. Intrinsic Safety Certifications and Warranties will
be void if these models are opened or serviced at locations
not certified by Intermec.
• Only Intermec provided spare parts should be used in the
repair of the CK32 I-Safe and accessory products.
• Immediately remove from service any product that exhibits
physical damage.
• Wired connections to the CK32 I-Safe must only be made
through a model AN1 Communications Adapter.
• Verify that the CK32 I-Safe is appropriately rated for your
hazardous location before use. Consult your Safety
Department for assistance.
• Use of any accessories not supplied and approved by
Intermec could compromise safety.
Global Services and Support
Warranty Information
To understand the warranty for your Intermec product, visit the
Intermec web site at www.intermec.com and click Service &
Support > Warranty.
Web Support
Visit the Intermec web site at www.intermec.com to download
our current manuals (in PDF). To order printed versions of the
Intermec manuals, contact your local Intermec representative or
distributor.
Visit the Intermec technical knowledge base (Knowledge
Central) at intermec.custhelp.com to review technical
information or to request technical support for your Intermec
product.
viii CK32 I-Safe Handheld Computer User’s Manual

Telephone Support
These services are available from Intermec.
Services Description
Order Intermec
products
Order Intermec
media
Order spare
parts
Te c h n i ca l
Support
Service • Get a return authorization
Service
contracts
• Place an order.
• Ask about an existing
order.
Order printer labels and
ribbons.
Order spare parts. 1 or 2 and then
Talk to technical support
about your Intermec
product.
number for authorized
service center repair.
• Request an on-site repair
technician.
• Ask about an existing
contract.
• Renew a contract.
• Inquire about repair
billing or other service
invoicing questions.
Before You Begin
In the USA and
Canada call 1-800755-5505 and
choose this option
1 and then choose 2
1 and then choose 1
choose 4
2 and then choose 2
2 and then choose 1
1 or 2 and then
choose 3
Outside the U.S.A. and Canada, contact your local Intermec
representative. To search for your local representative, from the
Intermec web site, click Contact.
Who Should Read This Manual
The CK32 I-Safe Handheld Computer User’s Manual is for the
person who is responsible for installing, configuring, and
maintaining the CK32 I-Safe.
Before you work with the CK32 I-Safe, you should be familiar
with your network and general networking terms, such as IP
address.
CK32 I-Safe Handheld Computer User’s Manual ix

Before You Begin
Related Documents
The Intermec web site at www.intermec.com contains our
documents (in PDF) that you can download for free.
To order printed versions of the Intermec manuals, contact your
local Intermec representative or distributor.
Other Copyright Information
Microsoft, Windows, and the Windows logo are registered
trademarks of Microsoft Corporation in the United States and/or
other countries.
Bluetooth is a trademark of Bluetooth SIG, Inc., U.S.A.
Wi-Fi is a registered certification mark of the Wi-Fi Alliance.
This product includes software developed by the
OpenSSL Project for use in the OpenSSL Toolkit.
(http://www.openssl.org/)
This product includes cryptographic software written by Eric
Youn g. ( eay@cryptsoft.com
This product uses Regex++, Index software during its operational
phases. The owner of Regex++ has granted use of the software to
anyone provided such use is accompanied by the following
copyright and permission notice:
)
Regex++, Index. (Version 3.31, 16th Dec. 2001)
Copyright ©1998-2001 Dr. John Maddock
Permission to use, copy, modify, distribute and sell this software
and its documentation for any purpose is hereby granted without
fee, provided that the above copyright notice appear in all copies
and that both that copyright notice and this permission notice
appear in supporting documentation. Dr. John Maddock makes
no representations about the suitability of this software for any
purpose. It is provided “as is” without express or implied
warranty.
x CK32 I-Safe Handheld Computer User’s Manual

Patent Information
This product is covered by one or more of the following US
Patents and corresponding international patents worldwide:
4894523, 4953113, 4961043, 4970379, 4988852, 5019699, 5021642,
5038024, 5081343, 5095197, 5144119, 5144121, 5182441, 5187355,
5187356, 5195183, 5216233, 5216550, 5195183, 5195183, 5218191,
5227614, 5233172, 5241488, 5243602, 5258606, 5278487, 5288985,
5308966, 5322991, 5331136, 5331580, 5342210, 5349678, 5359185,
5371858, 5373478, 5389770, 5397885, 5410141, 5414251, 5416463,
5442167, 5464972, 5468947, 5468950, 5477044, 5486689, 5488575,
5500516, 5502297, 5504367, 5508599, 5514858, 5530619, 5534684,
5536924, 5539191, 5541419, 5548108, 5550362, 5550364, 5565669,
5567925, 5568645, 5572007, 5576529, 5592512, 5594230, 5598007,
5608578, 5616909, 5619027, 5627360, 5640001, 5657317, 5659431,
5671436, 5672860, 5684290, 5719678, 5729003, 5742041, 5761219,
5764798, 5777308, 5777309, 5777310, 5786583, 5793604, 5798509,
5798513, 5804805, 5805807, 5811776, 5811777, 5818027, 5821523,
5828052, 5831819, 5834753, 5834749, 5837987, 5841121, 5842070,
5844222, 5854478, 5862267, 5869840, 5873070, 5877486, 5878395,
5883492, 5883493, 5886338, 5889386, 5892971, 5895906, 5898162,
5902987, 5902988, 5912452, 5923022, 5936224, 5949056, 5969321,
5969326, 5969328, 5979768, 5986435, 5987192, 5987499, 5992750,
6003775, 6012640, 6016960, 6018597, 6024289, 6034379, 6859190,
6064763, 6075340, 6095422, 6097839, 6102289, 6102295, 6109528,
6119941, 6128414, 6138915, 6149061, 6149063, 6152370, 6155490,
6158661, 6164542, 6164545, 6173893, 6195053, 6234393, 6234395,
6244512, 6249008, 6328214, 6330975, 6345765, 6356949, 6367699,
6375075, 6375076, 6375344, 6431451, 6435411, 6484944, 6488209,
6497368, 6532152, 6538413, 6539422, 6621942, 6641046, 6681994,
6687403, 6688523, 6732930, 6036093, 6039252, 6889903, 6967280,
7027037, 7035466, 7090137, 7121467
There may be other U.S. and foreign patents pending.
CK32 I-Safe Handheld Computer User’s Manual xi

xii CK32 I-Safe Handheld Computer User’s Manual

1
Using the CK32 I-Safe Handheld Computer
Use this chapter to familiarize yourself with the CK32 I-Safe
Handheld Computer. In this chapter you will find these sections:
• Introducing the CK32 I-Safe Handheld Computer
• Using the Battery
•Using the Keypad
• Understanding the Status Lights
•Using the Touch Screen
•About the Audio System
• Understanding the Audio Feedback
• Scanning Bar Codes
CK32 I-Safe Handheld Computer User’s Manual 1
Chapter 1 — Using the CK32 I-Safe Handheld Computer
Introducing the CK32 I-Safe Handheld Computer
The Intermec CK32 I-Safe is an ergonomically designed
handheld computer built on the Microsoft
operating system. It is a easy-to-use, reliable computer that runs
client/server and browser-based applications and is certified to be
intrinsically safe.
The CK32 I-Safe is designed to support world-wide intrinsic
safety standards and comply with relevant European Directives.
Testing and certification requires meeting the standards of
Underwriters Laboratories, ATEX directives in Europe and IEC
standards in the rest of the world.
®
Windows® Mobile
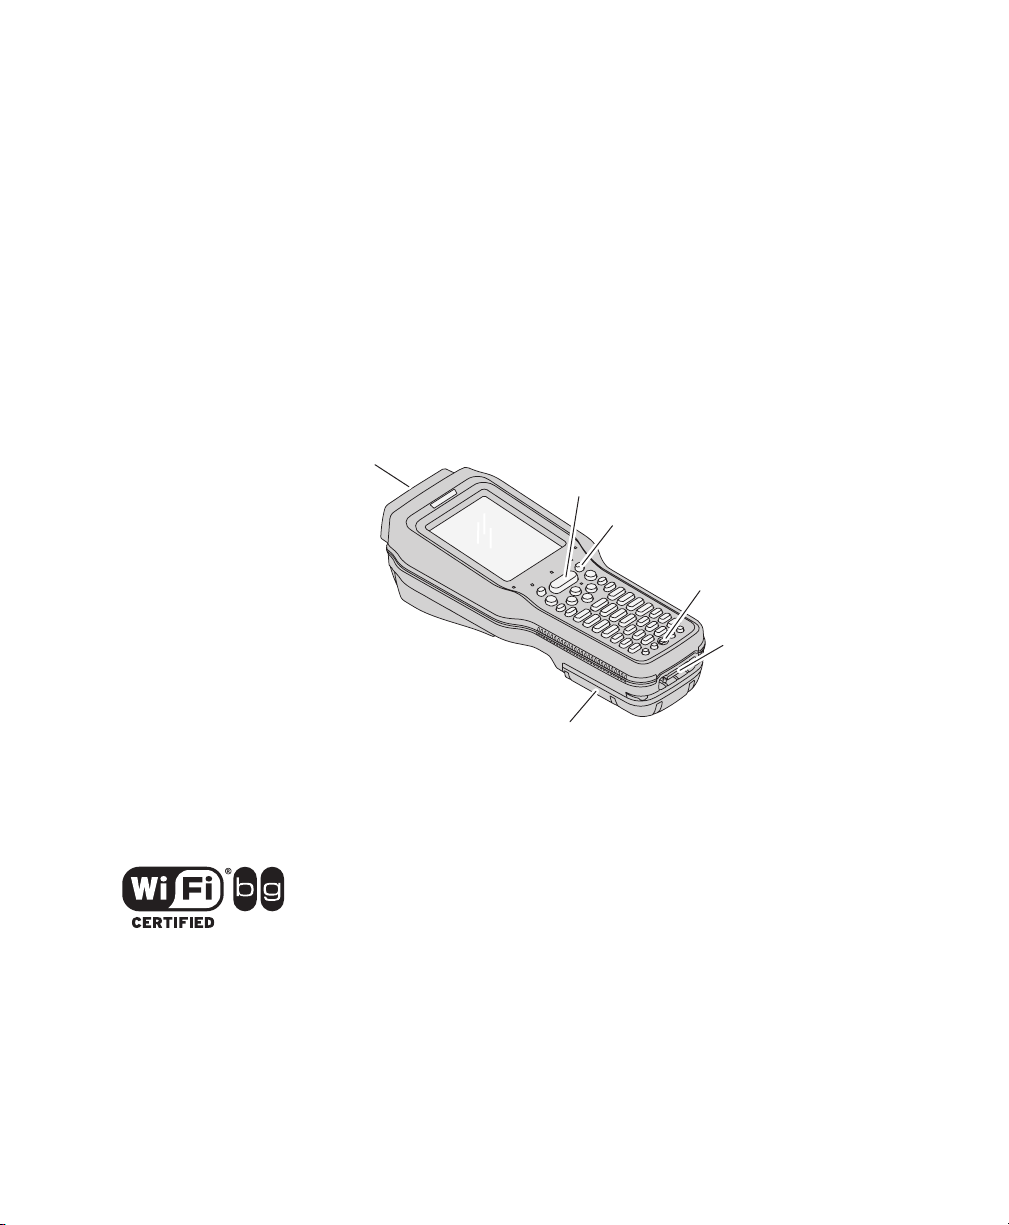
Scanner
window
CK32 I-Safe Handheld Computer
Scan
button
Backlight
Power
Communications
port
Battery
CK32 I-Safe Handheld Computers with an IEEE 802.11b/g
radio installed are Wi-Fi
®
certified for interoperability with other
802.11b/g wireless LAN devices.
2 CK32 I-Safe Handheld Computer User’s Manual

Chapter 1 — Using the CK32 I-Safe Handheld Computer
The CK32 I-Safe includes these features:
• PXA270 Intel Processor
• Windows Mobile 5.0 Operating System
• Voice over IP support. User responsible for software
integration.
• Bluetooth support for scanner, RFID, Voice
• 128 MB DRAM, 64 MB Flash
• 512 MB embedded SD Mass Storage Card
• Intrinsic safety certification for North America, Europe and
countries accepting IECEx Scheme
• European directive compliance
These options are available for the CK32 I-Safe:
• TE 2000 terminal emulation application including 3270,
5250, and VT/ANSI as well as support for third-party TE
applications
• Data Collection Browser (dcBrowser™) application
Use this manual to understand how to use the features and
options available on the CK32 I-Safe. For additional help using
terminal emulation, see the TE 2000 Terminal Emulation
Programmer’s Guide (P/N 977-055-xxx).
For additional help using dcBrowser, see the documentation that
ships with the dcBrowser gateway software or the Data Collection
Browser Client User’s Guide (P/N 070-011-xxx).
iBrowse is a locked-down web browser for Intermec devices that
is compatible with Microsoft’s Internet Explorer but does not
allow the user to exit the browser or access non-work related web
sites. For additional help using iBrowse, see the iBrowse User’s
Guide (P/N 961-055-xxx).
For a complete list of accessories, see “Accessories” on page 122.
CK32 I-Safe Handheld Computer User’s Manual 3
Chapter 1 — Using the CK32 I-Safe Handheld Computer
Using the Battery
The CK32 I-Safe uses a model AB6 (P/N 318-021-xxx) lithiumion battery as its main power source. You must fully charge the
main battery before you can use the CK32 I-Safe. When you
change the battery, a backup battery maintains your status,
memory, and real-time clock for at least 10 minutes. You must
suspend your CK32 I-Safe before removing the battery, or data
loss may occur..
If the battery is at a critical level, you may not be able to boot
the device. You must replace the battery with a fully charged
battery
The lithium-ion battery pack that is used in this device may
present a fire or chemical burn hazard if it is mistreated. Do
not disassemble it, heat it above 100°C (212°F) or incinerate
it.
When the battery reaches the end of its useful life, the spent
battery should be disposed of by a qualified recycler or hazardous
Li-ionLi-ion
materials handler. Do not mix this battery with the solid waste
stream. Contact your Intermec Technologies Service Center for
recycling or disposal information.
Note: In the U.S.A., the EPA does not consider spent lithium-ion
batteries as hazardous waste.
4 CK32 I-Safe Handheld Computer User’s Manual

Chapter 1 — Using the CK32 I-Safe Handheld Computer
Charging and Installing the Battery
Make sure you fully charge the AB6 battery before using your
CK32 I-Safe.
To charge the battery
• Insert the battery into the AC11 4-slot battery charger.
Charging time is approximately 7 hours.
To install the battery
You must suspend your CK32 I-Safe before removing the
battery, or data loss may occur.
• Insert the tabs on the bottom of the charged battery into the
CK32 I-Safe and snap the battery into place.
Speaker
(internal)
Inserting the AB6 Battery
Beeper
Battery latch
AB6 battery
Explosion Hazard – Use Intermec battery pack Model AB6
only. It is rated as Intrinsically Safe but it MUST NOT BE
CHANGED while in a Class II or Class III environment. The
battery can be changed in a Class 1 (gas) environment.
CK32 I-Safe Handheld Computer User’s Manual 5

Chapter 1 — Using the CK32 I-Safe Handheld Computer
Maximizing Battery Life
There are several things that you can do to extend the life of your
fully charged battery.
• Verify that Radio Power Management is enabled (Fast PSP).
Enabling radio power management allows your radio to
switch between awake and sleep modes based on network
traffic. If you use the default setting of disabled (CAM), you
will have the best network performance (data throughput) but
it will draw the most power from your battery.
• Verify that the backlight timeout is set to 15 seconds.
• Verify that each setting under Power Management (Device
timeout, Screen timeout) has a value of 1 minute.
You can use Intermec Settings to easily make all of these
configuration changes.
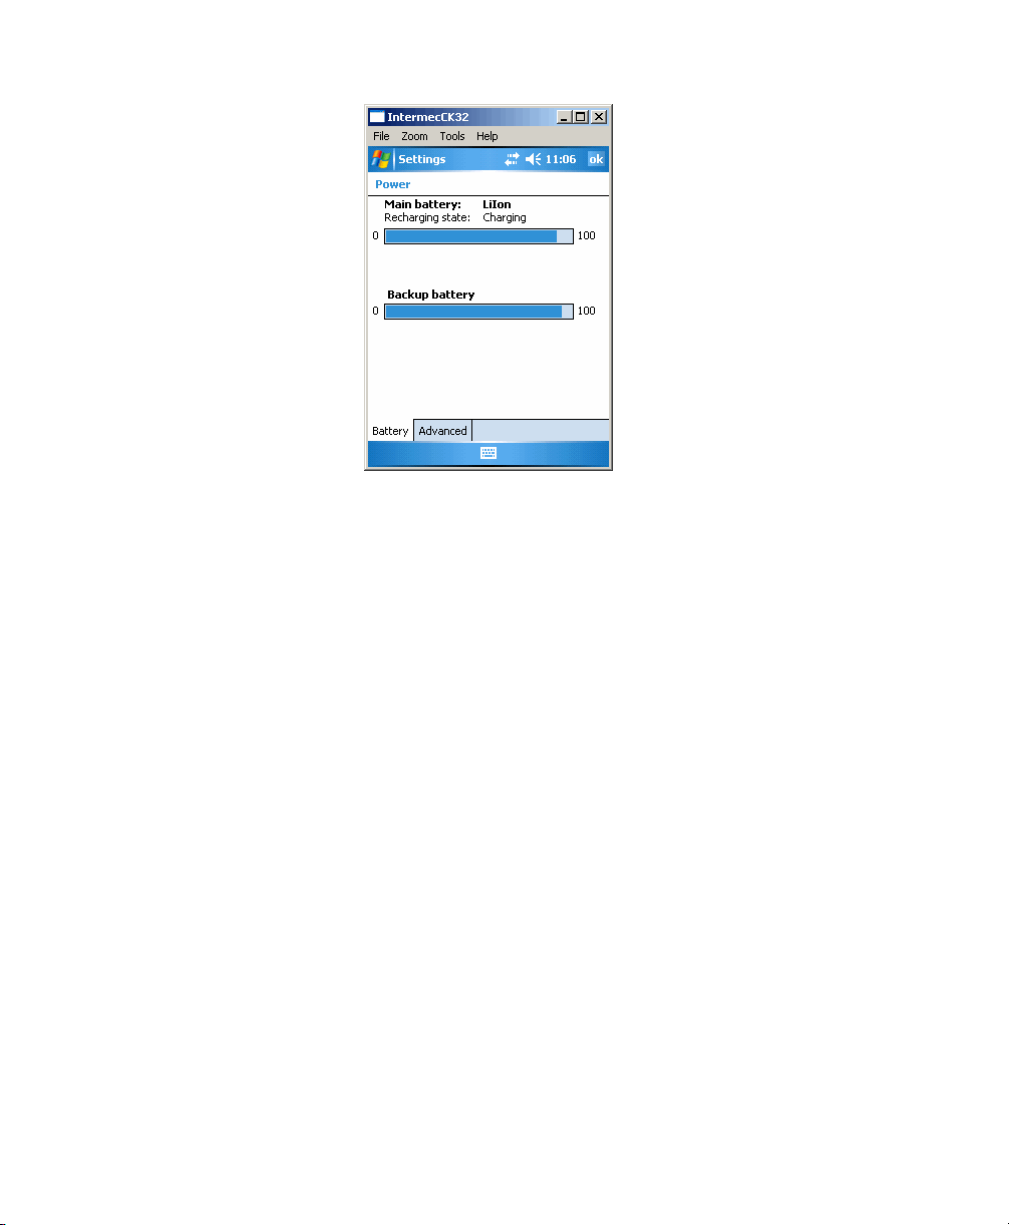
Checking the Battery Status
You can check the battery status by looking at the Battery icon on
the front of the CK32 I-Safe or by checking the Power Settings.
Tap the Battery icon on the Status bar or use the following
procedure to check the Power Settings on your CK32 I-Safe.
Either method will take you to the Settings display which
indicates the percent of battery charge remaining.
To check the Power Settings
1 Ta p Start. The Start menu appears.
2 Ta p Settings > System.
3 Tap th e Power icon. The Power Settings display appears.
6 CK32 I-Safe Handheld Computer User’s Manual
Chapter 1 — Using the CK32 I-Safe Handheld Computer
Understanding the Low Battery Warnings
When the battery charge is getting low, you will receive an
audible alert and an initial pop-up warning message with a blue
border. The warning message indicates “Main Battery Low. To
prevent possible data loss, replace or recharge your battery
according to the owner’s manual.” A second battery icon with an !
inside also appears on the Status bar.
If the first warning is not dismissed, it is followed by another
audible alert and a second pop-up warning message with a red
border. This message indicates “Main Battery Very Low. To
prevent possible data loss, replace or recharge your battery
according to the owner’s manual.”
If the battery charge continues to drop, the red battery status
LED blinks and the CK32 I-Safe enters Suspend mode. If the
battery charge continues to drop, the battery status LED will stop
blinking
You can change the audible alert using the Sounds &
Notifications applet.
To change the audible alert
•Tap Settings > Personal > Sounds & Notifications.
CK32 I-Safe Handheld Computer User’s Manual 7

Chapter 1 — Using the CK32 I-Safe Handheld Computer
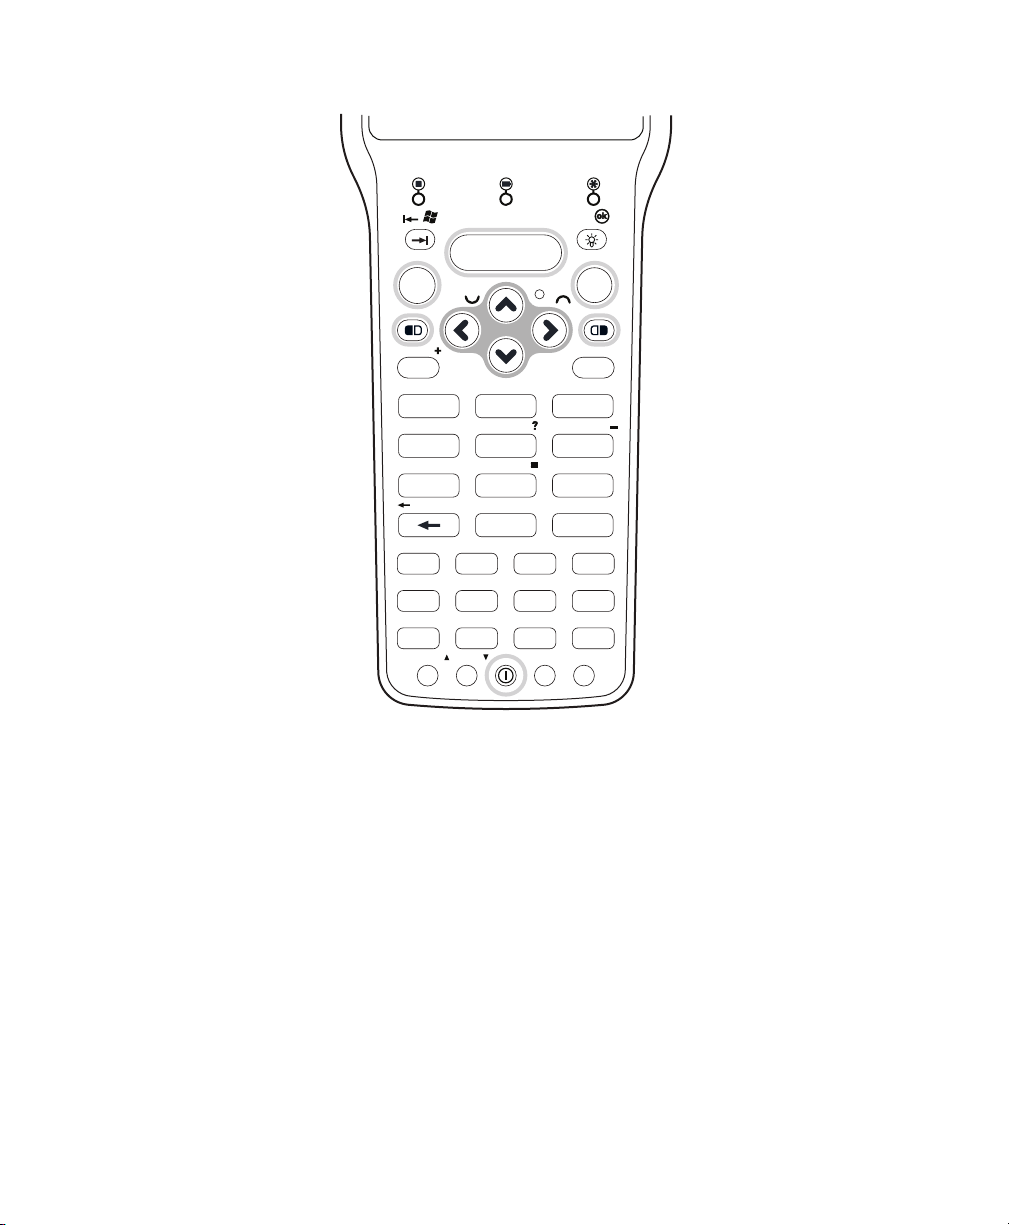
Using the Keypad
Your CK32 I-Safe has one of the following keypad overlay
options:
• 42-key large numeric and function
• 56-key full alphanumeric
You enter all of the characters and functions printed above the
keys just like you would on a standard keypad.
Note: You must use the color-coded keys to access several hidden
characters (such as { and }) on the CK32 I-Safe keypad.
The CK32 I-Safe supports TE 2000 VT100/220/320/340 and
ANSI, TE 2000 5250, and TE 2000 3270. Use the TE 2000
keypad overlays to enter the same keys that you can enter on a
VT/ANSI keyboard, and IBM 5250 keyboard, or an IBM 3270
keyboard. Like the standard CK32 I-Safe overlay, the TE 2000
keypad overlays let you enter all the characters printed on or
above the keys. The terminal emulation keypads also come with
the same color-coded keys that are on the standard overlay.
For help using TE 2000 terminal emulation, see the TE 2000
Terminal Emulation Programmer’s Guide (P/N 977-055-xxx).
8 CK32 I-Safe Handheld Computer User’s Manual
Chapter 1 — Using the CK32 I-Safe Handheld Computer
\
I
.
L
/
-
+
Ins
Esc
C
NewLnHelp
F
6
EOF
3
Fld
Caps
A
D
G
Shift
7
4
1
Print E
Fld H
Del
Page
Home
B
89
5
2
J
Reset
0
K
F1
O
F5
FldExit
S
F9
W
Ctl
42-Key Large Numeric and Function Keypad: This keypad is designed for
applications that enter mainly numeric data (0-9) and that need dedicated
function keys (F1- F12). This keypad also lets you enter the entire alphabet and
special characters by pressing color-coded key sequences.
PA2
PA1
F2
Attn P Clear
F6
HexUFMark V
T
F10
Roll
X
Roll
Alt
3270/5250
PA3
M
F3
Q
Dup R Clr
F7
F11
Y
Alpha
N AutLg
F4
F8
y
S
sRq
F12
Sp
Z
Sp
CK32 I-Safe Handheld Computer User’s Manual 9

Chapter 1 — Using the CK32 I-Safe Handheld Computer
_
^
Home
(
)
/
\
+
<
>
#
-
+
Roll Roll
56-Key Full Alphanumeric Keypad: This keypad is designed for
applications that enter mainly numeric data (0-9) and that may need to enter
the entire alphabet. The keypad also provides function keys (F1-F24) and
special characters, symbols, and functions by pressing color-coded key
Using the Color-Coded Keys
sequences.
The keypad of the CK32 I-Safe provides color-coded keys to let
you access additional characters, symbols, and functions printed
on the keypad overlay. Once you understand how to use the
color-coded keys and key sequences, you will know how to access
all of the additional features printed on the keypad overlay. There
are two color-coded modifier keys on the CK32 I-Safe: the
orange B key and the green C key.
&
FldExit
7
PA1
F5
F6
Shift
Print
F1
4
PA2
Fld
F2
Ctl
1
Alt
Sp
DelReset
A
Caps
Attn
Clr
C
D
F11 F12
F10
FldExit Hex
H
I
F16 F17
F15
M
F20 F21
N
R
S
Pg
Pg
X
W
*
8
5
2
0
E
J
O
F22
T
3270/5250
Home
Help
=
Clea
r Dup
FM
ark
NewLn
9
6
EOF
3
Fld
.
’
F
F13
K
F18
P
SR
eq
F23 F24
U
Pg
Y
Ins
PA3
F7
F3
Aut
Lg
F8
F4
Esc
B
F9
Erase
G
F14
L
F19
Q
V
Pg
Z
10 CK32 I-Safe Handheld Computer User’s Manual

You press and release the first key and then press and release the
second key to access the color-coded character or function
printed above a key.
Capitalizing All Characters
To type all alphabetic characters as uppercase letters, you can
enable the Caps Lock feature on the CK32 I-Safe keypad.
To enable Caps Lock
1 Press the orange B key. The B icon appears on the status
bar.
Chapter 1 — Using the CK32 I-Safe Handheld Computer
2 To enable Caps Lock and make the Caps Lock icon (
appear on the status bar, press a second key:
• On the 42-key keypad, press Shift.
• On the 56-key keypad, press A.
3 Type an alphanumeric character. The letter appears as an
uppercase character on the screen.
To disable Caps Lock
•Press the orange B key and then press either Shift or A
(depending on your keypad). The Caps Lock icon disappears
from the status bar.
Using the Power Button
When you press the Power button to turn off the CK32 I-Safe,
you actually put the computer in Suspend mode. In Suspend
mode, the CK32 I-Safe continues to supply power to all memory,
but turns off power to most hardware. Network connectivity for
802.11 is not maintained in Suspend mode but are restored upon
resume. This power-saving feature is designed to prolong battery
life.
When you press the Power button to turn the CK32 I-Safe back
on, your computer resumes where it was when you turned it off.
If you are using WPA or 802.1x security, the computer may need
to reauthenticate before it starts your application.
)
CK32 I-Safe Handheld Computer User’s Manual 11
Chapter 1 — Using the CK32 I-Safe Handheld Computer
If the Battery light flashes and your CK32 I-Safe does not resume
after pressing the Power button, your battery may be too low to
supply power. Replace the battery. If replacing the battery does
not solve the problem, see “Resetting Your Computer” on
page 110.
You can also use the Power button to reset the CK32 I-Safe. See
“Resetting Your Computer:” on page 110 for more information.
Note: Microsoft Windows Mobile supports other power saving
modes including Screen Off, Unattend, and Suspend. Refer to
Windows Mobile documentation for additional information.
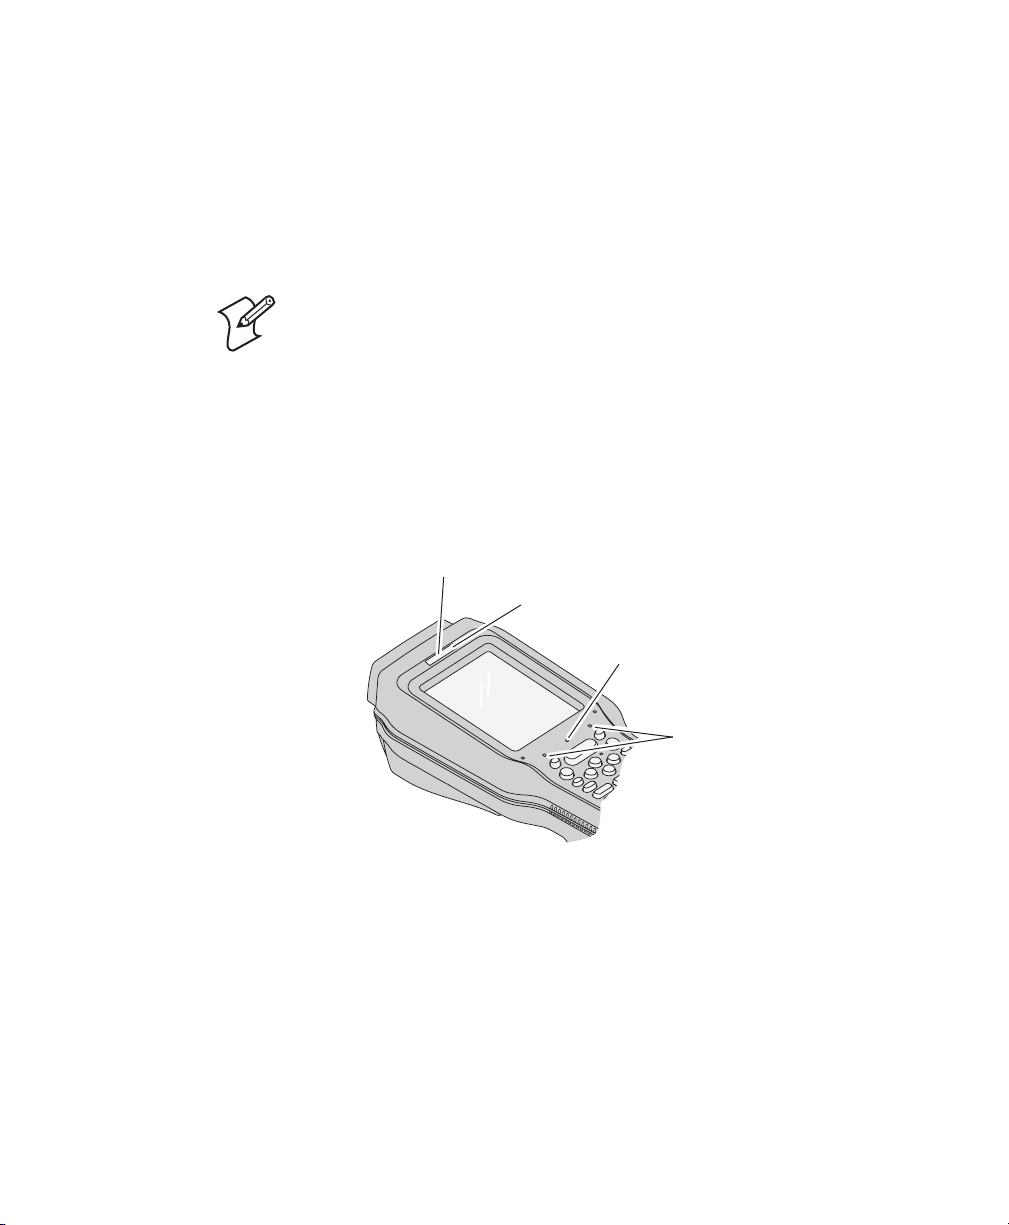
Understanding the Status Lights
The status lights on the CK32 I-Safe turn on to indicate the
status of the keyboard, battery, or a successful decode of a bar
code.
Ready to-Work
indicator (blue)
Good read
light (green)
Battery
light (red)
Keyboard
status lights
CK32 I-Safe Status Lights
12 CK32 I-Safe Handheld Computer User’s Manual

Chapter 1 — Using the CK32 I-Safe Handheld Computer
Understanding the CK32 I-Safe Status Lights
Light Name Description
Keyboard Status lights The left keyboard status light indicates the Shift Lock (orange)
key is selected. The right keyboard status light indicates the Alpha
Lock (green) key is selected.
Battery
Good Read This green light indicates when the CK32 I-Safe successfully
Ready-to-Work™ indicator This blue light indicates when the CK32 I-Safe is ready to use in
Light Status What It Means
Off The battery is charged.
Blinking Red The battery blinks when the charge is low.
Continued use causes the CK32 I-Safe to enter
Suspend mode. You may also experience a
blinking low battery light when the battery is
low and you attempt to take the CK32 I-Safe
out of Suspend mode. This is normal and
indicates the battery needs to be charged
before you use the computer.
decodes a bar code.
your application, typically TE 2000. If you have problems using
TE 2000, see the TE 2000 Terminal Emulation Programmer’s
Guide (P/N 977-055-xxx).
Light Status What It Means
Off The TE 2000 application has not loaded
successfully, or you are not running a Readyto-Work application.
Blinking The CK32 I-Safe is not connected to the host.
On A connection to the server has been established
and all network connections are active.
CK32 I-Safe Handheld Computer User’s Manual 13

Chapter 1 — Using the CK32 I-Safe Handheld Computer
Using the Touch Screen
The CK32 I-Safe has a color touch screen display. The screen is
240 x 320 pixels. The desktop is 240 x 300 pixels and the taskbar
is 240 x 20 pixels. In addition, the screen supports Unicode
characters, user-programmable fonts, and bitmap graphics.
CK32 I-Safe Start Screen
The Start screen has two distinct areas: the desktop and the
taskbar.
The desktop displays shortcuts to some of the applications
installed on the CK32 I-Safe. The taskbar displays the Start
menu icon, the time, the keyboard icon, and the desktop icon.
14 CK32 I-Safe Handheld Computer User’s Manual
Using the Stylus
Aligning the Screen
Chapter 1 — Using the CK32 I-Safe Handheld Computer
Your CK32 I-Safe has a stylus for selecting items and entering
information on the touch screen. Use the stylus in place of a
mouse.
Using the Stylus
Action Description
Touch Touch the screen once with the stylus to select options,
launch applications, close applications, or launch
menus from the taskbar.
Double-tap Double-tap the screen with the stylus to launch
applications.
Drag Hold the stylus on the screen and drag across the screen
to select text and images.
Tap and hol d Tap and hold the stylus on an item to see a list of
actions available for that item. Tap the action you want
to perform.
If the screen does not respond correctly when you tap it with the
stylus, you may need to align the screen.
To align the screen
1 Tap th e Start icon. The Start menu appears.
CK32 I-Safe Handheld Computer User’s Manual 15

Chapter 1 — Using the CK32 I-Safe Handheld Computer
2 Ta p Settings > System.
3 Tap th e Screen icon to open the Screen applet and then tap
the Align Screen button.
About the Audio System
The CK32 I-Safe provides audio paths to support the following
third-party applications:
•Interactive VoIP
• Walkie-Talkie
• Digital recording
•AV playback
Understanding the Audio Feedback
The CK32 I-Safe provide you with audio feedback when it
performs some functions. For example, you may hear a beep each
time you scan a valid bar code.
You can change the beeper volume for your needs and
environment.
To enable and adjust the beeper volume
1 Ta p Start > Settings > the Personal tab > the Sounds &
Notifications tab > Sounds tab.
2 Tap the sounds that you want to enable, then tap ok to close
the Sounds tab.
16 CK32 I-Safe Handheld Computer User’s Manual

Chapter 1 — Using the CK32 I-Safe Handheld Computer
3 Tap th e Vo lu me icon at the top of the screen, tap On, and
then move the slider bar to the desired volume level.
To disable the beeper volume
• To disable the beeper, tap the Vol u me icon, then drag the
slider to the bottom of the scale, or tap Off.
CK32 I-Safe Handheld Computer User’s Manual 17

Chapter 1 — Using the CK32 I-Safe Handheld Computer
You can also change the beeper volume using the Intermec
Setting application or by using the Beeper Volume command as
described below.
Additional Ways of Changing the Beeper Volume
Method Procedure
Use the Intermec
Settings application.
Use the Beeper
Volume command.
Go to Start > Settings > System > Intermec
Settings > Device Settings > Beeper > Vo lum e.
Remember to press Save when using Intermec
Settings.
For help, see “Beeper Volume” in the Intermec
Computer Command Reference Manual.
Scanning Bar Codes
Do not look directly into the window area or at a reflection of
the beam while the CK32 I-Safe is scanning. Long-term
exposure to the beam can damage your vision.
Use the scanner to scan and enter bar code data. The CK32
I-Safe supports the scanning of 1D linear bar codes.
When you unpack the CK32 I-Safe, these bar code symbologies
are enabled:
•Code 39
•Code 128
•PDF417
•UPC-A
•UPC-E
•EAN-8
• EAN-13
If you are using bar code labels that are encoded in a different
symbology, you need to enable the symbology on the CK32
I-Safe. Use Intermec Settings to enable and disable symbologies
for your scanner.
18 CK32 I-Safe Handheld Computer User’s Manual

Chapter 1 — Using the CK32 I-Safe Handheld Computer
Enabling or Disabling Symbologies
Use the following procedure to enable or disable symbologies on
your CK32 I-Safe.
To enable or disable symbologies
1 Ta p Start. The Start menu appears.
2 Ta p Settings > System.
3 Tap th e Intermec Settings icon. The Intermec Settings
application appears.
4 From the Intermec Settings application, go to Data
Collection > Internal Scanner > Symbologies.
5 Enable or disable any of the supported symbologies.
6 Ta p File > Save Setting to save your settings.
7 Ta p File > Exit to close Intermec Settings.
8 Scan bar code labels.
Scanning a Bar Code Label to Verify Scanner Operation
Use the following procedure to practice how to scan a bar code
and to verify that your scanner is working correctly.
CK32 I-Safe Handheld Computer User’s Manual 19

Chapter 1 — Using the CK32 I-Safe Handheld Computer
To scan most bar code labels and verify scanner operation
1 Press the Power button to turn on the CK32 I-Safe.
2 Ta p Start on the navigation bar located at the top of the
screen.
3 Ta p Word M o bil e > New to open the Word Mobile
application and a blank document.
4 Point the scanner window at the bar code label and hold the
computer at a slight angle 15 to 25 cm (6 to 10 in) from the
label.
5 Press the Scan button on the keypad, or pull the trigger on a
handle, and direct the red beam so that it falls across all bars
in the bar code label.
The information you scanned appears in the Word Mobile
document.
*INTERMEC*
Code 39 Test Bar Code
*123456*
*123456*
When the CK32 I-Safe successfully reads a bar code label, you
hear a high beep and the green Good Read light turns on
briefly.
20 CK32 I-Safe Handheld Computer User’s Manual

Chapter 1 — Using the CK32 I-Safe Handheld Computer
6 Release the Scan button.
To scan a PDF417 or Micro PDF417 bar code and verify scanner operation
1 Press the Power button to turn on the CK32 I-Safe.
2 Point the scanner window PDF417 or Micro PDF417 bar
code label and hold the computer at a slight angle 15 to
25 cm (6 to 10 in) from the label.
3 Press the Scan button on the keypad or pull the trigger on a
handle, and direct the red beam so that it falls across at the
top row of the bar code label.
Scanning a PDF417 or Micro PDF417 Bar Code Label
Use this test bar code:
PDF417 Test Bar Code
*123456789abcdefg*
4 Move the beam down all rows of the bar code label. The
CK32 clicks as it reads each row.
5 The CK32 I-Safe emits a high beep and the green Good Read
light turns on briefly when the CK32 I-Safe successfully reads
the entire bar code label.
CK32 I-Safe Handheld Computer User’s Manual 21

Chapter 1 — Using the CK32 I-Safe Handheld Computer
You may need to continue moving the beam from the bottom
of the bar code label to the top, and back to the bottom, until
you hear the high beep.
6 Release the Scan button.
22 CK32 I-Safe Handheld Computer User’s Manual

2
Understanding Windows Mobile
This chapter introduces Microsoft Windows Mobile 5.0 for
Pocket PC. In this chapter you will find these sections:
• Understanding Windows Mobile
• Using Microsoft ActiveSync
• Using Internet Explorer Mobile
CK32 I-Safe Handheld Computer User’s Manual 23

Chapter 2 — Understanding Windows Mobile
Understanding Windows Mobile
This chapter introduces Microsoft Windows Mobile 5.0. While
using your CK32 I-Safe, keep these key points in mind:
•Tap Start on the navigation bar, located at the top of the
screen, to quickly move to programs, files, and settings. Use
the command bar at the bottom of the screen to perform tasks
in programs. The command bar includes menus, icons, and
the onscreen keyboard.
• Tap and hold an item to see a pop-up menu containing a list
of actions you can perform. Pop-up menus give you quick and
easy access to the most common actions.
Ta p Start > Help, then select a topic on your CK32 I-Safe to find
additional information on Windows Mobile components.
Microsoft Windows Mobile contains these standard companion
programs:
•Word Mobile
•Excel Mobile
•PowerPoint Mobile
Finding Information in Windows Mobile
This chapter describes your CK32 I-Safe hardware, provides an
overview of the programs on your CK32 I-Safe, and explains how
to connect your CK32 I-Safe to a desktop, a network, or the
Internet. Use the following table to understand more about the
CK32 I-Safe.
Finding Information in Windows Mobile
For Information on: See this Source:
Programs on the CK32 I-Safe. This chapter and the CK32 I-Safe Help. To view Help,
tap Start > Help and then select a topic.
Additional programs you can install
on the CK32 I-Safe.
24 CK32 I-Safe Handheld Computer User’s Manual
The Windows Mobile CD.

Chapter 2 — Understanding Windows Mobile
Finding Information in Windows Mobile (continued)
For Information on: See this Source:
Connecting to and synchronizing
with a PC.
Last minute updates and detailed
technical information.
Up-to-date information on Windows
Mobile.
The ActiveSync Help on your desktop. To view Help,
click Help > Microsoft ActiveSync Help.
The readme files located in the Microsoft ActiveSync
folder on the desktop and on the Windows Mobile CD.
www.microsoft.com/windowsmobile/
Windows Mobile and many of the technologies supported by the
CK32 I-Safe are not from Intermec Technologies. Many of the
utilities and features on a Windows Mobile device come directly
from Microsoft without any modification from Intermec
Technologies. There may be certain Microsoft-specific issues that
Intermec Technologies would not be able to support, so contact
our front-line support personnel to determine the best source of
assistance.
Use these URLs for additional information about Microsoft
Windows Mobile (Pocket PC):
• msdn.microsoft.com/support/
• support.microsoft.com/
• news.microsoft.com
Learning the Basic Skills
Learning to use the CK32 I-Safe is easy. This section describes
the basic concepts of using and customizing your CK32 I-Safe
Computer.
Using the Today Screen
When you turn on your CK32 I-Safe for the first time each day,
you see the Today screen. You can also display it by tapping the
Start icon at the top left of your display and then To d a y . On the
Today screen, you can see important information for the day.
To customize what displays on the Today screen
•Tap Start > Settings > the Persona l tab > To d a y.
Status icons display information such as when the CK32 I-Safe is
connected to the network or to the Internet. You can tap an icon
to open the associated setting or program.
CK32 I-Safe Handheld Computer User’s Manual 25

Chapter 2 — Understanding Windows Mobile
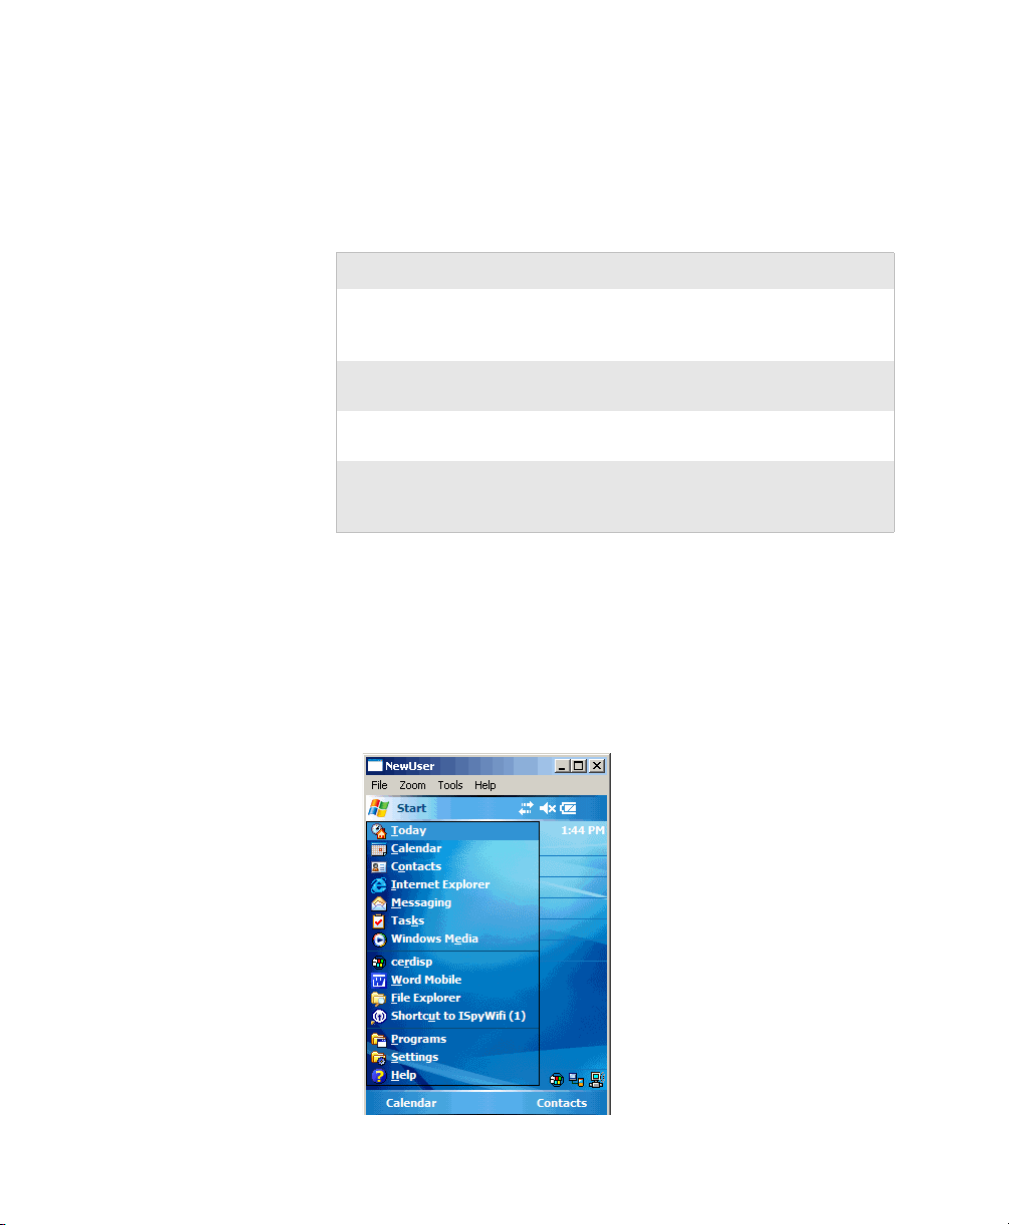
Accessing Programs
You can switch from one program to another by selecting it from
the Start menu.
To access programs
•Tap Start > Programs and then the program name.
The following is a partial list of programs that are on your CK32
I-Safe, in the order they appear in the Start menu. Look on the
Windows Mobile CD for additional programs that you can
install onto your CK32 I-Safe.
•Calendar
•Contacts
• Internet Explorer
• Messaging
• Windows Media
Closing an Application
Tapping the OK at the upper right of the application display does
not mean that the application is closed. To make sure that an
application is properly closed you need to verify that the memory
used by the application is released.
To release memory
•Tap Start > Settings > System > Memory > Running
Programs. Select the application you want to close and tap
Stop.
Using the Navigation Bar and the Command Bar
The navigation bar is located at the top of the screen. It displays
the active program and current time, and allows you to switch to
programs and close screens.
Windows Mobile Navigation Bar
The command bar is located at the bottom of the screen. Use the
command bar to perform tasks in programs. The command bar
includes menu names, functions, and the Input Panel icon when
needed.
26 CK32 I-Safe Handheld Computer User’s Manual

Chapter 2 — Understanding Windows Mobile
Windows Mobile Command Bar
Using Pop-Up Menus
Use pop-up menus to quickly perform an action on an item. For
example, you can use a pop-up menu to delete or make a copy of
an item. To access a pop-up menu, tap and hold the item on
which you want to perform the action. When the menu appears,
tap the action you want to perform, or tap anywhere outside the
menu to close the menu without performing the action.
Entering Information
You can enter information on your CK32 I-Safe in several ways
depending on the program you are using:
Understanding the Ways to Enter Information
Enter Information By: Description
Synchronizing Use Microsoft ActiveSync to synchronize or copy information
between your desktop PC and the CK32 I-Safe. For more
information on ActiveSync, see ActiveSync Help on your desktop PC.
Intermec recommends using ActiveSync version 4.1 or later with
Windows Mobile devices. You can download the latest version of
ActiveSync on the Microsoft web site.
Ty pi ng Enter typed text into the CK32 I-Safe by tapping keys on the
onscreen keyboard or by using the handwriting recognition
software.
Writing Use the stylus to write directly on the screen.
Drawing Use the stylus to draw directly on the screen.
Recording Create a stand-alone recording or embed a recording into a
document or note.
Use the input panel to enter information in any program on your
CK32 I-Safe Computer. You can either type using the onscreen
keyboard or write using Block Recognizer, Letter Recognizer,
or Tr an sc r ib e r. In either case, the characters appear as typed text
on the screen.
To show or hide the input panel
1 Tap th e Input Panel icon.
CK32 I-Safe Handheld Computer User’s Manual 27

Chapter 2 — Understanding Windows Mobile
2 Tap the arrow next to the Input Panel icon to see your
choices.
When you use the input panel, your CK32 I-Safe Computer
anticipates the word you are typing or writing and displays it
above the input panel. When you tap the displayed word, it is
inserted into your text at the insertion point. The more you use
the CK32 I-Safe, the more it learns to anticipate.
To change word suggestion options, such as the number of words
suggested at one time, tap Start > Settings > the Personal tab >
Input > the Wo r d Co mpl eti on tab.
Typing With the Onscreen Keyboard
Tap the input panel arrow, then tap Keyboard. On the soft
keyboard that is displayed, tap the keys with your stylus.
• To type lowercase letters, tap the keys with the stylus.
• To type a single uppercase letter or symbol, tap the Shift key.
To tap multiple uppercase letters or symbols, tap the CAP
key.
• To convert a letter to uppercase, tap and hold the stylus on
the letter and drag up.
• To add a space, drag the stylus to the right across at least two
keys.
• To backspace one character, drag the stylus to the left across at
least two keys.
• To insert a carriage return, tap and hold the stylus anywhere
on the keyboard and drag down.
28 CK32 I-Safe Handheld Computer User’s Manual

Chapter 2 — Understanding Windows Mobile
To use larger keys
1 Tap the input panel arrow.
2 Select Options.
3 Select the Large keys radio button.
Using Block Recognizer
Character recognition software gives you a fast and easy method
for entering information in any program on the CK32 I-Safe.
Letters, numbers, and punctuation you write are translated into
typed text.
To use Block Recognizer
1 Tap the input panel arrow and then tap Block Recognizer.
2 Write a letter in the box. It converts to typed text that appears
on the screen.
For help using Block Recognizer, tap the question mark next to
the writing area.
Using Letter Recognizer
With Letter Recognizer, you can write letters using the stylus just
as you would on paper.
To use Letter Recognizer
1 Tap the input panel arrow and then tap Letter Recognizer.
2 Write a letter in the box. It converts to typed text that appears
on the screen.
For help using Letter Recognizer, tap the question mark next to
the writing area.
Using Transcriber
With Transcriber, you can write anywhere on the screen using the
stylus block just as you would on paper. Unlike Letter Recognizer
and Clock Recognizer, you can write an entire sentence of
information.
To use Transcriber
1 Tap the input panel arrow and then tap Tr a n sc r i b e r.
2 Ta p ok.
CK32 I-Safe Handheld Computer User’s Manual 29

Chapter 2 — Understanding Windows Mobile
3 Write anywhere on the screen. Pause and let Transcriber
change the written characters to typed characters.
For help using Transcriber, tap the question mark in the lower
right-hand corner of the screen.
Selecting Typed Text
If you want to edit or format typed text, you must select it first.
Drag the stylus across the text you want to select. You can cut,
copy, and paste text by tapping and holding the selected words
and then tapping an editing command on the pop-up menu or
by tapping the command under Menu.
Writing on the Screen
In any program that accepts writing, such as the Notes program,
you can use your stylus to write directly on the screen. Write the
way you do on paper. You can edit and format what you have
written and convert the information to text in the future.
To convert the writing to text
•Select Menu > To o l s > Recognize. Your writing is converted
to text.
Finding and Organizing Information
You can use File Explorer to find files on your CK32 I-Safe and
organize these files into folders.
To open File Explorer
•Select Start > Programs > File Explorer.
Customizing the CK32 I-Safe
You can customize the CK32 I-Safe by adjusting settings and
installing additional software.
Adjusting Settings
You can adjust CK32 I-Safe settings for your environment.
To view the Settings options
•Select Start > Settings > either the Personal tab, the System
tab, or the Connections tab.
30 CK32 I-Safe Handheld Computer User’s Manual

Chapter 2 — Understanding Windows Mobile
Example of the Personal Tab
Adjustable Settings on the CK32 I-Safe
Setting Why Adjust It?
Buttons To associate a program with a button or customize
the way your Up/Down control repeats.
Input To select and customize the input method you
want to use (Keyboard, Block Recognizer, Letter
Recognizer, or Transcriber).
Lock To limit access to the CK32 I-Safe.
Menus To customize what appears on the Start menu.
Only 7 programs can appear on the Start menu.
Owner
Information
Sounds &
Notifications
Today To select items to appear on the Today screen.
To enter your contact information.
To Enable or Disable sounds for events, programs,
or notifications.
You can also change the appearance of your
desktop.
CK32 I-Safe Handheld Computer User’s Manual 31

Chapter 2 — Understanding Windows Mobile
Adding or Removing Programs
Programs added to your CK32 I-Safe at the factory are stored in
Read Only Memory (ROM). You cannot remove this software.
All other programs and files added to the CK32 I-Safe after
factory installation are stored in Random Access Memory
(RAM).
You can install any program created for the CK32 I-Safe, as long
as the computer has enough memory available. Go to the
Windows Mobile web site (www.microsoft.com/windowsmobile/
resources/communities/default.mspx) to find software.
Using Microsoft ActiveSync
Use Microsoft ActiveSync to synchronize the information on
your desktop with the information on the CK32 I-Safe.
Synchronization compares the data on the CK32 I-Safe with
your PC and updates both computers with the most recent
information.
Note: By default, ActiveSync does not automatically synchronize
all types of information. Use ActiveSync options to turn
synchronization on or off for specific information types.
You can also perform these functions with ActiveSync:
• Copy files between the CK32 I-Safe and the desktop.
• Back up and restore the CK32 I-Safe data.
• Control when synchronization occurs by selecting a
synchronization mode.
• Select which information types are synchronized and control
how much data is synchronized.
Note: Intermec recommends using ActiveSync version 4.1 or later
with Windows Mobile devices. You can download the latest
version of ActiveSync on the Microsoft web site.
To install ActiveSync
1 Connect the CK32 I-Safe to your desktop PC using the AN1
Communications Adapter (P/N 872-223-xxx).
2 Install ActiveSync on your desktop. ActiveSync is available
from the Windows Mobile CD or from the Microsoft web
site. ActiveSync is already installed on the CK32 I-Safe.
32 CK32 I-Safe Handheld Computer User’s Manual
Chapter 2 — Understanding Windows Mobile
After installation, ActiveSync automatically launches the
ActiveSync Setup Wizard.
3 Follow the screens of the ActiveSync to complete the
synchronization process. The wizard helps you connect to the
CK32 I-Safe, set up a partnership for synchronization, and
customizes synchronization settings.
The synchronization process automatically begins when you
finish the wizard.
4 Disconnect the CK32 I-Safe from your desktop PC.
Once you have set up ActiveSync and completed the first
synchronization process, you can initiate synchronization from
your CK32 I-Safe.
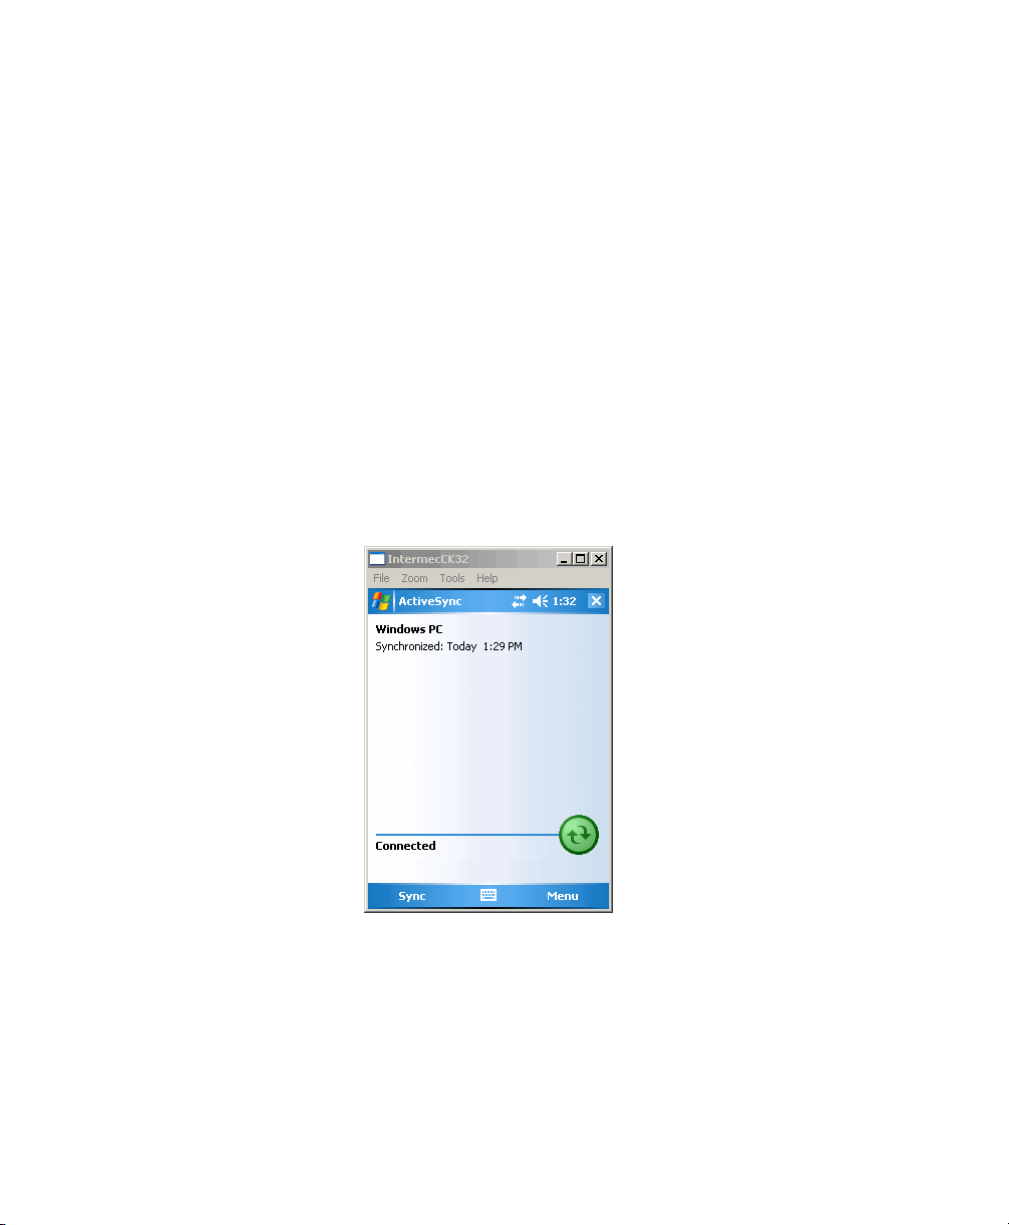
To start ActiveSync on your CK32 I-Safe
•Tap Start > Programs > ActiveSync. ActiveSync opens and
shows you the synchronization status.
For more information about ActiveSync on the CK32 I-Safe,
switch to ActiveSync, tap Start > Help, and then select a topic.
CK32 I-Safe Handheld Computer User’s Manual 33

Chapter 2 — Understanding Windows Mobile
Using Internet Explorer Mobile
You can use Internet Explorer Mobile to run web-based
applications, and view pages downloaded to the CK32 I-Safe.
You can also connect to the internet through an ISP or a network
connection.
You can make connections using a modem, a wireless network, or
Ethernet. You can use a modem connection to set up connections
with an external modem.
To use Internet Explorer
1 Set up a connection to your ISP or corporate network by
going to Start > Settings > Connections > and tap the
Connections icon. Use the Connections Help to understand
the process you need to go through to set up a connection.
2 Ta p Start > Internet Explorer. The default page that appears
when you open Internet Explorer contains links to Intermecspecific information and to the Windows Mobile web site.
Default Internet Explorer Web Page
34 CK32 I-Safe Handheld Computer User’s Manual

3
Use this chapter to understand how to configure the CK32 I-Safe
to communicate in your network. In this chapter, you will find
these sections:
• Configuring the CK32 I-Safe Operating Parameters
• Setting Up Ethernet Communications
• Setting Up Bluetooth Communications
• Setting Up 802.11 Radio Communications
• Configuring Security on the CK32 I-Safe
Configuring the CK32 I-Safe
CK32 I-Safe Handheld Computer User’s Manual 35

Chapter 3 — Configuring the CK32 I-Safe
Configuring the Operating Parameters
You can configure many operating parameters on the CK32
I-Safe, such as the symbologies it decodes or the network settings
it uses. The CK32 I-Safe provides a configuration application
called Intermec Settings that allows you to set all of the operating
parameters in one place.
Configuring the CK32 I-Safe Using Intermec Settings
Use Intermec Settings to configure the CK32 I-Safe and to view
system information.
Note: Using Intermec Settings, there is no way of detecting
preferred networks.
You access Intermec Settings from the Settings menu.
To start Intermec Settings
1 Tap th e Start icon to open the Start menu.
2 From the Start menu, select Settings.
3 From the Settings window, select the System tab.
4 Tap the Intermec Settings icon ( ). The Intermec
Settings application appears.
36 CK32 I-Safe Handheld Computer User’s Manual

Chapter 3 — Configuring the CK32 I-Safe
For detailed information on the commands available in Intermec
Settings, see the Intermec Computer Command Reference Manual
(P/N 073529). The Intermec Computer Command Reference
Manual is available from the Intermec web site.
Navigating in Intermec Settings
To Do This Function Do This
Select or expand a command Tap the command
Select text in a text box Tap in the text box and drag the
stylus over the text
Save settings Tap File > Save Settings or tap the
disk icon.
Remotely Configuring the CK32 I-Safe Using SmartSystems Foundation
The SmartSystems™ server lets you manage all your
SmartSystems-enabled devices at the same time from a central
host PC. The CK32 I-Safe ships with the SmartSystems client,
which means it is SmartSystems enabled. The SmartSystems
server has a console that displays all of the CK32 I-Safes in your
network. In the console, you can right-click a CK32 I-Safe and a
menu appears. To configure the CK32 I-Safe, choose Intermec
Settings from the menu.
The SmartSystems server and console are part of SmartSystems
Foundation and are available from the Intermec web site. To
download SmartSystems Foundation, go to www.intermec.com/
SmartSystems. For information on how to use the SmartSystems
server, see the online manual.
Setting Up Ethernet Communications
You can use the CK32 I-Safe directly in an Ethernet network by
connecting to the network using the AN1 Communications
Adapter.
Note: The CK32 I-Safe supports Ethernet communication or
802.11 communications but it cannot support both at the same
time. The factory default is no communications are enabled.
CK32 I-Safe Handheld Computer User’s Manual 37

Chapter 3 — Configuring the CK32 I-Safe
Intrinsically Safe rules prohibit direct connection to the CK32
I-Safe.
To use the CK32 I-Safe in an Ethernet network
1 Tap the iConnect icon ( ) in the lower right corner of the
Today screen.From the menu, select Enable > Ethernet. This
change disables 802.11 networking on the CK32 I-Safe.
2 You will be prompted to reboot the device for changes to take
affect. Press and hold the Power button for 10 seconds to
initiate the reboot. Do not use the Reset button . See
“Preferred Reset Method” on page 110 for more information.
3 Go to Start > Settings > the System tab > Intermec Settings
> Communications > Ethernet Adapter > IP Settings.
4 If you have a DHCP server, enable DHCP.
or
If you do not have a DHCP server, set these parameters:
• IP address
•Subnet mask
• Default router
38 CK32 I-Safe Handheld Computer User’s Manual

Chapter 3 — Configuring the CK32 I-Safe
5 If required for your network, you may also need to set these
parameters on each CK32 I-Safe:
• Primary and secondary DNS servers
• Primary and secondary WINS servers
6 Make sure your CK32 I-Safe is talking to the network and
that the network can see your CK32 I-Safe.
To check the status of your Ethernet connection
1 Tap the iConnect icon ( ) in the lower right corner of the
Today screen.
2 From the menu, select Status > Ethernet. The Ethernet
Status screen appears and checks the connection.
You can also use iConnect to configure the network settings if
you need to change any setting. Tap To o l s > Ethernet IP
Settings from the iConnect menu.
Setting Up Bluetooth Communications
You can send information to a Bluetooth device wirelessly using
the standard Bluetooth radio in the CK32 I-Safe. The Bluetooth
technology uses short-range radio links and allows for
communications over a 10-meter (32.8 foot) range.
You can use the Bluetooth radio to connect to wireless devices
including:
• Scanners
•Printers
• Headsets
CK32 I-Safe Handheld Computer User’s Manual 39

Chapter 3 — Configuring the CK32 I-Safe
To turn the Bluetooth radio on
1 Select Start > Settings > System > Intermec Settings >
Bluetooth.
2 Tap th e Power On radio button and tap File > Save Settings.
Once Bluetooth is enabled, it stays enabled through a warm or
cold boot and maintains virtual COM ports (such as printing)
registration.
For more information on Bluetooth software, see the Bluetooth
Resource Kit and the Wireless Printing Development Guide in the
Intermec Developer Library (IDL). You can download this
Resource Kit from the Intermec Developer Library web site at
www.intermec.com/idl.
40 CK32 I-Safe Handheld Computer User’s Manual

Chapter 3 — Configuring the CK32 I-Safe
Use this table to understand the settings you see in the Bluetooth
menu in Intermec Settings.
Bluetooth Settings
Setting Description
Power Set and view whether the Bluetooth radio is on or
off.
Class of Device Determines how the device appears to other devices
during discovery.
Discoverable Makes the CK32 I-Safe discoverable.
Connectable Makes the CK32 I-Safe connectable.
IBT Displays the version of the Intermec Bluetooth
Library.
Radio Displays the version of the Bluetooth Radio
Hardware.
Device Address Displays the Bluetooth address of your CK32 I-
Safe.
Configuring Bluetooth Communications for Wireless Printing
This section explains how to configure the CK32 I-Safe for
Bluetooth wireless printing. You need to:
• make sure Bluetooth power is on. For help, see the procedure
in “Setting Up Bluetooth Communications” on page 39.
• create an application that lets you print. For help, see the next
section.
• select the current wireless printer on the CK32 I-Safe. For
help, see “Selecting the Current Wireless Printer on the
CK32 I-Safe” on page 42.
Creating an Application That Lets You Print Wirelessly
The CK32 I-Safe does not ship with an application that lets you
print wirelessly. You must create an application that opens the
wireless printing COM port on the CK32 I-Safe. For help, see
the Bluetooth Resource Kit section of the IDL Resource Kit
Developer’s Guide, P/N 934-006-xxx.
The Wireless Printing applet is available from Start > Settings >
System. The applet separates the task of wireless printing setup
from other Bluetooth management tasks.
CK32 I-Safe Handheld Computer User’s Manual 41

Chapter 3 — Configuring the CK32 I-Safe
The Wireless Printing applet uses the concept of a “current
wireless printer.” The CK32 I-Safe connects to the current
wireless printer when your application opens the wireless printing
COM port on the CK32 I-Safe. If there is no current wireless
printer selected on your CK32 I-Safe, there is no wireless printing
COM port registered on your CK32 I-Safe. You must select a
current wireless printer on your CK32 I-Safe, as described in the
next section.
The Wireless Printing applet performs these tasks on the CK32 ISafe:
• Helps you select the current wireless printer
• Stores the current wireless printer in the registry
• Registers/deregisters the wireless printing COM port
• Stores the wireless printing COM port in the registry as the
WPort
Specifically, the current wireless printer is registered and
deregistered on Bluetooth stack load/unload. If you select a
different current wireless printer, the existing wireless printing
COM port is deregistered and the new one is registered instead.
The Wireless Printing applet uses the Bluetooth COM Port
Control to handle COM port registration/deregistration.
Selecting the Current Wireless Printer on the CK32 I-Safe
By default, there is no current wireless printer selected on the
CK32 I-Safe.
There are three ways to select the current wireless printer:
• Discovering the printer using Bluetooth device discovery
• Manually entering the printer’s Bluetooth device address
• Choosing the printer from a list of previously discovered
printers
42 CK32 I-Safe Handheld Computer User’s Manual

Chapter 3 — Configuring the CK32 I-Safe
To discover the printer with Bluetooth device discovery
1 Select Start > Settings > the Systems tab > Wireless
Printing. The Wireless Printing wizard appears.
2 Ta p Acquire Printer to initiate printer discovery. All
Bluetooth printers discovered within range appear in the
devices list.
3 Select the printer you want to connect to and then tap OK.
If your preferred printer does not appear, make sure the
printer is turned on and discovery is enabled, and then repeat
Steps 1 through 3.
4 Ta p Tes t P ri nt . The printer prints out the test page.
CK32 I-Safe Handheld Computer User’s Manual 43

Chapter 3 — Configuring the CK32 I-Safe
To manually enter the device address of the printer
1 Select Start > Settings > the System tab > Wireless
Printing. The Wireless Printing wizard appears.
2 Ta p Manual > Acquire Printer. The wizard advances to the
next screen where you enter the device address.
3 Type the address of the printer in the Enter Device Address
text box and then tap OK. The keyword -unknown- appears
in the Device Name field in the Current Wireless Printer box.
The name of the printer is not sent to the CK32 I-Safe when
you manually enter the printer address.
4 Ta p Tes t P ri nt . The printer prints out the test page.
To choose the printer from a list of previously discovered printers
1 Make sure you have already performed a Bluetooth device
discovery.
2 Select Start > Settings > the System tab > Wireless
Printing. The Wireless Printing wizard appears.
3 Tap Set Different Printer. The Devices list appears with the
list of previously discovered printers.
4 Select the printer you want and tap OK.
5 Ta p Tes t P ri nt . The printer prints out the test page.
44 CK32 I-Safe Handheld Computer User’s Manual

Connecting to a Bluetooth Audio Device
Use the Bluetooth Audio applet to discover, activate, and connect
to Bluetooth audio devices such as a Bluetooth headset. You can
control the audio volume and microphone gain for the connected
Bluetooth audio device.
To connect to a Bluetooth headset
1 Select Start > Settings > the System tab > Bluetooth Audio.
2 Ta p Search for devices. Discovered audio devices are added
to the list with an icon to identify them.
3 Double-tap a Bluetooth audio device from the list of Connect
headsets / hands-free devices.
4 When a pop-up menu appears and then select Activate. The
device icon changes to include a check mark.
5 Double-tap the device name and then select Connect. When
a connection is established, the statues changes to connected.
6 Tap th e Vo lu me slider bar or Microphone slider bar to adjust
the setting.
Chapter 3 — Configuring the CK32 I-Safe
Setting Up 802.11 Radio Communications
The CK32 I-Safe has an internal 802.11 b/g radio to transfer
data using wireless communications. This section of the manual
assumes that you have already set up your wireless
communications network including your access points. If you are
using a UDP Plus network, you also need to have your Intermec
Application Server communicating with a host computer.
Note: The CK32 I-Safe supports Ethernet communication or
802.11 communications but it cannot support both at the same
time. The factory default is no communications are enabled.
The CK32 I-Safe supports these network protocols:
•TCP/IP
• UDP Plus
The next sections explain the parameters you need to configure
for the CK32 I-Safe to work in your wireless network.
CK32 I-Safe Handheld Computer User’s Manual 45

Chapter 3 — Configuring the CK32 I-Safe
Configuring the Network Parameters for a TCP/IP Network
In a TCP/IP network, the CK32 I-Safe communicates with a
host computer directly using TCP/IP. The access point acts as a
bridge to allow communications between the wired network and
the wireless network.
To use wireless communications in a TCP/IP network
1 Tap the iConnect icon ( ) in the lower right corner of the
Today screen.From the menu, select Enable > Wireless. This
disables the Ethernet connection.
2 You will be prompted to reboot the device for changes to take
affect. Press and hold the Power button for 10 seconds to
initiate the reboot. Do not use the Reset button. See
“Preferred Reset method” on page 110 for more information.
3 Go to Start > Settings > the System tab > Intermec Settings
> Communications > 802.11 Radio.
4 Configure these network parameters on each CK32 I-Safe in
the network:
• Network name (SSID)
• IP settings (if not using DHCP)
5 Make sure that the CK32 I-Safe is talking to the network and
that the network can see the CK32 I-Safe.
46 CK32 I-Safe Handheld Computer User’s Manual

Chapter 3 — Configuring the CK32 I-Safe
6 Configure security. For help, see See “Using ISpyWiFi” on
page 48.
You can configure the network parameters on the CK32 I-Safe to
using Intermec Settings or ISpyWiFi. For information on
Intermec Settings, see “Configuring the CK32 I-Safe Using
Intermec Settings” on page 36.
Configuring the Network Parameters for a UDP Plus Network
In a UDP Plus network, the CK32 I-Safe communicates with a
host computer through the Intermec Application Server. The
Intermec Application Server translates UDP Plus packets on the
wireless network into TCP/IP packets on the wired network and
vice versa. The access point acts as a bridge to allow
communications between the wired network and the wireless
network.
To use wireless communications in a UDP Plus network
1 Go to Start > Settings > the System tab > Intermec Settings
> Communications >UDP Plus.
2 Configure these network parameters on the CK32 I-Safe:
• UDP Plus Activate
• Controller IP address
• Controller Port
3 Make sure the CK32 I-Safe is talking to the network and that
the network can see the CK32 I-Safe.
4 Configure security. For help, see “Configuring Security on the
CK32 I-Safe” in the next section.
Checking the Status of Your Wireless Connection
After you configure your wireless settings, you can use iConnect
to check the status of your connection.
To check the status of your wireless connection
1 Tap the iConnect icon ( ) in the lower right corner of the
Today screen.
2 From the menu, select Status > Wireless. The Wireless Status
screen appears and checks the connection.
CK32 I-Safe Handheld Computer User’s Manual 47

Chapter 3 — Configuring the CK32 I-Safe
You can also use iConnect to configure the network settings if
you need to change anything by tapping To o l s > Wireless
Settings from the iConnect menu.
Using ISpyWiFi
The ISpyWiFi utility provides more detailed information for the
802.11 radio connection in your CK32 I-Safe, such as MAC
address, access point information, association, encryption, power
management, antenna status, RSSI, data link rates, and
supplicant status.
Starting the Utility
The ISpyWiFi utility is installed in your CK32 I-Safe as an
executable. You can either start the utility using File Explorer, or
creating a shortcut to start the utility from the CK32 I-Safe
desktop, or from iConnect.
To start the ISpy WiFi utility via File Explorer
•Tap Start > Programs > the File Explorer icon, then tap the
“\Windows” folder from the root. Scroll down for, then
double-click the ISpyWifi executable.
To place the ISpyWiFi utility in the Programs group
1 Press and hold your stylus on the ISpyWifi executable for its
pop-up menu, then select Copy.
48 CK32 I-Safe Handheld Computer User’s Manual

Chapter 3 — Configuring the CK32 I-Safe
2 Scroll up to the “\Start Menu\Programs” folder, then tap it to
open.
3 Press and hold your stylus in an empty (white) area in the
folder, for its pop-up menu, then select Paste Shortcut.
Close the File Explorer, select Start > Programs to locate
the Shortcut to ISpyWifi icon, like the following. Tap this
icon to access the ISpyWifi application.
To start iSpyWiFi from iConnect
1 Tap the iConnect icon ( ) in the lower right corner of the
Today screen.
2 From the menu, select Status > Wireless > Advanced. The
iSpyWiFi screen appears.
ISpyWiFi
The ISpyWiFi tab contains network inte rface, configurat ion, access point, and rad io frequency informat ion:
CK32 I-Safe Handheld Computer User’s Manual 49

Chapter 3 — Configuring the CK32 I-Safe
ISpyWiFi Tab Contents
WiFi NIC (Network Interface Card)
BCMCF1 A WLAN adapter and its associated driver version
MAC The client radio MAC address
IP(DHCP) The IP address of the client radio, if using DHCP
IP (Static) The IP address of the client radio, if using a static IP address
AP
Status Shows whether the radio is associated with the access point
Channel The channel on which the radio is communicating with the access point
ESSID The text SSID (Network Name) for your network
BSSID MAC address of radio AP with which the client radio is communicating
Config
Association Shows one of the following types:
Encrypt Shows potential encryptions for the association shown:
Power CAM (Constantly Awake Mode) or FAST PSP (Power Save Poll)
Antenna Diversity (multiple antennas), Primary (one antenna)
RF
TX Power Transmit power level in milliwatts (mW).
RSSI The Received Signal Strength Indicator. The closer to zero, the better.
Link The data rate at which the radios are communicating
50 CK32 I-Safe Handheld Computer User’s Manual
Open, WPA, WPA-PSK, WPA2, Network EAP
Key Absent/WEP, TKIP, Key Absent, TKIP/AES, WEP
For example: -40dBm is excellent, while -60dBm is good.

Chapter 3 — Configuring the CK32 I-Safe
WiFi Scan
Use the WiFi Scan tab to scan your network and bring back
information about any access points with which you can
communicate.
Ta p Scan, then wait for the table to fill with information. Tap
any of the columns to sort by ascending or descending order. Tap
the slider bar on the bottom to scroll left and right to view all of
the information.
WiFi Scan Tab Contents
Scan
SSID The SSID broadcast from the access point
Signal The RSSI seen from the access point
Channel Channel on which client radio is communicating with access point
BSSID The MAC address for the access point radio
Privacy “Y” - WEP, TKIP, or AES encryption is being used;
“N” - no encryption is being used
CK32 I-Safe Handheld Computer User’s Manual 51

Chapter 3 — Configuring the CK32 I-Safe
Supplicant
The Supplicant tab provides you with security and
authentication information configured elsewhere in the
CK32 I-Safe.
SuppSupplicant Tab Contents
Supplicant Tab Contents
Supplicant
Service Status ON: Intermec Funk Security is enabled
OFF: Microsoft Security is enabled
Starting Up:
Shutting Down:
Unknown/Undefined:
Authentication State: authenticated: Authentication Server successful
authentication failed: Previous authentication attempt failed
disconnected: No authentication used, Open or Static WEP
connection used
acquired: Access point located, authentication process not
initiated
authenticating: Attempting authentication with Authentication
Server
logoff: Current session terminated by supplicant
unknown: Error occurred, but not defined
52 CK32 I-Safe Handheld Computer User’s Manual

Chapter 3 — Configuring the CK32 I-Safe
Supplicant Tab Contents (continued)
Authentication Result success: Authentication successful
time-out: Authentication Server not responding to requests, you
may be out of range
no credentials: Proper credentials not configured in device
client reject: Unable to validate access point certificate
server reject: Authentication Server rejects submitted credentials
unknown: No authentication used or in the process of
authentication
Supplicant Events Displays output from the supplicant detailing its status.
Intermec Supplicant
Version
Version of Intermec Funk Security in the CK32 I-Safe
• Click Configure Profile to launch the Profile Wizard and
configure 802.11 options.
• Click Reconnect to disassociate the radio, momentarily
dropping its connection. The radio then reassociates and
reauthenticates, but does not do anything with the radio
driver.
• Click Clear Events to remove the information shown in the
Supplicant Event box.
CK32 I-Safe Handheld Computer User’s Manual 53

Chapter 3 — Configuring the CK32 I-Safe
Ping
Use the Ping tab to contact with any host in your network for
information.
Ping Tab Contents
Ping
Timing Statistics Min: The shortest ping reply in milliseconds (ms)
Max: The maximum ping reply in milliseconds
Avg: The average ping reply time
Count: The number of pings already completed
Timeouts: The number of pings that did not receive a response
BSSID The MAC address for the access point radio
Channel: The channel on which the access point is communicating
RSSI The RSSI seen on the access point
Link The speed at which the last ping occurred.
1 From the Host drop-down list, select an IP address for the
host you want to ping. Enter a new IP address using the input
panel or the keypad. Select Clear List to remove all the IP
addresses from the drop-down list.
2 From the Repetitions drop-down list, select the number of
times to ping the selected host. These repetitions are done
once per second.
54 CK32 I-Safe Handheld Computer User’s Manual

Chapter 3 — Configuring the CK32 I-Safe
3 Ta p Ping to initiate contact with the selected host
4 Depending on how the screen is set up, you can toggle
between a graph and a list of ping results:
•Tap Graph to toggle to the graphical view of 25 of the
most recent pings and their response results, like in the
following sample graph:
Note the size of the gray area represents the standard deviation from
the mean.
•Tap List to toggle to detailed information showing what
ping touched what host and its RTT (Round Trip Time).
Supplicant Logging
If you reach a situation where you need to send in debug
information to Intermec Product Support or Intermec
Engineering, you can use the Intermec Funk Security logging
feature.
1 Tap t he Supplicant tab, then tap Configure Profile to access
the Profile Wizard.
2 Ta p Edit Selected Profile, then tap the Advanced tab.Check
Enable Logging, tap ok to close the profile settings, then tap
ok to close the Profile Wizard.
CK32 I-Safe Handheld Computer User’s Manual 55

Chapter 3 — Configuring the CK32 I-Safe
The debug output file is then stored in the “\My Device” root
folder as a text file called “uroddsvc.” Using File Explorer,
press and hold your stylus on this file for its pop-up menu,
then select any of its options to copy, beam, send, or delete
this file.
Configuring Security on the CK32 I-Safe
The CK32 I-Safe provides three types of security for your wireless
network:
• Wi-Fi Protected Access (WPA)
• 802.1x
•WEP
This section explains how to configure security on your wireless
CK32 I-Safe. If you choose not to use security, see “Disabling
Security” on page 79. Intermec always recommends that you
implement security.
You must use either Funk or Microsoft security to implement
your security solution. For details, see “Choosing Between Funk
and Microsoft Security” on page 60.
56 CK32 I-Safe Handheld Computer User’s Manual

If you are using WPA-802.1x, WPA2-802.1x, or 802.1x security,
this section assumes that your authentication server and
authenticators are properly configured.
Note: Your security choice does not depend on your
authentication server. For example, you can choose Funk security
if you use Microsoft’s Internet Authentication Service.
Understanding the Wireless Network
Your wireless radio adapter (network interface card) connects to
wireless networks of two types: infrastructure and ad-hoc
networks.
• Infrastructure networks get you onto your corporate network
and the internet. The CK32 I-Safe establishes a wireless
connection to an access point, which links you to the rest of
the network. When you connect to a network using an access
point, you are using the 802.11 b/g infrastructure mode.
• Ad-hoc networks are private networks shared between two or
more clients.
Each wireless network is assigned a name or SSID (Service Set
Identifier) to allow multiple networks to exist in the same area
without infringing on each other.
Chapter 3 — Configuring the CK32 I-Safe
Intermec recommends using security with wireless networks to
prevent unauthorized access to your network and to ensure the
privacy of transmitted data. Authentication by both the network
and the user are required elements for secure networks. Use the
following table to understand some of the wireless network
terminology.
Using WPA Security
Wi-Fi Protected Access (WPA) is a strongly enhanced,
interoperable Wi-Fi security that addresses many of the
vulnerabilities of Wired Equivalent Privacy (WEP). Instead of
WEP, WPA uses Temporal Key Integrity Protocol (TKIP) for its
data encryption method.
Currently, WPA satisfies some of the requirements in the IEEE
802.11i draft standard. When the standard is finalized, WPA will
maintain forward compatibility.
CK32 I-Safe Handheld Computer User’s Manual 57

Chapter 3 — Configuring the CK32 I-Safe
WPA runs in 802.1x (Enterprise) mode or PSK (Pre-Shared Key)
mode:
• In Enterprise mode, WPA provides user authentication using
802.1x and an Extensible Authentication Protocol (EAP).
That is, an authentication server (such as a RADIUS server)
must authenticate each device before the device can
communicate with the wireless network.
• In PSK mode, WPA provides user authentication using a
shared key between the authenticator and the CV30. WPAPSK is a good solution for small offices or home offices that
do not want to use an authentication server.
To use WPA security, you need:
• an authentication server (Enterprise mode only).
• an access point with an 802.11 b/g radio that supports WPA.
• a CK32 I-Safe with the 802.11b/g radio and the 802.1x/WPA
security option.
The CK32 I-Safe also supports Wi-Fi Protected Access 2 (WPA2)
if you are using Funk security. WPA2 uses an Advanced
Encryption Standard (AES) for data encryption.
WPA2 runs in 802.1x (Enterprise) mode or PSK (Pre-Shared
Key) mode:
• For WPA2-802.1x mode, WPA2 requires authentication in
two phases; the first is an open system authentication and the
second uses 802.1x and an Extensible Authentication
Protocol (EAP) authentication method.
• In PSK mode, WPA2 provides user authentication using a
shared key between the authenticator and the CK32 I-Safe.
WPA2-PSK is a good solution for small offices or home
offices that do not want to use an authentication server.
Using Static WEP Security
The CK32 I-Safe uses the Wired Equivalent Privacy (WEP)
protocol to add security to your wireless network based on the
802.11 standard.
58 CK32 I-Safe Handheld Computer User’s Manual

To use WEP security, you need:
• a CV30 with an 802.11b/g radio.
• an access point with an 802.11b/g radio.
Using 802.1x Security
802.1x security provides centralized user authentication using an
authentication server, authenticators (access points), and
supplicants. These components communicate using an EAP
authentication type, such as TLS (Transport Layer Security) or
PEAP (Protected Extensible Authentication Protocol). 802.1x
security provides data encryption using dynamic WEP key
management.
To use 802.1x security, you need:
• an access point with an 802.11b/g radio.
• a CK32 I-Safe with an 802.11b/g radio and the 802.1x/WPA
• an authentication server.
Using LEAP Security
Chapter 3 — Configuring the CK32 I-Safe
security option.
Lightweight Extensible Authentication Protocol (LEAP), also
known as Cisco-Wireless EAP, provides username/passwordbased authentication between a wireless client and a RADIUS
server. In the 802.1x framework, traffic cannot pass through an
Ethernet hub or wireless network access point until it successfully
authenticates itself.
The station must identify itself and prove that it is an authorized
user before it is actually allowed to use the LAN. LEAP also
delivers a session key to the authenticated station, so that future
frames can be encrypted with a key that is different than keys
used by other sessions.
To use LEAP security, you need:
• a RADIUS server.
• Cisco access points.
LEAP security is not supported with Microsoft security.
CK32 I-Safe Handheld Computer User’s Manual 59

Chapter 3 — Configuring the CK32 I-Safe
Choosing Between Funk and Microsoft Security
The CK32 I-Safe provides both Funk and Microsoft security
choices. Funk security is the default setting. Use the following
sections to set security using either Funk or Microsoft as your
security choice. Both security choices offer similar features, but
Funk security also offers these features:
• CCX v2.0 compliance
• Support for LEAP, TTLS, and FAST
• Configuration of up to four profiles
If you want to use the default Funk security, you need to select a
profile. For help, see one of the following sections, “Configuring
Funk Security Using Intermec Settings.” or “Configuring Funk
Security Using the Profile Wizard.”
If you want to use Microsoft security, you need to select it as your
security choice. For help, see “Configuring Microsoft Security”
on page 73.
Configuring Funk Security Using Intermec Settings
You can define up to four profiles for Funk security. Different
profiles let your CK32 I-Safe communicate in different networks
without having to change all of your security settings. For
example, you may want to set up one profile for the
manufacturing floor and one for the warehouse. By default, the
active profile is Profile_1.
To select a profile for Funk security
1 Select Start > Settings > the System tab > Intermec Settings.
2 Select Communications > 802.11 Radio > Funk Security.
3 Select Active Profile, choose a profile from the list, and save
your settings.
4 Tap the active profile to expand it.
5 (Optional) Give your profile a meaningful name:
a Select Profile Label and a text box appears.
b Select the text in the box, type a meaningful name, and
save your settings.
60 CK32 I-Safe Handheld Computer User’s Manual

Chapter 3 — Configuring the CK32 I-Safe
6 Select one profile as the active profile by tapping Active
Profile and choosing a profile fro the drop-down list.
7 Save your settings.
Configuring WPA Security With Funk Security
Use these procedures to set WPA-802.1x, WPA2-802.1x, WPAPSK, or WPA2-PSK security on your CK32 I-Safe with Funk
security.
To configure WPA-802.1x with Funk security
1 Open Intermec Settings.
2 Make sure you have configured the communications and
radio parameters on your CK32 I-Safe.
3 Make sure you have selected Funk as your security choice.
4 Open Intermec Settings.
5 Choose Communications > 802.11 Radio > Funk Security
> Profile.
6 For Association, choose WPA or WPA2 and press Enter.
Encryption automatically defaults to TKIP if you are using
WPA. Encryption automatically defaults to WEP if you are
using Shared.
7 For 8021x, choose TTLS, PEAP, EAP-FAST, or TLS and
press Enter.
If you choose TTLS or PEAP:
a For Prompt for Credentials, choose Enter credentials
now.
Note: You can use Prompt for credentials to
troubleshoot your connection to the network if you have
problems. By choosing Enter credentials now, you are
storing the user name and password on the device so that
you will not need to enter it every time.
b Select User name and type your user name.
c Select User Password and type a user password.
d For Va lid a te Se rver Cert ifi ca te, choose Ye s.
CK32 I-Safe Handheld Computer User’s Manual 61

Chapter 3 — Configuring the CK32 I-Safe
Note: You must have the date on the CK32 I-Safe set
correctly when you enable Validate Server Certificate.
If you choose TLS:
a Load a user and root certificate on your CK32 I-Safe. For
help, see “Loading a Certificate” on page 76.
b For Va lid a te Se rver Cert ifi ca te, choose Ye s.
c You m ust ent er a User Name and Subject Name. You can
also enter a Server Common Name if you want to
increase your level of security.
8 Save your settings.
To enable WPA-PSK or WPA2-PSK with Funk security
1 Open Intermec Settings.
2 Make sure you have configured the communications
parameters and selected Funk as your security choice.
3 Make sure you have selected Funk as your security choice.
4 Open Intermec Settings.
5 Choose Communications > 802.11 Radio > Funk Security
> Profile.
6 For Association, choose WPA or WPA2.
7 For 8021x, choose None.
8 For Pre-Shared Key, enter the pre-shared key or the
passphrase.
The pre-shared key may be given in hexadecimal by prefixing
a string of 64 hex digits with 0x for a total of 66 characters, or
by entering a passphrase of 8 to 63 characters.
The pre-shared key value must exactly match the key on the
authenticator.
9 Save your settings.
Configuring 802.1x Security With Funk Securi
ty
1 Open Intermec Settings.
62 CK32 I-Safe Handheld Computer User’s Manual

Chapter 3 — Configuring the CK32 I-Safe
2 Make sure you have configured the communications and
radio parameters on your CK32 I-Safe.
3 Make sure you have selected Funk as your security choice.
4 Choose Communications > 802.11 Radio > Funk Security
> Profile.
5 For Association, choose Open.
6 For Encryption, choose WEP.
7 For Inner Authentication, choose TTLS, PEAP or TLS.
If you choose TTLS or PEAP:
a Select User name and type your user name.
b Select Password prompt, and choose Enter password
now.
Note: You can use Prompt for password to troubleshoot your
connection to the network if you have problems.
c Select User Password and type a user password.
d For Va lid a te Se rver Cert ifi ca te, choose Enabled.
If you choose TLS:
a Load a user and root certificate on your CK32 I-Safe. For
help, see “Loading a Certificate” on page 76.
b For Va lid a te Se rver Cert ifi ca te, choose Ye s.
c You m ust ent er a User Name and Subject Name. You can
also enter a Server Common Name if you want to
increase your level of security.
8 Save your settings.
Configuring LEAP Security on the CK32 I-Safe
1 Open Intermec Settings.
1 Make sure you have selected Funk as your security choice.
2 Make sure you have configured the communications
parameters and selected Funk as your security choice.
CK32 I-Safe Handheld Computer User’s Manual 63

Chapter 3 — Configuring the CK32 I-Safe
3 From Intermec Settings, choose Communications > 802.11
Radio > Funk Security > Profile.
4 For 8021x, choose LEAP.
5 For Association, choose Open, WPA, WPA2, or Network
EAP. Encryption automatically defaults to TKIP if you
choose WPA, to AES if you choose WPA2, and to WEP if
you choose Open or Network EAP.
6 For Prompt for Credentials, select Enter credentials now.
7 Select User name and type your user name.
8 Select User Password and type your user password.
9 Save your settings.
Configuring Static WEP Security With Funk Security
1 Open Intermec Settings.
2 Make sure you have configured the communications
parameters and selected Funk as your security choice.
3 Choose Communications > 802.11 Radio > Funk Security
> Profile.
4 For Association, choose Open.
5 For Encryption, choose WEP.
6 For 8021x, choose None.
7 Define a value for the keys you want to use. You can define up
to four keys (Key 1 through Key 4).
Enter an ASCII key or a hex key that is either 5 bytes or 13
bytes long depending on the capability of the radio. Set a 5byte value for 64-bit WEP or a 13-byte value for 128-bit
WEP. Hex keys must be preceded by 0x and contain 5 or 13
hex pairs.
8 For Tr an smi t k ey, choose the key you want to use for
transmitting data.
9 Save your settings.
64 CK32 I-Safe Handheld Computer User’s Manual

Chapter 3 — Configuring the CK32 I-Safe
Configuring Funk Security Using the Profile Wizard
You can start 802.11 b/g communications on the CK32 I-Safe
using the Profile Wizard. A profile contains all the information
necessary to authenticate you to the network, such as login name,
password or certificate, and protocols by which the CK32 I-Safe
is authenticated. You can have up to four profiles for different
networks. For example, you may have different login names or
passwords on different networks.
To select a profile for Funk security
1 Open Intermec Settings.
2 Select Start > Settings > the Systems tab > Wireless
Network.
or
Tap the iConnect icon ( ) icon in the lower right corner
of the screen and select To o l s > Wireless Settings.
The Profile Wizard appears on the screen.
3 From the Profile list, select the profile you want to configure
4 Ta p Edit Selected Profile.
5 (Optional) Give your profile a meaningful name by selecting
the text in the Profile Label text box and typing a meaningful
name.
CK32 I-Safe Handheld Computer User’s Manual 65

Chapter 3 — Configuring the CK32 I-Safe
6 From the Network type list, select either Infrastructure or
Ad-Hoc. Select Infrastructure if the network uses access
points to connect to the corporate network or internet. Select
Ad-Hoc to set up a private network with one or more
participants.
7 Enter the SSID (Network Name) if different than the profile
name.
8 Ta p OK.
Configuring WEP Security With Profile Wizard
1 In the Profile Wizard, select the Security page.
2 For 8021x Security, choose None.
3 For Association, choose Open or Shared to match the
settings on your access point.
4 For Encryption, choose WEP.
5 From the Data TX Key list, select the key you want to use for
transmitting data.
6 Define a value for the keys you want to use. You can define up
to four keys (Key 1 through Key 4).
Enter an ASCII key or a hex key that is either 5 bytes or 13
bytes long depending on the capability of the radio. Set a 5-
66 CK32 I-Safe Handheld Computer User’s Manual

Chapter 3 — Configuring the CK32 I-Safe
byte value for 64-bit WEP or a 13-byte value for 128-bit
WEP. Hex keys must be preceded by 0x and contain 5 or 13
hex pairs.
7 Ta p OK.
Configuring WPA-PSK Security With Profile Wizard
1 In the Profile Wizard, select the Security page.
2 For 8021x Security, choose None.
3 For Association, choose WPA.
4 For Pre-Shared Key field, enter the passphrase as ASCII. The
passphrase must be 8 to 63 characters and match the
passphrase on the access point.
5 Ta p OK.
Configuring WPA2-PSK Security With Profile Wizard
1 In the Profile Wizard, select the Security page.
2 For 8021x Security, choose None.
3 For Association, choose WPA2.
4 For Pre-Shared Key field, enter the passphrase as ASCII. The
passphrase must be 8 to 63 characters and match the
passphrase on the access point.
5 Ta p OK.
CK32 I-Safe Handheld Computer User’s Manual 67

Chapter 3 — Configuring the CK32 I-Safe
Configuring PEAP Security With Profile Wizard
Protected EAP (PEAP) performs secure authentication against
Windows domains and directory services. It is comparable to
EAP-TTLS, though not as flexible.
To configure PEAP security
1 In the Profile Wizard, select the Security page.
2 For 8021x Security, choose PEAP.
3 For Association, choose Open, WPA, or Network EAP.
4 For Encryption, choose TKIP if you selected WPA for
association, or WEP if you selected Network EAP for
association.
5 For Username, type a unique username for this protocol.
6 Select Prompt for password to have the user enter this
password each time to access the protocol, or select Use
following password to use the protocol without entering a
password each time you use the CK21 I-Safe.
7 In the Password field, type a unique password for this
protocol.
8 Ta p Get Certificates to obtain or import server certificates.
For help with certificates, see “Loading a Certificate” on
page 76.
68 CK32 I-Safe Handheld Computer User’s Manual

Chapter 3 — Configuring the CK32 I-Safe
9 Ta p Additional Settings to assign an inner PEAP
authentication and set options for server certificate validation
and trust.
10 From the Inner PEAP Authentication list, choose EAP/MS-
CHAP-V2, EAT/Token Card, or EAP/MD5-Challenge.
11 Check Valid ate Ser ver Ce rt if ic at e to verify the identity of the
authentication server based on its certificate when using
PEAP.
12 Ta p Root CA, select a root certificate, and then tap OK.
13 Enter the Common Names of trusted servers.
14 Ta p OK.
Configuring TLS Security With Profile Wizard
EAP-TLS is a protocol based on the Transport Layer Security
(TLS) protocol widely used to secure web sites. This protocol
requires both the user and authentication server to have
certificates for mutual authentication.
To configure TLS security
1 In the Profile Wizard, select the Security page.
2 For 8021x Security, choose TLS.
3 For Association, choose Open, WPA, WPA2, or Network
EAP.
4 For Encryption, choose TKIP or AES if you selected WPA2
for association, or WEP or CKIP if you selected Network
EAP for association.
5 For Username, type a unique username for this protocol.
6 Select Prompt for password to have the user enter this
password each time to access the protocol, or select Use
following password to use the protocol without entering a
password each time you use the CK32 I-Safe.
7 In the Password field, type a unique password for this
protocol.
8 Ta p Get Certificates to obtain or import server certificates.
For help with certificates, see “Loading a Certificate” on
page 76.
CK32 I-Safe Handheld Computer User’s Manual 69

Chapter 3 — Configuring the CK32 I-Safe
9 Ta p Additional Settings to Certificate Settings.
10 Check Valid ate Ser ver Ce rt if ic at e to verify the identity of the
authentication server based on its certificate when using TLS.
11 Ta p Root CA, select a root certificate, and then tap OK.
12 Enter the Common Names of trusted servers.
13 Ta p OK.
Configuring TTLS Security With Profile Wizard
TTLS protocol provides authentication like EAP-TLS but does
not require user certificates. User authentication is done using a
password or other credentials that are transported in a securely
encrypted “tunnel” established using server certificates.
To configure TTLS security
1 In the Profile Wizard, select the Security page.
2 For 8021x Security, choose TTLS.
3 For Association, choose Open, WPA, WPA2, or Network
EAP.
4 For Encryption, choose TKIP or AES if you selected WPA2
for association, or WEP or CKIP if you selected Network
EAP for association.
5 For Username, type a unique username for this protocol.
6 In the Password field, type a unique password for this
protocol.
7 Select Prompt for password to have the user enter this
password each time to access the protocol, or select Use
following password to use the protocol without entering a
password each time you use the CK32 I-Safe.
8 (Optional) Tap Get Certificates to obtain or import server
certificates. For help with certificates, see “Loading a
Certificate” on page 76.
9 Ta p Additional Settings to assign an inner TTLS
authentication, inner EAP, and set options for server
certificate validation and trust.
70 CK32 I-Safe Handheld Computer User’s Manual

Chapter 3 — Configuring the CK32 I-Safe
10 From the Inner TTLS Authentication list, choose PA P,
CHAP, MS-CHAP, MS-CHAP-V2, PA P/Tok en Ca rd , or
EAP.
11 If you select EAP for the inner authentication protocol, select
an inner EAP protocol from the Inner EAP list.
12 Check Valid ate Ser ver Ce rt if ic at e to verify the identity of the
authentication server based on its certificate when using
PEAP.
13 Ta p Root CA, select a root certificate, and then tap OK.
14 Enter the Common Names of trusted servers.
15 For Anonymous EAP-TTLS Name, type an outer identity to
protect your login name or identity.
16 Ta p OK.
Configuring LEAP Security With Profile Wizard
LEAP is the Cisco Lightweight version of EAP.
To configure LEAP security
1 In the Profile Wizard, select the Security page.
2 For 8021x Security, choose LEAP.
3 For Association, choose Open, WPA, WPA2, or Network
EAP.
CK32 I-Safe Handheld Computer User’s Manual 71

Chapter 3 — Configuring the CK32 I-Safe
4 For Encryption, choose TKIP or AES if you selected WPA2
for association, or WEP or CKIP if you selected Network
EAP for association.
5 For Username, type a unique username for this protocol.
6 In the Password field, type a unique password for this
protocol.
7 Select Prompt for password to have the user enter this
password each time to access the protocol, or select Use
following password to use the protocol without entering a
password each time you use the CK32 I-Safe.
8 Ta p OK.
Configuring EAP-FAST with Profile Wizard
The EAP-FAST protocol is a client-server security architecture
that encrypts EAP transactions with a TLS tunnel. While similar
to PEAP, EAP-FAST differs significantly since tunnel
establishment is based on strong secrets unique to users. These
secrets are called Protected Access Credentials (PACs), which
CiscoSecure ACS generates using a master key known only to
CicsoSecure ACS. EAP-FAST does not require certificate
management.
1 In the Profile Wizard, select the Security page.
2 For 8021x Security, choose EAP-FAST.
3 For Association, choose Open, WPA, WPA2, or Network
EAP.
4 For Encryption, choose WEP or CKIP if you selected
Network EAP for association.
5 For Username, type a unique username for this protocol.
6 In the Password field, type a unique password for this
protocol.
7 Select Prompt for password to have the user enter this
password each time to access the protocol, or select Use
following password to use the protocol without entering a
password each time you use the CK32 I-Safe.
8 Ta p Additional Settings to set options for PAC management
and assign an anonymous EAP-FAST name.
72 CK32 I-Safe Handheld Computer User’s Manual

Chapter 3 — Configuring the CK32 I-Safe
9 Ta p PAC Manager to view the PAC files currently installed
on the CK32 I-Safe. Tap ok to return to the Additional
Settings screen.
10 If you already have a PAC on the CK32 I-Safe, clear Allow
Automatic PAC provisioning to avoid receiving more PACs
from the server.
11 If Allow Automatic PAC provisioning is selected, you can
check:
• Prompt before acquiring a new PAC for notification of
any incoming PACs.
• Prompt before replacing a PAC for notification whether
to replace a current PAC with an incoming PAC.
12 For Anonymous EAP-FAST Name, type the outer identity
assigned for public usage.
13 Ta p OK.
Configuring Microsoft Security
The default security setting is Funk. If you want to use Microsoft
security, you need to select it as your security choice. After you
select Microsoft as your security choice, you will be prompted to
save your settings and reset your computer for your change to
take effect.
To select Microsoft security as your security choice
1 Select Start > Settings > the System tab > Intermec Settings.
The Intermec Settings application appears.
2 Select Communications > 802.11 Radio > Security Choice.
CK32 I-Safe Handheld Computer User’s Manual 73

Chapter 3 — Configuring the CK32 I-Safe
3 From the Security Choice list, select Microsoft Security and
save your settings. An alert box appears telling you that you
must save your settings and warm boot the CV30 for the new
security choice to take effect.
4 An alert box appears telling you that you must save your
settings and warm boot the CK32 I-Safe for the new security
choice to take effect. Tap Yes to warm boot the CK32 I-Safe
with Microsoft Security as the Security Choice.
74 CK32 I-Safe Handheld Computer User’s Manual

Chapter 3 — Configuring the CK32 I-Safe
Networks already configured are preferred networks. You can
connect to only preferred networks or search for and connect to
any available network.
You can add a wireless network when the network is detected or
manually by entering settings information. To determine if
authentication information is needed, see your network
administrator.
When the CK32 I-Safe restarts with Microsoft selected as the
security choice, a dialog box with your wireless network
information appears. You can connect to an existing preferred
connection or set up a new connection. The following
information is for setting up a new connection.
To configure Microsoft security for a new connection
1 In the radio network connection dialog box, double-tap Add
New.
2 Enter a network name. If the network was detected, the
network name is entered and cannot be changed.
3 (Optional) To connect to an ad-hoc connection, select This is
a computer-to-computer (ad-hoc) network; wireless access
points are not used.
4 Follow these steps to disable authentication:
a Set Authentication to Open if WEP keys are not required
or to Shared when WEP keys are required for association.
b Set Data Encryption to Disabled.
Follow these steps to enable WEP encryption:
a Set Authentication to Open if WEP keys are not required
or to Shared when WEP keys are required for association.
b Set Data Encryption to WEP.
c To change the network key, clear The key is provided
automatically check box, enter the new Network key,
and then select the appropriate Key index.
Follow these steps to enable WPA authentication:
a Set Authentication to WPA.
b Set Data Encryption to either WEP
CK32 I-Safe Handheld Computer User’s Manual 75
or TKIP.

Chapter 3 — Configuring the CK32 I-Safe
Follow these steps to enable WPA authentication using a
preshared key:
a Set Authentication to WPA-PSK.
b Set Data Encryption to either WEP or TKIP.
c Enter the new Network key.
5 From the EAP type list, select either MD5-Challenge, PEAP
or TLS.
6 Ta p OK to close the screen.
Note: If you select to automatically connect to non-preferred
networks, the CK32 I-Safe detects any new networks and
provides you with the opportunity to configure them.
Loading a Certificate
If you choose to use transport layer security (TLS) with WPA or
802.1x security, you need to have a unique client certificate on
the CK32 I-Safe and a trusted root certificate authority (CA)
certificate. You can use a third-party CA to issue unique client
certificates and a root certificate.
There are three ways to load certificates on the CK32 I-Safe:
• If you are using Active Directory to issue certificates, you can
use the Enroll Certificates application to load the certificates.
• If you are using another third-party CA, you can use the
Import Certificates application to load the certificates.
• If you have multiple certificates to install, you can use the
Import Root Certificates and Import User Certificates
functions.
Note: For certificates to be valid, the CK32 I-Safe must be set to
the correct date and time. After cold booting the CK32 I-Safe,
you may need to correct the date and time.
To load certificates if you are using Active Directory
1 Configure the network and radio settings for the CK32 I-Safe
to communicate with your certificate authority or establish an
ActiveSync connection with the CA.
76 CK32 I-Safe Handheld Computer User’s Manual

Chapter 3 — Configuring the CK32 I-Safe
2 From Intermec Settings, select Communications > 802.11
Radio > Certificates.
3 Select Enroll Certificates and tap the Run App button. The
Enroll Certificates dialog box appears.
4 In the Enroll Certificates dialog box, enter the User Name,
Password, and Server (IP address) to log into the CA server.
5 Ta p OK. A dialog box appears asking if you want to load the
root certificate.
6 Ta p OK for yes. The Enrollment Tool message box appears
telling you that the user certificate has been added.
7 Ta p OK to close the Enrollment Tool message box.
8 Configure your CK32 I-Safe for WPA, or 802.1x security.
To load certificates if you are using a third-party CA
1 From Intermec Settings, select Communications > 802.11
Radio > Certificates.
2 Select Import Certificates and tap the Run App button. The
certificates application appears.
3 Ta p in the Import pfx Certificate box and navigate to
your private .pfx file.
4 Select the file and the path to your .pfx file now appears in the
text box.
5 Ta p Import Certificate. A dialog box appears asking if you
want to add the certificate to the root store.
6 Press OK to add the certificate. A message box appears telling
you that the root certificate has been imported.
7 Ta p OK to close the Success message box.
8 Ta p Import User Cert. A dialog box appears telling you that
the user certificate and the associated key were successfully
imported.
9 Ta p OK to close the Success message box.
10 Configure your CK32 I-Safe for WPA, or 802.1x security.
CK32 I-Safe Handheld Computer User’s Manual 77

Chapter 3 — Configuring the CK32 I-Safe
To load multiple certificates
1 Create the \Temp\Root and the \Temp\User folders on the
CK32 I-Safe.
2 Copy at least one root certificate .cer file into the \Temp\Root
folder.
3 Copy at least one user certificate .cer file and key .pvk file into
the \Temp\User folder. The filenames must match (for
example, cert1.cer and cert1.pvk).
4 From Intermec Settings, select Communications > 802.11
Radio > Certificates.
5 Select Import Root Certificates = False. Choose Tr u e from
the drop-down menu.
6 Select Import User Certificates = False. Choose Tr u e from
the drop-down menu.
7 Exit Intermec Settings and save your settings. The certificates
are immediately imported:
a All root certificates in \Temp\Root are imported into the
Trusted Authorities certificate store.
Note: You are prompted when a root certificate is
imported, unless that certificate is already in the store.
b All certificate and key files in \Temp\User are imported
into the My Certificates certificate store.
c The Import Root Certificates and the Import User
Certificates settings are changed from Tr u e to False.
8 Configure your CK32 I-Safe for WPA, or 802.1x security.
78 CK32 I-Safe Handheld Computer User’s Manual

Disabling Security
Chapter 3 — Configuring the CK32 I-Safe
If you choose not to use security with your wireless network, you
can disable it on the CK32 I-Safe. Intermec recommends that
you always set security in your network.
To disable security
1 Open Intermec Settings.
2 Choose Communications > 802.11 Radio > Microsoft
Security.
3 For Network Authentication, choose Open.
4 For Data Encryption, choose Disabled.
5 Close Intermec Settings.
CK32 I-Safe Handheld Computer User’s Manual 79

Chapter 3 — Configuring the CK32 I-Safe
80 CK32 I-Safe Handheld Computer User’s Manual

4
Developing and Installing Applications
Use this chapter to understand the guidelines for developing
applications and converting existing Trakker Antares applications
for use on the CK32 I-Safe. You will also find information on
installing applications and automatically launching them. This
chapter contains these sections:
• Developing Applications for the CK32 I-Safe
• Installing Applications on the CK32 I-Safe
• Launching an Application Automatically
CK32 I-Safe Handheld Computer Users Manual 81

Chapter 4— Developing and Installing Applications
Developing Applications for the CK32 I-Safe
The CK32 I-Safe Handheld Computers run applications
programmed in Microsoft Visual Studio 2003 or later. You can
also use Microsoft eMbedded Visual C++ version 4.2 or later, but
some features may not be available. Use this section to
understand the hardware and software you need to:
• develop a new application for the CK32 I-Safe.
• develop a web-based application for the CK32 I-Safe.
• convert a Trakker Antares application to a CK32 I-Safe
application.
Developing a New Application Using the Intermec Developer Library
Use the Intermec resource kits to develop new applications to run
on the CK32 I-Safe. The Intermec resource kits are a library of
C#, C++, and .NET components grouped by functionality that
you can use to create applications for the CK32 I-Safe. The
resource kits are part of the Intermec Developer Library (IDL),
and can be downloaded from the Intermec web site at
www.intermec.com/idl.
At a minimum, you need the following hardware and software
components to use the Intermec resource kits:
• Pentium PC, 400 MHz or higher
• Windows 2000 (Service Pack 2 or later) or Windows XP
(Home, Professional, or Server)
• For native and managed development, Microsoft Visual
Studio 2005
• 128 MB RAM (196 MB recommended)
• 360 MB hard drive space for minimum installation (720 MB
for complete)
• CD-ROM drive compatible with multimedia PC
specification
• VGA or higher-resolution monitor (Super VGA
recommended)
• Microsoft Mouse or compatible pointing device
82 CK32 I-Safe Handheld Computer Users Manual

Chapter 4 — Developing and Installing Applications
Developing a Web-Based Application
You can develop web-based data collection applications for use
on the CK32 I-Safe. For help, see any HTML source book. The
CK32 I-Safe contains Internet Explorer Mobile for you to use.
Microsoft Internet Explorer Mobile is available from the Start
menu and provides all of the common elements you expect to
find.
Converting a Trakker Antares Application for the CK32 I-Safe
If you have an existing Trakker Antares application that you
would like to run on the CK32 I-Safe, you can use the Antares
Migration Resource Kit to convert it. The Antares Migration
Resource Kit is a set of libraries and tools that you use to convert
your existing Trakker Antares C applications into C++
applications for use on the CK32 I-Safe.
The CK32 I-Safe does not support all Trakker Antares functions.
You may need to rewrite parts of your application when
converting it for use on the CK32 I-Safe. See the resource kit for
a list of functions that are not supported.
You need these hardware and software components to use the
resource kit:
• PC with at least 100 MB of free disk space running Microsoft
Windows 2000/XP
• Microsoft Visual Studio 2003 (or later)
• Microsoft eMbedded Visual C++ version 4.2 or later
• Antares Migration Resource Kit (from IDL 2.4 or later)
The resource kit is part of the Intermec Developer Library (IDL),
which you can download from the Intermec web site at
www.intermec.com/idl.
CK32 I-Safe Handheld Computer Users Manual 83

Chapter 4— Developing and Installing Applications
Installing Applications on the CK32 I-Safe
There are several ways you can install applications on the CK32
I-Safe:
• You can package your application as a cabinet (.cab) file.
• If you have a simple application, you may only need to deliver
the .exe file.
• You can copy a directory structure that contains the
application, supporting files, DLLs, images, and data files.
Intermec recommends using .cab files to install your applications.
The CK32 I-Safe uses standard Windows Mobile .cab files and
will install third-party .cab files. You can have your .cab files place
your application in any of these memory locations on the CK32
I-Safe:
• Applications can be installed into the Object Store or the
Flash File Store. Both locations are virtual partitions on the
embedded storage card in the system. The Object Store will
be erased during a ‘clean’ boot, but the Flash File store will
persist. Neither location will be erased during a normal reset
of the system. The registry always persists to the Object Store
region for normal resets. If you need files and/or registry
entries to persist through a ‘clean’ boot, it is suggested that
you use a cab file installed from the Flash File Store area. For
more information on ‘clean’ boots, see “Resetting Your
Computer” on page 110.
There are several ways you can install files and applications on the
CK32 I-Safe:
• SmartSystems server
•ActiveSync
• Wavelink Avalanche
The following sections explain how to use each one of these
processes to install your application on the CK32 I-Safe.
84 CK32 I-Safe Handheld Computer Users Manual

Chapter 4 — Developing and Installing Applications
Installing Applications Using SmartSystems Foundation
You can use the SmartSystems server to drag-and-drop Intermec
applications onto your CK32 I-Safe. The CK32 I-Safe ships with
the SmartSystems client, which means it is SmartSystemsenabled. The console is part of SmartSystems Foundation, which
you can download from www.intermec.com/SmartSystems. For
help using the console, see the online help.
To install an application using SmartSystems Foundation
1 Download your application file to your desktop PC.
2 Double-click the application file to install it. The application
file should appear in the software vault.
3 From the SmartSystems console in the Software Vault,
drag-and-drop the application onto each CK32 I-Safe in your
network.
Installing Applications Using Microsoft ActiveSync
You can use Microsoft ActiveSync to establish a connection
between your PC and the CK32 I-Safe. ActiveSync transfers files,
synchronizes files, performs remote debugging, and other device
management activities. For more information on ActiveSync see
“Using Microsoft ActiveSync” on page 32.
You can have a USB or 802.11 b/g ActiveSync connection to the
CK32 I-Safe. When you only have a few CK32 I-Safes to update,
you can copy files using Windows Explorer on a PC.
This procedure assumes that Microsoft ActiveSync is installed on
your PC and is up and running.
To install an application using ActiveSync
1 Use the AN1 Communications Adapter to connect the CK32
I-Safe to a PC or host via the USB port.
Intrinsically Safe rules prohibit direct connection to the CK32
I-Safe.
You may have to disconnect and then connect the cable to
“wake” the connection.
CK32 I-Safe Handheld Computer Users Manual 85

Chapter 4— Developing and Installing Applications
2 Wait for a “Connected” message to appear in the Microsoft
ActiveSync application to signal a connection to the CK32
I-Safe.
If necessary, select File > Get Connected to initiate a
connection.
3 Click To o l s > Explore Device to open the Mobile Device
window on the CK32 I-Safe.
4 On your desktop PC, locate the .cab file you want to
download to the CK32 I-Safe and copy it.
86 CK32 I-Safe Handheld Computer Users Manual
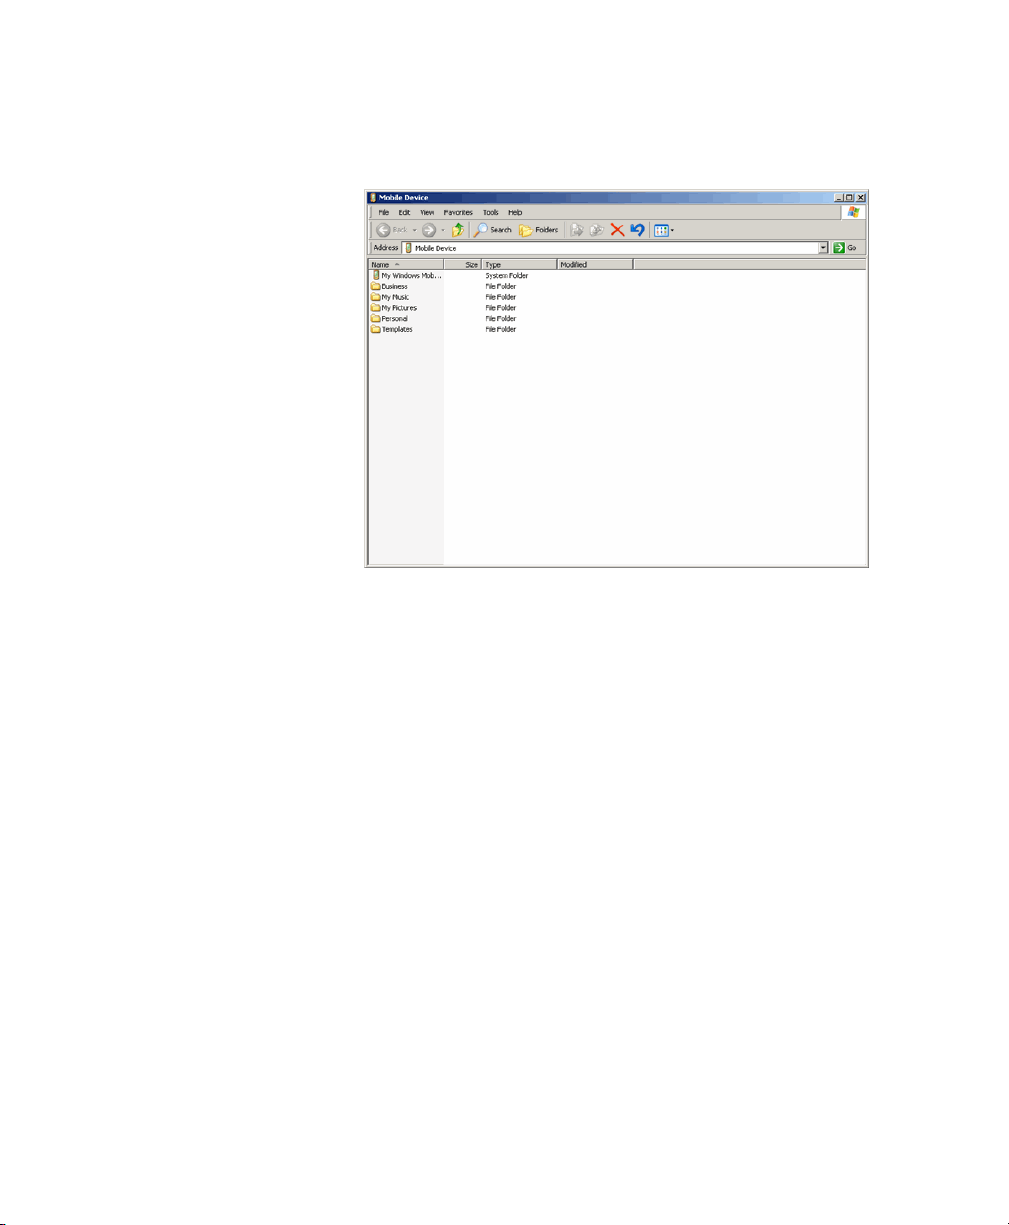
Chapter 4 — Developing and Installing Applications
5 From the Mobile Device window, open the My Windows
Mobile-Based Device folder and navigate to the folder where
you want to paste the .cab file.
6 Paste the .cab file into the desired folder.
7 When you are done copying files, reset the CK32 I-Safe.
8 After the CK32 I-Safe is done resetting, tap Start > Programs
> File Explorer to locate the newly copied files.
9 Tap the .cab files to install them.
Installing Applications Using Wavelink Avalanche
You can use the Wavelink Avalanche device management system
to install applications on all of your wireless CK32 I-Safes. The
CK32 I-Safe ships with the Avalanche Enabler already loaded on
it. In order to use Avalanche Enabler you must also have the
Avalanche Administrative Console installed on your PC.
To install Avalanche Enabler
1 Ta p Start > Programs > File Explorer and navigate to the
Windows folder.
2 Locate and tap InstallSelect to launch the application
CK32 I-Safe Handheld Computer Users Manual 87
 Loading...