

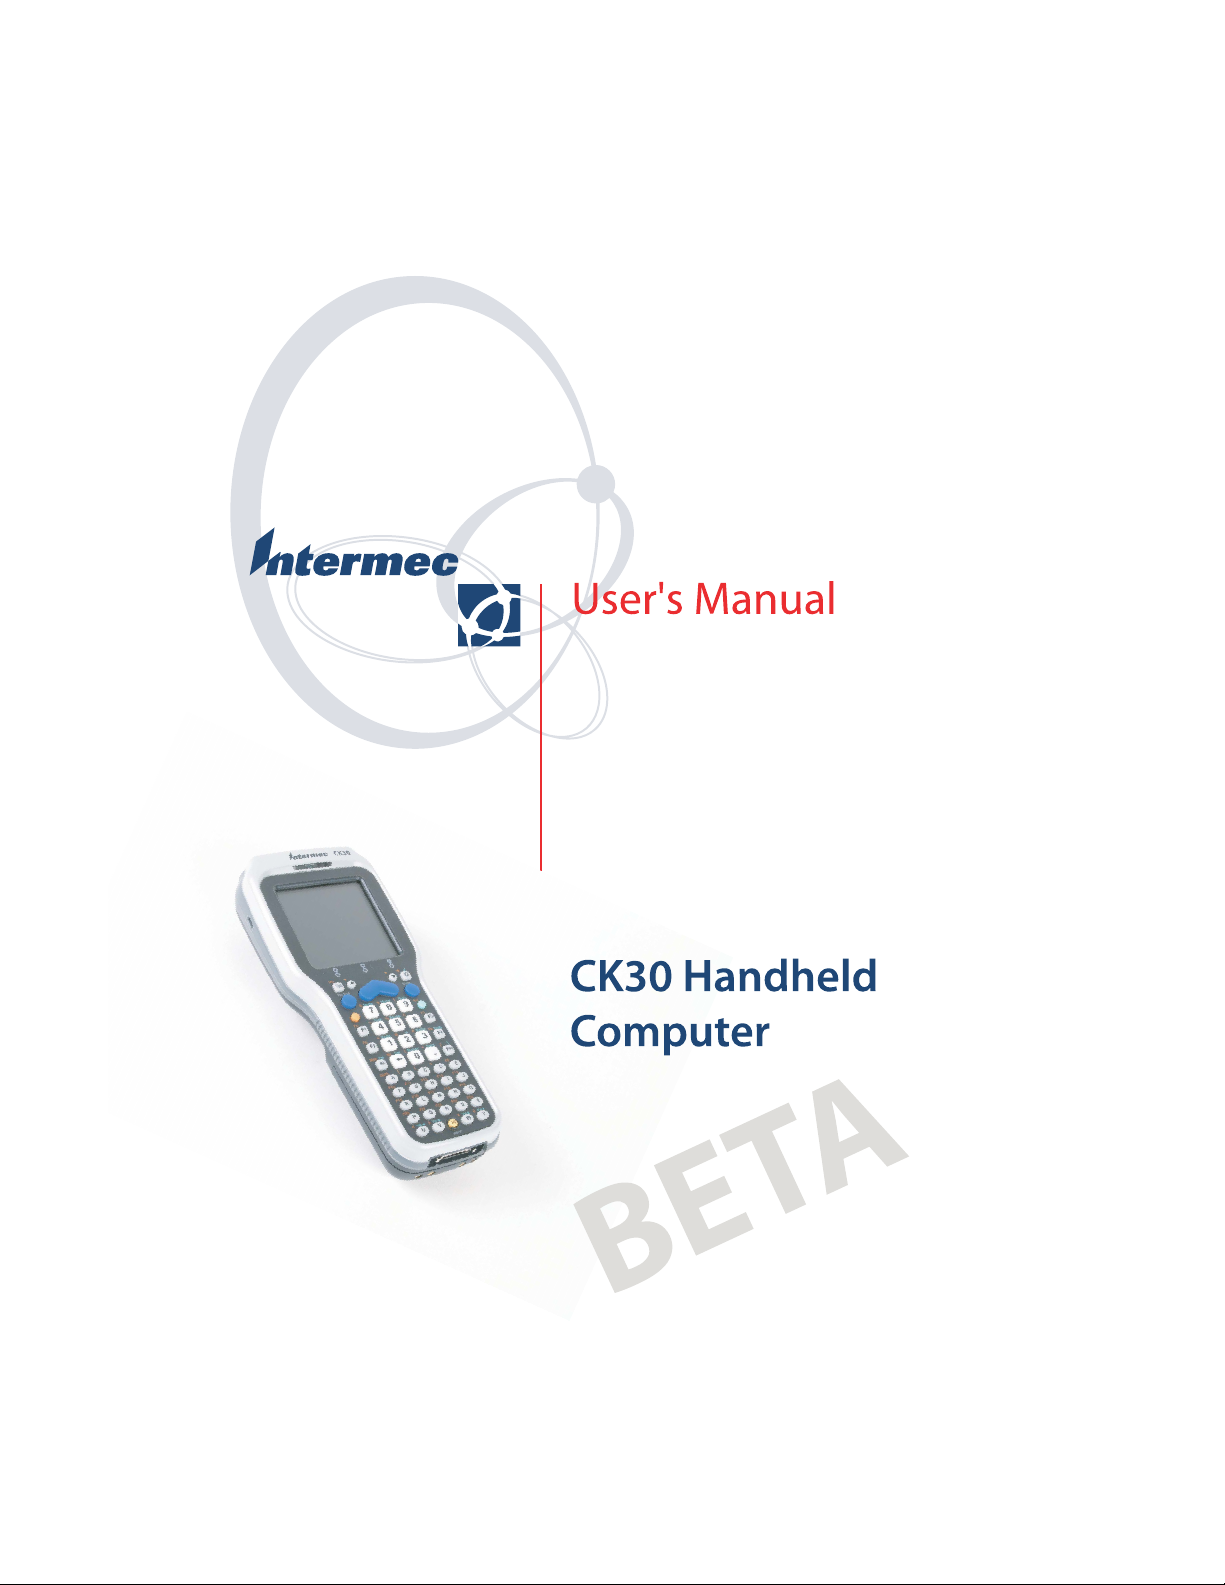
Page 1
Page 2

Intermec Technologies Corporation
Corporate Headquarters
6001 36th Ave. W.
Everett, WA 98203
U.S.A.
www.intermec.com
The information contained herein is proprietary and is provided solely for the purpose
of allowing customers to operate and service Intermec-manufactured equipment and is
not to be released, reproduced, or used for any other purpose without written
permission of Intermec.
Information and specifications contained in this document are subject to change
without prior notice and do not represent a commitment on the part of Intermec
Technologies Corporation.
2003 by Intermec Technologies Corporation. All rights reserved.
The word Intermec, the Intermec logo, Norand, ArciTech, CrossBar, Data Collection
Browser, dcBrowser, Duratherm, EasyCoder, EasyLAN, Enterprise Wireless LAN,
EZBuilder, Fingerprint, i-gistics, INCA (under license), InterDriver, Intermec Printer
Network Manager, IRL, JANUS, LabelShop, Mobile Framework, MobileLAN,
Nor*Ware, Pen*Key, Precision Print, PrintSet, RoutePower, TE 2000, Trakker
Antares, UAP, Universal Access Point, and Virtual Wedge are either trademarks or
registered trademarks of Intermec Technologies Corporation.
Microsoft and Windows are registered trademarks of Microsoft Corporation.
This product includes software developed by the OpenSSL Project for use in the
OpenSSL Toolkit. (http://www.openssl.org/)
This product includes cryptographic software written by Eric Young.
(eay@cryptsoft.com)
Throughout this manual, trademarked names may be used. Rather than put a
trademark ( or ) symbol in every occurrence of a trademarked name, we state that
we are using the names only in an editorial fashion, and to the benefit of the trademark
owner, with no intention of infringement.
Microsoft, Windows, and the Windows logo are registered trademarks of Microsoft
Corporation in the United States and/or other countries.
Bluetooth is a trademark of Bluetooth SIG, Inc., U.S.A.
ii CK30 Handheld Computer User’s Manual
Page 3

Contents
Before You Begin..................................................................................................... vi
Using the CK30 Handheld Computer.................................................1
Contents
Safety Summary.........................................................................................vi
Safety Icons .............................................................................................. vii
Global Services and Support..................................................................... vii
Who Should Read This Document? ..........................................................ix
Related Documents...................................................................................ix
Patent Information.................................................................................... ix
1
Introducing the CK30 Handheld Computer.............................................................2
Understanding the CK30 Models and Options...........................................3
Using the CK30 Battery ...........................................................................................4
Maximizing Battery Life .............................................................................5
Checking the Battery Status........................................................................6
Charging and Installing the Battery............................................................6
Using the Keypad .....................................................................................................7
Using the 42-Key Large Numeric and Function Keypad.............................8
Using the 50-Key Full Alphanumeric Keypad.............................................9
Using the 52-key Full Alphanumeric Keypad............................................10
Understanding How to Use the Keypad....................................................11
Capitalizing All Characters.......................................................................12
Using the International Keypad................................................................12
Using the TE 2000 Keypad......................................................................13
Understanding the Power Key..................................................................13
Using the Screen.....................................................................................................14
Navigating on the Screen..........................................................................14
Understanding the Screen Icons ...............................................................14
Rotating the Screen ..................................................................................15
Using the Mouse Pointer..........................................................................16
Understanding the LEDs........................................................................................17
Understanding the CK30 Beeps..............................................................................18
Scanning Bar Codes................................................................................................19
Scanning With the Integrated Laser Scanner and 1D Linear Imager .........20
CK30 Handheld Computer User’s Manual iii
Page 4

Contents
Scanning Bar Codes With the 2D Area Imager.........................................21
Attaching a Tethered Scanner...................................................................22
Using the SD Card .................................................................................................23
Configuring the CK30...................................................................................25
2
3
How to Configure the CK30..................................................................................26
Configuring the CK30 With the Setup Assistant ......................................27
Configuring the CK30 With the Configuration Utility.............................28
Configuring the CK30 With Commands Through the Network ..............31
Configuring the CK30 With the Intermec Configuration Utility (ICU) ...31
Configuring the CK30 by Scanning Bar Codes.........................................31
How the CK30 Fits Into Your Network..................................................................32
Using Serial Communications on the CK30.............................................33
Using RF Communications on the CK30.................................................34
Using Ethernet Communications on the CK30 ........................................38
Configuring the CK30 for Bluetooth
Configuring Security on the CK30 .........................................................................40
Wireless Printing ..........................39
Managing the CK30........................................................................................43
Accessing the System Main Menu...........................................................................44
Using File Manager ................................................................................................45
Using Task Manager...............................................................................................47
Using ActiveSync on the CK30...............................................................................48
Installing ActiveSync and Establishing a Partnership.................................48
Using ActiveSync to Copy Files and Install Applications...........................51
Installing Applications Using AutoCab ...................................................................52
Changing the Password...........................................................................................52
Saving Your Configuration or Application to Flash.................................................53
Upgrading the Firmware.........................................................................................53
iv CK30 Handheld Computer User’s Manual
Page 5

Contents
Troubleshooting and Maintaining the CK30.............................55
4
A
Problems and Solutions ..........................................................................................56
Problems While Operating the Terminal..................................................57
Problems While Configuring the Terminal...............................................57
Problems While Configuring 802.1x Security...........................................58
Problems With RF Connectivity...............................................................61
Problems Transmitting Data Through the Serial Port...............................63
Problems Transmitting Data Through the DCS 30X or G4000 ...............63
Problems While Scanning Bar Codes........................................................64
Booting the CK30 ..................................................................................................66
Warm Booting the CK30.........................................................................66
Cold Booting the CK30 ...........................................................................67
Cleaning the Scanner Window and CK30 Screen...................................................67
Appendix................................................................................................................69
Physical and Environmental Specifications..............................................................70
Accessories for the CK30 ........................................................................................71
Using Hidden Key Sequences .................................................................................73
CK30 Handheld Computer User’s Manual v
Page 6

Before You Begin
Before You Begin
This section provides you with safety information, technical
support information, and sources for additional product
information.
Safety Summary
Your safety is extremely important. Read and follow all warnings
and cautions in this document before handling and operating
Intermec equipment. You can be seriously injured, and
equipment and data can be damaged if you do not follow the
safety warnings and cautions.
Do not repair or adjust alone
Do not repair or adjust energized equipment alone under any
circumstances. Someone capable of providing first aid must
always be present for your safety.
First aid
Always obtain first aid or medical attention immediately after an
injury. Never neglect an injury, no matter how slight it seems.
Resuscitation
Begin resuscitation immediately if someone is injured and stops
breathing. Any delay could result in death. To work on or near
high voltage, you should be familiar with approved industrial
first aid methods.
Energized equipment
Never work on energized equipment unless authorized by a
responsible authority. Energized electrical equipment is
dangerous. Electrical shock from energized equipment can cause
death. If you must perform authorized emergency work on
energized equipment, be sure that you comply strictly with
approved safety regulations.
vi CK30 Handheld Computer User’s Manual
Page 7

Safety Icons
Before You Begin
This section explains how to identify and understand dangers,
warnings, cautions, and notes that are in this document. You
may also see icons that tell you when to follow ESD procedures
and when to take special precautions for handling optical parts.
A warning alerts you of an operating procedure, practice,
condition, or statement that must be strictly observed to
avoid death or serious injury to the persons working on
the equipment.
Avertissement: Un avertissement vous avertit d’une
procédure de fonctionnement, d’une méthode, d’un état
ou d’un rapport qui doit être strictement respecté pour
éviter l’occurrence de mort ou de blessures graves aux
personnes manupulant l’équipement.
A caution alerts you to an operating procedure, practice,
condition, or statement that must be strictly observed to
prevent equipment damage or destruction, or corruption
or loss of data.
Attention: Une précaution vous avertit d’une procédure de
fonctionnement, d’une méthode, d’un état ou d’un
rapport qui doit être strictement respecté pour empêcher
l’endommagement ou la destruction de l’équipement, ou
l’altération ou la perte de données.
Note: Notes either provide extra information about a topic or
contain special instructions for handling a particular condition
or set of circumstances.
Global Services and Support
Warranty Information
To understand the warranty for your Intermec product, visit the
Intermec web site at http://www.intermec.com, click Support,
and then click Warranty.
CK30 Handheld Computer User’s Manual vii
Page 8

Before You Begin
Disclaimer of warranties: The sample code included in this
document is presented for reference only. The code does not
necessarily represent complete, tested programs. The code is
provided “as is with all faults.” All warranties are expressly
disclaimed, including the implied warranties of merchantability
and fitness for a particular purpose.
Web Support
Visit the Intermec web site at http://www.intermec.com to
download many of our current manuals in PDF format. To
order printed versions of the Intermec manuals, contact your
local Intermec representative or distributor.
Visit the Intermec technical knowledge base (Knowledge
Central) at http://intermec.custhelp.com to review technical
information or to request technical support for your Intermec
product.
Telephone Support
These services are available from Intermec by calling
1-800-755-5505 and choosing an option.
Service Description Option
Factory Repair and
On-site Repair
Technical Support Get technical support on your
Service Contract
Status
Schedule Site
Surveys or
Installations
Ordering Products Talk to sales administration, place an
viii CK30 Handheld Computer User’s Manual
Request a return authorization
number for authorized service center
repair, or request an on-site repair
technician.
Intermec product.
Inquire about an existing contract,
renew a contract, or ask invoicing
questions.
Schedule a site survey, or request a
product or system installation.
order, or check the status of your
order.
1
2
3
4
5
Page 9

Who Should Read This Document?
The CK30 Handheld Computer User’s Manual provides you with
information about the features of the CK30, and how to install,
operate, maintain, and troubleshoot them.
Before you install and configure the CK30, you should be
familiar with your network and general networking terms, such
as IP address.
Related Documents
The Intermec web site at http://www.intermec.com contains
many of our documents that you can download in PDF format.
To order printed versions of the Intermec manuals, contact your
local Intermec representative or distributor.
Patent Information
Product is covered by one or more of the following patents:
4,455,523; 5,627,360; 4,553,081; 5,657,317; 4,709,202; 5,671,436;
4,845,419; 5,684,290; 4,961,043; 5,777,309; 5,195,183; 5,793,604;
5,216,233; 5,805,807; 5,218,187; 5,818,027; 5,218,188; 5,821,523;
5,227,614; 5,828,052; 5,241,488; 5,831,819; 5,278,487; 5,834,753;
5,322,991; 5,841,121; 5,331,136; 5,844,222; 5,331,580; 5,883,492;
5,349,678; 5,883,493; 5,397,885; 5,886,338; 5,371,858; 5,889,386;
5,373,478; 5,898,162; 5,410,141; 5,969,328; 5,488,575; 5,986,435;
5,500,516; 6,075,340; 5,504,367; 6,109,528; 5,508,599; 6,158,661;
5,530,619; 6,234,395; 5,567,925; 6,244,512; 5,568,645; 6,330,975;
5,592,512; 6,431,451; 5,598,007, 6,497,368; 5,617,343; 6,538,413.
Before You Begin
There may be other U.S. and foreign patents pending.
CK30 Handheld Computer User’s Manual ix
Page 10

Before You Begin
x CK30 Handheld Computer User’s Manual
Page 11

Using the CK30 Handheld
1
Use this chapter to familiarize yourself with the CK30 Handheld
Computer. In this chapter you will find these sections:
• Introducing the CK30 Handheld Computer
• Using the CK30 Battery
• Using the Keypad
• Using the Screen
• Understanding the LEDs
• Understanding the Beeps
Computer
• Scanning Bar Codes
• Using the SD Card
Page 12
Chapter 1 — Using the CK30 Handheld Computer
Introducing the CK30 Handheld Computer
The Intermec CK30 is the first in a new line of ergonomically
designed handheld computers built on the Microsoft®
Windows® CE .NET operating system. It is a lightweight, easyto-use, reliable computer that enables you to use legacy
applications as well as develop applications based on the latest
technologies. The CK30 supports programming tools such as
VB.NET, C#, JavaScript, and XML.
Use this table to understand the features included with each
model of the CK30. For a complete list of accessories, see the
Appendix.
Feature Model A Model B Model C
Batch only
.Net Compact Framework
Color Display
Monochrome Display
32M/32M Memory
64M/64M Memory
200 MHz Processor
400 MHz Processor
IBrowse
2 CK30 Handheld Computer User’s Manual
9
9
9
9 9
99
9
99
9
999
Page 13
Chapter 1 — Using the CK30 Handheld Computer
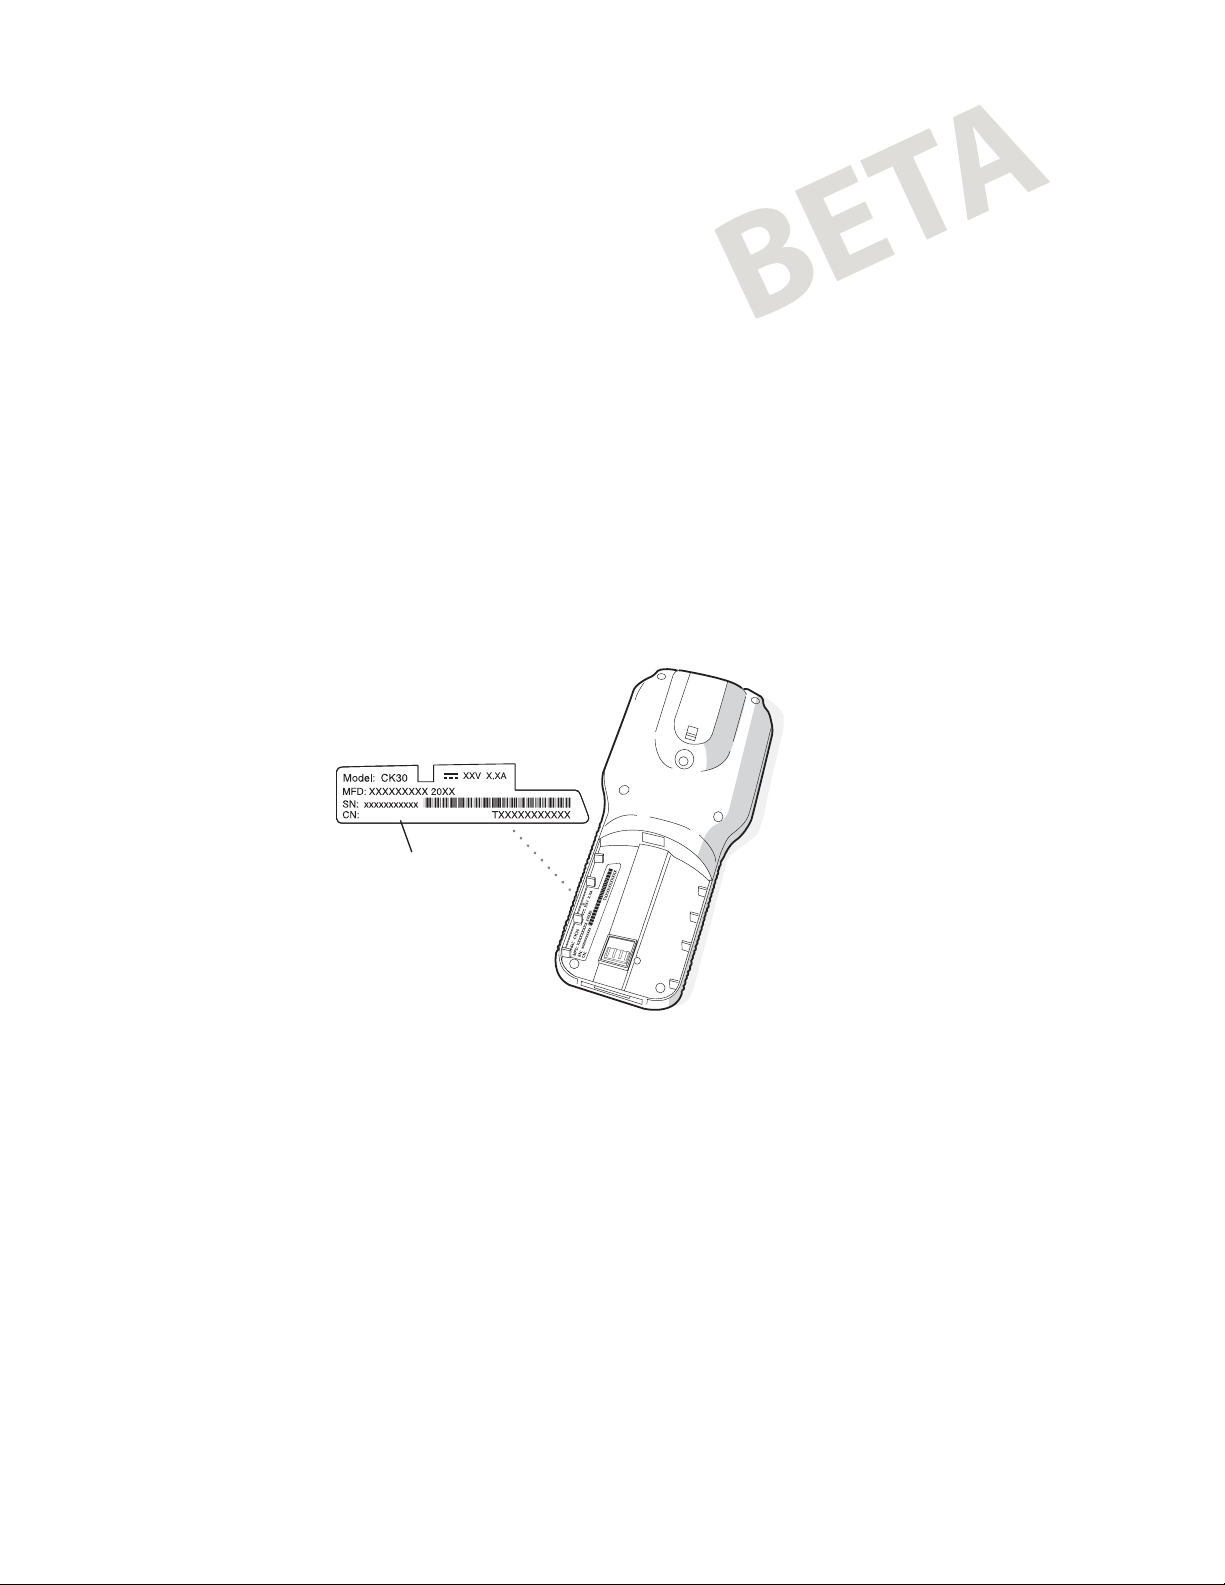
Understanding the CK30 Models and Options
The CK30 computer is available in three different models that
consist of different options. To find out which model of the
CK30 you have, locate the configuration label on the back of the
computer. The first five letters of the configuration number
indicate the model of CK30 you ordered. For example, the label
in the following illustration is for a CK30 model A (CK30A).
CK30AA0301000
Configuration
number
00
10
030
A
A
30
K
C
This option is available for model A of the CK30:
• 10/100 base T Ethernet interface
These options are available for models B and C of the CK30:
• TE 2000 including 3270, 5250, and VT/ANSI as well as
third-party TE applications
• WiFi certified 802.11b radio
• DcBrowser application
• Java™ platform
• 1D linear imager
• Bluetooth™ compatible module from Socket
Communications
These options are for the CK30 Model C only:
• 2D area imager
CK30 Handheld Computer User’s Manual 3
Page 14

Chapter 1 — Using the CK30 Handheld Computer
™
CK30 Handheld Computers with an IEEE 802.11b radio
installed are Wi-Fi certified for interoperability with other
802.11b wireless LAN devices.
Use this manual to understand how to use the features and
options available on the CK30. For additional help using
terminal emulation, see the appropriate TE 2000 guide:
• TE 2000 5250 Terminal Emulation Programmer’s Guide
(P/N 977-055-004)
• TE 2000 3270 Terminal Emulation Programmer’s Guide
(P/N 977-055-003)
• TE 2000 VT/ANSI Terminal Emulation Programmer’s
Guide (P/N 977-055-005
For additional help using dcBrowser, see the documentation that
ships with your G4000, the dcBrowser gateway software, or the
Data Collection Browser Client User’s Guide (P/N 070011).
IBrowse is a locked-down web browser for Intermec devices that
is compatible with Microsoft's Internet Explorer but does not
allow the user to exit out of the browser or key in a URL to
access a non-work related website. For additional help using
IBrowse, see ??????
Using the CK30 Battery
The CK30 uses an AB1 lithium-ion battery as its main power
source. You must fully charge the main battery before you can
use the CK30.
If you fail to replace the battery immediately, you may lose
important data or applications.
Attention: Si la batterie n’est pas remplacée immédiatement,
des données ou applications importantes risquent d’être
perdues.
4 CK30 Handheld Computer User’s Manual
Page 15

The lithium-ion battery pack that is used in this device may
present a fire or chemical burn hazard if it is mistreated. Do
not disassemble it, heat it above 100° C (212° F) or
incinerate it.
Avertissement: Le paquet de piles d’ions de lithium qui est
utilisé dans cet appareil peut presenter un risque feu ou un
risque chimique de brûlure s’il est maltraité. Il ne faut pas le
désassembler, le réchauffer à une température plus élevée que
100° C (212° F) ou l’incinérer.
Dispose of used battery packs promptly. Keep away from
children. Contact your local Intermec sales representative for
replacement batteries.
Several factors determine the life of your battery such as extreme
temperatures, input devices, and your usage. For example, if you
use a tethered scanner every day, you will need to replace your
battery more often than someone who uses an internal scanner.
Maximizing Battery Life
Chapter 1 — Using the CK30 Handheld Computer
To prolong the life of your battery, follow these guidelines.
When You Want To: Do This to Save Battery Power:
Operate the CK30 and
the Low Battery status
icon appears or the
Battery light comes on.
Stop using the CK30
for 5 minutes or longer.
Store the CK30 for
more than a day.
CK30 Handheld Computer User’s Manual 5
1 Press Power to turn off the CK30.
2 Remove the battery and insert another fully
charged battery within 10 minutes or you may
lose data.
Or, you can insert the CK30 into a powered
AC1, AC2, AD1, or AD2.
1 Make sure the Low Battery icon is not on the
screen and that the Battery light is not turned
on.
2 Press Power to turn of f the CK30.
1 Save your data and end your computer session.
2 Press Power to turn off the CK30.
3 Insert a fully charged battery.
Page 16

Chapter 1 — Using the CK30 Handheld Computer
Checking the Battery Status
The easiest way to tell the status of your battery is to look at the
battery icon in the status bar of your CK30.
Icon Status
Battery has a full charge.
Battery has a medium charge. You should be able to
work for several more hours before changing batteries.
Battery is low. You need to replace the battery now.
If you cannot see a status bar on your screen, you can also check
the battery status by looking at the Battery Status light on the
front of the CK30. See “Understanding the LEDs” later in this
chapter for more information.
Charging and Installing the Battery
Make sure you fully charge the AB1battery before you install it
in your CK30.
To charge the battery
• Either insert the battery into the AC1 4-slot battery charger
or place the CK30 with battery installed in the AC2, AD1, or
AD2.
Use the following table to understand how long it will take to
charge your batteries in each of the CK30 charging or
communications dock accessories.
CK30 Accessory Charging Time
AC1 4-Slot Battery Charger 5 hours
AC2 4-Bay Charging Dock 5 hours
AD1 1-Bay Communications Dock 3 hours
AD2 4-Bay Communications Dock 5 hours
6 CK30 Handheld Computer User’s Manual
Page 17
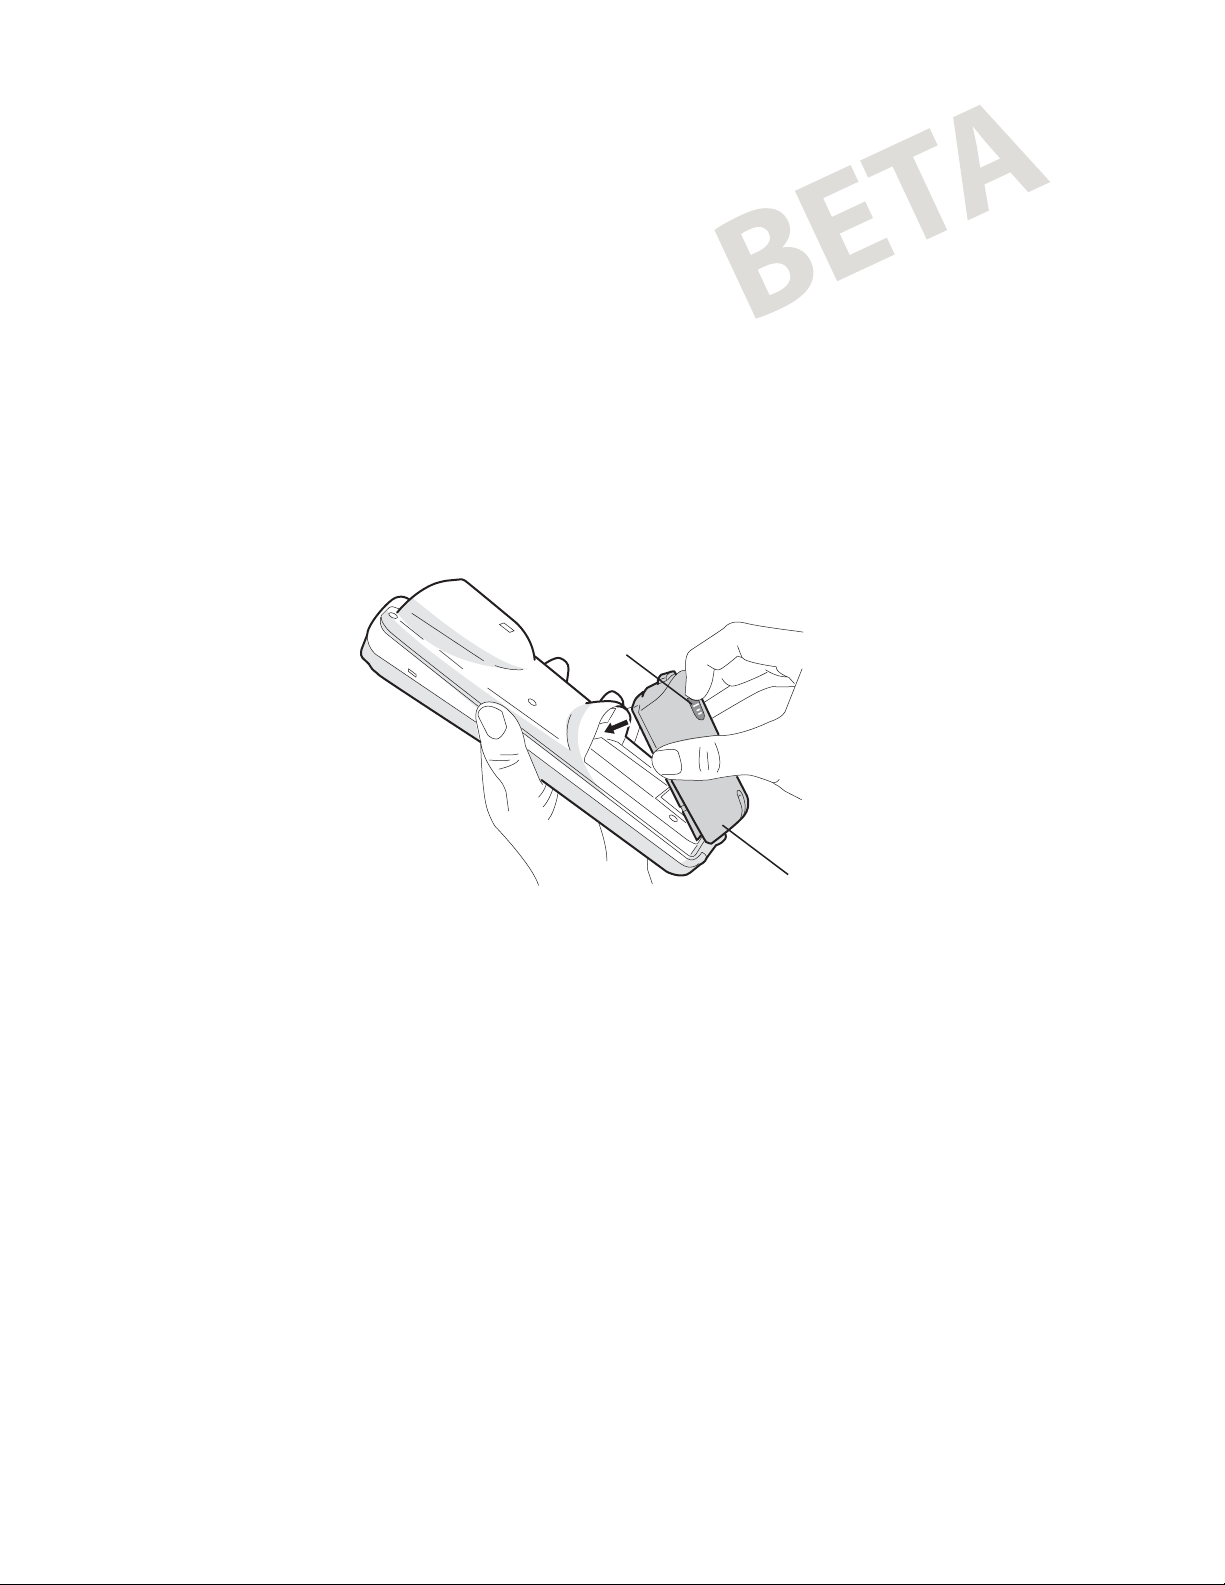
To install the battery
• Insert the tabs on the bottom of the charged battery into the
CK30 and snap the battery into place.
Using the Keypad
Chapter 1 — Using the CK30 Handheld Computer
Battery
latch
AB1
battery
Your CK30 has one of the following keypad overlay options:
• 42-key large numeric and function
• 50-key full alphanumeric
• 52-key full alphanumeric
Each of these keypads also comes in an International version.
The International keypads support French, German, Italian,
Portuguese, and Spanish. Although the keypads are smaller than
standard PC or terminal keyboards, you can use special keys to
access all of the keys and functions you need.
In addition, there are keypad overlays available for each type of
TE 2000 supported: 3270, 5250, and VT/ANSI. You receive the
appropriate TE overlay when you order your TE 2000
application. Each TE 2000 keypad overlay is almost identical to
the standard keypad overlay, but it contains additional keys that
are available on an IBM 3270, IBM 5250, or VT/ANSI
keyboard. For help using your terminal emulation keypad
overlay, see your specific TE 2000 guide.
CK30 Handheld Computer User’s Manual 7
Page 18
Chapter 1 — Using the CK30 Handheld Computer
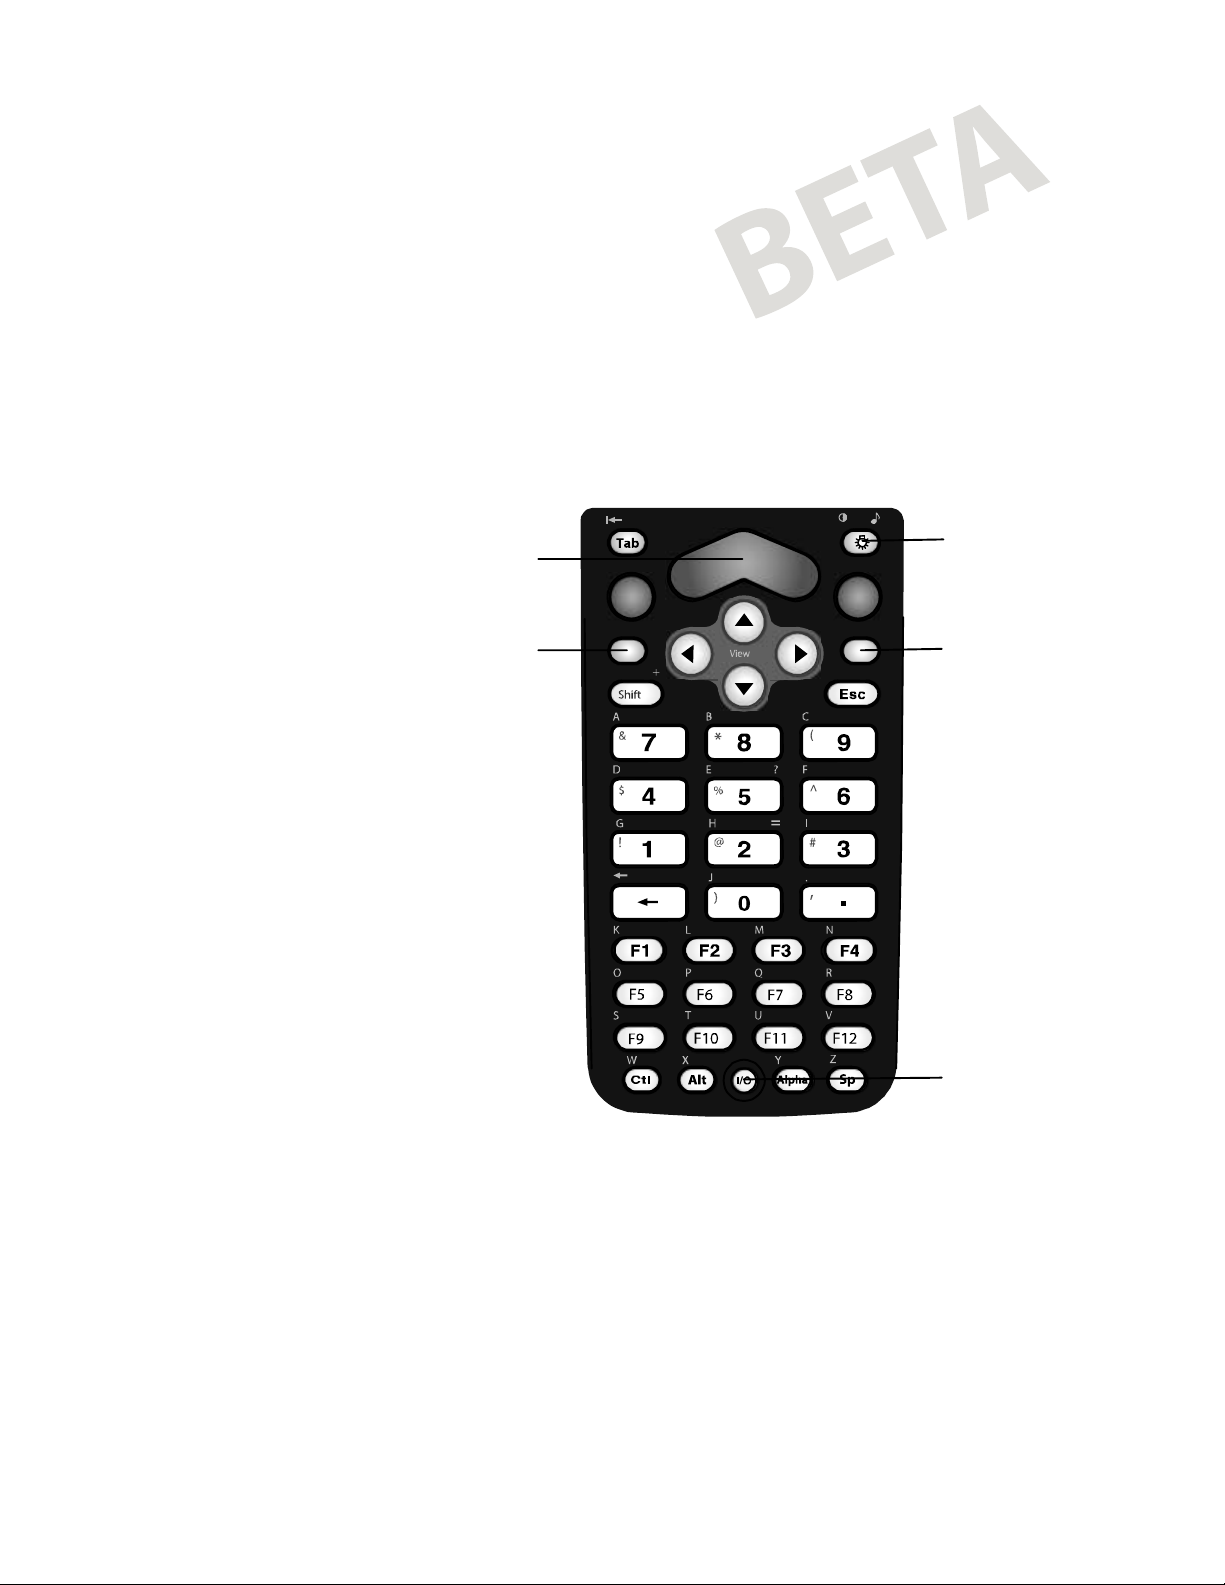
Using the 42-Key Large Numeric and Function Keypad
Scan button
Enter
CAPS
Backlight key
Enter
Ins
Green key Orange key
/
\
Home
Del
[
<
]
>
Sp
Power key
PROG
42-key large numeric and function keypad: Use this keypad to easily
print numbers (0-9) and access function keys F1 through F12. You can also
print the entire alphabet and special characters by pressing color-coded key
sequences.
8 CK30 Handheld Computer User’s Manual
Page 19
Chapter 1 — Using the CK30 Handheld Computer
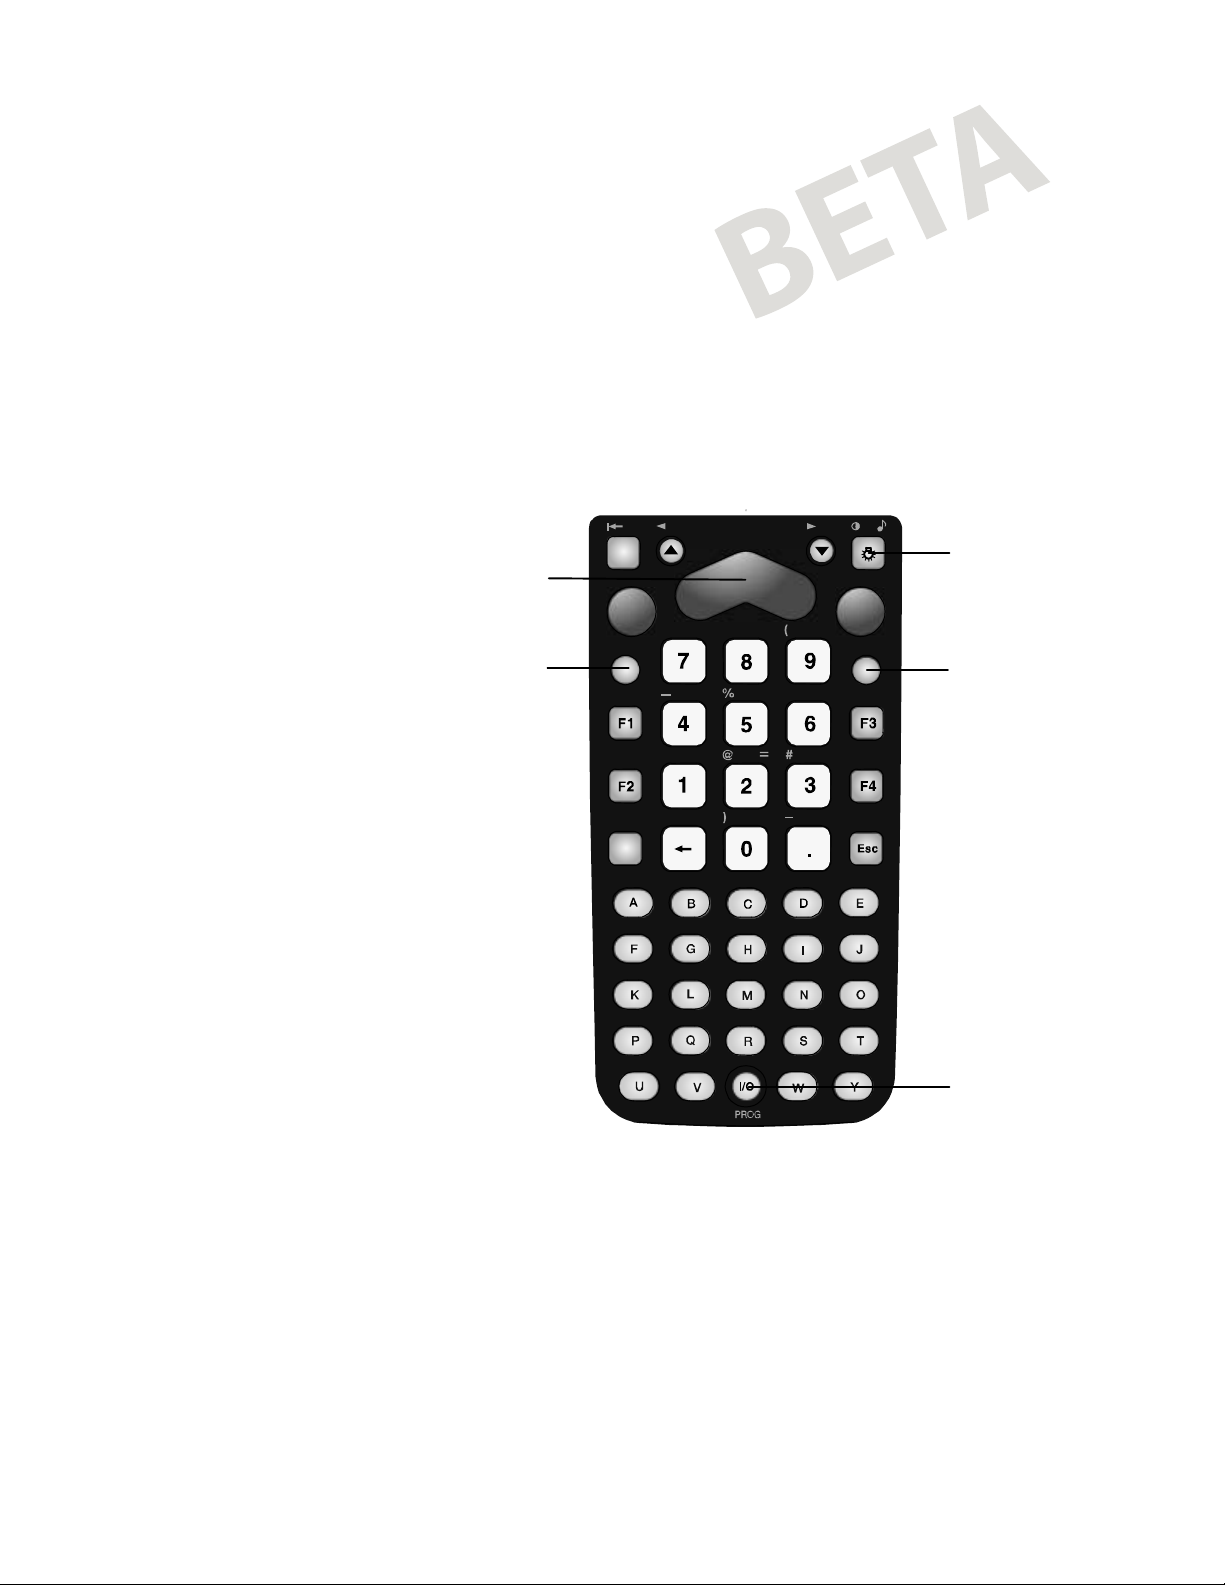
Using the 50-Key Full Alphanumeric Keypad
Power key
?
Backlight key
+
“‘
Green key
Orange key
50-key full alphanumeric keypad: Use this keypad to easily print numbers
(0-9) and the entire alphabet. You can access Function keys (F1-F9) and
special characters, symbols, and functions by pressing color-coded key
sequences.
Note: The 50-key keypad does not have a scan key because it
was designed to work with the AH1 handle that has a built-in
scanner trigger.
CK30 Handheld Computer User’s Manual 9
Page 20
Chapter 1 — Using the CK30 Handheld Computer
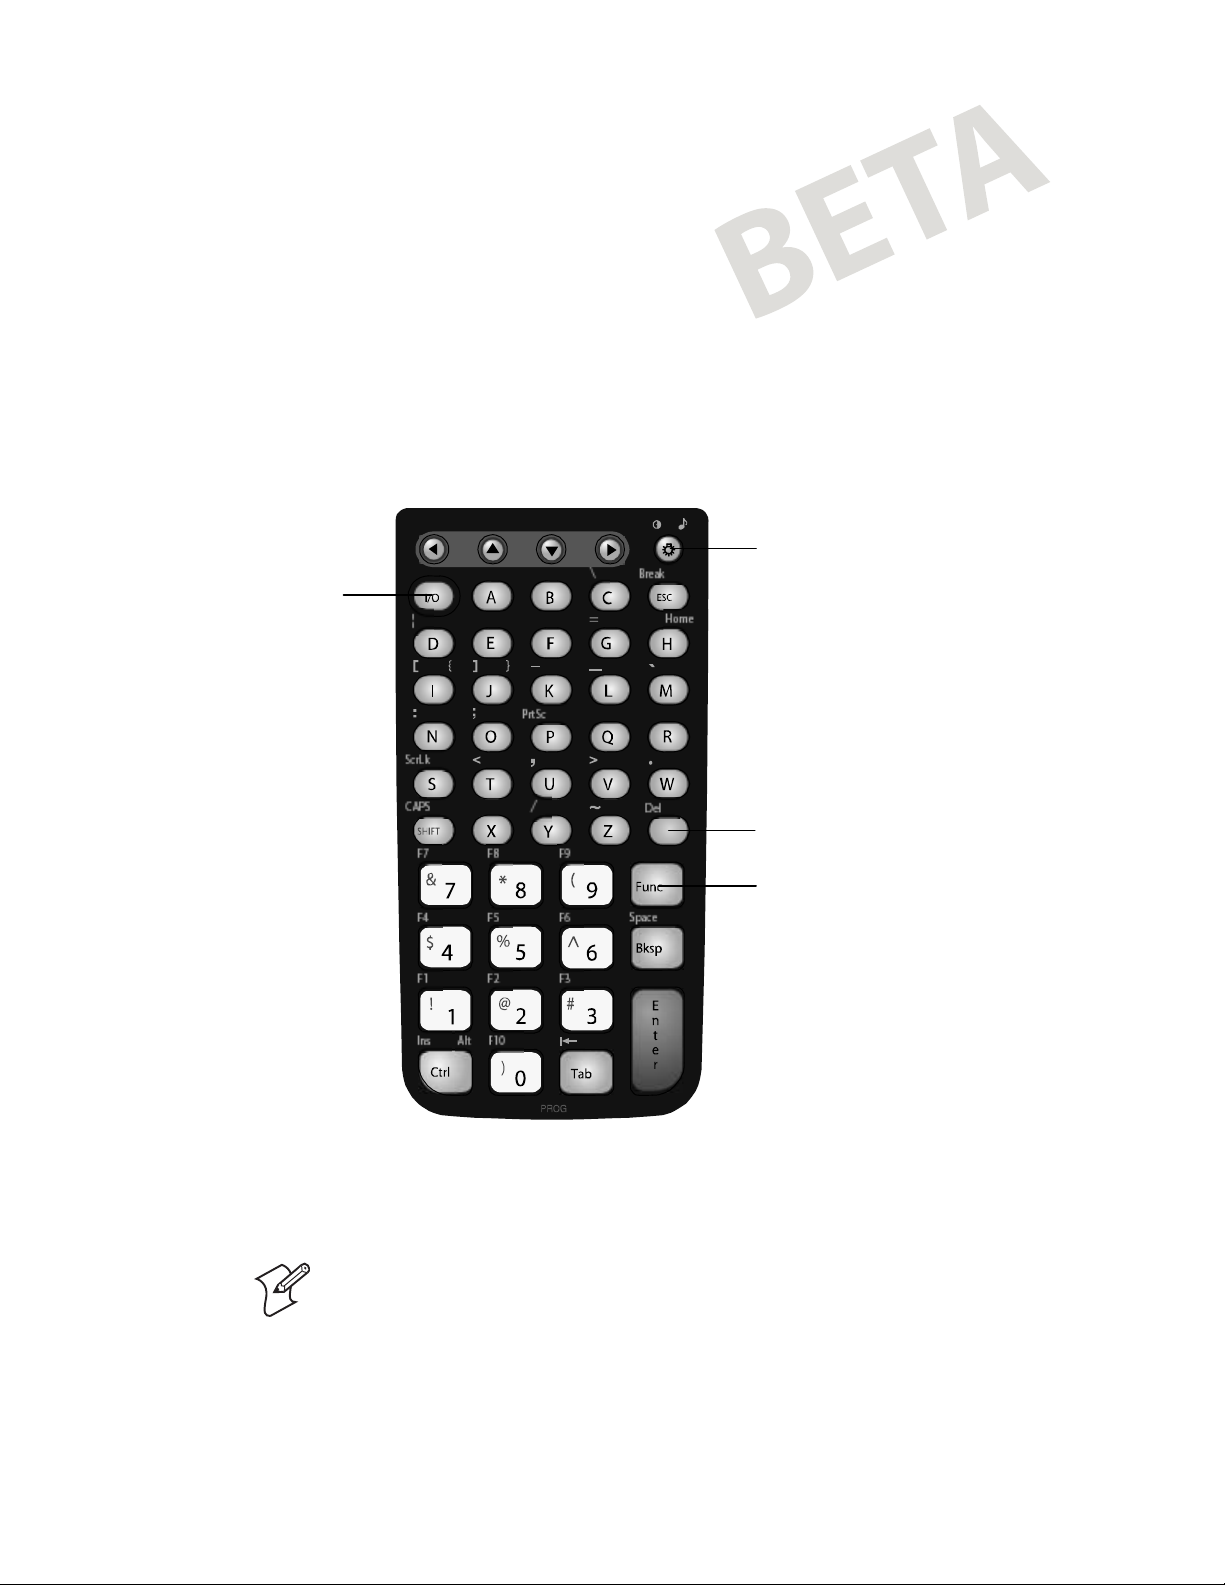
Using the 52-key Full Alphanumeric Keypad
Scan button
Orange key
Tab
Enter
&
Ins
F5
+
F6
Sp
Del
Ctl
Shift
Alt
CAPS
[]
F10 F11 F12
F15 F16
F21 F23
><
Home
*
^
,
F9
F14
F13
F17 F18 F19
F22F20 F24
XZ
Backlight key
Enter
Green key
F7
F8
\/
Power key
52-key full alphanumeric keypad: Use this keypad to easily print numbers
(0-9) and the entire alphabet. You can access Function keys (F5-F24) and
special characters, symbols, and functions by pressing color-coded key
sequences.
10 CK30 Handheld Computer User’s Manual
Page 21

Chapter 1 — Using the CK30 Handheld Computer
Understanding How to Use the Keypad
Each keypad available for the CK30 provides color-coded keys
to let you to access additional characters, symbols, and functions
printed on the keypad overlay. Once you understand how to use
the color-coded keys and key sequences, you will know how to
access all of the additional features printed on the keypad
overlay. There are two color-coded modifier keys on the CK30:
the Green key and the Orange key.
Use the CK30 modifier keys in these two ways:
• Press the key once to hold the modifier state until the next
key is pressed.
• Press the key twice to lock the modifier key. Press the key
again to release it.
This manual uses the following convention when referring to
keys that you press in sequence. That is, you press and release
the first key and then press and release the second key:
• Modifier key, key
Use this table to understand how to use the color-coded keys.
You Want To: Press:
Use an orange character or function
printed above a key
Use a green character or function
printed above a key
Use a blue character printed on a key
(42-key and 50-key keypads only)
Lock the orange or green key so that
you can continually access characters or
functions printed above a key
Orange key, key with character
or function printed above it
Green key, key with character or
function printed above it
Shift key (in blue text on the
key), key
Orange key twice
or
Green key twice
Note: There are several hidden key functions (such as { and })
on each CK30 keypad. For more information on these hidden
key sequences, refer to “Using Hidden Key Sequences” in
Appendix A.
CK30 Handheld Computer User’s Manual 11
Page 22

Chapter 1 — Using the CK30 Handheld Computer
Capitalizing All Characters
To type all alphabetic characters as uppercase letters, you can do
one of the following:
• Enable the Caps lock feature. For help, see the next
procedure.
• Use the Keypad Caps Lock configuration command. For
help, see "Keypad Caps Lock" in Chapter 6 of the CK30
Handheld Computer Configuration Manual.
To enable Caps lock
1 Press Orange key to activate the modifier key. The Orange
modifier key icon appears in the status bar (
2 Press one of these keys:
• On the 52-key keypad, press A.
• One the 42-key and 50-key keypad, press Shift.
).
The Caps lock icon (
3 Type an alphanumeric character. The letter appears as an
uppercase character on the CK30's screen.
The Caps lock icon remains in the status bar until you disable it
by pressing the same key sequence you used to enable it.
Using the International Keypad
You can order all versions of the CK30 keypad with an
international overlay. The international overlay supports English
and most Western European languages, such as French,
German, Italian, Portuguese, and Spanish.
You enter all of the characters and functions printed above the
keys just like you would on a standard keypad. For help, see
"Understanding How to Use the Keypad" earlier in this chapter.
Note: There are several hidden key functions (such as { and })
on each international keypad. For more information on these
hidden key sequences, refer to “Using Hidden Key Sequences”
in Appendix A.
)appears in the status bar.
12 CK30 Handheld Computer User’s Manual
Page 23

Using the TE 2000 Keypad
The CK30 supports TE 2000 VT100/220/320/340 and ANSI,
TE 2000 5250, and TE 2000 3270. When you order the CK30
with a TE 2000 application, you also receive the corresponding
keypad overlay. Use the TE 2000 keypad overlays to enter the
same keys that you can enter on a VT/ANSI keyboard, an IBM
5250 keyboard, or an IBM 3270 keyboard.
Like the standard CK30 keypad overlays, the TE 2000 keypad
overlays lets you enter all the characters printed on or above the
keys. The TE keypads also come with the same color-coded keys
that are on the standard overlay.
For more help using TE 2000, see the appropriate TE 2000
guide.
Understanding the Power Key
When you press the Power key to turn off the terminal, you
actually put the terminal in Suspend mode. In Suspend mode,
the terminal continues to supply power to all memory, but turns
off power to most hardware. This power-saving feature is
designed to prolong battery life.
Chapter 1 — Using the CK30 Handheld Computer
When you press the Power key to turn the CK30 back on, your
computer resumes where it was when you turned it off. If you
are using 802.1x security, the computer may reauthenticate
before it starts your application.
If you have programmed the Resume Execution command, your
CK30 may warm boot and restart your application. For help
with the Resume Execution command, see Chapter 6 of the
CK30 Handheld Computer Configuration Manual.
If your CK30 does not resume after pressing Power, you may
need to warm boot it.
To warm boot the CK30
• Press and hold the Power key for five seconds. The CK30
will tell you it is performing a warm boot and the screen will
come back up to the splash screen or your application.
CK30 Handheld Computer User’s Manual 13
Page 24

Chapter 1 — Using the CK30 Handheld Computer
Using the Screen
The CK30 can have either a color or monochrome display
depending on the model. Both screens are 160 x 160 pixels: the
client area is 160 x 140 pixels and the status bar is 160 x 20
pixels. In addition, the screens support double-byte characters,
user-programmable fonts, and bitmap graphics.
Navigating on the Screen
There are several ways to navigate through the CK30 screens.
Use this table to understand what keys to press to navigate:
To Do This: Press:
Select an option • The number associated with the option
Exit or return to a
previous screen
Move back a space
Move forward a space
Client area
Status bar
• a or b to select an option and then press
Enter
• Press Tab to select an option and then press
Enter
Esc until you exit the application or return to a
previous screen
• Backspace
• Orange key, a
• Orange key, b
Understanding the Screen Icons
Use the screen icons in the status bar to easily see the status of
the battery, any connections to the network or applications, and
any special keys or functions you may be using.
14 CK30 Handheld Computer User’s Manual
Page 25

CK30 Screen Icons
Icon Description
Battery has a full charge.
Battery has a medium charge. You should be able to work for
several more hours before changing batteries
Battery is low. You need to replace the battery now.
Strong connection to the network.
Medium-strength connection to the network.
Weak connection to the network.
No connection to the network.
No Ethernet connection.
Ethernet connection.
Orange modifier key pressed.
Green modifier key pressed.
Alt key is enabled.
Ctrl key is enabled.
Shift key is enabled.
Caps lock key is enabled.
Alpha lock key is enabled.
Buffered data.
You are in the password-protected area of the CK30.
The CK30 is connected using ActiveSync.
Mouse pointer turned on.
Chapter 1 — Using the CK30 Handheld Computer
Rotating the Screen
If you turn the CK30 sideways to scan information, you might
find it useful to rotate the screen 90 degrees clockwise for easier
readability.
CK30 Handheld Computer User’s Manual 15
Page 26

Chapter 1 — Using the CK30 Handheld Computer
To rotate the screen 90 degrees clockwise
• Press Alt, a
Programs
Using the Mouse Pointer
If you need to use a mouse to perform an action in the Windows
environment, you can use the mouse pointer that came on your
CK30.
To turn on the mouse pointer
• Press Alt key, b key.
The mouse pointer can simulate single-clicks, double-clicks,
right mouse button, middle mouse button, and left mouse
button functions. Use this table to understand the keys that
produce each function.
Function:
Left mouse button
Middle mouse button
Right mouse button
Single-click
Double-click
Mouse down event
Mouse up event
Programs
Press This Key on One of the Keypads: To Simulate This
42-key 50-key 52-key
F2 X B
F3 Y C
F4 Z D
5 5 5
sss
0 (zero) 0 (zero) 0 (zero)
. (period) Tab . (period)
For example, to generate a left single-click with the 52-key keypad
• Press B, 5
16 CK30 Handheld Computer User’s Manual
Page 27

Moving the mouse pointer around the screen is very easy. You
just need to press the appropriate number key that is associated
with the direction you want the mouse pointer to move.
Using the numeric keypad to move the mouse pointer
To continue moving the mouse pointer in one direction
• Press and hold the number key that corresponds to the
direction you want to move.
Understanding the LEDs
Chapter 1 — Using the CK30 Handheld Computer
The LEDs on the CK30 turn on to indicate the status of the
battery, a successful decode of a bar code, or a user-defined
function.
Good read
LED
Battery
LED
User-Defined
LEDs
Understanding the LEDs on the CK30
CK30 Handheld Computer User’s Manual 17
Page 28

Chapter 1 — Using the CK30 Handheld Computer
Use this table to understand what the CK30 LEDs mean.
LED Name Icon Description
User-defined Use the CK30 Programmer’s Software Kit
Battery status
(PSK) to program these LEDs to turn on and
off for any task or error within your application.
For help, see the CK30 Programmer’s Software
Kit (PSK) Reference Manual.
LED Status What it means
Off The battery is fully charged
Good Read This LED comes on when the CK30
Understanding the CK30 Beeps
The CK30 uses beeps to provide you with audio feedback when
it performs some functions. For example, you hear a beep each
time you scan a valid bar code.
Use the following table to understand what the beep sequences
mean.
Beep Sequence What it means
High beep You entered valid data or a valid command, the
Three low beeps You entered or scanned an invalid command or data.
Low beep (every 15
seconds)
Low beep, high beep Your 802.1x CK30 has been authenticated
High beep, low beep Your 802.1x CK30 is not authenticated. For help, see
Click You pressed a key. You can use the Configuration
computer decoded a label, or the computer decoded
the last row of a two-dimensional bar code.
The battery is low. Replace or recharge the battery as
soon as possible.
“Problems While Configuring 802.1x Security” in
Chapter 4.
Utility to change the volume of the keyclick.
On The battery is low. Replace the
battery.
successfully decodes a bar code.
18 CK30 Handheld Computer User’s Manual
Page 29

Chapter 1 — Using the CK30 Handheld Computer
You can change the beep volume and duration to accommodate
your needs and environment. When you change the beep
volume, you also change the keyclick volume if you have the
Keypad Clicker command enabled. The keyclick is the sound
you hear when you press a key.
You can set the beep volume to off, low, medium, and high
(default). Use one of these three ways to change the beep
volume:
Method Procedure
Use the keypad.
Use the Intermec
Configuration menu.
Use the Beep
Volume command.
Press the Green key, Backlight key to increase the
volume. There are four beep volumes on the CK30
including off. When you reach the loudest setting,
the next setting is off. The volume will then start
with the lowest setting and go up.
From the Intermec CK30 menu, choose
Configuration Utility > CK30 Settings > Beeper
and LED.
For help, see “Beep Volume” in the CK30 Handheld
Computer Configuration Manual.
Scanning Bar Codes
Do not look directly into the window area or at a reflection
of the laser beam while the laser is scanning. Long-term
exposure to the laser bean can damage your vision.
Avertissement: Ne regardez pas directement la réflexion d’un
rayon laser ou dans la fenêtre du laser lorsque celui-ci est en
opération. Si vous regardez trop longtemps un rayon laser,
cela peut endommager votre vue.
Use the scanner to scan and enter bar code data. The type of
scanner you are using and the type of bar code you are decoding
determines the way you scan the bar code. The CK30 supports
the scanning of 1D linear bar codes and 2D images depending
on your model of CK30. Plus, if you have are using an
integrated handle or a tethered scanner, the way you scan bar
codes will be different.
CK30 Handheld Computer User’s Manual 19
Page 30

Chapter 1 — Using the CK30 Handheld Computer
When you unpack the CK30, these bar code symbologies are
enabled:
• Code 39
• Code 128
• UPC/EAN
• PDF 417 (with Model C only?)
If you are using bar code labels that are encoded in a different
symbology, you need to enable the symbology on the computer.
Use the Configuration Utility to enable and disable symbologies
for your scanner. For help understanding how to use the
Configuration Utility, see “Configuring the CK30 With the
Configuration Utility” in Chapter 2.
The next sections describe how to scan a bar code label with the
integrated laser scanner, 1D linear imager and the 2D imager.
Scanning With the Integrated Laser Scanner and 1D Linear Imager
If the CK30 has a laser scanner or 1D linear imager, use the
following procedure to understand how to scan a bar code. The
linear imager can decode PDF417 bar codes as well as bar codes
with high-density, wide-density, and poor quality in any lighting
conditions.
To scan a bar code label with the laser scanner
1 Press Power to turn on the CK30.
2 Point the scanner window at the bar code label and hold the
computer at a slight angle a few inches from the label.
Note: If you have an advanced long-range scanner, you may
need to hold the computer further away from the label.
3 Press the Scan button on the keypad and direct the red beam
so that it falls across all bars in the bar code label.
Insert illustration
20 CK30 Handheld Computer User’s Manual
Page 31

Chapter 1 — Using the CK30 Handheld Computer
When the CK30 successfully reads a bar code label, you will
hear a high beep and the green Good Read LED turns on
briefly.
4 Release the Scan button.
Scanning Bar Codes With the 2D Area Imager
The CK30C may have a 2D area imager instead of the
conventional laser scanner. Omni-directional (360°) scanning
means that you can position the CK30 in any direction to scan a
bar code label.
To scan a bar code label with the 2D area imager
1 Press Power to turn on the CK30.
2 Point the scanner window at the bar code label and hold the
computer a few inches from the label.
3 Press the Scan button on the keypad and center the red
aiming beam over the bar code label.
Note: The aiming beam is smaller when the imager is closer
to the bar code and larger when it is further away.
Insert illustration
CK30 Handheld Computer User’s Manual 21
Page 32

Chapter 1 — Using the CK30 Handheld Computer
When the CK30 successfully reads a bar code label, you will
hear a high beep and the green Good Read LED turns on
briefly.
4 Release the Scan button.
Attaching a Tethered Scanner
You can use a tethered scanner with the CK30 if you ordered it
with a 10-pin tethered scanner port in place of the integrated
scanner. The following devices are currently supported by the
CK30:
• Decoded scanners: 1470B, 1551E, 1553, 1555, 1800-series
laser scanners
• Undecoded scanners: 1550C, 128X wands
An auto-detection wizard automatically detects the presence of a
scanner connected to the 10-pin scanner port. If the scanner is
not auto-detected, an optional wizard allows you to identify
scanner types that cannot be auto-detected by the CK30.
To attach a tethered scanner
1 Locate and remove the scanner port cover.
Scanner
port cover
22 CK30 Handheld Computer User’s Manual
Page 33

2 Insert the scanner 10-pin connector until it locks in place.
Using the SD Card
You can use an SD card to increase file storage and install
software. The CK30 supports the following type of SD card:
• SanDisk SD cards supporting 1-bit mode only
Chapter 1 — Using the CK30 Handheld Computer
Scanner port
To scanner
The SD card slot is located on the top of the CK30 just above
the laser scanner window. The SD card will appear in the File
Manager as "SDMMC Disk."
To insert an SD card
1 Press Power to turn on the CK30.
2 Remove the two screws on the SD card slot cover and remove
the cover.
Cover
SD card
CK30 Handheld Computer User’s Manual 23
Screw
(2 places)
Page 34

Chapter 1 — Using the CK30 Handheld Computer
3 Gently insert the SD card into the CK30 with the printed
side facing the front of the CK30.
4 Push the card into the slot until it fits firmly.
5 Replace the cover and two screws.
24 CK30 Handheld Computer User’s Manual
Page 35

Configuring the CK30
2
Use this chapter to understand how to configure the CK30 to
communicate in your network. In this chapter, you will find
these sections:
• How to Configure the CK30
• How the CK30 Fits Into Your Network
• Configuring Security on the CK30
Page 36

Chapter 2 — Configuring the CK30
How to Configure the CK30
You can configure many operation characteristics of the CK30,
such as the bar code symbologies it decodes or the network
settings. These characteristics are controlled by configuration
parameters. The values you set for these configuration
parameters determine how the computer operates.
There are several ways to configure the CK30:
Use Applications on the CK30
Programs
Use Setup Assistant
to quickly enter
network parameters
or to use the
Configuration Utility
to set all paramaters.
Use Intermec Configuration Utility (ICU)
Ethernet
or RF
Network
Scan Bar Codes
Scan bar codes
to configure basic
unit and data
collection
parameters.
Use Configuration Commands
Send commands
through the
network to
your CK30s.
Ethernet
or RF
Network
Use a Web browser on your
desktop PC with ICU to
configure parameters for
each CK30 on your network.
26 CK30 Handheld Computer User’s Manual
Page 37

Configuring the CK30 With the Setup Assistant
S
When first setting up the CK30, use the Setup Assistant to set or
enable basic network parameters and connect your CK30 to the
network. The Setup Assistant is a wizard that guides you
through setting the following basic network parameters:
• Date and time
• SSID (Network name)
• 802.1x security
• DHCP server or IP address, subnet mask, and default router
• Primary and secondary DNS addresses
• Primary and secondary WINS addresses
• Device name
To set other parameters, use the Configuration Utility or
another configuration method. The Setup Assistant runs on the
CK30 the first time you turn on the computer.
Chapter 2 — Configuring the CK30
The first screen of the Setup Assistant Wizard
However, if you exit Setup Assistant before you are finished
configuring the CK30, you can restart it from the S
ystem Main
Menu. See the next section for information on how to access the
System Main Menu.
After you complete the Setup Assistant, the CK30 should be
communicating with your network. If you are using RF
communications on your CK30, a network connection icon
appears in the status bar.
CK30 Handheld Computer User’s Manual 27
Page 38

Chapter 2 — Configuring the CK30
Configuring the CK30 With the Configuration Utility
Use the menu-driven Configuration Utility to configure the
CK30 and view system information. You can access the
Configuration Utility while running any application.
Opening the Configuration Utility
When using the Configuration Utility, you may not see a
parameter until you enable or disable a value for another key
field. For example, you will not see IP Settings unless you disable
DHCP. You may also not see a parameter if your computer does
not support a particular feature.
To open the Configuration Utility
1 From the CK30 splash screen, press Green key, Orange key.
2 In the password dialog box, type
intermec and press Enter.
The System Main Menu appears.
An icon ( ) appears in the status bar showing that you are in
the password-protected area of the CK30.
3 Select the Configuration Utility. The Configuration Utility
main menu appears.
28 CK30 Handheld Computer User’s Manual
Page 39

Chapter 2 — Configuring the CK30
Use this table to understand your menu options in the
Configuration Utility.
Configuration Utility Menu Options
Menu Option Description
Scanners, Symbologies Configure scanner settings and bar code
Communications Set up network settings including the 802.11b
CK30 Settings Configure settings specific to the CK30 such as the
SNMP ??
About the CK30 View the part number, firmware version, radio, and
Summary View a summary of all settings for the Scanners,
Restore Defaults Restore factory default settings on your CK30.
symbologies.
radio and the Bluetooth printer.
date, time, beeper volume, and backlight timeout.
RF protocol loaded on your CK30.
Symbologies menu, the Communications menu,
the CK30 Settings menu, and the SNMP menu.
Configuration Utility Menus at a Glance (placeholder graphic)
CK30 Handheld Computer User’s Manual 29
Page 40

Chapter 2 — Configuring the CK30
Use this table to understand how to navigate and enter
information in the Configuration Utility.
To Do This: Press:
Select an option • The number associated with the option
Save a setting
Exit or return to a previous
screen
Move back a space
Move forward a space
Delete a character
Delete all characters in a field
when highlighted
Restoring Default Settings
You can restore the CK30 to factory default settings from the
Configuration Utility.
• a or b to select an option and then press
Enter
• Tab to select an option and then press
Enter
Enter key
Esc until you exit the application or return
to a previous screen
• Backspace
• Orange key, a
• Orange key, b
Green key, Backspace () key
Backspace () key
Note: Using the Restore Defaults option resets all network
parameters. As a result, you may lose network communications.
This option should only be used by network administrators or
by Intermec support personnel.
To restore factory default settings
1 From the Configuration Utility menu, select Restore
Defaults. The following Alert box appears:
30 CK30 Handheld Computer User’s Manual
Page 41

Chapter 2 — Configuring the CK30
2 Press Enter to restore factory defaults.
A progress bar appears on the screen to show you the status of
restoring the factory defaults.
Exiting the Configuration Utility
When you exit the Configuration Utility, you leave the
password-protected area of the CK30. The password-protected
icon (
To exit the System Main Menu
1 From the System Main Menu, press Esc or select Exit.
2 When asked if you want to exit the System Main Menu,
) disappears from the status bar.
press Enter.
Configuring the CK30 With Commands Through the Network
You can change the configuration parameters of the CK30 by
sending commands through a host computer or through the
network. If you are using a network, you can configure one or
more CK30 at a time. For help, see Chapter 2 of the CK30
Handheld Computer Configuration Manual.
Configuring the CK30 With the Intermec Configuration Utility (ICU)
I don’t have any information to put here yet….
Configuring the CK30 by Scanning Bar Codes
You can change the configuration parameters of the CK30 by
scanning Code 39 or Code 93 bar codes labels containing
configuration commands. This method is a fast and easy way to
change just a few configuration parameters on a single CK30.
You can scan the bar code labels in the CK30 Handheld
Computer Configuration Manual or you can create your own bar
code labels. Chapter 2 in the Configuration Manual describes
how to create your own bar code labels.
CK30 Handheld Computer User’s Manual 31
Page 42

Chapter 2 — Configuring the CK30
You can only change some of the configuration parameters by
scanning bar codes. To configure all of configuration
parameters, use the Configuration Utility, send commands
through the network to your Ck30, or use the Intermec
Configuration Utility.
For example, you can use the Beep Volume configuration
command to adjust the beep volume of the CK30. Scan this bar
code label to set the volume to the lowest level:
Set Beep Volume to Low
*$+BV1*
*$+BV1*
When you scan bar code configuration commands, the CK30
emits a series of beeps unless the volume is turned off. There are
two beep sequences:
• One high beep means you scanned a valid configuration
command.
• Three low beeps means you scanned an invalid configuration
command.
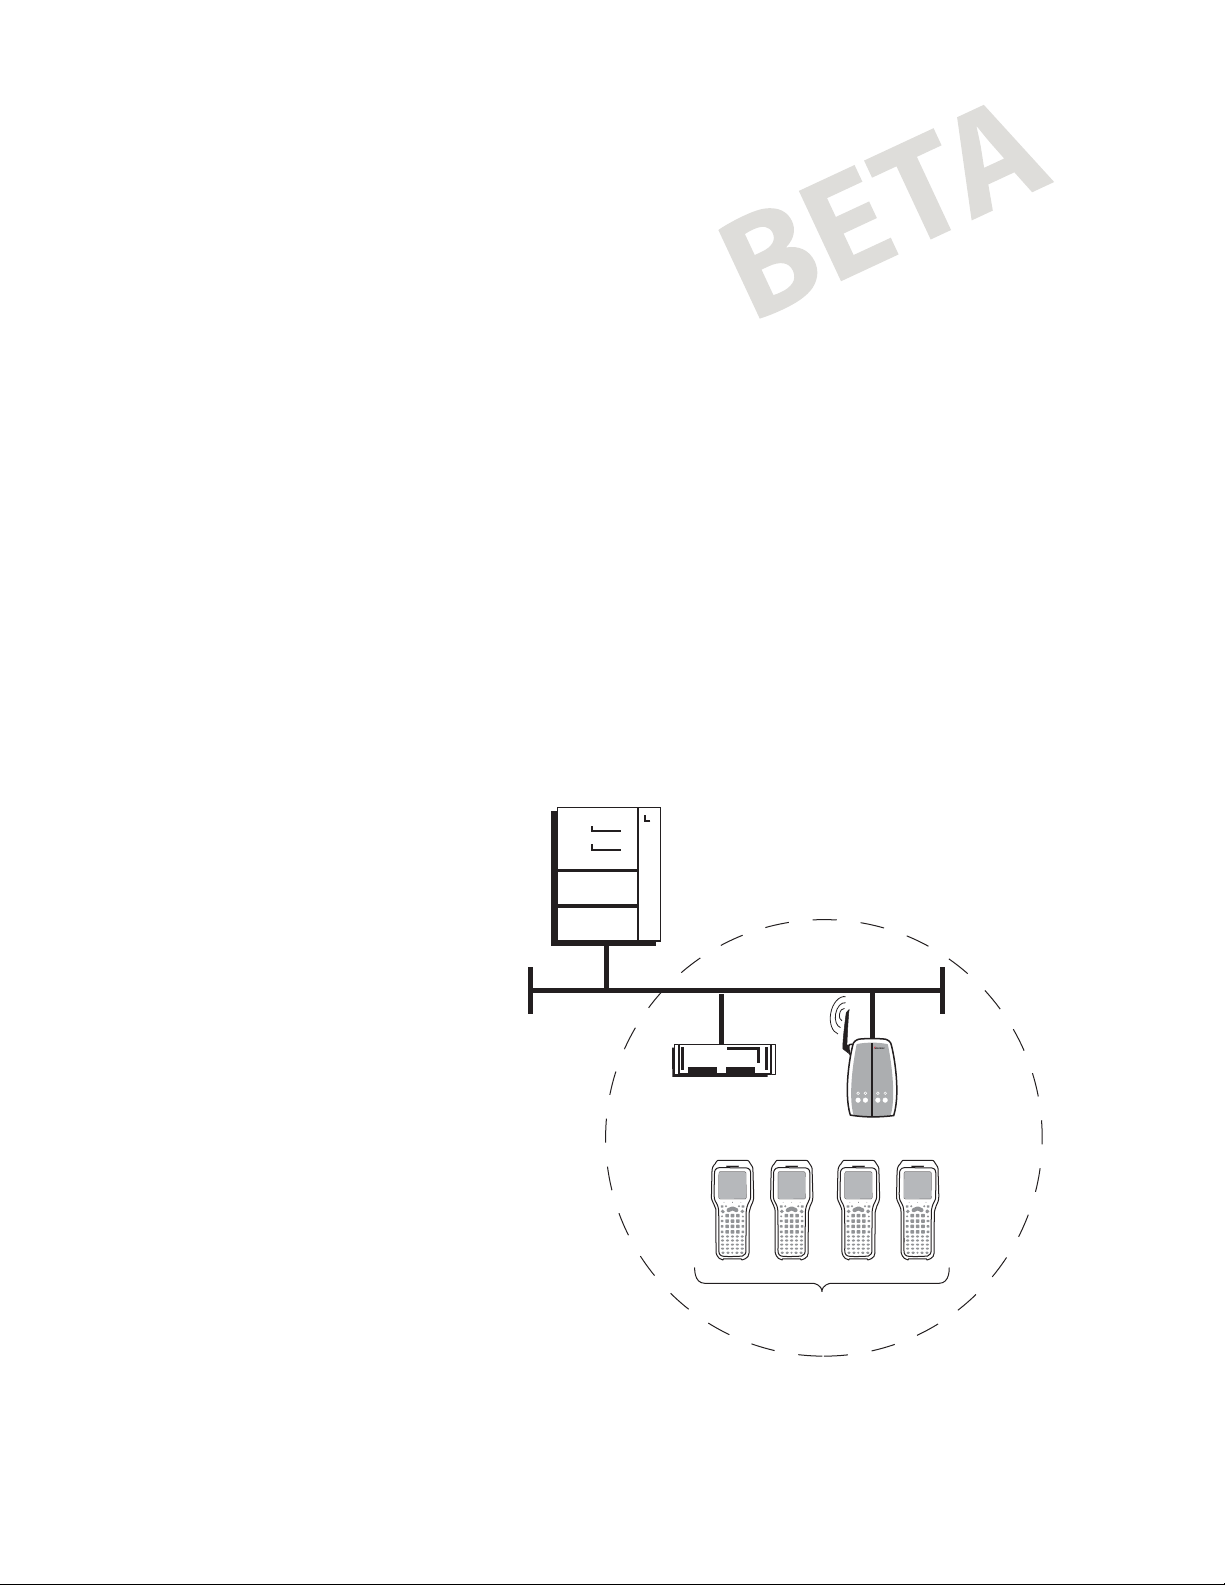
How the CK30 Fits Into Your Network
The CK30 is a versatile handheld computer that you can easily
add to your wired or wireless data collection network. You can
connect your CK30 to your network using:
• Serial Communications
• RF Communications
• Ethernet Communications
• Bluetooth Wireless Printing
32 CK30 Handheld Computer User’s Manual
Page 43

Using Serial Communications on the CK30
The CK30 has a serial port to transfer data to and receive data
from another device via RS-232 communications. You can also
insert the CK30 into a communications dock to transmit data to
and receive data from a host computer or PC using serial
communications.
Chapter 2 — Configuring the CK30
Mainframe
Terminals
Ethernet
Serial cable
CK30
To use serial communications with your CK30
File server
PC
1 Turn off the CK30.
2 Connect the CK30 to the serial port of another device. You
can do this in one of the following ways:
• Connect the CK30 serial port to the serial port of the other
device using the AA1A (26-pin to DB9-pin) serial adapter
cable.
CK30 Handheld Computer User’s Manual 33
Page 44

Chapter 2 — Configuring the CK30
• Connect the AD1 or AD2 Communications Dock to the
serial port of the other device using a DB9-pin to DB9-pin
serial adapter cable.
3 Turn on the CK30.
Using RF Communications on the CK30
Make sure all components with antennas are at least 30 cm
(1 ft) apart when power is applied. Failure to comply could
result in equipment damage.
Attention: Assurez-vous que la distance entre tous les
éléments avec antennes soit d’au moins 30 centimètres (un
pied) avant de faire la connexion avec l’alimentation
électrique, faute de quoi vous risquez d’endommager votre
installation.
The CK30 has an internal antenna to transfer data using RF
communications. This section of the manual assumes that you
have already set up your RF communications network including
your access points. If you are using a UDP Plus network, you
also need to have your DCS 30X or G4000 communicating
with a host computer.
If you are using 802.1x security, this section also assumes that
your authentication server and access points are properly
configured and that they have been set to the current date and
time.
Your CK30 supports one of the following types of network
protocol:
• TCP/IP
• UDP Plus
The next sections explain the parameters you need to configure
for the CK30 to work in your RF network.
34 CK30 Handheld Computer User’s Manual
Page 45

Chapter 2 — Configuring the CK30
Configuring the Network Parameters for a TCP/IP Network
In a TCP/IP network, the CK30 communicates with a host
computer directly using TCP/IP for the RF protocol. The access
point acts as a bridge to allow communications between the
wired network and the RF network.
Host
TCP/IP
Direct Connect
Ethernet
Access point
CK30s
To use RF communications in a TCP/IP network
1 Configure these network parameters on each CK30 in the
network:
• Network Name (SSID)
• Host IP Address
CK30 Handheld Computer User’s Manual 35
Page 46
Chapter 2 — Configuring the CK30
• IP Settings (if not using DHCP)
• Network Port
2 Configure the security.
The easiest way to configure the network parameters on the
CK30 is to use the Configuration Utility. For help, see
“Configuring the CK30 With the Configuration Utility” on
page 28.
Configuring the Network Parameters for a UDP Plus Network
In a UDP Plus network, the CK30 communicates with a host
computer through the DCS 30X or the G4000.
Host
UDP Plus
Ethernet
G4000
Access point
CK30s
36 CK30 Handheld Computer User’s Manual
Page 47

Chapter 2 — Configuring the CK30
The DCS 30X or G4000 translate UDP Plus packets on the RF
network into TCP/IP packets on the wired network and vice
versa. The access point acts as a bridge to allow communications
between the wired network and the RF network.
To use RF communications in a UDP Plus network
1 Configure these network parameters on each CK30 in the
network:
• Network Name (SSID)
• Controller IP Address
• IP Settings (if not using DHCP
• Network Port
• Default Router (DCS 30X or G4000 on different
subnetwork)
• Subnet Mask (DCS 30X or G4000 on different
subnetwork)
2 Configure the security.
The easiest way to configure the network parameters on the
CK30 is to use the Configuration Utility. For help, see
“Configuring the CK30 With the Configuration Utility” on
page 28.
CK30 Handheld Computer User’s Manual 37
Page 48

Chapter 2 — Configuring the CK30
Using Ethernet Communications on the CK30
You can use the CK30 directly in an Ethernet network if you
have ordered Ethernet on your CK30 and you insert it into an
AD1 or AD2 communications dock. The communications dock
has an Ethernet connector that makes it possible for the CK30
to connect to your Ethernet network.
Host
Terminals
Ethernet
243X hardwired to PC
File server
PC
To use the CK30 in an Ethernet network
1 Either enable DHCP or configure these network parameters
on each CK30 in the network:
• IP Address
• Subnet Mask
• Default Router
2 If required for your network, set these parameters on each
CK30 in the network:
• Primary and Secondary DNS Servers
• Primary and Secondary WINS Servers
38 CK30 Handheld Computer User’s Manual
Page 49

Chapter 2 — Configuring the CK30
Configuring the CK30 for Bluetooth Wireless Printing
You can send information to printers wirelessly using the
Bluetooth qualified module by Socket Communications. The
Bluetooth technology uses short-range radio links and allows for
communications over a ten-meter range.
To configure the CK30 for wireless printing
1 Go to Configuration Utility > Communications >
Bluetooth.
2 Select Set Wireless Printer to start the Bluetooth device
discovery. A list of discovered devices appears in the Devices
dialog box.
3 Select the device you want to use from the list and press
Enter.
If devices are discovered, but your device is not displayed,
make sure your device and radio are turned on and try device
discovery again.
Use this table to understand the parameters you see in the
Bluetooth menu.
Parameter Description
Remote Device Name Name of the remote Bluetooth compatible
printer.
Remote Device Address The network address of the Bluetooth
compatible printer.
Set Wireless Printer Discovers Bluetooth compatible devices.
Device Name The name assigned to your CK30.
Device Address The network address of your CK30.
CK30 Handheld Computer User’s Manual 39
Page 50

Chapter 2 — Configuring the CK30
Bluetooth Parameter Descriptions (continued)
Parameter Description
Discoverable Makes your CK30 discoverable on the
Connectable Makes your CK30 connectable on the
Class of Device Determines how the device appears to other
For more information about using Bluetooth
communications, see the Wireless Printing Development Guide
available on the Intermec Developer’s Library CD.
Configuring Security on the CK30
The CK30 uses the Wired Equivalent Privacy (WEP) protocol
to provide your wireless networks the same level of protection as
a comparable wired network. WEP adds security to wireless local
area networks (WLANs) based on the 802.11b standard. You
can enable or disable WEP security.
network.
network.
devices during discovery.
To use 802.11 security, you need:
• An Intermec MobileLAN access point with an 802.11b radio
and software release 1.80 or later.
• A CK30 handheld computer with an 802.11b radio and the
wireless security option.
To enable WEP security on the CK30
1 Make sure you have configured the communications and
radio parameters on your CK30.
2 Open the Configuration Utility. For help, see “Configuring
the CK30 With the Configuration Utility” earlier in this
chapter.
3 Enable WEP Encryption.
4 Set the value of each of the four WEP keys.
40 CK30 Handheld Computer User’s Manual
Page 51

Chapter 2 — Configuring the CK30
You can enter either an ASCII key or a hex key that is either 5
bytes or 13 bytes long depending on the capability of the
radio. Set a 5-byte value for WEP 64-bit or a 13-byte value
for WEP 128-bit. Hex keys must be preceded by 0x and
contain 10 or 26 hex numbers.
For example, to enter a key with the value of ABCDE for a
radio that supports WEP 64-bit:
• Enter ABCDE for an ASCII key
• Enter 0x4142434445 for a hex key
5 Select the WEP key you want to use for data transmission.
6 Exit the Configuration Utility.
CK30 Handheld Computer User’s Manual 41
Page 52

Chapter 2 — Configuring the CK30
42 CK30 Handheld Computer User’s Manual
Page 53

Managing the CK30
3
Use this chapter to understand how to manage information on
the CK30. In this chapter, you will find these sections:
• Accessing the System Main Menu
• Using File Manager
• Using Task Manager
• Using ActiveSync on the CK30
• Installing Applications Using AutoCab
• Changing the Password
• Saving Your Configuration or Application to Flash
• Upgrading the Firmware
Page 54

Chapter 3 — Managing the CK30
Accessing the System Main Menu
You need to access the System Main Menu to be able to use
most of the tools for managing the CK30. Access to the System
Main Menu is password protected to ensure that only authorized
individuals can use it.
To access the System Main Menu
1 From the CK30 splash screen, press Green key, Orange key.
2 In the password dialog box, type
The System Main Menu appears.
Note: When you access the System Main, an icon ( ) appears
in the status bar indicating that you are in the passwordprotected area of the CK30.
To exit the System Main Menu
• From the System Main Menu, press Esc or select Exit from
the list.
When you exit the System Main Menu, the icon disappears
from the status bar.
intermec and press Enter.
44 CK30 Handheld Computer User’s Manual
Page 55

Using File Manager
File Manager provides the ability to run an executable file, delete
a file, or view the properties of a file.
To open File Manager
• From the System Main Menu, select File Manager.
The File Manager screen appears.
To run an application
1 Navigate to the folder containing the application file.
Chapter 3 — Managing the CK30
2 Select the file by pressing its associated number or by scrolling
to it and pressing Enter. The following dialog box appears:
3 Select Run and press Enter. Your application opens.
CK30 Handheld Computer User’s Manual 45
Page 56

Chapter 3 — Managing the CK30
To delete a file
1 Navigate to the folder containing the file you want to delete.
2 Select the file by pressing its associated number or by scrolling
to it and pressing Enter.
3 From the dialog box, select Delete and press Enter.
4 When the screen asks for confirmation that you want to
delete the file, Press Enter.
The file is deleted and you remain in the selected folder.
To view the properties of a file
1 Navigate to the folder containing the file you want to view.
2 Select the file by pressing its associated number or by scrolling
to it and pressing Enter.
3 From the dialog box, select Properties and press Enter. A
screen appears showing you the details of the file. For
example, you should see something similar to this screen:
4 Press any key to return to the File Manager.
46 CK30 Handheld Computer User’s Manual
Page 57

Using Task Manager
Task Manager provides information about applications running
on the CK30. You do not need to use the System Main Menu to
access Task Manager - you can access Task Manager at any time.
Use Task Manager to perform several tasks, such as:
• View all applications currently running on the CK30
• Close an application
• Switch between applications
To view applications currently running on the CK30
• Press Alt, Tab
The Task Manager dialog box appears with the active
application selected.
Chapter 3 — Managing the CK30
To close an application
1 Select the application you want to close. The following list
box appears:
2 Scroll to End Task and press Enter.
CK30 Handheld Computer User’s Manual 47
Page 58

Chapter 3 — Managing the CK30
The application closes and you return to the System Main
Menu.
To switch between applications
1 Select the application you wan to close.
2 Select Switch To and press Enter.
The application you selected now appears on the screen.
Using ActiveSync on the CK30
You can use ActiveSync to establish a connection between your
desktop PC and the CK30. ActiveSync allows you to transfer
files, synchronize files, perform remote debugging, and other
device management activities. ActiveSync is a free application
available from the Microsoft website.
To establish a partnership between your desktop PC and the
CK30, you will need:
• A USB cable
• An AD1 or AD2 communications dock
• ActiveSync version 3.7 or later
Installing ActiveSync and Establishing a Partnership
You must use a USB cable to establish your initial partnership
between the CK30 and your desktop PC. If you are running
Windows NT on your desktop PC, you cannot connect to your
CK30 with ActiveSync.
To install ActiveSync and establish a partnership
1 Download ActiveSync from the Microsoft website and follow
the onscreen instructions for installing it on your desktop PC.
When the installation process is complete, the Get
Connected dialog box appears:
48 CK30 Handheld Computer User’s Manual
Page 59

Chapter 3 — Managing the CK30
The ActiveSync Get Connected dialog box
2 Connect the AD1 to your desktop PC with the USB cable
3 Click Next in the Get Connected dialog box. ActiveSync
detects a device on the USB port and prompts you to set up a
new partnership.
4 In the Set Up a Partnership dialog box, click Next.
5 In the Select Number of Partnerships dialog box, select Yes,
I want to synchronize with only this computer and then
click Next.
6 In the Select Synchronization Settings dialog box, check the
items you want to synchronize and click Next.
7 In the Setup Complete dialog box, click Finish.
CK30 Handheld Computer User’s Manual 49
Page 60

Chapter 3 — Managing the CK30
When the partnership has been established, the following screen
appears on your desktop showing the device name of your CK30
and the Connected status.
The Microsoft ActiveSync screen
An icon also appears in the CK30 status bar indicating that it
has established an ActiveSync partnership with your desktop PC.
Note: If ActiveSync does not establish a partnership on the first
try, the Get Connected dialog box appears on your desktop
with the message “Your device was not detected.” Click Next on
the Get Connected dialog box until your device is detected.
Now that the partnership has been established, all future
connections will be handled through ActiveSync. To connect to
your PC using ActiveSync in the future, all you need to do is
place a CK30 in the AD1 or AD2 communications dock or turn
on the CK30 by pressing Power.
50 CK30 Handheld Computer User’s Manual
Page 61

Chapter 3 — Managing the CK30
Using ActiveSync to Copy Files and Install Applications
You can use ActiveSync to copy files to the CK30 and to install
applications. Basically, to install an application, you need to
copy the .cab file to a directory on the CK30 and then run it.
Use the following procedures to learn how to copy files and
install applications on the CK30 using ActiveSync.
To copy a file to the CK30
1 Connect the CK30 to your desktop PC using ActiveSync. For
help, see the previous section “Installing ActiveSync and
Establishing a Partnership.”
2 In ActiveSync, click Explore. Windows Explorer will open
the Mobile Device window of your CK30:
3 In Windows Explorer, browse to the file that you want to
copy on your device or desktop computer.
CK30 Handheld Computer User’s Manual 51
Page 62

Chapter 3 — Managing the CK30
S
4 Right-click the file and click Copy.
5 Place the cursor in the desired folder for your device, right-
click, and click Paste.
The file has now been copied to the CK30 and you will be able
to see it using File Manager.
To install an application on the CK30
1 Open File Manager on the CK30.
2 Navigate to the .cab file you want to install.
3 Select the file by pressing its associated number or by scrolling
to it and pressing Enter.
4 Select Run from the dialog box and press Enter.
The .cab file executes and your application begins the
installation process on the CK30.
Installing Applications Using AutoCab
Still waiting to see how this is going to work on the CK30…
Changing the Password
You may want to change the password from the default
(
intermec) to help restrict access to the S
The Change Password dialog box is very easy to access and to
use.
To change the password
1 From the CK30 splash screen, press Green key, Orange key.
2 In the password screen, type
System Main Menu appears.
52 CK30 Handheld Computer User’s Manual
intermec and press Enter. The
ystem Main Menu.
Page 63

Chapter 3 — Managing the CK30
3 From the System Main Menu, select Change Password. The
Change Password dialog box appears:
4 Type intermec in the Old Password field.
5 Press Tab to move to the New Password field.
6 Type your new password and then press Tab to move to the
Retype New field.
7 Type your new password in again.
8 Press Enter.
The screen displays a message reading “Password successfully
changed.”
Saving Your Configuration or Application to Flash
There is now an option to save the configuration or applications
to Flash. There will be a menu option at the System Main Menu
level for applications and a menu option at the Configuration
Utility level. Saving the changes to Flash ensures that the
changes will be persistent – that is, that the changes will be there
after the CK30 is cold-booted.
Upgrading the Firmware
How is this done?
CK30 Handheld Computer User’s Manual 53
Page 64

Chapter 3 — Managing the CK30
54 CK30 Handheld Computer User’s Manual
Page 65

Troubleshooting and
4
Use this chapter to solve problems you may encounter while
using the CK30. You will also find information on booting the
computer and routine maintenance.
Maintaining the CK30
Page 66

Chapter 4 — Troubleshooting and Maintaining the CK30
Problems and Solutions
If you have any problems using the CK30, look in this chapter
to find a possible solution. This chapter consists of the following
sections:
Sections Page
Problems While Operating the CK30 4-57
Problems While Configuring the CK30 4-57
Problems While Configuring 802.1x Security 4-58
Problems With RF Connectivity 4-61
Problems Transmitting Data Through the Serial Port 4-63
Problems Transmitting Data Through the DCS 30X or G4000 4-63
Problems While Scanning Bar Codes 4-64
Booting and Resetting the CK30 4-66
Cleaning the Scanner Window and Computer Screen 4-67
You can also use the error numbers and messages table and the
terminal diagnostics to help analyze and solve problems. For
help, see Chapter 4, “Running Diagnostics,” in the CK30
Handheld computer configuration Manual (P/N 073528).
If you have problems with the TE 2000 terminal emulation
applications, see the appropriate TE 2000 guide.
If you send the CK30 in for service, it is your responsibility to
save the terminal data and configuration. Intermec is responsible
only for ensuring that the keypad and other hardware features
match the original configuration when repairing or replacing
your computer.
56 CK30 Handheld Computer User’s Manual
Page 67

Chapter 4 — Troubleshooting and Maintaining the CK30
Problems While Operating the Terminal
Problem Solution
You press Power to turn on the
CK30 and nothing happens.
The Battery light is on and the
terminal beeps once every 15 seconds.
The terminal appears to be locked up
and you cannot enter data.
Make sure you have a charged battery installed correctly. For
help, see “Charging and Installing the Battery” in Chapter 1.
The battery may be discharged. Replace the battery pack with
a spare charged battery, or charge the battery and try again.
The battery charge is low. You have a few minutes of power
left. Immediately replace the battery with a spare charged
battery pack, or charge the battery.
• Press Power to turn on the CK30. The CK30 boots all the
systems, clears RAM memory, and starts the application.
• Remove the battery pack. Let the terminal sit for 1
minute. Install the battery pack. Press Power to turn on
the CK30.
• (CK30 with an 802.11b radio only) Wait at least 10
seconds and try again. If the CK30 is still connecting to
the G4000 or the host, it ignores any input from the
keypad or scanner.
• Try reloading the firmware. For help, see “Upgrading the
Firmware” in Chapter 3.
• If the CK30 will not boot or reset, contact your local
Intermec service representative for help.
Problems While Configuring the Terminal
Problem Solution
You scan a configuration
command, such as Keypad Caps
Lock, and nothing happens.
CK30 Handheld Computer User’s Manual 57
There are two possible solutions:
• You may have one or more reader commands disabled,
such as Change Configuration, so that you cannot
change the configuration. Enable all of the reader
commands and try again.
Page 68

Chapter 4 — Troubleshooting and Maintaining the CK30
Problems While Configuring the Terminal (continued)
Problem Solution
• The terminal may be waiting for another command
to complete the configuration change. If you
started by scanning the Enter Accumulate
command, you must finish the command by
scanning the Exit Accumulate command. For help,
see Chapter 6, “Configuration Command
Reference,” in the CK30 Handheld Computer
Configuration Manual.
Scan the Enable Override to temporarily enable all of
the reader commands. When you are finished,
remember to disable the override so that your data is
not interpreted as a command.
Enable Override
*$+DC3*
*$+DC3*
You scan or enter an option for the
Scanner Selection configuration
command and you hear three low beeps.
You scan a configuration command, such
as Keypad Caps Lock, and you hear three
low beeps.
You may have scanned or entered a Scanner Selection
command that does not apply to the type of scanner
that you have installed. Try scanning or entering the
Scanner Selection command again and select an option
for the type of module you have installed.
If you are working in the CK30 System Main Menu,
you cannot scan configuration commands. Use the
Configuration Utility to change the CK30
configuration, or exit the system menu to scan
configuration commands.
Problems While Configuring 802.1x Security
If you have trouble configuring the terminal for 802.1x security,
check these problems and possible solutions. For more error
numbers and messages, see “802.1x Security Error Numbers and
Messages” in Chapter 4 of the CK30 Handheld Computer
Configuration Manual.
This section references error numbers that are displayed on the
Error Logger screen in the Diagnostics menu. To view the Error
Logger screen, from the System Main Menu, choose
Diagnostics > Software Diagnostics > Error Logger.
58 CK30 Handheld Computer User’s Manual
Page 69

Chapter 4 — Troubleshooting and Maintaining the CK30
Problems While Configuring 802.1x Security
Problem Possible Solution
The CK30 indicates that it is authenticated
by emitting a low beep and a high beep,
but it does not communicate with the host.
Make sure that the CK30 IP address, host IP address,
subnet mask, and default router are properly configured for
your network.
Note: Do not cold boot the terminal. Cold booting the
terminal resets the time and date.
The “AUTHENTICATING” message does
not appear on the screen, and a network
connection icon is not in the status bar.
The “AUTHENTICATING” message does
not appear on the screen. A network
connection icon appears in the status bar,
but it disappears.
The terminal indicates that it is not
authenticated by emitting a high beep and
a low beep.
This error code appears on the Error
Logger screen:
0x377
The terminal may not be communicating with your
MobileLAN access point. Make sure the network name on
the CK30 is the same as the network name (SSID) of the
access point that you are trying to communicate with. The
default network name is “INTERMEC.”
The 802.1x security network may not be active. Make sure
that the Odyssey server software is properly loaded and
configured on the server PC. For help, see the
documentation that shipped with your server software.
The CK30 may not be communicating with the
MobileLAN access point that you want it to communicate
with. Make sure that the network name on the CK30 is the
same as the network name of the access point that you are
trying to communicate with. The default network name is
“INTERMEC.”
The MobileLAN access point that you are trying to
communicate with may not be communicating with the
Odyssey server. Make sure your MobileLAN access point is
turned on, properly configured, and has 802.1x security
enabled.
Make sure that:
• The User Name and Password parameters on your
CK30 match the user name and password on your
Odyssey server. You may need to re-enter the password
on both your CK30 and Odyssey server.
• On your Odyssey server, the user and group are allowed
and the group policy is allowed to log in to the Odyssey
server. For help, see the documentation that shipped
with your Odyssey server software.
CK30 Handheld Computer User’s Manual 59
Page 70

Chapter 4 — Troubleshooting and Maintaining the CK30
Problems While Configuring 802.1x Security (continued)
Problem Solution
• The IP address and secret key for your MobileLAN access
point must match the IP address and secret key on your
Odyssey server. You may need to re-enter the IP address and
secret key on both your MobileLAN access point and
Odyssey server.
• Your Odyssey server is active and that it can communicate
with your MobileLAN access point. You can use the PING
command to determine communications.
• The Odyssey server software is running on the server PC.
• The UDP port (standard RADIUS port, 1812) on your
Odyssey server is active. For help, see the documentation
that shipped with your Odyssey server software.
The “AUTHENTICATING”
message appears on the screen, but
the CK30 does not emit a low beep
and a high beep to indicate that it is
authenticated.
The “AUTHENTICATING”
message appears on the screen, but
the CK30 does not emit a low beep
and a high beep to indicate that it is
authenticated.
This error code appears on the Error
Logger screen:
0x37B
The CK30 takes up to 60 seconds to authenticate; however, this
process may take longer if there is interference in RF
communications. You may need to wait for the authentication
process to finish.
You may be out of range of the MobileLAN access point you
are trying to communicate with. Try moving closer to the
MobileLAN access point.
The authentication process timed out. You may be out of range
of the MobileLAN access point that you are trying to
communicate with. Try moving closer to the MobileLAN
access point.
The CK30 indicates that it is not
authenticated by emitting a high beep
and a low beep.
One of these error codes appears on
the Error Logger screen:
The time and date on your CK30 does not fall within the range
of valid dates indicated on the server certificate. Modify the
time and date so that it falls within the range of valid dates. For
help, see “Time and Date” in Chapter 6 of the CK30 Handheld
Computer Configuration Manual.
0x50A or 0x509
60 CK30 Handheld Computer User’s Manual
Page 71

Chapter 4 — Troubleshooting and Maintaining the CK30
Problems While Configuring 802.1x Security (continued)
Problem Possible Solution
The terminal indicates that it is not
authenticated by emitting a high beep and
a low beep.
This error code appears on the Error
Logger screen:
0x513
The terminal indicates that it is not
authenticated by emitting a high beep and
a low beep.
This error code appears on the Error
Logger screen:
0x542
The root Certificate Authority certificate on your terminal
cannot validate the server certificate.
• Make sure your Odyssey server is using a server
certificate that matches the root certificate loaded on
your terminal.
• Verify the root certificate in the CACERT.PEM file on
your terminal’s C drive. WHERE WILL THIS BE ON
THE CK30?
For help, see the documentation that shipped with your
Odyssey server software.
Neither of the server certificate common names configured
on your terminal match the server certificate common
name in the active server certificate on your Odyssey
server.
• Delete both server certificate common names on your
terminal to see if you can authenticate without
checking the server certificate common name.
• Change one or both server certificate common names
on your terminal so that they match the server
certificate common names in the active server
certificate on your Odyssey server.
For help, see “Server Certificate Common Name” in
Chapter 6 of the CK30 Handheld Computer Configuration
Manual.
Problems With RF Connectivity
Problem Solution
You are having problems with your
802.11b RF network coverage.
CK30 Handheld Computer User’s Manual 61
Make sure that the Multiple Density Distribution
(MDD) command on your access point is not enabled.
When MDD is enabled, the access point distributes
values for these RF coverage parameters to your
terminal: AP Density and Medium Reservation.
Changes made by your access point are not reflected in
the terminal menu system.
Page 72

Chapter 4 — Troubleshooting and Maintaining the CK30
Problems With RF Connectivity (continued)
Problem Possible Solution
When you turn on the terminal after it
was suspended for a while (10-15
minutes or longer), the terminal can no
longer send or receive messages over the
network.
The no network connection icon appears
in the status bar. The CK30 is not
communicating with the access point.
The CK30 is connected to the G4000 or
host computer and you move to a new
site to collect data. The network
connection icon was visible but now the
no network connection icon is visible.
The host may have deactivated or lost your current
terminal emulation session. In a TCP/IP direct connect
network, you need to turn off the “Keep Alive” message
(if possible) from the host so that the TCP session is
maintained while a terminal is suspended.
The CK30 is not connected to the access point. Make
sure the access point is turned on and operating. You
may also be using the terminal out of range of an access
point. Try moving closer to an access point to reestablish communications. If you are using a
MobileLAN access point with firmware release 1.34 or
earlier, it may not be able to communicate with the
terminal. For help upgrading your access point firmware,
see the MobileLAN access System Manual (P/N 067150).
Make sure the CK30 is configured correctly for your
network. The radio parameters on the terminal must
match the values set for all access points the terminal
may communicate with. For help, see “Using RF
Communications on the CK30” in Chapter 2.
If you have an 802.11b radio, the radio initialization
process may have failed. Try resetting the CK30. See
“Booting the CK30” later in this chapter.
If you have tried these possible solutions and the no
network connection icon still appears, you may have a
defective radio card. For help, contact your local
Intermec service representative.
You may have gone out of range of an access point. Try
moving closer to an access point or to a different
location to re-establish communications. Once you are
in range again, the network connection icon will appear
again. Any data you collected while out of range will be
transmitted over the network.
62 CK30 Handheld Computer User’s Manual
Page 73

Chapter 4 — Troubleshooting and Maintaining the CK30
Problems With RF Connectivity (continued)
Problem Possible Solution
The network connection icon is in the
status bar, but you cannot establish a
terminal emulation session with the host
computer.
The network connection icon is in the
status bar, but the host computer is not
receiving any data from the CK30.
There may be a problem with the host computer, a
problem with the connection between the G4000 and
the host computer, or a problem with the connection
between the access point and the host computer. Check
with your network administrator to make sure the host is
running and allowing users to login to the system.
In a UDP Plus or WTP network, there may be a
problem with the connection between the G4000 and
the host computer. Check with your network
administrator or see the user’s manual for the G4000.
In a TCP/IP network, there may be a problem with the
connection between the access point and the host
computer. Check with your network administrator or
use your access point user’s manual.
Problems Transmitting Data Through the Serial Port
If you are having problems sending or receiving data through the
integrated I/O port on the terminal, check these possible
problems:
• Make sure the terminal is connected to the PC, host
computer, or RS-232 serial device using the appropriate
cable.
• If the terminal is in a communications dock, make sure that
the communications dock is connected to the serial device
using the appropriate cable.
Problems Transmitting Data Through the DCS 30X or G4000
Problem Solution
Transaction Buffer Full. The buffer holding transactions to be sent to the DCS
30X or G4000 is full. Stop collecting data with this
terminal. Make sure the terminal is communicating with
the DCS 30X or G4000 and let the terminal send all the
transactions in the buffer before you continue collecting
data.
CK30 Handheld Computer User’s Manual 63
Page 74

Chapter 4 — Troubleshooting and Maintaining the CK30
Problems Transmitting Data Through the DCS 30X or G4000 (continued)
Problem Solution
Sending Buffer Transactions. This is an information message to tell you that buffered
transactions are now being sent to the DCS 30X or
G4000. You can begin collecting data again once the
message clears.
Transaction Aborted. The transaction just sent to the DCS 30X or G4000 was
not received. Try sending the transaction again.
Transmit Error XX, press Enter. There is an error transmitting data to the DCS 30X or
G4000. XX represents the status code error. Note the
error code listed in the message and contact your local
Intermec service representative for help. Press Enter to
continue.
Receive Error XX, press Enter. There is an error receiving data from the DCS 30X or
G4000. XX represents the status code error. Note the
error code listed in the message and contact your local
Intermec service representative for help. Press Enter to
continue.
Shutting down. The DCS 30X or G4000 is shutting down. You may
continue collecting data and buffer the transactions in
the terminal until the DCS 30X or G4000 starts again,
or stop collecting data with the terminal.
Controller Shutdown. The DCS 30X or G4000 has shut down. You may
continue collecting data and buffer the transactions in
the terminal until the DCS 30X or G4000 starts again,
or stop collecting data with the terminal.
Problems While Scanning Bar Codes
Problem Solution
You cannot see a red beam of light from
the scanner when you press the Scan
button and aim the scanner at a bar code
label.
64 CK30 Handheld Computer User’s Manual
There are two possible problems:
• You may be too far away from the bar code label.
Try moving closer to the bar code label and scan it
again.
• You may be scanning the bar code label “straight
on.” Change the scanning angle and try again.
You can test the effective range of the scanner. Move
within 2 feet of a wall and test the scanner. You need to
be within the scanning range to scan bar code labels. For
help on scanning distances, see “Specifications” in
Appendix A.
Page 75

Chapter 4 — Troubleshooting and Maintaining the CK30
Problems While Scanning Bar Codes (continued)
Problem Solution
When you release the Scan button, the
Good Read LED does not turn off.
You have an input device attached to the
terminal and it cannot read any bar
codes.
The input device attached to the
terminal does not appear to work well or
read bar code labels very quickly.
The scanner will not read the bar code
label.
The scanner does not read the bar code
labels quickly, or the scanning beam
seems to be faint or obscured.
The Good Read LED will remain on if you configure
the terminal to use edge triggering. If you configure the
terminal for level triggering and the Good Read LED
remains on, there may be a problem. Press the Scan
button again without scanning a bar code label. If the
LED is still on, contact your local Intermec service
representative.
You may not be using an input device that is supported
with the terminal. Make sure you are using one of the
supported input devices.
Try setting the Scanner Selection command to the
specific input device you have attached. Check the bar
code symbologies you have enabled on the terminal.
Enable only the symbologies that you are using.
Make sure you aim the scanner beam so it crosses the
entire bar code label in one pass.
The angle you are scanning the bar code label may not
be working well, or you may be scanning the label
“straight on.” Try scanning the bar code label again, but
vary the scanning angle.
The bar code label print quality may be poor or
unreadable. To check the quality of the bar code label,
try scanning a bar code label that you know scans.
Compare the two bar code labels to see if the bar code
quality is too low. You may need to replace the label that
you cannot scan.
Make sure the bar code symbology you are scanning is
enabled. Use the Configuration Utility to check the
symbologies. On the Symbologies Menu, each
symbology that is enabled has a check mark (➼) next to
the name of the symbology. If your bar code symbology
is disabled, enable it and then try scanning the bar code
label again.
Make sure that the application you are running on the
terminal is expecting input from a bar code. You may
need to type this information instead of scanning it.
The scanner window may be dirty. Clean the window
with a solution of ammonia and water. Wipe dry. Do
not allow abrasive material to touch the window.
CK30 Handheld Computer User’s Manual 65
Page 76

Chapter 4 — Troubleshooting and Maintaining the CK30
Problems While Scanning Bar Codes (continued)
Problem Solution
You scan a reader command, such as
Backlight On, and nothing happens.
The reader commands are disabled. Scan the Enable
Override command shown here to temporarily enable all
of the reader commands. When you are finished,
remember to disable the override so that your data is not
interpreted as a command.
Enable Override
*$+DC3*
*$+DC3*
You scan a valid bar code label to enter
data for your application. The data
decoded by the scan module does not
match the data encoded in the bar code
label.
The terminal may have decoded the bar code label in a
symbology other than the label’s actual symbology. Try
scanning the bar code label again. Make sure you scan
the entire label.
To operate the terminal quickly and efficiently, you
should enable only the bar code symbologies that you
are going to scan.
Booting the CK30
You seldom need to warm or cold boot the CK30. The CK30
uses the configuration currently saved in flash memory during
the boot process. Once the CK30 finishes booting, your
application appears on the screen.
You need to cold boot the CK30 when an application is locked
up and will not respond, when you upgrade the firmware, or
when you reflash the computer. The next instructions explain
how you warm and cold boot the CK30.
Warm Booting the CK30
If your CK30 does not resume after pressing Power, you may
need to warm boot it.
To warm boot the CK30
• Press and hold the Power key for five seconds. The CK30
will tell you it is performing a warm boot and the screen will
come back up to the splash screen or your application.
66 CK30 Handheld Computer User’s Manual
Page 77

Cold Booting the CK30
If the CK30 or application is locked up, follow this procedure to
perform a cold boot:
To cold boot the CK30
1 Remove the battery.
2 Using a small pointed device (such as the end of a paper clip),
Chapter 4 — Troubleshooting and Maintaining the CK30
press the reset switch on the back side of the CK30.
1000
CK30AA030
Reset
switch
3 Replace the battery.
The battery LED on the CK30 will blink three times and the
CK30 will start performing the power on sequence.
Cleaning the Scanner Window and CK30 Screen
To keep the terminal in good working order, you may need to
perform these minor maintenance tasks:
• Clean the scanner window.
• Clean the CK30screen.
CK30 Handheld Computer User’s Manual 67
Page 78

Chapter 4 — Troubleshooting and Maintaining the CK30
Clean the scanner window and CK30 screen as often as needed
for the environment in which you are using the terminal. To
clean the CK30, use a solution of ammonia and water.
There are no user-serviceable parts inside the terminal.
Opening the unit will void the warranty and may cause
damage to the internal components.
Attention: La terminal ne contient pas de pièces révisibles
par l’utilisateur. Le fait d’ouvrir l’unité annule la garantie et
peut endommager les pièces internes.
To clean the scanner window and terminal screen
1 Press Power to turn off the CK30.
2 Dip a clean towel or rag in the ammonia solution and wring
out the excess solution. Wipe off the scanner window and
CK30 screen. Do not allow any abrasive material to touch
these surfaces.
3 Wipe dry.
68 CK30 Handheld Computer User’s Manual
Page 79

A
Appendix
Page 80

Chapter A — Appendix
Physical and Environmental Specifications
Use the tables in this section to locate technical information
about the CK30 and its available features and options.
Physical Dimensions
Length: 20.3 cm (8.0 in)
Width: 8.9 cm (3.5 in)
Depth: 5.5 cm (2.15 in), 6.2 cm (2.45 in) with large
bottom enclosure
Weight: 476 g (16.8 oz)
Power Specifications
Operating: Rechargeable 2200 mAh lithium-ion battery
Backup: Super Cap supplying 10 minutes bridge time
while the main battery is replaced
Electrical Specifications
Models: CK30A, CK30B, CK30C
Electrical rating: 12VDC at XXX mA
Temperature and Humidity Specifications
Operating temperature: 0°C to 50°C (32°F to 122°F)
Operating humidity: 10 to 90% non-condensing
Storage temperature: -20°C to 60°C (-4°F to 140°F)
Storage humidity: 0 to 95% relative humidity, non-
condensing
Screen Specifications
• 160 x 160 pixels
• 3.12 inch diagonal square active area
• Contrast: eight settings
• CK30A, CK30B: electroluminescent backlight with on/off
control
• CK30C: LED backlight with high and low settings
70 CK30 Handheld Computer User’s Manual
Page 81

Keypad Options
• 42-key large numeric and function keypad, available with
programmable, international, 3270 TE, 5250 TE, and
VT/ANSI TE overlays
• 50-key full alphanumeric keypad, available with
programmable, international, 3270 TE, 5250 TE, and
VT/ANSI TE overlays
• 52-key full alphanumeric keypad, available with
programmable, international, 3270 TE, 5250 TE, and
VT/ANSI TE overlays
Accessories for the CK30
You can use these accessories (sold and ordered separately) with
the CK30:
AB1 Battery
Use the lithium-ion battery to provide main power to the
computer.
AC1 4-Slot Battery Charger
Use the AC1 to charge up to four AB1 batteries at a time. The
battery charger is designed to sense when a battery is fully
charged and not overcharge it, ensuring long and consistent
battery life.
Chapter A — Appendix
AC2 4-Bay Battery Charging Dock
Use the AC2 to charge up to four AB1 batteries without having
to remove them from the CK30. You can insert up to four
CK30s with batteries installed making it easy to remember to
charge your batteries overnight.
AD1 Communications Dock
Use the AD1 to charge your AB1 battery and provide power to
your CK30 while still having the ability to communicate via a
serial, Ethernet, or USB port.
AD2 4-Bay Communications Dock
Use the AD2 to accommodate up to four CK30s with a battery
installed. The AD2 dock charges the batteries, provides power to
CK30 Handheld Computer User’s Manual 71
Page 82

Chapter A — Appendix
the computer, and provides a USB and serial port for each
inserted CK30.
AG1 Protective Case
The protective case provides a clear vinyl covering to protect the
display and keypad area.
AG2 Protective Boot
The protective boot provides additional ruggedness for the
CK30.
AH1 Handle
The handle works with all models of the CK30 and provides a
convenient scanning trigger.
AL1 Holster and Belt
The holster and belt provide an easy way for you to carry the
CK30 while not using it. The holster and belt support either
right or left-handed use and you can use it with a CK30 with or
without a handle.
AL2 Handstrap
The removable and adjustable handstrap make it easy for you to
hold and use the CK30 without fatiguing your hand.
AL3 Swiveling Belt Clip
Use the swiveling belt clip to expediently store your CK30 while
not in use. Once you have attached the belt clip, it is easy to
insert and remove the CK30 as necessary.
AV1 Vehicle Cradle
The vehicle cradle provides protection from vibrations that
exceed the level the CK30 can withstand alone.
AA1A Serial Adapter
The serial adapter is a 26-pin dual-row connector to DB-9
connector that connects directly to the bottom of the CK30.
AE1 Power Supply
Provides power to all of the communication docks and chargers.
72 CK30 Handheld Computer User’s Manual
Page 83

Using Hidden Key Sequences
Both the standard and international keypads have hidden key
sequences to access special characters not printed on the keypad
overlay. Use the following tables to understand how to access
these hidden functions on the different versions of the keypads.
Hidden Key Sequences on the Standard Keypads
Press This Key Sequence on One of the Keypads:
To Type: 42-Key 50-Key 52-Key
$
`
!
"
'
{
}
:
;
|
?
~
Green key, F9 Green key, G
Green key, F6 Green key, K
Green key, F7 Green key, L
Green key, F11 Green key, N
Green key, F12 Green key, O
Green key, F3 Green key, P
Green key, F4 Green key, Q
Green key, F8 Green key, R
Green key, F10 Green key, T
Chapter A — Appendix
Green key, 6
Green key, I
Green key, S
Hidden Key Sequences on the International Keypads
To Type: 42-Key 50-Key 52-Key
$
{
}
<
>
]
[
CK30 Handheld Computer User’s Manual 73
Press This Key Sequence on One of the Keypads:
Green key, a
Green key, b
Green key, _
Green key, `
Green key, 9
Green key, Tab
Green key, 6
Green key, S Green key, 9
Green key, T Green key, 0
Page 84

Chapter A — Appendix
74 CK30 Handheld Computer User’s Manual
Page 85

Corporate Headquarters
6001 36th Avenue West
Everett, Washington 98203
U.S.A.
tel 425.348.2600
fax 425.355.9551
www.intermec.com
CK30 Handheld Computer User's Manual
*067670-003*
P/N 073528-001
 Loading...