

Page 1

Compliance Statement Insert
Device Name: Beltpack and Workbook Printers Model Number: 6808, 6808 CR,
6808 Workboard, 6808 SCR Workboard,
PW40, PB40
The responsible party for the compliance of this device is: Intermec Technologies Corporation
6001 36
Everett, WA 98203 USA
(425) 348-2600
This product conforms to the following approvals. The user(s) of this product are cautioned to use accessories and peripherals
approved by Intermec Technologies Corporation. The use of accessories other than those recommended, or changes to this product
that are not approved by Intermec Technologies Corporation, may void the compliance of this product and may result in the loss of
the users authority to operate the equipment.
This device complies with Part 15 of the FCC Rules. Operation is subject to the following two conditions: (1) This device may not cause harmful
interference, and (2) this device must accept any interference received, including interference that may cause undesired operation.
FCC Digital Emissions Compliance
This equipment has been tested and found to comply with the limits for a Class B digital device, pursuant to Part 15 of the FCC Rules. These limits are
designed to provide reasonable protection against harmful interference in a residential installation. This equipment generates, uses and can radiate radio
frequency energy and, if not installed and used in accordance with the instructions, may cause harmful interference to radio communications. However,
there is no guarantee that interference will not occur in a particular installation. If this equipment does cause harmful interference to radio or television
reception, which can be determined by turning the equipment off and on, the user is encouraged to try to correct the interference by one or more of the
following measures:
• Reorient or relocate the radio of television receiving antenna.
• Increase the separation between the computer equipment and receiver.
• Connect the equipment into an outlet on a circuit different from that to which the radio or television receiver is connected.
• Consult the dealer or an experienced radio television technician for help.
Canadian Digital Apparatus Compliance
This Class B digital apparatus meets all requirements of the Canadian Interference-Causing Equipment Regulations.
Cet appareil numérique de la classe B respecte toutes les exigences du Règlement sur le matériel brouilleur du Canada.
th
Avenue West
578-100-076 Revision D Page 1 of 2
*578-100-076D*
*578-100-076D*
Page 2

DECLARATION OF CONFORMITY
(According to ISO/IEC Guide 22 and EN 45014)
PAGE ONE OF ONE
THE PRODUCT HEREWITH COMPLIES WITH THE REQUIREMENTS OF :
THE LOW-VOLTAGE DIRECTIVE 73/23/EEC.
THE EMC DIRECTIVE 89/336/EEC.
Manufacturer’s Name: European Representative:
Intermec Technologies Corporation Intermec International Incorporated
6001 36
Everett, WA 98203 Reading, Berkshire
USA RG1 8BT England
Declares that the product listed below:
Product Type: ITE/Residential, Commercial, and Light Industrial
Product Name: Beltpack and Workboard Printers
Model Number: 6808, 6808 CR, Options: All
6808 Workboard, 6808 SCR Workboard,
PW40, PB40
Beginning Serial Number: All Date Issued: February 25, 2003
Conforms to the following product specifications:
Safety: IEC 60950 / EN 60950
EMC: EN 55022 : 1998 / CISPR Publication 22 : 1997, Class B Limits and Methods
EN 55024 : 1998 (CISPR 24) Information Technology Equipment – Immunity Characteristics –
Limits and Methods of Measurement
EN 61000-4-2 : 1995 – Electrostatic Discharge
EN 61000-4-3 : 1995 – Radiated RF Field
EN 61000-4-4 : 1995 – Electrical Fast Transients
EN 61000-4-5 : 1995 – Voltage Surge
EN 61000-4-6 : 1996 – Conducted RF Field
EN 61000-4-11 : 1994 – Voltage Dips, Short Interruptions, and Variations
EN61000-3-2 : 1995 + A1 : 1998 + A2 : 1998 – Harmonic Current Emissions
EN61000-3-3 : 1995 – Voltage Fluctuation and Flicker
I, the undersigned, hereby declare that the equipment specified above conforms to the above Directive(s)
and Standard(s).
Company Official: Arvin Danielson Position: Vice President
Signature: Signed Copy on File
European Contact: Intermec International Incorporated, Sovereign House, Vastern Road, Reading, Berkshire, RG1
8BT England; Phone INT+44 118 987 9400; Fax INT+44 118 987 9401
th
Avenue West Sovereign House, Vastern Road
Date: February 25, 2003
578-100-076 Revision D Page 2 of 2
*578-100-076D*
*578-100-076D*
Page 3
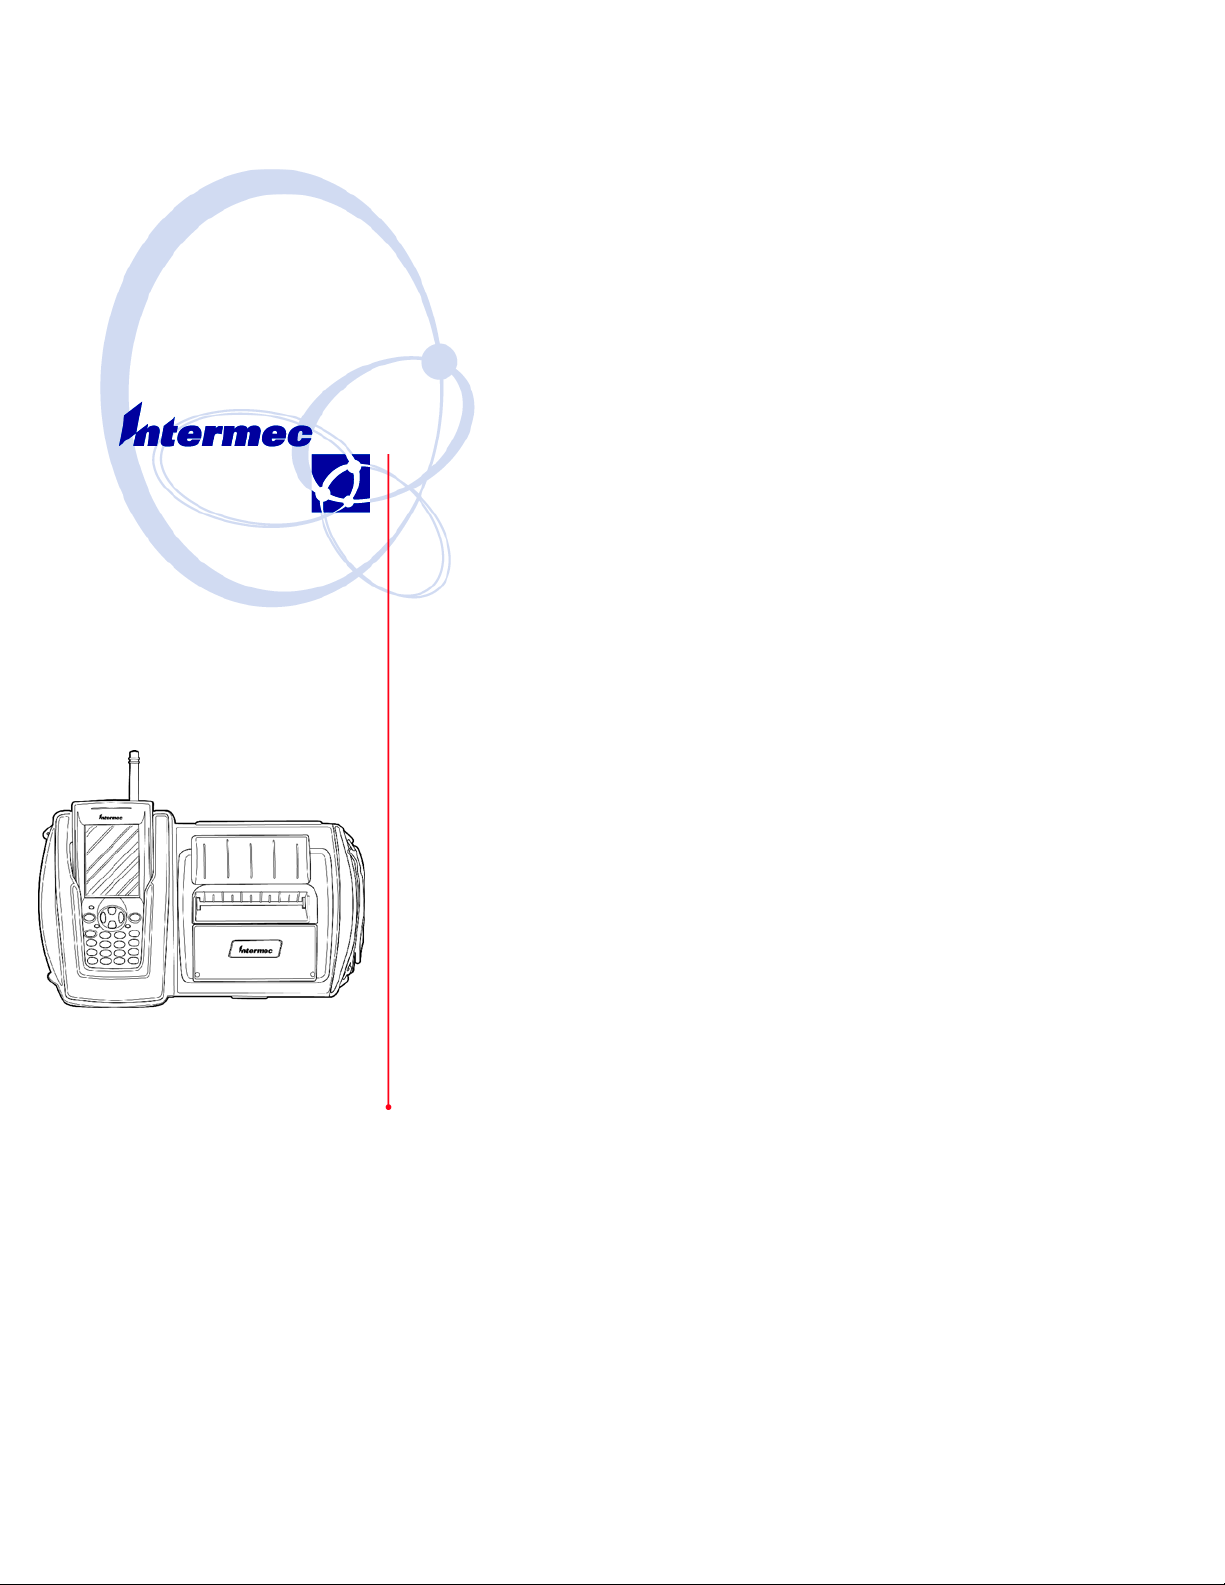
Quick Start Guide
PW40
4-Inch Workboard
Printer
Equipped with a
Bluetooth
TM
Qualified Module
by Socket
Communications
Page 4

Packing List
Checktoensurethatyoureceivetheseitems:
R
S Intermec
printer with Bluetooth* a qualified module by Socket Communications)
S One roll of paper (in printer)
S Battery Packs (installed)
S Compliance Statement
S Warranty Card
*Bluetooth is a trademark of Bluetooth SIG, Inc., U.S.A.
E 2003 by Intermec Technologies Corporation. All rights reserved.
Common Accessories List
Cable Part
Data Cable (Hirose to RJ-45) 321-578-001
Power Adapters Part
Cigarette Lighter Auto Adapter (5 Amp 12 Volt 6 inch coiled) 320 -066-033
Charger for W orkboard batteries ONLY 320-066-042
International Charger for Mobile Computer batteries ONLY 851-060-002
International Charger for Workboard and Mobile Computer 851-060-003
PW40A0B140 Printer (4-inch thermal workboard
Number
Number
Supplies Part
Number
Replacement Li-Ion 7.2 volt 1.35 mAhr Battery 320-081-021
Thermal paper 130’/roll, 50/case 815-034-015
Cleaning Card 320-066-013
2 PW40 Printer Quick Start Guide
Page 5
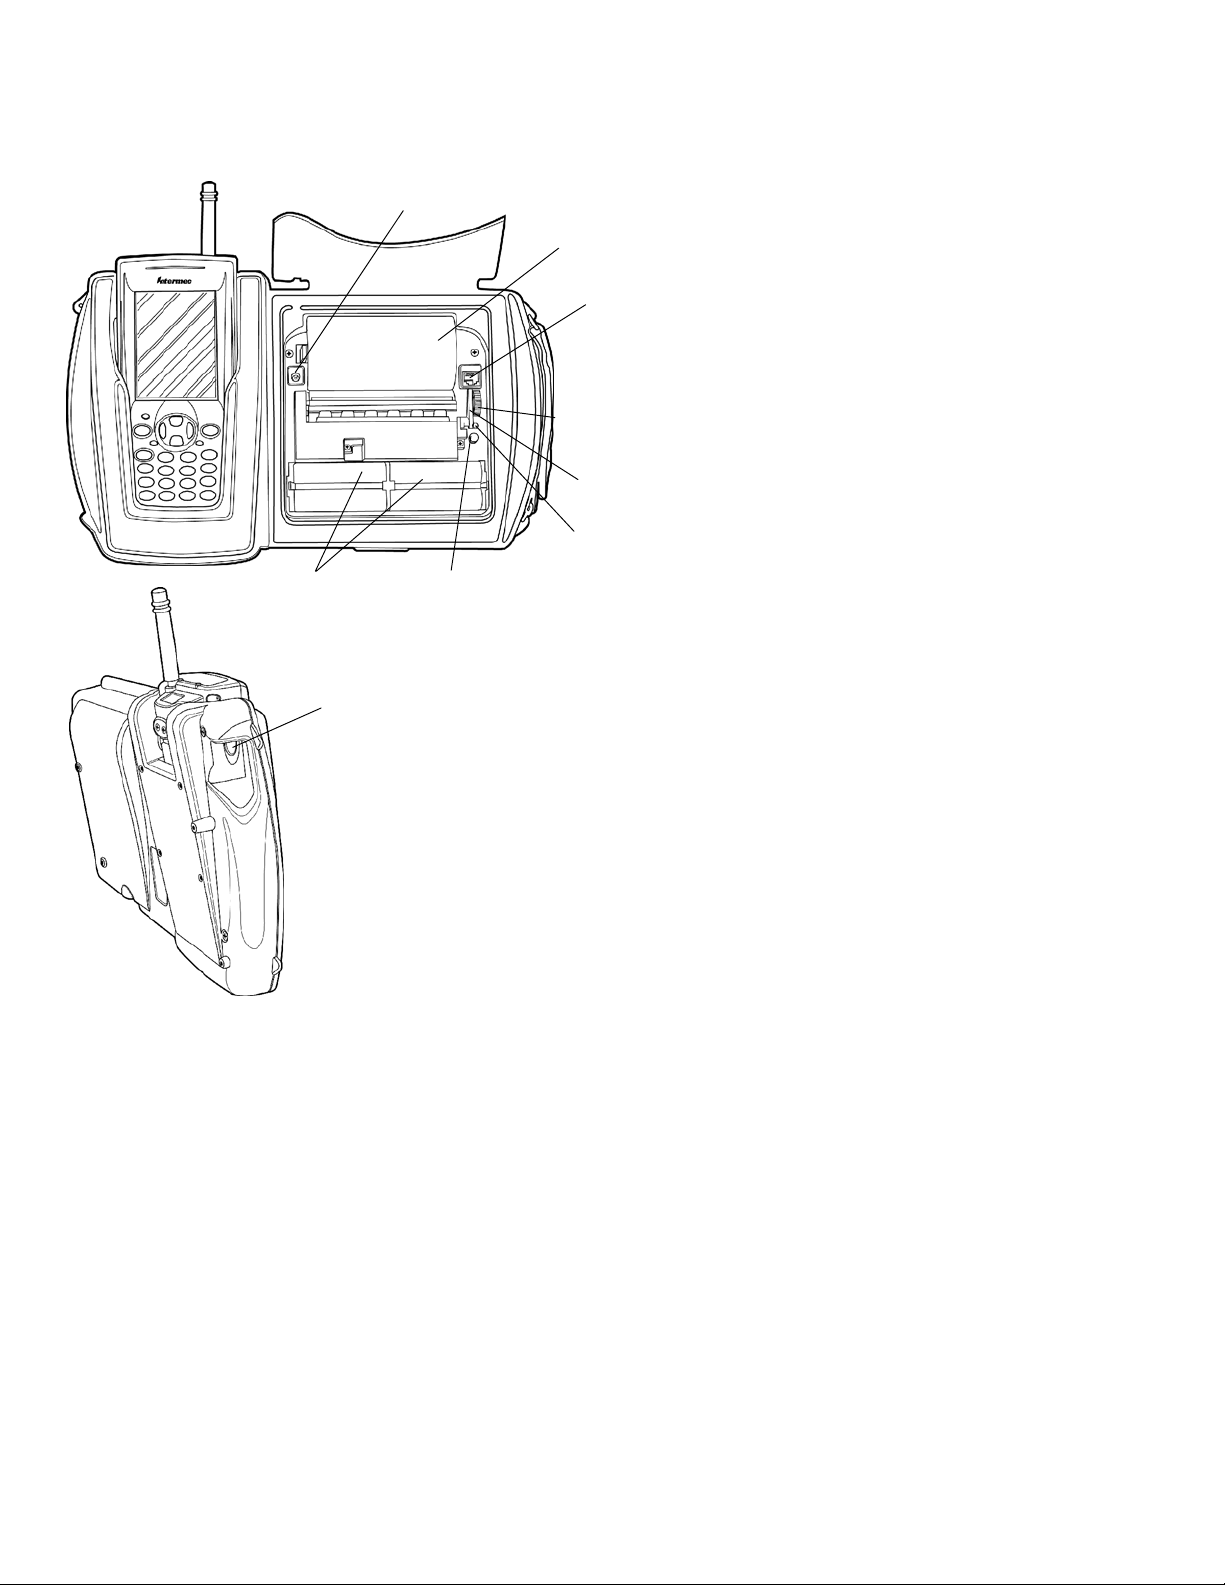
Getting Started
Battery packs
DC power jack
Self-Test button
Paper roll
RJ-11 port
Paper advance
wheel
Paper
release lever
Charge LED:
Green-ready, Redbattery low
Scan trigger access opening
PW40 Printer Quick Start Guide
3
Page 6
Before Using Your Printer For the First
Time
Remove the protective tab strips underneath the batteries. They
are placed there to keep your printer from discharging during
shipment.
1 Push against the battery removal tabs and lift the battery up
before pulling on t he protective tab strips. These tabs prevent the battery contacts from touching and therefore, no
charging occurs.
2 If your printer won’t charge after removing the protective
tabs, check for and remove any residue in the battery pin
area.
Center battery
support posts
Battery removal tabs
(one on each side)
Battery contact protective tab strip
(one for each pack)
Battery contact
protective tab strips (removed)
Battery pack
Charging the Lithium Ion Batteries
S The printer battery charges in about three hours.
S Depending on the charger you are using, you can charge the
mobile computer battery, workboard battery or both.
4 PW40 Printer Quick Start Guide
Page 7

LED Battery Indicators
LED State of Charge Action
Solid Red In Progress Waiting for green LED
Green Complete Remove Charger
Slow Red Flashing Low Temperature or
battery is disconnected
Fast Red Flashing High Temperature Change environment
Slow Re d and Orange
Flashing
Fast Red and Orange
Flashing
Slow Orange Flashing Timeout Restart charge
Fast Orange Flashing Internal Error Remove battery to pow-
Low Voltage Wait for solid red
High Voltage Wait for solid red
Change environment or
connect battery
er down completely and
reconnect. Or unplug
from charging source,
wait 15-20 seconds, and
reconnect.
Beep Indicator
Number of Beeps Indicates
One Printer has come out of sleep mode
Two Printer is out of paper
Three Battery is low
One long beep No program in printer, only boot code
DeterminingCurrent Battery Power
To determine the current charge on the battery pack, print out a
self-test by pressing and holding the red self-test button for four
seconds. If the battery is good, you will see the abbreviation for
the word “GOOD” next to the Battery voltage print out.
This printer has a built in low battery detector. When the printer’s battery voltage is low, the printer beeps three times, indicating a Low Battery Warning. This only happens if the printer is
awake.
PW40 Printer Quick Start Guide
5
Page 8

Paper Loading
Out of Paper
The PW40 Printer sounds two quick beeps when it runs out of
paper. If the printer is out of paper, the printer suspends operation until paper is present and the lever is down. The printer
continues to communicate with the mobile computer as long as
it does not “time out.” Once the printer restarts, it finishes the
rest of the print job from where it left off.
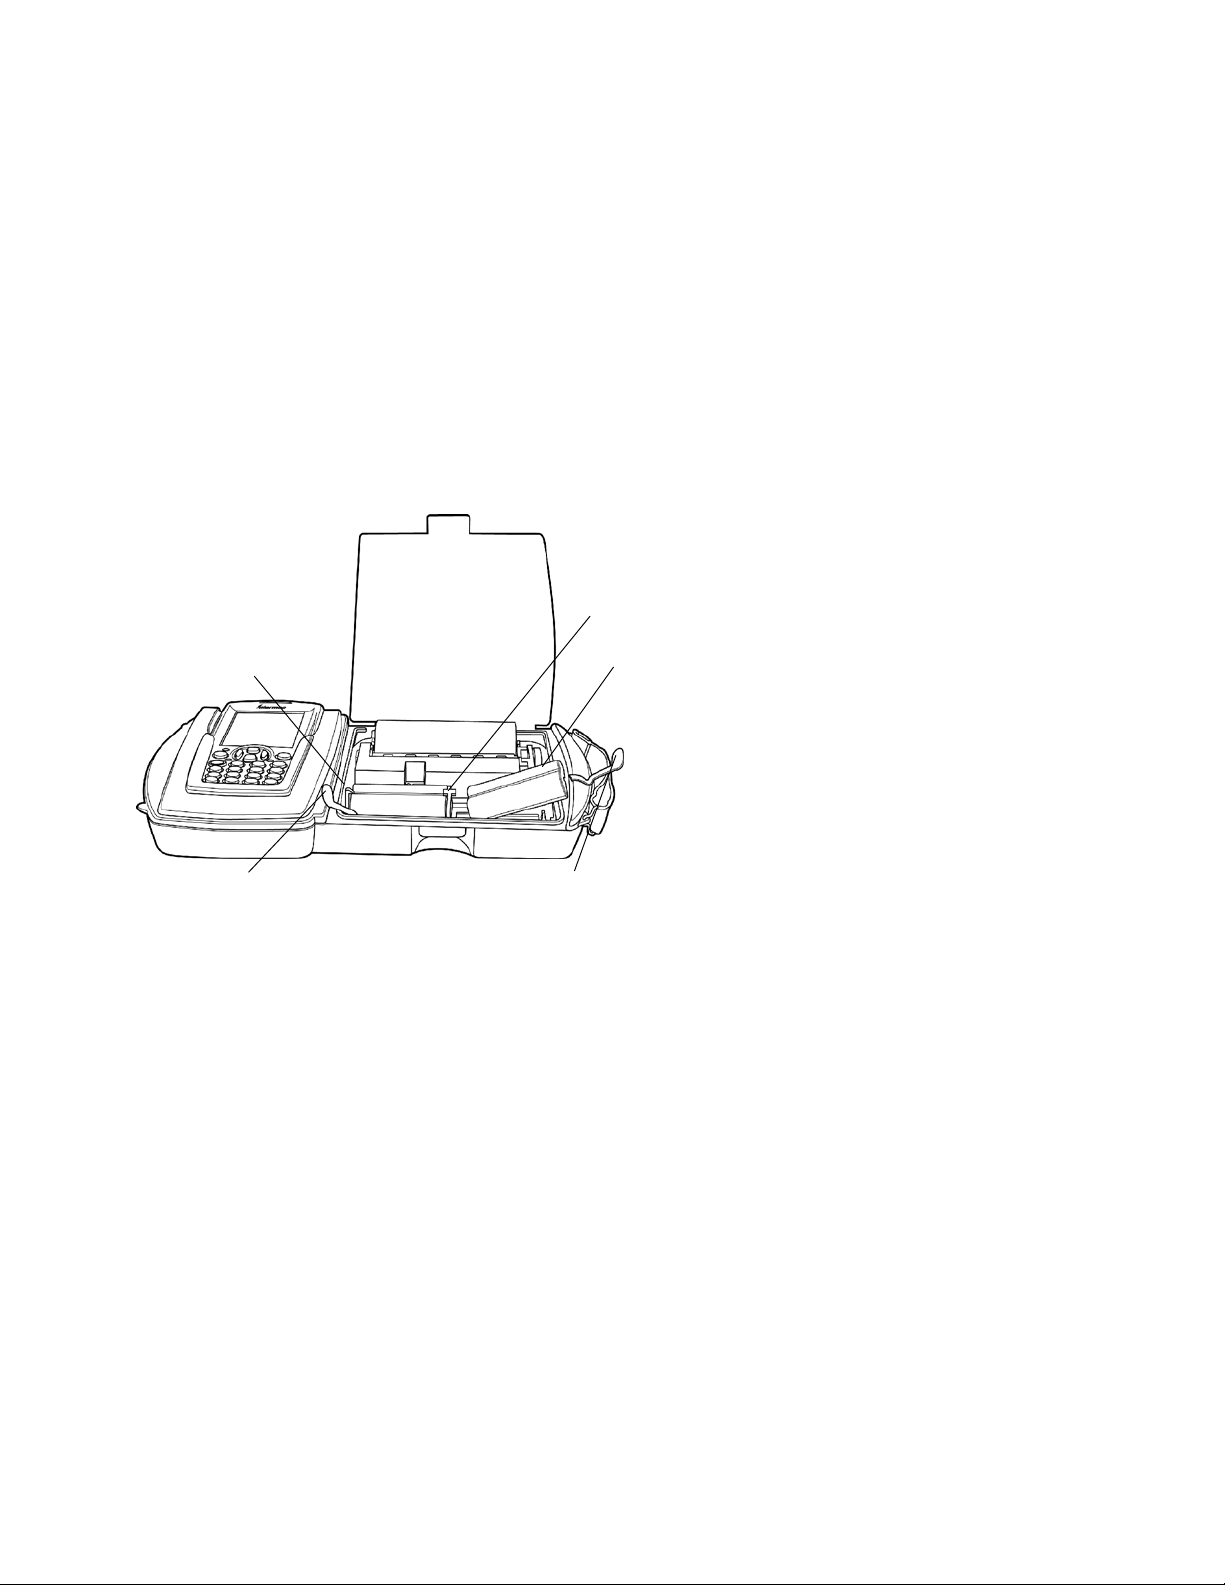
Removing Paper Core from your PW40 Printer
1 Unsnap the latch and lift up the cover.
2 Wrap your index finger around the empty paper core and pull
up. The paper rod will snap out.
3 Remove the empty paper core and discard.
Paper Loading
Standard Paper
If you are using standard paper, you can load the paper automatically or manually. Experiment to find out which method is
best for you.
Linered Labels
If you are using linered paper, it is best to use the manual paper
loading method.
Automatic Paper Loading
1 Press the red self-test button to wake the printer.
2 With the loose, clean edge of the paper coming from the bot-
tom of the roll, insert the edge of the paper between the roller
and the platen.
3 Pushing the bu tton again while the printer is awake causes
the mechanism to feed about one inch of paper.
4 Insert the paper into the paper well with it resting on the pa-
per rod clips.
Manual PaperLoading
1 Lift up the paper release lever. This takes the pressure off the
platen. Make sure you have a clean edge on the new paper
roll.
6 PW40 Printer Quick Start Guide
Page 9

2 Taketheedgeofthepaperandfoldit45degrees.
3 Insert the tip of the paper between the roller and the platen.
4 Push on the paper until the tip is peeking out the other side.
(If it seems too tight to insert the tip, lift up the paper release
lever and turn the gear to advance the paper).
5 Grab the tip and pull it through until the paper is straight.
6 Push down the paper release lever and insert the paper into
the paper well with it resting in the paper rod clips.
7 Press the red button while the printer is on and it will feed
paper. You will need about two inches of paper coming out of
the mechanism.
8 Lower the cover while placing the extra paper though the tear
bar.
9 Close Latch Cover and tear off extra paper.
PW40 Printer Quick Start Guide
7
Page 10

Printer Self-Test
Push the red button and hold for about four seconds to print a
self-test. Below is an explanation of the print-out.
Self-Test Print-out Explanation
Test Item Description
F/W Ver The internal software version (4.26 for printer, 1.09
or greater for card reader)
Timeout The seconds between printing and sleep mode.
Baud Rate The speed at which the printer receives data.
Parity Odd, Even, or None
Data Bits Matches with computer sending data to printer.
Handshake The way the printer handles flow control from host.
Burn Adj Amount of heat used to print on the thermal paper.
Beeper May be turned On or Off.
Batt Volt Current voltage of the battery pack.
Batt Temp Temperature of the battery.
Flash/RAM 1Mbor4MbFlash/1Mbor4MbRAM
Boot Version Boot se ctor firmware.
Prnhd Temp Temperature of print head (between 0 and 50 de-
grees).
Infrared Toggles between On and Off
Device Name Showstypeofdevice(i.e.4t)
Device Nickname Shows user name for printer.
Available Fonts “LOC” shows whether a font is Resident (R) or
Downloaded (D). “CPI” shows characters per inch.
“DESCRIPTION” describes the font. “NAMES”
give the “Easy Print” name, the Line Printer name,
and the hexadecimal equivalent of that name.
Available Graphics “LOC” shows whether a font is Resident (R) or
Downloaded (D). “CPI” shows characters per inch.
“DESCRIPTION” describes the graphic.
“NAMES” give the “Easy Print” name, the Line
Printer name, and the hexadecimal equivalent of that
name.
8 PW40 Printer Quick Start Guide
Page 11

Self-Test Print-out Explanation (continued)
DescriptionTest Item
Available Bar Codes All supported barcodes are displayed. “DE-
SCRIPTION” describes the graphic. “NAMES”
give the “Easy Print” name, the Line Printer name,
and the hexadecimal equivalent of that name.
Card Reader Option Shows the current Card Reader configuration (not
available at this ti me).
Replacing the Battery
1 Open the cover and gently push the battery lock tabs away
while lifting the battery up.
2 Insert the new battery by putting the non contact area of the
battery in first towards the center.
3 Push down on the battery near the battery lock tabs.
4 Charge the new battery.
Center battery
support posts
Battery removal tabs
(one on each side)
PW40 Printer Quick Start Guide
Battery packs
9
Page 12

Using Your Printer
1 Put the mobile computer in the holder on the printer.
2 As you use the printer the power comes from the battery in
the printer. When the printer battery runs down the printer
will not operate until the battery is recharged.
PW40 Printer using Wireless Printing
Serial/Wireless Mode
The PW40 comes to you as a serial mode printer. To switch the
mode to Wireless Printing it is necessary to toggle the mode via
the self-test function of the printer.
Performing the self-test indicates the current mode of the printer. The mode displays on the ticket and an audible indication
sounds. Each time the self-test function is performed the mode
will toggle between wireless printing and serial modes.
Printer Self-Test
1 Press the Paper Advance (red) button for at least five seconds
to run a Self-Test. Verify that the RF Module Power is On.
S This means you will be holding it long enough to hear the
beep and complete a paper advance.
S The self-test indicates the current state of your printer.
Verify the current mode by reading the Power status line
from the printout.
Note: When shipping your printer via air freight,
turn the wireless printing mode off and set to serial
to disable the radio.
700 Mobile Computer Preparation
1 On your mobile computer, tap the Bluetootht icon located
in the System tray on the Today screen.
2 Select Advanced Features → Bluetooth Devices.
3 From the Tools menu, select Device Discovery.Youarepre-
sented with a couple of screens detailing the device discovery
process.
4 You are now presented with a screen allowing you to modify
the selection parameters. The default should work for your
needs.
10 PW40 Printer Quick Start Guide
Page 13

5 Click Next to proceed. A search for Bluetooth devices is per-
formed followed by a look-up of discovered device names.
The progress bars indicate the inquiry status.
6 A list of discovered devices displays:
S If your remote wireless printer is discovered and presented
in the list, select the appropriate check box and click
Next.
S If your remote device is not displayed, ensure that the de-
vice and its radio are switched ON. Click Next, then select
Finish.
7 A progress bar appears indicating Service Discovery is being
performed.
If the discovery is successful a screen with Successful discovery
displays. Click Finish. The remote device icon appears in the
Bluetooth Devices Folder. Verify that the service for this device
was discovered by looking at the properties (Device → Proper-
ties).
If the Services tab lists ”Wireless Printer”, the service was
discovered correctly.
If it doesn’t, select the Update buttonontheServices tab to
try to rediscover the services available (sometimes it will take
a couple tries to correctly discover the services).
8 Verify that your Wireless Printing device is set as your “favor-
ite” COM device. In the Bluetooth Devices Folder, select
Tools → My Favorite.IntheFavorites screen, ensure your
printer shows as My Favorite COM Port Device.
700 Color Mobile Computer applications access the wireless
printing on COM6 port. 700 Monochrome Mobile Computer
applications access wireless printing on COM7 port.
Note: Dropping your printer can cause a power interruption to your wireless printing operation. To
ensure that your Wireless Printing is still active, print
a self-test. If the radio is off, the self-test turns the
radio On.
PW40 Printer Quick Start Guide
11
Page 14

Maintenance and Troubleshooting
Cleaning the Interior
Dirt, adhesive, and residue collect on the print head of the
printer and need to be removed. Clean your printer once a
month if you use it frequently, or once every three months if
used infrequently.
Cleaning the Exterior
When the outside of your portable printer needs cleaning, use a
soft cloth and mild cleanser if necessary. Do not use abrasive
cleanser, chemicals or scrubbing pads, as your printer’s finish
could become marked.
Troubleshooting
PaperLoading Problems
If the paper feed mechanism does not feed correctly on the first
part of a new paper roll, remove two to three feet of paper from
theoutsideoftheroll.Thelengthofpaperrollscanvarybyas
much as five feet, making the roll too thick for the printer to
accommodate.
If the printer is out of paper (or the paper release lever is in the
up position) this condition interrupts a batch of receipts, and
the printer suspends operation until the condition is fixed. The
printer continues to communicate with the mobile computer as
long as it does not “time out.”
Once the printer is operational, the suspended print batch (if
any) continues to print, ensuring that all receipts are properly
printed.
Not Printing
1 Print a self-test. If the self-test will not print, check battery
voltage by plugging the printer into a wall outlet using the
AC adapter. Repeat the self-test, and check the Battery Voltage print out. Charge battery if necessary or replace.
Note: If the battery is depleted, it may take 5-10
minutes of charging before the printer can print a
self-test.
2 Make sure the paper is properly installed (with lever closed).
3 Turn the print head knob to ensure that paper is not
jammed.
12 PW40 Printer Quick Start Guide
Page 15

4 Check cable connections. Make sure the modular connector
is inserted and clipped in.
5 Check to see if your cable has been damaged by excessive
pulling.Acablemayalsobedamagedifitisbentatsharp
angles.
6 Use only the recommended battery pack for the printer.
7 Printer will not print on wrong side of paper. Re-load if nec-
essary.
Print Roller Appears Dirty
Clean Your Printer.
Liner’ed Labels
Liner’ed label printing can cause the print head to become
sticky.
Print is too Light
If you are not getting satisfactory darkness, connect your printer
to the personal computer containing your Configuration Program and click on the Paper Options button. Adjust the darkness setting to a higher percentage until the print is dark and
crisp.
Charging Problems
Usingan AC Adapter
If the printer does not respond when it is connected to an AC
adapter, there could be a problem with the adapter or with the
wall outlet.
Note: If the battery is depleted, it may take 5-10
minutes of charging before the printer can print a self
test.
Usinga CigaretteLighter Adapter
If the printer does not respond when it is connected to a cigarette lighter adapter, it is possible that the fuse may be blown.
To check, remove the cigarette lighter adapter from all power
supplies and unscrew the cover over the pin. Pull out the fuse. If
the elements in the fuse appear broken, replace the fuse.
Programming Problems
Refer to the Intermec Portable Printers Technical Reference Manual (p/n: 978-018-001) Section 4 for more details OR call the
Intermec Technical Support 1-800-755-5505 for assistance.
PW40 Printer Quick Start Guide
13
Page 16

Specifications
Printer Specifications
Item Spec Detail
Dimension 13.6 x 8.5 x 2.7 in.
(34.54 x 21.6 x 6.9 cm)
Weight 3.15 lb (1428.82 g) printer
4.30 lb (1950.45 g ) printer with mobile computer
Print Method Direct Thermal
Paper Medium Thermal paper
Paper Width 4.40 in. (112 mm)
Operating Temperature +32° to +122°F(0° to +50°C)
Interface RS-232C, ASK
Characters Full IBM and international character sets
Protocol Easy Print Protocol for Bar Codes, Stored Graph-
ics, Rotated Fonts.
Power 1350 mAh Li Ion cell pack
Warranty One year, includes print head. Extended warranty
available.
14 PW40 Printer Quick Start Guide
Page 17

Global Services and Support
To request technical support, on-site repair service, return your
equipment for factory repair, arrange to have a site survey or
product installation or check on service contract status, you may
select one of the options:
Web Support
Visit our web site http://www.intermec.com to download many of
our current manuals in PDF format, utilize our technical knowledge base ‘Knowledge Central’ or to request technical support.
Technical Support
To request technical support on your Intermec product call
1-800-755-5505.
Product Warranty
We warrant that Intermec Technologies Corporation products
will be free from defects in manufacturing materials and workmanship for one (1) year from date of shipment. This one year
warranty applies to the PW40 Printer only. The warranty on the
battery pack is 90 days from date of shipment.
Conditions of Warranty
1 Purchaser must obtain a Return Authorization (RA) number
from the Intermec Service Center (1-800-755-5505) within
the warranty period.
2 Purchaser will provide a written, detailed description of the
defect.
3 The product must be promptly returned to the designated
Intermec Service Center, freight prepaid by Purchaser.
4 Upon examination of the product, Intermec must agree that
the defect exists and is covered by this warranty. Warranty
repairs will be completed at the Service Center and returned to the Purchaser by prepaid surface freight.
The foregoing is a summary of the standard warranty, which
shall be purchaser’s sole remedy. Complete warranty details can
be found in your purchase agreement or obtained from your
local Intermec sales office.
In no event shall Intermec Technologies Corporation nor its
suppliers be liable for any special, consequential, or incidental
damages.
PW40 Printer Quick Start Guide
15
Page 18

Corporate Headquarters
6001 36th Avenue West
Everett, Washington 98203
tel 425.348.2600
fax 425.355.9551
www.intermec.com
PW40A0B140 Printer Quick Start Guide-April, 2003
*962018020B*
962018020B
16 PW40 Printer Quick Start Guide
 Loading...