


Compliance Statement Insert
Device Name: Mobile Computer Model Number: Model CN30 with
14-Key and 56-Key Modules
The responsible party for the compliance of this device is: Intermec Technologies Corporation
6001 36
Everett, WA 98203 USA
(425) 348-2600
CAUTION: See users guide instructions for handling, charging, and replacing batteries. Failure to follow those instructions can result in
personal injury, fire, or battery explosion.
This product conforms to the following approvals. The user(s) of this product are cautioned to use accessories and peripherals approved by
Intermec Technologies Corporation. The use of accessories other than those recommended, or changes to this product that are not approved by
Intermec Technologies Corporation, may void the compliance of this product and may result in the loss of the users authority to operate the
equipment.
FCC Digital Emissions Compliance
This equipment has been tested and found to comply with the limits for a Class B digital device, pursuant to Part 15 of the FCC Rules. These limits are designed to
provide reasonable protection against harmful interference in a residential installation. This equipment generates, uses and can radiate radio frequency energy and, if not
installed and used in accordance with the instructions, may cause harmful interference to radio communications. However, there is no guarantee that interference will not
occur in a particular installation. If this equipment does cause harmful interference to radio or television reception, which can be determined by turning the equipment off
and on, the user is encouraged to try to correct the interference by one or more of the following measures:
• Reorient or relocate the radio or television receiving antenna.
• Increase the separation between the computer equipment and receiver.
• Connect the equipment into an outlet on a circuit different from that to which the radio or television receiver is connected.
• Consult the dealer or an experienced radio television technician for help.
Canadian Digital Apparatus Compliance
This Class B digital apparatus meets all requirements of the Canadian Interference-Causing Equipment Regulations.
Cet appareil numérique de la classe B respecte toutes les exigences du Règlement sur le matériel brouilleur du Canada.
Radio Wave Exposure and Specific Absorption Rate (SAR) Information for Model CN30
The Model CN30 Mobile Computer has been designed to comply with applicable safety requirements for exposure to radio waves.
These requirements are based on scientific guidelines that include safety margins designed to assure the safety of all persons,
regardless of age and health.
The radio wave exposure guidelines employ a unit of measurement known as the Specific Absorption Rate or SAR. Tests for SAR
are conducted using standardized methods with the device transmitting at its highest certified power level.
While there may be differences between the SAR levels of various products, they are all designed to meet the relevant guidelines for
exposure to the radio waves.
This radio has been tested and meets the FCC RF exposure guidelines when used with the Intermec accessories supplied or
designated for this product. Use of other accessories may not ensure compliance with FCC RF exposure guidelines. The highest
SAR value for the CN30 Mobile Computer, as tested by Compliance Certification Services, for single or collocated configuration is
0.056 W/kg.
15.19(a)(3)
This device complies with part 15 of the FCC Rules. Operation is subject to the following two conditions:
(1) This device may not cause harmful interference, and (2) this device must accept any interference received, including interference
that may cause undesired operation.
th
Avenue West
578-100-131 Revision B Page 1 of 2
*578-100-131B*
*578-100-131B*

DECLARATION OF CONFORMITY
(According to ISO/IEC Guide 22 and EN 45014)
PAGE ONE OF ONE
THE PRODUCT HEREWITH COMPLIES WITH THE REQUIREMENTS OF:
THE LOW-VOLTAGE DIRECTIVE 73/23/EEC.
THE EMC DIRECTIVE 89/336/EEC.
THE R&TTE DIRECTIVE 1999/05/EC.
Manufacturer’s Name: European Representative:
Intermec Technologies Corporation Intermec International Incorporated
6001 36
Everett, WA 98203 Reading, Berkshire
RG1 8BT England
Declares that the product listed below:
Product Type: ITE/Residential, Commercial, and Light Industrial
Product Name: Model CN30
Model Number: Model CN30 Options: All, including 14-Key and 56-Key Modules
Beginning Serial Number: All Date Issued: July 25, 2005
Conforms to the following product specifications:
Safety: IEC 60950-1 / EN 60950-1
EMC: EN 55022 : 1998 / CISPR Publication 22 : 1997, Class B Limits and Methods
EN 55024 : 1998 (CISPR 24) Information Technology Equipment – Immunity Characteristics –
Limits and Methods of Measurement
EN 61000-4-2 : 1995 – Electrostatic Discharge
EN 61000-4-3 : 1995 – Radiated RF Field
EN 61000-4-4 : 1995 – Electrical Fast Transients
EN 61000-4-5 : 1995 – Voltage Surge
EN 61000-4-6 : 1996 – Conducted RF Field
EN 61000-4-8 : 1995 – Magnetic Field
EN 61000-4-11 : 1994 – Voltage Dips, Short Interruptions, and Variations
EN61000-3-2 : 1995 + A1 : 1998 + A2 : 1998 + A14 : 2000 – Harmonic Current Emissions
EN61000-3-3 : 1994 – Voltage Fluctuation and Flicker
Radio: ETSI EN 300 328-2 V1.1.1 (2000-7)
EN 301 893 V1.2.3 (2003-08)
EN 301 489-17 V1.2.1 (2002-08)
Linear Imager: IEC 60825-1 / EN 60825-1 – Class 1 LED Product
th
Avenue West Sovereign House, Vastern Road
I, the undersigned, hereby declare that the equipment specified above conforms to the above Directive(s) and
Standard(s).
Company Official: Michael Abel Position: Vice President
Signature: Signed Copy on File
European Contact: Intermec International Incorporated, Sovereign House, Vastern Road, Reading, Berkshire, RG1 8BT England;
Phone INT+44 118 987 9400; Fax INT+44 118 987 9401
578-100-131 Revision B Page 2 of 2
Date: July 25, 2005
*578-100-131B*
*578-100-131B*
User Manual
Preliminary
Not for Distribution
CN30
Mobile
Computer

Intermec Technologies Corporation
Corporate Headquarters Technical Communications Department
6001 36th Ave.W. 550 Second Street SE
Everett, WA 98203 Cedar Rapids, IA 52401
U.S.A. U.S.A.
www.intermec.com
The information contained herein is proprietary and is provided solely for the purpose of allowing
customers to operate and service Intermec-manufactured equipment and is not to be released, reproduced, or used for any other purpose without written permission of Intermec.
Information and specifications contained in this document are subject to change without prior
noticed and do not represent a commitment on the part of Intermec Technologies Corporation.
© 2005 by Intermec Technologies Corporation. All rights reserved.
The word Intermec, the Intermec logo, Norand, ArciTech, CrossBar, Data Collection Browser,
dcBrowser, Duratherm, EasyCoder, EasyLAN, Enterprise Wireless LAN, EZBuilder, Fingerprint, igistics, INCA (under license), InterDriver, Intermec Printer Network Manager, IRL, JANUS,
LabelShop, Mobile Framework, MobileLAN, Nor*Ware, Pen*Key, Precision Print, PrintSet, RoutePower, TE 2000, Trakker Antares, UAP, Universal Access Point, and Virtual Wedge are either trademarks or registered trademarks of Intermec Technologies Corporation.
Throughout this manual, trademarked names may be used. Rather than put a trademark (™ or ®)
symbol in every occurrence of a trademarked name, we state that we are using the names only in an
editorial fashion, and to the benefit of the trademark owner, with no intention of infringement.
There are U.S. and foreign patents pending.
Wi-Fi is a registered certification mark of the Wi-Fi Alliance.
Microsoft, Windows, and the Windows logo are registered trademarks of Microsoft Corporation in
the United States and/or other countries.
Bluetooth is a trademark of Bluetooth SIG, Inc., U.S.A.
.
ii CN30 Mobile Computer User’s Manual

CN30 Mobile Computer User’s Manual iii

11 CN30 Mobile Computer User’s Manual

Before You Begin
Safety Summary
Before You Begin
This section provides you with safety information, technical support information, and sources for additional product information.
Your safety is extremely important. Read and follow all warnings and cautions in this document before handling and operating Intermec equipment.
You can be seriously injured, and equipment and data can be damaged if
you do not follow the safety warnings and cautions.
Do not repair or adjust alone
Do not repair or adjust energized equipment alone under any circumstances. Someone capable of providing first aid must always be present for
your safety.
First aid
Always obtain first aid or medical attention immediately after an injury.
Never neglect an injury, no matter how slight it seems.
Resuscitation
Begin resuscitation immediately if someone is injured and stops breathing.
Any delay could result in death. To work on or near high voltage, you
should be familiar with approved industrial first aid methods.
Energized equipment
Never work on energized equipment unless authorized by a responsible
authority. Energized electrical equipment is dangerous. Electrical shock
from energized equipment can cause death. If you must perform authorized
emergency work on energized equipment, be sure that you comply strictly
with approved safety regulations.
CN30 Mobile Computer User’s Manual ix
Before You Begin
Safety Icons
This section explains how to identify and understand dangers, warnings,
cautions, and notes that are in this manual. You may also see icons that tell
you when to follow ESD procedures and when to take special precautions
for handling optical parts. ..
A warning alerts you of an operating procedure, practice, condition, or
statement that must be strictly observed to avoid death or serious
injury to the persons working on the equipment.
Avertissement: Un avertissement vous avertit d’une procédure de
fonctionnement, d’une méthode, d’un état ou d’un rapport qui doit
être strictement respecté pour éviter l’occurrence de mort ou de
blessures graves aux personnes manupulant l’équipement.
A caution alerts you to an operating procedure, practice, condition, or
statement that must be strictly observed to prevent equipment damage
or destruction, or corruption or loss of data.
Attention: Une précaution vous avertit d’une procédure de fonctionnement, d’une méthode, d’un état ou d’un rapport qui doit être strictement, respecté pour empêcher l’endommagement ou la destruction de
l’équipement, ou l’altération ou la perte de données.
Note: Notes either provide extra information about a topic or contain special instructions for handling a particular condition or set of circumstances.
x CN30 Mobile Computer User’s Manual

Global Services and Support
Warranty Information
To understand the warranty for your Intermec product, visit the Intermec
web site at http://www.intermec.com and click Service & Support. The
Intermec Global Sales & Service page appears. From the Service & Support
menu, move your pointer over Support, and then click War ran ty.
Disclaimer of warranties: The sample code included in this document is
presented for reference only. The code does not necessarily represent complete, tested programs. The code is provided as is with all faults." All warranties are expressly disclaimed, including the implied warranties of
merchantability and fitness for a particular purpose.
Web Support
Visit the Intermec web site at http://www.intermec.com to download our
current manuals in PDF format. To order printed versions of the Intermec
manuals, contact your local Intermec representative or distributor.
Visit the Intermec technical knowledge base (Knowledge Central) at http://
intermec.custhelp.com to review technical information or to request technical support for your Intermec product.
Before You Begin
Telephone Support
These services are available from Intermec Technologies Corporation.
In the USA and Canada
call 1-800-755-5505 and
Services Description
Factory Repair and
On-site Repair
Tec hn i c a l Su pp or t Get technical support on your
Service Contract
Status
Schedule Site Surveys
or Installations
Ordering Products Talk to sales administration,
Request a return authorization number for authorized
service center repair, or request
an on-site repair technician.
Intermec product.
Inquire about an existing contract, renew a contract, or ask
invoicing questions.
Schedule a site survey, or
request a product or system
installation.
place an order, or check the status of your order.
choose this option
1
2
3
4
5
Outside the U.S.A. and Canada, contact your local Intermec representative.
To search for your local representative, from the Intermec web site, click
Contact.
CN30 Mobile Computer User’s Manual xi

Before You Begin
Who Should Read This Document
This document provides you with information about the features of the
access points, and how to install, configure, operate, maintain, and troubleshoot them.
Before you install and configure the access points, you should be familiar
with your network and general networking terms, such as IP address.
xii CN30 Mobile Computer User’s Manual

Using the CN30 Mobile
1
Computer
Use this chapter to familiarize yourself with the CN30 Mobile Computer.
In this chapter you will find these sections:
• Introducing the CN30 Mobile Computer
• Audio
•Battery
• Beeper
• Using the Keypad
• Resetting your CN30 Mobile Computer
• Using the SD Card
CN30 Mobile Computer User’s Manual 1
Chapter 1 — Using the CN30 Mobile Computer
7
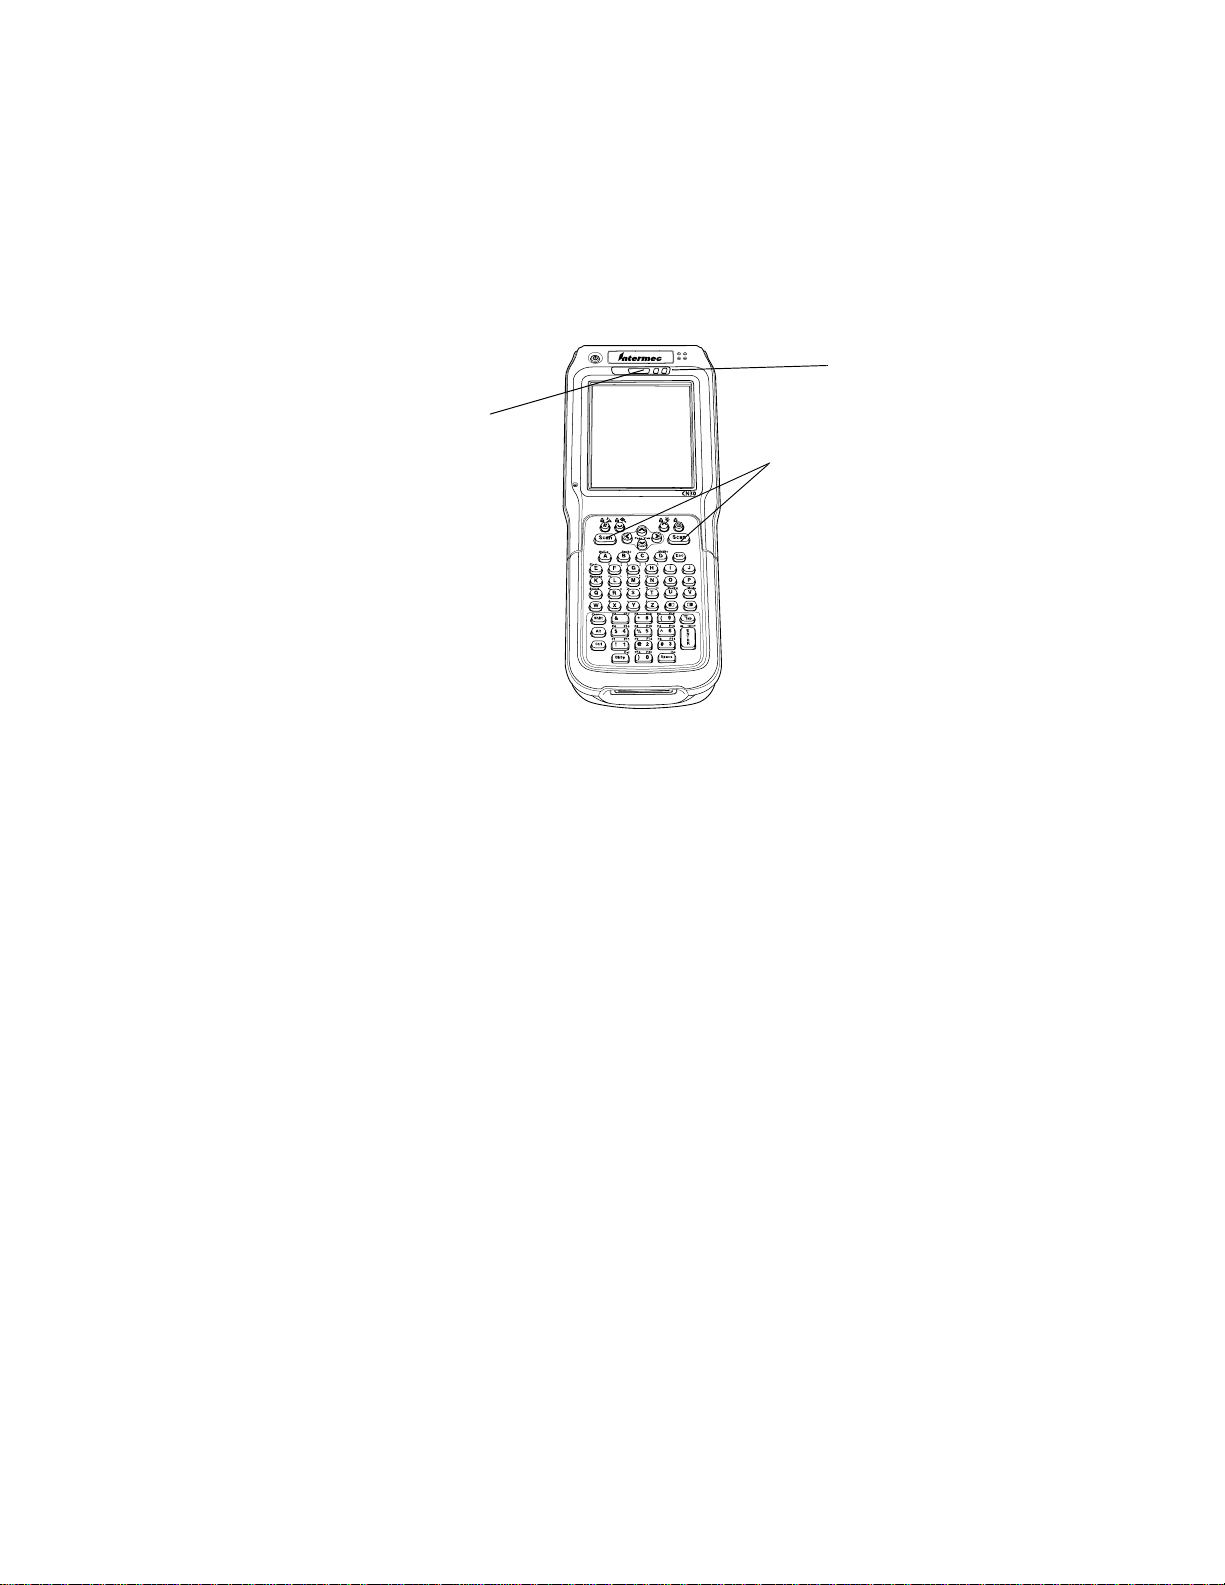
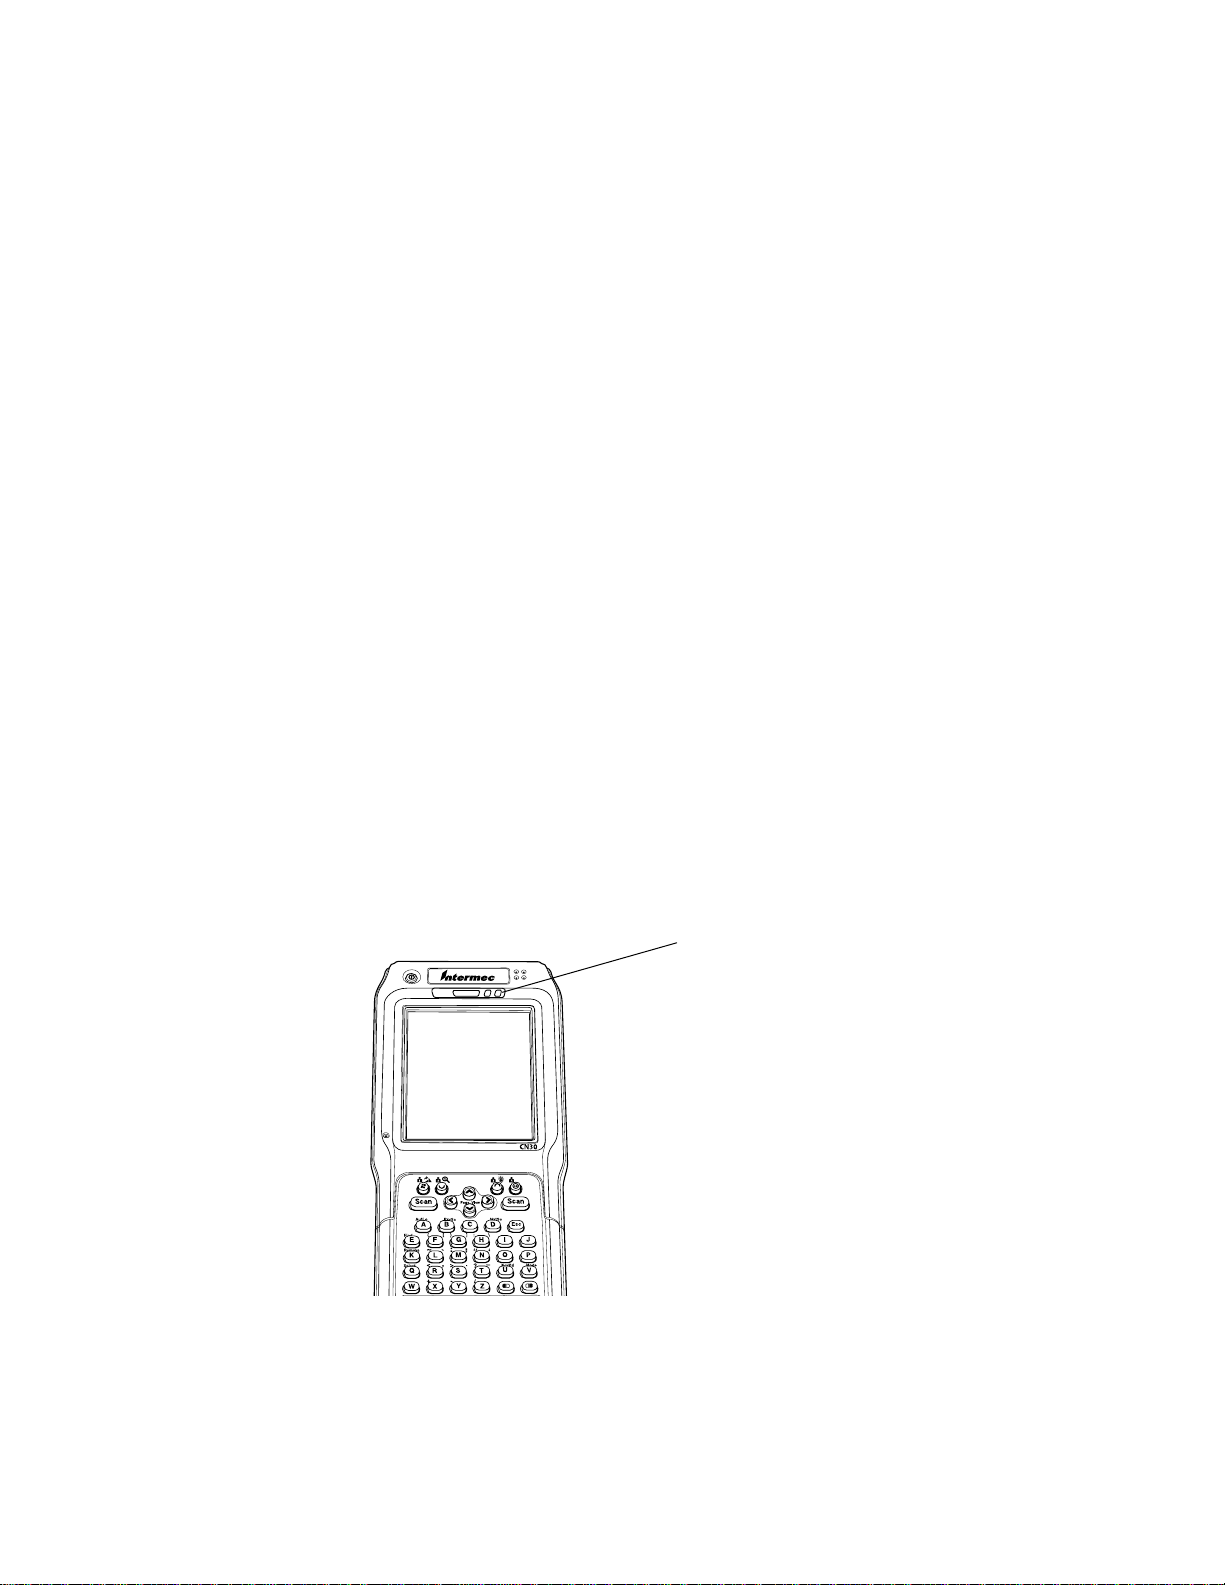
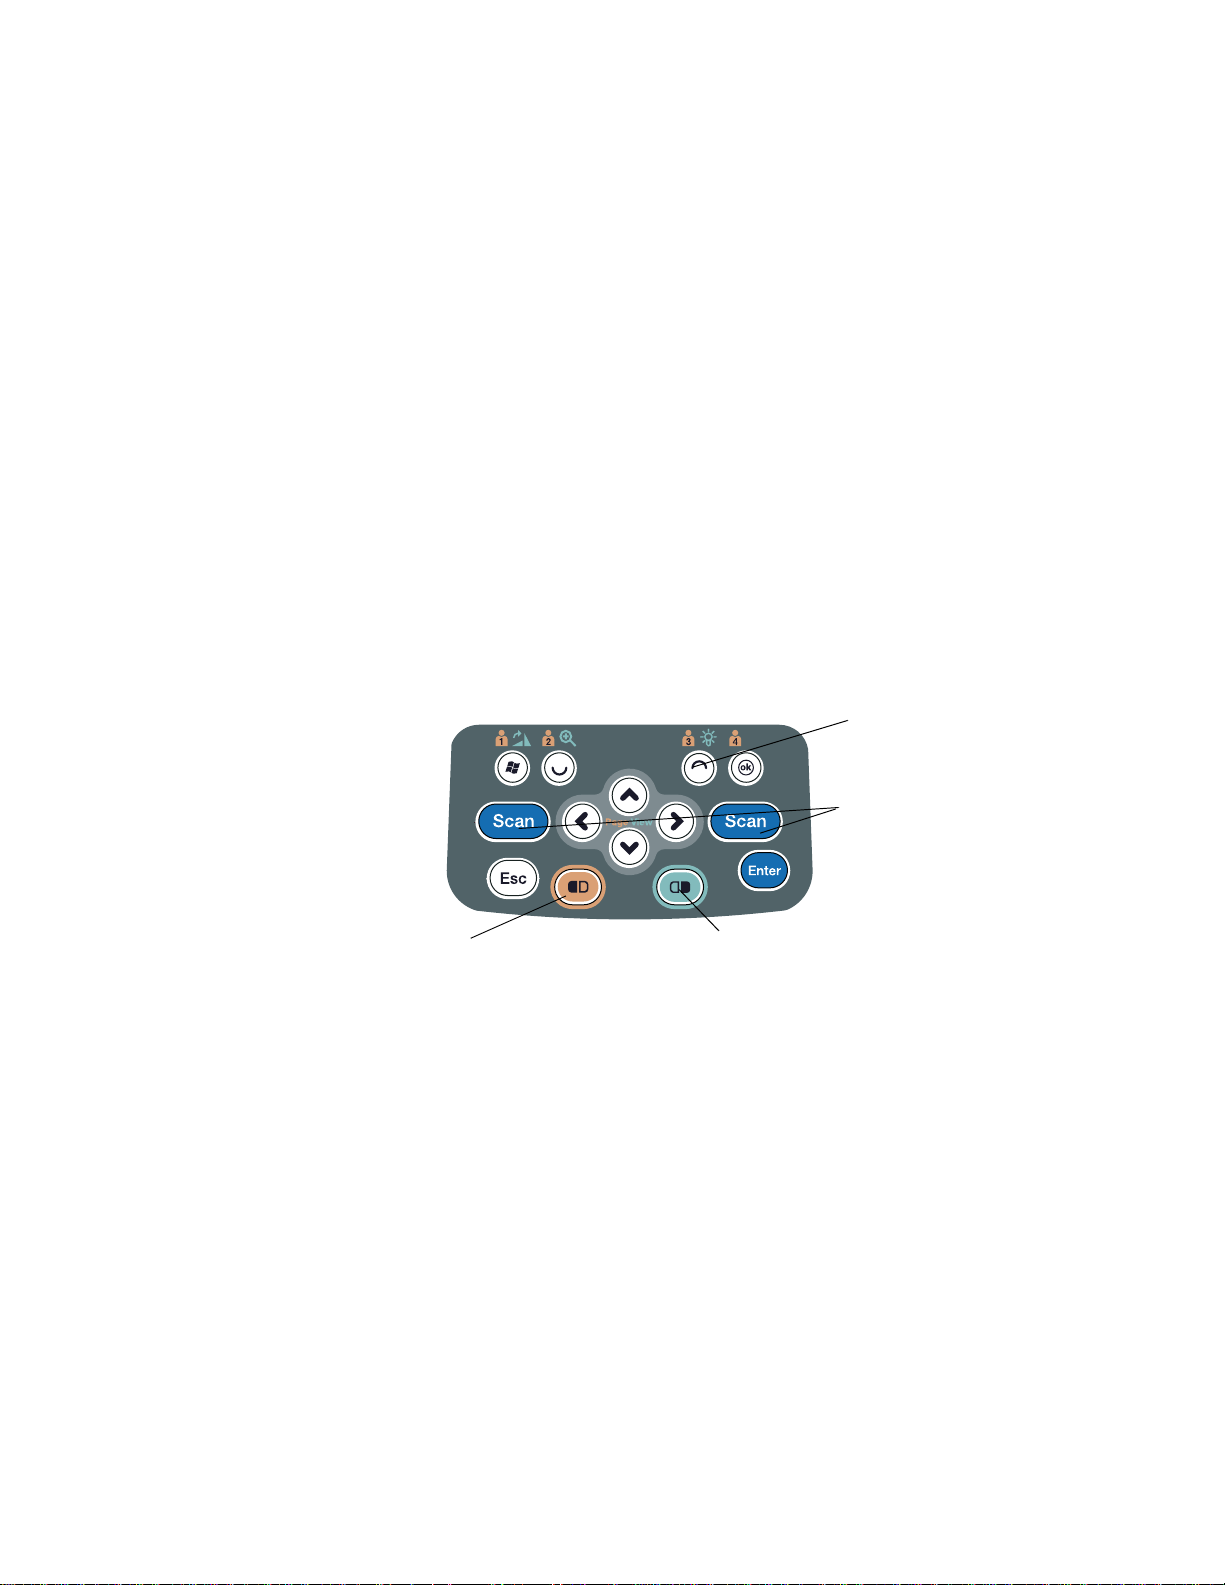
Introducing the CN30 Mobile Computer
The Intermec CN30 is an ergonomically designed Mobile computer built
on the Microsoft® Windows® Mobile Version 5.0 operating system. It is a
lightweight, easy-to-use, reliable computer that runs client/server applications, terminal emulation applications, as well as browser-based applications.
Intermec
Ready-to-work
Indicator
Battery Light
Scan Buttons
CN30 Mobile Computers with an IEEE 802.11b/g radio installed are Wi-
® certified for interoperability with other 802.11b/g wireless LAN devices.
Fi
2 CN30 Mobile Computer User’s Manual
Audio
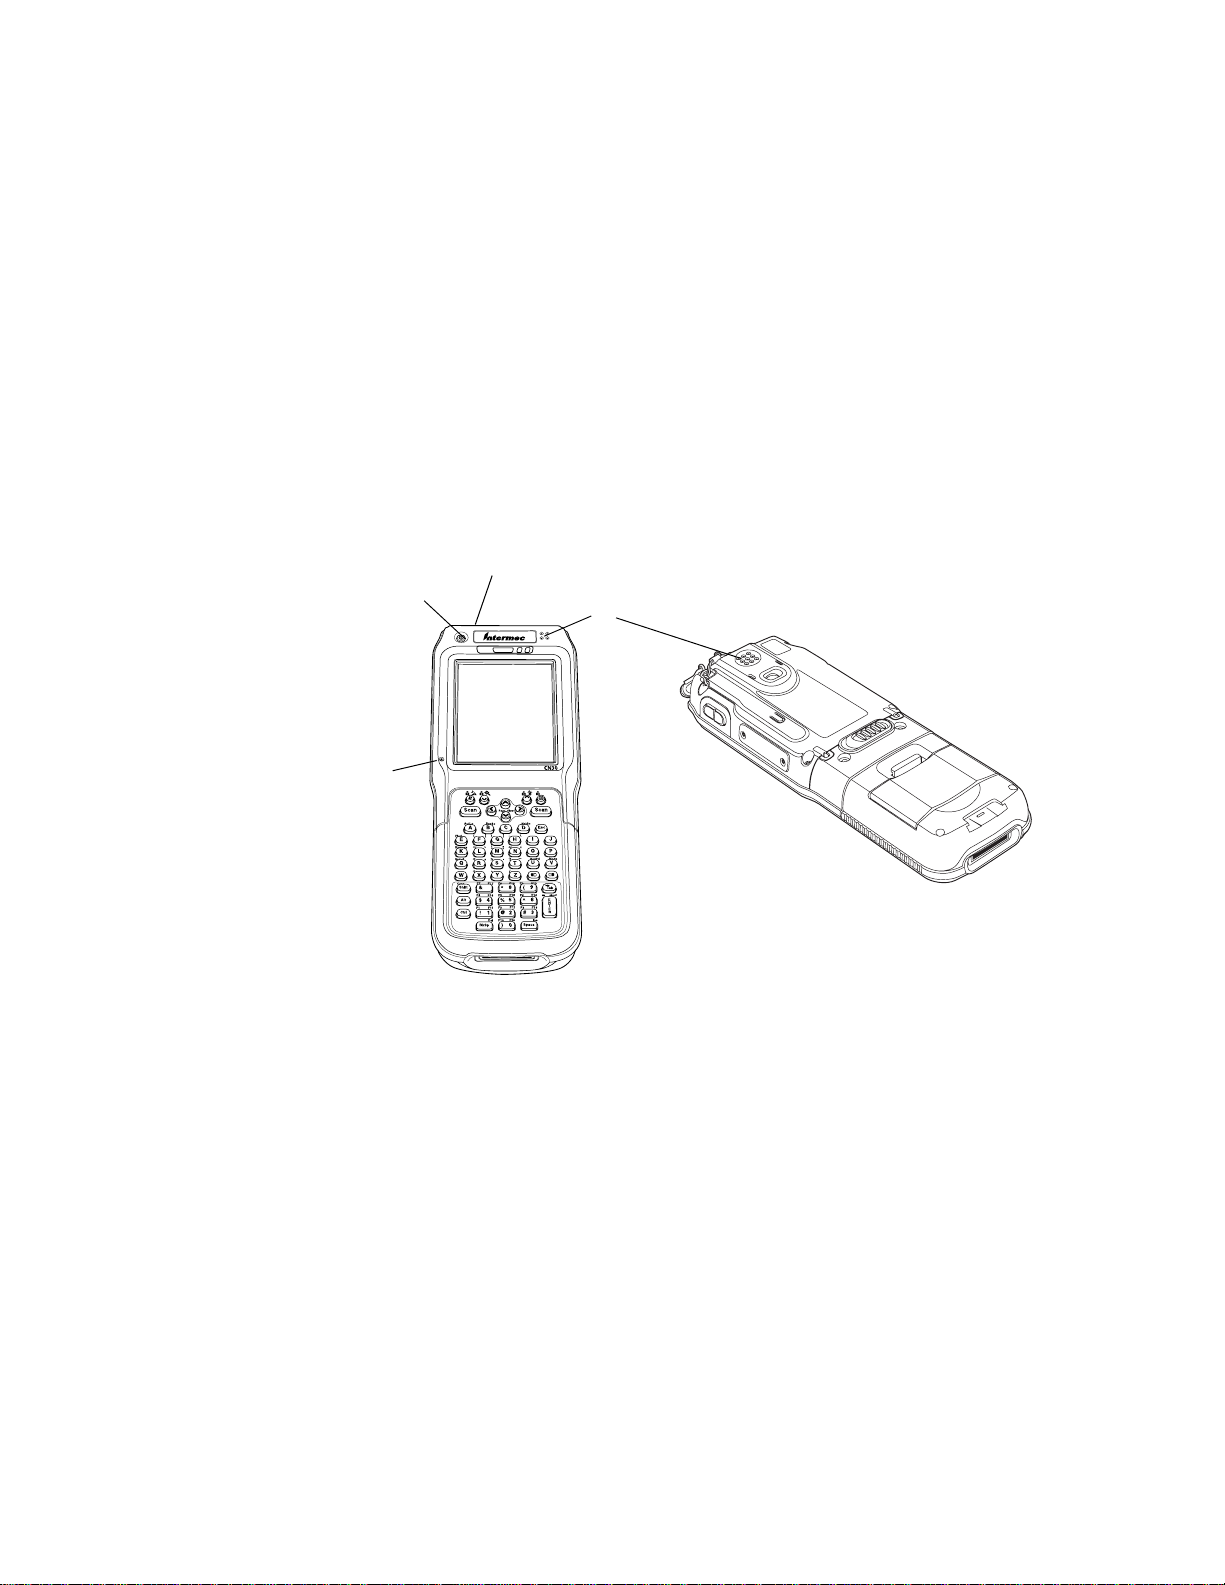
Speaker
Chapter 1 — Using the CN30 Mobile Computer
The audio system consists of two speakers, internal microphone and an
external headset jack.
The main speaker is capable of variable volume levels and is located on the
back of the computer. The external headset jack connects a mobile phone
style headset to your mobile computer for use in noisy environments. The
jack is a 2.5 mm, three-conductor jack, with autosensing of the headset jack
insertion which disables the internal speaker and microphone. The external
headset jack is located on the top of the mobile computer in front of the
scan window.
Headset Jack
[I/O] Key
Speaker
Microphone
7
CN30 Mobile Computer User’s Manual 3
Chapter 1 — Using the CN30 Mobile Computer
Using the Battery
The CN30 uses a lithium-ion battery as its main power source. You must
fully charge the main battery before you can use the CN30. When you
change the battery, a backup battery (super capacitor) maintains your memory, data and real-time clock for at least 10 minutes.
The 14-key keypad module has a 3.7V 2400 MAh battery that is internal
to the module and is not user replaceable.
The 56-keypad module has a removable 3.7V 4800 MAh replaceable Lithium-Ion (LiIon) battery.
Removing the main battery when the backup battery low or critically low
icon displays in the status bar may cause your CN30 to cold boot and you
may lose data.
Attention: L’enlèvement de la batterie principale quand le bas de secours
de batterie ou les affichages en critique bas d’icône dans la barre de statut
peut causer votre CN30 à la botte froide et de vous peut perdre des données.
The lithium-ion battery pack that is used in this device may present a fire or
chemical burn hazard if it is mistreated. Do not disassemble it, heat it above
100°C (212°F) or incinerate it.
Avertissement: Le paquet de piles d’ions de lithium qui est utilisé dans cet
appareil peut presenter un risque feu ou un risque chimique de brûlure s’il
est maltraité. Il ne faut pas le désassembler, le réchauffer à une température plus élevée que 100°C (212°F) ou l’incinérer.
Attention: Si la batterie n’est pas remplacée immédiatement, des données ou
applications importantes risquent d’être perdues
Dispose of used battery packs promptly. Keep away from children. Contact
your local Intermec sales representative for replacement batteries.
Several factors determine the life of your battery such as extreme temperatures, input devices, and your usage.
4 CN30 Mobile Computer User’s Manual
Charging and Installing the Battery
To charge the battery
Either insert the battery into the CN30 AC9 Quad charger or place the
CN30 with battery installed in the AD9 charge dock. For more information
on these accessories, see page ‘Accessories for the CN30’.
The batteries fully charge in approximately 4 hours.
If you do not plan to use the computer for several months, remove the keypad module from the console and store it in the shipping box.
To install the battery
Insert the tabs on the bottom of the charged battery into the CN30 56Keyboard module and snap the battery into place.
Maximizing Battery Life
There are several things that you can do to prolong the life of your fully
charged battery.
1 Verify that the backlight timeout is set to 15 seconds.
Chapter 1 — Using the CN30 Mobile Computer
2 Verify that Power Management has an automatic shutoff time of 3
minutes.
Checking the Battery Status
The easiest way to tell the status of your battery is to look at the battery
icon in the status bar of your CN30.
You can also check the battery status by looking at the Battery light on the
front of the CN30 or by using the battery diagnostics screen.
Battery Light
Flashes red on low
battery condition
To view the status of this battery, tap Start > Settings > the System tab >
the Power icon > the Power tab to view the current status of both the main
battery and the backup battery. Tap ok to exit this information.
CN30 Mobile Computer User’s Manual 5

Chapter 1 — Using the CN30 Mobile Computer
Your computer contains an internal super capacitor, a temporary power
storage device, that protects data for up to ten minutes. This is to give you
time to replace the main battery pack before that data is lost. Be sure to put-
the computer in a suspend mode before doing so.
The configuration and time are lost if:
• The battery discharges beyond this level.
• The battery is removed when the computer is not in suspend mode.
• A cold reset is performed on the computer.
Beeper
For information about setting volume levels for screen taps, ActiveSync
alert noises, etc., tap Start > Help > Learning the Basics
the volume for sounds.
Enable the Beeper
To enable the beeper:
, then select Adjust
1 Ta p Start > Settings > the Personal tab > Sounds & Notifications >
the Vol um e tab.
2 Drag the System volume slider bar to the bottom of the “Silent” position.
3 Ta p ok to exit this applet.
6 CN30 Mobile Computer User’s Manual
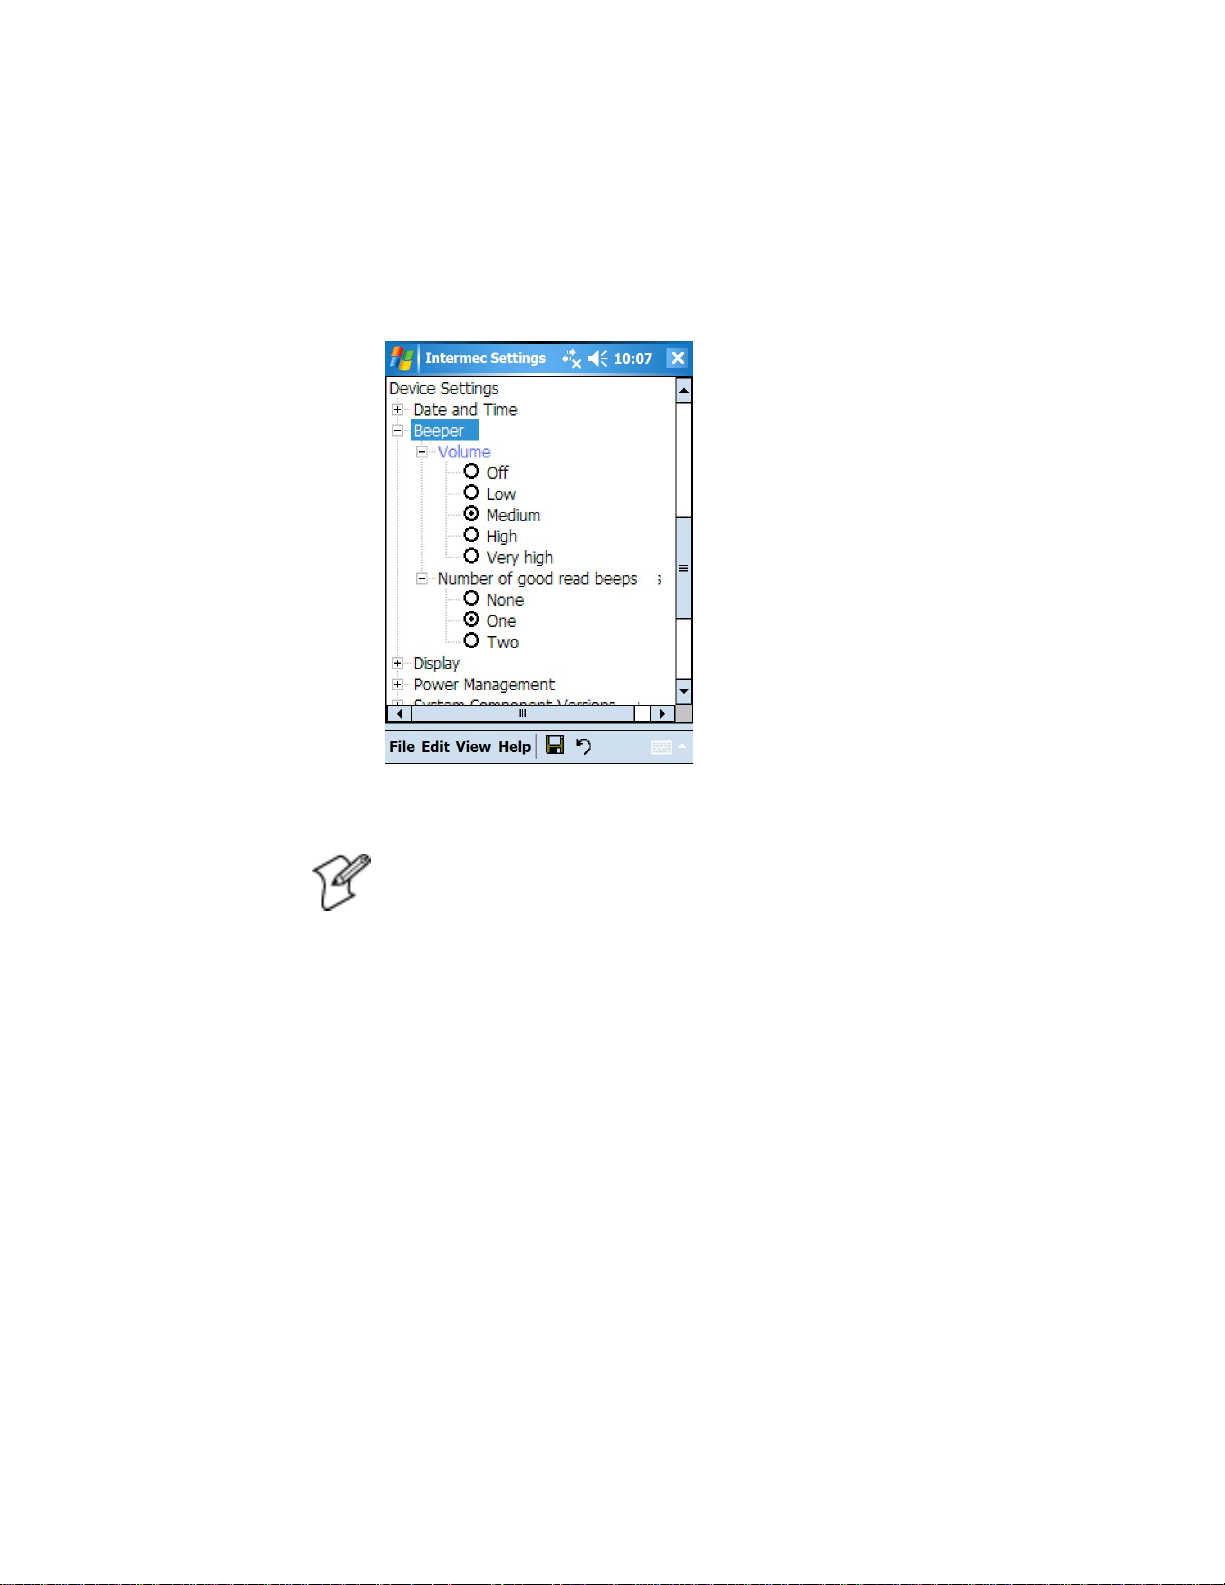
Select a Beeper Volume
To select a beeper volume for the CN30 Mobile Computer, tap Start > Set-
tings > the System tab > the Intermec Settings icon. Tap the Device Set-
tings option, tap (+) to expand Beeper, then tap (+) to expand Vol um e.
Select an item, then close this option.
Chapter 1 — Using the CN30 Mobile Computer
Disable the Beeper
Note: Information about the settings you can configure with the Intermec
Settings control panel applet is described in the Intermec Computer Com-
mand Reference Manual (P/N: 073529). The online manual is available
from the Intermec web site at www.intermec.com.
Do the following to disable the beeper:
1 Ta p Start > Settings > the System tab > the Intermec Settings icon. Tap
the Device Settings option, tap (+) to expand Beeper, then tap (+) to
expand Volume.
Select OFF, then close this option.
CN30 Mobile Computer User’s Manual 7
Chapter 1 — Using the CN30 Mobile Computer
Using the Keypad
Your CN30 has one of the following keypads:
• 56-key full alphanumeric
• 14-key function
You can order all versions of the CN30 56-keypad with an international
overlay. The international overlay supports English and many Western
European languages, such as French, German, Italian, Portuguese, and
Spanish. You enter all of the characters and functions printed above the
keys just like you would on a standard keypad.
The CN30 supports TE 2000 VT100/220/320/340 and ANSI, TE 2000
5250, and TE 2000 3270. When you order the CN30 with a TE 2000
application, you must order the corresponding keypad overlay. Use the TE
2000 keypad overlays to enter the same keys that you can enter on a VT/
ANSI keyboard, an IBM 5250 keyboard, or an IBM 3270 keyboard.
Like the standard CN30 keypad overlays, the TE 2000 keypad overlays let
you enter all the characters printed on or above the keys. The terminal
emulation keypads also come with the same color-coded keys that are on
the standard overlay.
For more help using TE 2000 terminal emulation, see the appropriate TE
2000 programmer’s guide.
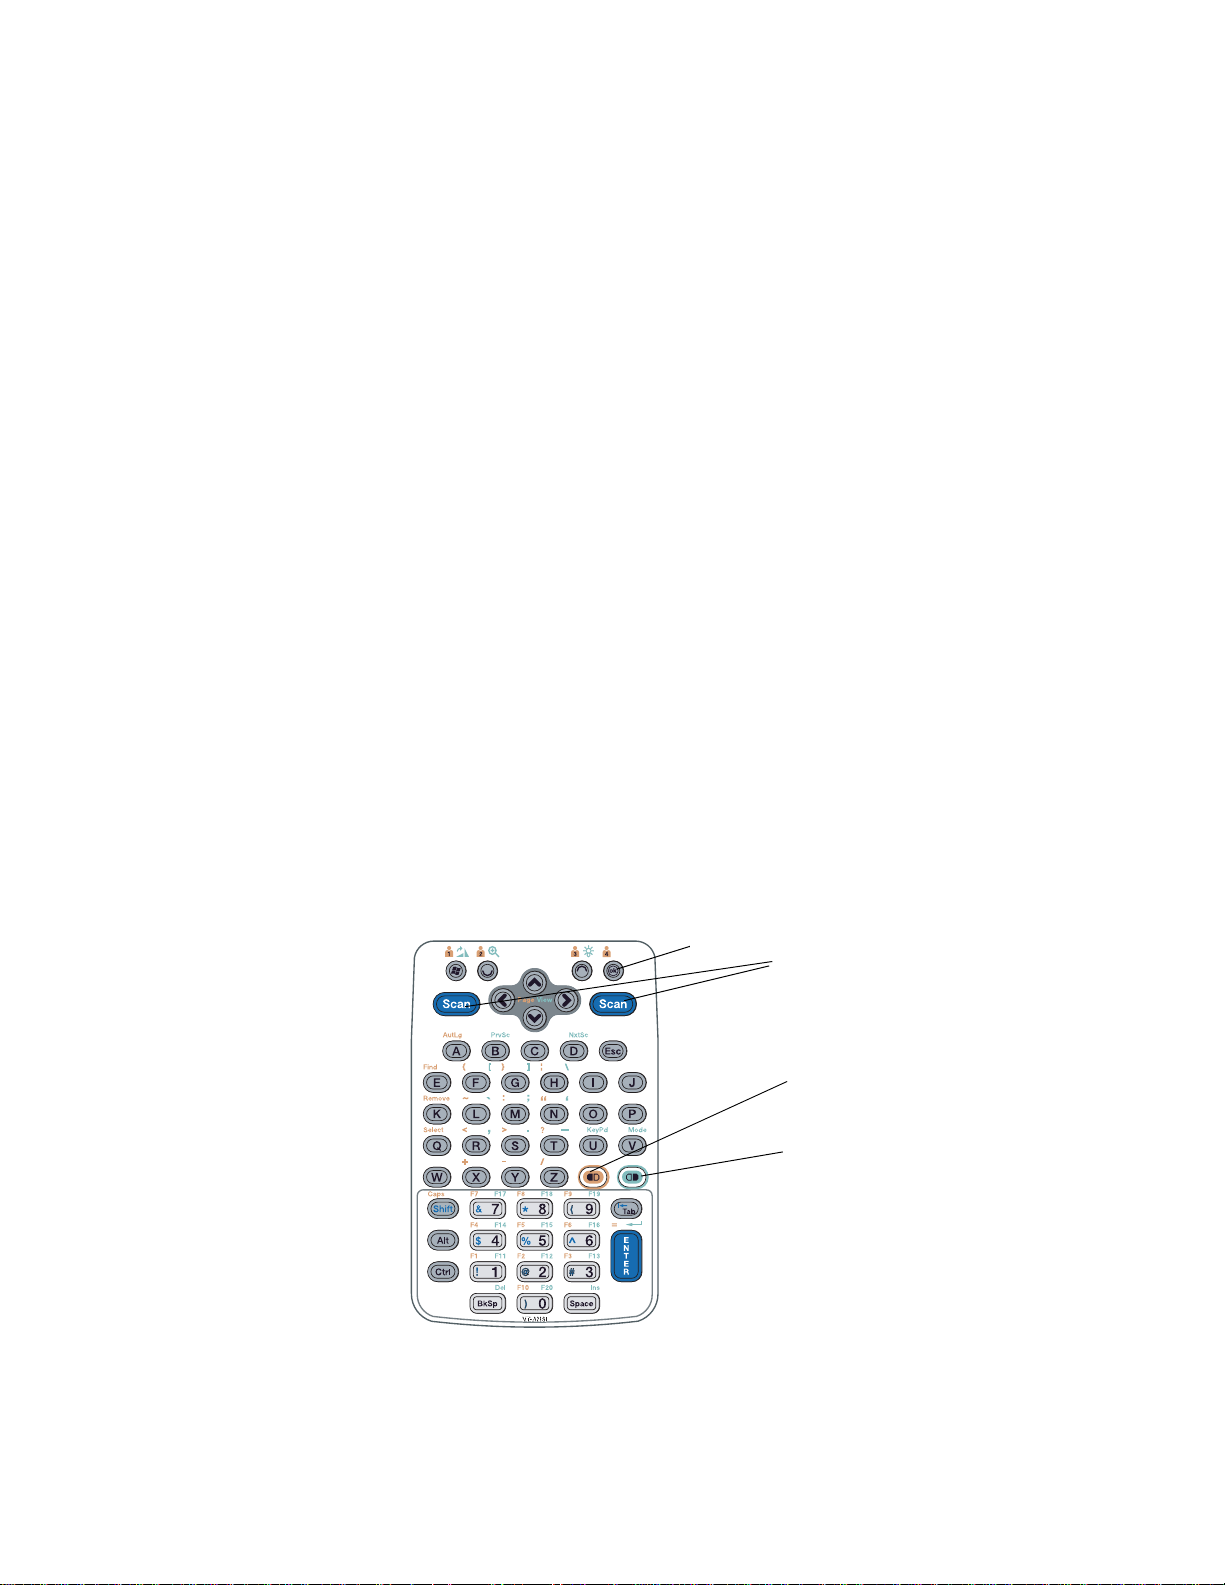
The 56-Key Keypad
Backlight Key
Scan Buttons
Orange Key
Green Key
8 CN30 Mobile Computer User’s Manual
Using the Color-Coded Keys
Each keypad available for the CN30 provides color-coded keys to let you
access additional characters, symbols, and functions printed on the keypad
overlay. Once you understand how to use the color-coded keys and key
sequences, you will know how to access all of the additional features printed
on the keypad overlay. There are two color-coded modifier keys on the
CN30: the orange key and the green key. You press and release the first key,
then press and release the second key to access the color-coded character or
function printed above a key.
Capitalizing All Characters
To type all alphabetic characters as uppercase letters, you can enable the
Caps Lock feature on the CN30 keypad. To enable Caps Lock on the 56key keypad, press the orange key. Press the same key sequence to disable the
Caps Lock.
Using the 14-Key Keypad Module
Chapter 1 — Using the CN30 Mobile Computer
Backlight key
Scan buttons
Orange key
Green key
The 14-key keypad module provides basic navigation through the Windows Mobile Version 5.0 screens.
To rotate the display
1 On the 14-key keypad, press the Green key. Press the Windows Logo
key. Press the key again to return to portrait (default) mode.
To enable the Backlight
On the 56-key keypad, press the Green key.
2 Press the backlight key.
CN30 Mobile Computer User’s Manual 9

Chapter 1 — Using the CN30 Mobile Computer
Magnifier Application
The Magnifier application allows you to view an enlarged portion of the
CN30 Computer screen by tapping and holding the stylus. The enlarged
window can be moved to any location on the screen.
To Start Magnifier
1 On the 14-key or 56-key keypad, press the orange key. Press the Magni-
fier key.
2 Tap and hold the stylus to move the displayed area of the screen. For
more help see the Magnifier help under Windows help.
Note: The Magnifier window is only a display window.
Using the Power (I) Key
When you press the (I) key to turn off the CN30, you actually put the
CN30 in Suspend mode. In Suspend mode, the CN30 continues to supply
power to all memory, but turns off power to most hardware. This powersaving feature is designed to prolong battery life.
When you press the (I) key to turn the CN30 back on, your computer
resumes where it was when you turned it off.
If you are using WPA or 802.1x security, the computer may need to reauthenticate before it starts your application.
If the Battery light flashes and your CN30 does not resume after pressing
(I), your battery may be too low to supply power. Replace the battery. If
replacing the battery does not solve the problem, see “Booting the CN30”
on page 122.
10 CN30 Mobile Computer User’s Manual
Using the Screen
Chapter 1 — Using the CN30 Mobile Computer
The CN30 Computer has a 3.8” diagonal 640x480 pixel (VGA) transflective TFT-LCD 64K color display. The screen supports Unicode characters,
user programmable fonts and bitmap graphics. The Start screen has two
distinct areas; the desktop and the taskbar. The desktop displays shortcuts
to some of the applications installed on the CN30 Computer. The taskbar
displays the Start menu, the time, the onscreen keyboard icon and the desktop icon.
Desktop
Tas kb ar
Your CN30 Computer has a stylus for selecting items and entering information. Use the stylus in place of a mouse.
Tap Touch the screen once with the stylus to select options, close
Double Tap Touch the screen twice with the stylus to launch applications.
Drag Hold the stylus on the screen and drag across the screen to
Tap and ho ld Tap and hold the stylus on an icon to see a list of actions avail-
applications, or launch menus from the taskbar
select text and images.
able for the item. On the pop-up menu that appears, tap the
action you want to perform.
CN30 Mobile Computer User’s Manual 11

Chapter 1 — Using the CN30 Mobile Computer
Resetting Your CN30 Mobile Computer
In some cases where the CN30 Mobile Computer completely stops
responding, it may be necessary to perform a cold reset. Because cold resetting may result in data loss, it is not recommended unless all other recovery
methods have failed.
Performing a Warm-Boot on the CN30 Computer
If your charged CN30 Computer does not resume after pressing (I), or if
the computer or an application is locked up, you may need to do a warmboot.
• Press and hold (I) for five to ten seconds, until the screen goes black.
The CN30 Computer tells you it is performing a warm-boot, then comes
back up to the start screen.
Performing a Cold-Boot on the CN30 Computer
If the CN30 Computer or an application is locked up and does not respond
to a warm-boot, do the following.
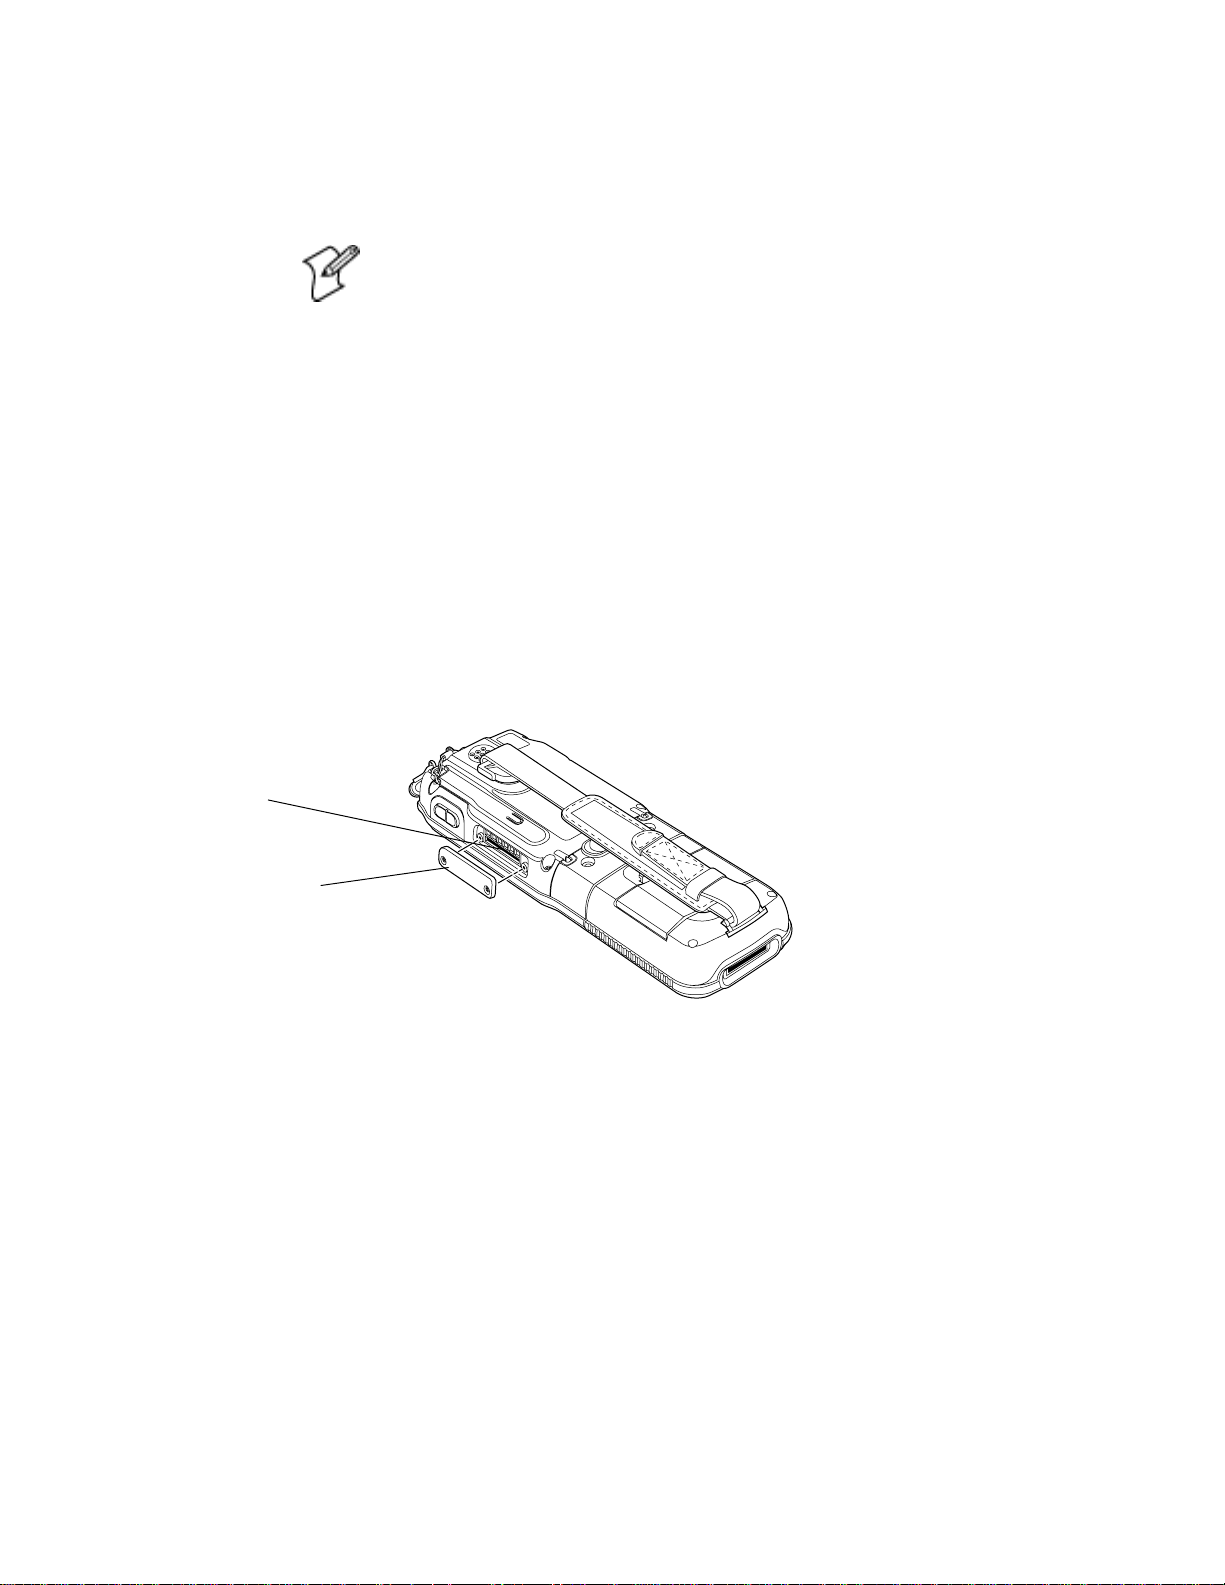
1 Release the lower clip of the hand strap and slide the latch to the left.
2 Remove the keypad module.
3 Press the Reset button located inside the console module.
4 Reinstall the keypad module.
Reset Button
CN30 Console
12 CN30 Mobile Computer User’s Manual
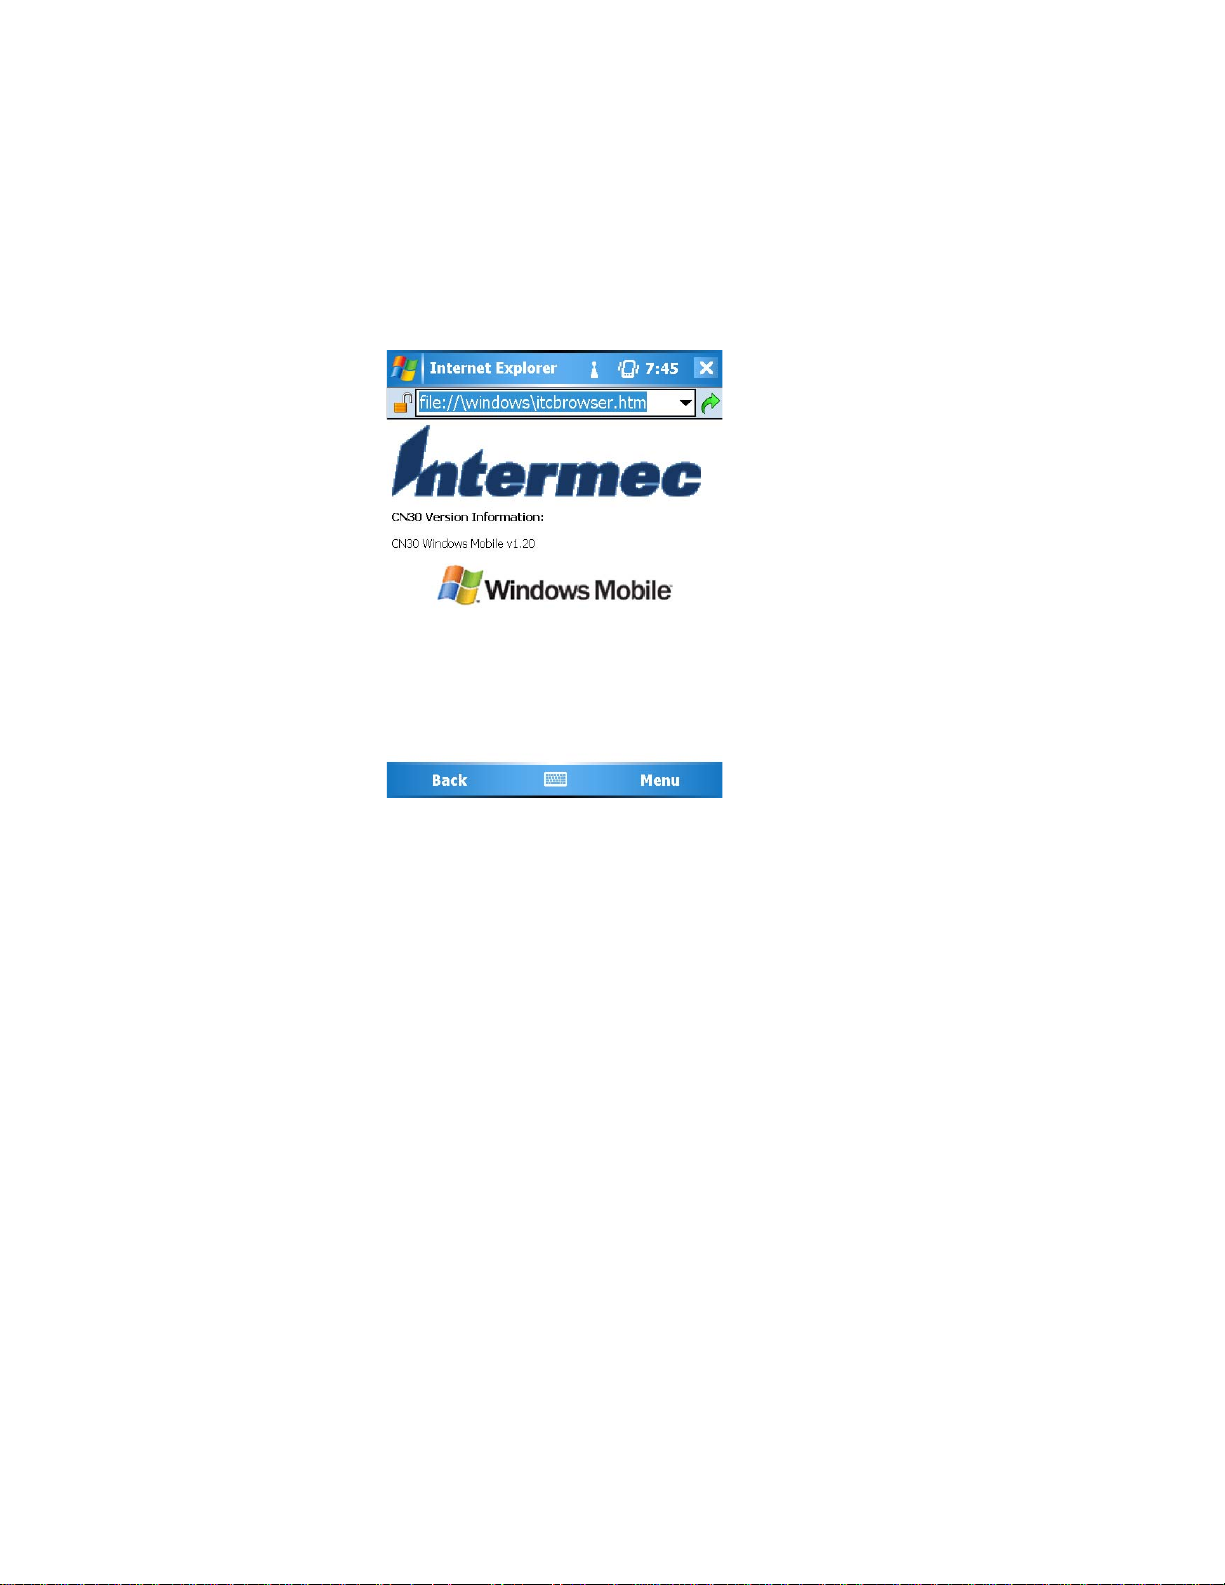
Software Build Version
To check to see if your CN30 Mobile Computer has the latest software
build, select Start > Internet Explorer > the Intermec logo. The latest software build version is displayed beneath the Version Information title. This
information is useful should you need product support assistance.
Chapter 1 — Using the CN30 Mobile Computer
CN30 Mobile Computer User’s Manual 13

Chapter 1 — Using the CN30 Mobile Computer
Understanding the Status Lights
The status lights on the CN30 Computer turn on to indicate battery status
or successful bar decodes. The battery lights and the battery screen icon
work with each other to alert you to the status of your battery. If the battery
light (under the right Scan button) comes on, check the status bar to see
which battery icon appears on it. The battery may be critically low and
need replacing. The Good Read light (green) above the display indicates
when the CN30 Computer successfully decodes a bar code.
Scanning Bar Codes
Do not look directly into the window area or at a reflection of the laser
beam while the laser is scanning. Long-term exposure to the laser beam can
damage your vision.
Use the scanner to scan and enter bar code data. The type of scanner you
are using and the type of bar code you are decoding determines the way you
scan the bar code. The CK60 Computer supports the scanning of 2D
images. Plus, if you are using an integrated handle or a tethered scanner, the
way you scan bar codes is different.When you unpack the CN30, these bar
code symbologies are enabled:
Good Scan Light
Battery Light
Flashes red on low
battery condition
Code 39
•
• UPC/EAN
• PDF417 (if supported)
If you are using bar code labels that are encoded in a different symbology,
you need to enable the symbology on the computer.
Use the Intermec Settings to enable and disable symbologies for your scanner.
14 CN30 Mobile Computer User’s Manual

Scanning with the 2D Area Imager
The CN30 Computer has the 2D area imager, which provides the ability to
scan 2D bar code symbologies and supports omni-directional (360°) scanning where you can position the CN30 Computer in any orientation to
scan a bar code label. Using the 2D area imager is very similar to taking a
picture with a digital camera.
1 Press (I) to turn on the CN30 Computer.
2 Point the scanner window at the bar code label and hold the CN30
Computer steady a few inches from the label.
3 Press the Scan button on the keypad or pull the trigger on a handle and
center the red aiming beam over the bar code label. The aiming beam is
smaller when the imager is closer to the bar code and larger when it is
further away.
When the CN30 Computer successfully reads a bar code label, you hear
a high beep and the green Good Read light turns on briefly.
4 Release the Scan button.
Chapter 1 — Using the CN30 Mobile Computer
If you have problems scanning a bar code with the 2D imager, try following
some of these tips to improve the performance of your imager:
• Set Lighting mode to Illum LED Priority.
• Keep your hand as steady as possible while scanning a label.
• Make sure that Aimer LED Duration is set to zero.
• Position the imager as close to the bar code as possible while still being
able to capture the entire bar code.
• Enable only the bar codes that you need to use every day.
Use Intermec Settings to configure these imager commands. For help using
Intermec Settings, see “Configuring the CN30 Computer With Intermec
Settings” on page 46. For more information on the commands and their
parameters, see the Intermec Computer Command Reference Manual (P/N
073529) via the Intermec web site. See “Before You Begin” for information
how to download this .CHM file.
CN30 Mobile Computer User’s Manual 15
Chapter 1 — Using the CN30 Mobile Computer
StorageMedia
Note: MultiMediaCards (MMCs) are not supported in CN30 Mobile
Computers.
The CN30 Mobile Computer supports Secure Digital storage cards. To
access the card slot, locate the access door at the side of the CN30 Mobile
Computer, remove its two screws, then remove the door. See the CN30
Mobile Computer Quick Start Guide (P/N: 962-054-125) for more information.
CompactFlash Cards
On CN30 Mobile Computers, the CompactFlash card slot accepts only
the 802.11b or 802.11b/g radio, which is factory-installed and cannot be
removed.
Secure Digital Cards
The SD (Secure Digital) card slot accepts storage cards only.
SD Card Slot
Access Door
16 CN30 Mobile Computer User’s Manual

Using the SD Card
You can use a Secure Digital (SD) card to increase file storage and install
software. The CN30 currently supports SanDisk SD cards only. The SD
card slot is located on the side of the CN30.
To insert an SD card
Chapter 1 — Using the CN30 Mobile Computer
1 Press (I) to turn off the CN30.
2 Remove the two screws on the SD card slot door and remove the door.
3 Gently insert the SD card into the CN30 with the printed side facing
the keypad and screen side of the CN30.
4 Push the card into the slot until it latches in place and the steel card
retainer covers the end of the SD card.
5 Replace the door, making sure to insert the door catch into the slot
above the steel card retainer.
6 Replace the two screws.
7 Press (I) to turn on the CN30.
To remove the SD card
1 Press I to turn off the CN30.
2 Remove the two screws on the SD card slot door and remove the door.
3 Push in on the SD card until you hear it unlatch. The card should eject
far enough that you can easily remove it from the CN30. If the card does
not eject easily, you can use the door catch to remove it by turning the
door upside down and using the catch to pull out the SD card.
4 Remove the SD card from the CN30.
CN30 Mobile Computer User’s Manual 17

Chapter 1 — Using the CN30 Mobile Computer
18 CN30 Mobile Computer User’s Manual

Windows Mobile Version 5.0
2
This chapter introduces MicrosoftWindows Mobile Version 5.0.
While using your CN30 Mobile Computer, remember to:
• Tap Start on the navigation bar, located at the top of the screen, to
quickly move to programs, files,and settings. Use the command bar at
the bottom of the screen to perform tasks in programs.The command
bar includes menus, buttons, and the onscreen keyboard.
• Tap and hold an item to see a pop-up menu containing a list of actions
you can perform. Popup menus give you quick and easy access to themost common actions.
To Check the Intermec build of Windows Mobile
Version 5.0 on your CN30:
1 Select Start > Internet Explorer > the Intermec logo.
2 Note the "Software Build" information displayed beneath the Version
Information title. Do the following to determine which Intermec build
of Windows Mobile Version 5.0 is on your unit.
CN30 MobileComputer User’s Manual 1

Chapter 2 — Windows Mobile Version 5. 0
Where to Find Information
This chapter describes your CN30 Mobile Computer hardware, provides
an overview of the programs on your CN30 Mobile Computer, and
explains how to connect your CN30 Mobile Computer to a desktop, a network, or the Internet. For instructions on setting up your CN30 Mobile
Computer and installing ActiveSync, see the Quick Start Guide.
Up-to-date information on your Windows Mobile Computer is available
from http://www.microsoft.com/windowsmobile/resources/communities/
default.mspx
Windows Mobile and many of the technologies supported by the CN30
Mobile Computer are not from Intermec Technologies. Many of the utilities and features on a Windows Mobile device come directly from
Microsoft without any modification from Intermec Technologies.
There may be certain Microsoft-specific issues that Intermec Technologies
would not be able to support, so contact our front-line support personnel
to determine the best source of assistance.Use these URLs for additional
information about Microsoft Windows Mobile Version 5.0:
• http:// msdn.microsoft.com/support/
• http://support.microsoft.com/
• news://news.microsoft.com (a free support option)
2 CN30 Mobile Computer User’s Manual

Getting Started
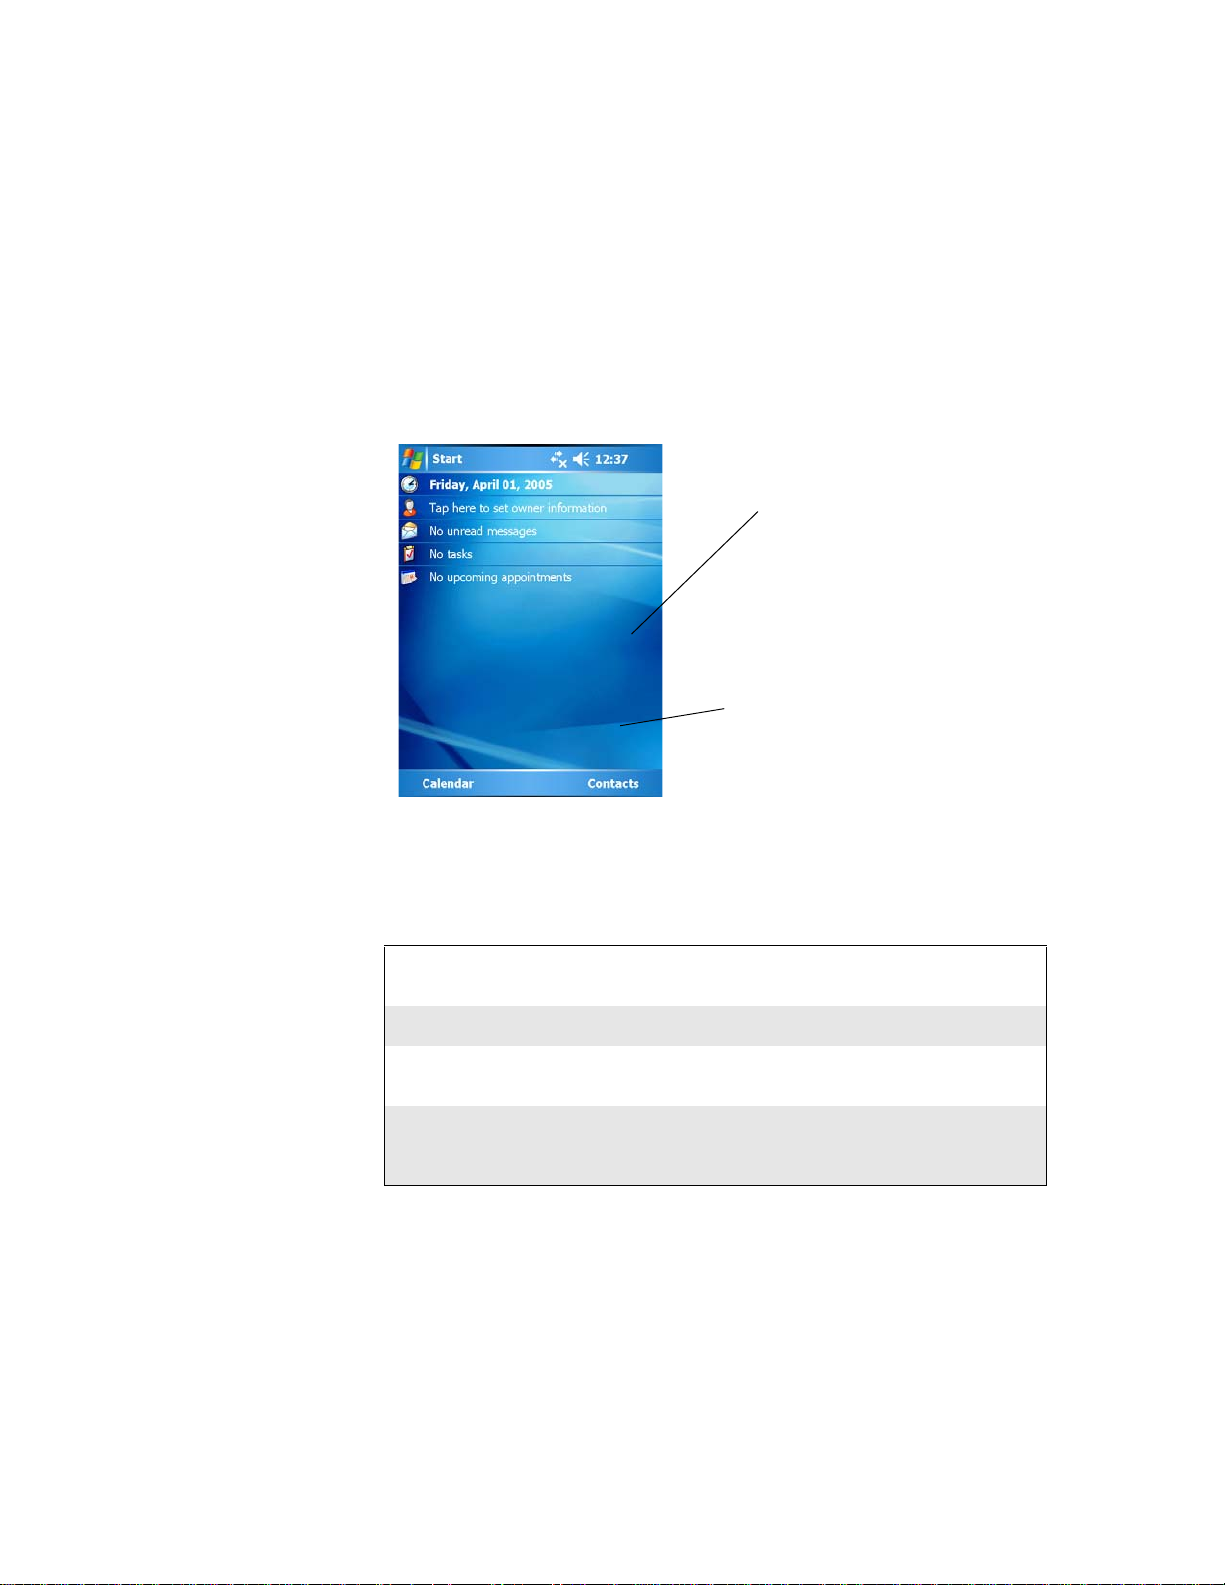
Today Screen
Chapter 2 — Windows Mobile Version 5.0
Learning to use your CN30 Mobile Computer is easy.
This section describes using and customizing your CN30 Mobile Computer.
When you turn on your CN30 Mobile Computer for the first time each
day (or after four hours of inactivity), you see the Today screen. You can also
display it by tapping the Start flag and then Today. On the Today screen,
you can see important information for the day.
Tap to start a program.Tap and hold to change time format.Tap to change
date and time.Tap to change owner information.
Your day at a glance.
Tap to open the associated program.
Tap to create a
Tap to disconnect from ActiveSync.new item.
To customize what is displayed on the Today screen, including the background image, tap Start > Settings > the Personal tab > Today.
Status icons display information such as low batteries or when the CN30
Mobile Computer is connected to a desktop or to the Internet. You can tap
an icon to open the associated setting or program.
CN30 Mobile Computer User’s Manual 3

Chapter 2 — Windows Mobile Version 5. 0
Programs
You can switch from one program to another by selecting it from the Start
menu. (You can customize which programs you see on this menu. For
information, see "Adjusting Settings" on page 41.) To access some programs, tap Start > Programs, and then the program name.
You can also switch to some programs by pressing a program button. Your
CN30 Mobile Computer has one or more program buttons located on the
front or side of the computer. The icons on the buttons identify the pro
grams to which they switch.
Note: Some programs have abbreviated labels for check boxes and dropdown menus. To see the full spelling of an abbreviated label, tap and hold
the stylus on the label. Drag the stylus off the label so that the command is
not carried out.
The following is a partial list of programs that are on your CN30 Mobile
Computer. Look on the Windows Mobile Companion CD for additional
programs that you can install onto your CN30 Mobile Computer.
Synchronize information between your CN30 Mobile Computer and desktop.
Keep track of your appointments and create meeting requests.
Keep track of your friends and colleagues.
Send and receive e-mail messages.
Browse Web and WAP (Wireless Application Protocol) sites, and download
new programs and files from the Internet.
Create handwritten or typed notes, drawings, and recordings.
Keep track of your tasks.
Play digital audio and video files that are stored on your CN30 Mobile
Computer or on a network.
Navigation Bar and Command Bar
The navigation bar is located at the top of the screen. It displays the active
program and current time, and allows you to switch to programs and close
screens.Tap to switch to a program.Tap to see more programs.Tap to switch
to a program that you recently used.Tap to change device settings.Tap to see
a Help topic for the current screen.Use the command bar at the bottom of
the screen to perform tasks in programs. The command bar includes menu
names, buttons, and the Input Panel button. To create a new item in the
current program, tap New. To see the name of a button, tap and hold the
stylus on the button. Drag the stylus off the button so that the command is
not carried out.Tap to display the input panel. Tap to select Tap to select
button commands.menu commands.7
4 CN30 Mobile Computer User’s Manual

Chapter 2 — Windows Mobile Version 5.0
Pop-up Menus
Use pop-up menus to quickly perform an action on an item. For example,
you can use a pop-up menu to delete or make a copy of an item. To access a
pop-up menu, tap and hold the item on which you want to perform the
action. When the menu appears, tap the action you want to perform, or tap
anywhere outside the menu to close the menu without performing the
action.Tap and hold to display the pop-up menu.Lift the stylus and tap the
action you want.Tap outside the menu toclose it without performing an
action.
Notifications
When you have something to do, your device notifies you in a variety of
ways. For example, if you have set up an appointment in Calendar, an email message arrives, or a friend sends you an instant message, you are no
tified in any of the following ways:
• A message box appears on the screen.
• A sound, which you can specify, is played.
• A light flashes on your CN30 Mobile Computer.
Entering Information
• The CN30 Mobile Computer vibrates.You can choose the notification
types.
You can enter information on your CN30 Mobile Computer in several
ways, depending on the type of device you have and the program you are
using:
• Synchronizing Using Microsoft ActiveSync, synchronize or copy information between your desktop and CN30 Mobile Computer. For more
information on ActiveSync, see ActiveSync Help on your desktop.
•Typing
• Using the input panel, enter typed text into the CN30 Mobile Computer.
You can do this by tapping keys on the onscreen keyboard or by using
handwriting recognition software.
• Writing
• Using the stylus, write directly on the screen.
• Drawing
• Using the stylus, draw directly on the screen.
• Recording
• Create a stand-alone recording or embed a recording into a document or
note.
CN30 Mobile Computer User’s Manual 5

Chapter 2 — Windows Mobile Version 5. 0
• Use the input panel to enter information in any program on your CN30
Mobile Computer. You can either type using the onscreen keyboard or
write using Block Recognizer, Letter Recognizer, or Transcriber. In either
case, the characters appear as typed text on the screen.To show or hide
the input panel, tap the Input Panel button. Tap the arrow next to the
Input Panel button to see your choices.Select an input method.Tap to see
your choices.
• Input Panel button.
Ta p Start > Help on your CN30 Mobile Computer to find additional
information on Windows Mobile components.
Do the following to determine which Intermec build of Windows Mobile
Version 5.0 is on your unit.
1 Select Start > Internet Explorer >the Intermec logo.
2 Note the “Software Build” information displayed beneath the Version
Information title.
3 Tap the Close icon in the top right corner to exit the Internet Explorer.
Software Builds
Where to Find Information
This chapter describes your CN30 Mobile Computer hardware, provides
an overview of the programs on your CN30 Mobile Computer, and
explains how to connect your CN30 Mobile Computer to a desktop, a network, or the Internet. For instructions on setting up your CN30 Mobile
Computer and installing ActiveSync, see the Quick Start Guide. The following is a guide to more information to assist you use your CN30 Mobile
Computer.
Windows Mobile and many of the technologies supported by the CN30
Mobile Computer are not from Intermec Technologies. Many ofthe utilities
and features on a Windows Mobile device come directly from Microsoft
withoutany modification from Intermec Technologies. There may be certain Microsoft-specific issues that Intermec Technologies would not be able
to support, so contact our front-line support personnel to determine the
best source of assistance.
Use these URLs for additional information about Microsoft Windows
Mobile (Pocket PC):
• http://msdn.microsoft.com/support/
• http://support.microsoft.com/
• news://news.microsoft.com (a free support option)
6 CN30 Mobile Computer User’s Manual

Getting Started
Today Screen
Chapter 2 — Windows Mobile Version 5.0
Learning to use your CN30 Mobile Computer is simple and easy. This
section describes using and customizing your CN30 Mobile Computer.
When you turn on your CN30 Mobile Computer for the first time each
day (or after four hours of inactivity),you see the Today screen. You can also
display it by tapping the Start flag (shown left) and then Today.
On the Today screen, you can see important information for the day.
Tap to start a program. Tap and hold to change time format.
Tap to change date and time.
Tap to change owner information.
Your day at a glance. Tap to open the associated
program.
Tap to create a new item
Tap to disconnect from ActiveSync.
To customize what is displayed on the Today screen, including the background image, tap Start > Settings >the Personal tab > Today.
Status icons display information suchas low batteries or when the CN30
Mobile Computer is connected to a desktop or to the Internet. You can tap
an icon to open the associated setting or program.
You can switch from one program to another by selecting it from the Start
menu. (You can customize which programs you see on this menu. For
information, see “Adjusting Settings” on page XX.)To access some programs, tap Start > Programs, and then the program name.
You can also switch to some programs by pressing a program button. Your
CN30 Mobile Computer has one or more program buttons locatedon the
front or side of the computer. The icons on the buttons identify the programs to which they switch.
CN30 Mobile Computer User’s Manual 7

Chapter 2 — Windows Mobile Version 5. 0
Note: Some programs have abbreviated labels for check boxes and dropdown menus. To see the full spelling of an abbreviated label, tap and hold
the stylus on the label. Drag the stylus off the label so that the command is
notcarried out.
The following is a partial list of programs that are on your CN30 Mobile
Computer. Look on the Windows Mobile Companion CD for additional
programs that you can install onto your CN30 Mobile Computer.
• Synchronize information between your CN30 Mobile Computer and
desktop.
• Keep track of your appointments and create meeting requests.
• Keep track of your friends and colleagues.
• Send and receive e-mail messages.
• Browse Web and WAP (Wireless Application Protocol) sites, and download new programs and files from the Internet.
• Create handwritten or typed notes, drawings, and recordings.
• Keep track of your tasks.
• Play digital audio and video files that are stored on your CN30 Mobile
Computer or on a network.
Navigation Bar and Command Bar
The navigation bar is located at the top of the screen. It displays the
active program and current time, and allows you to switch to programs
and close screens.
Use the command bar at the bottom of the screen to perform tasks in programs. The command bar includes menu names, buttons, and the Input
Panel button. To create a new item in the current program, tap New.To see
the name of a button, tap and hold the stylus on the button. Drag the stylus
off the button so that the command is not carried out.
Tap to display the input panel.
Tap to select
Tap to select button commands.
menu commands.
Pop-up Menus
Use pop-up menus to quickly perform an action on an item. For example, you can use a pop-up menu to delete or make a copy of an item. To
access a pop-up menu, tap and hold the item on which you want to perform the action. When the menu appears, tap the action you want to perform, or tap anywhere outside the menu to close the menu without
8 CN30 Mobile Computer User’s Manual

Chapter 2 — Windows Mobile Version 5.0
performing the action.
Tap and hold to display the pop-up menu.
Lift the stylus and tap the action you want.
Tap outside the menu to close it without performing an
action.
Notifications
When you have something to do, your device notifies you in a variety of
ways. For example, if you have set up an appointment in Calendar, an email message arrives, or a friend sends you an instant message, you are
notified in anyof the followingways:
Entering Information
You can enter information on your CN30 Mobile Computer in several
ways, depending on the type of device you have and the program you
are using:
• A message box appears on the screen.
• A sound, which you can specify, is played.
• A light flashes on your CN30 Mobile Computer.
• The CN30 Mobile Computer vibrates.
You can choose the notification types.
• Synchronizing
Using Microsoft ActiveSync, synchronize or copy information
between your desktop and CN30 Mobile Computer. For more information on ActiveSync, see ActiveSync Help on your desktop.
•Typing
Using the input panel, enter typed text into the CN30 Mobile Computer. You can do this by tapping keys on the onscreen keyboard or by
using handwriting recognition software.
• Writing
Using the stylus, write directly on the screen.
• Drawing
Using the stylus, draw directlyon the screen.
CN30 Mobile Computer User’s Manual 9

Chapter 2 — Windows Mobile Version 5. 0
• Recording
Create a stand-alone recording or embed a recording into a document
or note.
Use the input panel to enter information in any program on your CN30
Mobile Computer. You can either type using the onscreen keyboard or
write using Block Recognizer, Letter Recognizer,or Transcriber.In either
case, the characters appear as typed text on the screen.
To show or hide the input panel, tap the Input Panel button. Tap the
arrow next to the Input Panel button to see your choices.
Select an input method. Tap to see your choices.
When you use the input panel, your CN30 Mobile Computer anticipates
the word you are typing or writing and displays it above the input panel.
When you tap the displayed word, it is inserted into your text at the insertion point. The more you use your CN30 Mobile Computer, the more
words it learns to anticipate. Tap a text box to display the currently selected
input panel(in this case, Keyboard).
Tap to insert anticipated word.
To enter characters, tap them on the onscreen keyboard.
To change word suggestion options, such as the number of words suggested
atone time, tap Start > Settings >the Personal tab > Input >the Word Completion tab.
Typing With the Onscreen Keyboard
Tap the arrow, then tap Keyboard. On the soft keyboard that is displayed,
tap the keys with your stylus.
To type lowercase letters, tap the keys with the stylus.
• To type a single uppercase letter or symbol, tap the Shift key. To tap multiple uppercase letters or symbols, tap the CAP key.
• To convert a letter to uppercase, tap and hold the stylus on the letter and
drag up.
• To add a space, drag the stylus to the right across at least two keys.
• To backspace one character, drag the stylus to the left across at least two
keys.
• To insert a carriage return, tap and hold the stylus anywhere on the keyboard and drag down.
Note: If you want to use larger keys, tap the arrow, tap Options, select
“Keyboard” from the Inputmethod drop-down list, then select Large keys.
10 CN30 Mobile Computer User’s Manual

Chapter 2 — Windows Mobile Version 5.0
Using Block Recognizer
Character recognition software gives you a fast and easy method for entering information in any program on your CN30 Mobile Computer. Letters,
numbers, and punctuation you write are translated into typed text.
Tap the arrow, then tap Block Recognizer. Write a letter in the box. When
you write a letter, it is converted to typed text that appears on the screen.
For specific instructions on using Block Recognizer, with Block Recognizer
open, tap the question mark next to the writing area.
Using Letter Recognizer
With Letter Recognizer, you can write letters using the stylusjust as you
wouldon paper.
Tap the arrow, then tap Letter Recognizer. Write a letter in the box. When
you write a letter, it is converted to typed text that appears on the screen.
For specific instructions on using Letter Recognizer, with Letter Recognizer
open, tap the question mark next to the writing area.
Using Transcriber
With Transcriber, you can write anywhere on the screen using the stylus
just as you would on paper. Unlike Letter Recognizer and Block Recognizer, you can write a sentence or more of information. Then, pause and let
Transcriber change the written characters to typed characters.
Tap the arrow, then tap Transcriber. Write anywhere on the screen.
For specific instructions on using Transcriber, with Transcriber open, tap
the question mark in the lower, right-hand corner ofthe screen. Tap for
assistance.
Selecting Typed Text
If you want to edit or format typed text, you must select it first.
• Drag the stylus across the text you want to select.
You can cut, copy, and paste text by tapping and holding the selected words
and then tapping an editing command on the pop-up menu, or by tapping
the command on the Edit menu.
Writing on the Screen
In any program that accepts writing, such as the Notes program, and in
the Notes tab in Calendar, Contacts, and Tasks, you can use your stylus
to write directly on the screen. Write the way you do on paper. You can
edit and format what you have written andc onvert the information to
text at a later time.
• Tap the Pen button to switch to writing mode. This action displays lines
on the screen to help you write.
CN30 Mobile Computer User’s Manual 11

Chapter 2 — Windows Mobile Version 5. 0
Tap to use your stylus like a pen.
Note: Some programs that accept writing may not have the Pen button. See
the documentation for that program to find out how to switch to writing
mode.
Selecting the Writing
If you want to edit or format writing, you must select it first.
1Tapand hold the stylus next to the text you want to selectuntil the insertion point appears.
2Without lifting, drag the stylus across the text you want to select.
If you accidentally write on the screen, tap Tools > Undo and try again. You
can also select text by tapping the Pen button to deselect it and then dragging the stylus across the screen.
You can cut, copy, and paste written text in the same way you workwith
typed text: tap and hold the selectedwords and then tap an editingcommand on the pop-up menu, or tap the command on the Edit menu.
Converting Writing to Text
You can convert words you write in printor cursive to text by tapping Tools
> Recognize. If a word is not recognized, it stays in its written form.
If you want to convert only certain words, tap Pen to disable the writing
function, tap twice over the word or phrase to highlight, then tap Tools >
Recognize.
Select the text you want to convert and tap Recognize
The writing is turned into text. on the pop-up menu. Tap to disable
the pen function.
If the conversion is incorrect, you can choose different words from a list of
alternates or return to the original writing. To do so, tap and hold the
incorrect word (tap one word at a time). On the pop-up menu, tap Alternates. Tap the word you want to use from the menu with a list of alternate
words, or tap the writing at the top of the menu to return to the original
writing.
Tap to return to your original writing.
Or, tap the word you want to use.
Tips for getting good recognition:
• Write neatly.
• Write on the lines and draw descenders below the line. Write the cross of
the “t” and apostrophes below the top line so they are not confused with
the word above. Write periods and commas above the baseline.
12 CN30 Mobile Computer User’s Manual

• For better recognition, try increasing the zoom level to 300% by using
• Write the letters of a word closely and leave big gaps between words so
• Hyphenated words, foreign words that use special characters such as
• If you add writing to a word to change it (such as changing a “3” to an
Drawing on the Screen
You can draw on the screen in the same way that you write on the
screen. The difference between writing and drawing on the screen is
how you select items and how they are edited. For example, you can
resize selected drawings, while you cannot resize writing.
Chapter 2 — Windows Mobile Version 5.0
the Tools menu. Recognition does not work well below a 150% zoom
level.
that the CN30 Mobile Computer can easily tell where words begin and
end.
accents, and some punctuation cannot be converted.
“8”) after you attempt to recognize the word, the writing you add is not
included if you attempt to recognize the writing again.
Creating a Drawing
• S Cross three ruled lines on your firststroke. A drawing box appears. Subsequent strokes in or touching the drawing box become part of the drawing. Drawings that do notcross three ruled lines are treated as writing.
The drawing box indicates the boundaries of the drawing.
Pen button.
Note: You may want to change the zoom levelso that you can more easily
work on or view your drawing. Tap Tools and then a zoom level.
Selecting a Drawing
If you want to edit or format a drawing, you must select it first.
Tap and hold the stylus on the drawinguntil the selection handle appears.
To select multiple drawings, deselect the Pen button and then drag to select
the drawings you want.
You can cut, copy, and paste selected drawings by tapping and holding the
selected drawingand then tapping an editing command on the pop-up
menu, or by tapping the command on the Edit menu. To resize a drawing,
make sure the Pen button is not selected, and drag a selection handle.
Recording a Message
In any program where you can write or draw on the screen, you can
also quickly capture thoughts, reminders, and phone numbers by
recording a message.
CN30 Mobile Computer User’s Manual 13

Chapter 2 — Windows Mobile Version 5. 0
In the Inbox program, you can add a recording to an e-mail message. In
Calendar, Tasks, and Contacts, you can include a recording in the Notes
tab. In the Notes program, you can create a stand-alone recording or add
a recording to an open note.
Creating a Recording
1Hold the CN30 Mobile Computer’s microphone close to your mouth
or source of sound.
2Tap and make your recording.
3Tap when finished. If you are recording in an open note, an icon
appears in the note. If you are creating a stand-alone recording, it appears
in the note list.
4To play a recording, tap the recording icon in the open note or tap the
recording in the note list.
Note: To quickly create a recording, hold down the Record hardware button. When you hear the beep, begin your recording. Release the button
when you are finished. The new recording is stored in the open note or as a
stand-alone recording if no note is open.
To play a recording, tap it in the list or tap its icon in the note.
Indicates an embeddedrecording.
Tap to show or hide the Recording toolbar. Tap to begin recording.
Using My Text
When using Inbox or MSN Messenger, use My Text to quickly insert preset
or frequently usedmessages into the text entry area. To insert a message, tap
My Text and tap a message.
• To quickly add common messages, tap My Text and tap a desired message.
• To edit a My Text message, tap Tools > Edit My Text Messages.Tap the
message you want to edit and enter new text at the bottom of the screen.
Tap to select a prewritten message.
Finding and Organizing Information
The Find feature on your CN30 Mobile Computer helps you quickly locate
information.
Tap Start > Find. Enter the text you want to find, select a data type, and
then tap Go to initiate the search.
Note: To quickly find information that is takingupstorage space on your
CN30 Mobile Computer, select Larger than 64 KB in Type.
14 CN30 Mobile Computer User’s Manual

You can also use the File Explorer to find files on your CN30 Mobile Computer and to organize these files into folders. Tap Start > Programs > File
Explorer.
Tapthe folder name to open it.
TapNew Folder to
create a new folder.
Note: You can move files in File Explorer by tapping and holding the item
you want to move, and then tapping Cut or Copy and Paste on the popup
menu.
Customizing Your CN30 Mobile Computer
You can customize your CN30 Mobile Computer byadjusting settings
and installing additional software.
AdjustingSettings
You can adjust settings to suit the way you work. To see available
options, tap Start > Settings >either o fthe following tabs located at the
bottom of the screen. You might want to adjust the following:
Chapter 2 — Windows Mobile Version 5.0
Personal Tab Menus:
To customize what appears on the Start menu, and to enable a pop-up
menu from the New button.
Owner Information:
To enter your contact information.
Password:
To limit access to your CN30 Mobile Computer.
To d a y :
To customize the look and information displayedon the Today screen.
SystemTab
Clock:
To change the time or to set alarms.
Power:
To maximize battery life.
CN30 Mobile Computer User’s Manual 15

Chapter 2 — Windows Mobile Version 5. 0
Adding or Removing Programs
Programs added to your CN30 Mobile Computer at the factory are stored
in ROM (Read Only Memory). You cannot remove this software, and you
cannot accidentally lose ROM contents. ROM programs can be updated
usingspecial installation programs with a*.XIPextension. All other programs
and data files added to your CN30 Mobile Computer after factory installation are stored in RAM (Random Access Memory).
You can install any program created for your CN30 Mobile Computer, as
long as your CN30 Mobile Computer has enough memory. The most popular place to find software for your CN30 Mobile Computer is on the Windows Mobile Web site (http://www.microsoft.com/windowsmobile/
resources/ communities/default.mspx).
Adding Programs Using ActiveSync
Install the appropriate software for your CN30 Mobile Computer on your
desktop before installing it on your CN30 Mobile Computer.
1Determine your CN30 Mobile Computer and processor type so that
you know which version of the software to install. Tap Start > Settings
>the System tab > About >the Version tab, then make a note of the information in Processor.
2Download the program to your desktop (or insert the CDor disk that
contains the program into your desktop). You may see a single *.XIP,
*.EXE, or *.ZIP file, a SETUP.EXE file, or several versions of files for different CN30 Mobile Computer types and processors. Be sure to select
the program designed for the Windows Mobile and your CN30 Mobile
Computer processor type.
3Read any installation instructions, Read Me files, or documentation
that comes with the program. Many programs provide special installation instructions.
4Connect your CN30 Mobile Computer and desktop.
5Double-click the *.EXE file.
• If the file is an installer, the installation wizard begins. Follow the directions on the screen. Once the software is installed, the installer automatically transfers the software to your CN30 Mobile Computer.
• If the file is not an installer, an error message stating that the program is
valid but it is designed for a different type of computer is displayed.
Move this file to your CN30 Mobile Computer. If you cannot find any
installation instructions for the program in the Read Me file or documentation, use ActiveSync Explore to copy the program file to the Program Files folder on your CN30 Mobile Computer. For more
information on copying files using ActiveSync, see ActiveSync Help.
Once installation is complete, tap Start > Programs, and then the program
icon to switch to it.
16 CN30 Mobile Computer User’s Manual

Adding a Program Directly from the Internet
Determine your CN30 Mobile Computer and processor type so that you
know which version of the software to install. Tap Start > Settings >the System tab > About >the Version tab, then make a note of the information in
Processor.
Download the program to your CN30 Mobile Computer straight from the
Internet using Pocket Internet Explorer. You maysee a single *.XIP, *.EXE,
or *.ZIP file, a SETUP.EXE file, or several versions of files for different
CN30 Mobile Computer types and processors. Be sure to select the program designed for the Windows Mobile and your CN30 Mobile Computer
processor type.
Read program installation instructions, Read Me files, or other documentation. Many programs provide installation instructions.
Tap the file, suchas a*.XIPor *.EXE file to start the installation wizard. Follow the directions on the screen.
Adding a Program to the Start Menu
Chapter 2 — Windows Mobile Version 5.0
Tap Start > Settings > Menus >the Start Menu tab, and then the check box
for the program. If you do not see the program listed, you can either useFileExploreron the CN30 MobileComputerto movethe program to the Start
Menu folder, or use ActiveSync on the desktop to create a shortcut to the
program and place the shortcut in the Start Menu folder.
UsingFile Explorer ontheCN30 Mobile Computer
Tap Start > Programs > File Explorer, and locate the program (tap the folder
list, labeled My Documents by default, and then My Device to see a list of
all folders on the CN30 Mobile Computer). Tap and hold the program and
tap Cut on the pop-up menu. Open the Start Menu folder located in the
Windows folder, tap and hold a blank area of the window, and tap Paste on
the pop-up menu. The program now appears on the Start menu. For more
information on using File Explorer, see “Finding and Organizing Information” on page 40.
UsingActiveSyncon the desktop
Use the Explorer in ActiveSync to explore your CN30 Mobile Computer
files and locate the program. Right-click the program, and then click Create
Shortcut. Move the shortcut to the Start Menu folder in the Windows
folder. The shortcut now appears on the Start menu. For more information,
see ActiveSync Help.
RemovingPrograms
Tap Start > Settings >the System tab > Remove Programs.
If the program does not appear in the listof installed programs, use File
Explorer on your CN30 Mobile Computer to locate the program, tap and
hold the program, and then tap Delete on the pop-up menu.
CN30 Mobile Computer User’s Manual 17

Chapter 2 — Windows Mobile Version 5. 0
Microsoft ActiveSync
Visit the following Microsoft Web site for the latest in updates, technical information, and samples:
http://www.microsoft.com/windowsmobile/resources/communities/
de-fault.mspx
Using Microsoft ActiveSync, you can synchronize the information on
your desktopwith the information on your CN30 Mobile Computer. Synchronization compares the data on your CN30 Mobile Computer with
your desktop and updates both computers with the most recent information. For example:
• Keep Pocket Outlook data up-to-date by synchronizing your CN30
Mobile Computer with Microsoft Outlook data on your desktop.
• Synchronize Microsoft Wordand Microsoft Excel files between your
CN30 Mobile Computer and desktop. Your files are automatically converted to the correct format
Note: By default, ActiveSync does not automatically synchronize all types
of information. Use ActiveSync options to turn synchronization on andoff
for specific information types.
With ActiveSync, you can also:
• Back up and restore your CN30 Mobile Computer data.
• Copy (rather than synchronize) files between your CN30 Mobile Computer and desktop.
• Control when synchronization occurs by selecting a synchronization
mode. For example, you can synchronize continually while connected to
your desktop or only when you choose the synchronize command.
• Select which information types are synchronized and control how much
data is synchronized. For example, you can choose how many weeks of
past appointments you want synchronized.
Before you begin synchronization, install ActiveSync on your desktop from
the Windows Mobile Companion CD. For more information on installing
ActiveSync, see your Quick Start card. ActiveSync is already installedon
your CN30 Mobile Computer.
After installation is complete, the ActiveSync Setup Wizard helps you connect your CN30 MobileComputerto yourdesktop,setupa partnershipso you
can synchronize information between your CN30 Mobile Computer and
your desktop, andcustomize your synchronization settings. Your firstsynchronization process automatically begins when finishedusing the wizard.
18 CN30 Mobile Computer User’s Manual

Chapter 2 — Windows Mobile Version 5.0
After your first synchronization, look at Calendar, Contacts, and Tasks on
your CN30 Mobile Computer. Notice that information you have stored in
Microsoft Outlook on your desktop was copied to your CN30 Mobile
Computer, and you did not have to type a word. Disconnect the CN30
Mobile Computer from your computer and you are ready to go!
Once you have set up ActiveSync and completed the first synchronization
process, you can initiate synchronization from your CN30 Mobile Computer. To switch to ActiveSync on your CN30 Mobile Computer, tap Start
> ActiveSync. Note that if you have a wireless LAN card, you can synchronize remotely from your CN30 Mobile Computer.
For information aboutusing ActiveSync on your desktop, start ActiveSync
on your desktop, and then see ActiveSync Help.
View connection status.
Tap to connect and synchronize. Tapto stop synchronization.
View synchronization status.
Tap to synchronize via IRor change
synchronization settings.
For more information about ActiveSync on your CN30 Mobile Computer,
switch to ActiveSync, then tap Start > Help.
Microsoft Pocket Outlook
Microsoft Pocket Outlook includes Calendar, Contacts, Tasks, Inbox, and
Notes. You can use these programs individually or together. For example,
you can use e-mailaddressesstored inContactstoaddresse-mailmessages in
Inbox.
Using ActiveSync, you can synchronize information in Microsoft Outlook
or Microsoft Exchange on your desktop with your CN30 Mobile Computer. You can also synchronize this information directly with a Microsoft
Exchange server. Each time you synchronize, ActiveSync compares the
changes you made on your CN30 Mobile Computer and desktop or server
and updates both computers with the latest information. For information
on using ActiveSync, see ActiveSync Help on the desktop.
You can switch to any program by tapping it on the Start menu.
Calendar:Scheduling Appointments and Meetings
To switch to Calendar on the CN30 Mobile Computer, tap Start > Calendar.
CN30 Mobile Computer User’s Manual 19

Chapter 2 — Windows Mobile Version 5. 0
Use Calendar to schedule appointments, includingmeetings andother
events. You can check your appointments in one of several views (Day,
Week, Month, Year, and Agenda) and set Calendar to remind you of
appointments with a sound or other method.
Appointments for the day can display on the Today screen.
If you use Outlook on your desktop, you can synchronize appointments
between your device and desktop.
TaptogotoToday
Tap to display or edit the appointment details.
Tap to create a new appointment
Synchronizing Calendar
Calendar items stored on your device can be synchronized with calendar
items on your desktop or Microsoft Exchange Server. (Note that you can
only synchronize information directly with an Exchange Server if your
company is running Microsoft Mobile Information Server 2002 or later.)
Calendar synchronization is automatically selected in ActiveSync.
Calendar items entered on one computer are copied to the other during
synchronization. Handwritten notes and drawings are saved as metafiles
(pictures).
For more information on synchronization, see ActiveSync Help on the
desktop.
Why Use Categories in the Calendar?
Use categories to group related tasks, contacts, and appointments. Then,
use these groupings to quickly display only the information you want. For
example, you can easily share your device with another by assigning your
appointments to a category with a special project’s name. You can then use
this category to filter Calendar and only display appointments for that
project.
Note: In Month View, the day ofan appointmentassigned to the Holiday
category appears in red.
This day was assigned the Holiday category.
Tap to access the Month view
What’s an All Day Event?
An appointment can either be a normal appointment or an all day event,
which lasts the full day or spans many days. Examples include a trade show,
a vacation, or a seminar. You can also use all day events to schedule an
annual event, such as a birthday or anniversary. In this case, change the Status box to Free (you may need to scroll to see it) so that it does not show
time as busy in your calendar. All day events do not occupy blocks of time
in Calendar; they appear in banners at the top of the calendar.
20 CN30 Mobile Computer User’s Manual

Chapter 2 — Windows Mobile Version 5.0
Note: You cannot modify or create all day events with attendees on the
device. If you create all day events with attendees on your desktop, use
ActiveSync to copysuch events to the device. Then, view them in Calendar.
For more information on copying files, see ActiveSync Help.To use the
device to schedule an appointment with attendees lasting all day, set type to
“Normal,” then adjust the date and time appropriately.
This describes the all day event.
Tap to access the Day view
What’s a Recurrence Pattern?
If you have an appointment or task that you do on a regular basis, such as a
weekly team meeting or a monthly status report, enter the item once and
set a recurrence pattern for it. If the default patterns in the list are not what
you need, you can create your own pattern using the wizard.
Select your recurrence pattern from this drop down list.
Select <Edit pattern...> to access the wizard with which to customize your
recurrence.
Viewing Appointments
You can view appointments in one of several views (Agenda, Day, Week,
and Month). In Agenda view, upcomingappointments are displayed in
bold. To see detailed appointment information in any view, tap the
appointment. To see a list of available actions for an appointment, tap and
hold the appointment.
This displays the appointment in bold.
Tap to access the Agenda view
Note:Tap Start > Today to quickly see your appointments for the day.
Month view displays symbols to indicate the types of appointments you
have on a given day. An upward triangle indicates a morning appointment;
a downward triangle indicates an afternoon appointment. If you have
appointments in the morning and afternoon, a solid square is displayed. If
you have an all day event not marked Free, a hollow square is displayed.
This displays an all day event not marked Free.
CN30 Mobile Computer User’s Manual 21

Chapter 2 — Windows Mobile Version 5. 0
This displays a morning appointment. This displays appointmentsin bothmorning and afternoon.
This displays an afternoon appointment.
Tap to access the Month view
Creating or Changing an Appointment
To create an appointment, tap New. To select a new date from a pop-up calendar, tap the display date. To enter or select a new time, tap the display
time. Enter the appointment details, and when finished, tap OK to return
to the calendar.
If you are working in Dayview, tap thetimeslot for the new appointment
and then tap New to have the time automatically entered for you.
To change an appointment, tap it in the calendar, and then tap Edit.
Change any appointment detail by tapping it and entering the new information.
Note: Tap the arrows to the right of the description and location boxes to
choose from previous entries.
When entering a time, you can type military and abbreviated time forms,
such as 2300 (becomes 11:00 PM), 913pm (becomes 9:13 PM), 911
(becomes 9:11 AM), and 9p (becomes 9:00 PM).
Tap to return to the calendar
(the appointmentis saved
automatically).
Tap to choose from predefined text.
Tap to choose from previously entered locations.
Tap to selecta time.
Tap to select a date.
Notes is a good place for maps and directions.
Creating an All Day Event
To create an all day event, do the following:
1 Tap New.
2 Tap All Day, then select Yes.
Tap to select either Yes or No whether thisis an all day event.
22 CN30 Mobile Computer User’s Manual

Chapter 2 — Windows Mobile Version 5.0
Note: To change an all day event, switch to Day or Agenda view, tap the
event listedat the top of the calendar, and then tap Edit. Change any
appointment detail by tapping it and entering the new information.
You cannot modify or create all day events withattendees on the CN30
Mobile Computer. If you create all day events with attendees on your desktop, use ActiveSync to copy such events to the CN30 Mobile Computer.
Then, view them in Calendar. For more information on copying files, see
ActiveSync Help. To use the device to schedule an appointment with
attendees lasting all day, set type to Normal, then adjust date and time
accordingly.
Setting a Reminder for an Appointment
Do the following to seta reminder for an appointment in the calendar:
1 Tap the appointment, then tap Edit to change the appointment.
2 Tap Reminder andselect Remind me.
3 To change how many minutes before the appointment you are
reminded, tap the minutes displayed, then select the new minutes from a
drop-down or enter the new minutes.
Tap minutes to change hours, days, or weeks.
Tap to select Remind me to enable the reminder feature.
Note: To automatically seta reminder for all new appointments, in the calendar, tap Tools > Options, select Set reminders for new items,then tap the
number and timeframe options to change the information given.
Tap this to set reminders for new appointments automatically.
To choose how you are reminded, for example by a sound, Tap Start > Settings >the Personal tab>the Sounds & Notifications icon.
Adding a Note to an Appointment
You can add written or typed notes and even recordings (if your device supports recordings) to an appointment. This is a good place for maps, drawings, and other detailed information.
1In the calendar, tap the appointment, then tap Edit.
2Tap the Notes tab to enter notes. For specific instructions, tap Start >
Help > Notes to see Notes Help.
These are controls for the recorder.
Use your stylus to write or draw yourinformation here.
CN30 Mobile Computer User’s Manual 23

Chapter 2 — Windows Mobile Version 5. 0
T ap to activate the keybo ard. Tap to activate the writing pad. T ap to activate
the recorder.
Note: To edit an existing note, tap the appointment in the calendar, tap
Edit,then tap the Notes tab.
Making an Appointment Recurring
Do the following to make a recurring appointment:
1 In the calendar, tap the appointment, then tap Edit
2 Tap Occurs and select a pattern from the list. Or, to create a new pattern, tap <Edit pattern...>, and follow the steps in the wizard.
Select your recurrence pattern from this dropdownlist.
Select <Edit pattern...> to access the wizard withwhichtocustomize your
recurrence.
Assigning an Appointment to a Category
1 In the calendar, tap the appointment, then tap Edit.
2 Tap Categories.
3 On the Select tab, select the categories to which you want to assign the
appointment.
4To create a new category, tap the Add/Delete tab, enter the category
name, then tap Add. The new category is automatically selected in the
Select tab.
5Tap ok to return to the appointment.
A check mark indicates a selected category.
Note: To find an appointment assigned to a category, tap Tools > Categories andselect the type ofappointment that you want displayed. To show all
appointments again, tap Tools > Categories and clear all categories.
Sending a Meeting Request
Use Calendar to schedule meetings with people who use Outlookor Pocket
Outlook. When attendees receive a meeting request, they can accept or
decline the meeting. If they accept, the meeting is automaticallyadded to
their schedule. In addition, their response is sent back to you, and your calendar is updated.
Before you can send a meeting request, you must enter e-mail addresses in
Contacts Help and set up Inbox to send and receive messages. For more
information on sending and receiving meeting requests, tap Start > Help >
24 CN30 Mobile Computer User’s Manual

Chapter 2 — Windows Mobile Version 5.0
Calendar to see Calendar Help,and tap Start > Help > Inbox to see Inbox
Help.
1Tap New, then enter the meeting information.
2Hide the onscreen keyboard, ifneeded, then tap Attendees.Only those
contacts with e-mail addresses are displayed. Select the contacts you want
to invite, then tap ok to return to the appointment.
3Select other desired options and then tap ok.
4Inbox automatically creates a meeting request and sends it to the
attendees the next time you synchronize with your desktop. Textualnotes
entered in the Notes tab (excludingwritingor recordings)are sentalso.
A check mark indicates a selected attendee.
Note: If you are sending the meeting request through a connection to an
ISPor the network, rather than throughsynchronization with your desktop,
tap Tools > Options.From the Send meeting requests via drop-down list,
tap the service to use to send the meeting request.
Finding an Appointment
There are two ways to find an appointment:
• S Tap Start > Find, enter the appointmentname, tap the Type arrow and
select Calendar from the drop-down list, and then tap Go.
• S In the calendar, tap Tools > Categories and select the type of appointment you want displayed. To show all appointments again, tap Tools >
Categories and clear all categories.
Tap this to select from a drop-down listor enter a phrase.
Tap this for a drop-downlistof areas where to search this phrase.
Tap this to seeits details.
Note: In Find, you can tap the Find arrow to select from a listof items of
previouslysearched items or phrases.
Deleting an Appointment
1In the calendar, tap and hold the appointment.
2On the pop-upmenu, tap Delete Appointment.The next time you synchronize, the appointment is also deleted from the desktop.
Changing Calendar Options
In the calendar, tap Tools > Options.
• S To see appointment indicators, select icons to display in Show icons.
You can choose to display indicators for such things as recurring appointments, appointments with notes, and appointments with reminders. Tap
and hold an icon to see its name.
CN30 Mobile Computer User’s Manual 25

Chapter 2 — Windows Mobile Version 5. 0
• If you are having trouble reading the calendar, select Use large font. You
may see less appointment information.
Tap this to view larger text.
Tap toindicate private. Tap toindicate attendees. Tap toindicatelocations.
Tap toindicate notes. Tap toindicate recurrences.
Tap to indicate reminders.
Contacts:Tracking Friends and Colleagues
To switch to Contacts on the CN30 Mobile Computer, tap Start > Contacts.
Contacts maintains a list of your friends and colleagues so that you can
easily find the information you are looking for, whether you are at home
or on the road. You can enter both personal and business information.
If you use Microsoft Outlook on your desktop, you can synchronize
contacts between your CN30 Mobile Computer and your desktop.
Tap and enter part of a name to quickly find it in the list.
Tap to see additional phone numbers and e-mail addresses.
Tap to display or edit the contact details.
Tap and hold to display a pop-up menu of actions.
Creating a Contact
1Tap New.
2Using the input panel, enter a name andother contact information.
Scroll down to see all available fields.
3To assign the contact to a category, scroll to and tap Categories and
select a category from the list. In the contact list, you can display contacts
by category.
4To add notes, tap the Notes tab. You can enter text, draw, or create a
recording. For more information on creating notes, see “Notes: Capturing Thoughts and Ideas”on page 71.
5When finished, tap OK to return to the contact list.
Tap to return to the contactlist (the contactis saved automatically).
Scroll to see more fields.
Notes is a good place for maps and directions.
26 CN30 Mobile Computer User’s Manual

Chapter 2 — Windows Mobile Version 5.0
Synchronizing Contacts
Contacts stored on your device can be synchronized with Outlook contacts
stored on your desktop or with Mobile Information Server 2002 or later.
New items entered in one location are copied to the other during synchronization. Handwritten notes and drawings are saved as pictures when synchronizing with your desktop, but are removed when synchronizing with a
server.
For more information on synchronization, see ActiveSync Help on the
desktop.
Viewing Contacts
The contact list displays the contact name and the first primary phone
number or e-mail address specified for that contact. Contacts are ordered
by name of contact or company.
• Tap the default letter (home, w ork, mobile, or e-mail) to the right of the
contact to see additional phone numbers and e-mail addresses.
• Select a contact and press the Left/Rightcontrols to change the default
number, displayed as a letter to the right of the contact name.
• To see more contact information, tap the contact.
• To see a list of available actions for a contact via a pop-up menu, tap and
hold the contact.
• To see a list of contacts employed bya specific company, tap View > By
Company. Then, tap the desired company name.
Note: You can change the appearance of the contact list by tapping Tools >
Options.
Tap for alistof phone numbers and e-mail addresses.
Indicates the default number.
Tap to toggle By Name and By Company views.
Creating or Changing a Contact
• To create a contact, tap New. To enter notes, tap the Notes tab. When
finished, tap ok to return to the contact list.
• To change a contact, tap it in the contact list, and then tap Edit.To cancel edits, tap Edit > Undo. When finished making changes, tap ok to
return to the contact list.
CN30 Mobile Computer User’s Manual 27

Chapter 2 — Windows Mobile Version 5. 0
Note: If you enter a name with more than two words, the middle word is
recorded as a middle name. If your contact has a double first or last name,
tap the Name arrow and enter the names in the proper box.
Tap to access the Name fields.
Tap anywhere outside the box to close and return to details.
Note: New contacts are added to the displayed category.
Adding a Note to a Contact
You can add written or typed notes and even recordings (if your device supports recordings) to a contact. Notes are handy for maps and drawings.
1In the contact list, tap the contact.
2Tap the Notes tab. For specific instructions, tap Start > Help > Notes to
see Notes Help.
These are controls for the recorder.
Use your stylus to write or draw your information here.
Tap to activate the keyboard.
Tap to activate the writing pad.
Tap to activate the recorder.
Note: To edit an existing note, tap the contact, tap Edit,then tap the Notes
tab.
Assigning a Contact to a Category
1 In the contact list, tap the contact, and then tap Edit.
2 Scroll to and tap Categories.
3 On the Select tab, select the categories to which you want to assign the
contact.
4To create a new category, tap the Add/Delete tab, enter the category
name, then tap Add. The new category is automatically selected in the
Select tab.
5Tap ok to return to the contacts.
A check mark indicates a selected category.
Copying a Contact
1In the contact list, select the contact. To select multiple contacts, tap
and drag.
2Tap Tools,and then select Copy Contacts.
28 CN30 Mobile Computer User’s Manual

Chapter 2 — Windows Mobile Version 5.0
Sending a Message to a Contact
1In the contact list, tap and hold the contact. To select multiple contacts,
tap and drag. Then, tap and hold the selected contacts.
2On the pop-up menu, select Send Email or Send SMS, depending
upon the type of message to send.
Note: To send an e-mail message, you must have an e-mail address configured for the contact. To send an SMS (Short Messaging Service)message,
you must have an SMS number for the contact, which is usually the mobile
phone number.
Finding a Contact
There are four ways to find a contact:
• Tap Start > Find, enter the contact name (first, last, or middle), phone
number, or address, select Contacts for the type, then tap Go.
• From Contacts, start typing a contact name until you see it displayed on
the screen. To show all contacts again, tap the text box at the top of the
screen and clear the text, or tap the arrow to the rightofthe text box.
• In the contact list, tap the category list (labeled All Contacts by default)
and tap the category to which you have assigned a contact. To show all
contacts again, select All Contacts.
• To view the names of companies for which your contacts work, in the
contact list, tap View > By Company. The number of contacts that work
for that company is displayed to the right of the company name.
Note: To quickly move through a long listofcontacts, tap one of the sets of
letters displayed at the top of the contact list. This takes you to the contact
names beginning with those letters.
Enter the first few letters of the contact in question here.
Tap to jump to that portion of the contacts list.
Tap to toggle to By Name (note the Company view)
Deleting a Contact
1In the contact list, tap and hold the contact. To select multiple contacts,
tap and drag. Then, tap and hold the selected contacts.
2On the pop-upmenu, tap Delete Contact. The next time you synchronize, the contact is deleted from the desktop also.
Adding aContact to Speed Dial
You can create speed dials to call frequently-called numbers with a single
tap. Before you can create a speed dial entry for a phone number, that number must already exist in Contacts.
CN30 Mobile Computer User’s Manual 29

Chapter 2 — Windows Mobile Version 5. 0
1From the Phone keypad, tap Speed Dial > New.
2Tapthe desiredcontactname andnumber.
3In the Location field, tap the Up/Down arrows to select an available
location to assign as the new speed dial entry. The firstspeed dial location
is reserved for your voice mail.
To delete a speed dial entry, go to the Speed Dial list, tap and hold the contact name in the box to the right of the assigned speed dial number, then
tap Delete.
ChangingContacts Options
In the contact list, tap Tools > Options.
• The area code and country/region for new contacts are automatically
entered based on the information in Country/Region settings.
• If you are having trouble reading the contacts in the contact list, select
Use large font.
• To increase the available space for displaying contacts in the list, clear
Show ABC tabs.
Clear this to view more contacts per screen. Tap this to view larger text.
Enter the three-digit area code. Select from a drop-down list.
Tasks:Keeping a To Do List
To switch to Tasks on your CN30 Mobile Computer, tap Start > Tasks.
Use Tasks to keep track of what you have to do. A variety of task information can display on the T oday screen. If you use Microsoft Outlook on
your desktop, you can synchronize tasks between your device and desktop.
Select the categoryof tasks you want displayedin thelist.
Select the sortorder of thelist.
Use this entry bar to assign a task quickly.
Indicates a high priority.
Tap to display or edit the task details.
Tap and hold to display a pop-up menu of actions.
Tap to create a new task.
Note: To change the way information is displayed in the list, tap Tools >
Options.
30 CN30 Mobile Computer User’s Manual

Chapter 2 — Windows Mobile Version 5.0
Creating a Task
• To quickly create a task, enter text in the Tap here to adda new task box
at the top of the screen. If you do not see this box, tap Tools > Entry Bar.
• To create a task with detailed information, suchas start and due dates, tap
New. To enter notes, tap the Notes tab.
You can enter a start date and due date or enter other information by first
tapping the field. If the input panel is open, you need to hide it to see all
available fields.
You can enter text, draw, or create a recording. For more information on
creating notes, see “Notes: Capturing Thoughts and Ideas” on page XX.
• To change a task, tap it in the task list, and then tap Edit.
• Using the onscreen keyboard, enter a description.
• To assign the task to a category, tap Categories andselect a category from
the list. In the task list, you can display tasks bycategory.
• When finished, tap ok to return to the task list.
Tap to return to the tasklist (the task is saved automatically).
Tap to choose from predefined subjects.
Notes is a good place for maps and drawings.
Note: To quickly create a task with only a subject, tap Entry Bar on the
Tools menu. Then, tap Tap here to add a new task and enter your task
information.
Synchronizing Tasks
Tasks stored on your CN30 Mobile Computer can synchronize with
Microsoft Outlook on your desktop. Task synchronization is automatically
selected in ActiveSync.
New items entered on one computer are copied to the other during synchronization. Handwritten notes and drawings are saved as metafiles (pictures).
For more information on synchronization, see ActiveSync Help on the
desktop.
Notes:Capturing Thoughts and Ideas
To switch to Notes on your CN30 Mobile Computer, tap Start > Notes.
Notes helps you quickly capture your ideas, notes, and thoughts. You can
create a note using written and typed text, drawings, and recordings. You
can also share your notes with others through e-mail, infrared, and synchronization with your desktop.
CN30 Mobile Computer User’s Manual 31

Chapter 2 — Windows Mobile Version 5. 0
Tap to change the sort order of thelist.
Taptoopenanoteor
play a recording.
Tap and hold to display a pop-up menu of actions.
Tap to record.
Tap to show or hide the Recording toolbar.
Tap to create a newitem.
Note: To create documents withadvanced formatting or templates, such as
bulletedlists andtabs, use wordprocessingsoftware developedfor your device,
such as Word Mobile.
Creating a Note
To create your note, tap New,then write,draw, type,orrecord yourinformation. For information aboutusing the input panel, writingand drawing, and
creating recordings, see “Basic Skills” on page 26.
• Writing
• Using the stylus, write directlyon the screen.
• Drawing
• Using the stylus, draw directlyon the screen.
•Typing
• Using the input panel, enter typed text into the CN30 Mobile Computer.
• Do this by tapping keys on the onscreen keyboard or by using hand writing recognition software.
• Recording
Create a stand-alone recording or embed a recording into a note.
Synchronizing Notes
Notes can be synchronized between your desktop and device either through
notes synchronization or file synchronization.
Notes synchronization synchronizes the notes on your CN30 Mobile Computer with Outlook Notes on your desktop.
File synchronization synchronizes all notes on your CN30 Mobile Computer with the My Documents folder for the CN30 Mobile Computer on
your desktop.
To synchronize your notes throughnotes synchronization, first select the
Notes information type for synchronization in ActiveSync. The next time
you synchronize, all notes in My Documents and its subfolder on your
device appear in Outlook Notes on your desktop. Notes that contain only
32 CN30 Mobile Computer User’s Manual

Chapter 2 — Windows Mobile Version 5.0
text appear as regular notes in Outlook on your desktop, while notes containingwritten textor drawings appear in the device format. In addition, all
notes in the Notes group in Outlook on the desktop appear in Notes on the
device.
To synchronize your notes as files, in ActiveSync, select the Files information type for synchronization and clear the Notes information type. When
you select Files, the My Documents folder for the CN30 Mobile Computer
is createdon your desktop. All .PWI files placed in the My Documents
folder on your device and all .DOC files placed in the My Documents
folder forthe CN30 MobileComputer on yourdesktop are synchronized.
Password-protected files cannot be synchronized.
ActiveSync converts documents during synchronization. For more information on synchronization or file conversion, see ActiveSync Help on the
desktop.
Note: When you delete or change an item on either your desktop or CN30
Mobile Computer, the item is changed or deleted in the other location the
next time you synchronize.
Note: If you synchronize your notes using file synchronization and then
later decide to use notes synchronization, all of your notes are synchronizedwith Outlook on your desktop and no longer store in the My Documents folder for the CN30 Mobile Computer.
Inbox: Sending and Receiving E-mail Messages
To switch to Inbox on your CN30 Mobile Computer, tap Start > Inbox.
You can receive Internete-mail messages and SMS messages in Inbox. Internet e-mail messages are sent by using an address you receive from your
Internet service provider (ISP)or your employer. SMS messages are sent
and received through your wireless phone service provider by usinga phone
number as the message address.
You can send and receive e-mail by synchronizing with your desktop, or
by connecting to a Post Office Protocol 3 (POP3)or Internet Message Access Protocol 4 (IMAP4)mail server. You need to set up an e-mail account
for eachmethod that you use except for Microsoft ActiveSync, which is set
up by default. The ActiveSync folder on your CN30 Mobile Computer
stores messages that you send and receive through synchronization with a
desk-top. Account names appear as folders in the folder list (located on the
left, under the navigation bar)in the Inbox message list.
With synchronization, messages are synchronized between the device Inbox and the PC Inbox by using ActiveSync and Microsoft Exchange or
Microsoft Outlook. For more information, see “Synchronizing E-mail Messages”below.
CN30 Mobile Computer User’s Manual 33

Chapter 2 — Windows Mobile Version 5. 0
When connecting to a POP3 or IMAP4 server, you use a modem to connect to your Internet service provider (ISP), or a modem or Ethernet card
to connect to the local area network to which your e-mail server is connected. You can also use your phone to connect by using a cellular line connection. For more information, see “Connecting to a Mail Server”on page
75.
Synchronizing E-mail Messages
After selecting Inbox for synchronization in ActiveSync, e-mail messages are
synchronized as partof the generalsynchronization process. During synchronization:
• S Messages are copied from the Inbox folder on your desktop or the
Microsoft Exchange server to the Inbox folder on your CN30 Mobile
Computer. (Note that you can onlysynchronize information directlywithan Exchange Server if your company is running Microsoft Mobile
Information Server 2002 or later.)By default, you receive messages from
the last three days only, the first 100 lines of each new message, and file
attachmentsof lessthan100 KB in size.
• S Messages in the Outbox folder on your device are transferred to
Exchange or Outlook and then sent from those programs.
• S The messages on the two computers are linked. When you delete a
message on your CN30 Mobile Computer, it is deleted from your desktop the next time you synchronize.
• S Messages in subfolders in other e-mail folders in Outlook are synchro
• nized only if they were selected for synchronization in ActiveSync. For
information on initiating Inbox synchronization or changing synchronization settings, see ActiveSync Help on your desktopor select Start >
Help > Connections to see Connections Help.
Managing E-mail Messages and Folders
Each e-mail account and SMS account has its own folder hierarchy with
five default folders:Inbox,Outbox, Deleted Items,Drafts, and Sent Items.
The messages you receive and send through the mail account are stored in
these folders. You can also create additional folders within each hierarchy.
The Deleted Items folder contains messages that were deleted on the device.
The behavior of the Deleted Items and Sent Items folders depends on the
Inbox options you have chosen.
The behavior of the folders you create depends on whether you are using
ActiveSync,SMS,POP3, or IMAP4.
• If you use ActiveSync,
• e-mail messages in the Inbox folder in Outlook automatically synchronize with your device. You can select to synchronize additional folders by
designating them for ActiveSync. The folders you create and the messages you move are then mirrored on the server. For example, if you
34 CN30 Mobile Computer User’s Manual

Chapter 2 — Windows Mobile Version 5.0
move two messages fromthe Inbox folder to a folder named Family, and
you have designated Family for synchronization, the server creates a copy
of the Family folder and copies the messages into that folder. You can
then read the messages while away from your desktop.
• If you use SMS, messages are stored in the Inbox folder.
• If you use POP3 and you move e-mail messages to a folder you created,
the link is broken between the messages on the device and their copies on
the mail server. The next time you connect, the mail server sees that the
messages are missing from the device Inbox and deletes them from the
server. This prevents you from having duplicate copies ofa message, but
it also means that you no longer have access to messages that you move
to folders created from anywhere except the CN30 Mobile Computer.
• If you use IMAP4, the folders you create and the e-mailmessages you
move are mirrored on the server. Therefore, messages are available to you
anytime you connect to your mail server, whether it is from your CN30
Mobile Computer or desktop. This synchronization of folders occurs
whenever you connect to your mail server, create new folders, or rename
or delete folders when connected.
For all accounts except ActiveSync, you can access folder options by tapping
Tools > Manage Folders.
Connecting to a Mail Server
In addition to synchronizinge-mailmessages with your desktop, you can
sendandreceive e-mail messages byconnecting to an e-mailserver usinga
modem or network card connected to your CN30 Mobile Computer. You
need to set up a remote connection to a network or an ISP, and a connection to your e-mailserver. For more information, see “Getting Connected”
on page .
When you connect to the e-mail server, new messages are downloaded to
the CN30 Mobile Computer Inbox folder, messages in the CN30 Mobile
Computer Outbox folder are sent, and messages that were deleted on the email server are removed from the CN30 Mobile Computer Inbox folder.
Messages that you receive directly from an e-mail server are linked to your
e-mail server rather than your desktop. When you delete a message on your
CN30 Mobile Computer, it is also deleted from the e-mail server the next
time you connect based on the settings selected in ActiveSync.
You can work online or offline. When working online, you read and
respond to messages while connected to the e-mail server. Messages are sent
as soon as you tap Send, which saves space on your CN30 Mobile Computer.
When working offline, once you have downloaded new message headers or
partial messages, you can disconnect from the e-mailserver and then decide
which messages to download completely. The next time you connect, Inbox
CN30 Mobile Computer User’s Manual 35

Chapter 2 — Windows Mobile Version 5. 0
downloads the complete messages you have marked for retrieval and sends
the messages you have composed.
Setting Up or Changing an Account
To set up an account:
• To setup a POP3 or IMAP4 e-mail account, tap Accounts > New
Account. Follow the instructions in the New Account Wizard.
• To setup an SMS account, tap Accounts > Accounts, and then tap SMS.
Follow the instructions on the screen.
To change options for an account:
1 Tap Accounts > Accounts.
2 Tap the name of the account, and follow the instructions on the screen.
To delete an account:
1 Tap Accounts > Accounts.
2 Tap and hold the name of the account, and then tap Delete.
Note: You can set up several e-mail accounts including your ActiveSync
account, but you can set up only one SMS account.
Note: You cannot add a new account while connected. Tap Accounts > Disconnect to disconnect.
Note: You cannot delete your SMS account.
DownloadingMessages from theServer
In Inbox, tap Accounts > Connect to open a connection to the Internet or
your corporate network, depending on the account. For more information,
tap Start > Help > Connections to see Connections Help.
1Tap Accounts andensure that the account you want to use is selected
(marked bya bullet.)
2Tap Connect.The messages on your CN30 Mobile Computer and email server are synchronized:new messages are downloaded to the CN30
Mobile Inbox folder, messages in the CN30 Mobile Outbox folder are
sent, and messages that were deleted from the server are removed from
the CN30 Mobile Inbox. Tap a message in the message list to open it.
3If you read a message and decide that you need the full copy, tap Edit >
Mark for Download while in the message window. If you are in the message list, tap and hold the message, and then tap Mark for Download.
This also downloads message attachments if you selected those options
when you set up the e-mail account. You can also choose to download
full copies of messages by default.
4When finished, tap Accounts > Disconnect.
Note: Receiving entire messages consumes storage memory.
36 CN30 Mobile Computer User’s Manual

Chapter 2 — Windows Mobile Version 5.0
Note: The size column in the message list displays the local size and server
size of a message. Even when a message has downloaded fully, these numbers may differ because the size of a message can vary between the server
and the device.
Composing and Sending Messages
To compose a message:
1 In the message list, tap New.
2 To select an account, tap the From list and select “ActiveSync,” “SMS,”
or the desired e-mail account.
3 Enter the e-mail address or SMS address of one or more recipients, separating them with semicolons. To access addresses and phone numbers
from Contacts, tap To.
4 Enter your message. To quickly add common messages, tap My Text
and tap a desired message.
5 To check spelling, tap Edit > Spell Check.
6 Tap Send. If you are working offline, the message is moved to the Out-
box folder and is sent the next time you connect.
Tap to show or hide the complete header.
Tap to show or hide the recording tool bar. Tap to display the Address
Book. Tap to insert common (preset) messages.
Note: If you are sending an SMS message and want to know if it was
received, before sending the message, tap Edit > Options > Request SMS
text message delivery notification.
You can directly call the sender of an SMS message by tapping the icon
shown to the left, then Call.
Note: Depending on the e-mail address options that you select, you can use
a directory service in addition to your contact list to verify names.
Companion Programs
The companion programs consist of Microsoft Word Mobile, Microsoft
Excel Mobile, Windows Media Player. To switch to a companion program on your CN30 Mobile Computer, tap Start > Programs, then tap the
program name.
Word Mobile
Word Mobile works with Microsoft Word on your desktop to give you
access to copies of your documents. You can create new documents on your
CN30 Mobile Computer, or you can copy documents from your desktop
to your CN30 Mobile Computer. Synchronize documents between your
CN30 Mobile Computer User’s Manual 37

Chapter 2 — Windows Mobile Version 5. 0
desktop and your CN30 Mobile Computer to have up-to-date content in
both locations.
Creating a Document
Use Word Mobile to create documents, such as letters or meeting minutes.
To create a new file, tap Start > Programs > Word Mobile > New.You get
either a blank document or a template, depending on what you have
selected in the Tools > Options dialog box. Select an input mode from the
View menu.
You can open only one documentata time;when you open a second document, you have to save the first. You can save a document you create or edit
in formats such as Word (.DOC), Word Mobile (.PSW), Rich Text Format
(.RTF), and Plain Text (.TXT).
Word Mobile contains a list of files stored on your CN30 Mobile Computer. Tap a file in the list to open it. To delete, make copies of, and send
files, tap and hold a file in the list, then, select the action on the pop-up
menu.
Tap to change the sort order of the list.
Tap to open a document.
Tap and hold an item to see a pop-up menu of actions.
Tap to create a new document.
You can enter information in Word Mobile in one of four modes (typing,
writing, recording, and drawing), which are displayed on the View menu.
Each mode has its own toolbar, which you can show and hide by tapping
the Show/Hide Toolbar buttononthe command bar.
You can change the zoom magnification by tapping View > Zoom,then
select the percentage you want. Select a higher percentage to enter text and
a lower one to see more of your document.
If you are opening a Word document created on a desktop, you may select
View > Wrap to Window so that you can see the entire document.
To check spelling, select text, then tap Tools > Spell Check.To use your new
document as a template, move the document to the Templates folder.
You can insert the data in a document. First, make sure thatno drawings are
selected, tap and hold anywhere on the document, then tap Insert Date
from the pop-upmenu.
38 CN30 Mobile Computer User’s Manual

Typing Mode
Chapter 2 — Windows Mobile Version 5.0
Using the input panel, enter typed text into the document. For more information on entering typed text, see “Basic Skills” on page .
To format existing text and to edit text, first select the text. You can select
textas you do in a Word document, using your stylus insteadof the mouse
to drag through the text you want to select. You can search a document to
find text by tapping Edit > Find/Replace.
Tap and hold to see a pop-up menu of actions.
Tap to return to the document list (changes are saved automatically).
Tap to change formatting options.
Tap to format text.
Tap to show or hide the toolbar.
Writing Mode
In writing mode, use your stylus to write directly on the screen. Ruled lines
are displayed as a guide, and the zoom magnification is greater than in typing mode to allow you to write more easily. For more information on writing and selecting writing, see “Basic Skills” on page 26.
With Space button selected, drag to insert space. An arrow appears
showing the space direction and size.
Tap to highlight selected text.
Tap to select formatting options, such as
pen weight andline color.
Space button.
Pen button.
Note: If you cross three ruled lines in a single stylus stroke, the writing
becomes a drawing, and can be edited and manipulated as described in
“Drawing Mode”onthe next page.
Note: Written words are converted to graphics (metafiles)when a Word
Mobile document is converted to a Word document on your desktop.
Recording Mode
In recordingmode, embeda recording into your document. Recordings are
saved as .WAV files. For more information on recording, see “Basic Skills”
on page .
For more information on using Word Mobile, tap Start > Help > Word
Mobile to see Word Mobile Help.
CN30 Mobile Computer User’s Manual 39

Chapter 2 — Windows Mobile Version 5. 0
Drawing Mode
In drawing mode, use your stylus to draw on the screen. Grid lines appear
as a guide. When you lift your stylus offthe screen after the firststroke, a
drawing box indicating the boundaries of the drawingappears. Everysubsequentstroke within or touching the drawing box becomes partof the drawing. For more information on drawing and selecting drawings, see “Basic
Skills” on page .
Resize an object by dragging the selection handles.
Tap to select formatting options, such as line weight, fill color, andline
color.
Tap an arrow to see your choices.
Pen button.
Synchronizing Word Mobile Documents
Excel Mobile
Word Mobile documents can be synchronized with Word documents on
your desktop. To synchronize files, first select the Files information type for
synchronization in ActiveSync. When you select Files, the My Documents
folder for the CN30 Mobile Computer is created on your desktop. Place all
files you want to synchronize with the device in this folder. Pass-word-protected files cannot be synchronized.
All Word Mobile files stored in My Documents and its subfolders are synchronizedwith the desktop. ActiveSync converts documents duringsynchronization.
For more information on synchronization or file conversion, see ActiveSync
Help on the desktop.
Note: When you delete a file on either your desktop or your CN30 Mobile
Computer, the file is deleted in the other location the next time you synchronize.
You can create and edit workbooks and templates in Microsoft Excel
Mobile as you do in Microsoft Excel on your desktop. Excel Mobile
workbooks are usually saved as .PXL files, but you can also save them in
.XLS format.
When you close a workbook, it is automatically namedand placed in
the Excel Mobile workbook list. You can attach a password to a workbook to help ensure privacy.
40 CN30 Mobile Computer User’s Manual

Creating a Workbook
Chapter 2 — Windows Mobile Version 5.0
Use Excel Mobile to create workbooks, such as expense reports and mileage
logs. To create a new file, tap Start > Programs > Excel Mobile > New. A
blank workbook appears. Or, if you have selected a template for new workbooks in the Tools > Options dialog box, that template appears with appropriate text and formatting already provided. You can open only one
workbook at a time; when you open a second workbook, save the first. You
can save a workbook you create or edit in a varietyof formats, including
Excel Mobile (.PXL) and Excel (.XLS). You can also save a workbook as a
template by moving the workbook to the Templates folder.
Excel Mobile contains a list of the files stored on your CN30 Mobile Computer. Tap a file in the list to open it. To delete, make copies of, and send
files, tap and hold a file in the list. Then select the appropriate action from
the pop-up menu.
Excel Mobile provides fundamental spreadsheet tools, such as formulas,
functions, sorting, and filtering. To display the toolbar, tap View > Toolbar.
Cell contents appear here as you enter them.
Zoom button.
AutoSum button.
Format button.
Note: If your workbook contains sensitive information, you can protect it
with a password. To do so, open the workbook, tap Edit > Password.Every
time you open the workbook, enter a password, preferably one that is easy
for you to remember but hard for others to guess.
Tips for Working in Excel Mobile
Note the following when working in large worksheets in Excel Mobile:
• View in full-screen mode to see as much of your worksheet as possible.
Tap View > Full Screen.To exit full-screen mode,tap Restore.
• Tap View > Zoom and select a percentage so that you can easily read the
worksheet.
• Show and hide window elements. Tap View and then tap the elements
you want to show or hide.
• Freeze panes on a worksheet. First select the cell where you want to freeze
panes. Tap View > Freeze Panes. You mightwanttofreeze the top and leftmost panes in a worksheet to keep row and column labels visible as you
scroll througha sheet. Tap View > Unfreeze Panes to undo this process.
• Split panes to view differentareas ofa large worksheet. Tap View > Split.
Then drag the split bar to where you want it. To remove the split, tap
View > Remove Split.
CN30 Mobile Computer User’s Manual 41

Chapter 2 — Windows Mobile Version 5. 0
• Show and hide rows. To hide a row, select a cell in the row you want to
hide. Then tap Format > Row > Hide. To show a hidden row, tap Tools >
Go To, and then type a reference that is in the hidden row. Then tap Format > Row > Unhide.
• Do the same to show and hide columns. To hide a column, select a cell
in the column you want to hide. Then tap Format > Column > Hide. To
show a hidden column, tap Tools > Go To, and then type a reference that
is in the hidden column. Then tap Format > Column > Un-hide.
For more information on using Excel Mobile, tap Start > Help > Excel
Mobile to see Excel Mobile Help.
MSN Messenger
MSN Messenger on your CN30 Mobile Computer provides the same chat
environment as MSN Messenger on your desktop. These features include:
• Seeing who is online
• Sending and receiving instant messages
• Having an instant message conversation with a group of contacts
• Telling contacts that you are unavailable
• Blocking contacts from seeing your status or sending you messages
To use MSN Messenger, you need a Microsoft Passport account, or a
Microsoft Exchange e-mail account that your employer provides. Once you
have one of these accounts, do the following:
1 Set up a connection on your CN30 Mobile Computer, such as a
modem or wireless connection, that enables you to connect to the Internet.
2 Setup an account in MSN Messenger.
3 Sign in to MSN Messenger.
Note: To set up a free Hotmail account, go to http://www.hotmail.com.
To set up a Microsoft Passport account, go to http://www.passport.com.
To set up an Exchange account, see your network administrator.
For more information on using MSN Messenger, tap Start > Help > MSN
Messenger to see MSN Messenger Help.
To switch to MSN Messenger, tap Start > Programs > MSN Messenger.
42 CN30 Mobile Computer User’s Manual

Setting Up an Account
Before you can use MSN Messenger, you must set up the instant messagingaccounts to use. For MSN Messenger Service, you must have a Micro-soft
Passport or Hotmail account. For Exchange Instant Messaging, you must
have an Exchange account.
Chapter 2 — Windows Mobile Version 5.0
1Create a connection for your device. To use MSN Messenger Service,
setup a connection to the Internet;to use Exchange Instant Messaging,
setup a connection to your corporate network. See page for more information on getting connected.
2In MSN Messenger, tap Tools > Options >the Accounts tab.
3Select Enable MSN Messenger Service or Enable Exchange Instant
Messaging.
4Enter your sign-in name and password for the selected accounts. Your
sign-in name is usually in the username@domain.com form.
5If you selected both accounts, under Sign in using this account first,
select which account to sign in to first.
Signing In and Out
• To sign in, tap anywhere on the screen. Follow the directions on the
• To sign out, tap Tools > Sign Out.
• To sign in upon connecting, tap Tools > Options > General and select
• Signing in to an Exchange accountmay take severalminutes depending
Working with Contacts
The MSN Messenger window shows all of your messenger contacts at a
glance, divided into Online and Not Online categories. From this view,
while connected, you can chat, send e-mail, block the contact from chatting
with you, or delete contacts from your list using the pop-up menu.
Tap a contact to start a
chat.
Tap and hold to display a pop-up menu of actions.
screen.
the Run this program upon connection box.
upon your connection speed. Reducing the number of Exchange contacts decreases your sign-in time.
To add a contact, tap Tools > Add a Contact and follow the directions on
the screen.
To delete a contact, tap and hold the contact’s name, then tap Delete Contact from the pop-upmenu.
To see others online without being seen, tap Tools > My Status > Appear
Offline.
CN30 Mobile Computer User’s Manual 43

Chapter 2 — Windows Mobile Version 5. 0
Managing Contacts
To be alerted each time you are added to a contact list, tap Tools > Options
>the Privacy tab.
• To block a contact from seeing your status and sending you messages, tap
the contactand tap the rightarrow. This moves the contact to the My
Block List.
• To unblock a contact, tap the contact and tap the left arrow. This moves
the contact to the My Allow List.
• To receive an alert when someone adds you to their contacts list, select
Alert me when I am added to a Passport contact list.
• To see who has you listed as a contact, tap View.
Sending a Message
• Tap a contact to whom you want to send a message. Enter your message
in the textentry area at the bottom ofthe screen and tap Send.To quickly
add common messages, tap My Text and tap a desired message.
• To invite another contact to an ongoingchat, tap Tools > Invite and tap a
contact.
To see who is already chatting or to switch between chats, tap Chats.
Enter a message.
Tap to send message.
Windows Media Player for Windows Mobile
Use Microsoft Windows Media Player for Windows Mobile to play digital audio and video files that are stored on your CN30 Mobile Computer
or on a network.
To switch to Windows Media Player on your CN30 Mobile Computer, tap Start >
Windows Media.
Use Microsoft Windows Media Player on your desktop to copy digitalaudio and video files to your CN30 Mobile Computer. You can play
Windows Media and MP3 files on your Windows Mobile.
44 CN30 Mobile Computer User’s Manual

Indicates the progress of the current track.
Tap to adjust volume.
Tap to skip to the next song.
Tap to playa previous song.
Tap to stop.
Tap to playor pause.
For more information about using Windows Media Player for Windows
Mobile, tap Start > Help > Windows Media Player to see Windows Media
Player Help.
Pocket Internet Explorer
Use Microsoft Pocket Internet Explorer to view Web or WAP pages in
either of these ways:
• During synchronization with your desktop, download your favorite links
and mobile favorites that are stored in the Mobile Favorites sub-folder in
Internet Explorer on the desktop.
Chapter 2 — Windows Mobile Version 5.0
• Connect to an ISP or network and browse the Web. To do this, create
the connection first, as described in “Getting Connected” on page 98.
• When connected to an ISP or network, you can also download files and
programs from the Internet or intranet.
To switch to Pocket Internet Explorer on your CN30 Mobile Computer,
tap Start > Internet Explorer.
The Mobile Favorites Folder
Only items stored in the Mobile Favorites subfolder in the Favorites
folder in Internet Explorer on your desktop are synchronized with your
CN30 Mobile Computer. This folder was created automatically when
you installed ActiveSync.
Favorite Links
During synchronization, the list of favorite links in the Mobile Favorites
folder on your desktop is synchronized with Pocket Internet Explorer on
your CN30 Mobile Computer. Both computers are updated with changes
made to either list each time you synchronize. Unless you mark the favorite
link as a mobile favorite, only the link is downloaded to your CN30 Mobile
Computer. Connect to your ISP or network to view the content.
1 In ActiveSync on your desktop, click Tools > Options, and select
“Favorites” from the Mobile Device list. For more information on
using ActiveSync, see ActiveSync Help on the desktop.
CN30 Mobile Computer User’s Manual 45

Chapter 2 — Windows Mobile Version 5. 0
2 In Internet Explorer on your desktop, save or move favorite links to
the Mobile Favorites subfolder in the Favorites list via Favorites >
Organize Favorites. For more information on using Internet Explorer,
see Internet Explorer Help on the desktop.
3 Connect your CN30 Mobile Computer to your desktop. If synchroni-
zation does not start automatically, in ActiveSync on your desktop,
click Sync.
Mobile Favorites
If you are using Microsoft Internet Explorer 5.0or later on your desktop,
you can download mobile favorites to your CN30 Mobile Computer. Synchronizing mobile favorites downloads Web content to your CN30 Mobile
Computer so that you can view pages while you are disconnected from your
ISP and desktop.
Use the Internet Explorer plug-in installedwith ActiveSync to create mobile
favorites quickly. To create a mobile favorite:
1In ActiveSync on your desktop, click Tools > Options,and select
“Favorites” from the Mobile Device list. For more information on using
ActiveSync, see ActiveSync Help on the desktop.
2In Internet Explorer 5.0or greater on your desktop, browse to the page
you want to view offline, then click Tools > Create Mobile Favorite.
3To change the link name, enter a new name in the Name box.
4In the Update box, select a desired update schedule to keep the page in
the Mobile Favorites folder up to date. You can also update content by
clicking Tools > Synchronize in Internet Explorer.
5To save the link in a subfolder of Mobile Favorites, click Create In and
select the desired subfolder.
6Click OK. Internet Explorer downloads the latest version of the page to
your desktop.
7To download the pages that are linked to the mobile favorite you just
created, in Internet Explorer on the desktop, right-click the mobile favorite, then click Properties.On the Download tab, specify the number of
links deep you want to download. To conserve CN30 Mobile Computer
memory, go only one level deep.
8Connect your CN30 Mobile Computer to your desktop. If synchronization between your CN30 Mobile Computer and desktop does not
start, in ActiveSync on your desktop, click Sync.
Mobile favorites take up storage memory on your CN30 Mobile Computer. To minimize the
amount of memory used:
• S In the settings for the Favorites information, type in ActiveSync
options, turn off pictures and sounds, or stop some mobile favorites from
46 CN30 Mobile Computer User’s Manual

Chapter 2 — Windows Mobile Version 5.0
being downloaded to the CN30 Mobile Computer. For more information, see ActiveSync Help.
• Limit the number of downloaded linked pages. In Internet Explorer on
the desktop, right-click the mobile favorite you want to change and then
Properties.In the Download tab, specify “0” or “1” for the number of
linked pages you want to download.
Using Pocket Internet Explorer
You can use Pocket Internet Explorer to browse mobile favorites andchannels that were downloaded to your CN30 Mobile Computer without
connecting to the Internet. You can also connect to the Internet through
an ISP or a network connection and browse the Web.
Viewing Mobile Favorites and Channels
1 Tap the Favorites button to display your list of favorites.
2 Tap the page you want to view.
Tap the favorite you want to view.
Tap to add or delete a folder or favorite link.
The page that was downloaded the last time you synchronized with your
desktop opens. If the page is not on your CN30 Mobile Computer, the
favorite is dimmed. Synchronize with your desktop again to download the
page to your CN30 Mobile Computer, or connect to the Internet to view
the page.
Browsing the Internet
1Set up a connection to your ISPor corporate network using Connections, as described in “Getting Connected” on page 98.
2To connect and start browsing, do one of the following:
• Tap the Favorites button, and then tap the favorite you want to view.
• Tap View > Address Bar. In the address bar that appears at the top of the
screen, enter the Web address you want to visitand then tap Go. Tap the
arrow to choose from previouslyentered addresses.
CN30 Mobile Computer User’s Manual 47

Chapter 2 — Windows Mobile Version 5. 0
Note: To add a favorite linkwhile using the CN30 Mobile Computer, go to
the page you want to add, tap and hold on the page, and tap Add to Favorites.
Getting Connected
You can setup connections to the Internet and corporate network at
work to do such activities as browsing the Internet or intranet, sending
and receiving e-mail and instant messages, and synchronizing information using ActiveSync.
Connections can be made using a modem, wireless network, or Ethernet. You can use a modem connection to setup connections with an
external modem, or through your mobile phone network using a cellular line or GPRS.
Your CN30 Mobile Computer has two groups of connection settings: My
ISP and My Work Network. Use My ISP settings to connect to the Internet. Use My Work Network settings to connect to any private network,
such as a corporate network used at work.
• My ISP: Once connected, you can send and receive e-mail messages by
using Inbox andview Web or WAP pages by using Pocket Internet
Explorer. The communication software for creating an ISP connection is
already installed on your CN30 Mobile Computer. Your service provider
provides the software needed to installother services, such as paging and
fax services. If this is the method you want to use, see “Connecting to an
Internet Service Provider”on page .
• My Work Network: Connect to the network at your company or organization where you work. Once connected, you can send and receive e-mail
messages by using Inbox, view Web or WAP pages by using Internet
Explorer, andsynchronize with your desktop. If this is the method you
want to use, see “Connecting to Work” on page 102.
Connecting to an Internet Service Provider
You can connect to your ISP, and use the connection to send and
receive e-mail messages and view Web or WAP pages. You can connect to your ISP via a modem connection.
Obtain the following information from your ISP. Some ISPs require
information in front of the user name, such as MSN/username.
• ISP dial-up access telephone number
• User name
• Password
If you do not have a modem dock, use a NULL modem cable and appropriate adapters to connect an external modem to your CN30 Mobile Computer through the serial port.
48 CN30 Mobile Computer User’s Manual

Chapter 2 — Windows Mobile Version 5.0
To view additional information for any screen in the wizard or while changing settings, tap the Help icon.
2 Enter a name for the connection, such as “ISP Connection.”
In the Select a modem list, select your modem type. If your modem type
does not appear, try reinserting the CN30 Mobile Computer into your
modem dock. If you are usingan externalmodem that is connected to your
CN30 Mobile Computer witha cable, select “Hayes Compatible on
COM1.” Tap Next to continue.
3 Enter the access phone number, then tap Next.
4You should not need to change any settings in Advanced.Most ISPs now
use a dynamically-assigned address. If the ISP you are connecting to does
not use a dynamically-assigned address, tap Advanced >the TCP/IP tab, tap
Use specific IP address, then enter the address. Tap ok to close the
Advanced page.
Enter the user name, password, and domain (if provided by an ISP or your
network administrator), then tap Finish.
5Tap the Advanced tab from the Connections screen, then tap Select Location to specify your current location. These settings apply to all connections. Tap Use dialing rules,tap OK,then tap Edit to continue.
Connecting to Work
Specify your current phone type. If your phone type is pulse dialing, check
the Pulse dialing box. If your type is tone dialing (as most phone lines are),
then clear the Pulse dialing box. Continue to tap ok to close each page and
return to the Settings page.
To start the connection, startusing one ofthe following programs. Once
connected, you can:
Send and receive e-mail messages byusing Inbox. Before you can use Inbox,
you need to provide the information it needs to communicate with the email server. For specific instructions, see “Connecting Directly to an E-mail
Server” on page 114.
• Visit Web and WAP pages by using Pocket Internet Explorer. For more
information, see “Pocket Internet Explorer” on page 94.
• Send and receive instant messages with MSN Messenger. For more information, see “MSN Messenger” on page 84.
Note: To change modem connection settings in My ISP, tap Manage existing connections. Select the desired modem connection, tap Settings, and
follow the instructions on the screen.
If you have access to a network at work, you can send e-mail messages, view
intranet pages, synchronize your CN30 Mobile Computer, and possibly
access the Internet. You can connect to work in one of two ways:
CN30 Mobile Computer User’s Manual 49

Chapter 2 — Windows Mobile Version 5. 0
Create a modem connection by using a RAS (Remote Access
Server)account. Before you can create this modem connection, your network administrator needs to set up a RAS account for you. Your network
administrator may also give you Virtual Private Network (VPN) settings.
Note: To change modem connection settings in My Work Network, tap
Manage existing connections. Select the desired modem connection, tap
Edit, and follow the instructions on the screen.
To view additional information for any screen in the wizard or while changing settings, tap the Help icon.
Creating a Modem Connection toWork
1Tap Start > Settings >the Connections tab>the Connections icon. Tap
Add a new modem connection beneath My Work Network to initiate
this procedure.
2Enter a name for the connection, such as “Company Connection.” In
the Select a modem list, select your modem type. If your modem type
does notappear, try reinserting your CN30 Mobile Computer into your
modem dock.
• If using an external modem connected to your CN30 Computer with a
cable, select “Hayes Compatible on COM1.”
• If using any type of external modem, select the modem by name. If a listing does not exist for your external modem, select “Hayes Compatible on
COM1.”
• Wireless connections can be made via a mobile phone networkor GPRS.
If using a mobile phone network to connect, select “Cellular Line.” Ifusing GPRS, tap “Cellular Line (GPRS).” Tap Next to continue.
3Enter the access phone number, usingsome of the following guidelines.
If you know partofthe phone number changes frequently as you travel,
create dialing rules to avoid creating numerous modem connections for
the same phone number. For more information, tap Use Dialing Rules.
• Enter the phonenumber exactly as you want it dialed. For example, if
you call from a business complex or hotel that requires a nine before dialingout, enter “9” in front of the phone number.
• Enter the APN provided by your mobile phone service provider.
• When using dialing rules, phone numbers are entered differently. To use
additional numbers, such as a “9” to dial from an office complex or
hotel, you must use additional dialing rules or change dialing patterns.
See “Create Dialing Rules” via your online help for information.
• a In the Country/Region box, enter the appropriate code when dialing
internationally. For more information, contact an operator at your local
phone company.
50 CN30 Mobile Computer User’s Manual

Chapter 2 — Windows Mobile Version 5.0
• b In the Area code box, enter the area code. Area codes are not needed in
all countries.
• c Enter the main phone number, then tap Next to continue.
4Enter the user name, password, and domain (if provided by an ISP or
your network administrator). Ifa domain name was not provided, try the
connection without entering a domain name.
5You should not need to change any advanced settings. Instances where
you are to change advanced settings include the following. To change
advanced settings, tap Advanced.Otherwise,tap Finish.
• You want to change baudrate settings, dialing string commands, or credit
card options.
• You need to change port settings.
• The server you are connecting to does not use dynamically-assigned
addresses, and you need to enter your TCP/IP settings.
Note: The following information applies when you have “Wireless 802.11”
selected via the NDISTRAY pop-up menu.
Creating aWireless NetworkConnection
Microsoft Corporation’s wireless network configuration tool is called
“Wireless Zero Config.” Intermec Technologies recommends that you use
the Wireless Network control panel applet instead as itoffers more security
choices and exhibit better roaming behavior. Information about the Wireless Network control panel applet is in Appendix A.
Networks already configured are preferred networks and are listed in Wireless networks. You can connect to only preferred networks or search for and
connect to any available network.
A wireless network can be added either when the network is detected, or
manually by entering settings information. To determine if authentication
information is needed, see your network administrator.
2Tap the Advanced tab > Network Card >the Wireless tab > Add New ... .
3Tap the General tab, then enter a network name. If the network was
detected, the network name is entered and cannot be changed.
From Connects to, select to what your network is to connect. If you select
“Work,” you can do a vpn connection or use proxy servers. If you select
“The Internet,” you can connect directly to the internet.
To connect to an ad-hoc connection, select This is a device-to-device (adhoc) connection.
4Tap the Network Key tab, then do the following:
To DisableAuthentication
aSet Authentication to either “Open” if WEP keys are notrequired;
CN30 Mobile Computer User’s Manual 51

Chapter 2 — Windows Mobile Version 5. 0
or “Shared” when WEP keys are required for association.
b Set Data Encryption to “Disabled.”
To Enable WEPEncryption
Set Authentication to either “Open” if WEP keys are notrequired; or
“Shared” when WEP keys are required for association.
bSet Data Encryption to “WEP.”
cTo change the network key, clear The Key is provided for me automatically box, then enter the new Network key andselect the appropriate Key
index.
Note: The following information applies when you have Enable Microsoft’s
Wireless Zero Config checked via the Wireless Network control panel
applet.
To EnableWPA Authentication
a Set Authentication to “WPA.” See page 364 for information about WPA
encryption.
b Set Data Encryption to either “WEP” or “TKIP.” See page 364 for information about WEP and TKIP encryption.
To EnableWPA Authentication Using a Preshared Key (puters) a Set
Authentication to “WPA-PSK.” See page 364 for information about WPA
encryption.
b Set Data Encryption to either “WEP” or “TKIP.” See page 364 for information about WEP and TKIP encryption.
c Enter the new Network key.
5 Tap the 802.1x tab, select either “PEAP” or “Smart Card or Certificate”
for the EAP type,then tap Properties to adjust its settings.
6Tap ok to return to the Configure Wireless Network screen.
7From the Networks to access drop-down list, select “All Available,” “Only
access points,” or “Only computer-to-computer” depending on thetypeofnetworks to which youconnect.
To connect only to networks you have already configured, clear Automaticallyconnect to non-preferred networks. Tap ok to close this screen.
Note: If you select to automatically connect to non-preferred networks,
your device detects any new networks and provide you the opportunity to
configure them.
52 CN30 Mobile Computer User’s Manual

Chapter 2 — Windows Mobile Version 5.0
Creating aVPN Server Connection toWork
A VPN connection helps you to securely connect to servers, such as a corporate network, via the Internet. Ask your network administrator for the
following:
• User name
• Password
• Domain name
TCP/IP settings
Hostname or IP address of the VPNserver
To view additional information for any screen in the wizard or while changing settings, tap the Help icon.
Note: To change existing settings in My Work Network, tap Manage existing connections >the VPN tab. Select the desired VPN connection, tap Settings, and follow the instructions on the screen.
1Tap Start > Settings >the Connections tab>the Connections icon. Tap
Add a new VPNserver connection beneath My Work Network to initiate
this procedure.
2In Name, enter a name for the connection, such as a company’s name.
In Host name/IP, enter the VPN server name or IP address. Next to
VPN type, select the type of authentication to use with your
device: “IPSec/L2TP” or “PPTP.” If you are not sure which option to
choose, ask your network administrator.
Tap Next to continue.
3 Select the type of authentication. If you select A pre-shared key, enter
the key provided by your network administrator.
4Enter your user name, password, and domain name as provided by your
ISPor network administrator. I a domain name was not provided, try the
connection without entering a domain name.
Ending a Connection
You should not need to change any Advanced settings. Instances where you
must change advanced settings include:
• The server to which you are connecting does not use dynamically-assigned addresses, and you need to enter your TCP/IPsettings.
• You need to change server DNS or WINS settings.
To change advanced settings, tap Advanced.Otherwise,tap Finish.
Insert necessary equipment, such as a network (Ethernet)card, into the
device, and use a desired program to automatically begin connecting. For
example, switch to Pocket Internet Explorer and browse to a Web page.
CN30 Mobile Computer User’s Manual 53

Chapter 2 — Windows Mobile Version 5. 0
• To disconnect, do one of the following:
When connected via modem or VPN, tap the Connectivity icon on the
navigation bar, and then tap Disconnect.
• When connected via cable or cradle, detach your device. S When connected via Infrared, move the device away from the other computer or
device.
• When connected via a wireless network, switch off the connection.
Connecting Directly to an E-mail Server
You can set up a connection to an e-mail server so that you can send and
receive e-mailmessages byusing a modem or networkconnection and In-box
on your CN30 Mobile Computer.
Note: The ISP or network must use a POP3 or IMAP4 e-mailserver and an
SMTP gateway.
You can use multiple e-mail services to receive your messages. For each
e-mail service you intend to use, first set up and name the e-mail service.
If you use the same service to connect to different mailboxes, setupand
name each mailbox connection.
Setting Up an E-mailAccount
Do the following to set up an e-mail service. Tap the question mark at the
top of the screen for more assistance.
1On your CN30 Mobile Computer, tap Start > Inbox to access the
Inbox application. Tap Accounts > New Account.
2Enter an e-mail address, tap Next, Cancel,then Next after the status of
the automatic configuration is listed as “Completed.”
3 Enter the Your name and Password information, then tap Next.
4Select the appropriate service type from the Account type drop-down
list, either “POP3” or “IMAP4,” or enter a new account type, then tap
Next.
5In Incoming mail, enter thenameof youre-mailserver. In Outgoing
mail, enter thenameof yourSimpleMail TransferProtocol (SMTP) host. If
you are using a network connection, enter your domain name in
Domain.Tap Options to do additional configurations. Tap Finish to
assign this service.
When finished, to connect to your e-mail server, from the Inbox application, tap Accounts > Connect. For more information on using the Inbox
application, see “Inbox: Sending and Receiving E-mail Messages”on page
54 CN30 Mobile Computer User’s Manual

Installing Applications
3
In this chapter you will find guidelines information on installing applications.
CN30 Mobile Computer User’s Manual 55

Chapter 3 — Developing and Installing Applications
Installing Applications
Use the following options to get the package to the preferred location on
your CN30 Computer.
• Microsoft ActiveSync
• Secure Digital storage cards
Using Microsoft ActiveSync
This can be a serial, USB, or 802.11i Microsoft ActiveSync connection.
These instructions assume that Microsoft ActiveSync was installed onto
your PC and is up and running.
If not, go to Chapter 2, “Windows Mobile Version 5.0 ” for a URL from
which to download the latest application.
1 Connect your CN30 Computer to your PC via a Microsoft ActiveSync
cable.
2 Wait for a “Connected” message to appear in the Microsoft ActiveSync
application to signal a connection to the CN30 Computer. If necessary,
select File > Get Connected to initiate a connection.
3 Click Explore to access the “Mobile Device” folder on your unit.
4 From your PC, select Start > Windows Explorer, then browse the
folder for files needed for your CN30 Computer. Select the appropriate
file, right-click the file for a pop-up menu, then select Copy.
5 Within the “Mobile Device” folder, go to the folder where you want
the files located on the CN30 Computer, do a right-click for a pop-up
menu, then select Paste.
6 When all of the files are pasted, perform a warm-boot on the CN30
Computer. When the computer reboots, wait for the LED on the top left
of your keypad to stop blinking. Tap Start > Programs > Windows
Explorer to locate the newly copied executable files, then tap these files
to activate their utilities.
56 CN30 Mobile Computer User’s Manual

Using a Storage Card
Chapter 3 — Developing and Installing Applications
Use the following steps to install an application using a storage card:
1 Suspend the CN30 Computer and remove its Secure Digital storage
card.
2 Using a Secure Digital Adapter card, place the Secure Digital storage
card in your PC card drive, then create a subdirectory on the PCMCIA
Secure Digital drive in which to store your application.
3 Use the CEImager application to add the autorun system to the storage
card. See the Software Tools User’s Manual to learn about CEImager.
4 Copy your application, data files, and all required DLLs and drivers to
the subdirectory created on the Secure Digital storage card.
5 Add your application to the AUTOUSER.DAT file on the
“\SDMMC Disk\2577” directory with the following statement:
RUN=\<your directory>\<yourapp.exe>
where your directory is the directory on the Secure Digital storage card
where the application was installed, and yourapp.exe is the name of your
application. Finish the “RUN=” statement with a carriage return linefeed
combination. There may be multiple run statements in the file.
6 Remove the Secure Digital storage card from your PC and reinstall it
into the CN30 Computer, then warm-boot the CN30 Computer to add
these files to the Secure Digital storage card.
If the AUTOUSER.DAT file is found and the “RUN=” statement is correct, the task manager launches and executes your program on startup.
Updating the System Software
You can use the Intermec Developer’s Library CD to reinstall or update the
operating system software on the CN30 Computer. For more information,
contact your Intermec representative.
Application Migration
Note: These instructions assume that the CN30 Management Tools portion of the Intermec Developer’s Library CD was installed on your PC and
that a storage card was added to the base configuration of the CN30 Computer.
Do the following required steps to ensure that CAB files are restored, appli-
cations automatically start, and registry is restored on cold-boot:
1 From your PC, double-click the Intermec CE Imager icon to access
the Intermec CEImager application. If this icon is not visible, then double-click the CEIMAGER.EXE executable from the
“C:\Intermec\CN30 Mgmt Tools\Tools\CEImager” folder.
2 Click Default under Components List to activate the components.
CN30 Mobile Computer User’s Manual 57

Chapter 3 — Developing and Installing Applications
3 Click (+) to expand the AutoRun System component, click (+) to
expand the Destination Media option, then select the Secure Digital
Card option.
4 Click Install to install the AUTORUN files onto the storage card.
5 Create a “\CabFiles” folder on the storage card. Copy any CAB files
that are to be extracted on every startup into this folder.
6 In the “\2577” directory, add your custom AUTOUSER.DAT file.
See the Recovery Help for more information on how to set up an
AUTOUSER.DAT file.
Note: The CN30 Computer automatically calls the RegFlushKey()
API every 5 seconds.
7 If you are using the RegFlushKey() API, you must enable persistent
registry storage as follows. See Appendix A, “Configurable Settings,”
for more information about the Utilities control panel applet.
• From the CN30 Computer, tap Start > Settings > Control
Panel.
• ouble-tap the Utilities icon, then tap the Registry Save tab.
• b Tap Enable Registry Storage to save the registry in the Flash
File System (PSM) via the “\Flash_File_Store” path.
• Tap OK to save your entry and exit the applet.
8 Remove the storage card from the PC and install the card into the
CN30 Computer.
9 Perform a cold-boot on the CN30 Computer. Files automatically
install from the storage card upon reboot. Any calls to the RegFlush-
Key() API automatically writes the registry to the Flash File Store.
58 CN30 Mobile Computer User’s Manual

Chapter 3 — Developing and Installing Applications
Migrating from Another Computer
As you migrate from another computer to a CN30 Computer, you need to
consider when converting other computer applications to run on the CN30
Computer, most APIs should work without changes. A few exceptions:
• Other computers may use the “\Storage Card” folder for nonvolatile
storage. You may need to change the application to store data onto the
“SDMMC Disk” folder instead of the “\Storage Card” folder if a Secure
Digital storage card is present in the system.
• Arrow and tab keys may be reversed from other computers. Keyboard
remapping is available on the CN30 Computer should you need to map
these keys like that of the other computer (see page 36).
Installing Applications Using the FTP Server
The CN30 has a built-in FTP server that connects to a network through
the 802.11b/g radio or Ethernet. You can use the server to transfer your
application file to the CN30. Another benefit of using the FTP server is
that you can create FTP scripts to automate the process of copying your
files to the CN30. This option is useful when you need to send files to a
large number of CN30s.
Installing Applications Using Wavelink Avalanche
You can use the Wavelink Avalanche™ device management system to
install applications on all of your wireless CN30s. The CN30 ships with the
Avalanche Enabler already loaded on it. Each time the Avalanche Enabler is
activated (typically on a warm boot), the CN30 attempts to connect to the
Avalanche Agent. When the CN30 connects to the agent, the Agent determines whether an update is available and immediately starts the software
upgrade, file transfer, or configuration update.
To use Avalanche to remotely manage the CN30
1 Install software packages and updates for the CN30 using the Avalanche
Administrative Console.
2 Schedule the CN30 updates or manually initiate an update using the Avalanche Administrative Console.
For more information on using Wavelink Avalanche, contact your local
Intermec representative or visit the Wavelink web site at
www.wavelink.com.
Cabinet File Installation
CAB files (short form of “cabinet” files) are compressed folders as defined by
Microsoft. A “cabinet” file is a single file, usually suffixed with .CAB, that
stores compressed files in a file library. A compressed file can be spread over
CN30 Mobile Computer User’s Manual 59

Chapter 3 — Developing and Installing Applications
several cabinet files. During installation, the setup application decompresses
the files stored in a cabinet and copies them to the user’s system.
For the CN30 Computer, CAB files register DLLs, create shortcuts, modify
registry entries, and run custom setup programs. Tap a CAB file to extract
that file or place the CAB file on one of the approved storage devices in the
“\CabFiles” folder, then perform a warm-boot on the CN30 Computer.
There are two methods available to extract a CAB file:
• Tap a CAB file to extract it. With this method, the CAB file is automatically deleted when the extraction process is successful, unless the CAB file
is set with the read-only attribute.
• Use the AUTOCAB method to extract all files when a cold-boot is performed on the CN30 Computer. This method is on the Intermec Devel-
oper’s Library CD, see its Software Tools User’s Manual for information.
60 CN30 Mobile Computer User’s Manual

Network Support
4
The CN30 Mobile Computer automatically installs the appropriate software for radio use when the unit is powered on. It provides wireless connectivity via the Wireless Local Area Network (WLAN) using an 802.1x radio
option that provides up to 11 Mb/sec throughput.
CN30 Mobile Computer User’s Manual 61

Chapter 4 — Network Support
Configuring the CN30 With the Setup Assistant
When first setting up the CN30, use the Setup Assistant to set or enable
basic network parameters and connect your CN30 to the network. The
Setup Assistant guides you through setting the following basic network
parameters:
Date and time
•
• 802.11 radio and SSID (Network name)
• 802.1x security
• DHCP server or IP address, subnet mask, and default router
• Primary and secondary DNS addresses
• Primary and secondary WINS addresses
• Device name
Note: If you are using the CN30 in an EasyADC system, enable the ION
client. Your CN30 configures the security parameters, reboots, and
launches TE 2000. When the CN30 connects to its host, the Intermec
Ready-to-Work Indicator turns on solid blue.
To set other parameters, use the Intermec Settings or another configuration
method. The Setup Assistant runs on the CN30 the first time you turn on
the computer.
Configuring the CN30 With Intermec Settings
Intermec Settings is an Intermec application that allows you to easily configure the CN30. You can use Intermec Settings in these ways:
• Intermec Settings can configure CN30s one-to-one through an ActiveSync connection.
Intermec Settings runs as a plug-in to the Wavelink Avalanche device man-
•
agement system. Avalanche automates device management within a network and lets you install, update, and manage the software and
configurations of wireless and other mobile devices.
The ActiveSync (one-to-one) version of Intermec Settings is available from
the Intermec web site as part of the Intermec Developer’s Library (IDL)
download or from the IDL CD. For information on installing ActiveSync
and establishing apartnership, see “Installing Applications Using ActiveSync” on page
Intermec Settings is also available as part of a Wavelink Avalanche package
for the CN30. You can also download this package from the Intermec web
site.
For information on how to use the Intermec Settings application, see the
online manual available from the Help menu in Intermec Settings.
62 CN30 Mobile Computer User’s Manual

Configuring the CN30 for Your Network
The CN30 is a versatile Mobile computer that you can easily add to your
wired or wireless data collection network. You can connect your CN30 to
your network using:
Serial communications
•
• 802.11b/g radio communications
• Ethernet communications
• Bluetooth™ radio communications
Configuring Serial Communications
The CN30 has a serial port to transfer data to and receive data from
another device via RS-232 communications. You can also insert the CN30
into a communications dock to transmit data to and receive data from a
host computer or PC using RS-232 communications. The serial cable and
the communications dock are sold separately. For more information on
accessories and how to order them, see page XX.
Chapter 4 — Network Support
To use serial communications with your CN30
1 Turn off the CN30.
2 Connect the CN30 to the serial port of another device. You can do
this in one of the following ways:
Connect the CN30 serial port to the serial port of the other device using the
•
(26-pin to DB9-pin) serial cable adapter and a female-to-female null
modem RS-232 cable.
Connect the AD9 charge dock to the serial port of the other device using a
•
DB9-pin to DB9-pin serial adapter cable. Insert the CN30 into the
dock.
3 Turn on the CN30.
Configuring 802.11b/g Radio Communications
Make sure all components with antennas are at least 30 cm (1 ft) apart
when power is applied. Failure to comply could result in equipment damage.
Attention: Assurez-vous que la distance entre tous les éléments avec
antennes soit d’au moins 30 centimètres (un pied) avant de faire la connexion avec l’alimentation électrique, faute de quoi vous risquez d’endommager votre installation.
The wireless CN30 has an internal 802.11b/g radio to transfer data using
wireless communications. This section of the manual assumes that you have
CN30 Mobile Computer User’s Manual 63

Chapter 4 — Network Support
already set up your wireless communications network including your access
points. If you are using a UDP Plus network, you also need to have your
Intermec Application Server communicating with a host computer.
Your CN30 supports these network protocols:
TCP/IP
•
• UDP Plus
The next sections explain the parameters you need to configure for the
CN30 to work in your wireless network.
Configuring the Network Parameters for a TCP/IP Network
In a TCP/IP network, the CN30 communicates with a host computer
directly using TCP/IP. The access point acts as a bridge to allow communications between the wired network and the wireless network.
To use wireless communications in a TCP/IP network
1 Configure these network parameters on each CN30 in the network:
• Network Name (SSID)
• IP Settings (if not using DHCP)
2 Configure security. For help, see “Configuring Security” on page XX.
work.
You can configure the network parameters on the CN30 with the Configuration Utility. For help, see “Configuring the CN30 with the Configuration
Utility” on page XX.
64 CN30 Mobile Computer User’s Manual

Configuring Bluetooth Radio Communications
You can send information to printers wirelessly using the Bluetooth qualified module by Socket Communications. The Bluetooth technology uses
short-range radio links and allows for communications over a 5-meter (16.4
ft) range.
To configure the CN30 for wireless printing
1 Go to Settings > System > Wireless Printing. The Bluetooth menu
appears:
2 Select Set Printer (Device Discovery) to start the Bluetooth device
discovery. A list of discovered devices appears in the Devices dialog box.
3 Select the device you want to use from the list and press Enter.
You are now ready to send information to the selected device. If devices are
discovered, but your device is not displayed in the box, make sure your
device and radio are turned on and try device discovery again. For more
information on using Bluetooth communications, see the Wireless Printing
Development Guide available on the Intermec Developer’s Library CD (P/N
235-114-001) or the Intermec web site.
Chapter 4 — Network Support
Configuring Security
The CN30 provides three types of wireless local area network (WLAN)
security:
•
• 802.1x
• WEP
Use the next sections to understand how to configure each type of security
on your wireless CN30. If you choose not to use security, see “Disabling
Security” on page XX for help. Intermec always recommends that you
implement security.
The CN30 provides both Microsoft and Funk security choices. Microsoft
security is the default setting. Use the following sections to set security
using either Microsoft or Funk as your security choice.
If you want to extend the connectivity of your WLAN to remote servers,
you can configure a virtual private network (VPN) to communicate
through a dedicated server to a corporate network over the internet. For
help setting up a VPN, see “Configuring a VPN” on page 67. If you are
using 802.1x security, this section also assumes that your authentication
server and access points are properly configured. For more information on
the different types of security, see the MobileLAN™ secure 802.1x Security
Solution
Wi-Fi Protected Access (WPA)
Installation Guide (P/N 073134) available at www.intermec.com.
Using Funk Security
CN30 Mobile Computer User’s Manual 65

Chapter 4 — Network Support
Funk security provides everything you receive with Microsoft security plus
CCX v1.0 compliance. Funk security enables you to use LEAP and TTLS
authentication on your CN30.
The type of security you can choose is not dependent on your authentication server. To use Funk security, you need to:
•
• Select a profile
Selecting Funk as Your Security Choice
The default security choice is Microsoft. If you want to use Funk security,
you need to select it as your security choice.
To select Funk security as your security choice
Select Funk security as your security choice
1 Press C and then B. The System Main Menu appears.
2 Select the Configuration Utility.
3 Select Communications > 802.11 Radio > Funk Security.
4 From the Security Choice dialog box, choose Funk Security. An
alert box appears asking if you want to warm boot now.
Selecting a Profile
5 Press Enter. Your CN30 warm boots.
You can define up to four profiles for your Funk security. Different profiles
let your CN30 communicate in different networks without having to
change all of your security settings. For example, you might want to set up
one profile for the manufacturing floor and one for the warehouse.
To select a profile
1 Press C and then B. The System Main Menu appears.
2 Select the Configuration Utility.
3 Select Communications > 802.11 Radio > Select Profile.
4 Select Active Profile and choose the profile you want to
name.
5 (Optional) Select Change Profile Label to give the active
profile a meaningful name.
6 Repeat Steps 4 and 5 for as many profiles as you want to
define.
7 Select the profile you want to configure with security settings.
8 Press Esc to return to the 802.11 Radio menu.
9 Configure your security settings.e
66 CN30 Mobile Computer User’s Manual

Configuring WPA Security
Wi-Fi Protected Access (WPA) is a strongly enhanced, interoperable Wi-Fi
security that addresses many of the vulnerabilities of Wired Equivalent Privacy (WEP). Instead of WEP, WPA uses Temporal Key Integrity Protocol
(TKIP) for its data encryption method.
Currently, WPA satisfies some of the requirements in the IEEE 802.11i
draft standard. When the standard is finalized, WPA will maintain forward
compatibility. WPA runs in Enterprise (802.1x) mode or PSK (Pre-Shared
Key) mode:
•
•
Chapter 4 — Network Support
In Enterprise mode, WPA provides user authentication using 802.1x and
the Extensible Authentication Protocol (EAP). That is, an authentication
server (such as a RADIUS server) must authenticate each device before
the device can communicate with the WLAN.
In PSK mode, WPA provides user authentication using a shared key
between the access point and the CN30. WPAPSK is a good solution for
small offices or home offices that do not want to use an authentication
server.
To use WPA security, you need:
An authentication server (Enterprise mode only)
•
Note: You can also use a MobileLAN access point with software release
1.80 or later as an authentication server. For help, see the system manual for
your access point.
An access point with an 802.11b/g radio that supports WPA
•
• CN30 with the 802.11b/g radio and the 802.1x/WPA security option
Configuring WPA Security With Enterprise Security
Use these procedures to set WPA and WPA-PSK security on your CN30
with Funk security.
To enable WPA security on your CN30 with Funk security
1 Make sure you have configured the communications and radio parameters on your CN30.
2 Make sure you have selected Funk as your security choice.
3 Press C and then B to open the System Main Menu.
4 Choose Configuration Utility > Communications > 802.11 Radio >
Profile Settings.
5 For Association, choose WPA and press Enter. Encryption automati-
cally changes to TKIP.
6 For Authentication, choose TTLS, PEAP, or TLS and press
Enter.
If you choose TTLS or PEAP:
CN30 Mobile Computer User’s Manual 67

Chapter 4 — Network Support
Note: You can use Prompt for password to troubleshoot your connection
to the network if you have problems.
Note: You must have the date on the CN30 set correctly when you enable
Validate Server Certificate..
If you choose TLS:
a Load a user and root certificate on your CN30. For help, see “Loading
Certificates” on page 64 for help.
b For Validate Server Certificate, choose Enabled and press Enter.
c You must enter a User Name and Subject Name. You can also enter a
Server Common Name if you want to increase your level of security.
a Select Password prompt, choose Enter password now, and then press
Enter.
b Select User Password, type a user password, and then press Enter.
c Select User name, type your user name, and then press Enter.
d For Validate Server Certificate, choose Enabled and press Enter.
7 Exit the Configuration Utility.
To enable WPA-PSK security on your CN30 with Funk security
1 Make sure you have configured the communications and radio parameters on your CN30.
2 Make sure you have selected Funk as your security choice.
3 Press C and then B to open the System Main Menu.
4 Choose Configuration Utility > Communications > 802.11 Radio >
Profile Settings.
5 For Association, choose WPA and press Enter. Encryption automati-
cally changes to TKIP.
6 For Authentication, choose None and press Enter.
7 For Pre-Shared Key, enter the pre-shared key or the pass phrase. The
pre-shared key must be a value of 32 Hex pairs. The preshared key must
be preceded by 0x. The value must match the key value on the access
point. The pass phrase must be between 8 and 63 characters.
8 Exit the Configuration Utility.
Configuring WPA Security With Microsoft Security
Use these procedures to set WPA and WPA-PSK security on your CN30
with Microsoft security.
To enable WPA security on your CN30 with Microsoft security
1 Make sure you have configured the communications and radio parameters on your CN30.
2 Press C and then B to open the System Main Menu.
68 CN30 Mobile Computer User’s Manual

Chapter 4 — Network Support
3 Choose Configuration Utility > Communications > 802.11 Radio >
Security Settings.
4 For Network Authentication, choose WPA and press Enter.
5 For 802.1x Authentication, choose either TLS or PEAP.
If you choose TLS:
a Select Properties. The Auth. Settings dialog box appears.
b Choose the Select button.
c Select your certificate from the list and press Enter.
If you choose PEAP:
a Select Properties. The Auth. Settings dialog box appears.
b Make sure the Validate Server check box is selected.
c Press Enter. Once the radio starts to authenticate, the Network Pass-
word dialog box appears.
d Enter the User Name, Password, and select the Save password check
box.
e (Optional) In the Domain field, enter the Active Directory domain
associated with the user account.
f Press Enter. You return to the Communications menu.
6 Exit the Configuration Utility.
To enable WPA-PSK security on your CN30
1 Make sure you have configured the communications and radio parameters on your CN30.
2 Press C and then B to open the System Main Menu.
3 Choose Configuration Utility > Communications > 802.11
Radio > Security Settings.
4 For Network Authentication, choose WPA-PSK.
5 For Network Key Value, enter a pass phrase or pre-shared key.
The pass phrase must be a value between 8 to 63 ASCII characters. The
pre-shared key must be a value of 32 Hex pairs. The pre-shared key must
be preceded by 0x. The value must match the key value on the access
point.
6 Exit the Configuration Utility.
CN30 Mobile Computer User’s Manual 69

Chapter 4 — Network Support
Configuring 802.1x Security
802.1x security provides centralized user authentication using an authenti-
cation server, authenticators (access points), and supplicants. These components communicate using an EAP authentication type, such as TLS
(Transport Layer Security) or PEAP (Protected Extensible Authentication
Protocol). 802.1x security provides data encryption using dynamic WEP
key management.
To use 802.1x security, you need:
An authentication server
•
Note: You can also use a MobileLAN access point with software release
1.80 or later as an authentication server. For help, see the MobileLAN access
System Manual (P/N 067150) or MobileLAN access WA2X System Manual
(P/N 073915).
An access point with an 802.11b/g radio
•
• A CN30 with an 802.11b/g radio and the 802.1x/WPA security option
Configuring 802.1x Security With Funk Security
Use this procedure to configure 802.1x security on your CN30 with Funk
security.
To enable 802.1x security on your CN30 with Funk security
1 Make sure you have selected Funk as your security choice.
2 Make sure you have configured the communications and radio parameters on your CN30.
3 Press C and then B to open the System Main Menu.
4 Choose Configuration Utility > Communications > 802.11 Radio
> Profile Settings.
5 For Association, choose Open and then press Enter.
6 For Encryption, choose WEP and then press Enter.
7 For Authentication, choose TTLS, PEAP, or TLS and then press
Enter.
If you choose TTLS or PEAP:
a Select User name, type your user name, and then press
Enter.
b Select Password prompt, choose Enter password now, and then
press Enter.
Note: You can use Prompt for password to troubleshoot your connec-
tion to the network if you have problems.
c Select User Password, type a user password, and then press Enter.
d For Validate Server Certificate, choose Enabled and press
70 CN30 Mobile Computer User’s Manual

Chapter 4 — Network Support
Enter.
If you choose TLS:
a Load a user and root certificate on your CN30. For help,
see “Loading a Certificate” on page 64 for help.
b For Validate Server Certificate, choose Enabled and press Enter.
c You must enter a User Name and Subject Name. You can
also enter a Server Common Name if you want to increase
your level of security.
8 Exit the Configuration Utility.
Configuring 802.1X Security With Microsoft Security
Use this procedure to configure 802.1x security on your CN30 with
Microsoft security.
To enable 802.1x security on your CN30
1 Make sure you have configured the communications and radio parameters on your CN30.
2 Press C and then B to open the System Main Menu.
3 Choose Configuration Utility > Communications > 802.11 Radio >
Security Settings.
4 For Network Authentication, choose Open.
5 For Data Encryption, choose WEP.
6 For 802.1X Authentication, choose TLS or PEAP.
If you choose TLS:
a Select Properties and choose the Select button.
b Select your certificate from the list and press Enter twice.
c Press Esc until you return to the Communications menu and “Apply
Network Settings” appears on the screen. The User Logon dialog box
appears.
d In the User Logon dialog box, enter the User Name and Domain and
press Enter.
If you choose PEAP:
Once the radio starts to authenticate, the Network Password
dialog box appears.
a Enter a User Name, Password, and Domain.
b Press Enter. You return to the Communications menu.
7 For Network Key Setting, choose Automatic.
CN30 Mobile Computer User’s Manual 71

Chapter 4 — Network Support
Configuring LEAP Security
Lightweight Extensible Authentication Protocol (LEAP), also known as
Cisco-Wireless EAP, provides username/passwordbased authentication
between a wireless client and a RADIUS server. In the 802.1x framework,
traffic cannot pass through an Ethernet hub or wireless network access
point until it successfully authenticates itself.
The station must identify itself and prove that it is an authorized user
before it is actually allowed to use the LAN. LEAP also delivers a session
key to the authenticated station, so that future frames can be encrypted
with a key that is different than keys used by others sessions
To use LEAP security, you need:
•
• Cisco access points
Note: LEAP security is not supported with Microsoft security.
8 Exit the Configuration Utility.
A RADIUS server
To enable LEAP security on your CN30
1 Make sure you have selected Funk as your security choice.
2 Make sure you have configured the communications and
radio parameters on your CN30.
3 Choose Configuration Utility > Communications > 802.11
Radio > Profile Settings.
4 For Authentication, choose LEAP and then press Enter.
5 For Association, choose Open or Network EAP and then
press Enter.
6 For Encryption, choose WEP and then press Enter.
7 Select Password prompt, choose Enter password now, and
then press Enter.
Note: You can use Prompt for password to troubleshoot
your connection to the network if you have problems.
8 Select User name, type your user name, and then press
Enter.
9 Select User Password, type a user password, and then press
Enter.
10 Exit Intermec Settings.
72 CN30 Mobile Computer User’s Manual
 Loading...