

Page 1
6822
Photo of printer not
available at this
time
User’s
Manual
Series 80-Column Printer
Page 2

Page 3

4
Configuring the Printer
A Printer Configuration Utility is used to load font on the
printer and to change the printer settings. In this chapter you
will find these sections:
• Connecting to the printer
• Understanding the font modules
• Using the Windows 95 or Windows 98 Printer
Configuration Utility
• Using the Windows 2000 or Windows XP Printer
Configuration Utility
25
Page 4
Chapter 4 — Configuring the Printer
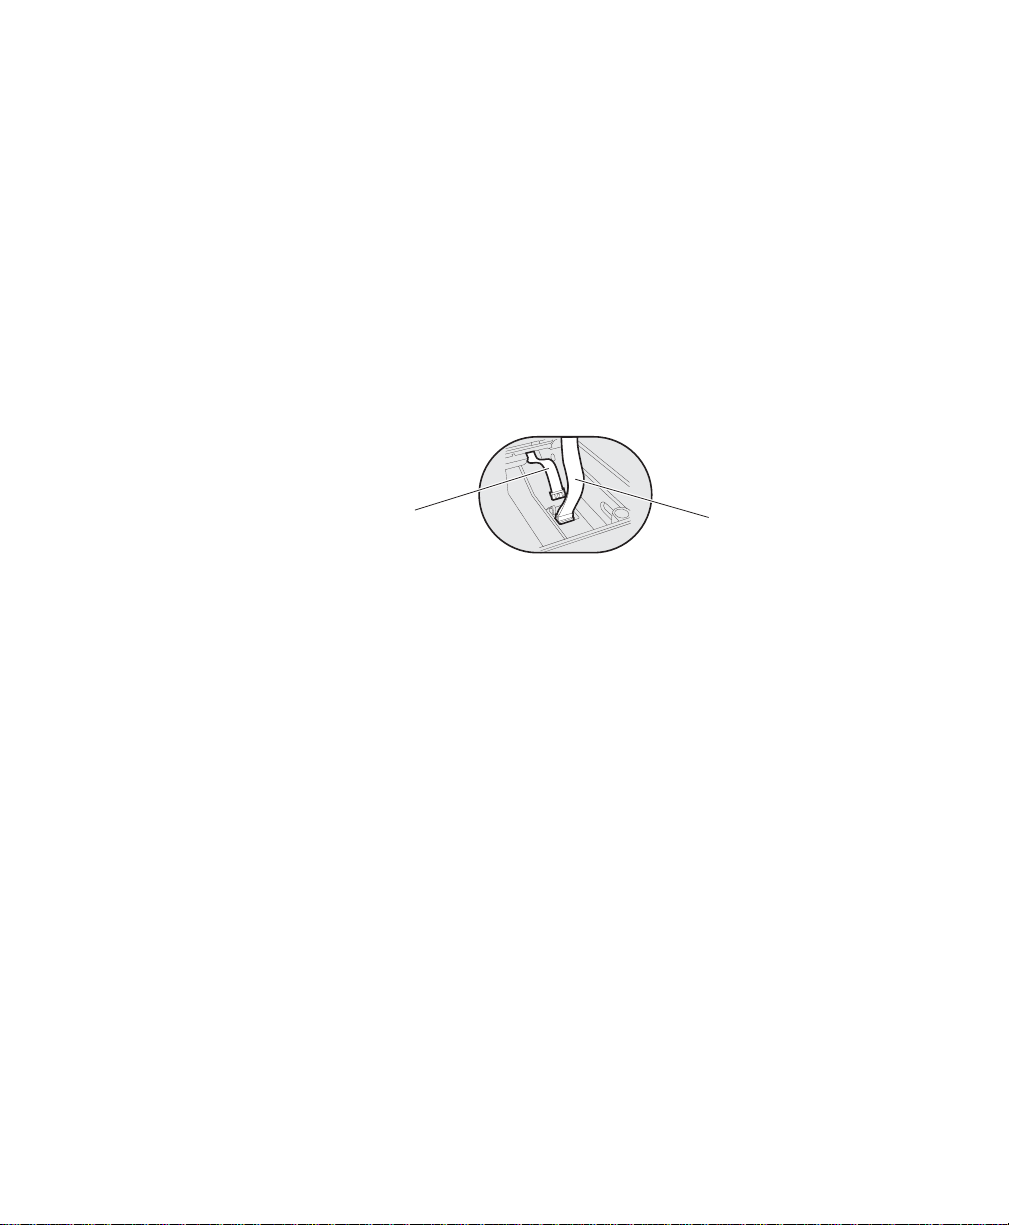
Disconnect this terminal holder
ribbon cable from the floor of
the printer cavity
Ignore this cable attached
to the printer mechanism
Connecting to the Printer
Connect your printer to your desktop computer using a serial cable
(P/N 226-270-001). The serial COM port connector on either the fixed
mount printer or portable printer is on your printer mechanism, the same
side as the green thumb wheel.
Before connecting to your PC, locate and disconnect the gray terminal
holder ribbon cable connector from the floor of the printer cavity. The
cable is located behind the printer mechanism on the same side as the
green thumb wheel and is the one that is not attached to the printer
mechanism.
Intermec provides printer configuration utilities for the following
Windows operating systems.
Understanding the Font Modules
26 6822 Series 80-Column Printer User’s Manual
• If your PC has either Windows 95 or Windows 98, go to page 27 for
instructions.
• If your PC has Windows 2000 or Windows XP, go to page 42.
Intermec provides the following font modules for your 6822:
• nft00000.mod — Default International, 4820 compatible
• nft00437.mod — IBM/Microsoft compatible Code Page 437
• nft00932.mod — JIS Japanese
• nft00936.mod — GB2312 Chinese Simplified
• nft00949.mod — KSC5601 Korean
Page 5
Chapter 4 — Configuring the Printer
• nft00950.mod — Big 5 Traditional Chinese
Note: There are three versions of the default font module
(nft0000.mod): Arabic, Turkish, and International. Any one
version of this module, but not all three versions, can appear in
the 6820 Printer Configuration Utility FONTS directory and
install on the 6822. The International version of this font
module is automatically placed in the FONTS directory when
the Printer Configuration Utility is installed on the PC.
All three versions are included on the printer toolkit CD:
• The Arabic version is included in the “Default Fonts\Arabic”
directory.
• The Turkish version is in the “Default Fonts\Turkish” directory.
• The International version is in the “Default Fonts\International”
directory.
Use the Printer Configuration Utility to replace the existing default font
module (nft00000.mod) with any of the of the other provided fonts. The
Printer Configuration Utility is provided in the 6820 Tool Kit.
Instructions for installing fonts are provided later in this chapter.
For Windows 95 and Windows 98 Users
If the default installation process was followed, the Printer Configuration
Utility “FONTS” directory is located at
“6820PRTR\T OOLKIT\FONTS” where “6820PRTR” is replaced by the
actual directory in which you chose to extract the files.
For Windows 2000 and Windows XP Users
If you followed the default installation process, the Printer Configuration
Utility “FONTS” directory is located at “Program Files\Intermec\6820
Printer Configuration Utility\FONTS.
Do not rename the font files in the FONTS directory. If
rename the fonts will not work correctly.
Using the Windows 95 or Windows 98 Printer
Configuration Utility
6822 Series 80-Column Printer User’s Manual 27
Page 6

Chapter 4 — Configuring the Printer
These instructions apply to desktop computers running either Windows
95 or Windows 98 operating systems.
Installing the Configuration Files
Configuration files for the 6822 are located in the toolkit CD
(P/N 215-270-001), these include the rpgpconf.exe Printer Configuration
Utility program and the rpgpconf.ini initialization file. The Printer
Configuration Utility uses the initialization file to specify the location
and names of font and printer control program folders.
To set up your PC
1 Extract the toolkit files from the nptk6822.exe self-extracting archive
file.
2 Create a directory, on your PC, with an appropriate name for the
Printer Configuration Utility files. You could choose to have the files
extracted at the root directory of your PC or specify another folder.
Execute the self-extracting file from the target directory while specifying
the path to nptk6822.exe in the command line.
When you run nptk6822.exe, a TOOLKIT folder is created, as well the
following folders:
• 6820SYS
• DOS
• FONTS
• PCFS
Generating Custom Configuration Files
The Printer Configuration Utility also helps you create custom
configuration files. These files have a .pcf file extension, and stored in
the folder specified in the initialization file. See the default .pcf file in
the PCFS folder for an example configuration file.
Understanding the Printer Configuration
A configuration consists of a list of fonts, some parameter settings, and
optionally, a printer control program.
28 6822 Series 80-Column Printer User’s Manual
Page 7
Chapter 4 — Configuring the Printer
When you start the Printer Configuration Utility, it creates a printer
configuration. This configuration has no fonts, parameters are set to the
default values, and there is no printer control program in memory. You
can modify the basic printer configuration to meet your needs and load
the custom configuration to your printer.
Note: The working configuration is deleted when you exit the
Printer Configuration Utility.
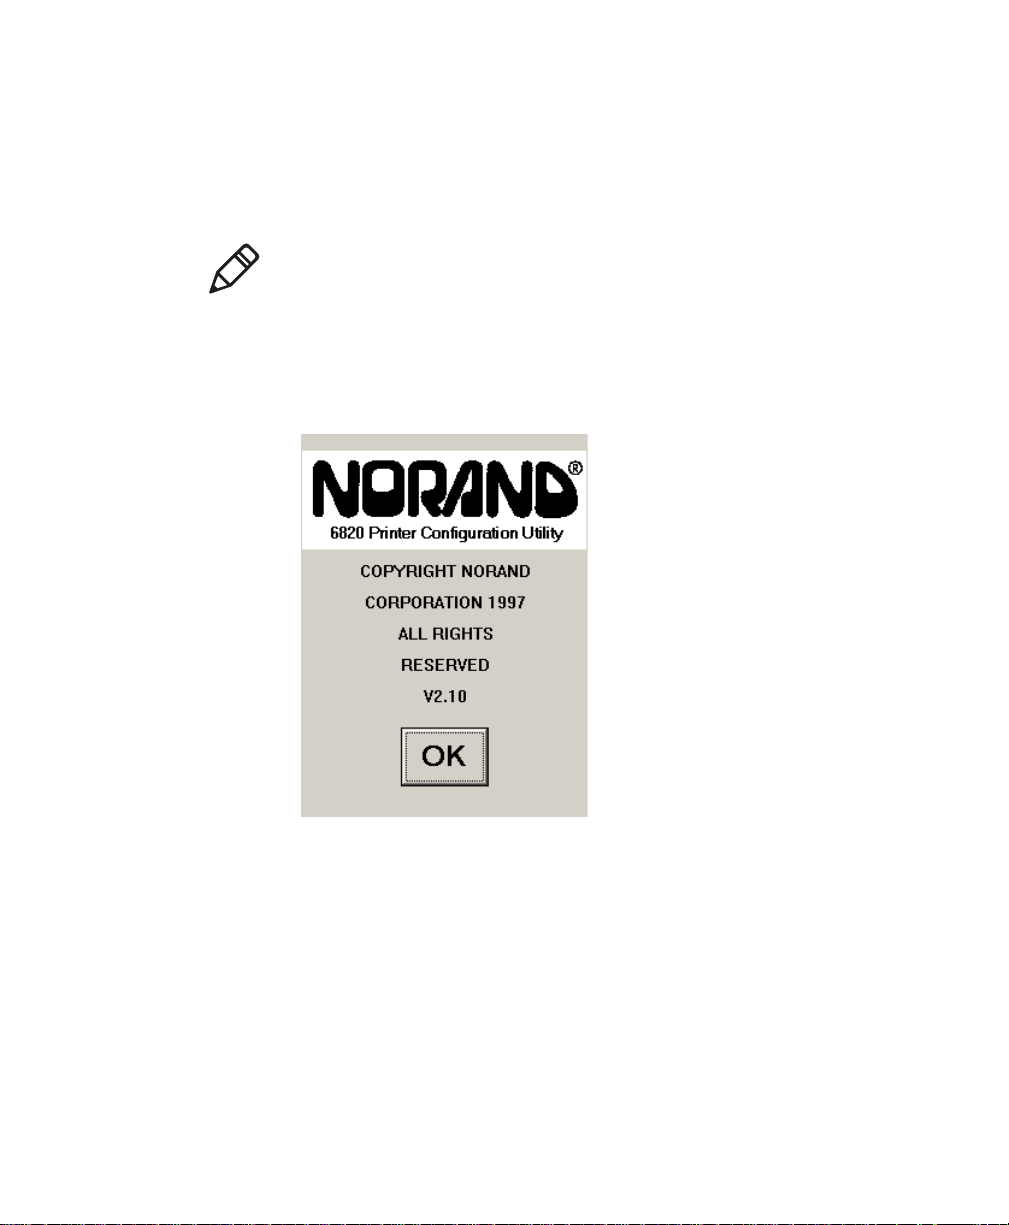
To start the Printer Configuration Utility.
1 Run rpgconf.exe and click OK on the first screen to continue to the
Main Menu.
6822 Series 80-Column Printer User’s Manual 29
Page 8
Chapter 4 — Configuring the Printer
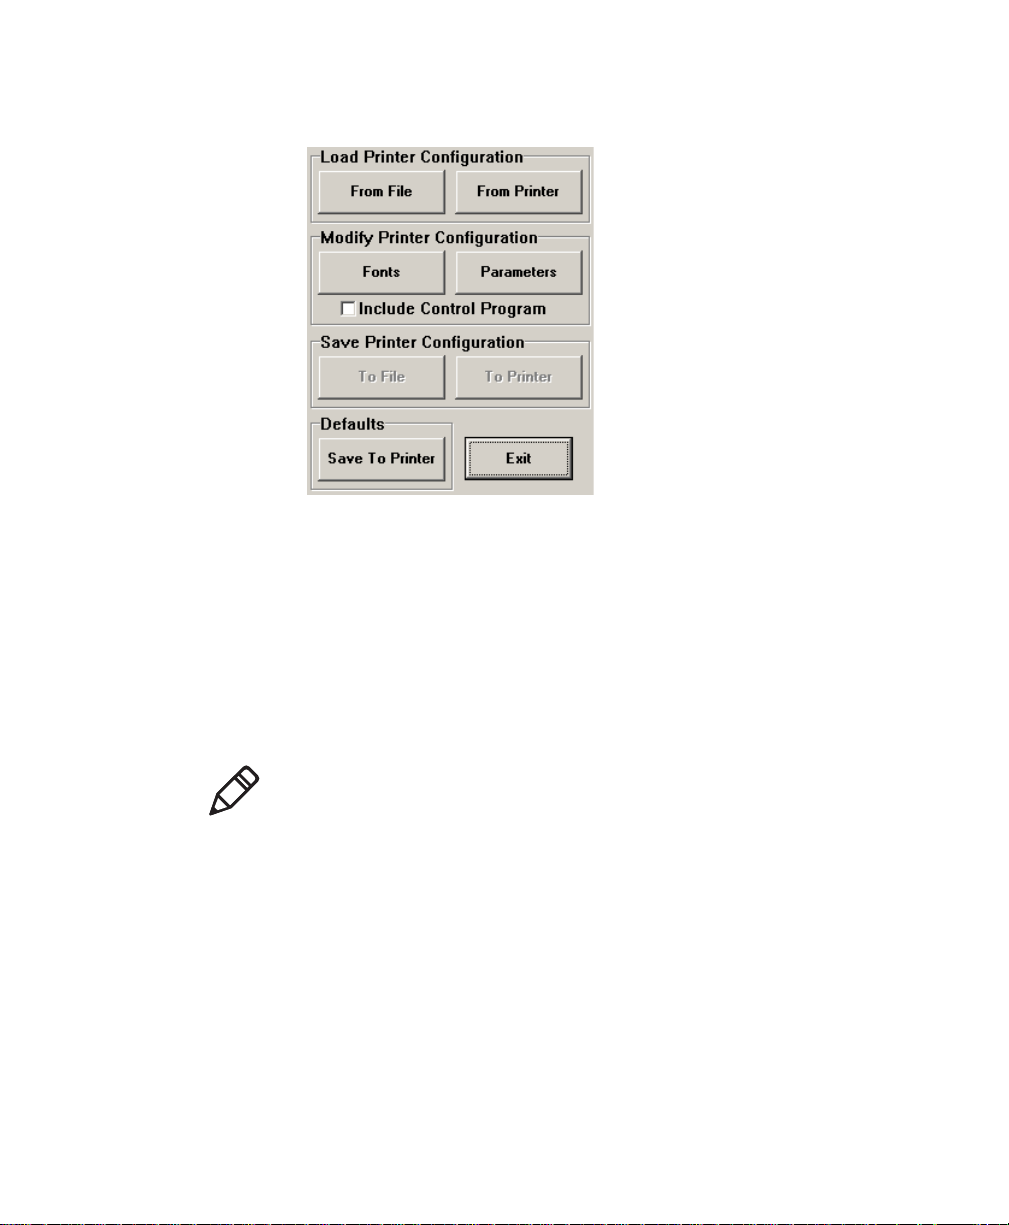
2 The following options are available on the Main Menu.
• Use Load Printer Configuration to load an existing configuration.
Load either from a file or from the printer.
• Use Modify Printer Configuration to review or modify the working
configuration, include the printer control program in the currently
loaded configuration, or load fonts.
• Use Save Printer Configurations to save a configuration file to disk
or download the working configuration to your 6822.
• Use Defaults to restore the printer to its default configuration.
Note: When the Main Menu is first displayed, the Save Printer
Configuration options are grayed out, prohibiting selection of
those options until a configuration is loaded or modified.
3 Click Exit, then click Yes to exit the Printer Configuration Utility.
Click No to the keep the Main Menu open.
30 6822 Series 80-Column Printer User’s Manual
Page 9
Chapter 4 — Configuring the Printer
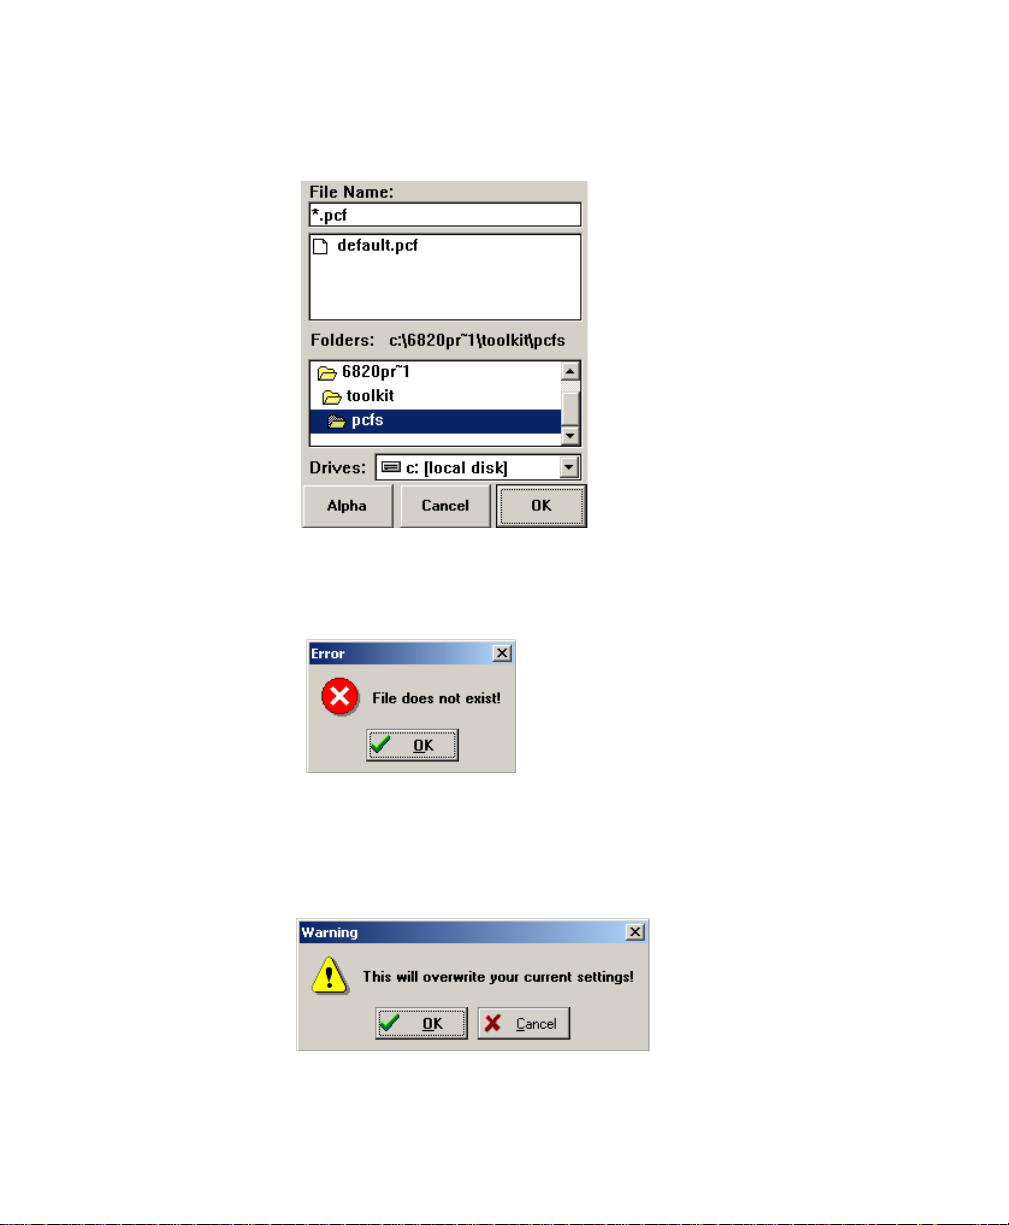
To load configuration files from your PC
1 Click From File to access the File, Open window.
2 Select a configuration file to load, then click OK. If the selected file
does not exist, a “File does not exist!” error message appears. Click
OK to return to the Main Menu without loading a file.
3 If the file does exist, a warning message indicates that loading the
selected file will overwrite your working configuration. Click OK to
overwrite settings in working configuration, or Cancel to return to
the Main Menu.
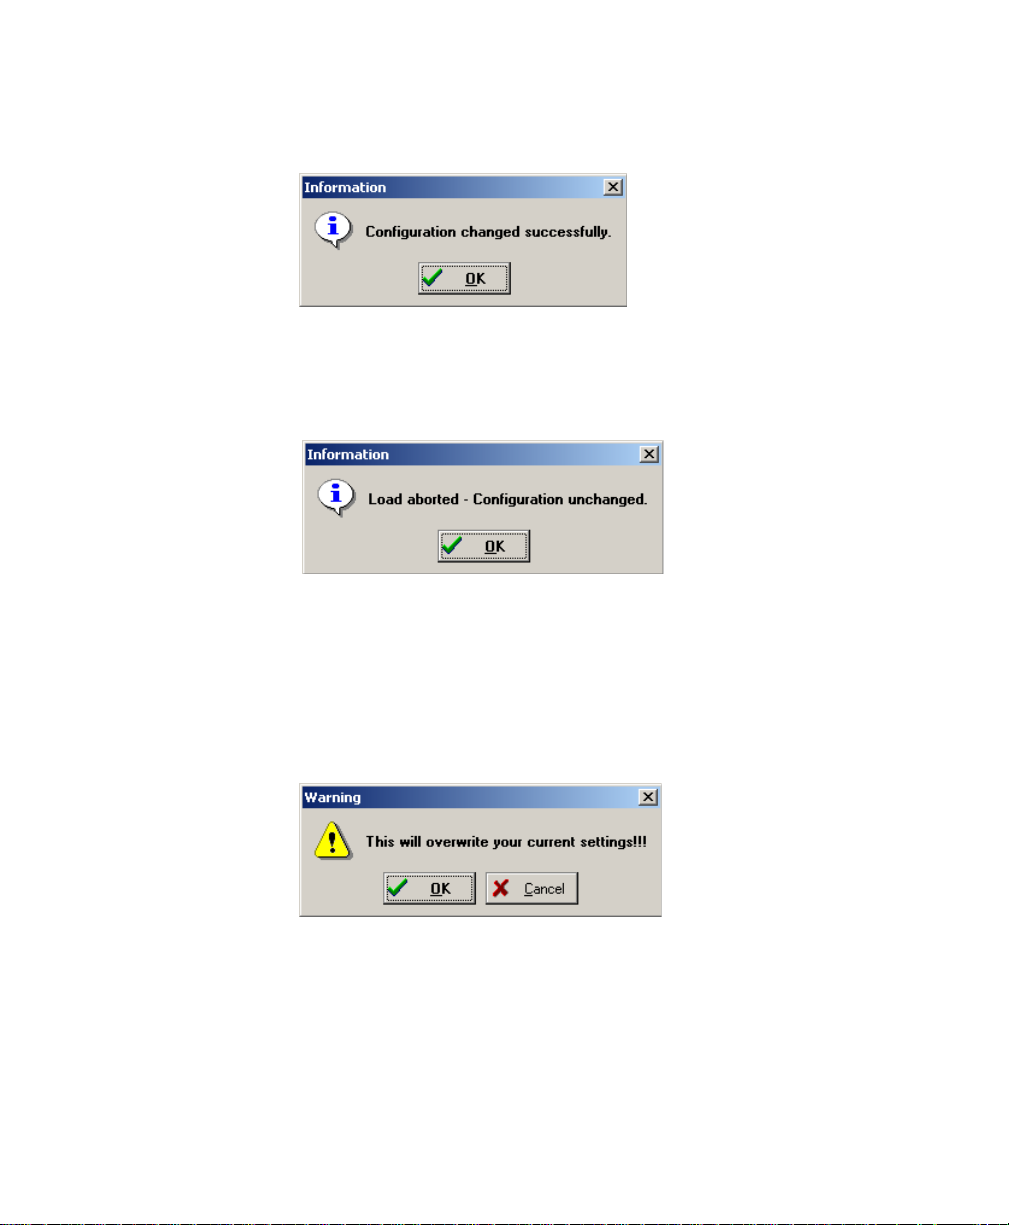
4 OK, the configuration from the selected file is loaded into memory
and becomes the current working configuration. If this load is
6822 Series 80-Column Printer User’s Manual 31
Page 10
Chapter 4 — Configuring the Printer
successful, a message similar to the one shown below is displayed.
Click OK to return to the Main Menu.
5 If the working configuration is not replaced successfully with the
configuration from the selected file, an error message appears
indicating that the operation failed. Click OK to return to the Main
Menu without loading a file.
To load a configuration from the 6822
1 Click From Printer from the Main Menu to display a warning
message that indicates that the printer’s configuration will overwrite
the working configuration.
2 Click OK to overwrite the configuration, otherwise click Cancel to
return to the Main Menu without loading the printer’s configuration.
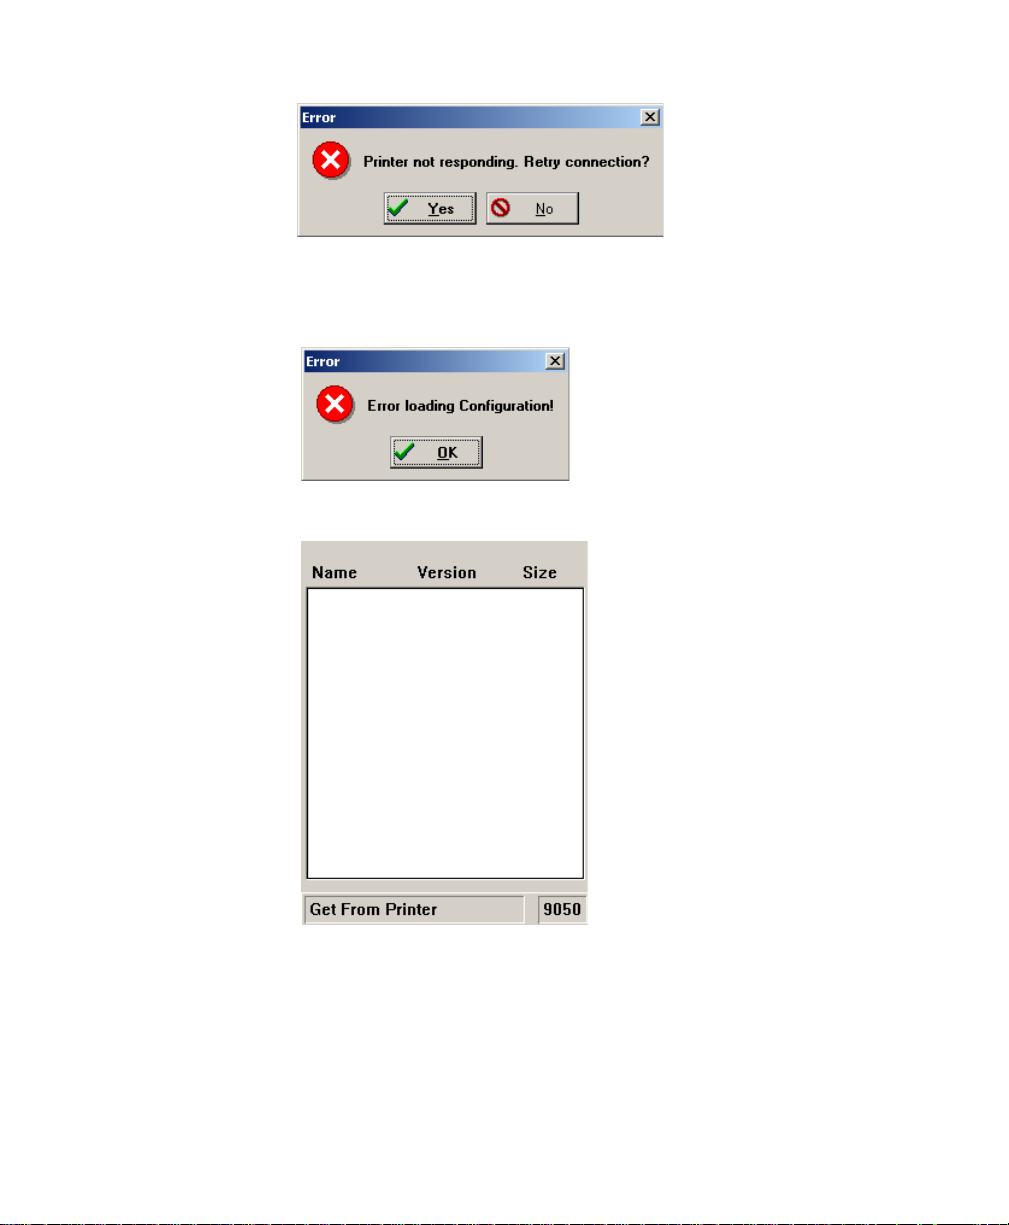
3 If you click OK, a message is then displayed prompting you to reset
the printer. If the connection is not successful, after approximately 20
seconds, the following message appears.
32 6822 Series 80-Column Printer User’s Manual
Page 11
Chapter 4 — Configuring the Printer
4 Click Yes, to retry connecting to the printer.
5 If you click No, an error message appears and indicates that the
configuration was not loaded. Click OK to return to the Main Menu.
6 If a connection is established, no further action is required
The Printer Configuration Utility communicates with the 6822 to
find out the current settings and which font modules are loaded. The
name, version, and size of the font modules are displayed on the Get
From Printer screen.
6822 Series 80-Column Printer User’s Manual 33
Page 12

Chapter 4 — Configuring the Printer
To modify a printer configuration
Use this option to view or change a working configuration, including
adding fonts from disk (on the PC), deleting printer fonts, and changing
parameters settings.
• Select Modify Printer Configuration to view or modify the printer
configuration.
To include the control program
Use this option to include the printer control program when saving the
working configuration to the printer . The npfl6822.mod control program
only needs to be changed when a new version becomes available.
• Select the Include Control Program check box to add the control
program the next time you save the printer configuration.
Selecting an International Font
A variety of different international fonts are also available in the toolkit
for the 6822.
To sele c t a font
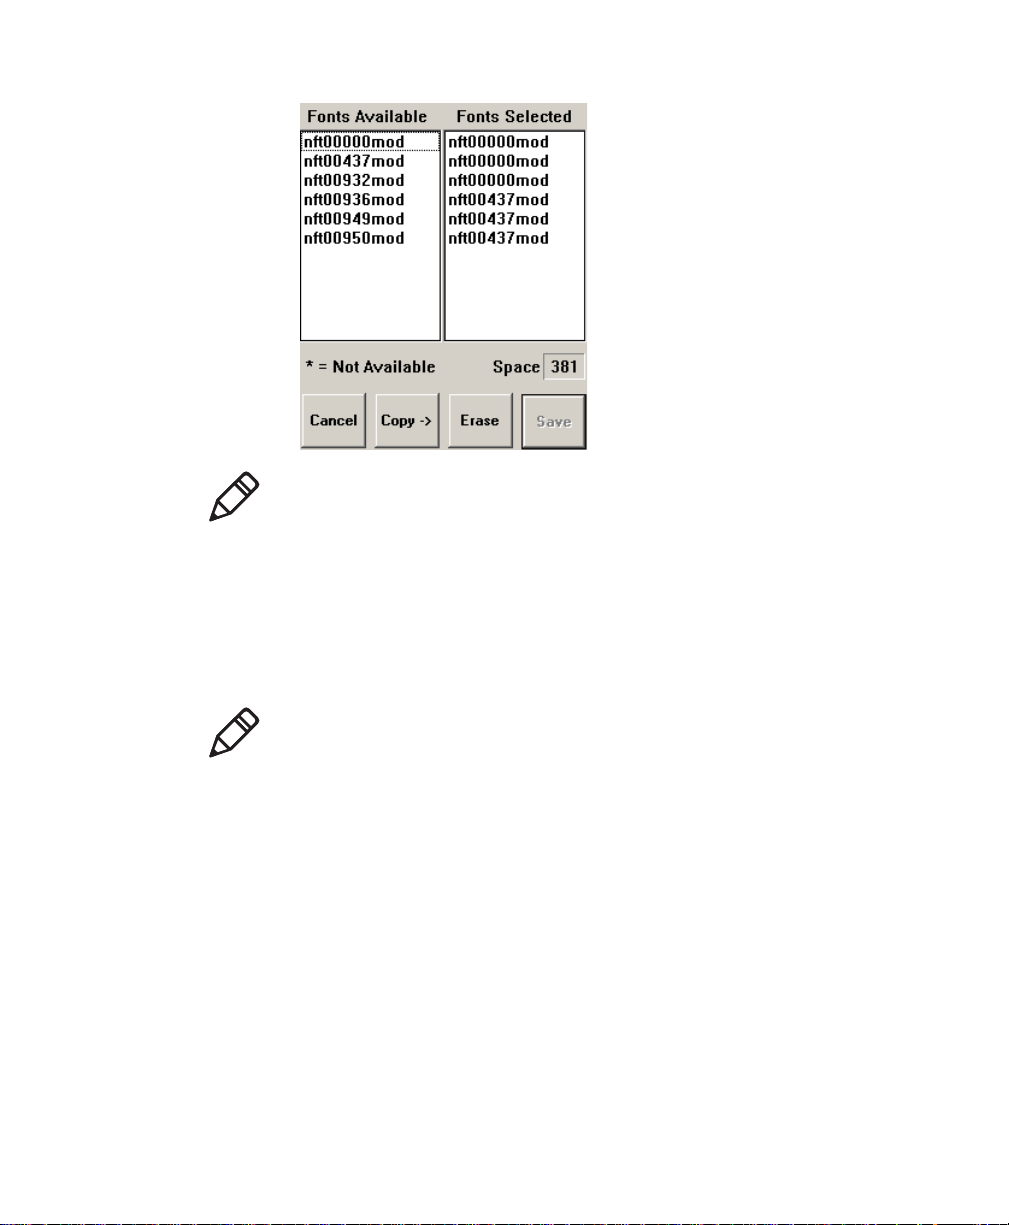
• Click Fonts from the Main Menu to access the Font Selection screen
where you can perform operations related to font files. The Fonts
Available list shows font files that are available on disk. The Fonts
Selected list show fonts that are in the current printer configuration.
34 6822 Series 80-Column Printer User’s Manual
Page 13
Chapter 4 — Configuring the Printer
Note: Save is grayed out, prohibiting that selection, until either
new fonts are selected, or fonts are removed from the Fonts
Selected list.
To copy font files
1 Highlight the font files in the Fonts Available list. You can highlight
several files at one time, using conventional Windows selection
methods.
Click Copy to copy those font files to the Fonts Se lected li st
Note: If you attempt to copy fonts from the Fonts Available list
when these fonts already exist in the Fonts Selected list, the
following error message is displayed, once for each of the
duplicate fonts (where the current font file name is listed in
place of nft00000.mod).
6822 Series 80-Column Printer User’s Manual 35
Page 14
Chapter 4 — Configuring the Printer
2 Click OK to close the error message and not copy the font to the
Fonts Selected list. If there are two or more duplicate fonts, the cycle
repeats until an error message is displayed for each of the duplicate
font files.
To delete font files
Delete fonts from the Fonts Selected list to increase available memory
in the printer.
• Select the font names you want to delete from the Fonts Selected
list, then click Erase to clear those names.
The Space Selection box, below the Fonts Selected list, displays the
space remaining in flash (in kilobytes), based on fonts cu rrently selected.
When this number is negative, it means the available space in flash is
less that the size of the selected fonts. Delete some fonts before saving
the rest.
Fonts marked with an asterisk (*), in the Fonts Selected list, are
currently in printer memory.
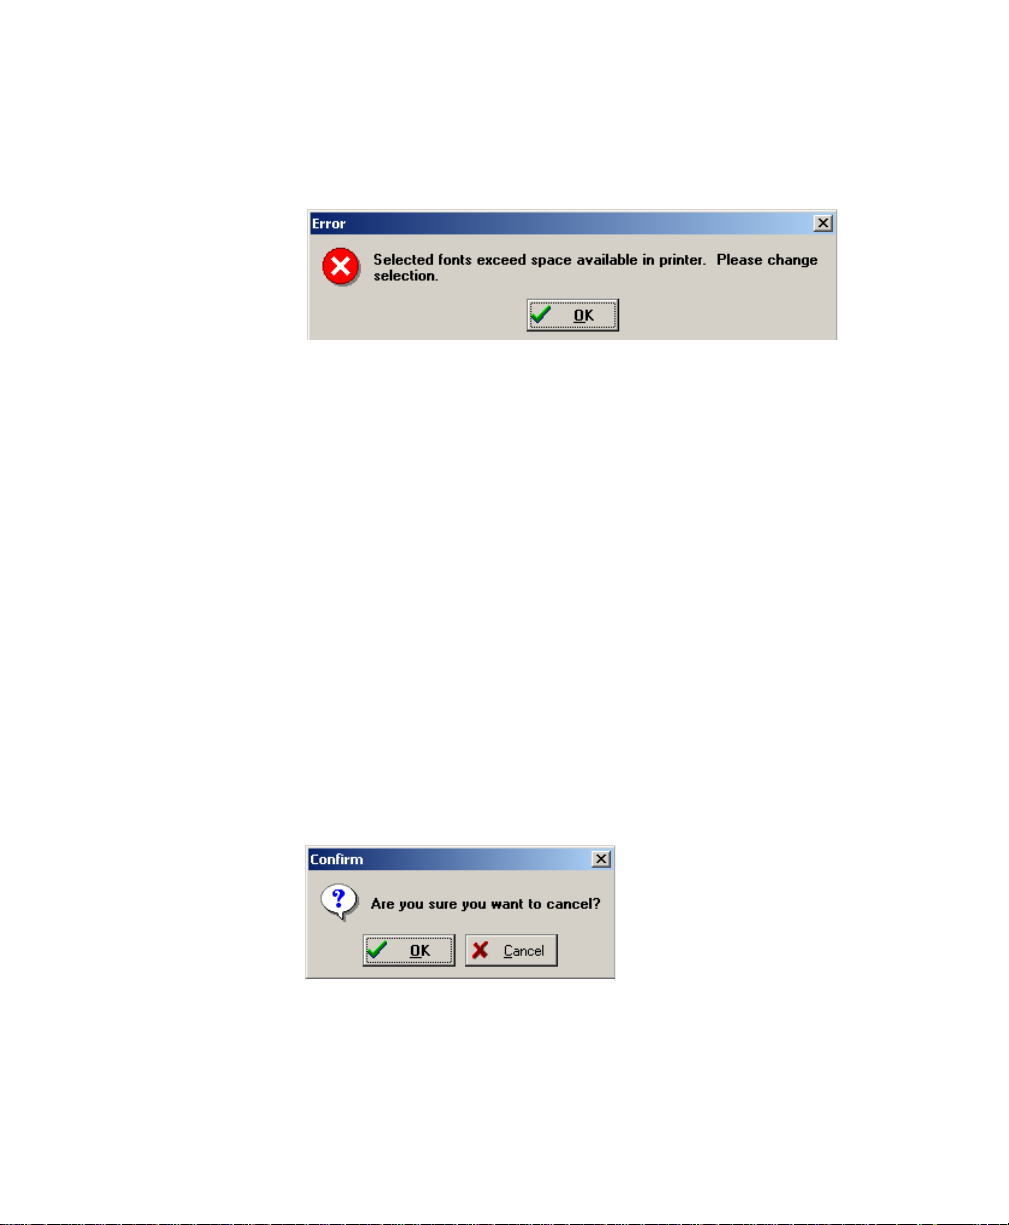
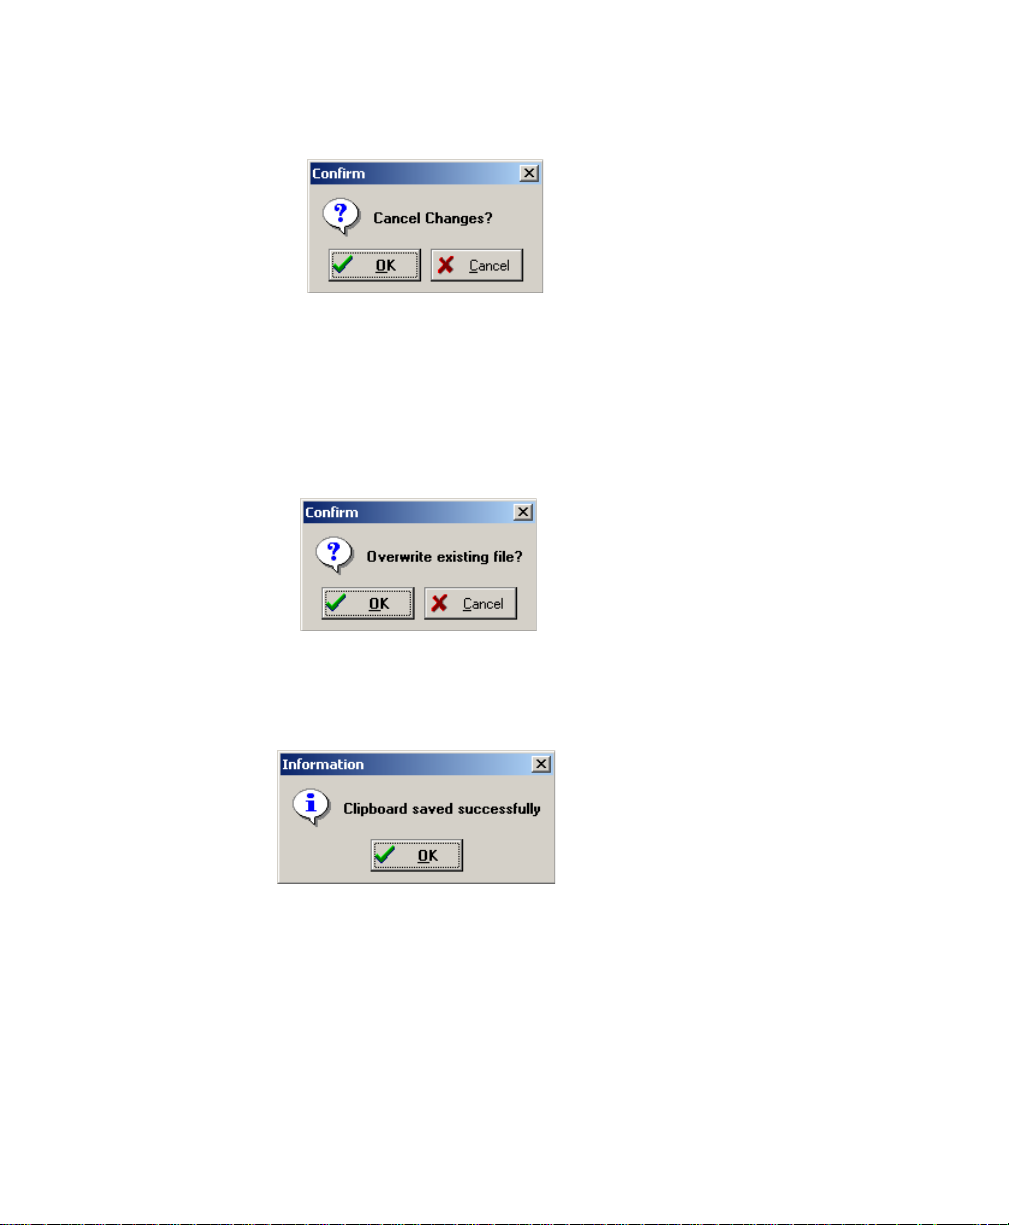
To cancel changes
• Click Cancel to return to the Main Menu without making any
changes. If you have not made any changes to the Fonts Selected list,
you return to the Main Menu.
36 6822 Series 80-Column Printer User’s Manual
Page 15
Chapter 4 — Configuring the Printer
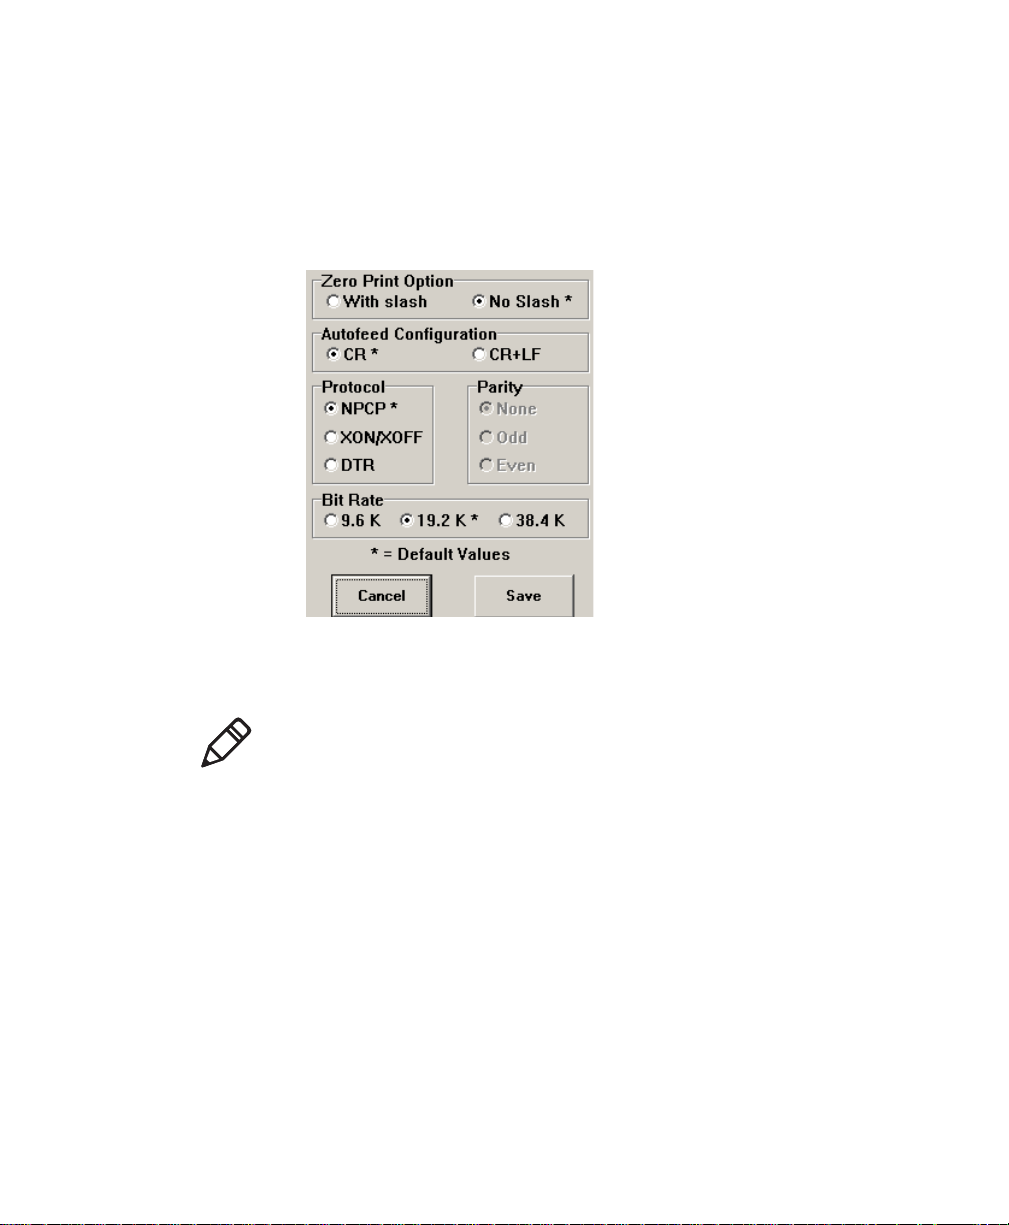
Selecting Parameters
To sele c t a p a rameter
• Click Parameters from the Main Menu to access the Parameters
window where you can modify any of the parameters that are not
grayed out. Default parameter values are marked with an asterisk (*).
To modify parameter configurations
• Select parameters on the screen using your stylus.
Note: If you are using Bluetooth communication, you must change
from the Norand Portable Communications Protocol (NPCP) mode to
the Epson DTR mode with the baud rate set to 19.2 K and the parity set
to None.
To save pa r ameters
• Click Save to update the working configuration and return to the
Main Menu.
To cancel the operation
• Click Cancel to return to the Main Menu without modifying any
configuration parameters.
6822 Series 80-Column Printer User’s Manual 37
Page 16
Chapter 4 — Configuring the Printer
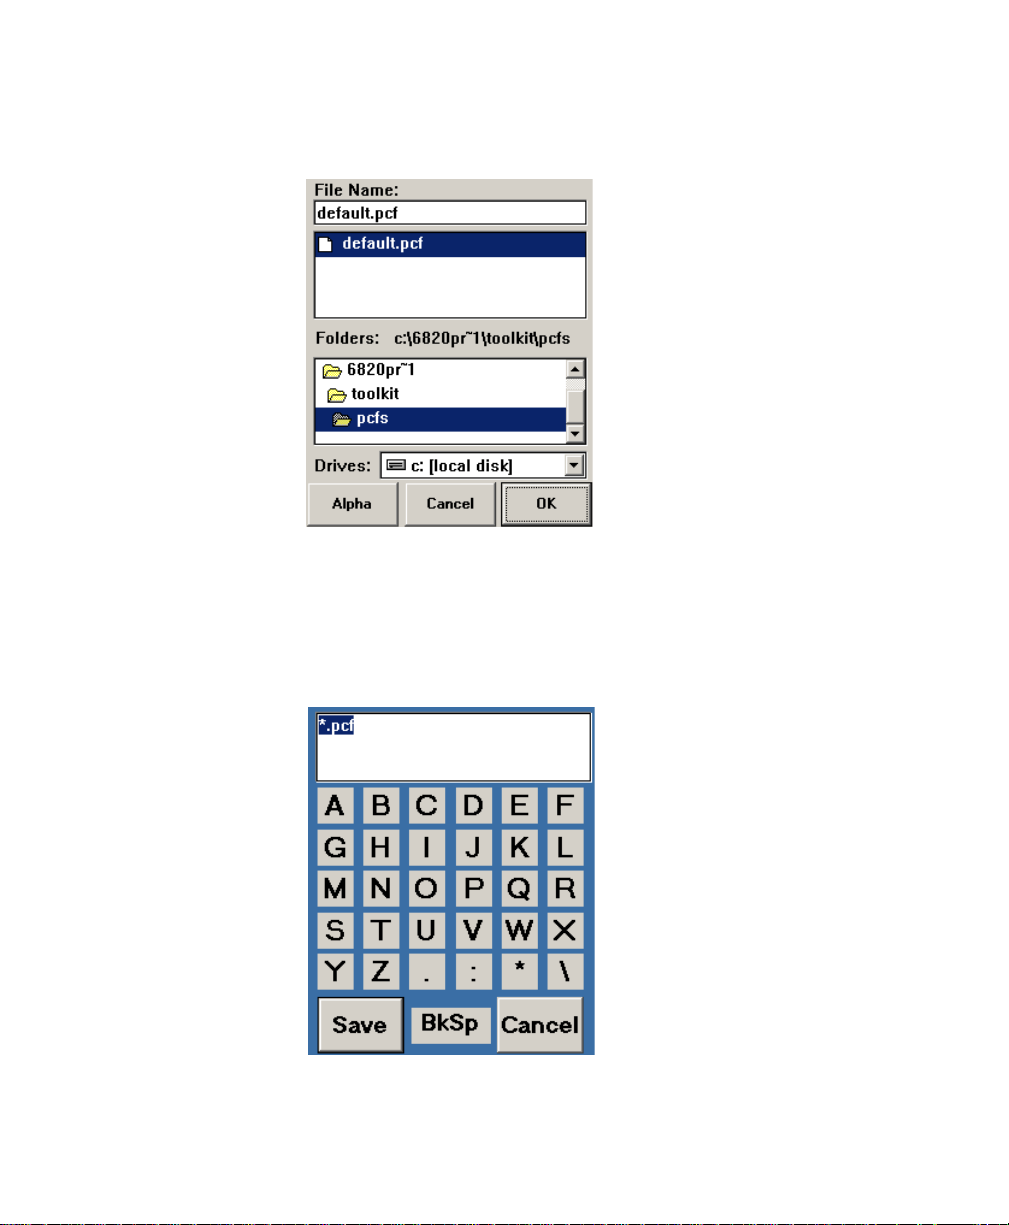
To save a printer configuration
• Click To F ile from the Main Menu to access the File Save As dialog.
Specify the drive, directory, and filename for the printer
configuration file.
To specify a file name
1 Click the Alpha button, on either the File Open window or the File
Save As window to open the keyboard onscreen for you to enter text.
2 Click Save to save the file name or click Cancel to exit without
saving the text. The following confirmation message appears.
38 6822 Series 80-Column Printer User’s Manual
Page 17
Chapter 4 — Configuring the Printer
3 Click OK to return to the previous window without the entered text,
or click Cancel to continue using the alpha keyboard.
To save the configuration to disk
• After you have selected the drive, directory, and file name, click OK
to save the configuration file. If a file by the same name exists, the
following confirmation message is displayed, informing you that if
you continue it will overwrite the existing file. Click Cancel to return
to the Main Menu without saving the working configuration.
Click OK fto continue. The following information is displayed assuring
you that the working configuration was successfully saved to disk. Click
OK to return to the Main Menu.
To cancel the “Save to File” operation
• From the File, Save As window, click Cancel to abort the Save to
File operation and return to the Main Menu without saving the
working configuration.
6822 Series 80-Column Printer User’s Manual 39
Page 18
Chapter 4 — Configuring the Printer
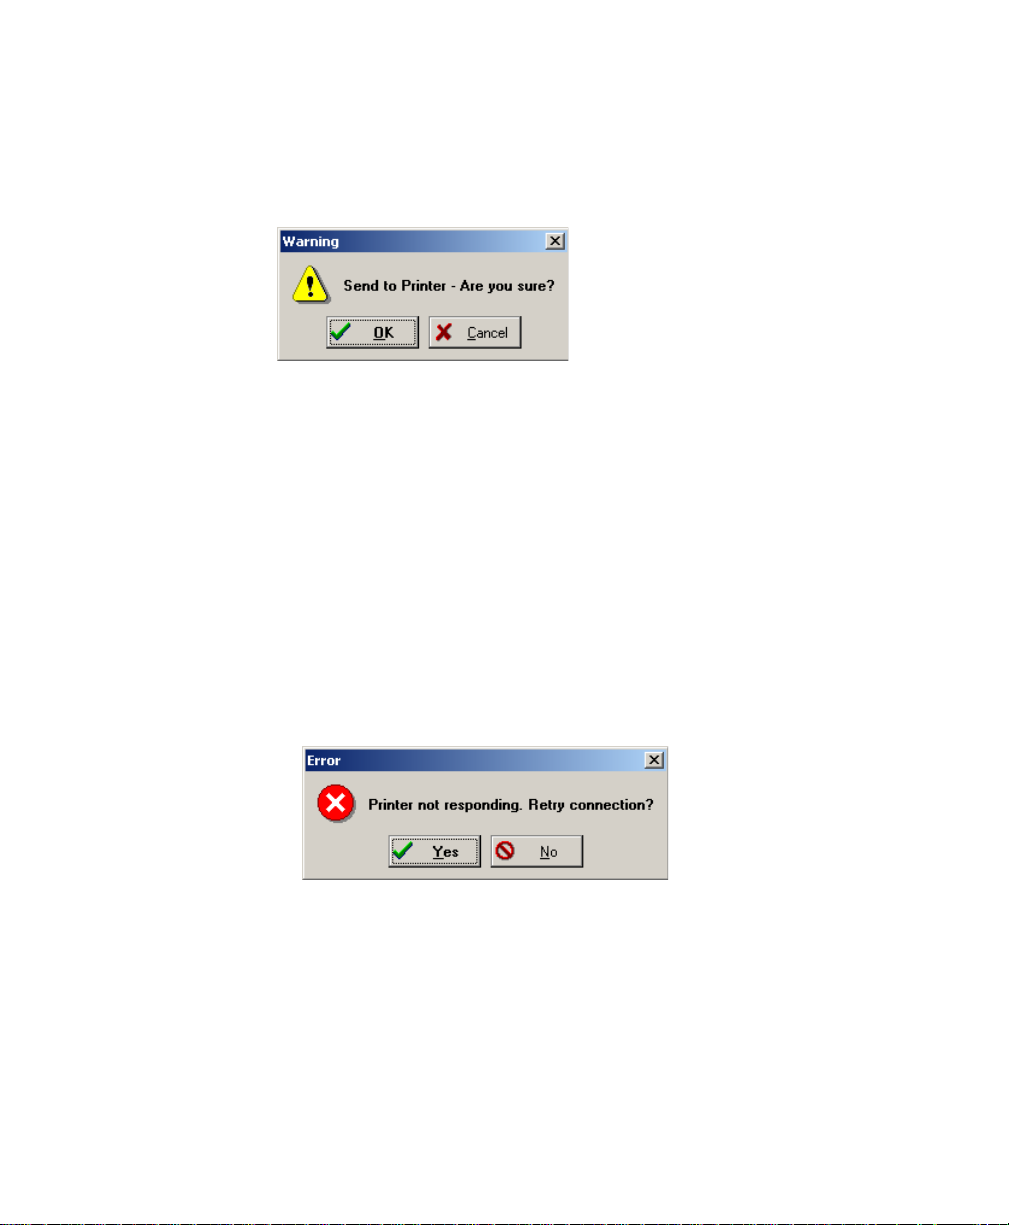
Saving Files to the Printer
Select the Save File to Printer option from the Main Menu, to send the
working configuration to your 6822. When you select this option, the
following warning message is displayed:
The message indicates the configuration will be copied into the 6822
flash memory and overwrite the current configuration. Click OK for the
system to connect to the printer and transfer the configuration, or Cancel
to return to the Main Menu without updating the printer.
Connecting to the printer
1 After you click OK, a message appears informing you that the
system is attempting to establish connection with the printer.
2 Connect a serial cable (P/N 226-270-001) between your PC and the
printer.
3 Press the Reset button to reset the printer.
4 If the connection is not successful after approximately 20 seconds,
the following message is appears.
5 Click Yes to retry making a connection to the printer.
40 6822 Series 80-Column Printer User’s Manual
Page 19
Chapter 4 — Configuring the Printer
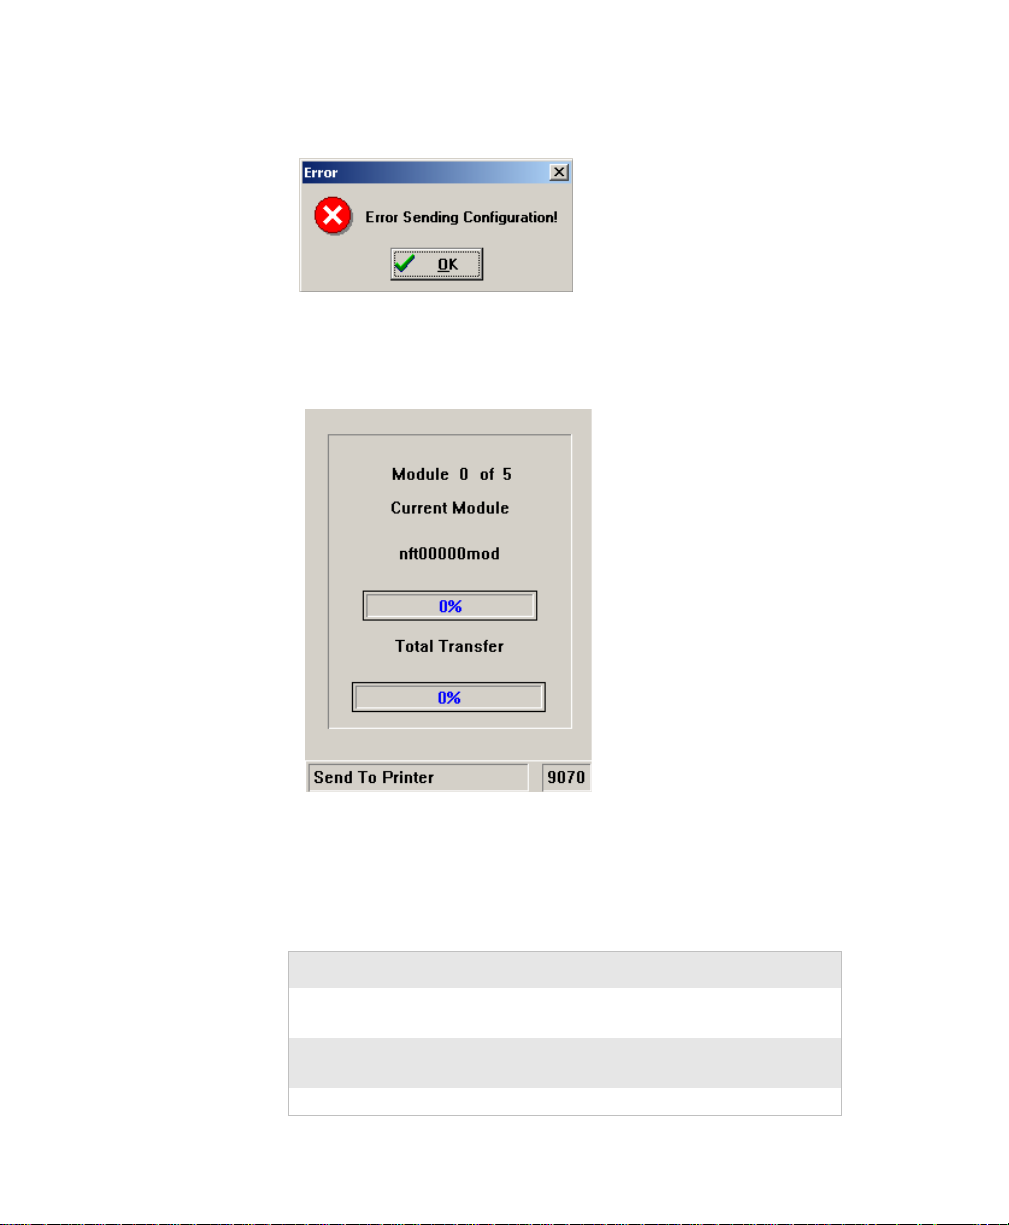
6 If the configuration was not saved to the printer, the following error
message appears.
If the connection is successful, the following screen appears and the
printer configuration is updated. The screen also displays the data
transfer status.
Default Printer Settings
The following are the default settings used when you click Restore
Defaults to Printer:
Default Printer Settings
Settings Values
Zero Print Option Slash all zeros (zeros are printed with a
slash)
Autofeed
Configuration
Protocol NPCP
6822 Series 80-Column Printer User’s Manual 41
CR (carriage return at end of line without
line feed)
Page 20

Chapter 4 — Configuring the Printer
Default Printer Settings
Settings Values
Parity N/A (for NPCP)
Bit Rate 19.2 K
For other printer defaults, see “Factory-Installed Printer Defaults” on
page 175.
Using the Windows 2000 or Windows XP Printer
Configuration Utility
These instructions apply to desktop computers running either Windows
2000 or Windows XP operating systems.
Installing the Windows 2000/XP Printer Configuration
Utility
The Windows 2000/XP Printer Configuration Utility is provided on the
6822TKCD toolkit CD (P/N 235-145-001).
To set up your PC to use the Printer Configuration Utility
1 Insert the toolkit CD in your PC.
2 From your desktop, use your Explorer application to view the
contents of the toolkit CD.
42 6822 Series 80-Column Printer User’s Manual
Page 21
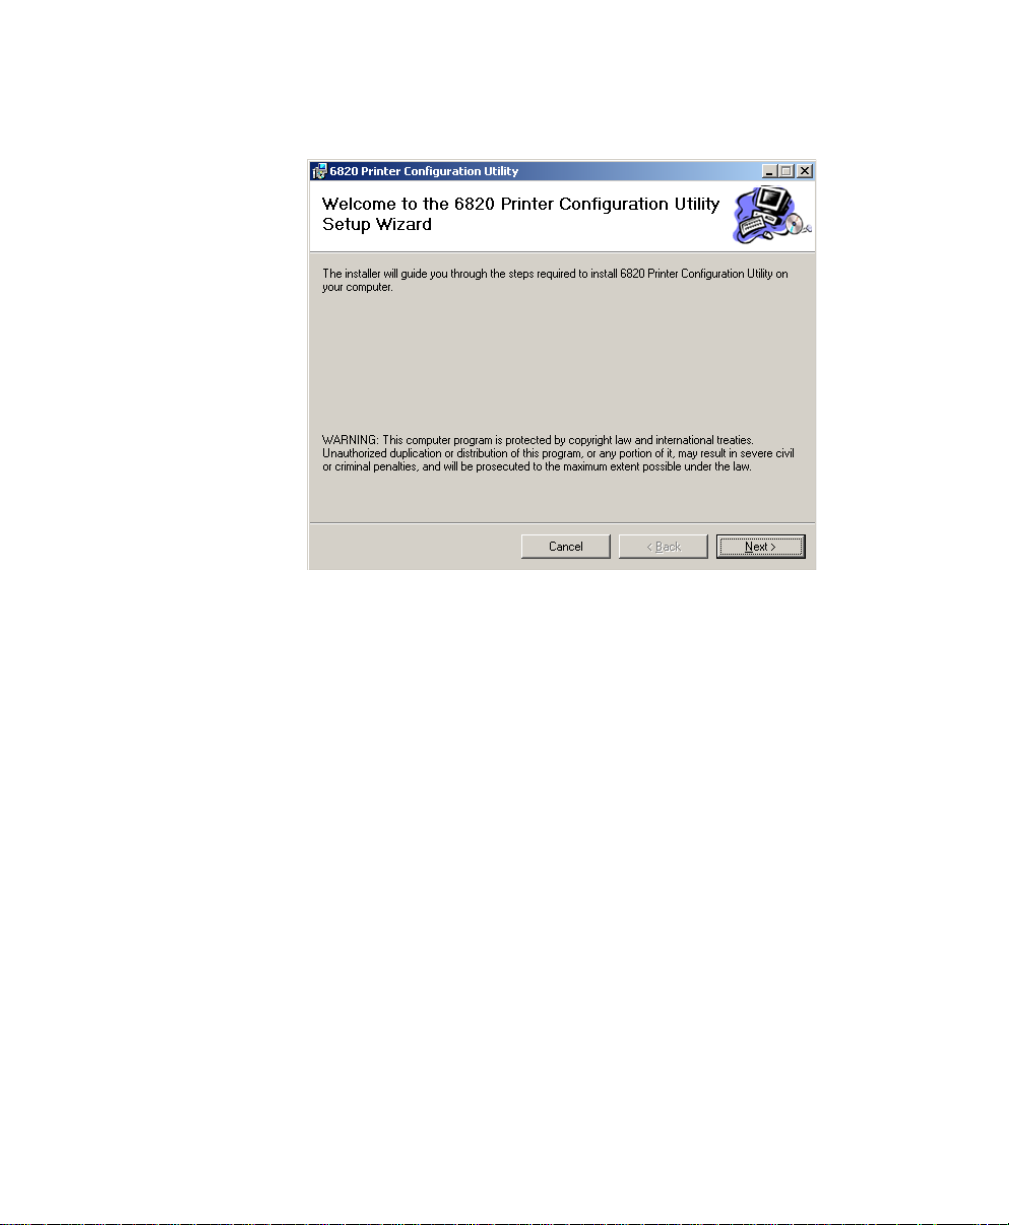
Chapter 4 — Configuring the Printer
3 Double-click the setup.exe executable file, then click Next from the
Welcome screen to continue.
4 The printer configuration utility files are copied to the Program
Files\Intermec\6822 Printer Configuration Utility folder. To
install the files in a different folder, enter the path and folder name.
6822 Series 80-Column Printer User’s Manual 43
Page 22
Chapter 4 — Configuring the Printer
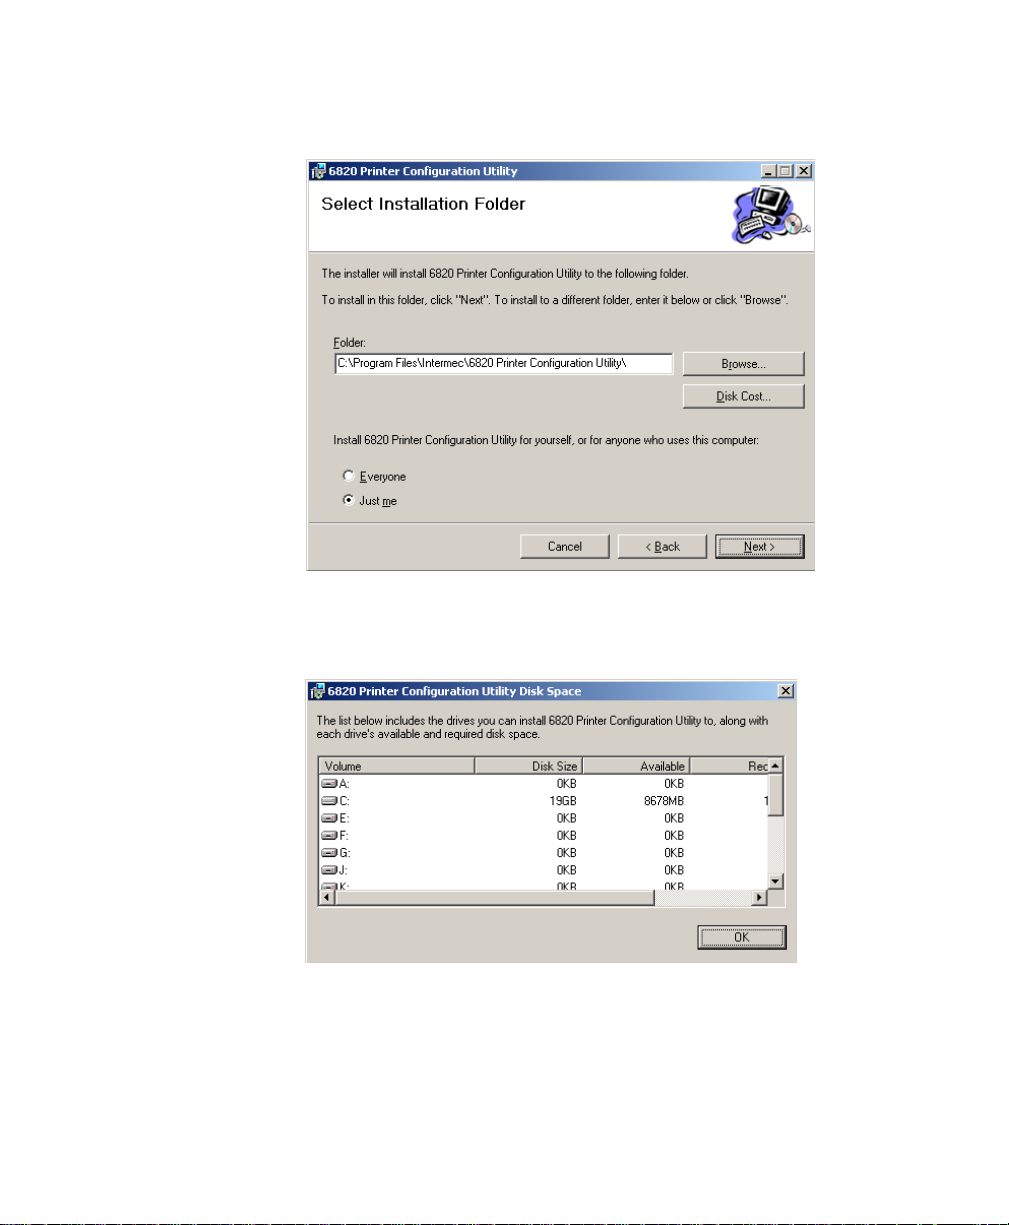
You can also specify if everyone who uses the computer has access to
the printer configuration files or limit access to yourself.
5 Click Disk Cost to see the amount of disk space required to install
the Printer Configuration Utility. Click OK to close and return to the
installation screens.
44 6822 Series 80-Column Printer User’s Manual
Page 23
Chapter 4 — Configuring the Printer
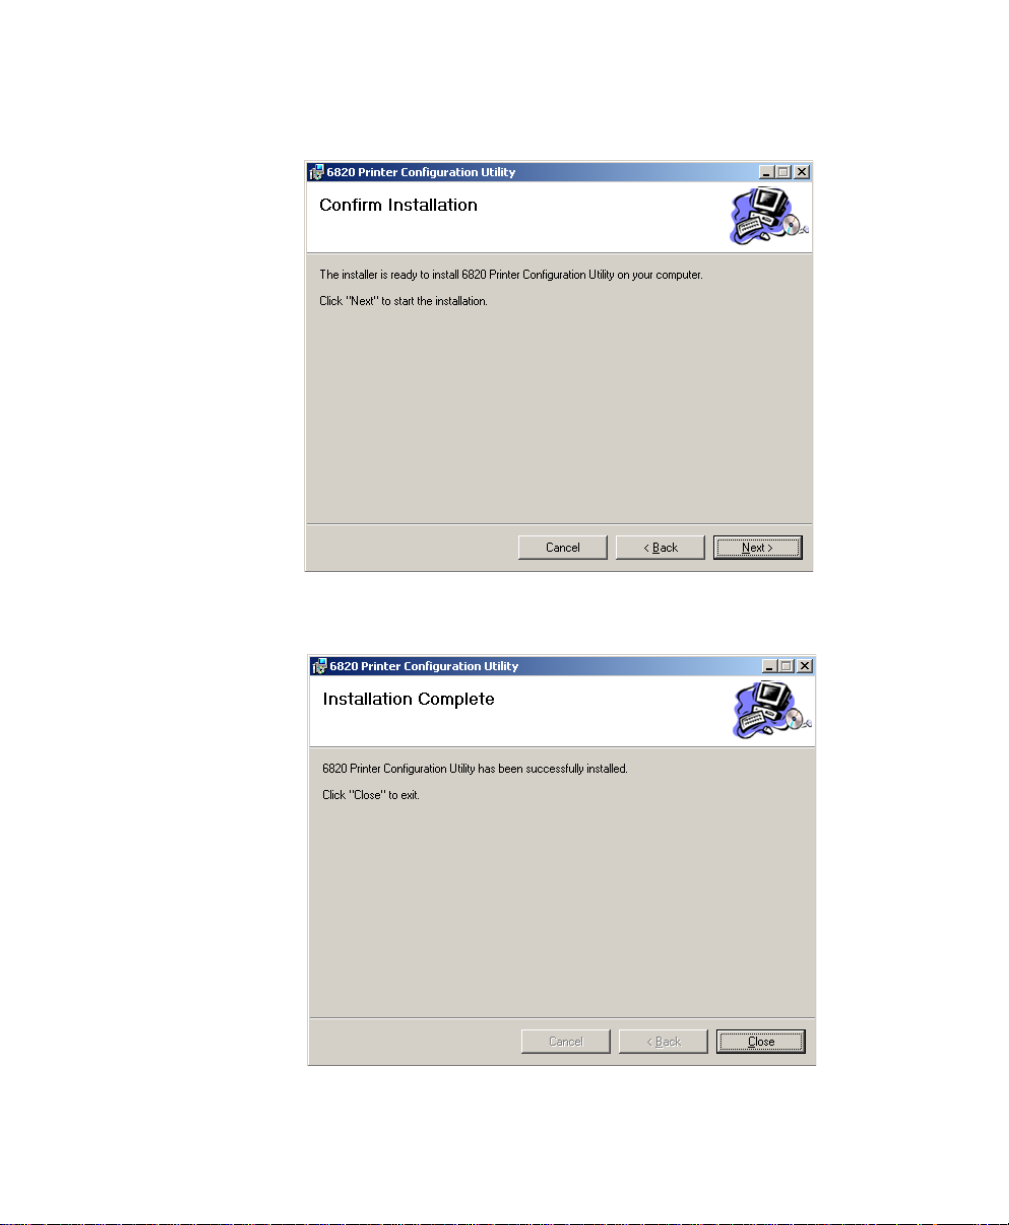
6 Click Next to verify installation, click Back to adjust the information
on the previous screen, or click Cancel to exit the installation.’
7 Installation Complete appears on the screen. Click Close to exit the
installation program.
6822 Series 80-Column Printer User’s Manual 45
Page 24

Chapter 4 — Configuring the Printer
Disabling the Microsoft ActiveSync Serial Port Connections
If you use Microsoft ActiveSync to connect to your computers, you need
to disable the serial port connections before using the Printer
Configuration Utility.
To disab l e ActiveSync
1 In the ActiveSync application on your desktop, select File >
Connection Settings.
2 Clear Allow USB connections and Allow connections to one of the
following.
3 Click OK.
4 Close the ActiveSync application.
Operating the Printer Configuration Utility
The Printer Configuration Utility consists of a list of fonts, some
parameter settings, and a printer control program.
When the Printer Configuration Utility is active, it holds a
“configuration clipboard” in memory. Initially, this configuration has
parameters set to their default values. Consider the contents of the
configuration clipboard as temporary and lost when you exit from the
utility.
• Click the Get 6820 Configuration button to view the current printer
configuration.
46 6822 Series 80-Column Printer User’s Manual
Page 25

Chapter 4 — Configuring the Printer
• Click the Set 6820 Configuration button to change printer setting
and send those settings to the printer.
• Click the Reset to Defaults button to reset the to the factory default
printer configuration.
To start the Printer Configuration Utility
• Click Start > Programs > Intermec > 6820 Printer Configuration
Utility > PConfigApp.exe to start the Printer Configuration Utility.
Communicating with the Printer
You can use COM port 1, 2, or 3 to communicate with your printer.
COM port 1 is the default selection, but if it is not available or is being
used by another application, select another COM port.
To communicate with the printer
1 Click either the Get 6820 Configuration or the Set 6820
Configuration button to open communications with the printer.
The “Opening COM Port x to printer . . . ” message appears in the
text box when you initiate communications sith the printer. The “x”
in the message indicates which COM port is being used.
6822 Series 80-Column Printer User’s Manual 47
Page 26

Chapter 4 — Configuring the Printer
2 When the “Press Reset on the printer” message appears in the text
box, press the Reset button on your printer. For the location of the
Reset button on your printer, see “Using the Reset Button” on
page 4
3 The “Opening COM Port x to printer. . . Done.” message indicates
that communication between your PC and the printer has been
established.
Note: If “Unable to open COM Port x to printer” appears in the
text box another software application may be using the selected
COM port. Select another COM port or disable the software
application using the COM port. See page 54 for more error
messages.
48 6822 Series 80-Column Printer User’s Manual
Page 27

Chapter 4 — Configuring the Printer
To view the settings on your 6822
1 Click the Get 6820 Configuration button to initiate communication.
2 The “Getting printer parameters . . . ” message appears when the
Printer Configuration Utility retrieves configuration information
from the printer.
3 The message “Getting printer parameters . . . Done” appears after
configuration information is retrieved.
4 Modify configuration settings or click OK to close the Printer
Configuration Utility.
Setting the 6822 Configuration
To modify configuration settings
1 Make changes to the Configuration Clipboard or click the Reset to
Defaults button to undo your selections and return them to their
defaults.
Note: When using a Bluetooth adapter you must select the
DTR communications protocol and a bit rate of 19.2K.
2 Click the Set 6820 Configuration button to initiate communication
with the printer. The “Setting printer parameters . . .” message
appears when you initiate communication with the printer.
6822 Series 80-Column Printer User’s Manual 49
Page 28

Chapter 4 — Configuring the Printer
3 The “Setting printer parameters . . . Done” message appears when
configuration parameters are set.
Note: The “Unable to set printer parameters” message indicates
a dropped connection between your PC and your printer.
4 Click OK to close the utility and detach the serial cable.
To update 6822 fonts or the 6822 control program
• Click the Fonts and Control button to update the fonts stored in
your printer or to update the printer control program. The Fonts
Available for Update list shows font files that are available. The
Fonts Selected for Update list show fonts that are to be installed jon
the printer.
50 6822 Series 80-Column Printer User’s Manual
Page 29

Chapter 4 — Configuring the Printer
To learn what fonts are currently installed on your printer
• Click the Get Printer Fonts button. The installed fonts appear in the
text box in the bottom right corner of the dialog.
To select font files
• Highlight the font files you want to download in the Fonts A vailable
for Update list.
• Click the right arrow pointing to the Fonts Selected for Update list
to copy the selected font files to this list. Below is a sample screen.
6822 Series 80-Column Printer User’s Manual 51
Page 30

Chapter 4 — Configuring the Printer
If the fonts you select exceed the space available in printer memory, an error
message appears. Click OK to close the error message and not copy the font
to the Fonts Selected for Update list. If there are two or more fonts that
exceed the space allowed, this message repeats until an error message is
displayed for each of the font files that went over the space allowed.
The Space Needed information shown beneath the Fonts Available for
Update list indicates the total space required (in bytes) for all of the fonts in
the list. The Space Remaining information listed below the Fonts Selected
for Update list displays the space remaining in the printer, given the fonts in
the Selected list.
Click Update Printer to update the printer fonts and the control program
depending on the options selected on the dialog. If the Selected list is
empty and the Include control program update is not checked, a “Nothing
selected for update” message appears in the text box.
• Formats the printer flash for font updates and writes new font files to
the printer for any fonts in the Selected list.
Click the top, right arrow to copy selected font files from the Fonts
Available for Update list to the Fonts Selected for Update list. Click the
bottom, left arrow to remove any selected files from the Fonts Selected for
Update list.
Click Update Printer to update the fonts in the printer with those in the
Fonts Selected for Update list. The Update progress: bar indicates the
progress as the control program or fonts are written to the printer.
52 6822 Series 80-Column Printer User’s Manual
Page 31

Chapter 4 — Configuring the Printer
• Check the Include program control update check box to include
the printer control program when updating the printer.
Note: You only need to update the control program when new
versions of the control program are released.
Default Printer Settings.
Default Printer Settings
Settings Value
Zero Print Option Print zeros without a slash
Autofeed Configuration CR (carriage return at end of line without
line feed)
Protocol NPCP
Parity N/A (for NPCP)
Bit Rate 19.2 K (19200)
For other printer defaults, see “Factory-Installed Printer Defaults” on
page 175.
6822 Series 80-Column Printer User’s Manual 53
Page 32

Chapter 4 — Configuring the Printer
Error Messages
There are three instances when the 6822 may not connect to your PC. In
the example error messages, an “x” indicates the assigned COM port
number.
Timeout Error
The timeout error may occur due to either of these situations:
• The printer was not reset in the time allowed.
• The COM port exists on the desktop computer but nothing is
connected to the port.
Error Message
Unable to open COM port x to printer. Printer not
reset within the time allowed or printer not connected
to COM port x.
Port Not Found Error
The COM port does not exist. The particular COM port is identified in
the error message.
Error Message
Unable to open COM port x to printer. COM port x
cannot be found.
Access Denied Error
The COM port exists but a connection with the 6822 is not established.
The particular COM port is identified in the error message.
Error Message
Unable to open COM port x to printer. Access to COM
port x is denied. Close applications using COM port x
or try another port.
Connecting to the Bluetooth Adapter
If your 6822 has a Bluetooth adapter, be sure to connect this adapter after
you finish reconfiguring the 6822 fonts and exit the Printer
Configuration Utility (gray cable beneath the printer mechanism).
To enable Microsoft ActiveSync serial port based connections
1 Start ActiveSync and select File > Connection Settings.
54 6822 Series 80-Column Printer User’s Manual
Page 33

Chapter 4 — Configuring the Printer
2 Check Allow USB connections and Allow connections to one of
the following.
3 Click OK.
4 Close the ActiveSync application.
6822 Series 80-Column Printer User’s Manual 55
Page 34

Chapter 4 — Configuring the Printer
56 6822 Series 80-Column Printer User’s Manual
Page 35

5
Control Code Definitions
This chapter contains a set of control code definitions and
specifications for page layout for the 6822 printer. In this
chapter you will find these sections:
• Understanding control code definitions
• Using printer control codes
• Understanding the fanfold paper page layout
6822 Series 80-Column Printer User’s Manual 57
Page 36

Chapter 5 — Control Code Definitions
Understanding Control Code Definitions
I/O Buffer
All characters and control codes received by the printer are stored in this
buffer . Characters and controls codes are read from this buffer and acted
upon to form the print buffer. Characters are removed from the I/O
buffer as they are processed.
Print Image Buffer
All characters go through this buffer on their way to the printed page.
This buffer contains the graphic image of the dots to print, from which
characters are rendered. It is cleared when its contents are printed.
Special Notations
The following information defines notations included in the format
definitions of the escape sequences, throughout this section.
Special Notations
Notation Description
(0) Used in the ASCII column of any of the Format definitions, indicates that its
value can only be zero (and not the character “0”). For example: Select TopDown Printing ESC US (0).
(1) Used in the ASCII column of any of the Format definitions, indicates that its
value can only be one (and not the character “1”). For example: Select
Bottom-Up Printing ESC US (1).
* When a number (at the end of an escape sequence) is marked with an
asterisk, then either the value corresponding to that number or the value of
the string character can be used for that number. For example, if 1* is
shown, then either the value (1), or the value of the string character
(decimal: 49, hex: 31) can be used.
NUL The NUL character is represented in the Dec column as 0, in the Hex
column as 00, and in the ASCII column as NUL.
58 6822 Series 80-Column Printer User’s Manual
Page 37

Using Printer Control Codes
These control code definitions are organized by categories of functions.
The following methods assist in locating control codes easily:
• Alphabetically organized (complete list)—refer to the “Control
Codes and Escape Sequences” table on page 164. Locate the index
for the control code, and turn directly to that page.
• Numeric order (single character codes only)—refer to the “Single
Character Control Code Definitions” table on page 180. Locate the
index for the control code, and turn directly to that page.
• Numeric order (complete list)—refer to the “Escape Sequ ence Quick
Reference” table on page 183 and look up control codes by their
actual code values. Locate the index for the escape sequence, and
turn directly to that page.
Backspace
The print buffer is emptied. The printhead is moved to the left one
character space (using the current pitch). This can be performed to, but
not beyond, the left margin setting. The backspace is ignored if
justification of right, full, or centered is selected.
Chapter 5 — Control Code Definitions
Format
Decimal Hex ASCII
808BS
The backspace control code (BS) is not reliable when text contains
different character pitches. For reliable backspacing, use the escape
sequence (ESC “\”), Set Relative Print Position.
Beeper
The printer produces a beep lasting approximately 1/10 of a second
Format
Decimal Hex ASCII
707BEL
6822 Series 80-Column Printer User’s Manual 59
Page 38

Chapter 5 — Control Code Definitions
Cancel Line
All of the characters currently in the print buffer are discarded. Current
print position is set to left margin. Text already printed cannot be
canceled
Format
Decimal Hex ASCII
24 18 CAN
Carriage Return
Repositions the printhead at the start of the print line (usually at the left
margin), and repositions the pointer to the start of the print buffer, after
printing all data in the buffer. Also, all of the “one line” functions are
reset, such as bold, double-strike, double-wide, or unidirectional
printing.
Format
Decimal Hex ASCII
13 0D CR
Note: You can add an automatic line feed with a configuration
item.
Delete
Deletes the last character in the print buffer. This functions only in left
justification.
Format
Decimal Hex ASCII
127 7F DEL
60 6822 Series 80-Column Printer User’s Manual
Page 39

Form Feed
Prints the contents of the print buffer, clears the print buffer, and
advances the paper to the top of the next page (Top of Form), according
to the current page length setting. The carriage position is moved to the
start of the line
Format
Decimal Hex ASCII
12 0C FF
Select Half-Speed Printing
Turns on half-speed mode to provide quiet printing, and more accurate
print positioning during text mode printing.
Format
Decimal Hex ASCII
27 115 1* 1B 73 01* ESC “s” 1*
Chapter 5 — Control Code Definitions
Cancel Half-Speed Printing
Turns off half-speed mode (factory default), and continues with normal
speed printing.
Format
Decimal Hex ASCII
27 115 0* 1B 73 00* ESC “s” 0*
Set Inactivity Time for Sleep Mode
Sets the amount of time the printer waits before it goes into low-power
mode. The factory default is 10 seconds.
Format
Decimal Hex ASCII
27 122 n 1B 7A n ESC “z” n
6822 Series 80-Column Printer User’s Manual 61
Page 40

Chapter 5 — Control Code Definitions
Line Feed
Perform Line Feed
Prints and then clears the contents of the print buffer, resets the character
count to zero; and advances the printhead to the next print line, using the
current spacing. The position of the carriage is not affected and a
carriage return is not executed.
Format
Decimal Hex ASCII
10 0A LF
Perform n/216-inch Line Feed
Advances the paper to n/216 of an inch. This does not affect subsequent
line feeds. Range of n is 0-255.
Format
Decimal Hex ASCII
27 74 n 1B 4A n ESC “J” n
Perform n/216-inch Reverse Line Feed
Reverses the line feed by n/216 of an inch. This does not affect
subsequent line feeds. Range of n is 0-255.
Format
Decimal Hex ASCII
27 106 n 1B 6A n ESC “j” n
Perform Master Reset
Initializes the printer and restores factory installed printer defaults, (see
“Factory-Installed Printer Defaults” on page 175 for a complete list
of settings that are initialized with this command).
Format
Decimal Hex ASCII
27 64 1B 40 ESC “@”
62 6822 Series 80-Column Printer User’s Manual
Page 41

Set Print Position (absolute)
Moves the printhead to an absolute horizontal position on the paper . The
distance is specified in dots from the left margin to the new print position
(at which subsequent characters are printed). Each dot represents 1/60 of
an inch. The values for n1 and n2 determine the distance, as follows:
number of dots = n1 + (n2 * 256)
Maximum position is 480. The previous contents of the current print
buffer is printed.
If the position specified moves the printhead outside the current margins,
the command is ignored and the previous setting remains in effect. This
command is also ignored in right, center, and full justification modes.
Format
Decimal Hex ASCII
27 36 n1 n2 1B 24 n1 n2 ESC “$” n1 n2
Set Print Position (relative)
Moves the printhead to a horizontal position on the paper, relative to the
current printhead position. The distance specified is in dots. To
determine n1 and n2, first calculate the displacement required in
1/120ths of an inch. If the displacement is to the left, subtract it from
65536. The values for n1 and n2 determine the distance, as follows:
Chapter 5 — Control Code Definitions
number of dots = n1 + (n2 * 256)
Maximum displacement is ±960. If the position specified would place
the printhead outside the current margins, this function is ignored and the
previous setting remains in effect. This function is also ignored in right,
center, and full justification modes.
Format
Decimal Hex ASCII
27 92 n1 n2 1B 5C n1 n2 ESC “\” n1 n2
6822 Series 80-Column Printer User’s Manual 63
Page 42

Chapter 5 — Control Code Definitions
Select Top-Down Printing
Enables top-down printing (factory default). First page is printed first.
Format
Decimal Hex ASCII
27 31 0 1B 1F 00 ESC US (0)
Select Bottom-Up Printing
Enables bottom-up printing. The last page is printed first.
Format
Decimal Hex ASCII
27 31 1 1B 1F 01 ESC US (1)
Select Unidirectional Printing
Turns on unidirectional printing mode. Unidirectional printing moves
the printhead from left-to-right only, allowing for more accurate print
positioning during text mode printing.
Format
Decimal Hex ASCII
27 85 1* 1B 55 01* ESC “U” 1*
Cancel Unidirectional Printing
Turns off unidirectional printing (facto ry default), allowing the printhead
to print in both directions
Format
Decimal Hex ASCII
27 85 0* 1B 55 00) ESC “U” 0*
64 6822 Series 80-Column Printer User’s Manual
Page 43

Select Unidirectional (one line) Printing
Turns on unidirectional printing for the current line only. The contents of
the print buffer is printed, and cleared before setting this mode. This
allows more accurate print positioning during text mode printing, for the
current line.
Format
Decimal Hex ASCII
27 60 1B 3C ESC “<”
Page Formatting Functions
This set of functions consists of control codes that change the formatting
of the page. The page length (form length) and margin settings define the
printable area on the page. These settings need to conform to the actual
size of the paper used in the printer. The line spacing functions set the
amount of space from one line to the next, for line feeds. The factory
default is 1/6 inch (6 lines per inch). The page length, vertical tab, and
skip over perforation functions are also dependent on the line spacing
function.
Chapter 5 — Control Code Definitions
Set Page Length (lines)
Sets the length of the paper in lines, where the range of n (number of
lines) is 1-127 (default = 66). Keep in mind the line spacing and actual
length of the paper when specifying this value, since this function is
dependent on those parameters. Top-of-Form is reset to the current line
and the Skip Over Perforation setting is canceled.
Format
Decimal Hex ASCII
27 67 n 1B 43 n ESC “C” n
6822 Series 80-Column Printer User’s Manual 65
Page 44

Chapter 5 — Control Code Definitions
Set Page Length (inches)
Sets thee length of the paper in inches, where the range of n (number of
inches) is 1-22 (default = 11). Keep in mind the line spacing and actual
length of the paper when specifying this value, since this function is
dependent on those parameters. Top-of-Form is reset to the current line
and the Skip Over Perforation setting is canceled.
Format
Decimal Hex ASCII
27 67 0 n 1B 43 00 n ESC “C” NUL n
Select 1/8-inch Line Spacing
Sets the line spacing is set to 1/8 of an inch (8 lines per inch), for
subsequent lines.
Format
Decimal Hex ASCII
27 48 1B 30 ESC “0”
Select 7/72-inch Line Spacing (7 dots)
Sets the line spacing to 7/72 of an inch (approximately 9.7 lines per
inch), for subsequent lines.
Format
Decimal Hex ASCII
27 49 1B 31 ESC “1”
Select 1/6-inch Line Spacing
Sets the line spacing to 1/6 of an inch (6 lines per inch), for subsequent
lines (factory default). 1/6 inch is equal to 12 dot spacing.
Format
Decimal Hex ASCII
27 50 1B 32 ESC “2”
66 6822 Series 80-Column Printer User’s Manual
Page 45

Format
Format
Chapter 5 — Control Code Definitions
Select n/216-inch Line Spacing
Sets the line spacing to n/216 of an inch, for subsequent lines. A spacing
of 1/216 inch is 1/3 the distance between pins of the printhead
(approximately 1/3 of a dot) and 27/216 is 8 lines per inch. Range of n is
0-255.
Decimal Hex ASCII
27 51 n 1B 33 n ESC “33” n
Select n/72-inch Line Spacing (n dots)
Sets the line spacing to n/72 of an inch, for subsequent lines. A spacing
of 1/72 inch (1 point in font size) is the distance between pins on the
printhead (approximately 1 dot) and 9/72 is 8 lines per inch. Range of n
is 0-85.
Decimal Hex ASCII
27 59 n 1B 41 n ESC “A” n
Set Right Margin
Clears all text in the print buffer and sets the right margin to n columns,
using the current character pitch. This is the number of the characters
from column 1 (at the left edge of the paper) to the last column before
the right margin (factory default = 80).
Minimum space between margins is the width of one double-width pica
character. Maximum value for this is the maximum number of characters
(based on the current pitch) that would fit between the left margin and
the right edge of the default printable area of the page. Ranges shown
below could vary, depending on values of other parameters that affect
character width. If the value specified is not within the allowed range, it
is ignored.
6822 Series 80-Column Printer User’s Manual 67
Page 46

Chapter 5 — Control Code Definitions
Range of n is 2-80 in Pica mode, 2-96 in Elite mode, and 2-13 6 in
Compressed mode.
Format
Decimal Hex ASCII
27 81 n 1B 51 n ESC “Q” n
Set Left Margin
Clears the print buffer text and sets the left margin, relative to the
number of columns to the left of the first column to print
(factory default = 0).
Minimum space between margins is the width of one double-width pica
character. Maximum value must be less than the right margin. Ranges
shown below could vary, pending on other parameter values that affect
character width. If the specified value is not within the range, it is
ignored.
Range of n is 0-78 in Pica mode; 0-93 in Elite mode, and 0-133 in
Compressed mode.
Format
Decimal Hex ASCII
27 108 n 1B 6C n ESC “l” n
Set Skip Over Perforation
Defines the number of lines to skip between the last printed line on the
page and the first printed line on the next page is set. If the value
specified for this function is greater than the page length, it is ignored.
This function is canceled by using one of the Set Page Length functio ns
(factory default = disabled). This function is valid for continuous paper
only.
The amount of space left blank at the bottom of the printed page is
dependent upon the current Line Spacing.
Format
Decimal Hex ASCII
27 78 n 1B 4E n ESC “N” n
68 6822 Series 80-Column Printer User’s Manual
Page 47
Chapter 5 — Control Code Definitions
Cancel Skip Over Perforation
Cancels the skip over perforation, which allows the maximum number of
lines to print on each page.
Format
Decimal Hex ASCII
27 79 1B 4F ESC “O”
Character Style and Text Mode Functions
The following set of functions affect the appearance of text on the
printed page. This could involve size, typeface, or other characteristics
of the text.
Select Condensed Mode (compressed)
Selects condensed mode which prints characters at approximately 60%
of the normal width. This results in character pitches, as shown below
(for exact pitch values, see “Master Select” on page 74).
Character Pitches
Condensed Mode Condensed + Expanded Condensed + Elite
17 cpi (approximate) 9 cpi (approximate) 20 cpi (approximate)
This function empties the print buffer and turns compressed mode on,
and stays on until canceled by Cancel Compressed Mode, ESC SI or
DC2 (factory default = disabled).
Note: This function is not supported in Double-Byte Character
Sets (DBCS).
Format
Decimal Hex ASCII
27 15 1B 0F ESC SI
15 0F SI
6822 Series 80-Column Printer User’s Manual 69
Page 48

Chapter 5 — Control Code Definitions
Cancel Condensed Mode
Cancels the compressed mode, enabled by Select Compressed Mode, SI
or ESC SI (1).
Note: This function is not supported in DBCS.
Format
Decimal Hex ASCII
27 18 1B 12 DC2
18 12 DC2
Select Double-Strike Mode
Enables double-strike printing, until Cancel Double-Strike Mode is
encountered. Factory default disables double-strike. Text is made bolder
by printing each dot twice, with the second dot slightly below the first
dot. This mode is not available in NLQ, but is not canceled when you
select NLQ.
Note: This function is not supported in DBCS.
Format
Decimal Hex ASCII
27 71 1B 47 ESC “G”
Cancel Double-Strike Mode
Cancels Double-Strike Mode.
Note: This function is not supported in DBCS.
Format
Decimal Hex ASCII
27 72 1B 48 ESC “H”
70 6822 Series 80-Column Printer User’s Manual
Page 49

Format
Chapter 5 — Control Code Definitions
Select Double-Wide Mode
Enables expanded print for the current line only. The mode set
previously returns on subsequent lines. However, expanded print can be
canceled with Cancel Expanded Print, DC4 or ESC “W” (0), before end
of current line, or wrapping of the print buffer. This works with all three
pitches (Pica, Elite, Compressed).
This mode is also terminated by the execution of a Carriage Return, Line
Feed, Form Feed, Vertical Tab or wrapping of the print buffer.
Note: This function is not supported in DBCS.
Decimal Hex ASCII
27 14 1B 0E ESC SO
14 0E SO
Cancel Double-Wide Print
Cancels expanded print for the current line only. Modes set previously
return on subsequent lines. However, it does not cancel expanded mode
set by Select Double-Wide (expanded) Mode, ESC “W” (1) or Master
Select, ESC “!”.
Note: This function is not supported in DBCS.
Format
Decimal Hex ASCII
27 20 1B 14 DC4
20 14 DC4
Select Double-Wide Mode
Enables expanded print until Cancel Expanded Print is encountered.
Factory default disables double-wide mode.
Note: This function is not supported in DBCS.
6822 Series 80-Column Printer User’s Manual 71
Page 50

Chapter 5 — Control Code Definitions
Format
Decimal Hex ASCII
27 87 1* 1B 57 01* ESC “W” 1*
Cancel Double-Wide Mode
Cancels Double-Wide Print mode.
Note: This function is not supported in DBCS.
Format
Decimal Hex ASCII
27 87 0* 1B 57 00* ESC “W” 0
Select Elite Pitch
A character pitch of 12 cpi (characters per inch) is selected. This also
cancels Pica Pitch (factory default = Pica).
Note: This function is not supported in DBCS.
Format
Decimal Hex ASCII
27 77 1B 4D ESC “M”
Select Emphasized Print Mode
Enables Emphasized Print mode until Cancel Emphasized Mode is
encountered. The text is made bolder by printing each dot twice, with the
second dot slightly to the right of the first dot. Factory default disables
Emphasized mode.
Note: This function is not supported in DBCS.
72 6822 Series 80-Column Printer User’s Manual
Page 51

Format
Decimal Hex ASCII
27 69 1B 4B ESC “E”
Cancel Emphasized Print Mode
Cancels Emphasized Pring mode.
Note: This function is not supported in DBCS.
Format
Decimal Hex ASCII
27 70 1B 46 ESC “F”
Defining Intercharacter Space
Defines the amount of space to the right of each character, in addition to
the space allowed in the character design. The variable n represents the
number of units of space, with each unit equal to 1/120 of an inch. Range
of values for n is 0-63 with a factory default of 0.
Chapter 5 — Control Code Definitions
Format
Decimal Hex ASCII
27 32 n 1B 20 n ESC SP n
Select Italic Mode
The text (nongraphic) characters are italicized. Factory default disables
Italic mode.
Note: This function does not work well with DBCS or alternate
Single Byte Character Sets (SBCS).
Format
Decimal Hex ASCII
27 52 1B 34 ESC “4”
6822 Series 80-Column Printer User’s Manual 73
Page 52

Chapter 5 — Control Code Definitions
Cancel Italic Mode
Cancels the Italic mode.
Note: This function does not work well with DBCS or alternate
Single Byte Character Sets (SBCS).
Format
Decimal Hex ASCII
27 53 1B 35 ESC “5”
Master Select
Allows you to specify a combination of print modes. The variable n is
determined by combining values for the desired modes, by adding them
together.
Note: This function is not supported in DBCS.
Format
Decimal Hex ASCII
27 33 n 1B 21 n ESC “!” n
Valid combinations of the values in the following table include any
combinations except that Pica cannot combine with Elite.
Example
Pica Compressed Italic Underlined, by adding values (00h + 04h + 40h +
80h), which results in C4h for the value of n.
Master Select Values
Hex Value Mode
00h Pica
01h Elite
04h Condensed (compressed)
08h Emphasized
10h Double-Strike
20h Double-Width (expanded)
74 6822 Series 80-Column Printer User’s Manual
Page 53

Master Select Values (continued)
Hex Value Mode
40h Italic
80h Underlined
The following print conflicts occur between modes. A mode in any
column takes precedence over all modes in the columns to its right.
Print Conflicts
1 2 3
Elite Emphasized Compressed
The following print modes can be combined producing different pitches:
Print Modes
Pitch Mode
5 cpi Expanded
6 cpi Expanded Elite
8.58 cpi Expanded Compressed
10 cpi Pica
12 cpi Elite
17.16 cpi Compressed
Chapter 5 — Control Code Definitions
Select Pica Pitch
Selecta a character pitch of 10 cpi (characters per inch) (factory default).
This also cancels Elite pitch.
Note: This function is not supported in DBCS.
Format
Decimal Hex ASCII
27 60 1B 50 ESC “P”
6822 Series 80-Column Printer User’s Manual 75
Page 54

Chapter 5 — Control Code Definitions
Select Superscript Mode
Prints all subsequent characters in approximately 2/3 the normal height
in the upper part of the character space, until Cancel Subscript/
Superscript is encountered.
Note: This function is not supported in DBCS.
Format
Decimal Hex ASCII
27 83 0* 1B 53 00* ESC “S” 0*
Select Subscript Mode
Prints all subsequent characters in approximately 2/3 the normal height
in the lower part of the character space, until Cancel Subscript/
Superscript is encountered.
Note: This function is not supported in DBCS.
Format
Decimal Hex ASCII
27 83 1* 1B 53 01* ESC “S” 1*
Cancel Subscript/Superscript Mode
Cancels the effects produced by Select Superscript Mode and Select
Subscript Mode. Factory default also disables both of these modes.
Note: This function is not supported in DBCS.
Format
Decimal Hex ASCII
27 84 1B 54 ESC “T”
76 6822 Series 80-Column Printer User’s Manual
Page 55

Select Underline Mode
Enables the underlining of all subsequent characters (including spaces)
until the Cancel Underline mode function is encountered.
Format
Decimal Hex ASCII
27 45 1* 1B 2D 01* ESC “–” 1*
Cancel Underline Mode
Cancels the effect of the Select Underline mode. Factory default also
disables the Underline mode.
Format
Decimal Hex ASCII
27 45 0* 1B 2D 00* ESC “–” 0*
Tabs and Tab Setting Functions
There are control codes for setting horizontal and vertical tabs.
Horizontal tabs:
Chapter 5 — Control Code Definitions
• Are not affected by subsequent changes in pitch.
• May range up to maximum width for character and printer size.
• All previous tab stops are cleared when new tab stops are set. If the
left margin is changed after the horizontal tabs are set, tab stops are
cleared.
• Become absolute positions and are not affected by any subsequent
change in character size.
• Set outside of the printable area are ignored.
Vertical tabs:
• Tab positions are line numbers, counting from the Top of Form.
• All tabs set beyond the page length are stored, but are not used.
• Any tab set within the SOP range (Skip Over Perforation), during the
time SOP is active, are stored but not used until SOP is canceled.
6822 Series 80-Column Printer User’s Manual 77
Page 56

Chapter 5 — Control Code Definitions
• If a vertical tab, and the next tab stop is outside the printable page
area, a form feed is executed placing the printhead at the next Top of
Form.
• Previous tab stops are cleared when new tab stops are set.
• Are not affected by subsequent changes in line spacing.
Perform Horizontal Tab
Moves the print position to the next horizontal tab stop. The tab
positions, set by ESC “D”, the Set Horizontal Tabs function, are not
affected by any changes in character pitch.
The factory default tab settings are at intervals of eight characters, in the
currently selected pitch. For the default tabs, the actual distance to each
tab position is affected by changes in character pitch.
Format
Decimal Hex ASCII
909HT
Set Horizontal Tabs
Resets the current horizontal tabs, and new horizontal tabs are set up,
based on the current character width (pitch).
Format
Decimal Hex ASCII
27 68 n1 n2 ..nk 0 1B 44 n1 n2 .. nk 00 ESC “D” n1 n2 .. nk NUL
n1 is the first tab (range for tab stops: 1-160), n2 is the second tab (all
tabs in ascending order), ... are subsequent tabs (maximum tabs: 32), nk
is the last tab to set (any value less than the previous tab value acts as a
terminating character), NUL is the terminating character.
78 6822 Series 80-Column Printer User’s Manual
Page 57

Format
Format
Chapter 5 — Control Code Definitions
Clear Horizontal Tabs
Clears all horizontal tab stops. It is merely a variant behavior of the Set
Horizontal Tabs function, where the NUL acts as an early terminating
character, as existing tabs normally clear before setting any new tabs.
Decimal Hex ASCII
27 68 0 1B 44 00 ESC “D” NUL
Perform Vertical Tab
Prints the contents of the current print buffer, and then moves the print
position to the next vertical tab stop. If no channel is selected, then
channel 0 is used. The carriage position is changed to the start of the next
print line. If the vertical tab is performed beyond the last tab position set
or beyond the last line of a form, then a form feed is performed. If no
vertical tabs are defined, then the paper advances one line, using the
currently selected line spacing, without changing the carriage position.
Decimal Hex ASCII
11 0B VT
Set Vertical Tabs
Resets the current tabs, and vertical tabs are set up, based on the current
line spacing. Tab settings are not affected by subsequent changes in line
spacing.
Format
Decimal Hex ASCII
27 66 n1 n2 .. nk 0 1B 42 n1 n2 .. nk 00 ESC “B” n1 n2 .. nk NUL
n1 is the first tab (range of values for tab stops: 1-255), n2 is the second
tab (all tabs must be in ascending order), ... are subsequent tabs
(maximum number of tabs: 16), nk is the last tab to set (any value less
than the previous tab value acts as a terminating character), NUL is the
terminating character. All tab settings with this function are stored in
channel 0.
6822 Series 80-Column Printer User’s Manual 79
Page 58

Chapter 5 — Control Code Definitions
Clear Vertical Tabs
Clears all vertical tab stops . This is a variant behavior of the Set Vertical
Tabs function, where the NUL acts as an early terminating character.
Format
Decimal Hex ASCII
27 66 0 1B 42 00 ESC “B” NUL
Set Vertical Tabs in Channel
This function works the same as the Set Vertical Tabs function, except
that it stores the tabs into a specified channel, as specified by the variable
c. This channel is selected for use by the Select Vertical Tab Channel
function.
Format
Decimal Hex ASCII
27 98 c n1 n2 .. nk 0 1B 62 c n1 n2 .. nk 00 ESC “b” c n1 n2 .. nk NUL
c is the channel number (range: 0-7), n1 is the first tab (range of values
for tab stops: 1-255), n2 is the second tab (all tabs must be in ascending
order), ... are subsequent tabs (maximum number of tabs: 16), nk is the
last tab to set (any value less than the previous tab value acts as a
terminating character), and NUL is the terminating character.
Clear Vertical Tabs in Channel
Clears all vertical tab stops in the specified channel. This is merely a
variant behavior of the Set Vertical Tabs in Channel function, where the
NUL acts as an early terminating character, since this function normally
clears the existing tabs before setting any new tabs.
Format
Decimal Hex ASCII
27 98 c 0 1B 62 c 00 ESC “b” c NUL
80 6822 Series 80-Column Printer User’s Manual
Page 59

Chapter 5 — Control Code Definitions
Select Vertical Tab Channel
Selects a specified vertical tab channel. It sets up the current tabs from
that channel. Once this function is performed, all subsequent Perform
Vertical Tab commands use the tab stops from the list retrieved from the
specified channel. At power on, the printer uses the tabs stored in
channel 0.
Format
Decimal Hex ASCII
27 47 c 1B 2F c ESC “/” c
c is the channel number (range: 0-7).
Using Character Sets and User-Defined Functions
You can install different character sets on the printer. In some cases more
than one character set may be present at one time, depending on the
amount of available font memory. The 6822 reserves 438K of memory for
installing fonts in flash memory. You can install fonts using NPCP or the
Printer Configuration Utility.
Single-Byte Character Sets
Single-byte character sets (SBCS) are supported for MS-DOS, PL/N, and
Intermec application compatibility. Nft00000.mod is the default character
set (font) for compatibility with the 6822 80-Column Printer.
Nft00437.mod is the IBM/Microsoft compatible character set for code
page 437.
6822 Series 80-Column Printer User’s Manual 81
Page 60

Chapter 5 — Control Code Definitions
Double-Byte Character Sets
Double-byte character (DBCS) sets require two bytes to send to the
printer to define the character to print. The first byte of the character
code sent to the printer is known as a lead-in byte. The second byte of
the character code is known as the trailing byte. Different character sets
have different requirements for the values of both lead-in and trailing
byte. When the lead-in byte does not fall in the range listed for the
character set, a character from a SBCS may print. The following doublebyte character sets are supported by the 6822.
Double Byte Character Sets
Code
Font Module
nft00936.mod 936 GB 2312 Chinese
nft00950.mod 950 big 5 Traditional
nft00932.mod 932 Shift JIS Japanese 81h–9Fh
nft00949.mod 949 KSC 5601 Korean A1h–ACh
Page
DBCS Languages Lead-in Byte Trailing Byte
A1h–ABh
(simplified)
Chinese
B0h–F7h
A1h–C6h
C9h–F9h
E0h–FCh
B0h–C8h
CAh–FDh
A1h–FEh
40h–FEh (except
7Fh)
40h–FCh (except
7Fh)
A1h–FEh
Multi-Byte Character Sets
Double-byte character sets and single-byte character sets can mix when
printing a report. This mixture is referred to as a Multi-Byte Character
Set (MBCS). When a DBCS is selected, the characters from the SBCS
code page currently selected are used for rendering character codes and
control codes from 0 to 127. Codes above 127 (that fall within the range
of lead-in bytes for the selected character set) treat the byte that follows
as a trailing byte for that character set. Otherwise, for character codes
above 128, the character code from the selected SBCS is printed.
NFT00950.MOD (BIG 5 DBCS) does not allow the MBCS mode. For
this character set, only control codes from 0-31 are treated as single byte
characters when they are not proceeded by a lead-in byte. All escape
sequence character strings are treated as SBCS.
82 6822 Series 80-Column Printer User’s Manual
Page 61

Format
Chapter 5 — Control Code Definitions
Select National Character Set
By default, code page 0 is selected by the printer at reset. Use the
following escape sequence to select international character support.
Escape sequence codes can only be used for code page 0. All other code
pages use direct character code mapping to select the appropriate font for
rendering.
Decimal Hex ASCII
27 82 n 1B 52 n ESC “R” n
n is 0-14 and is the country code, as shown in the International Character
Sets table on the next page. The default value for n is zero (USA).
A full 256 character set is not provided for these sets. There are 64
international characters stored in ROM, 32 in Roman and 32 in Italic.
They are stored as codes 0-31 and 128-255. These are normally not
accessible. The ESC
only 12 characters at a time. These 12 are available in these positions of
the ASCII character table: 35, 36, 64, 91, 92, 93, 94, 96, 123, 124, 125,
and 126, as shown in the International Character Sets table.
“R” command makes these codes available, but
International Character Sets
Country
USA 0 # $ @ [ \ ] ^ ‘ { | } ~
France 1 # $ à º ç § ^ ‘ é ù è ¨
Germany 2 #$§ÄÖÜ^‘ ä ö üb
England (UK) 3 £ $ @ [ \ ] ^ ‘ { | } ~
Denmark 1 4 # $ @ Æ Ø Å ^ ‘ æ ø å ~
Sweden 5 # ¤ É Ä Ö Å Ü é ä Ö å ü
Italy 6 # $ @ º \ é ^ ù à è ì
Spain 1 7 P $ @ ¡ Ñ ¿ ^ ‘ ¨ ñ } ~
Japan 8 # $ @ [ ¥ ] ^ ‘ { | } ~
Norway 9 # ¤ É Æ Ø Å Ü é æ ø å ü
Denmark 2 10 # $ É Æ Ø Å Ü é æ ø å ü
Spain 2 11 # $ á ¡ Ñ ¿ é ‘ í ñ ó ú
Latin America 12 # $ á ¡ Ñ ¿ é ü í ñ ó ú
6822 Series 80-Column Printer User’s Manual 83
Country
Number
35 36 64 91 92 93 94 96 123 124 125 126
Page 62

Chapter 5 — Control Code Definitions
International Character Sets (continued)
Country
Hebrew 13 Hebrew fon ts are available in the supplied fo nt files. See
Greek 14 Greek fonts are available in the supplied font files. See the
Country
Number
35 36 64 91 92 93 94 96 123 124 125 126
“Hebrew Character Fonts” below.
“Greek Character Sets” on page 85.
Hebrew Character Fonts
Hebrew characters represented by decimal values 38 and 65 through 90
are represented by the following 7x7 font descriptions.
*.*.*.. ....*.* *.*.*.* *.*.*.* ....*.* *.*.*.* *.*.*.* *..*.*.
....*.. ......* .....*. .....*. ......* ...*... .*...*. *..*..*
....*.. ....*.* .....*. *....*. ......* ...*... *....*. *..*..*
....*.. ...*..* .....*. *....*. ......* ...*... *....*. *.....*
*.*.*.* ..*...* .....*. *....*. ......* ...*... *....*. *....*.
....... ....... ....... ....... ....... ....... ....... *.*.*..
....... ....... ....... ....... ....... ....... ....... .......
65 66 67 68 69 70 71 72
....... ....... ....... *...... ....... ....... ....... .......
....*.* ..*.*.* *.*.*.. *.*.*.* *.*.*.* *..*... ....*.* ....*.*
......* ......* ......* ......* *.....* .*.*.*. ......* ......*
......* ......* ......* .....*. *.....* ..*...* ......* ......*
....... ......* ......* ....*.. *.....* .*....* ......* ......*
....... ......* *.*.*.. .*.*... *.*.*.* *...*.* ......* ..*.*.*
....... ....... ....... ....... ....... ....... ....... .......
....... ....... ....... ....... ....... ....... ....... .......
73 74 75 76 77 78 79 80
....... ....... ....... ....... ....... ....... ....... .......
*.*.*.* *.....* *.*.*.* *.*.*.. *....*. *.....* *.*.*.* *.*.*.*
..*...* *.....* *.....* *.....* .*..*.. .*...*. ......* ......*
.*....* .*...*. *.*...* *.*...* ..*.*.. ...*... .*....* ......*
*....*. ..*.*.. ......* ......* ......* .....*. *.*.*.* ......*
*.*.*.. *.*.*.* ......* *.*.*.. ......* *.*.*.* *...... ......*
....... ....... ......* ....... ......* ....... *...... .......
....... ....... ....... ....... ....... ....... ....... .......
81 82 83 84 85 86 87 88
84 6822 Series 80-Column Printer User’s Manual
Page 63

Chapter 5 — Control Code Definitions
.....*. ....... .......
*..*..* ..*.*.* *.....*
*..*..* ..*...* .*....*
*..*..* ..*...* .*.*.*.
*.*..*. ..*...* *....*.
*...*.. *.*...* *.....*
....... ....... .......
....... ....... .......
89 90 91
Greek Character Sets
Dec Hex Chr Dec Hex Chr Dec Hex Chr
97 61 A 105 69 I 113 71 P
98 62 B 106 6a K 114 72 S
99 63 G 107 6b L 115 73 T
100 64 D 108 6c M 116 74 Y
101 65 E 109 6d N 117 75 F
102 66 Z 110 6e X 118 76 X
103 67 H 111 6f O 119 77 Y
104 68 q 112 70 P 120 78 W
The selected set stays in effect until the printer is reset and receives a
Master Reset command, or a new international character set is selected.
Note: This function is only used with the default character set.
User Defined Characters
This code addresses user-defined characters and selection into memory.
Note: RAM-based definition or redefinition of standard
characters is only useful when the default SBCS code page is
selected. There is no method to redefine characters in the other
code pages, since unique code pages can be created and loaded
into the printer memory.
6822 Series 80-Column Printer User’s Manual 85
Page 64

Chapter 5 — Control Code Definitions
Copy ROM to RAM
The characters in ROM are copied into RAM, so a complete
user-defined character set is created by editing selected characters. This
ensures that all characters are defined when a user-defined character set
is selected. This eliminates the need to cancel th e selection when printing
defined characters.
Note: This function is only useful with the default SBCS.
Format
Decimal Hex ASCII
27 58 0 0 0 1B 3A 00 00 00 ESC “.” NUL NUL NUL
Define User-Defined Characters
Characters are redefined by the user in the currently selected mode.
However, they can only be used in draft mode.
Note: This function is only useful with the default SBCS.
Format
Decimal Hex ASCII
27 38 0 k1 k2 s1
d1 ... d11
1B 26 00 k1 k2 s1
d1 ... d11
ESC “&” k1 k2 s1
d1.....d11
k1 is the character code of the first character to redefine, k2 is the
character code of the last character to redefine (any character between
0-255 can be redefined), and (k1 could equal k2, if only one character is
defined).
For each character defined, you must supply 12 bytes of data.
• s1 is the first byte that describes the character format
• Bits 0-3 represent the end position in the grid
• Bits 4-6 represent the start position in the grid
• Bit 7 determines whether the character uses the top eight pins or the
bottom eight pins of the printhead. If bit 7 = 0, the top eight pins are
86 6822 Series 80-Column Printer User’s Manual
Page 65

Chapter 5 — Control Code Definitions
used. If bit 7 = 1, the bottom eight pins are used. The start and end
positions are ignored during character imaging, but must be accurate
to redefine the character code. d1...d11 is the data that comprises the
dot image pattern of the defined character.
When printable code expansion is enabled with ESC I, the Printable
Code Area Expansion function, and the user-defined character set is
selected with ESC “%” (1), the Select User-Defined Set function, then
the codes (less than 20h and greater than 7Fh) can be defined for use and
are printable.
When printable code expansion is enabled with the Enable Printing of
Codes 128-159 function, and the user-defined character set is selected
with the Select User-Defined Set function, then codes (between 80h and
9Fh) can be defined for use and are printable.
For a list of these characters, refer to the “Printable Code Expansion
Characters” on page 89
Select User-Defined Character Set
A user-defined character set can be selected, after the Define
User-Defined Characters function is used to define the character set.
Note: This function is only useful with the default SBCS.
Format
Decimal Hex ASCII
27 37 1 1B 25 01 ESC “%” (1)
Select Default Character Set
If the Select User-Defined Set function was previously set, this function
switches back to the default character set.
Note: This function is only useful with the default SBCS.
Format
Decimal Hex ASCII
27 37 0 1B 25 00 ESC “%” (0)
6822 Series 80-Column Printer User’s Manual 87
Page 66

Chapter 5 — Control Code Definitions
Enable Printing of Codes 128-159
All codes (128-159) are treated as printable characters, rather than
control codes, with this function. This allows the use of these characters
for user-defined characters. A user-defined set must be selected, using
the Select User-Defined Set function, before these characters can print.
Factory default disables printing of these codes..
Note: This function can only be used when the default SBCS is
selected.
Format
Decimal Hex ASCII
27 54 1B 36 ESC “6”
Disable Printing of Codes 128-159
Disables the printing of codes 128-159. By default, these codes are
disabled.
Format
Decimal Hex ASCII
27 55 1B 37 ESC “7”
Expand Printable Code Area
This function allows certain ASCII codes (00h to 1Fh) and codes (80h to
9Fh) to print when the variable n is set to the value of 1. This allows the
use of these codes for user-defined characters. If n = 0, the function
returns these two ranges of characters to non-printable control codes. A
user-defined character set must be selected by ESC “%” (1), the Enable
Printing of Codes 128-159 function, before these codes can print. In both
ranges, only the following codes can redefine as printable characters.
Codes not listed, within the range (00h-1Fh), print as standard control
codes. Codes not listed, within the range (80h-9Fh), are converted to a
control code in the range of (00h-1Fh), by subtraction of 80h.
Note: This function is only useful with the default SBCS.
88 6822 Series 80-Column Printer User’s Manual
Page 67

Chapter 5 — Control Code Definitions
Format
Decimal Hex ASCII
27 73 n 1B 49 n ESC “I” n
Printable Code Expansion Characters
Hex ASCII Hex ASCII Hex ASCII Hex ASCII
00 NUL 11 DC1 80 none 91 none
01 SOH 15 NAK 81 none 95 none
02 STX 16 SYN 82 none 96 none
03 ETX 17 ETB 83 none 97 none
04 EOT 1C FS 84 none 9C none
05 ENQ 1D GS 85 none 9D none
06 ACK 1E RS 86 none 9E none
10 DLE 1F US 90 none 9F none
Enable Printing of Character Graphics
Enables the printing of character graphics, until disabled with the
Disable Printing of Character Graphics function.
Note: This function is only useful with the default SBCS.
Format
Decimal Hex ASCII
27 116 1 1B 74 01 ESC “t” (1)
For character values from 0 to 31 (00h-1Fh):
• When the default SBCS code page is selected, the FX-86e IBM
character graphics symbol set is printed.
• When other SBCS code pages are selected, the codes (00h-1Fh),
listed above in the Printable Code Expansion Characters table are
printed.
For character values from 32 to 126 (20h-7Eh):
6822 Series 80-Column Printer User’s Manual 89
Page 68

Chapter 5 — Control Code Definitions
• When the default SBCS code page is selected, the selected
international character set is printed.
• When other SBCS code pages are selected, the international
character set selection is not in effect.
For the character value 127 (7Fh):
• When the default SBCS code page is selected, a space is printed
• When other SBCS code pages are selected, the character associated
with the code page is printed.
For character values from 128 to 255 (80h-FFh), the FX-86e Epson
Character Graphics set is printed.
Disable Printing of Character Graphics
Disables the printing of character graphics. Factory default disables this
function.
Format
Decimal Hex ASCII
27 116 0 1B 74 00 ESC “t” (0)
Printing Character Graphics
This function allows printing of character graphics from the currently
selected SBCS code page, by sending a graphics string to t he printer . The
values of the graphics data bytes can range between 0-255.
Format
Decimal Hex ASCII
27 43 n d1 ... dn 1B 2B n d1 ... dn ESC “+” n d1 ... dn
n is the length of the character graphic string and d1 ... dn are the
character graphics data stream.
The number of data bytes must be equal to the value of the variable n.
The range of values (for the characters in each graphics data byte):
0-255.
For character values from 0 to 31 (00h-1Fh):
90 6822 Series 80-Column Printer User’s Manual
Page 69

Chapter 5 — Control Code Definitions
• When the default SBCS code page is selected, the FX-86e IBM
character graphics symbol set is printed.
• When other SBCS code pages are selected, currently selected single
byte code page character graphics are printed.
For character values from 32 to 126 (20h-7Eh):
• When the default SBCS code page is selected, the selected
international character set is printed.
• When other SBCS code pages are selected, the character from the
currently selected code page are printed.
For the character value 127 (7Fh):
• When the default SBCS code page is selected, a space is printed
• When other SBCS code pages are selected, the character graphics
symbol is printed.
For character values from 128 to 255 (80h-FFh):
• When the default SBCS code page is selected, the FX-86e Epson
Character Graphics set is printed.
• When other SBCS code pages are selected, the corresponding
character is printed.
Graphics Functions
Eight-Pin Graphics Modes
All 8-pin graphics functions require parameters, n1 and n2, which
represent the length of the graphics string that follows the Select
Graphics Mode command, and are calculated as follows (assuming a
temporary variable n):
• n = total number of graphics dots needed for the graphic string
• n2 = integer of (n divided by 256)
• n1 = remainder of the n2 calculation
The simplest calculation, is to divide n (total number of dots needed for
the graphics string) by 256. Then n2 is the quotient (the whole number)
and n1 is the remainder . If you require less than 256 do ts (columns), then
n1 indicates the number of dots and n2 is set to zero.
6822 Series 80-Column Printer User’s Manual 91
Page 70

Chapter 5 — Control Code Definitions
Select Graphics Mode
Enables the Graphics moderepresented by the variable m in the Graphic
Modes table. The total number of dot columns to print is represented by
n1 and n2. Any graphic string that exceeds the length of the print line is
discarded.
Format
Decimal Hex ASCII
27 42 m n1 n2 1B 2A m n1 n2 ESC “*” m n1 n2
Reassign Graphics Mode
Changes Graphic modes.
Format
Decimal Hex ASCII
27 63 s n 1B 3F s n ESC “?” s n
s is one of the K, I, Y, or Z characters and n is one of the 0-7 modes as
shown in Graphic Modes table.
Graphic Modes
Mode m Dots per Inch / Dots per 8 in Line
Single-density 0 60 dots per inch, 480 dots per 8 in line
Low Speed Double–density 1 120 dots per inch, 960 dots per 8 in line
*High Speed Double-density 2 120 dots per inch, 920 dots per 8 in line
*Low-Speed Quadruple-density 3 240 dots per inch, 1920 dots per 8 in line
CRT I 4 60 dots per inch, 480 dots per 8 in line
Single–Density Plotter 5 72 dots per inch, 576 dots per 8 in line
CRT II 6 90 dots per inch, 720 dots per 8 in line
*Double-Density Plotter 7 144 dots per inch, 1152 dots per 8 in line
*Adjacent dots in a given row cannot be printed in these modes.
92 6822 Series 80-Column Printer User’s Manual
Page 71

Format
Format
Chapter 5 — Control Code Definitions
Select Single Density Graphics Mode
This is a simple method of printing graphics. The resolution is 60 dots
per inch. Each 8 in line can accommodate 480 columns of graphic dots.
A graphic string that exceeds the length of the print line is discarded.
Calculating the parameters, n1 and n2, is described on page 94.
Decimal Hex ASCII
27 75 n1 n2 1B 4B n1 n2 ESC “K” n1 n2
Select Low-Speed Double Density Graphics Mode
If Single Density graphics does not produce high enough density, try this
mode. The number of dots per inch is doubled. However, the speed is
reduced to half of what it would be with single density. Calculating the
parameters, n1 and n2, is described on page 94.
This is 8-pin single density graphics. The resolution is now 120 dots per
inch. Each 8-inch line can accommodate 960 columns of graphic dots. A
graphic string that exceeds the length of the print line is discarded.
Decimal Hex ASCII
27 76 n1 n2 1B 4C n1 n2 ESC “L” n1 n2
Select High-Speed Double Density Graphics Mode
This 8-pin graphics mode produces the same density as the Low-Speed
Double Density mode, however, the speed is doubled. Calculating the
parameters, n1 and n2, is described on page 94.
Format
Decimal Hex ASCII
27 89 n1 n2 1B 59 n1 n2 ESC “Y” n1 n2
The resolution is still 120 dots per inch. Each 8-in line can accommodate
960 columns of graphic dots. A graphic string that exceeds the length of
the print line is discarded. Make sure adjacent dots in a given dot row are
not printed.
6822 Series 80-Column Printer User’s Manual 93
Page 72

Chapter 5 — Control Code Definitions
Select Low-Speed Quadruple Density Graphics Mode
With this 8-pin graphics mode, the number of dots per inch has gone up
to 4x what it was in single density. Calculating the parameters, n1 and
n2, is described on page 94.
Format
Decimal Hex ASCII
27 90 n1 n2 1B 5A n1 n2 ESC “Z” n1 n2
The resolution is now 240 dots per inch. Each 8-in line can
accommodate 1920 columns of graphic dots. A graphic string that
exceeds the length of the print line is discarded. Make sure adjacent dots
in a given dot row are not printed.
Nine-Pin Graphics Modes
These 9-pin graphics functions also require two parameters, n1 and n2.
However, they are calculated slightly different than in the 8-pin graphics
modes. Since two data bytes represent each dot column to print, first
divide the total length of the graphic string (following the Select ...
Graphics Mode command) by two. These parameters are calculated as
follows (assuming a temporary variable n):
• n = total number of dots needed, divided by 2
• n2 = integer of (n divided by 256)
• n1 = remainder of the n2 calculation
First, divide n (the total number of dots needed for the graphics string)
by 2, then divide the result by 256. Then n2 is the quotient (the whole
number) and n1 is the remainder. If you require less than 256 dots
(columns), then n1 indicates the number of dots and n2 is set to zero.
Select 9-Pin Single Density Graphics Mode
Enables Single Density 9-pin Graphics mode. Calculating the
parameters, n1 and n2, is described previously under Nine-Pin Graphics
Modes.
Format
Decimal Hex ASCII
27 94 0 n1 n2 1B 5E 00 n1 n2 ESC “^” (0) n1 n2
94 6822 Series 80-Column Printer User’s Manual
Page 73

Format
Chapter 5 — Control Code Definitions
The resolution is 60 dots per inch. Each 8-in line can accommoda te 480
columns of graphic dots. A graphic string that exceeds the length of the
print line is discarded.
Select 9-Pin Double Density Graphics Mode
Enables Double Density, 9-pin graphics Mode. The parameters, n1 and
n2, is described previously under Nine-Pin Graphics Modes
Decimal Hex ASCII
27 94 1 n1 n2 1B 5E 01 n1 n2 ESC “^” (1) n1 n2
The resolution is now 120 dots per inch. Each 8-in line can
accommodate 960 columns of graphic dots. A graphic string that
exceeds the length of the print line is discarded.
6822 Series 80-Column Printer User’s Manual 95
Page 74

Chapter 5 — Control Code Definitions
96 6822 Series 80-Column Printer User’s Manual
 Loading...