

Page 1

Maintaining the Computer
4
Use this chapter to solve problems you may encounter and perform routine
maintenance on your CN3 Mobile Computer:
CN3 Mobile Computer User’s Manual - PRELIMINARY 91
Page 2

Chapter 4 — Maintaining the Computer
Upgrading the Operating System on your CN3 Computer
You can use the Intermec Recovery Tools CD to reinstall or upgrade the oper-
ating system software on the CN3 Computer. For more information, contact your Intermec representative for more information about this CD.
You can use the SmartSystems™ Foundation application from Intermec to
perform upgrades on your CN3 Computer, versions 2.0 or later. Contact
your Intermec representative for more information about the SmartSystems
Foundation software.
When you upgrade the operating system, you erase the current configuration and replace it with the new default configuration. You will need to
reset the network parameters on the CN3 Computer to reestablish communications with other devices in the network. In other words, if you upgrade
the operating system and the default registry from the operating system has
changed, the registry is rolled back to the new default.
Troubleshooting Your CN3 Computer
• Problems While Operating the CN3 Computer (page 92)
• Problems While Configuring the CN3 Computer (page 93)
• Problems While Configuring 802.1x Security (page 94)
• Problems with Wireless Connectivity (page 93)
• Problems While Scanning Bar Codes (page 95)
Before sending the CN3 Computer in for service, save its data and configuration. Intermec is responsible only for the keypad and hardware features to
match the original configuration when doing repairs or replacements.
Problems While Operating the CN3 Computer
Problem Solution
You press I to turn on the CN3 Computer and nothing
happens.
Make sure the backlight is on by pressing E.
Make sure you have a charged CN3 Battery installed cor-
rectly. For help, see
“Using the Batteries” on
page 7.
The battery may be discharged. Replace the battery with a
spare charged battery, or charge the battery.
Perform a clean-boot.
The Battery status LED is on. If the battery status LED is a steady green, the battery is
more than 95% charged and unit is on a charger.
If the battery status LED is blinking red, then the battery
is low.
If the battery status LED is a steady red, the main battery
is on charge.
92 PRELIMINARY - CN3 Mobile Computer User’s Manual
Page 3

Problems While Operating the CN3 Computer (continued)
Problem Solution
Chapter 4 — Maintaining the Computer
The CN3 Computer appears to be locked up and you
cannot enter data.
Press I to turn off the CN3 Computer, then press I
again to turn on the CN3 Computer.
Press and hold I for ten seconds to clean-boot the CN3
Computer.
Try reloading the firmware. See
tem Software” on page 73.
If the CN3 Computer does not boot or reset, contact
your local Intermec representative for help.
Problems While Configuring the CN3 Computer
Problem Solution
You scan a configuration command, such as Beeper Volume, and you hear three low beeps.
You scan or enter an option for the Scanner Model configuration command and you hear three low beeps.
You cannot type a character on the keypad or you can
only type uppercase or lowercase letters.
If you are working in the Intermec Settings applet, you
cannot scan configuration commands. Exit the applet to
scan configuration commands.
You may have scanned or entered a Scanner Model command that does not apply to the type of scanner that you
have installed. Try scanning or entering the Scanner
Model command again and select an option for the type
of device you are using.
You may have locked a modifier key on the keypad.
Check the CN3 toolbar to see if it contains an icon with a
locked symbol. Press the necessary key sequence to
unlock the key. See
page 11.
“Updating the Sys-
“Using the Keypad” on
Problems with Wireless Connectivity
Problem Solution
When you turn on the CN3 Computer after it was suspended for a while (10-15 minutes or longer), it can no
longer send or receive messages over the network.
The No Network Connection icon appears on the tool-
bar. The CN3 Computer is not communicating with the
access point.
Host may have deactivated or lost current terminal emulation session. In a TCP/IP direct connect network, turn
off the “KeepAlive” message from host to maintain the
TCP session while a CN3 Computer is suspended.
CN3 Computer is not connected to access point. Ensure
access point is turned on and operating. Move closer to
access point to reestablish communications. Ensure CN3
Computer is configured correctly for network. CN3 radio
parameters must match all access point values (see
page 113).
If you have an 802.11b/g radio and its radio initialization
process failed, reset the CN3 Computer (see
If No Network Connection icon still appears, you may
have a defective radio card. For help, contact your local
Intermec representative.
page 3).
CN3 Mobile Computer User’s Manual - PRELIMINARY 93
Page 4

Chapter 4 — Maintaining the Computer
Problems with Wireless Connectivity (continued)
Problem Solution
The CN3 Computer is connected to the Intermec Application Server or host computer and you move to a new
site to collect data. The Network Connection icon was
visible, but is now replaced with the No Network Con-
nection icon.
The Network Connection icon is in the toolbar, but you
cannot establish a terminal emulation session with the
host computer.
The Network Connection icon is in the toolbar, but the
host computer is not receiving any data from the CN3
Computer.
Problems While Configuring 802.1x Security
If you have trouble configuring the computer for 802.1x security, check
these problems and possible solutions.
Move closer to an access point or to a different location to
reestablish communications until the Network Connec-
tion icon appears. Any data you collected while out of
range is transmitted over the network.
There may be a problem with the host computer, with
the connection between the Intermec Application Server
and the host computer, or with the connection between
the access point and the host computer. Check with network administrator to make sure the host is running and
allowing users to login to the system.
In a UDP Plus network, there may be a problem with the
connection between the Intermec Application Server and
the host computer. Check with network administrator or
see the user’s manual for the Intermec Application Server.
In a TCP/IP network, there may be a problem with the
connection between the access point and the host computer. Check with network administrator or use your
access point user’s manual.
Problem Solution
The CN3 Computer indicates that it is authenticated,
but it does not communicate with the host.
The CN3 Computer does not appear to be authenticating
and a network connection icon does not appear on the
toolbar.
Ensure CN3 IP address, host IP address, subnet mask,
default router are configured for network.
CN3 Computer may not be communicating with access
point. Ensure CN3 network name matches access point
network name (SSID).
802.1x security network may not be active. Ensure the
server software is properly loaded and configured on
server PC. For help, see server software documentation.
94 PRELIMINARY - CN3 Mobile Computer User’s Manual
Page 5

Problem Solution
Chapter 4 — Maintaining the Computer
A network connection icon appears in the toolbar, but
then disappears.
The CN3 Computer indicates it is not authenticated. User Name and Password parameters on CN3 Computer
You are setting up multiple access points in a network,
with different SSIDs, and the connection fails.
You receive a message saying “The server certificate has
expired or your system date is incorrect” after you perform a clean-boot on the CN3 Computer.
CN3 Computer may not be communicating with the
intended access point. Ensure the CN3 network name
matches the access point network name. Default network
name is “INTERMEC.”
Access point may not be communicating with server.
Ensure the access point is turned on, properly configured,
and has 802.1x security enabled.
must match the user name and password on authentication server. You may need to reenter the password on
both CN3 Computer and authentication server.
On your authentication server, the user and group are
allowed and the group policy is allowed to log into the
server. For help, see the documentation that shipped with
your authentication server software.
IP address and secret key for access point must match the
IP address and secret key on authentication server. You
may need to reenter the IP address and secret key on both
your access point and authentication server.
Authentication server software is running on server PC
CN3 Computer does not save WEP key values when
changing the SSID. Reenter the WEP key value after
changing the SSID, select Apply Network Settings from
the 802.11 Radio menu. You should now be able to connect to the different access points.
Date and time are not saved when a clean-boot is performed. Reenter the date and time, then select Apply
Network Settings from the 802.11 Radio menu.
Problems While Scanning Bar Codes
Problem Solution
You cannot see a red beam of light from the scanner when
you press the Scan button and aim the scanner at a bar
code label.
When you release the Scan button or handle trigger, the
Good Read light does not turn off.
You may be too far away from the bar code label. Try
moving closer to the bar code label and scan it again.
You may be scanning the bar code label “straight on.”
Change the scanning angle and try again.
Move within 2 feet of a wall to test the effective scan of
the scanner. For help scanning bar codes, see
The Good Read light will remain on if you configure the
CN3 Computer to use continuous/edge triggering. If you
configure the CN3 Computer for level triggering and the
Good Read light remains on, there may be a problem.
Press the Scan button or pull the trigger again without
scanning a bar code label. If the light is still on, contact
your local Intermec representative.
page 4.
CN3 Mobile Computer User’s Manual - PRELIMINARY 95
Page 6

Chapter 4 — Maintaining the Computer
Problems While Scanning Bar Codes (continued)
Problem Solution
The input device attached to the CN3 Computer does
not work well or read bar code labels very quickly.
The scanner will not read the bar code label. Aim the scanner beam to cross entire bar code label in
The scanner does not read the bar code labels quickly, or
the scanning beam seems to be faint or obscured.
You scan a valid bar code label to enter data for your
application. The data decoded by the scan module does
not match the data encoded in the bar code label.
You receive a message reading “Scanner Communication
Failure” when trying to connect a 1551E or 1553
decoded scanner.
Set the Scanner Model command to the specific attached
input device. Check enabled bar code symbologies and
enable only the symbologies being used.
one pass. Vary the scanning angle.
Check the quality of the bar code label, Scan a bar code
label that you know will scan. Compare the two bar code
labels to see if the bar code quality is too low. You may
need to replace the label that you cannot scan.
Ensure the bar code symbology is enabled. Use the Intermec Settings applet to check the symbologies. Expand
Data Collection > Symbologies beneath devices listed
(scanner, virtual wedge) to check and enable symbologies,
then scan the bar code label again.
Ensure the CN3 application is expecting input from a bar
code. You may need to type this information instead.
The scanner window may be dirty. Clean the window
with a solution of ammonia and water. Wipe dry. Do not
allow abrasive material to touch the window.
CN3 Computer may have decoded the bar code label in a
symbology other than the label’s actual symbology. Try
scanning the bar code label again. Make sure you scan the
entire label.
Make sure you are using the correct cable.
Make sure the scanner cable is attached correctly. When
you attach the scanner to the port, it should emit a single
power up beep.
Try enabling the port state using the Intermec Settings
applet.
Try upgrading the scanner firmware.
Select ASCII as the scanner model.
Your 1551E or 1553 scanner was working fine, but after
changing the port setting you cannot change the configuration.
Configuration settings in the Intermec Settings applet do
not match the settings on your 1551E or 1553 Scanner.
96 PRELIMINARY - CN3 Mobile Computer User’s Manual
1551E or 1553 scanner port must use the correct RS-232
settings to allow configuration in the Intermec Settings
applet. Disable, then enable the scanner port state.
Disable, then enable the scanner port state to synchronize
the CN3 Computer settings with the scanner.
Page 7
Chapter 4 — Maintaining the Computer
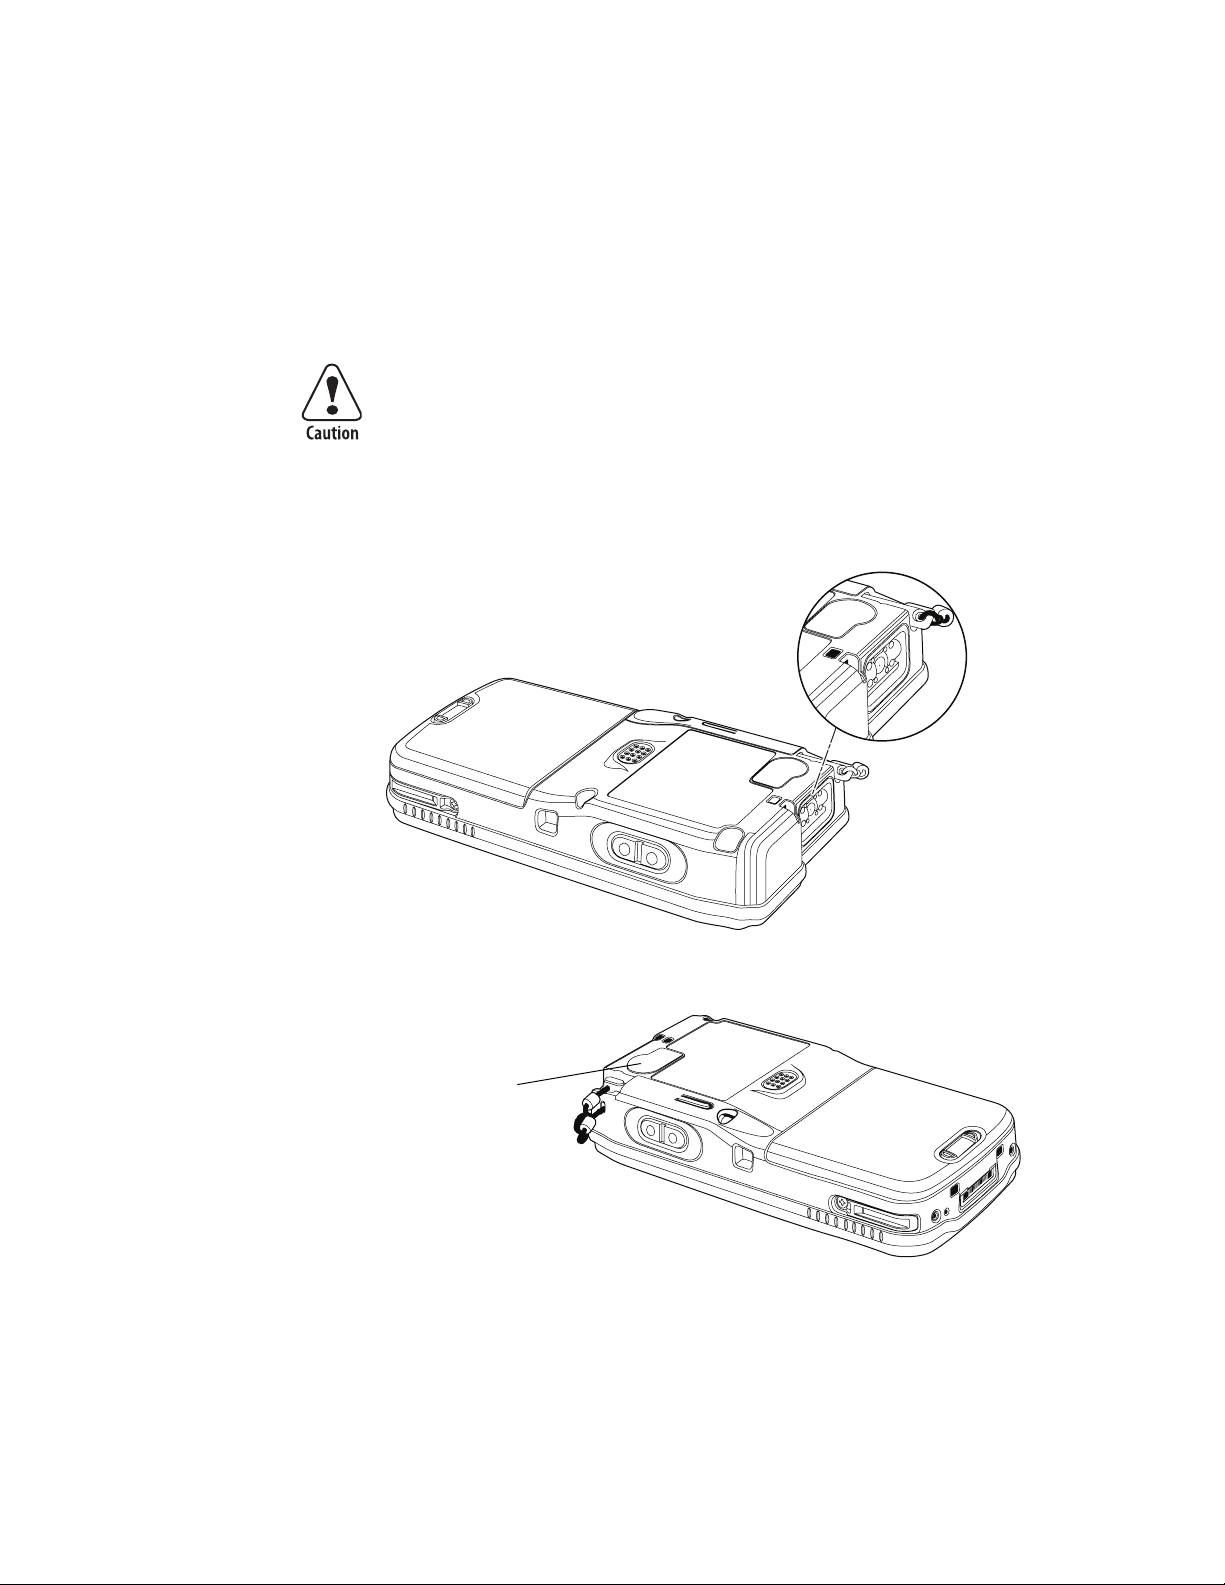
Cleaning the Scanner and Camera Windows and Screen
To keep the CN3 Computer in good working order, you may need to clean
the EA11 scanner and color camera windows and the screen.
Clean the scanner and camera windows and screen as often as needed for
the environment in which you are using the CN3 Computer. To clean the
CN3 Computer, use a solution of ammonia and water.
There are no user-serviceable parts inside the CN3 Computer. Opening
the unit will void the warranty and may cause damage to the internal
components.
Press I to turn off the CN3 Computer. Dip a clean towel or rag in the
ammonia solution and wring out the excess. Wipe off the scanner and camera windows and screen. Do not allow any abrasive material to touch these
surfaces. Wipe dry.
CN3 Computer with EA11 Scanner
Color Camera
CN3 Computer with Color Camera
CN3 Mobile Computer User’s Manual - PRELIMINARY 97
Page 8

Chapter 4 — Maintaining the Computer
98 PRELIMINARY - CN3 Mobile Computer User’s Manual
Page 9

Network Support
5
This chapter includes information about the different networks supported
by the CN3 Mobile Computer, and ways to configure and manage those
networks. Note that the CN3 Computer automatically installs the appropriate software for radio or phone use when the unit is turned on.
Note: Desktop icons and applet icons are shown to the left. Any place that
Start is mentioned, tap the following Windows icon in the top, left corner
of your CN3 desktop.
CN3 Mobile Computer User’s Manual - PRELIMINARY 99
Page 10
Chapter 5 — Network Support
Personal Area Networks
“Bluetooth” is the name given to a technology standard using short-range
radio links, intended to replace cables connecting portable and fixed electronic devices. The standard defines a uniform structure for a range of
devices to communicate with each other with minimal user effort. Its key
features are robustness, low complexity, low power, and low cost. The technology offers wireless access to LANs, the mobile phone network, and the
internet for a host of home appliances and mobile computer interfaces.
Wireless Printing can also be done with Microsoft APIs, including Bluetooth extensions for Winsock, and Bluetooth virtual COM ports. Information about other Bluetooth software is in the Bluetooth Resource Kit and
the Bluetooth Resource Kit User's Guide via the Intermec Developer Library
(IDL), which is available as a download from the Intermec web via
www.intermec.com/idl. See your Intermec representative for information.
Bluetooth is not started by default after a clean-boot is performed. You can
turn on Bluetooth doing either of the following:
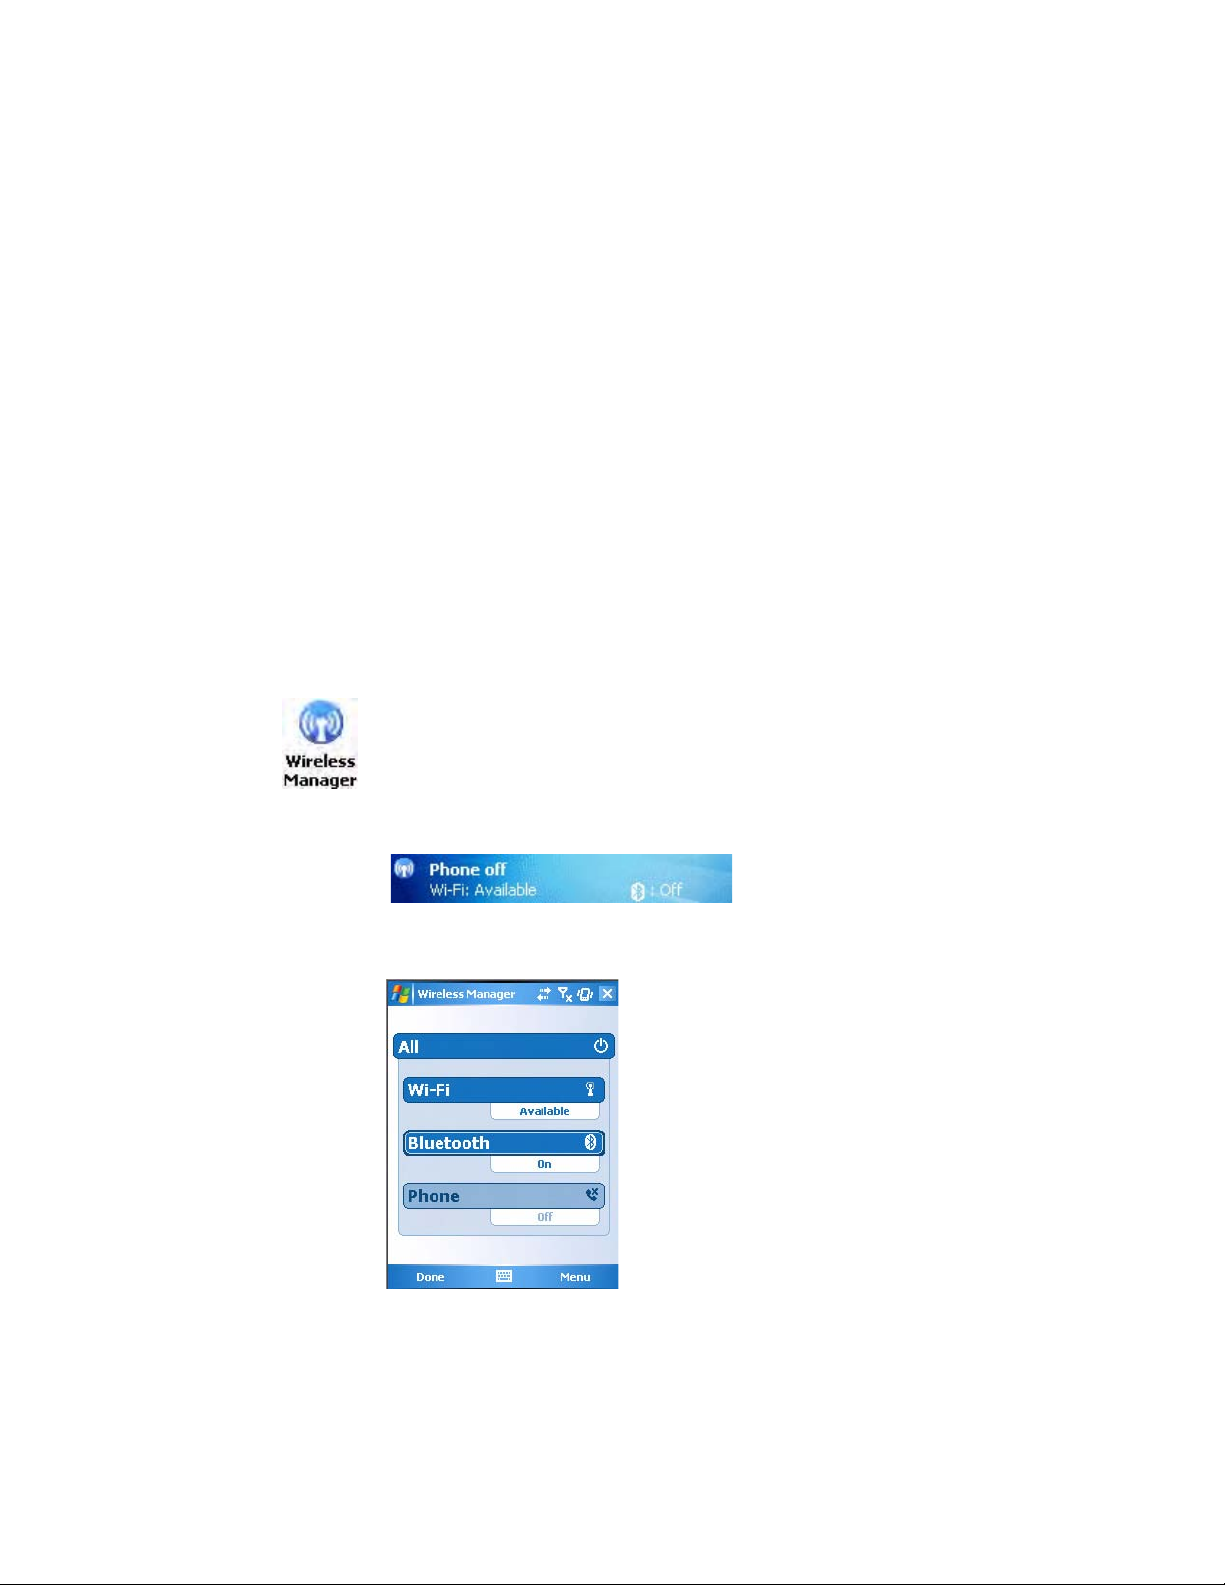
Wireless Manager
You can use the Wireless Manager to enable and disable Bluetooth, Wi-Fi,
and the Phone if it is built into your CN3 Computer.
To enable Bluetooth using the Wireless Manager, tap Start > Settings > the
Connections tab > the Wireless Manager icon, or tap the Wireless Manager row from the Today desktop.
In the Wireless Manager, either tap All or tap Bluetooth, then wait for
“On” to appear beneath the Bluetooth row.
Ta p Menu > Bluetooth Settings to do device discovery (more information
on the next page). Tap Done to close the Wireless Manager.
100 PRELIMINARY - CN3 Mobile Computer User’s Manual
Page 11
Bluetooth
Chapter 5 — Network Support
Bluetooth is not started by default after a clean-boot is performed. To run
Bluetooth, tap Start > Settings > the Connections tab > the Bluetooth
icon.
The CN3 Computer retains the Bluetooth state when clean-boots are performed, for example:
• If Bluetooth is enabled, and a clean-boot was performed, the CN3 Computer boots up with the Bluetooth state enabled and Bluetooth virtual
COM ports (such as printing) registered. Reactivate the connections
manually as the system does not do them.
• If Bluetooth is disabled, and a clean-boot was performed, the CN3 Computer boots up with Bluetooth disabled.
Mode
To turn on Bluetooth, select Start > Settings > the Connections tab > the
Bluetooth icon > the Mode tab. Check Turn on Bluetooth, check Make
this device visible to other devices, then click ok.
Devices
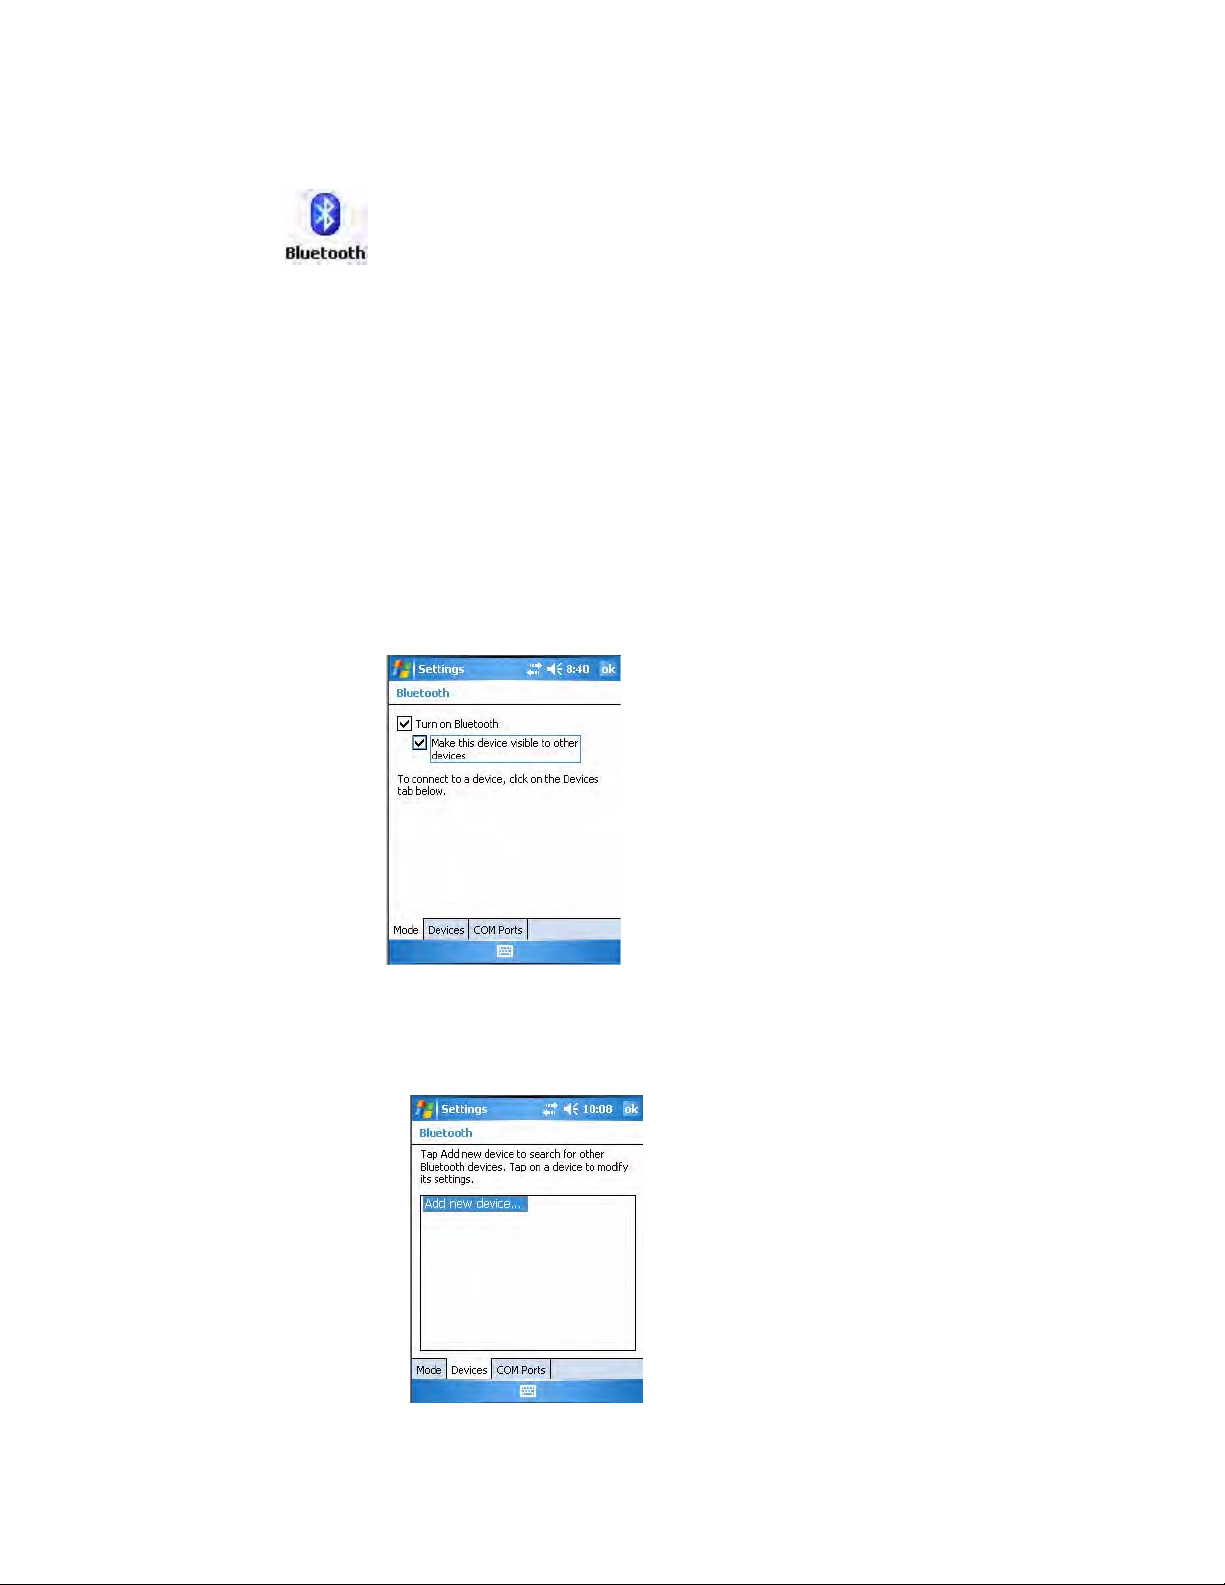
Use this tab to scan for other Bluetooth devices.
1 Tap Add new device... to discover (or scan) remote Bluetooth devices.
CN3 Mobile Computer User’s Manual - PRELIMINARY 101
Page 12
Chapter 5 — Network Support
2 When the CN3 Computer is finished scanning, any newly discovered
3 Select a device to which to connect, then click Next.
devices appear in the box. Tap Refresh to do additional discoveries.
4 Enter a passkey to establish a secure connection, then tap Next. Tap Ye s
if prompted to let the other device connect with your CN3 Computer.
102 PRELIMINARY - CN3 Mobile Computer User’s Manual
Page 13
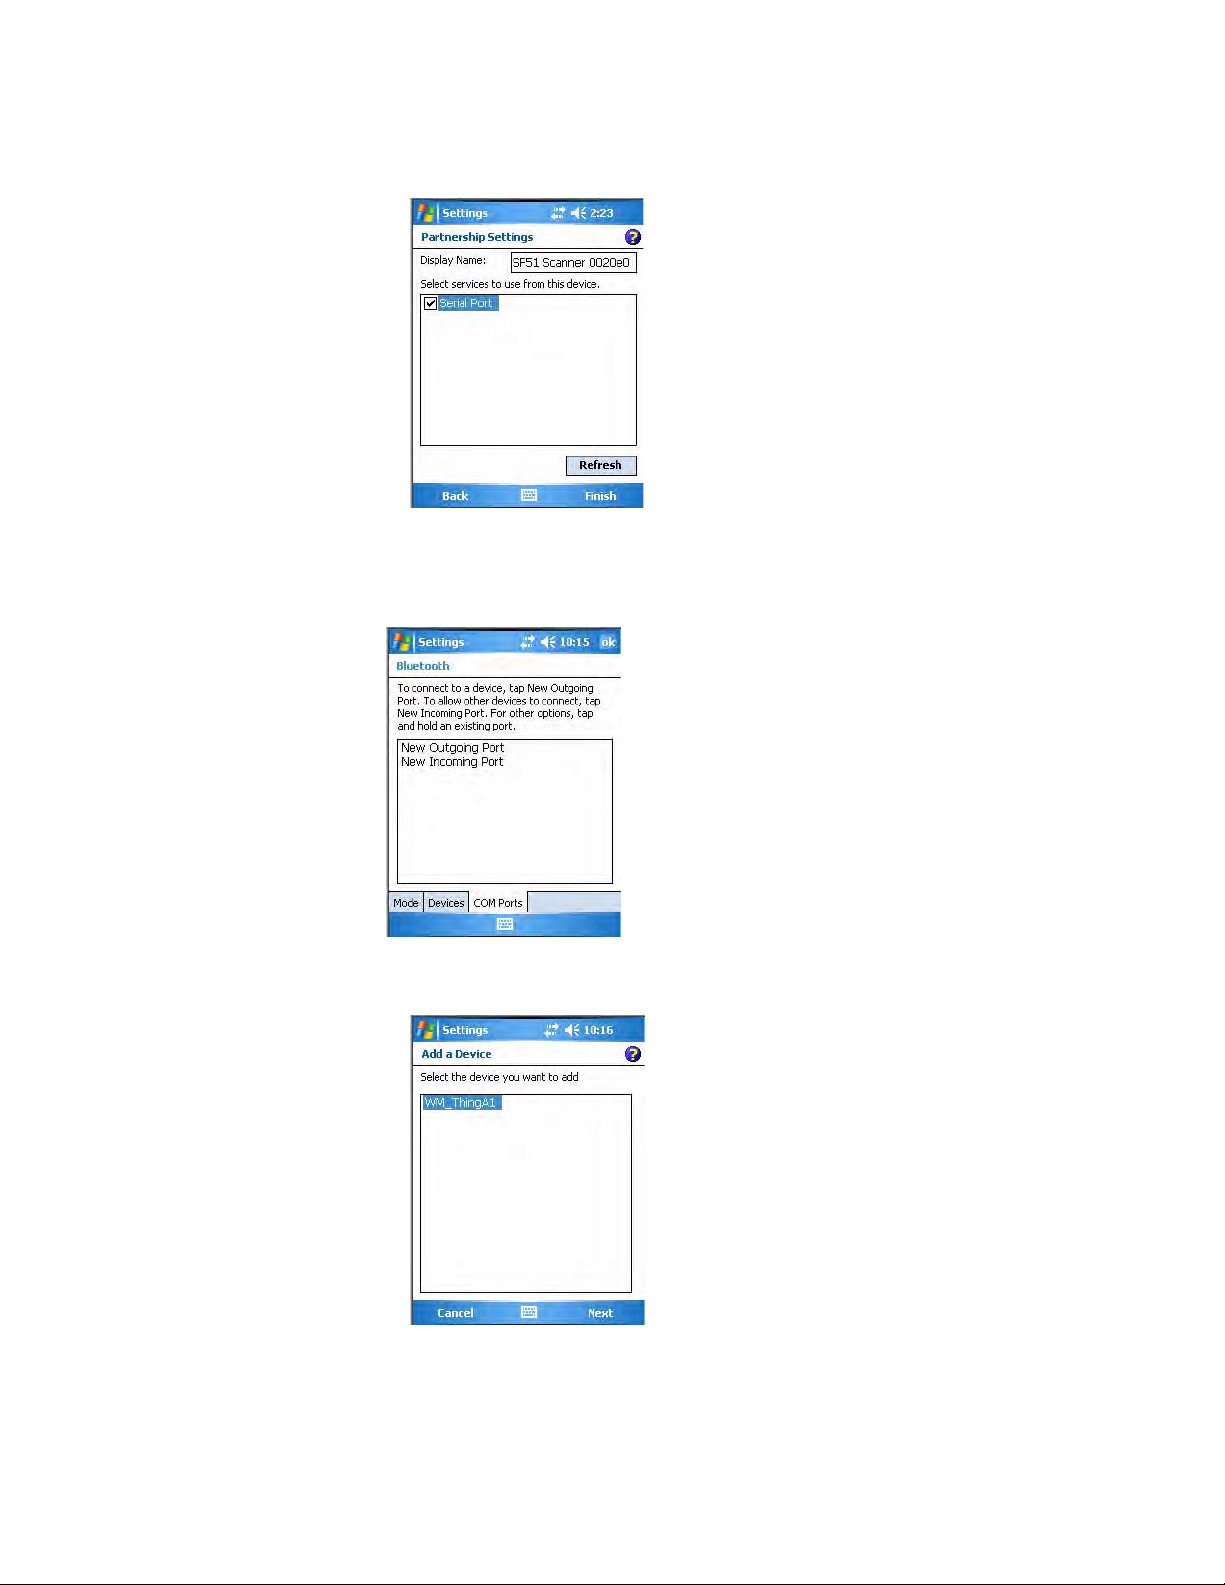
Chapter 5 — Network Support
5 Select what services you want from this remote device, then click Finish
to return to the Devices tab.
COM Ports
Use this page to connect to other devices or allow other devices to connect
with your CN3 Computer.
1 Tap New Outgoing Port to connection to a Bluetooth device, select the
device to add, then click Next.
CN3 Mobile Computer User’s Manual - PRELIMINARY 103
Page 14
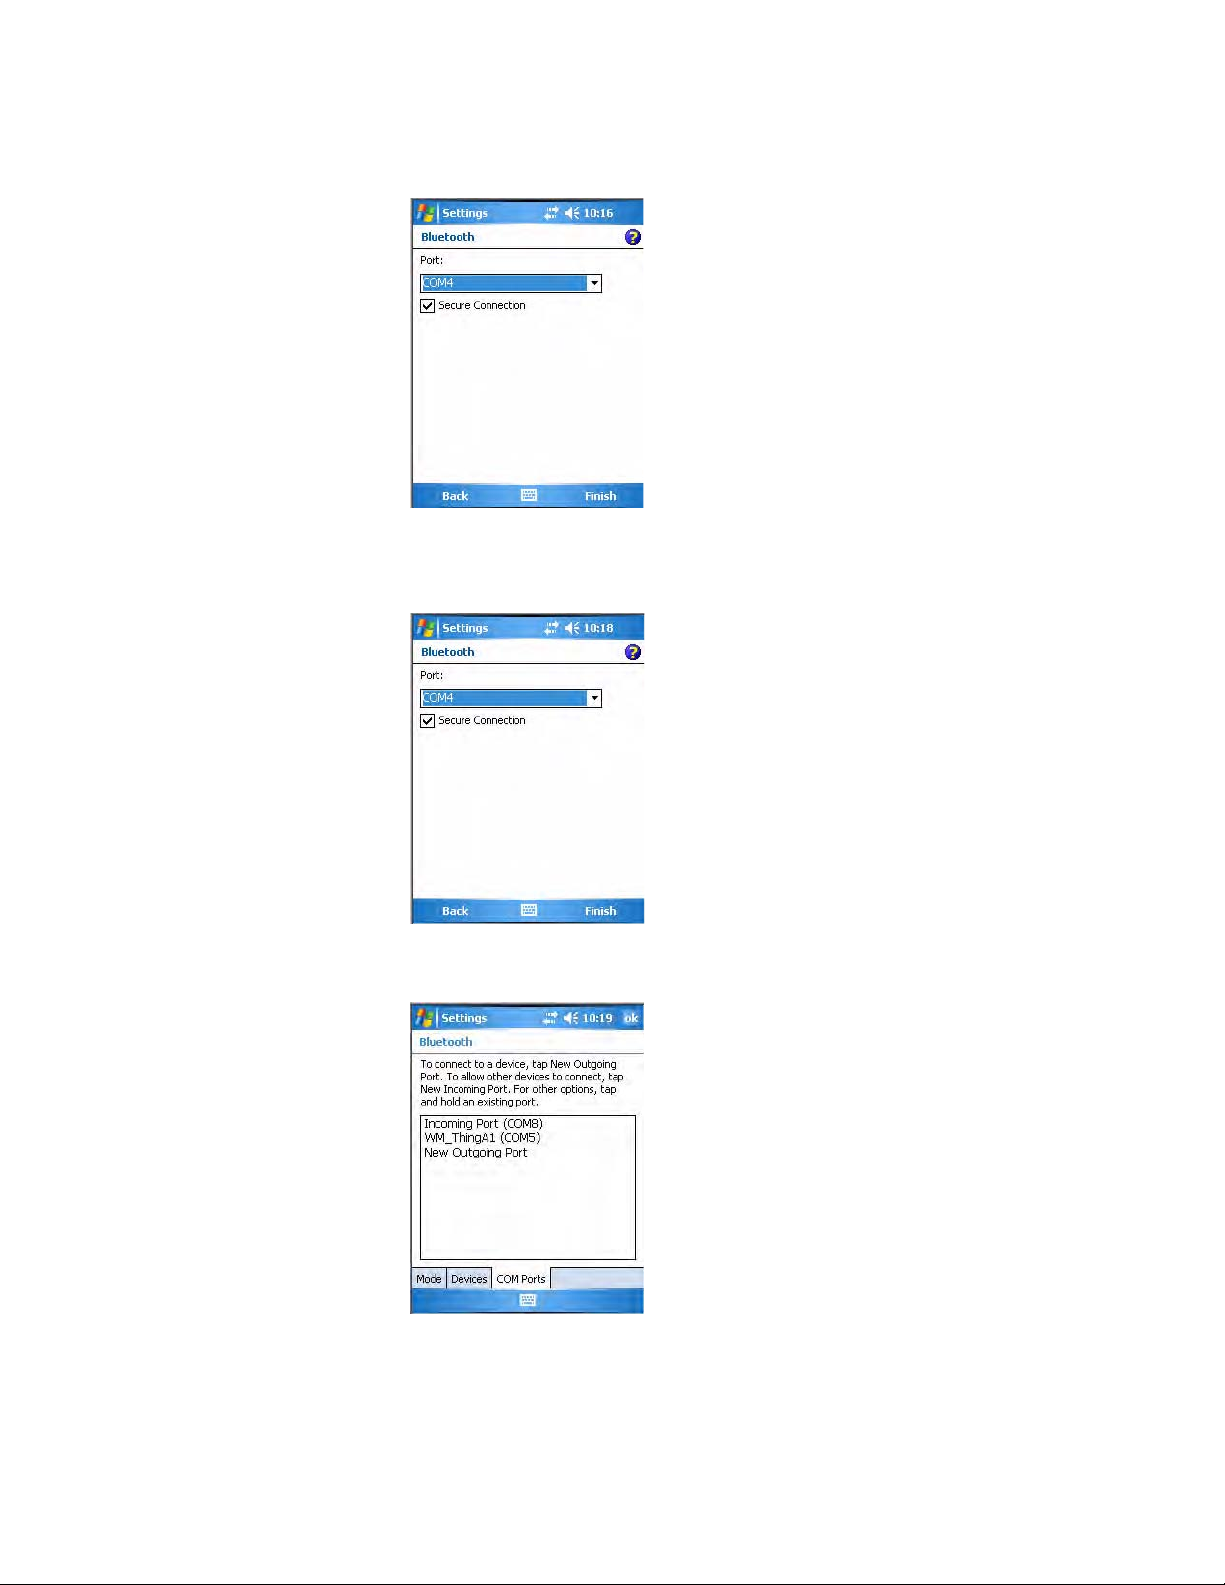
Chapter 5 — Network Support
2 Select a port from the Port drop-down list, check Secure Connection,
3 Tap New Incoming Port to allow other Bluetooth devices to connect
then click Finish to return to the COM Ports page.
with your CN3 Computer, select on which port to secure this connection, then click Finish to return to the COM Ports page.
4 You can press and hold on a device to either edit that device or delete it
from the list.
104 PRELIMINARY - CN3 Mobile Computer User’s Manual
Page 15
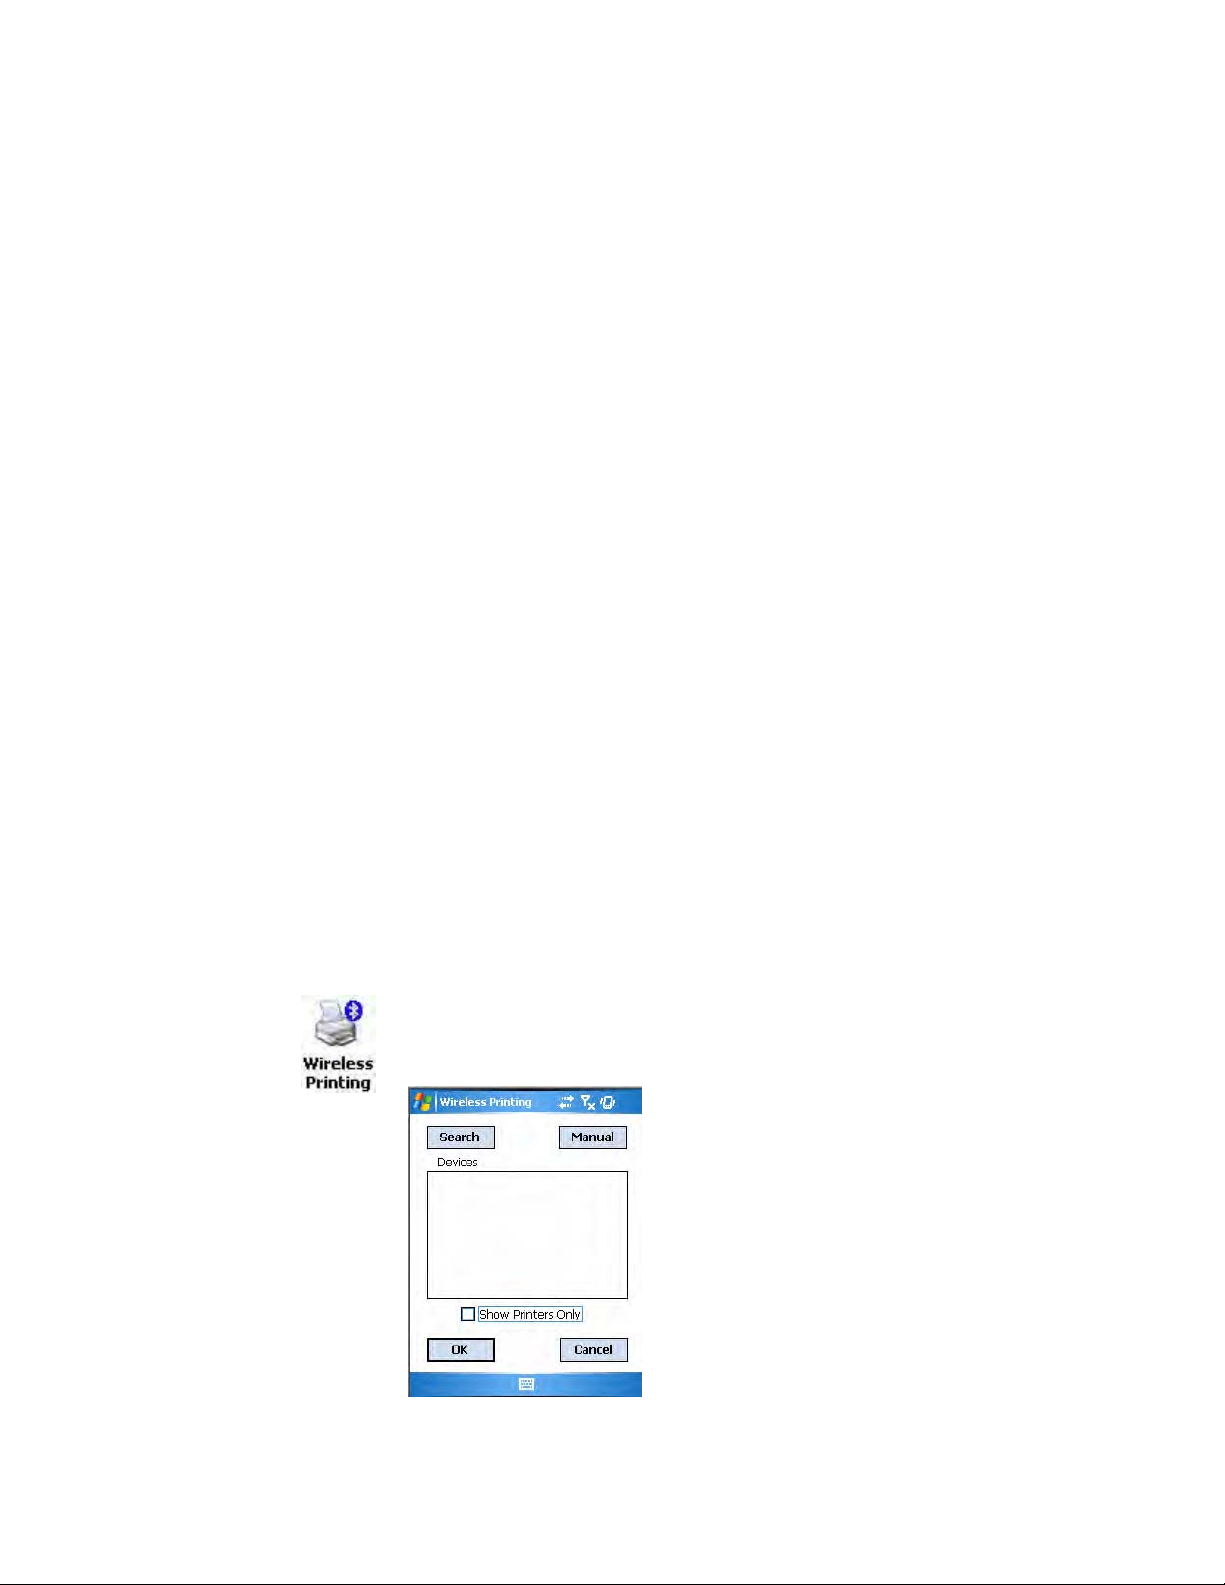
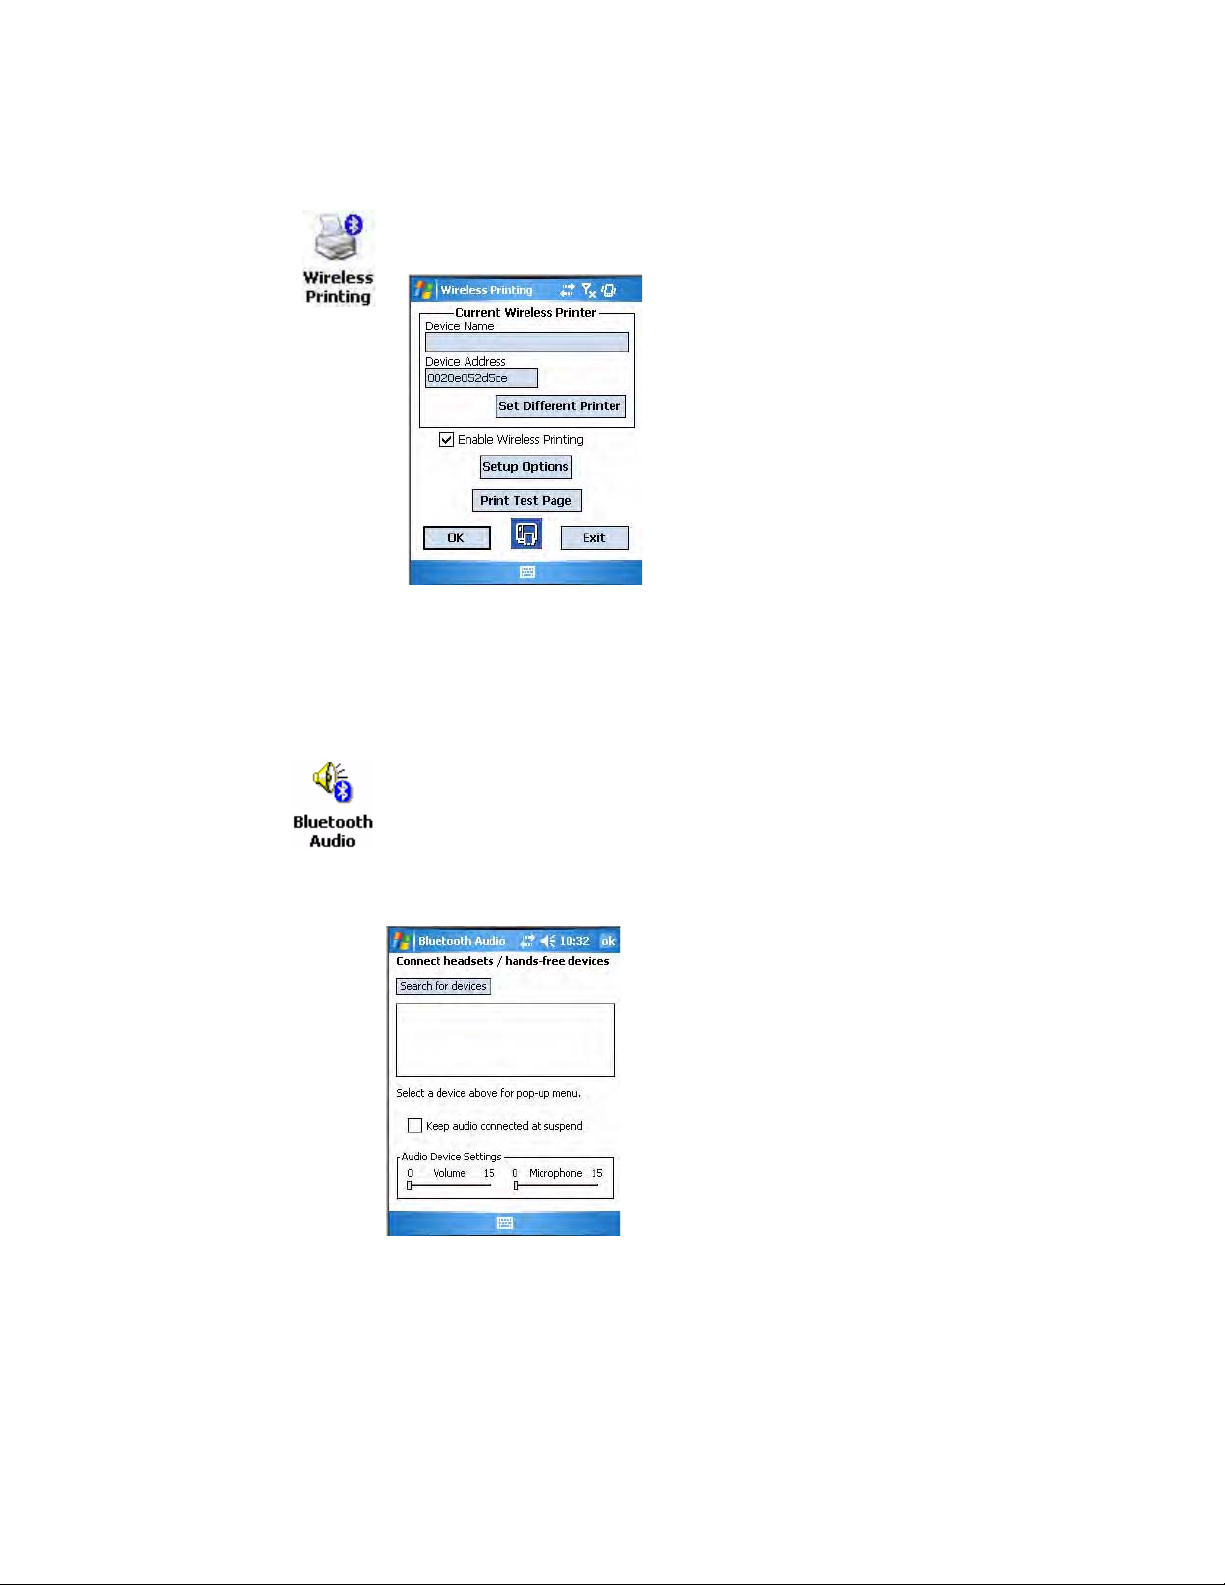
Wireless Printing
Chapter 5 — Network Support
The Wireless Printing applet separates the task of wireless printing from
other Bluetooth management items not relevant to this task.
Wireless Printing has a concept of the “current wireless printer.” This
printer is the one to which the CN3 Computer makes a connection when
the wireless printing COM port is opened. If there is no current wireless
printer, there is no wireless printing COM port. Registration and deregistration of this COM port is controlled by the Bluetooth COM port control. Use the Wireless Printing applet to handle the COM port registration.
Customer software or other test applications can also use this applet to
manage the COM port registration and deregistration.
The current wireless printer is stored in the registry and is registered and
deregistered on Bluetooth stack load/unload. If the current wireless printer
changes, the existing wireless printing COM port is deregistered, and the
new one is registered instead. The registered COM port is stored in the registry as the “WPort.”
For information on using Bluetooth communications, see the Bluetooth
Resource Kit in the IDL, which is available as a download from the Intermec web site at www.intermec.com/idl. Contact your Intermec representa-
tive for more information.
Use any of the following methods to set the wireless printer:
• Use a Bluetooth device discovery to locate the remote device (page 105)
• Manually enter the remote Bluetooth Device Address (page 106)
• Use the Current Wireless Printer screen to set a different printer
(page 107)
Search
To do a Bluetooth device discovery, do the following:.
1 Select Start > Settings > the System tab > the Wireless Printing icon.
2 Clear the Show Printers Only box if you want to discover more than
just the Bluetooth printers. Tap Search to initiate the device discovery.
CN3 Mobile Computer User’s Manual - PRELIMINARY 105
Page 16
Chapter 5 — Network Support
3 In about half a minute, Bluetooth devices discovered within your range
will appear. If your preferred printer is in the list, select to highlight the
printer, then tap OK.
If you do not see your preferred device, make sure this device is powered
on and set to discovery, then tap Search again. Tap Cancel to return to
the first screen without making changes.
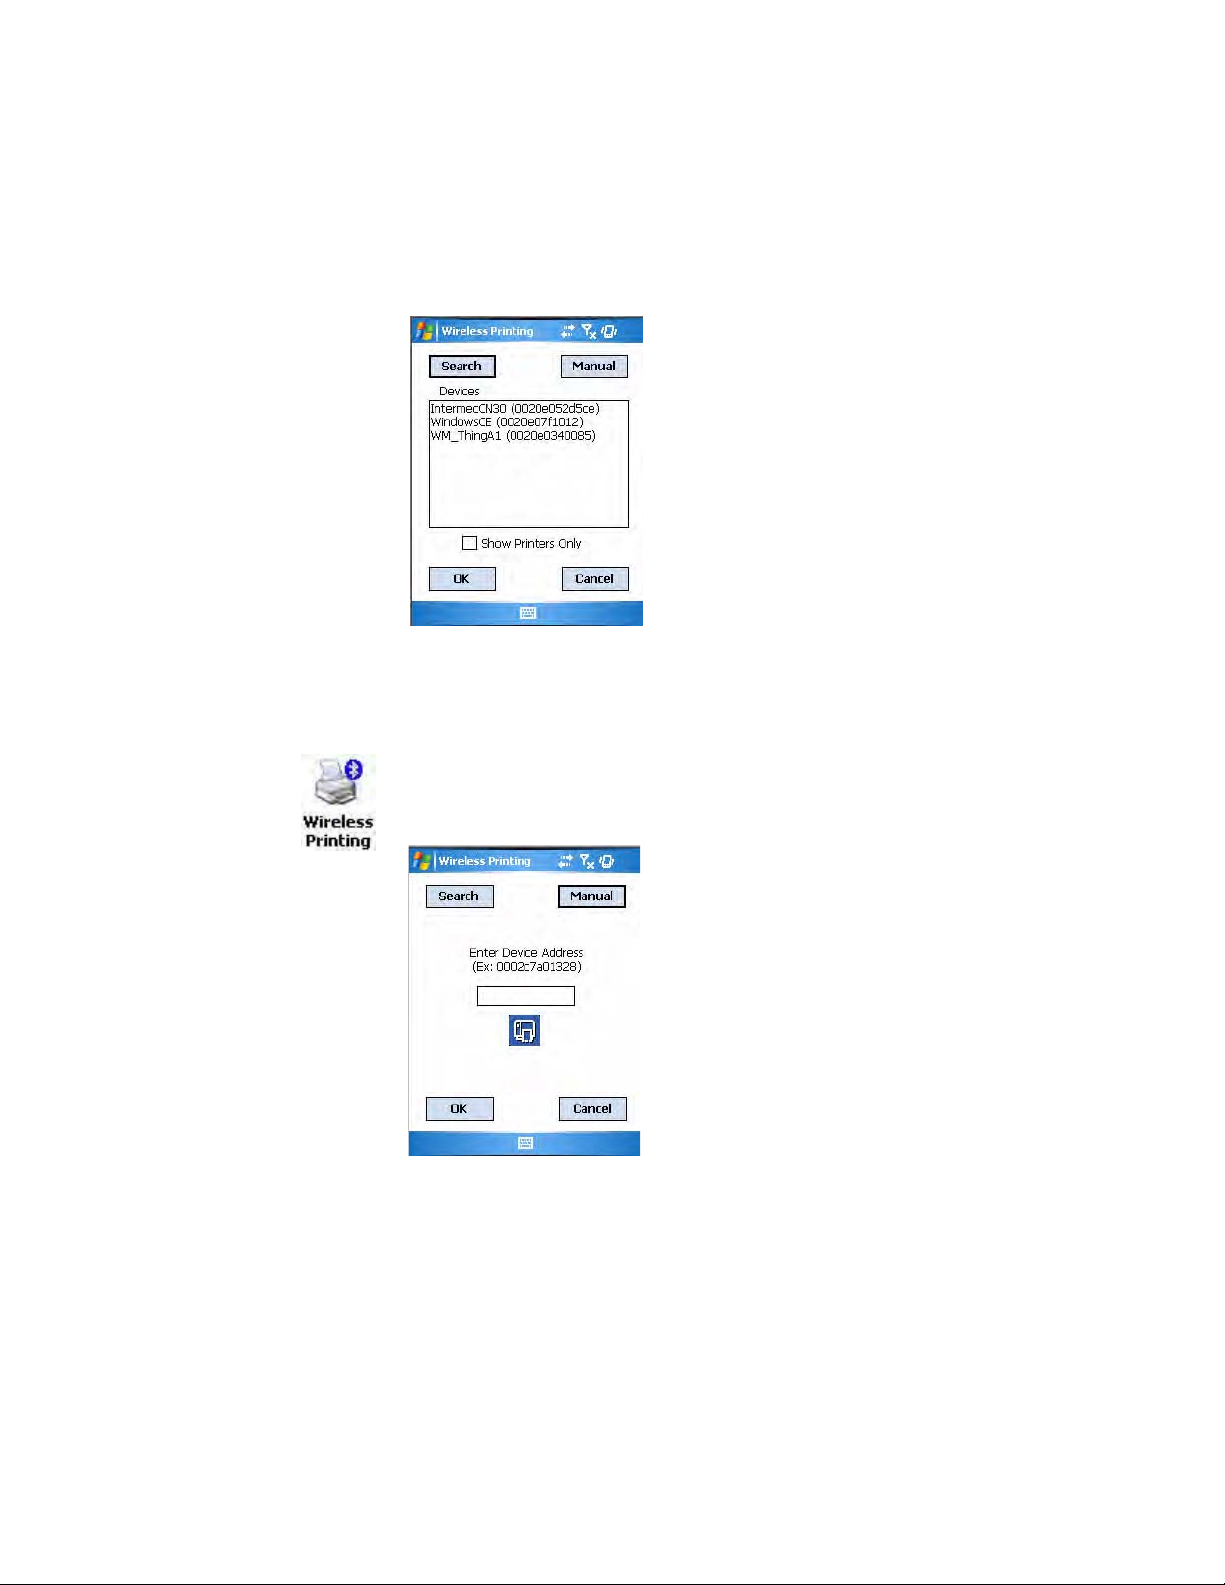
Manual
If you know the Bluetooth Device Address of the printer you want to use,
do the following to avoid Device Discovery and perform a manual setup.
1 Select Start > Settings > the System tab > the Wireless Printing icon.
2 Tap Manual, enter the address of your device in the field, then tap OK.
Ta p Cancel to return to the first screen without making changes.
When you set your printer manually, your device may not receive the
printer name. Therefore, “-unknown-” can display under Device Name
unless you enter the correct value in to the registry in some other way.
106 PRELIMINARY - CN3 Mobile Computer User’s Manual
Page 17
Chapter 5 — Network Support
Set Different Printer
To change your printer, do the following:
1 Select Start > Settings > the System tab > the Wireless Printing icon.
2 Tap Set Different Printer to return to the device discovery screen.
3 Tap either Search or Manual, tap OK., then do the applicable steps.
Ta p Cancel to the current wireless printer settings without making
changes, then tap Exit to close the applet.
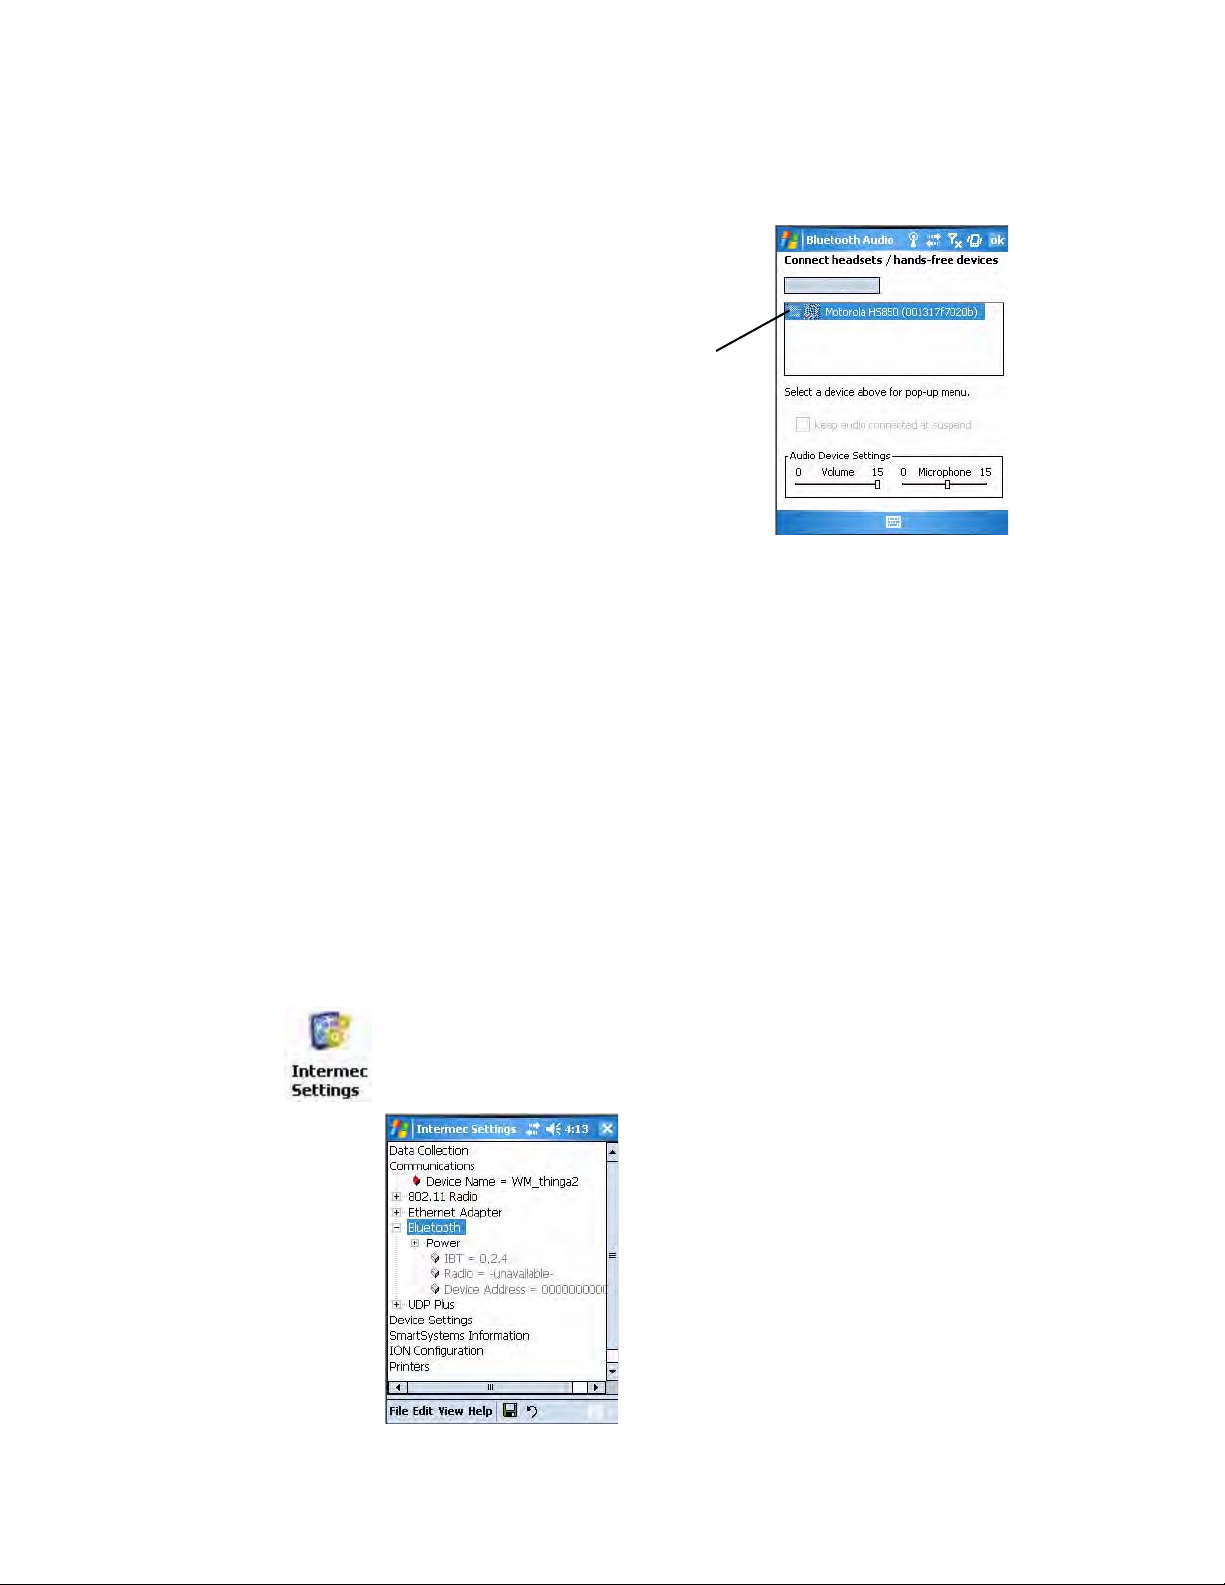
Bluetooth Audio
Use this to discover, activate, and connect to Bluetooth audio devices, such
as Bluetooth headsets. You can select a desired audio mode or control the
audio volume and microphone gain for the connected Bluetooth headset (if
the connected headset has these capabilities).
From the CN3 desktop, select Start > Settings > the System tab > the Blue-
tooth Audio icon to access the Bluetooth Audio applet.
CN3 Mobile Computer User’s Manual - PRELIMINARY 107
Page 18

Chapter 5 — Network Support
Discovering Bluetooth Headsets
To discover a Bluetooth headset with either a “headset” or a “hands-free”
profile, tap Search for devices. Discovered audio devices are added to the
list with an icon to identify either profile.
Connecting to a Bluetooth Headset
Note: You can only select one Bluetooth audio device.
1 Tap a Bluetooth audio device from the list of discovered devices. When a
pop-up menu appears and if the device selected was not authenticated
during the discovery process, select Authenticate to continue.
108 PRELIMINARY - CN3 Mobile Computer User’s Manual
Page 19
Chapter 5 — Network Support
2 Tap the device name, then select Connect from the pop-up menu. On
successful device activation, the device icon changes to remove the red
bar from the left connection image.
Red bar cleared from connection image
•Tap the Vo lu m e slider bar to adjust the volume of the connected
Bluetooth audio device.
•Tap the Microphone slider bar to adjust the microphone gain of the
connected Bluetooth audio device.
3 If the activated device has a “hands-free” profile, press a button on the
device to establish an audio connection between the CN3 and the activated device. See the user manual for the Bluetooth device for information
on what button to press.
4 To establish an audio connection from the CN3 Computer to the acti-
vated device with either a “headset” or “hands-free” profile, tap the
device name, then select Connect from the menu. When connection is
established, the “connected/disconnected” status changes to that of a
“connected” status.
Configuring Bluetooth Using Intermec Settings
You can also configure your Bluetooth communications using the Intermec
Settings applet. From the CN3 desktop, select Start > Settings > the Sys-
tem tab > the Intermec Settings icon. Tap to expand (+) Communications,
then Bluetooth to configure its settings.
CN3 Mobile Computer User’s Manual - PRELIMINARY 109
Page 20
Chapter 5 — Network Support
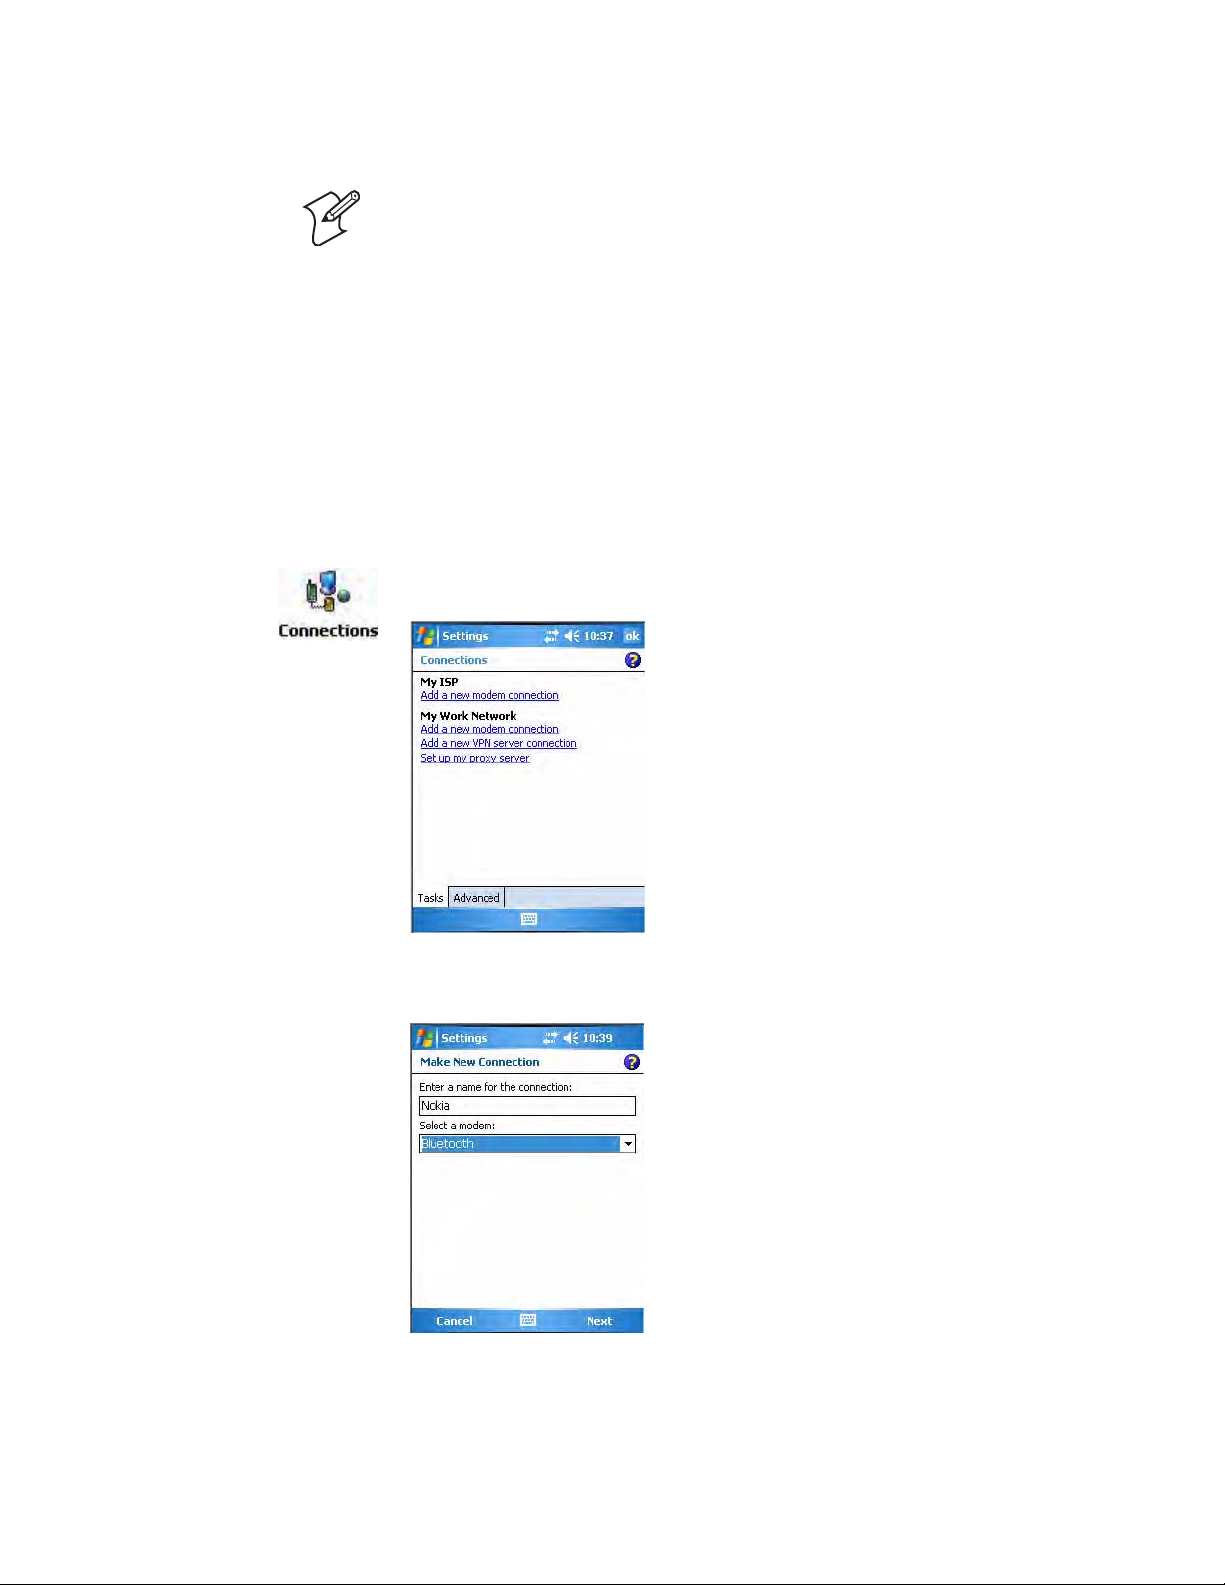
Connecting with Bluetooth
Note: While these instructions apply to many Bluetooth devices, these
instructions use the Nokia 3650 for example purposes.
Make sure Bluetooth is enabled on your mobile phone. For example, with
the Nokia 3650, go to its menu, select Connect > Bluetooth, then set My
phone’s visibility to “Shown to all.”
Before you connect to the network, make sure Bluetooth is enabled on your
CN3 Computer so you can discover and connect to remote devices. Go to
“Personal Area Networks” on page 100 for information.
Do the following to establish a Bluetooth connection between your CN3
Computer and your mobile phone, then establishing a dial-up networking
session with your wireless network. Once connected, you should be able to
browse Internet websites and use other online resources.
1 Tap Start > Settings > the Connections tab > the Connections icon,
then tap Add a new modem connection.
2 Enter a name for the connection, such as “Nokia.” In the Select a
modem list, select “Bluetooth,” then tap Next to continue.
110 PRELIMINARY - CN3 Mobile Computer User’s Manual
Page 21
Chapter 5 — Network Support
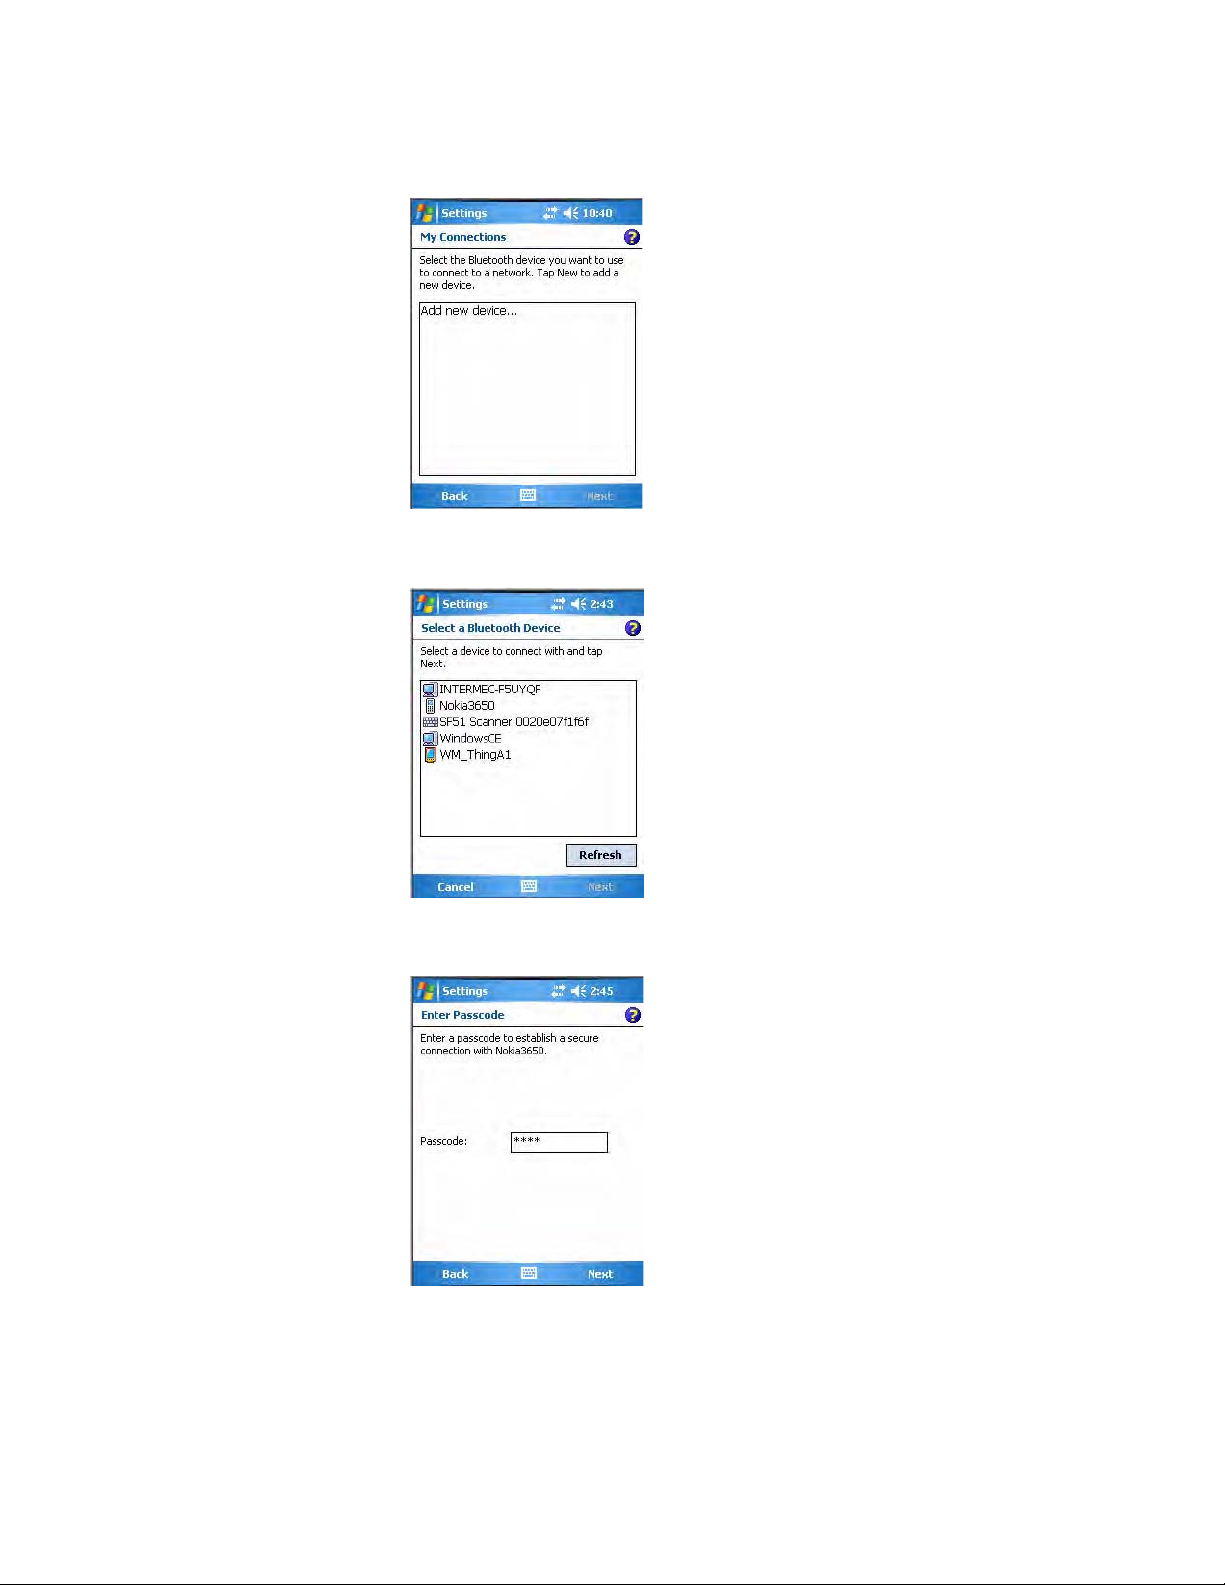
3 Tap Add new device... if the phone is not listed in the known devices.
Make sure your Bluetooth device is turned on before you start the search.
4 When the discovery of devices is complete, select your Bluetooth device,
then tap Next to continue.
5 Enter the correct Passkey on both the Bluetooth device and the CN3
Computer, then tap Next to continue.
CN3 Mobile Computer User’s Manual - PRELIMINARY 111
Page 22
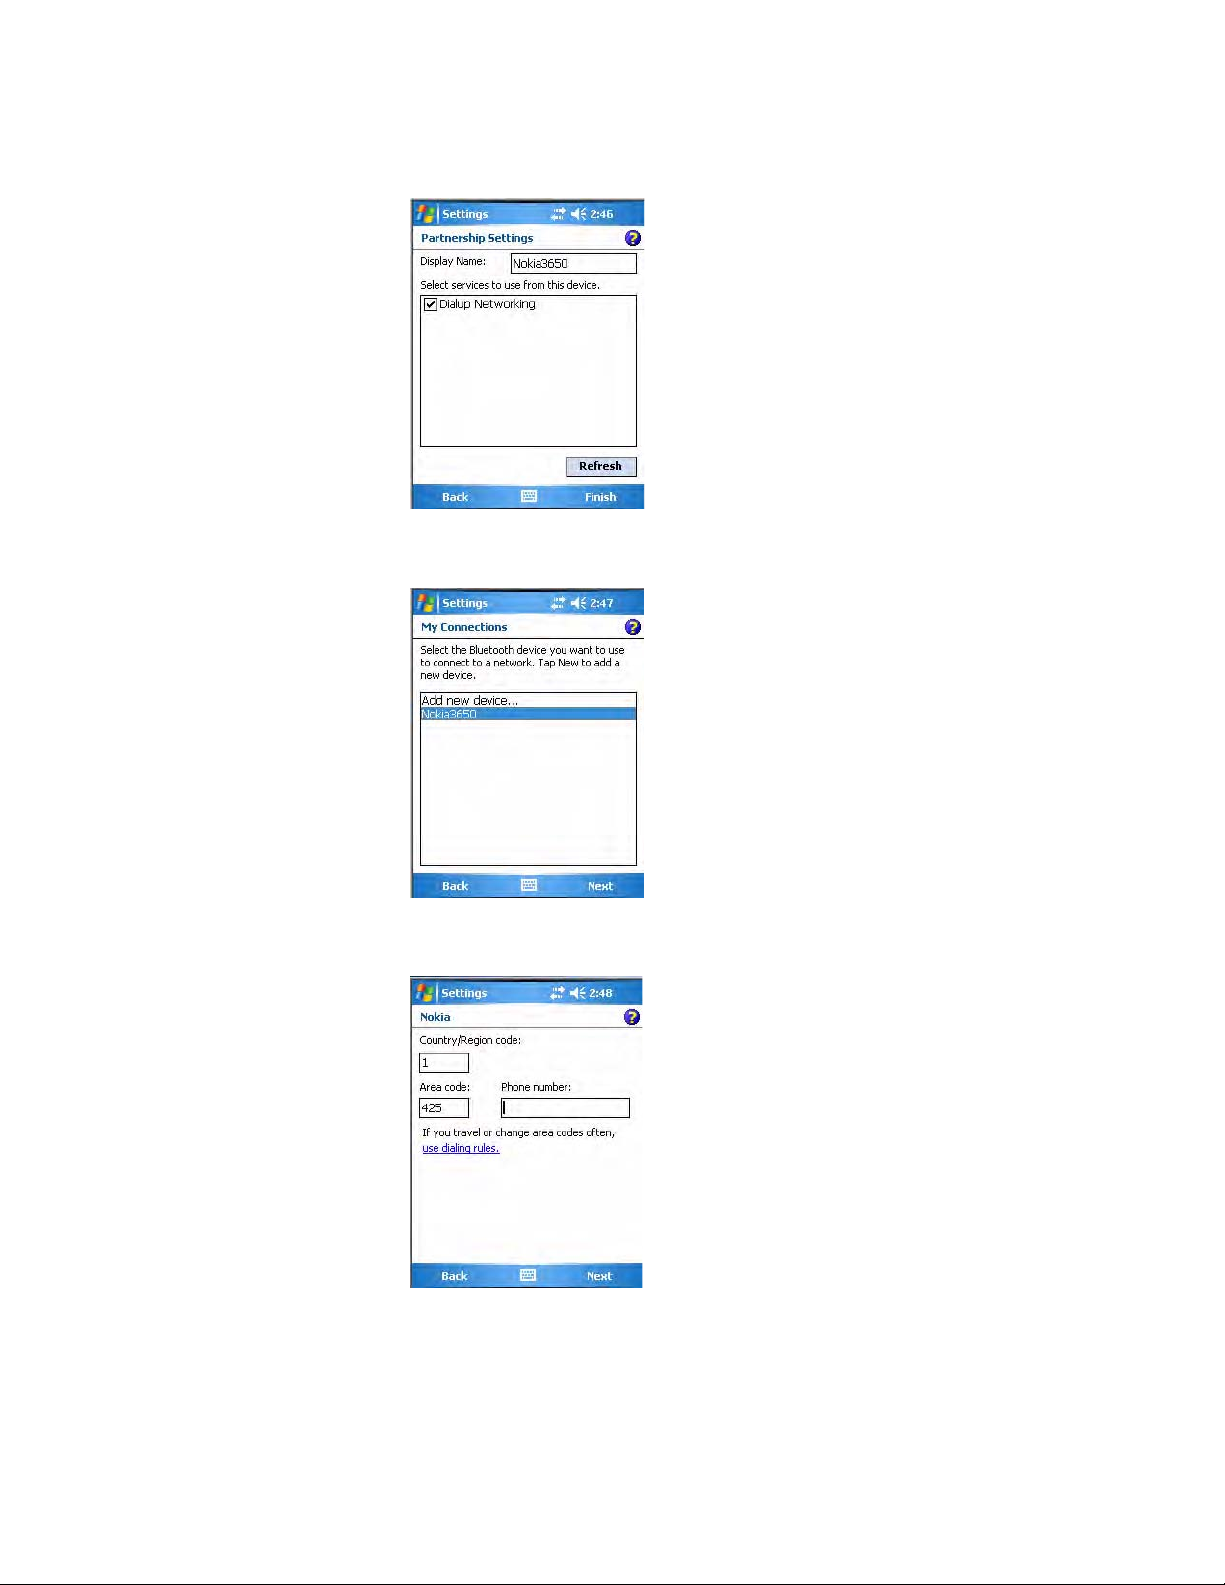
Chapter 5 — Network Support
6 Enter a name for the device if needed, or select what services to use, then
7 Select the Bluetooth device to use to connect to the network, then tap
tap Finish.
Next to continue.
8 Enter the appropriate number as it should be dialed for your Bluetooth
connection, then tap Next to continue.
112 PRELIMINARY - CN3 Mobile Computer User’s Manual
Page 23
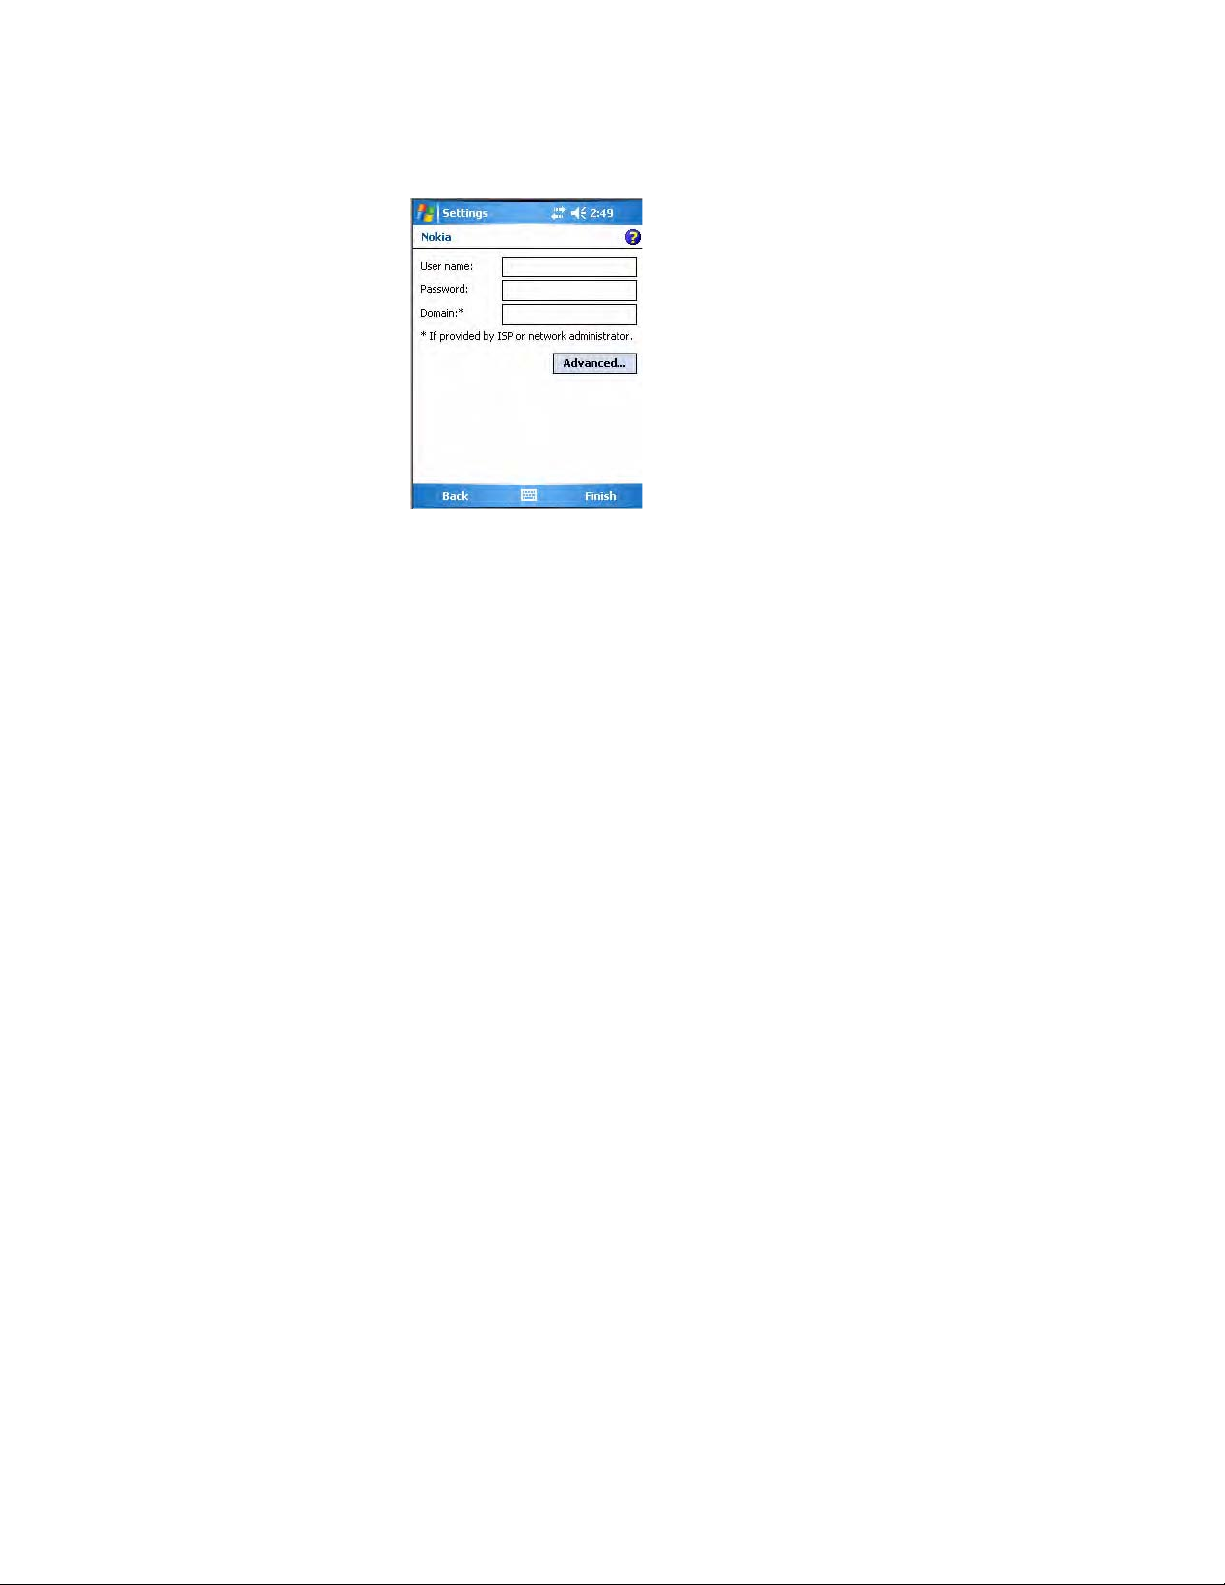
9 Enter the user name, password, and domain required for your Bluetooth
device, then tap Finish.
Now you can establish a connection to your network via the Internet
Explorer application. To disconnect, tap the Connectivity icon in the top
menu bar, then select Disconnect.
Local Area Networks
Chapter 5 — Network Support
The CN3 Computer is a versatile mobile computer that you can add to
your wired or wireless data collection network. You can connect your CN3
Computer to your network using either the 802.11b/g radio or the Bluetooth radio.
Configuring 802.11b/g Radio Communications
The wireless CN3 Computer has an internal 802.11b/g radio to transfer
data using wireless communications. This section of the manual assumes
that you have already set up your wireless communications network including access points. If you are using a UDP Plus network, you also need to
have an Intermec Application Server communicating with a host computer.
Your CN3 Computer supports TCP/IP and UDP Plus network protocols.
The easiest way to configure the network parameters on the CN3 Computer is to use the Intermec Settings applet. See “Intermec Settings
Applet” on page 10 for more information.
Configuring the Network Parameters for a TCP/IP Network
In a TCP/IP network, the CN3 Computer communicates with a host computer directly using TCP/IP. The access point acts as a bridge to allow
communications between the wired and wireless networks.
Configuring the Network Parameters for a UDP Plus Network
In a UDP Plus network, the CN3 Computer communications with a host
computer through the Intermec Application Server. The Intermec Application Server translates UDP Plus packets on the wireless network into
TCP/IP packets on the wired network and vice versa. The access point acts
as a bridge to allow communications between wired and wireless networks.
CN3 Mobile Computer User’s Manual - PRELIMINARY 113
Page 24

Chapter 5 — Network Support
Phone Application (GPRS/GSM Radios)
With the WAN radio module installed in your CN3 Computer, you can
send and receive telephone calls within your Wi-Fi range.
Use the speaker on the back of the computer as your earpiece and use the
connector on the bottom of the computer for your mouthpiece.
Tap Start > Settings > the Phone desktop icon from the Personal tab or tap
Start > Phone to access the application which processes your phone calls.
Tap the Close button in the upper right corner of this application to close.
Activation
At factory-default, the phone is disabled. To turn on the phone, use either
of the following methods:
Wireless Manager
You can use the Wireless Manager to enable and disable Bluetooth, Wi-Fi,
and the Phone if it is built into your CN3 Computer.
To turn on the phone using the Wireless Manager, tap Start > Settings >
the Connections tab > the Wireless Manager icon, or tap the Wireless
Manager row from the Today desktop.
In the Wireless Manager, either tap All or tap Phone, then wait for “On”
to appear beneath the Phone row.
Ta p Menu > Phone Settings to configure the phone (more information on
the next page). Tap Done to close the Wireless Manager.
114 PRELIMINARY - CN3 Mobile Computer User’s Manual
Page 25

Chapter 5 — Network Support
Phone Application
Tap the appropriate keys to enter a telephone number, then tap Tal k to
dial the number.
Tap this to backspace one digit.
Tap this to view your previous calls.
Tap this to select a previously
dialed number.
Tap this to dial the phone number
shown above the keypad.
Tap this toggle the mute option.
Tap this to access the Contacts application.
Call History
Ta p Call History to note the telephone numbers that were previously
dialed from this CN3 Computer.
Speed Dial
Ta p Speed Dial to select a telephone number with which the CN3 Com-
puter is to dial automatically. To add to this list, use the Contacts application. See “Contacts: Tracking Friends and Colleagues” on page 48 for
CN3 Mobile Computer User’s Manual - PRELIMINARY 115
Page 26

Chapter 5 — Network Support
more information about the Contacts application.
Too ls
Ta p Tools > Send SMS tab to access the Inbox application and send an
SMS (Short Messaging Service) message. Be sure to have an SMS number
ready to send the message — this is usually the mobile phone number. See
“Messaging: Sending and Receiving E-mail Messages” on page 56 for
information about Messaging.
Phone Settings
Either select Tools > Options from the Phone application or select Start >
Settings > the Personal tab > the Phone icon to access the applet.
•Tap the Phone tab to customize your phone settings such as the ring
type and ring tone to use for incoming calls, and the keypad tone to use
when entering phone numbers. Tap Other Settings to go to the Sounds
116 PRELIMINARY - CN3 Mobile Computer User’s Manual
Page 27

Chapter 5 — Network Support
& Notifications applet.
•Tap the Services tab to access settings for any of the provided services.
CN3 Mobile Computer User’s Manual - PRELIMINARY 117
Page 28

Chapter 5 — Network Support
Tap any of the settings, then tap Get Settings. Make your changes, then
tap ok to return to the Settings screen. Below is a sample Settings screen.
Tap the Network tab to find, set, or select the type of network on which
this phone is to communicate.
Remote Access (Modems)
You can set up connections to the Internet and corporate network at work
to browse the Internet or intranet, send and receive e-mail, and synchronize
information using ActiveSync. Connections are made via wireless networks.
Your CN3 Computer has two groups of connection settings: My ISP and
My Work Network. Use My ISP settings to connect to the Internet. Use
My Work Network settings to connect to any private network.
• My ISP: Once connected, you can send and receive e-mail messages by
using Messaging and view Web or WAP pages by using Internet
Explorer Mobile. The communication software for creating an ISP connection is already installed on your CN3 Computer. Your service pro-
118 PRELIMINARY - CN3 Mobile Computer User’s Manual
Page 29

vider provides the software needed to install other services, such as
paging and fax services. If this is the method you want to use, see “Con-
necting to an Internet Service Provider” on page 119.
• My Work Network: Connect to the network at your company or organization where you work. Once connected, you can send and receive email messages by using Messaging, view Web or WAP pages by using
Internet Explorer Mobile, and synchronize with your desktop. If this is
the method you want to use, see “Connecting to Work” on page 121.
Connecting to an Internet Service Provider
You can connect to your ISP, and use the connection to send and receive e–
mail messages and view Web or WAP pages.
Get an ISP dial-up access telephone number, a user name, and a password
from your ISP.
To view additional information for any screen in the wizard or while
changing settings, tap the Help icon.
1 Tap Start > Settings > the Connections icon. In My ISP, tap Add a new
modem connection.
Chapter 5 — Network Support
2 Enter a name for the connection, such as “ISP Connection.”
If using an external modem connected to your CN3 Computer with a
cable, select “Hayes Compatible on COM1” from the Select a modem
CN3 Mobile Computer User’s Manual - PRELIMINARY 119
Page 30

Chapter 5 — Network Support
3 Enter the access phone number, then tap Next. For more information,
list drop-down, then tap Next to continue.
tap use dialing rules.
4 Enter the user name, password, and domain (if provided by an ISP or
your network administrator), then tap Finish.
5 Tap the Advanced tab from the Connections screen, then tap Dialing
Rules to specify your current location. These settings apply to all con-
120 PRELIMINARY - CN3 Mobile Computer User’s Manual
Page 31

Chapter 5 — Network Support
nections. Tap Use dialing rules, tap ok, then tap Edit to continue.
6 Specify your current phone type. If your phone type is pulse dialing,
check Pulse dialing. If your type is tone dialing (as most phone lines
are), then clear Pulse dialing. Continue to tap ok to close each page and
return to the Settings page.
To start the connection, start using one of the following programs. Once
connected, you can:
• Send and receive e-mail messages by using Messaging. Before you can
use Messaging, you need to provide the information it needs to communicate with the e-mail server.
• Visit Web and WAP pages by using Internet Explorer Mobile. For more
information, see “Internet Explorer Mobile” on page 66.
Note: To change modem connection settings in My ISP, tap Manage exist-
ing connections. Select the desired modem connection, tap Settings, then
follow the instructions on the screen.
Connecting to Work
If you have access to a network at work, you can send e-mail messages, view
intranet pages, synchronize your CN3 Computer, and possibly access the
Internet. Create a modem connection via a RAS (Remote Access Server)
account. Before you can create this modem connection, your network
CN3 Mobile Computer User’s Manual - PRELIMINARY 121
Page 32

Chapter 5 — Network Support
administrator needs to set up a RAS account for you. Your network administrator may also give you Virtual Private Network (VPN) settings.
Note: To change modem connection settings in My Work Network, tap
Manage existing connections. Select the desired modem connection, tap
Settings, then follow the instructions on the screen.
To view additional information for any screen in the wizard or while
changing settings, tap the Help icon.
1 Tap Start > Settings > the Connections icon. In My Work Network, tap
Add a new modem connection.
2 Enter a name for the connection, such as “Company Connection.” In
the Select a modem list, select your modem type, then tap Next to continue. If your modem type does not appear, try reinserting your CN3
Computer into your modem dock.
• If using an external modem connected to your CN3 Computer with a
cable, select “Hayes Compatible on COM1.”
• If using any type of external modem, select the modem by name. If a
listing does not exist for your external modem, select “Hayes Compatible on COM1.”
3 Enter the access phone number, using some of the following guidelines.
If you know part of the phone number changes frequently as you travel,
122 PRELIMINARY - CN3 Mobile Computer User’s Manual
Page 33

Chapter 5 — Network Support
create dialing rules to avoid creating numerous modem connections for
the same phone number. For more information, tap use dialing rules.
• Enter the phone number exactly as you want it dialed. For example, if
you call from a business complex or hotel that requires a nine before
dialing out, enter “9” in front of the phone number.
• Enter the APN provided by your mobile phone service provider.
• When using dialing rules, phone numbers are entered differently. To
use additional numbers, such as a “9” to dial from an office complex
or hotel, you must use additional dialing rules or change dialing patterns. See “Create Dialing Rules” via your online help for information.
a In Country/Region code, enter the appropriate code when dialing
internationally. For more information, contact an operator at your
local phone company.
b In Area code, enter the area code, if needed.
c Enter the Phone Number, then tap Next to continue.
4 Enter the user name, password, and domain (if provided by an ISP or
your network administrator). If a domain name was not provided, try
the connection without entering a domain name. Tap Finish.
CN3 Mobile Computer User’s Manual - PRELIMINARY 123
Page 34

Chapter 5 — Network Support
Creating a VPN Server Connection to Work
A VPN connection helps you to securely connect to servers, such as a corporate network, via the Internet. Ask your network administrator for the
following: user name, password, domain name, TCP/IP settings, and host
name or IP address of the VPN server
To view additional information for any screen in the wizard or while
changing settings, tap the Help icon.
Note: To change existing settings in My Work Network, tap Manage exist-
ing connections > the VPN tab. Select the desired VPN connection, tap
Settings, then follow the instructions on the screen.
1 Ta p Start > Settings > the Connections icon. In My Work Network,
tap Add a new VPN server connection.
2 In Name, enter a name for the connection, such as a company’s name.
In Host name/ IP, enter the VPN server name or IP address.
Next to VPN type, select the type of authentication to use with your
device: “IPSec/L2TP” or “PPTP.” If you are not sure which option to
choose, ask your network administrator. Tap Next to continue.
124 PRELIMINARY - CN3 Mobile Computer User’s Manual
Page 35

Chapter 5 — Network Support
3 Select the type of authentication. If you select A pre-shared key, enter
the key provided by your network administrator.
4 Enter your user name, password, and domain name as provided by your
ISP or network administrator, then tap Finish. If a domain name was
not provided, try the connection without entering a domain name.
Insert necessary equipment, such as a network card, into the CN3 Computer, and use a desired program to begin connecting.
Ending a Connection
• When connected via modem or VPN, tap the Connectivity icon on the
top, then tap Disconnect.
• When connected via cable or cradle, detach your CN3 Computer.
• When connected via Infrared, move the CN3 Computer away from the
other computer or device.
• When connected via a wireless network, switch off the connection.
CN3 Mobile Computer User’s Manual - PRELIMINARY 125
Page 36

Chapter 5 — Network Support
iConnect
The default network adapter or radio is dependent on what radios are
installed in your CN3 Computer. With the iConnect menu, using the
Enable feature, you can specify “Wireless” or “No Networking” to load
onto your CN3 Computer when a cold-boot is performed.
If you had specified a network prior to when a warm-boot is performed on
the CN3 Computer, the iConnect application restores your network interfaces to what they were before the warm-boot was performed.
See the Developer’s Support area of the Intermec web site for the latest
information on network adapters for your unit.
To access the iConnect menu, tap the iConnect icon (shown to the left)
above your command bar for the following menu:
Select Dismiss from the iConnect menu to end the session without exiting
the application.
Select Exit iConnect to exit the application. To access the iConnect
application after you have exited it, perform a warm-boot on the CN3
Computer. The iConnect icon then reappears above the command bar.
No Networking
If you do not need any networking interface, select Enable > No Network-
ing from the iConnect menu. The Wireless radio tower icon is replaced
with one that shows an “X,” a check mark appears next to the “No Networking” option in the menu, and the iConnect application disables all
other networking interfaces.
Wireless Communications
To enable wireless communications on the CN3 Computer, select Enable
> Wireless from the iConnect menu. The Wireless icon (shaped like a
radio tower) appears in the toolbar, a check mark appears next to the
“Wireless” option in the menu, and wireless communications is enabled.
To configure wireless communications on the CN3 Computer, select
Tools > Wireless Settings from the iConnect menu to access the Profile
Wizard for the 802.11b/g radio module.
You can configure wireless 802.11b/g communications through the applet.
Ta p Start > Settings > the System tab > the Wireless Network icon to
access the Profile Wizard. Go to “Configuring Microsoft Security” on
page 148 for information.
126 PRELIMINARY - CN3 Mobile Computer User’s Manual
Page 37

Chapter 5 — Network Support
To view information about the Wireless 802.11b/g communications, select
Tools > Wireless IP Settings from the iConnect menu for the following:
To view the status of the Wireless communications, select Status > Wire-
less from the iConnect menu to view the status. Tap Try Again to check
the status after you make changes to the connection.
Ping Test
Select To o l s > Ping Test from the iConnect menu to test the connection of
your CN3 Computer against your network. If you want to ping your gateway or DHCP server, select Ping my gateway or DHCP server, then select
which to ping from the top drop-down list. If you want to ping a specific
host, select Ping the host address below, then enter its IP address in the
field beneath. After you make your selection, tap Ping! and wait for results.
CN3 Mobile Computer User’s Manual - PRELIMINARY 127
Page 38

Chapter 5 — Network Support
Configuring Security
Use the next sections to understand how to configure each type of security
on your wireless CN3 Computer.
The CN3 Computer provides three types of security for your wireless network: Wi-Fi Protected Access 2 (WPA2/802.11i), WPA, and WEP.
802.1x should be referred to as an authentication method used for WPA
and WPA2. Another authentication method for WPA and WPA2 would be
the Pre-Shared Key (PSK).
By default, Funk security is enabled. You must use either Microsoft or
Funk security to implement your security solution. Go to page 130 for
more information.
Loading Certificates
If you choose to use Transport Layer Security (TLS) with WPA or 802.1x
security, you need to have a unique client certificate on the CN3 Computer
and a trusted root certificate authority (CA) certificate. If you choose to use
PEAP, you need to load a root CA certificate. You can use a third-party CA
to issue unique client certificates and a root certificate.
Wireless Network
If your CA is on your WLAN, select Start > Settings > the System tab > the
Certificates icon > the Root tab to view certificate details. To remove a cer-
tificate, press and hold a certificate, then select Delete.
Your wireless adapter (network interface card) connects to wireless networks of two types: infrastructure networks and ad-hoc networks.
• Infrastructure networks get you onto your corporate network and the
internet. Using the 802.11b/g infrastructure mode, the CN3 Computer
establishes a wireless connection to an access point, linking you to the
rest of the network.
• Ad-hoc networks are private networks shared between two or more clients, even with no access point.
128 PRELIMINARY - CN3 Mobile Computer User’s Manual
Page 39

Encryption
Chapter 5 — Network Support
Each wireless network is assigned a name (or Service Set Identifier - SSID)
to allow multiple networks to exist in the same area without infringement.
Intermec recommends using security measures with wireless networks to
prevent unauthorized access to your network and to ensure your privacy of
transmitted data. Authentication (cryptographically protected) by both the
network and the user, transmitted data, and encryption are required elements for secure networks. There are schemes available for implementing
these features.
AES (Advanced Encryption Standard)
CKIP (Cisco Key Integrity Protocol)
TKIP (Temporal Key Integrity
Protocol)
WEP (Wired Equivalent Privacy)
encryption
Key Management Protocols
A block cipher, a type of symmetric key cipher that uses groups of bits of a fixed
length - called blocks. A symmetric key cipher is a cipher using the same key for
both encryption and decryption.
As implemented for wireless, this is also known as CCMP, which implements
AES as TKIP and WEP are implementations of RC4.
This is Cisco's version of the TKIP protocol, compatible with Cisco Aironet
products.
This protocol is part of the IEEE 802.11i encryption standard for wireless
LANs., which provides per-packet key mixing, a message integrity check and a
re-keying mechanism, thus overcoming most of the weak points of WEP. This
encryption is more difficult to crack than the standard WEP. Weak points of
WEP include: No Initiation Vector (IV) reuse protection, weak keys, no protection against message replay, no detection of message tampering, and no key
updates.
With preconfigured WEP, both the client CN3 Computer and access point are
assigned the same key, which can encrypt all data between the two devices. WEP
keys also authenticate the CN3 Computer to the access point - unless the CN3
Computer can prove it knows the WEP key, it is not allowed onto the network.
WEP keys are only needed if they are expected by your clients. There are two
types available: 64-bit (5-character strings, 12345) (default) and 128-bit (13character strings, 1234567890123). Enter these as either ASCII (12345) or Hex
(0x3132333435).
WPA (Wi-Fi Protected Access) This is an enhanced version of WEP that does not rely on a static, shared key. It
encompasses a number of security enhancements over WEP, including improved
data encryption via TKIP and 802.11b/g authentication with EAP. WiFi Alliance security standard is designed to work with existing 802.11 products and to
offer forward compatibility with 802.11i.
WPA2 (Wi-Fi Protected Access) Second generation of WPA security. Like WPA, WPA2 provides enterprise and
home Wi-Fi users with a high level of assurance that their data remains protected
and that only authorized users can access their wireless networks. WPA2 is based
on the final IEEE 802.11i amendment to the 802.11 standard ratified in June
2004. WPA2 uses the Advanced Encryption Standard (AES) for data encryption
and is eligible for FIPS (Federal Information Processing Standards) 140-2 compliance.
CN3 Mobile Computer User’s Manual - PRELIMINARY 129
Page 40

Chapter 5 — Network Support
Authentication
EAP (Extensible Authentication
Protocol)
EAP-FAST (Flexible Authentication via Secure Tunneling)
LEAP (Lightweight Extensible
Authentication Protocol)
EAP-PEAP (Protected Extensible
Authentication Protocol)
EAP-TLS (Transport Layer Security)
EAP-TTLS (Tunneled Transport
Layer Security)
802.11b/g uses this protocol to perform authentication. This is not necessarily an
authentication mechanism, but is a common framework for transporting actual
authentication protocols. Intermec provides a number of EAP protocols for you
to choose the best for your network.
A publicly accessible IEEE 802.1X EAP type developed by Cisco Systems. It is
available as an IETF informational draft. An 802.1X EAP type that does not
require digital certificates, supports a variety of user and password database types,
supports password expiration and change, and is flexible, easy to deploy, and easy
to manage.
Also known as Cisco-Wireless EAP, provides username/password based authentication between a wireless client and a RADIUS server. In the 802.1x framework,
traffic cannot pass through a wireless network access point until it successfully
authenticates itself.
Performs secure authentication against Windows domains and directory services.
It is comparable to EAP-TTLS both in its method of operation and its security,
though not as flexible. This does not support the range of inside-the-tunnel
authentication methods supported by EAP-TTLS. Microsoft and Cisco both
support this protocol.
Based on the TLS (Transport Layer Security) protocol widely used to secure web
sites. This requires both the user and authentication server have certificates for
mutual authentication. While cryptically strong, this requires corporations that
deploy this to maintain a certificate infrastructure for all their users.
This protocol provides authentication like EAP-TLS (see page 141) but does
not require certificates for every user. Instead, authentication servers are issued
certificates. User authentication is done using a password or other credentials that
are transported in a securely encrypted “tunnel” established using server certificates.
EAP-TTLS works by creating a secure, encrypted tunnel through which you
present your credentials to the authentication server. Thus, inside EAP-TTLS
there is another inner authentication protocol that you must configure via Additional TTLS Settings.
Choosing Between Microsoft and Funk Security
Before you can implement a security solution on the CN3 Computer, you
need to choose between Microsoft and Funk security:
• By default, Funk security is enabled. It provides everything you get with
Microsoft security plus the addition of Cisco Compatible Extensions features. It also provides additional authentication types like EAP-TTLS,
LEAP, and EAP-FAST. If you want to use Funk security, you can starting configuring your security now. Information starts on the next page.
• If you want to use Microsoft security, you need to select Microsoft security as your security choice before you can do configurations. Go to
“Configuring Microsoft Security” on page 148 to begin.
Note: Your security choice does not depend on your authentication server.
For example, you can choose Funk security if you use Microsoft Active
Directory® to issue certificates.
130 PRELIMINARY - CN3 Mobile Computer User’s Manual
Page 41

Chapter 5 — Network Support
Configuring Funk Security
You can define up to four profiles for your Funk Odyssey security. Different profiles let your CN3 Computer communicate in different networks
without having to change all of your security settings. For example, you can
set up one profile for the manufacturing floor and one for the warehouse.
1 Select Start > Settings > the System tab > the Intermec Settings icon.
2 Tap (+) to expand Communications > 802.11 Radio > Funk Security.
3 Select an active profile, then configure its security settings.
Using WPA Security
Wi-Fi Protected Access (WPA) is a strongly enhanced, interoperable Wi-Fi
security that addresses many of the vulnerabilities of Wired Equivalent Privacy (WEP). Instead of WEP, WPA uses Temporal Key Integrity Protocol
(TKIP) for its data encryption method. Currently, WPA satisfies IEEE
802.11i standards.
WPA runs in Enterprise (802.1x) mode or PSK mode:
• In Enterprise mode, WPA provides user authentication using 802.1x and
the Extensible Authentication Protocol (EAP). That is, an authentication
server (such as a RADIUS server) must authenticate each device before
the device can communicate with the wireless network.
• In PSK mode, WPA provides user authentication using a shared key
between the authenticator and the CN3 Computer. WPA-PSK is a good
solution for small offices or home offices that do not want to use an
authentication server.
To use WPA security, you need an access point with an 802.11b/g radio
that supports WPA.
CN3 Mobile Computer User’s Manual - PRELIMINARY 131
Page 42

Chapter 5 — Network Support
Configuring WPA Security With Funk Security
Use this procedure to set WPA security with Funk security.
1 Make sure you have configured the communications and radio parame-
2 Open Intermec Settings. Tap (+) to expand Communications > 802.11
ters on your CN3 Computer and that Funk is your security choice.
Radio > Funk Security > Profile X with “X” being “1” through “4.”
3 For Association, select “WPA” and press Enter.
4 For 8021x, select “PEAP,” “TLS,” “TTLS,” “LEAP,” or “EAP-FAST”
and press Enter.
If you select “TTLS” or “PEAP:”
a Select User Name, type your user name, then press Enter.
b Select User Password, type a user password, then press Enter.
c For Validate Server Certificate, select “Yes,” then press Enter. Note
that you must have the date on the CN3 Computer set correctly when you
enable Validate Server Certificate.
d You must enter a User Name and Subject Name. You can also enter a
Server 1 Common name or Server 2 Common name if you want to
increase your level of security.
If you select “TLS:”
a Load a user and root certificate on your CN3 Computer. For help, see
“Loading Certificates” on page 128.
b For Validate Server Certificate, select “Yes,” then press Enter. Note
that you must have the date on the CN3 Computer set correctly when you
enable Validate Server Certificate.
c You must enter a User Name and Subject Name. You can also enter a
Server 1 Common name or Server 2 Common name if you want to
increase your level of security.
132 PRELIMINARY - CN3 Mobile Computer User’s Manual
Page 43

Chapter 5 — Network Support
If you select “LEAP” or “EAP-FAST:”
a Select User Name, type your user name, then press Enter.
b Select User Password, type a user password, then press Enter.
6 Exit the Intermec Settings applet.
Configuring WPA-PSK Security With Funk Security
Use this procedure to set WPA-PSK security on your CN3 Computer with
Funk security.
1 Make sure you have configured the communications and radio parame-
ters on your CN3 Computer and that Funk is your security choice.
2 Open Intermec Settings. Tap (+) to expand Communications > 802.11
Radio > Funk Security > Profile X with “X” being “1” through “4.”
3 For Association, select “WPA” and press Enter.
4 For 8021x, select “None” and press Enter.
5 For Pre-Shared Key, enter the pre-shared key or the passphrase.
The pre-shared key must be a value of 32 hex pairs preceded by 0x for a
total of 66 characters. The value must match the key value on the access
point. The passphrase must be from 8 to 63 chtomaracters. After you
enter a passphrase, the CN3 Computer internally converts it to a preshared key. This value must match the passphrase on the authenticator.
6 Exit the Intermec Settings applet.
Using 802.1x Authentication
802.1x authentication provides centralized user authentication using an
authentication server, authenticators (access points), and supplicants. These
components communicate using an EAP authentication type, such as TLS
(Transport Layer Security) or PEAP (Protected Extensible Authentication
Protocol). 802.1x security provides data encryption using dynamic WEP
key management. To use 802.1x security, you need:
• An access point with an 802.11b/g radio.
• A CN3 Computer with an 802.11b/g radio and the 802.1x/WPA security option.
CN3 Mobile Computer User’s Manual - PRELIMINARY 133
Page 44

Chapter 5 — Network Support
Configuring 802.1x Security With Funk Security
Use this procedure to set 802.1x security on your CN3 Computer with
Funk security.
1 Make sure you have configured the communications and radio parame-
2 Open Intermec Settings. Tap (+) to expand Communications > 802.11
ters on your CN3 Computer and that Funk is your security choice.
Radio > Funk Security > Profile X with “X” being “1” through “4.”
3 For Association, select “Open” and press Enter. When working with
Cisco Aironet access points, you can select “Network-EAP.”
4 For Encryption, select “WEP” and press Enter.
5 For 8021x, select “PEAP,” “TLS,” “TTLS,” “LEAP,” or “EAP-FAST”
and press Enter.
If you select “TTLS” or “PEAP:”
a Select User Name, type your user name, then press Enter.
b Select User Password, type a user password, then press Enter.
c For Validate Server Certificate, select “Yes,” then press Enter. Note
that you must have the date on the CN3 Computer set correctly when you
enable Validate Server Certificate.
d You must enter a User Name and Subject Name. You can also enter a
Server 1 Common name or Server 2 Common name if you want to
increase your level of security.
If you select “TLS:”
a Load a user and root certificate on your CN3 Computer (page 128).
b For Validate Server Certificate, select “Yes,” then press Enter. Note
that you must have the date on the CN3 Computer set correctly when you
enable Validate Server Certificate.
c You must enter a User Name and Subject Name. You can also enter a
Server 1 Common name or Server 2 Common name if you want to
increase your level of security.
134 PRELIMINARY - CN3 Mobile Computer User’s Manual
Page 45

Chapter 5 — Network Support
If you select “LEAP” or “EAP-FAST:”
a Select User Name, type your user name, then press Enter.
b Select User Password, type a user password, then press Enter.
7 Exit the Intermec Settings applet.
Using Static WEP Security
The CN3 Computer uses the Wired Equivalent Privacy (WEP) protocol to
add security to your wireless network based on the 802.11b/g standard. To
use WEP security, you need an access point with an 802.11b/g radio.
Configuring Static WEP Security With Funk Security
Use this procedure to set Static WEP security with Funk security.
1 Make sure you have configured the communications and radio parame-
ters on your CN3 Computer and that Funk is your security choice.
2 Open Intermec Settings. Tap (+) to expand Communications > 802.11
Radio > Funk Security > Profile X with “X” being “1” through “4.”.
3 For Association, select “Open” and press Enter.
4 For Encryption, select “WEP” and press Enter.
5 For 8021x, select “None” and press Enter.
7 For Transmit key, select which WEP key to use for encryption of trans-
mitted data.
8 Define a value for each key, up to four. Enter an ASCII key or a hex key
either 5 or 13 bytes long based on the radio capability. Set a 5-byte value
for 64-bit WEP or a 13-byte value for 128-bit WEP. Precede hex keys
with 0x and make sure the keys use 5 or 13 hex pairs.
9 Exit the Intermec Settings applet.
Using the Profile Wizard
To start 802.11b/g communications on the CN3 Computer, tap Start >
Settings > the System tab > the Wireless Network icon to access the Pro-
file Wizard for the 802.11b/g radio module.
CN3 Mobile Computer User’s Manual - PRELIMINARY 135
Page 46

Chapter 5 — Network Support
A profile contains all the information necessary to authenticate you to the
network, such as login name, password or certificate, and protocols by
which you are authenticated.
You can have up to four profiles for different networks. For example, you
may have different login names or passwords on different networks, or you
may use a password on one network, and a certificate on another.
Use the Profiles page to select and configure between the networking environments assigned to this 802.11b/g radio.
Profile Tap the drop-down list to choose between four different profiles assigned to this unit, then
tap Edit Select Profile, make the changes needed for this profile (starting on the next page),
then tap ok to return to the Profiles page.
Enable Microsoft's
Wireless Zero Config
Check this to enable Microsoft's Wireless Zero Config application and disable the Intermec
software solution for 802.11b/g, including configuration via the Wireless Network applet.
Basic
Use the Basic page to set the network type, name, and manage battery
power for this profile. Tap ok to return to the Profiles page.
136 PRELIMINARY - CN3 Mobile Computer User’s Manual
Page 47

Chapter 5 — Network Support
Profile Label Enter a unique name for your profile.
Network type Tap the list to select “Infrastructure” if the network uses access points to connect to the corporate
network or internet; or “Ad-Hoc” to set up a private network with one or more participants.
Channel If you select “Ad-Hoc” for the network type, select the channel on which you are communicating
with others in your network. There are up to 11 channels available.
SSID (Network Name)
Enable Power
Management:
This assumes the profile name unless another name is entered in this field. If you want to connect to
the next available network or are not familiar with the network name, enter “ANY" in this field.
Consult your LAN administrator for network names.
Check this box to conserve battery power (default), or clear this box to disable this feature.
Security
The following are available from the 8021x Security drop-down list: None,
PEAP (page 139), TLS (page 141), TTLS (page 142), LEAP (page 145),
and EAP-FAST (page 146).
None
Use “None” to disable 802.1x security and enable WEP encryption. Set
8021x Security as “None,” Association to “Open,” and Encryption to
“None.”
To enable WEP encryption:
1 Set 8021x Security as “None” and Association to “Open” or “Shared” as
required to match the settings in your access point. Note “Open” is the
recommended choice as “Shared” key authentication has security weaknesses.
2 Set Encryption to “WEP.”
CN3 Mobile Computer User’s Manual - PRELIMINARY 137
Page 48

Chapter 5 — Network Support
3 Select a data transmission key from the Data TX Key drop-down list
4 Enter an ASCII key or a hex key either 5 or 13 bytes long based on the
To enable WPA encryption using a pre-shared key:
near the bottom of this screen.
radio capability in the appropriate Key # field. Set a 5-byte value for 64bit WEP or a 13-byte value for 128-bit WEP. Precede hex keys with 0x
and make sure the keys use 5 or 13 hex pairs.
1 Set 8021x Security as “None.”
2 Set Association to “WPA.”
3 Enter the passphrase as ASCII (12345) in the Pre-Shared Key field.
To enable WPA2 encryption using a preshared key:
1 Set 8021x Security as “None.”
2 Set Association to “WPA2.”
3 Set Encryption to either “TKIP” or “AES.”
138 PRELIMINARY - CN3 Mobile Computer User’s Manual
Page 49

Chapter 5 — Network Support
4 Enter the passphrase as ASCII (12345) in the Pre-Shared Key field.
PEAP (Protected EAP)
This protocol performs secure authentication against Windows domains
and directory services. It is comparable to EAP-TTLS (see page 142), both
in its method of operation and its security, though not as flexible. This does
not support the range of inside-the-tunnel authentication methods supported by EAP-TTLS. Microsoft and Cisco both support this protocol.
Use “PEAP” to configure the use of PEAP as an authentication protocol
and to select “Open,” “WPA,” “WPA2,” or “Network EAP” as an association mode.
1 Set 8021x Security as “PEAP,” then choose any of the following:
•Set Association to “Open.”
•Set Association to “WPA.”
•Set Association to “WPA2” and Encryption to either “TKIP” or
“AES.”
•Set Association to “Network EAP” and Encryption to either “WEP”
or “CKIP.”
2 Enter your unique Username and password to use this protocol.
3 Select Prompt for password to have the user enter this password each
time to access the protocol; or leave Use following password as selected
and enter your unique password to use the protocol without entering a
password each time you use your CN3 Computer.
4 Ta p Get Certificates to obtain or import server certificates. See
page 144.
CN3 Mobile Computer User’s Manual - PRELIMINARY 139
Page 50

Chapter 5 — Network Support
5 Ta p Additional Settings to assign an inner PEAP authentication and set
options for server certificate validation and trust.
Additional PEAP Settings
1 Select an authentication method from the Inner PEAP Authentication
drop-down list.
EAP/MS-CHAP-V2 Authenticates against a Windows Domain Controller and other non-Windows user data-
bases. This is Microsoft's implementation of PEAP.
EAP/Token Card Use with token cards. The password value entered is never cached. This is Cisco's imple-
mentation of PEAP.
EAP/MD5-Challenge Message Digest 5. A secure hashing authentication algorithm.
2 Check Validate Server Certificate to verify the identity of the authenti-
cation server based on its certificate when using PEAP.
3 Ta p Root CA, select a root certificate, then OK to return to the Inner
PEAP Authentication.
4 Enter the Common Names of trusted servers. Note that if these fields are
left blank, the client will accept any authentication server with a valid certificate. For increased security, you should specify exactly which authentication
servers you expect to use.
5 Ta p ok to return to the Security page.
140 PRELIMINARY - CN3 Mobile Computer User’s Manual
Page 51

Chapter 5 — Network Support
TLS (EAP-TLS)
EAP-TLS is a protocol that is based on the TLS (Transport Layer Security)
protocol widely used to secure web sites. This requires both the user and
authentication server have certificates for mutual authentication. While
cryptically strong, this requires corporations that deploy this to maintain a
certificate infrastructure for all their users.
Use “TLS” to configure using EAP-TLS as an authentication protocol, pick
“Open,” “WPA,” “WPA2,” or “Network EAP” as an association mode.
1 Set 8021x Security as “TLS, then choose any of the following:
•Set Association to “Open.”
•Set Association to “WPA.”
•Set Association to “WPA2” and Encryption to either “TKIP” or
“AES.”
•Set Association to “Network EAP” and Encryption to either “WEP”
or “CKIP.”
2 Enter your unique Subject Name and User Name of the corresponding
certificate installed on your CN3 Computer to use this protocol.
3 Ta p Get Certificates to obtain or import server certificates. See
page 144.
4 Ta p Additional Settings to set options for server certificate validation
and trust.
Additional TLS Settings
1 Check Validate Server Certificate to verify the identity of the authenti-
cation server based on its certificate when using TLS.
2 Ta p Root CA, select a root certificate, then tap OK to return to the TLS
settings.
3 Enter the Common Names of trusted servers. Note that if these fields are
left blank, the client will accept any authentication server with a valid certificate. For increased security, you should specify exactly which authentication
servers you expect to use.
CN3 Mobile Computer User’s Manual - PRELIMINARY 141
Page 52

Chapter 5 — Network Support
4 Ta p ok to return to the Security page.
TTLS (EAP-Tunneled TLS)
This protocol provides authentication like EAP-TLS (see page 141) but
does not require user certificates. User authentication is done using a password or other credentials that are transported in a securely encrypted “tunnel” established using server certificates.
EAP-TTLS works by creating a secure, encrypted tunnel through which
you present your credentials to the authentication server. Thus, inside EAPTTLS there is another inner authentication protocol that you must configure
via Additional TTLS Settings.
Use “TTLS” to configure EAP-TTLS as an authentication protocol, select
“Open,” “WPA,” “WPA2,” or “Network EAP” as an association mode.
1 Set 8021x Security as “TTLS,” then choose one of the following:
•Set Association to “Open.” (default configuration)
•Set Association to “WPA.”
•Set Association to “WPA2” and Encryption to either “TKIP” or
“AES.”
•Set Association to “Network EAP” and Encryption to either “WEP”
or “CKIP.”
2 Enter your unique Username to use this protocol.
3 Select Prompt for password to have the user enter this password each
time to access the protocol, or leave Use following password as selected
and enter your unique password to use the protocol without entering a
password each time you use your CN3 Computer.
4 Ta p Get Certificates to obtain or import server certificates (see
page 144).
142 PRELIMINARY - CN3 Mobile Computer User’s Manual
Page 53

Chapter 5 — Network Support
5 Ta p Additional Settings to assign an inner TTLS authentication and an
inner EAP, and set the server certificate validation and trust.
Additional TTLS Settings
1 Select an authentication method from the Inner TTLS Authentication
drop-down list.
PAP Password Authentication Protocol. A simple authentication protocol that sends security
information in the clear.
CHAP Challenge Handshake Authentication Protocol. Use of Radius to authenticate a termi-
nal without sending security data in the clear. Authenticates against non-Windows user
databases. You cannot use this if authenticating against a Windows NT Domain or Active
Directory.
MS-CHAP; MS-CHAP-V2 Authenticates against a Windows Domain Controller and other non-Windows user
databases.
PAP/Token Card Use with token cards. The password value entered is never cached.
EAP Extensible Authentication Protocol
2 If you select “EAP” for the inner authentication protocol, then select an
inner EAP protocol from the Inner EAP drop-down list.
3 Enter the Common Names of trusted servers. Note that if these fields are
left blank, the client will accept any authentication server with a valid certificate. For increased security, you should specify exactly which authentication
servers you expect to use.
Check Validate Server Certificate to verify the identity of the authenti-
cation server based on its certificate when using TTLS.
4 Ta p Root CA, select a root certificate, then tap OK to return to the
Inner TTLS Authentication.
5 Enter the Anonymous EAP-TTLS Name as assigned for public usage.
Use of this outer identity protects your login name or identity.
CN3 Mobile Computer User’s Manual - PRELIMINARY 143
Page 54

Chapter 5 — Network Support
6 Ta p ok to return to the Security page.
Get Certificates
Certificates are pieces of cryptographic data that guarantee a public key is
associated with a private key. They contain a public key and the entity
name that owns the key. Each certificate is issued by a certificate authority.
Use this page to import a certificate onto the CN3 Computer.
Root Certificates
1 Tap the <<< button next to the Import Root Certificate field to select
the root certificate (DER-encoded .CER file) to import.
2 Click Import Root Cert to install the selected certificate.
User Certificate
1 Tap the <<< button next to the Certificate Path (.cer) field to select the
user certificate (DER-encoded .CER file without the private key) to
import.
2 Tap the <<< button next to the Key Path (.pvk) field to select the private
key (.PVK file) which corresponds to the user certificate chosen in step 1.
3 Ta p Import User Cert to install the selected certificate.
Web Enrollment
Ta p Web Enrollment to obtain a user certificate over the network from an
IAS Server.
144 PRELIMINARY - CN3 Mobile Computer User’s Manual
Page 55

Chapter 5 — Network Support
Ta p ok to return to the Security page.
LEAP (Cisco Lightweight EAP)
LEAP is the Cisco Lightweight version of EAP.
Use “LEAP” to configure the use of LEAP as an authentication protocol,
select “Open,” “WPA,” “WPA2,” or “Network EAP” as an association
mode, or assign “Network EAP.” Note that this defaults to the Network EAP.
1 Set 8021x Security as “LEAP,” then choose one of the following:
•Set Association to “Open.”
•Set Association to “WPA.”
•Set Association to “WPA2” and Encryption to either “TKIP” or
“AES.”
•Set Association to “Network EAP” and Encryption to either “WEP”
or “CKIP.”
2 Enter your unique Username to use this protocol.
3 Select Prompt for password to have the user enter this password each
time to access the protocol, or leave Use following password as selected
and enter your unique password to use the protocol without entering a
password each time you use your CN3 Computer.
CN3 Mobile Computer User’s Manual - PRELIMINARY 145
Page 56

Chapter 5 — Network Support
EAP-FAST (EAP-Flexible Authentication via Secured Tunnel)
The EAP-FAST protocol is a client-server security architecture that
encrypts EAP transactions with a TLS tunnel. While similar to PEAP, it
differs significantly as EAP-FAST tunnel establishment is based on strong
secrets unique to users. These secrets are called Protected Access Credentials
(PACs), which CiscoSecure ACS generates using a master key known only
to CiscoSecure ACS. Because handshakes based upon shared secrets are
intrinsically faster than handshakes based upon PKI, EAP-FAST is the significantly faster of the two solutions that provide encrypted EAP transactions. No certificate management is required to implement EAP-FAST.
Use “EAP-FAST” to configure the use of EAP-FAST as an authentication
protocol, select “Open,” “WPA,” “Network EAP” as an association mode.
1 Set 8021x Security as “EAP-FAST,” then choose one of the following:
•Set Association to “Open.”
•Set Association to “WPA.”
•Set Association to “WPA2.”
•Set Association to “Network EAP” and Encryption to either “WEP”
or “CKIP.”
2 Enter your unique Username to use this protocol.
3 Select Prompt for password to have the user enter this password each
time to access the protocol, or leave Use following password as selected
and enter your unique password to use the protocol without entering a
password each time you use your CN3 Computer.
4 Ta p Additional Settings to set options for PAC management and assign
an anonymous EAP-FAST name.
Additional Settings
1 Ta p PAC Manager to view the PAC files currently installed on your
CN3 Computer. Tap ok to return to the Additional Settings screen.
2 If you already have a PAC on your CN3 Computer, clear Allow Auto-
matic PAC provisioning to avoid receiving additional PACs from the
server.
146 PRELIMINARY - CN3 Mobile Computer User’s Manual
Page 57

Chapter 5 — Network Support
3 If Allow Automatic PAC provisioning is checked, you can check:
• Prompt before acquiring a new PAC for notification of any incom-
ing PACs.
• Prompt before replacing a PAC for notification whether to replace a
current PAC with an incoming PAC.
4 Enter the Anonymous EAP-FAST Name as assigned for public usage.
This outer identity protects your login name or identity.
5 Click ok to return to the Security page.
Advanced
Use this page to configure additional settings for this profile.
• Detect Rogue APs:
Wireless NICs and APs associate based on the SSID configured for the
NIC. Given an SSID, the BSSID with the strongest signal is often chosen for association. After association, 802.1x authentication may occur
and during authentication credentials to uniquely identify a user - these
are passed between the NIC and the AP.
The base 802.1x technology does not protect the network from “rogue
APs.” These can mimic a legitimate AP to authentication protocols and
user credentials. This provides illegal users ways to mimic legitimate
users and steal network resources and compromise security.
CN3 Mobile Computer User’s Manual - PRELIMINARY 147
Page 58

Chapter 5 — Network Support
• Enable mixed cell:
• Allow fast roaming (CCKM):
• Enable Logging:
Check this box to detect and report client behavior suspected of being
rogue APs. Once a rouge AP is detected, your CN3 Computer no longer
associates with that AP until you perform a clean boot.
Clear this box to solve AP connection problems that result when an AP
gets put on the rogue AP list due to inadvertent failed authentications
and not because it is a real rouge.
Mixed cell is a profile-dependent setting. If enabled, using WEP, you can
connect to access points that allow the optional use of encryption.
When using a wireless LAN that uses Cisco Access Points, a LEAPenabled client device can roam from one access point to another without
involving the authentication (RADIUS) server. If enabled, an access
point configured to provide Wireless Domain Services (WDS) takes the
place of the RADIUS server (caching credentials of an initial authentication with the RADIUS server) and authenticates the client without perceptible delay in voice or other time-sensitive applications.
Check this box to log what activity occurs for this profile.
Configuring Microsoft Security
The default security setting is Funk. If you want to use Microsoft security,
you need to select it as your security choice.
1 Select Start > Settings > the System tab > the Intermec Settings icon.
2 Tap (+) to expand Communications > 802.11 Radio > Security Choice.
Tap to select “Microsoft Security” from the drop-down list, press Enter.
3 An alert box appears telling you that you must save your settings and
clean boot the CN3 Computer for your new security choice to take
effect. Tap Ye s or press Esc to clear this box.
4 Save your settings, then perform a clean-boot on the CN3 Computer.
Networks already configured are preferred networks. You can connect to
only preferred networks or search for and connect to any available network.
148 PRELIMINARY - CN3 Mobile Computer User’s Manual
Page 59

Chapter 5 — Network Support
A wireless network can be added either when the network is detected, or
manually by entering settings information. To determine if authentication
information is needed, see your network administrator.
1 Ta p Start > Settings > the Connections tab > the Wi-Fi icon, then tap
Add New . . .
2 Enter a Network name. If the network was detected, the network name
is entered and cannot change.
From Connects to, select to what your network is to connect. If you
select “Work,” you can do a VPN connection or use proxy servers. If you
select “The Internet,” you can connect directly to the internet.
To connect to an ad-hoc connection, select This is a device-to-device
(ad-hoc) connection.
CN3 Mobile Computer User’s Manual - PRELIMINARY 149
Page 60

Chapter 5 — Network Support
3 Do the following to disable WEP encryption:
4 Do the following to enable WEP encryption:
a Set Authentication to either “Open” if WEP keys are not required; or
“Shared” when WEP keys are required for association.
b Set Data Encryption to “Disabled.”
a Set Authentication to either “Open” if WEP keys are not required; or
“Shared” when WEP keys are required for association.
b Set Data Encryption to “WEP.”
c To change the network key, clear The key is automatically provided,
then enter the new Network key and select the appropriate Key index.
150 PRELIMINARY - CN3 Mobile Computer User’s Manual
Page 61

Chapter 5 — Network Support
5 Do the following to enable WPA authentication:
a Set Authentication to “WPA.”
b Set Data Encryption to either “AES” or “TKIP.”
c Enter the new Network key:
6 Do the following to enable WPA authentication using a preshared key:
a Set Authentication to “WPA-PSK.”
b Set Data Encryption to either “AES” or “TKIP.”
c Enter the new Network key.
CN3 Mobile Computer User’s Manual - PRELIMINARY 151
Page 62

Chapter 5 — Network Support
7 Do the following to enable WPA2 authentication:
8 Do the following to enable WPA2 authentication using a preshared key:
a Set Authentication to “WPA2.”
b Set Data Encryption to either “AES” or “TKIP.”
c Enter the new Network key:
a Set Authentication to “WPA2-PSK.”
b Set Data Encryption to either “AES” or “TKIP.”
c Enter the new Network key.
152 PRELIMINARY - CN3 Mobile Computer User’s Manual
Page 63

Chapter 5 — Network Support
9 Ta p Next, select either “PEAP” or “Smart Card or Certificate” for the
EAP type, then tap Properties to adjust its settings. Tap Finish to return
to the Configure Wireless Network screen.
From the Networks to access drop-down list, select “All Available,” “Only
access points,” or “Only computer-to-computer” depending on the type of
networks to which you connect. Tap ok to close this screen.
Note: If you select to connect to non-preferred networks, your CN3 Computer detects any new networks and provides configuration opportunities.
Management
Use the following tool and information to configure and manage your network. You can also contact your Intermec representative for support.
SmartSystems™ Foundation Console (www.intermec.com/SmartSystems)
This tool, available as a free download from Intermec, includes a management console that provides a default method to configure and manage
Intermec devices “out-of-the-box,” without the purchase of additional software licenses. This is for anyone who must configure and deploy multiple
devices or manage multiple licenses.
CN3 Mobile Computer User’s Manual - PRELIMINARY 153
Page 64

Chapter 5 — Network Support
Use the Intermec Settings applet to do device configuration settings within
the SmartSystems Foundation. Information about the Intermec Settings
applet is in the Intermec Computer Command Reference Manual (P/N:
073529) available online at www.intermec.com.
Information about the SmartSystems Foundation is available as an online
help within the SmartSystems Console application. Select SmartSystems >
Help in the console to access the manual.
See the Data Collection Resource Kit in the IDL for information about
data collection functions. The IDL is available as a download from the
Intermec web site at www.intermec.com/idl. Contact your Intermec repre-
sentative for more information.
Ta p Start > Settings > the System tab > the Intermec Settings icon, then
tap to expand the SmartSystems Information option.
SNMP Configuration on the Mobile Computer
In short, SNMP is an application-layer protocol that uses the exchange of
management information between network devices. The CN3 Computer is
such an SNMP-enabled device. Use SNMP to control and configure the
CN3 Computer anywhere on an SNMP-enabled network.
The CN3 Computer supports four proprietary Management Information
Bases (MIBs) and Intermec provides SNMP support for MIB-II through
seven read-only MIB-II (RFC1213-MIB) Object Identifiers (OIDs).
Note: Only query the seven OIDs through an SNMP management station.
Management Information Base
The Management Information Base is a database that contains information
about the elements to be managed. The information identifies the management element and specifies its type and access mode (Read-Only, ReadWrite). MIBs are written in ASN.1 (Abstract Syntax Notation.1) — a
machine independent data definition language. Note: Elements to manage
are represented by objects. The MIB is a structured collection of such objects.
154 PRELIMINARY - CN3 Mobile Computer User’s Manual
Page 65

Chapter 5 — Network Support
These MIB files are either in the CN3 Management Tools or on the web
via www.intermec.com:
• INTERMEC.MIB
Defines the root of the Intermec MIB tree.
• ITCADC.MIB
Defines objects for Automated Data Collection (ADC).
• ITCSNMP.MIB
Defines objects for Intermec SNMP parameters and security methods,
such as an SNMP security IP address.
• ITCTERMINAL.MIB
Defines objects for parameters, such as key clicks.
Object Identifiers
Each object has a unique identifier called an OID, which consist of a
sequence of integer values represented in dot notation. Objects are stored in
a tree structure and OIDs are assigned based on the position of the object
in the tree. For example, the internet OID is equal to 1.3.6.1.
MIB-II Item OID Group or Table Description
ifNumber 1.3.6.1.2.1.2.1.0 Interfaces Group Indicates the number of adapters
present in the system. For the
CN3 Computer, if one adapter is
present in the system, then
ifNumber = 1 and ifIndex = 1.
ifIndex 1.3.6.1.2.1.2.2.1.1.ifIndex Interfaces Table (ifTable) A unique value for each interface.
The value ranges between 1 and
the value of ifNumber.
ifDescr 1.3.6.1.2.1.2.2.1.2.ifIndex Interfaces Table (ifTable) A textual string containing infor-
mation about the interface.
ifType 1.3.6.1.2.1.2.2.1.3.ifIndex Interfaces Table (ifTable) An integer containing informa-
tion about the type of the interface. It is equal to 1 for Other.
ipAdEntAddr 1.3.6.1.2.1.4.20.1.1.IpAddress IP address Table
(ipAddrTable)
ipAdEntIfIndex 1.3.6.1.2.1.4.20.1.2.IpAddress IP address Table
(ipAddrTable)
The IP address to which this
entry’s addressing information
pertains (same as CN3 IP
address), where IP Address is the
valid non-zero IP address of the
CN3 Computer.
Index value that uniquely identifies the interface that this entry is
applicable (same as ifIndex).
ipAdEntNetMask 1.3.6.1.2.1.4.20.1.3.IpAddress IP address Table
(ipAddrTable)
CN3 Mobile Computer User’s Manual - PRELIMINARY 155
The subnet mask associated with
the IP address of this entry (same
as Subnet Mask).
Page 66

Chapter 5 — Network Support
Configuring with SNMP
The community string allows an SNMP manager to manage the CN3
Computer with a specified privilege level. The default read-only community string is “public” and “private” is the default read/write community
string. See the specific configuration parameter to find its OID.
To configure the CN3 Computers using SNMP
1 Configure CN3 Computers for RF communications.
2 Determine the OID (Object Identifier) for the parameter to change. The
3 Use your SNMP management station to get and set variables that are
Intermec base OID is 1.3.6.1.4.1.1963.
defined in the Intermec MIBs. You can set the traps, identification, or
security configuration parameters for SNMP.
156 PRELIMINARY - CN3 Mobile Computer User’s Manual
Page 67

I
Index
CN3 Mobile Computer User’s Manual - PRELIMINARY 157
Page 68

Index
Numerics
1D area imager reading distances, 6
2D area imager reading distances, 5
802.11
WPA authentication
Zero Configuration, 151
WPA authentication with pre-shared key
Zero Configuration, 151
WPA2 authentication
Zero Configuration, 152
WPA2 authentication with pre-shared key
Zero Configuration, 152
zero configuration
WEP encryption, 150
802.1x authentication
Funk, 133
802.1x security
troubleshooting, 94
A
AB8 batteries, 7
AB9 batteries, 7
Abstract Syntax Notation.1 See ASN.1
Accounts
via Messaging, 58
ActiveSync
ActiveSync Help, 38
adding programs, 34
adding programs to Start menu, 36
Folder behavior connected to email server, 57
installing applications, 71
Internet Explorer Mobile
favorite links, 66
mobile favorites, 66
Mobile Favorites folder, 66
URL, 36
Windows Mobile, 36
Adding programs
ActiveSync, 34
to the Start menu, 35
via ActiveSync, 36
via File Explorer, 36
Windows Mobile, 33
Address assigned to CK60, 89
Adjusting settings
Windows Mobile, 33
Advanced Encryption Standard, 129
AES (Advanced Encryption Standard), 129
AllDay events
Calendar, 40
creating, 42
Applets
Bluetooth, 88
Bluetooth audio, 107
intemec settings
beeper volume, 11, 154
intermec settings
beeper volume, 15
Bluetooth, 109
funk security, 131
SF51 scanner information, 90
smartsystems, 11, 154
vibrate, 17
phone settings
GSM radios, 116
pictures & videos, 87
power, 9
battery status, 7
sounds & notifications, 9
vibrator, 17
wireless manager
bluetooth, 100
phone, 114
wireless printing, 105
Appointments
Calendar
adding a note, 44
assigning to a category, 45
changing, 42
creating, 42
deleting, 47
finding, 47
making recurring, 45
setting a reminder, 43
viewing, 41
via Calendar, 38
ASN.1, 154
Avalanche, 72
B
Bar codes
troubleshooting, 95
Battery
status, 7
Beeper
enabling via Sounds & Notifications applet, 9
volume
turning it on, 15, 17
Block recognizer
Windows Mobile input panel, 27
Bluetooth
Bluetooth Audio applet, 107
connecting with remote devices, 110
discovering headsets, 108
intermec settings, 109
wireless manager, 100
Wireless Printing applet, 105
158 PRELIMINARY - CN3 Mobile Computer User’s Manual
Page 69

Index
Bluetooth applet, 89
address assigned to CK60, 89
devices, 88
enabling for SF51 scanner, 88
Bluetooth Audio applet
Bluetooth, 107
Browsing the Internet
Internet Explorer Mobile, 68
C
Calendar
all day events, 40
creating, 42
appointments
adding a note, 44
assigning to a category, 45
changing, 42
creating, 42
deleting, 47
finding, 47
making recurring, 45
setting a reminder, 43
viewing, 41
categories, 39
meetings
sending a request, 46
options
changing, 47
Pocket Outlook, 38
recurrence pattern, 41
Start menu icon, 23
synchronizing, 39
Call history
Phone application
GSM radios, 115
Camera, 87
Capacitor
internal super, 7
Capturing thoughts and ideas
via Notes, 54
Categories
calendar, 39
contacts
assigning to, 51
Cisco Key Integrity Protocol, 129
Cisco Lightweight EAP, 145
CKIP (Cisco Key Integrity Protocol), 129
Clean boot, performing, 3
Cleaning the scanner window and CK60 screen, 97
CompactFlash cards
installing applications, 72
Configuration parameters, 90
Configuring security, 128
Configuring service settings
Phone application
GSM radios, 117
Configuring the CK60
troubleshooting, 93
Configuring the SF51 scanner, 88
Connecting to
an ISP, 119
email server, 154
work, 121
Connecting to a mail server
via Messaging, 58
Connections
directly to email server, 154
ending, 125
to an ISP, 119
via modem, 119
to work, 121
via VPN server, 124
via modem
to an ISP, 119
via VPN server
to work, 124
via wireless network, 148
Contacts
adding a note, 50
adding a telephone number
GSM radios, 115
assigning to a category, 51
changing, 50
changing options, 53
copying, 51
creating, 48, 50
deleting, 52
finding, 52
Pocket Outlook, 48
sending a message, 51
Start menu icon,
24
synchronizing, 49
viewing, 49
Converting writing to text, 29
Converting writing to text on the screen, 29
Copying
contacts, 51
CN3 Mobile Computer User’s Manual - PRELIMINARY 159
Page 70

Index
Creating
a modem connection
to an ISP, 119
a VPN server connection
to work, 124
a wireless network connection, 148
contacts via Contacts, 48
document via Word Mobile, 60
drawing via Notes, 30
note via Notes, 55
task via Tasks, 53
workbook via Excel Mobile, 63
D
Detect rogue APs, 147
E
EAP (Extensible Authentication Protocol), 130
EAP-FAST, 130
profile security information, 146
WEP encryption, 146
EAP-TLS, 141
EAP-Tunneled TLS, 142
EasySet
creating an SF51 connection label, 88
scan bar code labels, 90
Edition information, 3
Emails
SMS messages via Phone application
GSM radios, 116
Ending a connection, 125
Ethernet
iConnect, 126
Excel Mobile
about, 62
creating a workbook, 63
tips, 63
Extensible Authentication Protocol, 130
F
FAST (Flexible Authentication via Secure Tunneling), 130
Favorite links
Internet Explorer Mobile, 66
File Explorer
adding programs to Start menu, 36
removing programs, 36
Windows Mobile, 32
Flash File Store
packaging an application, 71
Flexible Authentication via Secure Tunneling
(FAST), 130
Folder behavior connected to email server
ActiveSync, 57
IMAP4, 58
POP3, 57
SMS, 57
Funk security, 130
802.1x, 133
selecting a profile, 131
static WEP, 135
WPA, 131
G
Getting connected
ISP, 118
to an ISP, 119
creating a modem connection, 119
to work, 121
creating a VPN server connection, 124
creating a wireless network connection, 148
Windows Mobile, 118
GSM/GPRS
phone application, 114
H
Headsets
connecting, 108
discovering, 108
I
iConnect, 126
disabling network communications, 126
network support, 126
ping test, 127
IDLs
Bluetooth, 100, 105
data collection, 11, 154
smartsystems, 76
URL, 13
Imager
beeper volume
turning it on, 17
configuration parameters, 90
Imager settings
SF51 scanner, 88
IMAP4
Folder behavior connected to email server, 58
Input panel
block recognizer, 27
keyboard, 26
letter recognizer, 27
selecting typed text, 28
transcriber, 27
Windows Mobile, 24
Word Mobile, 61
word suggestions, 26
160 PRELIMINARY - CN3 Mobile Computer User’s Manual
Page 71

Index
Installing applications
Avalanche, 72
SmartSystems, 73
using a storage card, 72
using Secure Digital cards, 72
with ActiveSync, 71
Intermec Developer Library, 11
Intermec settings
beeper volume, 154
Intermec Settings applet
Bluetooth, 109
enable speaker, 15
Funk security, 131
set vibrator, 17
viewing SF51 information, 90
Intermec settings applet
smartsystems, 11, 154
INTERMEC.MIB, 155
Internal scanners
reading distances
EA11, 6
Internet Explorer Mobile
about, 66
browsing the Internet, 68
favorite links, 66
getting connected, 118
mobile favorites, 66
Mobile Favorites folder, 66
viewing mobile favorites and channels, 68
ISP
connecting to via Windows Mobile, 119
creating
a modem connection, 119
Internet Explorer Mobile, 66
Windows Mobile, 118
ITCADC.MIB, 155
ITCSNMP.MIB, 155
ITCTERMINAL.MIB, 155
K
Keeping a todo list
via Tasks, 53
Keyboard
Windows Mobile input panel, 26
L
LEAP security
fast roaming (CCKM), 148
Microsoft, 145
Letter recognizer
Windows Mobile input panel, 27
Loading certificates, 128
Microsoft, 144
M
Managing email messages and folders
via Messaging, 57
Meetings
Calendar
sending a request, 46
via Calendar, 38
Messages
sending to
contacts, 51
via Messaging
composing/sending, 59
Messaging
accounts, 58
composing/sending messages, 59
connecting to a mail server, 58
getting connected, 118
managing email messages and folders, 57
Pocket Outlook, 56
Start menu icon, 24
synchronizing email messages, 56
using My Text, 31
MIBs
ASN.1, 154
files, 154
object identifier, 155
Microsoft security, 130
allow fast roaming (CCKM), 148
detect rogue APs, 147
enable mixed cell, 148
LEAP, 145
PEAP, 139
TLS, 141
TTLS, 142
Mixed cell
enable via Microsoft security, 148
Mobile Favorites
Internet Explorer Mobile, 66
Mobile Favorites folder
Internet Explorer Mobile, 66
Modems
creating a connection
to an ISP, 119
MP3 files
Windows Media Player, 65
N
Network adapters, 126
Network settings
Phone application
GSM radios, 118
CN3 Mobile Computer User’s Manual - PRELIMINARY 161
Page 72

Index
Notes
adding to
appointments, 44
contacts, 50
creating a note, 55
drawing on the screen, 30
creating a drawing, 30
selecting a drawing, 30
Pocket Outlook, 54
recording a message, 31
synchronizing notes, 55
writing on the screen, 28
alternate writing, 29
converting writing to text, 29
selecting the writing, 28
tips for good recognition, 29
O
Object Store
packaging an application, 70
Operating the CK60
troubleshooting, 92
P
Packaging an application
Flash File Store, 71
Object Store, 70
Secure Digital storage cards, 70
SmartSystems Platform Builds, 70
PEAP security
Microsoft, 139
Performing a clean boot, 3
Phone
wireless manager, 114
Phone application
GSM radios, 114
adding contact to speed dial, 115
call history, 115
customizing phone settings, 116
finding, setting, selecting networks, 118
sending SMS messages, 116
service settings, 117
Phone Settings applet
customizing via Phone application
GSM radios, 116
GSM radios, 116
network settings
GSM radios, 118
Pictures & Videos applet, 87
Ping test
iConnect, 127
Pocket Internet Explorer
Start menu icon, 24
Pocket Outlook, 38
Calendar, 38
POP3
Folder behavior connected to email server, 57
Power
applet
battery status, 7
Power applet
battery status, 9
PowerPoint Mobile
starting a slide show presentation, 64
Windows Mobile, 64
Programs, adding or removing
Windows Mobile, 33
Protected EAP
R
, 139
Reader commands, 90
Reading distances
EA11, 6
Record button
recording a message, 31
Recording
via Notes, 31
Recurrence pattern
Calendar, 41
Removing programs
Windows Mobile, 33, 36
Reset button, 3
Resource kits
Bluetooth, 100, 105
data collection, 11, 154
smartsystems, 76
URL, 13
Roaming
Microsoft security, 148
S
Scanning bar codes
troubleshooting, 95
Scheduling appointments and meetings
via Calendar, 38
Secure Digital cards
installing applications, 72
packaging an application, 70
Security
choosing between Funk and Microsoft, 130
configuring, 128
loading certificates, 128
wireless network, 128
Selecting
drawing via Notes, 30
Selecting the writing on the screen, 28
Sending and receiving messages
via Messaging, 56
162 PRELIMINARY - CN3 Mobile Computer User’s Manual
Page 73

Index
Services
Phone application
GSM radios, 117
Settings applets
Bluetooth, 88
Bluetooth audio, 107
intermec settings
Bluetooth, 109
funk security, 131
SF51 scanner information, 90
wireless printing, 105
SF51 scanner
configuring, 88
creating a connection label, 88
enabling Bluetooth
Bluetooth
enabling for SF51 scanner, 88
imager settings, 88
viewing information from CK60 computer, 90
Simple Network Management Protocol See SNMP
SmartSystems, 11, 73, 154
SMS
Folder behavior connected to email server, 57
SMS messages
Phone application
GSM radios, 116
SNMP, 154
Sounds & Notifications applet
enable beeper, 9
set vibrator, 17
Speakers, 14
beeper volume
turning it on, 15
enabling via intermec settings applet, 15
Speed dial
Phone application
GSM radios, 115
SSPB
packaging an application, 70
Start Menu
adding programs, 35
via ActiveSync, 36
via File Explorer, 36
Static WEP security
Funk, 135
Status icons
Windows Mobile, 23
Synchronize system time, 84
Synchronizing
Calendar, 39
contacts, 49
email messages, 56
favorite links, 66
mobile favorites, 66
notes, 55
Tasks, 54
Word Mobile, 62
System software updates
, 73
System time, 84
T
Tasks
creating a task, 53
Pocket Outlook, 53
Start menu icon, 24
synchronizing, 54
Temporal Key Integrity Protocol, 129
Text messages
Windows Mobile, 31
Time server, 84
Tips for working
Excel Mobile, 63
TKIP (Temporal Key Integrity Protocol), 129
TLS security
Microsoft, 141
Today screen
Windows Mobile, 23
Tools CD
CAB files, 72
MIB files, 155
Tracking people
via Contacts, 48
Transcriber
Windows Mobile input panel, 27
Troubleshooting, 92
802.1x security, 94
bar code scanning, 95
CK60 configuration, 93
CK60 operation, 92
wireless connectivity, 93
TTLS security
Microsoft, 142
Typing mode
Word Mobile, 61
Typing on the screen
Word Mobile, 61
U
Updating
bootloader, 71
Updating the system software, 73
Upgrading the operating system, 92
CN3 Mobile Computer User’s Manual - PRELIMINARY 163
Page 74

Index
URLs
ActiveSync, 36
MIBs, 155
Microsoft support, 22
Windows Mobile, 22
Windows Mobile support, 22
V
Vibrator
enabling via intermec settings applet, 17
enabling via sounds & notifications applet, 17
Viewing mobile favorites and channels
Internet Explorer Mobile, 68
VPN server
creating a connection
to work, 124
W
WAP pages, 66
connecting to an ISP, 119
Wavelink Avalanche, 72
Web pages, 66
connecting to an ISP, 119
WEP (Wired Equivalent Privacy) encryption, 129
WEP encryption
EAP-FAST security method, 146
zero configuration, 150
Wi-Fi Protected Access, 129, 131
Windows Media files
Windows Media Player, 65
Windows Media Player Mobile
Start menu icon, 24
Windows Mobile
ActiveSync, 36
basic usage, 22
Calendar, 38
command bar, 24
Contacts, 48
Excel Mobile, 62
getting connected, 118
Messaging, 56
navigation bar, 24
Notes, 54
notifications, 25
popup menus, 24
PowerPoint Mobile, 64
programs, 23
status icons, 23
support URLs, 22
Tasks, 53
Today screen, 23
where to find information, 22
Word Mobile, 60
writing on the screen,
28
Wired Equivalent Privacy, 129, 135
Wireless 802.11b/g
iConnect, 126
Wireless connectivity
troublshooting, 93
Wireless Manager applet
bluetooth, 100
phone, 114
Wireless network
creating a connection, 148
security, 128
Wireless Printing applet, 105
Word Mobile
about, 60
creating a document, 60
synchronizing, 62
typing mode, 61
writing mode, 62
Work
creating
a VPN server connection, 124
getting connected, 121
WPA (Wi-Fi Protected Access), 129
WPA authentication
802.11 radio module
Zero Configuration, 151
with pre-shared key
Zero Configuration, 151
WPA security
Funk, 131
WPA2 (Wi-Fi Protected Access), 129
WPA2 authentication
802.11 radio module
Zero Configuration, 152
with pre-shared key
Zero Configuration, 152
Writing mode
Word Mobile, 62
Writing on the screen
Word Mobile, 62
164 PRELIMINARY - CN3 Mobile Computer User’s Manual
Page 75

Page 76

Corporate Headquarters
6001 36th Avenue West
Everett, Washington 98203
U.S.A.
tel 425.348.2600
fax 425.355.9551
www.intermec.com
CN3 Mobile Computer User's Manual
*935-003-001*
P/N 935-003-001
 Loading...