

Page 1

User’s Guide
WWAN
Communicator
Page 2

Intermec Technologies Corporation
Worldwide Headquarters
6001 36th Ave.W.
Everett, WA 98203
U.S.A.
www.intermec.com
The information contained herein is proprietary and is provided solely for the purpose of allowing customers to
operate and service Intermec-manufactured equipment and is not to be released, reproduced, or used for any
other purpose without written permission of Intermec.
Information and specifications contained in this document are subject to change without prior noticed and do
not represent a commitment on the part of Intermec Technologies Corporation.
© 2006 by Intermec Technologies Corporation. All rights reserved.
The word Intermec, the Intermec logo, Norand, ArciTech, Beverage Routebook, CrossBar, dcBrowser,
Duratherm, EasyADC, EasyCoder, EasySet, Fingerprint, INCA (under license), i-gistics, Intellitag, Intellitag
Gen2, JANUS, LabelShop, MobileLAN, Picolink, Ready-to-Work, RoutePower, Sabre, ScanPlus, ShopScan,
Smart Mobile Computing, SmartSystems, TE 2000, Trakker Antares, and Vista Powered are either trademarks
or registered trademarks of Intermec Technologies Corporation.
Throughout this manual, trademarked names may be used. Rather than put a trademark (™ or ®) symbol in
every occurrence of a trademarked name, we state that we are using the names only in an editorial fashion, and
to the benefit of the trademark owner, with no intention of infringement.
There are U.S. and foreign patents pending.
ii WWAN Communicator User’s Guide
Page 3

Document Change Record
This page records changes to this document. The document was originally
released as version -001.
Ver sion
Number Date Description of Change
002 07/2004 Revisions for firmware version 1.1:
• The section “Starting a Data Session” is now called
“Connecting to the Internet” and includes new functionality
for automatically launching Pocket Internet Explorer.
• Make calls by dialing a number with the 760 keypad.
• Additional languages added to new Application Settings
screen.
• Missed Calls icon allows direct access to the Missed Calls list.
003 03/2006 Revisions for firmware version 1.51:
• New main screen
• RAS / Connection manager destination parameters added
WWAN Communicator User’s Guide iii
Page 4

iv WWAN Communicator User’s Guide
Page 5

Contents
Before You Begin . . . . . . . . . . . . . . . . . . . . . . . . . . . . . . . . . . . . . . . . . . . . . . . . . . . . . . . . vii
About Notes . . . . . . . . . . . . . . . . . . . . . . . . . . . . . . . . . . . . . . . . . . . . . . . . . . . . . vii
Global Services and Support. . . . . . . . . . . . . . . . . . . . . . . . . . . . . . . . . . . . . . . . . vii
Who Should Read This Manual . . . . . . . . . . . . . . . . . . . . . . . . . . . . . . . . . . . . . . viii
Related Documents . . . . . . . . . . . . . . . . . . . . . . . . . . . . . . . . . . . . . . . . . . . . . . . viii
Getting Started . . . . . . . . . . . . . . . . . . . . . . . . . . . . . . . . . . . . . . . . . . . . . . . . . . . . . . . . . . . . . . 1
1
What is WWAN Communicator? . . . . . . . . . . . . . . . . . . . . . . . . . . . . . . . . . . . . . . . . . . . . 2
Installing and Starting WWAN Communicator. . . . . . . . . . . . . . . . . . . . . . . . . . . . . . . . . . 3
Installing Communicator . . . . . . . . . . . . . . . . . . . . . . . . . . . . . . . . . . . . . . . . . . . . 3
Starting WWAN Communicator . . . . . . . . . . . . . . . . . . . . . . . . . . . . . . . . . . . . . . 4
Entering Your PIN . . . . . . . . . . . . . . . . . . . . . . . . . . . . . . . . . . . . . . . . . . . . . . . . . 4
Using WWAN Communicator . . . . . . . . . . . . . . . . . . . . . . . . . . . . . . . . . . . . . . . . . . . . . . 6
About the White Buttons . . . . . . . . . . . . . . . . . . . . . . . . . . . . . . . . . . . . . . . . . . . . 6
About the Connection Icons. . . . . . . . . . . . . . . . . . . . . . . . . . . . . . . . . . . . . . . . . . 7
Using the Virtual Keypad . . . . . . . . . . . . . . . . . . . . . . . . . . . . . . . . . . . . . . . . . . . . 8
Contents
Running WWAN Communicator in the Background . . . . . . . . . . . . . . . . . . . . . . . . . . . . 10
Exiting WWAN Communicator . . . . . . . . . . . . . . . . . . . . . . . . . . . . . . . . . . . . . . . . . . . . 11
Making and Answering Phone Calls. . . . . . . . . . . . . . . . . . . . . . . . . . . . . . . . . . . . . . . 13
2
Holding the 760 When Making Calls . . . . . . . . . . . . . . . . . . . . . . . . . . . . . . . . . . . . . . . . 14
Dialing a Phone Number and Placing a Call . . . . . . . . . . . . . . . . . . . . . . . . . . . . . . . . . . . 15
To place a call using the 760 keypad . . . . . . . . . . . . . . . . . . . . . . . . . . . . . . . . . . . 15
To Place a Call Using the Voice Dialer Screen. . . . . . . . . . . . . . . . . . . . . . . . . . . . 16
Adjusting the Speaker or Microphone Volume . . . . . . . . . . . . . . . . . . . . . . . . . . . 17
Ending a Call . . . . . . . . . . . . . . . . . . . . . . . . . . . . . . . . . . . . . . . . . . . . . . . . . . . . 17
Answering a Call. . . . . . . . . . . . . . . . . . . . . . . . . . . . . . . . . . . . . . . . . . . . . . . . . . 17
Using the Phonebook . . . . . . . . . . . . . . . . . . . . . . . . . . . . . . . . . . . . . . . . . . . . . . 18
Sending and Receiving SMS Messages. . . . . . . . . . . . . . . . . . . . . . . . . . . . . . . . . . . . 21
3
Using the SMS Function in Communicator . . . . . . . . . . . . . . . . . . . . . . . . . . . . . . . . . . . 22
Sending a New SMS Message . . . . . . . . . . . . . . . . . . . . . . . . . . . . . . . . . . . . . . . . . . . . . . 23
Reading and Responding to SMS Messages . . . . . . . . . . . . . . . . . . . . . . . . . . . . . . . . . . . . 24
Working with Messages in the Outbox . . . . . . . . . . . . . . . . . . . . . . . . . . . . . . . . . . . . . . . 27
Working with Sent Messages . . . . . . . . . . . . . . . . . . . . . . . . . . . . . . . . . . . . . . . . . . . . . . . 28
WWAN Communicator User’s Guide v
Page 6

Contents
Viewing and Working with Call Registers. . . . . . . . . . . . . . . . . . . . . . . . . . . . . . . . . 29
4
Navigating the Call Registers Main Screen. . . . . . . . . . . . . . . . . . . . . . . . . . . . . . . . . . . . . 30
About the Call Register Entries . . . . . . . . . . . . . . . . . . . . . . . . . . . . . . . . . . . . . . . . . . . . . 31
Connecting to the Internet . . . . . . . . . . . . . . . . . . . . . . . . . . . . . . . . . . . . . . . . . . . . . . . . 33
5
About Connection Types . . . . . . . . . . . . . . . . . . . . . . . . . . . . . . . . . . . . . . . . . . . . . . . . . . 34
Setting up a Default Internet Connection for the First Time . . . . . . . . . . . . . . . . . . . . . . . 35
Connecting to the Internet . . . . . . . . . . . . . . . . . . . . . . . . . . . . . . . . . . . . . . . . . . . . . . . . 39
Viewing and Changing Settings . . . . . . . . . . . . . . . . . . . . . . . . . . . . . . . . . . . . . . . . . . . 41
6
Navigating the Settings Main Screen . . . . . . . . . . . . . . . . . . . . . . . . . . . . . . . . . . . . . . . . . 42
Viewing Version Information. . . . . . . . . . . . . . . . . . . . . . . . . . . . . . . . . . . . . . . . . . . . . . . 43
Changing Voice Call Settings. . . . . . . . . . . . . . . . . . . . . . . . . . . . . . . . . . . . . . . . . . . . . . . 44
Changing Settings on the SIM Card (GSM Only). . . . . . . . . . . . . . . . . . . . . . . . . . . . . . . 45
Changing Call Register Settings. . . . . . . . . . . . . . . . . . . . . . . . . . . . . . . . . . . . . . . . . . . . . 46
Managing Data Connection Settings . . . . . . . . . . . . . . . . . . . . . . . . . . . . . . . . . . . . . . . . . 47
Adding a Connection or Changing Existing Settings . . . . . . . . . . . . . . . . . . . . . . 48
Changing Connectivity Settings . . . . . . . . . . . . . . . . . . . . . . . . . . . . . . . . . . . . . . 53
Importing Connections . . . . . . . . . . . . . . . . . . . . . . . . . . . . . . . . . . . . . . . . . . . . 55
Creating a Definition File . . . . . . . . . . . . . . . . . . . . . . . . . . . . . . . . . . . . . . . . . . . 56
Modifying a Definition File . . . . . . . . . . . . . . . . . . . . . . . . . . . . . . . . . . . . . . . . . 58
Setting up the Speed Dialer . . . . . . . . . . . . . . . . . . . . . . . . . . . . . . . . . . . . . . . . . . . . . . . . 59
Changing Application Settings . . . . . . . . . . . . . . . . . . . . . . . . . . . . . . . . . . . . . . . 60
Button Glossary. . . . . . . . . . . . . . . . . . . . . . . . . . . . . . . . . . . . . . . . . . . . . . . . . . . . . . . . . 61
vi WWAN Communicator User’s Guide
Page 7

Before You Begin
This section provides you with safety information, technical support
information, and sources for additional product information.
About Notes
Note: Notes either provide extra information about a topic or contain
special instructions for handling a particular condition or set of
circumstances.
Global Services and Support
Warranty Information
To understand the warranty for your Intermec product, visit the Intermec
web site at www.intermec.com and
Disclaimer of warranties: The sample code included in this document is
presented for reference only. The code does not necessarily represent
complete, tested programs. The code is provided “as is with all faults.” All
warranties are expressly disclaimed, including the implied warranties of
merchantability and fitness for a particular purpose.
Before You Begin
click Service & Support > Warranty.
Web Support
Visit the Intermec web site at www.intermec.com to download our current
manuals (in PDF). To order printed versions of the Intermec manuals,
contact your local Intermec representative or distributor.
Visit the Intermec technical knowledge base (Knowledge Central) at
intermec.custhelp.com to review technical information or to request
technical support for your Intermec product.
Telephone Support
These services are available from Intermec.
In the USA and Canada
call 1-800-755-5505 and
Services Description
Order Intermec
products
Order Intermec media Order printer labels and ribbons. 1 and then choose 1
Order spare parts Order spare parts. 1 or 2 and then choose 4
Technical Support Talk to technical support about
Service • Get a return authorization
• Place an order.
• Ask about an existing order.
your Intermec product.
number for authorized service
center repair.
• Request an on-site repair
technician.
choose this option
1 and then choose 2
2 and then choose 2
2 and then choose 1
WWAN Communicator User’s Guide vii
Page 8

Before You Begin
Services Description
Service contracts • Ask about an existing contract.
Outside the U.S.A. and Canada, contact your local Intermec representative.
To search for your local representative, from the Intermec web site, click
Contact.
Who Should Read This Manual
This User’s Guide is written for the person who is responsible for installing,
configuring, and maintaining the WWAN Communicator software.
This User’s Guide provides you with information about the features of
WWAN Communicator, and how to install, configure, operate, maintain,
and troubleshoot it.
In the USA and Canada
call 1-800-755-5505 and
choose this option
1 or 2 and then choose 3
•Renew a contract.
• Inquire about repair billing or
other service invoicing
questions.
Related Documents
Before you work with the WWAN Communicator, you should be familiar
with your network and general networking terms, such as IP address.
Document Title
700 Series Color Mobile Computer Quick Start Guide
700 Series Color Software Tools CD
Windows 95 and Windows CE Configuration Utilities Reference Manual
WWAN Toolkit User’s Guide
WWAN Toolkit C++ API Programmer’s Reference Manual
The Intermec web site at www.intermec.com contains our documents (as
PDF files) that you can download for free.
To download documents
1 Visit the Intermec web site at www.intermec.com.
2 Click Service & Support > Manuals.
3 In the Select a Product field, choose the product whose documentation
you want to download.
To order printed versions of the Intermec manuals, contact your local
Intermec representative or distributor.
viii WWAN Communicator User’s Guide
Page 9

Getting Started
1
This chapter contains the following sections:
• What is WWAN Communicator?
• Installing and Starting WWAN Communicator
• Using WWAN Communicator
• Running WWAN Communicator in the Background
• Exiting WWAN Communicator
WWAN Communicator User’s Guide 1
Page 10

Chapter 1 — Getting Started
What is WWAN Communicator?
WWAN Communicator is an application that lets you use your GSM/
GPRS or CDMA/1xRTT radio-equipped 760 Color Mobile Computer
like a cell phone.
To use WWAN Communicator, you need to install a SIM card in your 760
unit. Contact your network operator for more information on obtaining
SIM cards. For help with installing the SIM card, see the 700 Color Mobile
Computer with Windows Mobile 2003 Quick Start Guide (P/N 962-054069C).
WWAN Communicator is based on Intermec’s WWAN Toolkit, which
also includes Communicator source code. For more information, contact
your Intermec sales representative.
Note: Some restrictions may apply in your locality about voice
communications over a CDMA network. For more information, contact
your network operator.
2 WWAN Communicator User’s Guide
Page 11

Installing and Starting WWAN Communicator
WWAN Communicator is pre-installed on the 760 Color Mobile
Computer. If you have a 760 that does not include Communicator, you can
download it as a Zip file from the Intermec web site. Choose Service and
Support > Developer Support > Developer Library.
Note: If your 760 is running Pocket PC 2002, you need to install the
Microsoft® .NET Compact Framework 1.0 (Service Pack 2) components on
the 760 before you install Communicator. To download the components,
go to www.microsoft.com/downloads and search for “compact framework.”
When you install Communicator, the installer program checks the amount
of available space in the Flash File Store on the 760. If there is not enough
space to install Communicator in the Flash File Store, the installer will
place Communicator on an installed Secure Digital (SD) or CompactFlash
(CF) card.
If no card is found, the installer will place Communicator in the root
directory. In this case, you will need to reinstall Communicator if you cold
boot the 760.
Chapter 1 — Getting Started
Installing Communicator
1 Unzip the Communicator Zip file to a directory on your desktop PC.
2 Copy the contents of the Zip file to the Temp directory on the 760.
3 On the 760, browse to setup.exe and tap the file. The Installer screen
appears.
4 Choose the type of radio your device is equipped with and then tap
Install to start the installation.
5 Follow the prompts to finish the installation process. When installation
is complete, the device will reboot and the Wireless Communicator icon
( ) appears in the start menu.
6 When rebooting has been completed successfully you can remove the
WWAN Communicator User’s Guide 3
contents of the temp folder.
Page 12

Chapter 1 — Getting Started
Starting WWAN Communicator
On the device, tap Start and then choose Wireless Communicator from
the menu.
If your SIM card is unlocked, your PIN is not required and the
Communicator main screen appears:
If your SIM card is locked, you need to enter your PIN. This is described in
the next section.
Entering Your PIN
If the SIM card installed in your 760 is locked, you need to enter your PIN
each time you start Communicator. You can unlock the SIM card so your
PIN is not required. For help, see “Changing Settings on the SIM Card
(GSM Only)” on page 45.
When you start Communicator, the next screen appears if your SIM card is
locked:
Follow the next steps to enter your PIN.
1 Tap the Enter PIN code field to place the cursor in the field.
2 Enter your PIN with the 760 keypad and then tap to submit the
4 WWAN Communicator User’s Guide
PIN. The Communicator main screen appears:
Page 13

Chapter 1 — Getting Started
If you submitted an incorrect PIN, a message box appears. Close the
message box and enter and submit the PIN again.
• If you submit an incorrect PIN three times, this screen appears:
You need to enter the PUK code that you received from your network
operator, and then enter the correct PIN in the Enter new PIN and
again fields.
After you enter the PUK code and the correct PIN, tap to submit the
codes or tap to cancel.
For more information, contact your network operator.
WWAN Communicator User’s Guide 5
Page 14
Chapter 1 — Getting Started
Using WWAN Communicator
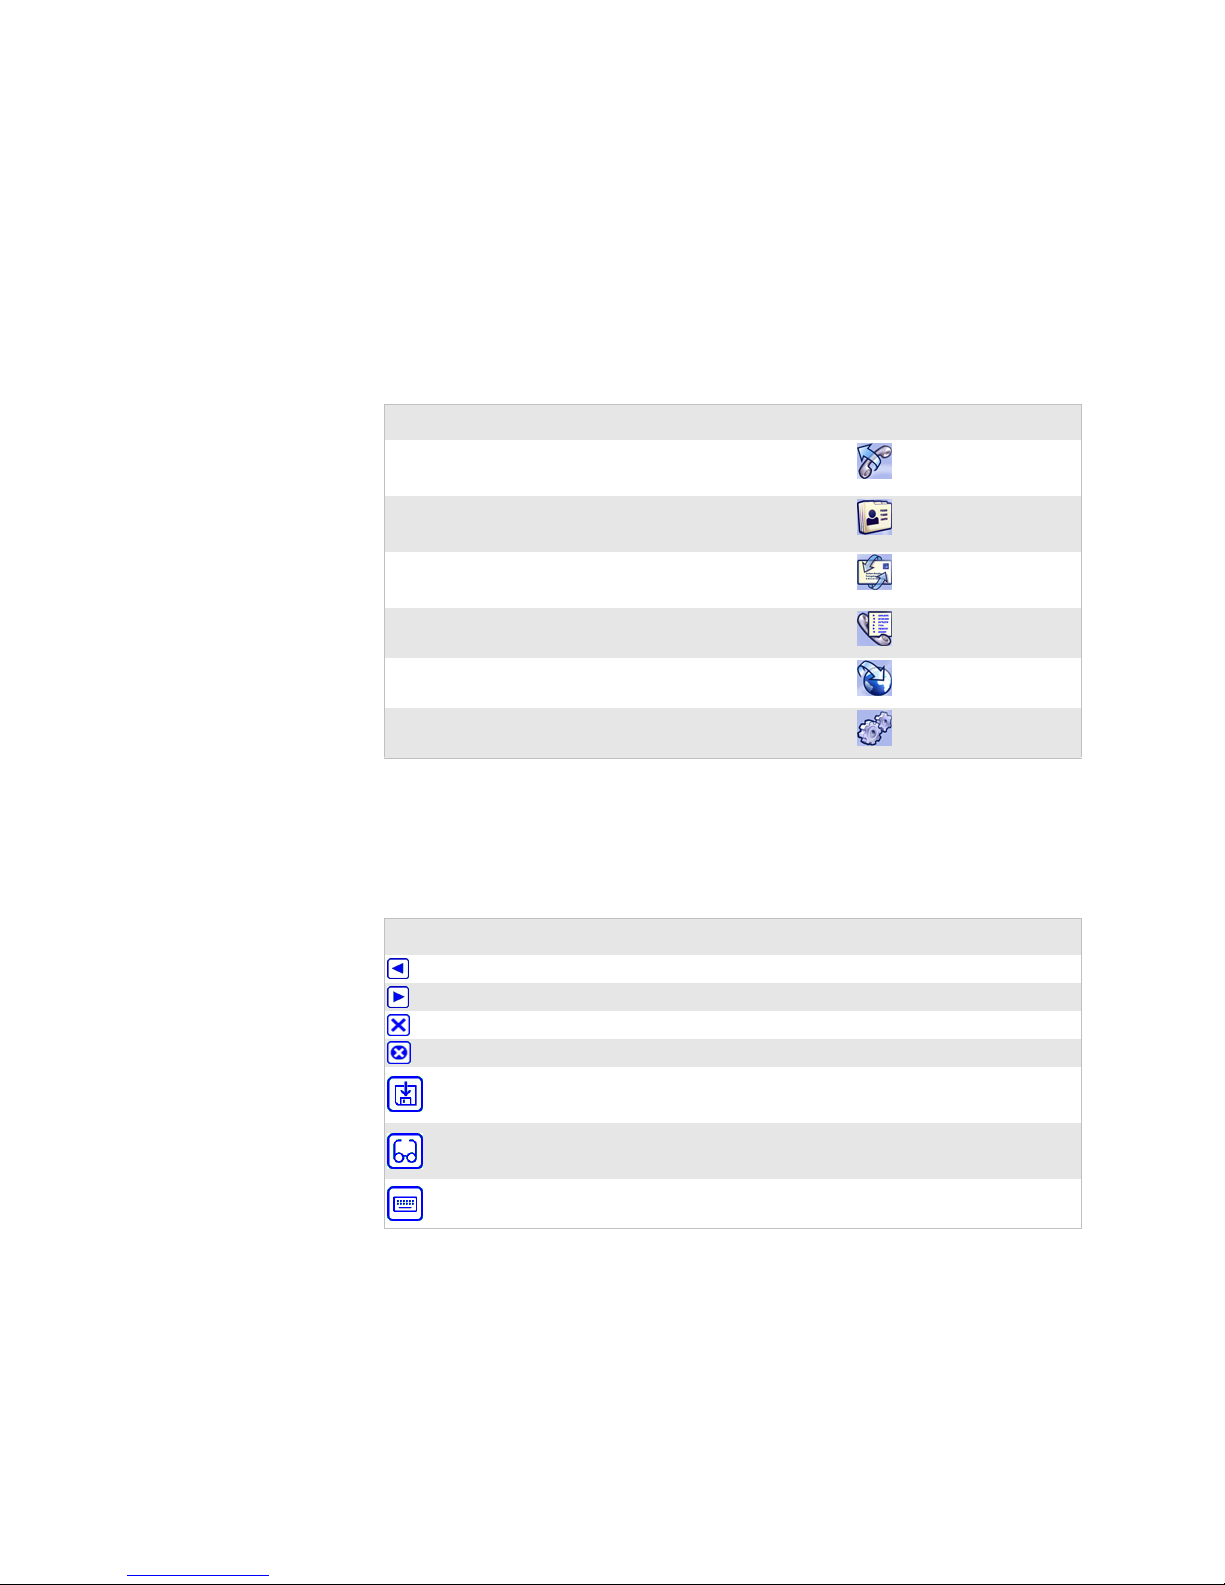
You can use Communicator to:
• Make voice calls as if you were using a mobile telephone. Voice call
features include call registers, a phonebook, and a speed dialer.
• Send SMS (Short Message Service) messages (GSM networks only).
• Connect to the Internet and send and receive data communications.
To do this : Tap: For help, see:
Make a voice phone call page 13
View and edit Phonebook entries page 18
Send and receive SMS messages page 21
See registers for calls made and received, missed calls and
data connections
Connect to the Internet and launch Pocket Internet
Explorer
Change settings for volume and ring tones, registry entries,
data connections and the Speed Dialer
About the White Buttons
Communicator has a variety of white buttons you tap to navigate from
screen to screen or to perform a task.
Button: Tap this button to:
page 29
page 33
page 41
Go back to the previous screen.
Continue to the next screen.
Delete the selected item.
Cancel an operation and go back to the previous screen.
Save changes you have made on a screen.
View details of a selected item.
Use the virtual keypad to write a message or enter text in a field. For help,
see “Using the Virtual Keypad” on page 8“.
If a white button is dimmed, you cannot tap it unless you make a selection
or change an option or entry on the screen.
6 WWAN Communicator User’s Guide
Page 15

About the Connection Icons
While using Communicator, icons appear at the bottom of the screen to
keep you informed of your connection status.
Communicator main screen: Connection icons appear along the bottom.
Icon: This means:
Chapter 1 — Getting Started
Signal strength. More bars indicate a stronger connection.
New SMS message in the inbox. Tap the icon to view SMS Inbox Messages. For
help, see “Reading and Responding to SMS Messages” on page 24.
SIM card is full of SMS messages. For help, see “Reading and Responding to
SMS Messages” on page 24.
Roaming. The 760 is connected to a network but not its home network.
Packet switch network is connected to the 760.
Packet switch network is not connected to the 760.
No signal from a packet switch network detected. PSD data connections are not
available.
Data connection is active. Tap the icon to see the Connection screen. For help,
see “Connecting to the Internet” on page 33.
You missed a call. Tap the icon to view the Missed Calls screen. For help, see
“Viewing and Working with Call Registers” on page 29.
WWAN Communicator User’s Guide 7
Page 16

Chapter 1 — Getting Started
Using the Virtual Keypad
On some screens, you can tap to use the virtual keypad. For help, see the
next procedure.
Communicator’s Virtual Keypad: Use this keypad to enter text and basic punctuation.
1 Tap letters to enter text and basic punctuation. Tap to toggle
between uppercase and lowercase letters.
• To type numbers and punctuation, tap . The numeric keypad
appears.
• To type non-ASCII characters such as ä or ø, tap . The non-
ASCII keypad appears.
8 WWAN Communicator User’s Guide
Page 17

Chapter 1 — Getting Started
In the numeric or non-ASCII keypads, tap to return to the
alphabetic keypad.
In all keypads, tap these special keys:
To do this : Tap:
Return to the previous screen without saving changes
Backspace
Delete a character
Insert a space
2 When you are finished, tap to close the virtual keypad and return to
the previous screen.
WWAN Communicator User’s Guide 9
Page 18

Chapter 1 — Getting Started
Running WWAN Communicator in the Background
WWAN Communicator can run in the background while you perform
other tasks on the 760.
Running Communicator in the Background: In the main screen, tap .
WWAN Communicator stays in the background until you:
• select it from the Start menu.
• tap at the bottom of the screen.
10 WWAN Communicator User’s Guide
Page 19

Exiting WWAN Communicator
You can exit WWAN Communicator by:
• turning it off from the Application Settings screen. For help, see
“Viewing Version Information” on page 43.
• turning it off from the 760’s Memory control panel. For help, see your
Pocket PC online Help.
Chapter 1 — Getting Started
WWAN Communicator User’s Guide 11
Page 20

Chapter 1 — Getting Started
12 WWAN Communicator User’s Guide
Page 21

Making and Answering Phone
2
This chapter contains the following sections:
• Holding the 760 When Making Calls
• Dialing a Phone Number and Placing a Call
Calls
WWAN Communicator User’s Guide 13
Page 22

Chapter 2 — Making and Answering Phone Calls
Holding the 760 When Making Calls
When using Communicator to make or answer a phone call, you should
hold the 760 as shown in the illustration.
Using WWAN Communicator: For best results, hold the 760 with the screen
approximately 30 cm (11.81 in) from your face.
14 WWAN Communicator User’s Guide
Page 23

Chapter 2 — Making and Answering Phone Calls
Dialing a Phone Number and Placing a Call
There are several ways to dial a phone number:
• Use the 760 keypad. For help, see the next procedure.
• In the Voice Dialer screen, use the keypad, the Phonebook, or the Speed
Dialer. For help, see “To Place a Call Using the Voice Dialer Screen” on
page 16.
To place a call using the 760 keypad
1 With the Communicator main screen active, enter the phone number
using the 760 keypad. When you start entering the number, the Voice
Dialer screen appears.
2 After you enter the phone number, press Enter. The Active call screen
appears and Communicator dials the number.
WWAN Communicator User’s Guide 15
Page 24

Chapter 2 — Making and Answering Phone Calls
To Place a Call Using the Voice Dialer Screen
1 In the Communicator main screen, tap . The Voice Dialer screen
appears.
2 In the Voice Dialer screen, do one of the following:
• Enter the phone number using the onscreen keypad:
• Tap to go back to the Communicator main screen.
• Tap to go delete a number.
When you have entered the phone number, tap . The Active call
screen appears and Communicator places the call.
• Tap to use the Phonebook. In the Phonebook screen, tap a
number to select it, and then tap to return to the Voice Dialer
screen.
• Tap . The Active call screen appears and Communicator places
the call. For help with the Phonebook, see “Using the Phonebook”
on page 18.
• Tap to use the Speed Dialer.
• In the Speed Dialer screen, tap a button to choose the person you
want to call. The Active call screen appears and Communicator
places the call. For help, see “Setting up the Speed Dialer” on
page 59.
16 WWAN Communicator User’s Guide
Page 25

Adjusting the Speaker or Microphone Volume
During a phone call, you may need to adjust the speaker or microphone
volume.
To change the speaker volume:
• Tap for less volume, or tap for more volume.
• Tap to mute the speaker.
To change the microphone volume:
• Tap for less volume, or tap for more volume.
• Tap to mute the microphone.
Ending a Call
To end the call, tap . Communicator hangs up and disconnects.
Answering a Call
WWAN Communicator can run in the background while you use other
applications on the 760. When WWAN Communicator is running, the
Active Call screen appears with the name of the caller in the Name field
when the 760 receives an incoming phone call.
Chapter 2 — Making and Answering Phone Calls
Communicator’s Active Call Screen: This screen appears when you receive a call.
To answer a voice call
1 In the Active Call screen, do one of the following:
2 When you answer the call, you may need to adjust the speaker or
3 To end the call, tap . Communicator hangs up and disconnects.
WWAN Communicator User’s Guide 17
• Tap to answer the call. Continue with Step 2.
• To reject the call, tap . Communicator saves the call information
in the Missed Calls register. For help, see “Viewing and Working
with Call Registers” on page 29.
microphone volume. For help, see “Adjusting the Speaker or
Microphone Volume” on page 17.
Page 26

Chapter 2 — Making and Answering Phone Calls
Using the Phonebook
To access the Phonebook
1 In the Communicator main screen, tap . The Phone Book screen
appears.
2 Do one of the following:
• To see details, tap a number in the list and then tap .This brings
up the Phonebook Entry screen (with entry fields containing contact
information):
• To add a number to the list, tap . The Phonebook Entry screen
appears (with entry fields blank):
3 Do one of the following:
18 WWAN Communicator User’s Guide
Page 27

Chapter 2 — Making and Answering Phone Calls
To do this : Follow these steps:
Edit the phone number or
contact name
Add a new phone number
and contact name
Delete the phone number
Send an SMS message to
the phone number
Place a voice phone call to
the number
Go back to the Phonebook
screen without saving any
changes
1 Tap a field to select it and enter information with
the 760 keypad or the virtual keypad. For help, see
“Using the Virtual Keypad” on page 8.
2 Tap to save your changes.
1 Tap a field to select it and enter information with
the 760 keypad or the virtual keypad. For help, see
“Using the Virtual Keypad” on page 8.
2 Tap to save your changes
Tap . The phone number is deleted and you return
to the Phonebook screen.
Tap . The SMS Messages screen appears.
For help, see “Sending and Receiving SMS Messages”
on page 21.
Tap . The Active Call screen appears and
Communicator places the call.
For help, see “Dialing a Phone Number and Placing a
Call” on page 15.
Ta p .
Note: If the Phonebook is empty, Communicator will automatically copy
Phonebook entries from an inserted SIM card.
WWAN Communicator User’s Guide 19
Page 28

Chapter 2 — Making and Answering Phone Calls
20 WWAN Communicator User’s Guide
Page 29

Sending and Receiving SMS
3
This chapter contains the following sections:
• Using the SMS Function in Communicator
• Sending a New SMS Message
• Reading and Responding to SMS Messages
• Working with Messages in the Outbox
Messages
• Working with Sent Messages
WWAN Communicator User’s Guide 21
Page 30

Chapter 3 — Sending and Receiving SMS Messages
Using the SMS Function in Communicator
SMS messages are text messages that can be up to 160 characters long. To
send and receive SMS messages, your 760 must have a GSM/GPRS radio
and must be connected to a GSM network.
To use SMS messaging
1 In the Communicator main screen, tap . The SMS Messages main
screen appears.
2 Do one of the following:
To do this task: Tap: For help, see:
Send a new SMS message The next section
Read or respond to a message you received page 24
See messages you unsuccessfully tried to send page 27
See messages you successfully sent page 28
Go back to the Communicator main screen
22 WWAN Communicator User’s Guide
Page 31

Sending a New SMS Message
To send a new message
1 In the Communicator main screen, tap . The SMS Messages main
screen appears.
2 Tap . The SMS Message screen appears with the cursor in the Phone
Number entry field.
Chapter 3 — Sending and Receiving SMS Messages
3 Use the 760 keypad to enter the phone number in the field.
You can also choose a number from the Phonebook by tapping . For
help, see “Using the Phonebook” on page 18.
4 Tap the Message field to move the cursor into the field.
5 Enter the text of your message using the 760 keypad. The SMS message
can contain up to 160 characters.
You can also use the virtual keypad by tapping . When you use the
virtual keypad, a counter keeps track of the number of characters in
your message. For help, see “Using the Virtual Keypad” on page 8.
6 To send the message, tap .
To cancel, tap to return to the SMS Messages main screen.
Note: If the message cannot be sent, a dialog box appears. Your message is
saved in the Outbox Messages list. For help, see “Working with Messages in
the Outbox” on page 27.
WWAN Communicator User’s Guide 23
Page 32

Chapter 3 — Sending and Receiving SMS Messages
Reading and Responding to SMS Messages
When Communicator is running, the symbol appears at the bottom of
the screen when you receive an SMS message:
Received messages stay in the Inbox until you delete them. To read and
respond to a message, see the next procedure.
To read a message
1 Tap at the bottom of the screen, or tap in the SMS Messages
screen. The Inbox Messages screen appears.
2 Tap a message in the list to select it and then tap . The Inbox Message
screen appears.
In the message screen, you can perform several tasks:
24 WWAN Communicator User’s Guide
Page 33

Chapter 3 — Sending and Receiving SMS Messages
To do this : Tap: For help, see:
Reply to the message The next section
Forward the message page 26
Place a voice call to the sender of the message page 26
Delete the message
Go back to the Inbox Messages screen
To reply to a message
1 In a message screen, tap . The SMS Message screen appears with the
Message field blank.
2 Tap the Message field to move the cursor into the field. Enter the text of
your message using the 760 keypad.
• To use Communicator’s virtual keypad, tap . For help, see“Using
the Virtual Keypad” on page 8.
3 To send the message, tap .
• To cancel and return to the SMS Messages main screen, tap .
WWAN Communicator User’s Guide 25
Page 34

Chapter 3 — Sending and Receiving SMS Messages
To forward a message
1 In a message screen, tap . The SMS Message screen appears with the
Phone Number field blank.
2 Tap t h e Phone Number field to move the cursor into the field. Use the
760 keypad to enter the number in the field.
• To choose a number from the Phonebook, tap . For help, see
“Using the Phonebook” on page 18.
• To use Communicator’s virtual keypad, tap . For help, see “Using
the Virtual Keypad” on page 8.
3 To send the message, tap .
• To cancel and return to the SMS Messages main screen, tap .
To place a voice call to the sender of a message
• In a message screen, tap . The Active Call screen appears and
Communicator places the call. For help, see “Dialing a Phone Number
and Placing a Call” on page 15.
26 WWAN Communicator User’s Guide
Page 35

Chapter 3 — Sending and Receiving SMS Messages
Working with Messages in the Outbox
When you unsuccessfully try to send an SMS message, Communicator
saves the message in the Outbox. These messages stay in the Outbox until
you successfully send or delete them. For help, see the next procedure.
To see the SMS Messages Outbox
1 In the Communicator main screen, tap . The SMS Messages main
screen appears.
2 Tap . The Outbox Messages screen appears showing a list of messages
you unsuccessfully attempted to send and the phone number of each
recipient.
3 To view a message, tap the message in the list to select it, and then tap
. The message screen appears.
• In the message screen, tap to send the message again, or tap to
cancel and return to the SMS Messages main screen.
To delete a message, tap the message in the list to select it and then tap .
To go back to the SMS Messages main screen, tap .
WWAN Communicator User’s Guide 27
Page 36

Chapter 3 — Sending and Receiving SMS Messages
Working with Sent Messages
When you successfully send an SMS message, Communicator places the
message in the Sent Messages list. These messages stay in the Sent Messages
list until you delete them.
To see the SMS Sent Messages screen
1 In the Communicator main screen, tap . The SMS Messages main
screen appears.
2 Tap . The Sent Messages screen appears showing a list of messages
you successfully sent and the phone number of each recipient.
3 To view a message, tap the message in the list to select it, and then tap
. The message screen appears.
• In the message screen, tap to send the message again, or tap to
cancel and return to the SMS Messages main screen.
To delete a message, tap the message in the list to select it and then tap .
To go back to the SMS Messages main screen, tap .
28 WWAN Communicator User’s Guide
Page 37

Viewing and Working with
4
This chapter contains the following sections:
• Navigating the Call Register Main Screen
• About the Call Register Entries
Call Registers
WWAN Communicator User’s Guide 29
Page 38

Chapter 4 — Viewing and Working with Call Registers
Navigating the Call Registers Main Screen
WWAN Communicator keeps a record of data connections and phone calls
you made, received, or attempted but were unsuccessfull.
To view and work with the call registers
1 In the Communicator main screen, tap . The Call Registers screen
appears.
2 Do one of the following:
To do this : Tap: This screen appears:
See calls you did not answer Missed Calls
See calls you answered Received Calls
See calls you unsuccessfully dialed Dialed Calls
See the data sessions successfully made Data Connections
Go back to the Communicator main screen Communicator main screen
3 In the Missed Calls, Received Calls, Dialed Calls, or Data Connections
screens, tap an entry in the list to select it. The next screen shows an
entry selected in the Missed Calls list.
30 WWAN Communicator User’s Guide
Page 39

4 Do one of the following:
To do this : Tap: This screen appears:
Add the number to the Phonebook page 18
Make a voice call to the number page 15
Send an SMS message to the number page 23
Delete the entry
Go back to the Call Registers main screen
About the Call Register Entries
By default, each register holds up to 50 entries. When a register is full, the
oldest entries are automatically deleted as new entries are added.
You can change the available number of entries for the call registers.
Although each register can hold up to 1000 entries, Intermec recommends
that you use the default values, since larger registers may degrade
Communicator performance.
Chapter 4 — Viewing and Working with Call Registers
For help with changing the number of entries, see “Changing Call Register
Settings” on page 46.
WWAN Communicator User’s Guide 31
Page 40

Chapter 4 — Viewing and Working with Call Registers
32 WWAN Communicator User’s Guide
Page 41

Connecting to the Internet
5
This chapter contains the following sections:
• About Connection Types
• Setting up a Default Internet Connection for the First Time
• Connecting to the Internet
WWAN Communicator User’s Guide 33
Page 42

Chapter 5 — Connecting to the Internet
About Connection Types
You can use WWAN Communicator to connect to the Internet and
automatically launch Pocket Internet Explorer.
Communicator includes a database of publicly defined connections. When
you start the application, Communicator looks for a publicly defined
connection for your network operator and makes this the default
connection.
If Communicator cannot locate a publicly defined connection for your
network operator, you need to create your own connection file before
connecting to the Internet for the first time. For help, see “Setting up a
Default Internet Connection for the First Time” on page 35.
The connection type you need to set up depends on the kind of service
your network operator provides. Consult your network operator to learn
what type of connection you should choose.
A CSD (Circuit Switched Data) connection is the typical form of data
transmission through circuit switching, like a dialup modem. As with voice
calls, network charges are based on the time spent in the connection.
In a PSD (Packet Switched Data) connection, information is split into
packets before transmission and reassembled at the receiving end. Radio
resources are used only when users are sending or receiving data, and thus
PSD connections typically occupy less bandwidth than CSD connections.
Users are charged for the amount of data sent and received.
For help with choosing and setting up a default Internet connection for the
first time, see the next section.
34 WWAN Communicator User’s Guide
Page 43

Chapter 5 — Connecting to the Internet
Setting up a Default Internet Connection for the First Time
Note: Follow this procedure to set up a default Internet connection for the
first time. To change your default Internet connection later, see “Changing
Connectivity Settings” on page 53.
To set up a default Internet connection
1 In the Communicator main screen, tap . A message box appears.
2 Tap OK to clear the message. The Data Connect screen appears, with
Connection Settings and Connection Wizard selected.
3 Tap . The Define A Connection screen appears.
4 In the Connection Type section, tap Packet Switched (PSD) or Circuit
Switched (CSD) to choose a type. For more information, consult your
network operator.
5 Tap . The Settings screen for your connection type appears.
WWAN Communicator User’s Guide 35
Page 44

Chapter 5 — Connecting to the Internet
If you chose PSD as the Connection
Type, this screen appears.
If you chose CSD as the Connection Type,
this screen appears.
6 Tap a field to select it and enter or change settings information. You can
use the 760 keypad or Communicator’s virtual keypad.
• To use the virtual keypad, tap . For help, see “Using the Virtual
Keypad” on page 8.
You get settings information from your network operator. The next
table describes settings information.
Setting Description
Connection Name A unique name for this connection.
APN Name (PSD only) Access point name.
Country, Area, Phone
Number (CSD only)
User Name and Password The username and password you want to specify for this
Extra Cmds
(CSD only)
The country code, area code, and phone number used for
your connection.
connection.
Extra commands (typically used for an ISDN
connection)
7 Tap . The Advanced Settings screen appears.
36 WWAN Communicator User’s Guide
Page 45

Chapter 5 — Connecting to the Internet
8 Enter advanced settings information in the fields. You get settings
information from your network operator. The next table describes
settings information.
Note: Some information may be optional depending on your network.
Typ e Description
DHCP Check this box if your server uses dynamic host control
protocol to assign IP addresses. If so, you may not need to
enter any other advanced settings information.
IP Address Static IP address.
DNS Domain name server for your network.
Alt DNS Alternate domain name server for your network.
WINS WINS server address.
Alt WINS Alternate WINS server address.
Domain The domain name for the network.
Connection Manager When checked MS Connection Manager is used,
unchecked and RAS is used. Connection manager is
required if you want to utilize Pocket Internet Explorer with
the connection.
Connection Manager
Destination
IP Comp Check this box if the packet is compressed. Not supported
Header Comp Check this box if the data package header is compressed.
The destination in MS Connection Manager. Typically this
value is “My ISP” but on non English OS version this value
varies.
on GSM devices.
Not supported on GSM devices.
9 Ta p Ping. The Ping Settings screen appears.
10 Enter ping settings information as described next:
WWAN Communicator User’s Guide 37
Page 46

Chapter 5 — Connecting to the Internet
Typ e Description
Ping IP The server IP address to query when establishing the
Max Packet Size Depends on your network. Contact your network operator.
Interval The interval at which to ping the IP address, in milliseconds.
Timeout The interval to wait between repeated pings, in milliseconds.
11 Tap to return to the Advanced Settings screen.
12 Tap . The Confirm Settings screen appears, listing all the
information you entered in the previous screens.
connection.
Default = 0 ms (maximum = 9000000 ms)
Default = 0 ms (maximum = 99000 ms)
13 Tap to save all settings. A dialog box appears asking if you want to
use this new connection as the default.
• Tap to go back to a previous screen and change information.
• Tap to cancel and return to the Communicator main screen.
14 Tap Ye s. The Data Connect screen appears.
15 Tap to go back to the Communicator main screen.
38 WWAN Communicator User’s Guide
Page 47

Connecting to the Internet
After you set up a default connection, you can connect to the Internet from
the Communicator main screen. For help with setting up a default
connection, see “Setting Up a Default Internet Connection for the First
Time” on page 26.
To connect to the Internet
• In the Communicator main screen, tap . Communicator connects
to the Internet. The Internet Explorer home page appears.
Chapter 5 — Connecting to the Internet
Pocket Internet Explorer Default Home Page
For help with using Explorer, see the Pocket PC online Help.
When the Internet connection is active, the Connection icon appears at the
bottom of the Communicator main screen:
To disconnect from the Internet
1 In the Communicator main screen, tap the Connection icon. The
Connection screen appears showing settings for the active connection.
WWAN Communicator User’s Guide 39
Page 48

Chapter 5 — Connecting to the Internet
2 Tap . Communicator ends the connection.
To add more connections, change connection settings, or connect to the
Internet without launching Explorer, see “Managing Data Connection
Settings” on page 47.
40 WWAN Communicator User’s Guide
Page 49

Viewing and Changing
6
This chapter contains the following sections:
• Navigating the Settings Main Screen
• Viewing Version Information
• Changing Voice Call Settings
• Changing Settings on the SIM Card (GSM Only)
Settings
• Changing Call Register Settings
• Managing Data Connection Settings
• Setting up the Speed Dialer
• Button Glossary
WWAN Communicator User’s Guide 41
Page 50

Chapter 6 — Viewing and Changing Settings
Navigating the Settings Main Screen
To see the Settings main screen
1 In the Communicator main screen, tap . The Settings main screen
appears.
2 In the Settings main screen, you can choose to do the following:
To do this : Tap: For help, see:
View version information The next section
Set the number of entries for each call registry page 47
Manage data connection settings page 47
Adjust the speaker or microphone volume or change the
ring sound
Change settings on the SIM card (GSM only) page 45
Add numbers from the Phonebook to the Speed Dialer page 59
Choose a language, set the default browser and browser
timeout, or exit Communicator
Go back to the Settings main screen
page 44
page 60
42 WWAN Communicator User’s Guide
Page 51

Viewing Version Information
In the Information screen, you can see the Communicator version number
and the type of radio.
To view the Information screen
• In the Settings main screen, tap . The Information main screen
appears showing copyright information, the version number, and the
type of radio installed in the 760.
Chapter 6 — Viewing and Changing Settings
To go back to the Settings main screen, tap .
WWAN Communicator User’s Guide 43
Page 52

Chapter 6 — Viewing and Changing Settings
Changing Voice Call Settings
In the Voice Call Settings screen, you can:
• adjust the speaker or microphone volume.
• choose a different ring tone or SMS notification sound.
To change voice call settings
1 In the Settings main screen, tap . The Voice Call Settings screen
appears.
2 To change the speaker volume:
• Tap for less volume, or tap for more volume.
• Tap to mute the speaker.
To change the microphone volume:
• Tap for less volume, or tap for more volume.
• Tap to mute the speaker.
To change the ring tone for phone calls or the SMS notification sound,
choose a tone from the drop-down list.
• To play the tone, tap .
To save your changes, tap .
To go back to the Settings main screen, tap . Changes will be lost if
you do not save them before going back to the Settings main screen.
Note: To add your own sounds, copy WAV files to the Program Files/
Intermec/Wireless Communicator/Waves directory on the 760.
44 WWAN Communicator User’s Guide
Page 53

Chapter 6 — Viewing and Changing Settings
Changing Settings on the SIM Card (GSM Only)
If the SIM card is locked, you need to enter the PIN each time you start
Communicator. You can change the required PIN code for a locked SIM
card or unlock the SIM card so the PIN is not required.
To change SIM card settings
1 In the Settings main screen, tap . The PIN Code Settings screen
appears.
2 Tap the Current PIN Code field to place the cursor in the field, and
then enter the current PIN with the 760 keypad.
3 Do one of the following:
• To unlock the SIM card, tap .
• To lock the SIM card, tap .
• To change the PIN, tap the Change PIN code field to place the
cursor in the field, and then enter the new PIN. Then tap the
Retype field to place the cursor in the field and enter the new PIN
again.
4 Tap to save the changes. An error message will appear if you retyped
the PIN incorrectly.
5 Ta p to go back to the Settings main screen.
WWAN Communicator User’s Guide 45
Page 54

Chapter 6 — Viewing and Changing Settings
Changing Call Register Settings
In the Register Settings screen, you can change the available number of
entries in the registers for Missed Calls, Dialed Calls, Received Calls, Data
Connections, SMS Messages, and the Phonebook.
To change call register settings
1 In the Settings main screen, tap . The Register Settings screen
appears.
2 Tap an entry field to select it and enter the new value using the 760
keypad as follows:
• To change the number of available entries in the registers for Missed
Calls, Dialed Calls, and Received Calls, choose the Call registers
field. The default is 50 entries.
• To change the number of available entries in the Data Connections
register, choose the Data call registers field. The default is 50
entries.
• To change the number of available entries in the SMS messages
register, choose the SMS messages field. The default is 50 entries.
• To change the number of available entries in the Phonebook, choose
the Phonebook entries field. The default is 200 entries.
Note: Although the call registers and Phonebook can hold more entries,
Intermec recommends that you use the default values for best performance.
3 To save your changes, tap .
To go back to the Settings main screen, tap .
Note: Changes will be lost if you do not save them before going back to the
Settings main screen.
46 WWAN Communicator User’s Guide
Page 55

Managing Data Connection Settings
After you first set up a connection, you can manage data connections and
settings in the Data Connect screen. From this screen, you can:
• add a connection or change settings for a connection.
• connect to the Internet without launching Pocket Internet Explorer.
To manage data connection settings
1 In the Settings main screen, tap . The Data Connect screen appears.
Chapter 6 — Viewing and Changing Settings
2 To connect to the Internet without launching Pocket Internet Explorer,
make sure that Start A Data Session is selected and then tap . A
message box shows the connection status. Tap to go back to the main
Settings screen.
To add a new connection or change settings for existing connections,
tap Connection Settings and continue with Step 3.
3 Choose an option below Select settings to configure:
• Choose Connection Wizard to add a new connection or change
settings for an existing connection. For help, continue with the next
procedure.
• Choose Connectivity Settings to set general parameters for all
connections or to set a different existing connection as the default.
For help, continue with “Changing Connectivity Settings” on
page 53.
WWAN Communicator User’s Guide 47
Page 56

Chapter 6 — Viewing and Changing Settings
Adding a Connection or Changing Existing Settings
When you choose the Connection Wizard, you can add a connection or
change settings for an existing connection.
Note: At any time during this procedure, you can:
•tap
to go back to the previous screen.
• tap to cancel and return to the Settings main screen.
To add a connection or change settings for an existing connection
1 In the Data Connect screen, tap Connection Settings and then tap
Connection Wizard.
2 Tap . The Define A Connection screen appears.
3 In the Connection Type section, tap Packet Switched (PSD) or Circuit
48 WWAN Communicator User’s Guide
Switched (CSD) to choose a type. For more information, consult your
network operator.
Page 57

Chapter 6 — Viewing and Changing Settings
4 Choose an option from the Connection Defined Using list:
• To create a new connection, choose Create New.
• To use an existing user-defined connection as a template for a new
connection, choose Create New from Template and then tap .
The Select screen for the type of connection you chose appears. Tap
a connection in the User Defined Connections list to select it.
If you chose PSD as the Connection
Type, this screen appears.
If you chose CSD as the Connection
Type, this screen appears.
• To change the settings for an existing user-defined connection, tap
Edit Existing and then tap . The Select screen for the type of
connection you chose appears. Tap a connection in the list to select
it.
If you chose PSD as the Connection
Type, this screen appears.
If you chose CSD as the Connection
Type, this screen appears.
WWAN Communicator User’s Guide 49
• To create a new connection based on a publicly defined connection,
tap Import connections. Continue with “Importing Connections”
on page 55.
Page 58

Chapter 6 — Viewing and Changing Settings
5 Tap . The Settings screen for the type of connection you chose
appears.
If you chose PSD as the Connection
Type, this screen appears.
If you chose CSD as the Connection
Type, this screen appears.
6 Tap a field to select it and enter or change settings information. You can
use the 760 keypad or Communicator’s virtual keypad.
• To use the virtual keypad, tap . For help, see “Using the Virtual
Keypad” on page 8.
You get settings information from your network operator. The next
table describes settings information.
Typ e Description
Connection Name A unique name for this connection, such as
“My Connection.”
APN Name (PSD only) Access point name.
Country, Area, Phone
Number (CSD only)
User Name and Password The username and password you want to
Extra Cmds (CSD only) Extra commands (typically used for an
The country code, area code, and phone
number used for your connection.
specify for this connection.
ISDN connection)
50 WWAN Communicator User’s Guide
Page 59

Chapter 6 — Viewing and Changing Settings
7 Tap . The Advanced Settings screen appears.
8 Enter advanced settings information in the fields. You get settings
information from your network operator. The next table describes
settings information.
Note: Some information may be optional depending on your network.
Typ e Description
DHCP Check this box if your server uses dynamic host control protocol to
assign IP addresses. If so, you may not need to enter any other
advanced settings information.
IP Address Static IP address for this 760.
DNS Domain name server for your network.
Alt DNS Alternate domain name server for your network.
WINS WINS server address.
Alt WINS Alternate WINS server address.
Domain The domain name for the network.
IP Comp Check this box if the packet is compressed.
Header Comp Check this box if the data package header is compressed.
9 Ta p Ping. The Ping Settings screen appears.
WWAN Communicator User’s Guide 51
Page 60

Chapter 6 — Viewing and Changing Settings
10 Enter ping settings information in the fields as described next:
Typ e Description
Ping IP The server IP address to query when establishing the
Max Packet Size Depends on your network. Contact your network operator.
Interval The interval at which to ping the IP address, in
Timeout The interval to wait between repeated pings, in
11 Tap to return to the Advanced Settings screen.
12 Tap . The Confirm Settings screen appears, listing all the information
you entered in the previous screens.
connection.
milliseconds. Default = 0 ms (maximum = 9000000 ms)
milliseconds. Default = 0 ms (maximum = 99000 ms)
13 Tap to save all settings. A dialog box appears asking if you want to
use this new connection as the default.
14 Tap Yes or No. If you click Yes, this connection will appear as the
default connection in the Data Connect screen.
52 WWAN Communicator User’s Guide
Page 61

Changing Connectivity Settings
Choose Connectivity Settings in the Data Connect screen to change
connectivity settings for any connection.
To change connectivity settings
1 In the Data Connect screen, choose Connection Settings.
2 Under Select Settings to Configure, choose Connectivity Settings and
then tap . The Data Settings screen appears.
Chapter 6 — Viewing and Changing Settings
3 Choose a connection from the PSD or CSD drop-down menu.
• To change the connection settings, continue with the next step.
• To set the connection as the default, continue with Step 5.
4 Tap a field to select it and use the 760 keypad to enter connectivity
settings:
Connectivity
Setting
Reconnect delay
(ms)
Modem initialize
delay (ms)
Connect retries Number of times the radio will try to
Reconnect when
failed
Timeout The number of minutes reconnection
Use backup CSD
on PSD fail
Reconnect on
start-up (PSD
only)
Description Default Maximum
Amount of time Communicator waits
until reconnecting.
Delay before the modem is initialized. 5000 ms 99000 ms
reconnect if the first try is unsuccessful.
Reconnects whenever the OS signals a
lost connection
will be attempted
Utilizes the CSD connection whenever
PSD fails
Reconnects your PSD connection
whenever the Communicator is started
5000 ms 99000 ms
299
5 10000
WWAN Communicator User’s Guide 53
Page 62

Chapter 6 — Viewing and Changing Settings
5 To save all settings, tap .
Note: When you save all settings, the connection names visible in the dropdown menus become your default connections.
54 WWAN Communicator User’s Guide
Page 63

Importing Connections
If you chose Import connections, you can browse to a publicly defined
connection file and use it as a template for your own connection.
To import a connection file
1 Tap . The Import Connection screen appears.
2 Ta p Browse to browse to a connection file, or enter the path to the
Chapter 6 — Viewing and Changing Settings
connection file. You can use the 760 keypad or the virtual keypad.
• To use the virtual keypad, tap . For help, see “Using the Virtual
Keypad” on page 8.
3 Tap . The connection file is imported and the Select screen appears
with the connection file you chose in the Publicly Defined
Connections list as shown in this example:
4 Tap . A dialog box appears asking if you want to make this
connection the default or use it as a template for a new connection.
5 Choose one and tap OK:
• If you chose to make the connection the default, the Data Connect
screen appears with the new default connection in the Connection
Typ e l ist .
WWAN Communicator User’s Guide 55
• If you chose Use as Template, the Settings screen for the type of
connection you chose appears. Continue with Step 5 of “Adding a
Connection or Changing Existing Settings” on page 48.
Page 64

Chapter 6 — Viewing and Changing Settings
Creating a Definition File
WWAN Communicator includes a database of publicly defined
connections. If Communicator cannot find a publicly defined connection
for your network operator, you can create your own definition file.
You create a definition file using a text editor such as Notepad. You also
need to contact your network operator for settings information as described
in the next procedure.
To create a publicly defined connection file
1 In your text editor, open a new document and enter this text:
connectionname=
connectiontype=
countrycode=
areacode=
phonenumber=
extradialstring=
apn=
username=
password=
domain=
pingip=
pinginterval=
pingtimeout=
dns=
altdns=
wins=
altwins=
headercompression=
ipcompression=
maxpacketsize=
dhcp=
deviceipaddress=
2 Add settings for each item as defined in the next table. All settings
Note: For any setting, you can specify %e to use the radio serial number, or
%s to use your Subscriber ID (phone number for CDMA networks, IMSI
for GSM networks).
For example, to use the radio serial number as the password, use
password=%e.
56 WWAN Communicator User’s Guide
entries are case sensitive.
Page 65

Chapter 6 — Viewing and Changing Settings
Connection Definition File Settings
Item Description
connectionname Name of the connection. Appears in the publicly defined
connections list.
connectiontype PSD for packet switched connections, CSD for circuit switched
connections.
countrycode (CSD only) Country code of the dialup connection.
areacode (CSD only) Area code of the dialup connection.
phonenumber (CSD only) Phone number of the dialup connection.
extradialstring (CSD only) Extra dial string of the dialup connection.
apn (PSD only) Access point name.
username User name for network login.
password Password for network login.
domain (Required when not using DHCP) Domain name.
pingip (PSD only) Server IP address to ping.
pinginterval (PSD only) Interval between pings.
pingtimeout (PSD only) Time before the connection is considered lost.
dns (Required when not using DHCP) Primary domain name
server.
altdns (Required when not using DHCP) Alternate domain name
server.
wins (Required when not using DHCP) WINS address.
altwins (Required when not using DHCP) Alternate WINS address.
headercompression True if header is compressed, false otherwise.
ipcompression True if data packet is compressed, false otherwise.
maxpacketsize Maximum size of data packets.
dhcp True if network settings are handled by a DHCP server, false
otherwise.
deviceipaddress (Required when not using DHCP) IP address of this 760.
needmoreinfo (Optional) Appears in a connection file with a setting of True if
you need to add more settings to the file before using it. Consult
your network operator for settings information. After you add
the required settings, set this to False.
3 If your 760 has a CDMA/1xRTT radio, save the file as
4 Copy the file to the Program Files/Intermec/Wireless Communicator/
5 Start Communicator. If Communicator is already running, you need to
WWAN Communicator User’s Guide 57
“OperatorName.txt,” where OperatorName is the name of your
network operator.
If your 760 has a GSM/GPRS radio, save the file as “OperatorCodeOperatorName.txt,” where OperatorCode is your operator code and
OperatorName is the name of your network operator.
Connections directory on the 760.
exit Communicator and restart the application. For help with exiting
Communicator, see “Viewing Version Information” on page 43.
Page 66

Chapter 6 — Viewing and Changing Settings
6 Tap . The Data Connect screen appears.
7 Choose Connection Settings and then choose Connection Wizard.
8 Tap . The Define A Connection screen appears.
9 Choose Edit Existing and tap . The Select screen for the type of
connection you chose appears. The name of the connection you defined
appears in the Publicly Defined Connections list.
10 Tap the connection name to select it and then tap . A dialog box
appears asking if you want to use this new connection as the default.
11 Tap Ye s or No. If you click Yes , this connection appears as the default
connection in the Data Connect screen.
Modifying a Definition File
If the publicly defined connection for your network operator requires you
to set more parameters, Communicator prompts you with a message box.
You need to add definition settings to the connection file before
Communicator can use the file. For help, see the next procedure.
To modify a connection file
1 On the 760, browse to the Program Files/Intermec/Wireless
Communicator/Connections directory.
2 Copy the connection file (OperatorCode-OperatorName.TXT) for
your network provider to your desktop PC.
3 Open the file in Notepad and add settings information as needed. For
settings information, see the Connection Definition File Settings table
on page 57.
4 Make sure you change the setting for needmoreinfo from True to
False and save the file.
5 Copy the file to the Program Files/Intermec/Wireless Communicator/
Connections directory on the 760. A message box appears asking if you
want to overwrite the existing file. Choose Ye s.
6 Start Communicator. If Communicator is already running, you need to
exit Communicator and restart the application. For help with exiting
Communicator, see “Viewing Version Information” on page 43.
58 WWAN Communicator User’s Guide
Page 67

Setting up the Speed Dialer
When you place a voice or data call, you can use the Speed Dialer to save
time. The Speed Dialer can hold up to 10 phone numbers.
Before you can store phone numbers in the Speed Dialer, you have to save
the numbers in the Phonebook. For help, see “Using the Phonebook” on
page 18.
To set up the Speed Dialer
1 In the Settings main screen, tap . The Speed Dialer screen appears.
Chapter 6 — Viewing and Changing Settings
2 Tap any button with a question mark (?). The Phonebook screen
appears.
3 Tap a number to select it and then tap . The Speed Dialer screen
appears with the contact name for the new number in the button.
To return to the Settings main screen, tap .
WWAN Communicator User’s Guide 59
Page 68

Chapter 6 — Viewing and Changing Settings
Changing Application Settings
In the Application Settings screen, you can choose a language, specify the
default browser, specify a timeout for the browser, or exit Communicator.
To change application settings
1 In the Settings main screen, tap . The Application Settings screen
appears.
2 Tap to exit Communicator, or do one of the following:
• Choose a language from the Language drop-down menu.
• Enter the path to and filename of the browser you want to set as the
default browser. The default is Pocket Internet Explorer.
• Enter the browser timeout value. This is the amount of time that
Communicator will wait for a connection to be established after you
tap . The default is 60 seconds.
After you choose one of the above, tap to return to the main Settings
screen.
60 WWAN Communicator User’s Guide
Page 69

Button Glossary
Chapter 6 — Viewing and Changing Settings
This illustrated glossary describes the various buttons that are used in the
WWAN Communicator interface.
Mainscreen Buttons
Make a voice phone call Connect to the Internet
Use SMS messaging features See the Phonebook and add entries
See the call registers View and change settings
White Buttons
Make a voice phone call
Hang up
See Dialed Calls register (phone calls you unsuccessfully dialed)
See the Received Calls register (calls you answered)
See the Missed Calls register
See the Data Connections register
Start a data connection
Send a new SMS message
See Inbox Messages screen (SMS messages you received)
See Outbox Messages screen (SMS messages you unsuccessfully tried to send)
See Sent Messages screen (SMS messages you successfully sent)
Add a new entry to the Phonebook
Use the virtual keypad
View the selection
Go back to the previous screen
Continue to the next screen
Save changes and continue to the next screen
Cancel and return to the previous screen
WWAN Communicator User’s Guide 61
Page 70

Chapter 6 — Viewing and Changing Settings
62 WWAN Communicator User’s Guide
Page 71

Page 72

Corporate Headquarters
6001 36th Avenue West
Everett, Washington 98203
U.S.A.
tel 425.348.2600
fax 425.355.9551
www.intermec.com
WWAN Communicator User’s Guide
*074250-003*
P/N 074250-003
 Loading...