

Page 1
User's Guide
CT60
Rugged
Tablet PC
Page 2
User Guide
CT60
Rugged
Tablet PC
Page 3

Intermec Technologies Corporation
Corporate Headquarters Technical Communications
Department
6001 36th Ave. W. 550 Second Street SE
Everett, WA 98203 Cedar Rapids, IA 52401
U.S.A. U.S.A.
www.intermec.com
The information contained herein is proprietary and is provided
solely for the purpose of allowing customers to operate and
service Intermec-manufactured equipment and is not to be
released, reproduced, or used for any other purpose without
written permission of Intermec.
Information and specifications contained in this document a re
subject to change without prior notice and do not represent a
commitment on the part of Intermec Technologies Corporation.
E 2003 by Intermec Technologies Corporation. All rights reserved.
The word Intermec, the Intermec logo, Norand, ArciTech,
CrossBar, Data Collection Browser, dcBrowser, Duratherm,
EasyCoder, EasyLAN, Enterprise Wireless LAN, EZBuilder,
Fingerprint, i-gistics, INCA (under license), InterDriver,
Intermec Printer Network Manager, IRL, JANUS, LabelShop,
Mobile Framework, MobileLAN, Nor*Ware, Pen*Key, Precision
Print, PrintSet, RoutePower, TE 2000, Trakker Antares, UAP,
Universal Access Point, and Virtual Wedge a re either trademarks
or registered trademarks of Intermec Technologies Corporation.
Throughout this manual, trademarked names may be used.
Rather than put a trademark ( or )symbolinevery
occurrence of a trademarked name, we state that we are using the
names only in an editorial fashion, and to the benefit of the
trademark owner, with no intention of infringement.
There are U.S. and foreign patents pending.
ii
Page 4

Contents
Contents
Before You Begin vii...............................
Introduction 1.....................................
1
Standard Features 2...............................
Accessories and Options 3..........................
Exterior Features 4................................
Battery Gauge: 4..........................
Charging status LED: 4.....................
Hard disk Drive Indicator: 4.................
Backlight Control Sensor: 5..................
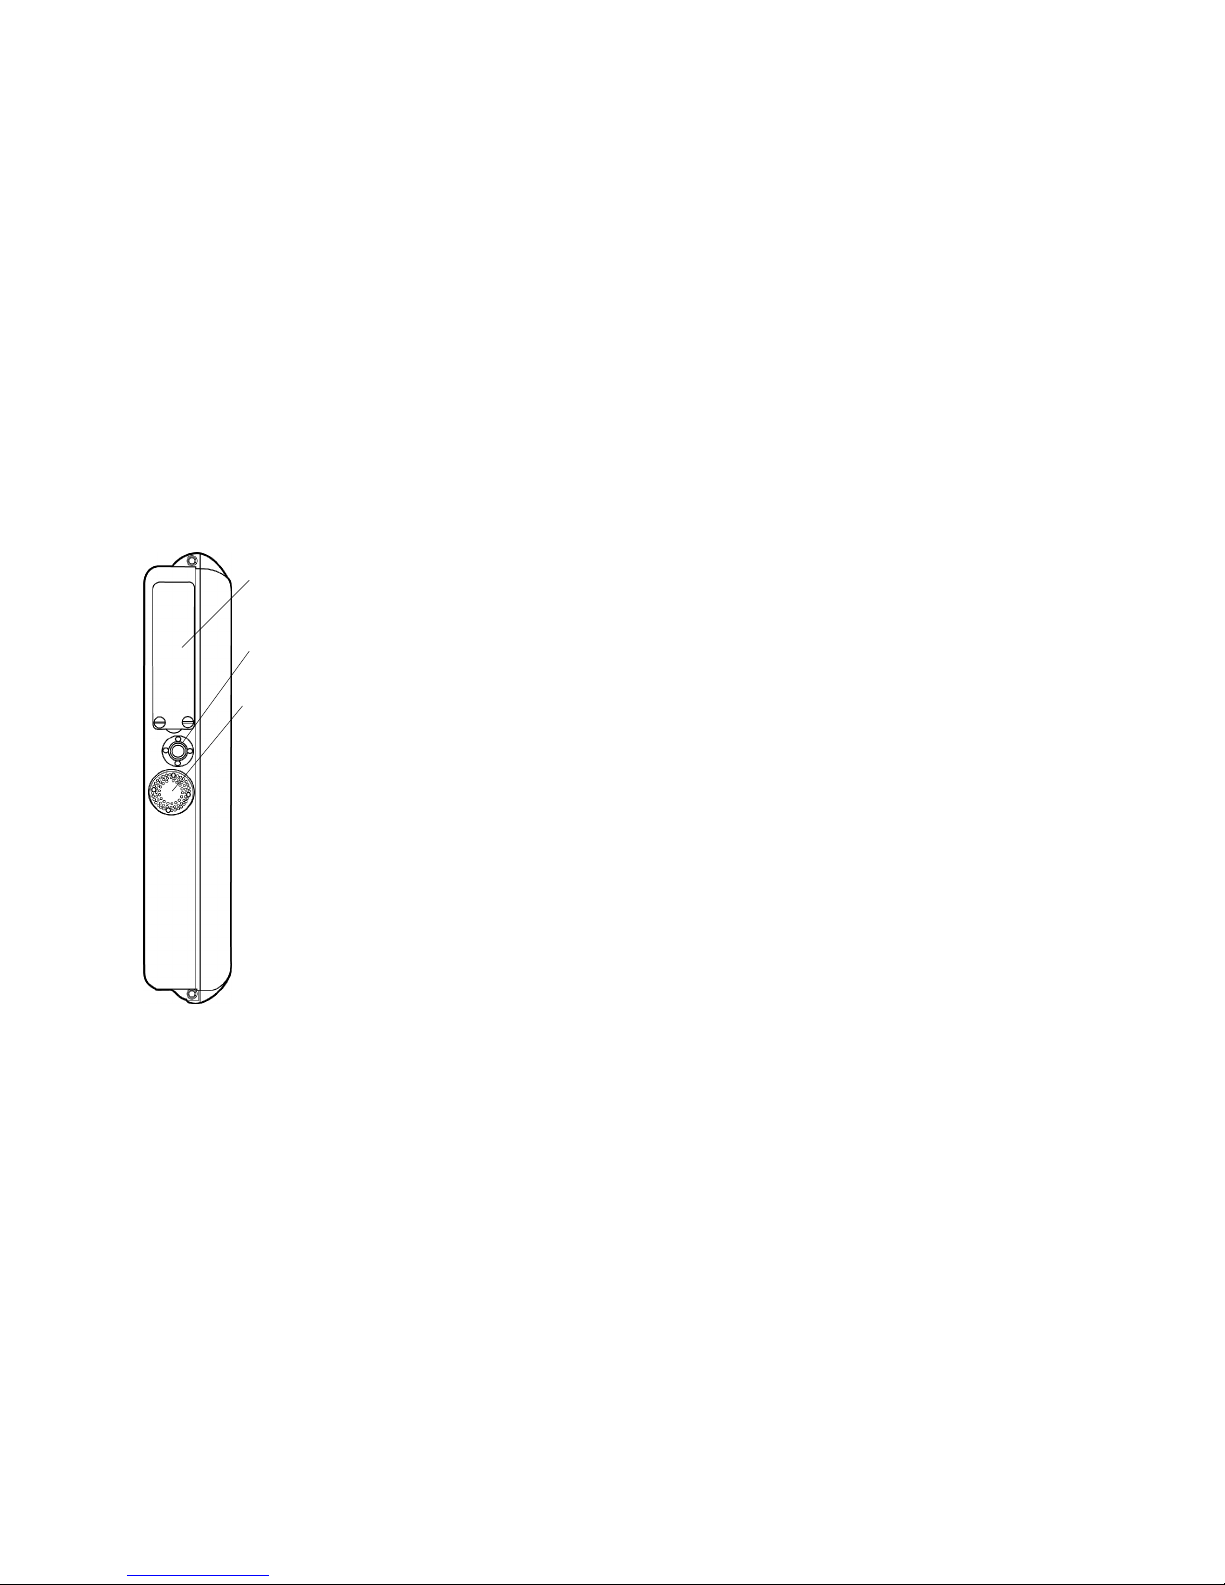
On/Off Switch: 5....................
USB Connector: 5....................
Cardbus/PCMCIA Expansion Slot 6......
Speaker: 6..........................
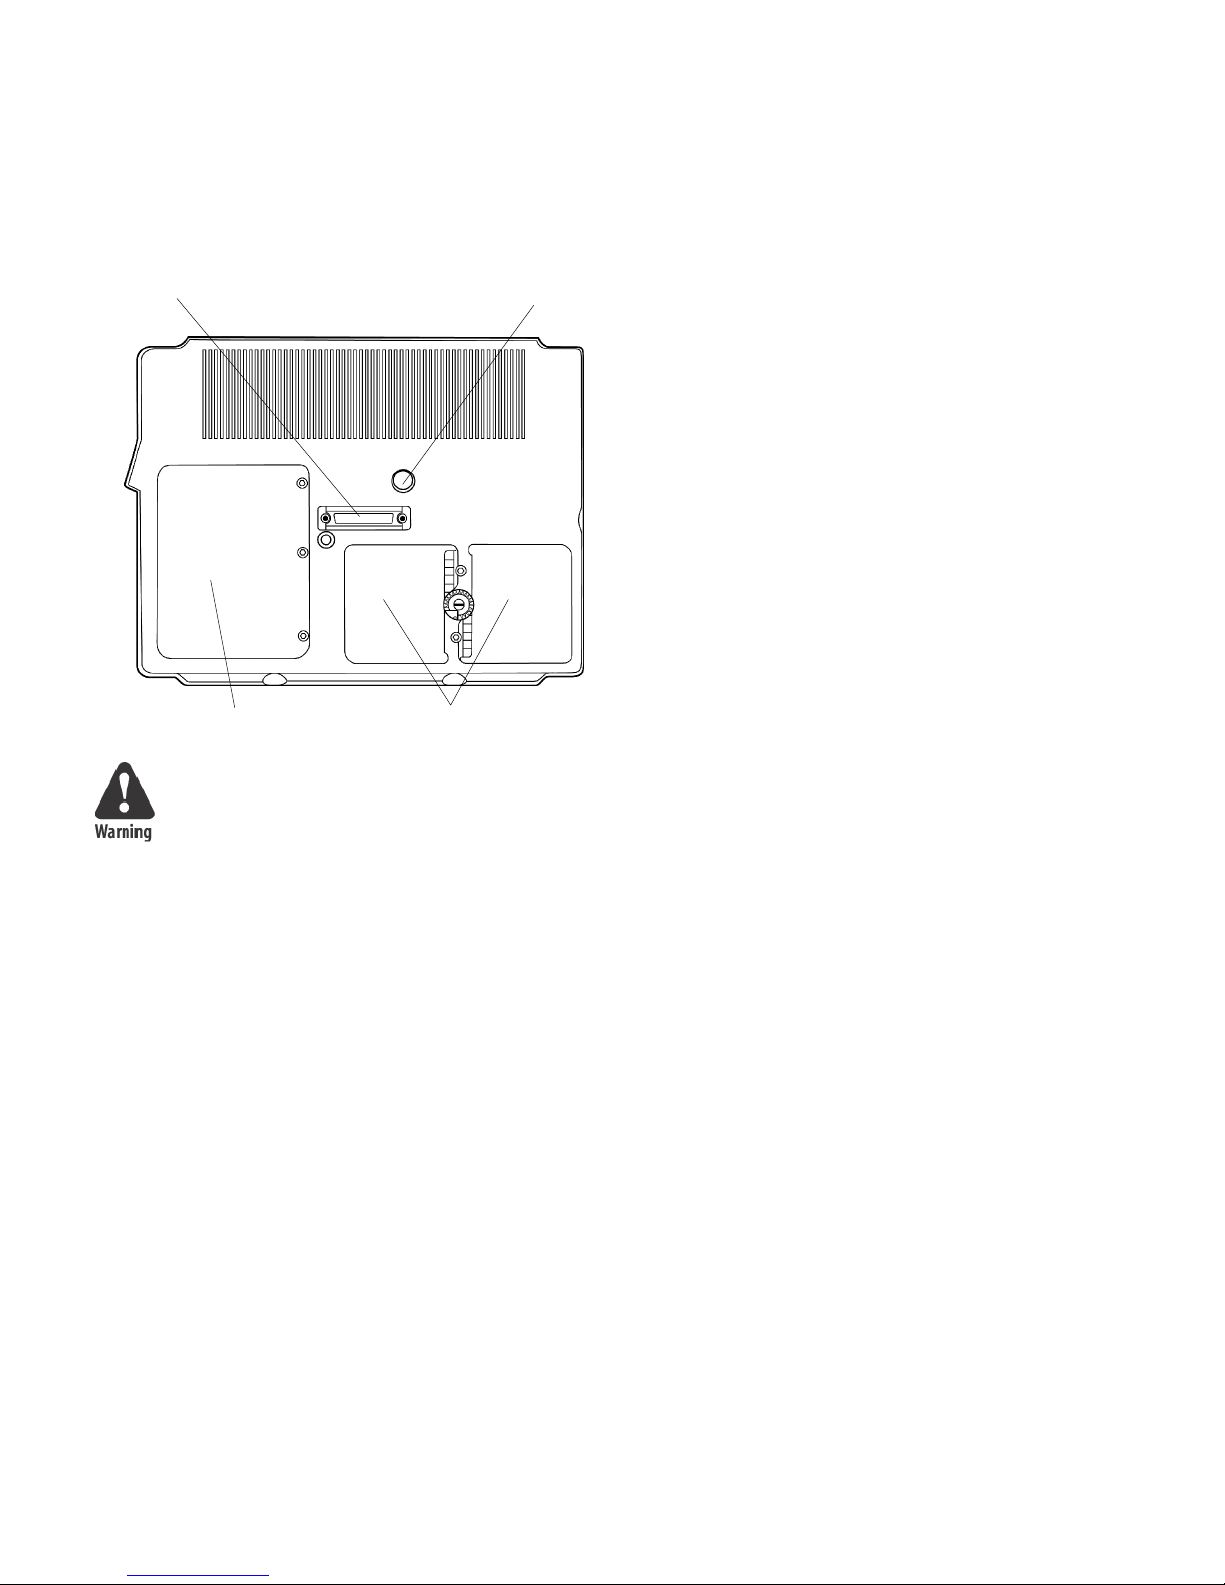
External Power Connector (15 VDC input): 7
Coaxial Connector: 7..................
Docking Connector: 7.................
Battery Compartments: 7..............
Hard Drive Compartment: 8............
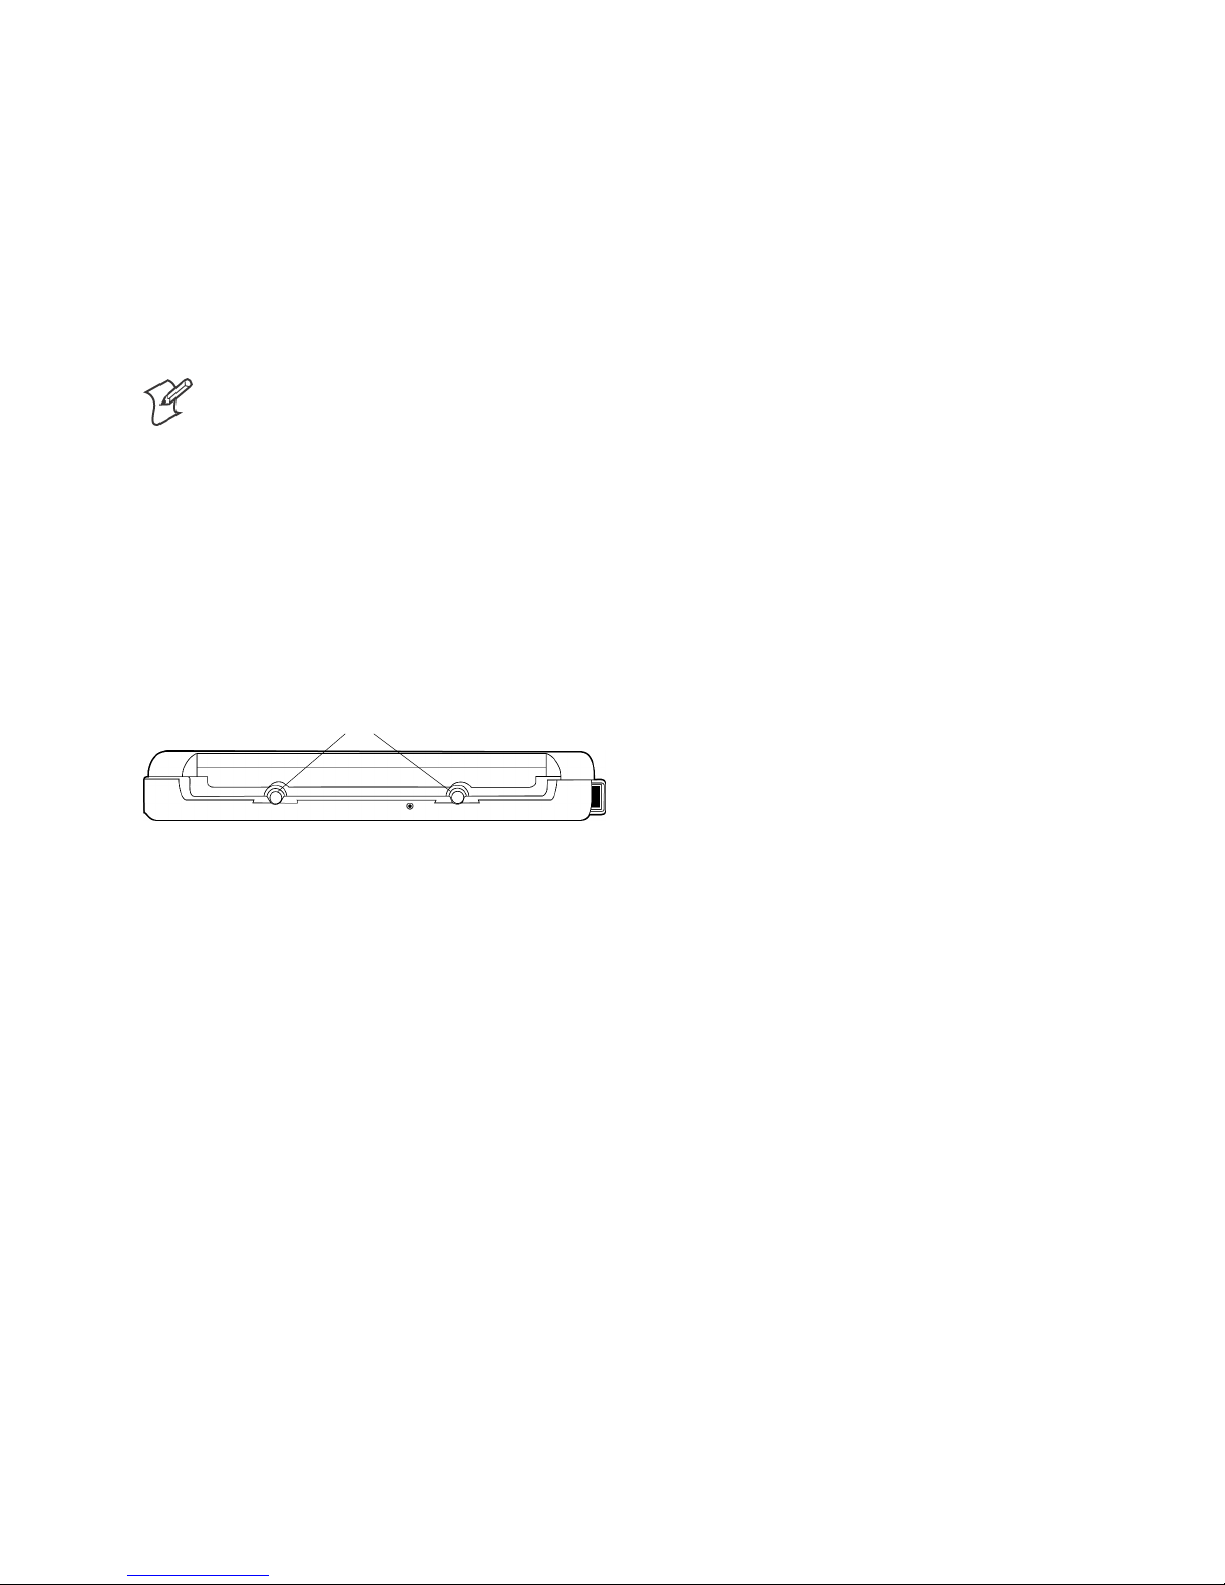
Bottom Guide Pin Holes: 8.............
Tips for Proper Use and Care 9.................
iiiCT60 Rugged Tablet PC Use r’s Guide
Page 5

Contents
2
Hardware Operation 11....................
Turning on the CT60 12.......................
Pen Operations 12.....................
Battery Use and Care 14.......................
New Batteries 14......................
How t o Install New Batteries 14..........
When to Recharge Batteries 14...........
How to Recharge Your Batteries 15........
When Batteries Have Finished Charging 16.
How t o Increase Battery Run Time 16.....
When to Replace Your Battery 17.........
Where to Purchase Replacement Batteries 17
Safety and Handling for Batteries 18.......
Disposing of Batteries 19................
Tips for Bes t Battery Performance 25......
Removable Hard Drive 20......................
Connectivity 20..............................
Port Replicators 21............................
Desktop Docking Station 24....................
Vehicle Docking 25...........................
Cardbus/PC Cards 26.........................
Internal Flex Space for OEM modules 27...
iv CT60 Rugged Tablet PC User’s Guide
Page 6

3
Contents
Software Operation 29......................
Windows XP Tablet PC Edition 30...............
Tablet and Pen Settings 30...............
Screen Rotation 30.............
Adjusting Screen Brightness 32....
When Should I Calibrate the Pen? 32
Handwriting Using the Input Panel 33.....
How to Open the Input Panel 33..
How to Convert Handwriting 34..
Handwriting Using Microsoft Journal 34...
How to Access Windows Journal 34
Restore the Default Settings 34...
Reinstall the Note Writer Printer 35
Improve Handwriting Recognition 36
How to Set the Pen and Screen 36.
How to Create “Sticky Notes” 36..
Use the Pen to Write 37.........
Speech Recognition 37.................
Performance and Maintenance 37.........
Monitoring Your Battery 37......
Turning Off Peripherals 38.......
Using Power Schemes 38.........
Standby 39...................
Hibernation 39................
CT60 Utilities 40............................
Manual Brightness Adjustment 40.........
Auto Backlight Settings 40.......
Side Button Function 40.........
Advanced Backlight 41..........
Backlight Adjustment 41.........
Auto Dim 42..................
vCT60 Rugged Tablet PC User’s Guide
Page 7

Contents
4
FAQs 45.......................................
What Software Options are Available? 48...
Installing Device Drivers Sold by Intermec? 48
How Do I Activate the “Screen Keyboard”? 48
Disabling Hand Writer Recognition? 49....
If the Computer Locks Up or Freezes 49...
How Do I Clean the Dock Connector ? 49..
How Do I Clean the Glass? 49...........
If the Pen Gets Out of Alignment? 49......
What if the Pen Still Will Not Align? 47....
If the “ Start” Button Disappears? 48.......
External Peripherals Support? 49..........
USB Networking In th e CT60? 50........
How Can USB be Used In the CT60? 50...
vi CT60 Rugged Tablet PC User’s Guide
Page 8

Before You Begin
Before You Begin
This section provides you with safety information, technical support information, and sources for additional product
information.
Safety Summary
Your safety is extremely important. Read and follow all warnings
and cautions in this document before handling and operating
Intermec equipment. You can be seriously injured, and equipment and data can be damaged if you do not follow the safety
warnings and cautions.
Donotrepairoradjustalone
Do not repair or adjust energized equipment alone under any
circumstances. Someone capable of providing first aid must always be present for your safety.
First aid
Always obtain first aid or medica l attention immediately after an
injury. Never neglect an injury, no matter how slight it seems.
Resuscitation
Begin resuscitation immediately if someone is injured and stops
breathing. Any delay could result in death. To work on or near
high voltage, you should be familiar with approved industrial
first aid methods.
Energized equipment
Never work on energized equipment unless authorized by a responsible authority. Energized electrical equipment is dangerous.
Electrical shock from energized equipment can cause death. If
you must perform authorized emergency work on energized
equipment, be sure that you comply strictly with approved safety regulations.
viiCT60 Rugged Tablet PC User’s Guide
Page 9

Before You Begin
Safety Icons
This section explains how to identify and understand dangers,
warnings, cautions, and notes that are in this guide. You may
also see icons that tell you when to follow ESD procedures and
when to take special precautions for handling optical parts.
A warning alerts you of an operating procedure,
practice, condition, or statement that must be
strictly observed to avoid death or serious injury
to the persons working on the equipment.
Avertissement: Un avertissement vous avertit d’une
procédure de fonctionnement, d’une méthode,
d’un état ou d’un rapport qui doit être strictement
respecté pour éviter l’occurrence de mort ou de
blessuresgravesauxpersonnesmanupulant
l’équipement.
A caution alerts you to an operating procedure,
practice, condition, or statement that must be
strictly observed to prevent equipment damage or
destruction, or corruption or loss of data.
Attention: Une précaution vous avertit d’une
procédure de fonctionnement, d’une méthode,
d’un état ou d’un rapport qui doit être strictement
respecté pour empêcher l’endommagement ou la
destruction de l’équipement, ou l’altération ou la
pertededonnées.
Note: Notes either provide extra information about a
topic or contain special instructions for handling a
particular condition or set of circumstances.
viii CT60 R ugge d Tablet PC User’s Guide
Page 10

Before You Begin
Global Services and Support
Warranty Information
To understand the warranty for your Intermec product, visit the
Intermec web site at http://www.intermec.com, click Support,
and then click Warranty.
Disclaimerofwarranties:Thesamplecodeincludedinthisdocument is presented for reference only. The code does not necessarily represent complete, tested programs. The code is provided
“as is with all faults.” All warranties are expressly disclaimed,
including the implied warranties of merchantability and fitness
for a particular purpose.
Web Support
Visit the Intermec web site at http://www.intermec.com to
download many of our current manuals in PDF format. To order printed versions of the Intermec manuals, contact your local
Intermec representative or distributor.
Visit the Intermec technical knowledge base (Knowledge Central) at http://intermec.custhelp.com to review technical information or to request technical support for your Intermec product.
ixCT60 Rugged Tablet PC User’s Guide
Page 11

Before You Begin
Telephone Support
These services are available from Intermec Technologies Corporation.
Service Description Call 1 -800-755-5505
and choose this option
Factory Re pai r and
On-site Repair
Technical Support Get technical support
Service Contract
Status
Schedule Site
Surveys or
Installations
Ordering Products Talk to sales
Request a return
authorization number
for authorized service
center repair, or request
an on-site repai r
technician.
on your Intermec
product.
Inquire about an
existing contract, renew
a contract, or ask
invoicing questions.
Schedule a site survey,
or request a product or
system installation.
administration, place an
order, or check the
status of your order.
1
2
3
4
5
x CT60 Rugged Tablet PC User’s Guide
Page 12

Before You Begin
WhoShouldReadthisGuide?
This guide provides you with information about the features of
the CT60, and how to install, operate and maintain it.
Before you configure the CT60, you should be familiar with
basic Windows-based PC operation, and how it relates to pen
computing.
Related Documents
This table contains a list of related Intermec documents and
their part numbers.
Document Title Par t Number
CT Rugged Tablet PC Quick Start Guide 962 -054-066A
CT60 Vehicle Mount Installation Guide 962-040-012A
The Intermec web site at http://www .intermec.com contains
many of our documents that you can download in PDF format.
To order printed versions of the Intermec manuals, contact your
local Intermec representative or distributor.
xiCT60 Rugged Tablet PC User’s Guide
Page 13

Introduction
1
The CT60 Rugged Tablet PC gives you the
power of a desktop computer, yet it is designed
for use on foot, in a vehicle, or in an office. It is
ideal for highly mobile applications in the most
demanding environments.
CT60 Rugged Tablet PC User’s Guide
1
Page 14

Chapter
—
1
Introduction
Standard Features
Your CT60 Data Collection Tablet PC includes the following
features at a minimum:
S Fully sealed aluminum housing with lifetime warranty
S 933 MHz Mobile Intel® Pentium® III MHz processor-M
S 256 MB main memory
S 512 KB L2 cache
S 4 MB dedicated video memory
S 10.4” 800 x 600 TFT active matrix color display
S Removable shock-mounted 20 GB or larger hard disk drive
S Type III Cardbus/PCMCIA expansion slot (two Type II de-
vices)
S Long-lasting Li-Ion battery (dual battery option)
S Built-in light sensor for automatic backlight control
S Phoenix BIOS
S Microsoft Windows XP Tablet PC Edition (Windows 98,
2000, XP Professional optional)
S Pen stylus for use with electromagnetic proximity sensing dig-
itizer
S One year warranty on all parts and labor
S Direct line technical support by Intermec Technologies tech-
nical support staff
2 CT60 Rugged Tablet PC User’s Guide
Page 15

Chapter
—
1
Introduction
Accessories and Options
The following options and accessories are available for the
CT60:
S Shock absorbing, dockable carrying case
S Universal AC power adapter 110-250 volts, 50-60 Hz
S Port replicator
S Vehiclecradleandmountingoptions
S Desktop docking station with communications options
S Additional batteries
S Battery charger
S GPS, Wired LAN, Wireless LAN and various public and
cellular radio modem(s)
S Additional antenna
S External CD ROM (USB)
S External 1.44 MB 3.5” bootable floppy disk drive
S (USB) Keyboard(s)
Note: A GPS option is sold for the sole purpose of
providing and accurate and easily obtainable signal
for location of equipment for time or signal synchronization.
CT60 Rugged Tablet PC User’s Guide
3
Page 16
Chapter
—
1
Introduction
Exterior Features
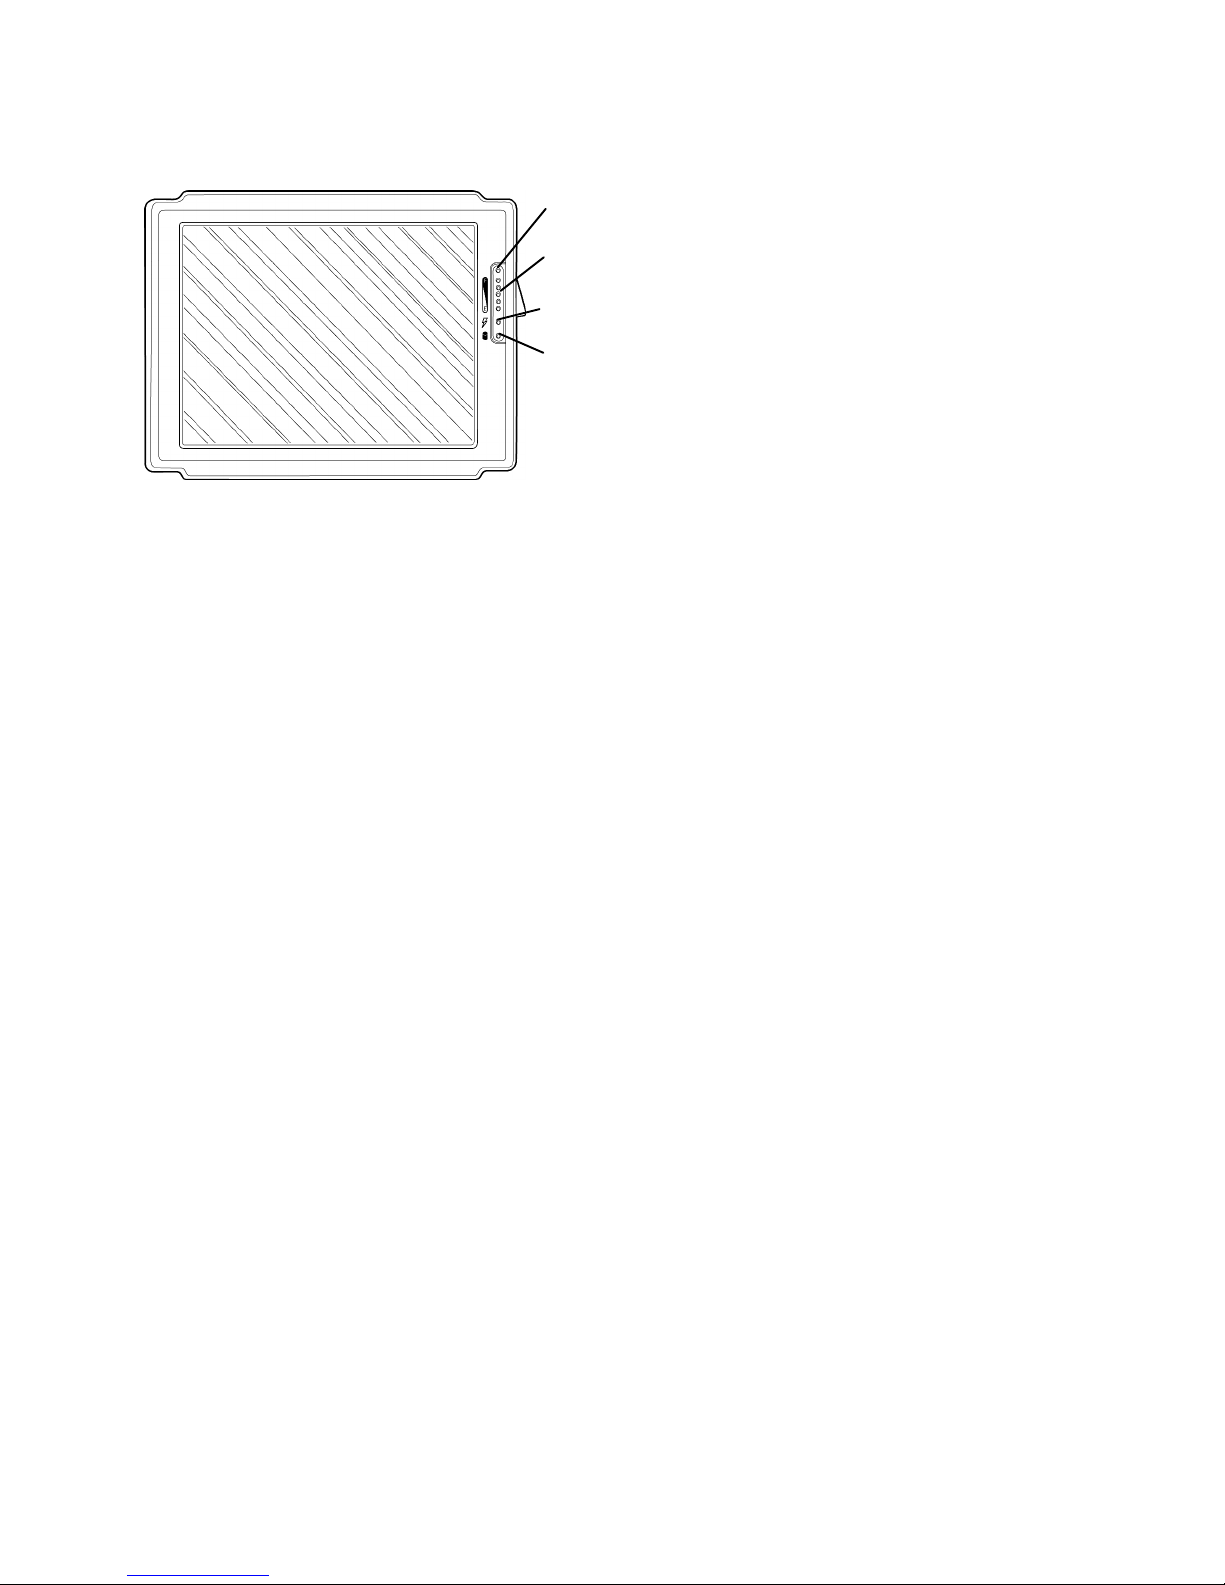
Front View
Battery Gauge:
Backlight Control
Sensor
Battery Gauge
Charge Status
Hard Disk Drive
Indicator
ThebatterygaugeconsistsoffiveLEDs,whichindicatethe
approximate charge remaining on your computer. When all five
lights are lit, the battery charge is full. As you use the battery,
the lights will turn off from top to bottom, indicating the
amount of charge that remains. Each light represents approximately 20% of the full charge. See Chapter 2 “Batteries and
Charging Procedures” for more detailed information on the battery gauge.
Chargingstatus LED:
The charge status indicator is lit whenever external power is
available. It blinks as the battery charges and remains a constant
green when the batteries are fully charged. The indicator identifies a positive connection when the CT60 is in the docking station with an external power source. The indicator will be green
when external power is connected.
Hard disk Drive Indicator:
The indicator flashes as the internal hard disk drive is accessed.
4 CT60Rugged TabletPC User’s Guide
Page 17
Chapter
—
1
Introduction
Backlight Control Sensor:
The backlight control sensor automatically turns the backlight
off when adequate external light is available. Make sure you
keep this sensor uncovered.
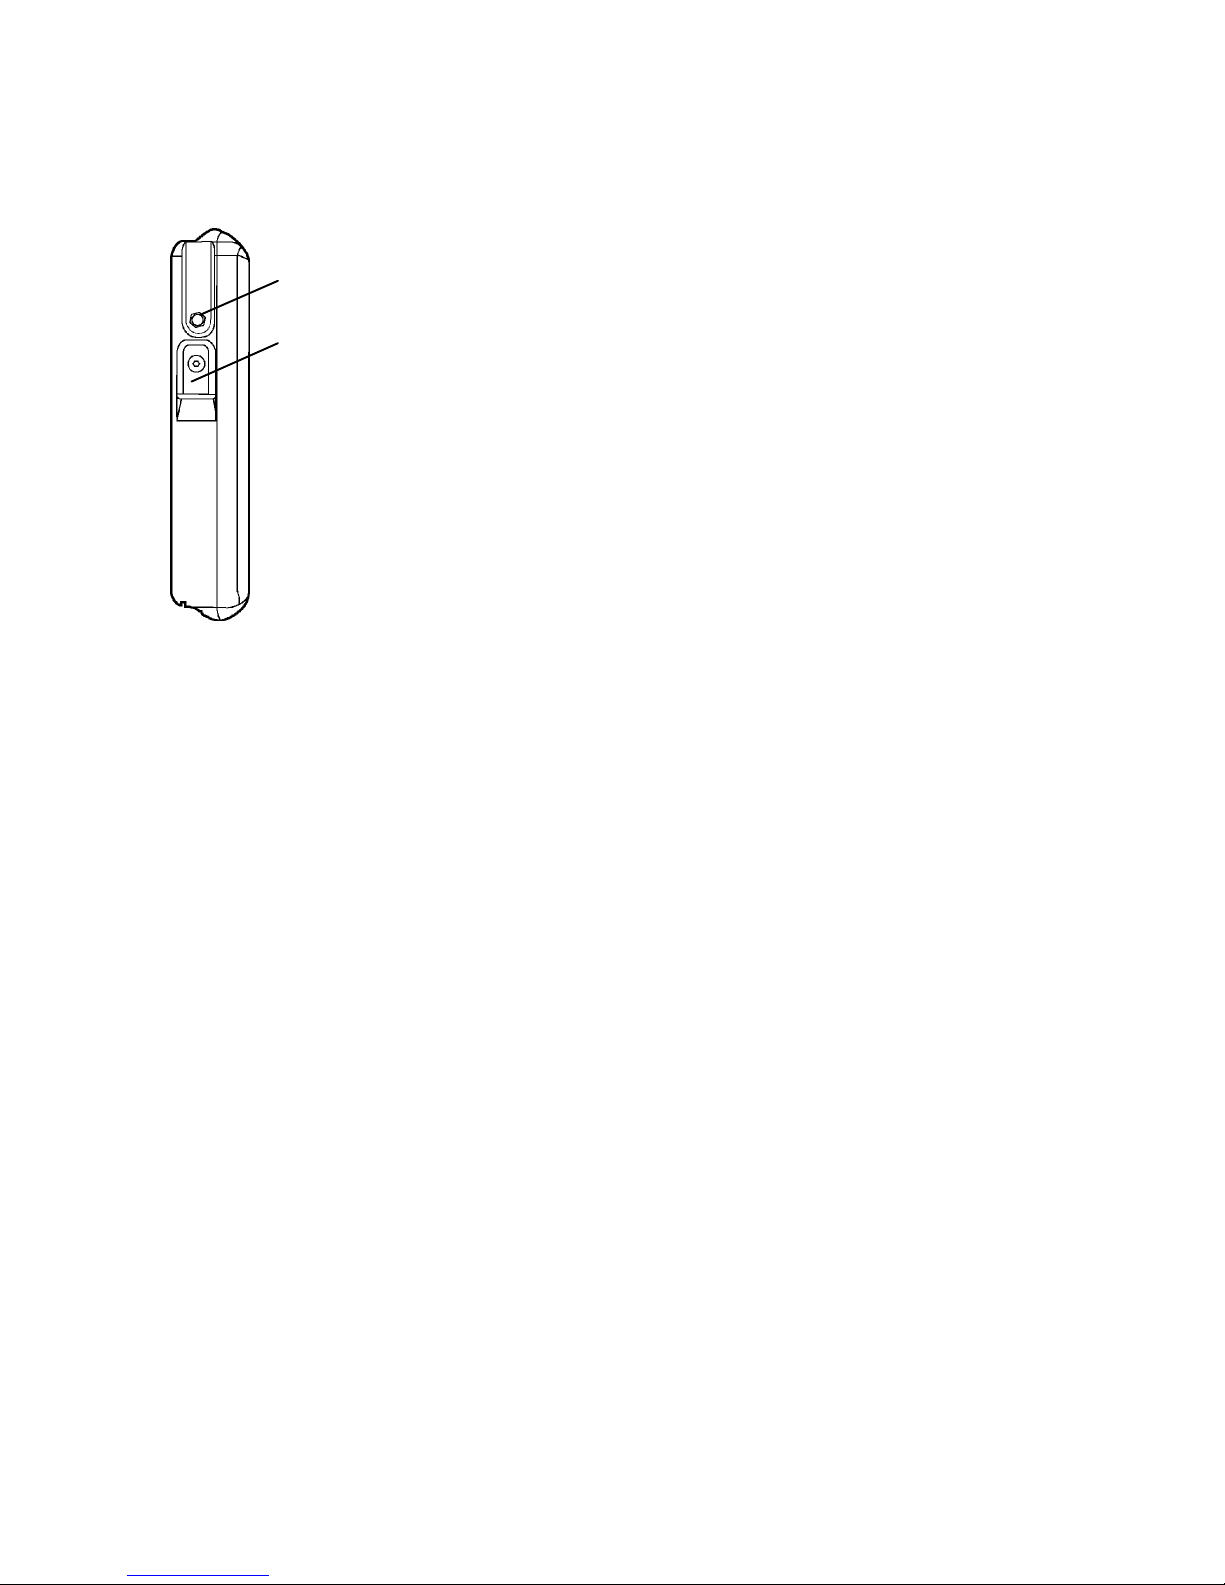
On/Off Switch
USB Connector
On/Off Switch:
Turn the computer on by quickly depressing the yellow on/off
button on the upper right-hand side of the computer (approximately ½ to 1 second). After the compu ter boots up, pressing
the on/off switch again will automatically start proper Windows
shutdown procedures.
Pressing the on/off button twice in rapid succession replicates
<CTRL>< ALT ><DEL> keystrokes. Holding the on/off button
down for a longer period of time (four to five seconds) causes an
emergency forced shut down of the computer.
When the CT60 is operating, the side switch will function according to the selection on the Advanced tab of the Power Options. To see the current setting, go to Start, Control Panel,
Performance and Maintenance, Power Options and click on
the Advanced tab.
USB Connector:
The Universal Serial Bus is a hot swappable, chainable serial port
with a maximum speed of 12 Mbps. It can be used for devices
like keyboards, mice, floppy drives, CD-ROM or DVD drives,
CT60 Rugged Tablet PC User’s Guide
5
Page 18
Chapter
—
1
Introduction
cameras, modems, scanners, etc. The CT60 supports booting
from bootable USB devices such as floppy drives and CD-ROM
drives. Devices can be connected to the CT60 with the computer turned on, without requiring a reboot.
There is a limit of 128 concurrent devices per USB port. The
CT60 can supply up to 0.5 amps of current through the USB
port. External USB hubs are available that will supply power to
external devices without using the CT60’s power supply.
Cardbus/PCMCIA Expansion Slot:
The Cardbus/PCMCIA expansion slot is sealed behind a hatch
plate held in place by two Phillips head screws. The hatch plate
must be removed to access the slot. Several hatch plates are available that will accommodate various Cardbus/PCMCIA devices
with features that extend beyond the housing of the computer.
These hatch plates keep the unit as sealed as possible.
Cardbus/PCMCIA
Expansion Slot
External Power
Connector
Speaker
Speaker:
The monaural speaker in located in the left side of the housing.
ThespeakerwillplayWindowssoundsaswellasPCaudioinformation.
6 CT60Rugged TabletPC User’s Guide
Page 19
Chapter
—
1
Introduction
External Power Connector (15VDC input):
This connector allows the user to plug the power supply directly
into the CT60 for operation and battery charge.
The CT60 may also be charged through a port replicator or
docking station.
Docking Connector Coaxial Connector
Hard Drive Compartment
Battery Compartments
Do not connect the CT60 to more than one power
source at a time when charging, or permanent
damage may occur.
Coaxial Connector:
Depending on the machine configuration, there may be a coaxial antenna connection near the center of the housing. The coaxial connector will allow you to connect an external antenna to an
internal radio or GPS solution.
Docking Connector:
The docking connector provides for all external communications
with the computer. It connects to a port replicator or docking
station.
CT60 Rugged Tablet PC User’s Guide
7
Page 20
Chapter
—
1
Introduction
Battery Compartments:
There are two battery compartments designed for convenient,
hot swappable battery replacement while in the field. See the
Batteries and Charging Procedures section of “Chapter 2, Hard-
ware Operation” for instructions on changing batteries.
Hard Drive Compartment:
The hard drive compartment allows field upgrades or repairs
without opening the CT60. Some customers may have IT Departments trained to replace hard drives at the customer location.
You should not open the hard drive compartment
without proper service training from Intermec
Technologies. Any tampering of the hard drive will
void the warranty.
Bottom Guide Pin Holes:
The bottom guide pin holes are used to align the computer
when placed in either a vehicle, desktop, or wall-mount docking
station. Simply insert the computer onto the gauge ball guide
pins and tilt the computer back until the docking connectors
engage.
Bottom Guide Pin Holes
8 CT60Rugged TabletPC User’s Guide
Page 21

Chapter
—
1
Introduction
Tips for Proper Use and Care
The CT60 is a hardened field computer, but it is an electronic
device and reasonable precautions should be taken:
S Do not subject the computer to extreme heat by placing it on
the dashboard of a vehicle with the display facing the sun.
S Do not leave the computer in temperatures below -25° F
(-31.7° C).
S Do not pile tools or heavy objects on top of the computer.
S Avoid severe impacts, especially on the display glass.
S Do not place the unit on the hood or roof of any vehicle, as it
mightbeleftbehind.
S Do not try to take the computer apart. Special tools are re-
quired to disassemble the computer.
S Do not use excessive force when inserting PC cards in the PC
card slots, as they may break.
CT60 Rugged Tablet PC User’s Guide
9
Page 22

Hardware Operation
2
This chapter outlines pen operation, battery
care and use, and connectivity options for the
CT60.
CT60 Rugged Tablet PC User’s Guide
11
Page 23

Chapter
—
Hardware Operation
2
Turning on the CT60
Turn the computer on by quickly depressing the yellow on/off
button on the upper right-hand side of the computer (press for
½ to 1 second).
Note: When turning on the computer, do not press
the On/Off button twice in rapid succession. A
double press replicates <CTRL> <ALT> <DEL> keystrokes. Holding the on/off button down for a longer
period of time (four to five seconds) causes an emergency-forced shut down of the computer.
The On/Off button is recessed to prevent accidentally turning
the Tablet PC on or off. The CT60 performs its self-check routines during the start up process. All units are configured at the
factory to automatically boot to the Microsoft Windows Desktop unless a custom-configuration has been requested.
Pen Operations
The pen is the primary screen navigation and data entry tool for
the CT60. Without a keyboard attached, the pen is the only means
of communicating with the computer. Do not lose or misplace the
pen. The pen is usually tethered to its carrying case. Attaching
thetethertooneofthezippersonthecarryingcasewithasplit
ring anchors the tether on either side of the computer. By shifting the position of the zipper, the tethered pen is convenient for
right or left-handed users. All users are encouraged to purchase a
spare pen as a backup.
The pen functions as a two-button mouse. There are two
switches in the pen, one in the pen tip and another on the barrel
of the pen. The tip switch performs the same functions as the
left button on a mouse and the barrel switch performs like the
right mouse button.
Few applications require the use of the pen’s barrel button. Do
not depress the barrel switch when writing on the display; it will
adversely affect handwriting recognition.Toactivatethetip
switch, press the tip of the pen against the display. This is similar to clicking the left mouse button.
12 CT60 Rugged Tablet PC User’s Guide
Page 24

Chapter
—
2 Hardware Operation
Double-clicking is accomplished by double tapping with the
pen. Move an icon by pressing the pen directly overhead and
dragging it to the desired destination, keeping the pen in
constant contact with the display.
Tapping the pen requires only light to moderate pressure. It is
possibletodamagethepenbypoundingthetipagainstthedisplay with force. Most problems using the pen are related to tapping speed and the tapping area size. When using XP Tablet PC
Edition, attributes related to use of the pen (such as tap speed)
can be adjusted by clicking on Control Panel → Tabl et an d
Pen Settings, and then the Pen Options tab. You can also im-
prove handwriting recognition accuracy by indicating is you are
rightorlefthandedontheSettingstab.
The CT60 utilizes a proximity-sensing electromagnetic digitizer.
This component tells the computer the pen’s exact position.
The computer senses the pen as it nears the display and the cursor appears when the pen is approximately an inch away. This
allows visibility of the exact location of input before making actual contact with the display.
The location of the cursor on the display is the location of input
regardless of the location of the pen tip. The cursor and the pen
tip should be closely aligned when the pen is in contact with the
display. If the pen and the cursor are out of alignment, tap on
Control Panel → Tablet and Pen Settings andgototheSet-
tings tab where you can calibrate the screen for both landscape
and Portrait orientations.
CT60 Rugged Tablet PC User’s Guide
13
Page 25

Chapter
—
Hardware Operation
2
Battery Use and Care
The Li-Ion batteries used in your CT60 Computer offer the best
technology available today. These “Smart Batteries” provide
CT60 users with the greatest power density and the most accurate gas-gauge possible. To achieve the best possible performance
from your batteries, follow the instructions provided below.
New Batteries
Your unit was shipped ready for operation with a Li-Ion battery
freshly installed at the factory. Due to current regulations regarding shipment of Li-Ion batteries, your batteries will arrive in a
partially charged condition, typically with a maximum charge of
30%. We recommend that you fully charge your batteries before
using them.
If you do not plan to deploy your computer immediately , be
aware that the batteries self -discharge at a slow rate, typically less
than 10% per month at normal temperatures.
How to Install New Batteries
The CT60 has the capability to run on one or two batteries in
the field. It does not require both batteries to run. The two-battery design allows users to hot swap batteries without turning
the computer off.
To install or replace a new battery, turn the round knob on the
back of the unit. The knob holds the batteries in place and is
designed so the batteries cannot be taken simultaneously. Turn
theknobuntilthequarterpieceexposesthecornerofthebattery
that is to be replaced. A lip on the batter y aids for easy removal.
Install the new battery by placing it into the compartment and
turning the knob to cover the edges of both batteries.
When to Recharge Batteries
The green LEDs on the upper right front of the unit indicate
the power status of the battery. At full charge, all five LED indicators will light a solid green. Each LED represents approximately 20% of the total charge.
As the battery power availability decreases, the LEDs will turn
off from top to bottom. For example, when the top light begins
to flash, the computer has approximately 90% charge remaining.
14 CT60 Rugged Tablet PC User’s Guide
Page 26
Chapter
—
2 Hardware Operation
If four LEDs are lit a solid green, an estimated 80% of the total
battery charge remains. If three are lit a solid green and the
fourth one begins flashing, the computer has approximately
70% charge remaining.
The last LED indicator flashes when approximately 10% of battery power remains. When the remaining battery power becomes
critical, all data should be saved. Failure to do so may result in
lost data! Replace one of the batteries with a fresh battery or recharge the unit.
WhentheCT60isturnedoff,thebatterystatusindicatorswill
also turn off after a delay of a few seconds. When the computer
is placed in standby mode, the battery status indicators will flash
as a reminder the unit is on standby.
How to Recharge Your Batteries
The CT60 batteries automatically fast-charge any time the
CT60 is connected to an external power source (AC or DC).
This is accomplished using either the CT60 internal battery
charger or an approved Intermec power source/battery charger.
To recharge the battery using the AC adapter, plug the circular
connector of the AC adapter into the AC connector in the
CT60 or in the power supply port on the replicator. Charging
begins automatically as the unit is docked when using a vehicledocking mount, desktop docking station, or a wall mount docking station. The CT60 is fully functional as it charges. Using the
computer as it charges will only slightly lengthen the recharging
process. The batteries may feel warm to the touch during this
process. It is normal for a battery to become warm during charging and discharging.
The CT60 requires at least 14.5 v DC for fast
charging. Do not use any external power source
other than the AC or DC adapters provided with
the CT60; permanent damage to the battery or
computer may occur.
Do not connect more than one power source at a
time, such as an AC power supply and a docking
station, when charging the CT60 or permanent
damage to the battery or computer may occur.
CT60 Rugged Tablet PC User’s Guide
15
Page 27
Chapter
—
Hardware Operation
2
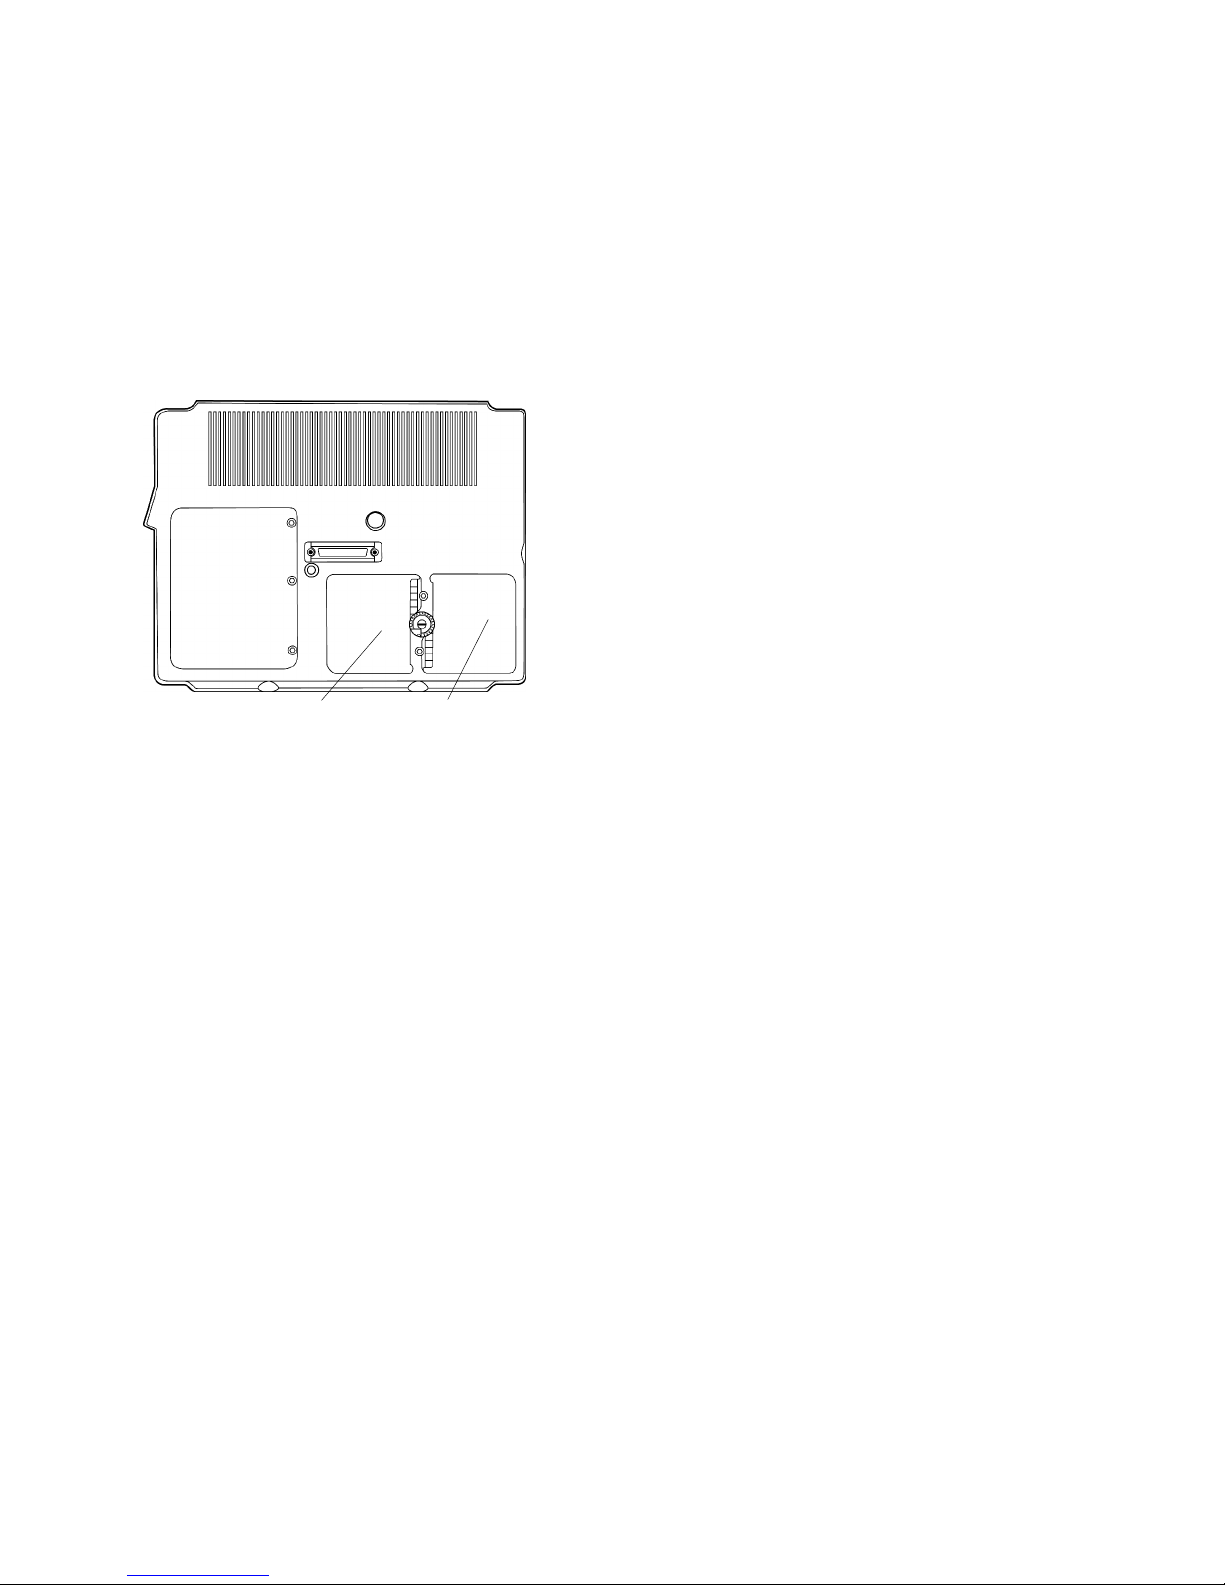
How to Tell When B atteries Have Finished Charging
When charging, the green charge indicator light will flash while
the unit is recharging. When charging two batteries, the first
battery will charge to 80% of full charge, then the second battery will charge to 80%. After both batteries reach 80%, the first
battery will then charge the remaining 20%, after which the
second battery will complete its recharging process. This method
provides the best ratio of charge time to run time for short battery charge cycles. When batteries are fully charged, the charge
indicator light will stop flashing and remain lit.
Primary Secondary
Battery Compartments
How to Increase Battery Run Time
The total run-time of the battery is dependent on a variety of
factors including temperature, backlight requirements, and computer usage.
To ensure maximum performance of the battery, optimize your
computer’s power management features. Settings for the display
and the hard drive shutdown, as well as the use of suspend,
stand-by and hibernate mode, result in lower overall drain on
the battery, effectively increasing the computer’s operating time.
16 CT60 Rugged Tablet PC User’s Guide
Page 28
Chapter
—
2 Hardware Operation
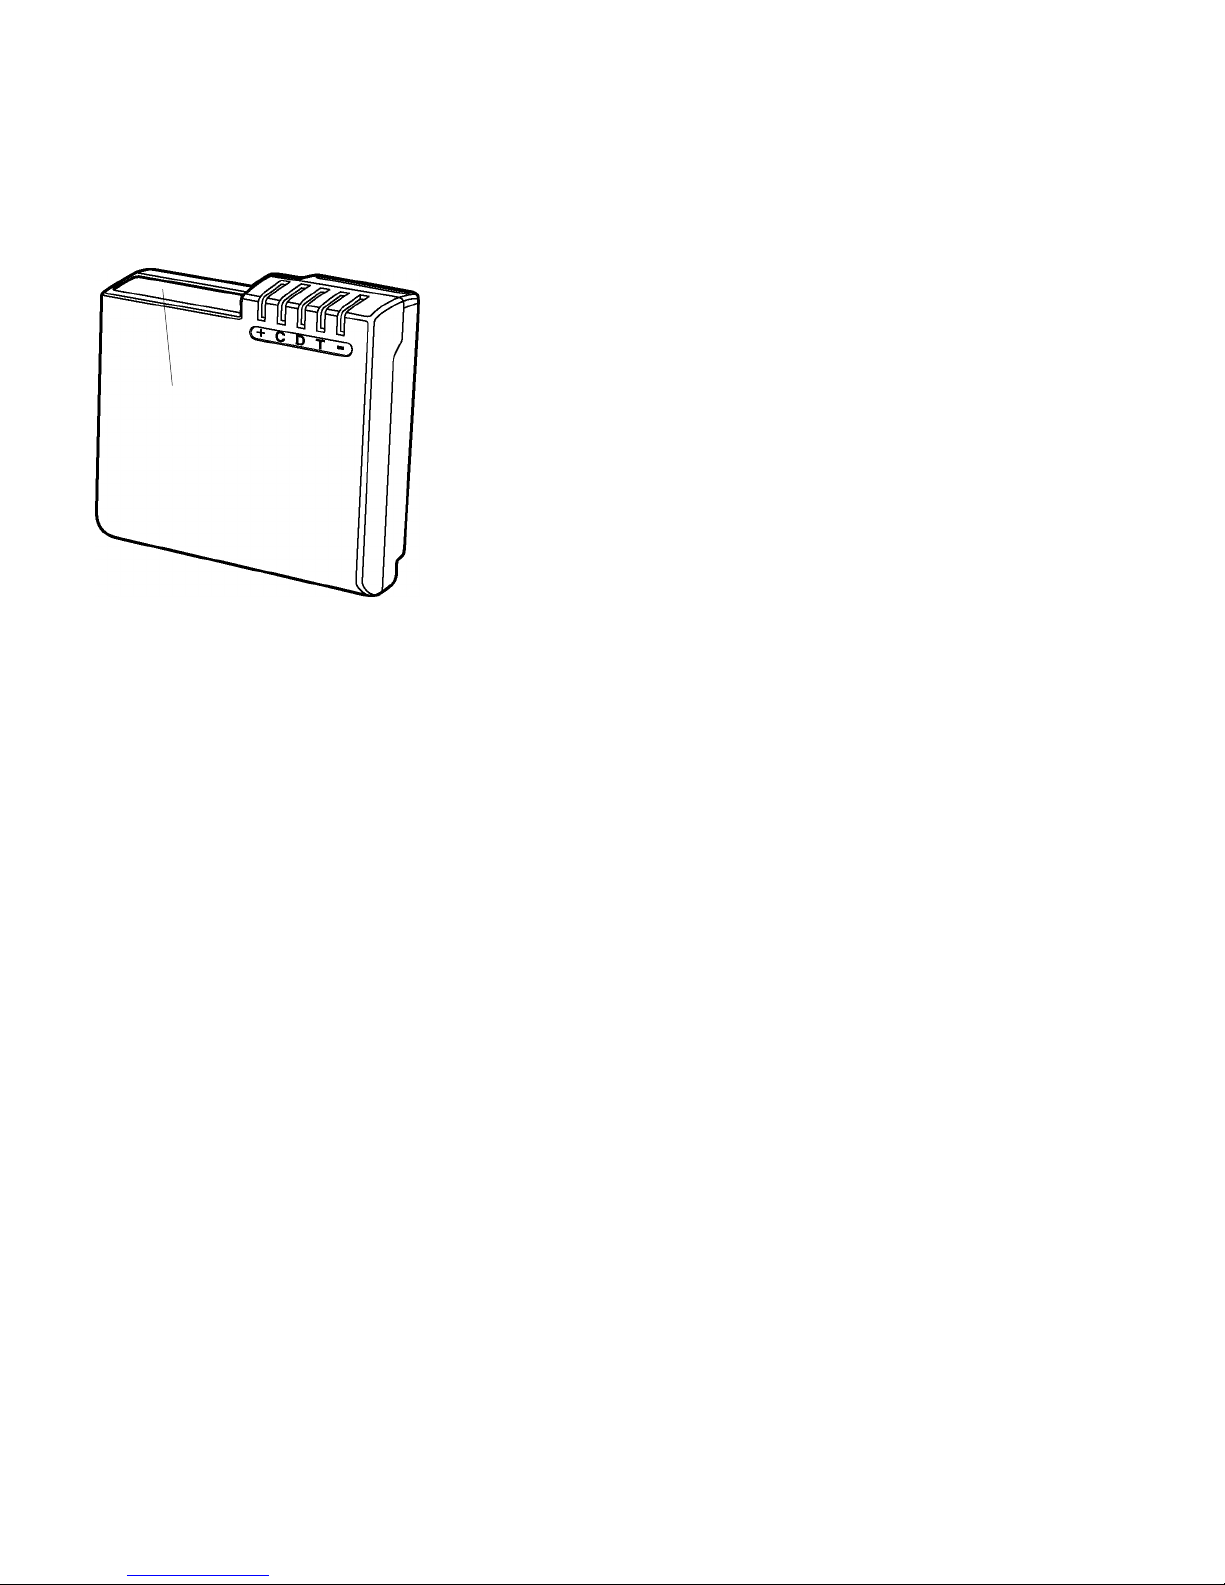
When to Replace Your Battery
Battery life is dependent on battery usage. Every time a battery
is fully charged and discharged, it decreases the amount of energy stored in the battery. To determine if the battery is past its
prime,firstcheckthedatecodeonyourbattery.
Date Code Number
Batteries beyond one year of service may experience shorter run
times. Intermec recommends replacing your batteries once a year
or every 400-500 charge/discharge cycles for optimal battery
performance.
Where to Purchase Replacement Batteries
The CT60 uses long lasting Li-Ion batteries that are custom
made for Intermec Technologies Corporation. If you need to
purchase replacement batteries for your CT60 Computer, contact your Intermec representative. Do not substitute any other
batteries. Substituting batteries may result in a void warranty.
The following storage tips will help you optimize the capacity
and performance of your batteries.
S If the battery will not be in use for a month or longer, re-
move it from the computer for storage.
S Store batteries in a cool, dry place.
S Do not leave batteries in direct sunlight during the summer
months or any other unusually hot location.
CT60 Rugged Tablet PC User’s Guide
17
Page 29

Chapter
—
Hardware Operation
2
S Do not expose battery terminals to metal objects or moisture,
which may short-circuit your battery .
S For long-term storage, store batteries below 50% state of
charge because the deterioration of battery capacity is slower
at the lower state of charge. However, do not store batteries in
a fully disc harged state.
Safety and Handling Considerations f orBatteries
To make the batteries as safe as possible, Intermec, along with
approved vendors, have incorporated several built in safety features to protect the pack. The safety circuit built in your battery
cannot protect against handling abuse.
Please use the following safety rules when handling and using
Li-Ion batteries:
S Do not expose the batteries to extremely high temperatures.
Do not dispose of batteries in fire.
S Do not short-circuit the battery or reverse polarity. Avoid
placing batteries around metal objects such as keys, pocket
change, paper clips, and jewelry.
S Do not let children play with batteries.
S Do not crush, dent, or allow any deformation of the battery.
S Do not disassemble or open the batteries or try to alter or
bypass the safety circuit.
S Do not allow the battery to get wet.
S Avoid exposing the battery to extremely humid environments.
S Avoid exposing the batteries to electrostatic discharge.
S Avoid extreme shock and vibration to the battery. Avoid
dropping the battery.
S Do not use or connect the battery to any other devices.
S Do not allow batteries to remain discharged for long periods
of time.
18 CT60 Rugged Tablet PC User’s Guide
Page 30

Chapter
—
2 Hardware Operation
Disposing of Batteries
The batteries used in the Intermec CT60 Computers are not
considered hazardous waste by EPA regulations, however local
regulations may require specific methods of disposal.
We strongly encourage recycling.
Tips for Best Battery Performance
S Fully discharge your battery before recharging.
S Fully charge within 24 hours of discharge.
S Battery charging should be done at temperatures between
0°Cto45°C(32°F to 113°F), preferably room temperature.
S Discharging should be done at temperatures between -30°C
to 55°C(-22°F to 131°F), preferably room temperature.
S Store your battery at temperatures between -20°Cto45°C
(-4°F to 113°F). Do not store batteries in fully discharged
states.
CT60 Rugged Tablet PC User’s Guide
19
Page 31

Chapter
—
Hardware Operation
2
Removable Hard Drive
The hard drive compartment allows field upgrades or repairs
without opening the CT60. Some customers may have IT Departments trained to replace hard drives at the customer location. You should not open the hard drive compartment with-
out the proper service training from Intermec.
Note: Please contact Intermec technical support be-
fore removing the cover plate of the hard drive
compartment. Any tampering of the hard drive will
result in a void warranty.
Connectivity
Connectivity with the CT60 is via the docking connector on the
backside of the unit.
Most units ship with a port replicator, desk dock, or vehicle
dock that provides standard ports for communications, keyboard, and power supply.
Port replicators and docking stations may be customized to your
requirements and may not be configured exactly as described in
the following pages.
20 CT60 Rugged Tablet PC User’s Guide
Page 32

Chapter
—
2 Hardware Operation
Port Replicators
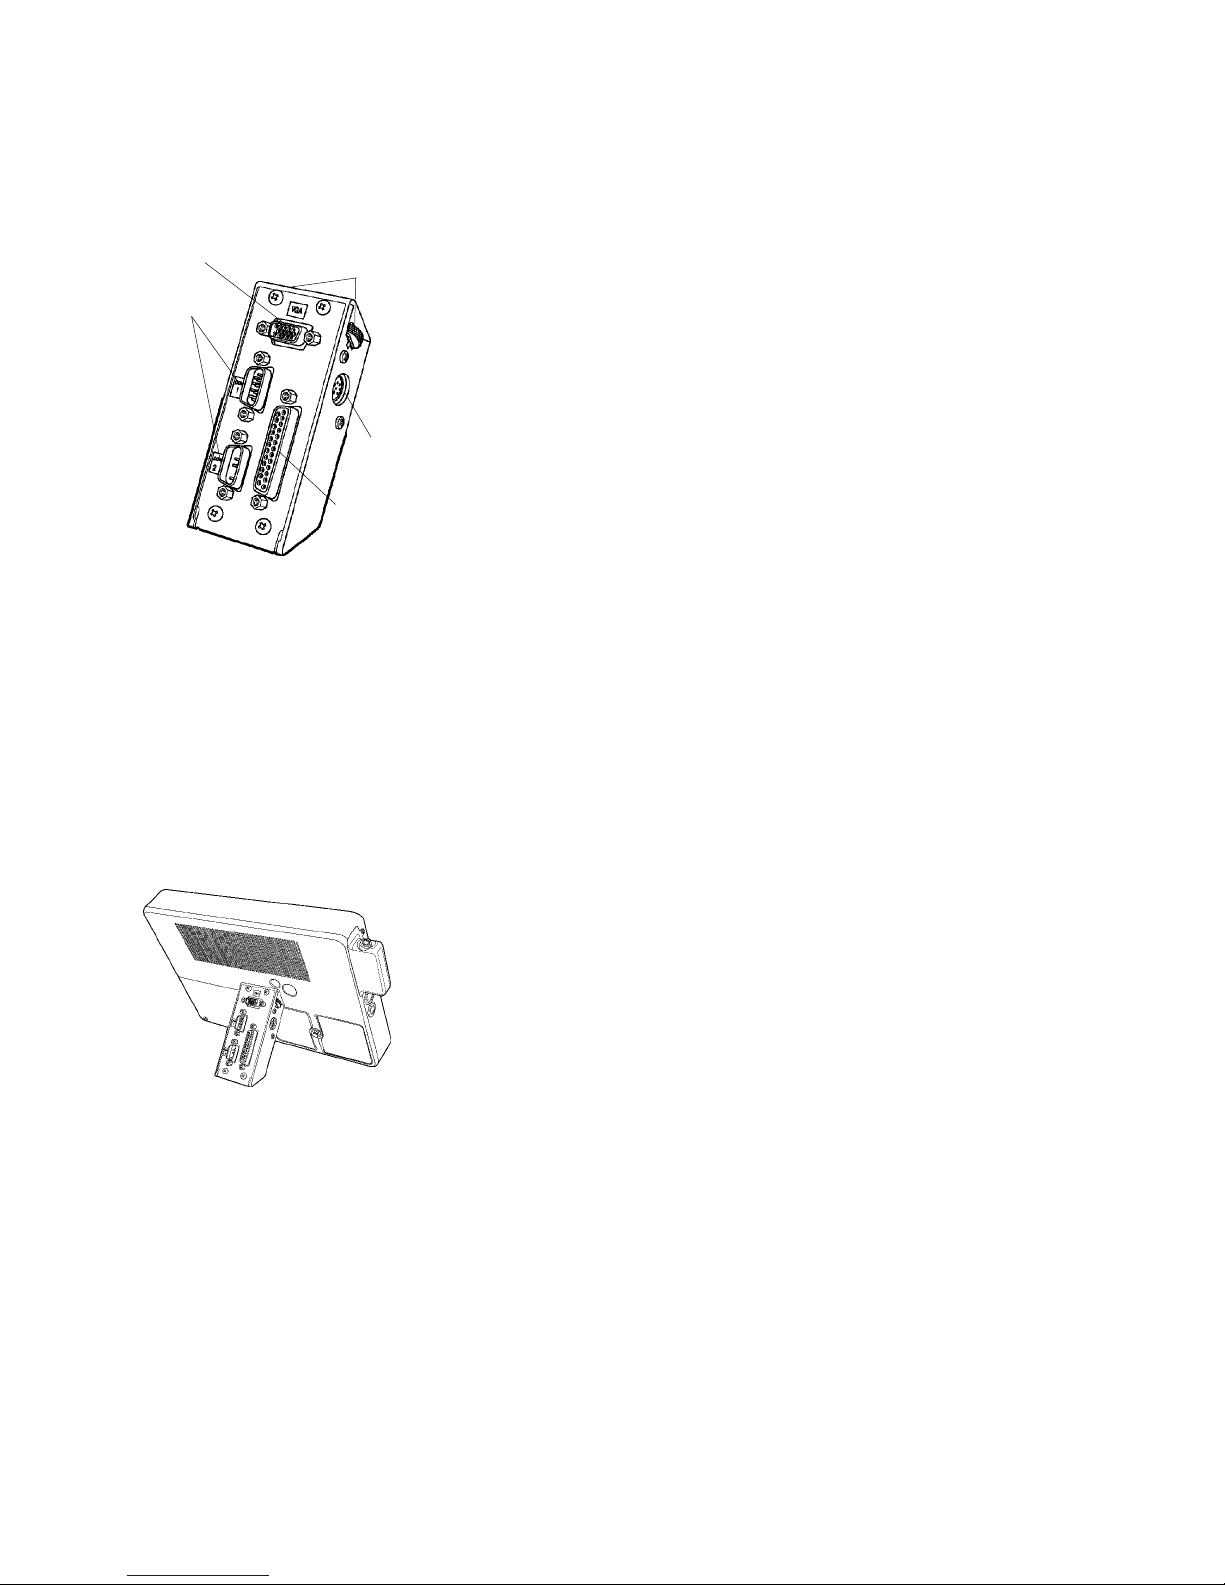
There are several variations of port replicators (flat, angled, custom, etc.) The following features are available on the standard
port replicator.
Port Replicator Features
Term Description
Male Docking
Connector:
External Power: Use only the approved power supplies provided especially
Keyboard: Industry standard 5 DIN PS2 style keyboard connector.
COM 1: Industry standard DB-9 serial connector.
COM 2: COM 2 on most docking solutions is a full, 9-pin DB-9
Thumb Screws: Thumbscrews secure a positive connection. Insert the port
LPT1: Industry standard 25-pin Centronics compatible parallel
The male docking connector is inserted into the female
docking connector on the back of the computer to activate all ports in the port replicator.
for the CT60, which supply the required DC power from
a standard AC outlet.
serial connector though only a subset of standard signals
are supported.
replicator fully before engaging thumbscrews. Be careful
not to over tighten.
connector.
CT60 Rugged Tablet PC User’s Guide
21
Page 33
Chapter
—
Hardware Operation
2
The standard port replicator also doubles as a desktop stand for
the CT60. Simply press the male docking connector on the port
replicator into the female docking connector on the back of the
unit.
COM 3 or VGA
COM Ports
Standard Port Replicator
Thumb Screws
Keyboard
LPT1 Port
The connectors are correctly oriented a nd only fit in one direction. It is impossible to join them incorrectly. Make sure the
connector is fully inserted, confirming the port replicator fits
snuggly against the back of the computer. Turn the thumbscrews
in a clockwise direction to insure a reliable, positive connection.
Do not over tighten.
22 CT60 Rugged Tablet PC User’s Guide
Page 34
Chapter
—
2 Hardware Operation
Do not connect the port replicator to the
computer while power is attached to the port
replicator. Attach the port replicator and then
connect the power to the port replicator.
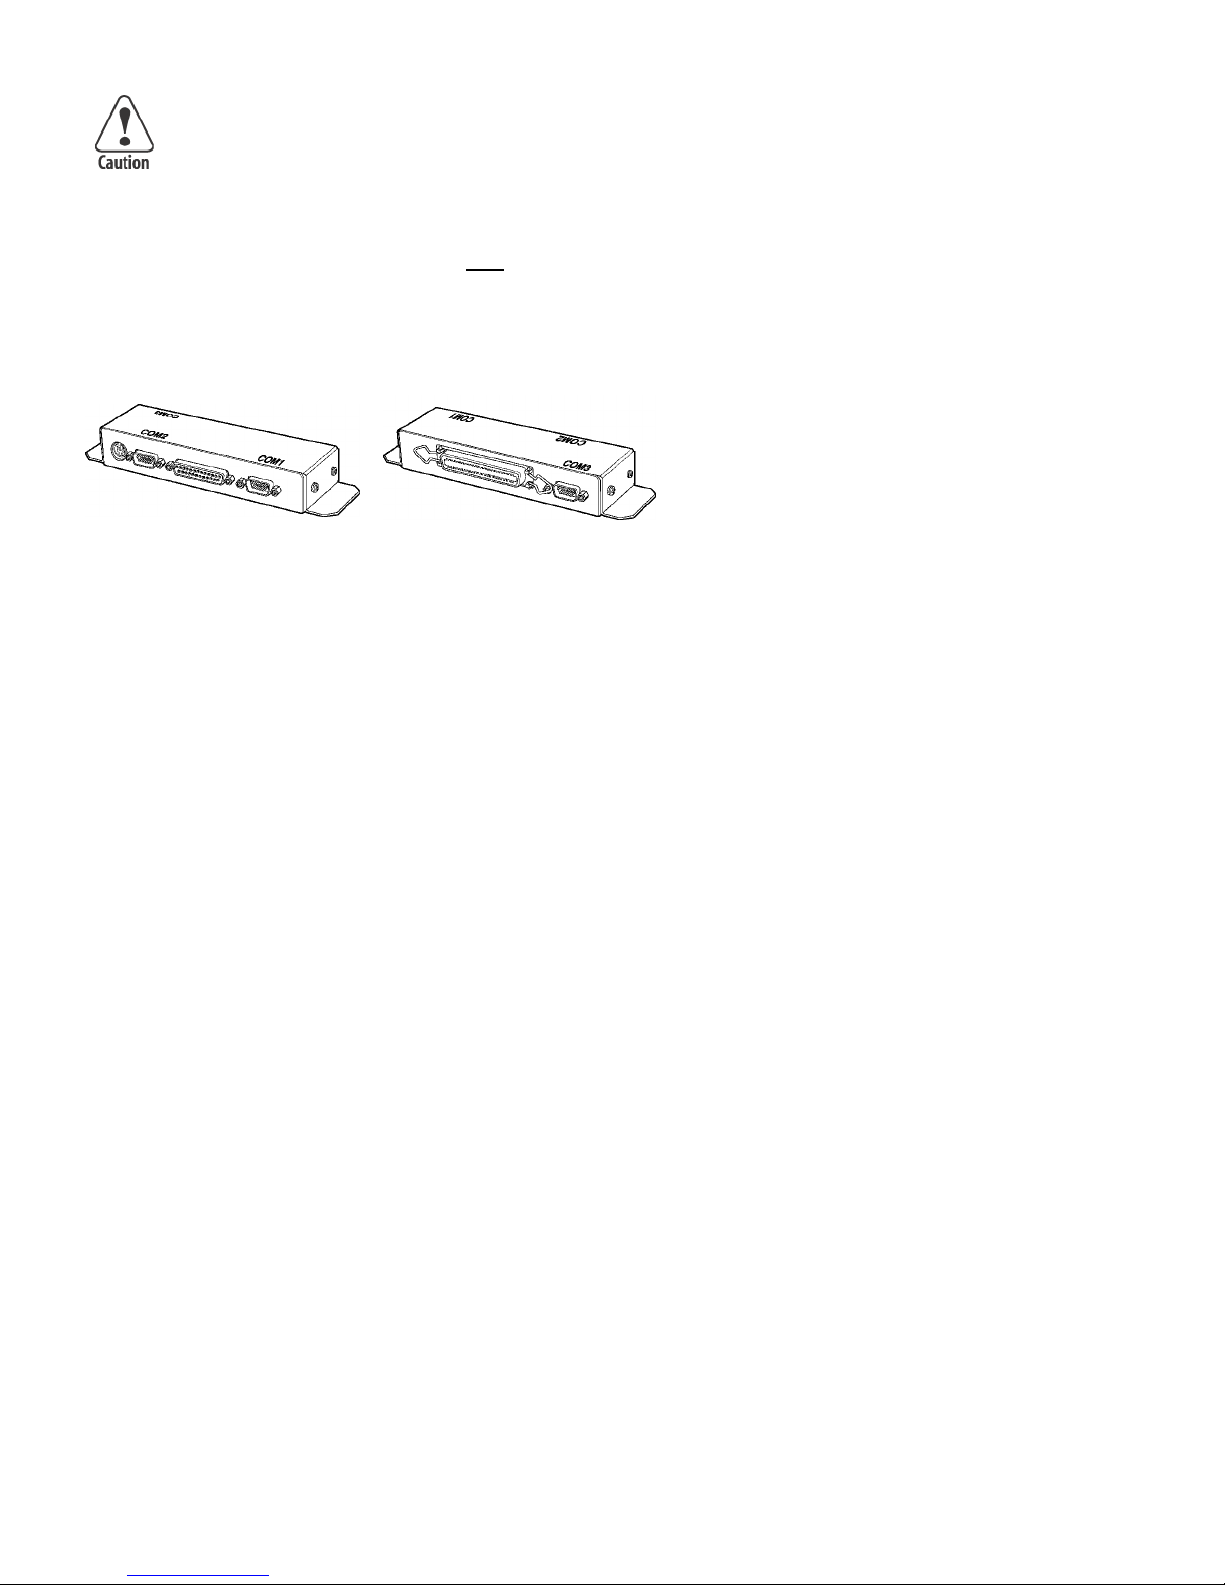
Flat port replicators and custom cable sets are available when
connectivity is needed while the unit is mobile. External power
should be connected to the port replicators after
being firmly
connected to the CT60. Some custom configurations provide
access to ports in the computer housing.
Flat Port Replicator
CT60 Rugged Tablet PC User’s Guide
23
Page 35
Chapter
—
Hardware Operation
2
Desktop Docking Station
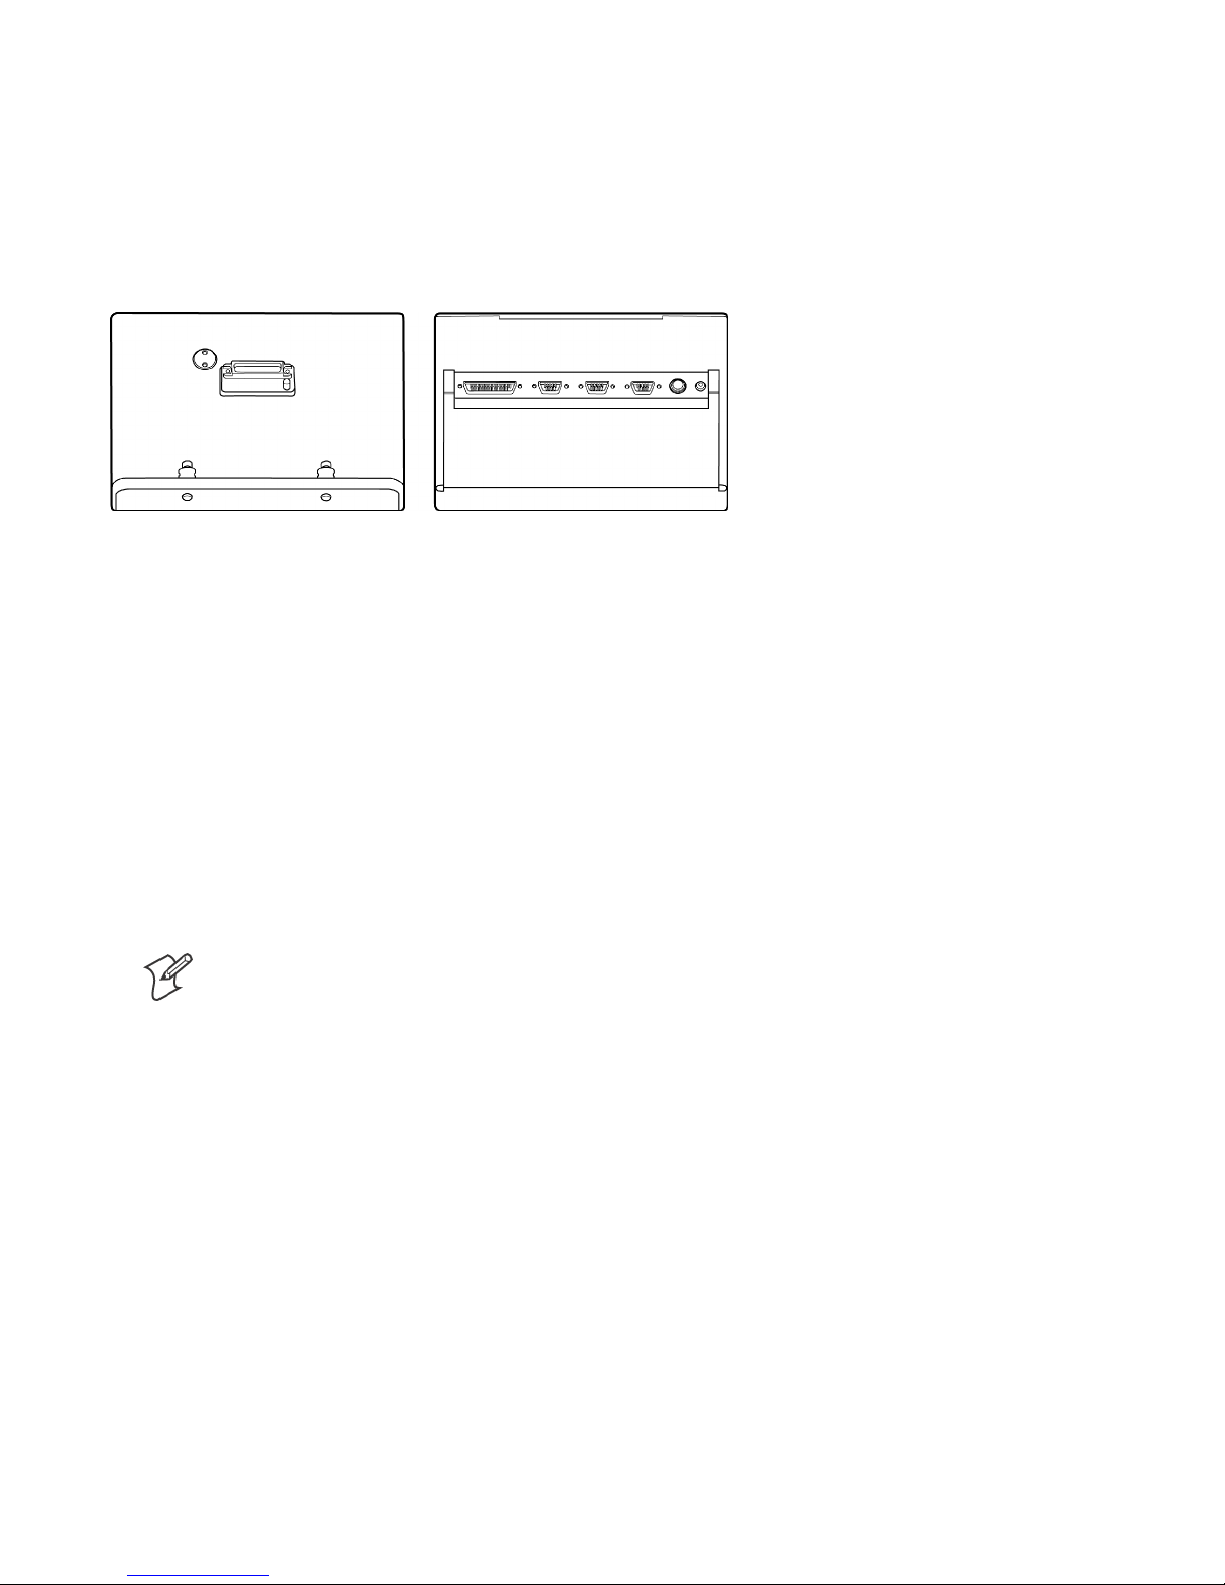
The desktop docking station (desk dock) provides complete connectivity and integrated options (such as LAN adapter, fax/modem, etc.) for using the CT60 on a desktop.
The desk dock offers the following connectors for the connection of external devices:
Front View Rear View
The desk dock offers the following connectors for the connection of external devices:
S Two RS-232 serial ports (COM1 and COM2-3-wire serial)
S One compatible parallel port/floppy interface
S One keyboard port
S Power connector
S One USB port
S One SVGA video port
If the CT60 is configured with video output capabilities, one
COM port can be used as a VGA port.
Note: If a desk dock is equipped for network communication, the connection is made through the
USB port.
24 CT60 Rugged Tablet PC User’s Guide
Page 36
Chapter
—
2 Hardware Operation
Vehicle Docking
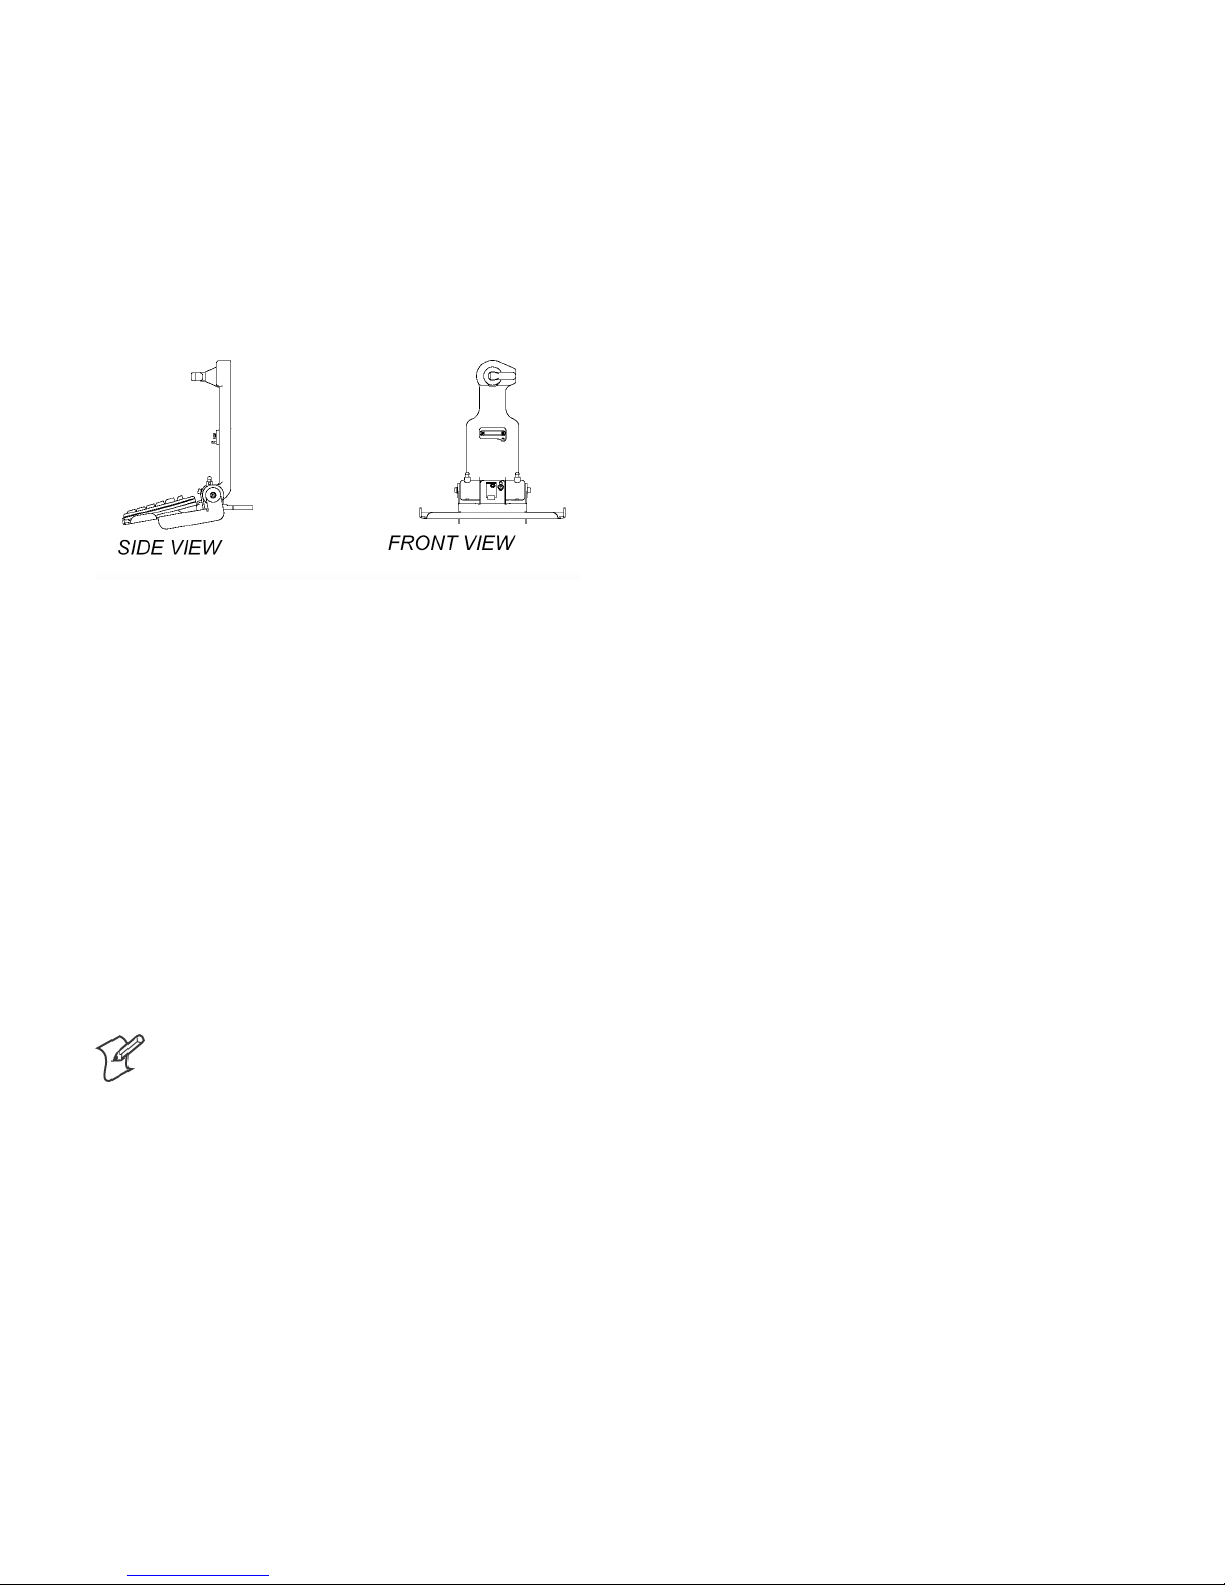
The vehicle dock offers compact versatile mounting for a variety
of transport. The one-piece aluminum body ensures sturdy
docking with no adjustments. The vehicle dock has tilt swivel
functionality, a built-in keyboard tray, and a push button key
lock. A break-out box with a 3-foot or 6-foot cable provides
convenient installation for permanent connections.
Noise reduction circuitry, surge protection, reverse polarity
protection, and power conditioning circuitry are built into the
vehicle dock. In some cases a GPS receiver may also be included.
Connectivity at the rear of the vehicle dock includes power, keyboard, and USB connector. Connectors in the “break-out box”
at the end of a 3’ or 6’ cable include: 1 keyboard, 2 COM ports,
1 USB and 1 parallel port.
The tilt/swivel function and keyboard tray angle are the only
adjustments available on the vehicle dock. All tension adjustments are made at the time of installation with an Allen key provided with the docking system. The keyboard tray is removable.
The computer can be secured in position by turning down the
spring-loaded red retention latch. Once the latch is turned completely down, the push button lock can be depressed to prevent
unauthorized removal. Security keys for fleet users are identical
to eliminate logistic problems.
Note:The vehicle dock cannot be installed without a
basetomountitinthevehicle.ContactyourIntermec Representative for a current list of vehicle mount
providers.
CT60 Rugged Tablet PC User’s Guide
25
Page 37

Chapter
—
Hardware Operation
2
Cardbus/PC Cards
Cardbus and PC Cards are two alternative types of PCMCIA
interfaces (or slots) on laptops, desktops, and PDAs.
PC cards are based on a 16-bit interface, while CardBus is a
32-bit interface. This allows the CardBus card to transfer data at
speeds exceeding 100 Mbps, while a 16-bit PCMCIA card transfers data at approximately 20 Mbps.
CardBus also offers lower power consumption: CardBus Cards
areall3.3-voltcards,while16-bitPCcardscanbe5-voltor
3.3-volt.
TheTypeIIIslotintheCT60willsupportbothCardbusorPC
cards. To insert a card, take off the hatch plate by removing the
two screws that hold the hatch cover. Cards should be inserted
face up (i.e. the up arrow on the card should point toward the
front of the CT60).
Do not apply excessive pressure when loading cards. They
should slide in easily. Remove the card in the same manner.
Many PC card devices require connections for communications
(RJ-11 or RJ-45) or antenna for wireless activity (wireless modems, GPS) or some other external function. Most PC card devices are too fragile for direct connections in field environments.
In response, Intermec provides a variety of hatch plates with a
milled cavity or “lump” containing combinations of connectors
and the cable assemblies needed to connect to common PC card
devices.
For example, a “lump” to accommodate a PC card fax/modem
and network connection includes a RJ-11 and RJ-45 connector.
A “lump” for a CDPD modem and wire-line fax/modem would
include an antenna mount and RJ-11.
The “lumps” serve two purposes:
S they provide for a sturdy and reliable connection not possible
when connecting directly to a PC card device, and
S they maintain the environmental integrity of the CT60 by
fully sealing the PC card compartment while providing the
needed connectivity. “Lumps” are available only for those
PCMCIA devices that have been tested and recommended by
Intermec. Custom “lumps” may be available for large purchases.
26 CT60 Rugged Tablet PC User’s Guide
Page 38

Chapter
—
2 Hardware Operation
Internal Flex Space for OEM Modules
In addition to a Type III Cardbus/PC card slot, the computer
has an internal “flex space” that will accommodate optional GPS
and GSM modules. The antenna for the internal module is
mounted on the top right hand side of the computer and does
not interfere with the Cardbus/PC card door and antenna options, which is located on the upper left-hand side of the computer.
CT60 Rugged Tablet PC User’s Guide
27
Page 39

Software Operation
3
This section describes some of the features of
Microsoft’s XP Tablet PC Edition software.
Your screens may appear differently, depending on
the software load and configuration.
CT60 Rugged Tablet PC User’s Guide
29
Page 40

Chapter
—
Software Oper ation
3
Windows XP Tablet PC Edition
Tabletand Pen Settings
Windows XP Tablet PC Edition lets you customize the tablet
and the tablet pen to suit the way you work. Not all users have
to use the same Tablet and Pen Settings. Individual users can
save their own settings. Attributes related to use of the pen can
be adjusted by tapping on Control Panel, Tablet and Pen Set-
tings.
In this section you can:
S Change the screen orientation between landscape and portrait
modes.
S Set the pen for left- or right-hand use.
S Calibrate the display based on how you hold the digital pen.
S Change the default settings of the hardware buttons on Tablet
PC.
S Change how a pen matches mouse movements, such as
single-click, double-click, right-click, and hover.
S Set handwriting-recognition language.
S You can also customize features of Microsoft Windows Jour-
nal, Input Panel, and Sticky Notes to get the most from your
Tablet PC.
Screen Rotation
Tablet PC supports rapid display rotation between portrait and
landscape modes without requiring the user to restart the computer. That makes it easy for you to work in either mode according to their preferences. For example, when annotating PowerPoint slides, it may be preferable to work in landscape
mode—the same orientation as most PowerPoint slides. However, when taking notes in Windows Journal, it is more natural to
do so in portrait mode—just like taking notes in a paper notebook. The Tablet PC screen display rotates almost instantly, so
you can go back and forth as often as desired or needed for a
specific task.
30 CT60 Rugged Tablet PC User’s Guide
Page 41
Chapter
—
3 Software Operation
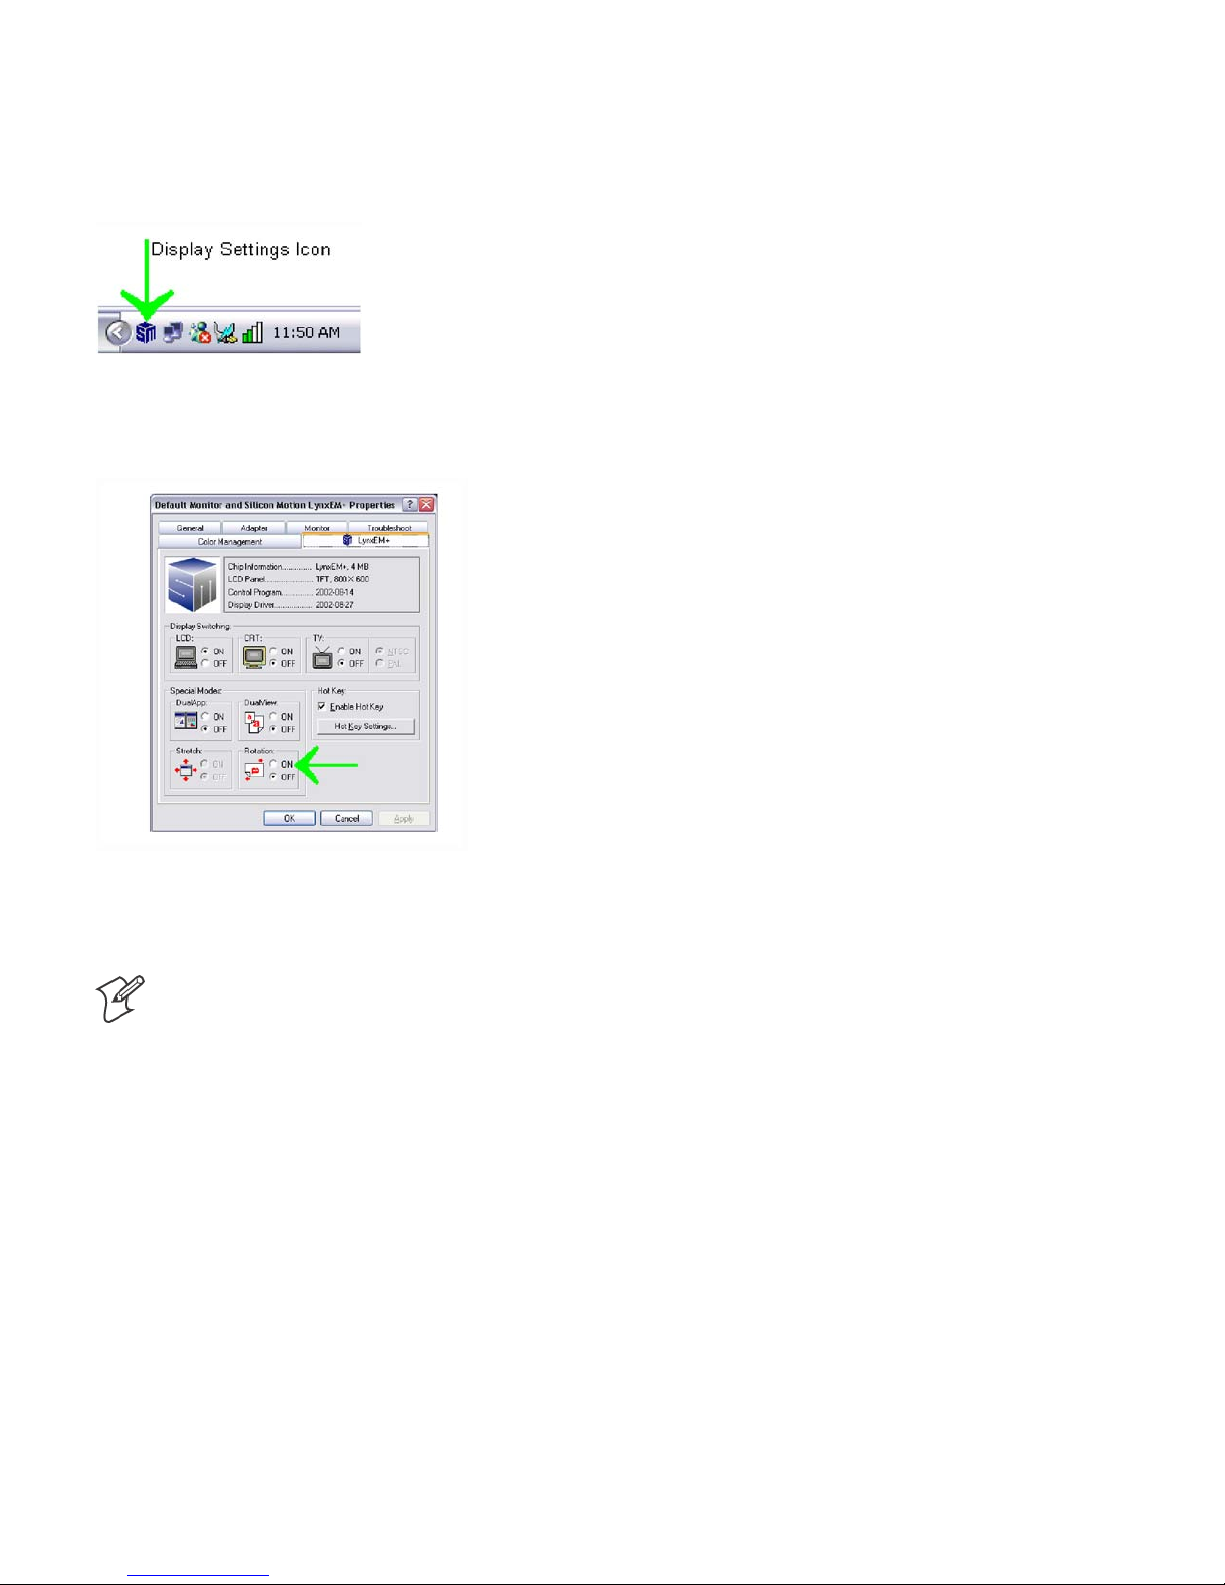
How Do I Rotate the Screen on My CT60?
In the system tray, tap on the display settings icon; this will open
the display properties menu. See figure below .
1 Ta p Settings→Advanced→LynxEM+6 tab.
2 Ta p ON under Rotation, then tap OK.
3 The system will prompt a degree of rotation.
4 Select a degree; tap OK.
Note: The pen may need to be calibrated after rotating the screen. See How Do I Calibrate the Tablet PC
Pen? pen calibration on the following page.
CT60 Rugged Tablet PC User’s Guide
31
Page 42

Chapter
—
Software Oper ation
3
Adjusting Screen Brightness
The screen brightness is often the number one consumer of
power, so you can conserve battery power by turning down the
brightness on your CT60. You can adjust the default settings for
both AC and DC power. When you are plugged into AC power,
your screen can be at its brightest, and when you unplug your
computer, your screen will automatically dim to conserve power.
How do I Adjust the Screen Brightness on My CT60?
1 Go to Start→Control Panel→Tablet and Pen Settings.
2 Ta p th e Display tab.
3 Under Screen Brightness, in the Settings for list, tap the
name of the power scheme to which you want your settings
to apply.
4 To make the screen darker or brighter, drag the slider to the
left or the right.
5 Ta p OK.
Note: You can conserve battery power by turning
down the screen brightness on your CT60.
When Should I Calibrate the Pen?
If you change screen srientations or sitting positions, etc. it may
be necessary to recalibrate the pen settings. The pen should be
calibrated any time options in the tablet and pen settings are
changed.
How Do I Calibrate the Tablet PC Pen?
1 Go to Start→Control Panel→Tablet and Pen Settings.
2 Ta p th e Settings tab.
3 Under Calibration, tap the name of the screen orientation for
which you would like to calibrate your tablet screen.
4 Ta p Calibrate.
5 Follow the on-screen instructions for calibrating the screen.
Note: You must calibrate the screen for each screen
orientation separately.
32 CT60 Rugged Tablet PC User’s Guide
Page 43
Chapter
—
3 Software Operation
Handwriting Using the Input Panel
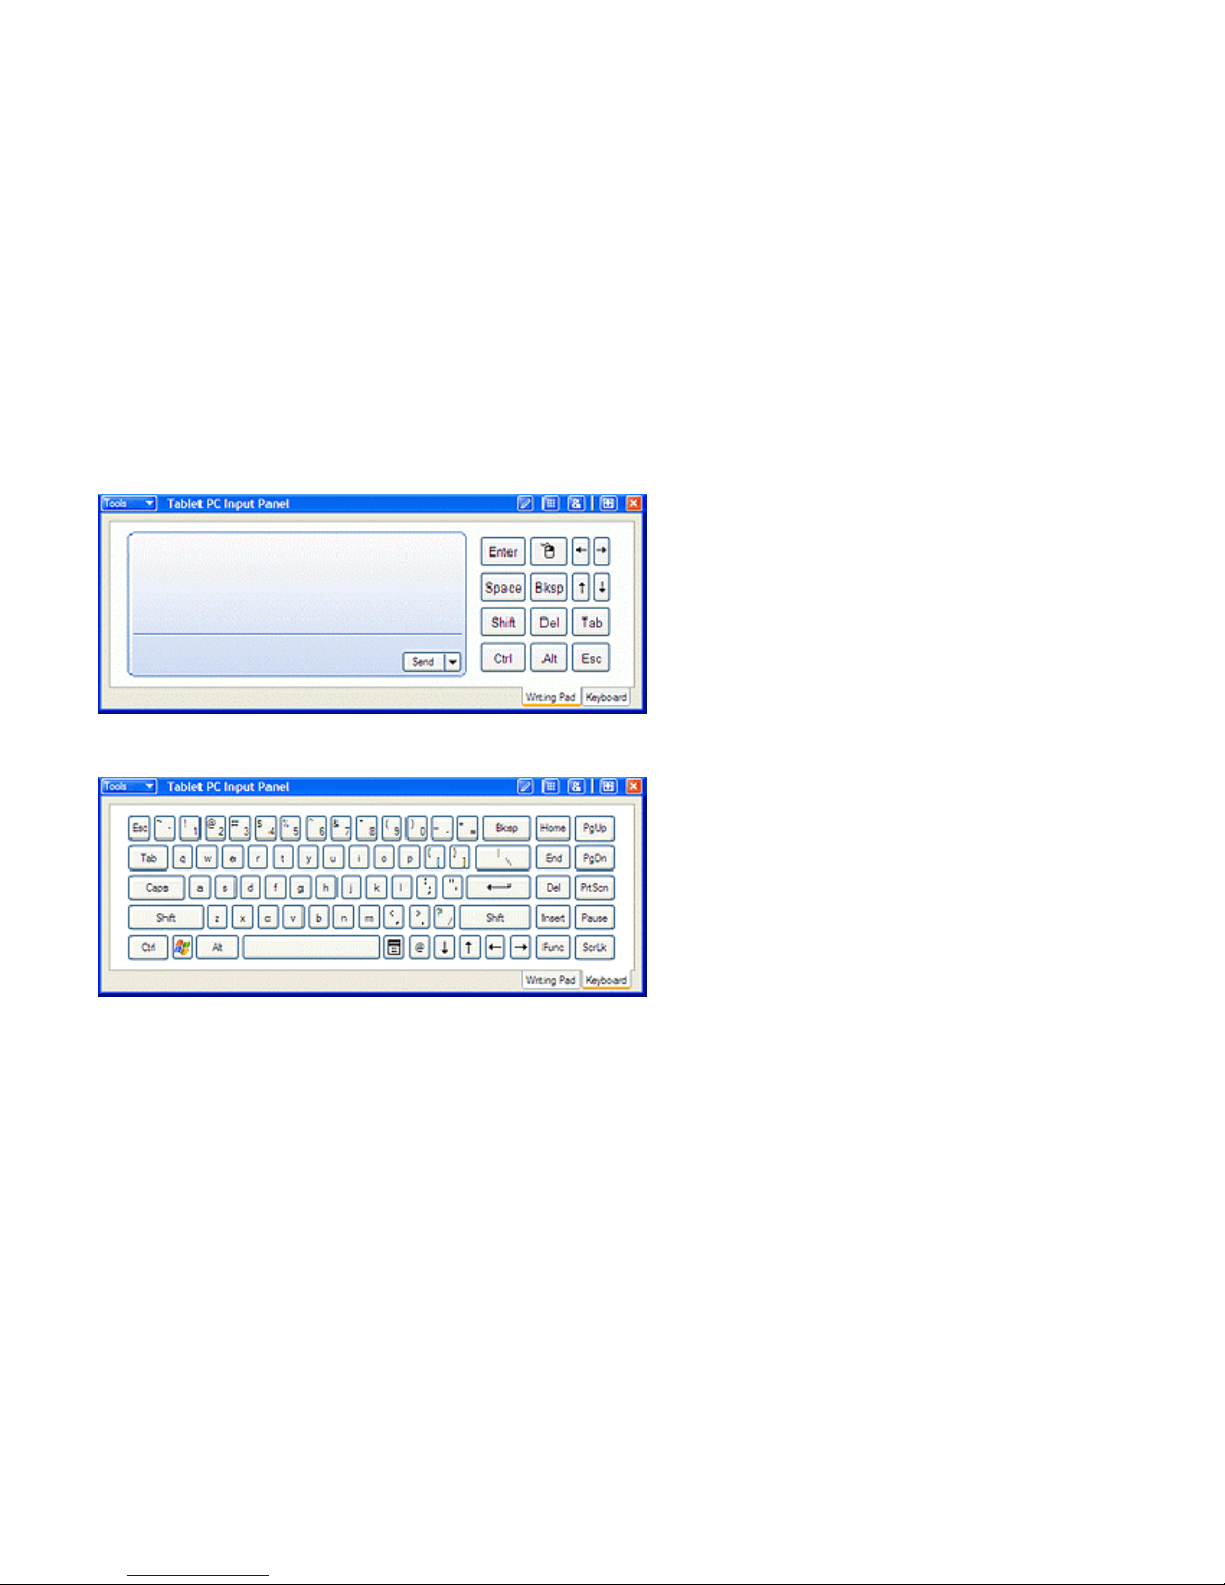
Onewaytowritewiththedigitalpenwhenyouarenotusing
your keyboard and mouse is by going to the Input Panel. The
Input Panel has two views; the writing pad and the keyboard.
You can input text into applications using your own handwriting on the writing pad or tap in characters using your pen with
the on-screen keyboard.
By default, the Tablet PC Input Panel is hidden when you first
start, but is easily opened.
How to Open the Input Panel
Ta p t h e Input Panel button on the task bar. The Tablet PC Input Panel opens. The Writing Pad and on-screen Keyboard are
shown below. T o hide the Input Panel, tap the Input Panel button again.
The Writing Pad
On-Screen Keyboard
CT60 Rugged Tablet PC User’s Guide
33
Page 44

Chapter
—
Software Oper ation
3
How to Convert Handwriting to Text Using the Input Panel
The Input Panel has a tool (called Text Preview) that helps convert your handwritten text into typed text by identifying words
that may have been recognized incorrectly and by giving you a
list of alternative words.
To Preview and Convert to Typed Text:
1 Tap Tools→Te x t P r e v i e w.
2 Write in the writing pad, and the text appears as typed text
above the Input Panel.
3 Correct any mistakes in recognition.
4 Ta p th e Send buttonintherightofthepreviewpanetoinsert
your text in the current application.
5 To send the text to a different application, tap the open ap-
plication so that it becomes the current window. This can be
any application, including a simple command line.
Handwriting Using Microsoft Windows Journal
Microsoft Windows Journal allows you to take notes in your
ownhandwriting,justlikeonapieceofpaper.Youcanlater
convert those notes to text if you wish or leave them as “ink.” In
either case, they are completely searchable. You can also create
drawings or graphics that can be saved or sent to other applications from Windows Journal.
How to Access Windows Journal
To access Windows Journal, tap Start→All Programs→Win-
dows Journal.
How to Convert Handwriting to Text in Windows Journal
1 Ta p th e Selection Tool icon on the toolbar .
2 Ta p Actions→Convert handwriting from the menu bar.
How to RestoreDefault Settingsin WindowsJo urnal
You can restore all Windows Journal settings to their defaults
such as Pen settings, Highlighter settings, Menu and tool bar
positions, Find pane, and note list pane positions and Stationery
settings.
34 CT60 Rugged Tablet PC User’s Guide
Page 45

Chapter
—
3 Software Operation
To Restore allWindows Journal Settings:
1 Ta p Tools →Options in the menu bar.
2 Ta p on t h e Other tab.
3 Under Restore, tap the Restore button.
Journal Note Writer Has Appeared in Printers. Is this Normal?
Yes. Journal Note Writer is the virtual printer for the Journal
application.
How to Reinstallthe Journal Note Writer Printer
If you have accidentally deleted this “printer,” replace it as follows:
1 Ta p on Start.
2 Ta p on Run.
3 Type in: journal /RepairNoteWriter.
4 Ta p on OK.
5 Launch the Journal application.
Check in Printers to ensure Journal Note Writer is now present.
CT60 Rugged Tablet PC User’s Guide
35
Page 46

Chapter
—
Software Oper ation
3
How to Improve Handwriting Recognition
S Calibrate the tablet PC pen and screen.
S Hold the tablet pen in the same way that you hold a pen or
pencil when writing on paper.
S Hold the pen near the tip and rest your hand on the screen.
S Write using cursive letters in a straight line.
S Avoid printing all uppercase letters.
S Write legibly, at a constant speed with even spacing between
letters and words.
S Write uppercase letters larger than lowercase letters.
S Avoid empty spaces and letters.
S Avoid adding additional words, diagrams, or drawings within
existing handwriting in a note.
Note: By design, highlighted words do not print
from Windows Journal documents.
How to Set the Pen and Screen Left-Handed Users
Follow these steps to change handedness settings.
1 Double-tap the Change Tablet and Pen Settings icon in the
Notification Area of the Windows Taskbar.
2 Under Menu Location, select right-handed or left-handed.
3 Under Handedness, select right-handed or left-handed.
How to Create “Stic ky Notes”
Windows XP Tablet PC Edition also includes a Sticky Notes
application that lets you scrawl a quick note and “stick” it on a
Word document (or any other application that needs marking
up and that supports OLE.) Sticky notes can contain both writing and voice recording. Voice Notes can be a maximum of 30
seconds.
To Create a Sticky Note:
1 Launch Sticky Notes. The application automatically opens to
anewnote.
2 Start writing on the surface of the note.
3 Taptheredrecordbuttontorecordavoicemessagefora
maximum of 30 seconds per note.
36 CT60 Rugged Tablet PC User’s Guide
Page 47

Chapter
—
3 Software Operation
4 To create another note, tap the New Note button.
Sticky Notes can only be viewed one at a time, in order of date
created. Sticky Notes can only be deleted one at a time.
How to Usethe Pen to Wr ite in Microsoft Excel or Word F iles
In order to use the Tablet PC features in these applications, you
must obtain the Microsoft Office XP Pack for Tablet PC. This is
available only from Microsoft’s website. If you use the pen to
writeinMicrosoftWordorExcel,andyouaresharingthefile
withanotheruserwhodoesnothaveWindowsXPTabletEdition,theywillbeabletoseetheinkcommentsiftheyareusing
Office 95 or newer versions. However they will not be able to do
anything with the document such as editing in ink, etc.
Speech Recognition
Speech recognition is also a component of Tablet PC. Speech
recognition allows users to dictate content or control a pplications with their voice. An external microphone is required. The
Tablet PC Platform SDK, in conjunction with the Microsoft
Speech API (SAPI), can be used to extend capabilities to thirdparty applications.
Performance and Maintenance
Monitoring Your Battery
Youcaneasilymonitoryourbatterytoseehowmuchpoweryou
have available while you are working away from your desk.
To check your battery power if you are running on battery power, double-tap the battery icon in the notification area of the
Windows taskbar. The battery icon appears only when your
Tablet PC is running on battery power.
You can monitor your battery as it charges to see when it is fully
charged.
Checking Battery Power
1 On the taskbar, tap the Start button, and then Control Pan-
el.
2 Ta p Perfor mance and Maintenance,andthentapPower
Options.
3 Ta p th e Power Meter tab.
4 Total battery power remaining is shown under Power status.
CT60 Rugged Tablet PC User’s Guide
37
Page 48

Chapter
—
Software Oper ation
3
Note:OntheAdvanced tab you can select the Al-
ways show icon on the taskbar check box if you want
to see a power status icon in the notification area at
all times. Use a right-click equivalent on the power
status icon to open the Power Meter.
Setting the Battery Alarm
You can set Po w er Options to warn you when the level of battery power falls below the levels you have defined as low and
critical. You can change the battery level at which the alarm or
message is activated.
1 On the taskbar, tap the Start button, and then tap Control
Panel.
2 Ta p Performance and Maintenance, and then tap Power
Options.
3 Ta p th e A la r m s ta b .
4 Under Low battery alarm and Critical battery alarm, specify
the settings that you want by moving the slider.
5 Tap Alarm Action to select the type of alarm notification and
resulting action you want.
Turning Off Power-Consuming Peripherals
Peripheral devices on your computer use power. For instance,
your Tablet PC may have a wireless network connection, a modem card, or USB devices. Because some of these peripherals can
draw a significant amount of power, you should consider unplugging them or turning them off in situations where you want
to conserve battery power. For information on turning off your
wireless network connection, please refer to the manufacturer’s
documentation.
Using Power Schemes
Power schemes are a collection of settings that manages the power usage of your computer. You can select from a number of
power schemes that are available in Power Options in the Control Panel, you can adjust individual settings of any available
power scheme, or you can create your own power schemes to
suit your particular system and preferences.
38 CT60 Rugged Tablet PC User’s Guide
Page 49

Chapter
—
3 Software Operation
Standby
Standby is a low-power state in which your monitor and CPU
turn off. When you want to use the computer again, it comes
out of standby quickly and your desktop is restored exactly as
you left it. Use standby to save power when you will be away
from the computer for a short time while working.
Hibernation
Hibernation is a state in which your computer shuts down to
save power but first saves everything in memory on your hard
disk. When you restart the computer, your desktop is restored
exactly as you left it. Use hibernation to save power when you
will be away from the computer for an extended time.
Other Questions about XP Tablet PC
Can User Rights Limit Functionality of Windows XP Tablet PC
Edition?
The same user rights that apply to Windows XP Professional
also apply to Windows XP Tablet PC Edition.
Can IReinstall or Remove One of My Tablet PC Components?
Tablet PC components cannot be independently installed, removed, or reinstalled.
CT60 Rugged Tablet PC User’s Guide
39
Page 50
Chapter
—
Software Oper ation
3
CT60 Utilities
The CT60 comes with a Utilities program that provides additional functionality to your computer.
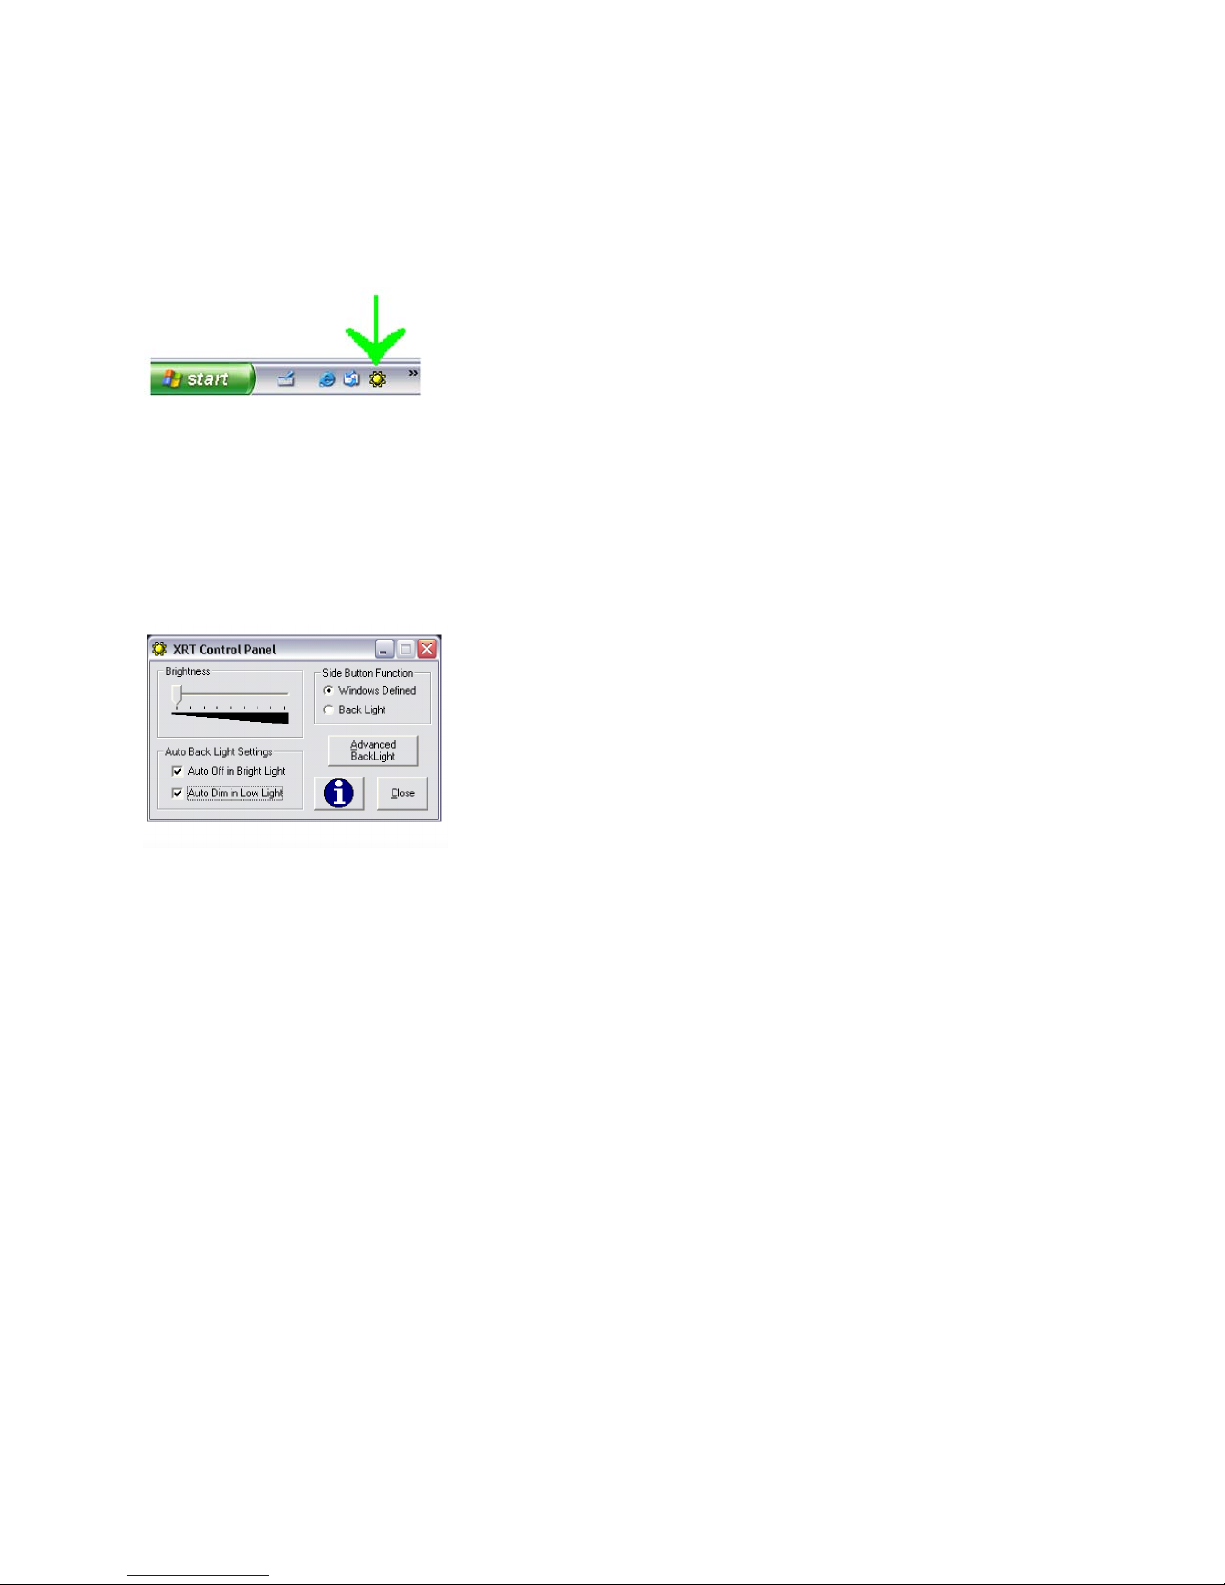
To launch the Utilities program, tap on the icon found in the
quick launch bar.
If the icon is not found, you can launch the program by tapping
on Start→All Programs→XRT Control Utilities.
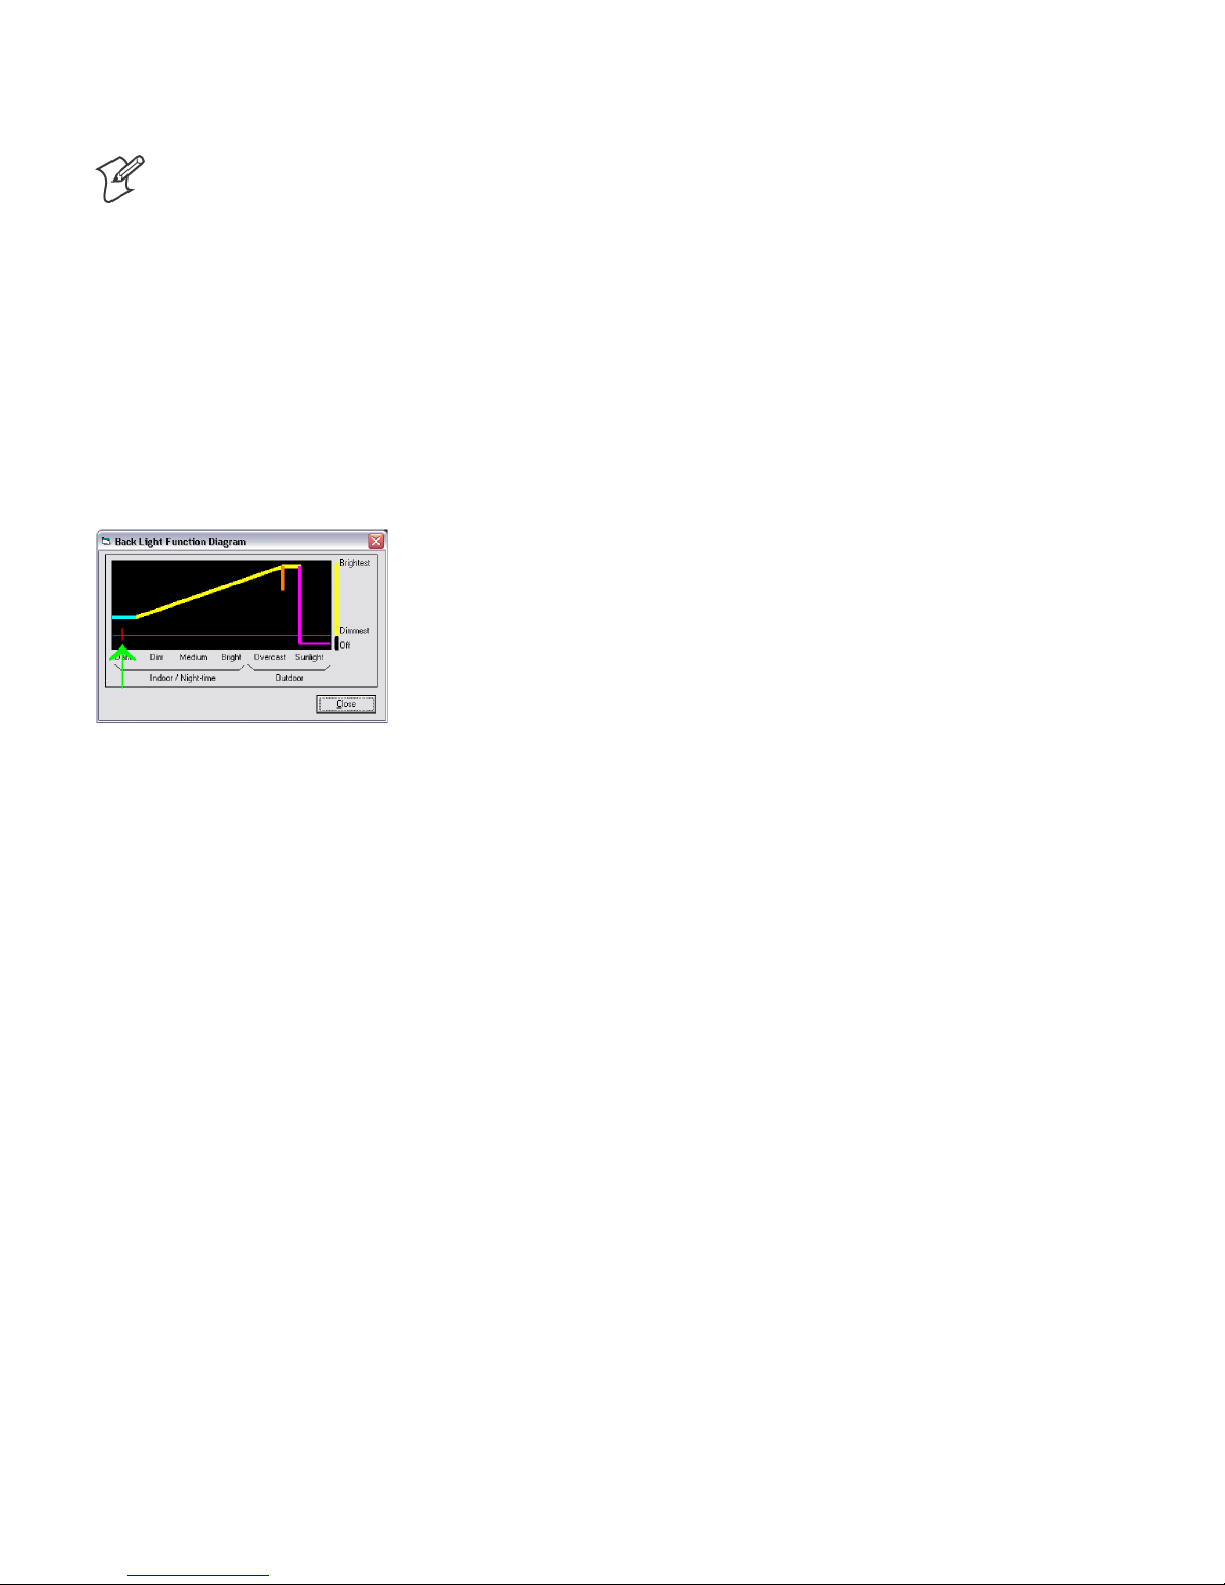
Manual Brightness Adjustment
The brightness slider control allows you to manually adjust the
backlight brightness. Tap on the bar and slide it to the left or
right to achieve the desired brightness.
Auto Backlight Settings
To have the backlight automatically turn off in direct sunlight,
check the Auto Off in Bright Light option.
To have the backlight automatically dim in low light conditions,
check the Auto Dim in Low Light option.
Side Button Function
TheSideButtonfunctionallowsyoutohavethesystemrespond
to the Windows side button options, or toggle the backlight on
and off.
40 CT60 Rugged Tablet PC User’s Guide
Page 51
Chapter
—
3 Software Operation
To have the side button function set to Windows-defined options, tap on the Windows Defined button.
Note: Windows side button options can be found
under Control Panel→Power Options →Advanced
Power Button.
To have the side button set to toggle the backlight on and off,
tap on the Back Light option.
Advanced Backlight
Your computer is delivered preset with the optimal settings for
most users. For those users with special needs, such as optimizing operation in dark environments, the Advanced Backlight
settings allow for optimal backlight performance. To make modifications to the backlight settings, tap on the Advanced Backlight button.
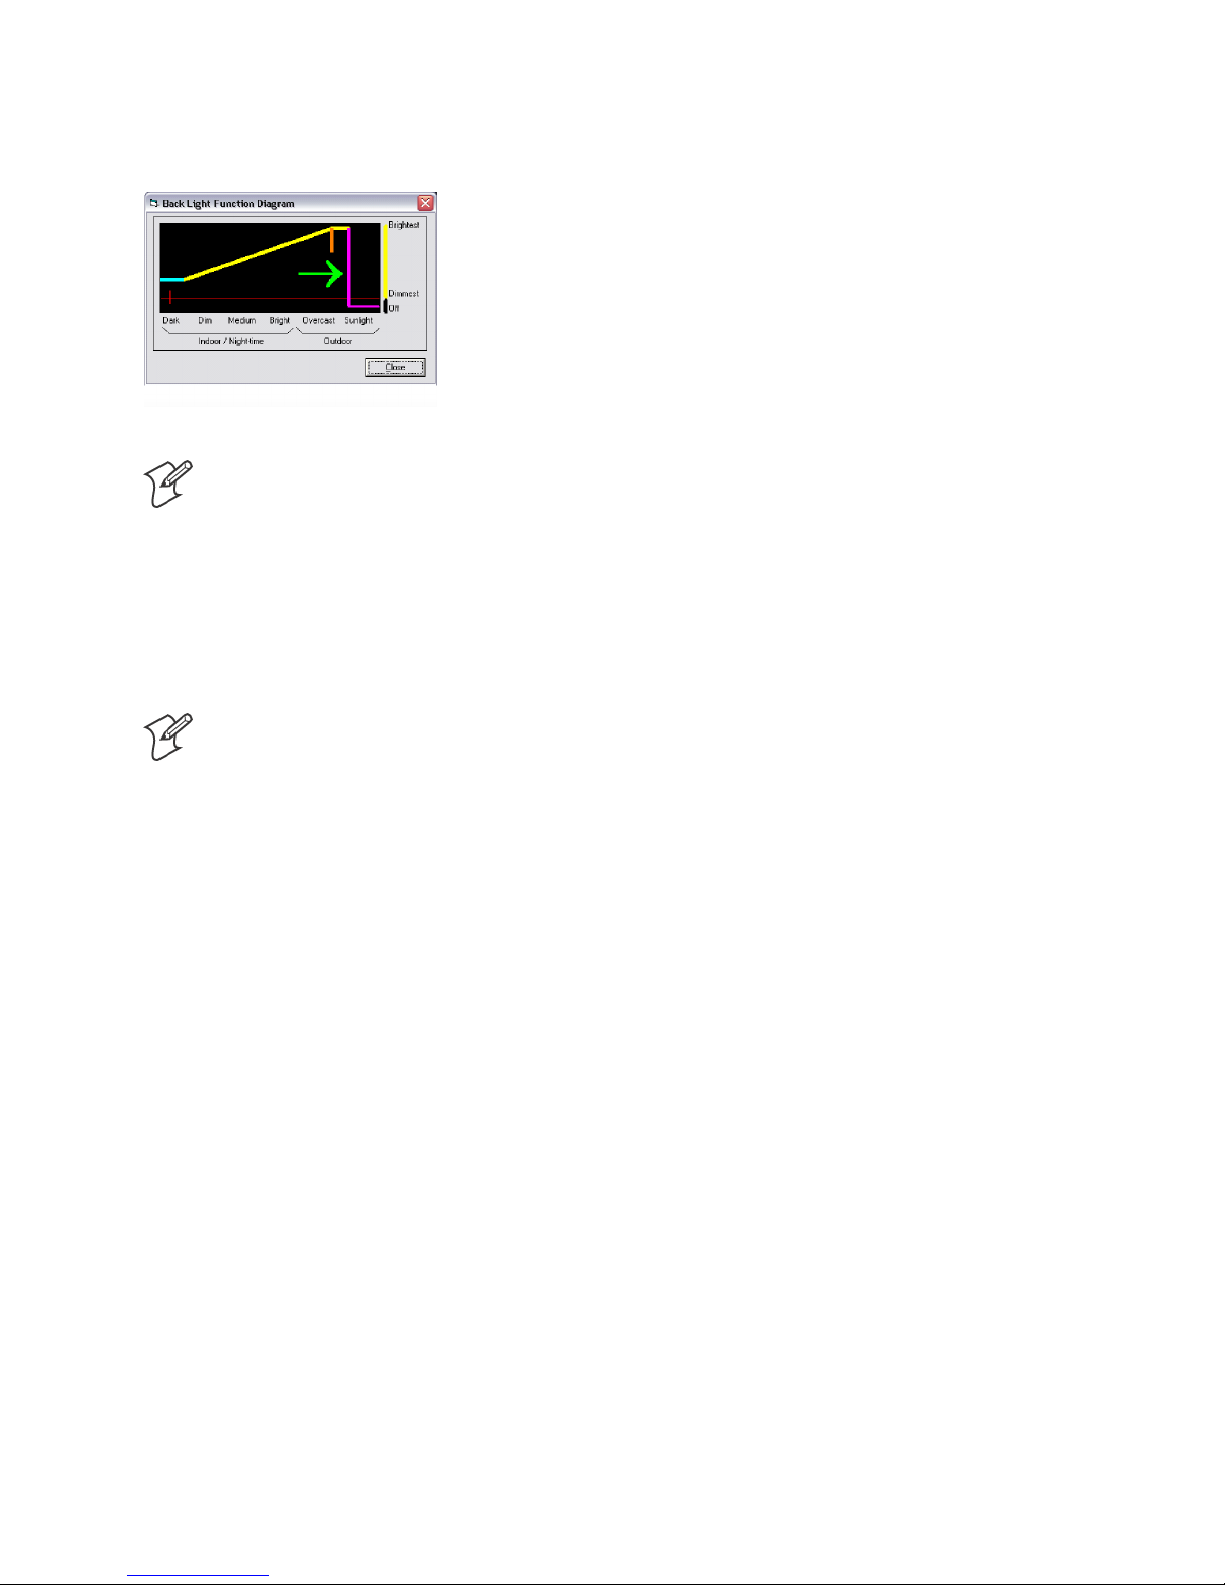
To help you optimize the settings for your special needs, the red
tick mark on the red line indicates the current ambient light
level. If the tick mark is located to the left, there is little ambient
light. As the ambient light becomes brighter, it will move further
to the right.
BacklightAdjustment
Sliding the pink line left or right will set the light level at which
youwantthebacklighttogooff.Iftheambientlightisgreater
than this setting (such as ambient light is to the right of this
line) the backlight is turned off.
CT60 Rugged Tablet PC User’s Guide
41
Page 52
Chapter
—
Software Oper ation
3
Iftheambientlightislessthanthissetting(suchastotheleftof
this line) the backlight will be on.
Note: You will only be able to move the pink line
within the “Sunlight” range of the light meter indicated at the bottom.
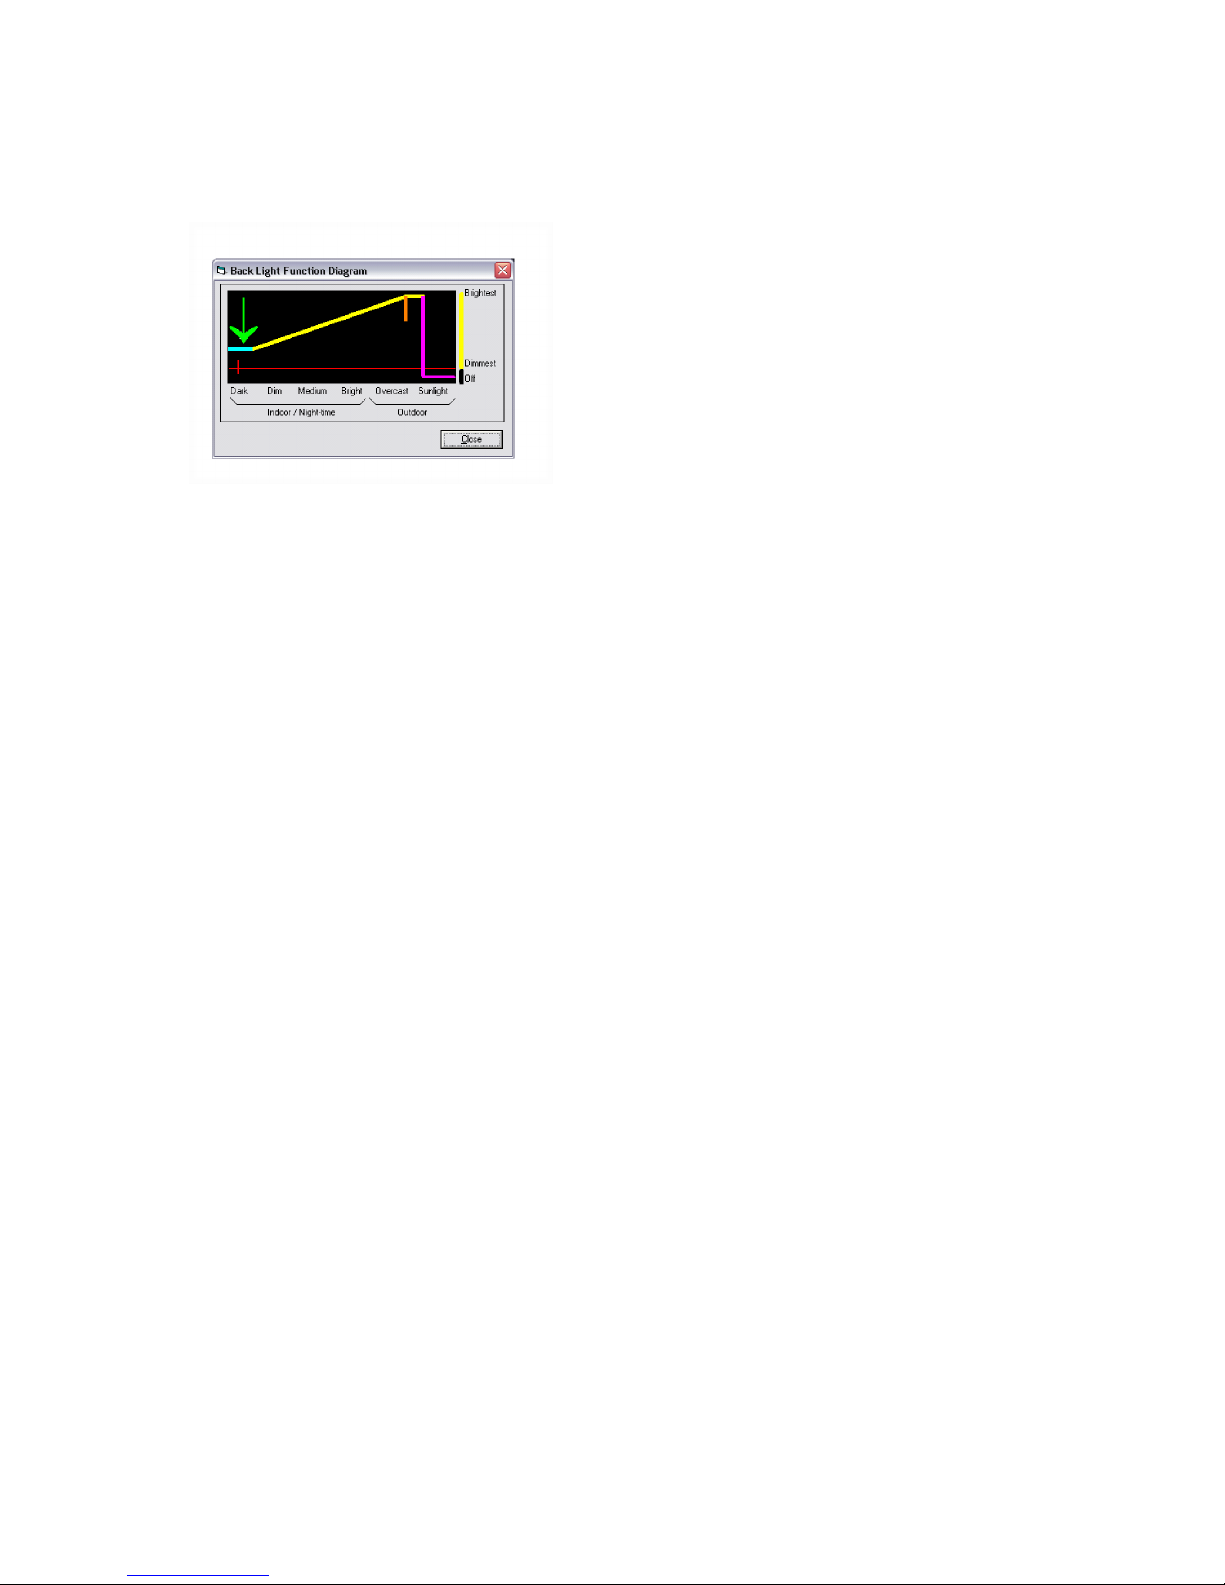
Auto Dim
Thebluelinerepresentstheminimumbacklightsettingatlow
light levels. Sliding the blue line up or down sets the auto dim
brightness level. Up is brighter; down is darker. The red line represents the minimum backlight level and the top of the window
represents maximum backlight level.
Note: The auto dim adjustment tab size can be adjusted.
Typing Alt-S using a keyboard allows grabbing the red line and
sliding it until the desired size of the tab is reached.
42 CT60 Rugged Tablet PC User’s Guide
Page 53
Chapter
—
3 Software Operation
Theorangesegmentrepresentsthelightlevelatwhichthebacklight is at full brightness. At light levels lower than this, Auto
dimming takes place, as represented by the sloping yellow line.
This full brightness setting can be adjusted by dragging the
orange line to the right or to the left.
CT60 Rugged Tablet PC User’s Guide
43
Page 54

FAQs
4
This chapter contains some common frequently
asked questions about the CT60. If you do not
find an answer to your question here, please
contact Technical Support at 800-755-5505
and one of our representatives will be able to
help you.
CT60 Rugged Tablet PC User’s Guide
45
Page 55

Chapter
—
FAQs
4
WhatO ptions are Availablefor LoadingSoftware into the CT60?
S USB Floppy Drive
S USB CD-ROM
S Local Area Network
S Direct Cable Connection
How Do I Install Drivers for Peripheral Devices Sold by Intermec?
Device drivers for peripherals that Intermec distributes reside on
the CT60 where they can be installed as needed.
Contact Technical Support for assistance on any of these installations at 800-755-5505.
How Do I InstallDrivers for Peripheral DevicesNot Sold by
Intermec?
Device drivers for peripherals not distributed by Intermec will
require loading via one of the options listed above.
Contact Intermec Technical Support at 800-755-5505 for loading device drivers for any variety of peripheral that may need to
be installed.
How Do I Activate the ”Screen Keyboard”?
If you are using Windows XP Tablet PC, tap the Input Panel
button on the task bar . The Tablet PC Input Panel opens.
If You are Using MS Pen Services:
From the Windows desktop,navigate through the Start Menu to
the Program group named “Pen Services”. Tap on the icon for
the screen keyboard in this group.
If You are Using My-T-Pen:
From the Windows desktop, navigate through the Start Menu to
the Program group named “My-T-Pen”. Tap on the icon for
“My-T-Pen” in this group.
How Can Hand Writer Recognition be Disabled?
For XP Tablet PC Edition, the handwriting recognition cannot
be disabled.
For MS Pen services, open the control panel applet for Hand
Writer Settings. Locate the option under the Personal tab that
will allow you to set the time delay for Switch from Ink to T ext
Selection. Set this adjustment to the extreme left (0.0 seconds)
to disable Hand Writer Recognition.
46 CT60 Rugged Tablet PC User’s Guide
Page 56

Chapter
4
—
FAQs
For Callig rapher, the handwriting recognition is only active
when the calligrapher program is running.
What Do I Do Ifthe Computer Locks Up or Freezes While under
Windows?
In the event that Windows locks up and you lose control of
screen activity, you can depress the on/off switch twice for a
<CTRL><ALT><DEL> function or hold the side power button
for a period of 4-5 seconds to force a “hardware shutdown.”
How Do I Clean the Dock Connector On theBack of the CT60?
Use a non-metallic bristle brush to sweep out any dust or foreign
particles.
How Do I Clean the Glass on t he Face of the Computer?
On pen machines, use a non-abrasive glass cleaner to clean the
display glass.
On touch screen machines, use a plastic cleaner such as (Microclean) to clean the display.
What Do I Do When the Pen Gets Out of Alignment?
When using Windows XP Tablet PC Edition, recalibrate the
pen any time you change screen orientations or sitting positions.
Go to Start→Control Panel→Tablet and Pen Settings.
Ta p t h e Settings tab. Under Calibration, tap the name of the
screen orientation for which you would like to calibrate your
tablet screen. Tap Calibrate. Follow the on-screen instructions
for calibrating the screen. You must calibrate the screen for each
screen orientation separately.
If you are using MS Pen services: In the Windows Control Panel
is an applet labeled Hand writer Settings (pen settings on some
machines), which has the pen alignment utility. You may have
to attempt alignment more than once to get the desired result.
If you are using Pen with Calligrapher: From the Windows
desktop, navigate through the Start Menu to the Program group
named “Fine Point” (“Mutoh pen system driver” on some
units). In this group, tap on the icon for “Recalibrate” and follow the onscreen instructions.
What if the Pen Still Will Not Align?
Check that the Windows Display settings are not set to a screen
resolution other than factory default. If so, adjust the setting to
factory default, reboot the unit and attempt pen alignment.
CT60 Rugged Tablet PC User’s Guide
47
Page 57

Chapter
—
FAQs
4
See supporting documentation for instructions on reinstalling
the pen services software. This will typically cure problems with
damaged support files that impact the pen function.
What Can I Do When the ”Start” Button Disappears?
In pen computing, it is not uncommon for the user to inadvertently resize the task bar so that it is not visible on the screen.
First, attempt to recover the start button and task bar by moving
around the edges of the display to see if you will get a double
arrow. If you get a double arrow, simply drag the task bar to the
size you need.
If not, follow these steps:
Note: you will need a keyboard to perform this function. Do not attempt to use the pen during this process.
1 Press the <CTRL>, <ESC> keys in combination to display
the “Start” menu.
2 Press the <ESC> button and the menu will disappear. You-
have now placed the focus on the “Start” button.
3 Press <ALT>, <SPACEBAR> keys in combination to display a
context menu.
4 Use the cursor keys to navigate in the context menu and
highlight “Size.”
5 Press <ENTER> and the pointer will move to the middle of
the taskbar along the edge of the display and become a twoway arrow.
6 Using the cursor key, size the task bar until it is the size you
prefer .
7 Press the <ENTER> key to set the task bar size.
To avoid this problem in the future, try sizing the task bar to
belarger than the default. This can be done at your discretion.
Windows XP also gives you the option of locking the task bar so
this will not happen. Intermec highly recommends locking your
taskbar if you are u sing Windows XP.
48 CT60 Rugged Tablet PC User’s Guide
Page 58

Chapter
4
—
FAQs
To Lock Your Taskbar:
1 Right tap on the taskbar.
2 Select the Properties tab.
3 Under task bar tab menu, check “Lock the taskbar.”
What Do I Do When the Battery Dischargesand Will
Not Charge in the Computer?
There are several fused circuits in the CT60 designed to protect
the core electronics. In the event that the unit will not initiate
thechargecycle,theremaybeablownfuseinthecircuit.See
Battery Use and Care in Chapter 2 for more information on
charging your batteries.
What External Peripherals Does the CT60 Support?
The CT60 will support all Cardbus/PC cards.
The CT60 has aType III Cardbus/PC card slot which will accommodate either one Type III card or up to two Type II devices.
CT60 Rugged Tablet PC User’s Guide
49
Page 59

Chapter
—
FAQs
4
How Can USB Networking Be UsedIn the CT60?
Intermec provides desk dock and wall dock options with a USB
network adapter that communicates to the CT60 via the docking connection and connects to the network hub by way of standard network patch cabling.
S No network cable is connected directly to the CT60.
S USB functionality is supported under Windows 98, 2000, XP
Pro and XP Tablet PC Edition.
How Can USB be Used In the CT60?
The CT60 is manufactured with a single USB connection on
the side of the unit. This USB connection can be used for a
wide variety of USB type devices.
Note: CT60 does not support USB 2.0.
There is also an additional USB port in the dock connector,
available on the desk dock, vehicle dock, and wall dock.
50 CT60 Rugged Tablet PC User’s Guide
Page 60

Corporate Headquarters
6001 36th Avenue West
Everett, Washington 98203
tel 425.348.2600
fax 425.355.9551
www.intermec.com
*961054034B*
*961-054-034B Rev B*
CT60 User's Guide - June 2004
 Loading...