

Page 1
User's Manual
CN2A Mobile
Computer
Page 2

Intermec Technologies Corporation
Corporate Headquarters
6001 36th Ave.W.
Everett, WA 98203
U.S.A.
www.intermec.com
The information contained herein is proprietary and is provided solely for the purpose of
allowing customers to operate and service Intermec-manufactured equipment and is not to be
released, reproduced, or used for any other purpose without written permission of Intermec.
Information and specifications contained in this document are subject to change without prior
noticed and do not represent a commitment on the part of Intermec Technologies Corporation.
© 2005-2006 by Intermec Technologies Corporation. All rights reserved.
The word Intermec, the Intermec logo, Norand, ArciTech, Beverage Routebook, CrossBar,
dcBrowser, Duratherm, EasyADC, EasyCoder, EasySet, Fingerprint, i-gistics, INCA (under
license), Intellitag, Intellitag Gen2, JANUS, LabelShop, MobileLAN, Picolink, Ready-to-Work,
RoutePower, Sabre, ScanPlus, ShopScan, Smart Mobile Computing, SmartSystems, TE 2000,
Trakker Antares, and Vista Powered are either trademarks or registered trademarks of Intermec
Technologies Corporation.
Throughout this manual, trademarked names may be used. Rather than put a trademark (™ or ®)
symbol in every occurrence of a trademarked name, we state that we are using the names only in
an editorial fashion, and to the benefit of the trademark owner, with no intention of
infringement.
There are U.S. and foreign patents pending.
ii CN2A Mobile Computer User’s Manual
Page 3

Document Change Record
This page records changes to this document. The document was
originally released as Revision 001.
Version Date Description of Changes
002 07/2005 Attached the Intermec Computer Command Reference Manual CD
(P/N 073529) to the inside front cover. Also added a color photograph
of the CN2A to the front cover.
003 08/2005 Added information on managing multiple tasks with the Task Manager
and Active Applications List. Added instructions for customizing
keypad behavior. Made Funk Security the default security choice.
Added instructions for viewing information about the wireless network
regardless of your security choice. Added instructions for allowing FTP
transfers to and from the CN2A. Added instructions for making
applications persist through a cold boot. Added the new LED and
keypad tests to the list of available diagnostics. Added German
translations of all cautions and warnings.
004 02/2006 Revised the manual to support Release 3 software, which includes:
• CCX v2.0 certification
• SmartSystems Client
• Intermec Ready-to-Work icons
•Asian fonts
• New version of Intermec Settings
• New InstallShield application for upgrading
• Remote Desktop Connection
Added a new Appendix C, which explains how to remap the keypads.
Also added a note that the CN2A supports one reader command
(Change Configuration), although an older version of the Intermec
Computer Command Reference Manual CD states that CN2 supports all
reader commands.
CN2A Mobile Computer User’s Manual iii
Page 4

iv CN2A Mobile Computer User’s Manual
Page 5

Contents
Before You Begin. . . . . . . . . . . . . . . . . . . . . . . . . . . . . . . . . . . . . . . . . . . . . . . . . . . . xi
Safety Information . . . . . . . . . . . . . . . . . . . . . . . . . . . . . . . . . . . . . . . . . . . xi
Global Services and Support. . . . . . . . . . . . . . . . . . . . . . . . . . . . . . . . . . . . xi
Warranty Information . . . . . . . . . . . . . . . . . . . . . . . . . . . . . . . . . xi
Web Support . . . . . . . . . . . . . . . . . . . . . . . . . . . . . . . . . . . . . . . . xii
Telephone Support . . . . . . . . . . . . . . . . . . . . . . . . . . . . . . . . . . . xii
Who Should Read This Manual . . . . . . . . . . . . . . . . . . . . . . . . . . . . . . . . xiii
Related Documents . . . . . . . . . . . . . . . . . . . . . . . . . . . . . . . . . . . . . . . . . xiii
Downloading or Ordering Intermec Documents . . . . . . . . . . . . xiii
Understanding the Difference Between CN2 and CN2A. . . . . . xiii
About the CD Attached to the Front Cover. . . . . . . . . . . . . . . . .xiv
Patent Information . . . . . . . . . . . . . . . . . . . . . . . . . . . . . . . . . . . . . . . . . . .xiv
Other Copyright Information. . . . . . . . . . . . . . . . . . . . . . . . . . . . . . . . . . .xiv
Using the CN2A Mobile Computer . . . . . . . . . . . . . . . . . . . . . . . . . . . 1
1
Contents
Introducing the CN2A Mobile Computer . . . . . . . . . . . . . . . . . . . . . . . . . . . . . . . . . 2
What’s New?. . . . . . . . . . . . . . . . . . . . . . . . . . . . . . . . . . . . . . . . . . . . . . . . . 2
CN2A Features, Applications, and Accessories . . . . . . . . . . . . . . . . . . . . . . . 3
Identifying the Optional Features Installed in Your CN2A . . . . . . . . . . . . . . 4
Using the Battery . . . . . . . . . . . . . . . . . . . . . . . . . . . . . . . . . . . . . . . . . . . . . . . . . . . . 5
Installing and Charging the Battery . . . . . . . . . . . . . . . . . . . . . . . . . . . . . . . 6
Removing the Battery . . . . . . . . . . . . . . . . . . . . . . . . . . . . . . . . . . . . . . . . . . 7
Maximizing Battery Life . . . . . . . . . . . . . . . . . . . . . . . . . . . . . . . . . . . . . . . . 9
Checking the Battery Status . . . . . . . . . . . . . . . . . . . . . . . . . . . . . . . . . . . . . 9
Using the Keypad . . . . . . . . . . . . . . . . . . . . . . . . . . . . . . . . . . . . . . . . . . . . . . . . . . . . 9
Using the Numeric Keypad . . . . . . . . . . . . . . . . . . . . . . . . . . . . . . . . . . . . . 9
Using the Scroll Keypad . . . . . . . . . . . . . . . . . . . . . . . . . . . . . . . . . . . . . . . 11
Using the Power Key. . . . . . . . . . . . . . . . . . . . . . . . . . . . . . . . . . . . . . . . . . 12
Using the Touch Screen . . . . . . . . . . . . . . . . . . . . . . . . . . . . . . . . . . . . . . . . . . . . . . 13
Using the Touch Screen and Stylus . . . . . . . . . . . . . . . . . . . . . . . . . . . . . . . 13
Understanding the Desktop . . . . . . . . . . . . . . . . . . . . . . . . . . . . . . . . . . . .14
Using Transcriber to Write on the Touch Screen. . . . . . . . . . . . . . . . . . . . . 14
Calibrating the Screen . . . . . . . . . . . . . . . . . . . . . . . . . . . . . . . . . . . . . . . . 15
Understanding the Screen Icons . . . . . . . . . . . . . . . . . . . . . . . . . . . . . . . . . . . . . . . . 15
CN2A Mobile Computer User’s Manual v
Page 6

Contents
Understanding the Status Lights . . . . . . . . . . . . . . . . . . . . . . . . . . . . . . . . . . . . . . . 17
Understanding the Beeps . . . . . . . . . . . . . . . . . . . . . . . . . . . . . . . . . . . . . . . . . . . . . 18
Running Multiple Applications on the CN2A . . . . . . . . . . . . . . . . . . . . . . . . . . . . . 19
Using Task Manager to Manage Multiple Active Tasks . . . . . . . . . . . . . . . 19
Using the Active Applications List To Manage Multiple Active Tasks . . . . 21
Scanning Bar Codes. . . . . . . . . . . . . . . . . . . . . . . . . . . . . . . . . . . . . . . . . . . . . . . . . 22
How to Scan a Bar Code . . . . . . . . . . . . . . . . . . . . . . . . . . . . . . . . . . . . . . 22
Using the ScanDemo Application . . . . . . . . . . . . . . . . . . . . . . . . . . . . . . . 23
Increasing File Storage With the Optional SD Card. . . . . . . . . . . . . . . . . . . . . . . . . 25
Attaching a Keyboard to the CN2A. . . . . . . . . . . . . . . . . . . . . . . . . . . . . . . . . . . . . 28
Configuring the CN2A . . . . . . . . . . . . . . . . . . . . . . . . . . . . . . . . . . . . . . . . 31
2
How to Configure the CN2A Parameters . . . . . . . . . . . . . . . . . . . . . . . . . . . . . . . . 32
Configuring the CN2A With the Setup Assistant . . . . . . . . . . . . . . . . . . . . . . . . . . 33
Configuring the CN2A Locally With Intermec Settings . . . . . . . . . . . . . . . . . . . . . 34
Learning About the Configuration Commands in Intermec Settings . . . . . 34
Opening Intermec Settings . . . . . . . . . . . . . . . . . . . . . . . . . . . . . . . . . . . . 34
Navigating Through Intermec Settings . . . . . . . . . . . . . . . . . . . . . . . . . . . 35
Saving Your Settings . . . . . . . . . . . . . . . . . . . . . . . . . . . . . . . . . . . . . . . . . 37
Exiting Intermec Settings . . . . . . . . . . . . . . . . . . . . . . . . . . . . . . . . . . . . . 37
Restoring the CN2A Default Settings . . . . . . . . . . . . . . . . . . . . . . . . . . . . 37
Configuring the CN2A With SmartSystems Console. . . . . . . . . . . . . . . . . . . . . . . . 38
Installing an Asian Font . . . . . . . . . . . . . . . . . . . . . . . . . . . . . . . . . . . . . . . . . . . . . . 39
Customizing the CN2A Keypad . . . . . . . . . . . . . . . . . . . . . . . . . . . . . . . . . . . . . . . 39
Using the Control Panel to Customize the Keypad . . . . . . . . . . . . . . . . . . 40
Using a Registry Editing Program to Customize the Keypad . . . . . . . . . . . 41
Writing an Application to Customize the Keypad . . . . . . . . . . . . . . . . . . . 42
Adding the CN2A to the Network . . . . . . . . . . . . . . . . . . . . . . . . . . 43
3
Configuring the CN2A For Your Network. . . . . . . . . . . . . . . . . . . . . . . . . . . . . . . . 44
Configuring USB Communications . . . . . . . . . . . . . . . . . . . . . . . . . . . . . 44
Configuring 802.11b/g Radio Communications . . . . . . . . . . . . . . . . . . . . 45
vi CN2A Mobile Computer User’s Manual
Page 7

Contents
Configuring the Network Parameters for a TCP/IP Network . . . 46
Configuring the Network Parameters for a UDP Plus Network . . 48
Configuring Network Security . . . . . . . . . . . . . . . . . . . . . . . . . . . . . . . . . . . . . . . . . 49
Choosing Between Funk Security and Microsoft Security Software. . . . . . . 50
Selecting and Defining Profiles for Funk Security . . . . . . . . . . . . 50
Choosing Microsoft Security Software . . . . . . . . . . . . . . . . . . . . . 51
Using WPA Security. . . . . . . . . . . . . . . . . . . . . . . . . . . . . . . . . . . . . . . . . . 52
Configuring WPA Security With Funk Security . . . . . . . . . . . . . 53
Configuring WPA Security With Microsoft Security . . . . . . . . . . 55
Using 802.1x Security. . . . . . . . . . . . . . . . . . . . . . . . . . . . . . . . . . . . . . . . . 58
Configuring 802.1x Security With Funk Security . . . . . . . . . . . . 58
Configuring 802.1x Security With Microsoft Security . . . . . . . . 60
Using LEAP Security . . . . . . . . . . . . . . . . . . . . . . . . . . . . . . . . . . . . . . . . . 62
Using Static WEP Security . . . . . . . . . . . . . . . . . . . . . . . . . . . . . . . . . . . . . 63
Configuring Static WEP Security With Funk Security . . . . . . . . 63
Configuring Static WEP Security With Microsoft Security . . . . . 64
Loading Certificates . . . . . . . . . . . . . . . . . . . . . . . . . . . . . . . . . . . . . . . . . . 65
Disabling Security . . . . . . . . . . . . . . . . . . . . . . . . . . . . . . . . . . . . . . . . . . . 67
Viewing Wireless Network Information . . . . . . . . . . . . . . . . . . . . . . . . . . . . . . . . . . 68
Using Remote Desktop Connection . . . . . . . . . . . . . . . . . . . . . . . . . . . . . . . . . . . . . 69
Transferring Files With FTP . . . . . . . . . . . . . . . . . . . . . . . . . . . . . . . . . . . . . . . . . . . 72
Enabling the FTP Server on the CN2A . . . . . . . . . . . . . . . . . . . . . . . . . . . 72
Changing the Default FTP User Name and Password. . . . . . . . . . . . . . . . . 73
Updating Your Access Control List. . . . . . . . . . . . . . . . . . . . . . . . . . . . . . . 74
Using FTP to Transfer Files . . . . . . . . . . . . . . . . . . . . . . . . . . . . . . . . . . . . 74
Using the Modem Dock for Internet Access and E-mail . . . . . . . . . . . . . . . . . . . . . . 75
Connecting to the Internet Through the Modem Dock . . . . . . . . . . . . . . . 75
Setting Up an E-mail Account Through the Modem Dock. . . . . . . . . . . . . 82
Developing and Installing Applications . . . . . . . . . . . . . . . . . . . 85
4
Developing Applications for the CN2A . . . . . . . . . . . . . . . . . . . . . . . . . . . . . . . . . . 86
Developing a New Application . . . . . . . . . . . . . . . . . . . . . . . . . . . . . . . . . . 86
Understanding the Resource Kits and Platform SDKs . . . . . . . . . 86
Downloading the Resource Kits and CN2A Platform SDK . . . . . 87
Understanding the Hardware and Software Requirements . . . . . . 87
Developing a Web-Based Application . . . . . . . . . . . . . . . . . . . . . . . . . . . . . 88
Installing Applications on the CN2A . . . . . . . . . . . . . . . . . . . . . . . . . . . . . . . . . . . . 88
Installing Applications Using ActiveSync . . . . . . . . . . . . . . . . . . . . . . . . . . 89
CN2A Mobile Computer User’s Manual vii
Page 8

Contents
Installing ActiveSync and Establishing a Partnership. . . . . . . . . . 90
Using ActiveSync to Copy Files and Install Applications. . . . . . . 91
Installing Applications Using the Optional SD Card . . . . . . . . . . . . . . . . . 92
Installing Applications Using the SmartSystems Console. . . . . . . . . . . . . . 93
Installing Applications Using Wavelink Avalanche. . . . . . . . . . . . . . . . . . . 93
Setting Up Applications to Persist Through a Cold Boot . . . . . . . . . . . . . . . . . . . . . 94
Launching Your Application Automatically . . . . . . . . . . . . . . . . . . . . . . . . . . . . . . . 95
Troubleshooting and Maintaining the CN2A. . . . . . . . . . . . . 97
5
Problems and Solutions . . . . . . . . . . . . . . . . . . . . . . . . . . . . . . . . . . . . . . . . . . . . . . 98
Running Diagnostics . . . . . . . . . . . . . . . . . . . . . . . . . . . . . . . . . . . . . . . . . . . . . . . 107
Contacting Intermec Product Support. . . . . . . . . . . . . . . . . . . . . . . . . . . . . . . . . . 110
Before Calling Product Support. . . . . . . . . . . . . . . . . . . . . . . . . . . . . . . . 110
Sending the CN2A to Intermec for Service . . . . . . . . . . . . . . . . . . . . . . . 110
Booting the CN2A . . . . . . . . . . . . . . . . . . . . . . . . . . . . . . . . . . . . . . . . . . . . . . . . 111
Warm Booting the CN2A . . . . . . . . . . . . . . . . . . . . . . . . . . . . . . . . . . . . 111
Cold Booting the CN2A . . . . . . . . . . . . . . . . . . . . . . . . . . . . . . . . . . . . . 112
Upgrading the CN2A . . . . . . . . . . . . . . . . . . . . . . . . . . . . . . . . . . . . . . . . . . . . . . 113
Downloading the Upgrade .exe File to Your PC . . . . . . . . . . . . . . . . . . . 114
Using the SmartSystems Console to Upgrade the CN2A. . . . . . . . . . . . . 115
Using an SD Card to Upgrade the CN2A . . . . . . . . . . . . . . . . . . . . . . . . 118
Cleaning the Scanner Window and the Touch Screen . . . . . . . . . . . . . . . . . . . . . . 125
Specifications and Accessories. . . . . . . . . . . . . . . . . . . . . . . . . . . . 127
A
Physical and Environmental Specifications. . . . . . . . . . . . . . . . . . . . . . . . . . . . . . . 128
Accessories for the CN2A . . . . . . . . . . . . . . . . . . . . . . . . . . . . . . . . . . . . . . . . . . . 130
Default Configuration . . . . . . . . . . . . . . . . . . . . . . . . . . . . . . . . . . . . . . 133
B
Default Configuration . . . . . . . . . . . . . . . . . . . . . . . . . . . . . . . . . . . . . . . . . . . . . . 134
viii CN2A Mobile Computer User’s Manual
Page 9

Remapping the CN2A Keypad. . . . . . . . . . . . . . . . . . . . . . . . . . . . . . 137
C
Remapping the CN2A Keypad . . . . . . . . . . . . . . . . . . . . . . . . . . . . . . . . . . . . . . . . 138
Choosing How to Change Keypad Registry Settings. . . . . . . . . . . . . . . . . 138
Locating the Registry Settings for Your Keypad . . . . . . . . . . . . . . . . . . . . 138
Identifying the Registry Entry for Each Physical Key . . . . . . . . . . . . . . . .139
Understanding Keypad Attributes. . . . . . . . . . . . . . . . . . . . . . . . . . . . . . . 140
Creating Multiple Key Definitions . . . . . . . . . . . . . . . . . . . . . . . . . . . . . . 141
Specifying a Key Sequence to Launch an Application . . . . . . . . . . . . . . . . . . . . . . . 142
Sample Registry Settings . . . . . . . . . . . . . . . . . . . . . . . . . . . . . . . . . . . . . . . . . . . . . 143
Numeric Keypad Registry Settings . . . . . . . . . . . . . . . . . . . . . . . . . . . . . . 143
Scroll Keypad Registry Settings. . . . . . . . . . . . . . . . . . . . . . . . . . . . . . . . . 144
Restoring the Default Registry Settings. . . . . . . . . . . . . . . . . . . . . . . . . . . . . . . . . . 144
Contents
Index . . . . . . . . . . . . . . . . . . . . . . . . . . . . . . . . . . . . . . . . . . . . . . . . . . . . . . . . . . . . . 145
I
CN2A Mobile Computer User’s Manual ix
Page 10

Contents
x CN2A Mobile Computer User’s Manual
Page 11
Before You Begin
This section provides you with safety information, technical
support information, and sources for additional product
information.
Safety Information
Your safety is extremely important. Read and follow all warnings
and cautions in this document before handling and operating
Intermec equipment. You can be seriously injured, and
equipment and data can be damaged if you do not follow the
safety warnings and cautions.
This section explains how to identify and understand warnings,
cautions, and notes that are in this document. You may also see
icons that tell you when to follow ESD procedures and when to
take special precautions for handling optical parts.
Before You Begin
A warning alerts you of an operating procedure, practice,
condition, or statement that must be strictly observed to avoid
death or serious injury to the persons working on the
equipment.
A caution alerts you to an operating procedure, practice,
condition, or statement that must be strictly observed to
prevent equipment damage or destruction, or corruption or
loss of data.
Note: Notes either provide extra information about a topic or
contain special instructions for handling a particular condition or
set of circumstances.
Global Services and Support
Warranty Information
To understand the warranty for your Intermec product, visit the
Intermec web site at www.intermec.com and click Service &
Support. The Intermec Global Sales & Service page appears.
From the Service & Support menu, move your pointer over
Support, and then click Warranty.
CN2A Mobile Computer User’s Manual xi
Page 12

Before You Begin
Disclaimer of warranties: The sample code included in this
document is presented for reference only. The code does not
necessarily represent complete, tested programs. The code is
provided “as is with all faults.” All warranties are expressly
disclaimed, including the implied warranties of merchantability
and fitness for a particular purpose.
Web Support
Visit the Intermec web site at www.intermec.com to download
our current manuals in PDF format. To order printed versions of
the Intermec manuals, contact your local Intermec representative
or distributor.
Visit the Intermec technical knowledge base (Knowledge
Central) at
intermec.custhelp.com to review technical
information or to request technical support for your Intermec
product.
Telephone Support
These services are available from Intermec Technologies
Corporation.
Services Description
Factory Repair
and On-site
Repair
Technical
Support
Service
Contract
Status
Schedule Site
Surveys or
Installations
Ordering
Products
Request a return
authorization number for
authorized service center
repair, or request an on-site
repair technician.
Get technical support on
your Intermec product.
Inquire about an existing
contract, renew a contract,
or ask invoicing questions.
Schedule a site survey, or
request a product or system
installation.
Talk to sales administration,
place an order, or check the
status of your order.
In the USA and
Canada call 1-800755-5505 and
choose this option
1
2
3
4
5
xii CN2A Mobile Computer User’s Manual
Page 13

Outside the U.S.A. and Canada, contact your local Intermec
representative. To search for your local representative, from the
Intermec web site, click Contact.
Who Should Read This Manual
The CN2A Mobile Computer User’s Manual provides you with
information about the features of the CN2A and how to install,
operate, maintain, and troubleshoot the CN2A.
Before you install and configure the CN2A, you should be
familiar with your network and general networking terms, such
as IP address.
Do not read this manual if you have a CN2B mobile computer.
Instead, you need the CN2B Mobile Computer User’s Manual
(P/N 935-001-xxx).
Related Documents
This section covers how to access documents, the difference
between CN2 and CN2A, and the CD attached to this manual.
Before You Begin
Downloading or Ordering Intermec Documents
The Intermec web site at www.intermec.com contains our
documents (as PDF files) that you can download for free.
To download documents
1 Visit the Intermec web site at www.intermec.com.
2 Click Service & Support > Manuals.
3 In the Select a Product field, choose the product whose
documentation you want to download.
To order printed versions of the Intermec manuals, contact your
local Intermec representative or distributor.
Understanding the Difference Between CN2 and CN2A
The CN2 family of mobile computers includes the CN2A,
CN2B, and CN2G computers. The designation “CN2” appears
on documents and accessories shared by CN2A, CN2B, and
CN2G computers. For example, consider the CN2 Modem
Dock (Model AD8).
Documents and accessories available for only one model of CN2
contain the specific model name. For example, consider this
CN2A Mobile Computer User’s Manual.
CN2A Mobile Computer User’s Manual xiii
Page 14

Before You Begin
Patent Information
About the CD Attached to the Front Cover
For your convenience, a copy of the Intermec Computer
Command Reference Manual (P/N 073529) is on the CD
attached inside the front cover of this user’s manual.
The Intermec Computer Command Reference Manual contains
detailed information about the commands available in Intermec
Settings, which you may use to configure the CN2A. Please refer
to this manual for help configuring your CN2A.
Note: Older versions of the Intermec Computer Command
Reference Manual incorrectly state that the CN2 supports reader
commands. The CN2A and CN2B support only the Change
Configuration reader command.
Product is covered by one or more of the following patents:
4,455,523; 4,553,081; 4,709,202; 4,845,419; 4,961,043;
5,195,183; 5.216,233; 5,218,187; 5,218,188; 5,227,614;
5,241,488; 5,278,487; 5,322,991; 5,331,136; 5,331,580;
5,349,678; 5,397,885; 5,371,858; 5,373,478; 5,410,141;
5,488,575; 5,500,516; 5,504,367; 5,508,599; 5,530,619;
5,567,925; 5,568,645; 5,592,512; 5,598,007; 5,617,343;
5,627,360; 5,657,317; 5,671,436; 5,684,290; 5,777,309;
5,793,604; 5,805,807; 5,818,027; 5,821,523; 5,828,052;
5,831,819; 5,834,753; 5,841,121; 5,844,222; 5,883,492;
5,883,493; 5,886,338; 5,889,386; 5,898,162; 5,969,328;
5,986,435; 6,075,340; 6,109,528; 6,158,661; 6,234,395;
6,244,512; 6,330,975; 6,431,451; 6,497,368; 6,538,413;
Des. 417,445.
There may be other U.S. and foreign patents pending.
Other Copyright Information
Microsoft, Windows, and the Windows logo are registered
trademarks of Microsoft Corporation in the United States and/or
other countries.
Wi-Fi is a registered certification mark of the Wi-Fi Alliance.
This product includes software developed by the OpenSSL
Project for use in the OpenSSL Toolkit. (www.openssl.org/)
xiv CN2A Mobile Computer User’s Manual
Page 15

Before You Begin
This product includes cryptographic software written by Eric
Young. ([email protected])
This product uses Regex++, Index software during its operational
phases. The owner of Regex++ has granted use of the software to
anyone provided such use is accompanied by the following
copyright and permission notice:
Regex++, Index. (Version 3.31, 16th Dec 2001)
Copyright© 1998-2001 Dr. John Maddock
Permission to use, copy, modify, distribute and sell this software
and its documentation for any purpose is hereby granted without
fee, provided that the above copyright notice appear in all copies
and that both that copyright notice and this permission notice
appear in supporting documentation. Dr. John Maddock makes
no representations about the suitability of this software for any
purpose. It is provided “as is” without express or implied
warranty.
CN2A Mobile Computer User’s Manual xv
Page 16

Before You Begin
xvi CN2A Mobile Computer User’s Manual
Page 17

1
Using the CN2A Mobile
Computer
Use this chapter to familiarize yourself with the CN2A mobile
computer. In this chapter you will find these sections:
• Introducing the CN2A Mobile Computer
• Using the Battery
•Using the Keypad
•Using the Touch Screen
• Understanding the Screen Icons
• Understanding the Status Lights
• Understanding the Beeps
• Running Multiple Applications on the CN2A
• Scanning Bar Codes
• Increasing File Storage With the Optional SD Card
• Attaching a Keyboard to the CN2A
CN2A Mobile Computer User’s Manual 1
Page 18
Chapter 1 — Using the CN2A Mobile Computer
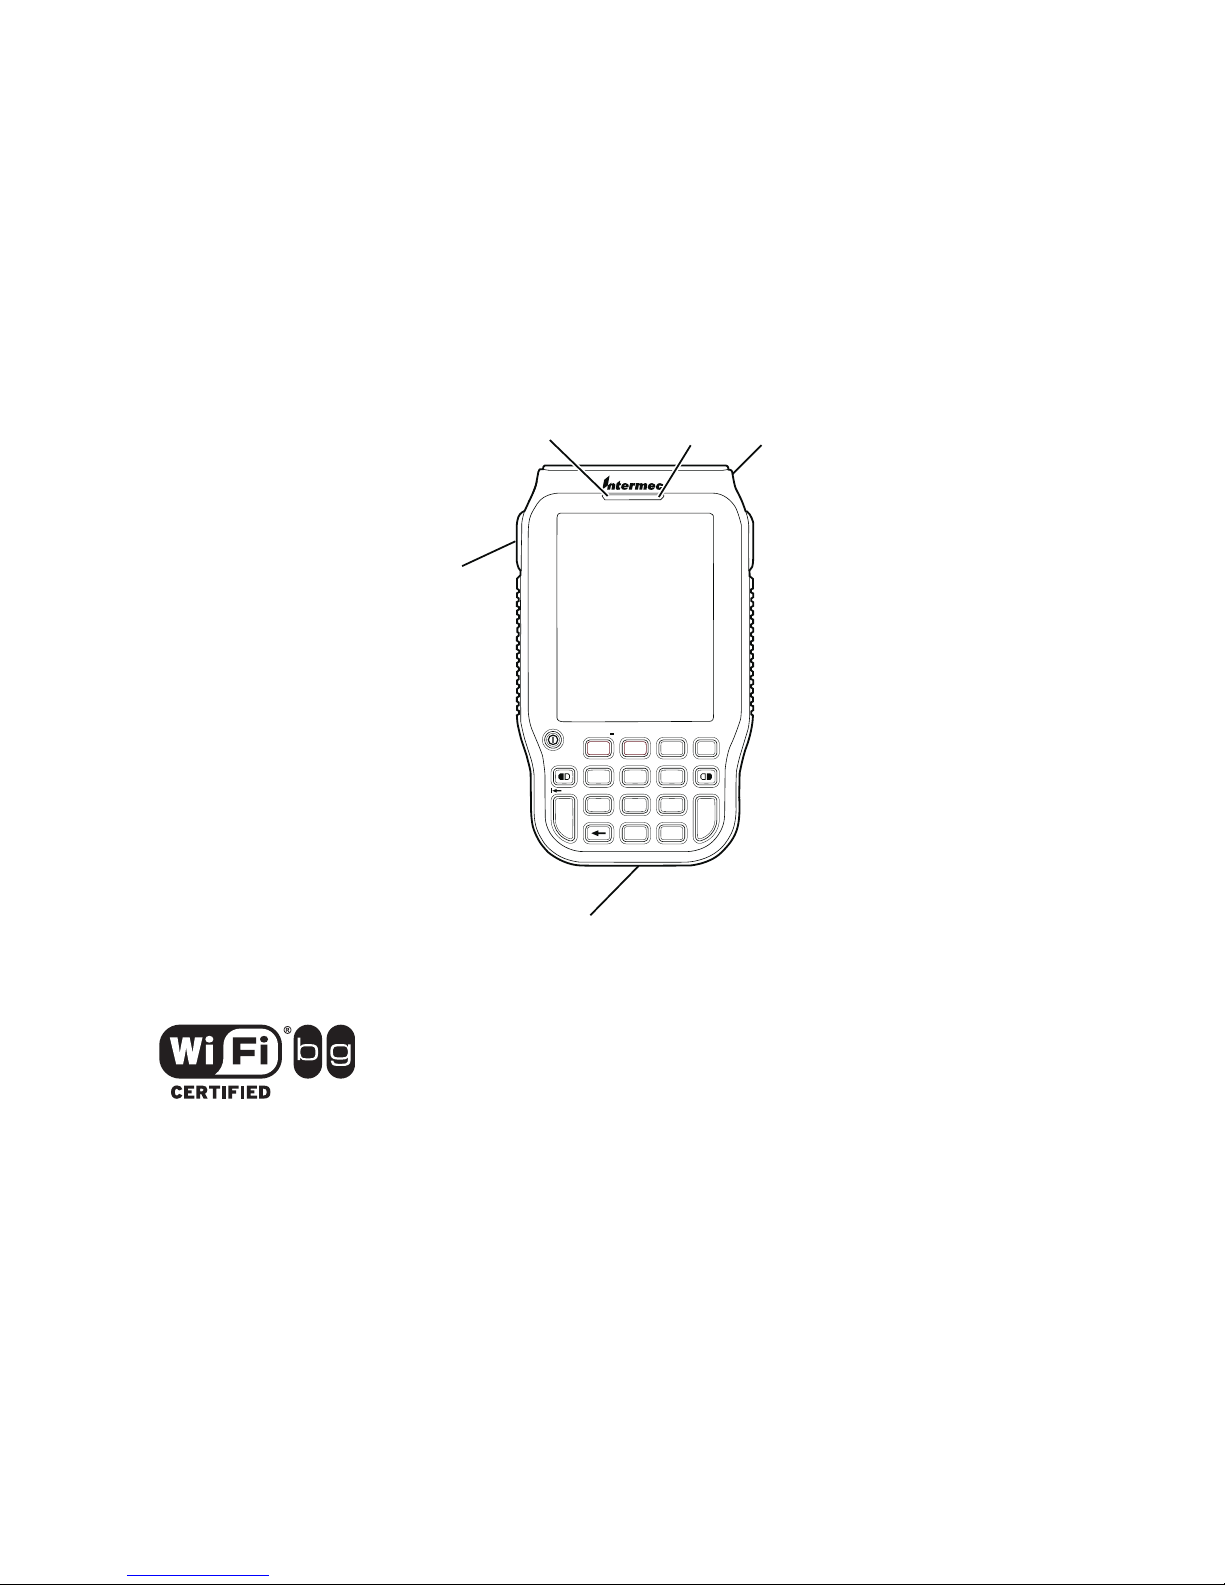
Introducing the CN2A Mobile Computer
The Intermec CN2A mobile computer is an ergonomicallydesigned mobile computer built on the Microsoft
®
Windows®
CE .NET operating system. It is a semi-rugged, lightweight
computer that runs client/server applications and browser-based
applications.
Good
Side Scan
button
(2 places)
Battery light
T
A
B
F1 F3 LockF2
1
F4 F6F5
GHI MNOJKL
4
F7 F9F8
PQRS WXYZTUV
7
Space Alt
Read light
CN2
DEF CapsABC
ESC
3
2
5
6
8
9
F12F10 F11
0
.
E
N
T
E
R
Stylus (not
visible from
front)
USB/Serial port (COM1)
CN2A Mobile Computer With Numeric Keypad
The CN2A mobile computer with an IEEE 802.11b/g radio
installed is Wi-Fi® certified for interoperability with other
802.11b/g wireless LAN devices.
What’s New?
This release of CN2A includes these new features:
• The Remote Desktop Connection application lets you
connect your CN2A over the network to a PC running
Windows NT
Professional, or to a server running Windows NT Server 4.0
Terminal Server Edition. For help, see “Using Remote
Desktop Connection” on page 69.
2 CN2A Mobile Computer User’s Manual
®
, Windows 2000, or Windows XP
Page 19

Chapter 1 — Using the CN2A Mobile Computer
• The CN2A has received CCX v2.0 certification.
• The CN2A operating system now supports Simplified
Chinese, Traditional Chinese, Japanese, Korean, or Thai
fonts. For help upgrading your CN2A to use one of these
fonts, see “Installing an Asian Font” on page 39.
• The CN2A is SmartSystems-enabled™. The SmartSystems™
Client software on the CN2A lets you use the SmartSystems
Console™ to manage CN2As as part of your Intermec data
collection network. For help using the SmartSystems Console
with your CN2As, see these sections:
• “Configuring the CN2A With SmartSystems Console” on
page 38
• “Installing Applications Using the SmartSystems Console”
on page 93
• “Using the SmartSystems Console to Upgrade the CN2A”
on page 115
• The blue Ready-to-Work indicator appears as an icon in the
CN2A taskbar. For details, see “Understanding the Screen
Icons” on page 15.
CN2A Features, Applications, and Accessories
The CN2A includes these features:
• 802.11b/g radio (optional)
• 1D linear imager (optional)
• CCX v2.0 certification
•IPv6 support
• .NET Compact Framework
• 64MB flash/128MB RAM memory
®
• 400 MHz Intel
• 18-key numeric keypad or 10-key scroll keypad
• Quarter VGA color display with touch screen
XScale™ processor
• Simplified Chinese, Traditional Chinese, Japanese, Korean,
CN2A Mobile Computer User’s Manual 3
and Thai fonts
Page 20

Chapter 1 — Using the CN2A Mobile Computer
The CN2A includes these applications:
• CE Internet Explorer 6
• CE Media Player
•Inbox
• ScanDemo (optional)
•Transcriber
• Wavelink Avalanche Enabler
•WordPad
• Remote Desktop Connection
For a complete list of accessories, see “Accessories for the CN2A”
on page 130.
Identifying the Optional Features Installed in Your CN2A
Before you continue learning to use your CN2A, you need to
determine which optional features are installed in your CN2A:
• 802.11b/g radio
• Numeric or scroll keypad
• 1D linear imager
Does Your CN2A Contain an 802.11b/g Radio?
How to Determine Description In This Manual
Look at the configuration number
(CN) on the label inside the
battery compartment. For help
removing the battery door and the
battery, see “Removing the
Battery” on page 7.
If the CN ends in 8xx, your CN2A
contains a radio. For example,
CN2A21E10N2804.
If the CN ends in 000, your
CN2A does not contain a radio.
For example, CN2A11E10N2000.
You have a wireless CN2A,
which can communicate in
a wireless network.
You have a batch CN2A,
which requires a modem
dock or USB client dock
to communicate with a
network.
For details about wireless
communications, see
“Configuring 802.11b/g Radio
Communications” on page 45.
For details about batch
communications, see
“Configuring USB
Communications” on page 44.
4 CN2A Mobile Computer User’s Manual
Page 21
Chapter 1 — Using the CN2A Mobile Computer
Does Your CN2A Contain a Numeric or Scroll Keypad?
How to Determine Description In This Manual
The numeric keypad has 18
keys.
The scroll keypad has 10 keys. You can use the arrow keys to
You can ty pe numbe rs an d
letters, and you can access
function keys (such as F1).
move through applications,
and you can access function
keys (such as F1).
For details, see “Using the
Keypad” on page 9.
For details, see “Using the
Scroll Keypad” on page 11.
Does Your CN2A Scan Bar Codes?
How to Determine Description In This Manual
The top of the CN2A contains
a clear scanner window.
The top of the CN2A does not
contain a clear scanner
window.
You can scan bar codes with
your CN2A.
You cannot scan bar codes
with your CN2A.
For details, see “Scanning Bar
Codes” on page 22.
Ignore all references to
scanning bar codes in this
manual.
Using the Battery
The CN2A uses a lithium-ion battery as its main power source.
You must fully charge the main battery before you can use the
CN2A.
While you change the battery, the backup battery maintains the
computer’s status, memory, and real-time clock for at least 5
minutes.
The lithium-ion battery pack that is used in this device may
present a fire or chemical burn hazard if it is mistreated. Do
not disassemble it, heat it above 100°C (212°F), or incinerate
it.
Dispose of used battery packs promptly. Keep away from
children. Contact your local Intermec sales representative for
replacement batteries.
CN2A Mobile Computer User’s Manual 5
Page 22
Chapter 1 — Using the CN2A Mobile Computer
Several factors determine the life of your battery, such as extreme
temperatures and your usage.
Installing and Charging the Battery
Make sure you fully charge the battery before you use your
CN2A. To charge the battery, you need to install it in the CN2A
and place the CN2A in a dock connected to external power.
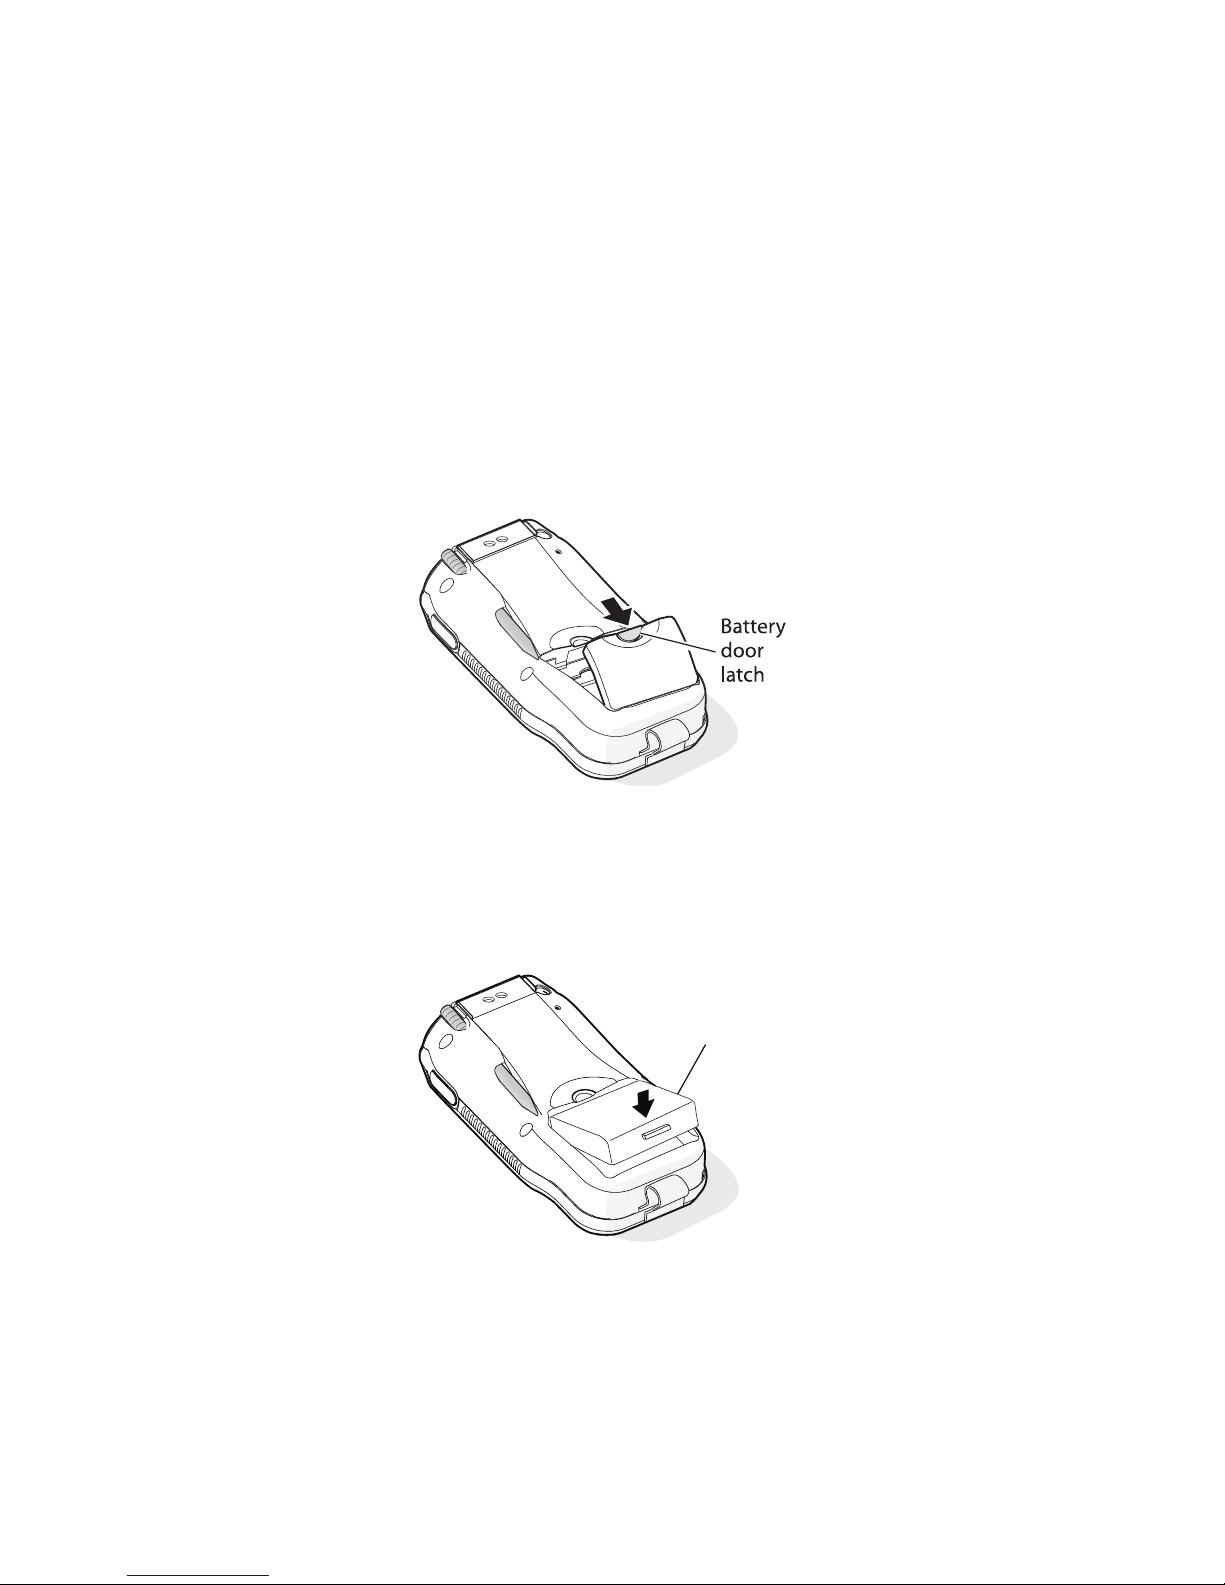
To install and charge the battery
1 Push down on the battery door latch, and pull up on the
battery door.
2 Remove the battery door and set it aside.
3 Align the battery contacts, and insert the battery in the
battery compartment. Press down on the battery until it clicks
into place.
Battery
4 Replace the battery door.
6 CN2A Mobile Computer User’s Manual
Page 23
Chapter 1 — Using the CN2A Mobile Computer
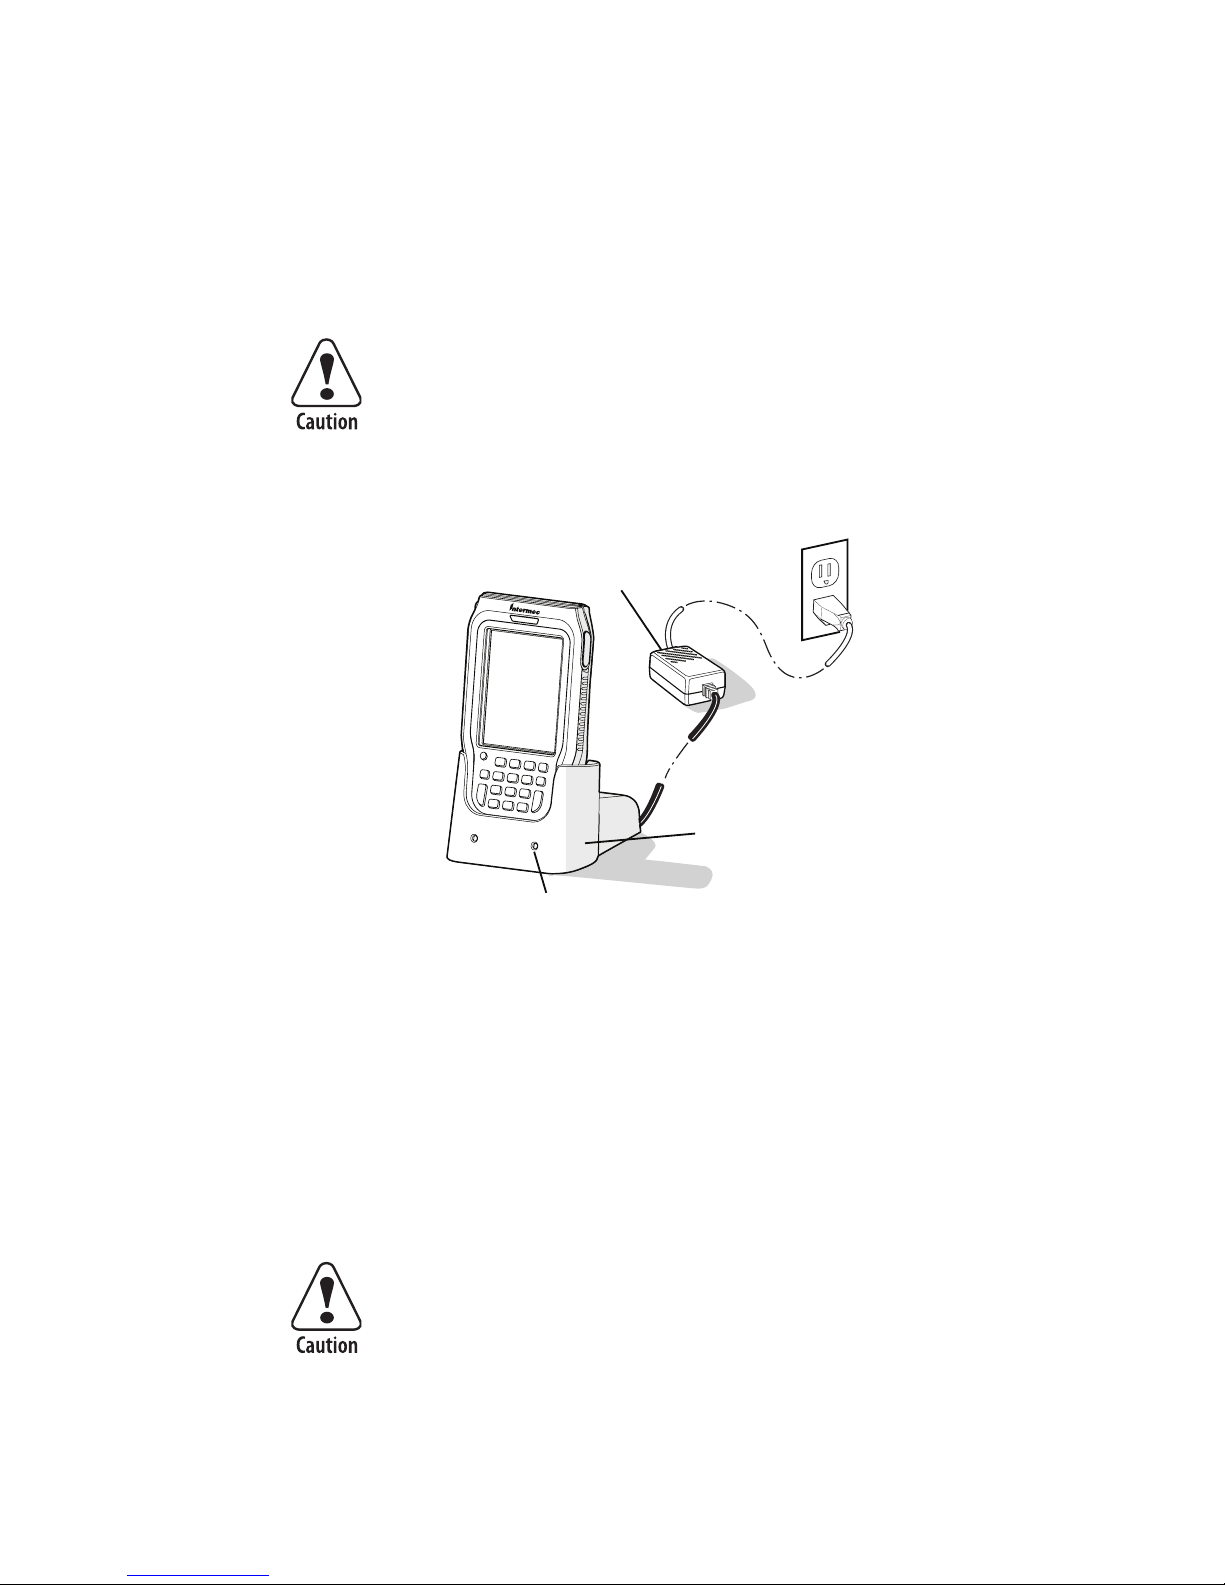
5 Connect the CN2A power supply (Model 074246) to the
power connector on the back of the CN2 USB client dock
(Model AD7) or the CN2 modem dock (Model AD8). For
help, see the instructions that shipped with the dock.
You must use only the Intermec power supply approved for
use with the CN2A. Using any other power supply will
damage the CN2A.
6 Connect the power cord to the CN2 power supply.
AC power
supply
CN2
7 Connect the power cord to an AC power outlet. The green
8 Place the CN2A in the dock. The battery is fully charged in
Removing the Battery
Follow these instructions to remove the battery from the CN2A.
Use only the stylus to remove the battery. If you use any other
tool or method to remove the battery, you may damage the
battery or the CN2A.
USB client dock
Power
light
Power light on the dock turns on.
approximately 4 hours.
CN2A Mobile Computer User’s Manual 7
Page 24
Chapter 1 — Using the CN2A Mobile Computer
Removing the main battery when the backup battery low or
critically low icon appears on the task bar may cause your
CN2A to cold boot and you may lose data.
When you remove the main battery, the backup battery
maintains your data for several minutes. If you remove the
main battery when the backup battery is low, or if you fail to
install a charged main battery within a few minutes, you may
lose important data or applications.
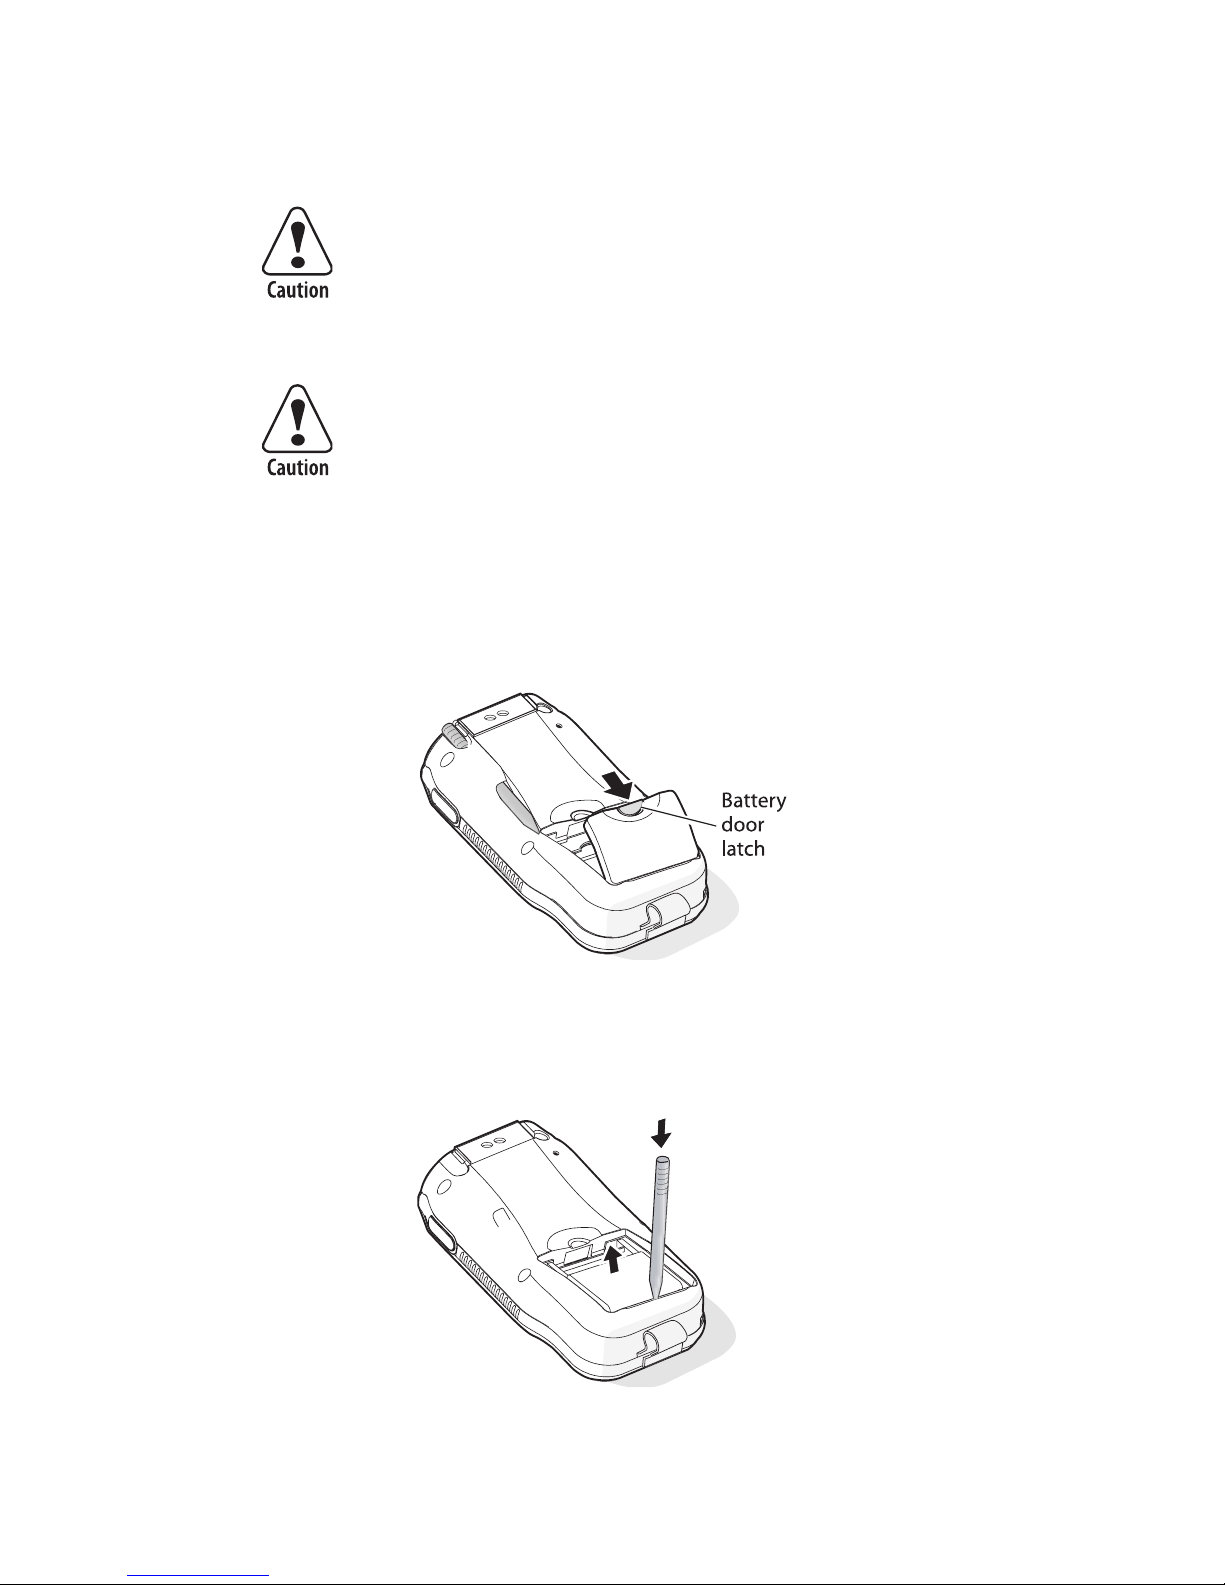
To remove the battery
1 Push down on the battery door latch, and pull up on the
battery door.
2 Remove the battery door and set it aside.
3 Insert the stylus between the battery and the CN2A case, and
press straight down until the battery is released.
8 CN2A Mobile Computer User’s Manual
Page 25
4 Lift the battery out of the battery compartment.
Maximizing Battery Life
There are several things that you can do to maximize the life of
your fully charged battery.
• Set the Backlight Timeout to 10 seconds.
• Verify that Radio Power Management is enabled (Fast PSP).
Enabling radio power management allows your radio to
switch between awake and sleep modes based on network
traffic.
• Verify that each setting under Power Management has a value
of 1 minute for a combined automatic shutoff time of 3
minutes.
You can use Intermec Settings to easily make all of these
configuration changes. For help, see
Locally With Intermec Settings” on page 34.
Chapter 1 — Using the CN2A Mobile Computer
“Configuring the CN2A
Checking the Battery Status
The easiest way to tell the status of your battery is to look at the
battery icon on the taskbar of your CN2A. For help locating the
taskbar, see the illustration on
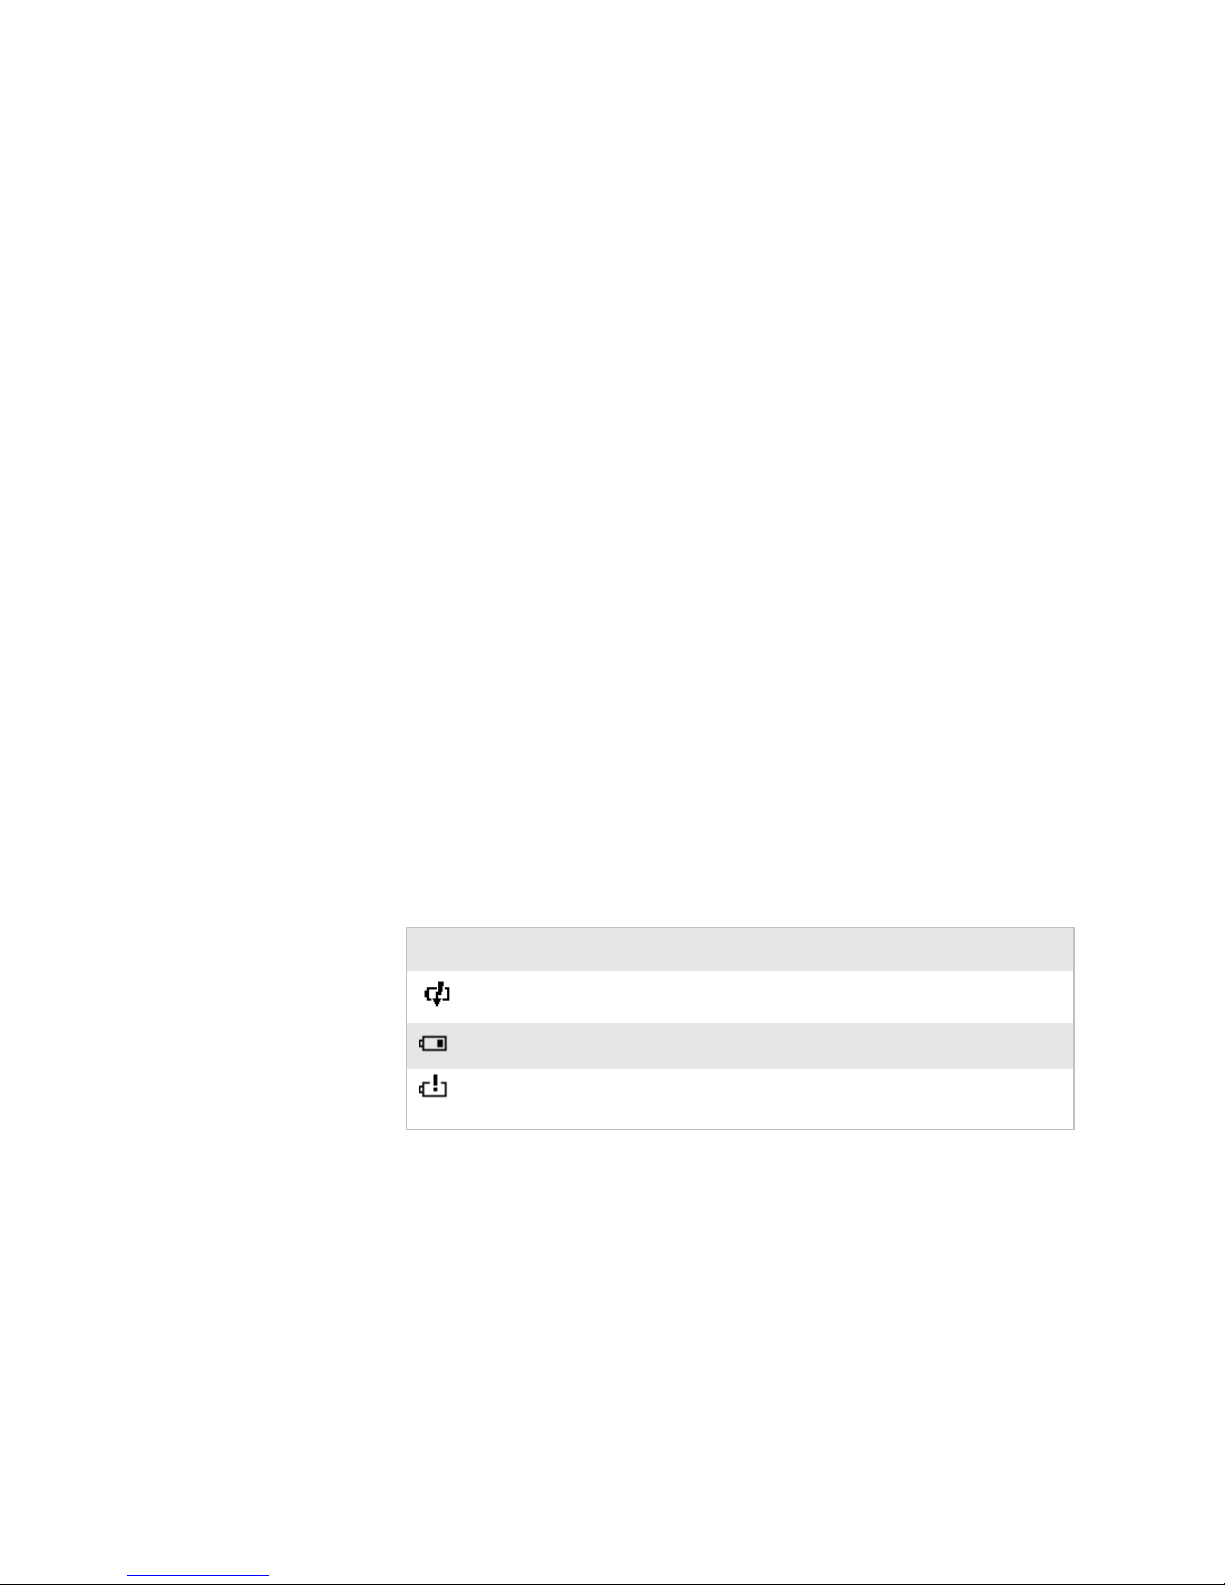
Battery Icon Status
Icon Status
The battery is charging.
The battery is low. You need to charge the battery soon.
The battery is critically low. You need to charge the battery
now.
Using the Keypad
The CN2A has either an 18-key numeric keypad or a 10-key
scroll keypad.
page 13.
Using the Numeric Keypad
You enter all of the characters and functions printed on the keys
just like you would on a
CN2A Mobile Computer User’s Manual 9
standard keyboard.
Page 26
Chapter 1 — Using the CN2A Mobile Computer
Power
key
Orange
key
T
A
B
F1 F3 LockF2
1
F4 F6F5
GHI MNOJKL
4
F7 F9F8
PQRS WXYZTUV
7
Space Alt
2
5
8
0
DEF CapsABC
ESC
3
Green
key
6
9
F12F10 F11
.
E
N
T
E
R
Enter
key
CN2A 18-Key Numeric Keypad
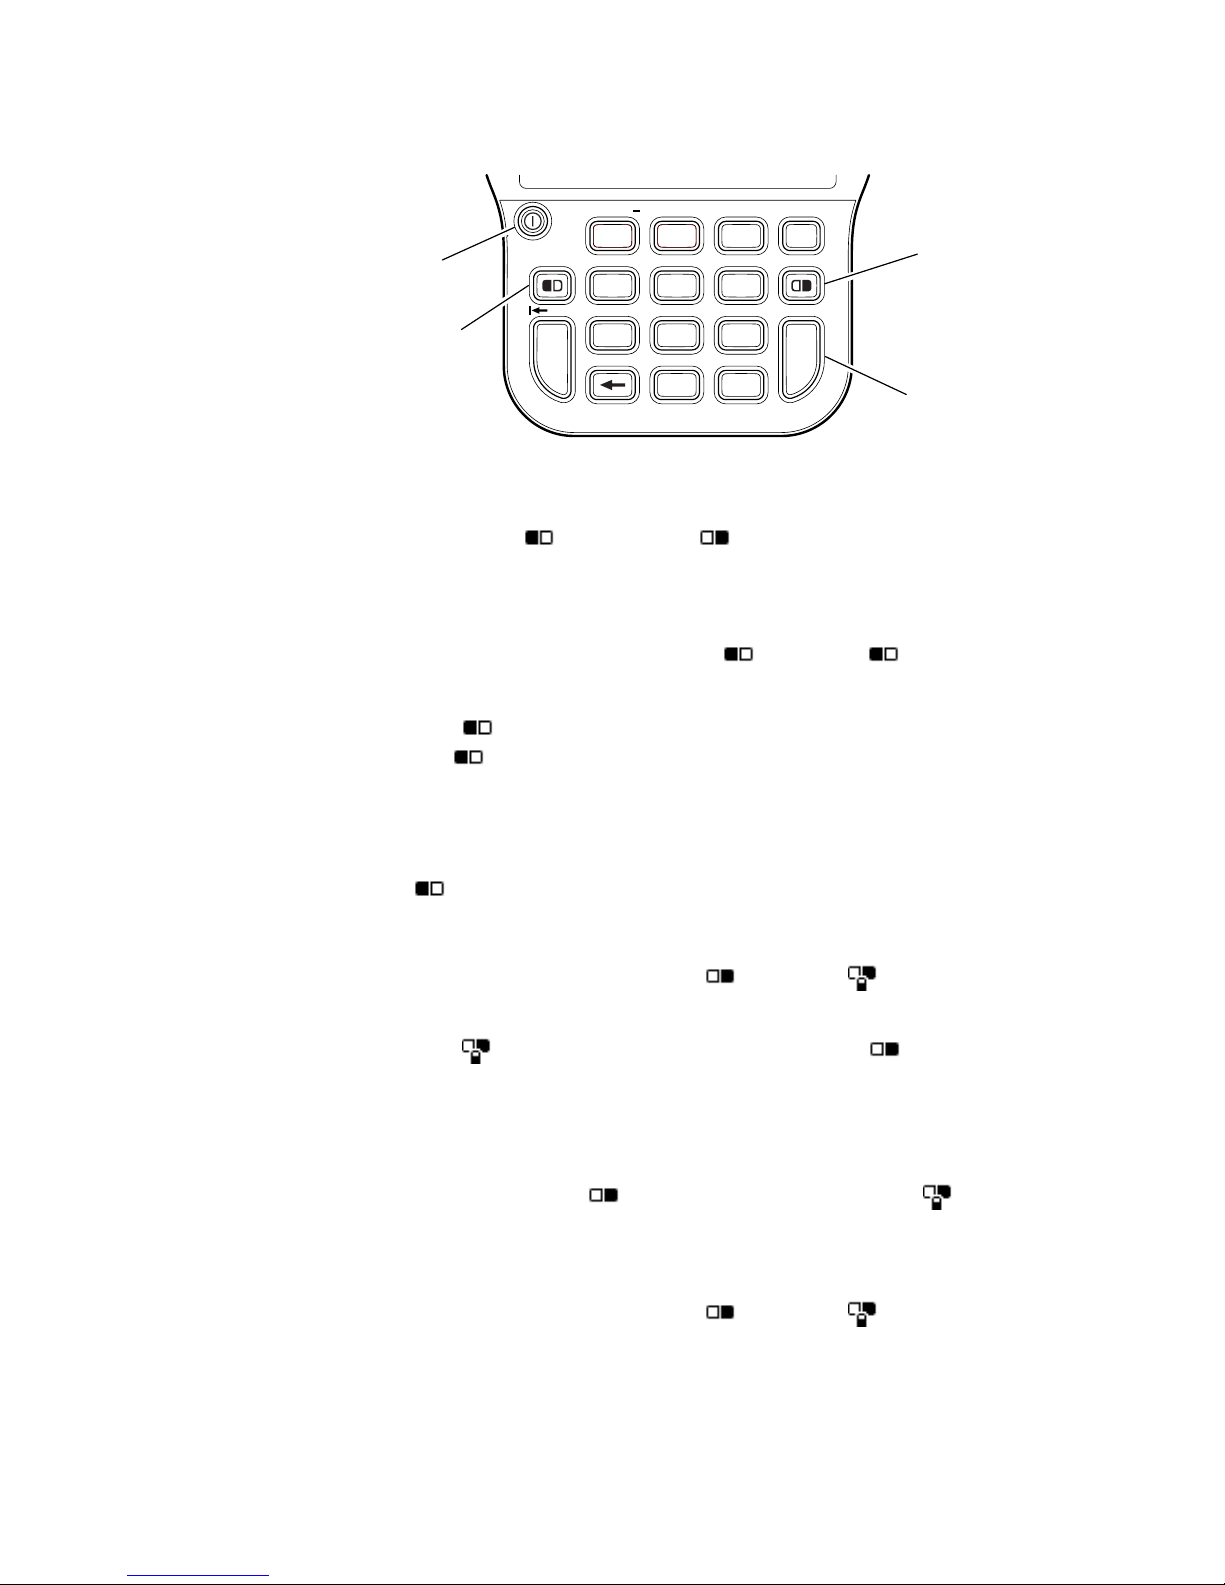
The Orange ( ) and Green ( ) keys let you access the
additional functions printed on the keypad overlay.
To access functions printed in orange on the keypad overlay
1 Press and release the Orange ( ) key. The icon appears
in the taskbar and Orange mode is enabled.
The icon remains on until you press another key or press
the key again.
2 Press and release the key below the function printed in
orange. For example, press the 5 key to access the F5
function, which refreshes the selected folder or desktop. The
icon turns off.
To access characters printed in green on the keypad overlay
1 Press and release the Green ( ) key. The icon appears in
the taskbar and Green mode is locked.
The icon remains on until you press the key again.
2 Press and release the key below the character printed in green.
For example, press the 2 key twice to type a lowercase b
character.
3 Press and release to disable Green mode. The icon
turns off.
To type uppercase characters
1 Press and release the Green ( ) key. The icon appears in
the taskbar and Green mode is locked.
10 CN2A Mobile Computer User’s Manual
Page 27

Chapter 1 — Using the CN2A Mobile Computer
2 Press and release the ESC key. The Caps Lock () icon
appears in the taskbar.
3 Type a few uppercase characters. For example, to type BYE,
follow these steps:
a Press the 2 key twice to type B.
b Press the 9 key three times to type Y.
c Press the 3 key twice to type E.
4 Press and release the ESC key. The icon turns off.
5 Press and release to disable Green mode. The icon
turns off.
To delete characters
1 Make sure neither nor appear in the taskbar.
2 Press the Backspace (A) key.
Using the Scroll Keypad
You enter all of the characters and functions printed on the keys
just like you would on a standard keyboard.
Power key
Orange key
CN2A 10-Key Scroll Keypad
The Orange ( ) key lets you access the additional functions
printed on the keypad overlay.
ESC
ENTER
Scan button
Arrow keys
(4 places)
Enter key
To access functions printed on the keypad overlay
CN2A Mobile Computer User’s Manual 11
1 Press and release the Orange ( ) key. The icon appears
in the taskbar and Orange mode is enabled.
Page 28

Chapter 1 — Using the CN2A Mobile Computer
2 Press and release the key below the function printed on the
keypad overlay. For example, press the key again to access
the F5 function, which refreshes the selected folder or
desktop. The icon turns off.
If you do not press another key within 3 seconds of pressing the
key, the icon turns off and Orange mode is disabled.
Using the Power Key
The Power key is the round yellow key in the upper left corner of
both keypads.
Actions You Can Perform With the Power Key
Action Do This Description
To turn on the CN2A Press and release the
Power key.
To turn off the CN2A Press the Power key
for 2 to 3 seconds
and then release it.
To toggle the backlight Press the Power key
for 5 to 6 seconds
and then release it.
To warm boot the
CN2A
Press the Power key
for 10 seconds (until
the backlight flashes)
and then release it.
Your CN2A resumes where it was when you
turned it off. If you are using WPA or 802.1x
security, the computer may need to
reauthenticate before it starts your application.
If your CN2A does not resume after you press
the Power key, your battery may be too low to
supply power. Replace or charge the battery. If
replacing or charging the battery does not solve
the problem, see “Booting the CN2A” on
page 111.
Your CN2A enters Suspend mode. In Suspend
mode, the CN2A continues to supply power to
all memory, but turns off power to most
hardware. This power-saving feature is designed
to prolong battery life.
The CN2A backlight toggles (turns on or off )
but the CN2A continues running.
For details, see “Warm Booting the CN2A” on
page 111.
12 CN2A Mobile Computer User’s Manual
Page 29
Using the Touch Screen
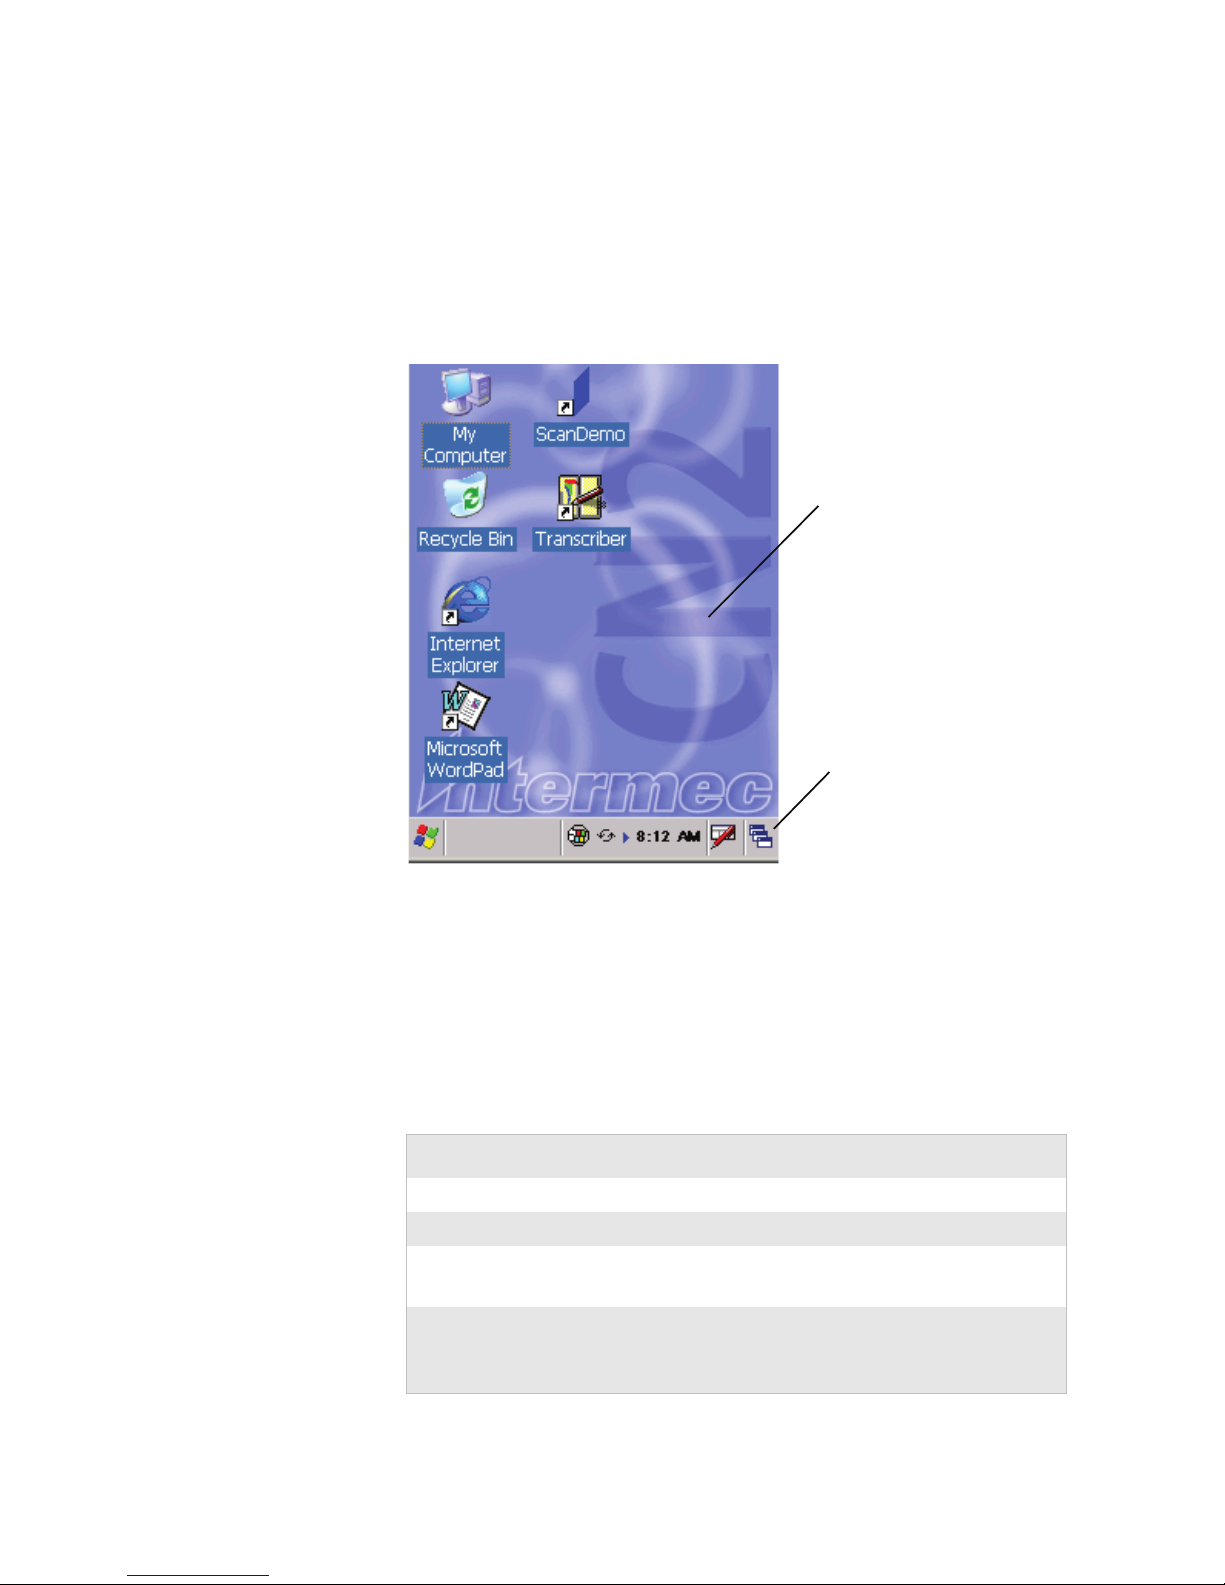
The CN2A has a color touch-screen display. The screen is 240 x
320 pixels. The desktop is 240 x 300 pixels and the taskbar is 240
x 20 pixels. In addition, the screen supports Unicode characters,
user-programmable fonts, and bitmap graphics.
Chapter 1 — Using the CN2A Mobile Computer
Desktop
CN2A Start Screen
Using the Touch Screen and Stylus
Your CN2A has a stylus for selecting items and entering
information. Use the stylus in place of a mouse.
Functions You Can Perform With the Stylus
Action Description
Tap Touch the screen once with the stylus to select items.
Double-tap Touch the screen twice with the stylus to open items.
Drag Hold the stylus on the screen and drag across the
screen to select text and images.
Tap a nd hol d Tap and hold the stylus on an item to see a list of
actions available for that item. On the pop-up menu
that appears, tap the action you want to perform.
Taskbar
CN2A Mobile Computer User’s Manual 13
Page 30

Chapter 1 — Using the CN2A Mobile Computer
Understanding the Desktop
As illustrated on the previous page, the Start screen has two
distinct areas:
• The desktop displays shortcuts to some of the applications
installed on the CN2A.
• The taskbar displays the Start menu icon, the time, the
keyboard icon, and the desktop icon the first time you turn
on the CN2A.
Most of the default shortcuts on the desktop are standard
Windows CE applications. However, Intermec provides shortcuts
to two additional applications:
• ScanDemo is a simple application you can use to verify that
your imager is working correctly. (This application is installed
only if your CN2A has a scanner.) For help, see “Using the
ScanDemo Application” on page 23.
• Transcriber enables you to write on the screen with your
stylus, and then it converts your writing to text. For help, see
the next section, “Using Transcriber to Write on the Touch
Screen.”
Using Transcriber to Write on the Touch Screen
In a program that accepts writing, such as Microsoft WordPad,
you can use your stylus to write directly on the screen. Write the
way you do on paper (print or cursive) and the Transcriber
program converts your writing to text.
To turn on Transcriber
• Double-tap the Transcriber shortcut on the desktop or go to
Start > Programs > Tr an s cr ib er.
The Transcriber Intro box appears and an icon ( ) appears
in the taskbar with a dark gray background.
To turn off Transcriber
• Tap the icon in the taskbar.
The background of the icon turns light gray to match the
taskbar and using the stylus does not produce a line on your
desktop.
14 CN2A Mobile Computer User’s Manual
Page 31

Chapter 1 — Using the CN2A Mobile Computer
To close Transcriber
1 Tap and hold the icon in the taskbar until the menu
appears.
2 Ta p Close Transcriber.
To select text
1 Tap and hold the stylus next to the text you want to select
until the insertion point appears.
2 Without lifting, drag the stylus across the text you want to
select.
To get help for Transcriber
1 Tap a n d ho l d the icon in the taskbar until the menu
appears.
2 Ta p Help. The help system for Transcriber appears on the
screen.
Calibrating the Screen
If the screen does not respond when you tap it with the stylus,
you may need to recalibrate the screen.
To calibrate the screen on a CN2A with the numeric keypad
1 Press and hold the Orange ( ) key and then press Enter.
Release both keys. The calibration screen appears.
2 Follow the instructions to calibrate the screen.
To calibrate the screen on a CN2A with the scroll keypad
1 Press and hold the Orange ( ) key and then press U.
Release both keys. The calibration screen appears.
2 Follow the instructions to calibrate the screen.
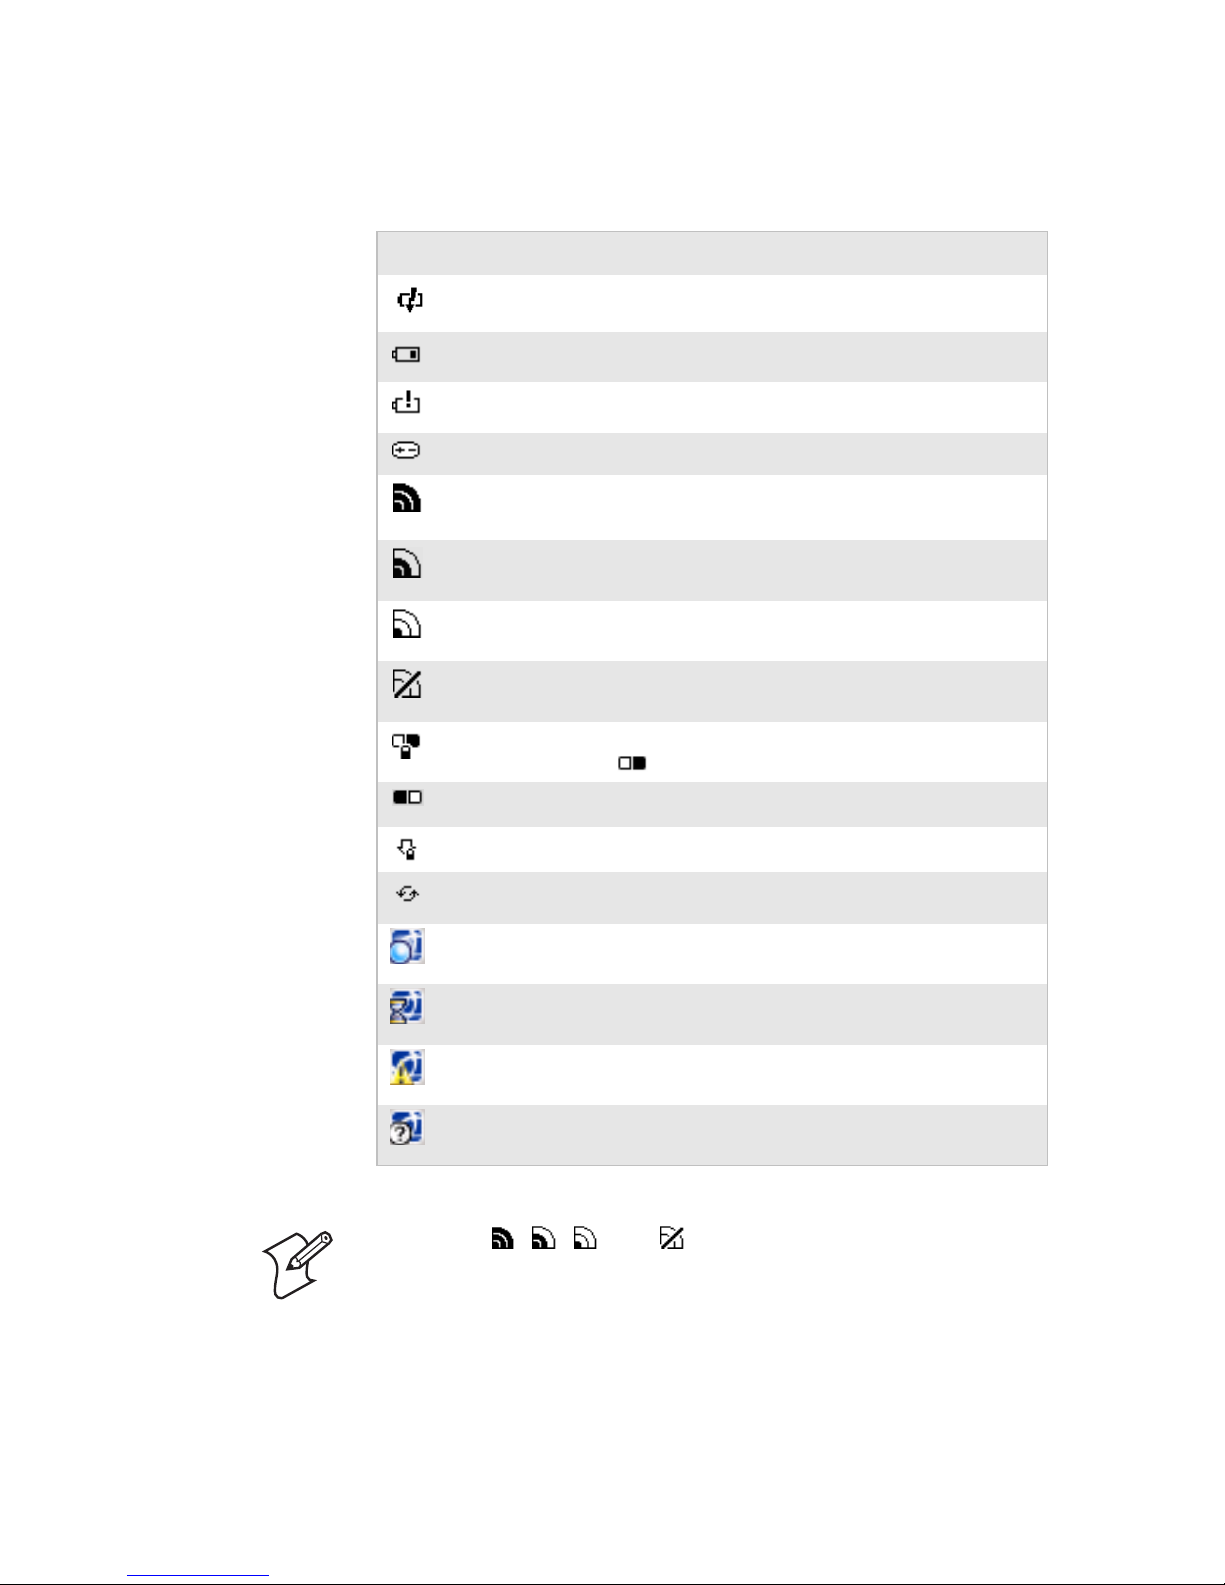
Understanding the Screen Icons
This table describes the screen icons that appear in the taskbar.
Standard Microsoft icons are not included in this table.
CN2A Mobile Computer User’s Manual 15
Page 32
Chapter 1 — Using the CN2A Mobile Computer
CN2A Screen Icons
Icon Description
Battery is charging.
Battery is low. Charge the battery soon.
Battery is critically low. Charge the battery now.
Backup battery is low. Charge the battery now.
The CN2A is authenticated with a strong connection to the
access point.
The CN2A is authenticated with a good connection to the
access point.
The CN2A is authenticated with a weak connection to the
access point. Try moving closer to an access point.
No connection to the access point. For help, see “Problems
With Wireless Connectivity” on page 102.
Green mode is enabled and locked. To disable Green mode,
you must press
Orange mode is enabled.
again.
Caps Lock is enabled.
The CN2A is connected using ActiveSync.
The CN2A is communicating with an application that
controls the Ready-to-Work icon.
The CN2A is busy. This icon appears only while you are
using theSmartSystems Console to upgrade the CN2A.
The CN2A is attempting to connect to an application that
controls the Ready-to-Work icon.
The CN2A is not communicating with an application that
controls the Ready-to-Work icon.
Note: The , , , and icons are all versions of the
Network Connection icon. Each version indicates a different
network connection state.
16 CN2A Mobile Computer User’s Manual
Page 33
Chapter 1 — Using the CN2A Mobile Computer
Note: The , , , and icons are all versions of the
Ready-to-Work icon. Each indicates a different operational state.
However, at this time, no application running on the CN2A
controls these icons.
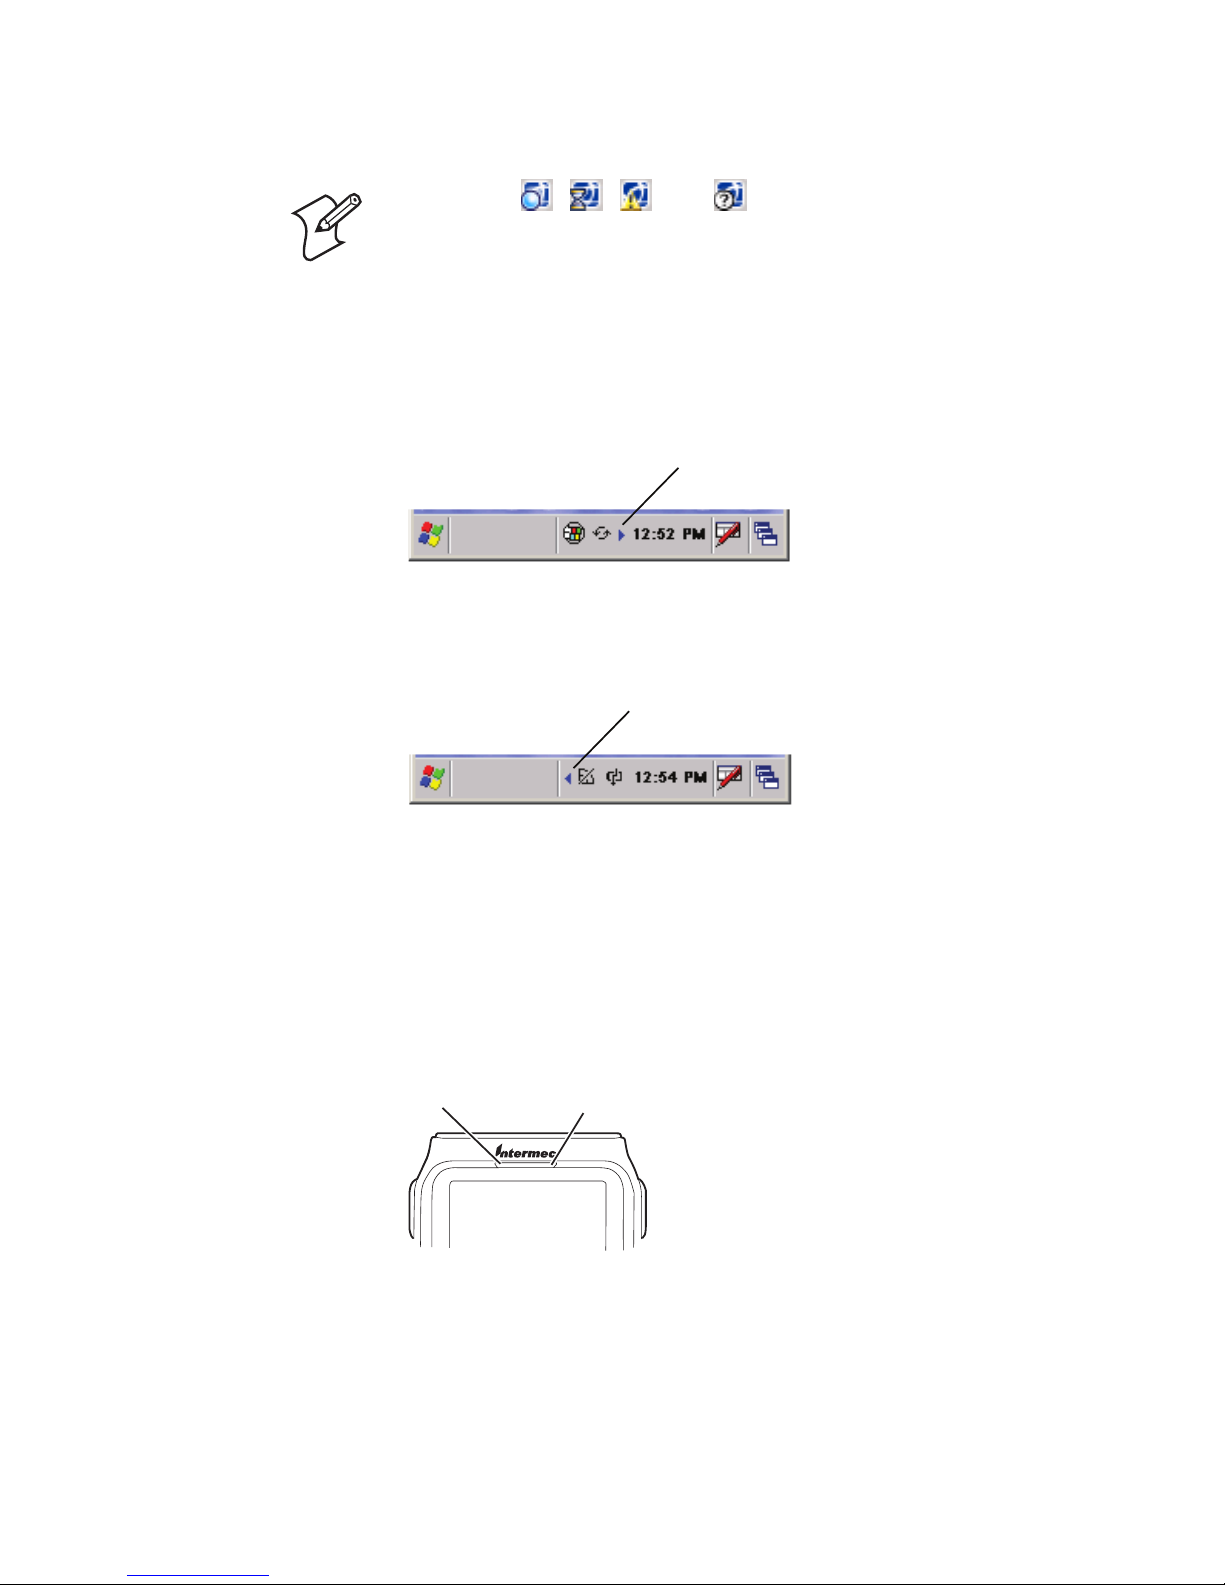
Only two screen icons are visible at one time. You can tap the
right arrow or left arrow to view additional icons, which are on
but not visible.
Tap the right arrow to view
more icons on the right.
Tap the Right Arrow: The CE Remote Display icon and the ActiveSync icon
are visible on the taskbar. Tap the right arrow to view additional icons.
Tap the left arrow to view
more icons on the left.
Tap the Left Arrow: The Network Connection icon and the Battery Charging
icon are visible on the taskbar. Tap the left arrow to view additional icons.
Understanding the Status Lights
The status lights on the CN2A turn on to indicate the status of
the battery or a successful decode of a bar code.
Battery
light
CN2A Status Lights: This illustration shows the location of the Battery and
Good Read lights.
The next table describes the status lights.
Good Read
light
CN2
CN2A Mobile Computer User’s Manual 17
Page 34

Chapter 1 — Using the CN2A Mobile Computer
Understanding the CN2A Status Lights
Light Color Description
Good Read Green This light turns on when the CN2A
Red This light turns on when you press one of
Battery Green When the CN2A is connected to a power
Orange When the CN2A is connected to a power
Red When the CN2A is connected to a power
successfully decodes a bar code.
the Side Scan buttons or the Scan button
on the scroll keypad.
source, this light turns on to indicate that
the battery is fully charged.
source, this light turns on if you cannot
charge the battery. The temperature may
not be within the charging range, or the
battery may be damaged.
source, this light turns on to indicate that
the battery is charging.
Understanding the Beeps
The CN2A uses beeps to provide you with audio feedback when
it performs some functions. For example, you hear a beep each
time you scan a valid bar code.
Understanding the CN2A Beeps
Beep Sequence What It Means
High beep, low beep You entered valid data or a valid command, or
Error beep (3 rapid
beeps)
Click You pressed a key.
You can change the beeper volume for your needs and
environment. You can set the beeper volume to Off, Low (quiet),
Medium (medium), High (loud), and Ver y high (very loud).
The default setting is Very high.
the CN2A decoded a bar code label.
You entered or scanned an invalid command.
Try entering or scanning the command again.
18 CN2A Mobile Computer User’s Manual
Page 35

Chapter 1 — Using the CN2A Mobile Computer
To change the beeper volume
1 Tap t h e Start icon and tap Intermec Settings. The Intermec
Settings application appears.
2 Ta p Device Settings > Beeper > Volu me.
3 Select a volume level.
4 Tap to save your settings and tap
Settings.
X to exit Intermec
Running Multiple Applications on the CN2A
You can simultaneously run several applications on your CN2A.
For example, you can check e-mail in your Inbox, view a web site
in Internet Explorer, and open a couple of documents in
WordPad. The last application that you open is the current task,
the one that is currently active on the screen.
The CN2A gives you two ways to manage multiple tasks:
• You can use the Task Manager to view, switch between, and
end tasks. For help, see the next section.
• You can use the Active Applications List to view and switch
between active tasks. For help, see “Using the Active
Applications List To Manage Multiple Active Tasks” on
page 21.
Using Task Manager to Manage Multiple Active Tasks
You can use Task Manager on the CN2A to view all the active
tasks, to switch to another active task, and to end a task. Task
Manager is especially helpful on the CN2A for switching
between several running tasks.
To start Task Manager on a CN2A with the numeric keypad
1 Press the key. The icon appears in the taskbar and
Green mode is locked.
2 Press and hold 0.
3 Press and hold TAB.
4 Release both keys. You have just pressed Alt-TAB. The Task
Manager screen appears.
CN2A Mobile Computer User’s Manual 19
Page 36
Chapter 1 — Using the CN2A Mobile Computer
5 (Optional) Press and release to disable Green mode. The
icon turns off.
To start Task Manager on a CN2A with the scroll keypad
• Hold while you press and release D. The Task Manager
screen appears.
To start Task Manager using the Control Panel
•Tap Start > Settings > Control Panel > System > Memory >
Active Programs. The Task Manager screen appears.
To use Task Manager
1 Press one of the keypad shortcuts described in the previous
procedures to make the Task Manager screen appear.
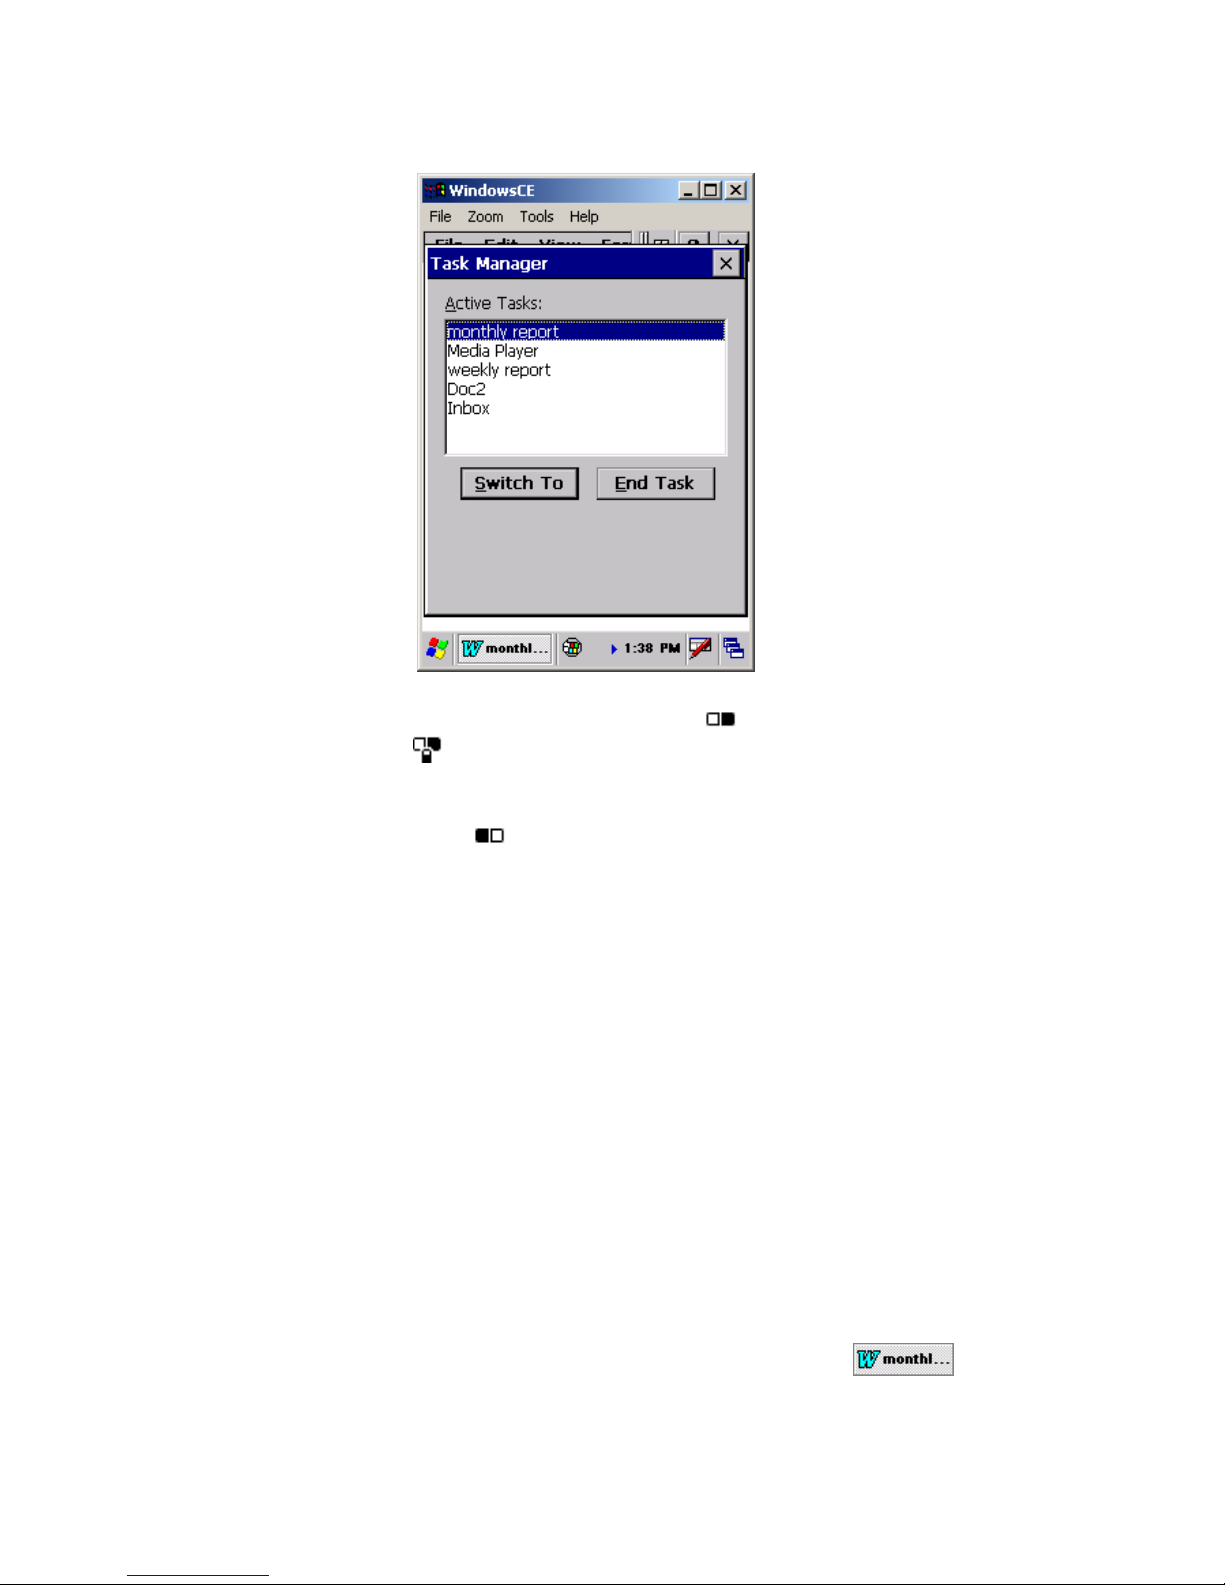
2 (Optional) View the list of active tasks. The tasks listed in the
Active Tasks box are currently running on the CN2A.
3 (Optional) Identify the current task. For example, in the
screen shown in Step 1, you can tell that editing the WordPad
file called monthly report is the current task because:
• monthly report is highlighted in the Active Tasks box.
• the WordPad logo and partial filename appear
20 CN2A Mobile Computer User’s Manual
in the taskbar.
Page 37
Chapter 1 — Using the CN2A Mobile Computer
4 (Optional) Switch to another active task using one of these
methods:
• Double-tap the task in the Active Tasks box. The Task
Manager screen closes, and the selected task becomes the
current task.
• Tap the task in the Active Tasks box and tap the Switch
To button. The Task Manager screen closes, and the
selected task becomes the current task.
5 (Optional) End a task by tapping the task in the Active Tasks
box and tapping the End Task button. The selected task ends,
the Task Manager screen closes, and you return to the current
task.
6 You need to tap
X to exit Task Manager only if you do not
switch to or end a task.
Using the Active Applications List To Manage Multiple Active Tasks
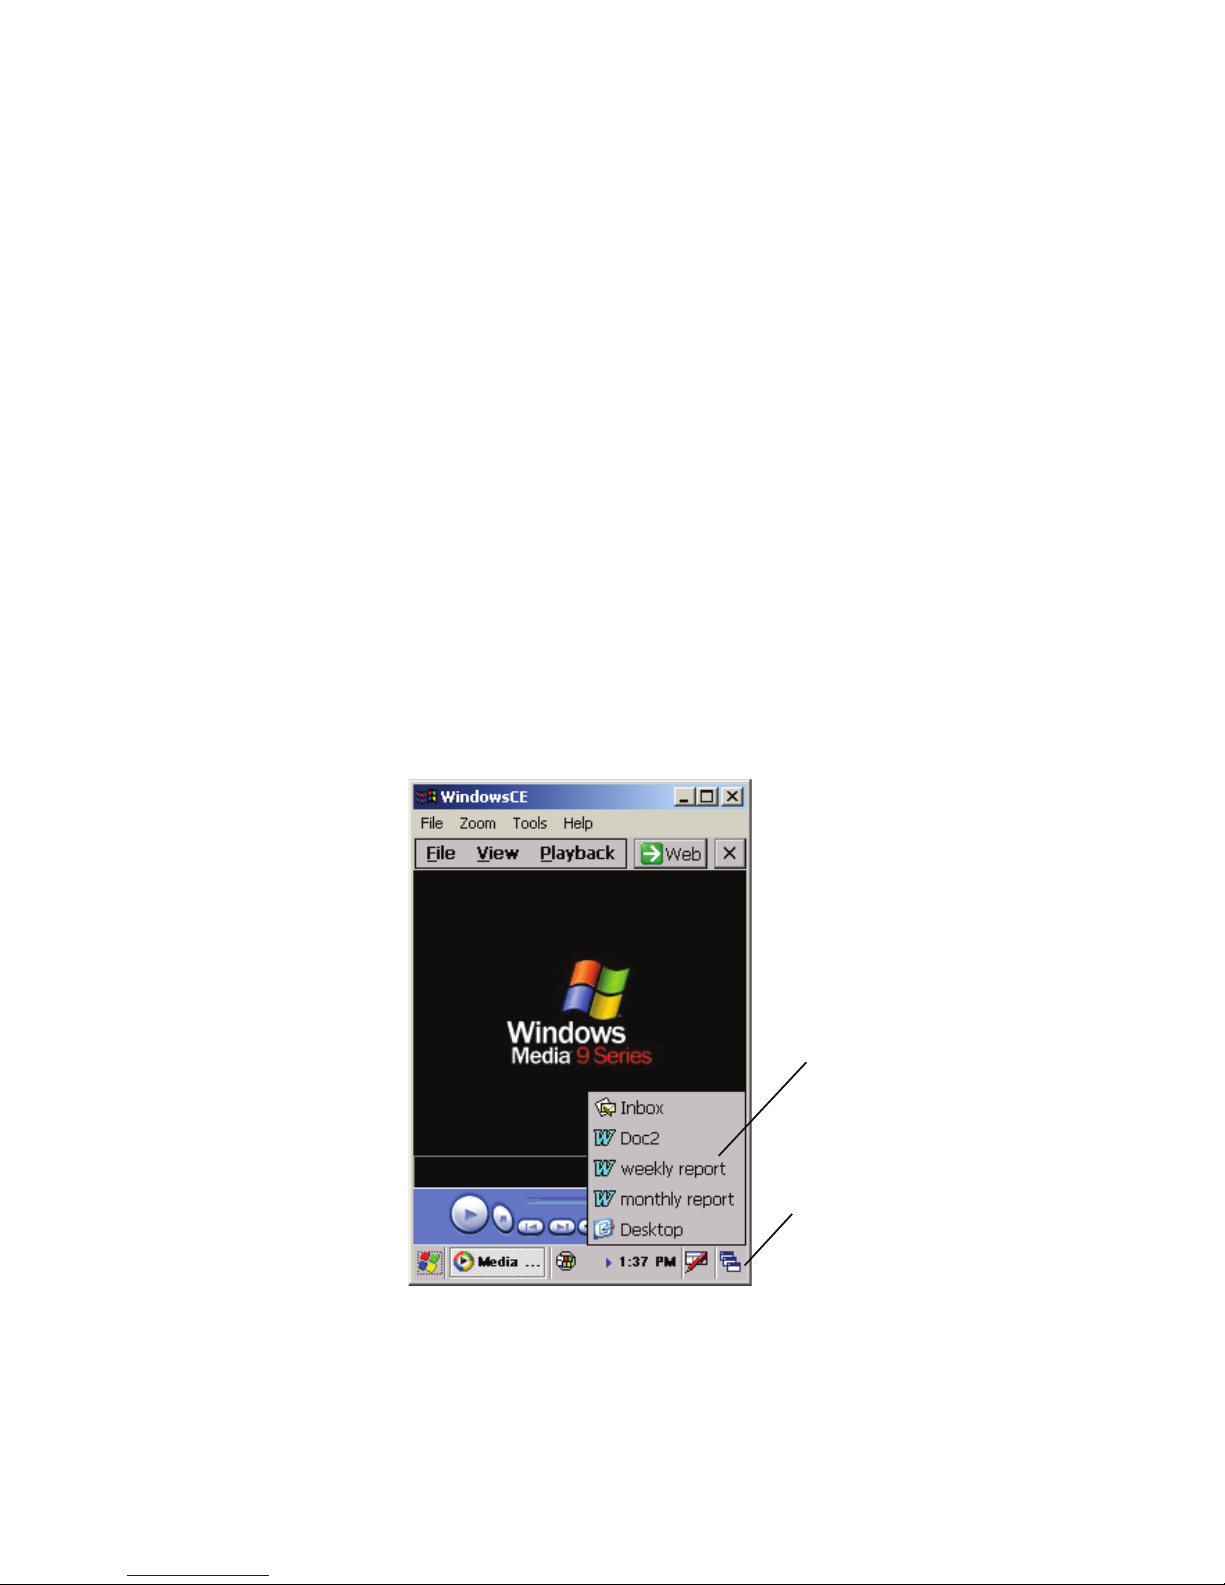
You access the active applications list by tapping the Active
Applications icon at the right end of the taskbar.
Active Applications list
Active Applications List: Tap the Active Applications icon to view the list of
active tasks. In this example, the current task is Media Player. The current task
is not included on the list.
CN2A Mobile Computer User’s Manual 21
Active Applications icon
Page 38

Chapter 1 — Using the CN2A Mobile Computer
A list of active tasks appears. The current task is not included on
the list.
You can perform these functions:
• To switch to another active task, tap the task in the list.
• To switch to the desktop, tap Desktop in the list.
• To return to the current task, tap the logo in the taskbar; in
this example, tap the Media player logo .
Scanning Bar Codes
If you have a scanner, you can use it to scan and enter bar code
data. The CN2A supports the scanning of 1D linear bar codes.
When you unpack the CN2A, all the supported bar code
symbologies are enabled:
•Codabar
•Code 39
•Code 128
• Interleaved 2 of 5
•UPC/EAN
•MSI
Use Intermec Settings to enable and disable symbologies. For
help using Intermec Settings, see
Locally With Intermec Settings” on page 34.
How to Scan a Bar Code
This section explains how to scan a bar code with your CN2A.
To scan a bar code label with the CN2A
1 Press the Power key to turn on the CN2A.
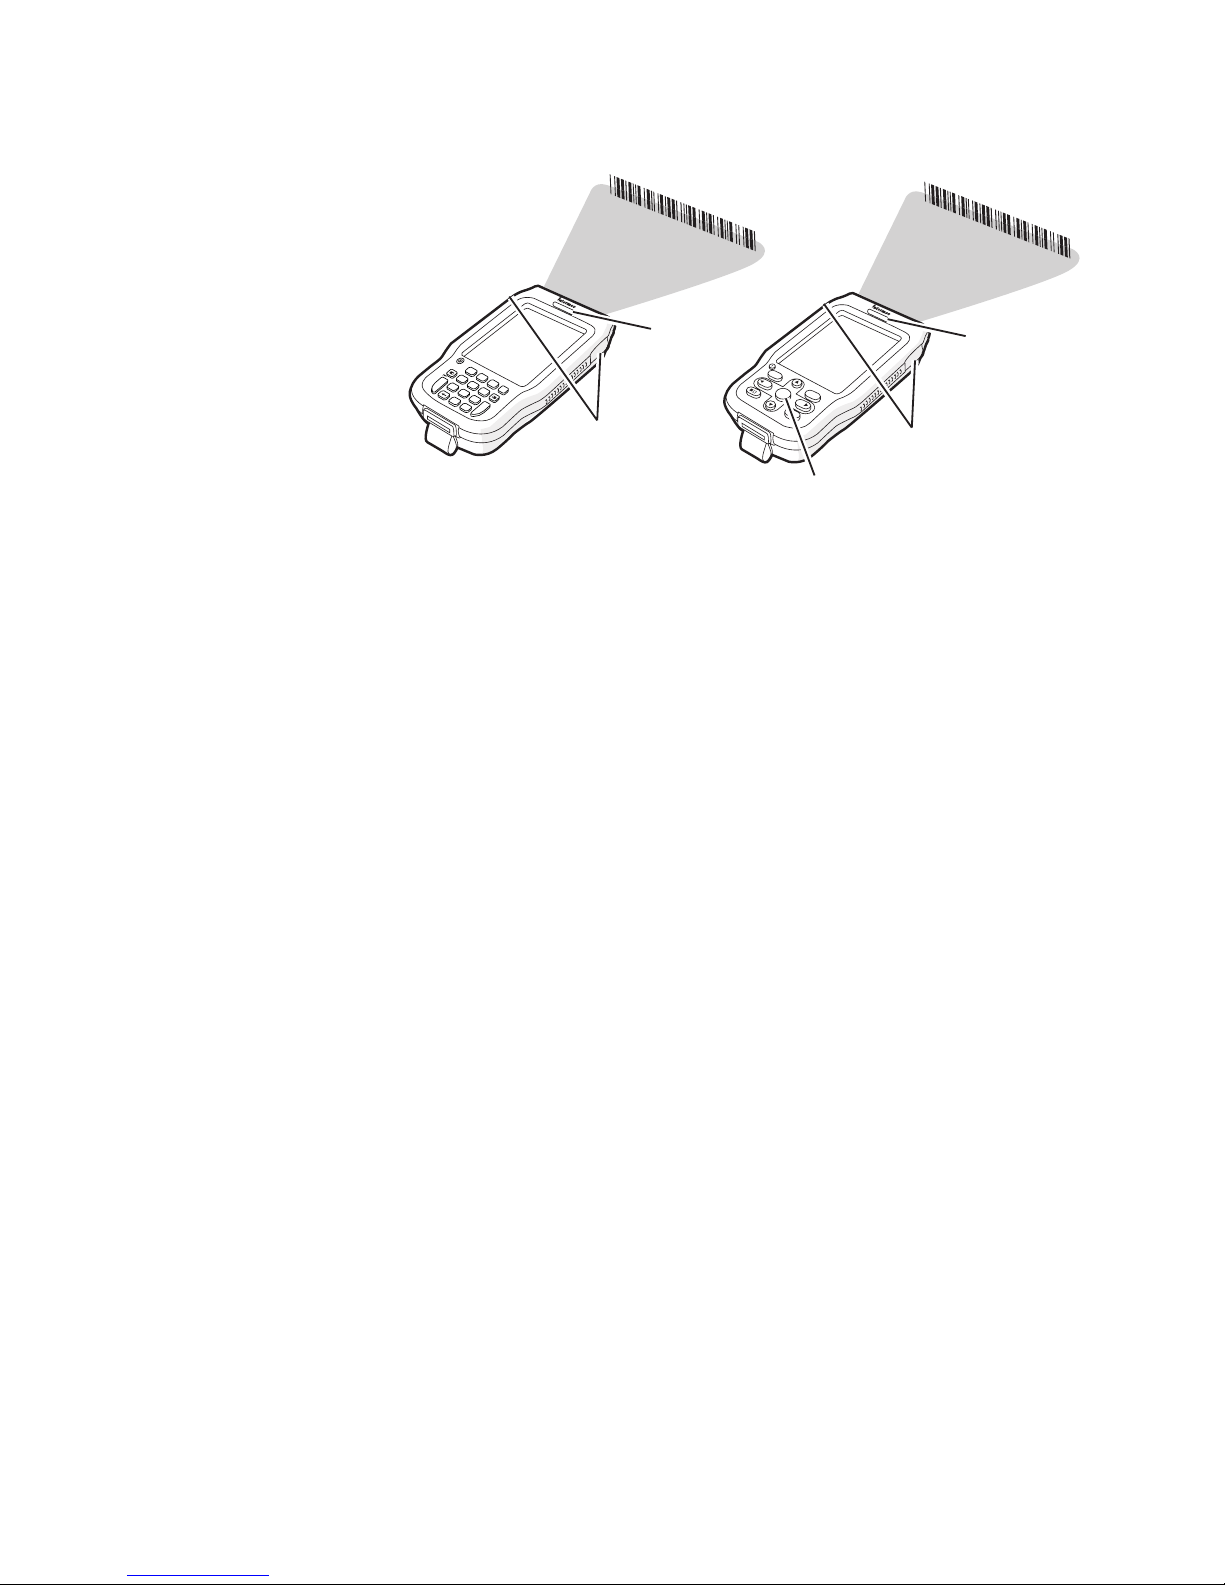
2 Point the scanner window at the bar code label and hold the
computer at a slight angle 15 to 25 cm (6 to 10 in) from the
label.
“Configuring the CN2A
22 CN2A Mobile Computer User’s Manual
Page 39
Chapter 1 — Using the CN2A Mobile Computer
CN2
Good
Read light
1
2
4
T
A
3
B
5
7
E
S
C
6
8
9
0
E
N
.
T
E
R
F1
S
C
A
F2
N
E
N
T
ER
Side Scan
buttons
CN2
Side Scan
buttons
Good
Read light
Scan
button
3 Press one of the Side Scan buttons or the Scan button on the
scroll keypad and center the red beam so that it falls across all
bars in the bar code label.
Use this test bar code:
Code 39 Test Bar Code
*123456*
*123456*
4 Release the Side Scan button or Scan button.
Using the ScanDemo Application
ScanDemo is an application that enables the CN2A to read bar
code labels and display the information encoded on the label
along with the symbology used to encode it.
To open ScanDemo
1 Double-tap the ScanDemo shortcut on the desktop. The
ScanDemo application opens.
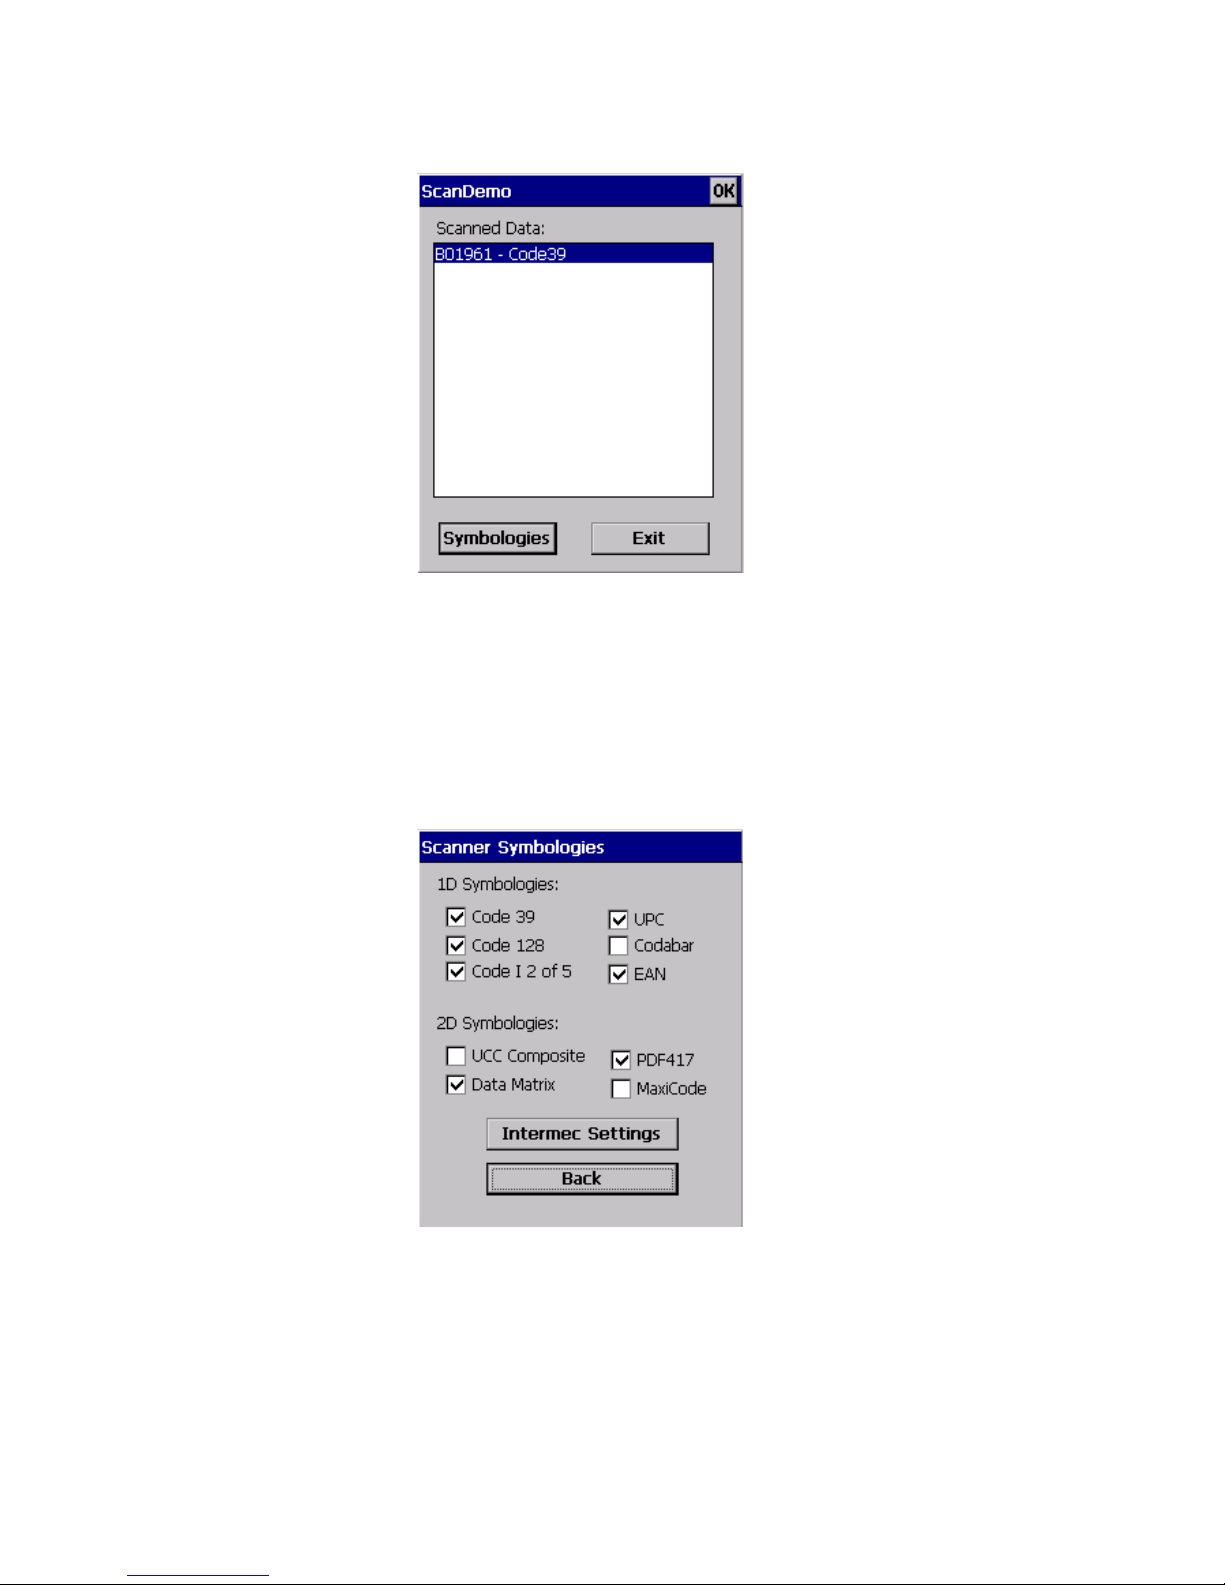
2 Scan a bar code label. The data and symbology appears on the
screen.
CN2A Mobile Computer User’s Manual 23
Page 40
Chapter 1 — Using the CN2A Mobile Computer
For help scanning a bar code label, see “Scanning Bar Codes”
on page 22. The information you scanned along with the
symbology used to encode it appears on the screen.
To enable or disable symbologies
1 From the ScanDemo window, tap the Symbologies button to
see the symbologies that are enabled.
2 Select or clear the symbologies you want to use and tap Back.
3 If you want to configure symbology parameters, tap Intermec
Settings. Intermec Settings appears on your screen.
24 CN2A Mobile Computer User’s Manual
Page 41

Chapter 1 — Using the CN2A Mobile Computer
4 From the Intermec Settings application, go to Scanners
Symbologies > Internal Scanner > Symbologies.
5 Select a symbology and modify its parameters.
6 Tap to save your settings and tap
X to exit Intermec
Settings. The Scanner Symbologies window appears.
7 Ta p Back.
8 Scan bar code labels.
Increasing File Storage With the Optional SD Card
You can use a SanDisk secure digital (SD) card to increase file
storage and install applications and files. The SD card slot is
located under the CN2A battery.
Note: The CN2A currently supports SanDisk SD cards only.
Intermec cannot guarantee that other SD cards will work with the
CN2A.
The following procedures explain how to:
•insert an SD card.
• access the files on an SD card.
• remove an SD card.
For help using an SD card to install applications and files, see
“Installing Applications Using the Optional SD Card” on
page 92.
To insert the SD card
1 Before inserting the SD card, you must attach one of the
pull-tabs that ships with the CN2A. An SD card without a
pull-tab can be very difficult to remove.
SD card
Pull-tab
2 Align the SD card as shown in the next illustration, and insert
the SD card into the slot.
CN2A Mobile Computer User’s Manual 25
Page 42
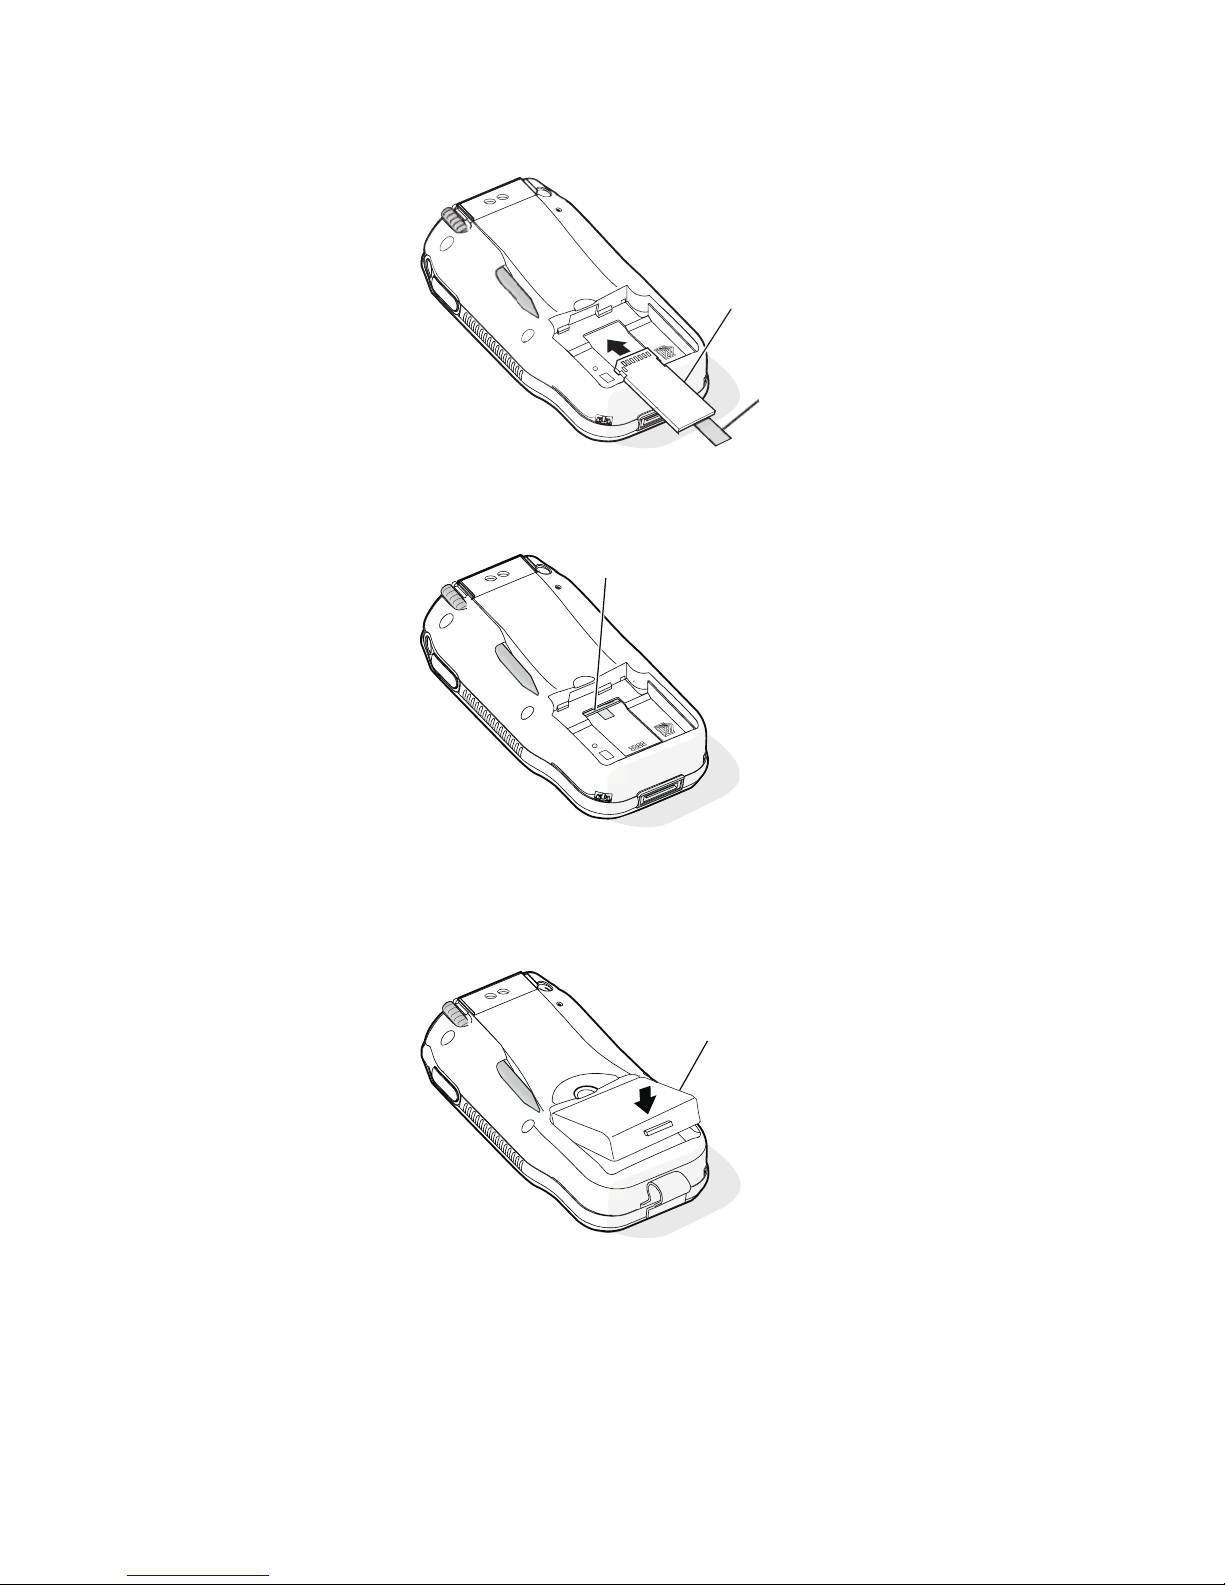
Chapter 1 — Using the CN2A Mobile Computer
3 Push the card into the slot until it is fully inserted.
Fully inserted
SD card
SD card
Pull-tab
4 Align the battery contacts as shown in the next illustration,
and insert the battery in the battery compartment. Press down
on the battery until it clicks into place.
Battery
5 Install the battery door.
26 CN2A Mobile Computer User’s Manual
Page 43
Chapter 1 — Using the CN2A Mobile Computer
To access files stored on the SD card
• If you have an SD card inserted in your CN2A, it appears as
the SDMMC Disk folder. To access this folder, double-tap
the My Computer icon on the desktop and then double-tap
the SDMMC Disk folder. You can copy files to and from this
folder just as you would any other folder on the CN2A.
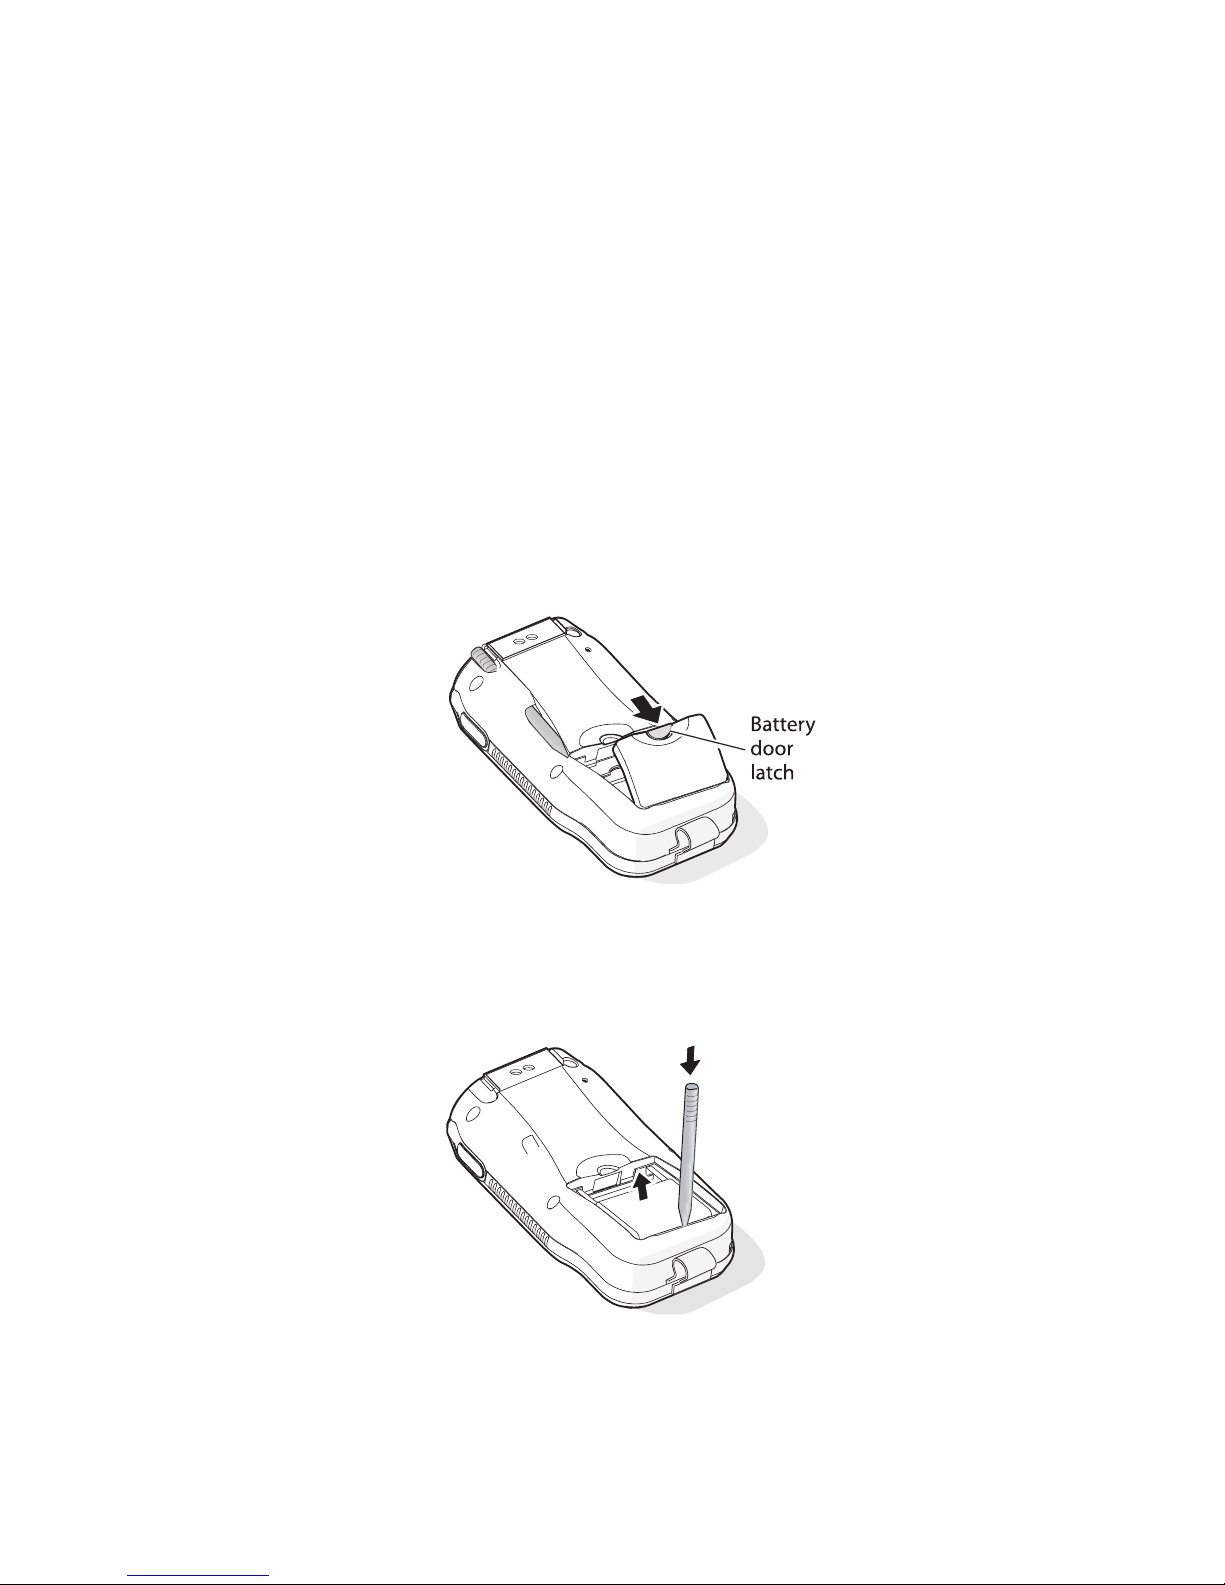
To remove the SD card
1 Press and hold the Power key for 2 to 3 seconds, and then
release the Power key to turn off the CN2A.
2 Place the CN2A face-down on a clean, flat, stable surface.
3 Push down on the battery door latch, and pull up on the
battery door.
4 Remove the battery door and set it aside.
5 Insert the stylus between the battery and the CN2A case, and
press straight down until the battery is released.
6 Remove the battery and set it aside.
CN2A Mobile Computer User’s Manual 27
Page 44
Chapter 1 — Using the CN2A Mobile Computer
d
r
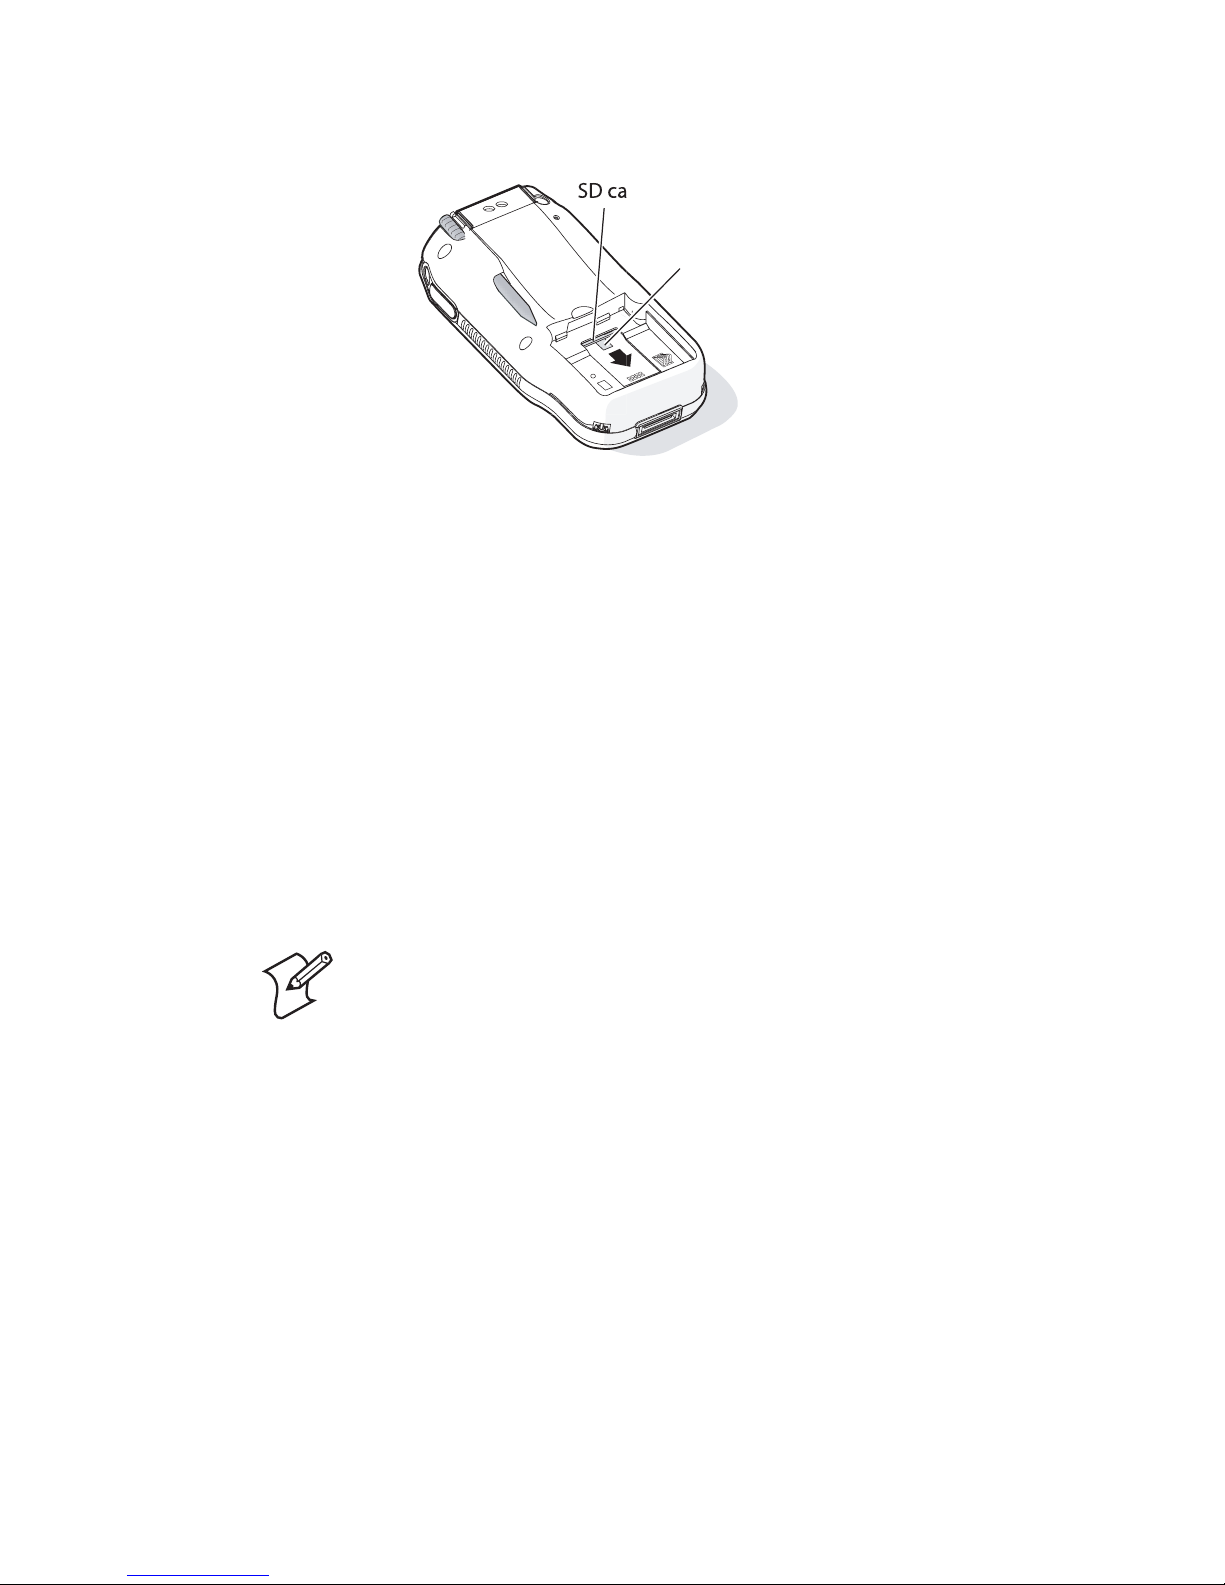
7 Pull the tab toward the bottom on the CN2A to remove the
SD card.
Attaching a Keyboard to the CN2A
If you prefer the convenience of using a keyboard with the
CN2A, you can attach a USB keyboard to the optional modem
dock.
Tab
You need these items:
• CN2 modem dock (Model AD8)
• CN2 power supply (Model 074246)
• Dell Model SK-8115 USB keyboard
or Logitech Model Y-BF37 USB keyboard
Note: The CN2A supports only the Dell Model SK-8115 and
Logitech Model Y-BF37 USB keyboards. Intermec cannot
guarantee that other USB keyboards will work with the CN2A.
To attach the USB keyboard
1 Read the CN2 Modem Dock Quick Start Guide (P/N 075481).
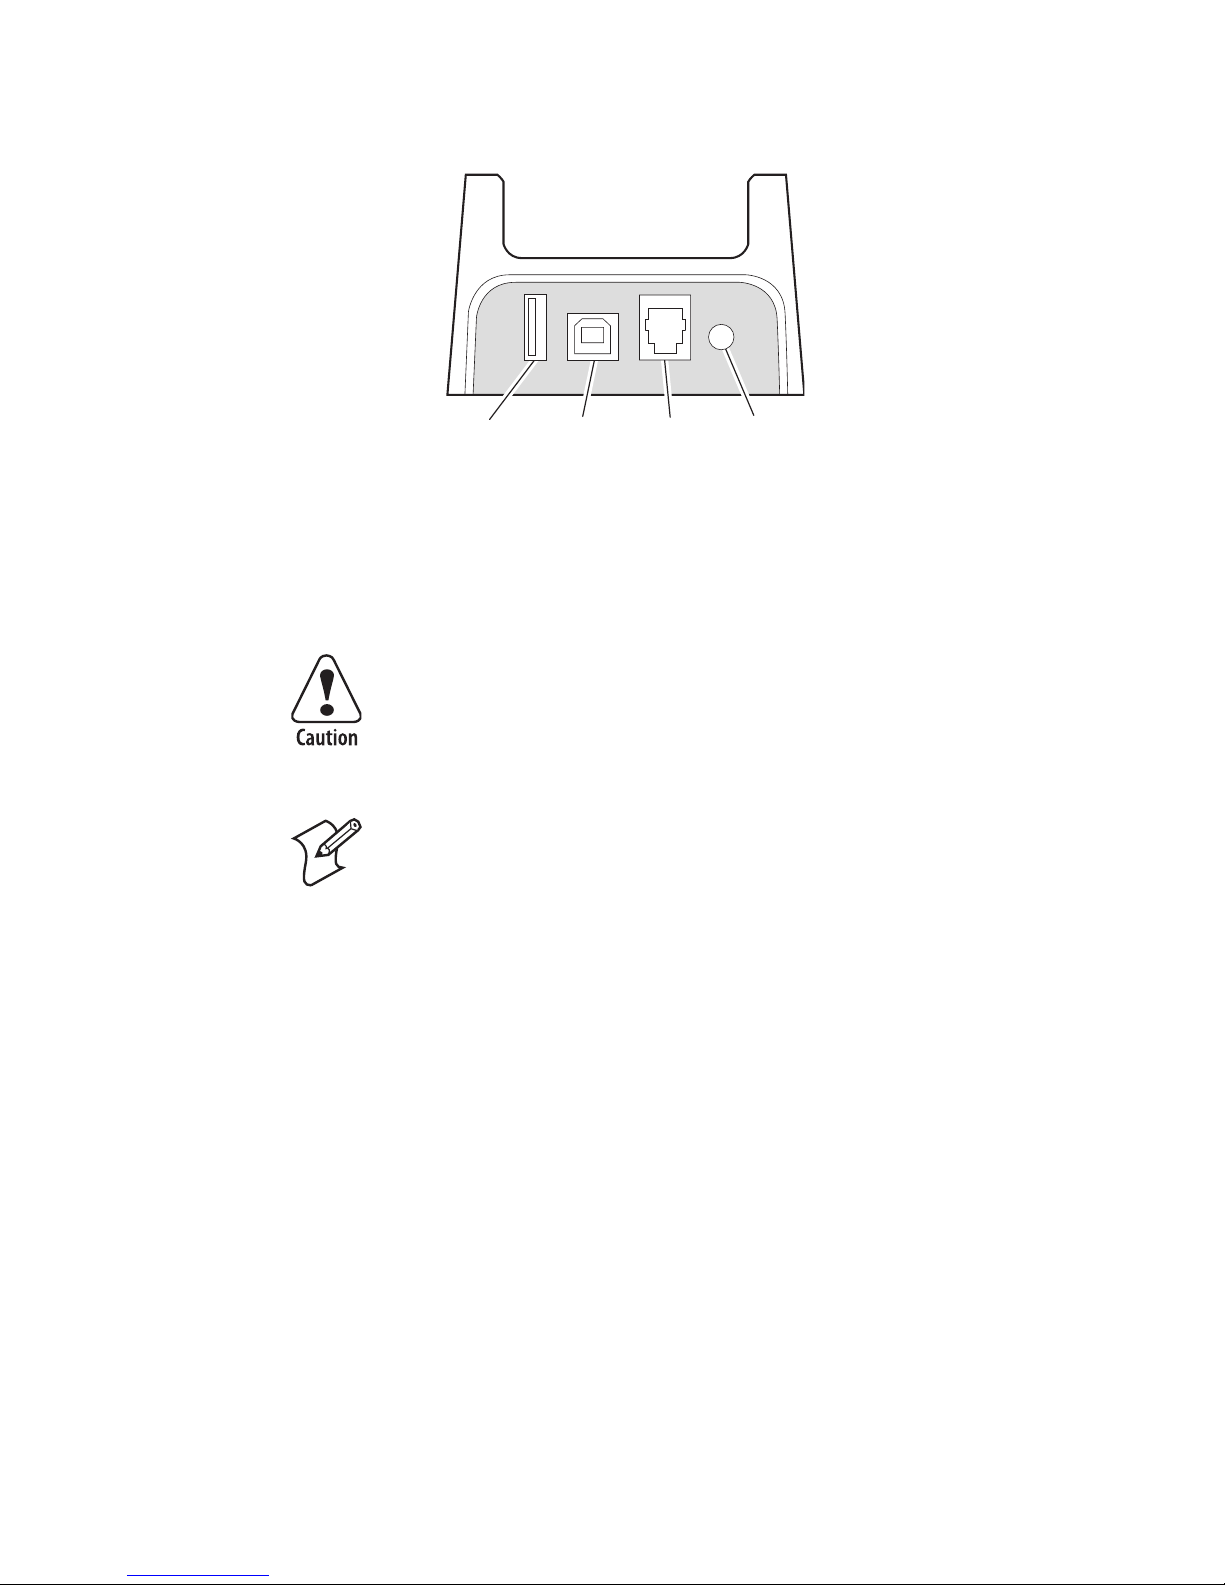
2 Connect the USB keyboard to the keyboard port on the
modem dock.
28 CN2A Mobile Computer User’s Manual
Page 45
Chapter 1 — Using the CN2A Mobile Computer
Keyboard
port
USB
port
Phone
port
Power
port
3 Connect the CN2 power supply (Model 074246) to the
power port on the modem dock. Then connect the CN2
power supply to an AC power source.
You must use only the Intermec power supply approved for
use with the CN2. Using any other power supply will
damage the CN2.
Note: If you cannot connect the modem dock to an AC power
source, you can configure the CN2A to use its battery to power
the USB keyboard. In Step 4c, set USB Host Power to Always
On. However, you will have to charge the CN2A battery more
often.
4 Configure the CN2A to provide power to the keyboard:
CN2A Mobile Computer User’s Manual 29
a Tap Start > Settings > Control Panel.
b Double-tap the Utilities icon.
c Set USB Host Power to On When Powered.
d Ta p OK to close the Utilities window.
e Tap
X to close the Control Panel window.
5 Place the CN2A into the modem dock.
6 Open an application like WordPad and begin typing. If the
characters you type do not appear on screen, see page 99 for
troubleshooting ideas.
Page 46
Chapter 1 — Using the CN2A Mobile Computer
To use the USB keyboard
• Type just as you would on a standard keyboard. You may use
standard Windows keyboard shortcuts, such as Ctrl-S to save
a file.
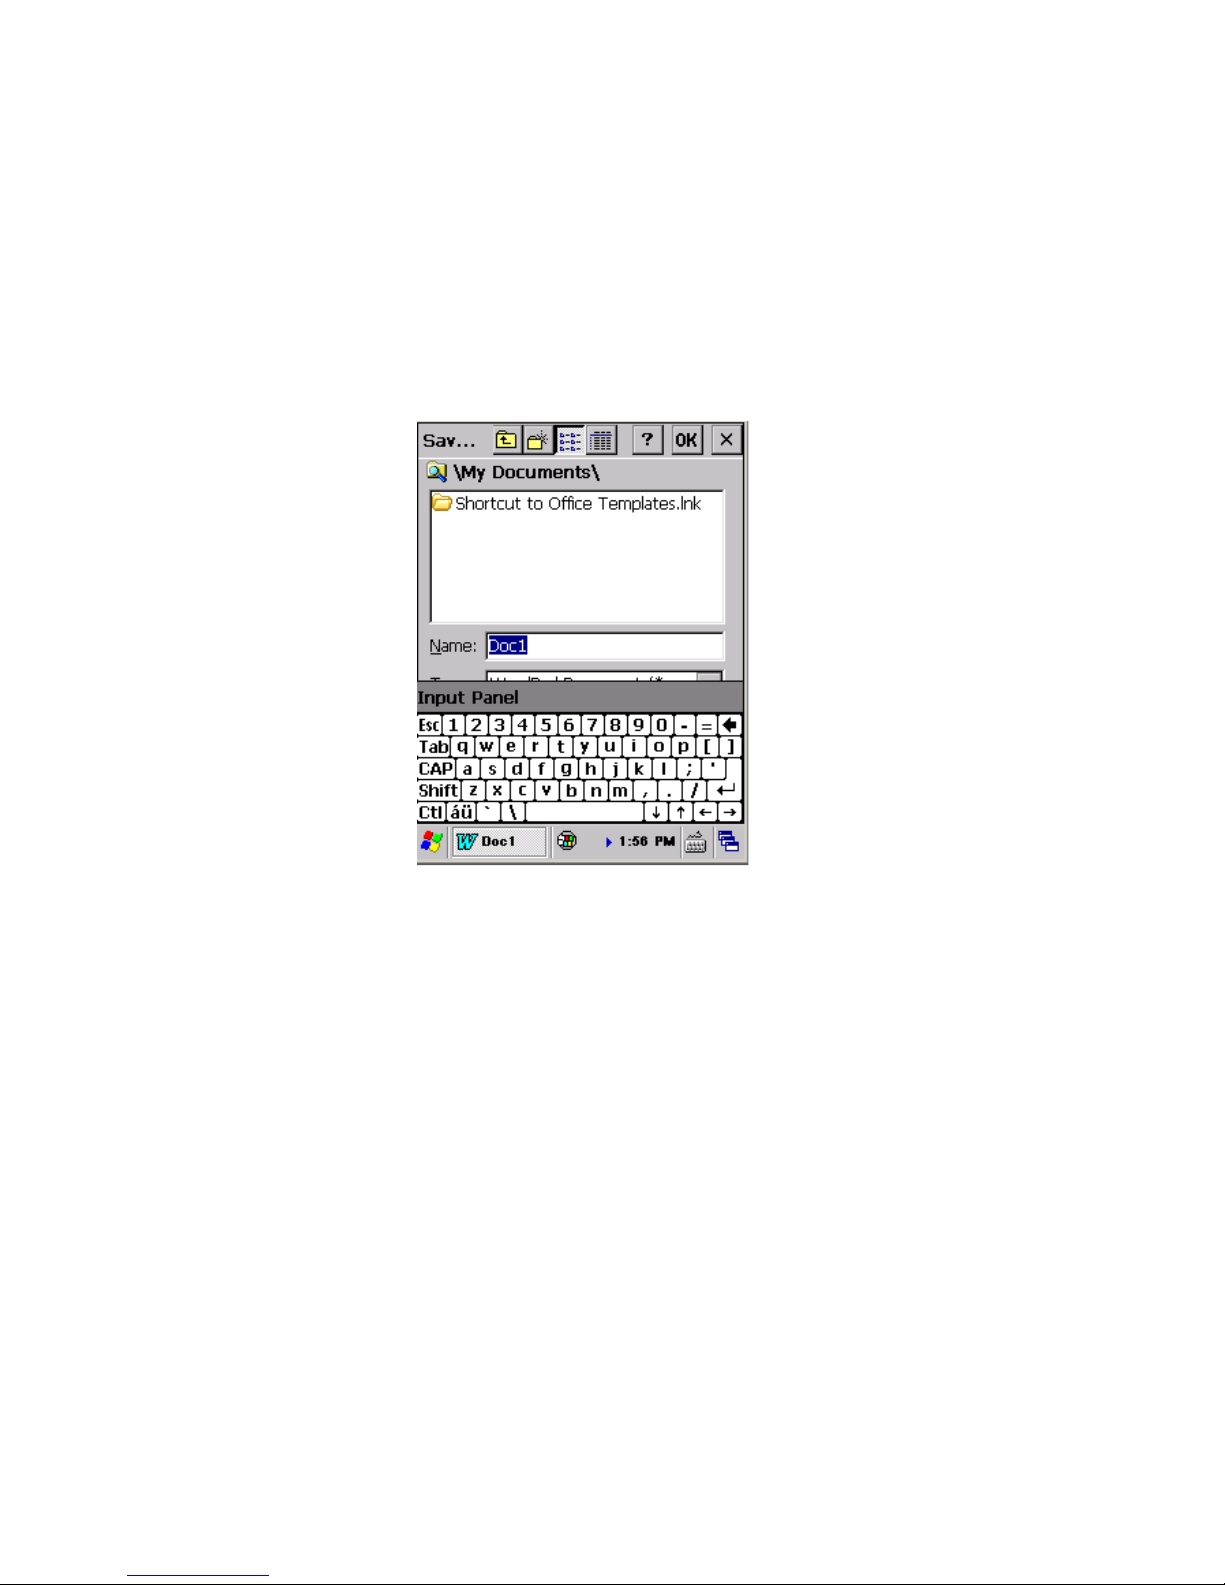
• When you tap some input fields, the soft keyboard appears on
your CN2A screen. You can ignore this soft keyboard and
continue typing on the USB keyboard.
Soft Keyboard: The soft keyboard is also called the Software Input Panel
(SIP).
30 CN2A Mobile Computer User’s Manual
Page 47

2
Use this chapter to understand how to configure the CN2A. In
this chapter, you will find these sections:
• How to Configure the CN2A Parameters
• Configuring the CN2A With the Setup Assistant
• Configuring the CN2A Locally With Intermec Settings
• Configuring the CN2A With SmartSystems Console
Configuring the CN2A
• Installing an Asian Font
• Customizing the CN2A Keypad
CN2A Mobile Computer User’s Manual 31
Page 48
Chapter 2 — Configuring the CN2A
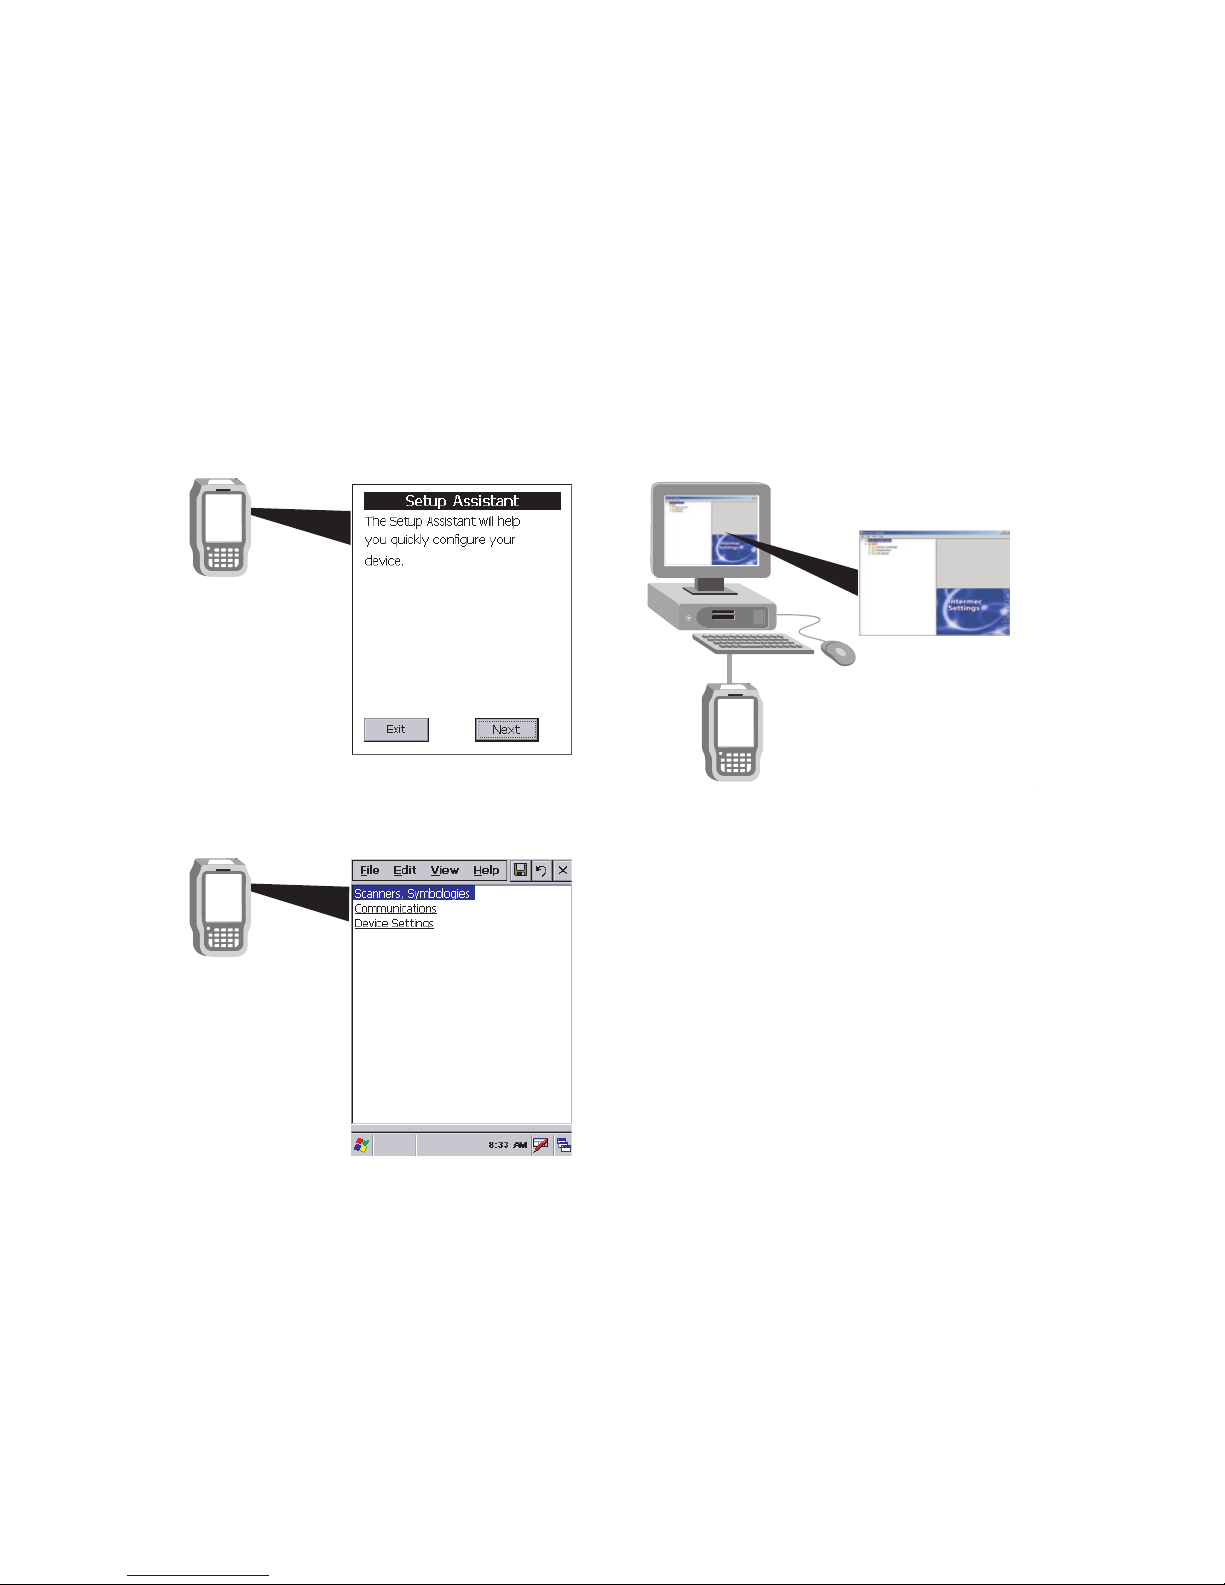
How to Configure the CN2A Parameters
You can configure many parameters on the CN2A, such as the
bar code symbologies it decodes or the network settings. These
characteristics are controlled by configuration parameters. The
values you set for these configuration parameters determine how
the computer operates.
There are several ways to configure the CN2A:
Use Setup Assistant
Use Setup
Assistant to
quickly enter
network
parameters.
Use Intermec Settings Locally
Use Intermec
Settings on
the CN2A to
set most
parameters.
Use the SmartSystems Console
Use Intermec Settings
from within the
SmartSystems Console
to remotely congure
network parameters.
Configuring the CN2A: The CN2A provides several ways for you to configure the communications,
device, and imaging parameters.
32 CN2A Mobile Computer User’s Manual
Page 49
Chapter 2 — Configuring the CN2A
Configuring the CN2A With the Setup Assistant
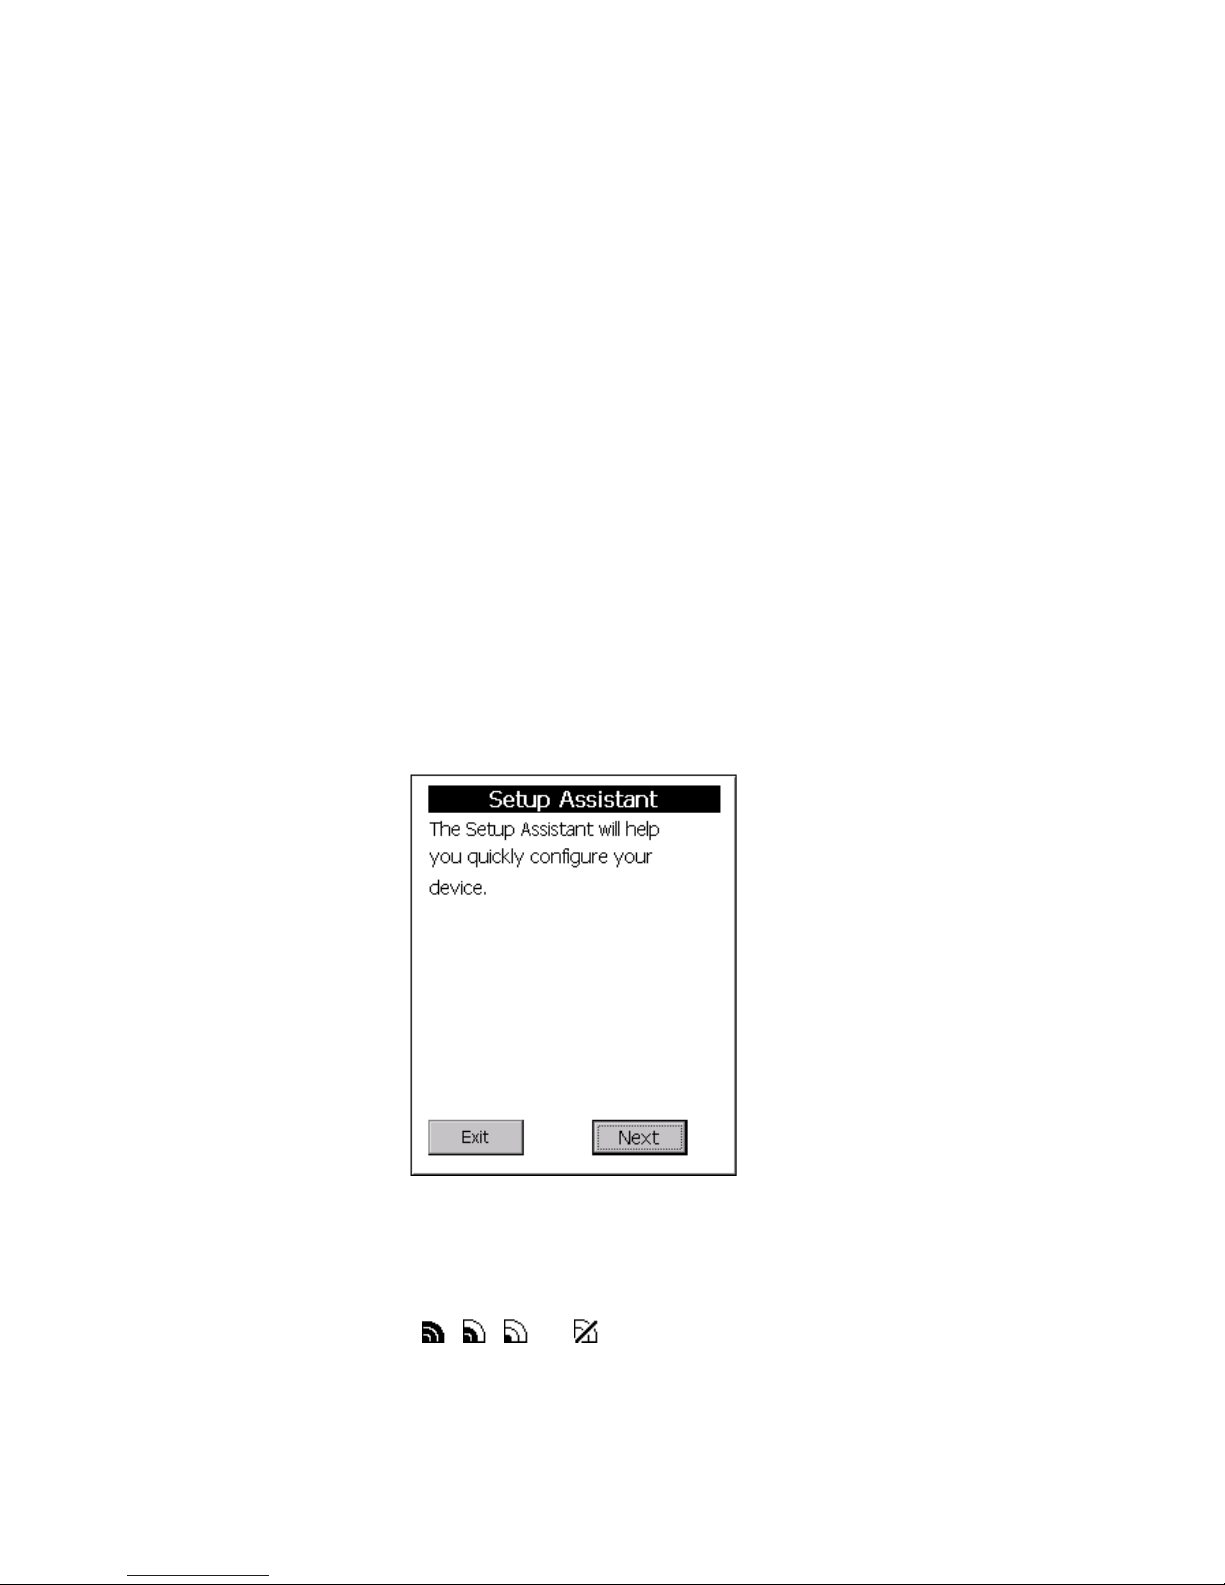
The Setup Assistant runs on the CN2A the first time you turn on
the computer. Use the Setup Assistant to set or enable basic
network parameters and connect your CN2A to the network.
The Setup Assistant guides you through setting the following
basic network parameters:
• Date and time
• 802.11b/g radio and SSID (Network name)
• 802.1x security
• DHCP server or IP address, subnet mask, and default router
• Primary and secondary DNS addresses
• Primary and secondary WINS addresses
• Device name
To set other parameters, use Intermec Settings or another
configuration method.
The Setup Assistant Start Screen
After you complete the Setup Assistant, the CN2A should be
communicating with your network. A Network Connection
, , , or ) appears on your taskbar. For more
(
information on the network icons, see “Understanding the
Screen Icons” on page 15.
icon
CN2A Mobile Computer User’s Manual 33
Page 50
Chapter 2 — Configuring the CN2A
Configuring the CN2A Locally With Intermec Settings
Use Intermec Settings to configure the CN2A and view system
information. You can access Intermec Settings while running any
application.
Learning About the Configuration Commands in Intermec Settings
For detailed information on most of the commands available in
Intermec Settings, see the Intermec Computer Command Reference
Manual (P/N 073529).
A copy of this online manual is on the CD attached inside the
front cover of this user’s manual. You should check the Intermec
web site at www.intermec.com to determine if a more recent
version is available for download.
Note: Some versions of the Intermec Computer Command
Reference Manual incorrectly state that the CN2 supports reader
commands. The CN2A and CN2B support only the Change
Configuration reader command.
Opening Intermec Settings
To open Intermec Settings
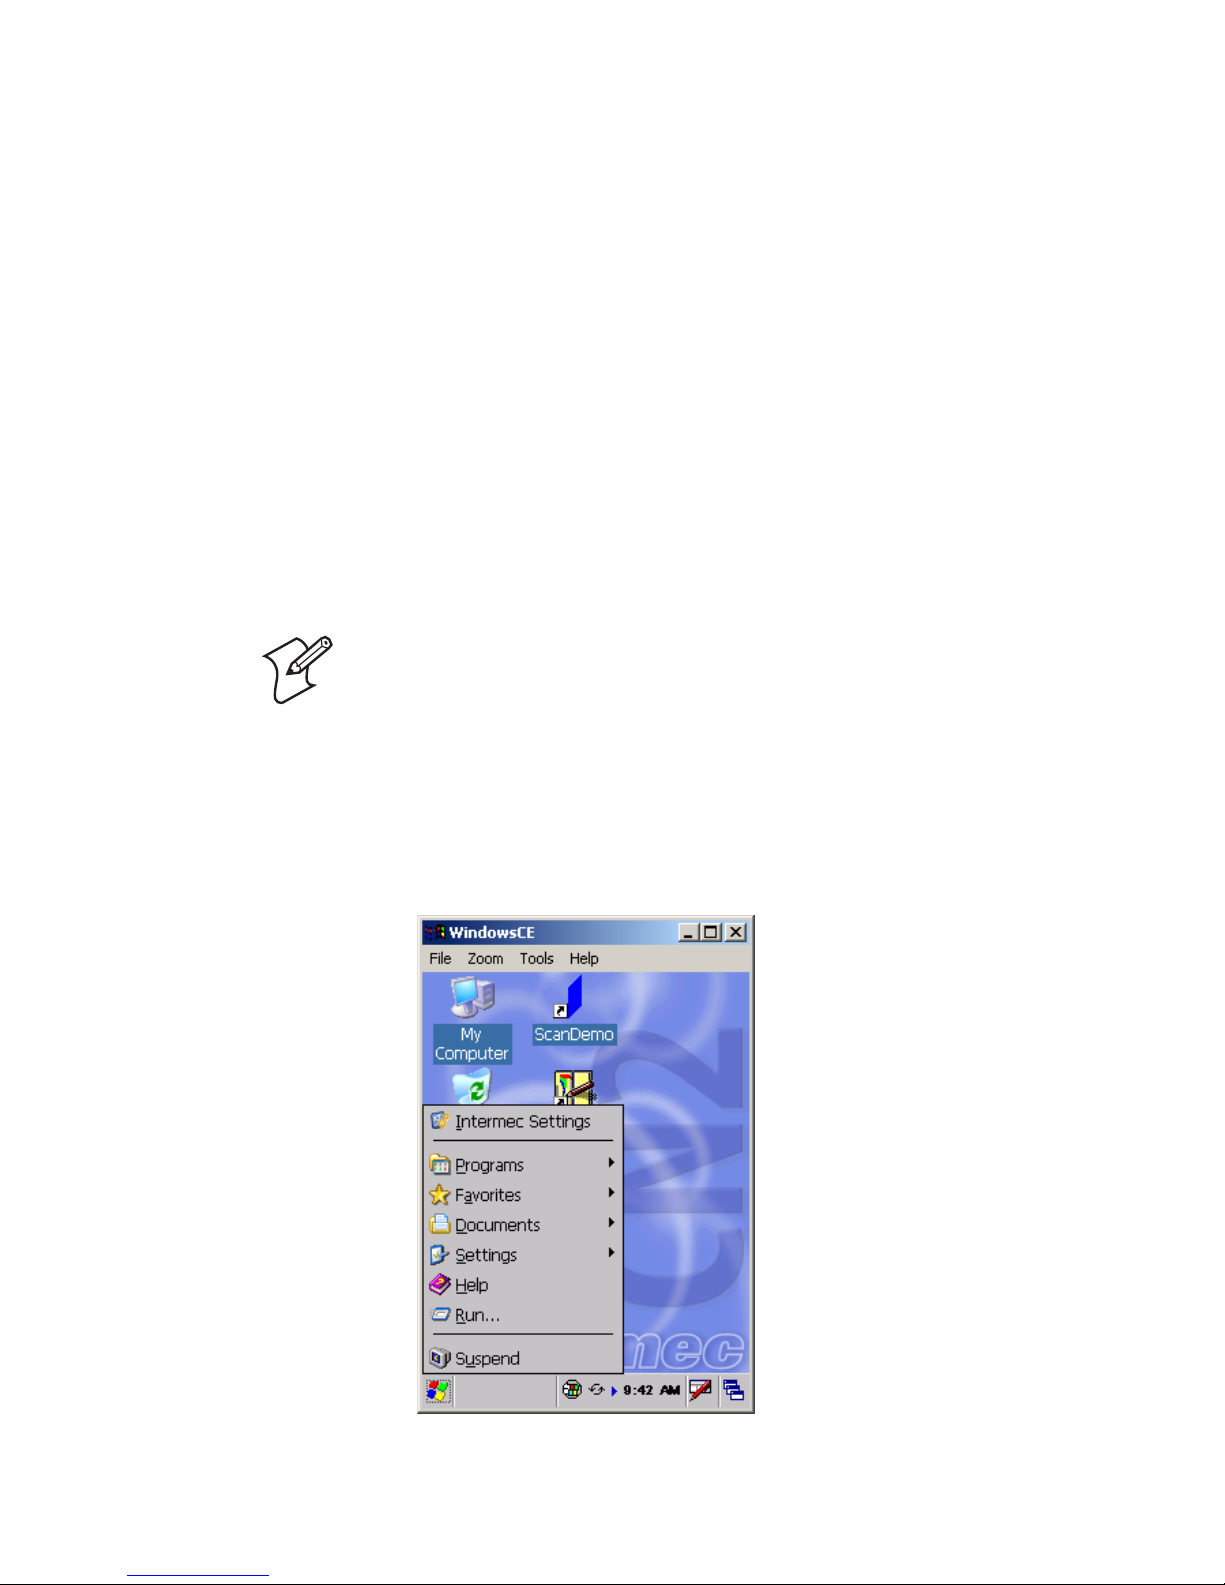
1 Tap t h e Start icon. The Start menu appears.
34 CN2A Mobile Computer User’s Manual
Page 51
Chapter 2 — Configuring the CN2A
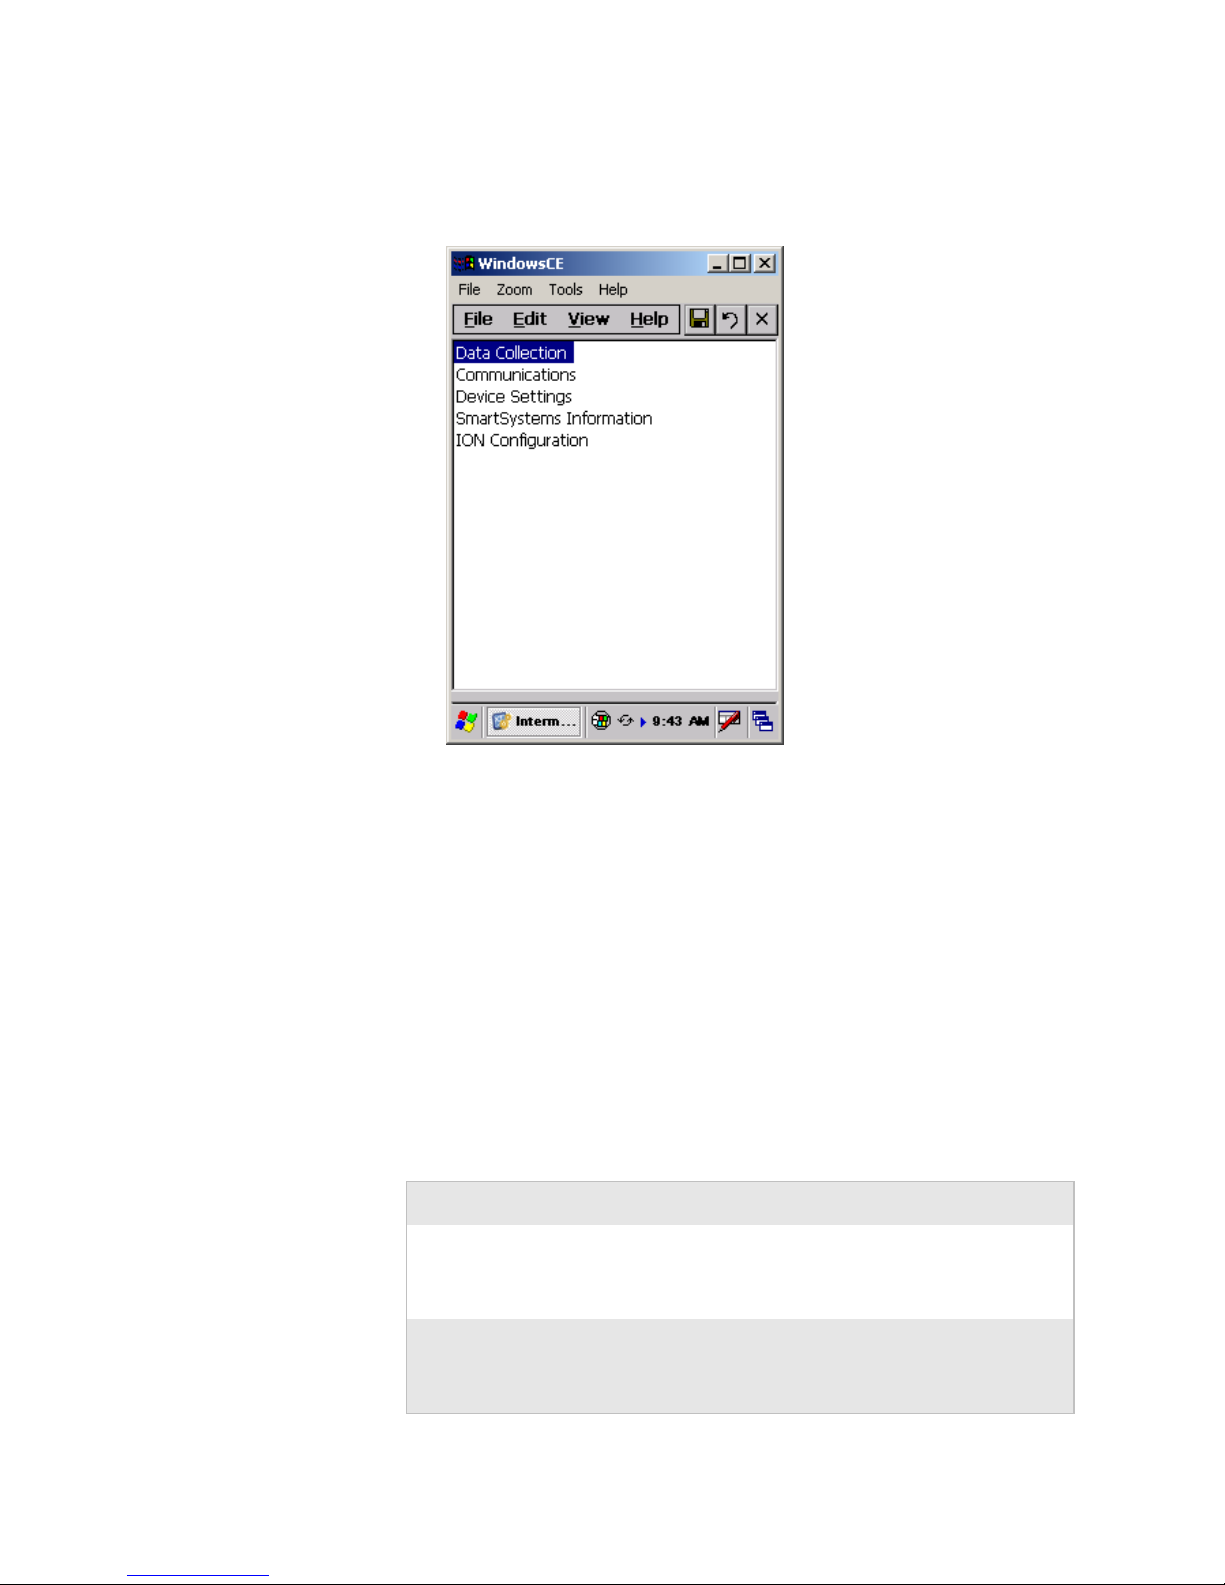
2 Ta p Intermec Settings. The Intermec Settings application
appears.
3 Make changes to the settings as necessary. For help, see the
next section, “Navigating Through Intermec Settings.”
4 Save your changes. For help, see “Saving Your Settings” on
page 37.
5 Exit Intermec Settings. For help, see “Exiting Intermec
Settings” on page 37.
Navigating Through Intermec Settings
Use this table to understand how to navigate and enter
information in Intermec Settings.
Navigating in Intermec Settings
Function Choose a Method
Select or expand an
option
Expand an option Tap the option.
Tap the option.
On the scroll keypad, press U or D to select an
option.
On the scroll keypad, press U or D to select the
option, and then press R.
CN2A Mobile Computer User’s Manual 35
Page 52
Chapter 2 — Configuring the CN2A
Navigating in Intermec Settings
Function Choose a Method
Enter information 1 Tap in the text box. The soft keyboard
Select text in a text
box
Save settings Tap File > Save Settings.
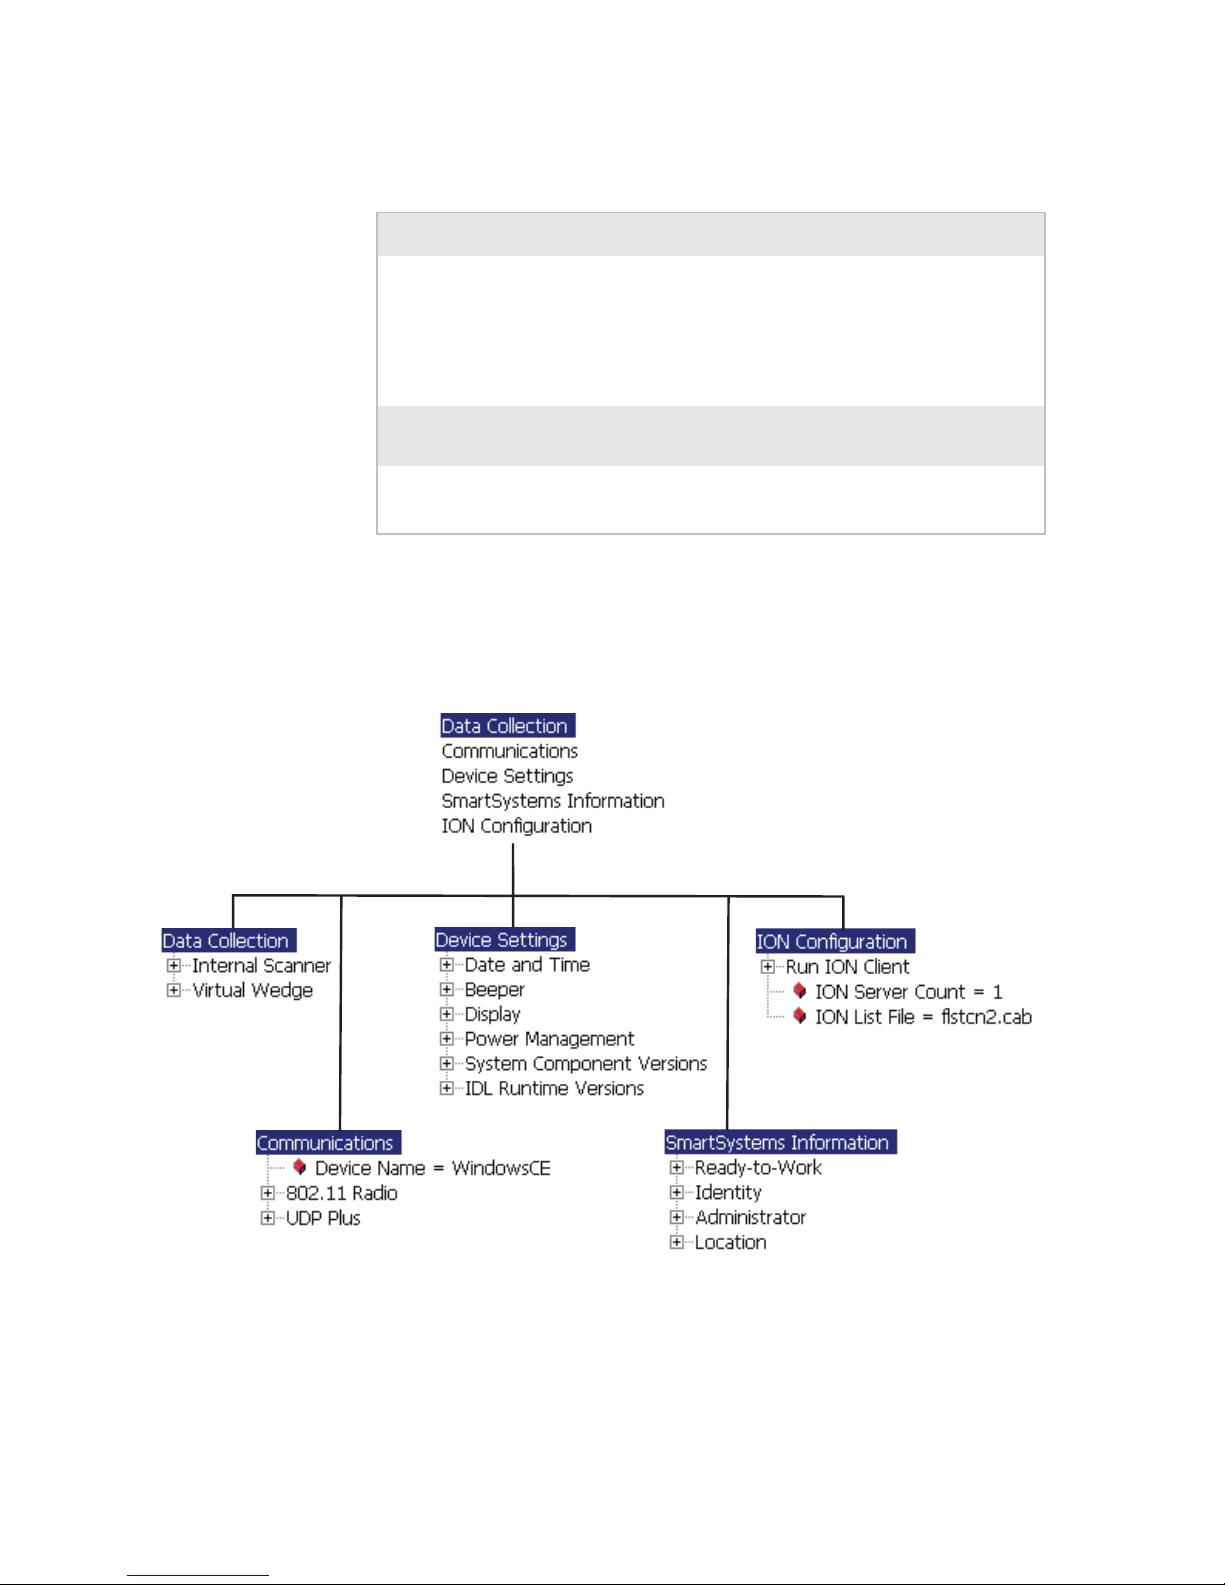
Use the following diagram to help find the commands you need
to use to configure your CN2A. These screens do not represent
the exact information you will see on your CN2A. They have
been modified to show you how the information is structured.
appears.
2 Tap the keyboard keys to enter information.
3 Tap outside the box or tap Enter when you
are finished.
Tap in the text box and drag the stylus over the
text.
Or tap the Save icon in the upper right corner.
Intermec Settings Menus: Use this diagram to help navigate through the Intermec Settings
application. This diagram should only be used as a guide; it does not accurately represent all of the
information you will see on your screen.
36 CN2A Mobile Computer User’s Manual
Page 53

Saving Your Settings
You can save the changes you make in Intermec Settings at any
time. After you save your changes, you can continue making
changes or you can exit Intermec Settings.
To save your settings
•Tap the Save icon at the top of the screen.
Or,
• From the Main Menu, tap File > Save Settings.
Exiting Intermec Settings
When you are done modifying your device configuration and
have saved your settings, you should exit Intermec Settings.
To exit Intermec Settings
Chapter 2 — Configuring the CN2A
•Tap the
Or,
• From the Main Menu, tap File > Exit.
If you try to exit Intermec Settings without saving your changes,
a message box appears asking if you want to save your
configuration changes. Tap Yes .
X in the upper right corner of the window.
Restoring the CN2A Default Settings
You can restore the CN2A to factory default settings. For a
complete list of the default settings, see
on page 134.
Note: Restoring the CN2A to factory default settings resets all
network parameters. As a result, you may lose network
communications. This option should only be used by network
administrators or by Intermec support personnel.
To restore default settings
“Default Configuration”
CN2A Mobile Computer User’s Manual 37
1 Ta p Start > Intermec Settings. The Intermec Settings
application appears.
2 Tap one of the menus:
• Data Collection
Page 54

Chapter 2 — Configuring the CN2A
• Communications
• Device Settings
• SmartSystems Information
• ION Configuration
3 Ta p Edit > Restore Item Defaults.
4 Ta p Yes to restore all default settings.
5 Repeats Steps 2, 3, and 4 for the other two menus.
6 Ta p Scanners Symbologies > Internal Scanner >
Symbologies and make sure every bar code symbology that
you need is enabled.
7 Tap to save your settings.
8 Ta p
X to exit Intermec Settings.
Note: You can also return the CN2A to its default software
configuration by resetting the registry and clearing the object
store. For instructions, see page 100.
Configuring the CN2A With SmartSystems Console
The SmartSystems Console lets you manage all your
SmartSystems-enabled devices at the same time from a central
host PC. The CN2A ships with a SmartSystems Client, which
means that it is SmartSystems-enabled.
The SmartSystems Console displays all of the CN2As in your
network that are communicating via wireless connection or via an
Ethernet connection. (You cannot establish a USB connection
between a CN2A and the Console.)
In the Console, you can right-click a CN2A icon and a menu
appears. To configure the CN2A, choose Intermec Settings from
the menu.
The Console is part of SmartSystems Foundation and is available
from the Intermec web site. To download SmartSystems
Foundation, go to www.intermec.com/SmartSystems. For help
using the SmartSystems Console, see the online manual available
from the Help menu in the Console.
38 CN2A Mobile Computer User’s Manual
Page 55

Installing an Asian Font
The CN2A operating system supports Simplified Chinese,
Traditional Chinese, Japanese, Korean, or Thai fonts.
To install one of these fonts, you need to upgrade the CN2A
operating system as described in
page 113. Follow these guidelines:
• Make sure that you choose the download that contains the
correct font. On the Intermec web site, the list of available
downloads includes a description which identifies the font
included in the download. For help, see Step 4 on page 114.
• Make sure that you upgrade the CN2A operating system by
selecting OS Upgrade Files at the Select Features screen:
• If you are using the SmartSystems Console to upgrade the
CN2A, see Step 9 on page 116.
• If you are using an SD card to upgrade the CN2A, see
Step 6 on page page 119.
Chapter 2 — Configuring the CN2A
“Upgrading the CN2A” on
Customizing the CN2A Keypad
Note: If you want to remap the keypad, see Appendix C,
“Remapping the Keypad.”
You can customize how the numeric and scroll keypads operate:
• You can configure the CN2A to click when you press any key.
• You can configure the CN2A to click only when a character is
“emitted.” For example, to emit the lowercase b character, you
press 2 2.
• You can disable the Task Manager keypad shortcut, so users
cannot use the keypad to start the Task Manager. This may be
useful if you are running a locked-down application.
Note: You can also use the Control Panel to start the Task
Manager, as described on page 20. This method cannot be
disabled.
CN2A Mobile Computer User’s Manual 39
Page 56
Chapter 2 — Configuring the CN2A
• You can disable the Power button so users cannot turn off the
CN2A. This may be useful if you have installed the CN2A in
a kiosk environment.
There are three ways to customize the CN2A keypad:
• You can use the Control Panel on your CN2A to configure
keyboard options. For help, see the next section, “Using the
Control Panel to Customize the Keypad.”
• You can use a registry editing program to change the keypad
registry entries. For help, see “Using a Registry Editing
Program to Customize the Keypad” on page 41.
• You can write an application to change the keypad registry
entries. For help, see “Writing an Application to Customize
the Keypad” on page 42. If you have many CN2As to
customize, this may be the most convenient method.
Using the Control Panel to Customize the Keypad
You can customize the keypad on a CN2A by making selections
at the Keyboard Properties screen, which you access through the
Control Panel.
To customize the keypad using the Control Panel
1 Go to Start > Settings > Control Panel.
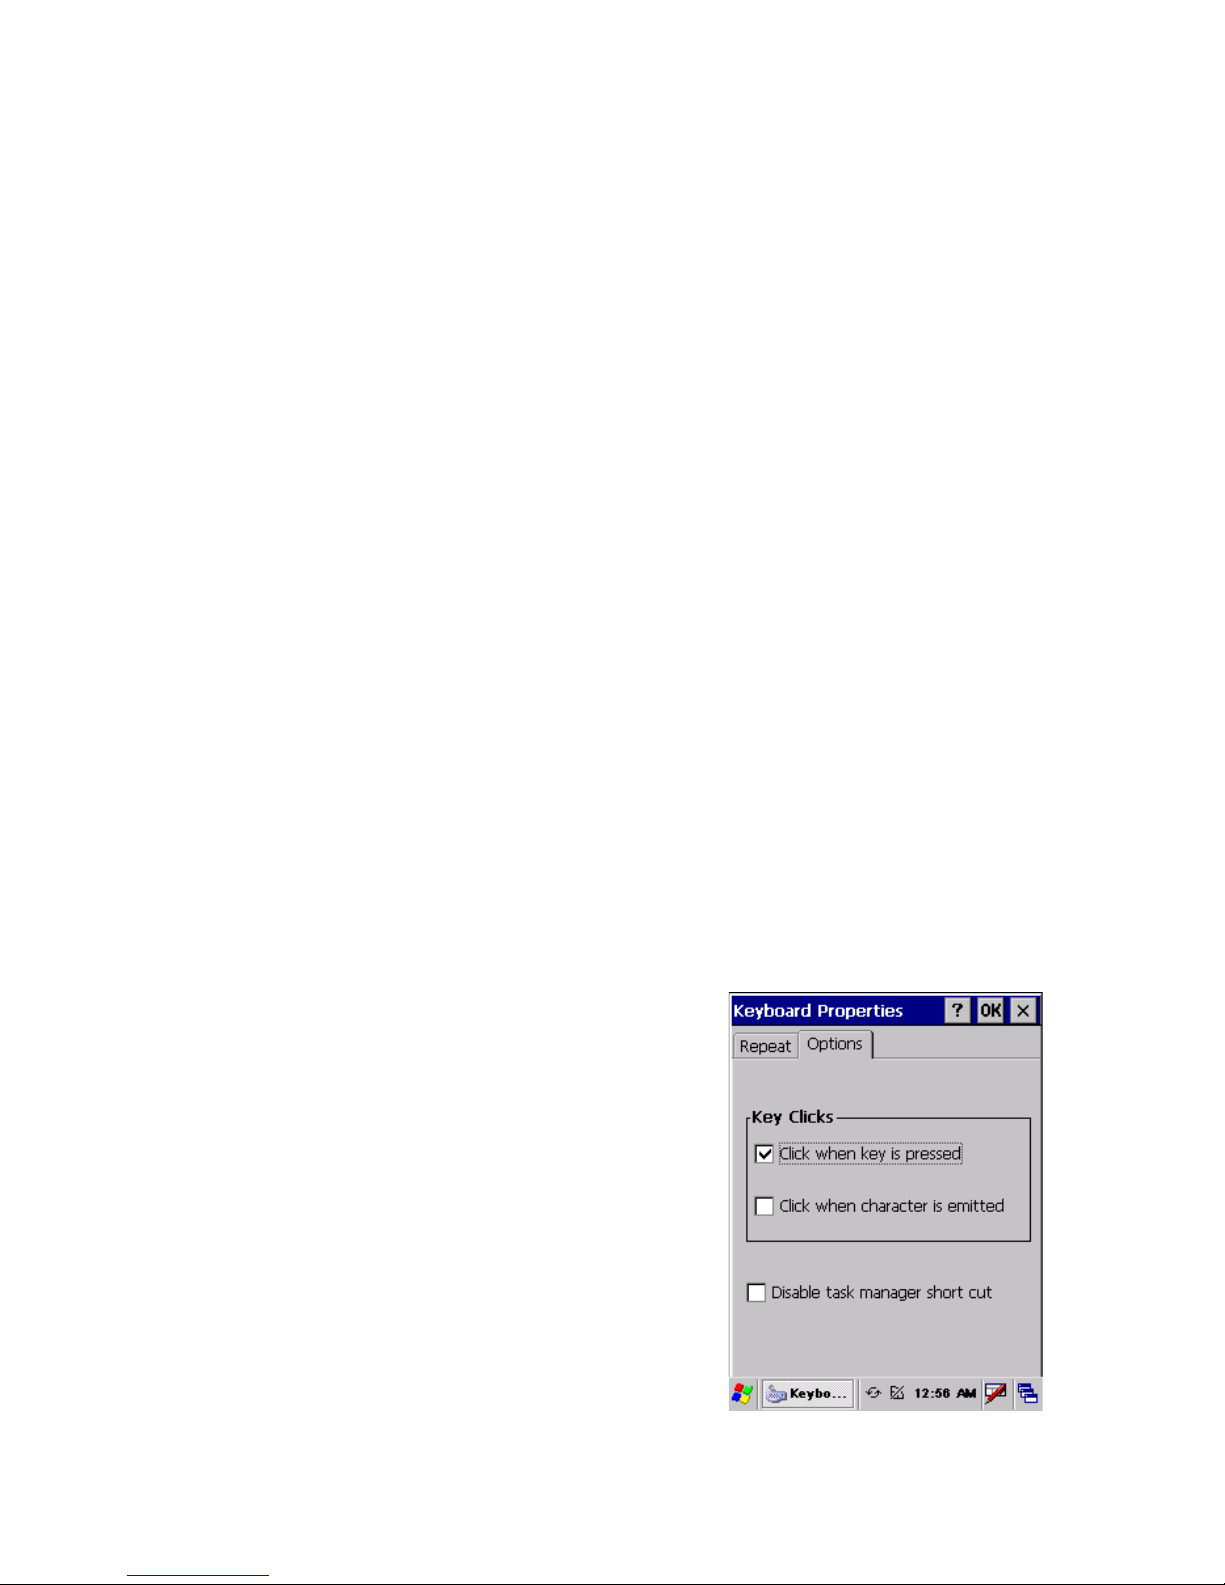
2 Double-tap the Keyboard icon. The Keyboard Properties
screen appears.
3 Tap t h e Options tab.
4 Check the box for each
option you want to enable.
For help, see the “Summary
of Options” table on
page 41.
5 Click OK to save your
changes and exit the
Keyboard Properties screen.
6 Ta p X to exit the Control
Panel. The changes take
effect immediately. You do
not need to warm boot the
CN2A.
40 CN2A Mobile Computer User’s Manual
Page 57
Chapter 2 — Configuring the CN2A
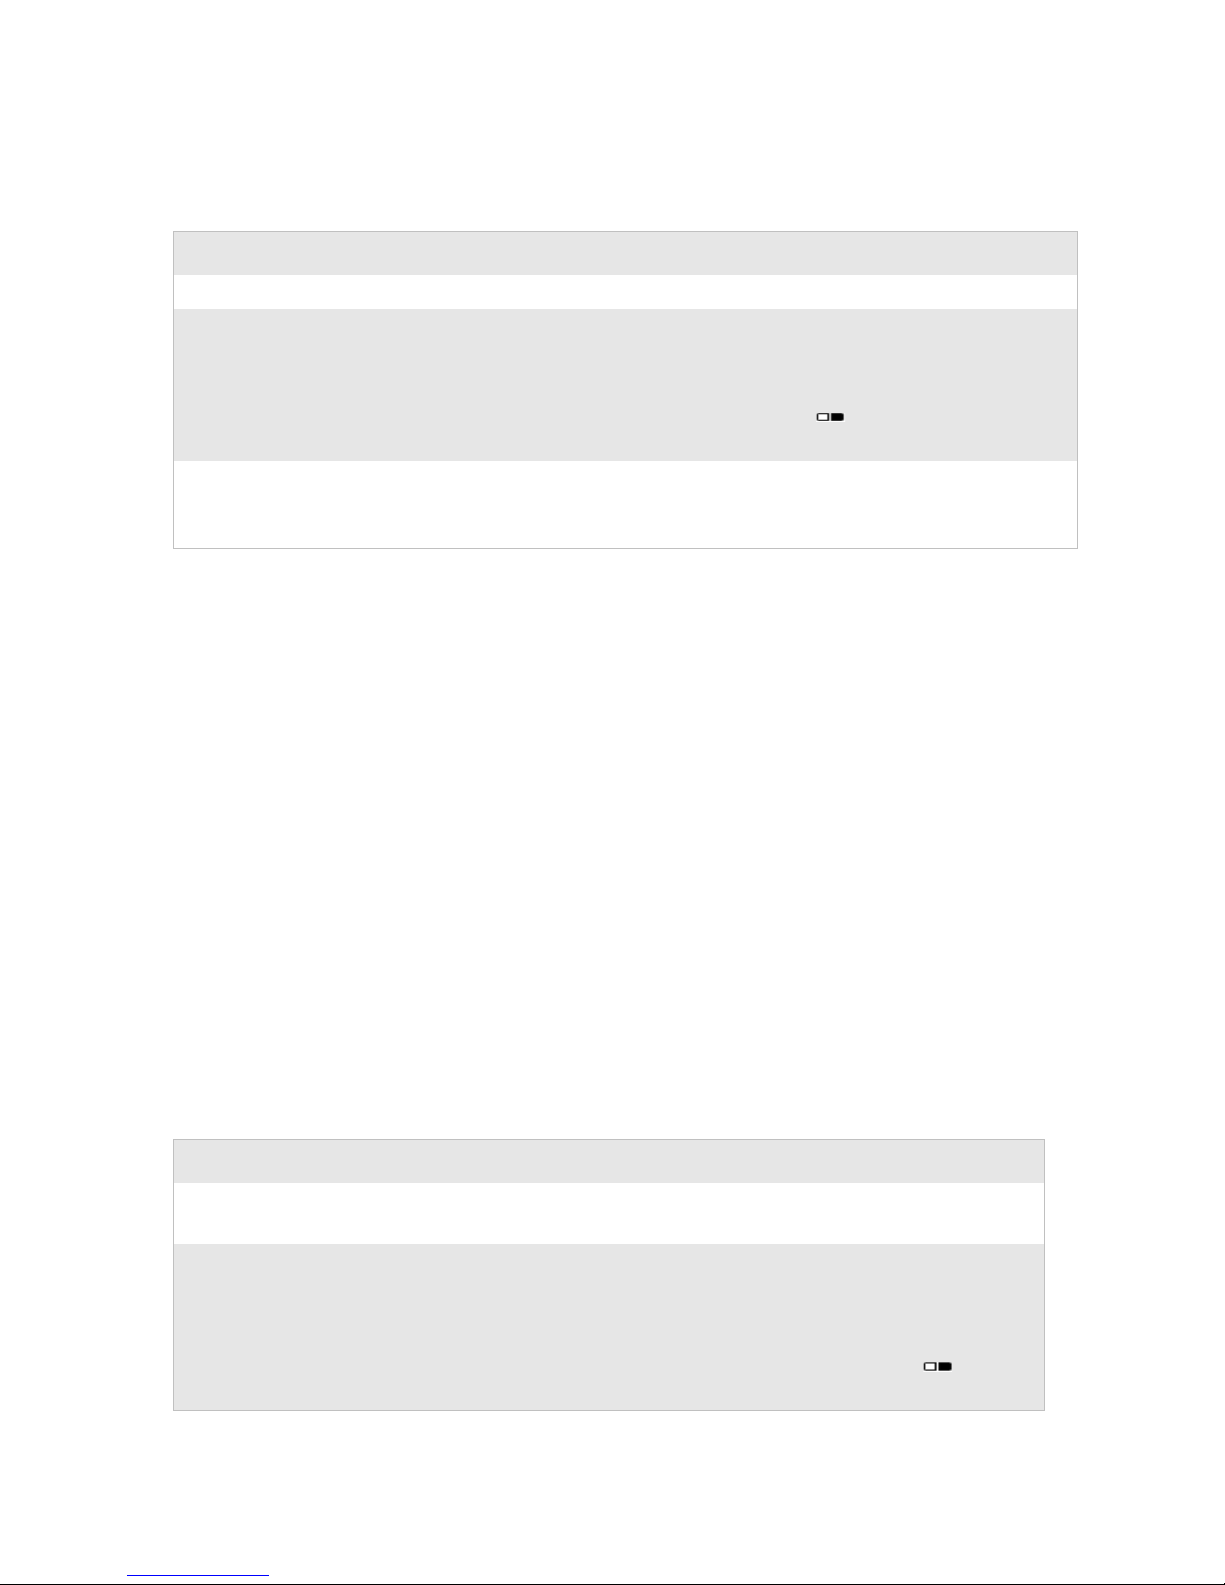
Summary of Options
Option If You Check This Option
Click when key is pressed You hear a keyclick every time you press a key.
Click when character is
emitted
Disable task manager short
cut
You hear a keyclick when a character is emitted. For example:
• You hear a keyclick when you press 2 and a 2 character appears
on the screen.
• You hear a keyclick when you press 2 2 and a lowercase b
character appears on the screen.
You cannot start Task Manager. You have disabled the keypad
shortcut for starting Task Manager, as described in “Using Task
Manager to Manage Multiple Active Tasks” on page 19.
Using a Registry Editing Program to Customize the Keypad
You can use a registry editing program to display and change the
keypad registry entries, which control how the CN2A keypad
operates. The registry entries are described in the next table,
“CN2A Keypad Registry Entries.”
You can run the Microsoft eMbedded Visual C++© Remote
Registry Editor on your PC, using ActiveSync to connect to the
CN2A. Or you can download and run a third-party registry
editing program on your CN2A.
After you make your changes, you need to warm boot the CN2A
for the changes to take effect. For help, see
“Warm Booting the
CN2A” on page 111.
The CN2A keypad registry settings are located in
HKEY_LOCAL_MACHINE\Drivers\Keypad.
CN2A Keypad Registry Entries
Registry Entry Default Description
ClickOnPress 1 When this registry entry is set to 1, a keyclick is
generated when the user presses a key.
ClickOnChar 0 When this registry entry is set to 1, a keyclick is
generated when the CN2A emits a character. For
numeric keys, the behavior is the same as ClickOnPress.
For alpha-mode, a keyclick is generated when the
character is emitted. For example, you press 2 2 to
emit the b character and generate the keyclick.
CN2A Mobile Computer User’s Manual 41
Page 58

Chapter 2 — Configuring the CN2A
CN2A Keypad Registry Entries (continued)
Registry Entry Default Description
DisableTaskMan 0 When this registry entry is set to 0, the user can start the
Task Manager, as described in “Using Task Manager to
Manage Multiple Active Tasks” on page 19.
When this registry entry is set to 1, the user cannot start
the Task Manager.
IgnorePowerButton 0 When this registry entry is set to 1, the Power button is
ignored. The user cannot turn off the CN2A.
Writing an Application to Customize the Keypad
You can write an application to change the keypad registry
entries, which are described in the previous table, “CN2A
Keypad Registry Entries.” An application gives you a convenient
way to customize multiple CN2As.
For help downloading and using the Intermec resource kits and
the CN2A platform SDK, see
on page 86.
“Developing a New Application”
Make sure your application sets the named event
KeybdSettingsChangeEvent after you change the registry entries,
for the changes to take effect.
42 CN2A Mobile Computer User’s Manual
Page 59

3
Adding the CN2A to the
Network
Use this chapter to understand how to configure the CN2A to
communicate in your network. In this chapter, you will find
these sections:
• Configuring the CN2A For Your Network
• Configuring Network Security
• Viewing Wireless Network Information
• Using Remote Desktop Connection
• Transferring Files With FTP
• Using the Modem Dock for Internet Access and E-mail
CN2A Mobile Computer User’s Manual 43
Page 60
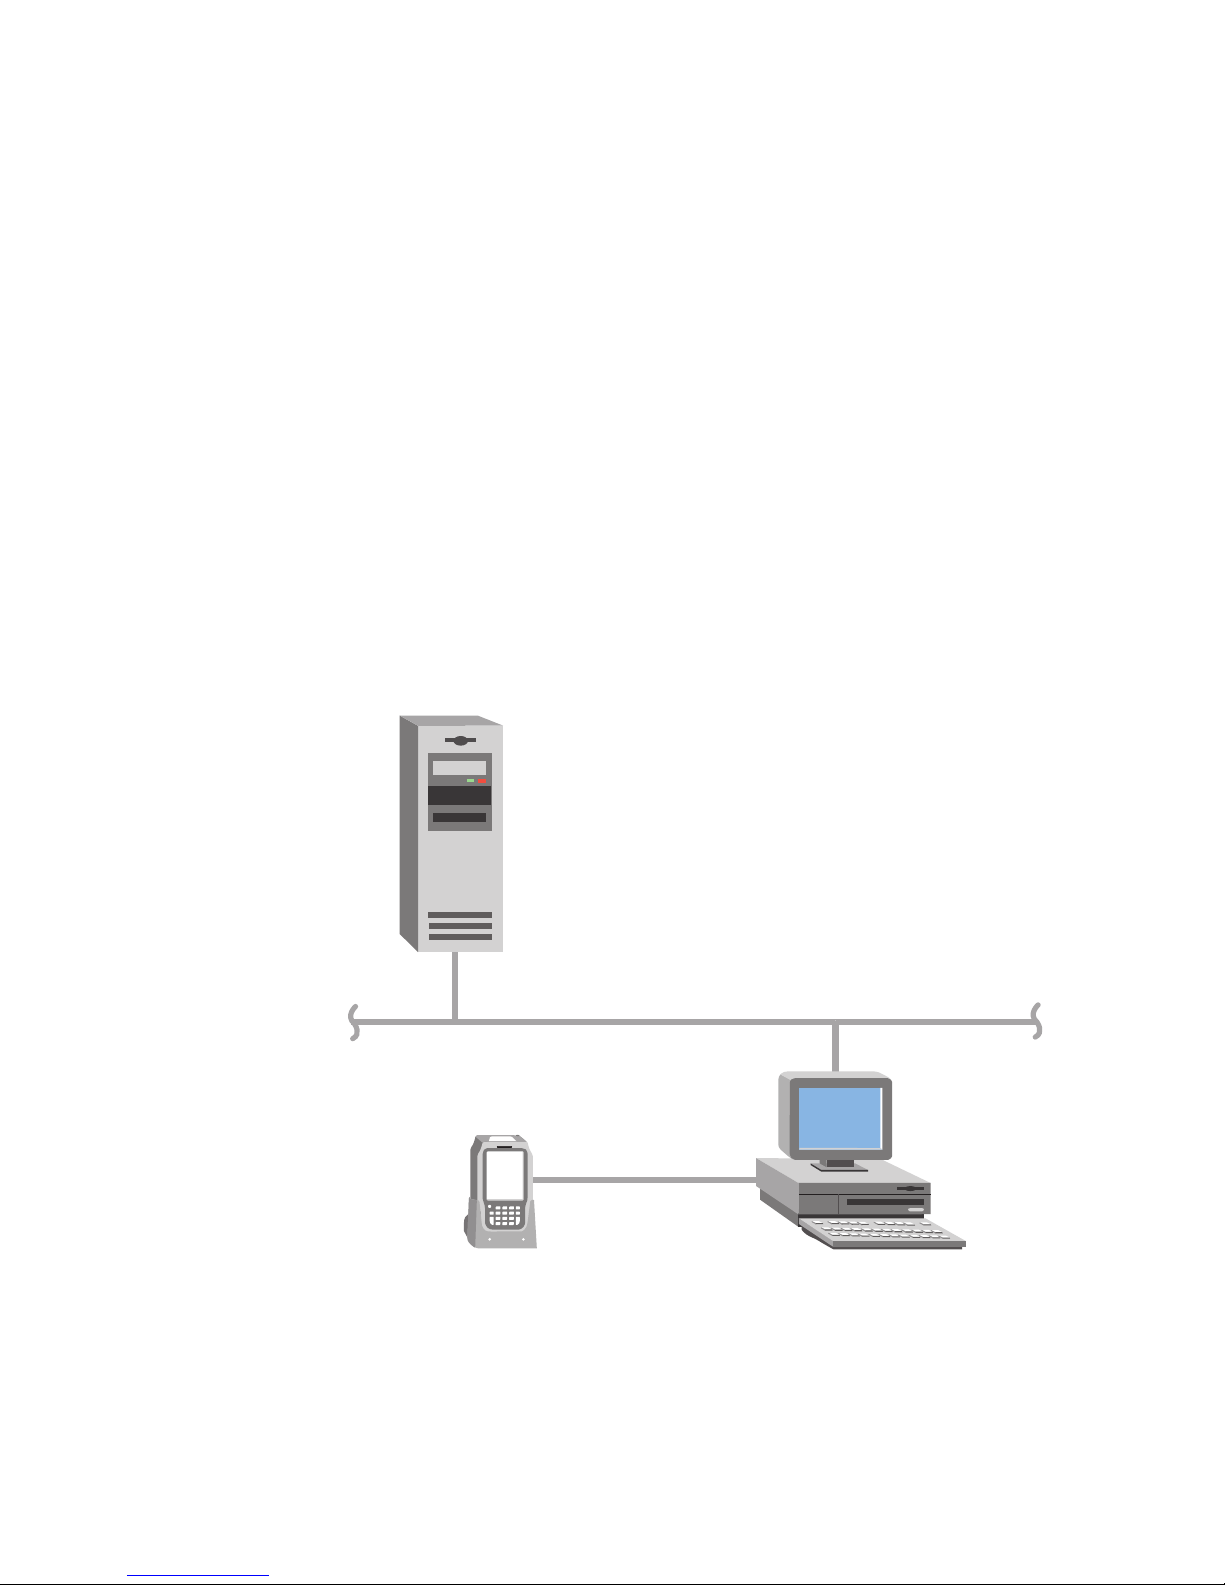
Chapter 3 — Adding the CN2A to the Network
Configuring the CN2A For Your Network
The CN2A is a versatile mobile computer that you can easily add
to your wired or wireless data collection network. You can
connect your CN2A to your network using:
• USB communications.
• 802.11b/g radio communications.
Configuring USB Communications
You can place the CN2A in the modem dock or the USB client
dock to transfer data to, and receive data from, another device
using USB communications. The USB cable, USB client dock,
and modem dock are sold separately. For more information on
accessories and how to order them, see
CN2A” on page 130.
Host
“Accessories for the
CN2A Using USB Communications
44 CN2A Mobile Computer User’s Manual
Ethernet
PC
USB cable
CN2A in single
USB client dock
Page 61

Chapter 3 — Adding the CN2A to the Network
To use USB communications with your CN2A
1 Connect the USB client dock to the USB port of the other
device using an appropriate USB cable.
2 Make sure that your USB device is configured for USB
communications.
3 Insert the CN2A into the USB client dock.
4 Turn on the CN2A.
For more information about the USB client dock, see the
instructions that shipped with the dock.
Configuring 802.11b/g Radio Communications
Make sure all components with antennas are at least 30 cm
(1 ft) apart when power is applied. Failure to comply could
result in equipment damage.
The wireless CN2A has an internal 802.11b/g radio to transfer
data using wireless communications. This section of the manual
assumes that you have already set up your wireless
communications network including your access points. If you are
using a UDP Plus network, you also need to have your Intermec
Application Server communicating with a host computer.
Your CN2A supports these network protocols:
•TCP/IP
• UDP Plus
The next sections explain the parameters you need to configure
for the CN2A to work in your wireless network.
CN2A Mobile Computer User’s Manual 45
Page 62
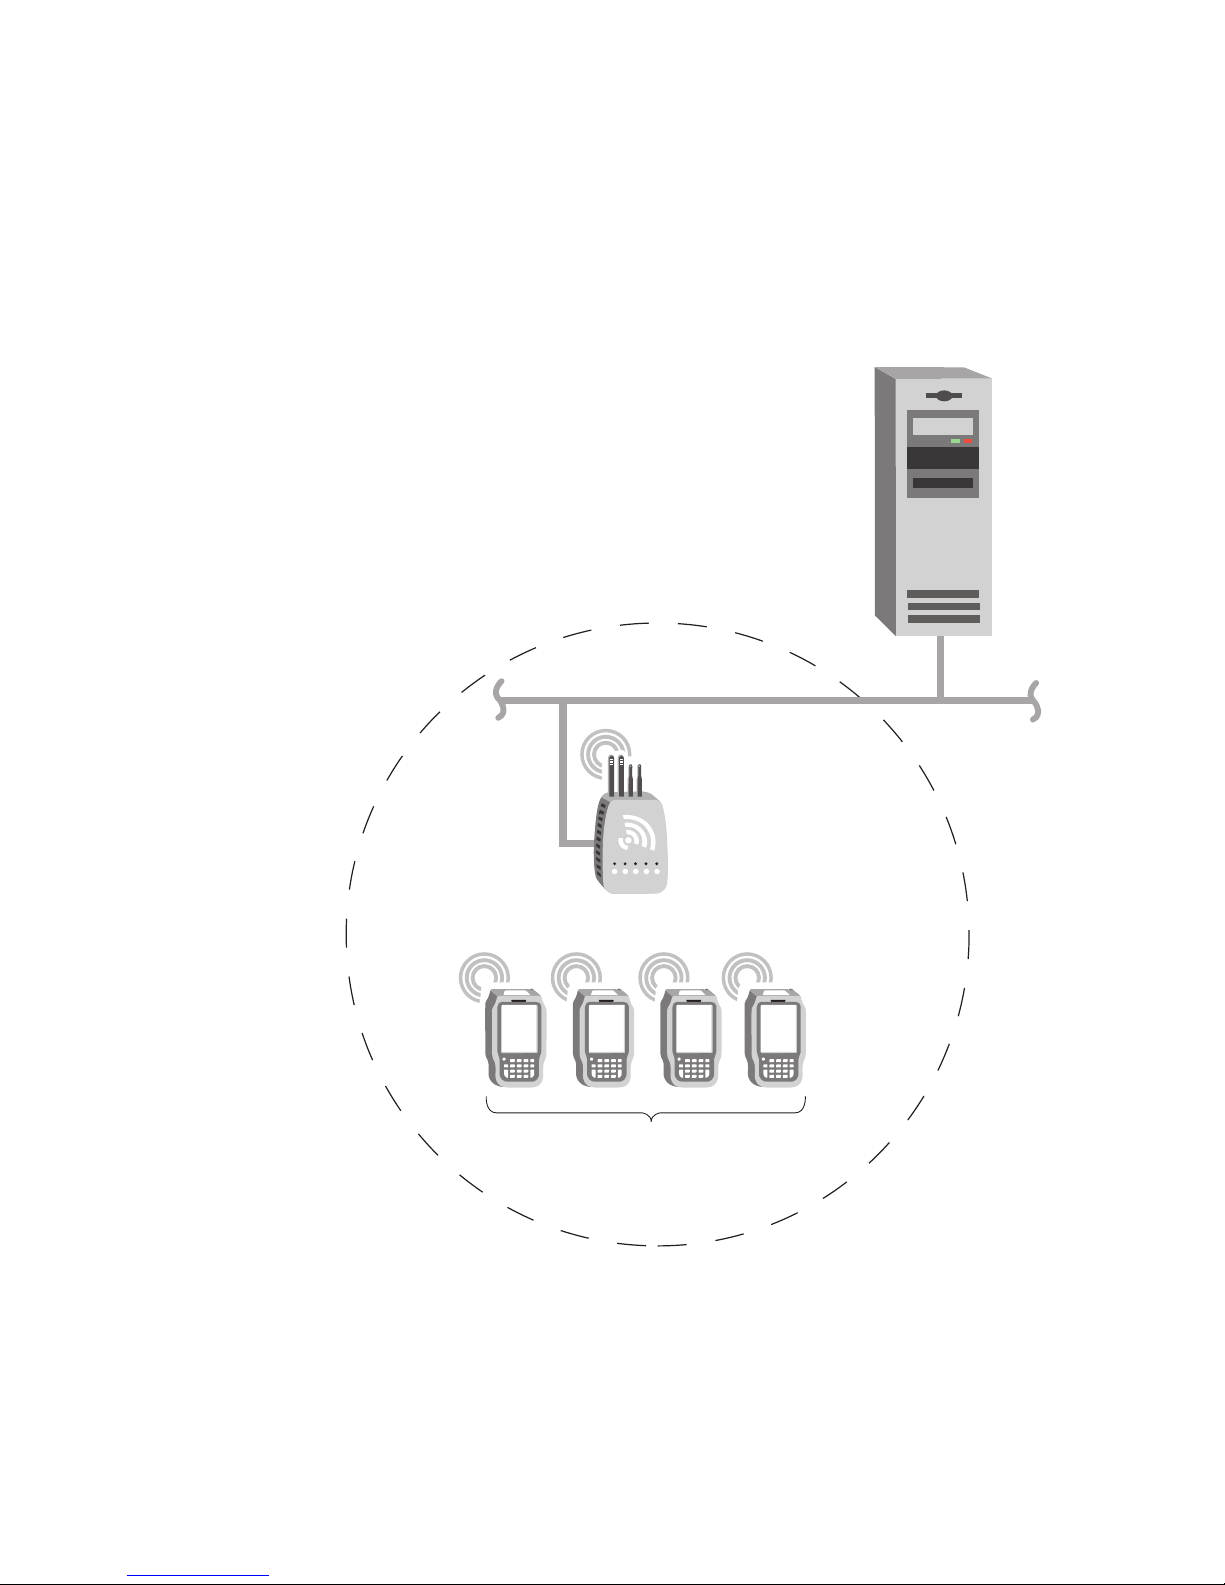
Chapter 3 — Adding the CN2A to the Network
Configuring the Network Parameters for a TCP/IP Network
In a TCP/IP network, the CN2A communicates with a host
computer directly using TCP/IP. The access point acts as a bridge
to allow communications between the wired network and the
wireless network.
Direct Connect
Host
TCP/IP
Access point
CN2As
CN2As in a TCP/IP Direct Connect Network
Ethernet
46 CN2A Mobile Computer User’s Manual
Page 63

Chapter 3 — Adding the CN2A to the Network
To use wireless communications in a TCP/IP network
1 Configure these network parameters on each CN2A in the
network:
• Infrastructure mode (set to Infrastructure by default)
• Network name (SSID)
•Host IP address
• IP settings (if not using DHCP)
2 Configure security. For help, see “Configuring Network
Security” on page 49.
The easiest way to configure the network parameters on the
CN2A is to use Intermec Settings. For help, see
“Configuring the
CN2A Locally With Intermec Settings” on page 34.
CN2A Mobile Computer User’s Manual 47
Page 64
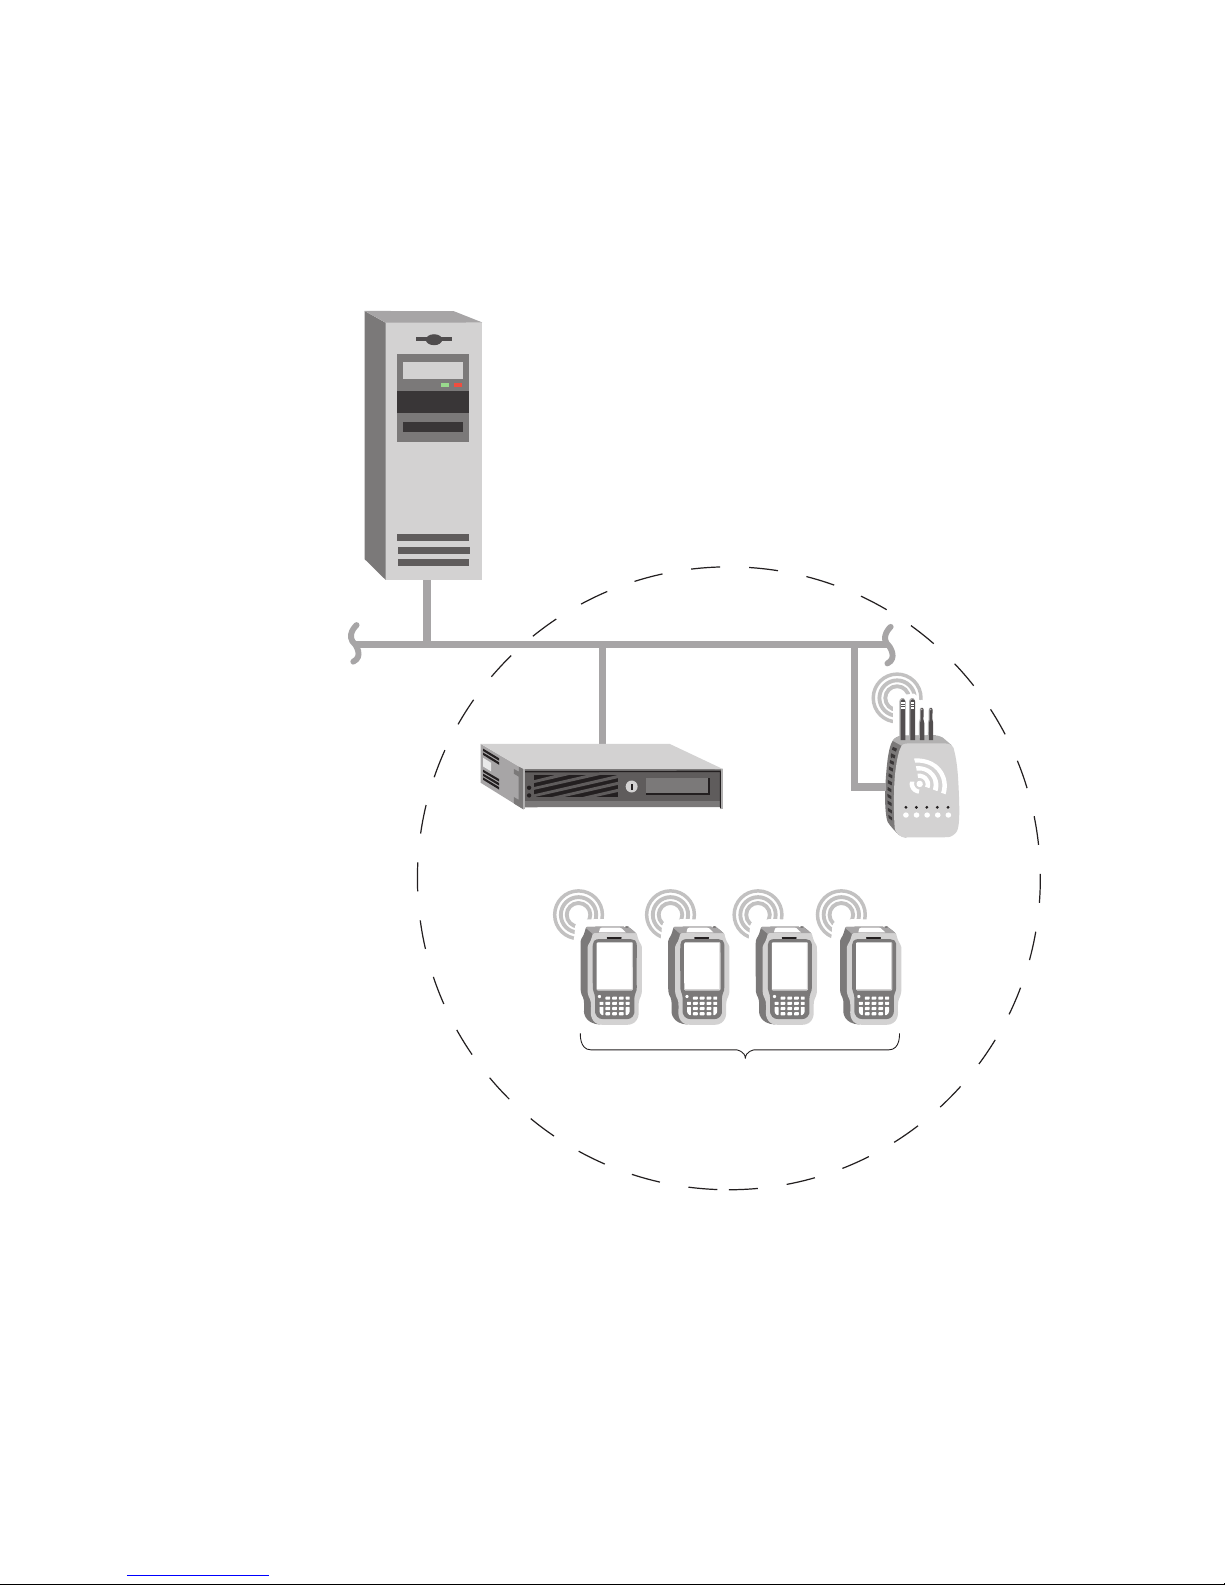
Chapter 3 — Adding the CN2A to the Network
Configuring the Network Parameters for a UDP Plus Network
In a UDP Plus network, the CN2A communicates with a host
computer through the Intermec Application Server.
Host
Ethernet
UDP Plus
Intermec Application Server
CN2As in a UDP Plus Network
Access point
CN2As
48 CN2A Mobile Computer User’s Manual
Page 65

Chapter 3 — Adding the CN2A to the Network
The Intermec Application Server translates UDP Plus packets on
the wireless network into TCP/IP packets on the wired network
and vice versa. The access point acts as a bridge to allow
communications between the wired network and the wireless
network.
To use wireless communications in a UDP Plus network
1 Configure these network parameters on each CN2A in the
network:
• Network name (SSID)
• Controller IP address
• IP settings (if not using DHCP)
• Controller port (set to 5555)
2 Configure the security. For help, see the next section,
“Configuring Network Security.”
The easiest way to configure the network parameters on the
CN2A is to use Intermec Settings. For help, see
CN2A Locally With Intermec Settings” on page 34.
Configuring Network Security
The CN2A provides three types of security for your wireless
network:
• Wi-Fi Protected Access (WPA)
• 802.1x
•WEP
This section explains how to configure security on your wireless
CN2A. If you choose not to use security, see
on page 67. Intermec always recommends that you implement
security.
You must use either Funk Security or Microsoft Security software
to implement your security solution. For details, see the next
section, “Choosing Between Funk Security and Microsoft
Security Software.”
“Configuring the
“Disabling Security”
CN2A Mobile Computer User’s Manual 49
Page 66

Chapter 3 — Adding the CN2A to the Network
Note: If you are using 802.1x security, this section assumes that
your authentication server and authenticators are properly
configured. For more information on the different types of
security, see the MobileLAN™ secure 802.1x Security Solution
Installation Guide (P/N 073134) available at www.intermec.com.
Choosing Between Funk Security and Microsoft Security Software
Before you can implement a security solution on the CN2A, you
need to choose between Funk Security and Microsoft Security
software.
Both offer the same features, except Funk Security (the default)
also offers these features:
• CCX v2.0 compliance
• Ability to use LEAP and TTLS authentication on your CN2A
• Up to four profiles, which are sets of configuration settings
If you choose Funk Security (the default), you are assigned Profile
1, which specifies a Network Name of INTERMEC and contains
no security settings. You should consider configuring security in
Profile 1 or selecting another profile. For help, see the next
section, “Selecting and Defining Profiles for Funk Security.”
If you choose Microsoft Security, you need to select Microsoft
Security. For help, see
“Choosing Microsoft Security Software”
on page 51.
Note: Your choice does not depend on your authentication server.
For example, you can choose Funk Security if you use Microsoft
®
Active Directory
to issue certificates.
Selecting and Defining Profiles for Funk Security
You can define up to four profiles for your Funk security.
Different profiles let your CN2A communicate in different
networks without having to change all of your security settings.
For example, you may want to set up one profile for the
manufacturing floor and one for the warehouse.
Only one profile can be active at a time. By default, the active
profile is Profile 1.
50 CN2A Mobile Computer User’s Manual
Page 67

Chapter 3 — Adding the CN2A to the Network
To select a profile for Funk security
1 Tap t h e Start icon. The Start menu appears.
2 Ta p Intermec Settings. The Intermec Settings application
appears.
3 Ta p Communications > 802.11 Radio > Funk Security.
4 (Optional) Select the active profile by tapping Active Profile
and choosing the profile name from the drop-down menu. By
default, Profile 1 is the active profile.
5 (Optional) Give your active profile a meaningful name:
a Select the active profile. All other profiles are grayed out
because you can only edit the active profile.
b Select Profile Label and a text box appears.
c Select the text in the box and use the input panel to type
in your meaningful name.
d Ta p th e Save icon at the top of the screen.
6 (Optional) Configure the security settings for the active
profile. For help, see the appropriate sections in this chapter.
7 (Optional) Repeat Steps 4 to 6 to rename and configure
additional profiles. Remember, you can only configure the
profile currently selected as the active profile.
8 Tap to save your settings.
9 Tap t h e
X at the top of the screen to exit Intermec Settings.
Choosing Microsoft Security Software
The default security choice is Funk Security. If you want to use
Microsoft Security, you need to choose it as your security choice.
To choose Microsoft Security
1 Ta p Start > Intermec Settings > Communications > 802.11
Radio.
2 For Security Choice, choose Microsoft Security.
3 Tap anywhere outside the Security Choice box, and an alert
box appears telling you that you must save your settings and
warm boot the CN2A for your new security choice to take
effect. Tap Yes to warm boot the CN2A now.
CN2A Mobile Computer User’s Manual 51
Page 68

Chapter 3 — Adding the CN2A to the Network
Note: You must warm boot the CN2A after you change your
security choice.
If you tap No, Intermec Settings resets the Security Choice
field to Funk Security.
4 When the CN2A finishes booting, the desktop appears. Tap
Ta p Start > Intermec Settings to continue configuring the
CN2A.
Using WPA Security
Wi-Fi Protected Access (WPA) is a strongly enhanced,
interoperable Wi-Fi security that addresses many of the
vulnerabilities of Wired Equivalent Privacy (WEP). Instead of
WEP, WPA uses Temporal Key Integrity Protocol (TKIP) for its
data encryption method.
Currently, WPA satisfies some of the requirements in the IEEE
802.11i draft standard. When the standard is finalized, WPA will
maintain forward compatibility.
WPA runs in 802.1x (Enterprise) mode or PSK (Pre-Shared Key)
mode:
• In Enterprise mode, WPA provides user authentication using
802.1x and the Extensible Authentication Protocol (EAP).
That is, an authentication server (such as a RADIUS server)
must authenticate each device before the device can
communicate with the wireless network.
• In PSK mode, WPA provides user authentication using a
shared key between the authenticator and the CN2A. WPAPSK is a good solution for small offices or home offices that
do not want to use an authentication server.
To use WPA security, you need:
• an authentication server (Enterprise mode only). You can use
a MobileLAN access WA2X product as an authentication
server.
• user and root certificates (if you plan to use TLS for
authentication).
• an access point with an 802.11b/g radio that supports WPA.
52 CN2A Mobile Computer User’s Manual
Page 69

Chapter 3 — Adding the CN2A to the Network
• a CN2A with the 802.11b/g radio and the 802.1x/WPA
security option.
Configuring WPA Security With Funk Security
Use these procedures to set WPA-802.1x and WPA-PSK security
on your CN2A with Funk security.
To enable WPA-802.1x security on your CN2A with Funk Security
1 Make sure you have configured the communications and
radio parameters on your CN2A.
2 Make sure you have selected Funk as your security choice, as
described in “Choosing Between Funk Security and Microsoft
Security Software” on page 50.
3 Make sure the date on the CN2A is correct. For help setting
the date and time, see Step 4 on page 113.
4 If you plan to use TLS for authentication, load a user and root
certificate on your CN2A. For help, see “Loading
Certificates” on page 65.
5 Open Intermec Settings.
6 Ta p Communications > 802.11 Radio > Funk Security >
active_profile, where active_profile is the name of the active
profile.
Note: All other profiles are grayed out and cannot be
configured. To edit another profile, you must make it the
active profile by selecting it in the Active Profile field.
7 For Association, choose WPA and tap or press Enter.
Encryption is set to TKIP by default.
8 For Pre-Shared Key, enter the pre-shared key or passphrase
and press Enter.
The pre-shared key must be a value of 32 hex pairs preceded
by 0x for a total of 66 characters. The value must match the
key value on the access point. The passphrase must be from 8
to 63 characters. After you enter a passphrase, the CN2A
internally converts it to a pre-shared key.
CN2A Mobile Computer User’s Manual 53
This value must match the passphrase on the authenticator.
Page 70
Chapter 3 — Adding the CN2A to the Network
9 For 802.1x, choose TTLS, PEAP, or TLS and tap or press
Enter.
If you choose TTLS or PEAP:
a For Prompt for Credentials, choose Enter credentials
now.
Note: You can us e Prompt for password to troubleshoot
your connection to the network if you have problems.
b Select User name, use the soft keyboard to type your user
name, and tap or press Enter.
c Select User Password, use the soft keyboard to type your
user password, and tap or press Enter.
d For Validate Se rver Cer tificate, choose Yes and tap or
press Enter.
Note: You must have the date on the CN2A set correctly
when you enable Validate Server Certificate.
If you choose TLS:
a For Va lidat e Server Ce rtificat e, choose Yes and tap or
press Enter.
b Yo u m us t ente r a User Name and Subject Name. You can
also enter a Server Common Name to increase your level
of security.
10 Exit Intermec Settings. If prompted to save your settings, tap
Yes .
To enable WPA-PSK security on your CN2A with Funk Security
1 Make sure you have configured the communications and
radio parameters on your CN2A.
2 Make sure you have selected Funk as your security choice, as
described in “Choosing Between Funk Security and Microsoft
Security Software” on page 50.
3 Open Intermec Settings.
54 CN2A Mobile Computer User’s Manual
Page 71

Chapter 3 — Adding the CN2A to the Network
4 Ta p Communications > 802.11 Radio > Funk Security >
active_profile, where active_profile is the name of the active
profile.
Note: All other profiles are grayed out and cannot be
configured. To edit another profile, you must make it the
active profile by selecting it in the Active Profile field.
5 For Association, choose WPA and tap or press Enter.
Data Encryption automatically defaults to TKIP.
6 For 802.1x, choose None and tap or press Enter.
7 For Pre-Shared Key, enter the pre-shared key or the
passphrase.
The pre-shared key must be a value of 32 hex pairs preceded
by 0x for a total of 66 characters. The value must match the
key value on the access point. The passphrase must be from 8
to 63 characters. After you enter a passphrase, the CN2A
internally converts it to a pre-shared key.
This value must match the passphrase on the authenticator.
8 Exit Intermec Settings. If prompted to save your settings, tap
Yes .
Configuring WPA Security With Microsoft Security
Use these procedures to set WPA-802.1x and WPA-PSK security
on your CN2A with Microsoft security. These procedures assume
that you have selected Microsoft Security software as your
security choice, as described in
Security and Microsoft Security Software” on page 50.
To enable WPA-802.1x security on your CN2A with Microsoft Security
1 Make sure you have configured the communications and
radio parameters on your CN2A.
2 Make sure you have selected Microsoft as your security
choice, as described in “Choosing Between Funk Security and
Microsoft Security Software” on page 50.
3 If you plan to use TLS for authentication, load a user and root
certificate on your CN2A. For help, see “Loading
Certificates” on page 65.
“Choosing Between Funk
CN2A Mobile Computer User’s Manual 55
4 Open Intermec Settings.
Page 72
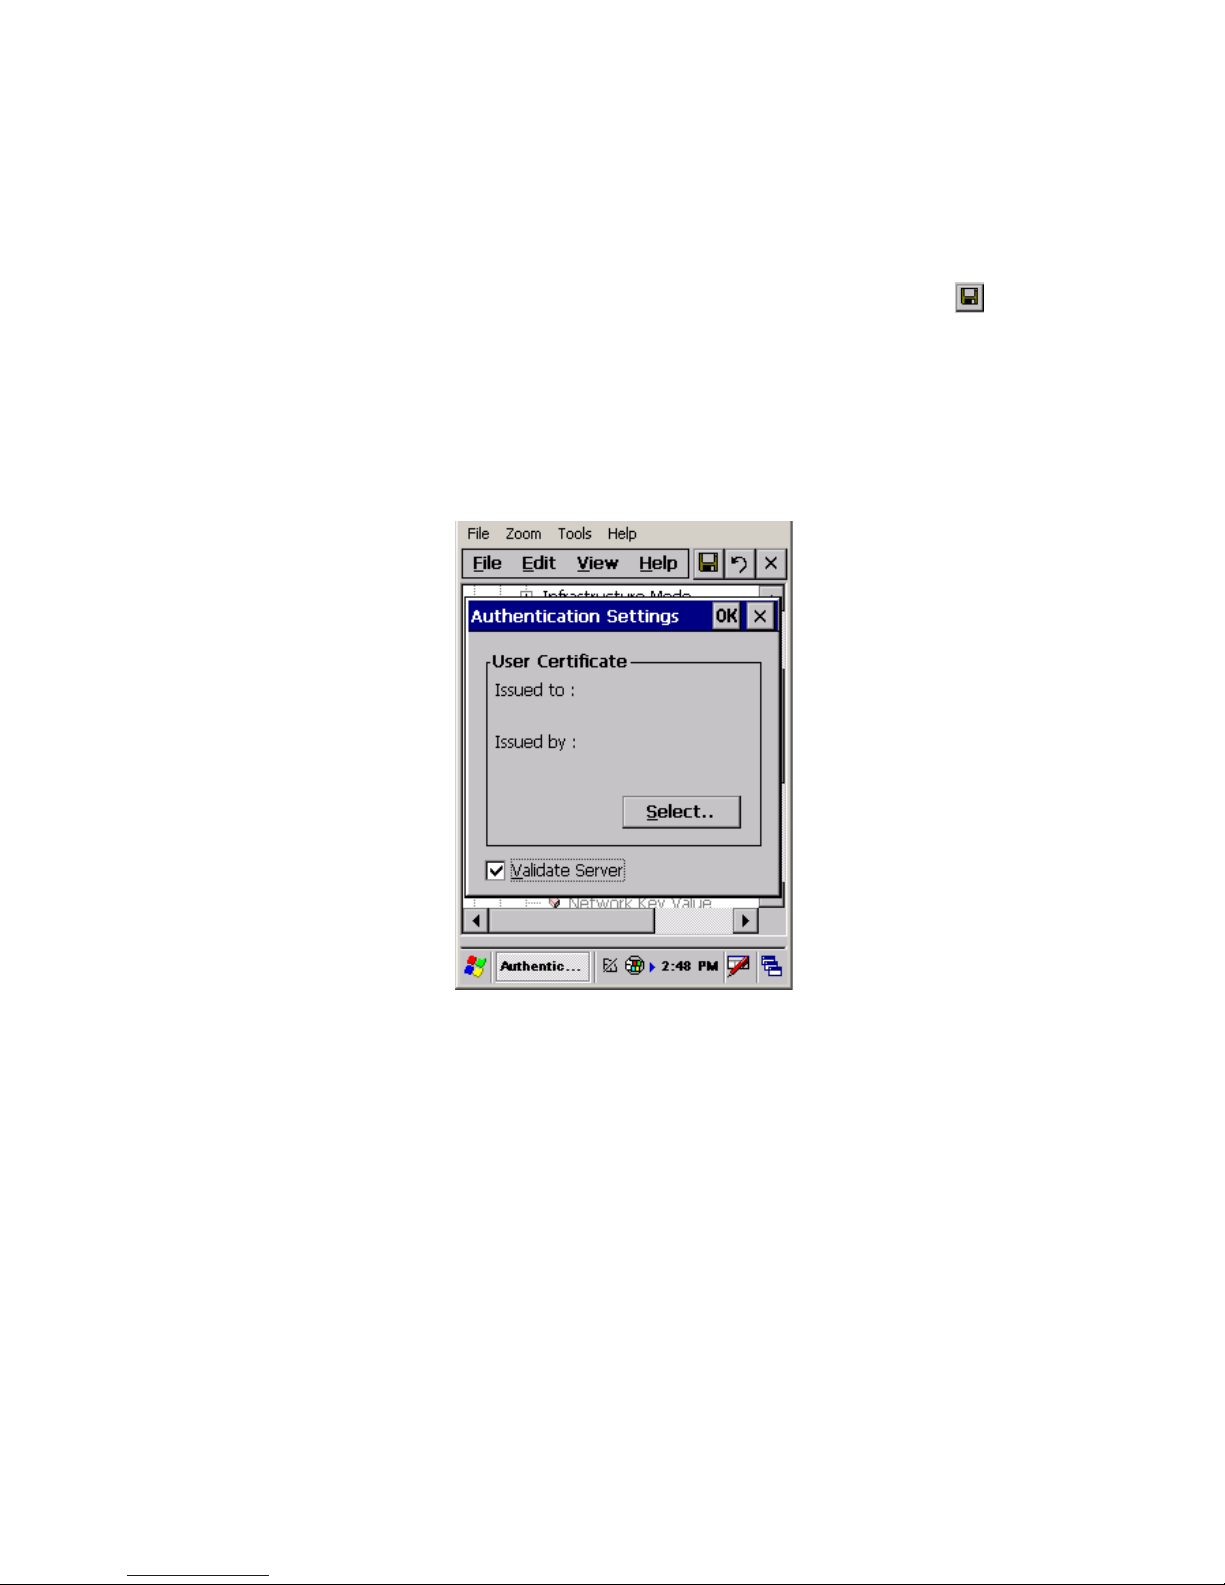
Chapter 3 — Adding the CN2A to the Network
5 Ta p Communications > 802.11 Radio > Microsoft
Security.
6 For Infrastructure Mode, choose Infrastructure.
7 For Network Authentication, choose WPA and tap or
press Enter. Data Encryption is set to TKIP by default.
8 For 802.1x Authentication, choose either TLS or PEAP.
If you choose TLS:
a Tap Properties and tap Run App. The Authentication
Settings box appears.
b From the Authentication Settings box, tap Select.
c Tap your certificate from the list and press Enter or tap
d Enter a User Name and Domain.
e Tap OK complete the process.
If you choose PEAP:
a Tap Properties and tap Run App. The Authentication
b Select the Vali date Ser ver check box.
56 CN2A Mobile Computer User’s Manual
OK. The User Logon dialog box appears.
Settings box appears.
Page 73

Chapter 3 — Adding the CN2A to the Network
c Tap OK. After the radio starts to authenticate, the
Network Password dialog box appears.
d Enter a User Name and Password and tap the Save
Password check box.
e (Optional) In the Domain field, enter the Active
Directory domain associated with the user account.
f Press Enter.
9 Exit Intermec Settings. If prompted to save your settings, tap
Yes .
To enable WPA-PSK security on your CN2A With Microsoft Security
1 Make sure you have configured the communications and
radio parameters on your CN2A.
2 Make sure you have selected Microsoft as your security
choice, as described in “Choosing Between Funk Security and
Microsoft Security Software” on page 50.
3 If you plan to use TLS for authentication, load a user and root
certificate on your CN2A. For help, see “Loading
Certificates” on page 65.
4 Open Intermec Settings.
5 Choose Communications > 802.11 Radio > Microsoft
Security.
6 For Infrastructure Mode, choose Infrastructure.
7 For Network Authentication, choose WPA-PSK and tap
or press Enter. Data Encryption is set to TKIP by default.
8 For Pre-Shared Key, enter the pre-shared key or the
passphrase.
The pre-shared key must be a value of 32 hex pairs preceded
by 0x for a total of 66 characters. The value must match the
key value on the authenticator. The passphrase must be from
8 to 63 characters. After you enter a passphrase, the CN2A
internally converts it to a pre-shared key.
This value must match the passphrase on the authenticator.
CN2A Mobile Computer User’s Manual 57
9 Exit Intermec Settings. If prompted to save your settings, tap
Yes .
Page 74

Chapter 3 — Adding the CN2A to the Network
Using 802.1x Security
802.1x security provides centralized user authentication using an
authentication server, authenticators (access points), and
supplicants. These components communicate using an EAP
authentication type, such as TLS (Transport Layer Security) or
PEAP (Protected Extensible Authentication Protocol). 802.1x
security provides data encryption using dynamic WEP key
management.
To use 802.1x security, you need:
• an authentication server. You can use a MobileLAN access
WA2X product as an authentication server.
• an access point with an 802.11b/g radio.
• a CN2A with an 802.11b/g radio and the 802.1x/WPA
security option.
• user and root certificates (if you plan to use TLS for
authentication).
These procedures assume that you have already selected either
Microsoft Security or Funk Security software as your security
choice, as described in
“Choosing Between Funk Security and
Microsoft Security Software” on page 50.
Configuring 802.1x Security With Funk Security
Follow these steps to configure 802.1x Security with Funk
Security.
To configure 802.1x Security with Funk Security
1 Make sure you have configured the communications and
radio parameters on your CN2A.
2 Make sure you have selected Funk as your security choice, as
described in “Choosing Between Funk Security and Microsoft
Security Software” on page 50.
3 If you plan to use TLS for authentication, load a user and root
certificate on your CN2A. For help, see “Loading
Certificates” on page 65.
4 Open Intermec Settings.
58 CN2A Mobile Computer User’s Manual
Page 75
Chapter 3 — Adding the CN2A to the Network
5 Ta p Communications > 802.11 Radio > Funk Security >
active_profile, where active_profile is the name of the active
profile.
Note: All other profiles are grayed out and cannot be
configured. To edit another profile, you must make it the
active profile by selecting it in the Active Profile field.
6 For Association, select Open and tap or press Enter.
7 For Encryption, select WEP and tap or press Enter.
8 For 802.1x, select TTLS, PEAP, or TLS and tap or press
Enter.
If you choose TTLS or PEAP:
a Select Prompt for Credentials, choose Enter credentials
now, and then tap or press Enter.
Note: You can us e Prompt for password to troubleshoot
your connection to the network if you have problems.
b Select User name, type your user name, and tap or
press Enter.
c Select User Password, type a user password, and tap or
press Enter.
d For Validate Se rver Cer tificate, choose Yes and tap or
press Enter.
If you choose TLS:
a For Va lidat e Server Ce rtificat e, choose Yes and tap or
press Enter.
b You must enter a User Name and Subject Name.
c (Optional) You can also enter a Server Common Name to
increase your level of security.
9 Exit Intermec Settings. If prompted to save your settings, tap
Yes .
CN2A Mobile Computer User’s Manual 59
Page 76

Chapter 3 — Adding the CN2A to the Network
Configuring 802.1x Security With Microsoft Security
Follow these steps to configure 802.1x Security with Microsoft
Security.
To configure 802.1x Security with Microsoft Security
1 Make sure you have configured the communications and
radio parameters on your CN2A.
2 Make sure you have selected Microsoft as your security
choice, as described in “Choosing Between Funk Security and
Microsoft Security Software” on page 50.
3 If you plan to use TLS for authentication, load a user and root
certificate on your CN2A. For help, see “Loading
Certificates” on page 65.
4 Open Intermec Settings.
5 Choose Communications > 802.11 Radio > Microsoft
Security.
6 For Infrastructure Mode, choose Infrastructure.
7 For Network Authentication, choose Open.
8 For Data Encryption, choose WEP.
9 For 802.1X Authentication, choose TLS or PEAP, and tap
or press Enter.
If you choose TLS:
a Select Properties and tap Run App. The Authentication
Settings box appears.
60 CN2A Mobile Computer User’s Manual
Page 77
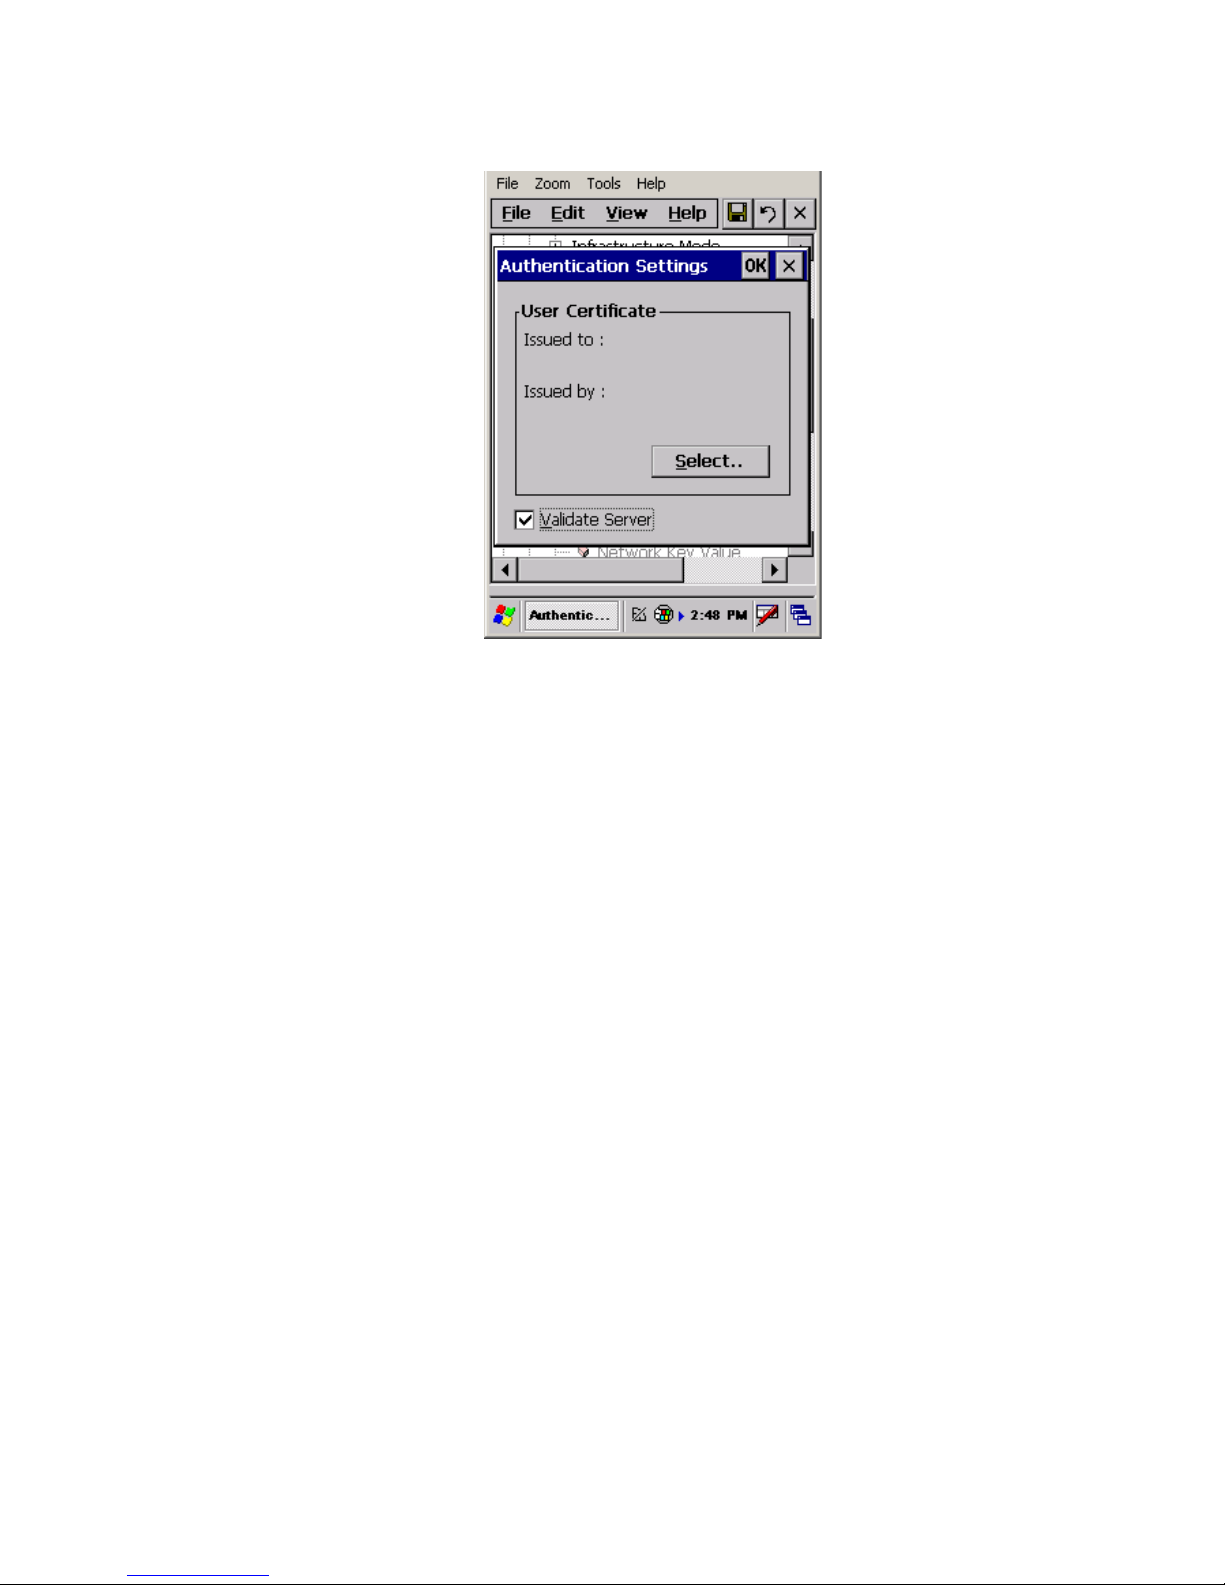
Chapter 3 — Adding the CN2A to the Network
b From the Authentication Settings box, tap Select.
c Select your certificate from the list and press Enter or tap
OK. The User Logon dialog box appears.
d Enter a User Name and Domain.
e Press Enter or tap OK.
If you choose PEAP:
a Select Properties and tap Run App. The Authentication
Settings box appears.
b Select the Vali date Ser ver check box.
c Press Enter or tap OK. Once the radio starts to
authenticate, the Network Password dialog box appears.
d Enter a User Name and Password and select the Save
Password check box.
e (Optional) In the Domain field, enter the domain.
f Press Enter or tap OK.
10 For Network Key Setting, choose Automatic.
11 Exit Intermec Settings. If prompted to save your settings, tap
CN2A Mobile Computer User’s Manual 61
Yes .
Page 78

Chapter 3 — Adding the CN2A to the Network
Using LEAP Security
Lightweight Extensible Authentication Protocol (LEAP), also
known as Cisco-Wireless EAP, provides username/passwordbased authentication between a wireless client and a RADIUS
server. In the 802.1x framework, traffic cannot pass through an
Ethernet hub or wireless network access point until it successfully
authenticates itself.
The station must identify itself and prove that it is an authorized
user before it is actually allowed to use the LAN. LEAP also
delivers a session key to the authenticated station, so that future
frames can be encrypted with a key that is different than keys
used by others’ sessions.
To use LEAP security, you need:
• a RADIUS server.
• a Cisco access point with an 802.11b/g radio
Note: LEAP security is not supported if you are using Microsoft
Security software, as described in “Choosing Between Funk
Security and Microsoft Security Software” on page 50.
To enable LEAP security on your CN2A
1 Make sure you have configured the communications and
radio parameters on your CN2A.
2 Make sure you have selected Funk as your security choice, as
described in “Choosing Between Funk Security and Microsoft
Security Software” on page 50.
3 Open Intermec Settings.
4 Ta p Communications > 802.11 Radio > Funk Security >
active_profile, where active_profile is the name of the active
profile.
Note: All other profiles are grayed out and cannot be
configured. To edit another profile, you must make it the
active profile by selecting it in the Active Profile field.
5 For 802.1x, select LEAP and tap or press Enter.
62 CN2A Mobile Computer User’s Manual
Page 79

Chapter 3 — Adding the CN2A to the Network
6 For Association, select Open, WPA, or Network EAP and
tap or press Enter. Encryption automatically defaults to
TKIP if you choose WPA, and to WEP if you choose OPen or
Network EAP.
7 For Prompt for Credentials, choose Enter credentials now.
Note: You can use Prompt for password to troubleshoot your
connection to the network if you have problems.
8 Select User Name, type your user name, and tap or press
Enter.
9 Select User Password, type your password, and tap or
press Enter.
10 Exit Intermec Settings. If prompted to save your settings, tap
Yes .
Using Static WEP Security
The CN2A uses the Wired Equivalent Privacy (WEP) protocol to
add security to your wireless network based on the 802.11b
standard.
To use WEP security, you need:
• an access point with an 802.11b/g radio.
• a CN2A mobile computer with an 802.11b/g radio.
Configuring Static WEP Security With Funk Security
Follow these steps to configure static WEP security with Funk
Security.
To configure static WEP security with Funk Security
1 Make sure you have configured the communications and
radio parameters on your CN2A.
2 Make sure you have selected Funk as your security choice, as
described in “Choosing Between Funk Security and Microsoft
Security Software” on page 50.
CN2A Mobile Computer User’s Manual 63
3 Open Intermec Settings.
Page 80

Chapter 3 — Adding the CN2A to the Network
4 Ta p Communications > 802.11 Radio > Funk Security >
active_profile, where active_profile is the name of the active
profile.
Note: All other profiles are grayed out and cannot be
configured. To edit another profile, you must make it the
active profile by selecting it in the Active Profile field.
5 For Association, choose Open and tap or press Enter.
6 For Encryption, choose WEP and tap or press Enter.
7 For Authentication, choose None and tap or press Enter.
8 Select WEP Key and then define a value for each WEP key.
You can define up to four WEP keys.
Enter an ASCII key or a hex key that is either 5 bytes or 13
bytes long depending on the type of WEP encryption you are
using. Set a 5-byte value for 64-bit WEP or a 13-byte value
for 128-bit WEP. Hex values must be preceded by 0x and
contain 5 or 13 hex pairs.
9 Select Network Key Index, choose the WEP key you want to
use for transmitting data.
10 Exit Intermec Settings. If prompted to save your settings, tap
Yes .
Configuring Static WEP Security With Microsoft Security
Follow these steps to configure static WEP security with
Microsoft Security.
To configure static WEP security with Microsoft Security
1 Make sure you have configured the communications and
radio parameters on your CN2A.
2 Make sure you have selected Microsoft as your security
choice, as described in “Choosing Between Funk Security and
Microsoft Security Software” on page 50.
3 Open Intermec Settings.
4 Choose Communications > 802.11 Radio > Microsoft
Security.
5 For Network Authentication, choose Open.
64 CN2A Mobile Computer User’s Manual
Page 81

Loading Certificates
Chapter 3 — Adding the CN2A to the Network
6 For Data Encryption, choose WEP.
7 For Network Key Setting, choose Enter Key and Index.
8 For Network Key Value, enter an ASCII key or a hex key that
is either 5 bytes or 13 bytes long depending on the type of
WEP encryption you are using.
Set a 5-byte value for 64-bit WEP or a 13-byte value for 128bit WEP. Hex values must be preceded by 0x and contain 5 or
13 hex pairs.
9 For Network Key Index, select the key you want to use for
data transmission.
10 Exit Intermec Settings. If prompted to save your settings, tap
Yes .
If you choose to use transport layer security (TLS) with WPA or
802.1x security, you need to have a unique client certificate on
the CN2A and a trusted root certificate authority (CA)
certificate. You can use a third-party CA to issue unique client
certificates and a root certificate.
If you are using Active Directory® to issue certificates, you can
use the Enroll Certificates application to load the certificates. If
you are using a third-party CA, you can use the Import Root or
User Certificates programs to load the certificates.
Note: Do not cold boot the CN2A. Cold booting the computer
resets the date and time. If you cold boot the CN2A, you must
immediately update the date and time, or the installed certificates
may be deemed invalid. For help setting the date and time, see
Step 4 on page 113.
To load certificates on the CN2A if you are using Active Directory
1 Configure the network and radio settings for the CN2A to
communicate with your certificate authority or establish an
ActiveSync connection with the CA.
2 Ta p Start > Intermec Settings > Communications > 802.11
Radio > Security Settings > Certificates.
3 Select Enroll Certificates and tap Run App.
CN2A Mobile Computer User’s Manual 65
Page 82
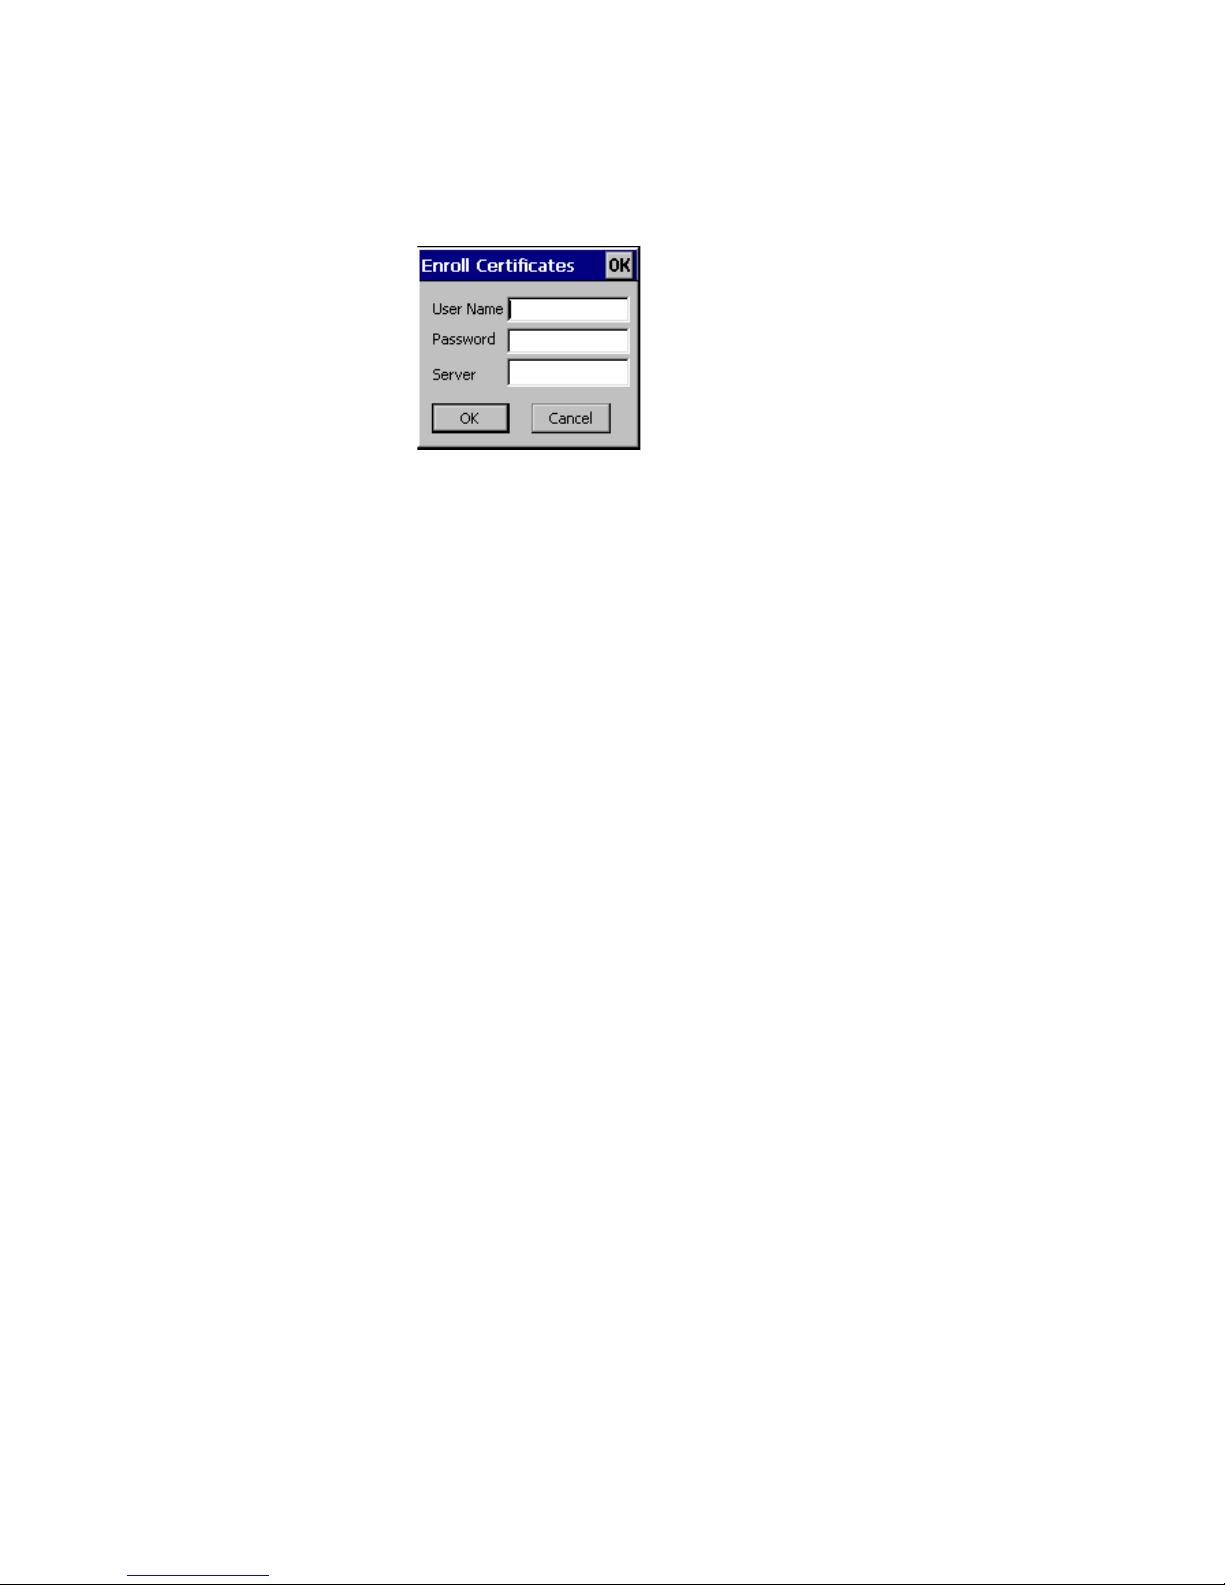
Chapter 3 — Adding the CN2A to the Network
4 From the Run Application box, tap Yes. The Enroll
Certificates dialog box appears.
5 Enter the User Name, Password, and Server (IP address) to
log in to the CA server.
6 Ta p OK. A dialog box appears asking if you want to load the
root certificate.
7 Ta p Yes or press Enter to load the certificate. The Enrollment
Tool message box appears telling you that the user certificate
has been added.
8 Press Enter to close the Enrollment Tool message box.
9 Configure your CN2A for WPA or 802.1x security.
To load certificates on the CN2A if you are using a third-party CA
1 Create the \temp\root and \temp\user folders on your CN2A.
2 Copy your .cer file to the \temp\root folder on the CN2A.
3 Copy your .der and .pvk files to the \temp\user folder on the
CN2A.
4 Ta p Start > Intermec Settings > Communications > 802.11
Radio > Security Settings > Certificates.
5 Select Import Root Certificates and tap Run App to load
the .cer file. A dialog box appears asking if you want to add
the certificate to the root store.
6 Ta p Yes or press Enter to add the certificate. A message box
appears telling you that the root certificate has been imported.
7 Ta p OK to close the Success message box.
8 Select Import User Certificate to load the .der and .pvk files.
A message box appears telling you that the certificate has been
imported.
66 CN2A Mobile Computer User’s Manual
Page 83

Disabling Security
Chapter 3 — Adding the CN2A to the Network
9 Ta p OK to close the Success message box.
10 Configure your CN2A for WPA or 802.1x security.
If you choose not to use security with your wireless network, you
can disable it on the CN2A. Intermec strongly recommends that
you always set security in your network.
The procedure you follow to disable security depends on whether
you are using Funk Security or Microsoft Security.
To disable Funk Security
1 Open Intermec Settings.
2 Ta p Communications > 802.11 Radio.
3 If Security Choice is not Funk Security, you need to use the
next procedure, “To disable Microsoft Security.”
4 Ta p Funk Security.
5 Tap the active profile.
6 For 8021x (or Authentication), choose None.
7 For Association, choose Open.
8 For Encryption, choose None.
9 Tap t h e Save icon in the upper right corner of the screen.
10 Exit Intermec Settings.
To disable Microsoft Security
1 Open Intermec Settings.
2 Ta p Communications > 802.11 Radio.
3 If Security Choice is not Microsoft Security, you need to use
the previous procedure, “To disable Funk Security.”
4 Ta p Microsoft Security.
5 For Network Authentication, choose Open.
6 For Data Encryption, choose Disabled.
CN2A Mobile Computer User’s Manual 67
7 Tap t h e Save icon in the upper right corner of the screen.
8 Exit Intermec Settings.
Page 84
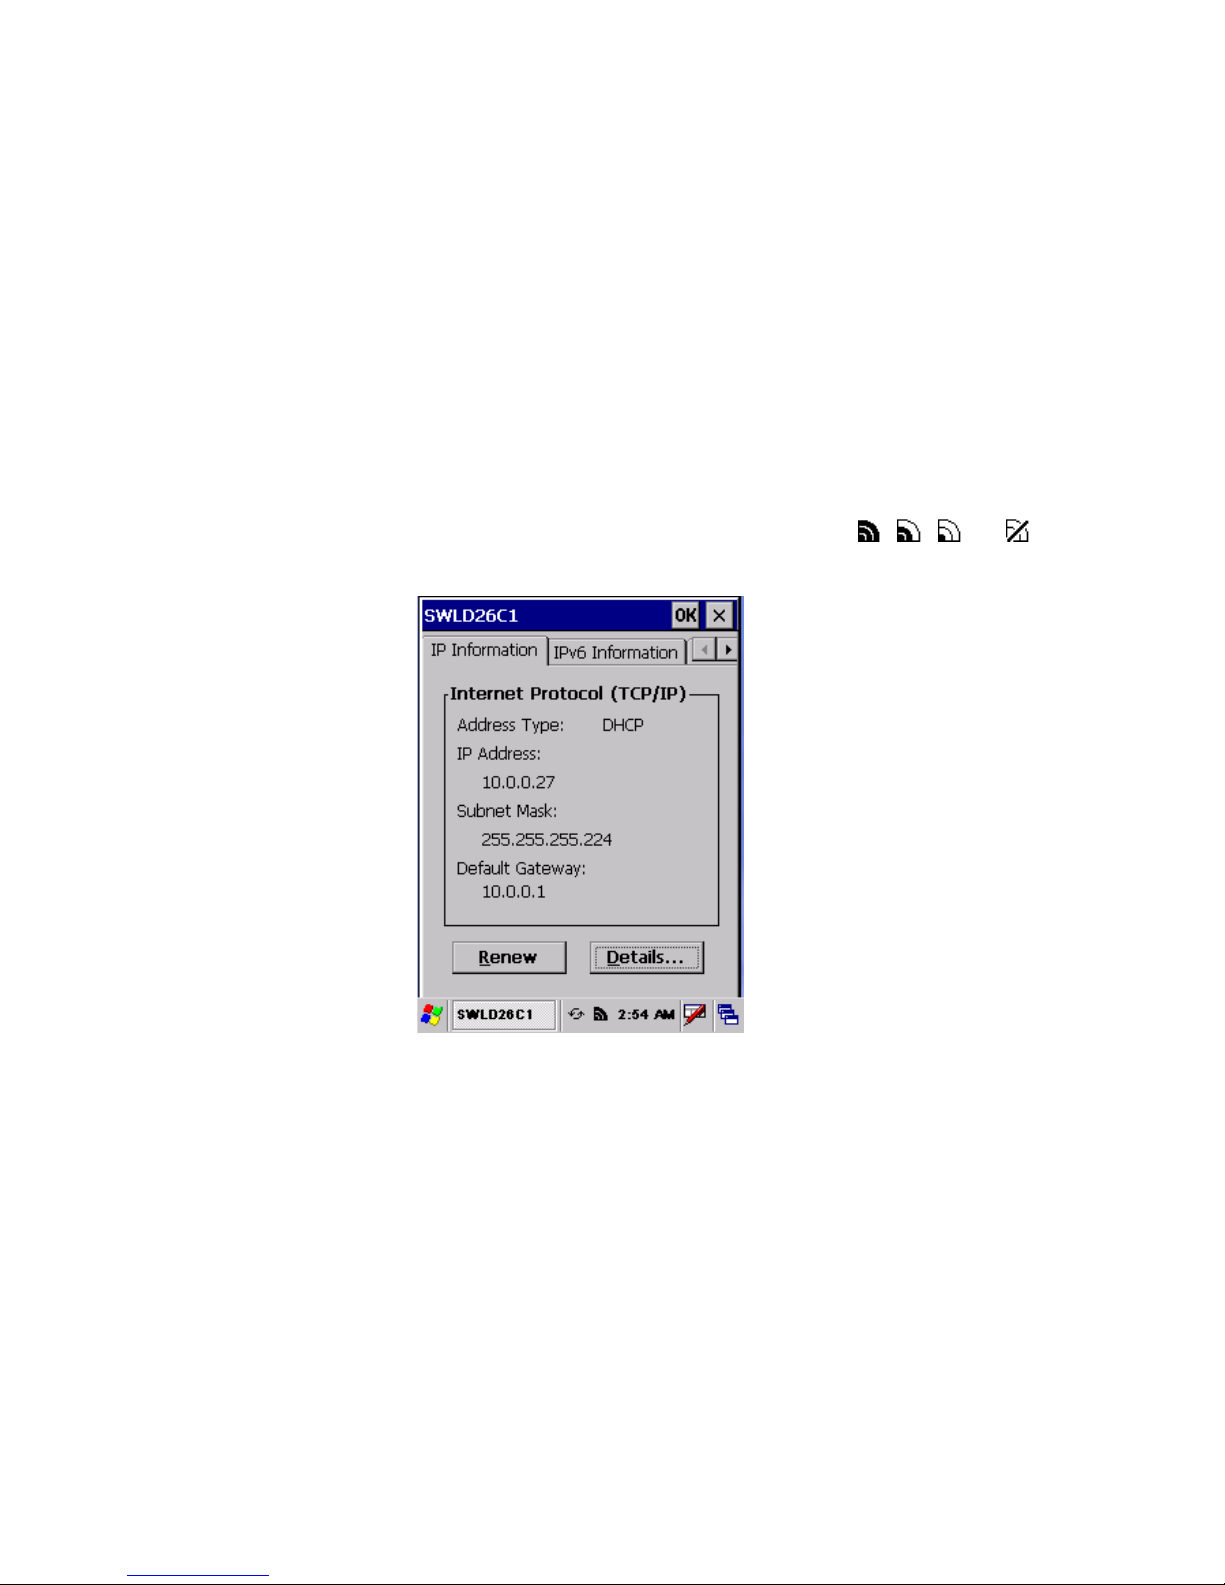
Chapter 3 — Adding the CN2A to the Network
Viewing Wireless Network Information
You can view wireless network information, such as current
network parameters and network parameters and a list of
available wireless networks.
This feature is available if you have Funk or Microsoft configured
as your security choice, as described in
Security and Microsoft Security Software” on page 50.
To view wireless network information
1 Configure and add your wireless CN2A to your network.
“Choosing Between Funk
2 Double-tap the Network Connection
icon ( , , , or )
in the taskbar. The SWLD26C1 configuration screen appears.
3 Tap the right arrow button ( R ) twice and then tap the
Wireless Information tab to bring the tab forward.
68 CN2A Mobile Computer User’s Manual
Page 85
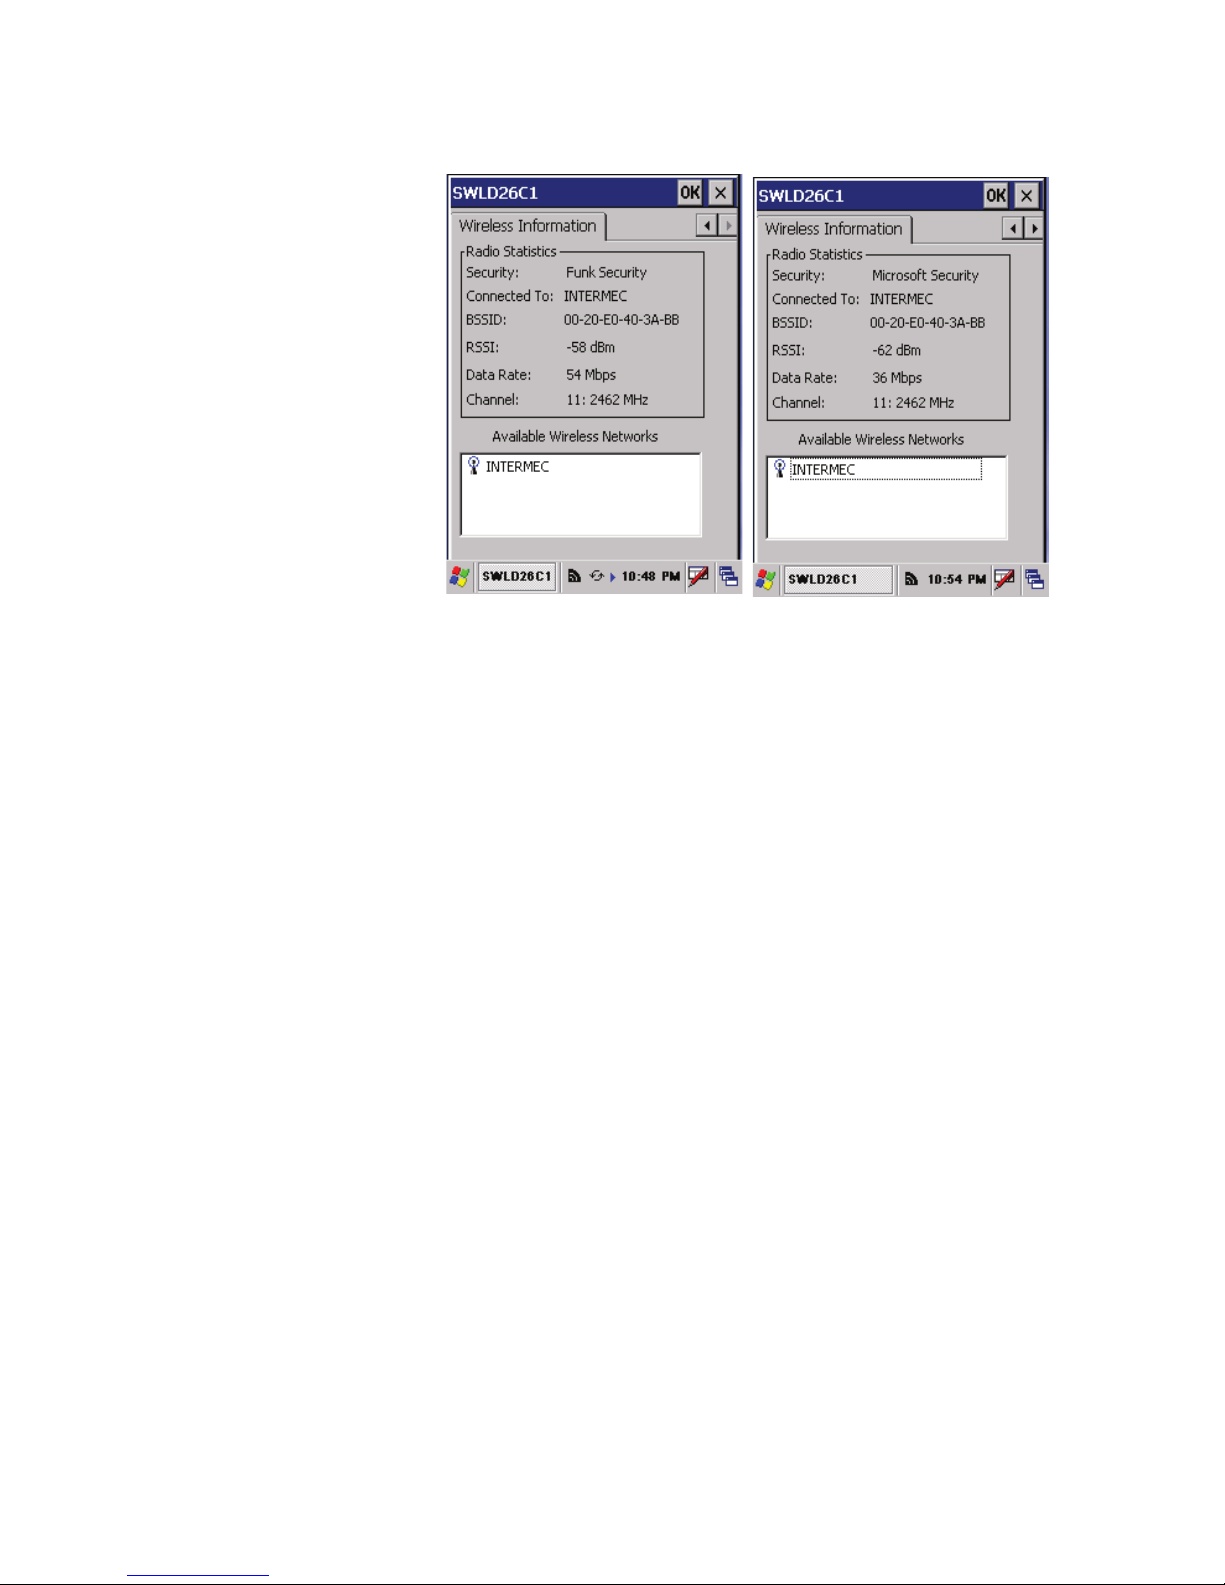
Chapter 3 — Adding the CN2A to the Network
Wireless Network Information: This tab shows wireless network
information for the CN2A, including your security choice, wireless network
parameters, and a list of available wireless networks. You cannot set
parameters or select a network on this tab.
4 Ta p OK to close the SWLD26C1 configuration screen.
Using Remote Desktop Connection
The Remote Desktop Connection application lets you connect
your CN2A over the network to either:
• a PC running Windows NT, Windows 2000, or Windows XP
Professional.
• a server running Windows NT Server 4.0 Terminal Server
Edition.
This version of Remote Desktop Connection lets you specify the
size of the remote desktop. If you choose a desktop larger than
the CN2A default (240 by 320 pixels), you can use scroll bars to
move around the screen.
To use Remote Desktop Connection
1 Make sure your CN2A is connected to the network. For help,
see “Configuring the CN2A For Your Network” on page 44.
2 Ta p Start > Programs > Remote Desktop Connection. The
Remote Desktop Connection screen appears.
CN2A Mobile Computer User’s Manual 69
Page 86
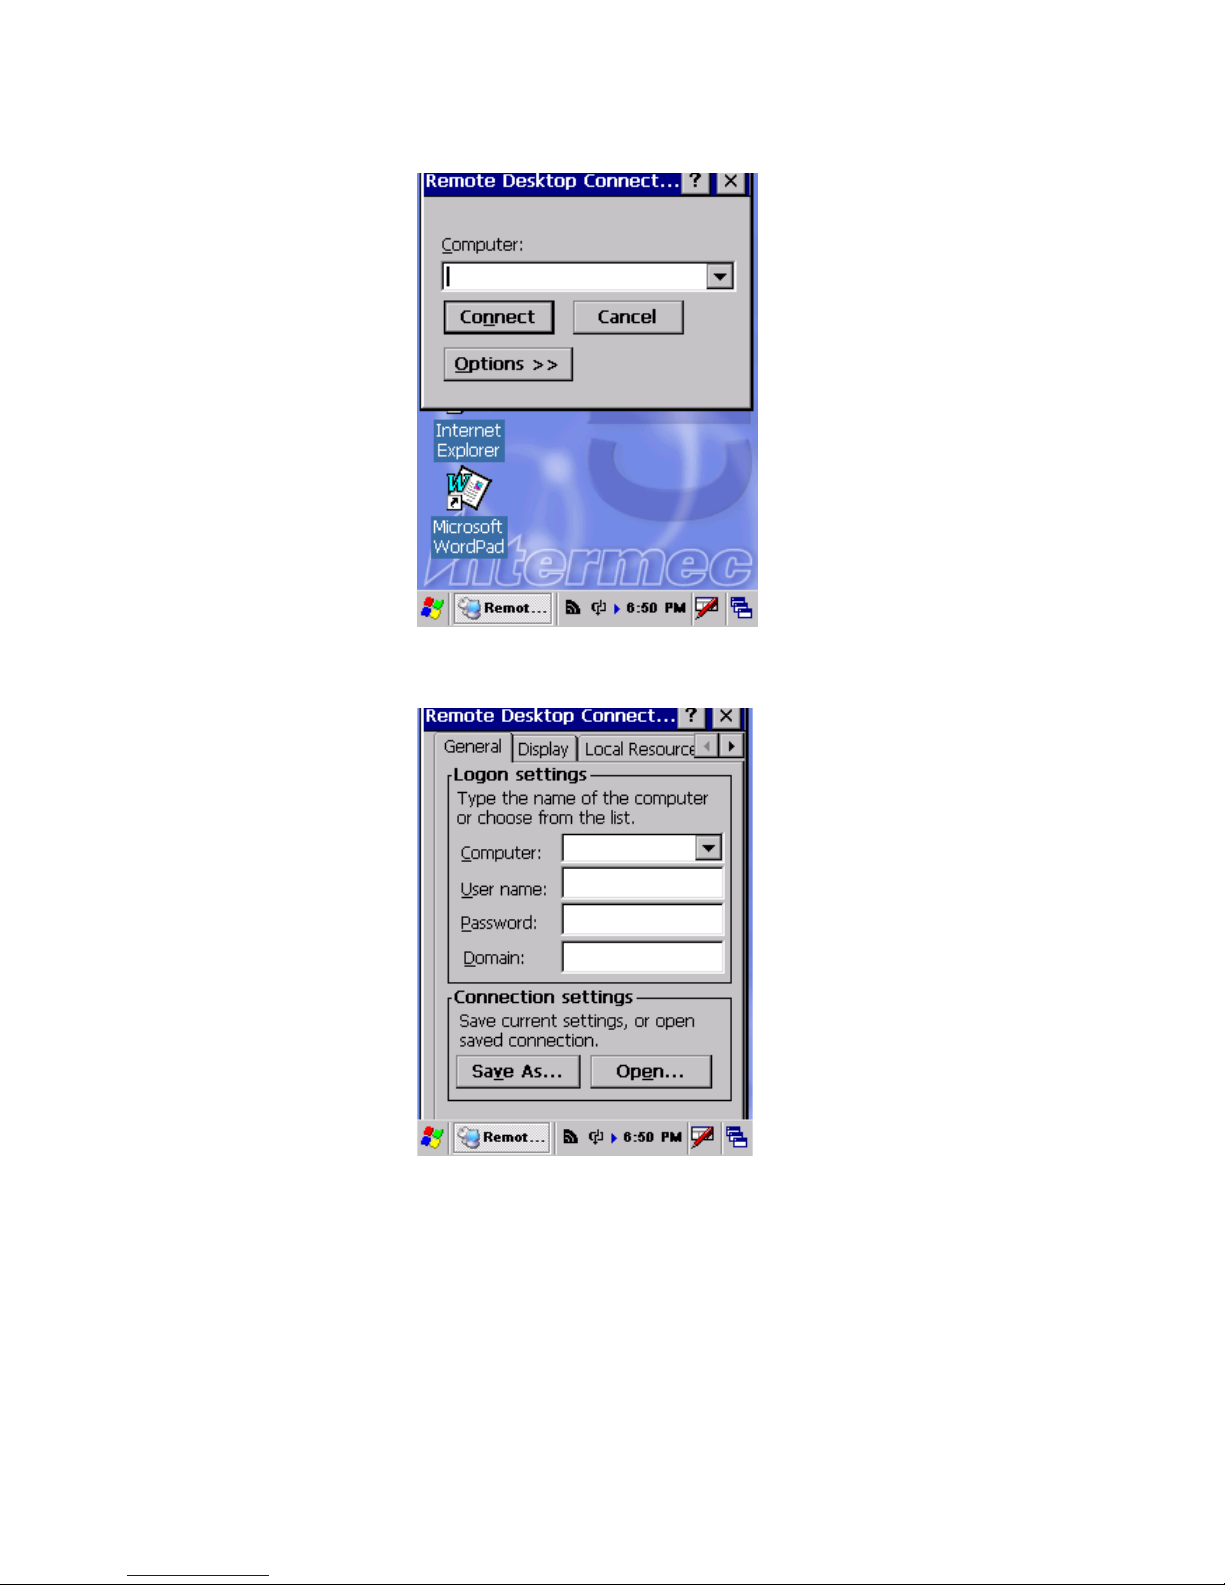
Chapter 3 — Adding the CN2A to the Network
3 Ta p Options. This screen appears:
4 On the General tab, specify the computer, user name,
password, and domain to use when connecting to the remote
desktop.
5 (Optional) Tap Save As to save your settings in an .rdp file, or
tap Open to load an existing .rdp file.
70 CN2A Mobile Computer User’s Manual
Page 87
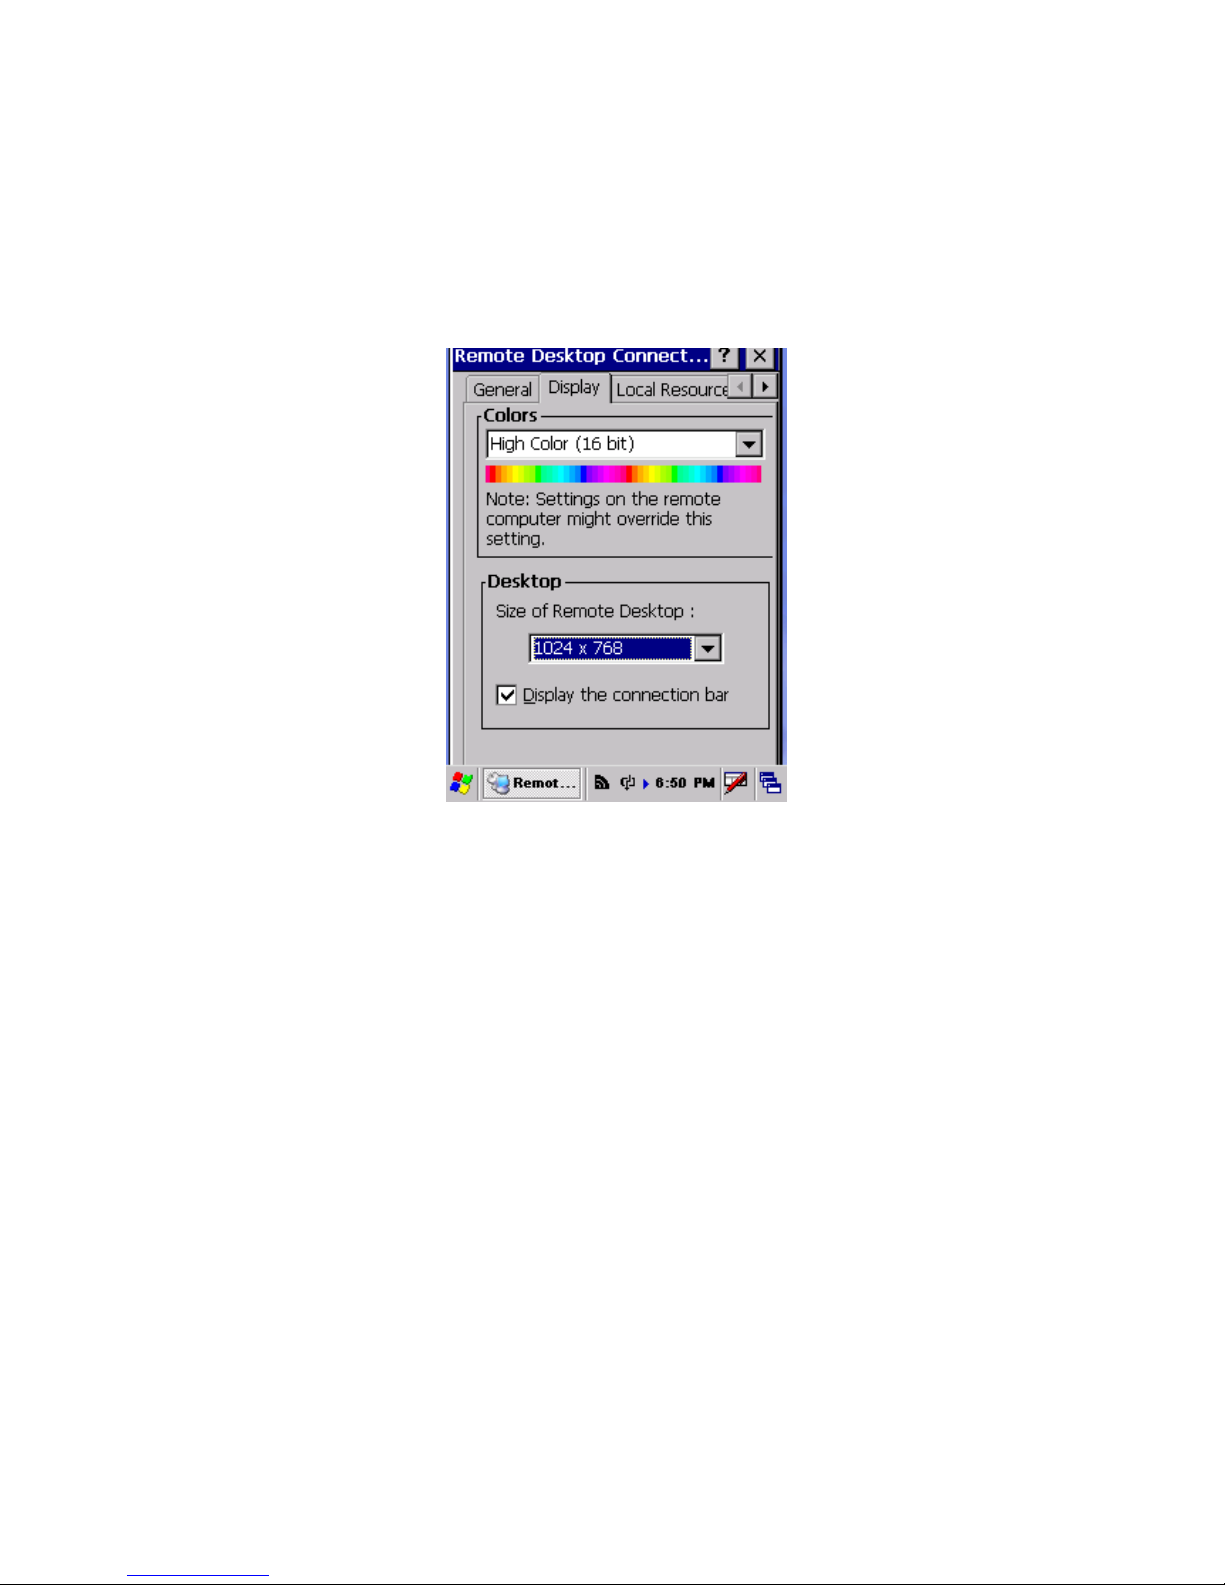
Chapter 3 — Adding the CN2A to the Network
6 (Optional) Tap the Display tab to specify the size of the
remote desktop.
You may find a larger desktop easier to use than the default
240 by 320 pixels. If you choose a larger desktop, you will use
scroll bars to move around the screen.
7 (Optional) If you are using the optional USB keyboard, tap
the Local Resources tab and choose On the local computer
in the Keyboard field. For help using the USB keyboard, see
“Attaching a Keyboard to the CN2A” on page 28.
8 (Optional) Tap the Programs tab to specify a program to start
when you connect.
9 (Optional) Tap the Experience tab to specify other settings
such as desktop background and animation. Be aware that
enabling animation will slow performance.
10 When you have finished configuring the connection, press the
Enter key on the CN2A keypad to open the connection to
the remote desktop.
CN2A Mobile Computer User’s Manual 71
Page 88
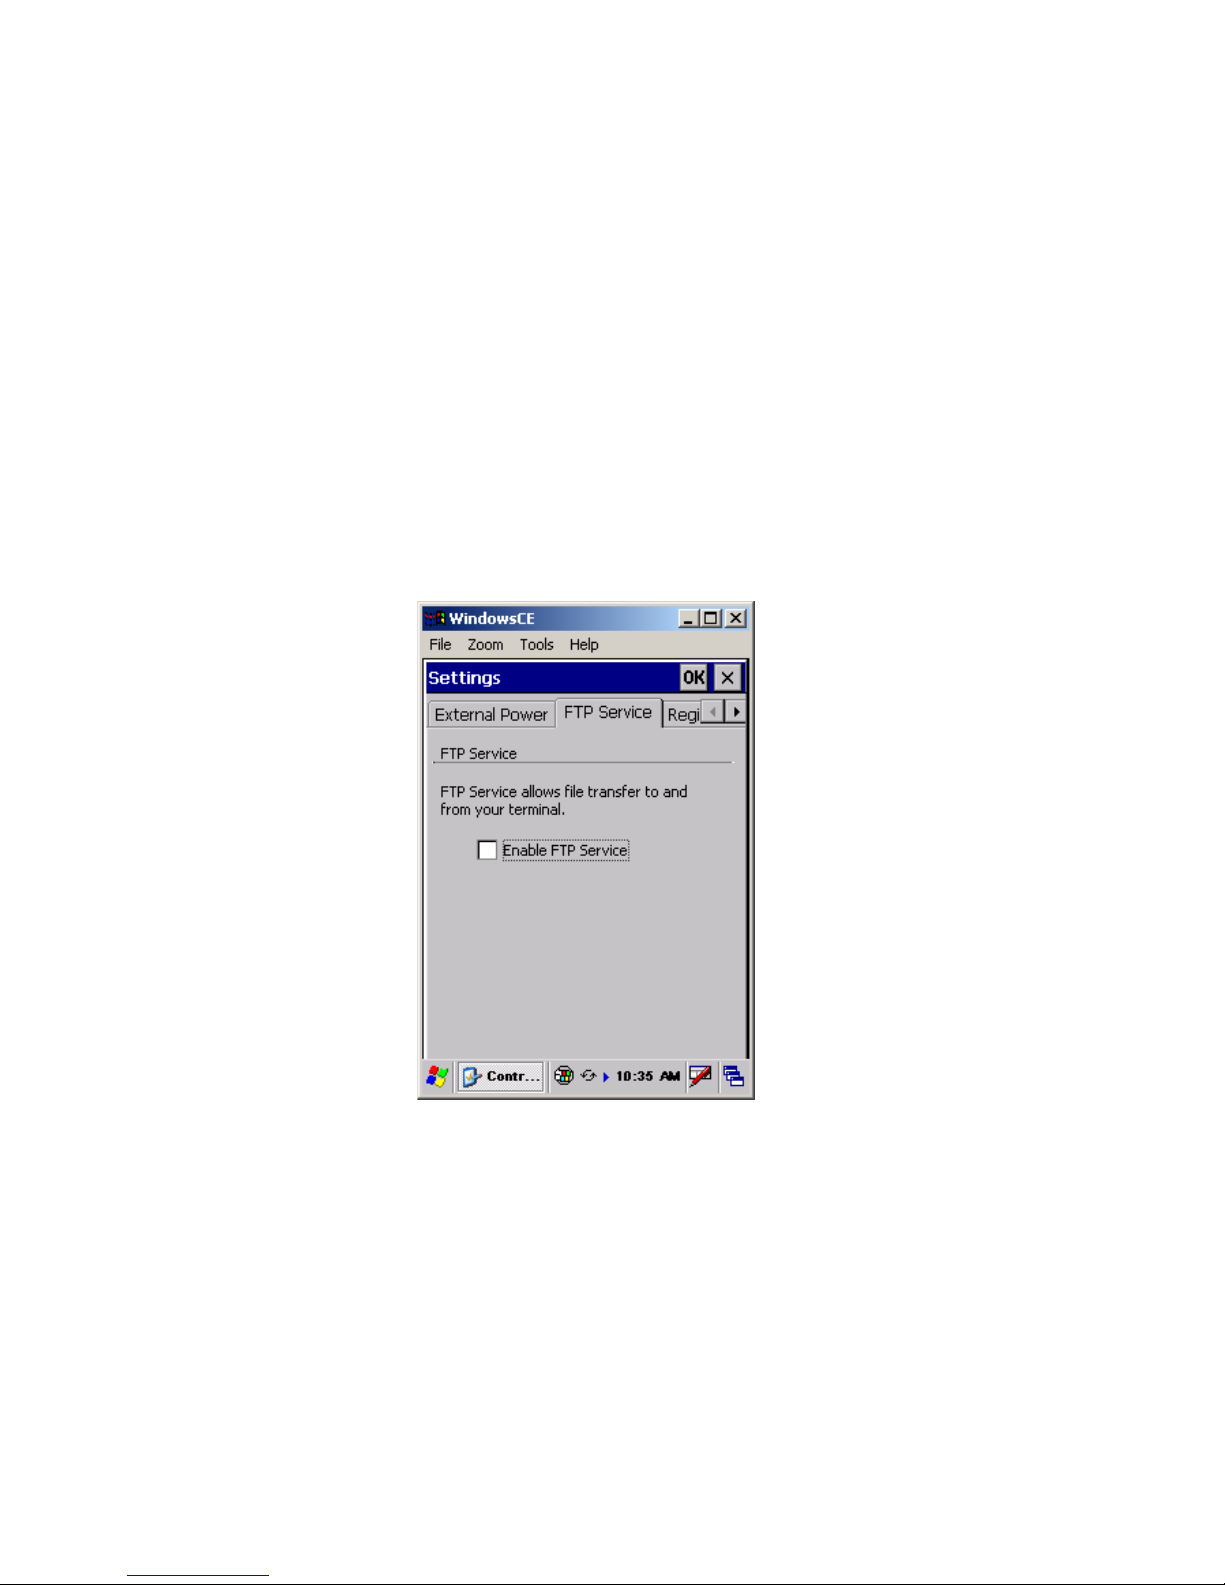
Chapter 3 — Adding the CN2A to the Network
Transferring Files With FTP
You can use FTP (File Transfer Protocol) to transfer files to or
from your CN2A. FTP support is provided through the FTP
Server application FTPDCE.EXE installed on your CN2A.
Enabling the FTP Server on the CN2A
You must enable the FTP Server through the Control Panel.
To enable FTP
1 Go to Start > Settings > Control Panel.
2 Double-tap the Utilities icon. The Settings screen appears.
3 Tap t h e FTP Service tab to bring the tab forward.
4 Check the Enable FTP Service check box.
5 Ta p OK to save your changes and exit the Settings screen.
6 Ta p X to exit the Control Panel. The FTP Server begins
running immediately. You do not need to warm boot the
CN2A.
You are ready to use FTP to transfer files. For help, see “Using
FTP to Transfer Files” on page 74.
72 CN2A Mobile Computer User’s Manual
Page 89

Chapter 3 — Adding the CN2A to the Network
Changing the Default FTP User Name and Password
The default FTP user name is Intermec and the default
password is
password and create an access control list that specifies which
users can use the FTP Server.
To change the default FTP user name and password
1 Edit the registry to set this parameter:
;disable default intermec account
[HKEY_LOCAL_MACHINE\Software\Intermec\IFTP]
“UseDefaultPW”=dword:00000000
Note: You can run the Microsoft eMbedded Visual C++©
Remote Registry Editor on your PC, using ActiveSync to
connect to the CN2A. Or you can download and run a thirdparty registry editing program on your CN2A.
cr52401. You can disable the default user name and
2 Create an access control list called FTPDCE.TXT using this
format:
FTPDCE:user1!password1<cr><lf>user2!password2<cr
><lf>user3!password3<cr><lf>...
Where user# and password# are the case-sensitive user names
and passwords, separated by an exclamation point (!).
3 Copy FTPDCE.TXT to the \Windows directory on the
CN2A, which is where the FTPDCE.EXE server is located.
4 Stop and start the FTP Server. This forces the FTP Server to
encrypt the access control list, create a hidden, encrypted file
called FTPDCE.DAT, and then delete FTPDCE.TXT.
Follow these steps to stop and start the FTP Server:
a Go to Start > Settings > Control Panel.
b Double-tap the Utilities icon to open the Settings screen.
c Uncheck the Enable FTP Service check box.
d Ta p OK to save the change and exit the Setting screen.
CN2A Mobile Computer User’s Manual 73
e Double-tap the Utilities icon to open the Settings screen.
f Ta p th e FTP Service tab to bring the tab forward.
Page 90

Chapter 3 — Adding the CN2A to the Network
g Check the Enable FTP Service check box.
h Ta p OK to save the change and exit the Settings screen.
i Ta p X to exit the Control Panel.
You are ready to use FTP to transfer files. For help, see “Using
FTP to Transfer Files” later on this page.
Updating Your Access Control List
If you need to install a new access control list onto the CN2A,
you must first delete the current FTPDCE.DAT file.
Note: You cannot copy the encrypted access control lists
(FTPDCE.DAT files) from one CN2A to another.
To update an access control list
1 Delete the FTPDCE.DAT file from the \Windows directory.
This is a hidden file.
2 Follow Steps 2 to 4 in the previous procedure to create a new
FTPDCE.TXT file, copy the file to your CN2A, and then
stop and start the FTP Server.
Using FTP to Transfer Files
You can follow these steps to start and use FTP to transfer files.
To use FTP
1 Start an FTP client and connect to the FTP Server on the
CN2A.
2 Log in. Enter the default FTP user name
password
your access control list.
3 From the FTP client, send an FTP command.
4 Wait for a response.
Intermec and
cr52401, or enter a user name and password from
74 CN2A Mobile Computer User’s Manual
Page 91

Chapter 3 — Adding the CN2A to the Network
Using the Modem Dock for Internet Access and E-mail
If you have purchased the optional CN2 modem dock, you can
configure the CN2A to use the modem dock to connect to the
Internet and to access e-mail.
If your Internet Service Provider (ISP) is providing your e-mail
service, follow the steps in the next section, “Connecting to the
Internet Through the Modem Dock,” before you follow the steps
in
“Setting Up an E-mail Account Through the Modem Dock”
on page 82.
For details about installing and using the modem dock, see the
CN2 Modem Dock Quick Start Guide, which ships with the
modem dock.
Connecting to the Internet Through the Modem Dock
You can connect to the Internet through the modem dock.
To configure a connection to your Internet service provider
1 Install the modem dock, as described in the CN2 Modem
Dock Quick Start Guide.
2 Contact your ISP and obtain the following information:
• ISP dial-up access phone number
•User name
• Password
3 Ta p Start > Settings > Network and Dial-up Connections.
CN2A Mobile Computer User’s Manual 75
Page 92
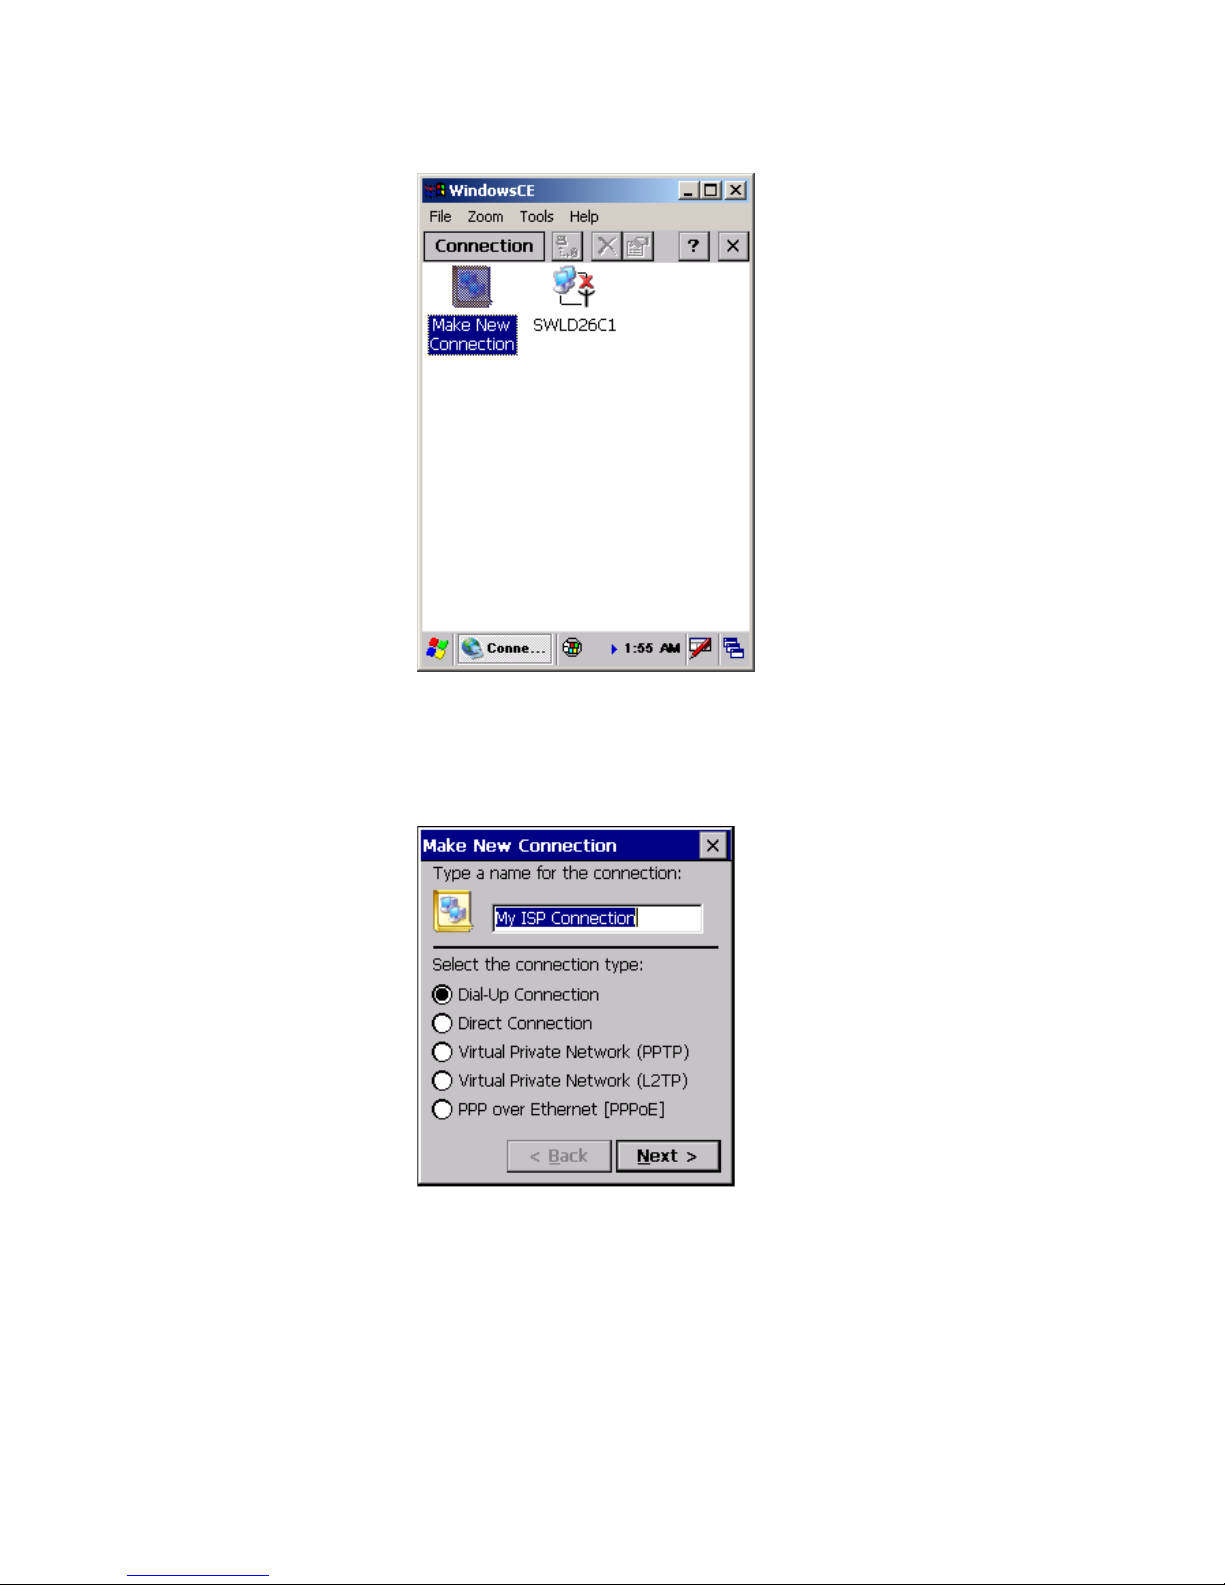
Chapter 3 — Adding the CN2A to the Network
4 Double-tap Make New Connection.
5 In the Type a name for the connection field, enter a name
for the connection, such as My ISP Connection.
6 From the Select the connection type list, select Dial-Up
Connection from the list of connection types.
7 Ta p Next. The Modem screen appears.
8 From the Select a modem drop-down menu, choose Hayes
Compatible on COM1.
76 CN2A Mobile Computer User’s Manual
Page 93
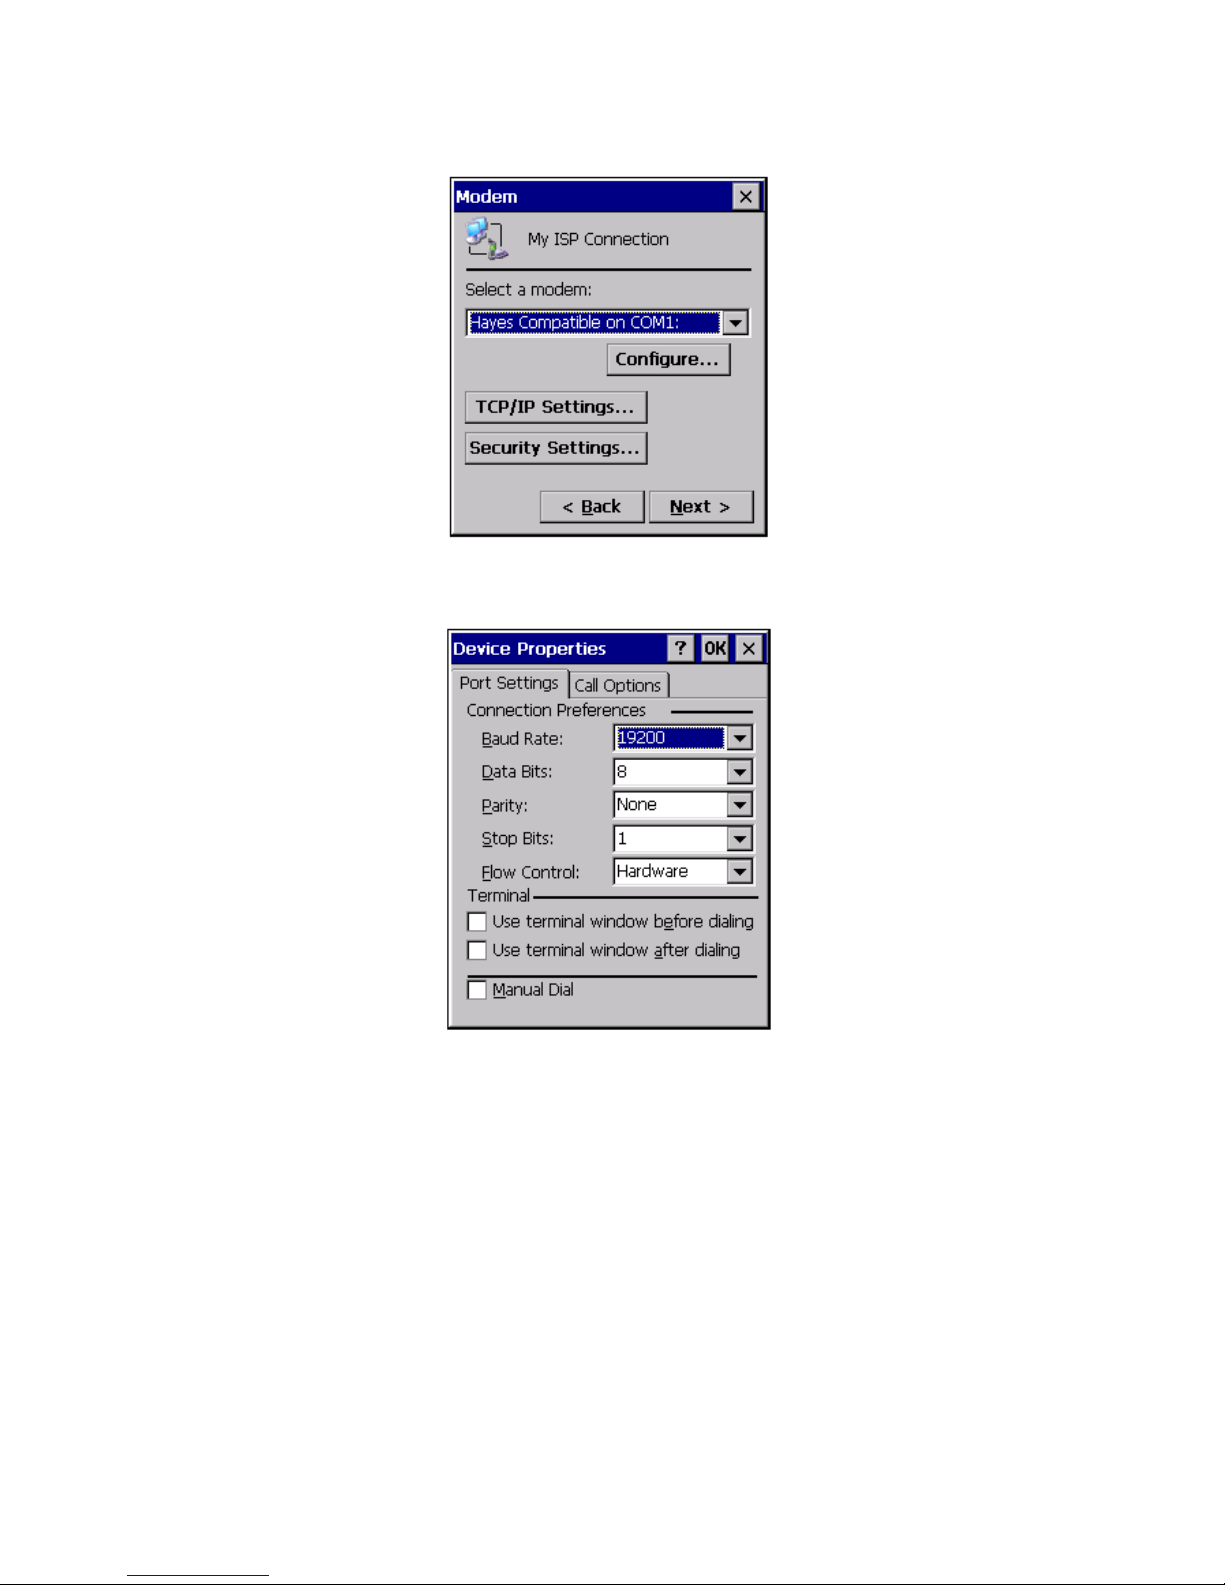
Chapter 3 — Adding the CN2A to the Network
9 Ta p Configure. The Device Properties screen appears.
10 Set the Baud Rate to 115200 bps.
11 (Optional) Tap the Call Options tab and make changes if
CN2A Mobile Computer User’s Manual 77
Connection Preferences: The connection preferences (such as Baud Rate)
specify how the CN2A communicates with the modem dock.
necessary.
Page 94
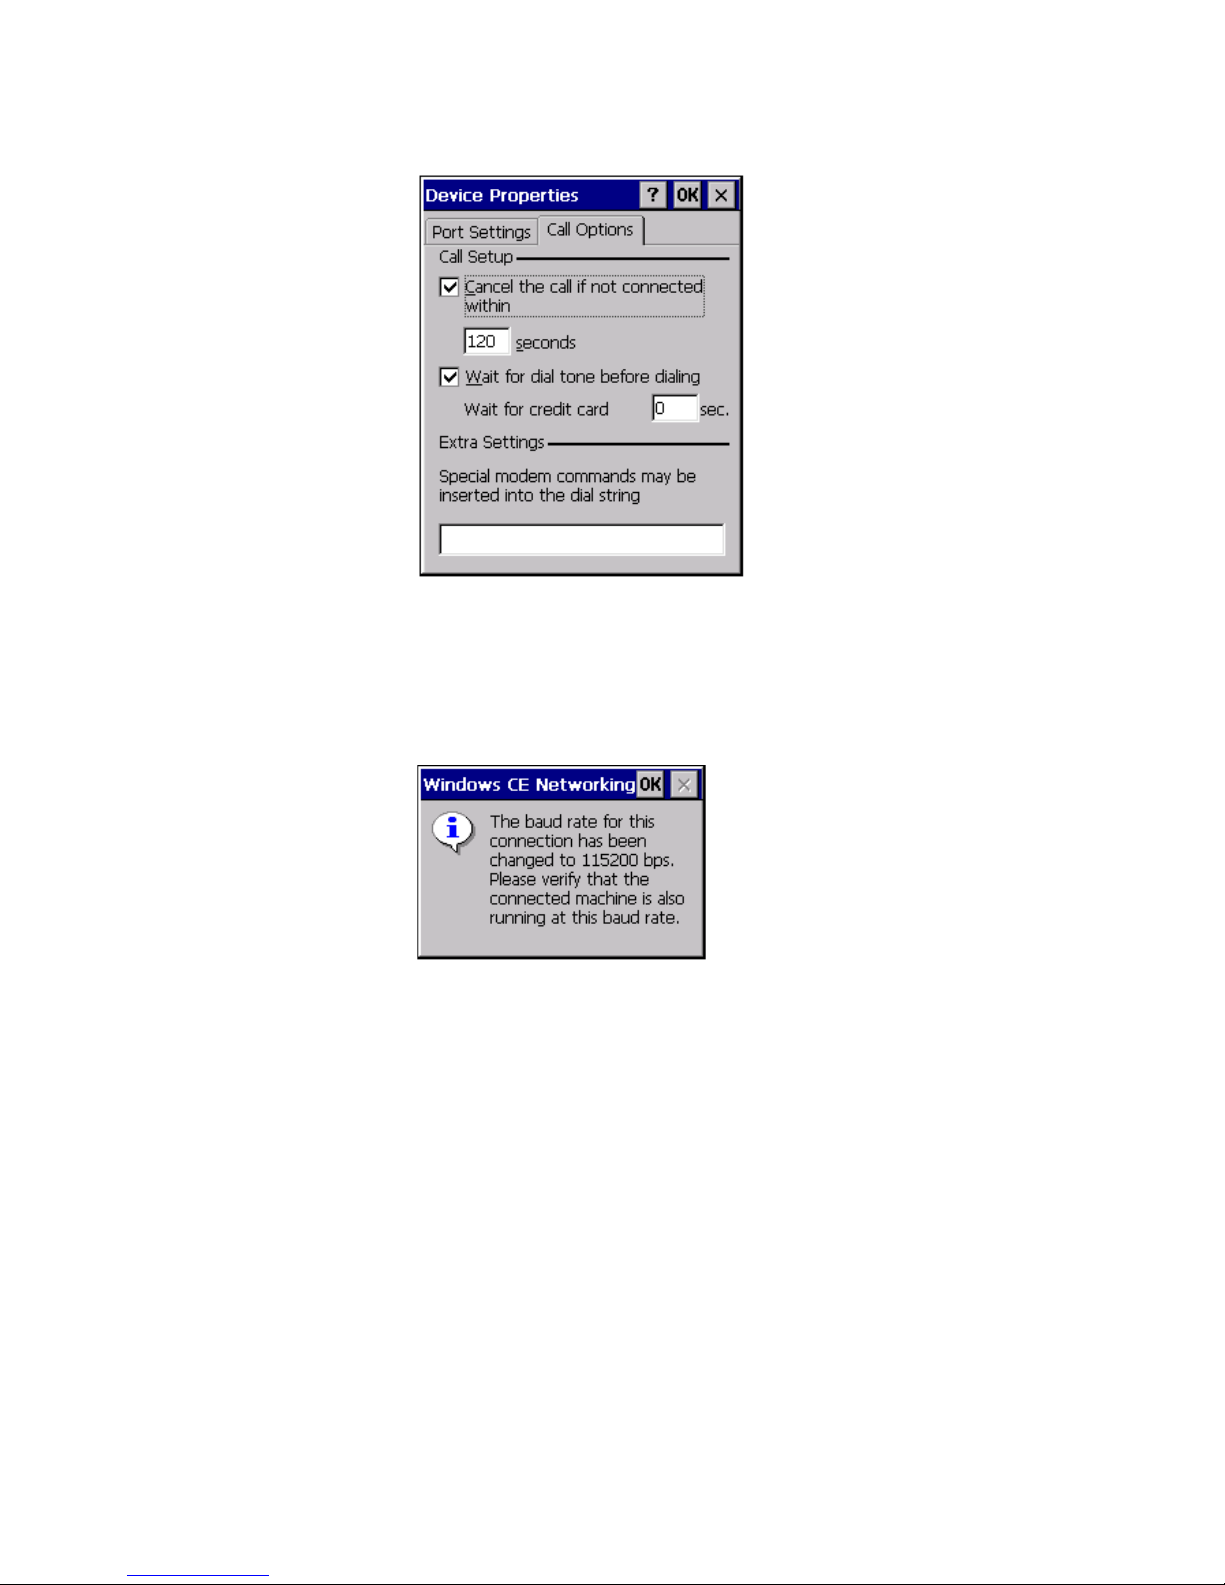
Chapter 3 — Adding the CN2A to the Network
12 Ta p OK at the top of the screen to return to the Modem
screen.
13 If you changed the baud rate in Step 10, a message box
appears. Tap OK to close the message box.
14 Ta p TCP/IP Settings only if your ISP does not use a
dynamically assigned IP address. When you are done making
selections, tap OK at the top of the screen to return to the
Modem screen.
15 Ta p Security Settings to configure advanced security settings,
if necessary. The Security Settings screen appears.
78 CN2A Mobile Computer User’s Manual
Page 95
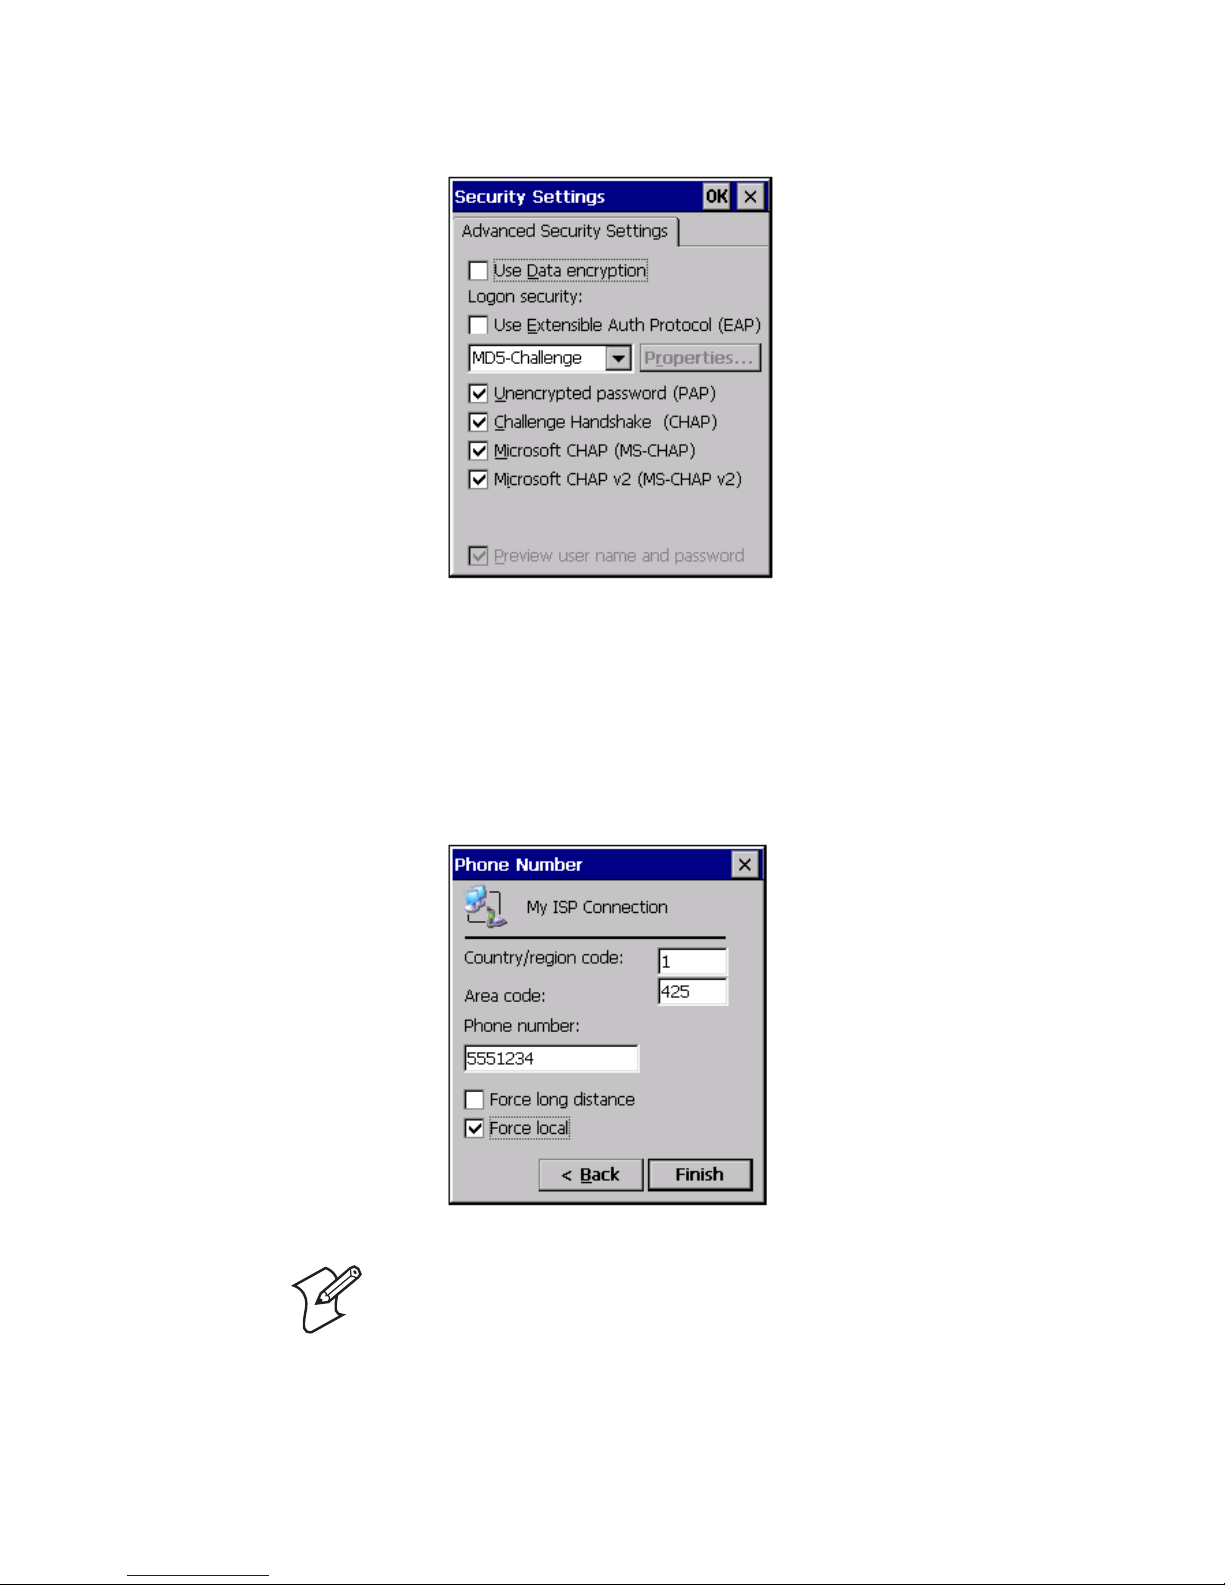
Chapter 3 — Adding the CN2A to the Network
When you are done making selections, tap OK at the top of
the screen to return to the Modem screen.
16 Ta p Next on the Modem screen.
17 Fill in the Country/region code field, the Area code field,
and the Phone Number field with the information provided
by your ISP.
Note: When you connect to the Internet for the first time,
you can specify the exact numbers that the modem dials. For
help, see the next procedure, “To connect to the Internet for
the first time.”
CN2A Mobile Computer User’s Manual 79
Page 96
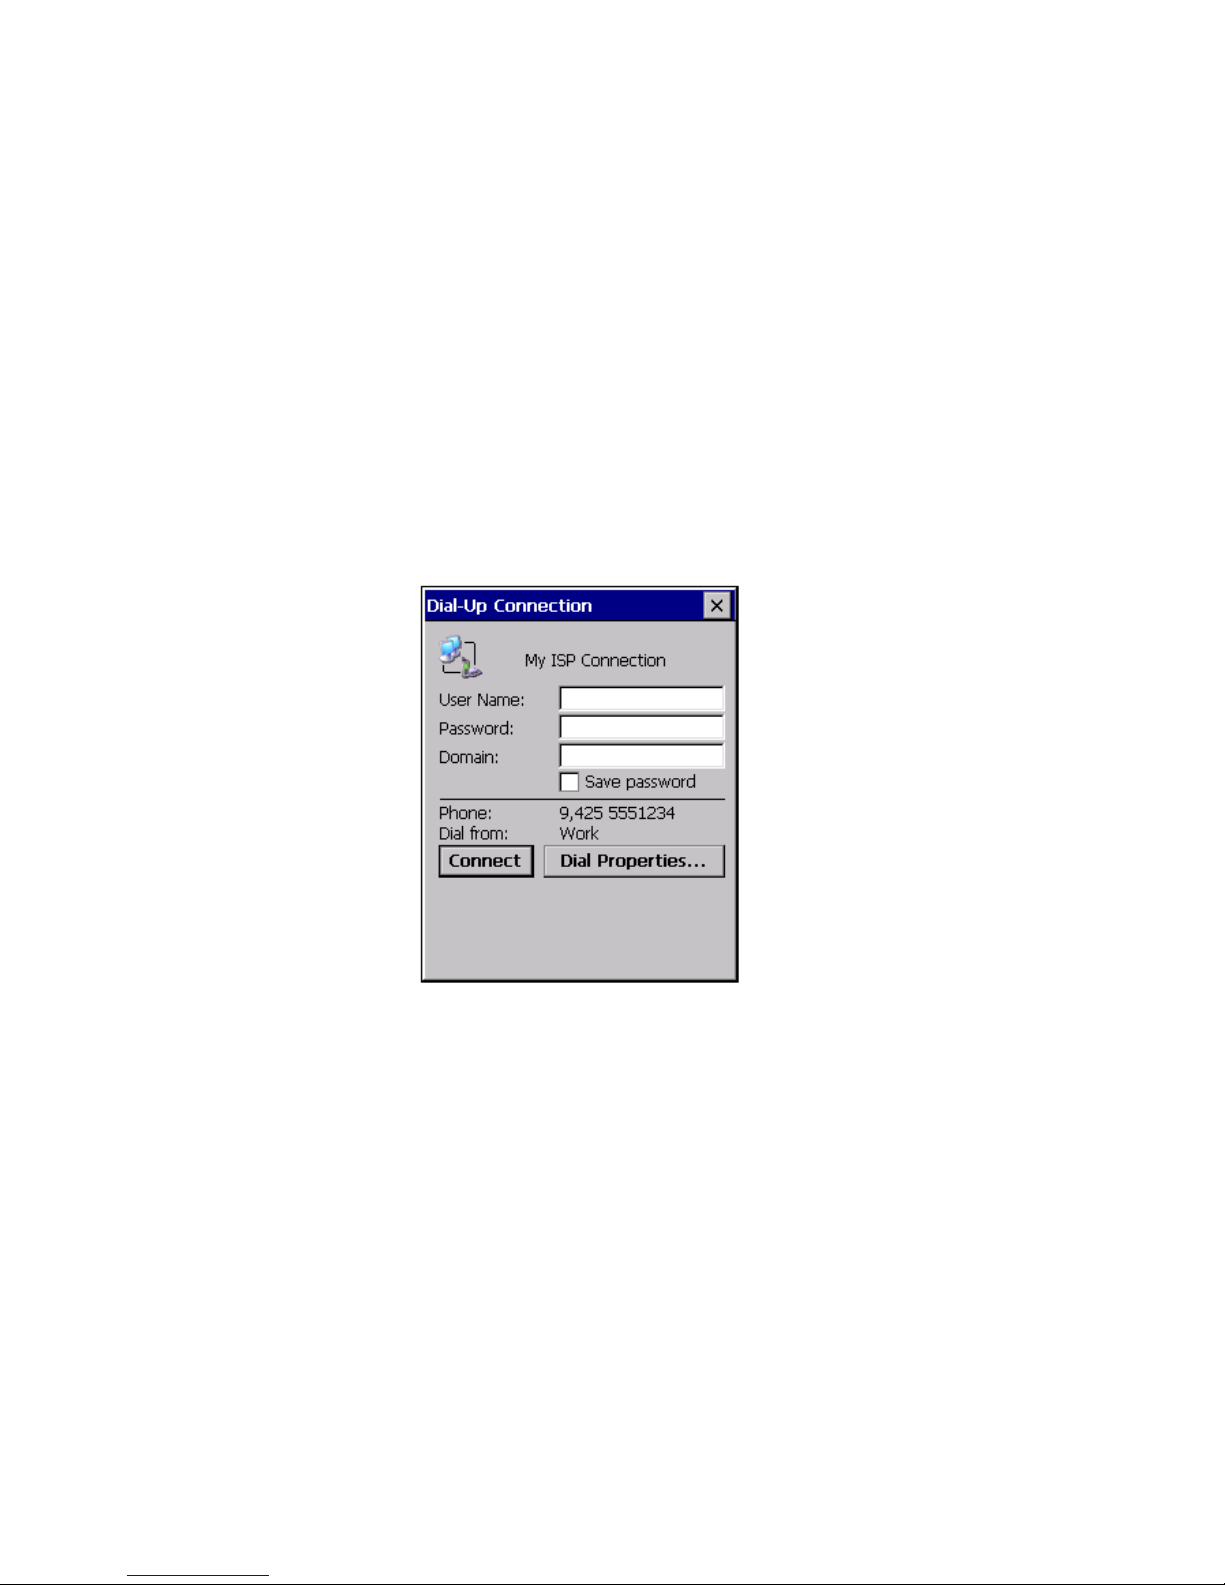
Chapter 3 — Adding the CN2A to the Network
18 Check Force long distance if the modem needs to dial the
country/region code, the area code, and the phone number.
Or check Force local if the modem needs to dial only the
phone number.
19 Ta p Finish.
20 Perform the steps in the next procedure, “To connect to the
Internet for the first time.”
To connect to the Internet for the first time
1 Ta p Start > Settings > Network and Dial-up Connections.
2 Double-tap the icon for the connection you just configured.
The Dial-Up Connection screen appears.
3 In the User Name field, enter the user name provided by your
ISP.
4 In the Password field, enter the password provided by your
ISP.
5 (Optional) Check the Save password check box if you do not
want to enter the password every time you connect.
6 Ta p Dial Properties. The Dialing Properties screen appears.
80 CN2A Mobile Computer User’s Manual
Page 97
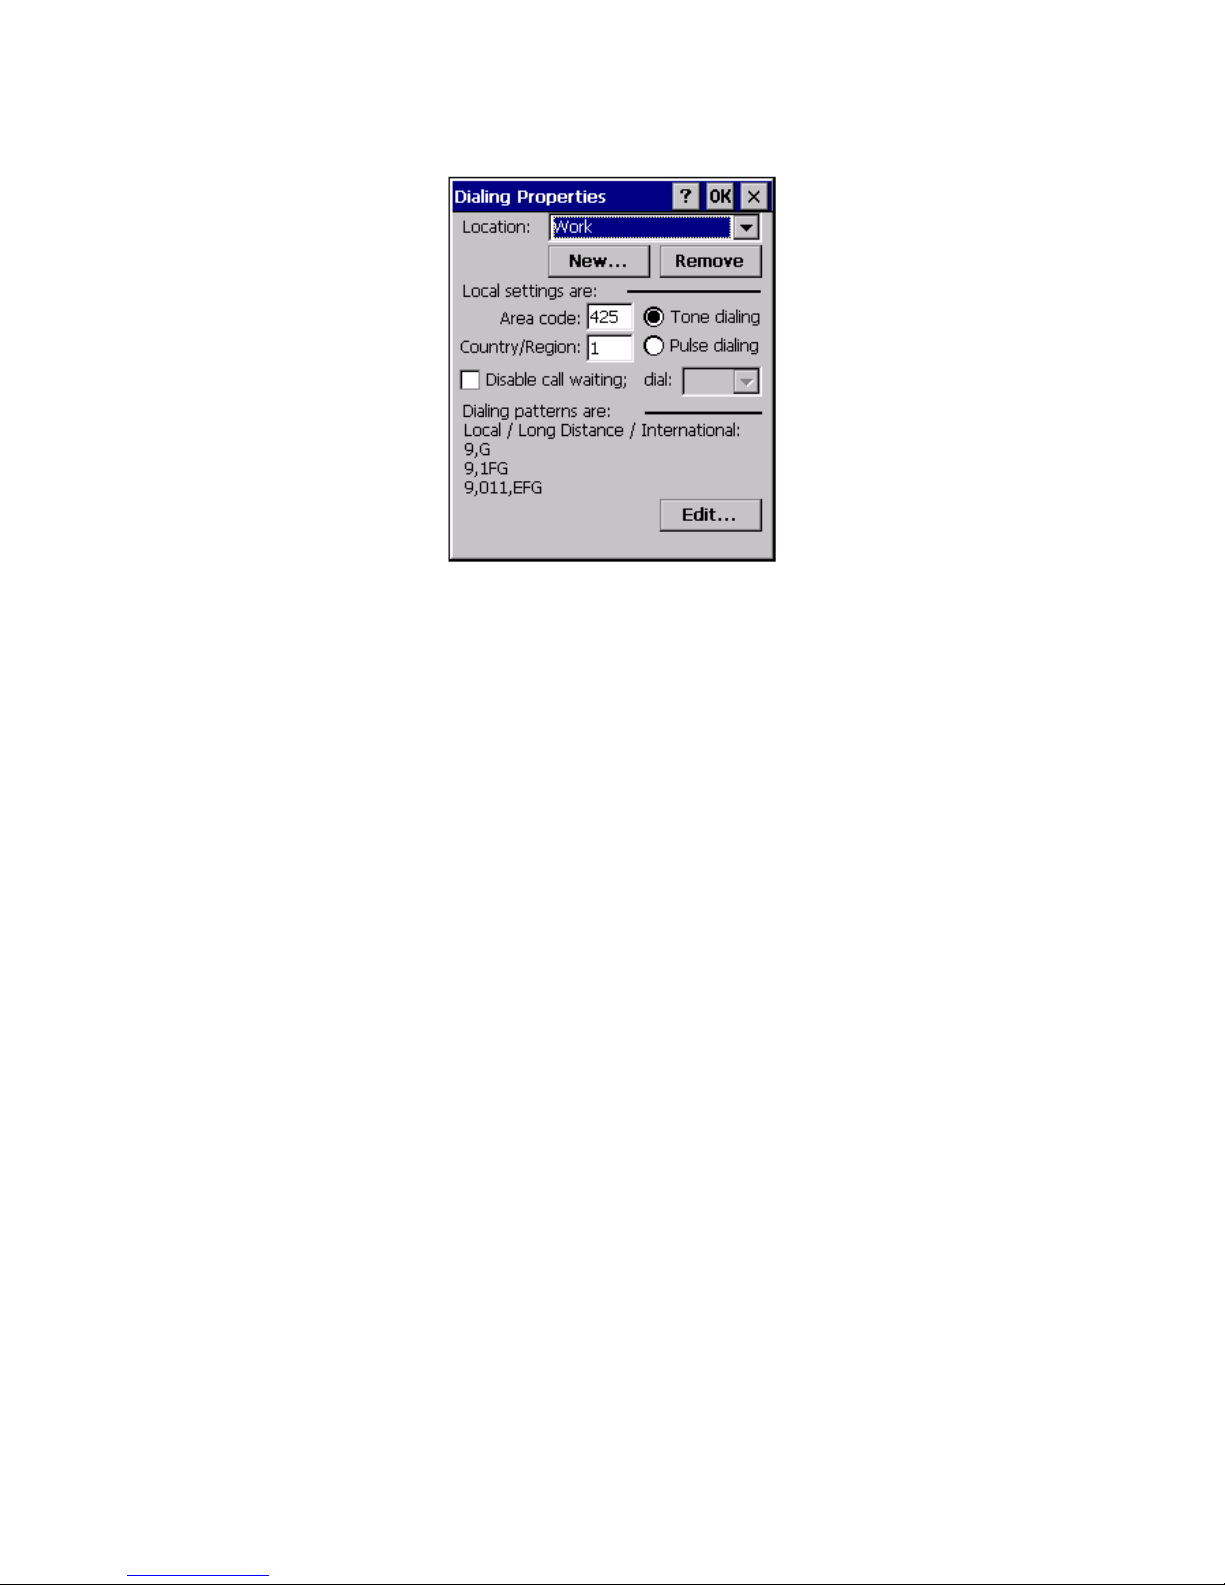
Chapter 3 — Adding the CN2A to the Network
7 By default, the CN2A assumes that you are dialing from
work, on a phone system that requires you to enter a 9 before
dialing. If you do not need to enter 9 before dialing, follow
these steps:
a Choose Home from the Location drop-down list. The
location setting has a dialing pattern that does not include
a 9 before dialing.
b Make sure the Area Code and Country/Region are
correct.
c (Optional) Tap Edit. The Edit Dialing Patterns screen
appears. Make sure the dialing pattern is appropriate and
tap OK to return to the Dialing Properties screen.
d Ta p OK to return to the Dial-Up Connection screen.
8 Ta p Connect. The modem dock connects to your ISP.
To connect to the Internet
1 Ta p Start > Settings > Network and Dial-up Connections.
2 Double-tap the appropriate connection icon. The Dial-Up
Connection screen appears.
3 Your user name automatically appears in the User Name field.
Your password automatically appears in the Password field if
you checked the Save password check box.
CN2A Mobile Computer User’s Manual 81
4 Ta p Connect. The modem dock connects to your ISP.
Page 98

Chapter 3 — Adding the CN2A to the Network
5 Ta p Hide to minimize the Connected to Name screen, where
Name is the name you configured for the connection.
To disconnect from the Internet
• Double-tap the Connectivity icon in the taskbar and then tap
Disconnect.
Setting Up an E-mail Account Through the Modem Dock
You can send and receive e-mail messages using the modem dock
and the Inbox application on your CN2A. You need to set up a
connection to an e-mail server.
The ISP or network must use a POP3 or IMAP4 e-mail server
and an SMTP gateway.
You can use multiple e-mail services to receive your messages. For
each e-mail service you intend to use, first set up and name the email service. If you use the same service to connect to different
mailboxes, set up and name each mailbox connection.
To configure your e-mail account
1 Contact your ISP and obtain the following information:
• POP3 or IMAP4 host name
•SMTP host name
•User name
• Password
2 Ta p Start > Programs > Inbox to open the Inbox application.
82 CN2A Mobile Computer User’s Manual
Page 99
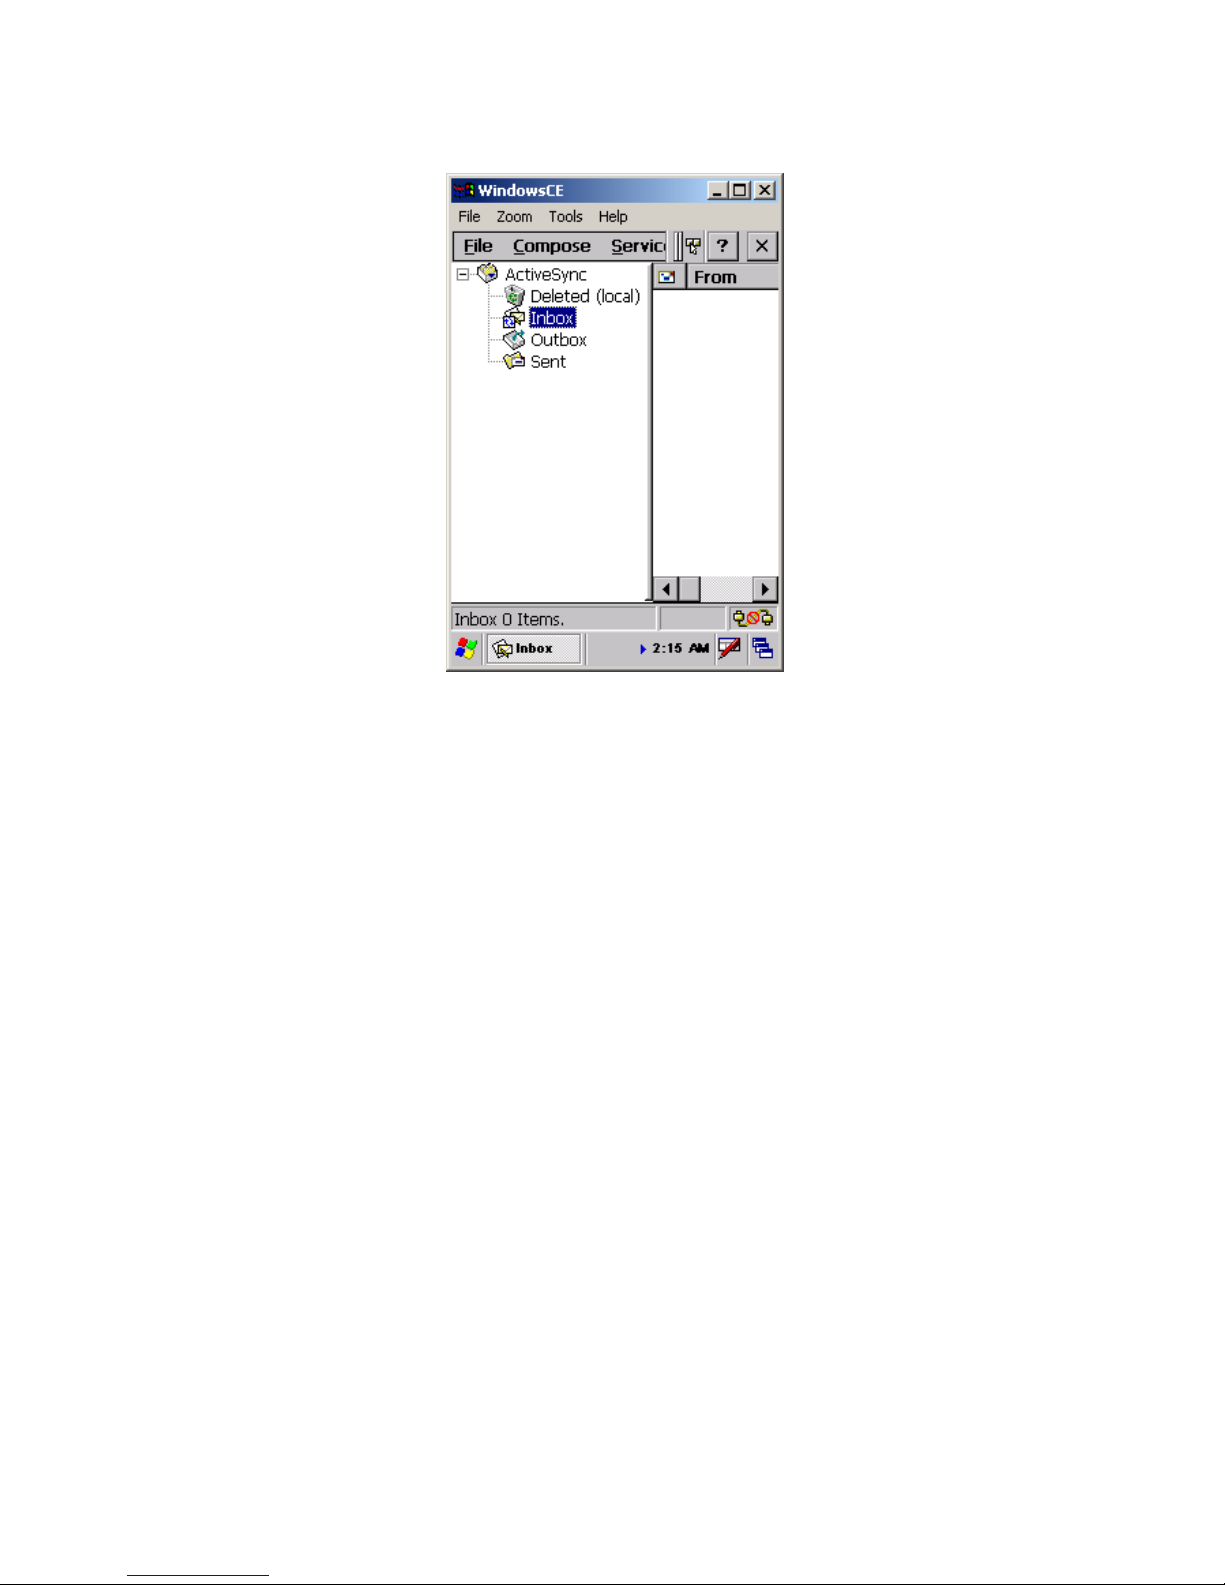
Chapter 3 — Adding the CN2A to the Network
3 Ta p Service > Options. The Options screen appears.
4 Drag the screen to the left to view the right side of the screen.
5 Ta p Add. The Service name screen appears.
6 Select the appropriate service type from the Service Type
drop-down menu, either POP3 or IMAP4.
7 (Optional) Enter a meaningful name in the Service Name
field. If you are setting up multiple e-mail services, each needs
a unique name.
8 Ta p OK.
9 In the Connection drop-down list, choose the appropriate
connection. If you configured a connection to your ISP as
described in the previous section, that connection appears in
the list. You may want to choose that connection.
10 In the POP3 Host or IMAP4 Host field, enter the host name
provided by your ISP.
11 In the User ID field, enter the user name provided by your
ISP.
12 In the Password field, enter the password provided by your
CN2A Mobile Computer User’s Manual 83
ISP.
Page 100

Chapter 3 — Adding the CN2A to the Network
13 If you do not want to type the password each time you
connect, check the Save Password check box.
14 Drag the screen to the left to view the right side of the screen.
15 If you want to be able to send e-mail from the CN2A, in the
SMTP host for sending email field, you must enter the
SMTP host name provided by your ISP.
Note: The SMTP host name may be the same as your POP3
host name or IMAP4 host name.
16 (Optional) For help determining if you need to set the
optional parameters like Domain, tap to view the Inbox
online help.
17 Ta p Next. The POP3 Mail General Preferences screen
appears.
18 Check or uncheck the check boxes to set your connection
preferences. For help, tap to view the Inbox online help.
19 Ta p Next. The POP3 Mail Inbox Preferences screen appears.
20 By default, Inbox downloads only the message headers. If you
want to download the entire e-mail message, select Get full
copy of message.
21 Drag the screen to the left to view the right side of the screen.
22 (Optional) If you want to download attachments and meeting
requests, check the appropriate check boxes.
23 Ta p Finish.
24 (Optional) Tap the Compose, Read, Delete, and Storage
tabs to further customize Inbox.
25 Ta p OK to exit the Options screen.
To send and receive e-mail
•Tap Start > Programs > Inbox. For help, tap to
Inbox online help.
view the
84 CN2A Mobile Computer User’s Manual
 Loading...