

Page 1
MODEL DT500CH Series
OFF
TIME
EVENT
AM
ON
PM
RANDOM
MOTU THWE SAFRPMSU
5
6
7
4
5
4
3
2
1
6
7
8
PM
12
11
9
10
8
11
10
9
AM
12
1
3
2
RANDOM
MO TU WE TH FR SA SU
12
1
1
2
2
3
3
4
4
5
5
66
7
7
8
8
9
9
10
10
11
11
PM
AM
12
PM
RANDOM
MO TU WE TH FR SA SU
12
1
1
2
2
3
3
4
4
5
5
66
7
7
8
8
9
9
10
10
11
11
PM
AM
12
PM
RANDOM
MO TU WE TH FR SA SU
12
1
1
2
2
3
3
4
4
5
5
66
7
7
8
8
9
9
10
10
11
11
PM
AM
12
PM
Digital Timer
Installation and User Instructions
Ratings
Input: 102-132 VAC 60 Hz, 2.5W max.•
Output: 10 Amp/1200W Resistive, 5 Amp Inductive, 500W Tungsten•
WARNING
Electrical shock hazard. Risk of injury or death. Always plug three-prong plug •
into a properly grounded outlet. Never attempt to defeat this safety feature.
•
Risk of fire. Do not use timer to control devices that could have dangerous
consequences due to inaccurate timing, such as sun lamps, sauna, heaters,
crock pots, etc.
NOTICE
Follow local electrical codes during use.•
Dispose of used batteries promptly per local regulations.•
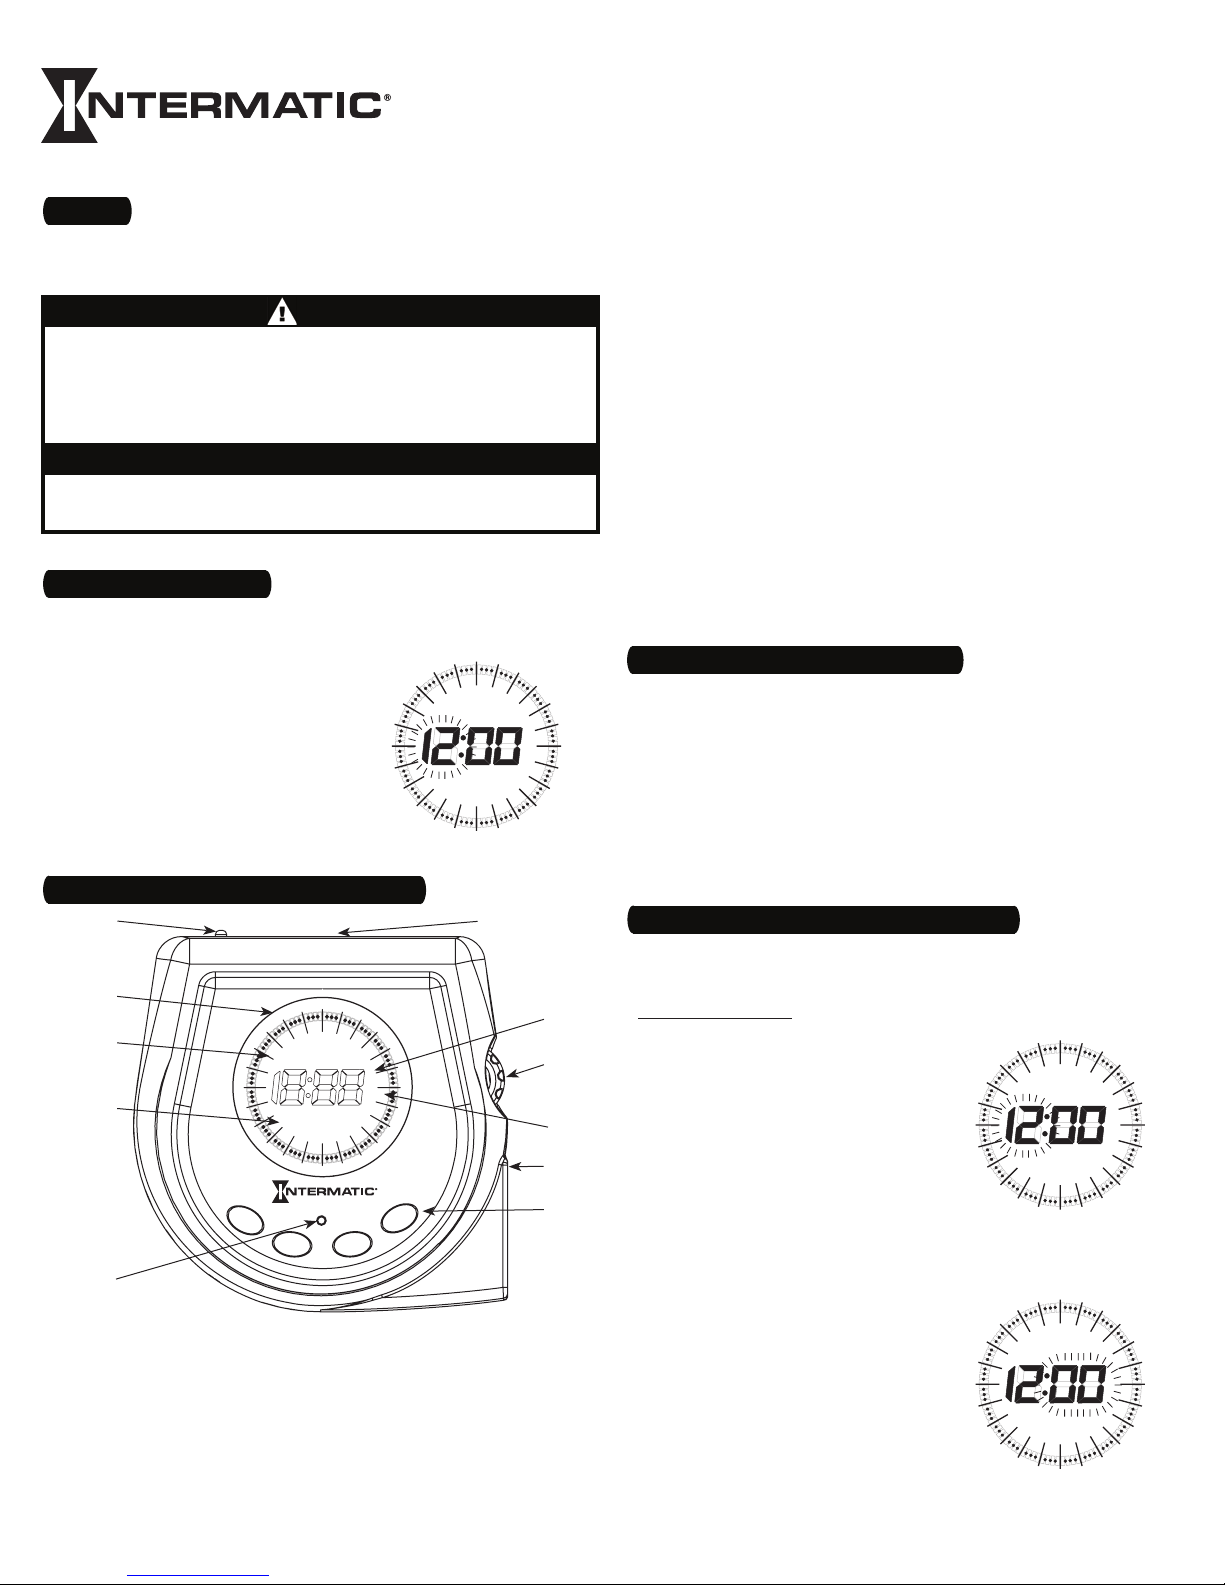
1 – Activate the Battery
The timer comes with two LR44 batteries installed.
Remove the pull tab from the 1.
battery holder to connect the
installed batteries.
The timer will turn on and show the 2.
default display (MO, “12:00 PM”)
with the ”12” flashing (Fig. 1).
NOTE: If the default display doesn’t
show, the batteries may be dead.
Replace the batteries before using the
digital timer.
2 – Get Familiar with the Timer’s Features
6
11
10
9
8
Battery Holder — two LR44 batteries keep time and data up to 1.
three months without power
Time Of Day (TOD) Display — acts like a clock during normal 2.
operation, displays messages during programming and displays
alerts, such as the Low Battery Display
Selector Wheel3.
PM Indicator — comes on to indicate TOD is PM, goes out to 4.
indicate TOD is AM
One Timed Outlet — has green LED that lights when outlet is 5.
turned on
Green LED6.
Pushbuttons — used for setup, programming and manual 7.
operation of plugged-in device
Reset Button8.
Random Display — indicates when the Random feature is turned 9.
on. Random uses the timer’s settings varied by random 5-minute
increments of ±15 minutes.
Day Of Week (DOW) Display — events can be programmed 10.
for just one day of the week (Daily Mode, 21 total events), all
the days of the week (Weekly Mode, 48 total events), or just
weekends or weekdays (Weekend/Weekday Mode, 24 + 24 total
events)
Event ON/OFF Indicators — a full day is broken into 96 segments 11.
(15 minutes each) to show the ON and OFF times programmed
NOTE: The timer may be set up and programmed before you plug
it in. Be aware that while it is unplugged, the display will turn off to
conserve battery power if there is no pushbutton activity for a few
minutes. If this happens, simply push any button to turn the display
back on.
3 – Clear Any Existing Programming
It’s unlikely that your new digital timer has any existing
programming, but to make sure, use this procedure before setting
the time.
Locate the Reset button. It is the small, round hole adjacent to the 1.
keypad. You will need a pen or paper clip to press this button.
Press and release the Reset button. The display will light up all 2.
the segments and then go blank.
Fig.
1
1
The timer has erased all programming, displays the default 3.
settings (MO, “12:00 PM”) and is ready for setup.
4 – Set the Time, Day and Operating Mode
NOTE: The time, day AND operating mode must be set before any
ON Events can be programmed. Settings for time and ON Events
will not be activated until setup and programming are complete.
2
Setting Time and Day
Ensure that the time is displayed. A 1.
3
timer that is just reset will display
MO, “12:00 PM”.
The first two digits (hours) of the 2.
4
Time of Day (TOD) display will begin
to flash (Fig. 3).
5
Turn the selector wheel until the 3.
correct hour shows in the TOD hours
7
display, along with the PM indicator,
if desired. Note that PM indicator will
Fig.
3
alternate on and off as the time
Fig.
2
passes through noon and midnight.
Press the 4. ON button to set the new
hour. Or, if no change to the hour
is needed, press the TIME button to
keep the original hour setting. The
last two digits of the TOD display
(minutes) will begin to flash (Fig. 4).
Turn the selector wheel until the 5.
correct time in minutes shows.
Fig.
4
1
Page 2
RANDOM
MO TU WE TH FR SA SU
12
1
1
2
2
3
3
4
4
5
5
66
7
7
8
8
9
9
10
10
11
11
PM
AM
12
PM
RANDOM
MO TU WE TH FR SA SU
PM
RANDOM
MO TU WE TH FR SA SU
PM
RANDOM
MO TU WE TH FR SA SU
PM
4 – Set the Time, Day and Operating Mode (Continued)
RANDOM
MO TU WE TH FR SA SU
12
1
1
2
2
3
3
4
4
5
5
66
7
7
8
8
9
9
10
10
11
11
PM
AM
12
PM
RANDOM
MO TU WE TH FR SA SU
12
1
1
2
2
3
3
4
4
5
5
66
7
7
8
8
9
9
10
10
11
11
PM
AM
12
PM
RANDOM
MO TU WE TH FR SA SU
12
1
1
2
2
3
3
4
4
5
5
66
7
7
8
8
9
9
10
10
11
11
PM
AM
12
PM
RANDOM
MO TU WE TH FR SA SU
12
1
1
2
2
3
3
4
4
5
5
66
7
7
8
8
9
9
10
10
11
11
PM
AM
12
PM
RANDOM
MO TU WE TH FR SA SU
12
1
1
2
2
3
3
4
4
5
5
66
7
7
8
8
9
9
10
10
11
11
PM
AM
12
PM
6. Press the ON button to set the
minutes. Or, press the TIME button to
keep the original minute setting. The
Day Of Week (DOW) will begin to
flash (Fig. 5).
Turn the selector wheel until the 7.
current day is displayed and press
the ON button for the new DOW or
the TIME button for the original DOW.
This completes the time and day
setup.
Setting the Operating Mode
“SEL” will show in the TOD display and the DOW icons displayed 8.
above “SEL” reflect the timer’s operating mode setting (Fig. 6, 7
or 8). The three possible modes are:
The Daily Mode will allow three
a.
events per individual day for a
total of 21 events all week. Only
the current day (MO, TU, etc.) will
be displayed above “SEL”.
The Weekend/Weekday Mode will
b.
allow up to 24 weekend events,
along with 24 weekday events.
Either SA SU or MO TU WE TH FR will
be displayed above “SEL”,
depending on the current day of
the week.
The Weekly Mode will allow up
c.
to 48 events, repeated every day
of the week. MO TU WE TH FR SA SU
will be displayed above “SEL”.
Turn the selector wheel to sequence through these modes.9.
Press the 10. ON button to set the new operating mode or the TIME
button to keep the original operating mode.
NOTE: Changing the Operating Mode will clear all the events
currently programmed in the timer.
5 – Set an Initial ON Event
Once the time, day and operating mode are set, events can be
viewed and programmed.
Viewing a DOW’s Events
Ensure that the time is displayed.1.
Press and release the 2. EVENT button to view the first DOW choice.
Each press of the EVENT button will display the next DOW choice.
The DOW choices will vary, depending on what you chose for the
operating mode.
The Daily Mode will scroll through
a.
seven choices — each day of the
week (MO, TU, etc.) (Fig. 9).
The Weekend/Weekday Mode
b.
will scroll through two choices —
either SA SU or MO TU WE TH FR.
The Weekly Mode will not scroll
c.
— MO TU WE TH FR SA SU will be
displayed.
NOTE: As you scroll through the DOW
choices, the TOD display does not change.
To immediately return to the current day, press the 3. TIME button.
The timer will also automatically revert to the current day if the
EVENT button is inactive for 5 seconds.
NOTE: You will only be able to view ON Events that begin on the
DOW choice you are viewing. For example, in the Daily Mode, an ON
Event that begins on Wednesday at 11 PM and ends on Thursday at 3
AM will show on the Wednesday view only.
2
Fig.
Fig.
Fig.
Fig.
Fig.
5 – Set an Initial ON Event (Continued)
Programming an ON Event
From the current day’s time display, 4.
press and hold the EVENT button.
The TOD display is replaced after 2
seconds by “-:--“ (Fig. 10).
Pressing the button down cycles 5.
through the DOW choices for the
operating mode.
The Daily Mode will scroll
5
a.
through seven choices — each
day of the week (MO, TU, etc.)
The Weekend/Weekday Mode will scroll through two choices
b.
Fig.
10
— either SA SU or MO TU WE TH FR.
The Weekly Mode will not scroll —
c. MO TU WE TH FR SA SU will be
displayed.
When the desired DOW choice appears, release the 6. EVENT button
to enter the programming mode.
NOTE: You may also enter programming
directly from viewing the desired DOW’s
6
events. Press and hold the EVENT button
for 2 seconds until the TOD display is
replaced by “-:--“.
A flashing cursor will appear at 12 7.
midnight (Fig. 11).
7
With no button pressed, turn the 8.
selector wheel until the cursor
reaches the time you’d like to turn
Fig.
11
the device on, for example, 4 AM
(Fig. 12).
Press and hold the 9. ON button while
8
you turn the selector wheel, moving
the cursor to the time you’d like to
turn the device off, for example, 7:30
AM (Fig. 13).
Release the 10. ON button.
You may now follow steps 7 through 11.
Fig.
12
10 to program another ON Event for
the same DOW choice.
After all events for that DOW choice 12.
are entered, press the EVENT button.
Depending on the operating mode
you chose:
In the Daily Mode, each press of
a.
the EVENT button will move you
to the programming mode of
the next DOW choice. You may
enter ON Events for those days or
Fig.
13
simply press EVENT to pass to the next day. After programming
has sequenced through all seven days, pressing EVENT will
light up the RANDOM feature.
In the Weekend/Weekday Mode, one press of the
b. EVENT button
will move you to the programming mode of the other DOW
choice. You may enter ON Events for that group of days or
simply press EVENT. The RANDOM feature will then light up.
In the Weekly Mode, there are no other DOW choices, so
c.
pressing EVENT will immediately light up the RANDOM feature.
9
NOTE: If the allowed number of ON Events for your chosen
operating mode has been reached, any attempt to program
additional events will cause the TOD display to read “FUL”.
To remove events, follow “Changing Program Times” to turn
them off.
Page 3
RANDOM
MO TU WE TH FR SA SU
12
1
1
2
2
3
3
4
4
5
5
66
7
7
8
8
9
9
10
10
11
11
PM
AM
12
PM
RANDOM
MO TU WE TH FR SA SU
12
1
1
2
2
3
3
4
4
5
5
66
7
7
8
8
9
9
10
10
11
11
PM
AM
12
PM
RANDOM
MO TU WE TH FR SA SU
12
1
1
2
2
3
3
4
4
5
5
66
7
7
8
8
9
9
10
10
11
11
PM
AM
12
PM
RANDOM
MO TU WE TH FR SA SU
12
1
1
2
2
3
3
4
4
5
5
66
7
7
8
8
9
9
10
10
11
11
PM
AM
12
PM
RANDOM
MO TU WE TH FR SA SU
12
1
1
2
2
3
3
4
4
5
5
66
7
7
8
8
9
9
10
10
11
11
PM
AM
12
PM
RANDOM
MO TU WE TH FR SA SU
12
1
1
2
2
3
3
4
4
5
5
66
7
7
8
8
9
9
10
10
11
11
PM
AM
12
PM
6 – Change the Time, Day or Operating Mode
Ensure that the time is currently being displayed.1.
Press and hold the TIME button until the hours begin to flash.2.
Follow the same procedure as outlined in Section 4, “Set the 3.
Time, Day and Operating Mode”.
NOTE: Changing the Operating Mode will clear all the events
currently programmed in the timer.
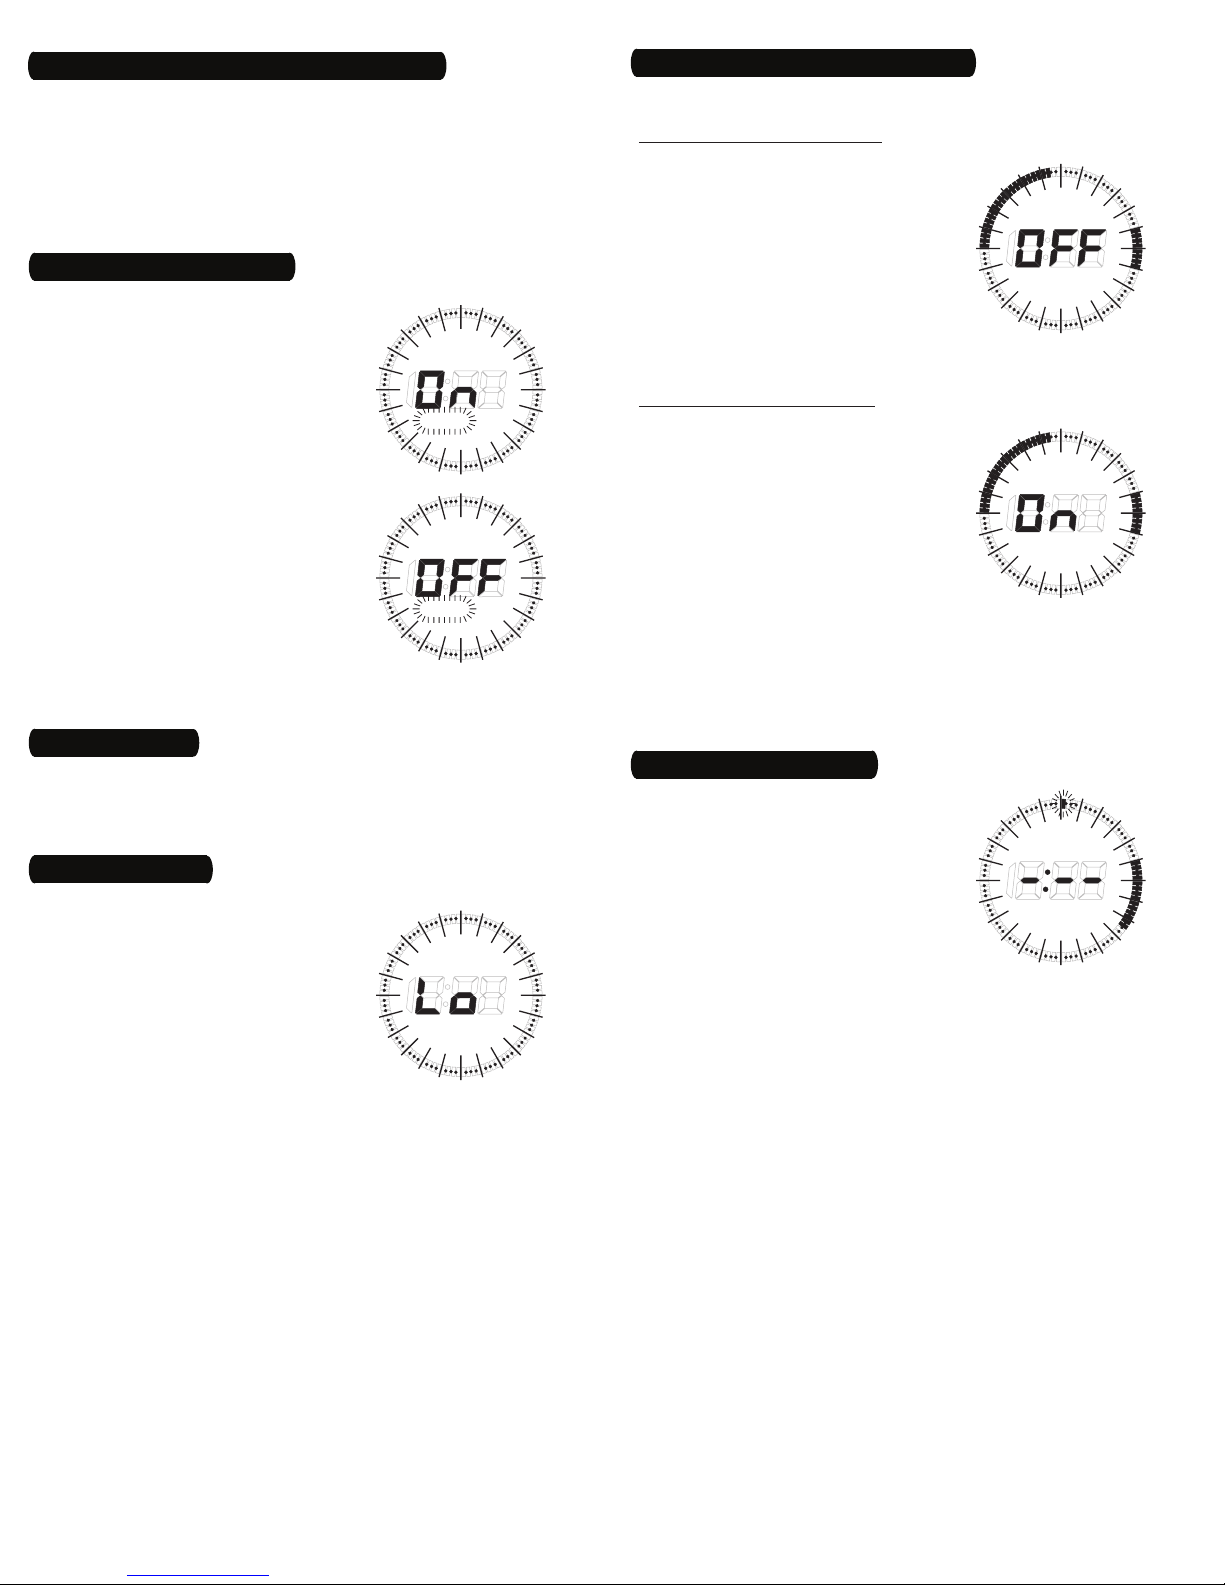
7 – Select RANDOM Feature
The RaNdom feature gives your
home a “lived-in” look by varying your
settings by random 5-minute increments
of ±15 minutes.
Continue in programming after all of 1.
the desired On Events are set until
the RANDOM feature lights up.
The RANDOM display begins to flash 2.
and the TOD display is replaced with
“On” or “OFF” (Fig. 14 and 15).
Press the 3. ON button to turn the
RANDOM feature on or the OFF button
to turn it off.
NOTE: The selector wheel may also
be used to toggle between “On” and
“OFF”.
Press the 4. TIME button to return
to normal operating and end the
programming session.
Fig.
14
Fig.
15
Manually Overriding with ON or OFF
The ON and OFF buttons can be used to override the timer’s
programming.
Manually Overriding an ON Event
If the device is currently on, press the 1.
OFF button to immediately turn it off.
The device will remain off until the 2.
next ON Event or until the ON button
is pressed.
If the device was programmed to 3.
be on and manually turned off, the
TOD display will toggle between the
current time and “OFF” to indicate
normal programming has been
interrupted (Fig. 17).
Manually Turning the Device ON
If the device is currently off, press the 4.
ON button to immediately turn it on.
The device will remain on until the 5.
end of the next ON Event or until the
OFF button is pressed.
If the device was programmed to 6.
be off and manually turned on, the
TOD display will toggle between the
current time and “On” to indicate
normal programming has been
interrupted (Fig. 18).
NOTE: If pressing the oN or oFF button in step 2 or 5 doesn’t have the
expected results, the timer may have simply gone back to original
programmed setting and require one more push of the button.
Fig.
17
Fig.
18
8 – Plug In Timer
To conserve battery power, as soon as setup and programming are
complete, plug the desired device into the timer and plug the timer
into a properly grounded outlet.
About the Battery
- The battery voltage is continuously
monitored. If a low voltage is
detected, the TOD display will
alternate between the current
TOD display and the “Lo” (low
battery) display (Fig. 16).
The timer requires two LR44 batteries to keep time up to three
months without power.
Replace the batteries as soon as possible after the low battery
display appears.
Change the batteries within one minute of unplugging in order to keep the time and programming settings. Afterwards, if the
display is wrong or displays MO, “12:00 AM”, reset the time
and programming.
While the batteries are removed, the timer will turn off the display to conserve power.
Dispose of the used batteries promptly according to local regulations. Keep batteries away from children.
Fig.
16
Changing Program Times
1. Enter the programming mode by
pressing and holding the EVENT
button. The TOD display is replaced
after 2 seconds by “-:--“ and
sequences through the DOW choices
for your chosen operating mode.
When the desired DOW choice 2.
appears, release the EVENT button.
A flashing cursor will appear at 3.
12 midnight (Fig. 19).
With no button pressed, turn the 4.
selector wheel until the cursor reaches the period of time that you
would like to change from on to off, or from off to on.
Press and hold the 5. OFF or ON button while you turn the selector
wheel, moving the cursor to the end of the time period you’d like
to change.
Release the button. The change is now complete.6.
Fig.
19
3
Page 4

Observed Problem Possible Cause What to Do
In the programming mode, “FUL” reads
on the display when the ON button is
pressed.
When viewing events, a programmed ON
Event is not showing in the early AM of a
viewed day.
The timer is set up so that all days
(Weekly Mode) or groups of days
(Weekend/Weekday Mode) are
programmed the same, and individual
days now need to be programmed
differently.
Digital timer switches at incorrect times or
skips some of the programmed times.
The lights or controlled devices don’t
match the programmed on/off status
immediately.
The load turns off immediately after being
turned on.
The digital timer operation is sluggish or
not switching on/off at all.
Timer shows ON but the light or other
controlled device is off.
Troubleshooting Guide
The allowed number of ON Events for the
chosen operating mode has been reached.
The start of the ON Event is actually on the
previous day. ON Events will only be viewed
on the day they begin.
The timer needs to be changed to the Daily
Mode in order to program individual days.
Programmed schedule(s) are incorrect.
Digital timer is in RANDOM feature, which
varies switching times up to ±15 minutes (to
give your home a “lived-in” look).
Digital timer does not “catch up”
automatically to the programmed load state.
The timer is not functioning properly. If the problem persists, contact Intermatic
Though the low battery indicator is not being
displayed, the batteries are getting weak.
The light or controlled device itself may be
switched off.
Follow instructions under “Changing Program
Times” to turn off some ON Events before
attempting to add new ON Events.
Press EVENT repeatedly until the day preceding
that early AM ON Event displays to view that
event.
Hold down the TIME button 2 seconds to enter
setup. Press TIME three times to accept the hours,
minutes and day of week. Choose Fn1 for Daily
Mode and press TIME. You may now follow the
instructions for programming in the Daily Mode.
Press EVENT to review the settings and revise
them as necessary. See instructions at the left.
If you don’t want to keep the timer in RANDOM
feature, enter programming by holding EVENT
down, progress to RANDOM by repeatedly
pressing EVENT, and change the “ON” setting to
“OFF”.
Finish programming. The status of the timer
will remain as is until the programming mode is
exited.
Customer Service.
Replace the batteries.
Make sure the light or controlled device is
switched on and plugged in.
LIMITED LIFETIME WARRANTY
If within the warranty period specified, this product fails due to a defect in material or workmanship, Intermatic Incorporated will repair or replace it, at its sole option, free of charge. This warranty is extended to
the original household purchaser only and is not transferable. This warranty does not apply to: (a) damage to units caused by accident, dropping or abuse in handling, acts of God or any negligent use; (b) units
which have been subject to unauthorized repair, opened, taken apart or otherwise modified; (c) units not used in accordance with instructions; (d) damages exceeding the cost of the product; (e) sealed lamps
and/or lamp bulbs, LED’s and batteries; (f) the finish on any portion of the product, such as surface and/or weathering, as this is considered normal wear and tear; (g) transit damage, initial installation costs,
removal costs, or reinstallation costs.
INTERMATIC INCORPORATED WILL NOT BE LIABLE FOR INCIDENTAL OR CONSEQUENTIAL DAMAGES. SOME STATES DO NOT ALLOW THE EXCLUSION OR LIMITATION OF INCIDENTAL OR CONSEQUENTIAL
DAMAGES, SO THE ABOVE LIMITATION OR EXCLUSION MAY NOT APPLY TO YOU. THIS WARRANTY IS IN LIEU OF ALL OTHER EXPRESS OR IMPLIED WARRANTIES. ALL IMPLIED WARRANTIES, INCLUDING
THE WARRANTY OF MERCHANTABILITY AND THE WARRANTY OF FITNESS FOR A PARTICULAR PURPOSE, ARE HEREBY MODIFIED TO EXIST ONLY AS CONTAINED IN THIS LIMITED WARRANTY, AND SHALL
BE OF THE SAME DURATION AS THE WARRANTY PERIOD STATED ABOVE. SOME STATES DO NOT ALLOW LIMITATIONS ON THE DURATION OF AN IMPLIED WARRANTY, SO THE ABOVE LIMITATION MAY NOT
APPLY TO YOU.
This warranty service is available by either (a) returning the product to the dealer from whom the unit was purchased, or (b) mailing the product, along with proof of purchase, postage prepaid to the authorized
service center listed below. This warranty is made by: Intermatic Incorporated/After Sales Service/7777 Winn Rd., Spring Grove, Illinois 60081-9698/815-675-7000 http://www.intermatic.com Please be sure to wrap
the product securely to avoid shipping damage.
INTERMATIC INCORPORATED
SPRING GROVE, ILLINOIS 60081-9698
4
158-00618REF
Page 5

MODELO de serie DT500CH
OFF
TIME
EVENT
AM
ON
PM
RANDOM
MOTU THWE SAFRPMSU
5
6
7
4
5
4
3
2
1
6
7
8
PM
12
11
9
10
8
11
10
9
AM
12
1
3
2
RANDOM
MO TU WE TH FR SA SU
12
1
1
2
2
3
3
4
4
5
5
66
7
7
8
8
9
9
10
10
11
11
PM
AM
12
PM
RANDOM
MO TU WE TH FR SA SU
12
1
1
2
2
3
3
4
4
5
5
66
7
7
8
8
9
9
10
10
11
11
PM
AM
12
PM
RANDOM
MO TU WE TH FR SA SU
12
1
1
2
2
3
3
4
4
5
5
66
7
7
8
8
9
9
10
10
11
11
PM
AM
12
PM
Temporizador digital
Instrucciones para el usuario y la instalación
Capacidades
Entrada: 102 a 132 V CA 60 Hz, 2.5 W máx.•
Salida: 10 amperios/1200 W resistivos, 5 amperios inductivos, •
500 W de tungsteno
ADVERTENCIA
Peligro de descarga eléctrica. Riesgo de lesión o muerte. Use siempre un •
enchufe de tres terminales en un tomacorriente debidamente conectado a
tierra. Nunca intente anular esta característica de seguridad.
•
Riesgo de incendio. No use el temporizador para controlar dispositivos
que puedan tener consecuencias peligrosas debido a cálculos de tiempo
imprecisos, como lámparas solares, saunas, calefactores, ollas eléctricas, etc.
AVISO
Siga los códigos eléctricos locales durante su uso.•
Elimine inmediatamente las baterías usadas según los reglamentos locales.•
1 – Active la batería
El temporizador viene con dos baterías LR44 instaladas.
Retire la lengüeta del 1.
compartimiento de baterías para
conectar las baterías instaladas.
El temporizador se encenderá 2.
y mostrará la visualización
predeterminada (MO [Lu], “12:00
PM”) con el “12” parpadeando
(Fig. 1).
NOTA: Si no aparece la visualización
predeterminada, es posible que
las baterías estén descargadas.
Reemplace las baterías antes de usar
el temporizador digital.
Un tomacorriente temporizado: Tiene un LED verde que se 5.
ilumina cuando el tomacorriente está encendido
LED verde6.
Botones: Se usan para configurar, programar y realizar la 7.
operación manual del dispositivo enchufado
Botón Reset8.
Random (Aleatorio): Indica cuando la función Random está 9.
encendida. Random usa los ajustes del temporizador que cambian
aleatoriamente en incrementos de 5 minutos cada ±15 minutos.
Día de la semana (DOW, por sus siglas en inglés): Se pueden 10.
programar eventos para un solo día de la semana (modo Daily
[Diario], 21 eventos totales), todos los días de la semana (modo
Weekly [Semanal], 48 eventos totales) o sólo fines de semana o
días de semana (modo Weekend/Weekday [Fin de semana/Día de
semana], 24 +24 eventos totales)
Indicadores de eventos de encendido/apagado: Un día completo 11.
se divide en 96 segmentos (15 minutos cada uno) para mostrar
las horas de encendido y apagado programadas
NOTA: Se puede configurar y programar el temporizador antes de
enchufarlo. Tenga en cuenta que mientras está desenchufado, se
apagará la pantalla para conservar energía si no hay actividad en
los botones durante algunos minutos. Si esto sucede, simplemente
presione cualquier botón para volver a encender la pantalla.
3 – Borre cualquier programación existente
Es poco probable que su nuevo temporizador digital tenga
alguna programación existente, pero para asegurarse, use este
procedimiento antes de ajustar la hora.
Ubique el botón Reset (Reinicio). Es el orificio pequeño y 1.
redondo adyacente al teclado. Necesitará un lápiz o un sujetador
de papel para presionar este botón.
Presione y suelte el botón Reset. La pantalla iluminará todos los 2.
segmentos y quedará en blanco.
El temporizador eliminó toda la programación, muestra los 3.
Fig.
1
ajustes predeterminados (MO, “12:00 PM”) y está listo para su
configuración.
2 – Familiarícese con las funciones del temporizador
6
11
10
9
8
Compartimiento de baterías: Dos baterías LR44 mantienen la 1.
hora y los datos hasta tres meses sin alimentación
Hora del día (TOD, por sus siglas en inglés): Funciona como 2.
un reloj durante el funcionamiento normal, muestra mensajes
durante la programación y muestra alertas, como la indicación de
batería baja
Rueda selectora3.
Indicador PM: Se enciende para indicar que la TOD está en PM, 4.
se apaga para indicar que la TOD está en AM
4 – Ajuste la hora, el día y el modo de funcionamiento
1
NOTA: La hora, el día Y el modo de funcionamiento deben estar
ajustados antes de que se pueda programar cualquier evento de
ENCENDIDO. Los ajustes para hora y eventos de encendido no
estarán activados hasta que se haya completado la configuración y
la programación.
2
Ajuste de hora y día
Asegúrese de que se muestre la 1.
3
4
hora. Un temporizador que se acaba
de reiniciar mostrará MO, “12:00
PM”.
Comenzarán a parpadear los 2.
primeros dos dígitos (horas) de la
hora del día (TOD) (Fig. 3).
5
Gire la rueda selectora hasta que se 3.
muestre la hora correcta en las horas
7
de TOD, junto con el indicador de
PM, si lo desea. Tenga en cuenta que
el indicador de PM alternará entre
Fig.
3
encendido y apagado a medida que
Fig.
2
la hora pasa el mediodía y la
medianoche.
Presione el botón 4. ON (Encender) para
ajustar la nueva hora. O, si no se
necesita realizar cambios a la hora,
presione el botón TIME (Hora) para
mantener el ajuste de hora original.
Comenzarán a parpadear los últimos
dos dígitos de TOD (minutos) (Fig. 4).
Gire la rueda selectora hasta que se 5.
muestre la hora correcta en minutos.
Fig.
4
5
Page 6

RANDOM
MO TU WE TH FR SA SU
12
1
1
2
2
3
3
4
4
5
5
66
7
7
8
8
9
9
10
10
11
11
PM
AM
12
PM
RANDOM
MO TU WE TH FR SA SU
PM
RANDOM
MO TU WE TH FR SA SU
PM
RANDOM
MO TU WE TH FR SA SU
PM
4 – Ajuste la hora, el día y el modo de funcionamiento (continuación)
RANDOM
MO TU WE TH FR SA SU
12
1
1
2
2
3
3
4
4
5
5
66
7
7
8
8
9
9
10
10
11
11
PM
AM
12
PM
RANDOM
MO TU WE TH FR SA SU
12
1
1
2
2
3
3
4
4
5
5
66
7
7
8
8
9
9
10
10
11
11
PM
AM
12
PM
RANDOM
MO TU WE TH FR SA SU
12
1
1
2
2
3
3
4
4
5
5
66
7
7
8
8
9
9
10
10
11
11
PM
AM
12
PM
RANDOM
MO TU WE TH FR SA SU
12
1
1
2
2
3
3
4
4
5
5
66
7
7
8
8
9
9
10
10
11
11
PM
AM
12
PM
RANDOM
MO TU WE TH FR SA SU
12
1
1
2
2
3
3
4
4
5
5
66
7
7
8
8
9
9
10
10
11
11
PM
AM
12
PM
6. Presione el botón ON para ajustar los
minutos. O, presione el botón TIME
para mantener el ajuste de minutos
original. Comenzará a parpadear
DOW (Día de la semana) (Fig. 5).
Gire la rueda selectora hasta que 7.
se muestre el día actual y presione
el botón ON para el nuevo día de la
semana o el botón TIME para el día
de la semana original. Esto termina
la configuración de hora y día.
Ajuste del modo de funcionamiento
Se mostrará “SEL” (Seleccionar) en la TOD y los iconos de DOW 8.
que se muestran arriba de “SEL” reflejan el ajuste del modo de
funcionamiento del temporizador (Fig. 6, 7 u 8). Los tres modos
posibles son:
a.
El modo Daily permite tres
eventos por día individual para un
total de 21 eventos en toda la
semana. Sólo se mostrará el día
actual (MO, TU, etc.) sobre “SEL”.
b.
El modo Weekend/Weekday
permite hasta 24 eventos de fin
de semana, junto con 24 eventos
de día de semana. Se mostrará SA
SU o MO TU WE TH FR sobre “SEL”,
dependiendo del día actual de la
semana.
c.
El modo Weekly permite hasta 48
eventos, repetidos cada día de la
semana. Se mostrará MO TU WE
TH FR SA SU (Lu ma mi ju vi sá do)
sobre “SEL”.
Gire la rueda selectora para pasar en secuencia por estos modos.9.
Presione el botón 10. ON para ajustar el nuevo modo de
funcionamiento o el botón TIME para mantener el modo de
funcionamiento original.
NOTA: Al cambiar el modo de funcionamiento se borrarán todos los
eventos programados actualmente en el temporizador.
5 – Ajuste un evento de encendido inicial
Una vez que estén ajustados la hora, el día y el modo de
funcionamiento, se pueden visualizar y programar eventos.
Visualización de eventos de DOW
Asegúrese de que se muestre la hora.1.
Presione y suelte el botón 2. EVENT (Evento) para visualizar la
primera opción de DOW. Cada vez que presione el botón EVENT se
mostrará la siguiente opción de DOW. Las opciones de DOW
variarán, dependiendo de lo que escoja para el modo de
funcionamiento.
a.
El modo Daily se desplazará por
siete opciones: Cada día de la
semana (MO, TU, etc.) (Fig. 9).
b.
El modo Weekend/Weekday se
desplazará por dos opciones: SA
SU o MO TU WE TH FR.
c.
El modo Weekly no se desplazará:
Se mostrará MO TU WE TH FR SA SU.
NOTA: A medida que se desplaza por las
opciones de DOW, TOD no cambia.
Para volver inmediatamente al día actual, presione el botón 3. TIME.
El temporizador también se devolverá automáticamente al día
actual si el botón EVENT está inactivo durante 5 segundos.
NOTA: Sólo podrá visualizar eventos de encendido que comiencen
en la opción de DOW que visualice. Por ejemplo, en el modo Daily,
un evento de encendido que comience el miércoles a las 11 PM y
termine el jueves a las 3 AM, sólo se mostrará en la visualización del
miércoles.
6
Fig.
Fig.
Fig.
Fig.
Fig.
5 – Ajuste un evento de encendido inicial (continuación)
Programación de un evento de encendido
En la pantalla de hora del día actual, 4.
presione y mantenga presionado
el botón EVENT. Después de 2
segundos, TOD se reemplaza por
“-:--” (Fig. 10).
Al presionar el botón, aparecen 5.
las opciones de DOW (Día de
la semana) para el modo de
funcionamiento.
a.
5
El modo Daily se desplazará por
siete opciones: Cada día de la
semana (MO, TU, etc.)
b.
El modo Weekend/Weekday se desplazará por dos opciones:
Fig.
10
SA SU o MO TU WE TH FR.
c. MO TU WE TH FR
El modo Weekly no se desplazará: Se mostrará
SA SU.
Cuando aparezca la opción de DOW que desee, suelte el botón 6.
EVENT para ingresar al modo de programación.
NOTA: También puede ingresar a la
programación directamente desde la
6
visualización de los eventos de DOW
que desee. Presione y mantenga
presionado el botón EVENT durante
2 segundos hasta que TOD se
reemplace por “-:--”.
7
8
A las 12, en la medianoche, 7.
aparecerá un cursor parpadeante
(Fig. 11).
Sin botones presionados, gire la 8.
rueda selectora hasta que el cursor
alcance la hora en que desee
encender el dispositivo, por ejemplo,
Fig.
11
las 4 AM (Fig. 12).
Presione y suelte el botón 9. ON
mientras gira la rueda selectora,
moviendo el cursor a la hora que
desee apagar el dispositivo, por
ejemplo, las 7:30 AM (Fig. 13).
Suelte el botón 10. ON.
Ahora puede seguir los pasos 7 a 11.
10 para programar otro evento de
encendido para la misma opción de
Fig.
12
DOW.
Después de que se hayan ingresado 12.
todos los eventos para esa opción
de DOW, presione el botón
EVENT. Dependiendo del modo de
funcionamiento que escoja:
a.
En el modo Daily, cada vez que
presione el botón EVENT pasará
al modo de programación de la
siguiente opción de DOW. Puede
ingresar eventos de encendido
Fig.
13
para esos días o simplemente presione EVENT para pasar al día
siguiente. Después de que la programación haya pasado en
secuencia por los siete días, al presionar EVENT se iluminará la
función RANDOM.
b.
En el modo Weekend/Weekday, al presionar una vez el botón
EVENT pasará al modo de programación de la otra opción de
DOW. Puede ingresar eventos de encendido para ese grupo de
9
días o simplemente presionar EVENT. Entonces se iluminará la
función RANDOM.
c.
En el modo Weekly, no hay otras opciones de DOW, de forma
que al presionar EVENT se iluminará inmediatamente la función
RANDOM.
NOTA: Si se alcanzó el número permitido de eventos de
encendido para su modo de funcionamiento elegido, cualquier
intento de programar eventos adicionales provocará que TOD
muestre “FUL” (Lleno). Para eliminar eventos, siga “Cambio de
horas de programa” para apagarlos.
Page 7

RANDOM
MO TU WE TH FR SA SU
12
1
1
2
2
3
3
4
4
5
5
66
7
7
8
8
9
9
10
10
11
11
PM
AM
12
PM
RANDOM
MO TU WE TH FR SA SU
12
1
1
2
2
3
3
4
4
5
5
66
7
7
8
8
9
9
10
10
11
11
PM
AM
12
PM
RANDOM
MO TU WE TH FR SA SU
12
1
1
2
2
3
3
4
4
5
5
66
7
7
8
8
9
9
10
10
11
11
PM
AM
12
PM
RANDOM
MO TU WE TH FR SA SU
12
1
1
2
2
3
3
4
4
5
5
66
7
7
8
8
9
9
10
10
11
11
PM
AM
12
PM
RANDOM
MO TU WE TH FR SA SU
12
1
1
2
2
3
3
4
4
5
5
66
7
7
8
8
9
9
10
10
11
11
PM
AM
12
PM
RANDOM
MO TU WE TH FR SA SU
12
1
1
2
2
3
3
4
4
5
5
66
7
7
8
8
9
9
10
10
11
11
PM
AM
12
PM
6 – Cambio de hora, día o modo de funcionamiento
Asegúrese de que actualmente se muestre la hora.1.
Presione y mantenga presionado el botón TIME (Hora) hasta que 2.
las horas empiecen a parpadear.
Siga el procedimiento que se describe en la sección 4 “Ajuste de 3.
hora, día y modo de funcionamiento”.
NOTA: Al cambiar el modo de funcionamiento se borrarán todos los
eventos programados actualmente en el temporizador.
7 – Seleccione la función RANDOM
La función RaNdom: Le otorga un
aspecto de estar “habitado” a su hogar
variando sus ajustes en incrementos
aleatorios de 5 minutos cada
±15 minutos.
Continúe programando después de 1.
que todos los eventos de encendido
estén ajustados hasta que se ilumine
la función RANDOM.
RANDOM comienza a parpadear y 2.
TOD se reemplaza con “On” u “OFF”
(Apagar) (Fig. 14 y 15).
Presione el botón 3. ON para encender
la función RANDOM o el botón OFF
para apagarla.
NOTA: También se puede usar la rueda
selectora para alternar entre “On” y
“OFF”.
Presione el botón 4. TIME para volver al
funcionamiento normal y terminar la
sesión de programación.
8 – Enchufe el temporizador
Para conservar la energía de las baterías, tan pronto la configuración
y la programación estén completas, enchufe el dispositivo que desee
en el temporizador y enchufe el temporizador a un tomacorriente
debidamente conectado a tierra.
Sobre la batería
- El voltaje de las baterías se
monitorea continuamente. Si se
detecta bajo voltaje, TOD
alternará entre la TOD actual y
“Lo” (batería baja) (Fig. 16).
El temporizador requiere dos baterías LR44 para mantener la
hora durante un máximo de tres
meses sin alimentación.
Reemplace las baterías tan pronto sea posible después de que
aparezca la pantalla de batería
baja.
Cambie las baterías a un minuto de desenchufar para mantener los ajustes de hora y la programación.
Posteriormente, si la pantalla tiene errores o parpadea MO,
“12:00 AM”, restablezca la hora y la programación.
Mientras el temporizador esté sin baterías, éste apagará la pantalla para conservar energía.
Elimine inmediatamente las baterías usadas de acuerdo con los reglamentos locales. Mantenga las baterías lejos de los
niños.
Fig.
14
Fig.
15
Fig.
16
Anulación manual con ON y OFF
Los botones ON y OFF se pueden usar para anular la programación
del temporizador.
Anulación manual de un evento de encendido
Si el dispositivo está encendido 1.
actualmente, presione el botón OFF
para apagarlo inmediatamente.
El dispositivo permanecerá apagado 2.
hasta el próximo evento de
encendido o hasta que se presione el
botón ON.
Si se programó el dispositivo 3.
para estar encendido y apagarse
manualmente, TOD alternará entre
la hora actual y “OFF” para indicar
que se interrumpió la programación
normal (Fig. 17).
Encendido manual del dispositivo
Si el dispositivo está apagado 4.
actualmente, presione el botón ON
para encenderlo inmediatamente.
El dispositivo permanecerá 5.
encendido hasta el fin del próximo
evento de encendido o hasta que se
presione el botón OFF.
Si se programó el dispositivo 6.
para estar apagado y encenderse
manualmente, TOD alternará entre
la hora actual y “On” para indicar
que se interrumpió la programación
normal (Fig. 18).
NOTA: Si al presionar el botón oN u oFF en el paso 2 ó 5 no se
obtienen los resultados esperados, el temporizador simplemente
puede haber vuelto al ajuste programado original y requerir que se
presione una vez más el botón.
Cambio de horas de programa
1. Ingrese al modo de programación
presionando y manteniendo
presionado el botón EVENT. Después
de 2 segundos, TOD se reemplaza
por “-:--” y pasa en secuencia por las
opciones de DOW para su modo de
funcionamiento elegido.
Cuando aparezca la opción de DOW 2.
que desee, suelte el botón EVENT.
A las 12, en la medianoche, 3.
aparecerá un cursor parpadeante
(Fig. 19).
Sin botones presionados, gire la rueda selectora hasta que 4.
el cursor alcance el período de tiempo que desee cambiar de
encendido a apagado, o de apagado a encendido.
Presione y mantenga presionado el botón 5. OFF u ON mientras gira
la rueda selectora, moviendo el cursor al final del período de
tiempo que desee cambiar.
Suelte el botón. El cambio ahora está completo.6.
Fig.
17
Fig.
18
Fig.
19
7
Page 8

Guía de solución de problemas
Problema observado Causa posible Lo que debe hacer
En el modo de programación, se muestra
“FUL” en la pantalla cuando se presiona
el botón ON.
Mientras visualiza los eventos, no
se muestra un evento de encendido
programado en las primeras horas AM de
un día visualizado.
El temporizador está configurado de
forma que todos los días (modo Weekly)
o grupos de días (modo Weekend/
Weekday) se programen igual, y ahora se
necesita programar días individuales de
una forma distinta.
El temporizador digital enciende o apaga
a horas incorrectas u omite algunas de las
horas programadas.
Los faroles o los dispositivos controlados
no coinciden inmediatamente con
el estado de encendido/apagado
programado.
La carga se apaga inmediatamente
después de encenderla.
El funcionamiento del temporizador
digital es lento o no enciende/apaga.
El temporizador muestra ON pero el farol
o el dispositivo controlado está apagado.
Se alcanzó el número permitido de eventos de
encendido para el modo de funcionamiento
elegido.
El inicio del evento de encendido es en
realidad en el día anterior. Los eventos de
encendido sólo se visualizarán en el día en
que comienzan.
Se debe cambiar el temporizador al modo
Daily para programar días individuales.
Las programaciones son incorrectas.
El temporizador digital está en la función
RANDOM, la cual varía las horas de encendido
y apagado hasta en ±15 (para otorgarle a su
hogar un aspecto de estar “habitado”).
El temporizador digital no se “pone al día”
automáticamente con el estado de carga
programado.
El temporizador no está funcionando
correctamente.
Aunque no se muestra el indicador de batería
baja, las baterías se están agotando.
El farol o el dispositivo controlado puede estar
apagado.
Siga las instrucciones en “Cambio de horas de
programa” para apagar algunos eventos de
encendido antes de intentar agregar eventos de
encendido nuevos.
Presione repetidamente EVENT hasta que se
muestre el día que precede ese evento de
encendido en las primeras horas AM para
visualizar ese evento.
Mantenga presionado el botón TIME durante
2 segundos para ingresar a la configuración.
Presione TIME tres veces para aceptar las horas,
los minutos y el día de semana. Elija Fn1 para el
modo Daily y presione TIME. Ahora puede seguir
las instrucciones para programación en el modo
Daily.
Presione EVENT para revisar los ajustes y
modificarlos, según sea necesario. Consulte las
instrucciones de la izquierda.
Si no desea mantener el temporizador en la
función RANDOM, ingrese a la programación
manteniendo presionado EVENT, avance hasta
RANDOM presionando repetidamente EVENT y
cambie el ajuste “ON” a “OFF”.
Termine la programación. El estado del
temporizador permanecerá como está hasta que
salga del modo de programación.
Si el problema persiste, comuníquese con
Atención al Cliente de Intermatic.
Reemplace las baterías.
Asegúrese de que el farol o el dispositivo
controlado esté encendido y enchufado.
GARANTÍA LIMITADA DE POR VIDA
Si dentro del período de garantía especificado, este producto falla debido a un defecto del material o de mano de obra, Intermatic Incorporated lo reparará o lo reemplazará, a su exclusivo criterio, libre de
cargo. Esta garantía se extiende sólo al comprador doméstico original y no es transferible. Esta garantía no se aplica a: (a) daño a las unidades causado por accidente, caída o uso indebido en su manipulación,
casos fortuitos o cualquier uso negligente; (b) unidades que hayan sido reparadas, abiertas, desmontadas o modificadas de otra forma sin autorización; (c) unidades que no se hayan usado de acuerdo con las
instrucciones; (d) daños que excedan el costo del producto; (e) focos o bombillas sellados, LED y baterías; (f) el acabado de cualquier parte del producto, como la superficie o la alteración por exposición a la
intemperie, puesto que se considera como desgaste natural; (g) daño en el transporte, costos de instalación inicial, costos de retiro o costos de reinstalación.
INTERMATIC INCORPORATED NO SERÁ RESPONSABLE POR DAÑOS INDIRECTOS O EMERGENTES. ALGUNOS ESTADOS NO PERMITEN LA EXCLUSIÓN O LIMITACIÓN DE DAÑOS INDIRECTOS O EMERGENTES,
DE MODO QUE LA LIMITACIÓN O EXCLUSIÓN ANTERIOR PODRÍA NO APLICARSE A SU CASO. ESTA GARANTÍA REEMPLAZA TODAS LAS DEMÁS GARANTÍAS EXPRESAS O IMPLÍCITAS. TODAS LAS
GARANTÍAS IMPLÍCITAS, INCLUIDA LA GARANTÍA DE COMERCIABILIDAD E IDONEIDAD DEL PRODUCTO PARA UN PROPÓSITO EN PARTICULAR, POR MEDIO DEL PRESENTE QUEDAN MODIFICADAS PARA
TENER VALIDEZ SÓLO COMO SE INDICA EN ESTA GARANTÍA LIMITADA Y TENDRÁN LA MISMA DURACIÓN DEL PERÍODO DE GARANTÍA ESTIPULADO ANTERIORMENTE. ALGUNOS ESTADOS NO PERMITEN
LIMITACIONES A LA DURACIÓN DE UNA GARANTÍA IMPLÍCITA, DE MODO QUE LA LIMITACIÓN ANTERIOR PODRÍA NO APLICARSE A SU CASO.
Este servicio de garantía está disponible (a) devolviendo el producto al concesionario en que se compró o (b) enviando por correo el producto con un comprobante de compra y franqueo pagado al centro de
servicio técnico autorizado mencionado más adelante. Esta garantía la otorga: Intermatic Incorporated/Servicios de Posventa/7777 Winn Rd., Spring Grove, Illinois 60081-9698/815-675-7000 http://www.intermatic.
com Asegúrese de envolver el producto de manera segura para evitar daños de transporte.
INTERMATIC INCORPORATED
SPRING GROVE, ILLINOIS 60081-9698
8
158-00618REF
 Loading...