

Intermatic DT200LT Instructions Manual
7777 Winn Road
Spring Grove, Illinois 60081
www.intermatic.com
Digital Landscape Timer
MODEL DT200LT
for use in Low Voltage Transformers up to 1200 W
SAFETY SECTION
WARNING
Risk of Fire or Electrical Shock
• Do Not use the timer to control devices that could have dangerous consequences due to inaccurate timing, such as sun lamps, saunas, heaters, crock pots, etc.
• Unplug the timer before replacing batteries.
• Do Not use to control receptacles.
• Installation should be in accordance with national and local electrical code requirements.
NOTICE
• Dispose of product per local regulations for disposal of used batteries.
PRODUCT DESCRIPTION
The Intermatic DT200LT Digital Landscape Timer is a simple-to-use landscape timer to be used with low voltage transformers
up to 1200 W in order to control landscape lighting. This timer supports pre-programmed dawn/dusk times or one set of
custom ON/OFF times.
Specications
Output
• 15 A Resistive, 120 VAC
• 12 A Inductive, 120 VAC
• 1000 W, 120 VAC
• 1/2 HP, 120 VAC
Input
• 120 VAC, 60 Hz, 2.5W max
Operating Temperature
• -40°F to 122°F (-40°C to 50°C), for 1200 W, 120 VAC
Batteries
• Two LR44 batteries that keep time and settings for up
to three months without power
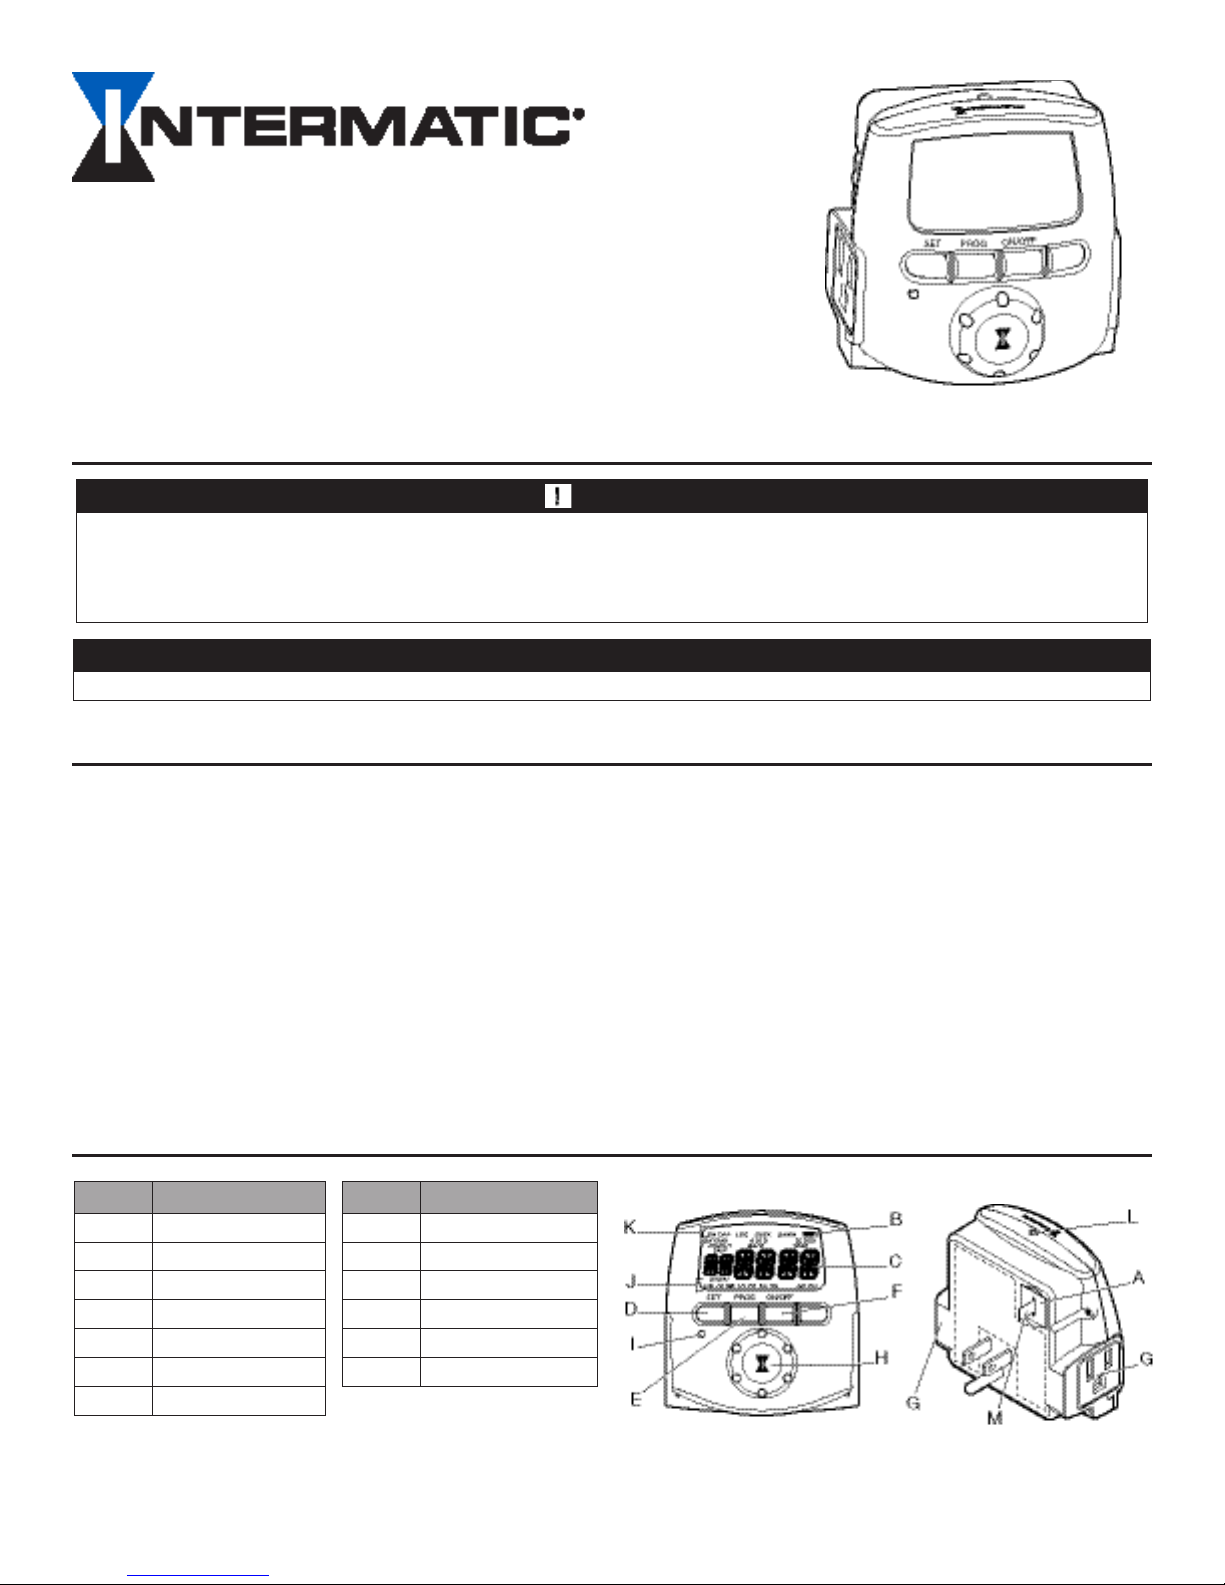
TIMER OVERVIEW
Item Description Item Description
A Battery Holder H Selector Knob
B Low Battery Indicator I Reset Button
C Time of Day Display J Day of the Week Display
D SET Button K Mode Display
E PROG Button L ON/OFF Indicator Light
F ON/OFF Button M Battery Pull Tab
G Grounded Outlet (2)
INITIAL SETUP
Overview
Upon first use, you must enable the battery and then set the Time, Date, and Location.
Enabling the Battery
1. Remove the pull tab (M) from the battery holder, if
present. See FIG. 1.
2. When the display shows 12:00 AM, the timer is
ready for initial set up. See FIG. 2. If 12:00 AM does
not display, perform a Factory Reset or see the
Troubleshooting section.
Note: The timer may be set while unplugged. The display
turns OFF after 1 minute of inactivity to save battery.
Press any button to turn the display back ON.
Setting the Time, Date, and Location
Upon initial use, you can easily program these timer settings
in succession by completing the steps in this section.
1. Turn the selector knob (H) to select the correct hour of
the day. Press SET (D). Repeat to select the minute of
the day. See FIG. 2.
2. Turn the selector knob (H) to select the correct YEAR.
Press SET (D). See FIG. 3.
3. Turn the selector knob (H) to select the correct MONTH.
Press SET (D). See FIG. 3.
4. Turn the selector knob (H) to select the correct DATE.
Press SET (D). See FIG. 3.
5. Turn the selector knob (H) to select the correct Daylight
Savings Time setting. The options are OFF, US/CAN,
and Mex.
a. If in Hawaii or Arizona, select OFF. Press SET (D).
b. If you live in a part of Mexico that observes
US/Canada Daylight Savings Time, select US/CAN.
Press SET (D).
6. Turn the selector knob (H) to select the state you are in.
Press SET (D). See FIG. 4.
7. Turn the selector knob (H) to select the section of the
state you are in. Press SET (D). See FIG. 4.
8. Turn the selector knob (H) to select the time zone you
are in. Press SET (D). See FIG. 5.
9. Turn the selector knob (H) to adjust the DAWN offset
time (+/- 15, 30, 45 or 60 minute increments). Press
SET (D). Offset is the amount of minutes you want the
lights to come on before (-) or after (+) DAWN or DUSK.
Repeat for the DUSK offset time. See FIG. 6.
10. Press SET (D) to finish setting up the timer.
FIG 1. Removing the Pull Tab
FIG 2. Setting the Time
FIG 3. Setting the Date
FIG 4. Setting the State
FIG 5. Setting the Time Zone
Digital Landscape Timer
FIG 6. Setting the DAWN/DUSK Offset Time
2
 Loading...