

Page 1

UltraView IP PTZ 36X
Camera Quick Start
Guide
P/N 1071694D-EN • ISS 07DEC12
Page 2

Copyright
© 2012
UTC Fire & Security Americas
Corporation, Inc.
Interlogix is part of UTC Climate Controls &
Security, a unit of United Technologies
Corporation. All rights reserved.
Contact
information
www.interlogix.com
or
www.utcfssecurityproducts.eu
Page 3

UltraView IP PTZ 36X camera 1 EN
Content
Introduction 1
Before you begin 1
Installation environment 1
Camera description 2
Installing a camera 2
Accessing the camera over the internet 4
Web browser interface 5
Configuring the camera over the internet 5
Specifications 7
Introduction
This pocket guide provides basic information on setting up and using
the UltraView IP PTZ 36X camera. Detailed information on the
cameras can be found in the user manual.
Before you begin
Unpack everything. Check the items for damage, and verify that all
items are included. The camera is shipped with the following items:
Dome camera
User manual
Quick Start Guide
Installation environment
When installing your camera, consider these factors:
• Place the camera in a secure location.
• Ensure that the camera is in a well-ventilated area.
• Do not expose the camera to rain or moisture.
Page 4
EN 2 UltraView IP PTZ 36X camera
Camera description
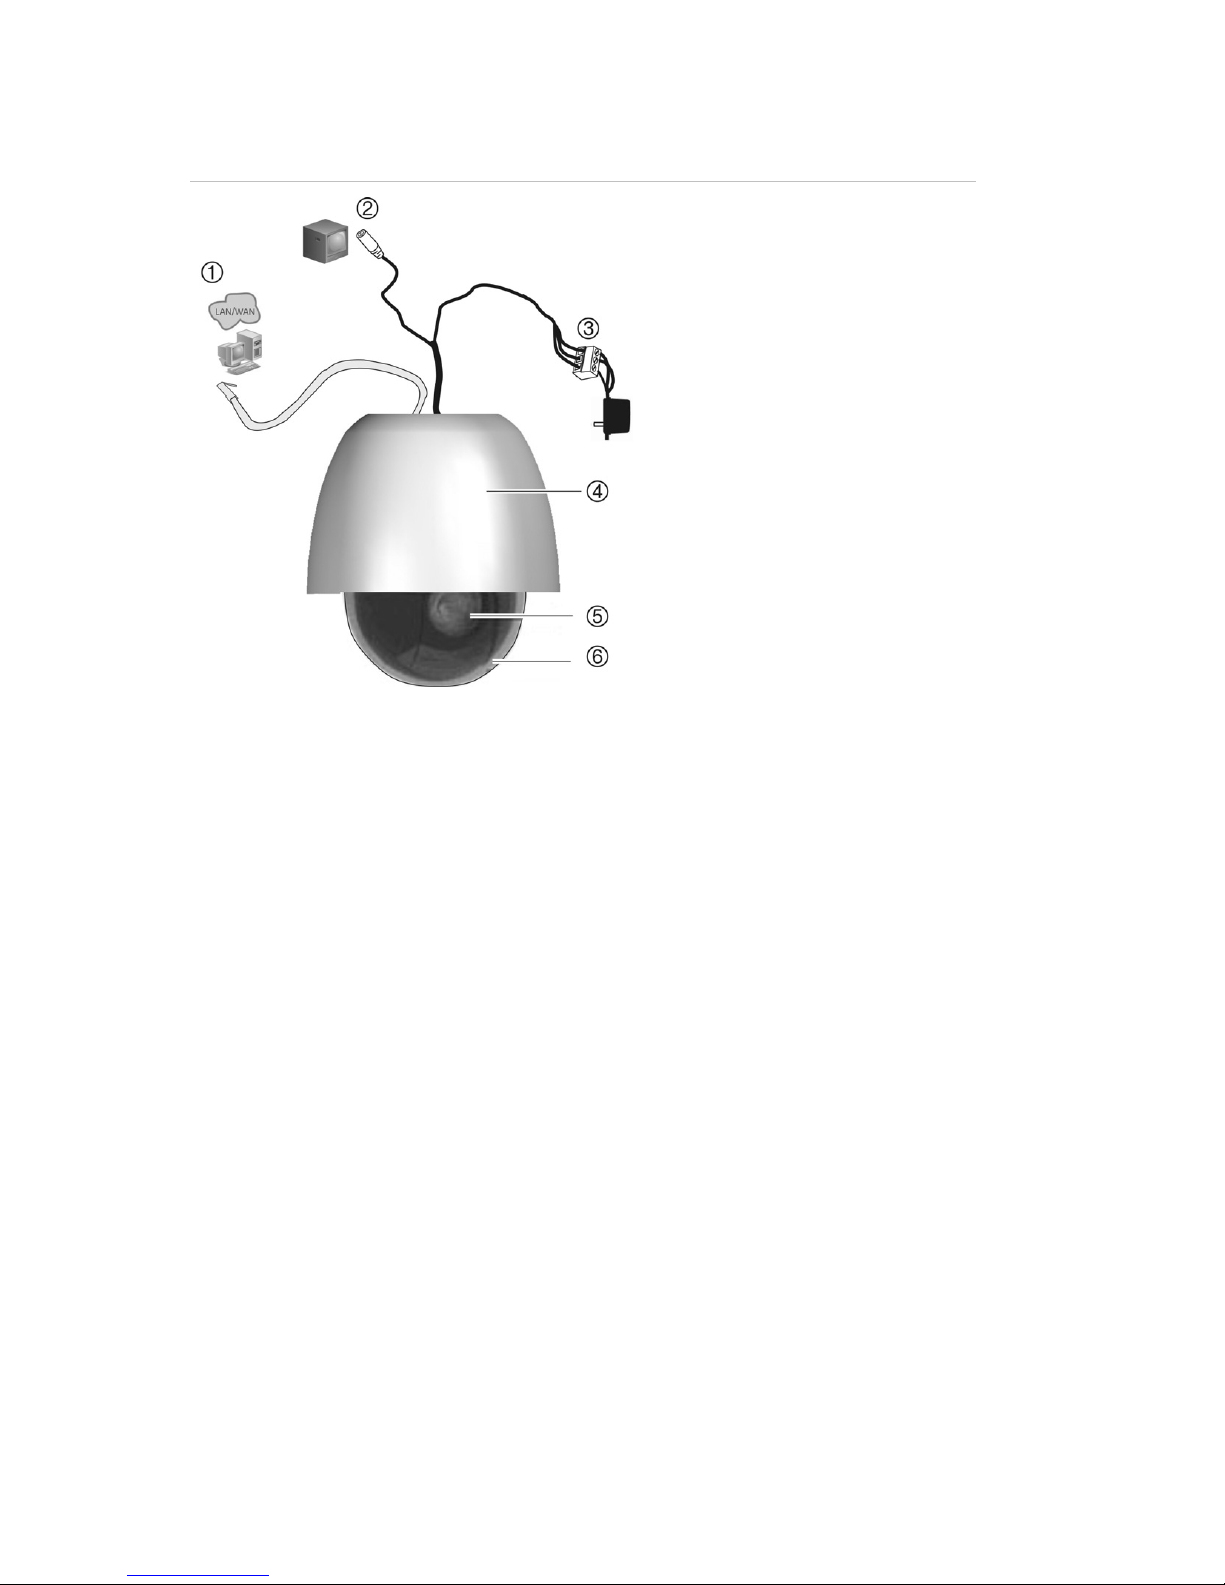
Figure 1: Overview of the dome camera (pendant-mount shown)
1. Ethernet RJ45 connector.
Connect to the network
devices.
2. Video output.
Connect the BNC
connector to a CCTV
monitor.
3. Power supply cord.
Connect +24 VAC power
supply.
4. Housing.
5. PTZ module.
6. Bubble.
Installing a camera
1. Prepare the mounting surface and install the camera bracket.
2. Unscrew the bubble from the camera and remove the protective
tape from the PTZ module.
3. Press the two tabs on either side of the PTZ module and remove it
from the camera housing. Ensure the module cables still exit from
the cable entry hole in the top of the housing.
Note: If alarm and audio input/output relays are to be used,
connect them to the PCB of the module and route their cables
through the cable entry hole on tom of the housing. See the user
manual for further information on the alarm connections.
4. Install the housing.
Pendant-mount camera:
Attach the camera housing to the bracket using the screws
enclosed with the bracket.
Flush mount camera:
Adjust the height of the two housing tabs by turning the screw on
which they are attached. The distance (h) of the tabs from the
housing ring must be greater than the thickness of the ceiling.
Page 5

UltraView IP PTZ 36X camera 3 EN
Housing tab
Screw
Make sure the housing tab is closed and then PUSH the housing
into the pass-through hole.Hold the housing and fix it by screwing
the housing tabs down to the mounting surface
5. Insert the PTZ module into the housing:
Position the tabs on the PTZ module by aligning the arrow label on
the module with those on the housing (see below). The module
should firmly snap into position. If using a SDHC card, insert it into
the module before inserting the module into the housing.
6. Re-attach the bubble by screwing it to the housing.
7. Pendant-mount camera only: Route the PTZ module cables
through the bracket.
Flush mount camera only: Install the trim ring. Align the trim ring
to the housing, and insert the fix-pins to the holes. Then rotate the
ring clockwise.
8. Connect the cables (see Figure 1).
Page 6

EN 4 UltraView IP PTZ 36X camera
Warning: After installation, the PTZ module will perform a PTZ
self-test and initializes with the power on. DO NOT touch and
move the camera while it is self-testing and initializing.
9. Configure the dome camera to suit its location.
Accessing the camera over the internet
Use the Web browser to access and control the camera over the
internet.
Note: Any changes made to the camera’s configuration only apply to
this camera.
Change the administrator password once the set up is complete. Only
authorized users should be able to modify camera settings.
To access the camera online:
1. In the Web browser enter the camera’s IP address (default is
192.168.1.70). The Login dialog box appears.
2. Enter your user name and password as well as the port to be used.
Default user name: admin
Default password: 1234
Default port: 8000
Click OK. The Web browser screen appears in live mode. The live
screen is initially blank.
3. Click the Start Live View button on the top of the screen for
the live mode images to appear on-screen.
4. Right-click Camera 01 to open the pop-up box and select the
desired stream: Main, Sub or Open sound.
Page 7

UltraView IP PTZ 36X camera 5 EN
Web browser interface
1. Menu toolbar select live view,
playback, search event logs
and configure camera over the
internet.
2. Viewer pane.
3. Current user
4. Exit the system.
5. PTZ button.
6. PTZ control panel
7. Preset selection
8. Full screen
9. Start live view, record video and
take snapshots.
10. Start/stop bi-directional audio.
11. Turn the audio function on or
off.
Configuring the camera over the internet
In the camera browser screen, click the Configuration button in the
menu toolbar to access the configuration screens. See Table 1 on
page 6 for the list of configuration parameters.
The configuration pane displays the configuration tree with 10
configuration parameter folders. The configuration pane is always
visible. Each folder has a list of subfolders that display the different
configuration screens.
Page 8

EN 6 UltraView IP PTZ 36X camera
Figure 2: Configuration screen
Configuration pane
Table 1: Overview of the configuration parameter folders
Configuration folder Description
Local configuration Manages the network type, display mode and
local storage paths.
Basic information Defines the device name and RS-485 bus ID
as used by the network. It also displays the
MAC address, device type, device SN, current
firmware version, U-Boot version and current
server time
DST time Defines when daylight saving time starts and
ends.
Channel parameters Defines the OSD properties of camera
information, recording schedule, recording
settings for alarm events, alarm response and
overlay text.
Network parameters Defines the network parameters required to
access the camera over the internet.
A
larm parameters Defines how the camera handles alarms such
as input type, notification of alarms, and
response schedules and duration.
Motion Defines how the camera moves such as
presets, shadow tours, and privacy masks..
Page 9

UltraView IP PTZ 36X camera 7 EN
Configuration folder Description
Deployment time Defines the schedules during which events can
be registered
User management Defines who can use the camera, their
passwords and access privileges.
HDD management Defines how to format the SDD card used in
the camera.
Remote upgrade Defines how to upgrade the camera’s
firmware.
Default Restores factory default settings.
Reboot device Reboots the camera.
Specifications
Operating temperature Pendant housing: -10 to +50 °C
(-14 to +122 °F)
Flush housing: -30 to +65 °C
(-22 to +149 °F)
Power supply 24 VAC +/- 4 VAC
Power consumption 30 W (heater on), 15 W (heater off)
Dimensions (mm) Pendant housing: Ø 220 × 299 mm
(Ø 8.66 ×10.27 in)
Flush housing : Ø 206 × 241 mm
(Ø 8.11 × 9.49 in.)
Environmental Pendant housing: IP66
Flush housing: IP54
Weight 5 kg (11 lb.)
Page 10

EN 8 UltraView IP PTZ 36X camera
Page 11

Page 12

 Loading...