

Page 1
TruVision NVR 10 Quick Start
Guide
P/N 1072767A-EN
• REV 1.0 • ISS 18APR14
Page 2

Copyright
© 2014 United Technologies Corporation.
Interlogix is part of UTC Climate Controls & Security, a unit of United
Technologies Corporation. All rights reserved.
Trademarks and
patents
The TruVision and Interlogix names and logos are trademarks of United
Technologies.
Other trade names used in this document may be trademarks or registered
trademarks of the manufacturers or vendors of the respective products.
Contact
information
www.interlogix.com or www.utcfssecurityproducts.eu
Page 3
NVR 10 Quick Start Guide 1
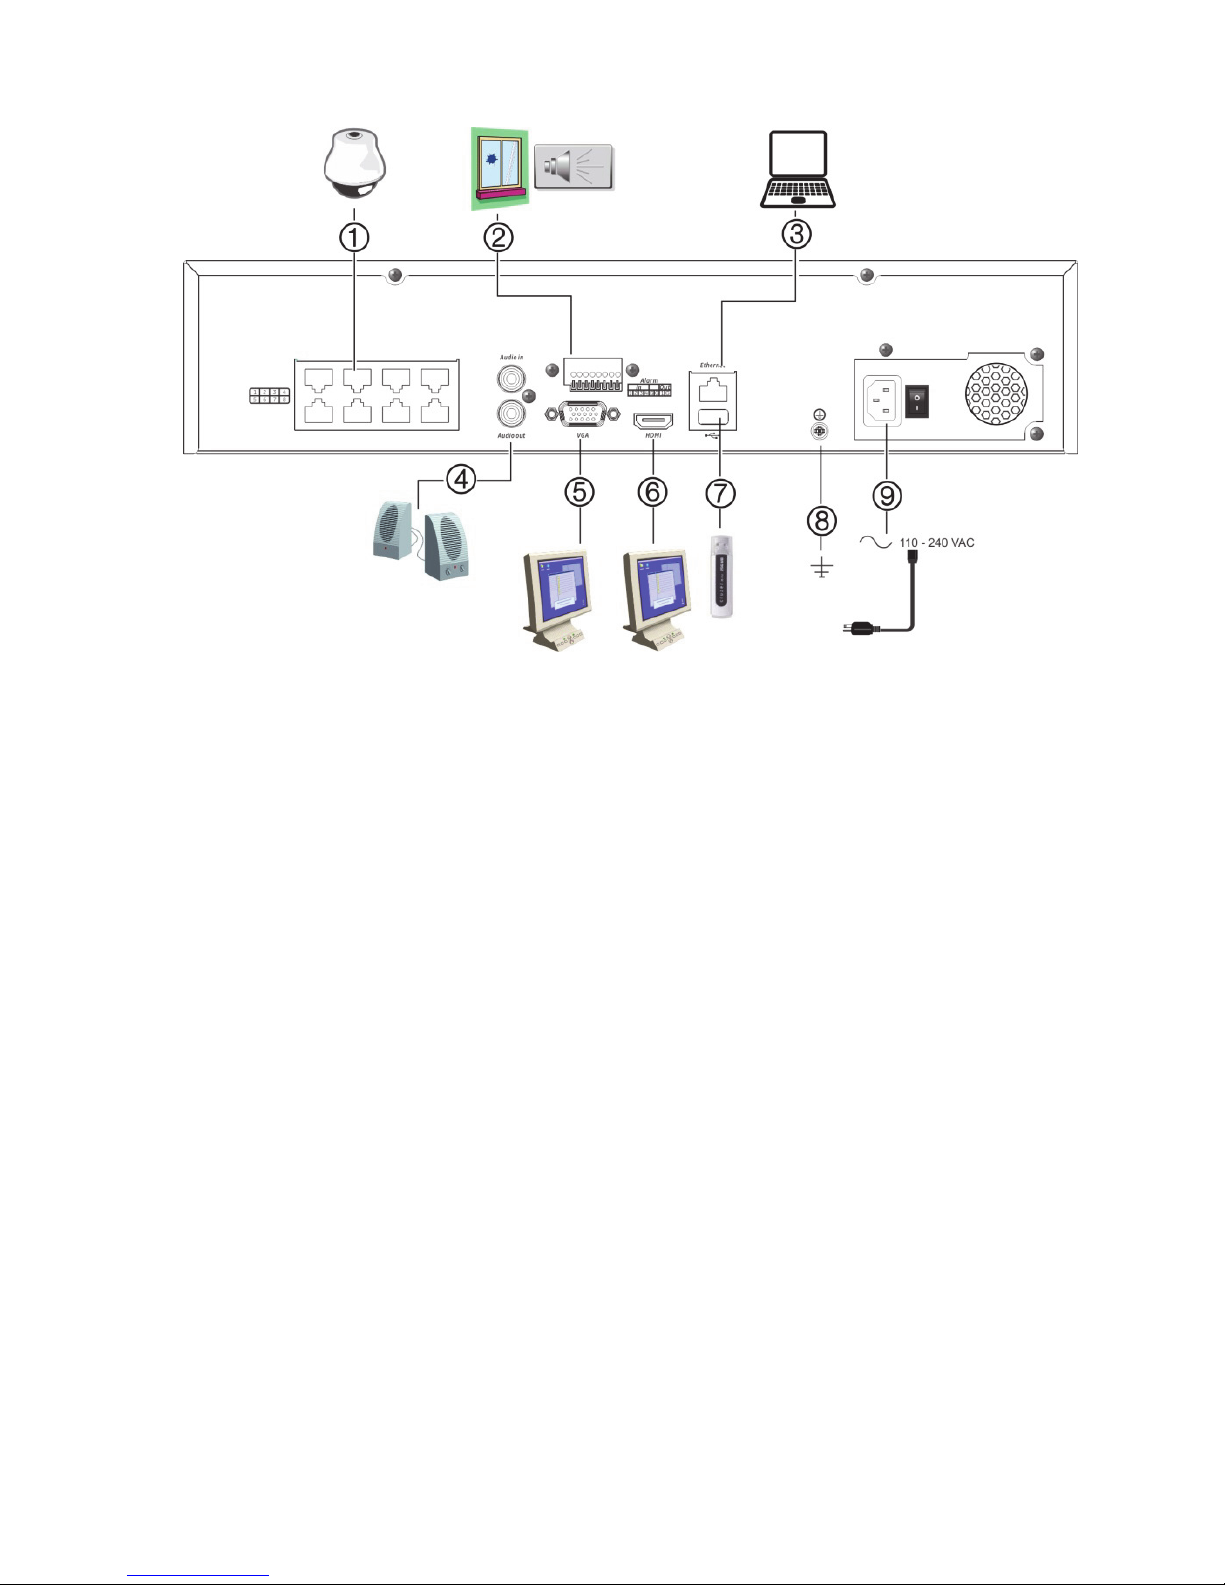
Figure 1: Back panel connections (8-channel PoE shown)
1. Embedded ports to connect up to eight IP
cameras (depending on model).
2. Connect up to four alarm inputs and one alarm
relay output.
3. Connect to a network device such as a
computer.
4. Connect to speakers for audio output.
5. Connect to a VGA monitor.
6. Connect to an HDTV. The HDMI connection
supports both digital audio and video.
7. Universal Serial Bus (USB) 3.0 port. Connect to
an additional device such as a USB mouse,
CD/DVD burner or USB HDD.
8. Connect to ground.
9. Connect to a power cord.
Page 4
2 NVR 10 Quick Start Guide
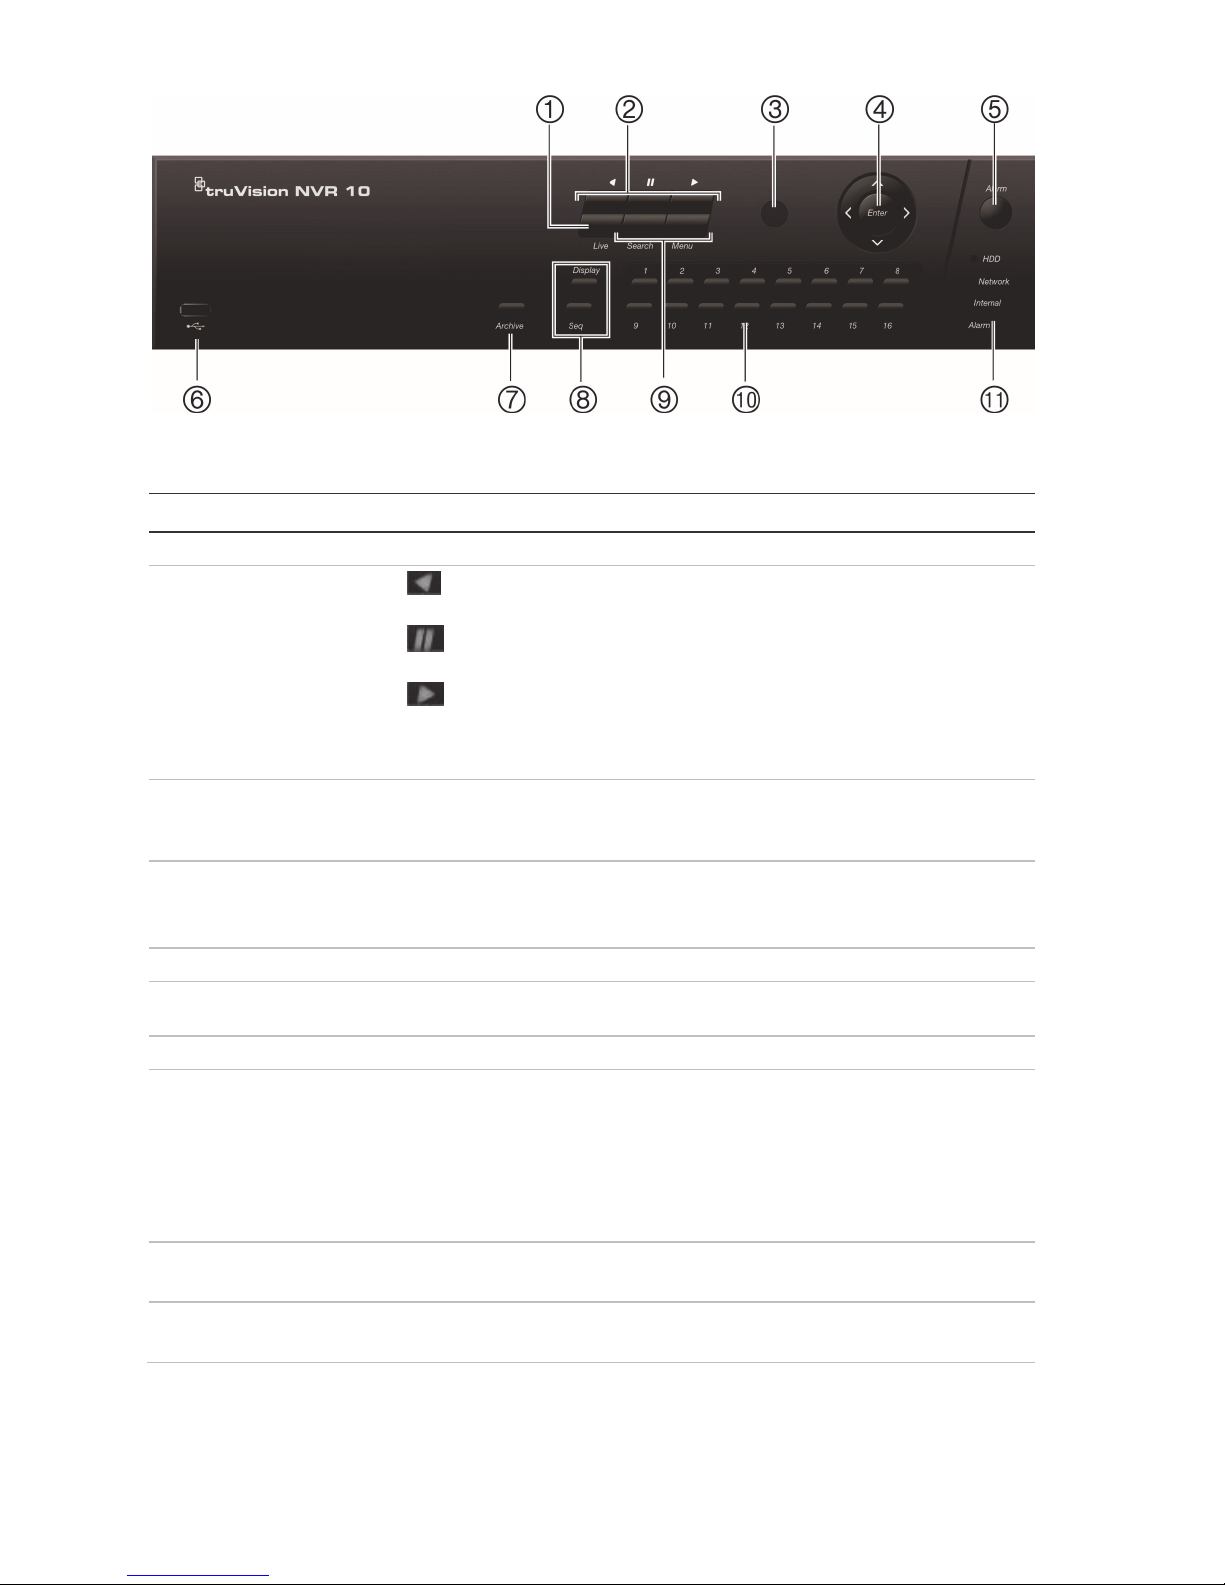
Figure 2: Front panel controls
For detailed information on all the button functions, please refer to the user manual.
Name Description
1. Live view button Switch to live view mode.
2. Playback buttons
Reverse: In live view mode, use to play back the earliest video. In
playback mode, playback a camera in the reverse direction.
Pause: In live view, freeze the last image of the live display for all
active cameras displayed. In playback mode, stop playback.
Play: In live view mode, play all-day playback of the current camera
(upper-left video tile if in multiview mode). In playback mode, play back a
camera in the forward direction. In search mode, play back a selected video
or view a snapshot.
3. IR receiver Receiver for IR remote.
To connect the remote control to the NVR, press the Device button, enter
the device address, and press Enter.
4. Direction The DIRECTION buttons are used to navigate between different fields and
items in menus.
Enter button The ENTER button is used to confirm selection in any of the menu modes.
5. Alarm button Use to manually acknowledge an alarm.
6. USB Interfaces Universal Serial Bus (USB) ports for additional devices such as a USB
mouse, CD/DVD burner, and USB Hard Disk Drive (HDD).
7. Archive button Press once to enter quick archive mode. Press twice to start archiving.
8. Display buttons Display: In multiview mode, toggle through the various multiviews (full,
quad, 1+5, 1+7, 9, and 16).
In HDD information mode and user management mode delete a selected
item. In PTZ mode, delete a selected key point. In Log Search mode, display
the details of a log file in Log Search result.
Seq: In Live View mode, start/stop sequencing cameras on the current
monitor.
9. Menu and Search
buttons
Menu: Enter/exit the main menu.
Search: In live view, enter the advanced search menu.
10. Numeric buttons Switch between different cameras in live, PTZ control or playback modes.
Enter numerals 0 to 9 when using the virtual keyboard.
Page 5

NVR 10 Quick Start Guide 3
Name Description
11. Status LEDs HDD: HDD indicator blinks red when data is being read from or written to the
HDD. A steady red light indicates an HDD exception or error.
Network: Flashing green indicates a normal network connection. No light
indicates that the NVR is not connected to any network.
Internal: Green indicates the NVR is working correctly. Red indicates a fault
Alarm: Red indicates that there is a sensor AlarmIn or another alarm such
as motion or tampering.
Package contents
The TruVision NVR 10 (model TVN 10) is
shipped with the following items:
• IR (infrared) remote control
• Two AAA batteries for the remote
control
• AC power cords (US, Europe, UK)
• USB mouse
• NVR
• CD with software and manuals
• TruVision NVR 10 Quick Start Guide
• TruVision NVR 10 Operator Guide (on
CD)
• TruVision NVR 10 User Manual (on CD)
Installation environment
Refer to the user manual for detailed
information, but observe these important
requirements:
• Place the unit in a secure location.
• Ensure that the unit is in a wellventilated area.
• Do not expose the unit to rain or
moisture.
Quick install
Recommended steps for setting up the
NVR:
1. Connect all the devices required to the
back panel of the NVR. See Figure 1 on
page 1.
Basic connections:
Connect monitor A to the BNC, VGA or
HDMI output. Connect the mouse to the
USB port in the front panel.
Optional connections:
All the other connections shown are
optional and depend upon installation
requirements.
2. Connect the power cord to the unit and
turn on the power.
3. Set up the unit with the required
settings using the setup wizard.
First-time use
The NVR has an express installation wizard
that lets you easily configure basic NVR
settings when first used. It configures all
cameras simultaneously. The configuration
can then be customized as required.
By default, the setup wizard will start once
the NVR has loaded. The wizard walks you
through some of the more important
settings of your NVR. Select the preferred
language for the system and then enter the
administrator password. The default admin
password is 1234. It is strongly
recommended that this password is
changed.
The wizard will then guide you through the
menus to set the time and date, network
configuration, HDD management, and
recording configuration.
When all the required changes have been
entered, click Finish to exit the wizard. The
NVR is now ready to use. Recording starts
automatically.
Page 6
4 TVN 10 Quick Start Guide
Operating the TVN 10
There are several ways to control the unit:
• Front panel
• IR remote control
• Mouse
• Web browser
Front panel
The buttons on the front panel control most
functions. See Figure 2 on page 2 for the
locations of the controls. Refer to the user
manual for a detailed description of the
button functions.
IR remote control
The IR remote control buttons are similar to
those on the front panel. Place the two AAA
batteries in the remote control.
To connect the remote control to the NVR,
press the Device button, enter the device
address, and press Enter.
To connect the remote control to the
NVR:
1. Press Menu on the front panel or right-
click the mouse and select Menu. The
main menu screen appears.
2. Select Display Mode Settings >
Monitor.
3. Check and remember NVR device
address value. The default value is 255.
The device address is valid for all IR
controls.
4. On the remote control, press the
Device button.
5. Enter the device address value. It must
be the same as that on the TVN 10.
6. Press ENTER on the remote or front
panel.
USB mouse
The USB mouse provided with the TVN 10
operates all the functions of the NVR, unlike
the front panel, which has limited
functionality. The mouse lets you navigate
and make changes to settings in the user
interface.
Connect the mouse to the NVR by plugging
the mouse USB connector into the USB
port on the front panel. The mouse is
immediately operational and the pointer
should appear.
Web browser control
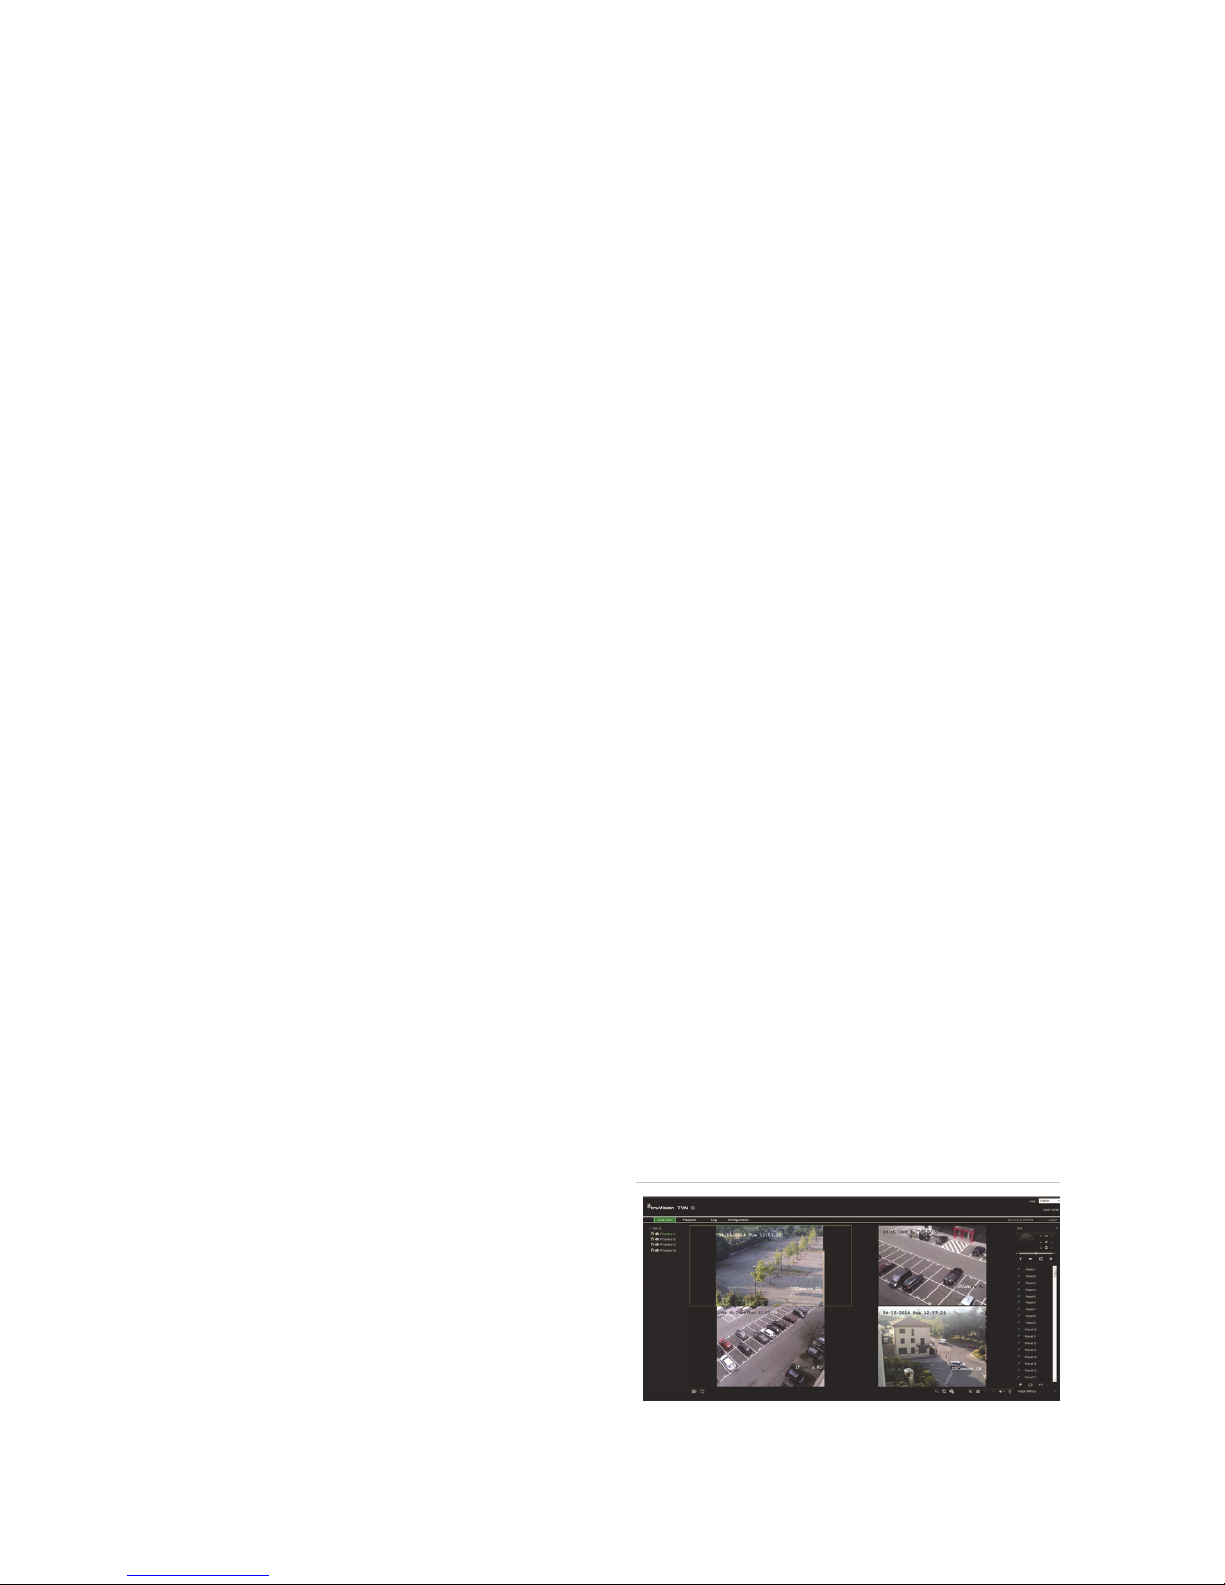
The TVN 10 web browser lets you view,
record, and play back videos as well as
manage all aspects of the NVR from any
PC with Internet access. The browser’s
easy-to-use controls give you quick access
to all NVR functions. See Figure 3 below.
To access the unit, open a web browser
and enter the IP address assigned to the
NVR as a Web address. In the login screen,
enter the default user ID and password:
• User ID: admin
• Password: 1234
The default values for TVN 10 network
settings are:
• DHCP: Disabled by default.
• IP address - 192.168.1.82
• Subnet mask - 255.255.255.0
• Gateway address - 192.168.1.1
• Ports:
When using the browser:
RTSP port: 554
HTTP port: 80
When using TruNav:
RTSP port: 554
Server/Client software port : 8000
Figure 3: Web browser interface
Page 7
TVN 10 Quick Start Guide 5
Live view mode
Live mode is the normal operating mode of
the unit where you watch live pictures from
the cameras.
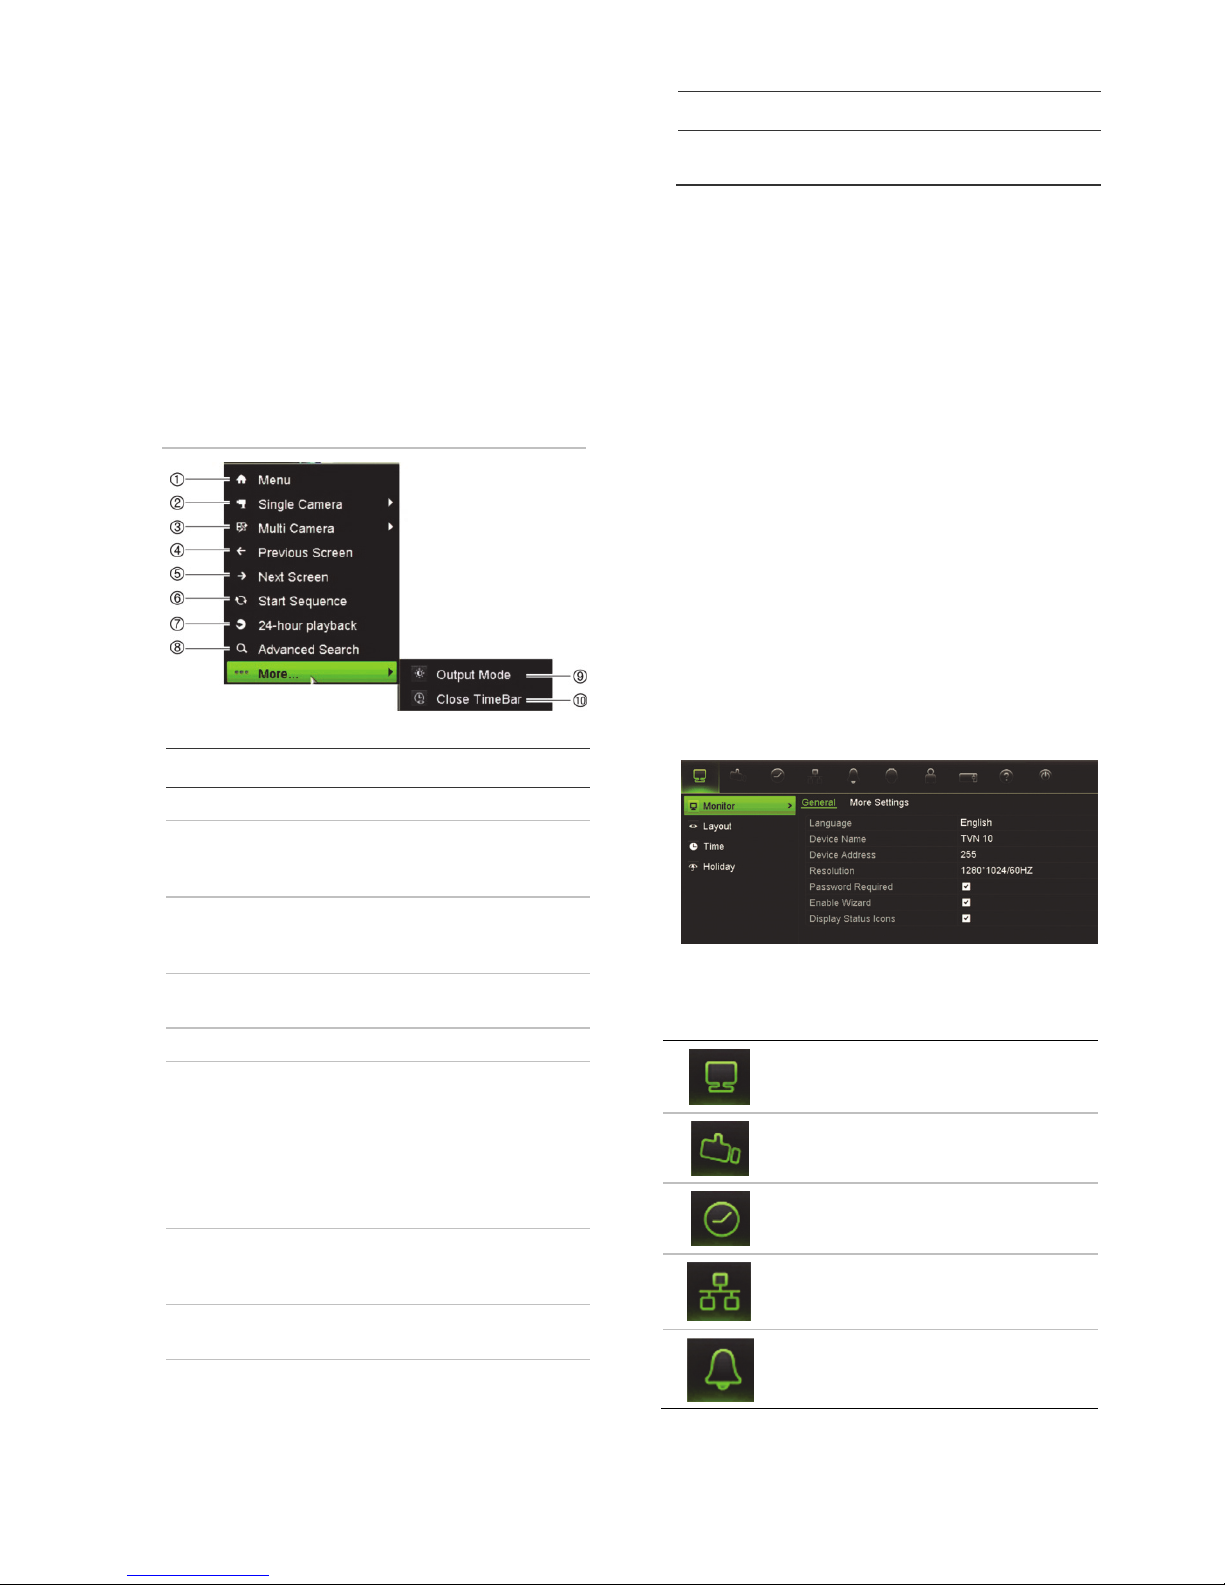
Regularly used functions in live view can be
quickly accessed by clicking the right-button
of the mouse on the camera image. The
mouse menur appears. See Figure 4 and
Table 1 below for a description of the
functions available.
Figure 4: The mouse menu for the main
monitor
Table 1: Mouse menu
Name Description
1. Menu Enter the Main menu.
2. Single
Camera
Switch to a full-screen view
for the selected camera from
the dropdown list.
3. Multi Camera Switch between the different
multiview options from the
dropdown list.
4. Previous
Screen
Displays the previous
camera.
5. Next Screen Displays the next camera.
6. Start
Sequence
Turn on sequence mode.
The screen automatically
sequences between
cameras.
Go to Menu > Display Mode
Settings > Layout > Dwell
Time to set up.
7. 24-hour
Playback
Playback the recorded video
of the current day from the
selected camera.
8. Advanced
Search
Enter the advanced video
search menu.
9. Output Mode Select Standard, Bright, Soft,
or Vivid mode to display.
Name Description
10. Close
Timebar
Open/close the time bar.
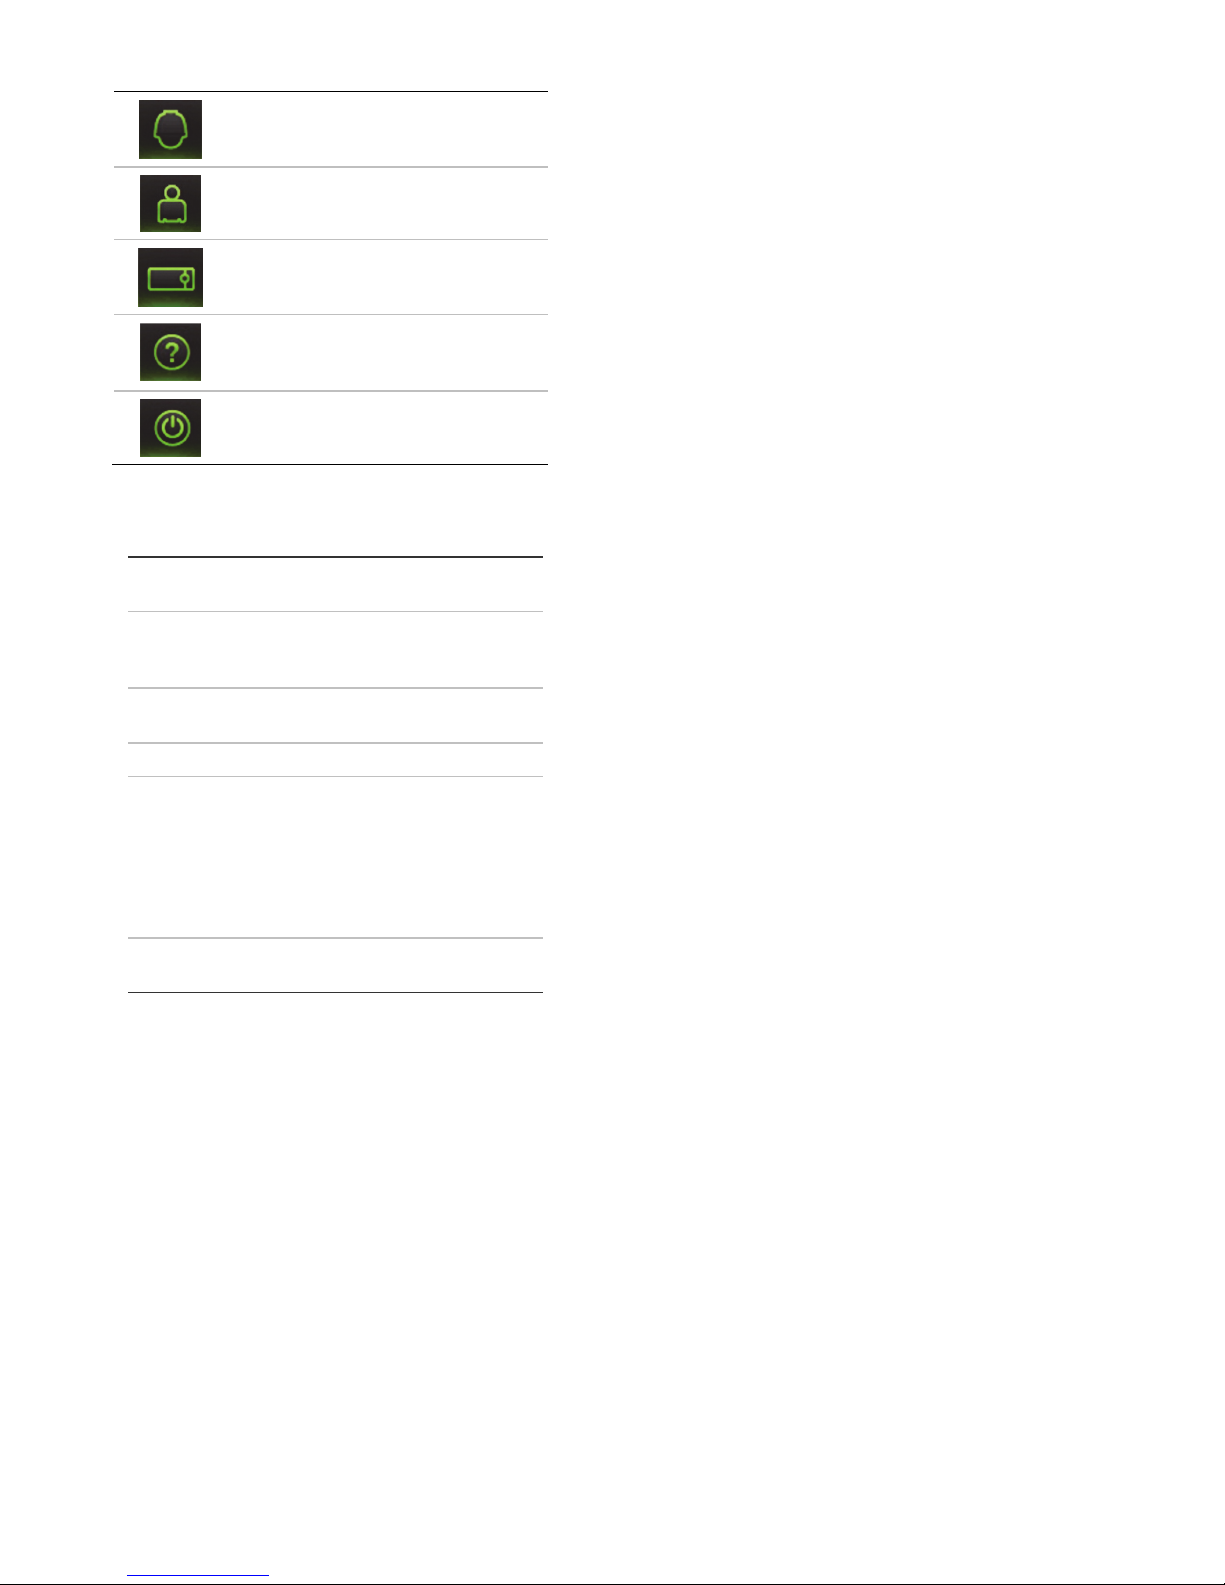
Configuring the TVN 10
The NVR has an icon-driven menu structure
that allows you to configure the unit’s
parameters. Each command icon displays a
screen that lets you edit a group of settings.
Most menus are available only to system
administrators.
Refer to the NVR user manual for detailed
information on configuring the unit.
To access the main menu from live view:
Press the Menu button on the remote
control or front panel
- Or -
Right-click the mouse and select Menu
from the pop-up menu.
The main menu screen appears. Move the
mouse over a command icon in the menu
toolbar and click to select it.
Description of the command icons in the
menu toolbar:
Configures display settings.
Configures camera settings.
Configures recording settings.
Configures standard network
settings.
Configures alarm settings.
Page 8
6 TVN 10 Quick Start Guide
Configures PTZ settings.
Configures user settings.
Configures system settings.
Provides reference information to
the various toolbars and menus
within the interface.
Provides access to logout, reboot,
and shutdown options.
Specifications
Power supply 100 to 240 VAC,
6.3 A, 50 to 60 Hz
Power
consumption
(without HDD)
<= 45 W
Operating
temperature
-10 to +55 ºC
(50 to 131 °F)
Relative humidity 10 to 90%
Dimensions
(W x D x H)
TVN: (with front panel)
362 × 332 × 79 mm
(14.25 × 13.07 × 3.11 in.)
TVNc: (with front panel)
315 × 236.5 × 47.5 mm
(12.4 × 9.3 × 3.11 in.)
Weight ≤ 8 kg (≤ 17.6 lb.)
(without HDD)
Contact information
For contact information, see
www.interlogix.com, or
www.utcfssecurityproducts.eu
 Loading...