

Page 1

TVM-1700 / TVM-1900 / TVM2200 Monitors User Manual
EN User Manual
DE Benutzerhandbuch
ES Manual de usuario
FR Manuel d’utilisation
IT Manuale dell'utente
NL Gebruikershandleiding
PL Instrukcja obsługi
PT Manual do Utilizador
RU Руководство пользователя
TR Kullanıcı Kılavuzu
P/N 1079200B-Multilingual • REV 1.0 • ISS 23FEB12
Page 2

A
Copyright
© 2012 UTC Fire & Security. All rights reserved
Trademarks and patents
Interlogix, TruVision brands and logos are trademarks of
UTC Fire & Security.
Other trade names used in this document may be trademarks
or registered trademarks of the manufacturers or vendors of
the respective products..
Manufacturer
UTC Fire & Security Americas Corporation, Inc.
2955 Red Hill Avenue, Costa Mesa, CA 92626-5923, USA
uthorized EU manufacturing representative:
UTC Fire & Security B.V.
Kelvinstraat 7, 6003 DH Weert, The Netherlands
Certification
N4131
FCC compliance
Class A: This equipment has been tested and found to comply
with the limits for a Class A digital device, pursuant to part 15
of the FCC Rules. These limits are designed to provide
reasonable protection against harmful interference when the
equipment is operated in a commercial environment. This
equipment generates, uses, and can radiate radio frequency
energy and, if not installed and used in accordance with the
instruction manual, may cause harmful interference to radio
communications. Operation of this equipment in a residential
area is likely to cause harmful interference in which case the
user will be required to correct the interference at his own
expense.
ACMA compliance
Notice! This is a Class A product. In a domestic environment
this product may cause radio interference in which case the
user may be required to take adequate measures.
Canada
This Class A digital apparatus complies with Canadian ICES-
003.
Cet appareil numérique de la classe A est conforme à la norme
NMB-0330 du Canada.
European Union directive
2004/108/EC (EMC directive): Hereby, UTC Fire & Security
declares that this device is in compliance with the essential
requirements and other relevant provisions of Directive
2004/108/EC.
2002/96/EC (WEEE directive): Products marked with this
symbol cannot be disposed of as unsorted municipal waste in
the European Union. For proper recycling, return this product to
your local supplier upon the purchase of equivalent new
equipment, or dispose of it at designated collection points. For
more information see: www.recyclethis.info.
Contact information
For contact information see: www.interlogix.com or
www.utcfssecurityproducts.eu.
Page 3

EN
Content
Important safeguards 1
Introduction 2
Features 2
Assembling the monitor 2
Assembling the monitor 2
Connections 3
Front panel controls 3
Control panel (TVM-1700/TVM-1900 model) 3
Control panel (TVM-2200 model) 4
Changing a monitor parameter 4
Hot keys 4
Adjustment procedure 5
OSD function 5
VGA menu (HDMI) 5
CAM menu 6
Self-diagnosis 8
Removing the monitor stand 8
Attaching the monitor stand 8
Troubleshooting 9
Specifications 10
TVM-1700/TVM-1900 models 10
TVM-2200 models 11
Factory preset timings 12
TVM-1700/TVM-1900 models 12
TVM-2200 models 13
Important safeguards
1. Installation cautions:
• Do not block any ventilation openings.
• Always ensure that the monitor is located in
a well-ventilated area to prevent the unit
from overheating.
• Only use accessories specified by the
manufacturer or those sold with the product.
• Avoid operating or placing the monitor in the
following environments: extremes of
temperatures, both hot and cold; high
humidity; direct sunlight; excessively dusty
surroundings; avoid close proximity to other
equipment that generates a strong magnetic
field
2. Water and moisture: Do not use this appliance
near water. To reduce the risk of fire or electric
shock, do not expose this unit to rain or
moisture.
3. Power cord and power cord protection:
Power cords should be routed so that they not
likely to be walked on or pinched. Pay particular
attention to the location of cords and plugs,
convenience receptacles, and the point of exit
from the appliance.
4. Product care: Do not touch the screen directly
with fingers. The oils from your skin may leave
marks on the surface of the screen, which are
difficult to be removed and may damage the
screen permanently. Do not apply pressure to
the screen.
5. Cleaning: Clean only with a dry cloth.
6. Servicing: Do not attempt to service this unit
yourself. Opening or removing covers may
expose you to dangerous voltage or other
hazards. Refer all servicing to qualified service
personnel.
7. Lightning: For added protection during a
lighting storm or when this unit is left
unattended and unused for long periods of time,
unplug the unit from the wall outlet and
disconnect the cable system. This will prevent
damage to the unit due to lightning and power
line surges.
8. Mains plug (2 pin/3 pin):
• Do not remove the grounding or earth
connection from the power supply / mains
plug.
• Always remember to unplug the monitor
from the power supply under the following
User Manual 1 EN
Page 4
circumstances if the monitor will not be used
for a long period of time, if the power supply
cable or plug/connector is damaged or if the
monitor housing is damaged or broken.
CAUTION: Do not attempt to dismantle this
product. Any attempt to dismantle or remove the
covers from this product will invalidate the warranty
and may also result in serious injury.
Introduction
This manual explains how to correctly install,
operate and get the best performance from your
monitor. Please read this user manual carefully
before installing your monitor then keep it near your
monitor for quick reference.
First, please check that the contents of the box
correspond with the following checklist:
• LCD monitor
• Power cord
• AC adaptor
• User manual
If any item is missing or damaged, please contact
your dealer. Please keep the box and packing
materials so that you may properly store or
transport your monitor.
Features
The monitor is designed for use in a small work
area or for those who need more work space on
the desk.
The convenient and user-friendly on-screen
display allows for easy and accurate
adjustments of screen size, position and screen
color.
The monitor complies with the VESA Display
Data Channel (DDC) specification for Plug and
Play compatibility. Advanced microcircuitry
makes setup and configuration fast and
effortless.
The monitor features Advanced Color Controls
for fine-tuning to meet your own personal tastes
or application requirements. Use the on-screen
controls to adjust the color temperature,
RGB gain value for the best possible screen
color and intensity.
Press the Menu button and activate the Self-
Diagnosis menu to determine whether your
monitor is functioning normally, not receiving a
signal or is receiving a signal that is out of
scanning range.
Activate the higher refresh rates of the monitor
to stabilize the screen and eliminate the
annoying flicker that contributes to eye-strain
and headaches.
The monitor supports the optimal display
performance with 1280 x 1024 @ 75 Hz (TVM1700/TVM-1900 Model) and 1680 x 1050 @
60 Hz (TVM-2200 Model).
The monitor can be connected to various types
of video devices with supporting video input
signals like Composite video (CVBS), Separate
video.
The internal stereo speakers make the end user
enjoy audio sound.
Assembling the monitor
The monitors are designed for use on a desktop.
The arm of the monitor stand is shipped pre-
installed on the monitor.
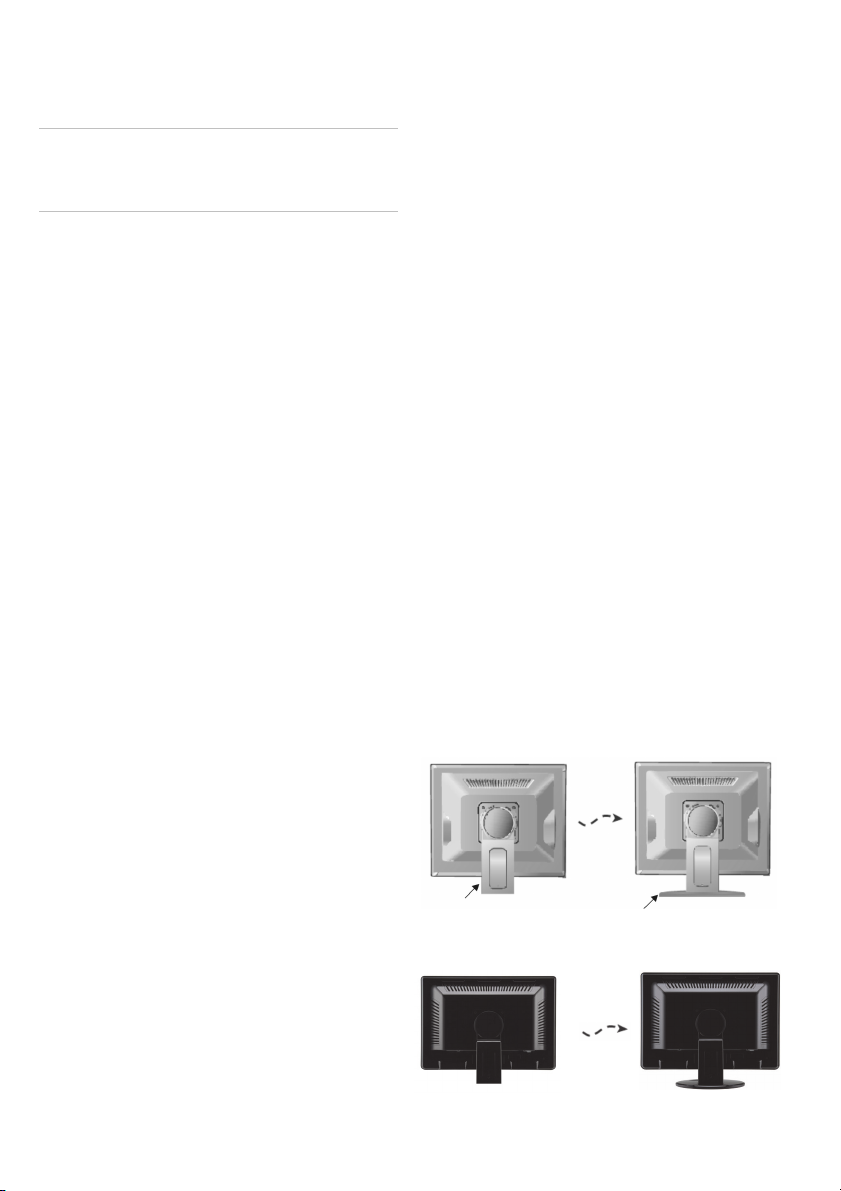
Assembling the monitor
1. Put a smooth pad or cloth on a level surface.
Place the monitor on it facing downwards.
2. Insert the arm of the monitor stand of the
monitor into the pedestral foot provided.
TVM-1700/TVM-1900 models
Arm of the monitor stand Pedestral foot
TVM-2200
model
EN 2 User Manual
Page 5
Disassembling the monitor
1. Put a smooth pad or cloth on a level surface.
Place the monitor on it facing downwards.
2. Using a screwdriver or a similar object with a
sharp end, carefully detach the supporting arm
from the foot by pressing the groove on the
back of the supporting arm. (Note that the
fixation point can be broken if too much force is
applied).
TVM-1700/TVM-1900 models
TVM-2200
model
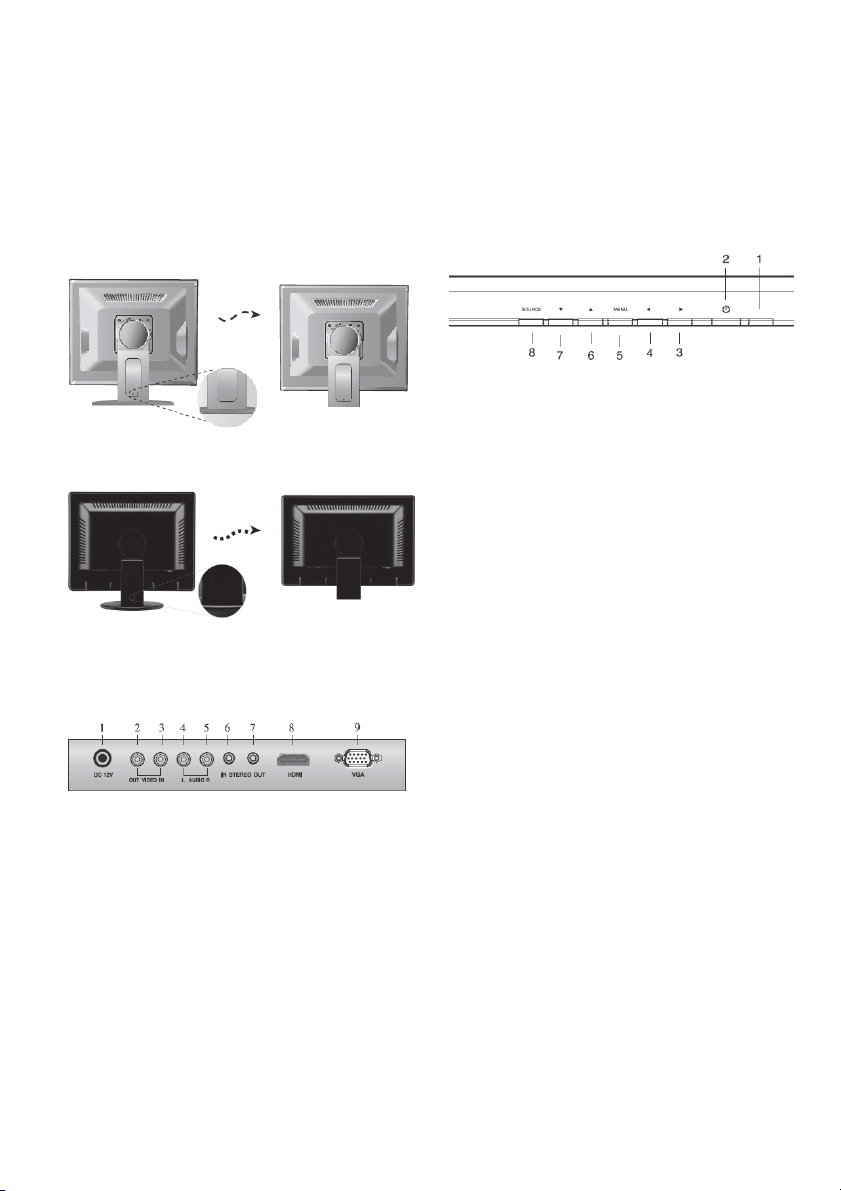
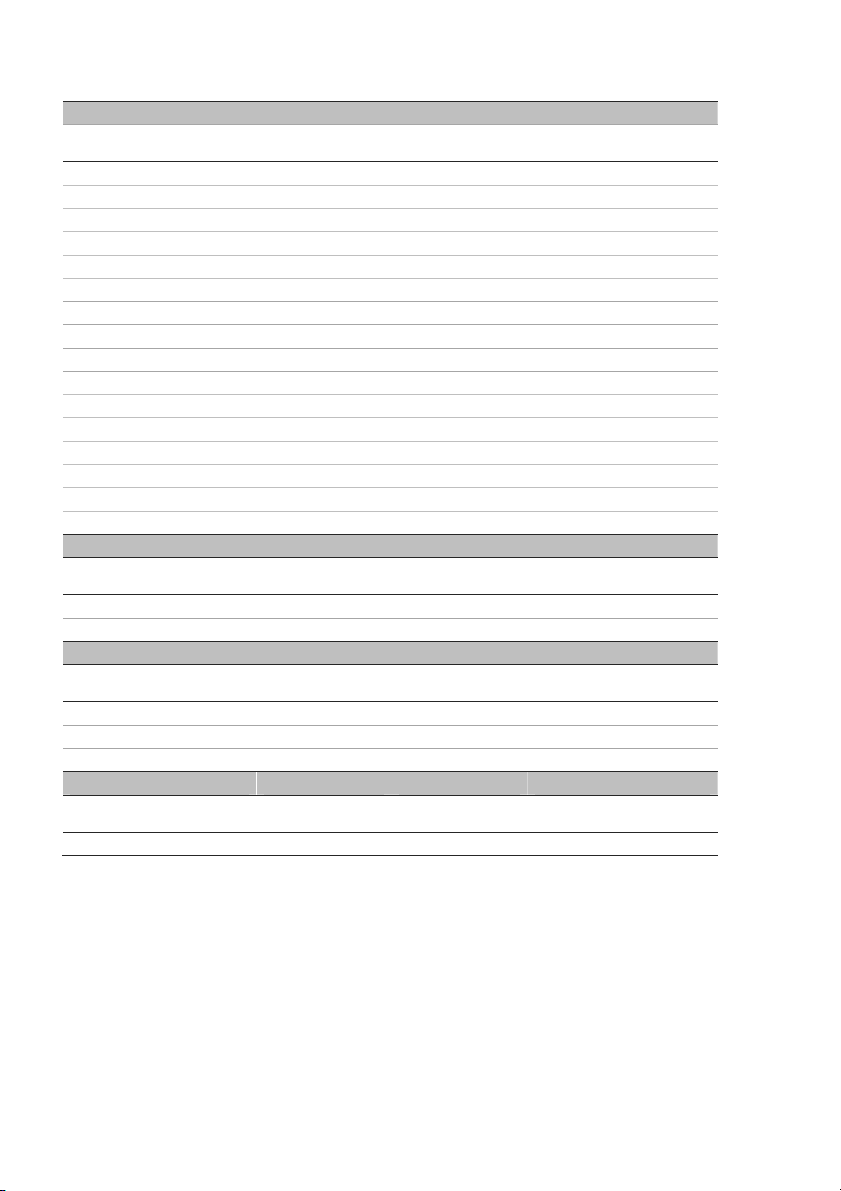
Connections
1. DC 12V Input
2. VIDEO OUT Composite signal output
3. VIDEO IN
Composite signal input.
4. AUDIO L
Audio signal input left.
5. AUDIO R
Audio signal input right.
6. PC Stereo Input
7. Head Phone Out
8. HDMI
HDMI signal input.
9. VGA
RGB signal input.
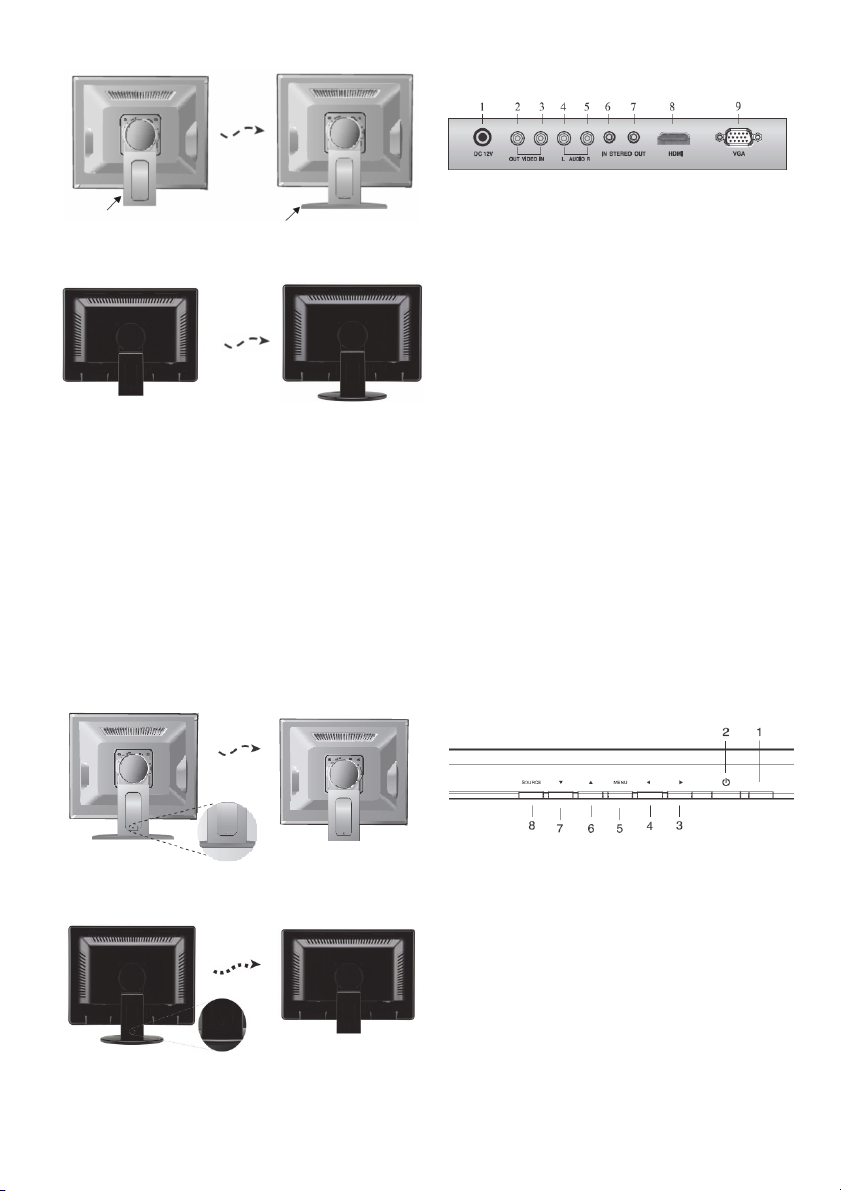
Front panel controls
Control panel (TVM-1700/TVM-1900
models)
1 POWER Indicator
Shows both normal operation and power
management status with power LED.
2 POWER
Switches the monitor on and off.
3
Right Arrow - Volume (*)
Selects menu.
Primary Function: Used to increase the volume.
Secondary Function: Moves cursor to the right
in the OSD (On-Screen Display) window and
increases the value of any selected menu.
4
Left Arrow - Volume (*) Selects menu
Primary Function: Used to decrease the
volume.
Secondary Function: Moves cursor to the left in
the OSD window and decreases the value of
any selected menu.
5 MENU
Turns the OSD window on. Turns the OSD
window off and moves from sub menu to top
menu in the OSD window.
6
Up Arrow - Auto Adjustment (*)
Primary Function: Automatically adjusts the
display to the most optimal setting
possible.(VGA mode only)
Secondary Function: Allows for vertical scrolling
in the OSD menu and to increase the value of
the selected menu function.
7
Down Arrow
Allows for vertical scrolling in the OSD menu,
and to decrease the value of the selected
submenu function.
8 SOURCE (*)
Used to select from different input sources.
User Manual 3 EN
Page 6
Press the UP or DOWN arrow to scroll through
the available sources, and press LEFT or
RIGHT arrow to confirm selection.
(*) = Hot key
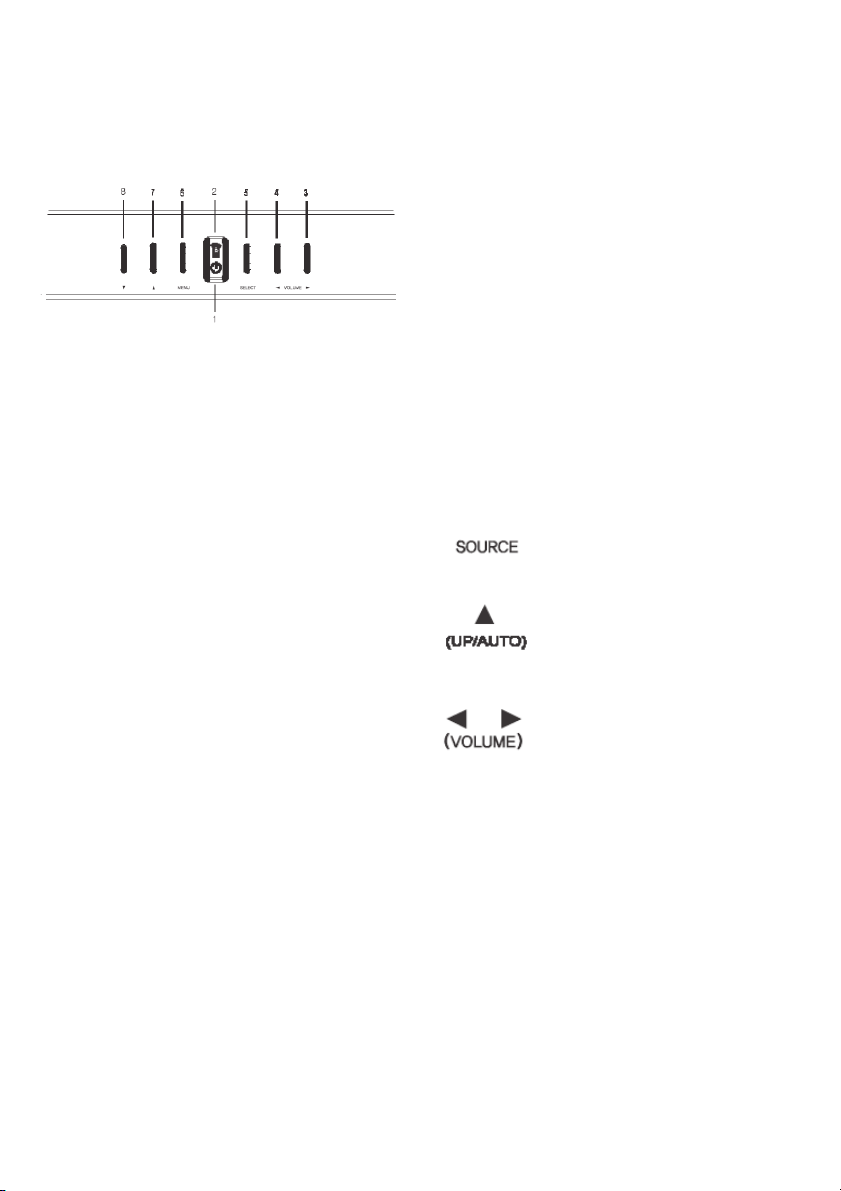
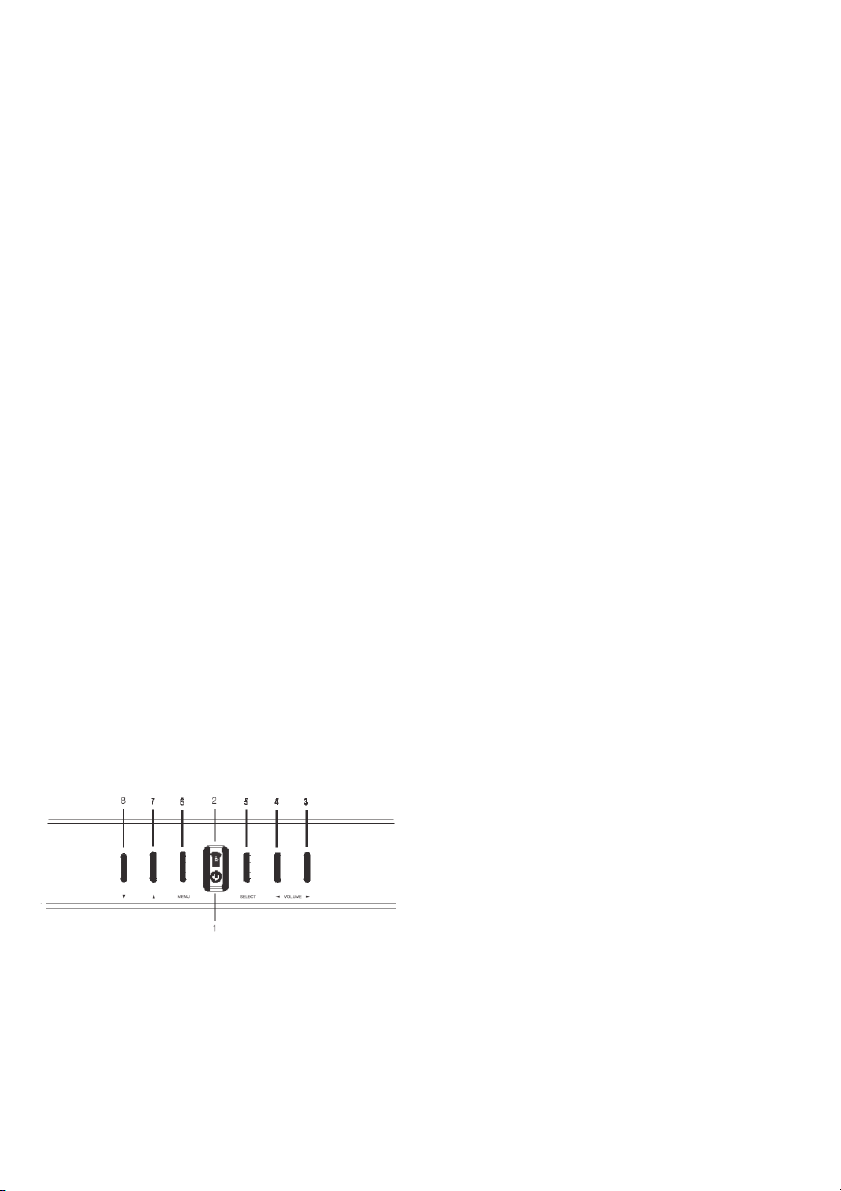
Control panel (TVM-2200 model)
1. POWER Indicator
Shows both normal operation and power
management status with power LED.
POWER Button
Switches the monitor on and off.
2. Sensor window
Remote control. Receives signal from the
remote controller.
3. VOLUME
Selects the menu.
Primary Function: Used to increase the volume.
Secondary Function: Moves cursor to the right
in the OSD window and increases the value of
any selected menu.
VOLUME (*)
4.
Selects the menu.
Primary Function: Used to DECREASE the
volume.
Secondary Function: Moves cursor to the Left in
the OSD window and decreases the value of
any selected menu.
5. SELECT Button (*)
Used to select from different input sources.
Press the UP or DOWN arrow to scroll through
the available sources, and press LEFT or
RIGHT arrow to confirm selection.
6. MENU Button
Turns the OSD window on. Turns the OSD
window off and moves from sub menu to top
menu in the OSD window.
7.
Up Button
Primary Function: Choose automatically the
proper horizontal position and vertical position
and size of the screen image.(PC mode)
(*)
Secondary Function: Allows for vertical scrolling
in the OSD menu, and to INCREASE the value
of the selected menu function.
8 Button ( * )
Allows for Vertical scrolling in the OSD Menu,
and to DECREASE the value of the selected
submenu function.
Changing a monitor parameter
1. Press the MENU button on the front panel to
obtain the OSD menu screen.
2. Use Left-Right buttons to select the menu.
3. Use Down button to select the submenus.
4. Use Up-Down buttons to select a submenu
function.
5. Press SOURCE button, then using left-right
buttons you can make adjustments as
necessary
6. To exit, press MENU.
Hot keys
Selects signal in order. VGA
- HDMI - CAM
When there is no OSD, if
you press this
button, you can use the best
display performance fit for a
current mode
When there is no OSD, you
can adjust the volume
directly
▲ (UP/AUTO)
EN 4 User Manual
Page 7
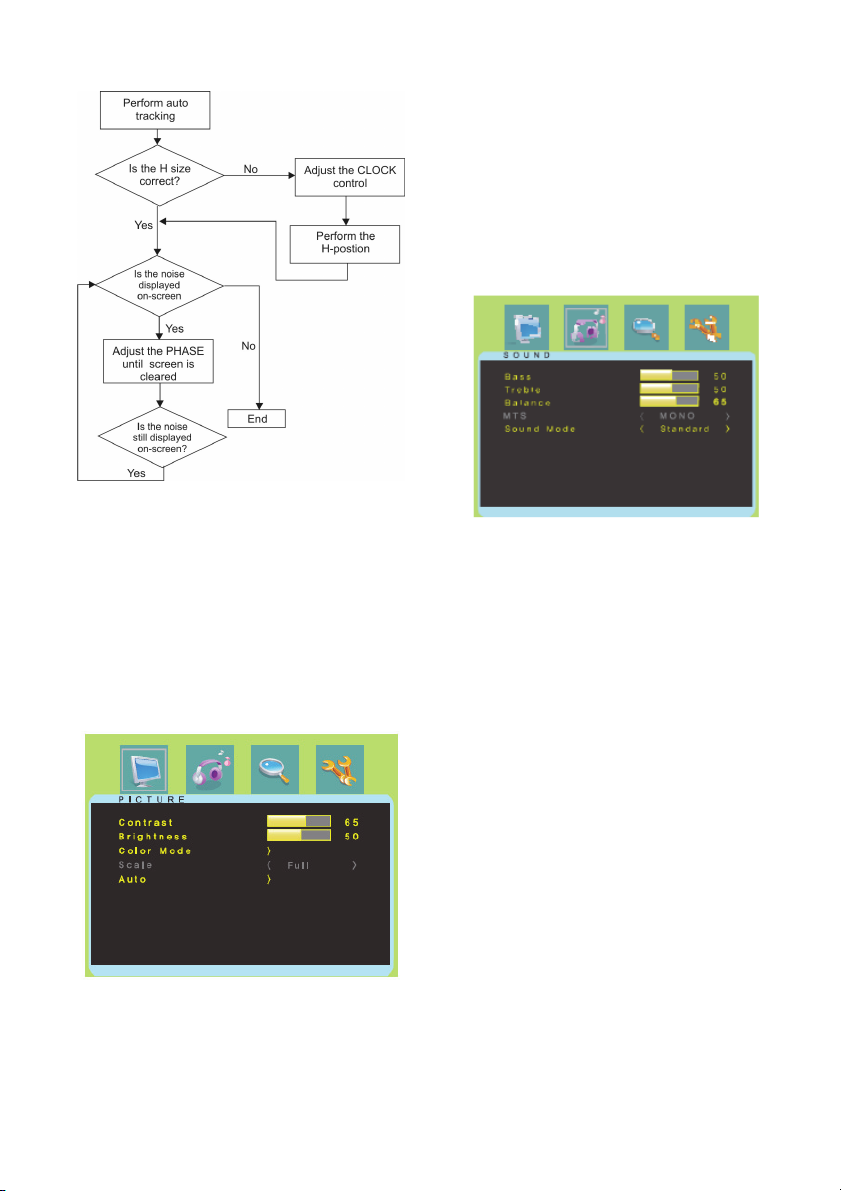
Adjustment procedure
3. Color Mode
Choose a different preset color temperatures or
set your own customized color parameters.
(Normal/Warm/Cool/User)
4. Scale
Select the screen size (HDMI mode only)
5. Auto
Choose automatically the proper horizontal
position and vertical position and size of the
screen image. (VGA mode only)
Sound
OSD function
Configure the monitor using the onscreen display
(OSD) menus and submenus. Changes are
immediately saved and implemented.
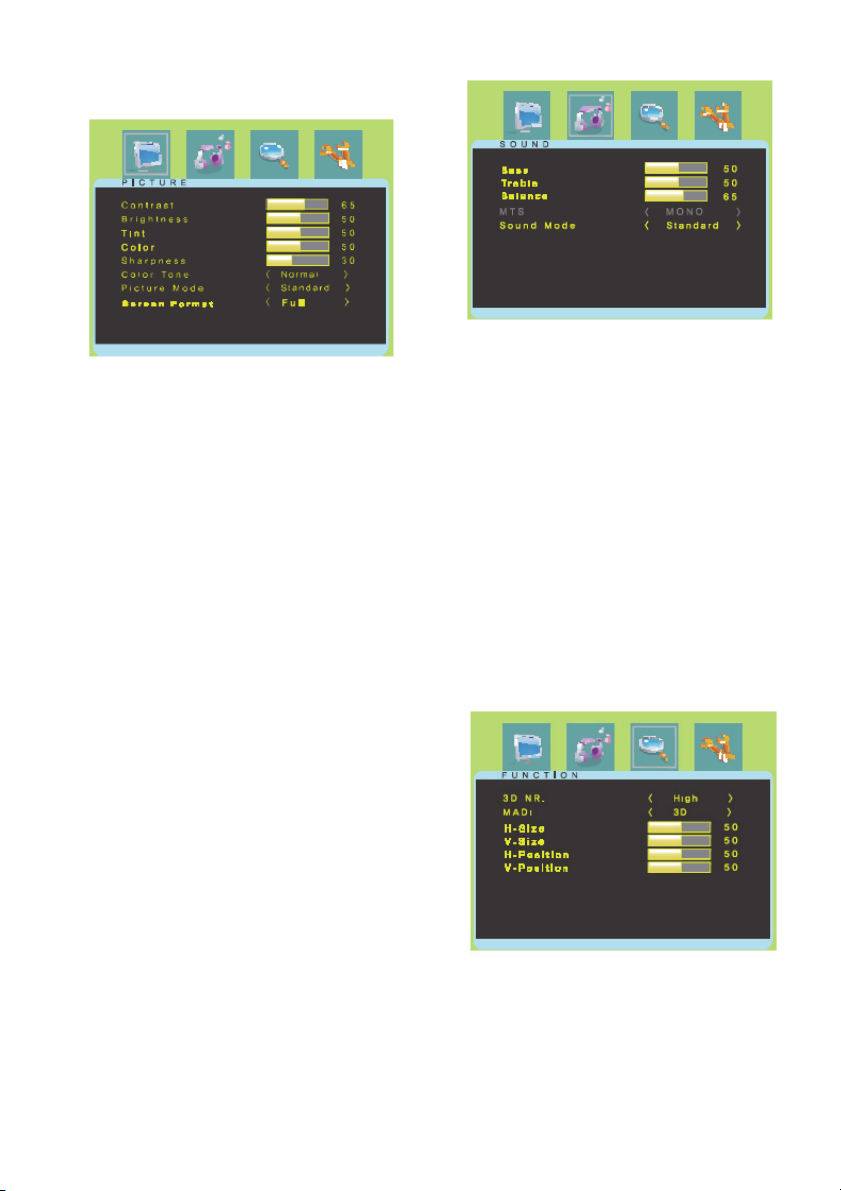
VGA menu (HDMI)
Picture
1. Contrast
Adjust the contrast of image, the difference
between light and dark areas on the screen.
2. Brightness
Adjust the brightness of the image.
1. Bass
When you select the user mode, adjust the
bass sound.
2. Treble
When you select the user mode, adjust the
treble sound.
3. Balance
Adjust the sound balance of the left and right
speakers.
4. MTS
Not used
5. Sound Mode
Choose a different preset sound mode or your
own customized sound. (Standard/ Movie/
Music/ User)
User Manual 5 EN
Page 8
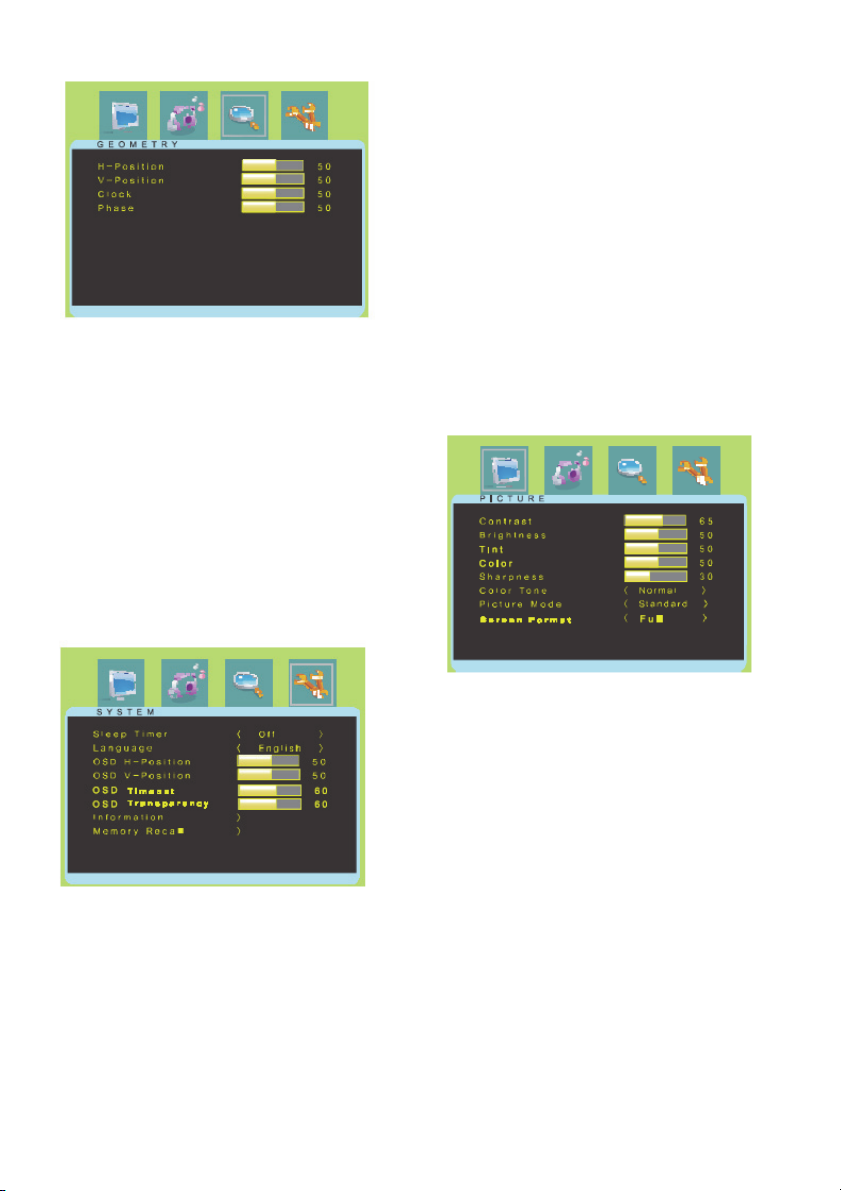
Geometry
1. H-Position
Adjust the position of the display horizontally
(left or right).
2. V-Position
Adjust the position of the display vertically (up
or down).
3. Clock
Adjust the width (horizontal size) of the screen
image.
4. Phase
Remove any horizontal noise and clear or
sharpen the image of the characters.
4. OSD V-Position
Adjust the OSD position of the Display vertically
(up or down).
5. OSD Timeout
Adjust the display of the OSD menu (5 to 60
seconds).
6. OSD Transparency
Adjust the OSD. Transparency
7. Information
Shows the status of the current Display
settings.
8. Memory Recall
Reset the screen to the factory preset display
settings.
CAM menu
Picture
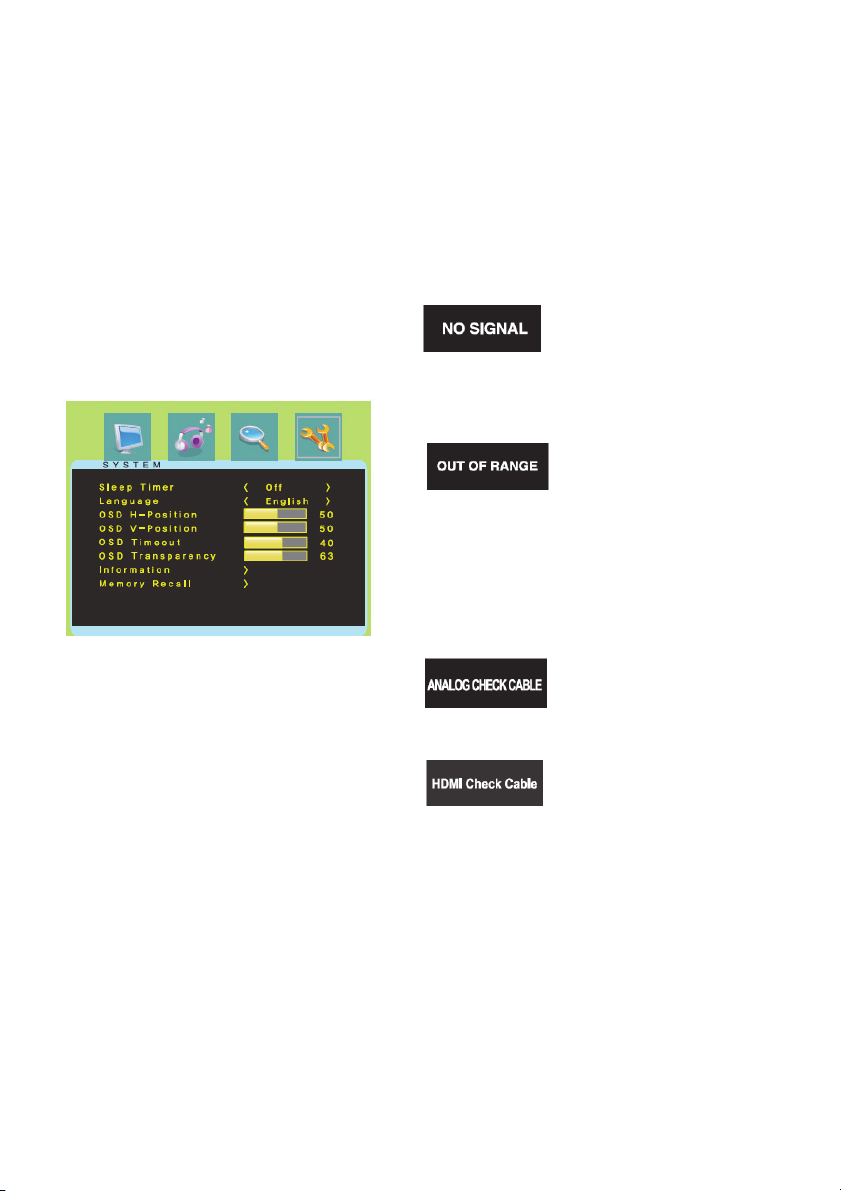
System
1. Contrast
Adjust the contrast of image, the difference
between light and dark areas on the screen.
2. Brightness
Adjust the brightness of the image.
3. Tint
Adjust the Tint of image.
4. Color
1. Sleep Timer
Select time to turn off the monitor.
(Off/15/30/45/60 Minutes)
2. Language
Select language for OSD. (English/German)
3. OSD H-Position
Adjust the OSD position of the display
horizontally (left or right).
Adjust Color of image.
5. Sharpness
Adjust the display image quality (if the screen
proceed to scaling up).
6. Color Tone
Choose different preset color temperatures or
set your own customized color parameters
(Normal/Warm/Cool).
7. Picture Mode
Select the picture mode
(Standard/Movie/Dynamic/User).
EN 6 User Manual
Page 9
8. Screen Format
(Full/Zoom1/Zoom2/Subtitle/4:3/panorama)
Sound
1. Bass
When you select the user mode, adjust the
bass sound.
2. Treble
When you select the user mode, adjust the
treble sound.
3. Balance
Adjust the sound balance of the left and right
speakers.
4. MTS
Not used.
5. Sound Mode
Choose different preset sound mode or your
own customized sound
(Standard/Movie/Music/User).
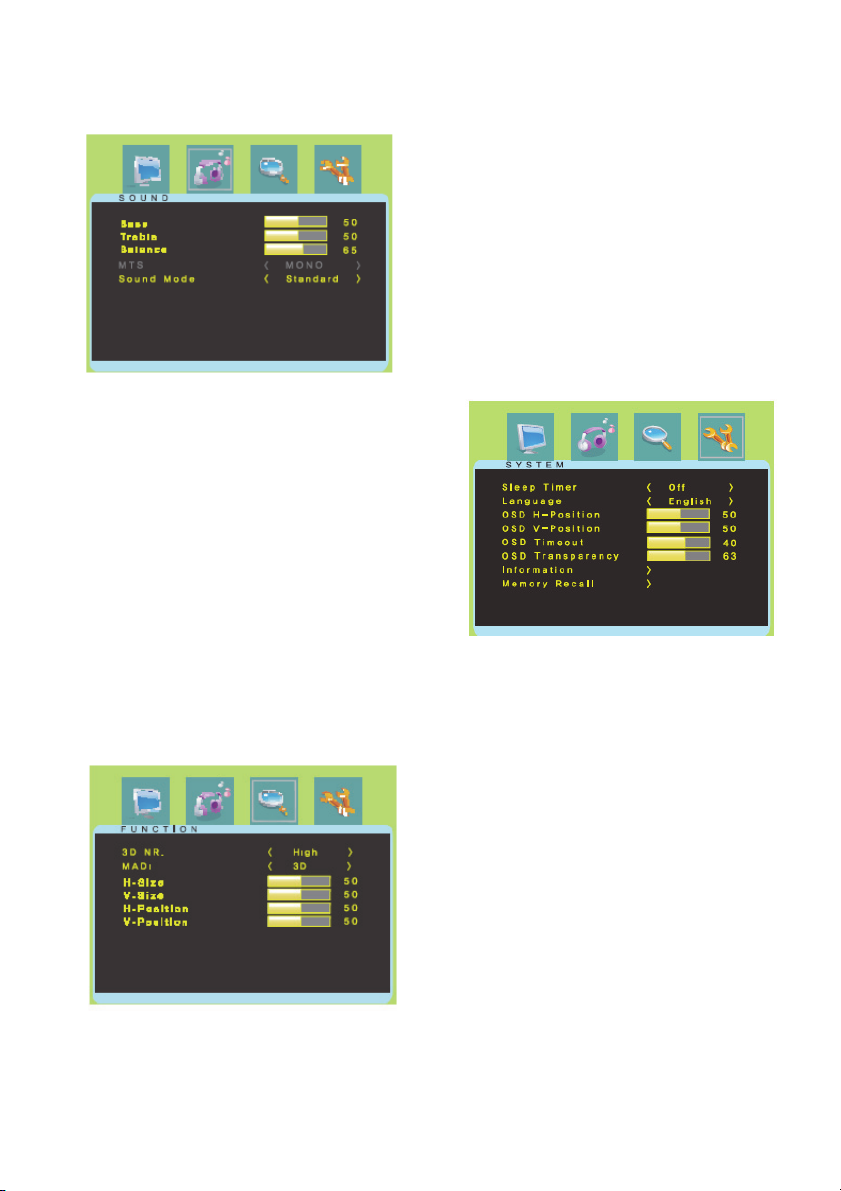
Function
1. 3D NR
Reduce the noise in the picture due to poor
reception or poor picture quality (Off/ Low/
Middle/ High).
2. MADi
Select advanced color engine for automatic
picture enhancement (2D/3D).
3. H-Size
Adjust the width (horizontal size) of the screen
image.
4. V-Size
Adjust the height (vertical size) of the screen
image.
5. H-position
Adjust the position of the display horizontally
(left or right).
6. V-position
Adjust the position of the display vertically (up
or down).
System
1. Sleep Timer
Select time to turn off the monitor
(Off/15/30/45/60 minute).
2. Language
Select language for OSD (English/German).
3. OSD H-Position
Adjust the OSD position of the Display
horizontally (left or right).
4. OSD V-Position
Adjust the OSD position of the Display vertically
(up or down).
5. OSD Time out
Adjust the display OSD Menu (5 to60 seconds).
6. OSD Transparency
Adjust the OSD transparency.
7. Information
Shows the status of the current Display
settings.
8. Memory Recall
Reset the screen to the Factory Preset Display
settings.
User Manual 7 EN
Page 10
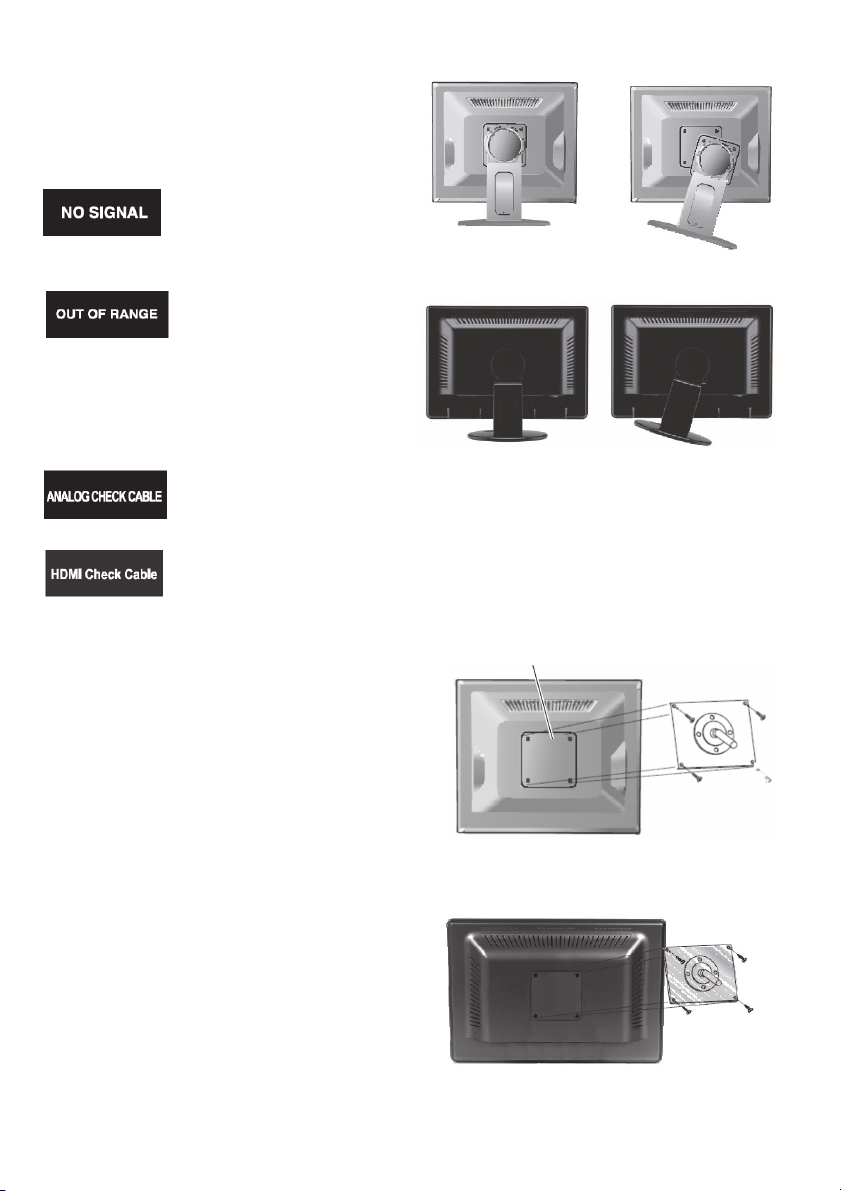
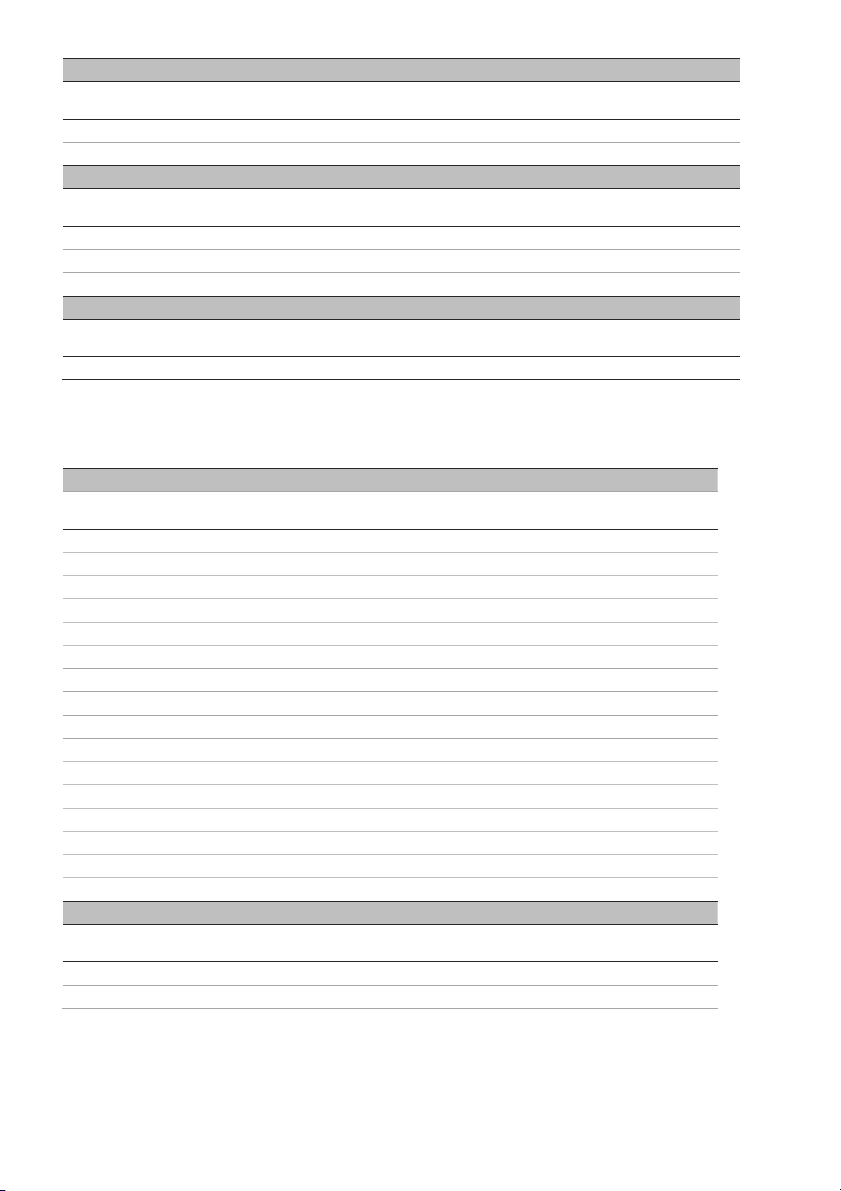
Self-diagnosis
If there is no image, the Self-Diagnosis screen will
be displayed. The self-diagnosis function checks if
the status of the monitor screen is No Signal, Out
of Range or None Supported.
No Signal screen is displayed
when the D- Sub signal
connector is connected but
the status of the monitor is on
DPMS mode.
Out of Range screen is
displayed when the applied
frequency is under or over
normal range.
Normal range (Non-interlaced
mode only):
H: 30 to 80 kHz
V: 56 to 77 Hz
Check that the cable screen
is displayed when the analog
signal cable is disconnected.
Check that the cable screen
is displayed when the HDMI
signal cable is disconnected.
TVM-1700/TVM-1900 models
TVM-2200 model
Attaching the monitor stand
Tighten the screws at the locations indicated by
arrows shown in the figures above. See pictures
below.
TVM-1700/TVM-1900 models
Monitor stand attached here
Removing the monitor stand
1. Turn off the monitor and unplug the power
cable.
2. Place a cushion or a soft cloth on the floor and
put the monitor on it with the front of the monitor
facing the floor.
3. Detach the rear cover of the monitor stand with
a screwdriver.
4. Remove the four screws connecting the stand
and monitor body. See pictures below.
EN 8 User Manual
TVM-2200 model
Face of monitor
stand arm
Page 11

The monitor’s installation surface is compatible with
other types of VESA standard stands.
Hole spacing: 100 x 100 mm
Screw length: 8 to12 mm
Troubleshooting
Symptom Check
Picture is jittery Adjust Clock to set the
No picture Check if the power switch
POWER LED is
not lit
Image is unstable Check if the signal cable is
Image is not
centered, too small
or too large
screen position and adjust
Clock value carefully until a
noise is no longer
displayed.
and computer power switch
are in the On position
Check if the signal cable is
correctly connected to the
video card.
Check if the pins of D subconnector are not bent.
Check if the computer is in
the power- saving mode.
Check if power switch is in
the On position.
Check if the power cord is
correctly connected.
suitable to the video card
Adjust Clock or H&V
Center to get the proper
image.
Symptom Check
Picture bounces or
a wave pattern is
present in the
picture
Picture is blurred Adjust Contrast and
No sound Check the audio cables are
Low sound Adjust the volume on the
VIDEO screen
cannot be seen
No video Check if the video cable is
Poor color in the
video
Grainy picture in
the video
Keep the devices that may
cause electrical interference
away from the monitor.
See the FCC information at
the front cover of the
manual.
Brightness.
correctly connected to the
computer.
Adjust the volume after
checking the sound is
muted.
Check the audio system in
the computer.
OSD menu.
Adjust the volume of the
sound card in the computer.
Check if PICTURE mode
has been set.
Check if the video terminal
is properly connected.
correctly connected to the
computer and set to
Functions on the OSD
picture menu.
Adjust the Color or Tint
values on the OSD Picture
menu.
Adjust the Sharpness on
the OSD Picture menu.
User Manual 9 EN
Page 12

Specifications
TVM-1700/TVM-1900 models
Items TVM-1700 model TVM-1900 model
Panel Screen size 17 in. (43.2 cm) 19 in. (48.3 cm)
Pixel pitch 0.264 x 0.264 mm 0.294 x 0.294 mm
View angle (H/V) 170°/160° 170°/160°
Contrast ratio 1000:1 (typ) 1000:1 (typ)
Response time 5 ms 5 ms
Brightness 250 cd/m² (typ) 250 cd/m² (typ)
Recommended
resolution
Audio Speaker power 2 W x 2 2 W x 2
Speakers Built-in Built-in
Sound features Stereo R/L Stereo R/L
Interface VGA in (15 Pin D-
Power Consumption < 30 W < 30 W
Special feature Filter type 3D comb filter,
Dimensions W x H x D (without
Weight Net (without stand) 3.1 kg (6.8 lb.) 4.3 kg (9.5 lb.)
VESA mount
Specifications
Hole patterns
Operating
temperature
The specifications can change without any notice.
The panel may have some defective pixels (ex. slightly light or dark) due to a characteristic of
the panel. But there is no defect in your panel product itself.
Sub)
HDMI in 1 1
CAM in/out 1/1 1/1
Audio in (RCA type) 1 1
PC stereo in Yes Yes
Head phone out Yes Yes
Source 12 VDC 12 VDC, 3.33 A
stand)
W x H x D (with stand) 383 x 386 x 202 mm
W x H x D (box) 421 x 155 x 426 mm
Net (with stand) 3.8 kg (8.4 lb.) 5 kg (11.0 lb.)
Gross (box) 5.3 kg (11.1 kg) 6.6 kg (14.6 lb.)
VESA standard 100 x 100 mm
Spacing screw size M4 screw M4 screw
Length 8.00 mm 8.00 mm
0 to 40 °C (32 to 104 °F)
1280 x 1024 @ 75 Hz 1280 x 1024 @ 75 Hz
1 1
deinterlacing
365 x 321 x 60 mm
15.08 x 12.64 x 2.36 in.
15.08 x 15.20 x 8.00 in.
16.57 x 6.10 x 16.77 in.
(3.94 x 3.94 in.)
3D comb filter,
deinterlacing
427 x 357 x 57 mm
16.81 x 14.06 x 2.24 in.
427 x 415 x 202 mm
16.81 x 16.34 x 7.95 in.
452 x 146 x 449 mm
17.80 x 5.75 x 17.68 in.
100 x 100 mm
(3.94 x 3.94 in.)
EN 10 User Manual
Page 13

TVM-2200 models
Items TVM-2200 model
Panel Screen size 22 in. (55.9 cm)
Pixel pitch 0.282 x 0.282 mm
View angle (H/V) 170°/160°
Contrast ratio 1000:1 (typ)
Response time 5 ms
Brightness 250 cd/m² (typ)
Recommended resolution 1680 x 1050 @ 60 Hz
Audio Speaker power 2 W x 2
Speakers Built-in
Sound features Stereo R/L
Interface VGA in (15 Pin D-Sub) 1
HDMI in 1
Cam in/out 1/1
Audio in (RCA type) 1
PC stereo in Yes
Head phone out Yes
Power Consumption < 50 W
Source 12 VDC, 5 A
Special feature
Dimensions
Filter type 3D comb filter, deinterlacing
W x H x D (without stand) 523 x 367 x 66 mm
W x H x D (with stand) 523 x 419 x 202 mm
W x H x D (box) 464 x 186 x 550 mm
20.59 x 14.45 x 2.60 in.
20.59 x 16.50 x 7.95 in.
18.27 x 7.32 x 21.65 in.
Weight Net (without stand) 5.4 kg (11.9 lb.)
Net (with stand) 6.1 kg (13.4 lb.)
Gross (box) 7.7 kg (17.0 kg)
VESA mount
Specifications
Hole patterns
Operating
temperature
VESA standard 100 x 100 mm
(3.94 x 3.94 in.)
Spacing screw size M4 screw
Length 8.00 mm
0 to 40 °C (32 to 104 °F)
The specifications can change without notice.
The panel may have some defective pixels (ex. slightly light or dark) due to a characteristic of
the panel. But there is no defect in your panel product itself.
User Manual 11 EN
Page 14
Factory preset timings
TVM-1700/TVM-1900 models
Mode Resolution
VGA 640 x 480 @ 60 Hz 31.5 60 Non-interlaced
VGA 640 x 480 @ 72 Hz 37.9 72 Non-interlaced
VGA 640 x 480 @ 75 Hz 37.5 75 Non-interlaced
SVGA 800 x 600 @ 56 Hz 35.2 56 Non-interlaced
SVGA
SVGA
SVGA
XGA 1024 x 768 @ 60 Hz 48.4 60 Non-interlaced
XGA 1024 x 768 @ 70 Hz 56.5 70 Non-interlaced
XGA 1024 x 768 @ 75 Hz 60.0 75 Non-interlaced
SXGA 1152 x 864 @ 75 Hz 67.5 75 Non-interlaced
SXGA 1280 x 960 @ 60 Hz 60.0 60 Non-interlaced
SXGA 1280 x 1024 @ 60 Hz 64.0 60 Non-interlaced
SXGA 1280 x 1024 @ 75 Hz 80.0 75 Non-interlaced
Mode Resolution
EGA 640 x 350 @ 70 Hz 31.5 70 Non-interlaced
DOS 720 x 400 @ 70 Hz 31.3 70 Non-interlaced
Mode Resolution
VGA 640 x 480 @ 67 Hz 35.0 67 Non-interlaced
SVGA 832 x 624 @ 75 Hz 49.7 75 Non-interlaced
SXGA 152 x 870 @ 75 Hz 68.7 75 Non-interlaced
Mode Resolution
SXGA 1280 x 1024 @ 70 Hz 74.4 70 Non-interlaced
The LCD monitor has only non-interlaced modes without flicker.
(dots X line)
800 x 600 @ 60 Hz 37.9 60 Non-interlaced
800 x 600 @ 72 Hz 48.1 72 Non-interlaced
800 x 600 @ 75 Hz 46.9 75 Non-interlaced
(dots X line)
(dots X line)
(dots X line)
VESA modes
H freq. (kHz) V freq. (Hz) Remark
IBM modes
H freq. (kHz) V freq. (Hz) Remark
MAC modes
H freq. (kHz) V freq. (Hz) Remark
MAC modes
H freq. (kHz) V freq. (Hz) Remark
EN 12 User Manual
Page 15
TVM-2200 models
VESA modes
Resolution
(dots Xlines)
H freq. (KHz) V freq. (Hz) Remark
640 x 480 @ 60 Hz 31.5 60 Non-interlaced
640 x 480 @ 72 Hz 37.9 72 Non-interlaced
640 x 480 @ 75 Hz 37.5 75 Non-interlaced
800 x 600 @ 56 Hz 35.2 56 Non-interlaced
800 x 600 @ 60 Hz 37.9 60 Non-interlaced
800 x 600 @ 72 Hz 48.1 72 Non-interlaced
800 x 600 @ 75 Hz 46.9 75 Non-interlaced
1024 x 768 @ 60 Hz 48.4 60 Non-interlaced
1024 x 768 @ 70 Hz 56.5 70 Non-interlaced
1024 x 768 @ 75 Hz 60.0 75 Non-interlaced
1280 x 1028 @ 60 Hz 64.0 60 Non-interlaced
1280 x 1028 @ 75 Hz 804.0 75 Non-interlaced
1152 x 864 @ 75 Hz 67.5 75 Non-interlaced
1280 x 960 @ 60 Hz 60.0 60 Non-interlaced
1440 x 900 @ 60 Hz 55.935 60 Non-interlaced
1680 x 1050 @ 60 Hz 65.290 60 Non-interlaced
IBM modes
Resolution
(dots Xlines)
H freq. (KHz) V freq. (Hz) Remark
640 x 350 @ 70 Hz 31.5 70 Non-interlaced
720 x 400 @ 70 Hz 31.3 70 Non-interlaced
MAC modes
Resolution
(dots Xlines)
H freq. (KHz) V freq. (Hz) Remark
640 x 480 @ 67 Hz 35.0 67 Non-interlaced
832 x 624 @ 75 Hz 49.7 75 Non-interlaced
152 x 870 @ 75 Hz 68.7 75 Non-interlaced
MAC modes
Resolution
(dots Xlines)
H freq. (KHz) V freq. (Hz) Remark
1280 x 1024 @ 70 Hz 74.4 70 Non-interlaced
The LCD Monitor has only Non-interlaced modes without flicker
User Manual 13 EN
Page 16

EN 14 User Manual
Page 17

DE
Wichtige
Sicherheitsvorkehrungen
Inhalt
Wichtige Sicherheitsvorkehrungen 1
Einführung 2
Merkmale 2
Montage des Monitors 2
Montage des Monitors 2
Anschlüsse 3
Bedienelemente an der Vorderseite 3
Steuerelemente (Modelle TVM-1700/TVM-1900) 3
Steuerelemente (Modell TVM-2200) 4
Ändern eines Monitorparameters 4
Hotkeys 5
Anpassungen vornehmen 5
OSD-Funktion 5
VGA-Menü (HDMI) 5
CAM-Menü 7
Selbsttest 8
Monitorfuß entfernen 8
Monitorfuß befestigen 9
Problemlösung 9
Technische Daten 10
Modelle TVM-1700/TVM-1900 10
Modell TVM-2200 11
Werkseinstellungen 12
Modelle TVM-1700/TVM-1900 12
Modell TVM-2200 13
Benutzerhandbuch 1 DE
1. Sicherheitshinweise für die Installation:
• Verdecken Sie nie die Lüftungsöffnungen.
• Achten Sie darauf, dass der Monitor immer
in einer gut belüfteten Umgebung steht,
damit er nicht überhitzt.
• Benutzen Sie ausschließlich Zubehör, dass
vom Hersteller empfohlen oder dass
zusammen mit dem Gerät verkauft wird.
• Achten Sie darauf, dass der Monitor am
Aufstell- oder Lagerort vor folgenden
Bedingungen geschützt ist: extremen
Temperaturen, heiß oder kalt;
hoher Luftfeuchtigkeit; direkter
Sonneneinstrahlung; übermäßig staubigen
Umgebungen; unmittelbarer Nähe zu
Geräten, die ein starkes Magnetfeld
erzeugen
2. Wasser und Feuchtigkeit: Benutzen Sie
dieses Gerät nicht in der Nähe von Wasser.
Um das Risiko eines Brands oder elektrischen
Schocks zu vermeiden, sollten Sie das Gerät
nicht Regen oder Feuchtigkeit aussetzen.
3. Sicherheitsmaßnahmen für das Stromkabel:
Stromkabel sollten so verlegt werden, dass
möglichst niemand auf sie tritt und sie nicht
eingeklemmt werden. Achten Sie auf Kabel,
Stecker, Steckdosen und auf die Austrittsstellen
der Kabel am Gerät.
4. Umgang mit dem Produkt: Berühren Sie den
Bildschirm nicht direkt mit den Fingern. Der
Talg auf der Haut kann Abdrücke auf dem
Schirm hinterlassen, die schwer zu entfernen
sind und die den Schirm dauerhaft beschädigen
können. Üben Sie keinen Druck auf den
Bildschirm aus.
5. Reinigung: Reinigen Sie das Gerät nur mit
einem trockenen Tuch.
6. Wartung: Versuchen Sie nicht, das Gerät
zu warten, sondern überlassen Sie dies
Fachleuten. Wenn Sie das Gehäuse öffnen
oder Abdeckungen entfernen, droht unter
anderem Gefahr durch hohe
Stromspannungen. Alle Servicearbeiten sind
qualifizierten Fachkräften zu überlassen.
7. Blitzeinschlag: Während eines Gewitters oder
wenn das Gerät über einen längeren Zeitraum
unbeaufsichtigt gelassen oder nicht benutzt
wird, sollten Sie es von der Wandsteckdose
und vom Kabelsystem trennen. Dadurch
Page 18

vermeiden Sie Schäden, die durch
Blitzeinschlag oder Spannungsanstiege
verursacht werden können.
8. Hauptstecker (2-polig/3-polig):
• Die Erdung darf nie von der
Stromversorgung bzw. vom Hauptstecker
entfernt werden.
• In den folgenden Fällen sollten Sie den
Monitor immer von der Stromversorgung
trennen: wenn der Monitor über einen
längeren Zeitraum nicht benutzt wird;
wenn das Stromkabel oder der Stecker
beschädigt ist; wenn das Monitorgehäuse
beschädigt ist.
ACHTUNG: Versuchen Sie nicht, dieses Gerät
in seine Bestandteile zu zerlegen. Wenn Sie
versuchen, das Gerät in seine Bestandteile zu
zerlegen oder Abdeckungen zu entfernen, erlischt
die Garantie und es drohen schwere Verletzungen.
Einführung
In diesem Handbuch wird erläutert, wie der Monitor
ordnungsgemäß installiert und verwendet wird und
wie die optimale Leistung erzielt wird. Lesen Sie
dieses Handbuch sorgfältig durch, bevor Sie Ihren
Monitor installieren, und halten Sie es zu
Referenzzwecken im Zugriff.
Prüfen Sie, ob der Verpackungsinhalt mit der
folgenden Checkliste übereinstimmt:
• LCD-Monitor
• Netzkabel
• AC-Adapter
• Bedienerhandbuch
Wenden Sie sich an Ihren Händler, falls
eines dieser Elemente fehlt oder beschädigt
ist. Bewahren Sie den Karton und das
Verpackungsmaterial auf, um den Monitor ggf.
sicher zu lagern oder zu transportieren.
Einstellung der Bildschirmgröße, -position und farbe.
Der Monitor erfüllt die VESA DDC-Spezifikation
(Display Data Channel) für Plug-and-PlayKompatibilität. Fortschrittliche Mikroschaltungen
ermöglichen ein schnelles und problemloses
Einrichten und Konfigurieren.
Über eine erweiterte Farbsteuerung ermöglicht
der Monitor eine Feineinstellung der Farben im
Hinblick auf persönliche Präferenzen oder die
Anforderungen von Anwendungen. Über die
Bildschirmregler können Sie die Farbtemperatur
anpassen.
RGB-Verstärkungswert für eine bestmögliche
Bildschirmfarbe und -intensität.
Drücken Sie die Menütaste und aktivieren Sie
das Menü für den Selbsttest, um festzustellen,
ob Ihr Monitor normal funktioniert, eventuell
kein Signal oder ein Signal außerhalb des
Abtastbereichs empfängt.
Aktivieren Sie die höheren
Aktualisierungsraten, um den Bildschirm zu
stabilisieren und das störende Flimmern zu
beseitigen, das Augen- und Kopfschmerzen
auslösen kann.
Der Monitor unterstützt die optimale
Anzeigeleistung mit 1280 x 1024 bei 75 Hz
(Modelle TVM-1700/TVM-1900) und
1680 x 1050 bei 60 Hz (Modell TVM-2200).
Der Monitor kann an diverse Videogerätetypen
angeschlossen werden, die
Videoeingangssignale wie Composite Video
(CVBS) und Separate Video unterstützen.
Die internen Stereolautsprecher sorgen für
einen angenehmen Audiosound.
Montage des Monitors
Die Monitore sind für den Einsatz auf dem
Schreibtisch ausgelegt.
Der Arm des Monitorfußes wird am Monitor
vorinstalliert ausgeliefert.
Merkmale
Der Monitor wurde für den Einsatz in einem
kleinen Arbeitsbereich entwickelt. Er kann auch
eingesetzt werden, wenn auf dem Schreibtisch
mehr Platz benötigt wird.
Das komfortable und benutzerfreundliche On-
Screen-Display ermöglicht eine exakte
DE 2 Benutzerhandbuch
Montage des Monitors
1. Legen Sie ein weiches Kissen oder ein Tuch
auf eine ebene Oberfläche. Legen Sie den
Monitor mit der Bildschirmseite nach unten
darauf.
2. Führen Sie den Arm des Monitorfußes in die
Fußhalterung ein.
Page 19
Modelle TVM-1700/TVM-1900
Arm des Monitorfußes Fußhalterung
Modell TVM-2200
Demontage des Monitors
1. Legen Sie ein weiches Kissen oder ein Tuch
auf eine ebene Oberfläche. Legen Sie den
Monitor mit der Bildschirmseite nach unten
darauf.
2. Entfernen Sie den Tragarm vorsichtig mit einem
Schraubendreher oder einem ähnlichen Objekt
mit einem scharfen Ende vom Fuß, indem Sie
auf die Nut auf der Rückseite des Tragarms
drücken. (Beachten Sie, dass die Halterung
abbrechen kann, wenn zuviel Druck ausgeübt
wird.)
Modelle TVM-1700/TVM-1900
Anschlüsse
1. 12V DC-Eingang
2. VIDEO OUT Composite-Signalausgang
3. VIDEO IN
Composite-Signaleingang.
4. AUDIO L
Audiosignaleingang links.
5. AUDIO R
Audiosignaleingang rechts.
6. PC-Stereoeingang
7. Kopfhörerausgang
8. HDMI
HDMI-Signaleingang.
9. VGA
RGB-Signaleingang.
Bedienelemente an der
Vorderseite
Steuerelemente (Modelle TVM-1700/
TVM-1900)
1 POWER (Netzanzeige)
Zeigt sowohl den Normalbetrieb als auch den
Modell TVM-2200
Benutzerhandbuch 3 DE
Strommanagementstatus über die LED-Leuchte
an.
2 POWER
Schaltet den Monitor ein bzw. aus.
3 Pfeil nach rechts - Lautstärke (*)
Auswahl der Menüs.
Hauptfunktion: Dient zur Erhöhung der
Lautstärke.
Page 20
Zweite Funktion: Bewegt den Kursor in den
rechten Bereich des OSD- (On-Screen Display)Fensters und erhöht den Wert eines
ausgewählten Menüs.
4 Pfeil nach links - Lautstärke (*)
Menüausahl
Hauptfunktion: Dient zur Verringerung der
Lautstärke.
Zweite Funktion: Bewegt den Kursor in den
linken Bereich des OSD-Fensters und reduziert
den Wert eines ausgewählten Menüs.
5 MENU
Blendet das OSD-Fenster ein. Schaltet das
OSD-Menü aus und wechselt vom Untermenü
zum Hauptmenü im OSD-Fenster.
6 Pfeil nach oben - Automatische
Anpassung (*)
Hauptfunktion: Automatische Anpassung der
Anzeige mit den optimalen Einstellungen (nur
im VGA-Modus).
Zweite Funktion: Ermöglicht das vertikale
Blättern im OSD-Menü und das Erhöhen des
Werts der ausgewählten Menüfunktion.
7 Pfeil nach unten
Ermöglicht das vertikale Blättern im OSD-Menü
und das Verringern des Werts der
ausgewählten Untermenüfunktion.
8 QUELLE (*)
Auswahl der verschiedenen Eingangsquellen.
Drücken Sie den PFEIL NACH OBEN oder
unten, um durch die verfügbaren Quellen zu
blättern, und den PFEIL NACH LINKS oder
RECHTS, um eine Auswahl zu bestätigen.
(*) = Hotkey
Steuerelemente (Modell TVM-2200)
2. Sensoröffnung
Fernbedienung. Empfängt das Signal der
Fernsteuerung.
3. VOLUME (*)
Auswahl des Menüs.
Hauptfunktion: Dient zur Erhöhung der
Lautstärke.
Zweite Funktion: Bewegt den Kursor in den
rechten Bereich des OSD-Fensters und erhöht
den Wert eines ausgewählten Menüs.
4. VOLUME (*)
Auswahl des Menüs.
Hauptfunktion: Dient zur VERRINGERUNG der
Lautstärke.
Zweite Funktion: Bewegt den Kursor in den
linken Bereich des OSD-Fensters und reduziert
den Wert eines ausgewählten Menüs.
5. SELECT-Taste (*)
Auswahl der verschiedenen Eingangsquellen.
Drücken Sie den PFEIL NACH OBEN oder
unten, um durch die verfügbaren Quellen zu
blättern, und den PFEIL NACH LINKS oder
RECHTS, um eine Auswahl zu bestätigen.
6. MENU-Taste
Blendet das OSD-Fenster ein. Schaltet das
OSD-Menü aus und wechselt vom Untermenü
zum Hauptmenü im OSD-Fenster.
7. Nach-oben-Taste
Hauptfunktion: Automatische Auswahl der
geeigneten horizontalen und vertikalen Position
und Größe der Bildschirmanzeige. (PC-Modus)
Zweite Funktion: Ermöglicht das vertikale
Blättern im OSD-Menü und das ERHÖHEN
des Werts der ausgewählten Menüfunktion.
8 Taste ( * )
Ermöglicht das vertikale Blättern im OSD-Menü
und das VERRINGERN des Werts der
ausgewählten Untermenüfunktion.
Ändern eines Monitorparameters
1. Drücken Sie auf der Vorderseite auf die Taste
MENU, um das OSD-Menü aufzurufen.
2. Wählen Sie mit den Links-/Rechts-Pfeiltasten
1. POWER (Netzanzeige)
Zeigt sowohl den Normalbetrieb als auch den
Strommanagementstatus über die LED-Leuchte
an.
POWER-Schalter
Schaltet den Monitor ein bzw. aus.
DE 4 Benutzerhandbuch
ein Menü aus.
3. Wählen Sie die Untermenüs mit der Pfeil-nachunten-Taste aus.
4. Wählen Sie eine Untermenüfunktion mit der
Pfeil-nach-oben-Taste aus.
Page 21

5. Drücken Sie die Taste QUELLE und nehmen
Sie mit den Links/Rechts-Tasten die
erforderlichen Anpassungen vor.
6. Drücken Sie zum Beenden auf MENU.
konfiguriert. Änderungen werden sofort gespeichert
und angewendet.
VGA-Menü (HDMI)
Hotkeys
Auswahl des Signals in der
gegebenen Reihenfolge.
VGA – HDMI – CAM
Wenn OSD nicht gestartet
ist, wird durch Drücken der
▲ (UP/AUTO) die für
Taste
den aktuellen Modus
optimale Anzeigeeinstellung
ausgewählt.
Wenn OSD nicht gestartet
ist, können Sie die
Lautstärke direkt anpassen.
Anpassungen vornehmen
Auto-Weißabgleich
durchführen
Stimmt die
horizontale Größe?
Ja
Wird Rauschen auf
dem Bildschirm
angezeigt?
Ja
Phase anpassen,
bis der Bildschirm
leer ist
Nein
Nein
UHR anpassen
H-position
durchführen
Bild
1. Kontrast
Passt den Kontrast des Bildes an, d. h. den
Unterschied zwischen den hellen und dunklen
Bildschirmbereichen.
2. Helligkeit
Passt die Helligkeit des Bildes an.
3. Farbmodus
Auswahl einer voreingestellten Farbtemperatur
oder Festlegen eigener Farbparameter.
(Normal/Warm/Kalt/User)
4. Größe
Auswahl der Bildschirmgröße (nur HDMIModus)
5. Auto
Automatische Auswahl der geeigneten
horizontalen und vertikalen Position und Größe
der Bildschirmanzeige. (Nur VGA-Modus)
Sound
Wird weiterhin
Rauschen auf dem
Bildschirm
angezeigt?
Ja
Ende
OSD-Funktion
Der Monitor wird über die auf dem Bildschirm
angezeigten OSD-Menüs und -Untermenüs
Benutzerhandbuch 5 DE
Page 22

1. Bass
Im Benutzermodus kann der Bass angepasst
werden.
2. Höhe
Im Benutzermodus kann die Höhe angepasst
werden.
3. Balance
Anpassen der Balance zwischen linkem und
rechtem Lautsprecher.
4. MTS
Ohne Funktion
5. Sound-Modus
Auswahl eines anderen voreingestellten
Soundmodus oder des selbst eingestellten
Sounds. (Standard/Film/Musik/User)
Geometrie
1. H-Position
Anpassen der horizontalen Position der
Anzeige (links oder rechts).
2. V-Position
Anpassen der vertikalen Position der Anzeige
(oben oder unten).
3. Uhr
Anpassen der Breite (horizontale Größe) der
Bildschirmanzeige.
4. Phase
Entfernen des horizontalen Rauschens
und Bereinigen oder Schärfen der
Zeichendarstellung.
System
1. Timer für Ruhemodus
Auswahl der Zeit bis zum Ausschalten des
Monitors. (Aus/15/30/45/60 Minuten)
2. Sprache
Auswahl der Sprache für OSD.
(Englisch/Deutsch)
3. OSD H-Position
Anpassen der horizontalen Position des OSD
(links oder rechts).
4. OSD V-Position
Anpassen der vertikalen Position des OSD
(oben oder unten).
5. OSD-Timer
Anpassen der Anzeige des OSD-Menüs.
(5 bis 60 Sekunden).
6. OSD-Transparenz
Anpassen der OSD- Transparenz.
7. Informationen
Zeigt den Status der aktuellen
Anzeigeeinstellungen.
8. Zurücksetzen
Zurücksetzen des Bildschirms auf die
werkseitigen Anzeigeeinstellungen.
DE 6 Benutzerhandbuch
Page 23
CAM-Menü
Bild
Sound
1. Kontrast
Passt den Kontrast des Bildes an, d. h. den
Unterschied zwischen den hellen und dunklen
Bildschirmbereichen.
2. Helligkeit
Passt die Helligkeit des Bildes an.
3. Farbton
Anpassen des Farbtons des Bildes.
4. Farbe
Anpassen der Farbe des Bildes.
5. Bildschärfe
Anpassen der Qualität der Bildanzeige (wenn
der Monitor Bilder skaliert).
6. Farbton
Auswahl einer voreingestellten Farbtemperatur
oder Festlegen eigener Farbparameter.
(Normal/Warm/Kalt)
7. Bildmodus
Auswahl des Bildmodus.
(Standard/Film/Dynamisch/User)
8. Bildschirmformat
(Voll/Zoom1/Zoom2/Untertitel/4:3/Panorama)
1. Bass
Im Benutzermodus kann der Bass angepasst
werden.
2. Höhe
Im Benutzermodus kann die Höhe angepasst
werden.
3. Balance
Anpassen der Balance zwischen linkem und
rechtem Lautsprecher.
4. MTS
Ohne Funktion.
5. Sound-Modus
Auswahl eines anderen voreingestellten
Soundmodus oder des selbst eingestellten
Sounds. (Standard/Film/Musik/User)
Funktion
1. 3D NR
Reduziert das Rauschen im Bild, das durch
einen schlechten Empfang oder eine schlechte
Bildqualität verursacht wird. (Aus/Niedrig/
Mittel/Hoch)
Benutzerhandbuch 7 DE
Page 24
2. MADi
Fortschrittliches Farbmodul generiert
automatische Bildverbesserungen. (2D/3D)
3. H-Größe
Anpassen der Breite (horizontale Größe) der
Bildschirmanzeige.
4. V-Größe
Anpassen der Höhe (vertikale Größe) der
Bildschirmanzeige.
5. H-Position
Anpassen der horizontalen Position der
Anzeige (links oder rechts).
6. V-Position
Anpassen der vertikalen Position der Anzeige
(oben oder unten).
System
1. Timer für Ruhemodus
Auswahl der Zeit bis zum Ausschalten des
Monitors. (Aus/15/30/45/60 Minuten)
2. Sprache
Auswahl der Sprache für OSD.
(Englisch/Deutsch)
3. OSD H-Position
Anpassen der horizontalen Position des OSD
(links oder rechts).
4. OSD V-Position
Anpassen der vertikalen Position des OSD
(oben oder unten).
5. OSD Timeout
Anpassen der Anzeige des OSD-Menüs.
(5–60 Sekunden)
6. OSD-Transparenz
Anpassen der OSD-Transparenz.
7. Informationen
Zeigt den Status der aktuellen
Anzeigeeinstellungen.
8. Zurücksetzen
Zurücksetzen des Bildschirms auf die
werkseitigen Anzeigeeinstellungen.
Selbsttest
Wenn kein Bild vorhanden ist, wird der Bildschirm
für den Selbsttest angezeigt. Die Selbsttestfunktion
prüft, ob der Status der Monitoranzeige besagt,
dass kein Signal, ein falscher Signalbereich oder
ein nicht unterstütztes Signal vorliegt.
Wenn der D-SubSignalanschluss
angeschlossen ist, der
Status des Monitors aber
im DPMS-Modus ist, wird
angezeigt, dass kein Signal
vorhanden ist.
Wenn die empfangene
Frequenz unter oder über
dem normalen Bereich liegt,
wird angezeigt, dass das
Signal außerhalb des
zulässigen Bereichs liegt.
Normaler Bereich (nur im
Vollbildmodus):
H: 30 bis 80 kHz
V: 56 bis 77 Hz
Prüfen Sie, ob der
Kabelbildschirm angezeigt
wird, wenn das
Analogsignalkabel getrennt
wird.
Prüfen Sie, ob der
Kabelbildschirm angezeigt
wird, wenn das HDMISignalkabel getrennt wird.
Monitorfuß entfernen
1. Schalten Sie den Monitor aus und ziehen Sie
das Netzkabel aus der Steckdose.
2. Legen Sie den Monitor mit der Vorderseite nach
unten auf ein Kissen oder ein weiches Tuch.
3. Lösen Sie die hintere Abdeckung des
Monitorfußes mit einem Schraubendreher.
DE 8 Benutzerhandbuch
Page 25

4. Entfernen Sie die vier Schrauben, die den Fuß
g
mit dem Monitor verbinden. Siehe folgende
Abbildungen.
Modelle TVM-1700/TVM-1900
Modell TVM-2200
Monitorfuß befestigen
Ziehen Sie die Schrauben an den in der obigen
Abbildung mit einem Pfeil gekennzeichneten
Positionen an. Siehe folgende Abbildungen.
Modelle TVM-1700/TVM-1900
Monitorfuß hier befestigt
Vorderseite des Monitors Fußhalterun
Modell TVM-2200
Die Verbindungen des Monitors sind mit anderen
Füßen nach VESA-Standard kompatibel.
Lochabstand: 100 x 100 mm
Schraubenlänge: 8 bis12 mm
Problemlösung
Symptom Prüfen
Bild ist verwackelt Passen Sie die Uhr
Kein Bild Prüfen Sie, ob der
Betriebsanzeige
leuchtet nicht
Bild ist instabil Prüfen Sie, ob
an und stellen Sie die
Bildschirmposition ein.
Passen Sie den Wert
vorsichtig an, bis
das Rauschen
verschwunden ist.
Netzschalter des Monitors
und des Computers
eingeschaltet ist.
Prüfen Sie, ob das
Signalkabel richtig mit der
Videokarte verbunden ist.
Prüfen Sie, ob die Stifte des
D Sub-Steckers verbogen
sind.
Prüfen Sie, ob sich
der Computer im
Stromsparmodus befindet.
Prüfen Sie, ob
der Netzschalter
eingeschaltet ist.
Prüfen Sie, ob das
Netzkabel richtig
angeschlossen ist.
das Signalkabel zur
Videokarte passt
Benutzerhandbuch 9 DE
Page 26

Symptom Prüfen
Bild ist nicht
zentriert, zu klein
oder zu groß
Bild springt oder
zeigt ein
Wellenmuster
Bild ist unscharf Passen Sie den Kontrast
Kein Ton Prüfen Sie, ob die
Passen Sie Uhr oder die
Horizontale und vertikale
Zentrierung an, um ein
korrektes Bild zu erhalten.
Entfernen Sie Geräte, die
elektrische Interferenzen
auslösen können.
Lesen Sie die FCCInformationen auf dem
Deckblatt des Handbuchs.
und die Helligkeit an.
Audiokabel richtig am
Computer angeschlossen
sind.
Prüfen Sie ob der Ton
ausgeschaltet ist und
erhöhen Sie die Lautstärke.
Überprüfen Sie das
Audiosystem im Computer.
Technische Daten
Symptom Prüfen
Geringe Lautstärke Passen Sie die Lautstärke
VIDEO-Bildschirm
wird nicht
angezeigt
Kein Video Prüfen Sie, ob das
Schlechte Farbe
im Video
Körniges Bild im
Video
im OSD-Menü an.
Passen Sie die Lautstärke
der Soundkarte im
Computer an.
Prüfen Sie, ob der BILDModus eingestellt ist.
Prüfen Sie, ob der
Videoanschluss richtig
verbunden ist.
Videokabel richtig mit dem
Computer verbunden ist
und ob im OSD-Bildmenü
Funktionen eingestellt ist.
Passen Sie im OSDBildmenü die Werte für
Farbe oder Farbton an.
Passen Sie im OSDBildmenü die Schärfe an.
Modelle TVM-1700/TVM-1900
Elemente Modell TVM-1700 Modell TVM-1900
Zentrale Bildschirmgröße 17 Zoll (43,2 cm) 19 Zoll (48,3 cm)
Pixelabstand 0,264 x 0,264 mm 0,294 x 0,294 mm
Sichtwinkel (H/V) 170°/160° 170°/160°
Kontrastverhältnis 1000:1 (Typ) 1000:1 (Typ)
Reaktionszeit 5 ms 5 ms
Helligkeit 250 cd/m² (Typ) 250 cd/m² (Typ)
Empfohlene
Auflösung
Audio Lautsprecherleistung 2 W x 2 2 W x 2
Lautsprecher Integriert Integriert
Soundfunktionen Stereo R/L Stereo R/L
Schnittstelle VGA-Eingang
DE 10 Benutzerhandbuch
(15-poliger D-Sub)
HDMI-Eingang 1 1
CAM-Ein-/Ausgang 1/1 1/1
Audio-Eingang (RCA-
Typ)
PC-Stereo-Eingang Ja Ja
Kopfhörerausgang Ja Ja
1280 x 1024 bei 75 Hz 1280 x 1024 bei 75 Hz
1 1
1 1
Page 27

Elemente Modell TVM-1700 Modell TVM-1900
Stromversorgung Stromaufnahme < 30 W < 30 W
Quelle 12V DC 12 VDC, 3,33 A
Spezialfunktion Filtertyp 3D-Kammfilter,
Abmessungen B x H x T (ohne Fuß) 365 x 321 x 60 mm
B x H x T (mit Fuß) 383 x 386 x 202 mm
B x H x T (Karton) 421 x 155 x 426 mm
Deinterlacing
15,08 x 12,64 x
2,36 Zoll
15,08 x 15,20 x
8,00 Zoll
16,57 x 6,10 x
16,77 Zoll
3D-Kammfilter,
Deinterlacing
427 x 357 x 57 mm
16,81 x 14,06 x
2,24 Zoll
427 x 415 x 202 mm
16,81 x 16,34 x
7,95 Zoll
452 x 146 x 449 mm
17,80 x 5,75 x
17,68 Zoll
Gewicht Netto (ohne Fuß) 3,1 kg 4,3 kg
Netto (mit Fuß) 3,8 kg 5 kg
Brutto (Karton) 5,3 kg 6,6 kg
VESA-Halterung VESA-Standard 100 x 100 mm
Technische Daten Größe der
Abstandsschraube
(3,94 x 3,94 Zoll)
M4-Schraube M4-Schraube
100 x 100 mm
(3,94 x 3,94 Zoll)
Bohrmuster Länge 8,00 mm 8,00 mm
Betriebstemperatur 0 bis 40 °C
Die Spezifikationen können ohne Ankündigung geändert werden.
Das Bedienfeld kann aus Konstruktionsgründen einige fehlerhafte Pixel (leicht hell oder dunkel)
aufweisen. Das Bedienfeldprodukt als solches ist aber nicht fehlerhaft.
Modell TVM-2200
Elemente Modell TVM-2200
Zentrale Bildschirmgröße 22 Zoll (55,9 cm)
Pixelabstand 0,282 x 0,282 mm
Sichtwinkel (H/V) 170°/160°
Kontrastverhältnis 1000:1 (Typ)
Reaktionszeit 5 ms
Helligkeit 250 cd/m² (Typ)
Empfohlene Auflösung 1680 x 1050 bei 60 Hz
Audio Lautsprecherleistung 2 W x 2
Lautsprecher Integriert
Soundfunktionen Stereo R/L
Schnittstelle VGA-Eingang
(15-poliger D-Sub)
1
HDMI-Eingang 1
CAM-Ein-/Ausgang 1/1
Audio-Eingang
(RCA-Typ)
1
PC-Stereo-Eingang Ja
Kopfhörerausgang Ja
Benutzerhandbuch 11 DE
Page 28

Elemente Modell TVM-2200
Stromversorgung Stromaufnahme < 50 W
Quelle 12 VDC, 5 A
Spezialfunktion
Abmessungen
Gewicht Netto (ohne Fuß) 5,4 kg
VESA-Halterung
Technische Daten
Bohrmuster
Betriebstemperatur 0 bis 40 °C
Die Spezifikationen können ohne Ankündigung geändert werden.
Das Bedienfeld kann aus Konstruktionsgründen einige fehlerhafte Pixel (leicht hell oder dunkel)
aufweisen. Das Bedienfeldprodukt als solches ist aber nicht fehlerhaft.
Filtertyp 3D-Kammfilter,
B x H x T (ohne Fuß) 523 x 367 x 66 mm
B x H x T (mit Fuß) 523 x 419 x 202 mm
B x H x T (Karton) 464 x 186 x 550 mm
Netto (mit Fuß) 6,1 kg
Brutto (Karton) 7,7 kg
VESA-Standard 100 x 100 mm
Größe der
Abstandsschraube
Länge 8,00 mm
Deinterlacing
20,59 x 14,45 x 2,60 Zoll
20,59 x 16,50 x 7,95 Zoll
18,27 x 7,32 x 21,65 Zoll
(3,94 x 3,94 Zoll)
M4-Schraube
Werkseinstellungen
Modelle TVM-1700/TVM-1900
Option Auflösung
VGA 640 x 480 bei 60 Hz 31,5 60 Vollbild
VGA 640 x 480 bei 72 Hz 37,9 72 Vollbild
VGA 640 x 480 bei 75 Hz 37,5 75 Vollbild
SVGA 800 x 600 bei 56 Hz 35,2 56 Vollbild
SVGA
SVGA
SVGA
XGA 1024 x 768 bei 60 Hz 48,4 60 Vollbild
XGA 1024 x 768 bei 70 Hz 56,5 70 Vollbild
XGA 1024 x 768 bei 75 Hz 60,0 75 Vollbild
SXGA 1152 x 864 bei 75 Hz 67,5 75 Vollbild
SXGA 1280 x 960 bei 60 Hz 60,0 60 Vollbild
SXGA 1280 x 1024 bei 60 Hz 64,0 60 Vollbild
SXGA 1280 x 1024 bei 75 Hz 80,0 75 Vollbild
DE 12 Benutzerhandbuch
(Punkte pro Zeile)
800 x 600 bei 60 Hz 37,9 60 Vollbild
800 x 600 bei 72 Hz 48,1 72 Vollbild
800 x 600 bei 75 Hz 46,9 75 Vollbild
VESA-Modi
H Freq. (kHz) V Freq. (Hz) Bemerkung
Page 29
IBM-Modi
Option Auflösung
(Punkte pro Zeile)
H Freq. (kHz) V Freq. (Hz) Bemerkung
EGA 640 x 350 bei 70 Hz 31,5 70 Vollbild
DOS 720 x 400 bei 70 Hz 31,3 70 Vollbild
MAC-Modi
Option Auflösung
(Punkte pro Zeile)
H Freq. (kHz) V Freq. (Hz) Bemerkung
VGA 640 x 480 bei 67 Hz 35,0 67 Vollbild
SVGA 832 x 624 bei 75 Hz 49,7 75 Vollbild
SXGA 152 x 870 bei 75 Hz 68,7 75 Vollbild
MAC-Modi
Option Auflösung
(Punkte x Zeile)
H Freq. (kHz) V Freq. (Hz) Bemerkung
SXGA 1280 x 1024 bei 70 Hz 74,4 70 Vollbild
Der LCD-Monitor bietet ausschließlich Vollbildmodi ohne Flimmern.
Modell TVM-2200
VESA-Modi
Auflösung
(Punkte x Zeilen)
H Freq. (kHz) V Freq. (Hz) Bemerkung
640 x 480 bei 60 Hz 31,5 60 Vollbild
640 x 480 bei 72 Hz 37,9 72 Vollbild
640 x 480 bei 75 Hz 37,5 75 Vollbild
800 x 600 bei 56 Hz 35,2 56 Vollbild
800 x 600 bei 60 Hz 37,9 60 Vollbild
800 x 600 bei 72 Hz 48,1 72 Vollbild
800 x 600 bei 75 Hz 46,9 75 Vollbild
1024 x 768 bei 60 Hz 48,4 60 Vollbild
1024 x 768 bei 70 Hz 56,5 70 Vollbild
1024 x 768 bei 75 Hz 60,0 75 Vollbild
1280 x 1028 bei 60 Hz 64,0 60 Vollbild
1280 x 1028 bei 75 Hz 804,0 75 Vollbild
1152 x 864 bei 75 Hz 67,5 75 Vollbild
1280 x 960 bei 60 Hz 60,0 60 Vollbild
1440 x 900 bei 60 Hz 55,935 60 Vollbild
1680 x 1050 bei 60 Hz 65,290 60 Vollbild
IBM-Modi
Auflösung
(Punkte x Zeilen)
H Freq. (kHz) V Freq. (Hz) Bemerkung
640 x 350 bei 70 Hz 31,5 70 Vollbild
720 x 400 bei 70 Hz 31,3 70 Vollbild
Benutzerhandbuch 13 DE
Page 30

MAC-Modi
Auflösung
(Punkte x Zeilen)
640 x 480 bei 67 Hz 35,0 67 Vollbild
832 x 624 bei 75 Hz 49,7 75 Vollbild
152 x 870 bei 75 Hz 68,7 75 Vollbild
MAC-Modi
Auflösung
(Punkte x Zeilen)
1280 x 1024 bei 70 Hz 74,4 70 Vollbild
Der LCD-Monitor bietet ausschließlich Vollbildmodi ohne Flimmern
H Freq. (kHz) V Freq. (Hz) Bemerkung
H Freq. (kHz) V Freq. (Hz) Bemerkung
DE 14 Benutzerhandbuch
Page 31

ES
Medidas de seguridad
importantes
Índice
Medidas de seguridad importantes 1
Introducción 2
Características 2
Cómo montar el monitor 2
Cómo montar el monitor 2
Conexiones 3
Controles del panel frontal 3
Panel de control (modelos TVM-1700/
TVM-1900) 3
Panel de control (modelo TVM-2200) 4
Cómo cambiar un parámetro del monitor 4
Teclas de acceso rápido 5
Procedimiento de ajuste 5
Función OSD 5
Menú VGA (HDMI) 5
Menú CAM 7
Autodiagnóstico 8
Cómo extraer la base del monitor 8
Cómo colocar la base del monitor 9
Resolución de problemas 9
Especificaciones 10
Modelos TVM-1700/TVM-1900 10
Modelos TVM-2200 12
Tiempos predeterminados de fábrica 13
Modelos TVM-1700/TVM-1900 13
Modelos TVM-2200 14
1. Precauciones de instalación:
• No bloquee las ranuras de ventilación.
• Asegúrese siempre de que el monitor
se encuentre en una zona con buena
ventilación para evitar que la unidad
se sobrecaliente.
• Utilice únicamente accesorios especificados
por el fabricante o aquellos que se vendan
con el producto.
• Evite utilizar o colocar el monitor en
entornos con las siguientes características:
temperaturas extremas, tanto calientes
como frías; humedad elevada; luz solar
directa; entornos con demasiado polvo;
evite la proximidad con otros equipos que
generen un campo magnético potente.
2. Agua y humedad: no utilice este aparato cerca
del agua. Para reducir el riesgo de incendio o
descarga eléctrica, no exponga la unidad a la
lluvia o la humedad.
3. Cable de alimentación y protección del
cable de alimentación: los cables de
alimentación se deben colocar de forma
adecuada a fin de evitar que se pisen o que se
ejerza presión sobre ellos. Preste especial
atención a la ubicación de los cables y los
enchufes, las tomas de corriente y el punto de
salida desde el aparato.
4. Cuidado del producto: no toque la pantalla
directamente con los dedos. La grasa de su piel
puede dejar marcas en la superficie de la
pantalla que son difíciles de eliminar y que
pueden dañar la pantalla de forma permanente.
No presione la pantalla.
5. Limpieza: utilice solo un paño seco.
6. Mantenimiento: no intente realizar
operaciones de mantenimiento por su cuenta
en la unidad. La apertura o la extracción de las
tapas puede exponerle a tensiones peligrosas u
otros peligros. Envíe todas las operaciones de
mantenimiento a personal técnico cualificado.
7. Rayos: para aumentar la protección durante
una tormenta, o cuando no utilice la unidad o
no esté pendiente de ella durante mucho
tiempo, desenchufe la unidad de la toma de
corriente y desconecte los cables. Así evitará
que se produzcan daños en la unidad debido a
los rayos y los picos de tensión.
Manual de usuario 1 ES
Page 32

8. Enchufe de corriente (2 patillas/3 patillas):
• No retire la toma o la conexión a tierra de
la fuente de alimentación o del enchufe
de corriente.
• No olvide nunca desconectar el monitor de
la fuente de alimentación en las siguientes
circunstancias: cuando no vaya a utilizar
el monitor durante un período prolongado
de tiempo, cuando el cable o el
enchufe/conector de la fuente de
alimentación esté dañado o cuando la
carcasa del monitor esté dañada o rota.
PRECAUCIÓN: no desmonte el producto.
Cualquier intento de desmontar o retirar las tapas
de este producto anulará la garantía. Además, se
corre el riesgo de sufrir lesiones graves.
Introducción
Este manual explica cómo instalar correctamente,
utilizar y obtener el mejor rendimiento de su
monitor. Lea este manual del usuario
detenidamente antes de instalar su monitor y
guárdelo cerca del mismo para poder consultarlo
rápidamente.
En primer lugar, compruebe que los contenidos
de la caja se correspondan con los elementos de
la siguiente lista de control:
• Monitor LCD
• Cable de alimentación
• Adaptador de CA
• Manual del usuario
Si cualquiera de los elementos faltase o estuviese
dañado, póngase en contacto con su distribuidor.
Conserve la caja y los materiales de embalaje
para que pueda guardar y transportar de forma
adecuada su monitor.
Características
El monitor cumple la especificación Display
Data Channel (DDC) VESA para su
compatibilidad Plug and Play. Sus
microcircuitos avanzados permiten que la
instalación y la configuración se realicen
de forma rápida y fácil.
El monitor incorpora controles del color
avanzados que permiten ajustarlo para
satisfacer sus propios gustos personales
o los requisitos de las aplicaciones. Utilice
los controles en pantalla para ajustar la
temperatura del color.
Ofrece valor de ganancia de RGB para obtener
el mejor color y la mayor intensidad posibles en
la pantalla.
Pulse el botón Menu (Menú) y active el menú
Self-Diagnosis (Autodiagnóstico) para averiguar
si su monitor está funcionando con normalidad,
no está recibiendo una señal o está recibiendo
una señal que se encuentra fuera del alcance
de detección.
Active las tasas de refresco superiores del
monitor para estabilizar la pantalla y eliminar
el molesto parpadeo que provoca cansancio
en la vista y dolores de cabeza.
El monitor admite un rendimiento de pantalla
óptimo de 1280 x 1024 a 75 Hz (modelo
TVM-1700/TVM-1900) y 1680 x 1050 a 60 Hz
(modelo TVM-2200).
El monitor se puede conectar a diversos tipos
de dispositivos de vídeo que admitan señales
de entrada de vídeo como, por ejemplo, vídeo
compuesto (CVBS) y vídeo independiente.
Los altavoces estéreo internos ofrecen al
usuario final la posibilidad de reproducir sonido.
Cómo montar el monitor
Los monitores están diseñados para su uso sobre
un escritorio.
El brazo de la base del monitor se incluye
preinstalado.
El monitor está diseñado para su uso en áreas
de trabajo de tamaño reducido o para aquellos
que necesiten más espacio en su escritorio.
La cómoda y sencilla visualización en pantalla
permite ajustar de manera fácil y precisa el
tamaño de la pantalla, la posición y el color
de la misma.
ES 2 Manual de usuario
Cómo montar el monitor
1. Coloque una almohadilla o un paño suaves
sobre una superficie plana. Coloque el monitor
sobre esta con la parte frontal hacia abajo.
2. Inserte el brazo de la base del monitor en el pie
de soporte suministrado.
Page 33

Modelos TVM-1700/TVM-1900
Brazo de la base del
monitor
Modelo
TVM-2200
Cómo desmontar el monitor
1. Coloque una almohadilla o un paño suaves
sobre una superficie plana. Coloque el monitor
sobre esta con la parte frontal hacia abajo.
2. Con un destornillador o un objeto similar con un
extremo puntiagudo, extraiga con cuidado el
brazo de soporte del pie presionando la ranura
ubicada en la parte posterior del mismo. (Tenga
en cuenta que el punto de fijación se puede
romper si se aplica una fuerza excesiva).
Modelos TVM-1700/TVM-1900
Pie de soporte
Conexiones
1. Entrada de CC de 12 V
2. VIDEO OUT Salida de señal compuesta
3. VIDEO IN
Entrada de señal compuesta
4. AUDIO L
Entrada izquierda de señal de audio
5. AUDIO R
Entrada derecha de señal de audio
6. Entrada estéreo para PC
7. Salida para auriculares
8. HDMI
Entrada de señal HDMI
9. VGA
Entrada de señal RGB
Controles del panel frontal
Panel de control (modelos
TVM-1700/TVM-1900)
1 Indicador POWER
Muestra tanto el funcionamiento normal como
Modelo
TVM-2200
Manual de usuario 3 ES
el estado de gestión de la alimentación
mediante el indicador LED de alimentación.
2 ALIMENTACIÓN
Permite encender y apagar el monitor.
3 Flecha DERECHA - Volumen (*)
Permite seleccionar el menú.
Función principal: permite aumentar el
volumen.
Función secundaria: permite mover el cursor
hacia la derecha en la ventana OSD
Page 34

(visualización en pantalla) y aumentar el valor
de cualquier menú que seleccione.
4 Flecha IZQUIERDA - Volumen (*) Permite
seleccionar el menú
Función principal: permite reducir el volumen.
Función secundaria: permite mover el cursor
hacia la izquierda en la ventana OSD y reducir
el valor de cualquier menú que seleccione.
5 MENU (MENÚ)
Permite activar la ventana OSD. Permite
desactivar la ventana OSD y desplazarse
desde el submenú hasta el menú principal
de la ventana OSD.
6 Flecha ARRIBA - Ajuste automático (*)
Función principal: ajusta de forma automática
la pantalla a la mejor configuración posible
(solo en modo VGA).
Función secundaria: permite desplazarse
verticalmente por el menú OSD y aumentar
el valor de la función de menú seleccionada.
7 Flecha ABAJO
Permite desplazarse verticalmente por el
menú OSD y reducir el valor de la función
de submenú seleccionada.
8 SOURCE (*) (FUENTE)
Permite seleccionar distintas fuentes de
entrada. Pulse la flecha ARRIBA o ABAJO
para desplazarse por las fuentes disponibles
y pulse la flecha IZQUIERDA o DERECHA
para confirmar la selección.
(*) = tecla de acceso rápido
Panel de control (modelo TVM-2200)
3. VOLUME (VOLUMEN) (*)
Permite seleccionar el menú.
Función principal: permite aumentar el
volumen.
Función secundaria: permite mover el cursor
hacia la derecha en la ventana OSD y
aumentar el valor de cualquier menú que
seleccione.
4. VOLUME (VOLUMEN) (*)
Permite seleccionar el menú.
Función principal: permite REDUCIR el
volumen.
Función secundaria: permite mover el cursor
hacia la izquierda en la ventana OSD y reducir
el valor de cualquier menú que seleccione.
5. Botón SOURCE (FUENTE) (*)
Permite seleccionar distintas fuentes de
entrada. Pulse la flecha ARRIBA o ABAJO para
desplazarse por las fuentes disponibles y pulse
la flecha IZQUIERDA o DERECHA para
confirmar la selección.
6. Botón MENU (MENÚ)
Permite activar la ventana OSD. Permite
desactivar la ventana OSD y desplazarse
desde el submenú hasta el menú principal
de la ventana OSD.
7. Botón ARRIBA
Función principal: seleccione automáticamente
la posición horizontal y vertical, y el tamaño de
la imagen en pantalla adecuados (modo PC).
Función secundaria: permite desplazarse
verticalmente por el menú OSD y AUMENTAR
el valor de la función de menú seleccionada.
8 Botón (*)
Permite desplazarse verticalmente por el
menú OSD y REDUCIR el valor de la función
de submenú seleccionada.
Cómo cambiar un parámetro del
monitor
1. Indicador POWER
Muestra tanto el funcionamiento normal
como el estado de gestión de la alimentación
mediante el indicador LED de alimentación.
Botón POWER
Permite encender y apagar el monitor.
2. Ventana del sensor
Mando a distancia. Recibe la señal del mando
a distancia.
ES 4 Manual de usuario
1. Pulse el botón MENU (Menú) del panel frontal
para entrar en la pantalla del menú OSD.
2. Utilice los botones Izquierda-Derecha para
seleccionar el menú.
3. Utilice el botón Abajo para seleccionar los
submenús.
4. Utilice los botones Arriba-Abajo para
seleccionar una función del submenú.
Page 35

5. Pulse el botón SOURCE (Fuente) y, a
continuación, utilice los botones IzquierdaDerecha para realizar los ajustes que desee.
6. Para salir, pulse MENU (Menú).
Teclas de acceso rápido
Le permite seleccionar la
señal por orden. VGA HDMI - CAM
Cuando no se encuentra
disponible ninguna OSD
(Visualización en pantalla),
si pulsa este botón ▲
(ARRIBA/AUTOMÁTICO),
puede utilizar el ajuste con
el mejor rendimiento de
pantalla para el modo actual.
Cuando no se encuentra
disponible ninguna OSD
(Visualización en pantalla),
puede ajustar el volumen
directamente.
Procedimiento de ajuste
Eseguire il tracking
automatico
La dimensione O
è corretta?
Sì
Sullo schermo ci
sono disturbi?
Sì
Regolare PHASE fino
a eliminare i disturbi
No
No
Regolare il
controllo CLOCK
Eseguire il
posizione O
Función OSD
Configure el monitor mediante los menús y
submenús de visualización en pantalla (OSD).
Los cambios que realice se aplicarán y se
guardarán inmediatamente.
Menú VGA (HDMI)
Picture (Imagen)
1. Contrast (Contraste)
Ajuste el contraste de la imagen, la diferencia
entre las zonas iluminadas y oscuras de la
pantalla.
2. Brightness (Brillo)
Ajuste el brillo de la imagen.
3. Color Mode (Modo color)
Seleccione una temperatura del color
predeterminada distinta o establezca sus
propios parámetros personalizados para el
color (Normal/Cálida/Fría/Usuario).
4. Scale (Escala)
Seleccione el tamaño de la pantalla (solo en
modo HDMI).
5. Auto (Automático)
Seleccione automáticamente la posición
horizontal y vertical y el tamaño de la imagen
en pantalla adecuados (solo en modo VGA).
Sullo schermo ci
sono ancora disturbi?
Sì
End
Manual de usuario 5 ES
Page 36

Sound (Sonido)
1. Bass (Graves)
Cuando seleccione el modo usuario, ajuste el
sonido de los graves.
2. Treble (Agudos)
Cuando seleccione el modo usuario, ajuste el
sonido de los agudos.
3. Balance (Balance)
Ajuste el balance de sonido de los altavoces
izquierdo y derecho.
4. MTS
No se utiliza.
5. Sound Mode (Modo de sonido)
Seleccione un modo de sonido predeterminado
distinto o su propio sonido personalizado
(Estándar/Cine/Música/Usuario).
Geometry (Geometría)
1. H-Position (Posición H)
Ajuste la posición de la pantalla
horizontalmente (izquierda o derecha).
2. V-Position (Posición V)
Ajuste la posición de la pantalla verticalmente
(arriba o abajo).
3. Clock (Reloj)
Ajuste la anchura (el tamaño en sentido
horizontal) de la imagen en pantalla.
4. Phase (Fase)
Elimine cualquier ruido horizontal y aclare
u obtenga una imagen más nítida de los
caracteres.
System (Sistema)
1. Sleep Timer (Temporizador de desconexión)
Seleccione el tiempo dentro del que deberá
apagarse el monitor (Apagado/15/30/45/60
minutos).
2. Language (Idioma)
Seleccione el idioma para la OSD
(inglés/alemán).
3. OSD H-Position (Posición H de la OSD)
Ajuste la posición de la OSD de la pantalla
horizontalmente (izquierda o derecha).
4. OSD V-Position (Posición V de la OSD)
Ajuste la posición de la OSD de la pantalla
verticalmente (arriba o abajo).
5. OSD Timeout (Tiempo de espera de la OSD)
Ajuste el tiempo de visualización del menú
OSD (5 a 60 segundos).
6. OSD Transparency (Transparencia de la
OSD)
Ajuste la transparencia de la OSD.
7. Information (Información)
Muestra el estado de los ajustes de pantalla
actuales.
8. Memory Recall (Recuperación de memorias)
Restablece la pantalla a los ajustes de pantalla
predeterminados de fábrica.
ES 6 Manual de usuario
Page 37

Menú CAM
Picture (Imagen)
Sound (Sonido)
1. Contrast (Contraste)
Ajuste el contraste de la imagen, la diferencia
entre las zonas iluminadas y oscuras de la
pantalla.
2. Brightness (Brillo)
Ajuste el brillo de la imagen.
3. Tint (Tinte)
Ajuste el tinte de la imagen.
4. Color (Color)
Ajuste el color de la imagen.
5. Sharpness (Nitidez)
Ajuste la calidad de la imagen en pantalla (si se
amplía la imagen en la pantalla).
6. Color Mode (Modo color)
Seleccione una temperatura del color
predeterminada distinta o establezca sus
propios parámetros personalizados para el
color (Normal/Cálida/Fría).
7. Picture Mode (Modo de imagen)
Seleccione el modo de imagen
(Estándar/Cine/Música/Usuario).
8. Screen Format (Formato de la pantalla)
(Completa/Zoom1/Zoom2/Subtítulo/4:3/Panorá
mica).
1. Bass (Graves)
Cuando seleccione el modo usuario, ajuste el
sonido de los graves.
2. Treble (Agudos)
Cuando seleccione el modo usuario, ajuste el
sonido de los agudos.
3. Balance (Balance)
Ajuste el balance de sonido de los altavoces
izquierdo y derecho.
4. MTS
No se utiliza.
5. Sound Mode (Modo de sonido)
Seleccione un modo de sonido predeterminado
distinto o su propio sonido personalizado
(Estándar/Cine/Música/Usuario).
Function (Función)
1. 3D NR (Reducción de ruido 3D)
Reduzca el ruido de la imagen debido a una
mala recepción o a una mala calidad de la
imagen (Apagada/Baja/Media/Alta).
2. MADi
El motor avanzado de generación de colores
Manual de usuario 7 ES
Page 38

permite mejorar la imagen automáticamente
(2D/3D).
3. H-Size (Tamaño H)
Ajuste la anchura (el tamaño en sentido
horizontal) de la imagen en pantalla.
4. V-Size (Tamaño V)
Ajuste la altura (el tamaño en sentido vertical)
de la imagen en pantalla.
5. H-Position (Posición H)
Ajuste la posición de la pantalla
horizontalmente (izquierda o derecha).
6. V-Position (Posición V)
Ajuste la posición de la pantalla verticalmente
(arriba o abajo).
System (Sistema)
1. Sleep Timer (Temporizador de desconexión)
Seleccione el tiempo dentro del que deberá
apagarse el monitor (Apagado/15/30/45/60
minutos).
2. Language (Idioma)
Seleccione el idioma para la OSD
(inglés/alemán).
3. OSD H-Position (Posición H de la OSD)
Ajuste la posición de la OSD de la pantalla
horizontalmente (izquierda o derecha).
4. OSD V-Position (Posición V de la OSD)
Ajuste la posición de la OSD de la pantalla
verticalmente (arriba o abajo).
5. OSD Time out (Tiempo de espera de la OSD)
Ajuste el tiempo de visualización del Menú
OSD (5~60 segundos).
6. OSD Transparency (Transparencia de la
OSD)
Ajuste la transparencia de la OSD.
7. Information (Información)
Muestra el estado de los ajustes de pantalla
actuales.
8. Memory Recall (Recuperación de memorias)
Restablece la pantalla a los ajustes de pantalla
predeterminados de fábrica.
Autodiagnóstico
Cuando no se muestre ninguna imagen, aparecerá
la pantalla de autodiagnóstico. La función de
autodiagnóstico comprueba si el estado de la
pantalla del monitor es No Signal (Sin señal), Out
of range (Fuera de rango) o None support (No
compatible).
La pantalla Sin señal se
muestra cuando el conector
de señal D-Sub está
conectado pero el estado del
monitor se encuentra en
modo DPMS.
La pantalla Fuera de rango se
muestra cuando la frecuencia
aplicada se encuentra por
debajo o por encima del
rango normal.
Rango normal (solo en modo
no entrelazado):
H: 30 a 80 kHz
V: 56 a 77 Hz
Compruebe que la pantalla
de cable se muestre cuando
el cable de la señal analógica
esté desconectado.
Compruebe que la pantalla
de cable se muestre cuando
el cable de la señal HDMI
esté desconectado.
Cómo extraer la base del
monitor
1. Apague el monitor y desconecte el cable de
alimentación.
2. Coloque un cojín o un paño suave en el suelo y
coloque el monitor sobre el mismo con la parte
frontal del monitor mirando hacia el suelo.
3. Separe la cubierta trasera de la base del
monitor con un destornillador.
ES 8 Manual de usuario
Page 39

4. Retire los cuatro tornillos que unen la base al
cuerpo del monitor. Consulte las imágenes que
se muestran a continuación.
Modelos TVM-1700/TVM-1900
Modelo TVM-2200
Cómo colocar la base del
monitor
Apriete los tornillos en los puntos que se indican
mediante flechas en las figuras que aparecen
anteriormente. Consulte las imágenes que se
muestran a continuación.
Modelos TVM-1700/TVM-1900
La base del monitor debe colocarse aquí.
Parte frontal del brazo de
soporte del monitor.
La superficie de instalación del monitor es
compatible con otros tipos de bases estándar
VESA.
Distancia entre orificios: 100 x 100 mm
Longitud del tornillo: de 8 a 12 mm
Resolución de problemas
Síntoma: Comprobación
La imagen
parpadea.
No se ve ninguna
imagen.
El LED de
alimentación no se
enciende.
La imagen es
inestable.
Ajuste el reloj (Clock) para
establecer la posición de la
pantalla y ajuste el valor del
reloj cuidadosamente hasta
que deje de verse ruido.
Compruebe que el
interruptor de alimentación
del monitor y del ordenador
se encuentren en la
posición de encendido.
Compruebe que el cable
de señal esté conectado de
forma correcta a la tarjeta
de vídeo.
Compruebe que las patillas
del sub-conector D no estén
dobladas.
Compruebe si el ordenador
se encuentra en modo de
ahorro de energía.
Compruebe que el
interruptor de alimentación
se encuentre en la posición
de encendido.
Compruebe que el cable
de alimentación esté
correctamente conectado.
Compruebe que el cable de
señal sea el adecuado para
la tarjeta de vídeo.
Manual de usuario 9 ES
Page 40

Síntoma: Comprobación
La imagen no está
centrada, es
demasiado
pequeña o
demasiado
grande.
La imagen salta o
aparecen ondas
en la imagen.
La imagen
aparece borrosa.
No se emite
ningún sonido.
Ajuste el reloj (Clock) o el
centro H y V (H&V Center)
para obtener la imagen
adecuada.
Mantenga los dispositivos
que puedan provocar
interferencias eléctricas
alejados del monitor.
Consulte la información
FCC que figura en la
portada del manual.
Ajuste el contraste
(Contrast) y el brillo
(Brightness).
Compruebe que los cables
de audio estén conectados
correctamente al equipo.
Ajuste el volumen tras
comprobar si se ha
desactivado el sonido.
Revise el sistema de audio
del equipo.
Síntoma: Comprobación
El sonido se
escucha
débilmente.
No se ve la
pantalla VIDEO
(VÍDEO).
No se ve el vídeo. Compruebe que el cable
El color del vídeo
es de mala
calidad.
La imagen del
vídeo se ve
granulada.
Ajuste el volumen en el
menú OSD.
Ajuste el volumen de
la tarjeta de sonido del
ordenador.
Compruebe que haya
establecido el modo
PICTURE (IMAGEN).
Compruebe que el terminal
de vídeo esté conectado
correctamente.
de vídeo esté conectado
correctamente al ordenador
y establezca las funciones
(Functions) en el menú de
imagen OSD.
Ajuste los valores del color
(Color) o del tinte (Tinte)
en el menú de imagen
OSD.
Ajuste la nitidez
(Sharpness) en el
menú de imagen OSD.
Especificaciones
Modelos TVM-1700/TVM-1900
Elementos Modelo TVM-1700 Modelo TVM-1900
Panel Tamaño de la pantalla 17 pulg. (43,2 cm) 19 pulg. (48,3 cm)
Separación de píxeles 0,264 x 0,264 mm 0,294 x 0,294 mm
Ángulo de visión (H/V) 170°/160° 170°/160°
Relación de contraste 1000:1 (típ.) 1000:1 (típ.)
Tiempo de respuesta 5 ms 5 ms
Brillo 250 cd/m² (típ.) 250 cd/m² (típ.)
Resolución
recomendada
Audio Potencia del altavoz 2 W x 2 2 W x 2
Altavoces Integrados Integrados
Características de
sonido
Interfaz Entrada VGA (D-Sub
ES 10 Manual de usuario
de 15 patillas)
Entrada HDMI 1 1
1280 x 1024 a 75 Hz 1280 x 1024 a 75 Hz
Estéreo Dch./Izq. Estéreo Dch./Izq.
1 1
Page 41

Elementos Modelo TVM-1700 Modelo TVM-1900
Entrada/salida CAM 1/1 1/1
Entrada de audio
(tipo RCA)
Entrada estéreo para
PC
Salida para
auriculares
1 1
Sí Sí
Sí Sí
Alimentación Consumo < 30 W < 30 W
Fuente 12 V CC 12 V CC, 3,33 A
Característica
especial
Dimensiones Al x An x Pr (sin base) 365 x 321 x 60 mm
Tipo de filtro Filtro comb (de peine)
Al x An x Pr (con
base)
Al x An x Pr (caja) 421 x 155 x 426 mm
3D, desentrelazado
(15,08 x 12,64 x 2,36
pulg.)
383 x 386 x 202 mm
(15,08 x 15,20 x 8,00
pulg.)
(16,57 x 6,10 x 16,77
pulg.)
Filtro comb (de peine)
3D, desentrelazado
427 x 357 x 57 mm
(16,81 x 14,06 x 2,24
pulg.)
427 x 415 x 202 mm
(16,81 x 16,34 x 7,95
pulg.)
452 x 146 x 449 mm
(17,80 x 5,75 x 17,68
pulg.)
Peso Neto (sin base) 3,1 kg 4,3 kg
Neto (con base) 3,8 kg 5 kg
Bruto (caja) 5,3 kg 6,6 kg
Posiciones de
orificios
para el montaje
mural
Estándar VESA 100 x 100 mm
(3,94 x 3,94 pulg.)
100 x 100 mm
(3,94 x 3,94 pulg.)
Tamaño del tornillo Tornillo M4 Tornillo M4
según normas VESA Longitud 8 mm 8 mm
Temperatura de
funcionamiento
0 a 40 °C (32 a 104 °F)
Las especificaciones pueden modificarse sin previo aviso.
Es posible que el panel posea algunos píxeles defectuosos (p. ej., algunos ligeramente
brillantes u oscuros) debido a una característica del panel. No obstante, el propio producto
de panel no tiene defectos.
Manual de usuario 11 ES
Page 42

Modelos TVM-2200
Elementos Modelo TVM-2200
Panel Tamaño de la pantalla 22 pulg. (55,9 cm)
Separación de píxeles 0,282 x 0,282 mm
Ángulo de visión (H/V) 170°/160°
Relación de contraste 1000:1 (típ.)
Tiempo de respuesta 5 ms
Brillo 250 cd/m² (típ.)
Resolución recomendada 1680 x 1050 a 60 Hz
Audio Potencia del altavoz 2 W x 2
Altavoces Integrados
Características de sonido Estéreo Dch./Izq.
Interfaz Entrada VGA (D-Sub de
15 patillas)
1
Entrada HDMI 1
Entrada/salida CAM 1/1
Entrada de audio (tipo
RCA)
1
Entrada estéreo para PC Sí
Salida para auriculares Sí
Alimentación Consumo < 50 W
Fuente 12 V CC, 5 A
Característica
especial
Dimensiones
Tipo de filtro Filtro comb (de peine) 3D,
Al x An x Pr (sin base) 523 x 367 x 66 mm
Al x An x Pr (con base) 523 x 419 x 202 mm
Al x An x Pr (caja) 464 x 186 x 550 mm
desentrelazado
(20,59 x 14,45 x 2,60 pulg.)
(20,59 x 16,50 x 7,95 pulg.)
(18,27 x 7,32 x 21,65 pulg.)
Peso Neto (sin base) 5,4 kg
Neto (con base) 6,1 kg
Bruto (caja) 7,7 kg
Posiciones de
orificios
para el montaje
mural
según normas VESA
Temperatura de
funcionamiento
Estándar VESA 100 x 100 mm
(3,94 x 3,94 pulg.)
Tamaño del tornillo Tornillo M4
Longitud 8 mm
0 a 40 °C (32 a 104 °F)
Las especificaciones pueden modificarse sin previo aviso.
Es posible que el panel posea algunos píxeles defectuosos (p. ej., algunos ligeramente
brillantes u oscuros) debido a una característica del panel. No obstante, el propio producto
de panel no tiene defectos.
ES 12 Manual de usuario
Page 43

Tiempos predeterminados de fábrica
Modelos TVM-1700/TVM-1900
Modo Resolución
VGA 640 x 480 a 60 Hz 31,5 60 No entrelazado
VGA 640 x 480 a 72 Hz 37,9 72 No entrelazado
VGA 640 x 480 a 75 Hz 37,5 75 No entrelazado
SVGA 800 x 600 a 56 Hz 35,2 56 No entrelazado
SVGA
SVGA
SVGA
XGA 1024 x 768 a 60 Hz 48,4 60 No entrelazado
XGA 1024 x 768 a 70 Hz 56,5 70 No entrelazado
XGA 1024 x 768 a 75 Hz 60,0 75 No entrelazado
SXGA 1152 x 864 a 75 Hz 67,5 75 No entrelazado
SXGA 1280 x 960 a 60 Hz 60,0 60 No entrelazado
SXGA 1280 x 1024 a 60 Hz 64,0 60 No entrelazado
SXGA 1280 x 1024 a 75 Hz 80,0 75 No entrelazado
Modo Resolución
EGA 640 x 350 a 70 Hz 31,5 70 No entrelazado
DOS 720 x 400 a 70 Hz 31,3 70 No entrelazado
Modo Resolución
VGA 640 x 480 a 67 Hz 35,0 67 No entrelazado
SVGA 832 x 624 a 75 Hz 49,7 75 No entrelazado
SXGA 152 x 870 a 75 Hz 68,7 75 No entrelazado
Modo Resolución
SXGA 1280 x 1024 a 70 Hz 74,4 70 No entrelazado
El monitor LCD dispone solo de modos no entrelazados sin parpadeo.
(puntos por línea)
800 x 600 a 60 Hz 37,9 60 No entrelazado
800 x 600 a 72 Hz 48,1 72 No entrelazado
800 x 600 a 75 Hz 46,9 75 No entrelazado
(puntos por línea)
(puntos por línea)
(puntos por línea)
Modos VESA
Frec. H (kHz) Frec. V (Hz) Observación
Modos IBM
Frec. H (kHz) Frec. V (Hz) Observación
Modos MAC
Frec. H (kHz) Frec. V (Hz) Observación
Modos MAC
Frec. H (kHz) Frec. V (Hz) Observación
Manual de usuario 13 ES
Page 44

Modelos TVM-2200
Modos VESA
Resolución
(puntos por línea)
Frec. H (kHz) Frec. V (Hz) Observación
640 x 480 a 60 Hz 31,5 60 No entrelazado
640 x 480 a 72 Hz 37,9 72 No entrelazado
640 x 480 a 75 Hz 37,5 75 No entrelazado
800 x 600 a 56 Hz 35,2 56 No entrelazado
800 x 600 a 60 Hz 37,9 60 No entrelazado
800 x 600 a 72 Hz 48,1 72 No entrelazado
800 x 600 a 75 Hz 46,9 75 No entrelazado
1024 x 768 a 60 Hz 48,4 60 No entrelazado
1024 x 768 a 70 Hz 56,5 70 No entrelazado
1024 x 768 a 75 Hz 60,0 75 No entrelazado
1280 x 1028 a 60 Hz 64,0 60 No entrelazado
1280 x 1028 a 75 Hz 804,0 75 No entrelazado
1152 x 864 a 75 Hz 67,5 75 No entrelazado
1280 x 960 a 60 Hz 60,0 60 No entrelazado
1440 x 900 a 60 Hz 55,935 60 No entrelazado
1680 x 1050 a 60 Hz 65,290 60 No entrelazado
Modos IBM
Resolución
(puntos por línea)
Frec. H (kHz) Frec. V (Hz) Observación
640 x 350 a 70 Hz 31,5 70 No entrelazado
720 x 400 a 70 Hz 31,3 70 No entrelazado
Modos MAC
Resolución
(puntos por línea)
Frec. H (kHz) Frec. V (Hz) Observación
640 x 480 a 67 Hz 35,0 67 No entrelazado
832 x 624 a 75 Hz 49,7 75 No entrelazado
152 x 870 a 75 Hz 68,7 75 No entrelazado
Modos MAC
Resolución
(puntos por línea)
Frec. H (kHz) Frec. V (Hz) Observación
1280 x 1024 a 70 Hz 74,4 70 No entrelazado
El monitor LCD dispone solo de modos no entrelazados sin parpadeo.
ES 14 Manual de usuario
Page 45

FR
Sommaire
Mises en garde importantes 1
Introduction 2
Fonctionnalités 2
Montage du moniteur 2
Montage du moniteur 2
Connexions 3
Commandes du panneau avant 3
Panneau avant (Modèles TVM-1700/TVM-1900) 3
Panneau avant (modèle TVM-2200) 4
Modification d’un paramètre du moniteur 4
Touches de raccourci 5
Procédure de réglage 5
Fonction d’affichage à l’écran 5
Menu VGA (HDMI) 5
Menu CAM 7
Diagnostic automatique 8
Retrait du support du moniteur 8
Fixation du support du moniteur 9
Dépannage 9
Spécifications 10
Modèles TVM-1700/TVM-1900 10
Modèles TVM-2200 12
Valeurs temporelles prédéfinies en usine 13
Modèles TVM-1700/TVM-1900 13
Modèles TVM-2200 14
Mises en garde importantes
1. Précautions d’installation :
• N’obstruez pas les orifices d’aération.
• Assurez-vous que le moniteur est installé
dans un endroit correctement aéré pour
éviter toute surchauffe de l’appareil.
• N’utilisez que les accessoires spécifiés par
le fabricant ou ceux vendus avec l’appareil.
• Evitez de placer et de faire fonctionner
le moniteur dans les environnements
suivants : températures extrêmes,
chaudes ou froides ; forte humidité ; lumière
directe du soleil ; endroits excessivement
poussiéreux ; à proximité de tout autre
équipement générant un champ magnétique
puissant
2. Eau et humidité : n’utilisez pas cet appareil
à proximité de l’eau. Pour réduire les risques
d’incendie ou d’électrocution, n’exposez pas
l’appareil à la pluie ou à l’humidité.
3. Protection des cordons d’alimentation : les
cordons d’alimentation doivent être placés dans
un endroit où ils ne risquent pas d’être piétinés
ou coincés. Vérifiez avec un soin particulier
l’emplacement des cordons et des fiches,
des prises de courant et du point de sortie
de l’appareil.
4. Précautions d’installation : ne touchez pas
l’écran avec vos doigts. Les huiles sécrétées
par votre peau peuvent laisser des marques
à la surface de l’écran. Ces marques sont
difficiles à nettoyer et peuvent endommager
l’écran irrémédiablement. N’exercez pas de
pression sur l’écran LCD.
5. Nettoyage : ne nettoyez l’appareil qu’avec un
chiffon sec.
6. Entretien : n’essayez pas de réparer cet
appareil vous-même. En ouvrant ou en retirant
les caches de l’appareil, vous vous exposez à
des risques d’électrocution et autres dangers.
L’entretien doit être effectué par du personnel
qualifié.
7. Foudre : pour une protection optimale en
cas d’orage ou lorsque l’appareil reste inutilisé
pendant une période prolongée, débranchez-le
de la prise murale et déconnectez le câblage.
L’appareil sera ainsi protégé contre la foudre
et les surtensions.
8. Prise secteur (2 broches/3 broches) :
• Ne retirez pas la connexion à la terre de la
prise d’alimentation/secteur.
Manuel d'utilisation 1 FR
Page 46

• N’oubliez pas de débrancher le moniteur
de sa source d’alimentation dans les cas
suivants : le moniteur va rester inutilisé
pendant une période prolongée, le
cordon d’alimentation ou la fiche est
endommagé(e) ou le boîtier du moniteur
est endommagé.
ATTENTION : n’essayez pas de démonter cet
appareil. Toute tentative de démontage ou de
retrait du boîtier de protection de cet appareil
entraîne une annulation de la garantie et peut
également engendrer de graves blessures.
Introduction
Dans ce manuel est expliqué comment
correctement installer, faire fonctionner et obtenir
les meilleures performances de votre moniteur.
Veuillez lire attentivement ce manuel d’utilisation
avant d’installer votre moniteur, puis le conserver
à portée de main afin de pouvoir le consulter
rapidement.
Tout d’abord, vérifiez le contenu de la caisse
d’après la liste suivante :
• Moniteur LCD
• Cordon d’alimentation
• Adaptateur c.a.
• Manuel d’utilisation
Si des éléments sont endommagés ou manquants,
veuillez contacter votre revendeur. Veuillez
conserver la caisse et les matériaux d’emballage
afin d’entreposer ou de transporter adéquatement
votre moniteur.
Le moniteur est doté de fonctions Advanced
Color Controls qui permettent un réglage
fin en fonction de vos goûts personnels
ou des besoins de l’application. Utilisez
les commandes à l’écran pour régler la
température des couleurs.
Valeur de gain RGB pour une intensité et une
couleur d’écran optimales.
Appuyez sur le bouton Menu et activez le menu
Self-Diagnosis (Diagnostic automatique) pour
déterminer si votre moniteur fonctionne
normalement, ne reçoit pas de signal ou reçoit
un signal qui est en dehors de la plage de
balayage.
Activez les fréquences d’actualisation
supérieures du moniteur pour stabiliser l’écran
et éliminer le scintillement gênant à l’origine de
fatigue oculaire et de céphalées.
Le moniteur prend en charge les performances
d’affichage optimales avec 1280 x 1024 @
75 Hz (modèle TVM-1700/TVM-1900) et
1680 x 1050 @ 60 Hz (modèle TVM-2200).
Le moniteur peut être connecté à divers types
d’appareils vidéo capables de recevoir des
signaux d’entrée vidéo tels qu’un signal vidéo
composite (CVBS) ou un signal vidéo séparé.
Grâce aux haut-parleurs stéréo internes,
l’utilisateur final pourra apprécier le son audio.
Montage du moniteur
Les moniteurs ont été conçus pour s’utiliser sur un
bureau.
Le moniteur est fourni avec le bras du support
préinstallé.
Fonctionnalités
Le moniteur a été conçu pour être utilisé dans
un espace de travail réduit ou par ceux qui ont
besoin de plus de place pour travailler sur leur
bureau.
Pratique et convivial, l’affichage à l’écran
permet de régler facilement et précisément
la taille, la position et la couleur de l’écran.
Le moniteur est conforme à la spécification
DDC (Display Data Channel) VESA pour la
compatibilité Plug and Play. Des microcircuits
avancés permettent une installation et une
configuration rapides et sans efforts.
FR 2 Manuel d'utilisation
Montage du moniteur
1. Placez un coussin ou un tissu doux sur une
surface plane. Placez le moniteur dessus,
façade tournée vers le bas.
2. Insérez le bras du support du moniteur dans le
socle fourni.
Page 47

Modèles TVM-1700/TVM-1900
Bras du support du
moniteur
Modèle
TVM-2200
Démontage du moniteur
1. Placez un coussinet ou un tissu doux sur
une surface plane. Placez le moniteur dessus,
façade tournée vers le bas.
2. A l’aide d’un tournevis ou d’un objet
similaire à l’extrémité tranchante, détachez
précautionneusement le bras support du pied
en appuyant sur la rainure située à l’arrière du
bras. (Vous pouvez casser le point de fixation
en appuyant trop fort).
Socle
Connexions
1. Entrée 12 Vcc
2. SORTIE VIDEO Sortie signal composite
3. ENTREE VIDEO
Entrée signal composite.
4. AUDIO G
Entrée signal audio gauche.
5. AUDIO D
Entrée signal audio droite.
6. Entrée stéréo PC
7. Sortie casque
8. HDMI
Entrée signal HDMI.
9. VGA
Entrée signal RGB.
Commandes du panneau
avant
Modèles TVM-1700/TVM-1900
Panneau avant (Modèles
TVM-1700/TVM-1900)
1 Indicateur d’alimentation
Modèle
TVM-2200
Manuel d'utilisation 3 FR
Indique le fonctionnement normal et l’état de la
gestion de l’alimentation avec témoin
d’alimentation.
2 ALIMENTATION
Permet de mettre le moniteur sous et hors
tension.
3
Flèche droite - Volume (*)
Permet de sélectionner le menu.
Principale fonction : permet d’augmenter le
volume.
Page 48

Fonction secondaire: permet de déplacer vers
la droite le curseur dans la fenêtre d’affichage
à l’écran (OSD) et d’augmenter la valeur d’un
menu sélectionné.
Flèche Gauche - Volume (*) Permet de
4
sélectionner le menu
Principale fonction : permet de diminuer le
volume.
Fonction secondaire: permet de déplacer vers
la gauche le curseur dans la fenêtre d’affichage
à l’écran et de réduire la valeur d’un menu
sélectionné.
5 MENU
Active la fenêtre d’affichage à l’écran. Ferme la
fenêtre d’affichage à l’écran, et passe du sousmenu au menu principal dans la fenêtre
d’affichage à l’écran.
6
Flèche Haut - Réglage automatique (*)
Principale fonction : règle automatiquement
l’affichage sur le réglage optimal. (mode VGA
uniquement)
Fonction secondaire: permet de parcourir
verticalement le menu OSD et d’augmenter la
valeur de la fonction du menu sélectionnée.
7
Flèche Bas
permet de parcourir verticalement le menu OSD
et de diminuer la valeur de la fonction du sousmenu sélectionnée.
8 SOURCE (*)
Permet de choisir parmi différentes sources
d’entrée. Appuyez sur la flèche Haut ou Bas
pour parcourir les sources disponibles, et
Gauche ou Droite pour confirmer votre choix.
(*) = touche de raccourci
Panneau avant (modèle TVM-2200)
2. Fenêtre capteur
Télécommande. Reçoit le signal de la
télécommande.
3. VOLUME
Permet de sélectionner le menu.
Fonction principale : permet d’augmenter le
volume.
Fonction secondaire: permet de déplacer vers
la droite le curseur dans la fenêtre d’affichage
à l’écran et d’augmenter la valeur d’un menu
sélectionné.
4.
VOLUME (*)
Permet de sélectionner le menu.
Fonction principale : permet de DIMINUER le
volume.
Fonction secondaire: permet de déplacer vers
la gauche le curseur dans la fenêtre d’affichage
à l’écran et de réduire la valeur d’un menu
sélectionné.
5. Bouton SELECT (*)
Permet de choisir parmi différentes sources
d’entrée. Appuyez sur la flèche Haut ou Bas
pour parcourir les sources disponibles, et
Gauche ou Droite pour confirmer votre choix.
6. Bouton MENU
Active la fenêtre d’affichage à l’écran. Ferme la
fenêtre d’affichage à l’écran, et passe du sousmenu au menu principal dans la fenêtre
d’affichage à l’écran.
7.
Bouton Haut (*)
Principale fonction : permet de choisir
automatiquement la position horizontale et la
position verticale appropriées, ainsi que la taille
de l’image à l’écran. (Mode PC)
Fonction secondaire: permet de parcourir
verticalement le menu OSD et d’AUGMENTER
la valeur de la fonction du menu sélectionnée.
8 Bouton ( * )
permet de parcourir verticalement le menu OSD
et de DIMINUER la valeur de la fonction du
sous-menu sélectionnée.
(*)
Modification d’un paramètre du
moniteur
1. Indicateur d’alimentation
Indique le fonctionnement normal et l’état
de gestion de l’alimentation avec témoin
d’alimentation.
Bouton ALIMENTATION
Permet de mettre le moniteur sous et hors
tension.
FR 4 Manuel d'utilisation
1. Appuyez sur le bouton MENU sur le panneau
avant pour afficher l’écran du menu OSD.
2. Servez-vous des boutons Gauche-Droite pour
sélectionner le menu.
3. Utilisez le bouton Bas pour sélectionner les
sous-menus.
Page 49

4. Utilisez les boutons Haut-Bas pour sélectionner
la fonction d’un sous-menu.
5. Appuyez sur le bouton SOURCE, puis apportez
les modifications voulues à l’aide des boutons
gauche-droite.
6. Pour quitter, appuyez sur MENU.
Touches de raccourci
Permet de sélectionner
successivement un signal.
VGA - HDMI - CAM
Lorsqu’il n’y a pas
d’affichage à l’écran,
appuyez sur le bouton
(UP/AUTO) pour appliquer
▲
les performances d’affichage
les plus adaptées au mode
actuel
En l’absence d’affichage à
l’écran, vous pouvez régler
directement le volume
Procédure de réglage
Exécuter réglage
automatique
Non
Fin
Régler la commande
Horloge
Exécuter réglage
H-position
La taille H est-elle
correcte?
Oui
Le bruit est-il
affiché à
l'écran?
Oui
Régler Phase jusqu'à
effacement de
l'écran
Le bruit est-il
encore affiché
à l'écran?
Oui
Non
Fonction d’affichage à
l’écran
Le moniteur se configure à l’aide des menus
et sous-menus OSD (affichage à l’écran). Les
modifications sont immédiatement enregistrées
et implémentées.
Menu VGA (HDMI)
Image
1. Contrast (Contraste)
Permet de régler le contraste de l’image, la
différence entre les zones claires et obscures
sur l’écran.
2. Brightness (Luminosité)
Permet de régler la luminosité de l’écran.
3. Color Mode (Mode couleur)
Permet de choisir une température des
couleurs prédéfinie différente ou de définir
vos paramètres chromatiques personnalisés.
(Normal/Warm (Chaud)/Cool (Froid)/User
(Utilisateur))
4. Scale (Echelle)
Permet de choisir la taille de l’écran (En mode
HDMI uniquement)
5. Auto
Permet de choisir automatiquement la position
horizontale et la position verticale appropriées,
ainsi que la taille de l’image à l’écran. (En mode
VGA uniquement)
Manuel d'utilisation 5 FR
Page 50

Son
1. Bass (Graves)
Lorsque vous avez choisi le mode utilisateur,
permet de régler le son des graves.
2. Treble (Aigus)
Lorsque vous avez choisi le mode utilisateur,
permet de régler le son des aigus.
3. Balance
Permet de régler l’équilibre des sons des hautparleurs gauche et droit.
4. MTS
Non utilisé
5. Sound Mode (Mode son)
Permet de choisir un mode sonore prédéfini
différent ou votre son personnalisé.
(Standard/Movie (Film)/Music (Musique)/User
(Utilisateur))
Géometrie
1. H-Position (Position H)
Permet de régler horizontalement (gauche ou
droite) la position de l’affichage.
2. V-Position (Position V)
Permet de régler verticalement (haut ou bas) la
position de l’affichage.
3. Clock (Horloge)
Permet de régler la largeur (dimension
horizontale) de l’image à l’écran.
4. Phase
Permet de supprimer le bruit horizontal et
d’éclaircir ou de rendre plus nette l’image
des caractères.
Système
1. Sleep Timer (Minuterie sommeil)
Permet de sélectionner le moment d’éteindre
le moniteur. (Off (Arrêt)/15/30/45/60 minutes)
2. Language (Langue)
Permet de sélectionner la langue de l’affichage
à l’écran. (Anglais/Allemand)
3. OSD H-Position (Position H OSD)
Permet de régler horizontalement (gauche ou
droite) la position de l’affichage à l’écran.
4. OSD V-Position (Position V OSD)
Permet de régler verticalement (haut ou bas) la
position de l’affichage à l’écran.
5. OSD Timeout (Délai d’expiration OSD)
Permet de régler l’affichage du menu à l’écran.
(5 à 60 secondes).
6. OSD Transparency (Transparence OSD)
Permet de régler la transparence de l’affichage
à l’écran.
7. Information (Informations)
Indique le statut des paramètres d’affichage
actuels.
8. Memory Recall (Rappel mémoire)
Rétablit les paramètres d’affichage prédéfinis
en usine de l’écran.
FR 6 Manuel d'utilisation
Page 51

Menu CAM
Image
Son
1. Contrast (Contraste)
Permet de régler le contraste de l’image, la
différence entre les zones claires et obscures
sur l’écran.
2. Brightness (Luminosité)
Permet de régler la luminosité de l’écran.
3. Tint (Tinte)
Permet de régler la teinte de l’image.
4. Color (Couleur)
Permet de régler la couleur de l’image.
5. Sharpness (Netteté)
Permet de régler la qualité d’image de
l’affichage (si l’écran lance la mise à l’échelle).
6. Color Ton (Ton couleur)
Permet de choisir une température des
couleurs prédéfinie différente ou de définir
vos paramètres chromatiques personnalisés.
(Normal/Warm (Chaud)/Cool (Froid))
7. Picture Mode (Mode image)
Permet de sélectionner le mode d’image.
(Standard/Movie (Film)/Dynamic
(Dynamique)/User (Utilisateur))
8. Screen Format (Format de l’écran)
(Full (Intégral)/Zoom1/ Zoom2/ Subtitle (Soustitrage)/ 4:3/ panorama)
1. Bass (Graves)
Lorsque vous avez choisi le mode utilisateur,
permet de régler le son des graves.
2. Treble (Aigus)
Lorsque vous avez choisi le mode utilisateur,
permet de régler le son des aigus.
3. Balance
Permet de régler l’équilibre des sons des hautparleurs gauche et droit.
4. MTS
Non utilisé.
5. Sound Mode (Mode son)
Permet de choisir un mode sonore prédéfini
différent ou votre son personnalisé.
(Standard/Movie (Film)/Music (Musique)/User
(Utilisateur))
Fonction
1. 3D NR
Permet de réduire le bruit dans l’image dû à
une mauvaise réception ou à une qualité
d’image médiocre. (Off (Arrêt)/Low
(Faible)/Middle (Moyen)/High (Haut))
Manuel d'utilisation 7 FR
Page 52

2. MADi
Amélioration automatique de l’image par
moteur chromatique avancé. (2D/3D)
3. H-Size (Taille H)
Permet de régler la largeur (dimension
horizontale) de l’image à l’écran.
4. V-Size (Taille V)
Permet de régler la hauteur (dimension
verticale) de l’image à l’écran.
5. H-Position (Position H)
Permet de régler horizontalement (gauche ou
droite) la position de l’affichage.
6. V-Position (Position V)
Permet de régler verticalement (haut ou bas) la
position de l’affichage.
Système
1. Sleep Timer (Minuterie sommeil)
Permet de sélectionner le moment d’éteindre le
moniteur. (Off (Arrêt)/15/30/45/60 minutes)
2. Language (Langue)
Permet de sélectionner la langue de l’affichage
à l’écran. (Anglais/Allemand)
3. OSD H-Position (Position H OSD)
Permet de régler horizontalement (gauche ou
droite) la position de l’affichage à l’écran.
4. OSD V-Position (Position V OSD)
Permet de régler verticalement (haut ou bas) la
position de l’affichage à l’écran.
5. OSD Time out (Délai d’expiration OSD)
Permet de régler l’affichage du menu OSD. (5 à
60 secondes)
6. OSD Transparency (Transparence OSD)
Permet de régler la transparence de l’affichage
à l’écran.
7. Information (Informations)
Indique le statut des paramètres d’affichage
actuels.
8. Memory Recall (Rappel mémoire)
Rétablit les paramètres d’affichage prédéfinis
en usine de l’écran.
Diagnostic automatique
En l’absence d’image, l’écran Self-Diagnosis
(Diagnostic automatique) s’affiche. La fonction de
diagnostic automatique vérifie si le statut de l’écran
du moniteur est No Signal (Pas de signal), Out of
range (hors de portée) ou None Support (Aucune
prise en charge).
L’écran No Signal s’affiche
lorsque le connecteur du
signal D-Sub est branché,
mais que le moniteur est en
mode DPMS.
L’écran Out of Range
s’affiche lorsque la fréquence
appliquée est au-dessous
ou au-dessus de la plage
normale.
Plage normale (Mode non
entrelacé uniquement) :
H : 30 à 80 kHz
V : 56 à 77 Hz
Vérifiez que l’écran Câble
s’affiche lorsque le câble du
signal analogique est
débranché.
Vérifiez que l’écran Câble
s’affiche lorsque le câble du
signal HDMI est débranché.
Retrait du support du
moniteur
1. Mettez le moniteur hors tension, et débranchez
le cordon d’alimentation.
2. Placez un coussin ou un linge souple sur le sol,
et posez le moniteur dessus, la façade tournée
vers le sol.
3. Détachez le capot arrière du support du
moniteur à l’aide d’un tournevis.
4. Retirez les quatre vis reliant le support au corps
du moniteur. Voir les illustrations ci-dessous.
FR 8 Manuel d'utilisation
Page 53

Modèles TVM-1700/TVM-1900
Modèle TVM-2200
Fixation du support du
moniteur
Serrez les vis aux endroits indiqués par les flèches
représentées sur les figures ci-dessus. Voir les
illustrations ci-dessous.
Modèles TVM-1700/TVM-1900
Support du moniteur fixé ici
Face du bras du support du moniteur
La surface d’installation du moniteur est compatible
avec d’autres types de supports conformes VESA.
Ecartement des trous : 100 x 100 mm
Longueur des vis : 8 à 12 mm
Dépannage
Symptôme Vérifier
Image vacillante Régler Clock (Horloge)
Pas d’image Vérifier si le bouton
Témoin
d’alimentation
éteint
Image instable Vérifier si le câble de
Image décentrée,
trop petite ou trop
grande
pour définir la position
de l’écran et régler
soigneusement la valeur de
l’horloge jusqu’à ce que le
bruit disparaisse de l’écran.
d’alimentation et le bouton
d’alimentation de
l’ordinateur se trouvent
dans la position On
(Marche)
Vérifier si le câble de
transmission du signal est
correctement branché sur la
carte vidéo.
Vérifier si les broches du
sous-connecteur D ne sont
pas pliées.
Vérifier si l’ordinateur est en
mode d’économie
d’énergie.
Vérifier si le bouton
d’alimentation se trouve
dans la position ON
(Marche).
Vérifier si le cordon
d’alimentation est
correctement branché.
transmission du signal
convient à la carte vidéo.
Régler Clock (Horloge) ou
H&V Center (Centre H&V)
pour obtenir l’image
appropriée.
Manuel d'utilisation 9 FR
Page 54

Symptôme Vérifier
L’image saute ou
un motif ondulé est
présent dans
l’image
L’image est floue Régler le Contrast
Pas de son Vérifier que les câbles
Son faible Régler le volume sur le
Tenir éloignés du moniteur
les appareils pouvant
provoquer des interférences
électriques.
Voir les informations
relatives à la FCC sur la
couverture du manuel.
(Contraste) et la
Brightness (luminosité).
audio sont correctement
reliés à l’ordinateur.
Régler le volume après
avoir vérifié que le son
est coupé.
Vérifier le système audio
de l’ordinateur.
menu OSD.
Régler le volume de la carte
son de l’ordinateur.
Spécifications
Symptôme Vérifier
Impossible de voir
l’écran VIDEO
Pas de signal
vidéo
Couleur médiocre
dans la vidéo
Image granuleuse
dans la vidéo
Vérifier si le mode
PICTURE (Image)
a été défini.
Vérifier si la borne vidéo est
correctement connectée.
Vérifier si le câble vidéo est
correctement branché sur
l’ordinateur et réglé sur
Functions (Fonctions)
dans le menu OSD Picture.
Régler les valeurs Color
(Couleur) ou Tint (Teinte)
sur le menu OSD Picture.
Régler la Sharpness
(Netteté) sur le menu
OSD Picture.
Modèles TVM-1700/TVM-1900
Eléments Modèle TVM-1700 Modèle TVM-1900
Panneau Taille de l’écran 43,2 cm 48,3 cm
Pas pixel 0,264 x 0,264 mm 0,294 x 0,294 mm
Angle d’affichage
(H/V)
Ratio de contraste 1000:1 (typ) 1000:1 (typ)
Temps de réponse 5 ms 5 ms
Luminosité 250 cd/m² (typ) 250 cd/m² (typ)
Résolution
recommandée
Audio Puissance haut-
FR 10 Manuel d'utilisation
parleur
Haut-parleurs Intégrés Intégrés
Fonctions sonores G/D stéréo G/D stéréo
170°/160° 170°/160°
1280 x 1024 sur 75 Hz 1280 x 1024 sur 75 Hz
2 W x 2 2 W x 2
Page 55

Eléments Modèle TVM-1700 Modèle TVM-1900
Interface Entrée VGA (D-Sub
15 broches)
1 1
Entrée HDMI 1 1
Entrée/sortie CAM 1/1 1/1
Entrée audio (type
RCA)
1 1
Entrée stéréo PC Oui Oui
Sortie casque Oui Oui
Courant Consommation < 30 W < 30 W
Source 12 Vcc 12 V cc, 3,33 A
Fonction spécifique Type de filtre Filtre-peigne 3D,
Dimensions L x H x P (sans le
support)
L x H x P (avec le
support)
L x H x P (caisse) 421 x 155 x 426 mm
désentrelacement
365 x 321 x 60 mm
15,08 x 12,64 x 2,36"
383 x 386 x 202 mm
15,08 x 15,20 x 8"
16,57 x 6,10 x 16,77"
Filtre-peigne 3D,
désentrelacement
427 x 357 x 57 mm
16,81 x 14,06 x 2,24"
427 x 415 x 202 mm
16,81 x 16,34 x 7,95"
452 x 146 x 449 mm
17,80 x 5,75 x 17,68"
Poids Net (sans le support) 3,1 kg 4,3 kg
Net (avec le support) 3,8 kg 5 kg
Brut (caisse) 5,3 kg 6,6 kg
Support VESA Norme VESA 100 x 100 mm
Spécifications Dimension vis
écartement
(3,94 x 3,94")
Vis M4 Vis M4
100 x 100 mm
(3,94 x 3,94")
Schémas des trous Longueur 8 mm 8 mm
Température de
service
de 0 à 40 °C
Les spécifications peuvent être modifiées sans préavis.
Il se peut que certains pixels du panneau soient défectueux (légèrement clairs ou foncés, etc.)
en raison d’une caractéristique du panneau. Votre appareil proprement dit n’est, toutefois, pas
défectueux.
Manuel d'utilisation 11 FR
Page 56

Modèles TVM-2200
Eléments Modèle TVM-2200
Panneau Taille de l’écran 55,9 cm
Pas pixel 0,282 x 0,282 mm
Angle d’affichage (H/V) 170°/160°
Ratio de contraste 1000:1 (typ)
Temps de réponse 5 ms
Luminosité 250 cd/m² (typ)
Résolution recommandée 1680 x 1050 sur 60 Hz
Audio Puissance haut-parleur 2 W x 2
Haut-parleurs Intégrés
Fonctions sonores G/D stéréo
Interface Entrée VGA (D-Sub
15 broches)
1
Entrée HDMI 1
Entrée/sortie CAM 1/1
Entrée audio (type RCA) 1
Entrée stéréo PC Oui
Sortie casque Oui
Courant Consommation < 50 W
Source 12 V CC, 5 A
Fonction spécifique
Dimensions
Type de filtre Filtre-peigne 3D,
L x H x P (sans le support) 523 x 367 x 66 mm
L x H x P (avec le support) 523 x 419 x 202 mm
L x H x P (caisse) 464 x 186 x 550 mm
désentrelacement
20,59 x 14,45 x 2,60"
20,59 x 16,50 x 7,95"
18,27 x 7,32 x 21,65"
Poids Net (sans le support) 5,4 kg
Net (avec le support) 6,1 kg
Brut (caisse) 7,7 kg (17 kg)
Support VESA
Spécifications
Schémas des trous
Température de
service
Norme VESA 100 x 100 mm
(3,94 x 3,94")
Dimension vis écartement Vis M4
Longueur 8 mm
De 0 à 40 ℃
Les spécifications peuvent être modifiées sans préavis.
Il se peut que certains pixels du panneau soient défectueux (légèrement clairs ou foncés, etc.)
en raison d’une caractéristique du panneau. Votre appareil proprement dit n’est, toutefois, pas
défectueux.
FR 12 Manuel d'utilisation
Page 57

Valeurs temporelles prédéfinies en usine
Modèles TVM-1700/TVM-1900
Mode Résolution
VGA 640 x 480 sur 60 Hz 31,5 60 Sans
VGA 640 x 480 sur 72 Hz 37,9 72 Sans
VGA 640 x 480 sur 75 Hz 37,5 75 Sans
SVGA 800 x 600 sur 56 Hz 35,2 56 Sans
SVGA
SVGA
SVGA
XGA 1024 x 768 sur 60 Hz 48,4 60 Sans
XGA 1024 x 768 sur 70 Hz 56,5 70 Sans
XGA 1024 x 768 sur 75 Hz 60,0 75 Sans
SXGA 1152 x 864 sur 75 Hz 67,5 75 Sans
SXGA 1280 x 960 sur 60 Hz 60,0 60 Sans
SXGA 1280 x 1024 sur 60 Hz 64,0 60 Sans
SXGA 1280 x 1024 sur 75 Hz 80,0 75 Sans
Mode Résolution
EGA 640 x 350 sur 70 Hz 31,5 70 Sans
DOS 720 x 400 sur 70 Hz 31,3 70 Sans
Mode Résolution
VGA 640 x 480 sur 67 Hz 35,0 67 Sans
SVGA 832 x 624 sur 75 Hz 49,7 75 Sans
SXGA 152 x 870 sur 75 Hz 68,7 75 Sans
(points X ligne)
800 x 600 sur 60 Hz 37,9 60 Sans
800 x 600 sur 72 Hz 48,1 72 Sans
800 x 600 sur 75 Hz 46,9 75 Sans
(points X ligne)
(points X ligne)
Modes VESA
Fréq. H (kHz) Fréq. V (Hz) Remarque
entrelacement
entrelacement
entrelacement
entrelacement
entrelacement
entrelacement
entrelacement
entrelacement
entrelacement
entrelacement
entrelacement
entrelacement
entrelacement
entrelacement
Modes IBM
Fréq. H (kHz) Fréq. V (Hz) Remarque
entrelacement
entrelacement
Modes MAC
Fréq. H (kHz) Fréq. V (Hz) Remarque
entrelacement
entrelacement
entrelacement
Manuel d'utilisation 13 FR
Page 58

Modes MAC
Mode Résolution
SXGA 1280 x 1024 sur 70 Hz 74,4 70 Sans
Le moniteur LCD comporte uniquement des modes non entrelacés sans scintillement.
Modèles TVM-2200
Résolution
(points X lignes)
640 x 480 sur 60 Hz 31,5 60 Sans entrelacement
640 x 480 sur 72 Hz 37,9 72 Sans entrelacement
640 x 480 sur 75 Hz 37,5 75 Sans entrelacement
800 x 600 sur 56 Hz 35,2 56 Sans entrelacement
800 x 600 sur 60 Hz 37,9 60 Sans entrelacement
800 x 600 sur 72 Hz 48,1 72 Sans entrelacement
800 x 600 sur 75 Hz 46,9 75 Sans entrelacement
1024 x 768 sur 60 Hz 48,4 60 Sans entrelacement
1024 x 768 sur 70 Hz 56,5 70 Sans entrelacement
1024 x 768 sur 75 Hz 60,0 75 Sans entrelacement
1280 x 1028 sur 60 Hz 64,0 60 Sans entrelacement
1280 x 1028 sur 75 Hz 804,0 75 Sans entrelacement
1152 x 864 sur 75 Hz 67,5 75 Sans entrelacement
1280 x 960 sur 60 Hz 60,0 60 Sans entrelacement
1440 x 900 sur 60 Hz 55,935 60 Sans entrelacement
1680 x 1050 sur 60 Hz 65,290 60 Sans entrelacement
Résolution
(points X lignes)
640 x 350 sur 70 Hz 31,5 70 Sans entrelacement
720 x 400 sur 70 Hz 31,3 70 Sans entrelacement
Résolution
(points X lignes)
640 x 480 sur 67 Hz 35,0 67 Sans entrelacement
832 x 624 sur 75 Hz 49,7 75 Sans entrelacement
152 x 870 sur 75 Hz 68,7 75 Sans entrelacement
Modes MAC
Résolution
(points X lignes)
1280 x 1024 sur 70 Hz 74,4 70 Sans entrelacement
Le moniteur LCD comporte uniquement des modes non entrelacés sans scintillement.
(points X ligne)
Fréq. H (kHz) Fréq. V (Hz) Remarque
Fréq. H (kHz) Fréq. V (Hz) Remarque
Fréq. H (kHz) Fréq. V (Hz) Remarque
Fréq. H (kHz) Fréq. V (Hz) Remarque
Fréq. H (kHz) Fréq. V (Hz) Remarque
Modes VESA
Modes IBM
Modes MAC
entrelacement
FR 14 Manuel d'utilisation
Page 59

IT
Indice
Precauzioni importanti 1
Introduzione 2
Caratteristiche 2
Installazione del monitor 2
Installazione del monitor 2
Collegamenti 3
Controlli del pannello frontale 3
Pannello di controllo (modelli TVM-1700/TVM-
1900) 3
Pannello di controllo (modello TVM-2200) 4
Modifica di un parametro del monitor 4
Tasti rapidi 4
Procedura di regolazione 5
Funzione OSD 5
Menu VGA (HDMI) 5
Menu CAM 7
Autodiagnostica 8
Rimozione del supporto del monitor 9
Fissaggio del supporto del monitor 9
Risoluzione dei problemi 10
Specifiche tecniche 11
Modelli TVM-1700/TVM-1900 11
Modelli TVM-2200 12
Temporizzazioni predefinite 13
Modelli TVM-1700/TVM-1900 13
Modelli TVM-2200 14
Precauzioni importanti
1. Precauzioni di installazione:
• Non bloccare i fori di ventilazione.
• Verificare sempre che il monitor sia
collocato in un’area ben ventilata per
prevenire il surriscaldamento
dell’apparecchiatura.
• Utilizzare solo accessori specificati dal
produttore o acquistati insieme al prodotto.
• Non utilizzare o collocare il monitor in
ambienti con le seguenti caratteristiche:
temperature estreme (alte o basse); umidità
elevata; luce del sole diretta; presenza
di polvere eccessiva; presenza nelle
immediate vicinanze di apparecchiature
che generano forti campi magnetici
2. Acqua e umidità: non utilizzare l’apparecchio
in prossimità di acqua. Per ridurre il rischio di
incendi e scosse elettriche, non esporre
l’apparecchio a pioggia o umidità.
3. Cavo di alimentazione e relativa protezione:
posizionare i cavi di alimentazione in modo tale
che non possano essere facilmente calpestati o
schiacciati. Prestare particolare attenzione al
posizionamento di cavi e connettori, alle prese
e al punto di uscita del cavo dall’apparecchio.
4. Cura del prodotto: non toccare lo schermo
direttamente con le mani. Il grasso
naturalmente presente sulla pelle potrebbe
lasciare impronte difficili da rimuovere senza
danneggiare lo schermo in modo permanente.
Non esercitare pressione sullo schermo.
5. Pulizia: utilizzare solo un panno asciutto.
6. Manutenzione e riparazione: non effettuare
operazioni di manutenzione autonomamente.
L’apertura o la rimozione delle coperture può
esporre a tensioni pericolose o ad altri pericoli.
Demandare tutti gli interventi di assistenza a
personale qualificato.
7. Fulmini: per maggiore sicurezza durante le
tempeste di fulmini o quando viene lasciato
incustodito o inutilizzato per periodi prolungati,
scollegare l’apparecchio dalla presa a muro e
scollegare il sistema di cavi. Questa
precauzione consente di evitare che
l’apparecchio subisca danni a seguito di fulmini
o picchi di tensione.
8. Spina di alimentazione (a 2 o 3 poli):
• Non rimuovere il contatto di messa a terra
dalla spina di alimentazione.
Manuale utente 1 IT
Page 60

• Scollegare sempre il monitor
dall’alimentazione nelle seguenti
circostanze: se il monitor non verrà
utilizzato per periodi di tempo prolungati,
se la spina o il cavo di alimentazione sono
danneggiati o se l’involucro del monitor è
danneggiato o rotto.
ATTENZIONE: non tentare di disassemblare il
prodotto. Qualsiasi tentativo di disassemblare il
prodotto o di rimuoverne le coperture comporta
l’annullamento della garanzia e può provocare
lesioni personali gravi.
Introduzione
Il presente manuale spiega come installare, far
funzionare correttamente e ottenere le prestazioni
migliori dal monitor. Leggere il presente manuale
utente con attenzione prima di installare il monitor,
quindi tenerlo vicino al dispositivo per potervi fare
rapidamente riferimento.
Verificare innanzitutto che il contenuto della
confezione corrisponda con il seguente elenco:
• Monitor LCD
• Cavo di alimentazione
• Adattatore CA
• Manuale dell’utente
In caso di componenti danneggiati o mancanti,
contattare il rivenditore locale. Conservare la
scatola e i materiali di imballaggio per poter
conservare o trasportare il monitor correttamente.
Caratteristiche
Il monitor è progettato per l’utilizzo in un’area di
lavoro ristretta o da parte degli utenti che
necessitano di maggiore spazio sulla scrivania.
Il pratico e intuitivo OSD consente semplici e
precise regolazioni per dimensione, posizione
e colore dello schermo.
Il monitor è conforme con la specifica VESA
Display Data Channel (DDC) per la
compatibilità Plug and Play. Microcircuiti
avanzati consentono di eseguire configurazione
e impostazione rapidamente e senza fatica.
Il monitor dispone di controlli avanzati del
colore per regolazione fine, per rispondere
alle proprie preferenze o ai requisiti delle
applicazioni. Utilizzare i controlli su schermo
per regolare la temperatura del colore.
Valore di guadagno RGB per colore dello
schermo e intensità ottimali.
Premere il pulsante Menu e attivare il
menu Self-Diagnosis [Autodiagnostica]
per determinare se il monitor funziona
normalmente, non riceve il segnale o riceve un
segnale al di fuori della gamma di scansione.
Attivare velocità di aggiornamento dello
schermo più alte per stabilizzare lo schermo
ed eliminare il fastidioso sfarfallio, causa di
affaticamento degli occhi e mal di testa.
Il monitor è in grado di supportare prestazioni
di visualizzazione ottimali con risoluzione di
1280 x 1024 pixel a 75 Hz (modelli TVM-1700/
TVM-1900) e di 1680 x 1050 pixel a 60 Hz
(modello TVM-2200).
È possibile collegare il monitor a diversi tipi di
dispositivi video in grado di supportare segnali
di ingresso video come video composito
(CVBS) e separato.
Grazie agli altoparlanti stereo interni l’utente
finale potrà godere dell’ascolto di contenuti
audio.
Installazione del monitor
I monitor sono progettati per l’utilizzo su scrivania.
Il monitor viene fornito con il braccio del supporto
già preinstallato.
Installazione del monitor
1. Posizionare un cuscino o un panno morbido
su una superficie piana. Appoggiarvi sopra il
monitor con la parte frontale verso il basso.
2. Inserire il braccio del supporto del monitor nel
piedistallo fornito.
Modelli TVM-1700/TVM-1900
Braccio del supporto del
monitor
Piedistallo
IT 2 Manuale utente
Page 61

Modello
Rimozione del monitor
1. Posizionare un cuscino o un panno morbido
2. Utilizzando un cacciavite o un oggetto simile
TVM-2200
su una superficie piana. Appoggiarvi sopra il
monitor con la parte frontale verso il basso.
con un’estremità appuntita, rimuovere con
attenzione il braccio di supporto dal piedistallo
premendo la scanalatura sul retro del braccio
di supporto (tenere presente che il punto di
fissaggio può rompersi se viene usata troppa
forza).
3. INGRESSO VIDEO
Ingresso segnale composito
4. AUDIO S
Ingresso segnale audio sinistro
5. AUDIO D
Ingresso segnale audio destro
6. Ingresso stereo PC
7. Uscita cuffie
8. HDMI
Ingresso segnale HDMI
9. VGA
Ingresso segnale RGB.
Controlli del pannello
frontale
Modelli TVM-1700/TVM-1900
Modello
TVM-2200
Collegamenti
1. Ingresso CC 12 V
2. USCITA VIDEO Uscita segnale composito
Pannello di controllo (modelli
TVM-1700/TVM-1900)
1 Indicatore POWER
Tramite il LED di alimentazione, mostra lo stato
del normale funzionamento e della gestione
dell’alimentazione.
2 POWER
Consente di accendere e spegnere il monitor.
3
Freccia destra - Volume (*)
Consente di selezionare il menu.
Funzione primaria: utilizzata per aumentare il
volume.
Funzione secondaria: sposta il cursore a destra
nella finestra dell’OSD (On-Screen Display) e
aumenta il valore di qualsiasi menu selezionato.
4
Freccia sinistra - Volume(*) Consente di
selezionare il menu
Funzione primaria: utilizzata per diminuire il
volume.
Funzione secondaria: sposta il cursore a
sinistra nella finestra dell’OSD e diminuisce il
valore di qualsiasi menu selezionato.
5 MENU
Attiva la finestra dell’OSD. Disattiva la finestra
Manuale utente 3 IT
Page 62

dell’OSD e sposta dal menu secondario a
quello superiore nella finestra dell’OSD.
Freccia su - Regolazione automatica (*)
6
Funzione primaria: regola automaticamente il
display sulla migliore impostazione possibile
(solo modalità VGA).
Funzione secondaria: consente lo scorrimento
verticale nel menu OSD e di aumentare il valore
della funzione di menu selezionata.
7
Freccia giù
Consente lo scorrimento verticale nel menu
OSD e di diminuire il valore della funzione del
menu secondario selezionata.
8 SOURCE (*)
Utilizzato per selezionare tra diverse sorgenti
di ingresso. Premere la freccia SU o GIÙ per
scorrere tra le sorgenti disponibili e premere la
freccia SINISTRA o DESTRA per confermare la
selezione.
(*) = Tasto rapido
Pannello di controllo (modello
TVM-2200)
1. Indicatore POWER
Tramite il LED di alimentazione, mostra lo stato
del normale funzionamento e della gestione
dell’alimentazione.
Pulsante POWER
Consente di accendere e spegnere il monitor.
2. Finestra sensore
Telecomando. Consente di ricevere il segnale
dal telecomando.
3. VOLUME
Consente di selezionare il menu.
Funzione primaria: utilizzata per aumentare il
volume.
Funzione secondaria: Sposta il cursore a destra
nella finestra dell’OSD e aumenta il valore di
qualsiasi menu selezionato.
4.
VOLUME (*)
Consente di selezionare il menu.
(*)
Function primaria: utilizzata per DIMINUIRE il
volume.
Funzione secondaria: sposta il cursore a
sinistra nella finestra dell’OSD e diminuisce
il valore di qualsiasi menu selezionato.
5. Pulsante SELECT (*)
Utilizzato per scegliere tra diverse sorgenti di
ingresso. Premere la freccia SU o GIÙ per
scorrere tra le sorgenti disponibili e premere la
freccia SINISTRA o DESTRA per confermare la
selezione.
6. Pulsante MENU
Attiva la finestra dell’OSD. Disattiva la finestra
dell’OSD e sposta dal menu secondario a
quello superiore nella finestra dell’OSD.
7.
Freccia su
Funzione primaria: consente di scegliere
automaticamente la corretta posizione
orizzontale e verticale e il formato
dell’immagine su schermo (modalità PC).
Funzione secondaria: consente lo scorrimento
verticale nel menu OSD e di AUMENTARE il
valore della funzione di menu selezionata.
8 Pulsante (*)
Consente lo scorrimento verticale nel menu
OSD e di DIMINUIRE il valore della funzione
del menu secondario selezionato.
Modifica di un parametro del monitor
1. Premere il pulsante MENU sul pannello frontale
per visualizzare la schermata del menu OSD.
2. Utilizzare i pulsanti Sinistra-Destra per
selezionare il menu.
3. Utilizzare il pulsante Giù per selezionare i
sottomenu.
4. Utilizzare i pulsanti Su-Giù per selezionare una
funzione del sottomenu.
5. Premere il pulsante SOURCE, quindi effettuare
le regolazioni necessarie con i pulsanti sinistradestra
6. Per uscire, premere MENU.
Tasti rapidi
Seleziona il segnale
nell’ordine. VGA - HDMI CAM
IT 4 Manuale utente
Page 63

Se non è disponibile l’OSD,
premendo questo pulsante
▲ (SU/AUTO), è possibile
utilizzare le migliori
Menu VGA (HDMI)
Picture [Immagine]
prestazioni di
visualizzazione per una
modalità corrente
Se non è disponibile
l’OSD, è possibile regolare
direttamente il volume
Procedura di regolazione
Eseguire il tracking
automatico
La dimensione O
è corretta?
Sì
Sullo schermo ci
sono disturbi?
Sì
Regolare PHASE fino
a eliminare i disturbi
Sullo schermo ci
sono ancora disturbi?
Sì
No
No
End
Regolare il
controllo CLOCK
Eseguire il
posizione O
Funzione OSD
Configurare il monitor mediante i menu e i
sottomenu OSD (On-Screen Display). Le modifiche
vengono salvate e implementate immediatamente.
1. Contrast
[Contrasto] Consente di regolare il contrasto
dell’immagine, la differenza tra le aree chiare
e scure sullo schermo.
2. Brightness
[Luminosità] Consente di regolare la luminosità
dell’immagine.
3. Color Mode
[Modalità colore] Consente di scegliere diverse
temperature di colore predefinite o impostare i
parametri di colore personalizzati.
(Normal/Warm/Cool/User)
[Normale/Caldo/Freddo/Utente]
4. Scale
[Scala] Consente di selezionare la dimensione
dello schermo (solo modalità HDMI)
5. Auto
consente di scegliere automaticamente la
corretta posizione orizzontale e verticale e
il formato dell’immagine su schermo. (Solo
modalità VGA)
Sound [Audio]
Manuale utente 5 IT
Page 64

1. Bass
[Bassi] Quando si seleziona la modalità utente,
consente di regolare i bassi.
2. Treble
[Alti] Quando si seleziona la modalità utente,
consente di regolare gli alti.
3. Balance
[Bilanciamento] Consente di regolare il
bilanciamento dell’audio degli altoparlanti
di sinistra e destra.
4. MTS
Non utilizzato
5. Sound Mode
[Modalità audio] Consente di scegliere una
diversa modalità audio predefinita o l’audio
personalizzato. (Standard/ Movie/ Music/ User)
[Standard/Film/Musica/Utente]
Geometry [Geometria]
1. H-Position
[Posizione O] Consente di regolare la posizione
orizzontale del display (sinistra o destra).
2. V-Position
[Posizione V] Consente di regolare la posizione
verticale del display (su o giù).
3. Clock
Consente di regolare l’ampiezza (dimensione
orizzontale) dell’immagine dello schermo.
4. Phase
[Fase] Consente di rimuovere eventuali disturbi
orizzontali e rendere più nitida l’immagine dei
caratteri.
System [Sistema]
1. Sleep Timer
[Timer spegnimento] Consente di selezionare
l’intervallo di tempo prima di spegnere il
monitor. (Off/15/30/45/60 Minuti)
2. Language
[Lingua] Consente di selezionare la lingua
dell’OSD. (English/German) [Inglese/Tedesco]
3. OSD H-Position
[Posizione O OSD] Consente di regolare la
posizione OSD orizzontale del display (sinistra
o destra).
4. OSD V-Position
[Posizione V OSD] Consente di regolare la
posizione OSD verticale (su o giù).
5. OSD Timeout
[Timeout OSD] Consente di regolare il tempo
di visualizzazione del menu OSD. (Da 5 a 60
secondi).
6. OSD Transparency
[Trasparenza OSD] Consente di regolare la
trasparenza dell’OSD.
7. Information
[Informazioni] Mostra lo stato delle impostazioni
di visualizzazione correnti.
8. Memory Recall
[Richiamo memoria] Ripristina lo schermo alle
impostazioni di visualizzazione predefinite.
IT 6 Manuale utente
Page 65

Menu CAM
Picture [Immagine]
Sound [Audio]
1. Contrast
[Contrasto] Consente di regolare il contrasto
dell’immagine, la differenza tra le aree chiare
e scure sullo schermo.
2. Brightness
[Luminosità] Consente di regolare la luminosità
dell’immagine.
3. Tint
[Tinta] Consente di regolare la tinta
dell’immagine.
4. Color
[Colore] Consente di regolare il colore
dell’immagine.
5. Sharpness
[Nitidezza] Consente di regolare la qualità
dell’immagine visualizzata (se il monitor passa
all’ingrandimento).
6. Color Tone
[Tonalità colore] Consente di scegliere diverse
temperature di colore predefinite o di impostare
i parametri di colore personalizzati.
(Normal/Warm/Cool) [Normale/Caldo/Freddo]
7. Picture Mode
[Modalità immagine] Consente di selezionare la
modalità immagine. (Standard/ Movie/
Dynamic/ User)
[Standard/Film/Dinamico/Utente].
8. Screen Format
[Formato schermo]
(Full/Zoom1/Zoom2/Subtitle/4:3/panorama).
1. Bass
[Bassi] Quando si seleziona la modalità utente,
consente di regolare i bassi.
2. Treble
[Alti] Quando si seleziona la modalità utente,
consente di regolare gli alti.
3. Balance
[Bilanciamento] Consente di regolare il
bilanciamento dell’audio degli altoparlanti
di sinistra e destra.
4. MTS
Non utilizzato.
5. Sound Mode
[Modalità audio] Consente di scegliere una
diversa modalità audio predefinita o l’audio
personalizzato. (Standard/ Movie/ Music/
User) [Standard/Film/Musica/Utente]
Function [Funzione]
1. 3D NR
Consente di ridurre il disturbo nell’immagine
dovuto a ricezione insufficiente o scarsa
qualità dell’immagine. (Off/ Low/ Middle/ High)
[Off/Basso/Medio/Alto]
Manuale utente 7 IT
Page 66

2. MADi
Consente di selezionare il motore del colore per
l’ottimizzazione automatica dell’immagine.
(2D/3D)
3. H-Size
[Dimensione O] Consente di regolare
l’ampiezza (dimensione orizzontale)
dell’immagine dello schermo.
4. V-Size
[Dimensione V] Consente di regolare l’altezza
(dimensione verticale) dell’immagine dello
schermo.
5. H-position
[Posizione O] Consente di regolare la posizione
orizzontale del display (sinistra o destra).
6. V-position
[Posizione V] Consente di regolare la posizione
verticale del display (su o giù).
System [Sistema]
1. Sleep Timer
[Timer spegnimento] Consente di selezionare
l’intervallo di tempo prima di spegnere il
monitor. (Off/15/30/45/60 minuti)
2. Language
[Lingua] Consente di selezionare la lingua
dell’OSD. (English/Deutsch) [Inglese/Tedesco]
3. OSD H-Position
[Posizione O OSD] Consente di regolare la
posizione OSD orizzontale del display (sinistra
o destra).
4. OSD V-Position
[Posizione V OSD] Consente di regolare la
posizione OSD verticale (su o giù).
5. OSD Time out
[Timeout OSD] Consente di regolare la
visualizzazione del menu OSD. (5~60 secondi)
6. OSD Transparency
[Trasparenza OSD] Consente di regolare la
trasparenza dell’OSD.
7. Information
[Informazioni] Mostra lo stato delle impostazioni
di visualizzazione correnti.
8. Memory Recall
[Richiamo memoria] Ripristina lo schermo alle
impostazioni di visualizzazione predefinite.
Autodiagnostica
Se non è presente alcuna immagine, viene
visualizzata la schermata di autodiagnostica. La
funzione di autodiagnostica controlla se lo stato
dello schermo del monitor è No Signal [Nessun
segnale], Out of range [Fuori intervallo] o None
support [Nessun supporto].
La schermata No Signal
viene visualizzata quando il
connettore di segnale D- Sub
è collegato ma lo stato del
monitor è in modalità DPMS.
La schermata Out of Range
viene visualizzata quando la
frequenza applicata è sotto o
sopra l’intervallo normale.
Intervallo normale (solo
modalità Non interlacciata):
O: Da 30 a 80 kHz
V: Da 56 a 77 Hz
Verificare che la schermata
del cavo sia visualizzata
quando è scollegato il cavo
del segnale analogico.
Verificare che la schermata
del cavo sia visualizzata
quando è scollegato il cavo
del segnale HDMI.
IT 8 Manuale utente
Page 67

Rimozione del supporto del
pp
monitor
1. Spegnere il monitor e scollegare il cavo di
alimentazione.
2. Posizionare un cuscino o un panno morbido su
una superficie piana e appoggiarvi il monitor
con la parte frontale verso il basso.
3. Scollegare il coperchio posteriore del monitor
con un cacciavite.
4. Rimuovere le quattro viti che collegano il
supporto al corpo del monitor. Vedere le
immagini seguenti.
Modelli TVM-1700/TVM-1900
Modello TVM-2200
Modelli TVM-1700/TVM-1900
Supporto monitor fissato qui
Modello TVM-2200
La superficie di installazione del monitor è
compatibile con gli altri tipi di supporti standard
VESA.
Spaziatura foro: 100 x 100 mm
Lunghezza vite: da 8 a 12 mm
Superficie del braccio di
su
orto monitor
Fissaggio del supporto del
monitor
Serrare le viti nei punti indicati dalle frecce nelle
figure precedenti. Vedere le immagini seguenti.
Manuale utente 9 IT
Page 68

Risoluzione dei problemi
Sintomo Verificare
L’immagine è
mossa
Nessuna
immagine
Il LED POWER
non è acceso
L’immagine non è
stabile
L’immagine non è
centrata, troppo
piccola o troppo
grande.
L’immagine si
sposta o
nell’immagine è
presente
un’ondulazione.
L’immagine è
sfocata
Regolare Clock per
impostare la posizione dello
schermo e regolare con
attenzione il valore di Clock
fino a eliminare il disturbo.
Verificare che l’interruttore
di alimentazione e
l’interruttore di
alimentazione del computer
siano nella posizione On
Verificare che il cavo
segnale sia collegato
saldamente alla scheda
video.
Verificare che i piedini del
connettore D sub non siano
piegati.
Controllare se il computer è
in modalità risparmio
energia.
Verificare che l’interruttore
di alimentazione sia nella
posizione On.
Verificare che il cavo di
alimentazione sia collegato
correttamente.
Verificare che il cavo
segnale sia adatto alla
scheda video.
Regolare Clock o H&V
Center [Centro O&V] per
ottenere l’immagine
corretta.
Tenere lontani dal monitor
dispositivi elettrici che
potrebbero provocare
interferenze elettriche.
Vedere le informazioni FCC
sulla copertina del manuale.
Regolare Contrast
[Contrasto] e Brightness
[Luminosità].
Sintomo Verificare
Nessun suono Verificare che i cavi
Audio basso Regolare il volume sul
Non è possibile
vedere la
schermata VIDEO
Nessun video Verificare che il cavo video
I colori nel video
sono tenui
L’immagine nel
video è granulosa
audio siano collegati
correttamente al computer.
Dopo aver verificato che
l’audio sia disattivato,
regolare il volume.
Verificare il sistema audio
del computer.
menu OSD.
Regolare il volume della
scheda audio del computer.
Verificare che sia stata
impostata la modalità
PICTURE.
Verificare che il terminale
video sia collegato
correttamente.
sia collegato correttamente
al computer e impostato su
Functions [Funzioni] nel
menu Picture OSD.
Regolare i valori di Color
[Colore] o Tint [Tinta] nel
menu Picture [Immagine]
dell’OSD.
Regolare la Sharpness
[Nitidezza] sul menu Picture
[Immagine] dell’OSD.
IT 10 Manuale utente
Page 69

Specifiche tecniche
Modelli TVM-1700/TVM-1900
Elementi Modello TVM-1700 Modello TVM-1900
Centrale Dimensione schermo 43,2 cm 48,3 cm
Pixel 0,264 x 0,264 mm 0,294 x 0,294 mm
Angolo visivo (O/V) 170°/160° 170°/160°
Rapporto di contrasto 1000:1 (tip) 1000:1 (tip)
Tempo di risposta 5 ms 5 ms
Luminosità 250 cd/m² (tip) 250 cd/m² (tip)
Risoluzione
consigliata
Audio Potenza altoparlante 2 W x 2 2 W x 2
Altoparlanti Integrati Integrati
Caratteristiche audio Stereo S/D Stereo S/D
Interfaccia VGA in (D-Sub 15 pin) 1 1
Ingresso HDMI 1 1
Ingresso/uscita CAM 1/1 1/1
Ingresso audio (tipo
RCA)
Ingresso stereo PC Sì Sì
Uscita cuffie Sì Sì
Power
(Alimentazione)
Funzione speciale Tipo filtro Filtro comb 3D,
Dimensioni L x A x P (senza
Massa Netto (senza
Montaggio VESA Standard VESA 100 x 100 mm 100 x 100 mm
Specifiche tecniche Spaziatura
Posizione fori Lunghezza 8 mm 8 mm
Temperatura di
funzionamento
Le specifiche tecniche possono variare senza nessun preavviso.
Lo schermo può presentare alcuni pixel difettosi (es. poco illuminati o spenti) a causa delle
relative caratteristiche. Tuttavia, non è un difetto dello schermo stesso.
Consumo < 30 W < 30 W
Sorgente 12 V CC 12 V CC, 3,33 A
supporto)
L x A x P (con
supporto)
L x A x P (scatola) 421 x 155 x 426 mm 452 x 146 x 449 mm
supporto)
Netto (con supporto) 3,8 kg 5 kg
Lordo (scatola) 5,3 kg 6,6 kg
dimensione vite
Da 0 a 40
1280 x 1024 a 75 Hz 1280 x 1024 a 75 Hz
1 1
deinterlacciato
365 x 321 x 60 mm
383 x 386 x 202 mm 427 x 415 x 202 mm
3,1 kg 4,3 kg
Vite M4 Vite M4
Filtro comb 3D,
deinterlacciato
427 x 357 x 57 mm
Manuale utente 11 IT
Page 70

Modelli TVM-2200
Elementi Modello TVM-2200
Centrale Dimensione schermo 55,9 cm
Pixel 0,282 x 0,282 mm
Angolo visivo (O/V) 170°/160°
Rapporto di contrasto 1000:1 (tip)
Tempo di risposta 5 ms
Luminosità 250 cd/m² (tip)
Risoluzione consigliata 1680 x 1050 a 60 Hz
Audio Potenza altoparlante 2 W x 2
Altoparlanti Integrati
Caratteristiche audio Stereo S/D
Interfaccia VGA in (D-Sub 15 pin) 1
Ingresso HDMI 1
Ingresso/uscita CAM 1/1
Ingresso audio (tipo
RCA)
1
Ingresso stereo PC Sì
Uscita cuffie Sì
Power
(Alimentazione)
Funzione speciale
Dimensioni
Consumo < 50 W
Sorgente 12 V CC, 5 A
Tipo filtro Filtro comb 3D,
L x A x P (senza
supporto)
L x A x P (con supporto) 523 x 419 x 202 mm
L x A x P (scatola) 464 x 186 x 550 mm
deinterlacciato
523 x 367 x 66 mm
Massa Netto (senza supporto) 5,4 kg
Netto (con supporto) 6,1 kg
Lordo (scatola) 7,7 kg
Montaggio VESA
Specifiche tecniche
Posizione fori
Standard VESA 100 x 100 mm
Spaziatura dimensione
vite
Vite M4
Lunghezza 8 mm
Temperatura di
funzionamento
Da 0 a 40 °C
Le specifiche tecniche possono variare senza preavviso.
Lo schermo può presentare alcuni pixel difettosi (es. poco illuminati o spenti) a causa delle
relative caratteristiche. Tuttavia, non è un difetto dello schermo stesso.
IT 12 Manuale utente
Page 71

Temporizzazioni predefinite
Modelli TVM-1700/TVM-1900
Modalità Risoluzione
VGA 640 x 480 a 60 Hz 31,5 60 Non interlacciato
VGA 640 x 480 a 72 Hz 37,9 72 Non interlacciato
VGA 640 x 480 a 75 Hz 37,5 75 Non interlacciato
SVGA 800 x 600 a 56 Hz 35,2 56 Non interlacciato
SVGA
SVGA
SVGA
XGA 1024 x 768 a 60 Hz 48,4 60 Non interlacciato
XGA 1024 x 768 a 70 Hz 56,5 70 Non interlacciato
XGA 1024 x 768 a 75 Hz 60,0 75 Non interlacciato
SXGA 1152 x 864 a 75 Hz 67,5 75 Non interlacciato
SXGA 1280 x 960 a 60 Hz 60,0 60 Non interlacciato
SXGA 1280 x 1024 a 60 Hz 64,0 60 Non interlacciato
SXGA 1280 x 1024 a 75 Hz 80,0 75 Non interlacciato
Modalità Risoluzione
EGA 640 x 350 a 70 Hz 31,5 70 Non interlacciato
DOS 720 x 400 a 70 Hz 31,3 70 Non interlacciato
Modalità Risoluzione
VGA 640 x 480 a 67 Hz 35,0 67 Non interlacciato
SVGA 832 x 624 a 75 Hz 49,7 75 Non interlacciato
SXGA 152 x 870 a 75 Hz 68,7 75 Non interlacciato
Modalità Risoluzione
SXGA 1280 x 1024 a 70 Hz 74,4 70 Non interlacciato
Il monitor LCD presenta solo modalità non interlacciate senza sfarfallio.
(punti per riga)
800 x 600 a 60 Hz 37,9 60 Non interlacciato
800 x 600 a 72 Hz 48,1 72 Non interlacciato
800 x 600 a 75 Hz 46,9 75 Non interlacciato
(punti per riga)
(punti per riga)
(punti per riga)
Modalità VESA
Freq O. (kHz) Freq V. (Hz) Osservazioni
Modalità IBM
Freq O. (kHz) Freq V. (Hz) Osservazioni
Modalità MAC
Freq O. (kHz) Freq V. (Hz) Osservazioni
Modalità MAC
Freq O. (kHz) Freq V. (Hz) Osservazioni
Manuale utente 13 IT
Page 72

Modelli TVM-2200
Risoluzione
(punti per riga)
640 x 480 a 60 Hz 31,5 60 Non interlacciato
640 x 480 a 72 Hz 37,9 72 Non interlacciato
640 x 480 a 75 Hz 37,5 75 Non interlacciato
800 x 600 a 56 Hz 35,2 56 Non interlacciato
800 x 600 a 60 Hz 37,9 60 Non interlacciato
800 x 600 a 72 Hz 48,1 72 Non interlacciato
800 x 600 a 75 Hz 46,9 75 Non interlacciato
1024 x 768 a 60 Hz 48,4 60 Non interlacciato
1024 x 768 a 70 Hz 56,5 70 Non interlacciato
1024 x 768 a 75 Hz 60,0 75 Non interlacciato
1280 x 1028 a 60 Hz 64,0 60 Non interlacciato
1280 x 1028 a 75 Hz 804,0 75 Non interlacciato
1152 x 864 a 75 Hz 67,5 75 Non interlacciato
1280 x 960 a 60 Hz 60,0 60 Non interlacciato
1440 x 900 a 60 Hz 55,935 60 Non interlacciato
1680 x 1050 a 60 Hz 65,290 60 Non interlacciato
Risoluzione
(punti per riga)
640 x 350 a 70 Hz 31,5 70 Non interlacciato
720 x 400 a 70 Hz 31,3 70 Non interlacciato
Risoluzione
(punti per riga)
640 x 480 a 67 Hz 35,0 67 Non interlacciato
832 x 624 a 75 Hz 49,7 75 Non interlacciato
152 x 870 a 75 Hz 68,7 75 Non interlacciato
Modalità MAC
Risoluzione
(punti per riga)
1280 x 1024 a 70 Hz 74,4 70 Non interlacciato
Il monitor LCD presenta solo modalità non interlacciate senza sfarfallio
Freq O. (KHz) Freq V. (Hz) Osservazioni
Freq O. (KHz) Freq V. (Hz) Osservazioni
Freq O. (KHz) Freq V. (Hz) Osservazioni
Freq O. (KHz) Freq V. (Hz) Osservazioni
Modalità VESA
Modalità IBM
Modalità MAC
IT 14 Manuale utente
Page 73

NL
Inhoud
Veiligheidsinformatie 1
Inleiding 2
Functies 2
De monitor assembleren 2
De monitor assembleren 2
Aansluitingen 3
Bedieningselementen op het voorpaneel 3
Bedieningspaneel (TVM-1700/TVM-1900-
modellen) 3
Bediendeel (TVM-2200-model) 4
Een monitorparameter wijzigen 4
Hotkeys 4
Aanpassingsprocedure 5
OSD-functie 5
VGA-menu (HDMI) 5
CAM-menu 7
Zelfdiagnose 8
De monitorvoet verwijderen 8
De monitorvoet bevestigen 9
Probleemoplossing 9
Specificaties 10
TVM-1700/TVM-1900-modellen 10
TVM-2200-modellen 11
Vooringestelde fabrieksinstellingen 12
TVM-1700/TVM-1900-modellen 12
TVM-2200-modellen 13
Gebruikershandleiding 1 NL
Veiligheidsinformatie
1. Installatiewaarschuwingen:
• Zorg dat er geen ventilatieopeningen
worden geblokkeerd.
• Zet de monitor op een goed geventileerde
plaats om te voorkomen dat de eenheid
oververhit raakt.
• Gebruik alleen accessoires die door de
leverancier worden opgegeven of bij het
product worden geleverd.
• Gebruik of plaats de monitor niet in
onderstaande omgevingen: omgevingen
met extreme temperaturen, zowel lage als
hoge; omgeving met hoge luchtvochtigheid;
omgeving met rechtstreeks zonlicht;
extreem stoffige omgevingen; in de
nabijheid van apparatuur met een sterk
magnetisch veld
2. Water en vocht: Dit apparaat is gevoelig voor
water en vocht. Stel deze unit dus niet bloot
aan regen of vocht om het risico op brand of
elektrische schokken te minimaliseren.
3. Voedingskabel en voedingskabelbeveiliging:
Voedingskabels moeten zo worden geleid dat
er niet eenvoudig over wordt gelopen en ze
niet beklemd kunnen raken. Let vooral op de
locaties van kabels en stekkers, contactdozen
en de uitgangen van de apparatuur.
4. Productbescherming: Raak het scherm niet
met de vingers aan. Huidsmeer laat strepen
achter op het scherm, die moeilijk te
verwijderen zijn en het scherm permanent
kunnen beschadigen. Zorg ook dat u geen druk
uitoefent op het scherm.
5. Reinigen: Gebruik een droge, schone doek
voor het reinigen.
6. Onderhoud: Probeer nooit zelf onderhoud uit
te voeren. Het openen van kap of behuizing
kan leiden tot blootstelling aan gevaar van
elektrische schokken of andere riskante
situaties. Laat al het onderhoud door
gekwalificeerd onderhoudspersoneel uitvoeren.
7. Onweer: Als het product langere tijd niet wordt
gebruikt en tijdens onweer, is het raadzaam
de stekker uit het stopcontact te halen en het
kabelsysteem los te koppelen. Op die manier
voorkomt u mogelijke schade door
stroomstoten of onweer.
8. Netstekker (2-pins/3-pins):
• Haal de aardaansluiting niet uit de
voedingseenheid/netstekker.
Page 74

• Vergeet nooit het LCD-scherm onder de
volgende omstandigheden los te koppelen
van de voedingsbron als de monitor langere
tijd niet zal worden gebruikt, als de
elektriciteitskabel of stekker/connector
beschadigd is of als de behuizing van de
monitor beschadigd of kapot is.
LET OP: Probeer nooit zelf onderhoud uit te
voeren. Elke poging om de behuizingen van dit
product te demonteren of te verwijderen, maakt de
garantie ongeldig en kan bovendien ernstig letsel
veroorzaken.
Inleiding
In deze handleiding wordt uitgelegd hoe u uw
monitor op de juiste manier installeert en bedient
en hoe u de maximale prestaties kunt verkrijgen.
Lees deze handleiding zorgvuldig door voordat u
de monitor installeert, en zorg dat u de monitor bij
de hand hebt om dingen snel na te kunnen kijken.
Controleer eerst of de inhoud van de doos
overeenkomt met de volgende controlelijst:
• LCD-monitor
• Voedingskabel
• Wisselstroomadapter
• Gebruikershandleiding
Indien er items ontbreken of zijn beschadigd, dient
u contact op te nemen met de leverancier. Bewaar
de doos en het verpakkingsmateriaal, zodat u uw
monitor altijd goed kunt opslaan of transporteren.
voldoet aan uw persoonlijke voorkeuren
of toepassingsvereisten. Gebruik de
bedieningselementen op het scherm
om de kleurtemperatuur aan te passen,
RGB-versterkingswaarde voor de best
mogelijke schermkleur en -intensiteit.
Druk op de Menu-knop en activeer het menu
Self-Diagnosis (Zelfdiagnose) om te bepalen of
uw monitor normaal functioneert, geen signaal
ontvangt of een signaal ontvangt dat buiten het
scanbereik ligt.
Activeer de hogere vernieuwingssnelheid van
de monitor om het scherm te stabiliseren en
de storende flikkering te voorkomen die vaak
oogvermoeidheid en hoofdpijn veroorzaakt.
De monitor ondersteunt de optimale
weergaveprestaties met 1280 x 1024 @ 75 Hz
(TVM-1700/TVM-1900-model) en 1680 x 1050
@ 60 Hz (TVM-2200-model).
De monitor kan worden aangesloten op
verschillende soorten videoapparaten met
ondersteunde videosignalen, zoals Compositevideo (CVBS), Separate video.
De interne stereoluidsprekers zorgen ervoor dat
de eindgebruiker van audiogeluid kan genieten.
De monitor assembleren
De monitors zijn bedoeld voor gebruik op een
bureaublad.
De arm van de monitorsteun is reeds
voorgeïnstalleerd op de monitor.
De monitor assembleren
Functies
De monitor is bedoeld voor gebruik in kleine
werkomgevingen of voor iedereen die meer
werkruimte nodig heeft op het bureau.
Dankzij het gemakkelijke en
gebruiksvriendelijke schermdisplay kunt u
eenvoudig en nauwkeurig uw schermgrootte,
positie en schermkleur aanpassen.
De monitor voldoet aan de VESA Display Data
Channel (DDC)-specificatie voor Plug and Playcompatibiliteit. Geavanceerde microcircuits
zorgen voor een snelle en moeiteloze installatie
en configuratie.
De monitor beschikt over geavanceerde
kleurenbediening voor een fijnafstelling die
NL 2 Gebruikershandleiding
1. Plaats glad materiaal of een doek op een
vlakke ondergrond. Plaats de monitor er
naar beneden gericht op.
2. Plaats de arm van de monitorsteun in de
meegeleverde voetstandaard.
TVM-1700/TVM-1900-modellen
Arm van de monitorsteun Voetstandaard
Page 75

TVM-2200-
De monitor demonteren
1. Plaats glad materiaal of een doek op een
2. Gebruik een schroevendraaier of een
model
vlakke ondergrond. Plaats de monitor er
naar beneden gericht op.
vergelijkbaar object met een scherp uiteinde
om de armsteun van de voet af te halen door
de inkeping aan de achterkant van de armsteun
in te drukken. (Let op dat het bevestigingspunt
kan afbreken als er teveel kracht wordt
gebruikt).
3. VIDEO IN
Composite signaalingang.
4. AUDIO L
Audiosignaalingang links.
5. AUDIO R
Audiosignaalingang rechts.
6. PC-stereo-ingang
7. Hoofdtelefoon uit
8. HDMI
HDMI-signaalingang.
9. VGA
RGB-signaalingang.
Bedieningselementen op het
voorpaneel
TVM-1700/TVM-1900-modellen
Bedieningspaneel (TVM-1700/
TVM-1900-modellen)
TVM-2200-
model
Aansluitingen
1. DC 12V ingang
2. VIDEO OUT Composite signaaluitgang
Gebruikershandleiding 3 NL
1 Aan/Uit-indicator
Toont zowel de normale werking als de
energiebeheerstatus met aan/uit-indicator.
2 Aan/uit
Hiermee schakelt u de monitor in of uit.
3 Pijl rechts - Volume (*)
Hiermee selecteert u een menu.
Primaire functie: Hiermee zet u het volume
harder.
Secundaire functie: Verplaatst de cursor naar
rechts in het OSD (On-Screen Display)-venster
en verhoogt de waarde van een geselecteerd
menu.
4 Pijl links - Volume (*) Hiermee selecteer
u een menu
Primaire functie: Hiermee zet u het volume
zachter.
Secundaire functie: Verplaatst de cursor naar
links in het OSD-venster en vermindert de
waarde van een geselecteerd menu.
5 MENU
Hiermee schakelt u het OSD-venster in.
Page 76

Schakelt het OSD-venster uit en gaat van het
submenu naar het bovenste menu in het OSDvenster.
6 Pijl omhoog - Automatische aanpassing
(*)
Primaire functie: De weergave van de meest
optimale instelling automatisch aanpassen
(alleen VGA-modus).
Secundaire functie: Hiermee kunt u verticaal
schuiven in het OSD-menu en de waarde van
de geselecteerde menufunctie verhogen.
7 Pijl omlaag
Hiermee kunt u verticaal schuiven in het OSDmenu en de waarde van de geselecteerde
submenufunctie verlagen.
8 SOURCE (*)
Hiermee kunt u de verschillende
ingangsbronnen selecteren. Druk op de
pijl OMHOOG of pijl OMLAAG om door de
verschillende bronnen te schuiven, en druk
op de pijl LINKS of pijl RECHTS om de selectie
te bevestigen.
(*) = Hotkey
Bediendeel (TVM-2200-model)
Primaire functie: Hiermee zet u het volume
ZACHTER.
Secundaire functie: Verplaatst de cursor naar
links in het OSD-venster en vermindert de
waarde van een geselecteerd menu.
5. SELECT-toets (*)
Hiermee kunt u de verschillende
ingangsbronnen selecteren. Druk op de pijl
OMHOOG of pijl OMLAAG om door de
verschillende bronnen te schuiven, en druk op
de pijl LINKS of pijl RECHTS om de selectie te
bevestigen.
6. MENU-toets
Hiermee schakelt u het OSD-venster in.
Schakelt het OSD-venster uit en gaat van het
submenu naar het bovenste menu in het OSDvenster.
7. Toets omhoog
Primaire functie: Kiest automatisch de juiste
horizontale en verticale positie en de grootte
van het schermbeeld. (PC-modus)
Secundaire functie: Hiermee kunt u verticaal
schuiven in het OSD-menu en de waarde van
de geselecteerde menufunctie VERHOGEN.
8 Toets ( * )
Hiermee kunt u verticaal schuiven in het OSDmenu en de waarde van de geselecteerde
submenufunctie VERLAGEN.
Een monitorparameter wijzigen
1. Druk op de knop MENU op het voorpaneel om
het OSD-menuscherm op te roepen.
2. Gebruik de knoppen Links-Rechts om het menu
1. Aan/Uit-indicator
Toont zowel de normale werking als de
energiebeheerstatus met aan/uit-indicator.
Aan/uit
Hiermee schakelt u de monitor in of uit.
2. Sensorvenster
Afstandsbediening. Ontvangt het signaal van de
afstandsbediening.
3. VOLUME (*)
Hiermee selecteert u het menu.
Primaire functie: Hiermee zet u het volume
harder.
Secundaire functie: Verplaatst de cursor naar
rechts in het OSD-venster en verhoogt de
waarde van een geselecteerd menu.
4. VOLUME (*)
Hiermee selecteert u het menu.
NL 4 Gebruikershandleiding
te selecteren.
3. Gebruik de knop Omlaag om de submenu’s te
selecteren.
4. Gebruik de knop Omhoog om een
submenufunctie te selecteren.
5. Druk op de knop SOURCE en breng vervolgens
de gewenste aanpassingen aan met de
knoppen Links-Rechts.
6. Druk op MENU om af te sluiten.
Hotkeys
Selecteert het signaal in de
volgorde: VGA - HDMI CAM
Page 77

Wanneer er geen OSD is
en u drukt op de knop
(UP/AUTO), kunt u de beste
weergaveprestaties voor de
huidige modus gebruiken.
Wanneer er geen OSD
is, kunt u het volume
rechtstreeks aanpassen.
Aanpassingsprocedure
Automatische
tracering uitvoeren
Is het H-formaat
correct?
Ja
Wordt de ruis
weergegeven op
het scherm?
Ya
Pas de fase aan
totdat het scherm
vrij is
Wordt de ruis nog
steeds weergegeven
op het scherm?
Ya
Nee
Nee
Einde
Pas de
CLOCK-regeling aan
H-positie uitvoeren
▲
VGA-menu (HDMI)
Picture (Beeld)
1. Contrast
Past het contrast van het beeld aan: het
verschil tussen lichtere en donkere gebieden
op het scherm.
2. Brightness (Helderheid)
Past de helderheid van het beeld aan.
3. Color Mode (Kleurmodus)
Kies een andere vooringestelde
kleurtemperatuur of stel uw eigen
kleurparameters in. (Normal (Normaal)/
Warm (Warm)/Cool (Koel)/User (Gebruiker))
4. Scale (Schaal)
Selecteert het schermformaat (alleen HDMImodus)
5. Auto
Kiest automatisch de juiste horizontale
en verticale positie en de grootte van het
schermbeeld. (alleen VGA-modus)
Sound (Geluid)
OSD-functie
Configureer de monitor met de OSD (On Screen
Display)-menu’s en -submenu’s. Wijzigingen
worden meteen opgeslagen en doorgevoerd.
1. Bass (Lage tonen)
Wanneer u de gebruikersmodus selecteert,
past u de lage tonen aan.
Gebruikershandleiding 5 NL
Page 78

2. Treble (Hoge tonen)
Wanneer u de gebruikersmodus selecteert,
past u de hoge tonen aan.
3. Balance (Balans)
Past de geluidbalans van de linker of rechter
luidsprekers aan.
4. MTS
Niet in gebruik
5. Sound Mode (Geluidmodus)
Kiest een andere vooringestelde geluidmodus
of uw eigen aangepaste geluid. (Standard
(Standaard)/ Movie (Film)/ Music (Muziek)/
User (Gebruiker))
Geometry (Geometrie)
1. H-Position (H-positie)
Past de positie van de weergave horizontaal
aan (naar links of naar rechts).
2. V-Position (V-positie)
Past de positie van de weergave verticaal aan
(omhoog of omlaag).
3. Clock (Klok)
Past de breedte (horizontale formaat) van het
schermbeeld aan.
4. Phase (Fase)
Verwijdert horizontale ruis en verscherpt het
beeld van de tekens.
System (Systeem)
1. Sleep Timer (Slaaptimer)
Selecteert de tijd wanneer de monitor wordt
uitgeschakeld. (Off (Uit)/15/30/45/60 minuten)
2. Language (Taal)
Selecteer de taal voor de OSD. (English
(Engels)/German (Duits))
3. OSD H-Position (H-positie OSD)
Past de OSD-positie van de weergave
horizontaal aan (naar links of naar rechts).
4. OSD V-Position (V-positie OSD)
Past de OSD-positie van de weergave verticaal
aan (omhoog of omlaag).
5. OSD Timeout (Timeout OSD)
Past de weergave van het OSD-menu aan.
(5 tot 60 seconden).
6. OSD Transparency (Transparantie OSD)
Past de OSD aan. Transparency
(Transparantie)
7. Information (Informatie)
Toont de status van de huidige
weergaveinstellingen.
8. Memory Recall (Geheugen terugzetten)
Stel de weergave-instellingen in op de
fabrieksinstellingen.
NL 6 Gebruikershandleiding
Page 79

CAM-menu
Picture (Beeld)
Sound (Geluid)
1. Contrast
Past het contrast van het beeld aan: het
verschil tussen lichtere en donkere gebieden
op het scherm.
2. Brightness (Helderheid)
Past de helderheid van het beeld aan.
3. Tint
Past de tint van het beeld aan.
4. Color (Kleur)
Past de kleur van het beeld aan.
5. Sharpness (Scherpte)
Past de beeldkwaliteit van de weergave aan
(als de monitor beelden in een hogere schaal
kan weergeven).
6. Color Tone (Kleurtoon)
Kies een andere vooringestelde
kleurtemperatuur of stel uw eigen
kleurparameters in. (Normal (Normaal)/Warm
(Warm)/Cool (Koel))
7. Picture Mode (Afbeeldingmodus)
Selecteert de afbeeldingmodus. (Standard
(Standaard)/ Movie (Film)/ Dynamic
(Dynamisch)/ User (Gebruiker))
8. Screen Format (Schermindeling)
(Full (Volledig)/ Zoom1 / Zoom2/ Subtitle
(Ondertiteling)/ 4:3/ Panorama)
1. Bass (Lage tonen)
Wanneer u de gebruikersmodus selecteert,
past u de lage tonen aan.
2. Treble (Hoge tonen)
Wanneer u de gebruikersmodus selecteert,
past u de hoge tonen aan.
3. Balance (Balans)
Past de geluidbalans van de linker of rechter
luidsprekers aan.
4. MTS
Niet in gebruik.
5. Sound Mode (Geluidmodus)
Kiest een andere vooringestelde geluidmodus
of uw eigen aangepaste geluid. (Standard
(Standaard)/ Movie (Film)/ Music (Muziek)/
User (Gebruiker))
Functie
1. 3D NR
Vermindert de ruis in het beeld vanwege
slechte ontvangst of slechte beeldkwaliteit.
(Off (Uit)/ Low (Laag)/ Middle (Gemiddeld)/
High (Hoog))
Gebruikershandleiding 7 NL
Page 80

2. MADi
Genereert geavanceerde kleur-engine die
automatische beeldverbetering geeft. (2D/3D)
3. H-Size (H-formaat)
Past de breedte (horizontale formaat) van het
schermbeeld aan.
4. V-Size (V-formaat)
Past de hoogte (verticale formaat) van het
schermbeeld aan.
5. H-position (H-positie)
Past de positie van de weergave horizontaal
aan (naar links of naar rechts).
6. V-position (V-positie)
Past de positie van de weergave verticaal aan
(omhoog of omlaag).
System (Systeem)
1. Sleep Timer (Slaaptimer)
Selecteert de tijd wanneer de monitor wordt
uitgeschakeld. (Off (Uit)/15/30/45/60 minuten)
2. Language (Taal)
Selecteer de taal voor de OSD. (English
(Engels)/Deutsch (Duits))
3. OSD H-Position (H-positie OSD)
Past de OSD-positie van de weergave
horizontaal aan (naar links of naar rechts).
4. OSD V-Position (V-positie OSD)
Past de OSD-positie van de weergave verticaal
aan (omhoog of omlaag).
5. OSD Time out (Timeout OSD)
Past de weergave van het OSD-menu aan.
(5~60 seconden)
6. OSD Transparency (Transparantie OSD)
Past de transparantie van de OSD aan.
7. Information (Informatie)
Toont de status van de huidige
weergaveinstellingen.
8. Memory Recall (Geheugen terugzetten)
Stel de weergave-instellingen in op de
fabrieksinstellingen.
Zelfdiagnose
Als er geen beeld is, wordt het scherm SelfDiagnosis (Zelfdiagnose) weergegeven. De
zelfdiagnosefuncties controleert of de status van
het monitorscherm No Signal (Geen signaal), Out
of range (Buiten bereik) of None support (Geen
ondersteuning) is.
Het scherm No Signal (Geen
signaal) wordt weergegeven
wanneer de D- Subsignaalaansluiting is
aangesloten, maar de status
van de monitor zich in de
DPMS-modus bevindt.
Het scherm Out of Range
(Buiten bereik) wordt
weergegeven wanneer de
toegepaste frequentie onder
of boven het normale bereik
ligt.
Normale bereik (alleen noninterlaced-modus):
H: 30 tot 80 kHz
V: 56 tot 77 Hz
Controleer of het
kabelscherm wordt
weergegeven wanneer
de analoge signaalkabel
is losgekoppeld.
Controleer of het
kabelscherm wordt
weergegeven wanneer
de HDMI-signaalkabel
is losgekoppeld.
De monitorvoet verwijderen
1. Schakel de monitor uit en trek de
voedingskabel uit het stopcontact.
2. Plaats een kussen of zachte doek op de vloer
en zet de monitor erop met de voorkant van de
monitor naar de vloer gericht.
NL 8 Gebruikershandleiding
Page 81

3. Maak de achterklep van de monitorvoet los met
een schroevendraaier.
4. Verwijder de vier schroeven waarmee de voet
aan de monitor is bevestigd. Zie onderstaande
afbeeldingen.
TVM-1700/TVM-1900-modellen
TVM-2200-model
De monitorvoet bevestigen
Zet de schroeven vast op de locaties die door de
pijlen worden aangegeven in de bovenstaande
afbeeldingen. Zie onderstaande afbeeldingen.
TVM-1700/TVM-1900-modellen
Monitorvoet wordt hier bevestigd
Aanzicht monitor-arm
TVM-2200-model
Het installatieoppervlak van de monitor is
compatibel met andere VESA-standaardtype
voeten.
Tussenruimte van gaten: 100 x 100 mm
Schroeflengte: 8 tot 12 mm
Probleemoplossing
Symptoom Controle
Beeld is
schokkerig
Geen beeld Controleer of de
AAN/UIT-LAMPJE
brandt niet
Beeld is onstabiel Controleer of de
Pas de instelling
Clock (Klok) aan om de
schermpositie in te stellen
en wijzig voorzichtig de
klokwaarde totdat er geen
ruis meer zichtbaar is.
aan/uitschakelaar en de
aan/uitschakelaar van de
computer zijn ingeschakeld
Controleer of de
signaalkabel goed op de
videokaart is aangesloten.
Controleer of de pennetjes
van de D sub-connector niet
zijn verbogen.
Controleer of de computer
zich in de
energiebesparingmodus
bevindt.
Controleer of de
aan/uitschakelaar
is ingeschakeld.
Controleer of de
voedingskabel
correct is aangesloten.
signaalkabel geschikt is
voor de videokaart.
Gebruikershandleiding 9 NL
Page 82

Symptoom Controle
Beeld is niet
gecentreerd, te
groot of te klein
Beeld stuitert of er
verschijnt een
golfpatroon in
beeld
Beeld is wazig Pas de instellingen
Geen geluid Controleer of de
Pas de instellingen aan
voor Clock (Klok) of H&V
Center (H&V midden) om
het juiste beeld te
verkrijgen.
Houd de apparaten die
mogelijk elektrische
interferentie kunnen
veroorzaken uit te
buurt van de monitor.
Raadpleeg de FCCinformatie op de voorzijde
van de handleiding.
aan voor Contrast en
Brightness (Helderheid).
audiokabels correct
zijn aangesloten op
de computer.
Pas het volume aan nadat
u hebt gecontroleerd of het
volume niet is gedempt.
Controleer het
audiosysteem in de
computer.
Symptoom Controle
Zacht geluid Pas het volume aan in het
VIDEO-scherm
wordt niet
weergegeven
Geen video Controleer of de videokabel
Slechte kleuren in
de videoweergave
Korrelig beeld in
de videoweergave
OSD-menu.
Pas het volume van de
geluidskaart in de computer
aan.
Controleer of de PICTUREmodus is ingesteld.
Controleer of de
videoterminal correct
is aangesloten.
correct is aangesloten op
de computer en is ingesteld
op Functions (Functies) in
het OSD-menu Picture
(Beeld).
Pas de waarden aan voor
Color (Kleur) of Tint in het
OSD-menu Picture (Beeld).
Pas Sharpness (Scherpte)
aan in het OSD-menu.
Specificaties
TVM-1700/TVM-1900-modellen
Items TVM-1700-model TVM-1900-model
Paneel Schermgrootte 17 in (43,2 cm) 19 in (48,3 cm)
Pixelafstand 0,264 x 0,264 mm 0,294 x 0,294 mm
Kijkhoek (H/V) 170°/160° 170°/160°
Contrastverhouding 1000:1 (type) 1000:1 (type)
Reactietijd 5 ms 5 ms
Helderheid 250 cd/m² (type) 250 cd/m² (type)
Aanbevolen resolutie 1280 x 1024 @ 75 Hz 1280 x 1024 @ 75 Hz
Audio Luidsprekervermogen 2 W x 2 2 W x 2
Luidsprekers Ingebouwd Ingebouwd
Geluidsfuncties Stereo R/L Stereo R/L
NL 10 Gebruikershandleiding
Page 83

Items TVM-1700-model TVM-1900-model
Interface VGA in (15 Pin
D-Sub)
1 1
HDMI-ingang 1 1
Camera in-/uitgang 1/1 1/1
Audioingang (RCA) 1 1
PC stereo-ingang Ja Ja
Hoofdtelefoonuitgang Ja Ja
Voeding Stroomverbruik < 30 W < 30 W
Bron 12 VDC 12 VDC, 3,33 A
Speciale functie Filtertype 3D comb.filter,
Afmetingen B x H x D (zonder
voet)
B x H x D (met voet) 383 x 386 x 202 mm
B x H x D (doos) 421 x 155 x 426 mm
de-interlacing
365 x 321 x 60 mm
15,08 x 12,64 x 2,36 in
15,08 x 15,20 x 8,00 in
16,57 x 6,10 x 16,77 in
3D comb.filter,
de-interlacing
427 x 357 x 57 mm
16,81 x 14,06 x 2,24 in
427 x 415 x 202 mm
16,81 x 16,34 x 7,95 in
452 x 146 x 449 mm
17,80 x 5,75 x 17,68 in
Gewicht Netto (zonder voet) 3,1 kg 4,3 kg
Netto (met voet) 3,8 kg 5 kg
Bruto (doos) 5,3 kg (11,1 kg) 6,6 kg
VESA-bevestiging VESA-standaard 100 x 100 mm
(3,94 x 3,94 inch)
100 x 100 mm
(3,94 x 3,94 inch)
Specificaties Schroefmaat M4-schroef M4-schroef
Gatenpatronen Lengte 8,00 mm 8,00 mm
Bedrijfstemperatuur 32 tot 40 °C (0 tot 104 °F)
De specificaties kunnen zonder voorafgaande kennisgeving worden gewijzigd.
Het paneel heeft mogelijk een aantal defecte pixels (bijv. iets lichter of donkerder) wat een
eigenschap is van het paneel. Maar er is geen defect in het paneelproduct zelf.
TVM-2200-modellen
Items TVM-2200-model
Paneel Schermgrootte 22 in (55,9 cm)
Pixelafstand 0,282 x 0,282 mm
Kijkhoek (H/V) 170°/160°
Contrastverhouding 1000:1 (type)
Reactietijd 5 ms
Helderheid 250 cd/m² (type)
Aanbevolen resolutie 1680 x 1050 @ 60 Hz
Audio Luidsprekervermogen 2 W x 2
Luidsprekers Ingebouwd
Geluidsfuncties Stereo R/L
Gebruikershandleiding 11 NL
Page 84

Items TVM-2200-model
Interface VGA in (15 Pin D-Sub) 1
HDMI-ingang 1
Camera in-/uitgang 1/1
Audioingang (RCA) 1
PC stereo-ingang Ja
Hoofdtelefoonuitgang Ja
Voeding Stroomverbruik < 50 W
Bron 12 VDC, 5 A
Speciale functie
Afmetingen
Gewicht Netto (zonder voet) 5,4 kg
VESA-bevestiging
Specificaties
Gatenpatronen
Bedrijfstemperatuur 32 tot 40 °C (0 tot 104 °F)
De specificaties kunnen zonder voorafgaande kennisgeving worden gewijzigd.
Het paneel heeft mogelijk een aantal defecte pixels (bijv. iets lichter of donkerder) wat een
eigenschap is van het paneel. Maar er is geen defect in het paneelproduct zelf.
Filtertype 3D comb.filter,
B x H x D (zonder voet) 523 x 367 x 66 mm
B x H x D (met voet) 523 x 419 x 202 mm
B x H x D (doos) 464 x 186 x 550 mm
Netto (met voet) 6,1 kg
Bruto (doos) 7,7 kg (17,0 kg)
VESA-standaard 100 x 100 mm
Schroefmaat M4-schroef
Lengte 8,00 mm
de-interlacing
20,59 x 14,45 x 2,60 in
20,59 x 16,50 x 7,95 in
18,27 x 7,32 x 21,65 in
(3,94 x 3,94 inch)
Vooringestelde fabrieksinstellingen
TVM-1700/TVM-1900-modellen
Modus Resolutie
VGA 640 x 480 @ 60 Hz 31,5 60 Non-interlaced
VGA 640 x 480 @ 72 Hz 37,9 72 Non-interlaced
VGA 640 x 480 @ 75 Hz 37,5 75 Non-interlaced
SVGA 800 x 600 @ 56 Hz 35,2 56 Non-interlaced
SVGA
SVGA
SVGA
XGA 1024 x 768 @ 60 Hz 48,4 60 Non-interlaced
XGA 1024 x 768 @ 70 Hz 56,5 70 Non-interlaced
NL 12 Gebruikershandleiding
(punten X lijn)
800 x 600 @ 60 Hz 37,9 60 Non-interlaced
800 x 600 @ 72 Hz 48,1 72 Non-interlaced
800 x 600 @ 75 Hz 46,9 75 Non-interlaced
VESA-modi
H-freq. (kHz) V-freq. (Hz) Opmerking
Page 85

VESA-modi
Modus Resolutie
(punten X lijn)
H-freq. (kHz) V-freq. (Hz) Opmerking
XGA 1024 x 768 @ 75 Hz 60,0 75 Non-interlaced
SXGA 1152 x 864 @ 75 Hz 67,5 75 Non-interlaced
SXGA 1280 x 960 @ 60 Hz 60,0 60 Non-interlaced
SXGA 1280 x 1024 @ 60 Hz 64,0 60 Non-interlaced
SXGA 1280 x 1024 @ 75 Hz 80,0 75 Non-interlaced
IBM-modi
Modus Resolutie
(punten X lijn)
H-freq. (kHz) V-freq. (Hz) Opmerking
EGA 640 x 350 @ 70 Hz 31,5 70 Non-interlaced
DOS 720 x 400 @ 70 Hz 31,3 70 Non-interlaced
MAC-modi
Modus Resolutie
(punten X lijn)
H-freq. (kHz) V-freq. (Hz) Opmerking
VGA 640 x 480 @ 67 Hz 35,0 67 Non-interlaced
SVGA 832 x 624 @ 75 Hz 49,7 75 Non-interlaced
SXGA 152 x 870 @ 75 Hz 68,7 75 Non-interlaced
MAC-modi
Modus Resolutie
(punten X lijn)
H-freq. (kHz) V-freq. (Hz) Opmerking
SXGA 1280 x 1024 @ 70 Hz 74,4 70 Non-interlaced
De LCD monitor beschikt alleen over non-interlaced modi zonder flikkering.
TVM-2200-modellen
VESA-modi
Resolutie
(punten X lijnen)
H-freq. (KHz) V-freq. (Hz) Opmerking
640 x 480 @ 60 Hz 31,5 60 Non-interlaced
640 x 480 @ 72 Hz 37,9 72 Non-interlaced
640 x 480 @ 75 Hz 37,5 75 Non-interlaced
800 x 600 @ 56 Hz 35,2 56 Non-interlaced
800 x 600 @ 60 Hz 37,9 60 Non-interlaced
800 x 600 @ 72 Hz 48,1 72 Non-interlaced
800 x 600 @ 75 Hz 46,9 75 Non-interlaced
1024 x 768 @ 60 Hz 48,4 60 Non-interlaced
1024 x 768 @ 70 Hz 56,5 70 Non-interlaced
1024 x 768 @ 75 Hz 60,0 75 Non-interlaced
1280 x 1028 @ 60 Hz 64,0 60 Non-interlaced
1280 x 1028 @ 75 Hz 804,0 75 Non-interlaced
1152 x 864 @ 75 Hz 67,5 75 Non-interlaced
1280 x 960 @ 60 Hz 60,0 60 Non-interlaced
1440 x 900 @ 60 Hz 55,935 60 Non-interlaced
1680 x 1050 @ 60 Hz 65,290 60 Non-interlaced
Gebruikershandleiding 13 NL
Page 86

VESA-modi
Resolutie
(punten X lijnen)
H-freq. (KHz) V-freq. (Hz) Opmerking
IBM-modi
Resolutie
(punten X lijnen)
H-freq. (KHz) V-freq. (Hz) Opmerking
640 x 350 @ 70 Hz 31,5 70 Non-interlaced
720 x 400 @ 70 Hz 31,3 70 Non-interlaced
MAC-modi
Resolutie
(punten X lijnen)
H-freq. (KHz) V-freq. (Hz) Opmerking
640 x 480 @ 67 Hz 35,0 67 Non-interlaced
832 x 624 @ 75 Hz 49,7 75 Non-interlaced
152 x 870 @ 75 Hz 68,7 75 Non-interlaced
MAC-modi
Resolutie
(punten X lijnen)
H-freq. (KHz) V-freq. (Hz) Opmerking
1280 x 1024 @ 70 Hz 74,4 70 Non-interlaced
De LCD-monitor beschikt alleen over non-interlaced modi zonder flikkering.
NL 14 Gebruikershandleiding
Page 87

PL
Ważne środki
bezpieczeństwa
Spis treści
Ważne środki bezpieczeństwa 1
Wstęp 2
Funkcje 2
Montaż monitora 2
Montaż monitora 3
Połączenia 3
Elementy sterujące na panelu przednim 3
Panel sterowania (model TVM-1700/TVM-1900) 3
Panel sterowania (model TVM-2200) 4
Zmiana parametrów monitora 5
Przyciski funkcyjne 5
Procedura regulacji 5
Funkcje menu ekranowego 5
Menu VGA (HDMI) 5
Menu CAM 7
Samodzielna diagnostyka 8
Zdejmowanie podstawki monitora 9
Mocowanie podstawki monitora 9
Rozwiązywanie problemów 10
Dane techniczne 11
Modele TVM-1700/TVM-1900 11
Model TVM-2200 12
Fabryczne ustawienia domyślne
synchronizacji 13
Modele TVM-1700/TVM-1900 13
Model TVM-2200 14
Instrukcja obsługi 1 PL
1. Ostrzeżenia dotyczące instalacji:
• Nie należy blokować otworów
wentylacyjnych.
• Zawsze należy upewnić się, że monitor
znajduje się w dobrze wentylowanym
pomieszczeniu, aby zapobiec
przegrzewaniu urządzenia.
• Należy używać wyłącznie akcesoriów
określonych przez producenta lub
sprzedawanych z produktem.
• Należy unikać umieszczania monitora lub
korzystania z niego w następujących
warunkach: w miejscach, w których
występują bardzo wysokie lub skrajnie
niskie temperatury; w miejscach narażonych
na bezpośrednie działanie światła
słonecznego; w miejscach, w których
występuje nadmierna ilość pyłu;
w miejscach, w których monitor mógłby
się znajdować zbyt blisko innych urządzeń
generujących silne pole magnetyczne.
2. Woda i wilgoć: urządzenia nie nale
w pobliżu wody. Aby zapobiec pożarowi lub
porażeniu prądem, należy chronić urządzenie
przed działaniem deszczu i wilgoci.
3. Przewód zasilający i jego zabezpieczenia:
przewody zasilające należy prowadzić
w miejscach, w których nie będą narażone na
deptanie lub przyciskanie. Należy szczególnie
starannie wybrać umiejscowienie przewodów,
wtyczek, gniazd i wyjść urządzenia.
4. Dbałość o produkt: nie należy dotykać
palcami ekranu monitora. Tłuszcz znajdujący
się na skórze może pozostawić ślady na
powierzchni ekranu, które trudno usunąć
i mogą spowodować trwałe uszkodzenie
ekranu. Nie naciskać ekranu.
5. Czyszczenie: do czyszczenia należy używać
wyłącznie suchej ściereczki.
6. Serwis: nie należy podejmować prób
samodzielnego wykonywania czynności
serwisowych. Otwarcie lub zdjęcie osłon może
narazić użytkownika na niebezpieczne napięcie
lub inne zagrożenia. Wszelkie czynności
serwisowe należy zlecić specjaliście.
7. Wyładowania atmosferyczne: aby zapewnić
dodatkową ochronę urządzenia podczas
wyładowań atmosferycznych lub gdy
urządzenie ma pozostawać bez nadzoru na
ży używać
Page 88

dłuższy czas, należy wyjąć wtyczkę przewodu
zasilającego z gniazdka i odłączyć kable.
W ten sposób można zapobiec uszkodzeniu
urządzenia wynikającego z działania
wyładowań atmosferycznych i skoków napięcia
linii elektroenergetycznych.
8. Wtyczka zasilania (2-pinowa/3-pinowa):
• Nie należy odłączać połączenia uziemienia
od wtyczki zasilania.
• Należy zawsze pamiętać o odłączeniu
monitora od zasilania w następujących
warunkach: jeśli monitor nie będzie
używany przez dłuższy czas; jeśli przewód
zasilania lub złącze/wtyczka są
uszkodzone; jeśli obudowa monitora jest
uszkodzona lub zepsuta.
POUCZENIE: nie należy podejmować
samodzielnych prób demontażu produktu. Wszelkie
próby rozmontowania tego produktu lub zdjęcia
z niego osłon spowodują utratę gwarancji, mogą
także spowodować poważne obrażenia.
Wstęp
Ta instrukcja obsługi przedstawia sposób
prawidłowej instalacji i obsługi monitora oraz
zapewnienia jego najwyższej wydajności.
Przed zainstalowaniem monitora należy dokładnie
zapoznać się z niniejszą instrukcją obsługi,
a następnie przechowywać ją w pobliżu monitora
w celach referencyjnych.
Najpierw należy sprawdzić, czy zawartość
opakowania jest zgodna z poniższą listą kontrolną:
• Monitor LCD
• Przewód zasilający
• Adapter prądu zmiennego
• Instrukcja obsługi
W przypadku braku lub uszkodzenia jakiegokolwiek
elementu należy skontaktować się z dealerem.
Opakowanie i materiały pakujące należy zachować,
aby możliwe było prawidłowe przechowywanie lub
transportowanie monitora.
Funkcje
Wygodne i łatwe w obsłudze menu ekranowe
umożliwia prostą i dokładną regulację rozmiaru,
pozycji i kolorów obrazu.
Monitor jest zgodny ze specyfikacją VESA
Display Data Channel (DDC) w zakresie
zgodności z funkcją Plug and Play.
Zaawansowane układy elektroniczne
zapewniają łatwą i szybką instalację
i konfigurację.
Monitor jest wyposażony w zaawansowane
elementy sterowania kolorami w celu
precyzyjnego dostrojenia zgodnie z własnymi
preferencjami lub wymaganiami aplikacji. Do
regulacji temperatury kolorów służą ekranowe
elementy sterowania.
Wartość wzmocnienia RGB pozwala uzyskać
najlepsze kolory ekranowe i intensywność
obrazu.
Po naciśnięciu przycisku Menu można
aktywować menu samodzielnej diagnostyki
w celu określenia, czy monitor działa normalnie,
nie odbiera sygnału lub odbiera sygnał poza
zakresem skanowania.
Aktywacja wyższych częstotliwości odświeżania
monitora pozwala uzyskać stabilizację ekranu
i wyeliminować denerwujące migotanie, które
przyczynia się do zmęczenia wzroku i bólów
głowy.
Monitor zapewnia optymalną wydajność
w rozdzielczości 1280 x 1024 przy 75 Hz
(model TVM-1700/TVM-1900) lub
w rozdzielczości 1680 x 1050 przy 60 Hz
(model TVM-2200).
Monitor można podłączyć do różnych typów
urządzeń wideo dzięki obsłudze wejściowych
sygnałów wideo takich jak złożony sygnał
wizyjny (CVBS) i rozdzielony sygnał wizyjny.
Wewnętrzne głośniki stereofoniczne
umożliwiają słuchanie dźwięku przez
użytkownika.
Montaż monitora
Monitory zostały zaprojektowane w celu użyciu na
biurku.
Ramię podstawy monitora jest fabrycznie
przymocowane do monitora.
Monitor jest przeznaczony do użycia
w niewielkim miejscu pracy lub dla osób,
które potrzebują więcej miejsca na biurku.
PL 2 Instrukcja obsługi
Page 89

Montaż monitora
1. Umieść miękką podkładkę lub ściereczkę na
płaskiej powierzchni. Połóż na niej monitor
ekranem skierowanym w dół.
2. Włóż ramię podstawki monitora do dostarczonej
podstawy.
Model TVM-2200
Modele TVM-1700/TVM-1900
Ramię podstawki
monitora
Model TVM-2200
Demontaż monitora
1. Umieść miękką podkładkę lub ściereczkę na
płaskiej powierzchni. Połóż na niej monitor
ekranem skierowanym w dół.
2. Używając śrubokrętu lub podobnego
przedmiotu z ostrym końcem, delikatnie odłącz
ramię wspornika od podstawy, naciskając
rowek z tyłu ramienia wspornika. (Użycie zbyt
dużej siły może spowodować uszkodzenie
miejsca mocowania).
Modele TVM-1700/TVM-1900
Podstawa
Połączenia
1. Wejście DC 12V
2. VIDEO OUT Wyjście złożonego sygnału
wizyjnego
3. VIDEO IN
Wejście złożonego sygnału wizyjnego
4. AUDIO L
Lewe wejście sygnału audio
5. AUDIO R
Prawe wejście sygnału audio
6. Stereofoniczne wejście komputerowe
7. Wyjście słuchawkowe
8. HDMI
Wejście sygnału HDMI
9. VGA
Wejście sygnału RGB
Elementy sterujące na
panelu przednim
Panel sterowania (model
TVM-1700/TVM-1900)
Instrukcja obsługi 3 PL
Page 90

1 Wskaźnik zasilania
Wskazuje normalne działanie i stan
zarządzania energią przy użyciu diody
LED zasilania.
2 POWER
Włączanie lub wyłączanie monitora.
Strzałka w prawo - głośność (*)
3
Wybór menu.
Główna funkcja: Zwiększanie poziomu
głośności.
Dodatkowa funkcja: Przesuwanie kursora
w prawo w oknie menu ekranowego lub
zwiększanie wartości w dowolnym wybranym
menu.
4
Strzałka w lewo - głośność (*) Wybór
menu
Główna funkcja: Zmniejszanie poziomu
głośności.
Dodatkowa funkcja: Przesuwanie kursora
w lewo w oknie menu ekranowego lub
zmniejszanie wartości w dowolnym wybranym
menu.
5 MENU
Powoduje wyświetlenie okna menu
ekranowego. Umożliwia ukrycie okna menu
ekranowego lub przejście z menu podrzędnego
do menu głównego w oknie menu ekranowego.
6
Strzałka w górę - automatyczna regulacja
(*)
Główna funkcja: Automatycznie dopasowuje
obraz do najbardziej optymalnego ustawienia
(tylko tryb VGA).
Dodatkowa funkcja: Umożliwia przewijanie
menu ekranowego w pionie oraz zwiększanie
wartości wybranej funkcji menu.
7
Strzałka w dół
Umożliwia przewijanie menu ekranowego
w pionie oraz zmniejszanie wartości wybranej
funkcji podmenu.
8 SOURCE (*)
Służy do wybierania różnych źródeł
wejściowych. Naciśnij przycisk strzałki w GÓRĘ
lub w DÓŁ, aby przewijać dostępne źródła.
Naciśnij przycisk strzałki w LEWO lub
w PRAWO, aby potwierdzić wybór.
(*) = Przycisk funkcyjny
Panel sterowania (model TVM-2200)
1. Wskaźnik zasilania
Wskazuje normalne działanie i stan
zarządzania energią przy użyciu diody LED
zasilania.
Przycisk POWER
Włączanie lub wyłączanie monitora.
2. Okienko czujnika
Zdalne sterowanie. Umożliwia odbiór sygnału
z pilota zdalnego sterowania.
3. VOLUME
Wybór menu.
Główna funkcja: Zwiększanie poziomu
głośności.
Dodatkowa funkcja: Przesuwanie kursora
w prawo w oknie menu ekranowego lub
zwiększanie wartości w dowolnym wybranym
menu.
4.
VOLUME (*)
Wybór menu.
Główna funkcja: ZMNIEJSZANIE poziomu
głośności.
Dodatkowa funkcja: Przesuwanie kursora
w lewo w oknie menu ekranowego lub
zmniejszanie wartości w dowolnym wybranym
menu.
5. Przycisk SELECT (*)
Służy do wybierania różnych źródeł
wejściowych. Naciśnij przycisk strzałki w GÓRĘ
lub w DÓŁ, aby przewijać dostępne źródła.
Naciśnij przycisk strzałki w LEWO lub
w PRAWO, aby potwierdzić wybór.
6. Przycisk MENU
Powoduje wyświetlenie okna menu
ekranowego. Umożliwia ukrycie okna menu
ekranowego lub przejście z menu podrzędnego
do menu głównego w oknie menu ekranowego.
7.
Przycisk w górę
Główna funkcja: Umożliwia automatyczne
wybranie właściwej pozycji poziomej i pionowej
oraz rozmiaru obrazu (tryb komputera).
(*)
PL 4 Instrukcja obsługi
Page 91

Dodatkowa funkcja: Umożliwia przewijanie
menu ekranowego w pionie oraz
ZWIĘKSZANIE wartości wybranej funkcji menu.
8 Przycisk ( * )
Umożliwia przewijanie menu ekranowego
w pionie oraz ZMNIEJSZANIE wartości
wybranej funkcji podmenu.
Zmiana parametrów monitora
1. Naciśnij przycisk MENU na panelu przednim,
żeby otworzyć menu ekranowe.
2. Użyj przycisków Lewo i Prawo, aby wybrać
menu.
3. Użyj przycisku Dół, aby wybrać podmenu.
4. Użyj przycisków Góra i Dół, aby wybrać funkcję
w podmenu.
5. Naciśnij przycisk SOURCE (ŹRÓDŁO),
a następnie użyj przycisków Lewo i Prawo,
aby wprowadzić odpowiednie zmiany.
6. Aby wyjść, naciśnij przycisk MENU.
Przyciski funkcyjne
Wybiera sygnał w kolejności
VGA - HDMI - CAM.
Jeśli nie jest wyświetlane
menu ekranowe, naciśnięcie
przycisku
umożliwia najlepsze
dopasowanie obrazu do
bieżącego trybu.
Jeśli nie jest wyświetlane
menu ekranowe, można
bezpośrednio dostosować
poziom głośności.
▲ (GÓRA/AUTO)
Procedura regulacji
Wykonaj
automatyczne
dopasowanie
Czy rozmiar
poziomy (H) jest
prawidłowy?
Tak
Czy na ekranie
widoczne są
zakłócenia?
Dostosuj ustawienie
wyczyszczenia obrazu
Tak
( ) do momentu
Faza
Czy na ekranie
ciągle widoczne są
zakłócenia?
Ta k
Phase
Nie
Nie
Koniec
Dostosuj ustawienie
CLOCK
(Częstotliwość)
Wykonaj
H-Position
(Pozycja pozioma)
Funkcje menu ekranowego
Monitor można skonfigurować przy użyciu menu
i podmenu wyświetlanych na ekranie. Zmiany są
zapisywane i stosowane natychmiast.
Menu VGA (HDMI)
Picture (Obraz)
1. Contrast (Kontrast)
Umożliwia dostosowanie kontrastu obrazu, czyli
różnicy między jasnymi i ciemnymi obszarami
na ekranie.
Instrukcja obsługi 5 PL
Page 92

2. Brightness (Jasność)
Umożliwia dostosowanie jasności obrazu.
3. Color Mode (Tryb koloru)
Umożliwia wybranie innej zaprogramowanej
temperatury kolorów lub ustawienie własnych
dostosowanych parametrów kolorów.
(Normal/Warm/Cool/User — Normalne/Ciepłe/
Zimne/Użytkownika)
4. Scale (Skala)
Umożliwia wybranie rozmiaru ekranu (tylko tryb
HDMI).
5. Auto
Umożliwia automatyczne wybranie właściwej
pozycji poziomej i pionowej oraz rozmiaru
obrazu. (Tylko tryb VGA)
Sound (Dźwięk)
Geometry (Geometria)
1. H-Position (Pozycja pozioma)
Umożliwia dostosowanie poziomej pozycji
obrazu (w lewo lub w prawo).
2. V-Position (Pozycja pionowa)
Umożliwia dostosowanie pionowej pozycji
obrazu (w górę lub w dół).
3. Clock (Częstotliwość)
Umożliwia dostosowanie szerokości (rozmiaru
poziomowego) obrazu na ekranie.
4. Phase (Faza)
Umożliwia usunięcie zakłóceń poziomych oraz
zwiększenie ostrości wyświetlanych znaków.
System
1. Bass (Niskie tony)
Po wybraniu trybu użytkownika można
dostosować poziom niskich tonów.
2. Treble (Wysokie tony)
Po wybraniu trybu użytkownika można
dostosować poziom wysokich tonów.
3. Balance (Balans)
Umożliwia ustawienie balansu dźwięku dla
lewego i prawego głośnika.
4. MTS
Nieużywane.
5. Sound Mode (Tryb dźwięku)
Umożliwia wybór innego zaprogramowanego
trybu dźwięku lub własnego dostosowanego
dźwięku. (Standard/Movie/Music/User —
Standardowy/Film/Muzyka/Użytkownika)
1. Sleep Timer (Zegar trybu uśpienia)
Umożliwia wybranie czasu wyłączenia
monitora. (Off/15/30/45/60 Minutes —
Wył./15/30/45/60 minut)
2. Language (Język)
Umożliwia wybranie języka menu ekranowego.
(English/German — Angielski/Niemiecki)
PL 6 Instrukcja obsługi
Page 93

3. OSD H-Position (Pozioma pozycja menu
ekranowego)
Umożliwia dostosowanie poziomej pozycji
menu ekranowego (w lewo lub w prawo).
4. OSD V-Position (Pionowa pozycja menu
ekranowego)
Umożliwia dostosowanie pionowej pozycji
menu ekranowego (w górę lub w dół).
5. OSD Timeout (Limit czasu menu
ekranowego)
Umożliwia dostosowanie czasu wyświetlania
menu ekranowego. (Od 5 do 60 sekund).
6. OSD Transparency (Przezroczystość menu
ekranowego)
Umożliwia dostosowanie przezroczystości
menu ekranowego.
7. Information (Informacje)
Powoduje wyświetlenie stanu bieżących
ustawień ekranu.
8. Memory Recall (Przywołanie pamięci)
Powoduje przywrócenie fabrycznych ustawień
domyślnych obrazu.
Menu CAM
Picture (Obraz)
5. Sharpness (Ostrość)
Umożliwia dostosowanie jakości obrazu (jeśli
monitor rozpocznie skalowanie w górę).
6. Color Tone (Odcień kolorów)
Umożliwia wybranie innej zaprogramowanej
temperatury kolorów lub ustawienie własnych
dostosowanych parametrów kolorów. (Normal/
Warm/Cool — Normalne/Ciepłe/Zimne)
7. Picture Mode (Tryb obrazu)
Umożliwia wybranie trybu obrazu.
(Standard/Movie/Dynamic/User —
Standardowy/Film/Dynamiczny/Użytkownika)
8. Screen Format (Format ekranu)
(Full/Zoom1/Zoom2/Subtitle/4:3/Panorama —
Pełny/Powiększenie1/Powiększenie2/Napisy/4:
3/Panorama).
Sound (Dźwięk)
1. Bass (Niskie tony)
Po wybraniu trybu użytkownika można
dostosować poziom niskich tonów.
2. Treble (Wysokie tony)
Po wybraniu trybu użytkownika można
dostosować poziom wysokich tonów.
1. Contrast (Kontrast)
Umożliwia dostosowanie kontrastu obrazu, czyli
różnicy między jasnymi i ciemnymi obszarami
na ekranie.
2. Brightness (Jasność)
Umożliwia dostosowanie jasności obrazu.
3. Tint (Odcień)
Umożliwia dostosowanie odcienia obrazu.
3. Balance (Balans)
Umożliwia ustawienie balansu dźwięku dla
lewego i prawego głośnika.
4. MTS
Nieużywane.
5. Sound Mode (Tryb dźwięku)
Umożliwia wybór innego zaprogramowanego
trybu dźwięku lub własnego dostosowanego
dźwięku. (Standard/Movie/Music/User —
Standardowy/Film/Muzyka/Użytkownika)
4. Color (Kolor)
Umożliwia dostosowanie kolorów obrazu.
Instrukcja obsługi 7 PL
Page 94

Function (Funkcja)
1. 3D NR
Umożliwia redukcję zakłóceń obrazu
wynikających z odbioru słabego sygnału lub
niskiej jakości obrazu. (Off/Low/Middle/High —
Wył./Niska/Średnia/Wysoka)
2. MADi
Umożliwia użycie zaawansowanego
mechanizmu obsługi kolorów w celu
poprawy jakości obrazu. (2D/3D)
3. H-Size (Rozmiar poziomy)
Umożliwia dostosowanie szerokości
(rozmiaru poziomowego) obrazu na ekranie.
4. V-Size (Rozmiar pionowy)
Umożliwia dostosowanie wysokości
(rozmiaru pionowego) obrazu na ekranie.
5. H-position (Pozycja pozioma)
Umożliwia dostosowanie poziomej
pozycji obrazu (w lewo lub w prawo).
6. V-position (Pozycja pionowa)
Umożliwia dostosowanie pionowej
pozycji obrazu (w górę lub w dół).
System
1. Sleep Timer (Zegar trybu uśpienia)
Umożliwia wybranie czasu wyłączenia
monitora. (Off/15/30/45/60 Minutes —
Wył./15/30/45/60 minut)
2. Language (Język)
Umożliwia wybranie języka menu ekranowego.
(English/Deutsch — Angielski/Niemiecki)
3. OSD H-Position (Pozioma pozycja menu
ekranowego)
Umożliwia dostosowanie poziomej pozycji
menu ekranowego (w lewo lub w prawo).
4. OSD V-Position (Pionowa pozycja menu
ekranowego)
Umożliwia dostosowanie pionowej pozycji
menu ekranowego (w górę lub w dół).
5. OSD Time out (Limit czasu menu
ekranowego)
Umożliwia dostosowanie czasu wyświetlania
menu ekranowego. (Od 5 do 60 sekund)
6. OSD Transparency (Przezroczystość menu
ekranowego)
Umożliwia dostosowanie przezroczystości
menu ekranowego.
7. Information (Informacje)
Powoduje wyświetlenie stanu bieżących
ustawień ekranu.
8. Memory Recall (Przywołanie pamięci)
Powoduje przywrócenie fabrycznych
ustawień domyślnych obrazu.
Samodzielna diagnostyka
W przypadku braku obrazu zostanie wyświetlony
ekran samodzielnej diagnostyki. Funkcja
samodzielnej diagnostyki sprawdza, czy monitor
ma stan No Signal (Brak sygnału), Out of range
(Poza zakresem) lub None support (Brak obsługi).
Ekran No Signal (Brak
sygnału) jest wyświetlany,
kiedy podłączone jest złącze
sygnału D-Sub, ale monitor
jest w trybie DPMS.
Ekran Out of Range (Poza
zakresem) jest wyświetlany,
kiedy zastosowana
częstotliwość jest poniżej lub
powyżej normalnego zakresu.
Normalny zakres (tylko tryb
bez przeplotu):
Poz.: 30 do 80 kHz
Pion.: 56 do 77 Hz
PL 8 Instrukcja obsługi
Page 95

Sprawdź, czy wyświetlany
jest ekran kabla, kiedy kabel
sygnału analogowego jest
rozłączony.
Sprawdź, czy wyświetlany
jest ekran kabla, kiedy kabel
sygnału HDMI jest
rozłączony.
Zdejmowanie podstawki
monitora
1. Wyłącz monitor i odłącz kabel zasilający.
2. Połóż na podłodze poduszkę lub miękką
szmatkę, a następnie połóż na niej monitor
przednią częścią skierowaną do podłogi.
3. Za pomocą śrubokręta odłącz tylną pokrywę
podstawki monitora.
4. Wykręć cztery śruby łączące podstawkę
i obudowę monitora. Patrz poniższe rysunki.
Modele TVM-1700/TVM-1900
Mocowanie podstawki
monitora
Przykręć śruby w miejscach wskazanych strzałkami
na powyższych rysunkach. Patrz poniższe rysunki.
Modele TVM-1700/TVM-1900
W tym miejscu mocowana jest podstawka
monitora
Model TVM-2200
Przednia część
ramienia podstawki
Powierzchnia instalacyjna monitora jest zgodna
z innymi typami standardowych podstawek VESA.
Odstępy otworów: 100 x 100 mm
Długość śrub: od 8 do 12 mm
Model TVM-2200
Instrukcja obsługi 9 PL
Page 96

Rozwiązywanie problemów
Symptom Kontrola
Drgający obraz Dostosować ustawienie
Brak obrazu Sprawdzić, czy włącznik
Wskaźnik LED
zasilania nie świeci
Obraz jest
niestabilny
Obraz nie jest
wyśrodkowany
bądź jest zbyt duży
lub zbyt mały
Obraz skacze lub
widoczny jest
wzorzec fali
Rozmyty obraz Dostosować ustawienia
Clock (Częstotliwość), aby
ustawić pozycję obrazu,
oraz precyzyjnie ustawiać
wartość (Częstotliwość) do
momentu, kiedy zakłócenia
przestaną być widoczne.
zasilania monitora
i włącznik zasilania
komputera są w pozycji
On (Wł.).
Sprawdzić, czy kabel
transmisji sygnału jest
prawidłowo podłączony
do karty graficznej.
Sprawdzić, czy styki złącza
D-Sub nie są wygięte.
Sprawdzić, czy komputer
nie jest w trybie
oszczędzania energii.
Sprawdzić, czy włącznik
zasilania jest w pozycji
On (Wł.).
Sprawdzić, czy przewód
zasilający jest prawidłowo
podłączony.
Sprawdzić, czy kabel
transmisji sygnału jest
odpowiedni dla karty
graficznej.
Dostosować ustawienie
Clock (Częstotliwość) lub
H&V Center (Środek poz.
i pion.), aby uzyskać
właściwy obraz.
Urządzenia, które mogą
powodować zakłócenia
elektryczne, należy trzymać
z dala od monitora.
Patrz informacje FCC na
przedniej okładce instrukcji
obsługi.
Contrast (Kontrast)
i Brightness (Jasność).
Symptom Kontrola
Brak dźwięku Sprawdzić, czy kable audio
Niski poziom
dźwięku
Nie jest widoczny
ekran VIDEO
Brak obrazu wideo Sprawdzić, czy kabel wideo
Nieprawidłowe
kolory obrazu
wideo
Ziarnisty obraz
wideo
są prawidłowo podłączone
do komputera.
Dostosować poziom
głośności po sprawdzeniu,
czy dźwięk jest wyciszony.
Sprawdzić system audio
w komputerze.
Dostosować poziom
głośności w menu
ekranowym.
Dostosować poziom
głośności karty dźwiękowej
w komputerze.
Sprawdzić, czy ustawiono
tryb PICTURE (Obraz).
Sprawdzić, czy złącze
wideo jest prawidłowo
podłączone.
jest prawidłowo podłączony
do komputera oraz czy
dokonano ustawienia
w menu ekranowym
Functions (Funkcje).
Dostosować wartości Color
(Kolor) lub Tint (Odcień)
w menu ekranowym Picture
(Obraz).
Dostosować wartość
Sharpness w menu
ekranowym Picture (Obraz).
PL 10 Instrukcja obsługi
Page 97

Dane techniczne
Modele TVM-1700/TVM-1900
Pozycje Model TVM-1700 Model TVM-1900
Wyświetlacz Rozmiar ekranu 17 cali (43,2 cm) 19 cali (48,3 cm)
Rozstaw pikseli 0,264 x 0,264 mm 0,294 x 0,294 mm
Kąt widzenia (w
poziomie/w pionie)
Współczynnik
kontrastu
Czas reakcji 5 ms 5 ms
Jasność 250 cd/m² (typowa) 250 cd/m² (typowa)
Zalecana
rozdzielczość
Dźwięk Moc głośników 2 W x 2 2 W x 2
Głośniki Wbudowane Wbudowane
Funkcje dźwięku Stereo P/L Stereo P/L
Interfejs Wejście VGA
Zasilanie Zużycie energii < 30 W < 30 W
Funkcja specjalna Typ filtra Filtr grzebieniowy 3D,
Wymiary Sz x W x G (bez
Waga Netto (bez podstawki) 3,1 kg 4,3 kg
Mocowanie VESA Standard VESA 100 x 100 mm
Dane techniczne Rozmiar śruby
Wzorce otworów Długość 8,00 mm 8,00 mm
Temperatura
robocza
Dane techniczne mogą ulec zmianie bez wcześniejszego powiadomienia.
(15-pinowe D-Sub)
Wejście HDMI 1 1
Wejście/wyjście CAM 1/1 1/1
Wejście audio (typu
RCA)
Stereofoniczne
wejście komputerowe
Wyjście słuchawkowe Tak Tak
Źródło 12 V, prąd stały 12 V, prąd stały, 3,33 A
podstawki)
Sz x W x G
(z podstawką)
Sz x W x G
(opakowanie)
Netto (z podstawką) 3,8 kg 5 kg
Brutto (opakowanie) 5,3 kg 6,6 kg
odległościowej
0 do 40°C
170°/160° 170°/160°
1000:1 (typowy) 1000:1 (typowy)
1280 x 1024 przy 75 Hz 1280 x 1024 przy 75 Hz
1 1
1 1
Tak Tak
usuwanie przeplotu
365 x 321 x 60 mm
383 x 386 x 202 mm 427 x 415 x 202 mm
421 x 155 x 426 mm 452 x 146 x 449 mm
Śruba M4 Śruba M4
Filtr grzebieniowy 3D,
usuwanie przeplotu
427 x 357 x 57 mm
100 x 100 mm
Instrukcja obsługi 11 PL
Page 98

Ze względu na charakterystykę wyświetlacza mogą znajdować się na nim uszkodzone piksele
(np. lekko jasne lub ciemne). Nie oznacza to jednak usterki samego wyświetlacza.
Model TVM-2200
Pozycje Model TVM-2200
Wyświetlacz Rozmiar ekranu 22 cale (55,9 cm)
Rozstaw pikseli 0,282 x 0,282 mm
Kąt widzenia (w poziomie/w
pionie)
170°/160°
Współczynnik kontrastu 1000:1 (typowy)
Czas reakcji 5 ms
Jasność 250 cd/m² (typowa)
Zalecana rozdzielczość 1680 x 1050 przy 60 Hz
Dźwięk Moc głośników 2 W x 2
Głośniki Wbudowane
Funkcje dźwięku Stereo P/L
Interfejs Wejście VGA (15-pinowe D-Sub) 1
Wejście HDMI 1
Wejście/wyjście CAM 1/1
Wejście audio (typu RCA) 1
Stereofoniczne wejście
komputerowe
Tak
Wyjście słuchawkowe Tak
Zasilanie Zużycie energii < 50 W
Źródło 12 V, prąd stały, 5 A
Funkcja specjalna
Wymiary
Typ filtra Filtr grzebieniowy 3D,
usuwanie przeplotu
Sz x W x G (bez podstawki) 523 x 367 x 66 mm
Sz x W x G (z podstawką) 523 x 419 x 202 mm
Sz x W x G (opakowanie) 464 x 186 x 550 mm
Waga Netto (bez podstawki) 5,4 kg
Netto (z podstawką) 6,1 kg
Brutto (opakowanie) 7,7 kg
Mocowanie VESA
Dane techniczne
Wzorce otworów
Temperatura
robocza
Standard VESA 100 x 100 mm
Rozmiar śruby odległościowej Śruba M4
Długość 8,00 mm
0 do 40°C
Dane techniczne mogą ulec zmianie bez wcześniejszego powiadomienia.
Ze względu na charakterystykę wyświetlacza mogą znajdować się na nim uszkodzone piksele
(np. lekko jasne lub ciemne). Nie oznacza to jednak usterki samego wyświetlacza.
PL 12 Instrukcja obsługi
Page 99

Fabryczne ustawienia domyślne synchronizacji
Modele TVM-1700/TVM-1900
Tryb Rozdzielczość
VGA 640 x 480 przy 60 Hz 31,5 60 Bez przeplotu
VGA 640 x 480 przy 72 Hz 37,9 72 Bez przeplotu
VGA 640 x 480 przy 75 Hz 37,5 75 Bez przeplotu
SVGA 800 x 600 przy 56 Hz 35,2 56 Bez przeplotu
SVGA
SVGA
SVGA
XGA 1024 x 768 przy 60 Hz 48,4 60 Bez przeplotu
XGA 1024 x 768 przy 70 Hz 56,5 70 Bez przeplotu
XGA 1024 x 768 przy 75 Hz 60,0 75 Bez przeplotu
SXGA 1152 x 864 przy 75 Hz 67,5 75 Bez przeplotu
SXGA 1280 x 960 przy 60 Hz 60,0 60 Bez przeplotu
SXGA 1280 x 1024 przy
SXGA 1280 x 1024 przy
Tryb Rozdzielczość
EGA 640 x 350 przy 70 Hz 31,5 70 Bez przeplotu
DOS 720 x 400 przy 70 Hz 31,3 70 Bez przeplotu
Tryb Rozdzielczość
VGA 640 x 480 przy 67 Hz 35,0 67 Bez przeplotu
SVGA 832 x 624 przy 75 Hz 49,7 75 Bez przeplotu
SXGA 152 x 870 przy 75 Hz 68,7 75 Bez przeplotu
Tryb Rozdzielczość
SXGA 1280 x 1024 przy
Monitor LCD zapewnia tylko tryby bez przeplotu oraz bez migotania.
(punkty x linie)
800 x 600 przy 60 Hz 37,9 60 Bez przeplotu
800 x 600 przy 72 Hz 48,1 72 Bez przeplotu
800 x 600 przy 75 Hz 46,9 75 Bez przeplotu
60 Hz
75 Hz
(punkty x linie)
(punkty x linie)
(punkty x linie)
70 Hz
Tryby VESA
Częst. poz.
(kHz)
64,0 60 Bez przeplotu
80,0 75 Bez przeplotu
Tryby IBM
Częst. poz.
(kHz)
Tryby MAC
Częst. poz.
(kHz)
Tryby MAC
Częst. poz.
(kHz)
74,4 70 Bez przeplotu
Częst. pion. (Hz) Uwaga
Częst. pion. (Hz) Uwaga
Częst. pion. (Hz) Uwaga
Częst. pion. (Hz) Uwaga
Instrukcja obsługi 13 PL
Page 100

Model TVM-2200
Tryby VESA
Rozdzielczość
(punkty x linie)
Częst. poz.
(kHz)
Częst. pion. (Hz) Uwaga
640 x 480 przy 60 Hz 31,5 60 Bez przeplotu
640 x 480 przy 72 Hz 37,9 72 Bez przeplotu
640 x 480 przy 75 Hz 37,5 75 Bez przeplotu
800 x 600 przy 56 Hz 35,2 56 Bez przeplotu
800 x 600 przy 60 Hz 37,9 60 Bez przeplotu
800 x 600 przy 72 Hz 48,1 72 Bez przeplotu
800 x 600 przy 75 Hz 46,9 75 Bez przeplotu
1024 x 768 przy 60 Hz 48,4 60 Bez przeplotu
1024 x 768 przy 70 Hz 56,5 70 Bez przeplotu
1024 x 768 przy 75 Hz 60,0 75 Bez przeplotu
1280 x 1028 przy 60 Hz 64,0 60 Bez przeplotu
1280 x 1028 przy 75 Hz 804,0 75 Bez przeplotu
1152 x 864 przy 75 Hz 67,5 75 Bez przeplotu
1280 x 960 przy 60 Hz 60,0 60 Bez przeplotu
1440 x 900 przy 60 Hz 55,935 60 Bez przeplotu
1680 x 1050 przy 60 Hz 65,290 60 Bez przeplotu
Tryby IBM
Rozdzielczość
(punkty x linie)
Częst. poz.
(kHz)
Częst. pion. (Hz) Uwaga
640 x 350 przy 70 Hz 31,5 70 Bez przeplotu
720 x 400 przy 70 Hz 31,3 70 Bez przeplotu
Tryby MAC
Rozdzielczość
(punkty x linie)
Częst. poz.
(kHz)
Częst. pion. (Hz) Uwaga
640 x 480 przy 67 Hz 35,0 67 Bez przeplotu
832 x 624 przy 75 Hz 49,7 75 Bez przeplotu
152 x 870 przy 75 Hz 68,7 75 Bez przeplotu
Tryby MAC
Rozdzielczość
(punkty x linie)
Częst. poz.
(kHz)
Częst. pion. (Hz) Uwaga
1280 x 1024 przy 70 Hz 74,4 70 Bez przeplotu
Monitor LCD zapewnia tylko tryby bez przeplotu oraz bez migotania.
PL 14 Instrukcja obsługi
 Loading...