

Page 1

TVK-800 User Manual
P/N 1072696A • REV • ISS 13MAY14
Page 2

Copyright
©
2014 United Technologies Corporation.
Interlogix is part of UTC
United Technologies Corporation
Trademarks and
patents
Trade names used in this document may be trademarks or
registered trademarks of the manufacturers or vendors of the
respective products.
Manufacturer
United Technologies Corporation
2955 Red Hill Avenue, Costa Mesa, CA 92626
Authorized EU manufacturing representative:
UTC Fire & Security B.V.
Kelvinstraat 7, 6003 DH Weert, The Netherlands
FCC compliance
Class A
the limits for a Class A digital device, pursuant to part 15 of the FCC
Rules. These limits are designed to provide reasonable protection
against harmful interference when the equipment is operated in a
commercial environment. This equipment generates, uses, and can
radiate radio frequency energy and, if not installed and used in
accordance with the instruction m anual, m a y cause harm f ul
interference to radio communications. Operation of this equipment in
a residential area is likely to cause harmful interference in which
case the user will be required to correct the interference at his own
expense.
Canada
This Class A digital apparatus complies with Canadian ICES
Cet appareil mumérique de la classe
NMB
Notice!
product may cause radio interference in which case the user may be
required to take adequate measures.
Certification
EU directives
2004/108/EC (EMC directive)
Systems
essential requirements and other relevant provisions of Directive
2004/108/EC.
2002/96/EC (WEEE
cannot be disposed of as unsorted municip al was te in the Europ ean
Union. For proper recycling, return this product to your local supplier
upon the purchase of equivalent new equipment, or dispose of it at
design
www.recyclethis.info.
Contact information
For contact information
www.utcfssecurityproducts.eu
Building and Industrial System s , a unit of
. All rights reserved.
-5923, USA
: This equipment has been tested and found to comply with
ACMA compliance
-003.
A est conforme à la norme
-003 du Canada.
This is a Class A product. In a domestic environment this
N4131
: Hereby, UTC Building and Industrial
declares that this device is in compliance or with the
directive): Products marked with this symbol
ated collection points. For more information see:
, see www.interlogix.com or
Page 3

Content
Introduction 3
Features 3
Package contents 4
Installation environment 4
Description 5
Connections 5
Keypad description 6
Function keys 6
Playback control dial and keys 7
Select options on the LCD display 8
Joystick operation 8
Using the key commands 8
Overview of the user groups 10
Logging in/out 11
Menu overview 13
Keypad configuration via the web browser 14
Login 14
Keypad management 15
Device management 16
User management 16
Input settings 18
Output list 20
Auxiliary functions 21
Live view and PTZ speed settings 21
FTP settings 21
System status 22
Local keypad configuration by the Administrator 24
Keypad management 24
Device management 29
Local live view 33
Playback a file 33
User management 35
Camera settings 37
Output settings 38
Macro settings 40
Playback files from a recorder 41
Advanced settings 42
Log out of the keypad 44
Reboot the keypad 44
Shutdown 44
TVK-800 User Manual i
Page 4

Local keypad configuration by the Manager 45
Logging in/out 45
Display list of accessible devices 46
Local live view 46
Playback a file 47
User management 48
Input settings 49
Output settings 50
Macro settings 50
Playback files from an enco der 51
Advanced settings 51
Log out of the keypad 51
Reboot the keypad 51
Shutdown 51
Local keypad configuration by the Operator and Custom users 52
Logging in/out 52
Display list of accessible devices 52
Change password 53
Shutdown 53
Using the keypad 54
Using shortcut operations 54
Local live view 54
Display decoded video on a monitor 55
Instant playback 61
Auxiliary functions 61
Saving recordings 62
Moving to next/previous cameras 63
Operating PTZ cameras 64
Setting a preset 64
Calling up a preset 65
Setting a preset tour 66
Calling up a preset tour 67
Setting a shadow tour 68
Calling up a shadow tour 69
Specifications 70
Index 71
ii TVK-800 User Manual
Page 5

Introduction
Features
Hardware
• 7’’ TFT touch screen at 800×480 resolution
• 4-axis joystick
• Shortcut keys for PTZ control, setting and calling of preset, preset tour, and shadow
tour
• Shortcut keys for playback operation
• Shortcut keys for input gr oups and output groups
• Shortcut keys for wiper and light control operation
Software
• Admin, manager, oper ator , a nd cus to m user man ag em ent
• Supports upgrade by USB flash drive
• Auto searches connected devices in the same network area
• Imports and exports keypad configuration parameters
• Macro command operation
• Storage of recorded files and snapshots to USB flash drive or FTP server
• Plays back recorded files from the USB flash drive
• Plays back remotely recorded files
• Bidirectional audio
• Supports configuration by web server
Decoding capability
• Provides 1-ch video decoding
• Supports standard MPEG4 and H.264 encoding formats
• Decodes at up to 720P real-time resolution
Display decoded video on the monitor
• Displays a decoded camera on the selected wi ndow
• Displays a decoded camera group on the selected window
• Sequences a display of a decoded camera group on a monitor
• Sequences a display of a decoded camera group on a monitor group
TVK-800 User Manual 3
Page 6

Package contents
When you receive the product, check the package and contents for damage and verify
that all items are included. If any items are damaged or missing, please contact your
local supplier.
Items shipped with the product include:
• TVK-800 keypad
• Power supply unit (PSU)
• Power supply cords (UK and Europe)
• CD-ROM
• User manual
Installation environment
When installing your keypad, consider these factors:
Ventilation: Do not block any ventilation openings. Install in accordance with the
manufacturer’s instructions. Ensure that the location planned for the installation of the
unit is well ventilated and dust-free.
Temperature: Consider the device’s operating temperature (-10 to +55 ºC, 14 to
131 °F) and noncondensing humidity specifications (10 to 90%) before choosing an
installation location. Do not install the device on top of other hot equipment.
Moisture: Do not use the unit near water. To reduce the risk of fire or electric shock, do
not expose this unit to rain or moisture.
Electrical: Ensure that the device is connected to a power supply that corresponds with
the characteristics listed in the technical specifications.
Working surface: Place the device on a horizontal solid surface. Avoid exposure to
severe vibrations.
Caution: Do not attempt to dismantle this product. Any attempt to dismantle or remove
the covers from this product will invalidate the warranty and may also result in serious
injury.
4 TVK-800 User Manual
Page 7

11. Power on/off
Description
This chapter describes how to connect the keypad as well the functions of the different
keys on the keypad.
Connections
Figure 1: Back view of the keypad
1. Touch pen
2. GND
3. Line in
4. Audio out
5. Reserved
6. RS-485 interface
7. LAN, PoE (802.3af)
8. RS-232 interface
9. USB interface
10. 12 VDC power supply
TVK-800 User Manual 5
Page 8
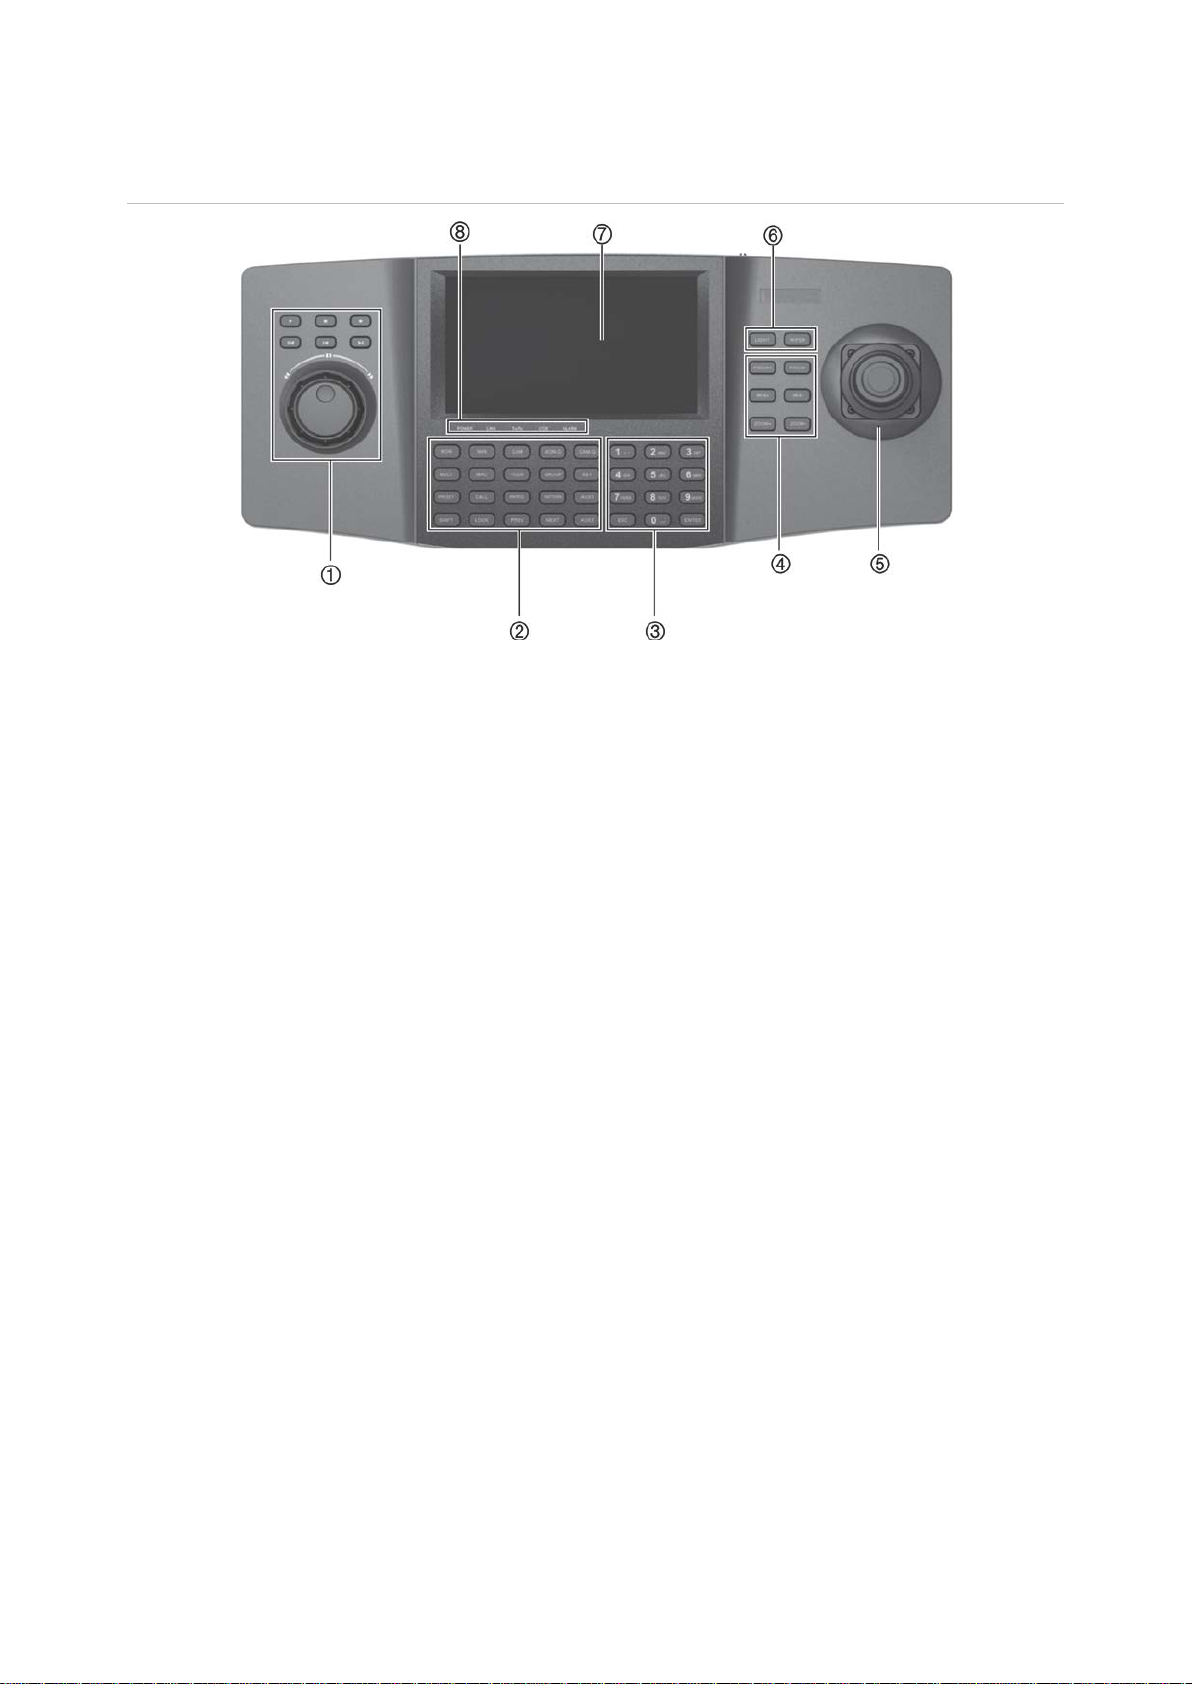
ALARM: Reserved.
Keypad description
Figure 2: Keypad top view
1. Playback control
See “Playback control dial and keys” on
page 7 for further information.
2. Function keys
Each key has a special function. See
“Function keys” below for further
information.
3. Numeric keys
Input numbers as well as ESC and
ENTER.
4. Lens control keys
Zoom in or out, focus near or far, open or
close iris.
5. 4-axis joystick.
Control pan, tilt and zoom as well as
capture snapshots. See “Joystick
operation” on page 8 for further
information.
6. Turn light and wiper on or off.
7. Touch-sensitive LCD display
8. LED indicators:
POWER: Lit when keypad is powered up.
LINK: Lit when the keypad is connected to
the network.
Tx/Rx: Flickers when the keypad is
transmitting/receiving data.
COM: Reserved.
Function keys
There are 20 function keys. They allow you to quickly select regularly used functions
such as to call up presets or to select a monitor .
See Figure 2 above for the location of the function keys on the keypad.
The keys are lit blue when inactive and red when active.
6 TVK-800 User Manual
Page 9
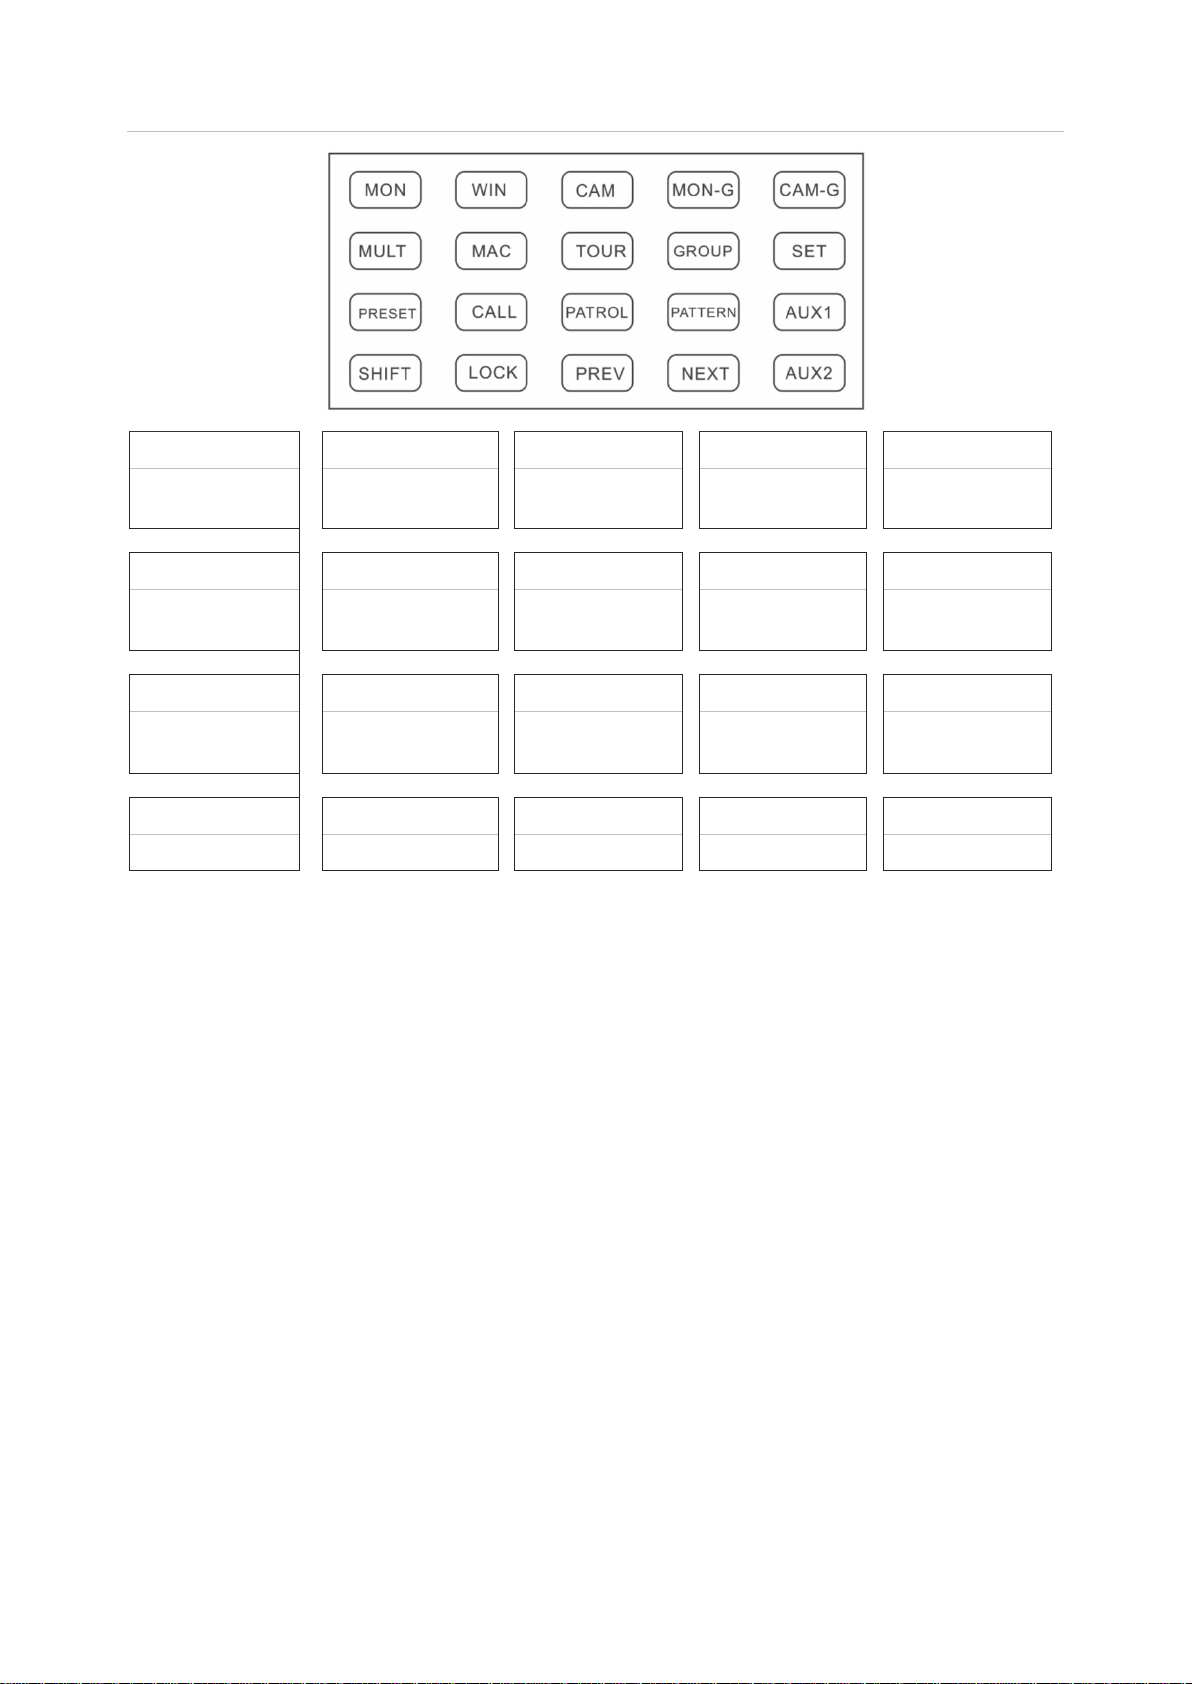
Select
Select a multiview
display format
Set
Shift
Figure 3: Description of the function keys
MON WIN CAM MON-G CAM-G
a monitor Select a video tile
(decoders only)
MULT MAC TOUR GROUP SET
Call a macro Set or call a tour Set or call a
PRESET CALL PATROL PATTERN AUX1
a preset Call a preset Call a preset tour Call a shadow
SHIFT LOCK PREV NEXT AUX2
Lock screen Previous camera Next camera AUX 2
Select a camera Select a monitor
group
group
tour
Select a camera
group
. Set preset tour,
shadow tour
AUX 1
Locking the keypad
When in live view mode, press the LOCK key to lock the keypad and mouse. Once
locked, none of the keys (except LOCK), the joystick, the mouse, or the touch screen
can be used.
To lock the keypad in live view, press and hold the LOCK key, or press the SHIFT +
LOCK keys. When the keypad is locked, the LOCK key is lit red.
To unlock the keypad, press and hold the LOCK key, or press the SHIFT + LOCK keys.
The LOCK key turns blue.
The keypad automatically locks after a predetermined period of inactivity. The time (in
minutes) can be set in the Keypad > Hardware Settings menu.
Note: The keys are also locked when the screen is automatically locked.
Playback control dial and keys
See Figure 2 on page 6 for the location of playback control on the keypad.
TVK-800 User Manual 7
Page 10

Key
MON
Figure 4: Description of the playback control dial and keys
Not used.
Stop play back.
Record.
Play the last five minutes in
decoder playback mode.
Play/pause.
Play back the previous file (not
available in USB playback mode).
Play back the next file (not
available in USB playback mode).
Select options on the LCD display
There are four ways to select and enter items on the LDC display:
• Touch pen: Use the touch pen (see Figure 1 on page 5) to select options on
screen. Replace the touch pen in its holder when finished using it.
• Finger: Use your finger to select options on screen.
• Joystick: Rotate the joystick to position the on-screen cursor in the desired location.
Press the center key on the joystick to select.
• Mouse: Use a mouse. Plug the mouse into the USB socket on the back of the
keypad.
Joystick operation
Move the joystick in one of eight directions to control pan/tilt. Rotate the knob for zoom
control.
Press the center key on the joystick for the Enter function and to capture snapshots.
Save the snapshots to a USB flash drive or to a FTP site.
Using the key commands
Key operation
Table 1: Operating a multiple video display
Description Example
Num+MON: Select the video output to
be controlled by the decoder, NVR, or
DVR.
Note: When Num=0, the system enters
local live view mode.
8 TVK-800 User Manual
Press the 2+MON keys to select monitor
2.
Page 11

Key
MULT
WIN
CAM
MON
CAM
SET
TOUR
GROUP
Key
PRESET
CALL
PATROL
PATTERN
shadow
Description Example
Num+MULT: Select the multiview
display format for the selected output
channel.
Num+MON+Num+WIN+Num+CAM-G:
Output and display the video signal
Press the 2+MON+2+MULT keys to
configure a two-division display for
monitor 2.
Press the 2+MON+3+WIN keys to select
video tile 3 of monitor 2.
from the camera group on the selected
video tile of the monitor in cycle.
Num+CAM: Select the video input. Press the 2+MON+3+WIN+5+CAM keys
to display video input 5 on video tile 3 of
monitor 2.
-G Num+MON-G: Select the monitor
group.
-G Num+CAM-G: Select the camera
group.
Press the 1+MON-G keys to select
monitor group 1.
Press the 1+MON+1+CAM-G keys to
select camera group 1 to be displayed on
monitor 1.
SET+Num+TOUR/ GROUP/ PATROL/
PATTERN/ PRESET: Set the tour,
Press the SET+1+PATTERN keys to set
shadow tour 1.
group, preset tour, sh ado w tour, or
preset.
SET+Num+TOUR: Set the tour.
Num+TOUR: Call the defined tour.
Press the SET+1+TOUR keys to set tour
1.
Press the 1+TOUR keys to call the pre-
defined tour 1.
SET+Num+GROUP: Set the group.
Num+GROUP: Call the defined group.
PTZ control keys
Table 2: PTZ control keys
Description Example
Num+PRESET: Move the PTZ
camera to the desired position, and
then press the Num+PRESET keys to
set a preset.
Num+CALL: Call the predefined
preset.
SET+Num+PATROL: Set a preset
tour.
Num+PATROL: Call a predefined
preset tour.
Num+PATTERN: Call a predefined
shadow tour.
Press the SET+1+GROUP keys to set
group 1.
Press the 1+GROUP keys to call the
defined group 1.
Press the 1+PRESET keys to set preset 1.
Press the 1+CALL keys to call preset 1.
Press the SET+1+PATROL keys to set
preset tour 1.
Press the 1+PATROL keys to call preset
tour 1.
Press the SET+1+PATTERN keys to set
shadow tour 1.
Press the 1+PATTERN keys to call
tour 1.
TVK-800 User Manual 9
Page 12

Key
MAC
SHIFT
to lock/unlock
LOCK
PREV
NEXT
AUX1
AUX2
Other keys
Table 3: Functions of the other keys
Description Example
Num+MAC: Call the MAC command. Press the 1+MAC keys to call MAC
command 1.
SHIFT+LOCK: Lock/unlock the
system.
Lock/unlock the system. Press and hold the LOCK key, or press the
Select the previous camera for live view on the keypad or a multiview display.
Select the next camera for live view on the keypad or a multiview display.
Press the AUX1 key to set its defined function (bidirectional audio or snapshot).
Press the AUX2 key to set its defined function (bidirectional audio or snapshot).
Press the SHIFT+LOCK keys
the system.
SHIFT+LOCK key, to lock/unlock the
system.
Entering characters on screen
A soft keyboard will appear on screen when you need to enter characters in a screen
option. Click a key to input that character.
Figure 5: Soft keyboard
Click to enter letters or numbers.
Click to switch between upper and
lower case.
Overview of the user groups
By default the keypad comes with four user groups: Administrator, Manager, Operator,
and Customized User.
10 TVK-800 User Manual
Page 13

User
Admin
Manager
Operator
remote control of DVR/NVR front
Custo
Table 4: User levels
Description
The administrator has full access to all menu settings.
The manager has reduced menu access:
• Configure basic parameters of the keypad
• Add, modify, and delete devices
• Remotely control the front panel
• Add, modify, and delete manager users
• Assign devices to manager users
• Modify number of inputs and outputs
• Local live view and PTZ control
There can only be one administrator.
The user name is “admin”. It cannot be modified.
The default password is 1234.
• Remotely control the front panel
• Add, modify, delete operator and custom users
• Assign devices to operator and custom
• Local live view and PTZ control
Only the manager can add operator and custom users.
Each manager has their own list of operator and custom users.
The operator only has access to the
panels.
m The customized user only has access to the remote control of
DVR/NVRs front panel.
Logging in/out
1. Power up the keypad. The following display appears:
TVK-800 User Manual 11
Page 14

2. Select your user name from the drop-down list (admin, manager,
operator/custom) and enter the pas sword.
Note: Record your password in a safe place. If you should forget your password,
you will not be able to access the keypad functi ons. Pl eas e cont act t echni cal
support for assistanc e.
3. Check Save Password to save the login password for future use.
4. Click Login. The main screen for the user type appears with the list of menu
options available displayed.
Note: The list of menu options available will depend on the user type.
To log out of the system:
1. Click the Logout button in one of the configuration screens.
You return to the Login screen.
12 TVK-800 User Manual
Page 15

Keypad
Device
User
Input
Output
Macro
Playback
Advanced
Shutdown
Menu overview
Not all user types have permission to access all menu functions.
Figure 6: Main menu (Admin shown)
Menu function Description
1.
2.
3.
4.
5.
6.
7.
Keypad management: View the device version, configure network
parameters, configure hardware settings, set date and time, select the
language, calibrate the touch screen, upgrade the system, and
import/export a configuration file.
Only available to the Admin. See “Keypad management” on page 24 for
more information.
Device management: Add, modify, and delete a device.
User management: Add and delete a user, add and delete devices
associated with a user, and change the password.
Input settings: Start local live view, change camera name/ number/
protocol/ stream type, and group cameras.
Output settings: Display output channels of user, play back recordings,
modify an output channel, and group outputs.
Macro settings: Set up a sequence of actions. Add, view, run, and delete a
macro.
Playback recordings: Playback recordings from a USB flash drive or FTP
site through a decoder.
8.
9.
TVK-800 User Manual 13
Advanced settings: Set AUX1 and AUX2 keys to bidirectional audio and
snapshots. Modify network performance and PTZ speed. Set up FTP server
settings.
Log out, reboot, and shutdown the system.
Page 16

Keypad configuration via the web browser
You can quickly and easily configure remotely the keypad via a web browser. The main
menu functions available depend on the type of user: Administrator, Manager, or
Operator/Customized user.
This chapter provides an overview on configuring the keypad via a browser. For further
information on how to config ur e by the different user types, see:
• Administrator: “Local keypad configuration by the Administrator” on pag e 24.
• Manager: “Local keypad configuration by the Manager” on page 45.
• Operator and Customized user: “Local keypad configuration by the Operator and
Custom users” on page 52.
Login
To access the keypad, open a web browser and enter the IP address assigned to the
keypad as a web address. In the Login window, enter the Admin user name and
password.
Admin User ID: admin
Password: 1234
IP address: 192.168.1.70
Subnet mask: 255.255.255.0
Port: 8000
14 TVK-800 User Manual
Page 17
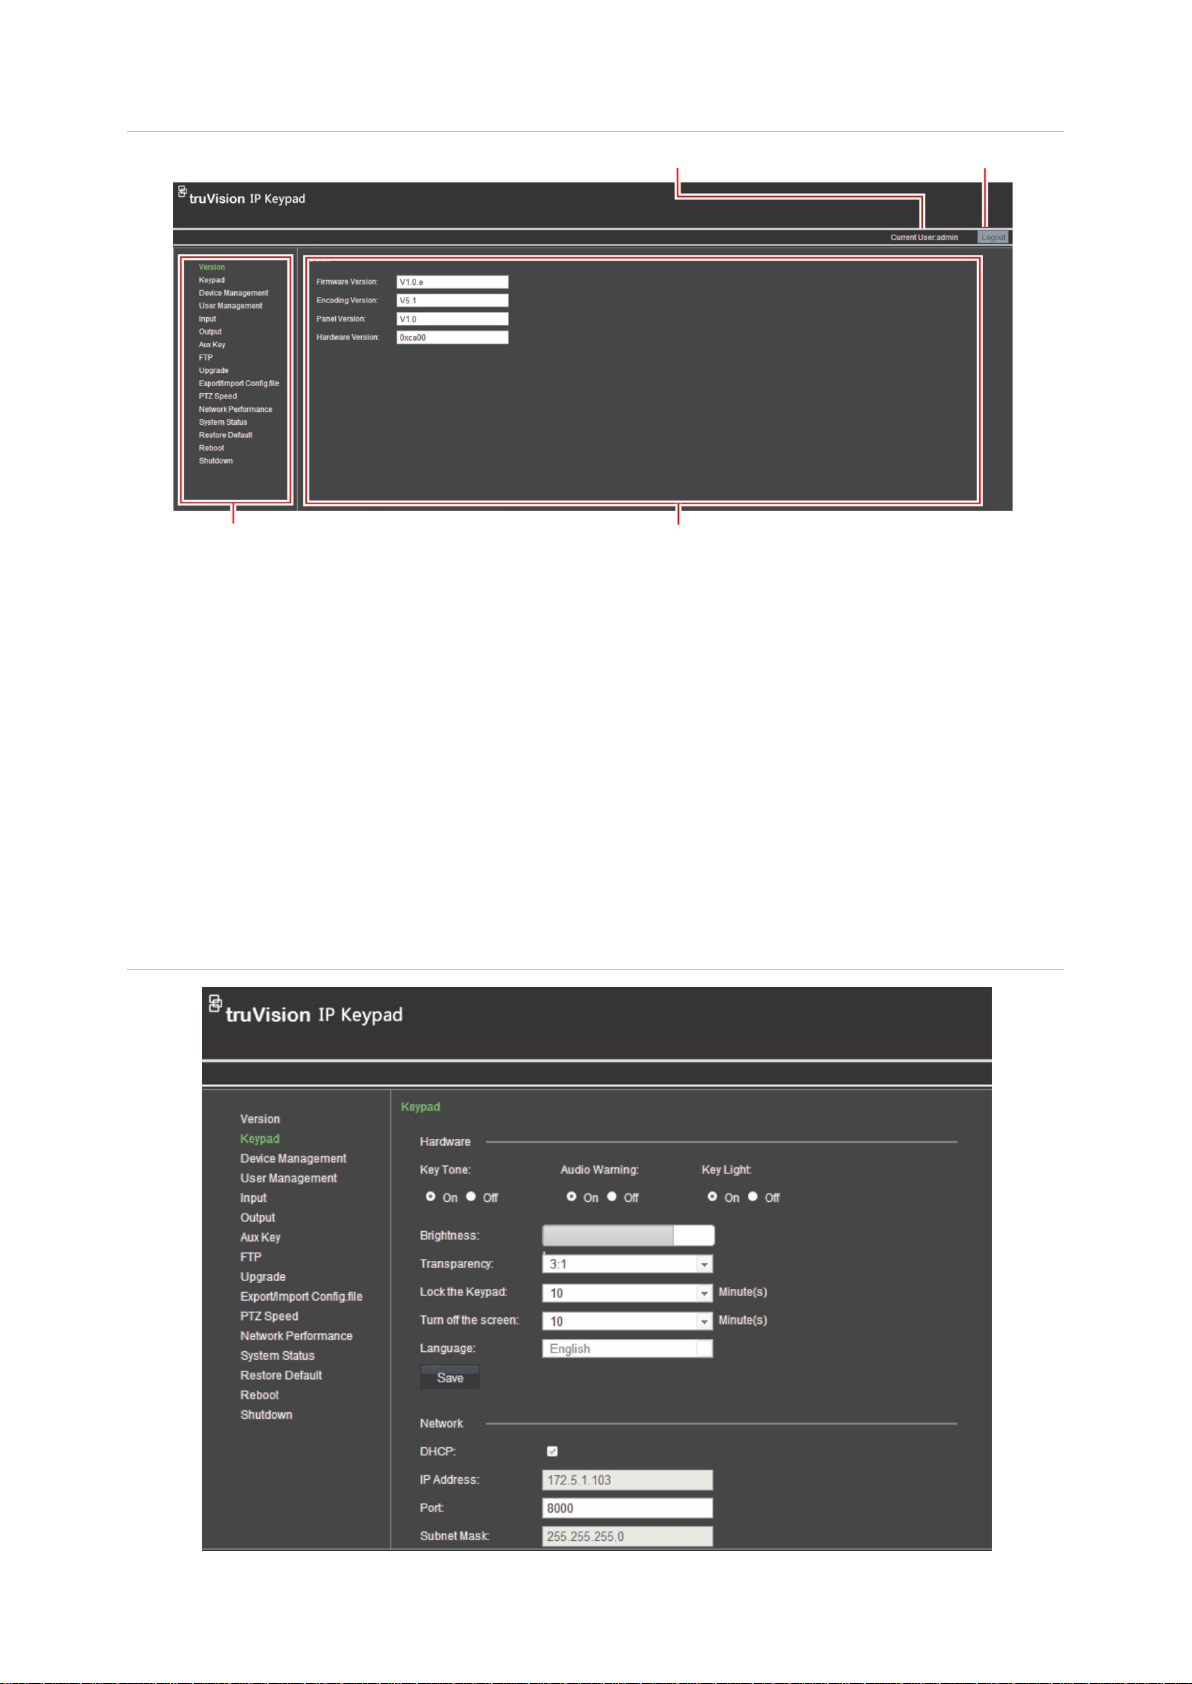
Figure 7: Main web window (Version menu shown)
User type (Admin shown) Logout
Menu panel
Click a menu item to select it.
Enter the required data for each parameter.
Setup window
Keypad management
This menu is only accessible by the Administrator.
You can configure all the keypad parameters from the browser by clicking Keypad in
the submenu panel and entering the required parameters. Click Save to save the
changes. See Figure 8 below.
For information on setting up keypad parameters locally, see “Keypad management” on
page 24.
Figure 8: Keypad management window
TVK-800 User Manual 15
Page 18

Device management
The Administrator can add, modify, or delete a device from the keypad. See Figure 9
below. The Manager and Operator/Custom users can only see the list of devices
available. For further information on setting up device parameters, see “Device
management” on page 29.
Figure 9: Device Management window
Add a device
1. Click Device Management in the submenu panel. The “Device Management”
window appears.
2. Click the Add button. In the pop-up window, add the device name, IP address,
port, as well as user name and password. Click OK to confirm.
The successfully added device is then listed in the Device Management window.
Modify a device
1. In the “Device Management” window, click for the selected device. In the
pop-up window, enter the new device name. Click OK to confirm.
Delete a device
1. In the “Device Management” window, click for the selected device. Click OK
to confirm the deletion of the user.
User management
The Administrator and Manager can use the browser to add, delete, and change the
user parameters. The O per at or /C ust o m users can modify their passwords.
Note: Only the Administrator can create Managers. However, only Managers can
create Operator and Custom users
See Figure 10 on page 17. For further information on setting up user parameters, see
“User management” on page 35.
16 TVK-800 User Manual
Page 19

Figure 10: User Management window
Add a user
1. Click User Management in the sub me nu pan el . The “User Management” window
appears.
2. Click the Add button. In the pop-up window, add the new user details. Enter the
user type (“Permission”) and new password. Con fir m the password and then click
OK.
Modify a user
1. In the “User Management” window, click for the selected user. In the pop-up
window, change the user password. Confirm the password and then clic k OK.
Delete a user
1. In the “User Management” window, click for the selected user. Click OK to
confirm the deletion of the user .
Set up a user to access a specific device
1. In the “User Management” window, click for the selected user. The “UserDevice” pop-up window appears, listing all the devices available.
TVK-800 User Manual 17
Page 20
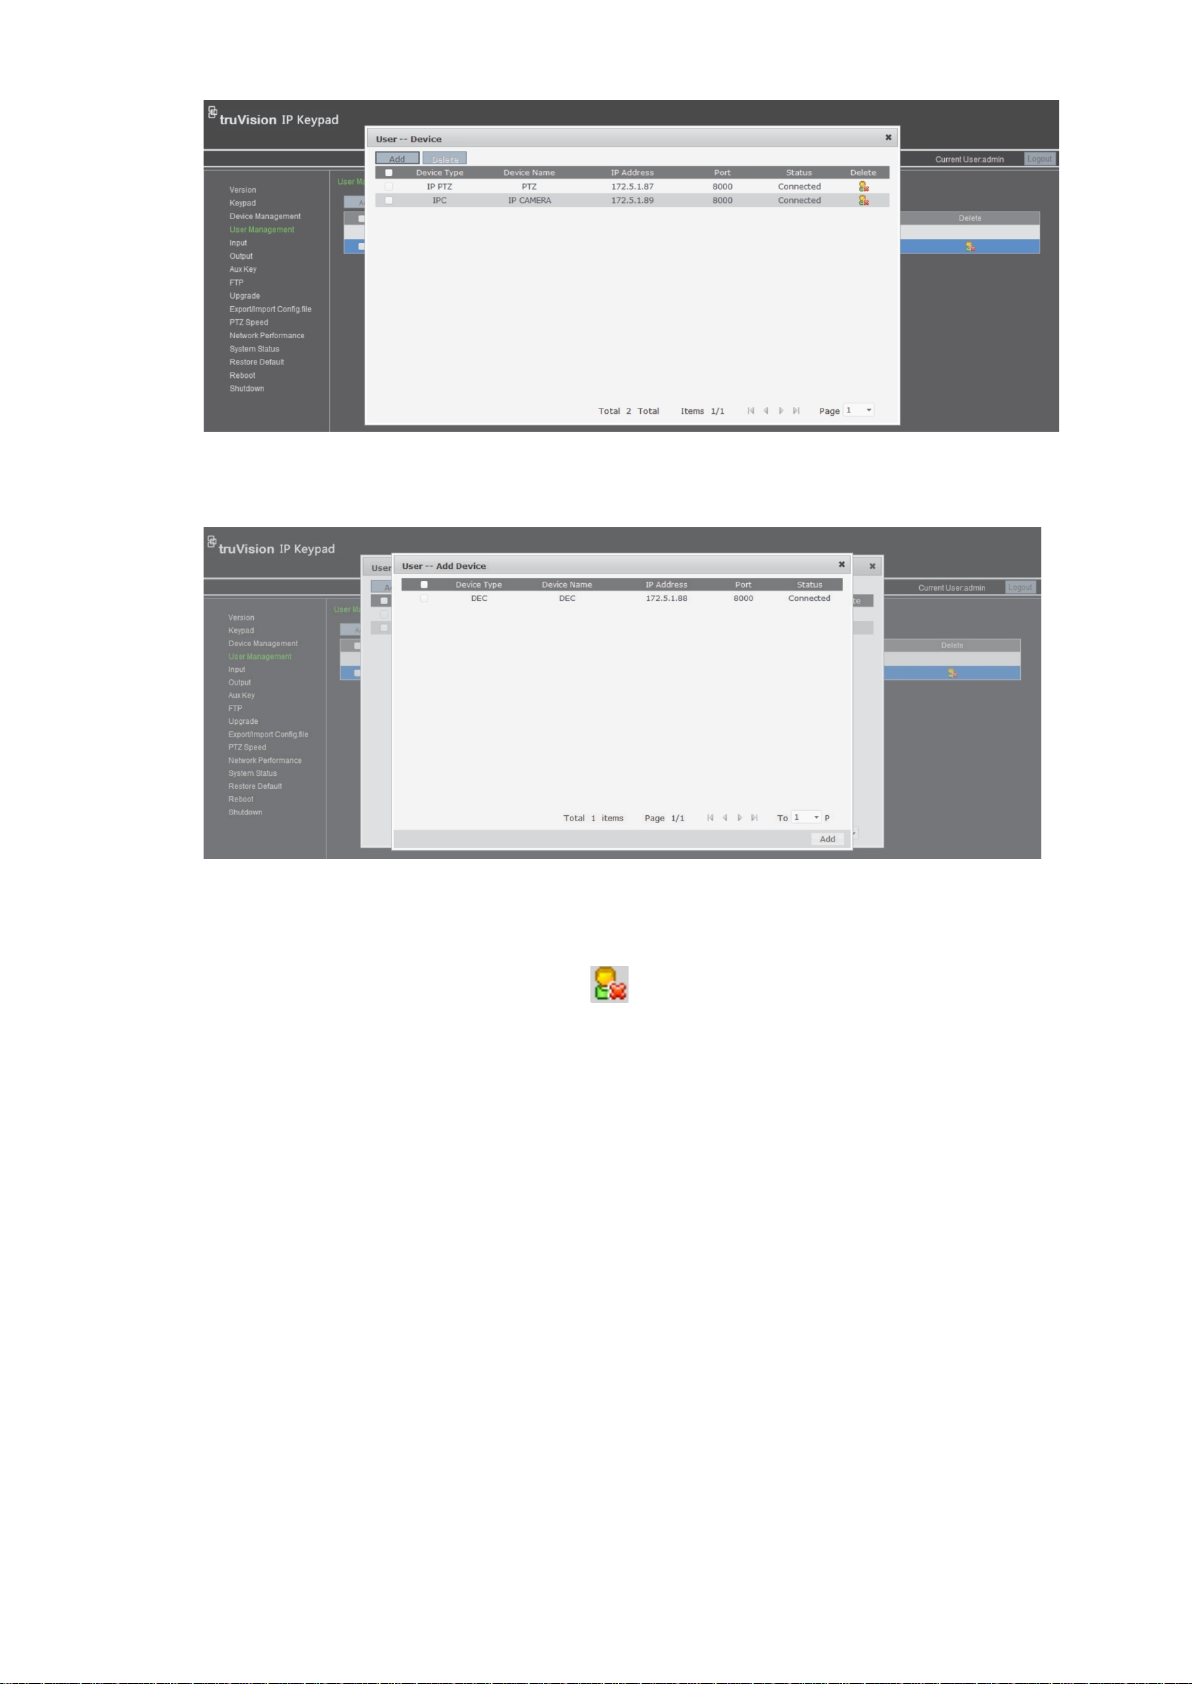
2. Click the Add button. The “User-Add Device” pop-up window appears, listing all
the devices added to the keypad by the Administrator.
3. Select the desired devi c es and click the Add button to add the devices to the
selected user. The successfully added devices are then added to the “UserDevice” window.
4. To delete a device from the list, click for the device you want to delete.
Input settings
The Administrator and Manager can modify inputs, such as cameras, from the browser.
Click Input in the submenu panel to get the Input window. See Figure 11 on page 19.
Cameras can also be grouped together so that they can be called up to appear together
on a specific monitor. For example, one group can be cameras viewing the car park
and another group can be cameras viewing the building entrances.
You can set up to 16 camera groups.
For further information on setting up input parameters, see “Input settings” on page 49.
18 TVK-800 User Manual
Page 21

Figure 11: Input window
Modify an input
1. In the “Input” window, select a camera from the list and click . The “Input
Settings-Modify Input” pop-up window appears.
2. Modify the input’s name, protocol number, and stream type. Click OK to accept.
Set up a camera group
1. In the “Input” window, click the Group button. The “Input Settings-Input Group”
window appears.
2. Select the desired group num ber from the Group No. drop-down list.
3. Click the Add Camera button. The “Input Settings-Add Camera” window appears.
TVK-800 User Manual 19
Page 22
4. Select the desired cameras that you want to group together. Click Add to accept
the changes and return to the “Input Group” window. The list of successfully
added cameras to the group is shown.
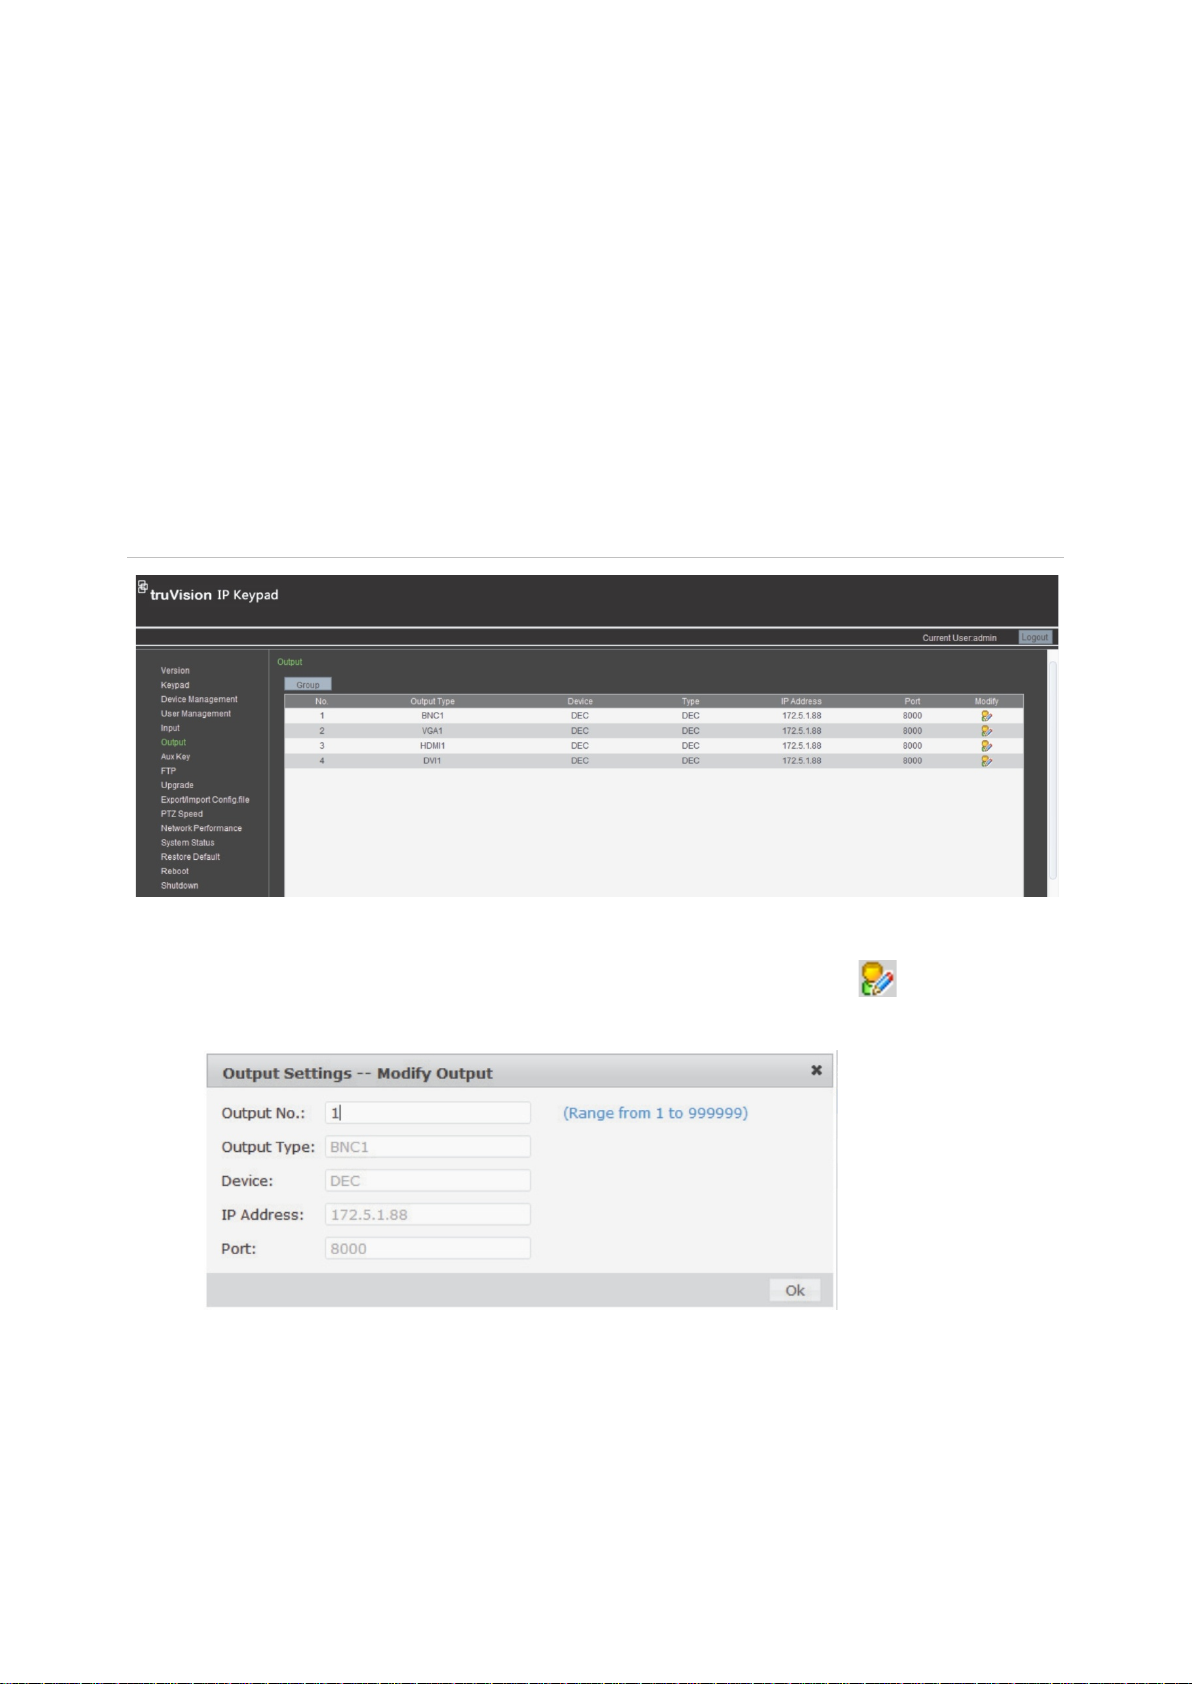
Output list
The Administrator and Manager can modify the parameters of outputs such as
monitors, decoders, DVRs, and NVRs. Click Output in the submenu panel to get the
Output window, which displays all the output channels that are accessible by the user
currently logged in. See Figure 12 below.
For further information on setting up output parameters, see “Out put s etti ng s ” on pag e
50.
Figure 12: Output window
Modify an output channel
1. In the “Output” window, selec t a camera from the list and click . The “Output
Settings-Modify Input” window appears.
2. Modify the output’s number. Click OK to accept.
Set up an output group
1. In the Input window, click the Group butto n. T he “Input Set t ings-Input Group”
window appears.
2. Select the desired group num ber from the drop-down list.
20 TVK-800 User Manual
Page 23
3. Click the Add Output button. The “Add Output” window appears.
4. Select the desired outputs to add to the group. Click Add.
5. Click Finish to return to the “Output Settings-Output List” window to see the list of
outputs added to the selected group.
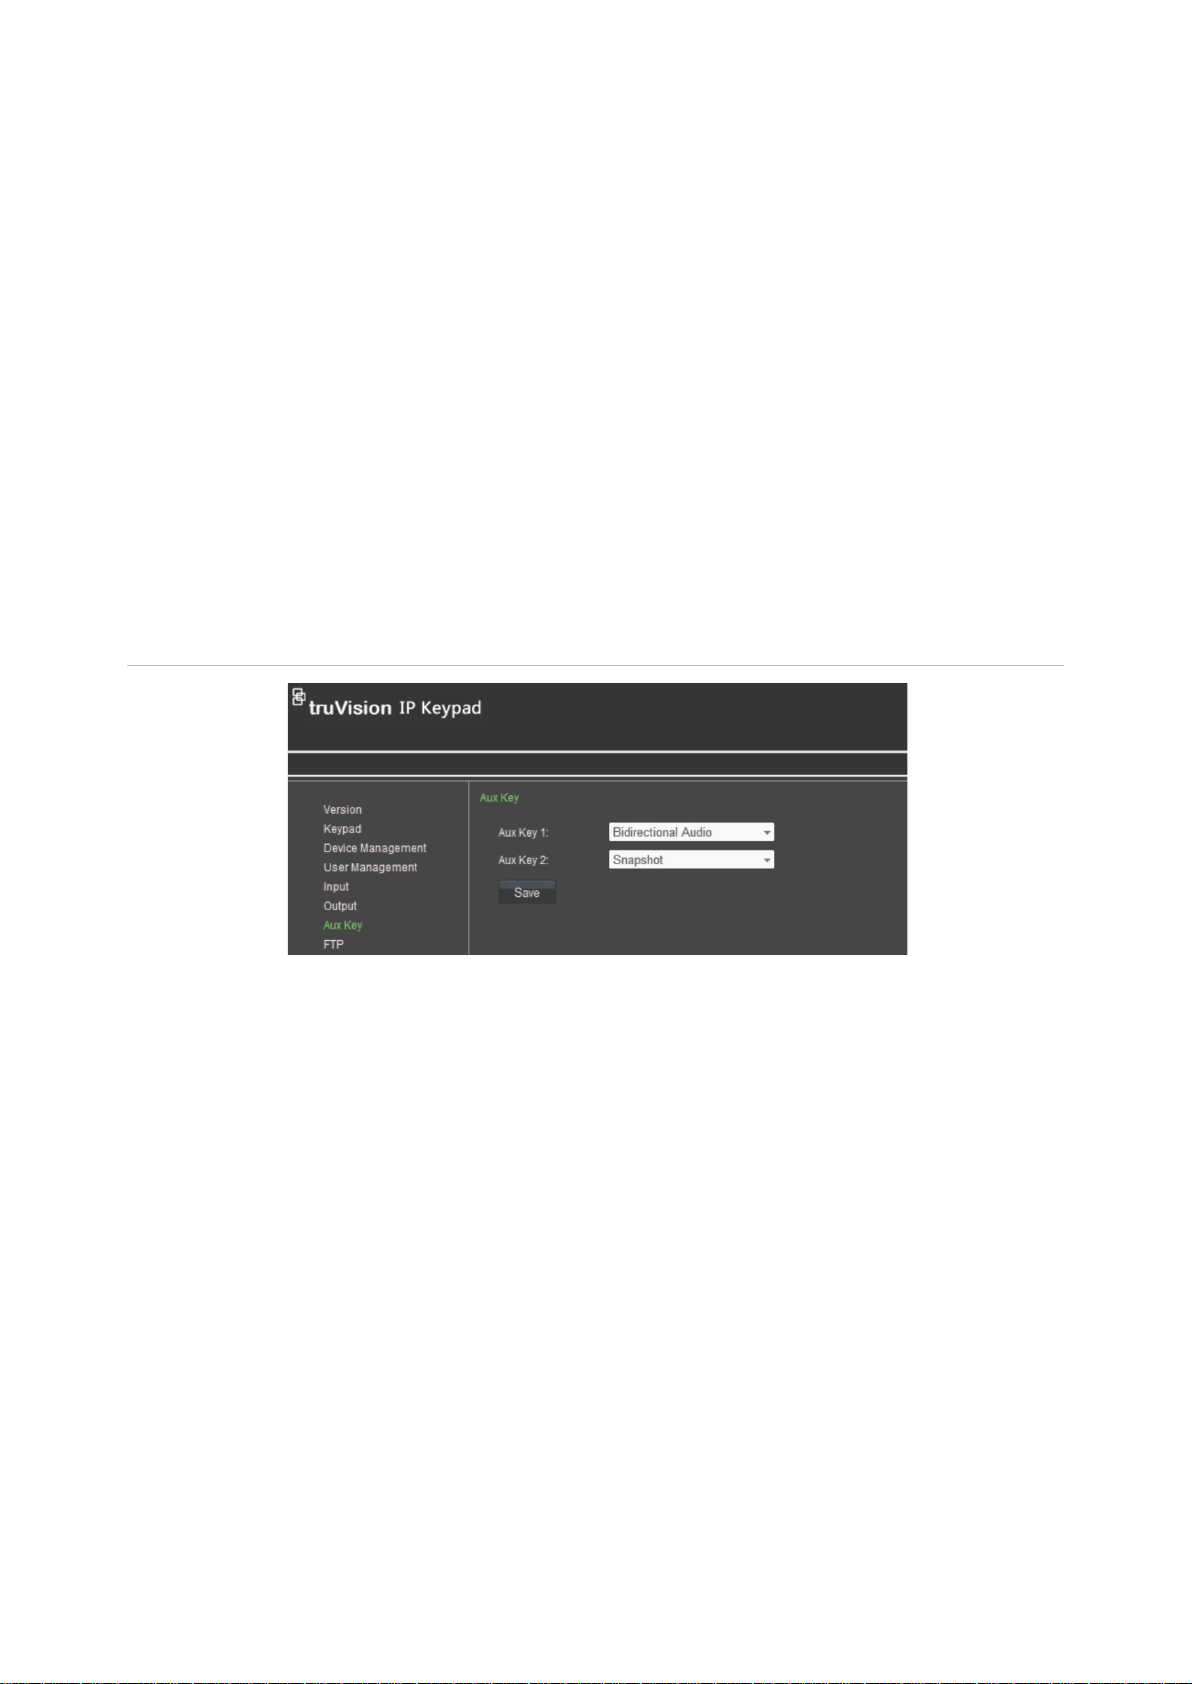
Auxiliary functions
The keypad has AUX1 and AUX2 keys that can be configured for the AUX1 and AUX 2
functions in the system. By default, AUX 1 is set to bidirectional audio and AUX 2 is set
to snapshot capture.
The Administrator and Manager can modify the auxiliary settings.
Click Aux Key in the submenu panel to get the Aux Key window. See Figure 13 below.
For further information on auxiliary key set up, see “Bidirectional audio and snapshot
settings” on page 42.
Figure 13: Aux Key window
Live view and PTZ speed settings
You can set up the network performance for local live view on the keypad as well as set
the PTZ movement speed.
Click Network Performance in the submenu panel to get the “Network Performance”
window. See Figure 12 on page 20. From the drop-down menu, select the performance
level: Least delay, Balanced (default), or Best fluency. Click Save to save the changes.
Click PTZ Speed in the submenu panel to select a PTZ movement speed level for the
connected PTZ camera. There are three levels: Low speed, Medium speed (default),
High speed. Click Save to save the changes.
For further information on setting up these parameters, see “Live view and PTZ speed
settings” on page 43.
FTP settings
You can upload video file and snapshots to an FTP server.
TVK-800 User Manual 21
Page 24

Click FTP in the submenu panel to get the FTP window. See Figure 14 below.
For further information on auxiliary key set up, see “FTP settings” on page 43.
Figure 14: FTP window
To set up the FTP server settings
1. In the FTP window, check the Enable FTP box.
2. Enter the IP address as well as the user name and password to log in to the FTP
server.
3. Enter the file path to which the video files and snapshots are uploaded.
4. Click Apply to save the settings.
System status
Click System Status to check the boot time of the keypad as well as the number of
different devices connected to the keypad.
22 TVK-800 User Manual
Page 25

Figure 15: System Status window
TVK-800 User Manual 23
Page 26

Local keypad configuration by the Administrator
This chapter describes how the administrator can configure the key p ad. Th e
administrator has access to all the keypad functions. The keypad configuration menus
are only accessible to the administrator.
Log into the keypad as Admin and enter the admin password (see “Logging in/out” on
page 11).
Keypad management
View the keypad version information
1. In the Main menu, click Keypad > Version. The “Keypad-Version” window
appears:
It lists the current version information of the firmware, encoding, panel, and
hardware.
2. Click Return to return to the Main menu or click another Keypad menu option.
Configure the keypad network settings
1. In the Main menu, click Keypad > Network. The “Keypad-Network Settings”
window appears:
24 TVK-800 User Manual
Page 27

Key tone
Audio warning
Key light
Lock the keypad
Turn off the screen
Transparency
Mouse speed
Brightness
2. Enter the port, IP address, subnet mask, default gateway values.
- Or Check the DHCP box. Ensure tha t you have a DHCP server on your network
before selecting this option.
3. Click Apply.
4. Click Return to return to the Main menu or click another Keypad menu option.
Hardware settings
1. In the Main menu, click Keypad > Hardware Settings. The “Keypad-Hardware
Settings” window appears:
2. Enter the desired value for each par a me ter :
Parameter Description
1.
2.
3.
4.
5.
6.
Key makes a beeping noise when pressed.
Enable or disable the option.
Keypad emits warning if the network cable is disconnected.
Enable or disable the option.
Keypad keys are lit red or blue to show if active or locked.
Enable or disable the option.
Set a timer so that the keypad automatically locks itself after
a defined period of inactivity.
Select a time between 0 and 10 minutes of inactivity.
Set a timer so that the keypad screen automatically turns off
after a defined period of inactivity.
Select a time between 0 and 10 minutes of inactivity.
Set the transparency level between the decoded video and
the menu. It only applies to local live view.
There are four values to select: 1:1, 3:1, 1:3, or Not
transparent.
TVK-800 User Manual 25
7.
8.
Set the mouse speed.
Select a level between 0 and 2.
Set the screen brightness.
Select a level between 0 and 3.
Page 28

3. Click Apply to save settings.
4. Click Return to return to the Main menu or click another Keypad menu option.
Time and date settings
1. In the Main menu, click Keypad > Tim e Settings. The “Keypad-Time Settings”
appears:
2. Select the desired date.
3. Enter the desired time.
4. Click Apply to save settings.
5. Click Return to return to the Main menu or click another Keypad menu option.
Language selection
1. In the Main menu, click Keypad > La nguage Settings. The “Keypad-Language
Settings” appears:
2. Select the desired language.
Note: Currently only English is available.
3. Click Apply to save settings.
4. Click Return to return to the Main menu or click another Keypad menu option.
26 TVK-800 User Manual
Page 29

Calibrate the key pad touch-screen
The keypad touch-screen needs to be calibrated for it to be correctly positioned.
To calibrate the touch-screen:
1. In the Main menu, click Keypad > Screen Verify. The “Keypad-Screen
Calibration” window appears:
The system displays the calibration instructions; “Click the spots in order” and “Do
not click the mouse while calibrating”. Click Calibration.
2. Using the touch pen, click the three “+” spots that appear on screen.
The message “Screen calibration complete” appears.
3. Click OK to complete the calibration.
Upgrade the software
There are two ways to upgrade the keypad software:
• Use an FTP server
• Use an USB flash drive
Before you can upgrade the keypad software by FTP, you must first set up an FTP
server connection by TFTP or WFTP to transfer the file.
TVK-800 User Manual 27
Page 30

To upgrade the software using an FTP site:
1. In the Main menu, click Keypad > Maintenance. The “Keypad-Maintenance”
window appears:
2. Enter the FTP address and then click FTP Upgrade.
3. When the upgrade is successful, the keypad automatically reboots.
If the upgrade fails, an error message appears. Click OK to accept.
Upgrade the software using an USB flash drive:
1. Insert the USB flash drive into the keypad slot.
2. In the Main menu, click Keypad > Maintenance. The window appears.
3. Click USB Upgrade to enter the USB Upgrade window.
4. Select the upgrade file from the li st and click Upgrade to start the upgrade
process. The configuration file is digicap.dav.
5. When the upgrade is successful, the keypad automatically reboots.
If the upgrade fails, an error message appears. Click OK to accept.
28 TVK-800 User Manual
Page 31

Import/export the configuration file
1. In the Main menu, click Keypad > Maintenance. The window appears.
2. Click Config File to enter the “Import/Export Config. File” window.
3. To import a configuration file:
1) Insert the USB flash drive into the keypad slot.
2) Ent er t he fl ash drive and select the file.
3) Click Import to import t he con fig ur ati o n fil e.
Note: If the imported configuration is invalid, the following error message
appears, “Importing file failed: File type does not match.”
4. To export a configuration file:
1) Insert the USB flash drive into the keypad slot.
2) Click Export to import the c on fig ur ati o n file.
Restore default settings
1. In the Main menu, click Keypad > Maintenance. The window appears.
2. Click Restore to restore the system to default. The following message appears,
“Restore Default?”
3. Click Yes to continue, or No to cancel the operation.
Device management
Use this menu to add, modify, or delete a device on the keypad. You can also set up
the keypad to remotely control a DNR or NVR.
The “Device-Device List” window lists all the devices that are in communication with the
keypad. See Figure 16 on page 30.
You can add devices to the keypad either by searching for all the devices available in
the same subnet, or by doing a manual search.
TVK-800 User Manual 29
Page 32

Figure 16: Device-Device List window
Add a device by auto searching
1. In the Main menu, click Device. The “Device-Device List” window appears. Click
the Auto Search button.
Note: Only devices that are in the same network area as the keypad can be
found by the keypad.
All devices found by the keypad are listed in the window.
2. Select the desired device from the list. Enter the login user name and password
of the device.
Several devices can be selected together if they share the same login user name
and password.
3. Click Add to add the device to the system.
The Status column indicates the status of each listed device:
30 TVK-800 User Manual
Page 33

The device is not added.
The device failed to be added.
The device has been successfully added.
4. Once all the desired devices have been successfully added, click Exit to return to
the “Device-Device List” window.
You can then see the information on each device that has been added.
Add a device manually
1. In the Main menu, click Device. The “Device-Device List” window appears. Click
the Add Device button.
2. In the window that appears, enter the device name, device IP port, user name,
and password. Click Add to add the device.
Note: If the information is invalid or the device is offline, the following error
message appears, “Failed to add device.”
Modify the device name
1. In the Main menu, click Device. The “Device-Device List” window appears.
2. Click for the device you want to modify. The “Device-Modify Device” window
appears.
TVK-800 User Manual 31
Page 34

Keypad
#1
#2
#3
#4
3. Modify the device name. Click Modify to accept the changes.
Note: The user name and password refer to those required to log in to the device
from the keypad.
Delete a device
1. In the Main menu, click Device. The “Device-Device List” window appears.
2. Select the device to be deleted. Click .
3. Click Yes in the pop-up window to confirm the deletion.
Remotely control a DVR/NVR
You can remotely control a DVR or NVR through the keypad. There are two ways to
remotely control a device:
• Use the remote panel of the keypad.
• Use the MON key to connect directly to a DVR/NVR. This method may be easier to
use when there are several DVRs/NVRs connected to the keypad.
You can call up a specific output DVR or NVR by entering its output device number
and pressing the MON key. The output device number associated with a DVR or
NVR is shown in the “Output Settings-Output List” window (see “Output settings” on
page 38 for more informati o n) . A DVR or NVR can have a maximum of two monitors
connected to it. See Table 5 for an example on how to call up the desired monitor of
a DVR accessible by the keypad.
Table 5: Example of how to access a DVR monitor
keys to press DVR Monitor
MON 1 A
MON 1 B
MON 2 A
MON 2 B
Note: Not all DVRs/NVRs support remote control.
To remotely control a DVR/NVR using the keypad MON key:
1. Press the Num + MON keys to call up the monitor of the desired DVR or NVR.
The Shortcuts window appears.
32 TVK-800 User Manual
Page 35

You can use the keypad keys as well the shortcut buttons displayed to control the
DVR or NVR.
Local live view
A full-screen overlay of local live view from the selected camera appears on the keypad
display.
There are two ways to see local live view on the keypad display. You can use the Input
menu as well as using the keypad keys. For instructions on using the keypad keys, see
“Local live view” on page 54.
To see local live view using the Input menu
1. In the Main menu, click Input. The “Input Settings-Input List” window appears.
2. Click for the desired camera. Local live view starts immediately.
3. To view other cameras listed, press the NEXT or PREV keys on the keypad to
view the next or previous cameras.
Playback a file
1. In the Main menu, click Output. The “Output Setting s-Output List” window
appears.
TVK-800 User Manual 33
Page 36

2. Click of the desired output channel. The Playback window appears.
3. Click the By File tab to enter the “Playback by File” window.
4. Enter the camera number, record type, and file type as well as the start and end
times for playback. Click Search. The results are listed on-screen.
5. Select a file for playback from the list and click the Playback button to play back
the file.
Note: You can also do instant playback. See “Instant playback” on p ag e 61 for more
information.
34 TVK-800 User Manual
Page 37

User management
You can set up the keypad so that a user can access specific devices, such as
cameras.
Add a user
1. In the Main menu, click User. The “User-User List” window appears.
2. Click the Add User button. The “User-Add User” window appears.
3. Select the user type: Manager, Operator, or Custom.
Note: Only the administrator can add managers.
4. Enter the user name and password. Verify the password.
5. Click Add to add the user to the system.
Set up a user to access a specific device
1. In the Main menu, click User. The “User-User List” window appears.
2. Select the desired user and click . The “User-Device” window appears.
3. Click the Add Device button.
4. In the window that appears, select the desired devices and click Add to add the
device to the selected user.
The successfully added devices are then added to the “User-Device” window.
TVK-800 User Manual 35
Page 38

Delete user access to a device
1. In the Main menu, click User. The “User-User List” window appears.
2. Select the desired user and click . The “User-Device” window appears.
3. Select the desired devices for this user and click . Click Yes in the pop-up
window to confirm deletion.
Switch user
1. In the Main menu, click User. The “User-User List” window appears. The list of
Managers is listed.
2. Click to directly access the desired user’s login window. Enter the user’s
password.
Modify a user password
1. In the Main menu, click User. The “User-User List” window appears.
2. Click for the desired user. The “User-Change Password” pop-up window
appears.
3. Enter the new password and verify it. Click OK to accept.
36 TVK-800 User Manual
Page 39

Delete a user
1. In the Main menu, click User. The “User-User List” window appears.
2. Click for the desired user.
3. Click Yes in the pop-up window to confirm the deletion.
Camera settings
Use this menu to configure inputs such as cameras.
You can set up the keypad to live view camera images. Cameras can also be grouped
together so that they can be called up to appear together on a specific monitor. For
example, one group can be cameras viewing the car park and another group can be
cameras viewing the building entrances.
You can set up to 16 camera groups.
Modify a camera’s information
1. In the Main menu, click Input. The “Input Settings-Input” window appears.
2. Click of the desired camera. The “Input Settings-Modify Camera” window
appears.
3. Enter the camera number, camera name, protocol, and stream type. Click OK.
Note: The camera number must be between 1 and 999,999.
Note: Managers can also modify camera information.
Set up a camera group
1. In the Main menu, click Input. The “Input Settings-Input” window appears.
2. Click the Input Group button. The “Input Settings-Input Group” window appears.
3. Select the desired group num ber from the Group No. drop-down list.
Up to 16 camera groups can be added.
TVK-800 User Manual 37
Page 40

4. Click the Add Camera button. The “Input Settings-Add Camera” window appears.
5. Select the desired cameras that you want to group together. Click Add.
6. Click Finish to return to the Input Group window. The list of successfully added
cameras to the group is shown.
Output settings
Use this menu to configure outputs such as monitors, decoders, DVRs, and NVRs.
You can display in the “Output Settings” window all the output channels th at ar e
accessible by the user currently logged in.
You can also playback files from the output channel, such as a DVR or NVR.
Display the list of output channels
1. In the Main menu, click Output. The Output Settings-Output window appears.
38 TVK-800 User Manual
Page 41

Modify an output channel
1. In the Main menu, click Output. The “Output Settings-Output List” window
appears.
2. Click on the desired output. The “Input Settings-Modify Output” window
appears.
3. Enter the output number and click OK to accept the change.
Set up an output group
You can group together the different channels of a decoder, such as cameras, DVRs,
and NVRs to make them easier to manage. However, you cannot create a group of
camera outputs if they are connected to different DVRs or NVRs.
To set up an output group of channels:
1. In the Main menu, click Output. The “Output Setting s-Output List” window
appears.
2. Click the Output Group button. The “Input Settings-Output Gr oup” window
appears.
3. Click to select the group number from the drop-down list.
4. Click the Add Output button. The “Add Output” window appears.
5. Select the desired outputs to add to the group. Click Add.
TVK-800 User Manual 39
Page 42

6. Click Finish to return to the “Output Settings-Output List” window to see the list o f
outputs added to the selected group.
Macro settings
A macro is a sequence of steps or commands. When you run a macro, the steps
programmed into the macro are performed. You can add up to 128 macro commands.
There can be up to a maximum of six numbers in a macro command.
Note: Local decoding and live view are currently not supported.
Add a macro
1. In the Main menu, click Macro. The “Macro Settings-Macro List” window appears.
2. Click the Add Macro button.
The “Input Settings-Output Group” window appears.
3. Enter the macro name. Then press the MAC key on the keypad to enter the text
box in the display window.
4. Click Add to add the current macro command.
Manage a macro
1. In the Main menu, click Macro. The “Macro Settings-Macro List” window appears.
All the current macro commands are listed.
2. Click one of the icons to view, run, or delete the selected macro command:
40 TVK-800 User Manual
Page 43

Macro icon
Description
Click to view a macro command.
Click to run a macro command.
Click to delete a macro command.
Playback files from a recorder
Video files stored in a recorder can be played back through the related decoder. There
are two ways to play back the files:
• Files located on a USB flash drive
• Remote playback
Play back using a USB file
1. Insert the USB flash drive into the keypad slot.
2. Click the Local tab on the Local Playback window . The “Local Playback” window
appears.
3. Select the desired file to play back.
4. Click the Playback button. The file start s to pl ay.
Remote playback
1. Click the Remote Record Files tab o n the “Local Playback” window. The
“Remote Record Files” window appears.
TVK-800 User Manual 41
Page 44

2. Enter the camera number, record type, and file type as well as the start and end
times for playback. Click Search. The results are listed on-screen.
3. Select the file for playback and clic k Playback to play back the file .
Advanced settings
Use this menu to configure FTP settings, the AUX keys, live view performance, and the
PTZ speed control settings.
Bidirectional audio and snapshot settings
1. In the Main menu, click Advanced. The “Advanced Settings” window appears.
2. Click Aux Key to view the “Aux Key” window.
The Aux Key 1 and Aux Key 2 options correspond to the AUX 1 and AUX 2 keys
on the keypad.
42 TVK-800 User Manual
Page 45

3. Select an Aux function for each Aux key; Bidirectional Audio and Snapshot
control.
4. Click Apply.
Live view and PTZ speed settings
1. In the Main menu, click Advanced. The “Advanced Settings” window appears.
2. Click Performance to view the Performance w i ndow .
3. Select a network performance level for live view; Least Delay, Balanced (default),
or Best Fluency.
4. Select a PTZ movement speed level for the PTZ camera; Low Speed, Medium
Speed (default), or High Speed.
5. Click Apply.
FTP settings
You can upload video files and snapshots to an FTP server.
To set up the FTP server settings:
1. In the Main menu, click Advanced. The “Advanced Settings” window appears.
2. Click FTP Settings to view the FTP Settings window.
3. Check Enable FTP box.
TVK-800 User Manual 43
Page 46

Note: If the option is left unchecked, video files and snapshots will be saved on
the USB flash drive.
4. Enter the IP address as well as the user name and password to log in to the FTP
server.
5. Enter the file path to which the video files and snapshots are uploaded.
6. Click Apply to save the settings.
Log out of the keypad
1. In the Main menu, click Shutdown. Select Logout.
The pop-up window appears, “Logout of the system?”
2. Click Yes to confirm, or No to cancel.
Reboot the keypad
1. In the Main menu, click Shutdown. Select Reboot.
The pop-up window appears, “Restart of the system?”
2. Click Yes to confirm, or No to cancel.
Shutdown
1. In the Main menu, click Shutdown. Select Shutdown.
The pop-up window appears, “Shut down the sy s tem?”
2. Click Yes to confirm, or No to cancel.
44 TVK-800 User Manual
Page 47

Local keypad configuration by the Manager
The Administrator must first set up the Managers as users.
Logging in/out
To log into the system:
1. Power up the keypad. The “User Login” window appears:
2. Select your user name from the drop-down list and enter the password.
3. Check Save Password to save the login password for future use.
4. Click Login. The main screen for the user type appears with the list of menu
options available displayed.
Note: The list of menu options available will depend on the user type.
To log out of the system:
1. Click the Logout button in one of the configuration screens.
TVK-800 User Manual 45
Page 48

You return to the Login screen.
Display list of accessible devices
The Administrator assigns the devices that can be accessed by users with Manager
rights.
To display list of accessible devices
1. In the Main menu, click Device. The “Device-Device List” window appears with
the list of devices available to the user.
Local live view
The Administrator assigns the cameras that can be viewed by Managers.
To live view cameras locally
1. In the Main menu, click Input. The “Input Settings-Input “window appears.
46 TVK-800 User Manual
Page 49

2. Click for the desired camera. Local live view starts immediately.
3. To view other cameras available, press the NEXT or PREV keys on the keypad to
view the next or previous cameras.
Playback a file
1. In the Main menu, click Output. The “Output Setting s-Output” List window
appears.
2. Click on the desired output channel. The Playback window appears.
3. Click the By File tab to enter the “Playback by File” window.
4. Enter the camera number, record type, and file type as well as the start and end
times for playback. Click Search. The results are listed on-screen.
5. Select a file for playback from the list and click Playback to play back the file.
TVK-800 User Manual 47
Page 50

User management
Only the Administrator can create Managers. However, only Managers can create
Operator and Cust om user s .
Add a user
1. In the Main menu, click User. The “User-User Lists” window appears.
2. Select the user type: Operator or Custom.
3. Enter the user name and password. Confirm the password.
4. Click Add to add the user to the system.
Set up a user to access a specific device
1. In the Main menu, click User. The “User-User List” window appears.
2. Select the desired user and click . The User-Device window appears.
3. Click the Add Device button.
4. In the window that appears, select the desired device and click Add Device to
add the device to the selected user.
The successfully added device is then added to the “User-Device” window.
Delete user access to a device
1. In the Main menu, click User. The “User-User List” window appears.
2. Click for the desired user. The “User-Device” window appears.
3. Select the desired device for this user and click . Click Yes in the pop-up
window to confirm deletion.
48 TVK-800 User Manual
Page 51

Switch user
1. In the Main menu, click User. The window appears. The list of Operators and
Customized users are listed.
2. In the “User-User List” window, click to directly access the user’s login
window.
Input settings
Use this menu to configure inputs such as cameras.
Managers can group cameras together so that the cameras can be called up to appear
together on a specific monitor. For example, one group can be the cameras viewing the
car park and another group the cameras viewing the building entrances.
You can set up to 16 camera groups.
Modify a camera’s information
1. In the Main menu, click Input. The “Input Settings-Input” window appears.
2. Click on the desired camera. The “Input Settings-Modify Camera” window
appears.
3. Enter the camera number, camera name, protocol, and stream type. Click OK.
Note: The camera number must be between 1 and 999,999.
TVK-800 User Manual 49
Page 52

Set up a camera group
1. In the Main menu, click Input. The “Input Settings-Input” window appears.
2. Click the Input Group button. The “Input Settings-Input Group” window appears.
3. Select the desired group num ber from the Group No. drop-down list.
Up to 16 camera groups can be added.
4. Click the Add Camera button. The “Input Settings-Add Camera” window appears.
5. Select the desired cameras that you want to group together. Click Add.
6. Click Finish to return to the Input Group window. The list of cameras successfully
added to the group is shown.
Output settings
Use this menu to configure outputs such as monitors, decoders, DVRs, and NVRs.
You can display in the “Output Settings” window all the output channels that are
accessible by the user currently logged in.
You can also playback files from the output channel, such as a DVR or NVR.
For instructions on setting up outputs, see “Output settings” on page 38.
Macro settings
A macro is a sequence of steps or commands. When you run a macro, the steps
programmed into the macro are performed. You can add up to 128 macro commands.
There can be up to a maximum of six numbers in a macro command.
For instructions on setting up and using macros, see “Macro settings” on page 40
50 TVK-800 User Manual
Page 53

Playback files from an encoder
Video files stored in an encoder can be played back through the related decoder. There
are two ways to play back the files:
• Files located on a USB flash drive
• Remote playback
For instructions on doing playback from an encoder, see “Playback files from a
recorder” on page 41.
Advanced settings
Use this menu to configure FTP settings, the AUX key, live view performance, and the
PTZ control speed control settings.
For instructions setting up bidirectional audio and snapshots using the AUX settings,
live view, PTZ speed control, FTP, see “Advanced settings” on page 42.
Log out of the keypad
1. In the Main menu, click Shutdown. Select Logout.
The pop-up window appears, “Logout of the system?”
2. Click Yes to confirm, or No to cancel.
Reboot the keypad
1. In the Main menu, click Shutdown. Select Reboot.
The pop-up window appears, “Restart of the system?”
2. Click Yes to confirm, or No to cancel.
Shutdown
1. In the Main menu, click Shutdown. Select Shutdown.
The pop-up window appears, “Shut down the sy s tem?”
2. Click Yes to confirm, or No to cancel.
TVK-800 User Manual 51
Page 54

Local keypad configuration by the Operator and Custom users
Operators and customized users can login to the system and see the list of accessible
devices. They can also change their password.
Logging in/out
1. Power up the keypad. The following display appears:
2. Select your user name from the drop-down list and enter the password.
3. Check Save Password to save the login password for future use.
4. Click Login. The main screen appears with the list of menu options available
displayed.
Display list of accessible devices
The Administrator assigns the devices that can be accessed by users with Manager
rights. Managers can then assign their devices to operators and customized users.
52 TVK-800 User Manual
Page 55

1. In the Main menu, click Device. The “Device-Device List” window appears with
the list of devices available to the user.
Change password
1. In the Main menu, click Advanced Settings. The “Advanced Settings-Change
Password” window appears.
2. Enter the current password and the new one. Confirm the new password.
3. Click Apply to accept the changes
Shutdown
1. In the Main menu, click Shutdown. Select Shutdown.
The pop-up window appears, “Shut down the sy s tem?”
2. Click Yes to confirm, or No to cancel.
TVK-800 User Manual 53
Page 56

Using the keypad
This chapter shows you how to use shortcut operations, display video on a monitor
from one or a group of cameras, use instant playback, and record. It also describes
how to use tours, presents, preset tours, and shadow tours.
Using shortcut operations
Use shortcut operations to quickly access many keypad functions. A shortcut is a
sequence or combination of keystrokes on the keypad that invokes commands in the
software.
You must be logged into the keypad in order to carry out a shortcut operation.
Figure 17: Shortcut window description
Displays the current
output channel.
Select multiview format.
Set the input channel for
each window
Displays the keypad
key commands
used
In local live view mode, the window (WIN), camera group (CAM-G), multiview (MULT),
and camera tour (TOUR) and functions are unavailable.
An error message will appear in the Hint box of the shortcut screen when an invalid
action is entered.
Local live view
A full-screen overlay of local live view from the selected camera appears on the keypad
display. It is not possible to use a multiview format.
There are two ways to see local live view on the keypad display. You can use the Input
menu and the keypad keys. For instructions on using the Input menu, see “Local live
view” on page 33.
You can carry out shortcut actions to live view.
To access local live view:
1. Press 0 + MON to enter local live view mode.
2. Enter the camera number Num and press CAM.
54 TVK-800 User Manual
Page 57

Note: Window (WIN), camera group (CAM-G), multiview (MULT), and camera
tour (TOUR) functions are not available in local mode.
3. Press ESC to enter full-screen mode.
Display decoded video on a monitor
This section describes how to display video on a monitor when using a decoder.
Multiview display
Depending on the decoder used, you can display the video on the selected monitor in
full-screen mode as well as in 2X2 multiview format.
When in multiview mode, you can easily switch a selected video tile to full-sc r een mod e
and back again as well as turn audio on and off. See Figure 18 below.
Figure 18: Multiview control icons
Switch the selected
camera in multiview
format to full-screen
mode
Switch full-screen mode
back to the selected
camera in multiview
format
Audio off Audio on
To view in full-screen or multiview mode:
1. Press the Num + MON keys to select the monitor.
2. Press the Num + MULT keys to select the multiview mode for the monitor.
TVK-800 User Manual 55
Page 58

Note: If you enter 0 + MON in live view mode, multiview mode is not supported
as video is then displayed on the keypad.
Display a specific camera on a monitor
You can select which camera to display on a monitor.
To display a specific camera on a monitor:
1. Press the Num + MON keys to select the monitor.
2. Press the Num + WIN keys to select the video tile to be displayed on the monitor
Or
Directly touch the keypad window to select the desired video tile.
3. Press the Num + CAM keys to select the camera.
For example, press 1+MON, 2+WIN, 3+CAM to decode the video signal from
Camera 3 and display it on Video tile 2 of Monitor 1.
Set up a camera group to display on a monitor
You can use a decoder to configure the keypad to display the images from a camera
group on a monitor.
When the number of cameras in a group is less than or equal to the number of video
tiles on-screen (for example three cameras and four video tiles), each camera is then
displayed on its corresponding time (for example, camera 1 on video tile 1, camera 2 on
video tile 2…)
When the number of cameras in a group is more than the number of video tiles onscreen (for example 16 cameras and 4 video tiles), the cameras are displayed in the
following sequence mode: cameras 1 to 4 are displayed on video tiles 1 to 4, next
cameras 5 to 8 on video tiles 1 to 4, cameras 9 and 12 are displayed on video tiles 1 to
4, and finally cameras 13 to 16 on video tiles 1 to 4.
Note: The default dwell time is 30 seconds.
An error message will appear in the Hint box of the shortcut screen when an invalid
action is entered.
56 TVK-800 User Manual
Page 59

To view a camera group on a monitor:
1. Press the Num + MON keys to select the monitor.
2. Press the Num + CAM-G keys to select the camera group to be decoded and
displayed on the monitor.
Note: If you enter 0 + MON in live view mode, multiview mode is not supported
as video is then displayed on the keypad.
Set up a camera group to display in the keypad window
The video signal from the camera group can be outputted to and displayed on the
selected window of the monitor in cycle.
Note: The default dwell time is 30 seconds.
An error message will appear in the Hint box of the shortcut screen when an invalid
action is entered.
To view a camera group on a monitor:
1. Press the Num + MON keys to select the monitor.
2. Press the Num + WIN keys, or directly touch the keypad window, to select the
display window.
3. Press the Num + CAM-G keys to select the camera group to be decoded and
displayed on the monitor.
For example, press 1+MON, 2+WIN, 3+CAM-G to decode the vi deo si g nal from
Camera group 3 and display it on video tile 2 of Monitor 1.
Note: If you enter 0 + MON in live view mode, multiview mode is not supported
as video is then displayed on the keypad.
TVK-800 User Manual 57
Page 60

Set up a camera group to display on a monitor group
You can configure the keypad to display the images from a camera group on a group of
monitors through a decoder .
When the number of cameras in a group is less than or equal to the number of video
tiles on-screen (for example eight cameras and nine video tiles), each camera is then
displayed on its corresponding time (for example, camera 1 on video tile 1, camera 2 on
video tile 2…)
When the number of cameras in a group is more than the number of video tiles onscreen (for example 16 cameras and 4 video tiles), the cameras are displayed in the
following sequence mode: cameras 1 to 4 are displayed on video tiles 1 to 4, next
cameras 5 to 8 on video tiles 1 to 4, cameras 9 and 12 are displayed on video tiles 1 to
4, and finally cameras 13 to 16 on video tiles 1 to 4.
Note: The default dwell time is 30 seconds.
An error message will appear in the Hint box of the shortcut screen when an invalid
action is entered.
To view a camera group on a monitor group:
1. Press the Num + MON-G keys to select the monitor group.
2. Press the Num + CAM-G keys to select the camera group to be decoded and
displayed on the monitor group.
Note: In monitor group mode, output channels are only displayed in full-screen
mode by default.
Set up a tour
A tour is the display of images from a sequence of different cameras. You can set up to
64 cameras in a tour.
The dwell time is the time a camera image remains on-screen before the image from
the next camera is displayed. The default dwell time is 30 seconds but it c an be
modified.
Tour setups are not saved when the device is restarted.
An error message will appear in the Hint box of the shortcut screen when an invalid
action is entered.
58 TVK-800 User Manual
Page 61

To set up a tour:
1. Press the SET key to enter the tour shortcut window.
2. Press the Num + TOUR keys to set up a tour.
3. Press the Num + ENTER keys to set up the dwel l time of the selected camera
and camera number.
4. Repeat step 3 for each camera to be included in the tour.
Note: The tour parameters are cleared if you the Num + TOUR keys again.
5. Press the SET key to complete the tour settings.
Up to eight tours can be set.
Call up a tour
1. Press the Num + MON keys to select the monitor.
2. Press the Num + TOUR keys to call up a programmed tour to be displayed on
the monitor.
Set up a group tour
You can set up a group tour so that multiple camera groups can be displayed on
specific monitors. Each user account can set up to eight tour groups. Each tour group
can contain up to eight camera groups to specific monitors.
Caution: Group tour setups are not saved when the keypad is rebooted.
A group tour cannot be set up in playback mode.
TVK-800 User Manual 59
Page 62

To set up a group tour:
1. Press the SET key to enter the group tour shortcut window.
2. Press the Num + GROUP keys and set up a group tour.
3. Press the Num + ENTER keys and set the monitor number.
4. Press the Num + ENTER keys and set the camera group (CAM-G) number.
5. Repeat steps 3 and 4 for each monitor and camera group to be included in the
group tour.
Caution: The tour parameters are cleared if you press the Num + GROUP keys
again.
6. Press the SET key to complete the group tour settings.
Call up a group tour
You can use a group tour to call up multiple camera groups on specific monitors. For
example, call up camera group 1 appears on monitor 1, and camera group 2 appears
on monitor 2. The dwell time of the group tour can also be modified.
If multiple camera groups have been set up to appear on the same monitor, then the
monitor only displays the last programmed camera group.
To call up a group tour:
1. Press the Num + GROUP keys to call up the programmed group tour.
60 TVK-800 User Manual
Page 63

Instant playback
Use the keypad to quickly replay recorded video from the previous five seconds.
Administrators and Manager scan also play back video from the Input menu. See
“Playback a file” on page 33 for more information.
To instantly playback a video:
1. Press the Num + MON keys and select the monitor .
2. Press the Num + WIN keys and select the video tile.
3. Press the Num + CAM keys and select the desired camera.
4. Press the key to enter instant playback window.
5. Press the key to stop playback.
Auxiliary functions
The keypad has AUX1 and AUX2 keys that can be configured for the AUX1 and AUX 2
functions in the system. By default, AUX 1 is set to bidirectional audio and AUX 2 is set
to capture a snapshot.
Note: An error message appears if an AUX function is requested when the current
window is in cycle view mode.
Bidirectional audio
To start bidirectional audio with a decoder/NVR/DVR:
1. Press Num and MON and select the decoder/NVR/DVR.
2. Press the AUX1/AUX2 key that is configured to the bidirectional function to start
bidirectional audio.
Note: The keypad takes the bidirectional audio from the nearest device.
To start bidirectional audio with a camera:
1. Press Num and CAM and select the camera.
2. Press the AUX1/ AUX2 key that is configured to the bidirectional function to start
bidirectional audio.
TVK-800 User Manual 61
Page 64

During bidirectional audio:
• Stop bidirectional audio by pressing 0 + AUX1/ AUX2
• If the network connection is lost during directional audio, press 0 + AUX1/AUX2
to stop the bidirectional audio and then restart it.
• If the system is in cycle view mode and you want to play bidirectional audio for a
specific camera, you must quit cycle view mode by pressing ESC. Then press the
Num + CAM keys and press AUX1/AUX2 key to start bidirectional audio.
Snapshots
You can use the keypad to capture a snapshot of a video image and save it on a USB
flash drive or upload it to an FTP server. To upload snapshots to an FTP server, you
must already have config ured t he sy st em for the FTP server.
There are two ways to capture a snapshot. You can do it from the output channel or the
input channel.
Note: An error message appears when the keypad window is configured to display
cameras in cycle view mode.
Method 1: To capture a snapshot
1. Press the Num + MON keys and select the monitor .
2. Press the Num + WIN keys and select the video tile.
3. Press the AUX key that has been configured for snapshot capture (AUX 1 or AUX
2) to capture the snapshot.
Method 2: To capture a snapshot
1. Press the Num + CAM keys and select the input channel.
2. Press the center button of the joystick to capture the snapshot.
Saving recordings
You can record video from the cameras and save the files to a USB flash drive or
upload it to an FTP server. You cannot record video during playback.
The REC key on the keypad is lit red during recording.
Note: An error message appears on-screen when the keypad window is configured to
display cameras in cycle view mode.
There are two ways to record video:
Method 1: To record video
1. Press the Num + MON keys and select the monitor .
2. Press the Num + WIN keys and select the video tile.
3. Press the REC key to start recording.
62 TVK-800 User Manual
Page 65

Method 2: To record video
1. Press the Num + CAM keys and select the input channel.
2. Press the REC key to start recording.
Moving to next/previous cameras
You can easily select the next or previous cameras when carrying out a shortcut
operation.
Note: An error message appears on-screen when the keypad window is configured to
display cameras in cycle view mode.
Method 1: To move to the next or previous camera
1. Press the Num + MON keys and select the monitor .
2. Press the Num + WIN keys and select the video tile.
3. Press the PREV or NEXT key and select the previous or next camera.
Note: This method only works if the current window is in dynamic decoding
mode.
Method 2: To move to the next or previous camera
1. Press the Num + CAM keys and select the input channel.
2. Press the PREV or NEXT key and select the previous or next camera.
TVK-800 User Manual 63
Page 66

Operating PTZ cameras
You can control PTZ dome cameras using the keypad. If the camera supports PTZ
functions, you can use the joystick as well as the Focus, Iris, and Zoom keys on the
keypad to control the camera.
Setting a preset
Presets are previously defined locations of a PTZ dome camera. They allow you to
quickly move the camera to a desired position.
An error message will appear in the Hint box of the shortcut screen when an invalid
action is entered.
There are two ways to set a preset:
Method 1: To set a preset using an output channel
1. Press the Num + MON keys and select the monitor .
2. Press the Num + WIN keys and select the video tile.
3. Using the joystick, move the PTZ camera to the desired position.
4. Press the Num + PRESET keys and enter the preset number to set the current
position as a preset.
Method 2: To set a preset using an input channel
1. Press the Num + CAM keys and select the camera.
Note: The action 0 + CAM is invalid.
2. Using the joystick, move the PTZ camera to the desired position.
3. Press the Num + WIN keys and enter the preset number to set the current
position as a preset.
64 TVK-800 User Manual
Page 67

Calling up a preset
There are two ways to call up a preset:
Method 1: To call up a preset using an output channel
1. Press the Num + MON keys and select the monitor .
2. Press the Num + WIN keys and select the video tile.
3. Press the Num + CALL keys and enter the desired preprogrammed preset.
Method 2: To call up a preset using an input channel
1. Press the Num + CAM keys and select the camera.
Note: The action 0 + CAM is invalid.
2. Press the Num + CALL keys and enter the desired preprogrammed preset.
TVK-800 User Manual 65
Page 68

Setting a preset tour
Preset tours move a PTZ dome camera to a sequence of steps. The camera stays at a
step for a set dwell time before moving on to the next step. A step consists of a step
number, a dwell time, and a speed.
The step number is the order the camera will follow while cycling through the preset
tour. The dwell time is the length of time that a camera stays at a step before moving to
the next step. The speed is the rate at which the camera will move from one step to the
next.
A preset tour requires at least two presets.
The PTZ dome camera must be able to support preset tours.
An error message will appear in the Hint box of the shortcut screen when an invalid
action is entered.
There are two ways to set a preset tour:
Method 1: To set a preset tour using an output channel
1. Press the Num + MON keys and select the monitor .
2. Press the Num + WIN keys and select the video tile.
3. Press the SET key to enter the Settings window.
4. Press the Num + PATROL keys to enter the “Preset Tour Settings” window.
5. Enter the preset number and press ENTER, enter the dwell time (called “Stop
Time on-screen) and press ENTER, and then enter the speed and press ENTER.
6. To set the next preset in the tour, repeat step 5.
Note: To clear all programmed parameters, press the Num + PATROL keys
again.
7. Press the SET key again to complete the preset tour.
Method 2: To set a preset tour using an input channel
1. Press the Num + CAM keys to select the camera.
Note: The action 0 + CAM is invalid.
2. Press the SET key to enter the Settings window.
3. Press the Num + PATROL keys to enter the Preset Tour Settings window.
66 TVK-800 User Manual
Page 69

4. Enter the preset number and press ENTER, enter the dwell time (called “Stop
Time on-screen) and press ENTER, and then enter the speed and press ENTER.
5. To set the next preset in the tour, repeat step 5.
Note: To clear all programmed parameters, press the Num + PATROL keys
again.
6. Press the SET key again to complete the preset tour.
Calling up a preset tour
There are two ways to call up a preset tour:
Method 1: To call up a preset tour using an output channel
1. Press the Num + MON keys to select the monitor.
2. Press the Num + WIN keys to select the video tile.
3. Press the Num + PATROL keys and enter the desired preprogrammed preset
tour.
Method 2: To call up a preset tour using an input channel
1. Press the Num + CAM keys to select the camera.
2. Press the Num + PATROL keys to enter the desired preprogrammed preset tour.
TVK-800 User Manual 67
Page 70

Setting a shadow tour
A shadow tour is a camera path that was manually-controlled. It has a beginning and
end. You can set a camera to move between two points such as two locations in a car
park. Only one shadow tour can be set up.
The PTZ dome camera must be able to support shadow tours.
There are two ways to set a shadow tour:
Method 1: To set a shadow tour using an output channel
1. Press the Num + MON keys and select the monitor .
2. Press the Num + WIN keys and select the video tile.
3. Press the SET key to enter the Settings window.
4. Press the Num + PATTERN keys and set the shadow tour number.
5. Using the joystick, move the PTZ camera through the desired positions.
6. Press the SET key again to complete the shadow tour.
Method 2: To set a shadow tour using an input channel
1. Press the Num + CAM keys and select the camera.
2. Press the SET key to enter the Settings window.
3. Press the Num + PATTERN keys and set the shadow tour number.
68 TVK-800 User Manual
Page 71

4. Using the joystick, move the PTZ camera through the desired positions.
5. Press the SET key again to complete the shadow tour.
Calling up a shadow tour
The PTZ dome camera must be able to support shadow tours.
There are two ways to call up a shadow tour:
Method 1: To call up a shadow tour using an output channel
1. Press the Num + MON keys and select the monitor.
2. Press the Num + WIN keys and select the video tile.
3. Press the Num + PATTERN keys to call up the shadow tour number.
Method 2: To call up a preset tour using an input channel
1. Press the Num + CAM keys and select the camera.
2. Press the Num + PATTERN keys to call up the shadow tour number.
TVK-800 User Manual 69
Page 72

Control mode
Audio input/o
External interface
General
Specifications
Control mode: IP-based
utput Line In: 1-ch, 3.5 mm connector (2.0 Vp-p, 1 kΩ)
Audio Out: 1-ch, 3.5 mm connector (Linear, 600 Ω)
Communication int erface: 1 RJ45 10M/100M/1 00 0M adap t ive
LCD screen: 7” TFT LCD monitor with touch panel
Joystick: 3-axis joystick
Power supply: 12 VDC
Power consumption: ≤15 W
Ethernet interface, PoE
1 RS-232 interface
1 RS-485 interface
1 USB2.0 interface (for data storage and
device upgrade)
Working temperature: -10 to +55°C (14 to 131 °F)
Working humidity: 10 to 90%
Size (H × W × D): 110 × 193 ×435 mm
(4.33 × 7.59 × 17.12 in.)
Weight: 2 kg (4.4 lb.)
70 TVK-800 User Manual
Page 73

Index
A
Admin
camera management, 37
device management, 29
macros management, 40
output settings, 38
playback files, 41
user management, 35
Auto search device
local, 30
Auxiliary settings
browser setup, 21
local setup, 42
B
Bidirectional audio
browser setup, 21
local setup, 42
Browser setup
default network parameters, 14
C
Camera settings
browser setup, 18
local setup, 37
Manager setup, 49
Connections, 5
D
Default settings
restore, 29
Device
auto search
local, 30
Device setup
browser, 16
Devices
local setup, 29
manually add and modify, 31
manually delete, 32
F
FTP settings
browser setup, 21
local setup, 43
Functions keys
description, 7
I
Input settings
browser setup, 18
local setup, 37
Manager setup, 49
Instant playback, 61
K
Keypad
browser setup, 15
Keypad calibration
touch screen, 27
update software, 27
Keypad configuration
Admin local, 24
browser, 14
language, 26
Manager, 45
Operator/Custom local, 52
Keypad configuration parameters
import/export, 29
Keypad setup
local by Admin, 24
L
Language setting, 26
Local live view
local setup, 33
Locking/unlocking the keypad, 7
Log in/log out, 11
M
Macros
local setup, 40
Main menu
Admin description, 13
Manager description, 45
Manager
camera management, 49
device list, 46
macro management, 50
playback files, 47
user management, 48
Monitors
camera groups, 56
display cameras, 55
display format, 55, 56
H
N
Hardware configuration, 25
TVK-800 User Manual 71
Network setup, 24
Page 74

O
Operator/Custom users
accessible devices, 52
passwords, 53
Output settings
browser setup, 20
local setup, 38
Manager setup, 50
P
Playback a file
Admin, 41
Manager, 47
Playback control dial and keys
description, 8
Playback setup
local, 33
Preset tours
set up, 66
Presets
set up, 64
PTZ control speed settings
local setup, 43
R
Reboot
local, 44
Recordings
saving, 62
Remote control
device, 32
S
Shadow tours
set up, 68
Shortcut operations, 54
Shutdown
local, 44
Snapshots
browser setup, 21
local setup, 42
T
Time/date configuration, 26
Tours
set up, 58
U
Upgrade software, 27
User
browser setup, 16
User management
admin local setup, 35
Manager, 48
Users
types, 10
V
Version information, 24
72 TVK-800 User Manual
Page 75

 Loading...