

Interlogix TVR 11, TruVision TVR 11 Quick Start Manual

© 2012 UTC Fire & Security Americas Corporation, Inc. All rights reserved.
P/N 1072596A-EN • REV 1.0 • ISS 11DEC12
TVR 11 Quick Start Guide
Figure 1: Back panel connections
1. Loop through for up to 16 analog cameras
(depends on DVR model).
2. Connect to a RS-232 device.
3. Connect up to four alarm input cables to relay
outputs.
4. Connect one alarm relay output.
5. Connect four audio inputs to RCA connectors.
6. Connect up to 16 analog cameras to BNC
connectors (depends on model of DVR).
7. Connect to an optional USB device such as a
mouse, CD/DVD burner or HDD.
8. Connect one CCTV monitor (BNC-type
connector).
9. Connect to a HDTV. The HDMI connection
supports both digital audio and video.
10. Connect to a VGA monitor.
11. Connect to speakers for audio output.
12. Connect to a network.
13. Connect to a RS-485 device such as a PTZ
camera or a keypad.
14. Connect to the 12 VDC PSU (enclosed).
15. Power switch (on/off).
16. Connect to ground.
2 TVR 11 Quick Start Guide
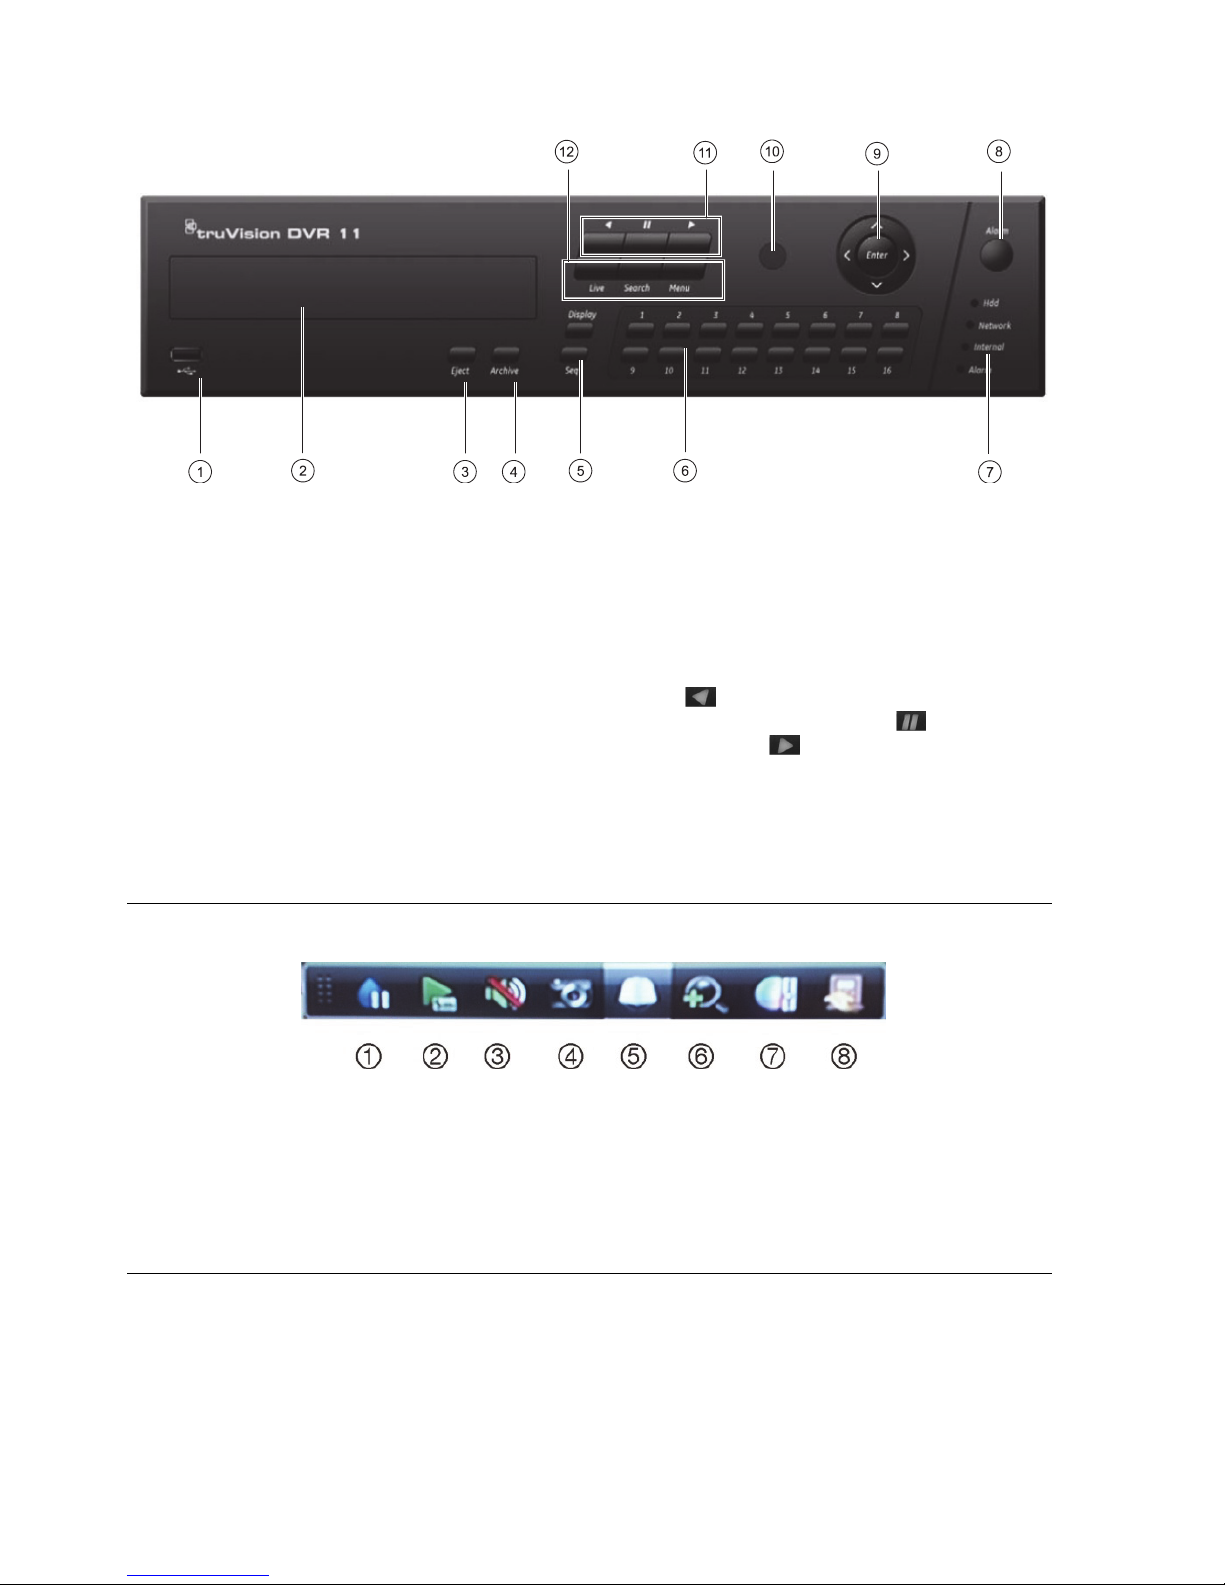
Figure 2: Front panel controls
1 USB port.
2. CD/DVD burner.
3. Eject button: Press to eject CD/DVD disc.
4. Archive button: Press to enter archive mode.
5. Display and Seq buttons: In live view mode,
press Display to toggle through the single and
multiviews. Press Seq to start/stop sequencing
in live view mode.
In menu mode, press Enter to select a menu
window and then Seq to toggle through the tabs
along the top of the menu window.
6. Channel buttons. Switch between different
cameras in live view, PTZ control or playback
modes.
7. Status LEDs.
8. Alarm button: Press to manually acknowledge
an alarm. 9. Enter and arrow buttons: Use to
select options in a menu and to control playback.
Press for Enter.
10. IR receiver.
11. Playback buttons: Press to control playback.
Press to jump back to the oldest available
video and start playback. Press to pause
playback. Press for all-day playback.
12. Live, Menu and Search buttons: Press Live to
switch to live view mode. Press Menu to enter
the main menu. Press Search to enter the
advanced search menu.
Figure 3: Quick access toolbar
1. Freeze: Freeze live image of the selected
camera.
2. Instant playback: Play back the recorded video
from the last five minutes.
3. Audio: Enable/disable audio output.
4. Quick snapshot: Capture a snapshot of a video
image.
5. PTZ control: Enter PTZ control mode.
6. Digital zoom: Enter digital zoom.
7. Image settings: Modify the image lighting levels.
8. Close: Close the toolbar.

TVR 11 Quick Start Guide 3
Quick Start Guide
Package contents
The TruVision DVR 11 (model TVR 11) is
shipped with the following items:
• IR (infrared) remote control
• Two AAA batteries for the remote control
• AC power cords
• 12 VDC PSU
• USB mouse
• DVR
• Video loop through cable
• CD with software and manuals
• TruVision DVR 11 Quick Start Guide
• TruVision DVR 11 User Manual (on CD)
Installation environment
Refer to the user manual for detailed
information, but observe these important
requirements:
• Place the unit in a secure location.
• Ensure that the unit is in a well-ventilated
area.
• Do not expose the unit to rain or moisture.
Quick install
Recommended steps for setting up the DVR:
1. Connect all the devices required to the
back panel of the TVR 11. See Figure 1 on
page 1.
Basic connections:
Connect the cameras to the BNC camera
inputs and monitor A to the BNC, VGA or
HDMI output. Connect the mouse to the
USB port in the front panel.
Optional connections:
All the other connections shown are
optional and depend upon installation
requirements.
2. Connect the power supply to the unit and
turn on the power.
3. Set up the unit with the required settings
using the setup Wizard.
First-time use
The TVR 11 has an express installation wizard
that lets you easily configure basic DVR
settings when first used. It configures all
cameras simultaneously. The configuration
can then be customized as required.
By default, the setup wizard will start once the
DVR has loaded. The wizard walks you
through some of the more important settings
of your DVR. Select the preferred language for
the system and then enter the administrator
password. The default admin password is
1234. It is strongly recommended that this
password is changed.
The wizard will then guide you through the
menus to set the time and date, network
configuration, HDD management, and
recording configuration.
When all the required changes have been
entered, click Finish to exit the wizard. The
TVR 11 is now ready to use. Recording starts
automatically.
Operating the TVR 11
There are several ways to control the unit:
• Front panel
• IR remote control
• Mouse
• Web browser
Front panel
The buttons on the front panel control most
functions. See Figure 2 on page 2 for the
locations of the controls.
IR remote control
The IR remote control buttons are similar to
those on the front panel. Place the two AAA
batteries in the remote control.
 Loading...