

Page 1

™
Monitor ISM/xL
Hardware
Guide
rev1.1
Page 2

Page 3

Contents
Part 1 Monitor ISM System Hardware....................................................................................................... 1
Main Control Board................................................................................................................................... 2
Keypad Modules.......................................................................................................................................3
LCD Keypad......................................................................................................................................3
Arming Station Reader......................................................................................................................4
Suite Security LED Keypads for Apartment and Office Protection......................................................7
8 and 16 Input/Output Expansion Modules.............................................................................................12
Output/Relay Card..................................................................................................................................13
RF Wireless Modules.............................................................................................................................. 14
Version 1......................................................................................................................................... 14
Version 2 Wireless........................................................................................................................... 17
North American Module ..............................................................................................................................17
European and Australian Module................................................................................................................ 19
Fire Module.............................................................................................................................................24
Graphic Map Annunciator Module........................................................................................................... 25
Smart / Vigil Module................................................................................................................................27
Door Controller Modules......................................................................................................................... 32
Version 1 Door Module.................................................................................................................... 32
Version 2 Door Module.................................................................................................................... 33
Multi-Door Controller........................................................................................................................34
Elevator / Lift Modules ............................................................................................................................ 35
Communication Modules........................................................................................................................42
Printer..............................................................................................................................................42
IP Module V3...................................................................................................................................43
MONITOR System Reference Topics..................................................................................................... 45
Adding Any Power Supply to the Module Bus .................................................................................................... 45
Communication Connections between the Main Controller and the Director PC Software................................ 45
Part 2 Monitor xL System Hardware.......................................................................................................47
Main Controller.......................................................................................................................................48
Modems.................................................................................................................................................. 49
Feature Expansion Board....................................................................................................................... 49
Wiring CA38A Alarm Jack for connection to xL Modems...................................................................................50
Keypad...................................................................................................................................................51
Input Point Expanders.............................................................................................................................52
VBUS......................................................................................................................................................52
Transistor Output Expander.................................................................................................................... 53
Relay Output Expander...........................................................................................................................53
Module Power Supply ............................................................................................................ ................. 54
Appendix “A” 12VDC Relay .................................................................................................................... 56
Appendix “B” Wiring Specifications ...................................................................................................... 56
Appendix “C” Basic Circuit Types ......................................................................................................... 57
Appendix “D” Mode m Notes................................................................................................................... 58
22-0375 rev1.1 (9.1.2006) © 2006 CSG Security Inc. / Sécurité CSG Inc. i
Page 4

Foreword
The Hardware Guide is designed as a quick reference for module circuit board layout, wiring and installation.
Some programming is included for e.g. Wireless, Smart and Printer modules. For Monitor ISM System programming
information, refer to the Commissioning Reference Guide. For Monitor xL System programming, refer to the Monitor
xL Simplified and Advanced programming guides. For software used with the Monitor ISM and Monitor xL systems,
refer to the Director Software User Guide. Specific installation and programming instructions produced for each
module by part number are referenced at the beginning of each module’s section in this manual.
VEREX Technology
5201 Explorer Drive, Mississauga, Ontario, L4W 4H1, Canada.
www.verextech.com | +1 877.249.9993
sales@verextech.com +1 905.206.8434
support@verextech.com +1 905.206.8436 | Fax: +1 905.629.4970
In This Issue:
V1.1 Additions/Deletions/Corrections
• Wire color for Arming Station Reader GProxI and II
Keypad Area Control Communications identified.
• Arming Station Reader LED and tone descriptions
added.
• Part 2, Monitor xL section updated to current status.
Includes correction to Relay Expansion Board’s
reversed contact labels.
• ULC, CE marks added to back cover.
ii Monitor ISM/xL™ Hardware Guide
22-0375 rev1.1
Page 5

Part 1
Monitor ISM
System
Hardware
22-0375 rev1.1 Monitor ISM/xL™ Hardware Guide 1
Page 6
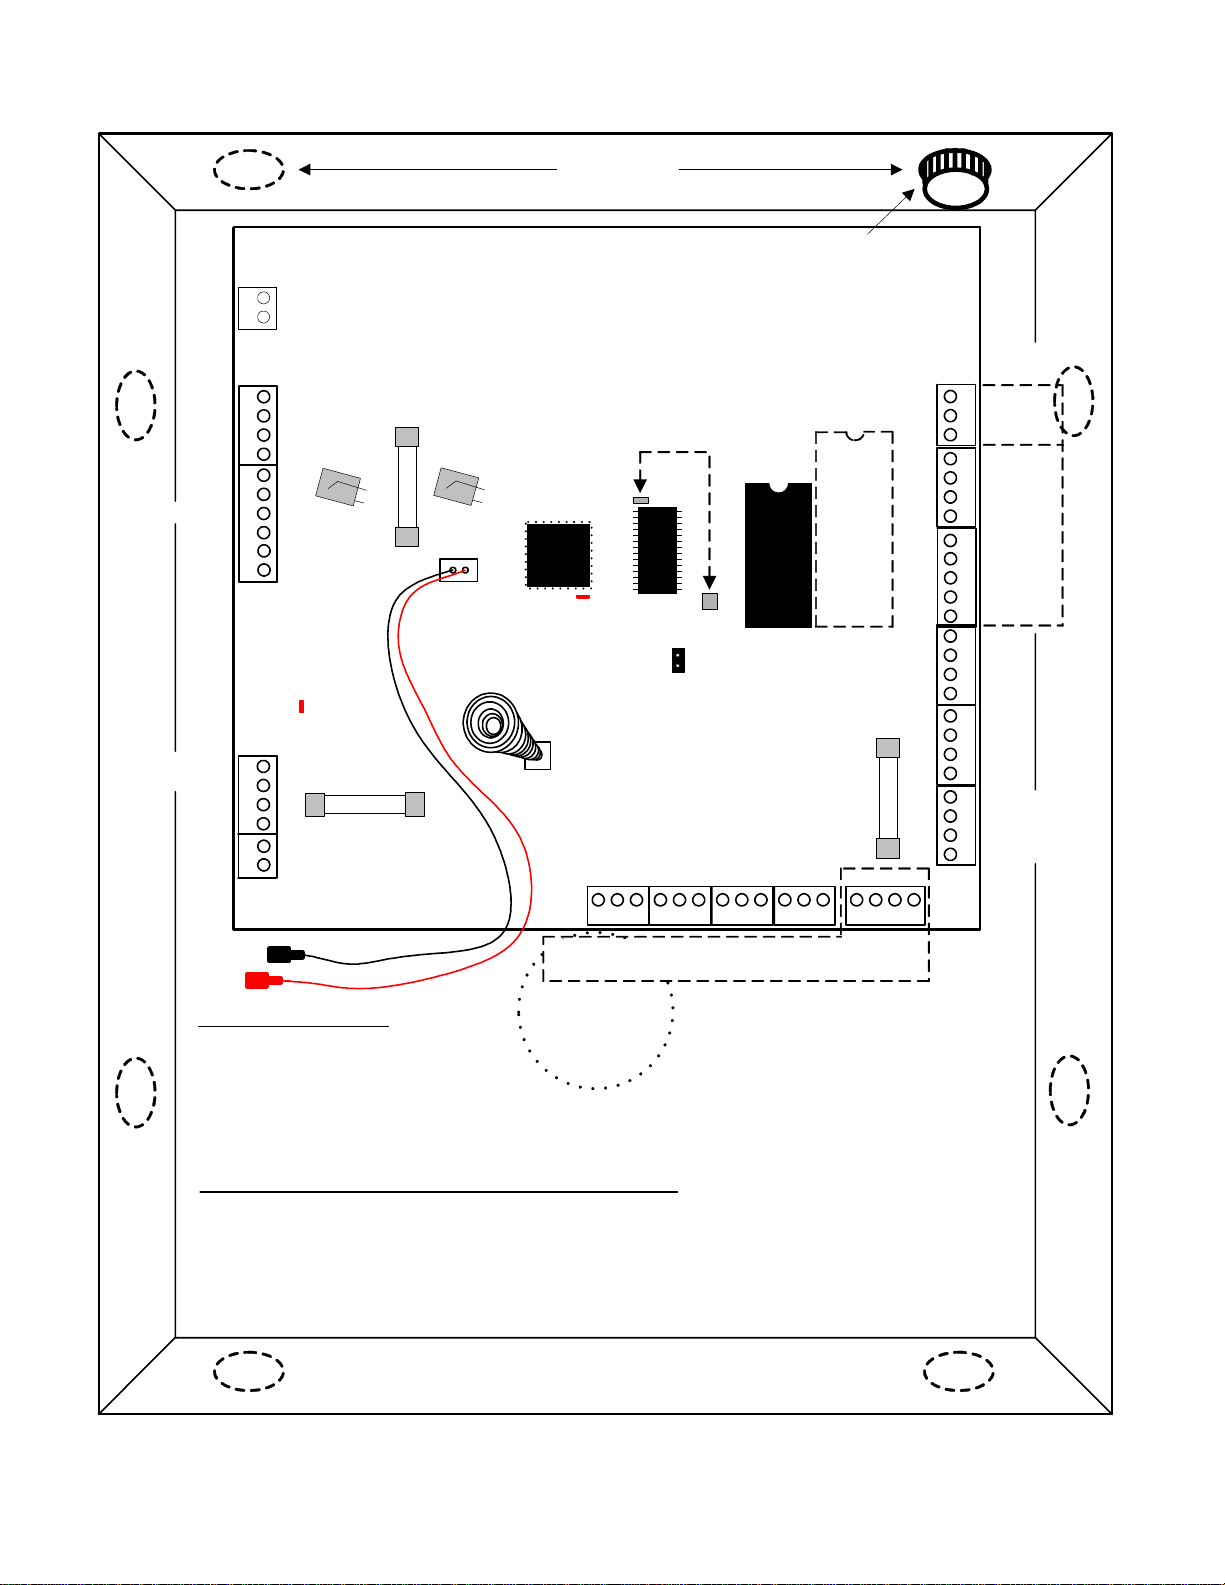
Main Control Board
Metal Enclosure
O/P3 Siren
(+)12V
Seized Tip
Seized Ring
TB1
12
TB2
1432
(+)
(-)
(+)
(-)
1432
O/P1
O/P2
O/P4
56
(-)0V
O/P Current Ratings
O/P1&4 = 10mA
O/P2 = 750mA
O/P3 = 1.8AMP
Telco Off Hook
TB4
1432
AC Input
16.5V, 40VA
(P/N 859-2246)
18 AWG CONNECTION
CABLE REQUIRED
Aux 12VDC
(750mA max.)
SIREN
TB3
LED
Fire
18V, 40VA
(P/N 859-0052)
Siren & Battery
are fused
F2
by a 1.8AMP
resetable fus e.
1 AMP
P/N 342-3350
AUX POWER
(-)
BATTERY
TELEPHONE
Tip
Ring
12
TB5
If using Station "Z" Quad cable for ground,
use all 4 conductors. Two wires can be
connected to terminal 1 and two to ter minal 2.
PHONE LINE
EARTH
GROUND
1.5 AMP
P/N 342-3821
F3
(-)
(+)
Resetable Fuse Notes
Will disconnect po wer if DC current
draw exceeds 1.8AMP.
WARNING: Very hot when
triggered: 120°C.
Disconnect battery for 1 min. to reset or,
silence siren. Hydro can stay connected.
Installation Notes for Further Reduction of RF Emissions
1. Terminating cables inside metal enclosure must never cross over the motherboard, behind
it or on top of it. Cables must run along th e sides of the board.
2. Cables being brought into the box should come in through the "knock out" ne arest the
terminal block it is being terminated at. E.g. A/C transformer cable should be brought in
through the knock out nearest the A/ C termianl block. Avoid leaving long cable lengths around
the board or inside box.
KNOCK OUTS
Main Control Board
To Clear Memory
with no power to panel
Short the upper lef t and
lower right silver pads.
See note
below.
Battery
micro-
processor
(+)
PLUG
Watchdog LED
TAMPER
SPRING
P/N 936-6800
I/P1
I/P2
COM
TB6
31 3 11312 2 2 2
Do not connect modules to this Module Bus connector
Reserved for Service use with LCD Keypad.
CABLE
INLET
Use plastic 3/4 in. bushings
P/N 364-5100 to insert in knockouts
before bringing i n cables.
R
A
M
32 pin
E-prom
socket
expansion RAM
36 pin battery backed
J5
IN (default) for Non
Res. UL Fire
OUT for Res. UL Fire
F5
1 AMP
TB9TB8TB7
MODULE BUS
I/P3
I/P4
I/P5
COM
I/P6
COM
I/P7
I/P8
COM
3
MODBUS 1
1432
TB16
TB15
TB14
TB13TB12
MODBUS 2 MODBUS 2
TB11
MODBUS 1
TB10
Host RS485
312
0V
B485
A485
GND/GND
CTS/RTS
RTS/CTS
DSR/DTR
5
DTR/DSR
TX/TX
RI/RI
CD/CD
1432
RX/RX
b
(-)0V
l
a
c
y
Data B
g
Data A
r
1432 1432 1432 1432
(+)12V
e
HOST PORTS
PC/Modem con nec tio n
k
e
l
l
o
w
r
e
e
n
d
2 Monitor ISM/xL™ Hardware Guide
22-0375 rev1.1
Page 7
Refer to Installation Instructions P/N 21
-
0369 for further information.
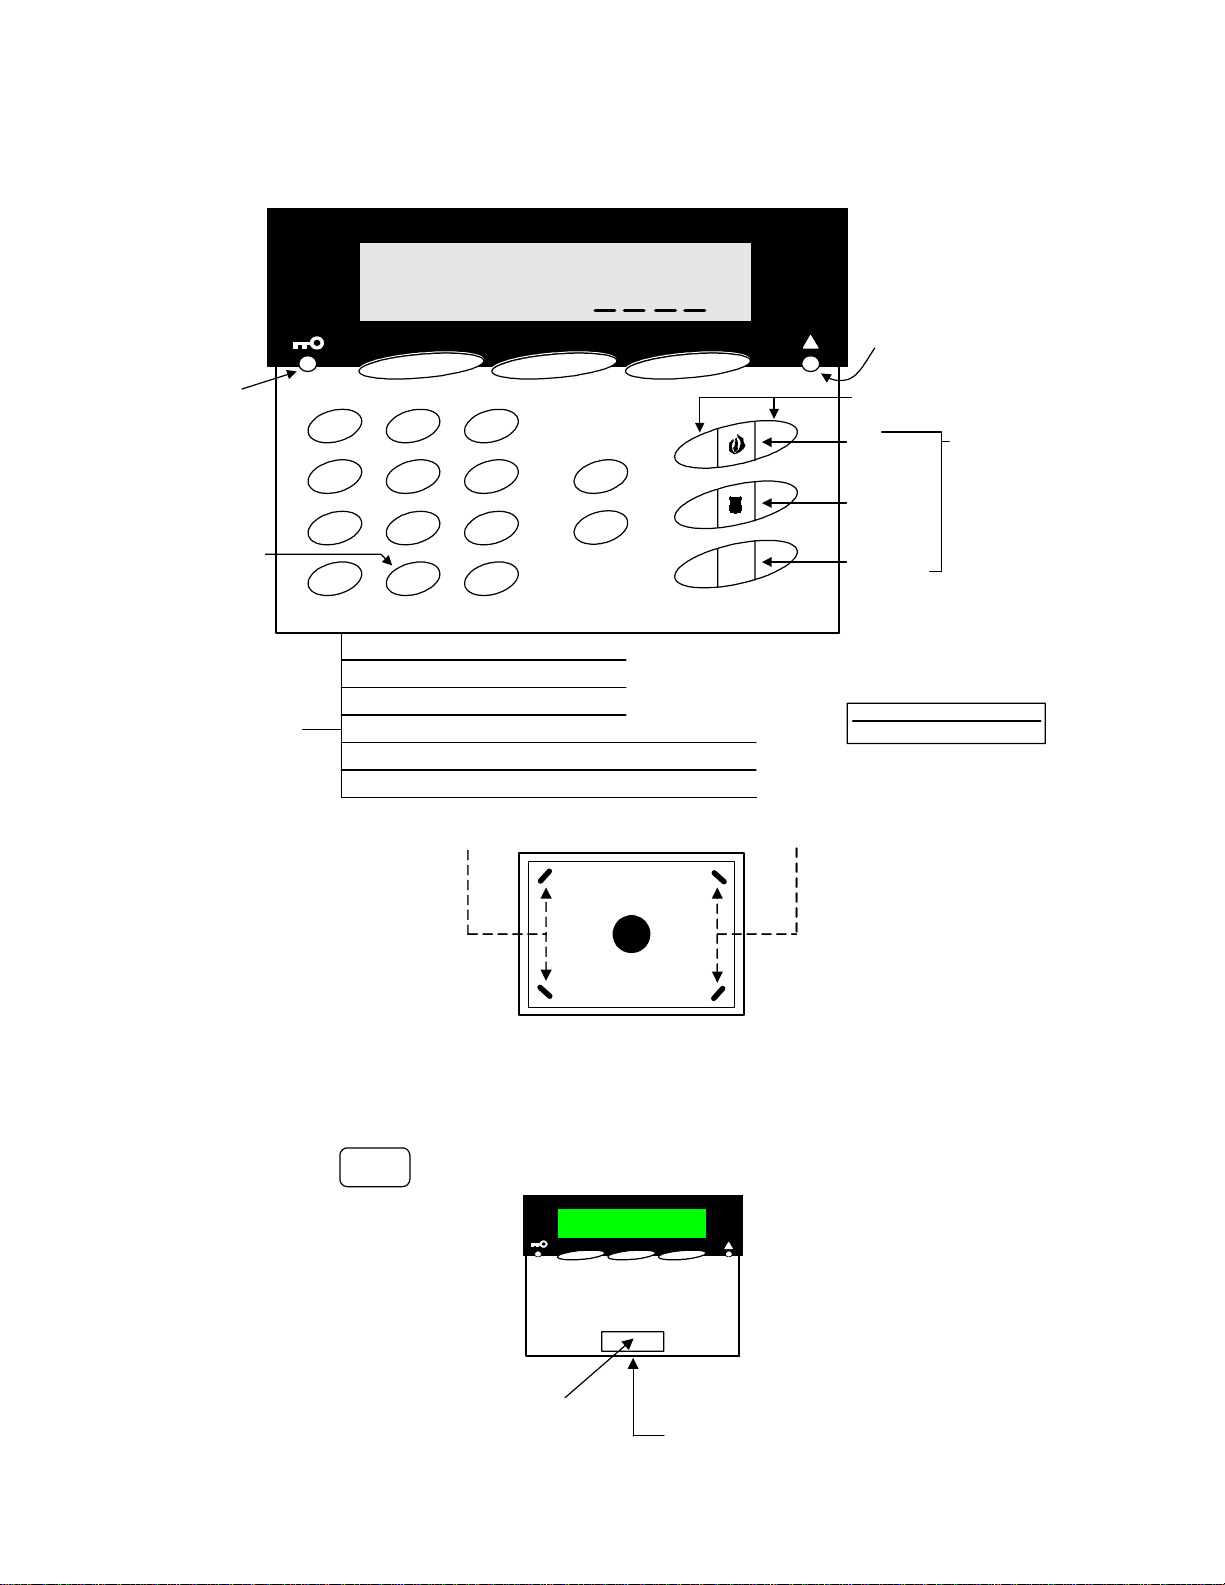
Keypad Modules
LCD Keypad
Area
Armed
Light
Steady =
STAY
Flashing =
Fully ON
When
programming,
use this key
"_" to insert a
blank space
or clear a
character
when cursor
flashing
under it.
Keypad
Wire
Connectors
WELCOME
Enter ID:
Down Arrow Keys
' - #
1 2 3
GHI JKL MNO
4 5 6
PRS TUV WXY
7 8 9
X
Left - Right arrow screen scrolling keys.
Orange = Hardwired Input. Connect common to Black
Blue = Hardwired Output. Obtain negative from Black
ABC DEF
_Q
Z
0
Red = Module Bus 12V Positive
Green = Module Bus Data "A"
Yellow = Module Bus Data "B"
Black = Module Bus Negative
Escape Key
Function Key
X
16 Character,
2 Line LCD
Screen
X
f
Power a device
(e.g. motion detector) from
Red (+) and Black
NOTE: This is Bus power and
must not be overloaded!
System Trouble
Indicator Light
Emergency Keys
Both buttons must be pressed
at same time to activate.
FIRE
POLICE
AUXILIARY
Apply emergency
label types
(supplied) in this
sequence to
match point type
default or blank
labels but, NEVER
LEAVE THESE
SPACES EMPTY!
Piezo sounder
is one volume only
(-- )
There is no Bus communications LED
indicator on the PCB board as whether the
LCD displays or not is used instead.
and not adjustable.
Module Current Rating
= 150mA max.
Always secure keypad base to wall using 4 screws.
Recommended mounting height: 1.5 meters (4 feet, 9 inches) from floor level to the
bottom of the keypad.
WARNING: If upgrading an existing previous version Fx LCD keypad with this one,
each keypad's base is a different size and their mounting holes do not align exactly
the same.
XXXXX
The sticker with the 5 digit serial number, for programming the module in Module
Programming, is located on the keypad PCB back when the keypad base is removed.
After placing the keypad
Apply dealer's logo label
(supplied) in the indented
space on keypad door.
on its base, make sure
the keypad's securing
screw (supplied) is
always I N !
22-0375 rev1.1 Monitor ISM/xL™ Hardware Guide 3
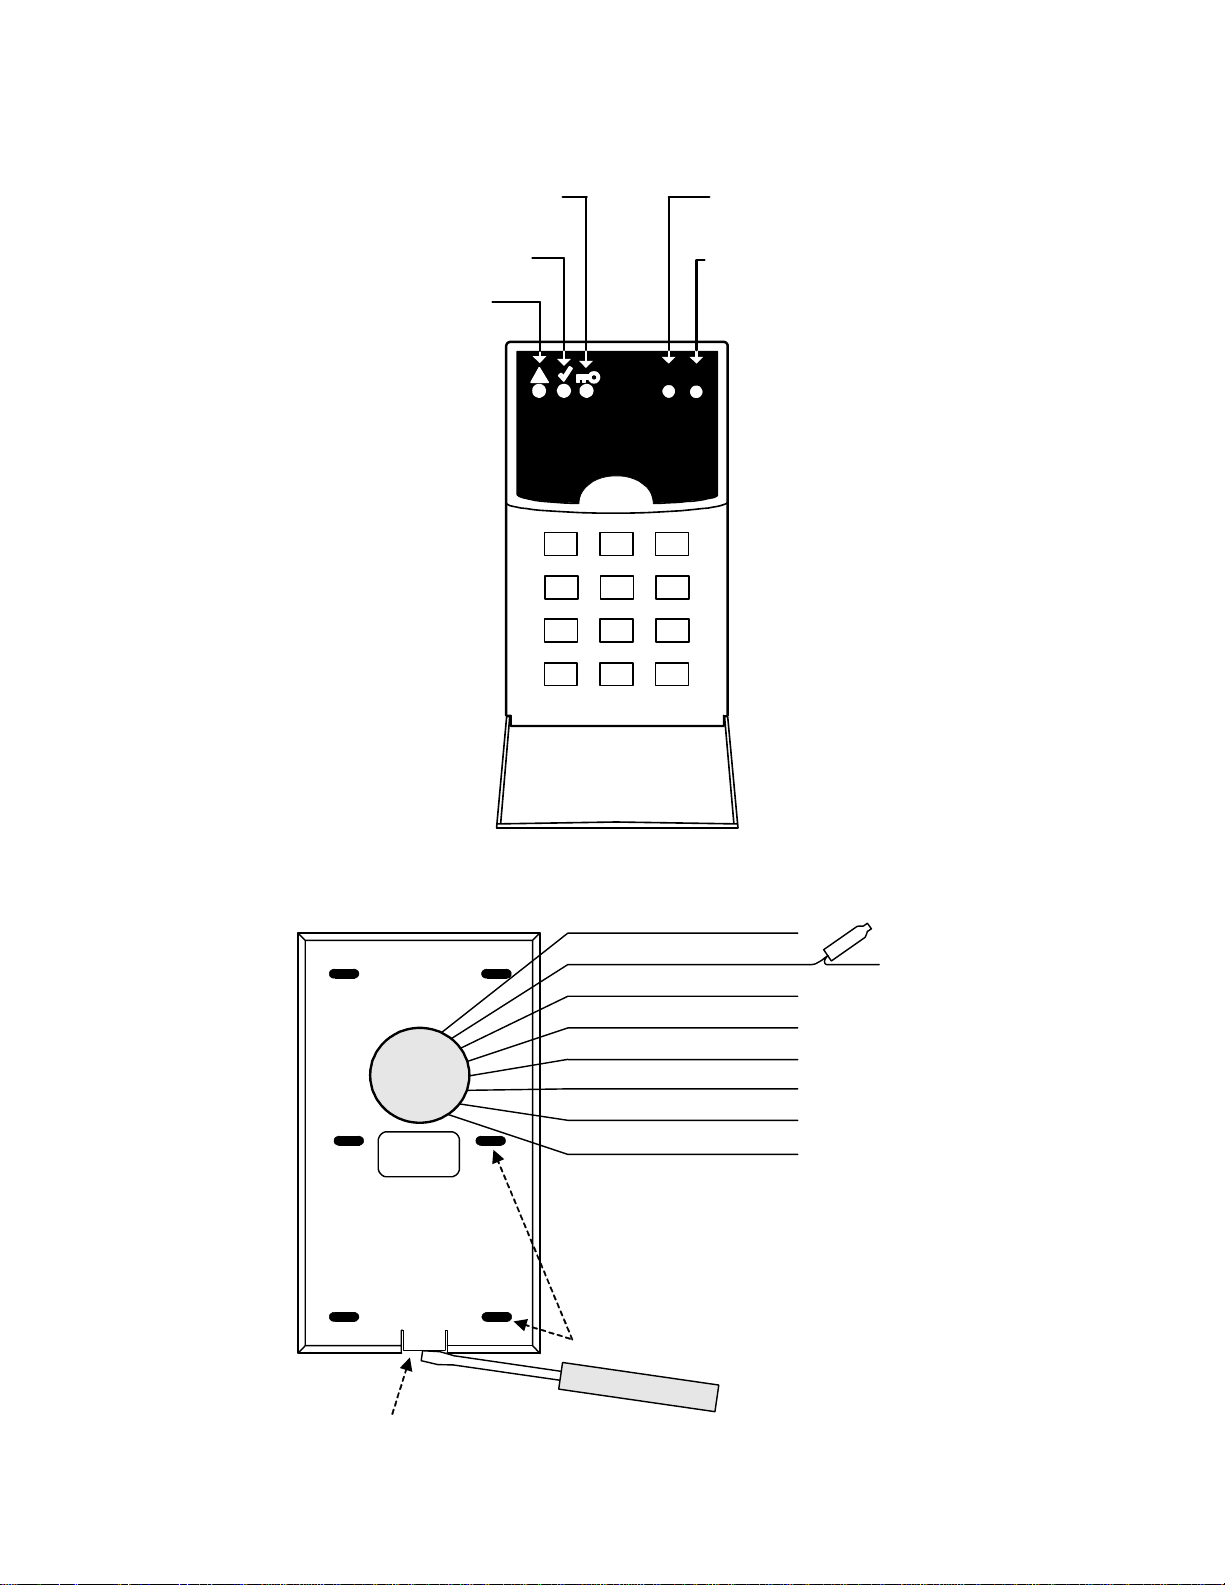
Page 8
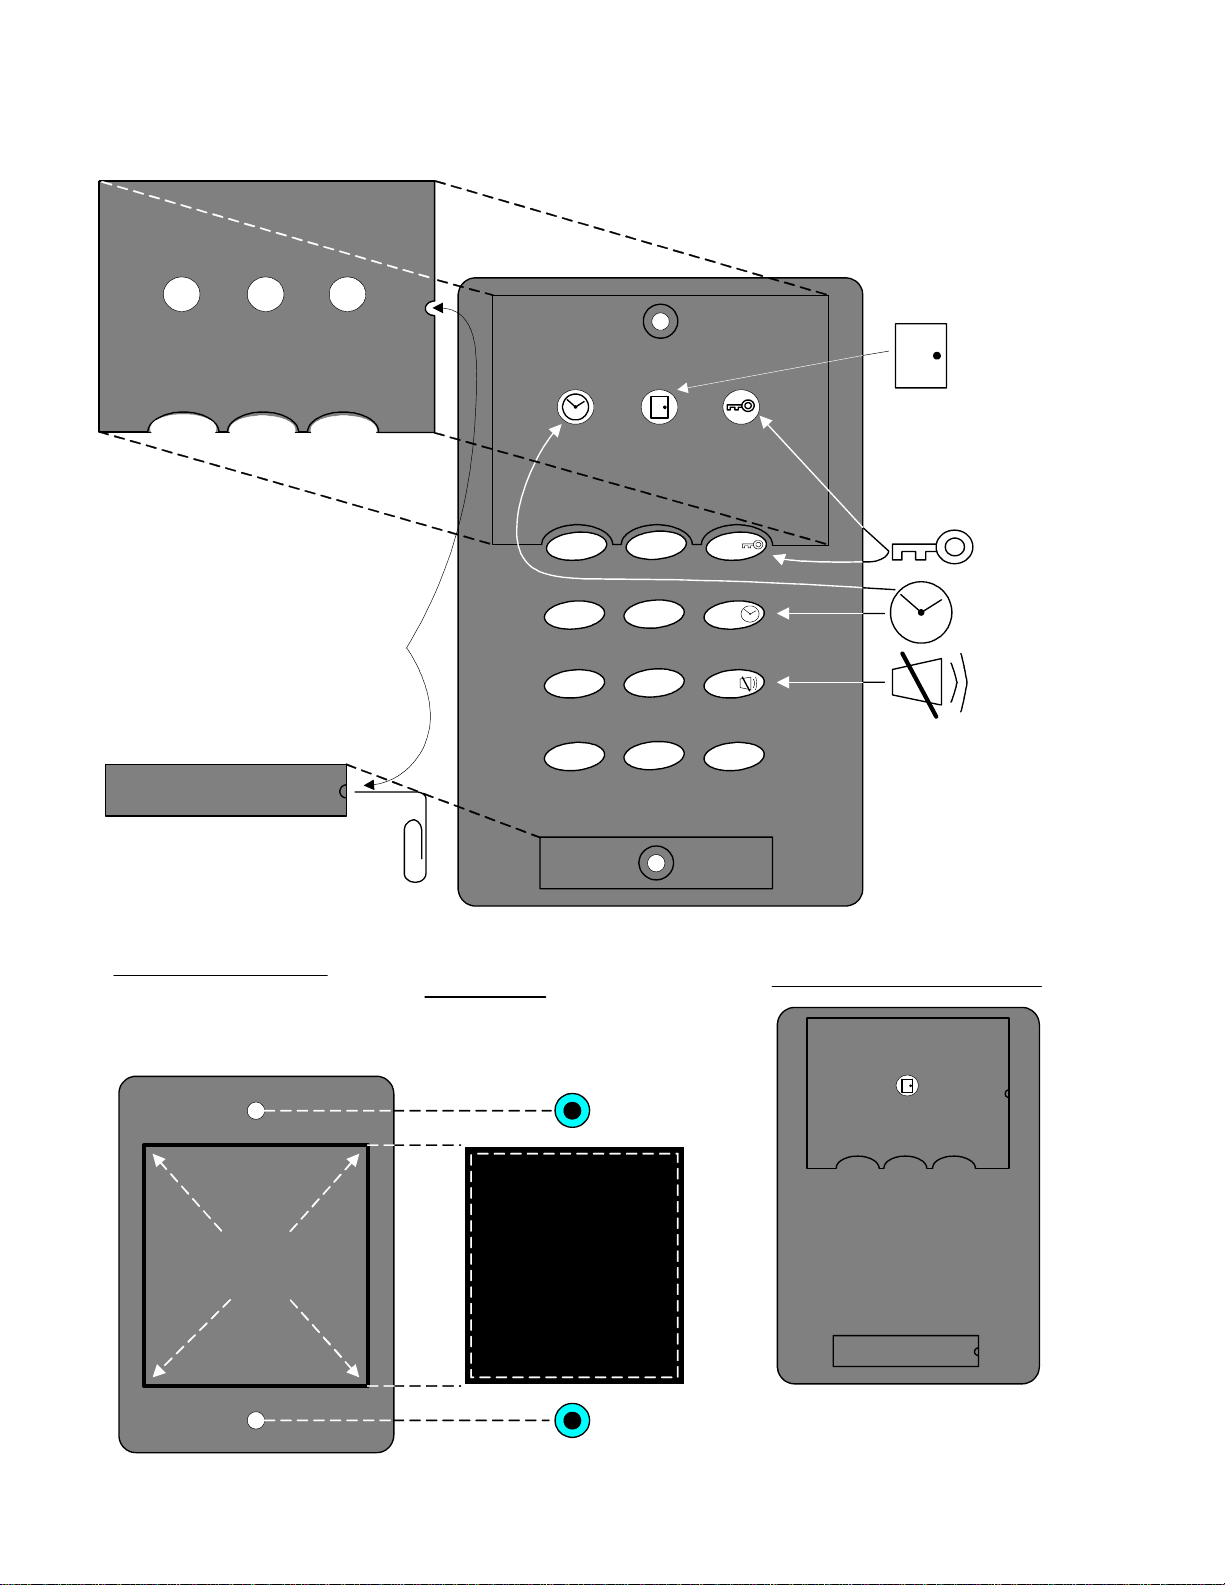
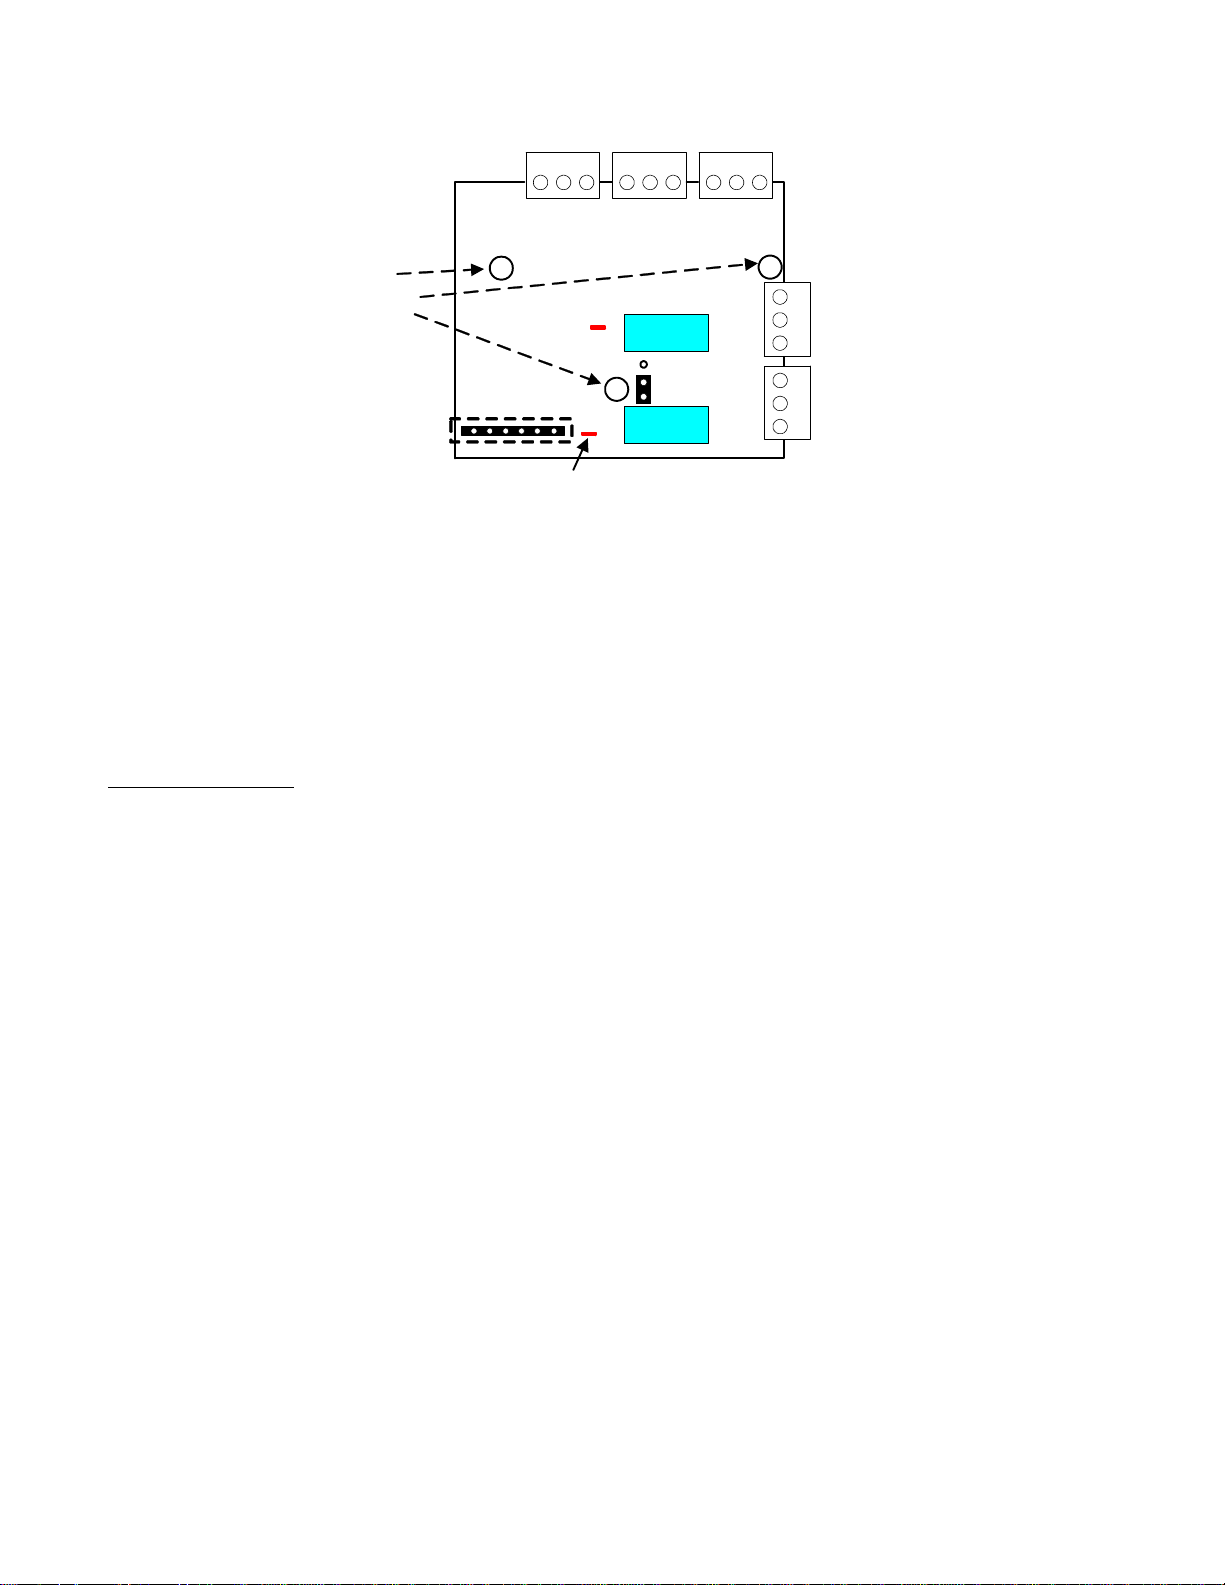
Arming Station Reader
Mounting
Remove detachable plates to
gain access to screw holes with a
pin like t ool (e.g. paper clip)
in the plate's notched right side.
Refer to Installation Instructions P/N 22-0346 for further information.
screw
hole
Door Unlock
bicolour light
Lights
1
4
7
2
5
8
3
6
9
Armed
Work Late
Silence
Mounting On Drywall
Reader back
Raised
Area
paper clip
example
0
screw
hole
WARNING!
Insert wall anchors FIRST
before cutting hole for inserting
reader back, raised area.
wall plug
screw anchor
Hole cut in
drywall for
reader back,
raised area.
#
Card Reader Only Version
single bicolour
door unlock light
wall plug
screw anchor
4 Monitor ISM/xL™ Hardware Guide
22-0375 rev1.1
Page 9
Wiring
NOTE: the Keypad area control communicatio ns
wire must be connected or the Work Late and
Armed LEDs will flash back and forth. 111-8240
GProxI wire is blue. 111-8270 (switch plate) or
111-8267 (mullion) GProxII wire is yellow.
Red Ensure power jumper set to 12V
Orange Controls Door Locked/Unlocked LED
Blue
White Data 1
2
1
4
7
3
5
6
8
9
0
#
Green
Black
or Yellow Keypad area control communications.
Data 0
GND + Shield Wire
Keypad Command Entries
NOTE:
Maximum cable distance from 2 Dr Access Module to
Arming Station is 500 feet.
Reader Connections at Door Access Module
1432
(+)5/1 2 VDC
Green LED
Red LED
Data 1 Clock
56
Data 0
Ground 0V
Arming Station Internal Buzzer follows LCD
Keypad Tones
e.g. Entry/Exit Delay, Work Late Tones etc. as
well as door access conditions e.g. Door Forced.
5V
Reader
12V
Arming Station
current rating =
80mA
Rea de r
Voltage
Jumper
...
<login> represents the form of user identification used e.g. badging card and or ID – PIN entry.
Key Sequence Command
< login > only Access (momentary unlock of door)
1 <login>
1 0 <login>
2 <login>
3 <login>
3 0 <login>
5 <login>
6 <login>
6 n <login>
7 <login>
9 <login>
# # Cancel any keys previously entered
# If performing a “” command with UID/PIN, insert a "#" key between
Turn area off
Turn all areas off
Turn area to stay mode
Turn area on
Turn all areas on
Toggle between Lock Door and Unlock Door & Disarm area
Door commands or if door is locked and area armed – unlocked and area disarmed.
Work Late in this area by 2 hours at a time from the current time. Scheduled
area only.
hours when the arming station will indicate closing time again with the work late LED
flashing and tones. At that time, this command can be used again to extend the
closing time another 2 hours.
Work Late in this area for n hours where n = 1…9. Scheduled area only.
Activate armed state LED display for approximately 20 seconds
To determine arming station’s area conditi on. Armed LED indicates for 20 sec:
green for OFF, red for STAY and flashing red for ON.
Silence alarm (in all areas)
command and UID/PIN entry (e.g. “ 1 # 341 1234 ” for user 341, pin=1234
trying to arm the area 1).
This command can only be used again at the end of the first entered 2
22-0375 rev1.1 Monitor ISM/xL™ Hardware Guide 5
Page 10

No Commands (Simple Access)
Door Mode <Login> Notes
Card Only <card> If a UID/PIN is entered, it will be ignored
Card & PIN <card> <pin> UID is not required since the card
automatically ident if ies the <u id >
Card or UID/PIN <card> or <uid> <pin>
UID/PIN Only <uid> <pin> If card is presented, it will be ignored.
<uid> – User ID
With Commands
Door Mode <cmd> <Login> Notes
Card Only <cmd> <card> If a UID/PIN is entered, it will be ignored
Card & PIN <cmd> <card> <pin> Card badging must always be done before
the PIN entry.
Card or UID/PIN <cmd> <card> or
<cmd> # <uid> <pin>
UID/PIN Only <cmd> # <uid> <pin> Pressing “#” is required between the
<cmd> – Command
Pressing “#” is required between the
command and uid/pin entry.
command and uid/pin entry. (Note
<cmd> # <pin> in PIN Only systems)
NOTES:
<login> requires your <card> OR alternatively, your uid/pin.
E.g. <3 digit UID> <4 digit PIN>. Leading zeros cannot be omitted in UID or PIN.
Example 1: Arm area using card – enter < 3 card >
Example 2: Work late for 3 hours using uid/pin – enter < 6 3 # 001 1234 > for user 001 with pin 1234
Example 3: Access area without using card – enter < 001 1234 > for user 001 with pin 1234.
Using Duress Pin at Arming Station
• A Duress Pin (reversing last 2 digits of a user’s pin entered on the keypad to transmit a potential hold-up
LED Indicators
Work Late LED
• Turns on if the area the Arming Station is assigned to is scheduled.
• Turns on solid 15 minutes before scheduled closing time.
• Does not operate if the area is not scheduled.
Door State LED
• Solid red if the door is locked.
• Solid green if the door is unlocked.
• Flashing red during disarming if there had been an alarm in the area.
Armed LED
• When activated, armed LED only stays on for the duration of the area’s Entry/Exit Delay during the following area
condition) can be used at an Arming Station if the duress feature has been enabled in the System Group.
arming state changes.
– Momentarily solid green when the area is disarmed to OFF.
– Momentarily solid red when the area is armed to STAY.
– Momentarily flashing red when the area is armed to Fully ON.
Arming Station Internal Buzzer Indications
• Entry/Exit tones same as LCD keypad.
• Fire Siren – intermittent tone.
• Burglary Siren – steady tone.
• Bad Command Entry – double short beeps.
• Command accepted – single long beep.
• Unauthorized to perform command – double long beep.
6 Monitor ISM/xL™ Hardware Guide
22-0375 rev1.1
Page 11
IMPORTANT:
Must refer to Installation Instructions P/N 21
-
9050 for detailed information.
User Guide
P/N 22
-
9050
IMPORTANT:
Suite Security LED Keypads for Apartment and Office Protection
2 Zone
System Armed Red Light
Flashing = System F ully ON
Solid = System in STAY
System Ready to Arm
Green Light
System Trouble
Yellow Light
1
12
4
3
56
789
Keypad Flip Cover
#
0
Protection Point # 1
Red Light
E.g. Main Entrance Door
Protection Point # 2
Red Light
E.g. Entry/Exit Route
Motion Detector
2
Wiring
s
e
r
d
i
a
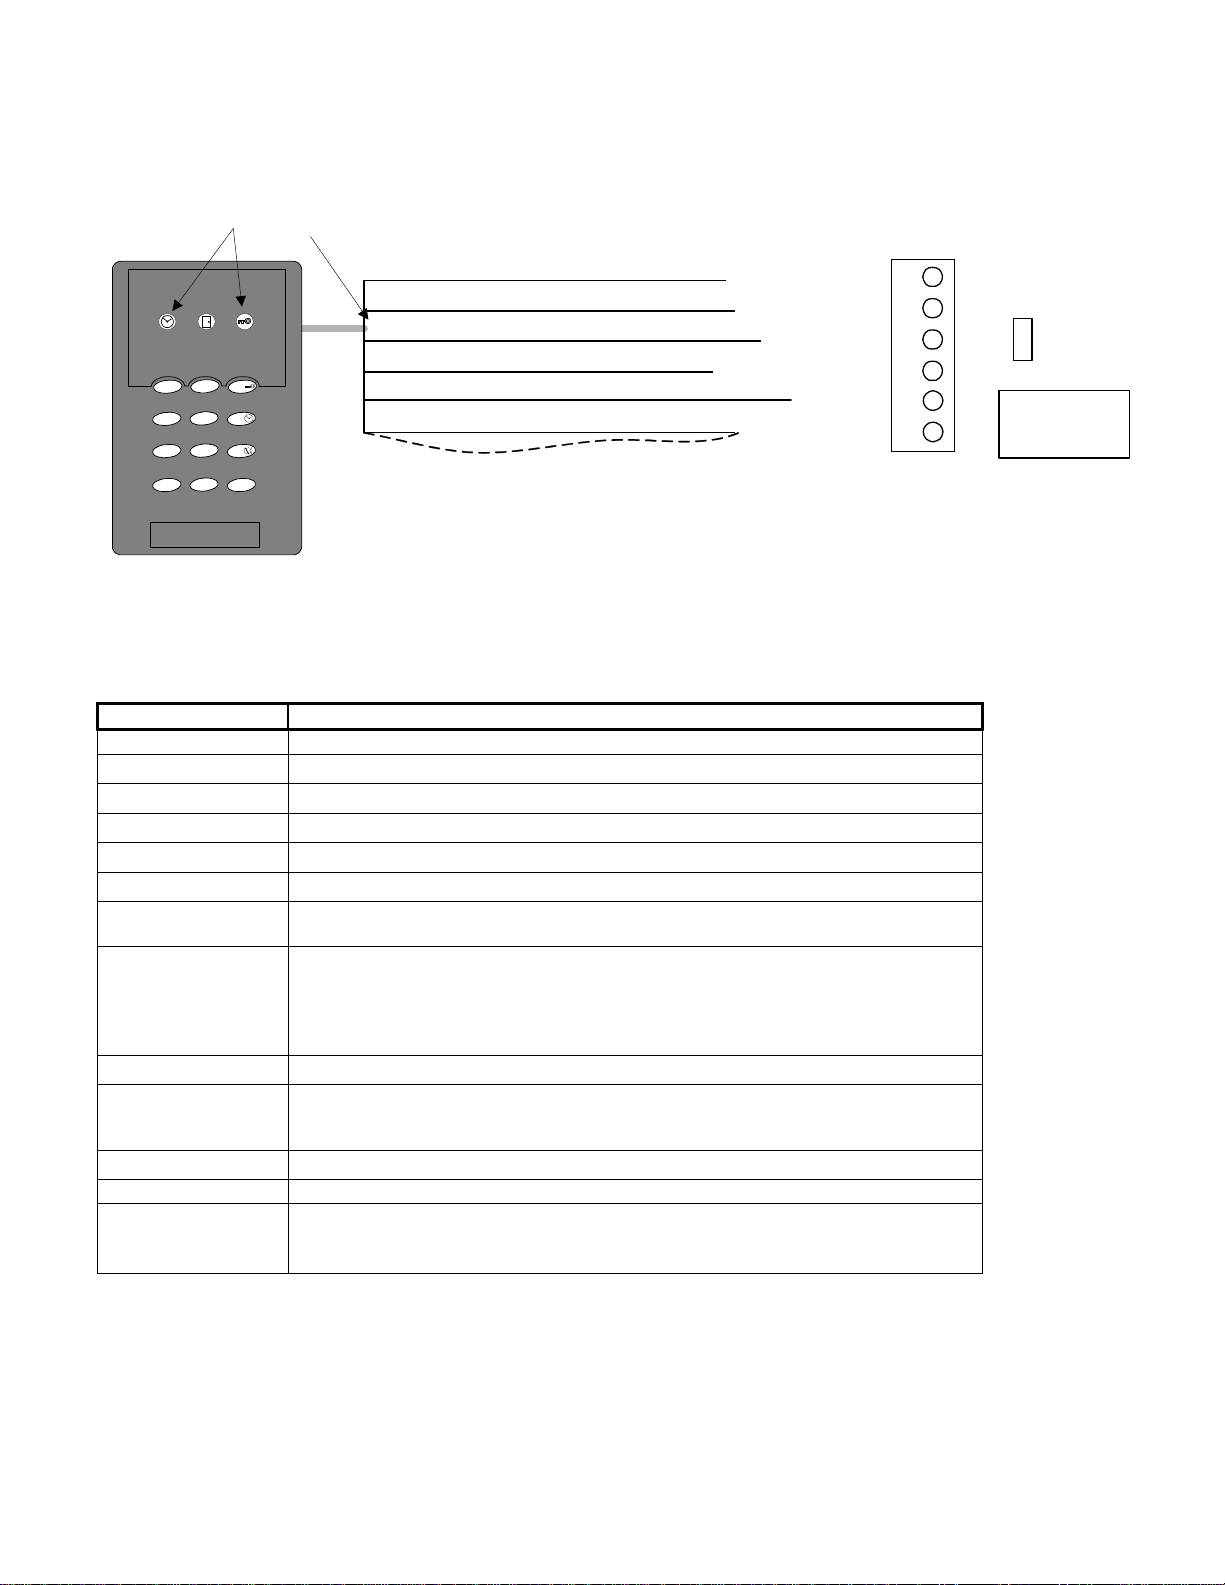
Keypad
Base
(back
view)
XXXXX
5 digit serial number to
program in "Suite Security"
Programming . Lo cated on
keypad circuit board back,
when this plas tic base is
removed from keypad
housing.
e
W
l
y
l
F
"B" Connect Wire Flyleads to system cables.
RED Module Bus (+)12VDC Power
GREEN Module Bus Data A
YELLOW Module Bus Data B
BLACK Module Bus VDC Power
ORANGE Protection Point Input # 1
PURPLE Protection Point Input # 2
BLUE Output switching to ground.
BLACK #2 Either black can be used for
a Module negative BUS connection or
input point common connection. E.g. this
black could be used to connect input 1
and 2's common connection. A local
power supply's negative connection can
be connected to either of them as a
common for the output to operate.
Mounting Holes
(--)
(P/N 496-1700)
Installation Instructions P/N
21-9050 for Power & Cable
Ratings / Requirements.
Refer to
Release Tab. Ins ert flat head screw driver to push tab forward and release base
from keypad enlcosure to mount base.
22-0375 rev1.1 Monitor ISM/xL™ Hardware Guide 7
Page 12
2 Zone Wiring cont.
Protection Input points 1 & 2 and Ou tput Wiring Example
RED
M
O
Keypad
Base
(back view)
GREEN
B
D
U
YELLOW
U
S
L
BLACK
E
ORANGE Protection Point Input # 1
PURPLE Protection Point Input # 2
BLUE Switching to GND Output.
BLACK Input point
common connection.
Output power source
negative.
Separate Data
A,B Cable
Separate
Power Cable
o
C
"
B
"
To output driven device.
E.g. electronic siren with
built in driver.
Siren
t
c
e
n
n
(+)(--)
Common
Negative
Reference
2.2 K
(+)
(--)
Power
Supply
NC NO
CM
Input # 2 e.g. Motion detector alar m contact.
Programmed and wired as normally closed.
NC NO
CM
Input # 1 e.g. Main entrance door contact.
Programmed and wired as norma lly open
with 2.2K end of line resist or.
8 Monitor ISM/xL™ Hardware Guide
22-0375 rev1.1
Page 13
f
f
f
f+f
f
f+f+f
f
f
IMPORTANT:
Must refer to Installation Instructions P/N 22
-
0362 for detailed information.
User Guide
P/N 22
-
9050
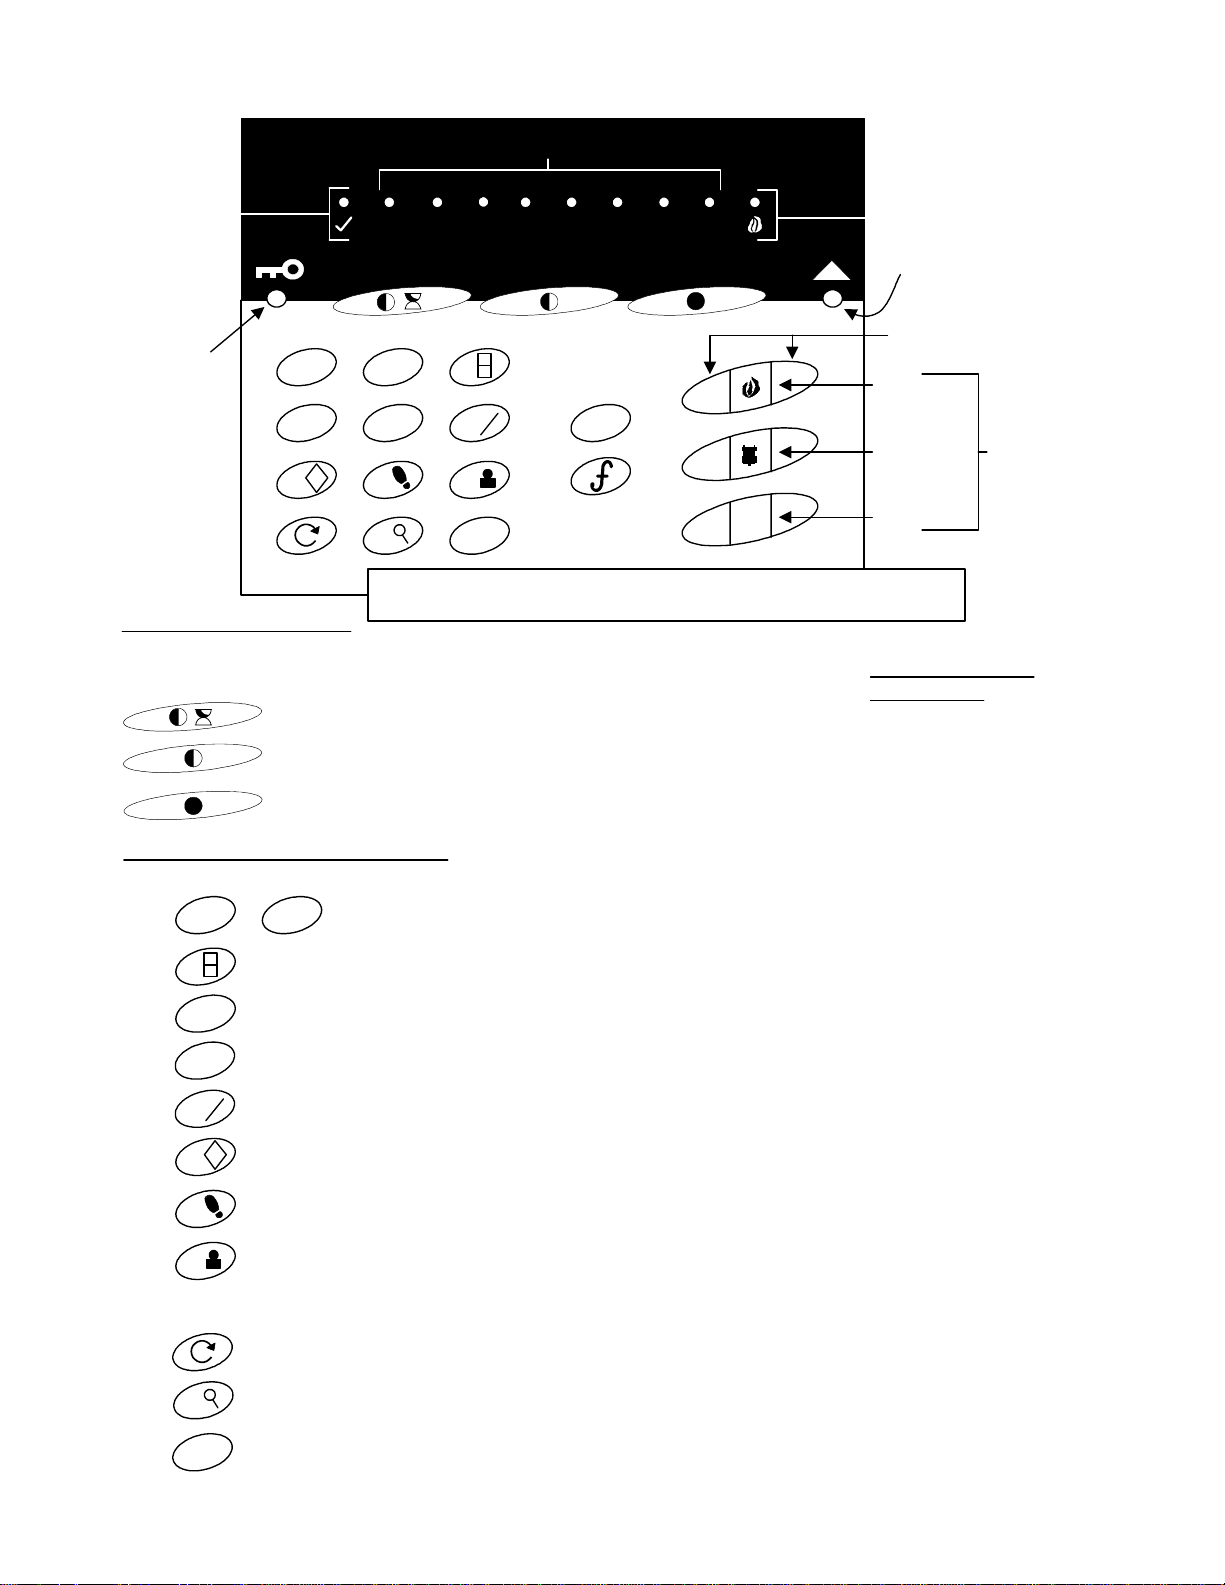
8 Zone
Input Points
Ready
Light
Area
Armed
Light
Steady =
STAY
Flashing =
Fully ON
Softkey Symbol Defi nitions
These keys can be used for Quick Arming from OFF wit h out having to include a PIN.
Pressing the Functi on key and then one of these key s will silence the arming tone.
Key Symbol Definitions and Functions
1 2 3
4 5 6
!
7 8 9
Arm to Stay with an Entry delay.
Arm to Stay with out an Ent ry delay. Instant alar m if entry made.
Arm to Fully On
1
2345
S
T
Function Key
0
Refer to Installation Instructions P/N 22-0362 and 2 Z one
Instructions P/N 21-9050 for Power & Cable Ratings / Requirements
67
Escape Key
X
8
Enter a user PIN only, to disarm the
system or silence an alarm c ondition.
f = function key
Pressing:
Fire Alarm
Light
System Trouble
Indicator Light
Emergency Keys
Both buttons pressed at
same time to activate.
FIRE
POLICE
AUXILIARY
The system trouble
indicator light will flash fast
if there is communication
trouble with the Module
Bus. Flash slowly if the
main control has AC Hydro
failure. On solid if the
keypad or input with tamper
supervision, is in tamper.
Apply
emergency label
types (supplied)
in this sequence
to match point
type default or
blank labels but,
NEVER LEAVE
THESE
SPACES
EMPTY!
+
+
+
+
+
+
+
+
or
1 2
S
T
3
4
5
6
7
8
9
+
+
+
+
!
+
+
+
+
0
+
+
+
= Grant lobby access.
PIN
= Verify User. Sends the main controller user identification in the event of a false alarm.
PIN
= Enable Chime.
PIN
= Disable Chime
PIN
= System test.
PIN
PIN
= Walk Test. As protection points are tripped, their keypad lights lock in for 5 min. or
press "X" to stop.
= Master User assigns new User's Authority Level and PIN.
PIN
F9 + master PIN + new user # (1 - 8) + Authority Level # + user's PIN # + confirm the same PIN #.
A user can be deleted by making the same entires but entering "0000" as their PIN #, twice.
The user's Authority Level must be "Suite Security Unassigned" to begin with in the Director 2 Software to assign
the user to this Suite Security Keypad.
Protection Point #
Master PIN
old PIN
depending on configurations. Repeat to turn them off.
Keypad tones when entry door opened.
LEDs, sounders turn on for 5 secs.
= Bypass/Unbypass input point.
PIN
+
User's PIN
+
new PIN confirm new PIN
++
= Displays user's ID number 1 - 8.
= Change PIN #.
= Output control. Pressing 1 can turn on output 1 and 2 can turn on output 2,
PIN
22-0375 rev1.1 Monitor ISM/xL™ Hardware Guide 9
Page 14
8 Zone Wiring and Mounting
Module Bus
1432
O/P2
(+)12V
Data A
n
d
w
e
o
l
e
l
r
e
g
y
Tamper
Spring
(-)0V
Data B
k
c
a
l
b
GND
COM
(+)12V
e
r
Current Consum ption
= 160mA max.
Reader
12
Data 0
Self resetting 0.5A fuse.
Unit voltage O K
indicator LED
Output 1
enabled LED
Output 2
enabled LED
NOTE: Output 2
current rating is
25mA.
Outputs
1432 5
O/P1
NC
NO
Always secure keypad base to wall using 4 scr ews.
Apply dealer's logo label
(supplied) in the indented
space on keypad door.
Recommended mounting height: 1.5
meters (4 feet, 9 inches) from floor
level to the bottom of the keypad.
Inputs
I/P6
I/P7
1
2345
313 1132 2 2
I/P8
COM
XXXXX
5 digit serial
number to
program in
Module
Programming
67
8
312
I/P3
I/P4
I/P5
COM
COM
I/P1
I/P2
Data 1
COM
Module Bus
communications
indicator LED
After placing the
keypad on its
base, make sure
the keypad's
securing screw
(supplied) is
always I N !
• Each 8 Zone Module 5 digit serial address sticker on the printed circuit board is entered in the “Suite
Security” programming. Not the Module programming.
Output 1 is a form “C” contact that changes state when this output turns on.
•
• Output 2 is a standard output that turns on 12VDC when it is enabled. It has a low current rating of 25mA to
trigger e.g. a low current relay.
• Input points can be configured as normally closed or open end of line (with 2.2K resistor) only.
• The Master Suite Security User can edit only Suite Security Authority Levels at the Suite Security Keypad and
LCD keypad. All other configurations must be done through the Director Software.
• Director Suite Security Authority Level “0”, System Authority Only means the user has no Suite Security abilities.
• Suite Security user groups can be allocated in blocks of 8 users. These are Director Suite Security Authority Level
“1”, Suite Security Unassigned. The F + 9 + PIN at a Suite Security keypad requires the user to be predefined in
the Director software database although you do not actually have to assign them to the suite (i.e. Suite Security
Authority of unassigned). A user assigned with suite Security Master Authority or through the Director software by
an Operator can do this via the Suite Security keypad MODULE at a later time. It simply allocates the space in the
database for the possible 8 users per Suite Security keypad similar to how you allocate points for possible future
use. The Director software restricts User's 1-8 to Suite Security keypad MODULE #1, User's 9-16 for Suite
Security keypad MODULE #2, etc .
10 Monitor ISM/xL™ Hardware Guide
22-0375 rev1.1
Page 15

Authority Levels
MASTER enter “2”
Turn System ON
Turn System OFF
Turn System to STAY
Bypass Zones
Remove Bypass
Test System
Edit Users
Reset Alarms
Output Key Use
RESIDENT enter “3”
GUEST enter “4”
CLEANER enter “5”
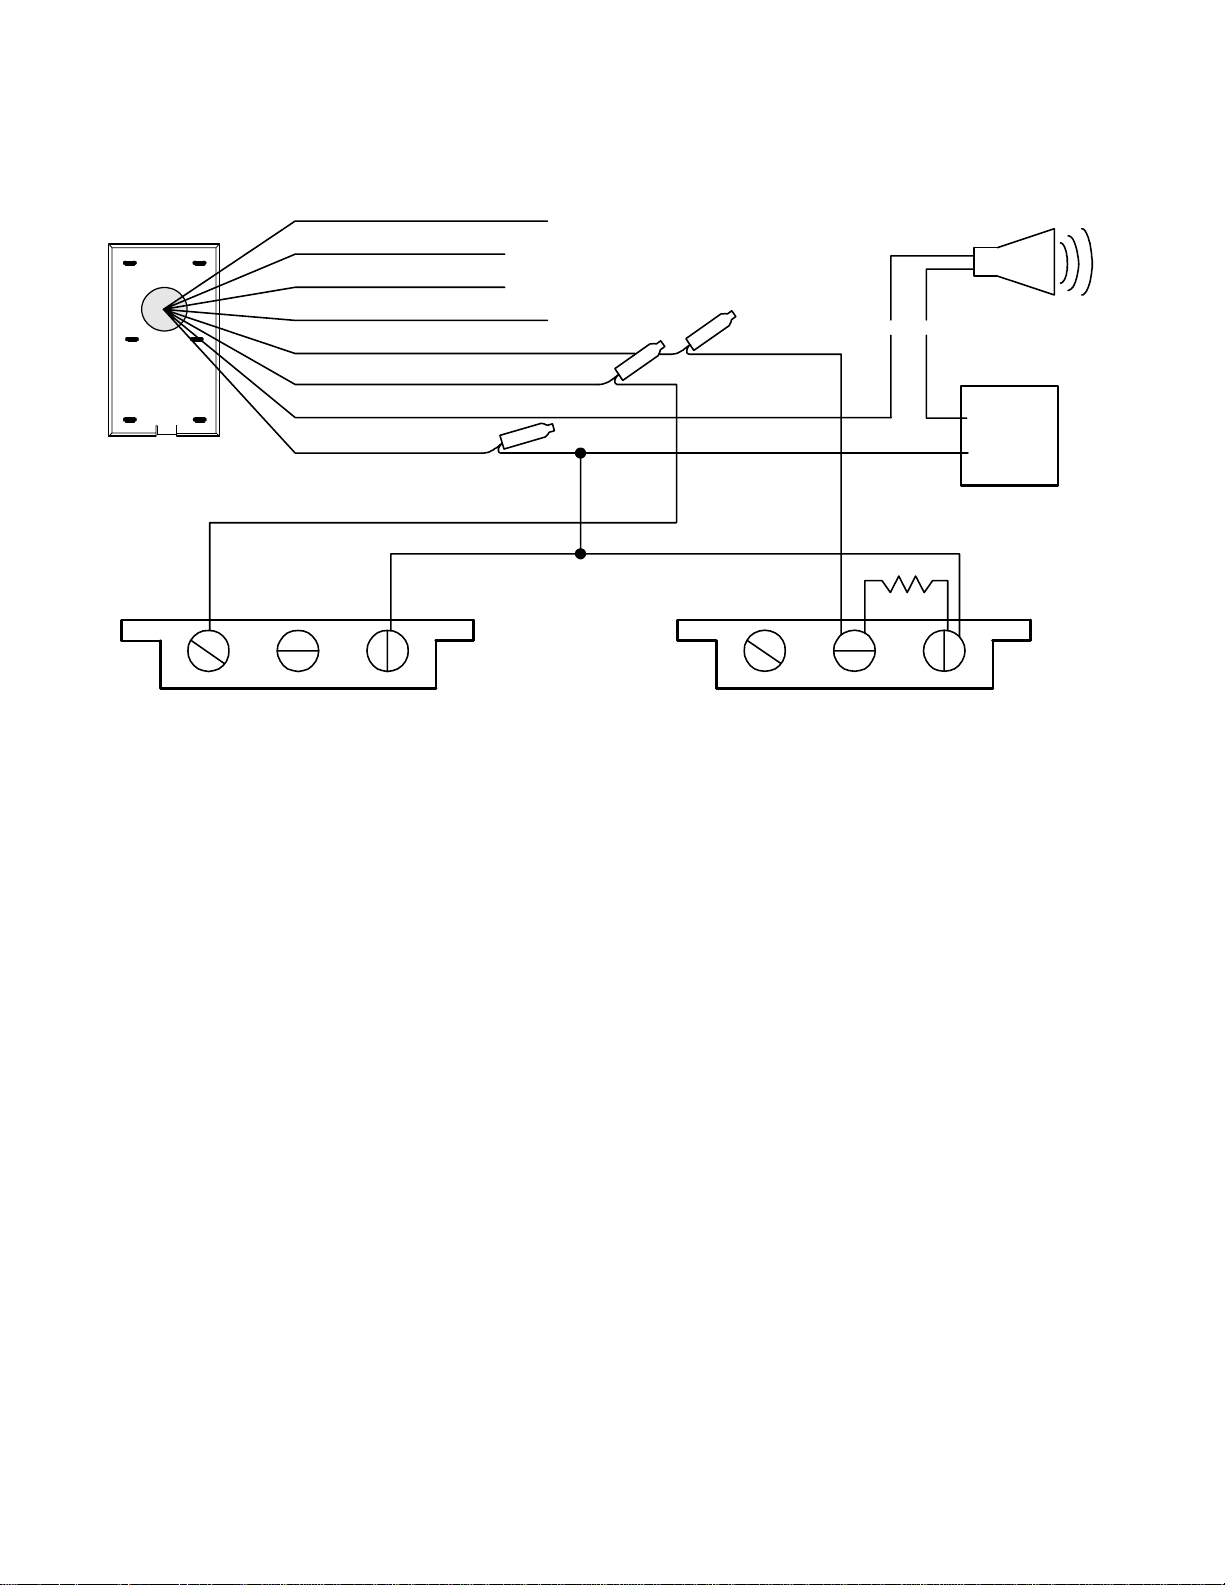
Adding an Electronic Siren
• If it is necessary to add an electronic siren with a built in driver, the recommended connection is to use the on
board form “C” relay.
• An additional power supply must be added, as the Suite Security module does not have sufficient power to run a
siren.
• Connect the siren’s negative power connection to the power supply’s negative supply.
• Connect the power supply’s positive connection to the Suite Security module’s output # 1 relay common
connection.
• Connect the siren’s positive connection to output # 1 relay normally open connection. Program output # 1 to follow
when the area is in alarm (fire/burglary).
• When the area is in alarm, output # 1 will trigger and supply power to run the siren.
• The maximum number of Suite Security Modules that can be connected to one Main Panel is 60 and is separated
into 30 daisy chained on data connection: Module Bus 1 and 30 daisy chained on data connection: Module Bus 2
of the main control board.
• The ratio between the number of Suite Security Modules that can be used and regular modules that can be used
on one Main Panel is 5 Suite Security Modules for every 1 regular module.
• It is important to consider power requirements in big Suite Security Module systems. Adequate power supplies
must be added to the Suite Security Module cable runs and paralleled onto the Module Bus connections of the
Suite Security Module on the run that is designated where more power will be needed. Remember to add an
isolating diode to the Module Bus 12VDC connection at the Main Panel’s control board end as described in
Appendix “A”, “Adding a power supply to the Module Bus”, of this document. Otherwise, “Battery Trouble” will
occur.
22-0375 rev1.1 Monitor ISM/xL™ Hardware Guide 11
Page 16

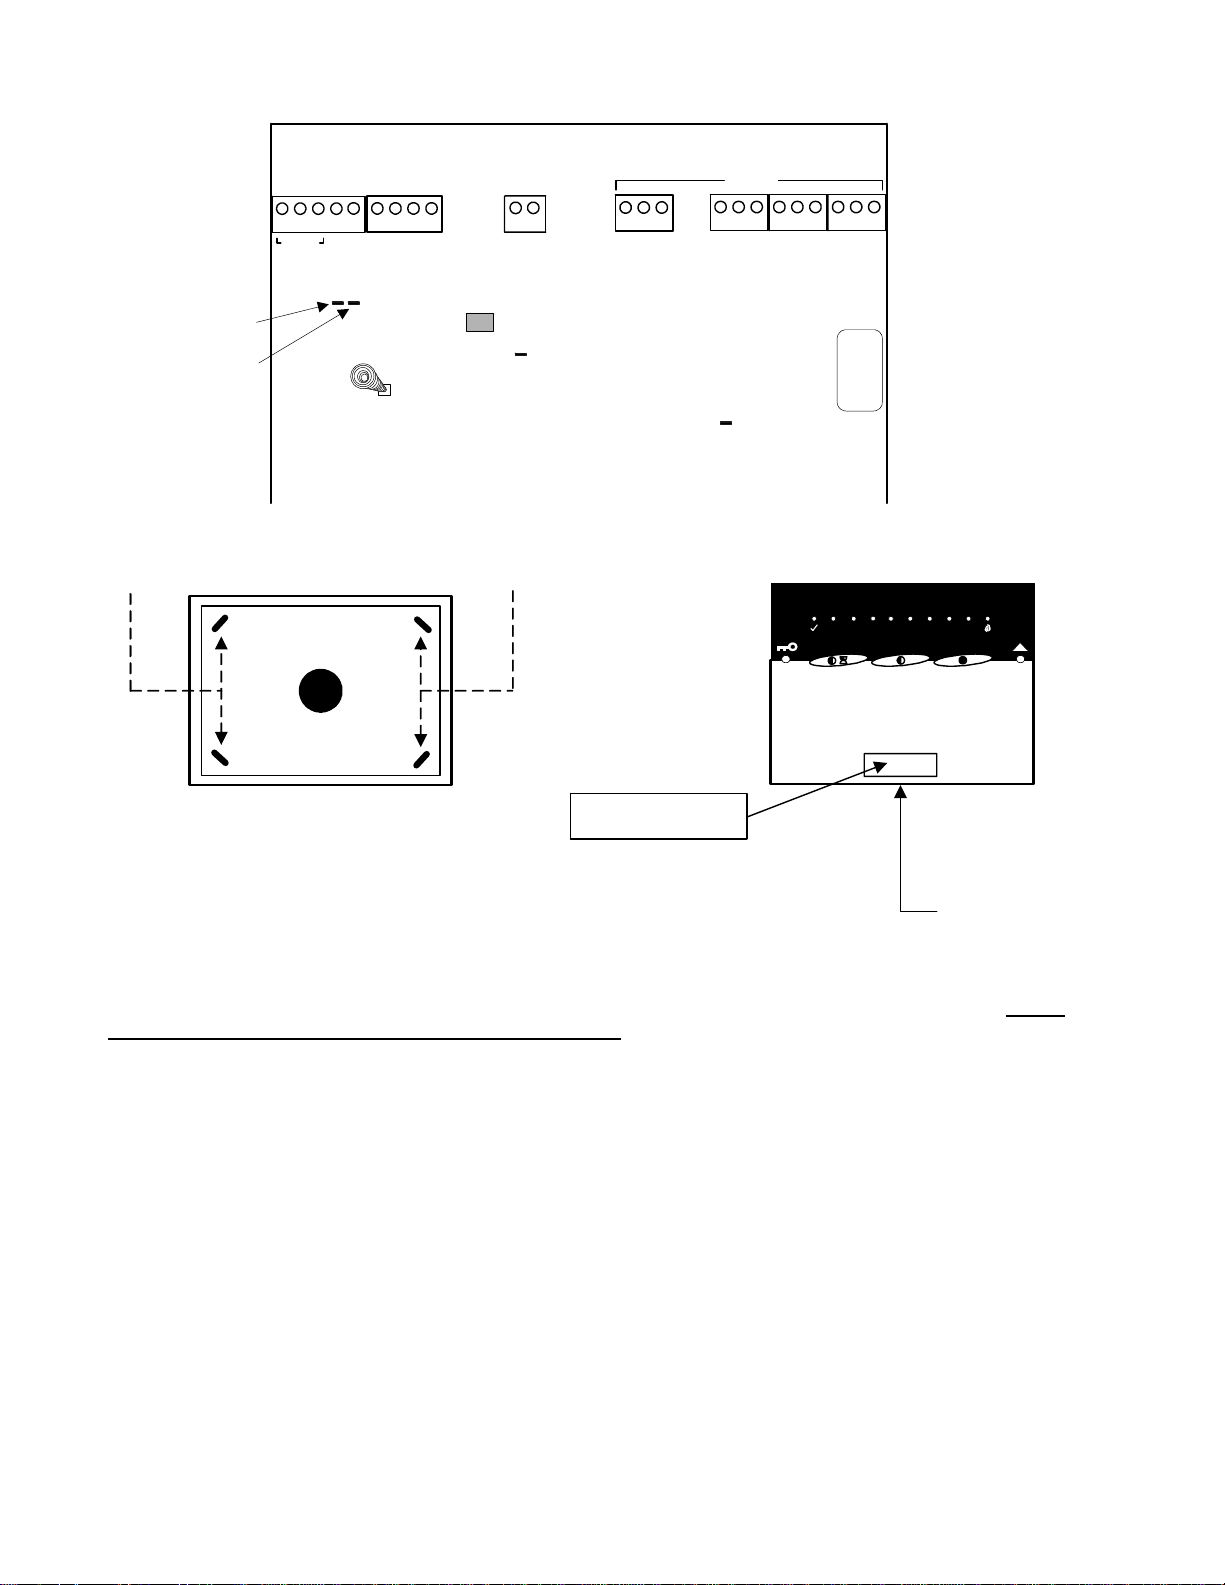
8 and 16 Input/Output Exp ansion Modules
Refer to Installation Instructions P/N 22-0363 for
further information.
O/P15
O/P16
0V
0V
14321432
0V
O/P14
0V
O/P13
1432
TB9TB5TB1TB6TB2
312 312 312 312
5 digit serial number to
program in Module
Programming
XXXXX
Annunciator
output board
male plug.
Switched (+)
O/P1
0V
Switched (-)
O/P2
(+) 12V
I/P1
COM
I/P2
I/P3
COM
I/P4
I/P5
COM
I/P6
I/P7
COM
I/P8
O/P3
TB10 TB11 TB12
LED 1 Bus
communications
indicator
LED 2
follows O/P1
Tamper Pins
O/P4
O/P5
0V
312 312 312
0V
F1
P/N 342-3356
1/2 AMP
O/P6
Module Bus Aux Power
O/P7
0V
(-)
(+) 12V
(-)
(+) 12V
0V
Data B
Data A
(+) 12V
I/P16
COM
I/P15
I/P14
COM
I/P13
I/P12
COM
I/P11
I/P10
COM
I/P9
O/P8
1432
TB13
1432
312
312
312312
TB14
black
yellow
green
red
TB4
TB7 TB3 TB8
identical
operation
LED 9
LED 10
LED 11
LED 12
LED 13
1432
LED 14
TB9TB1TB2
LED 15
LED 16
I/P1
COM
312 312
I/P2
5 digit serial
number to
program in Module
Programming
I/P3
COM
I/P4
Outputs 3 - 8 do not exist.
Annunciator
Output Board
follows O/P1
XXXXX
TB3TB4
TB1 TB2
F1
1/2 AMP
P/N 342-3356
LED 1 Bus
communications
indicator
LED 2
Tamper Pins
0V
O/P12
0V
O/P11
0V
O/P10
0V
1432 1432
O/P9
(+) 12V
(+) 12V
Data B
Data A
(+) 12V
Module Bus Aux Power
COM
COM
(-)
(-)
0V
I/P8
I/P7
I/P6
I/P5
1432
TB13
1432
312
312
TB14
black
yellow
green
red
TB4
TB3
16 Input (8 Ou tput) Expander Module
16 Outputs with Annunciator Output Board
Current rating = 25mA without
annunciator card. 60mA with
annunciator card and all LEDs on.
8 Input (2 Output) Expander Module
10 outputs with Annunciator Output Board
Current rating = 25mA without
annunciator card. 52mA with
annunciator card and all LEDs on.
• The Annunciator Output Board (P/N 650-2660) can be used on either Input / Output module.
• When used on the 8 Input module, outputs 1 and 2 can be programmed but, in order to program outputs and
LEDs 9 – 16 on the annunciator card, outputs 3 – 8 must be skipped.
• The 8 Input module must still be assigned 16 outputs in order to program outputs/LEDs 9 – 16 on the annunciator
card.
• Outputs 1 and 2 are identical operation on both modules.
• 16 Inputs and 16 outputs are available on the 16 Input module using the annunciator card.
12 Monitor ISM/xL™ Hardware Guide
22-0375 rev1.1
Page 17
Output/Relay Card
TB4
312312 312
TB5
TB3
Mounting Holes
Screw into plastic
base posts at top of
Expander board.
Annunciator output
board female plug
back of this board.
Plug into Expand er board male plug
used for 8 outpu t/LED annunc. card
0V
O/P15
O/P16
LED2
Follows relay2
LED1
Follows relay1
0V
O/P14
Relay 2
J1
normal
dual
Relay 1
O/P13
O/P10
O/P12
NO
COM
NC
NO
COM
NC
O/P9
0V
O/P11
312
Form 'C' relays rated at 2 AMPS.
Current consumption = 70mA
312
with both relays/LEDs energized.
TB1 TB2
• Can be used in place of the 8-output/LED-annunciator card on 8 and 16 point Expander pods to reduce
installation of additional separate relays.
• Output 9 and 10 are relay outputs that can be configured the same as regular outputs but whose
contacts will change state upon activation.
• Outputs 11 to 16 act as standard voltage outputs that will turn 12VDC high upon activation.
• When using the card with the 8-pt. Expander, the pod is configured with 16 outputs and outputs 1 and 2
on the board can be programmed. Outputs 3 to 8 must be skipped, as they do not exist. Programming
for the card would then begin at 9 to 16.
• With the 16-pt. Expander, a full 16 outputs can be programmed.
Dual Action Relays
• When jumper J1 is in the lower position (dual), programming output 9 will cause both relays 1 and 2 to
trigger at the same time. Output 10 can not be programmed or used.
• When jumper J1 is in the upper position (normal), relay 1 will respond to output 9’s programming and
relay 2 will respond to output 10’s programming.
• In either jumper position, outputs 11 to 16 will react normally.
• If jumper J1 is not connected at all, relay 1 will follow output 9 but relay 2 and output 10 will not function
at all.
• LED 1 follows relay 1 when triggered and LED 2 follows relay 2 when triggered for Service use only.
NOTE: Also compatible with Chubb Smart Commercial Concentrator. Connected to a Chubb Smart alarm
system, card outputs would be 1 – 8. On a Smart commercial concentrator connected to a Fx/ISM Smart
Pod, card outputs would be the same as stated here, 9 – 16.
22-0375 rev1.1 Monitor ISM/xL™ Hardware Guide 13
Page 18
Refer to Installation Instructions P/N 22
-
0365 for further information.
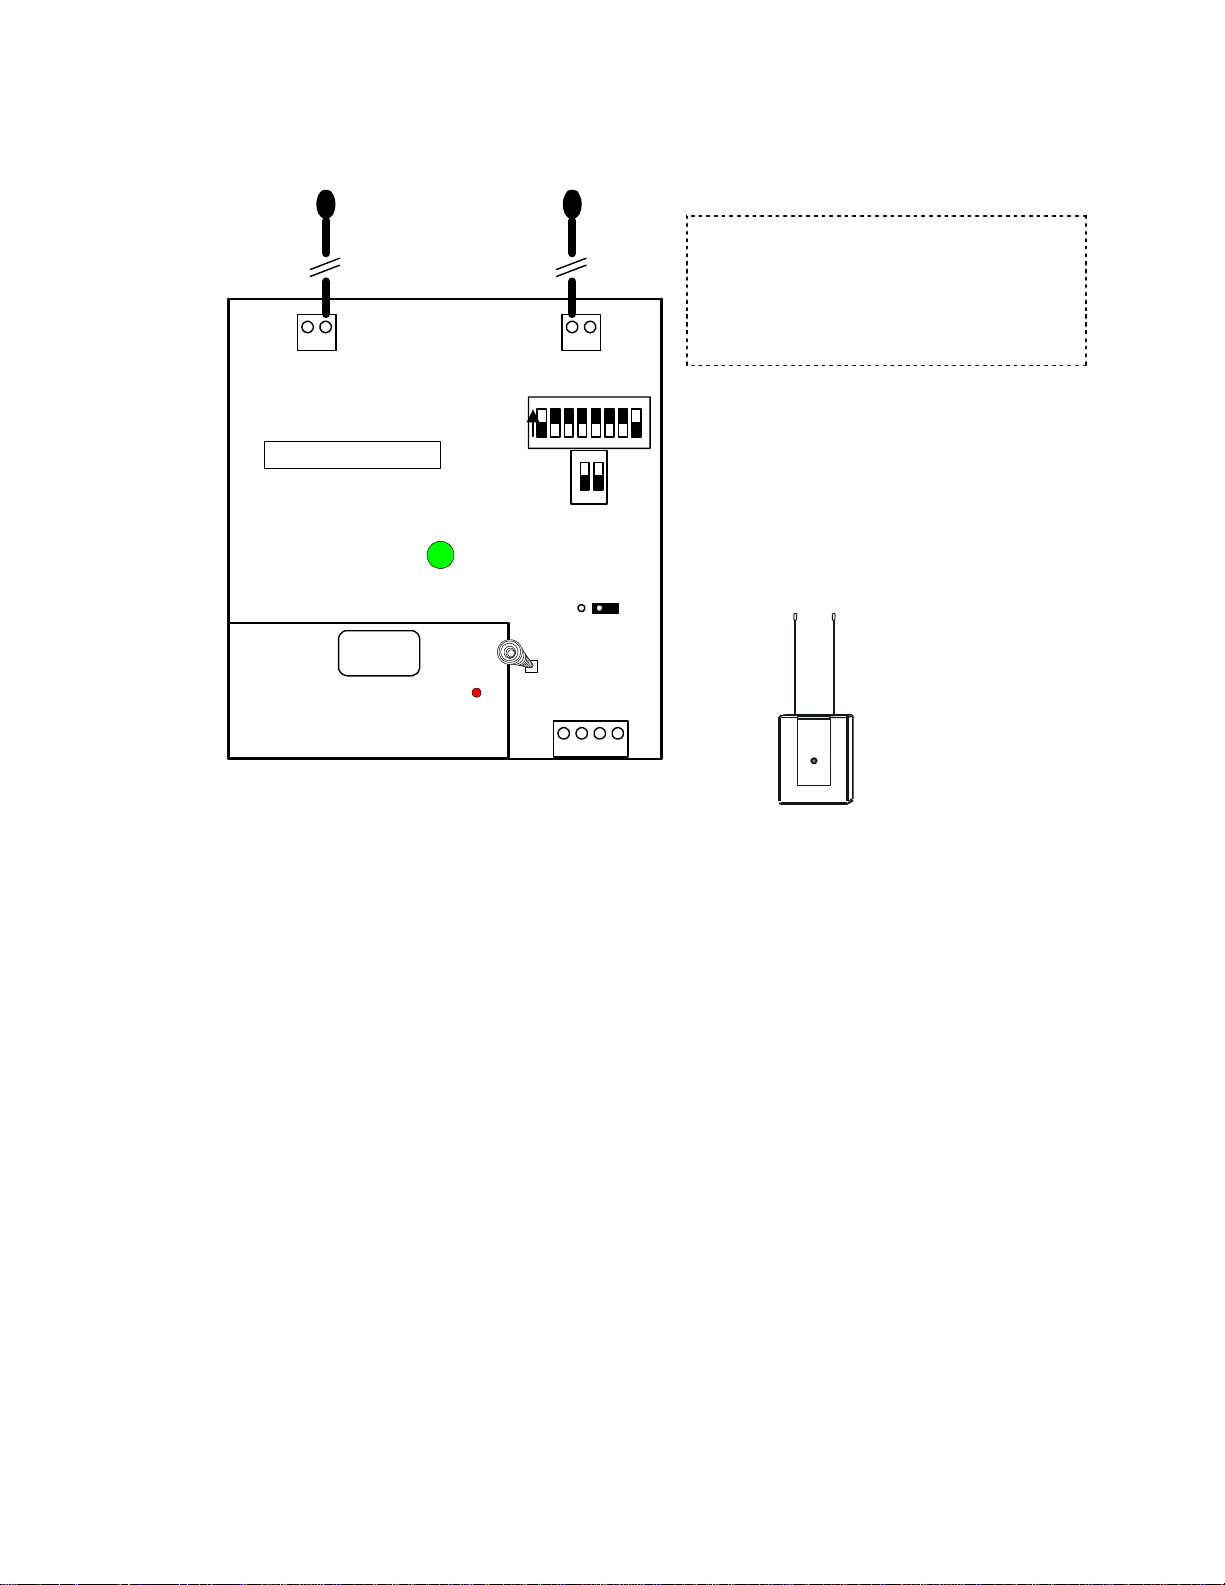
RF Wireless Modules
Version 1
Insert in block inn er terminals
12 12
to align with module cover.
Antennas
NOTE: If the system’s Feature Set is greater than 5,
Module, Input number Type and Name are
programmed in the Director software program and
sent to the panel. All other wireless sensor
programming described here is done at the system’s
LCD keypad ‘Configs’ screens. Regardless that after
entering Configs, “No Local Edits” displays.
Monitor RF Module PCB
Current rating = 52 m A
Power ON LED
and RF reception
indicator.
5 digit serial num be r to
program in Module
Programming
Module Bus
Interface
Board
XXXXX
Bus
communications
indicator LED
ON
15678432
Dip Switch
Settings
must be left
in these
positions.
Tamper
Spring
Module Bus
ON
Jumper
J1 must
be out.
(+) 12V
1432
red
12
Data A
green
Data B
yellow
J1
0V
black
• Referred to as an Application Module.
• Uses ITI learn mode wireless sensors at 319.5 frequency.
• Maximum 32 sensors can be programmed per one Version 1 RF module.
• 16 wireless hand held keypads can be programmed per one V1 RF module.
• Programming is done locally through the LCD keypad. The RF module must be connected to the Module bus to
program.
• Mount centrally to the wireless sensors.
• Range approximately 31 meters (100 feet).
• If more than one V1 RF module is used, separate them 2.5 meters (8.5 feet) apart to prevent interference.
Programming
• Enter the module’s 5-digit address in Module programming and assign required number of input points for the
number of sensors being used. Do not assign outputs, as there are none. Turn on tamper and all other settings
may remain defaulted. Exit the Module programming and then go back to Module programming and the same
address. This initializes the module.
Hand Held Keypads
• When back at the same Module programming 5 digit address, press Save.
• Display reads No Keypad Learn. The first keypad-programming screen is e.g. M002A (A = 1
Keypad programming screens following this one are e.g. M001
can be programmed.
• Press the right arrow key. Display reads Enroll Keypad .
• Press the “ f “ (function) key on the hand held keypad.
• LCD keypad display changes to 00000.
• The first 2 zeros represent the area the keypad is assigned to.
• The next 3 zeros represent the input # the hand held keypad’s panic button (police badge icon) is assigned to.
Reserve a point # in the group of inputs assigned to the RF module for this.
14 Monitor ISM/xL™ Hardware Guide
st
keypad).
B – P for a total of 16 hand held keypads that
22-0375 rev1.1
Page 19

RF Handheld Keypad Operation
User Code + Command Key + 1 Turns Area OFF
User Code + Command Key + 2 Turns Area to STAY
User Code + Command Key + 3 Turns Area to Fully ON
User Code + Command Key + 4 System Test (turns on LCD keypad lights/sounder, system
siren for 5 seconds.
User Code + Command Key + 9 Clears or silences alarms.
User Code + Function Key + 1, 2
… 9
Function Key Press once to learn RF Hand Held Keypad into system.
(Escape Key) Used to clear incorrect entries.
Police Badge Icon Button Panic Button. Press and hold until rapid beeps heard to
NOTE: If “Allow User Entry Delay” in System programming is enabled, and a user arms to STAY, they are prompted
with a next screen message if they want an Entr y Delay or not while in ST A Y. If the area the Handhe ld Keypad is
assigned to is turned to STAY using the Handheld KP, this feature will default to “User Entry Delay Allowed”.
Engage Programmable Outputs Functions
enable.
Sensors
• Enter Point programming and the first input point # assigned to the RF module.
TIP: An easy way to find points assigned to this module and any modules with inputs and outputs is to
press the middle button when in the point’s main screen where its point type is configured. E.g. P001
button displays:
• Pressing the button below this will indicate on a help screen what module the point you are at is connected to.
E.g. screen displays:
digit module address). Outputs do not show, as the RF module has none. A module with outputs would also
include
applicable, in this special screen.
• Wireless sensor’s circuit types are always “0” – normally closed.
• Press Save and enter the Sensor’s name (12 characters max.) e.g. PIR JOHNS RM
• Press Save and a different screen displays saying No Sensor Learn.
• Press the right arrow key. Screen changes to Enroll…, Stop, Force.
• Trigger the tamper on the sensor or if there is no tamper, cause it to alarm.
• If it is not convenient to tamper the sensor, then it can be force learned by pressing the button beneath Force.
Cause the sensor to alarm to learn it into the system. Pressing the button beneath Stop can stop the Force
method.
• When the sensor has been learned, the screen will change to default: 3 .
• 3 represents the sensor’s supervisory signal time limit (0=disabled, 1=2hrs, 2=6hrs, 3=12hrs, 4=24hrs). The first
check mark is sensor tamper on or off. The second check is the hardwire input. Normally closed =
open =
keypad will toggle it.
• Press Save. Screen displays “Programming” and changes to the sensor’s wireless address e.g. Cnt:56DB5. Cnt
= wireless door window contact.
• The sensor has now been learned.
b000 – 000 in place of the mod address number. bCAPL output group and the output number range
. With the LCD screen cursor flashing under a check mark or a box, pressing any key number on the
(or ? for other modules).
002 (module # 2) Wireless (RF module) p013 – 016 (input point range 13 to 16) S#10097 (5
0, middle
normally
22-0375 rev1.1 Monitor ISM/xL™ Hardware Guide 15
Page 20

SENSOR
CATEGORY
Cnt Door Window Contact (surface mount)
FrP Fire Pull 3. .
Frz Freeze Temperature Detector 3..
Gls Glass Break Detector 3..
HKP Hand Held Keypad 0. .
PIR Passive Infra-red Detector 3..
Pnc Panic Pendant OR Hand Held Double Button Panic 0. .
Rcn Recessed Contact 3..
RoR Rate of Rise Detector 3. .
Smk Smoke Detector 3. .
SoS Shock and Sound Detector 3..
??? Unknown sensor type – delete this sensor and re-learn
- also used as an RF transmitter for hard wire inputs
- e.g. Overhead Door Contacts
DESCRIPTION DEFAULT
SETTINGS
.
3.
Testing (Signal Strength)
• Use the Service PIN to go to the TEST menu.
• Select App for application module and then W/L for wireless.
• Select Scan. Activate a sensor.
• The screen will display information about each sensor it receives. E.g. Cnt56DB5 (door/window contact and its
address),
• Press XESC escape to return to the TEST screen. Press Signal.
• Activate a sensor. Screen indicates signal strength of sensor it receives. E.g. “Strength is 8 !”. Signal strength of
7 to 8 is acceptable. Signal strength of 6 or less is poor to unacceptable. The input point # transmitting will also
indicate:
• Another method to check if a sensor is transmitting is to stand near the RF module holding a sensor and activate
the sensor. The large green LED, visible through the module’s cover will flash upon activating the sensor to
indicate signal transmission.
• RF Module sensor inputs OK or Not OK and Tamper can be checked in System Status/Area/Points.
• RF Module, hand held keypad(s) and sensor status can be checked in System Status under App – Wireless
using the left or right arrow LCD keypad keys for conditions such as low battery, sensor loss. Disregard any codes
in lower right corner of these screens.
014 (input #14), 80 02 4 (sensor transmit codes).
(Tx: 014).
16 Monitor ISM/xL™ Hardware Guide
22-0375 rev1.1
Page 21

Version 2 Wireless
North American and
European Versions
are in the same
enclosures.
Antennas enclosed
North American Module
Version 2 Wireless Module
P/N 683-9240
(Refer to Installation Instructions P/N 22-9240 for further information.)
Side knockout
Plastic base cable
inlet knockouts
Interface Board
XXXXX
Box Tamper
Enable
Jumper
See NA Module Notes.
NOTE: DO NOT attempt to
jumper this pin block.
Damage may occur. It is for
the manufacturer’s use only.
1432
Interconnection
Data Send to Interf ace board LED
5 digit serial number
to program in Module
Programming
Back knockout
w
k
o
l
c
l
e
a
l
y
g
b
Green
(-)0V
Data B
Module Bus
Yellow
Diagnostic LEDs
See NA Module No tes.
Module Bus
communications
indicator LED
Box Tamper Spring
Box Tamper Enable Jum per must be
removed. See module notes below.
#1 or #2 Receiver Jumper
See NA Module Notes.
e
e
r
Data A
n
d
e
r
1432
(+)12V
Total Current
Consumption
= 75mA
1
2
Radio Receiver Board
Decode LED
Valid Decode LED
See NA Module Notes.
Radio Antennas
22-0375 rev1.1 Monitor ISM/xL™ Hardware Guide 17
Page 22

Versio n 2 No rth American Wireless General Information
• The V2 Wireless Module communicates with Inovonics learn mode wireless sensors. They transmit with Frequency
Agile 900MHz spread spectrum radio transmissions.
• For each sensor’s instructions, consult the Inovonic’s instructions packed with each sensor.
• Each wireless (RF) module supports a maximum of 32 wireless sensors. The V2 wireless module must be
connected to the module bus to enable programming.
• For programming information, see the MONITOR Commissioning Reference Guide, mentioned at the beginning of
these installation instr uc tio ns .
• Mount the module centrally to the wireless sensors.
• Install module away from large metal objects.
• Mounting the module on metal surfaces will impair performance.
• This module is intended for indoor use only. Use in outdoor applications may impair performance.
• If a sensor reports a ‘low battery’ and the sensor’s battery is replaced, the sensor’s reset button must be pressed to
restore the sensor.
NOTE:
Reed Switch
Hardwire
Input
Tamper
Example:
North American
Battery
Wireless Door/
Window Sensor
Internal View
Reset
Button
a hardwire input and some can only have a
hardwire input. Check your sensor’s model/part
number in your sales order to ensure you have the
correct version.
A North American version door/window sensor has
2 reed switches and one hardwire input. Eit her
position reed switch and the hardwire input can be
used for e.g. 2 doors. However, if only a reed
switch is used, the hardwire input must be closed
with a wire short. If only the Hardwire input is
used, the magnet must be installed next to one of
the reed switches to close the circuit.
Some sensors can have reed switches and
NA Module Notes
Tamper Enable Jumper
• Enable Box Tamper Detection: While the module is de-powered, remove this jumper. When power is applied to
the module, the spring box tamper on the Interface board will be active.
• Disable Box Tamper (factory default): While the module is de-powered, replace this jumper if it had been removed.
Re-power the module and the box tamper is disabled.
Diagnostic LEDs
Yellow LED Green LED Condition Description
0 to 9 pulses to
indicate module
serial number,
5 digit value.
Off Flashing slowly. All ok System operating normally.
On Flashing slowly. Sensor Trouble One or more of the RF sensors enrolled is having
On for 1 second
per serial number
digit.
Module Serial Five
Number display
When the board is first powered up, the serial
number is displayed in an encoded format. The
number of times the yellow LED flashes while the
green LED is ON steady gives the digit value.
E.g. green on, count 3 flashes on yellow, green
off, first digit is “3”. Green turns back on, yellow
flashes 9 times, green off, second digit is “9”.
Etc. etc. until the entire serial number is
displayed, one digit at a time. It takes several
seconds to complete the entire process. NOTE:
“0” is indicated by the green LED turning on and
the yellow LED does not flash.
trouble (supervision fail, sensor tamper or low
battery). Wireless test and status menus can be
checked at the system LCD keypad to identify
the sensor trouble. Consult the Commissioning
Reference Guide for these procedures.
18 Monitor ISM/xL™ Hardware Guide
22-0375 rev1.1
Page 23

Flashing slowly. Flashing slowly. Receiver Failure The receiver board is not communicating
properly with the interface board. Check the
condition of the three wire interconnec tio n
between the two boards and check power.
Flashing fast,
alternating with
the green LED.
Flashing fast,
alternating with
the yellow LED.
The Module serial
number is not
programmed.
The non-volatile module memory is not
programmed or has failed. If (re)programming
fails, return the module to the factory for a
replacement, .
Data Send to Interface Board LED
• Flashes as data is transmitted to the Interface, which then transmits the information over the module bus to the
main panel.
Decode LED
• Flashes as any RF data is being received.
Valid Decode LED
• Flashes as the receiver decodes a message.
# 1 or # 2 Receiver Jumper
• WARNING: Disconnect the module bus connector, to remove power, before re-positioning this jumper.
• If it is necessary to mount two receivers close to each other, they must be at least 91.4 cm apart (3 feet).
• This jumper on one of the receivers must be set in the # 1 position. This jumper on the other receiver must be in the
# 2 position.
• When there is only one receiver in a general area, this jumper is left in the # 1 position (default).
• Never leave this jumper out.
Interface Board
1432
Interconnection
Data Send to Interface board LE D
Radio
Box Tamper Spring
#1 or #2 Receiver Jumper
Position 1
Receiver 1
Position 2
Receiver 2
1
2
NOTE: If the system’s Feature Set is greater than 5,
Module, Input number Type and Name are
programmed in the Director software program and
sent to the panel. All other wireless sensor
programming described here is done at the system’s
LCD keypad ‘Configs’ screens. Regardless that after
entering Configs, “No Local Edits” displays.
Receiver
Board
European and Australian Module
Refer to Euro Installation Instructions P/N 22-9241 and Australian P/N 22-9242 for further information.
• The EURO and Australian V2 Wireless Modules communicate with Inovonics learn mode EURO wireless sensors.
For each sensor’s instructions, consult the Inovonic’s instructions packed with each sensor.
• Each EURO and Australian wireless (RF) module supports a maximum of 32 wireless sensors. The V2 wireless
module must be connected to the module bus to enable programming.
• Mount the module centrally to the wireless sensors.
• Install module away from large metal objects.
• Mounting the module on metal surfaces will impair performance.
• This module is intended for indoor use only. Use in outdoor applications may impair performance.
• If a sensor reports a ‘low battery’ and the sensor’s battery is replaced, the sensor’s reset button must be pressed to
restore the sensor. Re-check the sensor’s programming to ensure it is correct.
22-0375 rev1.1 Monitor ISM/xL™ Hardware Guide 19
Page 24

European and Australian Version 2 Wireless Module cont.
Hardwire Input
Reed Switch
Tamper
Example:
European
Battery
Door/Window
Wireless
Contact
Internal View
Factory Wired
Parallel
Interconnection
Reset
Button
NOTE:
Some sensors can have a reed switch and
hardwire input and some can only have a hardwire
input. Check your sensor’s model/part number in
your sales order to ensure you have the correct
version.
A European version door/window sensor has 1
reed switch on its side and one hardwire input.
Both can be used for e.g. 2 doors. However, if only
the reed switch is used, the hardwire input must
be closed with a wire short. If only the hardwire
input is used, the magnet must be installed next to
the reed switch to close the circuit.
Side knockout
Plastic base cable
inlet knockouts
Interface Board
XXXXX
Tamper
Enable
Jumper
See Module notes.
NOTE: DO NOT attempt to
jumper these pin blocks.
Damage may occur. They are
for the manufactur er ’ s use only .
Factory Wired
Parallel
1432
Interconnection
5 digit serial number
to program in Module
Programming
Factory Wired Parallel Interconnection
Back knockout
Yellow
Green
Diagnostic LEDs
Module Bus
communications
indicator LED
Interface Board Tamper Spr ing
Tamper Enable Jumper must be
removed. See Module notes.
w
k
o
e
l
c
l
e
r
e
a
l
y
g
b
(-)0V
Data A
Data B
Module Bus
n
d
e
r
1432
(+)12V
Total Current
Consumption
= 75mA
TX
RX
Transmit &
Receive to
Interface
Brd LEDs
Radio Antennas
Radio Brd Tamper Spring
New Zealand Australia
European
Radio Receiver
Board Version
Decode LED
See Module notes.
20 Monitor ISM/xL™ Hardware Guide
Radio Brd Tamper Spring
NOTE:
Ensure the location jumper
selection is in the correct position
Radio Antennas
Australian
Radio Receiver
Board Version
Decode LED
See Module notes
TX
RX
Transmit &
Receive to
Interface
Brd LEDs
22-0375 rev1.1
Page 25

Euro and Australian Wireless Module Notes
Tamper Enable Jumper
• Dual Tamper Detection: While the module is de-powered, remove this jumper. When power is applied to the
module, both the Interface and Radio board tampers are active. With the jumper in, only the Radio board’s tamper
is active.
Diagnostic LEDs
Operation is the same as the previously mentioned North American version.
Transmit and Receive data between Interface and Radio Boards, LEDs
• Flash as data is transmitted between the Interface and Radio boards, which supplies information over the module
bus to the main panel.
Decode LED
• Flashes as any RF data is being received.
Euro / Australian RF Repeater Module
LEDs
Decode.
(Processing RF
DATA)
Transmit DATA
Low S/B Battery
Main power on
Re-chargeable Stand-by Battery (12 hr life span)
Plug
Side knockout
Back knockout
Power Input
Insert a wire link
(short) in this block
to disable tamper.
Plastic base cable
inlet knockouts
Tamper
Spring
(+)12V
(-)0V
Total Current
Consumption
= 40mA
Press to reinitialize Repeater if all power lost.
Reset
Button
This 7 pin plug not used.
NOTE: Re-check the Repeater’s
programming to ensure it is correct.
• The repeater module is used to increase the range of transmitting and receiving signals.
• Mounting for the Repeater is the same as the Receiver as it is in the same plastic enclosure. Follow the same
General Information Notes as the Receiver.
Version 2 Wireless Programming
NA and Euro Modules
The version 2 wireless module is very similar to the
version 1 in the way it learns wireless sensors.
• The V2 does not support wireless keypads and it is
not necessary to re serve input point numbers for
keypad ‘panic’ buttons like V1.
V2 Module Programming
• The V2 has a 5-digit module serial number, which is
programmed into the system module programming,
like the V1. For systems with a Feature Set of 5 or
above, local configuration programming at an LCD
keypad cannot be done. Module enrollment, input
point assigning, must be done through the Director
software and sent to the panel. V2 wireless sensors
can be learned into the system the same as V1
through the LCD keypad. V1 wireless sensors can
not be used with the V2 module and V2 sensors can
not be used with the V1 module.
• If for some reason the serial number sticker is
missing, the V2 will display its serial number when it
is first powered. Using the yellow and green LEDs
beside the module bus terminal block, the number
of pulses on the yellow LED while the green LED is
ON, gives the digit value. E.g. green on, count 3
22-0375 rev1.1 Monitor ISM/xL™ Hardware Guide 21
Page 26

programmed through the
system’s LCD key pad. If the module config was sent
button, press it several
button) press the button on the keypad under Force.
When the sensor has been
pulses on yellow, green off, first digit is “3”. Green
turns on, yellow pulses 9 times, green off, second
digit is “9”. Etc. etc. until the entire serial number is
displayed, one digit at a time. It takes several
seconds to complete the entire process. NOTE: “0”
is indicated by the green on and NO pulses of the
yellow LED.
Module Programming
• Program the V2 module serial # into the module
configurations. Ass ign the number of input points
required (4 to 32). Like the V1, the V2 does not have
outputs. The outputs selection may be left as ‘0’.
After making these selections, press the button
below ‘Next’ in the LCD keypad’s module enrollment
screen, or send the module info to the panel from
Director.
• The next screen will look
like this. It can only be
AllSVN:1 Force:2
↓Save ↓
to the panel by the Director, go to an LCD keypad
on the system and log on as a service user. Select
‘Config’ and the first Module Configurations screen
for this module: e.g. M005
button from that screen to get to this one
AllSVN: V2 Module Supervision Timeouts. The
↓0. Press the ‘Next’
.
time allowed before a supervision signal is
transmitted from the V2 because it has not received
a trigger or supervisory signal from any of the
sensors assigned to it.
Selections: 1 = 2 Hrs, 15 Min (default)
2 = 6 Hrs, 35 Min
3 = 12 Hrs
4 = 25 Hrs, 15 Min
0 (None) cannot be entered.
Force: The number of times any sensors should be
triggered before the V2 will Force learn it into the
system. This can be helpful if in a big system with
e.g. wireless PIRs that are being periodically tripped,
the force count is increased to avoid false ‘force’
enrolment of a sensor.
The default is 2 triggers but can be changed from 1
to 9 triggers.
When these selections are acceptable, press the
Save button. Pressing the button will display the
module type and its input and output range.
Input Configuration
• Wireless sensor’s circu it types are always “0” –
normally closed.
• If the system’s Feature Set is greater than 5, the
input point type and name screens cannot be
programmed through the system’s LCD keypad
Configs. That information must be programmed in
the Director software and sent to the panel.
If the circuit type, sensor type and name have been
programmed into the system with the LCD keypad
and Save is pressed, the next screen below will
display:
If they were programmed in using the Director
because the Feature set is greater then 5, re-enter
input point programming at the keypad and ignore
any warnings about no programming using the
keypad. Wireless points are learned into the system
using keypad input programming regardless of the
Feature Set. Return to this following screen and
follow the next steps:
• Press the right arrow key
on the LCD keypad.
(xxx represents an input #)
• In this next screen, if the
V2 sensor has a tamper
times until the screen changes. Or, if the sensor does
No Sensor
↓Save ↓
→Learn
Pxxx↓2
Enroll....
↓Stop ↓Force
not have a tamper button (e.g. pendent panic
The down arrow next to Force will clear. Trigger the
sensor as many times as Force is set in the
previously mentioned
AllSVN:/ Force: screen
(default: 2 times). NOTE: The sensor cannot be
triggered in rapid successions. Trigger it once, wait
a few moments and then the next trigger and wait a
few moments again. As many times as the Force
times are set. To disengage Force, press the button
under ‘Stop’. The keypad display will return to the
‘No Sensor – Learn’ screen. If a sensor is not
enrolled within 1 minute, the
to be pressed again.
•
detected, this screen will
display:
• SVN: Sensor Supervision Timeouts. The time
Force button will need
SVN:0 TMP: IN:
↓Save ↓Del
allowed before the V2 will send a supervision signal
identifying a specific sensor that has not transmitted
after these timeout selections.
Selections: 0 = None (default)
1 = 2 Hrs, 15 Min
2 = 6 Hrs, 35 Min
3 = 12 Hrs
4 = 25 Hrs, 15 Min
TMP: Whether the sensor’s ‘Tamper’ will be
monitored (
IN: Whether the sensor alarm output is ‘Inverted’
) or not ( default). This selection should always
(
default) or not ().
be left defaulted unless it is necessary for a sensor
to act opposite to its regular normal or alarm
condition.
Del: Delete Sensor. After a sensor has been
programmed or, an error was made, the keypad
button below this selection can be pressed and the
sensor will be deleted. The screen will return to ‘No
Sensor – Learn’.
If the SVN:0 TMP: IN: screen selections are
acceptable, press
• The screen will momentarily display:
Programming...‘
‘
Save.
22 Monitor ISM/xL™ Hardware Guide
22-0375 rev1.1
Page 27

firmware version number.
• This screen will then
display:
SN#:1B3414: This is
SN#:1B3414 →Edit
↓Save ↓ Pxxx↓2
the Serial Number of the sensor that was enrolled
into this input number.
Pressing the keypad right arrow button will display
“SVN:0 TMP: IN:” screen for editing. The
the
‘Del‘ button can also be pressed to remove the
sensor and another sensor could be pr ogr am med
for this input number if desired.
Equipment/Pseudo Point Selections for Wireless V 2
Module Trouble (E011), ensure this is set to detect:
• Module Bus connection to V2 module failure.
• V2 module failure.
• V2 module has not received any sensor signal for X
amount of time (
AllSVN).
Module Battery Low (E012), ensure this is set so
‘Senor Low Battery’ will be detecte d.
Module Program Edit (E013) can be optionally set to
detect when the sensor settings have been changed.
This alert will not re-set until there have not been any
further program changes for one hour.
LCD Keypad Status
• Enter ‘Status’ at the system’s LCD keypad.
• Press the keypad’s right arrow key until ↓App
(Application Module) displays. Press the keypad
button under it.
• When Wireless2 or WL2 displays, press the butt on
under
↓Yes.
• Keypad left and right arrow keys can be pressed to
scroll through the input numbers and V2 module
conditions.
Input Number Status
• The input number range associated with the V2 will
display and the input’s condition e.g.
• It can also display the following for an input:
NoSvn‘ No Supervision. A sensor supervision signal
‘
009→Ok.
failure. The input will appear in point status as a
tamper.
Lobat‘ Low senor battery. This will generate a
‘
module or pod low battery alert. If the sensor’s
battery was replaced, the sensor’s reset button on
its printed circuit board must be pressed.
Not Enrolled‘ A sensor is not programmed to
‘
this input. The input will appear in point status as a
tamper. Delete the input if it will not be used.
NoRcv‘ No Receiver detected. V2 module
‘
malfunction.
PtTmp‘ Input sensor tamper. The input will appear
‘
in point status as a tamper.
V2 Module Status
• After scrolling through all the V2 input conditions, the
condition of the V2 module will display: e.g.
Pod→Ok.
• It can also display the following for a module:
NoSvn‘ The V2 module is not communicating on the
‘
module bus.
‘
NoSen‘ The V2 module has not received
communication from its sensors, based on the
supervision delay period set for the V2 module
AllSVN).
(
• Module Status will displ a y the V2 m odule in tamper
for either of these conditions.
V2 Test Menus
• Log on to the system LCD keypad as a Service
User.
• Select ‘Test‘ from the Menu and App → WL2 or
Wireless2.
• This screen will display:
(X.Xx) indicates the V2
• ‘Signal‘ selects a sensor signal strength menu.
• Pr es s ing ‘Signal‘ will
display this screen:
xxx represents an
input sensor number on the V2 module.
< > keypad left and right arrow keys can be pressed
to scroll through the input numbers.
Si(gnal) > 3 OK is an example of the V2 receiver
getting an adequate signal strength from the sensor.
• This screen is an example
of the V2 receiver getting
an inadequate signal from
the sensor.
• The second line in both screens displays the actual
signal strength measured on a scale of 000 to 021
(maximum).
• If a sensor has not been enrolled in an input
number,
• ‘Scan‘ selects an RF scanning menu.
• When ‘Scan’ is pressed the screen will display
‘
Waiting...’ to receive an RF transmission from
‘Not Enrolled‘ will display on the top line.
any sensor. NOTE: if this screen never changes, it is
possible the V2 module is not working properly.
• If this screen displays
when a signal is received,
it is from a sensor that has
not been enrolled in the system, indicated by
LEARN. SN#:1B3414 is the sensor’s unique serial
number.
• If this screen displays
when a signal is received,
it is from a sensor that is
enrolled in the system, indicated by P#xxx where
xxx is the input number.
• Either an asterisk or a blank will display after a
sensor’s serial number as it toggles every time a
transmission from a different sensor is received.
• In either screen, ‘AA BB‘ is changing data that can
be ignored. It is for internal Engineering use only.
Check (X.Xx)
↓Signal ↓Scan
xxx < > Si > 3 OK
Signal 014 of 21
xxx < > Si > 4 Weak
Signal 001 of 21
SN#:1B3414 LEARN
AA BB
SN#:1B3414*P#xxx
AA BB
22-0375 rev1.1 Monitor ISM/xL™ Hardware Guide 23
Page 28

Refer to Installation Instructions P/N 22
-
0367 for further information.
Fire Module
5 digit serial number to
program in Module
Programming
Annunciator
Jumper for each input.
IN = Input wired Class "A"
(double loop)
OUT = Input wired Class "B"
(normally open, 2.2K resistor
end of line).
TB9
1432
output board
male plug.
Switched (+)
O/P1
0V
Switched (-)
O/P2
(+) 12V
NOTE: Do not twist pairs
together under connections.
Keep connections separate.
red
green
yellow
black
loop 1
loop 1
loop 2
loop 2
loop 1
loop 1
loop 2
loop 2
loop 1
black
loop 1
loop 2
loop 2
2.2K
loop 1
loop 1
loop 2
loop 2
yellow
1432 1432 1432 1432
Jumper IN
INPUT1
Jumper OUT
INPUT2
INPUT3INPUT4
m
r
a
l
A
Tamper
(if existing)
r
a
l
A
Tamper
(if existi ng)
Class "A" Wiring
(fire switches)
t
c
a
common
t
n
o
C
normally open
normally closed
closed tamper
closed tamper
Class "B" Wiring
(door contacts, PIRs)
t
c
a
common
t
n
o
C
normally open
m
normally closed
closed tamper
closed tamper
Current Rating = 25mA without annunciator card.
60mA with annunciator card and all LEDs on.
• Capacity of 8 inputs and 10 outputs (with standard plug on output annunciator card).
• With jumper settings illustrated, inputs can be wired class “A”. A short between the 2 loops wired between normally
open connections = alarm. Either loop opening = tamper. Most commonly used to monitor water flow sprinkler
alarm switches.
Or the inputs can be wired class “B”
connections = alarm. Resistor loss = tamper. This connection can be used to monitor sprinkler switches such as
water pressure and gate valve but can also be used as burglary inputs.
• Whether the point is class “A” or “B”, fire or burglary, the point circuit type is always “0” normally closed. Any point
type may be used. However, for a class “A” fire point, it must be defined as “010” = Fire Class A.
• For an approved fire monitoring system, an 18V, 40VA, AC transformer (P/N 859-0052) must be installed on the
control unit box. This txmr. has two 18V secondary white leads connected to motherboard AC input. The txmr.
primary is then fastened to an AC supply (e.g. 2X4 electrical box, P/N 573-3735 and cover, P/N 573-3742).
• For ULC applications all cabling connected to the fire module MUST be run inside armored BX flex cable. From fire
module to sprinkler switches and Module Bus line from fire module directly back to main control unit.
• When programming outputs, this board is similar to the 8/16 input/output expander module. Outputs 3 to 8 do not
exist. Therefore, if the outputs on the annunciator card are required, the module is programmed with 16 outputs.
st
The 1
annunciator card.
and 2nd output can be programmed. Outputs 3 to 8 are skipped. Outputs 9 to 16 can be programmed on the
. A short across the 2.2K end of line resistor between normally open
XXXXX
F1
1/2 AMP
P/N 342-3356
LED 1 Bus
communications
indicator
LED 2
follows O/P1
Tamper Pins
Fire Module
(-)
(+) 12V
(-)
(+) 12V
Aux Power
0V
Data B
Data A
(+) 12V
Module Bus
INPUT5 INPUT6 INPUT7 INPUT8
TB14
1432
TB13
1432
1432
143214321432
black
yellow
green
red
loop 2
loop 2
loop 1
loop 1
loop 2
loop 2
loop 1
loop 1
loop 2
loop 2
loop 1
loop 1
loop 2
loop 2
loop 1
loop 1
24 Monitor ISM/xL™ Hardware Guide
22-0375 rev1.1
Page 29

Graphic Map Annunciator Module
Refer to Installation Instructions
P/N 22-0364 for further
Features:
• Recommended mounting height: 1.5 meters (4 feet, 9 inches).
• Can be assigned with maximum 16 outputs to turn on any 16 LEDs over the display of 70 possible LED locations.
• This module can be assigned with 4 hardwire inputs.
• Outputs 1 and 2 can be the first 2 LEDs on the screen or used as hardwire outputs or both as these 2 outputs will
turn on both sources (LEDs or hardwire connections) at the same time.
• When outputs 1 and 2 are used as hardwire connections they behave the same as on the input/output modules.
Output 1 turns positive 12V and output 2 turns negativ e.
• The 0V negative for hardwire positive output #1 and 12V positive for hardwire negative output #2 can also be used
as auxiliary 12V power connections (fused at .5 AMP).
• Applying a magnet to a reed switch on the PCB will turn on all LEDs in the display for testing.
• The Map Module drawing software is a Windows based draw program. It is installed as a template to use over and
over. It allows a user to do a diagram of a system’s layout for the LEDs to turn on and highlight certain point
programmable output conditions in the diagram. E.g. point not normal, point in alarm. It could also be used to make
alpha/numeric labels that can have the LEDs turn on next to them for various area, point indications. E.g. “Area 1
ON”, “Area 2 STAY”. When the diagram is complete, it can be printed out and cut out to fit inside the Map Module’s
display.
• The Map Module drawing software is available on the Director Software CD and listed as “MAP MODULE
TEMPLATE.dot.”
LED PIN CONNECTION STRIP
LED Test Reed Switch
hold magnet over it and
all LEDs on face will
turn on.
F1
1/2 AMP
P/N 342- 3356
Bus
communications
indicator LED
D5.....D1
Tamper
Spring
C10.....C1
B10.....B1
A10 A1
TB9TB13
1432
COM
I/P2
I/P1
312
TB1
Switched (+)
O/P1
0V (Aux Pow)
O/P2
Switched (-)
(+)12V
(Aux Pow)
Module Bus
TB2
0V
Data B
Data A
1432
(+) 12V
COM
I/P4
312
black
yellow
green
red
I/P3
Graphic Map Module
Current Rating = 150mA max when
all LEDs on.
G10.....G1 F10.....F1 E10.....E1
LED PIN CONNECTION STRIP
BROWN
12-
RED
3-ORANGE
YELLOW
4-
GREEN
56-BLUE
PURPLE
78-GREY
WHITE
9-
BLACK
1011-BROWN
RED
1213-ORANGE
14-YELLOW
15-GREEN
16-BLUE
5 digit address to program
in Module Group
RIBBON CABLE
D10...D6
XXXXX
Each ribbon
cable coloured
wire represents
outputs 1 to 16.
They are
connected to the
desired pin on the
pin strips to turn
on the required
LED # on the
face of the
module to display
a condition. E.g.
follow an input
that is not normal.
22-0375 rev1.1 Monitor ISM/xL™ Hardware Guide 25
Page 30

Graphic Map Module cont.
A1 A2 A10A9A8A7A6A5A4A3
B1 B2
C1 C2 C10
D1 D2 D10D9D8D7D6D5D4D3
E1 E2 E10E9E8E7E6E5E4E3
F1 F2 F10F9
G1 G2 G10G9G8G7G6G5G4G3
LED position IDs on face correspond with those on PIN strip. All LEDs are RED except as shown.
Green
LED
Green
B4B3
C8C7C6C5C4C3
F6F5F4F3
F8F7
B10B9B8B7B6B5
C9
LED
Green
LED
Green
LED
Yellow
LED
Yellow
LED
Yellow
LED
Using the Graphic Map
Module drawing software
can produce a diagram
similar to this. Points of
interest can be labeled
and illuminated for any
programmable output
condition by strategically
assigning the outputs to
the LEDs.
LED ID letters and numbers are
displayed in this example only.
A printed out drawing will not
show them.
MANUFACTURING FLOOR AREA
26 Monitor ISM/xL™ Hardware Guide
22-0375 rev1.1
Page 31
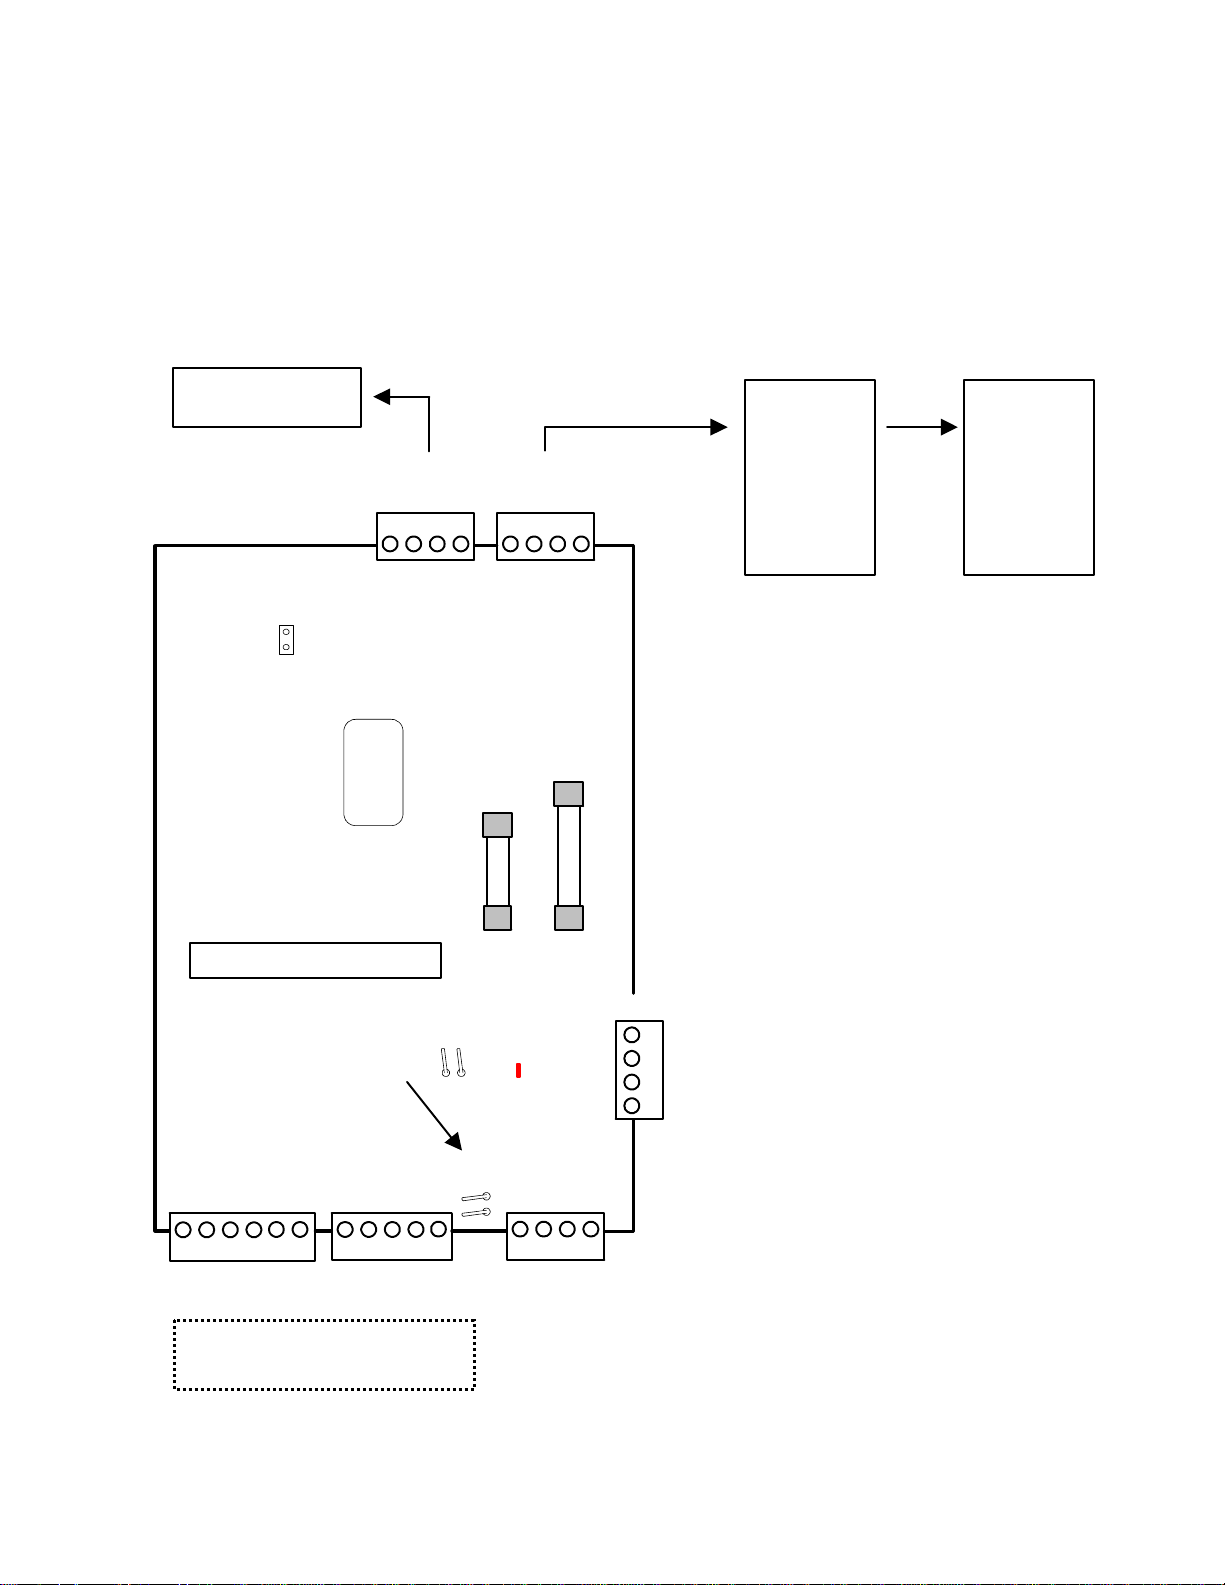
all markets.
Smart / Vigil Module
• This module is an interface to allow compatibility between the concentrator control devices of the Chubb
Smart/Vigil security system and the ISM/AFx security system for upgrade purposes. The Smart module also
features a printer connection.
• Any existing Chubb Smart/Vigil keypads must be replaced with the ISM/AFx version and they are connected to
the Monitor control unit via the Modu le Bus .
• For Chubb Smart concentrators quick reference and wiring, please see technical information bulletins #139 for
Commercial and #142 for Financial Chubb Smart. For Smart module application notes, please see Intrusion
Technical Bulletin #12-001: Smart Fx
Chubb Smart Safe
Seismic Concentrator
Chubb Smart
Concentrator Bus
These jumper
pins not used
and left open
TB2
green
yellow
black
0V
Data
Clock
red
1432
(+) 12V
green
yellow
black
red
1432
Chubb Smart
Concentrator Bus
0V
TB2A
Data
Clock
2 identical Chubb Smart
Concentrator Trunk Line
(+) 12V
connectors.
Chubb Smart
Safe/Vault
Concentrator
Chubb Smart
Commercial
Concentrator
XXXXX
F2
F1
5 digit seri al
number to
program in
Module
Programming
1 AMP
P/N 342-3350
Smart Module
1/2 AMP
P/N 342-3356
Current Rati ng = 120m A
LED Bus
Standard
Tamper Pins
These tamper pins engage when drill
through housing version used to
monitor short between housings.
communications
indicator
Module Bus
TB4
TX
(-)0V
RX
TB3 TB1A
1432
HSC Comms
CTS
RTS
(+)12V
56 1432
0V
RTS
Printer
CTS
RX
5
TX
Tamper Pins
(+) 12V
1432
NOT USED
HSC is a proprietary communications
of CSG Security Inc. and not used in
Data B
Data A
(+) 12V
Data A
red
green
Module Bus
0V
TB1
Data B
0V
black
yellow
NOTE: A Smart Concentrat or can be
any of a number of varied types of
modules us e d in a “Chubb Smart”
System similar to the Modules used
with an ISM System.
black
yellow
green
red
1432
2 identical Mo dule Bus. Parallel
connections between main panel
- other modules on one
connector. Leave one connector
open to connect LCD service
keypad for conv en ience.
22-0375 rev1.1 Monitor ISM/xL™ Hardware Guide 27
Page 32
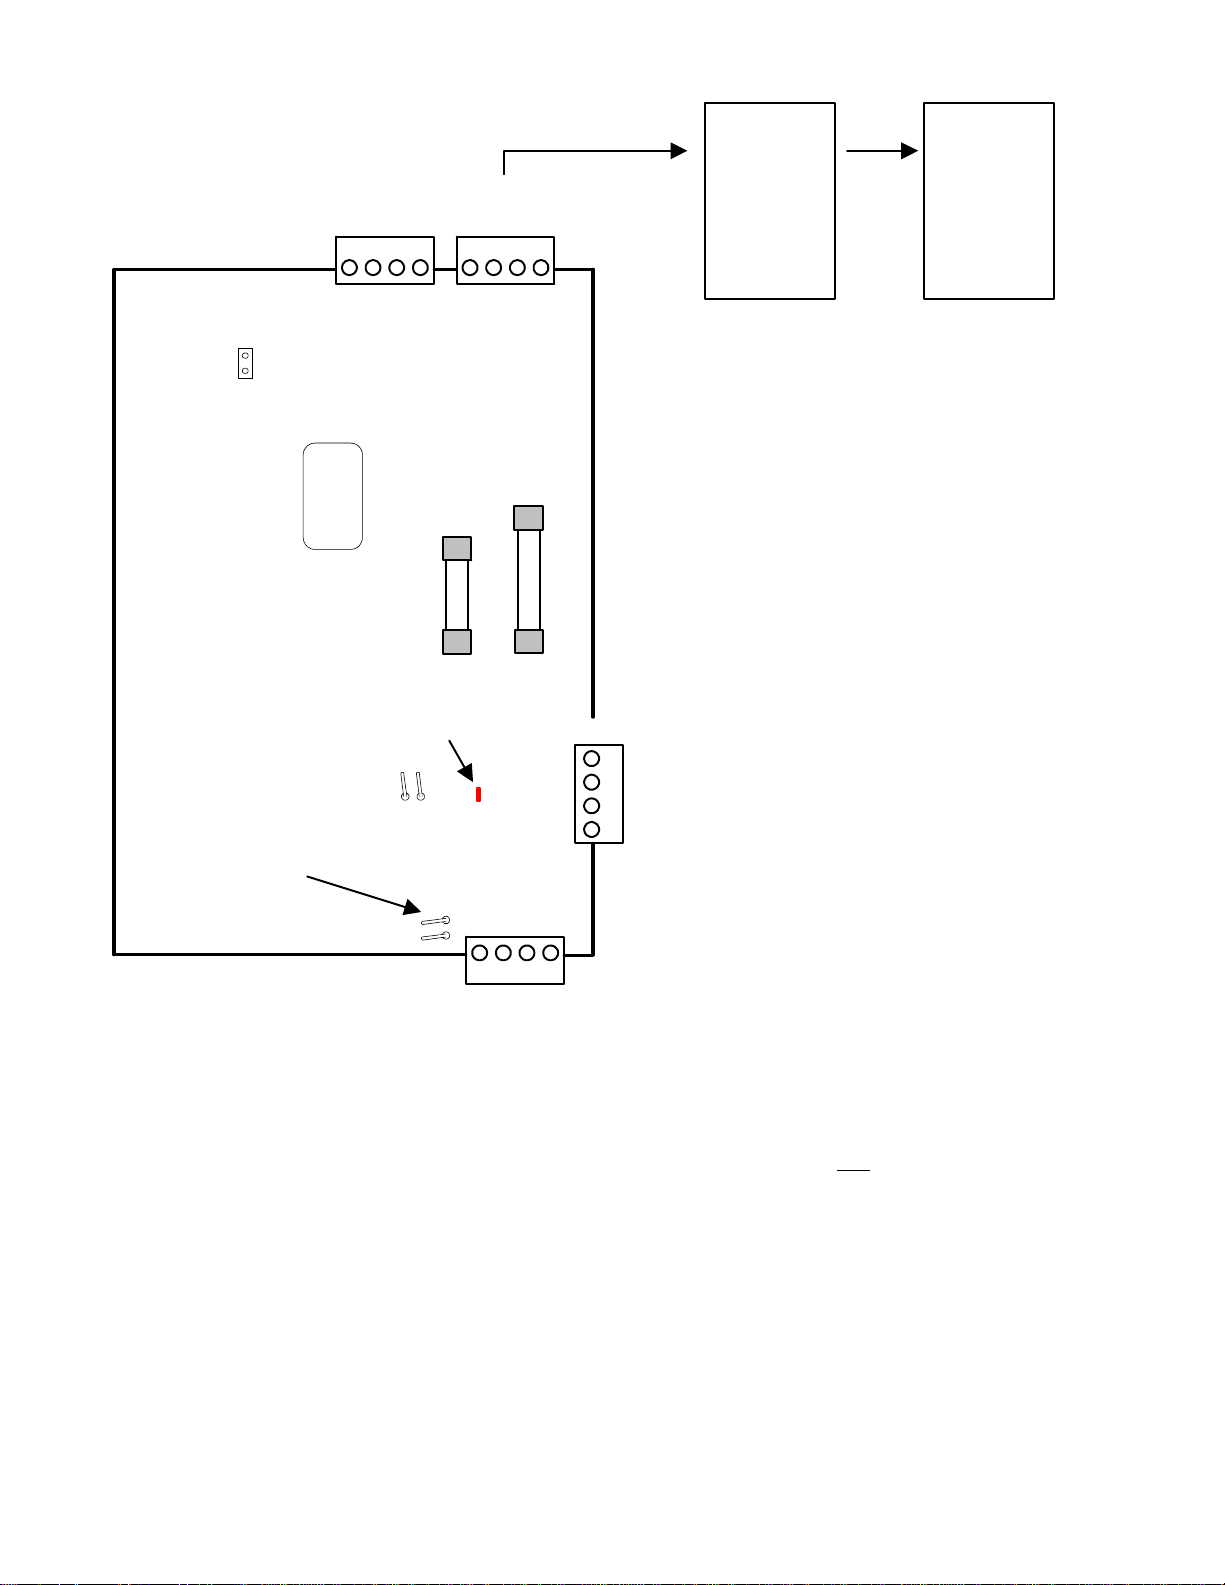
Vigil Module for use in the UK
2 identical Vigil Concentrator
Trunk Line connectors.
Vigil Concen trator
These jumper
pins not used
and left open
5 digit ser ial
number to
program in
MONITOR
Module
Programming
green
Bus
TB2
Clock
XXXXX
Vigil Module
Standard
Tamper
Pins
These tamper pins engage
when drill through housing
version used to monitor short
between housings.
Tamper Pins
yellow
black
0V
Data
LED Bus
communications
indicator
green
red
1432
Clock
(+) 12V
F1
1/2 AMP
P/N 342-3356
Module Bus
(+) 12V
1432
red
black
yellow
red
1432
0V
Data
(+) 12V
F2
1 AMP
P/N 342-3350
Module Bus
0V
Data B
Data A
(+) 12V
Data A
Data B
green
yellow
Vigil
Concentrator
Bus
TB2A
NOTE: A Vigil Concentrators can be
any of a number of varied types of
modules used in a Vigil System.
Similar to the Modules used with a
MONITOR System.
black
yellow
green
red
1432
TB1
2 identical MONITOR Module
Bus connectio ns. Can be
0V
TB1A
black
interconn ec ted between main
panel and other modules on one
connector. Leave one connector
open to connect LCD service
keypad for convenience.
Vigil
Concentrator
# 1
Vigil
Concentrator
# 2
Module Programming
• The Smart/Vigil Module is capable of 64 input points and 80 output points to match the number available with a
full size Chubb Smart system.
• For easier programming of inputs/outputs the Smart/Vigil module must occupy the first module position in the
ISM/AFx Module Group.
• Enter the module’s 5-digit address in Module programming.
• It may be left assigned to Area 1 and enable the module’s tamper.
• Inputs and outputs are programmed differently from other modules to achieve the full amount on a Chubb
Smart/Vigil system.
• The Smart/Vigil module is 3 modules in one. It has 3 module group addresses.
• If a Smart/Vigil module was taking over a full 64 inputs and 80 outputs, this first address would be programmed
with “7” = 32 inputs and “7” = 32 outputs.
• Press Save. In the following module address, enter the next consecutive number after the last address. E.g. if the
Smart/Vigil module’s original address number was “
• Program the same as the last address with “7” = 32 inputs and “7” = 32 outputs.
28 Monitor ISM/xL™ Hardware Guide
15281” in this second module address enter “15282”.
22-0375 rev1.1
Page 33

• Press Save. The next address is the third Smart/Vigil module address. Enter the next consecutive address
number after the last. E.g. “
• Program the same as the last 2 addresses but only enter “4” for 16 outputs. “0” for inputs.
• This will now supply 64 inputs and 80 outputs. For smaller Chubb Smart/Vigil systems, it is only necessary to
program the number of inputs/outputs required. All 3 addresses may not be needed and other module addresses
could occupy their places.
• Exit the module programming and then go back to module programming and the first Smart/Vigil module address.
This initializes the module.
• Press Save. The following screen supplies three programming options. HSC (NOT USED), PRN (printer),
SMR (Chubb Smart/Vigil Concentrators).
• Printer programming is the same as with a Printer module (discussed later in this manual). Please refer to
programming it with that module, to program it with the Smart module.
• Press the button below SMR.
15283”.
Smart/Vigil Concentrators Programming
• The next screen displays programming for the first Smart/Vigil concentrator.
• The top line displays: Conc1 (concentrator 1), [enable conc1, with the cursor under this box (press LCD
keypad left or right arrow keys) press any key number to make the box a
necessary to test a seismic connected to this concentrator (seismic concentrator, safe/vault concentrator), enter
if yes],
concentrator can have 1 seismic configured as a safe or a maximum of 5 for a vault) make each box a
seismic]. E.g. for a commercial concentrator there are no seismics. Only enable the conc. and do not enable any
test selections. Press
• Programming for the next conc. is displayed. Programming for all concentrators continue in the same way.
S [how many seismics require a test signal (seismic concentrator has 1 seismic, a safe/vault
Save.
to enable the conc.] T [is it
for each
Programming Inputs/Outputs
• Programming inputs is the same as any inputs with e.g. Expander module.
• With the Smart/Vigil module occupying the first module location, inputs for it begin at 009. 001 – 008 being on the
ISM/AFx main panel.
• When programming outputs, they begin at 009. 001 – 004 (005 – 008 not existing) being on the ISM/AFx main
panel.
• It is very IMPORTANT to remember that the 9
programmed as “AREA ON” [bCAPL programmable output code: 01.10XX (XX = area #01 – 10)] to generate the
test.
• Use the following chart to compare Chubb Smart/Vigil inputs/outputs as they are converted to ISM/AFx.
th
output for any concentrator with seismics to test must be
22-0375 rev1.1 Monitor ISM/xL™ Hardware Guide 29
Page 34

Smart/Vigil Concentrator to Smart/Vigil Module Inputs and Outputs Conversion Chart
Smt/Vig Smt/Vig Smt/Vig Smt/Vig Smt/Vig Smt/Vig Smt/Vig Smt/Vig
Conc.
Input #
C
O
N
C
#
1
C
O
N
C
#
2
C
O
N
C
#
3
C
O
N
C
#
4
1
2
3
4
5
6
7
8
9
10
11
12
13
14
15
16
17
18
19
20
21
22
23
24
25
26
27
28
29
30
31
32
NOTE: This Table applies when the
Smart / Vigil Module is configured
as Module # 1.
The first 8 inputs and outputs
of the ISM/AFx are located on
the main control board.
Module
Input #
9
10
11
12
13
14
15
16
17
18
19
20
21
22
23
24
25
26
27
28
29
30
31
32
33
34
35
36
37
38
39
40
C
O
N
C
C
O
N
C
C
O
N
C
C
O
N
C
#
5
#
6
#
7
#
8
Conc.
Input #
33
34
35
36
37
38
39
40
41
42
43
44
45
46
47
48
49
50
51
52
53
54
55
56
57
58
59
60
61
62
63
64
Module
Input #
41
42
43
44
45
46
47
48
49
50
51
52
53
54
55
56
57
58
59
60
61
62
63
64
65
66
67
68
69
70
71
72
C
O
N
C
#
1
C
O
N
C
#
2
C
O
N
C
#
3
C
O
N
C
#
4
Conc.
Output #
1
2
3
4
5
6
7
8
9
10
11
12
13
14
15
16
17
18
19
20
21
22
23
24
25
26
27
28
29
30
31
32
33
34
35
36
37
38
39
40
Module
Output #
11
12
13
14
15
16
17
18
9
10
21
22
23
24
25
26
27
28
19
20
31
32
33
34
35
36
37
38
29
30
41
42
43
44
45
46
47
48
39
40
C
O
N
C
#
5
C
O
N
C
#
6
C
O
N
C
#
7
C
O
N
C
#
8
Conc.
Output #
41
42
43
44
45
46
47
48
49
50
51
52
53
54
55
56
57
58
59
60
61
62
63
64
65
66
67
68
69
70
71
72
73
74
75
76
77
78
79
80
Module
Output #
51
52
53
54
55
56
57
58
49
50
61
62
63
64
65
66
67
68
59
60
71
72
73
74
75
76
77
78
69
70
81
82
83
84
85
86
87
88
79
80
Output Locations on Sma rt/Vigil Concentrators
Commercial Concentrator: output 9 becomes output 1. Output 10 becomes output 2. Outputs 1 – 8 on the plug on, 8zone annunciator card become outputs 3 – 10.
Safe/Vault Concentrator: outputs 1 – 5 start their programming at output 3 – 7.
Safe Seismic Concentrator: output 1 becomes output 3. Output 2 becomes output 4.
Checking Status
• When in the Status menu, select App and then SMA for the Smart/Vigil module.
• Select SMR to check Smart concentrators. HSC is NOT USED. Printer status and some printer user control is
in the History menu the same as using a Printer module (discussed later in this manual).
30 Monitor ISM/xL™ Hardware Guide
22-0375 rev1.1
Page 35

• When selecting SMR, the status of each concentrator will display and pressing the LCD keypad left or right arrow
keys will display each concentrator’s status. Pressing
• The concentrator may state that it’s OK. Tmpr = conc. tamper. Tmpr Au_ERR = the concentrator is in tamper
and has had an authentication error (concentrator substitution e.g. conc. dis/reconnected).
Smart/Vigil module itself is in tamper and the concentrator is OK.
Next will return to the main Smart/Vigil module menu.
PTmpr = the
Smart/Vigil Module Test and Diagnostics
• Using Service user ID/PIN, enter the Test menu and select App. Select SMA for Smart/Vigil module.
• HSC is NOT USED.
Printer Option (Smart Module ONLY)
• Pressing PRN will allow you to control and do tests on the printer.
• Pressing Ctrl will give you the options to Strt: start the printer, Cncl: cancel pending messages, Plg: print
the entire log.
• Pressing L/B will do a printer port loop back test the same as the HSC loop back test on the HSC/Printer
module (discussed later in this manual) to test printer hardware integrity.
Smart/Vigil Concentrator Tests
• Pressing SMR from the SMA menu will display Alog for point analog. Pressing it will display the condition of a
Smart/Vigil input using different values. The Smart/Vigil input point numbers can be scrolled using the LCD
keypad left or right arrow keys. Values indicate: “
may vary but still be within these ranges.
• Pressing Vault Tst will test all seismics connected to any concentrators through out the system. The display will
change to “
afterwards.
• After this delay is finished, go to the Analog screen again. Scroll the various points until the ones that may have
had a test fail display. They will display with an “
• Pressing TFAL (test fail) will display the concentrator number and seismic that failed. E.g. Conc: 001
(concentrator #1),
Testing Vault Concentrators” and stay on for 1 second. The test occurs in 15 to 20 seconds
F-X-F-X-X (seismics 2 and 3 failed the test).
018” = normal, “001” = tamper, “032” = in alarm. These readings
F” (failed).
22-0375 rev1.1 Monitor ISM/xL™ Hardware Guide 31
Page 36

Door Controller Modules
Version 1 Door Module
This Module Bus is for trunk
connection from the motherboard
or paralleling to another module
Normally Open
Common
Normally Closed
Common
Normally Open
Auxiliary Inp ut
Common
Request to Exit
Door Contact Input
Common
Reader Tamper
Reader Buzzer (-) Output
(+)5/12VDC
Green LED
Red LED
Data 1 Clock
Data 0
Ground 0V
5 digit serial
number to
program in
Module
Programming
TB1
Auxiliary Relay
Door Unlock Relay
TB2
DOOR 1
TB3TB4
1432 561432 5 132 1432
5V
Reader
Reader
Voltage
Jumper
...
12V
XXXXX
2 DOOR ACCESS
MODULE
Tamper
Pins
Refer to Installation Instructions P/N 22-0345 for further information.
w
n
o
l
e
l
k
e
e
r
c
y
Data B
TB10
Module
Bus
F1
Reader
Voltage
Jumper
Door Unlock Relay
Auxiliary Relay
d
g
a
e
l
r
b
(+)12 V
(-)0V
Data A
1212
TB14
0.5 AMP
P/N342-3356
5V
...
12V
TB7
DOOR 2
This Module Bus is for
connecting a Service
TB5
Reader
TB9
TB8
LCD Keypad Module
black
(-)0V
yellow
green
red
Reader cable shield. Connect at
system 0V ground only.
Ground 0V
Data 0
Data 1 Clock
Red LED
Green LED
(+)5/12VDC
Reader Buzzer (-) Output
Reader Tamper
Common
Door Contact Input
Request to Exit
Common
Auxiliary Input
Normally Open
Common
Normally Closed
Common
Normally Open
TB6
Data B
Data A
1432
(+)12V
56
1432
132 1432
5
1432
Reader
Connection
Example
black
green
white
not used
orange
red
HID Thin
Line II
Proximity
Reader
Current Rating
= 60mA min. 180mA with
all 4 relays energized.
Remember to add reader
current. Above reader is
20mA. X 2 = 40mA. This
board's total current could
be 220mA.
Reader cable
shield. Do not
connect at
reader. Leave
floating.
yellow, blue, vilolet,
not used
32 Monitor ISM/xL™ Hardware Guide
22-0375 rev1.1
Page 37

Version 2 Door Module
This Module Bus is for trunk
connection from the motherboard
or paralleling to another module
12
Auxiliary Relay
132
Door Unlock Relay
132 1432
1432
Reader
56
Data 0
12
XXXXX
Door Control Module
Version 2
DOOR 1
5V
12V
Low Voltage
LED
In Reader
Connections
Reader cable sh ield.
Connect to 0V ground.
Out Reader
Connections
Door Contact Input
Reader Buzzer Negative
red
orange
not used
white
green
black
white
green
Aux Reader Data 1
Aux Reader Data 0
Normally Open
Common
Normally Closed
Common
Normally Open
Auxiliary Input
Common
Request to Exit
Common
Reader Tamper
(+)5/12VDC
Green LED
Red LED
Data 1 Clock
Ground 0V
5 digit serial
number to
program in
Module
Programming
Current Rating
= 160mA min. 200mA with all 4 relays and their indicator LEDs energized.
Remember to add reader current. Example readers are 110mA. X 2 = 220mA. Two
readers per each door would be 440mA. This board's total current could be 640mA.
Refer to Installation Instructions P/N 22-0353 for further information.
w
n
o
e
l
l
k
e
d
r
e
c
y
g
e
a
l
r
Door 1
Auxiliary
Relay LED
Reader
Voltage
Jumper
...
Door 1
Unlock
Relay
LED
Optional
Tampers
Processor
OK LED
(normal =
slow flash)
Door 2 Unlock
Relay LED
Module Bus
Self resetting
0.5A fuse.
Module Bus
communications
indicator LED
Tamper
Spring
Tamper
Pins
Door Unlock Relay
Auxiliary Relay
Door 2 Auxiliary
Relay LED
b
(-)0V
Reader
Voltage
Jumper
Data B
Data A
12V
5V
(+)12V
1432
...
DOOR 2
This Module Bus is for
connecting a Service
LCD keypad module
black
(-)0V
yellow
Data B
green
Data A
red
(+)12V
Module Bus
Aux Reader Data 0
Aux Reader Data 1
Ground 0V
Data 0
56
Data 1 Clock
Red LED
Reader
Green LED
(+)5/12VDC
1432
Reader Buzzer Negative
Reader Tamper
Common
Door Contact Input
Request to Exit
Common
Auxiliary Input
132 1432 1432
Normally Open
Common
132 1212
Normally Closed
Common
Normally Open
SPECIAL NOTE:
For Rev A replacement boards this stand off hole must be isolated by the
technician with e.g. a fiber washer on either side of the hole. This is not
required for current Rev D boards and greater. R ev B & C boards do not
exist. The Rev version can be found “silk screened” on the back of the board.
22-0375 rev1.1 Monitor ISM/xL™ Hardware Guide 33
Page 38

Multi-Door Controller
Door Lock Detail
Install diode or MOV close to the lock [DC
Fail-Safe Door Strikes
The default door strike wiring is for
strike, or mag. lock w/o rev. coils: Use
B
Door7
Door5
Door4
Door3
Door2
2
18 19 20
15 16 17
14
13
12
10 11
9
78
56
4
3
12
DC
BAT
16V, 40VA
DC
BAT
(+)
(-)(+)(-)
AC AC
(+)
(-)(+)(-)
AC AC
PS for Door
`
Add PS for Door
Controllers 1 & 2
Required for 8-door units.
Controllers 3 & 4
120-8520
2 Door Controller Ratings
Input: 12VDC, 840mA
Output: 12VDC, 40mA (Auxiliary power)
12VDC, 500mA or 5VDC , 240mA
(Reader power)
120-8520
-
P/SP/S
+
Included in 4-8 door upgrade kits.)
Battery
+
+
Coil
Door
Lock
+
-
Grounding
Door
Controller 4
Diode. Otherwise, install 27 V M.O.V.]
+
"Fail-Secure" (powered = unlocked).
For "Fail-Safe" door strikes
(powered = locked), connect to the
large terminal strips as usual, AND at
-
Ensure each cabinet is connected to
a locally-approved earth ground
using at least 18 AWG wire.
Do not connect anythi ng else to the
earth ground.
Connect the Module Bus cable
shields together inside each cabinet
and only connect the shie ld to earth
ground at the ISM panel.
Door
Controller 3
N/C
Com
N/O
1 2 3
X
X
each applicable Door Controller Unlock
Relay, move the N/O wire to N/C
terminal:
For UL Installations
The system shall not be installed in the
fail secure mode unless permitted by the
local authority having jurisdiction and
shall not interfere with the operation of
panic hardware.
T
Not
Used
Lock
Door 8
Lock
Door 7
Lock
Door 6
Lock
Door 5
(-)(+)(-)(+)(-)(+)(-)(+)
Door8
Door6
Door1
(-)(+)
TB2
Power Links for Mag Locks
Door 4
Door 2
Multi - Door Controller General Wiring
Door
Door
Strike and mag lock connections are pre-wired between the door
Controller 2
Controller 1
controller boards and the two large terminal strips near the bottom
Door
Door 8
Door 3
Door 1
Door 6
of the cabinet. Modu le Bus connections are provided as well.
Other connections (such as reader cables, door contact s, etc .)
connect directly to t he door controller boards.
Door 7
Controller 4
Door
Door 5
Controller 3
TB1
For door-str i ke and mag lock in st r uctions, ref er to the "Power
Links" sections.
The Multi-Door Controller is pre-wired to power 8 Doors with D oor
Strikes.
Power Links for Door Strikes (Momentary Power)
If a door requires mag lock power instead, remove the link for the
Module Bus
Multi-Door Controller Cabinet
door number strike and ju m p the previous door’s strike power to
the next door s’ .
Example: Door 3 has a mag lock. Rem ove the pre-wired jumper
between door 3 and 4 and move the connection from 3 to 4 to
(Maintained Power)
Example: Door 3 has a mag lock. After i ts st r i ke
(-) In and Out
(B) In and Out
(A) In and Out
(+) pass-through
Connections
Door
Door
Jumper
Remove
continue supplying power to the remaining doors.
Continued at Power Links for Mag Locks TB2
power jumper has been bypassed, add a jumper
Controller 2
Controller 1
to fit into the cabinet. Exception: If you must share a battery between 2 P/Ss, insert a
diode in the BAT (+) connection to the second PS.
Each power supply require s a separate battery. These may need to be smaller than 7 Ah
120-8520
Backup Batteries
Upgrading the
Door Capacity
Multi-Door
The 4-6 door and 4-8 door upgrade
kits include door -controller board(s),
a power supply, and m ounting
hardware.
The wiring harness is pre-wired to
power the additional door controller
board(s) from the second P/S.
For use in 2 Door Controller models:
950-9011, 950-90 12, 950-9013, 950-9014
See Two Door Controller Installation
Controller
Instructions: 22-0353
© 2003 CSG Security Inc. / Sécurité CSG Inc. 452-9151 v1.2 (Oct 2003)
for its positive mag power. Supply mag power to
each door using a mag, in the same way.
(-)(+)
B
A
Lock
Door 4
Lock
Door 3
Door 2
Door 1
Bypass
15 16 17 18 19 20 21 22
14
Lock
13
12
Lock
(-)(+)(-)(+)(-)(+)(-)(+)(-)(+)
Door8
Door7
Door6
Door5
Door4
567891011
Door3
4
Door2
3
Door1
12
T
B
1
DC
BAT
16V, 40VA 16V, 40VA
DC
BAT
16V, 40VA
(+)
(-)(+)(-)
AC AC
(+)
(-)(+)(-)
AC AC
120-8520
`
Add PS for Mag locks
Strikes
PS for Door
34 Monitor ISM/xL™ Hardware Guide
22-0375 rev1.1
Page 39

IMPORTANT:
Elevator / Lift Modules
IMPORTANT: Must refer to Installation Instructions P/N 21-0372 for detailed information.
Mounting and Cabling
Elevator System Board Progression
132132132132132132
Relay Brd
12132
13213213213213213
Relay Brd
12132
13213213213213213
132132
Relay Brd
331 3 11312 2 2 21432 5
331 3 11312 2 2 214325
12132
2
132132132132132132
13
2
132132
Relay Brd
1
2
2
2
13
2
13
331 3 11312 2 2 21432 5
132132
331 3 11312 2 2 21432 5
321321 45632145 32145
12
Elevator
Isolator
1
45
32
Elevator
Isolator
12
32143214321
1
456
32143214321
2 Elevator Controller
Mounting
Hole
1432
2nd Elevator Connections
2 Elevator
2.5AMP
Power Supply
P/N 110-5560
12VDC
(+) (-)(+)(-)
Battery
16V, 40VA
TXMR
AC AC
1st Elevator Connections
10&1/16"
25.5cm
A low interference knock-out used for comms
lines from I solators to E levator Modules
must not be shared with any other cables. Example.
Elevator R elay Boards
(4 maximum)
Refer to
Installation Instructions P/N
21-0372 for Power & Cable
Requirements.
12
nd
2
1432
121212
2 Elevator Module
1
45
12 12 12 32132
32
1st Elevator
121212
P/N 950-9017
1432 56132 1432 1432132 1212
Module
1432 56132 143213212 12
Knock- ou t 7/8"
2.22cm.
12VDC 7.0AH
Battery
NOTE: The same metal enclosure is used for
the Elevator Starter and Expansion cabinets.
Elevator Starter Cabinet P/N 950-9036
Knock Outs for Incoming, High Interference,
Existing, Elevator, Control Cables ONLY. E.g.
call buttons, floor relays etc. Run in conduit.
Elevator
1432 56132 1432 1432132 1212
1432 56132 143213212 12
For interference
free operation,
connections for
each elevator must
be wired through
their own Elevator
Isolator filter board
before being wired
into the Elevator
Module.
Run
cables in
conduit
14"
35.5cm
between
boxes.
3",
7.6cm
Knock-outs
Small 7/8" (2.2cm).
Large 1&3/8" (3.5cm).
Elevator Expansion Cabinet
P/N 950-9038
132132132132132132
12132
132132132132132132
12132
12VDC 7.0AH
Battery
P/N 133-4788
Mounting Holes
331 3 11312 2 2 21432 5
331 3 11312 2 2 21432 5
17&5/8"
44.7cm
132132
2
13
2
13
132132132132132132
12132
132132132132132132
2
1213
Power
Supply
132132
331 3 11312 2 2 21432 5
132132
331 3 11312 2 2 21432 5
Elevator Relay Boards
132132132132132132
13
2
1
2
132132132132132132
13
2
1
2
45
32
High In
1
456
331 3 11312 2 2 21432 5
2
13
2
13
2
13
2
13
331 3 11312 2 2 21432 5
terference Side
1
1
45
12 12 12 32132
32
Elevator
Isolator
121212
32143214321
Low Interfer
Mount Pwr
Supply away
from Module
1&15/16"
4.9cm
Bus lines.
12VDC Battery
7.0AH
Any knock-outs on the
low interference side
of the Isolator (except
the one reserved for
Elevator Module
comms)
can be used for
Relay Board
interconnecting
data lines,
Elevator Readers
and electric
TXMRs ONLY.
24&1/4"
61.6cm
Terminate all cable shields to
the closest ground lug at the
wire, entry point. Move the
copper lug to the ground stud
nearest the cable entry. Re-
3&1/2",
8.8cm
arrange copper grounding
lugs as required.
132132132132132132
(4 maximum)
2
1213
132132132132132132
12132
Elevator
Isolator
ence Side
Power
Supply
132132
331 3 11312 2 2 21432 5
2
13
2
13
331 3 11312 2 2 21432 5
12 12 12 32132145632145 32145
121212
32143214321
Reader
TXMR
Run cables in
conduit between
boxes.
GND
Lug
Run cables
in conduit
between
boxes.
22-0375 rev1.1 Monitor ISM/xL™ Hardware Guide 35
Page 40

ELEVATOR RELAY BOARD
NOTE: The building's
Elevator Company supplies
cable to floor selecti on relay
connections and call button
report inputs.
NOTE: The Elevator Relay Board
does not have a module serial
number to program into Module
Programming. The serial # used
is on the Elevator Module.
12VDC Power Out
(Auxiliary)
DATA In or Out
Earth ground input when a cabinet
ground lug is not available. If quad
cable is used, use all four wires.
Terminate two wires in #1 and two
wires in #2, for convenience.
Relay Board 12VDC
Power Supply In
Relay Board's current rating = 340mA.
To Elevator Module 1
after going through an Isolator Board
Either of these 2 Data connections can be used to connect
Data In and use the other to run Data out to the next Relay
board.
Jumpers J1 - J4
st
or 2nd Elev Data In,
address Elevator Relay Boards
Address J1 J2 J3 J4
= Jumper IN. (–) = Jumper OUT.
10
11
12
13
14
15
0
1
2
3
4
5
6
7
8
9
–
–
–
–
–
–
–
–
–
–
–
–
–
–
–
–
13
(+)
2
(--)
1
2
–
–
–
–
–
–
–
–
Floor Selection Relay Connections
COM
NC
RLY1 RLY2 RLY3 RLY4 RLY5 RLY6
Board address
jumpers 1 - 4 out =
Relay Board # 1.
2
3
14
(+)
(--)
DATA In or Out
–
–
–
–
–
–
–
–
COMNCNO
NO
13213213213213213
COMNCNO
COMNCNO
COMNCNO
Elevator Relay Boa rd P/N 650-9035
Relay LED turn on when relay activated.
1
J5J4J3J2J
J6J7J
8
I/P3
I/P1
COM
I/P4
I/P2
I/P5
I/P6
COM
I/P7
COM
COM
5
Call Button Report Inputs
(from building elevator control
DATA 0
DATA 1
equipment)
To Elevator Module 1st or 2nd Elev Data 0
and 1 after going through an Isolator Board.
Jumpers J5 - J8 select Special Functions
Jumper
(Fail Safe
Mode)
J5
J6
J7
J8
For Wiegand reader
operation.
Call button repor t inputs
normally open.
Normal operation.
IN
All relays energize if
communications lost
between Relay Board and
Elevator Modules.
RLY7
RLY8
I/P8
331 3 11312 2 2 2
Terminate cable
shield wires at
cabinet ground lug.
NOTE: Floor Selection
Relay Wiring: Floor
COMNCNO
2
NC
2
COM
NO
13
NC
2
COM
NO
13
Use all 4
quad cable
wires.
For Magstripe reader
operation.
Call button report inputs
normally closed.
Service Mode
-
Call button report inputs
will open or short
(depending on J6)
individually, to trigger
associated relay and test it.
- An “Off Line” condition for
the associated Elevator
Module will indicate, with this
jumper out.
All relays de-energize if
relays must be wired in
the same relative order
for all elevators (such as
lowest to highest as
accessed from each
specific cab). Remember
basement levels as well.
Tip:
When floors are
defined through the
Director software, the
same convention must
be used (e.g., lowest to
highest overall).
The software will display
a Relay Board's address
# and the relay #
assigned to the floor #.
GND
Connect common
Lug
earth ground to
cabinet GND lug.
EARTH
GROUND
OUT
communications lost
between Relay Board and
Elevator Modules.
36 Monitor ISM/xL™ Hardware Guide
22-0375 rev1.1
Page 41

ELEVATOR MODULE and ISOLATOR BOARD (1st elevator connected to 2 Elevator Module)
Elevator
Module
12VDC
Power
Supply must
also be
connected to
the Elevator
Module side
of its Isolator
boards.
RLY1 RLY2
P/N 650-9035
Elevator
Relay Board
13
(+)
Aux
2
(-)
12VDC
DATA
1
2
(+
( )
)
2
This Module Bus
connector is for
connecting a
Service LCD
Keypad Module
Module Bus
connection
from the
motherboard
or paralleling
to another
Module
Elevator
Module
Power
Supply
(+) ( )
13213
2
Elevator
Module
side
Elevator
side
Cutaway view
DATA
DATA0
DATA1
5
3
1214
Earth Ground
Waterpipe ground input when a
cabinet ground lug is not available.
If quad cable is used, use all four
wires. Terminate two wires in #1
and two wires in #2, for
convenience.
yellow
black
(-)0V
Data B
Module Bus
1432
(+)12V
Data A
Data B
(-)0V
Module Bus
Unlock Relay
1 LED
Auxiliary
Relay 1 LED
Aux
Unlock
Rly 1
Rly 1
12
Com.
N. O.
Not Used
Elevator Module
current rating =
180mA.
maximum.
Aux
12VDC
121212
TB11
TB12
(+) (-)
(+)
(-)
12VDC
0V Neg
0V Neg
Reader Voltage
Jumper
P/N 641-9036
0V Neg
12VDC
(+)
(-)
Ground
12
TB10
Earth
5V 12V
TB1
Elev 1/2 Data In
green
red
Elev Data 0
nd
2
(+)12V
Data A
1432
Self resetting
0.5A fuse.
Com.
N. C.
N. O.
12VDC
Elev 1/2 Data 0
Elev1/2 Data 1
Elev1/2 Data 0
TB4
Elev Data 1
Elev Data 1
Elev Data 0
nd
st
st
2
Ground 0V
1
1
56
Reader
Module Bus communications
indicator LED
Elev Data In
nd
2
(+)5/12VDC
Green LED
Red LED
1432
Reader Voltage
Jumper
5V 12V
Tamper Output
2 Elevator
Module
P/N 650-9017
132 1432132
Bypass
Common
Panic In put
Fire Bypass
321432
TB16
Ground 0V
Elev 1/2 Data 1
(+) 5 / 12 VDC
Reader 1/2 Data 1
Reader 1/2 Data 0
Green LED
Reader 1/2 Data 1
Reader 1/2 Data 0
Spare
Reader cable shield. Connect
to control unit ground lug.
Reader Voltage
Jumper
5V 12V
Reader
1432
Common
Green LED
Normal RS485
Ground 0V
Green LED
(+)5/12VDC
Elev Data In
st
Tamper Output
1
TB14
TB15
Elevator
Isolator
Board
RS485 Reader
Connections for
reader runs over 500
ft.
See following
“Wiegand to RS485
Interface Board”
TB9 TB7 TB3 TB2
12
Not Used
Fire Bypass
Bypass
Low Voltage
LED
56
Reader 1 Data 0
Reader 1 Data 1
4
Common
Tamper Output
Elev 1/2 Data In
Panic Input
Com.
Common
N. O.
132 1432
Unlock
Rly 2
Unlock Relay
2 LED
12
XXXXX
12
5 digit serial
number to program
in Module
Ground 0V
Programming
Reader 2 Data 0
Reader 2 Data 1
1
32
Bypass
Common
Fire Bypass
Panic In
Fire Bypass
Common
12
132145632145 32145
Common
Auxiliary Relay 2 LED
Tamper
Switch
Input
Processor OK LED
(normal = slow flash)
Red LED
N. O.
Com.
N. C.
132 1212
Aux
Rly 2
Not Jumper PINs.
Do not short.
Connect current
protected LED to
remote “Proc essor
OK LED”.
Not Jumper PINs.
Do not short.
Connect current
protected LED to
remote “LED
Always on When
Power OK”.
First Elevator
Connections
to 2 Elevator
Module
Elevator
Isolator Board
1
current rating:
Elevator
TB13
Module
Connections
side =
100mA.
Panic Out
Elevator
Connections
side = 130mA
Plus add all
reader’s
current rating.
READER
for
Elevator
Common
Bypass
Module’s
first
32
elevator
brown not used
green
orange
Relay and
Isolator board
cabinet 12VDC
power supply.
Power
Supply
(+) ( )
black
white
red
Parallel connections to next Elevator Relay board(s)
Power to next Elevator Relay board(s) in this cabinet only. NOTE: If more elevator
relay boards are added in additional expansion cabinets with their own power
supply - ALL RELAY BOARD’S POWER SUPPLY NEGATIVES MUST HAVE A
COMMON CONNECTI ON.
Elevator Isolators and Relay boards do not have a 5 digit
serial # to program in Module Programming.
Fire Bypass is not intended for
"Life/Safety" applications.
22-0375 rev1.1 Monitor ISM/xL™ Hardware Guide 37
Page 42

ELEVATOR MODULE and ISOLATOR BOARD (2nd elevator connected to 2 Elevator Module)
Second
Elevator
Connections
to 2 Elevator
Module
Module Bus
connection
from the
motherboard
or paralleling
to another
Module
Elevator
Module
Power
Supply
(+) ( )
Elevator
Module
12VDC
Power
Supply must
also be
connected to
the Elevator
Module side
of its Isolator
boards.
Reserved for a
Service LCD Keypad
Module
1432
Module Bus
Auxiliary
Relay 1 LED
Elevator Module
current draw =
green
yellow
black
(-)0V
Data A
Data B
Module Bus
(+)12V
Data A
Data B
(-)0V
Unlock Relay
1 LED
Aux
Unlock
Rly 1
Rly 1
Com.
N. C.
N. O.
Not Used
180mA.
maximum.
red
Elev Data 1
Elev Data 0
Elev Data 0
Elev Data 1
st
st
nd
nd
2
(+)12V
1432
Self resetting
0.5A fuse.
1
1
Ground 0V
2
56
Reader
Module Bus communications
indicator LED
2 Elevator
132 143213212 12
Com.
N. O.
P/N 650-9017
Bypass
Common
Panic Input
Module
Fire Bypass
Elev Data In
nd
2
(+)5/12VDC
Green LED
Red LED
1432
Reader Voltage
Jumper
5V 12V
Reader Voltage
Jumper
5V 12V
1432
Common
(+)5/12VDC
Elev Data In
st
Tamper Output
1
Tamper Output
Common
Auxiliary Rela y 2 LED
Tamper
Switch
Input
Processor OK LED
(normal = slow flash)
Reader
Red LED
Green LED
Fire Bypass
Bypass
Common
Low Voltage
LED
56
Ground 0V
Reader 1 Data 0
Reader 1 Data 1
Not Used
Panic Input
Com.
N. O.
132 1432
Unlock
Rly 2
Unlock Relay
2 LED
12
XXXXX
5 digit serial
number to
program in
Module
Programming
Reader 2 Data 0
Reader 2 Data 1
N. O.
Com.
N. C.
132 1212
Aux
Rly 2
Aux
RLY1 RLY2
P/N 650-9035
Elevator
Relay Board
13
(+)
Aux
2
(-)
12VDC
DATA
1
2
(+
( )
)
12VDC
13213
2
Elevator
Module
side
121212
TB11
TB12
(+) (-)
(-) (+)
12VDC
0V Neg
Reader Voltage
Jumper
12VDC
0V Neg
Elev 1/2 Data 0
TB16
Elev 1/2 Data 1
P/N 641-9036
Elevator
side
Cutaway view
DATA
DATA0
DATA1
1214325
Earth Ground
Waterpipe ground input when a
cabinet ground lug is not available.
If quad cable is used, use all four
wires. Terminate two wires in #1
and two wires in #2, for
convenience.
Parallel connections to next Elevator Relay board(s)
Power to next Elevator Relay board(s) in this cabinet only. NOTE: If more elevator
relay boards are added in additional expansion cabinets with their own power supply ALL RELAY BOARD’S POWER SUPPLY NEGATIVES MUST HAVE A COMMON
CONNECTION.
1
TB10
Earth
0V Neg
12VDC
(-) (+)
Ground
TB1
5V 12V
2
Elev1/2 Data In
32
45
1
Green LED
(+) 5 / 12 VDC
Elev1/2 Data 1
Elev1/2 Data 0
TB4
1
1
32
4
Ground 0V
Reader 1/2 Data 1
Reader 1/2 Data 0
Reader 1/2 Data 1
Reader 1/2 Data 0
Spare
456
Reader cable shield. Connect
to control unit ground lug.
TB14
TB15
Elevator
Green LED
Isolator
Board
Normal RS485
RS485 Reader
Connections for
reader runs over 500
See following
ft.
“Wiegand to RS485
Interface Board”
Ground 0V
TB9 TB7 TB3 TB2
12
1
3214321
Tamper Output
Elev1/2 Data In
32
45
Elevator Isolators and Relay boards do not have a 5 digit
serial # to program in Module Programming.
Common
12
Relay and Isolator
TB13
Bypass
Common
Panic Out
Fire Bypass
Fire Bypass
Panic In
Common
Common
Bypass
32
132
board cabinet
12VDC power
supply.
Power
Supply
(+) ( )
READER
for
Elevator
Module’s
second
elevator
black
green
white
orange
red
brown not used
Fire Bypass is not intended for
"Life/Safety" applications.
38 Monitor ISM/xL™ Hardware Guide
22-0375 rev1.1
Page 43

Wiegand to RS485 Interface Board for longer cable distances (P/N 650-9037)
4 Pair Travel Cable Reader Wiring
The Interface is a small, narrow,
circuit board covered in heat shrink.
It can be located behind the
Elevator
READER
red
orange
white
green
black
brown
Brown Not used for Elevator
Sys. Do not connect.
NOTE: Maximum length of cable allowed for 485 operation may be lower due to cable
capacitance characteristics, card reader technology and manufacturer.
Additional 12VDC
power supply
(-)
Power
Supply
(+)
n
o
C
"
B
"
12VDC(+)
LED
Data 1
Data 0
(-)Neg
Reader cable shield. Connect to control unit ground lug.
t
c
e
n
installed on
Elevator
Cab roof.
(red)
(orange)
(white)
(green)
(black)
(brown)
Wire Connections
"B" Connect
Elevator Isolator board Jumper positions
for Normal reader distance: 500 feet
(152 meters) - connect to normal
distance isolator board reader
connections (see figures 8 and 9).
RS485 Jumper positions for
recommended maximum distance of
2000 feet (610 meters) - connect to
these isolator board terminal blocks 9
and 7.
If interference is encountered with 485 communications, terminate all A and B connections at both ends of the reader
cable with 150 ohm resistors, P/N 750-2465 (5%).
elevator cab reader, where the
reader cable connections are
made.
Twisted 4 Pair Example:
Connect Interfac e colo ur e d
pairs to twisted pairs with "B"
I
N
T
E
R
F
A
C
E
P/N650-9037
connectors (P/ N 496-1700 ).
LED
Data 1
Data 0
Orange
Blue
White
Purple
Green
Grey
Brown
Yellow
Black
Data A
Data B
Data A
Data B
Data A
Data B
}
Reader
(-)Neg.
Not
Used
Wh/Blu
Blu/Wh
Wh/Grn
Grn/Wh
Wh/Org
Org/Wh
Wh/Brn
Brn/Wh
Elevator
Isolator
Board
RS485 Long
Distance
Reader
Connections
RS485 Long Distance
Reader Jumper Selection
Normal
485-A Green LED
TB9
1
Wh/Blu
485-B Green LED
TB7
2
Blu/Wh
485-A Reader Data1
485-B Reader Data1
Wh/Grn
Grn/Wh
RS485
Ground 0V
45
321
Wh/Brn
Brn/Wh
IMPORTANT NOTE:
For RS485 operation.
Set reader voltage jumper to
5V.
Put a 2.2K ohm resistor
between normal reader pos.
voltage and green LED inputs.
Reader Voltage
Jumper
485-A Reader Data 0
Wh/Org
485-B Reader Data 0
Shield
Org/Wh
Cable
12
TB10
Earth
5V 12V
Green LED
(+) 5 / 12 VDC
Ground
TB4
2
1
2.2 K
GND Lug
Elevator Isolator Board
Data A
Data B
Data A
Data B
Data A
Data B
150 ohm
resistors
To reader
connections
N
T
E
R
F
A
C
E
P/N650-9037
Data 1
I
Data 0
LED
Orange
Blue
White
Purple
Green
Grey
22-0375 rev1.1 Monitor ISM/xL™ Hardware Guide 39
Wh/Blu
Blu/Wh
Wh/Grn
Grn/Wh
Wh/Org
Org/Wh
485-A Green LED
TB9 TB7
Wh/Blu
485-B Green LED
21
Blu/Wh
485-A Reader Data1
1
485-B Reader Data1
32
Wh/Grn
Grn/Wh
485-B Reader Data 0
485-A Reader Dat a 0
4
5
Org/Wh
Wh/Org
Page 44

ELEVATOR ISOLATOR and RELAY BOARDS in STARTER KIT CABINET
WATERPIPE
GROUND
2
Spare
GND
Lug.
Use all 4 quad
cable wires
1st Elevator 2nd Elevator
13213213213213213
Ground Lug
Elevator Relay Board P/N 650-9035
Move as
required.
Address 0
DATA 0
DATA 1
DATA IN
32
5
114
J5J4J3J2J
J6J7J
1
8
331 3 1132 2 2 2
GND
(+)
13
2
1
2
)
)(+(
()
13213213213213213
DATA IN
DATA 0
DATA 1
Address 1
114325
J6J7J
J5J
4J3J2J1
8
331 3 1132 2 2 2
13
2
GND GND
1
2
()
)(
+
2
Connect common waterpipe
ground to cabinet GND lug.
Elevator Relay Board P/N 650-9035
GND
(+)
()
13
2
1
2
2
13
2
13
Elevator Relay Board P/N 650-9035Elevator Relay Board P/N 650-9035
2
13
2
13
13
2
1
2
4 Relay Boards
Maximum
13213213213213213
Address 0
)
)(+(
DATA 0
DATA 1
DATA IN
32
5
114
13213213213213213
Address 1
()
)(
+
DATA 0
DATA 1
DATA IN
114325
(+)
()
J5J
J6J7J
4J3J2J1
8
331 3 1132 2 2 2
J5J4J3J2J
J6J7J
1
8
331 3 1132 2 2 2
Spare
GND Lug.
Move as
required.
2
2
13
2
13
2
2
2
13
13
(+) ()
D1
D0
DIN
Power the
Elevator Module
side of the
Elevator Isolator
Boards with a
321
45
321
456
Elevator Isolator Board
P/N 641-9036
32
D1
D0
DIN
To Relay Boards in Expansion Cabinet
1
321
45
12 12 12
+
)(
(
)
GND
Elev1/2 Data 1
Elev1/2 Data 0
Elev 1/2 Data In
separate power
supply (P/N 110-
5560).
4
32
3214321
NOTES:
Use pre-wired Main Terminal Block to connect 2 separate isolator board elevator systems.
Shipped as pre-wired for 2 el ev ator cabs, 16 f loors each (when 3 more relay boards and 1 addit ional
isolator board ar e added). To change for a single elevat or cab, 32 floors maximum (when 3 more
relay boards are added) add jumper wires as shown by dashed lines at Main Terminal Block. See
Packages and Products list, page 10.
Proceed from these connections to more relay boards in add-on Expansion Cabinets.
Always interconnect power supply ground with power supply ground in additional expansion
boxes.
CABINET FR AME TAMPER SWITCH Each Starter, Expans ion cabinet tamper switch must be in
series (normally closed) with the 2 Elevator Module controller tamper connection. Use shielded 4
conductor P/N 120-3401. Connect at tamper terminals on Main Terminal Block. Terminate shield
at ground lug in El evator Module cabinet. Interconnect shield between additional cabinets but do
not terminate any wh ere else.
1
() )(+(
)(
+
121212
Starter cabinet power supply negative.
Main Terminal Block
See Notes below.
Interconnect with all expansion
cabinet power suppl y negatives.
To Relay Boards in Expansion Cabinet
132145632145 32145
32
12
Elevator Isolator Board
P/N 641-9036
32143214321
AC (-)(+)
AC
16V40VA
TXMR
Battery
Power Supply
(P/N 110-5560)
Elev1/2 Data 1
Elev1/2 Data 0
Elev 1/2 Data In
(-)(+)
12VDC
12 12
+
)(
()
GND
)
121212
Cabinet Frame
Tamper Switch
SEE NOTES
(+)
()
40 Monitor ISM/xL™ Hardware Guide
22-0375 rev1.1
Page 45

ELEVATOR RELAY BOARD EXPANSION CABINET
WATERPIPE
Connect common waterpipe
ground to cabinet GND lug.
GROUND
2
Spare
GND
Lug.
Use all 4 quad
cable wires
1st Elevator
13213213213213213
Ground Lug
Elevator Relay Board P/N 650-9035
Move as
required.
GND
(+)
13
2
1
2
)(
+
()
DATA IN
DATA 0
DATA 1
Address 2
11432 5
J5J4J3J2J
J6J7J
1
8
331 3 1132 2 2 2
2
13
2
13
()
13213213213213213
13
2
GND GND
1
2
(
)(
+
Address 3
)
DATA 0
DATA 1
DATA IN
32
5
114
J5J4J3J2J
J6J7J
1
8
331 3 1132 2 2 2
2
2
13
2
13
2nd Elevator
GND
(+)
()
4 Relay Boards
Maximum
13213213213213213
Elevator Relay Board P/N 650-9035
Address 2
2
1213
()
)(
+
DATA 0
DATA 1
DATA IN
11432 5
13213213213213213
J5J4J3J2J
J6J7J
1
8
331 3 1132 2 2 2
Elevator Relay Board P/N 650-9035Elevator Relay Board P/N 650-9035
13
2
1
2
+
Address 3
)
(
)(
DATA 0
DATA 1
DATA IN
32
5
114
(+)
1
()
J5J4J3J2J
J6J7J
8
331 3 1132 2 2 2
Spare
GND Lug.
Move as
required.
2
2
13
2
13
2
2
13
2
13
(+) ()
D1
D0
DIN
DIN
Starter cabinet power supply negative.
Main Terminal Block
See Notes below.
D1
D0
Interconnect with Starter cabinet an d all addi tio na l
Expansion box power supply negatives.
To next Expansion Cabinet
To next Expansio n Cabinet
From Relay boards in St arter Cabinet
From Relay boards in Starter Cabinet
NOTES:
Use pre-wired Main Te rminal Block to connect 2 separate isolator board elevator systems from a Starter Cabinet.
Shipped as pre-wired for 2 elevator cab systems to add 16 floors when 3 additional relay boards are added to this box. To change t o a single
elevator cab syst em and add 32 floors when 3 additional relay boards are added to this box, add jumper wires as shown by dashe d li nes at
Main Terminal Block.
Proceed from these c onnections to more relay boards in a dd-on Expansio n Cabinets.
Always interconnect power supply ground with pow er supply ground in Starter Cabinet and additional Expansion boxes.
CABINET FRAME TAMPER S WITCH Each Starter, Expansio n cabinet tamper switch must be in series (normally closed) with the
2 Elevator Module controller tamper connection. Use shielded 4 conductor P/N 120-3401. Connect at tamper term inals on Main
Terminal Block. Termi nate shield at ground lug in Elevator M odule cabinet. Interconnect shield between addi ti onal cabinets but do
not terminate any where else.
AC
AC
16V40VA
(-)
Battery
(+)
(-)(+)
12VDC
TXMR
Power Supply
(P/N 110-5560)
(+)()
Cabinet Frame
Tamper Switch
SEE NOTES
22-0375 rev1.1 Monitor ISM/xL™ Hardware Guide 41
Page 46

Communication Modules
Printer
Refer to Installation Instructions P/N 22-0370 for further information.
Pin 7 - BLACK
Pin 20 - RED
Printer Serial Port Male DB25 Co nnector
(viewed from the connections side)
Printer Programming
(using LCD Keypad only)
NOTE: The term “HSC” is used to access
the printer abilities in this application.
HSC is a proprietary communications of CSG
Security Inc. and not used in all markets.
• This module has no inputs or outputs.
• Enter the module’s 5-digit address in
Module programming.
• Enable the tamper and make
input/output values “0”. Leave
defaulted to area 1 and leave all other
selections defaulted.
• Press Save. Exit module programming
and then go back to module
programming and the same address.
This initializes the module.
• Check Prn? (Printer) enabled: .
Screen changes to “HSC/Printer
Module Rebooting”. Press OK. Return
to Prin ter programming screen.
• Enter baud rate for printer:
0 = 1200, 1 = 2400, 2 = 4800,
3 = 9600, 4 = 19200.
• If CTS is enabled (), only users with
authority to view History can start the
printer if it runs out of paper, etc. If it is
disabled (), simply fixing the printer
problem (e.g. load paper) will re-start
the printer. Press Save.
1432
56
Not Used
TB3
Printer
TB4
1432
0V
RTS
CTS
RX
5
TX
1432
5
Pin 5 - BROWN
TB2
Pin 3 - WHITE
PIN 1 - 13
PIN 14 - 25
Printer Specifications
Type: RS232 serial 80 columns (or more)
Data Setup: 1 start bit, 1 stop bit, 8 data
bits, no parity, baud rate selectable
(recommend 1200), hardware
handshake.
Printer Connection: female DB25.
Settings for Epson LX300
(P/N 400-0810)
Character spacing = 10cpi, Shape of zero
= 0, Skip-over-perforation = Off,
Character table = PC 437, Auto line feed
= Off, Page length = 11 inches, Auto tear
off = Off, Tractor = Single, Interface =
Serial, Bit rate = 1200 bps (baud), Parity
= None, Data length = 8 bit, EXT/ACK =
On, Software = ESC/P, Auto CR = Off.
To start the Printer
• Enter the History menu in the main
menus and select “Category” and
“App” for application module.
• Select “HSC”.
• Select Printer or Lang for the
language the printer will print in.
• When selecting printer press Start to
start the printer.
• Press Pause to stop printing or
Resume to commence printing.
Printer Module
Bus communicat io ns
indicator
Not Used
Module Bus
(+) 12V
1432
red
Current rating = 61m A
Tamper Pins
P/N 342-3356
Data A
Data B
0V
1/2 AMP
XXXXX
F1
5 digit serial number
to program in Module
Programming
black
green
yellow
• Press Cncl to cancel a backlog of
pending messages.
• Press Plog to reprint the entire log in
the History menu.
Wiring Printer Connection to a PC
Serial Port (TB 4: Printer Port)
(when the customer wants the history to
go directly to a computer instead of a
printer)
•
In the module settings, turn off the
CTS option in the Printer Menu.
In the terminal program (‘Terminal.exe’
in Windows for Workgroups; ‘Hyper
Terminal’ in Windows ’95/98) set the
baud rate for the same speed as the
module (typically 1200) and turn off
hardware flow control.
• Only 2 connections are required:
• Connect Tx on the module to Rx on
the PC serial port 9pin 3 on DB25;
pin 2 on DB9).
• Connect OV/Gnd on the module to
0V/Gnd for the serial port (pin 7 on
DB25; pin 5 on DB9).
42 Monitor ISM/xL™ Hardware Guide
22-0375 rev1.1
Page 47

IP Module V3
Wire Connectors
Black
Red
Green
Yellow
Blue
RS485 A (Director Sftwr)
Orange
RS232 RX (SIP)
RS485 B (Dir Sftwr)
RS232 TX (SIP)
(+) 12VDC
( ) Neg. GND
This connector can be used
to interconnect additional
panels for Director software
communications.
Refer to the IP Connectivity Guide P/N 22-9059 for programming information.
These 4
mounting
Communcation LEDS
V3 IP Module
Network LEDS
1
Green Aux RX
2
3
Yellow Aux TX
Dir RS485 A
Dir RS485 B
Yellow SIP TX
Green SIP RX
Yellow DIR TX
Green DIR RX
On = network
connection OK.
Green
Flashing =
network
activity.
Yellow
holes for
new V3 brd
installation
adhesive
stand-offs.
Dir Ground
Not Use d
Jumper
Pins
Discovery Mode
Program Button
Jumper Pins
Not Used
LAN/WAN
Network
P3
P2
RJ45
Female
Network
Connector
10BaseT
RJ45 Plug
& Cable to
Network
These 3 mounting holes are adaptable to previous version 2 IP
Module adhesive stand-offs.
Orange and blue wires can also be
used for “Direct Serial Configuration”.
See Sect. 4.5.2
Dir
: Refers to MONITOR ISM / AFx Director software communications.
SIP
: Refers to monitoring station communications (Security IP Receiver reporting).
This is the position where the 4
Module adhesive stand-off would be located but, could not be
accommodated. Cut the existing stand-off pin lower to support this
corner if replacing an existing V2 with a V3 board.
th
hole for the previous version 2 IP
22-0375 rev1.1 Monitor ISM/xL™ Hardware Guide 43
Page 48

V3 IP Interface Module Connections at Monitor Motherboard
Yellow
TB2
Red
12
Black
RS485 A (Director Sftwr)
RS485 B (Dir Sftwr)
RS232 RX (SIP)
This connector is used
to interconnect
additional panels for
Director software
communications.
Recommended
interconnecting comms
cable: Modul e Bus, 4
conductor shielded P/N
120-3401.
The comms cable ground shield is
connected to the fi r st motherboard
waterpipe ground,TB5. It is connected
together, running through addi tional
panels but, not terminated in any of
them.
Main Panel # 2
motherboard
GND/GND
Main Panel
(+)
motherboard
(-)
auxiliary 12VDC
(+)
(750mA max.) left
(-)
side of board.
Wire Connectors
( ) Neg. GND
RS232 TX (SIP)
3
(Black)
Dir Ground
TB16
0V
B485
A485
CTS/RTS
RTS/CTS
DSR/DTR
DTR/DSR
TX/TX
RI/RI
CD/CD
RX/RX
Monitor Main Panel # 1
When installing the IP Interface
Module, remove any applicable
existing terminal blocks and replace
with the supplied pre-wired ones as
indicated. Wrap wire and store
unused connectors.
Black
(+) 12VDC
Orange
Blue
2
(Green)
(Yellow)
Dir RS485 A
Dir RS485 B
Black
Yellow
Green
1432 312
TB15
5
1432
TB14
Red
Green
Yellow
1
V3 IP Module
Yellow
Black
Green
Maximums: 30
Panels, 300 meter s
(1000 feet) cable
distance.
TB16
312
0V
B485
A485
TB15
GND/GND
CTS/RTS
RTS/CTS
DSR/DTR
DTR/DSR
TX/TX
RI/RI
CD/CD
RX/RX
NOTE: If the IP Inte rface Module is
powered from th e m otherboard, t his
ground conne ction is not necessary .
Only use this connection when the
IP Interfac e is po we red by a
separate power supply.
1432
5
1432
TB14
Green
Orange
1432 5
Main Panel
motherboard
comms
connections,
right side of
board.
WARNING: Do not cross wires over top of the
motherboard. Always run them around the
motherboard. If a remote power supply is used
to power the IP Module, use separate cables for
power and Director comms interconnection
between multiple panels. These precautions will
reduce harmful electrical interference.
Please see general cable specifications, Sect.
2.2
Main Panel # 3
motherboard
GND/GND
CTS/RTS
RTS/CTS
DSR/DTR
DTR/DSR
0V
B485
A485
TX/TX
RI/RI
CD/CD
RX/RX
TB16
1432 312
TB15
5
1432
TB14
Black
Yellow
Green
Blue
44 Monitor ISM/xL™ Hardware Guide
22-0375 rev1.1
Page 49

MONITOR S ystem Reference Topics
Adding Any Power Supply to the Module Bus
• An additional power supply’s positive is not connected to the main control module bus positive with an isolating
diode, as was previously done.
• The modules using power from the additional power supply have their module bus Data A and B interconnected as
normal.
• The additional power supply’s negative is connected common to the module bus negative.
• The additional power supply’s positive is never connected to the module bus positive.
Communication Connections between the Main Controller and the Director PC
Software
Direct Connect to PC
Currently
Supplied
Version
RS485
Converter
P/N
650-9061
DB9 (insert into
free serial port on
the specific PC)
NOTE:
The A and B
connections
are one to one.
(-)0V
Data B
Data A
(+)12V
1432
black
white
green
To additional panels (maximum 30 )
0V
RS485
Main
Panel
Mother
board
TB16
TB14 TB15
132
GND/GND
CTS/RTS
RTS/CTS
1432
DSR/DTR
5
DTR/DSR
TX/TX
RI/RI
CD/CD
1432
RX/RX
RS485 Communic at ion Cable
P/N 120-3401 (24 AWG, 4wires, shielded)
Cable shield (do not ground at the PC)
Modem Connection for PC Communications
Additional power may be needed when
connecting multiple panels. Connect 12V DC
A
B
black
0V
white
B
green
A
and parallel neg0Vgnd at either converter’s
black
white
green
terminal block.
Cable
Shield:
Connect to
the chassis/
earth
ground at
one panel
only (e.g.
1st or last)
Previous Version
RS485 Converter
P/N 11-0343
NOTE: The
A and B
connections
here are
reversed
relative to
the panel(s).
DB9 (insert into
free serial port on
the specific PC)
black
green
white
+12V
GND
GND
B
A
Currently
Supplied
Version
RS485
Converter
P/N
650-9061
M
O
D
E
M
NOTE:
The A and B
connections
are one to one.
(- )0V
Data B
Data A
(+)12V
1432
Connect via DB9-DB25 and a null-modem adapter (or equiv.cable)
To additional panels (maximum 30)
A
0V
B
black
0V
white
B
green
A
132
GND/GND
CTS/RTS
RTS/CTS
1432
DSR/DTR
5
DTR/DSR
TX/TX
RI/RI
CD/CD
1432
RX/RX
RS485 Communication Cable
P/N 120-3401 (24 AWG, 4wires, shielded)
Cable shield (do not ground at the modem)
black
white
green
Main
Panel
Mother
board
RS485
TB16
TB14 TB15
Additional power may be needed when
connecting multiple panels. Connect 12VDC
and parallel neg0Vgnd at either converter’s
terminal bloc k.
black
white
green
Cable
Shield:
Connect to
the chassis/
earth
ground at
one panel
only (e.g.
1st or last)
Previous Version
RS485 Converter
P/N 11-0343
NOTE: The
A and B
connections
here are
reversed
relative to
the panel(s).
Connect via DB9DB25 and
modem adapter
(or equiv.cable)
black
green
white
a null-
+12V
GND
GND
B
A
22-0375 rev1.1 Monitor ISM/xL™ Hardware Guide 45
Page 50

46 Monitor ISM/xL™ Hardware Guide
22-0375 rev1.1
Page 51

Part 2
Monitor xL
System
Hardware
Please Note: Modules in the previous Monitor ISM System section are also compatible with the
Monitor xL System
22-0375 rev1.1 Monitor ISM/xL™ Hardware Guide 47
Page 52

Main Controller
NOTE: Remove enclosure knock-outs before installing circuit boards.
Unpack the Modem and Memory Expansion Modules, if included, in package. With
power disconnected, plug them into the main control board’s Modem and Memory
Expansion Sockets. Secure them to their control cabinet stand-offs with th e sup plied
screws.
NOTICE: Use
minimum 26AWG
UL/CSA/or
equivalent
approved
telephone cable .
Main Control Module
CAUTION:
during service,
heat sink may
be hot.
Factory set
Do not adjust
Relay 1 is for large
applications such
as a siren. Relay 2
is for smaller ones
such as a strobe.
TB2
312
AC Mains
AC Mains
Earth GND
(-)0V
Green
RS485 A
(Director Sftwr)
Yellow RS485 B (Dir Sftwr)
green
Data A
white
This unjumpered
connector not used.
Data A
TB1
16V
40VA
Do not jumper.
Data B
Off Hook
LED
Seized Tip
Seized Ring
312 4
Tip
Ring
Manual Battery
Re-start
Momentarily jump er
after a battery has been
connected and there is
no AC mains available.
Relay 1
TB3
Turns on when
unit dialing out
Example:
North American Modem
(Bell 103)
Modem
Expansion
Socket
Battery
power resetable fuse.
Host
LEDS
Yel
RX
Relay 2
TB4
Grn
TX
TB5
Battery
(+)
leads
(-)
plug
Auxiliary power
reset-able fuse
The control box tamper
spring is included in the
accessories kit. Fit it on
to the main board cover
tamper button.
2
E non volatile memory.
Power loss will not lose
program.
These unjum pe re d
connectors for factory
use only. Do not jumper.
Status Grn LED
Trouble Yel LED
Mod Bus (SNAPP)
reset-able fuse.
Input Protection Points
TB6 TB7 TB8 TB9 TB10 TB11 TB12
312 312 312 12 312 312 312 312 312 312312
0V
0V
0V
Host B
Host A
Common 1
Normally Open 1
Common 2
Normally Open 2
Normally Closed 1
Normally Closed 2
Auxiliary (+)12VDC
V BUS
Auxiliary (+)12VDC
P1
Position the battery with its terminals
on the left in the control box. Secure
the 12V 7.0Ah battery with the
securing bracket (p/n 232-2605) and
screws from the supplied accessories
kit. For a 17Ah battery bracket, order
kit 250-3617.
P3
P2
0V
Battery Connectors
To battery 12V 7.0AH
p/n 133-4788
IP Module
Network
Comms to the Director
Software PC
TB4 RS485 Host
(-) Neg. GND
(+) 12VDC
Black
Red
RS232 TX (SIP)
Blue
Orange
RS232 RX (SIP)
Direct Connect to the Director Software PC
1432
Data B
black
(+)12V
(-)0V
RS485 Converter
P/N 650-9061
RS485 Communication Cable
P/N 120-3401 (24 AWG, 4wi res, shielded)
Cable Shield: Connect to the chassis/earth ground
at main control box (do not ground at the PC)
Communications To
connect to an external
modem, use the 6509061 Conver ter. The
Security IP
Receiver
main control board ca n
not dial out to the
Director software.
DB9
Plug in to PC
Comms Port
NOTE:
Feature Expans io n Mo dul e
Memory
Expansion
Socket
Memory Expansion Socket
Connecting 2 unprogrammed
keypads on the
module trunk will
cause one to
become a service
tool and the other
will not be
accessible. All
programmed
keypads will
function normally.
TB14
(-)0V
Reserve
for service
keypad.
Data B
Data A
(+)12V
(SNAPP)
LEDs
Yel
RX
Module Bus
(-)0V
312 4 312 4
Data B
Data A
(SNAPP)
TB13
(+)12V
For module
Module Bus
Rear Tamper on back
of board.
CFG0
CFG1
Program Reset
Jumpers
SNAPP
Grn
TX
trunk line.
Use shielde d
0V
P4
P50VP6
P70VP8
(+)
P9
0V
P10
(-)
P12 is Bell
Return (Siren
Tamper) in UK
configuration. It
is a regular
input in all other
configurations.
P11
0V
P12
cable.
Module Bus (shielded)
FT4
Preferred (24 AWG)
120-3401
ULC (22 AWG)
120-3408 120-3409
FT6
120-3405
Terminate sh ield at
control box earth
ground. Loop through
modules . Do not
terminate at end of line.
Anti-Attack Bushing Cap (p/n 364-5102) covers the rear
tamper spring. It fits inside an “ O “ Ring Bushing (p/n 364-
5103) that fits inside the metal cabinet’s rear wall, anti-tamper
spring, knock-out. Leave the O ring bushing and cap IN if the
rear tamper is not used. If the rear tamper is used, remove the
cap and the O ring with the edge of a flat screw driver. Discard
the O ring. Align the cap to insert in the tamper spring, knock-out
hole on the control cabinet back. Screw the cap by its center hole
to the mounting surface. Place the control cabinet over it,
allowing the rear tamper spring to fit inside the cap. The cap will
insert in the metal cabinet’s tamper spring, knock- out hole.
Complete securing the metal cabinet to the mounting surface.
Module Description (voltage 12VDC) Current Rating (mA)
LCD Keypad – 95 (includes 10mA /1 o/p)
LCD Keypad with Reader
North American Modem
8 Output STU
Worldwide Modem with 8 o/p STU
Feature Expansion Board
8 Transistor Output Board – 135 (includes 10mA / 8 o/p)
8 Relay Output Board
16 Point Expander Board – 100 (includes 10mA / 2 o/p)
8 Point Expander Board
8 Input VBUS Expander Board
Power Supply Board
– 110 (includes 10mA /1 o/p)
– 45
– 115 (includes 10mA / 8 o/p)
– 145 (includes 10mA / 8 o/p)
– 100
– 155
– 85
– 35
– 50
MAIN CONTROL MODULE RELAY OUTPUTS
TB2 Relay 1:
5AMPS Resistive, 1 AMP Inductive.
TB3 Relay 2: 1 AMP Resistive, 0.1 AMPS Inductive.
b
l
a
c
k
y
e
l
l
o
w
g
r
e
e
n
r
e
d
48 Monitor ISM/xL™ Hardware Guide
22-0375 rev1.1
Page 53

STU Interface
Procedure for Cold Booting the Main Control Board and Clearing Memory
1. Remove all power from main control board.
2. Insert the Program Reset Jumpers (CFG0 and CFG1) horizontally. See Program Reset Jumpers on the right side of the main
control module in the “Main Controller” diagram.
3. Apply AC Mains power.
4. The Status and Trouble LEDs will flash on and off together slowly.
5. Remove the 2 jumpers.
6. The same LEDs will momentarily flash rapidly together. (Controller processing)
7. The trouble light will turn off and only the Status LED will flash rapidly.
8. Proceed through the keypad log on procedure explained on page 4 and reset the config. as mentioned on page 4, lower 2
column.
9. The keypad will display regular screens and only the Status LED will flash slowly to indicate a normal condition.
10. The memory has been returned to factory defaults. Reconnect all power.
nd
Modems
Refer to Installation Instructions P/N 21-3611 for further information.
North American Modem (Bell 103)
(P/N 650-3630)
Works to Feature set 3
Off Hook
LED
Seized Tip
Seized Ring
Tip
Ring
312 4
Turns on when
unit dialing out.
North American Modem
Plugs into xL Main Con trol Board
Modem Expansion Socket
Notice: Use minimum 26AWG UL/CSA/or
equivalent approved telephone cable.
STU (Subscriber Terminal Unit) Interface
REDCARE
(P/N 650-3631)
From
REDCARE Unit
See “ENABLE
LINE FAILURE”
next page.
Line Failure
0V
9312 4
01
To REDCARE Unit
Output 8
Output 7
Output 6
Output 5
Output 4
756 8
Output 3
Output 2
Output 1
World Wide Modem
(P/N 650-3633)
Works to Feature set 7
From REDCARE Unit
See “ENABLE LINE
FAILURE” next page.
World Wide Modem
with
REDCARE
Seized Tip
Seized Ring
Tip
Ring
Interface
312 4
1 Jumper in 1+ 2 on left side =
Output 8 is a standard outp ut #
8 on this board.
Plugs into xL Main Control Board
Modem Expansion Socket
2 vertical Jumpers in 1+2 = Output 8 will be 12VDC
high from 0V if main control board CPU fails
2 vertical Jumpers in 2+3 = Output 8 will be 0V low
from 12VDC high if main control board CPU fail s
Off Hook LED
Turns on when
unit dialing out.
To REDCARE Unit
0V
Output 8
Output 7
Line Failure
756 8
9312 4
01
1
2
3
Output 6
Output 5
Output 4
CPU
Failure
Output 3
Output 2
Output 1
Feature Expansion Board
(P/N 650-3660)
Refer to Installation Instructions P/N 21-3612 for further
information.
Feature Expansion Board
2 vertical Jumpers in 1+2 = Output 8 will be 12VDC
high from 0V if main control board CPU fails
CPU
Failure
22-0375 rev1.1 Monitor ISM/xL™ Hardware Guide 49
2 vertical Jumpers in 2+3 = Output 8 will be 0V low
from 12VDC high if main control board CPU fails
1 Jumper in 1+2 on right side = Output 8
1
2
is a standard output # 8 on this board.
3
STU (Subscriber Terminal Unit)
Plugs into xL Main Control Board
Modem Expansion So cket
REDCARE
Plugs into xL Main Control Board
Memory Expansion Socket
Feature Expansion Socket
Page 54

WW Modem and STU Interface “CPU Failure” available with main control module firmware 4.3 or greater.
CPU Failure
Output 8 must be programmed as “System Fault” in System Outputs. Use Director Software outputs or Simplified or Advanced
(B000:00, System Outputs #56) keypad programming. For a negative to positive output, it can be left defaulted. For a positive to
negative output, it must also be programmed to be inverted.
(WW Modem and STU)
ENABLE LINE FAILURE on WW Modem and STU Interface
This feature is used to monitor for line faults from switched communicators such as Redcare
NOTE: Either of these modules must be plugged into main control module.
Simplified Configurations:
– Enable Line Failure: Default: No
– Line Fail Polarity: Positive 12VDC going to Negative 0V or Negative 0V going to Positive 12VDC. Default: Positive
Advanced Configurations:
– Field 2: Parallel STU 8OP Supports Line Fail: (yes)
– Field 3: Parallel STU 8OP Line Fail Negative Polarity: (yes) □ (no) Default: no = Positive Polarity
Enable Equipment failure point E16 (HSC, Security IP, Trouble). Set delay as 01 immediate in Simplified or Advanced
programming. If the WW Modem or STU Interface have a Line Failure condition, it will be indicated by an HSC fault.
HSC (High Security Communications) is a proprietary communications of CSG Security Inc. and not used in all markets.
Comms (Communications) Configure Group
(UK ACPO = yes)
S00503
□ (no) Default: no (UK ACPO = yes)
Wiring CA38A Alarm Jack for connection to xL Modems
Incoming Phone
Line to CA38A
Alarm Jack
Ring
+
Red Green
Yellow Black
House
Phones
Alarm Panel
Digital Phone
Line Connection
Seized Ring
Seized Tip
Tip
Tip
Ring
-
CA38A Alarm Jack
Red Green
Black Yellow
8 Pin Telephone Cord
Telephone Block
Yellow
House
Phones
Black
Gray
Brown
Red
Green
Green
Red
Red
Telephone
Line
Green
8 pin phone line cord VEREX part number: 166-4500
The CA38A Alarm Jack is commonly installed by the telephone company and is a requirement for Canadian
installations.
If a supplementary cord and jack are used, they must comply with FCC Part 68.
50 Monitor ISM/xL™ Hardware Guide
22-0375 rev1.1
Page 55

Keypad
Refer to Installation Instructions P/N 21-3610 for further information.
Flip Cover
Module Point Assignment: 8
points.
First point: Fire Alert buttons
Second point: Panic (HoldUp) buttons
Third point: Auxiliary Alert
buttons
Points 4 – 7 are hard wire
inputs 1 – 4 on the Standard
and G-ProxII version.
Points 4 – 5 are hard wire
inputs 1 – 2 on the Wiegand
version. All unused points
are skipped.
Apply dealer's logo label (supplied) in
the indented space at the top of the
keypad. Apply the Alert Button labels
as required.
Ratings:
LCD Keypad with Reader
Input: 12VDC, 110mA
Output: 12VDC, 1x10 mA
LCD Keypad
Input: 12VDC, 95mA
Output: 12VDC, 1x10 mA
Temp for both: -10°C to
+55°C (14°F to 131°F) @
93%
p
y
e
K
Circuit board pin connectors insert
into fixed terminal blocks on inside
of keypad back. This allows the
keypad to make wire connections
in the terminal blocks.
Sonalert
Tamper Spring
t
n
o
r
F
d
a
X
X
X
Keypad Terminal Block Wiring
Standard and G-ProxII
Point
4 – 7
Point
4 – 5
X
X
After placing the keypad o n its back
section, make sure the keypad's securing
screws (supplied) are al ways I N !
Rectangular Conduit
(Trunking)
143256
0V
PT1
PT2 PT3 PT4
Wiegand
143256
0V
PT1 PT2
Input 1
Serial # sticker
for programmin g
into Module
Programming.
Input 2
Common
0V
D1 D0
0V
T
e
r
m
Module Bus
143256
A
+12V
1
+12V
Wiegand Reader Data 1 and 0.
No reader LED connection.
K
e
y
p
a
i
n
a
l
Cable
B
l
o
c
k
B0V
Module Bus
A
B
d
B
a
c
k
Keypad Output
goes negative.
Interface with a
relay or power
supply. Common
their negativ es
with keypad 0V.
Wall tamper
knock out
43256
0V
Terminal
Block
Future
Future
OUT
OUT
Output
Keypad LEDs
ComsLost #50624ef
Enter code
Red GreenYellow
42822
To use the keypad tamper spring as a wall tamper
break out this plastic cylinder inside the back cover.
Screw it to the wall, keeping it in the same hole as it
was attached, so the back cover fits over i t.
The plastic cylinder prevents the spring from being
affected by flat objects wedged in behind the
,
- #
1
45
78
X
ABC
2
JKL
TUV
Z_Q
0
Point 2
DEF
3
MNOGHI
6
WXYPRS
9
X
keypad.
The additional keypad base is optional. For
installations using it there is a similar, shorter,
washer style, plastic break out.
Place it behind the plastic cylinder and screw
them down together.
Then place the holes in the base and keypad
backing over top of them.
Fit the spring inside the plastic cylinder part
and secure the keypad front to the keypad
Point 1
Red Flashing:
Protection ON
Solid: Partial
protection (STAY)
Alert Labels
Green On Always
with power present.
Point 3
Yellow On when
trouble condition
present. Flashing when
there is no AC mains.
back. The spring compressing should reset
the keypad tamper condition.
Knock outs for rectangular
conduit using additional
keypad base.
3 Keypad Versions
• LCD Keypad P/N 111-3610 (white), 111-3620 (gray): standard keypad includes 3 programmable alert button inputs, 4 hardwire
alarm input points and 1 output point.
• LCD Keypad with RF reader P/N 111-3611 (white), 111-3621 (gray): keypad includes 3 programmable alert button inputs, 4
hardwire alarm input points and 1 output point. Includes a built-in RF G-Prox reader.
• LCD Wiegand Keypad P/N 111-3612 (white), 111-3622 (gray): keypad includes the capability to connect an external Wiegand
reader to it. Keypad includes 3 programmable alert button inputs, 2 hardwire alarm input points and 1 output point.
22-0375 rev1.1 Monitor ISM/xL™ Hardware Guide 51
Page 56

Input Point Expanders
Refer to Installation Instructions P/N 21-3615 for further information.
VBUS
• VBUS is an internal communication bus that related VBUS modules are used with. The VBUS is not intended for external use. It
has been designed to be used in a protected enclosure with adjoining interconnection between modules in the same enclosure.
It communicates with the main control over the Module Bus (SNAPP) which is for external communications.
• VBUS and VBUS modules allow the system to be expanded without adding additional modules on the main Module Bus
(SNAPP).
16 Point Expander
Master Unit (P/N 650-3646)
0V
IN14
IN15
IN16
TB7
TB8
5 digit serial number
to program in Module
Programming
XXXXX
16 Point Input
Expander Board
TB6
TB5
0V
Rear Tamper
on back of
board.
0V
IN12
IN13
312 312 312
TB9
Wire short to disable rear tamper.
TB4
IN10
IN11
312
TB10
TB3
0V
OP1 OP2
IN9
TB1
TB12
Tampr
0V
12
LEDs
Tamper
Spring
Ratings:
Input:
12VDC, 100mA
Output:
12VDC, 2x10mA
TB11
Disables
Module Bus
(SNAPP)
g
r
r
e
d
Not used
P1 IN
y
e
e
l
l
o
e
n
w
b
l
a
c
k
Processor OK
green
VBUS Active
yellow
LEDs
Power
green
12VDC
Auxiliary
TB13
0V
(+)
12
312
1432
0V
VBUS
12V IN
Aux
(+)
(+)12VDC
Data A
Data B
TB2
0V
For more information, see
Point Expander Installati on
Instructions 21-3615.
NOTE:
312
0V
IN1
IN2
IN3
0V
312 312
IN4
IN5
0V
312
0V
IN7
IN6
0V
IN8
OP1
8 or 16 Point Expander has plastic plug holding Rear
Tamper in. Remove plug for rear tamper protection.
312
OP2
See the following Module Power Supply for a further description of the same Rear Tamper assembly.
8 Point Expander
Refer to Installation Instructions P/N 21-3615 for further information.
Processor OK LED
(with VBUS = slow flash)
(no VBUS = quick flash)
TB6
0V
IN1
312
VBUS Unit (P/N 650-3642)
P4
P3
P2
8 Point Input Expander
TB5
IN2
IN3
0V
IN4
312 312
TB3TB4
0V
IN5
IN6
This unjumpered
connector for
factory use only.
Do not jumper.
0V
IN8
IN7
312 312
TB12
Ratings:
IN
VBUS
0V
(+)12VDC
12VDC, 35mA
Input:
Temp:
-10°C to +55°C
(14°F to 131°F) @ 93%
52 Monitor ISM/xL™ Hardware Guide
22-0375 rev1.1
Page 57

Slave Unit Address
Address Jumper P2
1 OUT
Address Jumpers P2
– P3
P2 P3
1 OUT OUT
Jumper Selections P2 to P5 for
8 Point Expander Board
2 IN
TEST Not used
Jumper
IN
OUT
P4 P3
ON Leave in
OFF
8 Point Expander Test Feature
Apply power to an 8 point expander board. It can have an address and the
VBUS connected or not.
All inputs are left open with nothing connected to them.
Insert the P4 test jumper.
The “Processor OK” LED will flash at a slow rate.
Short (bridge) each input with a piece of wire. E.g. between IN1 and 0V or IN2
and 0V etc.
The “Processor OK” LED will flash at a faster rate when each input is shorted
(bridged).
This will indicate that the inputs should function normally.
Remove P4 after the test to return the 8 point expander board to normal
operation.
Transistor Output Expander
VBUS Unit (P/N 650-3640) Refer to Installation Instructions P/N 21-3616 for further information.
Processor OK LED
(with VBUS = slow flash)
(no VBUS = quick flash)
Output LEDs turn on when
outputs activated. Turn on/
off with P5 test jumper in.
P5
P4
P3
P2
8 Transistor
Output
Expansion
Ratings:
Input:
Output:
Temp:
131°F) @ 93%
This unjump er ed
connector for factory use
only. Do not jumper.
12VDC, 135m A
12VDC, 8x10mA
-10°C to +55°C (14°F to
IN
VBUS
(+)12VDC
OP2
0V
OP1
TB1
312 312 312
OP3
0V
OP4
TB2
0V
OP5
OP6
TB3
OP7
0V
312
OP8
TB4
0V
312
TB5
Relay Output Expander
VBUS Unit (P/N 650-3641) Refer to Installation Instructions P/N 21-3616 for further information.
Processor OK LED
(with VBUS = slow flash)
(no VBUS = quick flash)
Relay LEDs turn on
when relays activated.
Turn on/off with P5
test jumper in.
312 312 312 312
NC
NO
COM
NO
COM
8 Relay Output
Expansion
NO
NC
COM
NO
COM
NC
P5
P4
P3
P2
Ratings:
Input:
12VDC, 155mA
Temp:
-10°C to +55°C
(14°F to 131°F) @ 93%
TB5TB2 TB4TB3TB1
TB6
312
NO
NC
COM
NO
NC
This unjumpered
connector for
factory use only.
Do not jumper.
(+)12VDC
TB7 TB8
312 312 312
NC
COM
NO
NC
COM
VBUS
NO
0V
IN
NC
COM
TB9
312
Transistor and Relay Expander Jumper Selections P2 to P5
Slave Unit
Address
2 IN OUT
3 OUT IN
4 IN IN
Jumper
IN
OUT
TEST
(all outputs switch
on and off)
P5 P4
ON Leave defaulted
OFF
Not used
22-0375 rev1.1 Monitor ISM/xL™ Hardware Guide 53
Page 58

Module Power Supply
Ratings:
North American
Input: 16.5VAC/4 0VA /5060Hz/60W, 50mA
Output: 12VDC
:
Europe
Input: 230VAC/50Hz , 50mA
Output: 12VDC
Temp for both: -10°C to
+55°C (14°F to 131°F) @
93%
:
Auxiliary (+)12VDC
Auxiliary (+)12VDC
1.0 AMP
Output
y
Normally Open
Normally Close d
Additional Cover
Wire short
for cover
tamper
spring
operation
only.
Tamper Input
AC Mains
AC Mains
Earth GND
Earth GND
r
e
d
(+)12V
g
r
e
e
n
Data A
e
l
l
o
w
Data B
b
l
a
c
k
(-) 0V
(+)12V
VBUS
Common
12
12
0V
312 4 312 4
0V
0V
312
312
12
0V
TB7
These unjumpered
connectors not used.
Do not jumper.
Refer to Installation Instructions P/N 21-3614 for further information.
This unjumpered
connector not used.
Do not jumper.
TB1
Module Power
AC Mains On
Green LED
Supply
TB2
SNAPP
Isolate
TB3
12
TB4
Module
Bus
(SNAPP)
TB5
TB6
Trouble
Output
Power On
Green LED
Module Bus
1
Trouble
Auxiliary power
reset-able fuse
Battery
Plug
(+)
(-)
Cover
Tamper
Spring
Battery Cable p/n 166-2645
Rear Tamper on
communi ca t ions Red LED
back of board.
Button
Yellow LED
Battery
reset-able
fuse
Manual Battery
Re-start
Not used
P3 jumper in = rear
tamper bypassed
Processor
OK Green
LED
Slow flash.
2
Battery Connectors
Fast flash
with no
VBUS
connected.
5 digit serial number
to program in Module
Programming
Factory set.
Do not adjust.
Momentarily jumper
after a battery has been
connected and there is
no AC mains available.
(+)
XXXXX
P4
P5
P6
P7
P8
P9
P10
(-)
Anti-Attack Bushing Cap (p/n 364-5102) covers the rear tamper spring. It fits inside an “ O “
Ring Bushing (p/n 364-5103) that fits inside the metal cabinet’s rear wall, anti-tamper spring,
knock-out. Leave the O ring bushing and cap IN if the rear tamper is not used. If the rear
tamper is used, remove the cap and the O ring with the edge of a flat screw driver. Discard the
O ring. Align the cap to insert in the tamper spring, knock-out hole on the control cabinet back.
Screw the cap by its center hole to the mounting surface. Place the control cabinet over it,
allowing the rear tamper spring to fit inside the cap. The cap will insert in the metal cabinet’s
tamper spring, knock-out hole. Complete securing the metal cabinet to the mounting surface.
SNAPP ISOLATE: Jumper/short with wire to enable Module Bus (SNAPP) connector 12VDC.
1
2
Brownout Button: After installation and all power connections are complete, press this button
to establish a frame of reference to detect a brownout.
54 Monitor ISM/xL™ Hardware Guide
22-0375 rev1.1
Page 59

Power Supply Selection Jumpers P4 to P10
Jumpers Power Supply Type
and other selections
Module Bus(SNAPP) and VBUS Master
(P9 and P10 are ignored)
VBUS Slave
(set P9 and P10 Slave Address)
Module Bus (SNAPP) ONLY OUT IN
Stand Alone, no Module Bus or VBUS OUT OUT
110V Operation IN
220V Operation OUT
Relay Test – disconnect the module bus (SNAPP). Momentarily insert P7
jumper and remove again. Relay will cycle on, off for 10 secs.
Defeat Battery – where a standby battery is not required, insert P8 jumper
and the system will ignore battery monitoring.
OUT for battery monitoring.
be left
IMPORTANT: This jumper must
LEDs
AC Mains On (green) – on with electrical present.
Power ON (green) – on if Auxiliary DC power is present
Trouble (yellow) Normal = not on. – will flash on and off for:
• AC Mains failure.
• Battery loss.
• Module Bus (SNAPP) not active.
– turns on solid if one or more of the board tampers are active.
Processor OK
– normally will flash on and off slowly.
– will flash on and off rapidly when VBUS is present.
Relay Trouble Output
– will change state with any trouble mentioned above present.
P4 P5 P6 P7 P8
IN IN
IN OUT
OUT
OUT
Jumpers Power Supply
Slave Address
P9 P10
1 OUT OUT
2 OUT IN
3 IN OUT
4 IN IN
NOTE: VBUS is an internal communication bus that related VBUS modules
are used with. The VBUS is not intended for external use. It has been
Main
Control
designed to be used in a protected enclosure with adjoining interconnection
between modules in the same enclosure. It communicates with the main
control over the Module Bus (SNAPP) which is for external communications.
Unit
Module Power Supply
VBUS
SNAPP
Module Bus (SNAPP)
Master Unit communicating
to the main control unit on
the Module Bus. The Module
Serial # on its sticker is
programmed into the Module
Program Section.
– P4 & P5 in
– P9, P10 ignored
MASTER – P4, P5 in
SLAVE – P4 in, P5 out
SNAPP only – P4 off, P5 in
Stand Alone – P4, P5 out
Module Power Supply
Parallel
Connections.
0V and VBUS.
A 12VDC
connection is
VBUS VBUS
not needed.
Slave unit # 1 on Master
Unit’s VBUS. The Module
Serial # on its sticker is
ignored.
– P4 in, P5 out.
– P9, P10 out = Address 0
or Slave #1
VBUS
Module Power Supply
VBUS
Slave unit # 2 on Master
Unit’s VBUS. The Module
Serial # on its sticker is
ignored.
– P4 in, P5 out.
– P9 out, P10 in = Address
1 or Slave #2
22-0375 rev1.1 Monitor ISM/xL™ Hardware Guide 55
Page 60

Cabling P/Ns:
FT4 FT6
Appendix “A” 12VDC Relay
Dimensions: 1&3/8” (3.5cm) wide X 2&3/8” (6.0cm) long X 1&1/16“ (2.7cm) high.
Power:
Terminal Connections:
1. Normally Closed
2. Normally Open
3. Common
4. Positive Trigger
5. Negative 12VDC
6. Positive 12VDC
7. Negative Trigger
Features:
• Form “C” contact.
• Contact will change state when 12VDC applied to Pos. pin 6 and Neg. pin 5 and there is a wire short between
• When continuously powered by 12VDC, will change state when:
− Low voltage trigger applied to Pos. Trigger pin 4 (greater then 3VDC, approximately 130 micro amps).
− A negative supply is applied to Neg. Trigger pin 7.
− On board red LED turns on when relay activated.
12VDC, 8.5 mA active current rating.
In
non-energized
state.
Pos. pin 6 and Pos. Trigger pin 4.
12V Relay
P/N 650-0912
-ve 12VDC
+ve 12VDC
NCNOCOM
+ve Trig
1234567
Red LED turns
on when relay
activated.
-ve Trig
Appendix “B” Wiring Specifications
• Earth Grounds:
Recommended:
Standard 22 AWG quad cable (use all 4 wires).
Good:
• Module Bus (RS485) Cabling (device comms & power):
Recommended:
Ω impedance, low capacitance, 41 pF / meter or
120
12.5 pF / foot (such as Belden 9842).
: 22 AWG, 4 conductors, Shielded Twisted Pair, low capacitance.
ULC
For regions that require CE conformity, C-Tick conformity or the
equivalent the recommended Module Bus cabling bus wire type
must be used.
• Max. Length: Up to 610 m / 2000 ft. of cable on a Module bus port.
• NOTE: For longer cable distances, and/or where many expansion
18 AWG, stranded & insulated;
24 AWG, 4 conductors, Shielded Twisted Pair,
Module Bus (shielded)
Preferred (24 AWG): 120-3401 120-3405
ULC (22 AWG): 120-3408 120-3409
Note: Max. distance may be reduced with the ULC cable.
Reader cable (24 AWG shielded):
6 Conductors: 120-3402 120-3406
10 Conductors: 120-3403 120-3407
Note: ULC requires 22 AWG shielded cable.
Power (18 AWG): 120-3400 120-3404
(quad): 120-3410 120-3411
I/O
modules are connected on one cable (daisy chained, star wiring
configurations are not acceptable) a 150 Ω ‘terminating’ resistor
will need to be installed across A and B communication terminals
of the last module on the ‘bus’ cable. If necessary, add a second resistor at the panel end module bus A and B if it is confirmed
that the panel connector is the “end of line” at that end.
• Separate Power (or door strike) Wiring:
Recommended:
(2 conductors; colour-coded is preferable);
Good:
22 AWG, 2 conductors, insulated.
• Inputs/Sensor Cabling:
22 AWG, 2-wires (For electrically noisy environments, use twisted pair, and/or shielded cable.)
• Outputs/Signalling: 22 AWG, 2 conductors.
• Reader Cabling: 24 AWG (ULC: 22 AWG), shielded (Max: 150 m / 500 ft.)
Basic reader (no LEDs, buzzer control, or tamper)
Reader with LED(s)
Reader with LEDs, plus buzzer and tamper
Modem/PC Link: Use kit provided, or 22/24 AWG low-cap cable (not reader cable). Shielded cable is recommended.
RS485 (shared cable or modem): 3 wires, see Module bus spec. above.
18 AWG, stranded & insulated
: 4 Conductors;
: 6 conductors;
: 9 conductors.
Notice: Use minimum 26AWG UL/CSA/or
equivalent approved telephone cable.
Notice: Elevator controller and
condominium keypad installations
include unique power and cabling
aspects. Always refer to the installation
instructions provided with each device.
56 Monitor ISM/xL™ Hardware Guide
22-0375 rev1.1
Page 61

Appendix “C” Basic Circuit Types
Normally Closed Normally Closed with 2.2 K End of Line Resistor
NC
NO
Single Device
NOCOM
NC
Yellow
Black
Multiple Device
Black
NO
NC
Yellow
COM
Form "C" Single Resistor EOL Normally Open with EOL
Single Device
NOCOM
NC
NC
2.2 K
Black
Multiple Device
NC
• A short on this Circuit Type equals Alarm.
• A break or a ground in the wiring equals a Tamper.
• Do not reverse the home run's common connection
at the contact, as this will also result in a Tamper
condition.
NO COM
2.2 K
Red
NC
Black Black
Red
Form "C" Dual Resistor EOL
NOCOM
NC
2.2 K 2. 2 K
Yellow
Black
NC
C
NO
CABLE
Black
Junction
NC
NO
C
NO
CABLE
NO COM
NC
NO
CABLE
C
NOCOM
NC
I
I
n
n
p
p
C
u
u
t
t
O
1
2
M
2.2 K
Yellow
NC
NO
C
CABLE
Yellow
Black
312
Yellow
Black
Black
Yellow
• CAUTION: This circuit type suppli es minimal supervision.
• The end of line resistor, must always be place d at the Device, NOT at
the Alarm Input.
• When the Contact is Open, the Control will see the 2.2K-ohm
resistor, which equals A larm.
• If the loop wiring is Open (loss of resistor), the S ystem will indicate a
NOCOM
NC
Yellow
Yellow
Black
Tamper condition.
• This Circuit Type cannot be used in a M u ltiple Device application.
• Each device using this alarm loop must be connected to 1 Alarm
Input only.
Sample use: Could be applied to a device alarm contact that would
ordinarily always be closed (e.g. a vibration detector). The 2.2K resistor is
not used. If the device is triggered in an off guard (unarmed) state and the
contact goes open, a tamper condition is transmitted because there is no
resistor. If the device is tr iggered in an on guard (armed) state, an alarm
condition is transmitted because there is no resistor.
I
n
p
u
t
2
312
Red
Single Device
NOCOM
2.2 K
Yellow
Black
NC
NC
NO NO
NC
C
CABLE
C
I
n
p
C
u
t
NC
C
C
NO
Red
Black
1
Black
O
M
Yellow
Black
Multiple Device
NO COM
NC
NO COM
Black
NC
Yellow
Red
Junction
Green
Yellow
Black
Yellow
Red
NO COM
NC
2.2 K
Yellow
Red
Black
• A short on this Circuit Type equals Alarm.
• A break or a ground in the wiring equals a Tamper.
I
I
n
p
C
u
t
O
1
C
Yellow
M
Black
• This Circuit Type has 2 end of line resistors, each one 2.2K ohms.
n
p
• W hen the Alarm Input is normal, the Control is looking at both resistors
u
t
2
312
(total resistance: 1.1K ohms).
• W hen the Alarm Input is Open (not secure), the control will see 2.2 K
ohms.
• There can only be 1 device on this alarm loop.
I
n
p
u
t
1
Black
C
O
M
I
n
p
u
t
1
I
n
p
u
t
2
312
Black
I
n
p
C
u
t
O
2
M
312
w
o
l
l
e
Y
22-0375 rev1.1 Monitor ISM/xL™ Hardware Guide 57
Page 62

Appendix “D” Modem
Notes
Windows Modem Setup
For use with the Director Software
When a new modem is installed on a Windows PC, the
Windows software will normally detect the new device,
and display some simple installation steps. An
installation CD or diskette may also be provided with
the modem.
If a new modem is not recognized, proceed into the windows
Control Panel and select "Add New Hardware", and follow the
prompts that appear. Note: Older modems may not meet
compatibility requirements for "Plug-and-Play" installation. In this
case, you may be able to use an installation diskette provided with
the modem (or the modem may need to be upgraded or
replaced).
Once the modem is installed and recognized under
Windows, the following items need to set through the
Control Panel as follows:
• Open the Windows [Start] menu, and select Control
.
Panel
• Open Phone and Modem Options (double-click).
• In the next screen, select the Modems tab.
• Select your modem in the list, and click [Properties].
• In the Modem tab, ensure the "Maximum Speed" is set
to 38400 or higher. ("General TAB" for Windows 2000)
• In the Advanced tab, enter the following text as a
modem initialization string:
Tip: Uppercase as shown; 0 = zero.
Purpose
long distance access codes, etc.)
•
: This allows for a longer 'phone number' (e.g., with pauses,
When finished, click [OK] as needed to close the
screens.
Tip: Be sure to repeat these steps for any additional modems (on
any applicable PCs).
Main Controll er Modem Configurat ion
(Samples: USR Sportster™ 56K and LASAT Safire 560™
Voice Modem)
Reference Information:
Modem Switches (USR Sportster
Switch 1 (down):
Switch 2 (up):
Switch 3 (down):
Switch 4 (up):
Switch 5 (up):
Switch 6 (up):
Switch 7 (up):
Switch 8 (down):.
LASAT Safire 560™ Voice Modem
The LASAT Safire 560™ Voice Modem has no
DTR override
Verbal result codes
Display result codes
Display offline commands
Answer on 1
Carrier Detect - Normal
Load NVRAM defaults
Smart Mode.
Once the switches are set correctly, you'll need to
temporarily connect the modem to a PC, and load
some specific settings into the modem's memory. This
can be done with the "HyperTerminal" program that is
included with MS Windows (or any other "terminalemulation" program that you may be familiar with):
Note: Ensure you have the specific modem with you, and a suitable
modem cable for connecting it to the PC. (This must be a standard
modem cable, NOT a 'laplink-style' cable, "null-modem" cable, or
ATS7=140.
™ 56K)
st
ring
on-board switches.
any other type of file-transfer cable.)
1) Start up the "HyperTerminal" program:
Windows XP: From the Windows Start menu, select
Programs, Accessories, Communications, and
HyperTerminal.
(Alternatively, you can open the Start menu, select Run, type
"hypertrm.exe", and click Ok).
2) Wait for the HyperTerminal logo screen to close (if
applicable).
3) Enter a suitable name such as "Panel Modem
Setup", and select a desired symbol (for
HyperTerminal's selection window). Then, click
[Ok].
4) At the bottom of the next screen, select "Direct to
ComX" (i.e., the port that you'll be connecting the
modem to). Then, click
[Ok].
5) In the next screen, select:
Bits per Second:
Data Bits
Parity
Stop Bits
Flow Control
:
:
:
38400
8
None
1
None
:
...and, click [Ok].
6) From the File menu, select Properties, and the
Settings tab.
7) Then, click [ASCII Setup], and select "Echo typed
characters locally".
8) Now click [Ok] to close each of the two screens.
9) Connect the modem to the previously-selected
serial port on the computer, and supply power to
the modem using its plug-in transformer.
10) Now, type "at" (lower-case as shown, and withou t
the quote marks), and press
Enter.
You should see the "at" appear as you type it, and
a response of "OK" when you press "Enter".
If nothing appears on-screen, this may mean that you didn't
select the "Echo typed..." setting as described previously, or
that the modem is either not powered up, or is plugged into a
serial port that doesn't match your selection. (You can select a
different port by selecting F
the setting for "Connect Using" at the bottom of the screen.)
The modem not responding may also indicate a problem with
your cable or; not being plugged in correctly.
ile, and Properties, and changing
11) (Do not proceed until you have your modem
responding with "OK".)
12) Now, enter the settings for your modem:
USR Sportster56 k
LASAT Safire 560™ Voice Modem
: AT&F&B1S0=1Y0&W0
:
AT&F0S0=1&D0&Y0&W0&W1
Tip: Uppercase as shown; 0 = zero)
Note: If you wish to allow more time for long phone
numbers, include
S7=140 after the S0=1, then the rest
of the strings.
Carefully check that you have typed the characters
correctly, and then press
Enter. (Look for the
modem to respond with "OK".)
58 Monitor ISM/xL™ Hardware Guide
22-0375 rev1.1
Page 63

13) Now, power the m odem down (i.e., r emove power
from the modem).
14) The modem is now ready to be used with a
system panel. You can unplug the modem and
shut down the HyperTerminal program when
ready. To shut down HyperTerminal, open the File
menu, and select
(If prompted to save your changes, select
Tip: If you need to set up another modem in the future, you
can open your saved session instead of setting up a new one.
Exit.
Yes.)
22-0375 rev1.1 Monitor ISM/xL™ Hardware Guide 59
Page 64

Page 65

Page 66

N3459
 Loading...