

Page 1
KTD-400 Controller Keypad
User Manual
KTD-400 GE Security
Page 2

Copyright Copyright © 2006, GE Security Inc. All rights reserved.
This document may not be copied or otherwise reproduced, in whole or in part, except as
specifically permitted under US and international copyright law, without the prior written
consent from GE.
Document number/ 1034790E (March 2006).
Disclaimer THE INFORMATION IN THIS DOCUMENT IS SUBJECT TO CHANGE WITHOUT NOTICE. GE ASSUMES
NO RESPONSIBILITY FOR INACCURACIES OR OMISSIONS AND SPECIFICALLY DISCLAIMS ANY
LIABILITIES, LOSSES, OR RISKS, PERSONAL OR OTHERWISE, INCURRED AS A CONSEQUENCE,
DIRECTLY OR INDIRECTLY, OF THE USE OR APPLICATION OF ANY OF THE CONTENTS OF THIS
DOCUMENT. FOR THE LATEST DOCUMENTATION, CONTACT YOUR LOCAL SUPPLIER OR VISIT US
ONLINE AT WWW.GESECURITY.COM.
This publication may contain examples of screen captures and reports used in daily operations.
Examples may include fictitious names of individuals and companies. Any similarity to names
and addresses of actual businesses or persons is entirely coincidental.
Trademarks and patents GE and the GE monogram are registered trademarks of General Electric.
Other trade names used in this document may be trademarks or registered trademarks of the
manufacturers or vendors of the respective products.
Intended use Use this product only for the purpose it was designed for; refer to the data sheet and user
FCC compliance This equipment has been tested and found to comply with the limits for a Class A digital device,
documentation. For the latest product information, contact your local supplier or visit us online
at www.gesecurity.com.
pursuant to part 15 of the FCC Rules. These limits are designed to provide reasonable
protection against harmful interference when the equipment is operated in a commercial
environment. This equipment generates, uses, and can radiate radio frequency energy and, if
not installed and used in accordance with the instruction manual, may cause harmful
interference to radio communications.
You are cautioned that any changes or modifications not expressly approved by the party
responsible for compliance could void the user's authority to operate the equipment.
Page 3

Contents
Preface . . . . . . . . . . . . . . . . . . . . . . . . . . . . . . . . . . . . . . . . . . . . . . . . . . . . . . . . . . . . . . . . . . . . . . . . . . . . . 1
Conventions used in this document. . . . . . . . . . . . . . . . . . . . . . . . . . . . . . . . . . . . . . . . . . . . . . . . . . . . . . . . . . . . . . . . . . . . . . . .1
Safety terms and symbols . . . . . . . . . . . . . . . . . . . . . . . . . . . . . . . . . . . . . . . . . . . . . . . . . . . . . . . . . . . . . . . . . . . . . . . . . . . . . . . .1
Product overview . . . . . . . . . . . . . . . . . . . . . . . . . . . . . . . . . . . . . . . . . . . . . . . . . . . . . . . . . . . . . . . . . . . . 2
Controller keypad placement . . . . . . . . . . . . . . . . . . . . . . . . . . . . . . . . . . . . . . . . . . . . . . . . . . . . . . . . . . . . . . . . . . . . . . . . . . . . .2
Installation . . . . . . . . . . . . . . . . . . . . . . . . . . . . . . . . . . . . . . . . . . . . . . . . . . . . . . . . . . . . . . . . . . . . . . . . . 3
DIP switch settings . . . . . . . . . . . . . . . . . . . . . . . . . . . . . . . . . . . . . . . . . . . . . . . . . . . . . . . . . . . . . . . . . . . . . . . . . . . . . . . . . . . . . . .3
Mounting the KTD-300R. . . . . . . . . . . . . . . . . . . . . . . . . . . . . . . . . . . . . . . . . . . . . . . . . . . . . . . . . . . . . . . . . . . . . . . . . . . . . . . . . . .4
Wiring connections . . . . . . . . . . . . . . . . . . . . . . . . . . . . . . . . . . . . . . . . . . . . . . . . . . . . . . . . . . . . . . . . . . . . . . . . . . . . . . . . . . . . . . .4
Power-up . . . . . . . . . . . . . . . . . . . . . . . . . . . . . . . . . . . . . . . . . . . . . . . . . . . . . . . . . . . . . . . . . . . . . . . . . . . . . . . . . . . . . . . . . . . . . . . .5
KTD-400 configuration . . . . . . . . . . . . . . . . . . . . . . . . . . . . . . . . . . . . . . . . . . . . . . . . . . . . . . . . . . . . . . . 6
iii
System component configuration . . . . . . . . . . . . . . . . . . . . . . . . . . . . . . . . . . . . . . . . . . . . . . . . . . . . 10
PTZ receiver configuration . . . . . . . . . . . . . . . . . . . . . . . . . . . . . . . . . . . . . . . . . . . . . . . . . . . . . . . . . . . . . . . . . . . . . . . . . . . . . . 11
Operation. . . . . . . . . . . . . . . . . . . . . . . . . . . . . . . . . . . . . . . . . . . . . . . . . . . . . . . . . . . . . . . . . . . . . . . . . . 14
Key layouts . . . . . . . . . . . . . . . . . . . . . . . . . . . . . . . . . . . . . . . . . . . . . . . . . . . . . . . . . . . . . . . . . . . . . . . . . . . . . . . . . . . . . . . . . . . . 14
Key functions . . . . . . . . . . . . . . . . . . . . . . . . . . . . . . . . . . . . . . . . . . . . . . . . . . . . . . . . . . . . . . . . . . . . . . . . . . . . . . . . . . . . . . . . . . 15
Keypad operation . . . . . . . . . . . . . . . . . . . . . . . . . . . . . . . . . . . . . . . . . . . . . . . . . . . . . . . . . . . . . . . . . . . . . . . . . . . . . . . . . . . . . . 17
Multiplexer operation . . . . . . . . . . . . . . . . . . . . . . . . . . . . . . . . . . . . . . . . . . . . . . . . . . . . . . . . . . . . . . . . . . . . . . . . . . . . . . . . . . . 19
VCR operation . . . . . . . . . . . . . . . . . . . . . . . . . . . . . . . . . . . . . . . . . . . . . . . . . . . . . . . . . . . . . . . . . . . . . . . . . . . . . . . . . . . . . . . . . . 20
Contacting technical support . . . . . . . . . . . . . . . . . . . . . . . . . . . . . . . . . . . . . . . . . . . . . . . . . . . . . . . . 21
Online publication library . . . . . . . . . . . . . . . . . . . . . . . . . . . . . . . . . . . . . . . . . . . . . . . . . . . . . . . . . . . . . . . . . . . . . . . . . . . . . . . 21
Index . . . . . . . . . . . . . . . . . . . . . . . . . . . . . . . . . . . . . . . . . . . . . . . . . . . . . . . . . . . . . . . . . . . . . . . . . . . . . . 23
Page 4

KTD-400 Controller Keypad
iv
User Manual
Page 5

Preface
This is the GE KTD-400 Controller Keypad User Manual for models KTD-400 and KTD-300R. This
document includes an overview of the product and detailed instructions explaining:
• how to install and program; and
• how to operate the KTD-400 and KTD-300R.
There is also information describing how to contact technical support if you have questions or concerns.
To use this document effectively, you should have the following minimum qualifications:
• a basic knowledge of CCTV systems and components; and
• a basic knowledge of electrical wiring and low-voltage electrical connections.
1
Read these instructions and all ancillary documentation entirely before
installing or operating this product.
The most current versions of this and related documentation may be found on our website. Refer to Online
publication library on page 21 for instructions on accessing our online publication library.
Note: A qualified service person, complying with all applicable codes, should perform all required hardware installation.
Conventions used in this document
The following conventions are used in this document:
Bold Menu items and buttons.
Italic Emphasis of an instruction or point; special terms.
File names, path names, windows, panes, tabs, fields, variables, and other GUI elements.
Titles of books and various documents.
Blue italic (Electronic version.) Hyperlinks to cross-references, related topics, and URL addresses.
Monospace Text that displays on the computer screen.
Programming or coding sequences.
Safety terms and symbols
These terms may appear in this manual:
CAUTION: Cautions identify conditions or practices that may result in damage to the equipment or other property.
WARNING: Warnings identify conditions or practices that could result in equipment damage or serious personal injury.
Page 6
KTD-400 Controller Keypad
2
User Manual
Product overview
The KTD-400 Controller Keypad is designed for use in a Digiplex system. The KTD-400 can address and
control 512 pan/tilt/zoom (PTZ) receiver sites, operate a matrix switcher with 64 monitor outputs, and address/
select views from as many as 64 multiplexers and VCRs. Several modes of multiplexers are supported.
Note: For CyberDome control with the KTD-400, pan/tilt operation is limited to three speeds. To operate and control
multiplexers and VCRs, you must have a KTD-93 auxiliary device driver attached to each device in a Digiplex system.
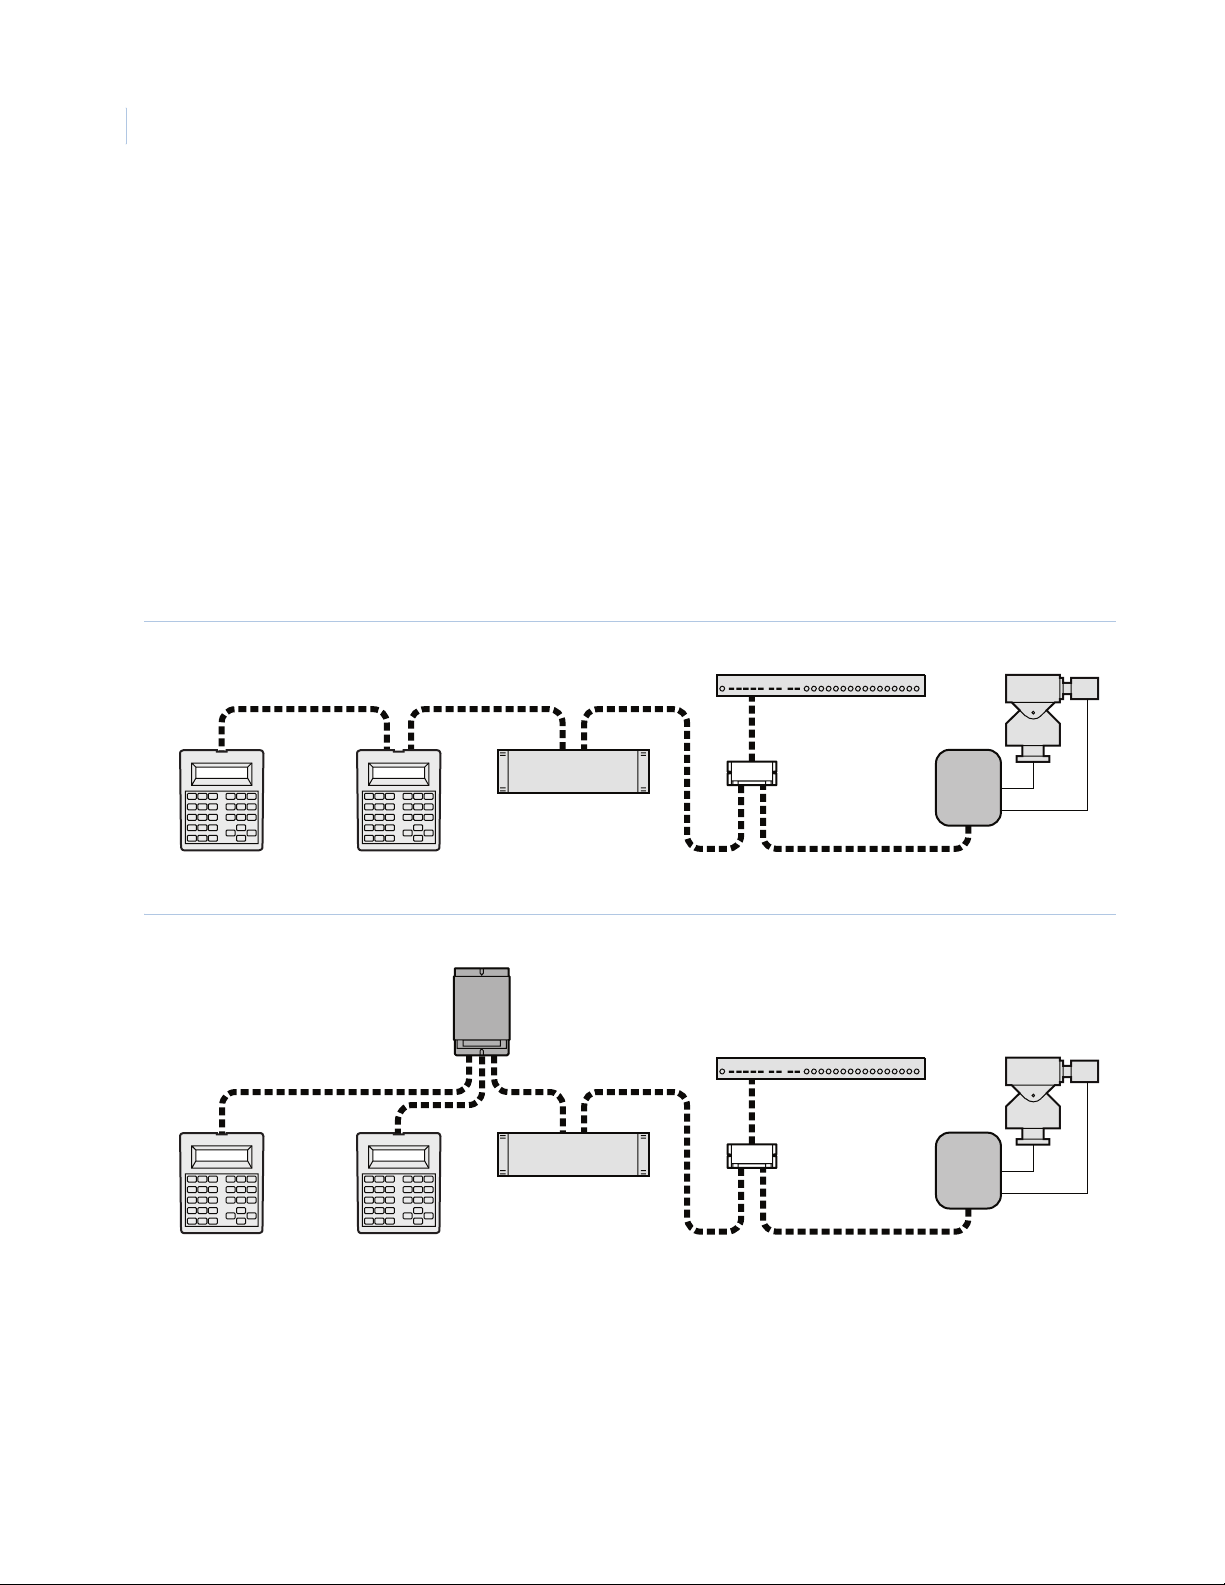
Controller keypad placement
A Digiplex system’s RS-422 control signal originates from the controller keypad located at the head of the
system and travels down line via twisted-pair cable. When more than one controller keypad is used, the signal
must loop through each keypad (Figure 1) or be merged using KTD-312 signal mergers (Figure 2) before
being routed to the rest of the components in the system.
Figure 1. Placement in a Digiplex system
RS-422
Keypad Keypad
Figure 2. Placement using a KTD-312 signal merger
KTD-312
RS-422
Keypad Keypad
Video switcher
Video switcher
Multiplexer
KTD-93
RX
Multiplexer
KTD-93
RX
Page 7
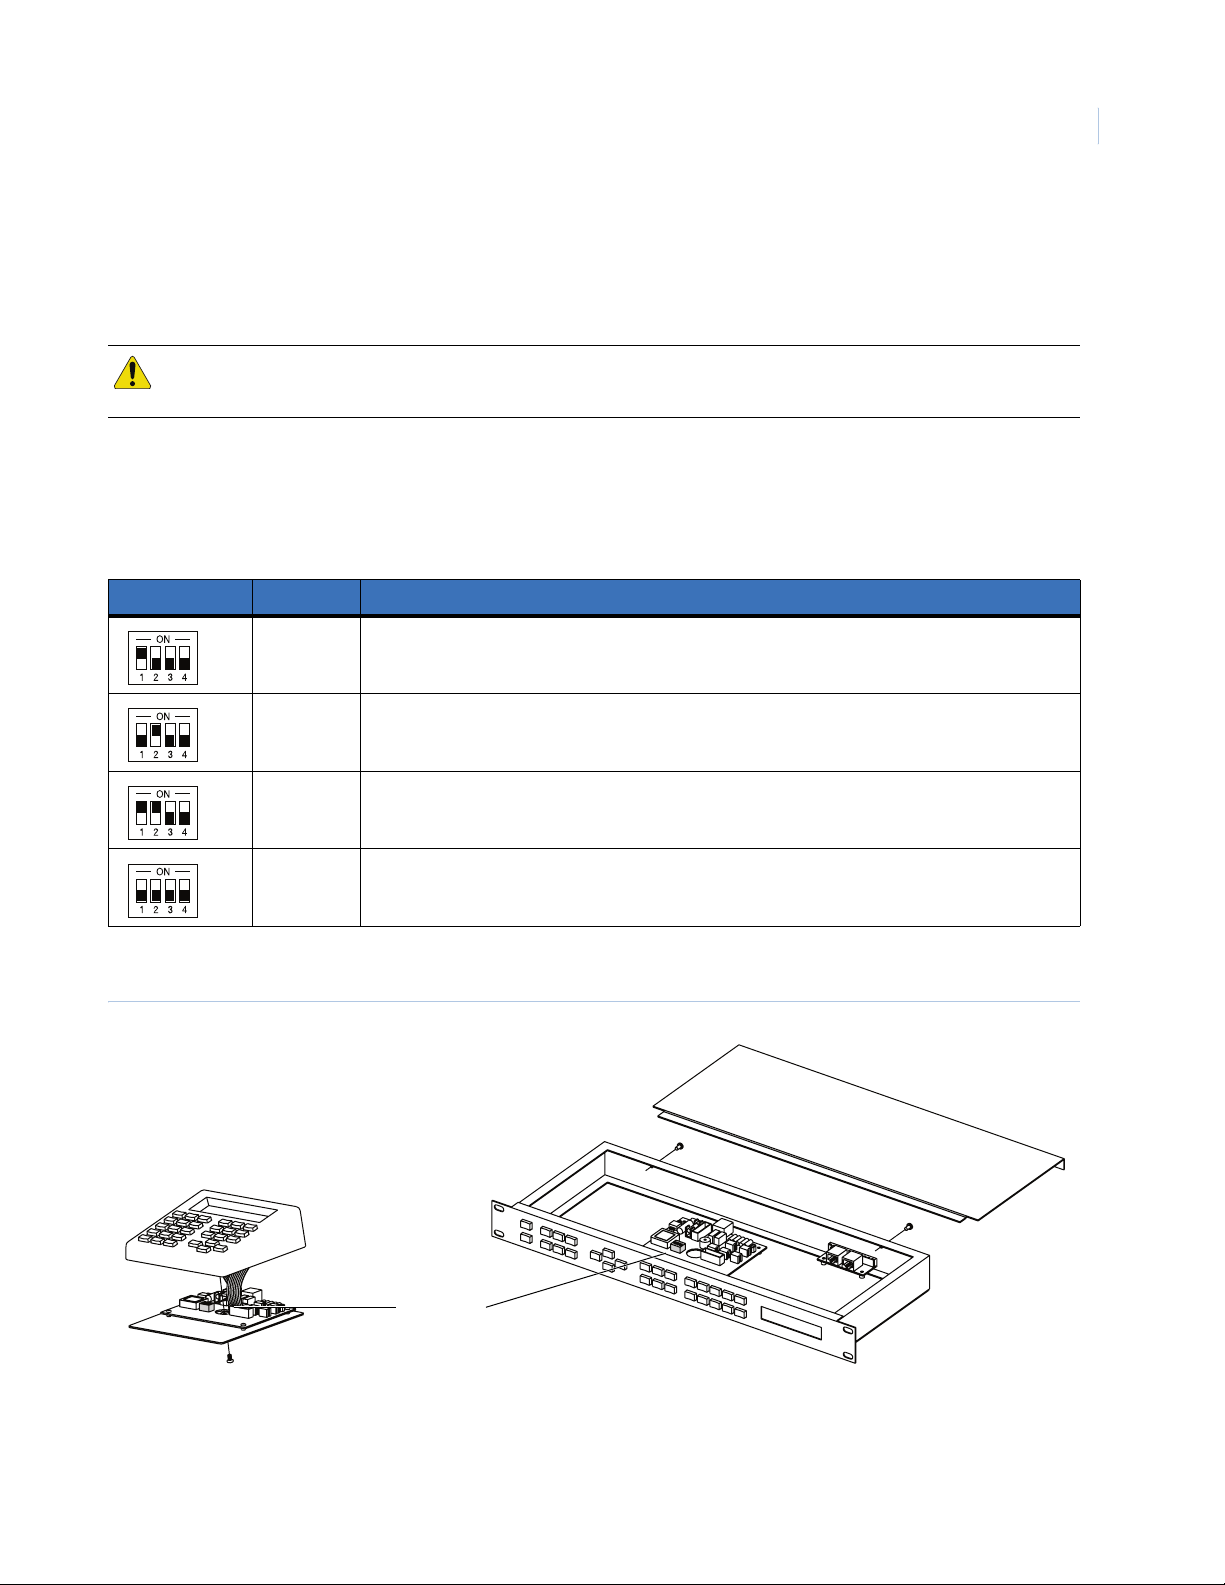
Installation
To install a KTD-400 keypad, you will need to set the DIP switches, mount the unit (KTD-300R only), and
wire the device.
CAUTION: Do not connect power to the unit before all installation steps have been completed. Do not connect directly to
a telecommunication network.
DIP switch settings
Use Tab le 1 to select your mode of operation.
Table 1. DIP switch settings
Setting Binary Description
1000 Digiplex PTZ and VCR control only.
3
0100 Controlling a robot MV96 multiplexer with a KTD-93.
1100 Digiplex PTZ, multiplexer, and VCR control (factory setting).
0000 Controlling a robot MV96 multiplexer with a KTD-93.
Figure 3 shows how to open the KTD-400 and KTD-300R and locate the DIP switches.
Figure 3. DIP switch locations for KTD-400 and KTD-300R models
4-position
DIP switch
KTD-400 KTD-300R
Page 8
KTD-400 Controller Keypad
4
User Manual
Mounting the KTD-300R
The KTD-300R is designed to fit into a standard EIA 19-inch rack and uses one unit (1.75 in.) of rack space.
Mount the unit using the four holes in its front panel and hardware provided from the rack manufacturer.
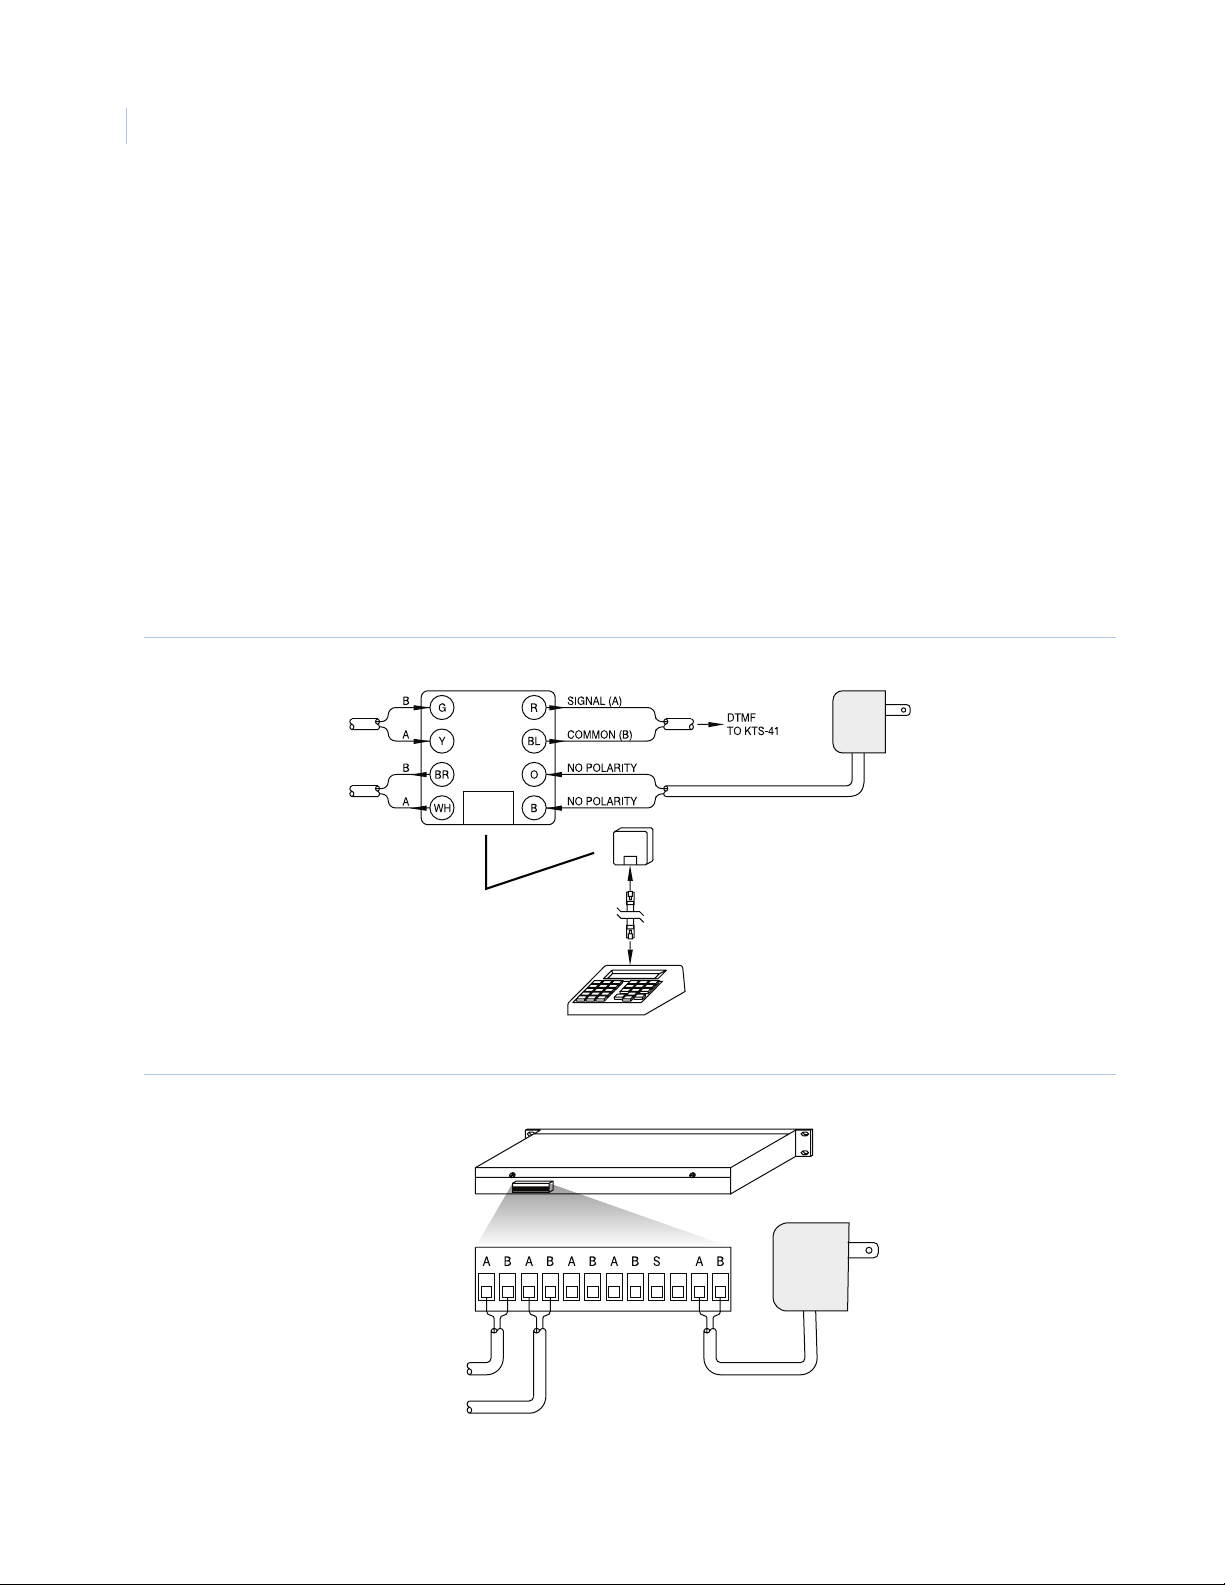
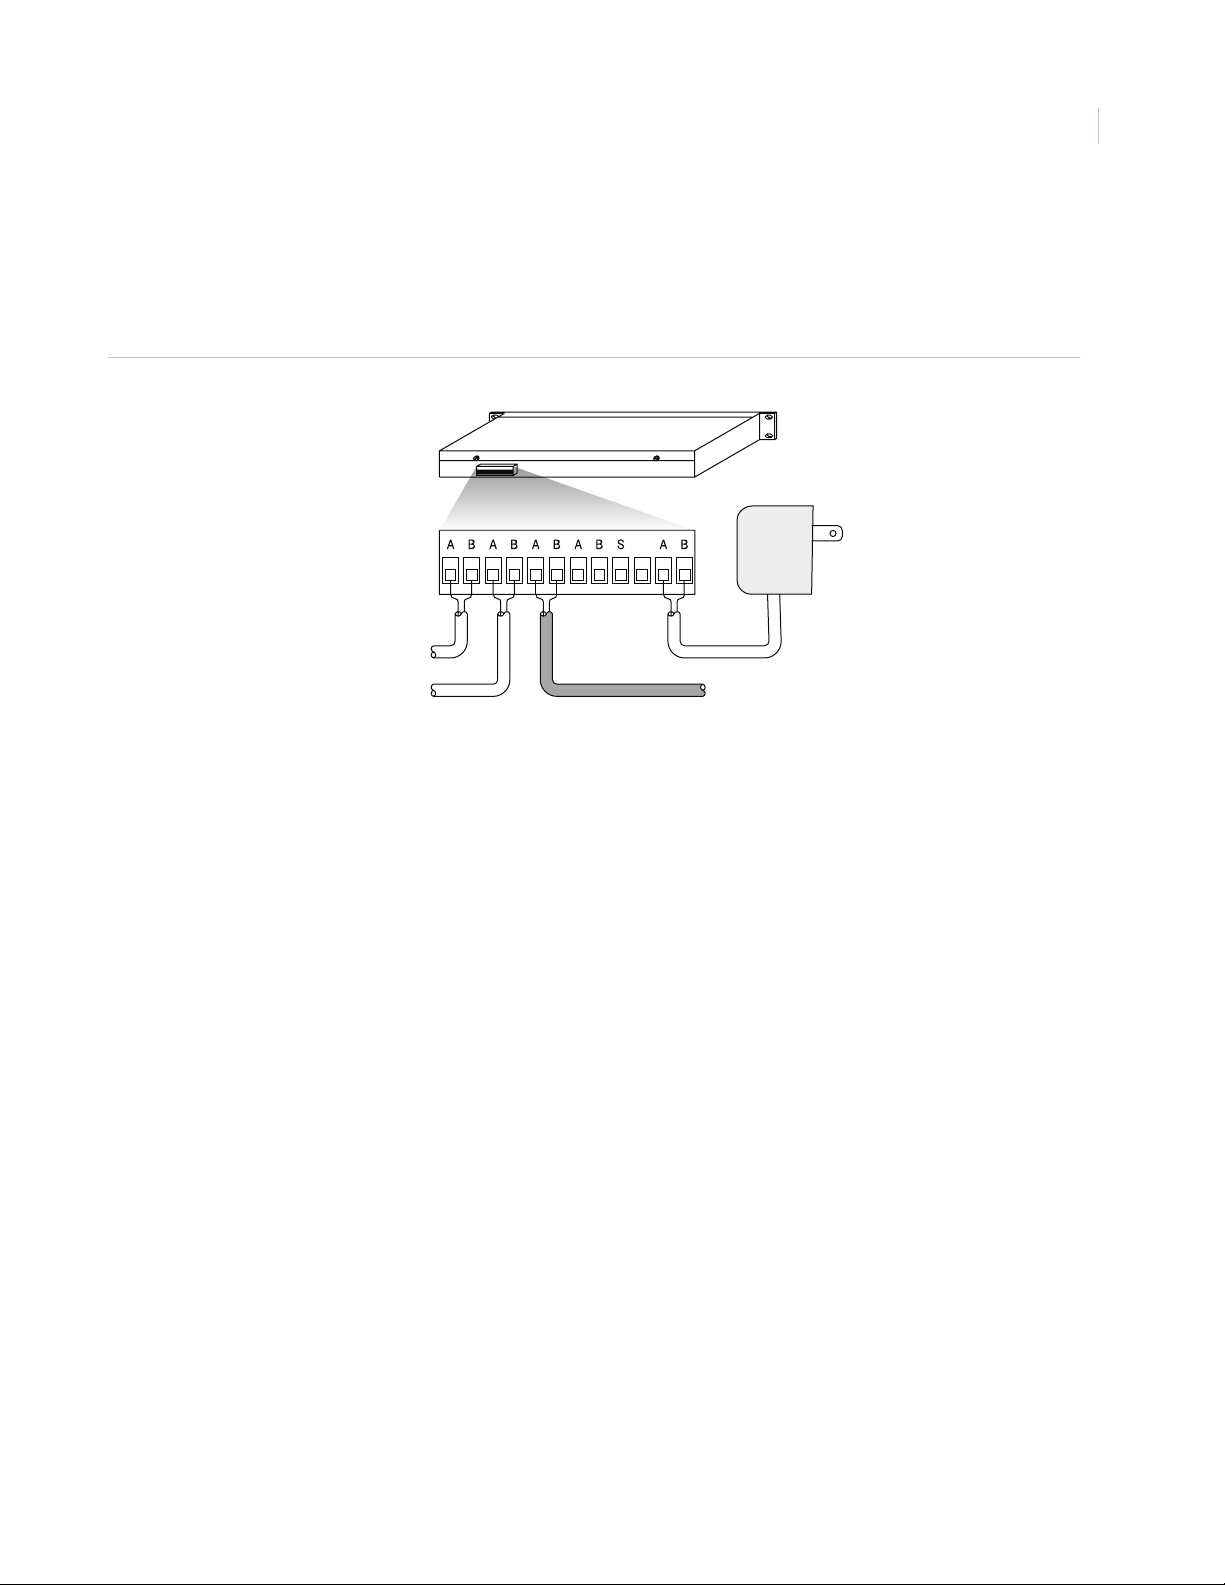
Wiring connections
The KTD-400 comes with a 6 ft. (1.8 m) cable that attaches to a modular phone box (Figure 4). All external
connections are made in the phone box. KTD-300R connections are made to the removable terminal strip
located on the back of the unit (Figure 5 on page 4). Wiring the KTD-400 and 300R to control a standard
Digiplex system involves connecting the RS-422 input cable (if used), the RS-422 output cable, and the
12 VDC wall transformer.
Note: Figure 4, Figure5, and Figure6 on page 5 show connection points for an RS-422 input cable and an RS-422 output
cable. Do not confuse the two. The input is used only if other keypads, alarm chassis, or time/date generators are
located ahead of the unit that is being wired.
Figure 4. KTD-400 modular phone box connections for standard Digiplex control
RS-422 control signal in
RS-422 control signal out
Color code
Y = Yellow
G = Green
BR = Brown
WH = White
R = Red
BL = Black
O = Orange
B = Blue
Figure 5. KTD-300R terminal strip connections for standard Digiplex control
KTD-300R keypad
Terminal strip
Modular phone box
12 VDC wall
transformer
Keypad
12 VDC wall
transformer
RS-422 control signal in
RS-422 control signal out
Page 9
KTS-41 system control
Wiring the KTD-300R to control a KTS-41A system involves connecting the RS-422 input cable (if used), the
RS-422 output cable (if used), the DTMF output cable (to the KTS-41A), and the 12 VDC wall transformer
(Figure 6).
Figure 6. KTD-300R connections with KTS-41A control
KTD-300R keypad
12 VDC wall
Terminal strip
RS-422 control signal in
transformer
5
RS-422 control signal out
DTMF to KTS-41A
Power-up
After you make all the connections, the KTD-400 or KTD-300R will be ready for operation. Plug the 12 VDC
wall transformer into a power outlet. The LCD window will briefly display keypad setting information
(Figure 7 on page 6), then it will enter the operating mode.
Page 10

KTD-400 Controller Keypad
6
User Manual
KTD-400 configuration
After you install and power up your KTD-400 keypad, you will need to configure it to operate within your
systems. You can also use the KTD-400 to configure other components in the Digiplex system. (See System
component configuration on page 10.)
The KTD-400 offers many programming choices that identify how it will function in the system. A separate
code is used to access the menus. For new installations, follow the programming steps in the order they are
presented. If you need to change any programmed data at a later date, enter the appropriate programming
mode and use the designated keys to advance the menu associated with that data.
• System size (see Figure 11 on page 7)
• Camera site access (see Figure 12 on page 7)
• Monitor access (see Figure 13 on page 8)
• Multiplexer enable and select (see Figure 14 on page 8)
• Multiplexer view display (see Figure 15 on page 8)
• VCR enabled (see Figure 16 on page 9)
• Maximum presets (see Figure 17 on page 9)
• Monitor offset (see Figure 18 on page 9)
When you supply power to the unit, the LCD will momentarily display a limited amount of configuration
information on the unit (Figure 7).
Figure 7. Programming display
KTD-400 DDMMYY
255 64 64 64 00 0
Largest Largest Largest Largest Monitor Key
camera monitor multiplexer VCR offset layout
Revision number
After a few seconds, the normal operating display menu (Figure 8 on page 6) will appear.
To configure the KTD-400, do the following:.
1. In the normal operating display (Figure 8),
enter programming mode by pressing and
holding the Set key until you see the display
in Figure 9.
2. At the code entry display (Figure 9), enter
the access code 5, 7, 9, Seq.
Figure 8. Normal operating display
CAMERA 000
MONITOR 01
Figure 9. Code entry display
CAMERA 000 (CODE)
MONITOR 01 (----)
Page 11

7
3. The clear memory option (Figure 10) will
erase all data in the controller keypad’s
nonvolatile memory and reload the factory
default values.
• If you do not want to clear the memory,
press 0. This will advance you to the
system size display (Figure 11).
• To clear the controller keypad’s memory,
press 1. This will advance you to the
confirmation display. Press 3 to reload
the controller keypad’s memory with
factory default values. If you do not
want to clear the memory, press 0. This
will advance you to the system size
display (Figure 11).
4. At the system size display (Figure 11), use
the numerical keys to enter the largest
camera number (maximum 511), largest
monitor number (maximum 64), largest
multiplexer number (maximum 64), and
largest VCR number (maximum 64) in the
system. Use the left and right arrow keys to
switch between columns. Once you have
made all entries, the display will advance to
the next menu.
Figure 10. Clear memory display
CLEAR MEMORY?
0=NO 1=YES SEQ=EXIT
ARE YOU SURE?
0=NO 3=YES SEQ=EXIT
Figure 11. System size display
SYST SIZE (CAMERAS)
511 64 64 64 SEQ=NEXT
Note: Multiplexer and VCR entries can be 00,
which means there are no units in the
system (display will skip subsequent
menus).
5. The camera site access display (Figure 12)
lets you deny or permit the controller keypad
access to certain camera sites. Press 0 to
deny access or 1 to permit access. After each
selection, the next camera number will
appear. Use the up and down arrow keys to
move between cameras. When done, press
Seq to advance to the next menu.
Note: In steps 6 through 8, Seq will not advance
to the next menu if you deny access to all
cameras, monitors, and VCRs. At least one
camera site, monitor, multiplexer, or VCR
must have access.
Figure 12. Camera site access display
CAMERA 000 ACC=YES
0=NO 1=YES SEQ=NEXT
Page 12

KTD-400 Controller Keypad
8
User Manual
6. Use the menu in Figure 13 to deny or permit
the controller keypad’s access to certain
monitors. Press 0 to deny access or 1 to
permit access. After each selection, the next
monitor number will appear. Use the up and
down directional arrows to move between
monitors. When done, press Seq to advance
to the next menu.
7. The menus in Figure 14 let you select which
multiplexers can be enabled from the
keypad. The first display will only come up
if your system has at least one multiplexer.
• If you don’t want to enable any
multiplexers, press Seq to advance to the
VCR access menu (Figure 16 on
page 9).
• Press 0 to advance to the next
multiplexer, or use the up and down
arrows to move between multiplexers.
• Press 1 to enable a multiplexer. This will
advance you to the multiplexer select
display. Use the up and down arrows to
scroll through the alphabetical list of
models. After selecting a multiplexer,
press Seq to advance to the next menu.
8. The multiplexer view display (Figure 15)
determines which views will be enabled
when the keypad is in multiplexer operating
mode. (In multiplexer operating mode,
pressing View toggles through the views.)
Some multiplexer models do not have
selectable views and will skip this menu.
Figure 13. Monitor access display
MONITOR 01 ACC=YES
0=NO 1=YES SEQ=NEXT
Figure 14. Multiplexer access menus
MPLXR 01 ACC=NO
0=NO 1=YES SEQ=NEXT
MPLX 01: ATV
SELECT(LK) SEQ=NEXT
Figure 15. Multiplexer view display
VIEW: PIP YES
0=NO 1=YES L=NXT SEQ=EX
Use the down key to scroll through the
list of views available. For each view,
press 1 to accept or 0 to decline. After
you have selected all views, press Seq to
return to the multiplexer enabled menu
display (Figure 14).
Page 13

9
9. The menu in Figure 16 lets you select which
VCRs can be can be enabled from the
keypad. This display will only come up if
your system has at least one VCR.
Figure 16. VCR access display
VCR 01 ACC=YES
0=NO 1=YES SEQ=NEXT
• If you don’t want to enable any VCRs,
press Seq to advance to the maximum
preset display (Figure 17).
• Press 0 to advance to the next VCR, or
use the up and down arrows to move
between VCRs.
• Press 1 to enable a VCR. After setting
values for all VCRs in your system,
press Seq to advance to the next menu.
10. The menu in Figure 17 determines the
maximum number of programmable presets
that can be accessed from the keypad. The
range is from 00 (none) to 63. Press Seq to
Figure 17. Maximum preset display
MAX PRESET: 09
(OO FOR NONE) SEQ=NEXT
advance to the next menu.
11. The default program for the keypad indicates
that the selected monitor number will
correspond to the number of the matrix
switcher output to which it is connected. For
Figure 18. Monitor offset display
MONITOR OFFSET
NUMBER? SEQ=NEXT
example, if monitor 12 appears in the
keypad’s display window and a camera
selection is made, the monitor that is
connected to output 12 of the matrix switcher
will switch to that camera.
In some applications, you may prefer to number the monitors 1, 2, 3, etc., instead of using the matrix switcher
output number. To allow for the difference in numbers, subtract the desired monitor number from the matrix
switch output number and enter the result as the monitor offset in the menu shown in Figure 18.
For example, if a keypad has a monitor that is connected to matrix switcher output 8, to enable the monitor to
be addressed as monitor 1, subtract 1 from 8 and enter 7 as the monitor offset.
8 (matrix switcher number) - 1 (monitor number) = 7 (offset)
In this example, if more than one monitor were to be controlled from the keypad, additional monitors would be
connected to matrix switcher outputs 9, 10, 11, etc. and would be controlled as monitors 2, 3, 4, etc.
Note: The keypad will deny any monitor offset number that conflicts with the largest monitor (Figure 11 on page 7) and
monitor access (Figure 13 on page 8) programming choices that you made earlier in this section.
After you make an entry in the monitor offset display, the keypad will return to the normal operating display.
Page 14

KTD-400 Controller Keypad
10
User Manual
System component configuration
After you have completed the KTD-400 keypad configuration, you can used the keypad to configure other
Digiplex system components. To configure these system components, begin at the normal operating display
and do the following:
1. In the normal operating display shown in
Figure 19, press and hold the Set key until
the display in Figure 20 appears.
2. In the menu in Figure 20, enter the access
code 9, 5, 1, Seq. The next display will
appear.
3. The component programming selection
menu (Figure 21) lets you select which
component (video switchers, PTZ receivers,
alarm interfaces, and CyberDomes) to
Figure 19. Normal operating display
CAMERA 000
MONITOR 01
Figure 20. Code entry display
CAMERA 000 (CODE)
MONITOR 01 (----)
Figure 21. Component configuration selection display
1=SWTCH 2=PTZ 3=ALRM
4=CYBER SEQ=EXIT
program.
To configure video switchers, alarm interfaces, and CyberDomes, press the appropriate number at the
component configuration selection menu (Figure 21) and refer to the programming instructions provided with
those products.
To configure PTZ receivers, press 2 at the component configuration selection display (Figure 21) and follow
the instructions in PTZ receiver configuration on page 11.
Page 15

PTZ receiver configuration
Each PTZ receiver offers modes of operation choices, many of which can be programmed using a KTD-400
series keypad. It can also store preset position information if applicable.
To program a PTZ receiver, complete the steps in System component configuration on page 10, press 2 at the
component programming selection menu (Figure 21 on page 10), then do the following (for all cameras):
11
1. At the receiver site selection display
(Figure 22), use the numerical keys to enter
the receiver site to be programmed. The next
display will appear.
2. At the receiver setup display (Figure 23),
press 1 to begin receiver setup. The display
will automatically advance to the first setup
menu. (Pressing 2 allows you to set the
PTZ’s presets. See PTZ receiver preset
position programming on page 13.)
3. If you want the pan/tilt receiver to autopan,
enter one of the following choices in
Figure 24:
0 = Disables the autopan function.
1 = Assigns a 50% duty cycle when the
receiver is in autopan mode (unit
alternately pans and rests for 8 second
intervals).
2 = Assigns a 100% duty cycle when the
receiver is in autopan mode (unit
continuously pans).
Figure 22. Receiver site selection display
ENTER RECEIVER SITE
NUMBER 00 SEQ=NEXT
Figure 23. Receiver setup display
1=SETUP 2=PRESETS
SEQ=NEXT
Figure 24. Pan cycle display
PAN CYCL? 0=0% 1=50%
2=100% 3=RDM SEQ=NEXT
3 = Causes the receiver to pan randomly
when in autopan mode.
The next display will appear.
4. You can program the receiver to resume
autopanning when power is restored after a
power loss. At the autopan autostart display
(Figure 25), press 1 to make the receiver
autopan when power is restored. Otherwise,
press 0. The next display will appear.
5. At the lens voltage display (Figure 26),
select the correct voltage for the receiver’s
motorized lens. Press 0 for 6 volts, or 1 for
12 volts. The next display will appear.
Figure 25. Autopan autostart display
AUTOPAN AUTOSTART?
0=NO 1=YES SEQ=NEXT
Figure 26. Lens voltage display
LENS VOLTAGE?
1=12v 0=6v SEQ=NEXT
Page 16

KTD-400 Controller Keypad
12
User Manual
6. Use the menu in Figure 27 to reverse the pan
and tilt directions for cameras that must be
mounted in an inverted position. Press 1 to
invert or 0 for normal pan/tilt operation. The
next display will appear.
7. The next three menus provide choices for
defining the polarity of the output voltage for
the motorized lens connected to the receiver.
a. For zoom direction, press 0 if the lens
requires positive voltage for zoom in and
negative voltage for zoom out.
Press 1 if the opposite is true.
b. For iris direction, press 0 if the lens
requires positive voltage for iris open
and negative voltage for iris close.
Press 1 if the opposite is true.
c. For focus direction, press 0 if the lens
requires positive voltage for focus near,
and negative voltage for focus far.
Press 1 if the opposite is true.
8. The clear receiver memory option
(Figure 29) will erase all data in the PTZ
receiver’s nonvolatile memory and reload
factory default values.
• If you do not want to clear the memory,
press 0. This will return you to the
receiver site selection display (Figure 22
on page 11).
• To clear the PTZ receiver’s memory,
press 1. This will advance you to the
confirmation display. Press 3 to reload
the PTZ receiver’s memory with factory
default values. If you do not want to
clear the memory, press 0. This will
return you to the receiver site selection
display (Figure 22 on page 11).
Figure 27. Invert pan/tilt display
INVERT PAN/TILT?
0=NO 1=YES SEQ=NEXT
Figure 28. Zoom, iris, and focus direction displays
ZOOM DIRECTION?
0=POS 1=NEG SEQ=NEXT
IRIS DIRECTION?
0=POS 1=NEG SEQ=NEXT
FOCUS DIRECTION?
0=POS 1=NEG SEQ=NEXT
Figure 29. First clear memory display
CLR RCVR MEM? 000
0=NO 1=YES SEQ=NEXT
ARE YOU SURE?
0=NO 3=YES SEQ=NEXT
Setting electronic autopan limits for domes
To set the electronic autopan limits on dome receivers, first position the dome at the limit. While holding down
the Zoom in and Zoom out keys, press the arrow keys in the direction of the limit being set.
For example, to set the left limit, move the dome to the position of the desired left limit. While holding down
the Zoom in and Zoom out keys, press the left arrow.
Page 17

PTZ receiver preset position programming
If a PTZ receiver or a KTA-12 series PTZ dome is equipped for preset camera positioning (P option), the
receiver can store 10 preset positions in its nonvolatile memory. You can call each preset position individually
and include each in a preset tour (camera automatically pans, tilts, zooms, and focuses through a series of
preset positions).
To program presets, complete the steps in System component configuration on page 10, press 2 at the
component programming selection menu (Figure 21 on page 10), then do the following (for all cameras):
1. and PTZ receiver configuration on page 11 to access the receiver site selection display.
2. At the receiver setup display (Figure 23 on
page 11), press 2 to begin receiver setup.
3. In the receiver site selection menu
(Figure 30), use the numerical keys to select
the PTZ receiver site to be programmed. The
next display will appear.
Figure 30. Receiver site selection display
ENTER RECEIVER SITE
NUMBER 000 SEQ=EXIT
13
4. At the receiver setup display (Figure 31),
press 2. The next display will appear.
5. Use the PTZ and focus keys to move the
camera to the desired position.
6. At the preset position display (Figure 32),
assign a preset number (one or two digits
depending on the receiver type and largest
preset number) using one of these methods:
a. If the position won’t be included in the
preset tour, enter the preset number. A
tone will sound to acknowledge that the
position has been entered, and the
display will return to Figure 32.
b. If the position will be included in the
preset tour, enter the preset number and
hold the last digit until a tone sounds.
The display in Figure 33 will appear.
7. At the dwell time display (Figure 33), enter
the amount of time the camera should remain
at the position (1 to 31 seconds). The display
will return to Figure 32 to allow you to enter
the next position.
Figure 31. Receiver setup menu display
1=SETUP 2=PRESETS
SEQ=EXIT
Figure 32. Preset position display
CAM 000 POSITION? - -
(00-63) SEQ=EXIT
Figure 33. Preset dwell time display
CAM 000 DWELL --
(01-31 SEC) SEQ=EXIT
8. Repeat the previous two steps for each
additional preset position. When you are
done, press Seq to exit to the receiver site
selection menu (Figure 30 on page 13)
Page 18

KTD-400 Controller Keypad
14
User Manual
Operation
A KTD-400 series keypad can address and control 512 PTZ receiver sites, operate a matrix switcher with 64
monitor outputs, address and select views from 64 multiplexers, and control 64 VCRs. It can also be used to
control a KTS-41 Mini-Matrix switcher.
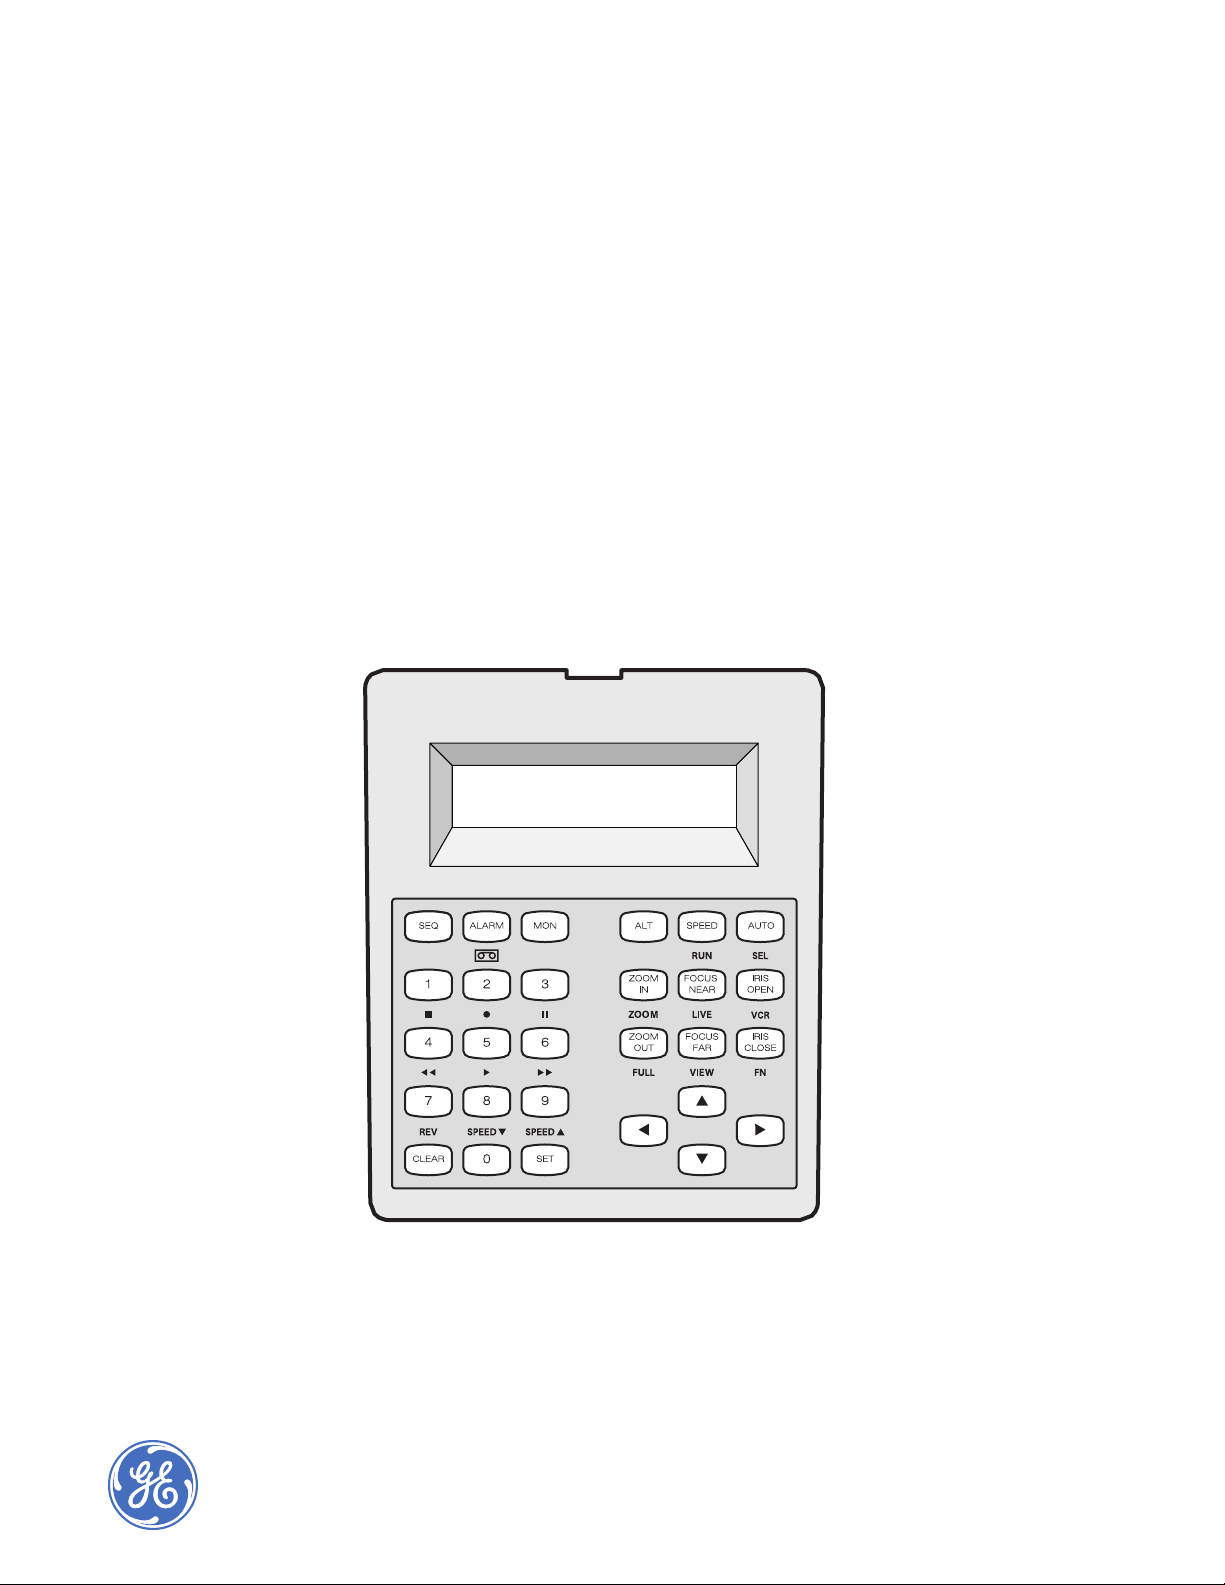
Key layouts
Figure 34 shows the key layout for the KTD-400.
Figure 34. KTD-400 key layout
KTD-400 GE Security
Video switcher
control keys
Site select keys
VCR control keys
Figure 35 shows the key layout for the KTD-300R.
Figure 35. KTD-300R key layout
Video switcher control keysMultiplexer function key
PTZ control keys
Multiplexer
function keys
PTZ control keys
Site select keys
Page 19

Key functions
PTZ control keys
Zoom in, Zoom out Used to control the zoom function of the selected receiver site’s motorized lens.
Focus near, Focus far Used to control the focus function of the selected receive site’s motorized lens. Also used to disengage
the autofocus feature on the CyberDome.
Iris open, Iris close Used to control the iris function of the selected receiver site’s motorized lens. Also used to enable the
Backlight compensation option.
Directional arrows Used to move the selected receiver site’s camera up, down, left, or right in P/T operation. Also used to
select views for multiplexer operation.
Speed Used to toggle between fast , medium, and slow speed control for variable speed PTZ camera
assemblies.
Auto Places the selected receiver site’s P/T unit in the autopan mode (camera pans left and right
automatically). When held down for one second, engages the key engages the autofocus feature on
CyberDomes. Also used in combination with Set to initiate the preset tour mode.
15
Video switcher control keys
Mon Used in combination with the number keys (0 to 9) to select an active monitor.
Seq Used to select sequence tour on the active monitor.
Alarm Toggles the active monitor between the alarm and alarm off modes.
VCR control keys
Eject, or menu, depending on the VCR model.
Stop playback or stop recording of the VCR.
Record.
Pause recording or playback.
Rewind (or reverse, if in Playback).
Playback.
Fast forward (or search, if in Playback).
Rev Reverse.
SpdL Decrease recording speed.
SpdK Increase recording speed.
Page 20

KTD-400 Controller Keypad
16
User Manual
Site select keys
0 to 9 Numerical keys are used for camera and monitor selection in Digiplex operation mode, or camera and
multiplexer selection in multiplexer operation. Also used for preset position selection when applicable.
Clear Refreshes the alphanumeric display on the selected monitor. Also used to clear infinite alarms using
numerical keys.
Set Used in combination with a numerical key (0 through 9) to find preset positions. Also used with Auto to
engage the preset tour mode.
Multiplexer function keys
The following keys may function differently, or not at all, on some models of multiplexers.
Mode Toggles the keypad between DigiPlex, multiplexer, and VCR control modes.
Run Selects automatic switching of videos in lower right window of the current view; also used in setup of
motion detection areas.
Sel Used to select an active multiplexer or VCR.
Zoom Toggles between a full screen view and a 2x view of the selected video, if available on the specific
multiplexer.
Live Used to view the live video inputs in any display mode; also used during setup of motion detection
areas.
VCR Selects VCR output for monitoring during taping or VCR input for viewing during playback. Also used in
setup of motion detection areas.
Full Used by some multiplexer types to restore full view.
View Toggles between selected views.
Fn Reserved for future development.
Page 21

Keypad operation
When power is first supplied to a KTD-400 series keypad, the LCD display will briefly display the company
name, and then show the normal operating display (Figure 36).
Figure 36. KTD-400 normal operating display
CAMERA 000
MONITOR 01
From this display and by observing the system’s monitors, you can use the function keys for control.
Monitor selection
To select a monitor, press Mon and use 0 through 9 to enter the desired number. For example to select monitor
12, press Mon, 1, 2. All video switching operations will now be done on the selected monitor.
17
Camera selection
To select a camera, use 0 through 9 to enter the desired number. For example, to select camera 345, press 3, 4,
5. The camera associated with the site will appear on the selected monitor, and all keys applicable to that site
will become operational.
Engaging autofocus on CyberDomes
To engage autofocus on CyberDomes, press and hold Auto for one second. Use Focus near or Focus far to
disengage.
Finding a preset
To find a preset, select the desired camera, press Set and use 0 through 9 to enter the preset number. The entry
may be one or two digits depending on the largest preset position programmed in the keypad setup. For
example, to preset 6, press Set, 6.
Note: The preset option referred to in this section will function only if activated during setup.
Preset tours
To activate a camera’s preset tours or ShadowTour, select the desired camera and press Set, Auto, and the tour
number (1 through 4). On older CyberDome models, only one preset tour could be programmed. Entering any
tour number will activate the preset tour. To deactivate the tour, press an arrow key.
Page 22

KTD-400 Controller Keypad
18
User Manual
Camera sequencing
To place a monitor in the sequence mode, select the monitor and press Seq. The display shown in Figure 37
will appear in the keypad’s display window.
Figure 37. Sequence selection
ENTER SEQUENCE
NUMBER? - (1, 2, 3, 4)
Use 1 through 4 to enter the desired sequence tour.
Setting electronic autopan limits for domes
To set the electronic autopan limits on dome receivers, first position the dome at the limit. While holding down
the Zoom in and Zoom out keys, press the arrow keys in the direction of the limit being set. For example, to
set the left limit, move the dome to the position of the desired left limit. While holding down the Zoom in and
Zoom out keys, press the left arrow key.
Video alarms
To place a monitor in or remove it from the alarm mode, select the monitor and press Alarm. Each time you
press Alarm, the monitor toggles in and out of alarm mode. When a monitor is in alarm mode, an A appears on
the monitor screen (Figure 38). In this mode the monitor will automatically call alarmed sites.
Figure 38. Monitor screen with alarm mode enabled
A monitor will only respond to alarms if it is in alarm mode. A manual video call will take a monitor out of
alarm mode.
Clearing alarms
In a Digiplex system, alarmed sites can be programmed to remain on the monitor screen indefinitely, and must
be cleared by the operator. To clear the alarm, press Clear and use 0 through 9 to enter the site number. For
example, to clear alarm site 22, press Clear, 0, 2, 2.
Page 23

Multiplexer operation
The Mode key toggles the KTD-400 between normal operation mode, multiplexer operation mode, and VCR
operation mode.
Switching to multiplexer control mode
To enter the multiplexer operation mode, press Mode once and the display shown in Figure 39 appears.
Figure 39. Multiplexer operation mode
MULTIPLEXER 01
VIEW --
The keypad is now able to control multiplexers.
Selecting an active multiplexer
19
Press Sel followed by the number keys to enter the multiplexer number you want to control. For example, to
select multiplexer number 12, press Sel, 1, 2.
Calling video input on an active multiplexer
Once you have selected the desired multiplexer, use the number keys to enter the video input number. For
example, to call video input number 9 on the active multiplexer, enter 0, 9.
Switching a multiplexer to live video
Press Live to place the active multiplexer in the live video mode.
Placing the multiplexer in the camera sequence mode
Press Run to place the active multiplexer in the video sequence mode.
Viewing VCR output or playback
Press VCR to view the output for the VCR during recording or playback from the VCR during review of the
VCR tapes.
Operating electronic zoom
For multiplexers equipped with zoom capability, the Zoom key will switch the multiplexer to this mode.
While view in this mode, the arrow keys are used to move the zoom area within the image (electronic zoom
may vary according to the model of multiplexer).
Page 24

KTD-400 Controller Keypad
20
User Manual
Selecting multiple camera views on a multiplexer
Press View to step the active multiplexer between those views programmed to be available for that multiplexer.
Each time you press View, the next available view will be displayed by the multiplexer. Refer to the
installation and operation documentation provided with the multiplexer to determine available views.
VCR operation
Press Mode to toggle the KTD-400 between normal operation mode, multiplexer operation mode, and VCR
operation mode.
Switching to VCR control mode
To enter the VCR operation mode, press Mode twice if multiplexers have been enabled, or once if there are no
multiplexers. The display shown in Figure 40 will appear.
Figure 40. VCR operation mode
VCR 01
The keypad is now able to control VCRs.
Selecting an active VCR
Press Sel followed by the number keys to enter the VCR number you want to control. For example, to select
VCR number 12, press Sel, 1, 2.
Page 25

Contacting technical support
For assistance installing, operating, maintaining, and troubleshooting this product, refer to this document and
any other documentation provided. If you still have questions, you may contact technical support during
normal business hours (Monday through Friday, excluding holidays, between 5 a.m. and 5 p.m. Pacific Time).
Table 2. Sales and support contact information
Sales Technical support
21
Phone
E-mail
Fax
Note: Be ready at the equipment before calling for technical support .
Toll-free: 888.GESECURity (888.437.3287) in the US, including Alaska and Hawaii; Puerto Rico; Canada.
Outside the toll-free area: 503.885.5700.
info@gesecurity.com generaltech@ge.com
800.483.2495 541.752.9096 (available 24 hours a day)
Online publication library
Another great resource for assistance with your GE product is our online publication library. To access the
library, go to our website at the following location:
http://www.gesecurity.com
In the Customer Support menu, select the Publication Library link. After you register and log on, you may
1
search through our online library for the documentation you need.
1. Many GE documents are provided as PDFs (portable document format). To read these documents, you will need Adobe
Acrobat Reader, which can be downloaded free from Adobe’s website at www.adobe.com.
Page 26

KTD-400 Controller Keypad
22
User Manual
Page 27

Index
23
A
alarms
clearing alarms...................................................................................18
video alarms .......................................................................................18
autofocus .................................................................................................17
autopan limits..........................................................................................12
C
camera sequencing ..................................................................................18
conventions ...............................................................................................1
D
DIP switches .............................................................................................3
K
key functions...........................................................................................15
key layouts ..............................................................................................14
keypad operation .....................................................................................17
KTA-12 ...................................................................................................13
KTD-300R ................................................................................................3
key layout............................................................................................14
mounting...............................................................................................4
KTD-312 signal mergers ..........................................................................2
KTD-93 .....................................................................................................3
KTS-41....................................................................................................14
KTS-41A...................................................................................................5
M
multiplexer control mode........................................................................19
multiplexer operation..............................................................................19
MV96 multiplexer.....................................................................................3
P
preface.......................................................................................................1
preset position programming ..................................................................13
preset tours..............................................................................................17
product
overview ...............................................................................................2
publication library...................................................................................21
S
safety terms and symbols ..........................................................................1
T
technical support .....................................................................................21
V
VCR control mode ..................................................................................20
VCR operation ........................................................................................20
video alarms ............................................................................................18
Z
zoom
electronic zoom ..................................................................................19
Page 28

KTD-400 Controller Keypad
24
User Manual
 Loading...