

Page 1

TruVision DVR 60 Quick Start Guide
Content
Setting up the TVR 60
Package contents 1
Installation environment 1
Setting up the TVR 60 1
Connecting the devices 2
Turning on and off the TVR 60 2
Operating the TVR 60 3
DDNS settings 5
Live mode 5
Quick Archive 5
Playing back exported DVR format files 6
PTZ mode 6
Logging on 6
Overview of the main menu 6
Setting up IP cameras 7
Setting up alarms 7
Connecting a keypad 8
Viewing an alarm event list 8
Contact information 8
Package contents
The TruVision DVR 60 (model TVR 60) is shipped with
the following items:
• IR (infrared) remote control
• Two AAA batteries for the remote control
• AC power cord (US, Europe, UK)
• USB mouse
• DVR
• TruVision DVR 60 Quick Start Guide
• TruVision DVR 60 User Manual (on CD)
Installation environment
Refer to the user manual for detailed information, but
observe these important requirements:
• Place the TVR 60 in a secure location.
• Ensure that the TVR 60 is in a well-ventilated area.
• Do not expose the unit to rain or moisture.
The TVR 60 has an express installation wizard that lets
you easily configure basic DVR settings when first used.
It configures all cameras simultaneously. The
configuration can then be customized as required.
By default, the Setup Wizard initiates once the DVR has
loaded. The Setup Wizard walks you through some of
the more important settings of your DVR. If you do not
wish to use the Setup Wizard at this time, click the
Cancel button. You may also choose to use the Setup
Wizard at a later time by leaving the “Start Wizard when
DVR starts?” checkbox checked.
Any changes you make to a setup configuration screen
are saved when you exit the screen and return to the
main eZ Setup screen.
Recommended steps for setting up the TVR 60:
1. Connect all the devices required to the back panel of
the TVR 60. See Figure 1 on page 2.
2. Set up the TVR 60 with basic settings using the
Setup Wizard.
3. Install the and configure the analog and/or IP
cameras.
4. Configure the system for motion alarms and other
alarm types, as required.
5. Configure the recording, network, HDD and user
settings, as required.
6. Install and configure the keypad.
To quickly put the TVR 60 into operation using Setup
Wizard:
1. Turn on the unit using the power switch on the back
panel. After the boot up screen, the TVR 60 displays
video images on-screen.
2. Select the preferred language for the system.
3. In the eZ Setup screen, click the Next button. In the
User Permission screen enter the default user ID
and password.
© 2011 UTC Fire & Security. All rights reserved. P/N 1069896B-EN • REV 2.0 • ISS 10MAY11
Page 2
User ID: admin
Password: 1234
4. Click the Next button and then Enter to open the
HDD Management screen. Define the HDD settings
as required. Click OK to save and return to the eZ
Setup screen.
5. Click the Next button and then Enter to open the
Record Settings screen. Define the recording
settings such as recording schedules. Click OK to
save and return to the eZ Setup screen.
6. Click the Next button and then Enter to open the
Network Settings screen. Define the network
settings such as the IP address, subnet mask, and
default gateway. Click OK to save and return to the
eZ Setup screen.
7. When all the required changes have been entered,
click the Finish button to exit the Setup Wizard. The
TVR 60 is now ready to use.
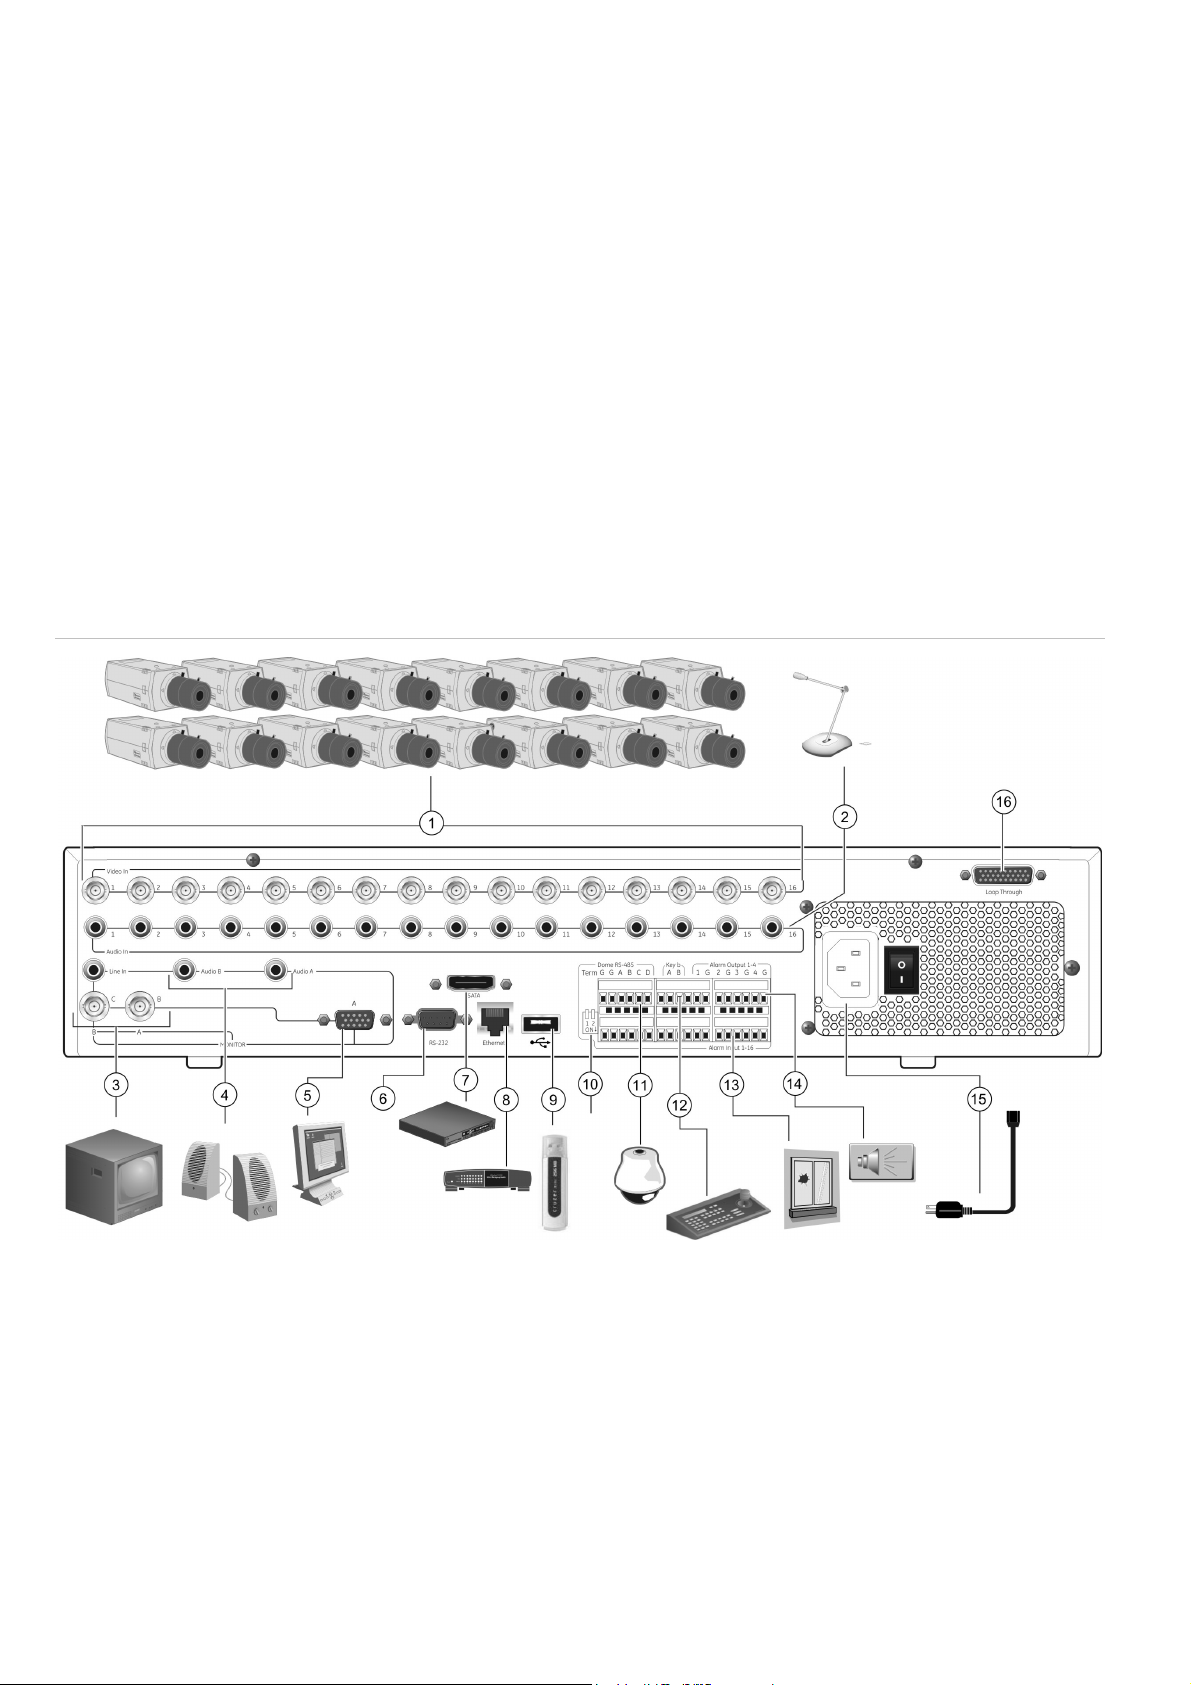
Figure 1: TVR 60 back panel connection diagram
Connecting the devices
Use Figure 1 below below as a visual guide to connect
the various peripherals to the TVR 60.
The monitor resolution should be at least 800 x 600.
Adjust your monitor accordingly to this resolution. If
looping video, ensure that the Termination option (under
Cameras > Adjust Video) is disabled.
Turning on and off the TVR 60
Turn on and off the TVR 60 using the power switch on
the back panel. When you turn on the device, the
TVR 60 automatically displays all live views from the
connected cameras. It also automatically begins
recording.
1. Connect up to 16 analog cameras.
2. Connect to audio inputs (available for each camera).
3. Connect up to two CCTV monitors (monitors B and C).
4. Connect to speakers for audio output.
5. Connect VGA monitor (default main monitor).
6. For future use.
7. Connect to an eSATA device.
8. Connect to a network.
9. Connect to USB devices such as a mouse. USB CD/DVD
burner and USB HDD are not supported.
10. Terminate the line to the dome cameras using this RS-485 switch.
Default is Off.
11. Connect to a PTZ control.
12. Connect to a keypad.
13. Connect up to 16 alarm input cables.
14. Connect up to four NO/NC alarm output relays.
15. Connect to a power cord.
16. Loop through for up to 16 analog cameras (see item 1).
EN - 2 TruVision DVR 60 Quick Start Guide
Page 3

Figure 2: Front panel
Operating the TVR 60
Control options
There are several ways to control the TVR 60:
• Front panel control
• IR remote control
• Mouse toolbar control
• Web browser control
Front panel control
The buttons on the front panel control most functions.
See Figure 2 above for locations of the controls.
Table 1: Front panel control descriptions
Item Name Description
1. USB ports Universal serial bus (USB) port for
additional devices such as USB mouse
and USB hard disk drive (HDD)
2. Eject Ejects CD/DVD disc.
3. Archive Press once to enter quick archive
mode. Press twice to start archiving.
4. Display buttons Display: Toggles through the various
multiscreens: full, quad, 1+5, 1+7, 9,
and 16.
Sequence: Starts/stops sequencing in
live mode.
A: Selects monitor A in live mode
B: Selects monitor B in live mode
Analog: Displays the analog cameras
IP: Displays the IP cameras
5. IR receiver Receiver for IR remote
6. Numeric buttons Switch between different cameras in
live, PTZ control or playback modes.
7. Status LEDs HDD: Green indicates the DVR is
working correctly. Red indicates a fault.
Network: Green indicates the network
is working correctly. Red indicates a
Item Name Description
fault.
Internal: Green indicates the Watchdog
is working correctly. Red indicates that
the Watchdog is reporting a fault.
Alarm: Green indicates no external
alarm. Red indicates an external alarm
status.
8. Alarm button Use to manually acknowledge an
alarm.
9. Alarm indicator
bar
10. Joystick Use to select options in a menu and to
11. PTZ buttons Zoom: Use + and – for digital zoom.
Blinking red indicates that there is an
alarm.
control playback. Press for Enter. LED
arrows are lit when the jog is active.
Live mode: Enter PTZ mode.
Menu mode: Move the joystick left/right
and up/down to position cursor in menu
screen. Press for Enter.
PTZ mode: Move the joystick left/right
and up/down to position cursor in menu
screen. Press for Enter.
Playback mode:
Rotate the joystick to control the
movement of the PTZ camera:
- Move left: Decrease speed.
- Move right: Increase speed.
- Move up: Jump forwards 30 seconds.
- Move down: Jump backwards 30
seconds.
Preset: Call up preprogrammed preset
positions.
Tour: Call up preprogrammed shadow
tours.
TruVision DVR 60 Quick Start Guide 3 - EN
Page 4

Item Name Description
12. Playback buttons
: Jumps back to the oldest
available video and starts the
playback.
panel. The mouse is immediately operational and the
pointer should appear.
Move the pointer to a command, option, or button on a
screen. Left-click the mouse to confirm a selection.
: Pauses playback.
: Instantly plays back the
currently selected file. Default
time is 1 minute.
Live: Switch to live mode.
Replay: Replay the current file in
playback Starts at the beginning of the
file.
13. Menu and
Search buttons
Menu: Enter main menu.
Search: Enter advanced search menu.
IR remote control
The IR remote control buttons are similar to those on
the TVR 60 front panel. You can use the remote
control to perform any TVR 60 function.
To place batteries into the IR remote control:
1. Remove the battery cover.
2. Insert the batteries (AAA). Make sure that the
positive and negative poles are correctly placed.
3. Replace the battery cover.
To connect the remote control to the TVR 60:
1. Press the Menu button on the remote control or
front panel or right-click the mouse and select the
Menu button. The main menu screen appears.
2. Click the Display icon.
3. Click the Monitor tab. The Monitor screen appears.
4. Check and remember DVR device address value.
The default value is 255. The device address is
valid for all IR controls.
5. On the remote control press the Device button.
6. Enter the device address value. It must be the
same as that on the TVR 60.
7. Press the ENTER button on the remote or front
panel.
See Table 2 below for a description of the mouse
buttons.
Table 2: Mouse buttons
Item Description
Left button Single-Click: Select a component of a menu, such as
a button or an input field. This is similar to pressing
the ENTER button on the remote/front panel controls.
Double-Click: Switch between single screen and
multi-screen mode in Preview/ Playback mode.
Click and Drag: Clicking and dragging the Left
mouse button can be used to control the pan/tilt of a
PTZ camera as well as to vary the position of digital
zoom area and camera OSD. It can also be used to
setup the alarm areas
Right button Single-Click: Shows pop-up menu
Scroll-wheel Scroll Up: In Preview mode, scrolling up switches to
the previous screen. In Menu mode, it moves the
selection to the previous item.
Scroll Down: In Preview mode, scrolling down
switches to the next screen. In Menu mode, it moves
the selection to the next item
Web browser control
The TVR 60 Web browser lets you view, record, and
play back videos as well as manage all aspects of the
TVR 60 from any PC with Internet access. The
browser’s easy-to-use controls give you quick access
to all TVR 60 functions.
To access the TVR 60, open a Web browser and enter
the IP address assigned to the TVR 60 as a Web
address. In the log on screen, enter the default user ID
and password.
• User ID: admin
• Password: 1234
The Web browser uses the following ports.
• IP address - 192.168.1.82
• Subnet mask - 255.255.255.0
• Gateway address - 192.168.1.1
USB mouse
The USB mouse provided with the TVR 60 can be
• Video Port: 8000
• HTTP Port: 80
used to operate all the functions of the DVR, unlike the
front panel, which has limited functionality. The USB
mouse lets you navigate and make changes to
settings in the user interface.
Connect the mouse to the TVR 60 by plugging the
mouse USB connector into the USB port on the front
EN - 4 TruVision DVR 60 Quick Start Guide
Page 5

Figure 3: Web browser interface
displayed on-screen, see the TruVision DVR 60 User
Manual.
Figure 4: Live mode example
DDNS settings
The DDNS function lets you define the device’s
domain name for access through a Web browser. Use
the DDNS screen to define the settings for the DDNS
function.
To define the DDNS settings:
1. Enter the Network Settings screen by selecting
Network in the main menu.
2. Click the Advanced tab.
3. Click Setup (next to DDNS) to enter the DDNS
screen.
4. Check the DDNS box to enable feature.
5. Select a DDNS Type. You can select one of the
following:
• PeanutHull: Enter the User Name and Password
obtained from the PeanutHull website.
• DynDNS: Enter the Server Address for DynDNS
(i.e. members.dyndns.org). In the DVR Domain
Name field, enter the domain obtained from the
DynDNS Web site. Then enter the User Name and
Password registered in the DynDNS network.
6. Enter the Server Address and the DVR Domain
Name.
7. Enter the User Name and Password.
8. Enter the password again to confirm.
9. Click OK to save.
Live mode
Live mode is the normal operating mode of the unit
where you watch live pictures from the cameras. The
TVR 60 automatically enters into live mode once
powered up. On the display screen, you can see the
current date and time as well as the camera name, as
shown in Figure 4 below. To change the information
Viewing in full screen
Press the numeric button on the front panel to switch
to the corresponding camera display. For example,
press button 10 to view camera 10.
Right-click the mouse and select Camera from the
menu. Select the camera required.
Viewing in multiscreen
A cameo is any cell in a multiscreen display. A camera
picture can only be shown in one cameo at a time. The
TVR 60 has five multiscreen display formats available
as well as full screen.
Configure which multiscreen display appears by
default in the Display screen.
Quick Archive
Quick archive lets you archive recorded files quickly by
using the Archive button on the front panel. The
TVR 60 then downloads all the recorded files on the
unit to fill the available memory space on the media.
This option is not available via the mouse.
To archive recorded video using Quick Archive:
1. Insert the backup device into the TVR 60.
If using a USB memory drive, insert the device into
the USB port on the front panel. If using a digital
video disk (DVD), insert the disc into the DVD
drive. If both media are found in the TVR 60, the
USB device takes precedence over the DVD.
2. Press the Archive button on the front panel or
remote control. The unit starts to download the
files.
A message appears to confirm when the download
is complete.
TruVision DVR 60 Quick Start Guide 5 - EN
Page 6

Playing back exported DVR format
files
Use the standard file player software to play back the
archived video on your PC. It can be downloaded from
the TVR 60 when archiving files onto a backup device.
7. Adjust the speed of the PTZ camera movement.
Logging on
Use passwords to limit access to the TVR 60. Only
authorized users should be able to modify menu
settings or carry out certain tasks.
PTZ mode
PTZ mode lets you control the PTZ operation of the
cameras using any TVR 60 user interface. You can
control PTZ cameras using the buttons on the front
panel and IR remote control or by using the PTZ
control buttons on the mouse toolbar. You must have
PTZ control access privileges to enter PTZ mode.
You can enter PTZ mode using the front panel, remote
control, and mouse.
Front panel Press the joystick for Enter. The PTZ
control panel appears.
Mouse Right-click the mouse on the desired
camera image. The mouse pop-up control
panel appears. Click the PTZ icon to enter
PTZ mode. The PTZ control panel
appears.
Remote control Press the OK button. The PTZ control
panel appears.
If the display was in multiscreen format, it changes to
full screen format.
PTZ control panel
When you enter PTZ mode, the PTZ control interface
displays as shown in Figure 5 below.
By default, your DVR comes with three user accounts:
an Administrator account, a Manager account and an
Operator account. These accounts provide multiple
levels of access and functionality.
• Administrator – The administrator account
includes extended menu with full access to all
settings. The Administrator has the authority to
add, delete or configure parameters for many of
the system functions. User name is admin. It
cannot be changed. There can only be one
administrator. The default password is 1234.
• Manager – The manager account includes
reduced menu access to Video settings
(inaccessible features that are not visible). The
default user name is manager. The default
password is 2222.
• Operator – The operator account includes menu
access with no programming possibilities
(inaccessible features are not visible). The default
user name is operator. The default password is
3333.
Caution: The default Admin password should be
changed immediately for security reasons. Write it
down in a safe place so that you do not forget it.
Figure 5: PTZ control panel
1. Directional pad/auto-scan buttons: Controls the movements
and directions of the PTZ. Center button is used to start autopan by the PTZ camera.
2. Adjust iris.
3. Adjust focus.
4. Adjust zoom.
5. Centers the PTZ camera. This function is not supported on all
PTZ cameras.
6. Instant zoom in. This function is not supported on all PTZ
cameras.
Overview of the main menu
The TVR 60 has an icon-driven menu structure that
allows you to configure the unit’s parameters. Figure
on page 7 shows the TVR 60 main menu screen. Each
command icon displays a screen that lets you edit a
group of TVR 60 settings. Most screens are available
only to system administrators.
You must be in live mode to access the main menu.
The currently selected command icon is highlighted in
green.
EN - 6 TruVision DVR 60 Quick Start Guide
Page 7

Figure 6: Main menu
Table 3: Main menu descriptions
Main menu
command icon
Display Configures display settings including dwell
Cameras Configures camera settings including motion
Record Configures recording settings including
Network Configures standard network settings including
Alarms Configures alarm settings including alarm
PTZ Configures PTZ settings.
User Configures users, passwords, and access
Systems Configures system settings including system
Help Provides reference information to the various
Description
time, schedule, and display formats.
detection, video image adjustments, camera
title, and copy settings to other cameras.
recording schedules, record quality, and record
mode.
IP address, e-mail notifications, DDNS setup,
and advanced network settings.
input, relay output, video loss, remote alert,
prealarm and post-alarm seconds.
privileges.
date and time, audio output, device name, RS485 settings, RS-232 settings, firmware
upgrade, hard drive settings, boot log, and
shutdown.
toolbars, menus, and keys within the interface.
See the TruVision DVR 60 User Manual for more
information.
To enter the main menu:
Press the Menu button on the front panel when in live
mode.
To exit the main menu:
Press the Menu button on the front panel to exit the
current menu screen. Continue pressing the Menu
button until you return to the live mode screen.
Setting up IP cameras
Use the Camera Management menu to set up IP
cameras. All Interlogix IP cameras connected to the
same network are listed in the IP camera setup menu.
Note: The default IP address for Interlogix IP cameras
is 192.0.0.64. Several IP cameras could be detected
and listed that may have this same IP address.
However, each camera must have a unique IP
address in order to function correctly. Change the IP
addresses from Camera IP setup menu or from the
Web browser.
To set up IP cameras:
1. Click the Cameras icon in the main menu. On the
Camera Management screen click Setup.
2. Select the desired IP camera from the list.
3. Enter the camera parameters such as IP address
and IP camera password. The default IP camera
password is 1234.
4. Click OK to save and return to the Camera
Management screen.
It takes between 10 and 20 seconds for the new IP
camera to be listed in the Camera Management
screen. Correctly set up IP cameras have a check
mark under their Status.
Setting up alarms
To set up external alarms:
1. Connect wired alarms as shown in Figure 1 on
page 2
2. Click the Alarm icon in the main menu. In the
Alarm Management menu select the channel to
configure and click Set.
3. Under the Alarm Input tab, select the Alarm Input
number, and click Set. The Alarm Settings screen
displays.
4. Select the alarm input type in the Input Type box.
5. Check the Rules box and click the Set button to
enter the Rules screen. Under the Associated
Cameras tab select the cameras to be triggered
for recording when an alarm is detected. Click
Apply.
6. Under the Schedule tab, define a recording
schedule for motion detection.
7. Under the Notifications tab, define the alarm
response method.
8. Click Apply and then OK button to save changes.
9. Copy the changes to another camera, if required.
TruVision DVR 60 Quick Start Guide 7 - EN
Page 8

10. Click Apply and then OK button to return to the
Alarm Management menu.
To set up motion detection alarms:
1. Click the Cameras icon in the main menu. On the
Camera Management screen select the camera to
configure for motion detection, and then click
Setup and Advanced tab to display the Advanced
Camera Settings menu.
2. Check the Motion Detection box to enable motion
detection for this camera.
3. Click Area Setup (next to the Motion Detection
box) and drag the mouse across the screen to
define the motion detection area.
4. Right-click the mouse to open the setup menu,
and click Sensitivity to set the motion detection
sensitivity. A higher value indicates higher
sensitivity and vice versa. Click Exit in the setup
menu to return to the Camera Settings screen.
Set the TVR 60 device address in the Display menu
and enter “1” as the device address. Set the keypad to
zone 1.
Figure 7: Connecting the KTD-405 keypad
5. Click Rules to open the Rules screen. Under the
Associated Cameras tab select the cameras to
be triggered for recording when motion is
detected. Click Apply to save your settings.
6. Under the Schedule tab, define a recording
schedule for motion detection.
7. Under the Notifications tab, define the alarm
response method.
8. Copy the changes to another camera, if required.
9. Click Apply and then OK button to return to the
Camera Management menu.
Connecting a keypad
The KTD-405 keypad controls the dome cameras
through the TVR 60 and not directly.
Connect the RS-485 bus of the KTD-405 I/O box to
the TVR 60 Keypb A/B screw terminal port. See
Figure 7 below.
Viewing an alarm event list
To view an alarm event list:
1. While in Live mode, press the Search button on
the remote control or front panel, or right-click the
mouse and select the Advanced Search button.
The Advanced Search screen appears.
2. In the Video Type box, select one of the following:
• Motion
• Alarm
• Motion or Alarm
• Motion and Alarm
3. Click Search. A list of files is produced based on
the search criteria specified.
Contact information
For contact information see our Web site:
www.interlogix.com or www.utcfssecurityproducts.eu
EN - 8 TruVision DVR 60 Quick Start Guide
 Loading...