

Page 1

Capabilities
Concord Express v4
Concord 4/Concord
Commercial v4
Zones
32
96
Partitions
2
6
Bus devices
16
16
User codes
16
230
Power
Input for an AC step-down, plug-in style
transformer.
Auxiliary power
output
Output that supplies 9 to 14 VDC w ith up to 1
amp for bus devices and hardwired detectors,
such as smoke and motion detectors.
Bus A and B
Input and output that provides communication
between bus devices and the panel.
Siren driver
Output that can drive an 8-ohm load and provides
intrusion and fire alarm sounds for partition 1 (6
watts maximum).
Two onboard
outputs
Can be used to activate other signaling devices
based on system events. Out 1 is a 9 to 14 VDC
source output, limited to 1.0 amp maximum. Out
2 is an open-collector output, rated up to 14 VDC,
300 mA maximum.
Microphone input
Input used for two-way audio w hen used in
conjunction w ith the Interrogator 200 audio
verification module.
Eight supervised
hardwired zones
Inputs for various hardwired detectors. Zone 8
can be set up in programming to accept tw o-wire
smoke detectors. It sources 9 to 14 VDC, 90 mA
maximum.
Built-in RF
receiver
Allows use of up to 96 or 32 319.5 MHz crystal
and/or SAW learn mode w ireless sensors and
touchpads.
Concord 4 Installation Guide
Content
Contact information 1
Description 1
Panel location 2
Power and wire length 2
Mounting the panel 3
Programming 4
Sensor group characteristics 7
Specifications 9
Regulatory information 9
Contact information
For contact information, see www.utcfireandsecurity.com
or www.interlogix.com.
Table 1: Panel capabilities
Table 2 below describes the basic panel (out-of-box)
hardware capabilities for all panels:
Table 2: Panel hardware capabilities
For technical support, toll-free: 888.437.3287 in the US
including Alaska, Hawaii, Puerto Rico, and Canada.
Outside the tool-free area, contact your dealer.
© 2012 UTC Fire & Security Americas Corporation, Inc.
Interlogix is part of UTC Climate Controls & Security, a
unit of United Technologies Corporation. All rights
reserved.
Description
This is the Installation Guide for the following Concord 4
control panel models:
• 600-1021-95R Concord 4 RF
• 600-1022-95R Concord Express V4
• 600-1040 Concord Commercial V4
• 600-1042 Concord Hybrid
This manual provides information for installing a basic
UL Listed Fire and Security System. To modify or use for
other purposes, visit the UTC Fire & Security website for
additional instructions and training.
Table 1 below shows the standard panel capabilities.
P/N 466-2371 • REV C • NOV12 1
Page 2

Phone line
connection
Allows panel to communicate with central
monitoring station and/or pagers.
Device
Max. wire
length to
panel
Standby
mA draw
Alarm mA
draw
SuperBus 2000 2x16 LCD
alphanumeric touchpad
22 ga.: 300 ft.
18 ga.: 750 ft.
15 mA
90 mA
SuperBus 2000 ATP 1000
alphanumeric touchpad
22 ga.: 300 ft.
18 ga.: 750 ft.
12 mA
110 mA
SuperBus 2000 ATP 2100
alphanumeric touchpad
22 ga.: 300 ft.
18 ga.: 750 ft.
30 mA
165 mA
SuperBus 2000 ATP 2600
alphanumeric touchpad
22 ga.: 300 ft.
18 ga.: 750 ft.
30 mA
165 mA
SuperBus 2000 GTS 50
22 ga.: 100 ft.
18 ga.: 250 ft.
270 mA
300 mA
SuperBus 2000 fixed display
touchpad
22 ga.: 300 ft.
18 ga.: 700 ft.
11 mA
65 mA
SuperBus 2000 FTP 1000
fixed display touchpad
22 ga.: 300 ft.
18 ga.: 700 ft.
12 mA
75 mA
SuperBus 2000 RF
transceiver
22 ga.: 1,000 ft.
18 ga.: 2,500 ft.
45 mA
55 mA
SuperBus 2000 RF receiver
1
22 ga.: 1,100 ft.
18 ga.: 2,800 ft.
35 mA
35 mA
SuperBus 2000 phone
interface/voice module
22 ga.: 40 ft.
18 ga.: 120 ft.
25 mA
600 mA
SuperBus 2000 voice-only
module
22 ga.: 40 ft.
18 ga.: 120 ft.
20 mA
300 mA
(jumper)
600 mA (no
jumper)
SuperBus 2000 2 amp
power supply
N/A
No load
No load
4 input/2 output SnapCard
N/A
20 mA
185 mA 1
8Z hardw ired zone
expander SnapCard
N/A
38 mA
230 mA 1
4 output SnapCard
N/A
1 mA
130 mA 1
SuperBus 2000 8Z input
module
22 ga.: 1,800 ft.
18 ga.: 4,000 ft.
18 mA
35 mA
SuperBus 2000 4-relay
output module
22 ga.: 350 ft.
18 ga.: 900 ft.
12 mA
180 mA
SuperBus 2000 energy
saver module
22 ga.: 1,600 ft.
18 ga.: 4,000 ft.
20 mA
20 mA
SuperBus 2000 cellular
backup module
Standard
power 22 ga.:
15 ft. 18 ga.:
40 ft. High
power 22
ga.: 10 ft. 18
ga.: 30 ft.
90 mA
90 mA
1600 mA
1900 mA
SuperBus 2000 automation
module
22 ga.: 1,500 ft.
18 ga.: 4,000 ft.
30 mA
35 mA
SuperBus 2000 w ireless
gateway-ready kit
22 ga.: 40 ft.
18 ga.: 90 ft.
65 mA
1600 mA
Interrogator 200
22 ga.: 3,200 ft.
18 ga.: 4,500 ft.
10 mA
10 mA
Note: The total current sourced from all terminals cannot
exceed 1 amp.
Panel location
Before permanently mounting the panel, use the
following guidelines to choose a mounting location.
• To help reduce wire run lengths and labor, centrally locate
the panel with relation to detection devices whenever
possible.
• Locate the panel where the temperature will not exceed
120ºF (49ºC) or fall below 32ºF (0ºC).
• To prevent wire runs from picking up electrical noise,
avoid running wires parallel with electrical wiring or fixtures
such as fluorescent lighting.
• Mount the panel at a comfortable working height.
• Leave at least 24 inches in front of the panel to open the
cabinet door and access the panel.
• Leave space to the left and right of the panel for wiring,
phone jack, and mounting optional modules.
• Leave at least 9 inches above the panel cabinet for
antennas.
Table 3: Wire length requirements
Power and wire length
The panel can supply up to 1 amp (1,000 mA) in full load
alarm condition for system devices connected to panel
terminals 4 (+12V), 7 and 8 (speaker terminals), 9
(OUT1), 11 (+12V), 24 (2W SMK ZONE 8), and
SnapCard terminals.
For 24-hour backup, the total standby current draw for all
devices connected to panel terminals 4 (+12V), 9
(OUT1), 11 (+12V), 24 (if configured for two-wire smoke
loop), and SnapCard terminals is limited to 90 mA
(during normal standby condition) using a 4.5 or 5.0 Ah
battery, or 190 mA (during normal standby condition)
using a 7.0 Ah battery.
The total system wire length allowed can vary depending
on devices powered by the panel, the wire length
between devices and the pane, and the combined wire
length of all devices.
Table 3 below describes the maximum wire length
allowed between compatible devices and the panel, and
the minimum and maximum current draw of each device.
2 Concord 4 Installation Guide
Page 3
Device
Max. wire
length to
panel
Standby
mA draw
Alarm mA
draw
Interrogator AVM
22 ga.: 110 ft.
18 ga.: 260 ft.
45 mA
300 mA
Two-wire smoke detectors
(429AT, 429C, 429CT,
521B, 521BXT, 521NCSXT
22 ga.: 330 ft.
18 ga.: 330 ft.
70 uA
60 mA
Two-wire smoke detectors
(system sensor 2400,
2400TH)
22 ga.: 330 ft.
18ga.: 330 ft.
120 uA
80 mA
Hardw ired interior siren (13-
949)
22 ga.: 750 ft.
18 ga.: 1,500 ft.
0 mA
85 mA
Piezo dynamic exterior siren
(13-060)
22 ga.: 750 ft.
18 ga.: 1,500 ft.
0 mA
150 mA
Speaker siren (60-528 or
13-060)
18 ga.: 100 ft.
0 mA
500 mA
Wire type
Total system wire
18-gauge, unshielded
4,000 ft.
18-gauge, shielded
3,000 ft.
22-gauge, unshielded
4,000 ft.
22-gauge, shielded
3,000 ft.
Device
Wire requirements
AC power transformer
2-conductor, 18-gauge, 25 ft. max.
Earth ground
Single conductor, 16-gauge solid, 25 ft. max.
Telephone (RJ-31X)
4-conductor
Detection devices
2- or 4-conductor, 22-gauge, 1,000 ft. max.
2- or 4-conductor, 18-gauge, 2,500 ft. max.
(based on 30 ohms max. loop resistance
including device)
Speakers
2-conductor, 18-gauge, 100 ft. max.
Device
Wire requirements
SuperBus 2000
devices
4-conductor, 22- or 18-gauge
Interrogator 200 AVM
power and microphone
4-conductor, 22-gauge, shielded
Two-wire smoke
detectors
2-conductor, 22-gauge, 330 ft. max.
2-conductor, 18-gauge, 830 ft. max.
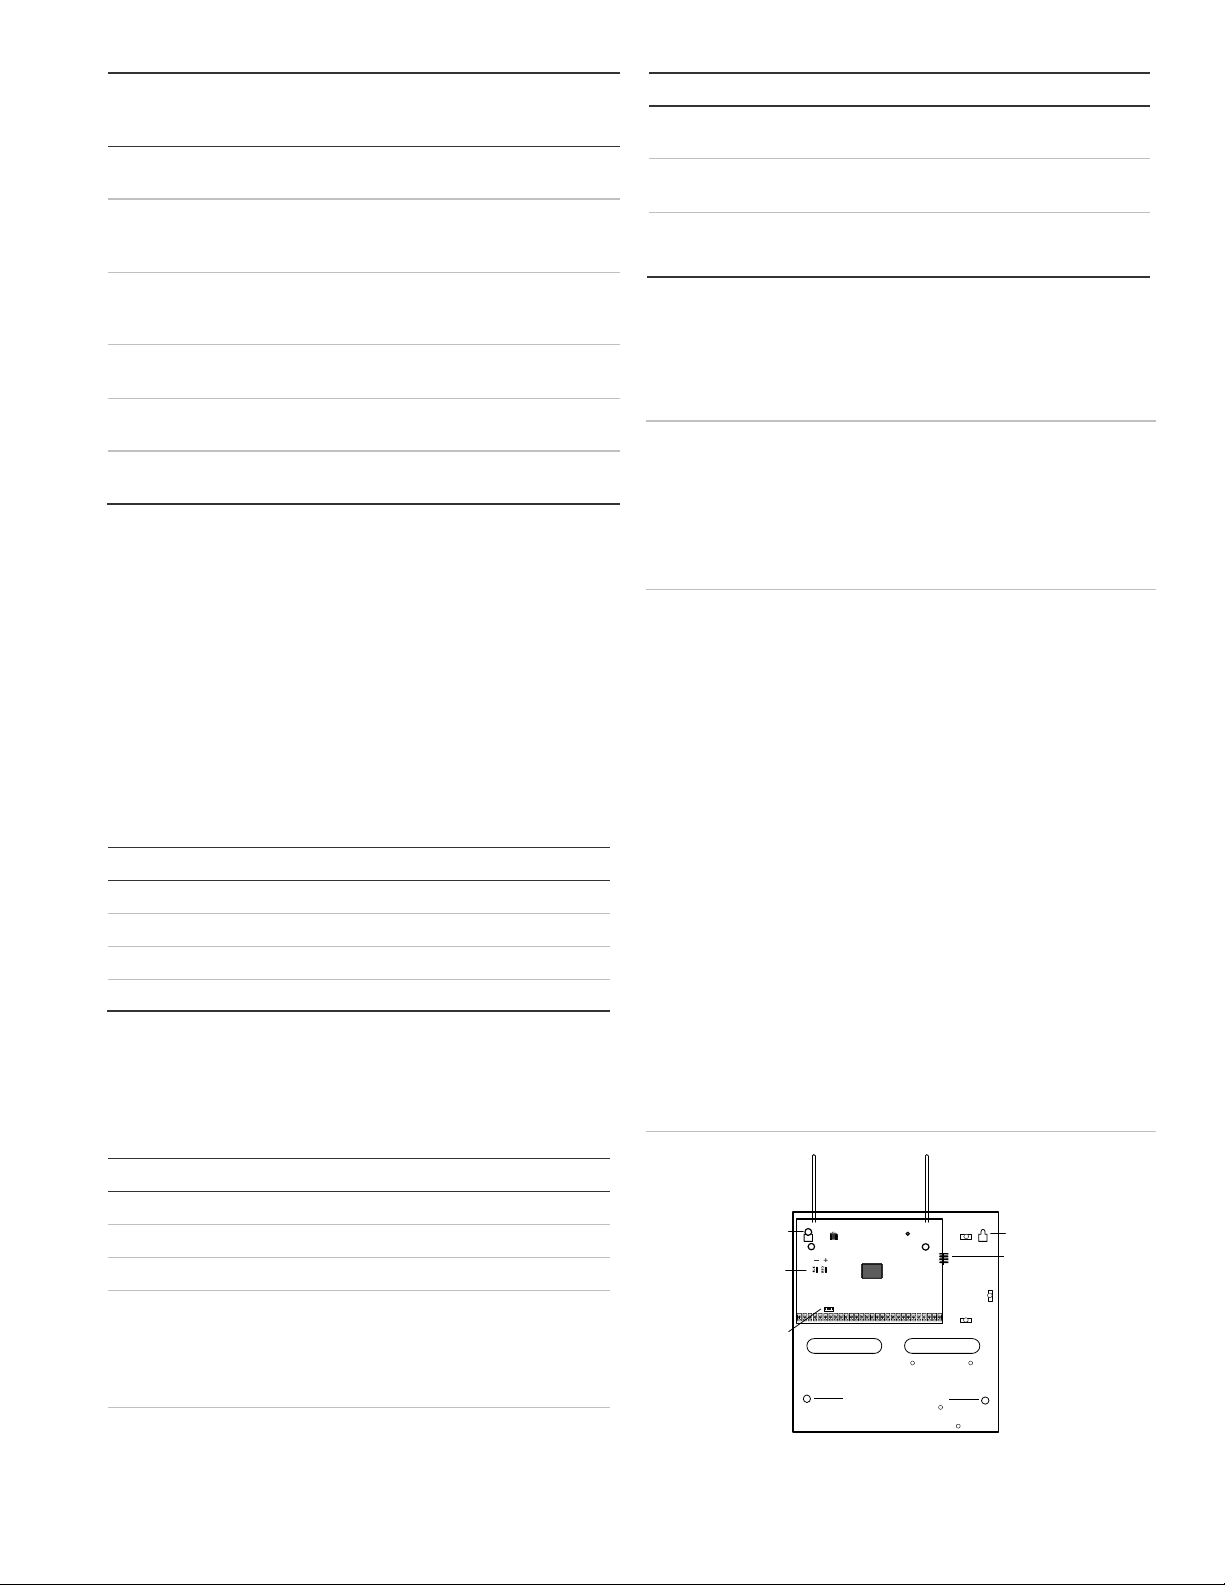
EPROM
Antennas
Mounting hole
Mounting hole
Mounting holes
Snapcard
connector
Terminal strip
Programming
touchpad
header
Battery
terminals
1
Maximum current draw for the SnapCards does not include the load
which may be applied to their auxiliary DC supply.
Note: When installing SuperBus 2000 RF receiver
modules, the antenna tamper feature must be set to off.
Mounting the panel
Mount the panel to the wall or wall studs.
Caution: Make sure you are free of static electricity
whenever you work on the panel with the cover open. To
discharge any static, first touch the metal panel chassis,
and then stay in contact with the chassis when touching
the circuit board. We recommend using a grounding
strap.
To mount the panel:
Table 4 below describes the total system wire lengths
allowed for all SuperBus 2000 devices when installing
systems using unshielded or shielded cable. The
maximum wire length for individual devices is shown
instable below.
Table 4: Total system wire lengths
After determining panel location, run all necessary wires
to that location using the guidelines in Table.
Table 5: Device wire requirements
1. Remove the panel door and remove the necessary
wiring knockouts. Be careful not to damage the
circuit board.
2. Feed all wires through wiring knockouts and place
the panel in position against the wall.
3. Level the panel and mark the top and bottom
mounting holes.
4. Install anchors where studs are not present.
5. Partially insert screws into the two top mounting hole
locations, then hang the panel on the two screws.
6. Recheck for level, insert the two lower screws, and
tighten all four mounting screws.
Figure 1 below shows the main component locations.
Figure 1: Panel components
Concord 4 Installation Guide 3
Page 4

Grounding the panel
Button
Programming function
#
Select menu item or data entry.
*
Deselect menu item or data entry (if pressed
before #).
A ()
B ()
Scroll through available option at the current
menu tier. Scroll through sensor text options
during sensor text programming.
C
Enter pauses when programming phone
numbers.
D
Delete certain programming settings.
0 to 9
Enter numeric values wherever needed.
1 and 2
Select off (1) or on (2) w herever needed.
1 to 6
Press and hold to enter alphabetical characters A
through F for account numbers.
7 and 9
Press and hold to enter * (7) or # (9) for phone
numbers.
The display shows SYSTEM PROGRAMMING.
For maximum protection from lightning strikes and
transients, connect the enclosure to earth ground. Use
16-gauge, solid copper wire from an earth grounded cold
water pipe clamp to the enclosure. For best results, we
recommend that you crimp a spade lug on the wire end
at the panel and secure the lug to the enclosure.
Antenna shrouds
Install a plastic antenna shroud (included with the panel)
over each antenna and snap them into the holes on top
of the enclosure (skip this step for hybrid and
commercial systems).
Programming
For onsite system programming, you must have an
alphanumeric touchpad.
You must use an installer/dealer code (default 4321) to
enter program mode. You may place the system into
programming mode only when you disarm all partitions.
Note: If the system is powered up after the programming
touchpad is connected or if a bus command scan is
executed, the programming touchpad will be learned
(programmed) into the system and must later be
manually deleted.
7. After programming is complete, disconnect the
touchpad from the panel header.
Touchpad programming options
In program mode, touchpad buttons let you navigate to
all installer programming menus for configuring the
system.
Table 6 below describes the touchpad button functions
in program mode.
Table 6: Touchpad programming functions
To enter program mode:
1. Make sure you disarm the system in all partitions.
2. Press 8, 4321, 0, 0.
The display shows SYSTEM PROGRAMMING.
To enter program mode using a programming
touchpad:
1. Connect the red, black, green, and white wires from
the programming touchpad cable (60-791) to the
power and bus wires/terminals on an alphanumeric
touchpad, matching the +12V (red), Bus A (green),
Bus B (white), and GDN (black) on each.
2. Make sure the system is powered up and disarmed.
3. Connect the plug on the cable onto the panel
programming touchpad header.
4. Press 8, 4321, 0, 2.
The touchpad sounds one short beep.
5. Press * and verify that the display shows SERVICE
TOUCHPAD ACTIVE.
Menu navigation
There are two basic tiers of programming menus, tier 1
and tier 2.
From the tier 1 System Programming menu, you can
access the following tier 2 programming menus:
• Security
• Phones
• Phone options
• Timers
• Light controls
• Touchpad options
• Reporting
• Siren options
• Sensors
• Audio verification
• Accessory modules
• Onboard options
• Macro keys
6. Press 8, 4321, 0, 0.
4 Concord 4 Installation Guide
Page 5

Only when the display shows SYSTEM PROGRAMMING
Sensor
How to trip the sensor
Hardw ired zones
Start with the zone in its normal state, and
then trip the zone into its alarm state. A
normally closed door, for example, should
be closed when you begin the learn
sensors process. To trip the zone, open
the door.
Wireless sensors
Follow the instructions included w ith each
sensor.
Wireless door/w indow
sensors with external
contacts
Place the external contact in the alarm
condition, and then activate the sensor
tamper sw itch.
Self-actuated bells
Activate the tamper sw itch.
Sensor
How to trip the sensor
Handheld wireless
touchpads
Press the BYPASS button.
Key fobs *
Press and hold the lock and unlock
buttons together until the key fob LED
flashes.
ELM key fobs *
Press and release the unlock button twice
quickly, then press and hold until the LED
flashes three times.
Press and release the unlock button once
quickly, then press and hold until the LED
flashes two times.
Press and hold the unlock button until the
LED flashes once.
can you advance to tier 2 programming menus.
Press B or # to advance forward through menus. Press
A or * to move backward through the menus.
Only when a specific menu is displayed can you
advance to those menu settings. For example, from the
SENSORS display, pressing # gives you access to
learning sensors, programming sensor text, deleting
sensors, and viewing/editing sensor programming.
To exit program mode:
1. Press * until the display shows SYSTEM
PROGRAMMING.
2. Press A or B until the display shows EXIT
PROGRAMMING READY.
3. Press # and the touchpad displays the time and
date.
* Key fobs have not been investigated by UL for use in a UL Listed
installation.
Learn sensors
The default setting is “None”.
Sensors menu
The Sensors menu gives you access to the following
settings:
• Learn sensors. Add (learn) hardwired zones, wireless
sensors, and wireless touchpads into panel memory.
• Sensor text. Name the sensors and zones you have
added to the system.
• Delete sensors. Delete zones and sensors from panel
memory.
• Edit sensors. View or change a sensor group or partition
assignment. You can also identify whether a zone is
wireless or hardwired, whether it is configured as normally
closed (NC) or normally open (NO), and whether the zone
is a touchpad.
Table 7 below describes how to trip different types of
sensors to program (learn) them in the panel.
Table 7: Tripping sensors
The panel comes with factory programmed onboard
hardwired zones. Install 2 kohm, end of line (EOL)
resistors on all unused factory sensors shown above and
hardwired zones. If you don’t want to install EOL
resistors, delete any unused zones from memory. See
Table on page 6 for onboard hardwired zone factory
programming. Sensors must be placed in a partition or
sensor group. To change the sensor group or partition
assignment after adding a sensor or zone, use the Edit
Sensors menu.
To add (learn) sensors into panel memory:
1. With the display showing SENSORS, press #.
The display shows LEARN SENSORS.
2. Press #.
The display shows SENSOR PTN 1.
3. Press # to select partition 1 or press 2, 3, 4, 5, or 6
and then press # to select the desired partition.
The display shows SENSOR GROUP 0.
4. Enter the sensor group and press #. (See Table for
a description of all sensor group characteristics.)
Concord 4 Installation Guide 5
The display shows TRIP SENSOR nn, where nn is
the displayed (next available) sensor number.
5. To change the displayed sensor number, enter the
desired sensor number and press #.
The desired sensor number is displayed.
6. With the desired sensor number displayed, use the
guidelines in Table 6 to force the sensor or zone you
Page 6

are adding (learning) into the panel memory to send
Zone input
Group number and description
1
10 - entry/exit
2
17 – instant interior follower
3
13 – instant perimeter
4
13 – instant perimeter
5
13 – instant perimeter
6
13 – instant perimeter
7
13 – instant perimeter
8
13 – instant perimeter
Account number
Partition number 1 to 6
Account number 00000
CS phone
CS phone 1
CS phone none
CS phone 2
CS phone none
CS phone 3
CS phone none
Learn sensors
Sensor partition number 1 to 6
Sensor group 0
Trip sensor number 1 to 96
End programming
a signal to the panel.
3. Cycle through the menus as shown in Table 9
below.
7. To add another sensor to the same sensor group
and partition, repeat the process.
8. To add sensors to another sensor group or partition,
press * twice and repeat the process.
Table 8 below describes the factory default zone inputs.
Table 8: Zone factory programming
If the panel memory is cleared, all onboard hardwired zone factory
programming w ill be cleared.
Table 9: Quick programming menu structure
Quick programming mode
Use the quick programming mode to program basic
system programming with a SuperBus 2000 fixed display
touchpad, SuperBus 2000 FTP 1000 touchpad, or any
SuperBus 2000 alphanumeric touchpad. The following
menus are accessible:
• Account number (all partitions)
• SC phone 1
• CS phone 2
• CS phone 3
• Learn sensors (limited to selecting sensor number, sensor
group, and partition assignment). An alphanumeric
touchpad is required for programming sensor text in
standard programming mode.
Use the A and B buttons to toggle across main menus
and use the # and * buttons to toggle up and down
through the submenus.
To enter quick programming mode:
1. Make sure the system is disarmed in all partitions.
2. Press 8, enter the installer/dealer code, and then
press 03.
The display shows ACCOUNT NUMBER.
6 Concord 4 Installation Guide
Page 7

Number
Name
Application
Alarm
Delay
Restoral
Supervisor
y
CS
report
Chime
(level)
Active
(level)
00
Fixed panic
24-hour audible fixed emergency
buttons
Police
Instant X X
1, 2, 3
01
Portable
panic
24-hour audible portable emergency
buttons
Police
Instant X
1, 2, 3
02
Fixed panic
24-hour silent fixed emergency
buttons
Silent
Instant X X
1, 2, 3
03
Portable
panic
24-hour silent portable emergency
buttons
Silent
Instant X
1, 2, 3
04
Fixed
auxiliary
24- hour auxiliary sensor, such as
pendant panic or holdup button
Auxiliar
y
Instant X X
1, 2, 3
05
Fixed
auxiliary
24-hour auxiliary emergency button,
siren shutoff confirms CS report
Auxiliar
y
Instant X X
1, 2, 3
06
Portable
auxiliary
24-hour portable auxiliary alert
button
Auxiliar
y
Instant X
1, 2, 3
07
Portable
auxiliary
24-hour portable auxiliary button,
siren shutoff confirms CS report
Auxiliar
y
Instant X
1, 2, 3
08
Special
intrusion
Special belongings, such as gun
cabinets and wall safes
Police
Instant X X X
1, 2, 3
09
Special
intrusion
Special belongings, such as gun
cabinets and wall safes
Police
Standard X X X
1, 2, 3
10
Entry/exit
delay
Entry and exit doors that require a
standard delay time
Police
Standard X X X X
2, 3
11
Entry/exit
delay
Garage doors and entrances that
require extended delay time 1
Police
Extended X X X X
2, 3
12
Entry/exit
delay
Drivew ay gates and entrances that
require a twice extended delay time
1
Police
Twice
extended
X X X
X
2, 3
13
Instant
perimeter
Exterior doors and w indows
Police
Instant X X X X
2, 3
14
Instant
interior
Interior doors (hardwired)
Police
Follower X X X
2, 3
15
Instant
interior
Interior PIR motion sensors 1 (RF
wireless)
Police
Follower X X
2, 3
16
Instant
interior
Interior doors (hardwired)
Police
Follower X X X
3
17
Instant
interior
PIR motion sensors 1 (RF wireless)
Police
Follower X X
3
18
Instant
interior
Instant interior cross-zone # PIR
motion sensors
1 2
Police
Follower X X
3
Sensor group characteristics
Table 10 below shows what the sensors on your Concord 4 system do. Every sensor is assigned to a group, and this
table specifies those groups and functions. Every device must be assigned to one of these groups.
Note: The “X” marks in the table represent characteristics present in a group.
Table 10: Sensor group characteristics
Concord 4 Installation Guide 7
Page 8

Number
Name
Application
Alarm
Delay
Restoral
Supervisor
y
CS
report
Chime
(level)
Active
(level)
19
Delayed
interior
Interior doors that initiate a delay
before going into alarm 1
Police
Interior X X X
3
20
Delayed
interior
PIR motion sensors that initiate a
delay before going into alarm 1
Police
Standard X X
3
21
Local instant
interior
24-hour local alarm zone protecting
anything that opens and closes
Police
Instant X X
1, 2, 3
22
Local
delayed
interior
Same as group 21, plus activation
initiates a delay before going into
alarm
Police
Standard X X
1, 2, 3
23
Local instant
auxiliary
24-hour local alarm zone protecting
anything that opens and closes 3
Auxiliar
y
Instant X X
1, 2, 3
24
Local instant
auxiliary
24-hour local alarm zone protecting
anything that opens and closes,
sirens shut off at restoral 1
Auxiliar
y
Instant X X
1, 2, 3
25
Local
special
chime
Notify the user when a door is
opened, sounds emit from a local
annunciator 1
Special
chime
Instant X
1, 2, 3
26
Fire
24-hour fire, rate-of-rise heat, and
smoke sensors
Fire
Instant X X X
1, 2, 3
27
Output
module
Hardw ired output module (HOM)
lamp control or other customer
features 3
Silent
Instant X X
1, 2, 3
28
Output
module
HOM, PIR motion sensor, sound
sensor, or pressure mat 3
Silent
Instant X
1, 2, 3
29
Auxiliary
Freeze sensor
Auxiliar
y
Instant X X X
1, 2, 3
32
Output
module
HOM, PIR motion sensor, sound
sensor, or pressure mat 3
Silent
Instant
1, 2, 3
33
Siren
Wireless siren supervision
Silent
Instant X X
1, 2, 3
34
Gas
Carbon monoxide (CO) gas
detectors 3
Auxiliar
y
Instant X X X
1, 2, 3
35
Local instant
police (day
zone)
Local alarm levels 1 and 2, report to
CS in level 3
Police
Instant X X
X (level 3
only)
1, 2, 3
38
Auxiliary
Water sensor 3
Auxiliar
y
Instant X X X
1, 2, 3
1. This group is not certified as a primary protection circuit for UL-listed systems and is for supplementary use only.
2. Sound instant police siren if two or more sensors are tripped within 4 minutes. Otherw ise sensors are followers to delayed sensors. If
Alarm Verification is on, group 18 functions like group 17.
3. This group has not been investigated by UL.
4. This group is required for UL-listed residential fire alarm applications.
8 Concord 4 Installation Guide
Page 9

Specifications
Power requirements
Class 2, 16.5 VAC, 40 VA, 60 Hz (600-1023 or
600-1024)
Rechargeable battery: 12 VDC, 4.5 or 5.0 Ah
lead-acid (60-681) or 12 VDC, 7 Ah (60-680).
The battery will last 24 hours with no AC and
specified stand-by load.
Auxiliary power
output
1.0 A at 9 to 14 VDC (12 VDC typical)
Radio frequency
319.5 MHz
Nominal RF range
1,000 feet (305 m) typical open air
Storage temperature
-30 to 140ºF (-34 to 60ºC)
Operating
temperature
32 to 120ºF (0 to 49ºC)
Maximum humidity
85% relative humidity, noncondensing
Dimensions (H x W x
D)
14 x 12 x 3 in. (35.6 x 30.5 x 7.6 cm)
• Hardwired magnetic contact (13-068 or 13-071) or
wireless learn mode door/window sensor (60-362)
• Immediate beeps set to on.
• UL 98 options set to on.
• Receiver failure set to on (if wireless devices are used).
• Siren verify set to on.
• Exit delay set to 60 seconds.
• Quick exit set to off.
• Siren timeout set to 4 minutes or more.
• Entry delay set to 45 seconds or less.
• RF TX timeout set to 24 hours (if system includes built in
receiver or SuperBus 2000 RF receiver or SuperBus 2000
RF transceiver and wireless burglary sensors).
• Extended delay set to off.
• Sleep time set to off.
• Two trip error set to off.
• Alarm verify set to off.
• Disable trouble beeps set to off.
Household fire warning system (UL 985)
Regulatory information
UL listed installations
This section describes the requirements for UL listed
installations.
Basic system:
• Control panel (600-1021-95R Concord 4 RF, 600-1022-
95R Concord Express V4, 600-1040 Concord Commercial
V4, or 600-1042 Concord 4 Hybrid).
• Standard class 2 16.5 VAC, 40 VA power transformer 22-
145 or 22-156 (600-1023), 22-156-CN, or 22-145-CN
(600-1023-CN), or power line carrier class 2 16.5 VAC, 40
VA power transformer 22-149 (600-1024) or 22-149-CN
(600-1024-CN). You must order these transformers
separately from UTC Fire & Security.
• Backup battery 12 V 4.5 or 5.0 Ah (60-681) or 12 V 7 AH
(60-680).
• SuperBus 2000 fixed display touchpad (60-820), FTP
1000 (600-1020), 2x16 LCD touchpad (60-746-01), ATP
1000 (60-983), ATP 2100 (60-985), ATP 2600 (60-984),
2x20 LCD touchpad (60-803), or 2x20 VFD touchpad (60-
804).
• Interior speaker siren (60-528), hardwired interior siren
(13-949), or speaker siren (13-060).
• Basic system but also include a SuperBus 2000 RF
receiver (60-764-95R-01) or a SuperBus transceiver (6001025-01-95R).
Household burglary alarm system unit (UL 1023)
Basic system plus the following:
Concord 4 Installation Guide 9
Basic system plus the following:
• Wireless smoke sensor 60-506-319.5, 60-848-02-95, or
TX-6010-01-1 learned into sensor group 26.
• Immediate beeps set to on.
• UL 98 options set to on.
• Receiver failure set to on (if wireless devices are used).
• Siren verify set to on.
• Sleep time set to off.
• Siren timeout set to 4 minutes or more.
• Two-trip error set to off.
• Disable trouble beeps set to off.
• RF TX timeout set to 4 hours (if system includes built in
receiver or SuperBus 2000 RF transceiver and wireless
smoke sensors).
UL 1023 and 985 24-hour backup
For 24-hour backup, the total current draw for all
connected devices is limited to 90 mA (during normal
standby conditions) using a 4.5 or 5.0 Ah battery, or 190
mA (during normal standby conditions) using a 7.0 Ah
battery.
SIA system requirements
SIA system requirements are the same as those
described for a UL-listed basic system. If multiple
annunciation is required, use additional touchpads. This
applies to model numbers 60-746-01, 60-803, 60-804,
60-820, 60-983, 60-984, 60-985, and 600-1020. UL
requirements take priority over SIA requirements.
Table 11 on page 10 describes programming
requirements to meet ANSI-SIA CP-01.
Page 10

Table 11: SIA setting requirements
Function
Default setting
Required setting
Exit extension
On
On
Duress code
Disabled
Disabled
Dialer abort delay
30 seconds
15 to 45 seconds
Cancel message
On
On
Call w ait cancel
Disabled
On if reporting to
central station and
customer has call
waiting service.
Entry delay
30 seconds
30 to 240 seconds
Exit delay
60 seconds
45 to 184 seconds
Swinger limit
1
1
Smoke verify
Off
On if smoke alarms
are programmed into
system.
Cross zone
Disabled
Enabled for zones
with high probability of
false alarms
Function
Operation
SIA false alarm
Enabled
Auto stay arming
Enabled
Disarm during entry delay
Enter code only (or 1 + CODE)
Cancel alarm
Enter code only (or 1 + CODE).
Abort annunciation
Enabled
Exit error
Enabled
Entry/exit progress annunciation
Enabled
Table 12 below describes nonprogrammable (hardcoded) system operation, as required to meet ANSI-SIA
CP-01 and is provided only for your reference.
• UL approved bell/housing, such as Ademco #AB12M or
equivalent.
• Immediate beeps set to on.
• UL 98 options set to on.
• Receiver failure set to on (if wireless devices are used).
• RF TX timeout set to 4 hours.
• 24-hour tamper set to on.
• System tamper set to on.
• Automatic phone test set to on.
• Phone text frequency set to 1.
• Next phone test set to 1.
• Siren verify set to on.
• AC failure set to on.
• Exit delay set to 120 seconds or less.
• Quick exit set to off.
• Two-trip error set to off.
• Alarm verify set to off.
• Disable trouble beeps set to off.
• Phone number must be programmed.
• High level reports set to on.
• Low level reports set to on.
• Communication failure set to on.
• Extended delay set to off.
• Sleep time set to off.
• Siren timeout set to 4 minutes or more.
Table 12: ANSI-SIA CP-01 requirements
Note: You may use the silent arming feature to suppress
arming level and exit beeps for the current arming
period. Refer to the Concord 4 user manual for more
information on silent arming.
Commercial burglary alarm system unit (UL 1610)
Basic system using control panel 600-1040, SuperBus
2000 RF transceiver module (600-1025-01-95R), plus
the following:
• Hardwired magnetic contact (13-068 or 13-071) or
wireless learn mode door/window sensor (60-499).
• SAW PIR sensor (60-639-95R), crystal PIR sensor (60-
703-95R), or DS924i PIR sensor (60-511-01-95).
UL 1610 24-hour backup
Same as UL 1023 and 985.
UL 1635 digital alarm communicator system
For UL 1635 installations, entry delay plus dialer abort
delay must not exceed 60 seconds. Same as UL 1023,
985, and 1610 plus:
• AC failure set to on.
• Phone number must be programmed.
• Low CPU battery set to on.
• Next phone test set to 1.
• Phone test frequency set to 1.
• High level reports set to on.
• Low level reports set to on.
• Communication failure set to on.
• RF TX timeout set to 4 hours.
Central station reporting
The panel has been tested with the following central
station receivers using SIA and Contact ID reporting
formats:
• CS-5000 central station receiver
• Sur-Gard central station receiver with models SG-DRL2A
and SG-CPM2
• Osborne Hoffman central station receiver
10 Concord 4 Installation Guide
Page 11

Note: The installer must verify the compatibility between
this panel and the central station receivers being used.
UL Canada listed installations
This section describes the requirements for CUL (UL
Canada) listed installations.
Residential burglary alarm system unit (ULC subject
C1023-1974)
Basic system as described for UL 1023 listed
installations plus:
• Hardwired magnetic contact (13-068 or 13-071) or
wireless learn mode door/window sensor (60-362)
• Siren timeout set to 5 minutes or more
Residential fire warning system control unit (ULCS545-M89)
Basic system as described for UL 985 listed installations
plus:
• Hardwired smoke detector: System sensor models 2400
or 2400TH learned into sensor group 26, or ESL models
429AT, 429CT, 521B, 521BXT, 521NCSXT, 711U, 711UT,
721U, 721UT, TS7-2, or TS7-2T learned into sensor group
26.
• Wireless smoke sensor 60-319.5 60-848-02-95, TX-6010-
01-1learned into sensor group 26.
• Siren timeout set to 5 minutes or more.
• RF TX timeout set to 4 hours (if system includes SuperBus
2000 RF transceiver and wireless smoke sensors).
• Immediate trouble beeps set to on.
uses, and can radiate radio frequency energy and, of not
installed and used in accordance with the instruction
manual, may cause harmful interference to radio
communications. However, there is no guarantee that
interference will not occur in a particular installation.
If this equipment does cause harmful interference to
radio or television reception, which can be determined
by turning the equipment off and on, the user is
encouraged to try to correct the interference by one or
more of the following:
• Reorient or relocate the receiving antenna.
• Increase the separation between the equipment and
receiver.
• Connect the affected equipment and the panel receiver to
separate outlets, on different branch circuits.
• Consult the dealer or an experienced radio/TV technician
for help.
Part 68. This equipment complies with Part 68 of the
FCC rules. Located on this equipment is a label that
contains, among other information, the FCC registration
number and the ringer equivalence number (REN) for
this equipment. If requested, this information must be
provided to the telephone company.
FCC Part 68 registration number: US: B4ZAL02B55910.
Note: For 24-hour backup, external power drain is
limited to 90 mA (during normal standby condition) using
a 4.5 or 5.0 Ah battery, or 190 mA continuous using a
7.0 Ah battery.
California State Fire Marshall listed installations
Same as Household Fire Warning System (UL 985) plus:
• Smoke verify must be set to off.
FCC compliance
Changes or modifications not expressly approved by
UTC Fire & Security can void the user’s authority to
operate the equipment.
This equipment has been tested and found to comply
with the limits for a Class B digital device, pursuant to
part 15 of the FCC rules. These limits are designed to
provide reasonable protection against harmful
interference when the equipment is operated in a
residential environment. This equipment generates,
Concord 4 Installation Guide 11
 Loading...